

Page 1

www.honeywell.com/yourhome/
W7006A
Home Controller
Gateway
User Guide
Page 2

Document Identification Number 69-1321-2
W7006A
Home Controller Gateway
USER GUIDE
Software License Advisory This document supports software that is proprietary to Honeywell Inc. and/or to third-
Software Release Note This document supports Honeywell Home Controller software version 3.x.x.
Trademarks: Microsoft Windows, and Microsoft Internet Explorer are registered trademarks of
party software vendors. Before software delivery, the end user must execute a software
license agreement that governs software use. Software license agreement provisions
include limiting use of the software to equipment furnished, limiting copying, preserving
confidentiality, and prohibiting transfer to a third party. Disclosure, use or reproduction
beyond that permitted in the license agreement is prohibited.
Microsoft Corporation.
Netscape, Netscape Navigator, and Netscape Communicator are registered trademarks
of Netscape Communications Corporation.
Page 3

CONTENTS
About this Guide ...........................................................................................................................1
Who Should Use This Guide ..............................................................................1
Product Safety....................................................................................................1
Getting Started ...........................................................................................................................3
Overview ...........................................................................................................................4
HOME & AWAY SYSTEM TASKS ...........................................................................................................................9
Configuring Home & Away System Controller Gateway....................................................................................................19
Using the Web Interface.....................................................................................4
Logging On and Off .......................................................................................6
Using the Wall Panel System User Interface......................................................7
Using the Telephone ..........................................................................................8
Viewing Event History.........................................................................................9
Checking Current House Status.........................................................................10
Web ...............................................................................................................10
SUI.................................................................................................................10
Phone ............................................................................................................10
Arming and Disarming Security..........................................................................11
Web ...............................................................................................................11
SUI.................................................................................................................11
Phone ............................................................................................................11
Setting Lights and Appliances from the Web......................................................12
Setting Thermostats ...........................................................................................13
Web ...............................................................................................................13
SUI.................................................................................................................13
Telephone ..........................................................................................................14
Using Lifestyle Modes ........................................................................................14
Defining Lifestyles ..............................................................................................15
Activating Lifestyles.......................................................................................16
Using Scheduled Control....................................................................................16
Defining Schedules........................................................................................17
Activating Scheduled Controls.......................................................................18
Default settings ...........................................................................................................................19
Troubleshooting ...........................................................................................................................23
Important Home & Away System Configuration Information ............................................................................................25
Limited One-Year Warranty ...........................................................................................................................26
Configuring Date and Time.................................................................................19
Configuring the Home Page...............................................................................19
Configuring Lights and Appliances .....................................................................20
Configuring Passwords.......................................................................................20
Configuring Security-Lifestyle Associations........................................................21
Configuring Telephone Settings.........................................................................21
Configuring Thermostat Periods.........................................................................22
Configuring Cameras..........................................................................................22
Adding/Deleting Devices ....................................................................................22
Security Conflicts................................................................................................24
Power Failures ...................................................................................................24
Computer or Internet Failures.............................................................................24
i 69-1321-2
Page 4

Home Controller Gateway User Guide Product Release Version 3.x.x
69-1321-2 ii
Page 5

ABOUT THIS GUIDE
This guide gives instructions for accomplishing Home Controller tasks using three of the
five user interfaces: a computer on the Internet World-Wide Web (Web), a System User
Interface (SUI), and a telephone. Refer to
(VISTA-30PSE, VISTA-10SE)
Microelectronic Communicating Programmable Thermostat Owner’s Guide
thermostat instructions.
The Guide is organized into:
! Overviews of the system and each interface.
! Start-up tasks.
! Tasks for setting, monitoring, and controlling events.
Some features and functions described in this guide may require equipment in addition
to the initial installation.
This is the primary reference for programming all Home & Away System features. It is
written for homeowners to carry out daily Home Controller tasks.
For related information (primarily for installers), refer to the installation instructions for
the Home & Away System connectivity products: W7006A Home Controller Gateway,
T8635L Thermostat, and S7340A System User Interface (SUI).
for security panel instructions, and
Ademco Security System User’s Manual
Honeywell T8635L
for
Who Should Use This Guide
Product Safety
WARNING
Electrical Shock Hazard.
Electrical shock can cause death, personal injury or equipment damage.
Devices controlled by the Home Controller Gateway may require multiple disconnects to
disable and remove power from the device.
1 69-1321-2
Page 6

Home Controller Gateway User Guide Product Release Version 3.x.x
69-1321-1 2
Page 7
Product Release Version 3.x.x. Home Controller Gateway User Guide
GETTING STARTED
At installation, the Home Controller Gateway is connected to your PC and powered on.
Software for the Home & Away System is installed in the Home Controller Gateway
using a compact flashcard memory. Thermostats, the Wall Panel System User Interface,
Web cameras and security panels are connected to the Gateway. Light and appliance
modules are connected to their respective devices, plugged in and programmed into the
system.
The installer also will configure, or help you to configure, default settings for some
devices, Lifestyles, Schedules and passwords required to use the interfaces. You can
change the default settings at anytime using the MyHome Portal Web interface;
Configuring Home Controller Default Settings section.
You will be able to use light, appliance, thermostat, and security features immediately.
However, you must define Lifestyles and Schedules, as described in this guide, before
you can take advantage of these features.
Familiarize yourself with each of the components installed as part of your Home & Away
System. Begin by reviewing the documentation provided for each component:
Component User Guide name (ID)
Web, telephone,
and SUI
Thermostat T8635L Honeywell Microelectronic Communicating
Security Ademco Security System User’s Manual (N7229V2 Rev. B
Web camera GWC308S Web Camera Installation Instructions (69-1560)
Home & Away W7006A Home Controller Gateway User
Guide (69-1321)
Programmable Thermostat Owner’s Guide (69-1332)
1/97)
see
the
For related information (primarily for installers) refer to the installation instructions for the
W7006A Home Controller Gateway, T8635L Thermostat, and S7340A System User
Interface (SUI).
Set-up your browser and computer for optimal Home & Away Web performance.
Set screen resolution to 800 x 600 (or higher) using your computer monitor or display
control panel.
3 69-1321-2
Page 8

Home Controller Gateway User Guide Product Release Version 3.x.x
OVERVIEW
The Honeywell Home & Away System gives you a new level of comfort and convenience
by letting you control and monitor security, lighting, Web camera, appliances, and
thermostats from control panels within your home or by several remote methods,
including a personal computer with Internet access and the telephone. With the
Honeywell Home & Away System, you can:
Monitor home security. Home & Away System installation may include an Ademco or
First Alert security system that enables you to monitor motion, window, and door use.
Control lighting and appliances. With Home & Away System, you can schedule lights
and appliances to turn on or off at selected times and you can control them remotely
from the MyHome Portal.
Control home comfort. Home & Away System displays the temperature for each
thermostat in the house and lets you change the thermostat system, temperature, and
fan settings.
Check status and set events remotely. The Home & Away System provides
interactive telephone and Internet access that lets you check the state of lights,
appliances, Web cameras, security, thermostats and set events from outside the house.
The following four subsections briefly describe how to use each interface type. The
remaining sections of this guide are instructions for performing specific tasks using each
interface.
Using the Web Interface
With the World-Wide Web (Web) interface, you can access your Home & Away System
from any computer with Internet access: at home, at the office, and from a modemequipped laptop. When you acquire the System, Honeywell creates a Web page for you
and the installer assigns it an Internet address. The installer will add your MyHome
Portal Web address to the Bookmarks or Favorites list for your browser.
You can use the MyHome Portal Web interface for most Home & Away System setup
tasks. To use this interface, you should:
! Be familiar with the way graphical Web browsers work (such as Microsoft®
Internet Explorer, Netscape® Communicator)
! Have access to the Internet through an Internet Service Provider (ISP) if
logging in from a computer outside your home.
! Have Netscape Communicator 4.0 or Microsoft Internet Explorer 4.0 or higher
installed.
Home & Away System interface works similarly to other Web pages. All tasks can be
carried out using a mouse or other pointing device; to begin any task, simply click its
labeled button or control on the MyHome Portal.
Each Web page on the MyHome Portal includes task, support, and navigation controls.
Navigation controls are displayed in the lower-left corner of each page and include:
! Home – returns you to the Home page.
! Device Control – takes you to the light, appliance, and thermostat control
panels.
! House History – takes you to a log that displays the last 1000 events that
have occurred (such as thermostat or security system changes).
! System Configuration – takes you to the system default settings (such as
passwords, date and time).
Task controls are the buttons and lists you use to change Device, Lifestyle, Schedule,
and security settings. They are displayed in the main task area of each page. Examples:
! Details buttons.
! Apply buttons.
! Option buttons.
69-1321-1 4
Page 9
Product Release Version 3.x.x. Home Controller Gateway User Guide
Support controls are located in the upper-right corner of the page:
! The Honeywell button links you to a Web page to learn more about the
Home & Away System, and receive advice from our home experts.
! The Help button calls-up on-line help files to assist you with task
completion, navigation, or other problems.
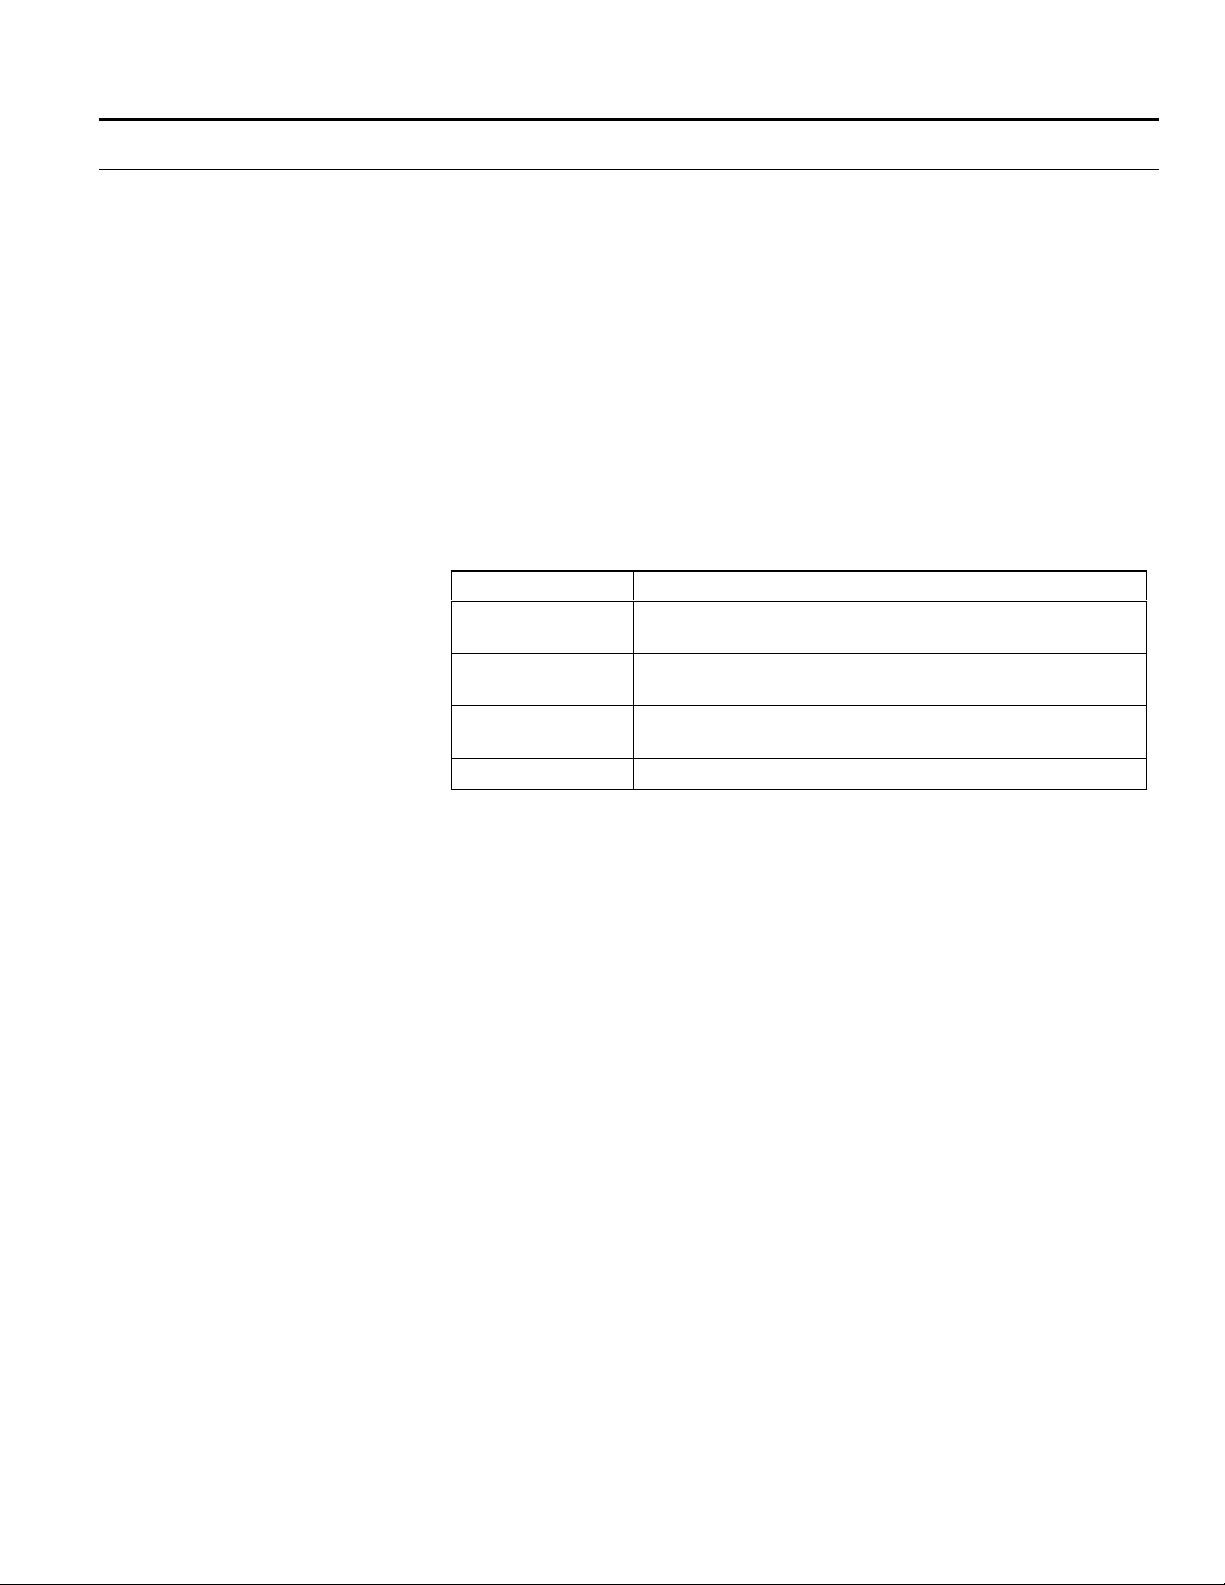
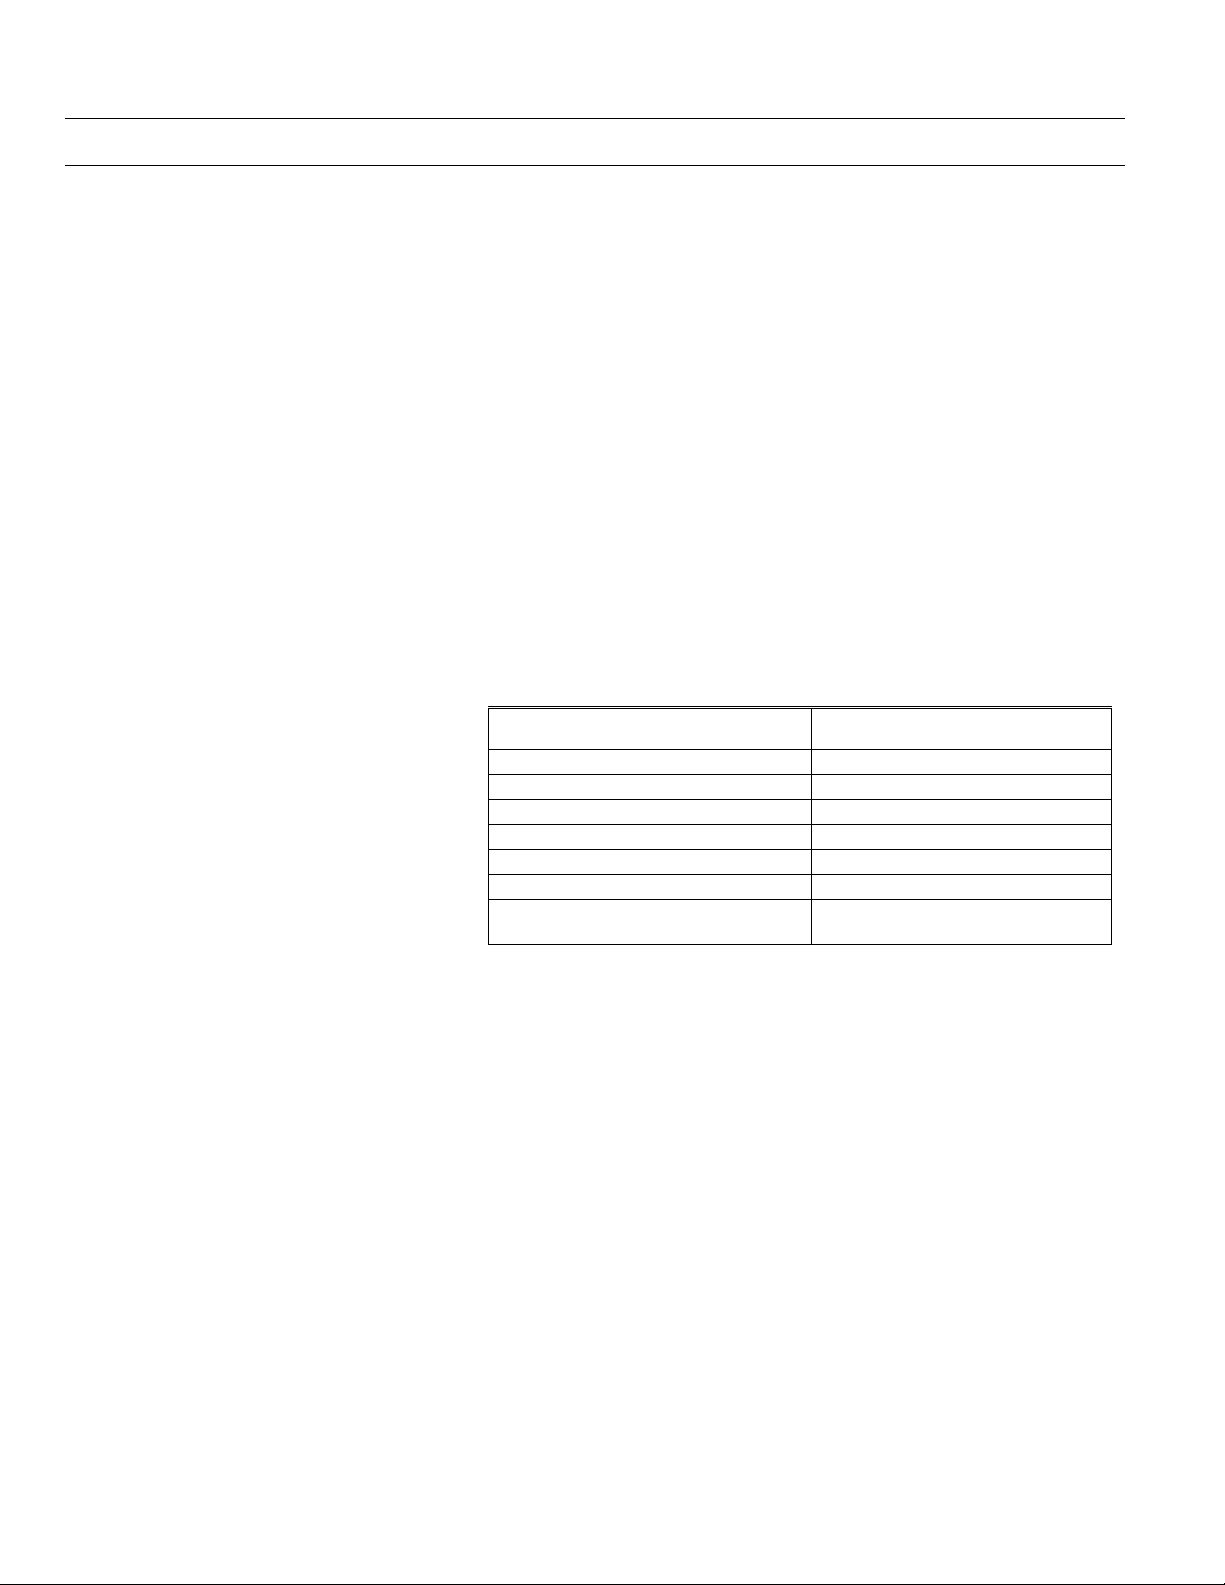
Fig. 1 shows the layout of the Home page; other pages have similar layouts. Table 1
lists the options available on each Web page.
Home Page
navigation button
Support navigation
buttons
Task area with
task controls
Main navigation
bottons
M19091
Fig. 1. MyHome Portal Home page.
Table 1. Home & Away System MyHome Portal Structure.
Web Page What You Can See What You Can Do
Device
Control
Thermostat settings.
Light state (on, off, brightness).
Change settings/states for
thermostats, lights, or
appliances.
Appliance state (on, off).
House History
System
Configuration
All user, sensor, or system initiated
events that occurred within the past 24
hours
The default (or current) settings for
passwords, date and time, security
Verify activities.
Track use and performance.
Change default settings.
associations.
Security
Details Page
Lifestyle
Details Page
Schedule
Details Page
Comfort
Details Page
Current security state.
Security associations.
Lighting group configurations Edit any Lifestyle’s
Lighting and thermostat configurations. Edit any Schedule’s
Thermostat settings, temperature
readings, and system/fan modes
Change security state.
configuration.
configuration.
Change settings and modes
for thermostats.
Honeywell Home & Away System Web site. Review product information.
Help
Description of current page and
procedures for using Home Controller
from the Web.
Read information about the
current page; browse for
other information.
5 69-1321-2
Page 10

Home Controller Gateway User Guide Product Release Version 3.x.x
Web Page What You Can See What You Can Do
Camera
Snapshot
If cameras are installed, page shows
snapshot image from each camera.
View camera image and
click on it for enlargement.
Logging On and Off
You can log into your Home & Away System on the Web from any computer that has
Internet access. The method for logging in is slightly different for using the Web interface
from home and using it remotely.
Because all your changes are automatically saved, there is no formal log-off procedure.
When you have completed accessing the MyHome Portal from the Web, you can enter
another URL in the Address box and perform other Internet tasks, or you can close your
Web browser and close your Internet connection as usual.
Be sure that a full time connection to the Internet is established to log in from a computer
outside your home. If it is not, follow instructions from your ISP to establish and maintain
the connection. No connection is needed if logging in from a computer within your home.
Logging in from home: Type your Internet Protocol (IP) address in the Address or Location box at the top
of your browser and press Enter. Your Home page is displayed.
Note: The IP address is a series of four numbers separated by periods; for example,
196.168.8.7. Your installer will give you the IP address and write it into your
installation materials.
After you log in, you can save the address to your Bookmarks or Favorites file.
Logging in remotely: 1. Type myhome.honeywell.com in the Address or Location box at the top of your
browser and press Enter. The public Honeywell Home Controller Gateway page is
displayed.
2. In the Username box, type the ID supplied by your installer.
3. In the Password box, type your password supplied by your installer.
4. Click the Login button. Your MyHome Portal Home page is displayed.
NOTE: If you browse to other sites, and then click the browser Back button to return to
the MyHome Portal site, you may need to log back into the site. You will not be
required to log in again if you return to the site within five minutes.
69-1321-1 6
Page 11
Product Release Version 3.x.x. Home Controller Gateway User Guide
Using the Wall Panel System User Interface
The Wall Panel System User Interface (SUI) is a small, wall-mounted control panel
installed in a convenient location—probably away from your personal computer with its
Web Interface. To use the Wall Panel SUI, you make selections from menus on its
display screen. When not in use, the Wall Panel SUI screen displays current status
information including temperature, the security system arm state, the last Lifestyle
activated, the time, and the outdoor temperature if an outdoor temperature sensor is
installed.
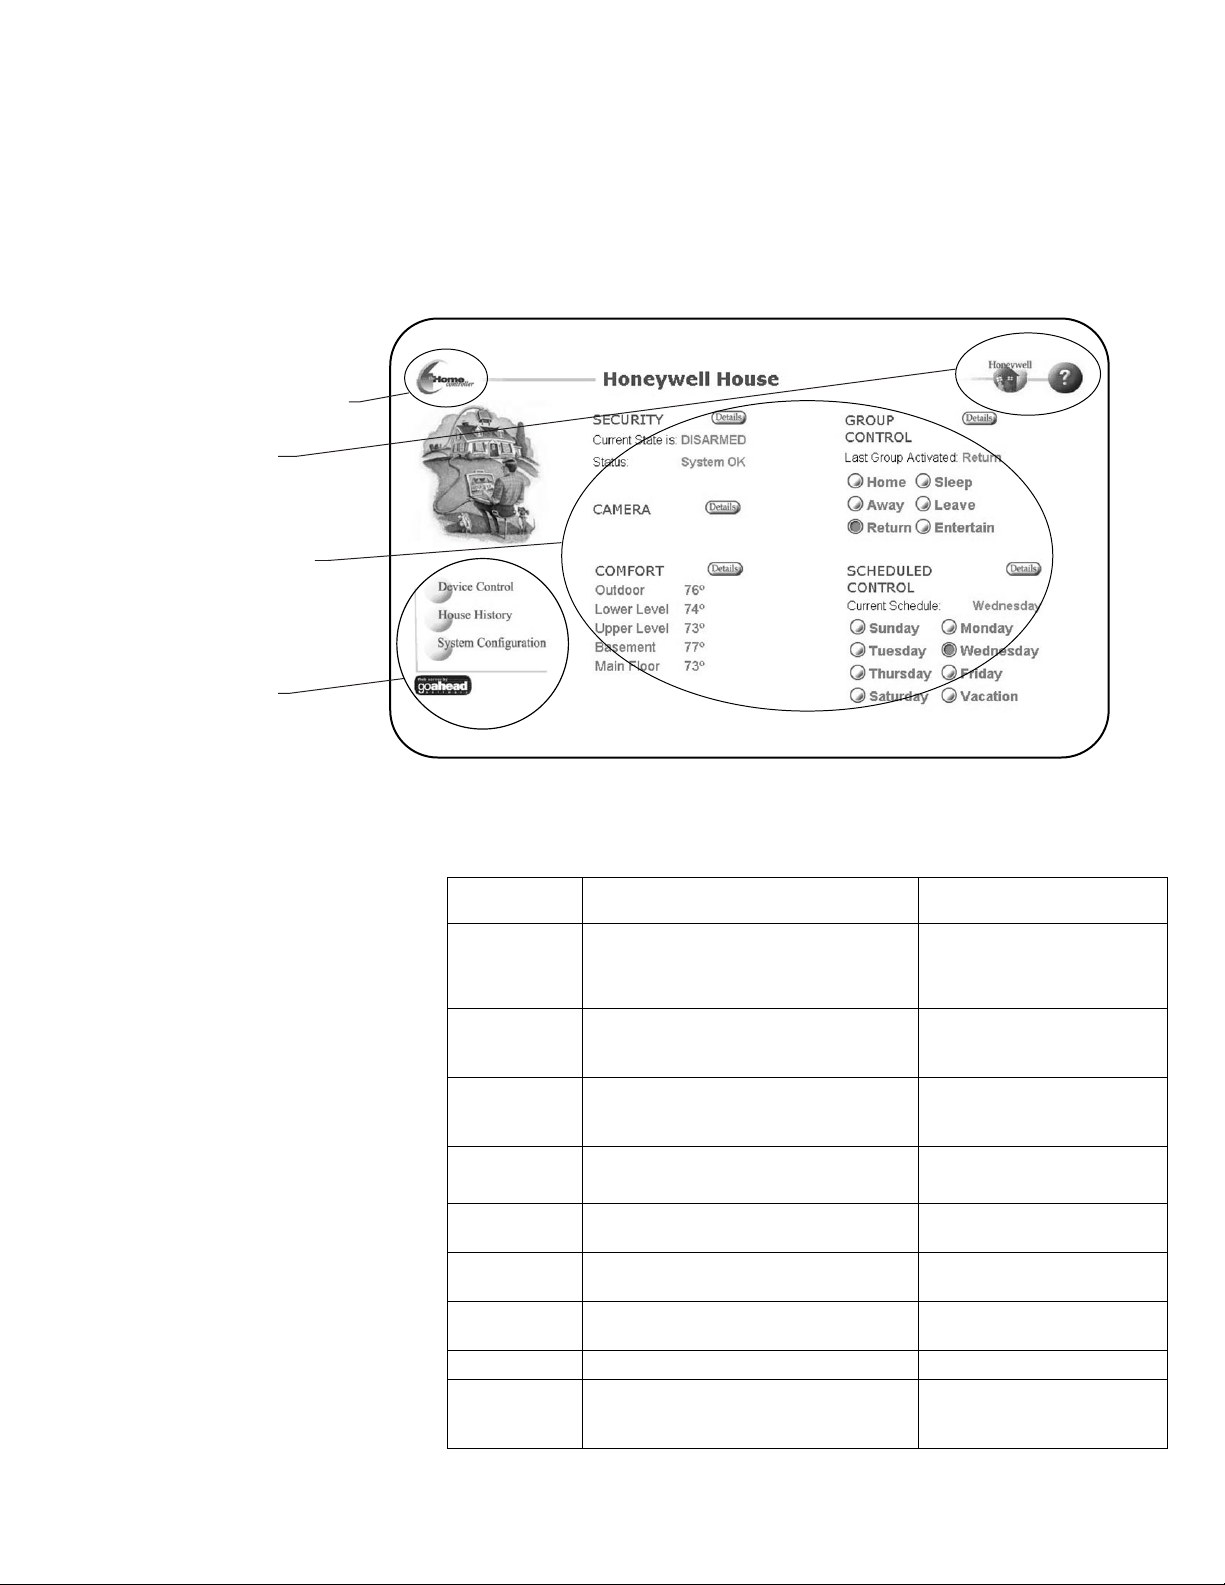
To navigate through the SUI screens, press either of the arrow keys at the top right of
the panel to display a new screen (Fig. 2). As a new screen is displayed, its task options
are listed next to the blank keys on the right of the screen. To select an option, press the
button next to it. Some actions, such as entering your user code, require use of the
number keys below the screen and the OK key on the far right. The Back key cancels
your last action.
Navigation and option buttons
for changing display.
Display screen shows the
name of the device you
can control and current
settings.
Control buttons to cancel or
complete transactions.
Numeric keypad for entering
codes and thermostat
settings.
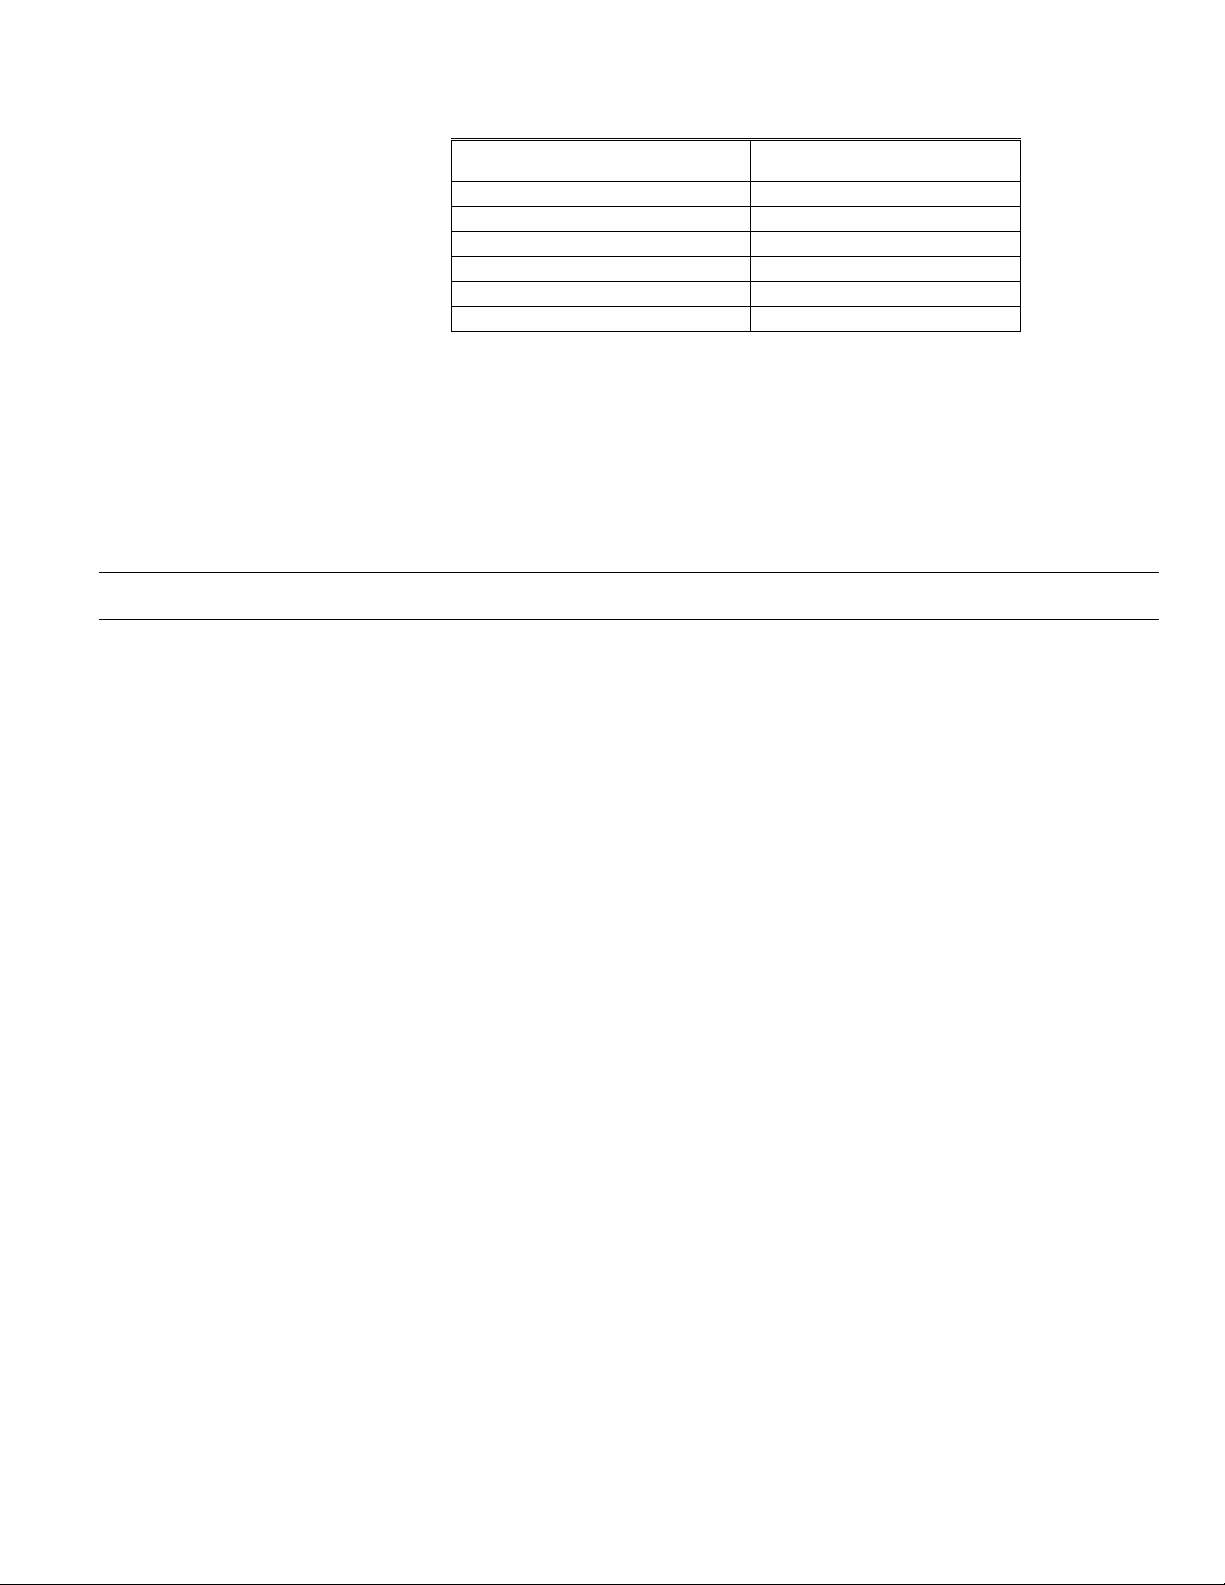
SUI Page What You Can See What You Can Do
Status Last Lifestyle activated.
Lifestyles Your Lifestyle modes. Activate a Lifestyle.
Comfort Indoor Temperature.
Security Current Security State.
M19092
Fig. 2. Wall Panel System User Interface (SUI).
Table 2. Home & Away System Wall Panel SUI structure.
Navigate to other screens.
Current Security State.
Current Indoor Temperature.
Enter security code and change
Security State.
Change Thermostat Settings.
Thermostat settings and modes.
Change Thermostat Modes.
Change Thermostat fan modes.
Change Security State.
Security Options.
7 69-1321-2
Page 12

Home Controller Gateway User Guide Product Release Version 3.x.x
Using the Telephone
The telephone interface works like banking or other transaction systems you may be
familiar with. To set the Home & Away options by telephone while away from home, dial
your home phone number. If you do not have an answering machine or answering
service, the System will answer your phone automatically after four rings (or the number
of rings you set in the Telephone Settings area of the System Configuration Page).
Otherwise, you must phone home, wait until after the second ring, hang up and redial
within 40 seconds. The Home Controller will pick up the connection and you will hear a
voice prompting you to enter your telephone access code. After logging in, follow the
voice prompts to select the option you want to use. If you set the System to zero rings,
the telephone interface will be disabled.
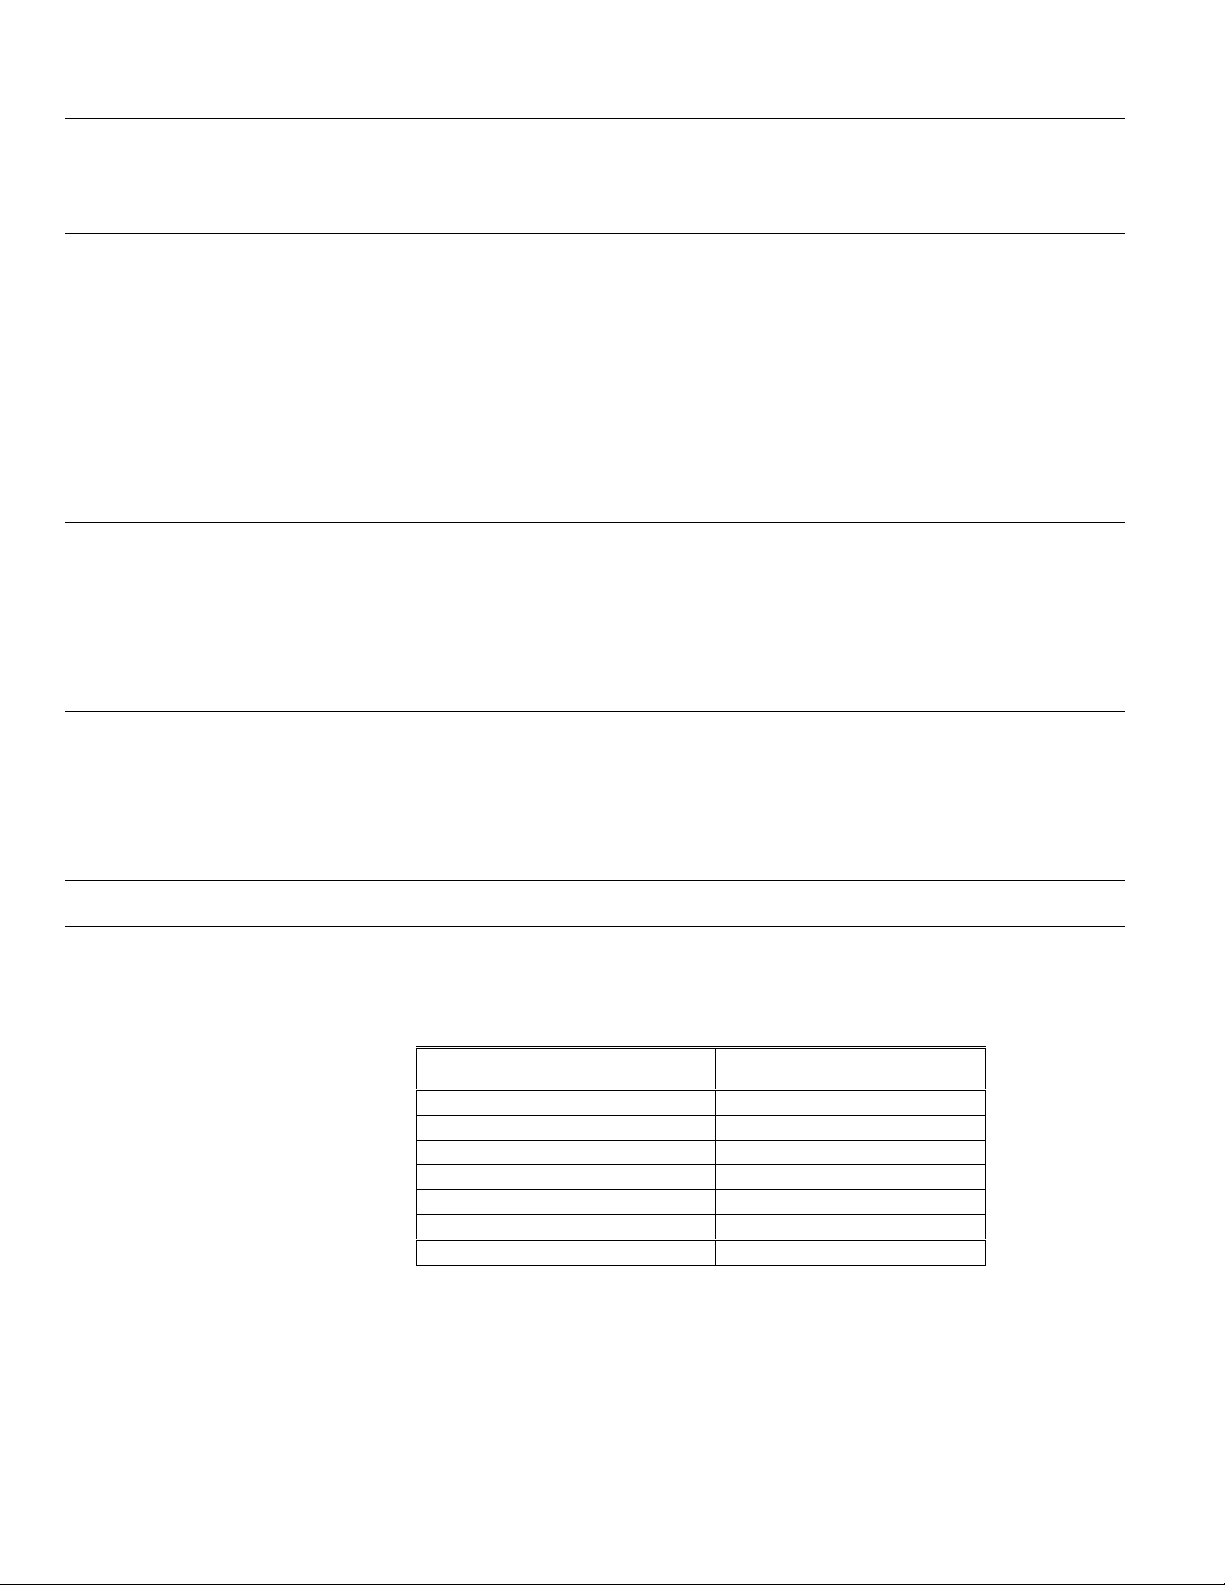
Table 3. Home & Away System Telephone Interface Structure.
Phone Options What You Can Hear What You Can Do
Main menu System Options.
Group Control
menu
Security menu Current Security State.
Comfort menu Indoor Temperature.
When you have completed all tasks you want to perform by phone, press the # key until
you return to the main menu, then log off the system by pressing # again.
Last Lifestyle Activated.
Lifestyle Options.
Security Options.
Thermostat Options.
Navigate to Lifestyle controls, security
controls, and comfort controls.
Activate a Lifestyle.
Change Security State.
Change thermostat settings.
69-1321-1 8
Page 13

Product Release Version 3.x.x. Home Controller Gateway User Guide
HOME & AWAY SYSTEM TASKS
This section describes each task you can perform with the Home Controller, then tells
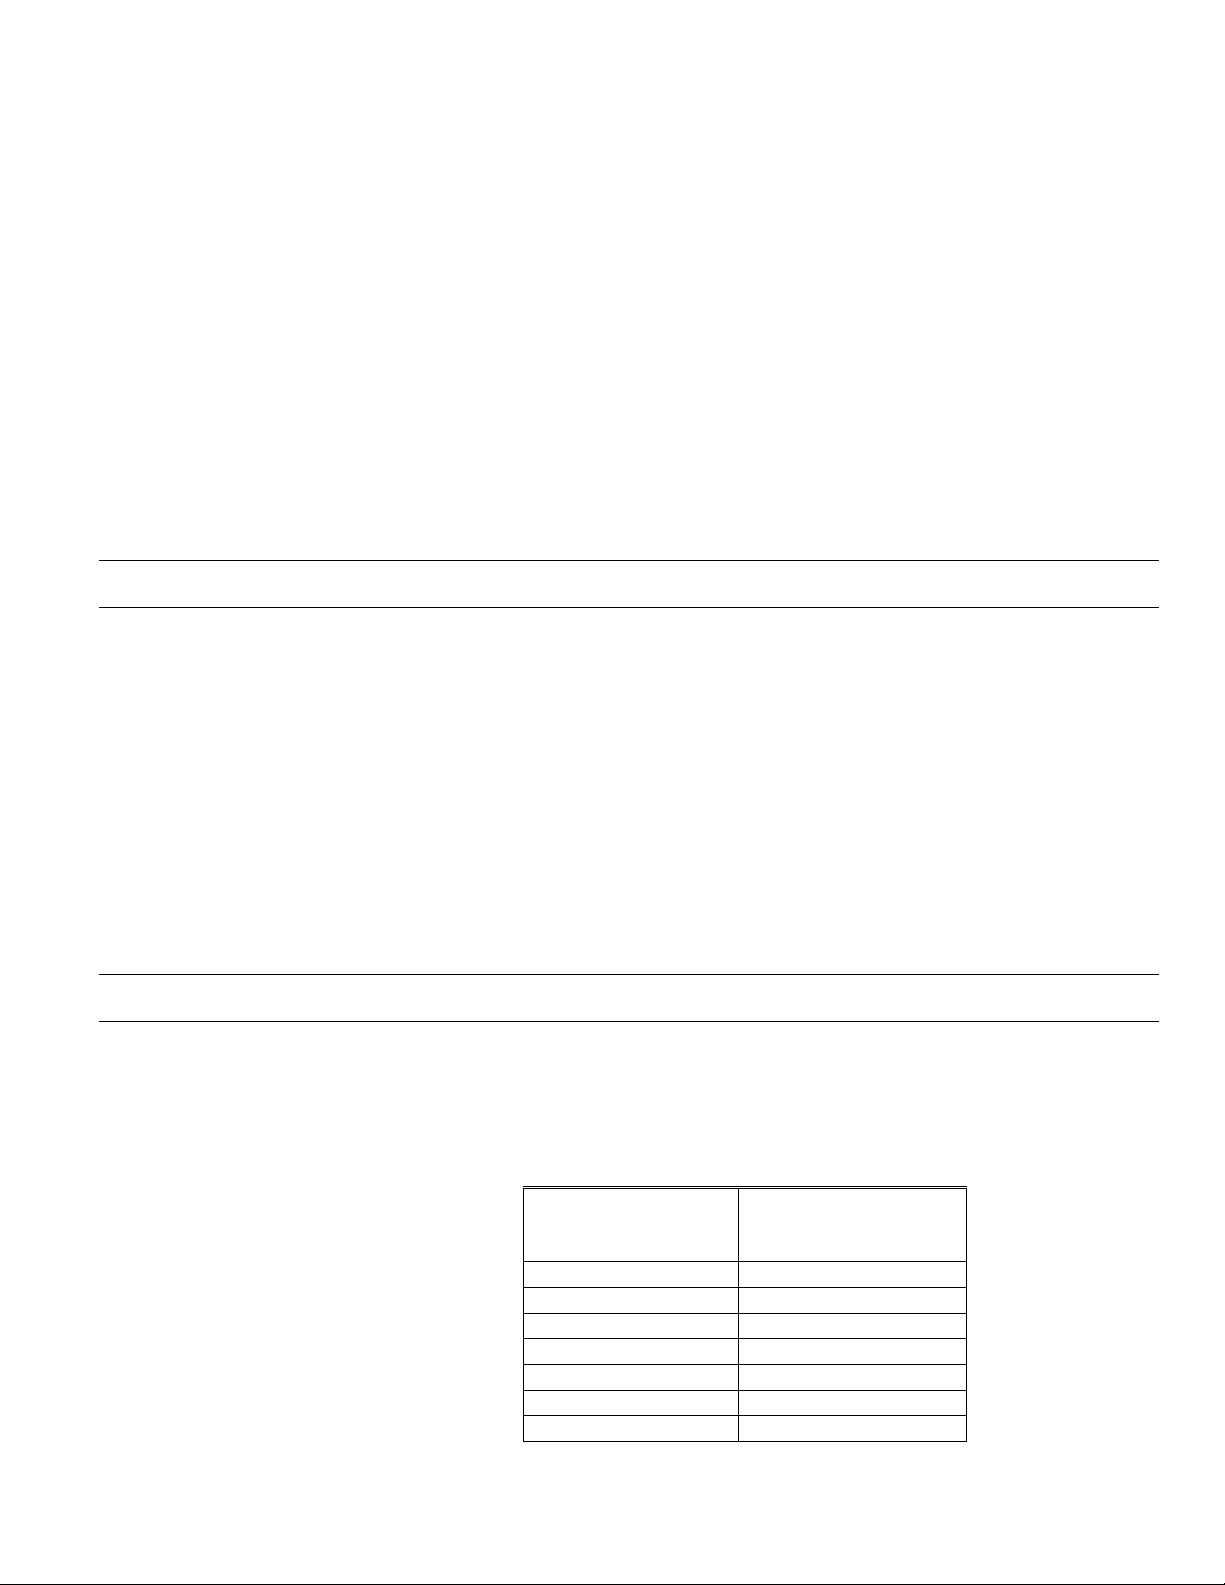
you how to use each interface to accomplish the task. Table 4 is an overview of the
tasks you can perform from each interface.
Table 4. Home Controller Tasks and Interface Options.
Interface
Tasks
Configure Home Controller Default Settings
Check Current House Status
Monitor & Control Lights and Appliances
Monitor & Control Comfort
Set Security State
Define Lifestyle Controls
Activate Lifestyles
Define Scheduled Controls
Activate Schedules
View History (events in last 24 hours)
View Camera Snapshots
Web SUI Phone
"
"" "
"
"" "
"" "
"
"" "
"
"
"
"
Viewing Event History
The MyHome Portal Web interface includes a log function that tracks the last onethousand Home & Away System events that have occurred during the previous 24
hours. You may find this feature especially useful, as you become familiar with the
System, to verify that events occurred as you expected.
To view event history: Click the Home History navigation button on any page.
You will be presented with a table that lists the time an event (such as a setting/state
change) occurred and a description of the event. Events are listed in chronological
order. As new events are added to the log, the oldest events are removed from the log.
The event history may be less than one-thousand events if the Home Controller has lost
power or been restarted for any reason.
9 69-1321-2
Page 14

Home Controller Gateway User Guide Product Release Version 3.x.x
Checking Current House Status
The Web, Wall Panel SUI, and telephone all provide limited status information as soon
as you begin using the interfaces. For example, you can determine the current Security
State, the last Lifestyle mode activated, which Schedule is active, and the current
temperature reading at the thermostat.
Web
To check status from the Home page:
To check status from another page:
To check status from the main screen:
To check status from another screen:
The MyHome Portal Web page shows status information for security, comfort, Lifestyle
Control, and Schedule Control. The active security state, Lifestyle, and Schedule are
indicated by orange selection buttons or text. You can immediately change the group or
schedule status by clicking on a selection button. The current temperature reading of
each thermostat is displayed next to the label Room.
To change the temperature setting, browse to the Comfort page using the
button. To change the security states, browse to the Security page using the
button.
Click the
Home
navigation button to return to the status display on the Home page.
Details
Details
SUI
The Home Status page on the Wall Panel SUI shows the last Lifestyle activated, security
state, and indoor temperature. Home Status is the normal at-rest display for the SUI.
That means it is automatically displayed 60 seconds after your last selection.
If you have displayed a different screen and want to redisplay the Home Status page,
press the
or < keys until the Home Status screen appears.
>
Phone
Status information is separated by category and presented under each of the three task
menus. The last Lifestyle activated is shown under the Lifestyle Control menu.
Information about the current Security State is shown under the Security menu. And the
current indoor temperature is shown under the Comfort menu.
To check status:
69-1321-1 10
After logging into the system by phone, you will hear the Ready prompt followed by the
Main menu. To access:
! Group Controls, press
! Security, press
! Comfort, press
As soon as you enter your selection, the system gives the current status. If you wish to
make changes to the system, follow voice prompts.
1.
2.
3.
Page 15
Product Release Version 3.x.x. Home Controller Gateway User Guide
Arming and Disarming Security
The Web, phone, and Wall Panel SUI interfaces let you change the security state
immediately. You can choose from among all available security states, just as you would
use the security keypad.
Security states are identified by number:
1 = Disarm, 2 = Away, 3 = Stay, 4 = Maximum, 7 = Instant.
If a door or window was left open, you will see that the system is not ready and cannot
be armed without first bypassing the zone. Press the ∨ key ( or ∧ key on the SUI) to
determine the zone number that remains open. Bypass the zone by entering the security
user code followed by 6, followed by the two-digit zone number.
Web
To change security state:
To change security state:
To change security state:
The MyHome Portal Web interface allows you to set the Security State by navigating to
the Security page (click on the Security
On the Security page:
! Read the status window to determine the current Security State.
! Enter your security user code.
! Click on the key that specifies the state change you wish to use
Details
button from the Home page).
SUI
Press the > or < keys until the Security screen is displayed. The current Security State
is displayed in the dark box.
! Enter your security user code.
! Press the numeric key that corresponds with the state you wish to use.
You can also set the Security State from the main SUI screen.
! Press a button to activate the screen.
! Enter your security user code.
! Press the numeric key for the Security State you want to use.
Phone
At the main menu, press 2 to display the security menu. You will hear the current
Security State.
! Enter your security user code.
! Press the numeric key that corresponds to the state you wish to use.
11 69-1321-2
Page 16
Home Controller Gateway User Guide Product Release Version 3.x.x
Setting Lights and Appliances from the Web
You can change the brightness of individual lights and turn appliances off and on from
the MyHome Portal.
To display status information
for lights and appliances: Click the Device Control navigation button on the Home page, then click the Lights or
Appliances option on the Device Control page.
To check or change the brightness
of a light: Click the Device Control navigation button on the Home page, then click the Lights
To check or change the state
of an appliance: Click the Device Control navigation button on the Home page, then click the
option on the Device Control page. Click the desired brightness level button (Off, On, or
a percentage) under the name of the light. When the setting takes effect, the button is
displayed in blue with white letters.
Appliances option on the Device Control page. Click the On or Off button under the
appliance name. When the setting takes effect, the button is displayed in blue with white
letters.
NOTE: The Home & Away System communicates differently with different types of
X10 devices. Changes made directly to some lights or appliances are not
communicated to the MyHome Portal. For example, if you manually turn off a
light that was turned on by a Schedule, the Portal continues to show the light
as on. The table below indicates which X10 devices tell the Home & Away
System when their state is manually changed.
X10 Device
1-way light modules No
1-way light switches No
1-way appliance modules No
2-way light modules No
2-way light switches Yes
2-way appliance modules No
OnQ Advanced Lighting Control
(ALC) Lighting
Communicates changes made
at the device itself?
Yes
69-1321-1 12
Page 17

Product Release Version 3.x.x. Home Controller Gateway User Guide
Setting Thermostats
You can control thermostat temperature, system mode (heating, cooling, automatic, or
off), or fan mode (continuous On or Auto), from the thermostat, the SUI, the telephone,
and the Web interface.
The thermostat and Web interfaces allow you to specifically set both a cool-mode
temperature setting and a heat-mode temperature setting. The SUI and telephone
interfaces only allow you to change one temperature setting. If the thermostat is in heat
mode, temperature changes will affect the heat-mode temperature setting. If the
thermostat is in cool mode, temperature changes will affect the cool-mode temperature
setting.
NOTE: The cool-mode temperature setting must be 3° higher than the heat-mode
temperature setting. If the heat and cool mode temperature settings are within
3° of one another, the temperature settings are automatically adjusted to
maintain the 3° difference. (See the thermostat user guide for more information.)
The MyHome Portal Web interface lets you change thermostat settings and system
modes to regulate temperature, and fan modes to regulate air circulation.
To check room temperature: Click the Home page navigation button to return to the status display on the Home
page. Or click the Device Control navigation button to go to the device pages, then
select Thermostats from the Show menu. Indoor temperature is shown next to the
label “Room”. Temperature settings are shown next to the label “Set” or “Setting”.
To check or change temperature
settings: Use either the Home page or the thermostat Device Control page.
Click the up arrow next to a current temperature setting to increase temperature. Click
the down arrow next to a current temperature setting to decrease temperature. Each
click changes the temperature by one degree.
To check or change system mode: Choose Show thermostats on the Device Control page. Select an option under the
System heading for the thermostat you want to change. You can set the system mode to
Heat, Cool, Off or Auto.
To check or change fan mode: Choose Show thermostats on the Device Control page. Select an option under Fan
heading for the thermostat you want to change. The fan can be set to On (continuous) or
Auto (runs whenever the thermostat initiates a heating or cooling cycle).
Web
The Wall Panel SUI interface lets you change thermostat settings and modes to regulate
temperature, and fan modes to regulate air circulation.
To change thermostat setting: 1. Press the
screen displays a thermostat name, its current temperature reading, and its current
temperature setting (in the box).
2. If desired, select a different thermostat by pressing the button next to the current
thermostat name.
3. Press the button next to the Warmer or Cooler option until the correct temperature
setting is displayed in the box.
4. Press OK to save the change (press Back to cancel the change).
To change thermostat mode: 1. On the Comfort screen, press the button next to the system/fan settings option.
or < keys until the Comfort screen is displayed. The first line of the
>
13 69-1321-2
SUI
Page 18

Home Controller Gateway User Guide Product Release Version 3.x.x
2. Press the button next to the system mode option until the correct mode setting is
displayed.
3. Press OK to save the change (press Back to cancel the change).
To change fan mode: 1. On the Comfort screen, press the button next to the system/fan settings option.
2. Press the button next to the fan mode option until the correct mode setting is
displayed.
3. Press OK to save the change (press Back to cancel the change).
Telephone
To set a thermostat setting: 1. At the main menu, press 3. You will hear the current room temperature followed by
the comfort options.
2. Press the number of the option you want:
Press 1 to decrease the main thermostat temperature setting by 1°
Press 2 to increase the main thermostat temperature setting by 1°
Press 3 to decrease the second thermostat temperature setting by 1°
Press 4 to increase the second thermostat temperature setting by 1°
Continue pressing the option until you hear the temperature you want.
(If you have only one thermostat, you will not hear options 3 and 4.)
Using Lifestyle Modes
Lifestyle Control enables you to enter one command to the Home & Away System
Controller that causes several lighting devices to change state simultaneously. For
example, when you arrive home from work, you might want to turn on the porch and
front hall lights. The Home Lifestyle could be defined to set the lights on. Then, when
you arrive home, all you’ll have to do is activate the Home Lifestyle to set up the house
the way you like it.
Activate a Lifestyle Control manually or through Scheduled Control. Devices remain in
the state defined by the Lifestyle until one of the following actions occurs:
! A change is made at the device itself,
! Another Lifestyle is activated, or
! A Schedule is activated.
The Home & Away System Controller lets you define six Lifestyles to control lighting and
appliances. Set the name of each Lifestyle from the Change Lifestyle page and define
each any way you wish. Lifestyles can be programmed with light and appliance events,
as listed below.
69-1321-1 14
Page 19
Product Release Version 3.x.x. Home Controller Gateway User Guide
Event type
Thermostat system settings No
Thermostat fan settings No
Thermostat temperature settings No
Security Settings No
Appliance settings Yes
Light settings Yes
After you define Lifestyles, you can activate them manually from the Home & Away
System Controller interfaces. If you would like more automatic control of devices, you
can schedule Lifestyles to automatically activate on specific days at specific times, using
the Scheduled Control page.
NOTE: The Home & Away System Controller interfaces identify a Lifestyle Last
Activated. Because Lifestyles are not continuous states, the last activated
Lifestyle may no longer be in effect. Continuing the example from above, the
Home Controller could show Home as the Last Lifestyle Activated, but the
porch and front hall lights may have been turned off at their switches.
Can event can be
programmed in a Group?
Defining Lifestyles
You define all Lifestyles from the MyHome Portal Web interface:
1. Click the Details button in the Lifestyles area of the Home page. Home Controller
displays the Lifestyles page.
2. Select the Lifestyles you wish to define under the Show all events for the group
heading. Then click the Change button next to the name of the Lifestyles you want
to define. Home Controller responds by adding selection buttons next to each event
in the group and displaying Delete and Add buttons in the instruction area of the
page.
3. Add or Delete events as needed.
To add an event:
a. Click the appropriate Add button (an appliance or a light). Home Controller
displays an add dialog for the device type you selected.
b. Select the name of the device to add from the first drop-down list.
c. Select device settings:
For Appliances, select the State (on or off).
−
For Lights, select the brightness Level (on, off, or percentage).
−
d. Click OK to close the dialog. (Click Cancel if you decide not to add this
event to the Group.)
To delete an event:
a. Click the selection button next to the event you wish to delete.
b. Click the Delete button. Home Controller displays a message confirming
your selections.
c. Click OK to complete the deletion.
To change an event:
a. Delete the event you want to change.
b. Then follow the Add procedure to re-enter the event with new settings.
15 69-1321-2
Page 20
Home Controller Gateway User Guide Product Release Version 3.x.x
Activating Lifestyles
After you define at least one Lifestyle, you can use the Web, Phone, or Wall Panel SUI
interfaces to activate the Lifestyle.
Web
You can activate Lifestyles manually from the Home Page (or you can include them as
see
events in a Schedule,
Scheduled Control procedures below).
To activate a Lifestyle: 1.
To activate a Lifestyle Group: 1.
2.
3.
To activate a Lifestyle Group: 1.
2.
Display the Home page.
2.
Click the selection button next to the name of the Lifestyle you wish to activate.
Home Controller displays a message confirming your selections. Click OK to
complete the activation. Home Controller shows the new Lifestyle in the Last
Lifestyle-activated status line but does not show the activated Lifestyle selection
button pushed in.
Press the > or < keys until the Lifestyle Control page is displayed.
Using the keypad, press the number of the Lifestyle you want to activate.
Press OK to save the change (press
At the main menu, press 1. You will hear the last Lifestyle activated followed by the
Lifestyle Control options.
Press the number of the Lifestyle you want to activate.
Back
to cancel the change).
Using Scheduled Control
SUI
Phone
Scheduled Control lets you set times for changing lights, appliances, thermostats, and
Lifestyles. Although you cannot change the names of these Schedules, you can define
them any way you wish. Schedules can be programmed with Lifestyle, light, and
appliance events, as listed below.
Event
Lifestyle Activation Yes
Thermostat system settings No
Thermostat fan settings No
Thermostat temperature settings No
Security settings No
Appliance settings Yes
Light settings Yes
Schedules do not require manual activation like Lifestyles do. Once you have added an
event to one of the Schedules, that event will automatically be activated at the
programmed time and on the programmed day. The Home & Away System provides
eight 24-hour Schedules one for each day of the week and Vacation.
69-1321-1 16
Daily
!
! The
schedules operate from 12:00 am through 11:59 pm for the specified
day.
Vacation
lived-in look while you are away from your home. The Vacation Schedule
Can event can be
programmed in a Schedule?
Schedule overrides daily Schedules. It helps you maintain a
Page 21

Product Release Version 3.x.x. Home Controller Gateway User Guide
operates until it is turned off or a different Schedule is activated (rather than
running only on specific days).
A note about scheduling conflicts: When many events are programmed for a Schedule, it is possible to have conflicting
events. For example, a light may originally have been programmed to turn on at 5:00
pm and a recent addition to the schedule has the same light turning off at 5:00 pm. This
will cause the light to turn on and off in 1-2 second intervals, as the Home & Away
Controller System tries to accommodate both Scheduled events. To solve this problem,
delete one of the conflicting events.
Defining Schedules
You can define schedules for Lights and Appliances or for each thermostat by day of
week or for vacations.
For Lights and Appliance Schedules, you add device events or Lifestyle and set times at
which the events occur. By defining Lifestyles as explained in an earlier task, you can
set a collection of device changes to occur at one time rather setting each event
individually in the Schedule.
For thermostats, you can set the time at which each Period starts and the heating and
cooling set points for the periods.
To define a Lights and
Appliance Schedule: 1. Click the Details button in the Scheduled Control area of the Home page. Home
Controller displays the Scheduled Control page.
2. Select the day for which you wish to define a schedule.
3. Click the Change Schedule under the Show all events for the schedule: Lights
and Appliances. Home Controller displays the schedule for the selected day.
4. Add or Delete events as needed.
To add an event:
a. Click the appropriate Add button (an appliance, a light, or a Lifestyle). Home
Controller displays an add dialog for the device type you selected.
b. Select the name of the device or Lifestyle to add from the Select Appliance
or Select Lifestyle drop-down list.
c. For appliances, select the device setting (on or off) from the Set State drop-
down list.
d. In the Time area, set the time at which the event should occur. You can set
an exact time, have the event occur at a specific number of minutes before
or after sunset/sunrise, or have it occur randomly (Lived In Look).
! To set an exact time for the event to occur, click the Time of Day
selection button, then select hours and minutes from the drop-downs,
and click the option for either am or pm.
! To have the event occur in relation to Sunrise, click the Sunrise
selection button. Then choose either minutes before sunrise, at
sunrise, or minutes after sunrise. Specify the number of minutes
before or after sunrise by clicking the up or down arrow in the minutes
box.
! To have the event occur in relation to Sunset, click the Sunset
selection button. Then choose either minutes before sunset, at sunset,
or minutes after sunset. Specify the number of minutes before or after
e. In Lived-in look, select Yes if you want Home Controller to vary the time
f. Click OK to save the event and close the dialog. (Click Cancel if you decide
sunset by clicking the up or down arrow in the minutes box.
device settings are changed. Time is varied plus or minus 15 minutes from
the time set in step d. Select No if you want the device settings to always
be changed at the exact time specified in the step d.
not to add this event to the Schedule.)
To delete an event:
a. Click the selection button next to the event you wish to delete.
17 69-1321-2
Page 22

Home Controller Gateway User Guide Product Release Version 3.x.x
b. Click the Delete button. Home Controller displays a message confirming
your selections.
c. Click OK to complete the deletion.
To change an event:
a. Delete the event you wish to change.
b. Then follow the Add procedure above to re-enter the event with new settings.
When you have completed all schedule changes, click Done Editing to return to the
schedule view.
To define a Thermostat Schedule: 1. Click the Details button in the Scheduled Control area of the Home page. Home
Controller displays the Scheduled Control page.
2. Select the day for which you wish to define periods and settings.
3. In the thermostat table, select the name of the thermostat for which you want to
change settings.
4. Click the Change Schedule under the Show all events for the schedule:
Thermostats. Home Controller displays a dialog of the periods and settings for the
thermostat for the selected day.
5. For each period that you want to change select a start time and the heating and
cooling setpoints.
6. Click OK when all periods are set correctly.
After you define a Schedule, it runs automatically on the days it is programmed for (if
you select Vacation, it remains in effect until you select a different schedule). If your
schedule changes suddenly and you wish to manually set a different Schedule, you can
use the Web interface to immediately activate or stop Schedules. If you switch between
daily Schedules, the regular schedule resumes after midnight (12:01 a.m.).
To activate a Schedule: 1. Display the Home page.
2. Click the selection button next to the name of the Schedule you want to activate.
Home & Away System displays a message confirming your selections. Click OK to
complete the activation. Home Controller shows the active Schedule’s selection
button "pushed in" and lists the new Schedule in the “Current Schedule” status line.
Activating Scheduled Controls
69-1321-1 18
Page 23

Product Release Version 3.x.x. Home Controller Gateway User Guide
CONFIGURING HOME & AWAY SYSTEM CONTROLLER GATEWAY
DEFAULT SETTINGS
All default system settings are controlled from your MyHome Portal Web site. The
System Configuration page of Home Controller Web site allows you to change settings:
! Date and time.
! Home page (title and confirmation preferences).
! Lights and appliances (renaming).
! Passwords.
! Security (Group associations).
! Telephone.
! Thermostat.
! Camera.
Configuring Date and Time
Scheduled Control events are based on the date and time information shown in the
System Configuration. If the information is not current, you may experience unexpected
device behavior—light, appliance, and thermostat settings may change unexpectedly.
If your Home & Away System installation includes an Internet connection, the time
and date are set automatically for you. The Home Controller Gateway contacts the NIST
(National Institute of Standards and Technology) time computer once a day, at 3:00 am,
to keep the time and date current. If the Internet connection is lost, the Controller
maintains the time and date based on its internal clock. If there is a power outage
longer than 12 hours, the time and date will be incorrect and you must manually reset
the time and date.
If your installation does not include Internet access, you need to manually set the
current time and date using this page. Once time and date information is set, the Home
Controller maintains the time and date based on its internal clock. If there is a power
outage longer than 12 hours, the time and date will be incorrect and you will need to
manually reset the time and date.
NOTE: Always verify the date and time information on the Date and Time Configuration
page after an interruption in Internet service or a loss of power.
Changing the date and time: On the System Configuration page, select Date & Time from the Show settings for list,
then select current time and date from the drop-down lists and option buttons displayed
on the right to set the time, day, date, and year.
Configuring the Home Page
Home & Away System allows you to personalize the MyHome Portal page by changing
its title. You can also use this configuration area to select whether the Home Controller
confirms new Lifestyle and Schedule settings.
During Home & Away System installation, the Home Controller Gateway is installed with
the confirmation box option activated. Whenever you change Lifestyles or Schedules
from the MyHome Portal, a dialog box appears for you to confirm the change. (To close
the confirmation box and continue with the Lifestyle or Schedule activation, click OK.
Click Cancel if you decide not to activate the Lifestyle or Schedule.)
Changing the Home Page title: On the System Configuration page, select Home Page from the Show settings for list,
then click in the box labeled Enter the Home Page title, and type in the new title. Titles
must be 21 characters or less.
19 69-1321-2
Page 24

Home Controller Gateway User Guide Product Release Version 3.x.x
Select confirmation action: To select whether the Controller displays confirmation messages, click the yes or no
option under Show a confirmation when activating any Lifestyle or Schedule.
Configuring Lights and Appliances
Changing a light or appliance name: Your Home & Away System can use either X10 lighting or OnQ ALC Lighting. ALC
Lighting provides reliable hard-wired control of your lights where X10 lighting provides
added flexibility. You can use any combination of ALC Lighting and X10 lighting in your
Home & Away System. You can change the device name on either the X10 or ALC
Lighting; however, you can change the address only on your X10 lighting. To change a
device name, select the desired device from the light or appliance pull-down list and
click its associated Edit button. A dialog box appears. Change the device name by
selecting the current name and typing in the new name. Changing a device name will
not interfere with device operation.
Changing X10 light or appliance
House Code or Unit Code: Generally, you should not have to change the House Code or Unit Code of any light or
appliance, after the Installer has configured the system. However, it is possible to
experience interference from X10 devices in neighboring homes. For example, a
neighbor may have all his/her X10 devices configured with the House Code C. So each
time your neighbor activates a device, your Home Controller activates all devices in your
home with the House Code C. This is not a problem when you are using OnQ ALC
Lighting. If this occurs, you should change the House Code of all devices experiencing
interference. Do not change the House Code or unit codes if you are using ALC
Lighting.
To change a device code, select the desired device from the light or appliance pull-down
list and click its associated Edit button. A dialog box will appear. Change the House
Code by clicking on a new letter in the red dial. Change the Unit Code by clicking on a
new number in the black dial.
Note: To decrease the probability of experiencing interference from X10 devices or
Adding a light or appliance: To add a new X10 light or appliance to the Home & Away System, go to the System
Configuration page and select Add/delete devices. Enter the House Code, unit code,
device type and device name. Select Apply.
Removing a light or appliance: If you wish to remove an existing light or appliance from the Home & Away System, go
to the System Configuration Page and Select Add/delete devices. Select the device
from the pulldown list and select Delete.
NOTE: Unplugging a light or appliance from the its associated X10 module and
systems outside your home, do not use the House Codes A or P. (A is the
default house code assigned to all X10 devices. P is the code reserved for X10
testing equipment.) If a neighbor is testing an X10 device or used the X10
modules as configured by the manufacturer, interference with your Home
Controller System may occur.
removing the module from the outlet prevents the device from being controlled
by the Home & Away Controller. However, the device name continues to appear
in the MyHome Portal Web site.
Configuring Passwords
The Home & Away System uses two different passwords:
! If your Home & Away System is configured with a security package, you will
have a security user code. You are required to use this code each time you
change security states (such as from Arm to Disarm). Make changes to the
security user code on the security system keypad interface in your house.
! The remote access code identifies you as an authorized user of your
MyHome Portal Web page. This code is required when logging into the System
from the telephone or the Internet. Change the remote access code in the
System Configuration on the MyHome Portal Web site.
69-1321-1 20
Page 25
Product Release Version 3.x.x. Home Controller Gateway User Guide
Both codes must be four digits, using only the numerals 0–9. You may use the same
four digits for both the security user code and the remote access code.
If you forget either password (security user code or your remote access code)
call your system installer.
To change the security user code: The user code for the security system is programmed directly into the Ademco security
panel. Refer to
To change the remote access code: On the System Configuration page of the MyHome Portal Web site:
1. Select Passwords in the Show settings for list.
2. Type in the existing access code in the first box.
3. Type the new access code in the second box.
4. Re-enter the new code in the third box.
5. Click the Apply button.
Security System User’s Manual
for instructions.
Configuring Security-Lifestyle Associations
If your Home & Away System installation does not include a security system, disregard
the Security Settings configuration page.
Each security level (such as Arm, Disarm, Instant, Stay, and Max) may be assigned a
Group (such as Home, Sleep, Away, Custom). If an assignment is made, a Lifestyle will
be activated each time its associated security level is activated. For example, if the
Sleep Lifestyle is assigned to the security level, Instant, each time security is changed to
Instant, the Sleep Group will automatically be activated. This means the Sleep Lifestyle
overrides any other Lifestyles or Schedules that are currently active.
To change the security associations: 1. On the System Configuration page select Security in the Show settings for list.
2. Select a Group from the pull-down list next to a security level shown on the right
3. Click Apply.
Configuring Tele p hone Settings
If you have an answering machine or answering service from your telephone
company, we recommend you set the Home Controller number-of-rings-before-pick-up
to be twice the number-of-rings-before-pick-up that is used by the answering
machine/service. See the table below for suggested settings. (It is recommended that
you have a telephone setting of at least 3.) The maximum setting is ten. If the number of
rings is set to zero, the telephone answering function is disabled.
Answering
machine/service call
pick-up setting
13
24
36
48
510
610
710
Suggested Home
Controller telephone
setting
21 69-1321-2
Page 26

Home Controller Gateway User Guide Product Release Version 3.x.x
If you do not have an answering machine or answering service, set the number-ofrings-before-pick-up to a number that is greater than the number of rings it usually takes
you to answer the phone. For example, if you normally pick up the phone on the
second ring, the Home & Away System should be set to pick up after three or more
rings.
To change the number of rings: On the System Configuration page, select Telephone in the Show settings for list, then
select a value from the Number of rings pull-down list.
Configuring Thermostat Periods
Your programmable thermostat uses Periods (Wake, Leave, Return, Sleep) to
automatically change thermostat settings. These periods will be configured during
installation. You can view and modify them at any time using either your thermostat or
the Web interface.
To modify the period settings using the Web interface, navigate to the
and follow on-screen instructions to make changes.
Schedule
page
Configuring Cameras
The Camera Configuration page allows you to add and remove Web video cameras to
obtain video snapshots remotely. The cameras must be compatible with your Home &
Away System. To configure the camera, first install the camera according to the
instructions. You should be able to view the camera from a Web browser.
To add a new camera: Enter the IP address of the camera in one of the camera Web address fields. The
Address should contain four numbers separated by periods (127.0.0.1) and click the
button next to the camera address. This writes the camera address into the Home &
Away System .
To remove a camera: Enter the Web address 0.0.0.0 and select the button at the end of the field.
To modify the period settings using the Web interface, navigate to the
and follow on-screen instructions to make changes.
Schedule
page
Adding/Deleting Devices
The Add/Delete Devices page allows you to add or delete lights from your system.
Note that when you delete a light, it will be removed from the associated schedules
and Lifestyles.
To add a new device: Select the House code and Unit code address for the X10 device. Set the address
To delete a device: Select the device name from the list and press the Delete button.
wheels on the device to the same address. Select either light or appliance as the
device type and enter a device name. The name should be less than 32 characters.
Select Apply. The device is now available.
69-1321-1 22
Page 27

Product Release Version 3.x.x. Home Controller Gateway User Guide
TROUBLESHOOTING
.
The thermostat heat and cool settings
I set are Immediately changed by
Lights and appliances are
unexpectedly activated: The Date & Time Settings on the System Configuration page may be incorrect. Verify
The Web interface shows lights and
appliances as on (or off) when they
are actually off (on): The Home & Away System Controller communicates differently with different types of
the system: The cool-mode temperature setting must be 3• higher than the heat-mode
temperature setting. If the heat and cool mode temperature settings are within 3• of
one another, the temperature settings will automatically be adjusted to maintain the 3•
difference. (See the thermostat user guide for more information.)
the date and time are correct.
You may be experiencing interference from X10 devices outside your home. Try
changing the house codes for the affected lights and appliances.
X10 devices. Changes made directly to some lights or appliances are not
communicated to the Web interface. For example, if you manually turn off a light that
was turned on by a Schedule, the Web interface continues to show the light as on.
Only two-way X10 light switches communicate state changes to the Controller. To be
sure a light or appliance is in the desired state, reset the state using the Web interface.
When I arm (or disarm) security
remotely the system shows security is
disarmed (armed) after the exit delay: This may be an indication that someone is in the home and using the security control
When I try to arm security remotely I
receive a message, “system is not
ready. The system cannot arm.”: This may indicate that there are not-ready zones in the house. All not-ready zones
The system configuration page shows
the incorrect date or time: This may indicate a recent loss of power or connection to the Internet. Verify the
Web page images and text are
not displayed correctly: The MyHome Portal Web interface was designed to work with Netscape
I have lost my MyHome Portal Web
Interface URL address: Check the Important Configuration Information section below for your URL address. If
panel. Phone home to verify occupancy before resetting the security system.
must be secured before arming from a remote interface (Web or telephone) can be
completed.
system is On and connected to the Internet. Manually reset the date and time.
Communicator 4.0 (or higher) or Microsoft Internet Explorer 4.0 (or higher). You may
experience unusual screen presentation and browser behavior if you use a 3.x or
earlier browser (this includes WebTV browsers).
it has not been recorded below, contact your installer for assistance.
23 69-1321-2
Page 28

Home Controller Gateway User Guide Product Release Version 3.x.x
Security Conflicts
About not-ready zones: If any zones are not ready when you try to arm the system, you will receive an error
About exit delay periods: When arming the security system, your home will not be secure until the exit delay
message. Your home can be armed from the Web, phone, and Wall Panel SUI only if all
zones are ready for arming. To arm a system with not-ready zones you must set your
system to bypass the zone.
period expires. (The exit delay period was programmed at the time of installation. It will
be set between 0 and 255 seconds.) To ensure your home is protected, verify this
update occurred before logging off the Web. After the exit delay expires, the Home and
Security pages of the Web will display the new security state. If you have changed
security state over the phone, wait until you hear confirmation that the system is in “exit
delay” before hanging up. To ensure security was changed correctly, call back into the
Home Controller after your exit delay period has ended.
Power Failures
In the event of a power failure, the Home & Away Controller saves all Lifestyle,
Schedule, and configuration settings.
NOTE: If you manually change the state of lights or appliances while the power is off,
the Controller does not recognize the new state when power is restored. For
example, the Controller interfaces may show a light as on when it is actually off.
However, when a new Lifestyle or Schedule is activated, the Controller resets
the device to the expected state.
Computer or Internet Failures
If your computer crashes, the Home & Away System continues to run normally because
it is not installed on your computer drive.
In the event the Internet connection is lost, you will not be able to log into the Web
interface from outside the home. If you have a computer in your home, you will still be
able to interact with the system through the Web interface.
Follow instructions from your ISP to re-establish the Internet connection.
69-1321-1 24
Page 29

Product Release Version 3.x.x. Home Controller Gateway User Guide
IMPORTANT HOME & AWAY SYSTEM CONFIGURATION INFORMATION
The following information is important for you to keep with your records. If you
encounter any problems with your Home & Away System, Honeywell Technical Support
may request the information below to help identify and test your system.
Internet Configuration
IP Address:
Gateway Address:
Subnet Mask:
Home Page URL:
Security Configuration
Optional features:
Location
Zip code:
Latitude:
Longitude:
Dealer
Company:
Representative:
Phone:
Support Line:
Installer
Company:
Representative:
Phone:
Support Line:
Camera IP Addresses
Camera 1_____________________________
Camera 2_____________________________
Camera 3_____________________________
Camera 4_____________________________
Camera 5_____________________________
Camera 6_____________________________
Technical Troubleshooting/Technical Support
For Technical Troubleshooting, contact your dealer or installer as listed above.
For Honeywell Home & Away Technical Support, call 1-866-760-2573.
25 69-1321-2
Page 30

Home Controller Gateway User Guide Product Release Version 3.x.x
LIMITED ONE-YEAR WARRANTY
Honeywell warrants this product, excluding battery, to be free from defects in the workmanship or materials, under
normal use and service, for a period of one year from the date of purchase by the consumer. If, at any time during the
warranty period, the product is defective or malfunctions, Honeywell shall repair or replace it (at Honeywell’s option)
within a reasonable period of time.
If the product is defective,
(i) return it, with a bill of sale or other dated proof of purchase, to the retailer from which you purchased it, or
(ii) package it carefully, along with proof of purchase (including date of purchase) and a short description of the malfunction,
and mail it, postage prepaid, to the following address:
Honeywell Canada: Honeywell Limited/Honeywell Limitée
Dock 4, MN10-3860 35 Dynamic Dr.
1885 Douglas Dr. No. Toronto, Ontario M1V 4Z9
Golden Valley, MN 55422
This warranty does not cover removal or reinstallation costs. This warranty shall not apply if it is shown by Honeywell
that the defect or malfunction was caused by damage, which occurred while the product was in the possession of a
consumer.
Honeywell’s sole responsibility shall be to repair or replace the product within the terms stated above. HONEYWELL SHALL NOT
BE LIABLE FOR ANY LOSS OR DAMAGE OF ANY KIND, INCLUDING ANY INCIDENTAL OR CONSEQUENTIAL DAMAGES
RESULTING, DIRECTLY OR INDIRECTLY, FROM ANY BREACH OF ANY WARRANTY, EXPRESS OR IMPLIED, OR ANY
OTHER FAILURE OF THIS PRODUCT. Some states do not allow the exclusion or limitation of incidental or consequential
damages, so this limitation may not apply to you.
THIS WARRANTY IS THE ONLY EXPRESS WARRANTY HONEYWELL MAKES ON THIS PRODUCT. THE DURATION OF ANY
IMPLIED WARRANTIES, INCLUDING THE WARRANTIES OF MERCHANTABILITY AND FITNESS FOR A PARTICULAR
PURPOSE, IS HEREBY LIMITED TO THE ONE-YEAR DURATION OF THIS WARRANTY. Some states do not allow limitations on
how long an implied warranty lasts, so the above limitation may not apply to you.
This warranty gives you specific legal rights, and you may have other rights that vary from state to state.
If you have any questions concerning this warranty, please write our Honeywell Customer Relations, Honeywell, P.O. Box 524,
Minneapolis, MN 55440-0524 or call 1-800-468-1502, Monday-Friday, 7:00 a.m. to 5:30 p.m., Central time. In Canada, write Retail
Products ON15, Honeywell Limited/Honeywell Limitée, 35 Dynamic Drive, Scarborough, Ontario, M1V4Z9.
69-1321-1 26
Page 31

Product Release Version 3.x.x. Home Controller Gateway User Guide
27 69-1321-2
Page 32

Home and Building Control Home and Building Control
Honeywell Honeywell Limited-Honeywell Limitee
1985 Douglas Drive North 35 Dynamic Drive
Golden Valley, MN 55422 Scarborough, Ontario
M1V 4Z9
Printed in U.S.A. on recycled
paper containing at least 10%
69-1321-2 G.H. Rev. 07-01
post-consumer paper fibers.
http://www.honeywell.com/yourhome
 Loading...