


Vypyr® X Series
Operating
Manual
www.peavey.com

FCC Compliancy Statement
This device complies with Part 15 of the FCC rules. Operation is subject to the following two conditions: (1) this device may not cause harmful interference, and (2) this device must accept any interference received, that may cause undesired operation.
Warning: Changes or modifications to the equipment not approved by Peavey Electronics Corp. can void the user’s authority to use the equipment.
Note - This equipment has been tested and found to comply with the limits for a Class B digital device, pursuant to Part 15 of the FCC Rules. These limits are designed to provide reasonable protection against harmful interference in a residential installation.This equipment generates, uses and can radiate radio frequency energy and, if not installed and used in accordance with the instructions, may cause harmful interference to radio communications. However, there is no guarantee that interference will not occur in a particular installation. If this equipment does cause harmful interference to radio or television reception, which can be determined by turning the equipment off and on, the user is encouraged to try and correct the interference by one or more of the following measures.
•Reorient or relocate the receiving antenna.
•Increase the separation between the equipment and receiver.
•Connect the equipment into an outlet on a circuit different from that to which the receiver is connected.
•Consult the dealer or an experienced radio/TV technician for help.
Caution
The equipment complies with FCC radiation exposure limits set forth for an uncontrolled environment.
Peavey Electronics Corporation • 5022 Hartley Peavey Drive • Meridian, MS • 39305 (601) 483-5365 • FAX (601) 486-1278 • www.peavey.com • 80305796 • ©2011
CAN ICES-3 B/NMB/3B

ENGLISH
Electric • Acoustic • Bass
Morphing from a bass amp, to an electric amp, to an acoustic amp, the VYPYR® X is Peavey's latest Variable Instrument Performance™ amplifier.
Peavey Electronics revolutionized the modeling amp industry with the introduction of the VYPYR® VIP Series — the world’s first amp that contained Bass guitar, Acoustic guitar and Electric guitar amplifier models. We are excited to introduce the latest evolution of that series, VYPYR® X. Using its Variable Instrument Input, a single VYPYR® X amp can provide amplification for a variety of instrument types.
Not only does the amplifier morph from a bass amp to an acoustic amp, to an electric amp, it also, allows the electric guitar player access to instrument models as well.
Peavey uses a combination of a powerful 32-bit, floating point SHARC processor and patented TransTube® analog circuitry to create the best sounding modeling amplifiers available. Nothing sounds as good as a VYPYR.
All VYPYR effects, amp models and parameter controls can be accessed via the amp itself, with no need to hook the amplifier to a
computer. Peavey’s WYSIWYG (What You See Is What You Get) control surface quickly allows the user the ability to see and adjust the control position — no guessing where the control is supposed to be or having to manually move it to where it should be from preset to preset.
VYPYR’s USB bi-directional data and audio port provides an easy way to record, and/or connect to our VYPYR software and store presets.
All of the revolutionary features from the original VYPYR series, now even better. More power, more effects, more amp models, Variable Instrument Input, instrument models, and more make this the ultimate amplifier.
VYPYR® X1
•Variable Instrument Performance Amplifier
•30 Watts RMS
•Acoustic Guitar Simulation
•Bass Guitar Simulation
•Acoustically Optimized Semi-Closed Back
•Patented TRANSTUBE® Technology
•22 Amp Accessible Effects
•36 On Board Amp Models (Includes 6 Bass Amp and 6 Acoustic Amp Models)
•Enhanced Chromatic Tuner
•On Board Looper*
•WYSIWYG LED Indicator Controls
•Amp Accessible Real-Time Dual Parameter Controls
•Amp Accessible Global Reverb and Delay
•Bi-Directional USB (Data-MIDI-Audio Record Out)
•AUX/MP3/CD Input
•Studio Quality Headphone Out
•Up to 4 Effects Simultaneously*
•Tap Tempo
VYPYR® X2
•Variable Instrument Performance Amplifier
•60 Watts RMS
•12" Custom Voiced Heavy Duty Speaker
•Patented TRANSTUBE® Technology
•Acoustically Optimized Semi-Closed Back
•10 Instrument Models
•Enhanced Chromatic Tuner
•12 Amp Accessible Stompbox Models
•36 On Board Amp Models
•6 Bass Amp Models
•6 Acoustic Amp Models
•25 Total On Board Amp Accessible Effects
•On Board Looper*
•WYSIWYG LED Indicator Controls
•Amp Accessible Real-Time Parameter Controls
•Amp Accessible Global Reverb and Delay
•Tap Tempo
•Bi-Directional USB (Data-MIDI-Audio Record Out)
•Studio Quality Headphone Out
•AUX/MP3/CD Input
•Up to 5 Effects Simultaneously*
•Bluetooth Connectivity
VYPYR® X3
•Variable Instrument Performance Amplifier
•100 Watts RMS
•12" Custom Voiced Heavy Duty Speaker
•Patented TRANSTUBE® Technology
•Power Sponge® 100 Watts to 1 Watt
•Acoustically Optimized Semi-Closed Back
•Over 400 Amp Accessible Presets
•LCD Display for Quick Preset, Model, and Effect Selection
•10 Instrument Models
•Enhanced Chromatic Tuner
•12 Amp Accessible Stompbox Models
•36 On Board Amp Models
•6 Bass Amp Models
•6 Acoustic Amp Models
•25 Total On Board Amp Accessible Effects
•On Board Looper*
•WYSIWYG LED Indicator Controls
•Amp Accessible Real-Time Parameter Controls
•Amp Accessible Global Reverb and Delay
•Tap Tempo
•Bi-Directional USB (Data-MIDI-Audio Record Out)
•Studio Quality Headphone Out
•AUX/MP3/CD Input
•Up to 5 Effects Simultaneously*
•Bluetooth Connectivity
*With optional Sanpera® 1 (Peavey part number 03017540) or Sanpera® II (Peavey part number 03017550) footcontroller.
3
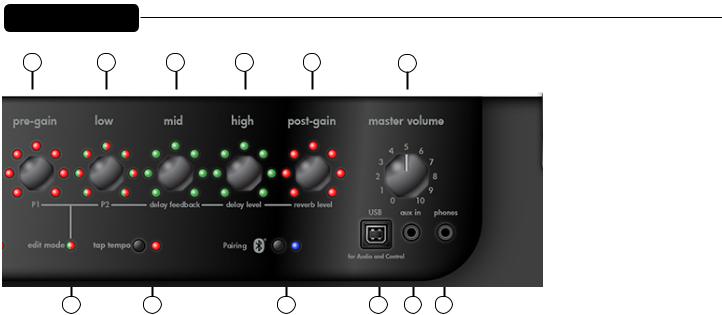
VYPYR X1 Front Panel
0 |
1 |
2 |
3 |
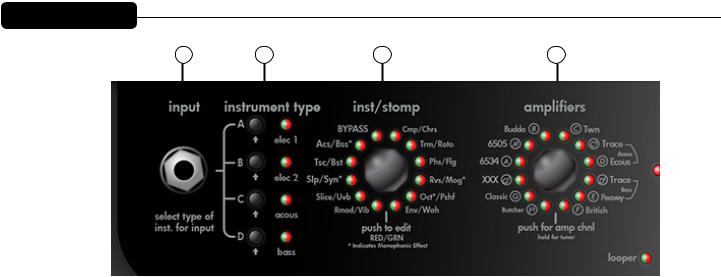
(0) VARIABLE INSTRUMENT INPUT
On the VYPYR X1, you can input an electric, an acoustic, or a bass guitar. There are amp models for all 3 instrument types. Once you plug into the amp, you select the instrument type to the right (item 1). The amp then changes its input sensitivity and gain structure to match your selection.
NOTE: VYPYR X Amplifers are designed to be used with instruments with passive electronics. When using instruments with active electronics, the volume of the instrument may need to be reduced to prevent clipping (unwanted distortion).
(1) INSTRUMENT TYPE/PRESETS
With these buttons you select which type of instrument you are using with the amp. There are 4 banks with 4 presets each, for a total of 16 presets. The names of the preset banks are associated with the type of instrument being used. To access the different presets within the current bank, simply continue pressing the button and the LED will change color to indicate which preset you have selected. Any changes you make to the settings (except for master volume level) can be saved back to the preset if desired. To save settings over the loaded preset, just press and hold its bank button until its LED begins to blink and then continue to hold the button until the LED stops blinking. Pressing the Tap Tempo button cancels the save. To save changes to the current preset over a different preset, press and hold its bank button until its LED begins to blink. The LEDs for any other banks in which the preset can be saved will also blink. Select the bank to save in by tapping the desired bank button - it will continue to blink but the other bank LEDs will turn off. If the bank LED is not the color of the desired preset to overwrite, tap the bank LED again until the color matches the desired preset number (red, orange, yellow, and green). To complete the save, press and hold the bank button until the LED stops blinking. Pressing the Tap Tempo button cancels the save.
NOTE: When selecting bass or acoustic presets (Banks C & D) the VYPYR X1 and VYPYR X2 will limit access to only those amp models associated with the selected instrument bank. Pressing and holding buttons B & D during power on will open up all amp models to any preset (e.g. you may use all 16 presets for electric guitar).
(2) INSTRUMENT/STOMPBOX ENCODER
Turn this knob to select your desired pre-amplifier effect (if any). Just think, 20 pedals you’ll never have to buy! In addition, there are 2 instrument models to choose from, an acoustic simulation and a bass simulation! Press the encoder momentarily to enter Edit mode (Item 11). You’ll also notice a small ‘m’ on a few effects and the bass simulation. This is because these are monophonic effects and as such, you’ll need to be careful to play one note at a time for them to work properly. The LEDs on this encoder are bi-color. At the bottom of the encoder is a guide to show which color represents which effect.
(3) AMPS ENCODER
Turn this knob to select your amp model. Each amp has 3 channels: if the LED is red, you are on the high gain channel, yellow for medium gain and green for low gain. When you are using an acoustic preset (Item 1, Bank C) only the acoustic amplifiers will be
4
VYPYR X1 Front Panel
4 |
5 |
6 |
7 |
8 |
9 |
10 |
11 |
12 |
13 |
14 |
15 |
available. If you are using a bass preset (Item 1, Bank D) only the bass amplifiers will be available.
TUNER MODE: Press and hold Amp Encoder (3) for 2 seconds to enter tuner mode. The LEDs around the Amp encoder will tell you what note you are tuning. At the same time, the LEDs around the Stompbox encoder (Item 2) will indicate whether the note is sharp or flat. If the LED is to the right of the 12:00 position you are sharp (Tune down). If the LED is to the left of the 12:00 position you are flat (tune up). When all of the LEDs around the Effects encoder come on, you are in tune.
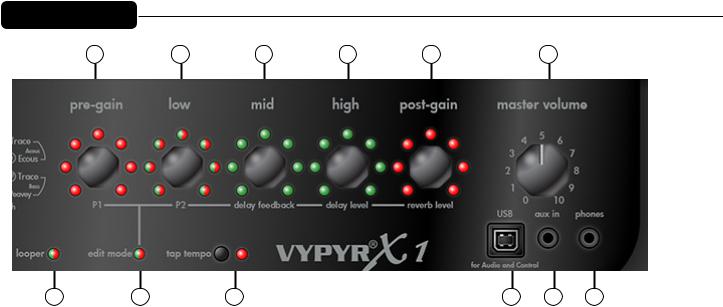
(4) PRE GAIN
Turn this knob to crank up the gain—think of it as how much distortion you want out of the amplifier. In Edit mode this knob controls parameter 1 of either the selected Stompbox or Effect.
(5) LOW ENCODER
Low EQ adjustment. In edit mode this knob controls parameter 2 of either the selected Stompbox or Effect.
(6) MID ENCODER
Mid EQ adjustment. In edit mode this knob controls the Feedback of the Delay effect. Feedback is the number of times the delay repeats.
(7) HIGH ENCODER
High EQ adjustment. In edit mode this knob controls the Level or amount of Delay effect. All the way to the left is zero and all the way to the right is max.
(8) POST GAIN
This is the individual preset volume. In edit mode this knob controls the amount of Reverb.
(9) MASTER VOLUME
Controls overall amp volume.
NOTE: Due to the low pregain settings for acoustic and bass amp models, the master volume may need to be set higher when using bass or acoustic guitars than when using electric guitars. Experiment with various levels of pregain, postgain, and master volume to achieve desired results.
5
VYPYR X1 Front Panel
(10) LOOPER INDICATOR
This function requires a Sanpera® I or Sanpera II foot controller. Waste no time in making that purchase— the looper will allow you hours and hours of fun. You can record any 30 plus seconds of anything, switch your tone (preset), and play over top of your recording. For example, try recording a bass track, then change your tone to a lead tone and play over the top! Note the LED that corresponds to the looper on the encoder will turn on when recording or playing back the loop.
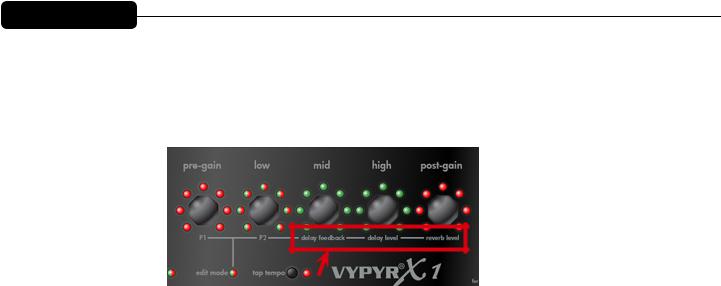
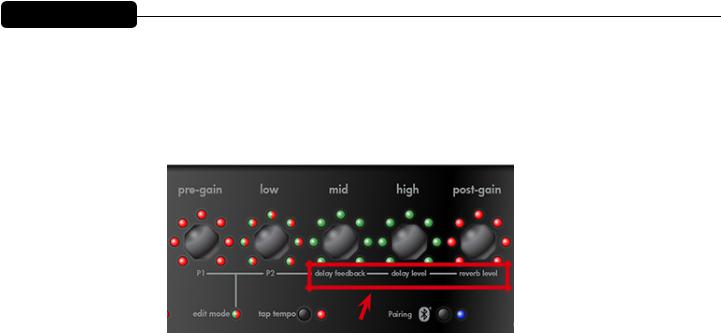
(11) INST/STOMPBOX EDIT MODE
Edit mode simply changes the 5 amp controls to their alternate function as listed on the bottom of the encoder (The red box above). On VYPYR X1, the edit mode LED color tells whether the effect is before the amp (red) or after the amp (green). To enter Edit mode simply press the Stompbox encoder (Item 2). To exit Edit mode simply press the same encoder again.
NOTE: Anytime you want access to the Delay or Reverb you will need to enter Edit mode.
(12) TAP TEMPO
Tap on this button to set the tempo of the Delay effect. If you aren’t hearing any delay enter Edit mode (Item 11) to turn the level up.
(13) USB RECORD OUT
The VYPYR USB Record out requires no additional drivers—just plug a standard USB 2.0 cable into your computer and it will detect it as an audio device. Open your favorite recording program and start recording. Don’t worry, the output is microphone/cabinet simulated and will sound great right in your computer.
NOTE: The speaker is intentionally muted when USB output is in use although the headphone output is active for real time monitoring. The USB port can also be used to download firmware updates and to connect to a computer to use the Vypyr Edit Graphic User Interface. MIDI works over the USB as well.
(14) AUX INPUT
Plug in your favorite mp3 player, drum machine, or CD player and play along. NOTE: Goes to amplifier and headphones but is not added to USB output.
(15) HEADPHONE/RECORD OUT
We really spent a lot of time making sure the headphone jack was studio quality. Because of that, and with the proper adapters (not supplied), you can use this output for recording as well as the USB port.
NOTE: When headphones are in use the speaker is muted and Master Volume (Item 9) controls headphone level. 16Ω or 32Ω headphones are best, but a lower impedance is okay.
NOTE: Headphones have a higher frequency response than guitar speakers.
6
VYPYR X2 Front Panel
0 |
1 |
2 |
3 |
4 |
11
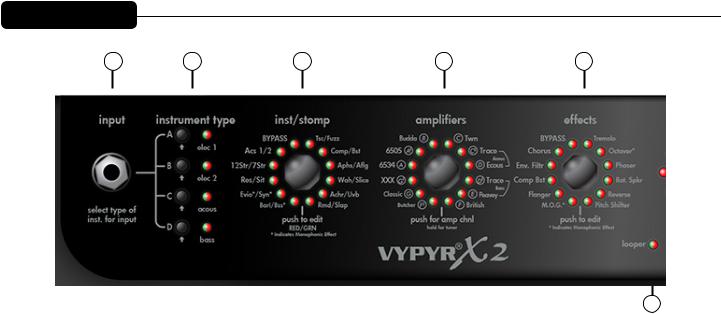
(0) VARIABLE INSTRUMENT INPUT
On the VYPYR X2, you can input an electric, an acoustic, or a bass guitar. There are amp models for all 3 instrument types. Once you plug into the amp, you select the instrument type to the right (item 1). The amp then changes its input sensitivity and gain structure to match your selection.
NOTE: Vypyr X Amplifers are designed to be used with instruments with passive electronics. When using instruments with active electronics, the volume of the instrument may need to be reduced to prevent clipping (unwanted distortion).
(1) INSTRUMENT TYPE/PRESETS
The Vypyr® X series was designed for use with electric guitars, acoustic guitars and bass guitars! With these buttons you select which type of instrument you are using with the amp. There are 4 banks with 4 presets each, for a total of 16 presets. The names of the preset banks are associated with the type of instrument being used . To access the different presets within the current bank, simply continue tapping the button and the LED will change color to indicate which preset you have selected. Any changes you make to the settings (except for master volume level) can be saved back to the preset if desired. To save settings over the loaded preset, just press and hold its bank button until its LED begins to blink and then continue to hold the button until the LED stops blinking. Pressing the Tap Tempo button cancels the save. To save changes to the current preset over a different preset, press and hold its bank button until its LED begins to blink. The LEDs for any other banks in which the preset can be saved will also blink. Select the bank to save in by tapping the desired bank button - it will continue to blink but the other bank LEDs will turn off. If the bank LED is not the color of the desired preset to overwrite, tap the bank LED again until the color matches the desired preset number. To complete the save, press and hold the bank button until the LED stops blinking. Pressing the Tap Tempo button cancels the save.
(2) INSTRUMENT/STOMP ENCODER
For the first time ever in a modeling amp, you have access to instrument models! Using your electric guitar, you can access 10 different instrument models, from acoustic guitars to baritone guitars and even a synth! The other side of the encoder is dedicated to stompboxes, so you have access to a full complement of stompbox effects! Turn this knob to select your desired pre-amplifier effect (if any). Press the encoder momentarily to enter Edit mode (Item 12). You’ll also notice a small ‘m’ on a few effects and the bass simulation. This is because these are monophonic effects and as such, you’ll need to be careful to play one note at a time for them
to work properly. The LEDs on this encoder are bi-color. At the bottom of the encoder is a guide to show which color represents which effect.
(3) AMPS ENCODER
Turn this knob to select your amp model. Each amp has 3 channels: if the LED is red, you are on the high gain channel, yellow for medium gain and green for low gain. When you are using an acoustic preset (Item 1, Bank C) only the acoustic amplifiers will be available. If you are using a bass preset (Item 1, Bank D) only the bass amplifiers will be available. Press and hold for 2 seconds to enter tuner mode.
7
VYPYR X2 Front Panel
5 |
6 |
7 |
8 |
9 |
10 |
12 |
13 |
14 |
15 |
16 |
17 |
The LEDs around the Amp encoder will tell you what note you are tuning. At the same time the LEDs around Effects encoder (Item 4) will indicate whether the note is sharp or flat. If the LED is to the right of the 12:00 position you are sharp (tune down). If the LED is to the left of the 12:00 position you are flat (tune up). When all of the LEDs around the Effects encoder come on, you are in tune.
(4) EFFECTS ENCODER
Turn this knob to select any “Rack” effect. These are effects you might find attached to the effects loop of an amplifier. Press the encoder momentarily to enter Edit mode.
(5) PRE GAIN
Turn this knob to crank up the gain—think of it as how much distortion you want out of the amplifier. In Edit mode this knob controls parameter 1 of either the selected Stompbox or Effect.
(6) LOW ENCODER
Low EQ adjustment. In edit mode this knob controls parameter 2 of either the selected Stompbox or Effect.
(7) MID ENCODER
Mid EQ adjustment. In edit mode this knob controls the Feedback of the Delay effect. Feedback is the number of times the delay repeats.
(8) HIGH ENCODER
High EQ adjustment. In edit mode this knob controls the Level or amount of Delay effect. All the way to the left is zero and all the way to the right is max.
(9) POST GAIN
This is the individual preset volume. In edit mode this knob controls the amount of reverb.
(10) MASTER VOLUME
Controls overall system volume.
8
VYPYR X2 Front Panel
(11) LOOPER INDICATOR
This function requires a Sanpera® I or Sanpera II foot controller. Waste no time in making that purchase— the looper will allow you hours and hours of fun. You can record any 30 plus seconds of anything, switch your tone (preset), and play over top of your recording. For example, try recording a bass track, then change your tone to a lead tone and play over the top! Note the LED that corresponds to the looper on the encoder will turn on when recording or playing back the loop.
(12) EDIT MODE
Edit mode simply changes the 5 amp controls to their alternate function as listed on the bottom of the encoder (The red box above). When in Edit mode the Edit mode LED will either be green if you are editing Effects, or red if you are editing Stompboxes. In addition, the corresponding LED for the feature you are editing will flash while in Edit Mode. To enter Edit mode simply press either the Stompbox encoder (Item 2) or the Effects encoder (Item 4). To exit Edit mode simply press the same encoder again.
Anytime you want access to the Delay or Reverb you will need to enter Edit mode!
(13) TAP TEMPO
Tap on this button to set the tempo of the Delay effect. If you aren’t hearing any delay enter Edit mode to turn the level up.
NOTE: Not accessible by Sanpera.
(14) BLUETOOTH PAIRING
The audio connection allows you to play music from your phone to the amp, and practice along with it (into speaker or using headphones). The master volume will set the overall level. You can balance the level of the music and your guitar using the phone volume and the Volume encoder on the amp.
The data connection allows you to use Peavey's Bluetooth Vypyr-X editor to change settings on the amp remotely.
BLUETOOTH LED:
- OFF: |
module off |
- ON: |
module on and connected |
- Blinking: pairing mode (looking for a connection)
BLUETOOTH SWITCH:
-Press switch to turn Bluetooth on (if the LED is off)
-If the LED is on (or blinking) press and hold switch for 2 seconds to turn it off
-If on, press and hold switch for 10 seconds to clear the device list in the module. (The LED will go off after 2 seconds, then back on 8 seconds later. It will stay on after the clearing function.)
9
 Loading...