

Page 1
PERCEUSE A PERCUSSION PSBM 500 A2
PERCEUSE A PERCUSSION
Instructions d‘utilisation et consignes de sécurité
Traduction du mode d‘emploi d‘origine
IMPA CT DRILL
Operation and Safety Notes
Translation of original operation manual
IAN 93163
SCHLAGBOHRMASCHINE
Bedienungs- und Sicherheitshinweise
Originalbetriebsanleitung
Page 2

Avant de lire le mode d‘emploi, ouvrez la page contenant les illustrations et familiarisez-vous ensuite avec
toutes les fonctions de l‘appareil.
Klappen Sie vor dem Lesen die Seite mit den Abbildungen aus und machen Sie sich anschließend mit allen
Funktionen des Gerätes vertraut.
Before reading, unfold the page containing the illustrations and familiarise yourself with all functions of the
device.
FR Instructions d‘utilisation et consignes de sécurité Page 5
DE / AT / CH Bedienungs- und Sicherheitshinweise Seite 13
GB Operation and Safety Notes Page 23
Page 3
2 3
41
A
C
10
89
9
10
B
67
5
D E
Page 4

Page 5

Table des matières
Introduction
Utilisation conforme ............................................................................................................................Page 6
Équipement .......................................................................................................................................... Page 6
Fourniture ............................................................................................................................................. Page 6
Caractéristiques...................................................................................................................................Page 6
Avertissements de sécurité généraux pour l’outil
1. Sécurité de la zone de travail ........................................................................................................ Page 7
2. Sécurité électrique .......................................................................................................................... Page 7
3. Sécurité des personnes ..................................................................................................................Page 8
4. Utilisation et entretien de l’outil ...................................................................................................... Page 8
5. Maintenance et entretien ............................................................................................................... Page 9
Consignes de sécurité pour les perceuses à percussion ..................................................................Page 9
Attention aux conduites ! .................................................................................................................... Page 9
Accessoires / équipements d’origine..................................................................................................Page 10
Avant la mise en service
Montage de la poignée supplémentaire ........................................................................................... Page 10
Utilisation de la butée de profondeur ................................................................................................ Page 10
Mise en place des outils ..................................................................................................................... Page 10
Mise en service
Mise en marche et arrêt .....................................................................................................................Page 10
Réglage progressif de la vitesse ........................................................................................................Page 10
Réglage du sens de rotation ..............................................................................................................Page 11
Réglage perçage / percussion ...........................................................................................................Page 11
Maintenance et nettoyage ............................................................................................... Page 11
Service ............................................................................................................................................... Page 11
Garantie ........................................................................................................................................... Page 11
Mise au rebut ............................................................................................................................... Page 12
Déclaration de conformité / Fabricant ....................................................................Page 12
5 FR
Page 6

Perceuse a percussion PSBM 500 A2
Q
Fourniture
Q
Introduction
Félicitations pour l‘acquisition de votre nouvel appareil ! Vous avez opté pour un produit de grande
qualité. Le mode d‘emploi fait partie intégrante de
ce produit. Il contient des indications importantes
pour la sécurité, l’utilisation et la mise au rebut. Veuillez lire consciencieusement toutes les indications
d‘utilisation et de sécurité du produit. Ce produit doit
uniquement être utilisé conformément aux instruc
tions
et dans les domaines d‘application spécifiés. Lors
d‘une cession à tiers, veuillez également remettre
tous les documents.
Q
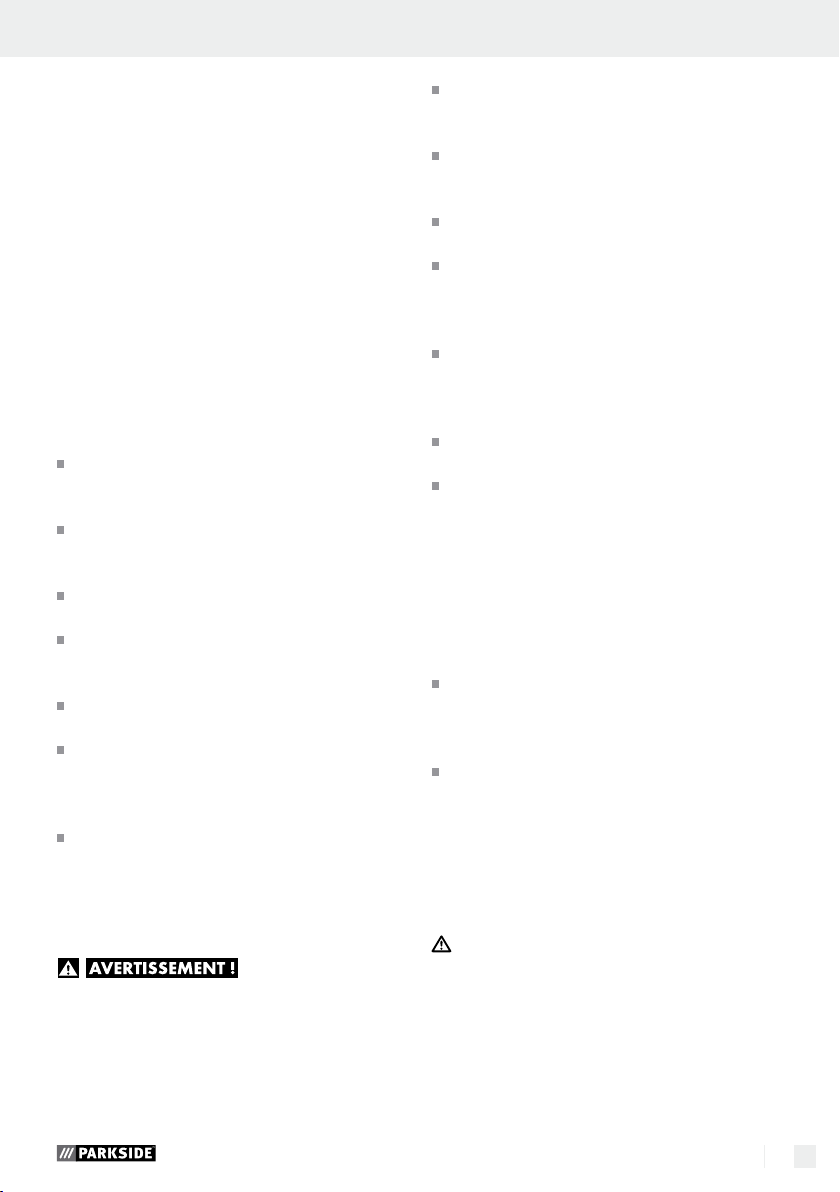
Utilisation conforme
Cet appareil est conçu pour le perçage à percussion
dans la brique, le béton et la pierre et le perçage
dans le bois, le métal, la céramique et le plastique
(voir ill. B-E). Grâce aux deux sens de rotation, il
convient également pour le vissage. Toute autre utilisation ou modification de l’appareil est considérée
comme non conforme et peut être source de graves
dangers. Le constructeur décline toute responsabilité
pour les dégâts issus d’une utilisation non conforme.
Non conçu pour une utilisation commerciale.
Q
Équipement
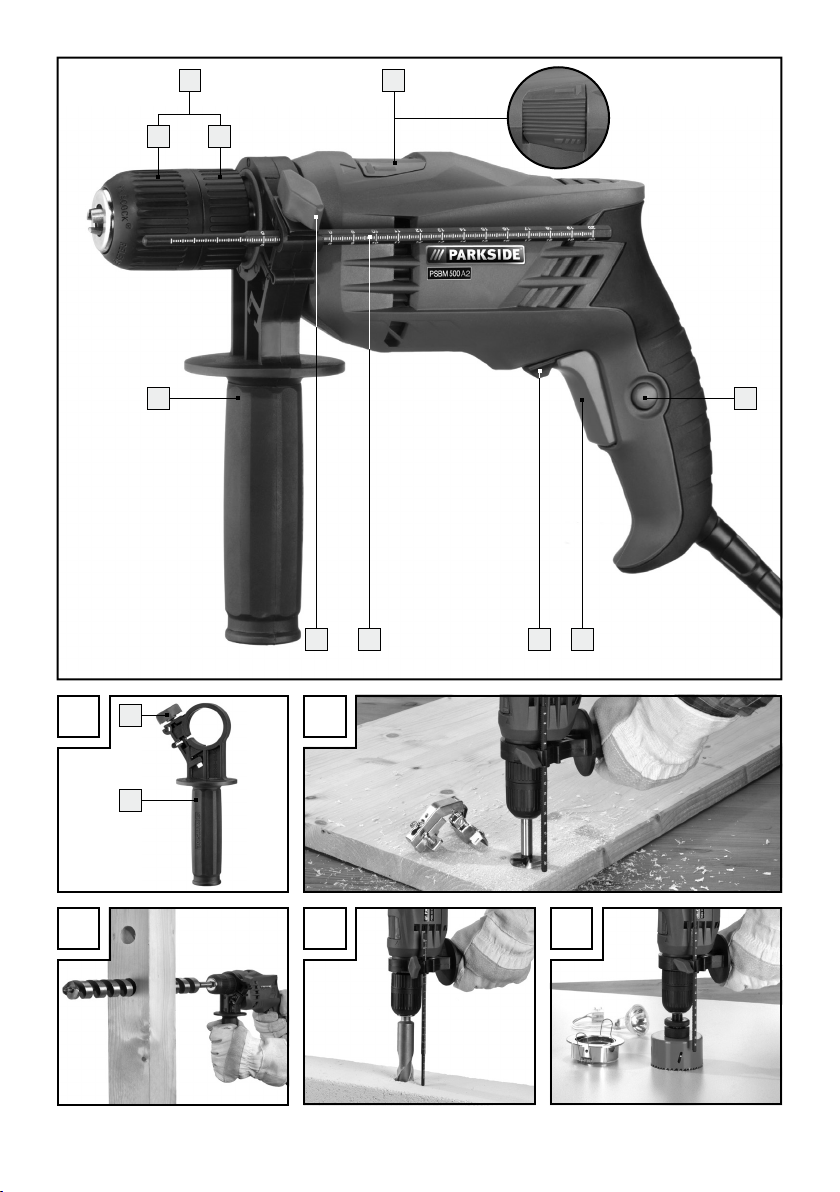
1
Mandrin à serrage rapide
2
Douille
3
Collet
4
Commutateur «PERÇAGE / PERCUSSION»
5
Bouton de blocage de l’interrupteur
MARCHE / ARRÊT
6
Interrupteur MARCHE/ARRÊT
7
Sélecteur du sens de rotation
8
Butée de profondeur
9
Vis papillon
10
Poignée supplémentaire (voir ill. A)
1 perceuse à percussion PSBM 500 A2
1 poignée supplémentaire
1 butée de profondeur
1 mode d‘emploi
Q
Caractéristiques
Tension nominale : 230–240 V∼ 50 Hz
Puissance nominale : 500 W
Vitesse à vide : max. 3000 min
-1
Cadence de frappe: max. 48000tr / min
Plage de serrage
du mandrin : max. 13 mm
Percer dans l‘acier : max. ø 10 mm
Percer dans le bois : max. ø 20 mm
Percer dans le béton : max. ø 13 mm
Classe de protection : II /
Bruit et vibrations :
L’indication du fait que la valeur totale de vibrations
déclarée peut également être utilisée pour une évaluation préliminaire de l’exposition.
Valeurs de mesure des bruits calculées selon la
norme EN 60745:
Niveau de pression acoustique : 95,2 dB(A)
Niveau de puissance
acoustique : 106,2 dB(A)
Incertitude K: 3 dB
Porter un casque auditif !
Percussion dans le béton :
Valeur d‘émission de vibrations
a
= 12,137 m / s2
h, ID
Incertitude
K = 1,5 m / s
2
Percer dans le métal :
Valeur d‘émission de vibrations
a
= 5,237 m / s2
h, D
Incertitude
K = 1,5 m / s
2
6 FR
Page 7

Introduction / Avertissements de sécurité généraux pour l’outilIntroduction
Le niveau de vibrations
indiqué dans ces instructions a été mesuré conformément aux méthodes de mesure décrites dans la
norme EN 60745 et peut être utilisé pour la comparaison d’outils. Le niveau de vibrations indiqué
peut être également utilisé pour évaluer l’exposition.
Le niveau de vibrations varie en fonction de l‘usage
de l‘outil électrique et peut, dans certains cas,
excéder les valeurs indiquées dans ces instructions.
La charge due aux vibrations pourrait être sous-estimée si l‘outil électrique est utilisé régulièrement de
cette manière.
Remarque : Afin d’obtenir une estimation précise
de la sollicitation vibratoire pendant un certain
temps de travail, il faut aussi tenir compte des
périodes pendant lesquelles l’appareil est éteint ou
allumé, mais n’est pas effectivement utilisé. Ceci
peut réduire considérablement la sollicitation vibratoire pendant toute la durée du travail.
Avertissements de sécurité
généraux pour l’outil
Lire tous
les avertissements de sécurité et
toutes les instructions. Ne pas suivre
les avertissements et instructions peut donner lieu à
un choc électrique, un incendie et / ou une blessure
sérieuse.
Conserver tous les avertissements et toutes
les instructions pour pouvoir s’y reporter
ultérieurement.
Le terme «outil» dans les avertissements fait réfé
à votre outil électrique alimenté par le secteur (avec
cordon d’alimentation) ou votre outil fonctionnant
sur batterie (sans cordon d’alimentation).
rence
1. Sécurité de la zone de travail
a) Conserver la zone de travail propre
et bien éclairée. Les zones en désordre ou
sombres sont propices aux accidents.
b) Ne pas faire fonctionner les outils
électriques en atmosphère explosive,
par exemple en présence de liquides
inflammables, de gaz ou de pous
Les outils électriques produisent des étincelles
qui peuvent enflammer les poussières ou les fumées.
c) Maintenir les enfants et les personnes
présentes à l’écart pendant l’utilisation
de l’outil. Les distractions peuvent vous faire
perdre le contrôle de l’outil.
sières.
2. Sécurité électrique
a) Il faut que les fiches de l’outil électrique
soient adaptées au socle. Ne jamais
modifier la fiche de quelque façon que
ce soit. Ne pas utiliser d’adaptateurs
avec des outils à branchement de terre.
Des fiches non modifiées et des socles adaptés
réduiront le risque de choc électrique.
b) Eviter tout contact du corps avec des
surfaces reliées à la terre telles que les
tuyaux, les radiateurs, les cuisinières
et les réfrigérateurs. Il existe un risque ac-
cru de choc électrique si votre corps est relié à
la terre.
c) Ne pas exposer les outils à la pluie ou
à des conditions humides. La pénétration
d‘eau à l’intérieur d’un outil augmentera le
risque de choc électrique.
d) Ne pas maltraiter le cordon. Ne jamais
utiliser le cordon pour porter, tirer ou
débrancher l’outil. Maintenir le cordon
à l’écart de la chaleur, du lubrifiant,
des arêtes ou des parties en mouvement. Des cordons endommagés ou emmêlés
augmentent le risque de choc électrique.
e) Lorsqu’on utilise un outil à l’extérieur,
utiliser un prolongateur adapté à
l’utilisation extérieure. L’utilisation d’un
cordon adapté à l’utilisation extérieure réduit
le risque de choc électrique.
f) Si l’usage d’un outil dans un emplace-
ment humide est inévitable, utiliser
une alimentation protégée par un dispositif à courant différentiel résiduel
7 FR
Page 8

(RCD). L’usage d’un RCD réduit le risque de
choc électrique.
3. Sécurité des personnes
a) Rester vigilant, regarder ce que vous
êtes en train de faire et faire preuve
de bon sens dans votre utilisation de
l’outil. Ne pas utiliser un outil lorsque
vous êtes fatigué ou sous l’emprise de
drogues, d’alcool ou de médicaments.
Un moment d’inattention en cours d’utilisation
d’un outil peut entraîner des blessures graves
des personnes.
b) Utiliser un équipement de sécurité.
Toujours porter une protection pour
les yeux. Les équipements de sécurité tels
que les masques contre les poussières, les
chaussures de sécurité antidérapantes, les
casques ou les protections acoustiques utilisés
pour les conditions appropriées réduiront les
blessures de personnes.
c) Eviter tout démarrage intempestif.
S’assurer que l’interrupteur est en position arrêt avant de brancher l’outil
au secteur et / ou au bloc de batteries,
de le ramasser ou de le porter. Porter
les outils en ayant le doigt sur l’interrupteur ou
brancher des outils dont l’interrupteur est en
position marche est source d’accidents.
d) Retirer toute clé de réglage avant de
mettre l’outil en marche. Une clé laissée
fixée sur une partie tournante de l’outil peut
donner lieu à des blessures de personnes.
e) Ne pas se précipiter. Garder une posi-
tion et un équilibre adaptés à tout
moment. Cela permet un meilleur contrôle
de l’outil dans des situations inattendues.
f) S’habiller de manière adaptée. Ne pas
porter de vêtements amples ou de bijoux. Garder les cheveux, les vête
et les gants à distance des parties en
mouvement. Des vêtements amples, des bi-
joux ou les cheveux longs peuvent être pris
des parties en mouvement.
g) Si des dispositifs sont fournis pour le
raccordement d’équipements pour
8 FR
ments
dans
l’extraction et la récupération des poussières, s’assurer qu’ils sont connectés
et correctement utilisés. Utiliser des collec-
teurs de poussière peut réduire les risques dus
aux poussières.
4. Utilisation et entretien de l’outil
a) Ne pas forcer l’outil. Utiliser l’outil
adapté à votre application. L’outil adapté
réalisera mieux le travail et de manière plus
au régime pour lequel il a été construit.
b) Ne pas utiliser l’outil si l’interrupteur
ne permet pas de passer de l’état de
marche à arrêt et vice versa. Tout outil
qui ne peut pas être commandé par l’interrupteur est dangereux et il faut le réparer.
c) Débrancher la fiche de la source d’ali-
mentation en courant et / ou le bloc de
batteries de l’outil avant tout réglage,
changement d’accessoires ou avant de
ranger l’outil. De telles mesures de sécurité
préventives réduisent le risque de démarrage
accidentel de l’outil.
d) Conserver les outils à l’arrêt hors de la
portée des enfants et ne pas permettre
à des personnes ne connaissant pas
l’outil ou les présentes instructions de
le faire fonctionner. Les outils sont dange-
reux entre les mains d’utilisateurs novices.
e) Observer la maintenance de l’outil.
Vérifier qu’il n’y a pas de mauvais
alignement ou de blocage des parties
mobiles, des pièces cassées ou toute
autre condition pouvant affecter le
fonctionnement de l’outil. En cas de
dommages, faire réparer l’outil avant
de l’utiliser. De nombreux accidents sont
dus à des outils mal entretenus.
f) Garder affûtés et propres les outils
permettant de couper. Des outils destinés
à couper correctement entretenus avec des
coupantes tranchantes sont moins susceptibles
de bloquer et sont plus faciles à contrôler.
g) Utiliser l’outil, les accessoires et les
etc., conformément à ces instructions,
en tenant compte des conditions de
sûre
pièces
lames
Page 9
Avertissements de sécurité généraux pour l’outil
travail et du travail à réaliser. L’utilisation
de l’outil pour des opérations différentes de
prévues pourrait donner lieu à des situations
dangereuses.
celles
5. Maintenance et entretien
a) F
aire entretenir l’outil par un réparateu
qualifié utilisant uniquement des pièces
de rechange identiques. Cela assurera
la sécurité de l’outil est maintenue.
Q
Consignes de sécurité pour les
que
perceuses à percussion
Utiliser la poignée supplémentaire liv-
rée avec l‘appareil. Toute perte de contrôle
de la machine peut causer des blessures.
Porter une protection auditive lors de
l‘usage de perceuses à percussion. Le
bruit peut entraîner la perte de l‘audition.
Fixer la pièce usinée. Utiliser des dispositifs
de serrage / un étau pour fixer la pièce usinée.
Immédiatement débrancher la fiche
secteur de la prise de courant en cas
de danger.
Toujours faire dégager le cordon
secteur vers l‘arrière de l‘appareil.
Veiller à ce que les fentes d‘aération
ne soient pas couvertes pendant le
fonctionnement. Ne pas insérer d‘objet
dans les fentes d‘aération.
RISQUE D‘INCENDIE PAR PROJECTION
D‘ETINCELLES ! Les projections d‘étincelles
se produisent lors de l‘usinage des métaux. Il
faut donc veiller à ne mettre personne en danger et tenir toutes les matières inflammables à
l‘écart de la zone de travail.
POUSSIERES
TOXIQUES ! L‘usinage matériaux dégageant
des poussières nocives / toxiques sont dangereuses pour la santé de l‘utilisateur et des
personnes séjournant à proximité.
Porter des lunettes protectrices et un
masque antipoussières !
Éviter de percer dans des peintures
contenant du plomb ou d‘autres matériaux toxiques.
Ne pas usiner des matériaux à base
d‘amiante. L‘amiante est considérée cancérigène.
Ne pas usiner des matières mouillées
ou des surfaces humides.
r
Travailler en tenant fermement l‘outil
électrique à deux mains et dans une
position stable. Le maniement de l‘outil
électrique est plus sûr à deux mains.
Immédiatement éteindre l‘appareil si
l‘outil utilisé se bloque. Soyez prêts à
faire face à des moments de retour élevés pouvant causer un contrecoup.
L‘appareil doit toujours rester propre,
sec et exempt d‘huiles ou de graisses.
Uniquement saisir l‘outil électrique
par les poignées isolées lorsque vous
exécutez des travaux comportant un
risque de contact avec une ligne électrique dissimulée ou le cordon secteur
de l‘outil. Tout contact avec un câble sous
tension met également les pièces métalliques
de l‘outil sous tension et provoque une décharge électrique.
Tenir votre plan de travail propre. Les
matériaux mixtes sont particulièrement dangereux. Les poussières de métaux légers peuvent
s‘enflammer ou exploser.
Attendre l‘arrêt complet de l‘outil
électrique avant de le poser. L‘outil
d‘usinage peut se coincer et ainsi faire perdre
le contrôle de l‘outil électrique.
Q
Attention aux conduites !
DANGER ! Lorsque vous travaillez avec
un outil électrique, il faut vous assurer que
vous ne risquez pas de toucher des lignes
électriques ou des conduites de gaz ou
d‘eau. Le cas échéant, utiliser un détecteur avant de
percer un trou ou creuser une rainure dans un mur.
9 FR
Page 10

Q
Accessoires / équipements
d’origine
Uniquement utiliser les accessoires et
équipements indiqués dans le mode
d’emploi. L’usage d’équipements ou d’accessoires
autres que ceux recommandés peut signifier un
risque de blessure pour l’utilisateur.
Q
Avant la mise en service
RISQUE DE BLES-
SURES ! Avant d‘effectuer n‘importe quelle tâche
sur l‘appareil, il faut l‘éteindre et débrancher la
fiche secteur.
Q
Montage de la poignée
supplémentaire
Q
Mise en place des outils
Mandrin à serrage rapide :
Maintenir le collet 3 du mandrin à serrage
1
rapide
et tourner la douille 2 jusqu’à ce
que l’outil d’usinage puisse être inséré.
Insérer l’outil.
Maintenir le collet 3 du mandrin à serrage
1
rapide
et serrer fermement la douille 2.
Outils de vissage :
Toujours utiliser un porte-embout universel avec
des embouts de vissage.
Toujours placer l’interrupteur «Perçage / percus-
4
sion»
Q
Mise en service
Q
Mise en marche et arrêt
à droite sur la position pour visser.
REMARQUE : Pour des raisons de sécurité, uniquement utiliser cet appareil lorsque la poignée
supplémentaire
Tourner la vis papillon
10
est correctement montée.
9
dans le sens contraire
des aiguilles d’une montre et pivoter la poignée
supplémentaire
10
dans la position désirée.
Resserrer ensuite la vis papillon 9.
Q
Utilisation de la butée
de profondeur
Desserrer la vis papillon 9.
Veiller à ce que la denture de la butée de pro-
fondeur
Sortir la butée de profondeur 8 jusqu’à ce
que l’écart entre la pointe du foret et la pointe
de la butée corresponde à la profondeur de
perçage désirée.
Resserrer la vis papillon 9.
10 FR
8
soit dirigée vers le bas.
Votre perceuse à percussion dispose d‘un mode à
arrêt instantané et d‘un mode permanent. L‘utilisation du mode désiré s‘effectue comme suit :
Fonctionnement à arrêt instantané Marche :
Appuyer sur l’interrupteur MARCHE / ARRÊT 6.
Fonctionnement à arrêt instantané Arrêt :
Relâcher l’interrupteur MARCHE / ARRÊT 6.
Mise en marche du fonctionnement
permanent :
Enfoncer l’interr upteur MARCHE / ARRÊT 6 et
appuyer sur la touche de verrouillage
5
.
Fonctionnement permanent Arrêt :
Appuyer sur l’interrupteur MARCHE / ARRÊT 6
et le relâcher.
Q
Réglage progressif de la vitesse
L‘interrupteur MARCHE / ARRÊT 6 dispose d‘une
régulation de vitesse variable.
Enfoncer l‘interr upteur MARCHE / ARRÊT 6
pour augmenter la vitesse.
Page 11

Mise en service / Maintenance et nettoyage / Service / GarantieAvertissements de sécurité … / Avant la mise en service / Mise en service
Q
Réglage du sens de rotation
Régler le sens de rotation de l‘outil électrique
au moyen du sélecteur du sens de rotation
REMARQUE : Ce réglage n‘est pas possible
lorsque l‘interrupteur MARCHE / ARRÊT
enfoncé.
REMARQUE : Maintenir l‘appareil dans la direction
de vissage.
Rotation à droite :
Poussez l‘inverseur de direction de rotation 7
vers la gauche pour percer et visser des vis.
Rotation à gauche :
Poussez l‘inverseur de direction de rotation 7
vers la droite pour desserrer ou dévisser des vis.
Q
Réglage perçage / percussion
7
6
est
Nettoyer la machine après avoir terminé le
travail.
N‘utilisez en aucun cas de l‘essence ni des
.
nettoyants agressifs.
Rangez l‘appareil dans un endroit sec.
Q
Service
Uniquement confier
la réparation de vos appareils à des
techniciens qualifiés et avec des pièces
de rechange d’origine. Ceci permet d’as-
surer la sécurité de fonctionnement de l’appareil.
Afin d’éviter tout
danger, toujours confier le remplace-
ment de la fiche ou du cordon secteur
au fabricant de l’appareil ou à son
S.A.V. Ceci permet d’assurer la sécurité de
fonctionnement de l’appareil.
Remarque : La fonction percussion est exclusivement adaptée pour les travaux de perçage avec
percussion dans la brique, le béton et la pierre.
Remarque : Uniquement manipuler le commutateur percer / percussion
4
lorsque l‘outil est à l‘arrêt.
Perçage :
Pousser le commutateur 4 vers la droite sur la
position
.
Percussion :
Pousser le commutateur 4 vers la gauche sur
la position
Q
Maintenance et nettoyage
.
RISQUE DE BLES-
SURES ! Avant d‘effectuer n‘importe quelle tâche
sur l‘appareil, il faut l‘éteindre et débrancher la
fiche secteur.
Éviter toute infiltration de liquides dans le boîtier
de l’appareil. Utiliser un chiffon doux pour essuyer le boîtier. Ne jamais utiliser d’essence, de
solvant ou détergent attaquant le plastique.
Q
Garantie
Indépendamment de la garantie commerciale souscrite, le vendeur reste tenu des défauts de conformité
du bien et des vices rédhibitoires dans les conditions
prévues aux articles L211-4 et suivants du Code de
la consommation et aux articles 1641 et suivants
du Code Civil.
Cet appareil bénéficie de 3 ans de garantie
à compter de la date d’achat. L’appareil
a été fabriqué avec soin et consciencieusement contrôlé avant sa distribution.
Veuillez conserver le ticket de caisse en
guise de preuve d’achat. Si la garantie
devait s’appliquer, contactez par télé
phone
votre interlocuteur du service après-vente.
Cette condition doit être respectée pour
assurer l’expédition gratuite de votre
marchandise.
La prestation de garantie s’applique uniquement
pour les erreurs de matériaux et de fabrication, pas
pour les dommages de transport, les pièces d’usure
ou les dommages subis par les pièces fragiles,
comme
par ex. les interrupteurs ou les batteries. Le produit
11 FR
Page 12

Garantie / Mise au rebut / Déclaration de conformité / Fabricant Inhaltsverzeichnis
est exclusivement destiné à un usage privé et non
commercial.
La garantie est annulée en cas de manipulation incorrecte et inappropriée, d’utilisation brutale et en
cas d’intervention qui n’aurait pas été réalisée par
notre centre de service après-vente agréé. Cette
garantie ne constitue pas une restriction de vos
droits légaux.
La durée de la garantie n’est pas prolongée par la
garantie du fabricant. Ceci vaut également pour
les pièces remplacées et réparées. Tous dommages
et défauts présents dès l’achat doivent être notifiés
dès que le produit est déballé, et au plus tard deux
jours après la date d’achat. Toutes réparations survenant après la période sous garantie ne seront
pas prises en charge.
FR
Service France
Tel.: 0800 919270
e-mail: kompernass@lidl.fr
IAN 93163
Q
Mise au rebut
L’emballage se compose exclusivement
de matières recyclables qui peuvent être
mises au rebut dans les déchetteries
locales.
Ne pas jeter les appareils électri-
ques dans les ordures ménagères !
Conformément à la directive européenne
2002 / 96 / EC, les outils électriques usés doivent
être collectés séparément et faire l’objet d’un recyclage adéquat.
Q
Déclaration de conformité /
Fabricant
Nous soussignés, KOMPERNASS HANDELS GMBH,
responsable du document : Monsieur Semi Uguzlu,
BURGSTRASSE 21, 44867 BOCHUM, GERMANY,
déclarons par la présente que ce produit est en
conformité avec les normes, documents normatifs
et référentiels, et directives CE suivants :
Directive Machines
(2006 / 42 / EC)
Directive basse tension
(2006 / 95 / EC)
Compatibilité électromagnétique
(2004 / 108 / EC)
RoHS Directive
(2011 / 65 / EU)
Normes harmonisées appliquées
EN 60745-1/A11:2010
EN 60745-2-1:2010
EN 55014-1/A2:2011
EN 55014-2/A2:2008
EN 61000-3-2/A2:2009
EN 61000-3-3:2008
Désignation / type du produit :
Perceuse a percussion PSBM 500 A2
Date of manufacture (DOM): 07–2013
Numéro de série : IAN 93163
Bochum, 31.07.2013
Renseignez-vous auprès de votre mairie ou de l’administration municipale concernant les possibilités
de mise au rebut des appareils usés.
12 FR
Semi Uguzlu
- Responsable qualité -
Tous droits de modifications techniques à fins
d’amélioration réservés.
Page 13

Inhaltsverzeichnis
Einleitung
Bestimmungsgemäßer Gebrauch ....................................................................................................... Seite 14
Ausstattung .......................................................................................................................................... Seite 14
Lieferumfang ........................................................................................................................................ Seite 14
Technische Daten ................................................................................................................................ Seite 14
Allgemeine Sicherheitshinweise für Elektrowerkzeuge
1. Arbeitsplatz-Sicherheit .................................................................................................................... Seite 15
2. Elektrische Sicherheit ...................................................................................................................... Seite 15
3. Sicherheit von Personen ................................................................................................................. Seite 16
4. Verwendung und Behandlung des Elektrowerkzeugs .................................................................. Seite 16
5. Service ............................................................................................................................................. Seite 17
Sicherheitshinweise für Schlagbohrmaschinen .................................................................................. Seite 17
Achtung Leitungen! .............................................................................................................................Seite 17
Originalzubehör / -zusatzgeräte ........................................................................................................ Seite 18
Vor der Inbetriebnahme
Zusatz-Handgriff montieren ................................................................................................................ Seite 18
Tiefenanschlag verwenden ................................................................................................................. Seite 18
Werkzeuge einsetzen ......................................................................................................................... Seite 18
Inbetriebnahme
Ein- und ausschalten ............................................................................................................................ Seite 18
Drehzahl stufenlos regulieren ............................................................................................................. Seite 18
Drehrichtung einstellen........................................................................................................................Seite 19
Bohren / Schlagbohren umschalten ................................................................................................... Seite 19
Wartung und Reinigung ..................................................................................................... Seite 19
Service ............................................................................................................................................... Seite 19
Garantie ........................................................................................................................................... Seite 19
Entsorgung ..................................................................................................................................... Seite 20
Konformitätserklärung / Hersteller ..........................................................................Seite 21
13 DE/AT/CH
Page 14

Einleitung
Schlagbohrmaschine PSBM 500 A2
Einleitung
Wir beglückwünschen Sie zum Kauf Ihres neuen
Gerätes. Sie haben sich damit für ein hochwertiges
Produkt entschieden. Die Bedienungsanleitung ist
Teil dieses Produkts. Sie enthält wichtige Hinweise für
Sicherheit, Gebrauch und Entsorgung. Machen Sie
sich vor der Benutzung
und Sicherheitshinw
des Produkts mit allen Bedien-
eisen vertraut. Benutzen Sie das
Produkt nur wie beschrieben und für die angegebenen Einsatzbereiche. Händigen Sie alle Unterlagen
bei Weitergabe des Produkts an Dritte mit aus.
Bestimmungsgemäßer Gebrauch
Das Gerät ist zum Schlagbohren in Ziegel, Beton
und Gestein sowie zum Bohren in Holz, Metall,
Keramik und Kunststoff geeignet (siehe Abb. B–E).
Durch den Links- /Rechtslauf eignet sich das Gerät
auch zum Schrauben. Jede andere Verwendung oder
Veränderung des Gerätes gilt als nicht bestimmungsgemäß und birgt erhebliche Unfallgefahren. Für
aus bestimmungswidriger Verwendung entstandene
Schäden übernimmt der Hersteller keine Haftung.
Das Gerät ist nicht für den gewerblichen Einsatz
bestimmt.
Ausstattung
1
Schnellspannbohrfutter
2
Vordere Hülse
3
Hintere Hülse
4
Umschalter „Bohren/Schlagbohren“
5
Feststelltaste für EIN- / AUS - Schalter
6
EIN- / AUS - Schalter
7
Drehrichtungsumschalter
8
Tiefenanschlag
9
Flügelschraube
10
Zusatz-Handgriff (siehe Abb. A)
Lieferumfang
1 Schlagbohrmaschine PSBM 500 A2
1 Zusatz-Handgriff
1 Tiefenanschlag
1 Bedienungsanleitung
Technische Daten
Nennspannung: 230–240 V∼ 50 Hz
Nennaufnahme: 500 W
Leerlaufdrehzahl:
Schlagzahl: max.
max. 3000 min
48000 min
Bohrfutter-Spannbereich: max. 13 mm
Bohren in Stahl: max. ø 10 mm
Bohren in Holz: max. ø 20 mm
Bohren in Beton: max. ø 13 mm
Schutzklasse: II /
Geräusch und Vibrationsinformationen:
Messwert für Geräusch ermittelt entsprechend
EN 60745. Der A-bewertete Geräuschpegel des
Elektrowerkzeugs beträgt typischerweise:
Schalldruckpegel: 95,2 dB(A)
Schallleistungspegel: 106,2 dB(A)
Unsicherheit K: 3 dB
Gehörschutz tragen!
Schlagbohren in Beton:
Schwingungsemissionswert
a
= 12,137 m / s2
h, ID
Unsicherheit
K = 1,5 m / s
2
Bohren in Metall:
Schwingungsemissionswert
a
= 5,237 m / s2
h, D
Unsicherheit
K = 1,5 m / s
2
Der in diesen Anweisungen
angegebene Schwingungspegel ist entsprechend
einem in EN 60745 genormten Messverfahren gemessen worden und kann für den Gerätevergleich
verwendet werden. Der angegebene Schwingungs-
-1
-1
14 DE/AT/CH
Page 15

Einleitung / Allgemeine Sicherheitshinweise für Elektrowerkzeuge
emissionswert kann auch zu einer einleitenden Einschätzung der Aussetzung verwendet werden.
Der Schwingungspegel wird sich entsprechend dem
Einsatz des Elektrowerkzeugs verändern und kann
in manchen Fällen über dem in diesen Anweisungen
angegebenen Wert liegen. Die Schwingungsbelast
könnte unterschätzt werden, wenn das Elektrowerkzeug regelmäßig in solcher Weise verwendet wird.
Hinweis: Für eine genaue Abschätzung der
Schwingungsbelastung während eines bestimmten
Arbeitszeitraumes sollten auch die Zeiten berücksichtigt werden, in denen das Gerät abgeschaltet
ist oder zwar läuft, aber nicht tatsächlich im Einsatz
ist. Dies kann die Schwingungsbelastung über den
gesamten Arbeitszeitraum deutlich reduzieren.
Allgemeine Sicherheitshinweise
ung
für Elektrowerkzeuge
Lesen Sie alle
Sicherheitshinweise und Anweisungen. Versäumnisse bei der Einhaltung
der Sicherheitshinweise und Anweisungen können
elektrischen Schlag, Brand und / oder schwere Verletzungen verursachen.
Bewahren Sie alle Sicherheitshinweise
und Anweisungen für die Zukunft auf!
Der in den Sicherheitshinweisen verwendete Begriff
„Elektrowerkzeug“ bezieht sich auf netzbetriebene
Elektrowerk
triebene Elektrowerkzeuge (ohne Netzkabel).
zeuge (mit Netzkabel) und auf akkube-
1. Arbeitsplatz-Sicherheit
a) Halten Sie Ihren Arbeitsbereich sauber
und gut beleuchtet. Unordnung und unbeleuch-
tete Arbeitsbereiche können zu Unfällen führen.
b) Arbeiten Sie mit dem Elektrowerk-
zeug nicht in explosionsgefährdeter
Umgebung, in der sich brennbare Flüssigkeiten, Gase oder Stäube befinden.
Elektrowerkzeuge erzeugen Funken, die den
Staub oder die Dämpfe entzünden können.
c) Halten Sie Kinder und andere Personen
während der Benutzung des Elektrowerkzeugs fern. Bei Ablenkung können
Sie die Kontrolle über das Gerät verlieren.
2. Elektrische Sicherheit
a) Der Anschlussstecker des Elektrowerk-
zeuges muss in die Steckdose passen.
Der Stecker darf in keiner Weise verändert werden. Verwenden Sie keine
Adapterstecker gemeinsam mit
schutzgeerdeten Elektrowerkzeugen.
Unveränderte Stecker und passende Steckdosen
verringern das Risiko eines elektrischen Schlages.
b) Vermeiden Sie Körperkontakt mit ge-
erdeten Oberflächen, wie von Rohren,
Heizungen, Herden und Kühlschränken.
Es besteht ein erhöhtes Risiko durch elektrischen
Schlag, wenn Ihr Körper geerdet ist.
c) Halten Sie Elektrowerkzeuge von Re-
gen oder Nässe fern. Das Eindringen von
Wasser in ein Elektrogerät erhöht das Risiko eines elektrischen Schlages.
d) Zweckentfremden Sie das Kabel nicht,
um das Elektrowerkzeug zu tragen,
aufzuhängen oder um den Stecker aus
der Steckdose zu ziehen. Halten Sie
das Kabel fern von Hitze, Öl, scharfen
Kanten oder sich bewegenden Geräteteilen. Beschädigte oder verwickelte Kabel
erhöhen das Risiko eines elektrischen Schlages.
e) Wenn Sie mit einem Elektrowerkzeug
im Freien arbeiten, verwenden Sie nur
Verlängerungskabel, die auch für den
Außenbereich zugelassen sind. Die
Anwendung eines für den Außenbereich
geeigneten Verlängerungskabels verringert
das Risiko eines elektrischen Schlages.
f) Wenn der Betrieb des Elektrowerk-
zeuges in feuchter Umgebung nicht
vermeidbar ist, verwenden Sie einen
Fehlerstromschutzschalter. Der Einsatz
eines Fehlerstromschutzschalters vermindert
das Risiko eines elektrischen Schlages.
15 DE/AT/CH
Page 16

Allgemeine Sicherheitshinweise für Elektrowerkzeuge Allgemeine Sicherheitshinweise für Elektrowerkzeuge
3. Sicherheit von Personen
a)
Seien Sie stets aufmerksam, achten Sie
darauf, was Sie tun und gehen Sie mit
Vernunft an die Arbeit mit einem Elekt
rowerkzeug. Benutzen Sie kein Elektrowerkzeug, wenn Sie müde sind oder
unter dem Einfluss von Drogen, Alkohol oder Medikamenten stehen. Ein
Moment der Unachtsamkeit beim Gebrauch
des Elektrowerkzeuges kann zu ernsthaften
Verletzungen führen.
b)
Tragen Sie persönliche Schutzausrüstung
und immer eine Schutzbrille. Das Tragen
persönlicher Schutzausrüstung wie Staubmask
rutschfeste Sicherheitsschuhe, Schutzhelm oder
Gehörschutz, je nach Art und Einsatz des
Elektrowerkzeuges, verringert das Risiko von
Verletzungen.
c) Vermeiden Sie eine unbeabsichtigte
Inbetriebnahme. Vergewissern Sie sich,
dass das Elektrowerkzeug ausgeschaltet ist, bevor Sie es an die Stromversorgung anschließen, es aufnehmen
oder tragen. Wenn Sie beim Tragen des
Elektrowerkzeuges den Finger am Schalter ha
oder das Gerät bereits eingeschaltet an die
Stromversorgung anschließen, kann dies zu
Unfällen führen.
d) Entfernen Sie Einstellwerkzeuge oder
Schraubenschlüssel, bevor Sie das
Elektrowerkzeug einschalten. Ein Werk-
zeug oder Schlüssel, der sich in einem drehenden
Geräteteil befindet, kann zu Verletzungen führen.
e) Vermeiden Sie eine abnormale Körper-
haltung. Sorgen Sie für einen sicheren
Stand und halten Sie jederzeit das
Gleichgewicht. Dadurch können Sie das
Elektrowerkzeug in unerwarteten Situationen
besser kontrollieren.
f) Tragen Sie geeignete Kleidung. Tragen
Sie keine weite Kleidung oder Schmuck.
Halten Sie Haare, Kleidung und Handschuhe fern von sich bewegenden
Teilen. Lockere Kleidung, Schmuck oder lange
Haare können von sich bewegenden Teilen
erfasst werden.
-
ben
g) Wenn Staubabsaug- und -auffangein-
richtungen montiert werden können,
vergewissern Sie sich, dass diese
angeschlossen sind und richtig verwendet werden. Die Verwendung einer
Staubabsaugung kann Gefährdungen durch
Staub verringern.
4. Verwendung und Behandlung
des Elektrowerkzeugs
a) Überlasten Sie das Gerät nicht. Ver-
wenden Sie für Ihre Arbeit das dafür
e,
bestimmte Elektrowerkzeug. Mit dem
passenden Elektrowerkzeug arbeiten Sie besser
und sicherer im angegebenen Leistungsbereich.
b) Benutzen Sie kein Elektrowerkzeug,
dessen Schalter defekt ist. Ein Elektrowerk-
zeug, das sich nicht mehr ein- oder ausschalten
lässt, ist gefährlich und muss repariert werden.
c) Ziehen Sie den Stecker aus der Steck-
dose, bevor Sie Geräteeinstellungen
vornehmen, Zubehörteile wechseln
oder das Gerät weglegen. Diese Vorsichts-
maßnahme verhindert den unbeabsichtigten
Start des Elektrowerkzeuges.
d) Bewahren Sie unbenutzte Elektrowerk-
zeuge außerhalb der Reichweite von
Kindern auf. Lassen Sie Personen das
Gerät nicht benutzen, die mit diesem
nicht vertraut sind oder diese Anweisungen nicht gelesen haben. Elektrowerk-
zeuge sind gefährlich, wenn sie von unerfahrenen
Personen benutzt werden.
e) Pflegen Sie Elektrowerkzeuge mit
Sorgfalt. Kontrollieren Sie, ob bewegliche Teile einwandfrei funktionieren
und nicht klemmen, ob Teile gebrochen
oder so beschädigt sind, dass die Funktion des Elektrowerkzeuges beeinträchtigt ist. Lassen Sie beschädigte Teile vor
dem Einsatz des Gerätes reparieren.
Viele Unfälle haben ihre Ursache in schlecht
gewarteten Elektrowerkzeugen.
f) Halten Sie Schneidwerkzeuge scharf
und sauber. Sorgfältig gepflegte Schneid-
16 DE/AT/CH
Page 17

Allgemeine Sicherheitshinweise für Elektrowerkzeuge
werkzeuge mit scharfen Schneidkanten verklemmen sich weniger und sind leichter zu führen.
g) Verwenden Sie Elektrowerkzeug,
Zubehör, Einsatzwerkzeuge usw.
entsprechend diesen Anweisungen.
Berücksichtigen Sie dabei die Arbeitsbedingungen und die auszuführende
Tätigkeit. Der Gebrauch von Elektrowerkzeu-
gen für andere als die vorgesehenen Anwendungen kann zu gefährlichen Situationen führen.
5. Service
a) Lassen Sie Ihr Elektrowerkzeug nur von
qualifiziertem Fachpersonal und nur
mit Original-Ersatzteilen reparieren.
Damit wird sichergestellt, dass die Sicherheit
des Elektrowerkzeugs erhalten bleibt.
Sicherheitshinweise für Schlag-
bohrmaschinen
Benutzen Sie den mit dem Gerät gelie-
ferten Zusatz-Handgriff. Der Verlust der
Kontrolle über die Maschine kann zu Verletzungen führen.
Tragen Sie Gehörschutz bei der Benut-
zung von Schlagbohrmaschinen. Die Einwirkung von Lärm kann Gehörverlust bewirken.
Sichern Sie das Werkstück. Benutzen Sie
Spannvorrichtungen / Schraubstock, um das
Werkstück festzuhalten.
Ziehen Sie bei Gefahr sofort den
Netzstecker aus der Steckdose.
Führen Sie das Netzkabel immer nach
hinten vom Gerät weg.
Stellen Sie sicher, dass die Lüftungs-
schlitze während des Betriebes nicht
abgedeckt sind. Führen Sie keine Gegen-
stände in die Lüftungsschlitze ein.
BRANDGEFAHR DURCH FUNKENFLUG!
Wenn Sie Metalle bearbeiten, entsteht Funkenflug.
Achten Sie darauf, dass keine Personen gefährdet
werden und sich keine brennbaren Materialien
in der Nähe des Arbeitsbereiches befinden.
GIFTIGE STÄUBE! Das Bear-
beiten
Vermeiden Sie das Bohren in bleihaltige
Asbesthaltiges Material darf nicht bear-
Bearbeiten Sie keine angefeuchteten
Halten Sie das Elektrowerkzeug beim
Schalten Sie das Elektrowerkzeug so-
Fassen Sie das Elektrowerkzeug nur an
Halten Sie Ihren Arbeitsplatz sauber.
Warten Sie, bis das Elektrowerkzeug
von schädlichen / giftigen Stäuben stellt
eine Gesundheitsgefährdung für die Bedienperson oder in der Nähe befindliche Personen dar.
Tragen Sie Schutzbrille und Staub-
schutzmaske!
Farben oder andere gesundheitsschädliche Materialien.
beitet werden. Asbest gilt als krebserregend.
Materialien oder feuchte Flächen.
Arbeiten fest mit beiden Händen und
sorgen Sie für einen sicheren Stand.
Das Elektrowerkzeug wird mit zwei Händen
sicherer geführt.
fort aus, wenn das Einsatzwerkzeug
blockiert. Seien Sie auf hohe Reaktionsmo
gefasst, die einen Rückschlag verursachen.
Das Gerät muss stets sauber, trocken
und frei von Öl oder Schmierfetten sein.
den isolierten Griffflächen an, wenn
Sie Arbeiten ausführen, bei denen das
Einsatzwerkzeug verborgene Stromleitungen oder das eigene Netzkabel
treffen kann. Kontakt mit einer spannungs-
führenden Leitung setzt auch Metallteile des
Elektrowerkzeuges unter Spannung und führt
zu einem elektrischen Schlag.
Materialmischungen sind besonders gefährlich.
Leichtmetallstaub kann brennen oder explodieren.
zum Stillstand gekommen ist, bevor
Sie es ablegen. Das Einsatzwerkzeug kann
sich verhaken und zum Verlust der Kontrolle
über das Elektrowerkzeug führen.
mente
Achtung Leitungen!
GEFAHR! Vergewissern Sie sich, dass Sie
nicht auf Strom-, Gas- oder Wasserleitungen
stoßen, wenn Sie mit dem Elektrowerkzeug
17 DE/AT/CH
Page 18

Allgemeine Sicherheitshinweise … / Vor der Inbetriebnahme / Inbetriebnahme Inbetriebnahme / Wartung und Reinigung / Service / Garantie
arbeiten. Prüfen Sie ggf. mit einem Leitungssucher,
bevor Sie in eine Wand bohren bzw. aufschlitzen.
Originalzubehör / -zusatzg eräte
Benutzen Sie nur Zubehör und Zusatzgeräte, die in der Bedienungsanleitung angegeben sind. Der Gebrauch anderer als in der
Bedienungsanleitung empfohlener Einsatzwerkzeuge
oder anderen Zubehörs kann eine Verletzungsgefahr für Sie bedeuten.
Vor der Inbetriebnahme
VERLETZUNGSGEFAHR!
Schalten Sie vor allen Arbeiten am Gerät das Gerät
aus und ziehen Sie den Netzstecker.
Zusatz-Handgriff montieren
HINWEIS: Aus Sicherheitsgründen dürfen Sie
dieses Gerät nur mit ordnungsgemäß montiertem
Zusatz-Handgriff
Drehen Sie die Flügelschraube 9 entgegen
dem Uhrzeigersinn und schwenken Sie den Zusatz-Handgriff
Danach drehen Sie die Flügelschraube 9
wieder fest.
10
verwenden.
10
in die gewünschte Position.
Tiefenanschlag verwenden
Öffnen Sie die Flügelschraube 9.
Achten Sie darauf, dass die Zahnung am
Tiefenanschlag
Ziehen Sie den Tiefenanschlag 8 so weit her-
aus, dass der Abstand zwischen der Spitze des
Bohrers und der Spitze des Tiefenanschlags
der gewünschten Bohrtiefe entspricht.
Drehen Sie die Flügelschraube 9 fest.
8
nach unten zeigt.
Werkzeuge einsetzen
Schnellspannbohrfutter:
Halten Sie die hintere Hülse 3 des Schnell-
spannbohrfutters
vordere Hülse
werden kann.
Setzen Sie das Werkzeug ein.
Halten Sie die hintere Hülse 3 des Schnell-
spannbohrfutters
vordere Hülse
Schraubwerkzeuge:
Benutzen Sie bei der Verwendung von Schrau-
berbits immer einen Universalbithalter.
Stellen Sie den Umschalter „Bohren / Schlag-
bohren“
auf die Position
Inbetriebnahme
1
fest und drehen Sie die
2
, bis das Werkzeug eingesetzt
1
fest und drehen Sie die
2
kräftig zu.
4
zum Schrauben immer nach rechts
.
Ein- und ausschalten
Sie können beim Betrieb der Schlagbohrmaschine
zwischen Moment- und Dauerbetrieb auswählen.
Die Bedienung Ihrer gewünschten Einstellung funktioniert wie folgt:
Momentbetrieb einschalten:
Drücken Sie den EIN- / AUS - Schalter 6.
Momentbetrieb ausschalten:
Lassen Sie den EIN- / AUS - Schalter 6 los.
Dauerbetrieb einschalten:
Drücken Sie den EIN- / AUS - Schalter 6, halten
ihn gedrückt und drücken Sie die Feststelltaste
Dauerbetrieb ausschalten:
Drücken Sie den EIN- / AUS - Schalter 6 und
lassen ihn los.
5
Drehzahl stufenlos regulieren
.
18 DE/AT/CH
Der EIN- / AUS - Schalter 6 verfügt über eine
variable Geschwindigkeitsregelung.
Page 19

Inbetriebnahme / Wartung und Reinigung / Service / Garantie
Durch Drücken des EIN- / AUS - Schalters 6
erhöhen Sie die Drehzahl.
Drehrichtung einstellen
Ändern Sie mit dem Drehrichtungsumschalter 7
die Drehrichtung des Elektrowerkzeuges.
HINWEIS: Bei gedrücktem EIN- / AUS - Schal-
6
ter
ist dies jedoch nicht möglich.
HINWEIS: Halten Sie das Gerät in Arbeitsrichtung.
Rechtslauf:
Schieben Sie den Drehrichtungsumschalter 7
nach links, um zu bohren und Schrauben einzudrehen.
Linkslauf:
Schieben Sie den Drehrichtungsumschalter 7
nach rechts, um Schrauben zu lösen bzw. herauszudrehen.
Bohren / Schlagbohren
umschalten
Es dürfen keine Flüssigkeiten in das Innere der
Maschine gelangen. Verwenden Sie zum
Reinigen ein Tuch.
Reinigen Sie die Maschine nach Abschluss der
Arbeit.
Verwenden Sie auf keinen Fall Benzin oder
scharfe Lösungsmittel.
Lagern Sie das Gerät in einem trockenen Raum.
Service
Lassen Sie Ihre Geräte
nur von qualifiziertem Fachpersonal
und nur mit Original-Ersatzteilen reparieren. Damit wird sichergestellt, dass die
Sicherheit des Gerätes erhalten bleibt.
Lassen Sie den Austausch
des Steckers oder der Netzleitung im-
mer
vom Hersteller des Gerätes oder
seinem Kundendienst ausführen.
Damit wird sichergestellt, dass die Sicherheit
des Gerätes erhalten bleibt.
Garantie
Hinweis: Die Funktion Schlagbohren ist ausschließlich für Schlagbohrarbeiten in Ziegel, Beton und
Gestein geeignet.
Hinweis: Schalten Sie den Umschalter Bohren /
Schlagbohren
4
nur beim Stillstand des Gerätes um.
Bohren:
Schieben Sie den Umschalter 4 nach rechts
auf die Position
.
Schlagbohren:
Schieben Sie den Umschalter 4 nach links
auf die Position
Wartung und Reinigung
.
VERLETZUNGSGEFAHR!
Schalten Sie vor allen Arbeiten am Gerät das
Gerät aus und ziehen Sie den Netzstecker.
Sie erhalten auf dieses Gerät 3 Jahre Garantie ab Kaufdatum. Das Gerät wurde
sorgfältig produziert und vor Anlieferung
gewissenhaft geprüft. Bitte bewahren Sie
den Kassenbon als Nachweis für den Kauf
auf. Bitte setzen Sie sich im Garantiefall mit
Ihrer Servicestelle telefonisch in Verbin
dung.
Nur so kann eine kostenlose Einsendung
Ihrer Ware gewährleistet werden.
Die Garantieleistung gilt nur für Material- oder Fabrikationsfehler, nicht aber für Transportschäden,
Verschleißteile oder für Beschädigungen an zerbrechlichen Teilen, z. B. Schalter oder Akkus.
Das Produkt ist lediglich für den privaten und nicht
für den gewerblichen Gebrauch bestimmt.
Bei missbräuchlicher und unsachgemäßer Behandlung, Gewaltanwendung und bei Eingriffen, die nicht
von unserer autorisierten Service-Niederlassung
vorgenommen wurden, erlischt die Garantie. Ihre
19 DE/AT/CH
Page 20

Garantie / Entsorgung Konformitätserklärung / Hersteller
gesetzlichen Rechte werden durch diese Garantie
nicht eingeschränkt.
Die Garantiezeit wird durch die Gewährleistung nicht
verlängert. Dies gilt auch für ersetzte und reparierte
Teile. Eventuell schon beim Kauf vorhandene Schäden
und Mängel müssen sofort nach dem Auspacken
gemeldet werden, spätestens aber zwei Tage nach
Kaufdatum. Nach Ablauf der Garantiezeit anfallende
Reparaturen sind kostenpflichtig.
DE
Service Deutschland
Tel.: 0800 5435 111
E-mail: kompernass@lidl.de
IAN 93163
AT
Service Österreich
Tel.: 0820 201 222
(0,15 EUR/Min.)
E-mail: kompernass@lidl.at
IAN 93163
CH
Service Schweiz
Tel.: 0842 665566
(0,08 CHF/Min., Mobilfunk
max. 0,40 CHF/Min.)
E-mail: kompernass@lidl.ch
gesammelt und einer umweltgerechten Wiederverwertung zugeführt werden.
Möglichkeiten zur Entsorgung des ausgedienten
Gerätes erfahren Sie bei Ihrer Gemeinde- oder
Stadtverwaltung.
IAN 93163
Q Entsorgung
Die Verpackung besteht aus umweltfreundlichen Materialien, die Sie über die örtlichen Recyclingstellen entsorgen können.
Werfen Sie Elektrowerkzeuge
nicht in den Hausmüll!
Gemäß Europäischer Richtlinie 2002 / 96 / EC
müssen verbrauchte Elektrowerkzeuge getrennt
20 DE/AT/CH
Page 21

Konformitätserklärung /
Hersteller
Konformitätserklärung / Hersteller
Wir, KOMPERNASS HANDELS GMBH, Dokumente
verantwortlicher: Herr Semi Uguzlu, BURGSTRASSE 21
44867 BOCHUM, DEUTSCHLAND, erklären hiermit, dass dieses Produkt mit den folgenden Normen,
normativen Dokumenten und EG-Richtlinien übereinstimmt:
Maschinenrichtlinie
(2006 / 42 / EC)
EG-Niederspannungsrichtlinie
(2006 / 95 / EC)
Elektromagnetische Verträglichkeit
(2004 / 108 / EC)
RoHS Richtlinie
(2011 / 65 / EU)
angewandte harmonisierte Normen
EN 60745-1/A11:2010
EN 60745-2-1:2010
EN 55014-1/A2:2011
EN 55014-2/A2:2008
EN 61000-3-2/A2:2009
EN 61000-3-3:2008
n-
,
Typ / Bezeichnung des Produktes:
Schlagbohrmaschine PSBM 500 A2
Herstellungsjahr: 07–2013
Seriennummer: IAN 93163
Bochum, 31.07.2013
Semi Uguzlu
- Qualitätsmanager -
Technische Änderungen im Sinne der Weiterentwicklung sind vorbehalten.
21 DE/AT/CH
Page 22

22
Page 23

Table of contents
Introduction
Proper use ............................................................................................................................................ Page 24
Features ...............................................................................................................................................Page 24
Included items .....................................................................................................................................Page 24
Technical data ..................................................................................................................................... Page 24
General safety advice for electrical power tools
1. Workplace safety ........................................................................................................................... Page 25
2. Electrical safety ............................................................................................................................... Page 25
3. Personal safety ................................................................................................................................ Page 25
4. Careful handling and use of electrical power tools ..................................................................... Page 26
5. Service ............................................................................................................................................. Page 26
Safety advice for hammer-action drills...............................................................................................Page 27
Caution utility services! .......................................................................................................................Page 27
Original accessories / attachments .................................................................................................... Page 27
Before first use
Attaching the auxiliary handle ...........................................................................................................Page 28
Using the depth stop ........................................................................................................................... Page 28
Inserting tools ......................................................................................................................................Page 28
First use
Switching on and off ........................................................................................................................... Page 28
Infinitely adjustable speed setting ...................................................................................................... Page 28
Setting the direction of rotation .......................................................................................................... Page 28
Switching between drilling / hammer-action ...................................................................................... Page 29
Servicing and cleaning.........................................................................................................Page 29
Service centre ..............................................................................................................................Page 29
Warranty ......................................................................................................................................... Page 29
Disposal ............................................................................................................................................ Page 29
Declaration of conformity / Producer ...................................................................... Page 30
23 GB
Page 24

Introduction
Impact drill PSBM 500 A2
Q
Introduction
We congratulate you on the purchase of your new
device. You have chosen a high quality product. The
instructions for use are part of the product. They
contain important information concerning safety,
use and disposal. Before using the product, please
familiarise yourself with all of the safety information
and instructions for use. Only use the unit as de
and for the specified applications. If you pass the
product on to anyone else, please ensure that you
also pass on all the documentation with it.
Q
Proper use
The tool is intended for Impact drilling into brick,
concrete and stone as well as drilling into wood,
metal, ceramics and plastic (see Fig. B-E). The clockwise / counter clockwise rotation direction switch also
allows the device to be used as a driver. Any other
use or modification to the device shall be considered
as improper use and could give rise to considerable
risk of accident. The manufacturer will not accept liability for loss or damage arising from improper use.
The device is not intended for commercial use.
scribed
Q
Included items
1 Impact drill PSBM 500 A2
1 Auxiliary handle
1 Depth stop
1 Operating instructions
Q
Technical data
Nom. voltage: 230–240 V∼ 50 Hz
Rated power: 500 W
No-load rotational
speed: max. 3000 min
Percussion rate: max. 48000 min
-1
-1
Chuck capacity: max. 13 mm
Drilling in steel: max. ø 10 mm
Drilling in wood: max. ø 20 mm
Drilling in concrete: max. ø 13 mm
Protection class: II /
Noise and vibration data:
Measured values for noise are determined in accordance with EN 60745. The A-weighted noise level
of the electrical power tool are typically:
Sound pressure level: 95.2 dB(A)
Sound power level: 106.2 dB(A)
Uncertainty K: 3 dB
Wear ear protection!
Q
Features
1
Quick-action drill chuck
2
Front casing
3
Back casing
4
Changeover switch “drill / percussion drill”
5
Locking button for ON / OFF switch
6
ON / OFF switch
7
Rotational direction switch
8
Depth stop
9
Wing screw
10
Additional handle (see Fig. A)
24 GB
Impact drilling in concrete:
Vibration emission value
a
= 12.137 m / s2
h, ID
Uncertainty
K = 1.5 m / s
2
Drilling in metal:
Vibration emission value
a
= 5.237 m / s
h, D
Uncertainty
K = 1.5 m / s
2
2
The vibration level specified in
these instructions was measured in accordance with
an EN 60745 standardised measurement process
and can be used to compare equipment. The vibration
Page 25

emission value specified can also serve as a preliminary assessment of the exposure. The vibration level
will change according to the application of the electrical tool an in some cases may exceed the value
specified in these instructions. Regularly using the
electric tool in such a way may make it easy to underestimate the vibration.
Note: If you wish to make an accurate assessment
of the vibration loads experienced during a particular period of working, you should also take into
account the intervening periods of time when the
device is switched off or is running but is not actually in use. This can result in a much lower vibration
load over the whole of the period of working.
Q
General safety advice for elec-
trical power tools
Read all the safe-
ty advice and instructions! Failure
to observe the safety advice and instructions may result in electric shock, fire and /
or serious injury.
Keep all the safety advice and instructions
in a safe place for future reference!
The term “electrical tool” used in the safety advice
refers to electrical tools powered by mains electricity
(by means of a mains lead) and electrical tools
powered by rechargeable batteries (without a
mains lead).
1. Workplace safety
a) Keep your working area clean and
well lit. Untidy or poorly lit working areas
can lead to accidents.
b) Do not work with the device in poten-
tially explosive environments in which
there are inflammable liquids, gases
or dusts. Electrical power tools create sparks,
which can ignite dusts or fumes.
c) Keep children and other people away
while you are operating the electrical
tool. Distractions can cause you to lose con-
trol of the device.
2. Electrical safety
a)
The mains plug on the device must match
the mains socket. The plug must not be
modified in any way. Do not use an
adapter plug with devices fitted with
a protective earth. Unmodified plugs and
matching sockets reduce the risk of electric shock.
b) Avoid touching earthed surfaces such
as pipes, radiators, ovens and refrigerators with any part of your body.
There is an increased risk of electric shock if
your body is earthed.
c) Keep the device away from rain or
moisture. Water entering an electrical device
increases the risk of electric shock.
d) Do not use the mains lead for any pur-
pose for which it was not intended, e.g.
to carry the device, to hang up the device or to pull the mains plug out of the
mains socket. Keep the mains lead
away from heat, oil, sharp edges or
moving parts of the device. Damaged
or tangled mains leads increase the risk of
electric shock.
e) When working outdoors with an
electrical power tool always use extension cables that are also approved
for use outdoors. The use of an extension
cable suitable for outdoor use reduces the risk
of electric shock.
f) Use a residual current device (RCD)
for protection if operating the electrical power tool in a moist environment
is unavoidable. The use of an RCD reduces
the risk of electric shock.
3. Personal safety
a) Remain alert at all times, watch what
you are doing and always proceed
with caution. Do not use the device if
you are tired or under the influence of
25 GB
Page 26

General safety advice for electrical power tools
drugs, alcohol or medication. One mo
of carelessness when using the device can lead
to serious injury.
b) Wear personal protective equipment
and always wear safety glasses. The
wearing of personal protective equipment such
as dust masks, non-slip safety shoes, safety
helmets or ear protectors, appropriate to the
type of electrical power tool used and work
undertaken, reduces the risk of injury.
c) Avoid unintentional operation of the
device. Check that the electrical power
tool is switched off before you connect
it to the mains, pick it up or carry it.
Accidents can happen if you carry the device
with your finger on the ON / OFF switch or with
the device switched on.
d) Remove any setting tools or spanners
before you switch the device on. A tool
or spanner left attached to a rotating part of a
device can lead to injury.
e) Avoid placing your body in an unnat-
ural position. Keep proper footing
and balance at all times. By doing this
you will be in a better position to control the
device in unforeseen circumstances.
f) Wear suitable clothing. Do not wear
loose clothing or jewellery. Keep your
hair, clothing and gloves clear of moving parts. Loose clothing, jewellery or long
hair can become trapped in moving parts.
g) If vacuum dust extraction and collection
devices are fitted do not forget to
that they are properly connected and
correctly used. The use of these devices
reduces the hazard presented by dust.
4.
Careful handling and use
ment
check
of electrical power tools
b) Do not use an electrical power tool if
its switch is defective. An electrical power
tool that can no longer be switched on and off
is dangerous and must be repaired.
c) Pull the mains plug from the socket
before you make any adjustments to
the device, change accessories or when
the device is put away. This precaution is
intended to prevent you from unintentionally
starting the device.
d) When not in use always ensure that
electrical power tools are kept out of
reach of children. Do not let anyone use
the device if he or she is not familiar
with it or has not read the instructions
and advice. Electrical power tools are dan-
gerous when they are used by inexperienced
people.
e) Look after the device carefully. Check
that moving parts are working properly and move freely. Check for any
parts that are broken or damaged
enough to detrimentally affect the
functioning of the device. Have damaged parts repaired before you use
the device. Many accidents have their origins
in poorly maintained electrical power tools.
f) Keep cutting tools clean and sharp.
Carefully maintained cutting tools with sharp
cutting edges are less likely to jam and are
easier to control.
g) Use the electrical power tool, accesso-
ries, inserted tools etc. in accordance
with these instructions and advice, and
the stipulations drawn up for this particular type of device. In doing this, take
into account the working conditions
and the task in hand. The use of electrical
power tools for purposes other than those intended can lead to dangerous situations.
a) Do not overload the device. Always
use an electrical power tool that is
intended for the task you are undertaking. By using the right electrical power
tool for the job you will work more safely and
achieve a better result.
26 GB
5. Service
a) Have your device repaired at the ser-
vice centre or by qualified specialist
personnel using original manufacturer
Page 27

parts only. This will ensure that your device
remains safe to use.
Q
Safety advice for hammer-
action drills
Use the auxiliary handle supplied with
the device. Loss of control of the tool can
lead to injury.
Always wear ear protection when us-
ing percussion drills. Exposure to noise can
cause hearing loss.
Secure the workpiece. Use clamps or a
vice to grip the workpiece firmly.
If a dangerous situation arises, pull
the mains plug immediately out of the
mains socket.
Always work with the mains lead
leading away from the rear of the
device.
Do not allow the ventilation slots to
become covered while the device is
operating. Do not insert any objects into the
ventilation slots.
DANGER OF FIRE FROM FLYING SPARKS!
Drilling or abrading metal creates flying sparks.
Always make sure that nobody is placed in any
danger and that there are no inflammable materials near the working area.
HAZARDOUS DUSTS!
Working with harmful / poisonous dusts presents
a danger to health for the tool operator and
any persons in the vicinity.
Wear safety glasses and a dust pro-
tection mask!
Avoid drilling paints containing lead
or other substances hazardous to
health.
Do not drill or abrade materials con-
taining asbestos. Asbestos is a known
carcinogen.
Do not drill moist materials or damp
surfaces.
When working with electrical tools,
hold them firmly in both hands and
make sure that your footing is secure.
Using both your hands to hold electrical tools
ensures safer operation of them.
If the inserted tool jams, switch off the
electrical power tool immediately. Be
prepared for high reaction torques as they may
cause kickback.
Always keep the device clean, dry and
free of oil or grease.
Only handle the electrical tool by
of the insulated handling surfaces
you are carrying out jobs where the
insertion tool may come into contact
with hidden power supply lines or its
own power cable. Contact with a live elec-
trical wire also makes metal parts of the electrical
tool live and leads to electric shock.
Keep your workplace clean and tidy.
Mixing materials is particularly dangerous. Dust
from light metals can burn or explode.
Wait until the electrical tool has come
to a standstill before putting it down.
The insertion tool could get caught up in something and this may lead to control of the electrical
tool being lost.
Q
Caution utility services!
DANGER! Ensure that you do not strike
electrical cables, gas or water pipes when
you are working with the electrical power
tool. Check a wall using a suitable detector before
you drill or cut slots.
Q
Original accessories /
attachments
Use only the accessories and attachments
detailed in the operating instructions.
The use of inserted tools or accessories other than
those recommended in the operating instructions
could lead to you suffering an injury.
means
when
27 GB
Page 28

Before first use / First use
Q
Before first use
DANGER OF INJURY!
Switch the device off and pull the plug out of the
mains socket before carrying out any work on the
device.
Q
Attaching the auxiliary handle
NOTE: For safety reasons this tool must always be
used with the auxiliary handle
10
in place.
Turn the wing screw 9 anti-clockwise and swivel
the additional handle 10 into the desired position.
Then tighten the wing screw 9 again.
Q
Using the depth stop
Open the wing screw 9.
Make sure that the toothing on the depth stop 8
is pointing downwards.
Pull the depth stop 8 out as far as necessary
so that the distance between the tip of the drill
and the tip of the depth stop corresponds to
the desired drilling depth.
Firmly tighten the wing screw 9.
Q
First use
Q
Switching on and off
When operating the hammer-action drill you can
select between intermittent or continuous operation
mode. In either mode the device functions as follows:
To switch on intermittent operation mode:
Press the ON / OFF switch 6.
To switch off intermittent operation mode:
Release the ON / OFF switch 6.
Switching continuous operation on:
Press and hold the ON / OFF switch 6 down
and press the locking button
5
.
To switch off continuous operation mode:
Press and then release the ON / OFF switch 6.
Q
Infinitely adjustable
speed setting
The ON / OFF switch 6 has a variable speed control.
Pressing the ON / OFF switch 6 increases the
speed.
Q
Inserting tools
Quick-action drill chuck:
Take firm hold of the back casing 3 of the
quick-action drill chuck
2
casing
until the tool can be inserted.
1
and turn the front
Insert the tool.
Take firm hold of the back casing 3 of the
quick-action drill chuck
2
casing
firmly shut.
1
and turn the front
Assembly tools for screws and nuts:
When using screwdriver bits, always use a
universal bit holder.
To screw things in, always switch the changeover
switch “drill / percussion drill”
position
28 GB
.
4
to the right to
Q
Setting the direction of rotation
With the rotational direction switch 7 you can
change the rotational direction of the electrical
tool.
NOTE: This is, however, not possible when the
ON / OFF switch
6
is pressed down.
NOTE: Hold the appliance in the direction of work.
Clockwise rotation:
Push the rotational direction switch 7 to the
Left in order to drill and to screw in screws.
Anticlockwise rotation:
Push the direction of rotation switch 7 to the
right to slacken a screw or screw it out.
Page 29

Q
Switching between drilling /
hammer-action
Note: The hammer-action drilling mode is intended
for drilling into brick, concrete and stone only.
Note: The drill / hammer-action switch
only be moved after the device has come to a
standstill.
Drilling:
Set the drill / hammer-action switch 4 to the
right into the
position.
4
must
Q
Warranty
The warranty for this appliance is for 3
years from the date of purchase. The appliance has been manufactured with care
and meticulously examined before delivery. Please retain your receipt as proof
of purchase. In the event of a warranty
claim, please make contact by telephone
with our Service Department. Only in this
way can a post-free despatch for your
goods be assured.
Impact drilling:
Set the drill / hammer-action switch 4 to the
left into the
Q
Servicing and cleaning
Switch the device off and pull the plug out of the
mains socket before carrying out any work on the
device.
Do not allow any liquids to enter the device.
Use a cloth to clean the device.
Clean the device after you have finished using it.
Do not under any circumstances use petrol or
strong solvents.
Store the device in a dry room.
Q
Service centre
only by qualified specialist personnel
using original manufacturer parts only.
This will ensure that your device remains safe
to use.
needs to be replaced, always have
the replacement carried out by the
manufacturer or his service centre. This
will ensure that your device remains safe to use.
position.
DANGER OF INJURY!
Have your device repaired
If the plug or mains lead
The warranty covers only claims for material and
maufacturing defects, but not for transport damage,
for wearing parts or for damage to fragile components, e.g. buttons or batteries. This product is for private use only and is not intended for commercial use.
The warranty is void in the case of abusive and improper handling, use of force and internal tampering
not carried out by our authorized service branch. Your
statutory rights are not restricted in any way by this
warranty.
The warranty period will not be extended by repairs
made unter warranty. This applies also to replaced
and repaired parts. Any damage and defects extant
on purchase must be reported immediately after
unpacking the appliance, at the latest, two days after
the purchase date. Repairs made after the expiration
of the warranty period are subject to payment.
GB
Service Great Britain
Tel.: 0871 5000 720
(0,10 GBP/Min.)
e-mail: kompernass@lidl.co.uk
IAN 93163
Q
Disposal
The packaging is wholly composed of
environmentally-friendly materials that can
be disposed of at a local recycling centre.
29 GB
Page 30

Disposal / Declaration of conformity / Producer
Do not dispose of electrical power
tools with the household rubbish!
In
accordance with European Directive 2002 / 96 / EC,
worn out electrical power tools must be collected
separately and taken for environmentally compatible
recycling.
Contact your local refuse disposal authority for more
details of how to dispose of your worn-out devices.
Q
Declaration of conformity /
Producer
We, KOMPERNASS HANDELS GMBH, the person
responsible for documents: Mr Semi Uguzlu, BURGSTRASSE 21, 44867 BOCHUM, GERMANY, hereby
declare that this product complies with the following
standards, normative documents and EU directives:
Machinery Directive
(2006 / 42 / EC)
EU Low Voltage Directive
(2006 / 95 / EC)
Electromagnetic Compatibility
(2004 / 108 / EC)
RoHS Directive
(2011 / 65 / EU)
Applicable harmonized standards
EN 60745-1/A11:2010
EN 60745-2-1:2010
EN 55014-1/A2:2011
EN 55014-2/A2:2008
EN 61000-3-2/A2:2009
EN 61000-3-3:2008
30 GB
Type / Description of product:
Impact drill PSBM 500 A2
Date of manufacture (DOM): 07–2013
Serial number: IAN 93163
Bochum, 31.07.2013
Semi Uguzlu
- Quality Manager -
We reserve the right to make technical modifications in the course of further development.
Page 31

KOMPERNASS HANDELS GMBH
BURGSTRASSE 21
44867 BOCHUM
GERMANY
Version des informations · Stand der
Informationen · Last Information Update:
07 / 2013 · Ident.-No.: PSBM500A2072013-FR
IAN 93163
 Loading...