

Page 1
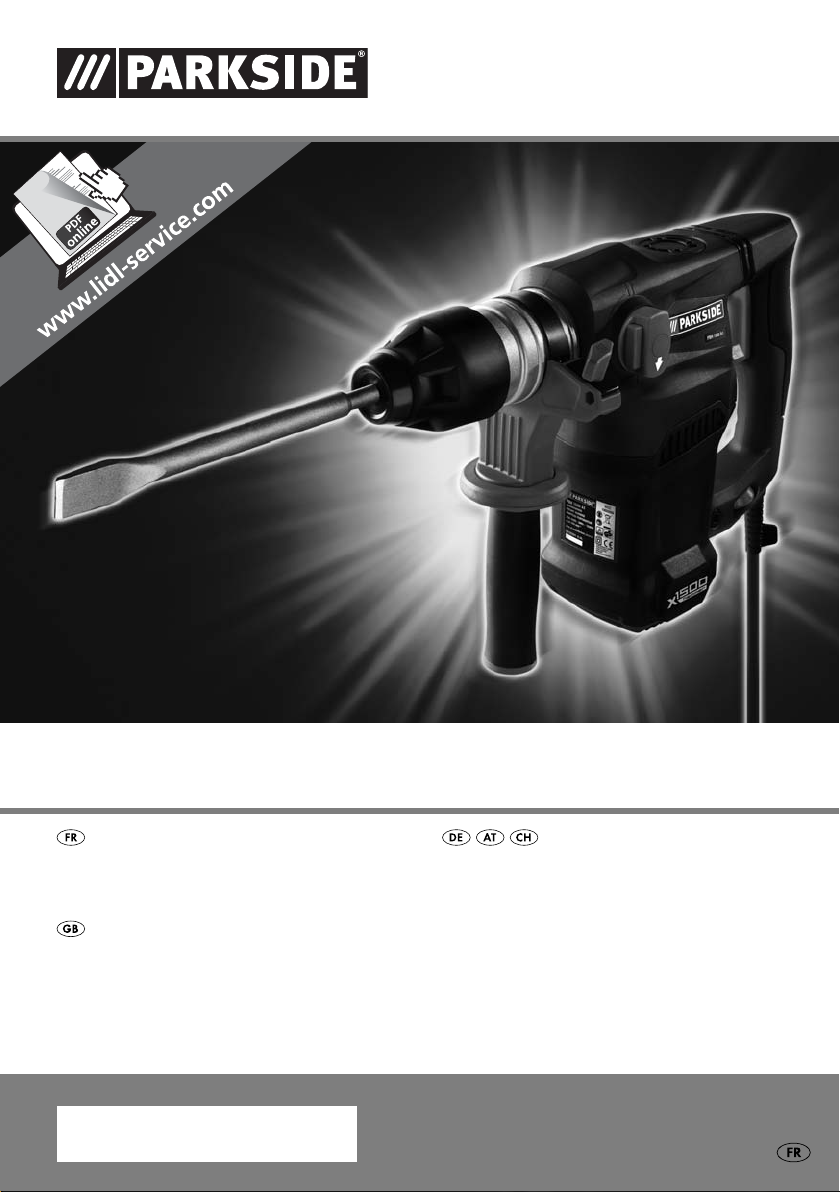
MARTEAU PERFORATEUR ET BURINEUR PBH 1500 A1
MARTEAU PERFORATEUR
ET BURINEUR
Traduction du mode d‘emploi d‘origine
HAMMER DRILL
Translation of original operation manual
BOHR- UND MEISSELHAMMER
Originalbetriebsanleitung
IAN 35391
Page 2

Avant de lire le mode d'emploi, ouvrez la page contenant les illustrations et familiarisez-vous ensuite avec
toutes les fonctions de l'appareil.
Klappen Sie vor dem Lesen die Seite mit den Abbildungen aus und machen Sie sich anschließend mit allen
Funktionen des Gerätes vertraut.
Before reading, unfold the page containing the illustrations and familiarise yourself with all functions of
the device.
FR Traduction du mode d‘emploi d‘origine Page 1
DE / AT / CH Originalbetriebsanleitung Seite 9
GB Translation of original operation manual Page 17
Page 3
A B
Page 4

Table des matières
Introduction . . . . . . . . . . . . . . . . . . . . . . . . . . . . . . . . . . . . . . . . . . . . . . . . . . . . . . 2
Usage conforme . . . . . . . . . . . . . . . . . . . . . . . . . . . . . . . . . . . . . . . . . . . . . . . . . . . . . . . . . . . . . 2
Composants représentés . . . . . . . . . . . . . . . . . . . . . . . . . . . . . . . . . . . . . . . . . . . . . . . . . . . . . . 2
Matériel livré . . . . . . . . . . . . . . . . . . . . . . . . . . . . . . . . . . . . . . . . . . . . . . . . . . . . . . . . . . . . . . . 2
Caractéristiques techniques . . . . . . . . . . . . . . . . . . . . . . . . . . . . . . . . . . . . . . . . . . . . . . . . . . . . 2
Avertissements de sécurité généraux pour l’outil . . . . . . . . . . . . . . . . . . . . . . . . . . 3
1. Sécurité de la zone de travail . . . . . . . . . . . . . . . . . . . . . . . . . . . . . . . . . . . . . . . . . . . . . . . . 3
2. Sécurité électrique . . . . . . . . . . . . . . . . . . . . . . . . . . . . . . . . . . . . . . . . . . . . . . . . . . . . . . . . . 3
3. Sécurité des personnes . . . . . . . . . . . . . . . . . . . . . . . . . . . . . . . . . . . . . . . . . . . . . . . . . . . . . 4
4. Utilisation et entretien de l’outil . . . . . . . . . . . . . . . . . . . . . . . . . . . . . . . . . . . . . . . . . . . . . . . 4
5. Maintenance et entretien . . . . . . . . . . . . . . . . . . . . . . . . . . . . . . . . . . . . . . . . . . . . . . . . . . . . 5
Consignes de sécurité spécifi ques aux marteaux perforateurs . . . . . . . . . . . . . . . . . . . . . . . . . 5
Accessoires / équipements supplémentaires d'origine . . . . . . . . . . . . . . . . . . . . . . . . . . . . . . . . 5
Mise en service . . . . . . . . . . . . . . . . . . . . . . . . . . . . . . . . . . . . . . . . . . . . . . . . . . . 5
Poignée supplémentaire . . . . . . . . . . . . . . . . . . . . . . . . . . . . . . . . . . . . . . . . . . . . . . . . . . . . . . . 5
Butée de profondeur . . . . . . . . . . . . . . . . . . . . . . . . . . . . . . . . . . . . . . . . . . . . . . . . . . . . . . . . . 6
Commande . . . . . . . . . . . . . . . . . . . . . . . . . . . . . . . . . . . . . . . . . . . . . . . . . . . . . . 6
Sélection du mode de fonctionnement . . . . . . . . . . . . . . . . . . . . . . . . . . . . . . . . . . . . . . . . . . . . 6
Présélection de la vitesse . . . . . . . . . . . . . . . . . . . . . . . . . . . . . . . . . . . . . . . . . . . . . . . . . . . . . . 6
Mise en marche et à l'arrêt . . . . . . . . . . . . . . . . . . . . . . . . . . . . . . . . . . . . . . . . . . . . . . . . . . . . . 7
FR
Maintenance et nettoyage . . . . . . . . . . . . . . . . . . . . . . . . . . . . . . . . . . . . . . . . . . 7
Mise au rebut . . . . . . . . . . . . . . . . . . . . . . . . . . . . . . . . . . . . . . . . . . . . . . . . . . . . 7
Garantie . . . . . . . . . . . . . . . . . . . . . . . . . . . . . . . . . . . . . . . . . . . . . . . . . . . . . . . . 7
Service après-vente . . . . . . . . . . . . . . . . . . . . . . . . . . . . . . . . . . . . . . . . . . . . . . . 7
Importateur . . . . . . . . . . . . . . . . . . . . . . . . . . . . . . . . . . . . . . . . . . . . . . . . . . . . . . 8
Traduction de la déclaration de conformité originale . . . . . . . . . . . . . . . . . . . . 8
PBH 1500 A1
1
Page 5

MARTEAU PERFORATEUR
FR
ET BURINEUR PBH 1500 A1
Introduction
Toutes nos félicitations pour l'achat de
votre nouvel appareil. Ainsi, vous venez
d'opter pour un produit de grande qualité.
Le mode d'emploi fait partie de ce produit. Il contient
des remarques importantes concernant la sécurité,
l'usage et la mise au rebut. Avant l'usage du produit,
veuillez vous familiariser avec toutes les consignes
d'utilisation et de sécurité. N'utilisez le produit que
conformément aux consignes et pour les domaines
d'utilisation prévus. Si vous cédez le produit à un
tiers, remettez-lui également tous les documents.
Usage conforme
Le marteau perforateur PBH 1500 A1 (ci-après
dénommé l'appareil) se prête:
▯ au perçage à percussion dans la brique, le
béton et la pierre
▯ au burinage dans le béton, la pierre et le plâtre
▯ au perçage dans la pierre, le bois et le métal
Toute autre utilisation ou modifi cation de l'appareil est considérée comme étant non conforme et
s'accompagne de risques d'accident non négligeables.
Le fabricant décline toute responsabilité en cas de
dommages résultant d'une utilisation non conforme.
L'appareil n'est pas conçu pour un usage commercial.
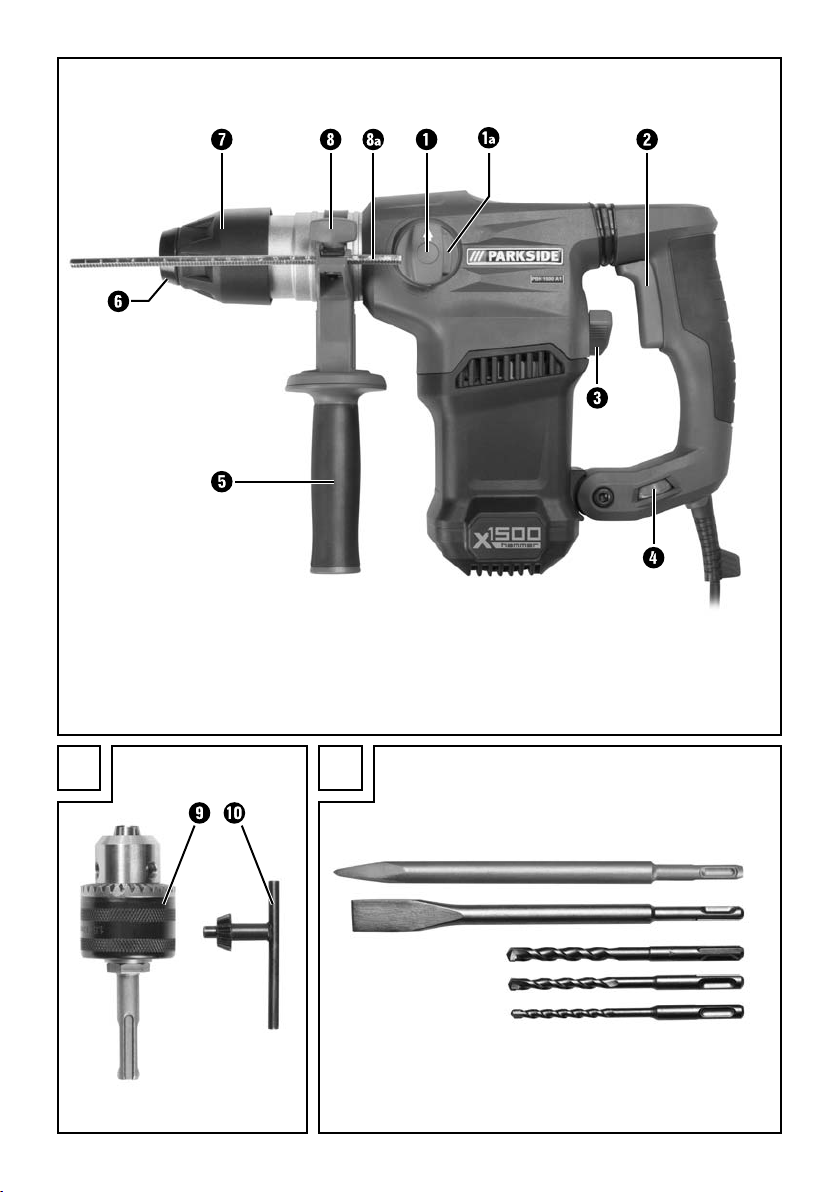
Composants représentés
Sélecteur de fonction
Touche de déverrouillage sélecteur de fonction
Interrupteur marche/arrêt
Interrupteur du mécanisme de percussion
Molette de présélection de vitesse
Poignée supplémentaire
Porte-outil avec capuchon anti-poussière
Manchon de verrouillage
Vis à ailettes
Butée de profondeur
Porte-foret à clé
Clé à couronne dentée
Matériel livré
1 marteau perforateur et burineur PBH 1500 A1
1 poignée supplémentaire
3 forets (voir fi g. B)
1 burin plat (voir fi g. B)
1 burin pointu (voir fi g. B)
1 butée de profondeur
1 porte-foret à clé (voir fi g. A)
1 clé à couronne dentée (voir fi g. A)
1 mallette de transport
1 mode d'emploi
Caractéristiques techniques
Puissance nominale
absorbée: 1500 W
Tension nominale: 230 - 240 V ∼ 50 Hz
Régime à vide: n
Fréquence de percussion: 0 - 3900 / min
Puissance de perçage: 13 mm max. pour l'acier
Classe de protection: II /
Informations relatives aux bruits et aux
vibrations:
Valeur de mesure du bruit déterminée conf. à la
norme EN 60745. Le niveau de bruit A pondéré
typique de l'outil électrique est de:
Perçage:
Niveau de pression acoustique: 85,61 dB(A)
Niveau de puissance acoustique: 96,61 dB(A)
Incertitude K: 3 dB
Burinage:
Niveau de pression acoustique: 94,31 dB(A)
Incertitude K: 3 dB
Niveau de puissance acoustique: 102,31 dB(A)
Incertitude K: 2,83 dB
0 - 750 / min
0
40 mm max. pour le bois
32 mm max. pour le béton
2
PBH 1500 A1
Page 6

Valeurs totales des vibrations (somme vectorielle
triaxiale) déterminées selon la norme EN 60745:
Poignée principale
Perçage dans le béton:
= 10,428 m/s2, K = 1,5 m/s
a
h(HD)
2
Poignée supplémentaire
Perçage dans le béton:
= 8,15 m/s2, K = 1,5 m/s
a
h(HD)
2
Poignée principale
Burinage : a
= 15,014 m/s2, K = 1,5 m/s
h(CHeq)
2
Poignée supplémentaire
Burinage : a
h(CHeq)
AVERTISSEMENT!
= 11,201 m/s2, K = 1,5 m/s
2
► Le niveau de vibrations indiqué dans ces
instructions a été mesuré conformément
aux méthodes de mesure décrites dans la
norme EN 60745 et peut être utilisé pour
la comparaison d'appareils. La valeur totale
de vibrations déclarée peut également être
utilisée pour une évaluation préliminaire de
l’exposition.
Le niveau des vibrations varie en fonction
de l'usage de l'outil électrique et peut, dans
certains cas, excéder la valeur indiquée
dans ces instructions. La sollicitation due aux
vibrations pourrait être sous-estimée si l'outil
électrique est utilisé régulièrement de cette
manière.
REMARQUE
Afi n d'obtenir une estimation précise de la
►
sollicitation due aux vibrations pendant un
certain temps de travail, il convient également de tenir compte des périodes pendant
lesquelles l'appareil est éteint ou allumé, mais
n'est pas eff ectivement utilisé. Ceci peut considérablement réduire la sollicitation due aux
vibrations pendant toute la durée du travail.
Avertissements de sécurité
généraux pour l’outil
AVERTISSEMENT!
► Lire tous les avertissements de sécurité et
toutes les instructions. Ne pas suivre les
avertissements et instructions peut donner lieu
à un choc électrique, un incendie et/ou une
blessure sérieuse.
Conserver tous les avertissements et toutes
les instructions pour pouvoir s’y reporter
ultérieurement.
Le terme «outil» dans les avertissements fait référence à votre outil électrique alimenté par le secteur
(avec cordon d’alimentation) ou votre outil fonctionnant sur batterie (sans cordon d’alimentation).
1. Sécurité de la zone de travail
a) Conserver la zone de travail propre et bien
éclairée. Les zones en désordre ou sombres
sont propices aux accidents.
b) Ne pas faire fonctionner les outils électriques
en atmosphère explosive, par exemple en
présence de liquides infl ammables, de gaz ou
de poussières. Les outils électriques produisent
des étincelles qui peuvent enfl ammer les poussières ou les fumées.
c) Maintenir les enfants et les personnes pré-
sentes à l’écart pendant l’utilisation de l’outil.
Les distractions peuvent vous faire perdre le
contrôle de l’outil.
2. Sécurité électrique
a) Il faut que les fi ches de l’outil électrique
soient adaptées au socle. Ne jamais modifi er
la fi che de quelque façon que ce soit. Ne pas
utiliser d’adaptateurs avec des outils à branchement de terre. Des fi ches non modifi ées et
des socles adaptés réduiront le risque de choc
électrique.
b) Eviter tout contact du corps avec des surfaces
reliées à la terre telles que les tuyaux, les
radiateurs, les cuisinières et les réfrigérateurs.
Il existe un risque accru de choc électrique si
votre corps est relié à la terre.
FR
PBH 1500 A1
3
Page 7

c) Ne pas exposer les outils à la pluie ou à des
FR
conditions humides. La pénétration d‘eau à
l’intérieur d’un outil augmentera le risque de
choc électrique.
d) Ne pas maltraiter le cordon. Ne jamais
utiliser le cordon pour porter, tirer ou débran-
cher l’outil. Maintenir le cordon à l’écart de
la chaleur, du lubrifi ant, des arêtes ou des
parties en mouvement. Des cordons endomma-
gés ou emmêlés augmentent le risque de choc
électrique.
e) Lorsqu’on utilise un outil à l’extérieur,
utiliser un prolongateur adapté à l’utilisation
extérieure. L’utilisation d’un cordon adapté à
l’utilisation extérieure réduit le risque de choc
électrique.
f) Si l’usage d’un outil dans un emplacement
humide est inévitable, utiliser une alimen-
tation protégée par un dispositif à courant
diff érentiel résiduel (RCD). L’usage d’un RCD
réduit le risque de choc électrique.
3. Sécurité des personnes
a) Rester vigilant, regarder ce que vous êtes
en train de faire et faire preuve de bon
sens dans votre utilisation de l’outil. Ne pas
utiliser un outil lorsque vous êtes fatigué ou
sous l’emprise de drogues, d’alcool ou de
médicaments. Un moment d’inattention en
cours d’utilisation d’un outil peut entraîner des
blessures graves des personnes.
b) Utiliser un équipement de sécurité. Toujours
porter une protection pour les yeux. Les
équipements de sécurité tels que les masques
contre les poussières, les chaussures de sécurité
antidérapantes, les casques ou les protections
acoustiques utilisés pour les conditions appro-
priées réduiront les blessures de personnes.
c) Eviter tout démarrage intempestif. S’assurer
que l’interrupteur est en position arrêt avant
de brancher l’outil au secteur et/ou au bloc
de batteries, de le ramasser ou de le porter.
Porter les outils en ayant le doigt sur l’interrup-
teur ou brancher des outils dont l’interrupteur
est en position marche est source d’accidents.
d) Retirer toute clé de réglage avant de mettre
l’outil en marche. Une clé laissée fi xée sur une
partie tournante de l’outil peut donner lieu à
des blessures de personnes.
e) Ne pas se précipiter. Garder une position
et un équilibre adaptés à tout moment. Cela
permet un meilleur contrôle de l’outil dans des
situations inattendues.
f) S’habiller de manière adaptée. Ne pas porter
de vêtements amples ou de bijoux. Garder les
cheveux, les vêtements et les gants à distance
des parties en mouvement. Des vêtements
amples, des bijoux ou les cheveux longs peuvent
être pris dans des parties en mouvement.
g) Si des dispositifs sont fournis pour le raccor-
dement d’équipements pour l’extraction et la
récupération des poussières, s’assurer qu’ils
sont connectés et correctement utilisés. Utiliser
des collecteurs de poussière peut réduire les
risques dus aux poussières.
4. Utilisation et entretien de l’outil
a) Ne pas forcer l’outil. Utiliser l’outil adapté
à votre application. L’outil adapté réalisera
mieux le travail et de manière plus sûre au
régime pour lequel il a été construit.
b) Ne pas utiliser l’outil si l’interrupteur ne
permet pas de passer de l’état de marche à
arrêt et vice versa. Tout outil qui ne peut pas
être commandé par l’interrupteur est dangereux
et il faut le réparer.
c) Débrancher la fi che de la source d’alimen-
tation en courant et/ou le bloc de batteries
de l’outil avant tout réglage, changement
d’accessoires ou avant de ranger l’outil. De
telles mesures de sécurité préventives réduisent
le risque de démarrage accidentel de l’outil.
d) Conserver les outils à l’arrêt hors de la
portée des enfants et ne pas permettre à des
personnes ne connaissant pas l’outil ou les
présentes instructions de le faire fonctionner.
Les outils sont dangereux entre les mains
d’utilisateurs novices.
4
PBH 1500 A1
Page 8
e) Observer la maintenance de l’outil. Vérifi er
qu’il n’y a pas de mauvais alignement ou
de blocage des parties mobiles, des pièces
cassées ou toute autre condition pouvant
aff ecter le fonctionnement de l’outil. En cas
de dommages, faire réparer l’outil avant de
l’utiliser. De nombreux accidents sont dus à des
outils mal entretenus.
f) Garder aff ûtés et propres les outils permet-
tant de couper. Des outils destinés à couper
correctement entretenus avec des pièces
coupantes tranchantes sont moins susceptibles
de bloquer et sont plus faciles à contrôler.
g) Utiliser l’outil, les accessoires et les lames
etc., conformément à ces instructions, en
tenant compte des conditions de travail et du
travail à réaliser. L’utilisation de l’outil pour des
opérations diff érentes de celles prévues pourrait
donner lieu à des situations dangereuses.
5. Maintenance et entretien
a) Faire entretenir l’outil par un réparateur
qualifi é utilisant uniquement des pièces de
rechange identiques. Cela assurera que la
sécurité de l’outil est maintenue.
Consignes de sécurité spécifi ques
aux marteaux perforateurs
■ Porter des protections auditives.
L’exposition aux bruits peut provoquer
une perte de l’audition.
■ Utiliser les poignées supplémentaires fournies
avec l’appareil. La perte de contrôle peut
entraîner des blessures.
■ Tenir l’outil par les surfaces de préhension
isolées, lors de la réalisation d’une opéra-
tion au cours de laquelle l’organe de coupe
peut entrer en contact avec un câblage non
apparent ou son propre cordon d’alimenta-
tion. Le contact avec un fi l « sous tension » peut
également mettre « sous tension » les parties
métalliques exposées de l’outil électrique et
provoquer un choc électrique sur l’opérateur.
AVERTISSEMENT ! POUSSIÈRES
TOXIQUES!
► Le traitement de poussières nocives / toxiques
représente un danger pour la santé de l'utilisateur ou des personnes proches.
■ ATTENTION CÂBLES! DANGER!
Veiller à ne pas entrer en contact avec des
conduites électriques, de gaz ou d'eau lors
de travaux eff ectués avec l'outil électrique.
Si nécessaire, consulter un détecteur de ligne
avant de percer un mur ou de l'entailler.
Accessoires / équipements supplémentaires d'origine
■ Utiliser uniquement des accessoires et des
équipements supplémentaires qui sont
spécifi és dans le mode d'emploi ou dont la
puissance est compatible avec l'appareil.
Mise en service
Poignée supplémentaire
REMARQUE
Pour des raisons de sécurité, cet appareil
►
doit être uniquement utilisé avec une poignée
supplémentaire montée.
♦ Desserrer la poignée supplémentaire en
tournant dans le sens anti-horaire.
♦ Tourner la poignée supplémentaire dans la
position souhaitée.
♦ Resserrer la poignée supplémentaire dans
la nouvelle position en tournant dans le sens
anti-horaire.
FR
■ Porter un masque anti-poussières.
PBH 1500 A1
5
Page 9
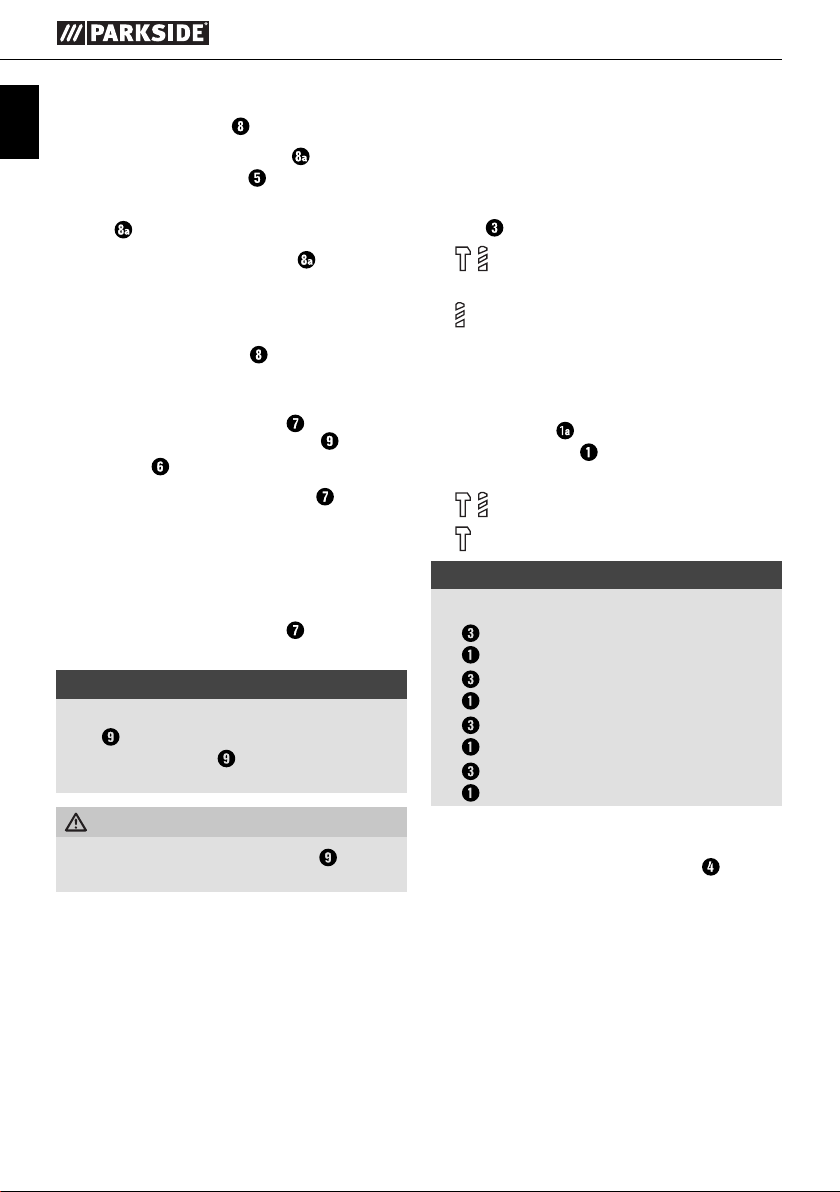
Butée de profondeur
FR
♦ Ouvrir la vis à ailettes .
♦ Insérer la butée de profondeur dans la
poignée supplémentaire .
♦ S'assurer que la denture de la butée de profon-
deur soit orientée vers le haut.
♦ Extraire la butée de profondeur jusqu'à ce
que la distance entre la pointe du foret et la
pointe de la butée de profondeur corresponde
à la profondeur de perçage désirée.
♦ Resserrer la vis à ailettes .
Outil/mandrin :
♦ Tirer la bague de verrouillage vers l'arrière
et placer l'outil/ le porte-foret à clé dans le
porte-outil .
♦ Relâcher la bague de verrouillage . Cela
permet de verrouiller le logement. Vérifi er que
le verrouillage est parfait en tirant l'outil. L'outil
a un jeu radial lié au système.
Retrait de l'outil/du mandrin:
♦ Tirer la bague de verrouillage de l'outil vers
l'arrière.
REMARQUE
Serrer uniformément le foret dans le porte-foret
à clé
! Placer la CRD autour des 3 positions
sur le porte-foret à clé
le foret) de manière uniforme.
AVERTISSEMENT!
► Ne pas utiliser le porte-foret à clé en
mode de perçage ou de burinage!
et serrez l'outil (par ex.
Commande
Sélection du mode de fonctionnement
Interrupteur du mécanisme de percussion:
♦ Tournez l'interrupteur du mécanisme de percus-
sion sur le symbole souhaité :
Perçage à percussion = mécanisme de
percussion MARCHE
Perçage = mécanisme de percussion
ARRÊT
Interrupteur de fonction :
♦ Appuyer et maintenir enfoncée la touche de
déverrouillage du sélecteur de fonction et
tourner ce dernier de sorte que le symbole
désiré s'enclenche au niveau du repère fl éché.
Perçage à percussion
Burinage
REMARQUE
Les combinaisons suivantes sont possibles :
Mécanisme de percussion ARRÊT +
►
perforateur = perçage
Mécanisme de percussion MARCHE +
►
perforateur = perçage à percussion
Mécanisme de percussion MARCHE +
►
burin = burinage
Mécanisme de percussion ARRÊT +
►
burin = sans fonction
Présélection de la vitesse
La molette de présélection de la vitesse vous
permet de présélectionner la vitesse.
Défi nir le réglage correct grâce à un test pratique.
- vitesse élevée : pour perforer/buriner dans le
béton ou la pierre
- vitesse moyenne : pour percer dans l'acier ou
le bois
6
PBH 1500 A1
Page 10

Mise en marche et à l'arrêt
Allumer l'appareil :
♦ Actionner l'interrupteur MARCHE / ARRÊT .
Éteindre l'appareil :
♦ Relâcher l'interrupteur MARCHE / ARRÊT .
Maintenance et nettoyage
AVERTISSEMENT! RISQUE DE
BLESSURES!! Éteindre et débrancher
l'appareil avant d'y eff ectuer des
travaux.
■ L'appareil doit toujours être propre, sec et
exempt d'huile ou de graisse.
■ Utiliser un chiff on sec pour nettoyer le boîtier.
■ Nettoyer régulièrement le porte-outil :
♦ Veuillez pour cela tirer la bague de verrouil-
lage
vers l'arrière et soulever le masque
anti-poussières duporte-outil
AVERTISSEMENT!
■ Si le câble d’alimentation de l’outil est en-
dommagé, il doit être remplacé par un câble
spécialement préparé disponible auprès du
service après vente.
.
Mise au rebut
L'emballage est réalisé à l'aide de
matériaux écologiques qu'il est possible
de confi eraux centres de recyclage
proches de chez vous.
Ne pas jeter les appareils électriques
dans les ordures ménagères!
Garantie
Cet appareil bénéfi cie de 3 ans de garantie à
compter de la date d’achat. L’appareil a été fabriqué
avec soin et consciencieusement contrôlé avant sa
distribution.
Veuillez conserver le ticket de caisse en guise
de preuve d’achat. Dans le cas où la garantie
s’applique, veuillez appeler le service après-vente
compétent. Cette condition doit être respectée pour
assurer l’expédition gratuite de votre marchandise.
REMARQUE
Cette garantie concerne uniquement les vices
►
de fabrication et ne couvre pas les dommages de transport, les pièces d'usure ou les
dommages subis par des éléments fragiles,
par ex. le commutateur ou les accus.
Ce matériel est exclusivement destiné à un usage
privé et non commercial. La garantie est annulée
en cas d’utilisation incorrecte et inappropriée,
d’utilisation brutale et en cas d’intervention qui
n’aurait pas été réalisée par un centre de service
après-vente agréé.
Cette garantie ne constitue pas une restriction de
vos droits légaux. La période sous garantie n’est pas
prolongée par la garantie du fabricant. Ceci vaut
également pour les pièces remplacées et réparées.
Tous dommages et défauts éventuellement déjà
présents à l’achat doivent être notifi és immédiatement
après le déballage, au plus tard deux jours après la
date d’achat.
Toutes réparations eff ectuées après la période sous
garantie sont payantes.
Indépendamment de la garantie commerciale
souscrite, le vendeur reste tenu des défauts de
conformité du bien et des vices rédhibitoires dans les
conditions prévues aux articles L211-4 et suivants
du Code de la consommation et aux articles 1641
et suivants du Code Civil.
FR
Conformément à la directive européenne
2012/19/EU, les outils électriques usagés doivent
faire l'objet d'un tri et d'un recyclage respectueux
de l'environnement.
Se renseigner auprès de votre mairie ou des
services de votre commune pour connaître les possibilités de mise au rebut de votre appareil usagé.
PBH 1500 A1
Service après-vente
Service France
Tel.: 0800 919270
E-Mail: kompernass@lidl.fr
IAN 35391
Assistance téléphonique: du lundi au vendredi
de 8 h à 20 h (HEC)
7
Page 11

Importateur
FR
KOMPERNASS HANDELS GMBH
BURGSTRASSE 21
44867 BOCHUM
GERMANY
www.kompernass.com
Traduction de la déclaration de
conformité originale
Nous soussignés, KOMPERNASS HANDELS
GMBH, responsable du document : M. Semi
Uguzlu, BURGSTR. 21, 44867 BOCHUM,
Allemagne, déclarons par la présente que ce
produit est conforme aux normes, documents
normatifs et directives CE suivants:
Directive Machines
(2006 / 42 / EC)
Directive européenne basse tension
(2006 / 95 / EC)
Compatibilité électromagnétique
(2004 / 108 / EC)
Directives concernant les émissions sonores
(2000 / 14 / EC)
(2005 / 88 / EC)
Directive RoHS
(2011 / 65 / EU)
Normes harmonisées appliquées:
EN 60745-1:2009 + A11
EN 60745-2-6:2010
EN 55014-1:2006 + A1 + A2
EN 55014-2:1997 + A1 + A2
EN 61000-3-2:2006 + A1 + A2
EN 61000-3-3:2008
Désignation du modèle de la machine:
Marteau perforateur et burineur PBH 1500 A1
Année de construction: 01 - 2014
Numéro de série: IAN 35391
Bochum, 02/01/2014
Semi Uguzlu
- Responsable qualitéSous réserve de modifi cations techniques à des
fi ns d'amélioration.
8
PBH 1500 A1
Page 12

Inhaltsverzeichnis
Einleitung . . . . . . . . . . . . . . . . . . . . . . . . . . . . . . . . . . . . . . . . . . . . . . . . . . . . . . . 10
Bestimmungsgemäßer Gebrauch . . . . . . . . . . . . . . . . . . . . . . . . . . . . . . . . . . . . . . . . . . . . . . . 10
Abgebildete Komponenten . . . . . . . . . . . . . . . . . . . . . . . . . . . . . . . . . . . . . . . . . . . . . . . . . . . 10
Lieferumfang . . . . . . . . . . . . . . . . . . . . . . . . . . . . . . . . . . . . . . . . . . . . . . . . . . . . . . . . . . . . . . . 10
Technische Daten . . . . . . . . . . . . . . . . . . . . . . . . . . . . . . . . . . . . . . . . . . . . . . . . . . . . . . . . . . . 10
Allgemeine Sicherheitshinweise für Elektrowerkzeuge . . . . . . . . . . . . . . . . . . 11
1. Arbeitsplatz-Sicherheit . . . . . . . . . . . . . . . . . . . . . . . . . . . . . . . . . . . . . . . . . . . . . . . . . . . . . 11
2. Elektrische Sicherheit . . . . . . . . . . . . . . . . . . . . . . . . . . . . . . . . . . . . . . . . . . . . . . . . . . . . . . 11
3. Sicherheit von Personen . . . . . . . . . . . . . . . . . . . . . . . . . . . . . . . . . . . . . . . . . . . . . . . . . . . . 12
4. Verwendung und Behandlung des Elektrowerkzeugs . . . . . . . . . . . . . . . . . . . . . . . . . . . . . 12
5. Service . . . . . . . . . . . . . . . . . . . . . . . . . . . . . . . . . . . . . . . . . . . . . . . . . . . . . . . . . . . . . . . . . 13
Gerätespezifi sche Sicherheitshinweise für Bohrhämmer . . . . . . . . . . . . . . . . . . . . . . . . . . . . . . 13
Originalzubehör / -zusatzgeräte . . . . . . . . . . . . . . . . . . . . . . . . . . . . . . . . . . . . . . . . . . . . . . . 13
Inbetriebnahme . . . . . . . . . . . . . . . . . . . . . . . . . . . . . . . . . . . . . . . . . . . . . . . . .13
Zusatz-Handgriff . . . . . . . . . . . . . . . . . . . . . . . . . . . . . . . . . . . . . . . . . . . . . . . . . . . . . . . . . . . . 13
Tiefenanschlag . . . . . . . . . . . . . . . . . . . . . . . . . . . . . . . . . . . . . . . . . . . . . . . . . . . . . . . . . . . . . 13
Bedienung . . . . . . . . . . . . . . . . . . . . . . . . . . . . . . . . . . . . . . . . . . . . . . . . . . . . . .14
Betriebsart wählen . . . . . . . . . . . . . . . . . . . . . . . . . . . . . . . . . . . . . . . . . . . . . . . . . . . . . . . . . . 14
Drehzahl vorwählen . . . . . . . . . . . . . . . . . . . . . . . . . . . . . . . . . . . . . . . . . . . . . . . . . . . . . . . . . 14
Ein- und ausschalten . . . . . . . . . . . . . . . . . . . . . . . . . . . . . . . . . . . . . . . . . . . . . . . . . . . . . . . . . 14
DE
AT
CH
Wartung und Reinigung . . . . . . . . . . . . . . . . . . . . . . . . . . . . . . . . . . . . . . . . . . . 15
Entsorgung . . . . . . . . . . . . . . . . . . . . . . . . . . . . . . . . . . . . . . . . . . . . . . . . . . . . . 15
Garantie . . . . . . . . . . . . . . . . . . . . . . . . . . . . . . . . . . . . . . . . . . . . . . . . . . . . . . . 15
Service . . . . . . . . . . . . . . . . . . . . . . . . . . . . . . . . . . . . . . . . . . . . . . . . . . . . . . . . . 16
Importeur . . . . . . . . . . . . . . . . . . . . . . . . . . . . . . . . . . . . . . . . . . . . . . . . . . . . . . 16
Original-Konformitätserklärung . . . . . . . . . . . . . . . . . . . . . . . . . . . . . . . . . . . .16
PBH 1500 A1
9
Page 13

BOHR- UND MEISSELHAMMER
PBH 1500 A1
Einleitung
DE
Wir beglückwünschen Sie zum Kauf Ihres
AT
CH
Bedienungsanleitung ist Teil dieses Produkts. Sie
enthält wichtige Hinweise für Sicherheit, Gebrauch
und Entsorgung. Machen Sie sich vor der Benutzung
des Produkts mit allen Bedien- und Sicherheitshinweisen vertraut. Benutzen Sie das Produkt nur wie
beschrieben und für die angegebenen Einsatzbereiche. Händigen Sie alle Unterlagen bei Weitergabe
des Produkts an Dritte mit aus.
Bestimmungsgemäßer Gebrauch
Der Bohrhammer PBH 1500 A1 (nachfolgend
Gerät) ist geeignet zum:
Jede andere Verwendung oder Veränderung des
Gerätes gilt als nicht bestimmungsgemäß und birgt
erhebliche Unfallgefahren.
Für aus bestimmungswidriger Verwendung entstandene Schäden übernimmt der Hersteller keine
Haftung.
Das Gerät ist nicht für den gewerblichen Einsatz
bestimmt.
Abgebildete Komponenten
neuen Gerätes. Sie haben sich damit für
ein hochwertiges Produkt entschieden. Die
▯ Hammerbohren in Ziegel, Beton und Gestein
▯ Meißeln in Beton, Gestein und Verputz
▯ Bohren in Gestein, Holz und Metall
Funktionswahlschalter
Entriegelungstaste Funktionswahlschalter
Ein-/Aus-Schalter
Schlagwerkschalter
Stellrad Drehzahlvorwahl
Zusatz-Handgriff
Werkzeugaufnahme mit Staubschutzkappe
Verriegelungshülse
Flügelschraube
Tiefenanschlag
Zahnkranzbohrfutter
Zahnkranzschlüssel (ZKS)
Lieferumfang
1 Bohr- und Meisselhammer PBH 1500 A1
1 Zusatz-Handgriff
3 Bohrer (siehe Abb. B)
1 Flachmeißel (siehe Abb. B)
1 Spitzmeißel (siehe Abb. B)
1 Tiefenanschlag
1 Zahnkranzbohrfutter (siehe Abb. A)
1 Zahnkranzschlüssel (siehe Abb. A)
1 Tragekoff er
1 Bedienungsanleitung
Technische Daten
Nennaufnahmeleistung: 1500 W
Nennspannung: 230 - 240 V ∼ 50 Hz
Leerlaufdrehzahl: n
Schlagfrequenz: 0 - 3900 / min
Bohrleistung: max. 13 mm für Stahl
Schutzklasse: II /
Geräusch- und Vibrationsinformationen:
Messwert für Geräusch ermittelt entsprechend
EN 60745. Der A-bewertete Geräuschpegel des
Elektrowerkzeugs beträgt typischerweise:
Bohrhämmern:
Schalldruckpegel: 85,61 dB(A)
Schallleistungspegel: 96,61 dB(A)
Unsicherheit K: 3 dB
Meißeln:
Schalldruckpegel: 94,31 dB(A)
Unsicherheit K: 3 dB
Schallleistungspegel: 102,31 dB(A)
Unsicherheit K: 2,83 dB
0 - 750 / min
0
max. 40 mm für Holz
max. 32 mm für Beton
10
PBH 1500 A1
Page 14

Schwingungsgesamtwerte (Vektorsumme dreier
Richtungen) ermittelt entsprechend EN 60745:
Hauptgriff
Bohrhämmern in
Beton: a
= 10,428 m/s2, K = 1,5 m/s
h(HD)
2
Zusatzgriff
Bohrhämmern in
Beton: a
= 8,15 m/s2, K = 1,5 m/s
h(HD)
2
Hauptgriff
Meißeln: a
= 15,014 m/s2, K = 1,5 m/s
h(CHeq)
Zusatzgriff
Meißeln: a
= 11,201 m/s2, K = 1,5 m/s
h(CHeq)
WARNUNG!
► Der in diesen Anweisungen angegebene
Schwingungspegel ist entsprechend einem
in EN 60745 genormten Messverfahren gemessen worden und kann für den Gerätevergleich verwendet werden. Der angegebene
Schwingungsemissionswert kann auch zu
einer einleitenden Einschätzung der Aussetzung verwendet werden.
Der Schwingungspegel wird sich entsprechend
dem Einsatz des Elektrowerkzeugs verändern
und kann in manchen Fällen über dem in diesen
Anweisungen angegebenen Wert liegen. Die
Schwingungsbelastung könnte unterschätzt
werden, wenn das Elektrowerkzeug regelmäßig in solcher Weise verwendet wird.
HINWEIS
Für eine genaue Abschätzung der Schwin-
►
gungsbelastung während eines bestimmten
Arbeitszeitraumes sollten auch die Zeiten
berücksichtigt werden, in denen das Gerät
abgeschaltet ist oder zwar läuft, aber nicht
tatsächlich im Einsatz ist. Dies kann die
Schwingungsbelastung über den gesamten
Arbeitszeitraum deutlich reduzieren.
Allgemeine
Sicherheitshinweise
für Elektrowerkzeuge
WARNUNG!
► Lesen Sie alle Sicherheitshinweise und An-
weisungen. Versäumnisse bei der Einhaltung
der Sicherheitshinweise und Anweisungen
können elektrischen Schlag, Brand und/oder
schwere Verletzungen verursachen.
2
Bewahren Sie alle Sicherheitshinweise und
Anweisungen für die Zukunft auf.
Der in den Sicherheitshinweisen verwendete Begriff
2
„Elektrowerkzeug“ bezieht sich auf netzbetriebene
Elektrowerkzeuge (mit Netzkabel) und auf akkubetriebene Elektrowerkzeuge (ohne Netzkabel).
1. Arbeitsplatz-Sicherheit
a) Halten Sie Ihren Arbeitsbereich sauber und
gut beleuchtet. Unordnung und unbeleuchtete
Arbeitsbereiche können zu Unfällen führen.
b) Arbeiten Sie mit dem Elektrowerkzeug nicht in
explosionsgefährdeter Umgebung, in der sich
brennbare Flüssigkeiten, Gase oder Stäube
befi nden. Elektrowerkzeuge erzeugen Funken, die
den Staub oder die Dämpfe entzünden können.
c) Halten Sie Kinder und andere Personen wäh-
rend der Benutzung des Elektrowerkzeugs fern.
Bei Ablenkung können Sie die Kontrolle über
das Gerät verlieren.
2. Elektrische Sicherheit
a) Der Anschlussstecker des Elektrowerkzeuges
muss in die Steckdose passen. Der Stecker
darf in keiner Weise verändert werden.
Verwenden Sie keine Adapterstecker gemeinsam mit schutzgeerdeten Elektrowerkzeugen.
Unveränderte Stecker und passende Steckdosen
verringern das Risiko eines elektrischen Schlages.
b) Vermeiden Sie Körperkontakt mit geerdeten
Oberfl ächen, wie von Rohren, Heizungen,
Herden und Kühlschränken. Es besteht ein
erhöhtes Risiko durch elektrischen Schlag, wenn
Ihr Körper geerdet ist.
DE
AT
CH
PBH 1500 A1
11
Page 15

c) Halten Sie Elektrowerkzeuge von Regen oder
Nässe fern. Das Eindringen von Wasser in ein
Elektrogerät erhöht das Risiko eines elektrischen
DE
AT
CH
Schlages.
d) Zweckentfremden Sie das Kabel nicht, um
das Elektrowerkzeug zu tragen, aufzuhängen
oder um den Stecker aus der Steckdose zu
ziehen. Halten Sie das Kabel fern von Hitze,
Öl, scharfen Kanten oder sich bewegenden
Geräteteilen. Beschädigte oder verwickelte Kabel
erhöhen das Risiko eines elektrischen Schlages.
e) Wenn Sie mit einem Elektrowerkzeug im
Freien arbeiten, verwenden Sie nur Verlängerungskabel, die auch für den Außenbereich
zugelassen sind. Die Anwendung eines für den
Außenbereich geeigneten Verlängerungskabels
verringert das Risiko eines elektrischen Schlages.
f) Wenn der Betrieb des Elektrowerkzeuges in
feuchter Umgebung nicht vermeidbar ist, verwenden Sie einen Fehlerstromschutzschalter.
Der Einsatz eines Fehlerstromschutzschalters vermindert das Risiko eines elektrischen Schlages.
d) Entfernen Sie Einstellwerkzeuge oder Schrau-
benschlüssel, bevor Sie das Elektrowerkzeug
einschalten. Ein Werkzeug oder Schlüssel, der
sich in einem drehenden Geräteteil befi ndet,
kann zu Verletzungen führen.
e) Vermeiden Sie eine abnormale Körperhaltung.
Sorgen Sie für einen sicheren Stand und halten
Sie jederzeit das Gleichgewicht. Dadurch kön-
nen Sie das Elektrowerkzeug in unerwarteten
Situationen besser kontrollieren.
f) Tragen Sie geeignete Kleidung. Tragen Sie
keine weite Kleidung oder Schmuck. Halten
Sie Haare, Kleidung und Handschuhe fern
von sich bewegenden Teilen. Lockere Kleidung,
Schmuck oder lange Haare können von sich
bewegenden Teilen erfasst werden.
g) Wenn Staubabsaug- und -auff angeinrichtun-
gen montiert werden können, vergewissern
Sie sich, dass diese angeschlossen sind und
richtig verwendet werden. Die Verwendung
einer Staubabsaugung kann Gefährdungen
durch Staub verringern.
3. Sicherheit von Personen
a) Seien Sie stets aufmerksam, achten Sie darauf,
was Sie tun und gehen Sie mit Vernunft an die
Arbeit mit einem Elektrowerkzeug. Benutzen
Sie kein Elektrowerkzeug, wenn Sie müde sind
oder unter dem Einfl uss von Drogen, Alkohol
oder Medikamenten stehen. Ein Moment der
Unachtsamkeit beim Gebrauch des Elektrowerkzeuges kann zu ernsthaften Verletzungen führen.
b) Tragen Sie persönliche Schutzausrüstung und
immer eine Schutzbrille. Das Tragen persönlicher
Schutzausrüstung wie Staubmaske, rutschfeste
Sicherheitsschuhe, Schutzhelm oder Gehörschutz,
je nach Art und Einsatz des Elektrowerkzeuges,
verringert das Risiko von Verletzungen.
c) Vermeiden Sie eine unbeabsichtigte Inbetrieb-
nahme. Vergewissern Sie sich, dass das Elektrowerkzeug ausgeschaltet ist, bevor Sie es
an die Stromversorgung anschließen, es aufnehmen oder tragen. Wenn Sie beim Tragen
des Elektrowerkzeuges den Finger am Schalter
haben oder das Gerät bereits eingeschaltet an
die Stromversorgung anschließen, kann dies zu
Unfällen führen.
12
4. Verwendung und Behandlung des
Elektrowerkzeugs
a) Überlasten Sie das Gerät nicht. Verwenden
Sie für Ihre Arbeit das dafür bestimmte
Elektrowerkzeug. Mit dem passenden Elektro-
werkzeug arbeiten Sie besser und sicherer im
angegebenen Leistungsbereich.
b) Benutzen Sie kein Elektrowerkzeug, dessen
Schalter defekt ist. Ein Elektrowerkzeug, das
sich nicht mehr ein- oder ausschalten lässt, ist
gefährlich und muss repariert werden.
c) Ziehen Sie den Stecker aus der Steckdose,
bevor Sie Geräteeinstellungen vornehmen,
Zubehörteile wechseln oder das Gerät weglegen. Diese Vorsichtsmaßnahme verhindert den
unbeabsichtigten Start des Elektrowerkzeuges.
d) Bewahren Sie unbenutzte Elektrowerkzeuge
außerhalb der Reichweite von Kindern auf.
Lassen Sie Personen das Gerät nicht benutzen,
die mit diesem nicht vertraut sind oder diese
Anweisungen nicht gelesen haben. Elektro-
werkzeuge sind gefährlich, wenn sie von
unerfahrenen Personen benutzt werden.
PBH 1500 A1
Page 16

e) Pfl egen Sie Elektrowerkzeuge mit Sorgfalt.
Kontrollieren Sie, ob bewegliche Teile einwandfrei funktionieren und nicht klemmen, ob Teile
gebrochen oder so beschädigt sind, dass die
Funktion des Elektrowerkzeuges beeinträchtigt ist. Lassen Sie beschädigte Teile vor dem
Einsatz des Gerätes reparieren. Viele Unfälle
haben ihre Ursache in schlecht gewarteten
Elektrowerkzeugen.
f) Halten Sie Schneidwerkzeuge scharf und
sauber. Sorgfältig gepfl egte Schneidwerkzeuge
mit scharfen Schneidkanten verklemmen sich
weniger und sind leichter zu führen.
g) Verwenden Sie Elektrowerkzeug, Zubehör,
Einsatzwerkzeuge usw. entsprechend diesen
Anweisungen. Berücksichtigen Sie dabei die
Arbeitsbedingungen und die auszuführende
Tätigkeit. Der Gebrauch von Elektrowerkzeugen
für andere als die vorgesehenen Anwendungen
kann zu gefährlichen Situationen führen.
5. Service
a) Lassen Sie Ihr Elektrowerkzeug nur von quali-
fi ziertem Fachpersonal und nur mit OriginalErsatzteilen reparieren. Damit wird sicherge-
stellt, dass die Sicherheit des Elektrowerkzeugs
erhalten bleibt.
Gerätespezifi sche Sicherheitshinweise
für Bohrhämmer
■ Tragen Sie Gehörschutz. Die
Einwirkung von Lärm kann Gehörverlust bewirken.
■ Benutzen Sie mit dem Gerät gelieferte Zusatz-
handgriff e. Der Verlust der Kontrolle kann zu
Verletzungen führen.
■ Halten Sie das Gerät an den isolierten Griff -
fl ächen, wenn Sie Arbeiten ausführen, bei
denen das Einsatzwerkzeug verborgene Stromleitungen oder das eigene Netzkabel treff en
kann. Der Kontakt mit einer spannungsführenden
Leitung kann auch metallene Geräte teile unter
Spannung setzen und zu einem elektrischen
Schlag führen.
■ Tragen Sie eine Staubschutzmaske.
WARNUNG! GIFTIGE STÄUBE!
► Das Bearbeiten von schädlichen / giftigen
Stäuben stellt eine Gesundheitsgefährdung
für die Bedienperson oder in der Nähe
befi ndliche Personen dar.
■ ACHTUNG LEITUNGEN! GEFAHR!
Vergewissern Sie sich, dass Sie nicht auf Strom-,
Gas- oder Wasserleitungen stoßen, wenn Sie
mit dem Elektrowerkzeug arbeiten. Prüfen Sie
ggf. mit einem Leitungssucher, bevor Sie in eine
Wand bohren bzw. diese aufschlitzen.
Originalzubehör / -zusatzgeräte
■ Benutzen Sie nur Zubehör und Zusatzgeräte,
die in der Bedienungsanleitung angegeben
sind bzw. deren Aufnahme mit dem Gerät
kompatibel ist.
Inbetriebnahme
Zusatz-Handgriff
HINWEIS
Aus Sicherheitsgründen dürfen Sie dieses
►
Gerät nur mit montiertem Zusatz-Handgriff
verwenden.
♦ Lösen Sie den Zusatz-Handgriff durch Drehen
im Uhrzeigersinn.
♦ Drehen Sie den Zusatz-Handgriff in die
gewünschte Position.
♦ Ziehen Sie den Zusatz-Handgriff durch
Drehen gegen den Uhrzeigersinn in der neuen
Position wieder fest.
Tiefenanschlag
♦ Öff nen Sie die Flügelschraube .
♦ Setzen Sie den Tiefenanschlag in den
Zusatz-Handgriff
♦ Achten Sie darauf, dass die Zahnung des
Tiefenanschlags nach oben zeigt.
♦ Ziehen Sie den Tiefenanschlag so weit heraus,
dass der Abstand zwischen der Spitze des Bohrers
und der Spitze des Tiefenanschlags der gewünschten Bohrtiefe entspricht.
♦ Drehen Sie die Flügelschraube wieder fest.
ein.
DE
AT
CH
PBH 1500 A1
13
Page 17

Werkzeug / Bohrfutter:
♦ Ziehen Sie die Verriegelungshülse nach hin-
ten und setzen Sie das Werkzeug/Zahnkranz-
DE
AT
CH
bohrfutter
♦ Lassen Sie die Verriegelungshülse los.
Dadurch wird die Aufnahme verriegelt. Überprüfen Sie durch Ziehen des Werkzeugs die
einwandfreie Verriegelung. Das Werkzeug hat
systembedingt ein radiales Spiel.
Werkzeug / Bohrfutter entnehmen:
♦ Ziehen Sie die Verriegelungshülse des Werk-
zeugs nach hinten.
HINWEIS
Bohrer im Zahnkranzbohrfutter gleichmäßig
spannen! Setzen Sie dazu den ZKS umlaufend
an alle 3 Positionen am Zahnkranzbohrfutter
an und spannen Sie das Werkzeug (z.B. Bohrer)
gleichmäßig fest.
in die Werkzeugaufnahme ein.
HINWEIS
Folgende Kombinationen sind möglich:
Schlagwerk AUS + Hammer-Bohren =
►
Bohren
Schlagwerk EIN + Hammer-Bohren =
►
Hammerbohren
Schlagwerk EIN + Meißel = Meißeln
►
Schlagwerk AUS + Meißel =
►
ohne Funktion
Drehzahl vorwählen
Mit dem Stellrad zur Drehzahlvorwahl können
Sie die Drehzahl vorwählen.
Ermitteln Sie die richtige Einstellung durch einen
praktischen Test:
- hohe Drehzahl: zum Hammerbohren/Meißeln
in Beton oder Stein
- mittlere Drehzahl: zum Bohren in Stahl oder
Holz
WARNUNG!
► Benutzen Sie das Zahnkranzbohrfutter
nicht im Hammerbohr- oder Meißelbetrieb!
Bedienung
Betriebsart wählen
Schlagwerk-Schalter:
♦ Drehen Sie den Schlagwerkschalter auf das
gewünschte Symbol:
Hammer-Bohren = Schlagwerk EIN
Bohren = Schlagwerk AUS
Funktions-Schalter:
♦ Drücken und halten Sie die Entriegelungstaste
des Funktionswahlschalter und drehen Sie
den Funktionswahlschalter
gewünschte Symbolik an der Pfeil-Markierung
einrastet:
Hammer-Bohren
Meißeln
so, dass die
Ein- und ausschalten
Gerät einschalten:
♦ Drücken Sie den EIN-/AUS-Schalter .
Gerät ausschalten:
♦ Lassen Sie den EIN-/AUS-Schalter los.
14
PBH 1500 A1
Page 18

Wartung und Reinigung
WARNUNG! VERLETZUNGSGEFAHR!
Schalten Sie vor allen Arbeiten am
Gerät das Gerät aus und ziehen Sie den
Netzstecker.
■ Das Gerät muss stets sauber, trocken und frei
von Öl oder Schmierfetten sein.
■ Verwenden Sie zum Reinigen des Gehäuses ein
trockenes Tuch.
■ Säubern Sie regelmäßig die Werkzeugauf-
nahme :
♦ Ziehen Sie dazu die Verriegelungshülse
nach hinten und ziehen Sie die Staubschutzkappe von der Werkzeugauf nahme
WARNUNG!
■ Wenn ein Ersatz der Anschlussleitung erfor-
derlich ist, dann ist dies vom Hersteller oder
seinem Vertreter auszuführen, um Sicherheitsgefährdungen zu vermeiden.
ab.
Entsorgung
Die Verpackung besteht aus umweltfreund-
lichen Materialien, die Sie über die örtlichen
Recyclingstellen entsorgen können.
Werfen Sie Elektrowerkzeuge nicht
in den Hausmüll!
Gemäß Europäischer Richtlinie 2012/19/EU
müssen verbrauchte Elektrowerkzeuge getrennt
gesammelt und einer umweltgerechten Wiederverwertung zugeführt werden.
Möglichkeiten zur Entsorgung des ausgedienten
Gerätes erfahren Sie bei Ihrer Gemeinde- oder
Stadtverwaltung.
Garantie
Sie erhalten auf dieses Gerät 3 Jahre Garantie ab
Kaufdatum. Das Gerät wurde sorgfältig produziert
und vor Anlieferung gewissenhaft geprüft.
Bitte bewahren Sie den Kassenbon als Nachweis
für den Kauf auf. Bitte setzen Sie sich im Garantiefall mit Ihrer Servicestelle telefonisch in Verbindung.
Nur so kann eine kostenlose Einsendung Ihrer
Ware gewährleistet werden.
HINWEIS
►
Das Produkt ist lediglich für den privaten und nicht
für den gewerblichen Gebrauch bestimmt. Bei
missbräuchlicher und unsachgemäßer Behandlung,
Gewaltanwendung und bei Eingriff en, die nicht von
unserer autorisierten Service-Niederlassung vorgenommen wurden, erlischt die Garantie.
Ihre gesetzlichen Rechte werden durch diese Garantie nicht eingeschränkt. Die Garantiezeit wird
durch die Gewährleistung nicht verlängert. Dies gilt
auch für ersetzte und reparierte Teile.
Eventuell schon beim Kauf vorhandene Schäden
und Mängel müssen sofort nach dem Auspacken
gemeldet werden, spätestens aber zwei Tage nach
Kaufdatum.
Nach Ablauf der Garantiezeit anfallende Reparaturen sind kostenpfl ichtig.
DE
AT
CH
Die Garantieleistung gilt nur für Material- oder
Fabrikationsfehler, nicht aber für Transportschäden, Verschleißteile oder für Beschädigungen an
zerbrechlichen Teilen, z. B. Schalter oder Akkus.
PBH 1500 A1
15
Page 19

Service
Service Deutschland
Tel.: 0800 5435 111
DE
AT
CH
E-Mail: kompernass@lidl.de
IAN 35391
Service Österreich
Tel.: 0820 201 222 (0,15 EUR/Min.)
E-Mail: kompernass@lidl.at
IAN 35391
Service Schweiz
Tel.: 0842 665566 (0,08 CHF/Min.,
Mobilfunk max. 0,40 CHF/Min.)
E-Mail: kompernass@lidl.ch
IAN 35391
Erreichbarkeit Hotline: Montag bis Freitag von
8:00 Uhr – 20:00 Uhr (MEZ)
Importeur
KOMPERNASS HANDELS GMBH
BURGSTRASSE 21
44867 BOCHUM
GERMANY
www.kompernass.com
OriginalKonformitätserklärung
Wir, KOMPERNASS HANDELS GMBH, Dokumentenverantwortlicher: Herr Semi Uguzlu, BURGSTR. 21,
44867 BOCHUM, Deutschland, erklären hiermit,
dass dieses Produkt mit den folgenden Normen,
normativen Dokumenten und EG-Richtlinien
übereinstimmt:
Maschinenrichtlinie
(2006 / 42 / EC)
EG-Niederspannungsrichtlinie
(2006 / 95 / EC)
Elektromagnetische Verträglichkeit
(2004 / 108 / EC)
Richtlinie für Geräuschemission
(2000 / 14 / EC)
(2005 / 88 / EC)
RoHS Richtlinie
(2011 / 65 / EU)
Angewandte harmonisierte Normen:
EN 60745-1:2009 + A11
EN 60745-2-6:2010
EN 55014-1:2006 + A1 + A2
EN 55014-2:1997 + A1 + A2
EN 61000-3-2:2006 + A1 + A2
EN 61000-3-3:2008
16
Typbezeichnung der Maschine:
Bohr- und Meisselhammer PBH 1500 A1
Herstellungsjahr: 01 - 2014
Seriennummer: IAN 35391
Bochum, 02.01.2014
Semi Uguzlu
- Qualitätsmanager Technische Änderungen im Sinne der Weiterent-
wicklung sind vorbehalten.
PBH 1500 A1
Page 20

Contents
Introduction . . . . . . . . . . . . . . . . . . . . . . . . . . . . . . . . . . . . . . . . . . . . . . . . . . . . . 18
Proper use . . . . . . . . . . . . . . . . . . . . . . . . . . . . . . . . . . . . . . . . . . . . . . . . . . . . . . . . . . . . . . . . 18
Depicted components . . . . . . . . . . . . . . . . . . . . . . . . . . . . . . . . . . . . . . . . . . . . . . . . . . . . . . . . 18
Package contents . . . . . . . . . . . . . . . . . . . . . . . . . . . . . . . . . . . . . . . . . . . . . . . . . . . . . . . . . . . 18
Technical details . . . . . . . . . . . . . . . . . . . . . . . . . . . . . . . . . . . . . . . . . . . . . . . . . . . . . . . . . . . . 18
General Power Tool Safety Warnings . . . . . . . . . . . . . . . . . . . . . . . . . . . . . . . 19
1. Work area safety . . . . . . . . . . . . . . . . . . . . . . . . . . . . . . . . . . . . . . . . . . . . . . . . . . . . . . . . . 19
2. Electrical safety . . . . . . . . . . . . . . . . . . . . . . . . . . . . . . . . . . . . . . . . . . . . . . . . . . . . . . . . . . 19
3. Personal safety . . . . . . . . . . . . . . . . . . . . . . . . . . . . . . . . . . . . . . . . . . . . . . . . . . . . . . . . . . . 20
4. Power tool use and care . . . . . . . . . . . . . . . . . . . . . . . . . . . . . . . . . . . . . . . . . . . . . . . . . . . 20
5. Service . . . . . . . . . . . . . . . . . . . . . . . . . . . . . . . . . . . . . . . . . . . . . . . . . . . . . . . . . . . . . . . . . 20
Appliance-specifi c safety instructions for hammer drills . . . . . . . . . . . . . . . . . . . . . . . . . . . . . . 21
Original accessories/additional equipment . . . . . . . . . . . . . . . . . . . . . . . . . . . . . . . . . . . . . . . 21
Initial operation . . . . . . . . . . . . . . . . . . . . . . . . . . . . . . . . . . . . . . . . . . . . . . . . .21
Additional handle . . . . . . . . . . . . . . . . . . . . . . . . . . . . . . . . . . . . . . . . . . . . . . . . . . . . . . . . . . . 21
Depth stop . . . . . . . . . . . . . . . . . . . . . . . . . . . . . . . . . . . . . . . . . . . . . . . . . . . . . . . . . . . . . . . . 21
Operation . . . . . . . . . . . . . . . . . . . . . . . . . . . . . . . . . . . . . . . . . . . . . . . . . . . . . . 22
Select operational mode . . . . . . . . . . . . . . . . . . . . . . . . . . . . . . . . . . . . . . . . . . . . . . . . . . . . . 22
Preselecting rotational speed . . . . . . . . . . . . . . . . . . . . . . . . . . . . . . . . . . . . . . . . . . . . . . . . . . 22
Switching on and off . . . . . . . . . . . . . . . . . . . . . . . . . . . . . . . . . . . . . . . . . . . . . . . . . . . . . . . . 22
GB
Maintenance and Cleaning . . . . . . . . . . . . . . . . . . . . . . . . . . . . . . . . . . . . . . . .22
Disposal . . . . . . . . . . . . . . . . . . . . . . . . . . . . . . . . . . . . . . . . . . . . . . . . . . . . . . . . 22
Warranty . . . . . . . . . . . . . . . . . . . . . . . . . . . . . . . . . . . . . . . . . . . . . . . . . . . . . . . 23
Service . . . . . . . . . . . . . . . . . . . . . . . . . . . . . . . . . . . . . . . . . . . . . . . . . . . . . . . . . 23
Importer . . . . . . . . . . . . . . . . . . . . . . . . . . . . . . . . . . . . . . . . . . . . . . . . . . . . . . . 23
Translation of the original conformity declaration . . . . . . . . . . . . . . . . . . . . . 24
PBH 1500 A1
17
Page 21

HAMMER DRILL PBH 1500 A1
Introduction
Congratulations on the purchase of your
new appliance. You have selected a
high-quality product. The operating
instructions are part of this product. They contain
important information about safety, use and disposal.
Before using the product, familiarise yourself with
GB
all operating and safety instructions. Use this product
only as described and only for the specifi ed areas
of application. Please also pass these operating
instructions on to any future owner(s).
Proper use
The PBH 1500 A1 hammer drill (hereinafter
appliance) is suitable for:
▯ Hammer-drilling into brickwork, concrete and
stone
▯ Chiselling into concrete, stone and plaster
▯ Drilling into stone, wood and metal
Any other usage of or modifi cation to the appliance
is deemed to be improper usage and carries the
risk of serious personal injury.
The manufacturer accepts no responsibility for
damage(s) arising out of usage contrary to the
instructions specifi ed below.
The appliance is not meant for commercial use.
Depicted components
Function selector
Function selector release switch
On/off switch
Hammer switch
Rotational speed preselector adjusting wheel
Additional handle
Tool holder with dust protector cap
Locking collar
Wing screw
Depth stop
Wheel-rim chuck
Chuck key
Package contents
1 hammer drill PBH 1500 A1
1 additional handle
3 drill bits (see fi g. B)
1 fl at chisel (see fi g. B)
1 pointed chisel (see fi g. B)
1 depth stop
1 wheel-rim chuck (see fi g. A)
1 chuck key (see fi g. A)
1 carrying case
1 operating manual
Technical details
Nominal power
consumption: 1500 W
Rated voltage: 230 - 240 V ∼ 50 Hz
Idle speed: n
Hammer frequency: 0–3900 / min
Drilling capacity: max. 13 mm for steel
Protection class: II /
Noise and vibration data:
Noise measurement determined in accableance
with EN 60745. The A-rated noise level of the
tool is typically:
Hammer drilling:
Sound pressure level: 85.61 dB(A)
Sound power level: 96.61 dB(A)
Uncertainty K: 3 dB
Chiselling:
Sound pressure level: 94.31 dB(A)
Uncertainty K: 3 dB
Sound power level: 102.31 dB(A)
Uncertainty K: 2.83 dB
0–750 / min
0
max. 40 mm for wood
max. 32 mm for concrete
18
PBH 1500 A1
Page 22

Total vibration values (vector total of three directions)
determined in accordance with EN 60745:
Main handle
Hammer drilling in
Concrete: a
= 10.428 m/s2, K = 1.5 m/s
h(HD)
2
Additional handle
Hammer drilling in
Concrete: a
= 8.15 m/s2, K = 1.5 m/s
h(HD)
2
Main handle
Chiselling: a
= 15.014 m/s2, K = 1.5 m/s
h(CHeq)
2
Additional handle
Chiselling: a
WARNING!
= 11.201 m/s2, K = 1.5 m/s
h(CHeq)
2
► The vibration level specifi ed in these instruc-
tions has been measured in accableance
with the standardised measuring procedure
specifi ed in EN 60745 and can be used to
make equipment comparisons. The declared
vibration total value may also be used in a
preliminary assessement of exposure.
The vibration level varies in accableance
with the use of the tool and may be higher
than the value specifi ed in these instructions
in some cases. It is easy to underestimate the
vibration load if the electrical power tool is
used regularly in this manner.
NOTE
For an accurate estimate of the vibration load
►
during a certain working period, the times
during which the appliance is switched off or
is running but not actually being used must
also be taken into consideration. This can
signifi cantly reduce the vibration load over
the total working period.
General Power Tool
Safety Warnings
WARNING!
► Read all safety warnings and all instructions.
Failure to follow the warnings and instructions
may result in electric shock, fi re and/or serious
injury.
Save all warnings and instructions for future
reference.
The term “power tool” in the warnings refers to your
mains-operated (corded) power tool or batteryoperated (cordless) power tool.
1. Work area safety
a) Keep work area clean and well lit. Cluttered
or dark areas invite accidents.
b) Do not operate power tools in explosive
atmospheres, such as in the presence of fl ammable liquids, gases or dust. Power tools create
sparks which may ignite the dust or fumes.
c) Keep children and bystanders away while
operating a power tool. Distractions can cause
you to lose control.
2. Electrical safety
a) Power tool plugs must match the outlet. Never
modify the plug in any way. Do not use any
adapter plugs with earthed (grounded)
power tools. Unmodifi ed plugs and matching
outlets will reduce risk of electric shock.
b) Avoid body contact with earthed or ground-
ed surfaces, such as pipes, radiators, ranges
and refrigerators. There is an increased risk
of electric shock if your body is earthed or
grounded.
c) Do not expose power tools to rain or wet
conditions. Water entering a power tool will
increase the risk of electric shock.
d) Do not abuse the cord. Never use the cord for
carrying, pulling or unplugging the power tool.
Keep cord away from heat, oil, sharp edges
or moving parts. Damaged or entangled cords
increase the risk of electric shock.
GB
PBH 1500 A1
19
Page 23

e) When operating a power tool outdoors, use
an extension cord suitable for outdoor use.
Use of a cord suitable for outdoor use reduces
the risk of electric shock.
f) If operating a power tool in a damp location
is unavoidable, use a residual current device
(RCD) protected supply. Use of an RCD
reduces the risk of electric shock.
GB
3. Personal safety
a) Stay alert, watch what you are doing and
use common sense when operating a power
tool. Do not use a power tool while you are
tired or under the infl uence of drugs, alcohol
or medication. A moment of inattention while
operating power tools may result in serious
personal injury.
b) Use personal protective equipment. Always
wear eye protection. Protective equipment
such as dust mask, non-skid safety shoes, hard
hat, or hearing protection used for appropriate
conditions will reduce personal injuries.
c) Prevent unintentional starting. Ensure the
switch is in the off -position before connecting
to power source and/or battery pack, picking
up or carrying the tool. Carrying power tools
with your fi nger on the switch or energising
power tools that have the switch on invites
accidents.
d) Remove any adjusting key or wrench before
turning the power tool on. A wrench or a key
left attached to a rotating part of the power tool
may result in personal injury.
e) Do not overreach. Keep proper footing and
balance at all times. This enables better control
of the power tool in unexpected situations.
f) Dress properly. Do not wear loose clothing or
jewellery. Keep your hair, clothing and gloves
away from moving parts. Loose clothes, jewel-
lery or long hair can be caught in moving parts.
g) If devices are provided for the connection of
dust extraction and collection facilities, ensure
these are connected and properly used.
Use of dust collection can reduce dust-related
hazards.
4. Power tool use and care
a) Do not force the power tool. Use the correct
power tool for your application. The correct
power tool will do the job better and safer at the
rate for which it was designed.
b) Do not use the power tool if the switch does
not turn it on and off . Any power tool that cannot be controlled with the switch is dangerous
and must be repaired.
c) Disconnect the plug from the power source
and/or the battery pack from the power tool
before making any adjustments, changing
accessories, or storing power tools. Such
preventive safety measures reduce the risk of
starting the power tool accidentally.
d) Store idle power tools out of the reach of
children and do not allow persons unfamiliar
with the power tool or these instructions to
operate the power tool. Power tools are
dangerous in the hands of untrained users.
e) Maintain power tools. Check for misalignment
or binding of moving parts, breakage of parts
and any other condition that may aff ect the
power tool’s operation. If damaged, have the
power tool repaired before use. Many
accidents are caused by poorly maintained
power tools.
f) Keep cutting tools sharp and clean.
Properly maintained cutting tools with sharp cutting edges are less likely to bind and are easier
to control.
g) Use the power tool, accessories and tool bits
etc. in accordance with these instructions, taking into account the working conditions and
the work to be performed. Use of the power
tool for operations diff erent from those intended
could result in a hazardous situation.
5. Service
a) Have your power tool serviced by a qualifi ed
repair person using only identical replacement parts. This will ensure that the safety of
the power tool is maintained.
20
PBH 1500 A1
Page 24

Appliance-specifi c safety instructions
for hammer drills
♦ Fix the additional handle in the new position
by turning it anti- clockwise.
■ Wear ear protectors. Exposure to
noise can cause hearing loss.
■ Use auxiliary handle(s), if supplied with the
tool. Loss of control can cause personal injury.
■ Hold power tool by insulated gripping surfac-
es, when performing an operation where the
cutting accessory may contact hidden wiring
or its own cord. Cutting accessory contacting
a “live” wire may make exposed metal parts of
the power tool “live” and could give the opera-
tor an electric shock.
■ Wear a dust mask.
WARNING! TOXIC DUST!
► Working with harmful/toxic dusts results in
health hazards for the person operating the
appliance and for other persons in the area.
■ ATTENTION – SERVICE LINES! DANGER!
Take steps to ensure that you do not hit any
service lines (electricity, gas, water) when
working with the electric tool. If necessary,
check with a service line detector before you
start to cut or drill into a surface.
Original accessories/additional
equipment
■ Only use the accessories and additional
equipment that are specifi ed in the operat-
ing instructions and are compatible with the
appliance.
Initial operation
Additional handle
NOTE
For safety reasons, you should only use this
►
appliance with the additional handle
attached.
♦ Remove the additional handle by turning it
clockwise direction.
♦ Turn the additional handle to the desired
position.
Depth stop
♦ Open the wing screw .
♦ Insert the depth stop into the additional
handle
♦ Ensure that the toothing on the depth stop is
facing upwards.
♦ Pull the depth stop out far enough for the
distance between the tip of the drill and the tip
of the depth stop to correspond with the
required drilling depth.
♦ Re-tighten the wing screw afterwards.
Tool/chuck:
♦ Pull the locking sleeve backwards and insert
the tool/chuck in the tool holder .
♦ Release the locking sleeve . This locks the
holder. Check that the tool is properly locked by
pulling it. The system has radial play because of
the design.
Removing tool/chuck:
♦ Pull the locking collar on the tool backwards.
NOTE
Tighten the drill in the wheel-rim chuck at the
same time. To do this, apply the chuck key to all
the 3 positions on the wheel-rim chuck and
tighten the tool (e.g. drill) at the same time.
► Do not use the wheel-rim chuck for ham-
mer drilling or chiselling!
.
WARNING!
GB
PBH 1500 A1
21
Page 25

Operation
Switching on and off
Select operational mode
Hammer switch:
♦ Turn the hammer switch to the required
symbol:
GB
Hammer drilling = Hammer ON
Drilling = Hammer OFF
Function selector:
♦ Turn and hold the release button for the func-
tion selector switch and rotate the function
selector switch so that the required symbol
engages at the arrow mark.
Hammer drilling
Chiselling
NOTE
The following combinations are available:
Hammer OFF + hammer drilling =
►
drilling
Hammer ON + hammer drilling =
►
hammer drilling
Hammer ON + chiselling = chiselling
►
Hammer OFF + chiselling = no function
►
Preselecting rotational speed
You can use the rotational speed preselector adjusting wheel
Work out the right setting with this practical test:
- high rotational speed: for hammer drilling/
chiselling in concrete or stone
- medium rotational speed: for drilling in steel
or wood
to preselect the rotational speed.
Switching the appliance on:
♦ Press the ON/OFF switch .
Switching the appliance off :
♦ Release the ON/OFF switch .
Maintenance and Cleaning
WARNING! RISK OF INJURY! Switch
the appliance off and remove the
power plug before starting any
work.
■ The appliance must always be kept clean, dry
and free from oil or grease.
■ To clean the casing, use a soft dry cloth.
■ Clean the tool holder regularly:
♦ To do this, pull the locking sleeve backwards
and pull the dust protector cap off the tool
holder .
WARNING!
■ If the supply cord of this power tool is dam-
aged, it must be replaced by a specially
prepared cord available through the service
organization.
Disposal
The packaging is made from environmen-
tally-friendly material and can be disposed
of at your local recycling plant.
Do not dispose of power tools in
your normal domestic waste!
European Directive 2012/19/EU requires that
worn-out power tools are collected separately and
fed into an environmentally compatible recycling
process.
Your local community or municipal authorities can
provide information on how to dispose of the wornout appliance.
22
PBH 1500 A1
Page 26

Warranty
The warranty for this appliance is for 3 years from
the date of purchase. The appliance has been
manufactured with care and meticulously examined
before delivery.
Please retain your receipt as proof of purchase. In
the case of a warranty claim, please make contact
by telephone with our Customer Service Department. Only in this way can a post-free despatch for
your goods be assured.
NOTICE
The warranty covers only claims for mate-
►
rial and manufacturing defects, but not for
transport damage, wearing parts or for
damage to fragile components, e.g. buttons
or batteries.
This product is for domestic use only and is not
intended for commercial use. The warranty is void
in the case of abusive and improper handling, use
of force and internal tampering not carried out by
our authorised service branch.
Your statutory rights are not restricted in any
way by this warranty. The warranty period is not
extended by repairs made under the warranty. This
applies also to replaced and repaired parts.
Damages and defects extant at the time of purchase must be reported immediately after unpacking, resp. no later than two days after the date of
purchase.
Repairs made after the lapse of the warranty
period are subject to charge.
Importer
KOMPERNASS HANDELS GMBH
BURGSTRASSE 21
44867 BOCHUM
GERMANY
www.kompernass.com
GB
Service
Service Great Britain
Tel.: 0871 5000 720 (£ 0.10/Min.)
E-Mail: kompernass@lidl.co.uk
IAN 35391
Hotline availability: Monday to Friday from
8:00 to 20:00 (CET)
PBH 1500 A1
23
Page 27

Translation of the original
conformity declaration
We, KOMPERNASS HANDELS GMBH, documents
offi cer: Mr. Semi Uguzlu, BURGSTR. 21, 44867
BOCHUM, Deutschland, hereby declare that this
product complies with the following standards,
normative documents and the EC directives:
GB
Machinery Directive
(2006 / 42 / EC)
EU Low Voltage Regulations
(2006 / 95 / EC)
EMC (Electromagnetic Compatibility)
(2004 / 108 / EC)
Directive for sound emission
(2000 / 14 / EC)
(2005 / 88 / EC)
RoHS Directive
(2011 / 65 / EU)
Applied harmonised standards:
EN 60745-1:2009 + A11
EN 60745-2-6:2010
EN 55014-1:2006 + A1 + A2
EN 55014-2:1997 + A1 + A2
EN 61000-3-2:2006 + A1 + A2
EN 61000-3-3:2008
Type designation of machine:
Hammer drill PBH 1500 A1
Year of manufacture: 01 - 2014
Serial number: IAN 35391
Bochum, 02/01/2014
Semi Uguzlu
- Quality Manager Subject to technical changes in the course of
further developments.
24
PBH 1500 A1
Page 28

KOMPERNASS HANDELS GMBH
BURGSTRASSE 21
44867 BOCHUM
DEUTSCHLAND / GERMANY
www.kompernass.com
Version des informations · Stand der Informationen
Last Information Update: 03 / 2014 · Ident.-No.: PBH1500A1-012014-2
IAN 35391
2
 Loading...