

Parkside PABH 20-Li A1 Original Instructions Manual
IAN 277022
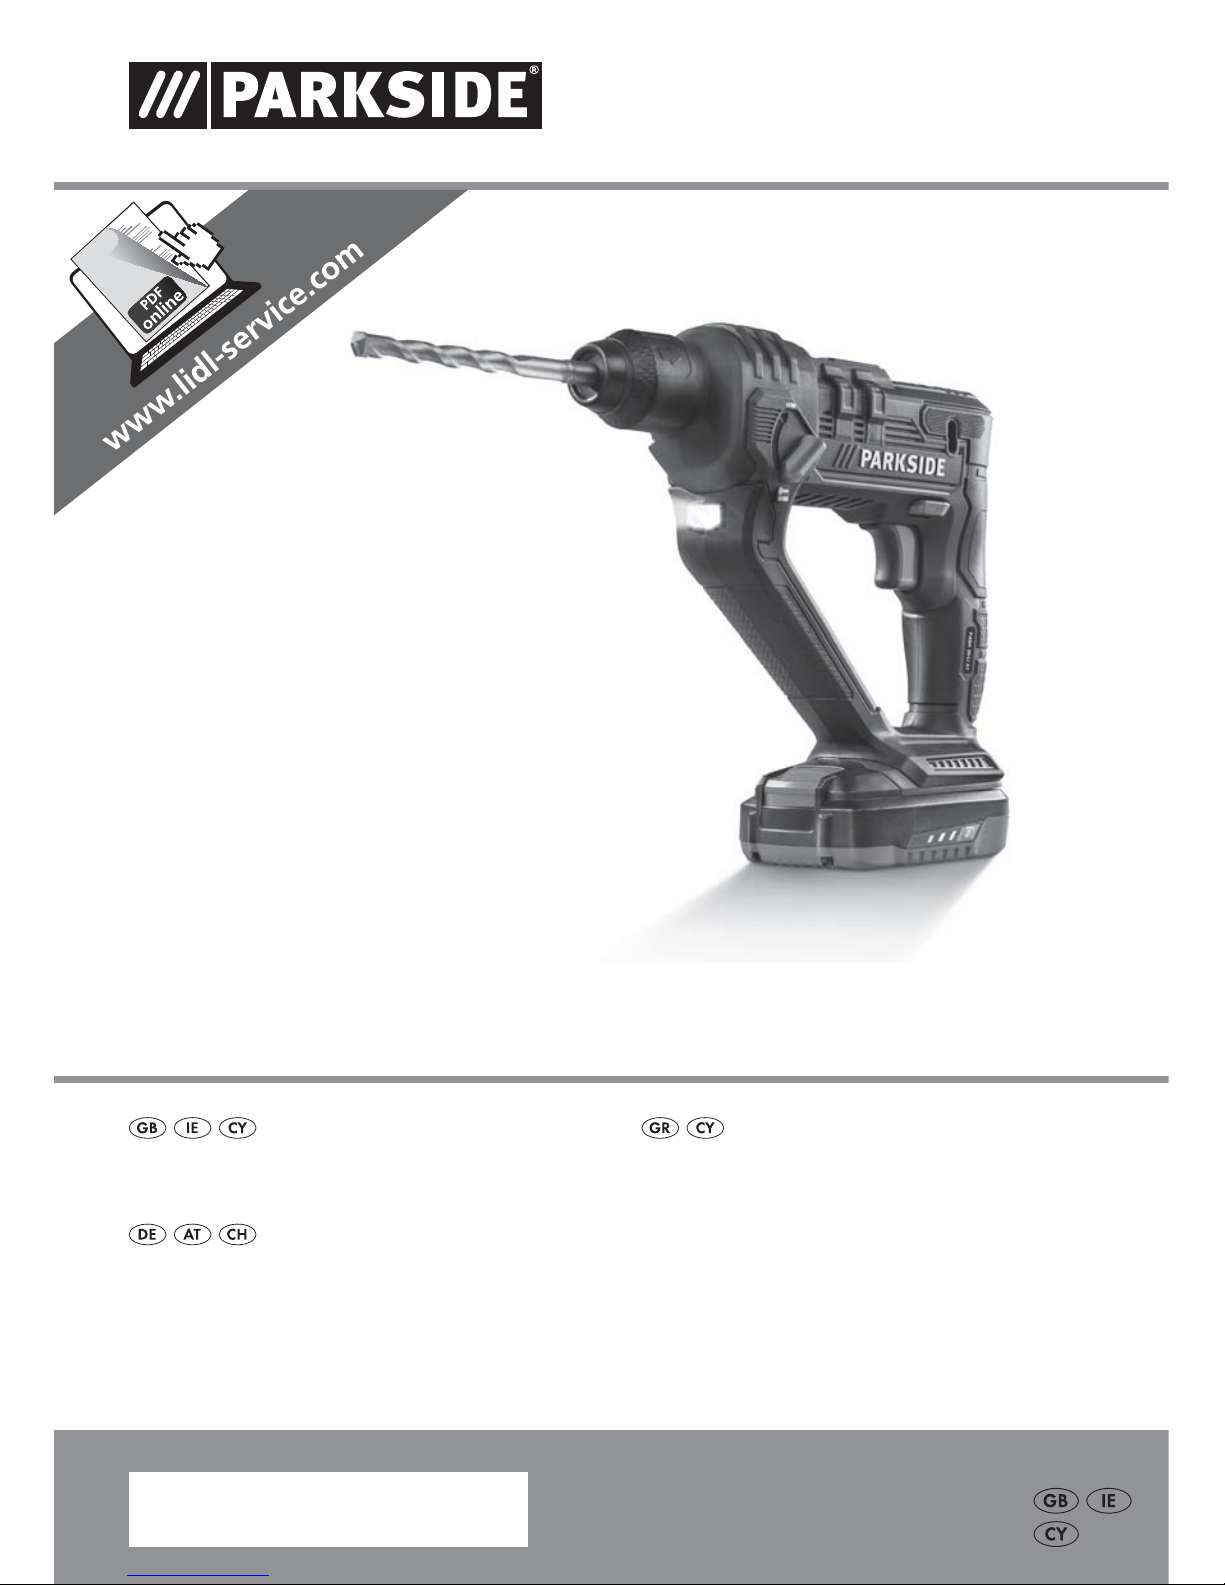
CORDLESS HAMMER DRILL PABH 20-Li A1
CORDLESS HAMMER DRILL
Translation of the original instructions
ΔΡΑΠΑΝΟ MΠATAPIAΣ
Μετάφραση των αυθεντικών οδηγιών λειτουργίας
AKKU-BOHRHAMMER
Originalbetriebsanleitung

GB / IE / CY Translation of the original instructions Page 1
GR / CY Μετάφραση των αυθεντικών οδηγιών λειτουργίας Σελίδα 13
DE / AT / CH Originalbetriebsanleitung Seite 25
Before reading, unfold the page containing the illustrations and familiarise yourself with all functions of
the device.
Πριν ξεκινήσετε την ανάγνωση, ανοίξτε τις δυο σελίδες με τις εικόνες και εξοικειωθείτε με όλες τις
λειτουργίες της συσκευής.
Klappen Sie vor dem Lesen die Seite mit den Abbildungen aus und machen Sie sich anschließend mit allen
Funktionen des Gerätes vertraut.
A

PABH 20-Li A1
GB│IE│CY
│
1■
Contents
Introduction ......................................................2
Intended use ................................................................ 2
Depicted components ......................................................... 2
Package contents ............................................................ 2
Technical details ............................................................. 2
General Power Tool Safety Warnings ................................3
1. Work area safety .......................................................... 3
2. Electrical safety ........................................................... 4
3. Personal safety ............................................................ 4
4. Use and handling of the power tool ........................................... 4
Use and handling of the cordless electrical power tool ............................... 5
5. Service .................................................................. 5
Safety guidelines for battery chargers ............................................ 5
Safety instructions for hammer drills .............................................. 6
Original accessories/auxiliary equipment ......................................... 6
Before use .......................................................6
Charging the battery pack (see fig. A) ............................................ 6
Checking the battery charge level ............................................... 6
Attaching/disconnecting the battery pack to/from the appliance ....................... 7
Operation .......................................................7
Selecting a tool ............................................................. 7
Tool-changing ............................................................... 7
Fitting an SDS tool ........................................................... 7
Removing an SDS tool ........................................................ 7
Fitting a tool with a hexagonal shank ............................................. 7
Removing a tool with a hexagonal shank ......................................... 8
Operation .......................................................8
Select operating mode ........................................................ 8
Setting the rotation direction .................................................... 8
Switching on/off ............................................................. 8
Set drill/hammer speed ....................................................... 8
Maintenance and cleaning ..........................................9
Disposal .........................................................9
Warranty .......................................................10
Service .........................................................10
Importer .......................................................10
Translation of the original Conformity Declaration .....................11

PABH 20-Li A1
■ 2
│
GB│IE│CY
CORDLESS HAMMER DRILL
PABH 20-LI A1
Introduction
Congratulations on the purchase of your
new appliance. You have selected a high-
quality product. The operating instructions
are part of this product. They contain important
information about safety, usage and disposal.
Before using the product, please familiarise yourself with all operating and safety instructions. Use
the product only as described and for the range
of applications specified. Please also pass these
operating instructions on to any future owner.
Intended use
The PABH 20-Li A1 hammer drill
(hereinafter appliance) is suitable for:
▯ Hammer-drilling into brickwork, concrete and
stone
▯ Drilling into stone, wood and metal
▯ Screwing into wood and metal
Any other usage of or modification to the appliance
is deemed to be improper and carries a significant
risk of accidents.
The manufacturer accepts no responsibility for
damage(s) attributable to misuse.
The appliance is not intended for commercial use.
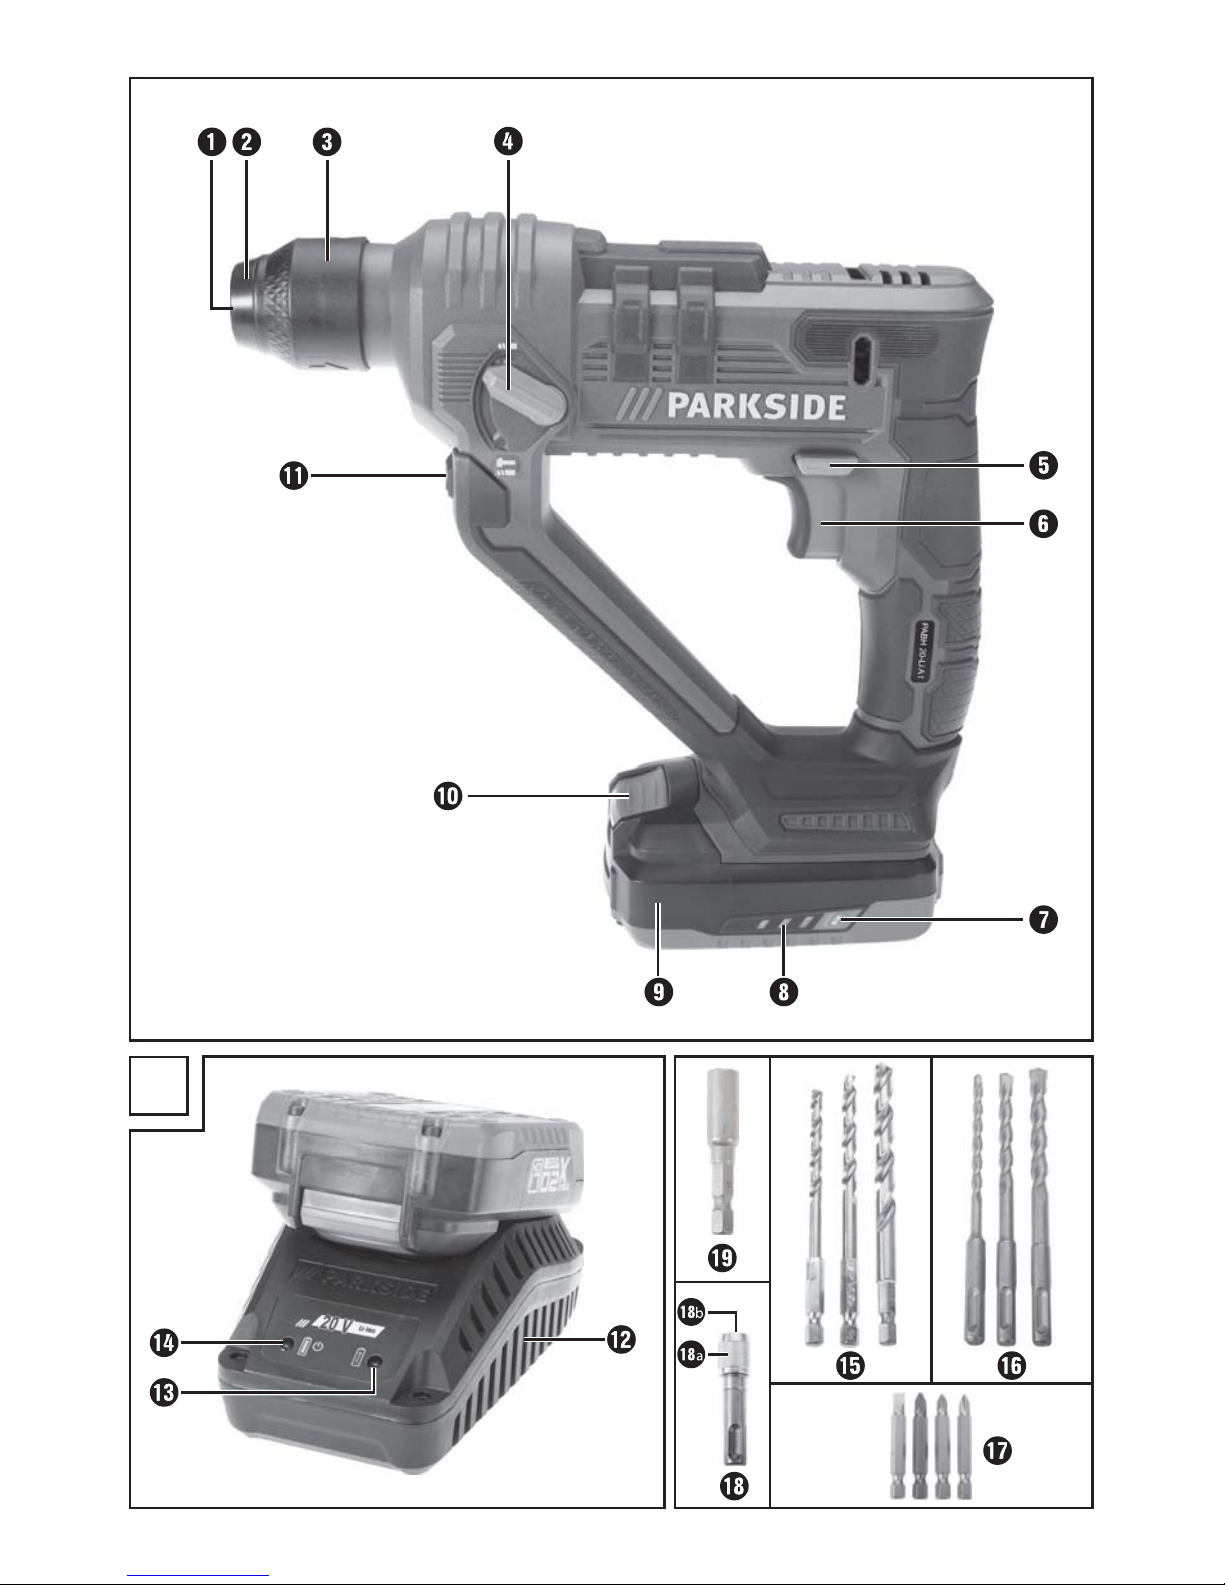
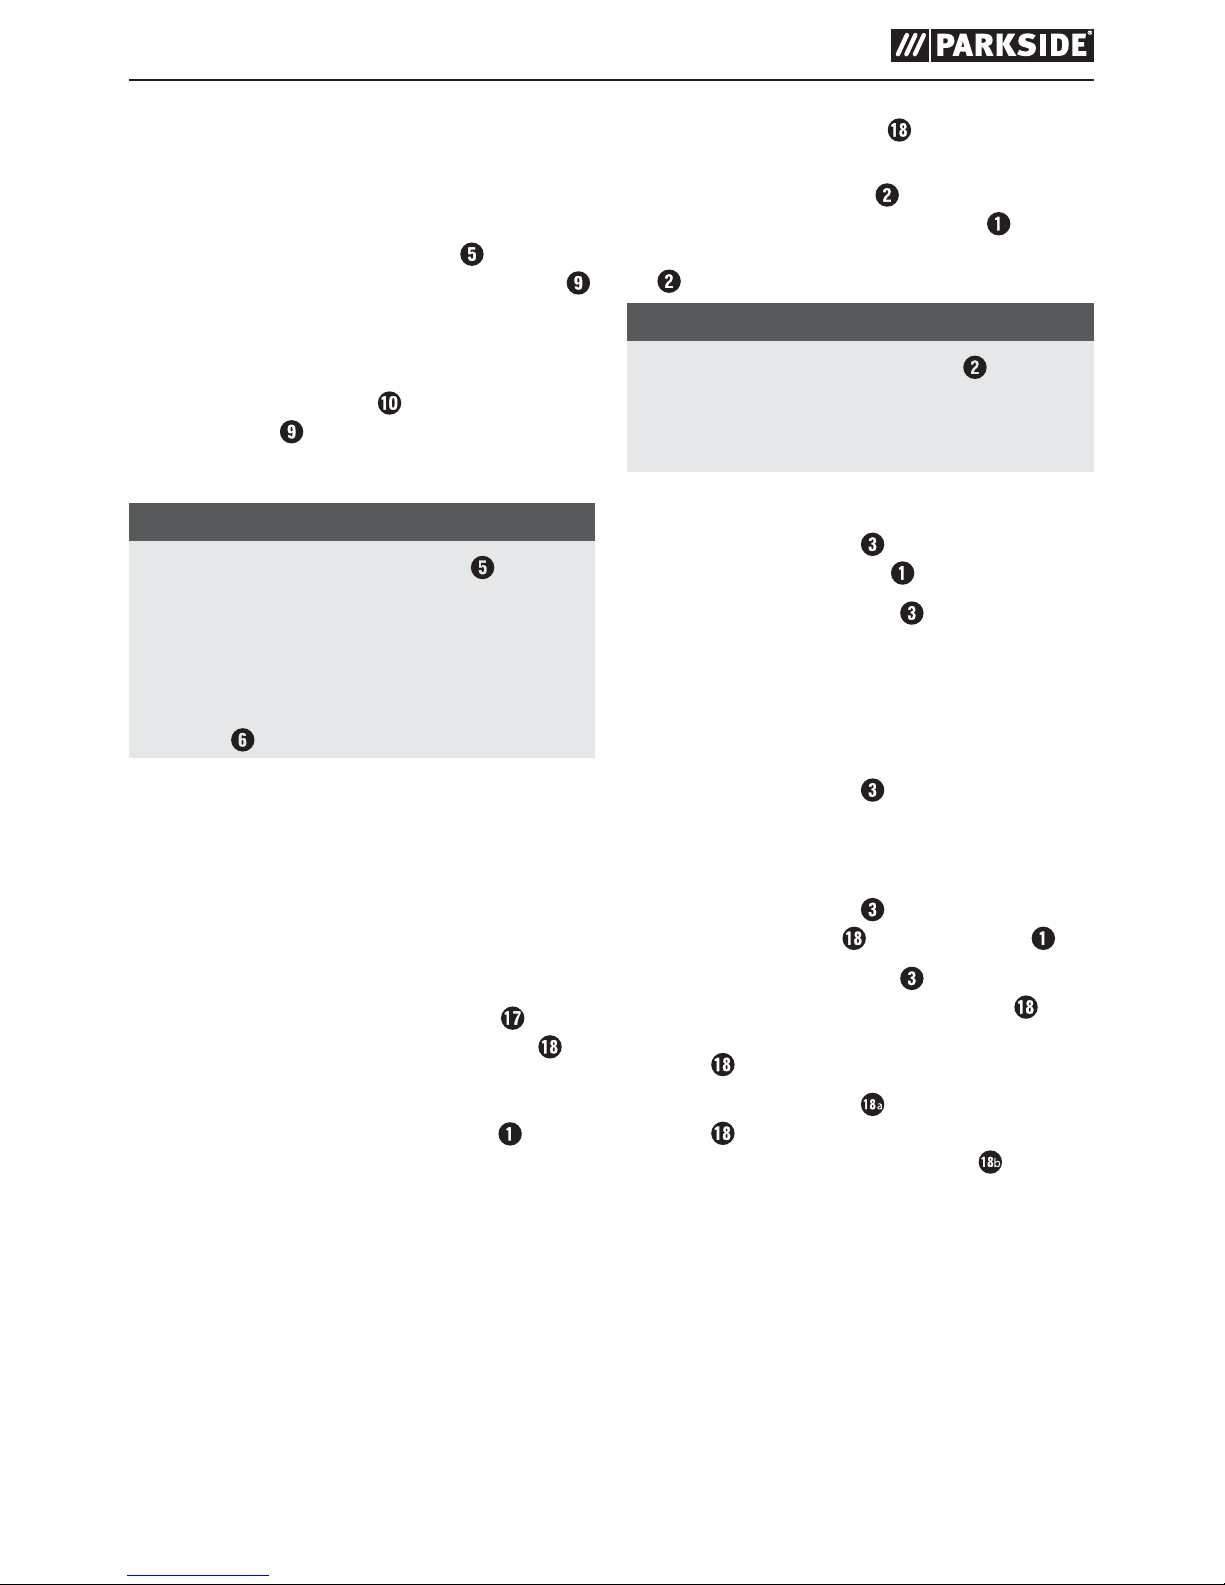
Depicted components
SDS-plus tool holder
Dust protection cap
Locking collar
“Drill/hammer drill” switch
Rotation direction switch
On/Off switch
Battery charge level button
Battery display LED
Battery pack
Release button for the battery pack
LED work light
High-speed charger
Red charge control LED
Green charge control LED
Drill with hexagonal shank
Drill with SDS-plus fitting
Screwdriver bits
SDS bit adapter
Locking collar
Tool holder
Universal bit holder
Package contents
1 cordless hammer drill PABH 20-Li A1
1 high-speed charger PABH 20-Li A1-2
1 battery pack PABH 20-Li A1-1
3 x 150 mm SDS-plus drills Ø 6 / 8 / 10 mm
3 x drill bits Ø 5 / 6 / 8 mm (HSS) with hexago-
nal shanks
4 x 50 mm bits (S2): 5.5 / PH1 / PZ1 / PZ2
1 x bit extension (hexagonal shank)
1 x bit extension (SDS-plus fitting)
1 carrying case
1 set of operating instructions
Technical details
Hammer drill PABH 20-Li A1
Nominal voltage: 20 V
(DC)
Idle speed: n
0
0 - 900 rpm
Stroke rate: 0–5000 bpm
Stroke energy: ≥ 1 joule
Max. drill diameter: 8 mm for metal
10 mm for concrete
16 mm for wood
PABH 20-Li A1-1 battery pack
Type: LITHIUM ION
Cells: 5
Nominal voltage: 20 V
(DC)
Capacity: 2.0 Ah
Energy value: 40 Wh
High-speed charger PABH 20-Li A1-2
INPUT:
Nominal voltage: 230–240 V∼, 50 Hz
(alternating current)
Power consumption: 65 W
PABH 20-Li A1
GB│IE│CY
│
3■
OUTPUT:
Nominal voltage: 21.5 V
(DC)
Charging current: 2.3 A
Charging time: approx. 60 min
Protection class: II /
Fuse: 2 A
Noise emission value:
Noise measurement value determined in accordance with EN 60745. The A-rated noise level of
the power tool is typically:
Hammer drilling:
Sound pressure level: L
pA
= 86.5 dB(A)
Uncertainty K: 3 dB(A)
Sound power level: L
WA
= 97.5 dB(A)
Uncertainty K: 3 dB(A)
Wear hearing protection!
Total vibration value:
Total vibration values (vector total of three directions)
determined in accordance with EN 60745:
Hammer drilling in concrete: a
h(HD)
= 4.724 m/s2,
K = 1.5 m/s
2
WARNING!
► The vibration level varies in accordance with
the use of the power tool and may be higher
than the value specified in these instructions
in some cases. Regular use of the electric tool
in such a way may cause the user to underestimate the vibration. Try to keep the vibration
loads as low as possible. Measures to reduce
the vibration load are, e.g. wearing gloves
and limiting the working time. All states of
operation must be taken into account (e.g.
times when the power tool is switched off and
times where the power tool is switched on but
running without load).
NOTE
► The vibration level specified in these instruc-
tions has been measured in accordance
with the standardised measuring procedure
specified in EN 60745 and can be used to
make equipment comparisons. The specified
vibration emission value can also be used to
make an initial exposure estimate.
General Power Tool
Safety Warnings
WARNING!
► Read all safety warnings and all
instructions. Failure to follow the
warnings and instructions may result
in electric shock, fire and/or serious
injury.
Save all warnings and instructions for future
reference.
The term "power tool" in the warnings refers to your
mains-operated (corded) power tool or batteryoperated (cordless) power tool.
1. Work area safety
a) Keep work area clean and well lit. Cluttered
or dark areas invite accidents.
b) Do not operate power tools in explosive atmo-
spheres, such as in the presence of flammable
liquids, gases or dust. Power tools create sparks
which may ignite the dust or fumes.
c) Keep children and bystanders away while
operating a power tool. Distractions can cause
you to lose control.

PABH 20-Li A1
■ 4
│
GB│IE│CY
2. Electrical safety
a) Power tool plugs must match the outlet. Never
modify the plug in any way. Do not use any
adapter plugs with earthed (grounded) power
tools. Unmodified plugs and matching outlets
will reduce risk of electric shock.
b) Avoid body contact with earthed or grounded
surfaces, such as pipes, radiators, ranges and
refrigerators. There is an increased risk of elec-
tric shock if your body is earthed or grounded.
c) Do not expose power tools to rain or wet
conditions. Water entering a power tool will
increase the risk of electric shock.
d) Do not abuse the cord. Never use the cord
for carrying, pulling or unplugging the power
tool. Keep cord away from heat, oil, sharp
edges or moving parts. Damaged or entangled
cords increase the risk of electric shock.
e) When operating a power tool outdoors, use
an extension cord suitable for outdoor use.
Use of a cord suitable for outdoor use reduces
the risk of electric shock.
f) If operating a power tool in a damp location
is unavoidable, use a residual current device
(RCD) protected supply. Use of an RCD reduces
the risk of electric shock.
3. Personal safety
a) Stay alert, watch what you are doing and
use common sense when operating a power
tool. Do not use a power tool while you are
tired or under the influence of drugs, alcohol
or medication. A moment of inattention while
operating power tools may result in serious
personal injury.
b) Use personal protective equipment. Always
wear eye protection. Protective equipment such
as dust mask, non-skid safety shoes, hard hat,
or hearing protection used for appropriate
conditions will reduce personal injuries.
c) Prevent unintentional starting. Ensure the
switch is in the off-position before connecting
to power source and/or battery pack, picking
up or carrying the tool. Carrying power tools
with your finger on the switch or energising
power tools that have the switch on invites accidents.
d) Remove any adjusting key or wrench before
turning the power tool on. A wrench or a key
left attached to a rotating part of the power tool
may result in personal injury.
e) Do not overreach. Keep proper footing and
balance at all times. This enables better control
of the power tool in unexpected situations.
f) Dress properly. Do not wear loose clothing or
jewellery. Keep your hair, clothing and gloves
away from moving parts. Loose clothes, jew-
ellery or long hair can be caught in moving
parts.
g) If devices are provided for the connection of
dust extraction and collection facilities, ensure
these are connected and properly used. Use
of dust collection can reduce dust-related hazards.
4. Use and handling of the power
tool
a) Do not force the power tool. Use the correct
power tool for your application. The correct
power tool will do the job better and safer at
the rate for which it was designed.
b) Do not use the power tool if the switch does not
turn it on and off. Any power tool that cannot
be controlled with the switch is dangerous and
must be repaired.
c) Disconnect the plug from the power source
and/or the battery pack from the power tool
before making any adjustments, changing
accessories, or storing power tools. Such
preventive safety measures reduce the risk of
starting the power tool accidentally.
d) Store idle power tools out of the reach of
children. Do not allow persons unfamiliar
with the power tool or these instructions to
operate the power tool. Power tools are
dangerous in the hands of untrained users.
e) Maintain power tools diligently. Check for
misalignment or binding of moving parts,
breakage of parts and any other condition
that may affect the power tool’s operation.
If damaged, have the power tool repaired
before use. Many accidents are caused by
poorly maintained power tools.

PABH 20-Li A1
GB│IE│CY
│
5■
f) Keep cutting tools sharp and clean. Properly
maintained cutting tools with sharp cutting edges
are less likely to bind and are easier to control.
g) Use the power tool, accessories and tool bits,
etc. in accordance with these instructions,
taking into account the working conditions
and the work to be performed. Use of the
power tool for operations different from those
intended could result in a hazardous situation.
Use and handling of the cordless
electrical power tool
a) Charge a rechargeable battery unit using only
the charger recommended by the manufacturer. Chargers are often designed for a partic-
ular type of rechargeable battery unit. There is
the danger of fire if other types of rechargeable
battery units are used.
b) Only the rechargeable battery units supplied
are to be used with an electrical power tool.
The use of other rechargeable battery units may
lead to the danger of injury or fire.
c) When they are not being used, store re-
chargeable battery units away from paperclips, coins, keys, nails, screws or other small
metal objects that could cause the contacts
to be bridged. Short-circuiting the contacts of
a rechargeable battery unit may result in heat
damage or fire.
d) Fluids may leak out of rechargeable battery
units if they are misused. If this happens,
avoid contact with the fluid. If contact occurs,
flush the affected area with water. Seek additional medical help if any of the fluid gets into
your eyes. Escaping battery fluid may cause
skin irritation or burns.
CAUTION! RISK OF EXPLOSION!
Never charge non-rechargeable batteries!
Protect the rechargeable battery
from heat, for example from continuous exposure to sunlight, fire, water
and moisture. There is a risk of explo-
sion.
5. Service
a) Have your power tool serviced by a qualified
repair person using only identical replacement parts. This will ensure that the safety of
the power tool is maintained.
Safety guidelines for battery chargers
■ This appliance may be used by chil-
dren aged 8 years and above and
by persons with limited physical,
sensory or mental capabilities or
lack of experience and knowledge,
provided that they are under supervision or have been told how to use
the appliance safely and are aware
of the potential risks. Children must
not play with the appliance. Cleaning and user maintenance tasks
may not be carried out by children
unless they are supervised.
■ To avoid potential risks, damaged
mains cables should be replaced
by the manufacturer, their customer
service department or a similarly
qualified person.
The charger is suitable for indoor use
only.
WARNING!
■ To avoid potential risks, damaged mains
cables should be replaced by the manufacturer, their customer service department or a
similarly qualified person.
PABH 20-Li A1
■ 6
│
GB│IE│CY
Safety instructions for hammer drills
■ Wear hearing protection. Exposure
to loud noise can lead to hearing loss.
■ Use the additional handles supplied with the
appliance. Loss of control can lead to injuries.
■ Hold the appliance using the insulated handle
areas if you are carry out any work during
which the attached tool could contact hidden
power cables. Contact with a live wire may
electrify exposed metal parts of the power tool
and could give the operator an electric shock.
■
Wear a dust mask.
WARNING! TOXIC DUST!
► Working with the tool can produce harmful/
toxic dusts which represent a health hazard
for the person operating the appliance and
for anyone else in the vicinity.
■ CAUTION, POWER CABLES! DANGER!
Ensure that you are not likely to hit power, gas
or water supply lines when you are working
with the power tool. If necessary, check with a
service line detector before you start to cut or
drill into a surface.
Original accessories/auxiliary
equipment
■ Only use the accessories and additional
equipment that are specified in the operating
instructions and compatible with the appliance.
Before use
Charging the battery pack (see fig. A)
CAUTION!
► Always pull out the plug before you remove
the battery pack
from or connect the
battery pack to the charger.
► Never charge the battery pack
when
the ambient temperature is below 10°C or
above 40°C.
♦ Connect the battery pack
to the high-speed
battery charger (see Fig. A).
♦ Insert the power plug into the socket. The con-
trol LED
lights up red.
♦ The green LED
indicates that the charging
process is complete and the battery pack is
ready.
♦ Switch off the charger for at least 15 minutes
between successive charging sessions. Also
disconnect the power plug from the mains
power socket.
Checking the battery charge level
♦ Press the battery charge level button to
check the status of the battery (see also main
diagram). The status/remaining charge will be
shown on the battery display LED
as follows:
♦ RED/ORANGE/GREEN = maximum charge
RED/ORANGE = medium charge
RED = low charge – charge the battery
PABH 20-Li A1
GB│IE│CY
│
7■
Attaching/disconnecting the battery
pack to/from the appliance
Inserting the battery pack:
♦ Push the rotation direction switch
into the
middle position (lock). Allow the battery pack
to click into the handle.
Removing the battery pack:
♦ Press the release button
and remove the
battery pack .
Operation
NOTE
► Push the rotation direction switch
into
the middle position before carrying out
any work on the power tool (e.g. maintenance, tool-changing, etc.) as well as during
carriage and storage of the power tool.
Unintentional activation of the On/Off
switch can result in injury.
Selecting a tool
■ For hammer drilling, you will need an SDS-plus
drilling tool.
■ For standard drilling in wood, metal, ceramics
and plastic, you can use an appropriate SDSplus drilling tool or a tool with a hexagonal
shank.
■ For screwing, use the screwdriver bits that
you can attach using the SDS bit adapter .
Tool-changing
■ You can use the SDS-plus tool holder to
change tools quickly and easily without the
need for any additional tools.
■ The SDS-plus drilling tool moves freely (depend-
ing on the system). This leads to a radial run-out
deviation while idling. This has no effect on the
accuracy of the drill hole as the drill centres
itself during drilling.
■ The SDS-plus bit adapter
can also hold dif-
ferent types of drills with hexagonal shanks.
■ The dust protection cap
largely prevents the
entry of drilling dust into tool holder during
operation. Ensure that the dust protection cap
does not get damaged when fitting tools.
NOTE
► A damaged dust protection cap
must
be replaced immediately. We recommend
having this done by a customer service
workshop.
Fitting an SDS tool
♦ Pull the locking sleeve backwards and insert
the tool in the tool holder .
♦ Release the locking sleeve
. This locks the
holder. Check that the tool is properly locked by
pulling it. The system has radial play because of
the design.
Removing an SDS tool
♦ Pull the locking sleeve backwards and re-
move the tool.
Fitting a tool with a hexagonal shank
♦ Pull the locking sleeve backwards and insert
the SDS bit adapter in the tool holder .
♦ Release the locking sleeve
. This locks the
holder. Check that the SDS bit adapter is
properly locked by pulling it. The SDS bit adapter has radial play because of the design.
♦ Pull the locking sleeve
of the SDS bit adapter backwards and insert the tool with the
hexagonal shank in the tool holder .

PABH 20-Li A1
■ 8
│
GB│IE│CY
♦ Release the locking sleeve of the SDS bit
adapter . This locks the holder. Check that
the tool with the hexagonal shank is properly
locked by pulling it. The tool with the hexagonal
shank has radial play because of the design.
Removing a tool with a hexagonal
shank
♦ Pull the locking sleeve backwards and remove
the tool with the hexagonal shank.
Operation
Select operating mode
■ Use the “Drill/hammer drill” switch to select
the operating mode of the power tool.
NOTE
► Change the mode only when power tool is
switched off. Otherwise, the tool could be
damaged.
♦ To change the operating mode, turn the “Drill/
hammer drill” switch
to the desired position.
Hammer drilling = Hammer ON
Drilling/screwing = Hammer OFF
Setting the rotation direction
NOTE
► Operate the rotation direction switch
only
when the appliance is at a standstill.
■ You can use the rotation direction switch
to
change the direction of rotation of the power
tool. This is not possible, however, while the on/
off switch is pressed in.
Clockwise:
♦ For drilling and screwing in screws, turn the
rotation direction switch
to the left as far
as the stop.
Anti-clockwise:
♦ For undoing and removing screws and nuts, turn
the rotation direction switch
to the right as
far as the stop.
Switching on/off
Switching on:
♦ To start the power tool, press the on/off switch
and keep it pressed in.
■ The lamp
lights up when the on/off switch
is pushed in slightly or fully and illuminates the
working area in low light conditions.
Switching off:
♦ To switch off the power tool, let go of the on/
off switch
.
■ At low temperatures, the power tool will only
reach its full hammer performance/strike power
after a certain time.
■ To save energy, do not switch the power tool
on unless you plan to use it.
Set drill/hammer speed
■ You can infinitely adjust the drill/hammer speed
of the switched on power tool, depending on
how far the on/off switch is pressed in.
Pressing the on/off switch lightly yields a
low drill/hammer speed. Increasing pressure
increases the speed.
Run-on brake:
■ When you release the on/off switch
, the
brake stops the chuck and prevents run-on of
the tool.

PABH 20-Li A1
GB│IE│CY
│
9■
Maintenance and cleaning
WARNING! RISK OF INJURY! Always
switch the appliance off and remove
the battery before carrying out any
work on the appliance.
■ The cordless hammer drill is maintenance-free.
■ The appliance must always be kept clean, dry
and free from oil or grease.
■ Use a soft, dry cloth to clean the housing.
■ If a lithium-ion battery is to be stored for an
extended period, the charge level should be
checked regularly. The optimum charge level is
between 50% and 80%. The optimum storage
environment is cool and dry.
NOTE
► Replacement parts not listed (such as carbon
brushes, switch) can be ordered via our
service hotline.
Disposal
The packaging protects the device from
damage during transport. The packaging
materials have been selected for their
environmental friendliness and disposal attributes,
and are therefore recyclable.
Returning the packaging into the material cycle
conserves raw materials and reduces the amount of
waste generated. Dispose of packaging materials
that are no longer needed in accordance with
applicable local regulations.
NOTE
► If possible, keep the original packaging of the
device for the entire duration of the warranty
period so that the device can be packed
properly for return shipment in the event of a
warranty claim.
Do not dispose of power tools in
your normal household waste!
European Directive 2012/19/EU requires that
worn-out power tools be collected separately and
recycled in an environmentally compatible manner.
Do not dispose of batteries in your
normal domestic waste!
WARNING!
■ Remove the battery before disposal.
Defective or worn-out rechargeable batteries must
be recycled according to Directive 2006/66/EC.
Take the battery pack and/or appliance to a nearby collection facility.
Please consult your local authorities regarding
suitable disposal of worn out power tools/battery
packs.
 Loading...