


 Loading...
32-Zone Security System
Always Armed,
Never Disarmed
User Guide

User Settings
For security reasons, write only the user’s name and not their user code. 4-Digit Codes N 6-Digit Codes N
User # and Name
001: Master__________________________________________________
002: Master1_________________________________________________
003: Master2_________________________________________________
004:________________________________________________________
005:________________________________________________________
006:________________________________________________________
007:________________________________________________________
008:________________________________________________________
009:________________________________________________________
010:________________________________________________________
011:________________________________________________________
012:________________________________________________________
013:________________________________________________________
014:________________________________________________________
015:________________________________________________________
016:________________________________________________________
017:________________________________________________________
018:________________________________________________________
019:________________________________________________________
020:________________________________________________________
021:________________________________________________________
022:________________________________________________________
023:________________________________________________________
024:________________________________________________________
025:________________________________________________________
026:________________________________________________________
027:________________________________________________________
028:________________________________________________________
029:________________________________________________________
030:________________________________________________________
031:________________________________________________________
032:________________________________________________________
Byp* |
Stay* Force* Arm* |
PGM* |
Duress* |
||
N |
N |
N |
only |
only |
N |
N |
N |
||||
N |
N |
N |
N |
N |
N |
N |
N |
N |
N |
N |
N |
N |
N |
N |
N |
N |
N |
N |
N |
N |
N |
N |
N |
N |
N |
N |
N |
N |
N |
N |
N |
N |
N |
N |
N |
N |
N |
N |
N |
N |
N |
N |
N |
N |
N |
N |
N |
N |
N |
N |
N |
N |
N |
N |
N |
N |
N |
N |
N |
N |
N |
N |
N |
N |
N |
N |
N |
N |
N |
N |
N |
N |
N |
N |
N |
N |
N |
N |
N |
N |
N |
N |
N |
N |
N |
N |
N |
N |
N |
N |
N |
N |
N |
N |
N |
N |
N |
N |
N |
N |
N |
N |
N |
N |
N |
N |
N |
N |
N |
N |
N |
N |
N |
N |
N |
N |
N |
N |
N |
N |
N |
N |
N |
N |
N |
N |
N |
N |
N |
N |
N |
N |
N |
N |
N |
N |
N |
N |
N |
N |
N |
N |
N |
N |
N |
N |
N |
N |
N |
N |
N |
N |
N |
N |
N |
N |
N |
N |
N |
N |
N |
N |
N |
N |
N |
N |
N |
N |
N |
N |
N |
N |
N |
N |
N |
N |
N |
N |
N |
N |
N |
N |
N |
N |
N |
*Programmed by your installer.

Zone Settings
Write the device type (motion detector, door contact etc.) and location.
Zone Number and Description |
Partition |
|
1 or 2 |
001:______________________________ _____
002:______________________________ _____
003:______________________________ _____
004:______________________________ _____
005:______________________________ _____
006:______________________________ _____
007:______________________________ _____
008:______________________________ _____
009:______________________________ _____
010:______________________________ _____
011:______________________________ _____
012:______________________________ _____
013:______________________________ _____
014:______________________________ _____
015:______________________________ _____
016:______________________________ _____
017:______________________________ _____
018:______________________________ _____
019:______________________________ _____
020:______________________________ _____
021:______________________________ _____
022:______________________________ _____
023:______________________________ _____
024:______________________________ _____
025:______________________________ _____
026:______________________________ _____
027:______________________________ _____
028:______________________________ _____
029:______________________________ _____
030:______________________________ _____
031:______________________________ _____
032:______________________________ _____
Byp |
Stay |
Sleep |
Force |
24Hr |
Entry |
Fire |
Fire |
|
delay |
zone |
Delay |
||||||
|
|
|
|
|
||||
N |
N |
N |
N |
N |
N |
N |
N |
|
N |
N |
N |
N |
N |
N |
|
|
|
N |
N |
|||||||
N |
N |
N |
N |
N |
N |
N |
N |
|
N |
N |
N |
N |
N |
N |
|
|
|
N |
N |
|||||||
N |
N |
N |
N |
N |
N |
N |
N |
|
N |
N |
N |
N |
N |
N |
|
|
|
N |
N |
|||||||
N |
N |
N |
N |
N |
N |
N |
N |
|
N |
N |
N |
N |
N |
N |
|
|
|
N |
N |
|||||||
N |
N |
N |
N |
N |
N |
N |
N |
|
N |
N |
N |
N |
N |
N |
|
|
|
N |
N |
|||||||
N |
N |
N |
N |
N |
N |
N |
N |
|
N |
N |
N |
N |
N |
N |
|
|
|
N |
N |
|||||||
N |
N |
N |
N |
N |
N |
N |
N |
|
N |
N |
N |
N |
N |
N |
|
|
|
N |
N |
|||||||
N |
N |
N |
N |
N |
N |
N |
N |
|
N |
N |
N |
N |
N |
N |
|
|
|
N |
N |
|||||||
N |
N |
N |
N |
N |
N |
N |
N |
|
N |
N |
N |
N |
N |
N |
|
|
|
N |
N |
|||||||
N |
N |
N |
N |
N |
N |
N |
N |
|
N |
N |
N |
N |
N |
N |
|
|
|
N |
N |
|||||||
N |
N |
N |
N |
N |
N |
N |
N |
|
N |
N |
N |
N |
N |
N |
|
|
|
N |
N |
|||||||
N |
N |
N |
N |
N |
N |
N |
N |
|
N |
N |
N |
N |
N |
N |
|
|
|
N |
N |
|||||||
N |
N |
N |
N |
N |
N |
N |
N |
|
N |
N |
N |
N |
N |
N |
|
|
|
N |
N |
|||||||
N |
N |
N |
N |
N |
N |
N |
N |
|
N |
N |
N |
N |
N |
N |
|
|
|
N |
N |
|||||||
N |
N |
N |
N |
N |
N |
N |
N |
|
N |
N |
N |
N |
N |
N |
|
|
|
N |
N |
|||||||
N |
N |
N |
N |
N |
N |
N |
N |
|
N |
N |
N |
N |
N |
N |
|
|
|
N |
N |
Table of Contents
User Codes ............................................................. |
4 |
Adding / Modifying a User .......................................... |
4 |
Deleting a User .......................................................... |
4 |
Setting the Time & Date ........................................ |
5 |
Setting Chime Zones ............................................. |
5 |
Trouble Display ...................................................... |
5 |
Keypads .................................................................. |
6 |
Keypad Feedback ...................................................... |
6 |
Keypad Muting & Backlight ........................................ |
6 |
Keypad Overviews ..................................................... |
7 |
Arming & Disarming with StayD ........................... |
9 |
To Turn On/Off StayD Mode ...................................... |
9 |
To Change Arm Mode ................................................ |
9 |
Advanced StayD Settings ........................................ |
10 |
Arming & Disarming ............................................ |
10 |
Regular Arming ........................................................ |
10 |
Sleep Arming ........................................................... |
10 |
Stay Arming ............................................................. |
11 |
Bypassing a Zone .................................................... |
11 |
One-Touch Arming ................................................... |
12 |
Auto-Arming ............................................................. |
12 |
Alarms .................................................................. |
13 |
Alarm Display ........................................................... |
13 |
Disarming & Deactivating an Alarm ......................... |
13 |
Panic Alarms ............................................................ |
13 |
Fire Alarms ............................................................... |
14 |
Testing & Maintenance ............................................ |
14 |
Communicating Through the Internet (IP100) .. 14 Communicating Using Text Messages (PCS100)15
Communicating by Phone (Voice-Guided VDMP3) 17
VDMP3 Instructions Diagram ................................... |
18 |
Advanced System Features ................................ |
19 |
Programmable Outputs (PGMs) .............................. |
19 |
Partitioning ............................................................... |
19 |
Quick Function Keys ................................................ |
19 |
System Notes ....................................................... |
19 |
Quick Programming ............................................ |
21 |
Master Quick Menus ................................................ |
21 |
INDEX .................................................................... |
23 |

User Codes
User codes are personal identification numbers for each user that allow you to enter certain programming modes, arm or disarm your system, as well as activate or deactivate PGMs. The system supports the following:
•1 System Master Code
•2 Master Codes
•29 User Codes
System Master Code (Default: 123456)
The System Master Code can arm or disarm any partition, and can create, modify or delete any user code.
Master Codes
Master Code 1 is permanently assigned to Partition 1 and can be used to create, modify or delete user codes that are assigned to Partition 1. Master Code 2 is permanently assigned to Partition 2 (exception: when partitioning is disabled, Master Code 2 will be assigned to Partition 1) and can be used to create, modify or delete user codes that are assigned to the same partition.
NOTE: Master Codes cannot modify or delete user codes assigned to both partitions. Only the System Master Code can modify or delete user codes assigned to both partitions.
Duress Code
If you are forced to arm or disarm your system, entering the user code with the duress option enabled will arm or disarm the system and immediately transmit a silent alert (Duress Code) to the monitoring station. The duress code must be enabled by your installer.
User Code Length
Your system can be programmed to use either 4- or 6-digit user codes, where each digit can be any value from 0 to 9. Six-digit codes are considered more difficult to “crack” and therefore, more secure. Avoid programming simple or obvious user codes, such as your telephone number, address, or codes such as 1234.
Adding / Modifying a User
How do I add / modify a user? |
Visual Feedback |
|
1 |
Press the [ ] key. |
|
2 |
Enter your [MASTER CODE]. |
[ ] and [1] flash. When a number on the |
|
|
keypad is lit, the user is already programmed. |
3 |
Select a user by entering a 2-digit user number (01 to 32). |
“Arm” flashes. |
4 |
Enter a 4- or 6-digit [USER CODE]. |
“Sleep” flashes. |
5 |
Confirm the code. |
“Stay” flashes. |
6 |
Press [ENTER]. |
“Off” flashes. |
|
Go to step 3 or press [CLEAR] to exit. |
|
|
For partitioned systems, go to step 7. |
|
7Press [1] and/or [2] to assign the user to a partition.
8Press [ENTER].
Go to step 3 or press [CLEAR] to exit.
Deleting a User
How do I delete a user?
1Press the [ ] key.
2Enter your [MASTER CODE].
3Select a user by entering a 2-digit user number.
4Press and hold the [SLEEP] key until you hear the confirmation beep.
Esprit E55 |
4 |

Setting the Time & Date
How do I set the time & date?
1Press the [TBL] key.
2Press [8].
3Enter time using the 24 hour format (e.g. 18:00 for 6:00 pm).
4Enter the year (4 digits).
5Enter the month (2 digits).
6Enter the day (2 digits). You have now set the time & date. Press [CLEAR] to exit.
Setting Chime Zones
A chime-enabled zone will advise you every time it is opened by causing your keypad to beep. Each keypad must be chimed separately.
How do I chime zones?
•For K636 & K10LED keypads: press & hold the zone key ([1] to [0(10)]) you wish to chime. For K32 & K32I keypads: press & hold the [T] key and enter the 2-digit zone number. Confirmation beep = Chime on, Rejection beep = Chime off
Note: For a description of the confirmation and rejection beeps, see Keypad Feedback on page 6.
To identify your keypad, see page 7.
Trouble Display
Your alarm system continuously monitors several trouble conditions that can be reported directly to your monitoring station. When a trouble condition occurs, the [TBL] key will illuminate. Press the [TBL] key, and the keypad will illuminate a number corresponding to the trouble the system is experiencing. We strongly suggest that you inform your monitoring station of the trouble and allow them to service your system.
NOTE: If the keypad emits a BEEP every 5 seconds whenever a new trouble condition has occurred, press the [TBL] key to stop the “Trouble Beep”.
|
|
Accessing the Trouble Display |
|
|
|
|
|
|
Key / LED |
Trouble Type |
Trouble Details |
|
Lit |
|
|
|
|
|
|
|
|
|
|
|
[2] |
Power Trouble (press [2] to view |
Three types of power trouble: |
|
|
the type of power trouble; the |
[1] The control panel is experiencing low/no battery. |
|
|
corresponding key illuminate) |
[2] There is an AC failure on the control panel. |
|
|
|
[3] There is an auxiliary overload on the control |
|
|
|
panel. |
|
|
|
|
|
[3] |
Bell Trouble |
There is a bell disconnect/overload on the control |
|
|
|
panel. |
Press |
|
|
|
[4] |
Communication Trouble |
Your alarm system, if monitored, could not |
|
[TBL] |
|
|
communicate with the monitoring station. |
|
|
|
|
|
[5] |
Tamper/Zone Wiring Failure |
A wiring problem is occurring on one or more zones. |
|
[6] |
Module Tamper Trouble |
A module’s anti-tamper switch has been triggered. |
|
[8] |
Timer Loss |
Your alarm system’s clock must be reprogrammed. |
|
|
|
See Setting the Time and Date above to set your |
|
|
|
system’s time and date. |
|
|
|
|
|
[0 (10)] |
Module Supervision Loss |
One or more modules are no longer communicating |
|
|
|
with the control panel. |
IMPORTANT: Except for the Timer Loss trouble, contact your monitoring station or installer to resolve the trouble condition.
5 |
User Guide |

Keypads
Keypad Feedback
Auditory Feedback
When you enter information on the keypad, it will guide you with beep tones that communicate confirmation or rejection of your entries. You should be familiar with these two keypad beep tones:
Confirmation Beep: When an operation (e.g. arming/disarming) is successfully entered on the keypad or when the system switches to a new status/mode, the keypad produces an intermittent beep tone (“BEEP-BEEP-BEEP-
BEEP”).
Rejection Beep: When the system reverts to its previous status or when an operation is incorrectly entered on the keypad, it will emit a continuous beep tone (“BEEEEEEEEP”).
The following are other types of auditory feedback, and will always be accompanied by the flashing of an arm key or LED ([ARM], [STAY], or [SLEEP]):
•Continuous beep = Alarm
•Variable beep = Fire alarm
•Intermittent beep = Beginning of exit delay
•Fast Intermittent beep = Last 10 seconds of exit delay
Visual Feedback
The keypad includes colored lights which convey the current status of your system. The state of each light represents a specific condition in your system.
NOTE: Many of the features in your system must be enabled by the installer. If the feature is not programmed, the keypad will emit a rejection beep and the action will be cancelled. Refer to Zone Settings on page 2 for details.
Keypad Muting & Backlight
Keypad Muting
When muted, the keypad will only emit the confirmation beep and rejection beep, and will beep when a key is pressed. Therefore, when muted, the keypad will not beep during an alarm and will not beep for chime enabled zones. Each keypad must be muted separately.
How do I mute the keypad?
•Press & hold the [CLEAR] key for 6 seconds to enable or disable keypad muting. If the keypad emits a confirmation beep, Keypad Muting is enabled for that keypad. If the keypad emits a rejection beep, the feature is disabled.
Keypad Backlight
The illumination level behind the keys can be modified to suit your needs. The [MEM] key is used to set the desired level. Each consecutive push of the [MEM] key will increase the backlight level until the maximum level is reached. After reaching the maximum level, the backlight level will return to the lowest level (backlight off) and the whole process is repeated.
How do I modify the backlight?
1Press and hold the [MEM] key. The [MEM] key will illuminate.
2Press the [MEM] key to set the desired backlight level.
3Press [CLEAR] twice to exit.
Esprit E55 |
6 |

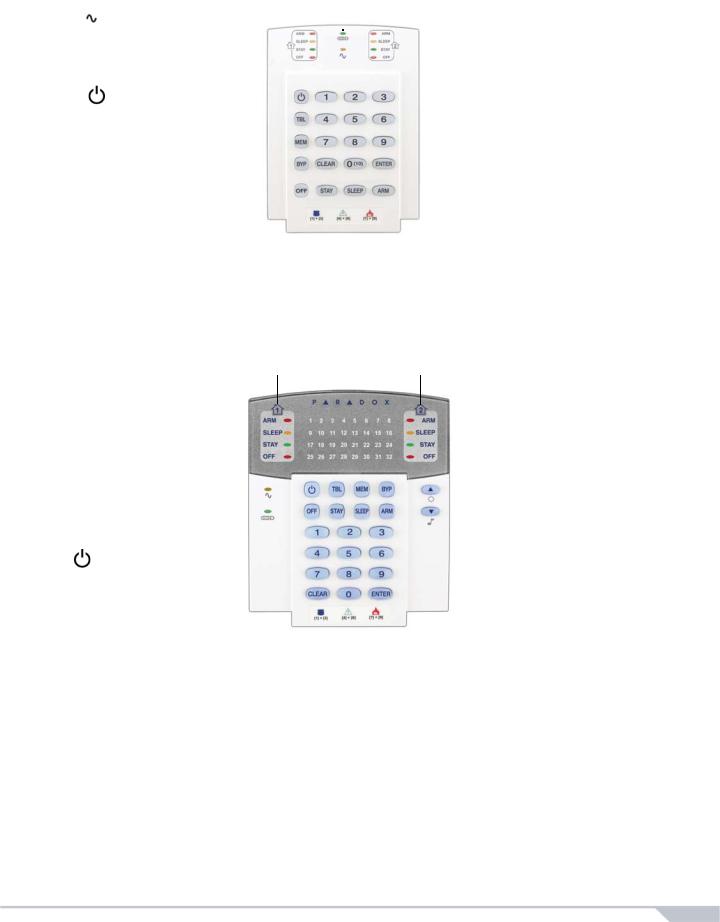
Keypad Overviews
K636 Keypad Overview
[TBL] Trouble display ON = Trouble(s) occurring (page 5)
[MEM] Alarm memory display ON = Alarm(s) occurred (page 13)
[BYP] Bypass programming ON = Zone(s) bypassed (page 13)
Zone Display:
The keys [1] to [0(10)] correspond to zones 1 to 10 respectively:
Key lit |
= Open or entry delay |
Key flash |
= In alarm |
IMPORTANT: If installed on a partitioned system, the K636 will only display partition 1.
=Press once + [MASTER CODE] for Quick Menu Programming. (see Master Quick Menus on page 21)
[ARM] (page 10) [SLEEP] (page 10) [STAY] (page 11) ON = System armed
OFF = Zone disarmed
Flash = Exit Delay
Fast Flash = Exit Delay (final 10 sec.) / zone in alarm
Off Key (red): |
StayD Light: |
|
ON = Disarmed |
ON |
= StayD on |
OFF = System armed |
OFF |
= StayD off |
Light (AC): |
(see StayD Mode on |
|
ON = Power on |
page 9) |
|
OFF = Power off
K32I Keypad Overview
Keys
=Press once + [MASTER CODE] for
Quick Menu programming
(see Master Quick Menus on page 21)
= Press & hold for keypad settings
=Press & hold for chime programming
(see Setting Chime Zones on page 5)
K32I Icon Display & Descriptions
Icon |
Description |
Icon |
Description |
StayD |
On = StayD mode enabled |
|
Flashing = System is in Master Quick Menu mode |
|
Indicate Partition 1 and 2 |
EXIT DELAY |
Flashing = Enter code before Exit Delay ends |
|
|
|
|
OFF |
On = System is disarmed |
ENTRY DELAY |
Flashing = Enter code before Entry Delay ends |
STAY |
On = System is Stay armed |
ENTER CODE |
On = Enter your user code |
SLEEP |
On = System is Sleep armed |
MEMORY |
On = Alarm(s) occurred |
ARM |
On = Partition is armed |
BYPASS |
On = Zone(s) bypassed |
ALARM |
Flashing = System is in alarm |
CHIME |
On = Displays chime zones when in Chime Prog. |
|
|
|
mode |
PRE-ALARM |
On = Countdown to alarm on Pre-Alarm zones |
TROUBLE |
Trouble flashes and number(s) corresponding to the |
DELAY |
|
|
trouble(s) illuminate (see Trouble List on page 5) |
ZONE OPEN |
On = Illuminated zone(s) are open |
AC |
On = AC power is supplied to the keypad |
|
|
|
|
ZONE IN ALARM |
On = Illuminated zone(s) are in alarm |
NO AC |
On = Keypad is running on backup battery power |
|
|
|
|
7 |
User Guide |
Off Light:
On |
= Disarmed |
Off |
= System armed |
|
Light (AC): |
On |
= Power on |
Off |
= Power off |
|
= Press once + [MASTER |
|
CODE] for Quick Menu |
|
Programming (see |
|
Master Quick Menus on |
|
page 21) |
[TBL] Trouble display ON = Trouble(s) occurring (page 5)
[MEM] Alarm memory display ON = Alarm(s) occurred (page 13)
[BYP] Bypass programming ON = Zone(s) bypassed (page 13)
K10LEDV/H Keypad Overview
On |
= StayD Enabled (see page 9) |
||||
Partition 1 |
Status |
|
Partition 2 Status |
||
|
|||||
|
|
|
|
|
|
|
|
|
|
|
|
|
|
|
|
|
|
[ARM] (page 10) [SLEEP] (page 10) [STAY] (page 11)
On = Partition armed Off = Partition disarmed
Flash= Exit Delay
Fast Flash= Exit Delay (final 10 sec.)
Fast Flash= Partition in alarm
Zone Display:
The keys [1] to [0(10)] correspond to zones 1 to 10 respectively.
Key Lit: Open or entry delay Key Flash: In alarm
K32LED Keypad Overview
Off Light:
On = Disarmed
Off = System armed
 Light (AC):
ON = Power on
OFF= Power off
StayD Light
ON = StayD on
(see StayD Mode on page 9)
= Press once + [MASTER CODE] for Quick Menu Programming (see Master Quick Menus on page 21)
Zone Display:
The numbers [1] to [32] correspond to zones 1 to 32 respectively. Open or entry delay zones are illuminated, and flash in alarm.
Partition 1 Status |
Partition 2 Status |
[ARM] (page 10) [SLEEP] (page 10) [STAY] (page 11)
On = Partition armed Off = Partition disarmed
Flash= Exit Delay
Fast Flash= Exit Delay (final 10 sec.)
Fast Flash= Partition in alarm
[TBL] Trouble display ON = Trouble(s) occurring (page 5)
[MEM] Alarm memory display ON = Alarm(s) occurred (page 13)
[BYP] Bypass programming ON = Zone(s) bypassed (page 13)
Esprit E55 |
8 |
Loading...