

Page 1

iDEA
+
Docking Station i
iiDDEEA
A
+
+
DDoocckkiinngg SSttaattiioonn
User Manual
Page 2

Copyright
The contents of this publication may not be reproduced in any part or as a whole, stored, transcribed in an
information retrieval system, translated into any language, or transmitted in any form or by any means,
mechanical, magnetic, electronic, optical, photocopying, manual, or otherwise, without the prior written
permission.
Trademarks
All product, company, brand names are trademarks or registered trademarks of their respective companies.
They are used for identification purpose only. Specifications are subject to be changed without prior notice.
iDEA
+
Docking Station i
Page 3
FCC Radiation Norm
This device complies with Part 15 of the FCC Rules. Operation is subject to the following two conditions:
(1) this device may not cause harmful interference , and
(2) this device must accept any interference received, including interferences that may cause
undesired operations.
CE Radiation Norm
This equipment has been tested and found to comply with the limits of the European Council Directive
99/5/EC on the approximation of the law of the member states relating to EN 300 328 V1.7.1 (2006-10), EN
301 489-1 V1.8.1 (2008-04) and EN 301 489-17 V1.3.2 (2008-04) and EN 60950.
FCC & CE Compliance Statement
These limits are designed to provide reasonable protection against radio interference in a residential
environment. This equipment can generates, uses and radiate radio frequency energy and, if not installed
and used in accordance with the instructions, may cause harmful interference to radio communications.
However, there is no guarantee that interference will not occur in a particular installation. If this equipment
does cause harmful interference to radio or television reception, which is found by turning the equipment ON
and OFF, the user is encouraged to try to reduce the interference by one or more of the following measures:
• Reorient or relocate the receiving antenna
• Increase the separation between the equipment and the receiver
• Connect the equipment into an outlet on a circuit different from that to which the receiver is connect to
• Consult a dealer or an experienced technician for assistance
RF exposure warning
This equipment must be installed and operated in accordance with provided instructions and the antenna(s)
used for this transmitter must be installed to provide a separation distance of at least 20 cm from all persons
and must not be co-located or operating in conjunction with any other antenna or transmitter. End-users and
installers must be provide with antenna installation instructions and transmitter operating conditions for
satisfying RF exposure compliance
.
CAUTION!
Any changes or modifications not expressly approved by the grantee of this device could void the user's
authority to operate the equipment.
iDEA
+
Docking Station ii
Page 4

iDEA
+
Docking Station iii
Contents
Copyright ............................................................................................................................................ i
Chapter 1 Introduction ..................................................................................................................... 1
1.1 Features ...................................................................................................................................... 2
1.2 System Requirement .................................................................................................................. 3
1.3 Package Contents ....................................................................................................................... 3
Chapter 2 Knowing Travel AP charger ........................................................................................... 4
2.1 LED Indicator ............................................................................................................................ 4
2.2 Ports ........................................................................................................................................... 4
2.3 Power ON/OFF .......................................................................................................................... 4
2.4 Hardware Connection ................................................................................................................ 5
2.5 Charging..................................................................................................................................... 9
Chapter 3 Configuration via PC ..................................................................................................... 10
3.1 Setting up the TCP/IP .............................................................................................................. 1 1
3.2 Login ........................................................................................................................................ 12
3.3 Wizard ...................................................................................................................................... 14
3.3.1 Gateway Mode .................................................................................................................. 14
3.3.2 Hotspot Mode ................................................................................................................... 17
3.4 Wireless .................................................................................................................................... 18
3.5 WAN ........................................................................................................................................ 19
3.6 File Server ................................................................................................................................ 21
3.7 System setting .......................................................................................................................... 22
3.7.1 Wireless ............................................................................................................................. 22
3.7.1.1 Basic Settings ............................................................................................................. 22
3.7.1.2 Active Clients ............................................................................................................. 23
3.7.1.3 Advanced Setting ....................................................................................................... 24
3.7.1.4 Security ...................................................................................................................... 26
3.7.1.5 Hotspot Mode ............................................................................................................ 27
3.7.2 TCP/IP Settings ................................................................................................................. 28
3.7.2.1 LAN Interface ............................................................................................................ 28
3.7.2.2 WAN Interface ........................................................................................................... 30
3.8 Management ............................................................................................................................ 38
3.8.1 Statistics ............................................................................................................................ 39
3.8.2 Time Zone Setting ............................................................................................................. 40
3.8.3 Log .................................................................................................................................... 41
3.8.4 Upgrade Firmware ............................................................................................................ 42
3.8.5 Save/Reload Setting .......................................................................................................... 43
3.8.6 Password ........................................................................................................................... 44
Page 5

iDEA
+
Docking Station iv
3.8.7 Reboot ............................................................................................................................... 45
3.8.8 Logout ............................................................................................................................... 46
Chapter 4 Configuration via Smart Phone.................................................................................... 47
4.1 Install APPs for Android Phone ............................................................................................... 47
4.2 Setting ...................................................................................................................................... 49
4.2.1 Gateway Mode .................................................................................................................. 49
4.2.2 Hotspot Mode ................................................................................................................... 50
4.2.3 Wireless Setting ................................................................................................................ 53
Appendix A: Tr oubleshooting ......................................................................................................... 56
Page 6

Chapter 1 Introduction
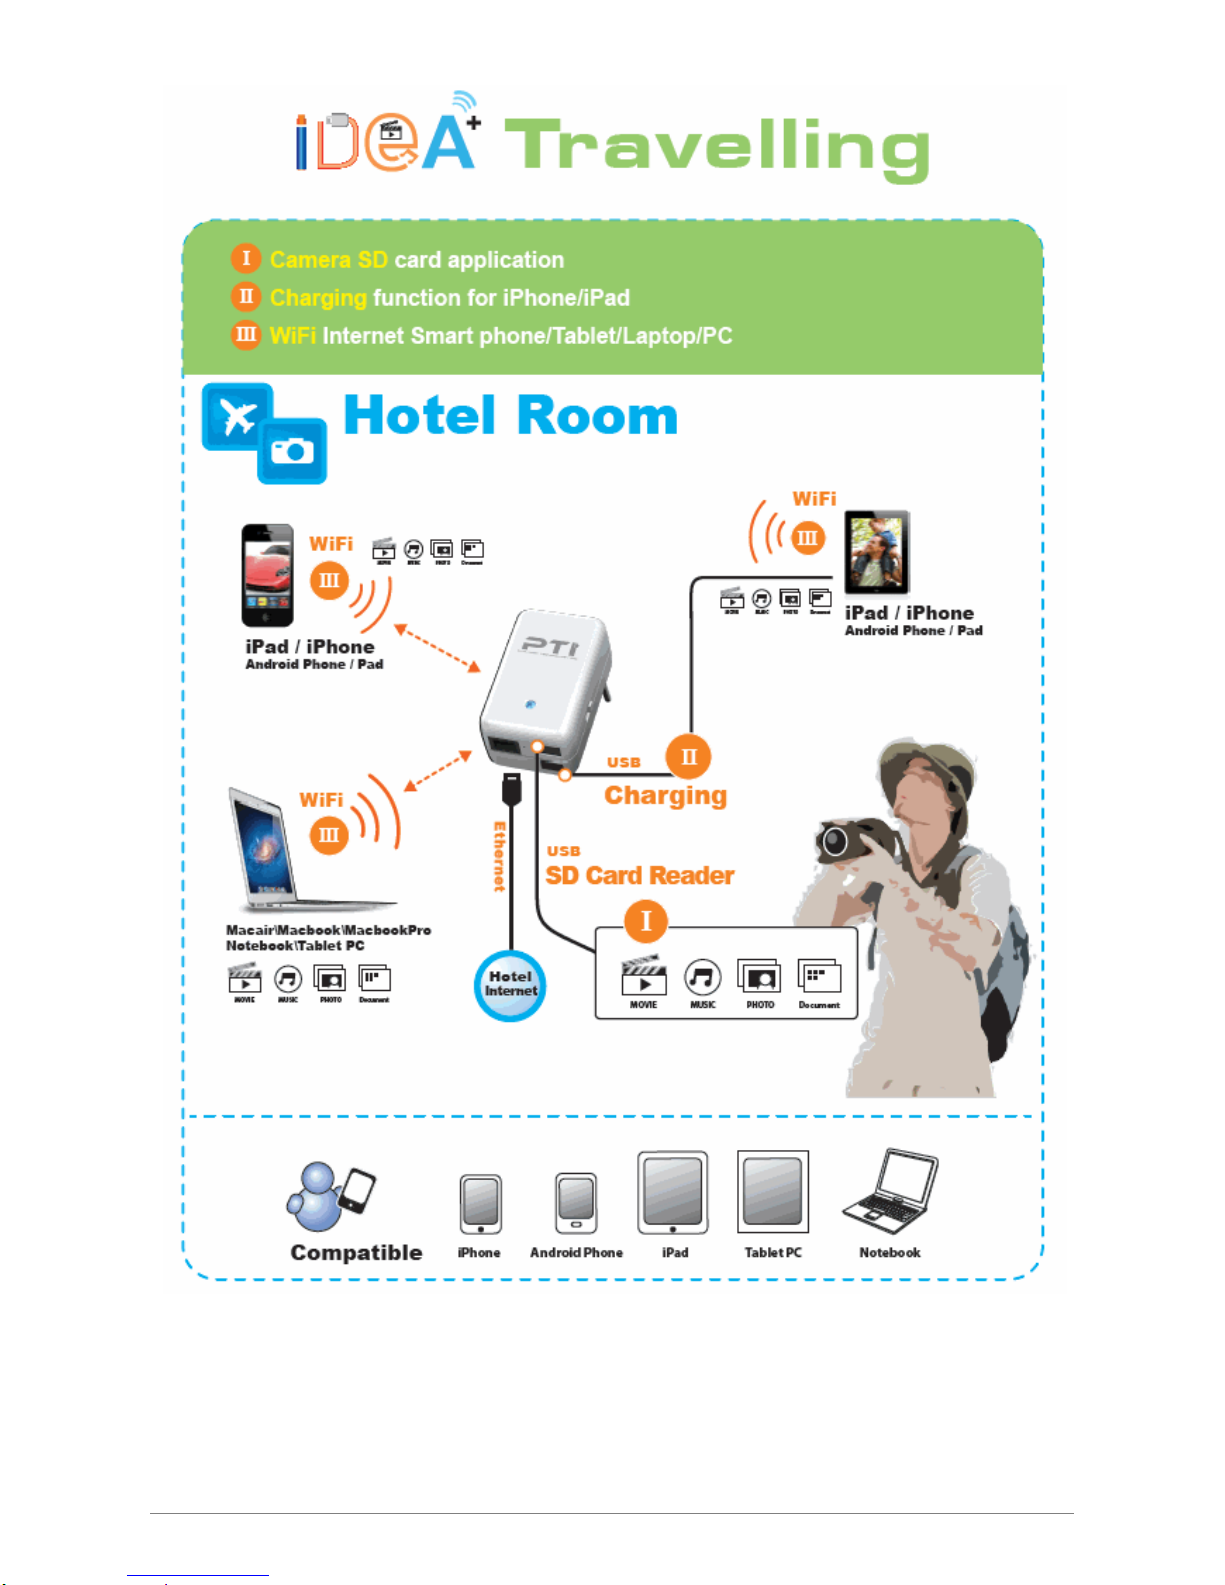
Congratulations on your purchase of this outstanding iDEA+ Docking Station. Great for traveler to
charge iPad/iPhone, mobile devices. Working as an AP router for traveler to access Internet easily by
their iPad, iPhone and Laptop via Wi-Fi. Support any 5V USB chargeable handheld devices including
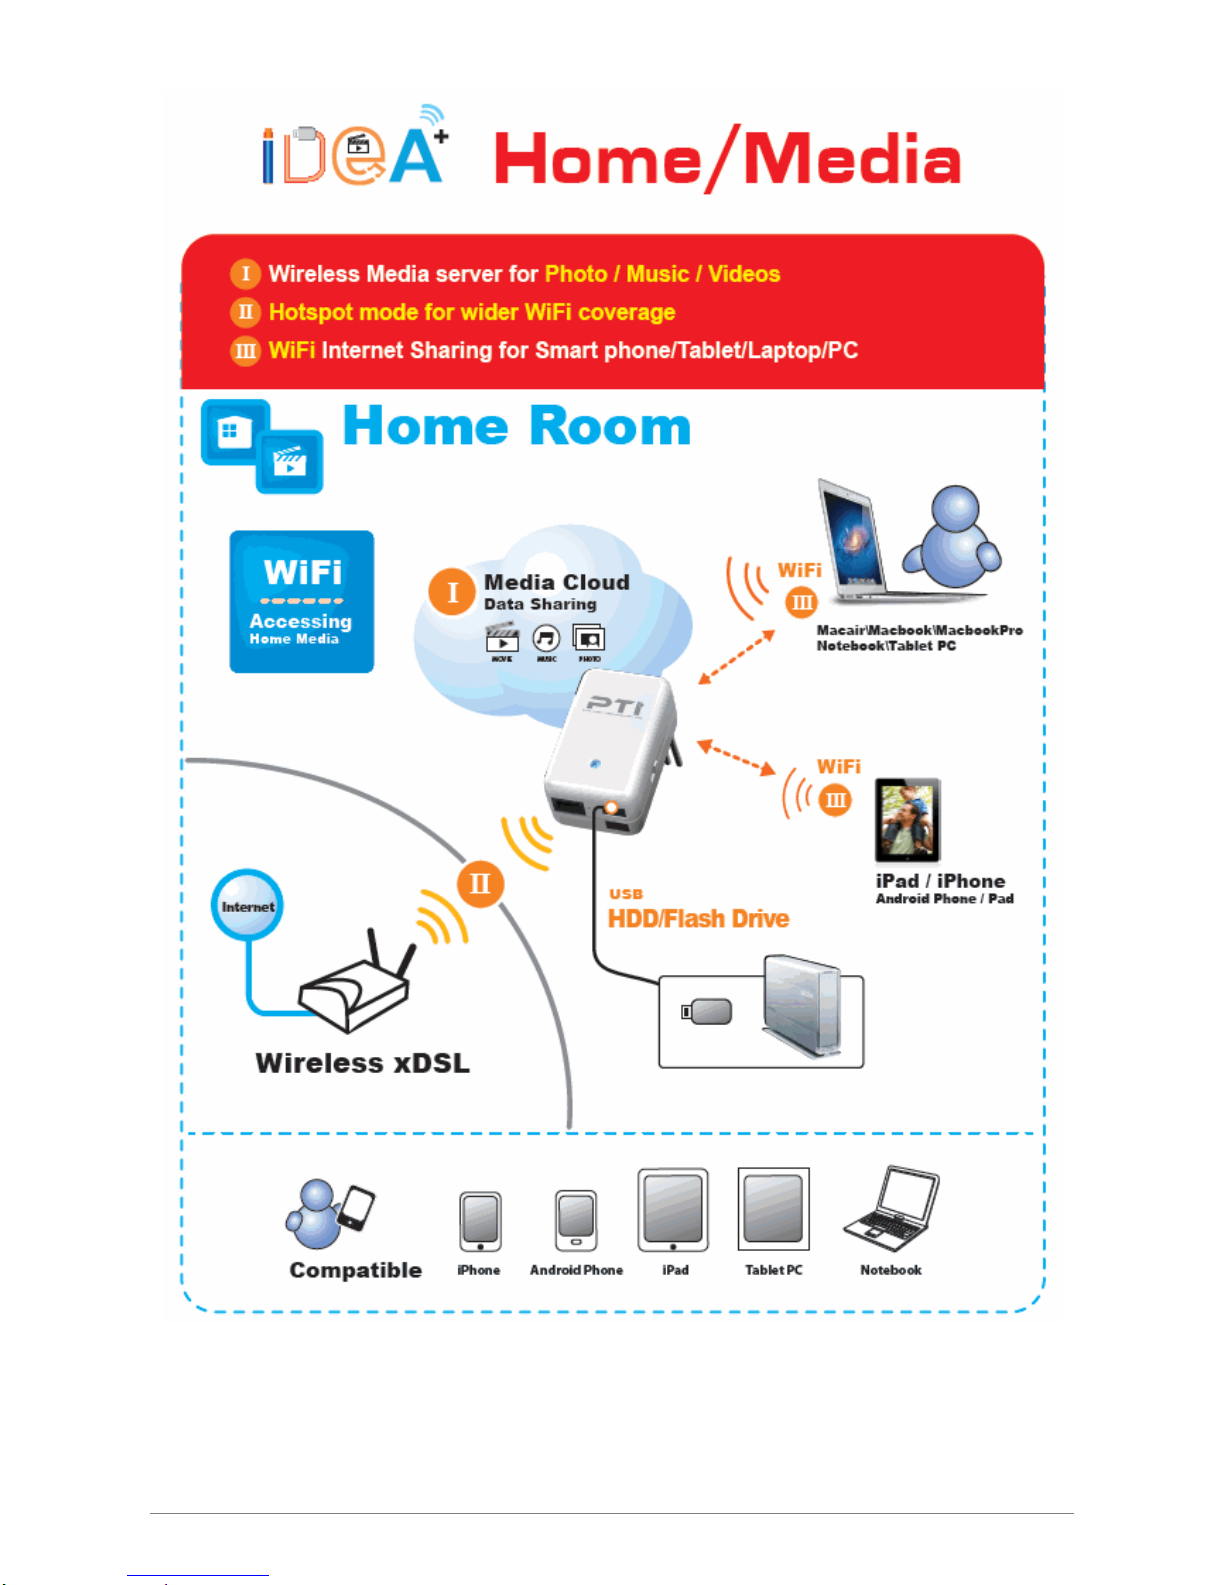
iPad, iPhone. With extra USB port, connecting a USB hard drive to act as a wireless HDD and support
HTTP file server for iPad/iPhone to browse contents via browser. USB port supports Smartphone or 3G
USB card to share Internet connection. With its Hotspot mode, it will let your network wirelessly and
extend your wireless coverage.
iDEA
+
Docking Station 1
Page 7

iDEA
+
Docking Station 2
1.1 Features
Functions
y Support Router, hotspot mode.
y Support Setup Wizard.
y Support File Server for user to playback Music/Video/Photo
y Support APP Configuration for Android Phone
y Support Simple configuration for Smart Phone
Wireless
y IEEE 802.11b/g/n standards compliant.
y Support data rates up to 150Mbps ( Auto-Rate Capable ).
y Support WEP/WPA/WPA2 Encryption.
y Support Wireless hotspot mode.
WAN Ethernet Interface
y 1 Port Interface compliant with IEEE 802.3x standards.
y Automatic MDI/MDIX crossover for 10/100 Base-T port.
y Auto-negotiation and speed-auto-sensing support.
y xDSL/Cable modem support
y WAN Access Type: Static IP,DHCP,PPPoE,3G USB and Android Mobile
Network Management
y Web-based Management
y Remote Access Control
y Firmware upgrade via HTTP/TFTP
y System Log
USB
y 5V/2.1A USB port for charging iPad/iPhone and Smartphone
y USB port for Smart Phone,3G USB card
y USB port for Flash Drive, USB Hard Drive, USB Card Reader
Page 8

iDEA
+
Docking Station 3
1.2 System Requirement
Check and confirm that your system/network meets the following requirements:
Personal computer (PC/Notebook/Tablet PC) or Smartphone.
One IEEE 802.11b/g/n Wireless adapter with installed TCP/IP
Internet Browser.
1.3 Package Contents
The iDEA
+
Docking Station package contains the following items:
One iDEA
+
Docking Station
One CD-ROM ( Manual / Quick Setup Guide )
One Quick Setup Guide
If any of the above items are damaged or missing, please contact your dealer immediately.
Page 9
Chapter 2 Knowing iDEA+ Docking Station
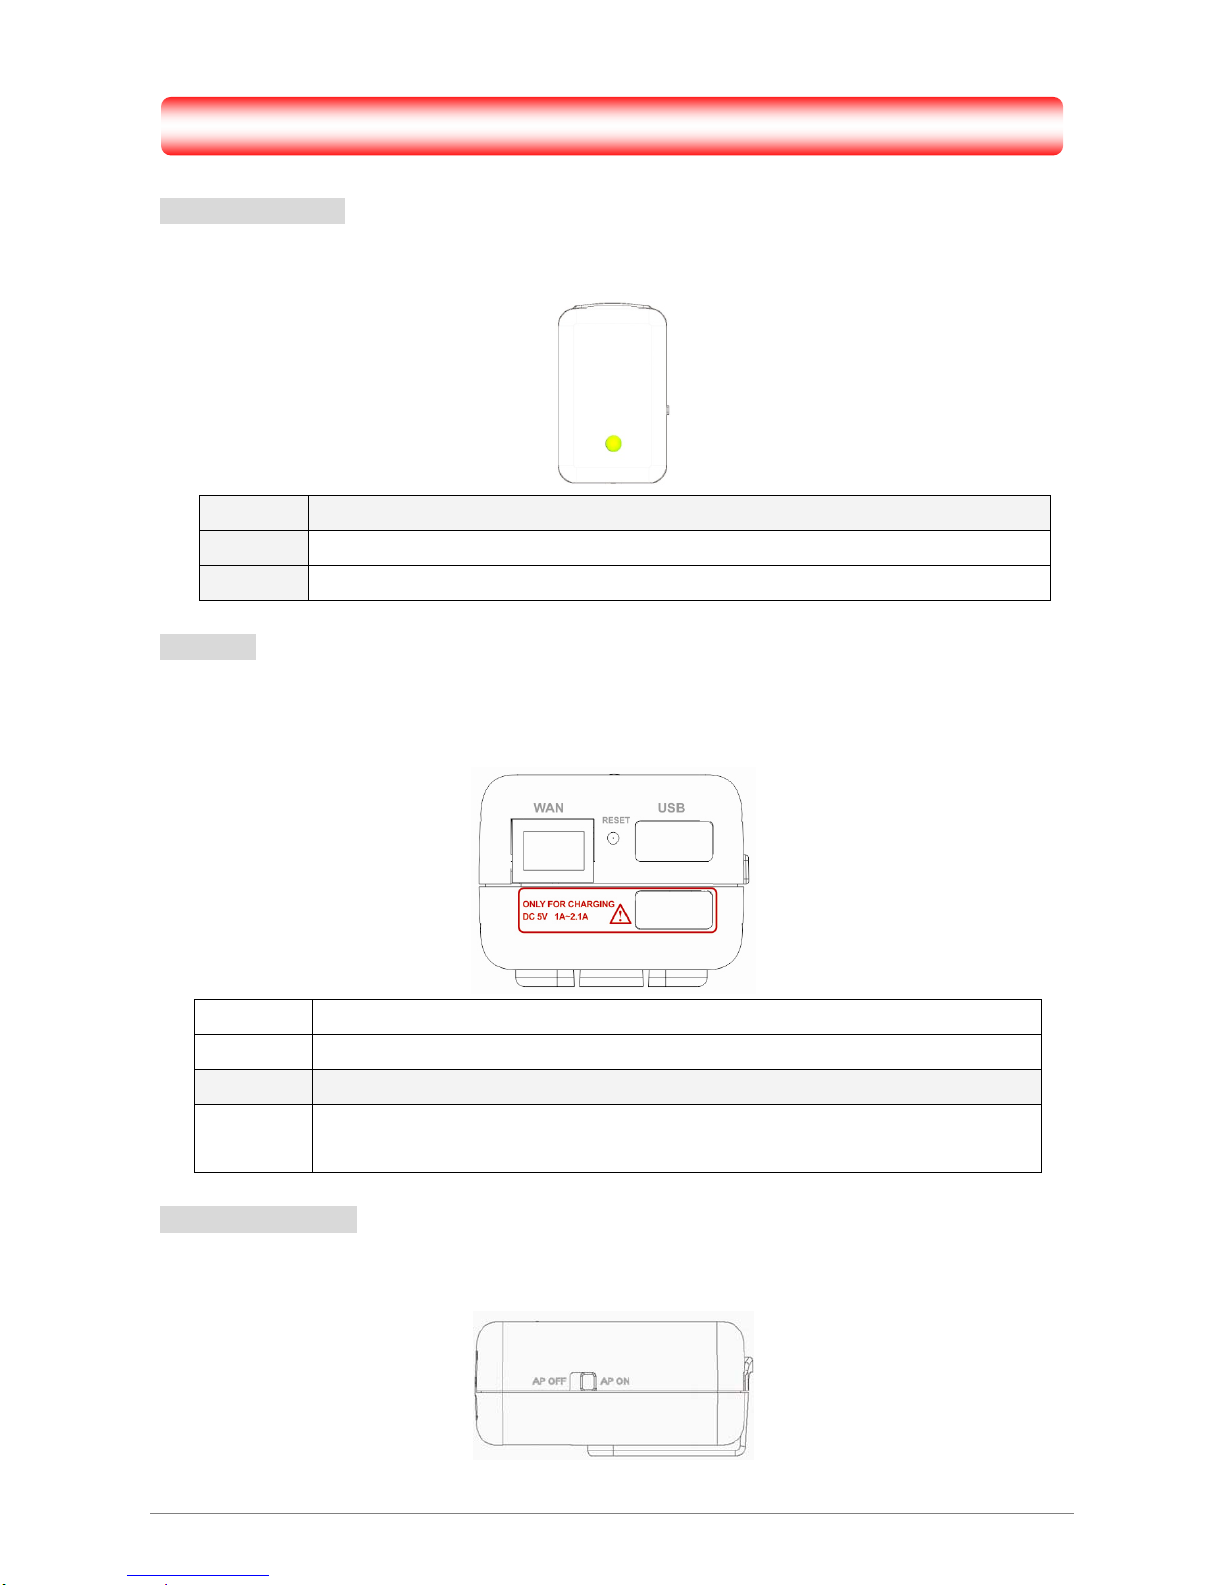
2.1 LED Indicator
The iDEA
+
Docking Station’s LED indicator display information about the device’s status.
Green iDEA+ Docking Station access Internet successfully
Orange Flashing when iDEA+ Docking Station cannot access Internet
Red iDEA+ Docking Station is booting
2.2 Ports
The ports of the iDEA
+
Docking Station contain WAN Ethernet port, Reset Button, USB data port and
USB only for charging port.
WAN Port for connecting to the cable or DSL modem through Ethernet cable
Reset Reset iDEA+ Docking Station to factory default. Press this button for more than 5 secs
USB Connect USB HDD, Flash Drive, 3G USB card and Smartphone
USB
Charging
Only for Charging iPad, iPhone and Smartphone
2.3 Power ON/OFF
The Power ON/OFF Button of iDEA+ Docking Station.
iDEA
+
Docking Station 4
Page 10

iDEA
+
Docking Station 5
2.4 Hardware Connection
This section describes the hardware connection mechanism of iDEA
+
Docking Station connected to the
Internet.
You need to prepare the following items before you can establish an Internet connection through your
iDEA
+
Docking Station:
1. A notebook/tablet PC which have wireless available.
2. Internet available of any ADSL/Cable modem or 3G USB card/3G Mobile phone.
3. Flash Drive/ USB hard drive.
Install the device
Gateway:
1. Insert one end of the Ethernet cable to the WAN port of iDEA
+
Docking Station.
2. Insert one end of the Ethernet cable to the LAN port of ADSL/Cable modem which is Internet
available.
3. Insert the flash drive to the USB port of iDEA
+
Docking Station if you want to share the contents of
flash drive to Wi-Fi devices.
4. Now other Wi-Fi devices can access Internet via your iDEA
+
Docking Station via wireless.
Hotspot:
1. Wi-Fi devices connect to your iDEA
+
Docking Station.
2. The iDEA
+
Docking Station connects to root AP which is Internet available.
3. Configure your iDEA
+
Docking Station to Hotspot mode.
4. Now the Wi-Fi devices can access Internet via your iDEA
+
Docking Station and root AP.
3G USB Sharing:
1. Insert your 3G data card to the USB port of iDEA
+
Docking Station.
2. Configure your iDEA
+
Docking Station to 3GUSB mode.
3. Now the Wi-Fi devices can access Internet sharing your 3G network.
Android Mobile Sharing:
1. Insert your Android phone to the USB port of iDEA
+
Docking Station.
2. Enable USB Tethering on your Android phone.
3. Configure your iDEA
+
Docking Station to Android Mobile mode.
4. Now the Wi-Fi devices can access Internet sharing your 3G network.
Figures show the overall hardware connection mechanism of your iDEA
+
Docking Station.
Page 11
iDEA
+
Docking Station 6
Page 12

iDEA
+
Docking Station 7
Page 13
iDEA
+
Docking Station 8
Page 14

2.5 Charging
Support any 5V USB chargeable handheld devices including iPad, iPhone. Connect your iPad/iPhone
or Smartphone to the USB charger port (red circle) of iDEA
+
Docking Station.
The USB port is only for charging. Do not plug any USB devices to this
charging port.
!
iDEA
+
Docking Station 9
Page 15

Chapter 3 Configuration via PC
For your convenience, the web GUI allows you to configure iDEA+ Docking Station using web browser. This
chapter will explain all the functions in this Web GUI.
iDEA
+
Docking Station 10
Page 16
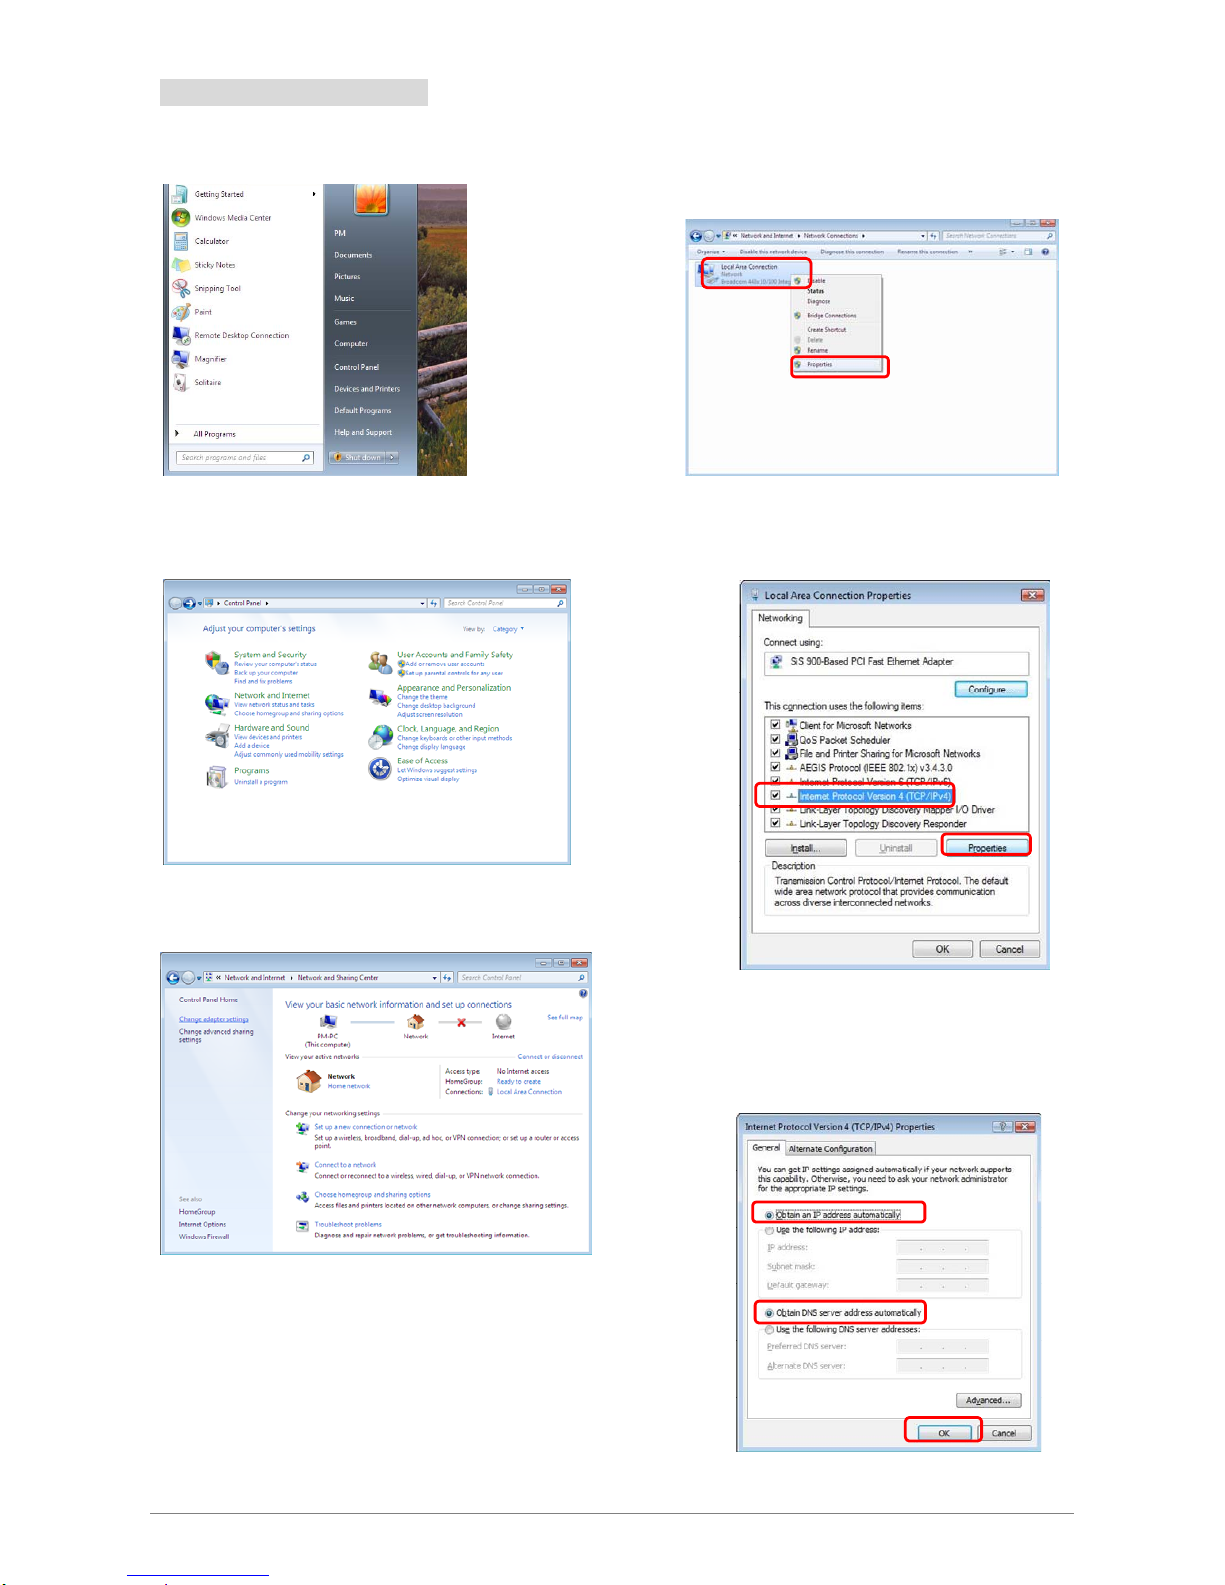
3.1 Setting up the TCP/IP
iDEA
+
Docking Station 11
Step 1: Click Start→Control Panel.
Step 4: Right click on the Local Area Connection
and select Properties.
1
2
Step 2: Click the View network status and tasks.
Step 5: Select Internet Protocol Version 4
(TCP/IPv4) and click Properties.
1
2
Step 3: Click on the Change adapter settings.
Step 6: Go to General icon, select Obtain an IP
address automatically and DNS server
address automatically.
1
2
3
Page 17

3.2 Login
To access the iDEA
+
Docking Station configuration screens, follow the following steps will enable you to
log into the iDEA
+
Docking Station.
1.
Launch your web browser, and enter the
iDEA+ Docking Station
’s IP Address:
“192.168.168.1”
in the
address field then press the “Enter” key to login.
iDEA
+
Docking Station 12
2. Enter the default User name: “admin” and Password: “admin”. Then press “OK” to login.
Page 18
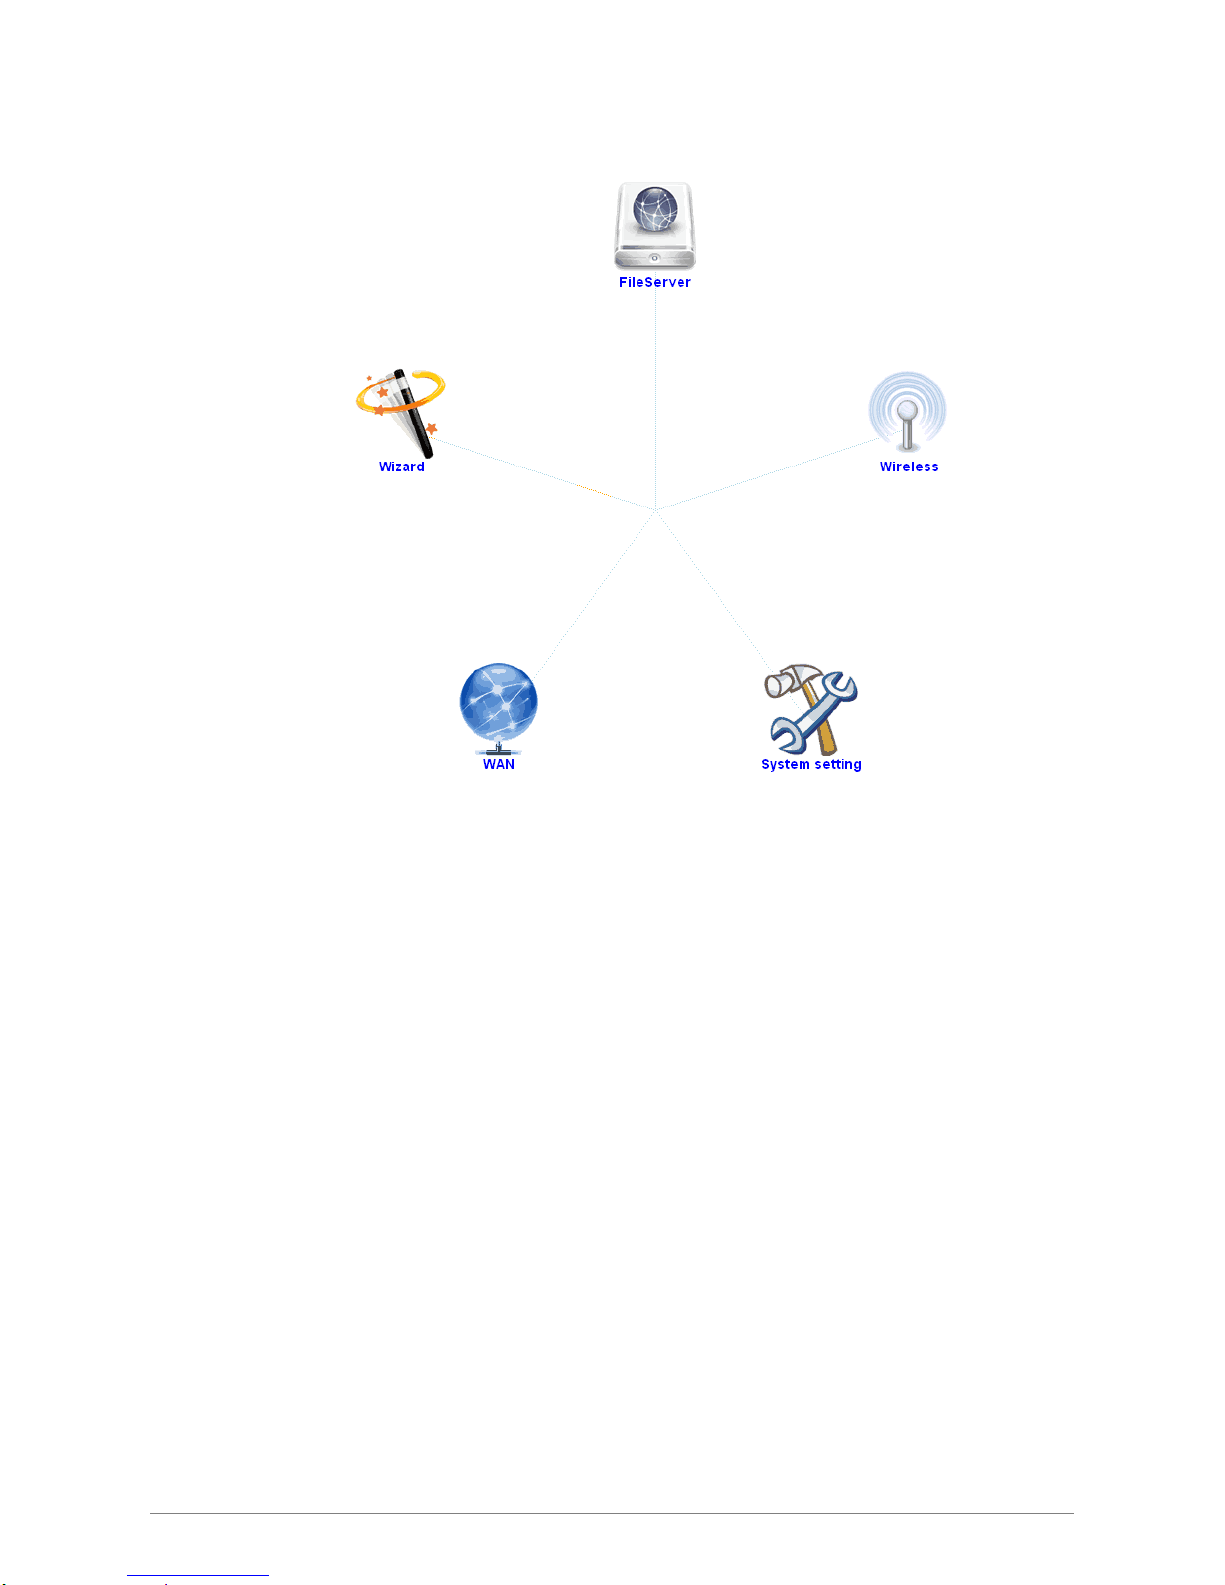
3. There are Wizard, WAN, System Setting, Wireless and FileServer icon to help you to configure the
iDEA
+
Docking Station easily.
iDEA
+
Docking Station 13
Page 19

3.3 Wizard
Click on “Wizard” and the following screen will pop-up:
Click Next>> button to continue.
Choose Gateway or Hotspot mode.
3.3.1 Gateway Mode
In the Gateway mode, the iDEA+ Docking Station connects to Internet through ADSL modem, cable modem,
3G USB card or Android mobile phone.
WAN access type: Static IP, DHCP, PPPoE, USB3G and Android Mobile.
Static IP, DHCP& PPPoE:
Select WAN access type from the drop-down list.
z DHCP: If you are using DHCP client, just click Apply changes to save the setting.
iDEA
+
Docking Station 14
Page 20

z Static IP: Please fill in IP address, subnet mask, Default Gateway, DNS IP address if you are using
Static IP.
z PPPoE: Please enter the username and password if you are using PPPoE connection.
USB3G
Please enter the information of APN service name, PIN code, dial number, account name and password if
you choose USB3G and use 3G USB card to access Internet.
iDEA
+
Docking Station 15
Page 21

Android Mobile
Select Android Mobile in WAN Access Type then click Apply Changes.
1. Click Next>> button to continue.
2. Enter a wireless SSID.
3. Select Encryption and key.
z None
z WEP-64bits
z WEP-128bits
z WPA PSK
z WPA2 PSK
z WPA2 Mixed
4. Click “Finished” button to finish the settings.
iDEA
+
Docking Station 16
Page 22

5. Enter status page to check the information in Gateway mode.
3.3.2 Hotspot Mode
In the Hotspot mode, the iDEA+ Docking Station connects to xDSL/Cable wireless router via wireless and
allows Wi-Fi devices to share the Internet connection. It also extends the wireless network coverage.
To configure iDEA
+
Docking Station charger to Hotspot mode:
1. Click “Scan network” button and select a root AP router to connect.
2. Select Encryption and key of the root AP router and click “Finished” button to save the settings.
iDEA
+
Docking Station 17
Page 23

3. Enter Status page to check the information in Hotspot mode.
3.4 Wireless
Click Wireless icon and it will show the wireless Basic Settings. A screen is displayed as shown in following
figure.
iDEA
+
Docking Station 18
Page 24

Fields in this page:
Field Description
Band Select the appropriate band from the list provided to correspond with your network
setting.
SSID The Service Set Identifier (SSID) or network name. It is case sensitive and must not
exceed 32 characters, which may be any keyboard character. The mobile wireless
stations shall select the same SSID to be able to communicate with your iDEA
+
Docking Station.
Channel Width The selections are 40MHz or 20MHz.
Control Sideband The selections are Upper or Lower.
Channel Number Select the appropriate channel from the list provided to correspond with your
network settings. You shall assign a different channel for each AP to avoid signal
interference.
Broadcast SSID The selections are Enabled or Disabled.
WMM Wi-Fi Multimedia (WMM) is a wireless Quality of Service feature that improves
quality of audio, video, and voice applications by prioritizing wireless traffic. To use
this feature, the wireless client devices in your network must support Wireless WMM.
Enabled by Default.
Data Rate The selections are Auto, 1M, 2M, 5.5M, 11M, 6M, 9M, 12M, 18M, 24M, 36M, 48M,
54M, MCS0, MCS1, MCS2, MCS3, MCS4, MCS5, MCS6 and MCS7.
Apply Changes
Change the settings. New parameters will take effect after save into flash memory and please reboot
device.
3.5 WAN
Click WAN icon and it will show the WAN Interface Setup. A screen is displayed as shown in following figure.
This page is used to configure the parameters for Internet network which connects to the WAN port or USB
port of iDEA
+
Docking Station. Here you may change the access type to static IP, DHCP, PPPoE, USB3G or
iDEA
+
Docking Station 19
Page 25

Android Mobile by click the item value of WAN Access type.
iDEA
+
Docking Station 20
Page 26

3.6 File Server
First, please connect your card reader, flash driver or USB Hard Drive to the USB port of the iDEA+ Docking
Station. Then click File Server icon and it will list all the folders and files in your Flash Driver or USB HDD.
It acts as a wireless HDD and support HTTP file server for iPad/iPhone to browse contents (Photo, Music,
Video) via browser.
You can also use Android Phone as USB storage device. Please refer to the user manual of Android Phone to
turn on USB storage.
Flash Drive/USB Hard Drive:
Card Reader
Here is the file list.
Icon in this page:
Icon Description
Disk Partitions Click this icon to see the disk partition of your USB HDD.
Delete Check folder or files you want to delete then click Delete icon to delete them.
Upload Click Upload icon and choose a file to upload to the flash drive which connects with
the iDEA
+
Docking Station.
Refresh Refresh the contents in the USB disk.
iDEA
+
Docking Station 21
Page 27

3.7 System setting
3.7.1 Wireless
Click System Setting icon and you can view Wireless link in the left navigation bar. Following are the options
available under Wireless:
Basic Settings
Active Clients
Advanced Settings
Security
Hotspot Mode
3.7.1.1 Basic Settings
To configure the wireless basic settings, click on the Basic Settings link in the left navigation bar. A screen is
displayed as shown in following figure.
Fields in this page:
Field Description
Band Select the appropriate band from the list provided to correspond with your network
setting.
SSID The Service Set Identifier (SSID) or network name. It is case sensitive and must not
exceed 32 characters, which may be any keyboard character. The mobile wireless
stations shall select the same SSID to be able to communicate with your wireless
broadband router.
Channel Width The selections are 40MHz or 20MHz.
Control Sideband The selections are Upper or Lower.
Channel Number Select the appropriate channel from the list provided to correspond with your
network settings. You shall assign a different channel for each AP to avoid signal
interference.
Broadcast SSID The selections are Enabled or Disabled.
WMM Wi-Fi Multimedia (WMM) is a wireless Quality of Service feature that improves
iDEA
+
Docking Station 22
Page 28

quality of audio, video, and voice applications by prioritizing wireless traffic. To use
this feature, the wireless client devices in your network must support Wireless WMM.
Enabled by Default.
Data Rate The selections are Auto, 1M, 2M, 5.5M, 11M, 6M, 9M, 12M, 18M, 24M, 36M, 48M,
54M, MCS0, MCS1, MCS2, MCS3, MCS4, MCS5, MCS6 and MCS7.
Apply Changes
Change the settings. New parameters will take effect after save into flash memory and please reboot
device.
3.7.1.2 Active Clients
Click on Active Clients link and it will show the clients currently associated with the iDEA
+
Docking Station.
iDEA
+
Docking Station 23
Page 29

3.7.1.3 Advanced Setting
This page allows advanced users who have sufficient knowledge of wireless LAN. These setting shall not be
changed unless you know exactly what will happen for the changes you made on your router.
Fields in this page:
Field Description
Fragment Threshold This value should remain at its default setting of 2346. It specifies the maximum
size for a packet before data is fragmented into multiple packets. If you
experience a high packet error rate, you may slightly increases the “Fragment
Threshold” value within the value range of 256 to 2346. Setting this value too
low may result in poor network performance. Only minor modifications of this
value are recommended.
RTS Threshold This value should remain at its default setting of 2347. Should you encounter
inconsistent data flow, only minor modifications are recommended. If a network
packet is smaller than the preset “RTS threshold” size, the RTS/CTS
mechanism will not be enabled. The AP sends Request to Send (RTS) frames
to a particular receiving station and negotiates the sending of a data frame.
After receiving an RTS, the wireless station responds with a Clear to Send
(CTS) frame to acknowledge the right to begin transmission.
Beacon Interval The Beacon Interval value indicates the frequency interval of the beacon. Enter
a value between 20 and 1024. A beacon is a packet broadcast by the router to
synchronize the wireless network. The default is 100.
Preamble Type The Preamble Type defines the length of the CRC (Cyclic Redundancy Check)
block for communication between the AP and mobile wireless stations. Make
sure to select the appropriate preamble type. Note that high network traffic
areas should use the short preamble type. CRC is a common technique for
detecting data transmission errors.
IAPP The IEEE 802.11F or Inter-Access Point Protocol (IAPP) is a recommendation
that describes an optional extension to IEEE 802.11 that provides wireless
iDEA
+
Docking Station 24
Page 30

iDEA
+
Docking Station 25
access-point communications among multivendor systems.
Protection Prevent from interference of 11b device.
Aggregation Aggregating data unit. It can improve some transmission efficiency.
Short GI Short guard interval. Short GI can improve transmission data rate
WLAN Partition Isolate each WLAN client.
20/40MHz Coexist 20MHz and 40MHz will be coexist if enabled.
RF Output Power RF Output power level 100%, 70%, 50%, 35%,15%
Function buttons in this page:
Apply Changes
Change the settings. New parameters will take effect after save into flash memory and please reboot
device.
Page 31

3.7.1.4 Security
This screen allows you to setup the wireless security. Turn on WEP or WPA by using encryption keys could
prevent any unauthorized access to your WLAN.
Fields in this page:
Field Description
Encryption There are 4 types of security to be selected. To secure your WLAN, it’s strongly
recommended to enable this feature.
WEP: Make sure that all wireless devices on your network are using the same
encryption level and key. Click Set WEP Key button to set the encryption key.
WPA: WPA uses Advanced Encryption Standard (AES) for data encryption. AES
utilized a symmetric 128-bit block data encryption.
WPA2: WPA2, also known as 802.11i, uses Advanced Encryption Standard (AES)
for data encryption. AES utilized a symmetric 128-bit block data encryption.
WAP Mixed: The AP supports WPA (TKIP) and WPA2 (AES) for data encryption.
The actual selection of the encryption methods will depend on the clients.
Authentication
Mode
Personal (Pre-Shared Key): Pre-Shared Key authentication is based on a shared
secret that is known only by the parties involved. To use WPA Pre-Shared Key,
select key format and enter a password in the “Pre-Shared Key Format” and
“Pre-Shared Key” setting respectively. Please refer to “Pre-Shared Key Format” and
“Pre-Shared Key” setting below.
Pre-Shared Key
Format
PassPhrase: Select this to enter the Pre-Shared Key secret as user-friendly textual
secret.
Hex (64 characters): Select this to enter the Pre-Shared Key secret as hexadecimal
secret.
Pre-Shared Key Specify the shared secret used by this Pre-Shared Key. If the “Pre-Shared Key
Format” is specified as PassPhrase, then it indicates a passphrase of 8 to 63 bytes
long; or if the “Pre-Shared Key Format” is specified as PassPhrase, then it indicates
a 64-hexadecimal number.
Function buttons in this page:
Apply Changes
Change the settings. New parameters will take effect after save into flash memory and please reboot
the device.
iDEA
+
Docking Station 26
Page 32

3.7.1.5 Hotspot Mode
To configure iDEA
+
Docking Station to Hotspot mode:
1. Click “Scan network” button and select a root AP to connect. Click Connect button to continue.
2. Select Encryption and key of the root AP and click “Finished” button to save the settings.
iDEA
+
Docking Station 27
Page 33

3.7.2 TCP/IP Settings
There are two sub-menus for TCP/IP Settings: [LAN Interface] and [WAN Interface].
3.7.2.1 LAN Interface
This page is used to configure the parameters for local area network which connects to the iDEA+ Docking
Station. Here you may change the setting for IP address, subnet mask, DHCP, etc..
Fields in this page:
Field Description
IP Address The LAN IP address of iDEA+ Docking Station
Subnet Mask LAN subnet mask.
Default Gateway The default gateway is the routing device used to forward all traffic that is not
addressed to a station within the local subnet.
DHCP Disabled, Client, Server mode.
DHCP Client Range Specify the lowest and highest addresses in the range.
Static DHCP Choose Enable to enable static DHCP.
Domain Name Domain name to be registered with the DNS server.
802.1d Spanning Tree Enable/Disable 802.1d Spanning Tree. Default is Disabled.
Function buttons for this setting block:
z Show Client
Click to show the DHCP clients.
z Set Static DHCP
Click to set static DHCP.
z Apply Changes
Click to apply the new configuration.
z Reset
Click to abort change and recover the previous configuration.
iDEA
+
Docking Station 28
Page 34

Static DHCP Setup
Fields in this page:
Field Description
IP Address The IP address of your PC.
MAC Address The MAC address of NIC in your PC.
Comment Fill in the comment
Function buttons for this setting block:
z Apply Changes
Click to apply the new configuration.
z Reset
Click to abort change and recover the previous configuration.
The Static DHCP List lists the IP Address and MAC addresses of PC which are with Static IP Address. You
can select the entries at the Select column and apply to the following function buttons.
Function buttons for the Static DHCP List:
z Delete Selected
Delete the selected entries from the list.
z Delete All
Flush the list.
z Reset
Click to abort change and recover the previous configuration.
iDEA
+
Docking Station 29
Page 35

iDEA
+
Docking Station 30
3.7.2.2 WAN Interface
This page is used to configure the parameters for Internet network which connects to the WAN port or USB
port of your iDEA
+
Docking Station. Here you may change the access method to static IP, DHCP, PPPoE,
USB3G or Android Mobile by click the item value of WAN Access type.
Page 36

3.7.2.2.1 DHCP Client
By default, the Configuration Type is set to DHCP Client, and it should be kept only if your ISP supports
DHCP or you are connecting through a dynamic IP address.
Fields in this page:
Field Description
WAN Access Type Choose DHCP Client mode
Host Name Host Name of the device
MTU Size Maximum Transmission Unit. Default is 1492 bytes.
Attain DNS Automatically Click to get DNS server IP address from DHCP server.
Set DNS Manually Click to set DNS server IP address manually.
DNS1 Primary DNS Server IP Address.
DNS2 Secondary DNS Server IP Address.
DNS3 Third DNS Server IP Address.
Enable IGMP Proxy Click to enable IGMP Proxy.
Enable Ping Access on
WAN
Click to enable Ping access on WAN.
Enable Web Server
Access on WAN
Click to enable Web remote management from WAN.
Function buttons for this setting block:
z Apply Changes
Click to apply the new configuration.
z Reset
Click to abort change and recover the previous configuration.
iDEA
+
Docking Station 31
Page 37

3.7.2.2.2 Static IP
If you are required to use a permanent IP address to connect to the Internet, then select Static IP.
Fields in this page:
Field Description
WAN Access Type Choose Static IP mode
IP Address Fill in Static IP Address provided by ISP.
Subnet Mask Fill in Subnet Mask provided by ISP.
Default Gateway Fill in Default Gateway IP Address provided by ISP.
MTU Size Fill in MTU size. Default is 1500 bytes.
DNS1 Primary DNS Server IP Address.
DNS2 Secondary DNS Server IP Address.
DNS3 Third DNS Server IP Address.
Enable IGMP Proxy Click to enable IGMP Proxy.
Enable Ping Access on WAN Click to enable Ping access on WAN.
Enable Web Server Access on WAN Click to enable Web remote management from WAN.
Function buttons for this setting block:
z Apply Changes
Click to apply the new configuration.
z Reset
Click to abort change and recover the previous configuration.
iDEA
+
Docking Station 32
Page 38

3.7.2.2.3 PPPoE
PPPoE: When PPPoE Mode is selected from the WAN Access Type drop down manual, the following screen
display. Point-to-Point Protocol (PPP) is a method of establishing a network connection between network
hosts. PPPoE, also known as RFC 2516, adapts PPP to work over Ethernet. PPPoE provides a mechanism
for authenticating users by providing User Name and Password fields and it is a connection type provided by
many ISP or Telecom.
Fields in this page:
Field Description
WAN Access Type Choose PPPoE mode
User Name Your ISP Account ID. Check your ISP for details.
Password Your ISP Account Password. Check your ISP for details.
Service Name Your ISP Service Name. Check your ISP for details.
Connection Type There are Continuous, connect on Demand and Manual in connection
type.
Idle Time Specifies that PPPoE connection should disconnect if the link has no
activity detected for n minutes. This field is used in conjunction with the
On-Demand feature and is enabled in connection type. To ensure that
the link is always active, enter a 0 in this field.
MTU Size Maximum Transmission Unit. The largest size packet that can be sent by
the modem. If the network stack of any packet is larger than the MTU
value, then the packet will be fragmented before the transmission.
Default is 1452 bytes.
Attain DNS Automatically Attain DNS server IP address from ISP automatically.
iDEA
+
Docking Station 33
Page 39

iDEA
+
Docking Station 34
Set DNS Manually Setup DNS server IP address manually.
DNS1 Primary DNS Server IP Address.
DNS2 Secondary DNS Server IP Address.
DNS3 Third DNS Server IP Address.
Enable IGMP Proxy Click to enable IGMP Proxy.
Enable Ping Access on WAN Click to enable Ping access on WAN.
Enable Web Server Access
on WAN
Click to enable Web remote management from WAN.
Function buttons for this setting block:
z Connect
Click to connect ISP. It is available when you choose manual in connection type.
z Disconnect
Click to disconnect ISP. It is available when you choose manual in connection type.
z Apply Changes
Click to apply the new configuration.
z Reset
Click to abort change and recover the previous configuration.
Page 40

3.7.2.2.4 USB3G
Connect your 3G USB card to the USB port of iDEA
+
Docking Station. You can share 3G Internet connection
among other Wi-Fi available devices.
Fields in this page:
Field Description
WAN Access Type Choose USB3G mode
User Name ISP Account ID. Check your ISP for details.
Password ISP Account Password. Check your ISP for details.
PIN Person Identification Number.
APN Enter APN string provided by ISP.
Dial Number Enter Dial Number provided by ISP.
Connection Type There are Continuous, connect on Demand and Manual in connection type.
Idle Time Specifies that connection should disconnect if the link has no activity
detected for n minutes. This field is used in conjunction with the
On-Demand feature and is enabled in connection type. To ensure that the
link is always active, enter a 0 in this field.
MTU Size Fill in MTU size. Default is 1490 bytes.
Attain DNS Automatically Attain DNS server IP address from ISP automatically.
Set DNS Manually Setup DNS server IP address manually.
DNS1 Primary DNS Server IP Address.
iDEA
+
Docking Station 35
Page 41

iDEA
+
Docking Station 36
DNS2 Secondary DNS Server IP Address.
DNS3 Third DNS Server IP Address.
Enable IGMP Proxy Click to enable IGMP Proxy.
Enable Ping Access on
WAN
Click to enable Ping access on WAN.
Enable Web Server
Access on WAN
Click to enable Web remote management from WAN.
Function buttons for this setting block:
z Connect
Click to connect ISP. It is available when you choose manual in connection type.
z Disconnect
Click to disconnect ISP. It is available when you choose manual in connection type.
z Apply Changes
Click to apply the new configuration.
z Reset
Click to abort change and recover the previous configuration.
Page 42

3.7.2.2.5 Android Mobile
Share your Android phone’s data connection via USB. Use the USB cable that come with your phone to
connect your phone to the USB port of iDEA
+
Docking Station.
Change the configuration on Android Phone:
1. Press Home, press Menu and touch Settings to open the Settings application
2. Touch Wireless & networks > Tethering & portable hotspot.
3. Check USB Tethering: The phone starts sharing its mobile network data connection with your
iDEA+ Docking Station via USB connection. An ongoing notification is added to the Status bar and
Notifications panel.
Fields in this page:
Field Description
WAN Access Type Choose Android Mobile mode
Attain DNS Automatically Attain DNS server IP address from ISP automatically.
Set DNS Manually Setup DNS server IP address manually.
DNS1 Primary DNS Server IP Address.
DNS2 Secondary DNS Server IP Address.
DNS3 Third DNS Server IP Address.
Enable IGMP Proxy Click to enable IGMP Proxy.
Enable Ping Access on WAN Click to enable Ping access on WAN.
Enable Web Server Access on
WAN
Click to enable Web remote management from WAN.
Function buttons for this setting block:
z Apply Changes
Click to apply the new configuration.
z Reset
Click to abort change and recover the previous configuration.
iDEA
+
Docking Station 37
Page 43

iDEA
+
Docking Station 38
3.8 Management
The Management page allows you to manage your iDEA
+
Docking Station.
You can view Management link in the left navigation bar. Following are the options available under
Management:
Statistics
Time Zone Setting
Log
Upgrade Firmware
Save/Reload Settings
Password
Reboot
Logout
Page 44

3.8.1 Statistics
This page shows the packet counters for transmission and reception regarding to Wireless LAN and
Ethernet WAN networks.
iDEA
+
Docking Station 39
Page 45

3.8.2 Time Zone Setting
You can maintain the system time by synchronizing with a public time server over the Internet.
Fields in this page:
Field Description
Current Time The current time of the specified time zone. You can set the current time by
yourself or configured by SNTP.
Time Zone Select The time zone in which the DSL device resides.
Enable NTP client update Enable the NTP client to update the system clock.
Automatically Adjust
Daylight Saving
Check to Automatically Adjust Daylight Saving.
NTP server The IP address of the NTP server. You can select from the list or set it
manually.
Function buttons for this setting block:
Apply Changes
Click to apply the new configuration.
Reset
Click to abort change and recover the previous configuration.
Refresh
Click to refresh the configuration.
iDEA
+
Docking Station 40
Page 46

3.8.3 Log
This page can be used to set remote log server and show the system log.
Fields in this page:
Field Description
Enable Log Check to enable Log.
System all Check to enable log of system all.
Wireless Check to enable log of Wireless.
DoS Check to enable log of DoS.
Enable Remote Log Check to enable remote log.
Log Server IP Address Fill in the IP address of Log server.
Function buttons for this setting block:
Apply Changes
Click to apply the new configuration.
iDEA
+
Docking Station 41
Page 47

3.8.4 Upgrade Firmware
This page allows you upgrade the firmware to new version. Please note, do not power off the device during
the upload because it may crash the system.
To upgrade the firmware for the device:
z Click the Browse button to select the firmware file.
z Confirm your selection.
z Click the Upload button to start upgrading.
IMPORTANT! Do not turn off your device or press the Reset button while this procedure is in progress.
iDEA
+
Docking Station 42
Page 48

3.8.5 Save/Reload Setting
This page allows you save current settings to a file or reload the settings from the file which was saved
previously. Besides, you could reset the current configuration to factory default.
Function button for this first setting block:
Save
Click to save the setting to a file.
Upload
To load the setting for the iDEA
+
Docking Station:
z Click the Browse button to select the setting file.
z Confirm your selection.
z Click the Upload button to start uploading.
Reset
Click to reset settings to default. The iDEA
+
Docking Station will reboot.
iDEA
+
Docking Station 43
Page 49

3.8.6 Password
This page is used to set the account to access the web server of iDEA
+
Docking Station. Empty user name
and password will disable the protection.
Fields in this page:
Field Description
User Name Fill in new username for login.
New Password Fill in new password for login.
Confirmed Password Fill in new password again to confirm.
Function buttons for this setting block:
Apply Changes
Click to apply the new configuration.
Reset
Click to abort change and recover the previous configuration.
iDEA
+
Docking Station 44
Page 50

3.8.7 Reboot
This page is used to reboot iDEA
+
Docking Station.
iDEA
+
Docking Station 45
Page 51

3.8.8 Logout
This page is used to logout iDEA
+
Docking Station.
iDEA
+
Docking Station 46
Page 52

Chapter 4 Configuration via Smart Phone
Please enter Wi-Fi Settings of your smart phone and connect to the iDEA+ Docking Station first. Please enter Wi-Fi Settings of your smart phone and connect to the iDEA+ Docking Station first.
4.1 Install APPs for Android Phone
Install the Android APP to configure iDEA
+
Docking Station using Android Phone.
Before you touch the iDEA
+
APK, please make sure that your Android phone is already connected to iDEA+
Docking Station via Wi-Fi.
Touch IDEAPlus.apk to install the iDEA
+
Docking Station application.
1. Touch Install to install the application.
2. Touch Open to open the status page of iDEA
+
Docking Station.
iDEA
+
Docking Station 47
Page 53

3. Please fill in username and password to login iDEA
+
Docking Station.
4. Here is the status page.
iDEA
+
Docking Station 48
Page 54

4.2 Setting
For Smart Phone user, l
aunch web browser, and enter the iDEA+ Docking Station’s IP Address:
“192.168.168.1”
and enter
the default User name: “admin” and Password: “admin”
4.2.1 Gateway Mode
1. Touch Setting->Internet.
2. Touch Choose and select DHCP. Touch “Submit” to continue setting.
3. Settings are saved. Touch Confirm to exit.
iDEA
+
Docking Station 49
Page 55

4.2.2 Hotspot Mode
1. Touch Setting -> Internet.
2. Touch Choose and select Hotspot. Touch “Submit” to continue setting.
iDEA
+
Docking Station 50
Page 56

3. It will list the Wireless AP for you to connect. Touch an AP to connect.
4. When AP’s encryption is WPA/WPA2, enter the pre-shared key of the wireless AP. Touch “Join” to
continue.
iDEA
+
Docking Station 51
Page 57

5. When AP’s encryption is WEP, choose Key Length, Key Format and enter the WEP key of the wireless
AP. Touch “Join” to continue.
6. Settings are saved. Touch Confirm to exit.
iDEA
+
Docking Station 52
Page 58

4.2.3 Wireless Setting
It is only to change the wireless setting of the iDEA
+
Docking Station.
1. Touch Setting->Wireless
2. In Authentication Type, choose “Open”,”WEP”, or “WPA-Auto”. Fill in the Pre-Shared Key when the
Authentication Type is WPA-Auto. Fill in the WEP key when the Authentication Type is WEP. You can turn on
Turbo mode and the channel width will be 40MHz. Fill in the SSID. Touch Submit to confirm the setting.
iDEA
+
Docking Station 53
Page 59

3. Settings are saved. Touch Confirm to exit.
iDEA
+
Docking Station 54
Page 60

4.3 Access USB Device
Touch USB Device
It will show the directory and file in the USB HDD or Flash Drive. Touch the video or music which you want to
playback.
iDEA
+
Docking Station 55
Page 61

Appendix A: Troubleshooting
iDEA+ Docking Station doesn’t respond
z Power ON iDEA
+
Docking Station
z If that doesn’t work, check if the power plug is connected to outlet.
Wi-Fi devices cannot connect with iDEA+ Docking Station
z Verify the network configuration of Wi-Fi devices.
z Verify the wireless security key.
z Verify if the Wi-Fi devices is too far to connect with iDEA
+
Docking Station.
The throughput is slow
z Avoid placing the iDEA
+
Docking Station near the metal objects
z Change the wireless channel.
Cannot access iDEA+ Docking Station webpage
z Check the IP address of your Wi-Fi client if it is in the same network domain as iDEA
+
Docking Station.
z Press reset button to reset iDEA
+
Docking Station to default.
iDEA
+
Docking Station 56
 Loading...