

Page 1

Panetfax
UF-766
USER'S GUIDE
Panasonic
Page 2

IMPORTANT INFORMATION
When requesting information, supplies, or service, always refer to the model and serial number of your machine. The
model and serial number plate is located on the rear of the machine. For your convenience, space is provided below to
record the information you may need in the future.
MODEL NO. UF-766
Date of Purchase
Dealer
Address
Telephone Number
( )
Supplies Telephone Number
( )
Service Telephone Number
( )
SERIAL NO.
o
t
№
a
t o o r a l
D d ^
p e g
Main Name Plate
Rear View
© 3992 by Matsushita Graphic Communication Systems, Inc.
All rights reserved.
Printed in Japan.
The contents of this manual are subject to change without notice.
Page 3
Panafax UF-766 Quick Guide
Panasonic®
16-APR-1992 15:00
Display shows
are not sure of the current mode, press I STOP | to return to the standby mode.
00%
in the standby mode. Start every session in the standby mode. If you make a mistake, or
Page 4
Panafax UF-766
Panasonic
CD
Deferred XMT
Polled
Ï
Polling
Making Single copy
fi'-
Making Multiple copy
ÎC
Journal
i
One Touch/ABBR. NO. Ust
Î
Directory Search Ust
ftogram Ust
Print out File Ust
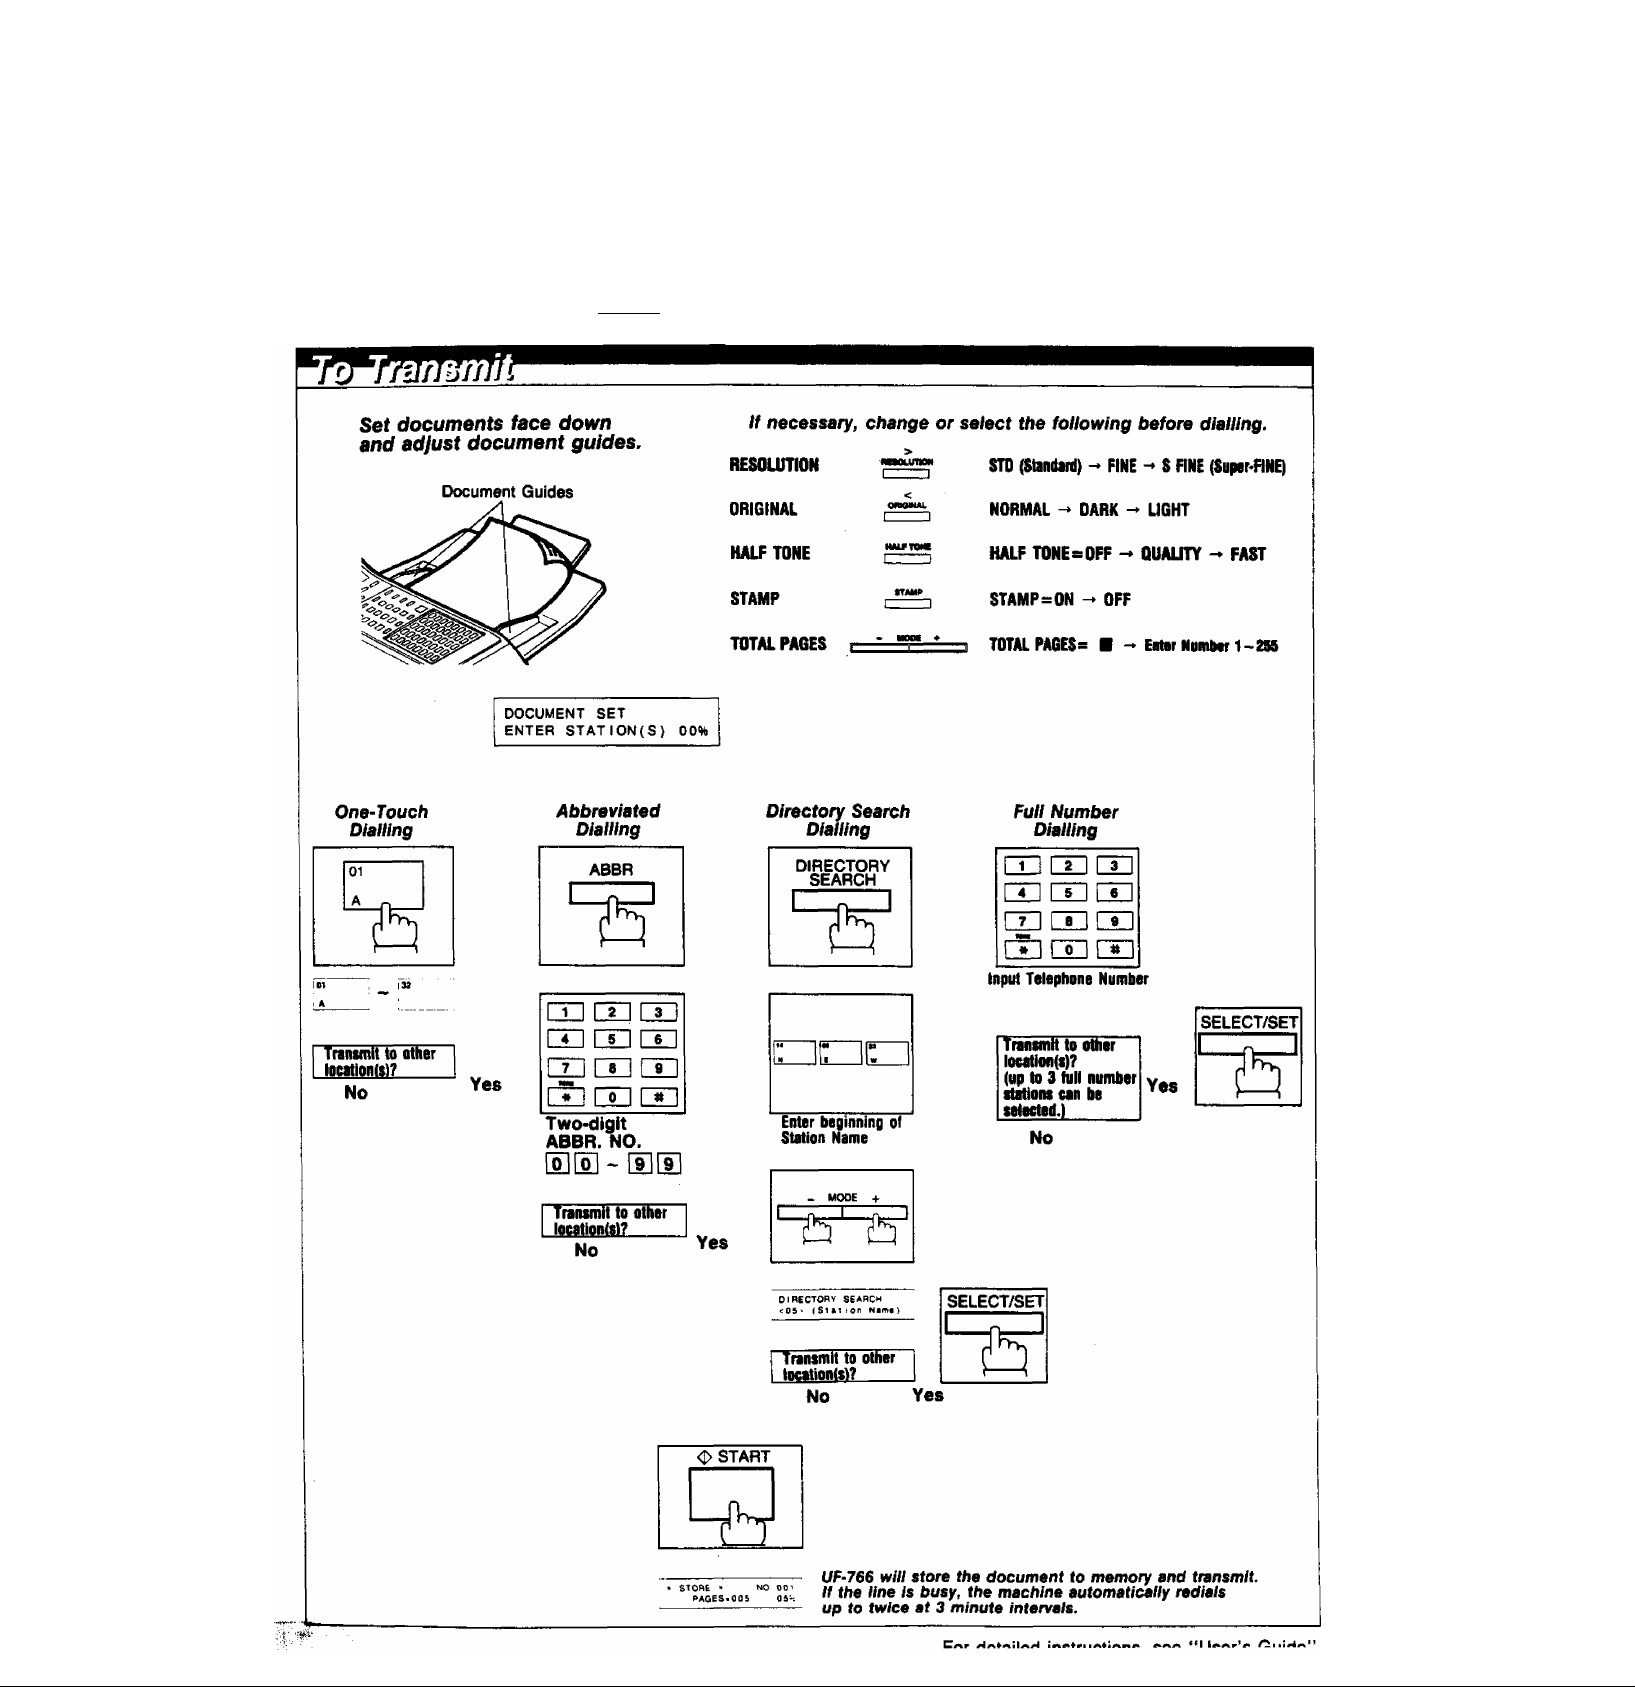
Set document
Set document
=cx]m j» Enter temporary pMsword ^ [ | Enter Stetion(s) | |
Set document
Set document
□□
rri □□ ^lZI]-*[11] Maintenance Report
□□ [T] User Parameter Ust
mr2~l7* Enter temporary pawword i |
.. o nâÊit
m
L?J ^ i
_ _ _ _ _ _
Enter Start Time Enter Stationfs)
Enter No. of copies
Max. 255
Fax Parameter Ust
1 ^ LU joymal
Individual Transmission
m
Œ2
>□
cri-a
CO - □
CO ->n
co-a
Change Time or Station
Delete File
Print File
INFORMATION CODE
INCOMPLETE
INFO. CODE.633
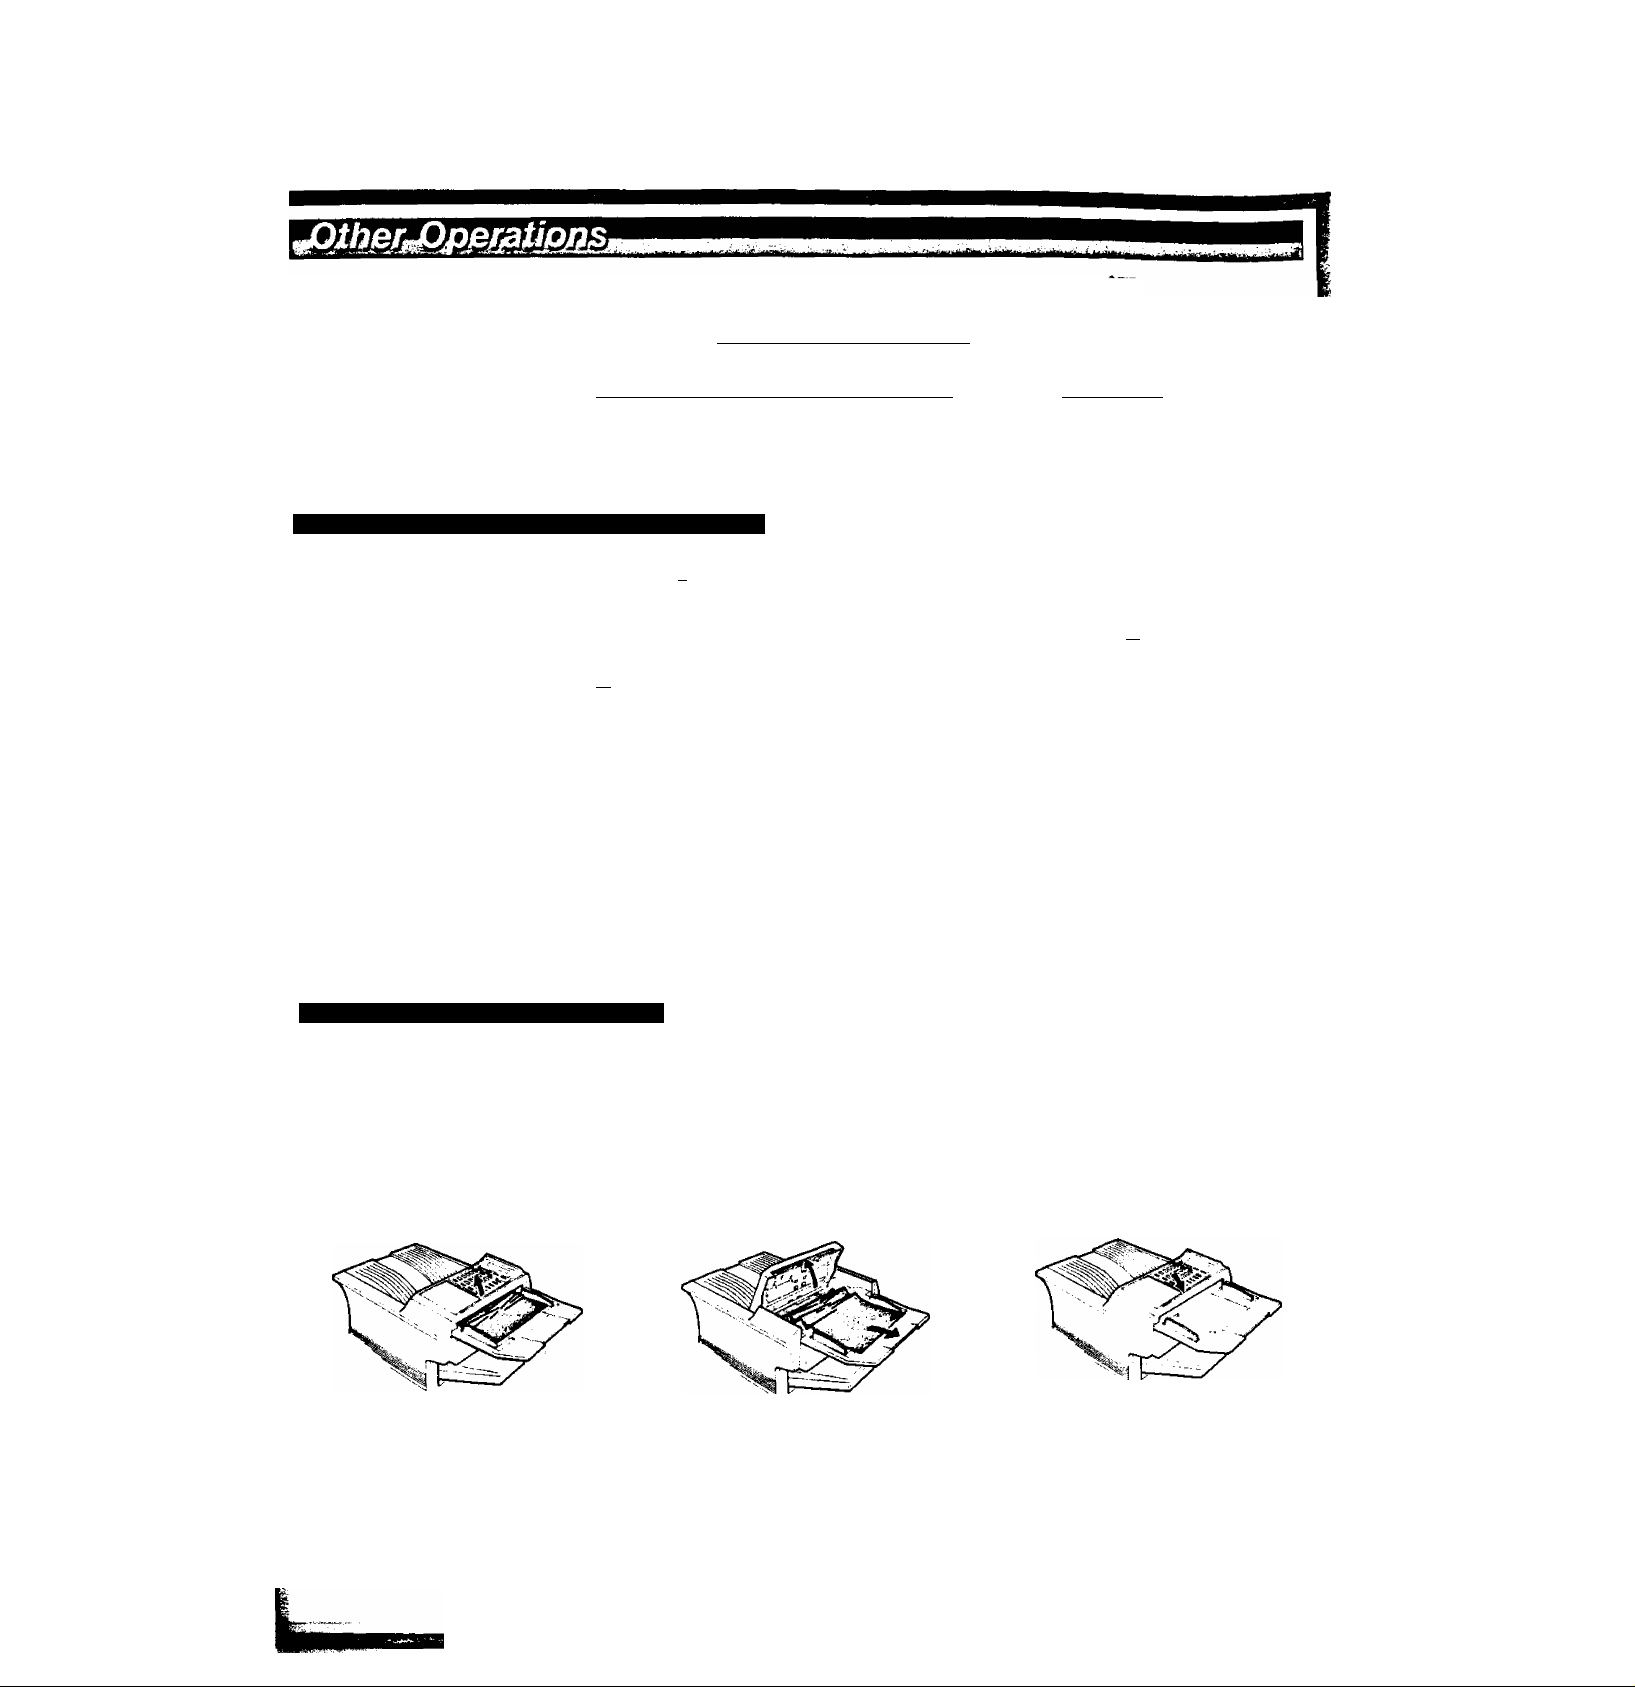
CLEARING A DOCUMENT JAM
1. To clear the jam, open the Transmitting Cover.
CLEARING A RECORDING PAPER JAM
If something unusual occurs, press DISPLAY key, the display may show INFO. CODE. For example,
-* tutor File NO.
►rT~im->ru T* Delete All Files
•LXJL3J-I
INFO. CODE » 633 means redial was not successful because of a busy line. For other codes, see
User's Guide.
-----------
1 yy,
»[Ht[Z]-^Q Enter Fite NO.
2. Remove the jammed paper.
UtQ
■Q
TIme'or
3. Close the Transmitting Cover gently.
Info. Code
001, 005 Remove paper cassette and fammed paper.
002 Open receiving cover, remove developer unit, drum unit and jammed paper.
003 Open receNlno cover, remove jammed paper from fuser area.
Action
For detailed instructions, see “User’s Guide". L
Page 5

Safety Information
ÄDANGER
denotes an immediately hazard that could result in serious injury or death.
INVISIBLE LASER RADIATION WHEN OPEN AND INTERLOCK DEFEATED.
AVOID DIRECT EXPOSURE TO BEAM.
ÄWARNING
denotes a potential hazard that could result in serious injury or death.
• TO PREVENT HRE OR SHOCK, DO NOT EXPOSE THIS PRODUCT TO RAIN OR ANY TYPE OF MOISTURE.
• TO MINIMIZE THE POSSIBILITY OF SHOCK OR DAMAGE TO THE MACHINE, IT MUST BE PROPERLY
GROUNDED.
• THIS PRODUCT CONTAINS HAZARDOUS RADIAHON. IF YOU DO NOT FOLLOW THESE INSTRUCHONS
OR USE CONTROLS, MAKE ADJUSTMENTS OR PROCEDURES OTHER THAN THOSE SPECIFIED HEREIN,
YOU MAY EXPOSE YOURSELF TO HAZARDOUS RADIAHON.
• WHEN YOU OPERATE THIS EQUIPMENT, THE SOCKET OUTLET SHOULD BE NEAR THE EQUIPMENT AND
BE EASILY ACCESSIBLE.
• MAKE SURE THAT THE MACHINE IS INSTALLED IN A SPACIOUS OR WELL-VENHLATED ROOM SO AS
NOT TO INCREASE THE AMOUNT OF OZONE IN THE AIR. SINCE OZONE IS HEAVIER THAN AIR, IT IS
RECOMMENDED THAT AIR AT FLOOR LEVEL BE VENTILATED.
CAUTION -Invisible User VORSICH T -Unslditbare ATTENTION -Rayonnement
ndistion when open and
InterKKk defeated.
AVO ID EXPOSURE
TO BEAM.
Laserstrahlung. wenn
Abdeckung geöflnet und en cas d'o uverture et lorsque
Sicheiheiteverrìegelung
überbrüdd. NICHT DEM
STR AHL AUSSETZEN.
laser invisible dangereux y se invalida el bloqueo, se
la sécurité est neutralisée. ínvisiUss de User.
EXP OSITION DANGEREUSE
AU FAISC EAU.
PELIGRO -Cuando se Are
producen radiaciones
EVITESE LA EXPOSICIÓN
DIRECTA A TALES RAYOS .
Ж
Ш X
Page 6
.CAUTION
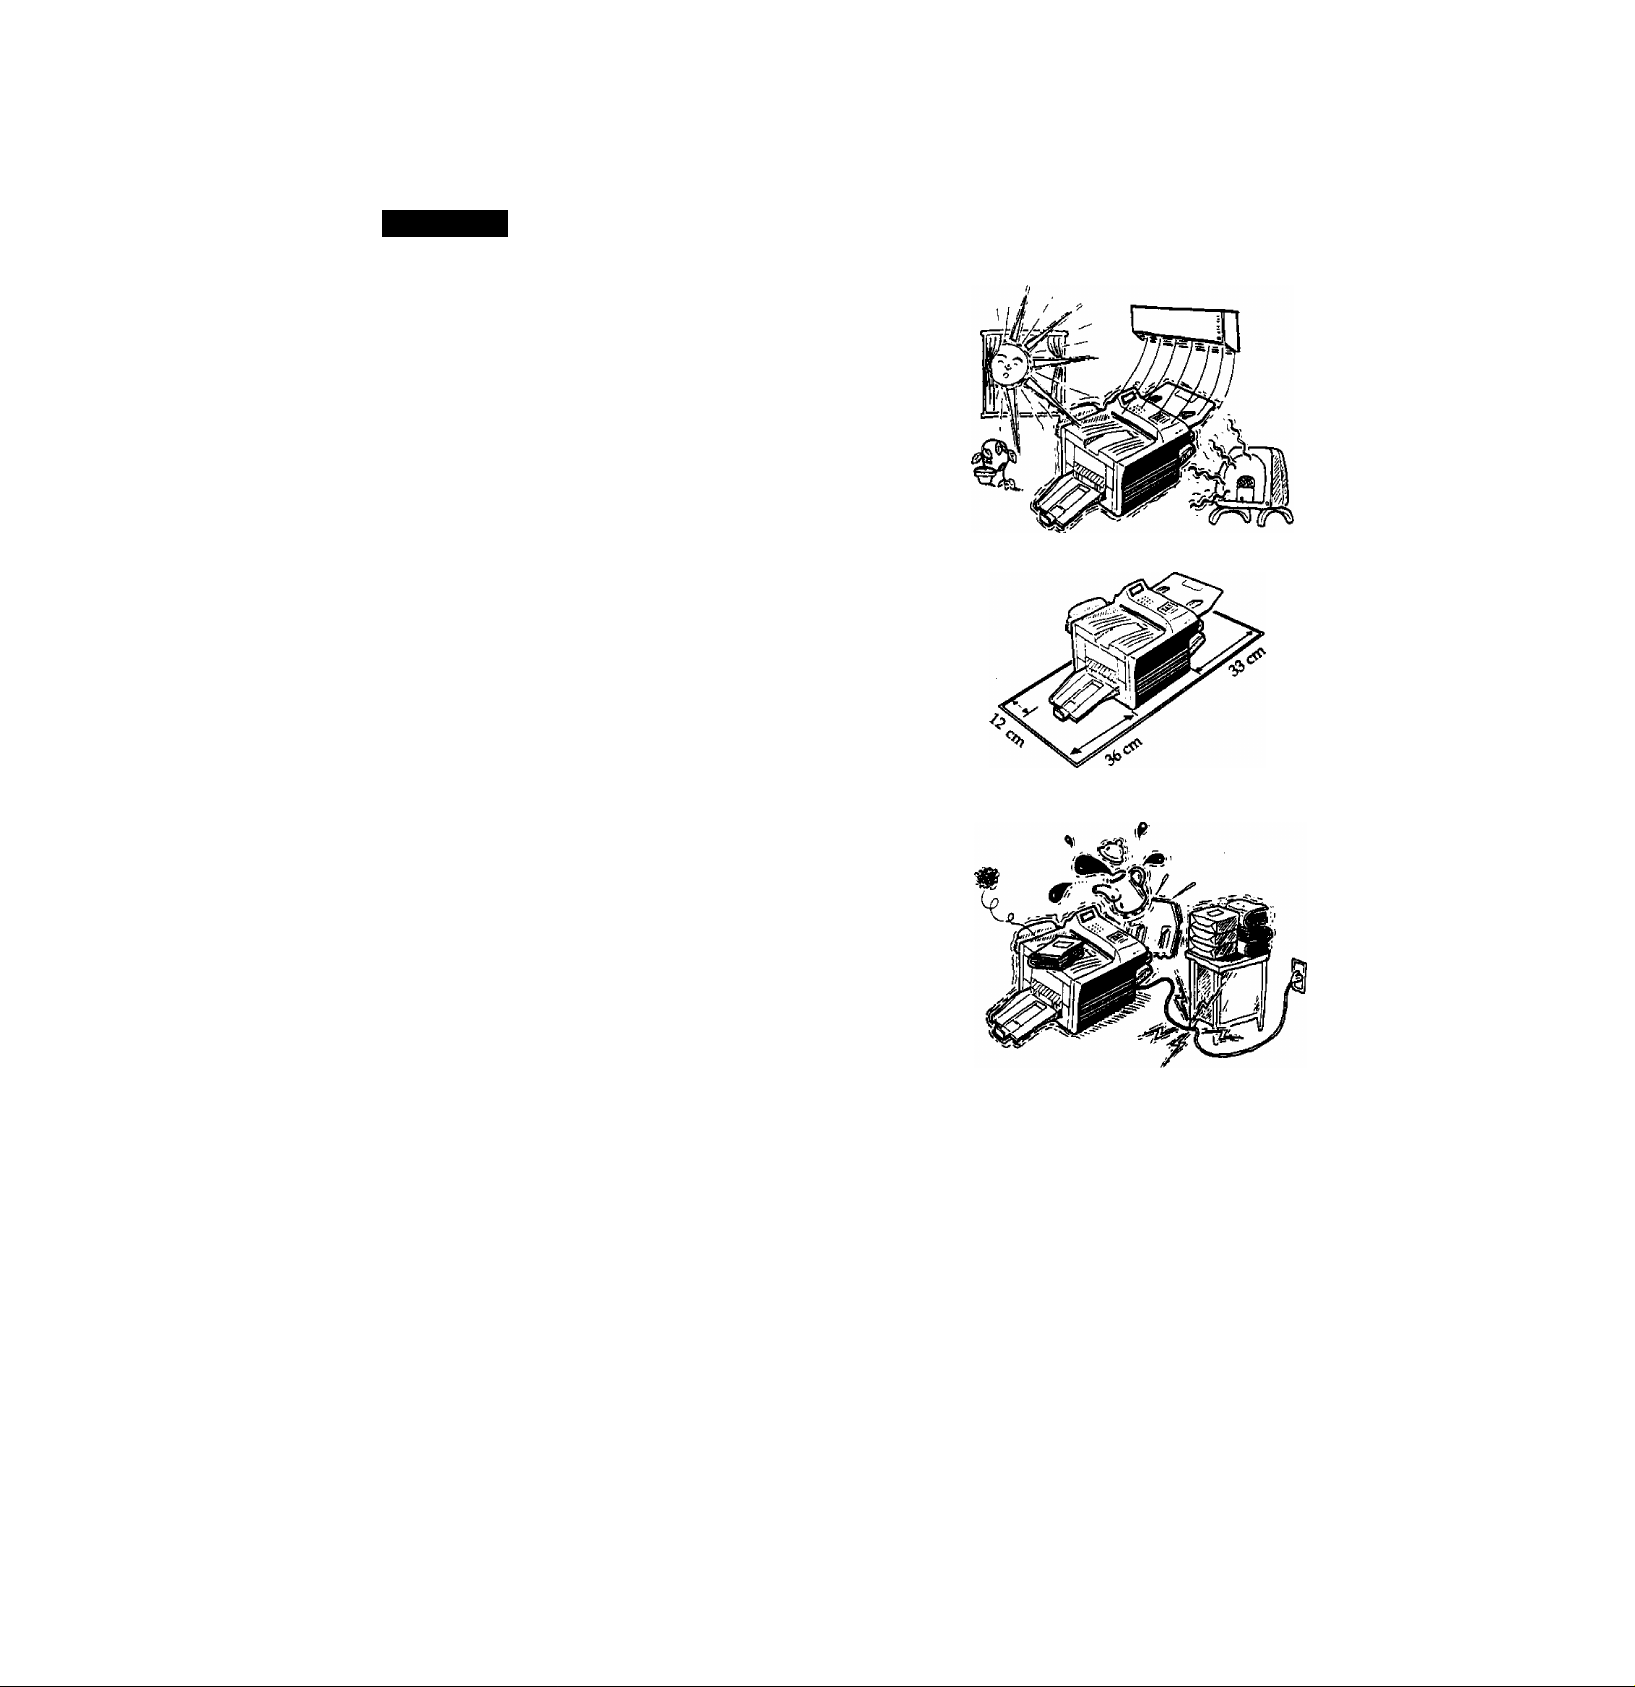
1. Do not install the machine near heating or air conditioning units.
2. Avoid exposure to direct sunlight.
3. Install the machine on a flat surface. Proper clearance should be
provided around the machine.
• Space of 33 cm or more to the right of the machine
• Space of 11 cm or more to the rear of the machine
• Space of 36 cm or more to the left of the machine
denotes hazards that could result in minor injury or damage to the machine-
4. Do not place heavy objects or spill liquids on the machine.
5. Do not step on or set anything on the power cord.
6. When you know that a thunderstorm is coming, we recommend that
you:
(1) Unplug the telephone line lead from the phone socket.
(2) Unplug the power supply lead from the AC outlet.
Page 7

Contents
Safety Information
About Your Fax Machine 3
The Parts and Controls............................................................................................................................................................................ 4
Installation............................................................................................................................................................................................... 8
Preparing for Initial Operation................................................................................................................................................................. 18
Basic Features 23
Function Key List................................................................................................................................................................................... 24
Loading Documents.............................................................................................................................................................................. 25
Sending Documents.............................................................................................................................................................................. 27
Receiving Documents.......................................................................................................................................................................... 34
Making Photocopies
Making Temporary Tr<insmission Adjustments..................................................................................................................................... 38
Using Your Machine's Telephone.......................................................................................................................................................... 41
....
......................................................................................................................................................................... 37
Advanced Features 43
Transmission to Multiple Stations.......................................................................................................................................................... 44
Polling.................................................................................................................................................................................................. 45
Using the Timer..................................................................................................................................................................................... 49
Using Program Keys............................................................................................................................................................................. 51
Timer Batch Transmission..................................................................................................................................................................... 57
Using Passwords.................................................................................................................................................................................. 58
Using Fax Access Codes...................................................................................................................................................................... 61
Using Department Codes...................................................................................................................................................................... 63
Edit File Mode....................................................................................................................................................................................... 65
Fax Parameters................................................................................................................................................................................... 68
Lists and Reports................................................................................................................................................................................ 72
Specialized Features 83
Sending Documents Via a Relay Network.............................................................................................................................................. 84
Using Confidential Communications..................................................................................................................................................... 94
Page 8

Problem Solving 103
If You Have Any of These Problems..................................................................................................................................................... 104
Information Codes............................................................................................................................................................................ 105
Troubleshooting................................................................................................................................................................................. 107
Repacking the Machine....................................................................................................................................................................... 121
Supplementary Information 123
Sorting Priority................................................................................................................................................................................... 124
lists and Reports Explanation............................................................................................................................................................. 125
Specifications.................................................................................................................................................................................... 128
Options and Supplies......................................................................................................................................................................... 131
Page 9

he UF-766 is one of the most advanced models
T
desktop facsimile (fax) machines.
It features a dual access mode, which allows you to
simultaneously perform one operation while the
machine is executing another and built-in memory
that allows storage of several pages of information.
The machine also offers a full range of speed dialling
in the Panafax family of G3/G2-compatible
techniques designed to make sending faxes easier,
faster, and more economical. In addition, this
machine uses laser beam printing for high picture
quality and high-speed printout.
Anyone can learn how to use the most frequently
used features with a few minutes of practice. How
ever, because the UP-766 has the capacity to perform
so many different functions, not everyone will need
to learn every feature.
The UF“766 Usor’S GuidB will help you to use your
UF-766 quickly and easily. The table of contents
shows where to find information on every feature.
Although we recommend that you at least review
each section briefly, you may only need to read the
sections that concern the feature(s) you are interested
in.
Page 10

Page 11

ABOUT YOUR FAX MACHINE
About Your Fax Machine
Read this section to get started using your fax machine. The
first chapter contains a short introduction to the UF-766 Fax
Machine. The second chapter tells you how to set up your fax
machine and connect it to a telephone line and AC power
source.
The contents and page numbers of this chapter are given
below.
..4
..4 Power Supply Leads
..5 Adjusting Volume...........................................
..8
..8
..9
..9
11
13
13 Setting Recording Paper Size
13
14
16
Connecting the Telephone Line and the
....................................
Ringer Volume.............................................
Monitor Volume
Preparing for Initial Operation
User Parameters
Setting Date, Time, LOGO and ID
Setting Dialling Type.......................................
Entering One-Touch/Abbreviated
Dialling Numbers
...........................................
.................
............................................
....................
..............................
........................................
...
....
....
....
....
....
....
....
....
17
18
18
18
19
19
20
21
21
22
Page 12
ABOUT YOUR FAX MACHINE
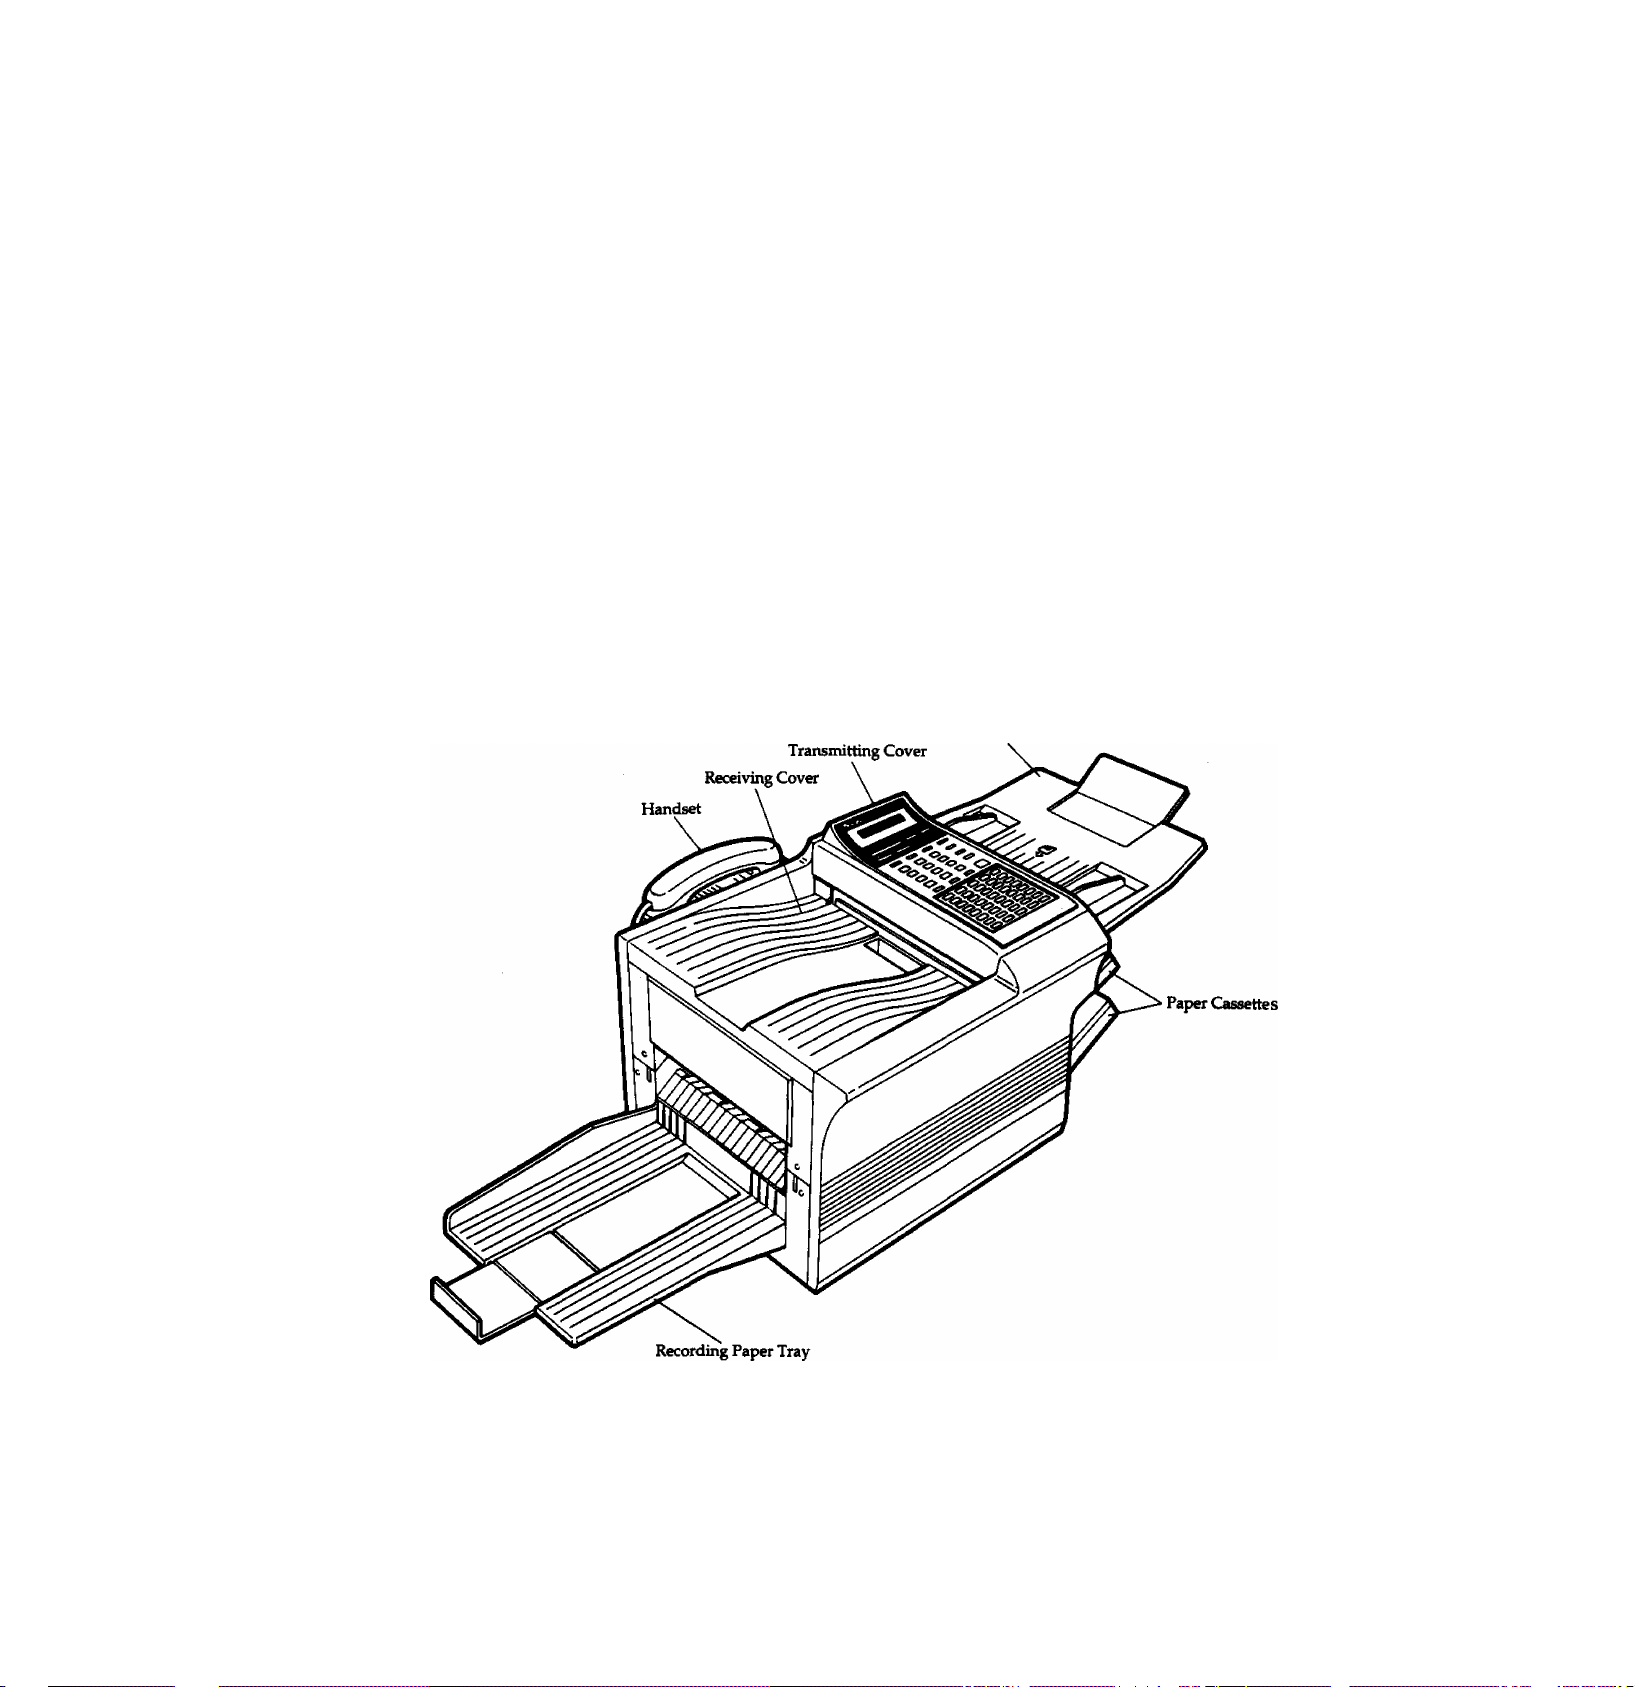
External View
efore setting up your UF-766 Fax Machine,
B
you should learn a little about it. Read the
following sections to identify the UF-766 parts and
controls and to become familiar with its features.
The Parts and Controls
ADF (Automatic
Document Feeder)
Tray
Page 13

Control Panel
Q LCD Display
Shows date and time, or the current operation.
@ POWER Lamp
Lights when the power is ON.
0 ON LINE Lamp
Lights when the machine is receiving or transmitting.
0 NO TONER Lamp
Lights when the toner has run out.
0 NO PAPER Lamp
Lights when one or both cassettes are empty or not
installed.
0 PAPER JAM Lamp
Lights when a recording paper jam occurs.
ABOUT YOUR FAX MACHINE
IRandIMODElW
Used to set total pages, reception mode, etc. Also used
to select sub-functions (i.e., instead of pressing the sub
function number key, you can scroll in opposite
directions by pressing either key repeatedly).
© lj=jgLKn-/SgTI
Used to change basic transmission settings.
© IDgffiCTORY SEARCH!
Used to search for a station name.
I© IDISPLAYI
This machine is provided with a dual access mode (see
Note). After communication begins the date and time
will reappear. Press this key to check the current status
of the machine.
ID
Used to start or set the machine's functions.
Note: Tte dual access feature allows you to perform two
0
operations at the same time. Documents can he stored into
memory when the machine is dialling, receiving or
transmitting from memory.
Page 14

ABOUT YOUR FAX MACHINE
® IHAUTONil
Provides OFF, QUALITY or FAST settings for halftone
documents.
IE) ISTAMPI
Used to set the verification stamp ON or OFF.
® lORKalNALi (CONTRAST)
Used to set Normal, Dark, or Light. Also serves as an
arrow key (<), together with IRKOLUTldNI (>), to
move the cursor over recorded numbers and characters.
® IRESOLUTIONl
Used to set Normal, Fine, or Super-Fine. Also used as an
arrow key (>), together with IORIGMNAD (<), to move the
cursor over recorded numbers and characters.
® Keypad
Used for manually entering a telephone number, and
selecting functions.
W fSTOP]
Used to cancel operations. When this key is pressed, the
machine will return to standby.
m iClEARl
Used to erase previously entered input.
€E) fo6^
Used to make copies of documents.
@) ISTARTI
Used to start or to set operations.
® ISRftCETEUDlAG
Used to start manual dialling, or to enter a space in
recorded telephone numbers.
m lABBRI
Used to start Abbreviated dialling.
® iRAUSEffiEPIAD
Used to start redialling, or to enter a pause when
recording or dialling a telephone number.
m frONg
Used to switch the dialling method from pulse dialling
to tone dialling.
Page 15
ABOUT YOUR FAX MACHINE
One-Touch Keys (
01
32
Used for One-Touch dialling.
program Keys (0 - @)
Used to record long dialling procedures, group number keys, and extra One-Touch keys.
Character Keys
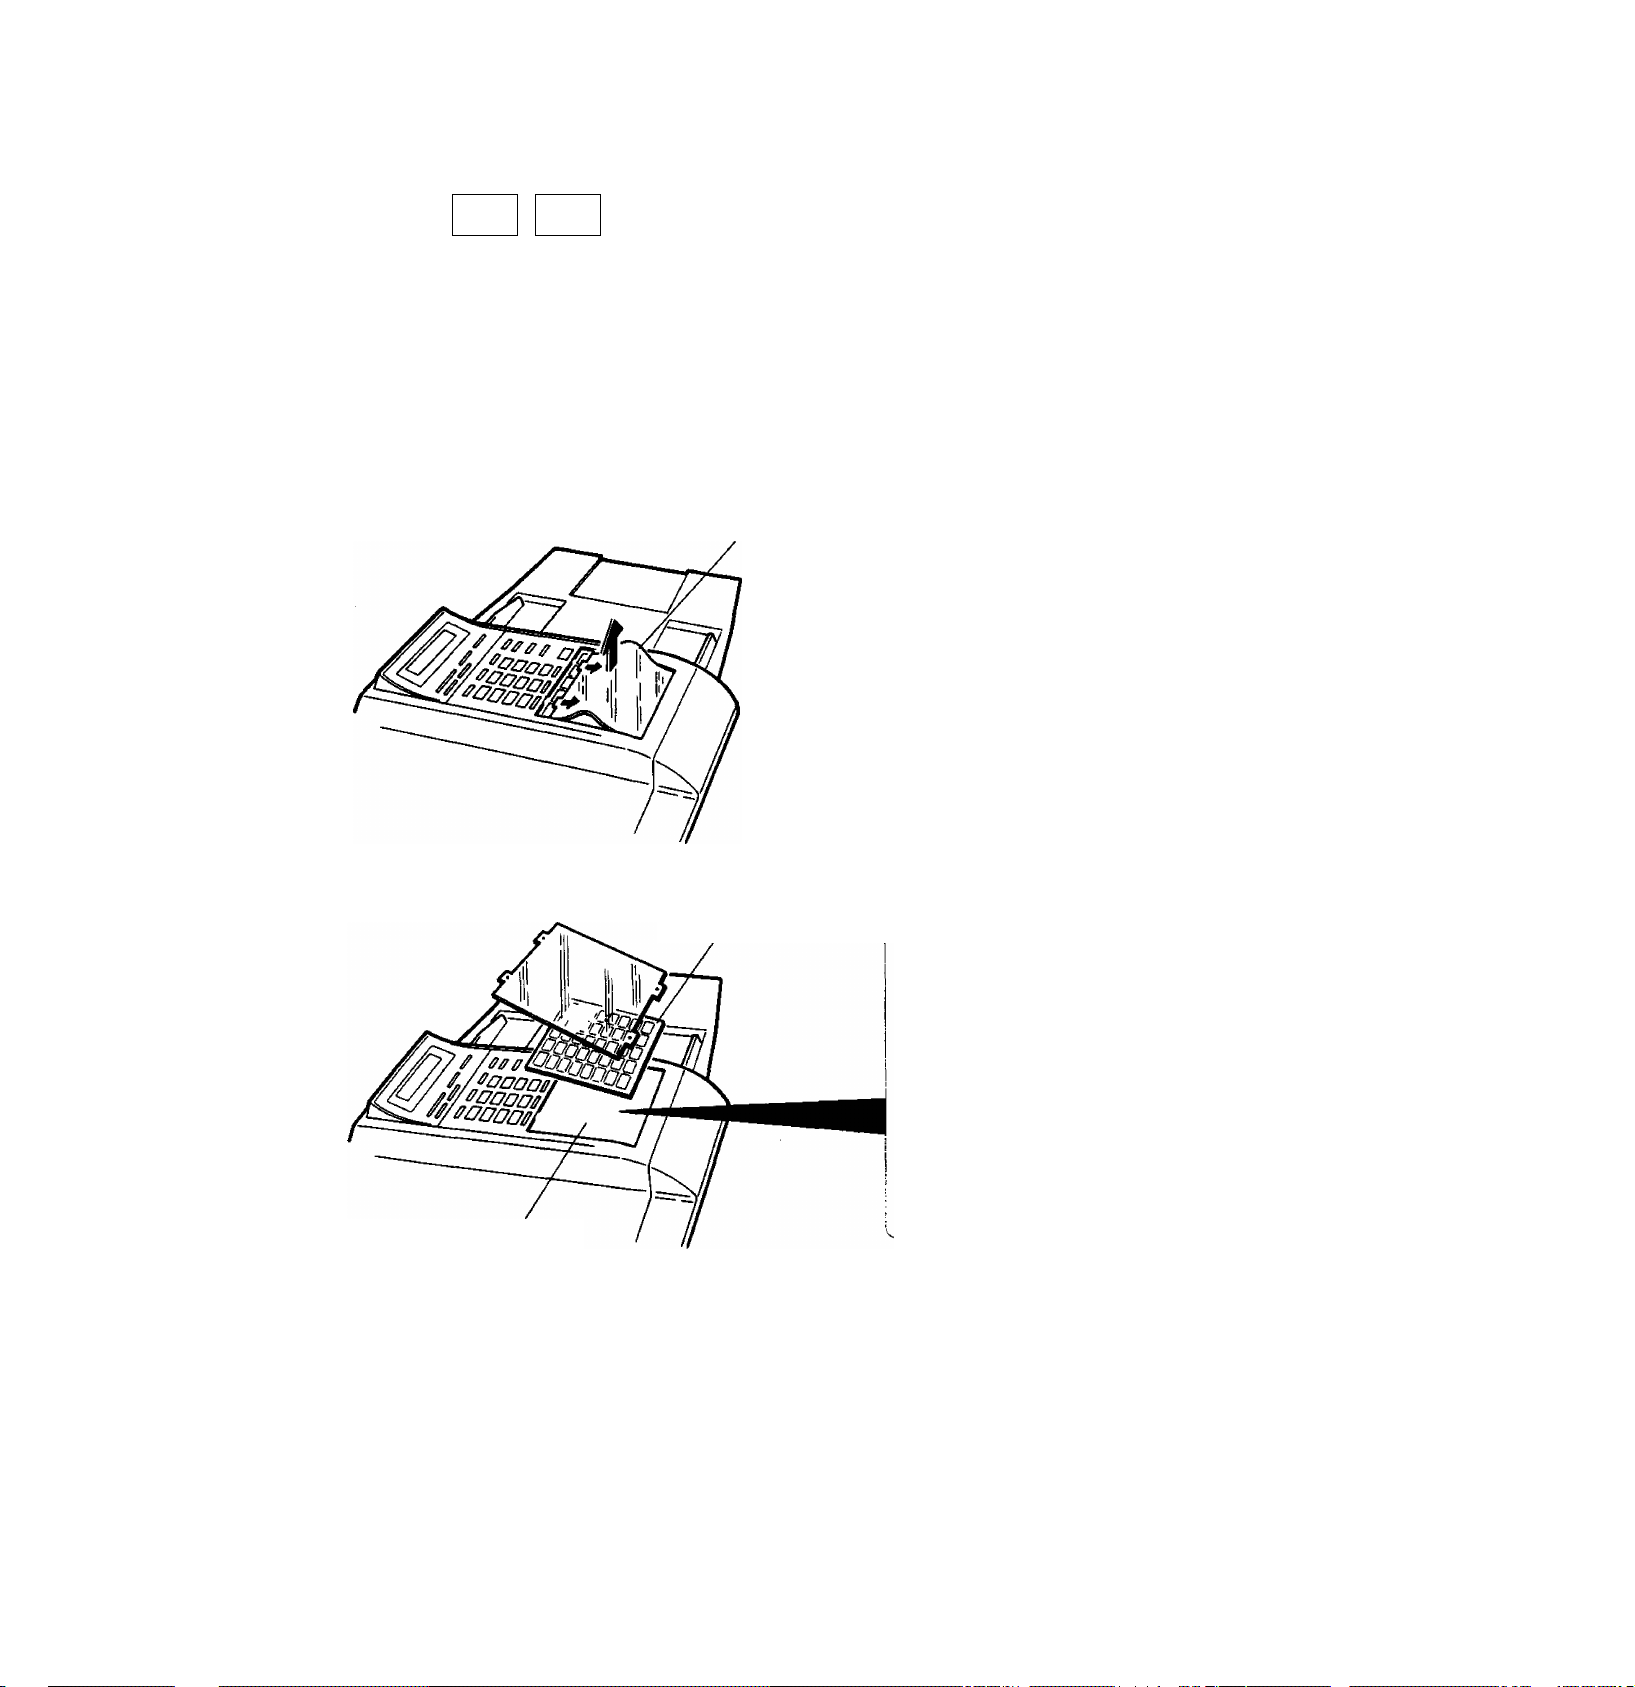
Xhe One-Touch keys on the control panel also serve as character and symbol input keys, which are used to record your LOGO and
other station names. The character key layout is printed on the panel under the station directory sheet, which can be removed as
shown below.
Transparent Plastic
Cover Sheet
Station Directory Sheet
(Used for recording
02 b
04 d
station names)
08 f
11 k
07 g
17 q
08 h
13 m
18 t y'
14 n
19 s
10 j
IS a
30 t
^ R
ai u
33 w
2S V
/ u
» 2
31 +
1*7 T
» ■
PI 4
P2 *
Character Sheet
Whenever One-Touch keys are changed to the character key mode (to record your LCXiO and station names), use the
to switch between upper-case and lower-case characters.
UPPER,
TwCT
key
Page 16

ABOUT YOUR FAX MACHINE
Installation
Accessories
Inspect the machine for any shipping damage and check that you have all accessories illustrated.
Carton (Top)
Handset
User's Guide
Recording Paper Tray-
ADF Tray
Styrofoam Cushion (Front)
Handset Cord
•Telephone Line Cord
' Power Supply Cord
Styrofoam Cushion (Rear)
Drum Unit
• Carton (Bottom)
‘ Developer Unit
Page 17

ABOUT YOUR FAX MACHINE
Installing the Printer Accessories
These accessories are supplied and need to be replaced when they have reached the replacement period,
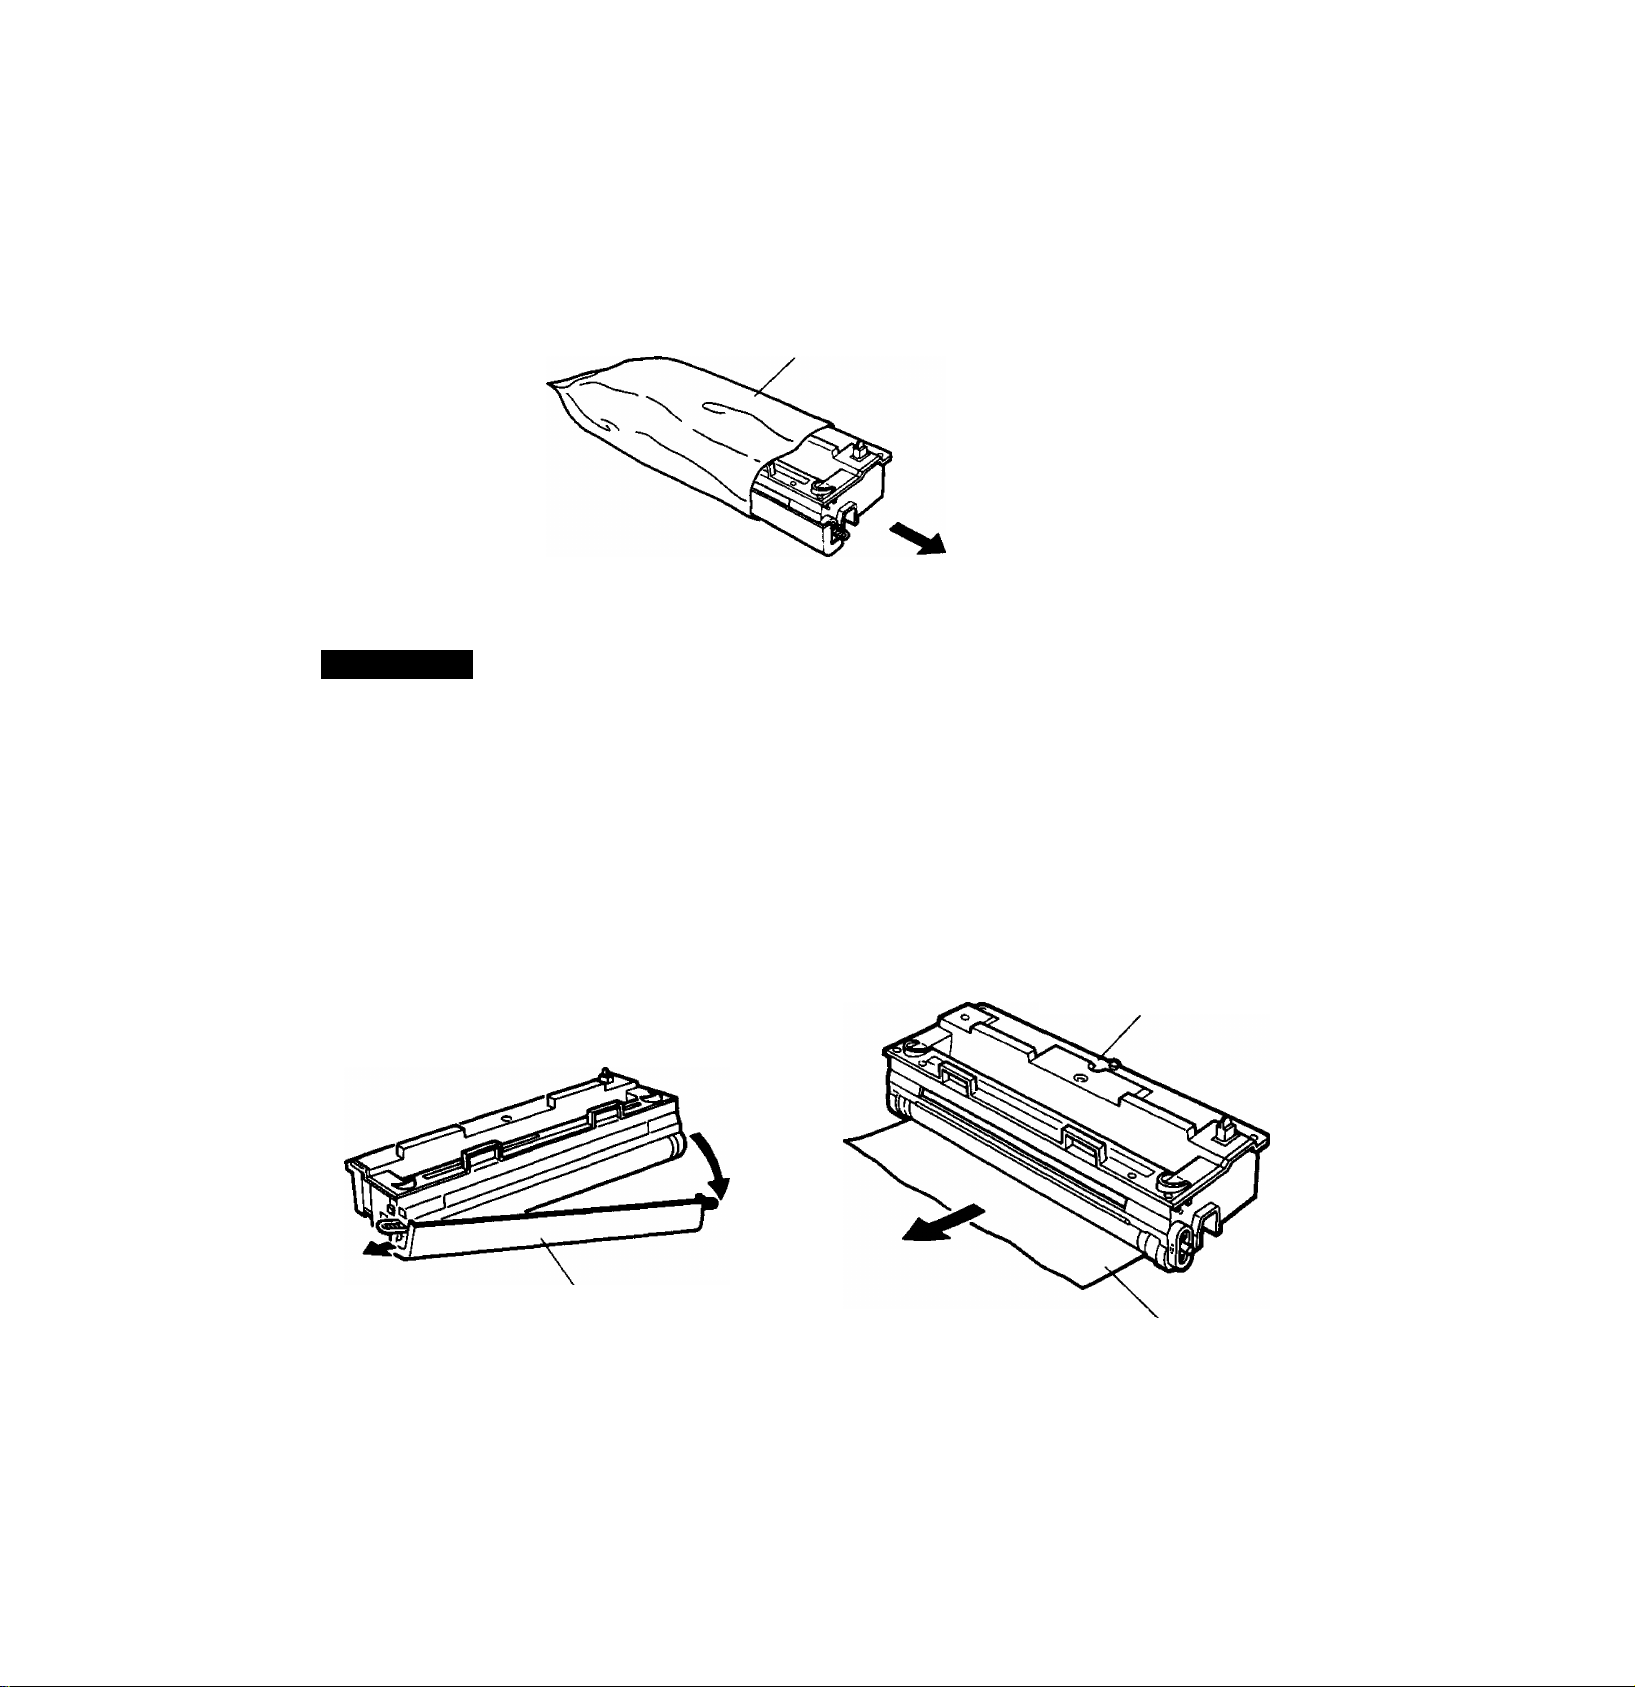
jlernove the drum unit and developer unit from their boxes before installing.
Installing the Developer Unit
“I Remove the developer unit from the protective bag.
2 Remove the tape, gently shake the developer unit to the right and left horizontally several times to even the developer level.
Remove the side seal cap.
IMPORTANT
• Always keep the developer unit level after removing the side seal cap to avoid spilling any toner.
• Do not remove the toner c*irtridge from the developer unit.
• Do not operate the machine without the developer unit otherwise received document will be blank.
Page 18

ABOUT YOUR FAX MACHINE
3 Press down on the toner cartridge with one hand and gently pull out the toner seal.
Toner Seal
4 Open the receiving cover by pulling up the lock release lever and lifting it until it stops. Install the developer unit into the
machine gently, align boss A with guide A on the chassis.
Receiving Cover
Boss A
Guide A
in
Page 19
Installing the Dnun Unit
2 Remove the dmm unit from the protective bag.
ACAUTION
ABOUT YOUR FAX MACHINE
Eirum Protective Bag
• Do not expose the drum unit to ambient room light or sunlight for more than 5 minutes.
It must be covered with the black plastic drum protective sheet.
• Do not place the drum unit near a window.
• Do not touch the green drum surface.
• Keep the drum unit away from dust or dirt.
• Do not place the drum unit in a high-humidity or high-temperature area.
2 Remove the drum protective cap and remove the drum protective sheet.
Drum Protective
Cap
Drum Unit
Drum Protective
Sheet
11
Page 20
ABOUT YOUR FAX MACHINE
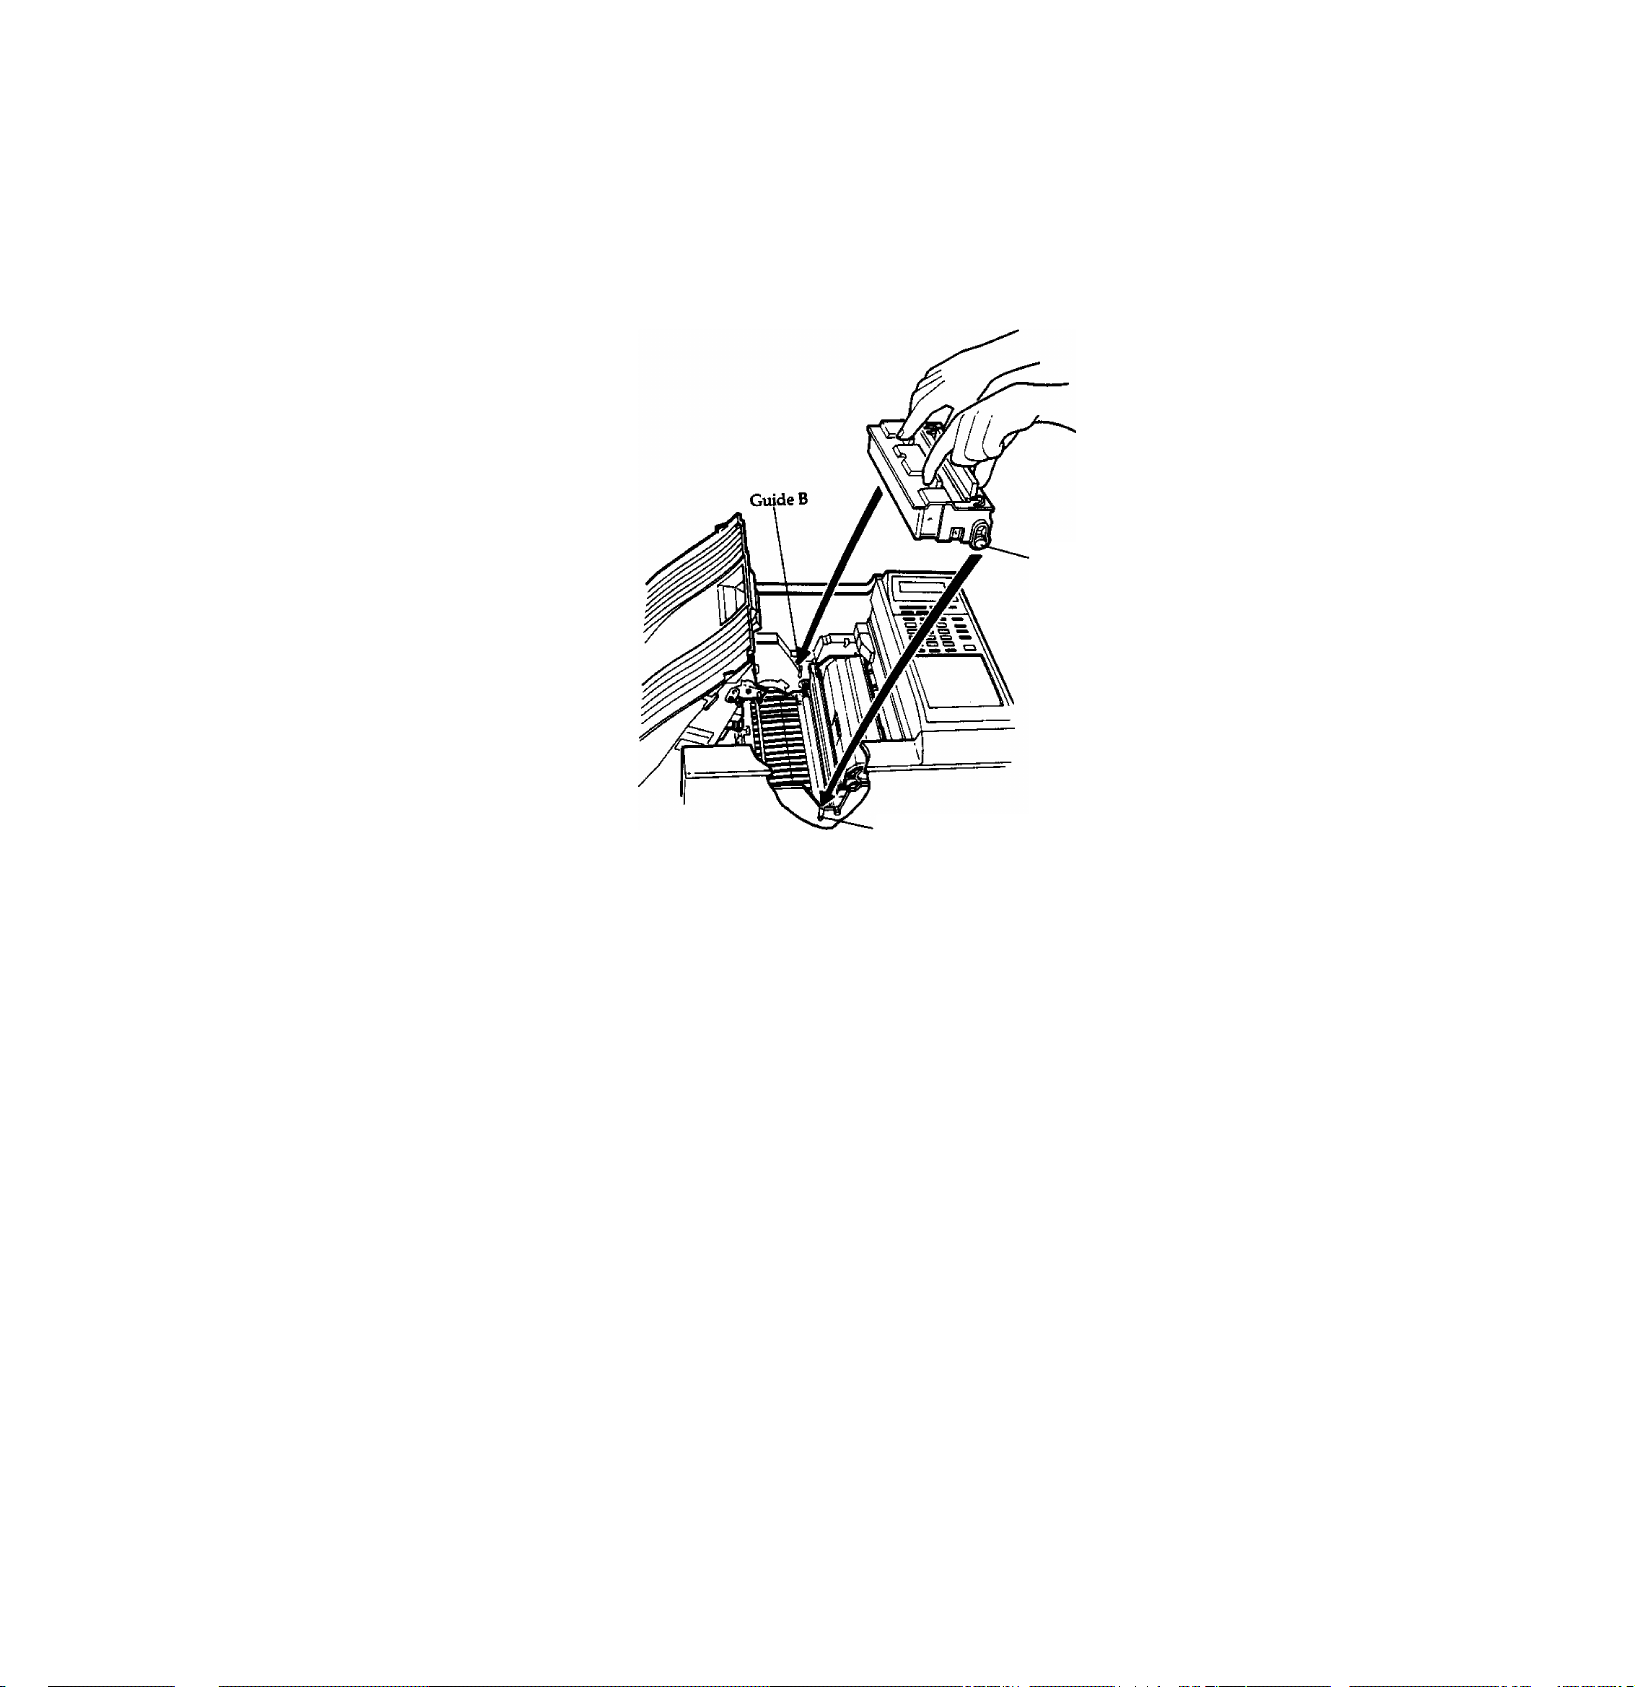
3 Align boss B with guide B on the chassis and instaU the drum unit into the machine.
Boss B
Guide B
Page 21

Installing the Trays
ADF Tray
1 open the transmitting cover by prilling up on the edge of the cover. Remove the ADF protective sheet.
2 Iirstall the ADF tray by inserting the tabs into the holes.
Transmitting Cover
ADF Protective Sheet
ABOUT YOUR FAX MACHINE
ADF Tray
Recording Paper Tray
Install the recording paper tray by inserting the tabs into the holes on the left side of your machine. When using A4 or legal
size paper in either paper cassette, put the paper retainer to the A4 or legal position.
Paper Retainer
Page 22
ABOUT YOUR FAX MACHINE
Loading the Paper Cassettes
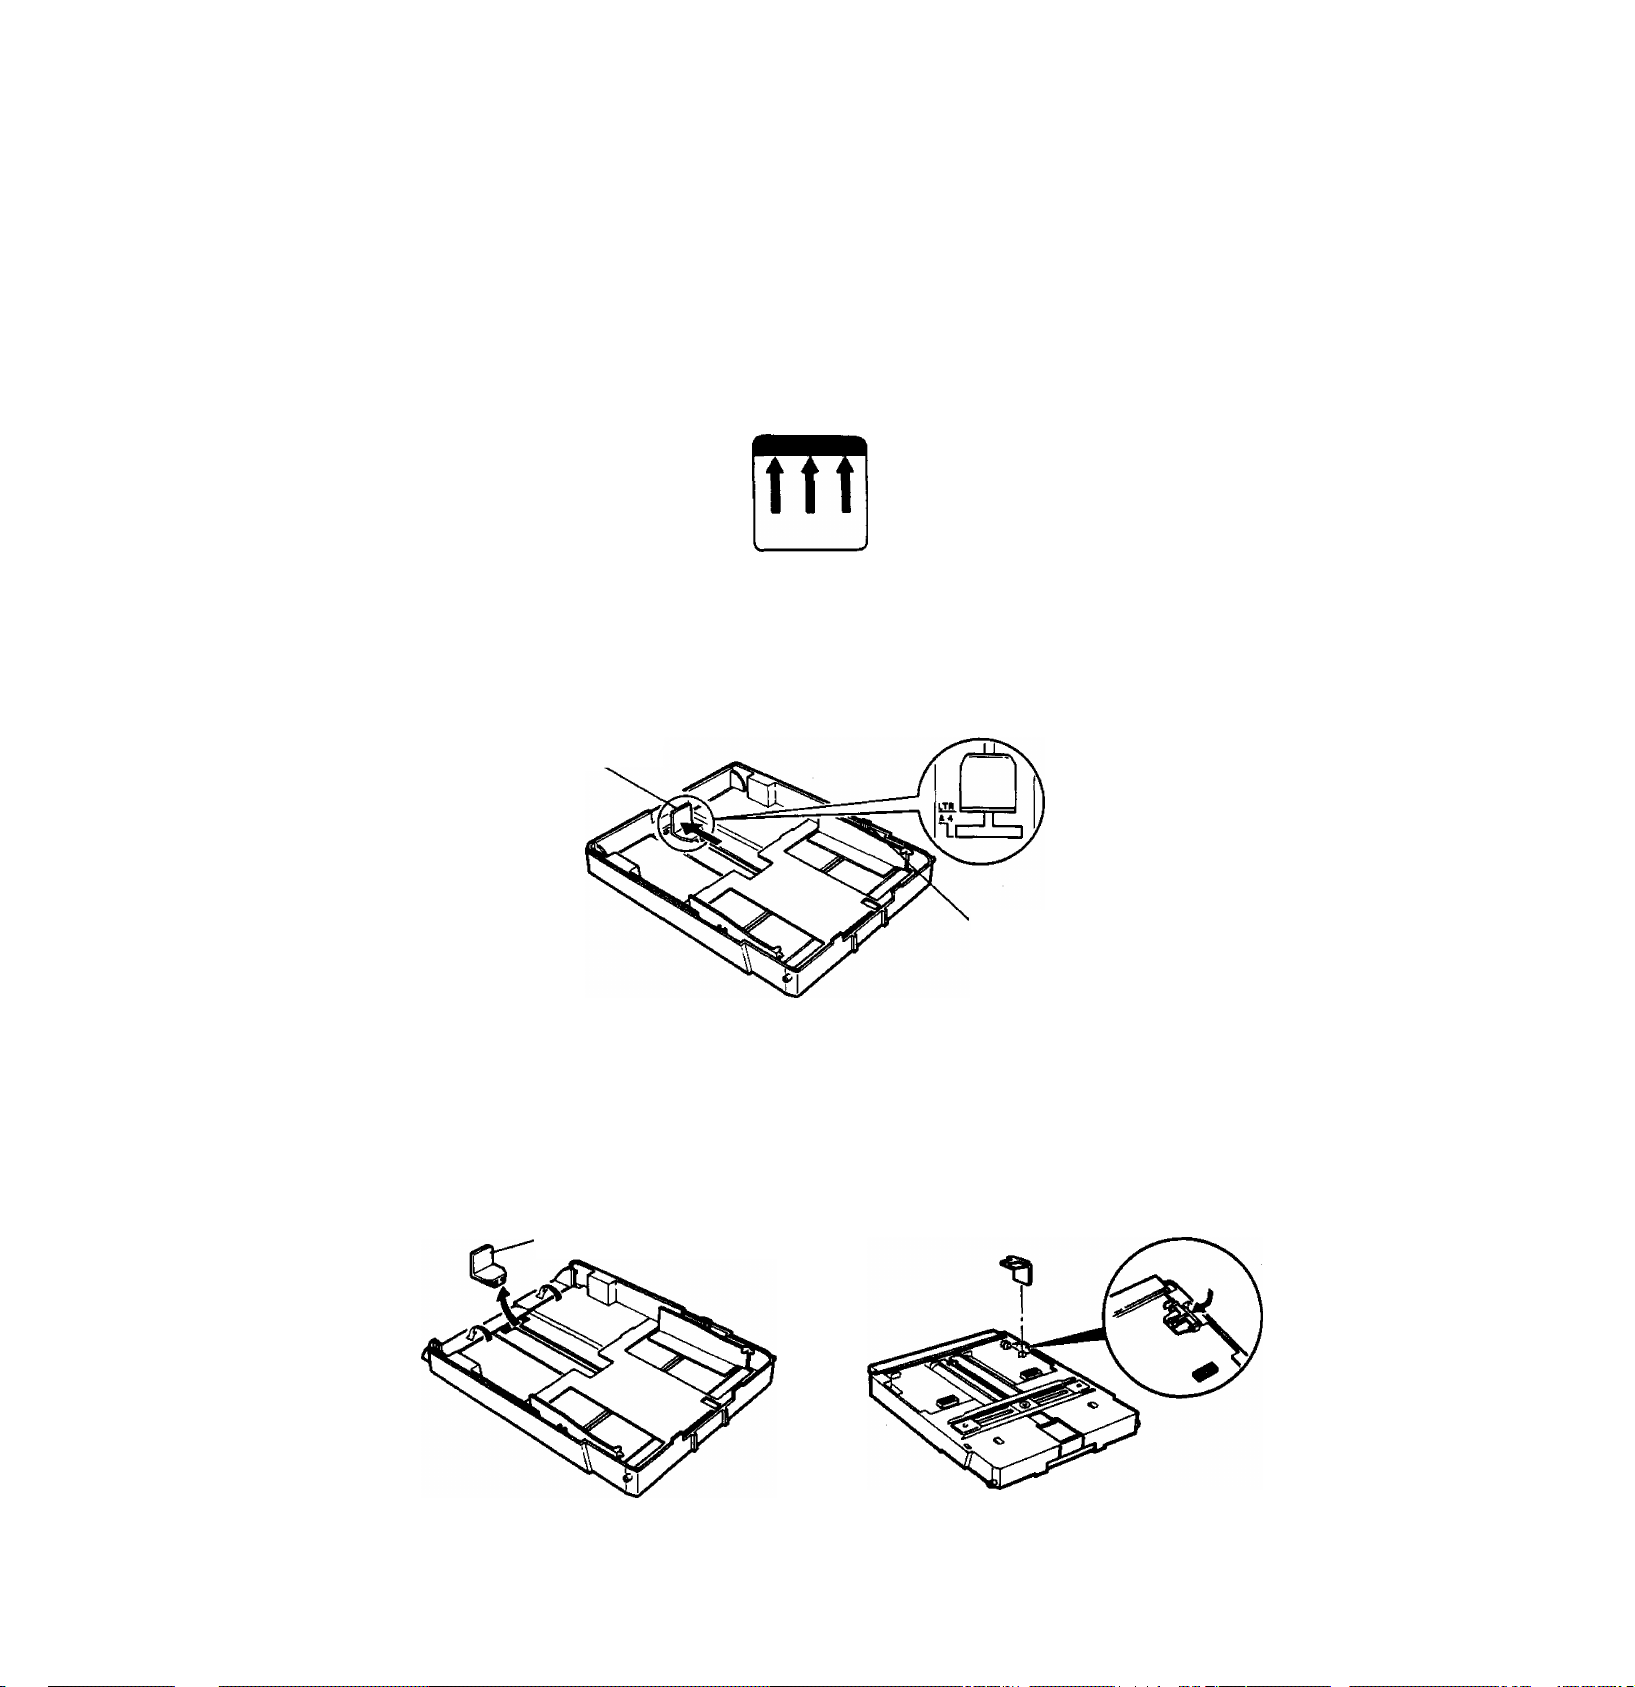
This machine is provided with two adjtistable cassettes. This allows for easy selection of either A4*size, letter-size or legal-size
paper.
• Use general-purpose photo copying paper (see page 130 for detailed paper specifications).
• E>o not load different types of paper or paper thickness at the same time; this may cause paper jamming.
• Most paper has instructions recommending the side to be printed. Make sure you load the paper with the print side up.
• Make sure the height of the paper does not exceed the limit mark (see below) on the paper cassette.
1 Remove the paper cassette and cover. Move the paper width guides outward imtil they reach the side walls of the paper
cassette.
For A4-size paper:
2a Move the paper length adjuster outward until it stops at the A4 position.
Length Adjuster
Width Guide
For letter-size paper:
2b Move the paper length adjuster outward until it clicks into the LTR position.
For legal-size paper.
2c Remove the paper length adjuster by sliding it to the end of the cassette. Then uxUatch the extension plate. The paper length
adjuster should be stored on the imderside of the paper cassette.
■ Length Adjuster
14
Page 23
3 Fan the stack of paper and place it into the paper cassette.
4 Move the paper width guides so that the paper is squarely positioned in the paper cassette.
Paper Width Guide
5 Install the paper cassette cover.
ABOUT YOUR FAX MACHINE
6 Install the paper cassette into the machine.
0 Note:
1. The machine will operate normally with only one cassette installed.
2. If both cassettes are installed and adjusted for the same paper size, the machine uses recording paper from the upper cassette first
IMPORTANT
The paper size that you are using in both cassettes must be set in fax parameters 45 and 46 before you use your machine (see
page 21). Both are preset at the factory for A4-size paper.
Page 24
ABOUT YOUR FAX MACHINE
Installing the Handset
Insert the plug on one end of the handset cord into the handset cradle. Insert the plug on the other end into flie handset.
Place the hanset on the cradle.
16
Page 25
Connecting the Telephone Line and
the Power Supply Leads
1 Plug one end of die telephone line lead into
the telephone socket supplied by the
telephone company and the other end into the
line socket on the rear of the machine.
2 Plug one end of the power supply lead into
the receptacle on the left side of the machine
and the other end into an ordinary threeprong AC outlet.
ABOUT YOUR FAX MACHINE
Turn the power switch to the "I" position to turn ON the power. The POWER lamp on the control panel wül light up and the
standby display (date and time) will appear after a short period of time.
You should keep the power ON at all times for receiving documents from other locations.
0 Note:
3. To connect an external telephone to the machine, break off the protective tab for the TEL socket on the rear panel
2. The line connecting method, the type of the telephone line lead vary depending on the country.
17
Page 26

ABOUT YOUR FAX MACHINE
Adjusting the Volume
Ringer Volume
You can adjust the ringer volume so that the fax
machine rings at a comfortable level when it
receives a call. Move the RINGER VOLUME
control on the handset cradle to the level desired,
either high, normal, or off.
Monitor Volume
When the fax machine is making a call, you hear
the dial tone, the dialling signals, and the ring-back
tone or busy signal through the built-in speaker.
You also hear the called person's voice through the
speaker if the other station is set to manual
reception.
Slide the MONITOR VOLUME lever on the right
side of the machine to adjust the volume to a
comfortable level.
18
Page 27

User Parameters
our fax machine has several basic
settings (user parameters) to help you keep
Y
records of the documents you sent or received and
simplify dialling. For example, the buUMn clock
keeps the exact date and time and your LOGO and
ID help identify you when you send or receive
documents. If a power failure occurs, a built-in
battery will back up this information for up to
about one month (when it is fully chained).
Preparing for Initial Operation
ABOUT YOUR FAX MACHINE
Date and Time
LOGO
Character ID and Numeric ID
Dialling Method
Recording Paper Size
One-Touch/Abbreviated Numbers
At standby the display will show the date and time. Once the standby display is set,
it will automatically be updated.
The LOGO helps identify you to someone who receives your document.
The Character ID and Numeric ID identify you to the party you are communicating
with. We suggest you use your telephone number and station name as your ID.
Once communication begins, your display will show the other party's ID.
Your machine can operate with either of two dialling methods (pulse or tone). It is
preset to pulse dialling at the factory. Contact your telephone company if you are
not sure of the type of line you have.
Your machine can use either A4-size, letter-size or legal-size recording paper.
Before using your machine, you must set both upper and lower recording paper
sizes using fax parameters 45 and 46. These settings should relate to the recording
paper sizes in the upper and lower cassettes. If not, a paper jam may occur or
received data may be lost.
One-Touch and Abbreviated dialling numbers are two fast ways of dialling full
telephone numbers. Up to 140 frequently called numbers can be entered into
memory, along with the name of the station. The entered One-Touch and
Abbreviated dialling numbers are sorted following the order shown on page 124.
19
Page 28
ABOUT YOUR FAX MACHINE
Setting Date, Time, LOGO and ID
FUNCTION
then
1 1=^
a
<b START
repeatedly until the display shows that you want to set or change.
USER PARAMETERS
DATE & TIME
Bl-01-1900 12:00
Enter the new date and time.
• day (2 digits)
• month {2 digits)
• year (4 digits)
• hour (24-hour clock)
• minute (2 digits)
Example:
To set 16 April, 1992,15:00
lilEEiilSBIIlillElI]®®
If you made a mistake, use the @ or
0 to move the cursor to the
incorrect number, and enter the new
number over it.
<^ START
©STOP
5 Then
if you want to return to standby.
LOGO
Enter your LOGO (up to 25
characters and digits) by using the
character keys (see page 7).
Example:
To set "Panafax HQ"
If you made a mistake, use the @ or
0 to move the cursor to the
incorrect character, and then
overwrite.
To delete all characters, move the
cursor to the first character pressing
the @ or S and press iCLfARl key.
O START
5 Then
if you want to return to standby.
1
A STOP
c
EHq]
Character ID:
Enter your ID (up to 16 characters)
by using the character keys.
Example:
To set TOKYO ORFICE
CHARACTER ID
s!
___________
[Ti[0]tK][Yl[0]rSRACEH0l[F][Fim[g
If you made a mistake, use the [<] or
[>] to move the cursor to the incorrect
character, and then overwrite.
To delete all characters, move the
cursor to the character to be changed
pressing the @ or @ and press
iri_eAp|ifpy
OSTART
Press fgf5^ to return to standby.
Numeric ID;
Enter your ID (up to 20 digits) by
using the ten-key pad and
Example:
To set 411112222
ID N0.
lSRftCEI[2liy][2li2l
If you made a mistake, press
4> START
POLLING PASSWORD
See page 45 to enter a password or
press IfiTOPI to return to standby.
20
Page 29

ABOUT YOUR FAX MACHINE
Setting Dialling Type
FUNCTION
1 then
n
(fax parameter number) then
<1> START
4 Enter the new setting code.
• Enter [T] for tone.
• Enter H] for pulse.
<t> START
then
©STOP
FAX PARAMETER
N0.-4
07 DIALLING METHOD
2:PULSE
07 DIALLING METHOD
1:T0NE
to return to standby.
Setting Recording Paper Size
FUNCTION
START
Enter the fax parameter number.
• Enter [T] and [T] to set the upper cassette paper size.
• Enter [T| and [T] to set tiie lower cassette paper size.
If you entered a wrong number, press
re-enter the correct number.
<b START
The default setting
message will appear.
Enter the paper size number.
• Enter [T] to use letter-size paper.
• Enter [D to use legal-size paper.
• Enter [a] to use A4-size paper.
then
T5-
FAX PARAMETER
4S UPPER CASS. SIZE
3:A4______________
46 LOWER CASS. SIZE
3;A4
N0.4
and then
Example: To set letter-size paper in upper cassette:
Enter ¡T].
To set legal-size paper in lower cassette:
Enter [2].
r^STABl ©STOP
45 UPPER CASS. SIZE
1:LFTTFR
___________
46 LOWER CASS. SIZE
2:LEGAL
to return to standby.
21
Page 30

ABOUT YOUR FAX MACHINE
Entering One-Touch/Abbreviated Dialling Numbers
If you use a nuinber regularly to save yourself time entering the whole number each time you dial, you can either assign it to
a One-Touch number or an Abbreviated number.
A total of up to 140 One-Touch and Abbreviated numbers may be entered.
Abbreviated dialling numbers iiTifolOne-Touch dialling numbers
Program keys [0 - ^ {are available to enter as a One-Touch dialling number; see page 55)
FUNCTION
J then
n
T]®]; Max. 100
Enter fax telephone number (up to 36 digits) including
pauses and spaces.
<t> START
Go to Step 3a: One-Touch dialling number
Go to Step 3b: Abbreviated dialling number
To enter a One-Touch dialling number
3a Press a One-Touch key (01 - 32).
Example: One-Touch key
To enter an Abbreviated number
ABBR
3b
Example: lABBRI then enter [|] |T]
and two keys on the keypad to enter any
code from |T| ® to [|] [?].
ONE-TOUCH/ABBR.
<07>TELEPH0NE N0.
[62]TE1-EPH0NE NO.
Example: EIWUSEIE E H [
If you require a special access number to get an outside
line, enter it first and then press IRftUffil.
A hyphen is displayed for pause.
Use ISRftCEl to enter a space between digits to make the
number easier to read.
If you input a wrong number in Step 4, press if^i fari to
erase the number before the cursor, then re-enter the
correct number.
5 To set the number,
IEEE®
<07>STAT10K NAHE
Q (
To enter the receiving station's name (up to 15 charac
ters), use the One-Touch/character keys (see page 7).
Example: E ® 1] ® [D [g [1E [C]
To set the name.
ONE-TOUCH/ABBR.
Q
D
• To add numbers: Repeat Steps 3a/3b through 7.
8
• To change the setting: Press ISTARTI repeatedly to
return to Step 2 and enter the same One-Touch or
Abbreviated number.
• To return to standby mode: Press ISTTOPI.
When you want to confirm your settings, print out a
One-Touch/Abbreviated number list referring to page
73.
22
Page 31

Basic Features
Read this section to begin using the basic easy-to-use
features of the UF-766; sending faxes, receiving faxes, and
using the telephone.
The contents and page numbers of this chapter are given
below.
BASIC FEATURES
Function Key List............................................24
Loading Documents.......................................25
Documents You Cannot Send
How to Load Etocuments
Sending Documents
Memory Transmission.........................................27
One-Touch Dialling
Abbreviated Dialling
Directory Search Dialling
Full Number Dialling..........................................30
How to Cancel a Memory Transmission
Eiirect Transmission............................................31
On-Hook Ehalling
Off-Hook Dialling...............................................31
Priority XMT Reservation
Redialling............................................................33
.......................................
...........................................
.............................................
Receiving Documents
Automatic Reception........................................... 34
.............................
.....
..............................
..........................................
...................................
..............
.....................................
....................................
27
25
26
27
31
34
28
29
32
30
Manual Reception...............................................34
How to Set Manual Reception
What to Eto When Your Telephone Rings ....34
Memory Reception
Receiving Oversize Ekxrvunents.........................35
Running Out of Recording
Paper (Substitute Reception)
Making Photocopies.................................................37
Making Temporary
Transmission Adjustments.......................................38
Setting Resolution
Setting Original (Contrast)................................... 38
Using the Halftone Setting...................................39
Using the Verification Stamp
Printing Total Page Numbers
Using Your Machine's Telephone
Making a Phone Call...........................................41
Voice Contact Request.......................................41
Answering a Voice Contact Request
.............................................
..............................................
...........................
............................
...............................
.............................
.............................
...................
34
34
36
38
39
40
41
41
23
Page 32

BASIC FEATURES
Function Key List
This machine has a variety of functions to assist you in operating the unit efficiently. Select a function by pressing
entering the number corresponding to the function as shown below.
Deferred
Transmission
Deferred
Polling
Polling
Polled (File
Save = Valid/
Invalid)
_______
FUNCTION
Printout
6
Set Mode
Deferred Communication
Polling-
Tum-around Polling
Confidential Communication
Jorimal Print
One-Touch/Abbreviated and Directory
Search List
Program List
FAX Parameter List
Individual Transmission Journal
Maintenance Report
Lfser Parameter List
— User Parameters
One-Touch/Abbreviated Numbers
Program Keys
FAX Parameters
Relayed Transmission & Confidential
Communication Parameters (see Note)
Reset Counters (for Printer Maintenance)
[аг::*^«тл
Transmission
Polling
Polled
Print
Delete
- Date & Time
- LOGO
— ID (character)
~ ID (number)
-----
Polling Password
“ XMT-Password (see Note)
- RCV-Password (see Note)
~ Department Code (see Not
-----
Fax Access Code (see Nott
anc
Print File list
Change Time/Station
Edit File Mode
Delete File
Print File
Before starting communication you can set or see the following items using [MODE10 or 1MCX)EI 0.
- MODE +
Setting Total Pages
Setting Password Transmission ON/OFF (see Note)
Automatic Reception ON/OFF
0
Note: If the Fax Parameter is not preset to Valid Position, which enables you to use the function, the display will not show the
junction.
24
Page 33

BASIC FEATURES
Loading Documents
In general, your machine will send any document printed on A4-size, letter-size or legal-size paper, or on paper up to 257 x 364
nun (B4 size).
Documents You Cannot Send
You must never try to send the following documents:
Wet
Too thin (e.g., onionskin, airmail
paper, pages from some magazines,
etc.)
Coated (e.g., glossy paper, etc.)
Covered with wet ink or paste
Too thick (e.g., card, etc.)
metric
Single
Sheet
Multi- 0.08 to
Sheet
Smaller than
metric
148(W) X
73(L) mm
0.06 to
0.15 mm
0.13 mm
inch
5.8(W) X
2.9(L) inch
inch
0.0024 to
0.006 inch
0,0031 to
0.006 inch
Wrinkled, curled, or folded
Chemically processed (e.g., pressuresensitive paper, cari>on<oated paper,
etc.) or made of cloth or metal
V- "A
(W)
To transmit these kinds of documents, make a photocopy first, then transmit the copy instead.
Page 34

BASIC FEATURES
How to Load Documents
Make sure that your document is free of staples and paper
clips, and is not tom or creased.
1 Place the document face down on the ADF tray with the
top edge going into the machine until it stops,
IZ Adjust the sliding Document Guides to ensure that the
document is centred on the ADF tray.
If you are sending two or more pages, make sure that
the bottom sheet enters first. You can stack up to 30
sheets on the ADF tray at one time.
When you set a document on the ADF tray, the display
message changes from date and time to
DOCUMENT SET
ENTER STATION(S) OOX
If you want to send more pages, you can place them on
the top of the last page on the ADF tray once
transmission has started, as long as you do not have
more than 30 sheets on the ADF tray at any one time.
Document Guides
INCORRECT
26
Page 35

Sending Documents
There axe two transmission methods.
• Direct transmission—Real time transmission from ADF
• Memory transmission—The machine stores the documents into memory and then transmits the stored documents
automatically.
The UF-766 is designed with an advanced dual memory access feature, which allows the machine to continue to store other
documents while transmitting from memory or receiving. You do not have to wait around until transmission or reception is
completed. All stored documents will be transmitted on a first come first served basis. The transmission progress can be
monitored by printing out a file list.
If you use direct transmission, the dual memory access feature cannot be used.
Other advantages of memory transmission are;
• The same document can be transmitted to multiple stations.
• Quick scanning of each page.
• Ail pages are numbered automatically with the total page number being transmitted to the receiving station.
• If communications fail when transmitting from memory, your machine will retransmit the remaining unsuccessful page(s)
automatically.
BASIC FEATURES
Memory Transmission
One-Touch Dialling
1 Place the document face down on the ADF and adjust
the document guides.
2 Press a One-Touch key.
Example: One-Touch key
<b START
y
(If you do not press , the document(s) will be
stored into memory 5 seconds after pressing a One-
Touch key.)
The machine stores the
document in memory
with a file number,
then begins to dial.
♦STORE*
PAQiS-QSi
16-APR-1992 15:00
KO.OOl
___
When the other station answers:
A beep sound is heard through the speaker and the ON LINE
lamp lights. The document is transmitted (when the other
station is set to automatic reception).
When transmission ends, the ON LINE lamp goes off. The
machine prints out a memory transmission journal (see page
75) when COMM. JOURNAL in fax parameter is set to "2".
The document in memory will be erased automatically.
If the line is busy: refer to redialling on page 33.
m-
lOX
'57
Page 36

BASIC FEATURES
Qirectory Search Dialling
1 Place the document face down on the ADF and adjust
the document guides.
DIRECTORY
SEARCH
Enter the station name (up to 15 digits) you want to
search for, then press IMODEl [+] or 0Example: Search for "NEW ORLEANS" in the directory
table shown on page 124.
(1) Enter full station name
"NEW ORLEANS."
Press ICLEARI to correct if necessary. Characters
are erased one at a time to the left each time
ICLEARI is pressed.
Press iMOPEim or Q to start searching.
The machine searches
for name recognition
between the entered
and registered station
name, the station name
appears on the display,
if registered.
If part of a station name is entered and there are
(2)
several registered station names beginning with
the same letters, the machine displays the first
station name corresponding to the entered letters
in the directory table.
ENTER LETTERS
1
ENTER LETTERS
NEW ORLEANSI
DIRECTORY SEARCH
[233KEW ORLEANS
Press IMODEI 0 or 0 repeatedly until the desired
station appears.
All registered station names will appear sequentially.
—
Press IMODEI
from the currently displayed station name.
When transmitting to mxiltiple stations, select the
required station name and press |
Do not press I START! in Step 5.
START
0
to scroll up or IMODEI 0 to scroll down
when you want to dial the selected station.
«
The machine stores the
document in memory
with a file number,
then begins to dial.
When the other station answers:
A beep sound is heard through the speaker and the ON LINE
lamp lights. The document is transmitted (when the other
station is set to automatic reception).
When transmission ends, ttie ON LINE lamp goes off. The
machine prints out a memory transmission jounuil (see page
75) when COMM. JOURNAL in fax parameter is set to "2".
The document in memory will be erased automatically.
If the line is busy: refer to redialling on page 33.
♦STORE* N0.003
PAfi£&-QQl
16-APR-1992 15:00
________
lOX
Enter "NEW" to search
for "NEW ORLEANS".
Press IMODEI S or Q to start searching.
The machine displays
"NEW JERSEY", which
is the first station name
that begins with the
entered letters.
The "NOT FOUND" message appears if the name
is not registered.
When you do not enter anything to search for,
"ALASKA" appears.
ENTER LETTERS
NEW ■
DIRECTORY SEARCH
[191NEW JERSEY
29
Page 37

BASIC FEATURES
Full Number Dialling
Place the document face down on the ADF and adjust
1
the document guides.
Enter a number using the keypad.
2
Example: a [H [5] 0] a a B
When transmitting to multiple stations, enter each
telephone number and press |
Do not press [STARTI in Step 3 (see Note).
<1> START
The document is stored
into memory with a file
number, then the
machine begins to dial.
When the other station answers:
A beep sound is heard through the speaker and the ON LINE
lamp lights. The document is sent (when the other station is
set to automatic reception).
When transmission ends, the ON LINE lamp goes off. The
machine prints out a memory transmission journal (see page
75) when COMM. JOURNAL in fax parameter is set to "2".
The document in memory will be erased automatically.
If the line is busy: refer to redialling on page 33.
0 Note: You can enter up to 3full telephone numbers.
♦STORE* N0
PAGES-0Q3
16-APR-1992 15:00
.001 \
I
10%
How to Cancel a Memory Transmission
If you wish to cancel the reserved memory transmission
documents, this can be done while the machine is dialling the
remote station or while it is transmitting the document.
1 Press [DISPLAY! to confirm whether the ID number or
dialling number on the display is the one you want to
cancel.
You can check ID, transmitted page and statin name or
telephone number using [MODEI [+] or 0 l^y-
2 Presr 'STOPI when the selected number or dialling
number it shown on the display.
COMMUNICATIN STOP ?
1:Y£S 2:N0
3 Enter [T] to cancel the transmission.
While Dialling
♦DIALLING*
STOPPED
While Transmitting
ON LINE *MEM.XMT*
STOPPED
The current trar\smission will be cancelled and erased
from memory. A communication journal is printed out
showing the results of the cancelled transmission. If
multiple files have been stored, they will remain in
memory and be transmitted.
'
0 Note:
lamp is it.
button is varied when the ON LINE
Page 38

BASIC FEATURES
Direct Transmission
On-Hook Dialling
Place the document face down on the ADF and adjust
1
the document guides.
SPACE
TEUDIAL
2
♦DIALLING*
3 Dial by using any of the following methods:
One-Touch dialling
ABBR dialling
Full number dialling
Example: I ABBR
The machine begins to dial.
When the other station answers:
A beep sound is heard through the speaker and the docu
ment is transmitted (when the other station is set to
automatic reception).
1
then enter |T| [Ò]
Off-Hook Dialling
1
Place the document face down on the ADF and adjust
the document guides.
2 Lift the handset.
3
Use the keypad to dial a number.
Example: H [s] [s] [T] [|] [3] H
4 When you hear a beep soimd,
the handset.
When the other station answers:
A beep sound is heard through the speaker and the docu
ment is transmitted (when the other station is set to
automatic reception).
The machine will transmit the document(s) from the ADF.
If the line is busy:
Replace the receiver. Then try again several minutes later by
pressing fpgPiAi I
DOCUMENT SET
1
then replace
-
The machine will transmit the document(s) from the ADF.
If the line is busy: refer to redialling on page 33.
31
Page 39

BASIC FEATURES
Priority XMT Reservation
If you wish to transmit a document using direct transmission, but thè machine is currently receiving or transmitting a document
stored in memory, you can use the priority transmission hmction. This function allows the document placed on the ADF to be
transmitted immediately after the current memory transmission or reception. The priority transmission function can only be used
if the display is showing either "DATE & TIME" or "DOCUMENT SET".
Place the document face down on the ADF and adjust
the document guides.
SPACE
TEUDIAL
ADF XMT RESERVE
ENTER STATION
<t> START
DOCUMENT SET
AOF XMT RESERVED
The document on the ADF is transmitted immediately
after the current memory transmission or reception is
over.
0 Note; If not in "DATE & TIME" or "DOCUMENT SET‘
(i.e. on-line) the operator can press IDISPLAYI and then
I
to access Operator Calling mode (see page 41).
3 Dial by using any of the following methods:
• One-Touch dialling
• ABBR dialling
• Full number dialling
Example: One-Touch key
01
—
AOF XMT RESERVE
<01> 123 45678
Page 40

Redialling
If the number you dialled is busy or there is no answer, your
niachine waits 3 minutes and then automatically redials the
number for you up to twice.
BASIC FEATURES
If no contact is made after the
last redial, the machine prints
out a memory transmission
journal or an individual
transmission journal depending
on the setting of fax parameter
41 (see page 71).
You can use IREDIALI after dialling a number using any of the
following:
• One-Touch dialling
• ABBR dialling
• Directory search dialling
• Full number dialling
• Redialling
Your machine will redial the last number a total of three
times.
INCOMPLETE
INFO.CODE-630
33
Page 41

BASIC FEATURES
our machine is provided with both automatic
reception and manual reception modes. The
Y
selection of reception mode is made by using the
MODE key. The received document(s) are stored
into memory if memory reception is set to valid
(see page 70).
Receiving Documents
Automatic Reception
When your fax madune is preset to receive documents
automatically, do not answer the telephone when it rings.
The machine will soon begin receiving.
Manual Reception
How to Set Manual Reception
If there is only one telephone line in your office and you
wish to use the telephone line for both fax and voice,
connect your telephone to the machine (see page 17)
and then set the machine to manual reception.
- MODE +
16-APR-1992 15:00
ptn
until the mode you want
appears.
SELECT/SET
to toggle between RCV=AUTO
and RCV^MANUAL.
©STOP
RCV-AUTO
16-APR-1992 15:00
RCV-HANUAL
3 To return to standby.
What to Do When Your Telephone Rings
Lift the handset. If you hear a beep... beep... beep
sound, it means someone wants to send a fax. Or, if the
caller ar\swers and says he/she wante to send a fax,
then...
Remove document from the ADF, if any.
<t> START
The machine starts receiving the document.
3 Replace the handset.
Memory Reception
If memory reception is set to valid, the machine starts
receiving document(s) into its memory. When the machine
finishes the memory reception, the message "MESSAGE IN
MEMORY" blinks.
If an error occurs while receiving, the documents received
prior to the error are stored in memory.
To print out the received documentfs) stored in memory:
COPY
♦PRINTING*
KENORY RCV'D DOC.
The document(s) will be printed out and erased from
memory after the printing is completed.
Page 42

BASIC FEATURES
Receiving Oversize Documents
You can use either A4-size, letter-size or legal-size recording paper. The size being used must be set in fax parameters 45 and 46.
When the size is set smaller than that of the sending stations' document, the machine prints according to the value set in fax
parameter 33 (REDUCTION RCV).
Automatic Reduction Mode
This mode is available when REDUCTION RCV is set to "valid". The received document is automatically reduced and
printed out.
Reduction ratio is from 95% to 75%
Transmitted Document
Longer than
the recording
paper
Reduction ratio is less than 75%
Longer than
the recording
paper
Received Document
(received document is reduced
to fit on a single sheet)
(received document is divided
into two sheets)
35
Page 43

BASIC FEATURES
Full-Size Printing Mode
When REDUCTION RCV in fax parameter 33 is set to
"invalid", the machine will print without reduction. In
this case, if the received document is longer than the
recording paper, the received document is divided onto
two sheets.
0 Note: If the part of a document that would be printed on the
second sheet is normally blank, you can set fax parameter 34
(OVERSIZED PAGE) to discard this porfiort and print only
the first sheet. The area to be discarded can be set to either 10,
20, or 30 mm (see page 70). Even when fax parameter 34 is
set to discard, when the received document is longer than the
specified discard length, it will be printed out on a second
sheet.
Running Out of Recording Paper
(Substitute Reception)
The machine automatically starts receiving into its memory
if any of the following conditior\s occur while receiving
documents or making copies.
Both upper and lower recording paper nm out (NO
PAPER lamp lights)
• Toner runs out (NO TONER lamp lights)
• Disposed toner in the drum unit becomes full
• Recording paper jams (PAPER JAM lamp tights)
• Receiving cover or transmitting cover is open
When the memory overflows, the machine stops receiving
and releases the communication line. The document(s)
received in the memory up to that time are stored and then
printed out automatically when the printer is ready.
1 When the machine finishes the memory reception, an
information code appears on the display.
N0 RECORDING PAPER
INFO.CODE-010
REPLACE DRUM UNIT
INFO.CODE-046
2 To clear the problem, do one of the following:
• Install recording paper (see page 13).
• Replace the toner cartridge (see page 114).
• Replace the drum unit (see page 113).
• Clear the recording paper jam (see pages 107-110).
• Close the cover.
—\
RECORDING PAPER JAM
INFO.CODE-001
' '
N0 TONER
INFO.CODE-041
3 When the printer is ready, the machine will automati
cally start printing out the document(s) stored in
memory. The memory will be erased. Stored
document(s) are printed out from the top of the page
that resulted in an incomplete recording.
0 Note: If power is turned OFF, document(s) stored in memory
will be kept for about 30 minutes. When power is recovered,
the machine will check whether the document stored in
memory is normal or not. When the memory data is not
normal, a power failure report (see page 80) and journal (see
page 74) will be printed out automatically. Check the journal
for M OK marks. "M OK" indicates that the receiving
documents have been lost because of a power failure. Ask the
calling party to send the lost document again. The report and
journal are not printed out when there are no document(s)
stored in memory.
Page 44

efore you transmit a document, you can make
a copy of it to see what it will probably look
B
like after it is transmitted. If you want to make
two or more copies of a document, the machine
first stores the document in memory.
Making Photocopies
BASIC FEATURES
Place the document face down on the ADF and adjust
the document guides. When making a copy, your
machine automaticaUy selects Fine resolution unless
you change the setting.
If necessary, adjust IRESOLUTIONl. lORIGaNALI. and
IHALFTONEl (see pages 38 - 39).
COPY
COPY
NO.OF COPY*
Enter the number of copies (max. 255).
3
<t> START
4
"5
The machine begins
making a copy.
♦COPY*
NO.OF COPY-001/005
To Stop the copy process.
©STOP
When you make multiple copies of a multi-page document,
copies are made page by page.
0 Note: When you make a copy larger than the recording paper
and the REDUCTION COPY in fax parameter 39 is set to
"valid", the copy is reduced as described on page 35.
37
Page 45

BASIC FEATURES
he following settings can be changed before
or after you place documents on the ADF.
T
After you finish transmission, your machine will
automatically return to the preset settings. You can
also change these settings during transmission.
Making Temporary
Transmission Adjustments
Setting Resolution
Yoim: machine is preset to Standard resolution, which is
suitable for general documents. Use Fine or Super-Fine for
documents with small print or fine detail.
1 RESOLUTION
>
repeatedly until the display
shows the setting you want.
[^1 Note: To change the preset resolution setting, see page 68.
DOCUMENT SET
RESOLUTION-STO
(STD = Standard)
or
DOCUMENT SET
RESOLUTION-FINE
DOCUMENT SET
RESOLUTION-S FINE
(S FINE - Super-Fine)
Setting Original (Contrast)
Your machine is preset to Normal contrast. If you have to
send a document with low contrast, you may obtain better
results by changing the setting to Dark. If you have to send a
document with high contrast, it may be wise to change the
setting to Light.
2 ORIGINAL
<
repeatedly until the display
shows the setting you want.
0
Note: To change the preset contrast setting, see page 68.
f
DOCUMENT SET
DOCUMENT SET
ORIGINAL-DARK
DOCUMENT SET
ORIGINAL-NORMAL
or
or
ORIGINAL-LIGHT
—)
>
38
Page 46

BASIC FEATURES
Using the Halftone Setting
The halftone setting is useful when sending halftone
photographs or illustrations with grey tones. Your machine
is preset to HALF TONE=OFF. You can select either
quality (64 step adjustments) or FAST (16 step
adjustments).
HALF TONE
DOCUMENT SET
HALF TONE-OFF
2 To change the setting,
HALF TONE
until the display you want
appears.
Press iggpYi to test the new setting.
DOCUMENT SET
HALF TONE-QUALITY
or
DOCUMENT SET
HALF TONE-FAST
Using the Verification Stamp
When you transmit the document by using direct
transmission, the verification stamp helps you to confirm
successful transmissions by putting a small ® mark at the
bottom of each successfully transmitted page. Your machine
is preset to STAMP=ON.
If you wish the verification stamp to operate when storing
documents in memory, see Setting Fax Parameters (page 68).
STAMP
DOCUMENT SET
STAMP-ON
To change the setting,
STAMP
0
Note: To change the preset stamp setting, see page 68.
DOCUMENT SET
STAMP-OFF
39
Page 47

BASIC FEATURES
Printing Total Page Numbers
The page number will be printed at the top of each page you
send. You can also set the total number of pages you send so
that it will be printed on each page in addition to the page
number (e.g., 001/005,002/005, etc.).
This setting is not required for memory transmission. The
machine automatically performs this function.
When you transmit the document by using direct
transmission, you can set the total number of pages.
- MODE +
1 i:
Kris
until the mode you want to
set appears.
DOCUMENT SET
TOTAL PAGESH
2 Enter any number from 1 - 255.
40
Page 48

BASIC FEATURES
Using Your Machine's Telephone
Making a Phone Call
You can use the handset on your machine to make regular calls. To do so, lift the handset and dial a full number just as if you were
using an ordinary telephone. If you wish, you can also use One-Touch/Abbreviated keys.
1 Lift the handset, then dial by using one of the following methods:
One-Touch dialling
ABBR dialling
Full number dialling
Example: One-Touch key «
Voice Contact Request
You may want to talk to the other party over the telephone after sending or receiving documents. To do so, perform Step 1 while
the machine is still sending or receiving.
DISPLAY
1 [
Example:
2 TEL/DIAL
LZ^Z]
When sending/receiving is completed and the other party answers the voice contact request, you will hear a beep-beep-beep
sound coming through the machine.
] ; the current machine's status appears on the display.
Transmitting
ON LINE *MEM.XMT*
SPACE
ON LINE *HEM.XMT*TEL
ON LINE *MEH.XMT*TEL
OPERATOR CALLING
Receiving
ON LINE *RCV*
ON LINE *RCV* TEL
ON LINE *RCV* TEL
OPERATOR CALLING
3 Lift the handset and talk.
0 Note: Press I DISPLAY I to see the ID or dialling number on the display and make sure that the current transmission is the line which you
want to contact.
Answering a Voice Contact Request
When you hear a beep-beep-beep soimd coming through the machine, it means you are receiving a voice contact request.
Lift the handset and talk.
41
Page 49

BASIC FEATURES
Page 50

Advanced Features
Read the chapters in this section if you want to use some of the
more interesting features offered by the UF-766 Fax Machine.
These chapters explain that your UF-766 does much more than
simply sending and receiving.
The contents and page numbers of this chapter are given below.
ADVANCED FEATURES
Transmission to Multiple Stations
Polling...............................
How to Prepare to Be Polled
Setting the Polling Password
PoUed................................................................ 46
How to Poll.........................................................47
Tum-around Polling
(Combined Trairsmission and Polling)
Using the Timer
Deferred Transmission
Deferred Polling..................................................50
Using Program Keys
Setting Program Keys
Deferred Transmission
Normal Polling....................................................53
Deferred Polling..................................................54
Group Dialling
One-Touch EHalling
How to Erase or Change
Program Key Settings
Timer Batch Transmission
Using Passwords ____—______.......................... .........58
How to Activate the Password
Communication Fimction
Setting Transmission Password
and Receiving Password
How to Use Password Transmission...................60
Using Fax Access Codes..........................................61
How to Set a Fax Access Code
How to Use the Machine After
You Set a Fax Access Code..............................62
.............................................
........................................................
................................................
....................................................
...........................................
.............................
...............................
..............................
..............
.......................................
........................................
..............
......................................
........................................
.........................
.................................
..................................
..........................
44
45
45
45
48
49
49
51
51
52
55
55
56
57
59
61
60
How to Clear a Fax Access Code
Using Department Codes.........................................63
Setting the Etepartment Codes...........................63
How to Use the Machine
after You Set Department Codes
How to Clear Etepartment Codes
Edit File Mode
Printing Out File List
Changing Time or Stations.................................66
Deleting a File....................................................67
Printing a File.....................................................67
Fax Parameters ................................—.................... 68
Changing Fax Parameters
Fax Parameter Table
Lists and Reports
How to Print Out Lists and Reports
Samples of Lists and Reports
Journal
Memory Transmission Journal
Individual Transmission Journal......................75
One-Touch List
Abbreviated Number List.................................76
Directory Search list
Program List................................................... 78
Fax Parameter List
User Parameter List.........................................79
Batch Communication Jourrwl
Power Failure Report.......................................80
Maintenance Report
Etepartment Code Journal...............................81
....
.................................................... 65
..........................................
...........
....................................................
...........................................................
...............................................
........................................
..........................................
........................................
.........................
......................
.......................
.................................
-...............................69
....................
............................
........................
........................
62
64
64
65
68
72
73
74
74
75
76
77
78
79
80
43
Page 51

ADVANCED FEATURES
1
Place the document face down on the ADF and adjust
the document guides.
2
Enter station(s) by using any combination of the
following methods:
Qne-Touch key
ABBR and 2-digits
Directory search
Full number dialling
Program key
You can enter up to 143 stations (including a maximum
of 3 full telephone numbers).
his machine can easily transmit a document to
T
multiple locations using memory transmission.
Transmission to
Multiple Stations
4> START
The machine stores the
document in memory
with a file number, then
begins to dial
automatically.
To cancel this transmission:
DISPLAY
1. c
♦STORE* N0.015
__
an.
16-APR-1992 15:00
lot
to confirm whether the dialling number
or ID on the display is same as you want
to cancel.
Example: One-Touch key
B
To review the entered station(s) before proceeding,
press IMCT)EI E or 0. If you find an error, press
ICLEARI.
\^\ Note: // the Program key is set for timer-controlled communi
cation or polling, it can not be used in this procedure.
then lABBRI and jT]
©STOP
COMMUNICATION STOP?
1;YES Z:N0
The machine will ask for confirmation on the display.
Enter 0 to cancel this transmission. The rest of the
transmission will be cancelled and the document(s)
stored in memory will be erased automatically.
If no contact is made, the machine will print out a
memory transmission journal (COMM. JOURNAL) (see
page 75) when COMM. JOURNAL in fax parameter is
set to "2". The document(s) stored in the memory will
be erased automatically.
AA
Page 52

r
his machine provides a choice of two polling
procedures: normal polling and tum-around
T
polling. The station that dials is called the polling
station, and the station to be polled is called the
polled station.
Foiling might not function with all fax machines.
We suggest you attempt a trial polling before you
actually poll for important documents.
ADVANCED FEATURES
How to Prepare to Be Polled
Setting the Polling Password
You will need to set a polling password shared by the
other station before you perform a polling operation. If
you do not set a polling password when you are setting
the user parameters, you can set a temporary polling
password during the polling operation. The temporary
password is erased after polling.
Setting the Fax Parameter
The station to be polled must know in advance that a
polling station win be calling, and therefore must have
a document in memory.
As a standard setting the polled file in the memory will
be erased after the document was polled.
Polling
Setting the Polling Password
FUNCTION
[ n 1 then
USER PARAMETERS
START
POLLING PASSWORD
repeatedly until the polling password appears on the
display.
Enter the four-digit password.
Example: IX! E S U1
POLLING PASSWORD
9876
You can set the polled file to be retained in the memory
after the document was polled (see fax parameter 4 on
page 69).
If you make a mistake in Step 3, use the [<1 or [>] to
move the cursor to the incorrect number, and then enter
the new number over it. To erase the password, press
ICLEARI.
4 To return to standby
, then|-fi^
TT ^5
lt/| Note: //the passvMjrd is not set at the other station, you can
poll the other station even though your machine has a
password.
45
Page 53

ADVANCED FEATURES
Polled
When your machine has been set to POLLED FILE
SAVE=Valid in fax parameter 4, the preparation to be polled
is as follows;
1
Place the document face down on the ADF and adjust
the document guides.
FUNCTION
2
then
2
The polling password
appears if it has been
previously set.
The temporary polling
password setting message
appears if it has not been
previously set.
3
POLLING
1:P0LL1NG 2;POLLEO
POLLED
PASSWORD-1234
POLLED
PASSWORD-
4 <t> START
The machine stores the
document in the memory
automatically with a file
number.
When your machine receives a polling request, the
document(s) stored in memory wiU be sent. Whether the
document in memory is erased automatically or not
depends on the setting in fax parameter 4 (see page 69).
To erase the document(s) from memory before being
polled, you must select file delete in the Edit File Mode
(see page 67).
*ST0R£*
I M. ...
16'APR-1992 15:00
N0.001
lOX
Enter a temporary polling
password if required.
Example; [U [S S [U
POLLED
PASSWORD-7890
46
Page 54

ADVANCED FEATURES
How to Poll
Xhe following procedtire allows you to poll one station or up
to 140 stations. If you want to poll two or more stations, you
must use One-Touch or Abbreviated numbers.
When polling ends, a multistation communication journal is
automatically printed out when COMM. JOURNAL in fax
parameter 41 is set to ''2". This journal lists the stations
polled and indicates whether polling was successful or not.
FUNCTION I I I
POLLING
POLLING 2:P0LLED
for polling.
n
The polling password
appears if it has been
previously set.
A temporary polling
password message appears if
it has not been previously set.
Enter a temporary polling
password if required.
Example: H [i] [f] [T]
<1> START
POLLING
PASSWORD-1234
POLLING
PASSWORO-fl
POLLING
PASSWORD-4321
POLLING
ENTER STATION(S)
4 Enter station(s) by using any combination of the
following methods:
• One-Touch key
• ABBR and 2-digits
• EHrectory search
• Full number dialling
Example: Press I ABBR L then enter [T| and J] and OneTouch key
POLLING
[35]{Station name)
To erase or change stations set in Step 2 or 3, press
iCUEARl.
To erase the entered stations, use IMODEI [+] or Q to
show the required station, then press API
<b START
If a polled station is busy or does not answer, it will be
skipped and the next station will be polled. The
skipped stationfs) will be redialled up to twice after all
registered stations have been polled.
The received document is stored into memory if
memory reception has been set to "Valid" in Fax
Parameter 35.
47
Page 55

ADVANCED FEATURES
Tum-around Polling
(Combined Transmission and
Polling)
This procedure lets you do two operations with one call,
automatically. First, your machine will send a document to a
station, and then it will poll the same station.
1 Place the document face down on the ADF and adjust
the document guides.
FUNCTION
2 C
then
is
The polling password
appears when it has been
previously set.
A temporary polling
password setting message
appears if it has not been
previously set.
XHT & POLLING
P/kSSM0RD-lZ34
XMT & POLLING
PASSWORD-M
4 Enter the station number using one of the following
methods:
• One-Touch key
• ABBR and 2-digits
• Directory search
• Full number dialling
Example: [1] [1] [o] [1] ij] [T] [|]
<1> START
XMT & POLLING
380Z765I
g
The received document is stored into memory if
memory reception has been set to "Valid" in Fax
Parameter 35.
Enter a temporary polling
password if required.
Example: [T] [S S [S
^START_
XHT & POLLING
PASSNORD-7890
Page 56

ou can send a document to one or more
stations at any preset time within the next 24
Y
hours. Up to 32 built-in timers can be used for
deferred transmission and deferred polling.
Using the Timer
ADVANCED FEATURES
Deferred Transmission
Place the document face down on the ADF and adjust
the document guides.
FUNCTION
If the 32 timers have already been used, the message
"TIMER REGISTER FULL" will appear.
Enter the start time (four digits, 24-hour clock) using the
keypad.
Example: [T| [|] [T|
If you enter the wrong time, press I CLEAR I and then re
enter the correct time.
] then
to select XMT
(deferred
transmission).
(11:30 p.m.)
DEFERRED COMM. N0.-|
1:XMT 2:P0LLING
START TIME
START TIME 23:30
ENTER STATIONCSI I
Example: One-Touch key
key
START TIME 23:30
<02XStat1on name)
__
/ ^
To erase the entered stations, use IMQDEl S or Q to
show the required station, then press |
START
The documents are stored
into die memory automati
cally with a file number.
To change the setting, you must select Edit File Mode
(see page 66).
then One-Touch
START TIME 23:30
<05XStat1on name) I
^STORE*
PAGES-OOl
N0.001
in
Enter station(s) by using any combination of the
following methods:
• One-Touch key
• ABBR and 2-digits
• Directory search
• Program key
49
Page 57

ADVANCED FEATURES
Deferred Polling
FUNCTtON
If the 32 timers have already been used, the message
"TIMER REGISTER FULL" wUl appear.
The polling password
appears when it has been
previously set.
A temporary polling
password setting message
appears if it has not been
previously set.
Enter a temporary polling
password if required.
Example: [U |T] [|] [o]
<^STABT
J then
2 I to select polling.
DEFERRED COMM. N0.-|
1:XMT 2:P0LLIN£
POLLING
PASSWORD-1234
POLLING
PASSWORD
POLLING
PASSWORD-7890
5 Enter station(s) by using any combination of the
following methods:
• One-Touch key
• ABBR and 2-digits
• Directory search
• Program key
Example; One-Touch key
START TIME 02:30
ClOXStation name! 1
<D START
To change the setting, you must select Edit File Mode
(see page 66).
then I ABBftI and [TlfTl
START TIME 02:30
[15](Station name) |
4 Enter the start time (four digits, 24-hour clock) using the
keypad.
Example: [o]|T][T][T}
(2:30 a.m.)
START TIME 02:30
ENTER STATIONCS) |
Rn
Page 58

our fax machine has eight special Program
keys. These keys are useful if you frequently
Y
send or poll the same stations. You can use these
keys to store a sequence of stations to be polled, a
deferred transmission or polling sequence, an
additional One-Touch key, or a One-Touch group
key.
Using Program Keys
ADVANCED FEATURES
Setting Program Keys
To set a number or a group of numbers in a Program key,
follow the procedure below.
FUNCTION
then
OSTART
PROGRAM KEY
Press one of the Program keys |p| to
Example:
Now you can choose one Program key mode out of the
following five modes.
• Deferred Transmission:
• Normal Polling:
• Deferred Polling:
• Group Dialling:
• One-Touch EHalling:
Go to Step 4a (see page 52).
Go to Step 4b (see page 53).
Go to Step 4c (see page 54).
Go to Step 4d (see page 55).
Go to Step 4e (see page 55).
NO.-I [PI]
1:PR0G. 2:0NE-T0UCH
51
Page 59

ADVANCED FEATURES
Deferred Transmission
4a
5a
6a
1
to select XMT
(deferred
transmission).
NO.-I [PI]
1;XMT/P0L a:GR0UP
NO.HI [PI]
1:XHT 2:P0LLING
START TIME
7a Enter the start time (four digits, 24-hour clock) using
keypad.
Example: ITHTHTirol
(11:30 p.m.)
8a Enter station(s) by using any combination of the
following methods:
START TIME 23:30
ENTER STATIOK(S) I
9a To store the starting time and station numbers.
^START
10a Enter the program i\ame using One-Touch/character
keys (max. 15 characters) (see page 7).
Example:® HU [gas
PROGRAM NAME
PROG.Al
11a To store the program name, r^SIiBL
You can now set another Program key by
repeating the procedure from Step 3.
Press ISTOPI to return to standby.
To perform the setting: Place the document on tiie
ADF, then press the Program key.
[PI]
One-Touch key
ABBR and 2-digits
Example; One-Touch key
¡02
Add more station numbers, if necessary.
You may use ¡MODE 10 or Q to review the station(s)
entered before going to the next step.
If you find an error, press Ifit pari to erase the dis
played station.
START TIME 23:30
<02XStat1on name) I
52
Page 60

ADVANCED FEATURES
Konnal Polling
4b
5b
6b
The polling password
appears when it has been
previously set.
A temporary polling
password setting message
appears if it has not been
previously set.
for polling.
NO-H [PI]
1:XMT/P0L 2:GR0UP
NO.-I [PI]
1:XHT 2:P0UING
POLLING
PASSWORD-1234
POLLING
PASSWORD-IM
9b Enter station(s) by using any combination of the
following methods:
• One-Touch key
• ABBR and 2-digits
Example: One-Touch key
Add more station numbers, if necessary.
You may use IMODEI0 or 0 to review the station(s)
entered before going to the next step.
If you find an error, press fiAPI to erase the
displayed station.
10b To store the station numbers,
<I> START
ENTER STNCS) [PI]
<05>(Stat1on name) I
PROGRAM NAME [PI]
Enter a temporary polling
password if required.
Example; E [j] B E
^START
7b
8b
for normal polling.
POLLING
PASSWORD-7890
DEFERRED POLL [PI]
1:YES 2:N0 N0.-|
11b Enter the program name using One-Touch/
character keys (nwx. 15 characters) (see page 7).
Example: fS[B][S[G!Q®
PROGRAM NAME
PROG.Al
^START
12b To store the program name.
You can now set another Program key by repeating
the procedure from Step 3.
Press ISTOPi to return to standby.
To perform the setting: Press the Program key.
[PI]
53
Page 61

ADVANCED FEATURES
Deferred Polling
5c
6c
The polling password
appears when it has been
previously set.
A temporary polling
password setting message
appears if it has not been
previously set.
Enter a temporary polling
password if required.
Example: [7] [H EE
START
for polling.
7c
N0.^ [PI]
1:XMT/P0L 2:GR0UP
KO.-I [PI]
1:XMT 2:P0LLIN6
POLLING
PASSWORD-1234
POLLING
PASSWORO-
DEFERRED POLL [PI]
1:YES 2;N0 ND.-|
lOc Enter station(s) by using any combination of the
following methods:
• One-Touch key
• ABBR and 2-digits
Example: lABBRI and [T] |T]
Add more station numbers, if necessary.
You may use IMODEI0 or 0 to review the station(s)
entered before going to the next step.
If you find an error, press
displayed station.
START TIME 22:00
[12](Station name) I
to erase the
<t>STAat
lie To store the station numbers.
12c Enter the program name using One-Touch/
character keys (max. 15 characters) (see page 7).
Example: [P] [U [Oj ® [D ®
'
--------
PROGRAM NAME
PROG.Al
13c To store the program name,
[PI]
8c
for deferred poUing. (start time
9c Enter the start time using four digits.
Example: E E B B (10:00 p.m.)
You can now set another Program key by repeating
the procedure from Step 3.
Press ISTOPI to return to standby.
To perform the setting: Make sure that no document
is on the ADF, then press the Program key.
Page 62

ADVANCED FEATURES
Group Dialling
4d
5d
NO.-I [PI] ’
1:XMT/P0L 2:GR0UP
^ —4
ENTER STNIS) [PI]
1
6d Enter station(s) by using any combination of the
following methods:
One-Touch key
ABBR and 2-digits
Example: One-Touch key orlABBRIandmiil
ENTER STKCS) [PI]
[12](Stat-Ion name) I
Add more station numbers, if necessary.
You may use I MOPE 10 or 0 to review the station(s)
entered before going to the next step.
If you find an error, press If^LgARI to erase the
displayed station.
OSTART
7d To store the station numbers
One-Touch Dialling
4e 1 2 1 torUne-louch r TELEPHONE NO. 1
L—ru^ number. | I
Q j
5C Enter the fax machine telephone number (up to 36
digits).
ФSTART
6e To store the telephone number.
[PI] STATION NAME
7e Enter the station name using One-Touch/character
keys (max. 15 characters) (see page 7).
Example: [N|[Y]|SRACEl[Q][Fl[F]mi^ [El
[PI] STATION NAME
NY OFFICE I
ФSTART
8e To store the station name
r "i
You can now set another Program key by repeating the
procedure from Step 3.
8d Enter the program name using One-Touch/character
keys (max. 15 characters) (see page 7).
Example: E IS U HD®
r '
...
PROGRAM NAME
PROG.A 1
ФSTART
....
9d To store the program name.
You can now set another Program key by repeating the
procedure from Step 3.
Press I STOP I to return to standby.
To perform the setting: Place the document on the
ADF, then press the Program key and ISTARTI.
[PI]
Press [STOP] to return to standby.
When you want to check your settings, print out a
\
program list (see page 73).
To perform the setting: Place the document on the
ADF, then press the Program key and ISTARTI.
55
Page 63

ADVANCED FEATURES
How to Erase or Change Program Key
Settings
To erase the settings in a Program key:
FUNCTION
1 I n i then
0START
PROGRAM KEY
3 Press the Program key you
want to erase.
Example; |m]
OSTART
NO.-l [PI]
1:PR06. 2:0NE-T0UCH
NO.-l [PI]
l.-PROG. 2: ONE-TOUCH
PROGRAM KEY
To change the settings in a Program key, see page 51.
• Start time or station(s) for deferred transmission
• Stationfs) for normal polling
• Start time or station(s) for deferred polling
• Station(s) for group dialling
• Telephone number for One-Touch dialling
You can now erase another Program key by repeating
the procedure from Step 3, or, press I STOP I to return to
standby.
Page 64

ADVANCED FEATURES
assword communication, including
password transmission and password
P
reception, will prevent your machine from sending
a document to a wrong station or receiving a
document from unauthorized stations. You can set
password transmission and password reception
independently, or both together.
Using Passwords
To use password transmission, you must set a four
digit transmission password in advance. The
password must be shared with other compatible
Panafax machine(s). If the transmission password
set in your machine does not match the
transmission password set in the other compatible
Panafax machine(s), the transmission will fail. You
can select password transmission by setting
PASSWORD-XMT to ON when you send a
document.
To use password reception, you must set a four
digit receiving password in advance. The
password must be shared with the other
compatible Panafax machine(s). If the receiving
password set in your machine does not match the
receiving password set in the other compatible
Panafax machine(s), the reception will fail. Once
you set password reception to ON, it is ON until
you change the setting to OFF.
You can only use password transmission and
reception communication with Panafax compatible
machine(s).
Page 65

f you stored several documents at different
times using the same Program key that is
I
programmed to perform deferred transmission, these
documents will be arranged in one file. The file can
then be transmitted by dialling only once.
Timer Batch Transmission
ADVANCED FEATURES
1 Place the document face down on the ADF and adjust
the document guides.
2 Press a Program key you programmed for deferred
transmission.
Example: @ (programmed
for transmitting to Panafax at
11:00 p.m.)
The first document will be
stored in memory.
DOCUMENT SET
[P2] PANAFAX
♦STORE* N0.015
PAGES-003
3 Place the second document face down on the ADF.
05%
4 Press Program key [^.
5 The second document will
also be stored in memory.
At 11:00 p.m., your machine will begin to dial. The first
and second documents that were stored into memory
'
will both be transmitted on the same deferred call.
The machine will then print out a batch communication
journal automatically (see page 79) when an error
occurs.
DOCUMENT SET
[P2] PANAFAX
‘STORE*
PAGES-004
N0.017
10%
Page 66

How to Activate the Password Commu
nication Function
ADVANCED FEATURES
^START
12 PASSWORD RCV
1: INVALID
4t
Password transmission and password reception are preset to
"invalid" in your machine. To change the fax parameter,
follow the procedure below.
FUNCTION
1 c
OSTART
J then
FAX PARAMETER
N O . - O
Enter the parameter number. ''
Enter ¡T] [T], then press
ISTARTl.
11 PASSWORD XMT
1: INVALID
4 To set password transmission:
Enter [U for "Invalid". Enter [2] for "OFF" setting (no
password check) or enter [|] for "ON" setting (check
password).
Example: Enter ¡T}.
11 PASSWORD XMT
3:0N
6 To set password reception:
Enter [U for "OFF" setting (no password check) or enter
[3] for "ON" setting (check password).
Example: Enter [T|.
OSTART
then
Q STOP
12 PASSWORD RCV
2:0FF
to return to standby.
59
Page 67

ADVANCED FEATURES
Setting Transmission Password and
Receiving Password
To set transmission password and receiving password,
follow the procedure below.
FUNCTION
1 I r. I then
USER PARAMETERS
<I> START
2 I I repeatedly.
3 Enter a four-digit transmission password.
Example: H] S S E
4 To set the trar^mission
password, gTART
5 Enter a four-digit receiving password.
Example: E E E E
6 To set the receiving password.
QSTQP
To return to standby.
XMT-PASSWORD
RCV-PASSWORD
<1> START
How to Use Password Transmission
To start password transmission, set PASSWD-XMT to ON
following the procedure below.
1 Place the document face down on the ADF and adjust
the document guides.
2 1
1—i or ?—1 repeatedly. ^
To turn FASSWE>-XMT to OFF, press
again.
4 Enter station(s) by using any combination of the
following methods:
• One-Touch key
• ABBR and 2-digits
• Directory search
• Full number dialling
Example: Ij^BRIandEE
If your machinées transmission password coincides with
the other stations' XMT PASSWORD, your machine
starts sending the document.
When transmission is completed, PASSWD-XMT
returns to OFF setting.
DOCUMENT SET
PASSWD-XMT-OFF
DOCUMENT SET
PASSWD-XMT-ON
Page 68

he fax access code prevents an unautho
rized user from operating the machine. Once
T
a four-digit fax access code is registered, no one
can operate the machine without entering the
correct access code. Automatic reception, however,
is always available. After you complete any
operation, such as mode setting or transmission,
and the display returns to standby, you have to re
enter the access code in order to use the machine
again. Registering the fax access code does not
affect the use of the machine in any other way.
ADVANCED FEATURES
Using Fax Access Codes
How to Set a Fax Access Code
Before you use the fax access code function, be sure to set fax
parameter 20 to the valid position (see pages 68 - 70).
FUNCTION
1 C
USER PARAHETERS
^START
2 I I repeatedly.
FAX ACCESS CODE
3 Enter a four-digit fax access
code.
Example: [H [T| [£1IXI
4 To set the code.
5 To return to standby.
, ©STOP
m
FAX ACCESS CODE
5S55
16-APR'1992 15:00
AC-
61
Page 69

ADVANCED FEATURES
How to Use the Machine After You Set a
Fax Access Code
1 Enter the fax access code.
Example: [US®® (The
entered code is not
displayed.)
‘START
If the fax access code you just entered coincides with the
code set in the machine, the display "AC=" will
disappear. If not, the machine returns to standby.
You can now use the machine for any normal operation.
3
After you complete any operation, the machine will
4
return to standby. To use the machine again, re-enter
the fax access code.
16-APR-1992
f
16-APR'1992
16-APR-1992
16-APR-1992 15:00
16:00
AC-
15:00
15:00
00%
AC-
How to Clear a Fax Access Code
1 Enter the fax access code.
Example: ® ® ® ®
<I> START
FUNCTION
^START
repeatedly.
16-APR-1992 15:00
16-APR-1992 15:00
USER PARAMETERS
FAX ACCESS CODE
Q
CLEAR
FAX ACCESS CODE
AC-
AC-U
1555
0
Note: The department code(s) have a higher priority than the
fax access code. Therefore, if both fax access code and
department code(s) are set, you do not have to enter the fax
access code to operate the machine, the department code is all
that is required.
-
----------------
^ START
7 To return to standby
, ©STOP
Page 70

he department code function allows you to
T
restrict the machines usage to individual
users (departments).
The UF-766 can be set with up to 20 department
codes. When department codes are set each user
must enter the four'digit code before any
operation. All four-digit codes are recorded on the
journal printout.
Using Department Codes
ADVANCED FEATURES
Setting the Department Codes
FUNCTION
1 I n I then
FAX PARAMETERS
FAX PARAMETER
47 DEPARTMENT CODES
1:INVALID
to set "VALID".
47 DEPARTMENT CODES
2:VALID
NO.-H
FUNCTION
then
—
DATE & TIME
16-04-1992
OSTART
DEPT. CODE-
until the department code
setting message appears.
8 Enter a four-digit department code.
Example: [Hll] SIT]
<1> START
DEPT. CODE-1234
I—
10 Enter a department name (max. 10 characters).
Example; H ® 1] iSl] EnKS [Gi
<1> START
NAME-1
11
’
15:00
OSTART
To set another department code, go to Step 8.
©STOP
12 To return to standby.
} "T
63
Page 71

ADVANCED FEATURES
How to Use the Machine After You Set
Department Codes
1 Enter the department cede.
Example: U] [I] [U B (The
entered code is not
displayed.)
<!> START
If the department code you just entered coincides with
the code set in the machine^, the display "DEPT.
CODE=" will disappear. If not, the machine returns to
standby.
16-APR-1992 15:00
DEPT. CODE-
16-APR-1992 15:00
DEPT. CODE-BH
16-APR-1992 15:00
00%
3 You can now use the machine for any normal operation.
4 After you complete any operation, the machine will
return to standby. To use the machine again, re-enter
the department code.
16-APR-1992 15:00
DEPT. CODE-
How to Clear Department Codes
1 Enter the department code. I6-APR-19 92 15:00
DEPT. CODE-
Example: U] [2] [U B
<^ START
16-APR-1992 15:00
DEPT. CODE-OB
16-APR-1992 15:00
4?
FUNCTION I I I I Z I
USER PARAMETERS
<& START
repeatedly.
DEPT. CODE-
5 Enter the department code you wish to clear.
Example: IB BBS
^START
DEPT. CODE-7890
NAME-MARKETING
00%
CLEAR
8
Q
9 To return to standby.
DEPT. COOE-fl890
NAME-1
QSTOP
Ad
Page 72

ADVANCED FEATURES
Edit File Mode
printing Out File List
The contents of the file created in the timer communication setting and the polled file stored in memory may have to be modified
or deleted. To verify the contents of an existing file, a file list can be printed out. Follow the procedure below to print out the file
list.
FUNCTION I ; I I Z I
PRINT FILE LIST
<I> START
The machine starts printing a list of files and returns to standby mode after printing out.
******************* -FILE LIST' ************** DATE 16'APR'1992 **** TIME 21:57 *** P.l
(4) (14)
FILE N0. COMM. TYPE
002
012 DEFERRED POLL 16-APR 18:00 21:15 [88].[04]
017 DEFERRED XMT 16-APR 20:26 22:45 003
029 POLLED 16-APR 20:40 002
044
051
052
**********************************
See pages 125 to 127 for an explarwHon of each item.
DEFERRED XMT
MEMORY RCV 16-APR 20:50 001
DEFERRED XMT 16-APR 20:55 22:45 005
DEFERRED XMT 16-APR
(5)
CREATE TIME
16-APR
16:30 21:00 001 [01].[02].[03].[04].[05]
21:18 23:30 010 [00],[01],[02],[03].[04].[05]
(6) (7)
START TIME
(10)
-LONDON OFFICE
(1) (2) (3)
(8)
PAGES DESTINATION(S)
[P7]
[P6]
[06].[07].[08].[09].[10].[11]
[12].[13].[14].[15].[16].[17]
[18].[19].[20],[21].[22].[23]
(9)
-UF-766 London-
(10)
.**** -212 111 1234 ■ ***********
65
Page 73

ADVANCED FEATURES
Changing Time or Stations
Follow these steps to change the time and/or stations in a
transmission file or a polling file created using the deferred
communication setting.
FUNCTION
1 1 n * then
CHANGE TIME/STATION
<J> START
CHANGE TIME/STATION
FILE NO.-H
3 Enter the file number (three digits) to be changed.
Example: [o][4]®
^START
CLEAR
to delete the time.
r
START TIME
[051TORONTO
START TIME
[053TORONTO
23:00
6 To delete the station,
- MODE +
I
START TIME
[123CHICAGO
22:30
imtil the station you want to delete appears.
CLEAR
I n I to delete.
n
7 To add a station name, enter the station name you want
to add.
Example: fABBRi and [2] [T)
<1> START
8
] to set.
/
START TIME
t23]NEW YORK
DEFERRED XMT 22:30
[231NEW YORK
22:30
>
1
TT
\
1
|t/| Note: You cannot change time and stations Jbr this file if you
set deferred communication using Program keys.
Enter a new time.
Example: [|] [|] |T| [o] (10:30 p.m.)
66
Page 74

ADVANCED FEATURES
Deleting a File
There are two types of file deleting, one is to delete a specific
file and the other is to delete all files in memory.
Follow these steps to delete a file in memory.
FUNCTION
1 c
OSTART
J then
r
DELETE FILE
_J
DELETE FILE
FILE NO.-H
4t
To delete a file:
3a Enter the file number you want to delete.
Example: [T] E [U
OSTART
4a
*DELETED*
FILE N0.-101
Printing a File
Follow these steps to print the contents of the timer transmis
sion file.
FUNCTION
1 I .. I then
PRINT FILE
)
<I> START
PRINT FILE
FILE N0.-
3 Enter the file number (three digits) to print.
Example: SEE
<I> START
The "PRINTING" message appears until printing is
completed. The machine prints out the image data
stored in the file and returns to the standby mode.
PRINT FILE
FILE N0.-101
To delete all files:
OSTART
3b
Enter [T] to delete all files, then
Enter E to cancel this operation.
The "DELETING" message appears, and the machine
returns to the standby mode.
DELETE ALL FILES?
1:YES 2:N0
I—jk_i
(-----------------
♦DELETING*
ALL FILES
♦PRINTING*
MEMORY STORED FILE
0 Note: The contents of the file are not erased automatically
after completing the printout.
67
Page 75

ADVANCED FEATURES
ome parameters, such as the resolution,
original (contrast), and veriJhcation stamp
S
parameters, can be temporarily changed by simple
key operations just before a transmission is made.
When the transmission ends, however, these
parameters return to their preset values. Other
parameters can be changed only by the procedure
described below.
Fax Parameters
Changing Fax Parameters
FUNCTION I Z I I 1 I
FAX PARAMETERS
<1> START
FAX PARAMETER
NO.Hi
3 Enter a fax parameter number from the parameter table
(see pages 69 to 71).
Example: [T] then iSTAFTTl for RESOLUTION.
—
01 RESOLUTION
1;STANDARD
Enter the new setting value.
Example: [T| for FINE.
To cancel the digit entered, press
again from Step 2.
<b START
6 You can now return to Step 3 to set the next parameter.
Press to return to standby mode.
To print out a fax parameter list, see page 73.
01 RESOLUTION
2:FINE
and then start
02 ORIGINAL
1: NORMAL
6»
Page 76

Fax Parameter Table
Setting numbers marked with an asterisk C^) indicate standard factory settings.
ADVANCED FEATURES
Parameter
Ntunber
01
02
03
04
05
Parameter
Resolution
Original (Contrast)
Stamp
Polled File Save
Journal Print
Setting
Number
1*
2
3 Super Fine
Standard
l*^ Normal
2
3 Light
1 OFF
2*
V Invalid
2 Valid
1 OFF
2*
Automatic
Setting
Fine
Dark
ON
Print
Comments
Setting home position of the resolution
mode.
Setting home position of the original
contrast mode.
Setting home position of the stamp function
On/Off.
Selecting whether the machine can be
polled for files repeatedly.
• Invalid; deletes the documoit after it is
polled.
• Valid: document not deleted after it is
polled.
Selecting whether the machine prints the
journal automatically after every 32
transactions.
06
07 Dialling Method
08 Relayed XMT Request
09
10
Header Print
Confidential Parameter
Key/Buzzer Volume
r Inside
2
3 None
1
2*
V Invalid
2 Valid
1* OFF
2
r
2
Outside
Tone
Pulse
ON
Soft
Loud
Selecting printing position of the header
Inside : ix\side the document area.
Outside: outside the document area.
None : header is not printed.
Selecting whether the machine dials by
pulse (rotary) or tone method.
Selecting whether the machine performs the
relayed transmission request fimction.
Selecting whether the machine checks the
confidential communication parameter.
Selecting whether the key/buzzer volume is
soft or loud.
69
Page 77

ADVANCED FEATURES
Parameter
Number
n
12
18
20 Fax Access Code
21 Header Print Format
Parameter
Password XMT
Password RCV
Stamp MEM. XMT
Setting
Number
r
2 OFF
3 ON
1*
2 OFF
3
1* OFF
2
1*
2
1*
2
Setting
Invalid
invalid
ON
ON
Invalid
VaUd
From to
LOGO ID No.
Comments
Selecting whettier the machine performs
and checks the XMT-password of the
receiving station when transmitting.
Selecting whether the machine performs and
checks the RCV-password of the
transmitting station when receiving.
Selecting whedier the machine stamps the
original document when storing into
memory. Selecting whether the machine
stamps the original document when storing
into memory (See Note 1).
Selecting whether the machine uses a 4-digit
password to prevent unauthorized use of the
machine.
Selecting the header text for fax transmission.
The header can either indicate FROM-TO, or
the sending station's LCXJO and ID.
22
32
33
34
35
39
RCVT> Time Print
Initial Operator Call
Reduction RCV
Oversized Page
(See Note 2)
RCV to Memory
Reduction Copy
1*
2
1
2*
1
2*
1*
2
3
4
1*
2
1
2*
Invalid
Valid
OFF
ON
Invalid
Valid
No Discard
10mm
20mm
30mm
Invalid
Valid
Invalid
Valid
Selecting whether the machine prints
received time, page # and remote ID on each
received page.
Selecting whether the machine sounds
operator call when no fax signal is received
in the fax mode.
Selecting whether ttie machine reduces the
printed copy automatically to fit the size of
the recording paper used when receiving.
Setting the amount of remaining data to be
discarded when an oversized document is
received.
Selecting whether the machine receives
document(s) into memory.
Selecting whether the machine reduces the
printed copy automatically to fit the size of
the recording paper when copying.
7n
Page 78

ADVANCED FEATURES
Parameter
Number
41
43
45
46
47
Parameter
Comm. Journal
Conf. RCV Report
Upper Cassette
Ree. Paper Size
Lower Cassette
Ree. Paper Size
Department Codes
Setting
Number
1
2
3*
1 Off
2* Automatic
1 Letter
2
3*
1 Letter
2
3*
1*
2
Setting
Off
Always
Inc. Only
Legal
A4
Legal
A4
Invalid
Valid
Comments
Selecting whether the machine prints out a
Comm, journal (memory transmission) or
XMT journal (direct transmission).
• Always: prints out after every transmission
ends.
• Inc. Only; prints out only when an error
occurs
Selecting whether the machine prints out a
confidential RCV report automatically.
Selecting which recording paper size is used
in upper and lower cassettes.
Selecting whether the department code
function can be performed.
0 Note:
3. V/hen you set this parameter to ON, parameter 03 on page 70 must also be set to ON.
2. Reduction RCV
This Junction is available when REDUCTION RCV or REDUCTION COPY is set to '‘invalid". It is to control printing on the second
page depending on the setting value in this parameter when the document is divided into two pages.
Example: The parameter is set to 20 mm.
Sending
Receiving
First page
Second page is not printed
less than 20 mm
The machine compares the length that was set in parameter 34 with the remaining length to be printed on the second page and discards
the data to be printed if the length is shorter than the setting value.
71
Page 79

ADVANCED FEATURES
o help you maintain records of the
T
documents you send and receive, as well
as lists of the numbers you record, your fax ma
chine is equipped to print out the following
reports and lists.
Lists and Reports
Journal (see page 74)
The journal is a record of the last 32 transactions (a
transaction is performed each time you send or receive a
dociunent). It is printed out automatically after every
32 transactions, but you can print it put manually at any
time.
Memory Transmission Journal (COMM.
JRNL) or Individual Transmission Journal
(XMT JRNL) (see page 75)
A memory transmission journal is printed out when
you transmit your document in memory transmission.
An individual transmission journal is printed out when
you use direct transmission. Whether the document is
printed out automatically depends on the setting of fax
parameter 41 (see page 71). If no transmission has been
made within the last 32 transactions, an individual
transmission journal with blank contents is printed out.
One-Touch/Abbreviated Dialling Number
or Directory Search List (see pages 76 and
77)
A list of all the fax numbers you have recorded imder
One-Touch/Abbreviated dialling numbers and
directory search Hst.
Program List (see page 78)
A list of all the dialling patterns programmed in the
Program keys.
Batch Communication Journal (BATCH
COMM. JOURNAL) (see page 79)
A batch transmission journal is printed out automati
cally when a transmission error occurs.
Power Failure Report (see page 80)
If a power failure occurs for more than 30 minutes, the
document information stored in the machine's memory
will be lost. In this case, a power failure report will be
printed out automatically after the power is returned.
The report is not printed out when there are no
documents stored in the memory.
Maintenance Report (see page 80)
This report shows you the status of printer components
(e.g., the ozone filter). It tells you whether these
components need to be replaced.
Department Code Journal (see pages 81 and
82)
If the department code in fax parameters is set to
"valid", three kinds of department code journals are
printed out automatically after printing out the 32transaction journal.
All contents of the journal will be erased automatically
after printing out.
Fax Parameter List (see page 78)
A list of the fax parameters.
User Parameter List (see page 79)
A list of the user parameters.
72
Page 80

How to Print Out Lists and Reports
FUNCTION
1 L
Q
then
PRINT OUT
NO.-I
3a
ADVANCED FEATURES
1:0NE-TCH/ABBR.LIST
2:DIR.SEARCH LIST
is
2 • Transaction journal
printout: Enter [T] and go
to Step 3b.
• One-Touch/Abbreviated
dialling number or
directory search list: Enter
[2] and go to Step 3a.
• Program list: Enter B and
go to Step 3b.
• Fax parameter list: Enter [T|
and go to Step 3b.
Individual transmission
journal: Enter [•] and go to
Step 3b.
Maintenance report: Enter
[T| and go to Step 3b.
JOURNAL PRINT
ONE-TOUCH/ABBR.NOS.
PROGRAM LIST
FAX PARAMETER LIST
XHT JOURNAL
MAINTENANCE REPORT
One-Touch/Abbreviated list: Enter [T] to print out.
Directory search list: Enter jTj to print out.
<^ START
3b
The message "PRINTING" is displayed and the
machine returns to standby mode after printing out.
Department code journal will be printed out
automatically after the 32-transaction journal is printed
when the department code is set to "valid".
User parameter list: Enter
[U and go to Step 3b.
USER PARAMETER LIST
73
Page 81

ADVANCED FEATURES
Samples of Lists and Reports
An explanation of each item can be found on pages 125 to 127.
Journal
*************************** -JOURNAL' ********** date 16"APR"1992 **** TIME 15:00 *******
(12)
(11)
NO.
01
02 S OK 000 00:00*20 XMT
03
04 OK
05 OK
06 OK *002
07
M OK
08
32
★*******^*******ifrifr*^*'******i^ifc-**** "SALES OFFICE
(7)
COM
PAGES
OK
002
OK
001
002 00:01*07 XMT
005/005
407
000
001 00:00*25 RCV 703 121 2234
OK 005/005
(4)
(13)
FILE
DURATION
00:01*06
00:03*19
001 00:02*38 XMT
00:01*09
00:00*46 XMT
002 00:02*52 XMT
(14) (15)
X/R
IDENTIFICATION DATE
XMT
RCV
RCV London B.O.
Paris Office
Central Office 16-APR
(16)
T 0466 23 1689
Tokyo B.O. 16-APR 11:07
T 555 6949
(10)
(1) (2)
(16)
16-APR 10:44
16-APR
GR0UP2
16-APR 10:47
16-APR 10:57
16-APR 11:04
16-APR 11:30
16-APR 12:32
(9)
-UF'766
(10)
- **** -212 111 1234
TIME
10:45
10:53
(17)
DIAGNOSTIC
840480AC7800
A40480AC7800
010220200000
B40480AC7600
840480AC7800
050280AC7800
840480AC7800
050251AC7820
840480AC7800
7A
Page 82

Memory Transmission Journal
ADVANCED FEATURES
******************* -COMM. JOURNAL- ****** DATE 16-APR-1992 **** TIME 23:20 *** P.l
(1) (2) (3)
(14) (28)
MODE -
TRANSMISSION START -
16-APR 23:11
END - 16-AP
(4)
FILE NO. - 004
(11)
NO.
(12)
COM
(23) (15)
ABBR.NO.
STATION NAME/ PAGES
(7)
(27) (27)
PRG.NO.
PROGRAM NAME
TELEPHONE NO.
01
02
03
04
05
06
OK
[01]
OK
[02] Geneva 005/005
OK
[15]
[16] Vancouver
INC
OK
[27] New York H.Q.
OK
London
San Francisco
Oil 81 3 111 1234
005/005
005/005
001/005
005/005
005/005
[PI]
[PI]
[P3]
Europe
Europe
North America
[P3] North America
(9)
-UF-766
*************************** -SALES OFFICE
C IO )
- *
212 111 1234 - ★★*★■*★*★★**********
C IO )
Individual Transmission Journal
************************ -JOURNAL- ********** DATE 16-APR-1992 **** TIME 15:00 *******
(1) (2)
C
(16)
DATE/TIME
JOURNAL NO,
(11)
(12)
COMM.RESULT
(7)
PAGES
(4)
FILE NO.
DURATION
(13)
(14)
MODE
(15)
STATION NAME
(19)
TELEPHONE NO.
RECEIVED ID
(20)
(21) RESOLUTION
-
16-APR 15:00
-
15
-
OK
-
001/001
-
004
-
00:0r58
-
MEMORY XMT
-
SEATTLE
-
206 708 9111
-
971 2345
-
STANDARD
(22)
VOICE CONTACT REQUESTED
***************************** -SALES OFFICE
(10)
(9)
-UF-766
(10)
**** -212 111 1234
7H
Page 83

ADVANCED FEATURES
One-Touch List
****************** -ONE'TOUCH LIST
(23)
ABBR.NO. STATION NAME TELEPHONE NO.
<01> Port!and 503 111 1234
<02>
<03> Houston 713 111 1234
<04> Washington 703 111 1234
<05> Charieston
<06> Stamford 203 111
<07> Miami 305 111 1234
<08> Atlanta 404 111 1234
(15)
Nashvi1 le
- ***********
SALES OFFICE
Abbreviated Number List
************* -ДВ5(^, N0, LIST- **************** DATE
(23) (15) (19)
ABBR.NO.
[01] Chicago 312 111
[02]
[03] Minneapoli s 612 111
[04]
[05] Denver 303 111 1234
[06] Seattle
[07] San Franci sco 415 111
[08] Los Angeles 213 111
STATION NAME TELEPHONE N0.
Detrolt 312 111
St. Louis
314 111 1234
206 111 1234
(1) (2) (3)
16-APR-1992 **** TIME 12:00 *** P.l
(19)
1234
1234
1234
1234
1234
1234
1234
1234
-UF-766
**** -212 111 1234 ■ *************
-
(1) .
16-APR-1992 **** TIME 12:00 *** P.2
615 111
304 111
(10) (10)
(9)
(2)
(3)
N0. OF STATIONS - 16 (25)
********************************
"SALES OFFICE
(10) (10)
(9)
-UF-766
**** -212 111 1234
- *************
7Л
Page 84

Directory Search List
ADVANCED FEATURES
************* DIRECTORY SEARCH LIST ****** DATE 16-APR-1992 **** TIME 15:00 *** P.l
STATION NAME
ALASKA
ALASKA N0.2
BOSTON
CINCINNATI
DALLAS [32]
DALLAS N0.2
DENVER
C15) (23) (19)
LONDON
LOS ANGELES <18>
NASHVILLE <27>
NEBRASKA
NEW JERSEY
NEW ORLEANS [42]
ABBR.NO. TELEPHONE NO.
C50]
[90]
[60]
[35]
[01]
<10>
[19]
[33]
<23>
907
212
907
212
617
312
414
513
214 222
214 222
323
101
213 792
714 847
763 2411
615
504
402
201 422
504
313
1234
1334
2347
5678
1212
1213
3411
1111
3112
1331
2222
0900
(1) (2) (3)
NEW YORK
NEWPORT
NORFOLK
SAN FRANCISCO
SEATTLE
(25)
NO. OF STATIONS - 18
**************************** "SALES OFFICE
<03>
[23]
[89]
[06]
[P5]
212
804
203
415 601
206
(10)
224
2020
1111
531
711
4010
1234
708 9111
-UF-766
- **** -212 111 1234 • *************
(9)
(10)
77
Page 85

ADVANCED FEATURES
Program List
************************** -PROGRAM LIST- ****** DATE 16-APR-1992 **** TIME 15:00 *** P.l
(27) (27)
PROGRAM PROGRAM NAME
[PI]
[P2]
[P4] PROGRAM 3
[P5]
******-*T*r*********iAf*****^************ “SALES OFFICE
PROGRAM 1
PROGRAM 2
(14)
TYPE TIMER ABBR.NOS.
XMT 22:00
POLL 10:00
GROUP
ONE-TCH
(6)
-
(10)
(1) (2) (3)
(23)
[01].[02],[04].[06].[08]
<01>,<02>.<03>
[01]. [02],[03].[04],[05].[06].[07]
(9)
-UF-766
(10)
- ***** -212 111 1234 - ********
Fax Parameter List
*************************** -PAX PARAMETERS LIST- * DATE 16-APR-1992 **** TIME 15
(26) (26) (26)
PARAMETER NO. & PARAMETER
RESOLUTION (1 : Standard 2: Fine
01
ORIGINAL (1:Norma1
02
STAMP (l:Off
03
04
POLLED FILE SAVE
JOURNAL PRINT (l:Off 2:Automatic
05
HEADER PRINT
06
07
DIALLING METHOD (1 :Tone
RELAY XMT REQUEST (1 : Invai id
08
CONF. PARAMETER (l:Off
09
10 KEY/BUZZER VOLUME
PASSWORD XMT
11
PASSWORD RCV
12
STAMP at MEM. XMT (l:Off
18
FAX ACCESS CODE
20
HEADER PRINT FORMAT
21
RCV'D TIME PRINT
22
INITIAL OPR. CALL
32
REDUCTION RCV
33
34 OVERSIZED PAGE
RCV to MEMORY
35
REDUCTION COPY
39
COMM. JOURNAL
41
CONF. RCV PRINT
43
UPPER CASS. SIZE
45
LOWER CASS. SIZE
46
DEPARTMENT CODE
47
(1 : Invai id 2:Valid)
(1: Inside 2;Outside 3:None)
(l:Soft
(1 : Invai id
(1 : Invaii d 2: Off
(liinvalid 2:Val1d)
(1:FR0M to 2:LOGO ID No
(1 : Invalid 2:Valid)
(l:Off
(1 : Invalid 2:Valid)
(l:No Discard 2:10mm
(1 : Invalid
(1 : Invai id
(l:Off
(l:Off
(1 : Letter 2:Legal
(1 : Letter 2:Legal
(1 : Invai id
2:Dark
2:0n)
2:Pulse)
2:Valid)
2:0n)
2:Loud)
2: Off
2:0n) 1 1
2:0n) 2 2
2:Valid)
2:Valid)
2:A1ways
2:Automatic
2:Valid)
(1)
3:S.Fine) 1 1
3:L1ght)
Print)
3:0n)
3:0n)
.)
3:20mm 4:30mm) 1 1
3:Inc. Only)
Pri nt) 2 2
3:A4)
3:A4)
(9)
-UF-766
(2)
CURRENT
SETTING
1
2 2
1 1
2 2
1 1
1 2
1 1
2 1
1 1
1 1
1 1
1 1
1 1
1 1
1 2
1
2 2
3
3 3
3 3
1 1
-
; 00 *******
STANDARD
SETTING
1
1
3
pi;.: .
************************************
(10)
SALES OFFICE
- ***** -212 111
(10)
1234 -
********
Page 86

User Parameter List
ADVANCED FEATURES
Batch Communication Journal
**************** -BATCH COMM. JOURNAL' ****** DATE 16-APR-1992 **** TIME 23:27
(4)
BATCHED FILES 015 16-APR 10:45
BATCH FILE 021
- BATCH TRANSMISSION
MODE
FILE NO. - 021
(11)
NO.
01
****************************** -
(12)
COM ABBR.NQ.
OK <30>
(4) (28) (28)
(14)
(23)
FILE NO.
017 16-APR 14:50
(4)
(15)
STATION
Chicago
(29) (7)
CREATE TIME
START - 16-APR 23 :00 END - 16-APR
(7)
NAME PAGES
007/007
(10)
SALES OFFICE
(1) (2)
PAGES
003
004
007
(7)
(27) (27)
PRG.NO. PROGRAM NAME
-UF-
Panafax
(9)
766
(10)
[P7]
. **** - 212 111 1234 - **************
23:27
(3)
p ^1
79
Page 87

ADVANCED FEATURES
Power Failure Report
****** -PWR FAILURE REP.- ***************** DATE 16-APR-1992 **** TIME 14:19 *******
(1) (2)
POWER FAILURE OCCURRED
(30)
FROM *** 16-APR-1992 13:45 ***
(30)
TO *** 16-APR-1992 14:19 ***
(9)
-UF-766
**************************** -SALES OFFICE
(10)
. **** *212 111 1234 - *************
(10)
Maintenance Report
************* -MAINTENANCE REPORT- ******** DATE 16-APR-1992 **** TIME 15:00 *******
(31) DRUM UNIT
(31) DEVELOPER UNIT
(31) OZONE FILTER
- OK
- CHANGE(REPLACEMENT SCHEDULE REACHED)
- CHANGE(REPLACEMENT SCHEDULE REACHED)
(1) (2)
(31) FUSER UNIT
(31) TRANS. CORONA UNIT
(32) DRUM COUNTER
(32) DEVELOPER COUNTER
(32) OZONE FILTER COUNTER
(32) FUSER UNIT COUNTER
(32) TRANSFER CORONA COUNTER
(33) TOTAL PRINTED PAGES
- OK
“ OK
- 012345
- 098765
- 970000
- 270000
- 300000
- 123456
(9)
-UF-766
*************************** - SALES OFFICE
(10)
. **** -
212 111 1234 - *************
(10)
ll/| Note: When the message "CHANGE" is printed on the fuser or transfer corona unit, please contact your service personnel The
replacement of both units is only for service personnel
fin
Page 88

Department Code Journal
(l)Detail Joumal/Originated Calls
ADVANCED FEATURES
*************************** -JOURNAL
ORIGINATED CALLS
(34)
01 -APR ^ 16-ÂPR
TOTAL PAGES - 000325 TOTAL TIME - 04*13 *’18
(36)
ACCOUNTING
(11) (12)
N0. COM
001 630
007 OK
008 OK 014/014 018 00:09*20 XMT
009 OK
010 407 010/014 018
SALES
002 407
003 OK 002/005 016 00:01*06 XMT
013 S-OK 001
119 OK 014/014 103 00:09*15 XMT
SERVICE
05 OK 023 00:25*06 XMT [20] CHICAGO 16-APR
15 OK 007/007 021
16 407 005/007 021
17 630 000/007 021
(35)
(7) (4)
PAGES FILE DURATION X/R IDENTIFICATION DATE
000/005 014
014/014 018
014/014 018
(35) (35)
TOTALS:000052 00:35*07
003/005 016 00:02*15
T0TALS:000020 00:15*42
T0TALS:000035 00:34*08
(13) (14) (15)
00:00’00
00:09‘15
00:09*19 XMT <10> HOUSTON 16-APR
00:07*13
00:03*06
00:05*06
00:03*56 XMT [40] OSAKA 16-APR
00:00*00
- ********* DATE 16-APR
(35)
XMT
<01> NEW JERSEY 16-APR
XMT
XMT <24> ATLANTA
XMT
XMT
XMT
XMT
TEL 1 201 555 9999 16-APR 15:01
[50] SAN FRANCISCO 16-APR 15:13
<05> LOS ANGELES 16-APR
<05> LOS ANGELES
<06> BOSTON
[10] ABC CORP.
[30] TOKYO 16-APR 23:00
[40] OSAKA 16-APR 23:27
(1)
-1992 **** TIME
16-APR 15:45
16-APR 11:22
16-APR 16:41
16-APR
(2) (3)
16:10 *** P.l
(16) (17)
TIME DIAGNOSTIC
10:35 888888888888
888888888888
888888888888
15:35 888888888888
888888888888
11:10 888888888888
888888888888
888888888888
15:56
888888888888
13:33 888888888888
888888668888
23:06 888888888888
888888888888
it*it*****!►***♦*★**^****** - SALES OFFICE
(2)Detail Joumal/Received Calls
************************
RECEIVED CALLS
(34)
01-APR -> 16 -APR
TOTAL PAGES -000035
(11) (12)
NO. COM
04 OK 003
06 OK
14 OK
(35)
(7) (4) (13)
PAGES FILE
028
012 00:09*46
******************************************* -SALES OFFICE
-JOURNAL- *********** date 16-APR-
(35)
TOTAL TIME
DURATION
00:13*15
00:19*58
- 04 *33**15
(14) (15)
X/R
RCV
RCV
RCV
(9)
-UF
-766
(10) (10)
(1)
IDENTIFICATION DATE
516 420 0055
LOS ANGELES
415 666 8888
-UF-
(10)
_ ***** *212
1992 **** TIME 16:10 *** P.2
16-APR
16-APR
16-APR
(9)
766
-
111 1234 - ***
(2) (3)
(16) (17)
TIME DIAGNOSTIC
11:40 888888888888
14:10 888888888888
16:56 888888888888
-
- **** -212
(10)
111 1234 - ***
81
Page 89

ADVANCED FEATURES
(3)Summary Journal
************************ -JOURNAL"
SUMMARY OF ORIGINATED CALLS
(34)
01-APR ^ 16-APR
DEPARTMENT NAME
ACCOUNTING 000003
SALES
SERVICE 000004
TOTAL
******************************************* .SALES OFFICE
TOTAL PAGES TOTAL TIME
000005 00:35*07
000012
(37)
*********** 16-APR"
00:26*03
00:34*08
01:35*18
(37)
(10)
(1)
-UF "766
1992 ****
(9)
-
(2)
TIME 16:10 ***
-
(10)
-212 111 1234
(3)
P.3
^ itirir
82
Page 90

SPECIALIZED FEATURES
Specialized Features
Read this section if you are interested in using relay networks
or confidential communications for your documents.
The contents and page numbers of this chapter are given below.
Sending Documents Via
a Relay Network........................................................84
Relay Network
Setting Up Your Machine
for Relayed Transmission.................................88
Sending a Document by
Relayed Transmission
Printouts and Reports.........................................92
Using Confidential Communications
Confidential Mailbox
Confidential Network Communication
UF-766 Compatibility with
Other Machines................................................ 96
Setting Up Your Machine
for Confidential Communication
....................................................
.....................................
.........................
...........................................
..................
.......................
84
91
94
94
97
95
Sending a Confidential
Document to a UF-766 .................................... 98
Printing Out Confidential
Etocuments Received in Your
UF-766 Memory...............................................98
Sending a Confidential
Document to a Centre Station
Foiling Confidential
Documents from a Centre Station
Storing Confidential Documents
in Your Machine's Memory.............................100
Deleting a Stored
Confidential Document
Confidential XMT Report
..........................
....................
..................................
..................................
99
99
100
101
83
Page 91

SPECIALIZED FEATURES
Relay Network
A relay network is a group of fax machines programmed to communicate with each other via a relay station. In this case,
"programmed" mear\s that certain numbers have been stored in the memory of each machine. These munbers, also
called parameters, are needed to identify the machines in the network.
elayed transmission is a feature that can save
you time and transmission costs if you need
R
to send the same document to several fax stations
at the same time. This is especially true if the
transmissions are long distance.
Sending Documents
Via a Relay Network
Because the UF-766 can only serve as an initial sending station or end receiving station in a relay network, it is assumed
that you will not have to establish the network yourself. All you have to do is follow the procedure described here, and
certain instructions provided by the network organizer (usually the person controlling the relay station). You should
know, however, what kind of network you are going to connect to, and how it works. A sample network is shown on the
following pages.
84
Page 92

SPECIALIZED FEATURES
The following illustrates a sample network as seen from New York. Chicago and Denver are relay stations connected to
New York. Detroit, Minneapolis, St Louis, Seattle, San Francisco, and Los Angeles are end receiving stations.
Sample Network A
With this simple network using two relay stations, you can send a document with one operation to any combination of
stations in the network via the Chicago relay station and/or Denver relay station. If New York only transmits to one
station, for example, then the document will go directly to the station or indirectly via the relay station depending on the
one-station XMT parameter you preset.
[^1 Note: The number of end receiving stations that con be reached by a relay transmission is limited by the rrmnory capacity of the initial
sending machine; that is, your machine cannot make a relay transmission to more than 140 end receiving stations. This is enough,
however, to allow more than one relay network to be set up.
85
Page 93

SPECIALIZED FEATURES
The following are sample parameter tables for Network A.
Sample Parameter Table for New York
One-Touch
/ ABBR
No.
01 Chicago
02 Detroit 313 111 1234 20 NO
03 St. Louis 314 111 1234 20 NO 2002
04
05 Seattle 206 111 1234 30 NO
06 Los Angeles
07
08 Osaka
09 London
10 Newcastle 008 555 5555 50
Station
Name
New York 212 111 1234
Denver
Tokyo 041 345 1999 40 YES
Telephone
Number
312 111 1234 20
303 111 1234
213 111 1234
041 451 1717
008445 5555 50 YES
Relay
Address
—
30 YES 3000
30 NO
40 NO 4001 Relay
Relay Station
Network
YES/NO
—
YES 2000 Direct
NO 5001 Relay
Address
1000
2001 EHrect
3001 Relay
3003 Relay
4000 Direct
5000 Direct
Sample Parameter Table for Chicago
One-Touch
/ABBR
No.
01 Detroit
02 St. Louis 612 111 1234 20
03 Denver 303 111 1234 20 NO 3000 Direct
04 New York
Station
Name
Chicago 312 111 1234 20
Telephone
Number
313 111 1234
2121111234
Relay
Address
Relay Station
YES/NO
20
NO
— —
Network
Address
—
—
2000
2001
2002
1000
One-Station
XMT
Direct
Direct
One-Station
XMT
—
—
One-Touch
/ABBR
No.
01
02 Los Angeles
03
Sample Parameter Table for Denver
Station
Name
Denver
Seattle
New York 2121111234
Telephone
Number
303 111 1234
206 2061234
213 111 1234 30
Relay
Address
30
30 YES 3001
—
Relay Station
YES/NO
—
NO 3003
—
Network
Address
3000
1000
One-Station
XMT
Direct
Relay
—
Page 94

Sample Parameter Table for Tokyo
SPECIALIZED FEATURES
One-Touch
/ ABBR
No.
01 Osaka
02 New York 212 111 1234
Station Telephone Relay Relay Station
Name Number
Tokyo 041 345 1999 40
041 4511717
Address YES/NO Address XMT
40
— —
Sample Parameter Table for London
One-Touch
/ABBR
No.
01 Newcastle 008 555 5555 50 —
02 New York 212 111 1234 —
Station Telephone Relay Relay Station
Name
London
Number
008 445 5555 50
Address YES/NO Address XMT
Network One-Station
—
—
—
—
4000
4001
1000
Network One-Station
5000
5001
1000
—
—
—
—
—
—
87
Page 95

SPECIALIZED FEATURES
Setting Up Your Machine for Relayed Transmission
To set up your machine for relayed transmission, use the procedures on the following pages to set the eight parameters
listed below. Some parameters (e.g., relayed XMT fax parameter) are only set once, but others must be set separately for
each station in the relay network.
Relayed XMT Fax Parameter
This switches the relayed XMT function to ON or OFF.
Own Telephone Number
Your full telephone number should be entered.
Network Address
End receiving station telephone numbers set in an initial
sending station may be different from the numbers set
at the relay station. To send a fax to an end receiving
station via the relay station, each station in the network
must be identified with a certain code that does not vary
depending on where you call from. The code is the
network address, which consists of a four-digit number
and is assigned to a One-Touch/Abbreviated number.
Network Password
The network password is a four-digit number that
prevents unauthorized (outside) stations from accessing
the relay station and using its memory. Every station in
the network should set the same network password.
One'Touch/Abbreviated Numbers
The One-Touch or Abbreviated number you set must
represent the fax number of a particular station in the
network as seen from your station.
Relay Station Parameter (Yes/No)
Set "Yes" if the particular station you are recording is a
relay station. If you are connected to more than one relay
station in series, set "Yes" only for the first relay station.
Relay Address
The relay address is a two-digit number that identifies
the relay station your machine will use. Your machine
may be connected to more than one relay station in
parallel, but when you use relayed XMT your machine
will only send documents to the relay station identified
by the relay address.
One*Station XMT (Relay/Direct) Parameter
If you send a document to only one end receiving station,
you can set your machine to transmit directly to that
station without going through the relay station by
selecting "Direct." Set "Relay" if you always want to go
through the relay station.
88
Page 96

SPECIALIZED FEATURES
To set the relayed XMT fax parameters:
FUNCTION
1 C3CZI then
TT
^START
3 Enter the fax parameter number 08.
0 START
4 Enter setting number 2.
,^21451 esTOP
then I
--------
-----
1
to return to standby.
“
FAX PARAMETER
N0.-1
08 RELAY XMT REOUEST
1: INVALID
08 RELAY XMT REQUEST
2:VALID
To set your own telephone number, your own network
address, and the network password:
<I> START
OWN TELEPHONE N0.
Enter your facsimile telephone number {max. 36 digits).
Example:
<1> START
3
Enter your network address (four digits).
Example: [U[o][T][5]
OSTART
-------------------------
OWN NETWORK ADDRESS
__________
NETWORK PASSWORD
,
Enter the network password (four digits).
Example: EESIS
<1> START
<asTOP
6 To return to Standby,
OWN TELEPHONE N0.
■ 212 111 1234
Page 97

SPECIALIZED FEATURES
To set a One-Touch/Abbreviated dialling number, network
address, relay station parameter (Yes/No), and one-station
XMT (relay/direct) parameten
FUNCTION
<!> START
then
ONE-TOUCH/ABBR.
I—^-1
3 Press a One-Touch key or lABBRl and two digits.
Example: One-Touch key
Enter called station's number.
Example: [E S [EISWCEIE
rrirnfsweEirniiiEE
OSTART
<01>TELEPH0NE NO.
312 111 12341
<01>STATION NAME
ФВТАЙТ
<01>RELAY STN NO.*
1:YES 2:N0
Цт
If the recorded station is the first relay station, press
E-
If not, press EExample: E
Enter the two-digit relay address.
8
Example: E B
ФSTART
<01>RELAY ADDRESS
_______
r
-------<01>ONE
1;RELAY 2:DIRECT
STN NO.-I
В
In case the station you have just recorded will be used
for one-station transmission, you can preset the
transmission route: Enter E for transmission via the
relay station, enter E for direct transmission.
Repeat Steps 3 through 7 to enter the numbers for
10
other stations, or return to standby by pressing ISTQPL
“>L
Enter called station's name.
Example: [g [H] Ш [C] S iH [I
ФSTART
<01>NETWORK ADDRESS
6 Enter the called station's network address.
Example; B [E E U]
Print out a list of One-Touch/ Abbreviated numbers to
confirm that you have recorded everything correctly.
For the printout operation, refer to page 73.
Page 98

SPECIALIZED FEATURES
Sending a Document by Relayed Transmission
Once you have recorded all the necessary parameters in accordance with the relay network you belong to, you can send a
document to two or more stations in the network system automatically, by using the procedure below. The operation is the
same as multistation transmission.
Once you have set up your network and are connected to a relay station, you can send faxes from the machine's memory.
1 Place the document face down on the ADF and adjust
the document guides.
2 Enter station(s) by using any combination of the
following methods:
• One-Touch key
• ABBR and 2-digits
• EHrectory search
• Program key
Example: l|il then One-Touch key
DOCUMENT SET
<27>{Stat1on name)
^START
‘STORE* N0.014
PARFS-nm n
16-APR-1992 15:00
First the machine stores the document in memory.
Then it dials the relay station and sends the document.
After the transmission ends, your machine prints out a
RELAY XMT REPORT automatically and returns to
standby.
After the relay station finishes its transmission to the
end receiving stations, your machine prints out a
RELAY XMT RESULT report sent back by the relay
station and returns to standby.
i?j
1.1 L
101
Q1
Page 99

SPECIALIZED FEATURES
Printouts and Reports
When you use relayed transmission, your machine will print out the following two reports to help you check and keep track
of yom faxes.
Relay XMT Report (COMM. JOURNAL)
When your machine finishes transmitting to the relay station, it will print out a RELAY XMT REPORT when COMM. JRNL in
fax parameter 41 is set to "2" to tell you what it did and whether it was successful or not.
Result Report
WTien the relay station finishes transmitting the fax it received from you to the end receiving station(s) in your network and/
or the relay station in another network, it will print out a RELAY XMT RESULT report telling you what it did and whether it
was successful or not.
Page 100

SPECIALIZED FEATURES
16-APR-1992 13:50 FROM Chicago
******************** -result report- ****** DATE 16-APR-1992 **** TIME 13:50 ****P.l
MODE - RELAY TRANSMISSION
REQUEST RCVD TIME - 16-APR 13:20 START - 16-APR 13:21 END - 16-APR 13:50
NUMBER OF PA6E(S) * 001 (7)
FILE NO. - 045 (4)
REQUESTING STATION
LONDON - (39)
TELEPHONE NUMBER
NETWORK ADDRESS
(45)
NO.
001 OK
002 OK 2002 Detroit 001/001
003 OK
(12)
COMM.
004 INC 2004 St. Louis 001/001
R-OK
005
(14)
(40) (41) (42)
; - 307 432 1211
- 2001 (44)
(46)
DESTINATION(S)
2000 Chicago 001/001
2003
3000
Minneapolis
Denver
TO
(43)
(7)
PAGE(S)
001/001
001/001 30/3000
(38)
LONDON
(1) (2) (3)
(44)
RLY STN
P.001/001
R-OK
006
007 R-OK
008 R-OK 3003 Los Angeles 001/001 30/3000
009 R-OK 3004 Bel fast 001/001 30/3000
***************************************************** -212 111 1234
Note: If you transmit via more than one relay station, you will receive separate result reports.
3001 Seattle 001/001 30/3000
3002
San Francisco
001/001 30/3000
RELAY STATION (47)
-BIRMINGHAM
TELEPHONE NUMBER - 021 111 1234
RELAY ADDRESS - 20
NETWORK ADDRESS - 2000
TOTAL P.OOl
(9)
-UF-650 New York-
(10)
. iritiritifieiritititifieir
93
 Loading...