

Panasonic UF-750 User Manual

ур.т50
so«»®

IMPORTANT INFORMATION------------------------------------------------------------
---------When requesting information, supplies, or service always refer to the model and
serial number of your machine. The model and serial number’s plate is located
on the rear of the machine.
For your convenience, space is provided below to record the information you
may need in the future.
MODEL NO. UF-750
Date of Purchase
Dealer
Address
Telephone Number
( )
Supplies Telephone Number
( )
Service Telephone Number
{ )
SERIAL NO.
© 1990 by Matsushita Graphic Communication Systems, Inc.
All rights reserved.
Printed in Japan.
The contents of this manual are subject to change without notice.
CAUTION:
USE OF CONTROL OR ADJUSTMENTS OR PERFORM
ANCE OF PROCEDURES OTHER THAN THOSE
SPECIFIED HEREIN MAY RESULT IN HAZARDOUS
RADIATION EXPOSURE.
WARNING:
TO PREVENT FIRE OR SHOCK HAZARD, DO NOT
EXPOSE THIS PRODUCT TO RAIN OR ANY TYPE OF
MOISTURE.

INTRODUCTION
The UF-750 is one of the most advanced models in the Panafax family of G3/G2
compatible, desktop facsimile machines. It features built-in memory which allows you
to store up to 20 standard pages (see Specifications) of information in the machine,
as well as use a full range of speed dialling techniques designed to make sending
faxes easier, faster and more economical. In addition, this machine serves laser beam
printing for high picture quality and high-speed printout.
Anyone can learn how to use the most frequently used features with a few minutes
of simple practice. However, because the UF-750 has the capacity to perform so many
different functions, not everyone will need to learn every feature.
This User’s Guide will help you to use your UF-750 quickly and easily. The Table
of Contents shows where to find information on every feature. Although we recommend
that you at least review each section briefly, you may need to read only the sections
that concern the feature(s) you are interested in.

CONTENTS
INTRODUCTION
1. GETTING TO KNOW YOUR MACHINE.......................................................................... 5
— External View................................................................................................................ 5
— Control Panel................................................................................................................. 6
— Function Key ................................................................................................................ 8
— Caution........................................................................................................................... 9
— Installing Developer Unit........................................................................................... 10
— Installing Drum Unit................................................................................................... 13
— Installing Toner.......................................................................................................... 15
— Removing ADF Protective Sheet.............................................................................. 17
— Installing Document Tray and Recording Paper Tray
— Loading Paper and Installing Paper Cassette.......................................................... 18
— installing Handset and Cradle................................................................................... 19
— Connecting the Telephone Line and Power Supply Cord
— Power Switch............................................................................................................. 21
— Lightning Precautions............................................................................................... 22
2. SETTING UP YOUR MACHINE........................................................................................ 23
CHARACTER KEY LAYOUT UNDER THE ONE-TOUCH KEYS .................................. 23
USER PARAMETERS ..................................................................................................... 24
— How to Set the Date and Time.................................................................................. 24
— How to Set Your LOGO............................................................................................. 25
— How to Set Your ID Number...................................................................................... 26
ONE-TOUCH/ABBREVIATED NUMBER ........................................................................ 27
— Entering One-Touch/Abbreviated Dialling Numbers .............................................
— Filling Out the Station Directory Sheet.................................................................... 29
FAX PARAMETERS ........................................................................................................ 30
— Setting FAX Parameters............................................................................................ 30
— Parameter Table......................................................................................................... 32
— Setting the Dialing Method (Pulse or Tone)............................................................ 34
ADJUSTING VOLUMES .................................................................................................. 35
— Setting the Ringer Volume........................................................................................ 35
— Setting the Speaker Volume...................................................................................... 35
— Final Installation Test................................................................................................ 36
3. SENDING DOCUMENTS ................................................................................................. 37
LOADING DOCUMENTS
— Documents You Can Send........................................................................................ 37
— Documents You Cannot Send................................................................................... 37
— Loading Documents................................................................................................... 38
BASIC TRANSMISSION SETTING ................................................................................. 39
— Resolution ................................................................................................................. 39
— Original (Contrast)...................................................................................................... 40
— Halftone...................................................................................................................... 41
— Verification Stamp..................................................................................................... 42
— Total Pages................................................................................................................. 43
— Error Correction Mode (ECM)................................................................................... 44
— Automatic Individual Transmission Journal (XMT JRNL)...................................... 45
DIALLING TECHNIQUES ................................................................................................ 46
— Dialling from the UF-750 Keypad.............................................................................. 46
— Dialling from the Telephone Set............................................................................... 48
................................................................................................
.............................................
.......................................
17
20
27
37

— One-Touch Dialling..................................................................................................... 49
— Abbreviated Dialling................................................................................................... 51
— Redialling..................................................................................................................... 53
MEMORY TRANSMISSION .............................................................................................. 54
— Memory Transmission............................................................................................... 55
— Multifile Transmission .............................................................................................. 57
TRANSMISSION RESERVATION .................................................................................... 60
— Setting Transmission Reservation
— Setting Memory Transmission Reservation
— Cancelling Transmission Reservation....................................................................... 63
4.
MAKING COPIES .............................................................................................................. 64
— Single Copies............................................................................................................... 64
— Multiple Copies (Using the Memory)....................................................................... 65
5.
RECEIVING DOCUMENTS ............................................................................................... 66
AUTOMATIC RECEPTION ............................................................................................... 66
MANUAL RECEPTION ...................................................................................................... 66
— How to Set Manual Reception.................................................................................. 66
— What to Do When Your Telephone Rings................................................................ 67
RECEIVING OVERSEAS DOCUMENTS............................................................................ 68
SUBSTITUTE RECEPTION (MEMORY RECEPTION) ..................................................... 69
6.
POLLING .......................................................................................................................... 70
— How to Set the Polling Password ........................................................................
— How to Prepare to be Polled..................................................................................... 71
— How to Poll................................................................................................................... 72
— Turnaround Polling (Combined Transmission and Polling)
7.
USING THE TELEPHONE................................................................................................. 74
— Making a Regular Call................................................................................................. 74
— Using Mute................................................................................................................... 74
— Making Voice Contact after Sending/Receiving
— Answering a Voice Contact Request
— What to Do when the Other Party is Set for Manual Reception
TIMER CONTROLLED COMMUNICATIONS.................................................................... 77
8.
— Deferred Transmission............................................................................................... 77
— Deferred Polling........................................................................................................... 79
— How to Cancel or Change the Settings
PROGRAMMED COMMUNICATION .............................................................................. 82
9.
— Setting Program Keys.............................................................................................. 82
— How to Erase or Change Program Key Settings
— Program Key Programming Flowchart...................................................................... 91
— Using Program Keys.................................................................................................. 92
PRINTOUT REPORTS AND LISTS.................................................................................. 93
10.
— Journal Printout.......................................................................................................... 93
— Individual Transmission Journal (XMT JRNL)......................................................... 94
— Memory Transmission Journal (COMM. JOURNAL)............................................... 97
— One-Touch/ABBR. Dialling Number List
— Program List.............................................................................................................. 101
— Fax Parameter List.....................................................................................................103
— Power Failure Report.................................................................................................105
— Maintenance Report.................................................................................................. 106
...........................................................................
.............................................................
....................................
.......................................................
.........................................................................
............................
...................................................................
....................................................
.................................................................
60
61
70
73
75
75
76
80
87
99

11. PROBLEM SOLVING ........................................................................................... 108
— Information Code.............................................................................................. 108
— Clearing a Recording Paper Jam......................................................................112
— Clearing a Document Jam
— Refilling the Toner and Replacing the Toner Disposal Bottle
— Replacing the Drum Unit................................................................................... 117
— Replacing the Developer Unit........................................................................... 118
— Refilling or Replacing the Verification Stamp....................................................119
— Cieaning the Inside of the Transmitting Guide Unit
— Cleaning the Inside of Your Machine................................................................122
— Cleaning the Tungsten Wire............................................................................ 123
— How to Adjust Print Density
— Repacking ...................................................................................................... 125
12. APPENDIX .......................................................................................................... 127
a. RELAYED (MULTI-STATION) TRANSMISSION
— Setting Up Your Machine for Relayed Transmission
— Sending a Document by for Relayed Transmission.........................................135
— Printouts and Reports
b. CONFIDENTIAL COMMUNICATIONS
— Setting Up Your Machine for Confidential Communications
— Sending a Confidential Fax to a Relay Station
— Polling a Confidential Fax from a Relay Station...............................................145
— Printouts and Reports.......................................................................................146
c. PASSWORD COMMUNICATION
— Settings Required in UF-750 .......................................................................... 148
— Setting Up Your Machine for Password Communications
— How to Start Password Transmission
— How to Set Password Receiving
d. FAX ACCESS CODE...................................................................................... 152
— How to Set Fax Access Code
— How to U«e the Machine after Your Set FAX Access Code
— How to Reset Fax Access Code
e. MEMORY POLLING (POLLED FROM MEMORY)
— Setting Up Your Machine for Memory Polling..................................................157
“ How to Use the Memory Polling
— How to Change or Delete Document from Memory.........................................159
13. OPTION & SUPPLIES......................................................................................... 160
14. SPECIFICATIONS .............................................................................................. 161
...............................................................................
...........................
..........................................
..............................................................................
...........................................
.......................................
......................................................................................
..........................................................
............................
...............................................
.................................................................
...............................
..............................................................
.....................................................................
..........................................................................
............................
.....................................................................
.........................................
........................................................................
115
116
121
124
127
128
136
140
141
.144
147
149
150
151
153
154
155
156
158
GETTING TO KNOW YOUR
MACHINE
External View
1
Speaker
Main Name Plate
Rear View
Control Panel
Display
Shows Date and Time, or the current
operation.
Power Lamp
Lights when the power is ON.
PAPER JAM Lamp
Lights when a recording
paper jam occurs.
TONE
Press to switch the dialling
method from Pulse Dialling to
Tone Dialling (only Pulse Dial
ling setting).
NO PAPER Lamp
Lights when the cassette Is empty or no
cassette is installed.
NO TONER Lamp
Lights when the toner
running out.
Panasonic
o~«» / * li) / * là /
— MOOC +
--------
Ii~—
• MCMoaY/ * XMT ^ ^
MULTIFIte MSERVK HALT TONE STAMP OmONAL RESOLUTION
XMT RESERVE
Used to reserve transmission
when the machine is still
receiving or transmitting from
the memory.
0 c
FUNCTION
'
SCLECT
D C D C
Keypad
Used for Direct Dialling,
recording phone numbers,
and selecting functions.
□DCIDCEl
'
CillCIDCEl
CDCIDCI]
K5][Z]C3]
SPACE
L AMR PAU]
TEUDIAL AMR PAUSE/REMAL
5 CZD C
HALF TONE
Provides ON and OFF settings for halftone
documents.
MEMORY/MULTIFILE
Used for memory transmission, multi
station transmission, multi-file transmission,
and multi-copy.
MODE 13] and FH
Used to set Total Pages, Individual
Transmission Journal, etc.
Also used to select Sub-functions (i.e.,
instead of pressing the sub-function
number key, you can scroll in opposite
directions by pressing either key
repeatedly).
SELECT
Used to switch Basic Transmission
settings.
RESOLUTION
Used to set Normal, Fine, or Super-Fine.
Also used as an arrow key (^), together
with ORIGINAL {<), to move the cursor
over recorded numbers and characters.
ORIGINAL
Used to set Normal, Dark, or Light. Also
serves as an arrow key (◄), together with
RESOLUTION (►), to move the cursor
over recorded numbers and characters.
STAMP
Used to set the Verification Stamp ON or
OFF.
FUNCTION
Used to start or set the following functions and
sub-functions:
'Deferred communication
3 POLLING
4 TRANSMISSION & POLLING
5 CONFIDENTIAL COMMUNICATION
6 PRINTOUT
(T) JOURNAL PRINT
@ ONE-TOUCH/ABBR. NOS.
® PROGRAM LIST
® FAX PARAMETER LIST
® INDIVIDUAL TRANSMISSION JOURNAL
@ MAINTENANCE REPORT
r-STOP
Used to cancel operations. When it is pressed, the
machine will return to standby.
7 SET MODE
® USER PARAMETERS
@ RELAYED TRANSMISSION & CONF.
COMM. PARAMETERS
@ ONE-TOUCH/ABBR. NOS.
0 PROGRAM KEYS
® FAX PARAMETERS
NOT€
Any function can be started by first
pressing I FUNCTION I and the func-
tion’s number key, or by pressing
IFUNCTIOFTI repeatedly until the
function appears on the display.
1
START
Used to start or set operations.
COPY
Used to make document copies.
CLEAR
Used to erase the previously entered input.
PAUSE/REDIAL
Used to start Redialling, or to enter a pause when
recording or dialling a telephone number.
ABBR
Used to start Abbreviated Dialling.
TEL/OIAL (SPACE)
Used to start Direct Dialling, and to enter a space
in recorded telephone numbers.
Program Keys (P1 - P8)
Used to record long dialling
procedures, Group Number keys,
and extra One-Touch keys.
One-Touch/Character Keys (01 - 32)
Used for One-Touch Dialling and recording
letters and symbols.

Function Key
— Mooe +
ihor to
FVHCTKM
DC
— Setting Total Pages
— Automatic Individual Transmission Journal ON/OFF
— Setting to be Polled
— Automatic Reception ON/OFF
— Error Correction Mode ON/OFF
— Displaying Used Memory Percentage
Deferred Communication
Polling
Turnaround Polling
Confidential Communication*
Journal Print
One-Touch/Abbreviated
Print Out
Dialling Number List
Program List
(page 43)
(page 45)
(page 71)
(page 66)
(page 44)
(page 54)
(page 77)
(page 72)
(page 73)
(page 140)
(page 93)
(page 99)
(page 101)
Set Mode
"C
— 3
— 4
FAX Parameter List
Individual Transmission Journal
Maintenance Report
—Date & Time
User
Parameters
Relayed Transmission &
Confidential Communication
Parameters (see Note)
One-Touch/Abbreviated Numbers
Program Keys
FAX Parameters
■Logo
h- ID No.
-Polling Password
(page 103)
(page 94)
(page 106)
(page 24)
(page 25)
(page 26)
(page 70)
(page 143)
(page 27)
(page 82)
(page 30)
NOT€
8
If the Fax Parameter is not preset to Valid Position, which enables you to use the
function, the display will not show the function.
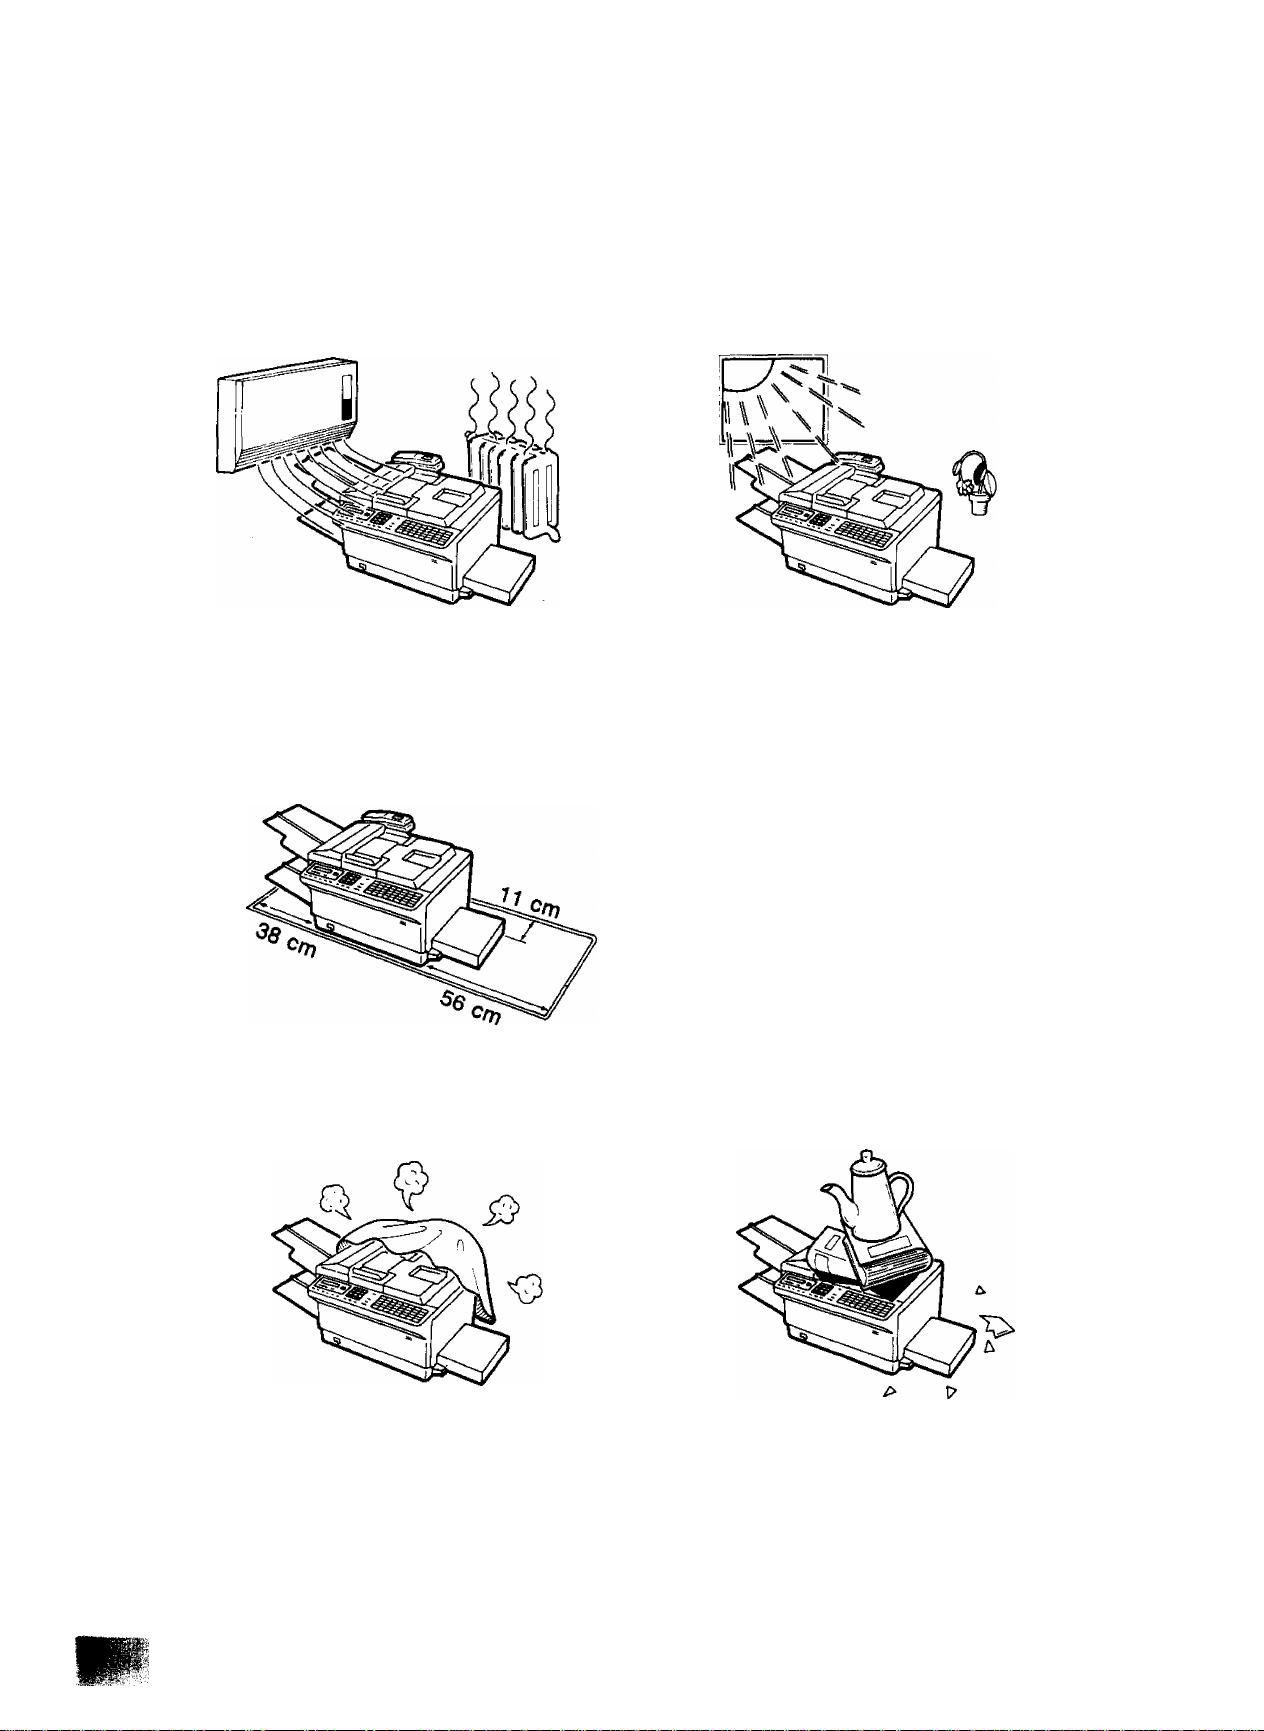
Caution
1
1. Do not install the machine near
heating or air conditioning units.
2. Avoid exposure to direct sunlight.
3. Install the machine on aflat place.
Proper operation and maintenance
clearance should be provided
around the machine.
Space of 38 cm or more to the
left of the machine
Space of 11 cm or more to the
rear of the machine
Space of 56 cm or more to the
right of the machine
4. Do not block the ventilation
openings.
5. Do not place heavy objects, or spill
liquids on the machine.
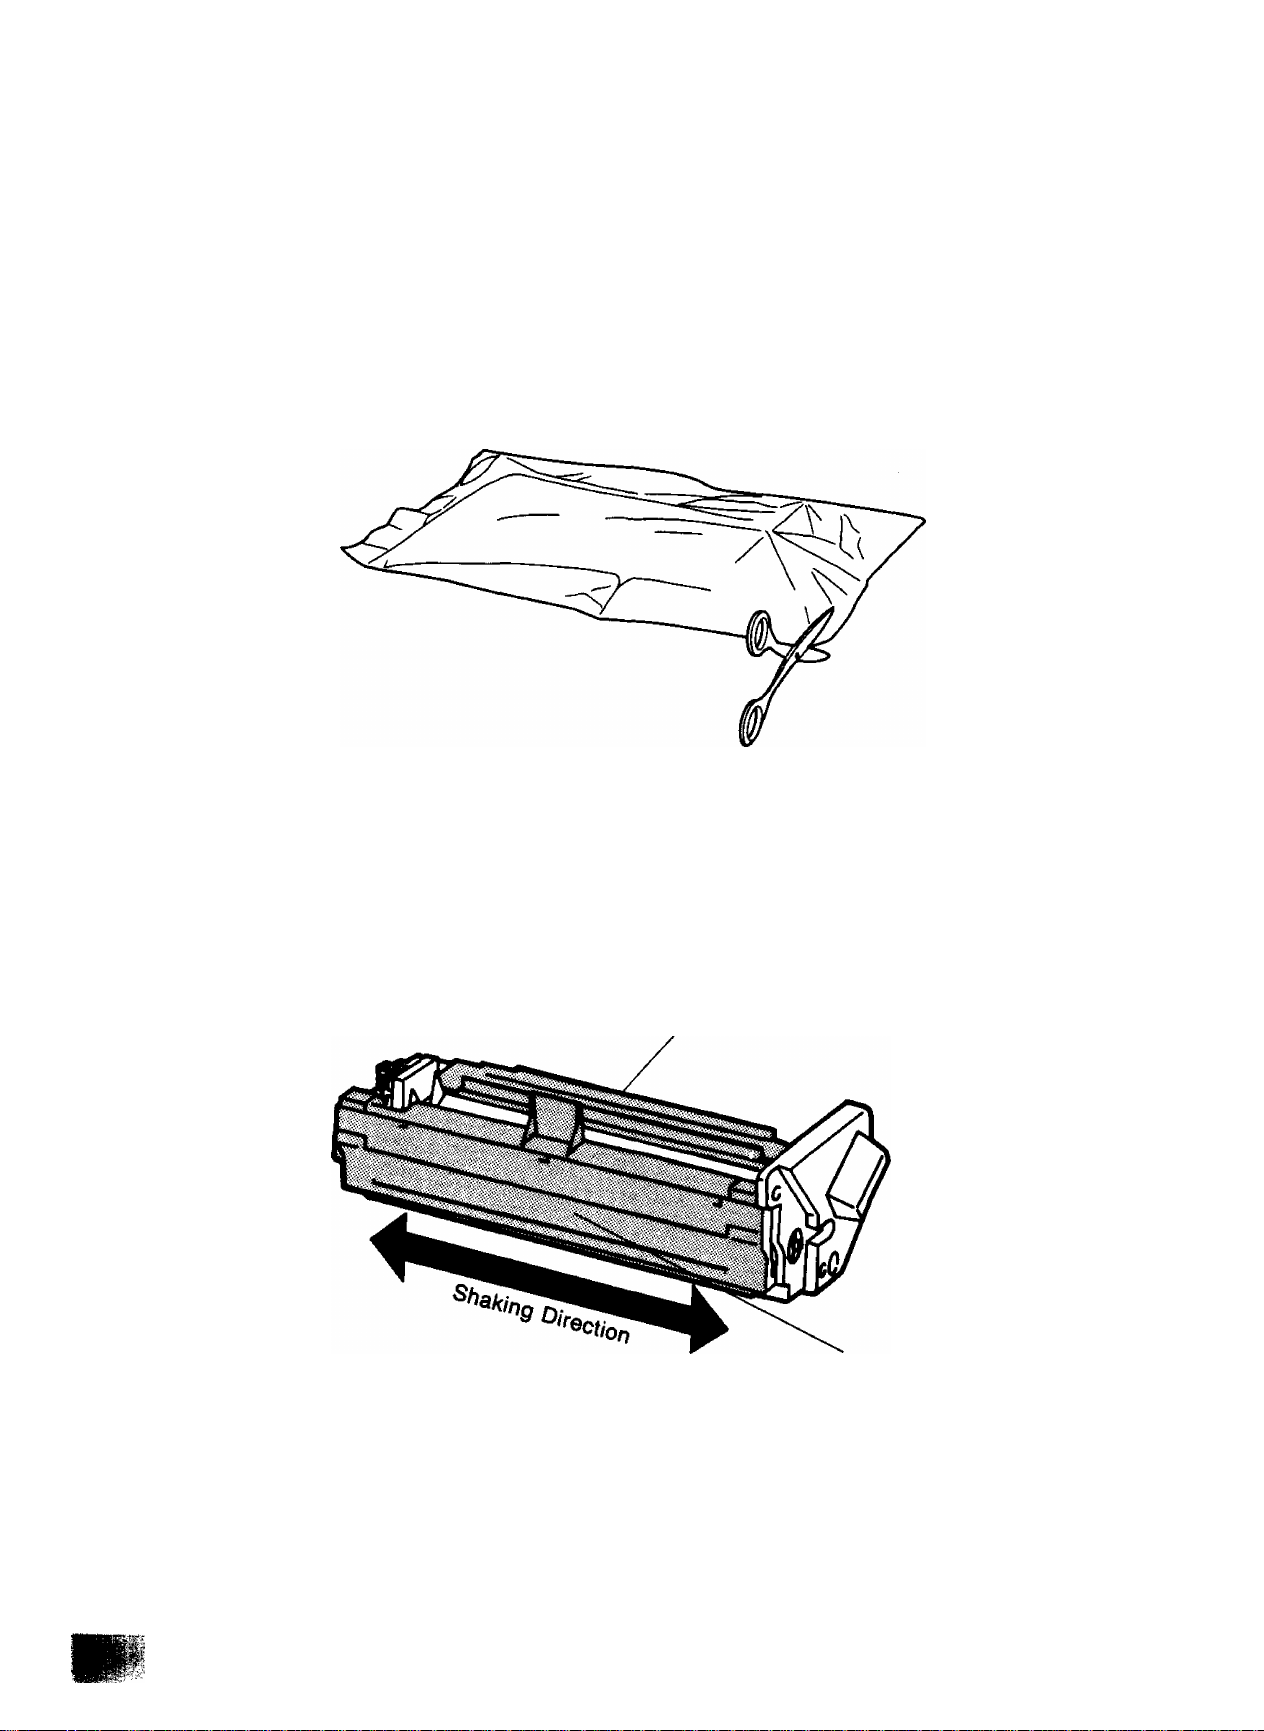
Installing Developer Unit
The developer unit contains developer for printing.
1. Open the protective bag by cutting the end of the bag. Remove the plastic bag,
inner pads and tapes.
2, Make sure that the top seal cap and the side seal cap are firmly fixed to the
developer unit. Then gently shake the developer unit several times horizontally
to even the developer level.
Top Seal Cap
Side Seal Cap
10
’■ """ ^ ««»«
cmmoN
Be sure not to tilt the developer unit or the developer mav soiii if tho h» ,
H
on the floor, clean it up quickly, since it may adhL to the flSoI ®P“'s
Top Seal Cap
Side Seal Cap
1
4. Open the front cover of the machine
11
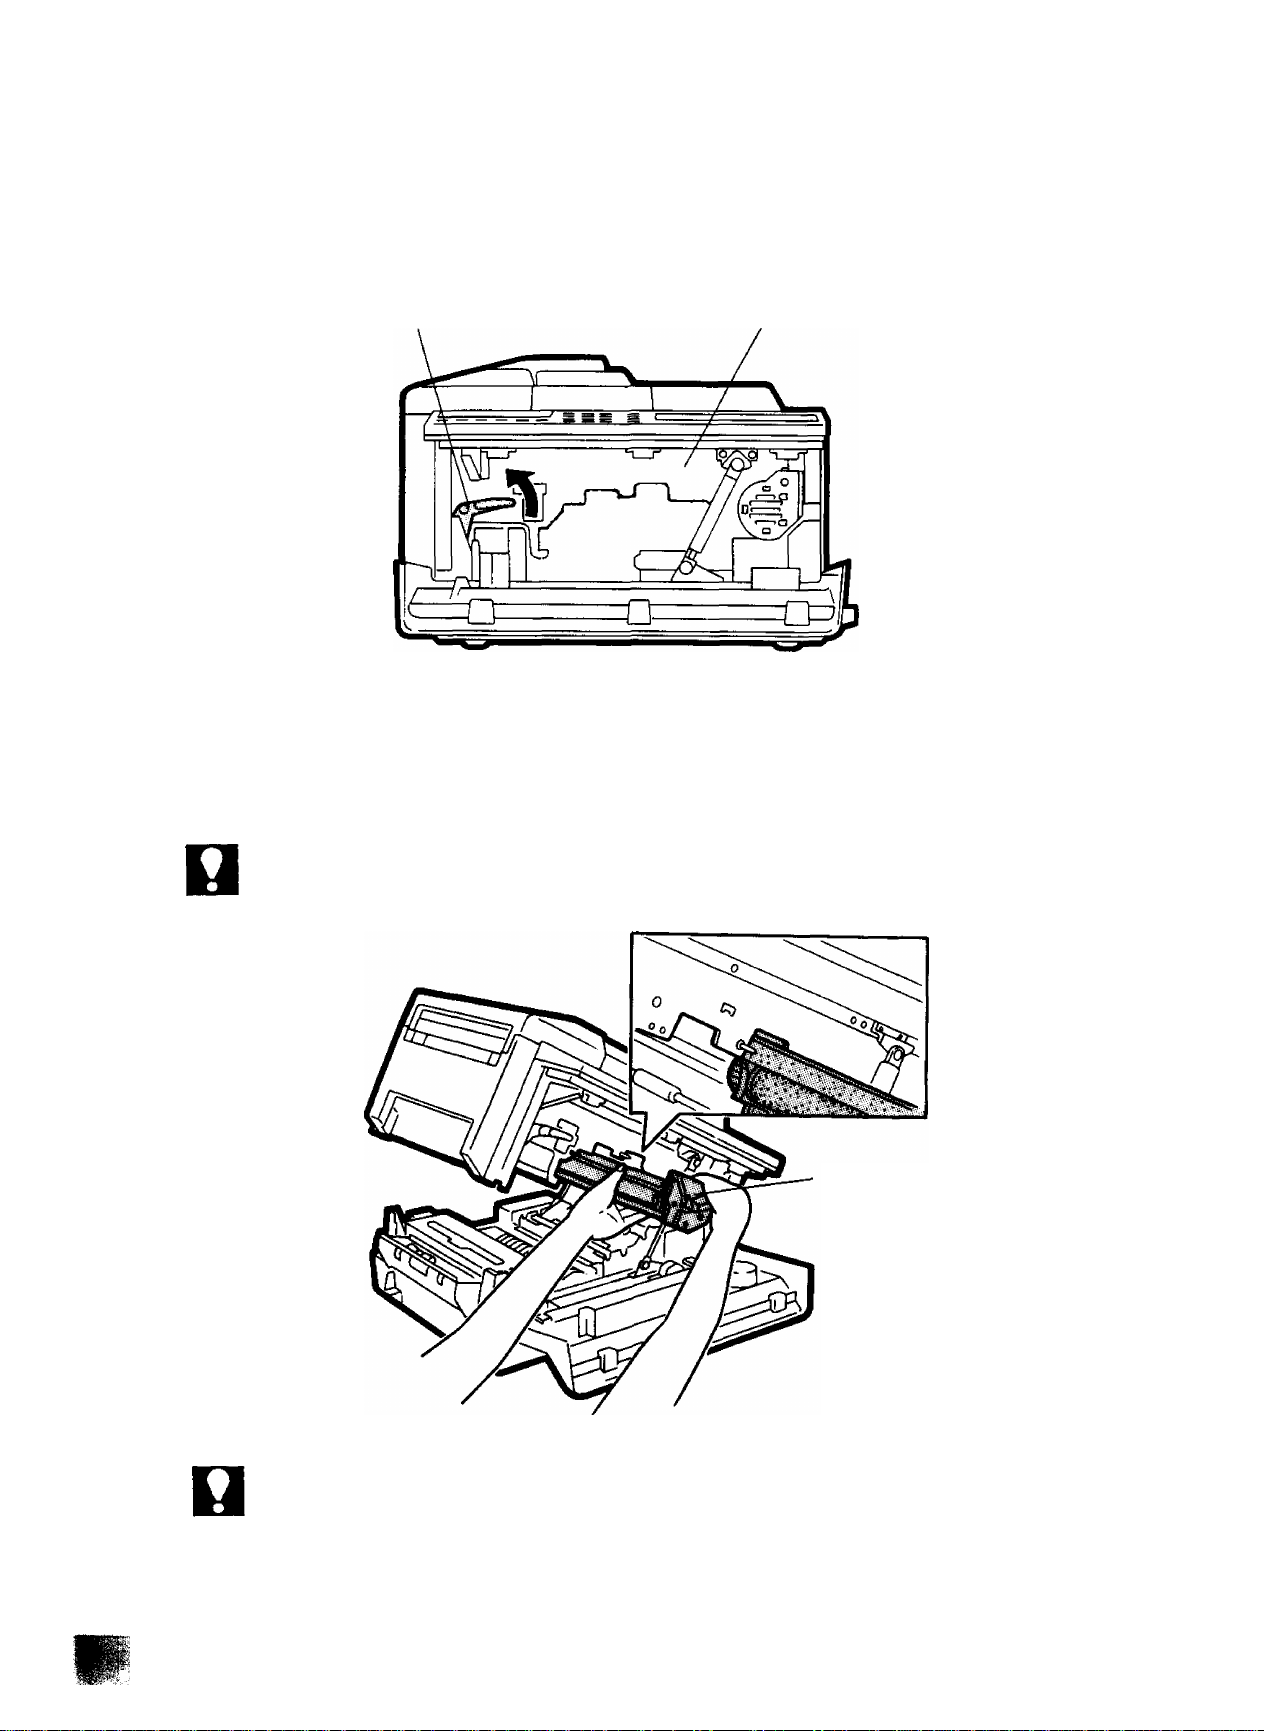
5. Raise the clamshell by lifting the clamshell release lever.
Clamshell Release Lever (Green) Clamshell
6. Install the developer unit fully into the machine while lifting it by its handle and
bottom with both hands. Be sure not to touch the exposed developer, for it will
make your hands dirty.
CAUTION
Always keep the developer unit horizontal and do not rotate its gears when it is outside
the machine.
■p-r- ■
NOT€
12
Developer Unit
1. Keep the developer unit away from dust and small objects.
2. Do not place the developer unit in a high humidity area, and keep it out of direct sunlight.
Installing Drum Unit
Prior to installing the drum unit make sure that the deuoi«n^, ■ •
drum unit contains a photosensitive drum. Exposina it to linht ^"1*The
DO not open the protective bag until you Kvf e^ tSe i
r..», » In,« ,he d,.. oi, t
Do not expose the drum unit to ambient room iight or suniight.
It must be covered with the black plastic drum protective sheet.
Do not place the drum unit near a window.
Do not touch the yellow drum surface. Lift the drum unit by Its handle.
Keep the drum unit away from dust or dirt.
Do not place the drum unit in a high humidity or high temperature area.
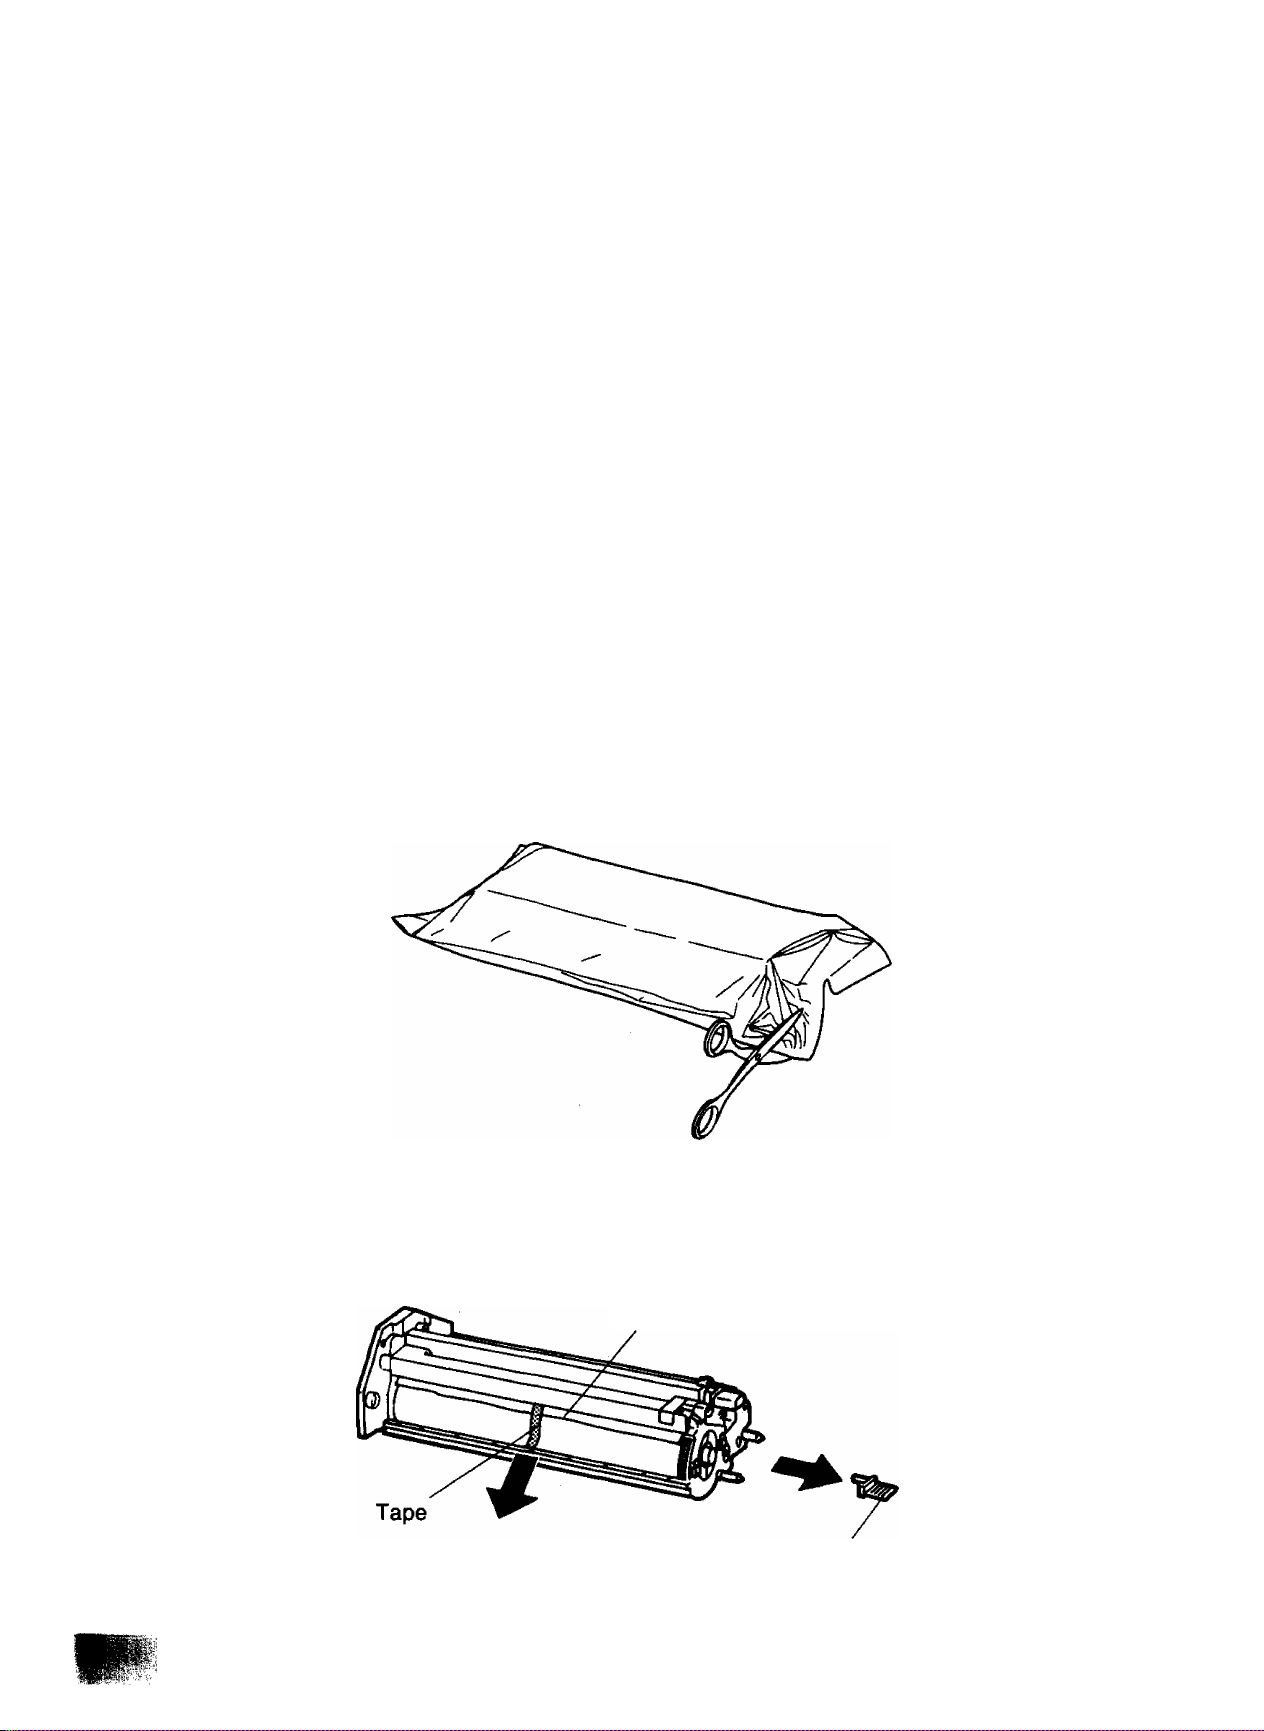
1. open the protective bag by cutting the end of the bag. Remove the plastic bag
and inner pads.
1
2. Remove the drum protection sheet by pulling its tape. Do not expose the drum
unit to iight for more than 5 minutes. Then remove the drum protection pin. This
pin will not be used later.
Drum Protection Sheet
Drum Protection Pin (Red)
13
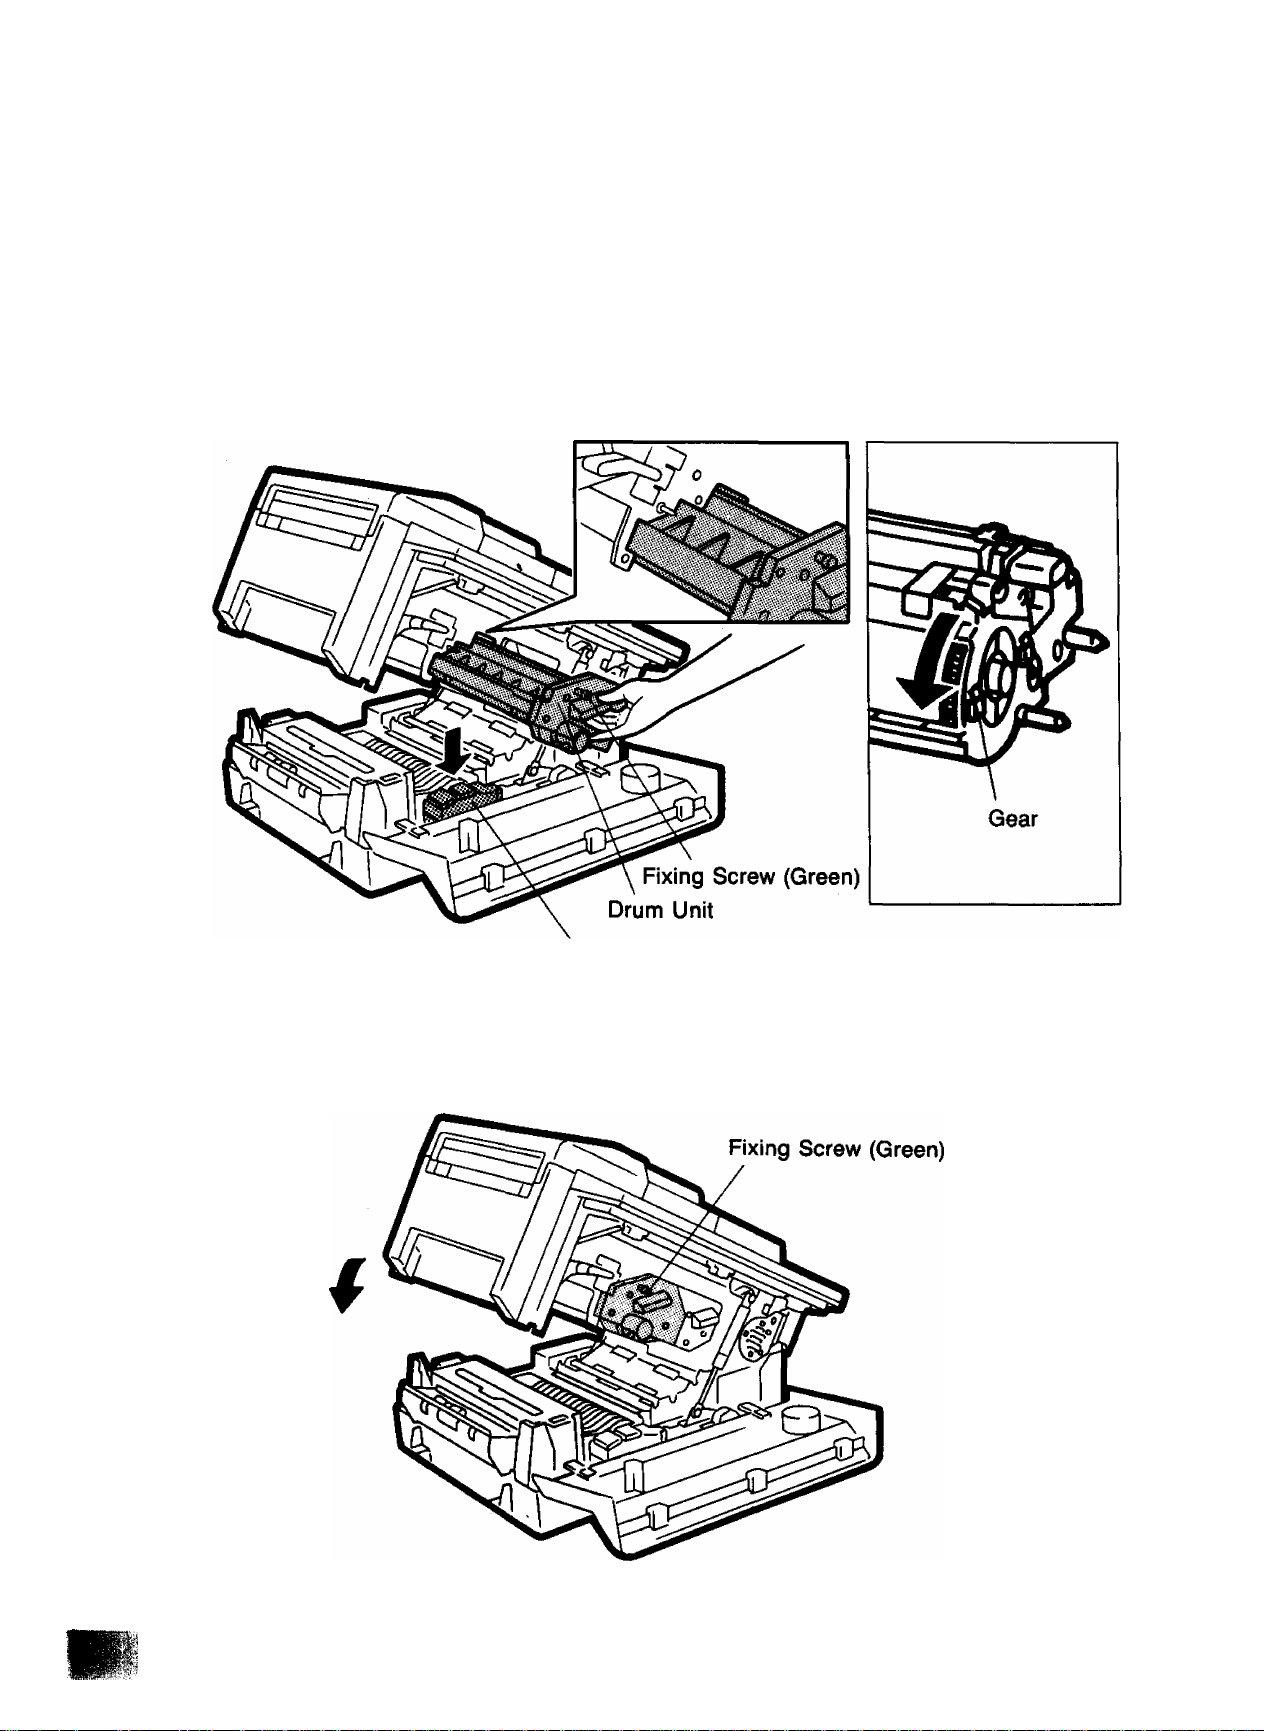
3. Slide the drum unit into the machine while holding its handle and edges with both
hands. Be sure not to touch the yellow drum surface, if you cannot insert the
drum unit completely into place, pull out the drum unit once, then slightly turn
the drum by rotating the gear. Tighten the fixing screw of the drum unit. Remove
the green cap from the toner disposal bottle and install the toner disposal bottle.
Toner Disposal Bottle
4. Lower the clamshell until it is locked and close the front cover.
14
Installing Toner
The toner is a dry, black powder used for the printing process.
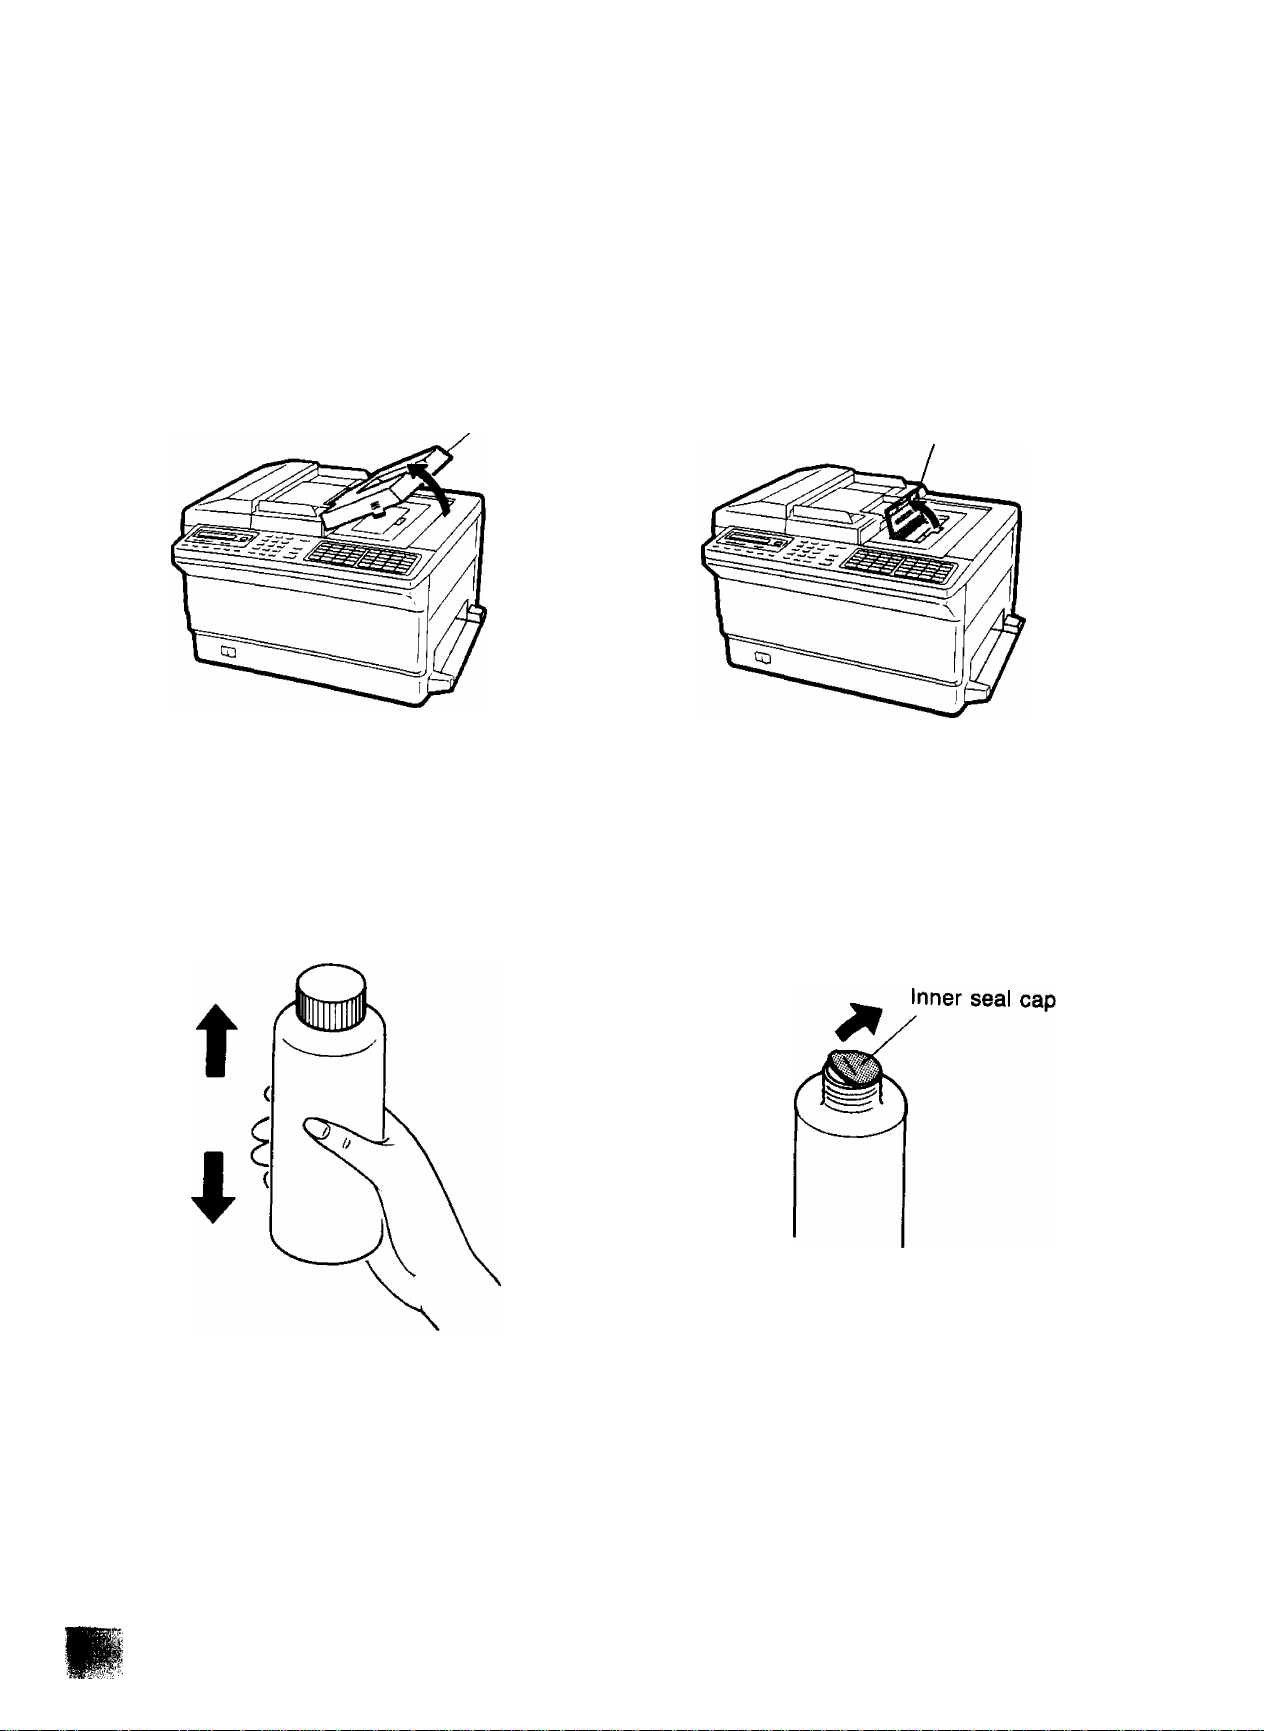
1. Remove the hopper cover and open the toner supply cover.
1
Hopper Cover
2. Shake the toner bottle well before opening. Then remove the cap of the toner bottle,
gently remove the inner seal, and attach the toner spout.
Toner Supply Cover
15
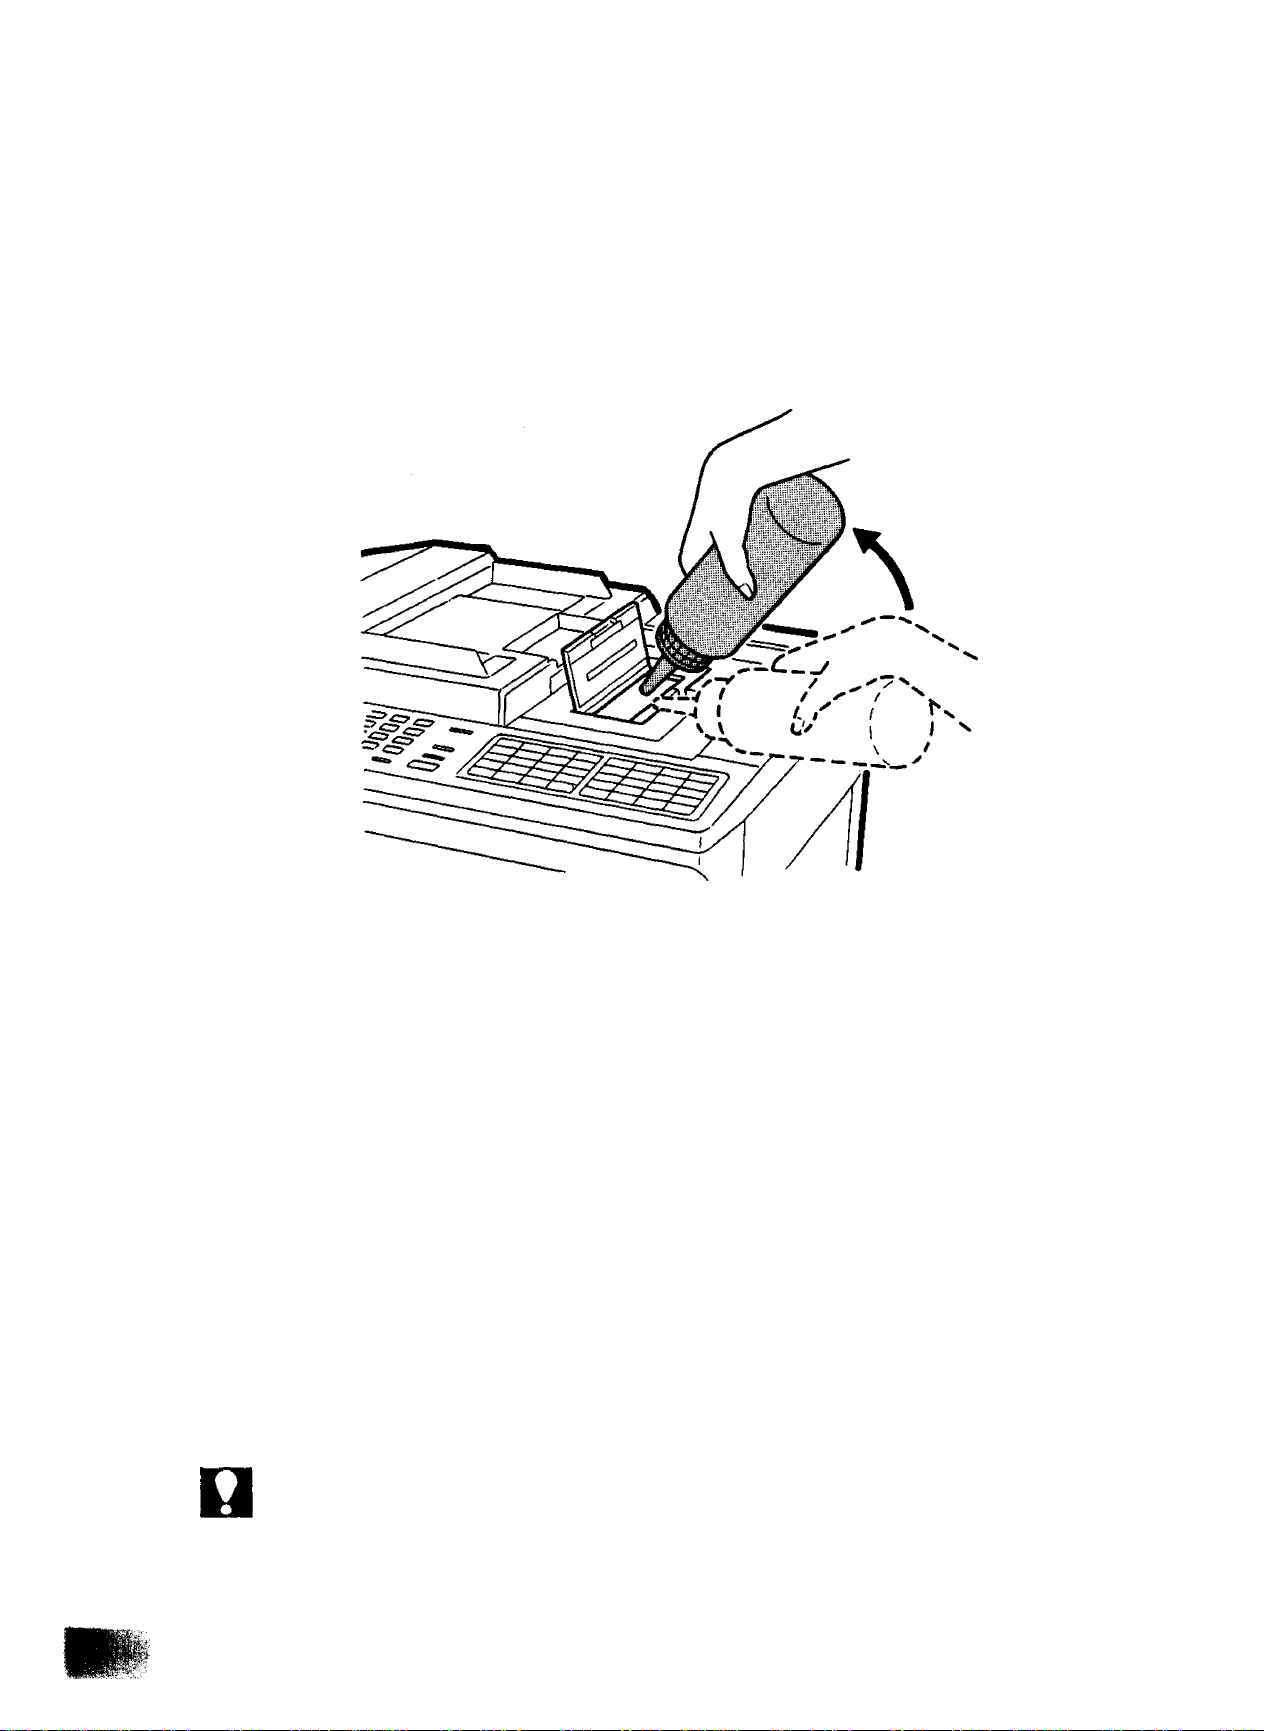
3. Insert the spout into the hopper and pour the entire bottle of toner into the hopper.
Tap the bottle against the edge of the hopper opening to completely empty the
bottle.
4. Close the toner supply cover and reset the hopper cover.
NOT€
Be careful not to spill the toner and do not mix with any other type of toner.
16
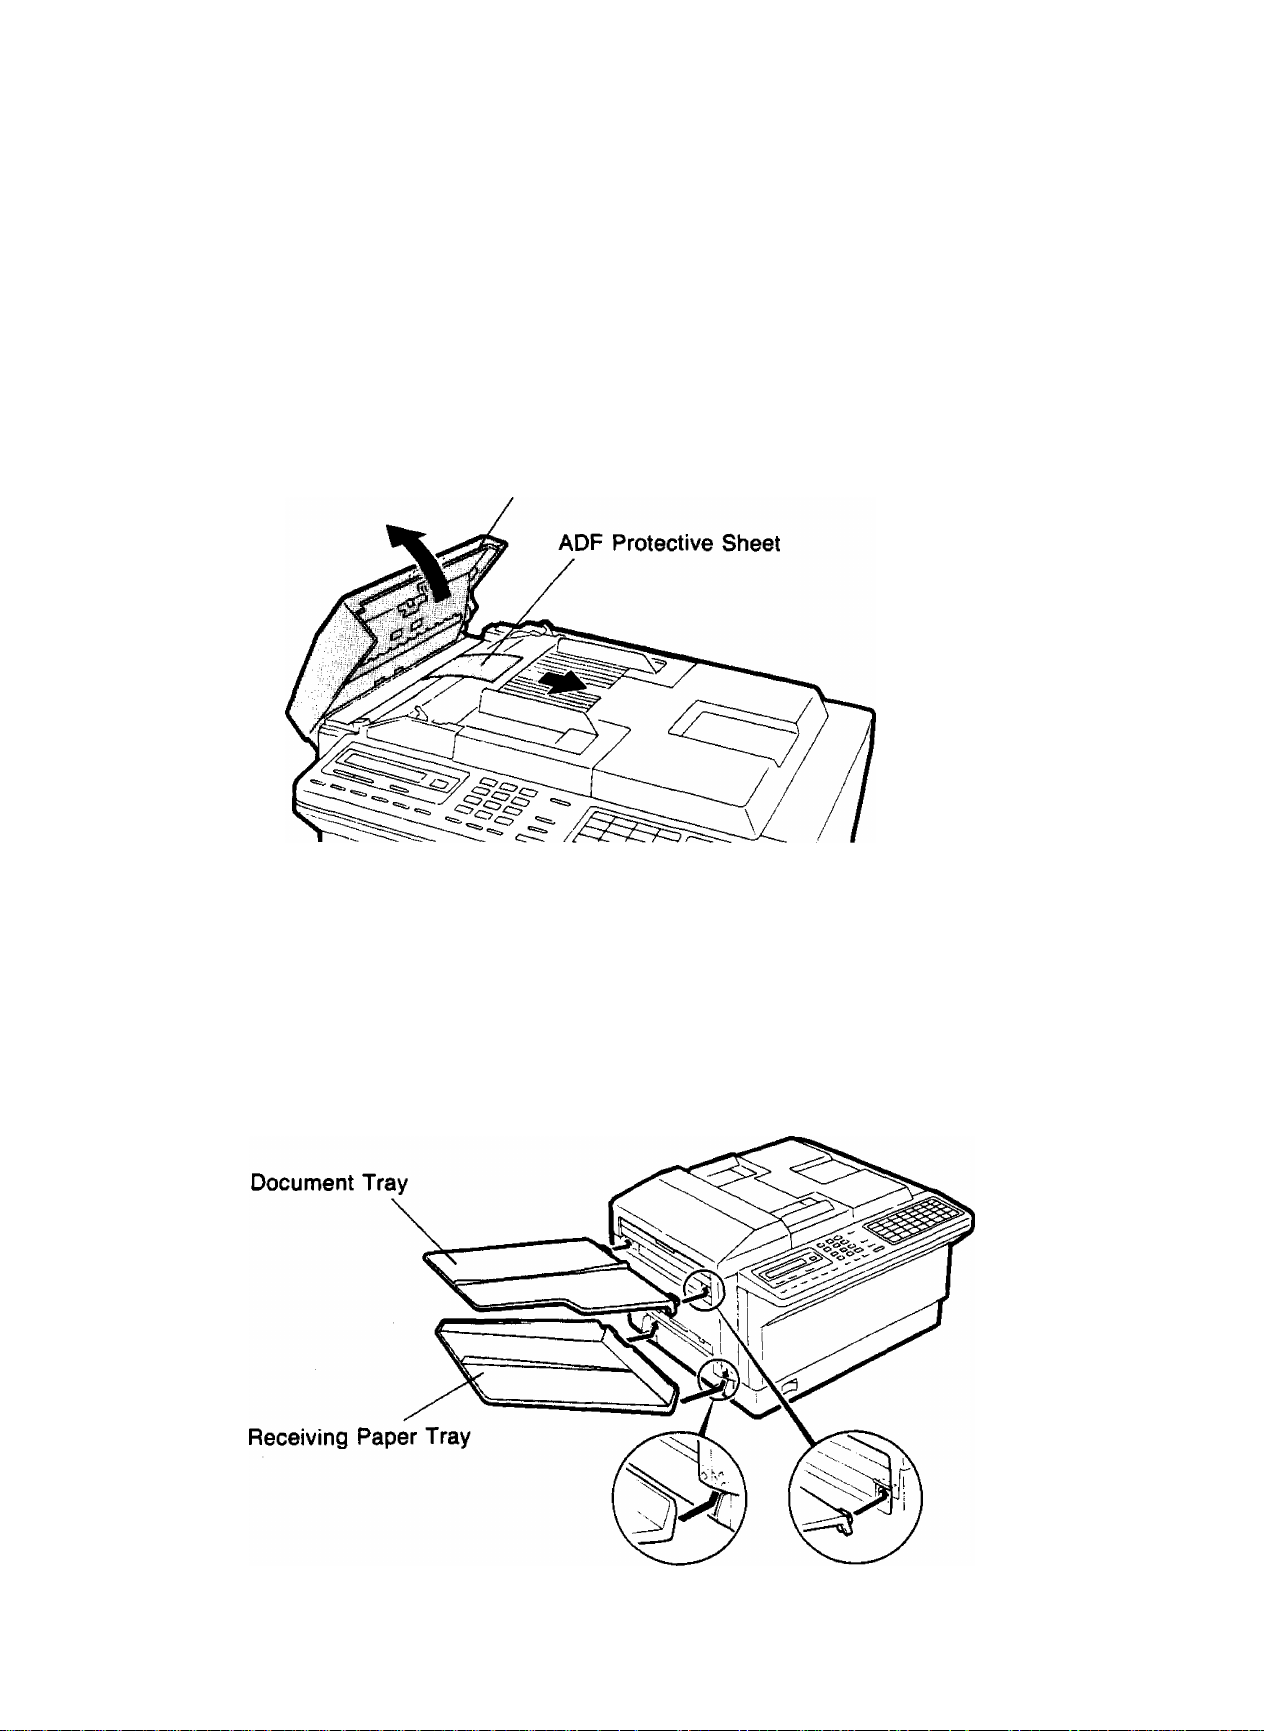
Removing ADF Protective Sheet
1, Open the transmitting guide unit by puliing up the tab located on the edge of the
unit, and remove the ADF protective sheet.
2, Close the transmitting guide unit by pushing down gently.
Transmitting Guide Unit
1
instaliing Document Tray and Receiving Paper Tray
Document tray and Receiving paper tray are provided as parts of the left side panel
of the machine.
Install the trays by inserting their brackets into the holes on the left side pane) until
they lock into position. See the figure shown below.
17
il;.-

Loading Paper and Installing Paper Cassette
This machine is provided with A4 paper cassette (210 x 297 mm).
1. Remove the paper cassette cover. Then fan the stack of paper, place it in the
paper cassette and push it under the clips.
2. install the paper cassette cover.
Paper Cassette Cover
Clips
3. Insert the paper cassette into the machine until it is firmly in place.
Paper Cassette
NOT€
1. Use general-purpose xerographic paper.
2. Do not load different types of paper or paper thickness at the same time, since it may
cause paper jamming.
3. The height of the paper should not exceed the limit mark on the paper cassette.
4. Most paper has instructions recommending the side to be print first. Make sure you
toad the paper with the print side up.
5. When installing the machine for the first time, allow the machine to warm-up before
installing the paper cassette. Installation of the paper cassette before the warm-up
period is complete may result in a paper jam.
18
Paper Specifications
Use general-purpose xerographic paper.
1
Basic Weight:
Thickness:
Moisture Content:
Smoothness:
Acid Content:
Fusing Compatibility; Must not scorch, melt, offset material, or release
Cutting Dimensions: ±0.8 mm of nominal, corners 90® ±4®
Grain:
Cut Edge Conditions: Cut with sharp blades, no paper dust
Ash Content:
Curl:
Packing:
Regular Paper 60 to 90 g/m^ (16 to 24 pounds)
94 to 140 fim (/im = 1/1000 mm)
4% to 6%
100 to 300 Sheffield
5.5 PH minimum
hazardous emissions when heated to 200°C for 0.1
second
Long grain
Not to exceed 10%
No allowable curl toward side to be imaged (printed)
Polylaminated moisture proof ream wrap
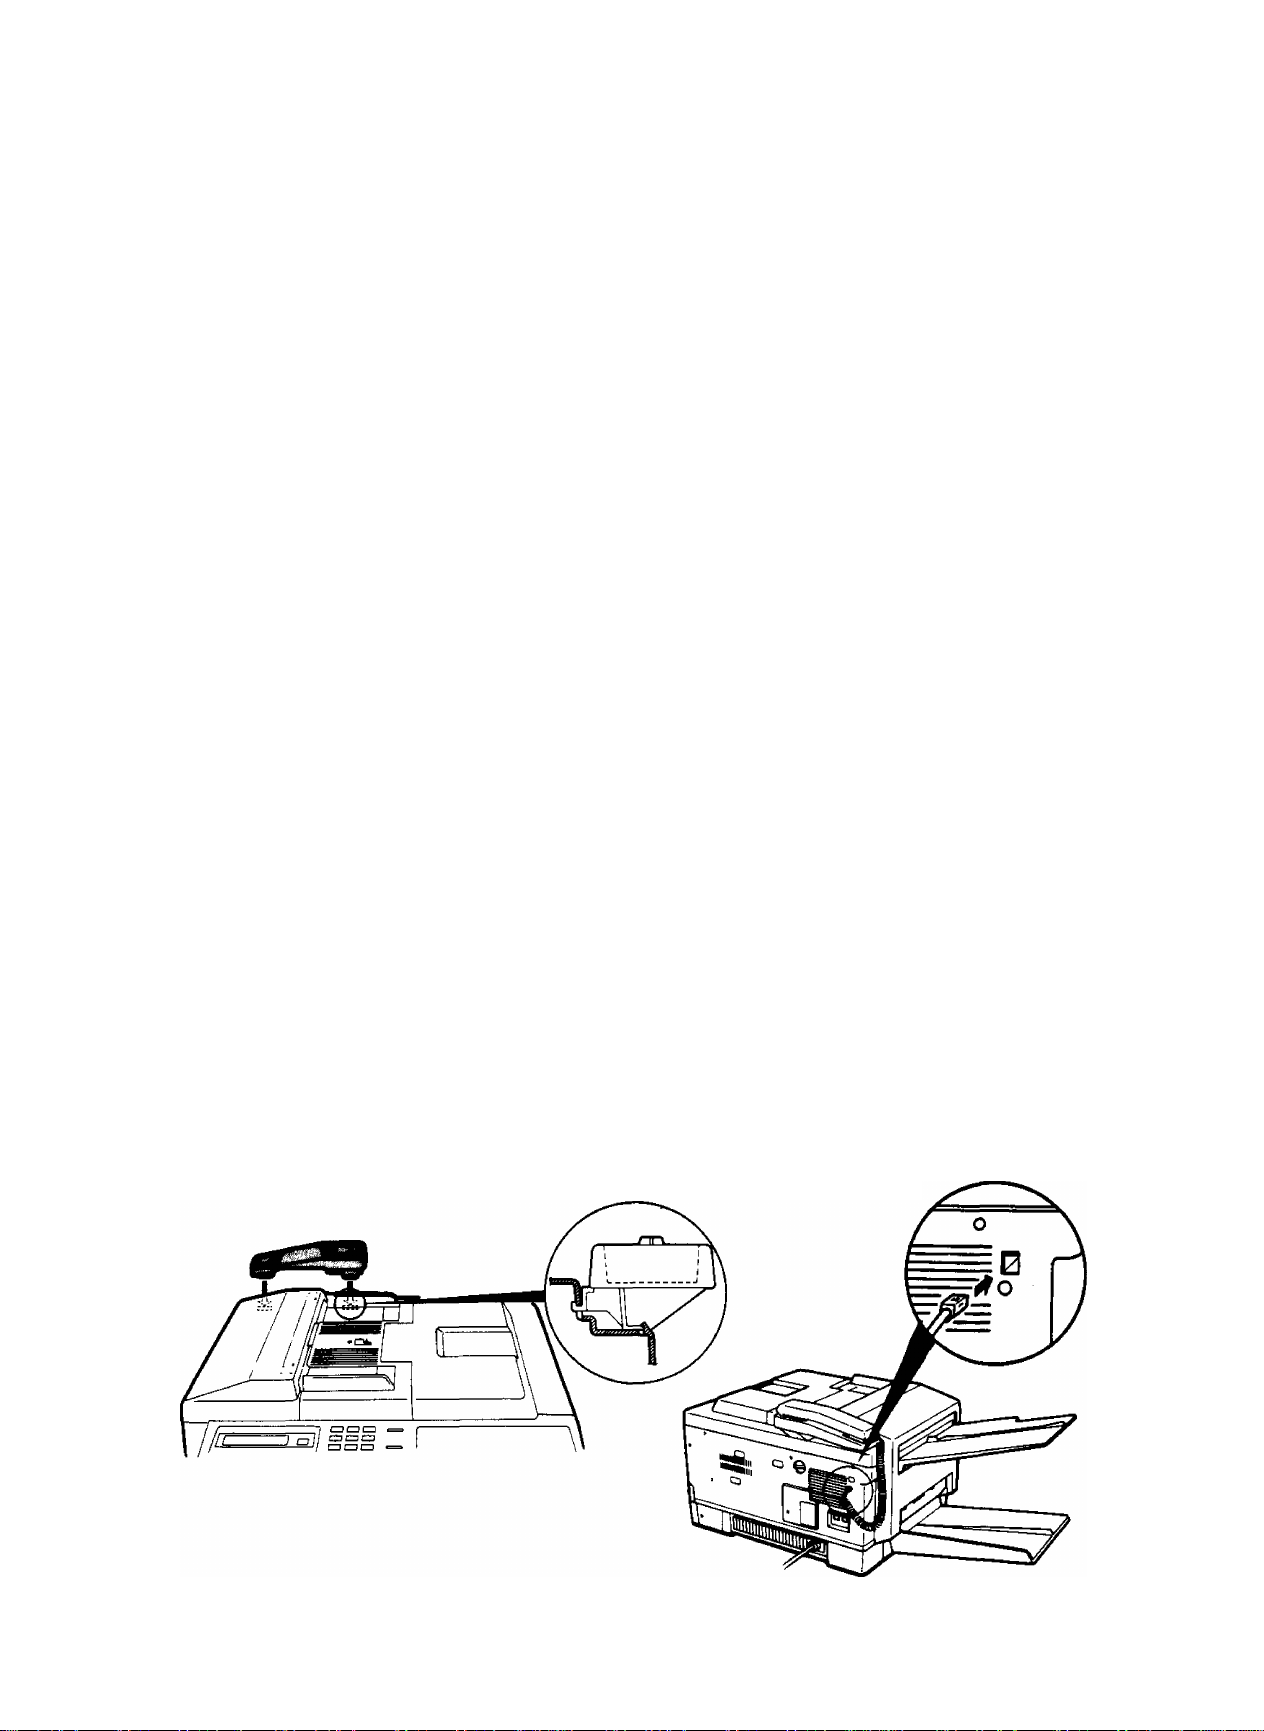
Installing Handset and Cradle
1. Insert the telephone cradle hooks into the two slots on the rear side of the top
cover and press upwards gently until they locks into place.
2. Plug the telephone handset into the jack on the rear panel of the machine.
Top Cover
19
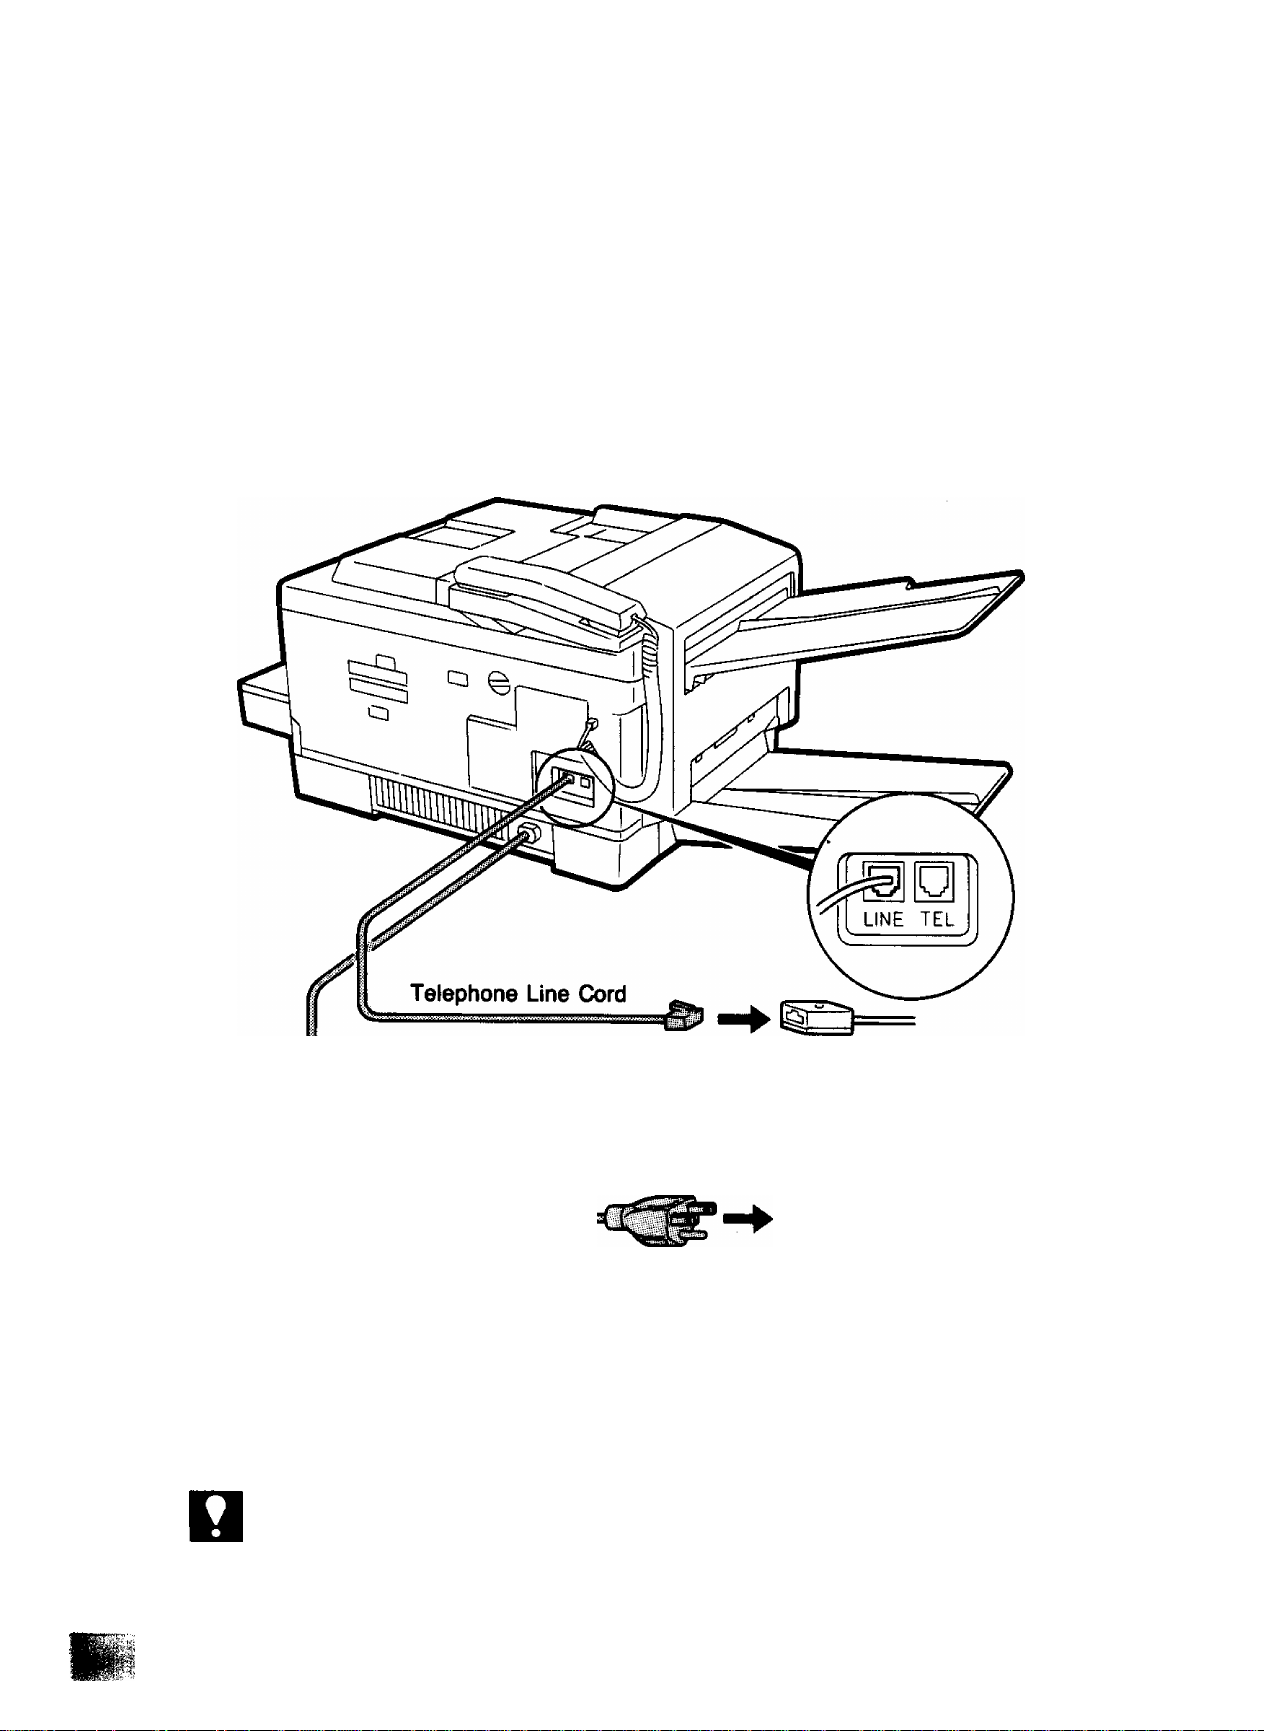
Connecting the Telephone Line and Power Supply Cord
1. Plug the telephone line cord into the telephone jack supplied by the telephone
company.
2. Plug one end of the power supply cord into the receptacle on the rear of the
machine and the other end into an ordinary AC outlet.
NOTC
20
RJ11C Telephone Jack
Wall AC Outlet
Power Supply Cord
1. To connect a telephone to the machine, break off the protective tab of the TEL connector
on the rear panel.
2. Connecting method of line cord and its type, the type of power supply cord and AC
outlet vary depending on the country.
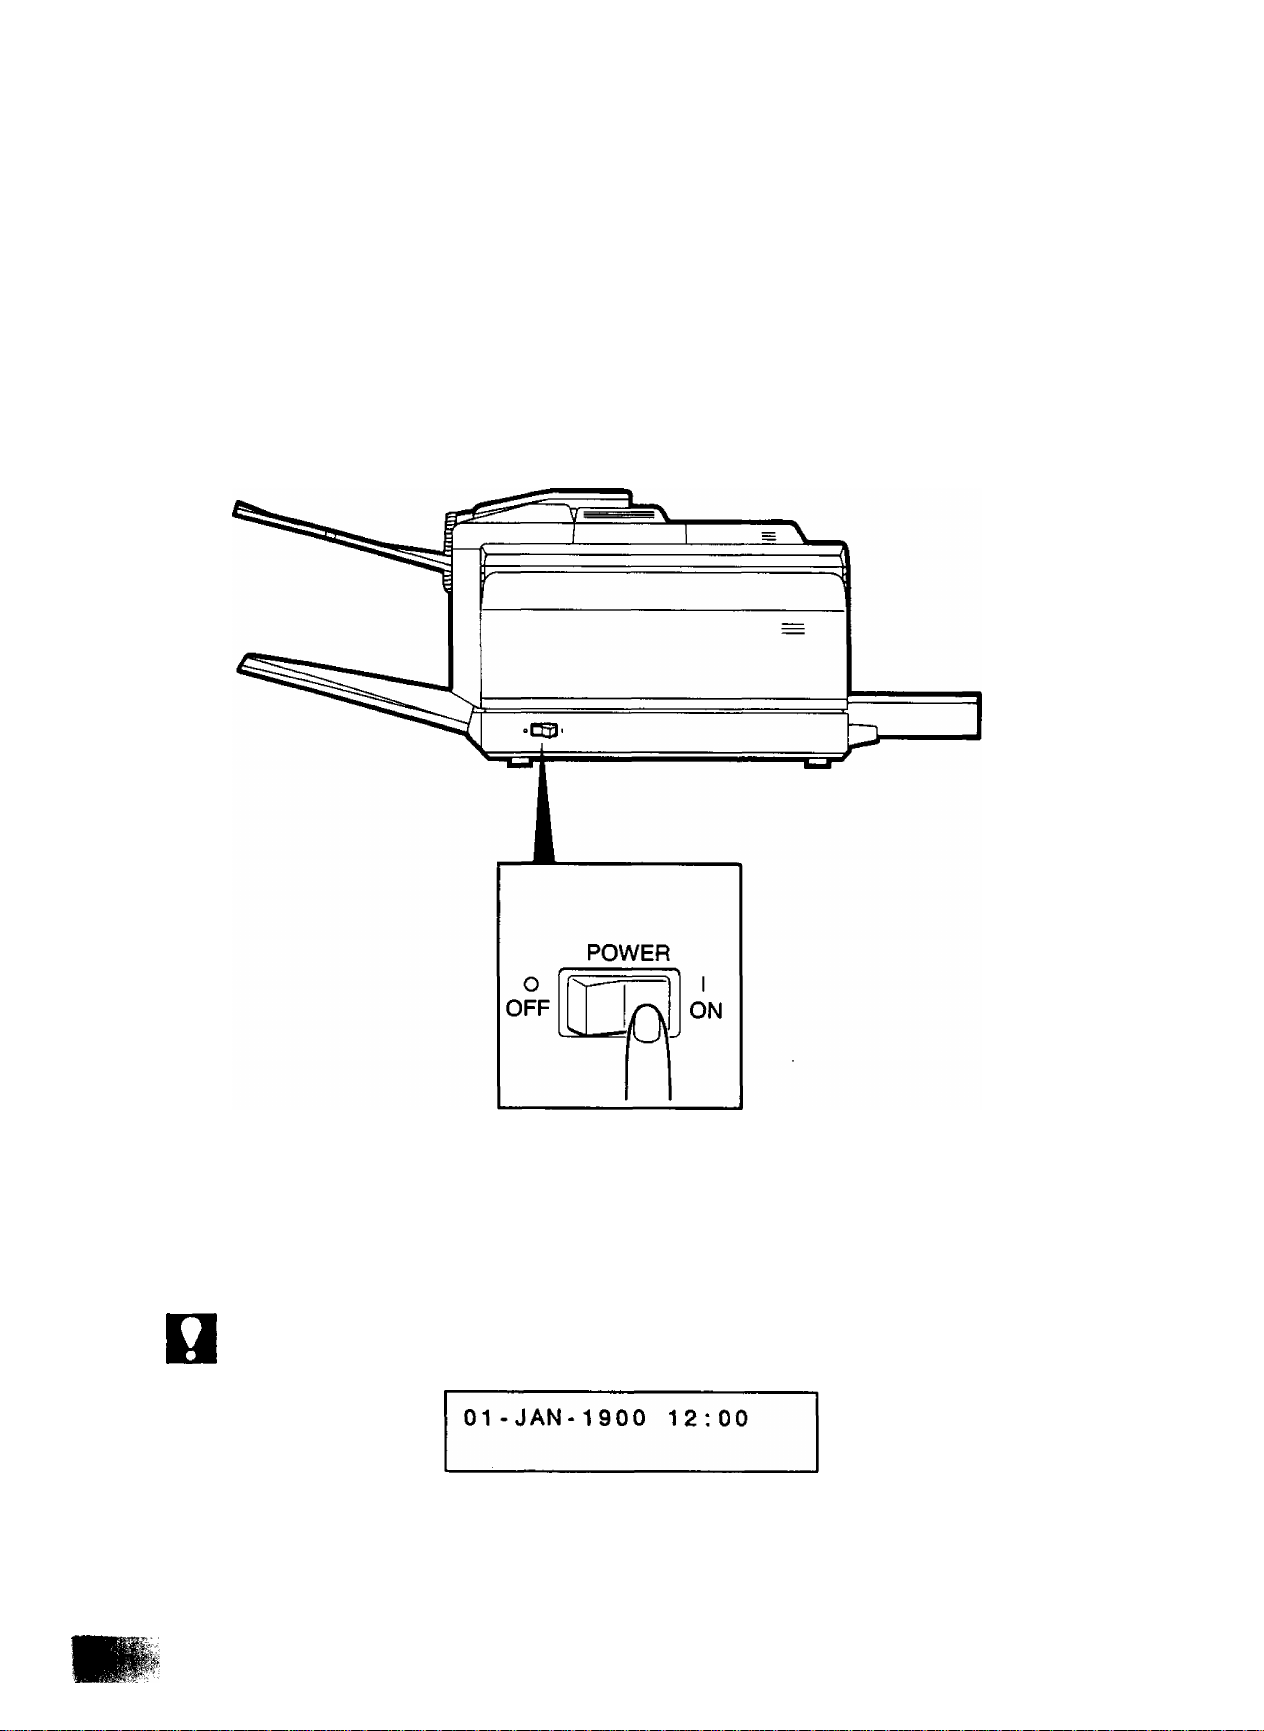
Power Switch
The power switch is located on the front oanel nf tho
Turn the power switch to “I" position to turn on thVpower The
control panel should light up. You should keep it ON at 111 f
documents from another party. ^ ^ times for receiving
1
NOT€
When the battery is fiat (after long storage or disuse), date and time on the display may
blink as shown below.
Set the correct date and time. Blinking will stop. (See page 24.) When the machine is
first installed, it is recommended to leave the machine on for at least 30 hours to fully
charge the battery.
21
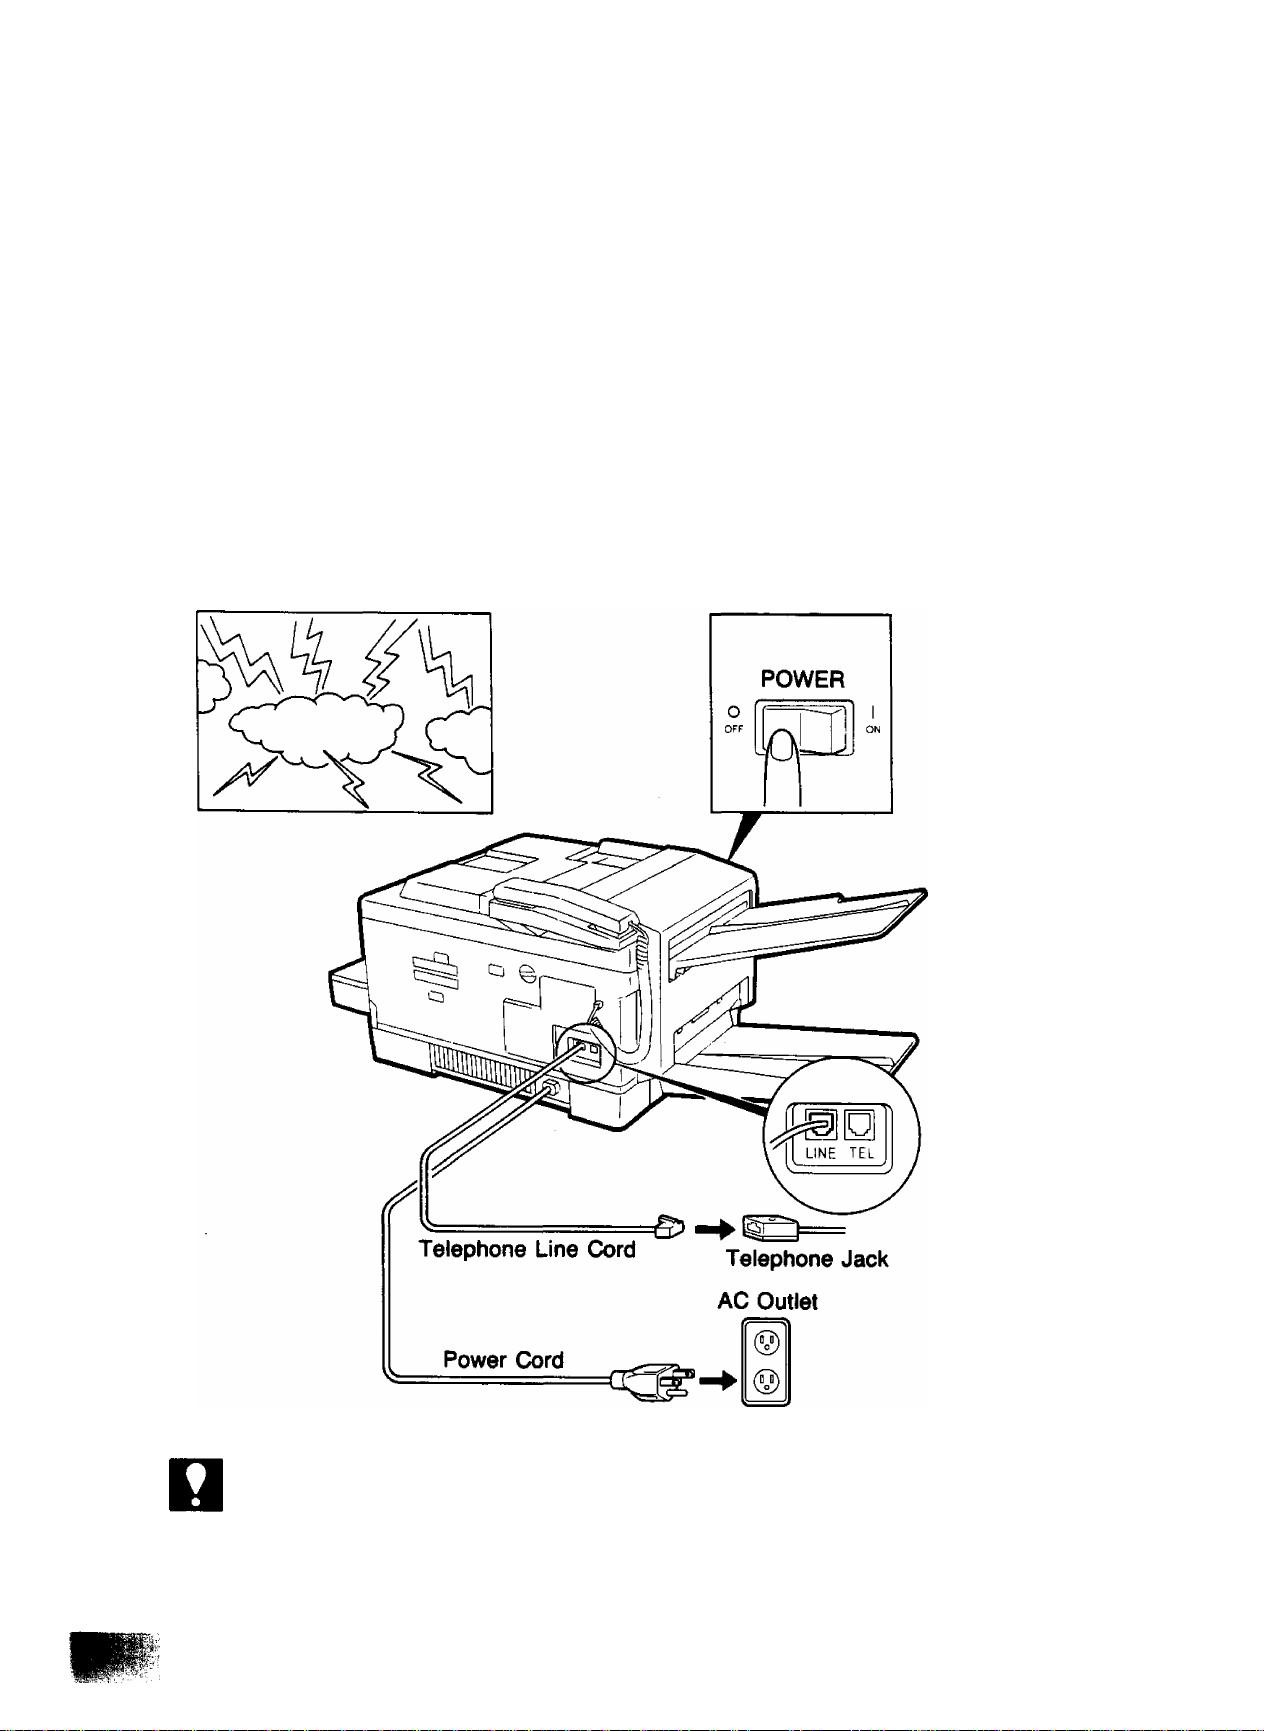
Lightning Precautions
To minimize the possibility of damage due to lightning, a surge protector is built into
your machine. Sometimes, though, this is not enough to protect the machine
completeiy when a strong lightning surge comes through the telephone line or AC
power line. To further protect the equipment when you know that a thunderstorm
is approaching, we recommend that you:
• Turn off the power switch and unplug the power cord from the AC outlet.
• Unplug the telephone line cord from the telephone jack.
Thunderstorm
Power Switch
NOT€
22
1. This machine is equipped with a battery pack which backs up the RAM date (i.e., clock,
telephone No., logo, ID number, etc.)
2. Connecting method of line cord and its type, the type of power supply cord and AC
outlet vary depending on the country.
SETTING UP YOUR MACHINE
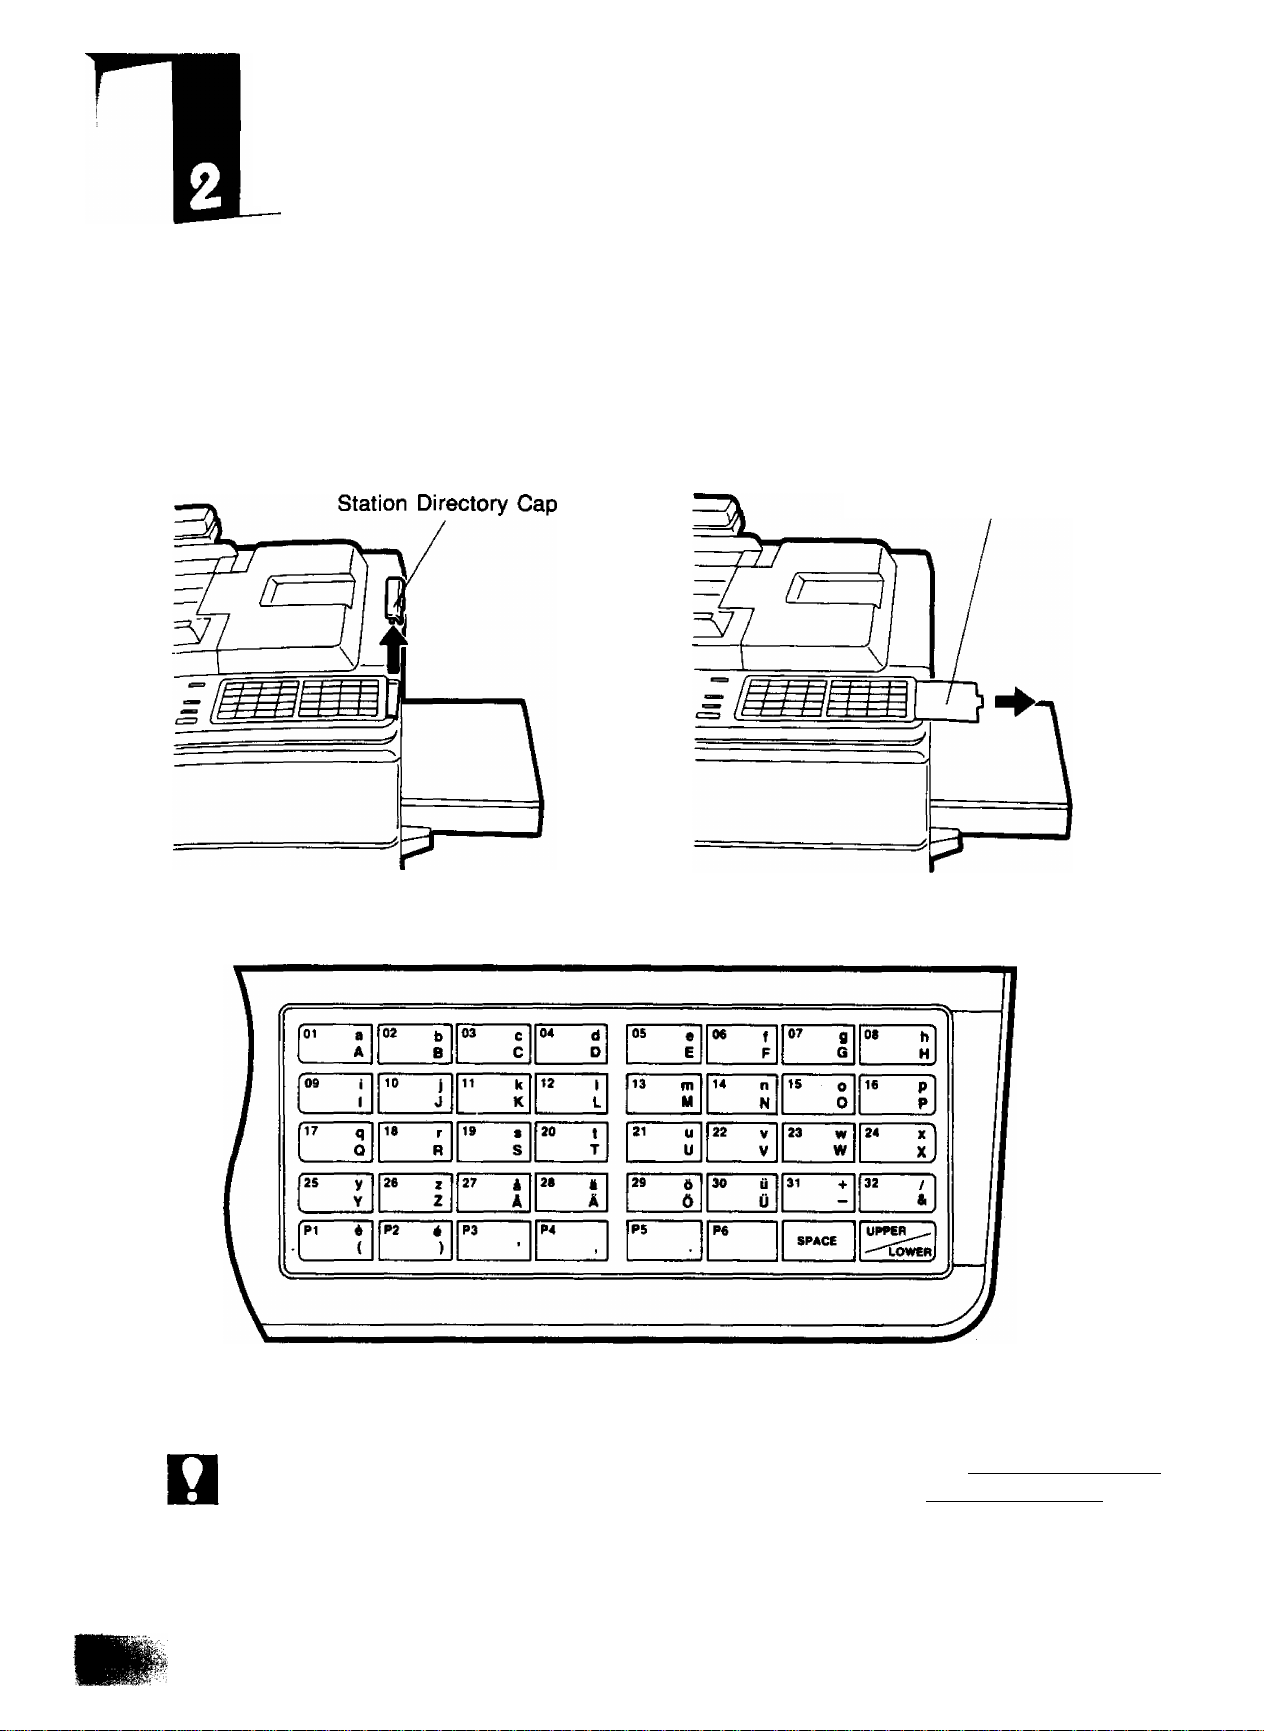
CHARACTER KEY LAYOUT UNDER THE ONE-TOUCH KEYS
The One-Touch keys on the control panel also serve as character and symbol input
keys when you need to record your LOGO and other station names. This layout is
printed on the panel under the Station Directory Sheet, which can be pulled out as
shown below.
Station Directory Sheet
NOT€
Character Key Layout
Whenever One-Touch keys are changed to the character key mode (to record your LOGO
and other station names), capital letters are selected first. Use the UPPER/LOWER
key to alternate between capital letters and small letters.
23

USER PARAMETERS
How to Set the Date and Time
You can set or reset the date and time when your machine is in standby, or when
you have already placed some documents on the ADF. To do so,
1
FUNCTION
SET MODE
NO. »1
and
The display will show a date and time.
Use the keypad to enter the new month
(two digits), day (two digits), year, and
time (24-hour clock).
24
Ex: 15 DEC., 1989 15:00 [T][5][T][2]
!T][l][8]II][TlII]lStoI
If you make a mistake, use the
I ORIGINAL I and I RESOLUTION
keys to move the cursor to the
incorrect number, and then enter the
new number over it.
To set the date and time,
Now you can go on and set the LOGO,
or return to standby with [STOP
DATE & TIME
05-12-1989 15:00

How to Set Your LOGO
The LOGO helps identify yog to someone who receive, wn,., ^
To set your LOGO (25 characters max ) use the rw -r u document,
page 23). ’’ One-Touch/Character keys (see
If you have just set the date and time and pressed Isra^ . •
4 below. If not, Stan from step 1. P ed L?TARTJ , skip to Step
and
USER PARAMETERS
4
repeatedly.
Enter each letter, number and/or symbol
in your LOGO using the One-Touch/
Character Keys.
Ex: for Panafax HQ
If more than 20 characters are entered,
the first 20 characters will scroll off the
display.
START
To set the LOGO,
Now you can go on and set the ID, or
return to standby with I STOP
25
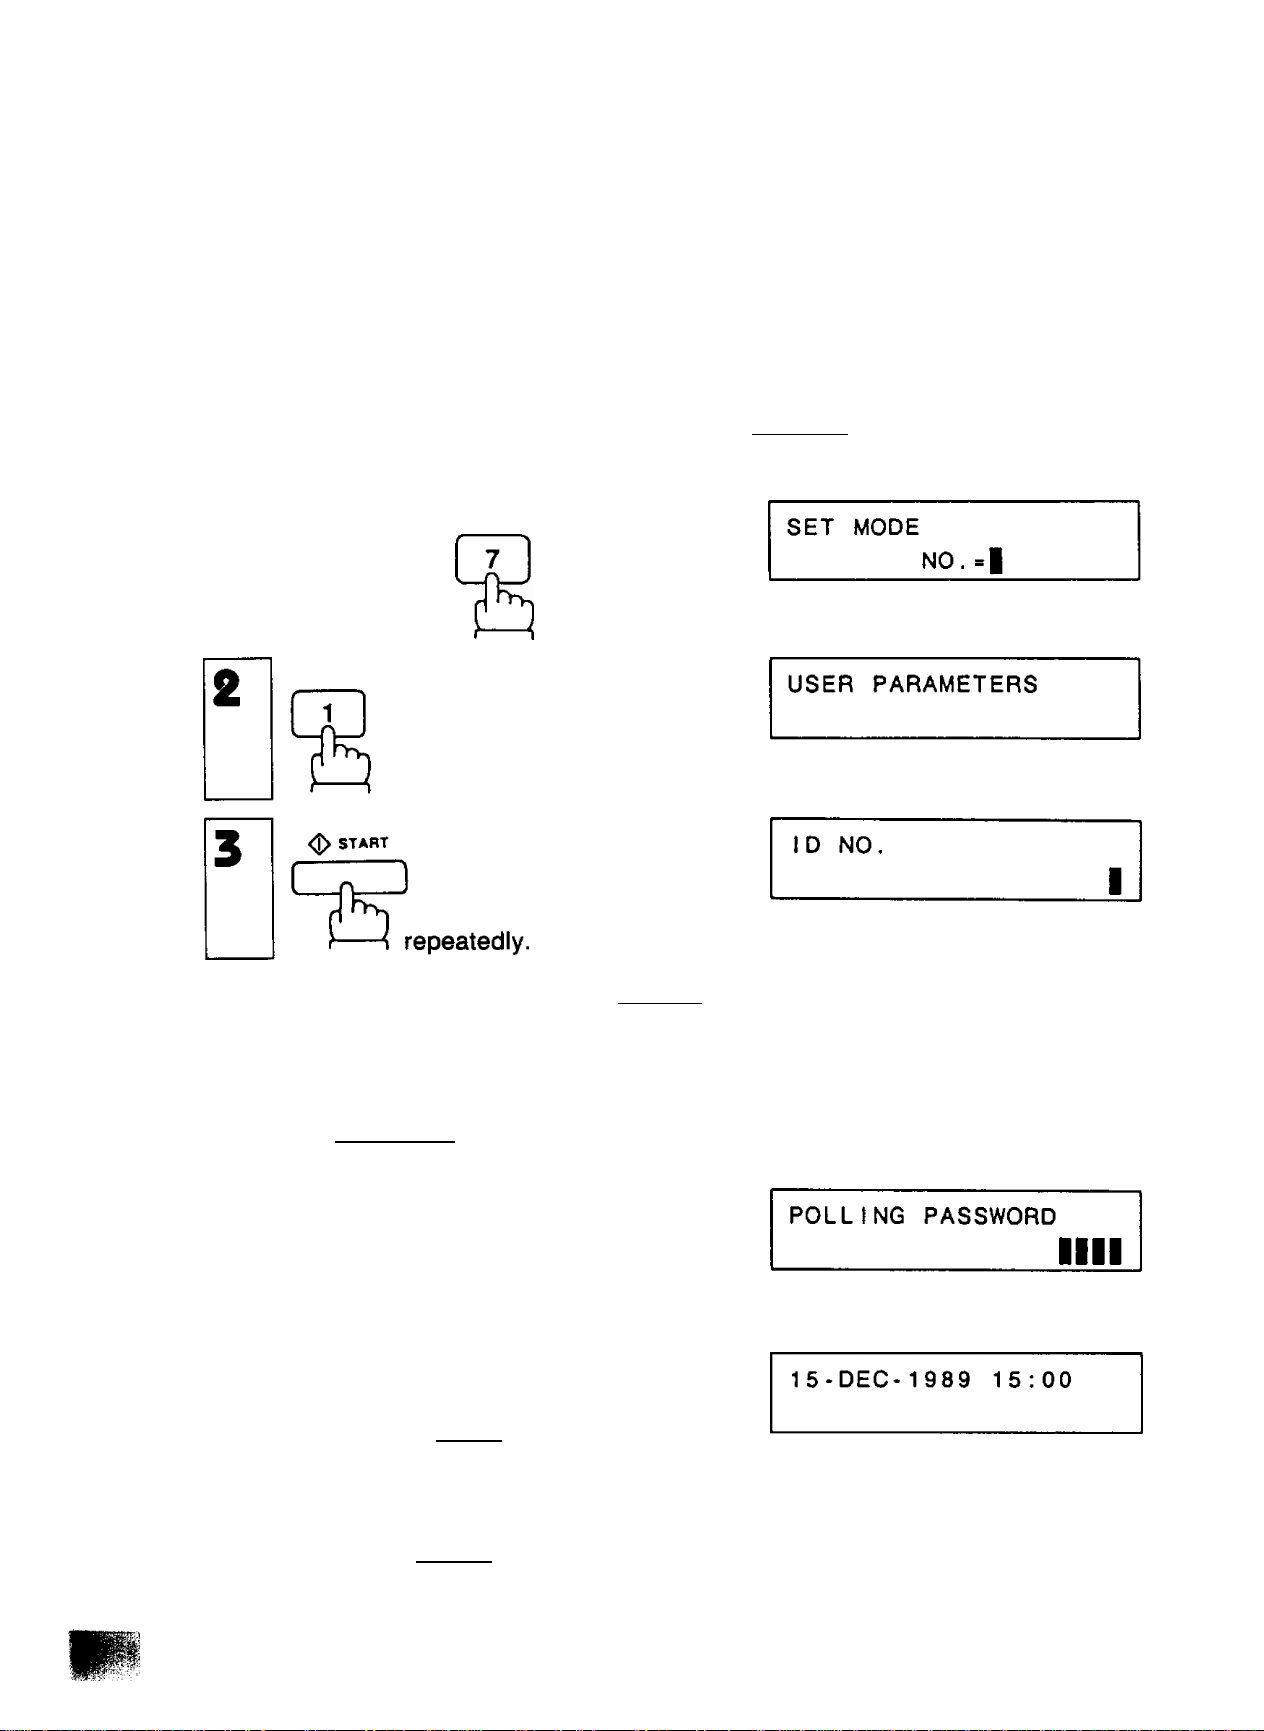
How to Set Your ID Number
When you transmit, your ID will appear on the other party’s display. When you receive
documents, the sender’s ID will appear on your display. We suggest you use your
facsimile telephone number as your ID, but you may use any nmber up to 20 digits
long.
If you have just set your LOGO and pressed [STARTI , skip to step 4. If not,
start from step 1.
FUNCTION
1
and
4
Enter the ID digits. Use SPACE to
enter a space. If you try to enter more
than 20 digits you will hear a pip-pip-pip
sound.
Ex: [2]|T|[g[l
SPACE
To set the ID,
Now you can go on and set the POLLING
PASSWORD (see page 70), or return to
standby with STOP
Note: Press CLEAR to erase the number you have just entered.
SPACE
12 3
^ START
mm
ID NO.
212 111 1230
26
ONE-TOUCH/ABBREVIATED NUMBERS
Entering One>Touch/Abbreviated Dialling Numbers
One-Touch Dialling and Abbreviated Dialling are two fast ways of dialling full numbers.
To use these dialling methods, you must first enter the full numbers using the following
procedure.
N
1
(z )
and
SET MODE
NO.-I
4d
4b
To assign a One-Touch number, press
one One-Touch key.
Ex: iW1
To assign an Abbreviated number, press
ABBR and two keys on the keypad
to enter any code from 00 to 99.
Ex: I ABBR
Enter facsimile telephone number (up to
36 digits) including pauses and spaces.
Ex:
9
2
1. If you need a special access number to get an outside line, enter it first and then press
PAUSE . A hyphen is displayed for pause.
2. Use SPACE to enter a space between the numbers to make it easier to see.
3. When you input a wrong number in step 5, press CLEAR to erase the number
before the cursor, then re-enter the right number and press [START
I [Tl [Tl
[PAUSE 5 5
4
LI
5
SPACE
[07] TELEPHONE NO.
9-555 1234|
1
27
 Loading...