

Page 1
Panafax
UF-650
User’s Guide
Panasonic^
Page 2

CONTENTS
Chapter 1 GETTING TO KNOW YOUR MACHINE
1-1. EXTERNAL VIEW ..................................................................................... 1-1
1-2. CONTROL PANEL ............................................................................... 1-2
1- 3. FUNCTION LIST ....................................................................................... 1-3
Chapter 2 INSTALLING AND SETTING UP YOUR MACHINE
2- 1. INSTALLING YOUR MACHINE
Caution
Unpacking..................................................................................................................2-2
Final Instalied View ..................................................................................................2-3
Installing Handset Base Ass’y and Handset...........................................................2-3
Installing Sub-Tray....................................................................................................2-4
Installing Document Return Tray ............................................................................2-4
Instalting/Replacing Recording Paper
Connecting the Telephone Une and Power Supply Cord......................................2-6
Setting the Dialling Method (Tone or Pulse) ..........................................................2-7
Lightning Precautions ..............................................................................................2-8
Final Installation Test
................
.....................................................................................................2-1
2-2. SETTING UP YOUR MACHINE
2-2-1. CHARACTER KEY UYOUT UNDER THE STATION DIRECTORY SHEET 2-10
2-2-2. USER PARAMETERS .............................................................................................2-11
How to Set the Date and Time ..............................................................................2-11
How to Set Your LOGO ......................................................................................... 2-12
How to Set Your Character ID ...............................................................................2-13
How to Set Your ID Numer .....................................................................................2-14
2-2-3. ONE-TOUCH/ABBREVIATED DIALLING NUMBERS ..........................................2-15
Entering One-Touch/Abbreviated Dialling Numbers
Filling Out the Station Directory Sheet ...........................................................2-16
2-2-4. FAX PARAMETERS .............................................................................................. 2-17
Setting FAX Parameters
FAX Parameter Table .............................................................................................2-18
2-2-5. ADJUSTING MONITOR VOLUME
2-2-6. ADJUSTING RINGER VOLUME
2-2-7. USING MUTE .......................................................................................................... 2-20
.................................................................
...................................................................
..............
.................................................................................
...........................................................
.........................................
........................................................................................
........................................................................
............................................................................
2-1
2-5
2-9
2-10
2-15
2-17
2-20
2-20
Page 3

Chapter 3 BASIC OPERATION
3-1. TRANSMITTING DOCUMENTS
3-1-1. LOADING DOCUMENTS .................................................................................................3-1
Documents You Can Send......................................................................................3-1
Documents You Cannot Send
How to use the Carrier Sheet ..................................................................................3-1
Loading Documents ...............................................................................................
3-1-2. BASIC TRANSMISSION SETTINGS ...........................................................................3-3
Original (Contrast) .................................................................................................. 3-3
Resolution .................................................................................................................3-4
Halftone .....................................................................................................................3-4
Verification Stamp ....................................................................................................3-4
Communication Journal (COMM. JOURNAL) ........................................................3-5
Error Correction Mode (ECM) ................................................................................ 3-6
Total Pages................................................................................................................ 3-7
3-1-3. TRANSMISSION ........................................................................................................ 3-8
Off-Hook Dialling ......................................................................................................3-8
On-Hook Dialling ......................................................................................................3-9
3-1-4. MEMORY TRANSMISSION ..................................................................................... 3-10
Direct Dialling ........................................................................................................ 3-11
One-Touch Dialling
Abbreviated Dialling ...............................................................................................3-13
Directory Search Dialling
Multi-Station Dialling ..............................................................................................3-15
3-2. RECEIVING DOCUMENTS
3-2-1. AUTOMATIC RECEPTION .........................................................................................3-16
3-2-2. MANUAL RECEPTION ...............................................................................................3-16
How to Set Manual Reception............................................................................ 3-16
What to do When Your Telephone Rings .............................................................3-17
3-2-3. SUBSTITUTE RECEPTION (MEMORY RECEPTION)
.....................................................................
................................................................................
................................................................................................
...
...................................................................................3-14
..........................................................................
..............................................
3-1
3-1
3-2
3-12
3-16
3-17
3-3. MAKING COPIES ........................................................................................ 3-18
Single Copies ..........................................................................................................3-18
Multiple Copies .......................................................................................................3-18
3-4. USING YOUR TELEPHONE ......................................................................... 3-19
Making a Regular Call ............................................................................................3-19
For Making Voice Contact after Sending/Receiving
...........................................
3-19
Page 4

Chapter 4 GETTING THE MOST OUT OF YOUR MACHINE
4-1. POLLING ...........................................................................................,....4-1
How to Set Common Polling Password
How to Prepare to be Polled ...................................................................................4-2
How to Poll .................................................................................................................4-3
How to Turnaround Poll (Combined Transmission and Polling)
How to Printout Polled File .....................................................................................4-5
How to Delete Polled File.........................................................................................4-6
4-2. TIMER CONTROLLED COMMUNICATIONS ............................................... 4-7
Deferred Transmisison ............................................................................................4-7
Deferred Polling .......................................................................................................4-8
................................................................
........................
4-1
4-4
4-3. PROGRAMMED COMMUNICATIONS
4-3-1. SETTING PROGRAM KEYS ...........................................................................................4-9
Setting for Deferred Transmission ........................................................................4-10
Setting for Polling ..................................................................................................4-12
Setting for Deferred Poliing ..................................................................................4-14
Setting for Group Dialling ..................................................................................... 4-16
Setting for One-Touch Key .................................................................................... 4-17
How to Erase Program Key Settings
Program Key Programming Flowchart
4-3-2. USING PROGRAM KEYS
Timer Batch Transmission ....................................................................................4-21
..........
...........................
........................................................
...................................................................
.................................................................
.......................................................4-20
4-9
4-18
4-19
4-4. INTERRUPT KEY OPERATION ................................................................. 4-22
4-5. MEMORY MANAGEMENT (Editing File)
How to Printout File List.........................................................................................4-23
Sample File List ......................................................................................................4-24
How to Change Communication Time and/or Stations
How to Delete an Individual File
How to Delete an All Files
How to Printout File ............................................................................................. 4-29
How to Add Documents .........................................................................................4-30
How to Retry Incomplete File ..............................................................................4-31
..........................................................................
.....
...............................................................................4-28
........................................
......................................
4-23
4-26
4-27
4-6. GROUP DIALLING USING ONE-TOUCH KEYS
Setting Fax Parameter ......................................................................................... 4-32
Entering Group Dialling Numbers
Using Group Dialling One-Touch Keys ................................................................4-34
4-7. PRINTOUT REPORTS AND LISTS
Journal .....................................................................................................................4-35
Individual Transmission Journal (XMT JOURNAL)
Communication Journal (COMM. JOURNAL)
Batch Communication Journal (BATCH COMM. JOURNAL)
One-Touch/ABBR. No./Directory Search List
Program List ...........................................................................................................4-43
Fax Parameter List .................................................................................................4-45
Power Failure Report ......................................................................................... 4-47
........................................................................
............................................................
....................................................
......................................................
...................................
.............................................
............................
4-32
4-33
4-35
4-35
4-38
4-39
4-40
Page 5

Chapters PROBLEMSOLVING
5- 1. PROBLEM SOLVING ................................................................................. 5-1
If You Have Any These Problems ...........................................................................5-1
Information Codes ...................................................................................................5-1
Clearing a Recording Paper Jam ............................................................................5-4
Clearing a Document Jam .......................................................................................5-5
Cleaning the Contact Image Sensor & Scanning Roller
Cleaning the Thermal Recording Head ..................................................................5-7
Adjusting the Automatic Document Feeder (ADF)
Refilling or Replacing the Verification Stamp .......................................................5-9
Checking the Telephone Line ...............................................................................5-10
Chapters APPENDIX
6- 1. RELAYED TRANSMISSION .........................................
General Description..................................................................................................6-1
UF-650 Compatibility with Other Machines ...........................................................6-2
Relay Network ..........................................................................................................6-3
Setting Up Your Machine for Relayed Transmission
Printout One-Touch/Abbr. No./Directory Search List .........................................6-12
Sending Documents by Relayed Transmission
Printouts and Reports ............................................................................................6-16
6-2. CONFIDENTIAL COMMUNICATION .......................................................... 6-19
General Description................................................................................................6-19
UF-650 Compatibility with Other Machines..........................................................6-21
Setting Up Your Machine for Confidential Communications..............................6-21
Storing Confidential Documents in Your Machine’s Memory
Sending Confidential Documents to a Relay Station
Polling Confidential Documents from a Relay Station
Printing Out Confidential Documents Received in Your Machine's Memory 6-27
Deleting a Stored Confidential Document
Printouts and Reports
......................................
...............................................
........... ..................
...........................................
...................................................
...........................
.........................................
......................................
...........................................................
...........................................................................................
5-6
5-8
6-1
6-7
6-15
6-24
6-25
6-26
6-28
6-29
6-3. PASSWORD COMMUNICATION
General Description................................................................................................6-30
UF-650 Compatibility with Other Machine
Setting Transmission Password & Receiving Password
How to Use Password Transmission
How to Set Password Reception
..............................................................
............................................................
...................................
...................................................................
.........................................................................
6-30
6-30
6-30
6-32
6-33
6-4. FAX ACCESS CODE ............................................................................... 6-34
Setting the Fax Access Code ................................................................................6-34
6-5. DEPARTMENT CODES
Setting the Department Codes...............................................................................6-35
Printout Journals ................................................................................................... 6-35
............................................................................
6-35
6-6. SPECIFICATIONS ..................................................................................... 6-39
6-7. INDEX ..................................................................................................... 6-40
Page 6

Ш'-
Page 7

1.
G E 1 T I N G T O
K N O W
Y O U R
M A C H I N E
EXTERNAL VIEW
CONTROL PANEL
FUNCTION LIST
Page 8

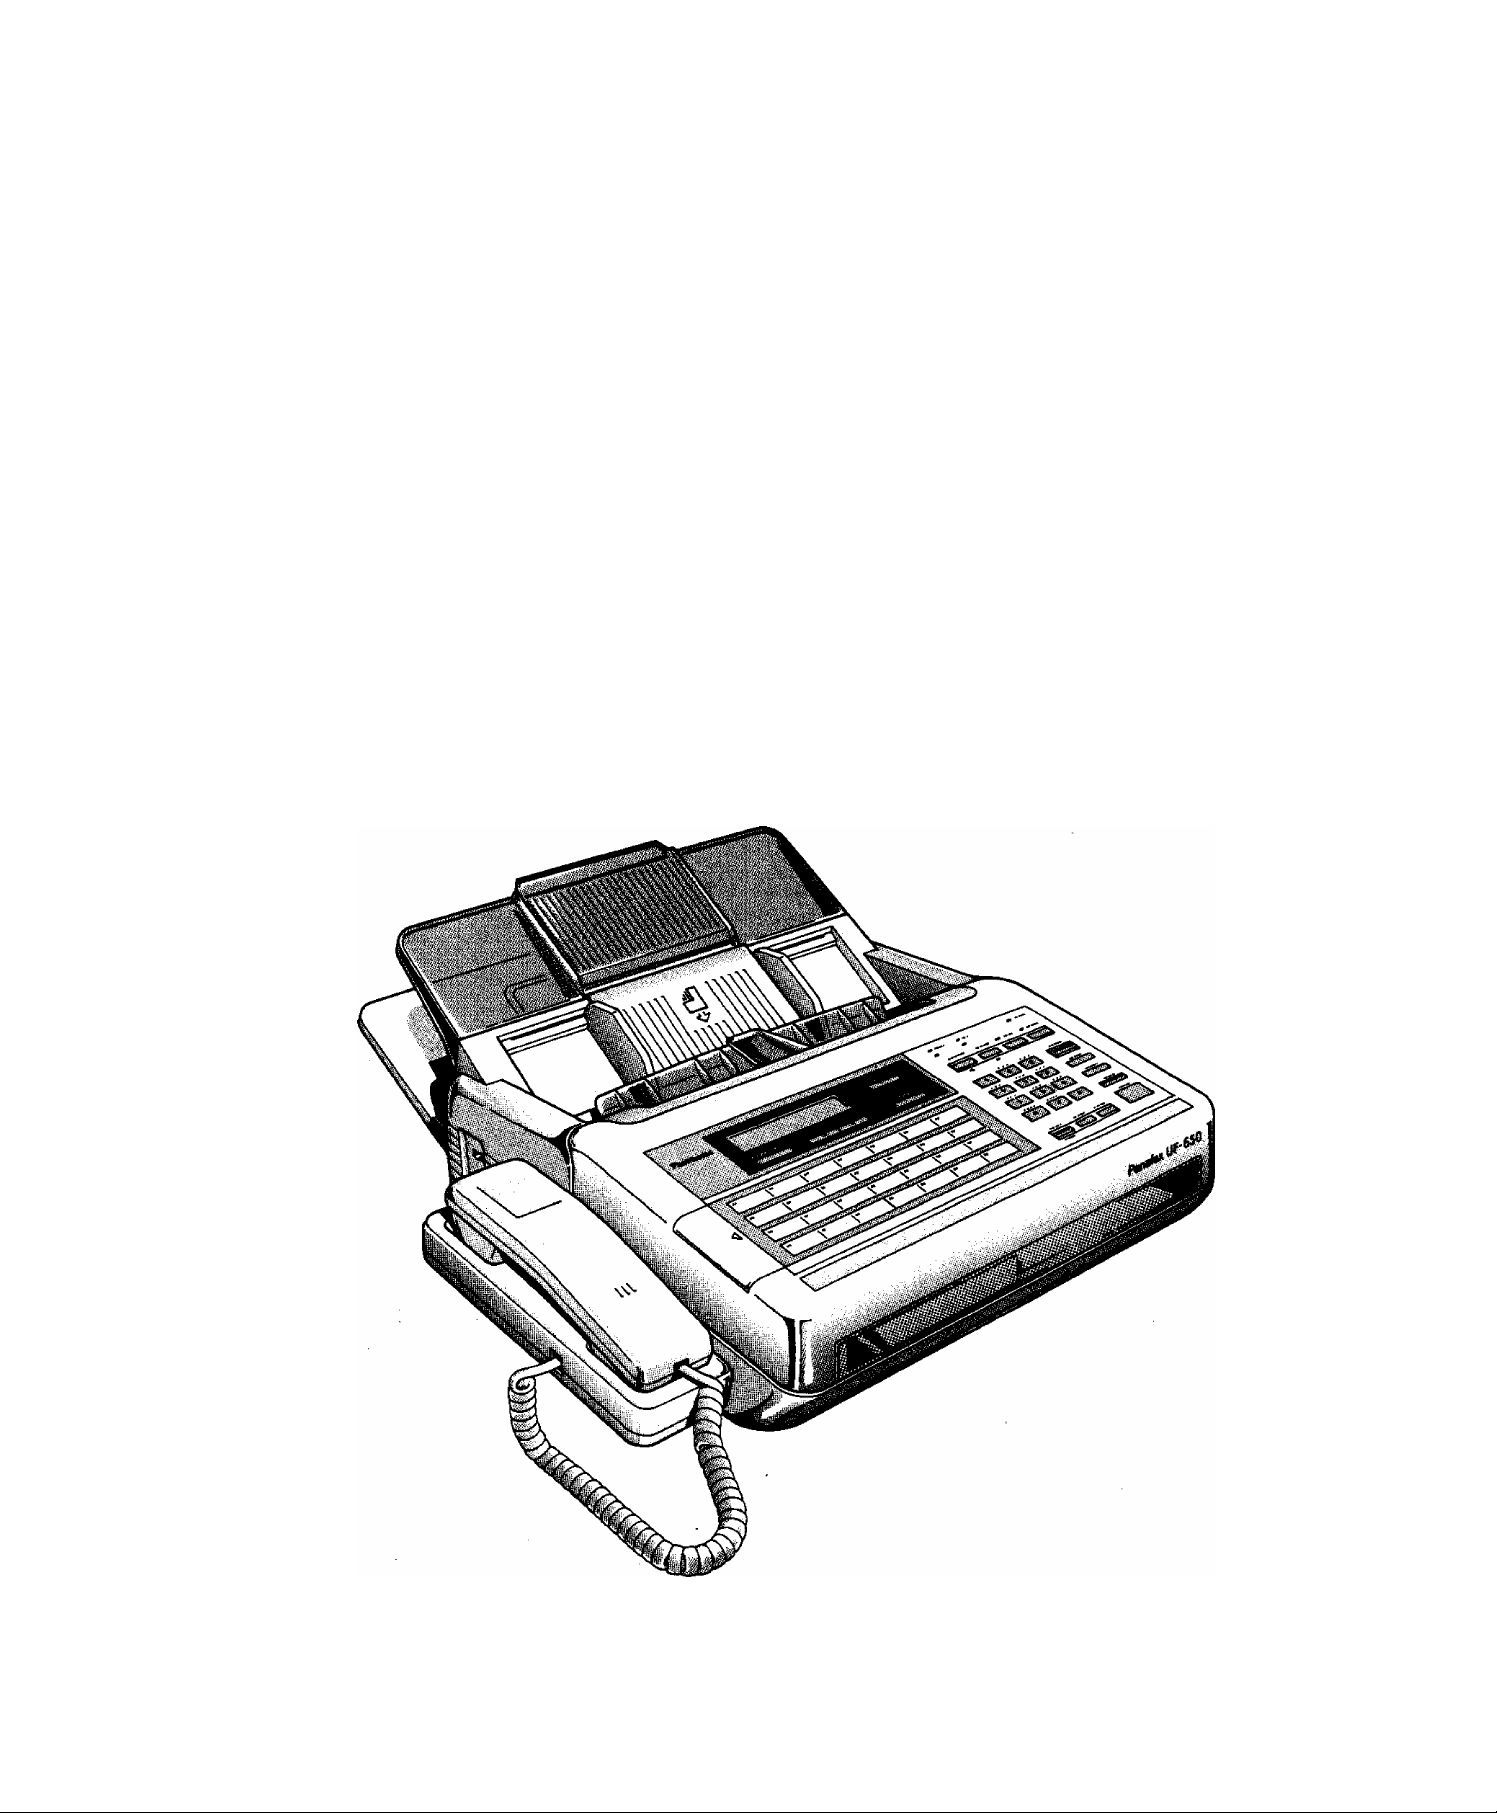
1-1.
EXTERNAL
VIEW
1. GETTING TO KNOW YOUR MACHINE
ADF (Automatic Document Feeder)
Main Name Plate
Front View
Rear View
Page 9

z
iNSTuum
A N D
S E T T I N 6 U P
Y O U R
M A C H I N E
INSTALLING YOUR MACHINE
SEHING UP YOUR MACHINE
Page 10
2-1.
INSTALLING YOUR MACHINE
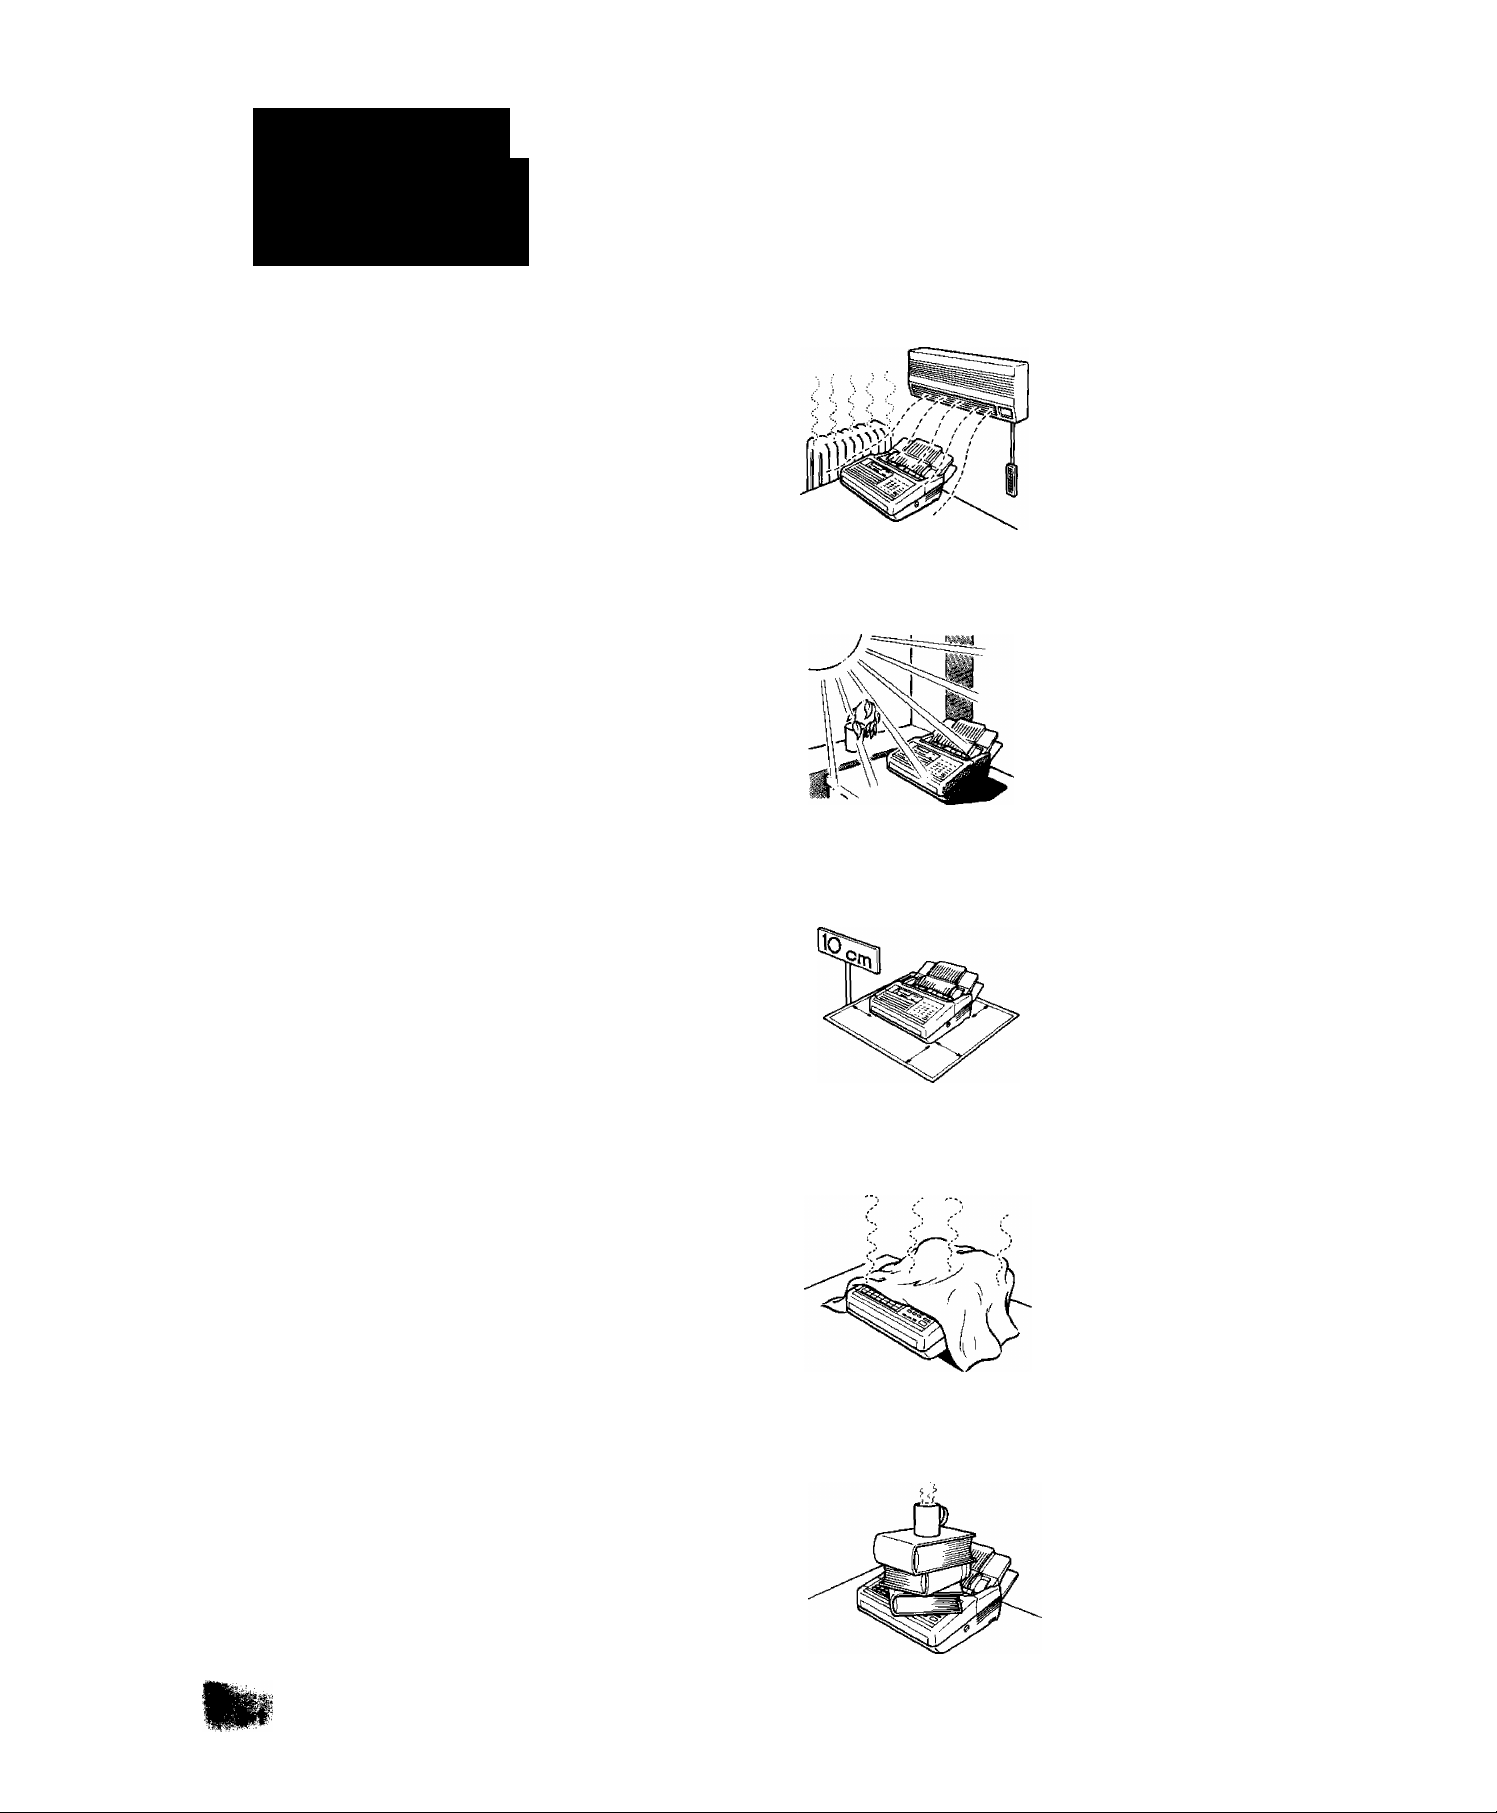
Caution
1. Do not install the machine near heating or air conditioning units.
2. Avoid exposure to direct sunlight
3. Install the machine on a flat surface, and leave at least 10 cm of space
between the machine and other objects.
4. Do not block the ventilation openings.
5. Do not place heavy objects, or spill liquids on the machine.
Page 11

2
. INSTALLING AND SETTING UP YOUR MACHINE
Unpacking
Unpack the carton referring to the illustration shown below. Inspect the machine for any shipping damage and check that you have all accessories illustrated.
Modular Cord
(NOTE)
Handset Base Ass’y
(NOTE)
Recording Paper-
Handset
(NOTE)
NOTE
t Handset, Modular Cord and
Handset Base Ass’y may not be
attached depending on each
regulation or specification of the
country.
Page 12
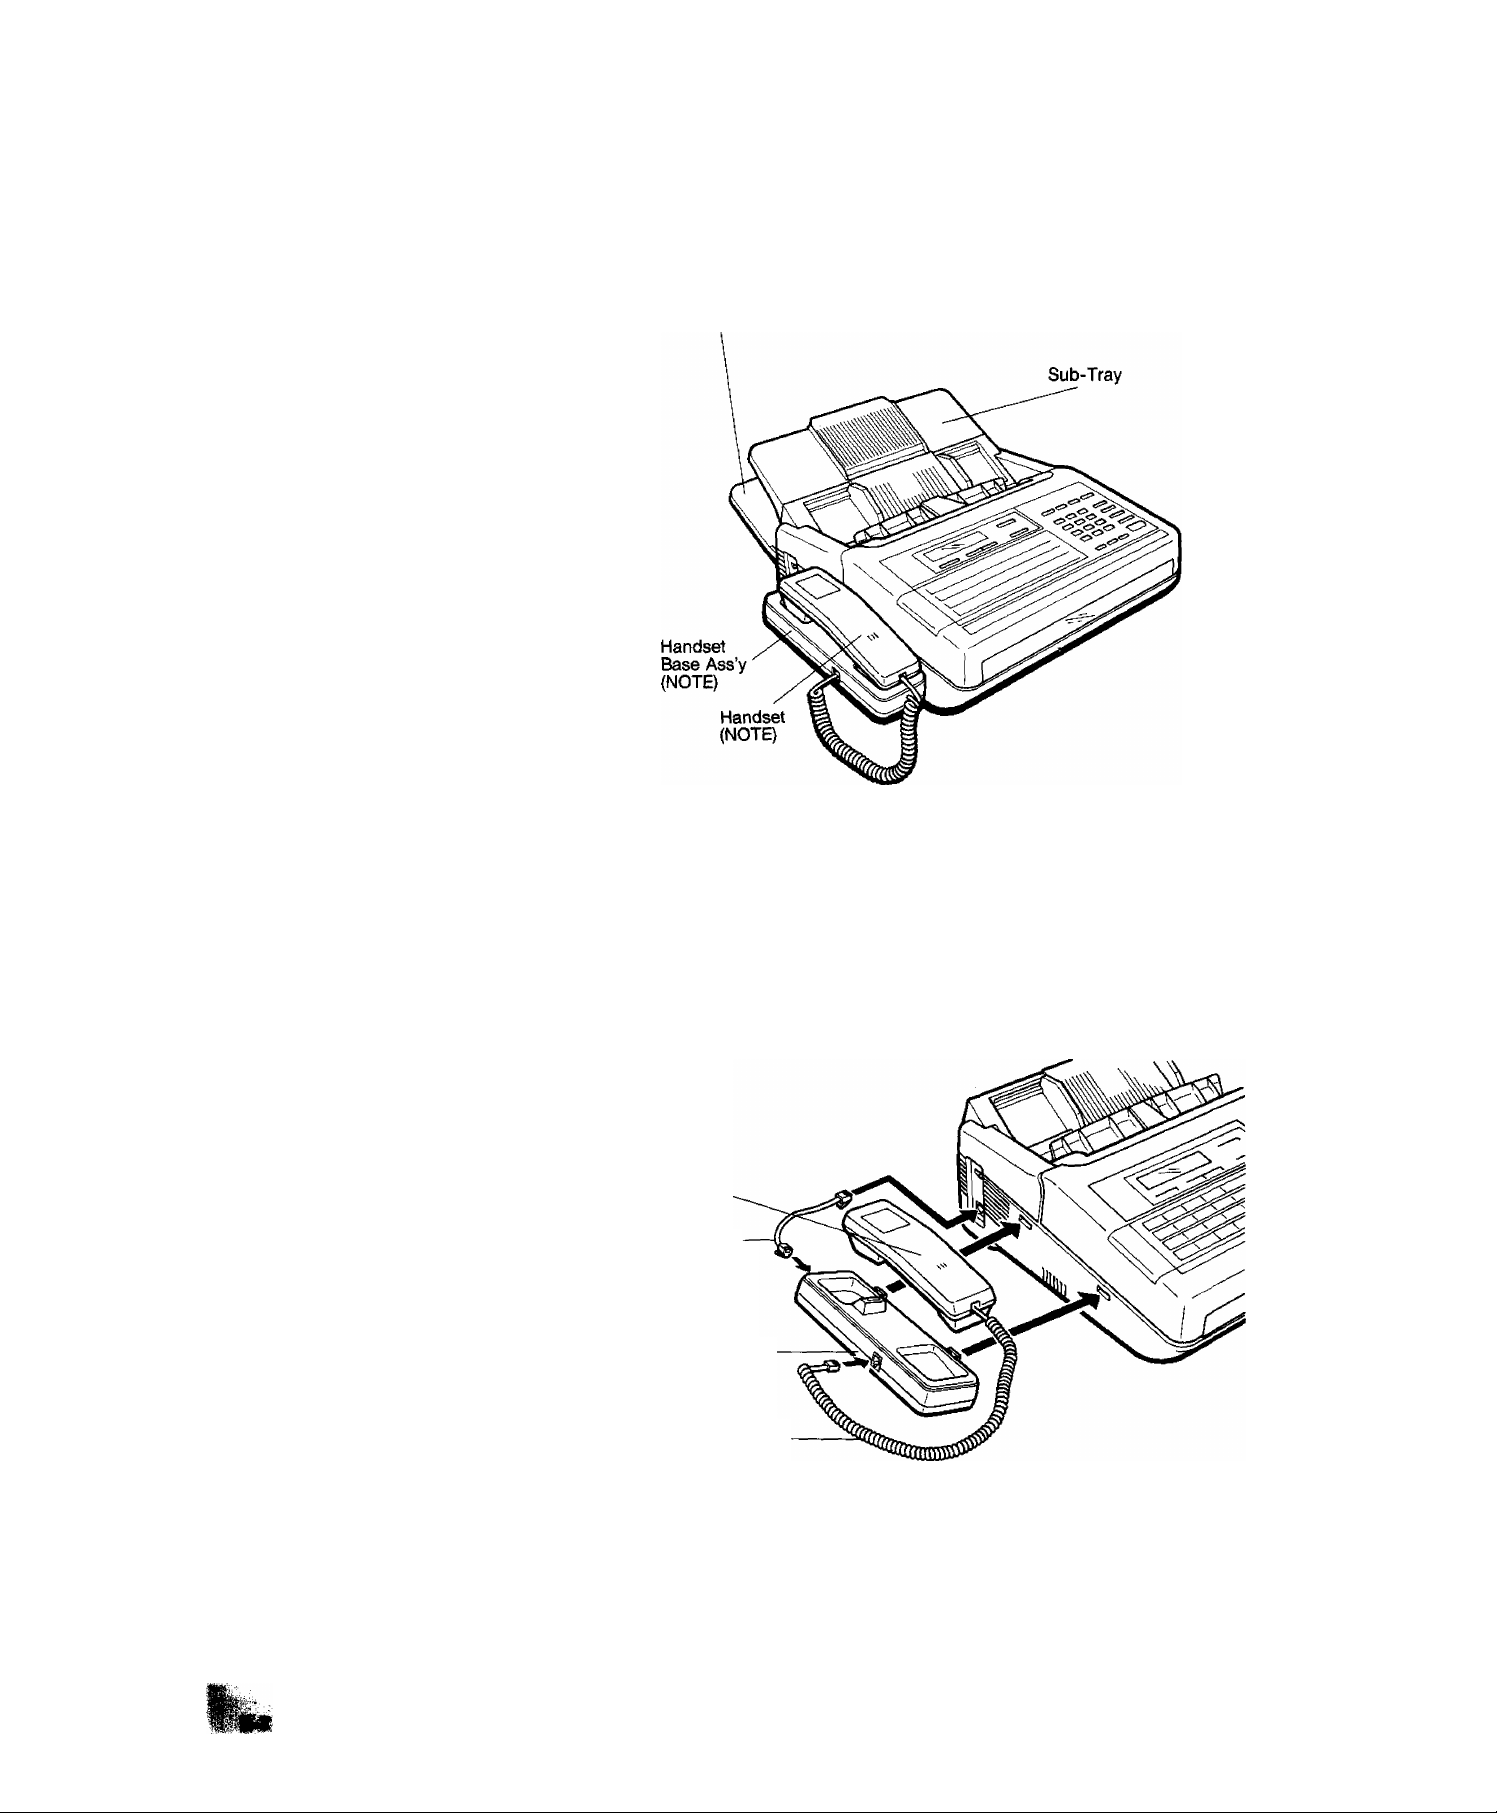
Final Installed View
Document Return Tray
Installing Handset Base
Ass’y and Handset
(NOTE)
1. Hook the projections of the Handset Base Ass'y into the square holes
on Left Side Cover.
2. Connect the attached Modular Cord (short) between the jack on the
rear of the Handset Base and the jack on the Side Panel.
3. Connect the Modular Curled Cord to the jack on the left side of the
Handset Base Ass’y.
Handset
Modular Cord
Handset Base Ass’y
Modular Curled Cord
NOTE
1. The handset may not be at
tached depending on each regu
lation or specification of the
country.
Page 13

2
. INSTALLING AND SETTING UP YOUR MACHINE
Installing Sub-Tray
1. Set the Sub-Tray onto the two hooks.
2. Tilt the Sub-Tray into the four holes.
Holes
Hooks
Sub-Tray
Holes
[nstalling Document
Return Tray
1. Insert the Document Return Tray into the four square holes on the rear
of machine.
Document Return Tray
Page 14
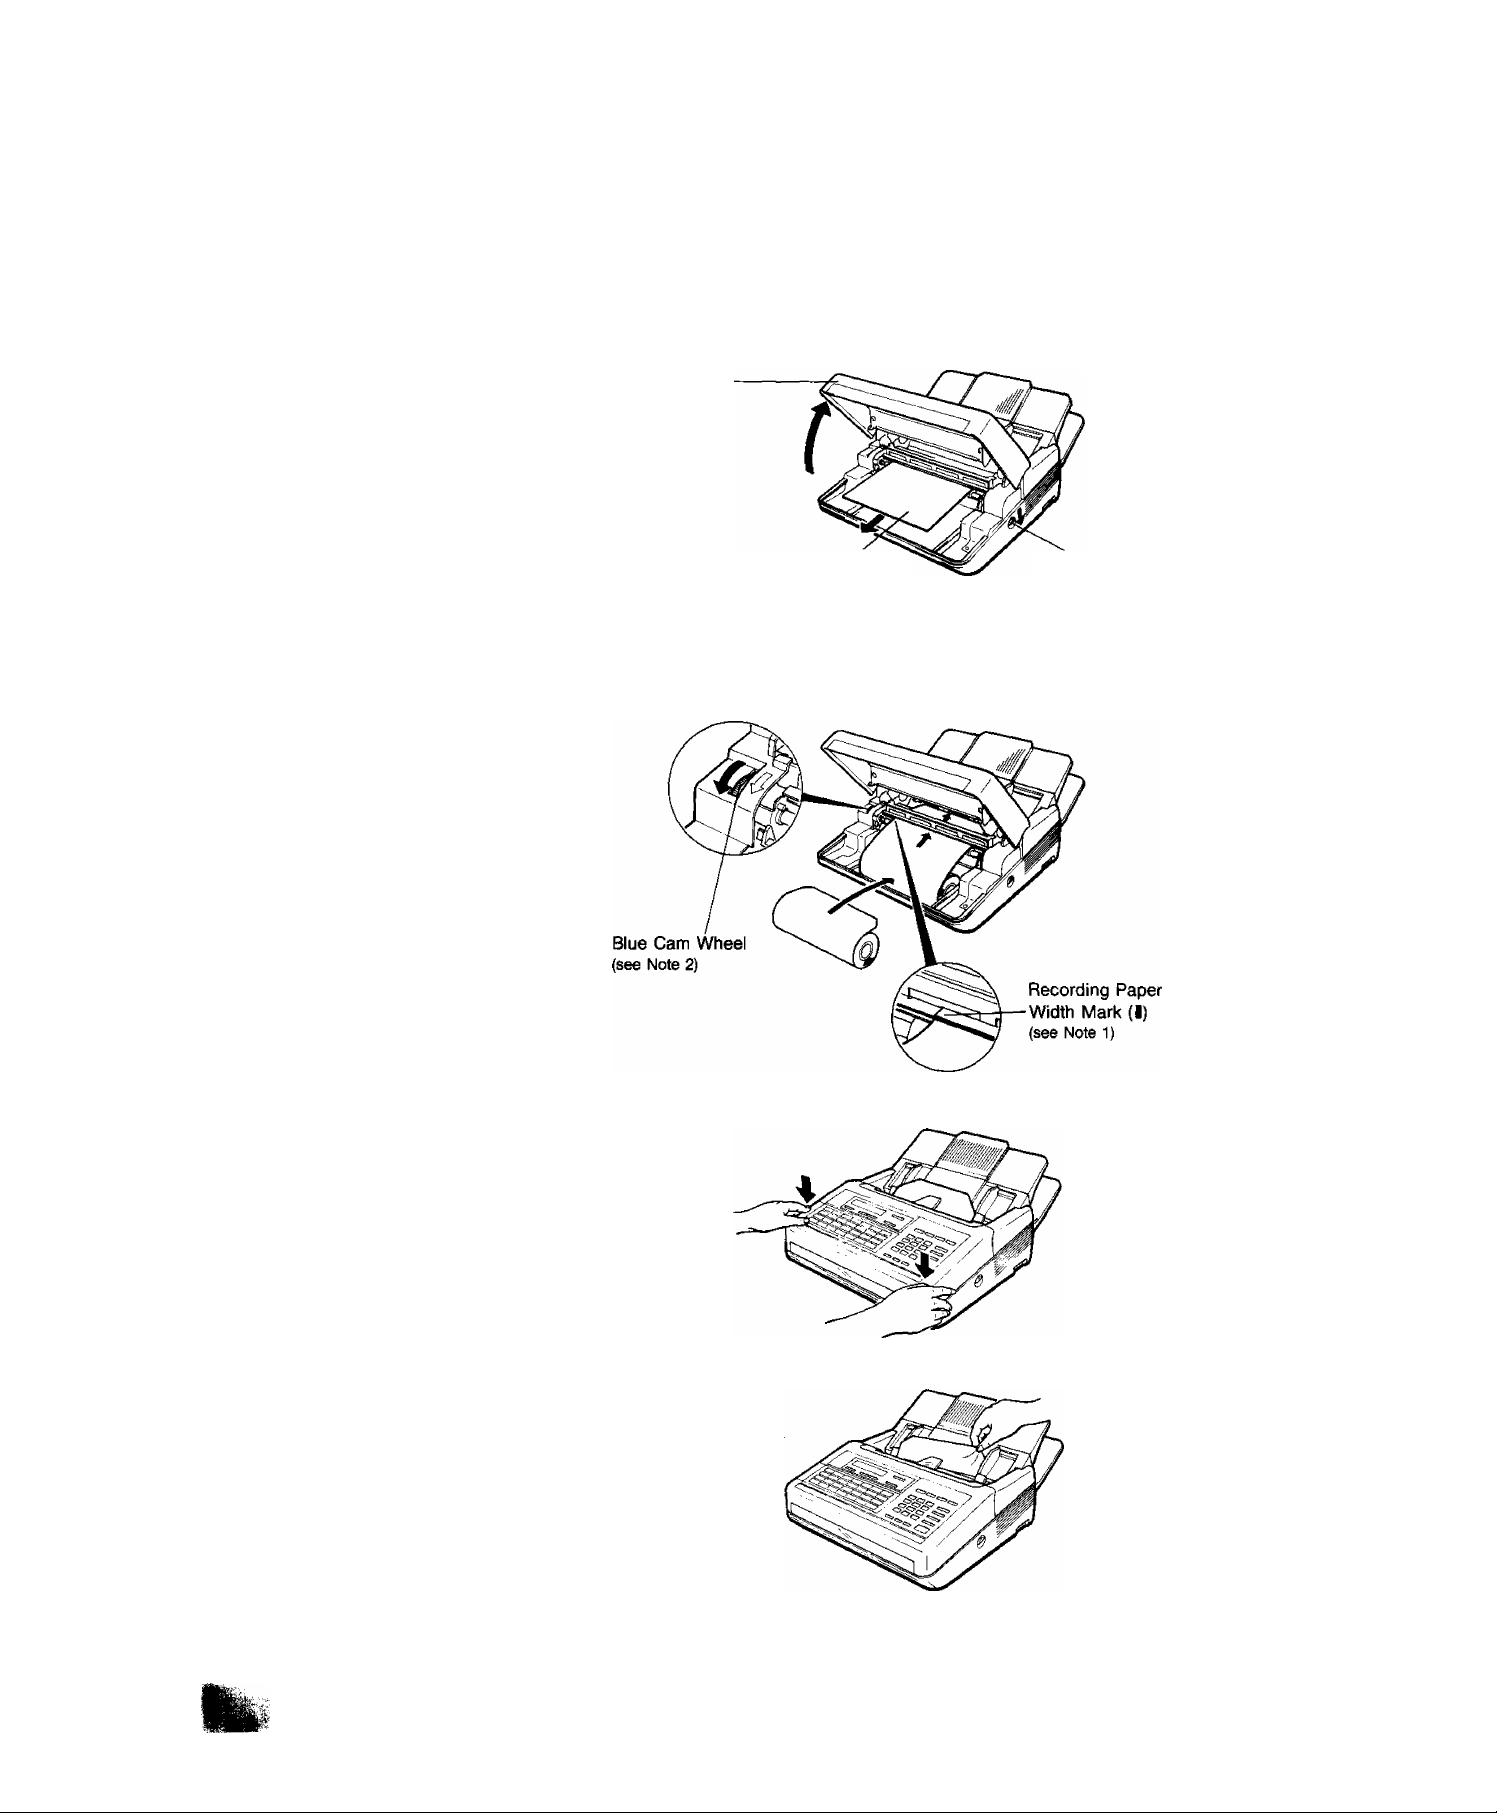
Installing/Replacing
Recording Paper
1. Press down on the latch button on the right side of the cover and open
the RCV Cover.
RCV Cover
Head Protective Sheet
.2, Set the recording paper into the unit and feed the leading edge of the
paper between the guide plates of the cutter unit until it projects out of
the unit Make sure that the recording paper is set correctly as shown
in the figure below. If it is set incorrectly, the machine will not
reproduce images.
3. Close the RCV Cover carefully by pressing both corners down until the
cover locks into position (you will hear a "click” sound).
Latch Button
NOTE
7.
The top guide piste has mark indi
cating the width of the recording
paper. When instaiiing the recording
paper, be sure to aiign the paper
with the mark (t).
2. if the recording paper cannot pass
between the guide pistes, turn the
Blue Cam Wheel until you hear a
“click" sound in the direction of
arrow.
4. Later, when you turn on the power, the recording paper projecting from
Page 15

2. INSTALLING AND SEHING UP YOUR MACHINE
Connecting the Telephone
Line and Power Supply Cord
1. Plug the telephone line cord.
2. Plug the Power Supply Cord {PSU Cord) into wall AC outlet.
3. Turn on the Power Switch.
NOTE
1. When you turn ON the AC power,
the ADF protective sheet will be
ejected out automatically.
WARNING (For New Zealand users)
When you operate this equipment the power socke’-outlet should be
near the equipment and be easily accessible.
Page 16

Setting the Dialling Method (Tone or Pulse)
Your machine can operate with either of two dialling methods (Tone or
Pulse), depending on the type of telephone line you are connected to.
If you need to change dialling method, follow the procedure below.
^ fUNCTiw jai
SET MODE (1 -5)
iy “
and
1:USER PARAMETERS
SET MODE (1-5)
4; FAX PARAMETERS
FAX PARAMETER (01-34)
01 RESOLUTION
FAX PARAMETER (01-34)
07 DIALLING METHOD
Enter new setting value.
T)
Ex; 1 for Pulse dialling
^7T
©STOP
for Pulse dialling.
for Tone dialling.
07 DIALING METHOD
2;TONE (1-2)
07 DIALING METHOD
1:PULSE (1-2)
FAX PARAMETER (01-34)
08 HEADER PRINT
15-AUG-1990 15:00
00%
To return to standby.
Page 17
2. INSTALUN6 AND SEHING UP YOUR MACHINE
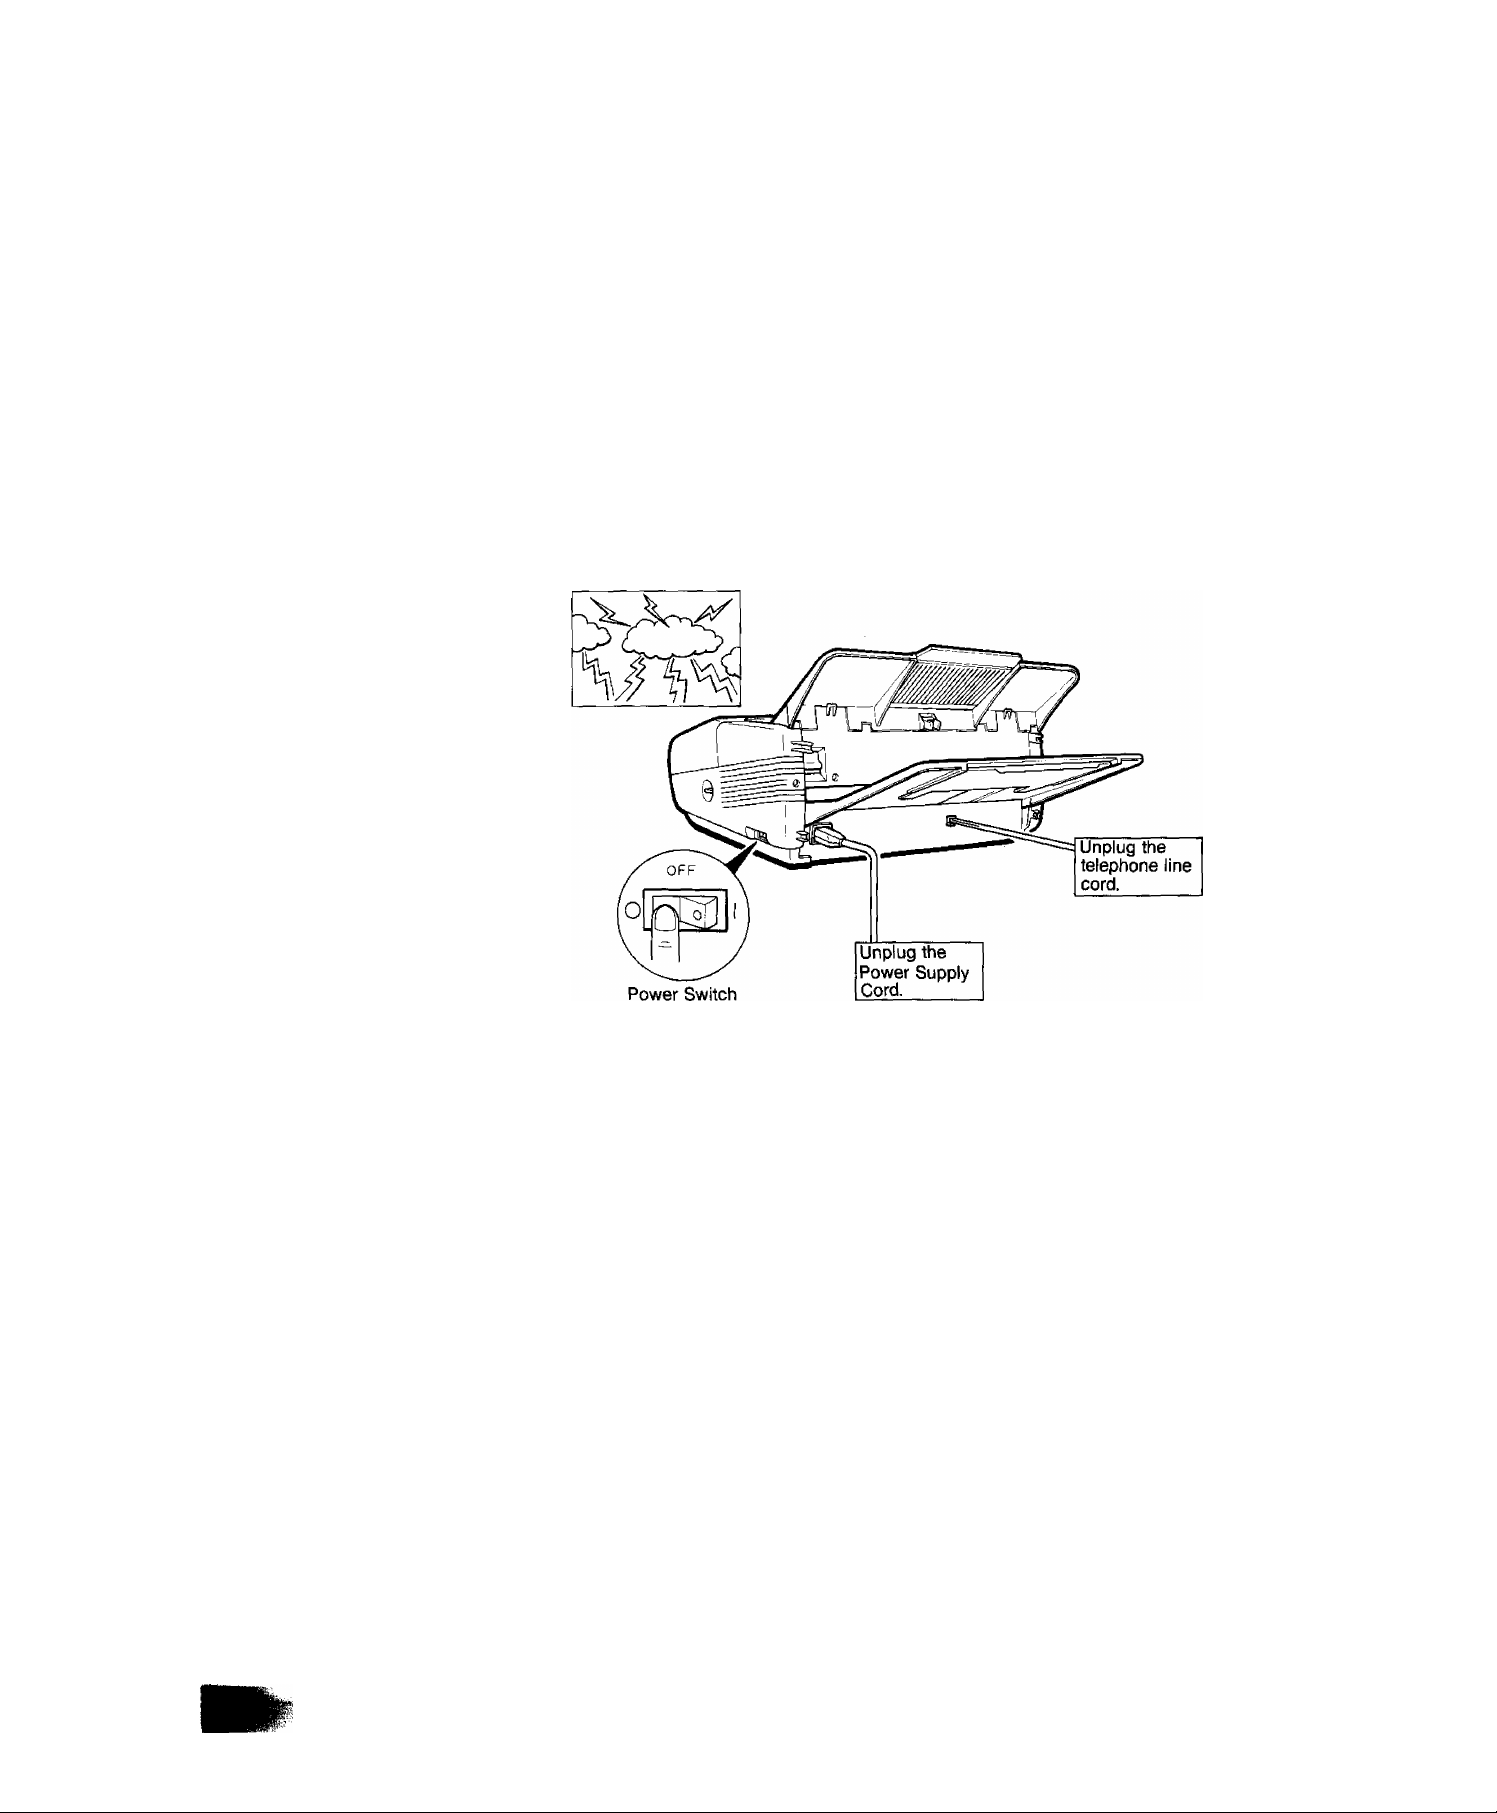
Lightning Precautions
To minimize the possibility of damage due to lightning, a surge protector
is built into your machine. Sometimes though this is not enough to protect
the machine completely when a strong lightning surge comes through the
telephone line or AC power line. To further protect the equipment, we
recommend that you:
If you know that a thunderstorm is coming:
• Turn off the power switch and unplug the power supply cord from
the AC outlet. {Note 1)
• Unplug the telephone line cord from the telephone jack.
NOTE
1. The battery can back up the docu
ment memory up to 3 days and
Telephone Number, ID, Logo
memory up to 10 days. As soon as
the thunderstorm is over, plug in the
AC cord and telephone line cord,
then turn on the power switch.
Page 18

Final Installation Test
After installing your machine, it is advisable to make a copy and also
send a fax to check if the machine is working properly.
• Copy Test
Place a document face down
fl / Document
Guides.
y\_
O START
Communication Test
Place a docurrwnt face down
on the ADF. Adjust Document
Guides.
and a full number
DOCUMENT SET
ENTER STATION(S)
* COPY *
NO. OF COPY=1
* COPY *
DOCUMENT SET
ENTER STATION(S)
* DIALLING *
5551234B
00%
EX: 55 5 1234
Page 19

2-2.
SETTING UP YOUR MACHINE
2. INSTALLING AND SEHING UP YOUR MACHINE
2-2-1.
CHARACTER KEY
UYOUT UNDER THE
STATION DIRECTORY
SHEET
The One-Touch keys on the control panel also serve as character and
symbol input keys when you record your LOGO and other station names.
This layout is printed on the panel under the Station Directory Sheet,
which can be pulled out as shown below.
NOTE
1. Whenever One-Touch keys are
changed to the character key mode
(to record your LOGO and other
station names), lower letters are
selected first Use the UPPER/
LOWER key to change to and from
capital letters and symbols.
Character Key Layout
Page 20

2"2”2.
USER PARAMETERS
How to Set the Date and Time
rfL n
7Tie display will show the date and time. Use the keypad to
enter the new day (two-digit), month (two-digit), year (fourdigit), and time (24-hour clock).
EX; 15-August 01, 1990 15:00
150819901500
If you make a mistake, use the < (ORIGINAL) and
> (RESOLimON) keys to move the cursor to the incorrea
number, and then enter the new number over it.
SET MODE (1-5)
1:USER PARAMETERS
DATE & TIME
01-01-1990 12:00
DATE & TIME
15-08-1990 15:00
To Store the date and time.
SET
Now you can go on and
set the LOGO, or return to
standty with STOP.
LOGO
15-AUG-1990 15:00
00%
Page 21

2. INSTALLING AND SEHING UP YOUR MACHINE
How to Set Your LOGO
The LOGO helps identify you to someone who receives your document.
To set your LOGO (25 characters max.), use the One-Touch/Character
keys (see page 2-10).
FUNCTION
and
repeatedly until display shows;
Enter each letter, number and/
or symtx)l in your LOGO using
the One-Touch/Character
Keys, and key pad. (Max. 25
characters).
Ex; PANAFAXHO
PANAFAX SPACE HQ
SET MODE (1-5)
1:USER PARAMETERS
LOGO
LOGO PANAF
AX Hoa
If you make a mistake, use the < (ORIGIIMAL) and
> (RESOLUTION) Keys to move the cursor to the incorrect
character, arxi then overwrite. Press SPACE to erase the
character on the cursor or press CLEAR to erase the character
before the cursor.
To store the LOGO,
SET
CHARACTER ID
7T
Now you can go on and set
the Character ID, or return to
standby with STOP.
15-AUG-1990 15:00
00%
Page 22

How to Set Your Character
ID
If the remote machine has Character ID, when sending or receiving, your
Character ID will appear on the remote machine’s display and the remote
machine’s Character ID will appear on the your display.
If the remote machine does not have Character ID, the machine will
display the ID Number Instead of Character ID.
mm
repeatedly until display shows;
Enter each letter, number and/
or Symbol in your character ID
ê
using the One-Touch/
Character Keys and key pad.
(A/lax. 16 characters)
EX: PANAFAX
PANAFAX
If you make a mistake, use the < (ORIGINAL) and
> (RESOLUTION) Keys to move the cursor to the incorrect
charaaer, and then overwrite. Press SPACE to erase the
character on the cursor or press CLEAR to erase the character
before the cursor.
To store the CHARACTER ID,
SET
SET MODE {1 -5)
1:USER PARAMETERS
CHARACTER ID
CHARACTER
PANAFAXl
ID NO.
ID
■
Now you can go on arxl set
the ID Number, or return to
standby with STOP.
15-AUG-1990
15:00
00%
Page 23

2. INSTALLING AND SEHING UP YOUR MACHINE
How to Set Your ID Number (NOTE)
<y “
^■fr
repeatedly until display shows;
Enter the ID digits. Use SPACE
to enter a space. (Max. 20
digits)
Ex; 2 I 2 SPACE I 1 I SPACE
1234
If you make a mistake, press CLEAR to erase the number then
reenter the correct number.
To store the ID Number,
SET
TT
SET MODE (1 -5}
1:USER PARAMETERS
ID NO.
ID NO.
______________________
DATE & TIME
212 111 1234
15-08-1990 15:00
Now you can go on and set
the Date and Time, or return
to standby with STOP.
15-AUG-1990 15:00
00%
NOTE
7, This function may be invalidated
depending on each reguiation or
specification of the country.
Page 24

2-2-3.
ONE-TOUCH/
ABBREVIATED
DIALLING NUMBERS
Entering One-Touch/
Abbreviated Dialling
Numbers
One-Touch Dialling and Abbreviated Dialling are two fast ways of dialling
full numbers. To use these dialling methods, you must first enter the full
numbers using the following procedure.
FUNCTION
and
SET MODE (1-5)
1;USER PARAMETERS
SET MODE (1-5)
2:ONE-TOUCH/ABBR.NOS
ONE-TOUCH/ABBR.
^77
NOTE
1.
If you require a special access
number to get an outside line, enter
it first and then press PAUSE. A
hyphen ” is displayed for pause.
2. Use SPACE to enter a space be
tween the numbers to make it eas
ier to read.
3. If you input a wrong number in Step
5. press CLEAR to erase the
number before the cursor, then re
enter the correct number and press
SET.
4. If you want to go back and change
anything, e.g., the telephone num
ber, press SET repeatedly to skip
through the preceding steps. You
do not need to reenter everything
again.
5. To print out a Qne-Touch/ABBR.
Dialling Number List, see page 4-40.
To assign a One-Touch
number, press a One-Touch
key.
Ex: 01
To assign an Abbreviated
number, press ABBR and
three-digit code on the keypad
to enter any code from 001 to
200.
EX: ABBR06 2
Enter facsimile telephone
number (up to 36 digits)
including pauses and spaces.
Ex: 9 PAUSE 5 5 5 SPACE 1
234
To store the number,
SET
TT
Enter receiving station's name
(up to 15 charaaers) using
One-Touch/Character k^
(see page 2-10).
Ex: PANASONIC
ONE-TOUCH<01>
■
ABBR[062]
■
0NE-TOUCH<01>
9-555 1234B
ONE-TOUCH<01> NAME
ONE-TOUCH<01> NAME
PANASONIC ■
TEL.
TEL.
TEL.
Page 25

2
. INSTALLING AND SEHING UP YOUR MACHINE
Filling Out the Station
Directory Sheet
To store the name,
SET
ONE-TOUCH/ABBR.
ТГ
Repeat Steps 4 to 8 to record
more numbers, or, to return to
ê
Slide the Station Directory Cap sideways with Station Directory Sheet. Use
a pencil or a ball-point pen to fill in the station directory with station
names corresponding to the One-Touch number keys.
standby press STOP.
15-AUG-1990 15:00
00%
NOTE
1. If you use a pen, be sure the ink is
dry. If you use a pencil, remove any
excess lead before replacing the
station directory.
Page 26

2-2-4.
FAX PARAMETERS
Setting FAX Parameters
Your facsimile machine has a variety of adjustable FAX parameters.
These parameters, listed in the Parameter Table, are normally preset for
you and do not need to be changed. If you do want to make changes,
read the table carefully. Some parameters, such as Resolution, Contrast,
and Verification Stamp parameters, can be temporarily changed by simple
key operations just before a transmission is made. When the transmission
ends, however, these parameters return to their preset values. Other
parameters can only be changed by the procedure described below.
/X wem
Enter a fax parameter number
from the Parameter Table (see
pages 2-18 and 2-19).
Ex: 03 for STAMP.
y\ SET
^TT
Enter the new setting value.
Ex: 2 for ON.
SET MODE (1 -5)
I '.USER PARAMETERS
SET MODE (1 -5)
4 FAX PARAMETERS
FAX PARAMETER (01 -34)
01 RESOLUTION
FAX PARAMETER (01-34)
03 STAMP
03 STAMP
1:OFF
03 STAMP
2: ON
(1-2)
(1-2)
NOTE
1. To print out a Fax Parameter List,
see page 4-42.
^TT
You can now return to Step 4
to enter another parameter
number, or, return to standby
ty pressing STOP.
FAX PARAMETER (01-34)
04 HALF TONE
15-AUG-1990 15:00
00%
Page 27

2. INSTALLING AND SEHING UP YOUR MACHINE
Fax Parameter Table
No. Parameter
RESOLUTION
01
02
03
04
05
06
(Home)
ORIGINAL
(Home)
STAMP
(Home)
HALFTONE
(Home)
ECM
(Home)
COMMJOURNAL
(Home)
07 DIALLING METHOD
HEADER PRINT
08
HEADER FORMAT
09
TOTAL PAGES
10
11
12
PRINT
MEMORY STORED
STAMP
ONE-STN XMT
13 AUTO RECEIVE
14 RING COUNTER
SUBSTITUTE RCV
15
PAPER END MARK
16
17 RCV'D TIME PRINT
Setting
Number
*1
2 Fine
Setting
Standard
Setting home position of the Resolution
mode.
Comments
3 S. Fine
*1 Normal
2 Dark
Setting home position of the Original
mode.
3 Light
*2
*1
*2
1
2
1
1
*3
Off
On
Off
On
Off
On
Off Selecting home position of printout mode
2
On
Inc
Setting home position of the Stamp func
tion On/Off.
Setting home position of the Haiftone On/
Off.
Setting home position of the ECM trans
mission function On/Off.
for COMM.Journal.
Off: No printout
On: Always printout
Inc ; Printout when communication is failed.
*1 Pulse Selecting Dialling Mode.
2 Tone
1
*2
None
Inside
3 Outside
*1 FROM TO
2
LOGO, ID NO.
1
*2
3
None Selecting printed location of the Total Pages
Inside
Outside
*1 Invalid
2
1
Valid
ADF
*2 Memory
1 Invalid Selecting whether or not the machine
*2
Valid
*1
-
9
1 Invalid Selecting whether or not the machine
*2
Valid
*1 Invalid
2
Valid
*1 Invalid
2
Valid
Selecting printed location of the header.
None: No print
Inside: Inside copy area.
Outside: Outside copy area.
Selecting Header Format.
of the bottom of the last page.
None; No print
Inside: Inside copy area.
Outside: Outside copy area.
Selecting whether or not the machine
stamps the original documents when stor
ing the documents into memory.
Selecting ADF TX or Memory TX when
sending to one station.
receives automatically
1
~
Setting the Ring Detect Counter.
9
receives to memory when the recording
paper runs out
Selecting whether or not the machine
ing paper.
Selecting whether or not the machine
on the bottom of the each received page.
of locoird'
Page 28

Fax Parameter Table
No.
18
19
20
21
22
23
Parameter
RCV TO MEMORY
AUTO JOURNAL
PRINT
CHARACTER ID
KEY/BUZZER
TONE
POLUNG PASSWORD
POLLED FILE
SAVE
24 INC. FILE SAVE
25
26
27
28
29
30
ONE-TOUCH
GROUP KEY
RELAY XMT
REQUEST
CONFIDENTIAL
COMM.
CONF, POLLED
FILE SAVE
XMT-PASSWORD
CHECK XMT-PW
ATTX
31 RCV-PASSWORD
CHECK RCV-PW
32
33
34
ATRX
FAX ACCESS CODE
DEPARTMENT CODES
Setting
Numb«’
*1
*2 Valid
*2
2
3
1
1
1
Setting
Invalid
Man. Print
Auto Print
Invalid
Invalid
Valid
Off
Comments
Selecting whether or not the machine
always receives to memory.
Invalid; Receive to printer.
Man. print: Receive to memory. Prints out
Auto print: Initialy receives to memory
Selecting whether or not the machine
prints the journal automatically after every
120 transactions.
Selecting whether or not the machine
sends the Character ID to remote station.
Selecting volume of the Key/Buzzer Tone,
when copy key is pressed.
then prints out automatically.
*2 Soft
3 Loud
—
—
*1 Invalid
2
Valid
*1 Invalid
2
Valid
*1 Invalid
2 Valid
*1 Invalid
2
*1
2
Valid
Invalid
Valid
*1 Invalid Selecting whether or not the machine can
2
—
*1
2
— —
*1
2
— —
Valid
—
Off Selecting whether or not the machine
On
Off
On
*1 Invalid
2
Valid
Common Polling Password
Selecting whether or not the machine can
be polled for the same files repeatedly.
Selecting whether or not the machine
saves the incomplete communication
memory files.
Selecting whether or not the one-touch
keys are used for Group Keys.
Selecting whether or not the machine per-
forms Relay XMT Request.
Selecting whether or not the machine performs Confidential Communication.
be polled for the same conf. files
repeatedly.
XMT-Password
checks the XMT-Password of receiving
station when transmitting.
RCV-Password
Selecting whether or not the machine
checks the RCV-Password of transmitting
station at receiving.
Fax Access Code
Selecting whether or not the machine can
enter the Department Codes.
NOTE
1. Depending on the PBX conditions
at the moment the fax machine is
called, the number of rings can
differ from the setting number.
2. mark indicates that the factory
setting.
3. Standard settings are printed on the
Fax Parameter List. To print out Fax
Parameter List, see page 4-45.
Page 29
2. INSTALLING AND SEHING UP YOUR MACHINE
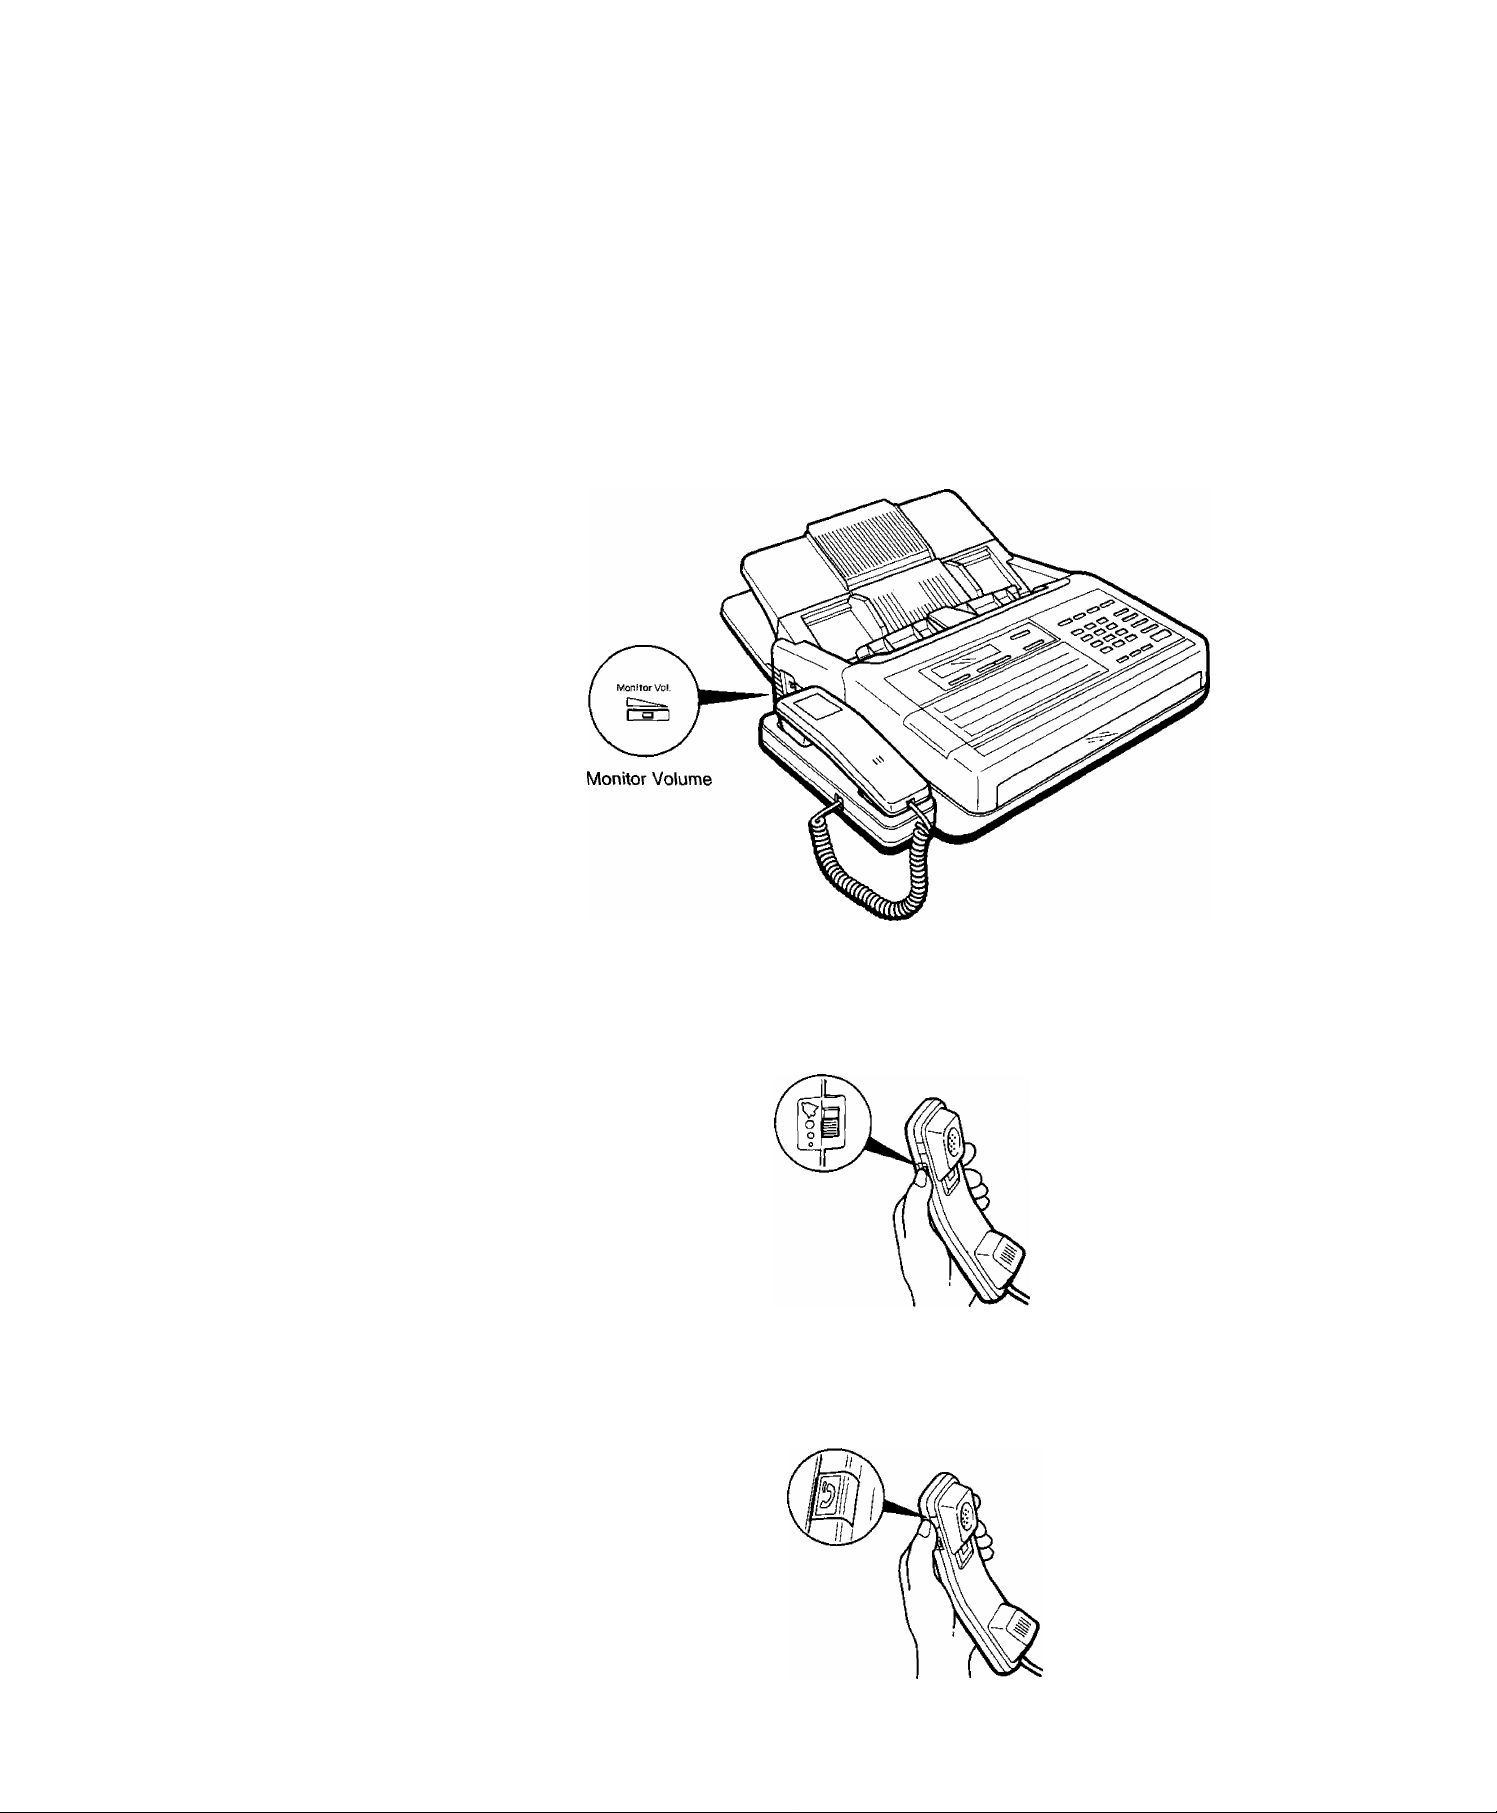
2-2-5.
ADJUSTING MONITOR
VOLUME
When the fax machine is making a call, you hear the dial tone, the dialling
signals, and the ringing or busy signal through the built-in speaker. Slide
the MONITOR VOLUME control on the left side of the machine to adjust
the volume to a comfortable level.
2-2-6.
ADJUSTING RINGER
VOLUME
(NOTE)
2-2-7.
USING MUTE
(NOTE)
You can adjust the RINGER VOLUME so the fax machine rings at a
comfortable level when it receives a call. Move the ringer control on the
handset to the level desired, either normal or reduced.
Ringer Volume
When you are using the fax machine’s built-in telephone, you can
tempoarily turn off the microphone in the handset. Press on the
handset. As long as you hold down this button, your caller cannot hear
you.
Mute Button
NOTE
1. The handset may not be attached
depending on each regulation or
specification of the country.
Page 30

Page 31

3.
BASIC
OPERATION
TRANSMITTING DOCUMENTS
RECEIVING DOCUMENTS
MAKING COPIES
USING YOUR TELEPHONE
Page 32

3-1.
TRANSMITTING
DOCUMENTS
3-1-1.
LOADING DOCUMENTS
Documents You Can Send
In general, your machine will send any document printed on A4-size
paper or paper up to A3 size.
Maximum Size
Documents You Cannot Send you must never try to send documents that are;
Wet
Covered with wet ink or paste
Wrinkled, curled or folded
Too thin (e.g. onionskin, airmail paper, pages from some magazines,
etc.)
Too thick (e.g. card, etc.)
Chemically processed (e.g. pressure-sensitive paper, carbon-coated
paper, etc.)
Coated (e.g. glossy paper, etc.)
Smaller than 148 mm (W) x 128 mm (L)
Made of cloth or metal
To transmit these kinds of documents, make a photocopy first and then
transmit the copy.
Minimum Size
‘ 148 mm
128 mm
Direction
How to Use the Carrier Sheet
NOTE
7.
Document thickness
Single sheet :
0.06 mm to 0.15 mm
Multiple sheet:
0.08 mm to 0.13 mm
Transmitting documents longer than
2.
420 mm requires user’s assistance.
If you send documents wrinkled, curled, folded, too thin, or smaller than
148 mm (W) x 128 mm (L), you can send them using the Carrier Sheet
Put them in the Carrier Sheet and then place the carrier in the ADF with
the sealed edge first
Page 33

3. BASIC OPERATION
Loading Documents
1. Be sure the document(s) is free of staples, paper clips, and is not torn,
greased or covered by any foreign objects.
2. Place the document(s) lace down on the Automatic Document Feeder
(ADF) with the top edge going into the machine until it stops.
If you are sending multiple pages, you can stack up to 30 pages on the
ADF at one time. If you have more than 30 pages, you can place them
on top of the last page on the ADF once transmission has started, as
long as you do not have more than 30 pages on the ADF at any one
time.
3. Adjust the document guides to ensure the document is centered on the
ADF.
Face down
When you set a document on the ADF the display message will change
to DOCUMENT SET, ENTER STATION(S) and display the percentage of
memory used. You can now make basic transmission settings, or begin
the dialling procedure.
DOCUMENT SET
ENTER STATION(S)
00%
Page 34

3-1-2.
BASIC TRANSMISSION
SEHINGS
You can temporarily change seven basic settings (Resolution, Contrast,
Halftone, Verification Stamp, Communication Journal, Error Correction
Mode and Total pages) before any ordinary transmission. These settings
can be altered before or after you place documents on the ADF. After you
finish transmission, your machine will automatically return to the preset
settings.
Original (Contrast)
Your machine is preset to NORMAL contrast. If you have to send a
document with dark contrast, you may get better results by changing the
setting to DARK. If you have to send a document with light contrast, it
may be wise to change the setting to LIGHT.
DARK
UK3HT
ORIGINAL = DARK contrast.
If satisfied, go to step 3.
DARK
LIGHT
ORIGINAL = LIGHT contrast.
You can now dial by pressing TEl/DIAL and a full
number, a One-Touch key, ABBR arxJ three-digit
code or REDIAL.
NOTE
1. After changing each setting, you
can make a copy of the document
to test the new setting by pressing
COPY twice.
2. To change the presef position, see
page 2-17.
Page 35

3. BASIC OPERATION
Resolution
Your machine is preset to Standard resolution, which is suitable for
ordinary documents. Use FINE or Super-FINE for very detailed docu
ments.
FINE
SUPER-FINE
RESCH.UTION = FINE resolution.
If satisfied, go to Step 3.
FINE
SUPER-FINE
RESOLUTION
You can now dial by pressing TEl/DIAL and a full
number, a One-Touch key, ABBR and three-digit
code or REDIAL..
= SUPER-FINE resolution.
Halftone
Verification Stamp
NOTE
1. If you transmit the documents from
memory (Memory Transmission), the
verification stamp will not stamp.
If you wish the stamp to operate
when using memory transmission,
change the Fax parameter setting
(No. 11). See page 2-17.
The Halftone setting is useful when sending photographs or illustrations
with gray tones.
-'">iALF TONE
The LED is lit when HALF TONE is ON.
T
You can now dial by pressing TEVDIAL and a full number, a
One-Touch key, ABBR and three-digit code or REDIAL
The verification stamp helps you to confirm successful transmissions by
stamping the bottom of each successfully transmitted page with a small
0 mark, (see Note)
'STAMP
The LED is lit when STAMP is ON.
T
You can now dial by pressing TEl/DIAL arxJ a full number, a
One^Touch key, ABBR and three-digit code or REDIAL
Page 36

Communication Journal
(COMM. JOURNAL)
The Communication Journal (COMM. JOURNAL) lets you verify if
communication was successful or not. You can select printout condition
(OFF, ON or INC) before dialling or storing into memory. When you set
COMM. JOURNAL = ON, a Communication Journal is printed out
automatically after every communication.
When you set COMM. JOURNAL = INC, a Communication Journal is
printed out only if the communication has failed, and it is printed out with
first page of document if you transmitted from memory. However, when
you set COMM. JOURNAL = OFF, a Communication Journal is not printed
out at all.
To set COMM. JOURNAL = OFF, ON or INC.
FUNCTKDN
Enter I, 2 or 3.
fs/ Ex. 2 for ON.
and
SELECT MODE
1 iCOMM.JOURNAL
COMM.JOURNAL = INC
1 :OFF 2;ON 3;INC
COMM.JOURNAL = ON
l:OFF 2;ON 3:INC
DOCUMENT SET
ENTER STATION(S) 00%
(1 -4)
NOTE
1. To change the preset position, see
page 2-17.
Page 37

3. BASIC OPERATION
Error Correction Mode (ECM)
ECM mode provides error free copy when your fax machine is connected
with a receiving fax machine which has the ECM mode capability and
your ECM mode is set to ON. The transmission time required in the ECM
mode is the same as the normal G3 mode in most cases.
Your machine is preset to ECM = ON. If the telephone line is poor, then
the transmission wilt take longer because the machine will have to
retransmit the lines that have errors. In the case where the transmission
time is more important than the quality of the received copy, you may set
your fax machine to ECM = OFF. This will inhibit the ECM mode for the
transmission regardless of the capability of the receiving machine. To set
ECM = OFF,
FUIMCTIOIM
and
SELECT MODE
1 :COMM.JOURNAL
SELECT MODE
2:ECM
ECM = ON
1=OFF 2=ON
(1 -4}
(1-4)
^■fr
ECM = OFF
1=OFF 2 = ON
DOCUMENT SET
ENTER STATION(S) 00%
Page 38

Total Pages
The total pages setting helps you to check document misfeeding. When
total pages is set, the machine will check it the number of pages sent or
stored is same as total pages setting or not. If it is not, the machine will
display “PAGE NUMBER MISMATCH’’ to indicate that document
misfeeding occurred.
FUNCTION H
y\ Enter page number.
J47 Ex: 10
SELECT MODE
1 rCOMM.JOURNAL
SELECT MODE (1 -4)
3;TOTAL PAGES
SET TOTAL PAGES
TOTAL PAGES=*
SET TOTAL PAGES
TOTAL PAGES=10B
DOCUMENT SET
ENTER STATION(S) 00%
(1-4)
Transmit the documents (see
1^7 page 3-8).
If the page mismatch.
Store the documents into
mJ memofy (see page 3-10).
y\ If the page total does rx>t
i7b/ nriatch, the file will be erased
<1 / automatically.
ON LINE * XMT *
ID; (Identification)
PAGE NUMBER MISMATCH
INFO. CODE=038
* STORE * NO. 010
PAGES=001/010 05%
PAGE NUMBER MISMATCH
INFO. CODE=038
FILE DELETED
INFO. CODE=640
Page 39

3-1-3.
TRANSMISSION
3. BASIC OPERATION
Ofi-Hook Dialing
Place tine document face down
on the ADF. Adjust Document
Guides.
Lift the handset,
or
Lift the External Telephone.
Dial the telephone number.
DOCUMENT SET
ENTER STATION(S)
Document Guide
» PHONE OFF HOOK *
TELEPHONE OFF HOOK
00%
NOTE
1. The handset may not be attached
depending on each regulation or
specification of the country.
When you hear a beep sound,
^START
then hang up the handset.
If the remote station has an
ID, it will appear on the
display.
When transmission is
completed, the display will
show the number of pages
sent.
If the line is bu;y, hang up the handset. Then try
again several minutes later by pressing REDIAL.
ON LINE * XMT *
ID: (Identification)
COMPLETED
TOTAL PAGE(S) = 005
Page 40

On-Hook Dialing
Place the document face down
on the ADF. Adjust Document
Guides.
DOCUMENT SET
ENTER STATION(S|
Document Guide
00%
TEL/DIAL
SPACE
You will hear dial tone from monitor speaker.
Dial the telephone number
from the keypad.
ê
Ex: S 551 234
Your machine will dial the
number. If the line is free, your
documents will be transmitted.
If the remote station has an ID,
it will appear on the display.
When transmission is
completed, the display will
show the number of pages
sent.
If the line is busy, your
machine will redial the number
for you up to twice with three
minute intervals.
DIALLING *
* DIALLING *
55512341
ON LINE * XMT
ID; (Identification)
COMPLETED
TOTAL PAGE(S) = 005
WAITING TO DIAL
5551234
If no contaa is made, the
display will show an
information code 630, that
means the line was busy or did
not answer.
INCOMPLETE
INFO. CODE=630
Page 41

3. BASIC OPERATION
3-1-4.
MEMORY
TRANSMISSION
The memory function allows you to easily perform many different tasks.
You can store your documents into memory to reserve a transmission
almost any time even when the machine is receiving or transmitting from
memory, and then have the machine transmit the stored documents
automatically after the completion of the current operation. You do not
have to wait around until transmission or reception is finished.
The advantages of memory transmission are:
1. The same document can also be transmitted to multiple stations.
2. If communications fail when transmitting from memory, your machine
will re-transmit the remaining unsuccessful page{s) automatically.
3. In addition to transmitting from memory, you can also reserve another
transmission into the memory.
NOTE
1. When you place the document on the ADF, if the machine is receiving or transmitting
from memory, the display will change to “DOCUMENT SET, ENTER STATION(S)" and
display the percentage of memory used. You are ready to now reserve the
transmission.
2. When you enter the stations, the total number of stations is shown at the upper right
corner of the display.
3. The Fite Number of the document being stored is shown at the upper right corner of
the display while storing takes place. It is also printed on the COMM. JOURNAL
(Communication Journal) and the File List. The percentage of memory used is shown
on the lower right corner of the display after each page is stored.
4. If a memory overflow condition occurs while storing documents into memory, the
machine wHI ask on the display, whether to start transmitting those pages which are
successfully stored or cancel, if you wish to cancel this transmission, press 1. If you
wish to transmit, press 2.
5. An information code and an error message will be displayed if the transmission has
failed or no answer at the receiving side after the last automatic redial. The document
stored for this transmission will be erased from the memory automatically and the
Communication Journal (COMM. JOURNAL) will be printed out stating the
transmission is INC” (incomplete), see page 3-5.
If you wish to save the incomplete communication memory files, change the Fax
parameter setting (No. 24), see page 2-77.
n
DOCUMENT SET
ENTER STATION(S)
ONE-TOUCH
<01> (Station
* STORE ^
060 PAGES COMPLETED
DELETE ? 1;YES 2:NO
00%
STNS=001
Name)
N0.015
PAGES=002 05%
MEMORY OVERFLOW
INFO. CODE=870
INCOMPLETE
INFO. CODE=633
6. Even if a power failure occurs, your machine will retain the documenf information
stored in the memory up to 72 hours.
Page 42

Direct Dialling
Place the document face down
on the ADF. Adjust Document
Guides.
DOCUMENT SET
ENTER STATION(S) 00%
Dial the telephone number by
using the keypad.
Ex: 5 5 5 1 2 3 4 (See Note)
To store the documents into
memory.
START
Your machine will dial the
number. If the line is free, your
document will be transmitted.
If the remote station has an
ID, it will appear on the
display.
When transmission is
completed, the display will
show the number of pages
sent.
TEL.
NO.
1234M
555
* STORE *
PAGES=001 05%
^ STORE * COMPLETED
TOTAL PAGES=005 10%
* DIALLING
5551234«
ON LINE * MEM.XMT
ID: (Identification)
COMPLETED
TOTAL PAGE(S) = 005
STN=000
N0.001
NOTE
7. If you require a special acess
number to get an outside line, dial it
first and then press PAUSE fo enter
a pause (represented by a
before dialing the full number.
Example: 9 PAUSE 5 5 5 1 2 3 4
If the line is busy, your
machine will redial the number
for you up to twice with three
minutes intervals,
If no contact is made, the
display will show an
information code.
WAITING TO DIAL
5551234
INCOMPLETE
INFO. CODE=630
Page 43

3. BASIC OPERATION
One-Touch Dialling
Place the document face down
on the ADF. Adjust Document
Guides.
Press a One-Touch k^.
Ex; 01
DOCUMENT SET
ENTER STATION(S) 00%
ONE-TOUCH
<01> (Station name)
STNS=001
ê
<î> START
Your machine will store the
document into memory.
The display will show the
One-Touch No. and station
name. The full number (e.g.
555 1234) will then be dialed
and shown on the display.
Your machine will dial the number. If the line is free, your
document will be transmitted.
* STORE ^
PAGES=001 05%
* STORE * COMPLETED
TOTAL PAGES=005 10%
* DIALLING *
<01> (Station name)
* DIALLING *
55512341
N0.001
If the remote station has an
ID, it will appear on the
display.
When the transmission is
completed, the display shows
the number of pages sent.
If the line is busy, your
machine will redial the number
for you up to twice with three
minutes intervals.
If no contaa is made, the
display will show an
information code.
ON LINE * MEM.XMT *
ID: (Identification)
COMPLETED
TOTAL PAGE(S) = 005
WAITING TO DIAL
5551234
INCOMPLETE
INFO. C0DE=630
Page 44

Abbreviated Dialling
Place the document face down
on the ADF. Adjust Document
Guides.
DOCUMENT SET
ENTER STATION(S) 00%
Press ABBR and three-digit
code.
ê
Ex: 001
<î> START
ABBR.
[001] (Station name)
STORE *
PAGES=001
STNS=001
N0.001
05%
ê
* STORE * COMPLETED
Your machine will store the
document into memory.
The display will show the
ABBR. No. and station name.
The full number (e.g. 555 1234)
will then be dialed and shown
on the displ^.
Your machine will dial the number. If the line is free, your
document will be transmitted.
If the remote station has an
ID, it will appear on the
display.
TOTAL PAGES=005 10%
* DIALLING *
[001] (Station name)
* DIALLING *
5551234«
ON LINE * MEM.XMT
ID: (Identification)
When transmission is
completed, the displ^ shows
the number of pages sent.
If the line is busy, your
machine will redial the number
for you up to twice with three
minutes intervals.
If no contaa is made, the
display will show an
information code.
COMPLETED
TOTAL PAGE(S) = 005
WAITING TO DIAL
[001 ] (Station name)
INCOMPLETE
INFO. CODE=630
Page 45

3. BASIC OPERATION
Directory Search Dialling
This function iets you search, using the LCD display for a station
registered in One-Touch/ABBR. Diai Numbers, and transmit without
having to look up the number on the number list
Place the document face down
on the ADR Adjust Document
Guides.
SEARCHDIRECTORY SEARC
DOCUMENT SET
ENTER STATION(S) 00%
ENTER LETTER(S)
y TT
Enter an initial letter of remote
station name from one-touch
character keys.
Ex: RAIMA
ENTER LETTER(S)
PANAI
DIRECTORY SEARCH
[005] PANAFAX
DIRECTORY SEARCH
[009] PANASONIC
repeatedly until display shows
station name you want to send.
Ex: PANASONIC
<i> START
The machine will store the
documents into memory and
then dial the number.
* STORE *
PAGES=001
* STORE » COMPLETED
TOTAL PAGES=005 10%
* DIALLING *
[009] PANASONIC
N0.001
05%
Page 46

Multi-Station Transmission
You can transmit a document to more than one station at one operation.
This save you the trouble of transmitting the same document to each
station one after another.
Place the document face down
11 / ^just Document
Guides.
Dial by any combination of
these:
• One-Touch Dialling
• Abbreviated Dialling
• Direaory Search Dialling and
SET
• Direct Dialling and SET
Ex:
One-Touch 15
ABBR 0 1 0
Directoiy Search A T
DOCUMENT SET
ENTER STATION(S) 00%
ONE-TOUCH
<1 5> (Station
ABBR.
[010] (Station
DIRECTORY SEARCH
[155] (Station name)
STNS=001
name)
STNS=002
name)
NOTE
1 You can enter up to 50 Direct
Dialings by pressing teiephone
number and SET.
2. To review the entered stations,
Press AT before pressing START.
If you find an error, Press CLEAR to
erase the displayed station.
SET
7T
5551234
SET
~
^ ^START
The machine will store the
documents into memory and
then dial then dial the number.
ABBR.
[155] (Station name)
TEL.NO.
5551234I
TEL.NO.
5551234
* STORE *
PAGES=001
* STORE * COMPLETED
TOTAL PAGES=005 15%
* DIALLING *
[010] (Station name)
STNS=003
STNS=003
STNS=004
N0.001
01%
Page 47

3-2.
RECEIVING
DOCUMENTS
3. BASIC OPERATION
3-2-1.
AUTOMATIC
RECEPTION
3-2-2.
MANUAL RECEPTION
How to set Manual Reception
When your facsimile machine is preset to receive documents automati
cally, do not answer the telephone when it rings. The machine will soon
begin receiving.
If there is only one telephone line in your office and you wish to use the
telephone line for both Fax and Voice, you may set the machine to
Manual Reception.
FUNCTION
SET MODE (1-5)
1 :USER PARAMETERS
SET MODE (1 -5)
4:FAX PARAMETERS
FAX PARAMETER (01-34)
01 RESOLUTION
T)
^TT
©STOP
“IT
To return to standby.
FAX PARAMETER (01-34)
13 AUTO RECEIVE
"
13 AUTO RECEIVE
2-.VALID (1-2)
13 AUTO RECEIVE
1 iINVALID (1 -2)
FAX PARAMETER (01-34)
14 RING COUNTER
01 -AUG-1990 15:00
MANUAL RCV 00%
Page 48

What to do When Your Telephone rings
If your machine is set for manual reception and the telephone rings,
Lift the Handset or External Telephone.
If you hear a beep.,. beep... beep sound, it rrteans soineone wants
to send a fax. Or, if the caller answers and says he/she wants to
send a fax, then...
3-2-3.
SUBSTITUTE
RECEPTION (MEMORY
RECEPTION)
Remove the document from
the ADF, if any.
<|> START
Your machine will start receiving a document.
Hang up the Handset or
External Telephone.
If the other station has an ID,
it will appear on the display.
If the recording paper runs out in the middle of a page during reception,
the machine wiil stop recording and automatically start receiving into its
image data memory. Stored documents are automatically printed out from
the part that resulted in an incomplete recording when the new recording
paper is installed.
When the machine finishes the
memoiy reception and there is
no recording paper, an
information code appears on
the display.
ON LINE » RCV *
ON LINE * RCV *
ID: (Identification)
NO RECORDING PAPER
INFO. CODE=010
NOTE
1. You can replace the recording
paper while the machine Is storing
a document into the memory.
2. If the memory overflows, the
machine will stop receiving and
release the communication line. The
document(s) stored in the memory
up to that moment will be printed
out automatically.
3. If a power failure occurs, the docu
ment information stored in memory
will remain up to 72 hours, if battery
is fully charged.
4. If you wish to turn off the substitute
reception function, see Fax Para
meter.
Open the Receiving Unit and
replace the recording paper.
RCV COVER OPEN
INFO. CODE = 060
ê
Close the Receiving Unit.
The machine will automatically
start printing out the
document stored in the
memoiy, which will be erased
when printing is completed.
The machine will return to
standby.
* PRINTING *
PAGE=001/005
01-AUG-1990 15:00
00%
Page 49

3-3.
MAKING
COPIES
3. BASIC OPERATION
Single Copies
Multiple Copies
Before you send a document, you can make a copy of it to see what it
will probably look like to the person who receives it.
Place the document face down f~ .
\\7 on the ADF. Adjust Document
Guides.
COPY
COPY
<i> START
The machine begins making a
copy.
If you wish to make two or more copies of a document, use the following
procedure.
Place the document face down
on the ADF. Adjust Document
Guides.
DOCUMENT SET
ENTER STATION(S) 00%
* COPY ^
NO. OF COPY=1
COPY »
DOCUMENT SET
ENTER STATION(S) 00%
NOTE
1. To stop the copy process, press
STOP.
2. To make copies of more than 30
pages, add additional pages while
at least one page still remains on
the ADF.
3. When making a copy, your machine
will automatically select Fine Reso
lution, unless you change the
setting.
Enter the number of copies.
Ex: 10
y\
<l> START
The machine begins storing
the document, then prints out
copies.
* COPY *
NO. OF C0PY=1
* COPY *
NO. OF C0PY=10
* STORE *
PAGES=001
* STORE * COMPLETED
TOTAL PAGES=005 15%
* COPY 01/10
PAGE = 005/005
COPY * 10/10
PAGE = 005/005
N0.005
01%
Page 50

3-4.
USING YOUR
TELEPHONE
Making a Regular Call (NOTE)
For Making Voice Contact
after Sending/Receiving
You can use the handset on your machine to make regular calls. To do
so, lift the handset and dial the number just as you would using an
ordinary telephone. If you wish, you can also use the One-Touch/ABBR.
keys.
Lift the handset.
Dial by pressing a One-Touch
key, ABBR and three-digit
code or TEiyOIAL and a full
♦ PHONE OFF HOOK *
ONE-TOUCH
<01> (Station name)
number.
Ex: One-Touch k^ 01
You may want to talk to the other person over the telephone after sending
or receiving documents. To do so. perform the following procedure while
the machine is still sending or receiving.
When sending
ON LINE * XMT *
ID:
* DIALLING
55512341
When receiving
ON LINE
ID;
RCV
TEL/DIAL
SPACE
ON LINE * XMT *
ID;
TEL
ON LINE RCV *
ID:
\X/hen sending/receiving is over, you wi) hear a beep-beep-beep
sound coming through the monitor speaker.
ON LINE * XMT *
OPERATOR CALLING
Lift the handset or
TEL/DIAL
ON LINE * RCV *
OPERATOR CALLING
externa) telephone Bsa
and
SPACE
Talk.
TEL
NOTE
1. The handset may not be attached
depending on each regulation or
specification of the country.
Page 51

POLLING
TIMER CONTROLLED
COMMUNICATIONS
PROGRAMMED COMMUNICATIONS
INTERRUPT KEY OPERATION
MEMORY MANAGEMENT
GROUP DIALING USING ONEjQUCH KEYS
PRINTOUT REPORTS AND USTS
Page 52

4-1.
POLLING
Polling means calling other station(s) to retrieve a document The other
station must know in advance that you will call and must have a
document stored in memory. You also need to set a polling password for
every polled files, shared by the other station, to ensure security.
How to Set a Common Polling Password
^ function
I'y ^
7
^
SET MODE (1 -5)
1:USER PARAMETERS
SET MODE -5)
4. FAX PARAMETERS
FAX PARAMETER (01-34)
01 RESOLUTION
FAX PARAMETER (01-34)
22 POLLING PASSWORD
22 POLLING PASSWORD
NOTE
1. Polling might not function with ail
fax machines. We suggest you
attempt a trial polling before you
actually poll for important docu
ments.
2. if you make a mistake in Step ft
press CLEAR, and then re-enter the
new number.
3. If a password is not set in the other
station, you can poll the other sta
tion even though your machine has
a password.
^"77
Enter four-digit Password using
key pad
Ex: 1234
©STOP
To return to standby.
22 POLLING PASSWORD
1234
FAX PARAMETER (01-34)
23 POLLED FILE SAVE
15-AUG-1990 15:00
00%
Page 53

4. GEHING THE MOST OUT OF YOUR MACHINE
How to Prepare to be Polled
In order to let other stations poll a document from your machine, you
must prepare your machine with a document in memory. You may set the
common polling password (see page 4-1) or individual polling password
with the document storing in memory.
You can store the document to be polled of up to 20 files with different
polling passwords.
</ ™
Place the document face down
on the ADF. Adjust left and
right Document Guides.
FUNCTION
FUNCTION
DOCUMENT SET
ENTER STATION(S)
POLLING
1 :POLLING
POLLING
2;POLLED
POLLED
PASSWORD=1234
00%
(1-4)
(1-4)
Enter four-digit new
Password if necessaiy.
Ex: 5678
If you just press SET in Step 5,
the-Polling Password will be
applied to a Common
Password.
<!> START
The document(s| will be stored
In meiTX)iy.
Common Polling Password
POLLED
PASSWORD = 5678
Individual Polling Password
* STORE *
PAGES=001
* STORE * COMPLETED
TOTAL PAGES=003 05%
15-AUG-1990 15:00
t
N0.005
01%
05%
NOTE
1. If you wish to save the polled file
and be polled repeatedly, change
Fax Parameter No. 23 (see page
2-17).
The unit will erase a polled file after polling once, (see NOTE)
Page 54

How to Poll
The following procedure lets you poll one station, or multiple stations in
one operation.
FUNCTION
Enter four-digit New
Password If necessary.
Ex: 5678
If you just press SET in Step 3,
the Polling Pasword will be
applied to a Common
Password.
POLLING
1 :POLLING
POLLONG
PASSWORD=1234
Common Polling Password
POLLING
PASSWORD = 5678
Individual Polling Password
POLLING
ENTER STATION(S)
(1-4)
NOTE
1 To erase or change the stations
setting in Step 5, press CLEAR. If
you recorded several, use A or T to
find the station you want clear.
Then press CLEAR. Add new sta
tions using Step 5 procedure.
2. If a polled station is busy, or does
not answer, it will be skipped and
the next station will be polled. The
skipped stations(s) will be redialled
up to five times after ail registered
stations have been polled.
3. You can verify that polling commu
nication was successful or not by a
communication Journal (see page
3-5).
Enter station(s) by using;
• OneTouch Keys (Up to 28
stations)
• ABBR and three-digit (Up
to 200 stations)
• Direct Dialing by pressing
SET key (Up to 50 stations)
Ex: One-Touch Key 01
ABBR and 003
7772345 and SET
<^ START
ONE-TOUCH
<01> (Station
ABBR. STNS=002
[003] (Station name)
TEL.NO.
7772345
* STORE *
* DIALLING *
[003] (Station name)
STNS=001
name)
STNS=003
N0.005
Page 55

4. GEniNG THE MOST OUT OF YOUR MACHINE
How to Turnaround Poll (Combined Transmission and Polling)
This procedure lets you do two operations with one call automatically.
First, your machine will send the document(s) to the station, and then it
will poll the same station.
Place the document face down
\/ Document Guides.
FUNCTION
^ir
Enter four-digit New
Password if necessary.
Ex: 5678
If you just press SET in Step 4,
the Polling Password will be
applied to the Common
Password.
DOCUMENT SET
ENTER STATION(S)
XMT & POLLING
XMT & POLLING
PASSWORD^ 1 234
Common Polling Password
XMT & POLLING
PASSWORD = 5678
Individual Polling Password
00%
Enter station by using;
• OneTouch Key
• ABBR and three-digit
• Direct Dialing by pressing
SET
Ex: One-Touch 01
^START
The document(s) will be stored
in memory. Then, your
machine will begin to dial
automatically.
XMT & POLLING
ENTER STATION
ONE-TOUCH
<01> (Station name)
* STORE *
PAGES=001
* STORE * COMPLETED
TOTAL PAGES=003 05%
* DIALLING *
<01> (Station name)
N0.005
01%
Page 56

How to Printout Polled Flies This procedure lets you print out Polled Files to confirm what you stored.
FUNCTION
and
POLLING
1 -.POLLING
^T T " T
POLLING
3;PRINT
PRINT POLLED FILE
PASSWORD = IBI
y\ Enter four-digit Polling Password which is assigned to the
[4 / out.
\y Ex: 5678
^^START
PRINT POLLED FILE
PASSWORD = 5678
* PRINTING *
PAGE = 001/003
(1-4)
(1 -4)
Page 57

4. GEHING THE MOST OUT OF YOUR MACHINE
How to Delete Polled Files
After Storing the Files to be polled, you may have some reason to delete
the Files.
FUNCTION IKfll
y\ Enter four-digit Polling Password which is assigned to the
l4 / vvant to delete.
Ex: 5678
POLLING
1 :POLLING
POLLING
4-.DELETE
DELETE POLLED FILE
PASSWORD = HHai
DELETE POLLED FILE
PASSWORD = 5678
(1 -4)
(1-4)
START
DELETING *
FILE NO. = 015
Page 58

4-2.
TI M E R C O N T R O L L E D
S
Deferred Transmission
You can transmit a document to one or more stations at any fixed time
within 24 hours. Built-in timers, for up to 50 files for Deferred Transmis
sion or Deferred Polling, make timer communications possible. Note that
both Deferred Transmission and Deferred Polling (see page 4-8) can be
set independently to occur at different times.
Place the docuirrent face down
on the ADF. Adjust left and
right Document Guides.
уЛ FUNCTION
and
Enter start time from k^pad.
(Use four-digit, 24-hour clock)
Ex: 2330 (11:30 p.m.)
DOCUMENT
ENTER STATION{S)
DEFERRED COMM.
1 :XMT
DEFERRED XMT
START TIME
DEFERRED XMT
START TIME
MODE
00%
(1 -2)
23:30
NOTE
1. If you enter a wong number in Step
4, press CLEAR, then reenfer that
number.
2. To change or cancel the settings,
see page 4-23.
3. To review the entered station(s) in
Step 6 before going to next step,
press A or ▼. if you find an error,
press CLEAR to erase the displayed
station.
Dial by pressing a One-Touch
key, or ABBR and three-digit
or a full number and SET.
Ex: One-Touch 01
ABBR and 015
123456789 and SET
ФSTART
Your machine will store the
document(s) into memory
automatically.
DEFERRED XMT
ENTER STATION(S)
ONE-TOUCH
<01 > (Station name)
ABBR. STNS=002
[015] (Station name}
TEL.NO.
123456789
* STORE * N0.012
PAGES^OOI
* STORE * COMPLETED
TOTAL PAGES=005 15%
15-AUG-1990 15:00
STNS=001
STNS=003
05%
15%
Page 59

4. GEHING THE MOST OUT OF YOUR MACHINE
Deferred Polling
/1 FUNCTION
and
Enter new Polling Password
from keypad using four-digit if
necessary, if not, just press
SET
Ex: New password "4567"
DEFERRED COMM. (1 -2}
;XMT
DEFERRED COMM. (1-2)
2:POLLING
DEFERRED POLLING
PASSWORD=1234
Common Polling Password
(see page 4-1)
DEFERRED POLLING
PASSWORD = 4567
DEFERRED POLLING
START TIME I
\
Enter start time from keypad.
(Use four-digit, 24-hour dock)
Ex; 2330 (11:30 p.m.)
Dial by pressing a One-Touch
key, or ABBR and three-digit.
Ex; One-Touch 01 and
ABBR and 015
OSTART
DEFERRED POLLING
START TIME 23:30
DEFERRED POLLING
ENTER STATION(S)
ONE-TOUCH
<01> (Station
ABBR.
[015] (Station name)
STORE
r
15-AUG-1990 15:00
STNS=001
name)
STNS=002
N0.020
00%
NOTE
The common polling password is
set by a Fax Parameter (see page
4-1). If no password is set, the
display will show blank.
Page 60

4-3.
PROGRAMMED
4-3-1,
Setting Program Keys
Your machine has Four Special Program Keys. These keys are useful if
you frequently need to send or poll the same group of numbers. You can
use these keys to store a sequence of stations to be polled, a deferred
transmission or polling sequence, or Group Dialing.
In addition to above mentioned functions, these keys are also able to be
used for one of the One-Touch keys.
To set a number or a group of numbers in a Program key, follow the
procedure below.
/1 FUNCTtON
and
SET MODE (1 -5)
1;USER PARAMETER
SET MODE
3:PROGRAM KEYS
PROGRAM KEY
n-5)
Press one of the Program Keys,
PI to P4.
Ex: PI
Now you can choose one Program Key mode out of the
following five modes.
• Deferred Transmission
• Polling
• Deferred Polling
• Group Diailing
Go to step 5a.
Go to step 5b.
Go to step 5c.
Go to step 5d.
PROGRAMtPI] NO.
1 :XMT/POLL 2:GROUP
NOTE
1. PROG means Programmed Com
munications. ONE-TOUCH means
One-Touch Key Diailing.
Page 61

4. GEHING THE MOST OUT OF YOUR MACHINE
Setting lor Deferred Transmission
To set Deferred Transmission,
a
for хмт/юа
7
)
forXMT
Enter the starting time using
four-digit.
Ex: 2 3 3 О |П:30 p.m.)
To set the starting time,
SET
PROGRAWl[P1]
l:XMT/POLL 2:GROUP
PROGRAMtPI]
I '.XMT 2: POLLING
PROGRAM[P1]
START TIME
PROGRAMfPI]
START TIME
ENTER STATION(S)
NO.=B
NO.=a
a
23:30 1
STNS=000
ТГ
Enter the station(s) number by
using a One-Touch key, or
ABBR and three-digit code.
Ex: ABBR ard 003 &
One-Touch key 02
Add more station numbers, if
necessary.
You may use A or ▼ key to
review the entered station(s)
before going to the next step,
if you find an error, press
CLEAR to erase the displayed
station.
To set station number(s),
OSTART
ABBR.
[003] (Station
ONE-TOUCH STNS=002
<02> (Station
PROGRAM[P1]
■
STNS=001
name)
name)
NAME
Page 62

Enter program name using
One-Touch/Character keys
(see page 2-10).
Ex; PROG. A
SET
TT
PR0GRAM[P1]
PROG.AI
PROGRAM KEY
NAME
You can now set another
Program Key repeating the
procedures from Step 4, or
return to standby by pressing
STOP.
15-AUG-1990 15:00
00%
NOTE
1. To print out a Progran) List, see
page 4-43.
Page 63

4. GEHING THE MOST OUT OF YOUR MACHINE
Setting for Polling
To set Normal Polling,
for XMT/POLL
7
)
for Polling
for Normal Polling
T
Enter new Polling Password
from keypad using four-digit if
necessaiy, if not, just press
SET.
Ex: New password 4567
PROGRAM[P1] NO.=l
1;XMT/POLL 2:GROUP
PROGRAM[P1] NO. =1
1 :XMT 2:POLUNG
PROGRAMIPI] NO.=l
1.DEFERRED 2:NORMAL
POLLING
PASSWORD = 1234
Common Polling Password
POLLING
PASSWORD = 4567
t
D
SET
TT
Enter the station(s) number by
using a One-Touch Key, or
AB6R and three-digit code.
Ex: One-Touch Key 02 &
ABBR and 003
You may use A or ▼ key to
review the entered station(s)
before going to the next step.
If you find an error, press
CLEAR to erase the displayed
station.
To set the station number(s|,
START
STNS=000
ENTER STATION(S)
ONE-TOUCH
<02> (Station
ABBR. STNS=002
[003] (Station name)
PROGRAM [PI] NAME
■
STNS=001
name)
Page 64

Enter program name using
One-Touch/Character
(see page 2-10).
Ex; PROG. A
PROGRAM(P1]
PROG.Al
PROGRAM KEY
NAME
You can now set another
Program Key repeating the
procedures from Step 4, or
return to standby by pressing
STOP.
15-AUG-1990 15:00
00%
NOTE
1. To print out a Program List, see
page 4-43.
Page 65

4. GETTING THE MOST OUT OF YOUR MACHINE
Setting for Deferred Polling
To set Deferred Polling,
fbrXMT/POLL
7
)
for Polling
for Deferred Polling
Enter new Polling Password
from keypad using four-digit if
necessaiy, if not, just press
SET.
Ex: New password 4567
PROGRAMIPI] NO.=l
1;XMT/POLL 2:GROUP
PROGRAMIPI] NO. =1
1;XMT 2-.POLLING
PROGRAMIPI] NO.=l
1 iDEFERRED 2;NORMAL
a
DEFERRED POLLING
PASSWORD=1234
Common Polling Password
DEFERRED POLLING
PASSWORD = 4567
SET
■in
y\ Enter the starting time using
four-digit
\J Ex: 2200 (10:00 p.m.)
To set the starting time,
SET
TT
PROGRAMIPI]
START TIME
PROGRAMIPI]
START TIME 22-.00
ENTER STATION(S)
■ :
STNS=000
Page 66

Enter the station(s) number by
using a One-Touch Key, or
ABBR and three-digit code.
Ex: One-Touch Key 02 &
ABBR and 003
You may use A or ▼ key to
review the entered station(s)
before going to the next step.
If you find an error, press
CLEAR to erase the displayed
station.
ONE-TOUCH
<02> (Station
ABBR.
[003] (Station
STNS=001
name)
STNS=002
name)
To set the station numberjs),
^START
Enter program name using
One-Touch/Character keys
(see page 2-10).
Ex: PROG. A
You can rx)w set another
Program Key repeating the
procedures from Step 4, or
return to standby by pressing
STOP.
PROGRAM[P1] NAME
■
PR0GRAM[P1]
PROG.AI
PROGRAM KEY
15-AUG-1990 15:00
NAME
00%
NOTE
1, To printout a Program List, see
page 4-43.
Page 67

4. GEniNG THE MOST OUT OF YOUR MACHINE
Setting for Group Dialling
To set Group Dialling,
for GROUP
T
Enter the station(s) number by
using a One-Touch Key, or
ABBR and three<ligit code.
Ex: One-Touch Key 02, 05
ABBR and 003, 010, 015
You may use A or ▼ key to
review the entered station(s)
before going to the next step.
If you find an error, press
CLEAR to erase the displayed
station.
PROGRAM[P1] NO. =1
1 :XMT/P0LL 2:GROUP
STNS=000
ENTER STATION(S)
ONE-TOUCH STNS=001
<02> (Station
ONE=TOUCH
<05> (Station
ABBR.
[003] (Station name)
ABBR.
[010] (Station
name)
STNS=002
name)
STNS=003
STNS=004
name)
^START
Enter program name using
One-Touch/Character keys
(see page 2-10).
Ex; PROG. A
You can now set another
Program Key repeating the
procedures from Step 4, or
return to standby by pressing
STOP.
ABBR.
[015] (Station
PR0GRAM[P1]
■
PROGRAMiPI]
PROG.AB
PROGRAM KEY
15-AUG-1990 15:00
STNS=005
name)
NAME
NAME
00%
Page 68

Setting for One-Touch Key to set tor one-Touch Key,
for ONE-TOUCH
Enter facsimile telephone
number (up to 36 digits)
including pauses and spaces.
Ex: 9 PAUSE 5 5 5 SPACE 1
234
To set the number,
SET
7
T
Enter receivirTg station's name
(up to 15 characters) using
One-Touch/Character keys
(see page 2-10).
Ex; PANASONIC
PROGRAMIP1J
■
PROGRAMiPI]
9-555 1234«
PROGRAM[P1]
■
PROGRAMIPI]
PANASONIC!
TEL.
TEL.
NAME
NAME
To set the name,
SET
TT
You can now set another
Program Key repeating the
procedures from Step 4, or
return to standty pressing
STOP.
PROGRAM KEY
01-AUG-1990 15:00
00%
Page 69

4. GEniNG THE №OST OUT OF YOUfl MACHINE
How to Erase Program key
Settings
To erase Program key settings.
^1 FUNCTION m
/9^
Press the Program key you
14/ ^
Ex; PI
■iy ^
"
SET MODE (1-5)
1:USER PARAMETER
T
SET MODE (1-5)
3:PROGRAM KEYS
PROGRAM KEYS
PROGRAM [PI] N0.^1
1 :XMT/POLL 2:GR0UP
PROGRAM [PI] NO.=l
1;XMT/P0LL 2-.GROUP
To erase another Program key
jy 7 or return to standby ty
<1 / pressing STOP.
PROGRAM KEY
15-AUG-1990 15:00
■
00%
Page 70

Program Key Programming
Flowchart
FUNCTION
and
T
SET
Tr.
0
iy
• Set Timer
Deferred XMT
(y
XMT/POLL
_TL
fr
IBH Polling
• Set Timer
• Set Password
___
n
Deferred
n _
V
• Set Called Station(s)
^START
PROGRAM
POLUNG
■RM Normal
IBH Polling
Set Password
ONE-TOUCH
GROUP
n
0
• Set Program Name
SET
T
Page 71

4. GETTIN6 THE MOST OUT OF YOUR MACHINE
4-3-2.
USING PROGRAM
KEYS
Once you have recorded a number, or group of numbers under a
Program Key (see pages 4-9), you can use the key by following the steps
below.
To transmit documents using Program Keys.
Place the document face down
on the ADF. Adjust left and
right Document Guides.
Press program key.
Ex: P2
The documentjs) will be stored
into memoiy. Then, dialling
automatically begins (see
NOTE).
To poll documents using Program Keys.
DOCUMENT SET
ENTER STATION(S)
PROGRAM
IP2] (Program
* STORE *
PAGES=002 05%
* DIALLING *
<02> (Station name)
name)
00%
STNS=002
N0.001
Make sure no documents are
on the ADF.
y\ Press program key:
I?1 Ex: P3
7T>en, dialling automatically
begins (see NOTE).
15-AUG-1990 15;00
PROGRAM STNS=001
[P3] (Program name)
* DIALLING *
<12> (Station name)
NOTE
1. The display varies according to the
entered mode setting.
Page 72

Timer Batch Transmission
If you stored several documents at different times using the same
Program Key that is programmed to perform deferred transmission, these
documents will be arranged in one file. Then, the file will be transmitted at
one dialling.
Ex:
Place the first document face
down on the ADF.
Press a Program Key you
entered for deferred
Transmisison.
DOCUMENT SET
ENTER STATION(S)
PROGRAM STNS=001
[PI] PANAFAX AT 11PM
Ex: PI
(Programmed for
transmitting to PANAFAX
at t1:00 p.m.j
The first document will be
stored in memory.
Place the second document face down on the ADF.
Press Program Key PI.
* STORE *
PAGES=003
DOCUMENT SET
ENTER STATION(S|
PROGRAM STNS=001
[PI] PANAFAX AT 11PM
00%
N0.015
05%
05%
NOTE
1. When Batch Transmission is exe
cuted, machine will printout a Batch
COMM. Journal automatically in
stead of original file’s COMM. Jour
nal regardless of COMM. Journal
setting (OFF, ON or INC).
The second document will be also stored in memory.
At 11:00 p.m., your machine
17 / begin to dial.
The first and second
documents that were stored
into memory will both be
transmitted on the same
deferred call.
Then, the machine will
printout a Batch COMM.
Journal automatically, (see
page 4-39).
STORE * N0.017
PAGES=004 10%
* DIALLING *
[OOljPANAFAX
ON LINE » MEM.XMT *
ID: PANAFAX
COMPLETED
TOTAL PAGE(S) = 007
Page 73

4-4.
INTERRUPT KEY OPERATION
4. GEHING THE MOST OUT OF YOUR MACHINE
This unit wiii reserve for transmission or poliing up to 50 fiies. Then, the
files you reserved will be executed in sequence.
However, if you have a document which has to send as soon as possible,
use the INTERRUPT KEY and the following procedure.
The command you reserved will be executed when this unit has finished
the current communication.
After interrupt communication is completed, unit will return to original
sequence.
Using the INTERRUPT key
lor Transmission Reservation
Unit is transmitting or
receiving.
INTERRUPT
fsee NOTE 1)
"T T
Place the document face down
on the ADF. Adjust Document
Guide.
Enter the station(s) from ariy
key.
Ex: One-Touch 01
^START
Yourmachine will
automatically store the
document into memoiy.
ON LINE * MEM.XMT *
ID:
ON LINE * MEM.XMT ^
INTERRUPT REQUEST
DOCUMENT SET
ENTER STATION(S)
ONE-TOUCH
<01> (Station
STORE * N0.025
* STORE * COMPLETED
TOTAL PAGES=002 15%
ON LINE * MEM. XMT *
ID:
name)
PAGES=001 10%
05%
STNS=001
NOTE
1. If you wish to transmit a document
without storing into the memory (On
Hook or Off Hook Dialling), in step
1, wait until current communication
is finished and display shows
“INTERRUPTED". Then follow the
On Hook or Off Hook Dialling
procedure.
2. When unit is executing interrupt file,
you can not use the INTERRUPT
key again until the interrupt file is
finished.
NX/hen finished transmitting or
receiving, your machine will
dial the numbers.
COMPLETED
TOTAL PAGE(S) = 004/004
* DIALLING *
<01> (Station name}
Page 74

4-5.
ME M O R Y MA N A G E
ME N T ( E d i t i n g F i l e )
Your machine has a document image memory which enables you to
memory transmission, deferred transmission or memory polling.
After storing documents for communication into memory, you may need to
modify the memory file while it is stiH in memory. This section describes
how to use the editing functions.
How to printout File List
You may need to verify pending Memory Files. To do so, printout the File
List by the following procedure.
FUNCTION
^START
EDIT FILE MODE (1 -6)
1 :PRINT FILE LIST
* PRINTING
FILE LIST
Page 75

Sample File List
4. GEHING THE MOST OUT OF YOUR MACHINE
*************************** *-FILE LIST-* ***********************DATE 15-AUG-1990*****TIME 16:20****P.1 ***
COMMAND FILE(S) = 03 (4)
DATA F!LE(S) = 01 (5)
TOTAL FILE(S) = 04 (6)
USED MEMORY = 33% (7)
FILE NO. = 018 (8)
(10)
FILE TYPE
XMT
(14)
DESTINATION(S)
[001] NEW YORK
® 02321111234
FILE NO. = 020
FILE TYPE
DEFERRED XMT
DESTINATION(S)
<02> LONDON
<04> STOCKHOLM
FILE NO. = 015
FILE TYPE
POLLED (5555)
FILE NO. = 014
FILE TYPE
XMT
DESTINATION(S)
<01 > ROME
[EXECUTING] (9)
(11)
CREATED
15-AUG 15:00
CREATED
15-AUG 14:05
PRG.NO.
[P1]
[PI]
CREATED
15-AUG 10:10 003
[INCOMPLETE]
CREATED
15-AUG 10:22
{15}
PRG. NO.
TIMER
15-AUG 23:00
PROGRAM NAME
SEND AT 11PM
SEND AT 11PM
TIMER
TIMER
PRG. NO.
(12)
TIMER
(16)
PROGRAM NAME
(1) (2) (3)
(13)
PAGE(S)
014
PAGE{S)
004
PAGE(S)
PAGE(S)
005
PROGRAM NAME
■******************************************************. PANAFAX
(17)
- PANAFAX HQ
(19)
-*****- 44 71 111 1234 - ***********
(18)
Page 76

Explanation of Contents
(1) Printout date: Day-Month-Year
(2) Printout time; Hour:Minute
(3) Printout page number
(4) Number of Command files;
Up to 50 files (XMT, Deferred
XMT, Polling, Turnaround
Polling and incomplete files)
(5) Number of Data files; Polled files {20 files) and
confidential Polled files (20
files)
(6) Total number of files; The two-digit number shows
the number of file you entered.
(7) Memory capacity: The amount used of the
document memory capacity
(8) File # 001 to 999
(9) Status of the files; [EXECUTING]
[INCOMPLETE]
[WAITING TO REDIAL]
(10) File type: Type of stored commands
• XMT : Transmission file
• DEFERRED XMT ; Deferred Transmission file
• POLLING (Password) : Polling file
• DEFERRER POLLING
(Password) ; Deferred Polling file
• XMT & POLLING
(Password)
• POLLED (Password)
• RCV TO MEMORY
• RELAY XMT
• CONF. XMT
• CONF. POLL
• CONF. POLLED
(11) Stored date/time:
(12) Executing date/time;
(13) Number of stored documents
(14) Destination;
(15) Program key No. ;
(16) Program name:
(17) LOGO:
(18) ID Number:
(19) Character ID;
: Turnaround Polling file
: Polled file
; Memory Reception file
: Requested Relay Trans
; Confidential Transmission
: Confidential Polling file
: Confidential Polled file
Day-Month-Time. Date/time
that these files were stored.
If the files are Timer Controlled
Comm, these start times are
printed in this column.
ABBR. No./One-Touch No.
and station name.
“®” indicates direct dialing
[PI] to [P4]
Up to 15 characters
Up to 25 characters
Up to 20 digits
Up to 16 characters
mission file
file
Page 77

4. GEHING THE MOST OUT OF YOUR MACHINE
How to change
Communication Time and/or
Stations
To change communication time and/or stations of a file in memory.
EDIT FILE MODE (1-6)
1 :PRINT FILE LIST
^"77
^
EDIT FILE MODE (1-6)
2;CHANGE TIME/STN.
CHANGE TIME/STN
FILE NO.=B
^77
Enter the File No. you want to
change, (see NOTE 1)
Ex: 045
^77
CHANGE TIME/STN
FILE NO. =045
DEFERRED XMT
START TIME
a
23:00
NOTE
1. A File No. is assigned for each
Memory Commun/caf/on. If you have
to confirm the File No., print out the
File List. For more details, see page
4-23.
2. After adding or deleting station(s),
the number of station(s} is counted
and shown at the upper right of the
display.
Enter new time.
J0 7 Ex: 0600... (6 am
^77
To delete station(s),
press A or ▼ key until shown
station you want to delete.
Then press CLEAR, (see NOTE
2)
To add station(sj,
|8b/ station(s) you want to
add. (see NOTE 2j
Ex: 5551234 +SET
^START
DEFERRED XMT
START TIME
TEL. NO.
55512351
ENTER STATION(S)
TEL. NO.
5551234B
15-AUG-1990 15:00
06:00
STNS=001
STNS=000
STNS=001
10%
Page 78

How to delete an Individual Fite
To delete a File
EDIT FILE MODE {1-6)
1:PRINT FILE LIST
<^77 « ^
EDIT FILE MODE {1 -6)
3; DELETE FILE
DELETE FILE
FILE NO.=l
^77
Enter the File No. you want to
J4/ NOTE)
\J Ex: 045
^7T
DELETE FILE
FILE NO. =045
* DELETING *
FILE NO. =045
NOTE
1. k File No. is assigned for each
Memory Communication. If you have
to confirm the File No., print out the
Fite List. For more details, see page
4-23.
Page 79

4. GETTING THE MOST OUT OF YOUR MACHINE
How to delete all Files
To delete all Files;
FUNCTION
7
<i ^7T
^TT
ED IT FI LE M O DE
1 iP R IN T F IL E LI ST
ED IT FI LE M O DE
3:D EL E TE F IL E
DE LE TE F IL E
FIL E N O -■
DE LE TE ALL FILE S
1:Y ES 2 :N O
* D EL ET IN G *
ALL F IL ES
n -6 )
(1-6 )
_______
□
?
7
Page 80

How to Printout Files
To print out files (documents) you entered to an existing memory file,
FUNCTION
^7T
Enter the File No. you want to print out (see NOTE)
Ex: 045
EDIT FILE MODE (1 -6)
1: PRINT FILE LIST
EDIT FILE MODE (1 -6}
4;PRINT FILE
PRINT FILE
FILE NO.=l
PRINT FILE
FILE NO. =045
* PRINTING *
PAGE=001/003
Your machine will print the document from memory,
TlTe files (documents) will
remain in memory even after
you print out the files.
NOTE
1. A File No. is assigned for each
Memory Communication. If you have
to confirm the File No., print out the
File List. For more details, see page
4-23.
Page 81

4. GEniNG THE MOST OUT OF YOUR MACHINE
How to add Documents
To add documents to a file,
y
k V add. {see NOTE)
Place documents face down on
ADR
FUNCTION
Enter the File No. you want to
Ex; 045
DOCUMENT SET
ENTER STATION(S) 05%
EDIT FILE MODE (1 -6)
1 :PRINT FILE LIST
EDIT FILE MODE (1-6)
5:ADD DOCUMENT
ADD DOCUMENT
FILE NO.=l
ADD DOCUMENT
FILE NO.
= 045
a
Your machine will
automatically store the
documents into memory.
* STORE *
PAGES=005
N0.045
10%
Page 82

How to Retry Incomplete
Memory Files
If a communication is incompiete because the receiving party was busy
or did not answer even after redialling, your machine will delete the
incomplete file automatically. You can change the setting of Fax
Parameter No. 24 {INC. FILE SAVE) to save the incomplete file. You may
retry the incomplete file using the following procedure.
<(y ^ ^
y\ Enter File No. you want to
/4 / NOTE)
\y Ex: 045
EDIT FILE MODE
1 :PRINT FILE LIST
EDIT FILE MODE {1 -6)
6:RETRY INCOMP FILE
RETRY INCOMP. FILE
FILE NO.=B
RETRY INCOMP. FILE
FILE NO. =045
* DIALLING
(1-6)
NOTE
1. A File No. is assigned for each
Memory Communication. If you have
to confirm the File No., print out the
File List. For more details, see page
4-23.
Page 83

ONE-TOUCH KEYS
4. GETTING THE MOST OUT OF YOUR MACHINE
Setting Fax Parameter
If you have programmed all Program Keys as TIMER KEYS, GROUP
DIALLING KEYS or One-Touch Dialling Keys, you may require more
GROUP DIALLING KEYs.
This unit can set One-Touch Keys (01 to 24) as GROUP DIALLING KEYS
by changing a Fax parameter.
To do so, use the following procedure, (see NOTE)
SET MODE n -5)
1:USER PARAMETERS
SET MODE (1-5)
4:FAX PARAMETERS
] □
FAX PARAMETER (01-34)
01 RESOLUTION
(i>fr
FAX PARAMETER (01-34)
25 GROUP KEY
NOTE
1. If you use this function, the Tel. No.
in the One-Touch Key you want to
program as a GROUP DIALLING
KEY will be erased
^ T T
To return to standby,
©STOP
25 GROUP KEY
1 : INVALID
25:GROUP KEY SET-UP
2;VALID (1-2)
FAX PARAMETER (01-34)
26 RELAY XMT REQUEST
15-AUG-1990 15:00
(1-2)
00%
Page 84

Entering Group Dialling Numbers
SET MODE (1-5)
1;USER PARAMETERS
^■ 77 - “
SET MODE (1-5)
2:ONE-TOUCH/ABBR.NOS.
ONE-TOUCH/ABBR
y'^\ Press the One-Touch Key you
14 / program
^
Ex: 01
Enter the station numberfs) by using ABBR and three-digit code.
Ex: ABBR and 003
ABBR and 010
(See NOTE 1)
You use the A or ▼ key to review the entered station(s)
before going to the next step. If you find an error, press CLEAR
to erase the displayed station.
<i> START
ONE-TOUCH<01> NO.=l
l:ONE-TCH 2;GROUP
ENTER STATION(S)
ABBR STNS=001
[003] (Station name)
ABBR. STNS=002
[010] (Station name)
0NE-TOUCH<01> NAME
STNS=000
NOTE
1. You cannot enter the station(s) by
using One-Touch key. Program key
or Direct dialling number.
Enter name using One-Touch/
Character Keys, up to 15
characters (see page 2-10).
Ex: EASTERN AREA
ONE-TOUCH<01> NAME
EASTERN AREA«
Page 85

4. GEniNG THE MOST OUT OF YOUR MACHINE
ONE-TOUCH/ABBR.
Using Group Dialling OneTouch keys
To return to standty,
©STOP
To transmit documents using Group Dialling One-Touch keys.
Place the document face down
M 7 on the ADF. Adjust left and
right Document Guides.
Press One-Touch key you
entered for Group Dialling.
Ex; 01
The document(sJ will be stored
into memoiy. Then, dialling
automatically begins.
15-AUG-1990 15:00
DOCUMENT SET
ENTER STATION(S) 00%
ONE-TOUCH STNS=002
<01> (Group name)
* STORE * N0.015
PAGES=001
00%
01%
* STORE * COMPLETED
TOTAL PAGES=003 05%
* DIALLING *
[003] (Station name)
Page 86

4-7.
PRINTOUT REPORTS
AND LISTS
To help you maintain records of the documents you send and receive, as
well as lists of the numbers you record, your facsimile machine is
equipped to print out the following reports and lists: a Journal, Individual
Transmission Journal, Communication Journal, Batch Communication
Journal, One-Touch List, ABBR. No. List, Directory Search List, Program
List, Fax Parameter List and a Power Failure Report.
Journal
Printout Procedure
Individual Transmission Journal (XMT JOURNAL)
The “Journal” is a record of the last 120 transactions (a transaction is
performed each time you send or receive a document). It is printed out
automatically after every 120 transactions, but you can print it out
manually in the following way.
FUNCTION
OSTART
The machine starts printing out
a Journal.
The Individual Transmission Journal contains information on the latest
transmission.
PRINT OUT
1 : JOURNAL
* PRINTING
JOURNAL
(1-6)
Printout Procedure
(X Wk
^
""
0
OSTART
The machine begins printing out an Individual Transmission Journal.
PRINT OUT
1 iJOURNAL
PRINT OUT (1 -6)
6:XMT JOURNAL
* PRINTING *
XMT JOURNAL
(1-6)
Page 87

Sample Journal
4. GEniNG THE MOST OUT OF YOUR MACHINE
****************************-JOURNAL-************************DATE 15-AUG-1990*****TIME 15:15****P. 1***
(4)
NO.
001 630 000/005 014 00:00'00 XMT
002 407 003/005 017
003 OK
004 630
005
006 OK
007 OK 014/014
119 OK
120 OK
***************»**********************#**************************. PANAFAX -****- 44 71 111 1234
(5)
COMM.
407
(6)
PAGE(S)
002/005 017 00:0r06 XMT
000/005
003/005 017
002/005
014/014 018
014/014
(7)
FILE
014
017
018 00:09'15 XMT
018
(8)
DURATION
00:02'15 XMT
00:00'00 RCV
00:02'15
00:0r06 RCV
00:09'20
00:09*20 XMT
(9)
X/R
RCV
RCV
(10}
IDENTIFICATION
<01>NEW YORK
[004] LONDON
[004] LONDON
061 111 1234
021 111 1234
GROUP 3
® 1 201 555 9999
031 111 1234
[003] ROME
- PANAFAX HQ -
(16)
(1) (2) (3)
(11)
DATE
01-AUG 10:35
01-AUG 11:10
01-AUG
01-AUG
01-AUG 11:50
01-AUG 12:22
JUN-01 15:01
15-AUG 15:13
15-AUG 15:13
(14)
(12)
TIME
11:22
11:35
(13)
DIAGNOSTIC
888888888888
888888888888
888888888888
888888888888
888888888888
888888888888
888888888888
888888888888
888888888888
(15)
Sample Individual Transmission Journal (XMT JOURNAL)
****************************-JOURNAL-**********************#*DATE 15-AUG-1990***# »TIME 15:15****P.1 ***
(4) (5) (6)
NO.
120
*******************#*********************#*****#*****###*****#***- PANAFAX -****- 44 71 111 1234 -**#*
COMM. PAGE(S)
OK 014/014
(7)
FILE
018 00:09*20 XMT
(8)
DURATION
(9)
X/R
(.10)
IDENTIFICATION DATE TIME
[O03]ROME 15-AUG 15:13
(1) (2) (3)
- PANAFAX HQ -
(16)
(11)
(14)
(12)
(13)
DIAGNOSTIC
888888888888
(15)
Page 88

Explanation of Contents
(1) Printout date: Day-Month-Year
(2) Printout time: Hour:Minute
(3) Printout page number
(4) Communication number; 001—120 (Does not always
begin with 001 when printed
out manually.)
(5) Communication result: “OK" indicates that the trans
mission was successful.
“S-OK” indicates that STOP
was pressed during
communication.
Three-digit information code
(see page 5-1) appears when
there was a problem.
(6) Number of pages transmitted or received:
The first three-digit number
represents the number of
pages successfully transmitted
or received. The second three-
digit number represents the
number of pages that were
stored into memory or set by
Total Pages setting.
An asterisk indicates that
the quality of some transmitted
or received copies was poor.
(7) File number: 001 to 999
(These numbers are assigned
for each memory
(8) Duration of communication;
Hour:Minute’ Second
(9) Type of communication: “XMT" means Transmission
“RCV” means Reception
(10) Remote station identification;
<nn> Name : One-Touch No. and recorded name,
[nnn] Name ; ABBR. No. and recorded name
® Number : Dialed telephone Number
Number : Remote station’s ID Number
Name ; Remote station’s Character ID
Group 2, 3 : Remote station was a CCITT G2, G3
machine
(11) Communication date: Day-Month
(12) Communication start time;
Hour-.Minute
Diagnostic: For service personnel only
LOGO:
ID Number: Up to 20 digits
Character ID;
Up to 25 characters
Up to 16 characters
Page 89

4. GEHING THE MOST OUT OF YOUR MACHINE
Communication Journai
(COMM. JOURNAL)
A Communication Journal (COMM.JOURNAL) lets you verify if transmis
sion or Polling was successful or not. You may select printout condition
in Function 8-1 (COMM.JOURNAL), see page 3-5 for datails.
Sample Communication Journal (COMM.JOURNAL)
************************ -COMM. JOURNAL- ********************* DATE 15-AUG-1990*****TIME 15:20****P.1***
(4)
MODE = TRANSMISSION
FILE NO. = 018 (7)
(8)
NO.
001 OK
002
001 OK
001
(14)
INCOMPLETE COMMUNICATION(S) OCCURRED.
FOLLOWING FILE(S) ARE STILL IN MEMORY. YOU MAY RETRY OR DELETE BY EDIT FILE MODE.
FILE NO. = 018
(9)
COMM.
OK
INC
(10)
DESTI NATION(S)
[001] SYDNEY
[002] TOKYO
<01>HONG KONG
® 03 1111 1234
(5)
START = 15-AUG 15:01
(1) (2) (3)
(11) (12)
PAGE(S) PRG.NO.
014/014
014/014
014/014
010/014
(6)
END = 15-AUG 15:20
(13)
PROGRAM
NAME
(15)
- PANAFAX HQ -
*********************************************************- PANAFAX -*****- 44 71 111 1234 -*****
Explanation of Contents
(1) Printout date; Day-Month-Year
(2) Printout time: HouriMinute
(3) Printout page number
(4) Type of communication
(5) Communication start date and time:
Day-Month Hour:Minute
(6) Communication end date and time:
Day-Month Hour:Minute
(7) File number
(8) Communication number
(9) Communication results: “OK” indicates that the trans
mission was successful.
“INC” indicates that the trans
mission was incomplete.
(10) ABBR. No/One-Touch No. and station name. Or Direct
Dialing No,
(11) Number of pages transmitted or received:
(12) Program number: [PI] to [P4]
(13) Program name recorded in the machine;
(14) Incomplete file(s) information:
(15) LOGO:
(16) ID Number;
(17) Character ID:
(17) (16)
The first three-digit number
represents the number of
pages successfully transmitted
or received. The second threedigit number represents the
number of pages that were
stored in memory or set by
Total Pages setting.
Up to 15 characters
When Function Parameter #24
is Valid position, this informa
tion will be printed out if
incomplete communication
occurred.
Up to 25 characters
Up to 20 digits
Up to 16 characters
Page 90

Batch Communication
Journai
(BATCH COMM. JOURNAL)
A Batch Communication Journal {BATCH COMM. JOURNAL) is printed
out automatically when machine executed Batch Communication. This
report lets you verify if Batch Communication is successful or not. See
page 4-21 details.
Sample Batch Communication Journal (BATCH COMM. JOURNAL)
****************- BATCH COMM. JOURNAL DATE 15'AUG'1990^^^TIME 23^031 ■jt'it'ii-
(4)
BATCHED FILES
BATCH FILE 021 007
MODE = BATCH TRANSMISSION
FILE NO. 021 (12)
(13)
NO.
001
(19)
INCOMPLETE COMMUNICATION(S) OCCURRED.
FOLLOWING FILE(S) ARE STILL IN MEMORY. YOU MAY RETRY OR DELETE BY EDIT FILE MODE.
FILE NO. = 015, 017
************#****************#**********************- PANAFAX -*****- 44 71 111 1234 - ****************
(9)
(14) (15)
COMM.
OK [001] SYDNEY 007/007
FILE NO. CREATED PAGE(S)
015 15-AUG 10:45
017 15-AUG 14.50
(7) (8)
DESTINATION(S) PAGE(S)
(5)
(16) (17) (18)
(6)
003
004
(10)
START = 15-AUG 23:00
PRG.NO.
[PI] SYDNEY AT 11PM
PROGRAM NAME
(22) (21)
(1) (2) (3)
(11)
END = 15-AUG 23:03
(20)
- PANAFAX HQ -
Explanation of Contents
(1) Printout date: Day-Month-Year
(2) Printout time: HourrMinute
(3) Printout page number
(4) Batched File Numbers
(5) Stored date/time for batched files
(6) Number of stored documents for batched files
(7) Batch file number
(8) Total page numbers
(9) Type of communication
(10) Communication start date and time:
Day-Month Hour:Minute
(11) Communication end date and time:
Day-Month Hour; Minute
(12) Batch File number
(13) Communication number
(14) Communication results: “OK" indicates that the trans
mission was successful.
“INC" indicates that the trans
mission was incomplete.
(15) ABBR. No./One-Touch No. and station name or Tele
phone number.
(16) Number of pages transmitted:
The first three-digit number
represents the number of
pages successfully transmitted
or received. The second threedigit number represents the
total number of pages that
were stored in memory.
(17) Program number: [PI] to [P4]
(18) Program name recorded in the machine:
Up to 15 characters
(19) Incomplete file(s) information;
When Function Parameter #24
is Valid position, this informa
tion will be printed out if
incomplete comm uni cation(s)
occurred.
(20) LOGO: Up to 25 characters
(21) ID Number: Up to 20 digits
(22) Character ID; Up to 16 characters
Page 91

4. GEHING THE MOST OUT OF YOUR MACHINE
One-Touch/ABBR. NO./ Directory Search List
Printout Procedure
To print out a One-Touch/Abbreviated Number and Directory Search List
of the telephone numbers you have stored.
FUNCTION MSI
<i> START
for One-Touch List
PRINT OUT
1 :JOURNAL
PRINT OUT (1 -6)
2:ONE-TCH/ABBR.LIST
1 :ONE-TOUCH
3:DIR.SEARCH
* PRINTING *
ONE-TOUCH LIST
(1-6)
2:ABBR.
r
for ABBR. No. List
for Directory
Search List
* PRINTING *
ABBR. NO. LIST
* PRINTING *
DIR. SEARCH LIST
Page 92

Sample One-Touch List
*************************-ONE-TOUCH LIST-*******»*************DATE 15-AUG-1990*****TIME 15:20****P.1 ***
(6)
ONE-TOUCH
<01>
<02>
<03>
<04>
(8)
NO. OF STATIONS = 4
***************************************************- PANAFAX -*****- 44 71 111 1234 - ****************
(5)
NAME
NEW YORK
LONDON
GENEVA
ROME
(7)
TELEPHONE NUMBER
0224 111 1234
031 111 1234
091 111 1234
0232 111 1234
(9)
- PANAFAX HQ -
(11) (10)
(1) (2) (3}
Sample ABBR. NO. List
**************************-ABBR. NO. LIST-*************#****#**DATE 15-AUG-1990*****TIME 15:15****P.1 ***
(6)
ABBR. NO.
[001]
[002]
[003]
[004]
(5)
NAME
HONG KONG
TOKYO
SYDNEY
SINGAPORE
(7)
TELEPHONE NUMBER
0727 111 1234
061 111 1234
021 111 1234
041 111 1234
(1) (2) (3)
(8)
NO, OF STATIONS = 4
(9)
- PANAFAX HQ
***************************************************- PANAFAX -*****- 44 71 111 1234 - ****************
(11)
(10)
mt
Page 93

Sample Directory Search List
4. GEHING THE MOST OUT OF YOUR MACHINE
*********************** *-DlR. SEARCH L1ST-*********************DATE 15-AUG-l 990*****TIME 15;20****P.1 ***
(5)
(4)
[G]
[H]
[L]
***************************************************. PANAFAX -*****- 44 71 111 1234 - ****************
[N]
[R]
[S]
[T]
NAME
GENEVA
HONG KONG
LONDON
NEW YORK
ROME
SINGAPORE
SYDNEY
TOKYO
(8)
NO. OF STATIONS = 8
(6)
ABBR. NO./
ONE-TOUCH
<03>
[001]
<02>
<01 >
<04>
[004]
[003]
[002] 061 111 1234
(7)
TELEPHONE NUMBER
091 111 1234
0727 111 1234
031 111 1234
0224 111 1234
0232 111 1234
041 111 1234
021 111 1234
(9)
- PANAFAX HQ -
(11) (10)
(1) (2) (3)
Explanation of Contents
□
(1) Printout date; Day-Month-Year
(2) Printout time: HouriMinute
(3) Printout page number
(4) The first letter of station name recorded in the machine.
(5) Station name recorded in the machine:
Up to 15 characters
(6) Abbreviated number or One-Touch number
(7) Telephone number recorded in the machine or ABBR.
number for Group keys;
Up to 36 digits
” indicates a pause.
(8) Number of recorded ABBR and One-Touch numbers
(9) LOGO;
(10) ID Number;
(11) Character ID:
Up to 25 characters
Up to 20 digits
Up to 16 characters
Page 94

Program List
To print out a Program List of the Dialling Patterns that you have
previously programmed into the Program keys.
Printout Procedure
r^i jTj MM
<!y ^ ^ ^
START
The machine starts printing out
a Program List.
PRINT OUT
1 : JOURNAL
PRINT OUT
3:PROGRAM LIST
* PRINTING *
PROGRAM LIST
n -6)
(1-6)
Page 95

Sample Program List
4. GEHING THE MOST OUT OF YOUR MACHINE
**************♦**********- PROGRAM LIST -■)t*********************DATE 15-AUG-1990*****TIME 15:20**** P.1 ***
(4) (5) (6) (7) (8)
PROGRAM PROGRAM NAME TYPE TIMER STATION{S)
[PI] TX AT 11PM XMT 23:00 [001]
[P2] POLLING POLL (1234)
[P3] EASTERN AREA GROUP
[P4] LONDON ONE-TOUCH .................... 061 555 1234
****************************************************##***#*****- PANAFAX -*****- 44 71 111 1234 -*****
......
[001], [002], [003], [005], [050], [120]
......
<01>, <02>, <03>
(1) i2) (3)
(9)
- PANAFAX HQ -
(11) (10)
Explanation of Contents
(1) Printout date: Day-Month-Year (7) Timer: Indicates the starting time.
(2) Printout time: Hour:Minute “
(3) Printout page number program key contains “non(4) Program key: P1—P4 deferred” program.
(5) Program name: Up to 15 characters (8) Numbers recorded in the program;
(6) Type of communication: “XMT” indicates transmission. One-Touch, ABBR numbers
“POLL (Password)" indicates (9) LOGO: Up to 25 characters
polling. (10) ID number: Up to 20 digits
“GROUP” indicates that the (11) Character ID: Up to 16 characters
program key is programmed as
a group key.
---------------
” indicates that the
a
Page 96

FAX Parameter List
To print ou the FAX Parameters List (see page 2-17).
Printout Procedure
FUNCTION ■RH
<i> START
The machine starts to print out a Fax Parameter List.
PRINT OUT
1 : JOURNAL
PRINT OUT (1-6)
4:FAX PARAMETER LIST
* PRINTING *
FAX PARAMETER LIST
(1-6)
Page 97

Sample Fax Parameter List
4. GETTING THE MOST OUT OF YOUR MACHINE
*****************-FAX PARAMETER LIST-*******************************DATE 15-AUG-1990***»*TIME 15:20*****
(3)
(4)
DESCRIPTION
NO.
RESOLUTION (HOME)
01
ORIGINAL (HOME)
02
STAMP (HOME)
03
HALF TONE (HOME)
04
ECM (HOME) (On)
05
COMM.JOURNAL (HOME)
06
07 DIALLING METHOD
HEADER PRINT
08
HEADER FORMAT
09
TOTAL PAGES PRINT (Inside)
10
MEMORY STORED STAMP (Invalid)
11
ONE-STN XMT
12
13 AUTO RECEIVE (Valid)
RING COUNTER
14
SUBSTITUTE RCV
15
PAPER END MARK (Invalid)
16
RCV'D TIME PRINT
17
RCV TO MEMORY
18
AUTO JOURNAL PRINT
19
CHARACTER ID
20
21 KEY/BUZ2ER TONE
POLLING PASSWORD (1234)
22
POLLED FILE SAVE (Invalid)
23
INC. FILE SAVE
24
25 ONE-TOUCH GROUP KEY
RELAY XMT REQUEST
26
CONFIDENTIAL FAX
27
CONF. POLLED FILE SAVE
28
XMT-PASSWORD (5555)
29
CHECK XMT-PW AT TX
30
RCV-PASSWORD
31
CHECK RCV-PW AT RX
32
FAX ACCESS CODE
33
34 DEPARTMENT CODES
(5)
CURRENT
SETTING SETTING
(Standard)
(Normal)
(On)
(Off)
(Inc)
(Pulse)
(Inside)
(FROM TO)
(Memory)
(3 Ring(s))
(Valid)
(Invalid)
(Invalid)
(Valid)
(Valid)
(Soft)
(Invalid)
(Invalid)
(Invalid)
(Invalid)
(Invalid)
(On)
(5555)
(On)
(-
------
(Valid)
NAME CODE
ACCOUNTING
SERVICE — 6892
)
(8)
(6) (7)
SELECTIONS STANDARD
Standard 2: Fine 3: Super Fine)
(1:
Normal 2: Dark
(1:
Off
(1:
Off
(1:
Off 2: On)
(1:
Off
(1:
Pulse 2: Tone)
(1:
Inside
(1:
FROM TO
(1:
Inside
(1:
Invalid
(1:
ADF
(1:
Invalid
(1
(1 Through
Invalid
(1
Invalid
(1
Invalid
(1
Invalid
(1
Invalid 2: Valid)
(1
Invalid
(1
Off
(1
Invalid
(1
Invalid 2; Valid)
(1
Invalid
(1
Invalid 2; Open
(1
Invalid
(1
Invalid
(1
Off
(1
Off
(1
Invalid
(1
(9)
— 4568
2: On)
2: On)
2: On
2; Outside
2: LOGO ID NO.)
2; Outside 3: None)
2: Valid)
2: Memory)
2: Valid)
9 Rings)
2: Valid)
2: Valid)
2; Valid)
2: Man. Print 3: Auto Print)
2: Valid)
2: Soft 3: Loud)
2: Valid)
2: Valid)
2: Valid)
2: Valid)
2: On)
2: On)
2: Valid)
NAME
SALES
3: Light)
3: Inc)
3; None)
3; Closed
CODE
....... 4528
ID 12)
(1)
(1)
(2)
(1)
(2)
(3)
(1)
(1)
(1)
(1)
(1)
(2)
(2)
(1)
(2)
(1)
(1)
(1)
(2)
(2)
(1)
(2)
(1)
(1)
(1)
(1)
(1)
(1)
(1)
(1)
**********************************************************- PANAFAX -*****44 71 111 1234 ******
Explanation of Contents
(1) Printout date;
(2) Printout time:
(3) Parameter number
(4) Description
(5) Current setting
(6) Selection
Day-Month-Year
Hour: Minute
(7) Standard setting
(8) Department name:
(9) Department code:
00) LOGO:
01) ID Number:
(12) Character ID:
00)
- PANAFAX HQ -
02) 01)
Up to 10 characters
4 digits
Up to 25 characters
Up to 20 digits
Up to 16 characters
Page 98

Power Failure Report
Sample Power Failure Report
This unit has a battery instatied for saving the document information when
a power failure occurs.
The battery will be able to save the document information for approxi
mately 72 hours after the power failure occurs.
However, if the battery system has problems with it, the document
information might be lost. The Power Failure Report will be printed out
automatically after a Power is turned ON again. The report is not printed
out when there are no files stored in the memory.
*************-)Mt**4(-)HHHMt- POWER FAILURE REPORT -*#»***********DATE 15-AUG-1990*******TIME 15:20*****#*P.l ***
POWER FAILURE OCCURED
(4)
FROM
15-AUG 1990 18.00
n) (2) (3)
(5)
TO
FOLLOWING FILE(S) HAS BEEN LOST.
***-)HHHM(-**íHHs-***4HMMHt*******íMHHHHt****************#*í(**»****- PANAFAX -****#- 44 71 111 1234*****
05-SEP 1990 07:59
(6)
FILE NO. - 018
(7)
FILE TYPE
DEFERRED XMT
(11)
DESTINATION(S)
[001] LONDON
(8)
CREATED
15-AUG 15:00
(12)
PRG.NO.
(9) (10)
TIMER PAGE(S)
15-AUG 23:00 014
(13)
PROGRAM NAME
(14)
- PANAFAX HQ -
(16) (15)
Explanation
(1) Printout date; Day-Month-Year
(2) Printout time: Hour; Minute
(3) Printout page number
(4) Power failure date and time;
Day-Month-Year
Hour; Minute
(5) Power return date and time:
Day-Month-Year
Hour: Minute
(6) File number;
(7) Type of file;
(8) Stored time;
001 to 999
Type of stored files
Day-Month Hour: Minute
(9) Executing time: Day-Month Hour:Minute
(10) Number of stored document
(11) Destination:
ABBR. No./One-Touch No.
and station name.
“®” indicates direct dialing.
(12) Program Key No.;
[P1] to [P4]
(13) Program name
(14) LOGO;
(15) ID Number;
(16) Character ID:
Up to 25 characters
Up to 20 digits
Up to 16 characters
Page 99

i:"'
Page 100

5-1.
PROBLEM
SOLVING
If You Have Any of These
Problems
During Transmission
1.
No dial tone see page 5-10
a)
Document feeding trouble
b)
i) Loading document(s)
ii) Document misfeeding see page 5-8
Document jam see page 5-5
c)
XMT copy quality is abnormal
d)
i) All black copy
ii) Copy with black line(s)
iii) All blank copy
Communication trouble
e)
Verification stamp trouble
f)
i) 0 mark is too light
During Receiving
2.
No Automatic receive
a)
i) “MANUAL RCV” on display
ii) Telephone not ringing
No recording paper
b)
Recording paper jam
c)
RCV copy quality is abnormal
d)
i) Black or black streaks
ii) Blank or blank streaks
Communication trouble
e)
see page 3-1
see page 5-6
see page 5-6
see Note 1
see Note 2
see page 5-9
see page 3-16
see page 5-10
see page 2-5
see page 5-4
see Note 3
see page 5-7
see Note 2
Information Codes
NOTE
1. Make sure the document is set face
down. If it is correct, report to serv
ice personnel.
2. Check with the other party or try
again.
3. Check own copy quality, if it is ab
normal, report to service personnel
If it is normal, report to other party.
No unit operation
3.
No power
a)
“ADF/RCV COVER OPEN” is displayed
b)
When something unusual occurs, the display may show one of the
information codes below. These will help you fix the problem.
Information
code
001
002
004 Recording paper jam.
010
020
030 Document misfeeding. 1. Reload the document
Recording paper jam.
No recording paper or recording
paper not set properly.
Thermal Recording Head
temperature is too high.
Meaning
Remove jammed paper.
(See page 5-4)
Remove jammed paper and
reset cutter position.
(See page 5-4)
Reload recording paper.
(See page 2-5)
Open the receiving unit for a few
minutes to permit cooling.
properly. (See page 3-1)
2. Remove document jam.
(See page 5-5)
3. Adjust ADF
(See page 5-5)
see page 2-8
see page 5-2
(Code 060 or 061)
Action
 Loading...