

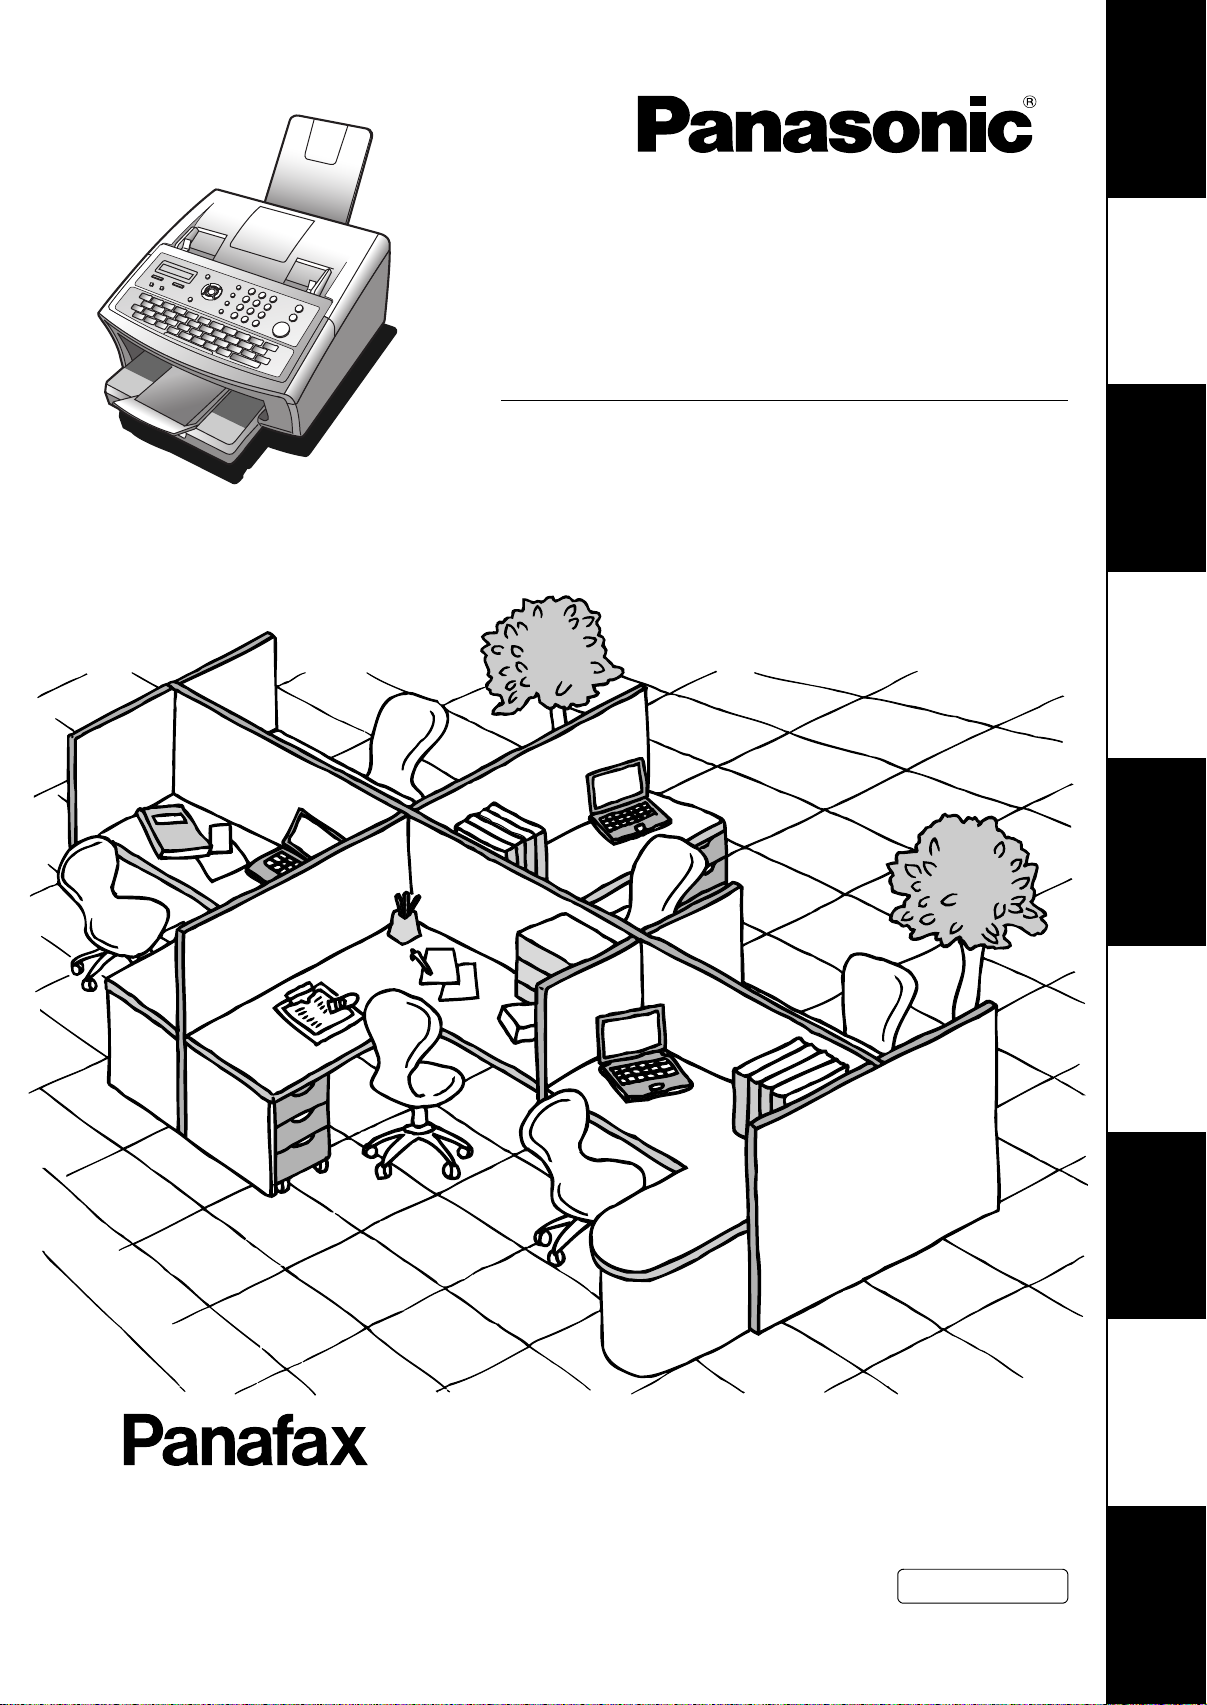
Panasonic UF-6300 Operating Instructions
Operating Instructions
Getting to Know
Your Machine
(For Facsimile)
Facsimile Transceiver
Model No.
UF-6300 / 5300
Machine
Installing Your
Your Machine
Programming
Basic Operations
Features
Advanced
Before operating this machine,please carefully read this manual,and keep this documentation in a safe place for future reference.
English
Network Features
and Lists
Printout Journals
Problem Solving
Appendix

Main Unit and Accessories
Unpack the carton and check that you have all the accessories llustrated. (Accessories included in the Main
Unit may be different depending on the destinations.)
Machine Toner Cartridge Recording Paper Tray
Telephone Line Cable
CD-ROM
(For UF-6300 only)
Telephone Line Cable Adapter
■ Installing the Accessories
Recording Paper Tray
Hook the projections into the square
holes on the machine.
Power Cord Operating Instructions
Final Installed View
(See Note 2)
Handset
[Available as an Option]
Handset Cord
[Available as an Option]
2
NOTE
Handset Cradle [Available as an Option]
Hook the projections into the square holes on the machine.
Connect the cable into the HANDSET jack on the machine.
1. The shape of the telephone line cable and power cord may differ depending on each country’s
regulation or specification.
2. The Telephone Line Cable Adapter is available in certain countries only.
3. For some countries, the handset may not be available because of the country’s regulation or
specification.

Table of Contents
Getting to Know Your Machine
Main Unit and Accessories............................................................................................ 2
Safety Information............................................................................................... 7
Precautions.....................................................................................................................12
External View.................................................................................................................. 13
Control Panel.................................................................................................................. 14
Function Key................................................................................................................... 16
Connecting the Telephone Line Cable and Power Cord............................................. 17
Installing Your Machine
Installing the Toner Cartridge ....................................................................................... 18
Loading the Recording Paper ....................................................................................... 20
How to Load the Recording Paper................................................................. 20
Adjusting the Paper Cassette for the Paper Length ................................................... 22
How to Adjust the Paper Cassette for the Paper Length................................ 22
Adjusting the Paper Cassette for the Paper Width ..................................................... 23
How to Adjust the Paper Cassette for the Paper Width ............ ... ... .... ........... 23
Setting the Dialling Method (Tone or Pulse)................................................................ 24
Adjusting the Volume .................................................................................................... 25
User Parameters............................................................................................................. 26
General Description........................................................................................ 26
Setting the Date and Time.............................................................................. 26
Setting Your LOGO........................................................................................ 27
Setting Your Character ID.............................................................................. 28
Setting Your ID Number (Fax Telephone Number)........................................ 29
Programming Your Machine
One-Touch/Abbreviated Dialling Numbers.................................................................. 30
Entering One-Touch/Abbreviated Dialling Numbers ...................................... 30
Editing One-Touch/Abbreviated Dialling Numbers......................................... 32
Printing Out a Directory Sheet........................................................................ 34
Customizing Your Machine ........................................................................................... 35
General Description........................................................................................ 35
Setting the Fax Parameters........................................................................... 35
Fax Parameter Table...................................................................................... 36
Basic Operations
Loading Documents....................................................................................................... 42
Documents You Can Send............................................................................. 42
Documents You Cannot Send...................... ... ... .... ... ... ... ... .... ... ...... .... ... ... ... .. 42
How to Load Documents................. ... ... .... ... ....................................... ... ... ... .. 43
Basic Transmission Settings ........................................................................................ 44
General Description........................................................................................ 44
Contrast.......................................................................................................... 44
Resolution...................................................................................................... 44
Verification Stamp.......................................................................................... 45
Communication Journal (COMM. JOURNAL) ............................................... 46
3

Table of Contents
Basic Operations
Sending Documents....................................................................................................... 47
General Description....................................................................................... 47
Memory Transmission.................................................................................... 49
Wrong Transmission Prevention Function..................................................... 54
Direct Transmission....................................................................................... 57
Voice Mode Transmission.............................................................................. 60
Transmission Reservation ............................................................................. 62
Redialling....................................................................................................... 65
Receiving Documents.................................................................................................... 66
Reception Modes........................................................................................... 66
Telephone Mode...... ... .... ... ... ....................................... ... ... .... ... ..................... 67
Fax / Tel Auto Switching Mode ...................................................................... 68
Fax Mode....................................................................................................... 69
TAM (Telephone Answering Machine) Interface Mode.................................. 70
Print Reduction .............................................................................................. 72
Receiving Oversize Documents..................................................................... 73
Substitute Memory Reception........................................................................ 74
Print Collation Mode....................................................................................... 74
Making Copies ............................................................................................................... 75
Copies............................................................................................................ 75
Advanced Features
Timer Controlled Communications .............................................................................. 76
General Description....................................................................................... 76
Deferred Transmission................................................................................... 76
Deferred Polling.................................... .... ... ... ... ... ....................................... .. 77
Polling ............................................................................................................................. 78
General Description....................................................................................... 78
Setting the Polling Password......................................................................... 78
Preparing to be Polled ................................................................................... 79
To Poll Documents from Another Station........... ... .... ... .................................. 80
Program Keys................................................................................................................. 81
General Description....................................................................................... 81
Setting for Group Dialling............................................................................... 81
Setting for Deferred Transmission................................................................. 82
Setting for Deferred Polling............................................................................ 83
Setting for Normal Polling.............................................................................. 84
Setting for One-Touch Key ............................................................................ 85
Changing or Erasing the Program Key Settings............................................ 86
Edit File Mode................................................................................................................. 87
General Description....................................................................................... 87
Printing a File List .......................................................................................... 87
Viewing the Contents of a File List............................................................... .. 88
Changing the Start Time or the Station of a File............................................ 89
Deleting a File.... ... ... ... .... ...................................... .... ... ... ... ............................ 90
Printing Out a File.......................................................................................... 91
Adding Documents into a File........................................................................ 92
Retry an Incomplete File................................................................................ 93
4

Table of Contents
Access Code................................................................................................................... 94
General Description........................................................................................ 94
Setting the Access Code................................................................................ 94
Operating Your Machine with the Acce ss Code (Restrict all operations) ...... 95
Operating Your Machine with the Acce ss Code
(Restrict access of Fax Parameters only) ...................................................... 95
Receive To Memory........................................................................................................ 96
General Description........................................................................................ 96
Setting the RCV To Memory Password.......................................................... 96
Setting RCV To Memory ................................................................................ 96
Printing Out Documents................................................................................. 97
Possibility of filtering unnecessary incoming faxes................................................... 98
General Description........................................................................................ 98
Set the Filter................................................................................................... 99
Receive without ID ......................................................................................... 100
Received ID Print............................... ... .... ...................................... .... ... ... ..... 101
Register Junk Fax Number........................................................ ... ... .... ... ... ... .. 102
Distinctive Ring Detector (DRD) ...................................................................................103
General Description........................................................................................ 103
Fax Cover Sheet .............................................................................................................104
General Description........................................................................................ 104
To use the Fax Cover Sheet .......................................................................... 104
PIN Code Access............................................................................................................106
General Description........................................................................................ 106
Selecting the Access Method (Prefix or Suffix).............................................. 106
Dialling with a PIN Code................................................................................. 107
Fax Forward....................................................................................................................108
Setting Fax Forward....................................................................................... 108
Network Features
Selective Reception .......................................................................................................109
General Description........................................................................................ 109
Setting the Selective Reception ..................................................................... 109
Password Communications ..........................................................................................110
General Description........................................................................................ 110
Compatibility with Other Machines................................................................. 110
Setting Password Transmission..................................................................... 111
Setting Password Reception.......................................................................... 112
Using Password Transmission....................................................................... 113
Using Password Reception............................................................................ 114
5

Table of Contents
Confidential Mailbox......................................................................................................115
General Description....................................................................................... 115
Confidential Mailbox....................................................................................... 115
Sending a Confidential Document to a Remote Station's Mailbox.. ....... ... ... .. 116
Polling a Confidential Document from a Remote Station's Mailbox... .... ... ... .. 117
Receiving a Confidential Document to Your Machine's Mailbox.................... 118
Storing a Confidential Document in Your Machine's Mailbox ...................... .. 119
Printing Out a Confidential Document from Your Machine's Mailbox ............ 120
Deleting a Confidential Document Stored in Your Machine's Mailbox........... 121
Sub-addressing..............................................................................................................122
General Description....................................................................................... 122
To set the Sub-address into a One-Touch/ABBR. Dialling Numbers............. 123
To send a Document with Sub-address......................................................... 124
Printout Journals and Lists
Journals and Lists..........................................................................................................125
General Description....................................................................................... 125
Transaction Journal ........ ...................................... .... ... ... ... ............................ 125
Individual Transmission Journal (IND. XMT JOURNAL)................................ 126
Communication Journal (COMM. JOURNAL)................................................ 129
One-Touch/Abbreviated and Directory Search List ..................................... .. 131
Program List................................................................................................... 134
FAX Parameter List................................................................... ... ... ... ............ 135
Toner Cartridge Order Forms ........................................................................ 136
Problem Solving
Troubleshooting.............................................................................................................137
Troubleshooting............................................................................................. 137
Information Codes........................ ...................................... .... ... ... .................. 141
Clearing a Recording Paper Jam. ... ...... ......................................................... 144
Clearing a Document Jam .... ... .... ... ....................................... ... ... ... ... ............ 145
Cleaning the Document Scanning Area......................................................... 146
Cleaning the Printer Roller . ... ... .... ... ... ... .... ... ... ... ... .... ... ... ... ....... ... ... ... .... ... ... .. 147
Adjusting the Automatic Document Feeder (ADF)......................................... 148
Verification Stamp.......................................................................................... 149
Checking the Telephone Line........................................................................ 150
Appendix
Specifications.................................................................................................................151
Recording Paper Specifications ...................................................................................153
Options and Supplies ....................................................................................................154
Regulatory Information..................................................................................................155
Glossary..........................................................................................................................158
ITU-T Image No. 1...........................................................................................................161
Index................................................................................................................................162
6
Safety Information
For Y our Safety
To prevent severe injury and loss of life, read this section carefully before using your machine to ensure proper and
safe operation of your machine.
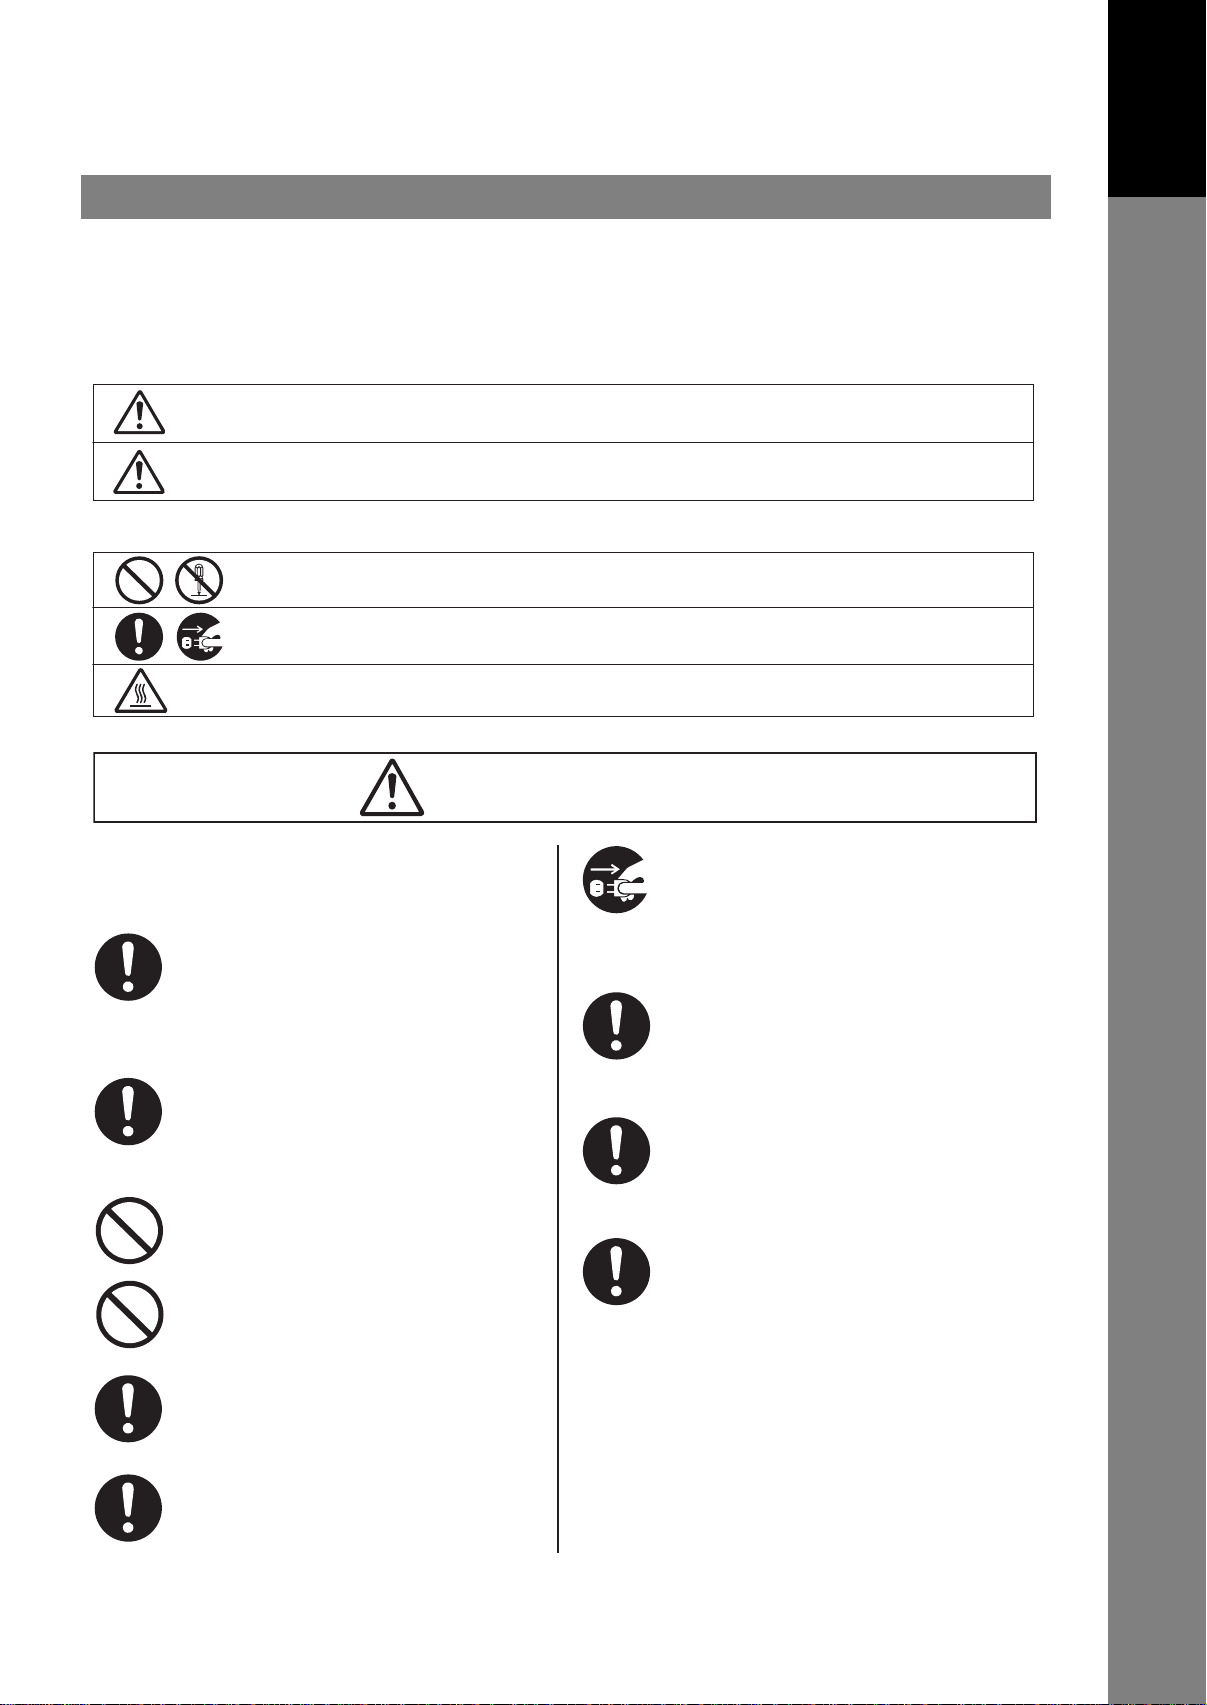
■ This section explains the Warnings and Cautions used in this Operating Instructions manual.
Getting to Know
Your Machine
WARNING
CAUTION
■ This section also explains the graphic symbols used in this Operating Instructions manual.
These symbols are used to alert operators to a specific operating procedure that must not be
performed.
These symbols are used to alert operators to a specific operating procedure that must be
emphasized in order to operate the machine safely.
This symbol is used to alert operators to a heated surface that may cause burns and requires
close attention.
Denotes a potential hazard that could result in serious injury, or death.
Denotes hazards that could result in minor injury, or damage to the machine.
WARNING
Power and Ground Connection
Cautions
Ensure that the plug connection is free of dust.
In a damp environment, a contaminated
connector can draw a significant amount of
current that can generate heat and eventually
cause fire if left unattended over an extended
period of time.
Always use the power cord provided with your
machine.
If you use a cord with an unspecified current
rating, the machine, or plug may emit smoke,
or become hot to the touch.
Do not attempt to repair, pull, bend, chafe, or
otherwise damage the power cord. Do not place
a heavy object on the cord. A damaged cord
can cause fire, or electric shocks.
Never touch a power cord with wet hands.
Danger of electric shock exists.
If the power cord is broken, or insulated wires
are exposed, contact the authorized Panasonic
dealer for a replacement. Using a damaged cord
can cause fire, or electric shocks.
When disconnecting the machine, grasp the
plug instead of the cord. Pulling on a cord
forcibly can damage it and cause fire, or electric
shock.
Stop operation immediately if your machine
emits smoke, excessive heat, unusual noise or
smell, or if water is spilt onto the machine. These
conditions can cause fire. Immediately unplug
the machine and contact the authorized
Panasonic dealer.
When the machine is not used over an extended
period of time, unplug it. If an unused machine
is left connected to a power source for a long
period, degraded insulation can cause electric
shocks, current leakage or fire.
Be sure to unplug the machine before
accessing the interior of the machine for
cleaning, maintenance or fault clearance.
Access to a live machine’s interior can cause
electric shock.
Once a month, unplug the machine and check
the power cord for the following. If you notice
any unusual condition, contact the authorized
Panasonic dealer.
● The power cord is plugged firmly into the
receptacle
● The plug is not e
or bent.
● The plug and receptacle are free of dust.
● The cord is not cracked or frayed.
.
xcessively heated, rusted,
7
Safety Information
e
t
e
Operating Safeguards
Do not touch areas where these caution labels are
attached to, the surface may be very hot and may
cause severe burns.
Do not place any liquid container such as a
vase or coffee cup on the machine. Spilt water
can cause fire or shock hazard.
Do not place any metal parts such as staples
or clips on the machine. If metal and flammab le
parts get into the machine, they can short-circuit
internal components and cause fire or electric
shocks.
If debris (Metal or liquid) gets into the machine,
unplug the machine immediately.
Contact the authorized Panasonic dealer.
Operating a debris-contaminated machine can
cause fire or electric shock.
Installation and Relocation
Cautions
Do not place the machine near heaters or
volatile, flammable, or combustible materials
such as curtains that may catch fire.
Do not place the machine in a hot, humid, dusty
or poorly ventilated environment. Prolonged
exposure to these adverse conditions can cause
fire or electric shocks.
Place the machine on a level and sturdy
surface that can withstand a weight of the
machine. (The machine weight without
optional unit : 9.3 kg) If tilted, the machine
may tip-over and cause injuries.
When relocating the machine, contact the
authorized Panasonic dealer.
When moving the machine, be sure to unplug
the power cord from the outlet. If the machine
is moved with the power cord attached, it can
cause damage to the cord which could result in
fire or electric shock.
Operating Safeguards
Do not place a magnet near the safety switch
of the machine. A magnet can activate the
machine accidentally, resulting in injuries.
Do not use a highly flammable spray or solvent
near the machine. It can cause fire.
Never open or remove machine covers that
are secured with screws unless specifically
instructed in the "Operating Instructions". A highvoltage component can cause electric shocks.
Do not try to alter the machine configuration or
modify any parts. An unauthorized modification
can cause smoke or fire.
Consumable Safeguards
Never dispose of toner, Toner Cartridge or a
Toner Waste Container into an open flame.
Toner remaining in the cartridge can cause an
explosion, burns, and/or injuries. For disposal
or recycling information, contact your local
authorities, or your local waste officials.
Keep stamp out of the reach of children. If a
stamp is swallowed accidentally, get medical
treatment immediately.
CAUTION
Never touch a labelled area. You can get burnt.
If a sheet of paper is wrapped around the heat
roller, do not try to remove it yourself to avoid
injuries or burns. Unplug the machine
immediately and contact the authorized
Panasonic dealer.
Do not use conductive paper, Ex: carbon
paper, and coated paper. When a misfed paper
occurs, they can cause a short-circuit and fire.
Do not place any heavy object on the machine.
An off-balance machine can tip-over or the
heavy object can fall, causing damage and/or
injuries.
Keep the room ventilated when using the
machine for an extended period of time to
minimize the ozone density in the air.
When copying with the ADF open, do not look
directly at the exposure lamp. Direct ey
exposure can cause eye fatigue or eye injury.
When removing misfed paper, make sure tha
no pieces of torn paper are left in the machine.
A piece of paper remaining in the machine can
cause fire. If a sheet of paper is wrapped around
the heat roller or when clearing a misfed paper
that is difficult or impossible to see, do not try
to remove it by yourself. Doing so can caus
injuries or burns. Unplug the machine
immediately and contact the authorized
Panasonic dealer.
If accessing the inner components of the
machine to clear misfed paper, etc., exercise
care not to touch heated areas, or you may get
burned.
8

For Your Safety
CAUTION
Caution on Toner Use
■ Avoid ingestion, inhalation, eye or skin contact.
● If ingestion occurs, drink several glasses of water
to dilute stomach contents.
● If inhalation occurs, exit the area immediately into
the fresh air.
● If skin contact occurs
and water
● If eye contact occurs, flush thoroughly with water.
● In all cases, seek medical treatment if adverse
symptoms occur.
■ When the toner car
not dispose of it into a fire. It can cause an explosion
and you can get burnt.
■ Keep the toner cartridge out of children’s reach. Store
in a cool and dry place (low humidity).
Do not unseal the toner cartridge unless you are
ready to use it.
.
, wash thoroughly with soap
tridge is at the end of its life, do
Safety Information
l
ack T oner INGREDIENTS:
B
Others
■ The machine has a built-in circuit for protection
against lightning-induced surge current. If lightning
strikes in your neighborhood, maintain ample distance
from the machine and do not touch the machine until
the lightning has stopped.
If you notice flickering or distorted images or noises on your
■
audio-visual units, your machine may be causing radio
interference. Unplug the machine and if the interference
disappears, the machine is the cause of the radio
interference. Perform the following procedure until the
interference is corrected.
● Move the machine and the TV and/or radio away
from each other.
● Reposition or reorient the machine and the TV and/
or radio
● Unplug the machine, TV and/or radio, and replug
them into outlets operating on diff
● Reorient the TV and/or radio antennas and cables
until the interf
antenna, ask your local electrician for support.
● Use a coaxial cable antenna.
Stylene / butylacrylate copolymer
Mn-Mg-Sr ferrite powder Polyethyele
Carbon Black (1333-86-4) Amorphous silica
.
erent circuits.
erence stops
. For an outdoor
Getting to Know
Your Machine
CAUTION
Denotes hazards that could result in minor injury or damage to the machine.
● DISCONNECT ALL POWER TO THE MACHINE BEFORE COVER(S) ARE REMOVED. REPLACE THE COVER(S)
●
BEFORE THE MACHINE IS RE-ENERGIZED.
9

Safety Information
CAUTION
denotes hazards that could result in minor injury or damage to the machine.
Do not place the machine near heaters or volatile, flammable, or
combustible materials such as curtains that may catch fire.
Avoid exposure to direct sunlight.
Install the machine on a flat surface, leave at least 4 inches (10 cm) of space
between the machine and other objects.
Do not block the ventilation openings.
Do not place any heavy object on the machine. An off-balance machine can
tip-over or the heavy object can fall, causing damage and/or injuries.
10

Safety Information
Getting to Know
Your Machine
Installation
The maximum power consumption is approx. 490 W.
■
A properly wired (grounded), dedicated, 10A, 220240V AC outlet is required. Do not use an extension
cord.
The power cord on this machine must be used to
disconnect the main power.
Please ensure that the machine is installed near a
wall outlet and is easily accessible.
■ The machine should not be installed in areas with the
following conditions:
● Extremely high or low temperature and humidity.
The machine should be installed under the
following ambient conditions:
e
mperature : 10-35˚C
T
Relative Humidity : 15-70%
● In areas with chemical fume concentration.
● With unstable or uneven conditions (floors, etc.).
● Direct exposure to sunlight or fluorescent light.
● In areas of high dust concentration.
● Directly in the air conditioning flow.
● In areas of poor ventilation.
● In areas with extreme vibration.
Supplies
■ Store the toner and paper in a cool area with low
humidity.
■ Use of other than genuine Panasonic supplies can
damage the machine. This may void the warranty of
the machine and supplies. Be sure to use only
genuine Panasonic Toner designed for the machine.
■ Dispose of Toner Cartridge according to your local
regulations.
Illegal Copies
It is unlawful to make copies of certain documents.
Copying certain documents may be illegal in your country.
Penalties of fines and/or imprisonment may be imposed
on those found guilty. The following are examples of
items that may be illegal to copy in your country.
● Currency
● Bank notes and cheques
● Bank and government bonds and securities
● Passports and identification cards
● Copyright material or trademarks without the consent
of the owner
● Postage stamps and other negotiable instruments
This list is not inclusive and no liability is assumed for
.
either its completeness or accurac
In case of doubt, contact your legal counsel.
Notice:
Install your machine near a supervised area to prevent
illegal copies from being made.
y
Others
Panasonic is not responsible for data loss and any
consequence caused by computer virus infection or
external shocks.
11

Precautions
■ Laser Safety
LASER SAFETY
This unit employs a laser. Only qualified ser vice personnel should attempt to
service this device due to possible eye injury.
CAUTION:
USE OF CONTROLS, ADJUSTMENTS OR PERFORMANCE
PROCEDURES OTHER THAN THOSE SPECIFIED HEREIN MAY RESULT
IN HAZARDOUS RADIATION EXPOSURE.
■ Caution Label
Precautions
12
ATTENTION:Hot Surface
ATTENTION:Zone chauffée
ACHTUNG :Heiße Oberfläche
ATENCION :
Superficie caliente
FDA1992
IMPORTANT SAFETY INSTRUCTIONS
When using your telephone equipment, basic safety precautions should always be followed to reduce the risk of fire,
electric shock, and injury to persons, including the following:
● DO NOT USE THIS PRODUCT NEAR WATER, FOR EXAMPLE, NEAR A BATH TUB, WASH BOWL, KITCHEN
SINK OR LAUNDR
● AVOID USING A TELEPHONE (OTHER THAN A CORDLESS TYPE) DURING AN ELECTRICAL STORM. THERE
Y BE A REMOTE RISK OF ELECTRIC SHOCK FROM LIGHTNING.
MA
● DO NOT USE THE TELEPHONE TO REPORT A GAS LEAK IN THE VICINITY OF THE LEAK.
SAVE THESE
Y TUB , IN A WET BASEMENT OR NEAR A SWIMMING POOL.
INSTRUCTIONS.
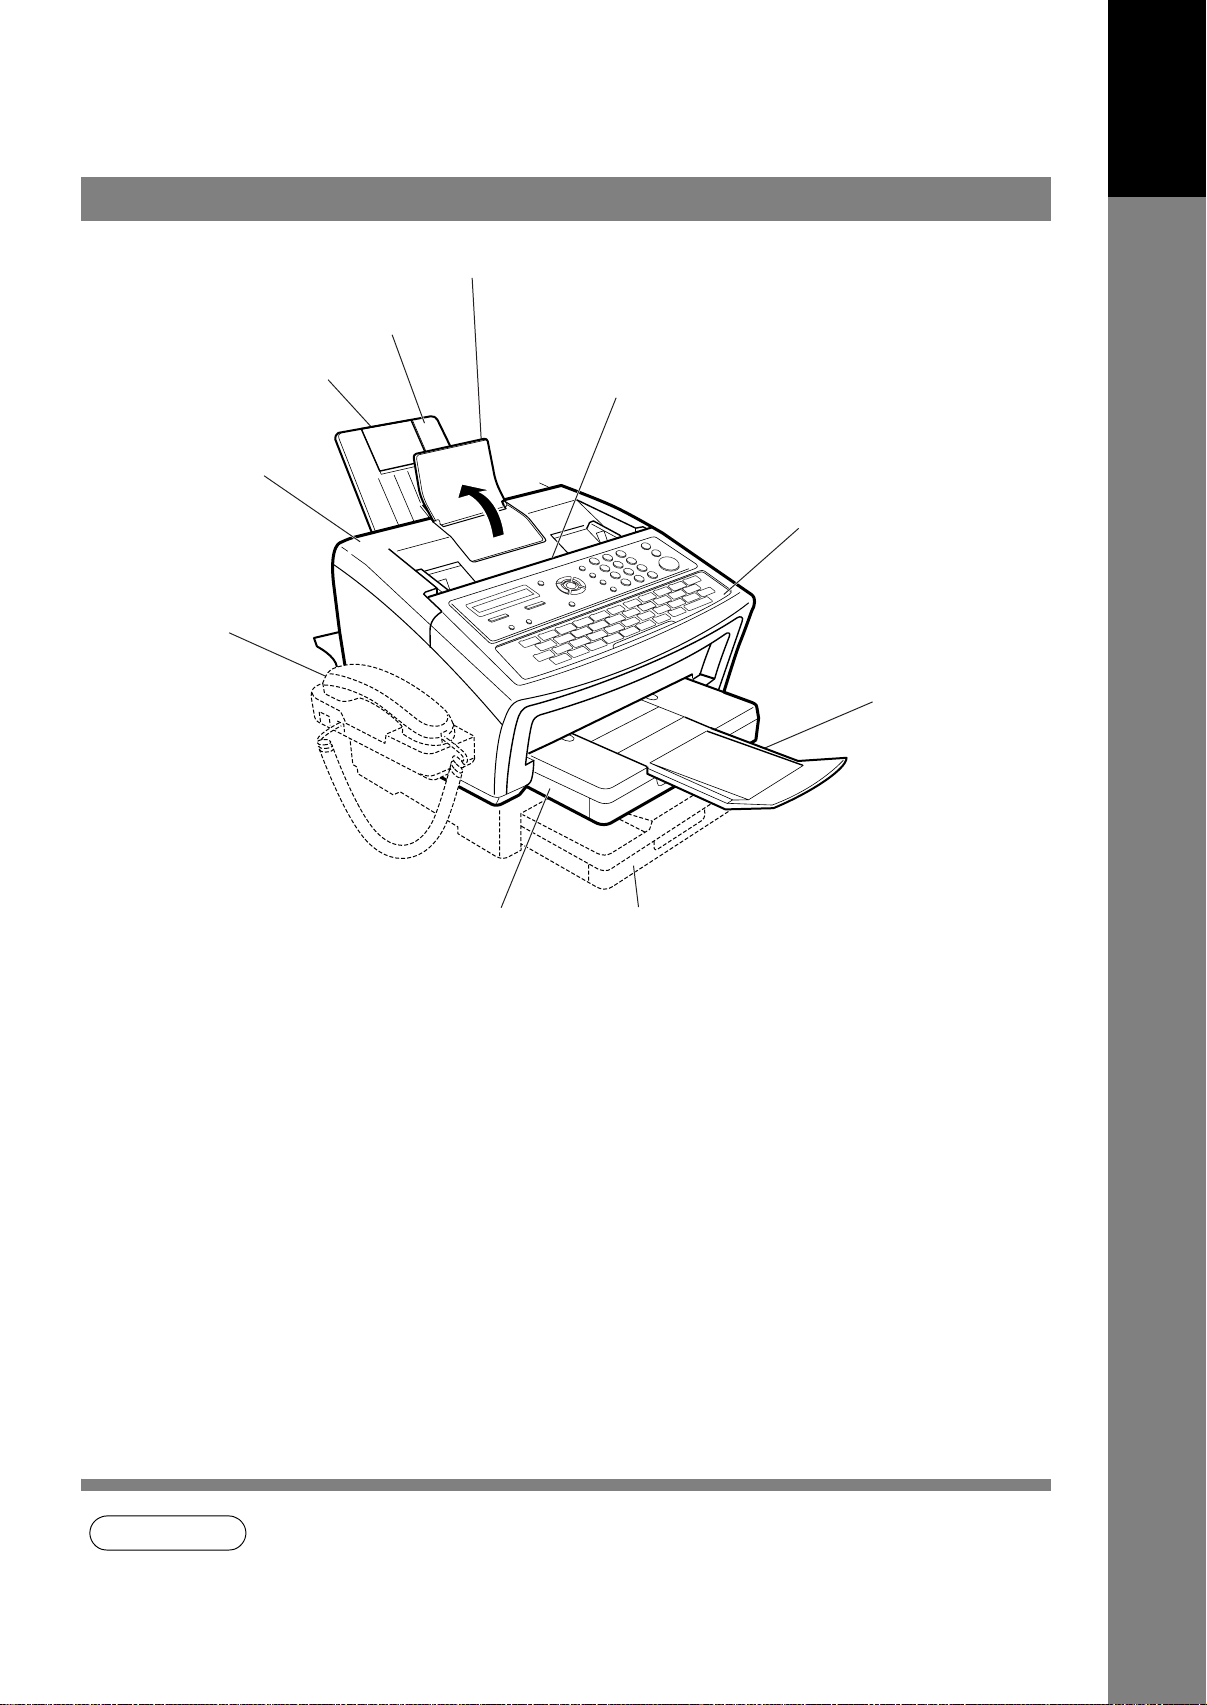
External View
Recording Paper Tray
Document Sub Tray
Getting to Know
Your Machine
Recording Paper
Sub Tray
Printer Cover
Handset Kit
(Available as an
option, see page 154)
Recording Paper Cassette
(Standard)
ADF Door
Control Panel
Document Return
Tray
2nd Paper Feed Module
(Available as an option, see page 154)
(For UF-6300 only)
NOTE
1. The handset may not be available in some countries because of the country’s regulation or
specification.
13
Control Panel
2
1 5
4 6
3
81310
7
91411 15
161718
12
No. Icon Contents No. Icon Contents
- Used to switch the machine
into energy saving mode.
Parameter No.34 (ENERGY
SAVER MODE) (See page 38)
- Used to turn the verification
stamp ON or OFF.
Lights when the verification
stamp is set to ON.
- Use this button when resetting all
the previously set functions.
Used for the following:
- Used to carry out setting operations.
- Search for a station name. (See pages 52 to 59)
- Adjust the monitor and ringer volume. (See page 25)
- Move the cursor while entering numbers and characters.
- Search the station name for Directory Search Dialling.
- Confirm the entered station for multi-station communication.
- Confirm the current communication modes (Ex: Page number, ID,
Dialled Telephone number, File number) when the unit is ON LINE.
- Used to set to Normal, Lighter
or Darker. (See page 44)
- Used to set to Standard, Fine,
Super-Fine or Halftone.
(See page 44)
- Start or select the function.
(See page 16)
14
Control Panel
No. Icon Contents No. Icon Contents
Getting to Know
Your Machine
- Used to start On-Hook
8 9
10 11
12
13 14
15
Dialling. (See page 61)
- Used to start Abbreviated
Dialling.
(See pages 51 and 58)
Keypad
- Used for manual number dialling, entering phone numbers, and numerical
entries.
Key
- Used to temporarily change the dialling mode to Tone when Pulse mode is set.
- Press this key to start activation.
- Press this button when you want
to stop communication,
registration operation, or audible
tone.
16
- Used to separate the Sub Address from the telephone
number.
- Used to enter a pause when
entering or dialling a telephone
number, or to redial the last
dialled number.
- Used for copy operations.
(See page 75)
Active LED lamp (GREEN)
Flashes: When machine is
active.
Lights: When the received fax
message is in memory.
17
18
Status LED lamp (RED)
- Lights/Flashes when trouble occurs.
Lights: Machine has detected a trouble status
- No paper in the selected tray or toner has run out.
- Machine has detected trouble, such as paper misfed or jammed.
Flashes: Machine detected an alarm status
- No paper in the tray. (Tray not selected)
- Toner is getting low, etc.
One-Touch Keys (01-32)
- Used for One-Touch Dialling. (See pages 51 and 58)
Program Keys (P1-P8)
- Used to enter long dialling procedures or Group Dialling Number keys.
(See pages 81 to 86)
Character Keys
- The One-Touch Keys and Program Keys serve as character and symbol input
keys which are used to enter your LOGO, character ID and station name.
- Used to enter a symbol for LOGO, character ID and station name.
Use or to select the symbols.
- Used to insert a space while entering LOGO, character ID and station name.
- Used to switch between upper and lower character set.
15
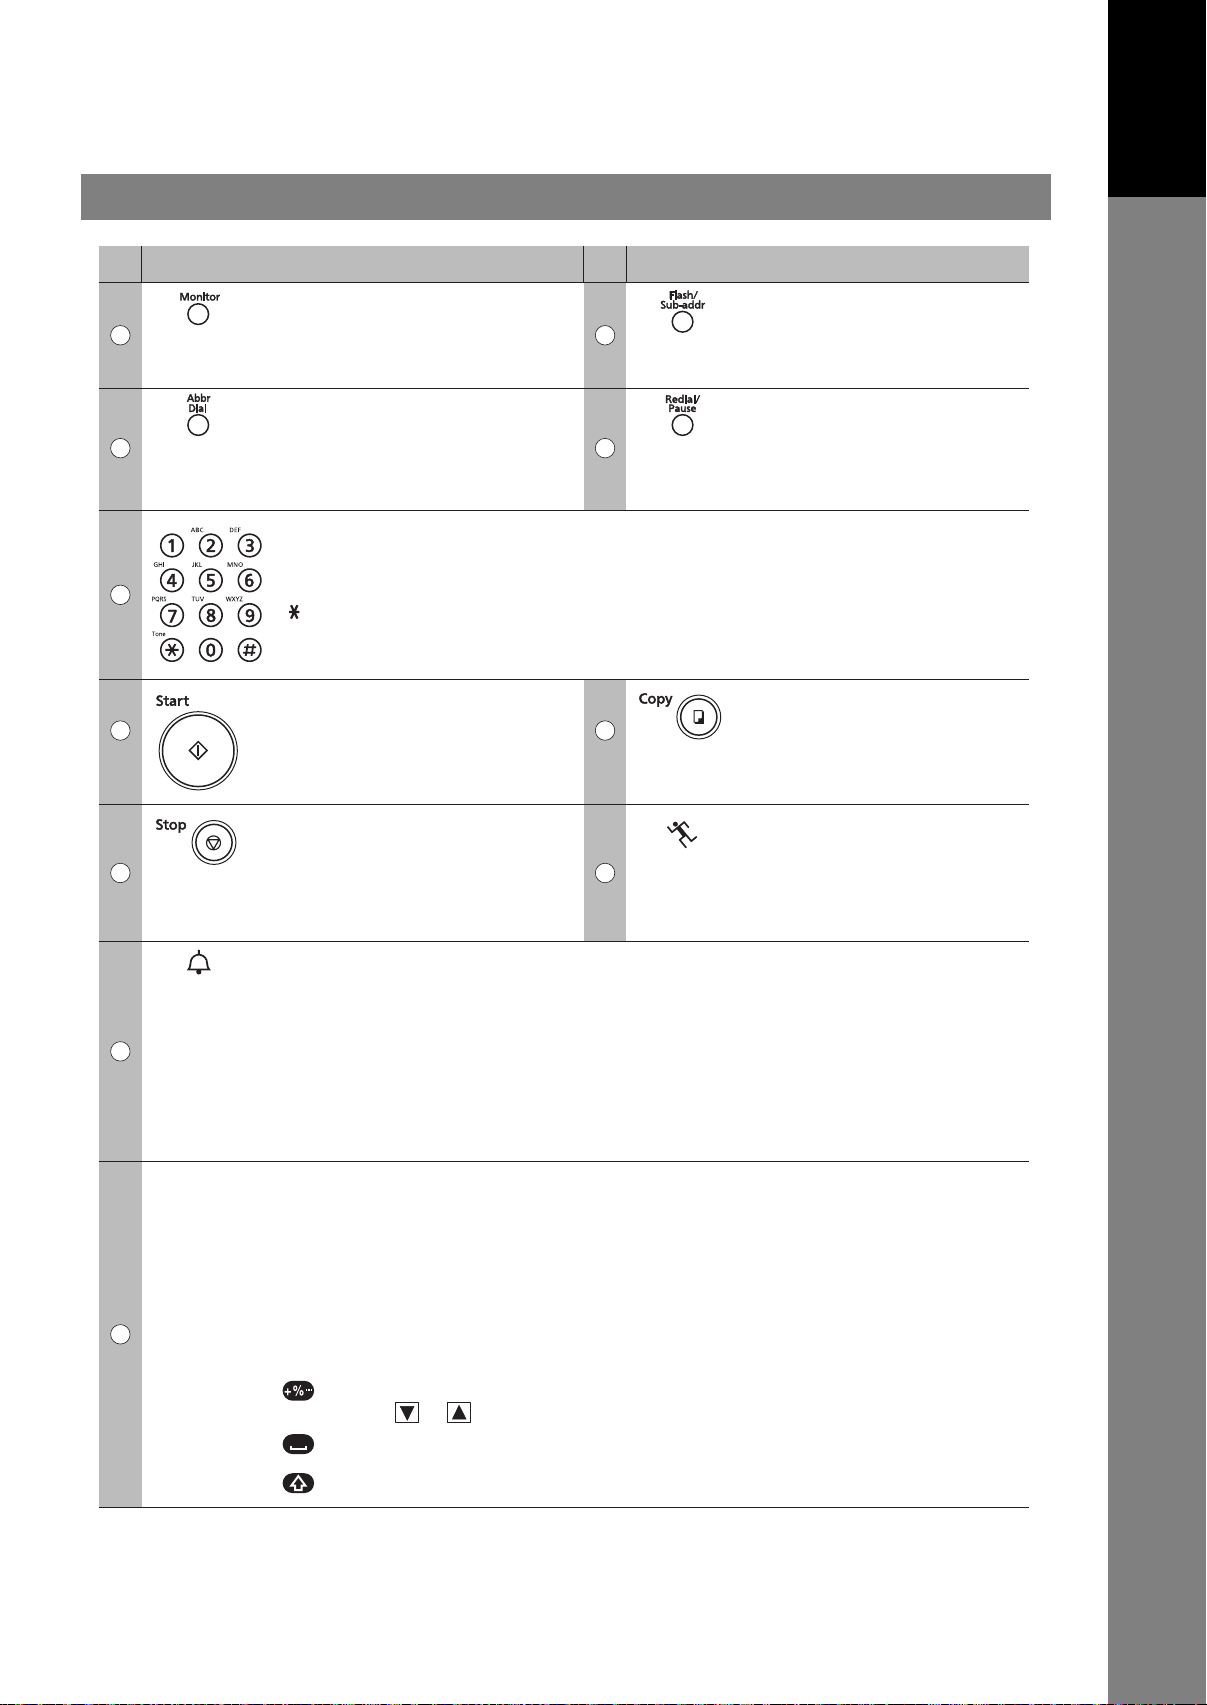
Function Key
Any function can be started by first pressing and then entering the function number, or by
pressing the or scroll keys repeatedly until the desired function appears on the display.
Deferred Communication
1
1 = XMT
2 = Polling
Advanced Communication
2
1 = Not Used
2 = Confidential Communication
Polling
3
1 = Polling
2 = Polled
Print List
6
1 = Journal (Print/View)
2 = One-Touch/Abbreviated/Directory Search List
3 = Program List
4 = Fax Parameter List
5 = Not Used
6 = Individual XMT Journal
7 = Directory Sheet
Set Mode
7
1 = User Parameters
• Date & Time
• Logo
• Character ID
• ID Number (Fax Telephone Number)
2 = One-Touch/Abbreviated Numbers
3 = Program Keys
4 = Fax Parameters
5 - 7 = Not Used
8 = Maintenance
• Cleaning Printer Roller
• Toner Order Forms
Function
16
Select Mode
8
1 = Communication Journal = OFF/ON/INC
2 = Not Used
3 = Cover Sheet = OFF/ON
4 = Password-XMT = OFF/ON
5 = RCV to Memory = OFF/ON
6 - 8 = Not Used
9 = Memory XMT = OFF/ON
Edit File Mode
9
1 = File List (Print/View)
2 = Change Time/Station
3 = Delete File
4 = Print File
5 = Add Document
6 = Retry Incomplete File

Connecting the Telephone Line Cable and Power Cord
■ Power Cord
Plug the supply cord into the main AC socket outlet.
Connect the supply cord coupler into the main supply inlet on
the rear of the machine.
Warning: This apparatus must be properly earthed.
Do not modify the AC outlet.
Getting to Know
Your Machine
Power Cord (Included)
Telephone Line Cable Adapter
External Telephone
(Optional)
You can connect an additional
standard single line telephone
to the machine. To connect
the telephone, break off
the protective tab on
the TEL jack.
Telephone Jack
Telephone Line Cable
(Included)
■ Telephone Line Cable
Plug one end of the telephone line cable into the telephone jack supplie d by the telephone company and the
other end into the LINE jack on the left side of the machine.
USB Cord (For UF-6300 only) (Optional)
Connecting a USB Cord will make printing,
scanning and other functions available.
Please refer to the accessory CD for more
information.
UF-6300
UF-5300
NOTE
1. The shape of the telephone line cable and power cord may differ according to regulations and
specifications in the specific country.
2. The Telephone Line Cable Adapter is available in certain countries only.
17
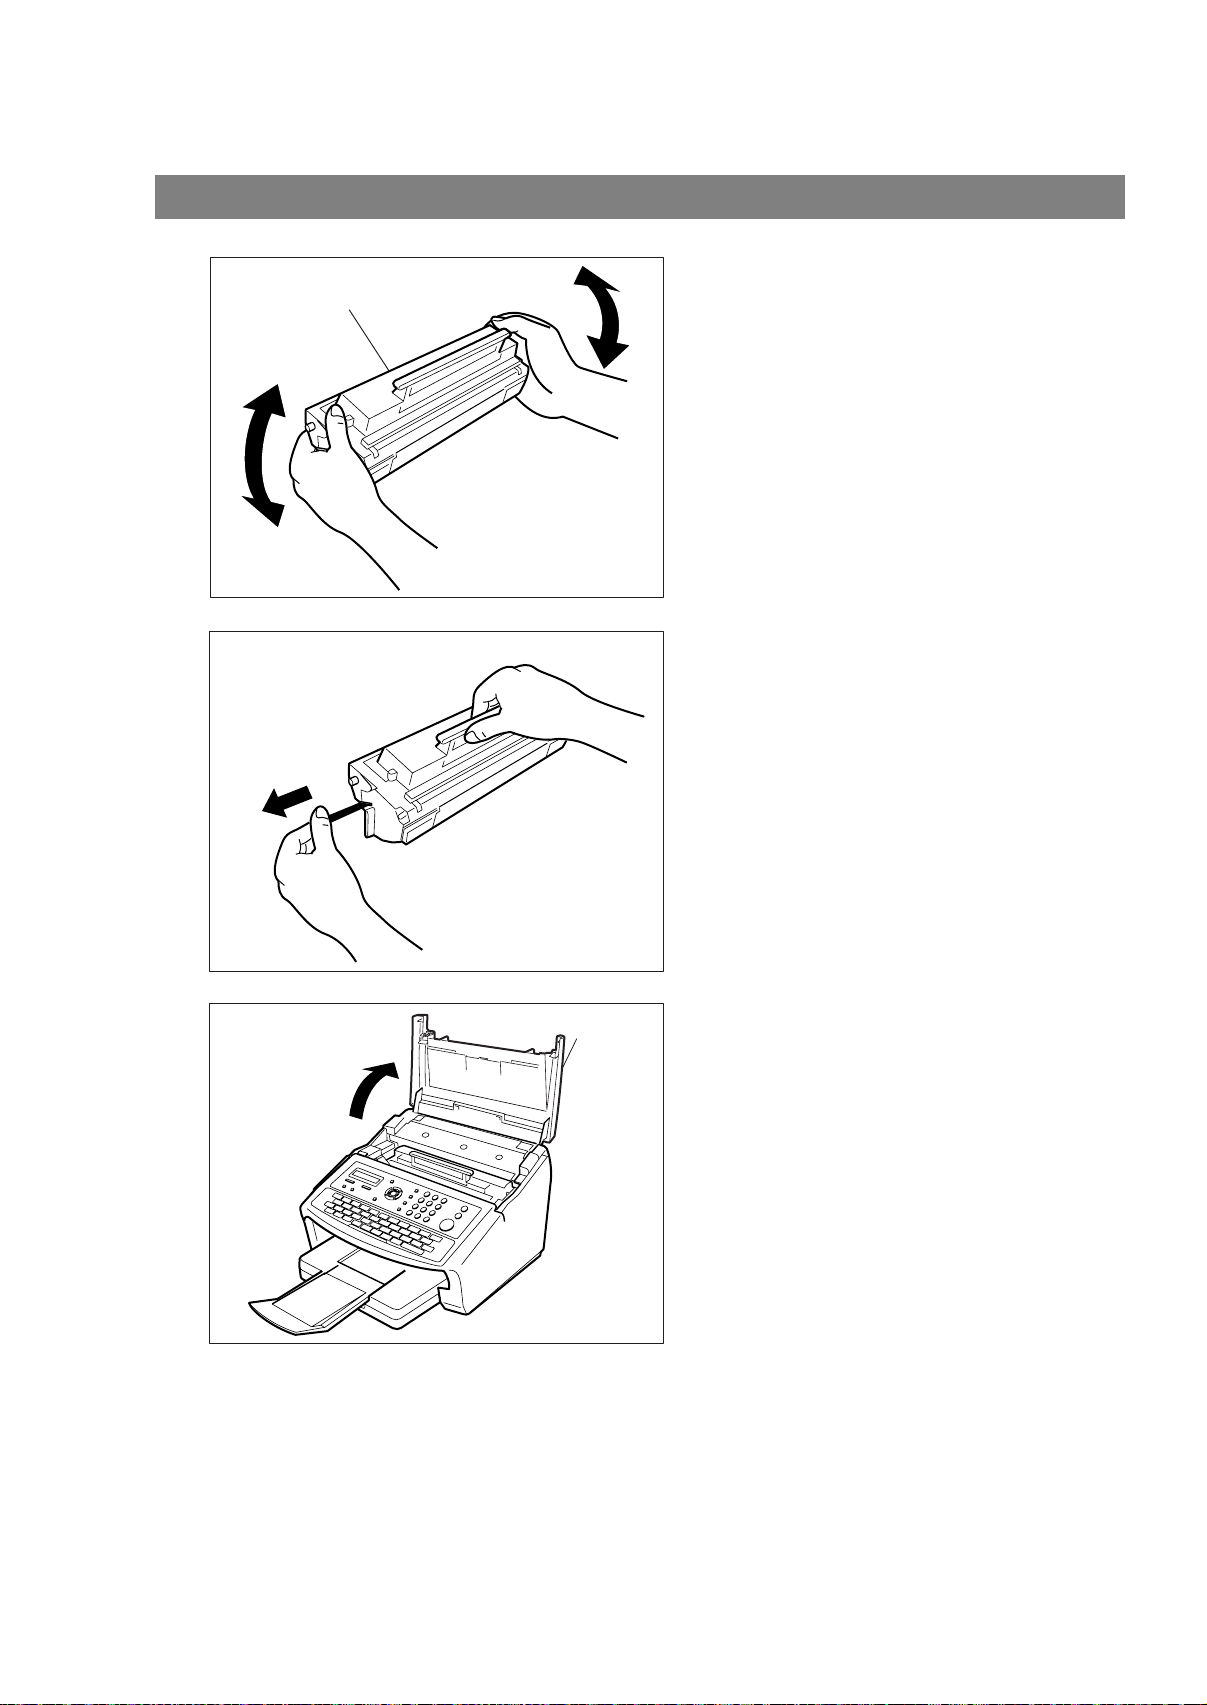
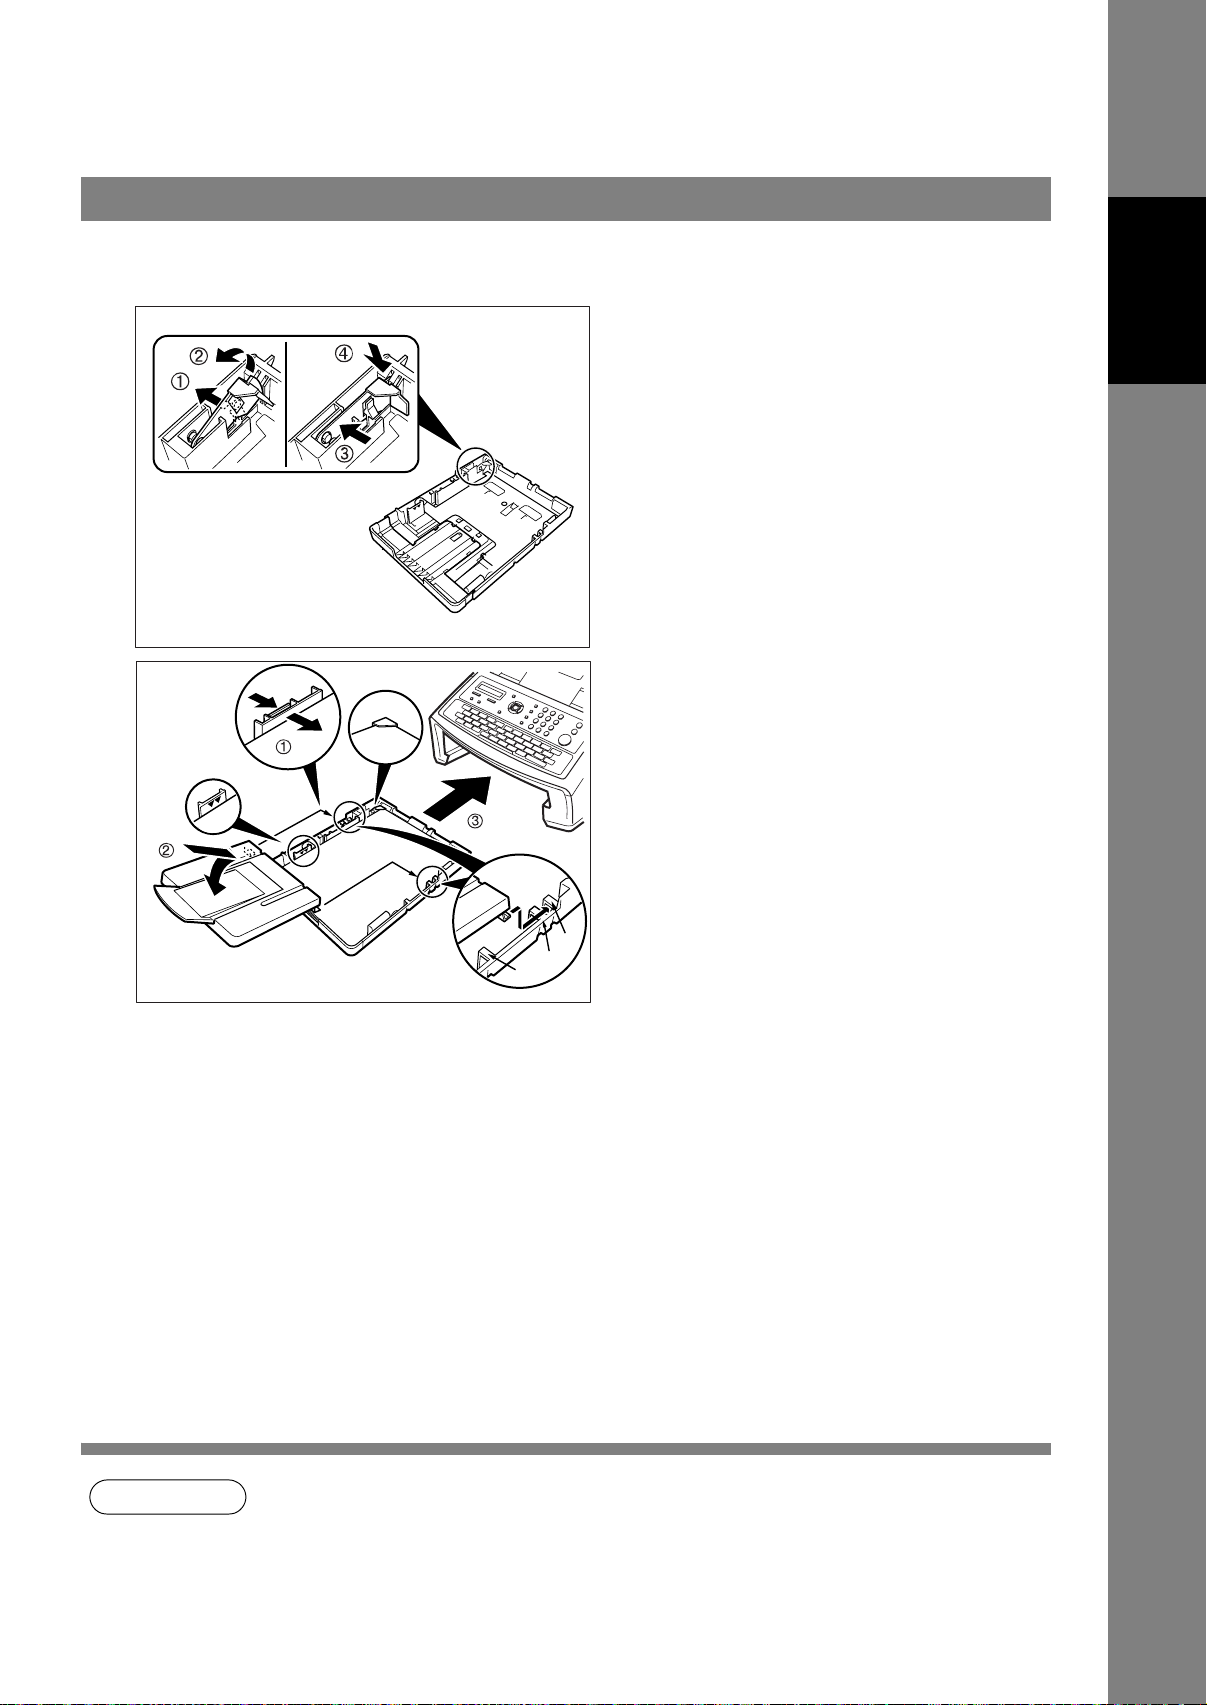
Inst alling the Toner Cartridge
1
2
T oner Cartridge
Unpack the Toner Cartridge and rock it back
and forth as shown for 5 or 6 times to even the
toner inside.
Remove the protective seal.
Note:
Pull on the seal slowly and straight
out.
3
Printer Cover
Open the Printer Cover.
18
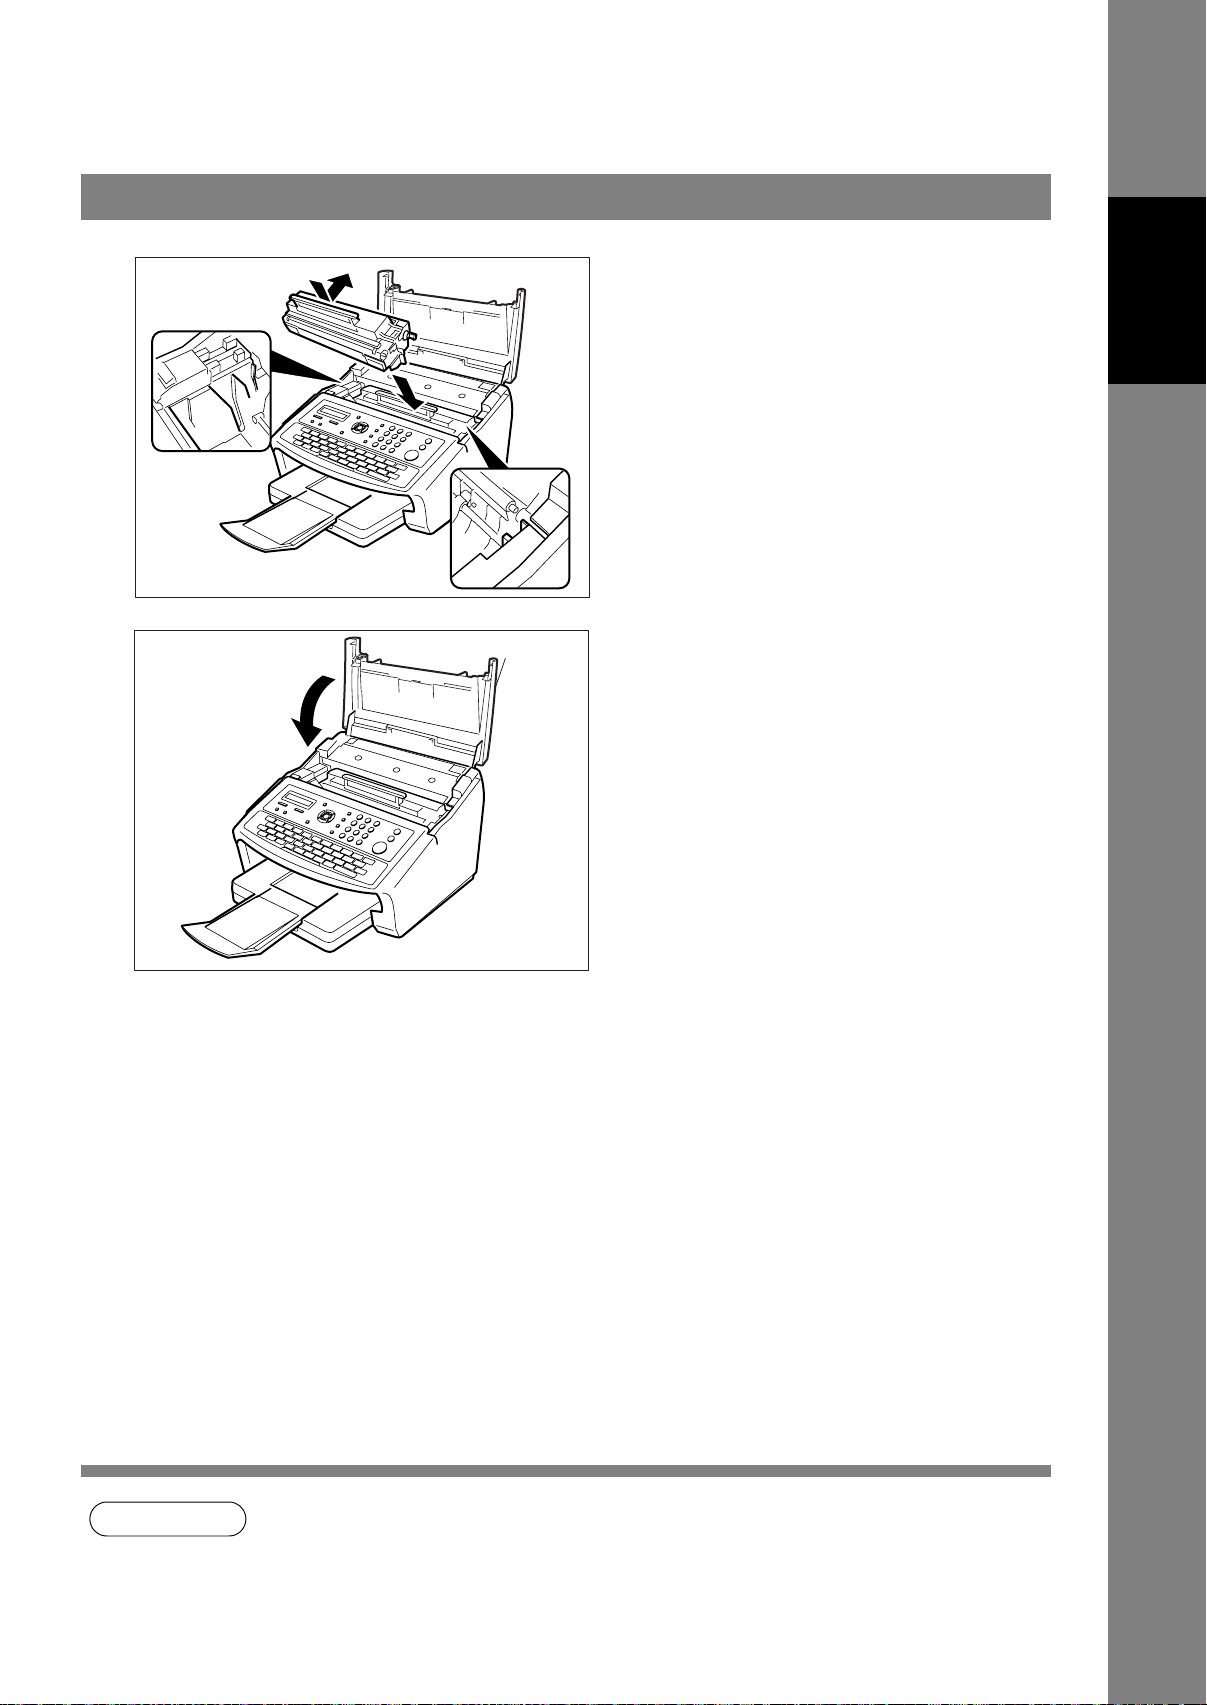
Installing the Toner Cartridge
4
5
Printer Cover
Align the projections on both sides of the
Toner Cartridge with the grooves in the
machine as shown and insert the Toner
Cartridge into the machine.
Note:
Lock the Toner Cartridge into place
by pressing the handle down and
then pushing towards the rear of the
machine.
Close the Printer Cover.
Machine
Installing Your
If you are replacing the Toner Cartridge, it is
6
recommended to clean the Printer Roller to maintain
good printing quality. To clean the Printer Roller, follow
the procedure on page 147.
NOTE
1. Used toner cartridge should be disposed of properly according to local regulations.
19
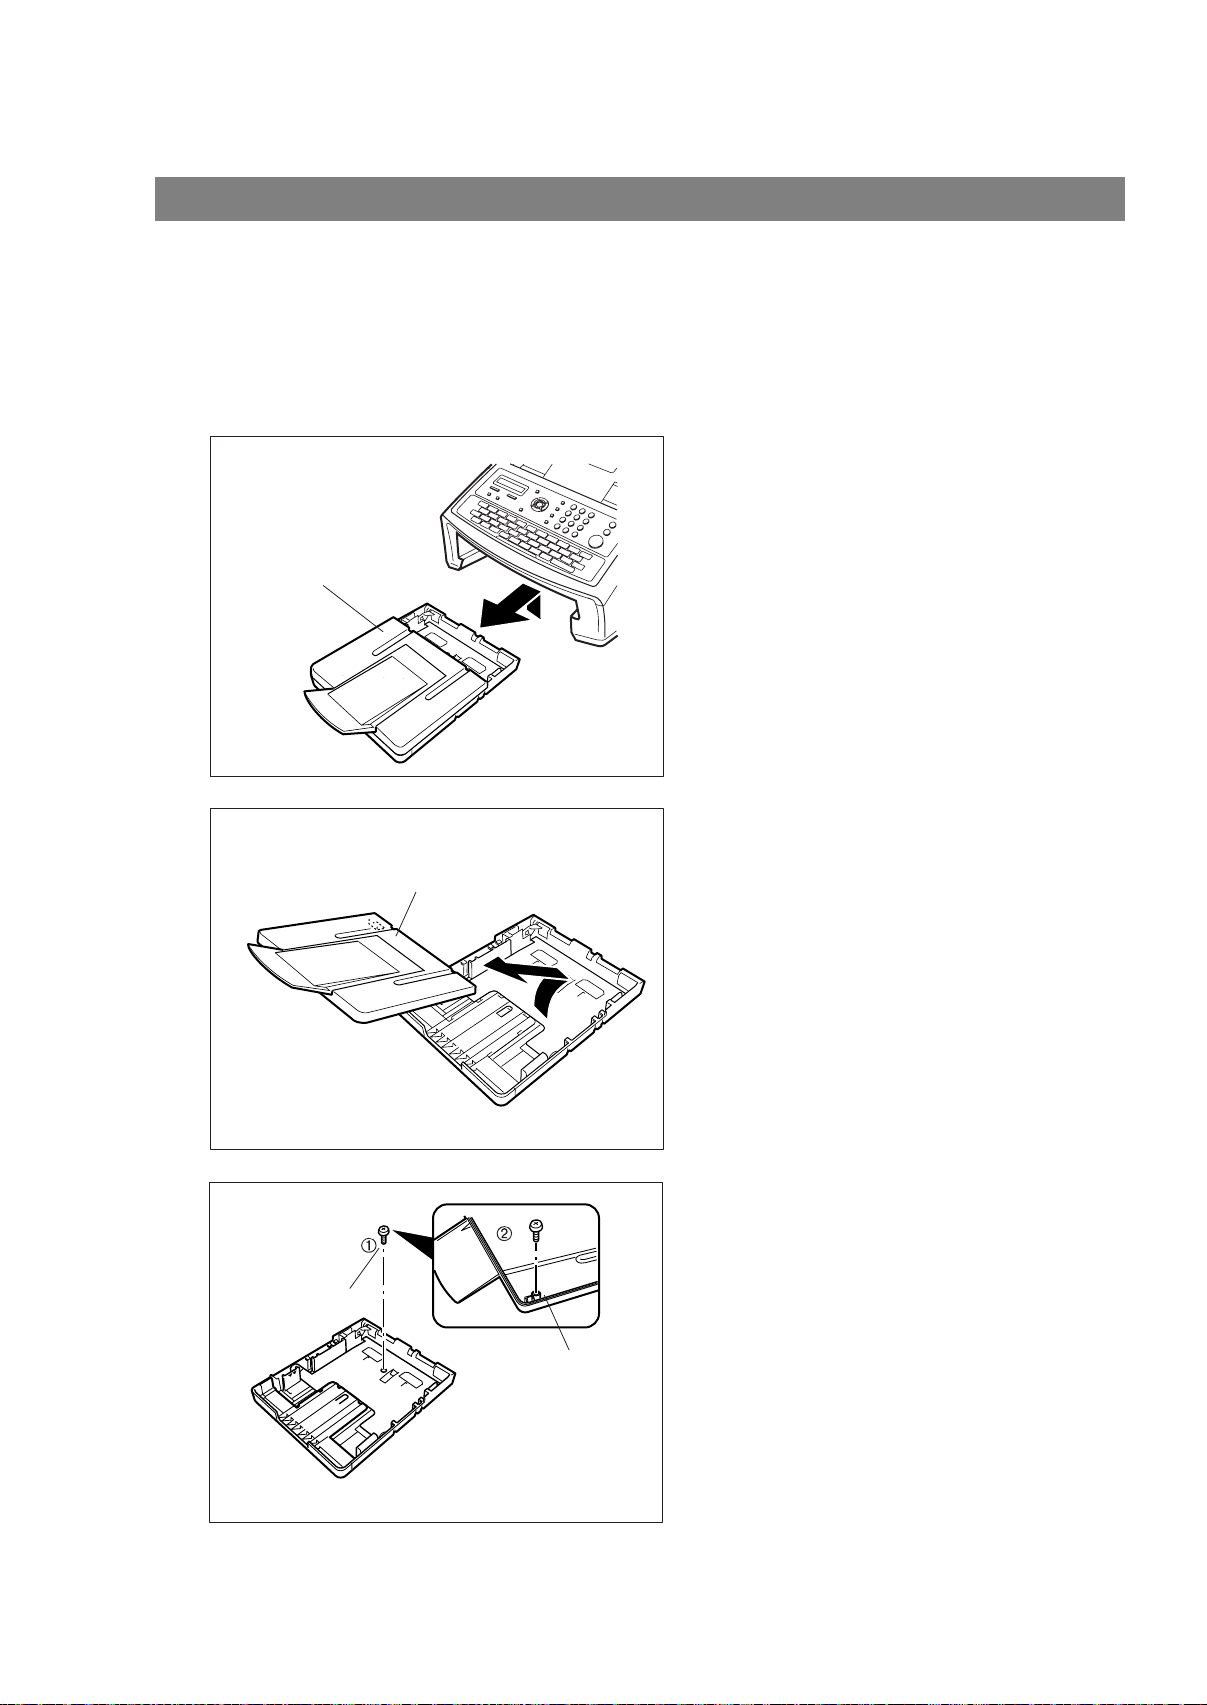
Loading the Recording Paper
How to Load the Recording Paper
Paper Specifications
In general, most bond papers will produce excellent results. Most photocopy papers will also work very well.
There are many "name" and "generic" brands of paper available. We recommend that you test various
papers until you obtain the desired results. For detailed recommended paper specifications, (See page
153).
1
2
Lift up the Paper Cassette slightly and slide it
out of the machine.
Paper Cassette
Remove the Paper Cassette Cover.
Cassette Cover
20
3
Shipping Screw
1. Remove the Shipping Screw securing
the Pressure Plate.
2. Store the screw by att aching it to the post
provided under the Paper Cassette
Cover for future use.
Cassette Cover
Loading the Recording Paper
4
Max. Paper
Capacity Mark
Paper
Width Guide
1. Load the paper into the Paper Cassette.
Slide the paper width guide to the left
until it lightly touches the stack of paper
without bending the paper. The paper
must fit squarely and firmly between the
Paper Width Guide and the right side of
tray. If it does not, the paper may feed
into the printer incorrectly resulting in a
paper jam.
Caution: Make sure tha t the paper is set
under the metal Paper
Separation Clips and that it does
not exceed the Maximum Paper
Capacity Mark. You can load
about 250 sheets (75g/m²
weight). For paper specifications.
(See page 153)
2. Re-install the Paper Cassette Cover.
3.
Slide the Paper Cassette into the
machine.
Machine
Installing Your
21
Adjusting the Paper Cassette for the Paper Length
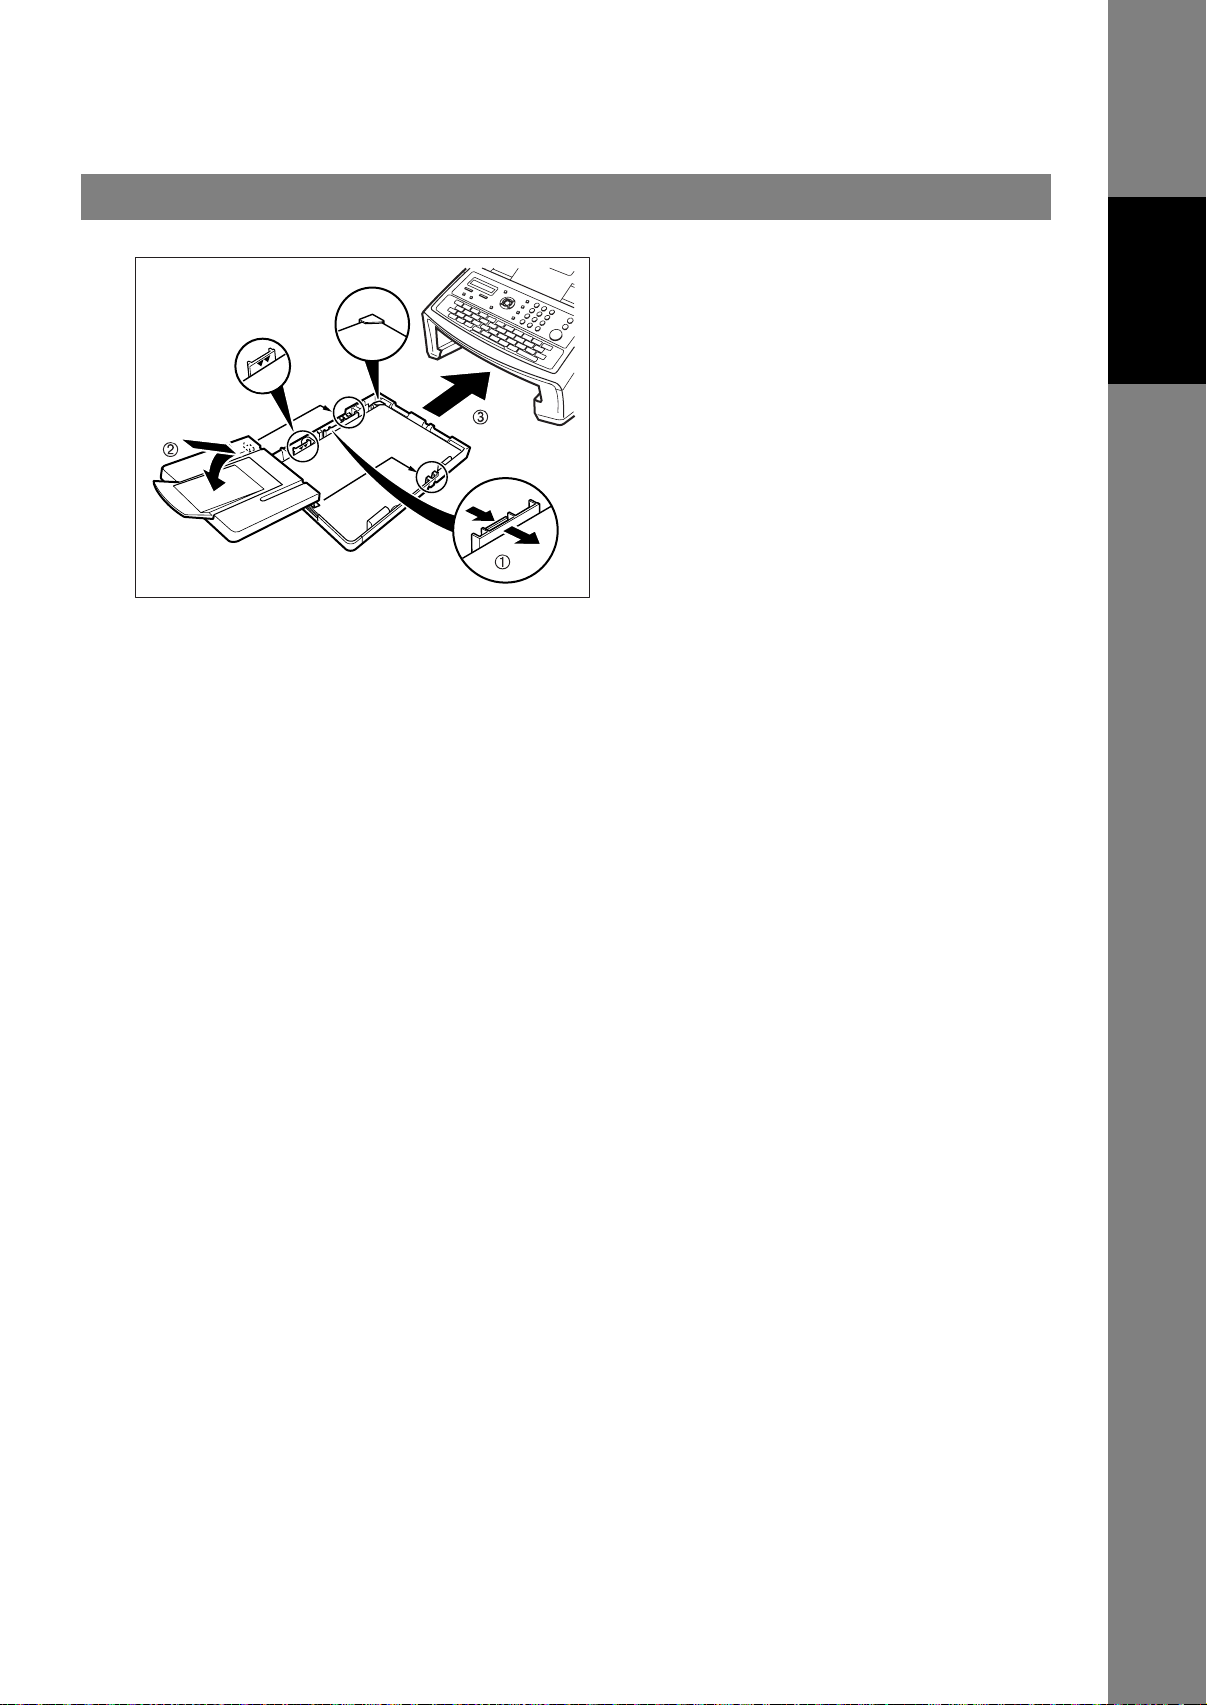
How to Adjust the Paper Cassette for the Paper Length
The factory default Paper Length setting for the Paper Cassette is A4 size. To change the paper length to
Letter or Legal size, follow the steps below.
1
Release Latch
1. Remove the paper from the Paper
Cassette and place the cassette upside
down on a flat surface.
2. While pushing down on the release latch,
pull out the Paper Length Guide.
3. Turn the Paper Cassette upright.
4. Insert the Paper Length Guide hooks into
the appropriate paper length slots (Letter
or Legal) and slide the guide towards the
back of the cassette until it locks in place.
Paper Width Guide
Max. Paper
Capacity Mark
Paper Length Guide
LGL
A4
LTR
5. Load the paper into the Paper Cassette.
Slide the paper width guide to the left
until it lightly touches the stack of paper
without bending the paper. The paper
must fit squarely and firmly between the
Paper Width Guide and the right side of
tray. If it does not, the paper may feed
into the printer incorrectly resulting in a
paper jam.
Caution:Make sure that the paper is set
under the metal Paper
Separation Clips and that it does
not exceed the Maximum Paper
Capacity Mark. You can load
about 250 sheets (75g/m²
weight). For paper specifications.
(See page 153)
6. Replace the Paper Cassette Cover to the
appropriate paper position (LTR, A4 or
LGL).
7.
Slide the Paper Cassette into the
machine.
22
Set it with the Control Panel of the machine. The Recording Paper Size setting of the Fax
2
NOTE
1. If you forget to change the Recording Paper Size setting in Fax Parameter No. 23 when
different paper is installed in the cassette, the unit will Stop printing after the 1st page of an
Incoming Fax and display a "PAPER SIZE MISMATCH" error. Then, the Recording Paper Size
setting automatically adjusts to the proper size and the unit resumes printing the Incoming Fax
from the 1st page.
Parameter No. 23 must match the paper
loaded in the cassette. If you change the
Recording Paper Size, please change the
setting accordingly in the Parameter No.23
(REC. PAPER SIZE). (See page 37)
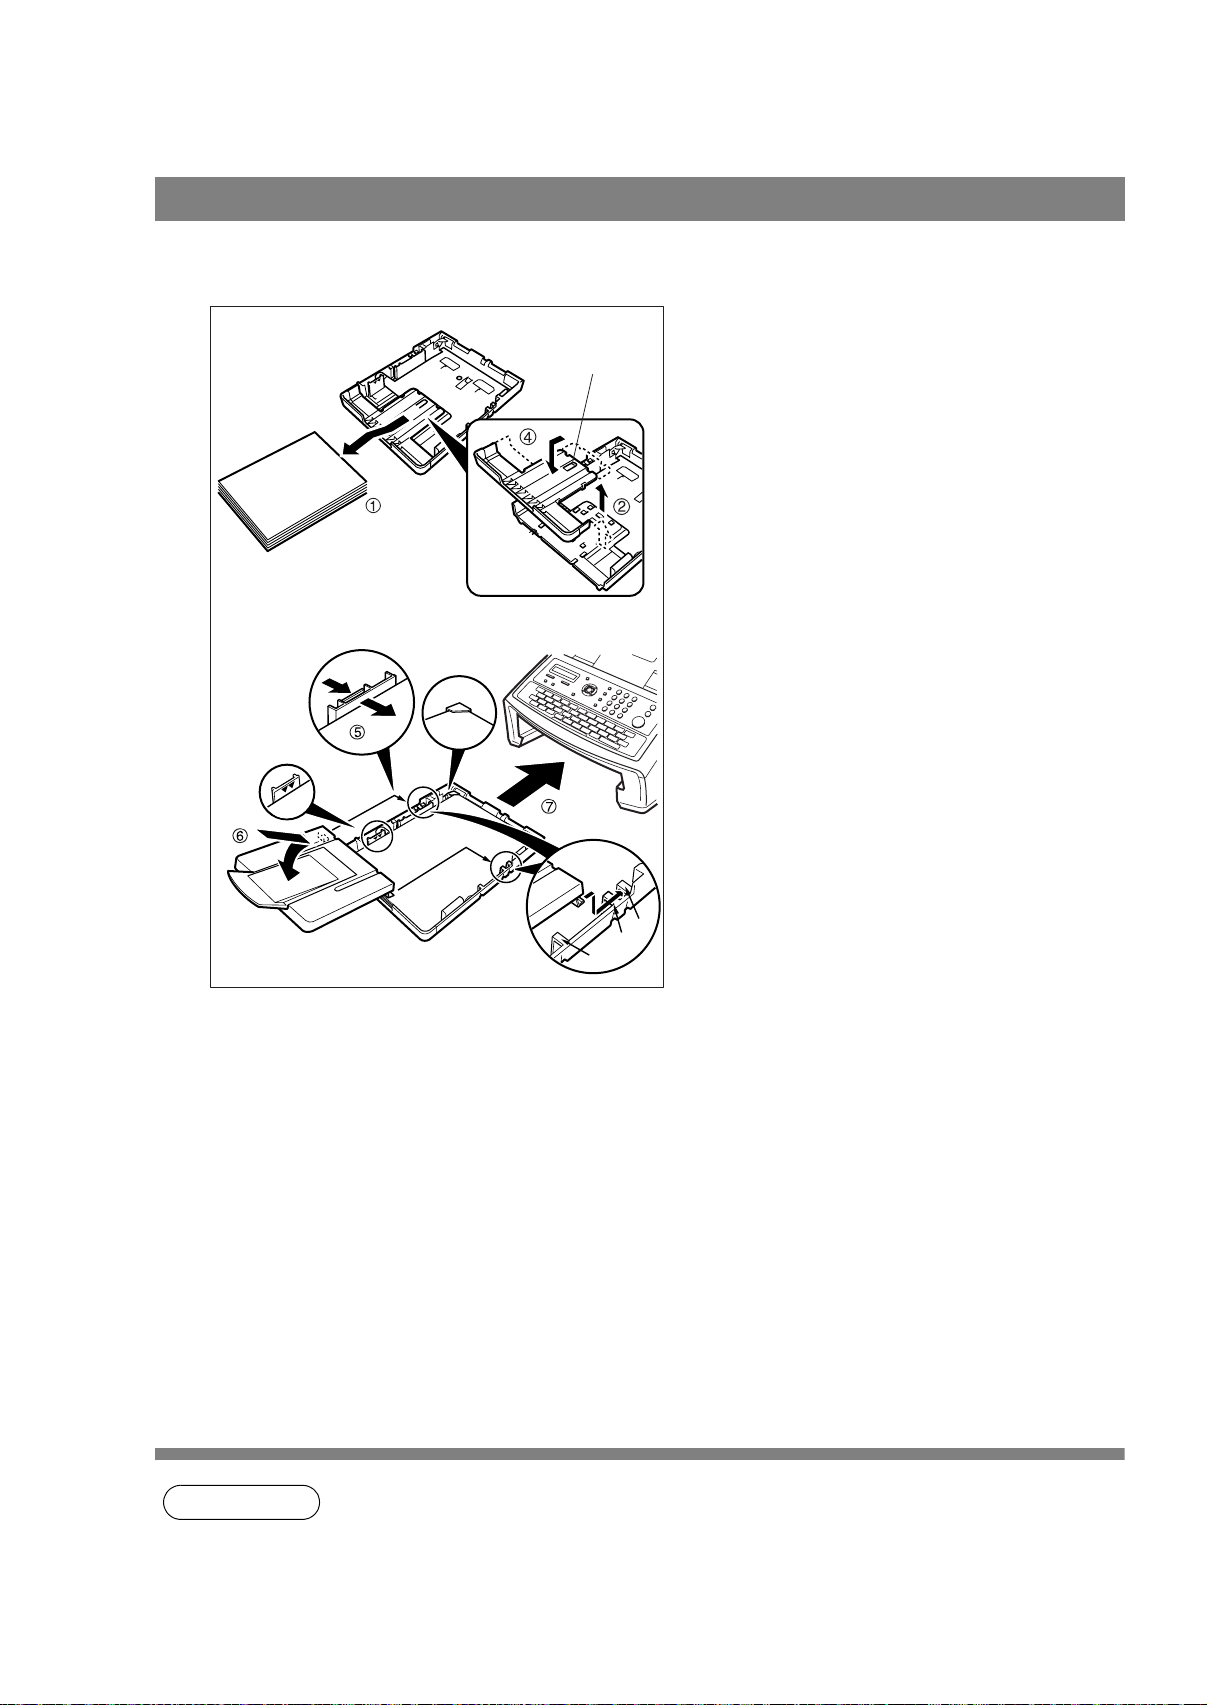
Adjusting the Paper Cassette for the Paper Width
How to Adjust the Paper Cassette for the Paper Width
The factory default Paper Width setting for the Paper Cassette is A4 size. To change the paper width to
Letter/Legal size, follow the steps below.
1
1. Release the left Paper Separation Clip
latch.
2. Pull up the Paper Separation Clip to
remove it.
3. Reposition the Paper Separation Clip
into the LTR/LGL slot.
Machine
Installing Your
2
Paper Separation Clip
Paper
Width Guide
Max. Paper
Capacity Mark
LGL
A4
LTR
4. Swing the Paper Separation Clip
downward to latch it in place.
1. Load the paper into the Paper Cassette.
Slide the paper width guide to the left
until it lightly touches the stack of paper
without bending the paper. The paper
must fit squarely and firmly between the
Paper Width Guide and the right side of
tray. If it does not, the paper may feed
into the printer incorrectly resulting in a
paper jam.
Caution:Make sure that the paper is set
under the metal Paper
Separation Clips and that it does
not exceed the Maximum Paper
Capacity Mark. You can load
about 250 sheets (75g/m²
weight). For paper specifications.
(See page 153)
2. Replace the Paper Cassette Cover to the
appropriate paper position (LTR, A4 or
LGL).
3.
Slide the Paper Cassette into the
machine.
Set it with the Control Panel of the machine. The Recording Paper Size setting of the Fax
3
NOTE
1. If you forget to change the Recording Paper Size setting in Fax Parameter No. 23 when
different paper is installed in the cassette, the unit will Stop printing after the 1st page of an
Incoming Fax and display a "PAPER SIZE M ISMA T CH" error . Then, the Recording Paper Size
setting automatically adjusts to the proper size and the unit resumes printing the Incoming Fax
from the 1st page.
Parameter No. 23 must match the paper
loaded in the cassette. If you change the
Recording Paper Size, please change the
setting accordingly in the Parameter No.23
(REC. PAPER SIZE). (See page 37)
23
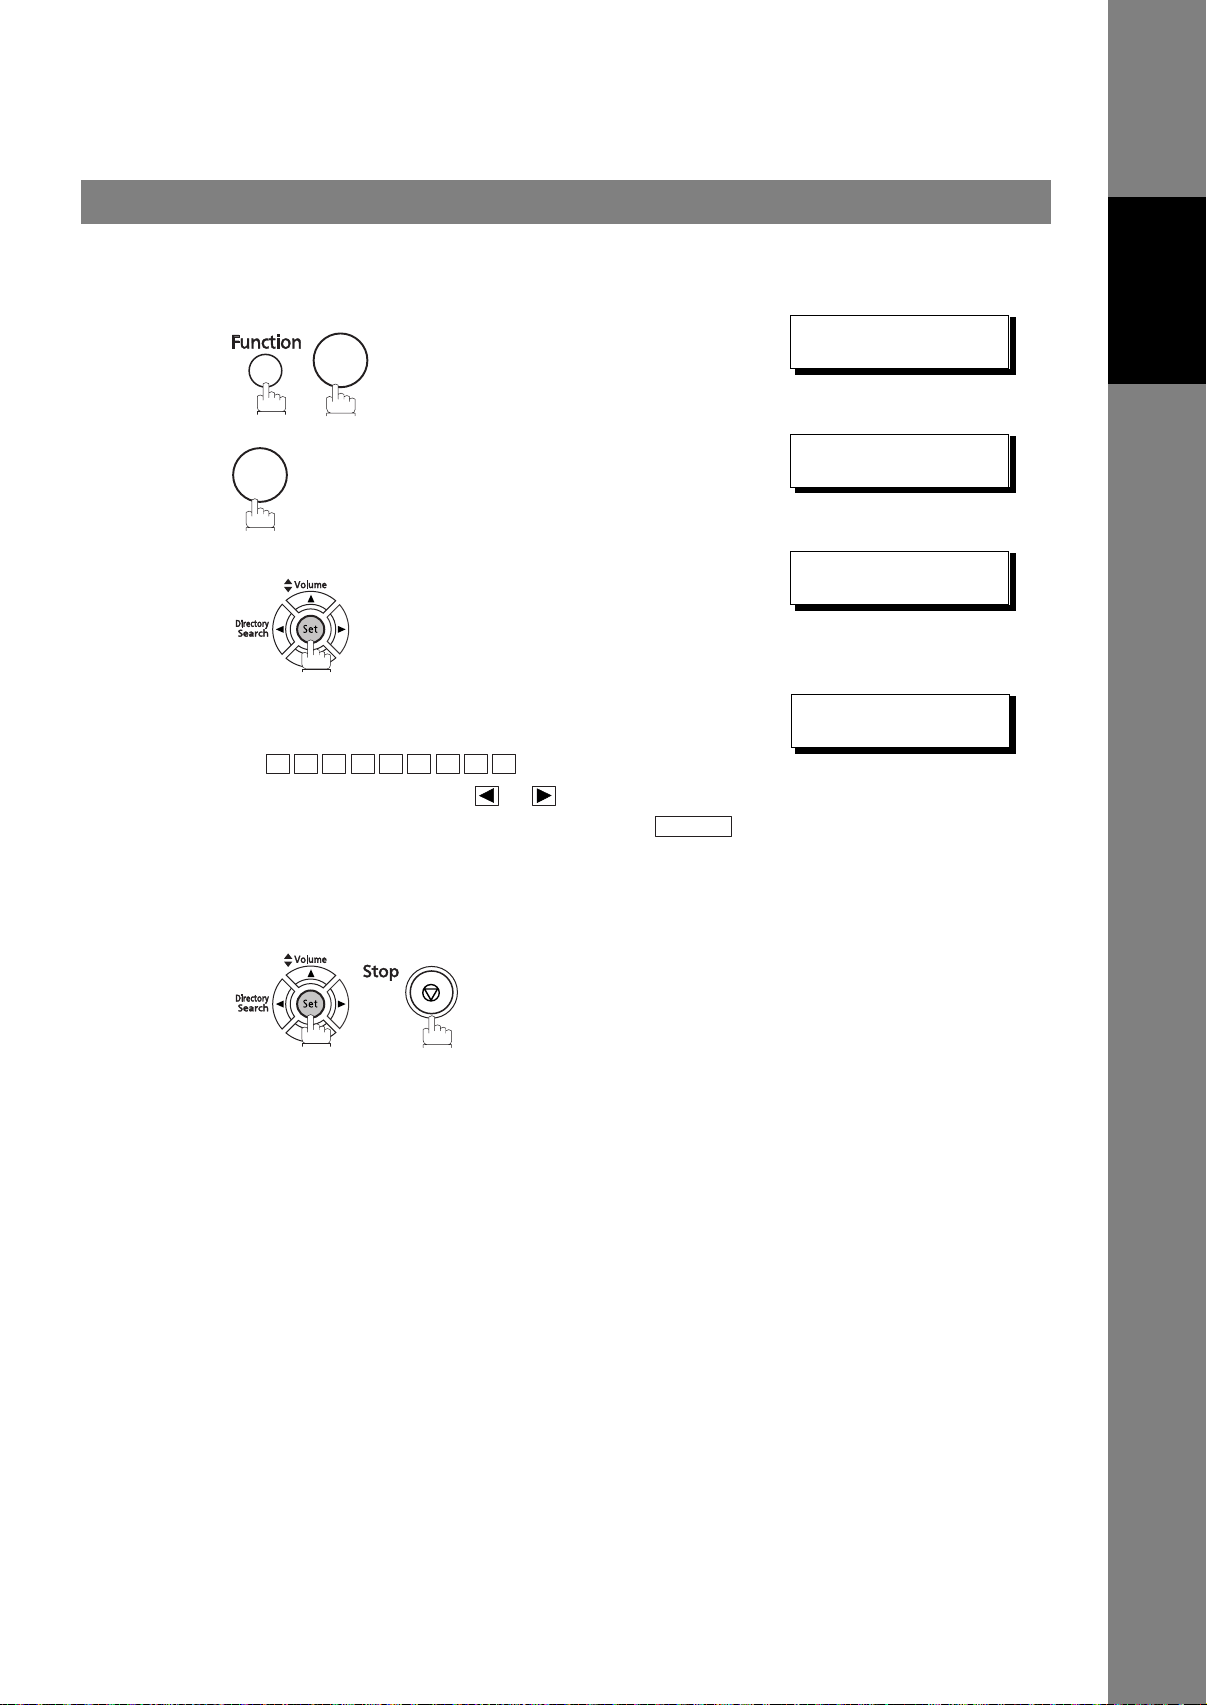
Setting the Dialling Method (Tone or Pulse)
Your machine can operate with either of two dialling methods (Tone or Pulse), depending on the type of
telephone line you are connected to. If you need to change the dialling method to Tone or Pulse, follow the
procedure below.
SET MODE (1-8)
1
2
3
4
0
7
ENTER NO. OR
FAX PARAMETER(1-137)
NO.=
06 DIALLING METHOD
2:TONE
6
∨ ∧
4
5
1
or
2
for "PULSE".
for "TONE".
06 DIALLING METHOD
1:PULSE
or
06 DIALLING METHOD
2:TONE
24
NOTE
1. This feature is not available in some countries due to local regulations. The display may not
show this feature.
Adjusting the Volume
Y ou can ad just the monitor and ringer volu me on your machine. The built- in speaker enables you to hea r the
dial tone, dialling signals, and busy tone. The ringer sound s when your machine receives a call.
Setting the Monitor Volume
* MONITOR *
1
You will hear the dial tone through the speaker.
Machine
Installing Your
2
or
3
Setting the Ringer Volume
Standby
1
2
or
repeatedly to raise the volume.
repeatedly to lower the volume.
repeatedly to raise the volume.
MONITOR VOLUME
LOW [
MONITOR VOLUME
LOW [
DD-MMM-YYYY 15:00
00%
RINGER VOLUME
(((( ))))
] HIGH
] HIGH
3
NOTE
RINGER VOLUME
repeatedly to lower the volume.
1. You can also adjust the volume of the key touch tone and the volume of the buzzer in the Fax
Parameter No. 10 (KEY/BUZZER VOLUME). (See page 36)
25
User Parameters
General Description
Your facsimile machine has several basic settings (User Parameters) to help you keep records of the
documents you send or receive. For example, the built- in clock keeps the current date and time, and your
LOGO and ID Number help to identify you when you send or receive documents.
Setting the Date and Time
At standby the display will show the date and time. Once the standby display is set, it will automatically be
updated.
SET MODE (1-8)
1
2
1
7
ENTER NO. OR
1:USER PARAMETERS?
PRESS SET TO SELECT
∨ ∧
3
4
5
Enter the new date and time.
Ex: Date : 12th
1 2
Month : August
8
0
Year : 2008
2 0 0
1 5 0 0
If you made a mistake, use or to move the cursor
over the incorrect number, then overwrite it with the
correct one.
8
Time : 3:00 PM
DATE & TIME
2-08-2008 00:00
DATE & TIME
12-08-2008 15:00
26
NOTE
On occasion, the clock may need adjustment. (Lunar inequality : ±1 minute)
User Parameters
Setting Your LOGO
When you send a document, your LOGO appears on the top of the copy printed out at the other station.
The LOGO helps to identify you to someone who receives your document.
SET MODE (1-8)
1
2
3
7
1
repeatedly until display shows;
ENTER NO. OR ∨ ∧
1:USER PARAMETERS?
PRESS SET TO SELECT
LOGO
Machine
Installing Your
4
5
Enter your LOGO (Up to 25 characters and digits) by
using the Character keys.
Ex:
If you made a mistake, use or to move the cursor
one space beyond the incorrect character, press
and then re-enter the new character.
If more than 19 characters are entered, the left side
characters will scroll off the display.
A N A S O N I C
P
Clear
LOGO
PANASONIC
27

User Parameters
Setting Your Character ID
If the remote machine has Character ID capabilities, when you are sending or receiving, your Character ID
will appear on the remote machine's display and the remote machine's Character ID will appear on your
display.
SET MODE (1-8)
1
2
3
7
1
repeatedly until display shows;
ENTER NO. OR ∨ ∧
1:USER PARAMETERS?
PRESS SET TO SELECT
CHARACTER ID
4
5
Enter your Character ID (Up to 16 characters and digits)
by using the Character keys.
Ex:
If you made a mistake, use or to move the cursor
beyond the incorrect character, press and then
re-enter the new character.
E A D O F F I C E
H
Clear
CHARACTER ID
HEAD OFFICE
28
NOTE
1. The special characters of Å, Ä, Ö, Ü, Æ, è and é cannot be used for Character ID.

User Parameters
Setting Your ID Number (Fax Telephone Number)
If the remote machine does not have a Character ID but has an ID Number , when sending or receiving, your
ID Number will appear on the remote machine's display and their ID Number will appear on your display.
We suggest you use your facsimile telephone number as your ID number. (Up to 20 digits)
SET MODE (1-8)
1
2
3
7
1
ENTER NO. OR ∨ ∧
1:USER PARAMETERS?
PRESS SET TO SELECT
ID NO.
Machine
Installing Your
4
5
repeatedly until display shows;
Enter your ID (Up to 20 digits) by using the keypad and
press the key to enter a space between numbers.
Ex:
2 0 1 5 5 5 1 2 1 2
If you made a mistake, use or to move the cursor
one space beyond the incorrect number, press
and then re-enter the new number.
Clear
ID NO.
201 555 1212
NOTE
1. You may use to enter a "+" character at the beginning of the ID number to indicate the
following digit(s) for your country code.
Ex:+1 XXX XXX XXXX+1 for U.S.A. country code.
+81 X XXX XXXX +81 for Japan country code.
29
One-Touch/Abbreviated Dialling Numbers
Entering One-Touch/Abbreviated Dialling Numbers
One-Touch and Abbreviated Dialling are two fast ways of dialling full telephone numbers. To use these
dialling methods, you must first store the telephone number using the following procedure.
To enter a One-Touch key, follow the steps below
SET MODE (1-8)
1
2
2
7
ENTER NO. OR
1:ONE-TOUCH
2:ABBR NO.
∨ ∧
3
4
5
6
7
8
1
Ex:
Enter the telephone number
(Up to 36 digits including pauses and spaces).
Ex:
Enter the station name using character keys
(Up to 15 characters).
Ex:
Redial/Pause
9
A L E S
S
5 5 5 1 2
E P TD
ONE-TOUCH< >
PRESS ONE-TOUCH
<01>
ENTER TEL. NO.
<01>
9-555 1234
3
4
<01> ENTER NAME
9-555 1234
<01> SALES DEPT
9-555 1234
ONE-TOUCH< >
PRESS ONE-TOUCH
30
To record another number, repeat steps 4 to 8.
To return to standby, press .
Sto
p
 Loading...