


Software
Operating Instructions
(For Document Management System and Printer)
Before StartingPrinter SectionTroubleshootingAppendix
Model No.
UF-4000/4100/6000/6100
System Section
Document Management
Before operating this software, please read these instructions completely and keep these operating instructions for future reference.
English

Notification for UF-4000/4100/6000/6100
These models are designed with the Energy Conservation in mind, which will automatically
goes into the Sleep mode when it is not in use for a period of time (The factory default is 1
hour).
While the machine is in the Sleep mode, it will not automatically come out of Sleep mode when
a print command from a connected computer is sent. If you attempt to print a document from
your computer to the machine while it is in the Sleep mode, an error message "LPT1 write
error." will appears on your computer.
Please press the ENERGY SAVER key on the control panel of the machine before starting a
print job from your computer.
If you wish to start printing at any time without having to press the ENERGY SAVER key to
come out of Sleep mode, you can change the setting of the Fax Parameter #34 from "3"
(SLEEP) to "2" (ENERGY-SAVER). This will stop the machine from switching into the Sleep
mode.
Please refer to the machine's Operating Instructions (For Facsimile) for details.
The following trademarks and registered trademarks are used throughout this manual:
Microsoft, MS-DOS, Windows and Windows NT are registered trademarks of Microsoft
Corporation in the USA and other countries.
i386, i486 and Pentium are trademarks of Intel Corporation.
Centronics is a registered trademark of Centronics Data Computer Corporation.
The USB-IF Logos are trademarks of Universal Serial Bus Implementers Forum, Inc.
TrueType is a registered trademark of Apple Computer, Inc.
Novell and NetWare are registered trademarks of Novell, Inc. in the USA and other countries.
All other trademarks identified herein are the property of their respective owners.
Copyright c 2005 by Panasonic Communications Co., Ltd.
All rights reserved. Unauthorized copying and distribution is a violation of law.
Published in Japan.
The contents of these Operating Instructions are subject to change without notice.
2

Table of Contents
Before Starting
External View and Control Panel .................................................................................. 6
External View ................................................................................................. 6
System Requirements.................................................................................................... 8
Printer Section
Installing the Printer Driver ........................................................................................... 9
Configuring the Printer Driver Settings ....................................................................... 12
Windows 98/Windows Me .............................................................................. 12
Windows NT 4.0 (Administrator) .................................................................... 18
Windows NT 4.0 (User) .................................................................................. 25
Windows 2000/Windows XP/Windows Server 2003 (Administrator).............. 26
Windows 2000/Windows XP/Windows Server 2003 (User) ........................... 34
Windows Common Settings ........................................................................... 35
Print Operation ............................................................................................................... 39
Printing from Windows Applications ............................................................... 39
Printing on Network........................................................................................ 40
Document Management System Section
Installing the Document Management System............................................................ 42
Document Manager ........................................................................................................ 46
Main Window .................................................................................................. 46
Basic Operations............................................................................................ 48
Setting Plug-in................................................................................................ 50
File Menu........................................................................................................ 51
Edit Menu ....................................................................................................... 58
View Menu...................................................................................................... 59
Document Menu............................................................................................. 60
Options Menu................................................................................................. 62
Image Converter ............................................................................................................. 63
General Description........................................................................................ 63
Windows 98/Windows Me .............................................................................. 63
Windows NT 4.0 ............................................................................................. 64
Windows 2000/Windows XP/Windows Server 2003 ...................................... 65
Document Viewer ........................................................................................................... 66
Main Window .................................................................................................. 66
Basic Operations............................................................................................ 68
Annotation Function ....................................................................................... 69
File Menu........................................................................................................ 70
Edit Menu ....................................................................................................... 75
Page Menu..................................................................................................... 76
View Menu...................................................................................................... 79
Annotation Menu ............................................................................................ 80
Window Menu................................................................................................. 89
3

Table of Contents
Document Management System Section
Document Scanner......................................................................................................... 90
Main Window ................................................................................................. 90
Tool Menu...................................................................................................... 92
Image Scanning ............................................................................................. 94
Panafax Desktop ............................................................................................................ 96
General Description ....................................................................................... 96
Connection Configurations............................................................................. 97
Installation and Setup .................................................................................... 99
Main Window and Toolbar ............................................................................. 104
Sending Document ........................................................................................ 106
Receiving Document...................................................................................... 110
Registering the Personal Phone Book ........................................................... 111
Cover Sheet ................................................................................................... 116
Configuration Menu........................................................................................ 119
Send Log/Receive Log................................................................................... 121
Status Monitor ................................................................................................................124
Task Bar Display............................................................................................ 124
Task Bar Menu............................................................................................... 125
Display Status Details .................................................................................... 126
Configuration Editor ...................................................................................................... 129
Main Window ................................................................................................. 129
User Parameters Folder................................................................................. 131
Fax Parameters Folder .................................................................................. 132
Journal Folder ................................................................................................ 133
Phone Book Setting Shortcut Activation Folder ............................................. 134
Phonebook Editor .......................................................................................................... 135
Features......................................................................................................... 135
Activation Procedure ...................................................................................... 136
Main Window ................................................................................................. 137
Retrieve/Write ................................................................................................ 139
Open/Save File .............................................................................................. 140
Insert Entry..................................................................................................... 142
Delete Entry ................................................................................................... 143
4
Troubleshooting
Troubleshooting............................................................................................................. 144
Printing Operation Failure.............................................................................. 144
Documents Not Printing Correctly.................................................................. 145
Error Messages Displayed on the Computer ................................................. 146
Appendix
Appendix ......................................................................................................................... 147
Printing Area .................................................................................................. 147

memo
5

Before Starting
External View and Control Panel
External View
UF-4000/4100
Parallel Interface Connector
Connect to the PC
Parallel Interface Cable
(A cable does not come with the unit.) Use a cable of IEEE1284
specifications, with a maximum length of 20 ft (6m). Consult a
service provider for details.
6

External View
UF-6000/6100
External View and Control Panel
Before Starting
Parallel Interface Connector
Connect to the PC
Parallel Interface Cable
(A cable does not come with the unit.) Use a cable of
IEEE1284 specifications, with a maximum length of 20 ft (6m).
Consult a service provider for details.
7

System Requirements
• Personal Computer : IBM PC/AT and compatibles (CPU Pentium II or greater)
• Operating System : Windows 98*1, Windows Me*2, Windows NT 4.0*3 (With Service Pack 3 or later is
required), Windows 2000*4, Windows XP*5, Windows Server 2003*
• System Memory : The minimum recommended Memory for each OS is as follows:
Windows 98, Windows Me
Windows 2000, Windows XP, Windows NT 4.0,
Windows Server 2003
• Free Disk Space : 100 MB or greater
• CD-ROM Drive : Used for installing the software and utilities from the CD-ROM.
• Interface : Parallel Port
* 1 Microsoft® Windows® 98 operating system (hereafter Windows 98)
* 2 Microsoft® Windows® Millennium Edition operating system (hereafter Windows Me)
* 3 Microsoft® Windows NT® operating system Version 4.0 (hereafter Windows NT 4.0)
* 4 Microsoft® Windows® 2000 operating system (hereafter Windows 2000)
* 5 Microsoft® Windows® XP operating system (hereafter Windows XP)
* 6 Microsoft® Windows Server ™ 2003 operating system (hereafter Windows Server 2003)
:
64 MB or greater
:
128 MB or greater
6
8
Printer Section
Installing the Printer Driver
1
2
3
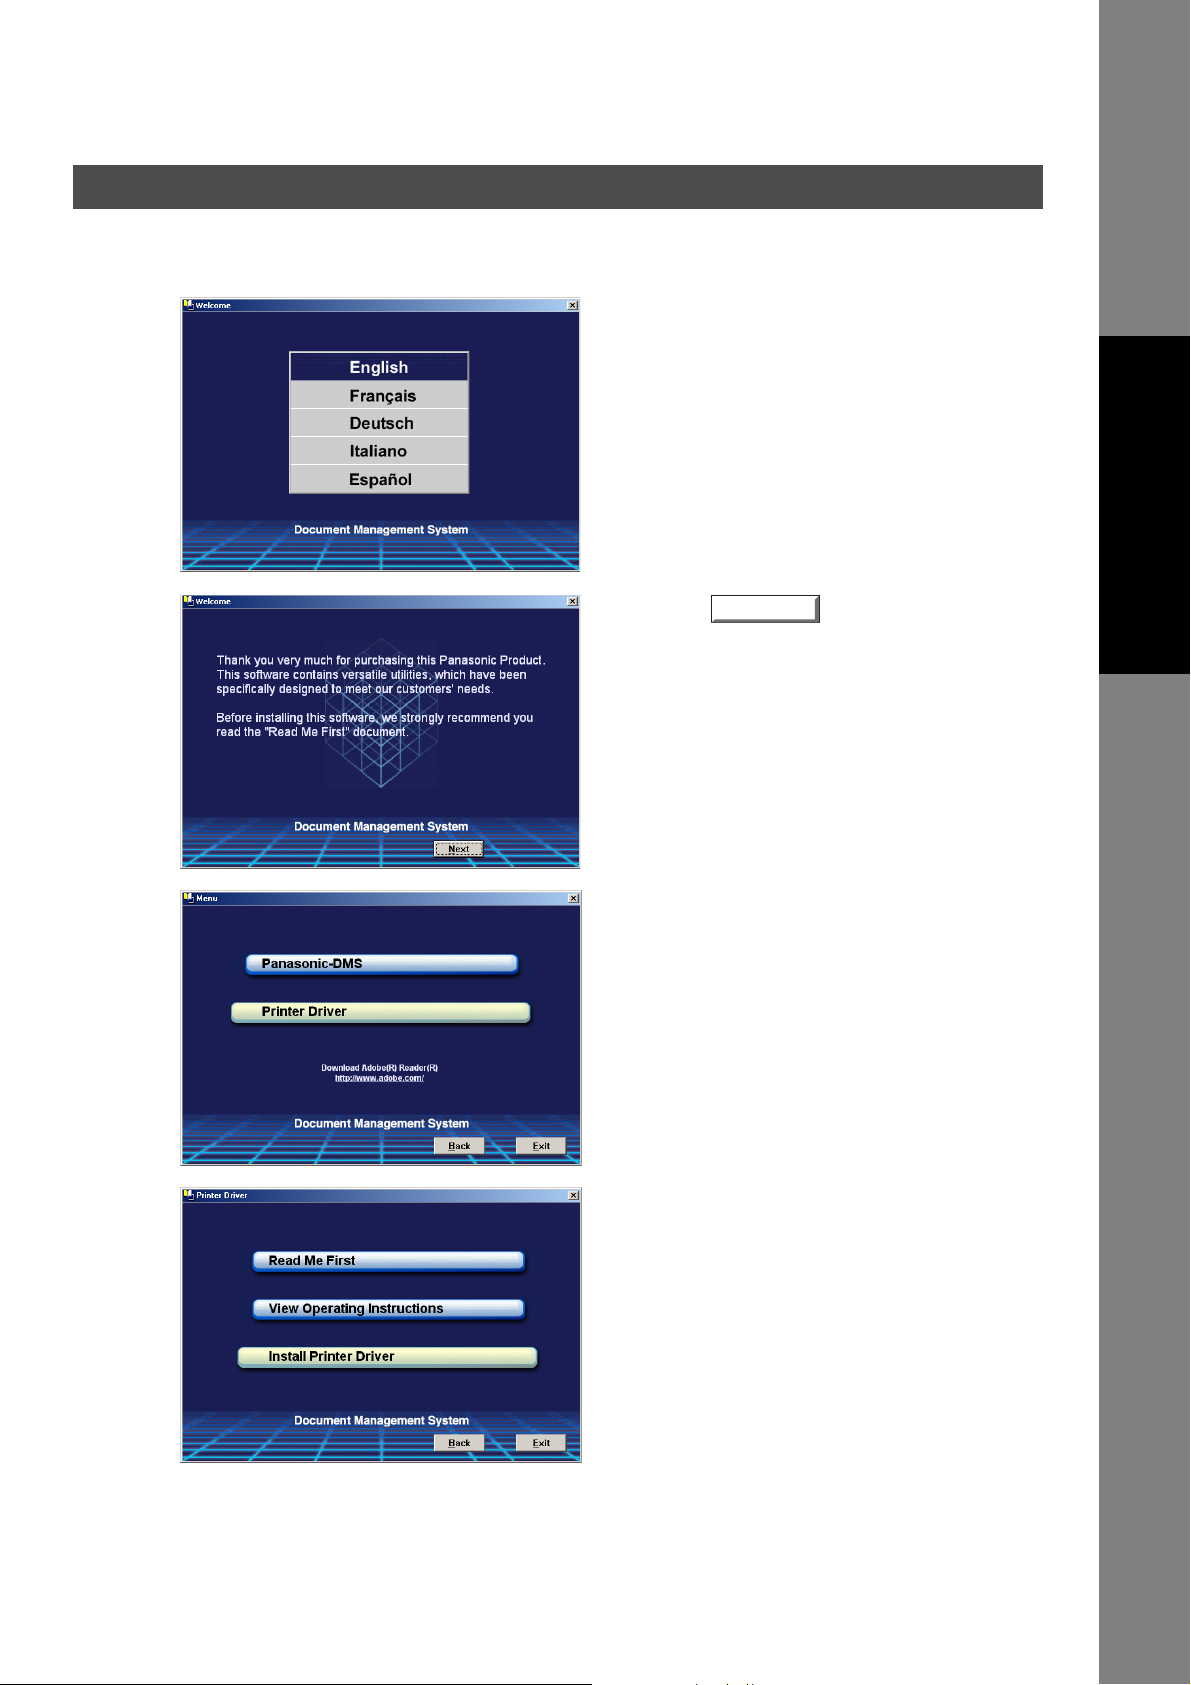
Insert the Panasonic Document Management
System CD-ROM.
Click on the desired language.
Note:
1.If the CD-ROM does not launch
automatically, double click the My
Computer icon on the Desktop or on
the Start menu, then double click the
CD-ROM icon.
2.The language screen differ depending
on the models.
Click the button.
Next
Printer Section
4
5
Click Printer Driver.
Click Install Printer Driver.
Continued on the next page...
9

Installing the Printer Driver
6
7
Select your machine's model(s) check box
and click the button.
Check LPT1: and click the
button.
Next
Next
8
9
Click the button if you would like
to change your current default printer to the
one that you are installing.
Note:
Select your new default printer from the New
Printer List and click the button.
Yes
This dialog box only appears if another
printer is already installed.
Next
10

Installing the Printer Driver
10
11
The required files are copied.
When the setup process is completed, a
screen is displayed prompting you to restart
your computer.
Click the button to restart your
Finish
Printer Section
computer.
The Panasonic/Panafax Printer Driver has been installed, and the Panasonic/Panafax Printer icon(s) have
been added to the Printer folder.
NOTE
1. When installing on Windows NT 4.0, Windows 2000, Windows XP or Windows Server 2003,
logon to the computer/network using an account with administrator rights.
2 To remove the Printer Driver, select Panasonic UF-xxxx in Add/Remove Programs
Properties in the Control Panel and click the / button.
Add... Remove
11

Configuring the Printer Driver Settings
Windows 98/Windows Me
To change the printer settings, open the dialog box for the printer properties by performing the following
steps.
Click the Start button, select Settings, and then click
1
2
Printers.
Right-click on the desired printer icon in the Printers
folder, and select Properties in the pop-up menu.
The printer properties dialog box appears.
12

Configuring the Printer Driver Settings
Windows 98/Windows Me
General Tab
Printer Section
1. Comment
Enter comments regarding the properties, if any.
If another user sets up this printer on his or her computer when sharing the printer, the comment specified
here will also appear on that computer. However, the comment displayed for an existing user will remain
unchanged even if this comment is modified later.
2. Separator page
This feature does not function properly on your machine. We recommend that you do not use it.
3. button
Print Test Page
Prints a test page. This allows the user to verify if the printer is installed properly.
13
Configuring the Printer Driver Settings
Windows 98/Windows Me
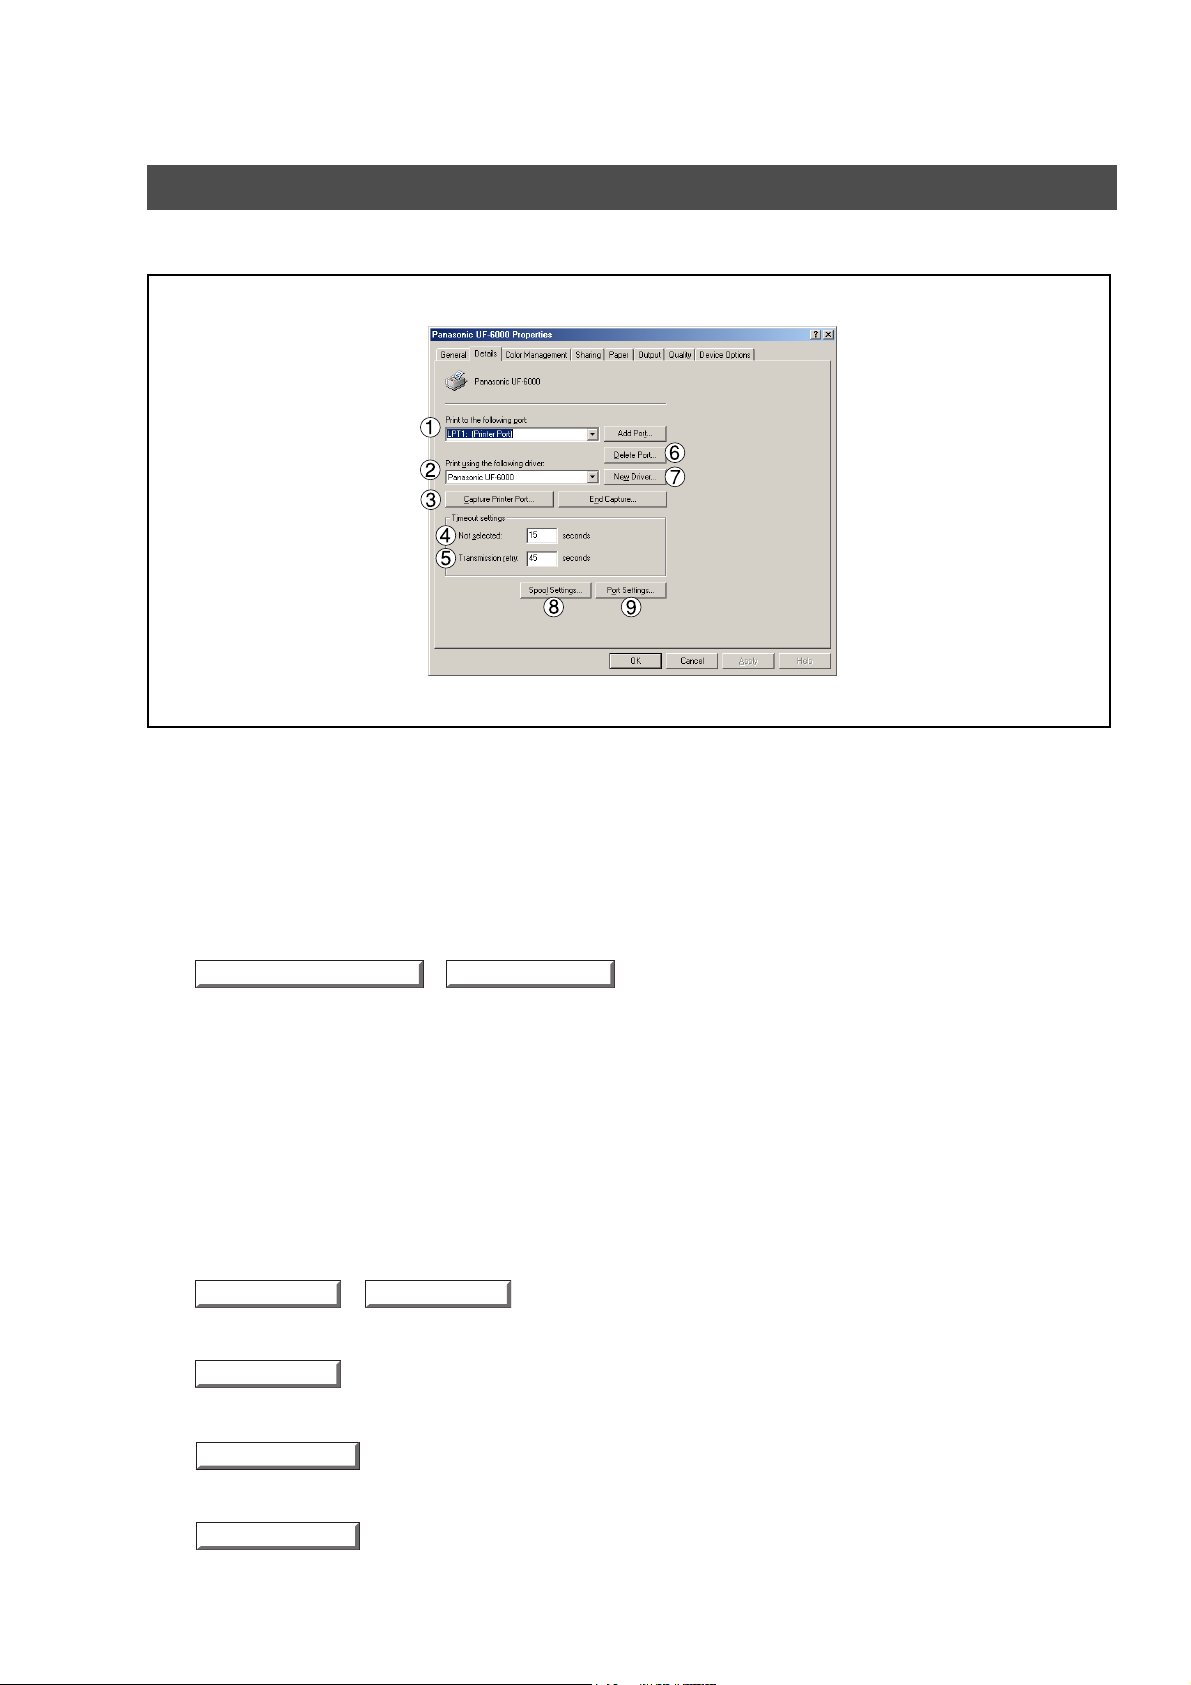
Details Tab
1. Print to the following port
Displays either the port where the printer is connected or the path to the network printer.
To change the printing destination, either select the printing destination port from the list or enter the
network path here.
2. Print using the following driver
Displays the type of the printer driver. Specify the printer being used or a printer model which can be
emulated with the printer being used.
3. / button
Capture Printer Port...
Assigns a local port to the network connected printer or cancels a local port assigned to the network
printer.
4. Timeout settings - Not selected
Specify the amount of time (in seconds) allowed to elapse before the printer comes online. If the printer is
not online within this duration, an error message will be displayed.
5. Timeout settings - Transmission retry
Specify the amount of time (in seconds) allowed to elapse before the printer is ready for printing. If the
printer is not ready for printing within this duration, an error message will be displayed.
Increase this value if a timeout error occurs when printing a large document.
6. / button
Add Port...
Adds/deletes a new port or a new network path.
Delete Port...
End Capture...
14
7. button
New Driver...
Updates or modifies the printer driver.
Spool Settings...
8. button
Specify the method of sending (spooling) documents from the program to the printer.
9. button
Port Settings...
Modifies printer port settings.

Configuring the Printer Driver Settings
Windows 98/Windows Me
Sharing Tab
Printer Section
1. Not Shared/Shared As
Select whether to display or share this printer with other computers.
2. Share Name
Specify the name of the shared printer. The displayed name can be used as is or a new name may be
entered. The name specified here will be displayed when other users view information about the printer
on the network.
3. Comment
You can enter comments regarding a shared printer (such as the type of printer and the location where it
is installed). When other users view information about the printer on the network, the comment specified
here will be displayed.
4. Password
Specify the password required when other users connect to this printer.
Leave the box blank in order not to use any password.
NOTE
1. Sharing Tab in property dialog box is not displayed unless printer sharing has been specified.
15

Configuring the Printer Driver Settings
Windows 98/Windows Me
Device Options Tab
<UF-4000/4100> <UF-6000/6100>
1. Number of Paper Trays
Select the number of available paper trays if optional Paper Feed Module(s) are installed.
16
NOTE
1. Device Options Tab specifies device-specific settings and settings of optional devices.
Make sure that the Device Option Tab is set properly before printing a document, or printing
problems may occur.

Configuring the Printer Driver Settings
Windows 98/Windows Me
Paper/Output/Quality
Refer to All Windows Common Settings (see pages 35 - 38).
Printer Section
17

Configuring the Printer Driver Settings
Windows NT 4.0 (Administrator)
To change the printer settings, open the dialog box for the printer properties by performing the following
steps.
Logon to the computer/network using an account with
1
2
3
administrator rights. (See Note 1)
Click the Start button, select Settings, and then click the
Printers icon.
Right-click on the desired printer icon in the Printers
folder, and select Properties in the popup menu.
The printer properties dialog box appears.
18
NOTE
1. In Windows NT 4.0, setting the properties depends on the logon account. This section
describes properties to be specified by the administrator (system manager).
See "Configuring the Printer Driver Settings (User)" for details on user properties. (See page
25)

Configuring the Printer Driver Settings
Windows NT 4.0 (Administrator)
General Tab
Printer Section
1. Comment
Enter comments regarding the properties, if any.
If another user sets up this printer on his or her computer when sharing the printer, the comment specified
here will also appear on that computer. However, the comment displayed for an existing user will remain
unchanged even if this comment is modified later.
2. Location
Specifies the printer location.
3. Driver
Displays the printer driver type. Specify the printer being used or a printer model that can be emulated
with the printer being used.
4. button
New Driver...
Updates or modifies the printer driver.
5. button
Separator Page...
This feature does not function properly on your machine. We recommend that you do not use it.
6. button
Print Processor...
Specify the processor to be used for printing (Print Processor) and the data type (Default Data type).
The processor and data type affect the manner in which the printer functions in Windows NT. Normally
they do not need to be modified. However, modification might be necessary when the printer is used with
a special application.
7. button
Print Test Page
Prints a test page. This allows the user to verify if the printer is installed properly.
19

Configuring the Printer Driver Settings
Windows NT 4.0 (Administrator)
Ports Tab
1. Print to the following port(s)
Displays a list of available ports for printing (Port), their status (Description) and printers that are
connected to these ports (Printer).
2. / button
Add Port...
Adds/deletes a new port or a new network path.
3. button
Configure Port...
Configures the selected port. In case of a parallel port, Transmission Retry should be specified. (See
Note 1 and 2)
4. Enable bidirectional support
This setting enables reception of configuration data and status data from the printer.
5. Enable printer pooling
Printer pooling allows data sent to one logical printer to be received and printed by two or more printers.
With printer pooling enabled, a transmitted printing job is output to the first printer that is ready for
printing.
Delete Port
20
NOTE
1. Specify the waiting time (seconds) for the printer to be ready for printing. If the printer is not
ready for printing after the specified time has elapsed, an error message is displayed.
2. If a timeout error occurs frequently upon printing a large size document, specify a larger value
here.

Configuring the Printer Driver Settings
Windows NT 4.0 (Administrator)
Scheduling Tab
Printer Section
1. Av ailable
Schedules when the printer is available for operation. Specify operating hours when From-To is selected.
2. Priority
Sets printing priority. The slider allows the priority to be adjusted from 1 through 99.
3. Spool print documents... / Print directly to the printer
Specify how documents should be sent from an application to the printer.
4. Hold mismatched documents
This feature does not function properly on your machine. We recommend that you do not use it.
5. Print spooled documents first
Always prints spooled documents first regardless of printing priority.
6. Keep documents after they have printed
Holds documents in the print queue even after they have been printed. These documents can be printed
again directly from the queue regardless of the state the application is in.
21

Configuring the Printer Driver Settings
Windows NT 4.0 (Administrator)
Sharing Tab
1. Not Shared/Shared
Select whether to display or share this printer with other computers.
2. Share Name
Specify the name of the shared printer. The displayed name can be used as is or a new name may be
entered. The name specified here will be displayed when other users view information about the printer
on the network.
3. Alternate Drivers (See Note 1)
Allows other operating systems' printer drivers to be loaded. When users of these operating systems
connect to the printer, the printer driver is automatically loaded.
22
NOTE
1. When sharing a printer on the network, the print driver needs to be installed on the print server
only; and other computers will automatically copy and use that driver.
For this reason, the print server must be ready with printer drivers for all the operating systems
of all the computers that will be sharing the printer.

Configuring the Printer Driver Settings
Windows NT 4.0 (Administrator)
Security Tab
Printer Section
1. button
Permissions
Set printer access privileges.
2. button
Auditing
Displays the users who have used this printer and how they used it.
3. button
Ownership
Set the ownership of the printer.
NOTE
1. In order to utilize these features, first you need to select Audit from User Manager's Policies
and enable File and Object Access in the Audit Policy dialog box.
23

Configuring the Printer Driver Settings
Windows NT 4.0 (Administrator)
Device Options Tab
<UF-4000/4100> <UF-6000/6100>
1. Number of Paper Trays
Select the number of available paper trays if optional Paper Feed Module(s) are installed.
24
NOTE
1. Device Options Tab specifies device-specific settings and settings of optional devices.
Make sure that the Device Option Tab is set properly before printing a document, or printing
problems may occur.

Configuring the Printer Driver Settings
Windows NT 4.0 (User)
To change the printer settings, open the dialog box for the printer properties by performing the following
steps.
Select Print in the File menu of the application.
1
Select the printer model in the name list box.
2
3
4
Click the button in the Print dialog box.
The printer properties dialog box appears. Click the
desired tabs of the dialog box and specify the properties.
(See Note 1)
(See pages 35 - 38)
Properties...
Printer Section
NOTE
1. In Windows NT 4.0, setting properties depends on the logon account. This section describes
properties to be specified by a user, upon executing a print operation in an application. See
"Configuring the Printer Driver Settings (Administrator)" for details on administrator properties.
(See page 18)
25

Configuring the Printer Driver Settings
Windows 2000/Windows XP/Windows Server 2003 (Administrator)
To change the printer settings, open the dialog box for the printer properties by performing the following
steps.
Logon to the computer/network using an account with
1
2
3
administrator rights.
Click the Start button, select Settings, and then click the
Printers (Windows XP/Windows Server 2003:
Printers and Faxes) icon.
Right-click on the desired printer icon in the Printers
folder, and select Properties in the popup menu.
The printer properties dialog box appears. (See Note 1)
26
NOTE
1. In Windows 2000/Windows XP/Windows Server 2003, setting the properties depends on the
logon account. This section describes properties to be specified by the administrator (system
manager). See "Configuring the Printer Driver Settings" for details on user properties. (See
page 34)

Configuring the Printer Driver Settings
Windows 2000/Windows XP/Windows Server 2003 (Administrator)
General Tab
Printer Section
1. Printer Name
Name of the printer specified upon installation is displayed.
2. Location and Comment
Enter a comment about the location of the printer and information about the printer.
If a printer is shared, the location and comments specified in this field appear when another user sets up
this printer on his/her computer. After completion of setup, however, changing this comment does not
update the location and comment appearing on users PCs.
3. Mo del
Model name of the printer is displayed.
4. Features
Functions and settings of the printer are displayed.
Printing Preferences...
5. button
Changes properties (print settings) specifiable for each user.
Refer to "Configuring the Printer Driver Settings (User)" for details on settings (see page 34).
6. button
Print Test Page
Prints a test page. This allows the user to verify if the printer is installed properly.
27

Configuring the Printer Driver Settings
Windows 2000/Windows XP/Windows Server 2003 (Administrator)
Sharing Tab
<Windows 2000> <Windows XP/Windows Server 2003>
1. Not shared/Shared as (Do not share this printer/Share this printer)
Specify if this printer is displayed or shared with other computers.
For sharing a printer, specify the share name of a printer. A name specified here appears when other
users view the printer information on a network.
2. button
Additional Drivers...
Install additional printer drivers on the system. (See Note 1)
When users running different versions of Windows share a printer, installing additional drivers avoids the
need for installing new drivers on their systems.
28
NOTE
1. When sharing a printer on the network, the print driver needs to be installed on the print server
only; and other computers will automatically copy and use that driver.
For this reason, the print server must be ready with printer drivers for all the operating systems
of all the computers that will be sharing the printer.
2. If Windows is set to disable remote access to your PC for security purpose, Windows will ask
you to activate the Network Setup Wizard. Follow the messages to enable the Sharing Tab.

Configuring the Printer Driver Settings
Windows 2000/Windows XP/Windows Server 2003 (Administrator)
Ports Tab
Printer Section
1. Print to the following port(s)
Displays a list of ports that allow printing, their status (description), and printers connected to the ports.
2. / button
Add Port...
Adds/deletes a new port or a new network path.
3. button
Configure Port...
Configure the port that is selected. On a parallel port, wait time (in seconds) for retransmission is
specified. (See Notes 1 and 2)
4. Enable bidirectional support
This setting enables reception of configuration data and status data from the printer.
5. Enable printer pooling
Printer pooling allows data sent to one logical printer to be received and printed by two or more printers.
With printer pooling enabled, a transmitted printing job is output to the first printer that is ready for
printing.
Delete Port
NOTE
1. Specify the waiting time (seconds) for the printer to be ready for printing. If the printer is not
ready for printing after the specified time has elapsed, an error message is displayed.
2. If a timeout error occurs frequently upon printing a large size document, specify a larger value
here.
29

Configuring the Printer Driver Settings
Windows 2000/Windows XP/Windows Server 2003 (Administrator)
Advanced Tab
1. Always available/Available from
Specify the operating schedule for a printer. Selecting Available from allows specifying an available
operation time.
2. Priority
Specify the priority in printing. Priority is adjustable from 1 to 99. Documents of higher priority are printed
before those of lower priority.
3. Driver
Displays the printer driver type. Specify the printer being used, or a printer model that can be emulated
with the printer being used.
4. button
New Driver...
Updates or modifies the printer driver.
5. Spool print documents so program finishes printing faster
Specify the method of sending a document from the program to the printer.
6. Print directly to the printer
Specify that the document should be sent directly to the printer device and not spooled. Use this if you
cannot print using either of the print spooling options.
7. Hold mismatched documents
This feature does not function properly on your machine. We recommend that you do not use it.
30
8. Print spooled documents first
Always prints spooled documents first regardless of printing priority.
9. Keep printed documents
After printing, documents are kept in the queue. The documents are allowed to be reprinted directly from
the queue regardless of the status of an application.
 Loading...