

Page 1
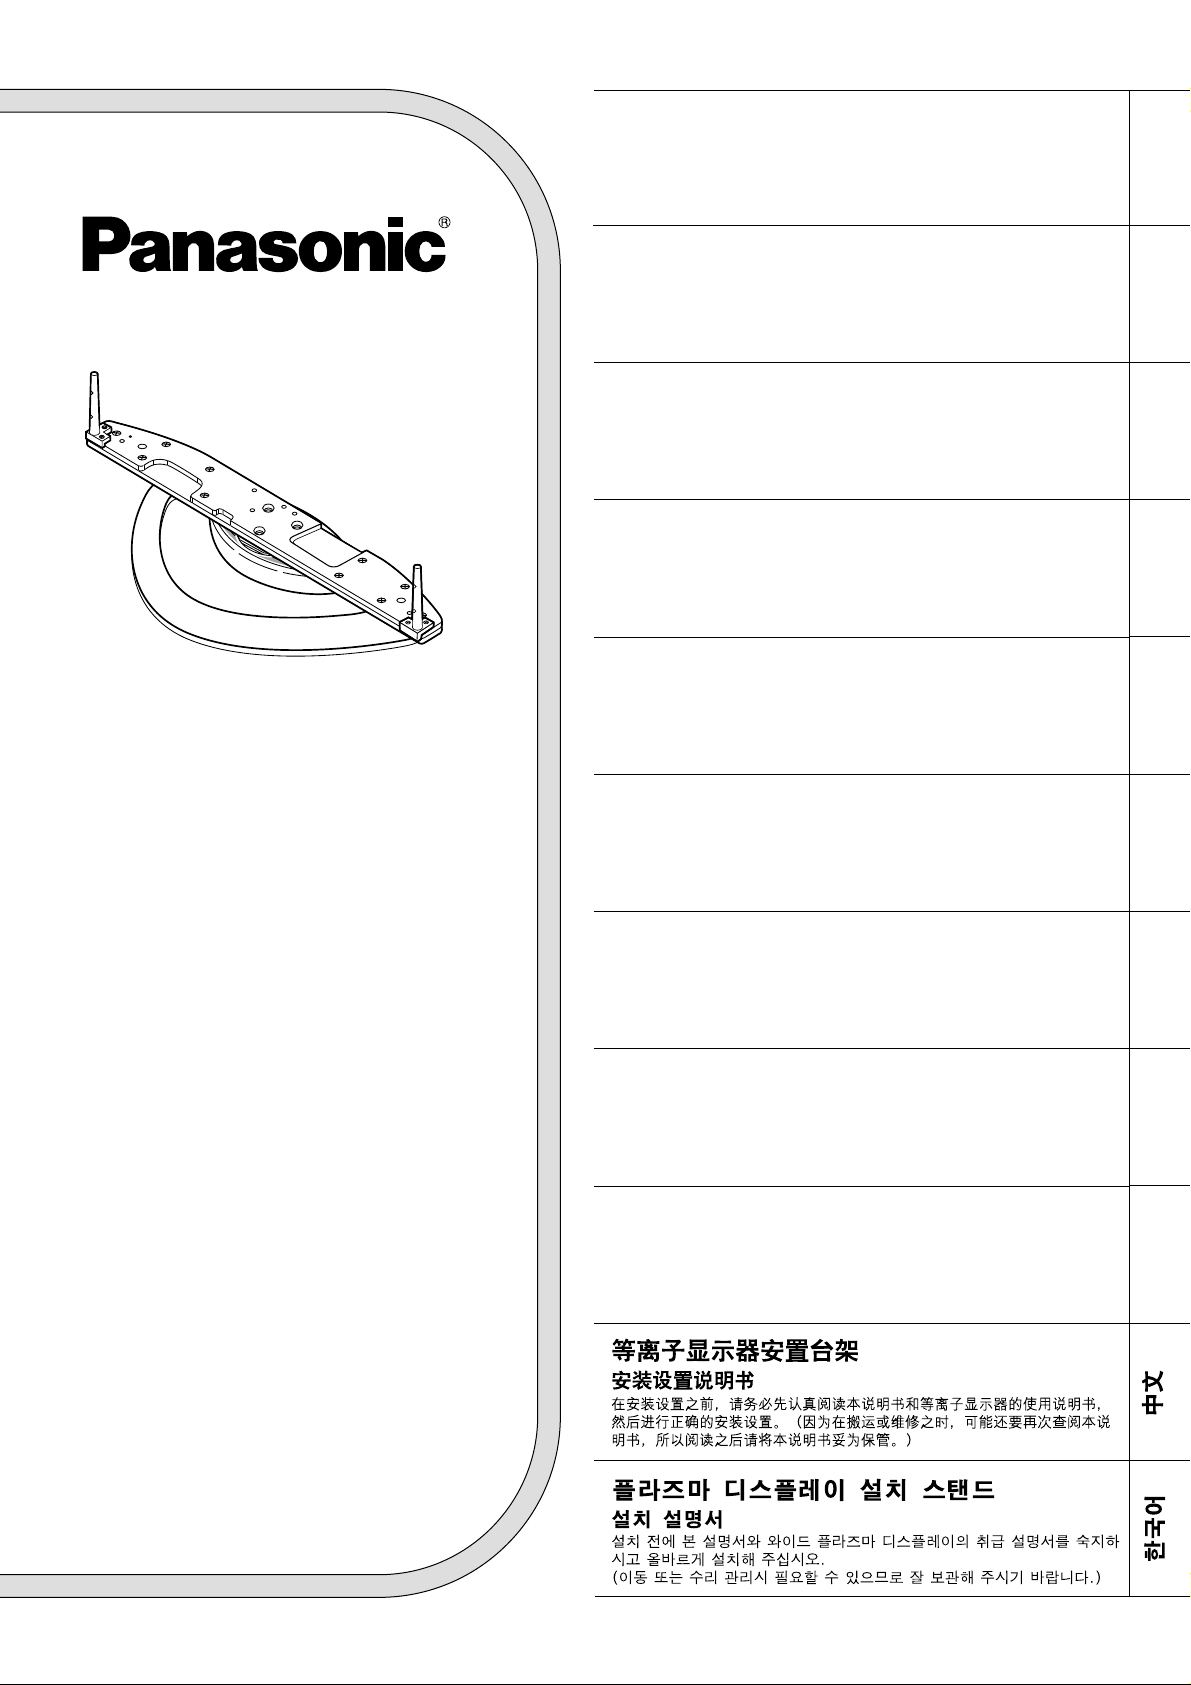
プラズマディスプレイ据置きスタンド
取り付け設置説明書
取り付け設置前に、この説明書とワイドプラズマディスプレイの取扱説明書をよ
くお読みのうえ、正しい取り付け設置を行ってください。
(移動やメンテナンスのときは、必要になる場合がありますので保存いただ
きますようお願いします。)
Pedestal for Wide Plasma Display
Installation Instructions
Before attempting to assemble these accessories, please read these
instructions completely.
Please retain this book for future reference.
Sockel für Plasmadisplay
Installationsanleitung
Vor der Installation lesen Sie bitte diese Anleitung sorgfältig durch.
Diese Anleitung zum späteren Nachschlagen aufbewahren.
Vloerstandaard voor Breedbeeld
Plasmadisplay Monitor
Installatiehandleiding
Lees deze handleiding zorgvuldig door alvorens u probeert deze accessoires te
monteren.
Bewaar de handleiding voor het geval dat u later iets wilt opzoeken.
Piedistallo per lo schermo al plasma-16:9
Instruzioni per I’installazione
Prima di iniziare a montare questi accessori, siete pregati di leggere interamente le
presenti istruzioni.
Siete inolte pregati di conservare questo libro per future consultazioni.
Piédestal pour l’Ecran plasma 16/9ème
Manuel d’installation
Avant d'essayer d'assembler ces accessoires, veuillez lire ces instructions
complètement.
Veuillez garder ce manuel pour une rèfèrence future.
Pedestal para Pantalla Panorámica de
Plasma
Instrucciones de instalación
Antes del instalar estos accesorios, lea cuidadosamente estas instrucciones.
Guarde estas instrucciones para futuras referencias.
Bottenplatta för Bred plasma-monitor
Monteringsanvisningar
Läs dessa anvisningar noggrant innan du monterar samman dessa tillbehör.
Behåll häftet för framtida referens.
Sokkel til bredformat-plasmaskærm
Monteringsvejledning
Læs hele denne vejledning grundigt, inden du samler dette tilbehør.
Gem vejledningen til brug i fremtiden.
TY-ST10-H
TY-ST10-M
Model No.
日本語
English
Deutsch
Nederlands
Italiano
Français
Español
Svenska
Dansk
TQZH389-2
Page 2
2
日本語
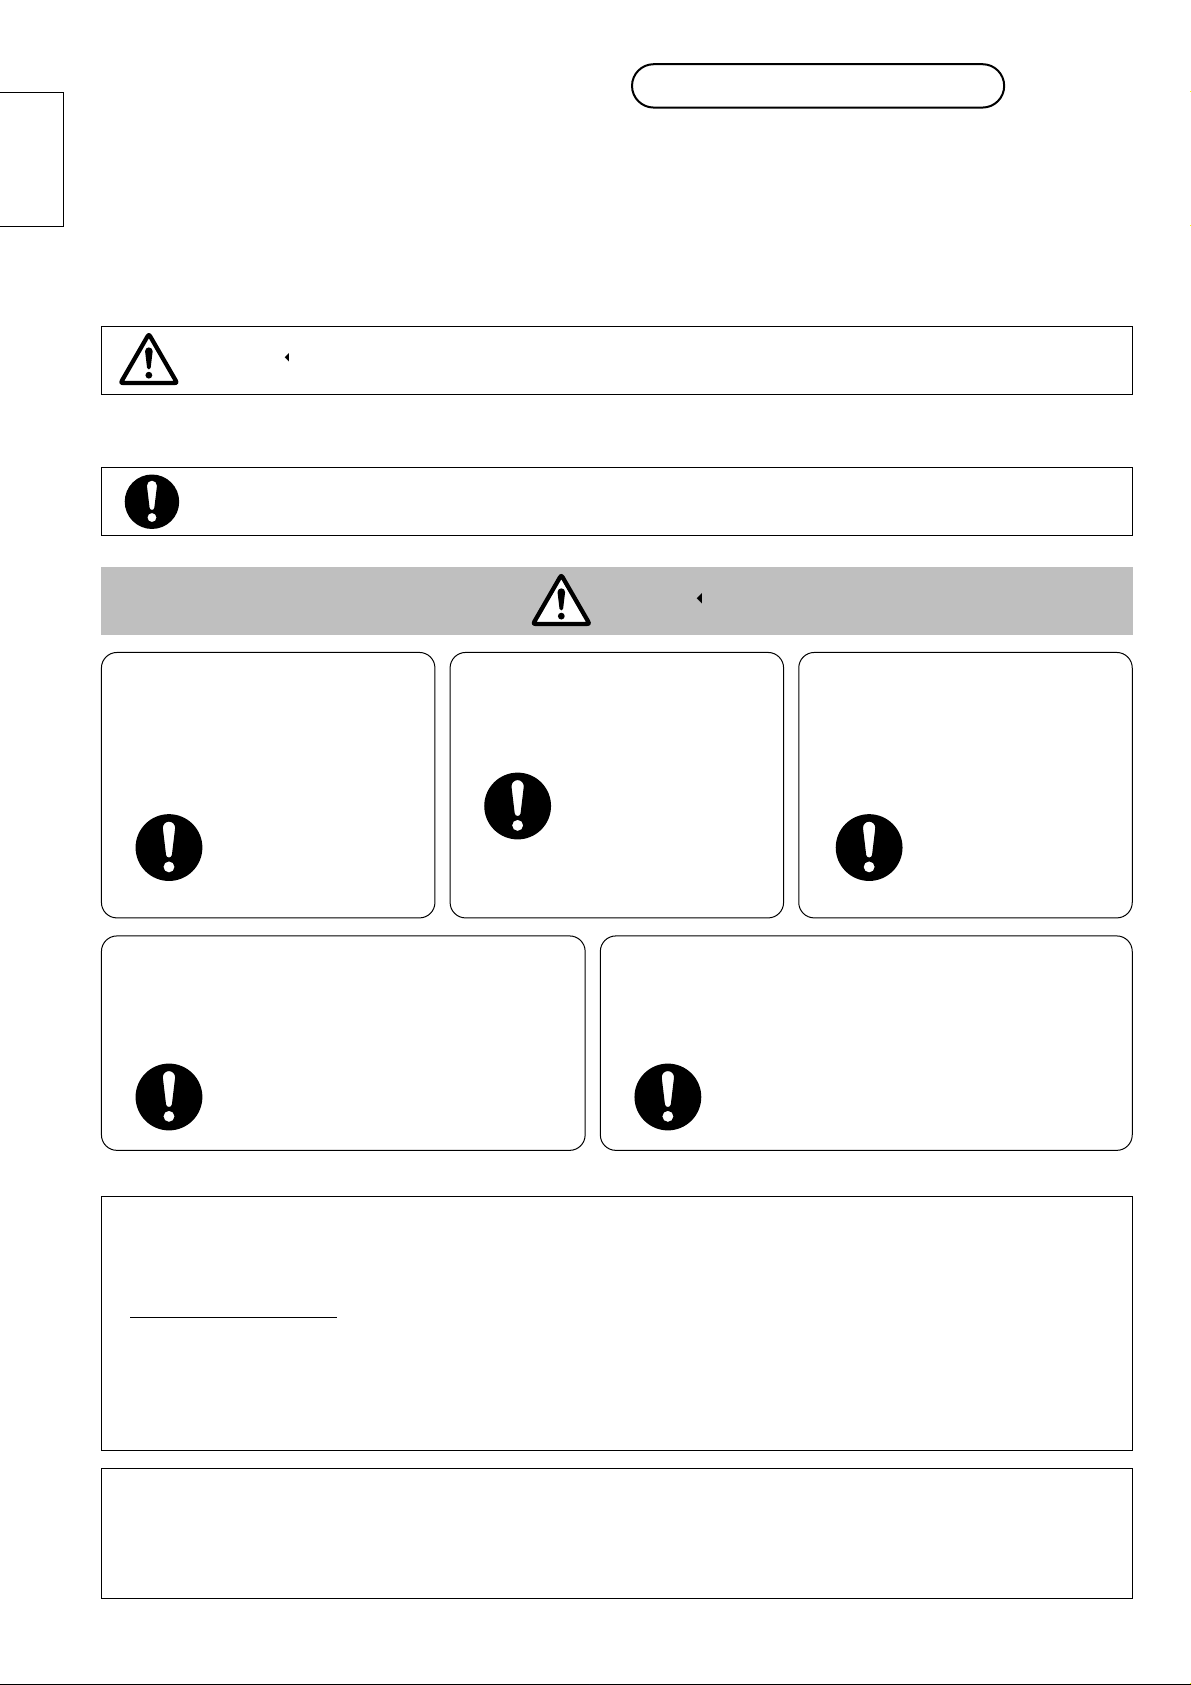
この絵表示は、必ず実行していただきたい「指示」内容です。
■
表示内容を無視して誤った使い方をしたときに生じる危害や物的損害の程度を、次の表示で説明しています。
■お守りいただきたい内容の種類を、次の絵表示で説明しています。(下記は、絵表示の一例です。)
安全上のご注意
必ずお守りください
この表示の欄は、「傷害を負うことが想定されるか、または物的損害の発生が想定される
危害・損害の程度」です。
お使いになる人や他の人への危害、物的損害を未然に防止するため、必ずお守りいただきたいことを、次のように
説明しています。
ディスプレイ本体と据置
きスタンドの取り付け、
取り外しは2人以上で
行ってください
組み立て時、ねじ止めを
する箇所は、すべてしっ
かりと止めてください
水平で安定した所に据え
付けてください
ディスプレイ本体が落
下してけがの原因とな
ることがあります。
不十分な組み立てか
たをすると強度が保
てず、倒れたり破損
してけがの原因とな
ることがあります。
倒れたり、破損して
けがの原因となるこ
とがあります。
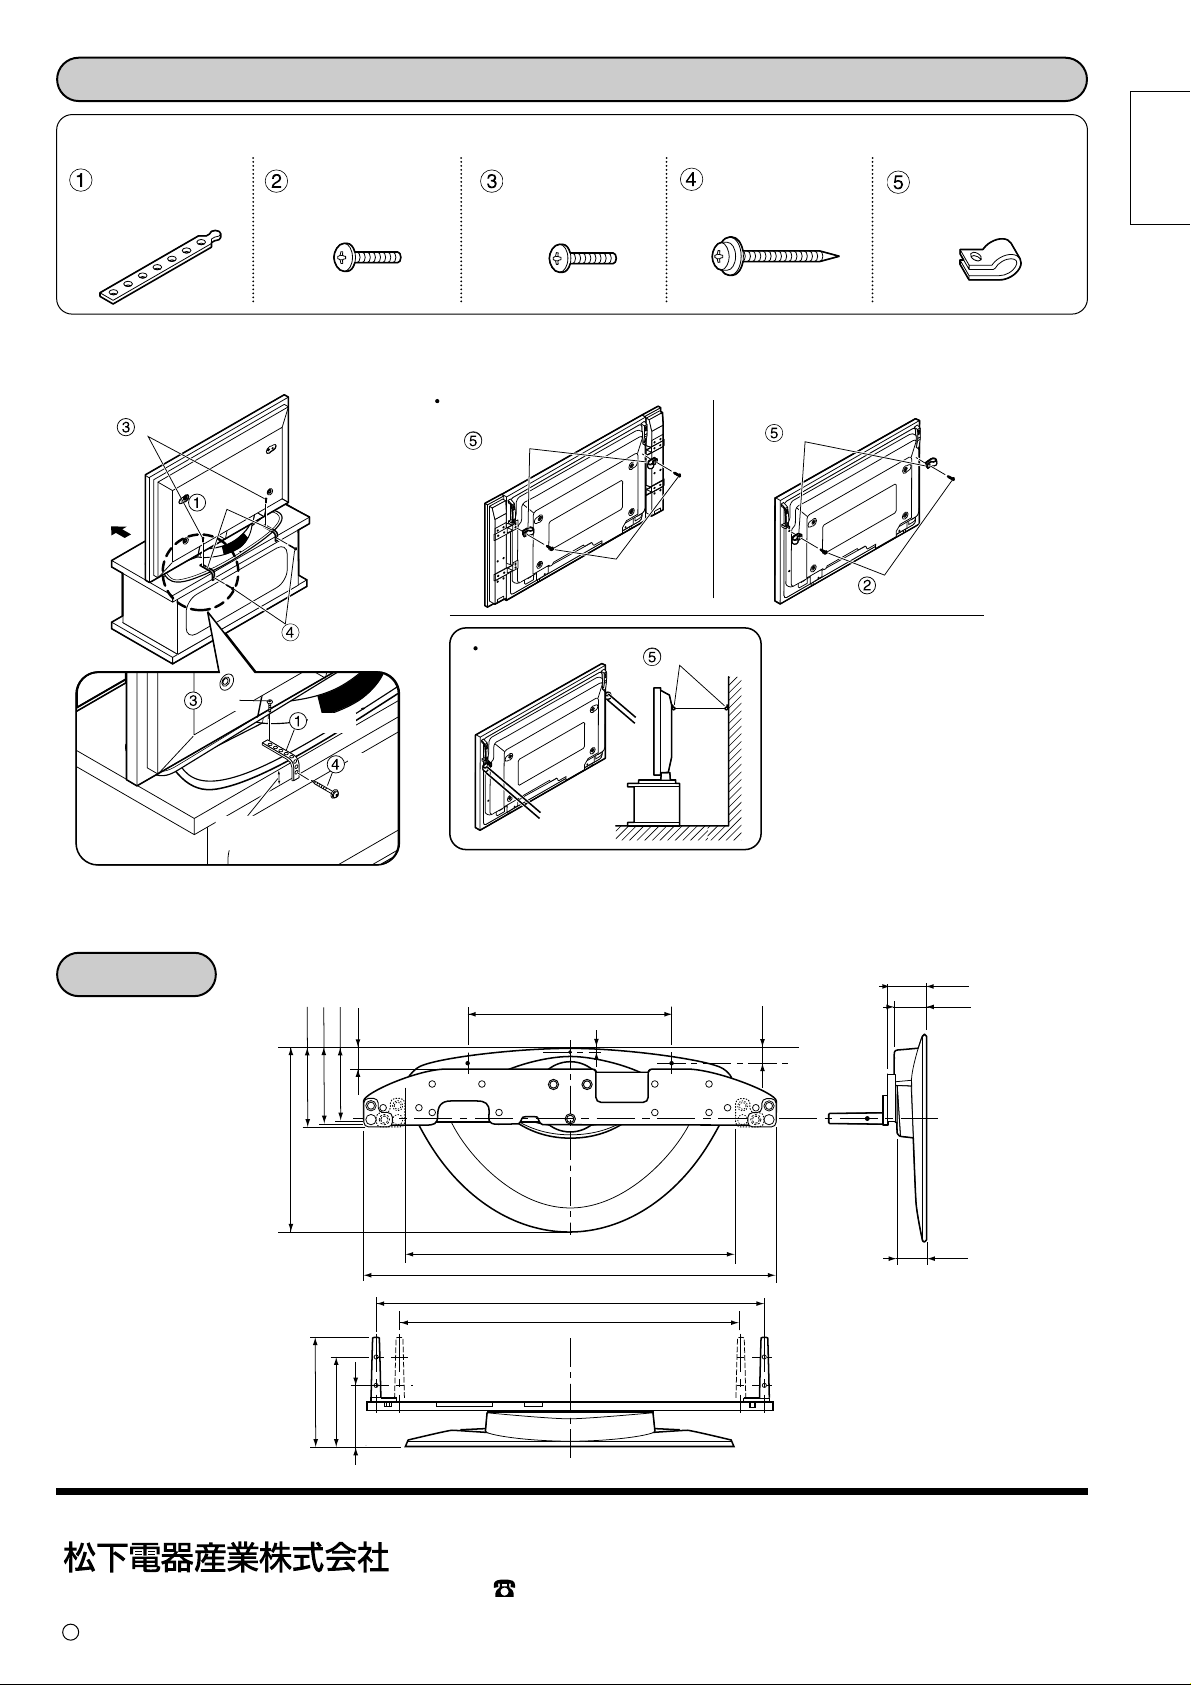
据置きスタンドに付属している転倒防
止金具を利用し、ディスプレイ本体を
固定してください
ディスプレイ本体より天面・左右は
100mm以上、底面は60mm以上、後面
は70mm以上の空間を確保してください
ディスプレイ本体には、天面に空気吹き出し
孔、底面と後面に吸気孔があり、これらをふ
さぐと火災の原因となることがあります。
地震やお子様がよじ登ったりする
と、転倒しけがの原因となることが
あります。
取り扱い上のお願い
1.直射日光に当てたり、ストーブなどのそばに置くと、光や熱によって変色したり変型することがあります
のでご注意ください。
2.汚れのふき取りかた
乾いた布でふいてください。ひどく汚れているときは、水でうすめた中性洗剤で汚れを取ってから乾いた
布でふいてください。
なおベンジンやシンナー、家具用ワックスなどは、塗装がはげたりしますので、使用しないでください。
(化学ぞうきんをご使用の際は、その注意書に従ってください。)
3.粘着性のテープやシールをはらないでください。据置きスタンド表面を汚すことがあります。
据置きスタンド設置上の留意点
●
本体の電源プラグは容易に手が届く位置の電源コンセントに接続してください。
●
機器周囲温度が40℃を超えることがないように空気の流通を確保してください。
ディスプレイ本体内部に熱がこもり、故障の原因となることがあります。
注意
注意
Page 3
3
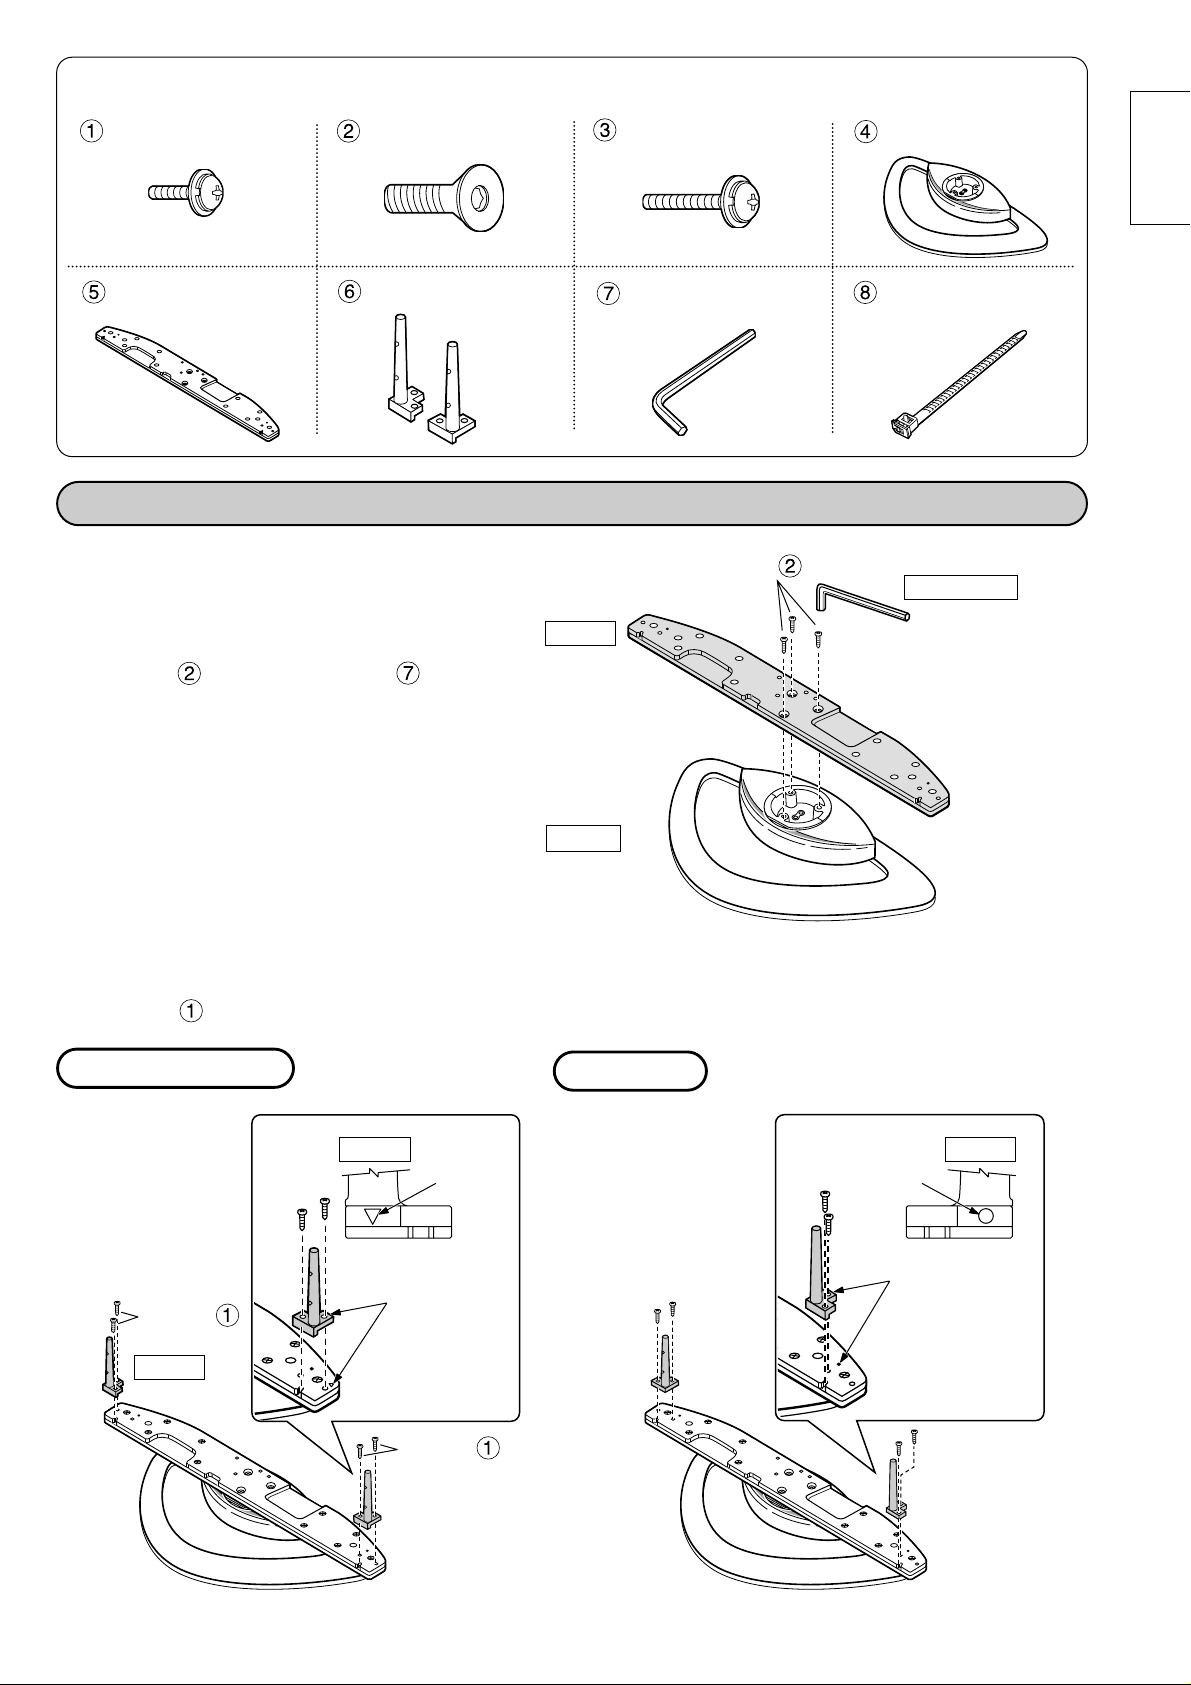
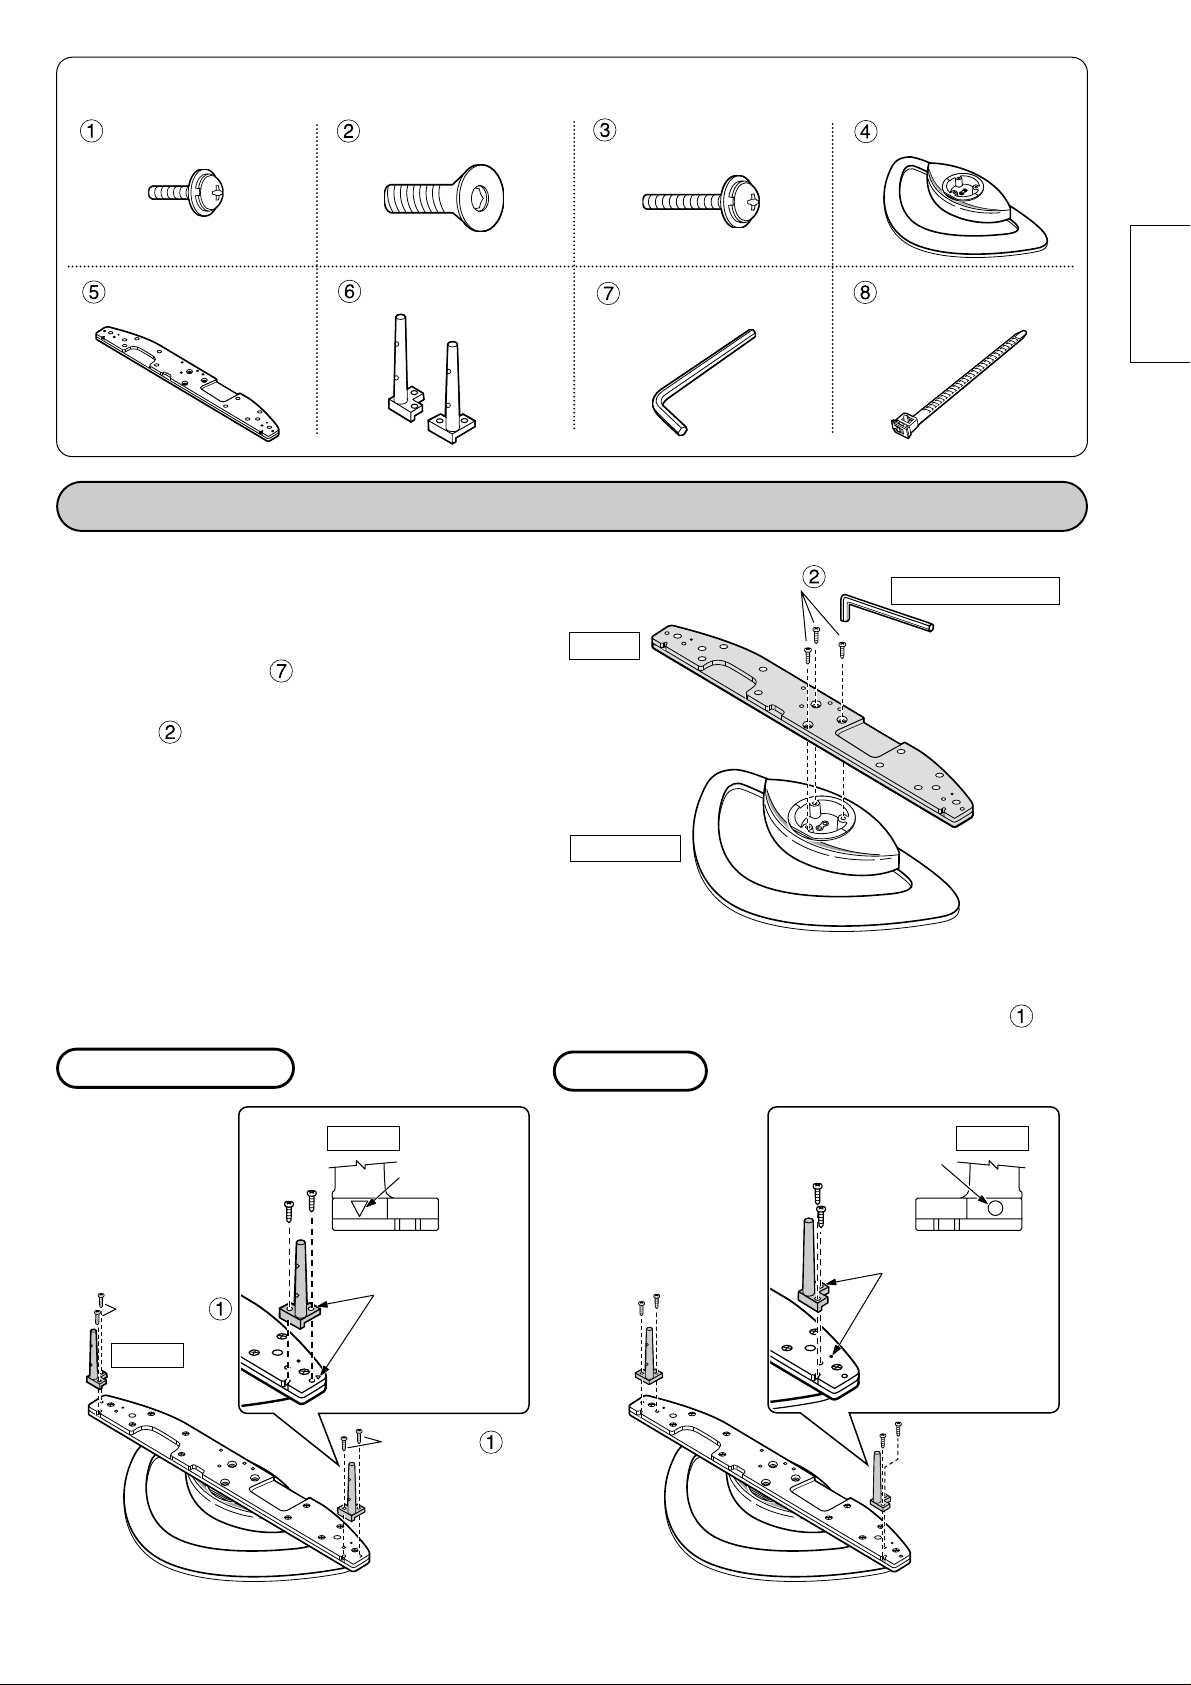
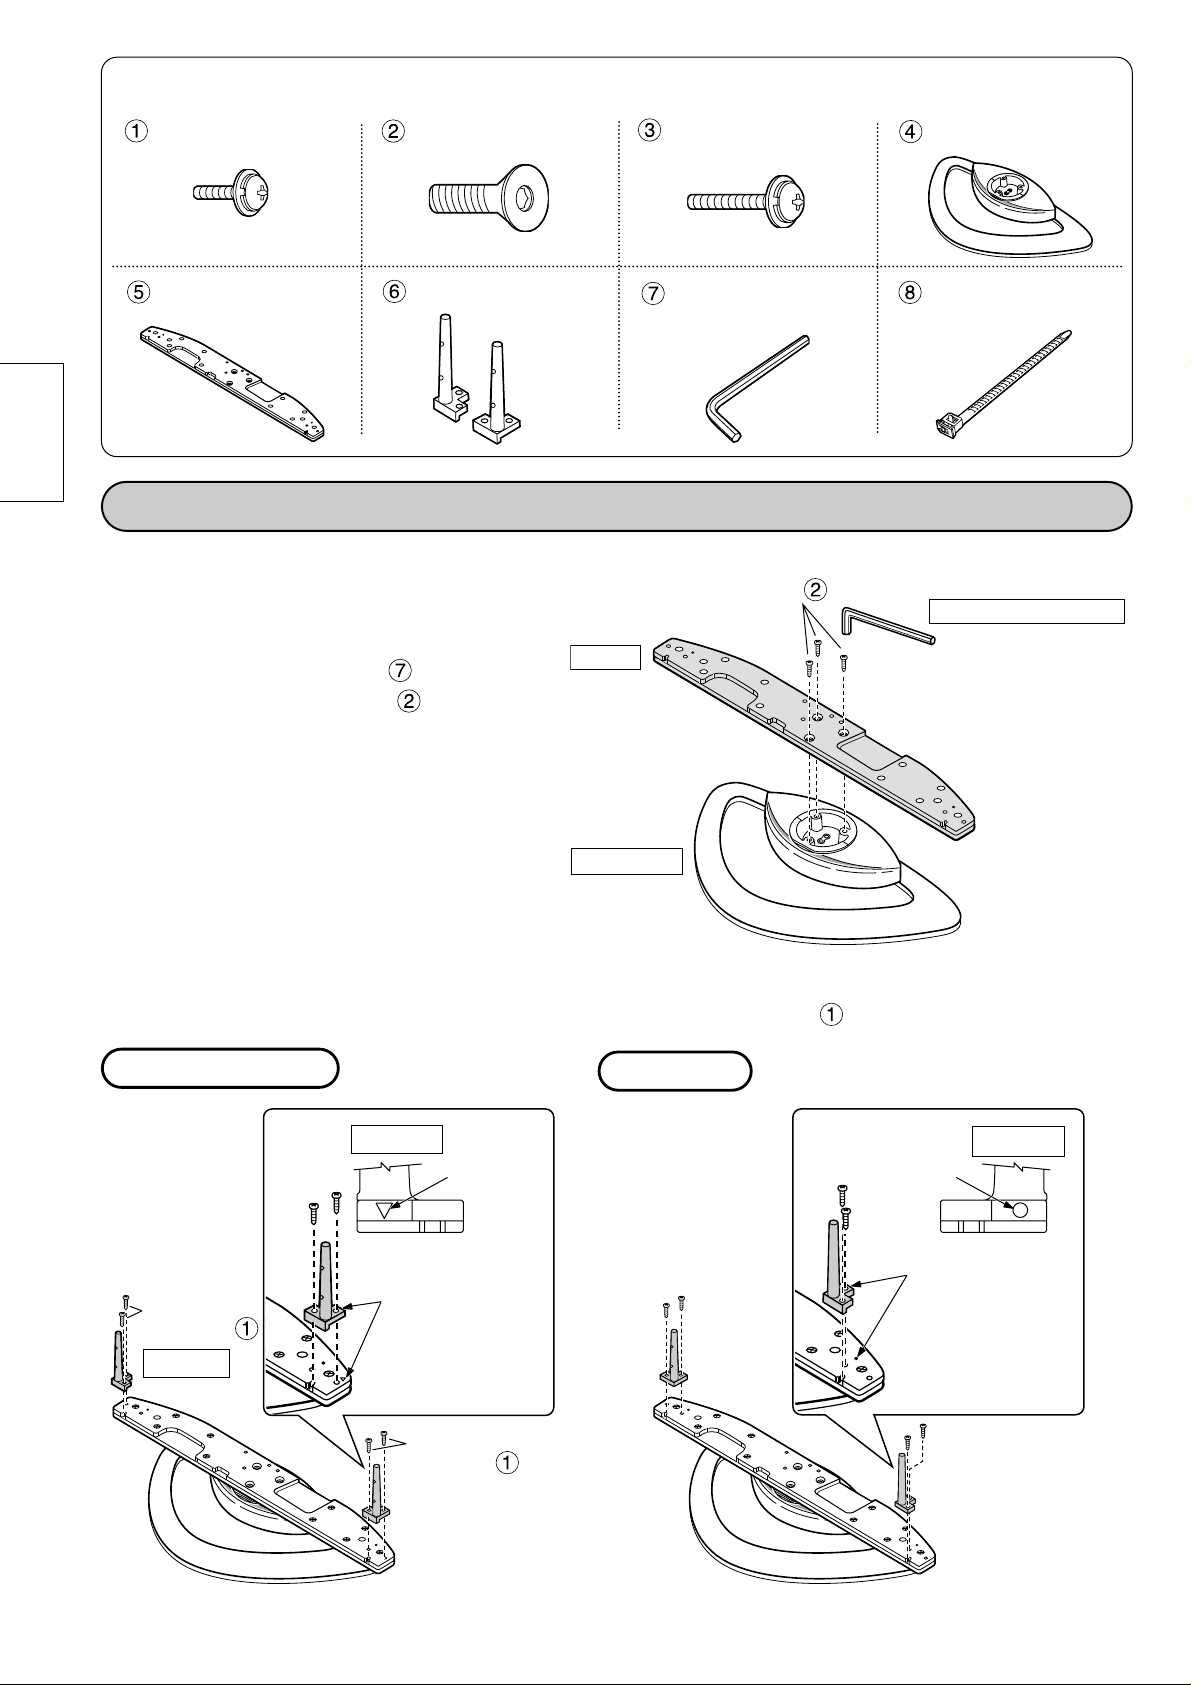
2.ポールを取り付ける
1.土台にベースを取り付ける
太いねじ (3本)を六角レンチ を
使って、土台にベースを右図のように確
実に固定してください。
短いねじ
(4本)
を使って、ベース面にポール左右とも下図のように確実に固定してください。
スタンドを組み立てる
42V型/50V型の場合
37V型の場合
日本語
組み立て用部品
ベース .............1
短いねじ .........4
太いねじ .........3
長いねじ..........4
土台 ..................1
ポール .............2
六角レンチ
..........1
バンド .............1
ベース
太いねじ
六角レンチ
短いねじ
ポール
土 台
ポール
刻印マーク
刻印マークを合せて下さい。
ポール
刻印マーク
刻印マークを合せて下さい。
短いねじ
Page 4
4
日本語
日本語
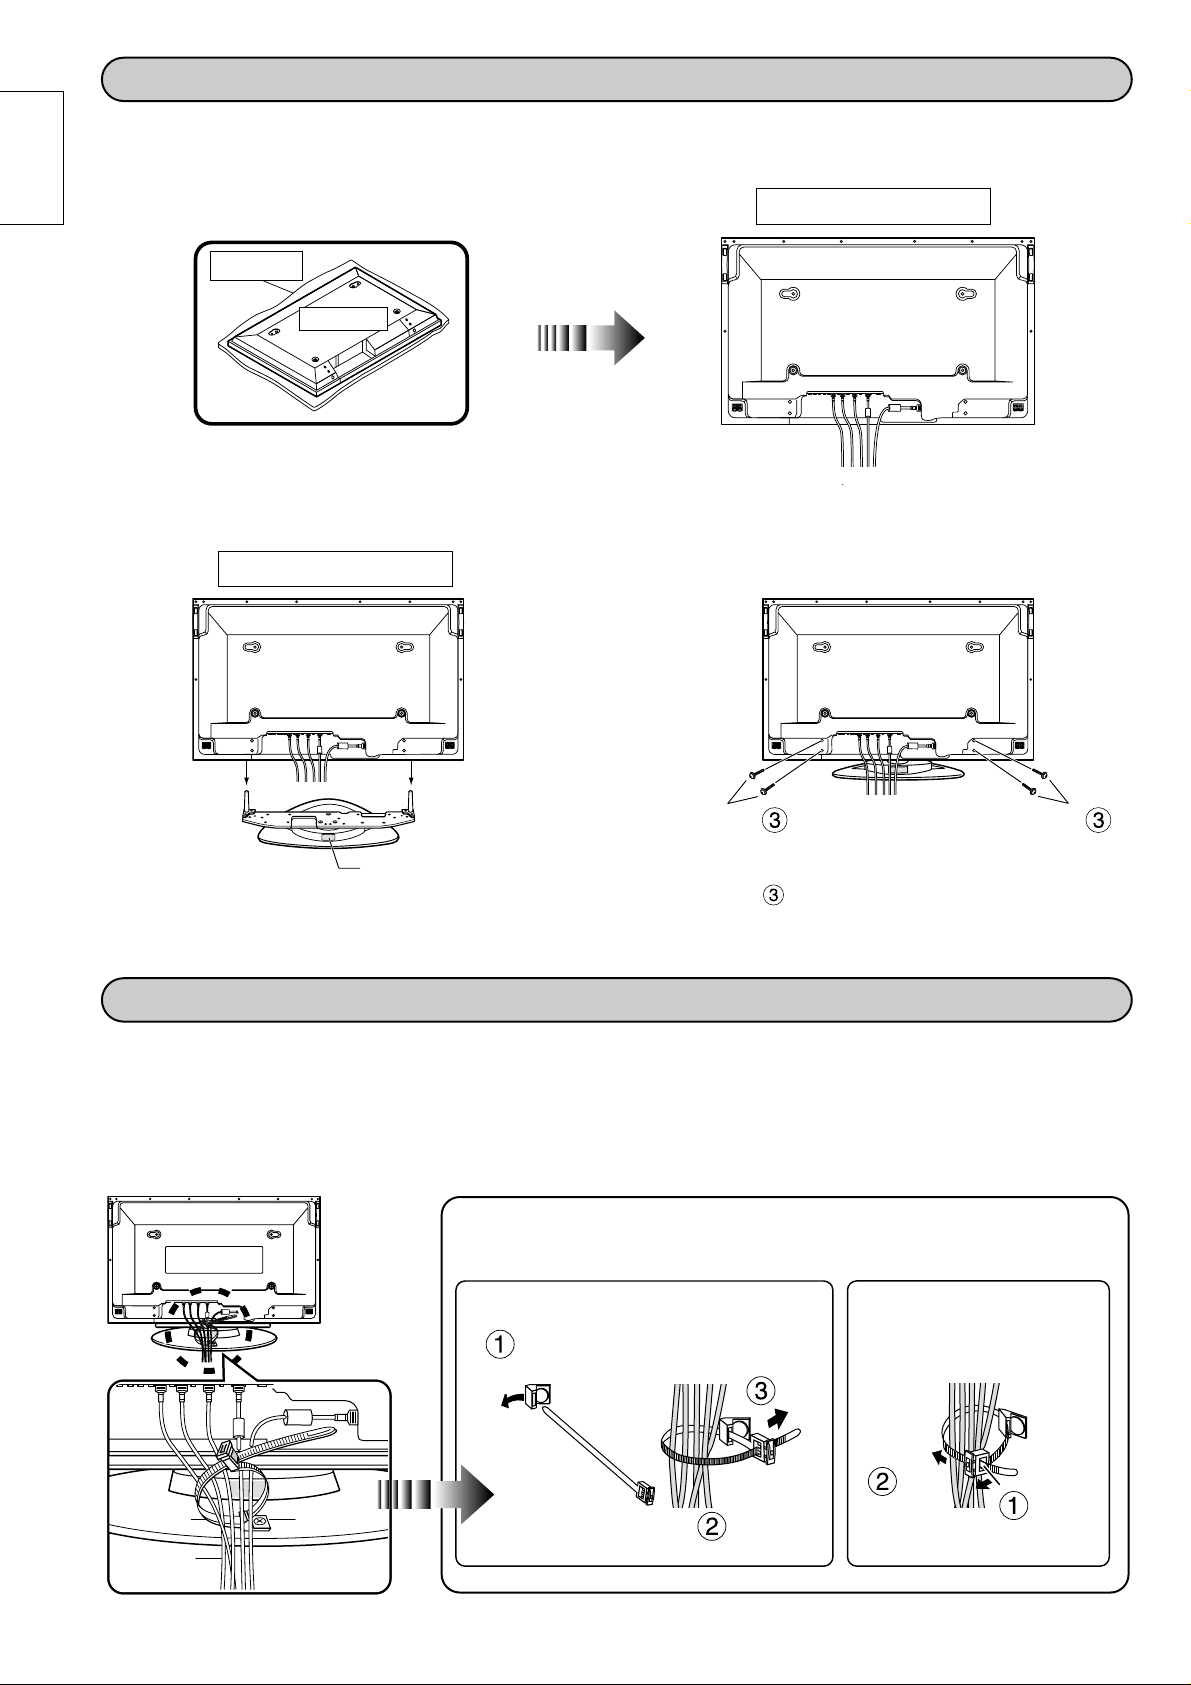
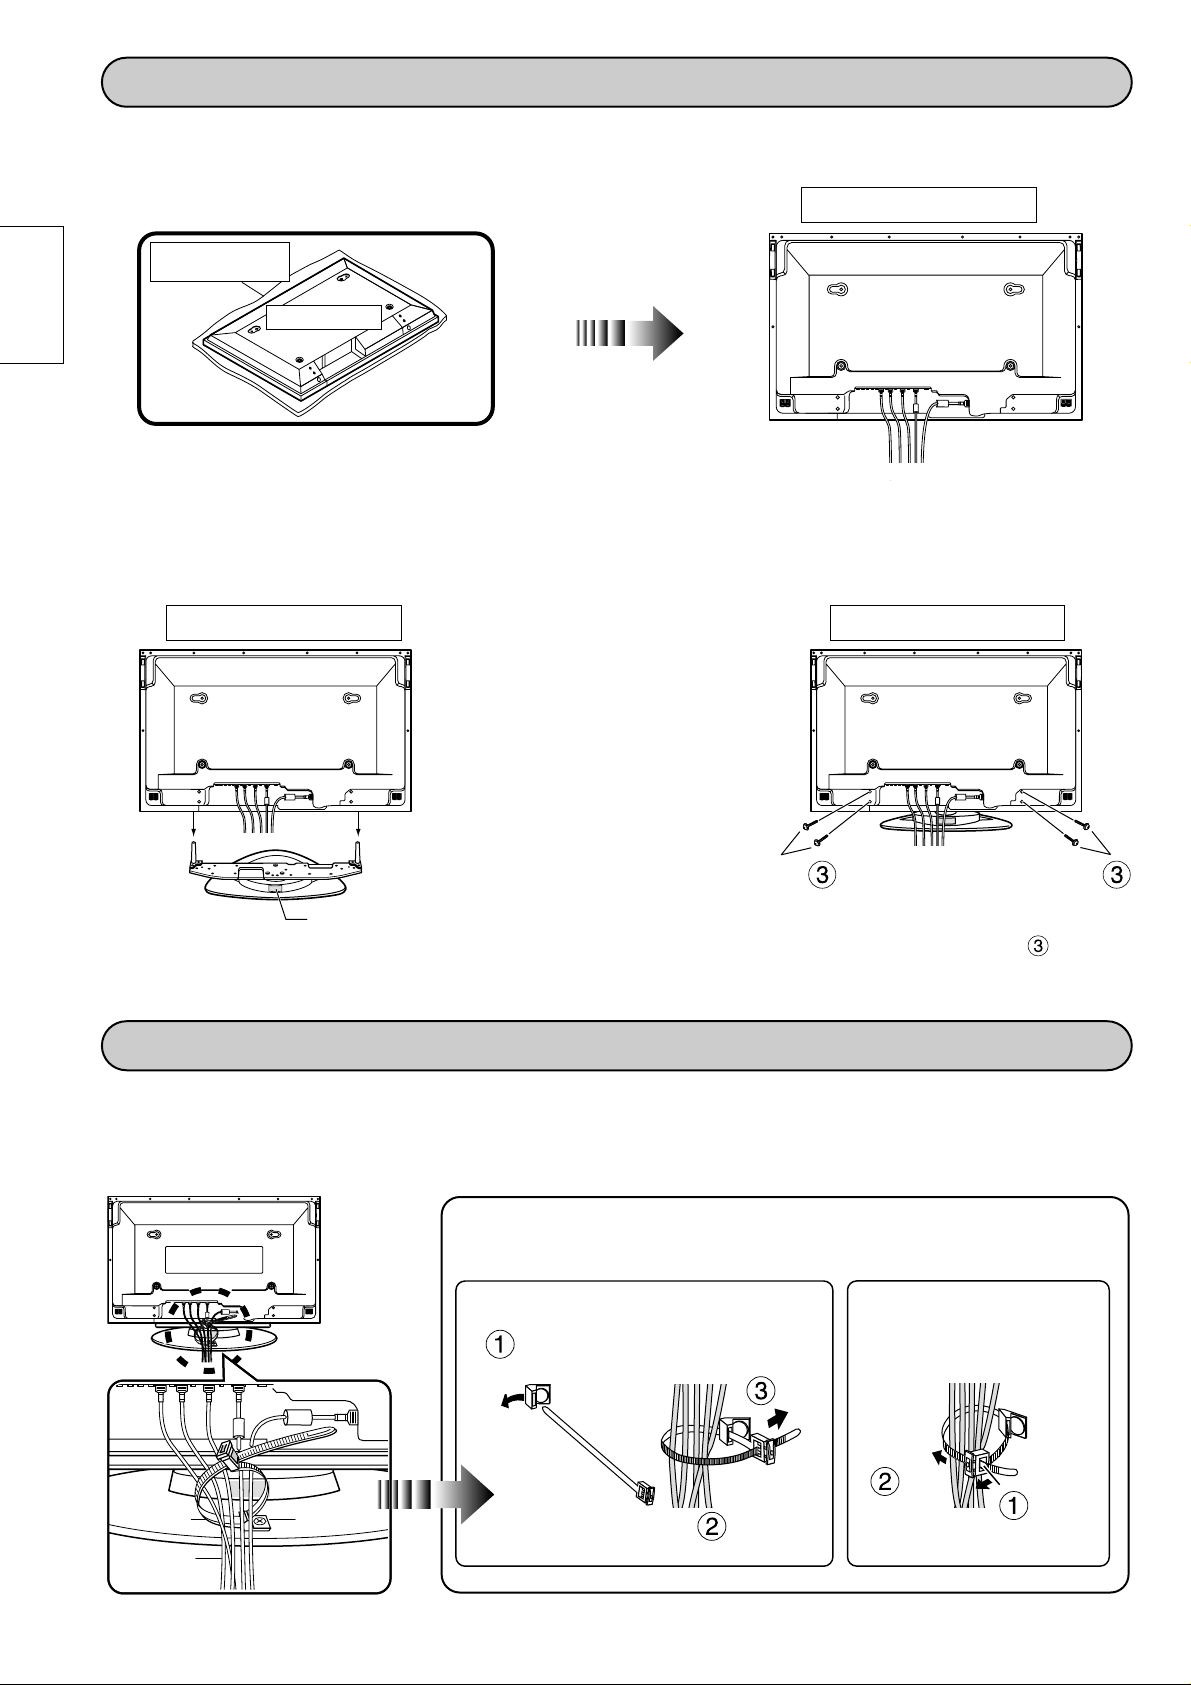
ディスプレイ本体に取り付ける
1.ディスプレイ本体に接続ケーブルを取り付ける
本体後面
2.
ディスプレイ本体の穴にポールを差し込む
3.ねじで固定する
※ 平らな床や台の上に、きれいな毛布などを敷き、
その上にディスプレイ本体前面を置いてください。
(後 面)
毛布など
ディスプレイ本体
接続ケーブルの処理について
■ プラズマディスプレイに接続された各種ケーブルは、本据置きスタンドに付属
のバンドで束ねてください。
※ 電源コードを少したるませコードに張力がかからない
ように付属のバンドでしっかり固定してください。
固定するとき
クリップにバンド
の先端を通す
引く
ケーブル
を束ねる
はずすとき
引く
ノブを
引く
(後 面)(後 面)
ディスプレイ本体
バンド
ケーブル
クリップ
長いねじ
長いねじ
品番ラベル
ディスプレイ本体
品番ラベルが見えるほうを後側にして、止まる
位置まで差し込んでください。
長いねじ を使って、しっかり固定してください。
※水平で安定した場所で作業してください。
Page 5
5
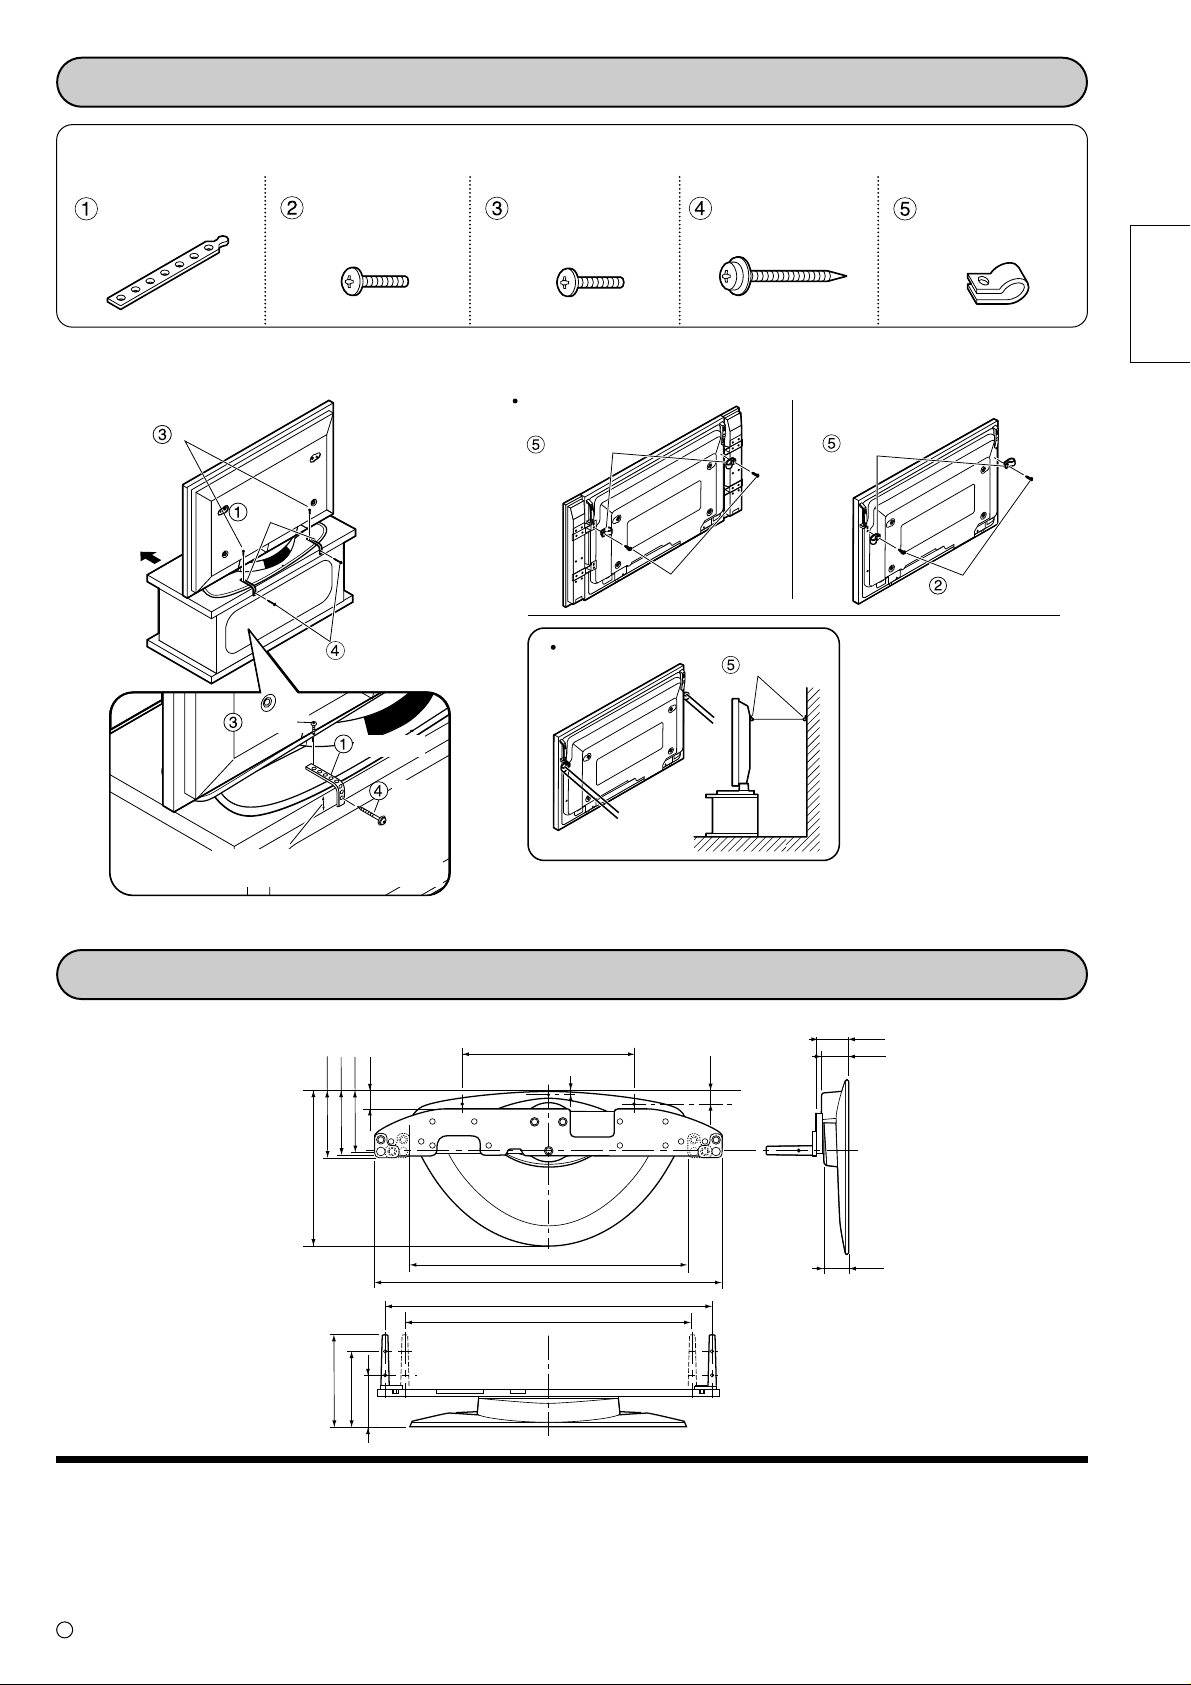
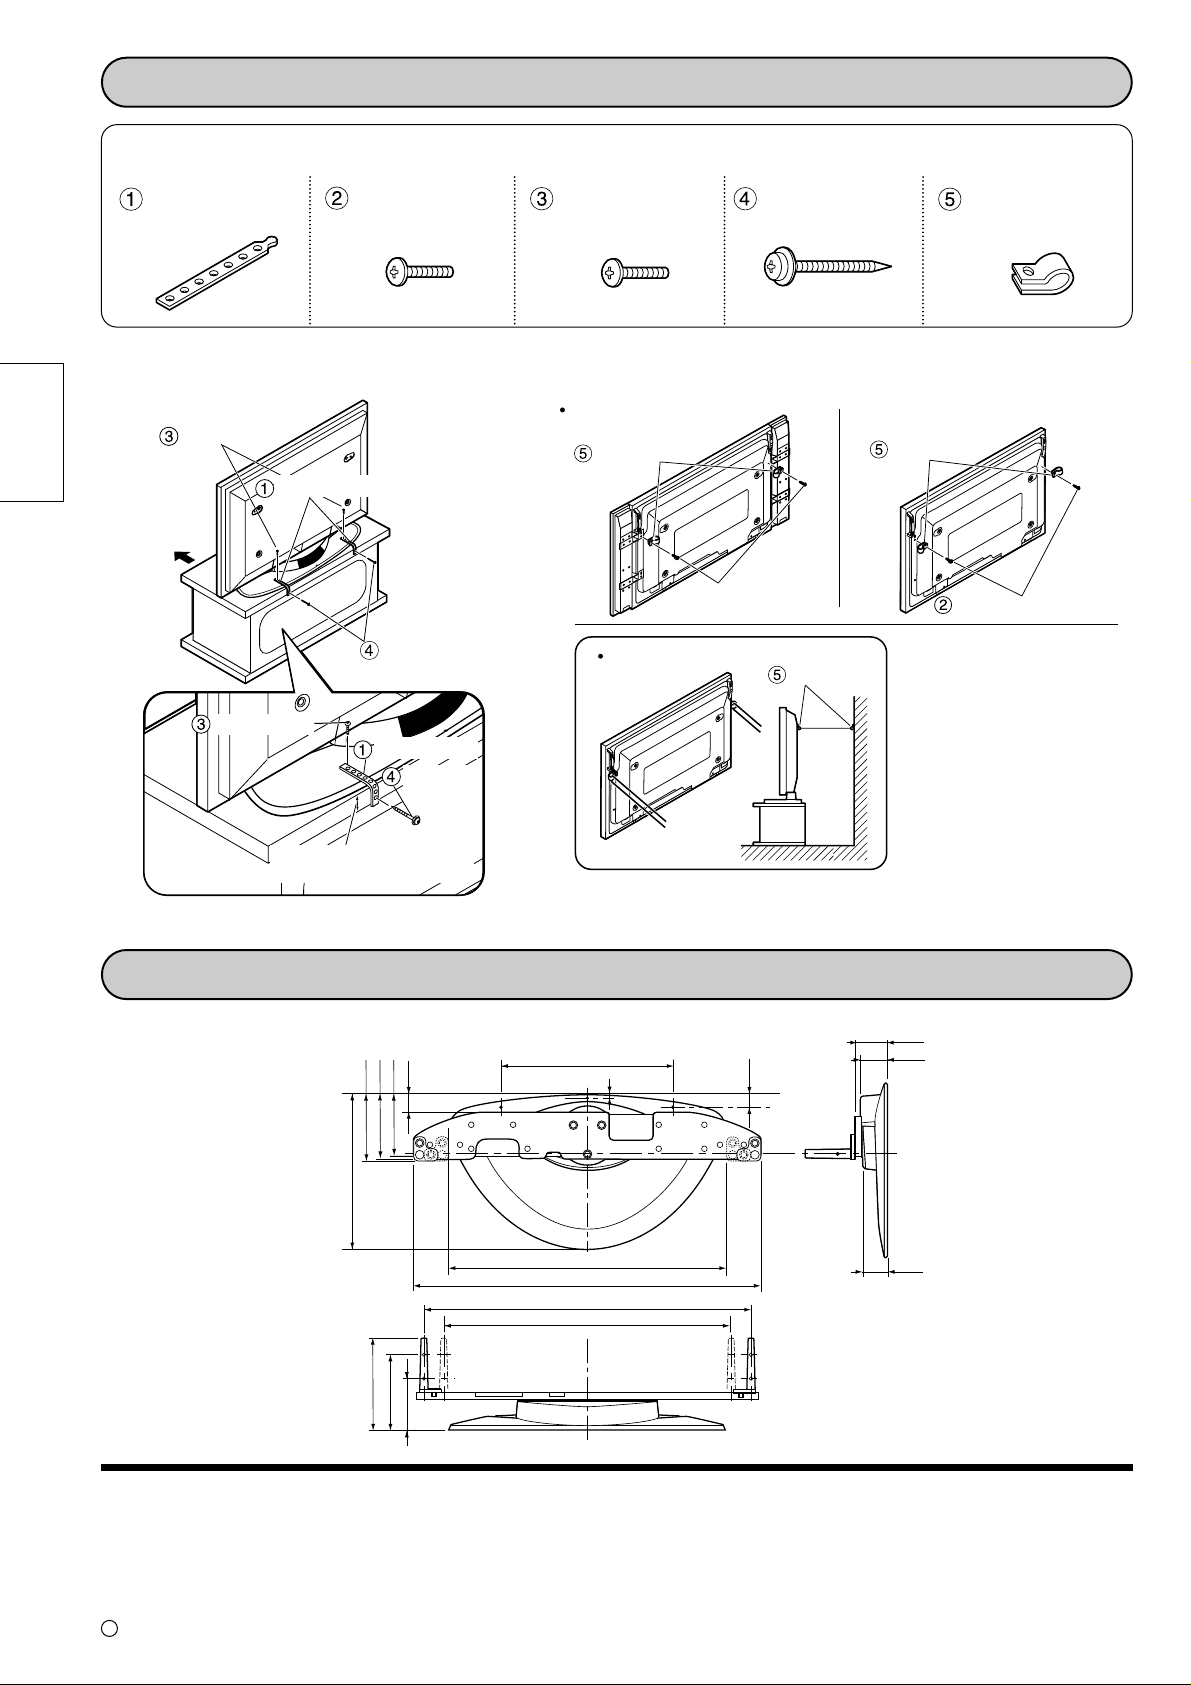
■ テレビ台に固定する場合 ■ 壁面に固定する場合
ねじ
木ねじ
ねじ
バンド
前面
バンド
木ねじ
厚さの中心に木ねじを
取り付けてください。
クランプ
準備
スピーカーあり スピーカーなし
固定方法
クランプ
スピーカー
取り付けねじ
クランプ
黒ねじ
75
327
単位:mm
テレビシステムプロダクツ事業部
〒567-0026 大阪府茨木市松下町1番1号 (0726)22-8181
C Matsushita Electric Industrial Co., Ltd.(松下電器産業株式会社) 2002
※丈夫なひもや鎖などの市販品をご利用いただき、壁や柱など
堅牢部にしっかりと取り付けてください。
黒ねじ .......2
黒ねじ .......2
ねじ.............2 クランプ...4
木ねじ.......2
組み立て用部品
転倒防止のために、本体を固定する
寸法図
バンド
日本語
46
131
136
141
180
146
101
360
578
704
684(42、50V型の場合)
602(37V型の場合)
8
前
40
63
53
Page 6

English
6
English
Precautions with regard to setting up
WARNING
Installation work should only be carried out by a qualified technician.
• If the pedestal is not installed correctly, the Wide Plasma Display may fall over and personal injury may result.
CAUTION
Do not use any displays other than those given in the catalogue.
Do not climb up onto the pedestal or use it as a step. (Young children should be made
particularly aware of this caution.)
• If the unit falls over or becomes damaged through misuse, injury may result.
Do not use the pedestal if it becomes warped or physically damaged.
• If you use the pedestal whilst it is physically damaged, personal injury may result. Contact your
nearest Panasonic Dealer immediately.
Set up on a stable, level surface.
• If this is not done, the unit may fall over and become damaged, and personal injury may result.
Do not use in places with high humidity.
• Long-term usage in such conditions can cause warping or deformation. This can lead to loss of
strength, and the unit may fall over and become damaged, and personal injury may result.
During setting-up, make sure that all screws are securely tightened.
• If sufficient care is not taken to ensure screws are properly tightened during assembly, the
pedestal will not be strong enough to support the Wide Plasma Display, and it might fall over
and become damaged, and personal injury may result.
Use the accessory fall-prevention brackets to secure the Wide Plasma Display.
• If the unit is knocked or children climb onto the pedestal with the Wide Plasma Display installed,
the Wide Plasma Display may fall over and personal injury may result.
Two people are required to install and remove the display.
• If two people are not present, the display may be dropped, and personal injury may result.
• Leave a space of at least 3
15
/16 inches (10 cm) at the top, left and right, at least 2 3/8 inches (6
cm) at the bottom, and at least 2 49/64 inches (7 cm) at the rear.
Notes on handling
1) If the unit is placed in direct sunlight or next to a stove, the light and heat may cause discoloration or deformation.
2) Cleaning
Wipe the unit with a dry cloth. If the unit is particularly dirty, clean it using a cloth soaked with water to which a
small amount of neutral detergent has been added, and then wipe with a dry cloth.
Do not use products such as solvents, thinner or household wax for cleaning, as they can damage the surface
coating.
(If using a chemically-treated cloth, follow the instructions supplied with the cloth.)
3) Do not attach sticky tape or labels, as they can make the surface of the pedestal dirty.
Page 7
7
2. Attach the poles.
1. Attach the base to the pedestal.
Using the Allen key , securely fasten
the base to the pedestal with the large
screws , as shown in the diagram on
the right.
Securely attach both left and right poles to the top face of the base as shown below using short screws .
Assembling the stand
For 42-inch/50-inch
For 37-inch
Parts for assembly
Base ................. 1
Short screws .... 4
Large screws ... 3
Long screws .... 4
Pedestal ........ 1
Poles ............... 2
Allen key ......... 1
Binding strap
... 1
English
Tornillos grandes
Base
Llave hexagonal
Pedestal
Pole
Stamped mark
Align the stamped marks.
Short screws
Pole
Pole
Stamped mark
Align the stamped marks.
Short screws
Page 8
English
8
Attach to the display console
1. Attach the connection cables to the display.
Rear View
2. Insert the poles into the holes
in the display console.
3. Fasten with screws
* Place clean blankets or similar
on a level floor or table,and place
the display on top of them facing down.
( Rear of display )
Blankets, soft
cloths or similar.
Display console
Cable Binding Instructions
■ Bind all cables to the PDP base with the supplied binding strap.
While ensuring there is sufficient slack in the power cord to minimize
stress, firmly bind all cables with the supplied binding strap.
Binding the Cables
Pass the binding
strap
through the
strap anchor.
Pull.
Bundle all
cables tidily.
Unbinding the Cables
Pull.
Pull clip.
Display console
Binding strap
Cables
Strap anchor
Long screws
Long screws
Model no. label
Display console
Position the side of the pedestal with the model
no. label to the rear. Push the assembly into the
display until it stops.
Securely fasten using long screws .
* Work on a level and stable surface.
( Rear of display )
( Rear of display )
Display console
Page 9
English
Parts for assembly
Black screws
...................2
Wood screws
...................2
Bands.........2
screws.........2 Clamps........4
Secure the console to prevent tipping
99
Front face
screw
screws
Bands
Band
Wood
screw
Locate the wood screw at the
center of the material width.
Wood screws
Clamps
Preparation
Fastening method
With speaker Without speaker
Black screws
Clamps Clamps
Speaker
attachment screws
Front
75(2
61
/64)
63(2
31
/64)
53(2
3
/32)
360(14
11
/64)
704(27
23
/32)
578(22
3
/4)
101(3
63
/64)
40(1
37
/64)
8(
5
/16)
146(
5
3
/4)
180(7
3
/32)
327(12
7
/8)
141(5
9
/16)
136(5
23
/64)
131(
5
5
/32)
46(1
13
/16)
684(26
59
/64)(For 42-, 50-inch)
602(23
45
/64)(For 37-inch)
Units : mm (inches)
C Matsushita Electric Industrial Co., Ltd. 2002
Dimension diagram
*
Securely attach to a wall, pillar or similarly solid structural feature using
separately- obtained products such as cords or chains of adequate strength.
Matsushita Electric Industrial Co., Ltd
Web Site : http://www.panasonic.co.jp/global/
■ Attaching to a TV stand ■ Attaching to a wall
Page 10
English
(For U.S.A)
10
Warranty
Panasonic Consumer Electronics Company
Division of Matsushita Electric Corporation
of America
One Panasonic Way
Secaucaus, NJ
07094
RACKS AND STANDS
Panasonic Consumer Electronics Company or Panasonic Sales Company (collectively referred to as “the
warrantor” ), will replace parts in case of defects in materials or workmanship, free of change, in the USA or
Puerto Rico, for ten (10) days from the date of the original purchase.
In-warranty parts in the USA can be obtained during the warranty period be contacting:
Panasonic Services Company (PASC)
20421 84th Avenue South
Kent, Washington 98032
Tel.:1-800-833-9626
Fax.:1-800-237-9080
(6 am to 5 pm Monday-Friday; 6 am to 10:30 am Saturday; PST)
Service in Puerto Rico can be obtained during the warranty period by calling the telephone number listed above.
This warranty is extended only to the original purchaser. A purchase receipt or other proof of the original
purchase is required for replacement parts under the warranty.
This warranty only covers failures due to materials and workmanship and does not cover normal wear. The
warranty does not cover damages which occurred in shipment or failures which result from accidents, misuse,
abuse, neglect, mishandling, misapplication, faulty installation, set-up adjustments, improper maintenance,
alteration, line power surge, lightning damage, modification,or commercial use, such as hotel, office,
restaurant, or other business or rental use of the product, or damage that is attributable to acts of God.
LIMITS AND EXCLUSIONS
There are no express warranties except as listed above.
PANASONIC SHALL NOT BE LIABLE FOR INCIDENTAL OR CONSEQUENTIAL DAMAGE RESULTING
FROM THE USE OF THIS PRODUCT, OR ARISING OUT OF ANY BREACH OF THIS WARRANTY. ALL
EXPRESS AND IMPLIED WARRANTIES. INCLUDING THE WARRANTIES OF MERCHANTABILITY, ARE
LIMITED TO THE APPLICABLE WARRANTY PERIOD SET FORTH ABOVE.
Some states do not allow the exclusion or limitation of incidental or consequential damages, or limitations on
how long an implied warranty lasts, so the above exclusions or limitations may not apply to you.
This warranty gives you specific legal rights and you may also have other rights which vary from state to state.
If a problem with this product develops during or after the warranty period, you may contact your dealer or call
the number listed above.
If the problem is not handled to your satisfaction, then write to the Customer Satisfaction Center at the
Panasonic Consumer Electronics Company address indicated above.
Panasonic Sales Company, Division of
Matsushita Electric of Puerto Rico, Inc.
AVE. 65 de Infanteria, Km 9.5
San Gabriel Industrial Park
Carolina, Puerto Rico 00985
Page 11

Deutsch
11
Vorsichtsmaßnahmen für die Aufstellung
WARNUNG
Die Installation darf nur von einem qualifizierten Fachmann ausgeführt werden.
• Falls der Sockel nicht richting installiert ist, kann das Plasmadisplay umfallen und dabei
Verletzungen verursachen.
VORSICHT
Nicht für Displays verwenden, die nicht in diesem Katalog aufgeführt sind.
Nicht auf den Sockel klettern oder den Sockel als Tritt verwenden. (Dies gilt besonders für
kleine Kinder.)
•
Beim Umfallen kann das Gerät beschädigt werden und es können Verletzungen verursacht werden.
Den Sockel nicht verwenden, falls er verzogen, gerissen oder gebrochen ist.
• Falls der Sockel in diesem Zustand verwendet wird, kann er noch mehr beschädigt werden und
dabei Verletzungen verursachen. Wenden Sie sich in diesem Fall an das Verkaufsgeschäft.
Auf einer stabilen, ebenen Fläche aufstellen.
• Auf einer instabilen Fläche kann das Gerät umfallen und dabei beschädigt werden oder
Verletzungen verursachen.
Nicht an Orten mit hoher Luftfeuchtigkeit verwenden.
• Bei längerer Verwendung unter solchen Bedingungen kann sich der Sockel verziehen und
verformen. Durch die verminderte Festigkeit kann das Gerät umfallen und dabei beschädigt
werden oder Verletzungen verursachen.
Beim Aufstellen kontrollieren, ob alle Schrauben richtig festgezogen sind.
• Falls beim Aufstellen nicht alle Schrauben richtig festgezogen werden, ist keine ausreichende
Tragfähigkeit für das Plasmadisplay gewährleistet. Das Gerät kann umfallen und beschädigt
werden oder es können Verletzungen verursacht werden.
Venwenden Sie zum Sichern des Plasmadisplays die mitgelieferte Halterung zur
Verhinderung des Umstürzens.
• Im Falle eines Erdbebens oder wenn Kinder auf den Sockel klettern, kann das Plasmadisplay
umstürzen und Verletzungen verursachen.
Für das Aufhängen und das Abnehmen des Displays sind zwei Personen notwendig.
• Falls nicht zwei Personen zur Verfügung stehen, kann das Display herunterfallen und
Verletzungen verursachen.
• Auf der Oberseite und links und rechts muß ein freier Abstand von mindestens 10 cm, auf der
Unterseite ein freier Abstand von mindestens 6 cm und auf der Rückseite ein freier Abstand
von mindestens 7 cm vorhanden sein.
Hinweise für die Handhabung
1) Bei der Aufstellung an einem Ort mit direkter Sonneneinstrahlung oder neben einer Heizung können
Verformungen und Verfärbungen auftreten.
2) Reinigung
Reinigen Sie das Gerät mit einem trockenen Tuch. Bei starker Verschmutzung können Sie das Tuch mit einer
verdünnten Reinigungsmittellösung anfeuchten. Reiben Sie das Gerät nach dem Reinigen mit einem anderen
Tuch trocken.
Verwenden Sie keine Lösungsmittel, Farbverdünner oder Reinigungswachs, weil die Oberfläche beschädigt
werden kann.
(Bei Verwendung von vorbehandelten Reinigungstücherm muß die Anwendungsanleitung des Tuchs genau
beachtet werden.)
3) Bringen Sie keine Kleber oder Klebebänder an, weil sie Spuren auf der Oberfläche des Sockels hinterlassen.
Page 12
12
Deutsch
2. Die Stangen anbringen.
1. Die Basis am Stand anbringen.
Mit dem Sechskantschlüssel die Basis
mit den großen Schrauben fest am
Stand wie in der Abbildung rechts gezeigt
anbringen.
Die linke und rechte Stange an der Oberfläche der Basis mit den kurzen Schrauben wie oben gezeigt sicher anbringen.
Zusammenbau des Standes
Für 40-Zoll/50-Zoll
Für 37-Zoll
Bauteile für den Zusammenbau
Basis ............... 1
Kurze Schrauben
...... 4
Große Schrauben
...... 3
Lange Schrauben
...... 4
Stand ............. 1
Stangen .......... 2
Sechskantschlüssel
...... 1
Klemmstreifen
... 1
Basis
Große Schrauben
Sechskantschlüssel
Stand
Kurze
Schrauben
Stangen
Stangen
Markierung
Die Markierungen
angleichen.
Stangen
Markierung
Die Markierungen
angleichen.
Kurze
Schrauben
Page 13

13
Deutsch
An der Konsole anbringen
1. Die Verbindungskabel am Display anschließen.
Ansicht der Rückseite
2.
Die Stangen in die Öffnungen
der Konsole einsetzen.
3. Mit den Schrauben
befestigen.
* Saubere Decken oder ähnliches auf einen
ebenen Boden oder Tisch legen und dann das
Display nach unten weisend darauf legen.
Decken, weiche Tücher
oder ähnliches.
Konsoule
Hinweise zum Bündeln der Kabel
■
Alle Kabel an der PDP-Basis mit dem mitgelieferten Klemmstreifen bündeln.
*
Um eine Belastung des Netzkabels zu vermeiden, sollte sichergestellt werden,
dass es ausreichend Spielraum hat und es dann mit den anderen Kabeln mit
dem mitgelieferten Klemmstreifen fest gebündelt wird.
Bündeln der Kabel
Den Klemmstreifen durch den
Klemmstreifenhalter schieben.
Ziehen.
Alle Kabel fest
bündeln.
Lösen der Kabel
Ziehen.
An der
Klemme ziehen.
Konsole
Klemmstreifen
Kabel
Klemmstrei
fenhalter
Lange Schrauben
Lange Schrauben
Modell-Nr.-Aufkleber
Die Seite des Standes mit dem Modell-Nr.-Aufkleber
nach hinten weisend aufstellen. Den Stand bis zum
Anschlag in das Display drücken.
Rückseite des
Displays
( )
Rückseite des
Displays
(
)
Mit den langen Schrauben sicher befestigen.
* Den Zusammenbau auf einer ebenen und
stabilen Oberfläche ausführen.
Konsole
Rückseite des
Displays
( )
Konsole
Page 14
14
Deutsch
■
Auf einem Fernsehschrank
befestigen
■ Befestigung an einer Wand
Vorderseite
Schrauben
Schrauben
Metallbänder
Metallband
Holz
schraube
Die Holzschrauben in der
Mitte der Mitte anbringen.
Holzschrauben
Klemmen
Vorbereitungen
Befestigungsverfahren
Mit Lautsprecher
Ohne Lautsprecher
Schwarze Schrauben
Klemmen
Klemmen
Schrauben zum Anbringen
der Lautsprecher
Bauteile für den Zusammenbau
Schwarze
Schrauben
...
2
Holzschrauben
...................2
Metallbänder
...................2
Schrauben...2 Klemmen.....4
Die Konsole sichern, um Umkippen zu verhindern
Vorderseite
Einheit: mm
C Matsushita Electric Industrial Co., Ltd. 2002
Abmessungen
*
An einer Wand, einem Balken oder ähnlichen stabilen Gegenstand unter Verwendung von im Handel
erhältlichen Produkten wie Schnur oder Kette von entsprechender Länge sicher anbringen.
Matsushita Electric Industrial Co., Ltd
Web Site : http://www.panasonic.co.jp/global/
46
131
136
141
327
180
146
101
360
8
Vorderseite
Vorderseite
578
704
684(Für 42-Zoll/50-Zoll)
602(Für 37-Zoll)
40
75
63
53
Page 15

15
Nederlands
Voorzorgsmaatregelen bij opstelling
WAARSCHUWING
De installatiewerkzaamheden dienen uitsluitend door een deskundige monteur uitgevoerd te worden.
• Als de vloerstandaard niet correct wordt geïnstalleerd, bestaat de kans dat de Breedbeeld
Plasmadisplay Monitor omvalt, hetgeen letsel kan veroorzaken.
OPGELET
Gebruik geen andere displays dan in de catalogus staan aangegeven.
Niet op de vloerstandaard gaan staan of deze als opstapje gebruiken. (Kleine kinderen
dienen speciaal op dit punt attent gemaakt te worden.)
•
Als het toestel omver valt of door verkeerd gebruik beschadigd wordt, kan dit tot verwondingen leiden.
De vloerstandaard niet gebruiken als deze verbogen, gebarsten of anderszins beschadigd is.
•
Als u de vloerstandaard gebruikt wanneer deze beschadigd is, kan deze verder beschadigd raken,
hetgeen tot verwondingen kan leiden. Neem zo spoedig mogelijk contact op met uw Panasonic dealer.
Op een stabiele, horizontale ondergrond plaatsen.
• Als dit niet gebeurt, bestaat de kans dat het toestel omver valt en beschadigd wordt, hetgeen
tot verwondingen kan leiden.
Niet gebruiken op plaatsen met een hoge vochtigheid.
• Langdurig gebruik onder dergelijke omstandigheden kan kromtrekken en of vervorming
veroorzaken. Dit kan tot vermindering van de stevigheid leiden, waardoor het toestel omver kan
vallen en beschadigd kan raken, hetgeen tot verwondingen kan leiden.
Zorg er voor dat bij het opstellen alle schroeven goed vastgedraaid zijn.
•
Als er tijdens de montage niet voldoende op gelet wordt om alle schroeven goed vast te draaien, bestaat
de kans dat de vloerstandaard niet stevig genoeg is om de Breedbeeld Plasmadisplay Monitor te dragen,
waardoor het toestel omver kan vallen en beschadigd kan raken, hetgeen tot venwondingen kan leiden.
Gebruik de bijgeleverde kantelpreventiesteunen om de Breedbeeld Plasmadisplay Monitor vast te zetten.
• In het geval van een aardbeving of wanneer er kinderen op de vloerstandaard klimmen
wanneer de Breedbeeld Plasmadisplay Monitor daarop geplaatst is, bestaat de kans dat de
Breedbeeld Plasmadisplay Monitor omver valt, hetgeen tot venwondingen kan leiden.
Het installeren en verwijderen van de display dient door twee personen te worden uitgevoerd.
• Als dit niet door twee personen wordt uitgevoerd, bestaat de kans dat de display komt te vallen
en verwondingen veroorzaakt.
• Laat een ruimte open van tenminste 10 cm aan de bovenlinker-en rechterzijde, tenminste 6 cm
aan de onderzijnde en 7 cm aan de achterzijde.
Aanwijzingen betreffende onderhoud
1) Als de vloerstandaard in direct zonlicht wordt geplaatst of naast een warmte bron, kan door het licht en de hitte
verkleuring en/of vervorming ontstaan.
2) Reinigen
Veeg de vloerstandaard schoon met een droge doek. Als de vloerstandaard zeer vuil is, deze met water waaraan
een kleine hoeveelheid van een neutraal schoonmaakmiddel is toegevoegd reinigen en vervlolgens met een
droge doek afvegen.
Gebruik voor het reinigen geen producten zoals wasbenzine, terpentijn of meubelwas, aangezien deze het
materiaal kunnen aantasten.
(Volg bij gebruik van een chemisch reinigingsdoekje de bij het doekje geleverde instructies.)
3) Bevestig geen plakband of etiketten, aangezien de buitenzijde van de vloerstandaard daardoor onnerstelbaar vuil
kan worden.
Page 16

Nederlands
16
2. Bevestig de insteekpennen.
1.
Bevestig de onderplaat op de voet.
Maak de onderplaat stevig met de
grote schroeven aan de voet vast
met behulp van de inbussleutel ,
zoals aangegeven in de afbeelding
rechts hiernaast.
Bevestig de linker en rechter insteekpen stevig met de korte schroeven aan de bovenkant van de onderplaat,
zoals aangegeven in de bovenstaande afbeelding.
Montage van de standaard
Voor 42-inch/50-inch
Voor 37-inch
Montage-onderdelen
Onderplaat ...... 1
Korte schroeven
...... 4
Grote schroeven
...... 3
Lange schroeven
...... 4
Voet ............... 1
Insteekpennen
...... 2
Inbussleutel ..... 1
Kabelbindriempje
...... 1
Onderplaat
Grote schroeven
Inbussleutel
Voet
Insteekpen
Merkteken Merkteken
Lijn de merktekens uit.
Korte
schroeven
Insteekpen
Insteekpen
Lijn de merktekens uit.
Korte
schroeven
Page 17

Nederlands
17
Breng het beeldscherm aan
1. Sluit de aansluitkabels op het beeldscherm aan.
Achterkant
2. Steek de insteekpennen in
de gaten van het beeldscherm.
3. Maak de schroeven vast.
* Leg schone dekens of iets dergelijks op een
vlakke vloer of tafel. Leg dan het apparaat met
het scherm naar beneden erop neer.
Achterkant van
beeldscherm
Dekens, zachte
doeken e.d.
Beeldscherm
Aanwijzingen voor het vastmaken van de kabels
■
Maak alle kabels met het bijgeleverde kabelbindriempje vast aan de PDP-voet.
* Controleer of het netsnoer niet te strak zit en maak dan alle
kabels met het bijgeleverde kabelbindriempje vast.
Vastmaken van de kabels
Steek het kabelbindriempje
door het bevestigingsanker.
Trekken.
Maak de kabels stevig
in een bundel vast.
Losmaken van de
kabelbundel
Trekken.
Trek aan het
klemmetje.
Beeldscherm
Kabelbindriempje
Kabels
Lange schroeven
Modelnummerlabel
Beeldscherm
Keer de kant van de voet met het
modelnummerlabel naar achteren.
Druk de pennen volledig in het beeldscherm.
Maak de lange schroeven stevig vast.
* Werk op een vlakke en stabiele ondergrond.
(
)
Achterkant van
beeldscherm
(
)
Achterkant van
beeldscherm
(
)
Lange schroeven
Bevestigingsanker
Beeldscherm
Page 18

18
Nederlands
■
Bevestigen aan een TV-standaard
■ Bevestigen aan een muur
Voorkant
Schroef
Montagestrip
Hout
schroef
Breng de houtschroef in het
midden van het materiaal aan.
Houtschroeven
schroeven
Montagestrips
Klemmen
Voorbereidingen
Bevestigings methode
Met luidspreker Zonder luidspreker
Zwarte schroeven
Klemmen
Klemmen
Luidspreker-bevestigings
schroeven
Vorderseite
Voorkant
Eenheid: mm
Montage-onderdelen
Zwarte
schroeven....2
Houtschroeven
...................2
Montagestrips
....................2
Schroeven...2 Klemmen.....4
C Matsushita Electric Industrial Co., Ltd. 2002
Vastmaken van het beeldscherm om omvallen te voorkomen
Afmetingen
*
Bevestig stevig met los verkrijgbaar montagemateriaal zoals een touw of
ketting van voldoende sterkte aan een muur, wand of pilaar.
Matsushita Electric Industrial Co., Ltd
Web Site : http://www.panasonic.co.jp/global/
327
46
131
136
141
180
146
101
684(Voor 42-inch en 50-inch)
360
8
Vorderseite
Voorkant
Voorkant
578
704
602(Voor 37-inch)
75
63
40
53
Page 19

Italiano
19
Precauzioni da adottare per l’installazione
AVVERTENZA
Le operazioni di installazione vanno eseguite esclusivamente da personale qualificato.
• Se il piedistallo non è installato correttamente, Io schermo al plasma 16:9 può cadere e
procurare danni a cose o persone.
ATTENZIONE
Non utilizzare altri schermi diversi da quelli indicati nel catalogo.
Non salire sul piedistallo o utilizzarlo come gradino. (Prestare attenzione affinché nessun
bambino possa utilizzarlo come giocattolo.)
• Se l’unità cade o viene danneggiata per un cattivo uso, può procurare danni a cose e persone.
Non utilizzare il piedistallo qualora presenti deformazioni, fenditure o addirittura rotture.
• Se si utilizza un piedistallo danneggiato, può rappresentare un pericolo per l’incolumità
personale. Rivolgersi immediatamente al proprio rivenditore.
Posizionare su una superficie stabile e livellata.
• In caso contrario, I’unità può cadere e danneggiarsi, procurando eventuali danni a cose e
persone.
Non utilizzare in ambienti con un alto tasso di umidità.
• L’utilizzo per lunghi periodi in simili condizioni ambientali può causare la deformazione
dell’apparecchio e la conseguente perdita di resistenza, a danno dell’incolumità personale di chi
ne fa uso.
Durante l’installazione, accertarsi che tutte le viti siano fissate in modo appropriato.
• Qualora non venissero fissate correttamente durante il montaggio, il piedistallo non sarà in
grado di reggere lo schermo al plasma-16:9 che potrebbe cadere e danneggiarsi, procurando
eventuali danni a cose e persone.
Utilizzare le staffe accessorie anti-caduta per fissare lo schermo al plasma-16:9.
• Se si verifica un movimento tellurico oppure se i bambini si arrampicano sul piedistallo sul quale
è montato lo schermo al plasma-16:9, può cadere e procurare danni a cose e persone.
Per installare e rimuovere lo schermo sono richieste due persone.
• In caso contrario, si corre il rischio di far cadere lo schermo, procurando così danni a cose e
persone.
• Lasciare uno spazio di 10 cm o piú in alto, a destra e sinistra, 6 cm o piú in basso e 7 cm o piú
nella parte posteriore.
Note sulla manutenzione
1) Se l'unità è esposta alla luce solare diretta o è posizionata accanto ad una fonte di calore, possono verificarsi
deformazioni e scolorimento.
2) Pulizia
Pulire l'unità con un panno asciutto. Se l'unità fosse particolarmente sporca, pulirla utilizzando un panno inumidito
con acqua e una piccola quantità di detergente neutro, quindi asciugarla con un panno asciutto.
(Se si utilizza un panno trattato chimicamente, seguire le istruzioni fornite con il panno.)
3) Non attaccare adesivi o etichette, in quanto possono raccogliere polvere e corpi estranei a sporcare la superficie
del piedistallo.
Page 20

20
Italiano
2. Montaggio dei paletti
1. Montaggio della base sul
piedestallo
Per mezzo delle viti grosse e utilizzando
la chiave esagonale fissare saldamente
la base al piedestallo come indicato nella
figura a lato.
Fissare saldamente i paletti sinistro e destro sulla parte superiore della base per mezzo delle viti corte ,
come indicato in figura.
Montaggio del supporto
Per apparecchi da 42 o da 50 pollici
Per apparecchi da 37 pollici
Pezzi per il montaggio
Base ................ 1
Viti corte ......... 4
Viti grosse ....... 3
Viti lunghe ....... 4
Piedestallo ..... 1
Paletti ............. 2
Chiave esagonale per
viti ad esagono incassato
...... 1
Fascetta
.......... 1
Base
Viti grosse
Chiave esagonale per viti
ad esagono incassato
Piedestallo
Paletto
Contrassegno
inciso
Allineare i contrassegni
Viti corte
Paletto
Paletto
Contrassegno
inciso
Allineare i contrassegni
Viti corte
Page 21

Italiano
21
Montaggio sul corpo dello schermo
1. Collegare i cavi allo schermo
Vista da dietro
2. Inserire i paletti negli appositi
fori dello schermo.
3. Fissare lo schermo con
le viti.
* Posizionare un panno pulito su una superficie in piano
o su un tavolo, e piazzarvi sopra lo schermo rivolto
verso il basso.
Lato posteriore
dello schermo
Panno, tessuto,
o simili
Schermo
Istruzioni per il legamento dei cavi
■ Usando l’apposita fascetta fornita in dotazione, legare insieme tutti i cavi
alla base dello schermo al plasma.
*
Legare insieme tutti i cavi con l’apposita fascetta in dotazione,
facendo attenzione a lasciare sufficientemente allentato il cavo di
alimentazione dell’apparecchio.
Legamento dei cavi
Passare la fascetta
attraverso la sua fibbia.
Tirare la
fascetta.
Fissare insieme i cavi
in modo ordinato.
Slegamento dei cavi
Tirare
Tirare la
fibbia.
Schermo
Fascetta
Cavi
Viti lunghe
Viti lunghe
Etichetta con il numero del modello
Posizionare il piedestallo in modo che l’etichetta
venga a trovarsi rivolta verso il retro.
Inserire i paletti nello schermo ben a fondo.
Fissare saldamente per mezzo delle viti lunghe .
*
Effettuare il montaggio su una superficie stabile
ed in piano.
Schermo
(
)
Lato posteriore
dello schermo
(
)
Lato posteriore
dello schermo
(
)
Fibbia della
fascetta
Schermo
Page 22

Italiano
22
C Matsushita Electric Industrial Co., Ltd. 2002
■ In caso di montaggio su
una base per televisori
■ In caso di montaggio alla parete
Lato anteriore
Vite
Viti
Bande
Banda
Vite da
legno
Posizionare le viti da legno in
corrispondenza del centro della
base su cui ha luogo il montaggio.
Viti da legno
Morsetti
Preparativi
Metodo di fissaggio
Schermo con altoparlanti
Schermo senza altoparlanti
Viti nere
Morsetti Morsetti
Viti di montaggio
degli altoparlanti
Lato anteriore
Unità: mm
Parti per assemblaggio
Viti nere
...................2
Viti da legno
...................2
Bande.........2
Viti.........2
Morsetti
...................4
Fissaggio dello schermo per evitare capovolgimenti
Diagramma delle dimensioni
*
Assicurare il tutto ad una parete, o ad un colonna, o ad un’altra simile solida
struttura, utilizzando una corda o una catena di robustezza adeguata.
Matsushita Electric Industrial Co., Ltd
Web Site : http://www.panasonic.co.jp/global/
360
Lato anteriore
Lato anteriore
578
704
141
327
180
46
131
136
684(per apparecchi da 42 o 50 pollici)
602(per apparecchi da 37 pollici)
146
101
75
63
8
40
53
Page 23

Français
23
Précautions pour l’installation
AVERTISSEMENT
Les travaux d’installation doivent être confiés à un technicien qualifié seulement.
• Si le piédestal n’est pas installé correctement, ceci risquera de causer une chute de l’Ecran
plasma 16/9ème et des blessures corporelles.
ATTENTION
N’utilisez pas d’autres moniteurs que ceux mentionnés dans le catalogue.
Ne montez pas sur le piédestal, et ne l’utilisez pas comme marche. (Cette remarque
concerne principalement les jeunes enfants.)
• Si I’appareil tombe ou est endommagé à la suite d’une utilisation incorrecte, il y aura risque de
blessures.
N’utilisez pas le piédestal s’il est tordu, fissuré ou rompu.
• Si vous utilisez le piédestal alors qu’il est rompu, il risque d’être endommagé encore davantage,
et vous risqueriez de vous blesser. Adressez-vous dès que possible à votre revendeur.
Installez l’appareil sur une surface stable et horizontale.
• Sinon, I’appareil pourrait tomber et être abîmé, ce qui pourrait causer des blessures.
N’utilisez pas l’appareil dans des endroits très humides.
• Si vous utilisez l’appareil dans ces conditions pendant une longue période, I’appareil risquera
d’être tordu ou déformé. Ceci amoindrira sa solidité, et l’appareil risquera alors de tomber ou
d’être endommagé, ce qui pourra entraîner des blessures.
Lors de I’installation, veillez à bien serrer toutes les vis.
• Si vous ne serrez pas suffisamment les vis lors du montage, Ie piédestal ne sera pas assez
solide pour supporter I’Ecran plasma 16/9ème, et il risquera de tomber et d’être endommagé,
ce qui pourra causer des blessures.
Utilisez les supports anti-chute fournis pour fixer l’Ecran plasma 16/9ème.
• Si un séisme se produit ou si des enfants grimpent sur le piédestal alors que l’Ecran plasma
16/9ème est installé, I’Ecran plasma 16/9ème risque de tomber et de causer des blessures.
Pour poser ou déposer l’écran, il faut le concours de deux personnes.
• Si deux personnes au moins ne sont pas présentes pour effectuer l’installation, I’écran risquera
de tomber et de causer des blessures.
• Laissez un espace de 10 cm ou plus en haut, à gauche et à droite, de 6 cm ou plus en bas, et
de 7 cm ou plus à I’arrière.
Remarques concernant les manipulations
1) Si l’appareil est placé sous les rayons directs du soleil ou à proximité d’un appareil de chauffage, la lumière et la
chaleur risqueront de le décolorer ou de le déformer.
2) Nettoyage
Essuyez l’appareil avec un chiffon sec. Si l’appareil est très sale, nettoyez-le à l’aide d’un chiffon imprégné d’une
solution légère de détergent neutre, puis essuyez avec un chiffon sec.
N’utilisez pas de produits tels que des solvants, des diluants ou de la cire ménagère pour le nettoyage, car ces
produits risquent d’abîmer le revêtement de l’appareil.
(Si vous utilisez un chiffon traité chimiquement, suivez la notice d’utilisation du chiffon.)
3) Ne fixez pas de ruban adhésif ou d’étiquettes, car ils risquent de salir la surface du piédestal.
Page 24

Français
24
2. Fixez les supports verticaux.
1. Fixez la base sur le pied.
En utilisant la clé hexagonale coudée ,
serrez solidement la base du pied avec la
vis large comme montré sur l’illustration
ci-à droite.
Fixez solidement les barres gauche et droite sur la face supérieure de la base comme montré ci-dessus en
utilisant les vis courtes .
Montage du support
Pour 42 pouces/50 pouces
Pour 37 pouces
Montage-onderdelen
Base ................. 1
Vis courtes ...... 4
Vis larges ........ 3
Vis longues ...... 4
Pied ............... 1
Supports verticaux
...... 2
Clé hexagonale coudée
...... 1
Serre-câble
..... 1
Base
Vis larges
Clé hexagonale
coudée
Pied
Support vertical
Vis courtes
Support
vertical
Repère embouti
Alignez les repères
emboutis.
Support vertical
Repère embouti
Alignez les repères
emboutis.
Vis courtes
Page 25

Français
25
Fixez la console de l'écran
1. Attachez les câbles de connexion à l’écran.
Vue arrière
2.
Introduisez les supports verticaux dans les
perçages de la console de l'écran.
3. Serrez les vis.
* Placez des couvertures propres ou des objets
similaires sur un sol ou une table plate, et placez
l’écran dessus, dirigé vers le bas.
(Arrière de l'écran)
Couverture, tissus
doux ou similaires.
Console de l'écran
Instructions de mise en place des serre-câble
■
Regroupez tous les câbles à la base PDP en utilisant le serre-câble fourni.
*
Tout en vous assurant que le cordon d'alimentation possède
suffisamment de mou pour ne pas être sous contrainte, maintenez
soigneusement tous les câbles en utilisant le serre-câble fourni.
Regroupement des câbles
Engagez le serre-câble dans
l'attache de serre-câble
.
Tirez.
Regroupez
soigneusement
tous les câbles.
Libération des câbles
Tirez.
Tirez le
clip.
Console de l'écran
Serre-câble
Câbles
Vis longues
Vis longues
Etiquette du numéro de modèle
Console de l'écran
Positionnez le côté du pied de manière que
l'étiquette de numéro de modèle soit à l'arrière.
Engagez à fond l'ensemble dans l'écran.
Assurez la fixation en utilisant des vis longues .
* Travaillez sur un plan horizontal et stable.
(Arrière de l'écran)
(Arrière de l'écran)
Attache de
serre-câble
Console de l'écran
Page 26

Français
26
■ Fixation sur un support
de téléviseur
■ Fixation sur un mur
Face avant
Vis
Vis
Bande
Vis à
bois
Placez la vis à bois au centre
de l'épaisseur du matériau.
Vis à bois
Bandes
Attaches
Préparation
Méthode de montage
Avec haut-parleur Sans haut-parleur
Vis noires
Attaches Attaches
Vis de montage
des haut-parleurs
Vorderseite
Unité: mm
Pièces à assembler
Vis noires....2
Vis à bois
...................2
Bandes.......2
Vis.........2
Attaches.......4
Maintenez la console pour éviter qu'elle ne bascule
Dimensions
*
Fixez solidement à un mur, un pilier ou une structure solide similaire en utilisant des
produits obtenus séparément, tels que des codes ou des chaînes d’une force suffisante.
Matsushita Electric Industrial Co., Ltd
Web Site : http://www.panasonic.co.jp/global/
C Matsushita Electric Industrial Co., Ltd. 2002
360
8
Avant
Vorderseite
578
704
602(Pour 37 pouces)
327
141
180
136
131
146
46
101
684(pour 42 ou 50 pouces)
75
63
40
53
Page 27

Español
27
Precauciones para la instalación
ADVERTENCIA
La instalación debe realizarla un técnico cualificado.
• Si no se ha instalado correctamente la Pantalla Panorámica de Plasma, puede caerse y
resultar dañada.
PRECAUCIÓN
No utilice otras pantallas que las indicadas en el catálogo.
No suba sobre el pedestal o utilice como escalón.(Se debe tener especial cuidado en el
caso de los niños pequeños.)
• Si la unidad se cae o se daña por el mal uso, puede sufrir daños.
No utilice el pedestal si está doblado, partido o, está roto.
• Si utiliza un pedestal roto, puede dañarse todavía más y puede resultar usted dañado. Llame a
la tienda donde lo compró, Io antes posible.
Instalese en una superficie estable y horizontal.
• En caso de no ser asi, Ia unidad puede caerse y dañarse, pudiendo sufrir daños personales.
No utilizar en lugares con alta humedad.
• EI uso durante largo tiempo en estas condiciones puede hacer que se curve o se deforme.
Esto puede hacer que se debilite y la unidad puede caerse y dañarse, pudiendo sufrir daños
personales.
Durante la instalación, asegúrese de apretar bien todos los tornillos.
• Si no se tiene cuidado y los tornillos no están bien apretados durante el armado, La instalacion
no será lo suficientemente fuerte como para sostener la Pantalla Panorámica de Plasma y
puede caerse y dañarse, pudiendo sufrir daños personales.
Utilice los soportes de fijación accesorias para evitar la caída y sostener la Pantalla
Panorámica de Plasma.
• En caso de terremoto o cuando los niños se suben al pedestal con la Pantalla Panorámica de
Plasma instalada, la Pantalla Panorámica de Plasma puede caerse, pudiendo sufrir daños
personales.
Es necesaria la ayuda de dos personas para instalar y desmontar la pantalla.
• Si no tiene la ayuda de otra persona, Ia pantalla puede, pudiendo sufrir daños personales.
• Deje un espacìo de 10 cm o más la parte superior, parte derecha e izquierda, 6 cm o más en la
parte inferior y 7 cm o más en la parte trasera.
Notas sobre el uso
1) Si se instala la unidad en un lugar donde se reciben los rayos directos de sol o cerca de la calefacción, la luz y el
calor pueden hacer que pierda color o se deforme.
2) Limpieza
Frote la nuided con un paño seco. Si la unidad esta muy sucia, limpie con un paño empapado en agua con una
pequeña cantidad de detergente neutro y frote con un paño seco. No utilice productos tales como disolventes,
diluyente o cera del hogar para la limpieza ya que pueden dañar el revestimiento de la superficie.
(Si utiliza un paño con tratamiento químico, siga las instrucciones que vienen con el paño.)
3) No pegue cinta adhesiva o etiquetas ya que pueden ensuciar la superficie del pedestal.
Page 28

Español
28
2. Coloque los postes
1. Coloque la base en el pedestal.
Utilizando la llave hexagonal , apriete
firmemente la base al pedestal con los
tornillos grandes , como se muestra
en el diagrama de la derecha.
Coloque firmemente ambos postes, el izquierdo, en la cara superior de la base, como se muestra en la
ilustración de arriba, utilizando los tornillos cortos .
Montaje del soporte
Para 42 pulgadas/50 pulgadas
Para 37 pulgadas
Piezas para hacer el montaje
Base ................ 1
Tornillos cortos
...... 4
Tornillos grandes
...... 3
Tornillos largos
...... 4
Pedestal ........ 1
Postes ............. 2
Llave hexagonal
...... 1
Banda de unión
...... 1
Tornillos grandes
Base
Llave hexagonal
Pedestal
Poste
Alinee las marcas
Tornillos cortos
Poste
estampadas.
Marca
estampada
Poste
Marca
estampada
Alinee las marcas
estampadas.
Tornillos cortos
Page 29

Español
29
Colocación en la consola de la pantalla
1. Coloque los cables de conexión en la pantalla.
Vista posterior
2.
Inserte los postes en los agujeros
de la consola de la pantalla.
3. Apriete con los tornillos
* Coloque mantas o materiales similares que estén
limpios en un piso plano o una mesa, y ponga la
pantalla encima de ellos con la parte frontal hacia abajo.
Parte posterior
de la pantalla
Mantas, paños blandos
o materiales similares.
Consola de
la pantalla
Instrucciones para la banda de unión
■ Una todos los cables a la base PDP empleando la banda de unión.
*
Asegurándose de que el cable de alimentación quede lo
suficientemente flojo como para reducir al mínimo el esfuerzo, una
firmemente todos los cables con la banda de unión suministrada.
Para unir los cables
Pase la banda de unión a
través de su anclaje.
Tire de la
banda.
Una todos los cables
ordenadamente.
Para soltar los cables
Tire de
la banda.
Tire de la
presilla.
Consola de la pantalla
Banda
de unión
Cables
Tornillos largos
Etiqueta del modelo
Consola de la pantalla
Coloque hacia la parte posterior el lado del
pedestal que tiene la etiqueta del modelo. Meta en
ensamblaje en la pantalla hasta que se detenga.
Apriete firmemente utilizando los tornillos largos .
*
Trabaje en un lugar nivelado y estable.
(
)
Parte posterior
de la pantalla
(
)
Consola de la pantalla
Parte posterior
de la pantalla
(
)
Tornillos largos
Anclaje de
banda de unión
Page 30

Español
30
■
Colocación en un soporte de TV
■ Colocación en una pared
Tornillos para madera
Cara frontal
Tornillo
Tornillos
Bandas
Banda
Tornillo para
madera
Coloque el tornillo para madera
en el centro del material.
Abrazaderas
Preparación
Método de apriete
Con altavoz
Sin altavoz
Tornillos negros
Abrazaderas
Abrazaderas
Tornillos para colocación
de altavoz
Parte delantera
Unidades: mm
Piezas para hacer el montaje
Tornillos negros
...................2
Tornillos para
madera........2
Bandas........2
Tornillos........2 Abrazaderas
.....................4
Asegure la consola para impedir que se caiga
Diagrama de dimensiones
*
Colóquela firmemente en una pared, columna o estructura sólida similar, empleando productos
obtenidos separadamente como, por ejemplo, cables o cadenas que tengan suficiente resistencia.
Matsushita Electric Industrial Co., Ltd
Web Site : http://www.panasonic.co.jp/global/
C Matsushita Electric Industrial Co., Ltd. 2002
46
131
136
141
327
684(Para 42, 50 pulgadas)
180
146
101
360
8
Parte delantera
Parte delantera
578
704
602(Para 37 pulgadas)
75
63
40
53
Page 31

Svenska
31
Försiktighetsåtgärder vid montering
VARNING
Monteringen skall endast utföras av utbildad tekniker.
• Om bottenplattan inte monteras på rätt sätt, kan den Breda plasma-monitorn falla ned och
orsaka personskador.
OBSERVERA
Använd inga andra monitor än de som anges i katalogen.
Klättra inte upp på bottenplattan eller använd den som stege. (Se till att barn inte klättrar
på stativet.)
• Om enheten välter eller skadas på grund av felaktig användning kan skada uppstå.
Använd inte bottenplattan om den blir skev, får sprickor eller på annat sätt blir trasig.
• Om bottenplattan används när den är trasig kan den skadas ytterligare och orsaka
personskada. Kontakta inköpsstället snarast.
Montera på stabil, jämn yta.
• Om så inte sker kan enheten välta och skadas och orsaka personskada.
Använd inte på platser med hög luftfuktighet.
• Långvarig användning i sådana förhållanden kan orsaka att bottenplattan blir skev eller
deformerad. Detta kan leda till minskad styrka och enheten kan välta och skadas ytterligare och
orsaka personskada.
Kontrollera under monteringen att alla skruvar är ordentligt åtdragna.
• Om tillräcklig omsorg inte läggs på att kontrollera att skruvarna dras åt ordentligt under
monteringen kommer bottenplattan inte att bli tillräckligt stark för att bära upp den Bred plasmamonitorn och den kan välta och skadas och orsaka personskada.
Använd tippskydden som finns som tillbehör för att fästa den Bred plasma-monitorn.
• Om en jordbävning inträffar eller om barn klättrar på stativet när den Bred plasma-monitorn är
monterad kan den Bred plasma-monitorn välta och orsaka personskada.
Det behövs två personer för att montera eller avlägsna monitorn.
• Om man hanterar monitorn ensam kan man tappa monitorn och personskada kan uppstå.
• Lämna ett fritt utrymme på 10 cm eller mer ovanför samt på vänster och höger sida om
monitorn, 6 cm eller mer under samt 7 cm eller mer bakom monitorn.
Att iaktta vid hantering
1) Om enheten är placerad i direkt solljus eller bredvid en spis, kan ljuset och värmen orsaka missfärgning eller
deformering.
2) Rengöring
Torka av enheten med en torr duk. Om enheten är mycket smutsig, skall den rengöras med en duk som har
fuktats med ett milt neutralt diskmedel uppblandat med vatten. Torka därefter av med en torr duk.
Använd inte produkter som t.ex. Iösningsmedel, thinner eller polervax till rengöring eftersom de kan skada
monitorns ytskikt.
(Vid användning av kemiskt behandlat tyg, följ de anvisningar som följer med tyget.)
3) Fäst inte självhäftande tape eller dekaler eftersom de kan smutsa ner bottenplattans yta.
Page 32

Svenska
32
2. Fäst stängerna.
1. Fäst basen på sockeln.
Använd sexkantsnyckeln för att fästa basen
på sockeln med de tjocka skruvarna , såsom
framgår av bilden till höger.
Fäst både vänster och höger stång på ovansidan av basen med de korta skruvarna såsom visas ovan.
Montering av ställningen
För 42 tum/50 tum
För 37 tum
Delar för montering
Bas ................. 1
Korta skruvar
... 4
Tjocka skruvar
... 3
Långa skruvar
... 4
Sockel ........... 1
Stänger ............ 2
Sexkantsnyckel
...... 1
Bindrem
.......... 1
Tjocka skruvar
Bas
Sexkantsnyckel
Sockel
Stäng Stäng
Stämplat märke
Anpassa de stämplade
märkena till varandra.
Korta skruvar
Stäng
Stämplat märke
Anpassa de stämplade
märkena till varandra.
Korta skruvar
Page 33

Svenska
33
Fäst på skärmens konsol
1. Koppla anslutningskablarna till skärmen.
Sett bakifrån
2.
För in stängerna i hålen
på skärmens konsol.
3. Fäst med skruvarna
* Placera en ren filt eller liknande på golvet eller
ett stabilt bord och lägg sedan ner enheten med
skärmen vänd nedåt.
(
Skärmens baksida
)
Filt, duk eller
liknande
Skärmkonsol
Anvisningar för kabelbindning
■
Bind alla kablar till plasmaskärmens bas med den medföljande bindremmen.
* Kontrollera att det finns tillräckligt med frigång för nätkabeln
så att den inte utsätts för tryck och bind samman alla kablar
ordentligt med den medföljande bindremmen.
Bindning av kablarna
Dra bindremmen
genom remfästet.
Dra.
Bunta samman alla
kablar ordentligt.
Unbinding the Cables
Dra.
Dra i
klämman
Skärmkonsol
Bindrem
Kablar
Remfäste
Långa skruvar
Långa skruvar
Etikett för modellnr
Skärmkonsol
Placera sidan av konsolen försedd med etiketten
för modellnummer vänd bakåt. Tryck in
ställningen i skärmen så långt det går.
Fäst ordentligt med de långa skruvarna .
*
Arbeta på ett jämnt och stadigt underlag.
(
Skärmens baksida
)
(
Skärmens baksida
)
Skärmkonsol
Page 34

34
Svenska
■
Montering på en TV-ställning
■ Montering på en vägg
Framsida
Skruv
skruvar
Band
Band
Träskruv
Placera träskruven mitt på
bredden av materialet.
Träskruvar
Framsida
Enhet: mm
Delar för montering
Svarta skruvar
...................2
Träskruvar
...................2
Band.........2
Skruvar........2 Klämmor......4
Fäst konsolen ordentligt så att den inte kan välta
Måttdiagram
*
Fäst ordentligt på en vägg, pelare eller annat stabilt underlag med separat
införskaffade rep eller kedjor som kan bära tyngden.
Matsushita Electric Industrial Co., Ltd
Web Site : http://www.panasonic.co.jp/global/
C Matsushita Electric Industrial Co., Ltd. 2002
327
141
180
136
131
146
46
101
75
360
8
Framsida
Framsida
578
704
684(För 42, 50 tum)
602(För 37 tum)
40
63
53
Page 35

35
Sikkerhed i forbindelse med brug af widescreen-plasmaskærm
ADVARSEL
Montering må udelukkende foretages af en kvalificeret tekniker.
• Hvis soklen ikke er monteret korrekt, kan Widescreen-plasmaskærmen tippe forover, hvilket
kan medføre personskader.
FORSIGTIG
Brug ikke andre skærme end dem, der er nævnt i kataloget.
Det er farligt at kravle eller træde op på soklen. (Især små børn bør informeres om dette.)
• Hvis enheden tipper forover eller bliver beskadiget som følge af forkert brug, kan det medføre
personskader.
Brug ikke soklen, hvis den bliver bøjet, får revner eller på anden måde bliver defekt.
• Hvis du bruger en defekt hylde, kan den blive beskadiget yderligere, hvilket kan medføre
personskader. Kontakt den forhandler eller forretning, hvor du har købt hylden, så hurtigt som
muligt.
Anbring enheden på en stabil, jævn overflade.
• I modsat fald kan enheden tippe forover og blive beskadiget, Iigesom det kan medføre
personskader.
Undgå at anvende enheden i områder med høj fugtighed.
• Langvarig brug under sådanne forhold kan medføre bøjning eller deformation. Dette kan
nedsætte styrken, og enheden kan tippe forover og blive beskadiget, Iigesom det kan medføre
personskader.
Sørg for, at alle bolte spændes helt fast i forbindelse med montering.
• Hvis man ikke er opmærksom på at boltene spændes ordentlig fast i forbindelse med
monteringen, vil soklen ikke være stærk nok til at bære Widescreen-plasmaskærmen. Det kan
betyde, at skærmen tipper forover og bliver beskadiget, Iigesom der kan ske personskader.
Brug de medfølgende sikkerhedsbeslag til at sikre Widescreen-plasmaskærmen.
• I tilfæIde af rystelser eller hvis børn kravler op på hylden, mens Widescreen-plasmaskærmen er
monteret, kan Widescreen-plasmaskærmen tippe forover, hvilket kan medføre personskader.
Der skal to personer til at montere og afmontere skærmen.
• Hvis der ikke er to personer til stede ved dette arbejde, er der risiko for at tabe skærmen, hvilket
kan medføre personskader.
• Hold en afstand på mindst 100 mm i toppen, til venstre og højre, mindst 60 mm i bunden og
mindst 70 mm på bagsiden.
Oplysninger vedrørende håndtering
1) Hvis plasmaskærmen placeres direkte i sollys eller ved siden af en brændeovn, kan lyset og varmen medføre
misfarvning eller deformation.
2) Rengøring
Tør enheden af med en tør klud. Hvis eneheden er meget tilsmudset, kan du bruge en klud, der er vredet op i
vand tilsat en smule neutralt rengøringsmiddel. Tør derefter enheden af med en ren klud.
Brug ikke stoffer som f.eks. opløsningsmidler, fortynder eller voks til rengøring, da disse stoffer kan beskadige
overfladebehandlingen.
(Hvis du bruger en kemisk imprægneret klud, skal du følge anvisningerne for den pågæIdende klud.)
3) Sæt ikke tape eller etiketter fast på soklen, da dette kan tilsmudse soklens overflade.
Dansk
Page 36

36
Dansk
2. Sæt masterne på.
1. Sæt basen på foden
Anvend unbrakonøglen til forsvarligt at
fastgøre basen til foden med de store
skruer som illustreret i diagrammet til
venstre.
Fastgør omhyggeligt både venstre og højre mast til topoverfladen af basen som vist ovenfor og med
anvendelser af korte skruer .
Samling af soklen
For 42-tommer / 50-tommer
For 37-tommer
Dele til samling
Base ................. 1
Korte skruer .... 4
Store skruer .... 3
Lange skruer ... 4
Fod ................ 1
Master ............. 2
Unbrakonøgle
... 1
Fastgøringsbånd
...... 1
Store skruer
Base
Unbrakonøgle
Fod
Mast
Indstemplet
mærke
Ret de indstemplede mærker
ind efter hinanden.
Korte skruer
Mast
Mast
Indstemplet
mærke
Ret de indstemplede mærker
ind efter hinanden.
Korte skruer
Page 37

Dansk
37
Sæt skærmkonsollen på
1. Tilslut forbindelseskablerne til skærmen.
Set bagfra
2. Før masterne ind i hullerne i
skærmkonsollen.
3. Fastgør med skruer
* Anbring rene tæpper eller lignende på et vandret
gulv eller bord, og anbring skærmen vendt nedad
oven på dem.
(
Bagside af skærm
)
Tæpper, bløde klude
eller lignende.
Skærmkonsol
Instruktioner for fastgøringsbånd
■
Fastgør alle kabler til PDB soklen med det medfølgende fastgøringsbånd.
* Mens det sikres, at der er tilstrækkelig slæk på netledningen,
så den ikke udsættes for unødig belastning, samles alle
kabler stramt med det medfølgende fastgøringsbånd.
Opbinding af kablerne
Før fastgøringsbåndet
gennem båndforankringen.
Træk til.
Bundt alle
kabler pænt.
Unbinding the Cables
Træk
Træk i
knoppen
Skærmkonsol
Fastgøringsbånd
Kabler
Lange skruer
Model nr. mærkat
Skærmkonsol
Anbring den side af foden med model nr.
mærkaten bagud. Skub enheden ind i skærmen,
indtil den ikke kan komme længere.
Fastgør omhyggeligt med lange skruer .
* Udfør arbejdet på en jævn og stabil overflade.
( Bagside af skærm )
( Bagside af skærm )
Skærmkonsol
Lange skruer
Båndforankring
Page 38

38
Dansk
■
Fastgørelse til TV-sokkel
■ Fastgørelse til en væg
Forside
Skrue
skruer
Bånd
Bånd
Træskrue
Placér træskruen i midten af
materialebredden.
Træskruer
Klamper
Klargøring
Fastgøringsmetode
Med højttaler Uden højttaler
Sorte skruer
Klamper Klamper
Skruer til fastgørelse
af højttaler
Forside
Enhed: mm
Dele til samling
Sorte skruer
...................2
Træskruer
...................2
Bånd........2
Skruer..........2 Klamper........4
C Matsushita Electric Industrial Co., Ltd. 2002
Fastgør konsollen, så den ikke tipper
Dimensioner
*
Fastgør omhyggeligt til en en væg, stolpe eller lignende solid struktur ved
hjælp af en tilstrækkelig stærk snor eller kæde, der indkøbes særskilt.
Matsushita Electric Industrial Co., Ltd
Web Site : http://www.panasonic.co.jp/global/
327
46
131
136
141
180
146
101
360
8
Forside
Forside
578
704
684(For 42-, 50-tommer)
602(For 37-tommer)
75
63
40
53
Page 39

39
Page 40

40
Page 41

41
Page 42

42
Page 43

43
Page 44

44
Page 45

45
Page 46

46
 Loading...