


取扱説明書
カバーフレームキット
品番
TY-CF55VW50
日本語
この取扱説明書をよくお読みのうえ、正しくお使いくだ
さい。そのあと保存し、必要なときにお読みください。

パナソニックのお客様へ
パナソニック製品をお買い上げいただき、まことにありがとうございます。新しい LCD ディス
プレイをこれから何年も楽しんで頂けることを願っています。
お使いの製品で最大限の利益を得るために、調整を行う前にはこの取扱説明書をお読みくださ
い。また、この取扱説明書は後で参照できるように保管してください。
購入時の領収書も同様に保管してください。また、取扱説明書の裏表紙の空きスペースには本
製品の型番とシリアル番号を記録してください。
パナソニックのウェブサイト http://panasonic.net にアクセスしてください
もくじ
基本構成キット ..........................................................1
1×1 単一ディスプレイ配列 ......................................... 1
2
2 マルチディスプレイ配列 ..................................... 1
×
基本構成キット
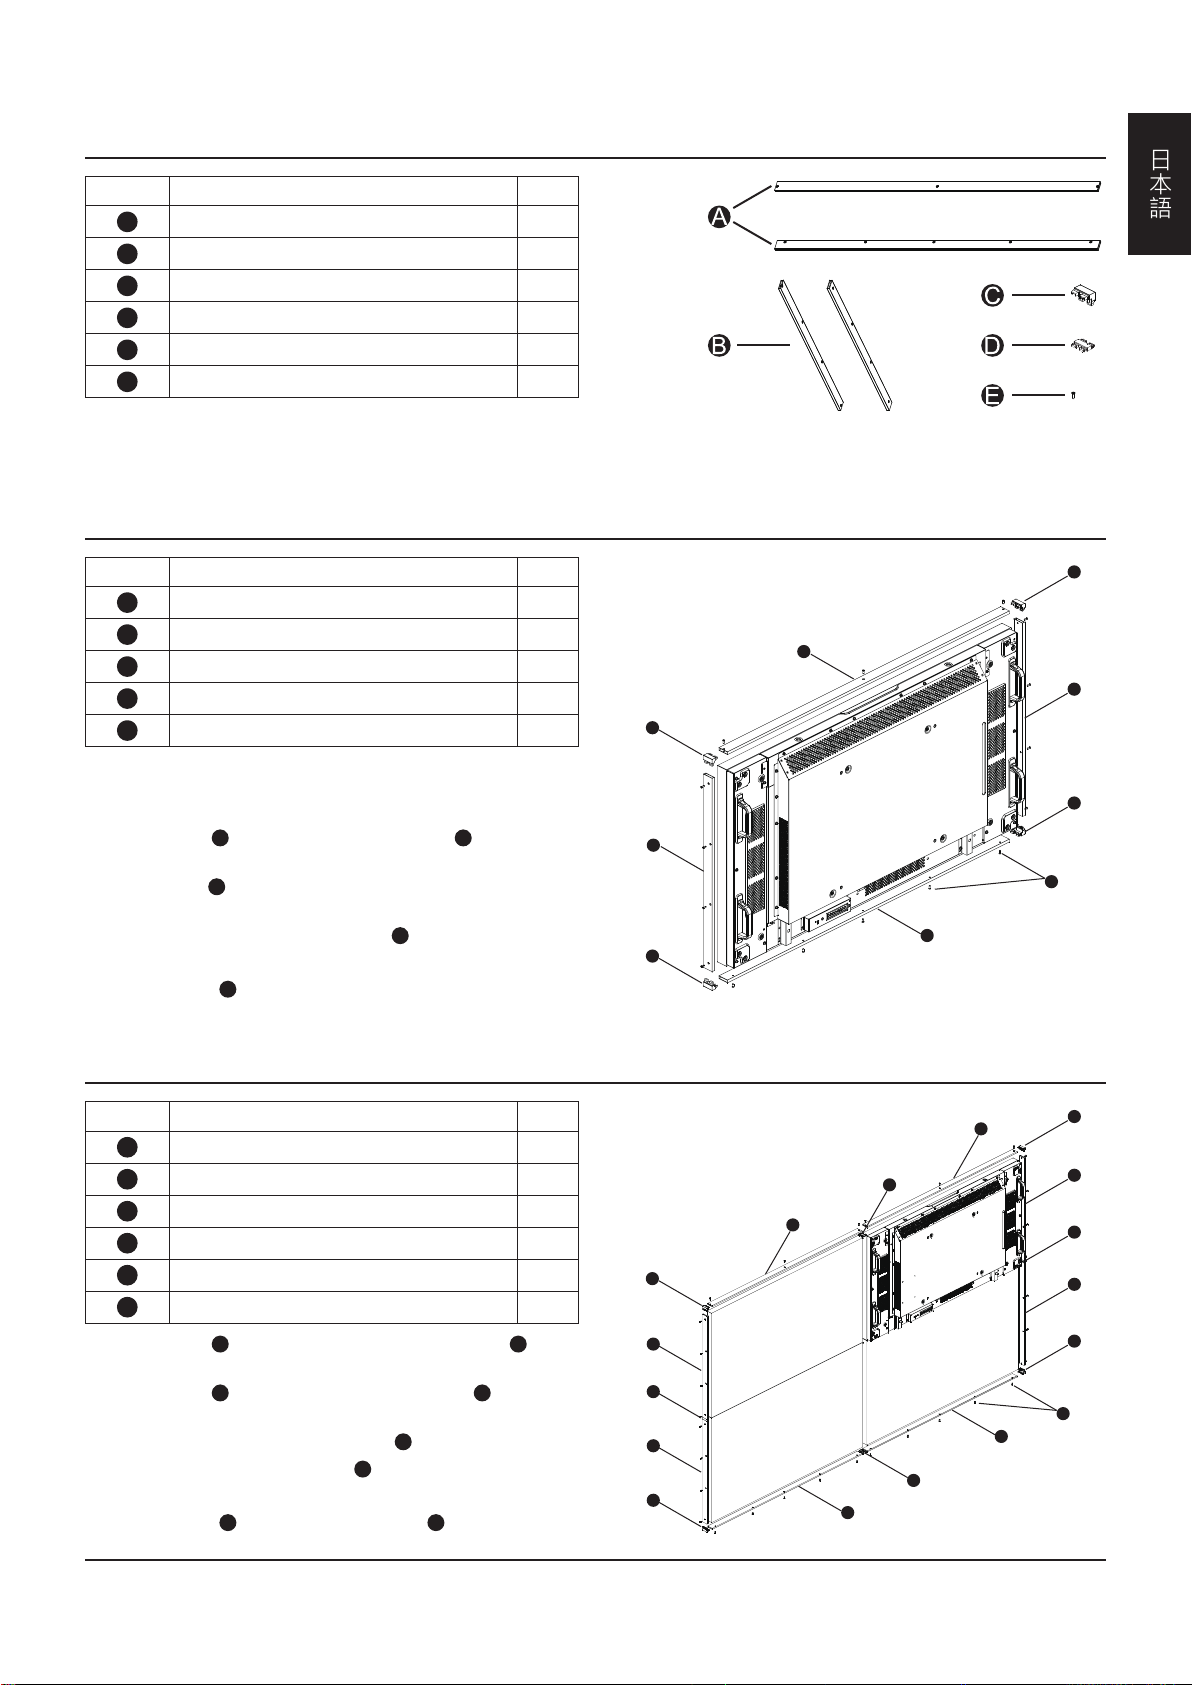
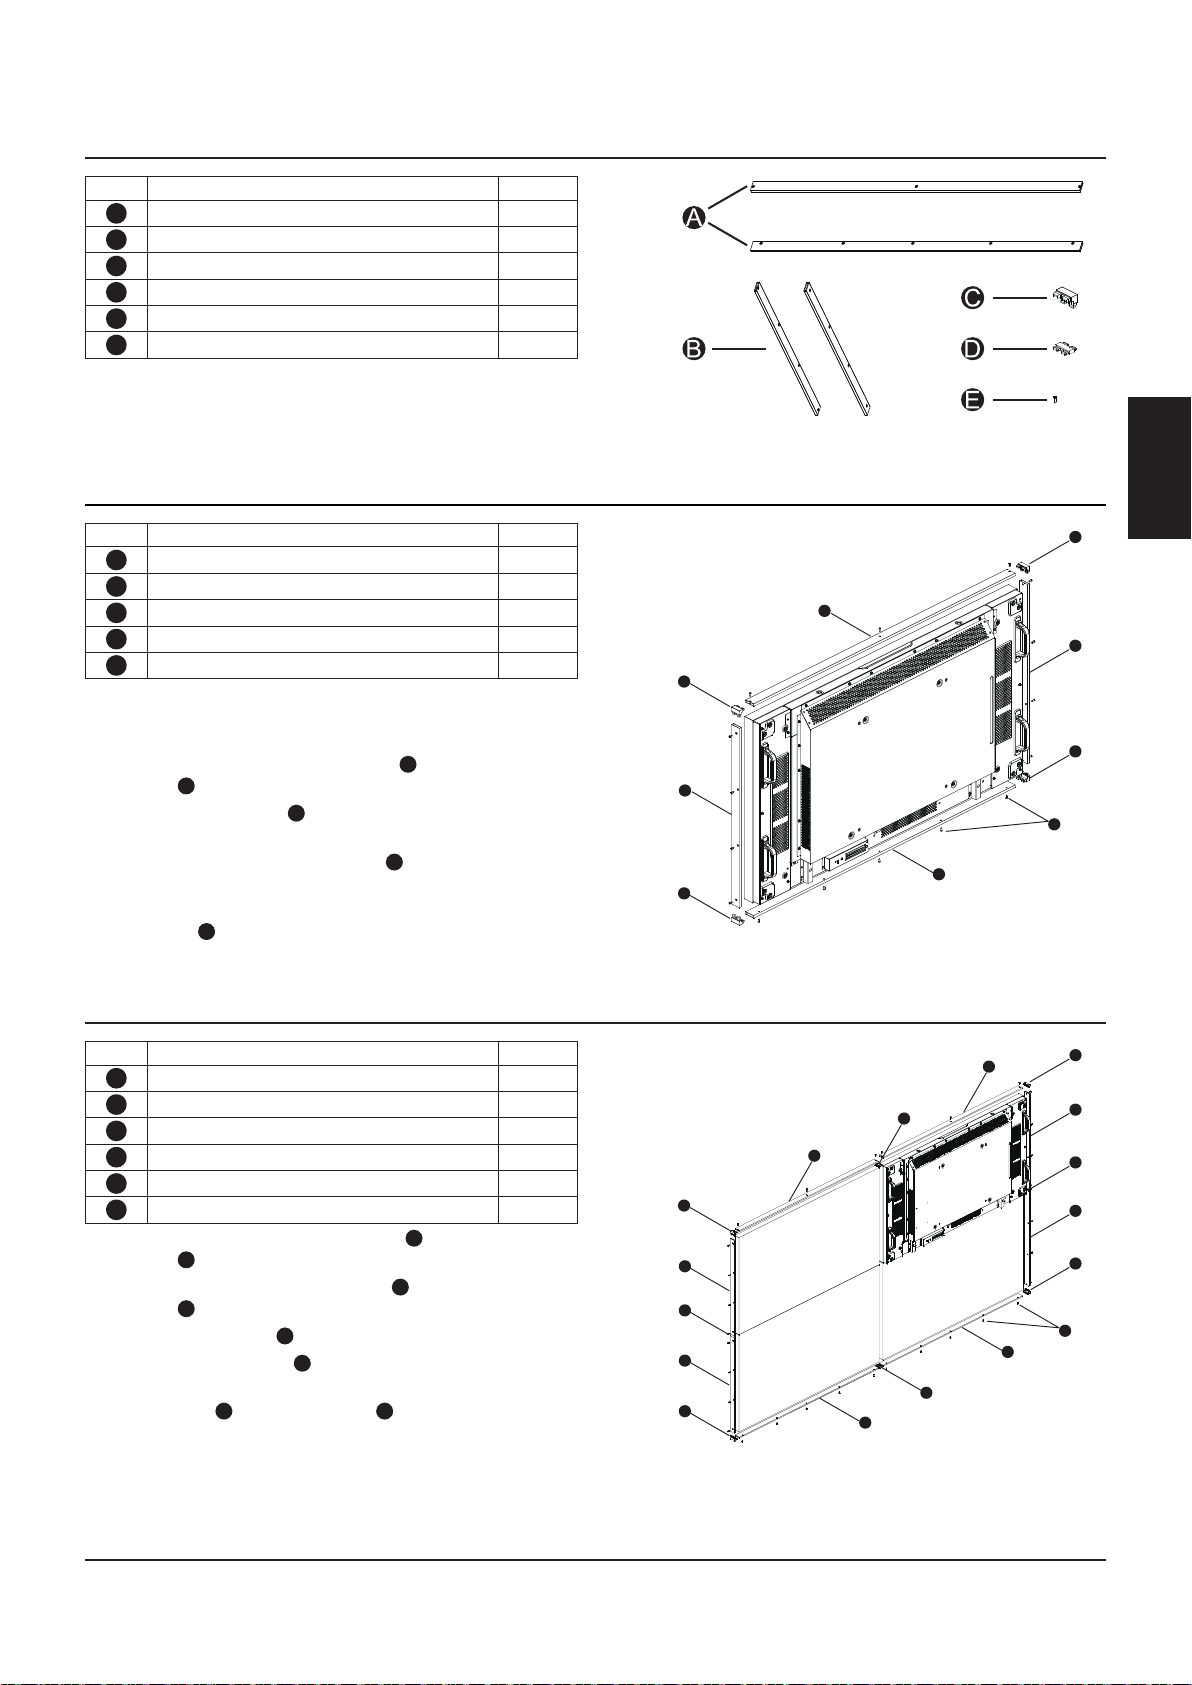
アイテム 説明 数量
上部フレーム / 下部フレーム 2
A
右フレーム / 左フレーム 2
B
L コーナー 4
C
T ジョイント 4
D
ネジ 16
E
セットアップマニュアル 1
F
注 : 付属のネジのみを使用してください。 付属していないネ
ジを使用すると、ディスプレイが損傷する原因となります。
1×1 単一ディスプレイ配列
日本語
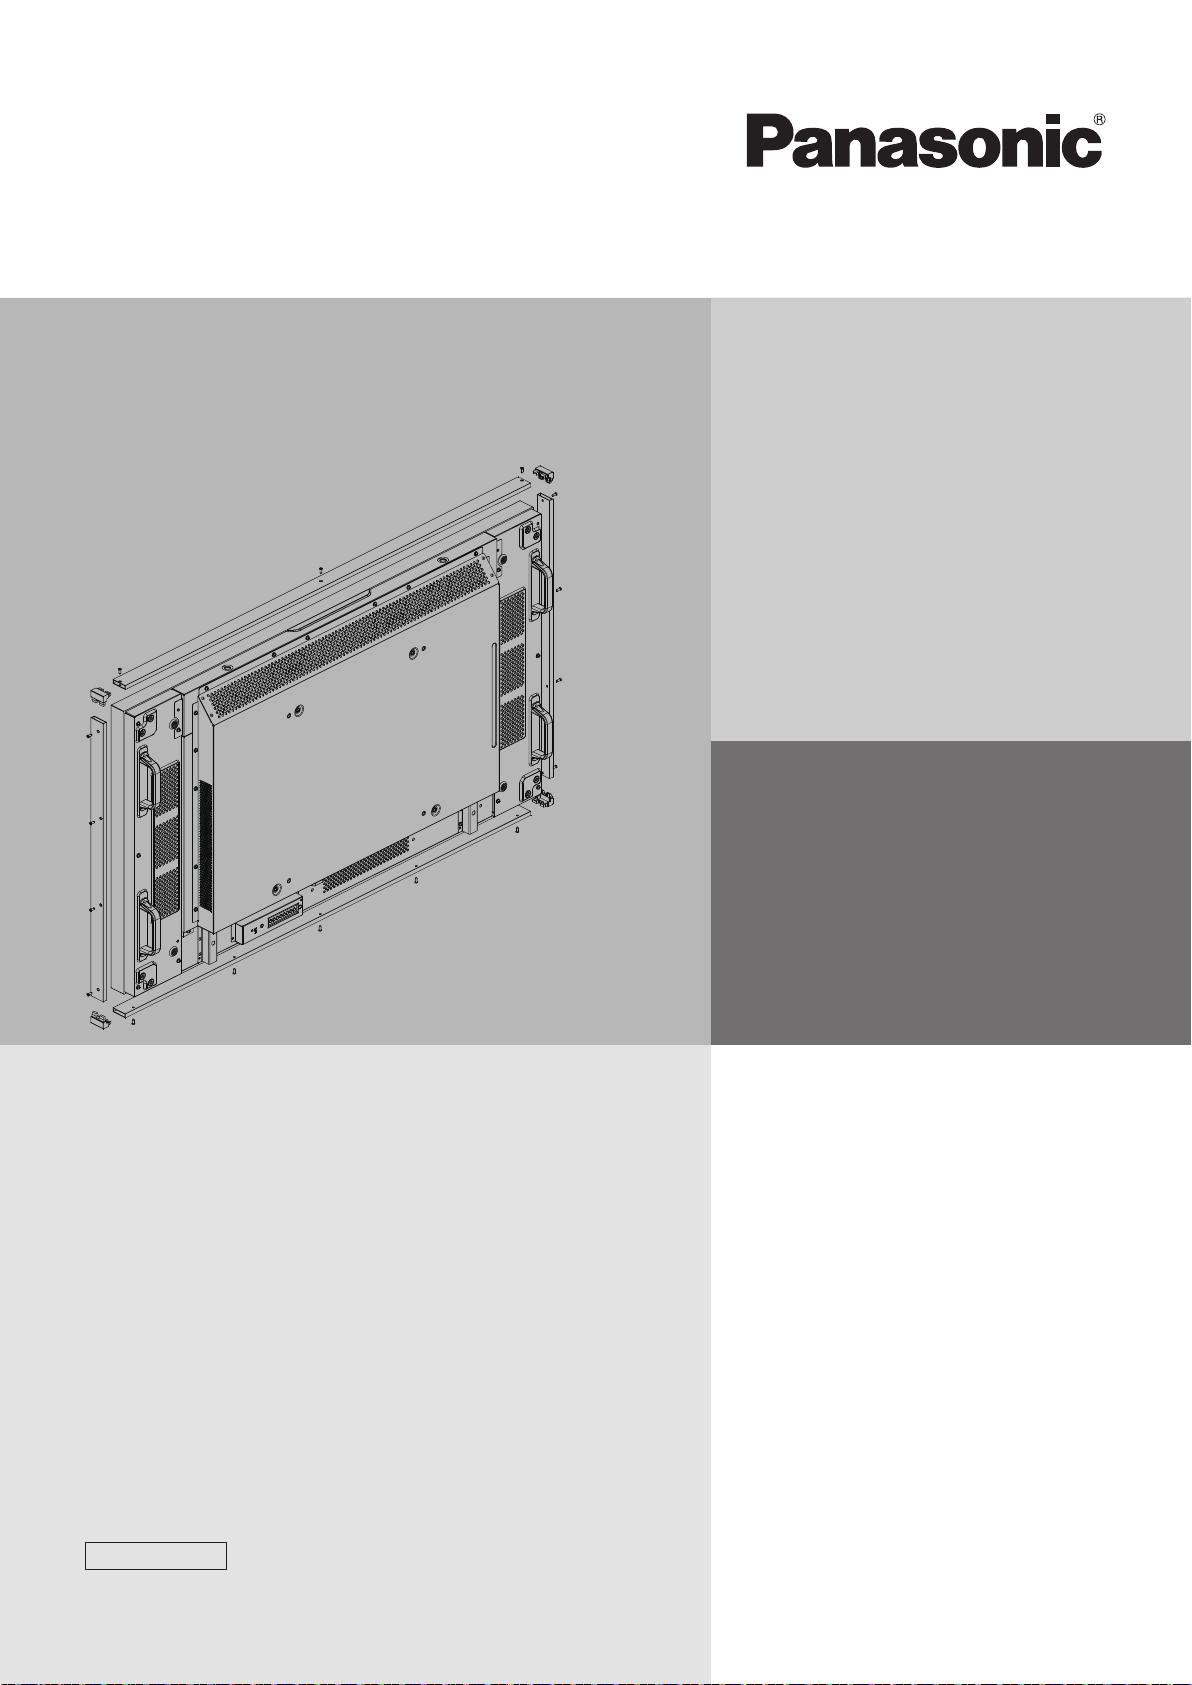
アイテム 説明 数量
上部フレーム / 下部フレーム 2
A
右フレーム / 左フレーム 2
B
L コーナー 4
C
ネジ
E
セットアップマニュアル 1
F
16
1. デスクなどの平らな表面に保護シートを広げ、その上に
ディスプレイを置きます。 デスクの端にディスプレイを
絶対に置かないでください。
2. 付属のネジ E で上部および下部フレーム A を取り付け
ます。
3. L コーナー C を上部フレームと下部フレームの両側に取
り付けます。
4. 付属のネジで右および左フレーム B を取り付けます。
注 : この 1×1 配列には 1 つの基本構成キットが必要です。4
つのジョイント D は使いません。
2×2 マルチディスプレイ配列
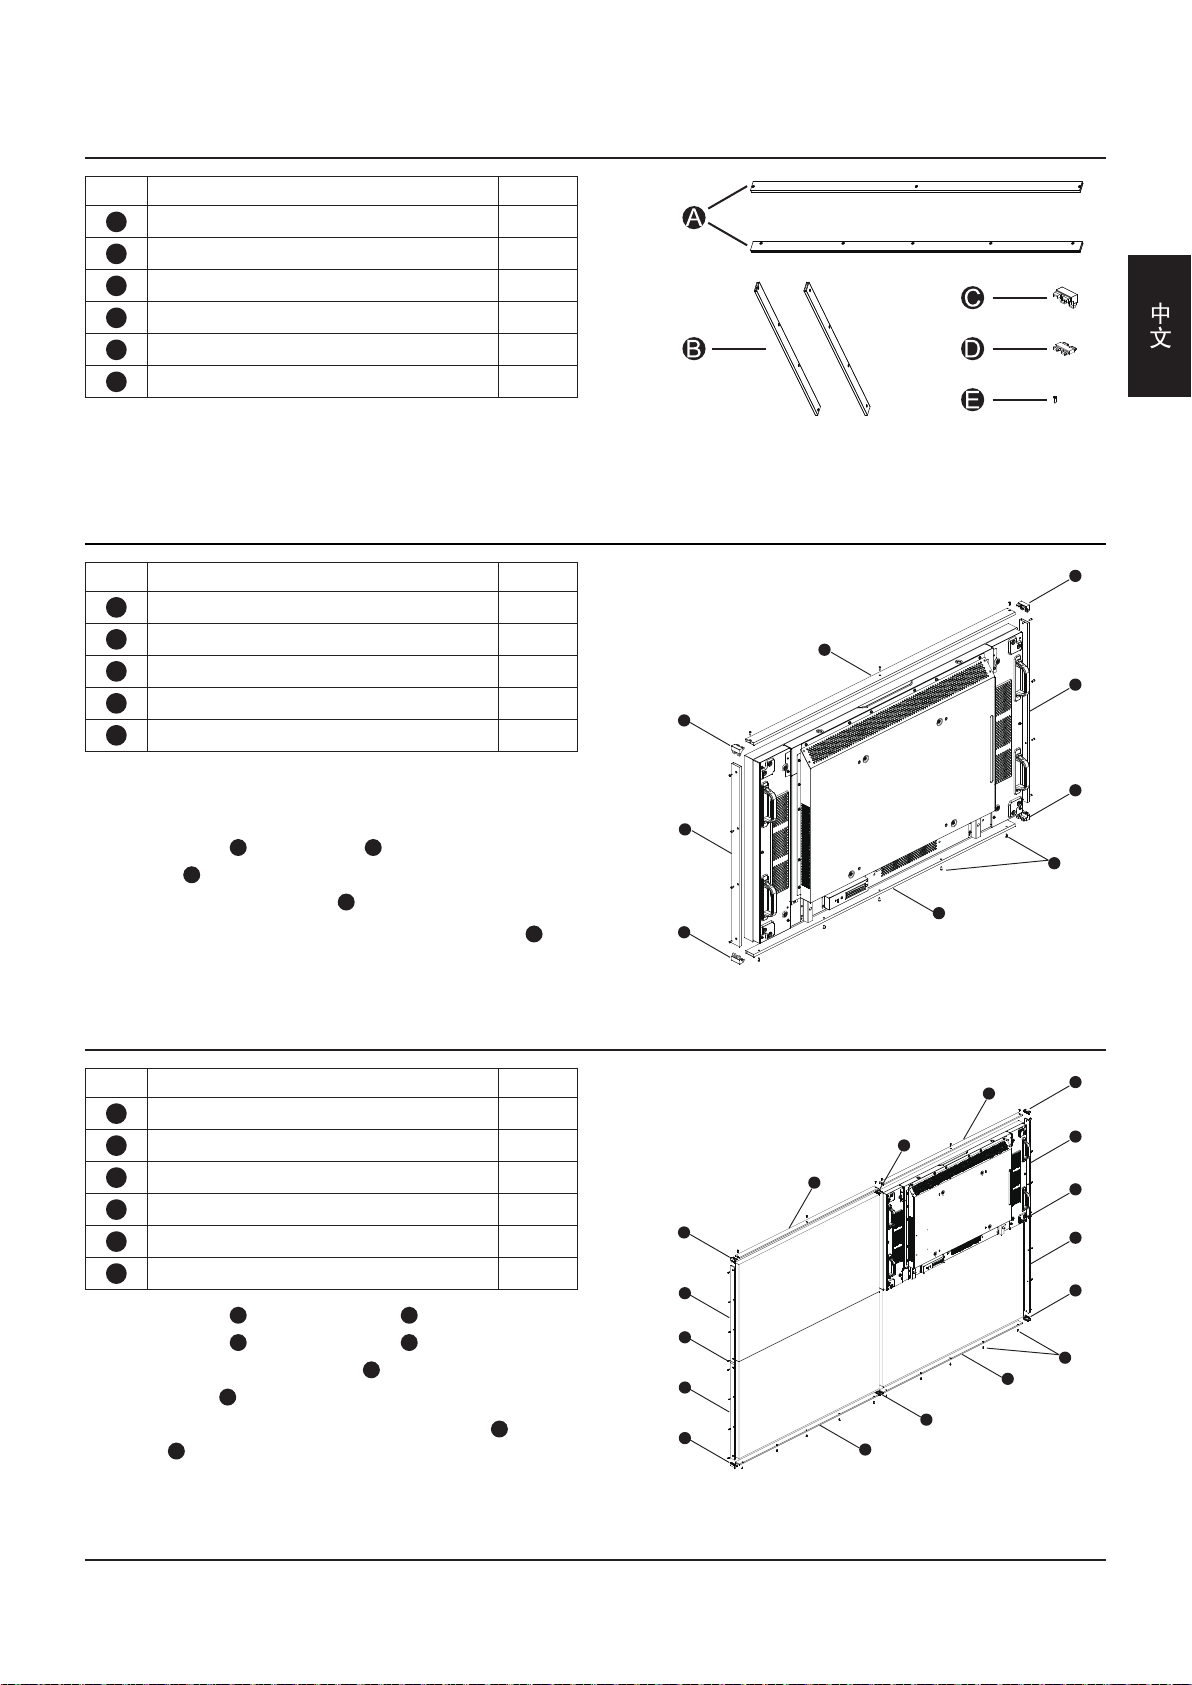
アイテム 説明 数量
上部フレーム / 下部フレーム 4
A
右フレーム / 左フレーム 4
B
L コーナー 4
C
T ジョイント 4
D
ネジ 32
E
セットアップマニュアル 1
F
1. 付属のネジ E で 4 つの上部および下部フレーム A を取
り付けます。
2. 付属のネジ E で 4 つの右および左フレーム B を取り付
けます。
3. 各フレームに 4 つの T ジョイント D を取り付けます。
4. 4 つの端に 4 つの L コーナー C を取り付けます。
注 : この 2×2 配列には 2 つの基本構成キットが必要です。4
つの L コーナー C と4つの T ジョイント D は使いません。
C
A
B
C
C
B
E
A
C
A
D
A
C
B
D
B
C
A
D
A
C
B
D
B
C
E
1

お買い上げ日 年 月 日 品 番
便利メモ
おぼえのため記入
されると便利です。
販 売 店 名
パナソニック株式会社
AVC ネットワークス社
〒 576-0026 大阪府茨木市松下町1番1号
© Panasonic Corporation 2012
お客様ご相談窓口
( ) - ( ) -
Printed in China
使用说明书
盖框套件
型号
TY-CF55VW50
中 文
请在使用本产品之前,仔细阅读使用说明书,
并妥善保存使用说明书以备日后参考之用。

亲爱的
Panasonic
产品用户
欢迎您加入
得全新享受。
若要使您的产品达到最佳性能,请在进行任何调整之前仔细阅读使用说明书,并将使用说明书妥
善保管,以作日后参考之用。
同样请您保管好购买发票,并在使用说明书封底指定空白处注明您所购产品的型号和制造编号。
请访问我们的网站
Panasonic
http://panasonic.net
产品用户大家庭,我们希望您在将来多年内能通过您崭新的液晶显示器获
目录
基本构件 ..................................................................... 1
1×1 单显示器结构 .....................................................1
2×2 多显示器结构 .....................................................1
基本构件
项目 说明 数量
A
上框架 / 下框架 2
B
右框架 / 左框架 2
C
L- 角 4
D
T- 接合点 4
E
螺丝 16
F
安装手册 1
注:只使用附带的螺丝。使用其它螺丝可能会对显示器造成损
坏。
1×1 单显示器结构
中文
项目 说明 数量
A
上框架 / 下框架 2
B
右框架 / 左框架 2
C
L- 角 4
E
螺丝
F
安装手册 1
16
1. 在一个平面(如桌面)上放一个保护垫,然后将显示器放
到上面。注意千万不要将显示器放在桌面等的边缘,以免
造成损坏。
2. 用附带的螺丝 E 安装上下框架 A 。
3. 将 L- 角 C 安装到上框架和下框架两侧。
4. 用附带的螺丝安装左右框架 B 。
注:这个 1×1 结构需要一个基本构件。四个 T- 接合点 D 不
会被使用。
2×2 多显示器结构
项目 说明 数量
A
上框架 / 下框架 4
B
右框架 / 左框架 4
C
L- 角 4
D
T- 接合点 4
E
螺丝 32
F
安装手册 1
1. 用附带的螺丝 E 安装四个上下框架 A。
2. 用附带的螺丝 E 安装四个左右框架 B。
3. 为每个框架安装四个 T- 接合点 D 。
4. 将四个 L- 角 C 安装到四边。
注:这个 2×2 结构需要两个基本构件。四个 L- 角 C 和四个
T- 接合点 D 不会被使用。
C
A
B
C
C
B
E
C
A
C
B
D
B
C
A
A
A
D
A
D
C
B
D
B
C
E
1
Panasonic客户咨询服务中心电话:8008100781
手机、小灵通及未开通800业务地区:4008100781
顾客记录
本产品型号和制造编号均在其后盖处。您应在下面填上制造编号并妥善保管本说明书,以及您的购买发票,以作
为您购买的永久记录,这样将有助于在发生遗失或失窃时进行识别,以及作保修服务之用。
型 号 制造编号
山东松下电子信息有限公司
济南市高新技术开发区新泺大街312号
原产地:福建省福清市
主页:http://panasonic.cn
© Panasonic Corporation 2012
中国印刷
发行:2012年10月

Operating Instructions
Cover-frame Kit
Model No.
TY-CF55VW50
English
Please read these instructions before operating your set
and retain them for future reference.

Dear Panasonic Customer
Welcome to the Panasonic family of customers. We hope that you will have many years of enjoyment from
your new LCD Display.
To obtain maximum benet from your set, please read these Instructions before making any adjustments,
and retain them for future reference.
Retain your purchase receipt as well, and record the model number and serial number of your set in the
space provided on the rear cover of these instructions.
Visit our Panasonic Web Site http://panasonic.net
Table of Contents
Basic Composition Kit................................................. 1
1×1 Single-display Formation ..................................... 1
2×2 Multiple-display Formation .................................. 1
Basic Composition Kit
Item Description Quantity
Top Frame / Bottom Frame 2
A
Right Frame / Left Frame 2
B
L-Corner 4
C
T-Joint 4
D
Screws 16
E
Setup Manual 1
F
NOTE: Use the supplied screws only. The screws other than
those supplied may cause damage to the display.
1×1 Single-display Formation
ENGLISH
Item Description Quantity
Top Frame / Bottom Frame 2
A
Right Frame / Left Frame 2
B
L-Corner 4
C
Screws 16
E
Setup Manual 1
F
1. Spread a protective sheet on a at surface, such as a
desk, and place the display on it. Be careful to never rest
display on its edges, damage may occur from doing this.
2. Attach the Top and Bottom Frames
A
with supplied
screws E.
3. Attach the L-Corners C to both sides of Top Frame and
Bottom Frame.
4. Attach the Right and Left Frames B with supplied
screws.
NOTE: This 1×1 formation rquires one basic-composition kit.
Four T-Joints D will be left unused.
2×2 Multiple-display Formation
Item Description Quantity
Top Frame / Bottom Frame 4
A
Right Frame / Left Frame 4
B
L-Corner 4
C
T-Joint 4
D
Screws 32
E
Setup Manual 1
F
1. Attach four Top and Bottom Frames A with supplied
screws E.
2. Attach four Right and Left Frames B with supplied
screws E.
3. Attach four T-Joints D for each frame.
4. Attach four L-Corners C to four edges.
NOTE: This 2×2 formation rquires two basic-composition kits.
Four L-Corners C and four T-Joints D will be left unused.
C
A
B
C
C
B
E
C
A
C
B
D
B
C
A
A
A
D
A
D
C
B
D
B
C
E
1
Information for Users on Collection and Disposal of Old Equipment and used Batteries
These symbols on the products, packaging, and/or accompanying documents mean that used electrical and
electronic products and batteries should not be mixed with general household waste.
For proper treatment, recovery and recycling of old products and used batteries, please take them to applicable
collection points, in accordance with your national legislation and the Directives 2002/96/EC and 2006/66/EC.
By disposing of these products and batteries correctly, you will help to save valuable resources and prevent any
potential negative effects on human health and the environment which could otherwise arise from inappropriate
waste handling.
For more information about collection and recycling of old products and batteries, please contact your local
municipality, your waste disposal service or the point of sale where you purchased the items.
Penalties may be applicable for incorrect disposal of this waste, in accordance with national legislation.
For business users in the European Union
If you wish to discard electrical and electronic equipment, please contact your dealer or supplier for further
information.
[Information on Disposal in other Countries outside the European Union]
These symbols are only valid in the European Union. If you wish to discard these items, please contact your local
authorities or dealer and ask for the correct method of disposal.
Note for the battery symbol (bottom two symbol examples):
This symbol might be used in combination with a chemical symbol. In this case it complies with the requirement set
by the Directive for the chemical involved.
Customer’s Record
The model number and serial number of this product can be found on its rear panel. You should note this serial
number in the space provided below and retain this book, plus your purchase receipt, as a permanent record of
your purchase to aid in identication in the event of theft or loss, and for Warranty Service purposes.
Model Number Serial Number
Panasonic Corporation
Web Site: http://panasonic.net
© Panasonic Corporation 2012
Printed in China
 Loading...