

Panasonic TX-65CZW954 Operating Instructions

TX-65CZW954
TX-65CZC954
e
HELP
English

Read first
eHELP
• How to use 12
Features
• 4K resolution 13
• Touch Pad Controller 14
• TV Anywhere 15
• DVB-via-IP 16
• Dual Tuner 17
• Easy Mirroring 18
Watching
Basic
• Satellite connection 19
• Basic connection 22
• Selecting channel 26
• Information banner 28
• Option Menu 31
• Subtitle 33
• Last view 34
• Off Timer 35
• Energy saving functions 36
• Adjusting time 38
• Language 39
4K resolution
• 4K compatible equipment 40
• HDCP Setting 41
• HDMI Auto Setting 42
• Valid 4K format 43
External equipment
• External connection 44
• Watching external input 48
• Operating with TV’s remote control 50
- 2 -

• HDMI features 52
• HDMI HDR Setting 54
• Terminal information 55
• Valid input signals 57
For best picture
• Viewing Mode 58
• Ambient Sensor 60
• Aspect 61
• Aspect Control Signal 63
• Basic settings 65
• Noise reduction settings 68
• Advanced Settings 69
• Option Settings 73
• Screen Settings 76
• Lock Settings 78
• Copy Adjustment 79
For best audio
• Sound mode 80
• Basic settings 81
• Volume settings 83
• Voice Guidance Settings 84
• Audio Description 86
• Advanced settings 87
TV Guide
• Using TV Guide 90
• Timer Programming 93
Teletext
• Viewing Teletext 95
• Teletext mode 97
• Teletext Character Set 98
3D
• Note 99
• 3D Eyewear - Maintenance 100
- 3 -

• Viewing 3D 101
• 3D Mode Selection 103
• 3D Settings 104
• Source image format 106
Tuning and editing channels
• Setting menu 107
• Favourites Edit 108
• Channel List 110
• Auto Setup 112
• Manual Tuning 116
• Update Channel List 119
• New Channel Message 120
• Signal Condition 121
• Other settings 122
• Selectable satellites 123
Recording
USB HDD setup
• Preparations 124
• Setting for USB HDD 126
Recording current programme
• One Touch Recording 128
• REW LIVE TV 129
Timer Programming
• Setting Timer Programming 131
• Editing Timer Programming 133
• Remote recording 134
• Note 135
Technical information
• USB HDD 136
- 4 -

Media Player
Using Media Player
• Information 137
• Selecting device / mode 139
• Network device 141
• Sharing file 142
Photo mode
• Selecting file 143
• Viewing photo 144
• Sorting photos 145
• Using Slideshow 146
Video mode
• Selecting file 149
• Watching video 150
• Video Setup 152
• Audio output settings 154
Recorded TV mode
• Selecting content 155
• Watching recorded TV 156
• Grouping content 158
• Deleting content 159
• Changing device 160
• Chapter List 161
• Audio output settings 162
Music mode
• Selecting file 163
• Playing music 164
• Music Setup 165
Technical information
• Device handling caution 166
• USB devices 167
• Photo format 168
• Video format 169
- 5 -

• Music format 172
Network
Internet content
• Information 173
• Selecting internet content 174
• Note 175
DLNA
• In-House streaming 176
• Using DLNA 180
Network connections
• Internet connection 181
• DLNA connection 182
• Note 184
Network settings
• Network Connection 185
• Custom - Wireless 187
• Custom - Wired 190
• Custom - Wireless Access Point 192
• Network Status 193
• VIERA Name 194
• TV Remote App Settings 195
• Network Link Settings 197
• DVB-via-IP Server Settings 199
• TV Anywhere Settings 200
• File Sharing Settings 201
• Mirroring Settings 202
• Software Update 203
• New Software Message 204
Photos
• Selecting file 205
• Viewing photo 206
• Using Slideshow 207
- 6 -

Videos
• Selecting file 209
• Watching video 210
• Video Setup 212
• Audio output settings 214
Music
• Selecting file 215
• Playing music 216
• Music Setup 217
DIGA Recorder
• Controlling DIGA Recorder 218
Technical information
• Photo format 219
• Video format 220
• Music format 223
Functions
APPS List
• Information 224
• How to use 225
Voice Control
• Information 226
• How to use 227
• Settings 228
• Note 229
Touch Pad Controller
• Information 230
• Pairing 231
• Identifying controls 232
• Settings 234
TV Anywhere
• How to use 235
• TV Anywhere Settings 236
- 7 -

Mirroring
• How to use 237
• Mirroring Settings 238
DVB-via-IP
• DVB-via-IP server connection 239
• DVB-via-IP Server Settings 241
• DVB-via-IP client connection 242
• DVB-via-IP Server Selection 244
• Note 245
Multi Window
• Information 246
• How to use 247
• Note 249
VIERA Link “HDAVI Control™”
• Summary of VIERA Link 250
• Preparations 255
• Easy playback 256
• Power on Link 257
• Power off Link 258
• Standby Power Save 259
• Intelligent Auto Standby 260
• VIERA Link Control 261
• Speaker Selection 263
• Note 264
Child Lock
• Using Child Lock 265
• PIN number 266
• Parental Rating 267
Data Service Application
• Using Data Service Application 268
• Cookie 269
• Note 270
- 8 -

Common Interface
• Caution 271
• Using Common Interface 272
Shipping Condition
• Shipping Condition 273
Updating the TV Software
• Information 274
• Auto update 275
• Manual update 276
Setting characters
• Using Numeric buttons 277
Bluetooth devices
• Bluetooth Setup 278
Keyboard
• Keyboard 279
Settings
Setting menu
• How to use 280
Picture
• Viewing Mode 282
• Basic settings 283
• Ambient Sensor 286
• Noise reduction settings 287
• Advanced Settings 288
• Option Settings 289
• Screen Settings 291
• 3D Settings 292
• Lock Settings 293
• Copy Adjustment 294
• Reset to Defaults 295
- 9 -

Sound
• Mode 296
• Basic settings 297
• Volume settings 298
• Voice Guidance Settings 299
• Audio Description 300
• Advanced settings 301
• Reset to Defaults 302
Network
• Network Connection 303
• Network Status 304
• VIERA Name 305
• TV Remote App Settings 306
• Network Link Settings 307
• DVB-via-IP Server Settings 308
• TV Anywhere Settings 309
• File Sharing Settings 310
• Mirroring Settings 311
• Other settings 312
Timer
• Off Timer 313
• Timer Programming 314
• Time Zone 315
• Auto Standby 316
• No signal Power off 317
Setup
• Eco Navigation 318
• Voice Control Settings 319
• USB Device Setup 320
• Recording Setup 321
• VIERA Touch Pad Controller 322
• Bluetooth Setup 323
• Child Lock 324
• Tuning Menu 325
- 10 -

• Language 328
• Display Settings 329
• HDCP Setting 331
• HDMI Auto Setting 332
• HDMI HDR Setting 333
• Common Interface 334
• VIERA Link Settings 335
• Data Service Application 336
• System Menu 337
• Other Settings 338
Support
Help menu
• Using Help menu 339
FAQs
• Picture 340
• Digital TV 342
• Analogue TV 344
• Sound 345
• 3D 346
• HDMI 347
• Network 348
• Other 350
Maintenance
• Care and Cleaning 353
Optional accessories
• 3D Eyewear 355
• Wall-hanging bracket 356
Licence
• Licence 357
- 11 -
Read first
eHELP
How to use
■ Meaning of signs
OK :
Letters enclosed in brackets indicate remote control buttons.
Menu :
Letters in cyan indicate on-screen display items.
:
References in this eHELP
When the icon (
detailed descriptions pressing Numeric buttons.
(red) :
Displays the menu related to the description (only for some descriptions)
= Note =
●
Design and Specifications are subject to change without notice.
●
The images shown in this eHELP are for illustrative purposes only.
- ) is displayed, you can jump to the page for
- 12 -

Features
4K resolution
You can watch content in 4K format that has twice the horizontal and vertical
resolution of the 1080p signal.
Watching > 4K resolution > 4K compatible equipment
- 13 -

Touch Pad Controller
Touch Pad Controller is designed for the convenient operations on the
application, internet content. You can operate the TV intuitively with this
controller.
Functions > Touch Pad Controller > Information
- 14 -

TV Anywhere
You can watch TV and set timer event with the network equipment
(smartphone, etc.) from outside the home network.
Functions > TV Anywhere > How to use
- 15 -

DVB-via-IP
This TV can serve as a DVB-via-IP server to provide broadcast streaming to
another TV supporting DVB-via-IP client function.
Functions > DVB-via-IP > DVB-via-IP server connection
This TV has DVB-via-IP client function and can connect to DVB-via-IP server
to watch broadcast streaming.
Functions > DVB-via-IP > DVB-via-IP client connection
- 16 -

Dual Tuner
You can watch or record 2 programmes simultaneously, watch a programme
while recording another programme, etc.
Functions > Multi Window > How to use
- 17 -

Easy Mirroring
You can watch display images of other devices (smartphone, etc.) on the TV
screen using a mirroring function. You can also start the mirroring function
from the other devices without operating the TV.
Functions > Mirroring > How to use
- 18 -
Watching
Basic
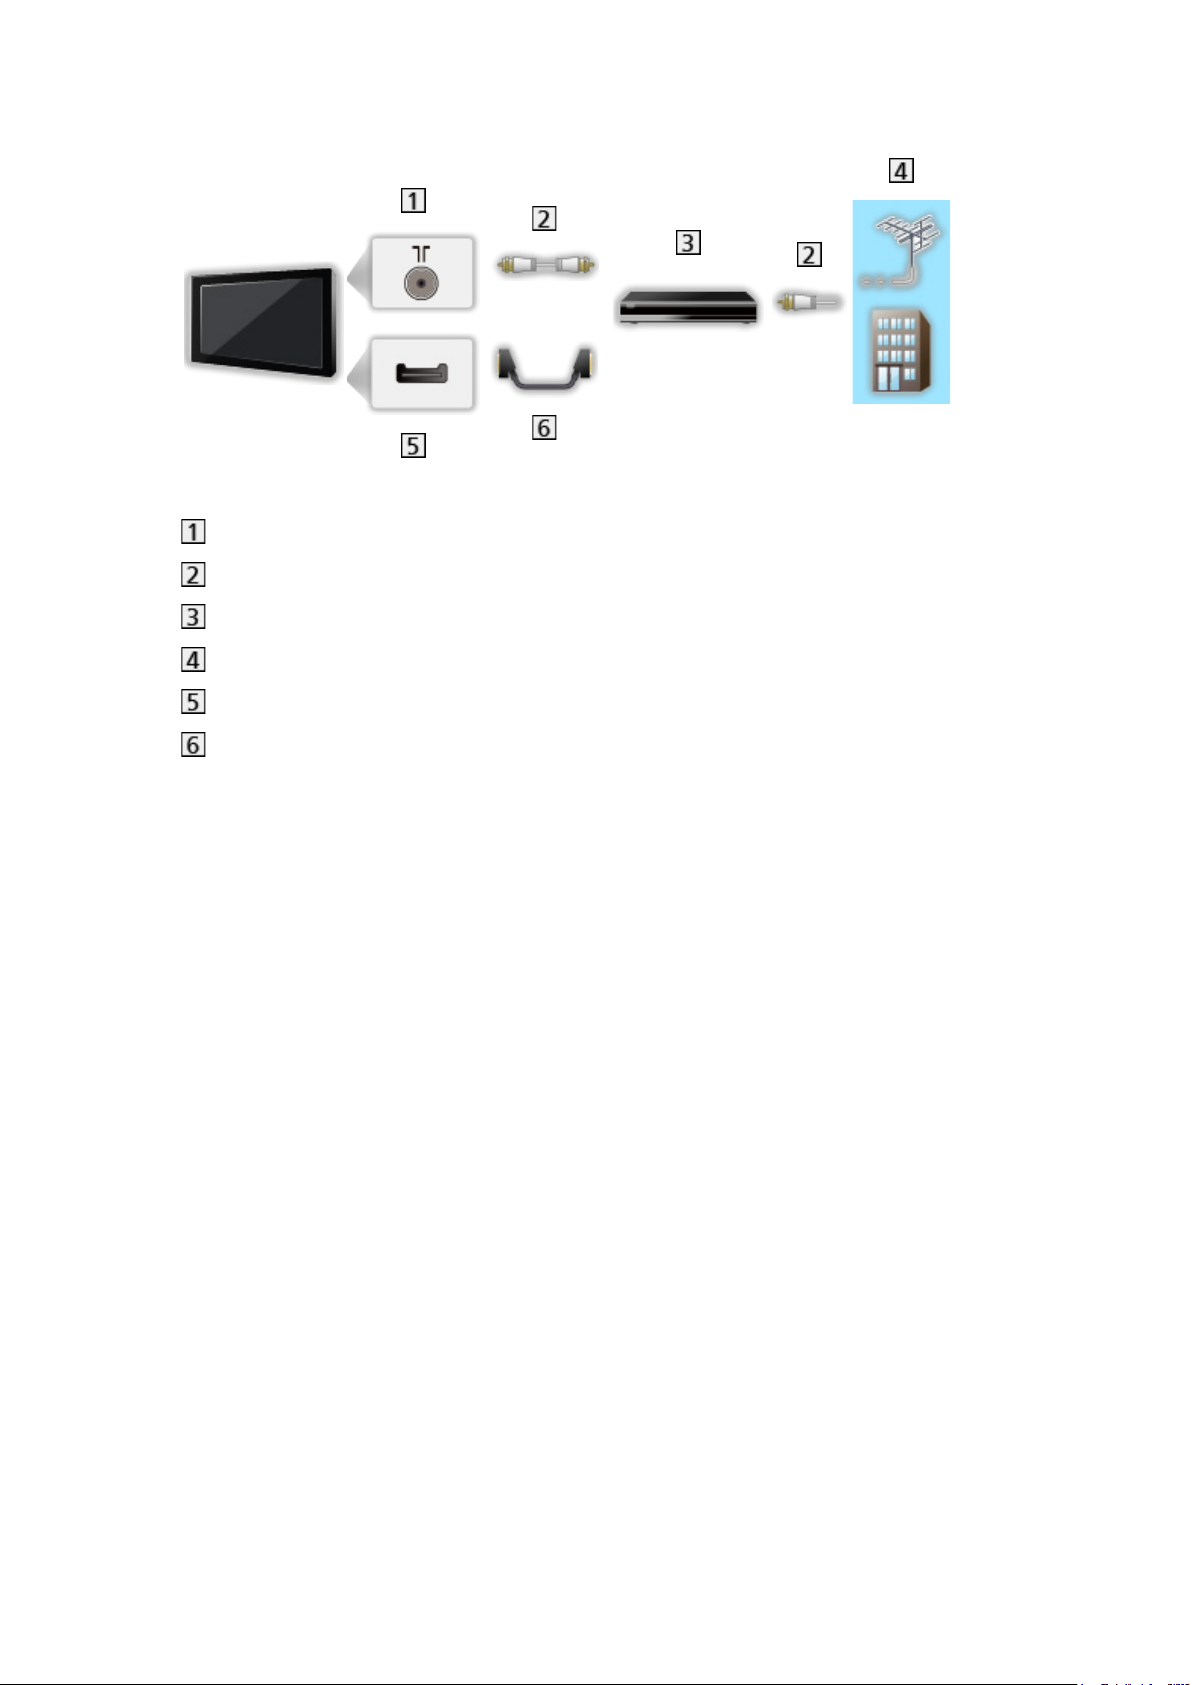
Satellite connection
Please ensure that the unit is disconnected from the mains socket before
attaching or disconnecting any cables.
●
External equipment and cables shown are not supplied with this TV.
●
For DVB-S
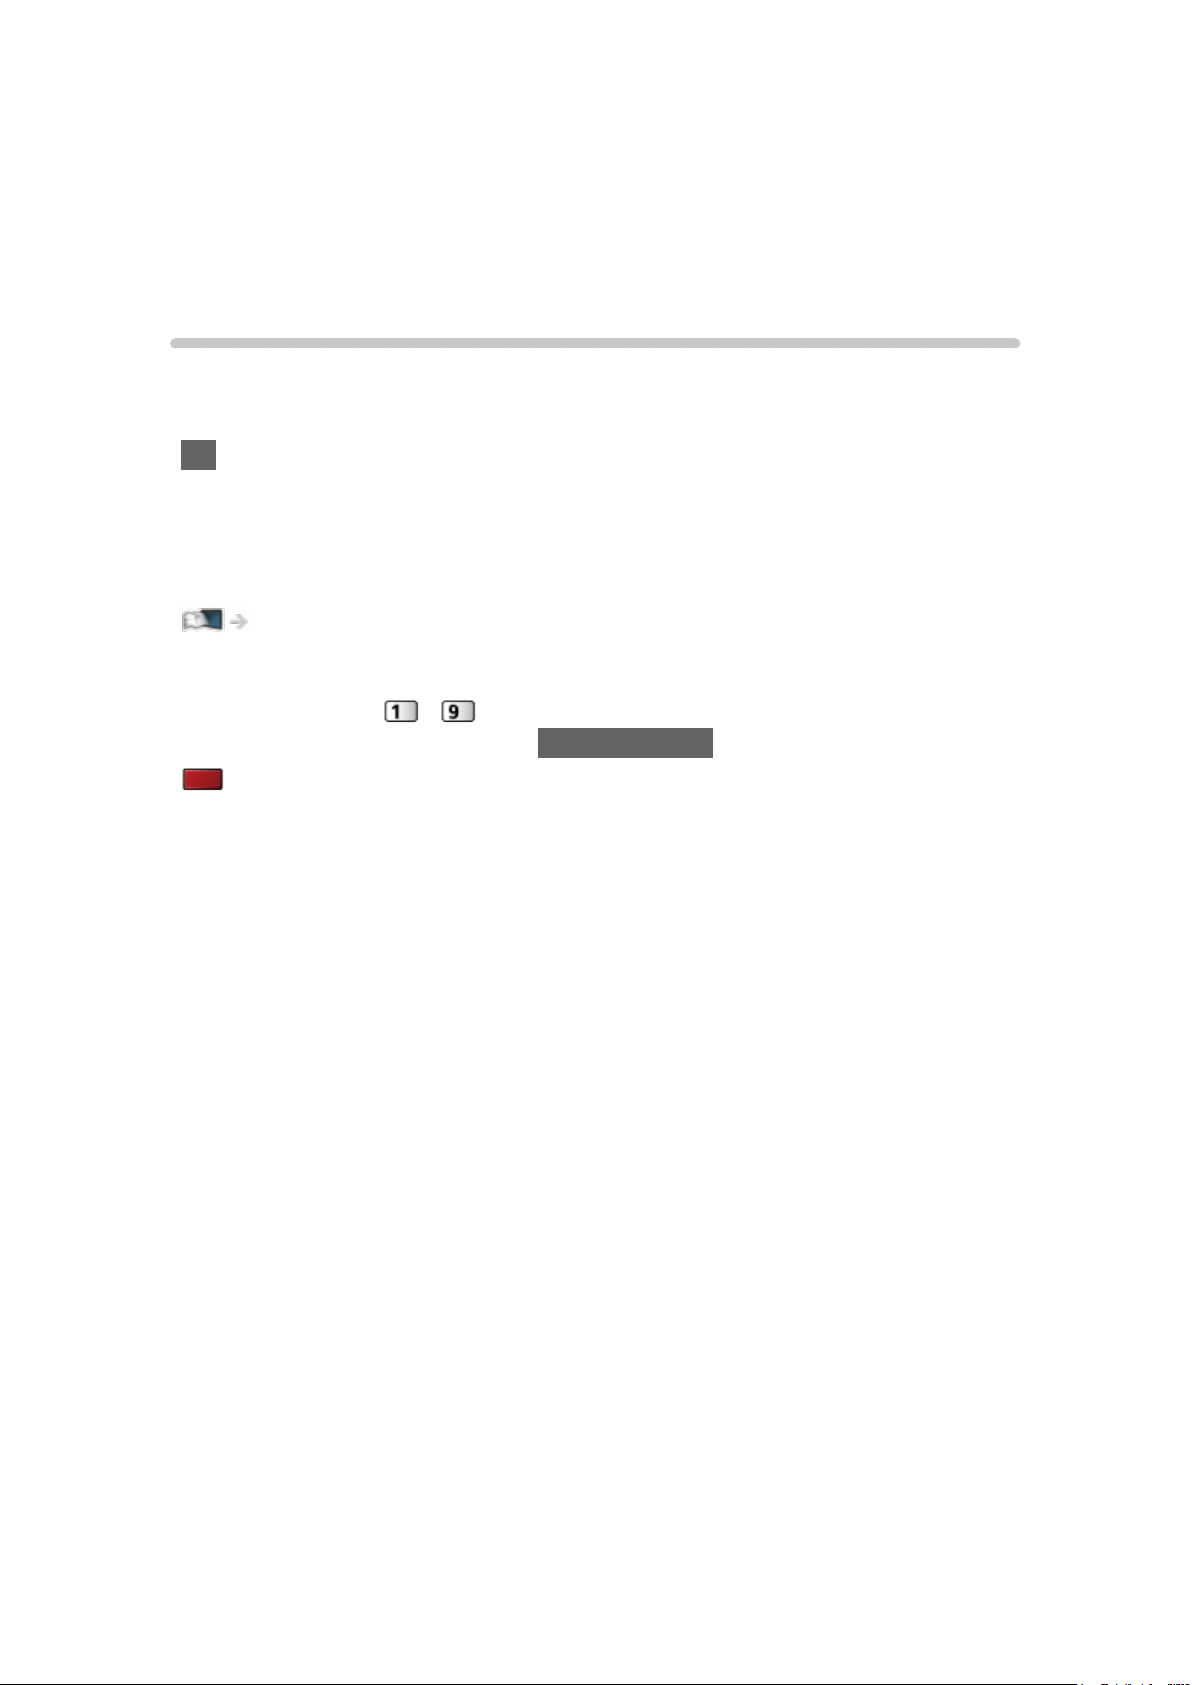
■ Dual Tuner (DiSEqC)
Connect the both of satellite IN 1 / IN 2 terminals to the satellite dish with Multi
Switcher, and you can watch or record 2 DVB-S programmes simultaneously,
etc.
Satellite IN 1 / IN 2 terminals
Satellite cables with Multi Switcher
Satellite dish
- 19 -
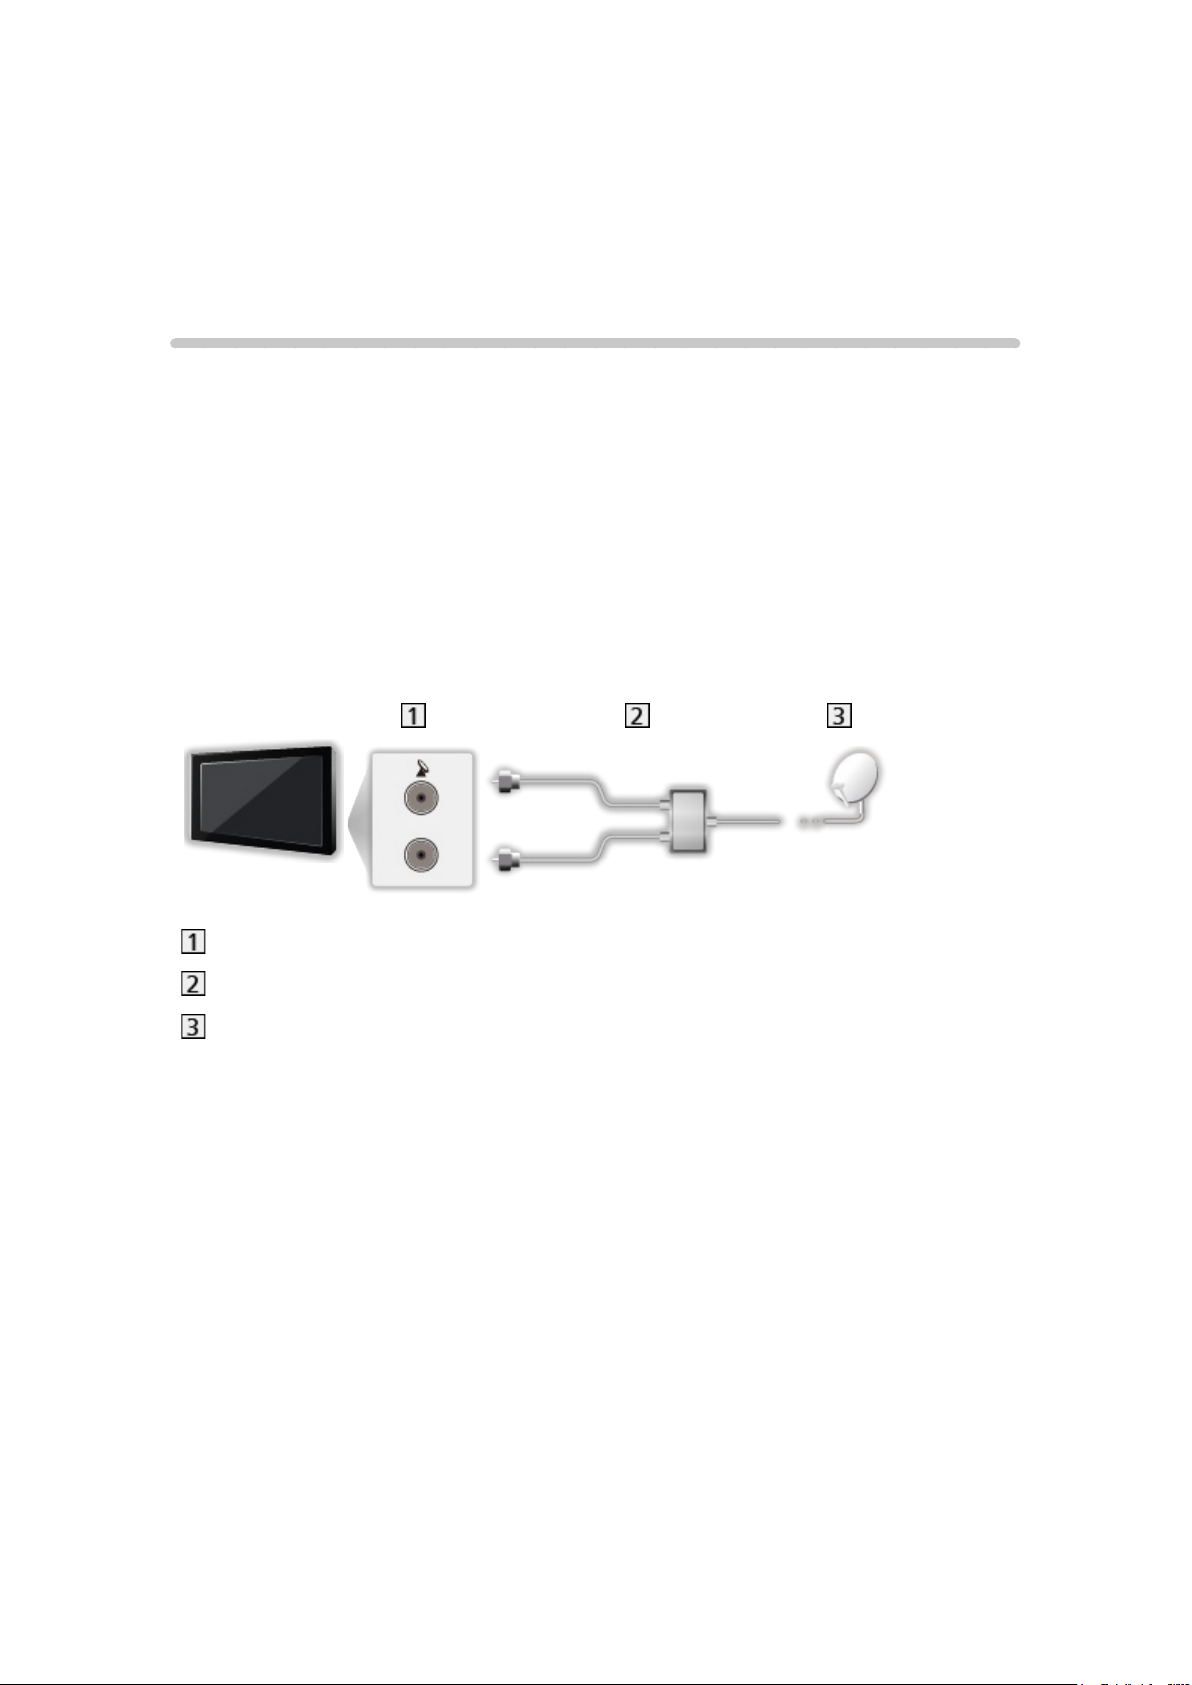
■ Dual Tuner (Single Cable System)
Connect the satellite IN 1 terminal to the satellite dish with the Single Cable
router, and you can watch or record 2 DVB-S programmes simultaneously,
etc.
Satellite IN 1 terminal
Satellite cable with Single Cable router
Satellite dish
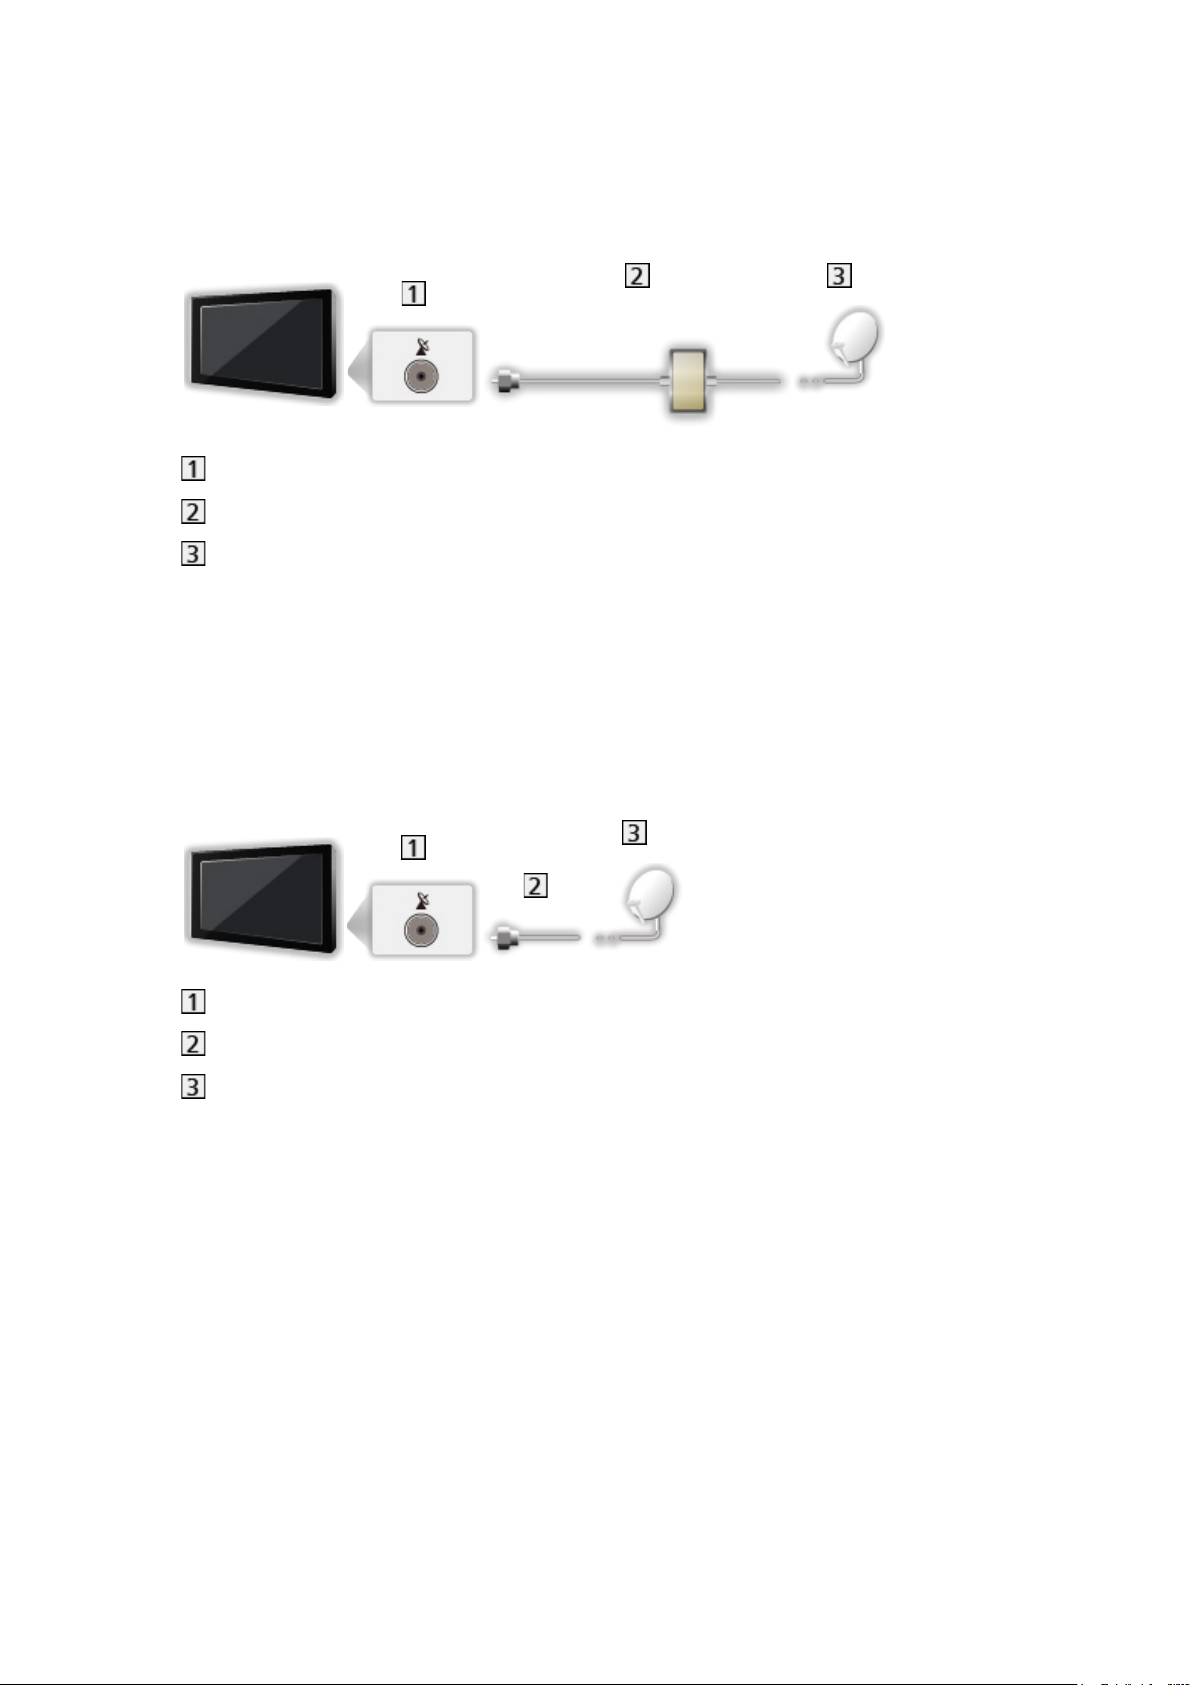
■ Single Tuner
Connect the satellite IN 1 terminal to the satellite dish.
●
Watching or recording 2 DVB-S programmes simultaneously, etc. are not
available.
Satellite IN 1 terminal
Satellite cable
Satellite dish
- 20 -

= Note =
●
To ensure your satellite dish is correctly installed, please consult your local
dealer. Also consult the received satellite broadcasting companies for
details.
●
Selectable satellites and dish alignment to tune DVB-S channels
Watching > Tuning and editing channels > Selectable satellites
●
Keep the TV away from electronic equipment (video equipment, etc.) or
equipment with an infrared sensor, otherwise distortion of image / sound
may occur or operation of other equipment may be affected.
●
Check the terminal type and cable plugs are correct for connection.
●
Dual tuner function (watching or recording 2 programmes simultaneously,
watching a programme while recording another programme, etc.) is not
available while using DVB-via-IP server function.
- 21 -
Basic connection
Please ensure that the unit is disconnected from the mains socket before
attaching or disconnecting any cables.
●
External equipment and cables shown are not supplied with this TV.
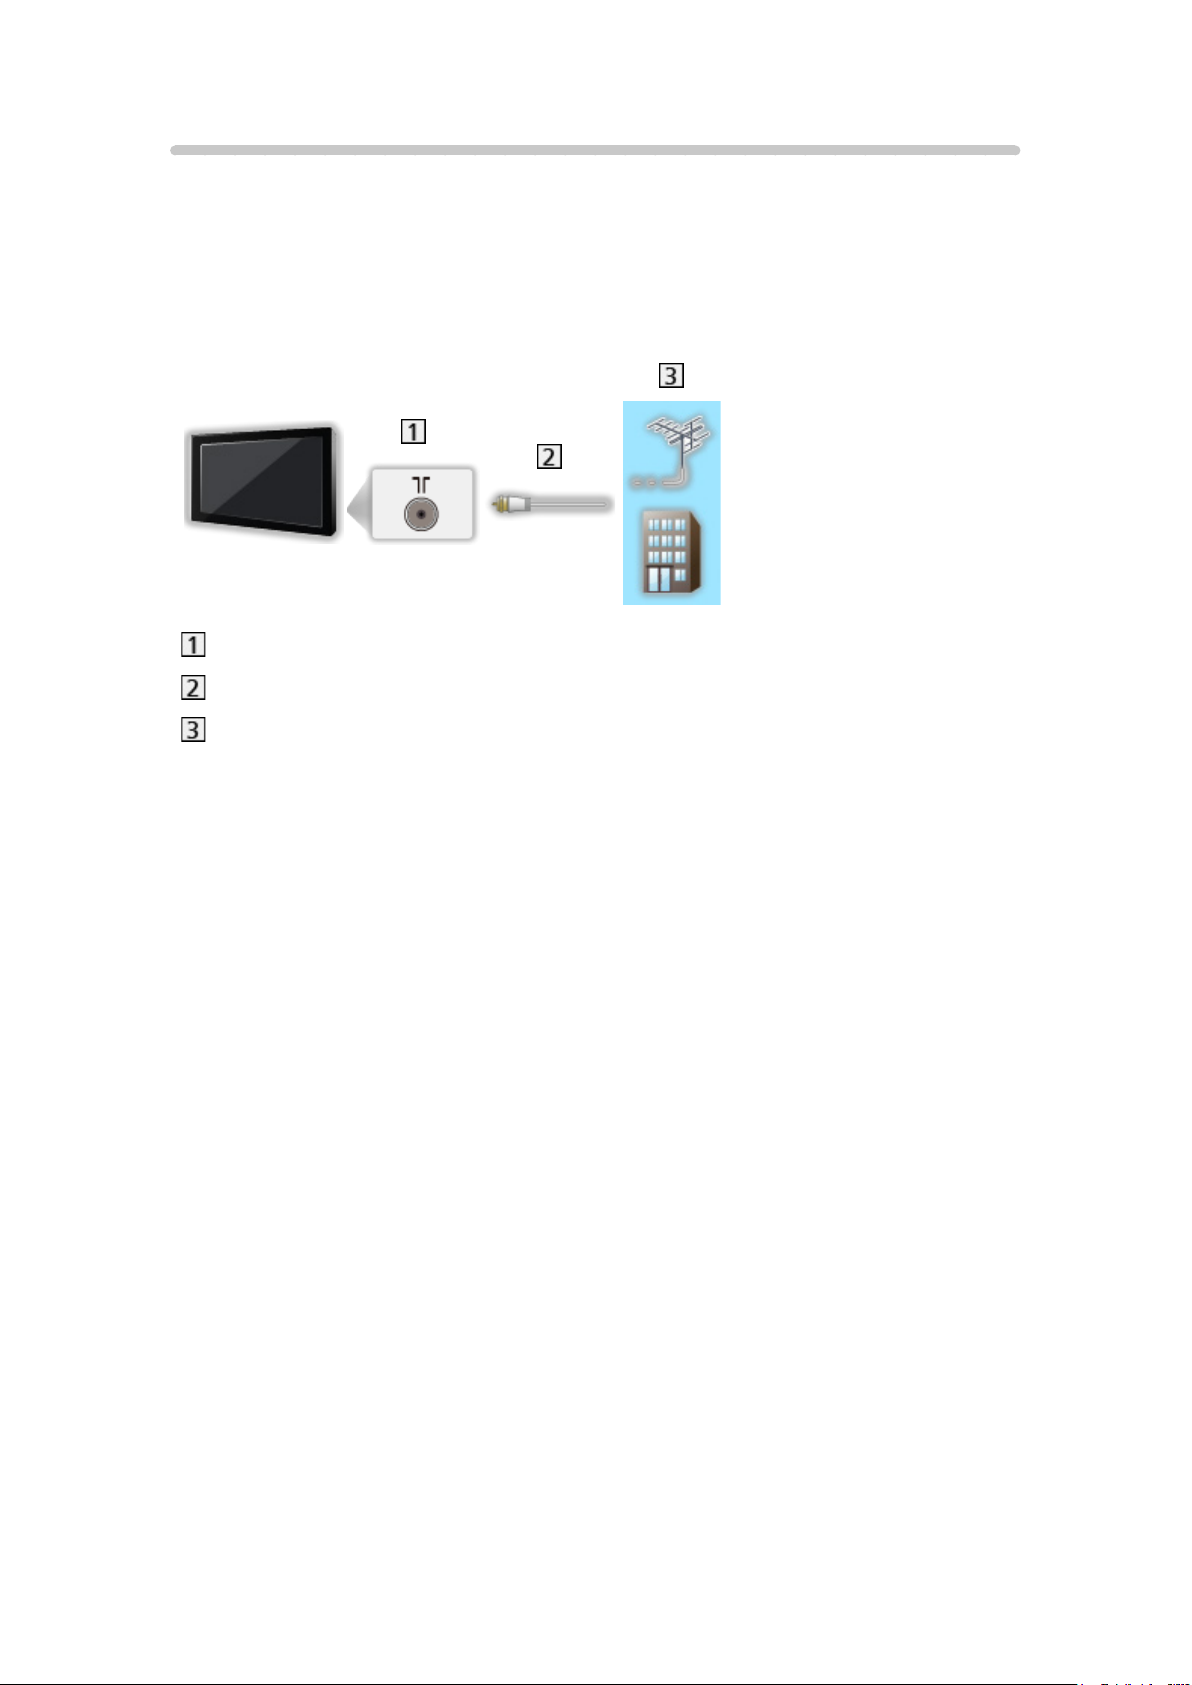
■ Aerial
Terrestrial / cable terminal
RF cable
Terrestrial aerial / Cable
●
For DVB-C, DVB-T, Analogue
- 22 -
■ DVD Recorder / VCR
Terrestrial / cable terminal
RF cable
DVD Recorder / VCR
Terrestrial aerial / Cable
AV1 (SCART) terminal
SCART cable
– AV1 (SCART) adaptor (supplied) is necessary when connecting to the
TV.
- 23 -
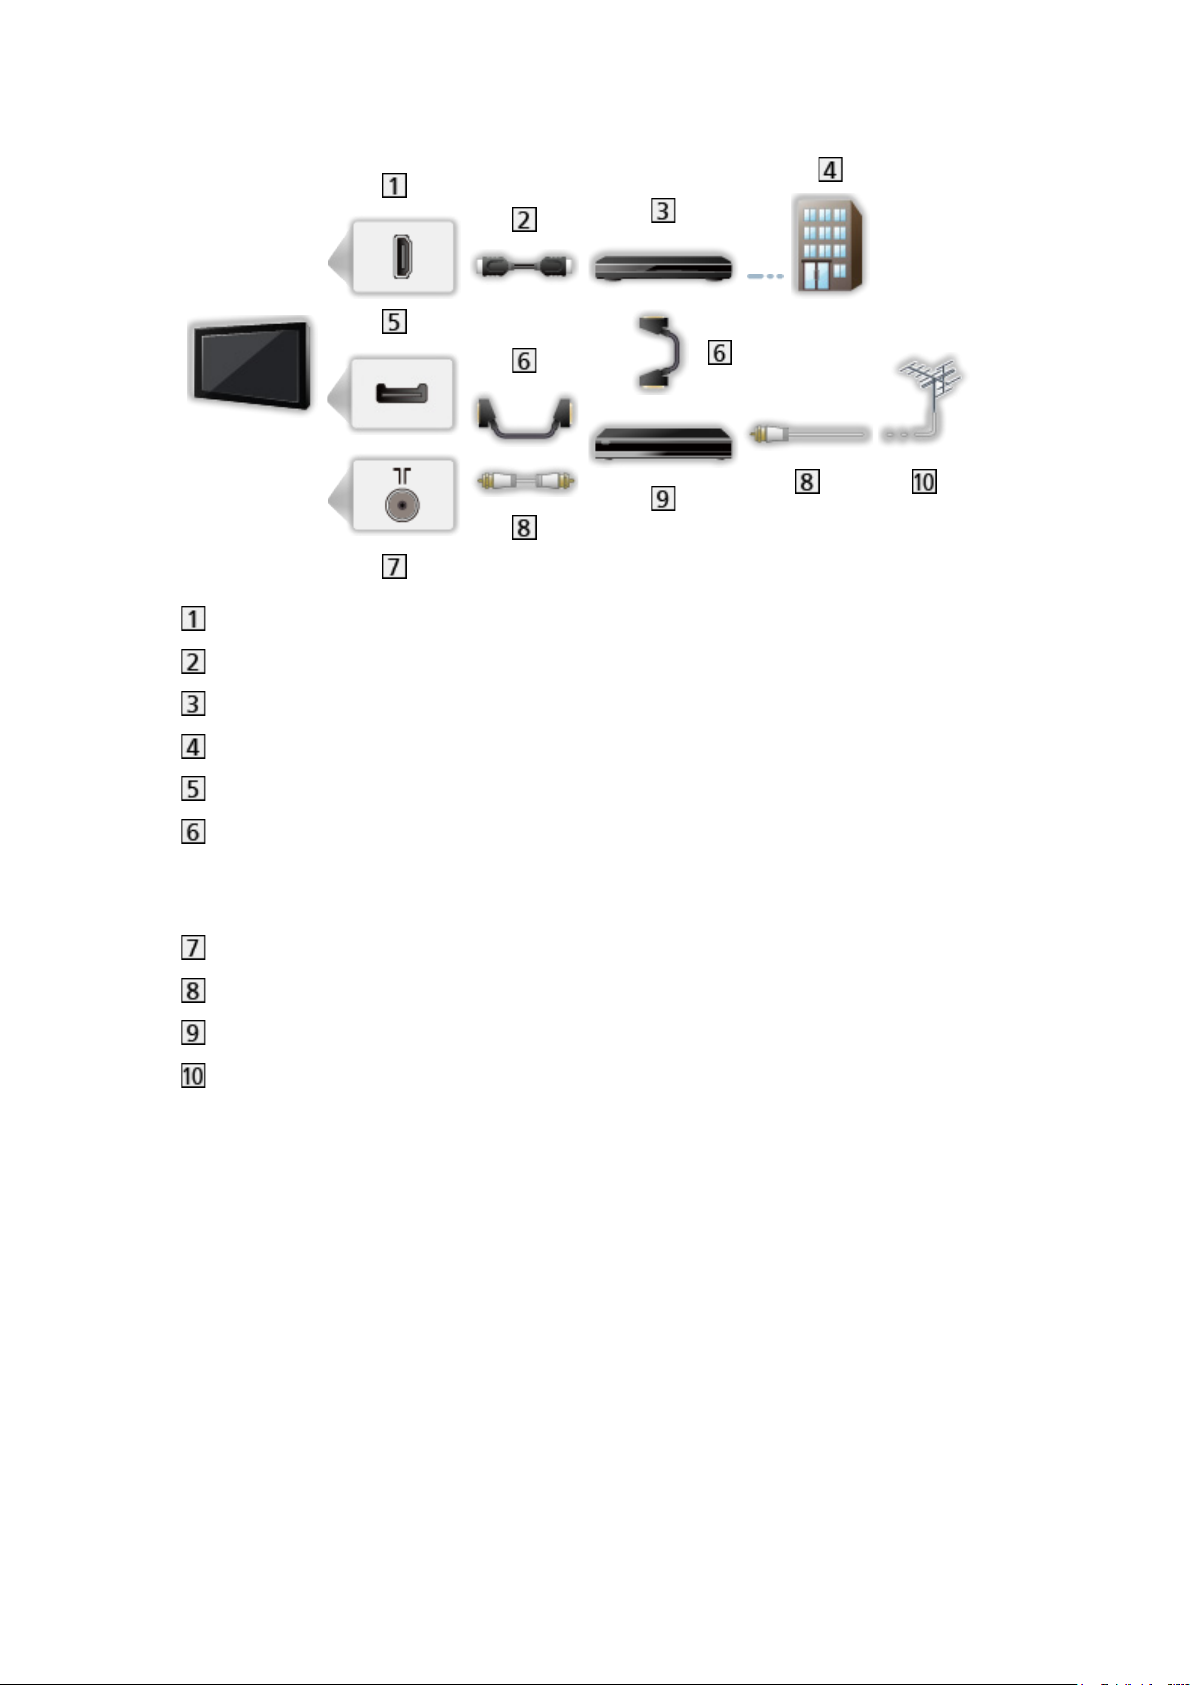
■ DVD Recorder (VCR) / Set top box
HDMI terminal
HDMI cable
Set top box
Cable
AV1 (SCART) terminal
SCART cable
– AV1 (SCART) adaptor (supplied) is necessary when connecting to the
TV.
Terrestrial / cable terminal
RF cable
DVD Recorder / VCR
Terrestrial aerial
- 24 -

= Note =
●
For details of DVB-via-IP connections
Functions > DVB-via-IP
●
For details of VIERA Link connections
Functions > VIERA Link “HDAVI Control™” > Summary of VIERA Link
●
Please also read the manual of the equipment being connected.
●
Keep the TV away from electronic equipment (video equipment, etc.) or
equipment with an infrared sensor, otherwise distortion of image / sound
may occur or operation of other equipment may be affected.
●
Use a fully wired HDMI compliant cable.
●
Use a fully wired SCART cable.
●
Check the terminal type and cable plugs are correct for connection.
- 25 -
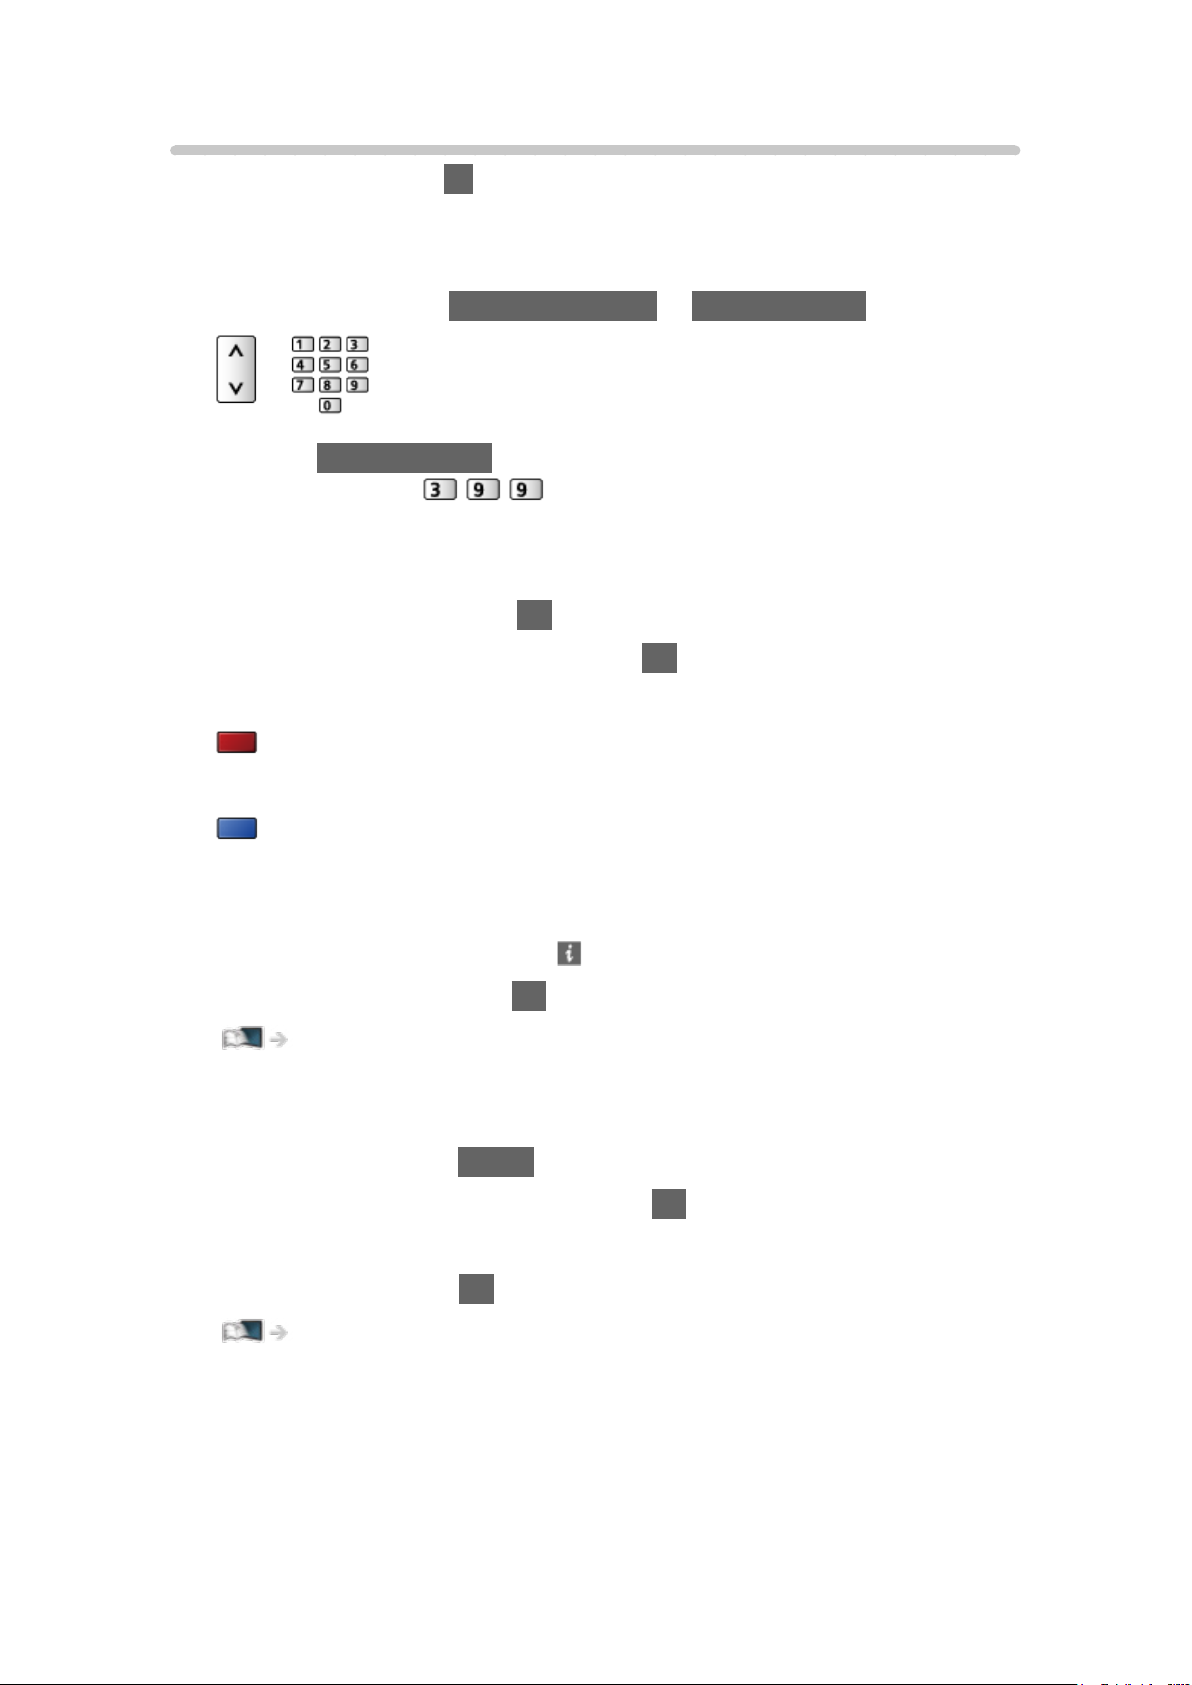
Selecting channel
1. Select the mode with TV.
DVB-S / DVB-C / DVB-T / DVB-via-IP / Analogue
●
Selectable modes vary depending on the channels stored.
2. Select a channel with Channel Up / Down or Numeric buttons.
●
Press Numeric buttons to select a channel position with 2 or more-digit
(e.g. 399, press
).
■ To select a channel from the channel list
1. Display the channel list with OK.
2. Select a channel from the list and press OK to watch.
●
To sort channel names in alphabetical order
(red)
●
To change the category
(blue)
■ To select a channel using information banner
1. Display information banner with if it is not displayed.
2. Select a channel and press OK to watch while the banner is displayed.
Watching > Basic > Information banner
■ To select a channel using TV Guide
1. Display TV Guide with GUIDE.
2. Select the current programme and press OK to access.
– The current programme is displayed on the top left of the screen.
3. Select View and press OK to watch.
Watching > TV Guide > Using TV Guide
●
Not valid in Analogue
- 26 -

■ To watch pay-TV
●
For details of the encrypted channels
Functions > Common Interface > Using Common Interface
●
Consult the operator / broadcaster or CI module manufacturer for more
information and conditions of the services.
- 27 -
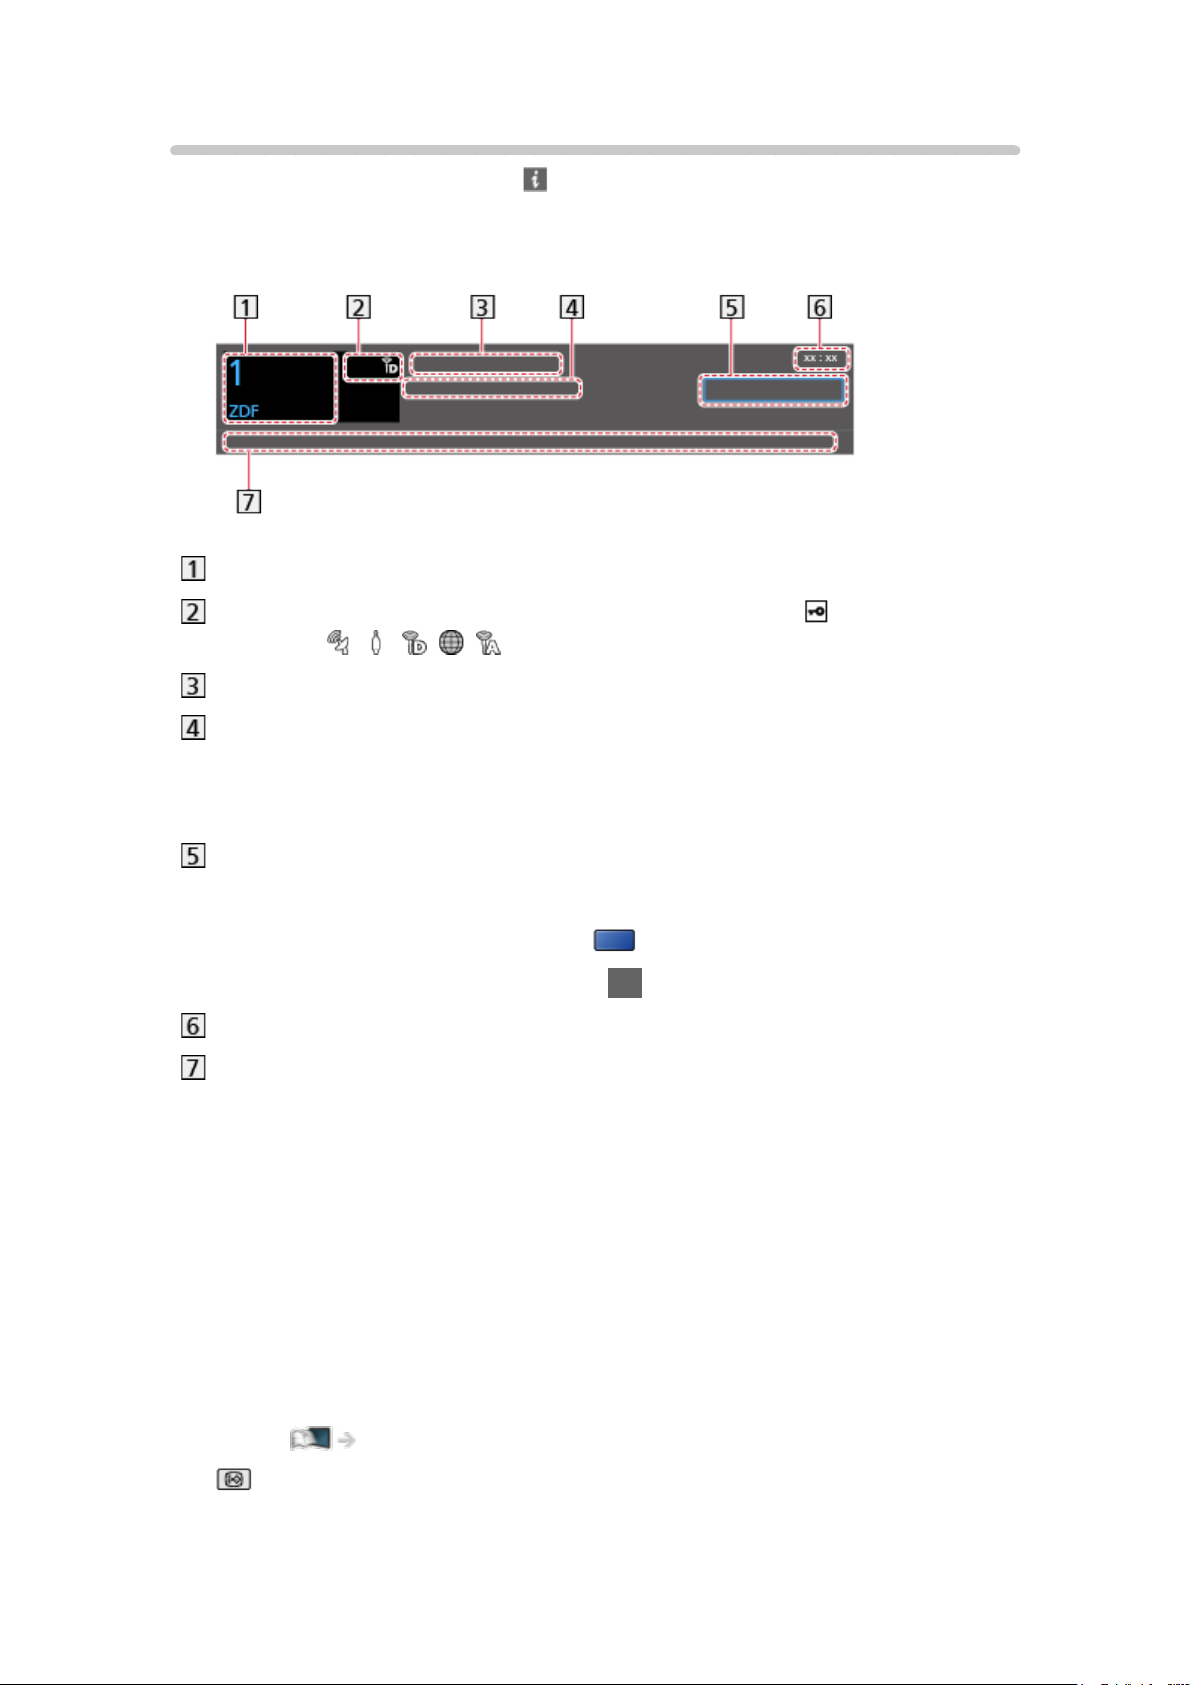
Information banner
Display information banner with .
●
Also appears when changing a channel.
(Example)
Channel position and name
Channel type (Radio, HDTV, etc.) / Encrypted channel ( ) /
TV mode (
Programme
, , , , )
Start time / End time (except Analogue)
Channel position, etc. (Analogue)
Progress time indicator of the selected programme (except Analogue)
Category
●
To change the category (DVB)
1) Display the category list with
(blue).
2) Select the category and press OK to change.
Current time
Features available / message meanings
Bad signal:
Poor quality TV signal
Dolby D+, Dolby D, HE-AAC:
Dolby Digital Plus, Dolby Digital or HE-AAC audio track
AD:
Audio Description service available
●
This function can aid visually-impaired viewers by providing an
additional audio track to describe events on screen.
Watching > For best audio > Audio Description
:
Subtitle service available
- 28 -
:
Teletext service available
:
Multiple audio available
:
Multiple video available
:
Multiple audio and video available
Stereo, Mono:
Audio mode
:
Data service (Hybrid Broadcast Broadband TV application) available
Functions > Data Service Application > Using Data Service Application
1 – 90:
Off Timer remaining time
Watching > Basic > Off Timer
●
To confirm another tuned channel
/
●
To watch the channel listed in the banner
OK
●
Information on the next programme (DVB)
●
Extra information (DVB)
– Press again to hide the banner.
●
To hide the banner
EXIT
●
To adjust banner timeout, set Banner Display Timeout.
1) Display the menu with MENU.
2) Select Setup > Display Settings > Banner Display Timeout and press
OK to access.
3) Set the item and press OK to store.
- 29 -

●
To display the introduction banner for the internet service
1) Display the menu with MENU.
2) Select Setup > Display Settings > Smart Banner and press OK to
access.
3) Select On / Off and press OK to set.
- 30 -
 Loading...