

Panasonic TX-65CZ952B Operating Instructions

TX-65CZ952B
e
HELP
English

Read first
eHELP
•How to use 12
Features
•4K resolution 13
•Touch Pad Controller 14
•TV Anywhere 15
•Dual Tuner 16
•Easy Mirroring 17
Watching
Basic
•Satellite connection 18
•Basic connection 20
•Selecting channel 23
•Information banner 25
•Option Menu 28
•Subtitle 30
•Last view 31
•Off Timer 32
•Energy saving functions 33
•Adjusting time 35
•Language 36
4K resolution
•4K compatible equipment 38
•HDCP Setting 39
•HDMI Auto Setting 40
•Valid 4K format 41
External equipment
•External connection 42
•Watching external input 46
•Operating with TV’s remote control 48
•HDMI features 50
- 2 -

•HDMI HDR Setting 52
•Terminal information 53
•Valid input signals 55
For best picture
•Viewing Mode 56
•Ambient Sensor 58
•Aspect 59
•Aspect Control Signal 61
•Basic settings 63
•Noise reduction settings 66
•Advanced Settings 67
•Option Settings 71
•Screen Settings 74
•Lock Settings 76
•Copy Adjustment 77
For best audio
•Sound mode 78
•Basic settings 79
•Volume settings 81
•Voice Guidance Settings 82
•Audio Description 83
•Advanced settings 84
TV Guide
•Using TV Guide 86
•Timer Programming 89
•Guide link programming 90
Teletext
•Digital text service 91
•Viewing Teletext 92
•Teletext mode 94
•Teletext Character Set 95
3D
•Note 96
- 3 -

•3D Eyewear - Maintenance 97
•Viewing 3D 98
•3D Mode Selection 100
•3D Settings 101
•Source image format 103
Tuning and editing channels
•Setting menu 104
•Favourites Edit 105
•Channel List 108
•Regional Channel Edit 110
•Auto Setup 111
•Channel Sorting by Region 114
•Manual Tuning 115
•Update Channel List 117
•New Channel Message 118
•Signal Condition 119
•Add New Channels 120
•Other settings 121
Recording
USB HDD setup
•Preparations 122
•Setting for USB HDD 124
Recording current programme
•One Touch Recording 126
•Rewind LIVE TV 127
Timer Programming
•Setting Timer Programming 129
•Editing Timer Programming 131
•Remote recording 132
•Note 133
Technical information
•USB HDD 134
- 4 -

Media Player
Using Media Player
•Information 135
•Selecting device / mode 137
•Network device 139
•Sharing file 140
Photo mode
•Selecting file 141
•Viewing photo 142
•Sorting photos 143
•Using Slideshow 144
Video mode
•Selecting file 147
•Watching video 148
•Video Setup 150
•Audio output settings 152
Recorded TV mode
•Selecting content 153
•Watching recorded TV 154
•Grouping content 156
•Deleting content 157
•Changing device 158
•Chapter List 159
•Audio output settings 160
Music mode
•Selecting file 161
•Playing music 162
•Music Setup 163
Technical information
•Device handling caution 164
•USB devices 165
•Photo format 166
•Video format 167
- 5 -

•Music format 170
Network
Internet content
•Information 171
•Selecting internet content 172
•Note 173
DLNA
•In-House streaming 174
•Using DLNA 178
Network connections
•Internet connection 179
•DLNA connection 180
•Note 182
Network settings
•Network Connection 183
•Custom - Wireless 185
•Custom - Wired 188
•Custom - Wireless Access Point 190
•Network Status 191
•VIERA Name 192
•TV Remote App Settings 193
•Network Link Settings 195
•TV Anywhere Settings 197
•File Sharing Settings 198
•Mirroring Settings 199
•Software Update 200
•New Software Message 201
Photos
•Selecting file 202
•Viewing photo 203
•Using Slideshow 204
- 6 -

Videos
•Selecting file 206
•Watching video 207
•Video Setup 209
•Audio output settings 211
Music
•Selecting file 212
•Playing music 213
•Music Setup 214
DIGA Recorder
•Controlling DIGA Recorder 215
Technical information
•Photo format 216
•Video format 217
•Music format 220
Functions
APPS List
•Information 221
•How to use 222
Voice Control
•Information 223
•How to use 224
•Settings 225
•Note 226
Touch Pad Controller
•Information 227
•Pairing 228
•Identifying controls 229
•Settings 231
TV Anywhere
•How to use 232
•TV Anywhere Settings 233
- 7 -

Mirroring
•How to use 234
•Mirroring Settings 235
Multi Window
•Information 236
•How to use 237
•Note 238
VIERA Link “HDAVI Control™”
•Summary of VIERA Link 239
•Preparations 244
•Easy playback 245
•Power on Link 246
•Power off Link 247
•Standby Power Save 248
•Intelligent Auto Standby 249
•VIERA Link Control 250
•Speaker Selection 252
•Note 253
Child Lock
•Using Child Lock 254
•PIN number 256
•Parental Rating 257
Common Interface
•Caution 258
•Using Common Interface 259
Shipping Condition
•Shipping Condition 260
Updating the TV Software
•Information 261
•Auto update 262
•Manual update 263
Setting characters
•Using Numeric buttons 264
- 8 -

Bluetooth devices
•Bluetooth Setup 265
Keyboard
•Keyboard 266
Settings
Setting menu
•How to use 267
Picture
•Viewing Mode 269
•Basic settings 270
•Ambient Sensor 273
•Noise reduction settings 274
•Advanced Settings 275
•Option Settings 276
•Screen Settings 278
•3D Settings 279
•Lock Settings 280
•Copy Adjustment 281
•Reset to Defaults 282
Sound
•Mode 283
•Basic settings 284
•Volume settings 285
•Voice Guidance Settings 286
•Audio Description 287
•Advanced settings 288
•Reset to Defaults 290
Network
•Network Connection 291
•Network Status 292
•VIERA Name 293
•TV Remote App Settings 294
- 9 -

•Network Link Settings 295
•TV Anywhere Settings 296
•File Sharing Settings 297
•Mirroring Settings 298
•Other settings 299
Timer
•Off Timer 300
•Timer Programming 301
•Time Zone 302
•Auto Standby 303
•No signal Power off 304
Setup
•Eco Navigation 305
•Voice Control Settings 306
•TV Guide Settings 307
•USB Device Setup 308
•Recording Setup 309
•VIERA Touch Pad Controller 310
•Bluetooth Setup 311
•Child Lock 312
•Tuning Menu 313
•Language 315
•Display Settings 316
•HDCP Setting 318
•HDMI Auto Setting 319
•HDMI HDR Setting 320
•VIERA Link Settings 321
•System Menu 322
•Other Settings 323
Support
Help menu
•Using Help menu 324
- 10 -

FAQs
•Picture 325
•Digital TV 327
•Analogue TV 329
•Sound 330
•3D 331
•HDMI 332
•Network 333
•Other 335
Maintenance
•Care and Cleaning 337
Optional accessories
•3D Eyewear 339
•Wall-hanging bracket 340
Licence
•Licence 341
- 11 -

Read first
eHELP
How to use
■ Meaning of signs
OK :
Letters enclosed in brackets indicate remote control buttons.
Menu :
Letters in cyan indicate on-screen display items.
:
References in this eHELP
When the icon (
detailed descriptions pressing Numeric buttons.
(red) :
Displays the menu related to the description (only for some descriptions)
= Note =
●
Design and Specifications are subject to change without notice.
●
The images shown in this eHELP are for illustrative purposes only.
- ) is displayed, you can jump to the page for
- 12 -

Features
4K resolution
You can watch content in 4K format that has twice the horizontal and vertical
resolution of the 1080p signal.
Watching > 4K resolution > 4K compatible equipment
- 13 -

Touch Pad Controller
Touch Pad Controller is designed for the convenient operations on the
application, internet content. You can operate the TV intuitively with this
controller.
Functions > Touch Pad Controller > Information
- 14 -

TV Anywhere
You can watch TV and set timer event with the network equipment
(smartphone, etc.) from outside the home network.
Functions > TV Anywhere > How to use
- 15 -

Dual Tuner
You can watch or record 2 programmes simultaneously, watch a programme
while recording another programme, etc.
Functions > Multi Window > How to use
- 16 -

Easy Mirroring
You can watch display images of other devices (smartphone, etc.) on the TV
screen using a mirroring function. You can also start the mirroring function
from the other devices without operating the TV.
Functions > Mirroring > How to use
- 17 -
Watching
Basic
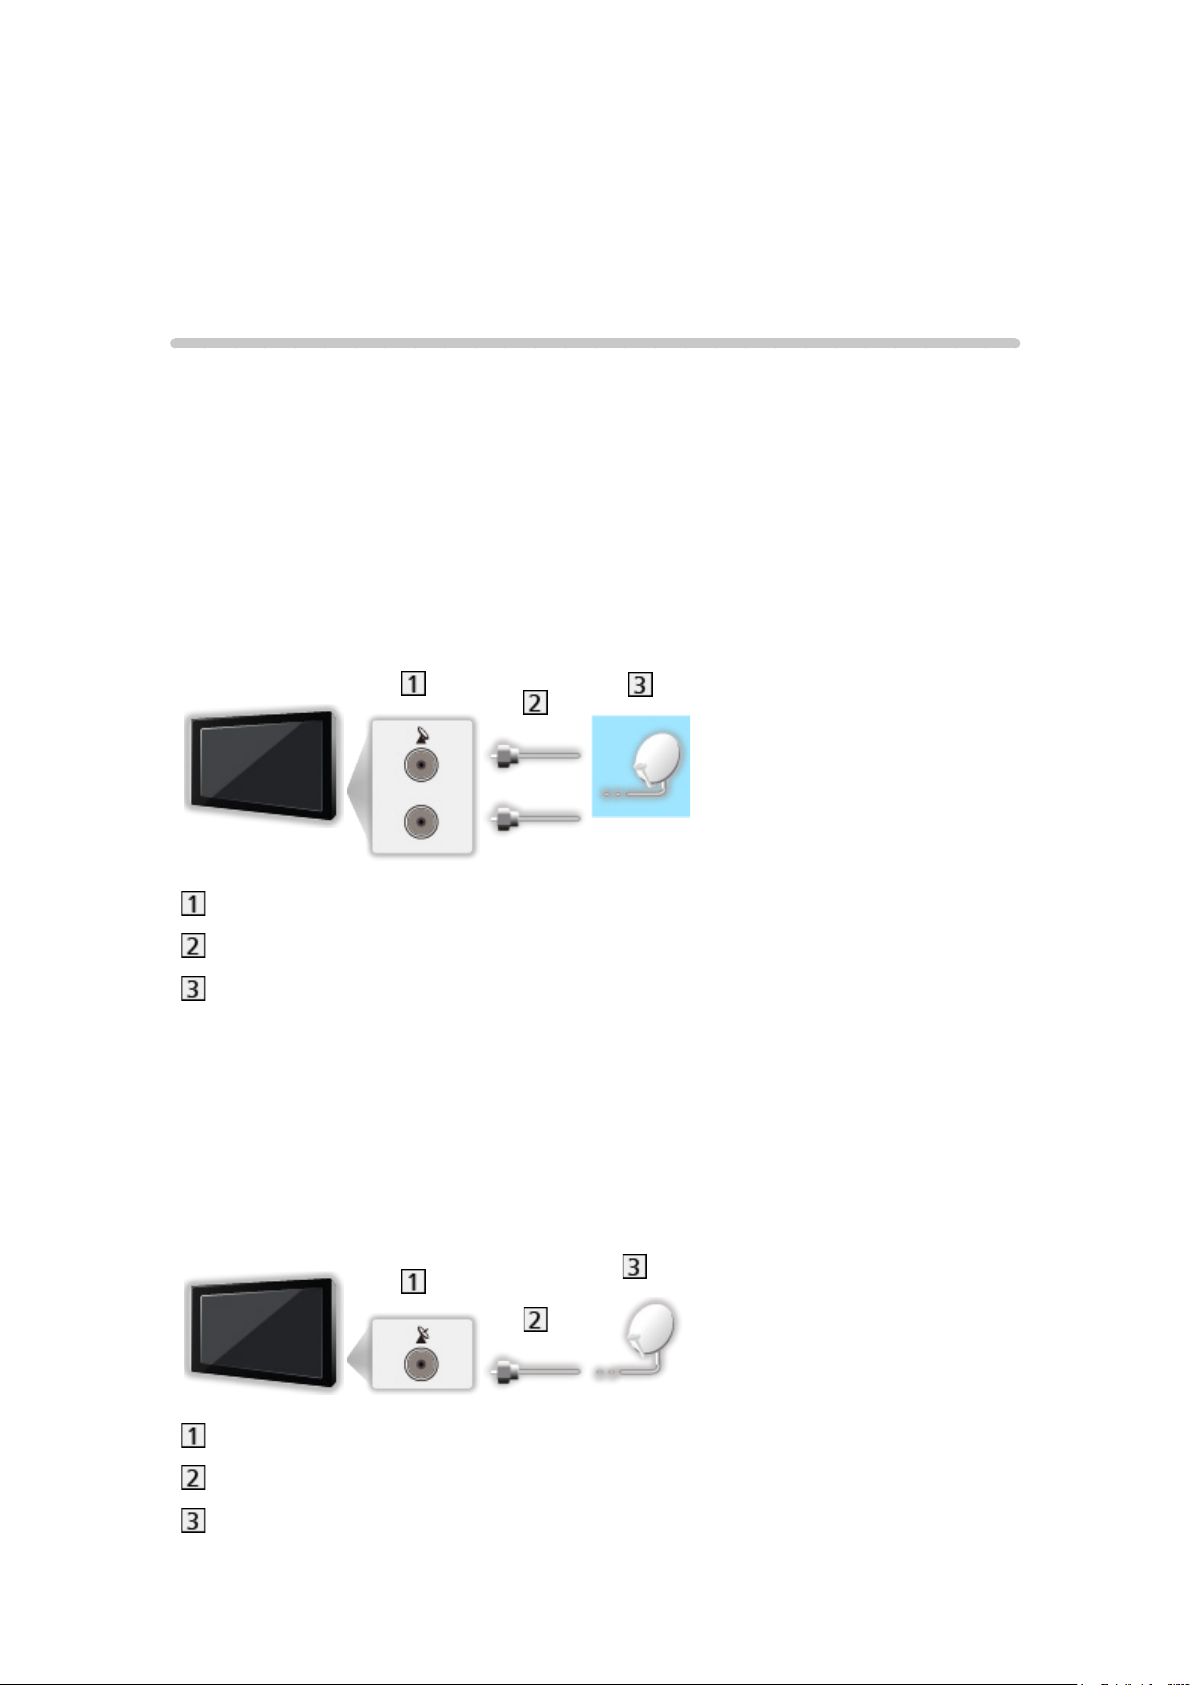
Satellite connection
Please ensure that the unit is disconnected from the mains socket before
attaching or disconnecting any cables.
●
External equipment and cables shown are not supplied with this TV.
●
For Freesat, Other Sat., Satellite
■ Dual Tuner
Connect the both of satellite IN 1 / IN 2 terminals to the satellite dish, and you
can watch or record 2 satellite programmes simultaneously, etc.
Satellite IN 1 / IN 2 terminals
Satellite cables
Satellite dish
■ Single Tuner
Connect the satellite IN 1 terminal to the satellite dish.
●
Watching or recording 2 satellite programmes simultaneously, etc. are not
available.
Satellite IN 1 terminal
Satellite cable
Satellite dish
- 18 -

= Note =
●
To ensure your satellite dish is correctly installed, please consult your local
dealer. Also consult the received satellite broadcasting companies for
details.
●
The Freesat channel uses Astra2 at 28.2° East and Eurobird1 at 28.5°
East satellites. To ensure your satellite dish is correctly installed, consult
your Freesat registered dealer. (UK only)
●
Keep the TV away from electronic equipment (video equipment, etc.) or
equipment with an infrared sensor, otherwise distortion of image / sound
may occur or operation of other equipment may be affected.
●
Check the terminal type and cable plugs are correct for connection.
- 19 -
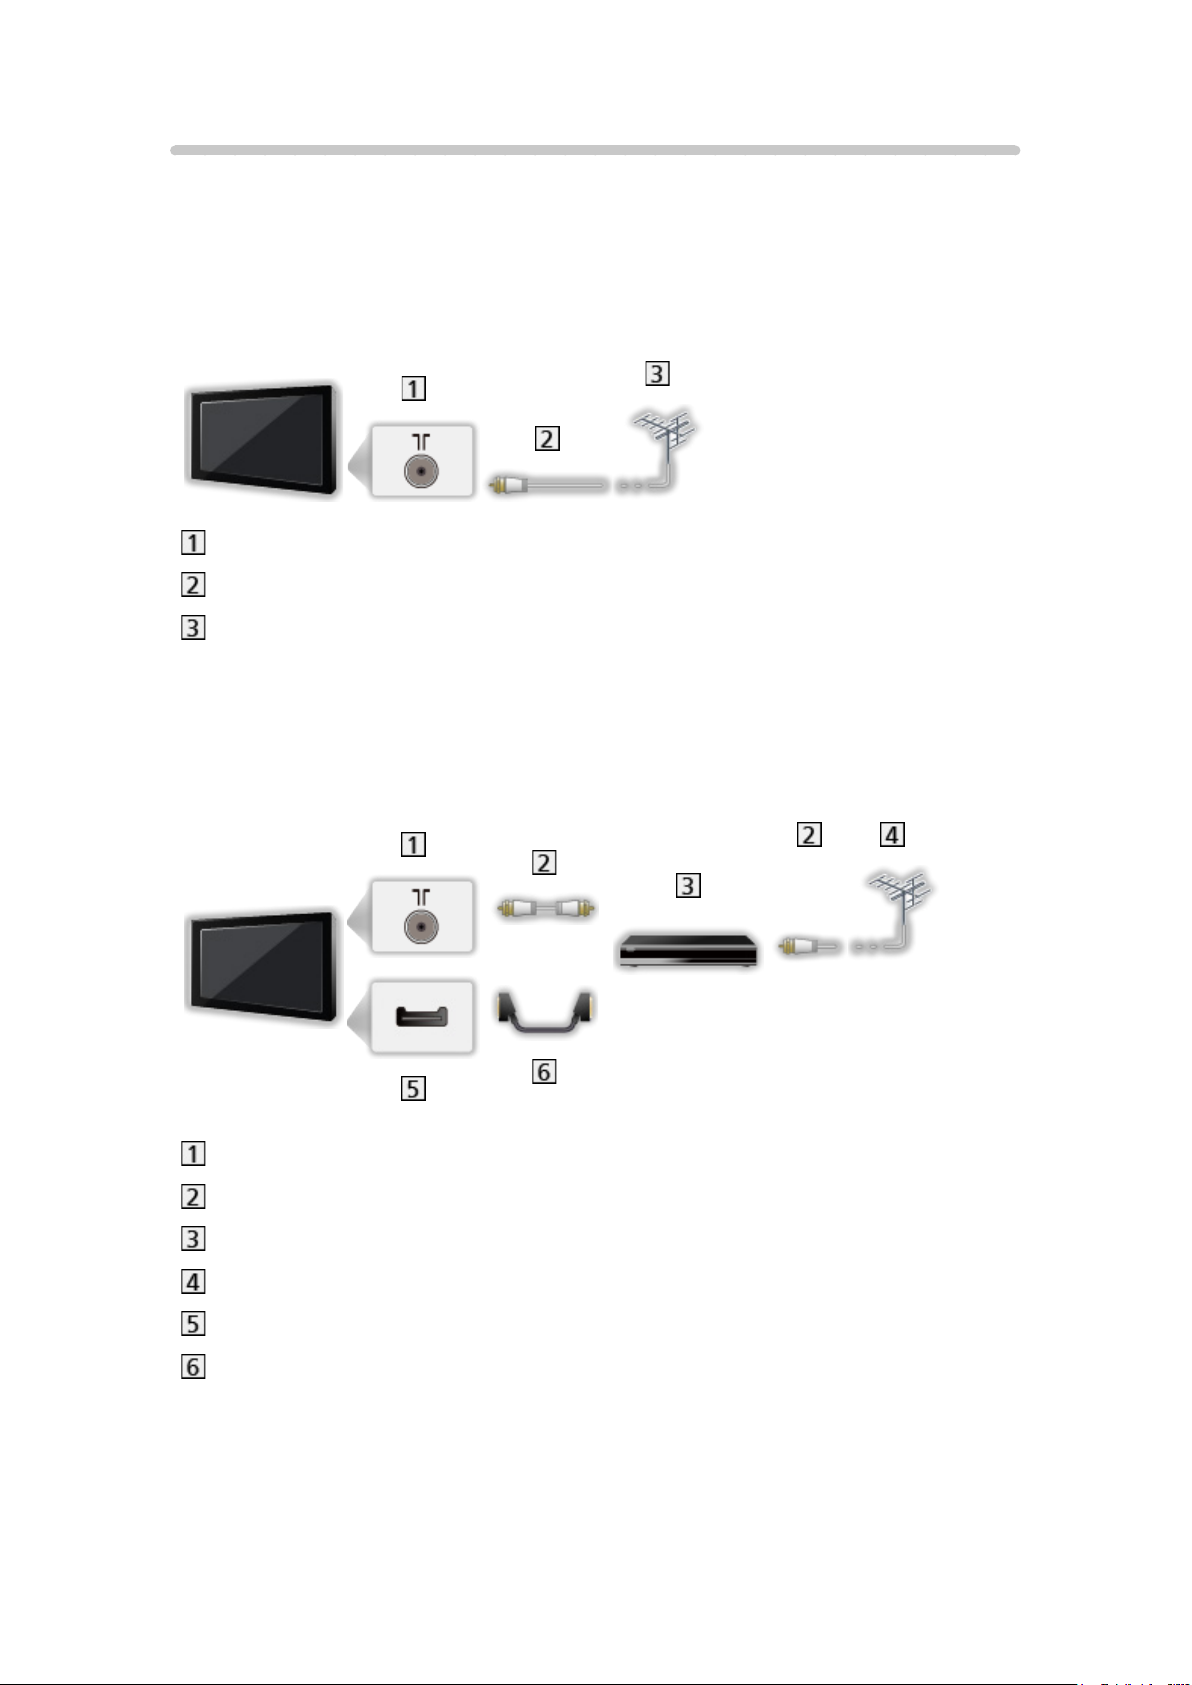
Basic connection
Please ensure that the unit is disconnected from the mains socket before
attaching or disconnecting any cables.
●
External equipment and cables shown are not supplied with this TV.
■ Aerial
Terrestrial terminal
RF cable
Terrestrial aerial
●
For DVB, Analogue
■ DVD Recorder / VCR
Terrestrial terminal
RF cable
DVD Recorder / VCR
Terrestrial aerial
AV1 (SCART) terminal
SCART cable
– AV1 (SCART) adaptor (supplied) is necessary when connecting to the
TV.
- 20 -
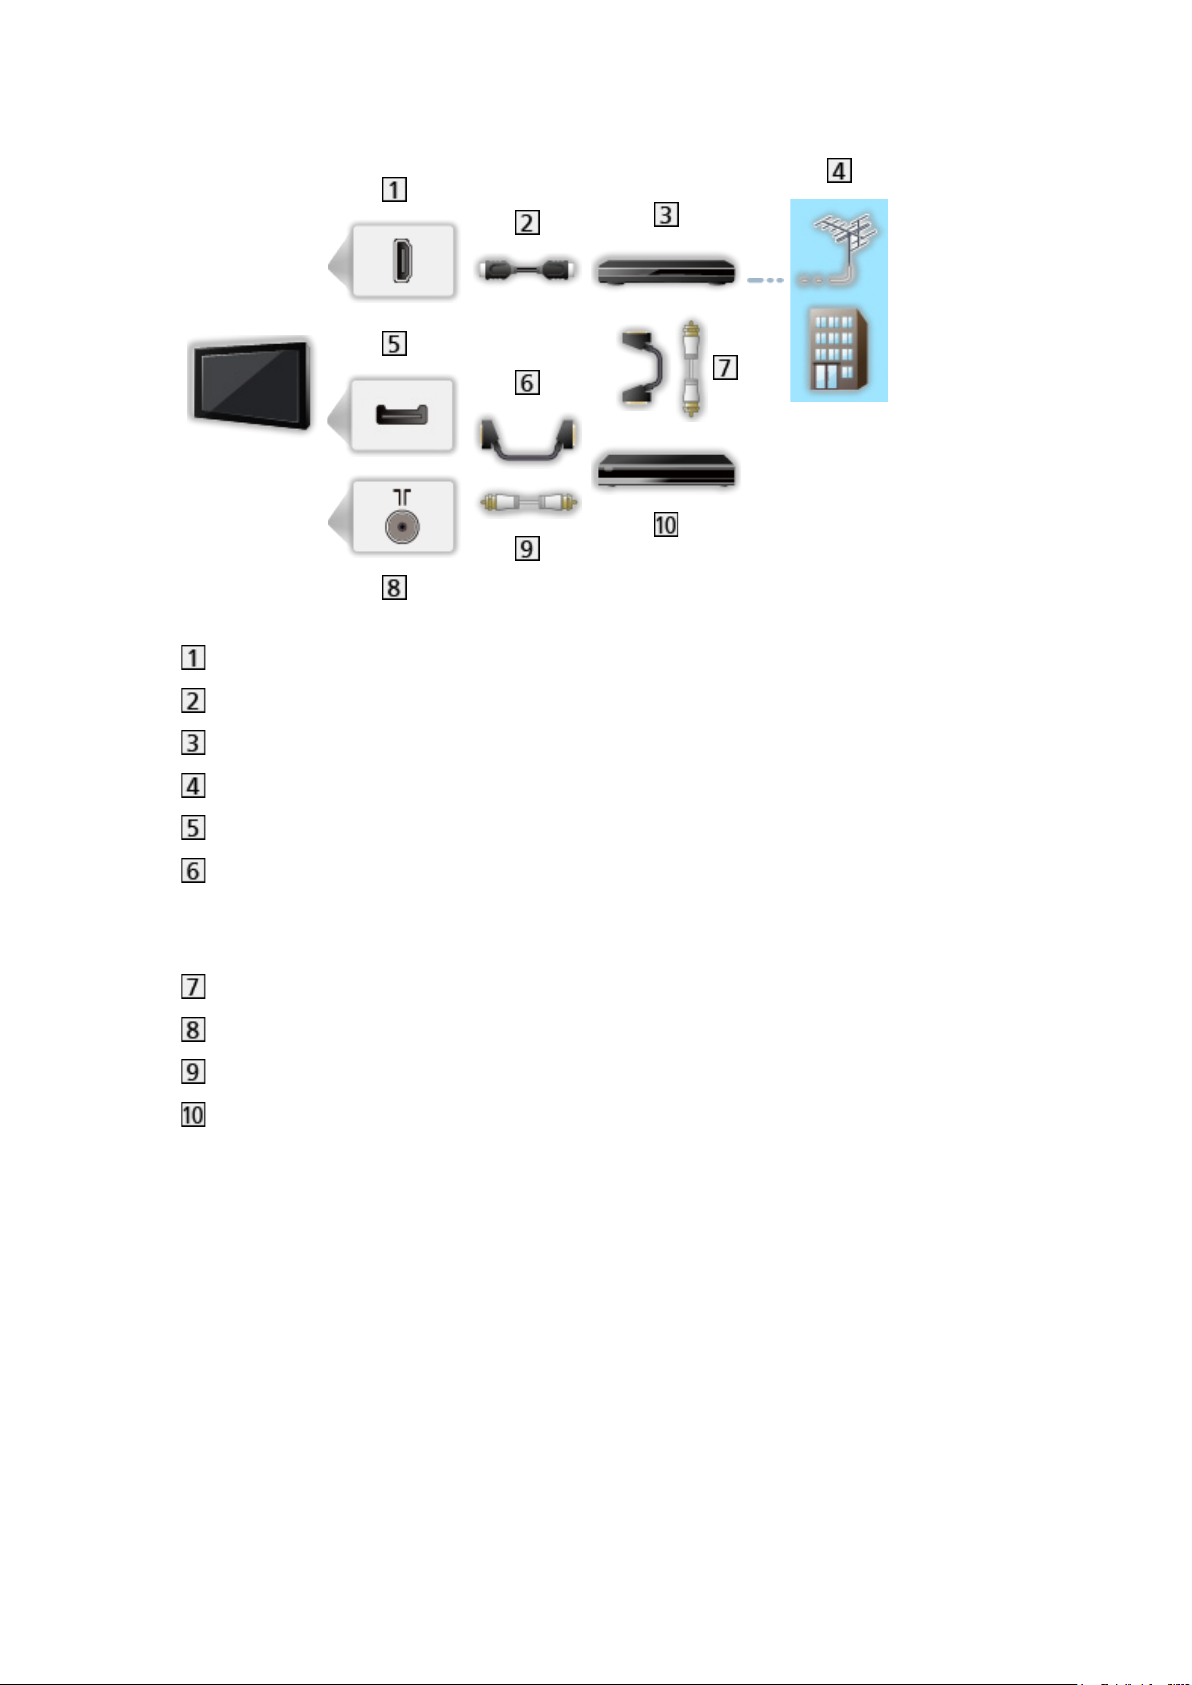
■ DVD Recorder (VCR) / Cable TV box
HDMI terminal
HDMI cable
Cable TV box
Terrestrial aerial / Cable
AV1 (SCART) terminal
SCART cable
– AV1 (SCART) adaptor (supplied) is necessary when connecting to the
TV.
RF cable / SCART cable
Terrestrial terminal
RF cable
DVD Recorder / VCR
- 21 -

= Note =
●
For details of VIERA Link connections
Functions > VIERA Link “HDAVI Control™” > Summary of VIERA Link
●
Please also read the manual of the equipment being connected.
●
Keep the TV away from electronic equipment (video equipment, etc.) or
equipment with an infrared sensor, otherwise distortion of image / sound
may occur or operation of other equipment may be affected.
●
Use a fully wired HDMI compliant cable.
●
Use a fully wired SCART cable.
●
Check the terminal type and cable plugs are correct for connection.
- 22 -

Selecting channel
1. Select the mode with TV.
Freesat (UK only) / DVB / Analogue / Other Sat. (UK only) / Satellite
(Ireland only)
●
Selectable modes vary depending on the channels stored.
2. Select a channel with Channel Up / Down or Numeric buttons.
●
Freesat channel position numbers are in the 100 - 999 and 0100 - 0999
ranges. DVB and Other Sat. / Satellite channel position begin from
number 1 upward. Analogue channel position numbers are in the 0 - 99
range.
■ To select a channel using information banner
1. Display information banner with if it is not displayed.
2. Select a channel and press OK to watch while the banner is displayed.
Watching > Basic > Information banner
■ To select a channel using TV Guide
1. Display TV Guide with GUIDE.
2. Select the current programme and press OK to access.
– The current programme is displayed on the top left of the screen.
3. Select View and press OK to watch.
Watching > TV Guide > Using TV Guide
●
Not valid in Analogue
■ To display the application bar (UK only)
1. Display the application bar with OK.
2. Select the application and press OK to access.
●
For details of EPG (DVB)
Watching > TV Guide > Using TV Guide
●
For the applications, follow the on-screen instructions.
- 23 -

■ To select the type of channel list
Automatically selects all channels or favourites list in the information banner
when the TV is turned on.
1. Display the menu with MENU.
2. Select Setup > Other Settings > Power on Channel List and press OK to
access.
3. Select All Channel List / Last and press OK to set.
■ To watch pay-TV
●
For details of the encrypted channels
Functions > Common Interface > Using Common Interface
●
Consult the operator / broadcaster or CI module manufacturer for more
information and conditions of the services.
- 24 -
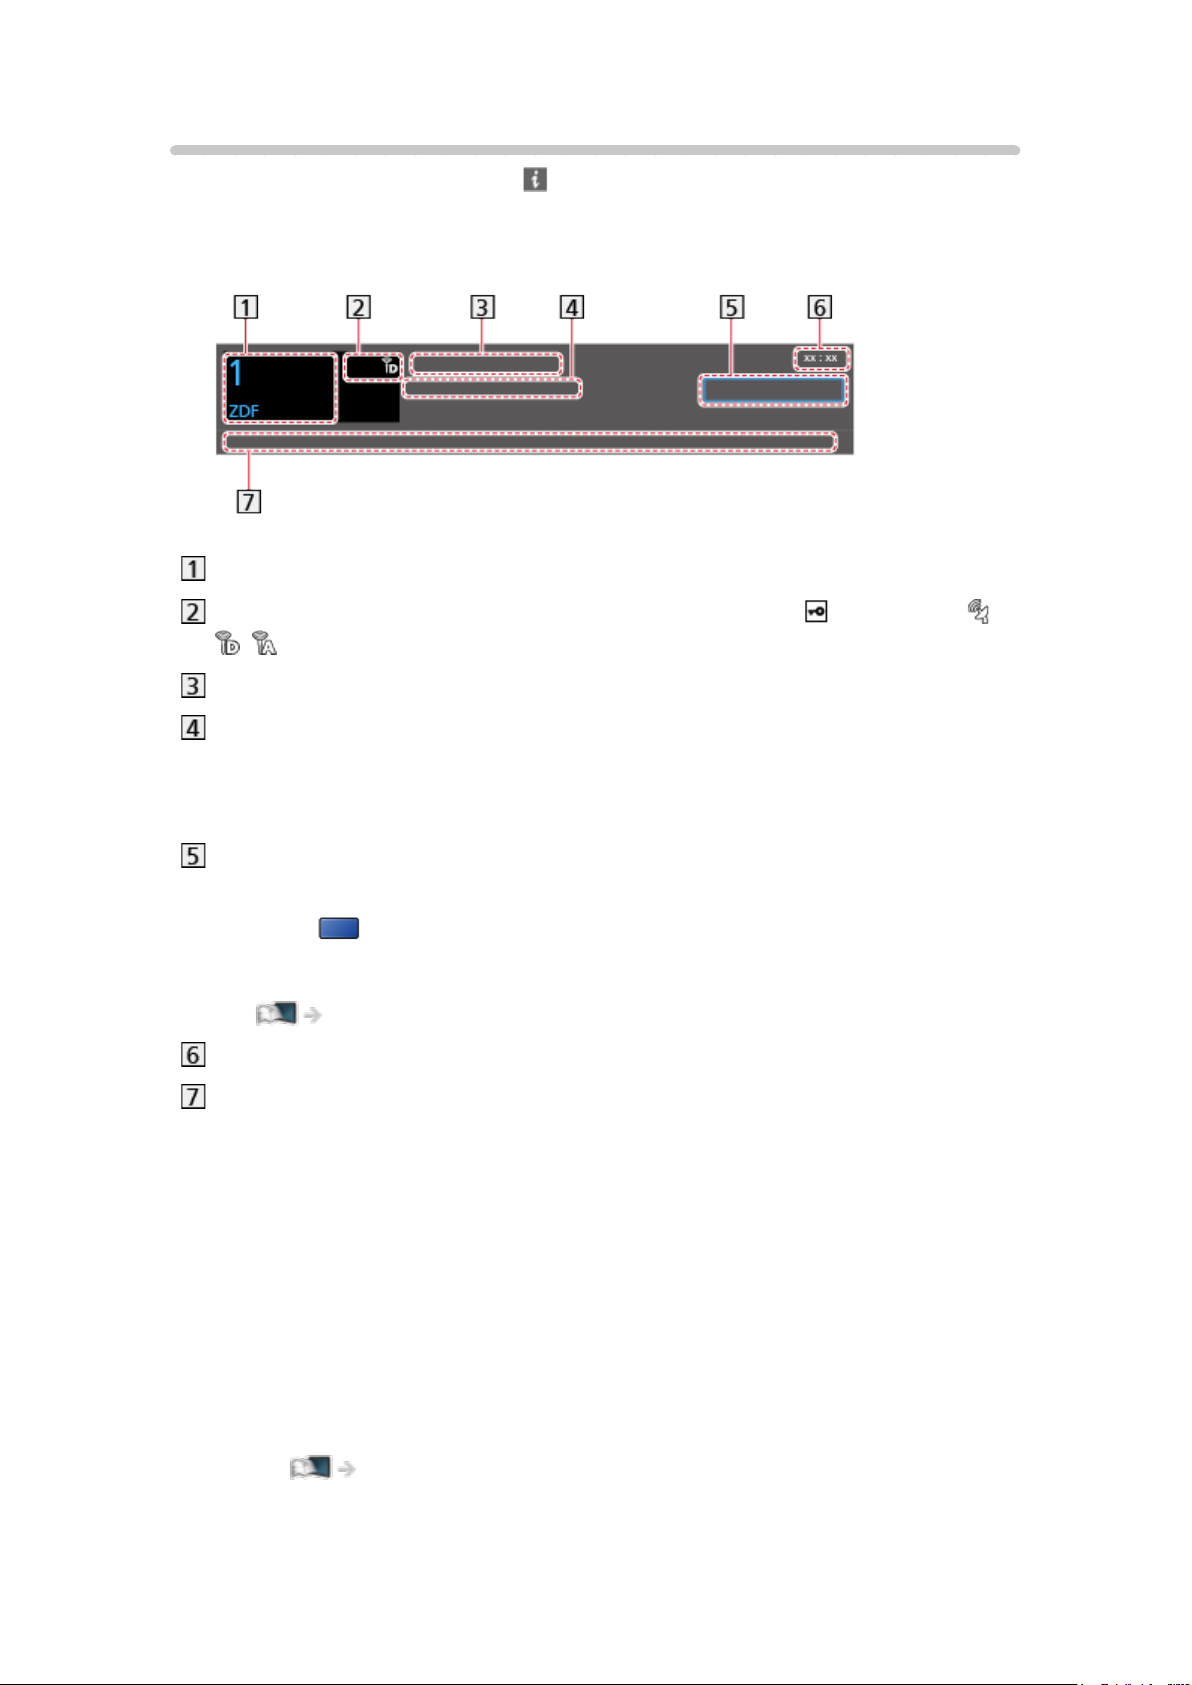
Information banner
Display information banner with .
●
Also appears when changing a channel.
(Example)
Channel position and name
Channel type (Radio, HDTV, etc.) / Encrypted channel ( ) / TV mode ( ,
, )
Programme
Start time / End time (except Analogue)
Channel position, etc. (Analogue)
Progress time indicator of the selected programme (except Analogue)
All DVB Channels / All Other Sat. Channels / All Satellite Channels /
All Analogue Channels / Favourites
●
Press (blue) to switch. (DVB / Other Sat. / Satellite)
●
To list favourite channels, set Favourites Edit.
Watching > Tuning and editing channels > Favourites Edit
Current time
Features available / message meanings
Bad signal:
Poor quality TV signal
Dolby D+, Dolby D, HE-AAC:
Dolby Digital Plus, Dolby Digital or HE-AAC audio track
AD:
Audio Description service available
●
This function can aid visually-impaired viewers by providing an
additional audio track to describe events on screen.
Watching > For best audio > Audio Description
- 25 -

Also in :
Same programme available as HD broadcast (UK only)
●
To display the extra information for details
STTL:
Subtitle service available
TEXT:
Text service available
Multi Audio:
Multiple audio available
Stereo, Mono, NICAM:
Audio mode
1 – 90:
Off Timer remaining time
Watching > Basic > Off Timer
●
To confirm another tuned channel
/
●
To watch the channel listed in the banner
OK
●
Information on the next programme (DVB)
●
Extra information (DVB)
– Press again to hide the banner.
●
To hide the banner
EXIT
●
To adjust banner timeout, set Banner Display Timeout.
1) Display the menu with MENU.
2) Select Setup > Display Settings > Banner Display Timeout and press
OK to access.
3) Set the item and press OK to store.
- 26 -

●
To display the introduction banner for the internet service
1) Display the menu with MENU.
2) Select Setup > Display Settings > Smart Banner and press OK to
access.
3) Select On / Off and press OK to set.
●
To change the type of channel banner
1) Display the menu with MENU.
2) Select Setup > Display Settings > Banner & TV Guide Selection and
press OK to access.
3) Select Freetime / Panasonic and press OK to set.
– For DVB, Freesat (UK only)
●
AD, STTL, TEXT, Multi Audio indications are displayed as available
on particular programmes, but may not be available for all individual
programmes being broadcast. Display the extra information to confirm
availability of these functions.
- 27 -
Option Menu
Confirm or change the current status.
1. Display the option menu with OPTION.
2. Select one of the following items and press OK to access.
Voice Guidance Settings / Audio Type / Multi Audio / Monaural Audio / Sub
Channel / Subtitle Language / Teletext Character Set / Teletext Language /
NICAM / Volume Correction
Voice Guidance Settings
Guidance settings for visually impaired users
Watching > For best audio > Voice Guidance Settings
Audio Type
Set to Audio Description if the programme has Audio Description service,
then you will hear an additional audio track to describe events on screen (if
available).
●
For DVB
●
To adjust the volume for Audio Description
Watching > For best audio > Audio Description
Multi Audio
Selects between alternative language or Audio Description for sound tracks (if
available).
●
This setting is not memorised and it returns to the default setting once you
exit the current programme.
●
For DVB
●
Multi Audio / AD is displayed instead of Multi Audio. (Ireland only)
Monaural Audio
Selects stereo / monaural (if available).
●
This setting is not memorised and it returns to the default setting once you
exit the current programme.
●
Not valid in Analogue
Sub Channel
Selects the multifeed programme - sub channel (if available).
●
For Other Sat. (UK only), Satellite (Ireland only)
- 28 -
Subtitle Language
Selects the language in which subtitles should appear (if available).
●
This setting is not memorised and it returns to the default setting once you
exit the current programme.
●
Not valid in Analogue
Teletext Character Set
Sets the teletext language font.
Watching > Teletext > Teletext Character Set
●
Ireland only
Teletext Language
Selects between alternative languages for teletext (if available).
●
For DVB, Satellite (Ireland only)
NICAM
Switches NICAM sound (if available).
Watching > For best audio > Advanced settings
●
For Analogue
Volume Correction
Adjusts the volume of each individual channel or input mode.
- 29 -

Subtitle
■ Freesat, DVB, Other Sat., Satellite
Display / hide subtitles (if available) with STTL.
●
To select the preferred subtitle type
1) Display the menu with MENU.
2) Select Setup > Display Settings > Preferred Subtitle Type and press
OK to access.
3) Select Standard / Hard of Hearing and press OK to set.
– Hard of Hearing provides aids in understanding and enjoyment with
digital channel subtitles (depending on the broadcaster).
– Ireland only
●
Preferred Subtitles 1 / 2 in Language are given priority.
Watching > Basic > Language
– Ireland only
■ Analogue
Display subtitles with STTL.
●
Hide subtitles with EXIT.
= Note =
●
Subtitles may not be displayed properly in 3D images.
●
If you press STTL in Analogue, the TV switches to teletext service and
calls up a favourite page. Press EXIT to return to TV mode.
●
This is the same as switching to analogue teletext service and selecting
“P888” (subtitle service).
Watching > Teletext > Viewing Teletext
●
Not valid on the sub screen in multi window mode
- 30 -
 Loading...