

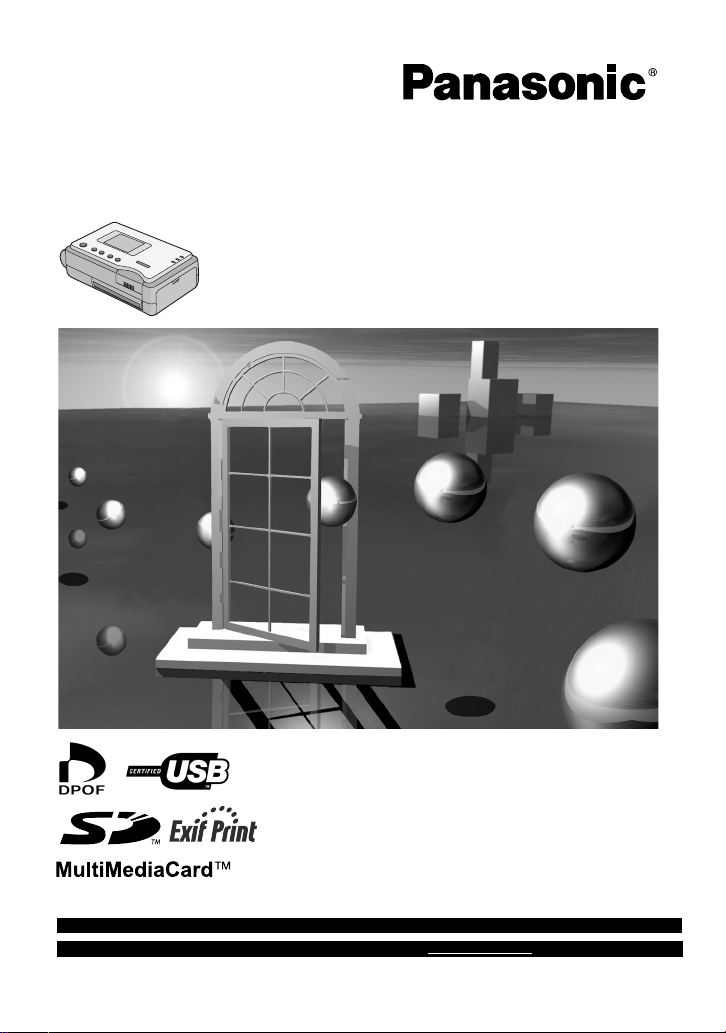
SD Mobile Printer
Operating Instructions
Model No. SV-P20U
Before use, please read these instructions completely.
For USA assistance, please call:1-800-272-7033 or send e-mail to:digitalstillcam@panasonic.com
For Canadian assistance, please call:1-800-561-5505 or visit us at www.panasonic.ca
VQT0A81-1

Before opening the CD-ROM package, please read the following.
End User License Agreement
You (“Licensee”) are granted a license for the Software defined in this End User License
Agreement (“Agreement”) on condition that you agree to the terms and conditions of this
Agreement. If Licensee does not agree to the terms and conditions of this Agreement,
promptly return the Software to Matsushita Electric Industrial Co., Ltd. (“Matsushita”), its
distributors or dealers from which you made the purchase.
Article 1 License
Licensee is granted the right to use the Software, including the information recorded or
described on the CD-ROM, instruction manuals, and any other media provided to
Licensee (collectively “Software”), but all applicable rights to patents, copyrights,
trademarks and trade secrets in the Software are not transferred to Licensee.
Article 2 Use by a Third Party
Licensee may not use, copy, modify, transfer or allow any third party, whether free of
charge or not, to use, copy or modify the Software, except as expressly provided for in
this Agreement.
Article 3 Restrictions on Copying the Software
Licensee may make a single copy of the Software in whole or a part solely for back-up
purpose.
Article 4 Computer
Licensee may use the Software only on one computer, and may not use it on more than
one computer.
Article 5 Reverse Engineering, Decompiling or Disassembly
Licensee may not reverse engineer, decompile, or disassemble the Software, except to
the extent either of them is permitted under law or regulation of the country where
Licensee resides. Matsushita, or its distributors will not be responsible for any defects in
the Software or damage to Licensee caused by Licensee’s reverse engineering,
decompiling, or disassembly of the Software.
Article 6 Indemnification
The Software is provided “AS-IS” without warranty of any kind, either expressed or
implied, including, but not limited to, warranties of non-infringement, merchantability and/
or fitness for a particular purpose. Further, Matsushita does not warrant that the
operation of the Software will be uninterrupted or error free. Matsushita or any of its
distributors will not be liable for any damage suffered by Licensee arising from or in
connection with Licensee’s use of the Software.
Article 7 Export Control
Licensee agrees not to export or re-export to any country the Software in any form
without the appropriate export licenses under regulations of the country where Licensee
resides, if necessary.
Article 8 Termination of License
The right granted to Licensee hereunder will be automatically terminated if Licensee
contravenes of any of the terms and conditions of this Agreement. In the event, Licensee
must destroy the Software and related documentation together with all the copies thereof
at Licensee’s own expense.
2

Contents
End User License Agreement ................ 2
Information for Your Safety.................... 4
Supplied Accessories ............................ 6
Optional Accessories ............................. 6
Introduction ............................................ 6
Preparation
Controls and Components ..................... 7
Power Supply......................................... 8
Using an AC Adaptor.......................... 8
Using the Battery ................................ 8
Paper/Ink Cassette .............................. 10
Inserting the Ink Cassette .....................11
Inserting an SD Memory Card/
MultiMediaCard.................................... 12
Turning the Power ON ......................... 12
Using the Menu Screen ....................... 13
Menu Interface ................................. 13
Basic Functions
Printing Images.................................... 14
Printing Multiple Screen Shots of
Different Images................................... 16
Printing Multiple Screen Shots of
the Same Images................................. 18
Inserting a Frame Illustration and
Printing................................................. 19
Date Printing........................................ 20
Trimming.............................................. 21
Printing DPOF-set Images................... 22
Adjusting Picture Quality...................... 23
Setting LCD Monitor ............................ 24
After Use.............................................. 25
Cutting the Left and Right Sides of the
Paper After Printing ............................. 26
Connecting with your PC
System Requirements (For Printer Driver
and SD Viewer for Printer)................... 27
Installing the Printer Driver .................. 28
Installing SD Viewer for Printer............ 38
Printing a file from the PC.................... 39
Uninstalling the Printer Driver........... 41
Notes on the Printer Driver............... 41
The Status Monitor ........................... 41
To Delete the Data of the Printing
Job.................................................... 41
To Confirm the USB port .................. 42
Note for installing from the
[Add Printer Wizard] screen.............. 42
Notes on SD Viewer for Printer ........ 42
Messages for Printer Driver.............. 43
Others
Precautions ..........................................44
Ink Cassette/Paper Set Notes .......... 44
Ink Cassette Notes ........................... 44
Paper Notes...................................... 44
Before Printing.................................. 44
During Printing.................................. 44
Notes on Handling Finished Prints ... 45
Optimal Use of the Battery ............... 45
State of Power Lamp While
Charging........................................... 46
Notes on Memory Cards................... 46
About the LCD Monitor ..................... 47
Internal Temperature ........................ 47
About the setting on the menu
screen............................................... 48
Condensation ................................... 48
About Unclean Thermal Heads ........ 48
Notes on Handling the SD Mobile
Printer............................................... 49
Maintenance Notes........................... 50
Messages on the LCD Monitor............. 51
Before Requesting Service .................. 52
Specifications....................................... 54
Limited Warranty (For U.S.A. Only)...... 56
Customer Services Directory
(For U.S.A. Only)..................................58
Spanish Quick Use Guide/Guía
española para el uso rápido.................59
3
Dear Customer,
We would like to take this opportunity to
thank you for purchasing this Panasonic
SD Mobile Printer. Please read these
Operating Instructions carefully and keep
them handy for future reference.
Information for Your Safety
WARNING
TO REDUCE THE RISK OF FIRE OR
SHOCK HAZARD AND ANNOYING
INTERFERENCE, USE ONLY THE
RECOMMENDED ACCESSORIES
AND DO NOT EXPOSE THIS
EQUIPMENT TO RAIN OR
MOISTURE. DO NOT REMOVE THE
COVER (OR BACK); THERE ARE
NOT USER SERVICEABLE PARTS
INSIDE. REFER SERVICING TO
QUALIFIED SERVICE PERSONNEL.
Notice:
This product has parts that contain a
small amount of mercury. It also
contains lead in some components.
Disposal of these materials may be
regulated in your community due to
environmental considerations. For
disposal or recycling information
please contact your local authorities, or
the Electronics Industries Alliance:
<http://www.eiae.org.>
≥Do not open the Ink Cassette
Compartment Door while printing is in
progress. Your fingers could be pinched
between the thermal head arms and the
Ink Cassette.
IMPORTANT
Please respect all copyrights.
Whatever you have recorded and
created can be used for your personal
entertainment only. Under copyright
laws, other materials cannot be used
without obtaining permission from the
holders of the copyrights.
≥Please note that the actual controls and
components, etc. of your printer may
look somewhat different from those
shown in the illustrations in these
Operating Instructions.
≥Only an SD Memory card or
MultiMediaCard can be used for this
printer.
≥
SD Logo is a trademark.
:
≥Microsoft
®
and Windows® is a trademark
of Microsoft Corporation in the United
States and/or other countries.
≥The other various designations,
company names, brand names, etc. are
registered trademarks or trademarks of
the respective companies.
≥The contents or complete reproduction
or copy of these Operating Instructions
could be changed without notice.
≥The USB-IF Logos are trademarks of
Universal Serial Bus Implementers
Forum, Inc.
≥(
00) indicates the page to be
llll
referred to.
RBRC
Li-ion
A lithium ion/polymer battery that is recyclable powers the product
you have purchased. Please call 1-800-8-BATTERY for information
TM
on how to recycle this battery.
4
FCC Note: (U.S. only)
This equipment has been tested and found to comply with the limits for a Class B
digital device, pursuant to Part 15 of the FCC Rules. These limits are designed to
provide reasonable protection against harmful interference in a residential
installation. This equipment generates, uses, and can radiate radio frequency energy
and, if not installed and used in accordance with the instructions, may cause harmful
interference to radio communications. However, there is no guarantee that
interference will not occur in a particular installation. If this equipment does cause
harmful interference to radio or television reception, which can be determined by
turning the equipment off and on, the user is encouraged to try to correct the
interference by one or more of the following measures:
≥Reorient or relocate the receiving antenna.
≥Increase the separation between the equipment and receiver.
≥Connect the equipment into an outlet on a circuit different from that to which the
receiver is connected.
≥Consult the dealer or an experienced radio/TV technician for help.
FCC Caution: To assure continued compliance, follow the attached
installation instructions and use only shielded interface
cables with ferrite core when connecting to computer or
peripheral devices.
Any changes or modifications not expressly approved by the
party responsible for compliance could void the user’s
authority to operate this equipment.
Trade Name: Panasonic
Model No.: SV-P20U
Responsible party: Matsushita Electric Corporation of America One Panasonic
Way, Secaucus, NJ 07094
Support Contact: Panasonic Consumer Electronics Company
1-800-272-7033
This device complies with Part 15 of the FCC Rules. Operation is subject to the
following two conditions: (1) This device may not cause harmful interference, and (2)
this device must accept any interference received, including interference that may
cause undesired operation.
This Class B digital apparatus complies with Canadian ICES-003.
SV-P20U
5
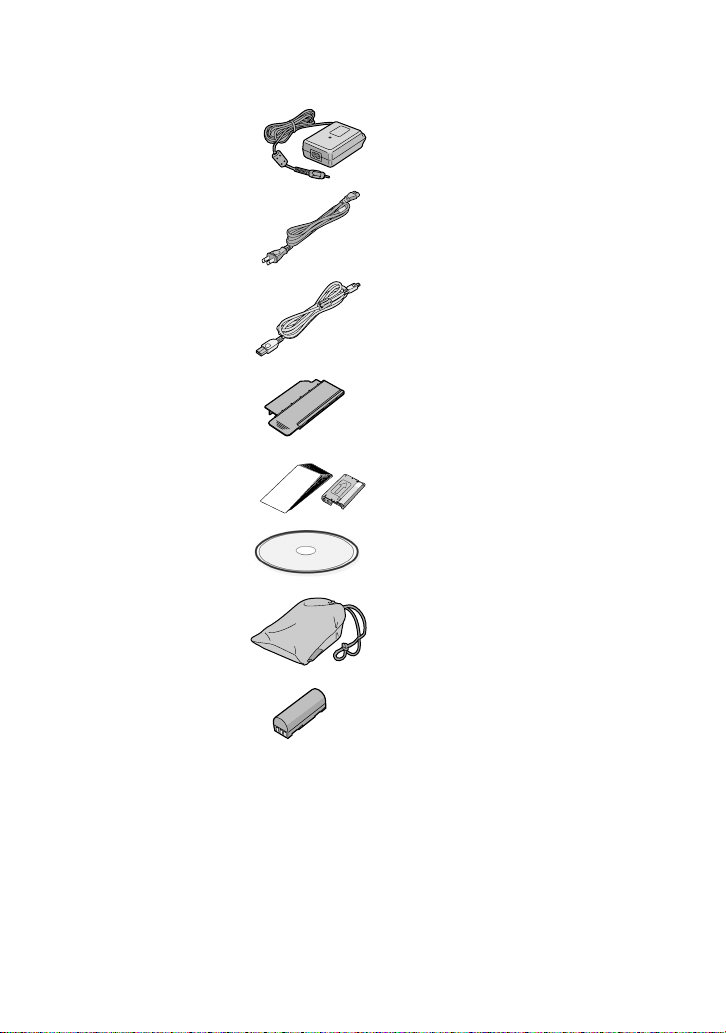
Supplied Accessories
Optional Accessories
AC Adaptor
(VSK0624)
Power Cable
(K2CA2EA00002)
USB Connection
Cable
(K2KZ4CB00002)
Head Cleaner
(VFQ0106)
Ink Cassette/Paper set
(For trial/20 sheets)
CD-ROM (Printer
Driver, SD Viewer for
Printer)(VFF0167)
Carrying Case
(RFC0069-H)
Battery Pack
(CGR-S601)
Ink Cassette/Paper set
(VW-CSA20/VW-CSASD8)
Introduction
This printer is used to print still pictures
recorded on a card taken by a digital
camera or other digital device using an
SD/MultiMediaCard.
Install the accessory printer driver on your
personal computer to use the printer with
your PC.
Battery Pack
(CGR-S603)
6
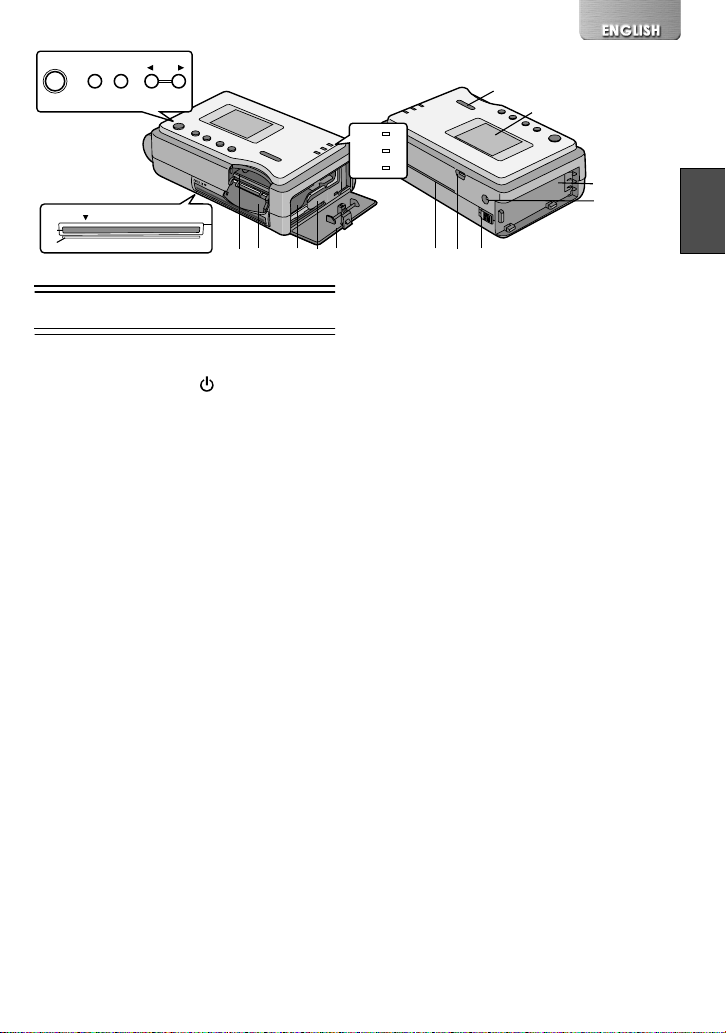
Í
MENU
DISPLAY
123 4
PAPER IN
8
9
11
10
1312
Preparation
Controls and Components
1
Power Button [ ]
Hold down (for about 2 seconds) to
turn on/off the SD Mobile Printer.
2
Menu Button [MENU]
Use this button to display the Menu
screen.
3
Display Button [DISPLAY]
Use this button to enter various
selections in the Menu screen.
Use to change the screen between a
Preview Display and an Index Display.
4
[2], [1] Button
Use these buttons to select Menu
items and images on the index screen.
5
Power Lamp [ON]
When you turn the power on, the
Power Lamp turns on.
6
Print Lamp [PRINT]
When this Lamp lights up, the printer
is ready to print.
7
Error Lamp [ERROR]
This lights when normal printing is no
longer possible because, for example,
the printing paper or ink has run out.
8
Paper Insert Slot [PAPER IN 4]
Insert a sheet of paper here.
9
Paper Exit Slot
A printed sheet of paper exits here.
18
ON
5
PRINT
6
ERROR
7
14
Do not insert a sheet of paper into this
slot. It may result in a paper jam or unit
failure.
10
Memory Card Slot
This is where the Memory Card is
inserted.
11
Memory Card Door
[SD CARD
12
Ink Cassette Insert Location
Insert the Ink Cassette.
13
Ink Cassette Eject Lever
Slide to eject the Ink Cassette.
14
Ink Cassette Compartment
17
1615
3]
Door
15
Paper Sliding Slot
This slot is the opening for sliding the
paper in and out while printing. Do not
touch the paper while printing.
16
USB Terminal [USB]
Connect the accessory USB cable
here for connection to your PC.
17
Battery Eject Lever
[BATTERY EJECT
Slide to remove the Battery.
18
Card Compartment Window
19
LCD Monitor
Menu Screen or Index screen etc. is
displayed here.
20
Battery Holder
Attach the battery here.
21
DC Input Socket [DC IN 4.9V]
Connect the AC Adapter (supplied
accessory) to supply the power.
19
2]
20
21
7
1
2
DC IN 4.9V
2
DC IN 4.9V
1
2
1
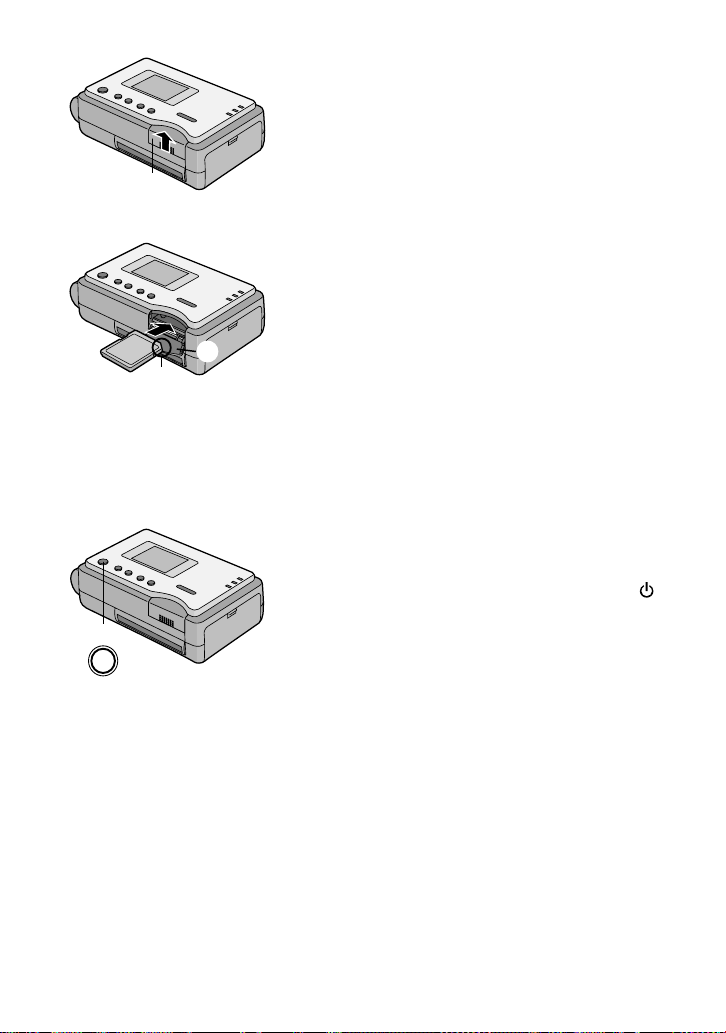
Power Supply
ª Using an AC Adaptor
1
Connect the DC Input Lead to the
[DC IN 4.9V] socket on the SD Mobile
Printer.
2
Connect the AC main Lead to the AC
Adaptor and the AC Outlet.
1
≥Hold down the Power Button [ ] for about 2
seconds, and the printer is on.
The SOCKET OUTLET SHALL BE
INSTALLED NEAR THE EQUIPMENT AND
SHALL BE EASILY ACCESSIBLE
ª
Using the Battery
Attach the Battery 1 to the Battery
1
Holder on the SD Mobile Printer 1 and
slide it forward until it locks with a
click. 2
Connect the AC mains Lead to the AC
2
Adaptor and to an AC Outlet. (Refer to
the description above.)
≥The [ON] Lamp flashes.
Leave them as above until the Power
3
Lamp [ON] goes off.
≥When recharging is completed, the
goes off.
≥Remove the AC Adaptor to use the Battery.
.
[ON] Lamp
8
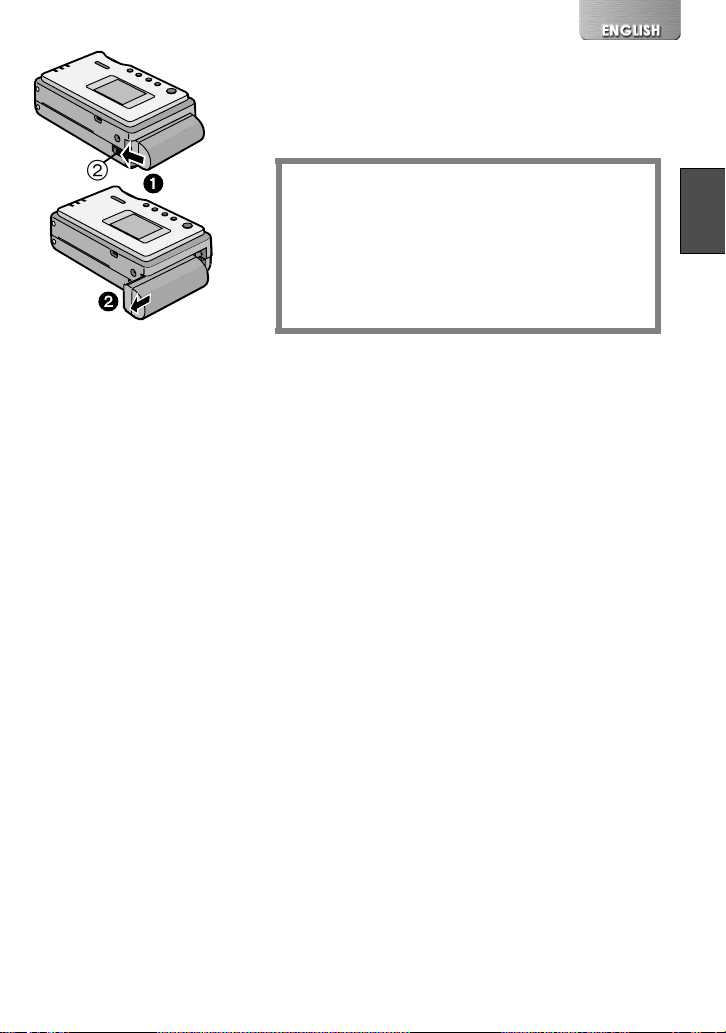
Ejecting the Battery
Slide and hold the Battery Eject Lever 2 toward
the direction shown by the arrow
battery to eject
2
.
and slide the
1
2
2
1
CAUTION
Danger of explosion if battery is incorrectly
replaced.
Replace only with the same or equivalent type
recommended by the manufacturer.
Dispose of used batteries according to the
manufacturer’s instructions.
≥When recharging, turn off the power of the printer.
≥Remove the battery if the printer is left unused for a
long time.
≥When the battery is fully charged, up to 24 sheets
can be printed in succession when the ambient
temperature is 77 degrees F/25 degrees C.
≥Typical charging time to fully charge the battery is
about 170 minutes (68 degrees F/20 degrees C and
humidity 60 %). Higher or lower ambient
temperature may cause a variation in the actual
charging time.
≥When the Power Lamp flashes more quickly or
slowly (or turns off), some abnormality may have
occurred. Refer to “State of Power Lamp While
Charging” on page 46.
9
Paper/Ink Cassette
The following Ink Cassette/Paper Sets may be used for this printer in addition to the
paper/ink cassette supplied.
Paper That Can Be Used For Printing
ª
The SD Mobile Printer can use the following types of paper. (optional)
≥Credit Card Size 2-1/8"t3-3/8"(54t86 mm) Printing Paper :
The Ink Cassette/Paper Set (VW-CSA20).
This is a set consisting of an ink cassette and 20 sheets of standard paper.
≥8 Pre-Cut Adhesive Paper*:
The Ink Cassette/Paper Set (VW-CSASD8).
This is a set of an ink cassette and 20 sheets of an over-coating type of adhesive
paper.
*All accessories may not be available in all markets.
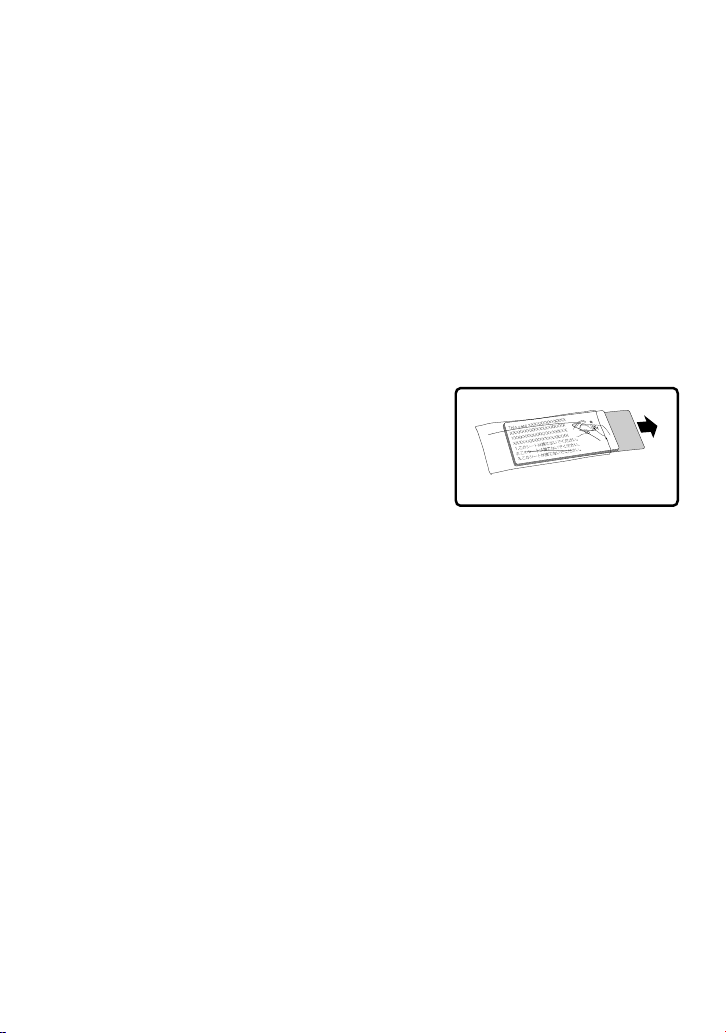
≥When taking the paper out of the package, remove
sheets one at a time in order from the bottom
sheet (opposite to the protection sheet). Then,
carefully stack the sheets by pulling them out
about 3 cm/1 inch off the package (Pay attention
not to contact the paper with the adhesive portion
.
of the package)
≥Please read the “Precautions” carefully. (llll
≥Handle the paper carefully, since surface of the paper is scratched easily.
≥Printing on paper with a flawed surface causes white patches on printed image.
≥When using adhesive paper, do not peel off the seal, otherwise, a paper jam or failure
may be caused.
≥Use the ink cassette and paper contained in the box (The Ink Cassette/Paper Set). The
ink cassette is designed to print the number of sheets contained in the Ink Cassette/
Paper Set.
≥When using adhesive paper, the picture printed may be displaced with reference to the
cutting frame.
≥Do not fold or bend the paper. Insert it into the Paper Insert Slot with the [PRINT SIDE]
facing upwards.
1
44)
1
10

1
1
Inserting the Ink Cassette
1
After removing the stopper 1, turn the
hole in the direction of the arrow to clear
any slack in the Ink Film.
2
Open Ink Cassette Compartment Door
2.
3
Push it into the direction shown by the
arrow until it clicks into place.
4
Close 2.
2
2
2
3
3,4
Ejecting the Ink Cassette
Slide the Ink Cassette Eject Lever 3 to take out
the Ink Cassette.
≥Do not touch the Ink Film in the Ink Cassette, and do
not pull it out of the cassette.
≥It is recommended that you do not pull out the Ink
Cassette before the full consumption of ink, because
the Ink Film may sag when resetting the Ink
Cassette.
≥Confirm that there is no paper and then remove or
replace the Ink Cassette.
≥Do not eject the Ink Cassette during printing.
≥Close the Ink Cassette Compartment Door during
printing.
≥After removing the Ink Cassette, pack it back into its
original case.
11
1
1
Inserting an SD Memory Card/ MultiMediaCard
1
Slide the Memory Card Door 1, and flip it
to open.
2
Hold the Memory Card placing the cut off
1
1
2
2,3
corner 2 at the front with the label facing
up, and then insert it fully into the
Memory Card Slot horizontally.
≥When inserted correctly, a clicking noise will be
heard.
3
Close the Memory Card Door 1.
≥After inserting the Memory Card, reverse the
procedure in step 1 to close the Memory Card
Door.
≥The actual time to read all the images from the
Memory Card will vary, depending on the number
and size of the photos.
≥While the [CARD ACCESS] sign is being displayed
in red, never take the card out or turn the power off.
≥If images cannot be recognized by this printer, “t” is
displayed on the index screen.
Turning the Power ON
Install the battery or plug in the AC
1
adaptor (llll 8) and hold down the [ ]
button for about 2 seconds.
Í
≥The [ON] Lamp is turned on.
≥The LCD monitor is turned on 2 seconds after
turning on the [ON] Lamp.
≥The [CARD ACCESS] sign is displayed in red
while the images in the Memory Card are being
read.
≥If no operation is performed with the printer for
about 10 minutes (about 5 minutes when the
Memory Card inserted into the Printer contains
no images) when using the battery, it
automatically turns off the power. (llll
44)
12

2
3
4
5
MENU
DISPLAY
MENU 1/2
Print style
Number of copies
Date print
DPOF
OK SETSELECT
MENU
DISPLAY
MENU 1/2
Print style
Number of copies
Date print
DPOF
OK SETSELECT
MENU
DISPLAY
MENU
DISPLAY
MENU 1/2
Print style
Number of copies
Date print
DPOF
OK SETSELECT
Standard
1
OFF
PRINT
Standard
2
OFF
PRINT
Standard
1
OFF
PRINT
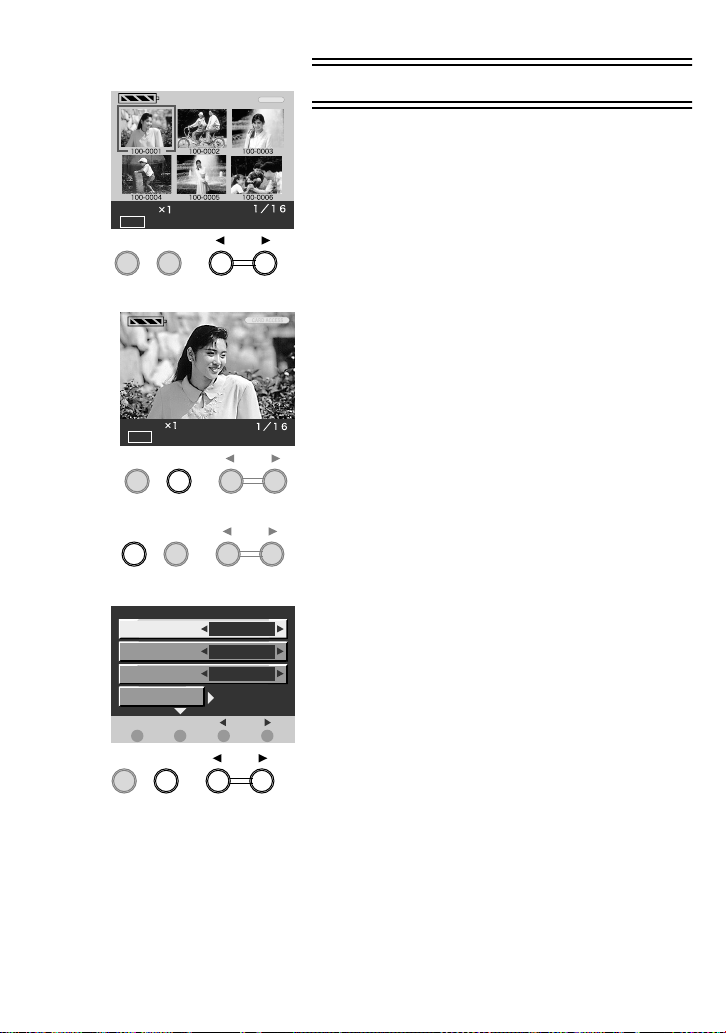
Using the Menu Screen
Use the Menu Mode as follows.
1
Turn the printer on. (llll 12)
2
Press the [MENU] button.
≥The Menu screen is displayed.
3
Press the [DISPLAY] button to select the
item to be set.
≥With each press of the [DISPLAY] button, the
next item is highlighted.
4
Press the [21] button to set the
selected item to a desired mode.
≥When adjusting the quality of printed images or
LCD monitor, press [1] to display the setting
screen. (l 23, 24)
5
Press the [MENU] button.
≥The setting selected on the Menu screen will be
cancelled when the printer is turned off.
ª
Menu Interface
1 Print style (llll 14)
2 Number of copies (llll 15)
3 Date print (llll 20)
4 DPOF (llll 22)
5 Frame (llll 19)
6 Trimming (llll 21)
7 Picture (llll 23)
8 LCD (llll 24)
MENU 2/2
Frame
Trimming
Picture
LCD
OK SETSELECT
ON
ADJUST
ADJUST
13
2
3
4
5
Standard
Date
MENU
DISPLAY
Standard
Date
MENU
DISPLAY
MENU
DISPLAY
MENU 1/2
Print style
Number of copies
Date print
DPOF
OK SETSELECT
DISPLAY:Print this picture.
Insert paper to print.
Standard
1
OFF
PRINT
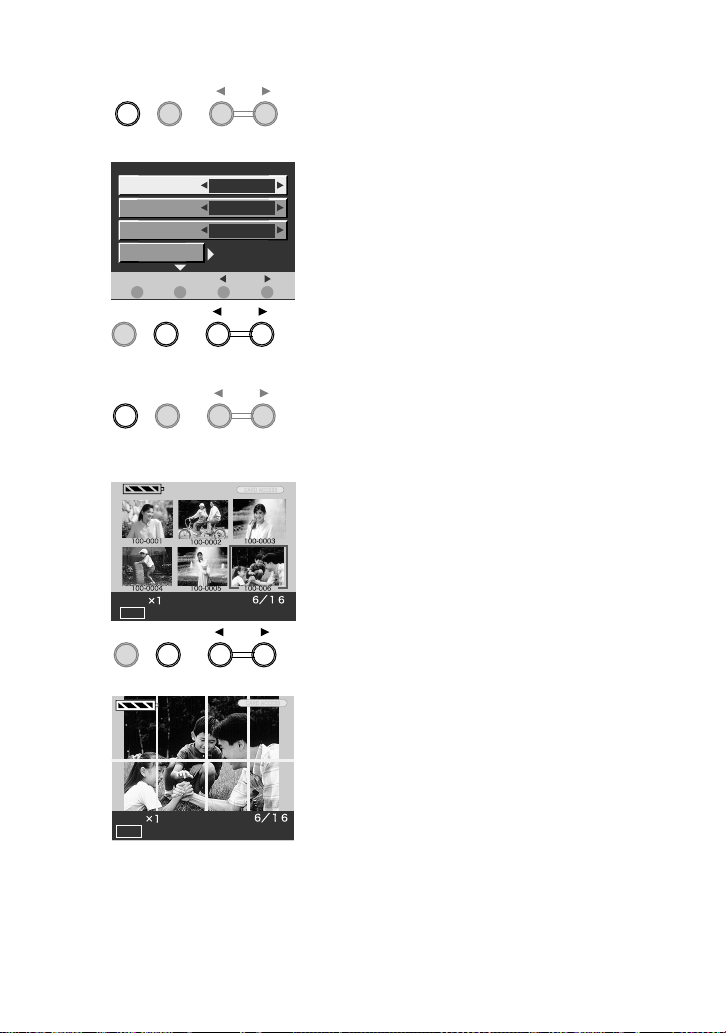
Basic Functions
Printing Images
1
Insert a Memory Card, and Turn on the
(
Printer.
≥The Index picture screen is displayed.
2
Press the [21] button to select a
desired image.
≥Each time the button is pressed, the next image
is framed by a blue line.
≥When 7 or more images are recorded on a card,
pressing the [21] button will move the screen
forward/backward the screen.
3
Press the [DISPLAY] button.
≥The preview image is displayed. (Each time the
[DISPLAY] button is held down, the preview
image switches to the Index screen and vice
versa.)
≥If you wish to print the previewed image as is,
proceed to Step 8.
4
Press the [MENU] button.
≥The Menu screen is displayed.
5
Press the [DISPLAY] button to select
[Print style] and press the [
to set it to a desired mode.
[Standard]: Prints an image
[Copy 8]: Prints 8 screen shots of the
[Select 8]: Prints 8 screen shots of the
12)
llll
21] button
same picture. (l 18)
different pictures. (l 16)
14
MENU
DISPLAY
6
7
8
MENU 1/2
Print style
Number of copies
Date print
DPOF
OK SETSELECT
MENU
DISPLAY
Standard
Date
MENU
DISPLAY
Standard
1
OFF
PRINT
Insert paper to print.
Press the [DISPLAY] button to select
6
[Number of copies] and press the [
button to set the number of the print.
Press the [MENU] button.
7
≥The preview image is displayed.
Insert a sheet of paper with the [PRINT
8
SIDE ] upward into the [PAPER IN
(Upper slot) 1.
≥Make sure the paper is fed into the [PAPER
IN 4] slot on the unit. The Paper will then start
to print. (If the Paper is not fed, push paper
lightly to begin paper feed process.)
≥The LCD monitor is turned off during the
printing operation. (l 24)
≥The paper is moved forward and backward
several times and exits from the Paper Exit Slot.
The printed paper is then ready to be removed
from the Paper Exit Slot
2
.
≥Do not insert the paper into the Paper Exit Slot
because this may result in a paper jam or a unit
failure.
After completion of the printing, pull out
9
the printed paper horizontally.
21]
4] slot
9
PAPER IN
15

2
3
MENU
DISPLAY
MENU 1/2
Print style
Number of copies
Date print
DPOF
OK SETSELECT
MENU
DISPLAY
Select 8
OFF
PRINT
≥After the image is finished printing, a message will
be displayed to feed in the next sheet of paper.
≥Do not touch the paper during printing.
≥Do not open the Ink Cassette Compartment Door
during printing.
≥When the printer stops during printing, refer to
“Internal Temperature“ page 47.
≥Please read the “Precautions” carefully. (
44)
llll
≥If the [ON] Lamp flashes, the battery will run down
shortly. Recharge the battery or connect the AC
adaptor.
≥If messages are displayed, refer to “Messages on
the LCD Monitor” on page 51.
≥Since the paper slides forward and back during
printing, keep a gap of at least 10 cm/4 inch or more
around the printer during the print process.
Printing Multiple Screen Shots of Different Images
This printer can divide the screen into 8, and print
multiple screen shots of different images.
1
Insert a Memory Card, and Turn on the
Printer.
≥The Index picture screen is displayed.
2
1
Press the [MENU] button.
≥The Menu screen is displayed.
3
Press the [DISPLAY] button to select
[Print style] and press the [
to set it to [Select 8].
(
12)
llll
21] button
16
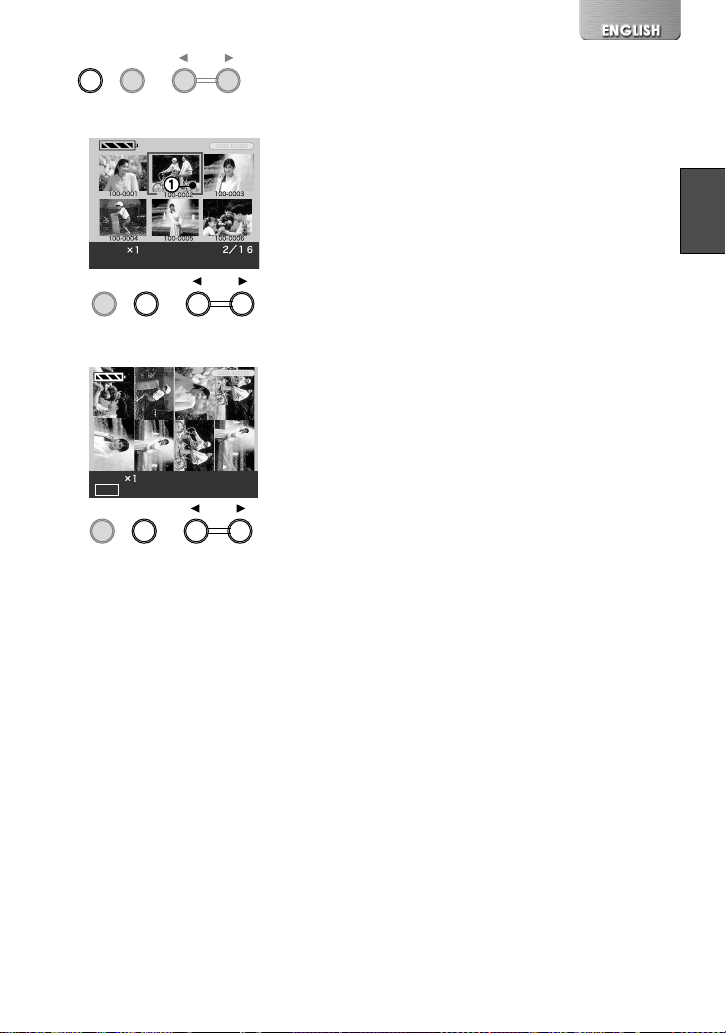
4
5
6
MENU
DISPLAY
Select8
Select 7 pictures by [DISPLAY].
MENU
DISPLAY
Select8
Date
MENU
DISPLAY
DISPLAY:Reselect
Insert paper to print.
Press the [MENU] button.
4
Press the [21] button to select a image
5
and press the [DISPLAY] button.
≥The selected image is marked with [¥]
the bottom-right corner of it.
Repeat step 5 and select 8 images.
6
≥After selecting 8 images, the preview image is
displayed.
≥Images are arranged in the order selected (in
the order they were marked).
Insert a sheet of paper. (llll 15)
7
≥Use of the Ink Cassette/Paper Set
(VW-CSASD8)* is recommended.
*All accessories may not be available in all markets.
≥When using adhessive paper, the picture printed
may be displaced with reference to the cutting
frame.
≥Even if you select 7 images or less, multiple screen
shots of different images can be printed. On
inserting a sheet of paper, the index picture screen
switches to the preview image and the image is
printed.
≥Select eight images, then print them. If you print
seven images or less, the blank space cannot be
used for additional printing.
≥NOTE: The date will not be printed, even if the
date feature is selected.
1
on
17
2
MENU
DISPLAY
Printing Multiple Screen Shots of the Same Images
This printer can divide the screen into 8, and print
multiple screen shots of the same images.
3
4
5
MENU 1/2
Print style
Number of copies
Date print
DPOF
OK SETSELECT
MENU
DISPLAY
MENU
DISPLAY
Copy8
Date
DISPLAY:Print this picture.
MENU
DISPLAY
Copy 8
OFF
PRINT
1
Insert a Memory Card, and Turn on the
1
Printer.
≥The Index picture screen is displayed.
2
Press the [MENU] button.
(
12)
llll
≥The Menu screen is displayed.
3
Press the [DISPLAY] button to select
[Print style] and press the [
21] button
to set it to [Copy 8].
4
Press the [MENU] button.
5
Press the [21] button to select a
desired image and press the [DISPLAY]
button.
≥The preview image is displayed.
6
Insert a sheet of paper. (llll 15)
≥Use of the Ink Cassette/Paper Set
(VW-CSASD8)* is recommended.
*All accessories may not be available in all markets.
≥When using adhesive paper, the picture printed may
be displaced with reference to the cutting frame.
≥NOTE: The date will not be printed, even if the
date feature is selected.
18
Copy8
Date
Insert paper to print.

2
MENU 2/2
Frame
Trimming
Picture
LCD
OK SETSELECT
MENU
Standard
Date
DISPLAY
Insert paper to print.
ON
ADJUST
ADJUST
Inserting a Frame Illustration and Printing
You can insert illustrations stored in this printer into
the image and print it.
1
Proceed to steps 1 through to 4 on
page 14.
≥The Menu screen is displayed.
2
Press the [DISPLAY] button to select
[Frame] and press the [
select a desired illustration.
≥After selecting the frame illustration, press the
[MENU] button.
3
Insert a sheet of paper. (llll 15)
≥The image with the frame illustrations are
printed.
≥NOTE: The date will not be printed, even if the
date feature is selected.
≥When [Copy 8] is selected, 8 images with frame
illustration are printed. When [Select 8] is selected,
a frame illustration is printed around the whole (8)
images.
≥When the frame illustration is selected, border areas
of the image are cut off.
21] button to
19

2
MENU 1/2
Print style
Number of copies
Date print
DPOF
OK SETSELECT
MENU
DISPLAY
Standard
Date
Standard
1
ON
PRINT
Insert paper to print.
Date Printing
You can print images with the date of recording
superimposed.
1
Proceed to steps 1 through to 4 on
page 14.
≥The Menu screen is displayed.
2
Press the [DISPLAY] button to select
[Date print] and press the [
set to [ON].
≥After setting, press the [MENU] button.
3
Insert a sheet of paper. (llll 15)
≥The [Date]
≥The image is printed with the recorded date in
the lower right corner.
≥If images have been saved or edited on the PC, the
date saved or edited will be printed.
≥The date is not printed when [Copy 8], [Select 8] or
[Frame] is selected.
mark turns to green.
1
2 1] button to
20

2,3
MENU 2/2
Frame
Trimming
Picture
LCD
OK SETSELECT
MENU
DISPLAY
No frame
ON
ADJUST
ADJUST
Trimming
This printer can trim the horizontal or vertical edges of
an image and stretch it so that the image fills up the
entire print space.
1
Proceed to steps 1 through to 4 on
page 14.
≥The Menu screen is displayed.
2
Press the [DISPLAY] button to select
[Trimming] and press the [
set to [ON].
≥After setting, press the [MENU] button.
3
Insert a sheet of paper. (llll 15)
≥The image is trimmed and printed.
(If [Trimming] is turned [OFF], a blank space will
2
)
remain.
21] button to
1
21

2
MENU 1/2
Print style
Number of copies
Date print
DPOF
OK PRINTSELECT
MENU
DISPLAY
Standard
1
ON
PRINT
Printing DPOF-set Images
Images marked with the DPOF option of a digital
camera or SD video devices will be printed
automatically. (“DPOF”: Digital Print Order Format; a
feature that allows the user to mark photos that they
wish to print. This feature is usually offered by digital
cameras or other SD video devices.)
1
Proceed to steps 1 and 4 on page 14.
≥The Menu screen is displayed.
2
Press the [DISPLAY] button to select
[DPOF] and press the [
3
Insert a sheet of paper. (llll 15)
≥Setting the print count in [Number of copies] will
have no effect. Only the DPOF configured print
count will be printed.
≥If 100 or more copies are set to be printed on the
DPOF settings, only 99 will be printed.
≥The SD Mobile Printer cannot configure DPOF.
≥When [Print style] is set to [Select 8], DPOF-set
images are selected automatically and printed.
≥ The date will not be printed, even if the printer’s
date function is activated. (The DPOF-set date will
be printed.)
1] button.
22

1
2
3,4
MENU
MENU 2/2
Frame
Trimming
Picture
LCD
OK ADJUSTSELECT
MENU
BRIGHTNESS
OK SETSELECT
MENU
DISPLAY
DISPLAY
DISPLAY
No frame
ON
ADJUST
ADJUST
Adjusting Picture Quality
1
Select the image you wish to adjust and
press the [MENU] button.
≥The Menu screen is displayed.
2
Press the [DISPLAY] button to select
[Picture] and press the [
≥The adjusting screen is displayed.
3
Press the [DISPLAY] button to select the
item to be adjusted.
[COLOR-LEVEL]: Adjusts the depth of the color.
[TINT]: Adjusts the tint of the color.
[BRIGHTNESS]: Clarify dark portions.
[CONTRAST]: Adjust picture brightness and
[SHARPNESS]: Sharpen outline.
4
Press the [2 1] button to adjust the
shade.
level.
5
Press the [MENU] button twice.
≥Adjustment on the LCD monitor is approximate.
≥We recommend adjusting picture quality when you
use this printer.
≥When adjusting the depth of the color on [COLOR
LEVEL], some colors may become darker when
printed.
≥Adjusting [SHARPNESS] cannot be checked on the
LCD monitor and only is noted on Print.
1] button.
5
MENU
DISPLAY
23

1
2
3,4
5
MENU
MENU 2/2
Frame
Trimming
Picture
LCD
OK ADJUSTSELECT
MENU
BRIGHTNESS
OK SETSELECT
MENU
DISPLAY
MENU
DISPLAY
DISPLAY
DISPLAY
No frame
ON
ADJUST
ADJUST
Setting LCD Monitor
1
Select an image and press the [MENU]
button.
≥The Menu screen is displayed.
2
Press the [DISPLAY] button to select
[LCD] and press the [
≥ The adjusting screen is displayed.
3
Press the [DISPLAY] button to select the
item to be adjusted.
[COLOR-LEVEL]: Adjusts the depth of the color.
[BRIGHTNESS]: Clarifies dark portions.
[SCREEN SAVER]: If this is turned [ON], the
[UNDER PRINT]: If this is turned [ON], the LCD
4
Press the [2 1] button to adjust the
level.
5
Press the [MENU] button twice.
≥LCD Monitor adjustments will have no effect on print
quality.
≥Adjust the LCD monitor if the visibility of the LCD
monitor is low.
≥The LCD monitor may not be seen clearly from a
certain angle.
≥Before printing it is advised that all LCD settings
should be set to the factory default settings. This will
give the most accurate representation of what the
print will look like.
1] button.
screen saver will be activated
when this printer is inactive
for approx. 30 minutes.
monitor stays ON while
images are being printed.
(This setting is disabled when
this printer is running on the
battery.)
24

1
2
After Use
1
Hold down the Power Button [ ] for
about 2 seconds.
≥Turn off the SD Mobile Printer.
2
Open the Memory Card Door 1 and push
Í
the edge of the Memory Card 2.
≥Pull out the Memory Card.
3
Put the Printer into the Carrying Case.
1
25

1
2
Cutting the Left and Right Sides of the Paper After Printing
1
Fold in both directions along the
perforation lines.
2
Tear along the perforation lines.
≥There are perforation lines on both ends of the
paper. Be sure to tear off both sides.
26

Connecting with your PC
System Requirements (For Printer Driver and SD Viewer for Printer)
Compatible machines:
®
PC/AT compatible personal computer with: Microsoft® Windows® XP Home Edition
IBM
/Professional, Windows
Edition pre-installed.
CPU:
®
Pentium® II/ Celeron
Intel
Graphic display:
High Color (16 bit) with a minimum resolution of 800 k600.
Installed memory:
64 MB or more (128 MB or more recommended)
128 MB or more for Windows XP (256 MB or more recommended)
Free hard disk space: At least 200 MB
Disk drive:
Interface:
CD-ROM drive
USB terminal (Up to 12 Mbps)
Other requirements: Pointing devices such as mouse or equivalent to Mouse
≥While every attempt is made to create software that will operate properly in most PC’s,
previously installed software and unique hardware in the PC may occasionally cause
an operating problem.
≥Use the supplied AC adapter when using this printer connecting with your PC.
≥Remove the memory card when using this printer as the printer for your PC.
≥If two or more USB devices are connected to the personal computer, normal operation
is not guaranteed.
≥When connecting to a PC use the USB cable supplied. A USB extension cable cannot
be used.
≥When connecting to a PC with USB Hub, normal operation is not guaranteed.
≥The names of the products you are using may differ from the names given in the text.
Depending on the operating environment and other factors, the contents of the screens
used in these instructions may not necessarily match what you will see on your screen.
≥Although the screens in these Operating Instructions are shown in English for the sake
of example, other languages are supported as well.
≥When the Printer Driver is installed on your PC for the first time, the USB port cannot
be selected in the selection stage for the port, because the USB port is not set. (l 42)
≥When the printer Driver is installed, the Windows’CD-ROM could be required
depending on the operating environment of your PC.
®
Me, Windows® 2000 Professional or Windows® 98 Second
TM
500 MHz or later (including compatible CPU)
27

3
4
5
USB
Installing the Printer Driver
Installing this printer driver allows the Printer to be
used as a full-color printer.
For Windows XP
1
Turn on the PC and insert the supplied
CD-ROM into the CD-ROM drive.
2
Turn on the Printer. (llll 12)
3
Connect the Printer to the PC using
auxiliary USB cable.
≥The [Found New Hardware Wizard] screen
appears.
4
Click the [Next] Button.
≥Confirm that the item [Install the software
automatically] is selected.
5
Click the [Finish] Button when the Printer
Driver Software is detected.
≥The driver setup is completed.
≥When the Printer Driver Software is not
detected, please refer to page 32.
≥Please read also the “Notes on the Printer
Driver” (llll
41)
carefully.
28

3
For Windows Me
4,6
5
7
USB
Turn on the PC and insert the supplied
1
CD-ROM into the CD-ROM drive.
Turn on the Printer. (llll 12)
2
Connect the Printer to the PC using
3
auxiliary USB cable.
≥The [Add New Hardware Wizard] screen
appears.
≥Depending on your PC, step 4 and 5 may be
skipped. If this is the case, proceed from step 6.
Click the [Next] Button.
4
Click the [Finish] Button when the Printer
5
Driver Software is detected.
≥[Add New Hardware Wizard] screen appears
again.
Click the [Next] Button.
6
Select [No] when the [Add Printer
7
Wizard] screen appears.
≥If a screen to select the default printer is
displayed, select [Yes] if it is to be the default
printer.
≥The item for selecting the default printer may not
be displayed depending on the environment of
the PC.
≥After clicking [Finish], the message [File
*****.DLL is not found] can be displayed
depending on the environment of the PC. Many
PCs may install this file on the Hard Disk. Click
[Refer] and select [C:\windows\option\cabs].
Click the [Finish] Button.
8
≥The driver setup is completed.
8
≥When the Printer Driver Software is not detected,
please refer to page 34.
≥Please read also the “Notes on the Printer Driver“
(
41)
llll
carefully.
29

3
4
5
6
USB
Installing the Printer Driver
(Cont.)
For Windows 98SE/2000
1
Turn on the PC and insert the supplied
CD-ROM into the CD-ROM drive.
2
Turn on the Printer. (llll 12)
3
Connect the Printer to the PC using
auxiliary USB cable.
≥The [Add (Found) New Hardware Wizard]
screen appears.
≥If the [Add (Found) New Hardware Wizard]
screen does not appear, please refer to page
34, 36.
≥Depending on your PC environment, steps 4 to
8 may be skipped. If this is the case, proceed
from step 9.
4
Click the [Next] Button.
≥The [Add (Found) New Hardware Wizard]
screen appears.
5
Click the [Next] Button.
≥Confirm whether your device is configured to the
optimal driver detection setting.
6
Check the location to be specified and
enter the path as “D:\Win9X-ME” if your
system is Windows 98SE. Enter the path
as “D:\Win2K-XP” if your system is
Windows 2000 (example of D drive
assigned as CD-ROM drive).
30

7
8
9
Click the [Next] Button.
7
≥Re-click the [Next] Button when the search
confirmation screen appears.
≥The message [File *****.DLL is not found] can
be displayed depending on the environment of
PC. Many PCs may install this file on the Hard
Disk. Click [Refer] and select
[C:\windows\option\cabs].
≥If your system is Windows 2000, proceed to
step 13.
Click the [Finish] Button.
8
[Add New Hardware Wizard] screen
9
appears again. Click the [Cancel] Button.
Restart the computer.
10
[Add New Hardware Wizard] screen
11
appears again. Repeat the steps from 4
through 7.
Select [No] when the [Add Printer
12
Wizard] screen appears.
≥Select [Yes] to set as the default printer.
≥The item for selecting the default printer may not
be displayed depending on the environment of
the PC.
Click the [Finish] Button.
13
≥The driver setup is completed.
11
12,13
≥When the Printer Driver Software is not detected,
please refer to page 34, 36.
≥Please read also the “Notes on the Printer Driver”
(
41)
llll
carefully.
≥When installation is not finished correctly or the
message is displayed, refer to [Readme.txt] file in
the supplied CD-ROM.
31

5
6,7
8,9
10
Installing the Printer Driver
(Cont.)
If the [Found New Hardware Wizard] screen does not
appear, install with the following steps.
Installing from the [Add Printer Wizard]
screen (Windows XP)
1
Before installation, check that all
applications have exited.
2
Connect the printer to your PC with a
USB cable and turn on the printer.
3
Select [Start] >> [Printers and Faxes].
[Printers and Faxes] may not be present
on some PCs. In this case, select [Start]
>> [Control Panel] >>( [Printers and
Other Hardware] >>) [Printers and
Faxes].
4
Select [Add a printer] from [Printer
Tasks].
5
When the [Add Printer Wizard] is
activated, click [Next].
6
Select [Local printer attached to this
computer] and deselect [Automatically
detect and install my Plug and Play
printer].
7
Click [Next].
8
Select [Use the following port] and select
the port through which the Printer is
connected from the pull-down menu.
≥Select only the [USB00X] port. (e.g. USB001).
9
Click [Next].
10
Click [Have Disk].
32

11,12
13
14
15
Select the folder where the Printer Driver
11
is located.
≥If the CD-ROM drive is assigned to the D drive,
select [D:\Win2K-XP] folder.
Click [OK].
12
Check that [Panasonic SV-P20] is
13
displayed and click [Next].
Click [Next].
14
≥If a screen to select the default printer is
displayed, select [Yes] if it is to be the default
printer.
≥If the screen to select whether the printer is
shared or not is displayed, select [This Printer is
not Shared], if the printer is not shared and click
[Next].
If a screen asking you to execute a test
15
print is displayed during installation,
select [No], and click [Next].
Click [Finish].
16
≥The installation is now completed.
16
33

3
Installing the Printer Driver
(Cont.)
If the [Add New Hardware Wizard] screen does not
appear, install with the following steps.
4
5
6
7
Installing from the [Add Printer Wizard]
screen (Windows 98SE/Me)
1
Before installation, check that all
applications have exited.
2
Connect the printer to your PC with a
USB cable and turn on the printer.
3
Select [Start] >> [Settings] >> [Printers].
4
Double-click the [Add Printer] icon.
5
When the [Add Printer Wizard] is
activated, click [Next].
6
Select [Local Printer] and click [Next].
7
Click [Have Disk].
8
Select the folder where the Printer Driver
is located.
≥If the CD-ROM drive is assigned to the D drive,
select [D:\Win9X-Me] folder.
9
Click [OK].
34
8,9

10
11
12
Check that [Panasonic SV-P20] is
10
displayed and click [Next].
Select the USB port through which the
11
Printer is connected and click [Next].
≥Select only the [USB00X] port. (e.g. USB001).
Click [Finish].
12
≥If a screen to select the default printer is
displayed, select [Yes] if it is to be the default
printer.
≥If a screen asking you whether a test print is
executed or not is displayed during installation,
select [No].
≥The installation is now completed.
35

3
4
5
6,7
8,9
Installing the Printer Driver
(Cont.)
If the [Found New Hardware Wizard] screen does not
appear, install with the following steps.
Installing from the [Add Printer Wizard]
screen (Windows 2000)
1
Before installation, check that all
applications have exited.
2
Connect the printer to your PC with a
USB cable and turn on the printer.
3
Select [Start] >> [Settings] >> [Printers].
4
Double-click the [Add Printer] icon.
5
When the [Add Printer Wizard] is
activated, click [Next].
6
Select [Local Printer] and deselect
[Automatically detect and install my Plug
and Play printer].
7
Click [Next].
8
Select [Use the following port] and select
the port through which the Printer is
connected in the adjacent list.
≥Select only the [USB00X] port. (e.g. USB001).
9
Click [Next].
10
Click [Have Disk].
36
10

11,12
13
14
15
Select the folder where the Printer Driver
11
is located.
≥If the CD-ROM drive is assigned to the D drive,
select [D:\Win2K-XP] folder.
Click [OK].
12
Check that [Panasonic SV-P20] is
13
displayed and click [Next].
Click [Next].
14
≥If a screen to select the default printer is
displayed, select [Yes] if it is to be the default
printer.
≥If the screen to select the whether the printer is
shared or not is displayed, select [This Printer is
not Shared], if the printer is not shared and click
[Next].
If a screen asking you whether a test
15
print is executed or not is displayed
during installation, select [No], and click
[Next].
Click [Finish].
16
≥The installation is now completed.
16
37

1
2
3
4
Installing SD Viewer for Printer
1
Insert the supplied CD-ROM into the CDROM drive and double-click the
[SD Viewer].
2
Double-click the [Setup.exe].
≥The install screen is displayed.
3
Click [Next].
≥After reading the displayed contents, please
carry out the installation according to
instructions.
4
Read the License Agreement and click
[I agree].
5
Complete the setup according to the
message.
≥Installation will be completed.
≥The SD Viewer for Printer is available in English,
German and French.
≥Please read the PDF-based instructions for how to
use the SD Viewer for Printer.
≥To view the installed operating instructions, Adobe
Acrobat Reader 4.0 or higher is required. Please
install Adobe Acrobat Reader 5.0 from the supplied
CD-ROM.
≥Before using for the first time, select [Readme] from
[Start] >> [(All) Programs] >> [Panasonic] >>
[SD Viewer for Printer], and read any supplementary
details or updates.
≥Please read [Readme.txt] before starting to use.
38
5

1
2,3
4
5,8
6
Printing a file from the PC
You can print an image with the SD Viewer for Printer.
For details, please refer to the PDF-based
instructions for how to use the SD Viewer for Printer.
1
Click [Start] >> [Program (All Programs)]
>> [Panasonic] >> [SD Viewer for Printer]
>> [SD Viewer for Printer].
≥[SD Viewer for Printer] starts.
2
Click the folder saving the picture from
the explorer.
≥The thumbnails are displayed.
≥When restarting, the pictures in the folder
selected last are displayed after finishing
[SD Viewer for Printer].
3
Click the pictures.
≥The selected pictures are surrounded with a
blue line.
4
Click [File] >> [Print].
5
Click
6
Select [Panasonic SV-P20].
≥The setting screen and name of printer
displayed are different depending on OS.
7
Set the kind of paper. (llll 40)
8
Click [Print].
9
Click [Yes].
10
Insert a sheet of paper. (llll 15)
≥When [Panasonic SV-P20-USB00X]
displayed, insert a sheet of paper.
to open detail setting.
1
is
9
≥If a Memory Card is inserted into the Printer, images
on the Memory Card are displayed. However, if an
image is printed from the PC, the image from the PC
will be printed, not the one from the Memory Card.
1
39

1
Printing a file from the computer
(Cont.)
If you click [Properties] in Step 6 on the previous
page, the Advanced setting screen will open to allow
you to set the paper, number of multiples, etc.
Click [OK] after setting, and the display will revert
back to the [Properties] screen. (Click [OK] again, and
the display will revert back to the print preview
screen.)
2
3
1,2
For Windows XP/2000
1
Click [Layout] tab and select the printing
direction.
2
Click [Advanced]
3
Select the kind of paper.
For Windows 98SE/Me
Click [Paper] tab and select the kind of
1
paper.
Select the printing direction.
2
≥An image may be larger than the defined printing
area or may be printed on two or more pages when
using some applications. Adjust the paper size or
paper setting in your application software.
40

ª Uninstalling the Printer Driver
For Windows XP:
To uninstall the driver, log into the
computer with a user name having
administrator or equivalent privileges.
1 Select [Start]>> [Printers and Faxes].
[Printers and Faxes] may not be present
on some personal computers.
In this case, select [Start]>> [Control
Panel]>> ([Printers and Other Hardware]
>>) [Printers and Faxes].
2 Right-click [Panasonic SV-P20] and
select [Delete].
3 [Are you sure you want to delete the
printer 'Panasonic SV-P20'?] appears.
Click [Yes].
This will uninstall the Printer Driver.
For Windows 98SE/Me:
1 Select [Start]>> [Settings]>>
[Printers].
2 Right-click [Panasonic SV-P20] and
select [Delete].
3 [Are you sure you want to delete the
printer 'Panasonic SV-P20'?] appears.
Click [Yes].
4 [Some files were used only for this
printer and are no longer needed.
Would you like to delete these files
now?] appears. Click [Yes].
If you select [No], the printer driver will
not be uninstalled completely. In this
case, turn ON the printer, and the driver
will be automatically installed in Plug
and Play mode. Then, uninstall the
driver again. This will uninstall the
Printer Driver.
For Windows 2000:
To uninstall the driver, log into the
computer with a user name having
Administrator or equivalent privileges.
1 Select [Start] >> [Settings] >>
[Printer].
2 Right-click [Panasonic SV-P20] and
select [Delete].
3 [Are you sure you want to delete the
printer 'Panasonic SV-P20'?] appears.
Click [Yes].
This will uninstall the Printer Driver.
Notes on the Printer Driver
ª
≥If your system is Windows XP or
Windows 2000, log on with the user
name of [Administrator (administrator of
your PC)] (or any user name having an
equivalent right to the administrator) and
then start to install.
≥Use the default setting (ICM (Image
Color Management)Disabled) for the
“ICM Method”. If you use any other
settings, the image may be printed with
an undesired brightness (for Windows
XP/2000 only). For detailed information,
refer to the [readme.txt] file in the CDROM.
ª
The Status Monitor
In some cases as indicated below, the
status monitor may not appear during
printing.
≥When the application is displayed on the
full screen or when you operate the
application during printing, the status
monitor may not be displayed. Click
[Panasonic SV-P20 USB0…] in the task
bar to display it.
≥The printer may not be connected or the
other printer may be selected. Confirm
the connection of the printer.
≥If you switch to another user in “Switch
User” on Windows XP and print data, the
status monitor may not present on the
screen for the user who switched. In this
case, the status monitor may be present
on the screen for the user to whom it was
switched to.
To Delete the Data of the
ª
Printing Job
If the old data is printed, printing data may
be left in the spool of the printer. Delete
the unnecessary data of the printing job.
41

To delete the data of the printing job, log
into the computer with a user name having
Administrator or equivalent privileges.
[For Windows XP]
≥Select [Start] >> [Printers and Faxes].
[Printers and Faxes] may not be present
on some PCs. In this case, select [Start]
>> [Control Panel] >>( [Printers and
Other Hardware] >>) [Printers and
Faxes].
≥Double-click this Printer’s icon, so the
window will be displayed. Select [Cancel
All Documents] from the [Printer] on the
menu bar in the window.
[For Windows 2000]
≥Select [Start] >> [Settings] >> [Printers]
and double-click this Printer’s icon, so
the window will be displayed.
≥Select [Cancel All Documents] from the
[Printer] on the menu bar in the window.
[For Windows 98SE/Me]
≥Select [Start] >> [Settings] >> [Printers]
and double-click this Printer’s icon, so
the window will be displayed.
≥Select [Cancel Printing Documents] from
the [Printer] on the menu bar in the
window.
ª
To Confirm the USB port
If the message [USB port cannot be
detected] is displayed when starting to
print, the usable USB port cannot be
selected. The USB port is displayed
[USB00X] such as [USB001] or [USB002].
Confirm it.
[For Windows XP]
≥Select [Start] >> [Printers and Faxes].
[Printers and Faxes] may not be present
on some PCs. In this case, select [Start]
>> [Control Panel] >> [Printers and Other
Hardware] >> [Printers and Faxes].
≥Open the properties of this Printer and
select USB port in the [Ports] tab.
42
≥Open the properties of this Printer and
select [Enable bidirectional support] in
the [Ports] tab.
[For Windows 2000]
≥Open the properties of this Printer and
select USB port in the [Ports] tab.
≥Open the properties of this Printer and
select [Enable bidirectional support] in
the [Ports] tab.
[For Windows 98SE/Me]
≥Open the properties of this Printer by
selecting [Start] >> [Settings] >>
[Printers] and set the USB port for [Print
Destination Port] in the [Details] tab.
≥Open the properties of this Printer, click
the [Spool Settings] button in the
[Details] tab and select [Enable
bidirectional support for this printer]
ª
Note for installing from the [Add
Printer Wizard] screen
When the Printer Driver is installed on
your PC for the first time, the USB port
cannot be selected in the selection stage
for the port, because the USB port is not
set.
Note that the [Add a Printer] function can
be used only when the Printer Driver is reinstalled or when another printer using the
USB port has been installed.
≥If the Plug and Play function activates
the Install Wizard, install the Driver in the
Plug and Play mode.
Notes on SD Viewer for Printer
ª
≥If a Memory Card is inserted into the
Printer, images on the Memory Card are
displayed. However, if an image is
printed from the PC, the image from the
PC will be printed, not the one from the
Memory Card.
≥A function for multiple screen shots of
different images is not provided.
≥When printing 8 screen shots of the
same image, the image size will be
reduced and the characters and dates

are not distinctly visible. It is
recommended to set the [Date print]
option to [OFF] when printing 8 screen
shots of the same image.
ª
Messages for Printer Driver
≥Please wait.
llll Please wait for a while.
≥Please insert paper to print.
llll There is no paper. Set the paper.
≥The temperature is too high, please
wait.
llllPlease wait for a while.
≥There is no ink.
llll There is no ink or ink cassette inserted.
Insert the new ink cassette.
≥A paper jam has occurred.
llll Remove the jammed paper and eject/
insert the ink cassette.
≥Hardware Error occurred. Please
abort printing.
llll Consult your dealer.
≥The printer is not corresponding to
this printer driver. Please abort
printing.
llll Install the driver again.
[Restart] to start printing or click
[Abort] to stop printing.
llll Turn the Photo Printer’s power off and
then back on or disconnect and
reconnect the USB connection cable.
Then restart the job or stop the printing.
≥The printing process is being
cancelled. Please wait for a while.
llllThe print job is cancelled.
≥The printing is being performed.
llllThe printing is being performed.
≥Error occurred. Turn the printer's
power off and then back on, and then
click [Restart] for printing or click
[Abort] to abort printing.
llll Restart the job or abort printing after
turning the Printer off and on.
≥Please remove the paper.
llllPlease remove the printed paper.
≥Communication with the printer has
failed. First, check that the printer is
connected properly, and click
43

Others
Precautions
To ensure high quality, precise printing,
always observe the following points.
Failure to observe these points will not
only result in poor quality prints, but also
paper jams, malfunctions and breakdowns
of the SD Mobile Printer.
Ink Cassette/Paper Set Notes
ª
≥Do not store the Ink Cassettes or paper
in high or low temperatures, high
humidity, or direct sunlight. Doing so
could result in a deterioration of printing
quality. They may also become
unusable.
≥Do not reuse printed paper or Ink
Cassettes that have already been
consumed.
≥Do not open the Ink Cassette/Paper Set
package immediately. Wait until it has
reached the surrounding temperature
before using it. If the Ink Cassette/Paper
Set has been stored at a low
temperature, condensation could form
when brought into a warmer room.
≥If the Ink Cassette/Paper Set is defective
due to a manufacturing error on the part
of Panasonic, we will replace the Ink
Cassette/Paper Set with an equivalent
Ink Cassette/Paper Set. Panasonic does
not bear any responsibility beyond
replacing the product.
≥Do not subject the Ink Cassette or paper
to a rapid temperature change.
ª
Ink Cassette Notes
≥The Ink Cassette is softened at about
131 degrees F/55 degrees C or higher
and will be hardened when the
temperature is lowered. Under similar
severe conditions the Ink Cassette
cannot be used. Do not place the Ink
Cassette or the Printer fitted with the Ink
44
Cassette in a location subject to high
temperatures.
≥Do not dispose of the protection sheet
attached to the paper until the last paper
has been consumed.
≥The ink cassette is made of plastic and
metal, and printing paper is made of
resin. When disposing of it, observe the
applicable rules in your country or
region.
Paper Notes
ª
≥Dust and humidity damage the paper.
Return remaining paper to its original
bag, and store it flat.
ª
Before Printing
≥Make sure the plug is properly inserted
when using the printer.
≥Do not place the printer on unsteady,
inclined, or other unstable surfaces.
ª
During Printing
≥Do not forcibly pull out the Ink Cassette
or paper, shake the printer, or add more
paper while printing is in progress.
≥When the ambient temperature or that
within the SD Mobile Printer is low, the
SD Mobile Printer feeds the paper and
stops operating to warm it for about 4 5 minutes. Particularly under a lowtemperature environment, printing one
sheet may take 10 minutes or more. In
this case, the printed image may have
faint colors.
≥Do not pull the paper out forcibly, and
never add any oscillation or vibration to
the device during printing.
≥Do not feed two or more sheets of paper
at a time.
≥If no operation is performed with the
printer for a period when using the
battery, it automatically turns off the
power. (Auto-power-save function). The
Auto-power-save function is activated
after a lapse of the following times.

-
If the card containing print images is
inserted:
Turns off about 10 minutes later.
-
If the card contains no print images:
Turns off about 5 minutes later.
≥Refer to page 48 when paper jam
occurs.
≥During printing, the paper moves forward
and backward several times. You can be
cut if you touch the paper during this
operation.
≥Printing in cold or hot temperatures may
take a little more time.
ª
Notes on Handling Finished
Prints
In order to preserve finished prints in the
best condition, observe the following
points. Failure to observe these points
could result in a deterioration of print
quality or injury.
≥Do not affix cellophane tape to the
printed surface. In particular, be careful
not to let plastic desk pads, business
card cases, or plastic erasers come into
contact with the printed surface.
≥Rubbing the surface with a hard object
and scratching will cause surface flaws
or color fade-out.
≥Do not touch the printed surface with
your fingers.
≥Do not spill or apply volatile solvents
such as alcohol to the printed surface.
Doing so could result in discoloration or
fading.
≥Do not leave printed surfaces in contact
with one another. Doing so could cause
color transfer between the two images.
Color transfer could also occur if a
printed surface is left in contact with any
other type of paper under pressure for an
extended period of time.
≥Do not store prints under conditions of
high temperatures or high humidity.
Leaving prints under such conditions for
an extended period of time could cause
a deterioration in print quality. Do not
leave prints exposed to direct sunlight.
ª
Optimal Use of the Battery
Battery Characteristics
This Battery is a rechargeable lithium ion
battery. Its ability to generate power is
based upon the chemical reaction that
takes place inside it. This reaction is
susceptible to the surrounding
temperature and humidity, and, if the
temperature is too high or too low, the
operating time of the Battery becomes
shorter. If the Battery is used in an
extremely cold environment, the possible
printing number may be reduced.
The number of sheets that can be printed
with the supplied battery is as follows:
At a low temperature: approx. 10 sheets
At a high temperature: approx. 20 sheets
If the Battery becomes extremely hot, a
protective function may operate, and the
Battery may become unusable for a while.
Be Sure to Detach the Battery after Use
Be sure to detach the Battery from the
printer after use. (If it is left attached to the
printer, a minute amount of current is
consumed even when the printer power is
off.) If the Battery is left attached to the
printer for a long time, over discharge
takes place. The Battery may become
unusable after it is charged.
Disposing of an Unusable Battery
≥The Battery has a limited life.
≥Do not throw the Battery into fire
because it may cause an explosion.
45

Always Keep the Terminals of the
Battery Clean.
Prevent the terminals from getting
clogged with dirt, dust, or other
substances.
If you drop the Battery accidentally,
check to see if the Battery body and
terminals are deformed.
Attaching damaged Battery to the
printer may damage the printer.
Cautions for Storage
≥Extremely high temperatures or low
temperatures will shorten the life of the
Battery.
≥Do not allow the Battery terminals to
come in contact with metal objects (such
as necklaces, hairpins, etc.). This can
result in a short circuit or heat generation
and, if you touch the Battery in this
condition, you may be badly burned.
ª
State of Power Lamp While
Charging
The [ON] Lamp flashes while charging.
(Flashes approx. every 2 seconds when
charging is normal.)
When the Power Lamps flashes more
quickly or slowly (or turns off), some
abnormality may have occurred.
The flashing speed suggests the following
states.
Flashing approx. every 0.5 seconds:
≥This printer, battery or AC adaptor may
be defective. Contact your nearest
Panasonic dealer.
Flashing approx. every 6 seconds:
≥The ambient temperature or that of the
battery itself is too high or too low.
Charging proceeds, but will take a longer
time.
Turning off:
Charging is completed.
46
If the [ON] Lamp turns off when charging is
not completed, the following reasons are
probable.
≥The ambient temperature or that of the
battery itself is too high or too low. Wait
until the proper temperature is reached
and charge the Battery again.
≥The AC Adaptor is probably defective.
Contact your nearest Panasonic dealer.
If the battery runs out quickly:
≥If a fully charged battery runs out quickly,
the printer may be defective. Contact
your nearest Panasonic dealer.
≥A defective battery may run out quickly.
Battery remaining capacity indication:
Along with the battery remaining capacity
being decreased, the indication will
change as follows:
r
l
sltlu
v
≥When you use the printer, it is
recommended to use it with a fully
charged battery.
≥If the battery is not charged sufficiently,
the number of sheets that can be printed
may become extremely limited.
≥If you start printing when the u (red)
indication appears, the printer may stop
while printing. When the u (red)
indication appears, recharge the battery
or use the AC adaptor for printing
Notes on Memory Cards
ª
≥Only an SD Memory Card or
MultiMediaCard can be used for this
printer.
≥Do not touch the terminals on the back of
the Card with your fingers. Do not allow
dirt, dust or water to contact the
terminals.
≥When the [CARD ACCESS] sign is
displayed in red, do not remove the
Card, turn off the power, or subject it to
vibration or impact.
l
.

≥This printer complies with the Design
rule for Camera File system (DCF)
specified by the Japan Electronics and
Information Technology Industries
Association (JEITA).
≥If you select an image compliant with the
DCF specification when thumbnails are
displayed, the folder name and the file
name for that image are displayed.
1) Names of DCF compliant folders and
files
2) Image to which a file name is
arbitrarily given
3) Image not recognizable by this printer
1)
2)
3)
≥Do not leave the Memory Card in places
where there is high temperature or direct
sunlight, or where electromagnetic
waves or static electricity are easily
generated.
≥Do not bend or drop the Memory Card.
The Card or the recorded content may
be damaged.
≥Do not add any oscillation or shock.
Those may cause damage to the
Memory Card or the data contained in
the card.
≥After use, be sure to remove the Memory
Card from the printer and pack the card
back into its original case.
≥Improper operation may cause the data
stored on a card to be damaged or
erased. We shall not be liable for such
loss by any means.
≥The SD Memory Card has a
write-protect switch. Sliding
the switch to [LOCK]
prevents the recording of
data to the card as well as
the deletion of data from the
card. Sliding back the switch permits
such operations.
ª
About the LCD Monitor
≥If you use the printer for a long time, the
LCD monitor will heat up. This is normal.
≥When the LCD screen gets dirty, wipe it
with a dry, soft cloth.
≥Do not forcefully squeeze the LCD
monitor. Otherwise, the display may
become uneven or the LCD monitor may
fail.
≥In a place with drastic temperature
changes, condensation may form on the
LCD Monitor. Wipe it with a soft dry cloth.
≥If your printer is extremely cold when you
turn its power on, the image on the LCD
Monitor will be slightly darker than usual
at first. However, as the internal
temperature increases, it goes back to
the normal brightness.
Extremely high precision technology is
employed to produce the LCD Monitor
screen featuring a total of approximately
110,000 pixels. The result is more than
99.99% effective pixels with a mere
0.01% of the pixels inactive or always lit.
However, this is not a malfunction and
does not affect the recorded picture.
ª
Internal Temperature
≥If you print continuously at a high
ambient temperature, [Temperature is
too high, please wait.] will be displayed
when the printer reaches a certain
temperature and stops. Wait until the
temperature goes down and the
displayed message disappears.
47

When the printer stops while printing:
If the printer stops while printing, the
following are probable causes:
When [Printing in process. Wait without
removing paper] is displayed and the
paper stops in the Paper Inside Slot:
The printer is being preheated when the
ambient temperature is low. Printing will
resume after preheating, so wait and do
not remove the paper.
When the printer stops after delivering
paper from the rear side:
The ink cassette may have come off while
printing.
Check that the ink cassette is properly set.
When the printer stops with the
indication of the error message, [Paper
jam has occurred]:
Turn the printer OFF without removing the
paper and turn it ON again. If [Paper jam
has occurred] is still displayed, contact
your nearest Panasonic dealer.
About the setting on the menu
ª
screen
≥When the power is turned OFF by
pressing the Power button, settings
carried out on the menu screen are
turned back to the initial settings.
However, in the following cases, this
printer retains the previous settings:
-
When the printer is turned off owing
to the low-battery cutoff
-
When Auto-power-save function is
activated
≥When the power is turned OFF owing to
the low-battery cutoff (or Auto-powersave function is activated) during DPOFprinting or when printing two or more
images, the images that remain
unprinted are held in memory. When the
power is turned ON again, the message,
[Last print job interrupted. To abort push
[MENU].] will be displayed for approx. 5
seconds. If the [MENU] button is pressed
when this message is displayed, printing
will not continue.
48
ª
Condensation
≥When a bottle is taken out from a
refrigerator in summer and left standing
for a while, droplets of water will form on
it. This phenomenon is known as
condensation. Condensation will form if
the printer or Ink Cassette/Paper Set is
moved to a location with a considerable
difference in temperature or humidity,
such as:
-
A high-humidity location, such as one
filled with steam
-
When suddenly moved from an airconditioned environment to one with
high temperatures and high humidity
-
A room that has just been heated
If condensation occurs, Printer cannot be
used. Wait for 1 hour. If the paper or rollers
are damp with condensation, the printed
surface that is produced may be
degraded.
About Unclean Thermal Heads
ª
If a line appears across a printed picture
and pictures cannot be printed clearly, the
Thermal head, located in the insertion
portion of the Ink Cassette, may be dirty. In
this case, clean it with the auxiliary Head
Cleaner.
Open the Ink Cassette Compartment
Door, remove the Ink Cassette and
push the head cleaner in and out
several times as illustrated.

≥You can use a Head Cleaner about 150
times.
≥Put the Head Cleaner into its bag after
using it.
ª
Notes on Handling the SD
Mobile Printer
≥When spraying or using insecticides or
other volatile solvents in the vicinity of
the printer, be careful not to allow any to
come into contact with the printer. If such
solvents come into contact with the
printer, they can damage the outer case
and cause the surface to peel. Do not
allow rubber or plastic products to be in
contact with the printer for extended
periods of time.
≥When not using the printer for extended
periods of time, turn off the power and
disconnect the Power Cable from the
outlet to conserve energy. (A minute
amount of current is consumed even
when the printer power is off.)
≥When transporting this printer, during a
move for example, pack the printer back
into the supplied Carrying Case. Do not
drop or impact the printer in any way. It
may cause damage to the printer.
≥If the printer emits smoke, becomes
unusually hot, or gives off an unusual
smell, turn off the printer and unplug it.
≥If water or other foreign matter gets
inside the printer, turn off the printer and
unplug it.
≥If the surface of the printer becomes
broken or cracked, turn off the printer
and unplug it.
≥If the main lead is damaged (such as the
core wires being exposed), turn off the
printer and unplug it.
≥Do not use the printer in any way which
overloads the electric outlet or wiring.
≥Do not damage the main lead or plug.
≥Remove dust or other foreign matter
adhering to the power plug.
≥Do not drop or insert metal or flammable
objects inside the printer.
≥Do not splash or wet the printer.
≥Do not disassemble or remodel the
printer.
≥Do not touch the metal parts on the
printer or the plug during a thunderstorm.
≥Do not unplug with wet hands.
≥Do not place the printer in locations with
smoke, steam, high humidity, large
amounts of dust, or severe vibrations.
≥Do not install the printer in such a way
that the power Cable is forcibly bent.
≥Do not place heavy objects on the
printer.
≥Do not move the printer with the power
Cable plugged in.
≥Do not unplug by pulling on the power
Cable.
≥Unplug the main lead as a safety
measure when cleaning the printer or
when the printer will not be used for a
long period of time.
≥Do not touch any internal components
other than those specified.
≥A minute amount of current is consumed
even when the printer power is off.
≥Install the printer away from other
devices that generate magnetic fields.
≥Electromagnetic waves produced in this
printer and in televisions, video games,
and other devices can cause mutual
interference, disrupting both the display
on the television screen and the printed
picture.
49

Maintenance Notes
ª
≥Do not use solvents such as Benzene
and paint thinner to wipe the printer
since they can damage the surface of
the printer and cause the surface to peel.
To clean the surface, wipe up any dust
with a soft, dry cloth. If the printer is
particularly dirty, soak the cloth in mild
kitchen detergent (neutral) diluted with
water and wring out thoroughly. Then,
wipe off the dust with the cloth and wipe
again with a dry cloth. When using a
synthetic cloth, follow the precautions in
the cloth’s usage instructions.
≥When you use this printer on a beach or
similar place, do not let sand, fine dust,
or seawater get into the printer.
50

Messages on the LCD Monitor
Message Remedy
This picture is unreadable. • Either the image format is incompatible or the data
There is no SD/MMC card inserted. • Insert the SD Memory Card or MultiMediaCard.
Card can’t be used. • Insert a card which can be used.
There is no picture. • Use a card with images recorded on it.
Now searching. • The card is being read. Please wait for a while.
There is no ink cassette. • Insert an Ink Cassette.
Paper jam has occurred. • Remove the jammed paper.
There is no ink. • Replace the Ink Cassette with a new one.
Temperature is too high, please wait. • Wait for a moment. (Internal temperature)
Image Printing. Please wait do not
remove paper.
External light is entering the printer
mechanism. Please reposition the
printer.
Insert paper to print. • Insert the printing paper correctly.
Remove paper. • Remove the paper.
This function can’t be used because
there is no card.
This function is not available
because this card can’t be used.
This function can’t be used because
there is no picture on the card.
This function can’t be used because
no files have DPOF setting.
Battery needs to be recharged. • Recharge the battery.
Printing Image from PC. • Printing an image on the PC.
This item can be set up only while
using AC Adapter.
Last print job interrupted. To abort
push [MENU].
has been destroyed.
• Please wait.
• A strong light is streaming in through the paper
sliding slot. Because this may cause a malfunction,
adjust the direction of the printer.
• Insert the card.
• Insert the proper card.
• Use a card with images recorded on it.
• DPOF-set files are not available and DPOF-printing
cannot be activated.
• This item can be set only when the AC adaptor is
connected.
• If you wish to continue printing, wait until the
message disappears.
51

Before Requesting Service
If the trouble persists even when the action suggested below has been taken, press the
Power Button to turn off the power and disconnect and re-connect the Power Cable.
1: The power cannot be switched on.
1: The power plug is not plugged in
correctly.
2: The printer does not print.
2-1: The Ink Cassette is not oriented
properly, or was not pushed all the
way in.
2-2: There is slack in the Ink Film.
Take up the slack in the Ink Film.
2-3: The internal temperature of the
printer is too high. Wait for a while.
2-4: Condensation has formed. Wait for a
while.
3: Printing is not of the expected
quality.
3-1: The paper being used is not of the
specified type.
3-2: The paper was not loaded correctly.
3-3: Thermal head is dirty. Clean it with
the supplied Head Cleaner.
4: The printed pictures are distorted.
4-1: The printer is located near a
television, video game, or other
source of electromagnetic waves.
Move the printer so that it is at least
1 m away from the television, video
game, etc.
4-2: The printer is located near a stereo
speaker, large motor, or other source
of a strong magnetic field.
Move the printer away from the
device generating the magnetic field.
5: Paper jams occur frequently.
5: The paper is creased or curled.
6: Battery runs down quickly.
6-1: Are you using the Battery in an
extremely cold place? In cold places,
the operating time of the Battery
becomes shorter.
6-2: Has the Battery worn out? If the
operating time is still too short even
after the Battery is fully charged, the
Battery has worn out.
7: The [CARD ACCESS] sign remains
displayed for a long time.
7: High resolution images take a long
time to read. The following are
approximate reading times per
resolution.
640t480 (VGA) :About 4 seconds
1280t960 (1.3 million pixels) :
About 12 seconds
1600t1200 (2 million pixels) :
About 20 seconds
2240t1680 (4 million pixels) :
About 40 seconds
8: Printing starts but printer stops
operating midway.
8: When the ambient temperature or the
temperature within SD Mobile Printer
is low, the printer feeds the paper but
stops operating to warm itself for a
while. Wait for one or two minutes
until the temperature rises.
9: If Two SD Mobile Printers are
connected to the PC, printing does
not occur.
9: Two or more SD Mobile Printers
connected to one PC do not operate
normally. Do not connect two or more
SD Mobile Printers.
10: The Power Lamp starts flashing
while the printer is printing.
10: The flashing Power Lamp indicates
that the number of printable copies is
reduced. (A few more copies can be
printed.) When the Power Lamp
flashes more frequently, printing will
stop. (If a sheet of paper is being
printed, printing will stop after printing
has been completed.)
52

11: The date when the image was
recorded and the one when it was
printed are different.
11: If an image is processed or saved on
a PC, the date it was processed or
saved will be printed.
12: You wish to stop printing.
12: You are not allowed to stop printing
while printing is in process. After a
sheet is printed, change the number
of prints, etc. from the menu.
13: When the DPOF printing was
carried out, multiple images have
been automatically printed.
13: If you print with the Print Style set to
[Select 8], a DPOF-set image is
automatically selected and eight
images will be printed.
14: DPOF setting is not available on
the printer.
14: DPOF set with equipment or software
that allows DPOF-setting. (This
printer can use information DPOF-set
by other equipment, but cannot carry
out DPOF-setting.)
53

Specifications
SD Mobile Printer (Panasonic SV-P20U) Information for Your Safety
Power Source: DC 4.9 V (AC Adaptor),
Power Consumption: Approx. 8.6 W
Printing System: Line thermal transfer with Variable Dot system
Printing Speed: Approx. 95 sec./sheet (AC Adapter)
Monitor: 1.5-inch LCD
Print Media
Ink Film: Cassette type (exclusive), 3 color field successive
Printing Paper*: Credit Card Size 2-1/8"t3-3/8" (54t86 mm)
Paper Feeding System: Manual insertion
Number of printing pixels: 290t290 dpi
Functions: Full-picture print, 8-picture print
Print Head: Film thermal head, 11.4 dots/mm (290 dpi)
Input Socket: USB terminal (Up to 12 Mbps)
Compatible Cards: SD Memory Card/MultiMediaCard
Format: DOS Format
Image Format: JPEG Baseline system (SD-Picture, DCF [Design
Number of Pixels: 6144 t4096 Max, Sampling ratio 4:4:4, 4:2:2,
Thawing Time: Approx. 4 seconds (VGA)/20 seconds (2 Mega
Allowable Temperature: For operation: 0 xC~40 °C
Allowable Humidity: For operation: 35 %~80 %
External Dimensions: Approx. 4-3/8" t1-3/8" t2-11/16"
Weight: Approx. 9.4 oz (265
DC 3.7 V (Battery)
Approx. 120 sec./sheet (Battery)
printing (magenta, yellow, cyan, overcoat)
Printing Paper , 8 Pre-Cut Adhesive Paper
(Picture Dimensions)
Printing Paper: 2-1/8"t3-3/8" (54t86 mm)
(After cut)
8 Pre-Cut Adhesive Paper:11/16"t7/8"
(17.3t22 mm) (After cut)
rule for Camera File system], Exif, JFIF, CIFF,
SISRIF),TIFF (no compression) (Baseline TIFF
Rev.6.0 RGB Full color Images compatible)
4:2:0, 4:1:1
pixels)
For storage: `10 °C~50 °C
For storage: 0 %~90 %
(110 (W)t34.2 (H)t68 (D) mm) (Without
protruding portion)
g ) (without Battery, Ink
Cassette, SD Memory Card)
*All accessories may not be available in all markets.
54

AC Adaptor
(Panasonic VSK0624) Information for Your Safety
Power Source: AC 110-240 V 50/60Hz
Input Current: 0.3 A
DC Output DC 4.9 V, 1.8 A
Dimensions Approx. 2-5/16" t1-7/32" t3-25/32"
(59 (W)t31 (H)t96 (D) mm)
Weight Approx. 4.6 oz (130
g )
Battery Pack
(Panasonic CGR-S603) Information for Your Safety
Nominal Voltage: 3.7 V
Nominal Capacity: 1,350 mAh
Dimensions Approx. 25/32" t53/64" t2-5/32"
(20 (W)t21 (H)t55 (D) mm)
Weight Approx. 1.4 oz (40
g )
55

Limited Warranty (For U.S.A. Only)
Panasonic Consumer Electronics
Company, Division of Matsushita
Electric Corporation of America
One Panasonic Way Secaucus, New
Jersey 07094
Panasonic Sales Company,
Division of Matsushita Electric of
Puerto Rico, Inc.
Ave. 65 de Infantería, Km. 9.5, San
Gabriel Industrial Park, Carolina, Puerto
Rico 00985
PANASONIC SD Products
Limited Warranty
Limited Warranty Coverage
If your product does not work properly because of a defect in materials or workmanship,
Panasonic Consumer Electronics Company or Panasonic Sales Company (collectively
referred to as “the warrantor”) will, for the length of the period indicated on the chart
below, which starts with the date of original purchase (“warranty period”), at its option
either (a) repair your product with new or refurbished parts, or (b) replace it with a new or
a refurbished product. The decision to repair or replace will be made by the warrantor.
Product or Part Name
SD Multi AV Device, SD Mobile Printer
(except items listed below)
CMOS Camera Assembly
Rechargeable Battery Pack, SD Memory Card, AC Adaptor
USB Reader-Writer (in exchange for defective item)
Parts
One (1) year
Six (6) months
Ninety (90) days
During the “Labor” warranty period there will be no charge for labor. During the “Parts”
warranty period, there will be no charge for parts. You must carry-in or mail-in your
product during the warranty period. If non-rechargeable batteries are included, they are
not warranted. This warranty only applies to products purchased and serviced in the
United States or Puerto Rico. This warranty is extended only to the original purchaser of
a new product which was not sold “as is”.
A purchase receipt or other proof of the original purchase date is required for warranty
service.
Labor
Ninety (90) days
Ninety (90) days
Not Applicable
Carry-In or Mail-In Service
For Carry-In or Mail-In Service in the United States call 1-800-272-7033.
For assistance in Puerto Rico call Panasonic Sales Company (787)-750-4300 or fax
(787)-768-2910.
56

Limited Warranty Limits And Exclusions
This warranty ONLY COVERS failures due to defects in materials or workmanship, and
DOES NOT COVER normal wear and tear or cosmetic damage. The warranty ALSO
DOES NOT COVER damages which occurred in shipment, or failures which are caused
by products not supplied by the warrantor, or failures which result from accidents,
misuse, abuse, neglect, mishandling, misapplication, alteration, faulty installation, set-up
adjustments, misadjustment of consumer controls, improper maintenance, power line
surge, lightning damage, modification, or commercial use (such as in a hotel, office,
restaurant, or other business), rental use of the product, service by anyone other than a
Factory Servicenter or other Authorized Servicer, or damage that is attributable to acts of
God.
THERE ARE NO EXPRESS WARRANTIES EXCEPT AS LISTED UNDER “ LIMITED
WARRANTY COVERAGE”. THE WARRANTOR IS NOT LIABLE FOR INCIDENTAL
OR CONSEQUENTIAL DAMAGES RESULTING FROM THE USE OF THIS
PRODUCT, OR ARISING OUT OF ANY BREACH OF THIS WARRANTY. (As
examples, this excludes damages for lost time, travel to and from the servicer, loss of
media or images, data or other memory content. The items listed are not exclusive, but
are for illustration only.) ALL EXPRESS AND IMPLIED WARRANTIES, INCLUDING
THE WARRANTY OF MERCHANTABILITY, ARE LIMITED TO THE PERIOD OF THE
LIMITED WARRANTY.
Some states do not allow the exclusion or limitation of incidental or consequential
damages, or limitations on how long an implied warranty lasts, so the exclusions may not
apply to you.
This warranty gives you specific legal rights and you may also have other rights which
vary from state to state. If a problem with this product develops during or after the
warranty period, you may contact your dealer or Servicenter. If the problem is not
handled to your satisfaction, then write to the warrantor's Consumer Affairs Department
at the addresses listed for the warrantor.
PARTS AND SERVICE WHICH ARE NOT COVERED BY THIS LIMITED WARRANTY
ARE YOUR RESPONSIBILITY.
57

Customer Services Directory (For U.S.A. Only)
For Product Information, Operating Assistance, Literature Request,
Dealer Locations, and all Customer Service inquires please contact:
1-800-272-7033, Monday-Friday 9am-9pm Saturday-Sunday 9am-7pm, EST.
or send e-mail: digitalstillcam@panasonic.com
Web Site: http://www.panasonic.com
You can purchase parts, accessories or locate your
nearest servicenter by visiting our Web Site.
Accessory Purchases:
1-800-332-5368 (Customer Orders Only)
Panasonic Services Company 20421 84th Avenue South, Kent, WA 98032
(6 am to 5 pm Monday - Friday; 6 am to 10:30 am Saturday; PST)
(Visa, MasterCard, Discover Card, American Express, Check)
Product Repairs
MAIL TO :
Please carefully pack and ship, prepaid and insured, to the Elgin Centralized Factory
Servicenter.
Customer’s in Puerto Rico, please ship or carry in to location below (“Service in Puerto Rico”).
Centralized Factory Servicenter
Panasonic Services Company
1705 N. Randall Road,
Elgin, IL 60123-7847
Attention: SD Products Repair
Service in Puerto Rico
Matsushita Electric of Puerto Rico, Inc. Panasonic Sales Company/ Factory Servicenter:
Ave. 65 de Infantería, Km. 9.5 San Gabriel Industrial Park, Carolina, Puerto Rico 00985 ,
Phone (787) 750-4300 Fax (787) 768-2910
As of January 2002
58

4
3
1
2
2
DC IN 4.9V
Spanish Quick Use Guide/Guía
española para el uso rápido
ª Preparación
1
1 Conecte el cable de entrada DC a la toma
de corriente [DC IN 4.9V] en la Impresora
Portátil SD.
2 Conecte el cable de la red de
alimentación CA al adaptador CA y a la
toma CA.
3 Después de haber retirado el taco 1, gire
en la dirección de la flecha para evitar
que la película de tinta quede floja.
4 Abra la puerta del compartimento del
cartucho de tinta 2.
5 Empuje en la dirección de la flecha hasta
que se ajuste en su lugar haciendo clic.
6 Cierre 2.
7 Abra la puerta de la tarjeta de memoria
3.
8 Coloque la tarjeta de memoria con el
ángulo cortado 4 delante con la etiqueta
mirando hacia arriba y luego insértelo
por completo en la ranura de la tarjeta de
memoria horizontalmente.
9 Cierre la puerta de la tarjeta de memoria 3.
4
2
3
5,6
7,8,9
59

1
2
3
4
Í
Standard
Date
MENU
Standard
Date
MENU
DISPLAY:Print this picture.
DISPLAY
Insert paper to print.
DISPLAY
Impresión de imágenes
ª
1 Instale la batería o enchufe en el
adaptador CA y presione el botón [ ]
durante unos 2 segundos
aproximadamente.
2 Presione el botón [2 1] para seleccionar
una imagen deseada.
3 Presione el botón [DISPLAY].
4 Introduzca una hoja de papel con [PRINT
SIDE ] mirando hacia arriba en la ranura
[PAPER IN 4] (ranura superior) 1.
≥El papel se moverá adelante y atrás diversas
veces y saldrá por la ranura de salida del papel.
A continuación, se podrá retirar el papel de la
ranura de salida del papel
2.
5 Cuando termine de imprimir, saque el
papel horizontalmente.
60
PAPER IN
5

1
MENU
DISPLAY
ª Pantalla del menú
2
3
4
MENU 1/2
Print style
Number of copies
Date print
DPOF
OK SETSELECT
MENU
DISPLAY
MENU 1/2
Print style
Number of copies
Date print
DPOF
OK SETSELECT
MENU
DISPLAY
MENU
DISPLAY
MENU 1/2
Print style
Number of copies
Date print
DPOF
OK SETSELECT
Standard
OFF
PRINT
Standard
OFF
PRINT
Standard
OFF
PRINT
1 Presione el botón [MENU].
1
≥Aparecerá la pantalla del Menú.
2 Presione el botón [DISPLAY] para
seleccionar la categoría a configurar.
≥Cada vez que se presiona el botón [DISPLAY]
se ilumina la categoría siguiente.
3 Presione el botón [2 1] para configurar
la categoría seleccionada en el modo
deseado.
4 Presione el botón [MENU].
2
1
ª Interfaz del menú
1 Estilo de impresión
2 Número de copias
3 Fecha de impresión
4 DPOF
5 Fotogramas guardados
6 Recorte
7 Imagen
8 LCD
MENU 2/2
Frame
Trimming
Picture
LCD
OK SETSELECT
ON
ADJUST
ADJUST
61

Panasonic Consumer Electronics Company,
Division of Matsushita Electric Corporation of America
One Panasonic Way, Secaucus, NJ 07094
Panasonic Sales Company ("PSC")
Division of Matsushita Electric of Puerto Rico, Inc.
Ave. 65 de Infantería, Km. 9.5, San Gabriel Industrial Park, Carolina, Puerto Rico 00985
Panasonic Canada Inc.
5770, Ambler Drive, Mississauga, Ontario, L4W 2T3
P
VQT0A81
F0103Mk0 (1000A)
 Loading...