

Page 1
Operating Instructions
Home Theater Audio System
Model No. SC-HTB700
Thank you for purchasing this product.
Please read these instructions carefully before using this product,
and save this manual for future use.
Included Installation Instructions
The installation work should be done by a qualified installation specialist. (> 12 to 15)
Before commencing work, carefully read these installation instructions and the operating instructions
to ensure that installation is performed correctly.
(Please keep these instructions. You may need them when maintaining or moving this system.)
Model number suffix “EB” denotes UK model.
EB
EG
GN GW
TQBM0483
Page 2
Safety precautions
WARNING
Unit
≥ To reduce the risk of fire, electric shock or product damage,
– Do not expose this unit to rain, moisture, dripping or
splashing.
– Do not place objects filled with liquids, such as vases, on
this unit.
– Use the recommended accessories.
– Do not remove covers.
– Do not repair this unit by yourself. Refer servicing to
qualified service personnel.
≥ To prevent injury, this apparatus must be securely attached
to the wall in accordance with the installation instructions.
AC mains lead
≥ To reduce the risk of fire, electric shock or product damage,
– Ensure that the power supply voltage corresponds to the
voltage printed on this unit.
– Insert the mains plug fully into the socket outlet.
– Do not pull, bend, or place heavy items on the lead.
– Do not handle the plug with wet hands.
– Hold onto the mains plug body when disconnecting the
plug.
– Do not use a damaged mains plug or socket outlet.
≥ The mains plug is the disconnecting device.
Install this unit so that the mains plug can be unplugged
from the socket outlet immediately.
Button-type battery (Lithium battery)
≥ Risk of fire, explosion and burns. Do not recharge,
disassemble, heat above 60 oC or incinerate.
WARNING
DO NOT INGEST BATTERY,
CHEMICAL BURN HAZARD
This product contains a coin/button cell battery. If the
coin/button cell battery is swallowed, it can cause severe
internal burns in just 2 hours and can lead to death. Keep
new and used batteries away from children. If the battery
compartment does not close securely, stop using the
product and keep it away from children. If you think
batteries might have been swallowed or placed inside
any part of the body, seek immediate medical attention.
Small object
≥ Keep the adhesive tape of the IR Blaster and the screws
out of reach of children to prevent swallowing.
CAUTION
Unit
≥ Do not place sources of naked flames, such as lighted
candles, on this unit.
This unit may receive radio interference caused by mobile
≥
telephones during use. If such interference occurs, please
increase separation between this unit and the mobile telephone.
≥ This unit is intended for use in moderate climates.
≥ Product Identification Marking is located on the bottom of
the unit.
Placement
≥ Place this unit on an even surface.
≥ To reduce the risk of fire, electric shock or product damage,
– Do not install or place this unit in a bookcase, built-in
cabinet or in another confined space. Ensure this unit is
well ventilated.
– Do not obstruct this unit’s ventilation openings with
newspapers, tablecloths, curtains, and similar items.
Do not block the top of the main unit and the rear of the
active subwoofer. (> 5, 6)
– Do not expose this unit to direct sunlight, high
temperatures, high humidity, and excessive vibration.
Button-type battery (Lithium battery)
≥ Danger of explosion if battery is incorrectly replaced.
Replace only with the type recommended by the
manufacturer.
≥ Insert with poles aligned.
≥ Mishandling of batteries can cause electrolyte leakage and
may cause a fire.
– Remove the battery if you do not intend to use the remote
control for a long period of time. Store in a cool, dark place.
– Do not heat or expose to flame.
– Do not leave the battery(ies) in a car exposed to direct
sunlight for a long period of time with doors and windows
closed.
When disposing of the batteries, please contact your local
≥
authorities or dealer and ask for the correct method of disposal.
Disposal of Old Equipment and Batteries
Only for European Union and countries with
recycling systems
These symbols on the products,
packaging, and/or accompanying
documents mean that used electrical and
electronic products and batteries must not
be mixed with general household waste.
For proper treatment, recovery and recycling of
old products and used batteries, please take
them to applicable collection points in
accordance with your national legislation.
By disposing of them correctly, you will
help to save valuable resources and
prevent any potential negative effects on
human health and the environment.
For more information about collection and
recycling, please contact your local municipality.
Penalties may be applicable for incorrect
disposal of this waste, in accordance with
national legislation.
(Note for the battery symbol (bottom symbol)):
This symbol might be used in combination
with a chemical symbol. In this case it
complies with the requirement set by the
Directive for the chemical involved.
2
TQBM0483
Page 3
Precautions
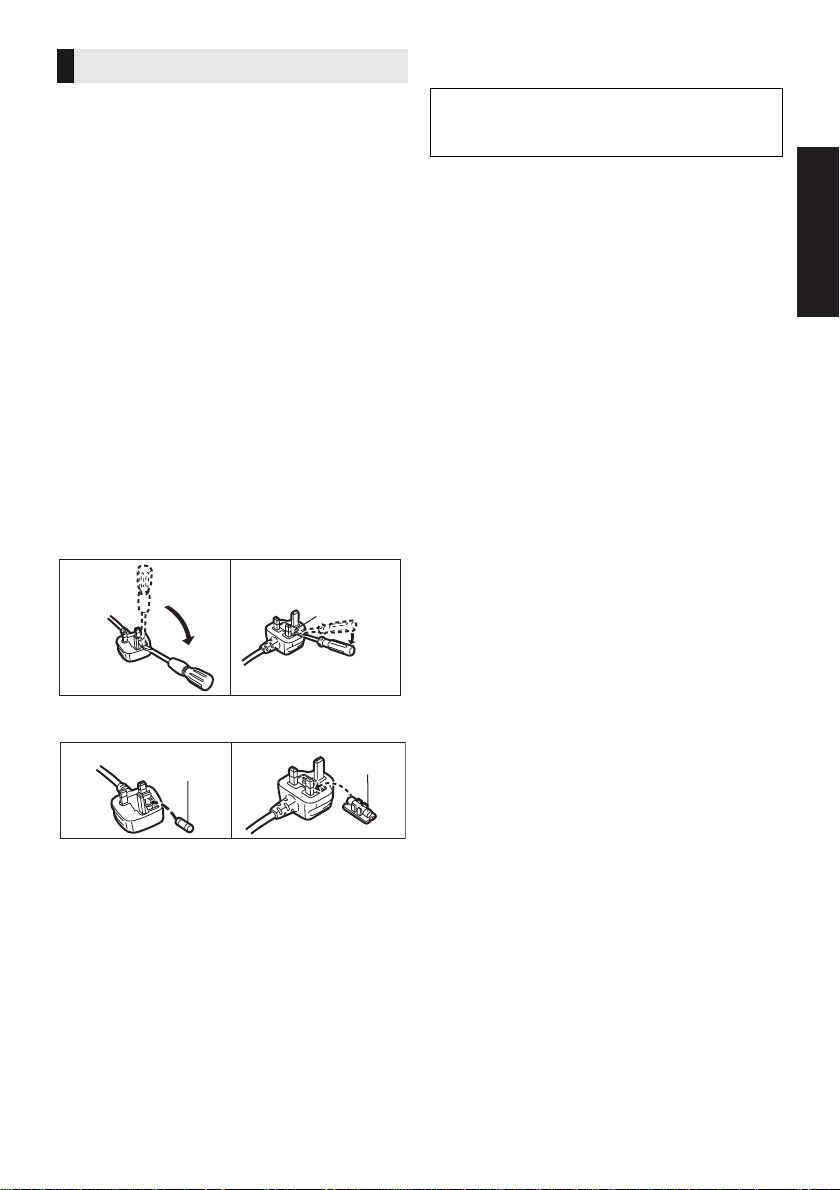
Caution for AC Mains Lead
Fuse cover
Figure A Figure B
(For the AC mains plug of three pins)
For your safety, please read the following text carefully.
This appliance is supplied with a moulded three pin mains
plug for your safety and convenience.
A 5-ampere fuse is fitted in this plug.
Should the fuse need to be replaced please ensure that the
replacement fuse has a rating of 5-ampere and that it is
approved by ASTA or BSI to BS1362.
Check for the ASTA mark Ï or the BSI mark Ì on the body
of the fuse.
If the plug contains a removable fuse cover you must ensure
that it is refitted when the fuse is replaced.
If you lose the fuse cover the plug must not be used until a
replacement cover is obtained.
A replacement fuse cover can be purchased from your local
dealer.
Before use
Remove the connector cover.
How to replace the fuse
The location of the fuse differ according to the type of AC
mains plug (figures A and B). Confirm the AC mains plug
fitted and follow the instructions below.
Illustrations may differ from actual AC mains plug.
1. Open the fuse cover with a screwdriver.
2. Replace the fuse and close or attach the fuse cover.
Figure A Figure B
Fuse
(5 ampere)
Fuse
(5 ampere)
About Bluetooth
®
Panasonic bears no responsibility for data
and/or information that is compromised
during a wireless transmission.
∫ Frequency band used
This system uses the 2.4 GHz frequency band.
∫ Certification of this device
≥ This system conforms to frequency restrictions
and has received certification based on
frequency laws. Thus, a wireless permit is not
necessary.
≥ The action below are punishable by law in some
countries:
jTaking apart or modifying the unit.
jRemoving specification indications.
∫ Restrictions of use
≥ Wireless transmission and/or usage with all
Bluetooth
≥ All devices must conform to standards set by
Bluetooth SIG, Inc.
≥ Depending on the specifications and settings of
a device, it can fail to connect or some
operations can be different.
≥ This system supports Bluetooth
features. But depending on the operating
environment and/or settings, this security is
possibly not sufficient. Transmit data wirelessly
to this system with caution.
≥ This system cannot transmit data to a
Bluetooth
®
equipped devices is not guaranteed.
®
security
®
device.
∫ Range of use
Use this device at a maximum range of 10 m.
The range can decrease depending on the
environment, obstacles or interference.
∫ Interference from other devices
≥ This system may not function properly and
troubles such as noise and sound jumps may
arise due to radio wave interference if the main
unit is located too close to other Bluetooth
®
devices or the devices that use the 2.4 GHz
band.
≥ This system may not function properly if radio
waves from a nearby broadcasting station, etc.
are too strong.
∫ Intended usage
≥ This system is for normal, general use only.
≥ Do not use this system near equipment or in an
environment that is sensitive to radio frequency
interference (example: airports, hospitals,
laboratories, etc.).
TQBM0483
3
Page 4

Table of contents
Supplied items
Safety precautions .......................... 2
®
About Bluetooth
............................ 3
Supplied items................................. 4
Before use
Control reference guide.................. 5
Getting started
Step 1 Connections........................ 8
Step 2 Placement.......................... 12
Step 3 Active subwoofer wireless
connection ................................... 16
Operations
Using this system.......................... 17
Bluetooth
Sound menu................................... 19
Setup menu.................................... 20
Linked operations with the TV
(VIERA Link
“HDAVI Control
®
operations .................. 18
TM
”) ....................22
Reference
This system (SC-HTB700)
∏ 1 Main unit (speaker) (> 5)
(SU-HTB700)
∏ 1 Active subwoofer (> 5)
(SB-HWA900)
Accessories
Check the supplied accessories before using this
system.
∏ 1 Remote control (with a battery) (> 7)
(N2QAYC000121)
∏ 1 IR Blaster (> 10)
(K2ZZ02C00007)
∏ 2 Wall mount brackets (> 14)
(T UWX2111)
∏ 2 AC mains lead (> 11 )
For the United Kingdom and Ireland
(K2CT2YY00089)
For Continental Europe
(K2CQ2YY00164)
For Australia and New Zealand
(K2CJ2YY00123)
For India
(K2CP2YY00070)
∏ 2 Screws (> 14)
(XYN5+J14FJK)
Troubleshooting ............................ 24
Unit care ......................................... 29
Licenses ......................................... 29
Specifications ................................ 30
About descriptions in these operating instructions
≥ Pages to be referred to are indicated as “> ±±”.
≥ Labels on this unit and the remote control are indicated as [±±] in these operating instructions.
≥ The illustrations shown may differ from your unit.
≥ These operating instructions are applicable to model SC-HTB700 for variety of regions. Unless otherwise indicated,
illustrations in these operating instructions are of the model for the United Kingdom and Ireland.
≥ Operations in this operating instructions are described mainly with the remote control, but you can perform the operations
on the main unit if the controls are the same.
TQBM0483
4
≥ Product numbers are correct as of June 2019. These may
be subject to change.
≥ The supplied AC mains lead is for use with this system
only.
Do not use it with other equipment. Also, do not use cords
from other equipment with this system.
Page 5
Getting started
Operations
Reference
Before use
Precautions
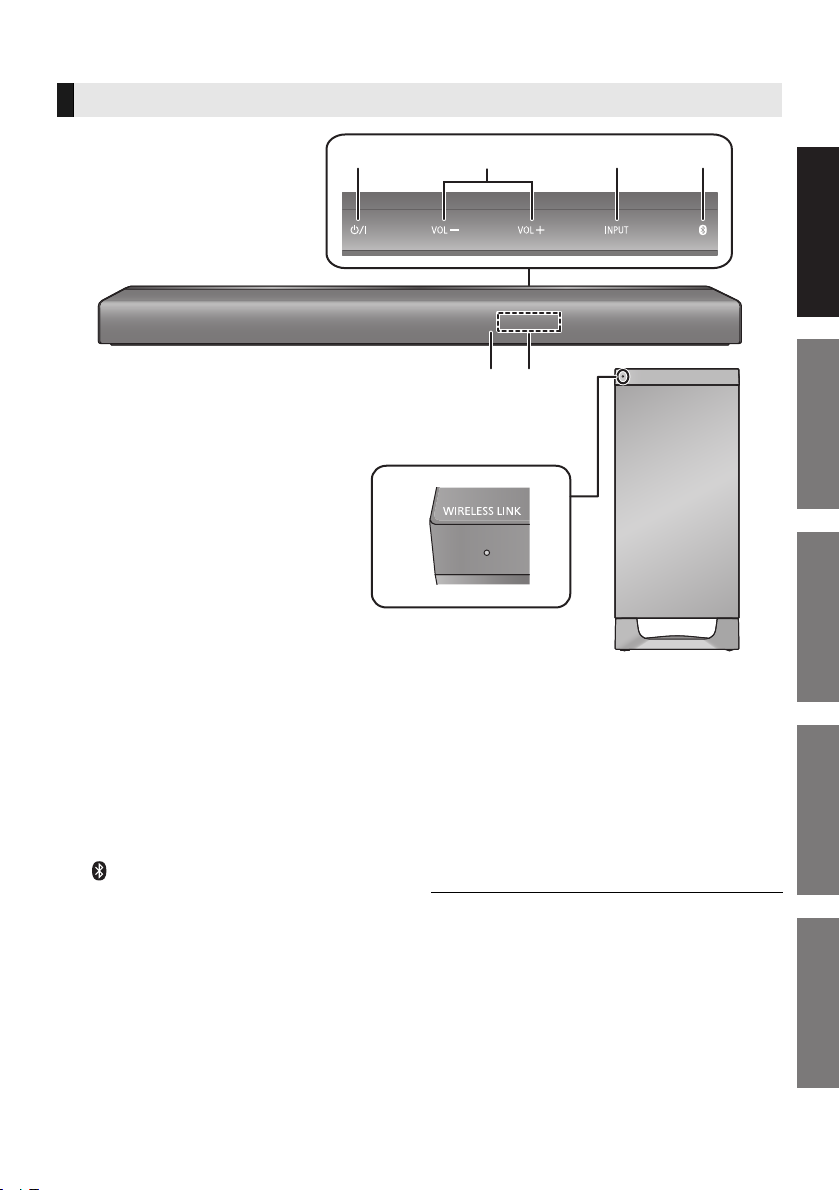
Control reference guide
This system (Front)
1* 3* 4*
Main unit
(SU-HTB700)
1 [Í/I] Standby/on switch (Í/I)*
Touch to switch the unit from on to standby
mode or vice versa. In standby mode, the unit
is still consuming a small amount of power.
2 [VOL j] [VOL i] Adjust the volume of this
system* (> 17)
3 [INPUT] Select the input source* (> 17)
4 [ ]*
≥ Select the Bluetooth
(> 17)
≥ Bluetooth
≥ Disconnecting a Bluetooth
5 Remote control signal sensor (> 7)
®
pairing (> 18)
®
device as the source
®
device (> 18)
2*
65
7
Active subwoofer
(SB-HWA900)
6 Display
7 WIRELESS LINK indicator (> 16)
* These switches work just by touching the
marks. Each time you touch the switch, there
will be a beep sound.
The beep sound setting can be changed.
(> 20, “BEEP”)
≥ Do not place objects in front of this system.
≥ Do not place objects on the top surface of the main unit.
Do not block the top surface of the main unit as it serves as
ventilation.
≥ Regularly remove dust, etc., from this system. (> 29,
“Clean this system with a soft, dry cloth”)
TQBM0483
5
Page 6
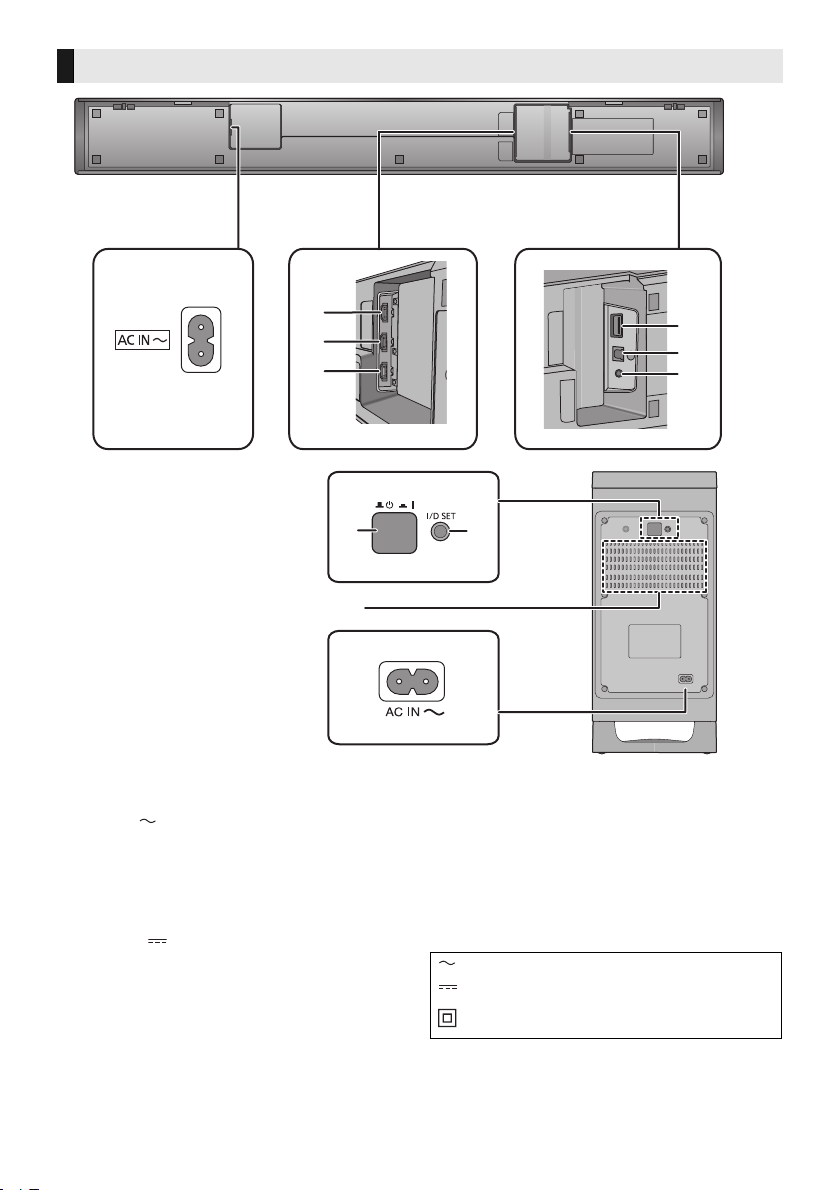
This system (Others)
Main unit
(Bottom)
Active subwoofer
(Rear)
1
2
3
4
5
6
7
1 AC IN ( ) terminal (> 11 )
2 HDMI AV OUT (TV (ARC)) terminal (ARC
compatible) (> 8)
3 HDMI AV IN (HDMI 2) terminal (> 10)
4 HDMI AV IN (HDMI 1) terminal (> 9, 10)
5 USB port (FOR UPDATE)
(DC 5 V 500 mA)
6 OPTICAL DIGITAL AUDIO IN (TV) terminal
(> 8)
7 Ir SYSTEM terminal (> 10)
8[BÍ CI] Active subwoofer on/off button
(> 16)
8
10
1
9
9 [I/D SET] I/D SET button
The main unit and the active subwoofer have already
been paired at the time of purchase, so this button is not
normally used. Use it when the main unit and the active
subwoofer need to be paired again. (> 27)
10 Ventilation holes
The symbols on this product represent the following.
AC
DC
Class II equipment (The construction of the product is
double-insulated.)
6
TQBM0483
Page 7
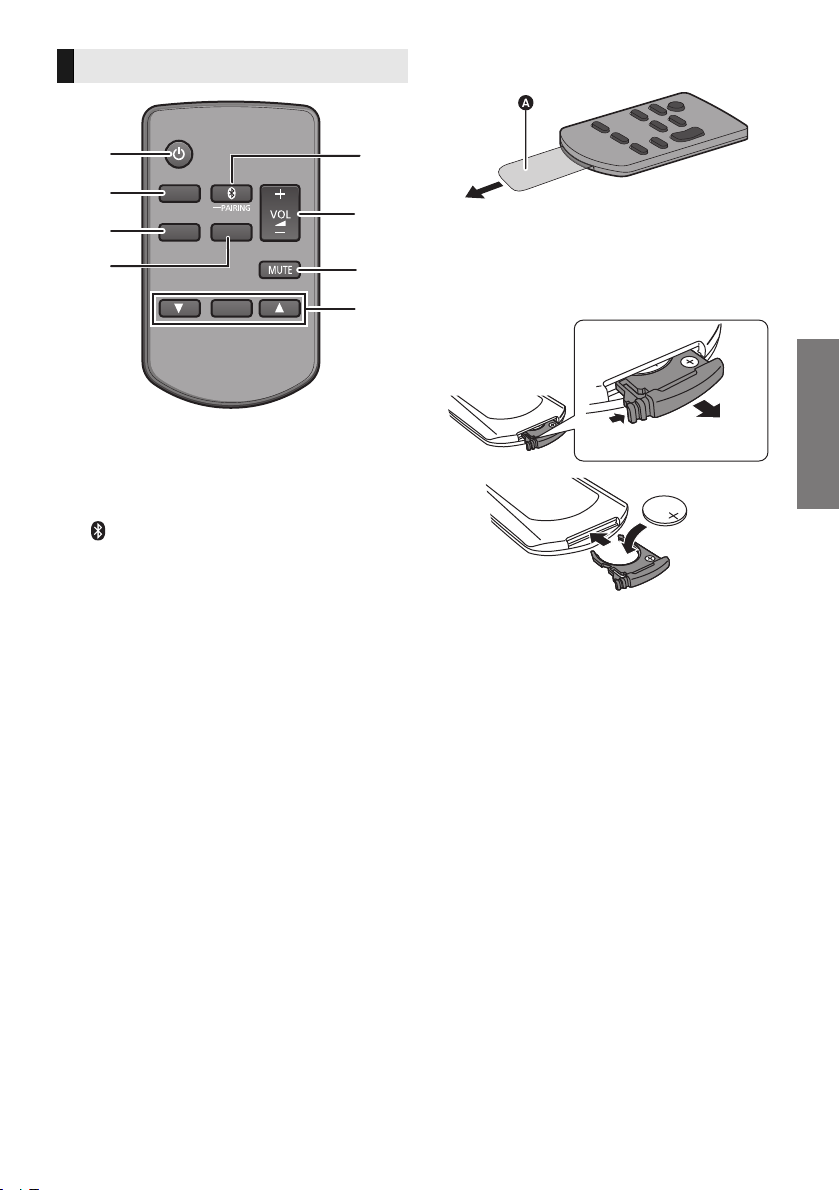
Before use
Remote control
1
5
6
7
8
2
3
4
INPUT
SOUND
SETUP
OK
1[Í] Switch the main unit from on to standby
or vice versa (> 17)
2 [INPUT] Select the input source (> 17)
3 [SETUP] Select the setup menu (> 20)
4 [SOUND] Select the sound menu (> 19)
5 [ -PAIRING]
≥ Select the Bluetooth
(> 17)
≥ Bluetooth
®
pairing (> 18)
≥ Disconnecting a Bluetooth
6[i VOL j] Adjust the volume of this system
(> 17)
7 [MUTE] Mute the sound (> 17)
8[4][OK][3] Select and confirm the option
®
device as the source
®
device (> 18)
∫ Before using for the first time
Remove the insulation sheet A.
≥ Dispose of the insulation sheet responsibly after
removing it.
∫ To replace a button-type battery
Battery type: CR2025 (Lithium battery)
≥ Set the button-type battery with its (i) mark
facing upward.
∫ About remote control signal sensor
The remote control signal sensor is located on
the main unit.
≥ Use the remote control within the correct
operation range.
Distance: Within approx. 7 m directly in front
Angle: Approx. 20e up and down, 30e left and
right
TQBM0483
7
Page 8
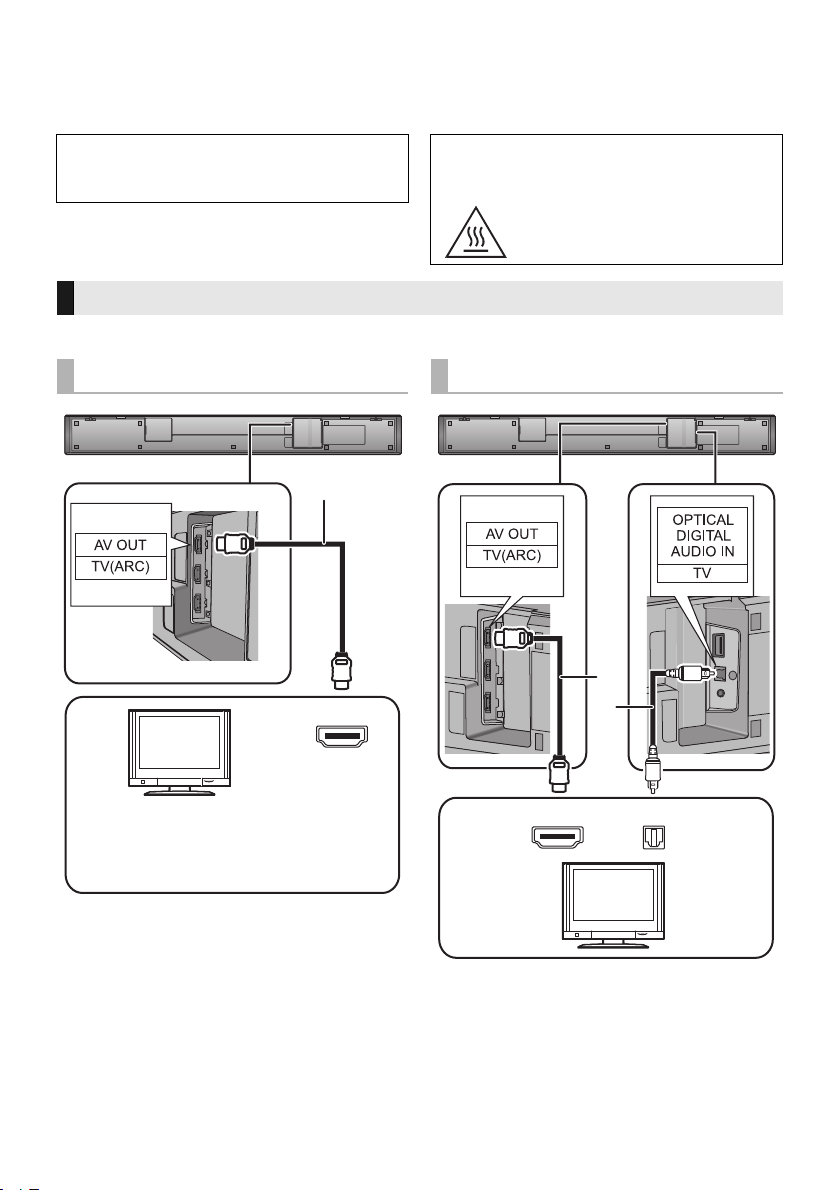
Step 1 Connections
TV
Be sure to connect to the TV’s ARC
compatible terminal. (Refer to the operating
instructions for the TV.)
HDMI IN
OPTICAL
OUT
TV
Turn off all equipment before connection and read the appropriate operating instructions.
Do not connect the AC mains lead until all other connections are completed.
When connecting to 4K compatible equipment
and 4K Ultra HD TV, use High Speed HDMI
cables which support 18 Gbps bandwidth.
Connection with the TV
Verify if the TV’s HDMI terminal is labelled “HDMI (ARC)”.
CAUTION
(Caution regarding the HDMI terminals on
the main unit)
Hot surface
Do not touch.
Labelled “HDMI (ARC)”
Not Labelled “HDMI (ARC)”
HDMI IN (ARC)
A HDMI cable
A HDMI cable
B Optical digital audio cable
≥ When you use the optical digital audio cable, insert
∫ What is ARC?
ARC is an abbreviation of Audio Return Channel, also known as HDMI ARC. It refers to one of the HDMI functions. When a
terminal labelled “ARC” and the “(TV (ARC))” terminal on the main unit are connected by HDMI, the optical digital audio cable
that is usually required in order to listen to sound from a TV is no longer required, and TV pictures and sound can be enjoyed
with a single HDMI cable.
8
TQBM0483
the tip correctly into the terminal.
Page 9
Getting started
Connection with players, etc., supporting HDR10+ and Dolby
TV
Player, etc.,
supporting HDR10+
Vision
TM
This system does not support HDR10+ and Dolby VisionTM. When connecting to a player, TV, etc., that
supports HDR10+ or Dolby Vision
≥ The name of the terminal may be different depending on the device that supports HDR10+. Refer to
the operating instructions of the supporting device for details.
≥ If you connect this system and are then unable to view Netflix, use the following connection.
≥ VIERA Link does not work when you use this connection. (> 22)
TM
, use the following connection.
*
HDMI
AUDIO OUT
HDMI IN
(ARC)
HDMI
VIDEO OUT
A HDMI cable
* If this terminal does not support ARC, also use an optical digital audio cable to connect the main unit
and the TV. (> 8, “Not Labelled “HDMI (ARC)””)
HDMI IN
TQBM0483
9
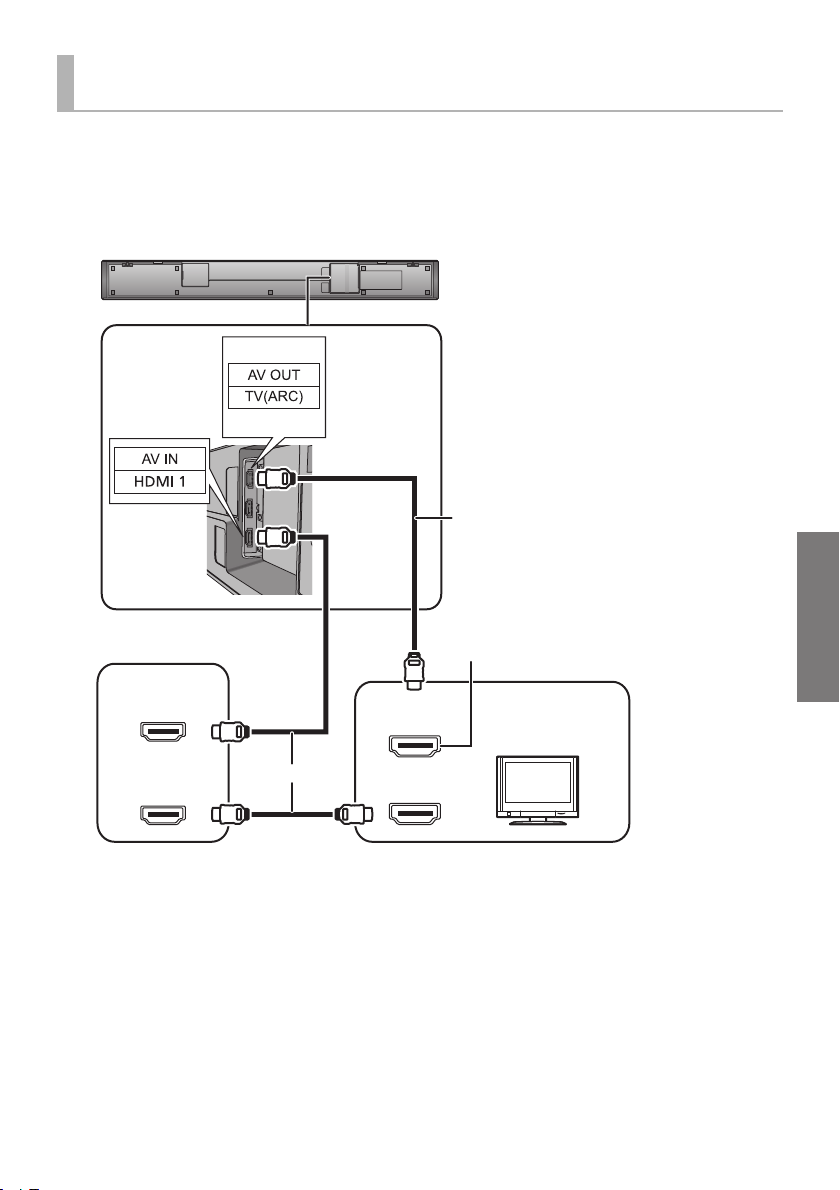
Page 10
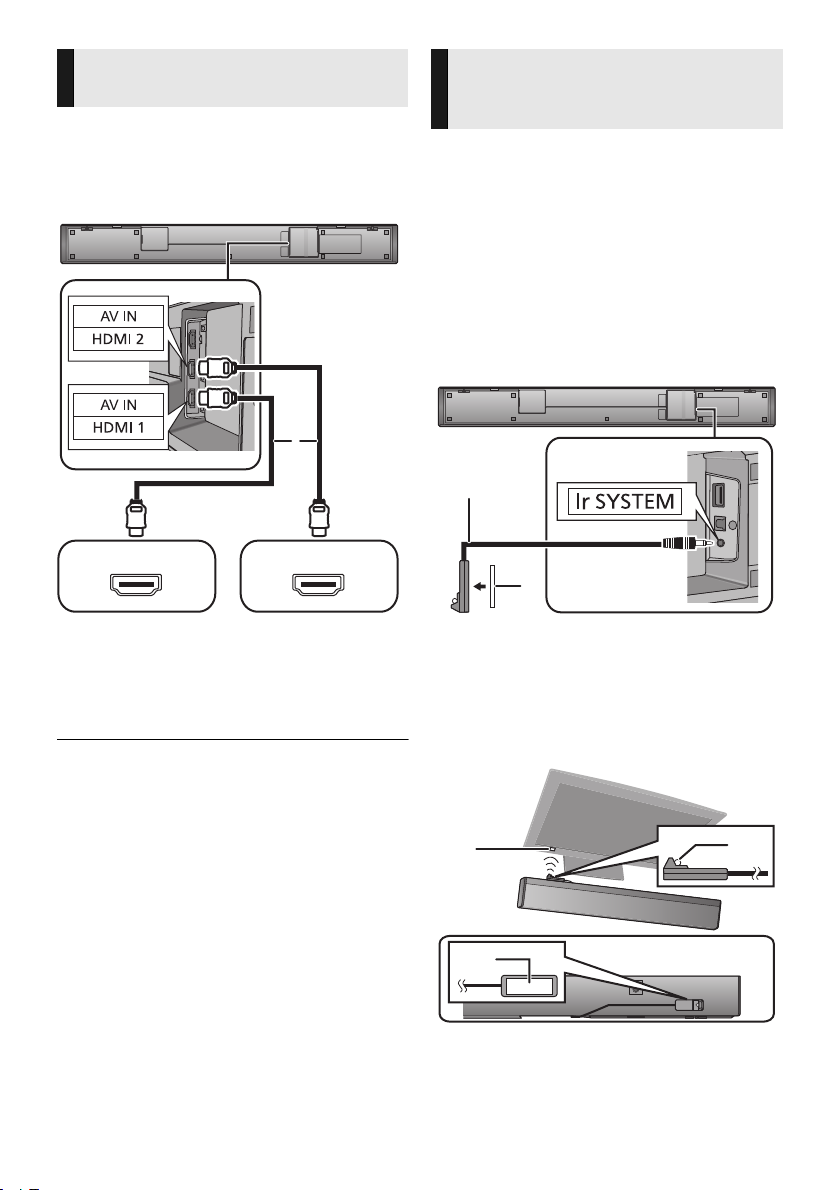
Connection from an HDMI
e.g.,
Blu-ray Disc player
e.g.,
Set top box
compatible device
You can direct the audio signal from the
connected Blu-ray Disc player, DVD player, Set
Top Box, etc. to this system.
Preparation
≥ Connect the main unit to the TV. (> 8)
HDMI OUT HDMI OUT
A HDMI cable
≥ Refer to the operating instructions of the connected HDMI
compatible device for the necessary setting, to output the
video and audio signals.
Using the IR Blaster
(When the remote control does not work
properly)
Depending on how the main unit is setup, it may
block the TV’s remote control signal sensor,
stopping the TV’s remote control from working.
Use the supplied Ir system cable if this occurs.
The TV remote control signals received by the
main unit are sent to the TV to operate it.
≥ For the operation range, refer to page 7.
≥ Do not use any other IR Blaster except the
supplied one.
1 Connect the jack plug to the main
unit’s Ir SYSTEM terminal.
A IR Blaster (supplied)
B Adhesive tape (supplied)
2 Place the infrared emitter in sight of
the TV’s remote control signal sensor.
Placement example
On the rear of the main unit:
10
TQBM0483
C TV remote control signal sensor
D Infrared emitter
E Adhesive tape (supplied)
Page 11
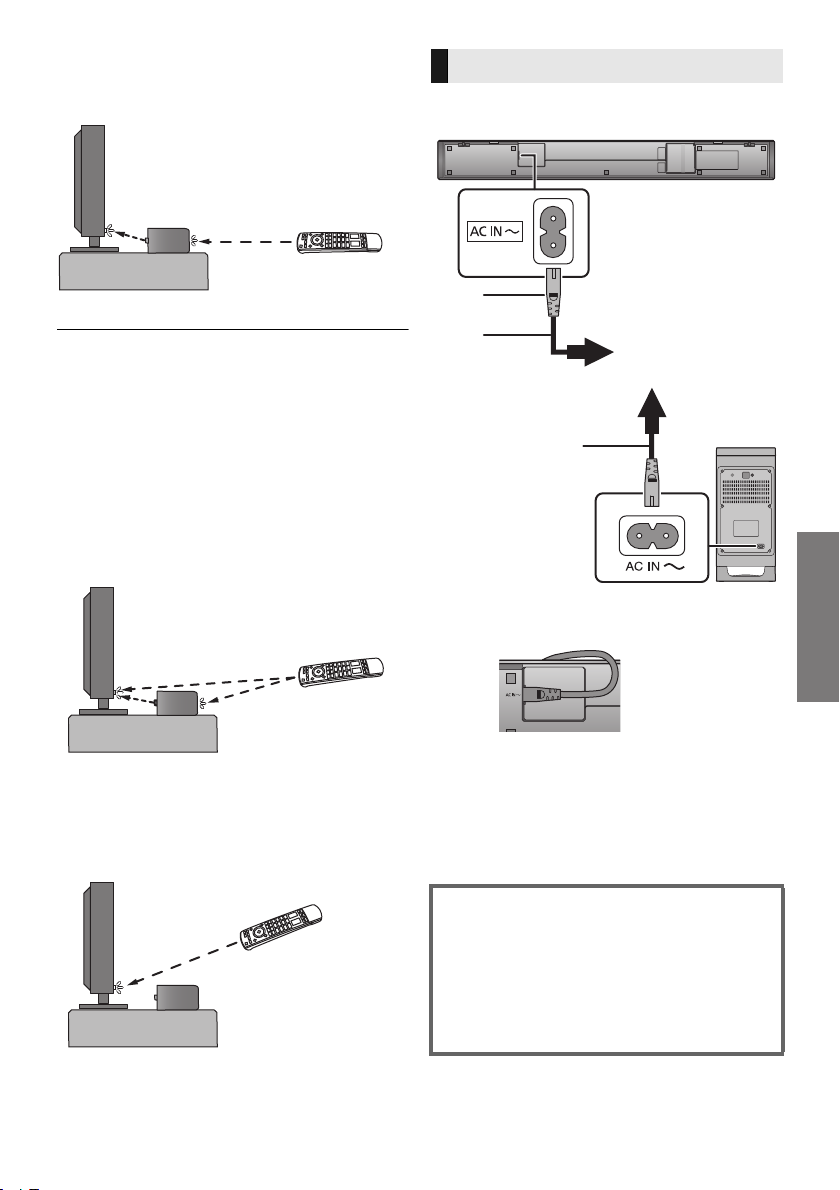
Getting started
3 Aim the TV’s remote control at this
*
To a household
mains socket
system’s remote control sensor and
operate the TV.
≥ For the location of the TV’s remote control signal sensor,
refer to the operating instructions for the TV.
≥ Select a location that suits the environment.
≥ Make sure to clean the surface, where the adhesive tape is
to be attached.
≥ If you peel off the adhesive tape, the surface may become
damaged and exposed adhesive may remain. Once you
have confirmed the TV is operating correctly, secure it by
attaching the adhesive tape.
≥ When the TV receives signals from both its remote control
and the IR Blaster, their signals may interfere with each
other, making it impossible for you to operate the TV.
Try using the TV’s remote control from a different angle.
AC mains lead connection
≥ Connect only after all other connections are
completed.
A AC mains lead (supplied)
* Insert the AC mains lead fully into the main unit.
If the TV remote control does not work even after you have
adjusted its angle, do not use the IR Blaster. Install the
main unit so that the TV’s remote control signal sensor is
visible from the position where you operate the TV remote
control.
≥ This system consumes a small amount of AC
power (> 30) even when it is turned off. In the
interest of power conservation, if you will not be
using this system for a long time, unplug it from
the household mains socket.
jOperation is not possible using the IR Blaster
if the AC mains plug is disconnected.
Saving energy
The main unit is designed to conserve its
power consumption and save energy.
≥ The main unit will automatically switch to
standby mode when no signal is input and
no operation is performed for approx. 20
minutes. Refer to page 20, “AUTO OFF” to
turn this function off.
TQBM0483
11
Page 12

Step 2 Placement
A
B
B
A
The active subwoofer
Safety Precautions
Professional installation is required.
The installation should never be done by
any other than a qualified installation
specialist.
PANASONIC DISCLAIMS ANY PROPERTY
DAMAGE AND/OR SERIOUS INJURY,
INCLUDING DEATH RESULTING FROM
IMPROPER INSTALLATION OR INCORRECT
HANDLING.
≥ Be sure to install the main unit as indicated within this
operating Instructions.
≥ Attach using techniques suited to the structure and
materials of the installation location.
Caution
≥ This system is to be used only as indicated in
these instructions. Failure to do so may lead
to damage to the amplifier and/or the
speaker, and may result in the risk of fire.
Consult a qualified service person if damage
has occurred or if you experience a sudden
change in performance.
≥ Do not attempt to attach the main unit to a
wall using methods other than those
described in this manual.
≥ Do not hold the main unit in one hand to avoid injury,
you may drop the main unit when carrying it.
≥ To prevent damage or scratches, lay down a soft cloth
and perform the assembly on it.
≥ Place the active subwoofer within a few meters of the
main unit and in a horizontal position with the top panel
facing upward.
≥ Do not use the main unit or the active subwoofer in a
metal cabinet.
≥ Placing the active subwoofer too close to the walls and
corners can result in excessive bass. Cover walls and
windows with thick curtains.
≥ Keep magnetised items away. Magnetised cards,
watches, etc., can be damaged if placed too close to
the main unit and active subwoofer.
When carrying the active subwoofer
Take care not to damage the inside speaker unit.
A Do not hold the active subwoofer from
this opening.
The parts inside may get damaged.
B Always hold the bottom of the active
subwoofer when moving it.
Wireless interference
Interference may occur if you are using other
devices (wireless LAN/microwave ovens/
cordless phones, etc.) that use the 2.4 GHz
frequency band, causing some
communication problems (sound is
interrupted, sound skips, there is a lot of
noise, etc.).
If this happens, separate the other electronic
equipment from the main unit and active
subwoofer so that interference does not
occur.
A Main unit/active subwoofer
B Wireless router, cordless phone and other
electronic devices
12
TQBM0483
Page 13

Getting started
Precautions
When placing the main unit in a rack or on a table
(Bottom)
Additionally required accessories (commercially available)
≥ Fall prevention cord (diameter: 1.5 mm to 2.0 mm)...................................................................... k 2
≥ Screw eyes (to attach the fall prevention cord) ............................................................................ k 2
≥ Use commercially available screws that are capable of supporting over 45 kg.
≥ Use a cord that is capable of supporting over 45 kg.
≥ Lay the unit on a blanket or soft cloth for assembly.
1 Attach the cord to the main unit.
A Cord*
* If the cord cannot be threaded through the holes, try bending the cord in a location about 5 mm
apart from the tip, at an angle of 45
o
(as illustrated above).
2 Place the main unit in the desired position and attach each cord onto the rack or
table.
≥ Make sure that the slack of the cord is minimal.
≥ Do not lean the main unit against the TV or wall.
B Screw eye
≥ Attach at a position capable of supporting over 45 kg.
≥ Depending on the placement of the main unit, the screwing position of the screw eye may differ.
∫ When placing the main unit in front of the TV
The main unit may block or interfere with the TV’s various sensors (C.A.T.S. (Contrast Automatic
Tracking System) sensor, remote control sensor, etc.) and the 3D Eyewear transmitters on a 3D
compatible TV.
≥ If interference occurs, move the main unit further away from the TV. If the TV still does not function
correctly, try using it in a rack or in the wall mount position.
TQBM0483
13
Page 14

When attaching the main unit to a wall
(Rear)
The main unit can be wall mounted using the supplied wall mount brackets, etc. Make sure that the
screw used and the wall are strong enough to support the weight of at least 45 kg.
The screws and other items are not supplied as the type and size will vary with each installation.
≥ Refer to step 3 for details about the required screws.
≥ Be sure to attach the fall prevention cord as a secondary safety measure.
Supplied accessories
∏ 2 Screws ∏ 2Wall mount
Additionally required accessories (commercially available)
≥ Screws for wall mounting............................................................................................................. k 2
≥ Fall prevention cord (diameter: 1.5 mm to 2.0 mm)..................................................................... k 2
≥ Screw eyes (to attach the fall prevention cord) ........................................................................... k 2
≥ Use a cord that is capable of supporting over 45 kg.
≥ Lay the unit on a blanket or soft cloth for assembly.
1 Attach the cord to the main unit.
≥ Perform step 1 in “When placing the main unit in a rack or on a table”. (> 13)
2 Attach the wall mount brackets to the main unit.
brackets
A Wall mount bracket (supplied)
B Screw (supplied)
TQBM0483
14
Page 15

Getting started
Precautions
3 Drive a screw into the wall.
≥ Use the measurements indicated below to identify the screwing positions on the wall.
≥ Leave at least 200 mm of space above of the main unit to allow enough space for fitting the main unit.
≥ Be sure to use a level to ensure that both mounting holes are level to each other.
C At least 30 mm
D ‰4.0 mm
E ‰7.0 mm to ‰9.4 mm
F Wall or pillar
G 2.5 mm to 4.5 mm
Front view (semi-transparent image)
H 700 mm I 175 mm J 175 mm
K 8mm L 89 mm M Wall mounting hole
4 Fit the main unit securely onto the screw(s).
5 Secure the cord to the wall.
≥ Make sure that the slack of the cord is minimal.
N Screw eye
O Cord
DO DO NOT
≥ Move the speaker so
that the screw is in
this position.
≥ In this position, the
speaker will likely fall
if moved to the left or
right.
TQBM0483
15
Page 16

Step 3 Active
subwoofer wireless
connection
Preparation
≥ Turn on the main unit.
1Press [BÍ CI].
Active subwoofer on/off button [BÍ CI]
Use this button to turn the active subwoofer on
and off.
C I: The active subwoofer is on.
BÍ: The active subwoofer is off.
The active subwoofer will still consume a small
amount of power even when it is turned off
(B, Í).
2 Check that the wireless link is
activated.
WIRELESS LINK indicator
Lights red:
The wireless link is not activated.
Refer to “The WIRELESS LINK indicator lights
red.” to activate this. (> 27)
Lights green:
The wireless link is activated.
Blinks green:
The active subwoofer is trying to activate the
wireless link with the main unit.
≥ The wireless link will be activated when the main unit and
the active subwoofer are both turned on.
TQBM0483
16
Page 17

Getting started
Operations
Operations
Using this system
Preparation
≥ Turn on the active subwoofer.
≥ Turn on the TV and/or connected device.
1
INPUT
2
1 Press [Í] to turn on the main unit.
2 Select the source.
Press To select
Input changes in the following
[INPUT]
[ -PAIRING]
≥ This remote control cannot be used to control the
operations of the connected devices.
∫ When you select “HDMI 1” or
“HDMI 2”
Change the input on the TV to the one this unit is
connected to, then start play on the device
connected to this unit.
order each time you press
[INPUT].
“TV” # “HDMI 1”# “HDMI 2”
Select the Bluetooth
the source. (> 18)
SOUND
SETUP
OK
^--- “BLUETOOTH”(----}
®
device as
∫ To adjust the volume of this system
Press [i VOL j].
≥ Volume range: 0 to 100
∫ To mute the sound
Press [MUTE].
≥ While muting, “MUTE” is indicated on the display.
≥ To cancel, press the button again or adjust the volume.
≥ Muting is cancelled if the main unit is turned off.
If this system does not operate as
expected or sound is unusual, returning
the settings to the factory preset may solve
the problem. (>
≥ If there is sound coming out of the TV’s speakers, reduce
the volume of the TV to its minimum.
≥ There may be a difference in the maximum volume value of
the TV and the unit.
≥ When playing equipment connected to the HDMI AV IN
terminal, to switch audio/video to the TV, switch input to the
TV tuner. If VIERA Link (HDMI) (> 22) is not enabled, also
switch the input of this unit to TV.
24)
Remote control code
When other Panasonic devices respond to this
system’s remote control, change the remote
control code on this system and the remote
control.
Preparation
≥ Turn off all other Panasonic products.
≥ Turn on the main unit.
≥ Aim the remote control at this unit’s remote
control sensor.
∫ When you select “BLUETOOTH”
Start play on the Bluetooth® device connected to
this unit.
∫ To set the code to “REMOTE 2”
While pressing and holding [MUTE], press and
hold [OK] for more than 4 sec.
“REMOTE 2” is indicated on the display.
∫ To set the code to “REMOTE 1”
While pressing and holding [MUTE], press and
hold [4] for more than 4 sec.
“REMOTE 1” is indicated on the display.
TQBM0483
17
Page 18

Bluetooth® operations
By using the Bluetooth® connection, you can
listen to the sound of the Bluetooth
from this system wirelessly.
≥
Refer to the operating instructions of the Bluetooth® device
for further instruction on how to connect a Bluetooth
Preparation
≥ Turn on the Bluetooth® feature of the device and
place the device near the main unit.
Bluetooth® pairing
1 Press [ -PAIRING] to select
“BLUETOOTH”.
≥ If “PAIRING” is indicated on the display, go to step 3.
2 Press and hold [ -PAIRING] until
“PAIRING” is indicated on the display.
3 Select “SC-HTB700” from the
Bluetooth
≥ A BD address (Bluetooth® Device address: an
alphanumeric character string that is displayed by and
unique to the device) may be displayed before the
name of the Bluetooth
≥ If prompted for the passkey on the Bluetooth
enter “0000”.
≥ Once the Bluetooth
the connected device will be indicated on the display
for a few seconds.
≥ If you register more than 8 devices, ones that have not
been connected for a long period of time may be deleted
from the list of registered devices. In that case, pair with
the deleted devices again.
®
device’s Bluetooth® menu.
®
device is displayed.
®
device is connected, the name of
®
audio device
®
device.
®
device,
Connecting a paired
®
Bluetooth
1 Press [ -PAIRING] to select
Bluetooth
≥ This may display “LINKING” and automatically
connect this system to the Bluetooth
last connected to.
≥ After “LINKING” is displayed, proceed to step 2 if
“BLUETOOTH READY” is displayed.
2 After confirming that “BLUETOOTH
READY” is indicated on the display,
select “SC-HTB700” from the
Bluetooth
∫ Disconnecting a Bluetooth
Follow the step below if, for example, a
connection has been made to any device other
than the Bluetooth
to.
Press and hold [ -PAIRING] until the
“BLUETOOTH READY” is indicated on the
display.
≥ When “BLUETOOTH” is selected as the source, this
system will automatically try and connect to the last
connected Bluetooth
fails, try to establish a connection again.
≥ This system can only be connected to one device at a time.
≥ To change the sound quality, refer to “LINK MODE”. (> 20)
≥ Video and audio may be out of sync when you play back
music accompanied by video.
device
®
mode.
®
device it was
®
device’s Bluetooth® menu.
®
device
®
device you want to connect
®
device. If the connection attempt
18
TQBM0483
Page 19

Operations
Sound menu
e.g., Impression of the 3D surround effect
1 Press [SOUND] repeatedly to select
the sound effect and then press [OK].
≥ You can also press [4] or [3] repeatedly to select the
setup item.
2Press [4][3] repeatedly to select the
desired setting and then press [OK].
∫ SOUND MODE
Select the sound mode to suit the TV programme
or connected equipment.
STANDARD: Best suited for dramas and comedy
shows.
STADIUM: Produces a realistic sound for live
sports broadcasts.
MUSIC: Enhance the sound of musical
instruments and songs.
CINEMA: Produces three-dimensional sound
unique to movies.
NEWS: Enhance the voice of news and sports
commentaries.
STRAIGHT*
stereo playback and 3.1 channels during multichannel playback.
∫ 3D SURROUND*
This system not only pushes the sound field out to
the left and right, but also upwardly to help realise
an immersive sound effect.
1
: Output is 2.1 channels during
1
∫ CLR DIALOG
You can change the level of dialogue clarity when
you want to emphasise people’s voices, etc.
Of the levels “LEVEL 1” to “LEVEL 4”, the effect
increases the higher the level number.
If the sound becomes unnatural, select “OFF”.
≥ For DTS:X® content, change the level using “DTS:X
DIALOG CONTROL”.
∫ DTS:X DIALOG CONTROL*
2
You can change the level of dialogue clarity when
you want to emphasise people’s voices, etc.
This has an effect only when playing back DTS:X
content.
Of the levels “LEVEL 0” to “LEVEL 6”, the effect
increases the higher the level number.
∫ DUAL AUDIO*
2
Sets the preferred audio channel mode when
there are two audio modes received by this
system.
M1: Main
M2: Secondary
M1+M2: Main + Secondary
This effect only works if the audio output of the TV
or player is set to “Bitstream” and “Dual Mono” is
available in the sound source.
∫ DRC*
2
You can listen at low volumes but still hear
dialogue clearly.
If the sound becomes unnatural, select “OFF”.
≥ When playing back “Dolby TrueHD” audio, if “AUTO” is
selected, then depending on the content, the effect output
may be the one when “ON” is selected.
≥ This function is enabled only when Dolby Audio
Digital, Dolby Digital Plus, or Dolby TrueHD), Dolby
®
, or DTS® signals are being input.
Atmos
TM
(Dolby
®
≥ The default setting is “OFF”.
≥ The surround effect depends on the source.
∫ SUBWOOFER
You can adjust the amount of bass.
Of the levels “LEVEL 1” to “LEVEL 4”, the effect
increases the higher the level number.
∫ AGC
Auto gain control prevents sudden loud sound by
reducing the sound level automatically when the
input is too high.
This function is suitable for TV broadcast that has
sound level difference.
If the sound becomes unnatural, select “OFF”.
∫ LOW VOL MODE
Enhance the dialogue in low volume condition.
Select “OFF” to cancel this effect if the dialogue
does not sound natural in low volume condition.
TQBM0483
19
Page 20

∫ WALL MOUNT
Select the appropriate speaker placement mode
to suit your placement method. This system will
adjust the sound effect according to the
placement mode setting.
ON: For wall mounting layout
OFF: For table top layout
≥ The default setting is “OFF”.
Setup menu
1 Press [SETUP] repeatedly to select
the setup item and then press [OK].
≥ You can also press [4] or [3] repeatedly to select the
setup item.
2 Press [4][3] repeatedly to select the
desired setting and then press [OK].
≥ Changed settings will be kept until it is changed again,
unless otherwise indicated.
*1 The effects of “STRAIGHT” in “SOUND MODE” and
“ON” in “3D SURROUND” will not be applied
simultaneously.
*2 Effects are disabled when the input selected is
“BLUETOOTH”. It is also not possible to change the
settings.
Audio format
You can view the current audio format.
Press and hold [SOUND] for more than 4 sec.
≥ The audio format is displayed for about 3 seconds.
≥ No audio format is displayed if input to this unit is
Bluetooth
®
.
∫ DIMMER
Switch the brightness of the display.
≥ While “DISPLAY OFF” is set, the display lights for about
5 seconds if operations are performed on the main unit or
with the remote control.
≥ While “DISPLAY OFF” is set, a part of the display lights if
the display is off but the main unit is on.
∫ BEEP
A beep sounds when you touch the switch on the
main unit or when you turn the unit on/off.
≥ This works during muting as well.
∫ AUTO OFF
The main unit automatically is turned off if there is
no audio input and when you do not use it for
approx. 20 minutes.
≥ When this is set, the display shows “P.OFF 1MIN” to
indicate that the main unit will turn off in approximately 1
minute.
≥ If “STANDBY MODE” or “VIERA LINK” is set to “ON”, this
function will also be set to “ON”. To change the setting, set
“STANDBY MODE” and “VIERA LINK” to “OFF”. (> 21)
∫ VOL LIMITATION
When this function is set to “ON”, if the volume
exceeds 50 when the main unit is turned off, then
the volume is set to 50 when the main unit is
turned on.
∫ LINK MODE
Change the Bluetooth
prioritise transmission quality or sound quality.
Make sure that the Bluetooth
®
transmission mode to
®
device is not
connected (“BLUETOOTH READY” is indicated
on the display).
MODE 1: Emphasis on connectivity.
MODE 2: Emphasis on sound quality.
≥ The default setting is “MODE 2”.
20
TQBM0483
Page 21

Operations
∫ VIERA LINK
Turn on the VIERA Link function.
Select “OFF” when your HDAVI Control device
does not work correctly with this system.
≥ ARC will be disabled. Connect an optical digital audio
cable.
≥ Turn off all connected devices and then turn them on again
after changing the setting.
∫ STANDBY MODE
When this function is set to “ON”, then the main
unit automatically turns on in the following cases.
– When a Bluetooth® connection is established to the main
unit from a paired Bluetooth
≥ The default setting is “ON”.
≥ If this function is set to “ON”, the standby power
consumption will increase. (> 30)
®
device.
∫ RESET
This restores the settings to the factory presets.
≥ For details, refer to “To return to the factory preset.” (> 24)
∫ F/W VERSION
You can check the firmware version.
≥ The version of the installed firmware is displayed when you
press [OK] while “F/W VERSION” is being displayed.
Press [OK] again to stop the display.
≥ Changed settings will be kept until it is changed again,
unless otherwise indicated.
Firmware update
Occasionally, Panasonic may release updated
firmware for this system that may add or improve
the way a feature operates. These updates are
available free of charge.
For the latest information, refer to the site
below.
https://panasonic.jp/support/global/cs/audio/
(This site is in English only.)
1 Turn off the main unit, then connect the
USB device containing the latest
firmware to the main unit.
≥ Depending on the shape of the USB device, the
cables connected to other terminals may obstruct the
connection. In that case, unplug the connection
cables around the USB device first, then reconnect it.
2Touch [Í/I] on the main unit to turn it on.
DO NOT DISCONNECT the AC mains
lead while one of the following messages
is displayed.
“CHECK □□ %”
“UPDATE □□□ %”
(“ □ ” stands for a number.)
≥ During the update process, no other operations
can be performed.
When the update has finished successfully,
“SUCCESS” is displayed.
3 Disconnect the USB device.
4Touch [Í/I] on the main unit to turn it off,
then touch [Í/I] on the main unit to turn
it on.
≥ If there are no updates, “NO NEED” is displayed.
≥ You cannot output sound from this unit while updating the
firmware.
≥ To view the TV during update, change the settings on the
TV to have the sound output from the TV’s speakers. Refer
to the operating instructions of the TV for details.
≥ If “PLEASE DISCONNECT USB DEVICE” appears on the
display, disconnect the USB device. After that, touch [Í/I]
on the main unit to turn it off, then touch [Í/I] again to turn
it on.
Preparation
≥ Download the latest firmware from the following
website and store it to a USB device to update
the firmware.
https://panasonic.jp/support/global/cs/audio/
(This site is in English only.)
TQBM0483
21
Page 22

Linked operations with
the TV
(VIERA Link “HDAVI
Control
What is VIERA Link “HDAVI
Control”?
VIERA Link “HDAVI Control” is a convenient
function that offers linked operations of this
system, and a Panasonic TV (VIERA) under
“HDAVI Control”.
You can use this function by connecting the
equipment with an HDMI cable. See the
operating instructions for connected
equipment for operational details.
Preparation
1 Confirm that the HDMI connection has been
made. (> 8, 10)
2 Set the “HDAVI Control” operations on the
connected equipment (e.g., TV).
3 For the optimal “HDAVI Control” operations
change the following settings on the
connected TV*
≥ Set the default speaker settings to this system.*
≥ Set the speaker selection settings to this system.
4 Turn on all “HDAVI Control” compatible
equipment and select the TV’s input for this
system so that the “HDAVI Control” function
works properly.
5 If a device is connected to the HDMI AV IN
terminal, start play to check that the picture is
displayed on the TV correctly.
When the connection or settings are changed,
repeat this procedure.
*1 The availability and function of the settings may vary
depending on the TV. Refer to the operating instructions
for the TV for details.
*2 If the TV has a default speaker setting within the VIERA
Link setting items, choosing this system as the default
speaker will automatically change the speaker selection
to this system.
TM
1
”)
.
2
≥ VIERA Link “HDAVI Control”, based on the control
functions provided by HDMI which is an industry standard
known as HDMI CEC (Consumer Electronics Control), is a
unique function that we have developed and added. As
such, its operation with other manufacturers’ equipment
that supports HDMI CEC cannot be guaranteed.
≥ This unit supports “HDAVI Control 5” function.
“HDAVI Control 5” is the standard for Panasonic’s HDAVI
Control compatible equipment. This standard is compatible
with Panasonic’s conventional HDAVI equipment.
≥ Please refer to individual manuals for other manufacturers’
equipment supporting VIERA Link function.
What you can do with
VIERA Link
“HDAVI Control”
To make sure that the audio is output from this
system, turn the main unit on by using the TV’s
remote control and selecting home cinema from
the speaker menu of VIERA Link menu.
The availability and function of the settings may
vary depending on the TV. Refer to the operating
instructions for the TV for details.
∫ Speaker control
You can select whether audio output is from this
system or the TV speakers by using the TV menu
settings.
Home cinema
This system is active.
≥ When the main unit is in standby mode, changing the TV
speakers to this system in the VIERA Link menu will
automatically turn the main unit on.
≥ You can control the volume setting of this system using the
volume or mute button on the TV remote control.
≥ If you turn off the main unit, TV speakers will be
automatically activated.
≥ Audio will automatically be output from this system if the
TV is compatible to VIERA Link “HDAVI Control 4” or later.
TV
TV speakers are active.
≥ The volume of this system is set to its minimum.
22
TQBM0483
Page 23

Operations
∫ Automatic input switching
When the following operations are performed, the
main unit will automatically change the input to
the corresponding source.
jWhen play starts on an HDMI connected
device.*
3
jWhen the TV input or the TV channel is
changed.
*3 If the speaker output setting on the TV is set to this
system, the TV and the main unit turn on automatically
(Power on link).
∫ Power off link
When the TV is turned off, the main unit also turns
off automatically.
(This function does not work when
“BLUETOOTH” is the source.)
∫ Automatic lip-sync function
(for HDAVI Control 3 or later)
Delay between audio and video is automatically
adjusted by adding time-lag to the audio output,
enabling you to enjoy smooth audio for the
picture.
≥ It may take up to 8 seconds for sound to be output from this
unit after turning the TV (VIERA) on. You can reduce the
amount of time it takes for sound to be output by using an
optical digital audio cable. If you do so, reconnect the
HDMI cable to a non-ARC compatible HDMI terminal on
the TV (VIERA). (> 8)
≥ The delay information is automatically set if the TV is
compatible to VIERA Link “HDAVI Control 3” or later and
the VIERA Link is set to on.
The setting causes a sound delay of approximately 0.04
seconds when connected to a Panasonic TV (VIERA) with
VIERA Link (HDMI) version 2 or earlier or a TV from
another manufacturer.
TQBM0483
23
Page 24

Reference
Troubleshooting
Before requesting service, make the following
checks. If you are in doubt about some of the
check points, or if the solutions indicated in the
following guide do not solve the problem, consult
your dealer for instructions.
If this system does not operate as
expected, returning the settings to the
factory preset may solve the problem.
To return to the factory preset.
1 Press [SETUP] repeatedly to select
“RESET” and then press [OK].
≥ You can also press [4] or [3] repeatedly to select
the setup item.
2 Press [4][3] to select “OK?YES” and
then press [OK].
≥ “RESET” blinks on the display. After the “RESET”
display goes out, “TV” is selected as the source for
this system.
≥ The remote control code will return to
“REMOTE 1” when this system is returned to
the factory preset. To change the remote
control code, refer to “Remote control code”
(> 17).
The remote control does not work properly.
≥ The battery is depleted. Replace it with a new
one. (> 7)
≥ It is possible that the insulation sheet has not
been removed. Remove the insulation sheet.
(> 7)
≥ It may be necessary to set the code of the
remote control again after changing the battery
of the remote control. (> 17)
≥ Use the remote control within the correct
operation range. (> 7)
The main unit is automatically switched to
standby mode.
“AUTO OFF” function is on.
The main unit will automatically switch to standby
mode when no signal is input and no operation is
performed for approx. 20 minutes. Refer to page
20 to turn this function off.
The main unit is turned off when the TV’s
speakers are selected in the speaker control.
This is a normal feature when using VIERA Link
(HDAVI Control 4 or later). Please read the
operating instructions for the TV for details about
its power save feature. (> 22)
General operation
The unit does not work.
Operations are not done properly.
1 Touch [Í/I] on the main unit to turn it off.
≥ If the main unit still does not turn off, touch and hold
[Í/I] on the main unit for at least 5 sec. This will force
turn off the main unit. Alternatively, disconnect the AC
mains lead, wait for at least 3 minutes, then reconnect
it.
2 Touch [Í/I] on the main unit to turn it on.
(It may take some time for the main unit to be
turned on.)
Consult your dealer if the problem persists.
No power.
≥ Unplug the AC mains lead for at least 3 minutes
before plug in again.
≥ After turning the main unit on, if the main unit
immediately turns off, unplug the AC mains lead
and consult your dealer.
≥ If the main unit does not turn on by turning on
TV (HDAVI Control), turn on the main unit
manually.
If the problem persists, refer to “HDMI” in
“Troubleshooting”.
TQBM0483
24
The switches on the main unit do not work.
[Í/I], [VOL j], [VOL i], [INPUT], and [ ] on the
main unit are touch keys. Touch the switches with
your finger. They may not work if operated with
your fingernails or hands wearing gloves.
Colour irregularities on a CRT TV.
If colour irregularities appear on the TV, turn off
the TV for about 30 minutes and move TV away
from this unit slightly. If this does not fix the
problem, move this unit away from the TV.
The TV remote control does not work even
when the IR Blaster is connected to the main
unit.
When the TV receives signals from both its
remote control and the IR Blaster, their signals
may interfere with each other, making it
impossible for you to operate the TV. Adjust the
angle at which you operate the TV remote control.
(> 11 )
Page 25

Reference
HDMI
This system does not operate correctly.
If the HDMI cable is connected to the wrong
terminal (HDMI AV IN or HDMI AV OUT), this
system will not operate correctly. Turn the main
unit off, disconnect the AC mains lead and
reconnect the HDMI cable(s). (> 8, 10)
VIERA Link related operations no longer
function properly.
≥ Check the VIERA Link setting on the connected
devices.
jTurn on VIERA Link function on the
connected devices.
jSelect this system as the speaker in the TV's
VIERA Link menu.
≥ Have you turned the VIERA Link settings off?
(> 21)
≥ When the HDMI connections are changed, after
a power failure or after the AC mains lead has
been removed, VIERA Link operations may not
function properly.
jTurn on all the devices that are connected to
the TV with an HDMI cable and then turn the
TV on.
jTurn off the VIERA Link settings of the TV and
turn it on again. For details refer to the
operating instructions for the TV.
jWhile the main unit and the TV are connected
with the HDMI cable, turn on the TV and then
remove the main unit’s AC mains lead and
reconnect it again.
The first few seconds of audio cannot be
heard when using the HDMI connection.
This may occur when a DVD is played back by
chapter, for example. The situation may improve
by changing the digital audio output setting on the
connected device from “Bitstream” to “PCM”.
When operating an HDMI compatible device of
a different brand, the main unit reacts in an
unwanted manner.
HDAVI Control commands may use a different
signal depending on the brand of the device. The
situation may improve by selecting a setting that
does not use VIERA Link. (> 21)
When the main unit is turned on or off, audio
and video are temporarily disabled.
When the main unit is turned on or off it is normal
for the audio and video to be temporarily disabled.
This is not a malfunction.
The images from this system do not appear on
the TV.
When outputting in 60p (4K), images may be
distorted depending on the HDMI cable. Use High
Speed HDMI cables which support 18 Gbps
bandwidth.
Bluetooth
Pairing cannot be done.
Check the Bluetooth
®
®
device condition.
The device cannot be connected.
≥ The pairing of the device was unsuccessful or
the registration has been replaced. Try pairing
the device again. (> 18)
≥ This system might be connected to a different
device. Disconnect the other device and try
pairing the device again.
The device is connected but audio cannot be
heard through this system.
For some Bluetooth
®
devices, you have to set the
audio output to “SC-HTB700” manually. Read the
operating instructions for the device for details.
Connection is interrupted.
Sound is interrupted/sound skips/there is a lot
of noise.
≥ Remove any obstacle between the main unit
and the device.
≥ Other devices that use the 2.4 GHz frequency
band (wireless router, microwaves, cordless
phones, etc.) are interfering. Bring the
Bluetooth
®
device closer to the main unit and
distance it from the other devices.
≥ Select “MODE 1” for stable communication.
(> 20, “LINK MODE”)
If the above does not fix the problem, you may be
able to fix the problem by reconnecting this unit
and the Bluetooth
®
device. (> 18)
TQBM0483
25
Page 26

Sound
No sound (or image).
≥ Turn muting off. (> 17)
≥ Check the connections to the other devices.
(> 8 - 10)
≥ Make sure that the received audio signal is
compatible with this system. (> 30)
≥ Turn this system off and then on again.
≥ If the main unit is connected to the TV with only
an HDMI cable, make sure that the TV’s HDMI
terminal is labelled “HDMI (ARC)”. If not,
connect using the optical digital audio cable.
(> 8)
≥ If the main unit is connected to a Panasonic TV
and turned on using the remote control or the
touch key on the main unit, sound might not be
output from this system. In this case, turn the
main unit on using the TV’s remote control.
(> 22)
≥ If the connections are correct, there might be a
problem with the cables. Redo the connections
with different cables.
≥ Check the audio output settings on the
connected device.
≥ The situation may improve by changing the
digital audio output setting on the connected
device from “Bitstream” to “PCM”.
The dual audio cannot be changed from main
to secondary.
If the audio received from the connected device is
not “Dual Mono” or the output setting is not
“Bitstream”, the setting cannot be changed from
this system. Change the setting on the connected
device.
The dialogue is too persistent or the dialogue
does not sound natural.
This system has a function to make the dialogue
stand out when the volume is low. (> 19)
The sound lags behind the image.
Depending on the TV, when this unit is connected
to it via Bluetooth
®
, the sound output from this unit
may lag behind the TV image. Connect this unit
and the TV with an HDMI cable/optical digital
audio cable. (> 8)
Sound stops.
The power of the main unit turns off
automatically.
(When the main unit detects a problem, a safety
measure is activated and the main unit
automatically switches to standby mode.)
≥ There is a problem with the amplifier.
≥ Is the volume extremely high?
If so, lower the volume.
≥ Is this system placed in an extremely hot place?
If so, move this system to a cooler place and
wait a few moments and then try to turn it on
again.
If the problem persists, confirm the display, turn
this system off, remove the AC mains lead cord
and consult your dealer. Please be sure to
remember the display that was indicated and
inform the dealer.
The volume is lowered when the main unit is
turned on.
“VOL LIMITATION” is on.
If the main unit is turned off with the volume
setting in the greater half (above 50), the main
unit will automatically lower the volume to the
middle (50) when the main unit is turned on.
(> 20)
TQBM0483
26
Page 27

Reference
Active Subwoofer Main unit displays
No power.
Ensure the AC mains lead of the active subwoofer
is connected properly.
After turning the subwoofer on, it immediately
turns off.
Unplug the AC mains lead and consult your
dealer.
No sound from the subwoofer.
≥ Check that the active subwoofer is turned on.
≥ Check that the WIRELESS LINK indicator lights
green. (> 16)
The WIRELESS LINK indicator lights red.
≥ There is no link between the main unit and the
active subwoofer. Check that the main unit is
turned on.
≥ The active subwoofer and the main unit may not
be paired correctly. Try the following operation.
(Wireless pairing)
1 Turn on the main unit and active subwoofer.
2 Press and hold [I/D SET] on the rear of the
active subwoofer for more than 3 sec.
(The WIRELESS LINK indicator will blink in
red.)
3 While pressing and holding [INPUT] on
remote control, touch and hold [VOL i] on
the main unit for more than 4 sec.
(“SUBWOOFER PAIRING” will be indicated
on the display.)
≥ When the wireless pairing is successful, “PAIRED”
will be indicated on the display for 2 sec and
WIRELESS LINK indicator lights green.
4 Turn the main unit off and on.
≥ Consult your dealer if the problem persists.
“F61”
≥ There is a problem with the amplifier of the
system.
≥ Disconnect the AC mains lead and consult the
dealer.
“F70 DSP”
≥ Turn off the main unit and then switch it on
again.
“F70 EEPROM” / “F77”
≥ Disconnect the AC mains lead and consult the
dealer.
“F70 HDMI” / “U701” / “U703”
≥ Check HDMI connection.
≥ Turn off the main unit and then switch it on
again.
≥ Disconnect the HDMI cable.
“F703”
≥ Turn off the main unit and then switch it on
again.
≥ Consult your dealer if the problem persists.
“F76”
≥ There is a problem with the power supply.
≥ Disconnect the AC mains lead and consult the
dealer.
“U704”
This system is receiving unsupported video
format signal from the input source.
≥ Change the video resolution setting on the
connected device. (Refer to the operating
instructions for the device.)
≥ If there is no image, connect the device directly
to the TV to change the settings.
“U705”
The TV’s HDMI terminal connected to the main
unit or the TV’s setting is not compatible with the
HDCP 2.2 playback source.
≥ Ensure to connect to the TV’s HDCP 2.2
compatible terminal.
≥ Ensure the TV’s HDMI HDCP setting
corresponds to HDCP 2.2.
(Refer to the operating instructions for the TV.)
TQBM0483
27
Page 28

“USB OVER CURRENT ERROR”
The USB device is drawing too much power.
≥ Disconnect the USB device. After that, turn off
the main unit and then switch it on again.
≥ Turn the main unit off and then on again.
“LOAD FAIL”
The firmware loading has failed. Check to see if
the correct firmware is stored on the USB device.
“LINKING”
≥ This system is trying to connect to the last
connected Bluetooth
®
device when
“BLUETOOTH” is selected.
“REMOTE ” (“ ” stands for a number.)
The remote control and this system are using
different codes. Change the code on the remote
control. (> 17)
28
TQBM0483
Page 29

Reference
Unit care
Licenses
∫ Clean this system with a soft, dry
cloth
(Pull out the AC mains lead from the socket
before maintenance.)
≥ When dirt is heavy, wring a cloth moistened in
water tightly to wipe the dirt, and then wipe it
with a dry cloth.
≥ When cleaning the speakers, use a fine cloth.
Do not use tissues or other materials (towels,
etc.) that can fall apart. Small grains may get
stuck inside the speaker cover.
≥ When cleaning the top surface (A) of the main
unit, wipe left and right along the line.
≥ Never use alcohol, paint thinner or benzine to
clean this system.
≥ Before using chemically-treated cloth, carefully
read the instructions that came with the cloth.
∫ To dispose or transfer this system
This system may keep the user settings
information in the main unit. If you discard the
main unit either by disposal or transfer, then
follow the procedure to return all the settings to
the factory presets to delete the user settings.
(> 24, “To return to the factory preset.”)
≥ The operation history may be recorded in the
memory of the main unit.
Dolby, Dolby Audio, Dolby Atmos, and the double-D symbol are
trademarks of Dolby Laboratories.
For DTS patents, see http://patents.dts.com.
Manufactured under license from DTS, Inc.
DTS, the Symbol, DTS and the Symbol together, DTS:X, the
DTS:X logo, Virtual:X, and the DTS Virtual:X logo are
registered trademarks or trademarks of DTS, Inc. in the United
States and/or other countries.
© DTS, Inc. All Rights Reserved.
The product with the Hi-Res Audio logo is conformed to Hi-Res
Audio standard defined by Japan Audio Society.
The logo is used under license from Japan Audio Society.
The terms HDMI and HDMI High-Definition Multimedia
Interface, and the HDMI Logo are trademarks or registered
trademarks of HDMI Licensing Administrator, Inc. in the United
States and other countries.
HDAVI ControlTM is a trademark of Panasonic Corporation.
The Bluetooth® word mark and logos are registered trademarks
owned by Bluetooth SIG, Inc. and any use of such marks by
Panasonic Corporation is under license.
Other trademarks and trade names are those of their respective
owners.
FLAC Decoder
Copyright (C) 2000,2001,2002,2003,2004,2005,2006,2007,
2008,2009 Josh Coalson
Redistribution and use in source and binary forms, with or
without modification, are permitted provided that the following
conditions are met:
– Redistributions of source code must retain the above
copyright notice, this list of conditions and the following
disclaimer.
– Redistributions in binary form must reproduce the above
copyright notice, this list of conditions and the following
disclaimer in the documentation and/or other materials
provided with the distribution.
– Neither the name of the Xiph.org Foundation nor the names
of its contributors may be used to endorse or promote
products derived from this software without specific prior
written permission.
THIS SOFTWARE IS PROVIDED BY THE COPYRIGHT
HOLDERS AND CONTRIBUTORS “AS IS” AND ANY
EXPRESS OR IMPLIED WARRANTIES, INCLUDING, BUT
NOT LIMITED TO, THE IMPLIED WARRANTIES OF
MERCHANTABILITY AND FITNESS FOR A PARTICULAR
PURPOSE ARE DISCLAIMED. IN NO EVENT SHALL THE
FOUNDATION OR CONTRIBUTORS BE LIABLE FOR ANY
DIRECT, INDIRECT, INCIDENTAL, SPECIAL, EXEMPLARY,
OR CONSEQUENTIAL DAMAGES (INCLUDING, BUT NOT
LIMITED TO, PROCUREMENT OF SUBSTITUTE GOODS OR
SERVICES; LOSS OF USE, DATA, OR PROFITS; OR
BUSINESS INTERRUPTION) HOWEVER CAUSED AND ON
ANY THEORY OF LIABILITY, WHETHER IN CONTRACT,
STRICT LIABILITY, OR TORT (INCLUDING NEGLIGENCE OR
OTHERWISE) ARISING IN ANY WAY OUT OF THE USE OF
THIS SOFTWARE, EVEN IF ADVISED OF THE POSSIBILITY
OF SUCH DAMAGE.
TQBM0483
29
Page 30

Specifications
AMPLIFIER SECTION
RMS OUTPUT POWER (non-simultaneous drive)
FRONT SPEAKER (L/R)
42 Wi42 W
(1 kHz, T.H.D. 10.0 %, 8 Ω, 20 kHz LPF)
FRONT SPEAKER (Centre)
42 W
(1 kHz, T.H.D. 10.0 %, 8 Ω, 20 kHz LPF)
SUBWOOFER
250 W
(100 Hz, T.H.D. 10.0 %, 8 Ω, 20 kHz LPF)
Total RMS OUTPUT POWER
376 W
TERMINALS SECTION
HDAVI Control
This unit supports “HDAVI Control 5” function
HDMI AV input (HDMI 1) 1
input connector Type A (19 pin)
HDMI AV input (HDMI 2) 1
input connector Type A (19 pin)
HDMI AV output (TV (ARC)) 1
output connector Type A (19 pin)
Digital Input
Optical digital input (Optical terminal)
IR Blaster
Ter min al Type ‰3.5 mm jack
USB Port
For UPDATE
SPEAKER SECTION
FRONT SPEAKER (L/R) Built in Main set
Type
1 way, 1 speaker (Bass reflex)
Speaker Unit(s)
Fullrange 6.5 cmk1/ch, Cone type
Impedance 8 Ω
FRONT SPEAKER (Centre) Built in Main set
Type
1 way, 1 speaker (Closed)
Speaker Unit(s)
Fullrange 6.5 cmk1/ch, Cone type
SUBWOOFER
Type
1 way, 1 speaker (Bass reflex)
Speaker Unit(s)
Sub woofer 16 cmk1, Cone type
GENERAL
Power consumption
Main unit 41 W
Active subwoofer 48 W
Standby
Main unit
0.2 W (Bluetooth Standby Off)*
0.3 W (Bluetooth Standby On)*
Active subwoofer
Power switch off
The wireless link is not activated
Power supply
AC 220 V to 240 V, 50 Hz
Dimensions (WkHkD)
Main unit
For table top layout
1050 mmk78 mmk129 mm
For wall mounting layout
1050 mmk89 mmk133 mm
Active subwoofer
180 mmk408 mmk306 mm
Mass
Main unit
Approx. 4.5 kg
Active subwoofer
Approx. 5.4 kg
Operating temperature range
0 oC to i40 oC
Operating humidity range
35 % to 80 % RH (no condensation)
1
1
0.3 W
0.6 W
30
TQBM0483
Page 31

Reference
FORMAT SECTION
WIRELESS SECTION
HDMI AV input
DTS-HD
HDMI AV input (TV(ARC))
Dolby Atmos
Optical digital input
LPCM (Max 7.1 ch)
Dolby Digital
Dolby TrueHD
Dolby Digital Plus
Dolby Atmos
DTS
DTS-ES Discrete 6.1
DTS-ES Matrix 6.1
®
High Resolution Audio
DTS-HD
®
DTS
96/24
®
Master Audio
DTS-Express
DTS:X
LPCM (2 ch)
Dolby Digital
Dolby Digital Plus
®
(Dolby Digital Plus)
DTS
DTS-ES Discrete 6.1
DTS-ES Matrix 6.1
DTS
®
96/24
LPCM (2 ch)
Dolby Digital
DTS
DTS-ES Discrete 6.1
DTS-ES Matrix 6.1
DTS
®
96/24
Wireless module
Frequency Range
2.40335 GHz to 2.47735 GHz
No. of channels
®
®
Bluetooth® SECTION
Bluetooth® System Specification
Bluetooth
Wireless Equipment Classification
®
Supported Profiles
Supported Codec
Frequency Band
®
Operating Distance
Approx. 10 m Line of sight*
≥ Specifications are subject to change without notice.
®
≥ Mass and dimensions are approximate.
≥ Total harmonic distortion is measured by a digital spectrum
analyzer.
≥ Uncompressed FLAC files may not operate correctly.
≥ Audio in formats with high-sampling rates is down-sampled
to 96 kHz or lower for playback.
*1 “Bluetooth Standby” means “STANDBY MODE” and
“VIERA LINK”.
When the other connected devices are turned off.
*2 Prospective communication distance.
Measurement environment: Temperature 25 oC/Height
1.0 m
Measure in “MODE 1”
®
Ver.2.1+EDR
Class 2 (2.5 mW)
A2DP/AVRCP
2.4 GHz Band FH-SS
38
SBC
2
TQBM0483
31
Page 32

Safety information for customers in the EU
English
Declaration of Conformity (DoC)
Hereby, “Panasonic Corporation” declares that this product is in
compliance with the essential requirements and other relevant
provisions of Directive 2014/53/EU.
Customers can download a copy of the original DoC to our RE
products from our DoC server:
http://www.ptc.panasonic.eu
Contact to Authorised Representative:
Panasonic Marketing Europe GmbH, Panasonic Testing Centre,
Winsbergring 15, 22525 Hamburg, Germany
Type of wireless Frequency band
®
Bluetooth
(The main unit)
2.4 GHz Wireless
System
(The mai n unit
and the active
subwoofer)
2402-2480 MHz 10 dBm
2401.35-
2479.35 MHz
Ελληνικά
Δήλωση συμμόρφωσης (DoC)
Η “Panasonic Corporation” δηλώνει ότι το προϊόν αυτό είναι
συμμορφωμένο προς τις βασικές απαιτήσεις και άλλες σχετικές
διατάξεις της Οδηγίας 2014/53/EΕ.
Οι πελάτες μπορο ύν να κατεβάσουν ένα αντίγραφο του πρωτοτύπου
DoC για τα RE προϊόντα μας από τον DoC server μας:
http://www.ptc.panasonic.eu
Επικοινωνήστε με τον Εξουσιοδοτημένο Αντιπροσωπό μας:
Panasonic Marketing Europe GmbH, Panasonic Testing Centre,
Winsbergring 15, 22525 Hamburg, Γερμανία
Τύπο ασύρµατης Ζώνη συχνοτήτων
®
Bluetooth
(The main unit)
2.4 GHz Wireless
System
(The mai n unit
and the active
subwoofer)
2402-2480 MHz 10 dBm
2401.35-
2479.35 MHz
Português
Declaração de Conformidade (DoC)
Com o presente documento, a “Panasonic Corporation” declara que este
produto se encontra em conformidade com os requisitos específicos e
demais especificações referentes à Diretiva 2014/53/UE.
Os clientes podem baixar uma cópia da declaração de
conformidade (DoC) para nossos produtos RE do Server DoC:
http://www.ptc.panasonic.eu
Contacto com um Representante Autorizado:
Panasonic Marketing Europe GmbH, Panasonic Testing Centre,
Winsbergring 15, 22525 Hamburg, Alemanha
Tipo de ligação
sem fios
Bluetooth
(The main unit)
2.4 GHz Wireless
System
(The mai n unit
and the active
subwoofer)
Banda de frequência
®
2402-2480 MHz 10 dBm
2401.35-
2479.35 MHz
Maximum power
(dBm e.i.r.p.)
10 dBm
Μέγιστη ισχύς
(dBm e.i.r.p.)
10 dBm
Potência máxima
(dBm e.i.r.p.)
10 dBm
Magyar
Megfelelőségi Nyilatkozat (DoC)
Ezennel a, “Panasonic Corporation” kijelenti, hogy a jelen termék
kielégíti az 2014/53/EU Irányelv létfontosságú követelményeit és
más vonatkozó rendelkezéseit.
A vásárlók letölthetik az RE termékek eredeti DoC másolatát a
DoC szerverünkről:
http://www.ptc.panasonic.eu
A hivatalos képviselő elérhetősége:
Panasonic Marketing Europe GmbH, Panasonic Testing Centre,
Winsbergring 15, 22525 Hamburg, Németország
Wireless típus Frekvenciasáv
®
Bluetooth
(The main unit)
2.4 GHz Wireless
System
(The main unit
and the active
subwoofer)
2402-2480 MHz 10 dBm
2401.35-
2479.35 MHz
Maximális
teljesítmény
(dBm e.i.r.p.)
10 dBm
Slovensky
Vyhlásenie o zhode (DoC)
“Panasonic Corporation” týmto vyhlasuje, že tento výrobok je v
súlade so základnými požiadavkami a ďalšími príslušnými
ustanoveniami smernice 2014/53/EÚ.
Zákazníci si môžu stiahnuť kópiu pôvodného DoC na naše RE
výrobky z nášho servera DoC:
http://www.ptc.panasonic.eu
Kontakt na splnomocneného zástupcu:
Panasonic Marketing Europe GmbH, Panasonic Testing Centre,
Winsbergring 15, 22525 Hamburg, Nemecko
Typ
bezdrôtového
pripojenia
®
Bluetooth
(The main unit)
2.4 GHz Wireless
System
(The main unit
and the active
subwoofer)
Frekvenčné pásmo
2402-2480 MHz 10 dBm
2401.35-
2479.35 MHz
Maximálny výkon
(dBm e.i.r.p.)
10 dBm
Eesti keel
Vastavusdeklaratsioon (DoC)
Käesolevaga kinnitab “Panasonic Corporation”, et see toode vastab
direktiivi 2014/53/EL olulistele nõuetele ja teistele asjakohastele sätetele.
Kliendid saavad koopia meie RE toodetele kehtiva
originaalvastavusdeklaratsiooni koopia alla laadida meie DoC-serverist:
http://www.ptc.panasonic.eu
Võtke ühendust volitatud esindajaga:
Panasonic Marketing Europe GmbH, Panasonic Testing Centre,
Winsbergring 15, 22525 Hamburg, Saksamaa
Juhtmevaba
seadme tüüp
®
Bluetooth
(The main unit)
2.4 GHz Wireless
System
(The main unit
and the active
subwoofer)
Sagedusriba
2402-2480 MHz 10 dBm
2401.35-
2479.35 MHz
Maksimaalne võimsus
(dBm EIRP)
10 dBm
32
TQBM0483
Page 33

Reference
Latviski
A
Atbilstības deklarācija (DoC)
r šo “Panasonic Corporation” paziņo, ka šis izstrādājums
atbilst pamatprasībām un pārējiem Direktīvas 2014/53/ES
noteikumiem.
Pircēji var lejupielādēt oriģinālo DoC kopiju mūsu RE
izstrādājumos no mūsu DoC servera:
http://www.ptc.panasonic.eu
Lūdzam sazināties ar pilnvaroto parstāvi:
Panasonic Marketing Europe GmbH, Panasonic Testing
Centre, Winsbergring 15, 22525 Hamburg, Vācijā
Bezvadu tips
Bluetooth®
(The main unit)
2.4 GHz Wireless
System
(The main unit
and the active
subwoofer)
Frekvenču josla
2402-2480 MHz 10 dBm
2401.35-
2479.35 MHz
Lietuviškai
Atitikties deklaracija (AD)
Bendrovė “Panasonic Corporation” patvirtina, kad šis gaminys
atitinka direktyvos 2014/53/ES esminius reikalavimus ir kitas
taikytinas nuostatas.
Mūsų RE gaminių originalios atitikties deklaracijos kopiją klientai
gali atsisiųsti iš mūsų AD serverio:
http://www.ptc.panasonic.eu
Įgaliotojo atstovo adresas:
Panasonic Marketing Europe GmbH, Panasonic Testing Centre,
Winsbergring 15, 22525 Hamburg, Vokietija.
Bevielio ryšio
tinklas
Bluetooth
(The main unit)
2.4 GHz Wireless
System
(The mai n unit
and the active
subwoofer)
Dažnių diapazonas
®
2402-2480 MHz 10 dBm
2401.35-
2479.35 MHz
Slovensko
Izjava o skladnosti (DoC)
“Panasonic Corporation” v tem dokumentu izjavlja, da je izdelek v skladu z
bistvenimi zahtevami in drugimi pomembnimi določbami Direktive 2014/53/EU.
Stranka lahko naloži izvod izvirnega DoC o naših izdelkih RE s strežnika DoC:
http://www.ptc.panasonic.eu
Naslov pooblaščenega predstavnika:
Panasonic Marketing Europe GmbH, Panasonic Testing Centre,
Winsbergring 15, 22525 Hamburg, Nemčija
Vrsta brezžične
povezave
Bluetooth
(The main unit)
2.4 GHz Wireless
System
(The mai n unit
and the active
subwoofer)
Frekvenčni pas
®
2402-2480 MHz 10 dBm
2401.35-
2479.35 MHz
Maksimālā jauda
(dBm EIRP)
10 dBm
Maksimali siuntimo galia
(dBm e.i.r.p.)
10 dBm
Največja moč
(dBm EIRP)
10 dBm
Norsk
Samsvarserklæring (DoC)
“Panasonic Corporation” erklærer herved at dette produktet
samsvarer med de grunnleggende kravene og andre relevante
bestemmelser i direktivet 2014/53/EU.
Kundene kan laste ned en kopi av den originale
samsvarserklæringen (DoC) for vårt RE utstyr fra vår DoC server:
http://www.ptc.panasonic.eu
Kontaktinformasjon autorisert representant:
Panasonic Marketing Europe GmbH, Panasonic Testing Centre,
Winsbergring 15, 22525 Hamburg, Tyskland
Type trådløs Frekvensbånd
®
Bluetooth
(The main unit)
2.4 GHz Wireless
System
(The main unit
and the active
subwoofer)
2402-2480 MHz 10 dBm
2401.35-
2479.35 MHz
Maks. effekt
(dBm e.i.r.p.)
10 dBm
Български
Декларация за съответствие (DoC)
С настоящото “Panasonic Corporation” декларира, че този
продукт е в съответствие с основните изисквания и други
съответни разпоредби на Директива 2014/53/EС.
Потребителите могат да свалят копие от оригиналните DoC към нашите
продуктите от типа RE от сървъра, на който се съхраняват DoC:
http://www.ptc.panasonic.eu
Свържете се с нашия упълномощен представител:
Panasonic Marketing Europe GmbH, Panasonic Testing Centre,
Winsbergring 15, 22525 Hamburg, Германия
Вид безжична
връзка
®
Bluetooth
(The main unit)
2.4 GHz Wireless
System
(The main unit
and the active
subwoofer)
Честотна лента
2402-2480 MHz 10 dBm
2401.35-
2479.35 MHz
Максимална мощност
(dBm e.i.r.p.)
10 dBm
Român
Declaraţie de Conformitate (DoC)
“Panasonic Corporati on ” declară prin prezenta că acest produs este conform
cu cerinţele esenţiale şi alte prevederi relevante ale Directivei 2014/53/UE.
Clienţii pot descărca o copie a DoC-ului original al produselor
noastre RE de la adressa noastră DoC din Internet:
http://www.ptc.panasonic.eu
Contactaţi Reprezentantul Autorizat:
Panasonic Marketing Europe GmbH, Panasonic Testing Centre,
Winsbergring 15, 22525 Hamburg, Germania
Tip de wireless Interval de frecvenţă
®
Bluetooth
(The main unit)
2.4 GHz Wireless
System
(The main unit
and the active
subwoofer)
2402-2480 MHz 10 dBm
2401.35-
2479.35 MHz
Putere maximă
(dBm e.i.r.p.)
10 dBm
TQBM0483
33
Page 34

Hrvatski
Deklaracija o podobnosti (DoC)
Ovime „Panasonic Corporation” izjavljuje da ovaj proizvod udovoljava
osnovnim zahtjevima i ostalim relevantnim odredbama Direktive 2014/53/EU.
Kupci mogu preuzeti kopiju originalne DoC za naše RE proizvode
s našeg DoC poslužitelja:
http://www.ptc.panasonic.eu
Adresa ovlaštenog predstavništva:
Panasonic Marketing Europe GmbH, Panasonic Testing Centre,
Winsbergring 15, 22525 Hamburg, Njemačka
Vrsta bežične
mreže
®
Bluetooth
(The main unit)
2.4 GHz Wireless
System
(The mai n unit
and the active
subwoofer)
Frekvencijski pojas
2402-2480 MHz 10 dBm
2401.35-
2479.35 MHz
Maksimalna snaga
(dBm e.i.r.p.)
10 dBm
Türkçe
Uygunluk Beyanı (DoC)
“Panasonic Corporati on ” bu belge ile bu ürünün 2014/53/EU Direkti’nin temel
gerekliliklerine ve diğer ilgili hükümlerine uygun olduğunu beyan eder.
Müşterilerimiz RE ürünlerimizle ilgili orijinal DoC belgesinin bir
kopyasını DoC sunucumuzdan indirebilir:
http://www.ptc.panasonic.eu
Yetkili Temsilci ile temasa geçin:
Panasonic Marketing Europe GmbH, Panasonic Testing Centre,
Winsbergring 15, 22525 Hamburg, Almanya
Kablosuz türü Frekans bandı
®
Bluetooth
(The main unit)
2.4 GHz Wireless
System
(The main unit
and the active
subwoofer)
2402-2480 MHz 10 dBm
2401.35-
2479.35 MHz
Maksimum güç
(dBm e.i.r.p.)
10 dBm
Safety information for customers in India
The specifications are exempted for any licensing requirement by Ministry of Communications and
Information Technology, G.S.R. 45 (E)., dated 28th January, 2005.
Safety information for customers in Norway
NORSK
ADVARSEL FORSIKTIG
Produkt
≥ For å redusere faren for brann, elektrisk støt eller skade på
apparatet:
– Utsett ikke produktet for regn, fukt, drypping eller sprut.
– Ikke plasser objekter som er fylt med væske, som vaser,
på apparatet.
– Bruk det anbefalte tilbehøret.
– Fjern ikke deksler.
– Reparer ikke denne enheten selv, overlat service til
kvalifisert servicepersonell.
Vekselstrømnett
≥ Nettstøpselet er trukket ut fra denne enheten.
Installer denne enheten slik at nettstøpselet umiddelbart
kan trekkes fra stikkontakten.
TQBM0483
34
Produkt
≥ Plasser ikke åpen ild, slik som levende lys, oppå apparatet.
≥ Dette apparatet er beregnet for bruk under moderate
klimaforhold.
Plassering
≥ For å redusere faren for brann, elektrisk støt eller skade på
apparatet:
– Ikke plasser apparatet i en bokhylle, et innebygget
kabinett eller et annet lukket sted. Pass på at produktet
er godt ventilert.
– Apparatets ventilasjonsåpninger må ikke dekkes til med
aviser, duker, gardiner eller lignende.
Page 35

Reference
[For_Australia]
Panasonic Warranty
If you require assistance regarding warranty condions or any other enquiries, please visit the Panasonic
Australia website
www.panasonic.com.au or contact by phone on 132 600
If phoning in, please ensure you have your operang instrucons available.
THIS WARRANTY CARD AND THE PURCHASE DOCKET (OR SIMILAR PROOF OF PURCHASE)
SHOULD BE RETAINED BY THE CUSTOMER AT ALL TIMES
Panasonic Australia Pty. Limited
ACN 001 592 187 ABN 83 001 592 187
1 Innovation Road, Macquarie Park NSW 2113
www.panasonic.com.au
PRO-031-F11 Issue: 5.0 23-01-2018
1.
Subject to the condions of thi s warranty Panasonic or its Authorised Service Centre will perform necessa ry service on the product,
without charge for parts or labour, if in the opinion of Panasonic the product is found to have a manufacturing defect within one
(1) year or (12 mo nths) (the “warranty period”) from the date of purchase appearing on your purchase receipt.
This warranty only applies to Panasonic products purchased in Australia and sold by Panasonic Australia, it’s Authorised Distributors, or
Dealers, and only where the products are used and serviced within Australia or its territories. Warranty cover only applies to the services
that are carried out by a Panasonic Authorised Service Centre and only if valid proof of purchase is presented when the warranty service is
requested.
This warranty only applies if the product has been installed and/or used in accordance with the manufacturer’s recommendaons (as noted
in the operang instrucons) under normal use and reasonable care (in the opinion of Panasonic). The warranty does not cover damage,
malfuncon or failure resulng from use of incorrect voltages, incorrect installaon, accident, misuse, neglect, build-up of dirt or dust,
abuse, maladjustment of customer controls, mains supply problems, thunderstorm acvity, infestaon by insects or vermin, tampering or
repair by unauthorised persons (including unauthorised alteraons), exposure to abnormally corrosive condions, or any foreign object or
maer having entered the product.
This warranty does not cover the following items unless the fault or defect existed at the me of purchase:
(a) Consumable parts
(b) Cosmec parts
(c) Worn or damaged parts
(d) Informaon stored on Hard Disk Drives, Opcal Discs, USB Devices, SD Cards, Tapes
(e) DTV recepon issues caused by TV Aerial / Cabling / Wall socket(s)
Some products may be supplied with Ethernet connecon hardware. The warranty is limited on such products and will not cover:
(a) Internet and or DLNA connecon / setup related problems
(b) Access fees and or charges incurred for internet connecon
(c) Incompable soware or soware not specifically spulated in the product operaons manual; and
(d) Any indirect or consequenal costs associated with the incorrect use or misuse of the hardware, its connecon to the internet or any
other device.
To claim warranty service, when required, you should:
• Contact Panasonic’s Customer Care Centre on 132 600 for Service Centre informaon.
• Confirm the opening and acceptance mes with the Authorised Service centre that you choose.
• Then send or take the product to a Panasonic Authorised Service Centre together with your proof of purchase receipt.
• Any freight and insurance costs associated with the transport of the product to and/or from your nearest Authorised Service Centre must
be arranged and paid for by you.
The warranes hereby conferred do not extend to, and exclude, any costs associated with the installaon, de-installaon or re-installaon
of a product, including costs related to the mounng, de-mounng or remounng of any screen, (and any other ancillary acvies), delivery,
handling, freighng, transportaon or insurance of the product or any part thereof or replacement of and do not extend to, and exclude,
any damage or loss occurring by reason of, during, associated with, or related to such installaon, de-installaon, re-installaon or transit.
2.
3.
4.
5.
6.
7.
Panasonic Authorised Service Centres are located in major metropolitan areas and most regional centres of Australia, however, coverage will
vary dependant on product. For advice on exact Authorised Service Centre locaons for your product, please telephone our Customer Care
Centre on 132600 or visit our website and use the Service Centre Locator.
In addion to your rights under this warranty, Panasonic products come with consumer guarantees that cannot be excluded under the
Australian Consumer Law. If there is a major failure with the product, you can reject the product and elect to have a refund or to have the
product replaced or if you wish you may elect to keep the goods and be compensated for the drop in value of the goods. You are also entled to
have the product repaired or replaced if the product fails to be of acceptable quality and the failure does not amount to a major failure.
If there is a major failure in regard to the product which cannot be remedied then you must nofy us within a reasonable period by contacng
the Panasonic Customer Care Centre. If the failure in the product is not a major failure then Panasonic may choose to repair or replace the
product and will do so in a reasonable period of me from receiving noce from you.
TQBM0483
35
Page 36

EU
Manufactured by:
Importer for Europe:
For the United Kingdom and Ireland customers
Sales and Support Information
Customer Communications Centre
≥ For customers within the UK: 0344 844 3899
≥ For customers within Ireland: 01 289 8333
≥ Monday–Friday 9:00 am – 5:00 pm (Excluding public holidays).
≥ For further support on your product, please visit our website:
www.panasonic.co.uk
Direct Sales at Panasonic UK
≥ Order accessory and consumable items for your product with ease and confidence by phoning our
Customer Communications Centre Monday–Friday 9:00 am – 5:00 pm (Excluding public holidays).
≥ Or go on line through our Internet Accessory ordering application at www.pas-europe.com
≥ Most major credit and debit cards accepted.
≥ All enquiries transactions and distribution facilities are provided directly by Panasonic UK.
≥ It couldn’t be simpler!
≥ Also available through our Internet is direct shopping for a wide range of finished products. Take a
browse on our website for further details.
.
Panasonic Corporation
Kadoma, Osaka, Japan
Panasonic Marketing Europe GmbH
Panasonic Testing Centre
Winsbergring 15, 22525 Hamburg, Germany
Panasonic Corporation
Web Site: http://www.panasonic.com
© Panasonic Corporation 2019
TQBM0483
F0619HA0
 Loading...