

Page 1
Home Theater Audio System
Model No. SC-HTB10P
SC-HTB10PC
Product Color: (K)...Black Type
PSG1005001CE
A6
TABLE OF CONTENTS
1 Safety Precautions ----------------------------------------------- 3
1.1. General Guidelines---------------------------------------- 3
1.2. Before Repair and Adjustment ------------------------- 4
1.3. Caution For Fuse Replacement------------------------ 4
1.4. Protection Circuitry ---------------------------------------- 4
1.5. Safety Part Information----------------------------------- 5
1.6. Safety Installation Instructions ------------------------- 6
2 Warning-------------------------------------------------------------- 7
2.1. Prevention of Electro Static Discharge (ESD)
to Electrostatically Sensitive (ES) Devices---------- 7
2.2. Service caution based on Legal restrictions -------- 8
3 Service Navigation ----------------------------------------------- 9
3.1. Service Information --------------------------------------- 9
4 Specifications ----------------------------------------------------10
5 Location of Controls and Components ------------------11
5.1. Main Unit Key Button Operations--------------------- 11
PAG E PAG E
5.2. Remote Control Key Buttons Operation------------ 12
5.3. Audio Information ---------------------------------------- 12
6 Self diagnostic and special mode setting -------------- 13
6.1. Automatically Displayed Error Codes --------------- 13
6.2. Service Mode --------------------------------------------- 14
7 Service Fixture & Tools --------------------------------------- 17
8 Disassembly and Assembly Instructions--------------- 18
8.1. Disassembly flow chart --------------------------------- 19
8.2. Main Parts Location Diagram ------------------------- 19
8.3. Disassembly of Back Cabinet Assembly ---------- 20
8.4. Disassembly of Front Speaker L (SP1) ------------ 26
8.5. Disassembly of Front Speaker R (SP2) ----------- 27
8.6. Disassembly of Subwoofer Speaker Front
(SP3) ------------------------------------------------------- 28
8.7. Disassembly of Subwoofer Speaker Rear
(SP4) ------------------------------------------------------- 29
© Panasonic Corporation 2010. All rights reserved.
Unauthorized copying and distribution is a violation of
law.
Page 2

8.8. Disassembly of Main Chassis Assembly ---------- 30
8.9. Disassembly of LED P.C.B. and Panel Tact
Switch P.C.B. --------------------------------------------- 33
8.10. Disassembly of AC Inlet P.C.B. ---------------------- 35
8.11. Disassembly of Main P.C.B. -------------------------- 37
8.12. Disassembly of SMPS P.C.B. ------------------------ 40
8.13. Replacement of Switch Regulator IC (IC5701)
----------------------------------------------------------------43
8.14. Replacement of Rectifier Diode (D5802) ---------- 45
8.15. Disassembly of HDMI P.C.B. ------------------------- 47
9 Service Position ------------------------------------------------- 50
9.1. Checking and Repairing of Main P.C.B. (Side
A) -------------------------------------------------------------50
9.2. Checking and Repairing of Main P.C.B. (Side
B) -------------------------------------------------------------51
9.3. Checking and Repairing of SMPS P.C.B. --------- 52
9.4. Checking and Repairing of HDMI P.C.B. (Side
A) ------------------------------------------------------------54
9.5. Checking and Repairing of HDMI P.C.B. (Side
B) ------------------------------------------------------------55
10 Voltage Measurement & Waveform Chart--------------- 56
10.1. HDMI P.C.B. (1/6) ----------------------------------------56
10.2. HDMI P.C.B. (2/6) ----------------------------------------57
10.3. HDMI P.C.B. (3/6) ----------------------------------------58
10.4. HDMI P.C.B. (4/6) ----------------------------------------59
10.5. HDMI P.C.B. (5/6) ----------------------------------------60
10.6. HDMI P.C.B. (6/6) ----------------------------------------61
10.7. MAIN P.C.B. (1/3) ----------------------------------------61
10.8. MAIN P.C.B. (2/3) ----------------------------------------62
10.9. MAIN P.C.B. (3/3) ----------------------------------------63
10.10. LED P.C.B. ------------------------------------------------- 63
10.11. SMPS P.C.B. ---------------------------------------------- 63
10.12. Waveform Chart (1/2) ----------------------------------- 64
10.13. Waveform Chart (2/2) ----------------------------------- 65
11 Illustration of IC’s, Transistors and Diodes ------------66
12 Overall Simplified Block -------------------------------------- 67
13 Block Diagram --------------------------------------------------- 69
13.1. SYSTEM CONTROL BLOCK DIAGRAM ---------- 69
13.2. HDMI BLOCK DIAGRAM ------------------------------ 70
13.3. AUDIO (1/2) BLOCK DIAGRAM --------------------- 71
13.4. AUDIO (2/2) BLOCK DIAGRAM --------------------- 72
13.5. IC TERMINAL CHART (HDMI/AUDIO) ------------- 73
13.6. POWER SUPPLY (1/2) BLOCK DIAGRAM ------- 74
13.7. POWER SUPPLY (2/2) BLOCK DIAGRAM ------- 75
14 Wiring Connection Diagram --------------------------------- 77
15 Schematic Diagram Notes ----------------------------------- 79
16 Schematic Diagram--------------------------------------------- 81
16.1. HDMI CIRCUIT (1/6) ------------------------------------81
16.2. HDMI CIRCUIT (2/6) ------------------------------------82
16.3. HDMI CIRCUIT (3/6) ------------------------------------83
16.4. HDMI CIRCUIT (4/6) ------------------------------------84
16.5. HDMI CIRCUIT (5/6) ------------------------------------85
16.6. HDMI CIRCUIT (6/6) ------------------------------------86
16.7. MAIN CIRCUIT (1/4) ------------------------------------ 87
16.8. MAIN CIRCUIT (2/4) ------------------------------------ 88
16.9. MAIN CIRCUIT (3/4) ------------------------------------ 89
16.10. MAIN CIRCUIT (4/4) ------------------------------------ 90
16.11. LED CIRCUIT, PANEL TACT SWITCH
CIRCUIT, AC INLET CIRCUIT ------------------------ 91
16.12. SMPS CIRCUIT (1/2) ----------------------------------- 92
16.13. SMPS CIRCUIT (2/2) ----------------------------------- 93
17 Printed Circuit Board------------------------------------------ 95
17.1. HDMI P.C.B. (SIDE A) --------------------------------- 95
17.2. HDMI P.C.B. (SIDE B) --------------------------------- 96
17.3. MAIN P.C.B. (SIDE A) ---------------------------------- 97
17.4. MAIN P.C.B. (SIDE B) ---------------------------------- 98
17.5. LED P.C.B. / PANEL TACT SWITCH P.C.B. ------ 99
17.6. AC INLET P.C.B. / SMPS P.C.B.--------------------100
18 Terminal Function of IC’s ----------------------------------- 101
18.1. IC604 (RFKWMHTB10PA) IC MICRO
PROCESSOR -------------------------------------------101
18.2. IC2002 (RFKWMHTB10PB) IC MICRO
PROCESSOR -------------------------------------------102
19 Exploded View and Replacement Parts List---------- 103
19.1. Exploded View and Mechanical replacement
Parts List--------------------------------------------------103
19.2. Electrical Replacement Parts List ------------------107
2
Page 3
1 Safety Precautions
1.1. General Guidelines
1. When servicing, observe the original lead dress. If a short circuit is found, replace all parts which have been overheated or
damaged by the short circuit.
2. After servicing, ensure that all the protective devices such as insulation barriers, insulation papers shields are properly
installed.
3. After servicing, check for leakage current checks to prevent from being exposed to shock hazards.
(This “Safety Precaution” is applied only in U.S.A.)
1. Before servicing, unplug the power cord to prevent an electric shock.
2. When replacing parts, use only manufacturer’s recommended components for safety.
3. Check the condition of the power cord. Replace if wear or damage is evident.
4. After servicing, be sure to restore the lead dress, insulation barriers, insulation papers, shields, etc.
5. Before returning the serviced equipment to the customer, be sure to make the following insulation resistance test to prevent
the customer from being exposed to a shock hazard.
1.1.1. Leakage Current Cold Check
1. Unplug the AC cord and connect a jumper between the two prongs on the plug.
2. Using an ohmmeter measure the resistance value, between the jumpered AC plug and each exposed metallic cabinet part on
the equipment such as screwheads, connectors, control shafts, etc. When the exposed metallic part has a return path to the
chassis, the reading should be between 1MΩ and 5.2Ω. When the exposed metal does not have a return path to the chassis,
the reading must be
1.1.2. Leakage Current Hot Check
1. Plug the AC cord directly into the AC outlet. Do not use an isolation transformer for this check.
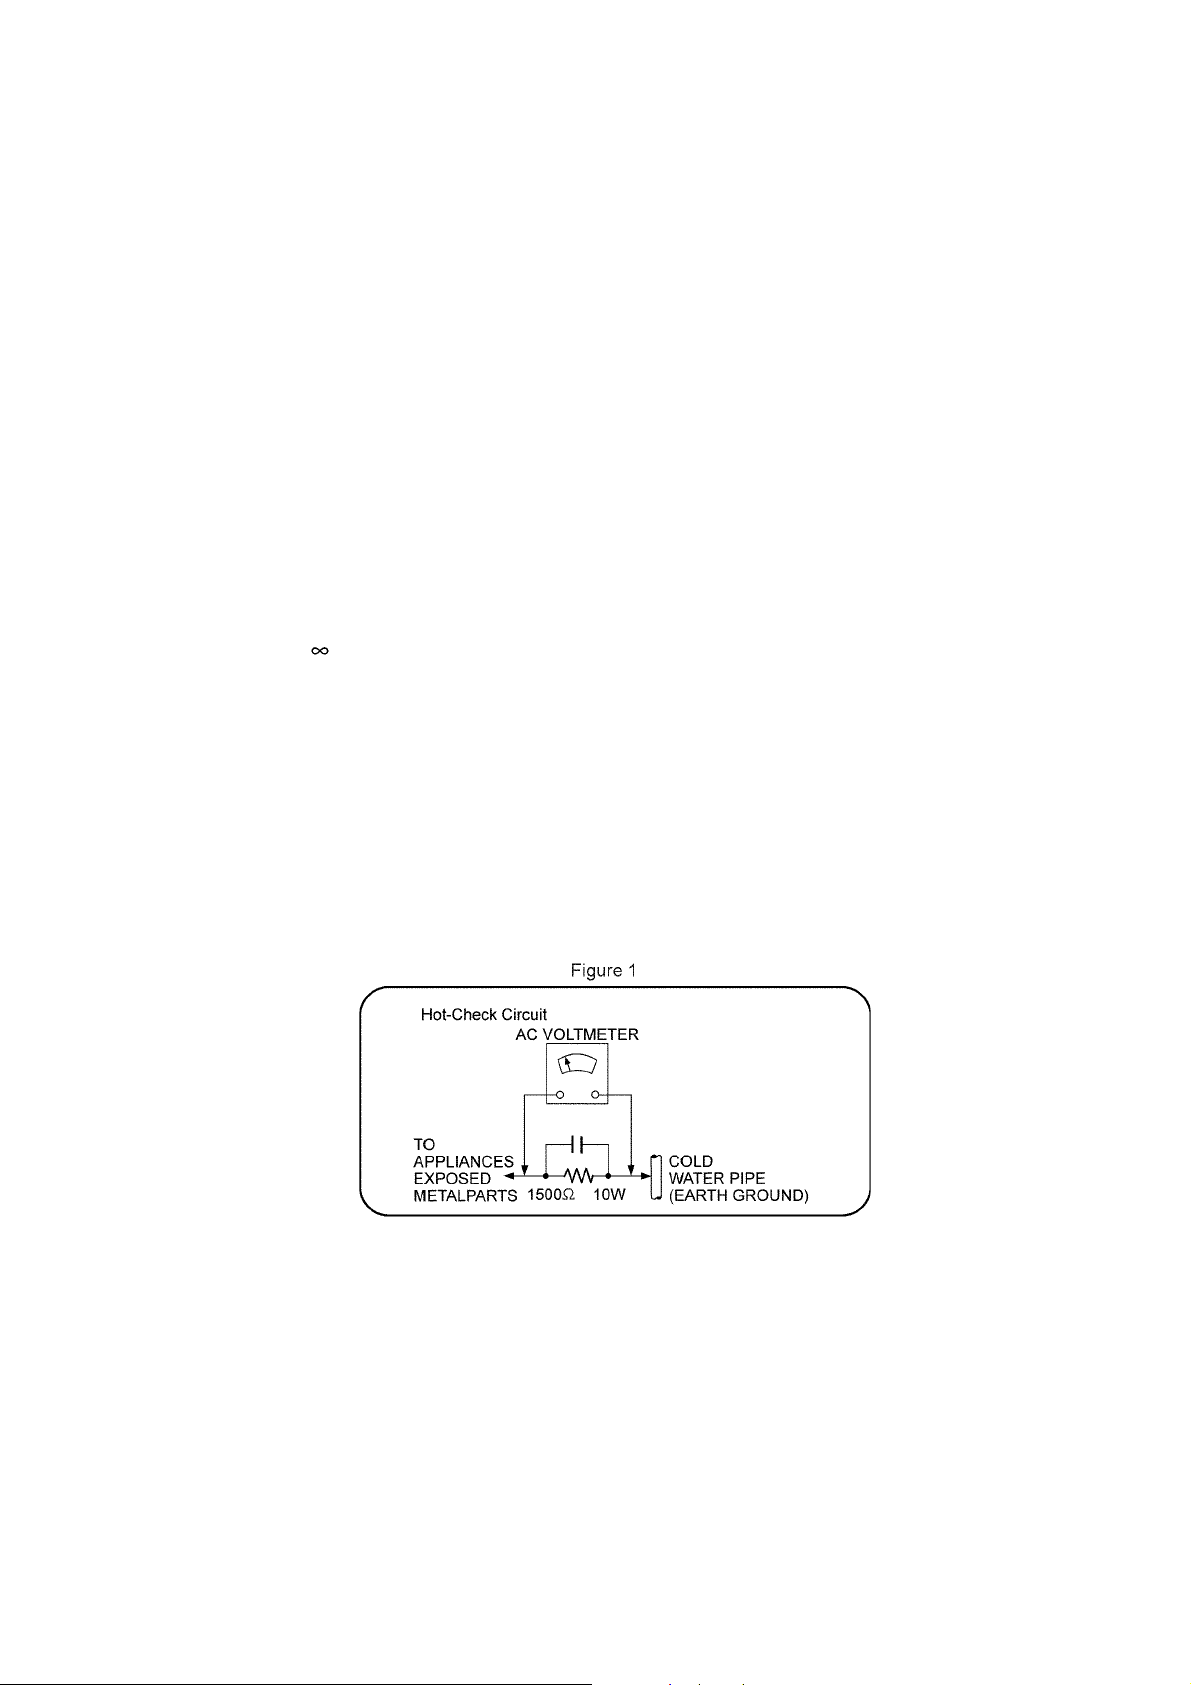
2. Connect a 1.5kΩ, 10 watts resistor, in parallel with a 0.15μF capacitors, between each exposed metallic part on the set and a
good earth ground such as a water pipe, as shown in Figure 1.
3. Use an AC voltmeter, with 1000 ohms/volt or more sensitivity, to measure the potential across the resistor.
4. Check each exposed metallic part, and measure the voltage at each point.
5. Reverse the AC plug in the AC outlet and repeat each of the above measurements.
6. The potential at any point should not exceed 0.75 volts RMS. A leakage current tester (Simpson Model 229 or equivalent)
may be used to make the hot checks, leakage current must not exceed 1/2 milliamp. should the measurement is outside of
the limits specified, there is a possibility of a shock hazard, and the equipment should be repaired and re-checked before it is
returned to the customer.
3
Page 4
1.2. Before Repair and Adjustment
Disconnect AC power, discharge unit AC Capacitors as such C5700, C5701, C5702, C5703, C5704, C5706, C5708 through a 10Ω,
1W resistor to ground.
DO NOT SHORT-CIRCUIT DIRECTLY (with a screwdriver blade, for instance), as this may destroy solid state devices.
After repairs are completed, restore power gradually using a variac, to avoid overcurrent.
• Current consumption at AC 120 V, at 60 Hz in NO SIGNAL mode, at volume minimum, SEL: HDMI/D-IN should be 600 mA.
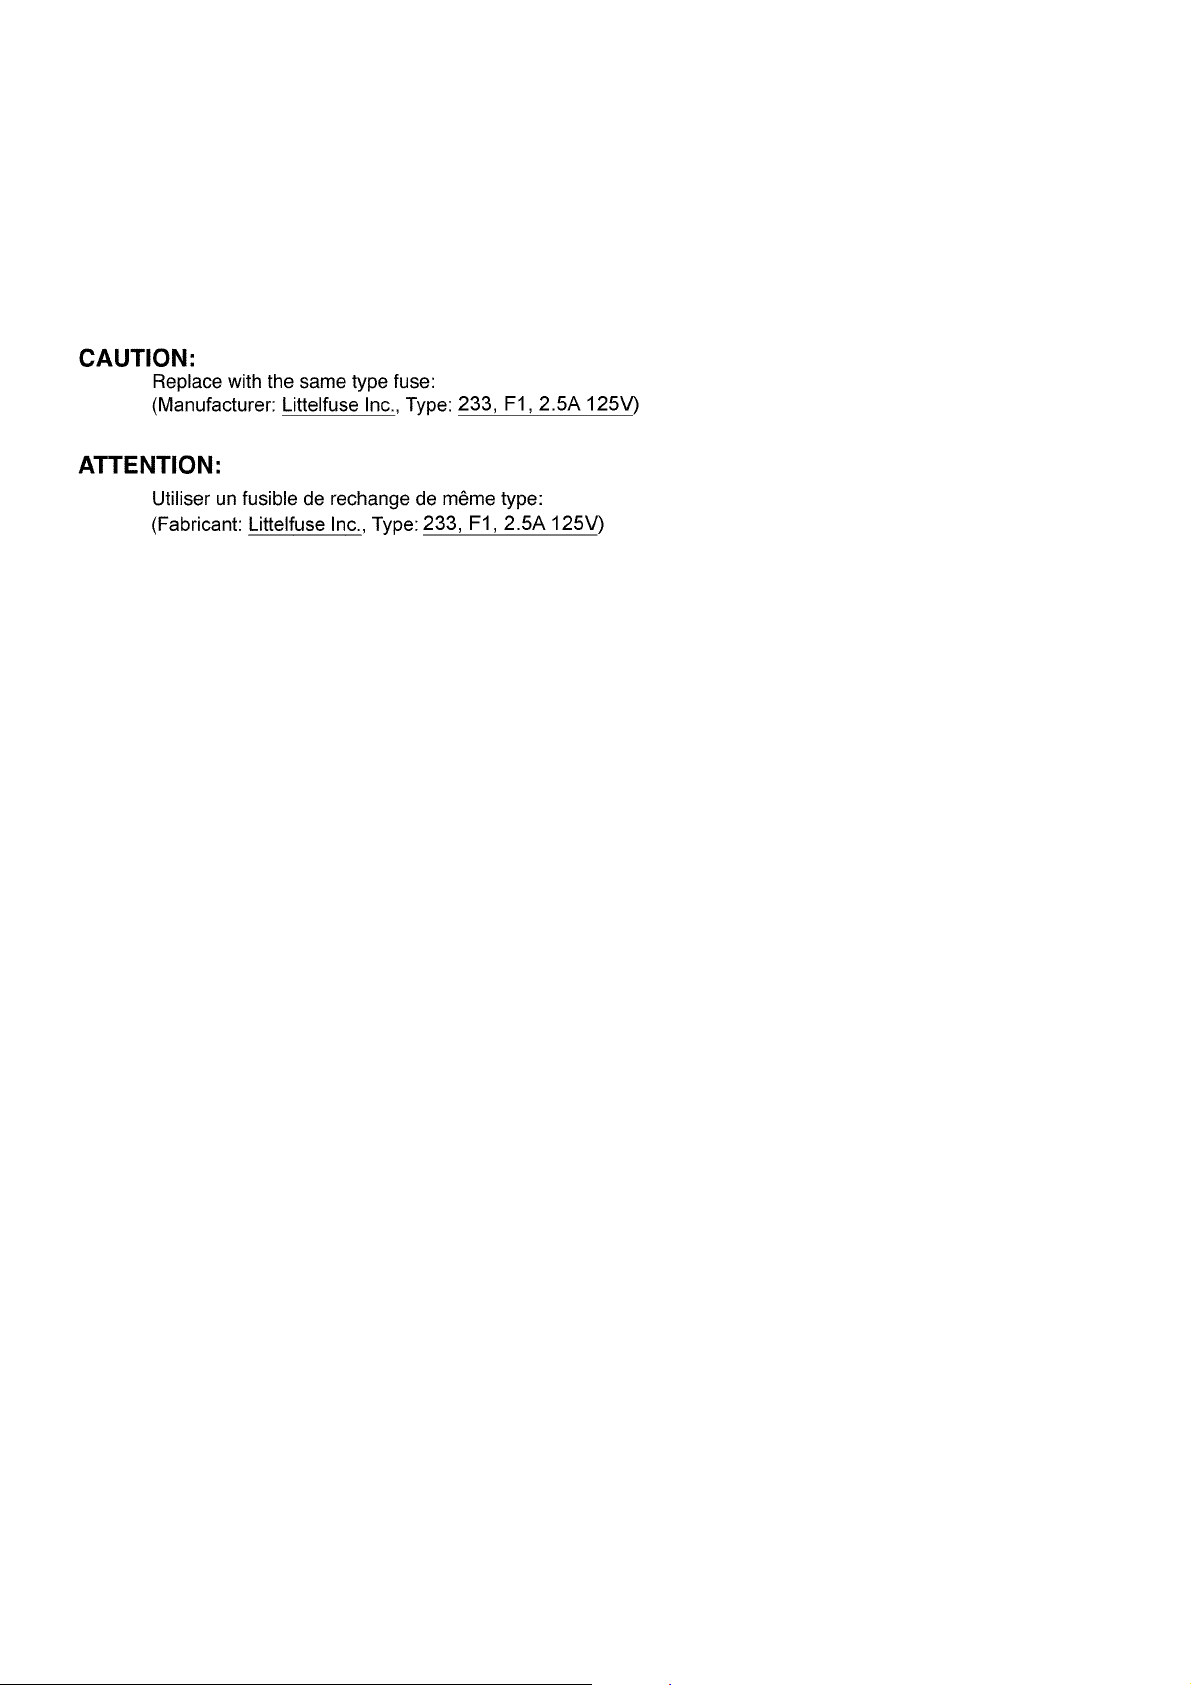
1.3. Caution For Fuse Replacement
1.4. Protection Circuitry
The protection circuitry may have operated if either of the following conditions are noticed:
• No sound is heard when the power is turned on.
• Sound stops during a performance.
The function of this circuitry is to prevent circuitry damage if, for example, the positive and negative speaker connection wires are
"shorted", or if speaker systems with an impedance less than the indicated rated impedance of the amplifier are used.
If this occurs, follow the procedure outlines below:
1. Turn off the power.
2. Determine the cause of the problem and correct it.
3. Turn on the power once again after one minute.
Note:
When the protection circuitry functions, the unit will not operate unless the power is first turned off and then on again.
4
Page 5
1.5. Safety Part Information
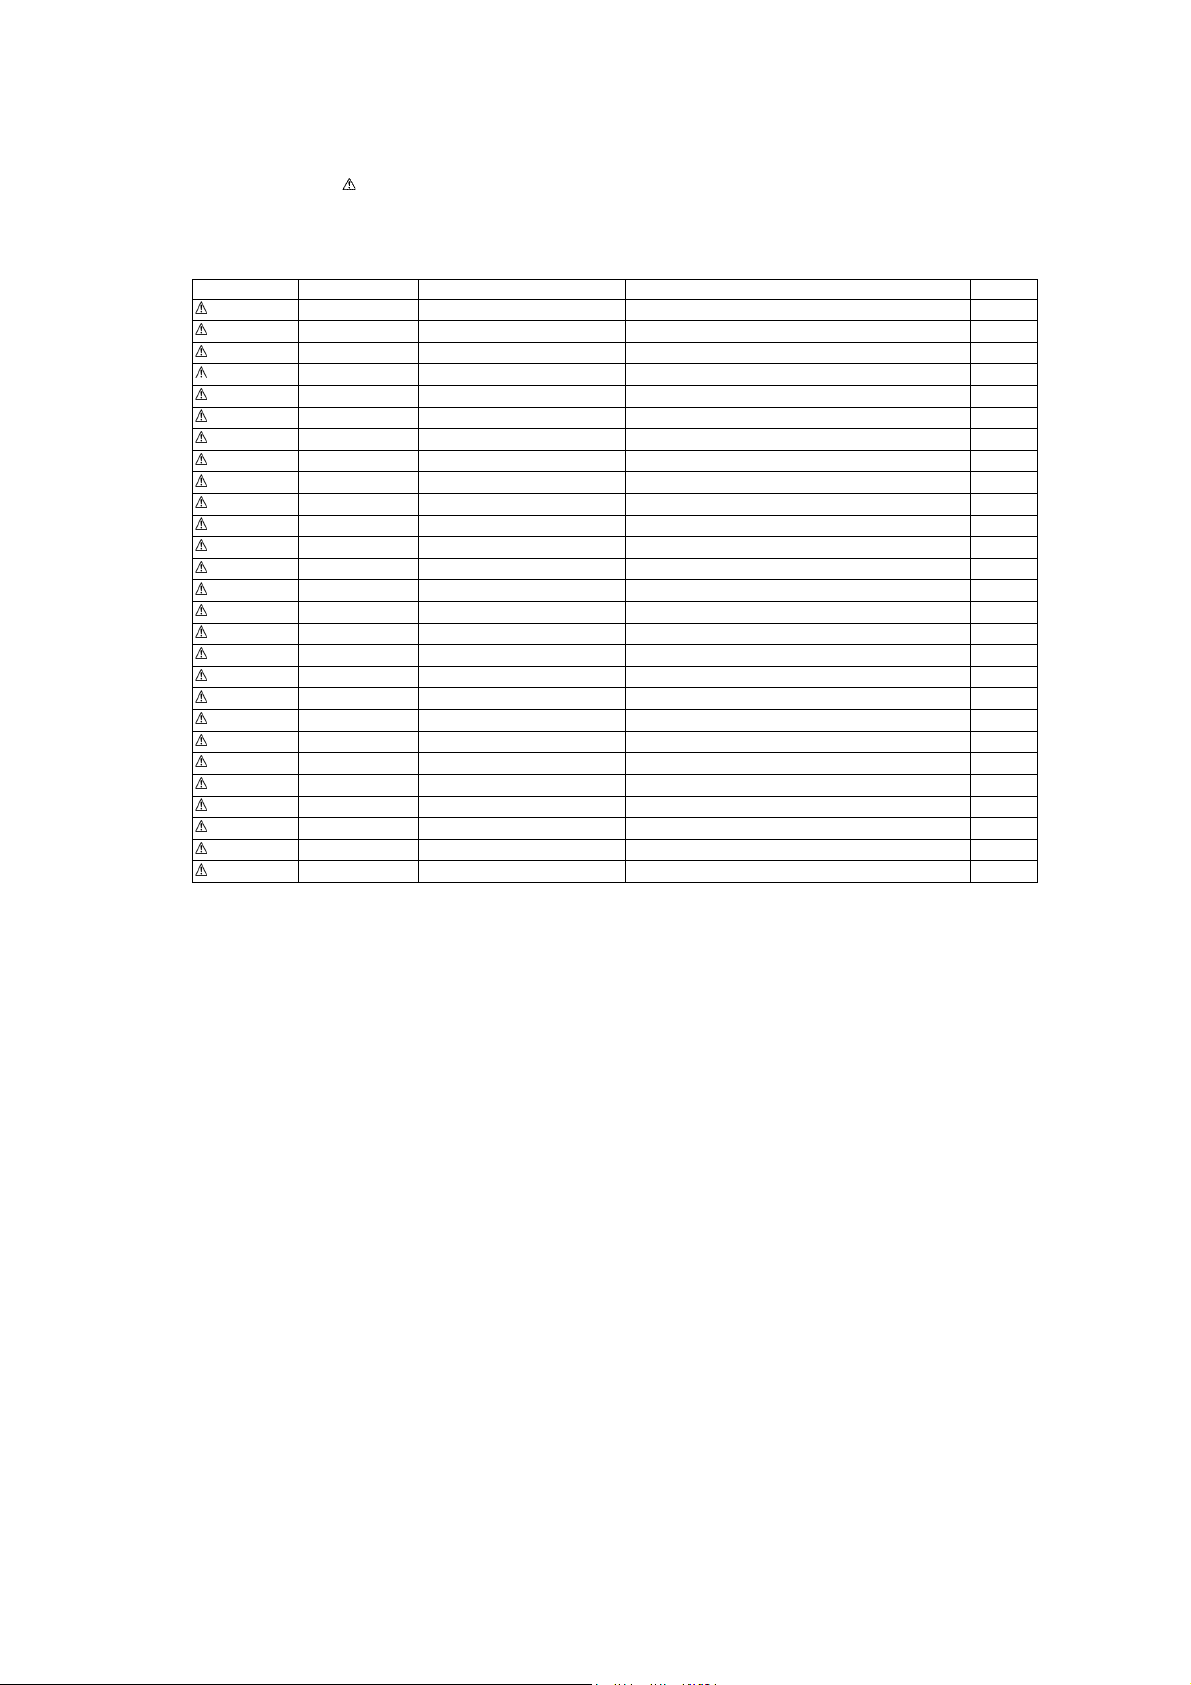
Safety Parts List:
There are special components used in this equipment which are important for safety.
These parts are marked by in the Schematic Diagrams & Replacement Parts List. It is essential that these critical parts should
be replaced with manufacturer’s specified parts to prevent shock, fire or other hazards. Do not modify the original design without
permission of manufacturer.
Safety Ref. No. Part No. Part Name & Description Remarks
2 REXX1104 1P RED/BLACK WIRE (AC INLET-SMPS)
17 RGNX1124-K1 SPEC LABEL P
17 RGNX1171-K1 SPEC LABEL PC
A2 RFAX1027 AC CORD /W FERRITE CORE
A3 RQTX1156-C O/I BOOK (Cf) PC
A3 RQTX1165-P O/I BOOK (En)
PCB5 REPX0841A SMPS P.C.B. (RTL)
PCB6 REPX0841A AC INLET P.C.B. (RTL)
DZ5701 ERZV10V511CS ZNR
L5701 ELF15N007A LINE FILTER
L5702 ELF19H010A LINE FILTER
T5703 ETS28BH1E5BC TRANSFORMER
T5751 ETS19AB2A6AG SUB TRANSFORMER
PC5720 B3PBA0000402 PHOTO COUPLER
PC5799 B3PBA0000402 PHOTO COUPLER
RY5701 K6B1AEA00003 RELAY
F1 K5D252APA008 FUSE
FP700 K5H302100004 FUSE PROTECTOR
TH5702 D4CAA5R10001 THERMISTOR
P5701 K2ABYA000001 AC INLET
C5700 F1BAF2220023 2200pF
C5701 F0CAF104A105 0.1uF
C5702 F0CAF104A105 0.1uF
C5703 F0CAF104A105 0.1uF
C5704 F1BAF1020020 1000pF
C5706 F1BAF1020020 1000pF
C5708 F1BAF1020020 1000pF
5
Page 6
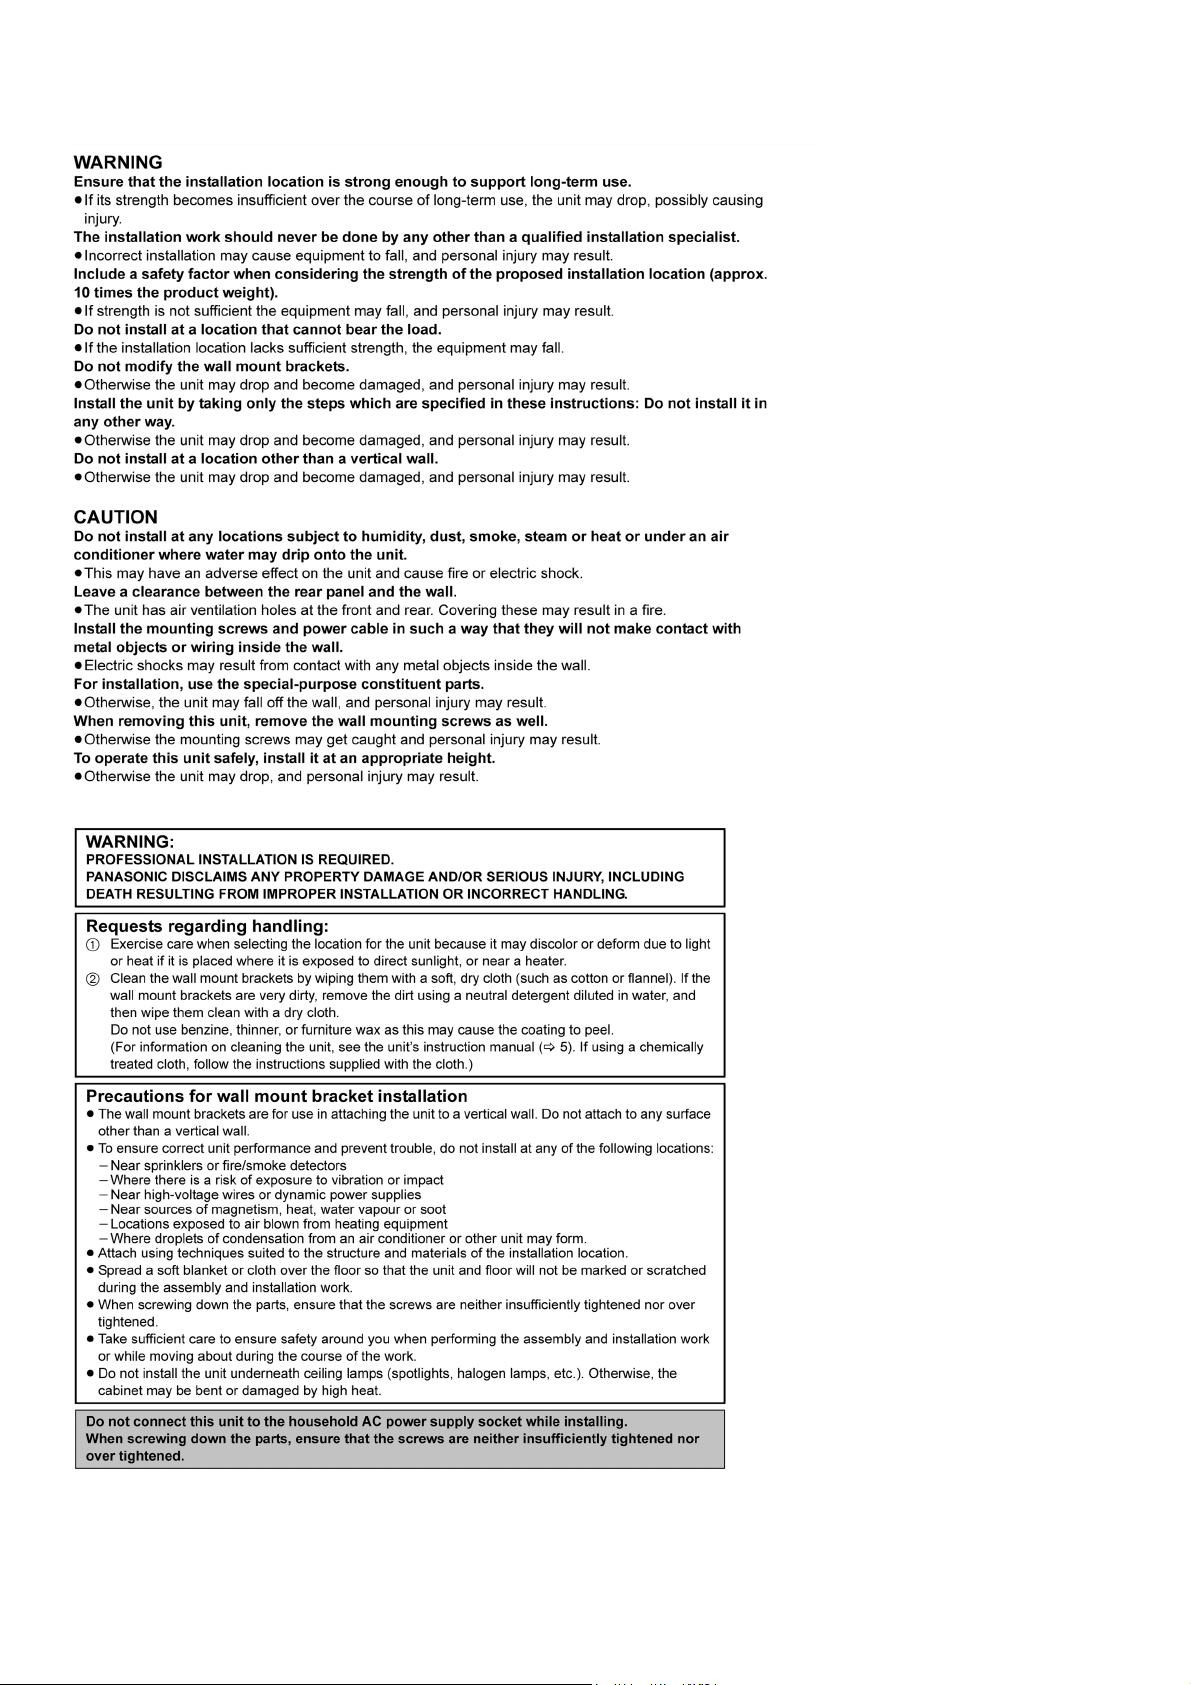
1.6. Safety Installation Instructions
6
Page 7

2Warning
2.1. Prevention of Electro Static Discharge (ESD) to Electrostatically Sensitive (ES) Devices
Some semiconductor (solid state) devices can be damaged easily by electricity. Such components commonly are called Electrostatically Sensitive (ES) Devices. Examples of typical ES devices are integrated circuits and some field-effect transistors and semiconductor “chip” components. The following techniques should be used to help reduce the incidence of component damage caused by
electro static discharge (ESD).
1. Immediately before handling any semiconductor component or semiconductor-equiped assembly, drain off any ESD on your
body by touching a known earth ground. Alternatively, obtain and wear a commercially available discharging ESD wrist strap,
which should be removed for potential shock reasons prior to applying power to the unit under test.
2. After removing an electrical assembly equiped with ES devices, place the assembly on a conductive surface such as aluminium foil, to prevent electrostatic charge build up or exposure of the assembly.
3. Use only a grounded-tip soldering iron to solder or unsolder ES devices.
4. Use only an anti-static solder remover device. Some solder removal devices not classified as “anti-static (ESD protected)” can
generate electrical charge to damage ES devices.
5. Do not use freon-propelled chemicals. These can generate electrical charges sufficient to damage ES devices.
6. Do not remove a replacement ES device from its protective package until immediately before you are ready to install it. (Most
replacement ES devices are packaged with leads electrically shorted together by conductive foam, aluminium foil or comparable conductive material).
7. Immediately before removing the protective material from the leads of a replacement ES device, touch the protective material
to the chassis or circuit assembly into which the device will be installed.
Caution
Be sure no power is applied to the chassis or circuit, and observe all other safety precautions.
8. Minimize body motions when handling unpackaged replacement ES devices. (Otherwise harmless motion such as the brushing together of your clothes fabric or the lifting of your foot from a carpeted floor can generate static electricity (ESD) sufficient
to damage an ES device).
7
Page 8

2.2. Service caution based on Legal restrictions
2.2.1. General description about Lead Free Solder (PbF)
The lead free solder has been used in the mounting process of all electrical components on the printed circuit boards used for this
equipment in considering the globally environmental conservation.
The normal solder is the alloy of tin (Sn) and lead (Pb). On the other hand, the lead free solder is the alloy mainly consists of tin
(Sn), silver (Ag) and Copper (Cu), and the melting point of the lead free solder is higher approx.30 degrees C (86°F) more than that
of the normal solder.
Definition of PCB Lead Free Solder being used
The letter of “PbF” is printed either foil side or components side on the PCB using the lead free solder.
(See right figure)
Service caution for repair work using Lead Free Solder (PbF)
• The lead free solder has to be used when repairing the equipment for which the lead free solder is used.
(Definition: The letter of “PbF” is printed on the PCB using the lead free solder.)
• To put lead free solder, it should be well molten and mixed with the original lead free solder.
• Remove the remaining lead free solder on the PCB cleanly for soldering of the new IC.
• Since the melting point of the lead free solder is higher than that of the normal lead solder, it takes the longer time to melt the
lead free solder.
• Use the soldering iron (more than 70W) equipped with the temperature control after setting the temperature at 350±30 degrees
C (662±86°F).
Recommended Lead Free Solder (Service Parts Route.)
• The following 3 types of lead free solder are available through the service parts route.
RFKZ03D01K-----------(0.3mm 100g Reel)
RFKZ06D01K-----------(0.6mm 100g Reel)
RFKZ10D01K-----------(1.0mm 100g Reel)
Note
* Ingredient: Tin (Sn), 96.5%, Silver (Ag) 3.0%, Copper (Cu) 0.5%, Cobalt (Co) / Germanium (Ge) 0.1 to 0.3%
8
Page 9

3 Service Navigation
3.1. Service Information
This service manual contains technical information which will allow service perssonnel’s to understand and service this model.
Please place orders using the parts list and not the drawing reference numbers.
If the circuit is changed or modified, this information will be followed by supplement service manual to be filed with original service
manual.
• Micro-processor :
1. The following components are supplied as an assembled part.
• Micro-processor IC, IC604 (RFKWMHTB10PA).
• Micro-processor IC, IC2002 (RFKWMHTB10PB).
9
Page 10

4 Specifications
Q GENERAL
Power consumption: 25 W
Power consumption in standby mode: Approx. 0.1 W
Power supply: AC 120 V, 60 Hz
Dimensions (W x H x D):
(Without wall mount bracket) 800 mm x 108 mm x 58 mm
(31 1/2” x 4 1/4” x 2 9/32”)
(With wall mount bracket) 800 mm x 108 mm x 80 mm
(31 1/2” x 4 1/4” x 3 5/32”)
Mass (Weight):
(Without wall mount bracket) Approx. 3.2 kg (7.1 lbs)
(With wall mount bracket) Approx. 3.3 kg (7.3 lbs)
Operating temperature range: 0°C to +40°C (+32°F to +104°F)
Operating humidity range: 20% to 80% RH (no condensation)
Q AMPLIFIER SECTION
RMS Output Power
Front ch: 30 W per channel (4 Ω), 1 kHz, 10% THD
Subwoofer ch: 30 W per channel (4 Ω), 100 Hz, 10% THD
Total RMS Dolby Digital mode power: 120W
FTC Output Power
Front ch: 20 W per channel (4 Ω), 120 Hz to 20 kHz, 1% THD
Subwoofer ch: 20 W per channel (4 Ω), 40 Hz to 120 Hz, 1% THD
Total FTC Dolby Digital mode power: 80 W
Q SPEAKER SECTION
FRONT SPEAKERS (BUILT-IN)
Type: 1 way 1 speaker system (Bass Reflex)
Full range: 6.5 cm (2 1/2”) Cone type x 2
SUBWOOFER (BUILT-IN)
Type: 1 way 1 speaker system (Bass Reflex)
Woofer: 8 cm (3 1/8”) Cone type x 2
Q TERMINAL SECTION
HDMI This unit supports “HDAVI Control 5” function.
HDMI input
Input Connector: Type A (19 pin)
HDMI AV output
Output Connector: Type A (19 pin)
Digital Audio Input
Optical digital input: Optical terminal
Sampling frequency: 32 kHz, 44.1 kHz, 48 kHz
Audio Format: LPCM, Dolby Digital
Note:
1. Specifications are subject to change without notice.
2. Total harmonic distortion is measured by the digital spectrum analyzer.
10
Page 11
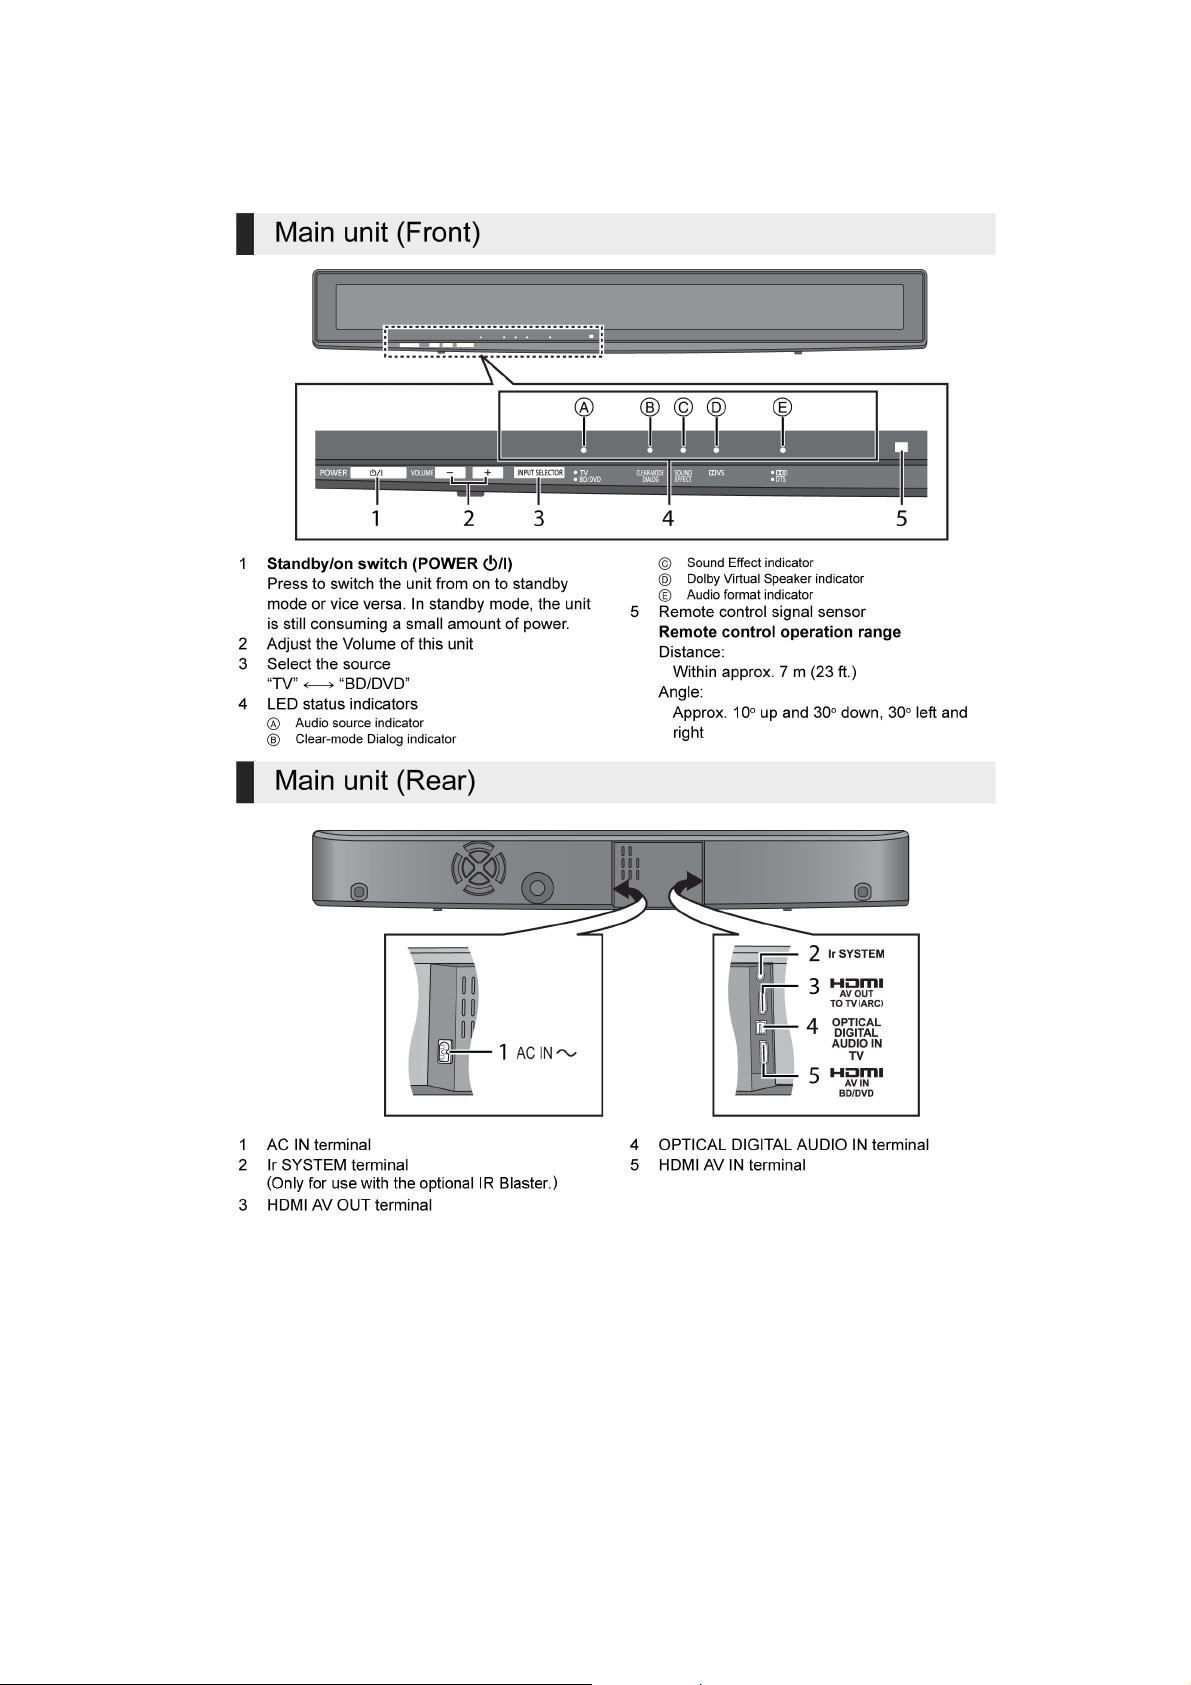
5 Location of Controls and Components
5.1. Main Unit Key Button Operations
11
Page 12
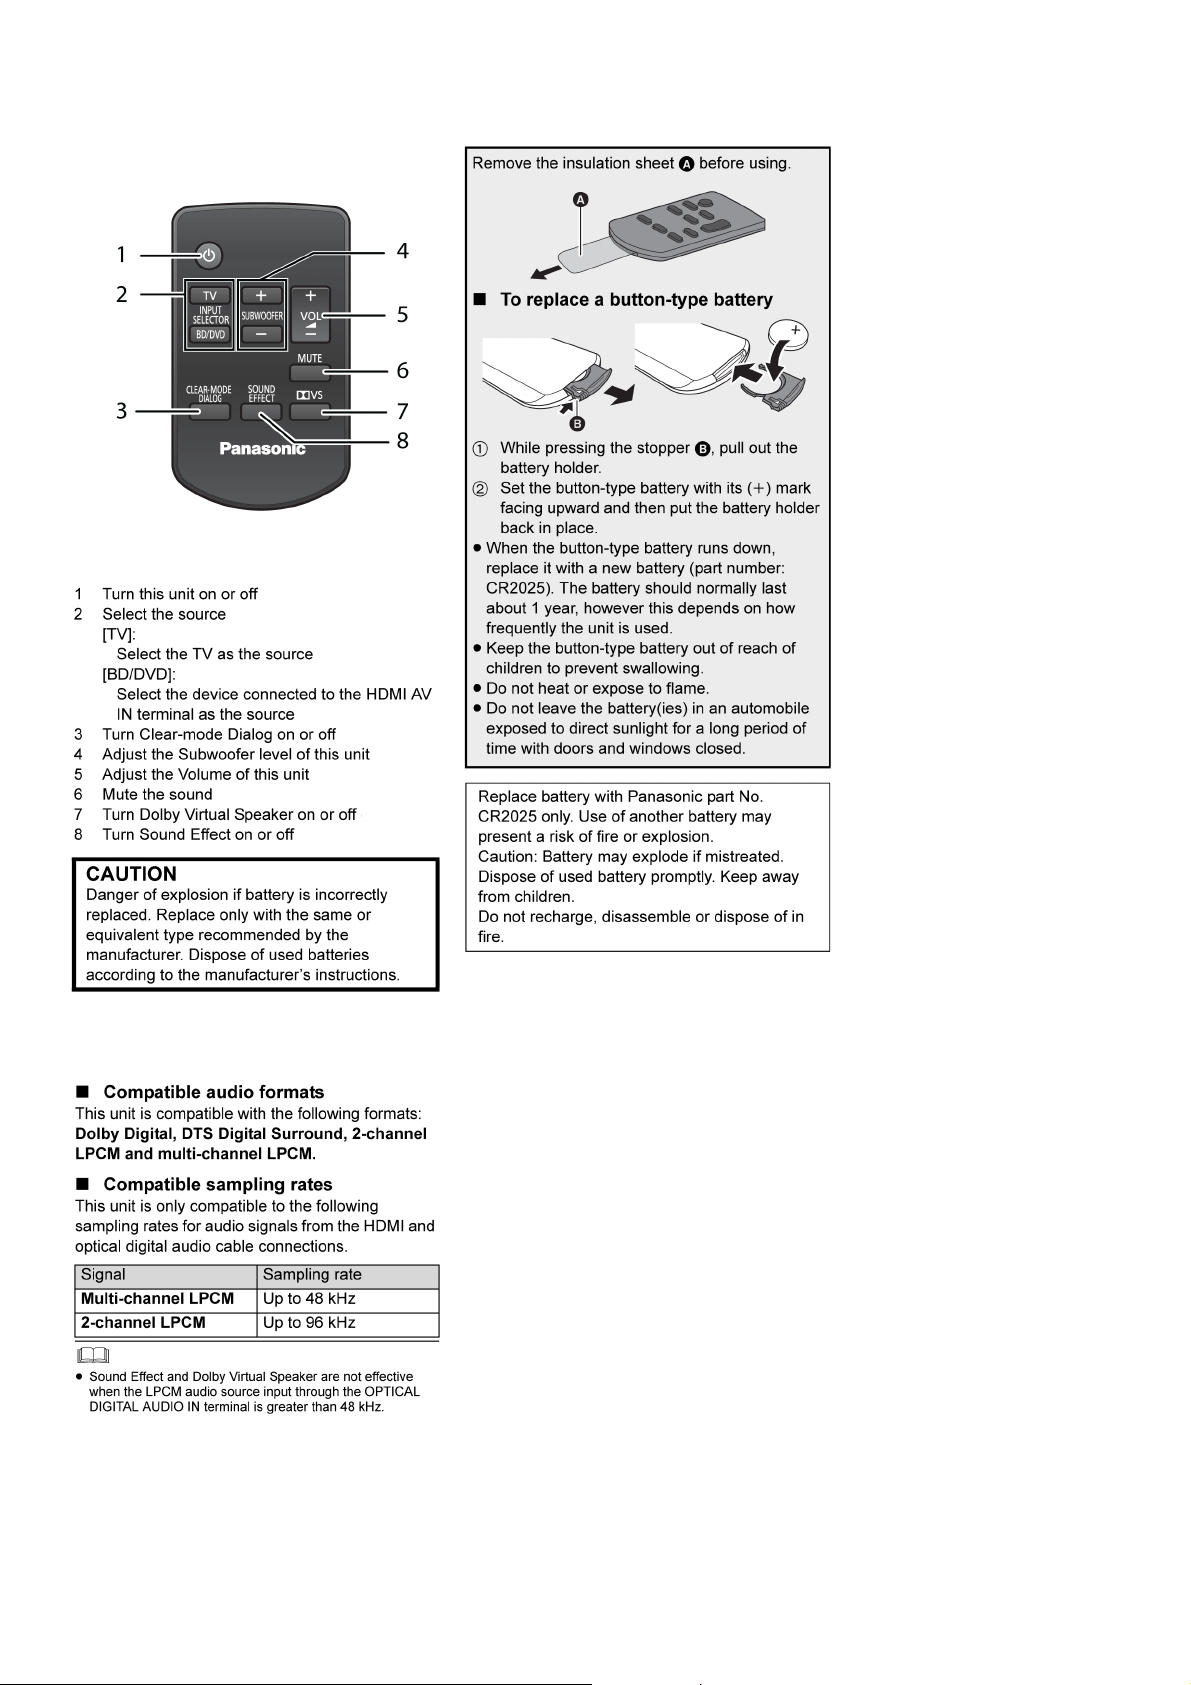
5.2. Remote Control Key Buttons Operation
5.3. Audio Information
12
Page 13
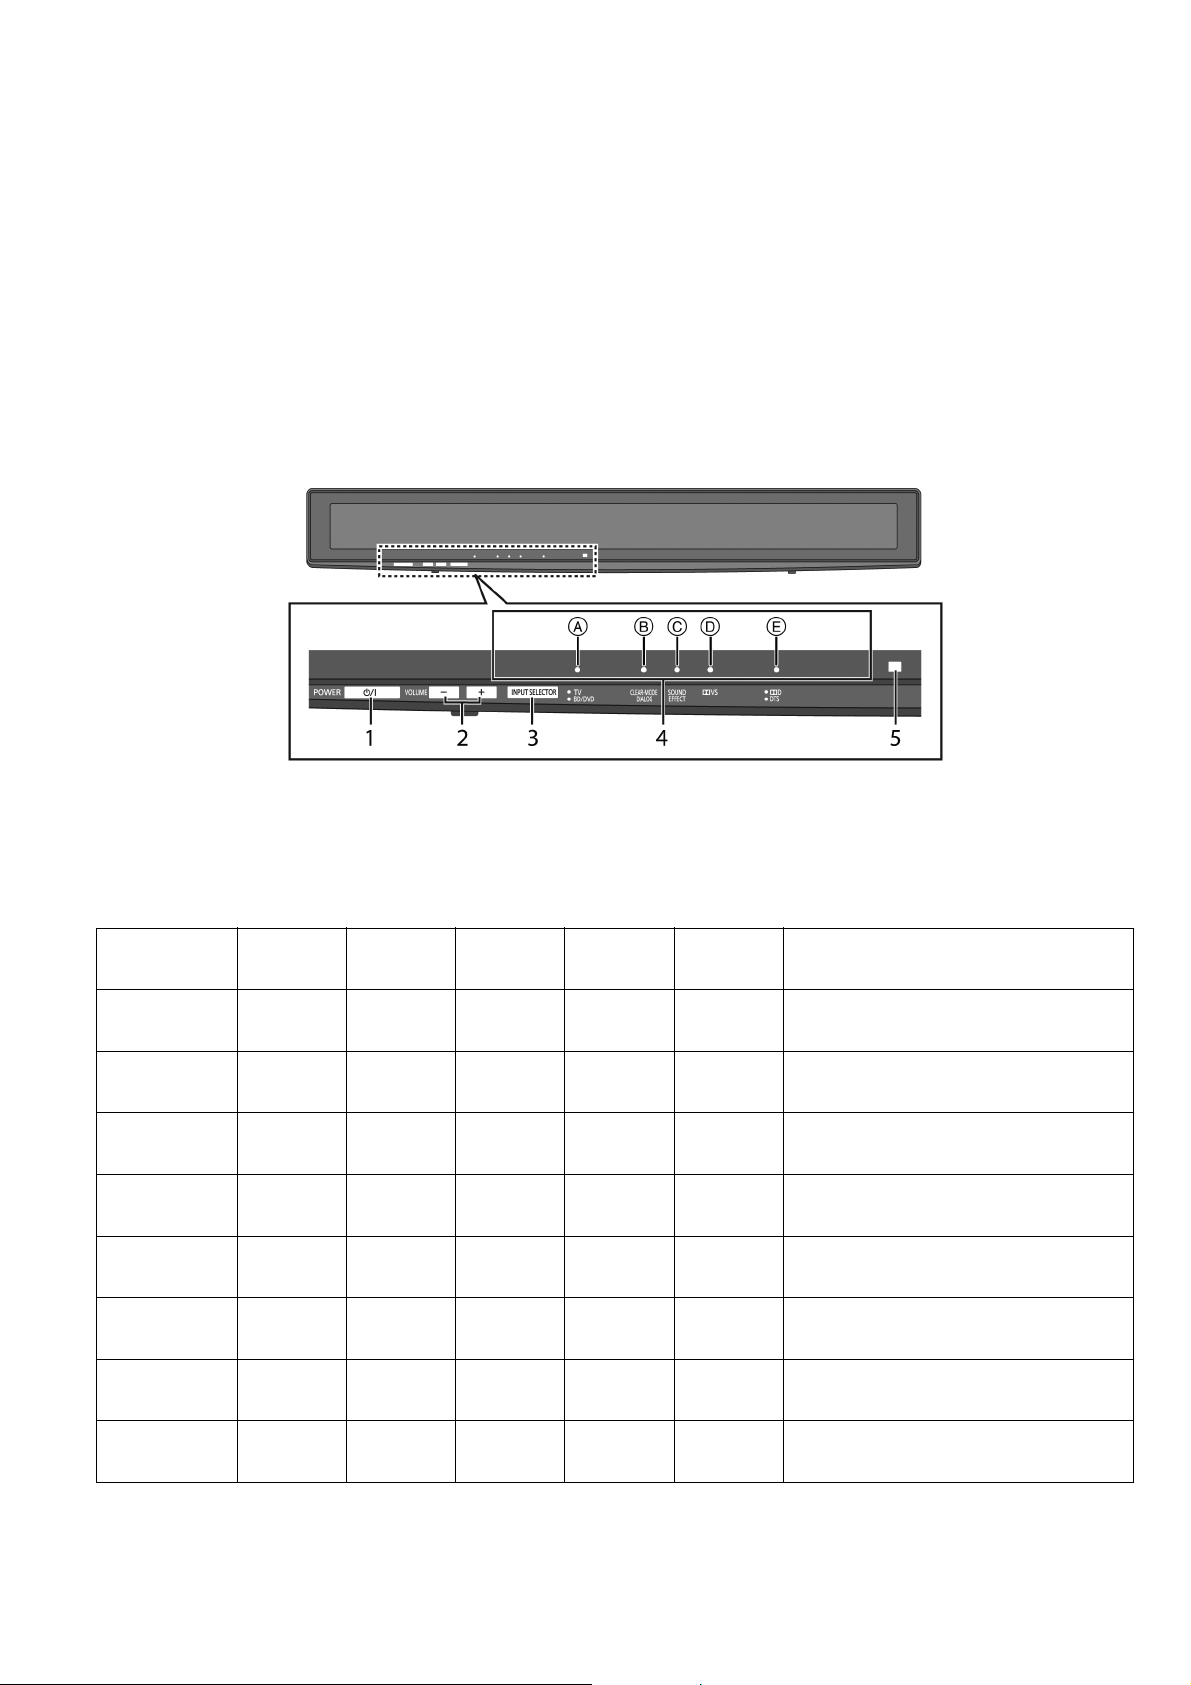
6 Self diagnostic and special mode setting
This unit is equipped with features of self-diagnostic & special mode setting for checking the functions & reliability.
Special Note : Checking of the reliability (ageing) & changer operation must be carry out to ensure good working condi-
tion in unit.
6.1. Automatically Displayed Error Codes
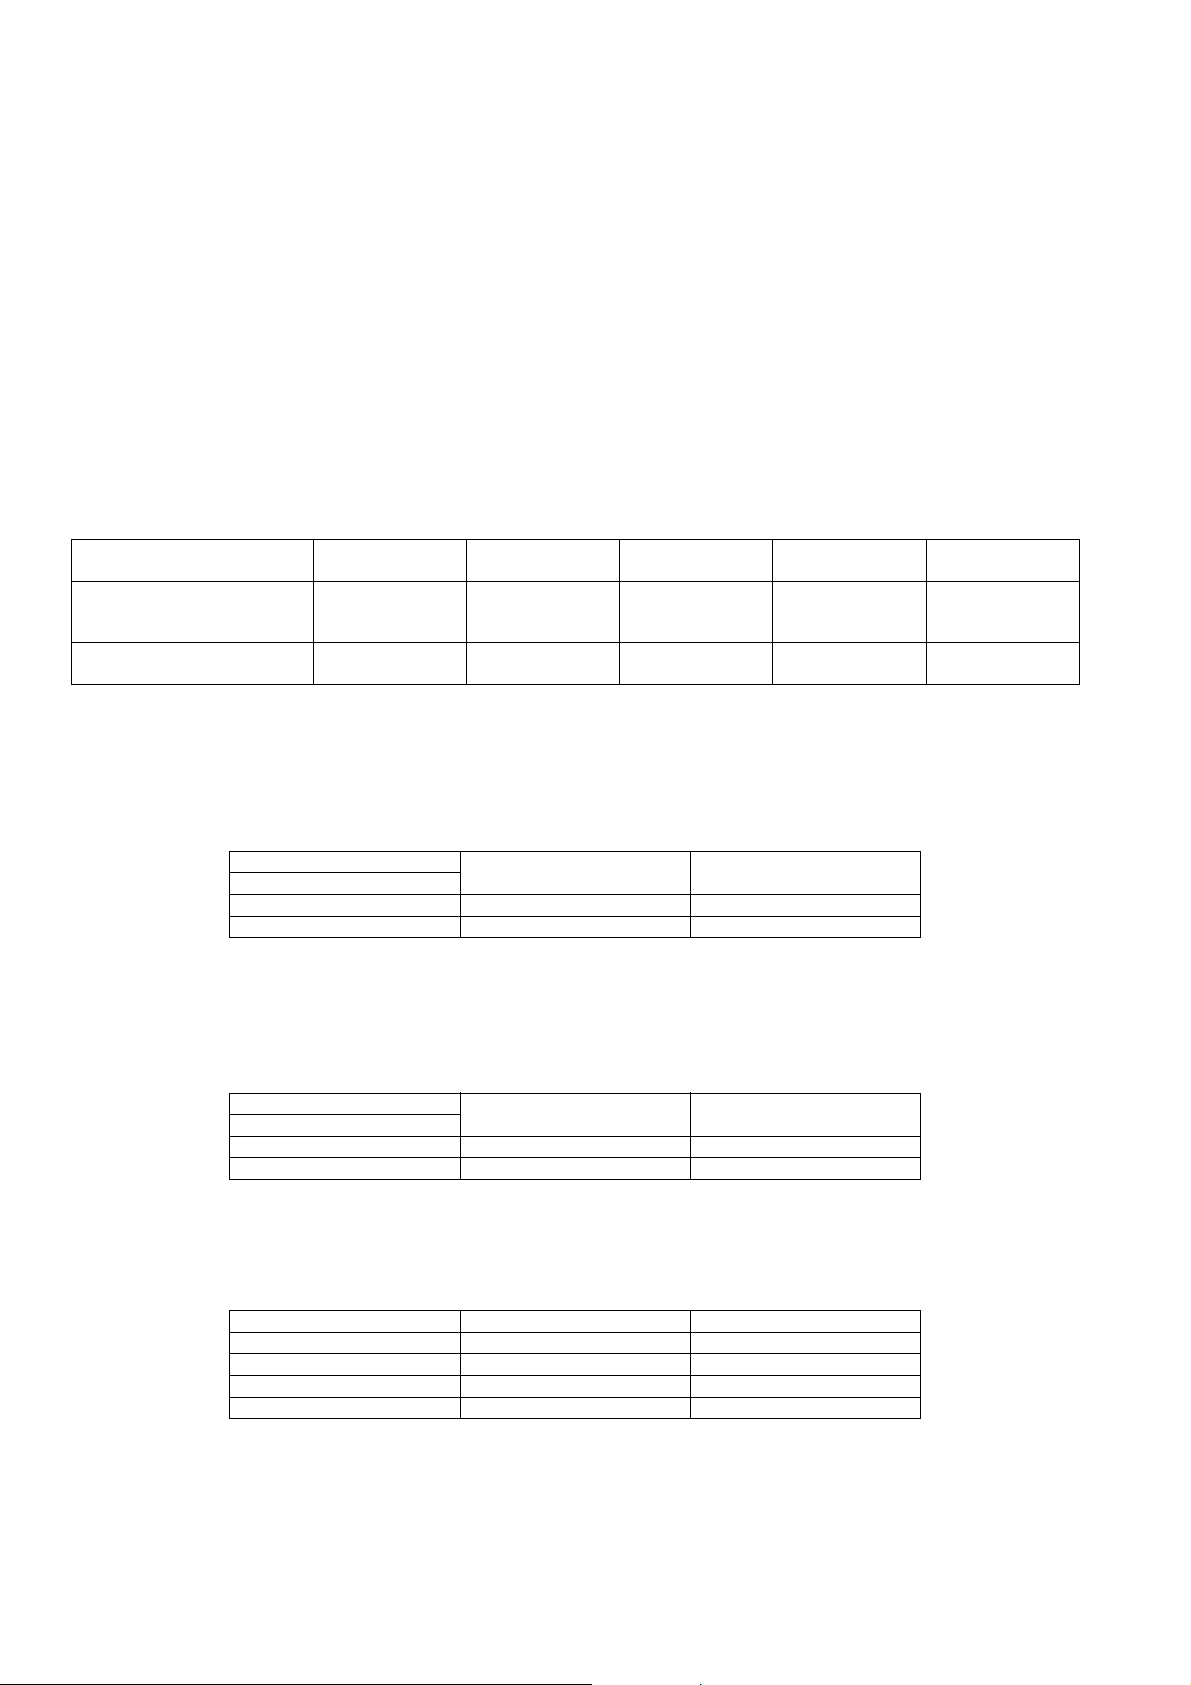
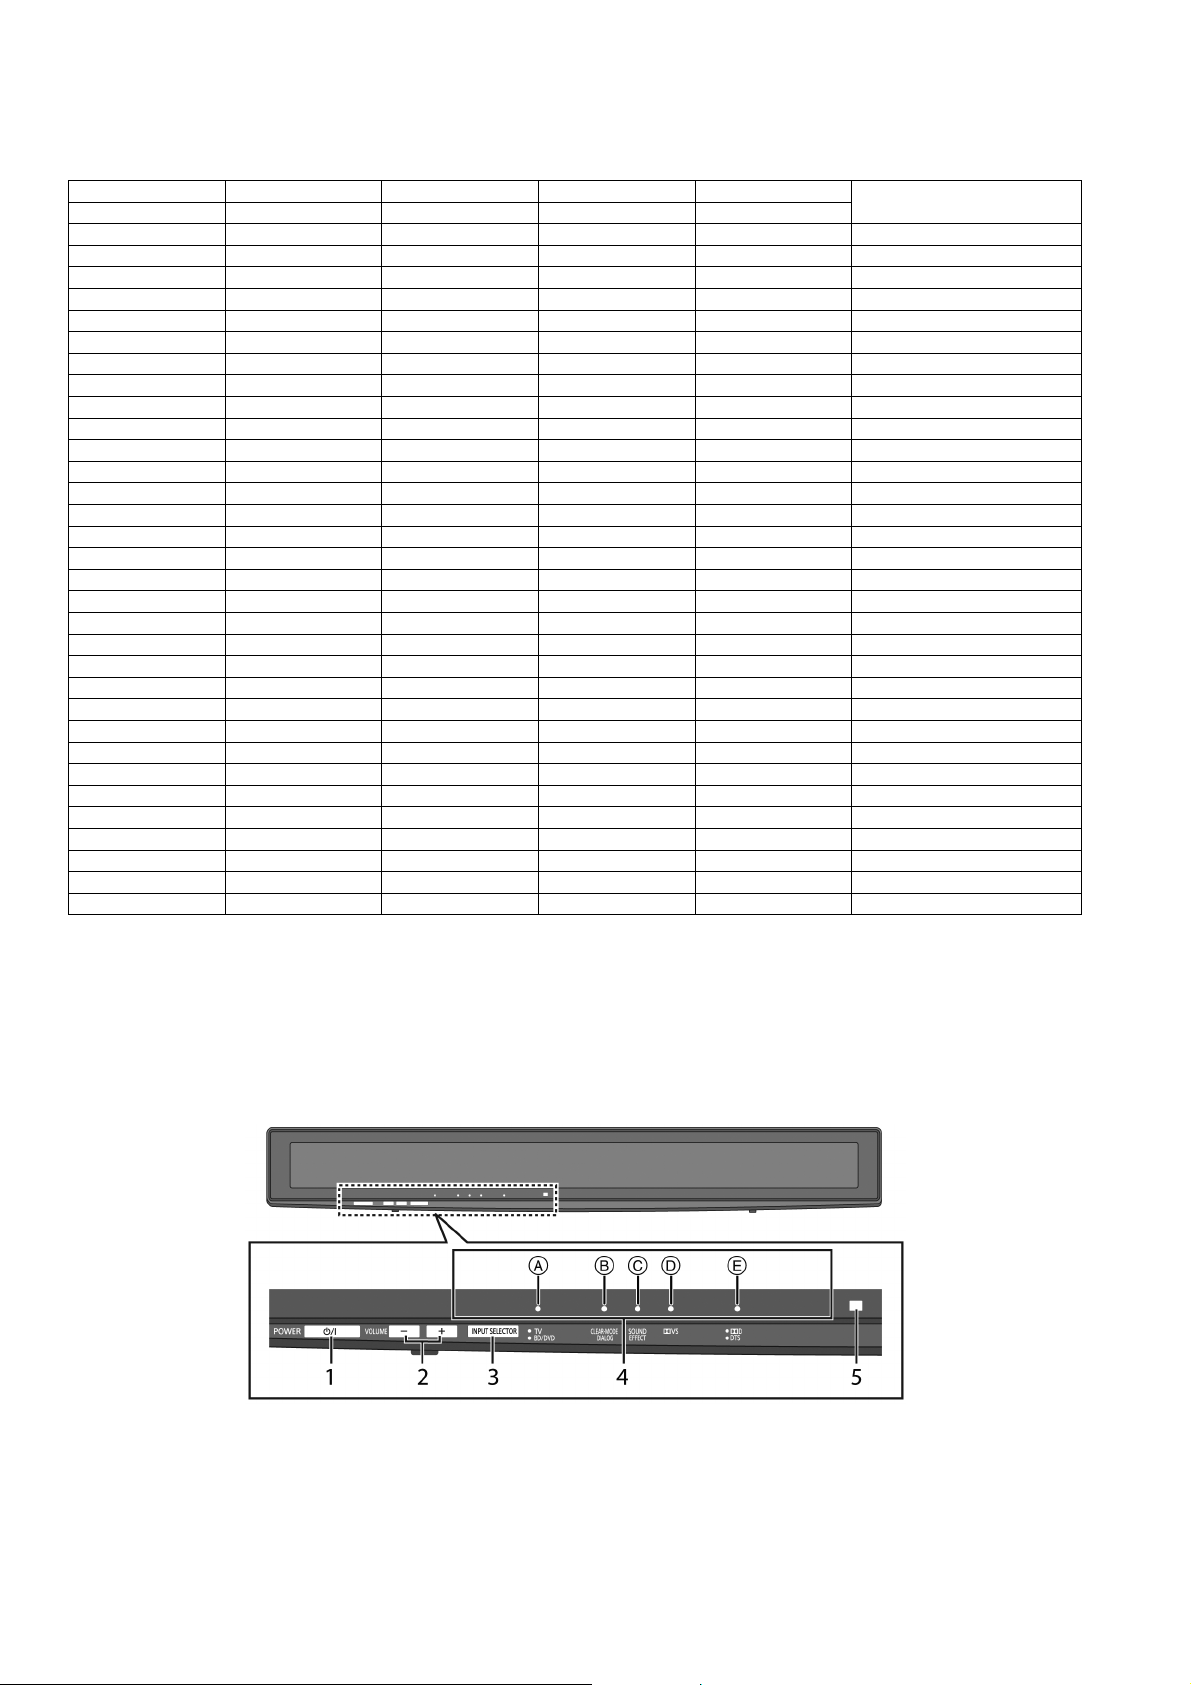
This model does not have a display unit hence error code (when a fault condition occurs) is represented by the LED status indicators. Refer to Fig 6.1
Here is the description of the LED status indicators:
(A) Audio source Indicator (TV, BD/DVD)
(B) Clear-mode Dialog indicator (Clear-Mode)
(C) Sound Effect Indicator (Sound-Effect)
(D) Dolby Virtual Sound Indicator (DVS)
(E) Audio Format Indicator (DD/DTS)
Fig 6.1
6.1.1. Error Code Display Details by LED Blinking Indicators
This section describes the LED status indicators by its blinking to represent the error codes.
Caution: The LED blinking process will stop only when the unit is power-off completely.
Error Code LED 1 (TV
OVERLOAD
(F61)
F76 (Blink 3 times
F70 DSP XXXX(Blink 2 times,
F70 DAP XXXX(Blink 3 times,
F70 HDMI XXXX(Blink 4 times,
U701 (Blink 2 times,
U703 (Blink 3 times,
U704 (Blink 4 times,
BD/DVD)
XXXX(Blink 3 times
and then
power-off)
all LED off for
3.5 secs)
all LED off for
3.5 secs)
all LED off for
3.5 secs)
LED 2
(CLEAR-
MODE)
X X X X DC Power/Voltage Supply abnormality. Check
X X X X Connected devices error (HDCP non-compli-
X X X X HDMI connectionabnormality (cable damage,
X X X X HDMI image format incompatibility. Check for
LED 3
(SOUNDEFFECT)
LED 4 (DVS) LED 5 (DD/
DTS)
and then
power-off)
all LED off for
3.5 secs)
all LED off for
3.5 secs)
all LED off for
3.5 secs)
Speaker protection, D-AMP IC or Fan abnormality. Check for faulty parts and replace with
new parts if necessary.
for faulty parts and replace with new parts if
necessary.
DSP - Main Micro-p IC communication failure/
abnormality. Check for faulty parts and replace
with new parts if necessary.
DAP - Main Micro- P IC communication failure /
abnormality. Check for faulty parts and replace
with new parts if necessary.
HDMI to Main Micro-P IC communication error.
Check for faulty parts and replace with new
parts if necessary.
ance). Check for faulty parts and replace with
new parts if necessary.
HDCP non-complianceetc). Check for faulty
parts and replace with new parts if necessary.
faulty parts and replace with new parts if necessary.
Table 6-1
Cause and Problem
13
Page 14
6.2. Service Mode
This mode can be used during servicing.
Here are the procedures to enter into service mode:
Step 1 : Power-up the main unit.
Step 2 : Press & hold [VOL+] button, [VOL-] button and [POWER] button on main unit.
This unit is equipped with service mode function for:
Step 1 : Checking the region/model and generation no.
Step 2 : Checking the Main micro-p & HDMI micro-p firmware version.
6.2.1. Checking of Main Micro-p Firmware version
Here are the procedures to check the region/model, generation no. and main firmware version:
Step 1 : Power-up the main unit.
Step 2 : Enter into service mode. (Refer to Section 6.2 for the procedures).
Step 3 : Press [VOL+] to check for the region/model & generation no. (Refer to table 6-2 for information on the LED indication).
Step 4 : Press [VOL+] to check for the main micro-p firmware version no. (Refer to table 6-2 for information on the LED indication).
Key Operation LED 1 (TV BD/DVD) LED 2 (CLEAR-
Press [VOL+] button on main
unit for one time
Press [VOL+] button on main
unit for two times
Generation Bit No.
(Refer to section
6.2.1.1)
Bit 4 Bit 3 Bit 2 Bit 1 Bit 0
MODE)
Model Bit No. (Refer
to section 6.2.1.2)
LED 3 (SOUND-
EFFECT)
Region Bit 1
(Refer to section
6.2.1.3)
LED 4 (DVS) LED 5 (DD/DTS)
Region bit 0 (Refer
to section 6.2.1.3)
Table 6-2
6.2.1.1. Generation Bit No.
The generation bit no. is used for indication of the Model Year. (Refer to table 6-3 for more information).
Generation Bit Number Model By Year
TV LED
X 0 2010
O 1 2011
Table 6-3
6.2.1.2. Model Bit No.
The model bit no. is to indicate the software for the specific model. (base on chip-select detection).
(Refer to table 6-4 for more information)
Model Bit Number Model No.
BD/DVD LED
X 0 HTB500
O 1 HTB10/50
Table 6-4
X
6.2.1.3. Region Bit No.
The region bit no. is to indicate the destination for model. (Refer to table 6-5 for more information).
Region Bit 1 Region Bit 0 Main Software
CLEAR-MODE DIALOG SOUND EFFECT By Destination
XX0 : Japan
XO1 : US
O X 2 : Europe/Asia
Table 6-5
14
Page 15
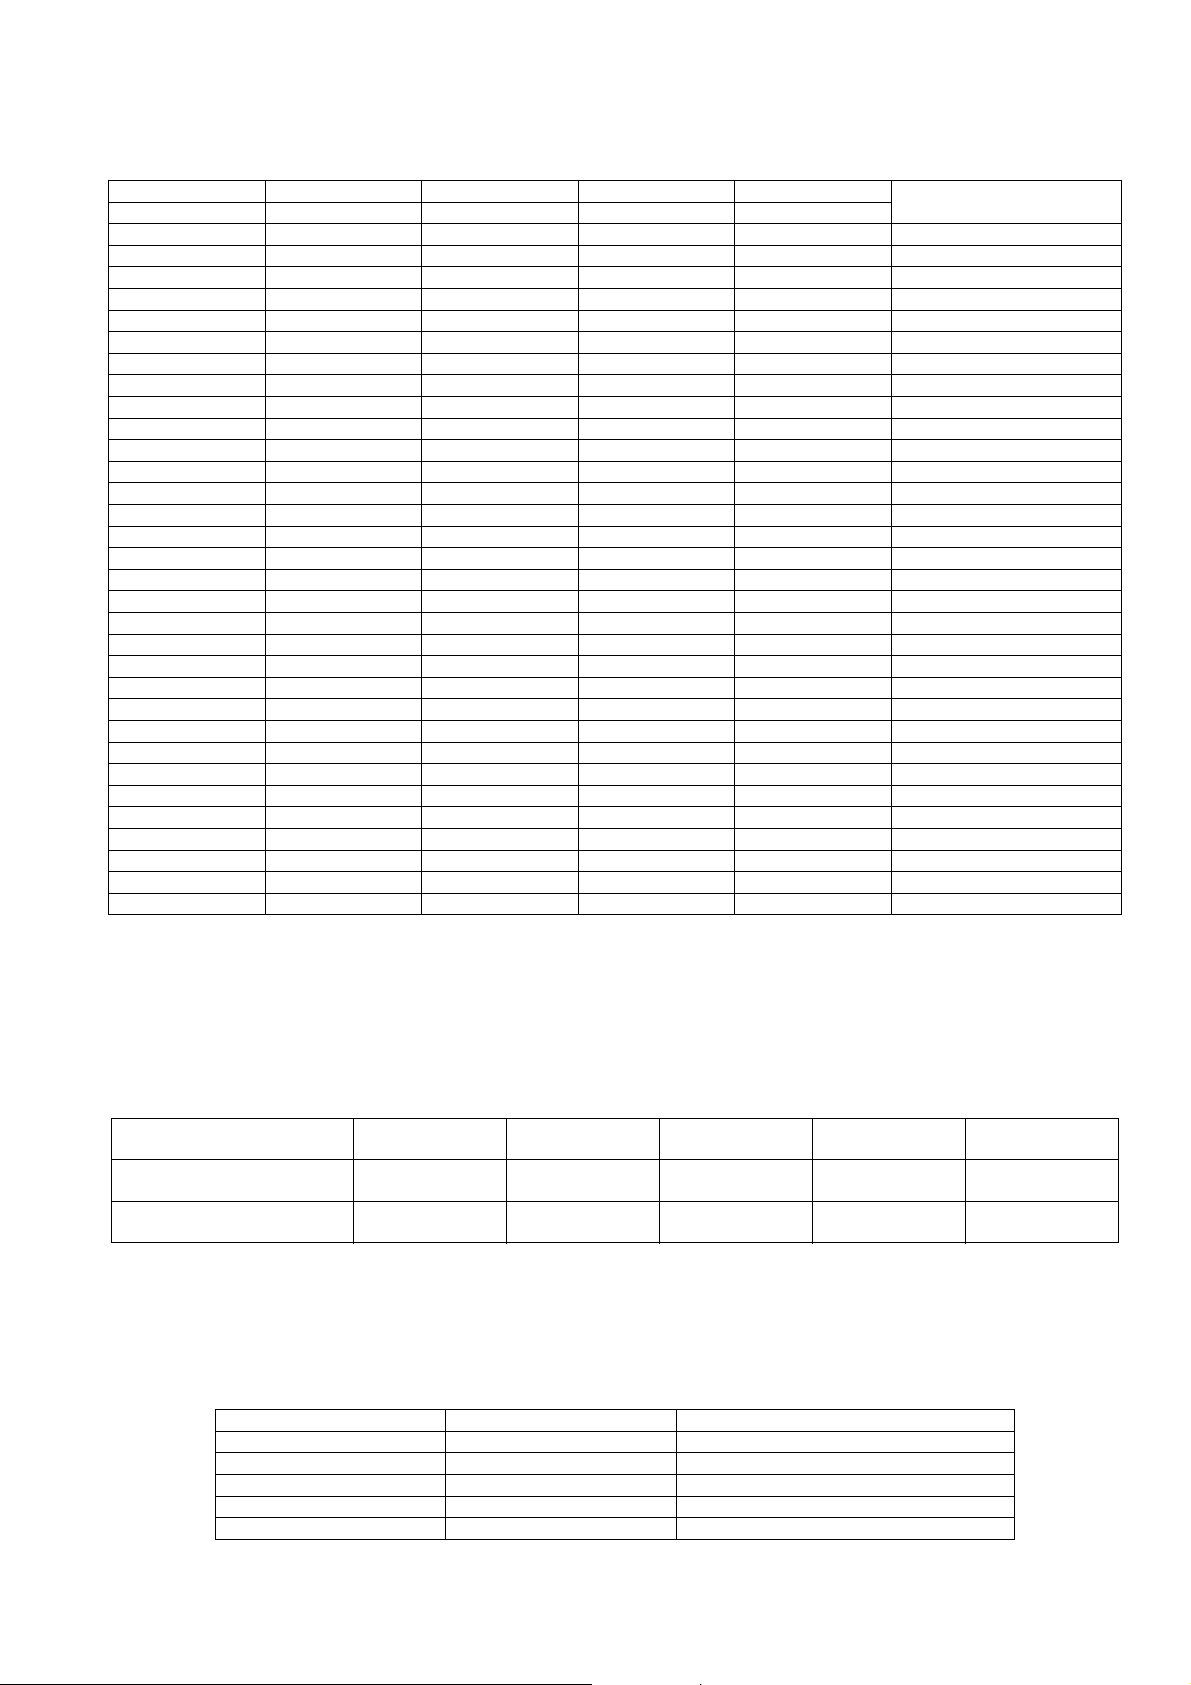
6.2.1.4. Firmware version Bit No. (Bit 0~4)
It is to indicate the firmware version no. (Bit 0 ~4). (Refer to table 6-6 for more information).
Bit 4 Bit 3 Bit 2 Bit 1 Bit 0 Version No
DVS DPLII DOLBY DTS PCM/AAC
XXXXX 00
XXXXO 01
XXXOX 02
XXXOO 03
XXOXX 04
XXOXO 05
XXOOX 06
XXOOO 07
XOXXX 08
XOXXO 09
XOXOX 10
XOXOO 11
XOOXX 12
XOOXO 13
XOOOX 14
XOOOO 15
OXXXX 16
OXXXO 17
OXXOX 18
OXXOO 19
OXOXX 20
OXOXO 21
OXOOX 22
OXOOO 23
OOX X X 24
OOX XO 25
OOX OX 26
OOX OO 27
OOOX X 28
OOOX O 29
OOOOX 30
OOOOO 31
Table 6-6
6.2.2. Checking of HDMI Micro-p Firmware version
Here are the procedures for checking the HDMI micro-p firmware version no:
Step 1 : Enter into service mode. (Refer to Section 6.2 for the procedures)
Step 2 : Press [VOL-] to check the region no. (Refer to table 6-7 for information).
Step 3 : Press [VOL-] to check the HDMI micro-p firmware version no. (Refer to table 6-7 for information).
Key Operation LED 1 (TV BD/DVD) LED 2 (CLEAR-
Press [VOL-] button on main
unit
Press [VOL-] button on main
unit
X X Region bit 1 Region bit 0 X
Bit 4Bit 3Bit 2Bit 1Bit 0
MODE)
LED 3 (SOUND-
EFFECT)
LED 4 (DVS) LED 5 (DD/DTS)
Table 6-7
6.2.2.1. Region Bit No.
The region bit no. is to indicate the destination for model. (Refer to table 6-8 for more information).
Region Bit 1 Region Bit 0 HDMI Software
CLEAR-MODE DIALOG SOUND EFFECT By last 2 digit
X X 9 : HDMI Version is originally as H9XX
X O E : HDMI Version is originally as HEXX
O X F : HDMI Version is originally as HFXX
O O X : HDMI Version is not one of above
Table 6-8
15
Page 16
6.2.2.2. Firmware version Bit No. (Bit 0~4)
It is to indicate the firmware version no. (Bit 0 ~4). (Refer to table 6-9 for more information).
Bit 4 Bit 3 Bit 2 Bit 1 Bit 0 Version No
DVS DPLII DOLBY DTS PCM/AAC
XXXXX 00
XXXXO 01
XXXOX 02
XXXOO 03
XXOXX 04
XXOXO 05
XXOOX 06
XXOOO 07
XOXXX 08
XOXXO 09
XOXOX 10
XOXOO 11
XOOXX 12
XOOXO 13
XOOOX 14
XOOOO 15
OXXXX 16
OXXXO 17
OXXOX 18
OXXOO 19
OXOXX 20
OXOXO 21
OXOOX 22
OXOOO 23
OOX X X 24
OOX XO 25
OOXOX 26
OOXOO 27
OOOX X 28
OOOXO 29
OOOOX 30
OOOOO 31
Table 6-9
6.2.3. Cold start
Here are the procedures to do a reset for the main unit.
Step 1 : Power-up the main unit.
Step 2 : Press & hold [POWER] button on main unit for 4s or more.
All LED will light-up and blink for 2 times (at frequency of 4Hz)
16
Page 17

7 Service Fixture & Tools
Prepare service tools before proccess service position.
Service Tools Remarks
Main P.C.B. (CN700) - SMPS P.C.B. (H2016) REEX1103 (10P Cable Wire)
17
Page 18
8 Disassembly and Assembly Instructions
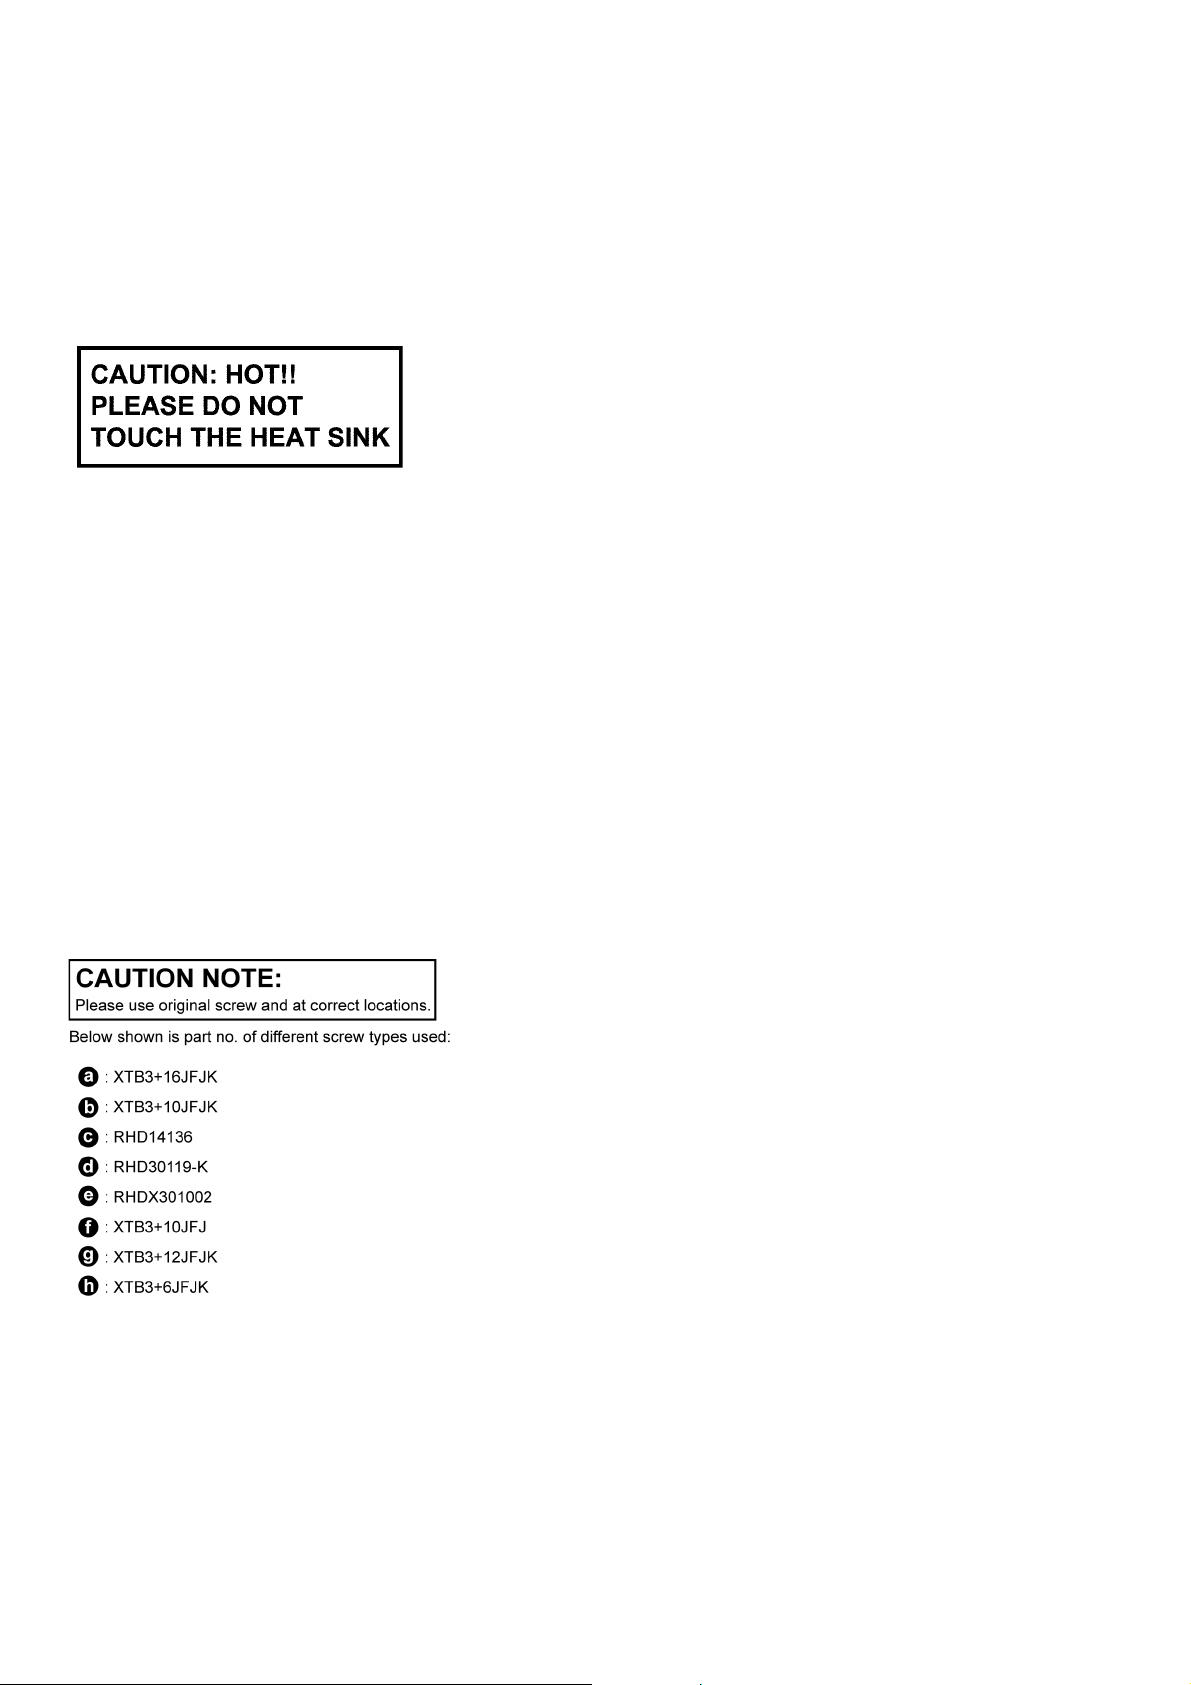
Caution Note:
• This section describes the disassembly and/or assembly procedures for all major printed circuit boards & main components for the unit. (You may refer to the section of “Main components and P.C.B Locations” as described in the service
manual)
• Before carrying out the disassembly process, please ensure all the safety precautions & procedures are followed.
• During the disassembly and/or assembly process, please handle with care as there may be chassis components with
sharp edges.
• Avoid touching heatsinks due to its high temperature after prolong use. (See caution as described below)
• During disassembly and assembly, please ensure proper service tools, equipments or jigs is being used.
• During replacement of component parts, please refer to the section of “Replacement Parts List” as described in the
service manual.
• Select items from the following indexes when disassembly or replacement are required.
• Disassembly of Back Cabinet Assembly
• Disassembly of Front Speaker L (SP1)
• Disassembly of Front Speaker R (SP2)
• Disassembly of Subwoofer Speaker Front (SP3)
• Disassembly of Subwoofer Speaker Rear (SP4)
• Disassembly of Main Chassis Assembly
• Disassembly of LED P.C.B. and Panel Tact Switch P.C.B.
• Disassembly of AC Inlet P.C.B.
• Disassembly of Main P.C.B.
• Disassembly of SMPS P.C.B.
• Replacement of Switch Regulator IC (IC5701)
• Replacement of Rectifier Diode (D5802)
• Disassembly of HDMI P.C.B.
18
Page 19
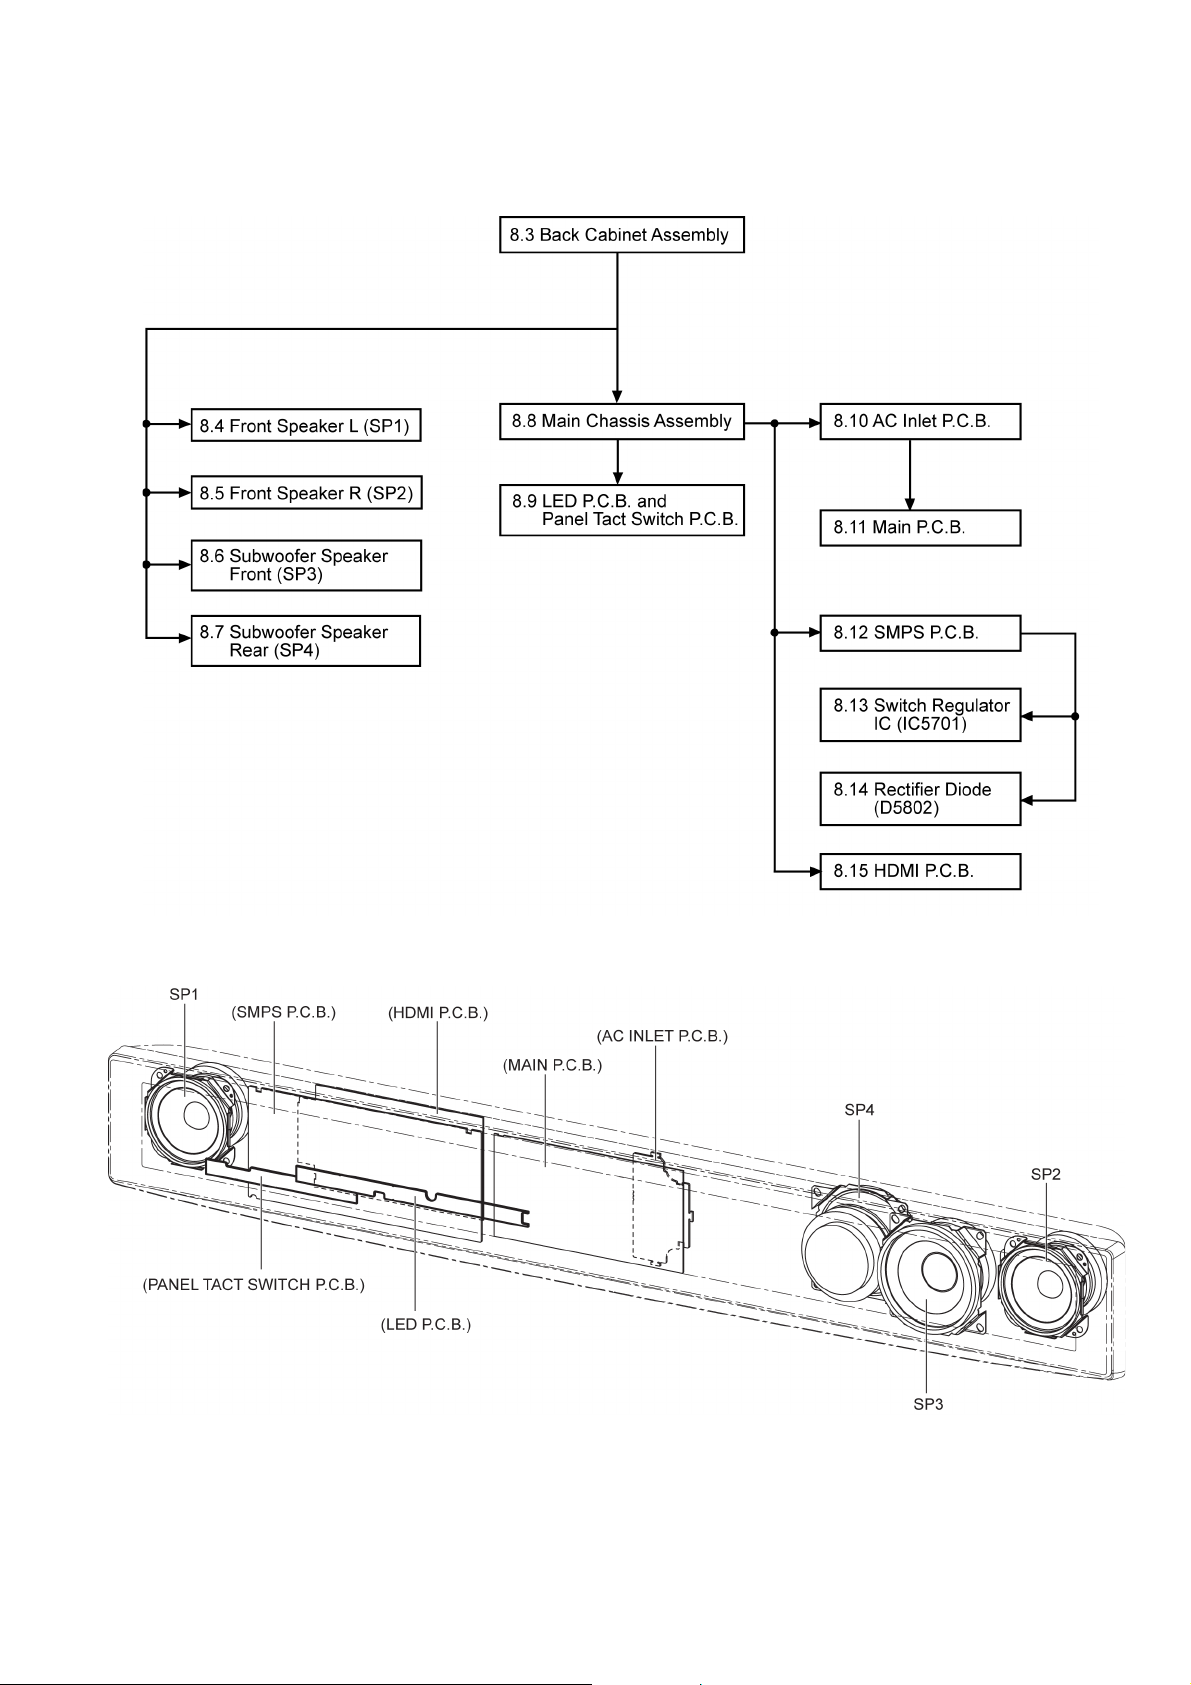
8.1. Disassembly flow chart
The following chart is the procedure for disassembling the casing and inside parts for internal inspection when carrying out the servicing.
To assemble the unit, reverse the steps shown in the chart below.
8.2. Main Parts Location Diagram
19
Page 20
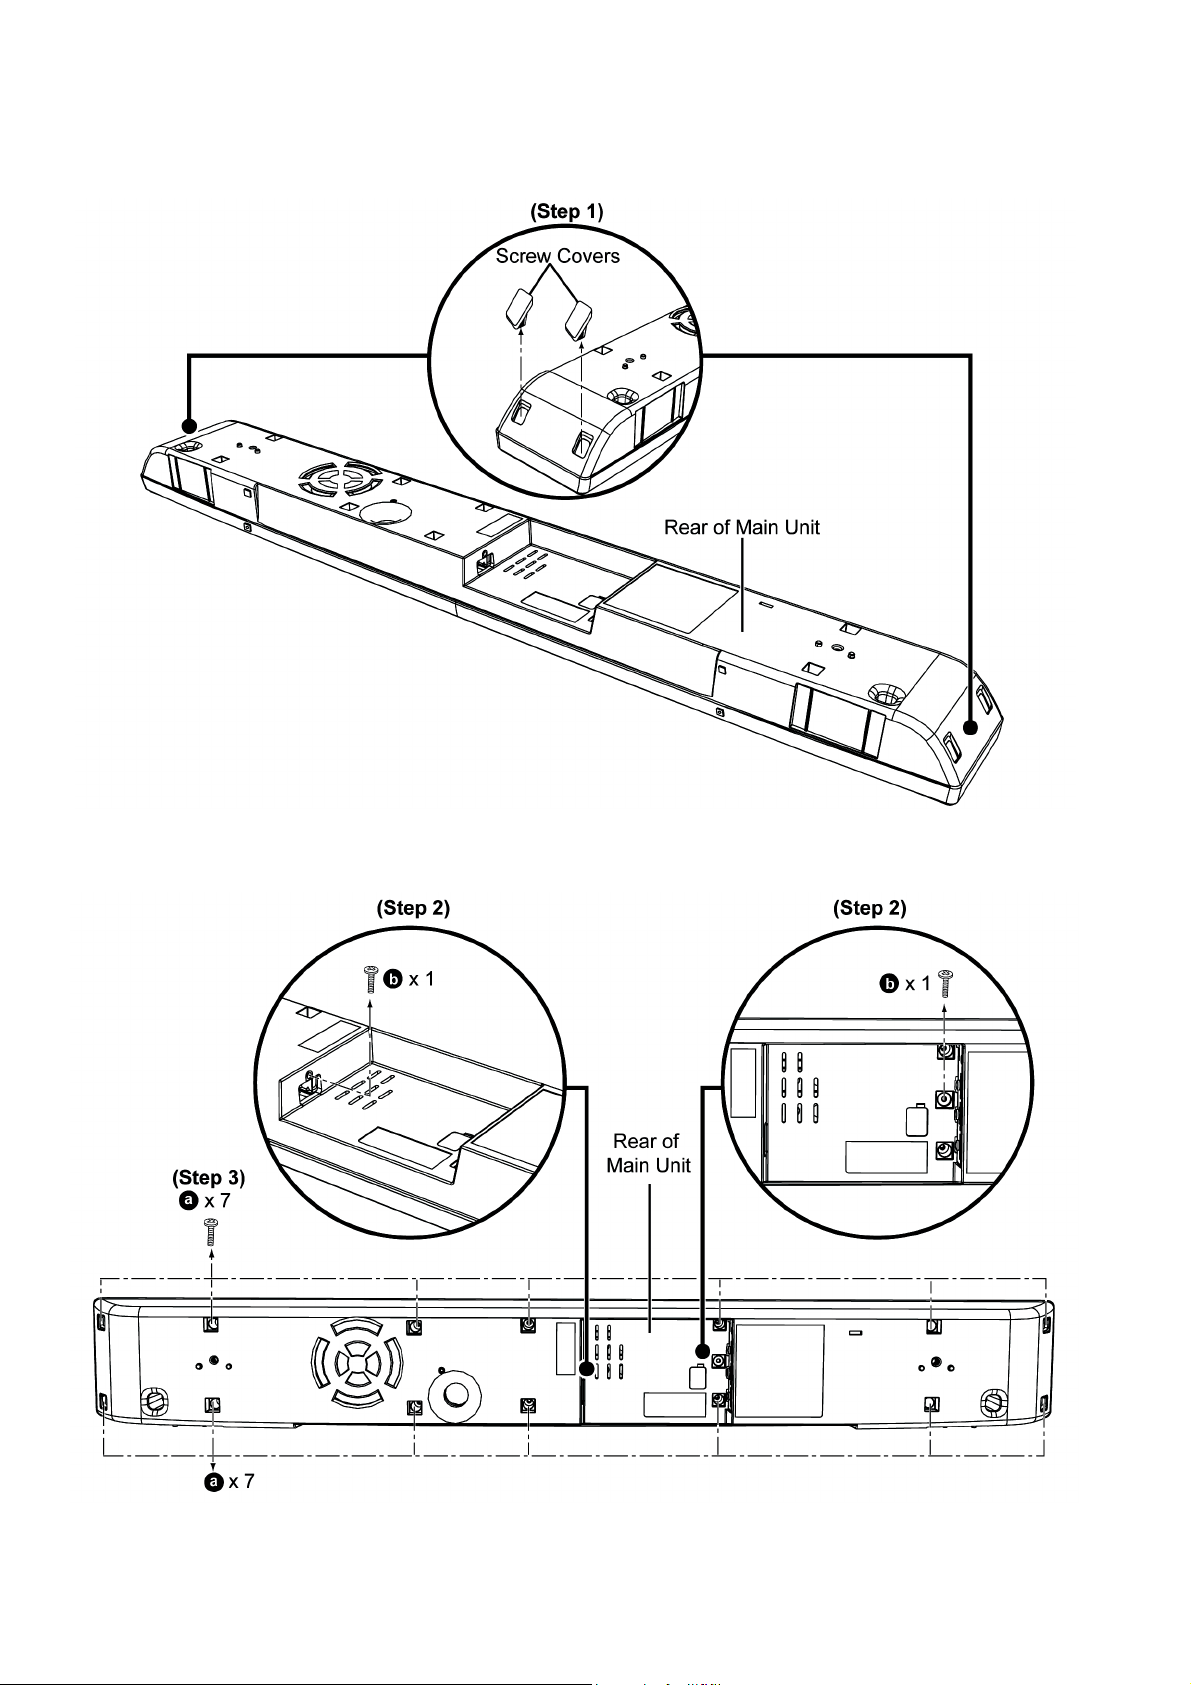
8.3. Disassembly of Back Cabinet Assembly
Step 1 : Remove 4 Screw Covers.
Step 2 : Remove 2 screws.
Step 3 : Remove 14 screws.
20
Page 21
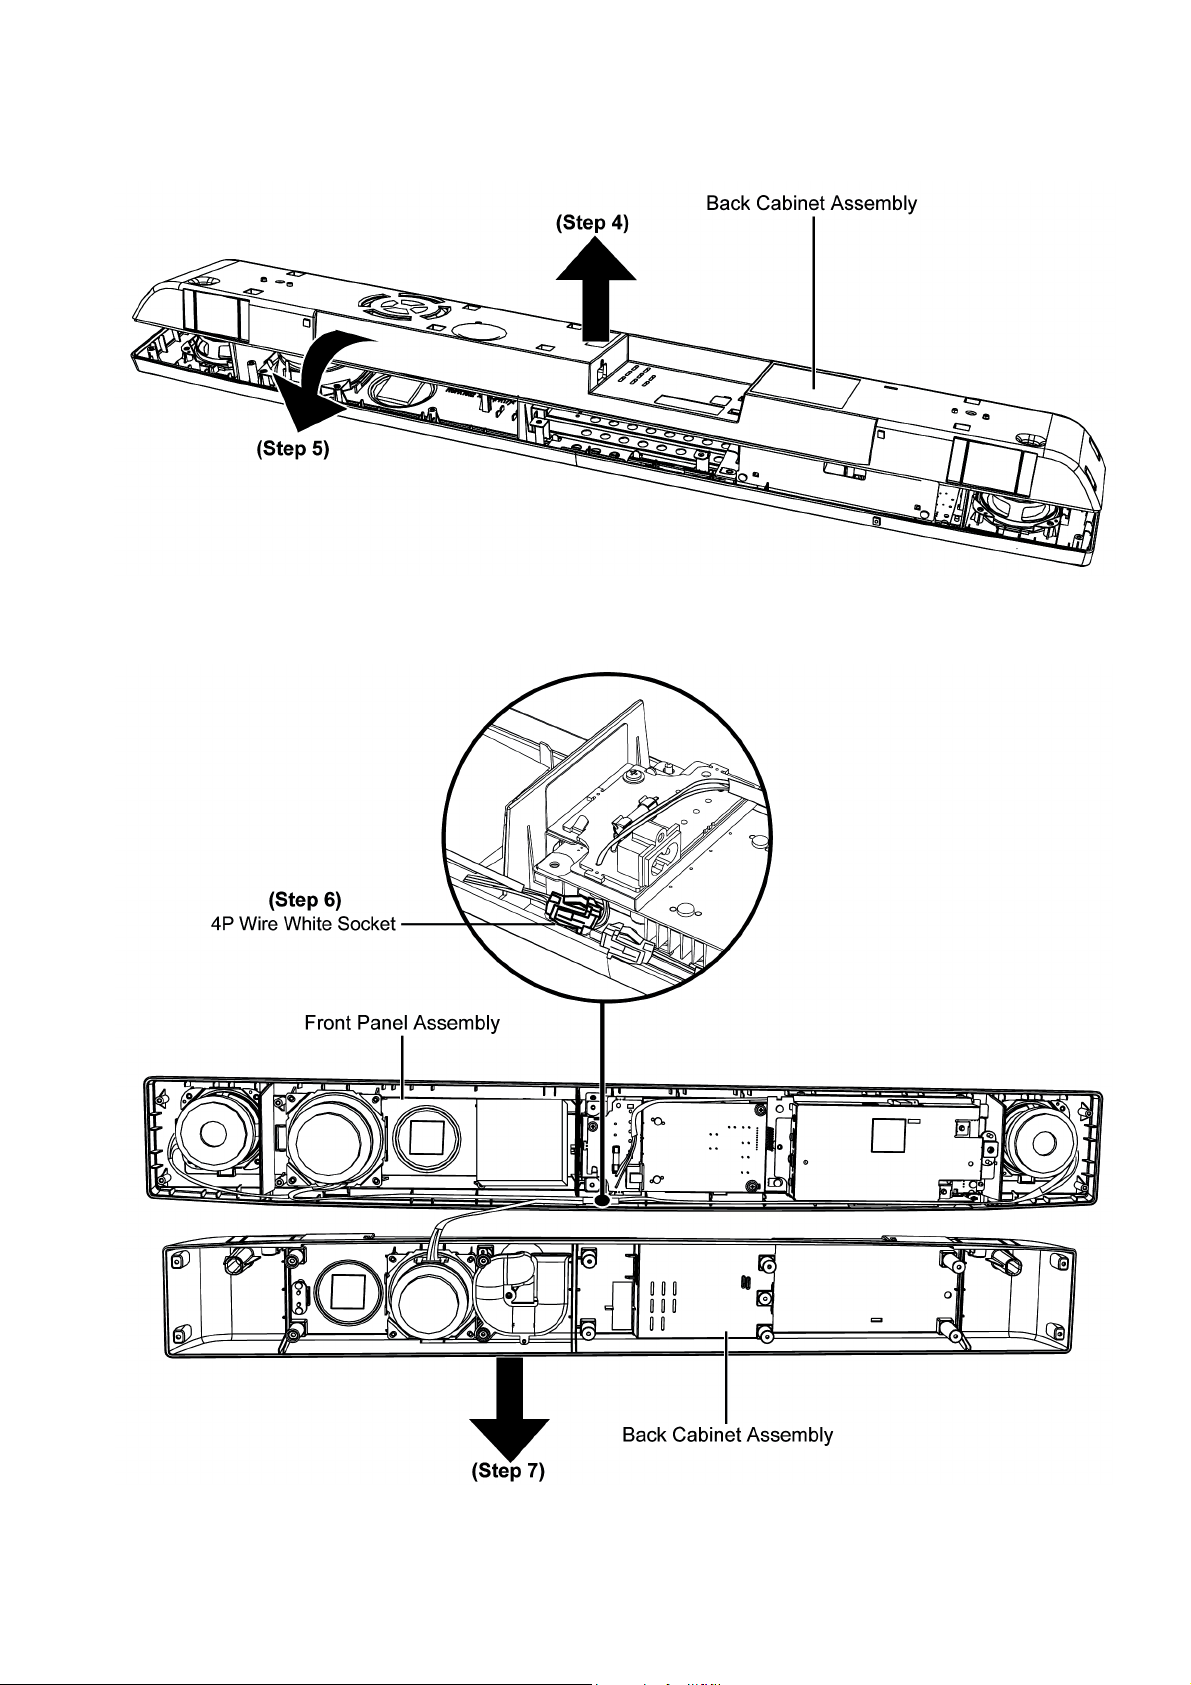
Step 4 : Lift up the Back Cabinet Assembly as arrow shown.
Step 5 : Flip over the Back Cabinet Assembly as arrow shown.
Caution : Do not exert too much force as it may damage the wiring within.
Step 6 : Disconnector 4P Wire White Socket.
Step 7 : Remove the Back Cabinet Assembly.
21
Page 22
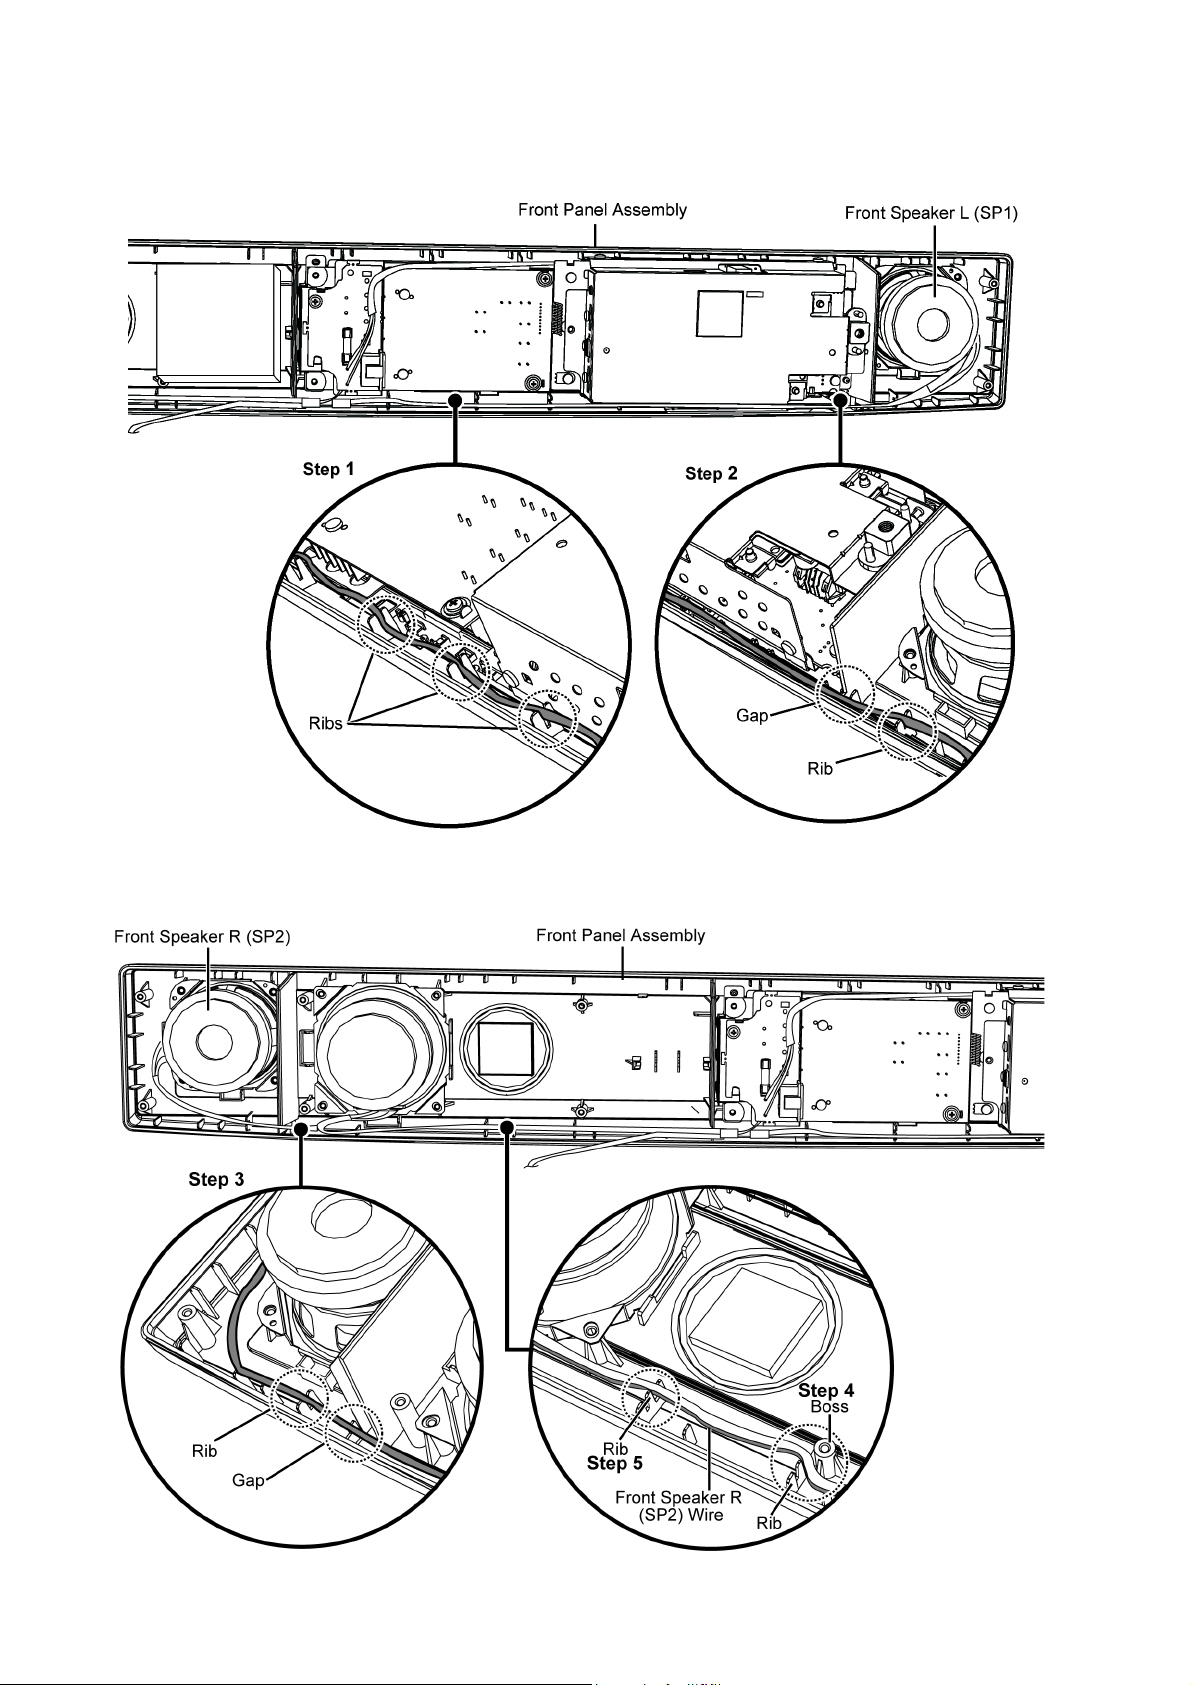
8.3.1. Wire Dressing for assembling
Step 1 : Ensure Front Speaker L (SP1) wire is properly dressed into the Front Panel Assembly ribs.
Step 2 : Ensure Front Speaker L (SP1) wire is properly dressed into the Front Panel Assembly gap and rib.
Step 3 : Ensure Front Speaker R (SP2) wire is properly dressed into the Front Panel Assembly rib and gap.
Step 4 : Ensure Front Speaker R (SP2) wire is properly dressed into the Front Panel Assembly between rib and boss.
Step 5 : Ensure Front Speaker R (SP2) wire is properly dressed into the Front Panel Assembly rib.
22
Page 23
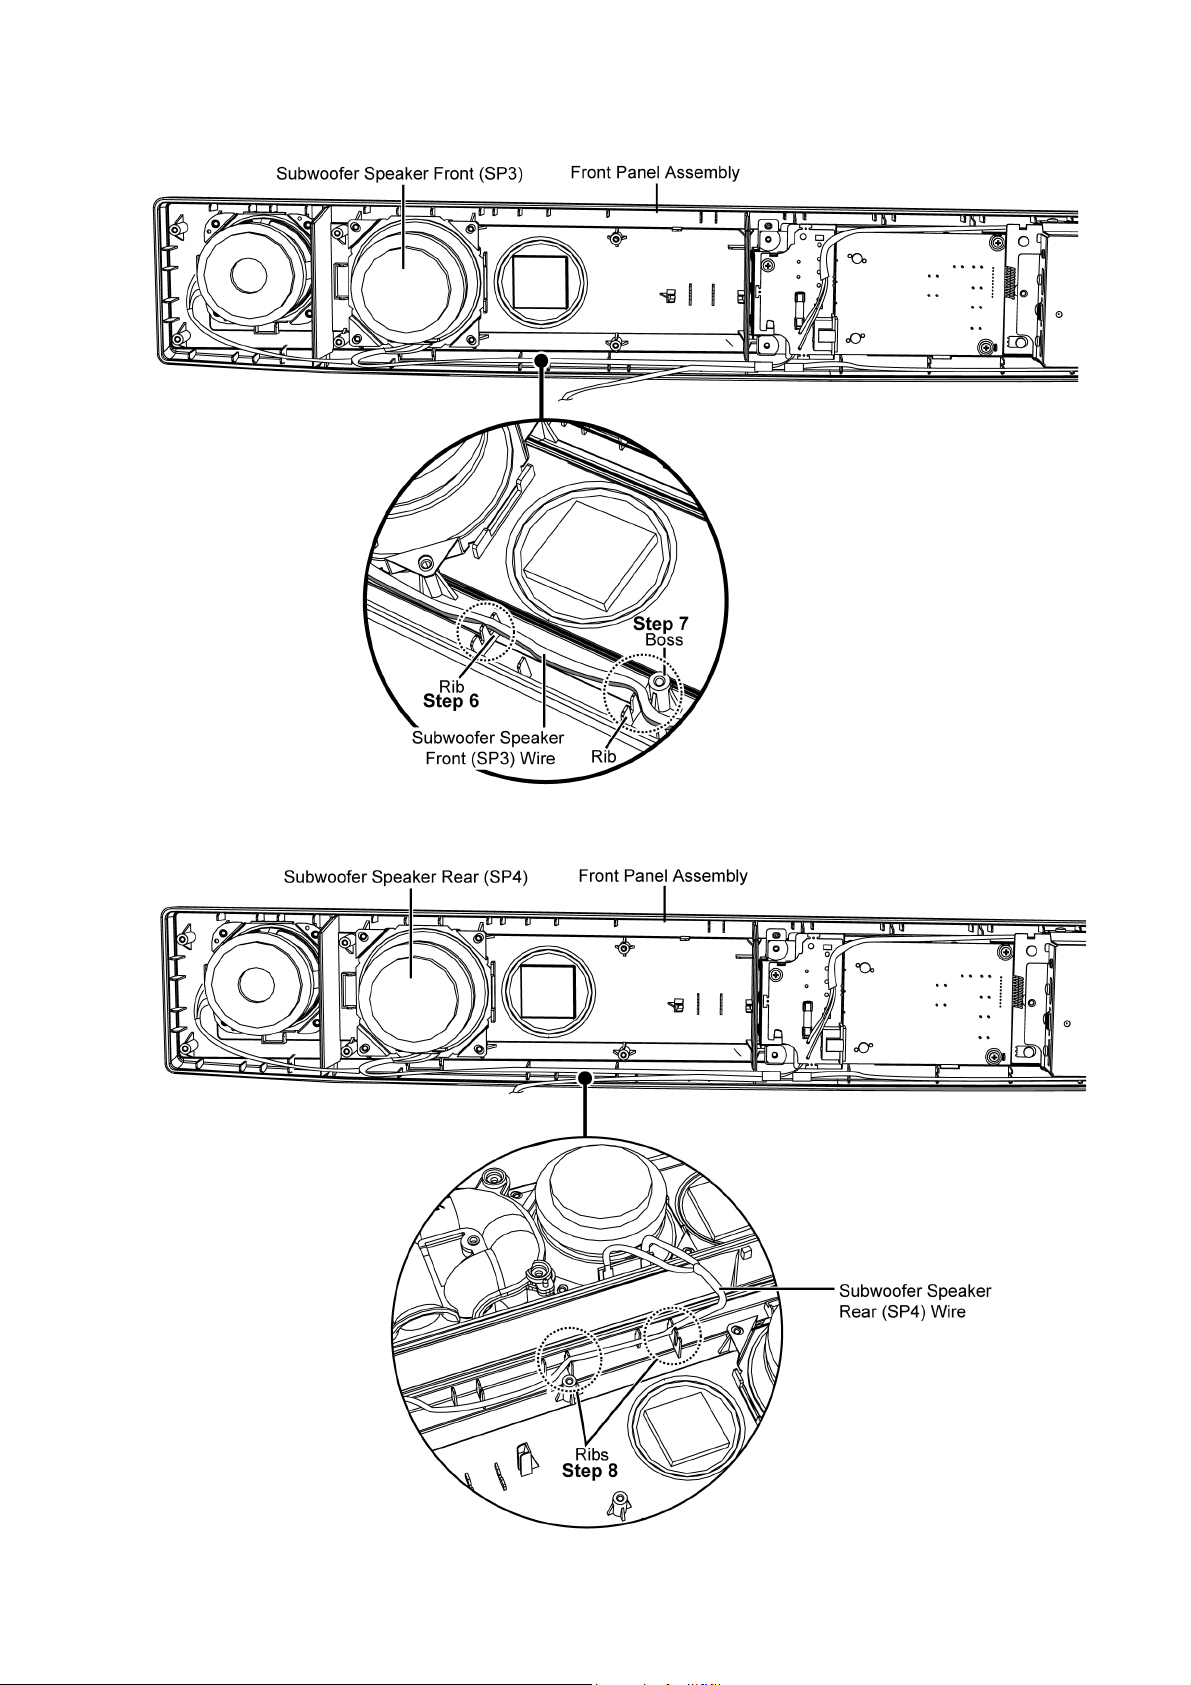
Step 6 : Ensure Subwoofer Speaker Front (SP3) wire is properly dressed into the Front Panel Assembly rib.
Step 7 : Ensure Subwoofer Speaker Front (SP3) wire is properly dressed into the Front Panel Assembly between rib and boss.
Step 8 : Ensure Subwoofer Speaker Rear (SP4) wire is properly dressed into the Front Panel Assembly ribs.
23
Page 24
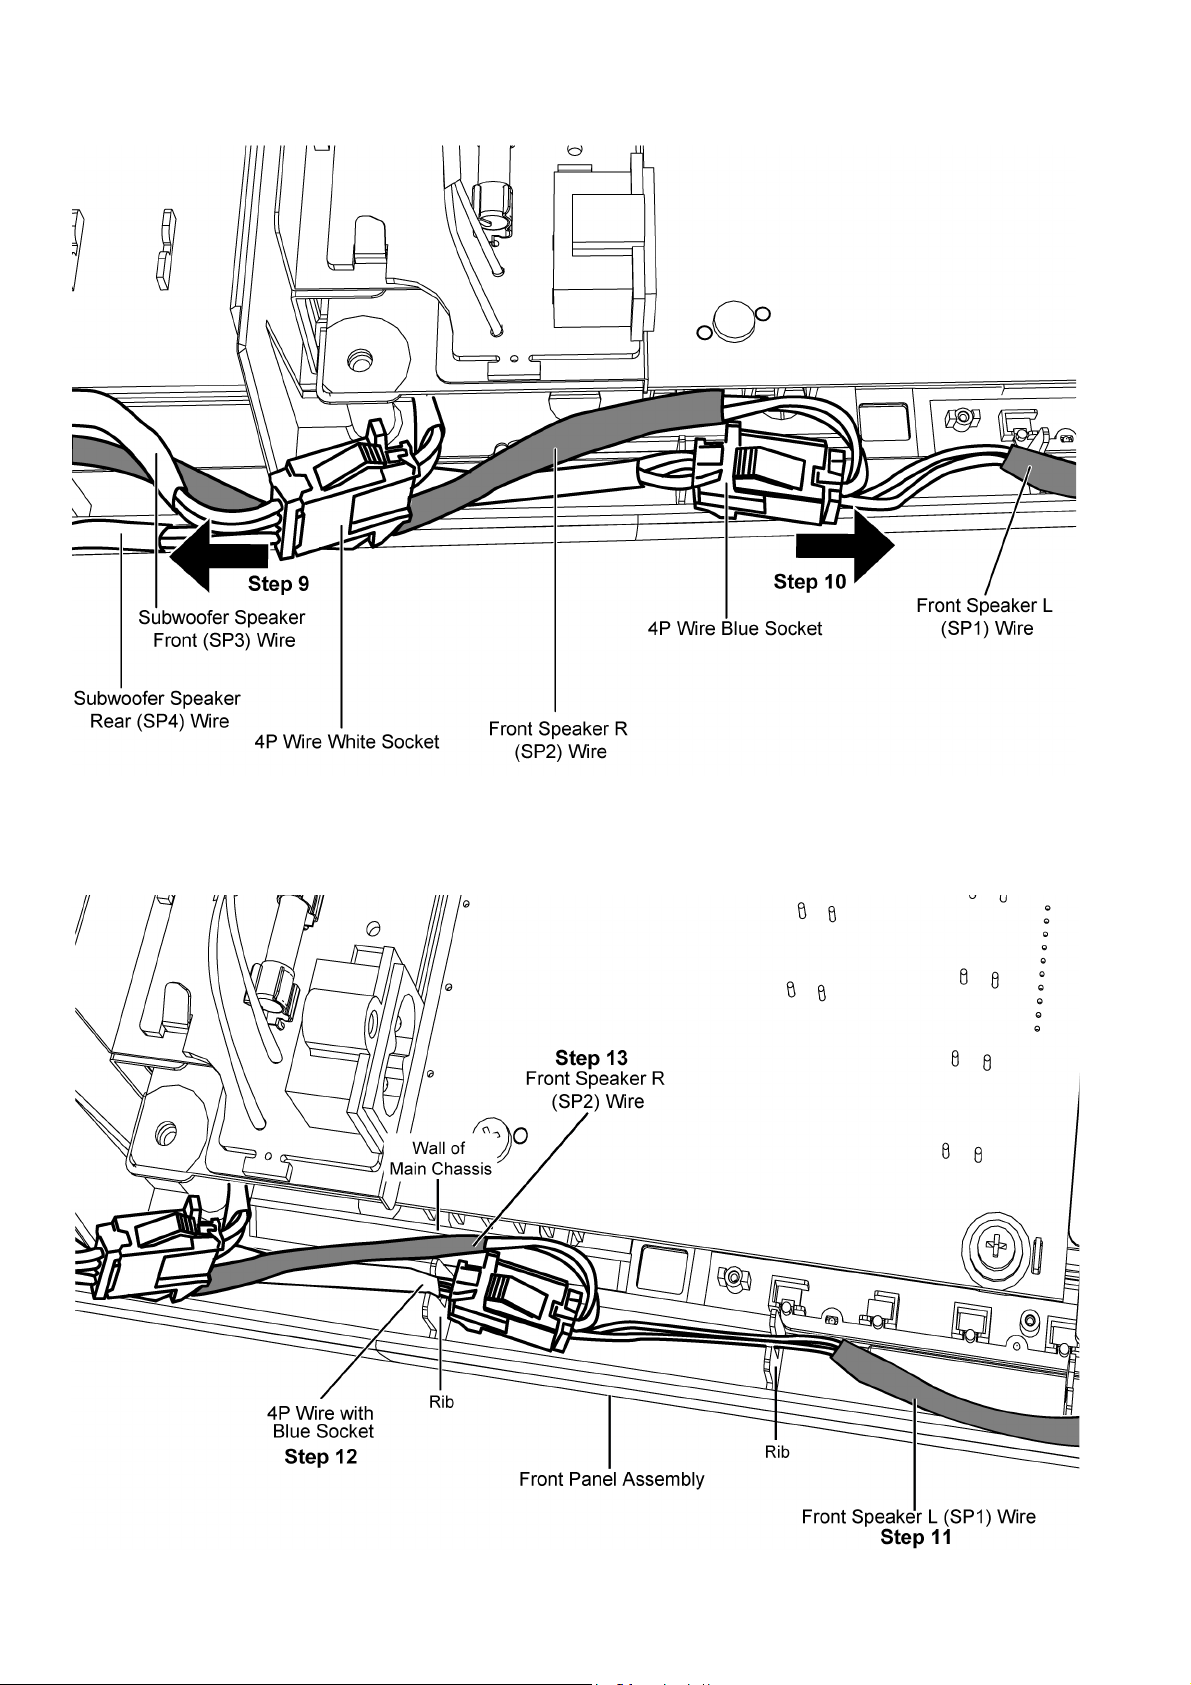
Step 9 : Ensure 4P Wire White Socket must be dressed facing toward left direction as shown.
Step 10 : Ensure 4P Wire Blue Socket must be dressed facing toward right direction as shown.
Step 11 : Ensure Front Speaker L (SP1) wire is properly dressed into the Front Panel Assembly rib.
Step 12 : Ensure 4P Wire with Blue Socket is properly dressed into the Front Panel Assembly rib.
Step 13 : Ensure Front Speaker R (SP2) wire is properly dressed into the Front Panel Assembly between rib and wall of Main Chas-
sis.
24
Page 25
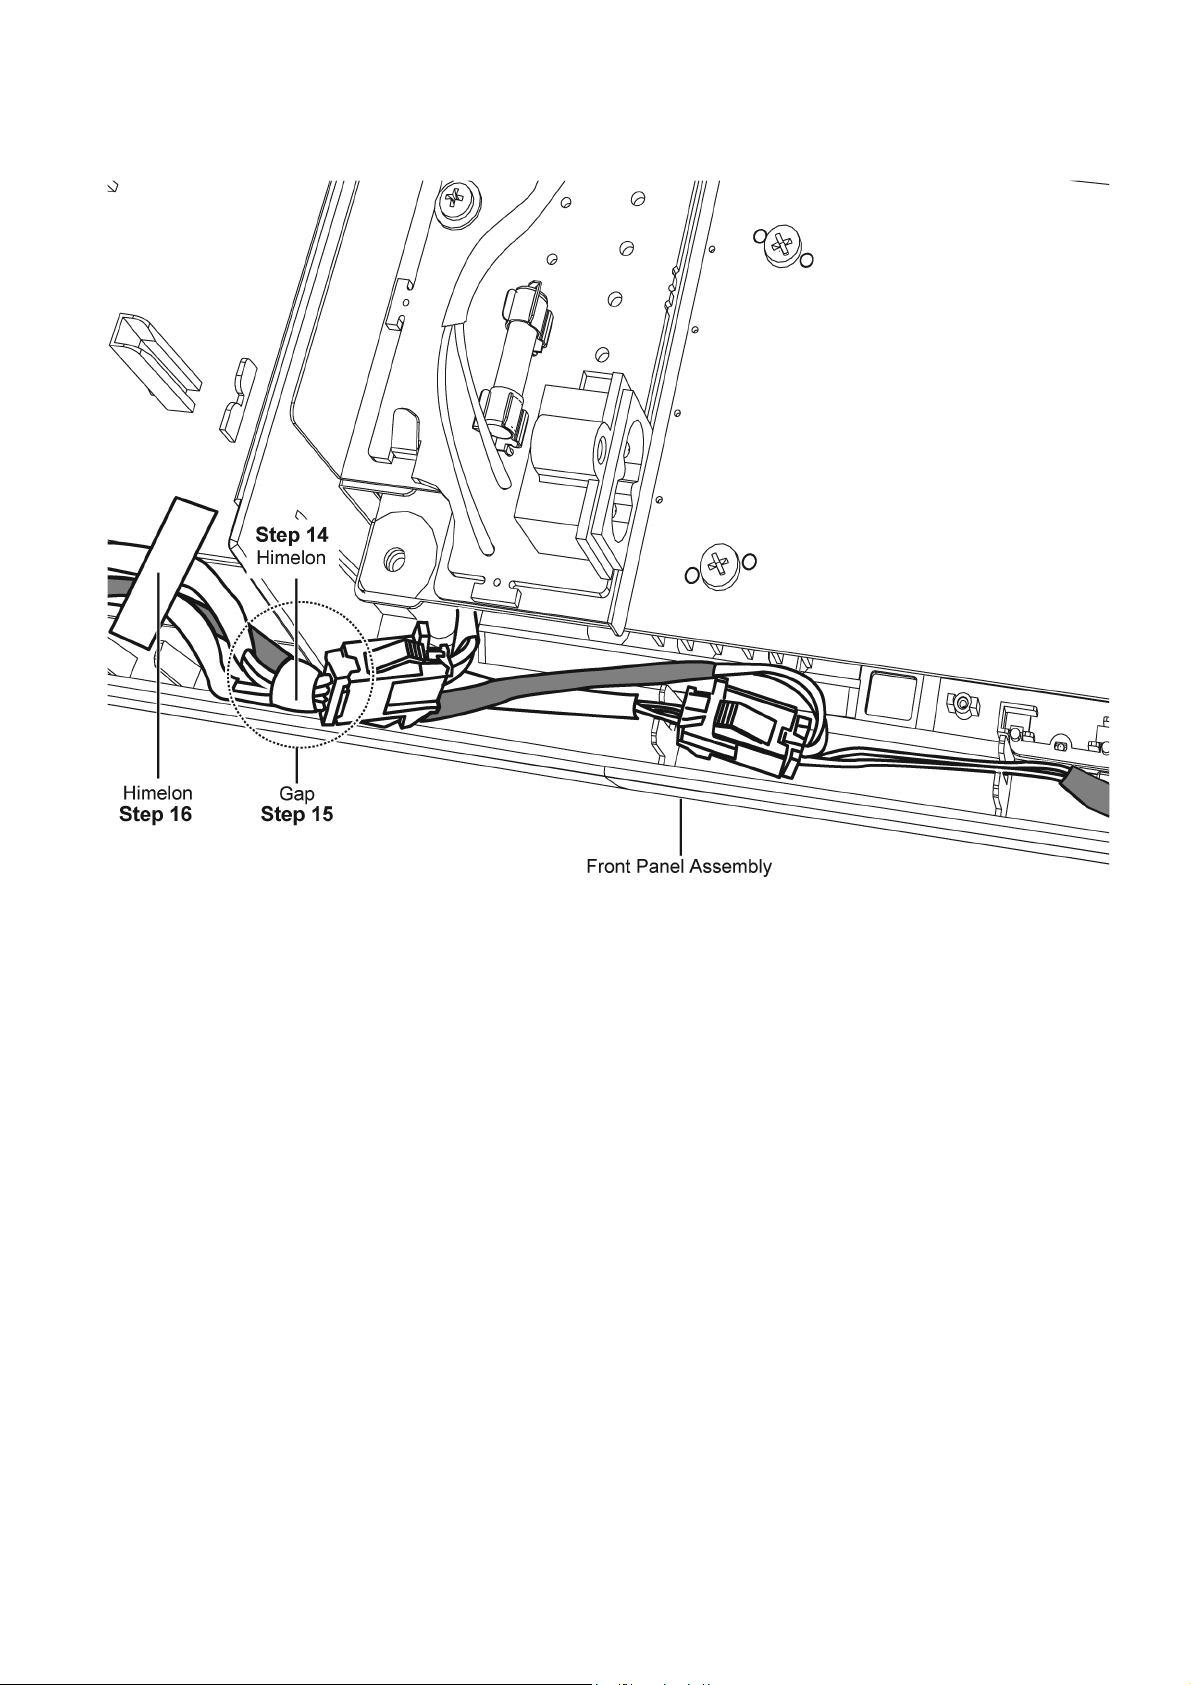
Step 14 : Wrap Front Speaker wire and Subwoofer Speaker wire with himelon.
Step 15 : Ensure the wrapped wires is properly dressed into the Front Panel Assembly gap.
Step 16 : Paste a piece of himelon over the wires.
25
Page 26
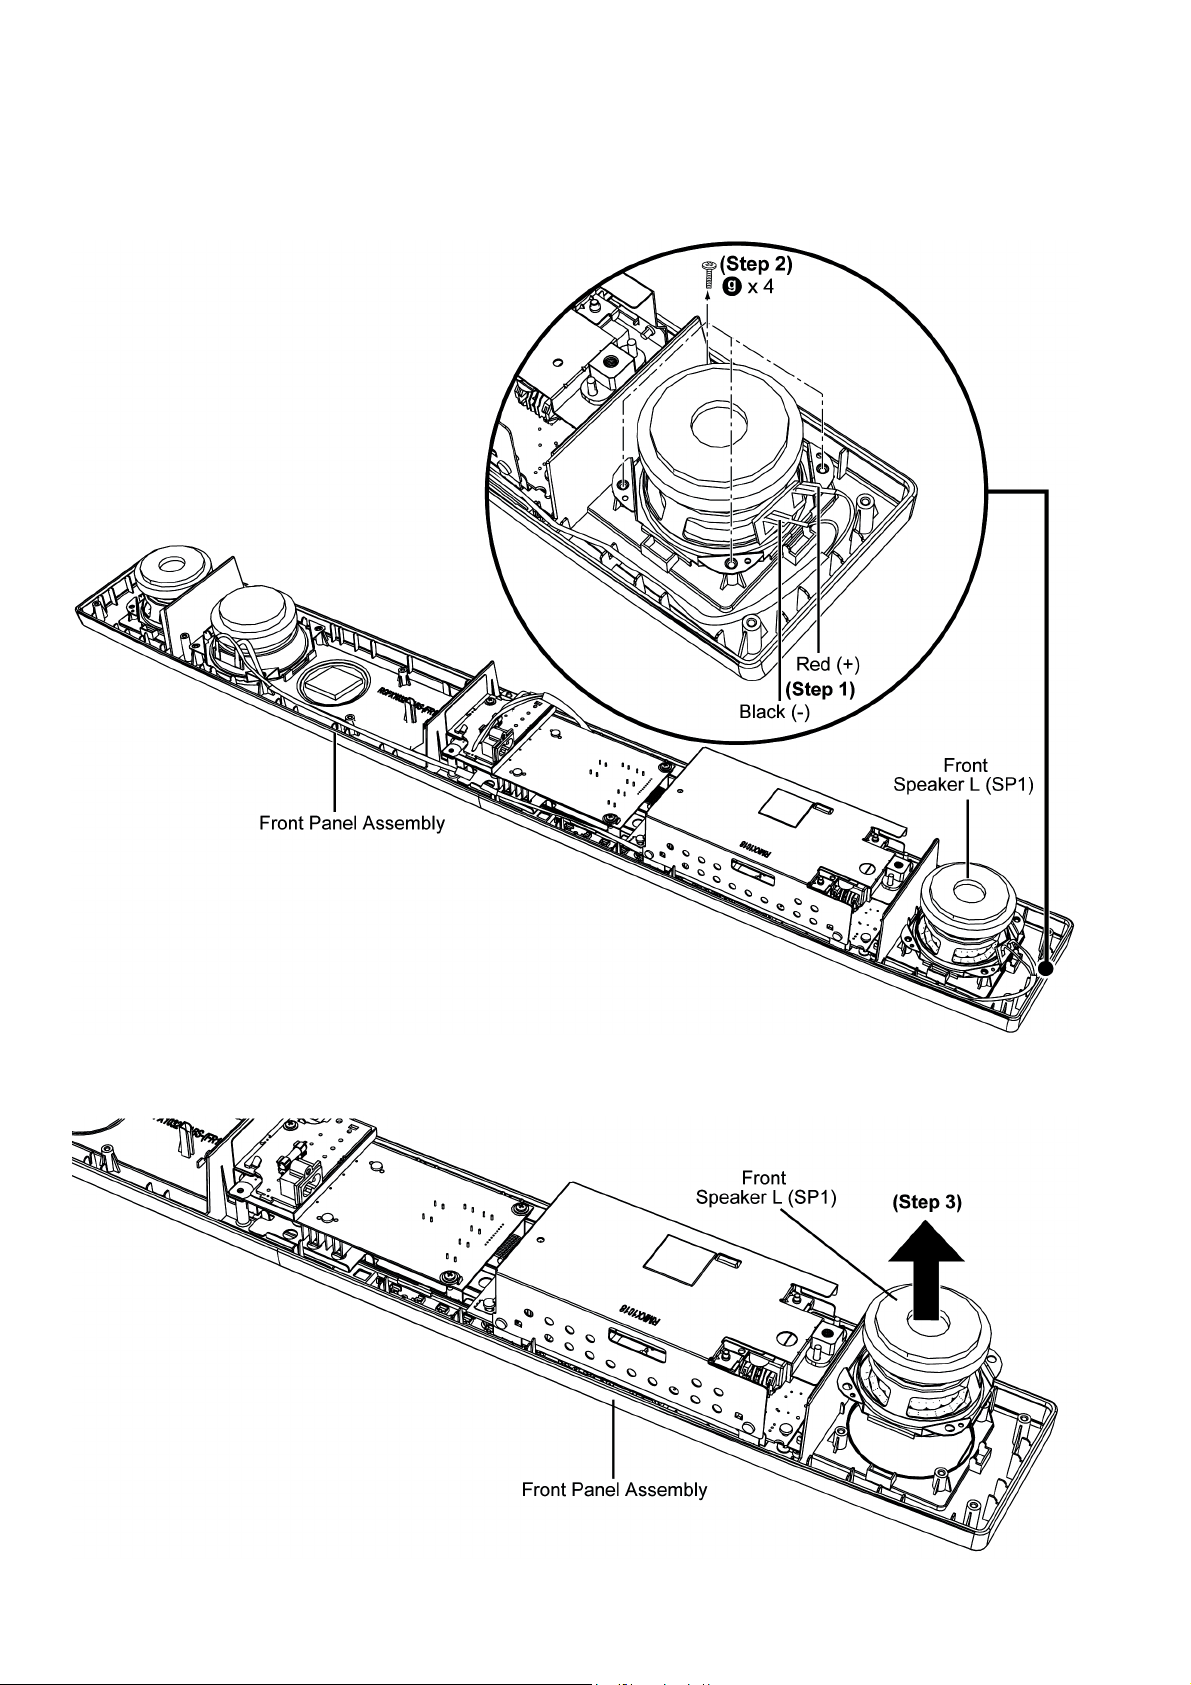
8.4. Disassembly of Front Speaker L (SP1)
• Refer to (Step 1) to (Step 5) of “Disassembly of Back Cabinet Assembly”.
Step 1 : Detach the Red (+) and Black (-) speaker wires.
Step 2 : Remove 4 screws.
Step 3 : Remove the Front Speaker L (SP1).
26
Page 27
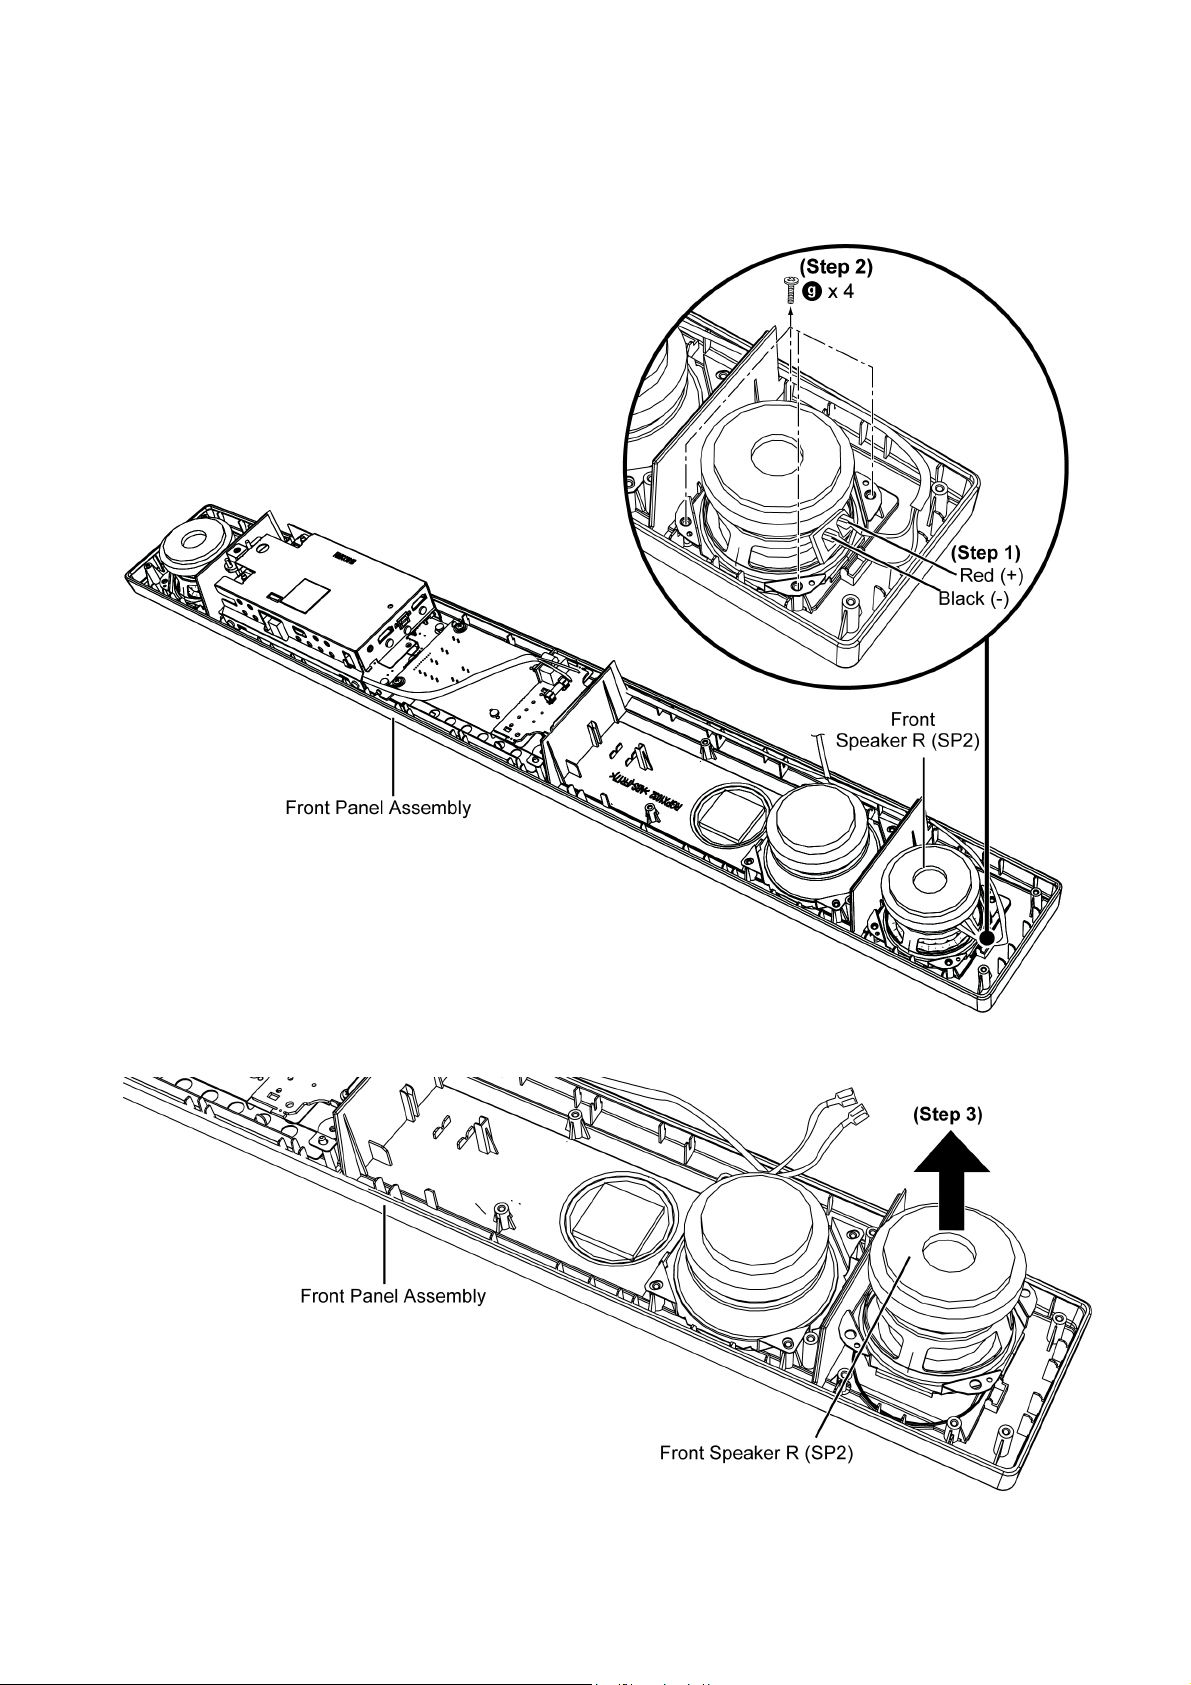
8.5. Disassembly of Front Speaker R (SP2)
• Refer to (Step 1) to (Step 5) of “Disassembly of Back Cabinet Assembly”.
Step 1 : Detach the Red (+) and Black (-) speaker wires.
Step 2 : Remove 4 screws.
Step 3 : Remove the Front Speaker R (SP2).
27
Page 28
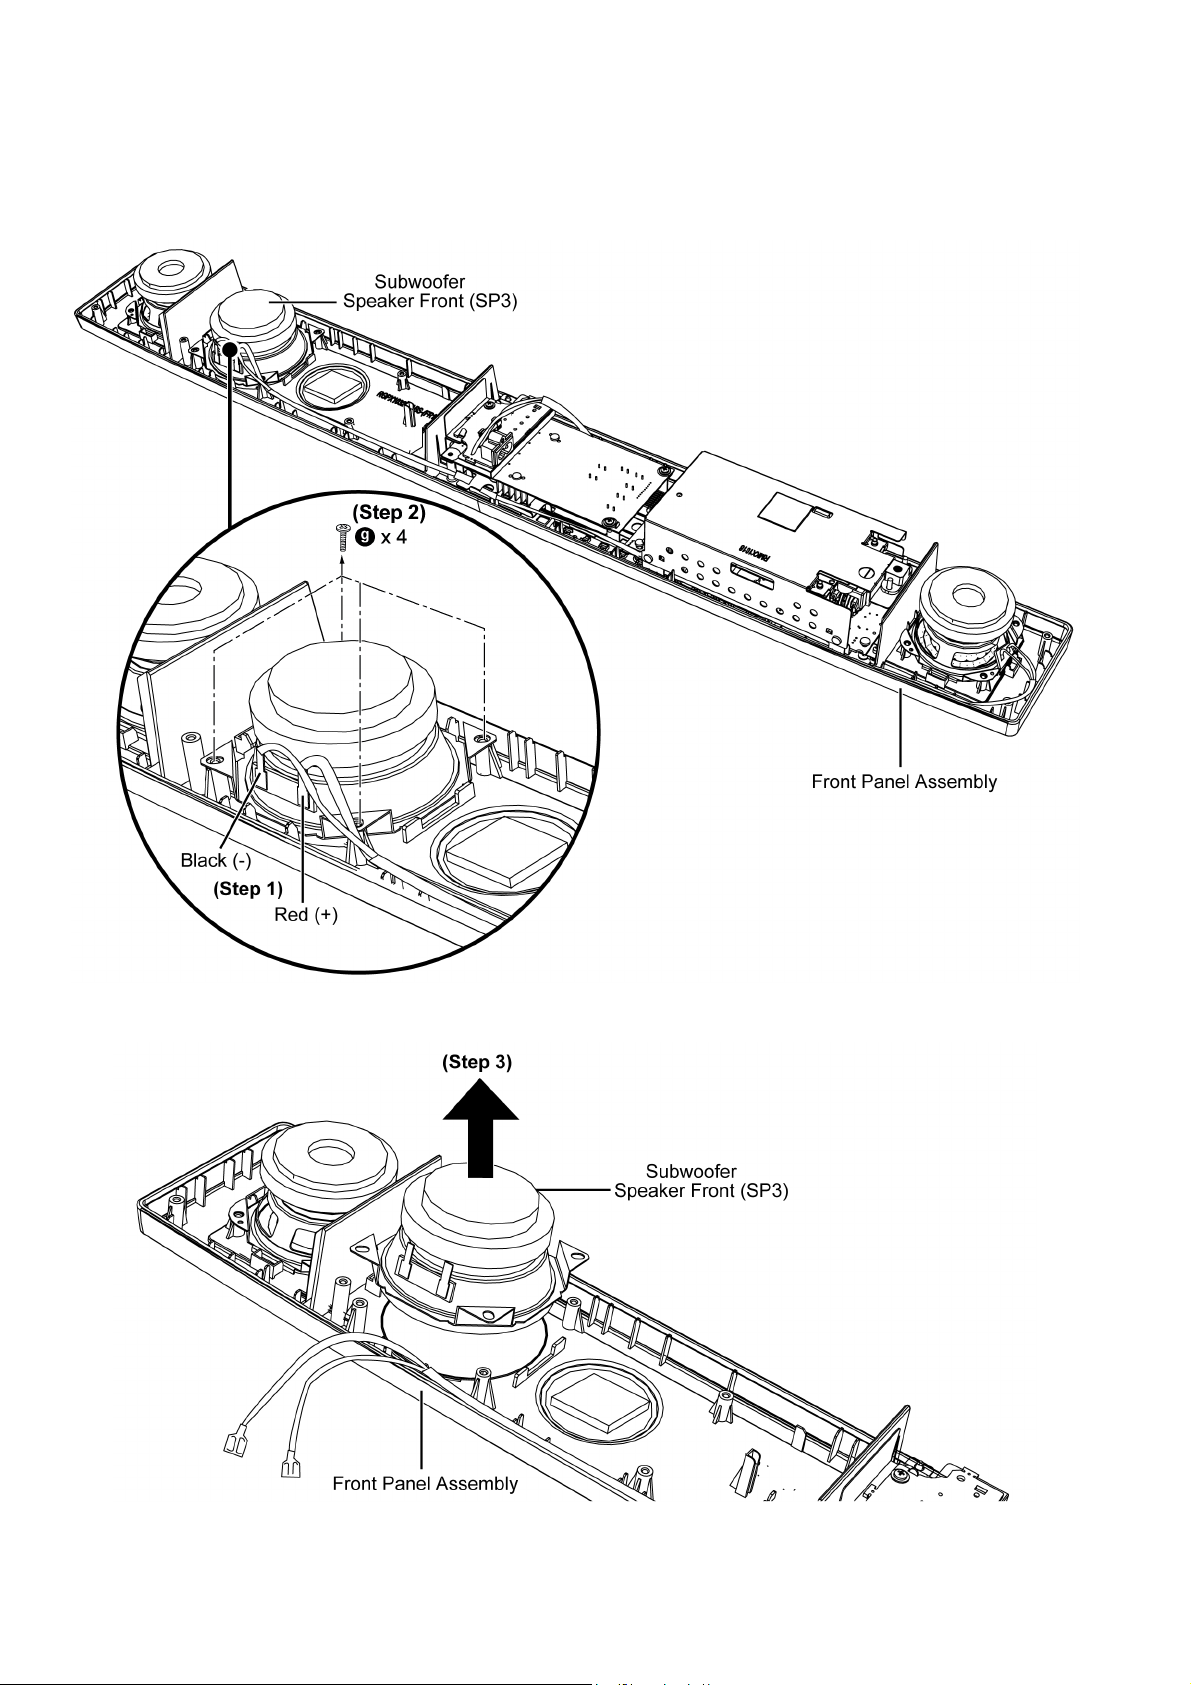
8.6. Disassembly of Subwoofer Speaker Front (SP3)
• Refer to (Step 1) to (Step 5) of “Disassembly of Back Cabinet Assembly”.
Step 1 : Detach the Red (+) and Black (-) speaker wires.
Step 2 : Remove 4 screws.
Step 3 : Remove the Subwoofer Speaker Front (SP3).
28
Page 29
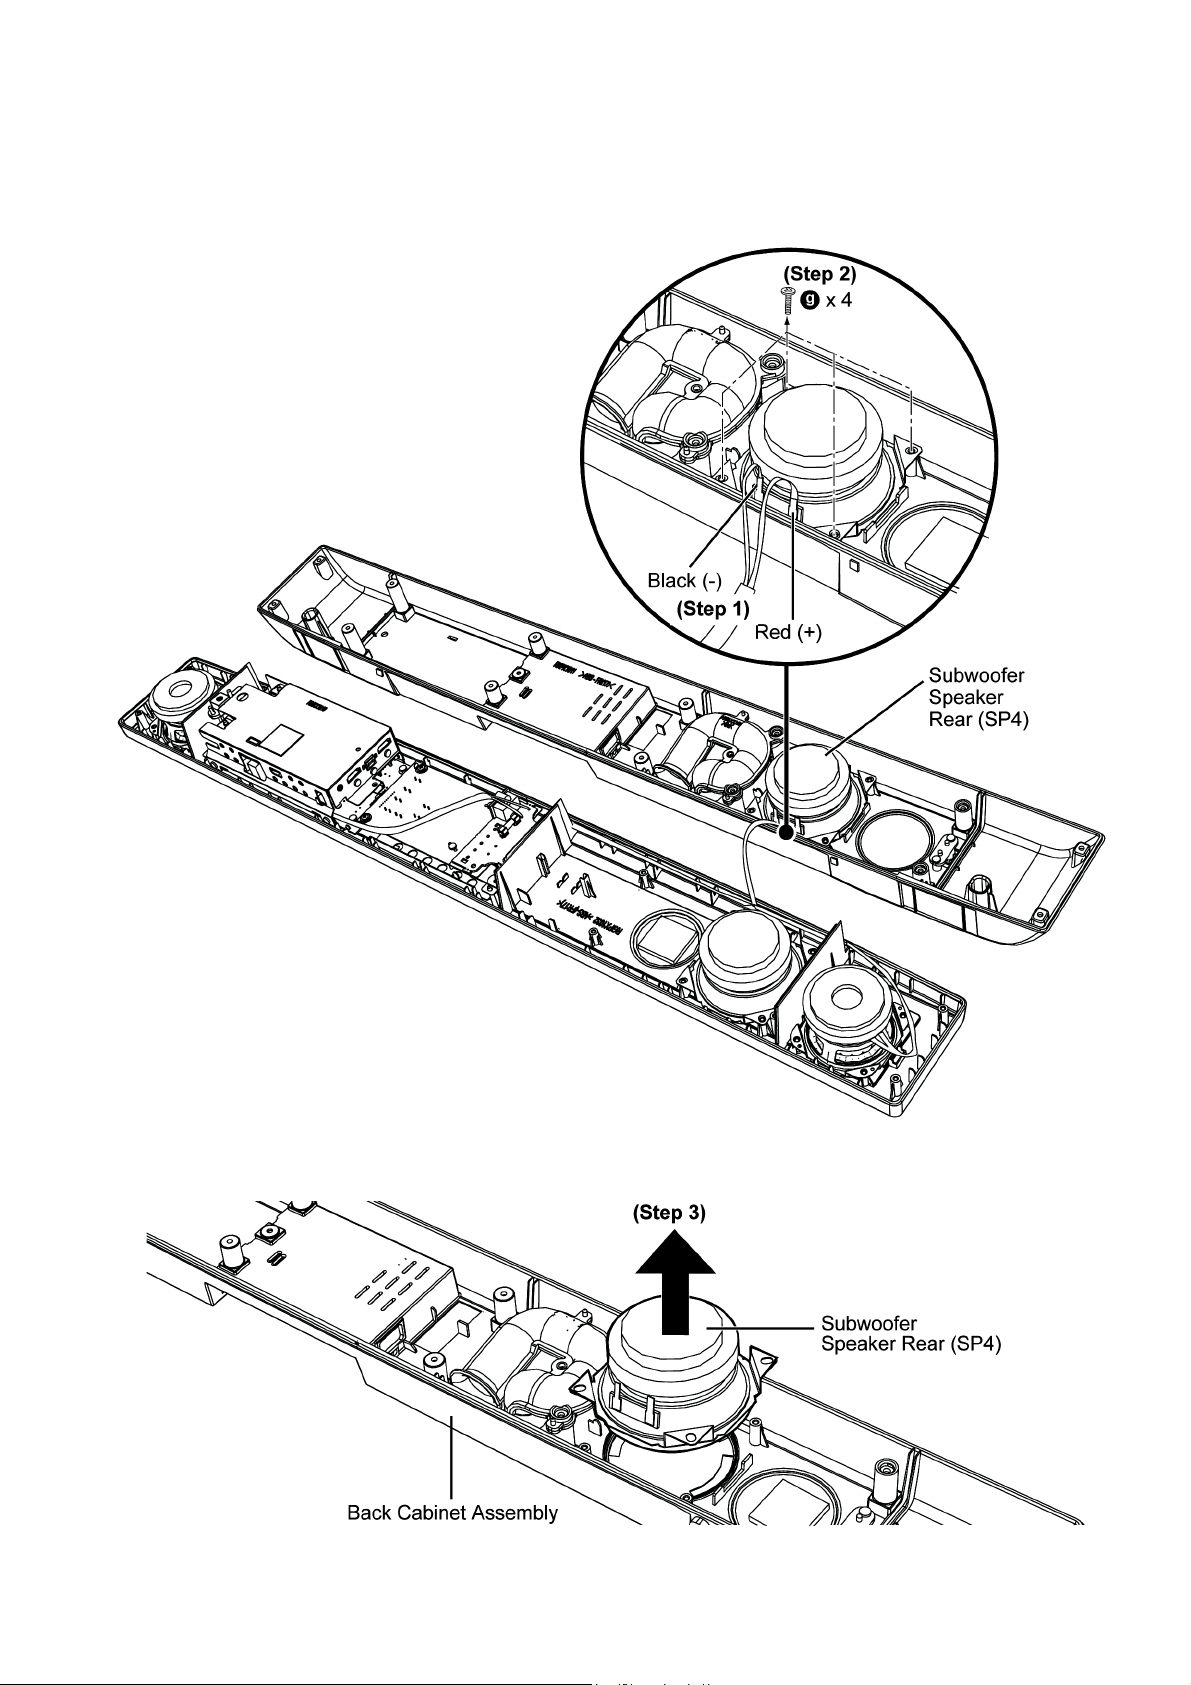
8.7. Disassembly of Subwoofer Speaker Rear (SP4)
• Refer to (Step 1) to (Step 5) of “Disassembly of Back Cabinet Assembly”.
Step 1 : Detach the Red (+) and Black (-) speaker wires.
Step 2 : Remove 4 screws.
Step 3 : Remove the Subwoofer Speaker Rear (SP4).
29
Page 30
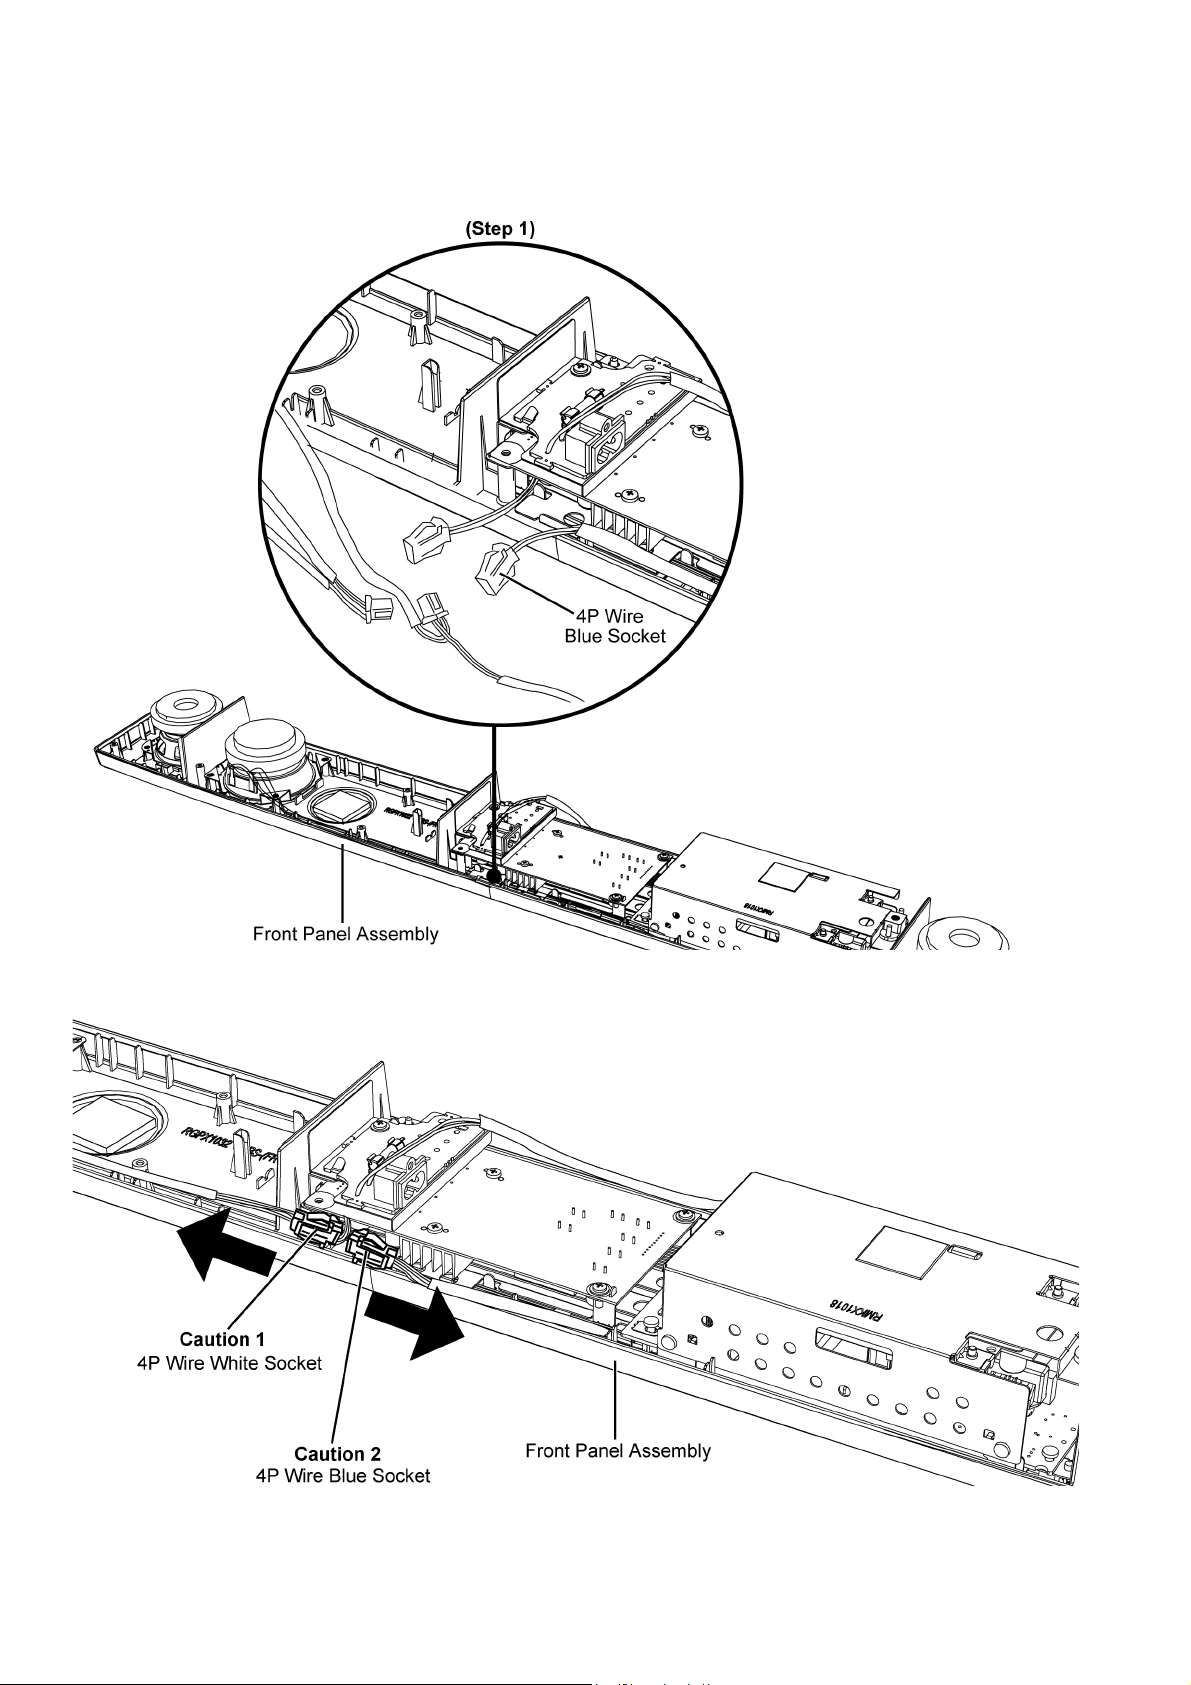
8.8. Disassembly of Main Chassis Assembly
• Refer to “Disassembly of Back Cabinet Assembly”.
Step 1 : Disconnect the 4P Wire Blue Socket.
Caution 1 : During assembling, ensure 4P Wire White Socket must be dressed facing toward left direction as shown.
Caution 2 : During assembling, ensure 4P Wire Blue Socket must be dressed facing toward left direction as shown.
30
Page 31
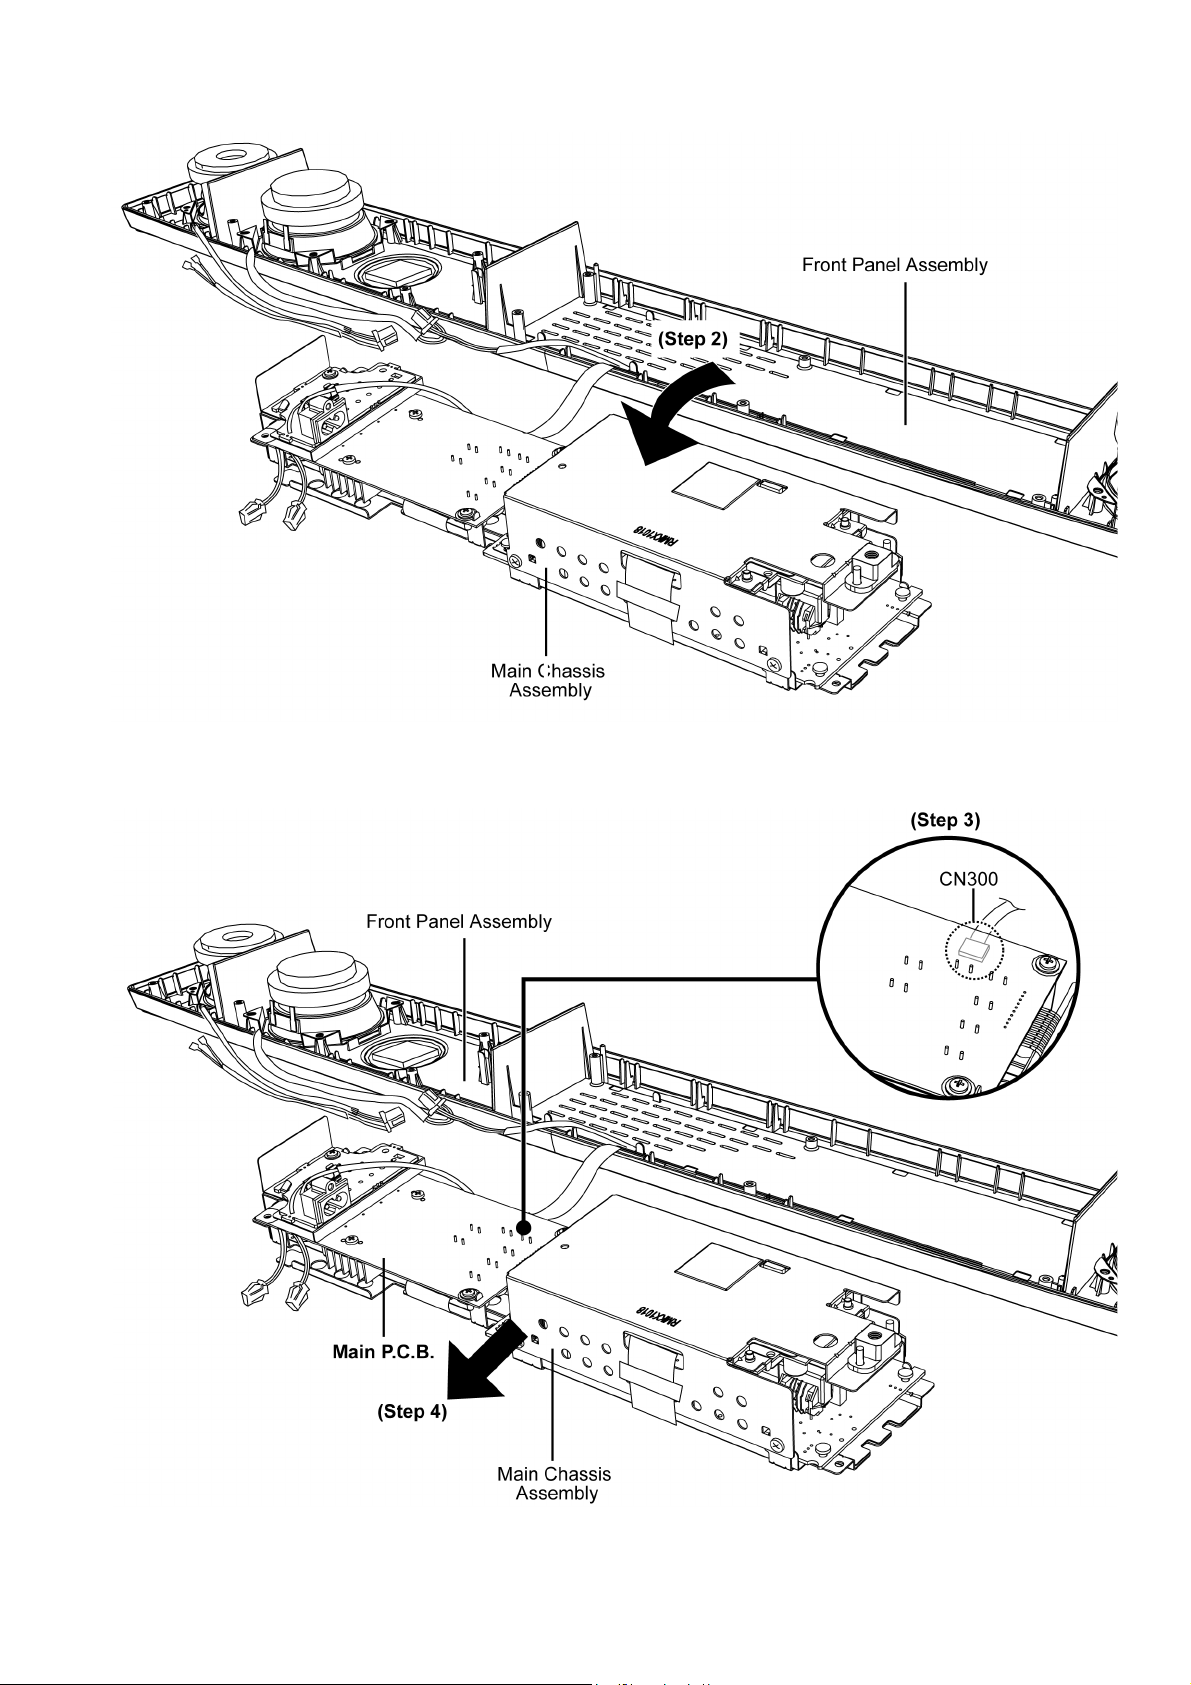
Step 2 : Place the Main Chassis Assembly beside the Front Panel Assembly as arrow shown.
Step 3 : Detach 12P FFC of the connector (CN300) on Main P.C.B.
Step 4 : Remove Main Chassis Assembly.
31
Page 32
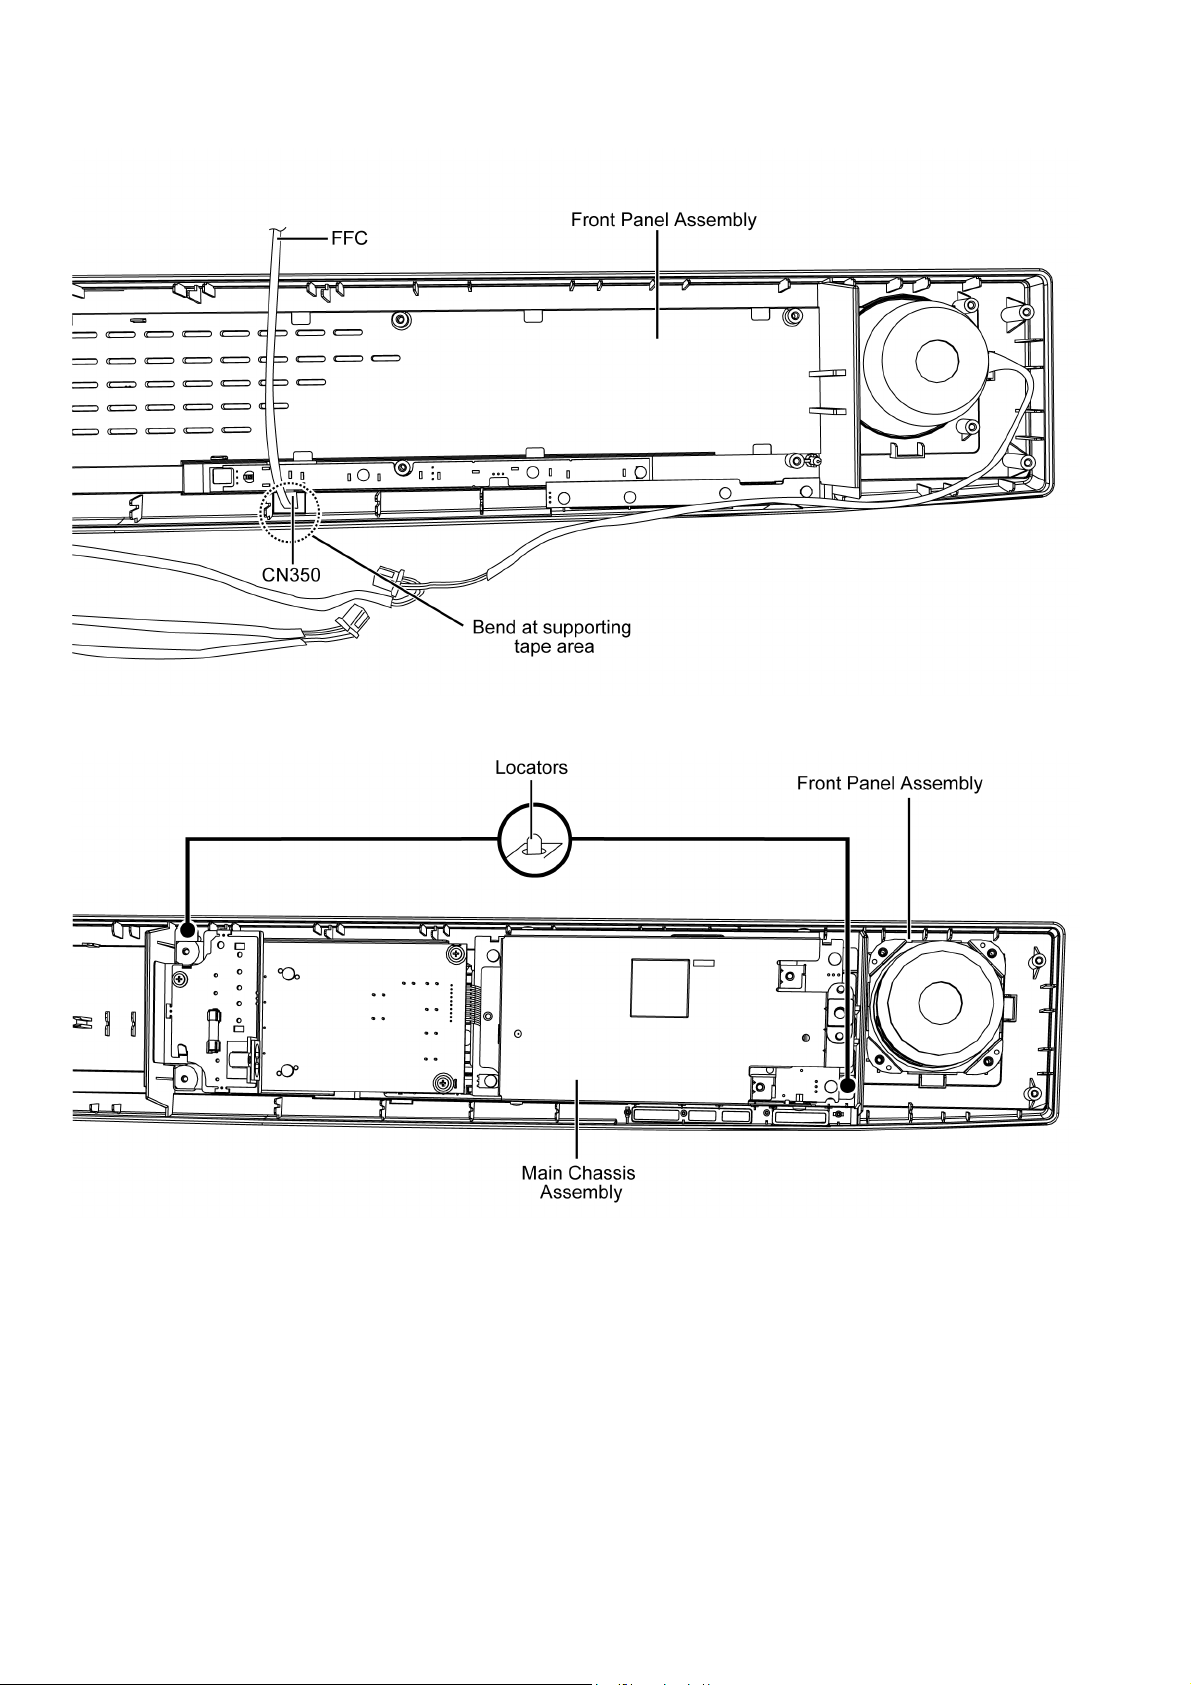
Caution 1 : Before assembling the Main Chassis Assembly, ensure the FFC of the connector (CN350) is properly bend at
supporting tape area.
Caution 2 : During assembling, ensure the Main Chassis Assembly is seated properly onto the locators.
32
Page 33
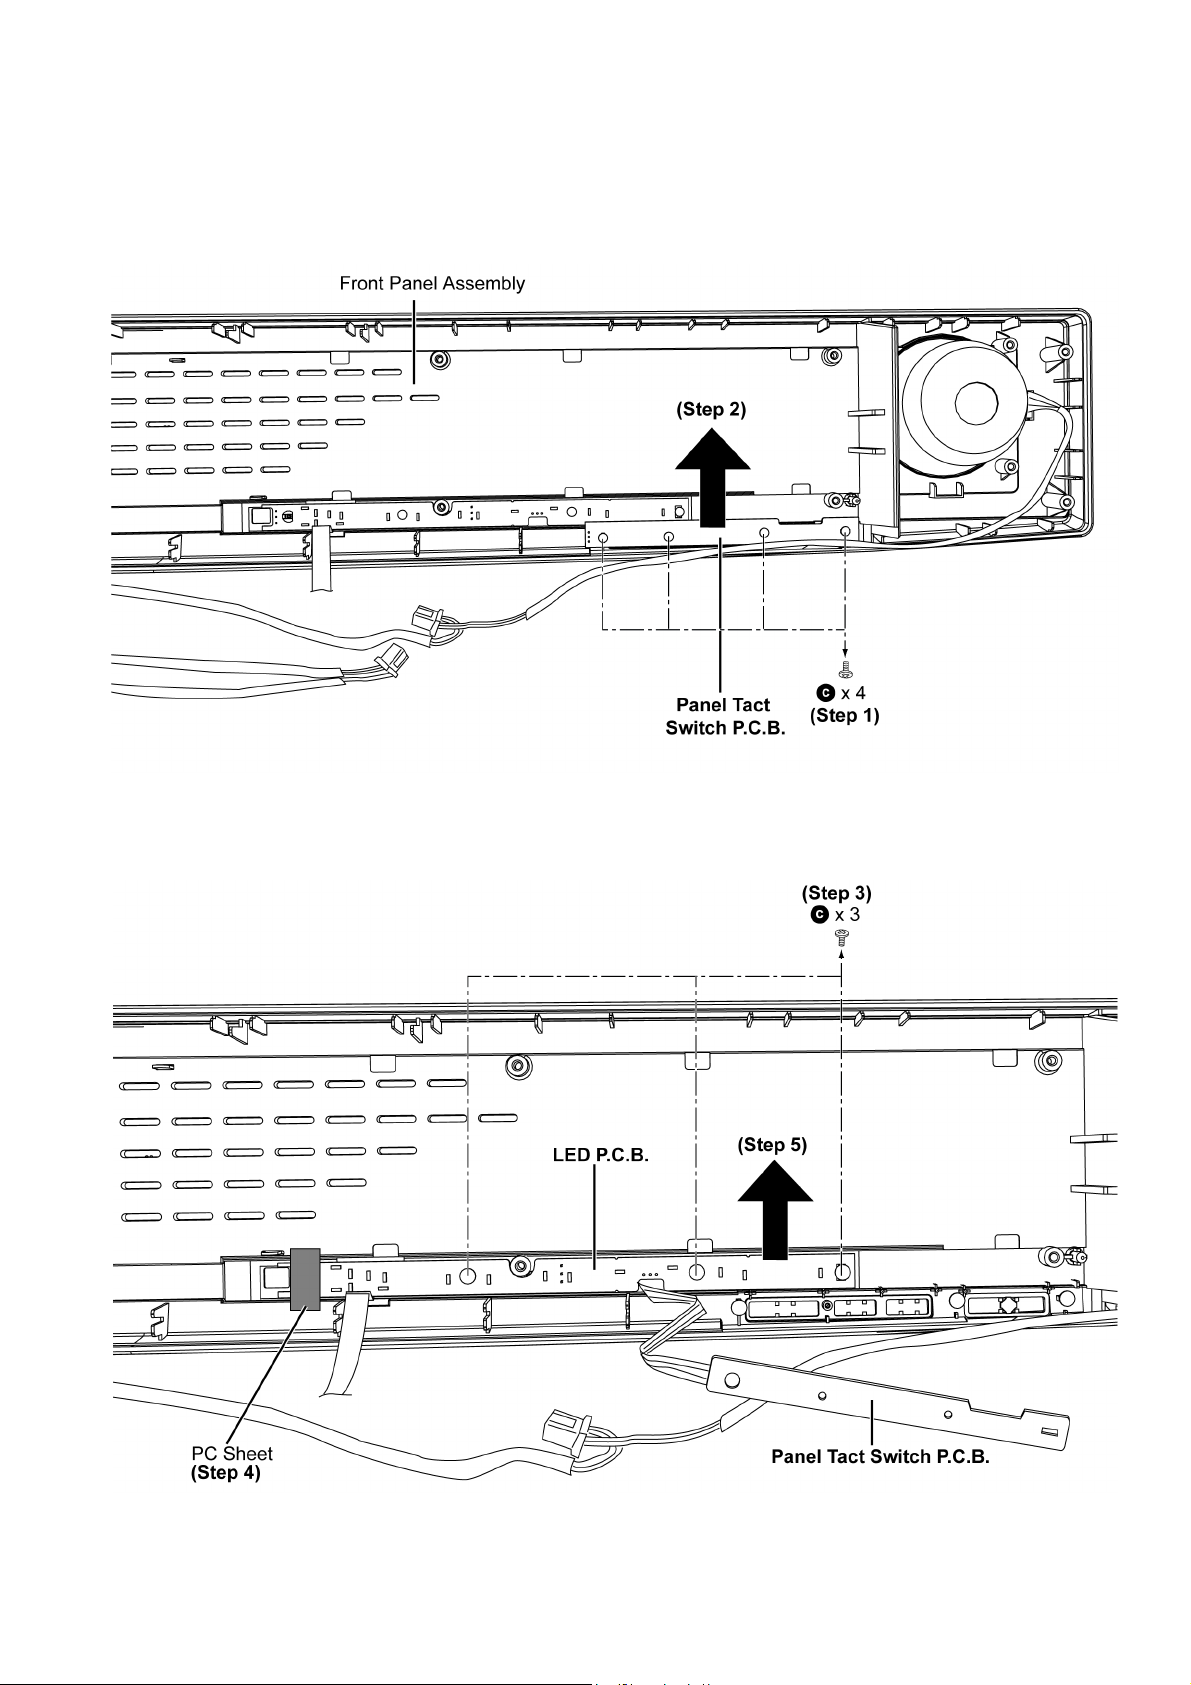
8.9. Disassembly of LED P.C.B. and Panel Tact Switch P.C.B.
• Refer to “Disassembly of Back Cabinet Assembly”.
• Refer to “Disassembly of Main Chassis Assembly”.
Step 1 : Remove 4 screws and detach Panel Tact Switch P.C.B..
Step 2 : Slightly detach the Panel Tact Switch P.C.B. from Front Panel Assembly.
Step 3 : Remove 3 screws.
Step 4 : Remove the PC Sheet.
Step 5 : Remove the LED P.C.B. together with Panel Tact Switch P.C.B. as arrow shown.
33
Page 34
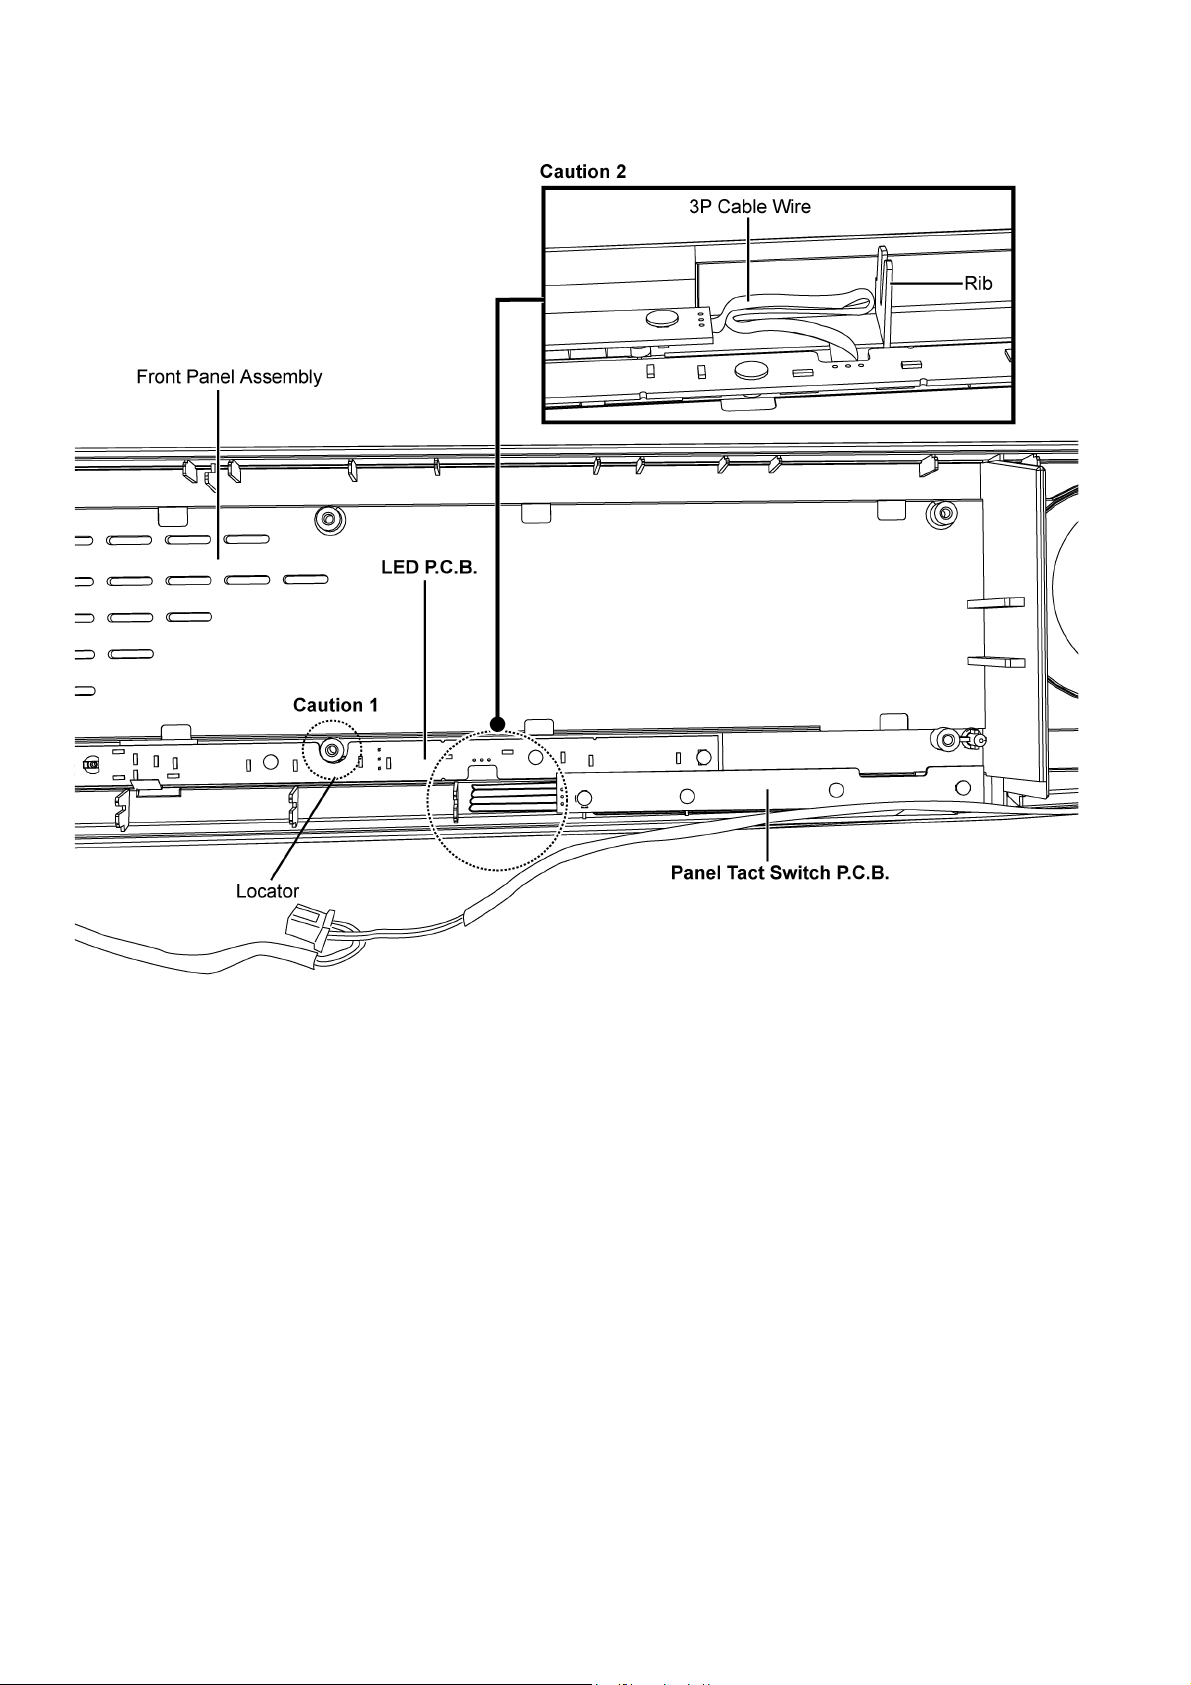
Caution 1 : During assembling, ensure the LED P.C.B. is seated properly onto the locator.
Caution 2 : During assembling, ensure the 3P Cable Wire is properly dressed behind Front Panel Assembly rib.
34
Page 35
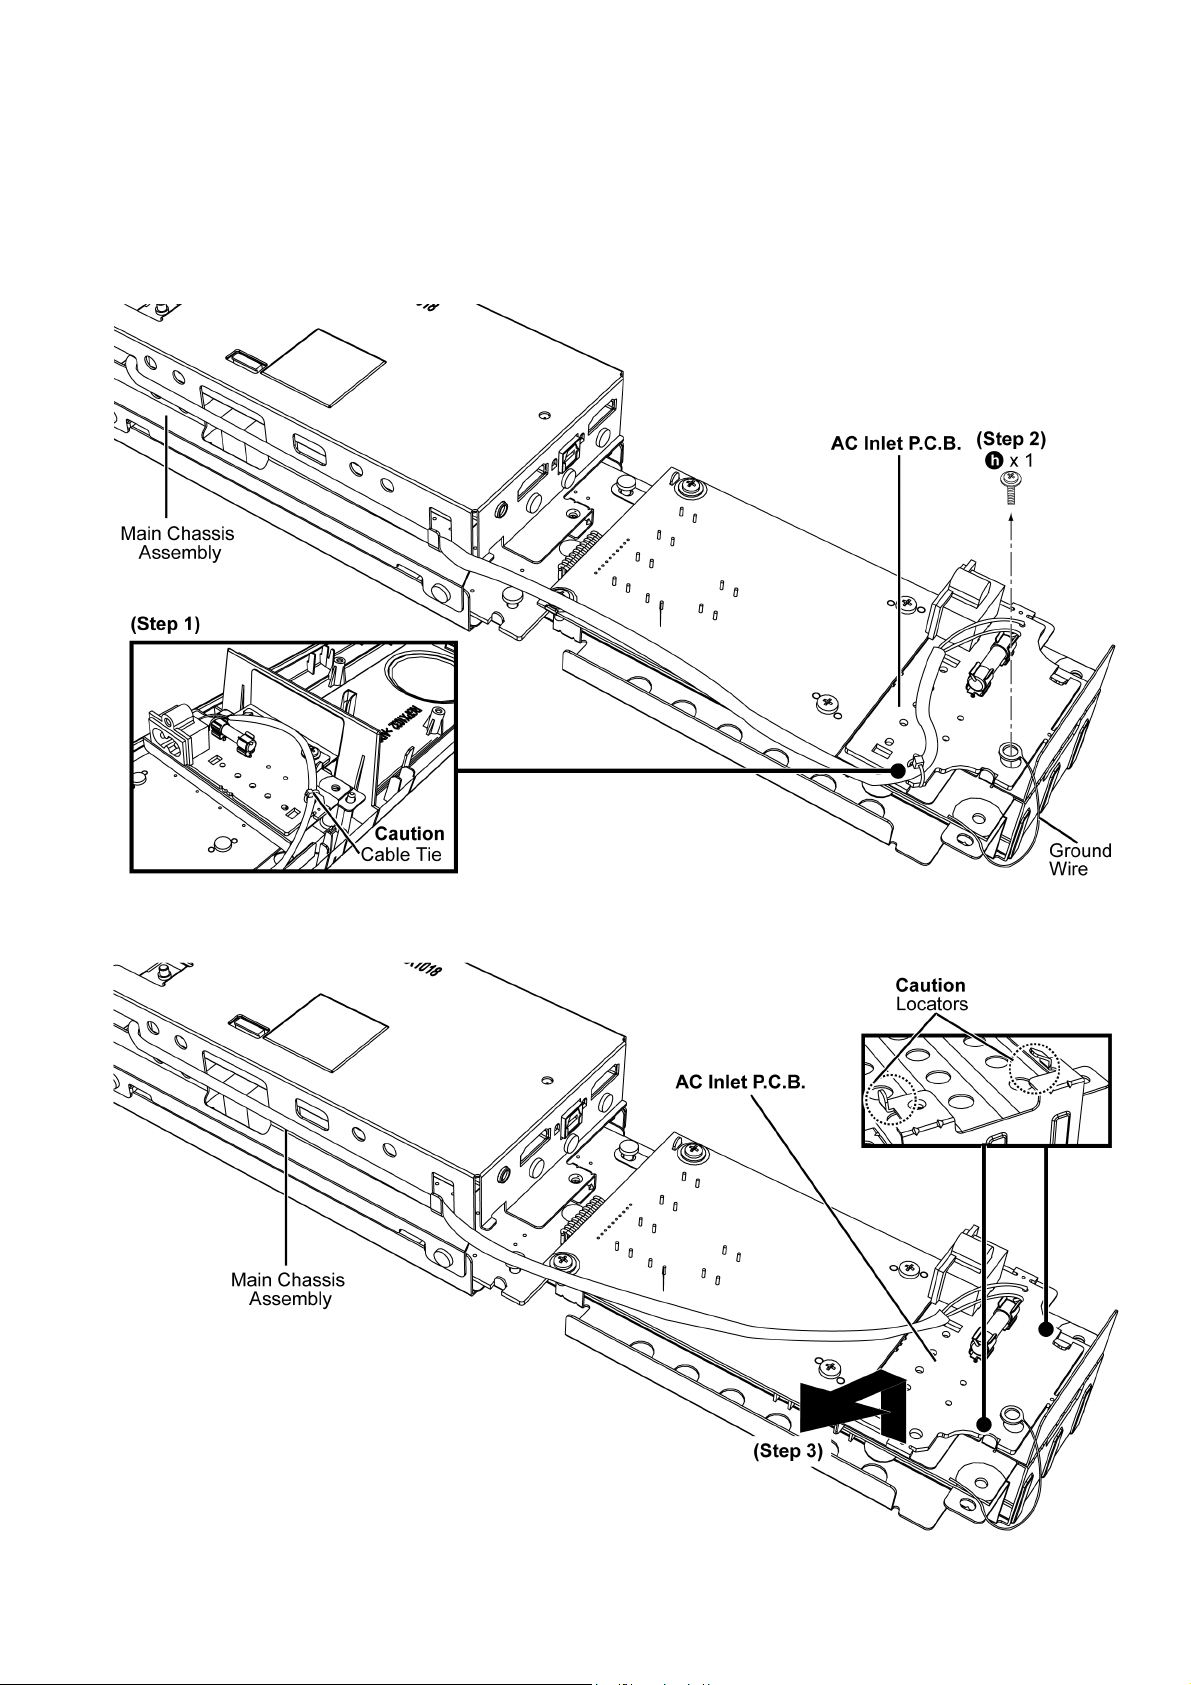
8.10. Disassembly of AC Inlet P.C.B.
• Refer to “Disassembly of Back Cabinet Assembly”.
• Refer to “Disassembly of Main Chassis Assembly”.
Step 1 : Cut off the Cable Tie.
Caution : During assembling, ensure the head of cable tie must be facing inward and tail of cable tie must be properly cut
with remaining 1mm away from the head.
Step 2 : Remove 1 screw.
Step 3 : Slightly lift up the AC Inlet P.C.B. as arrow shown.
Caution : During assembling, ensure the AC Inlet P.C.B. is properly seated onto the locators.
35
Page 36
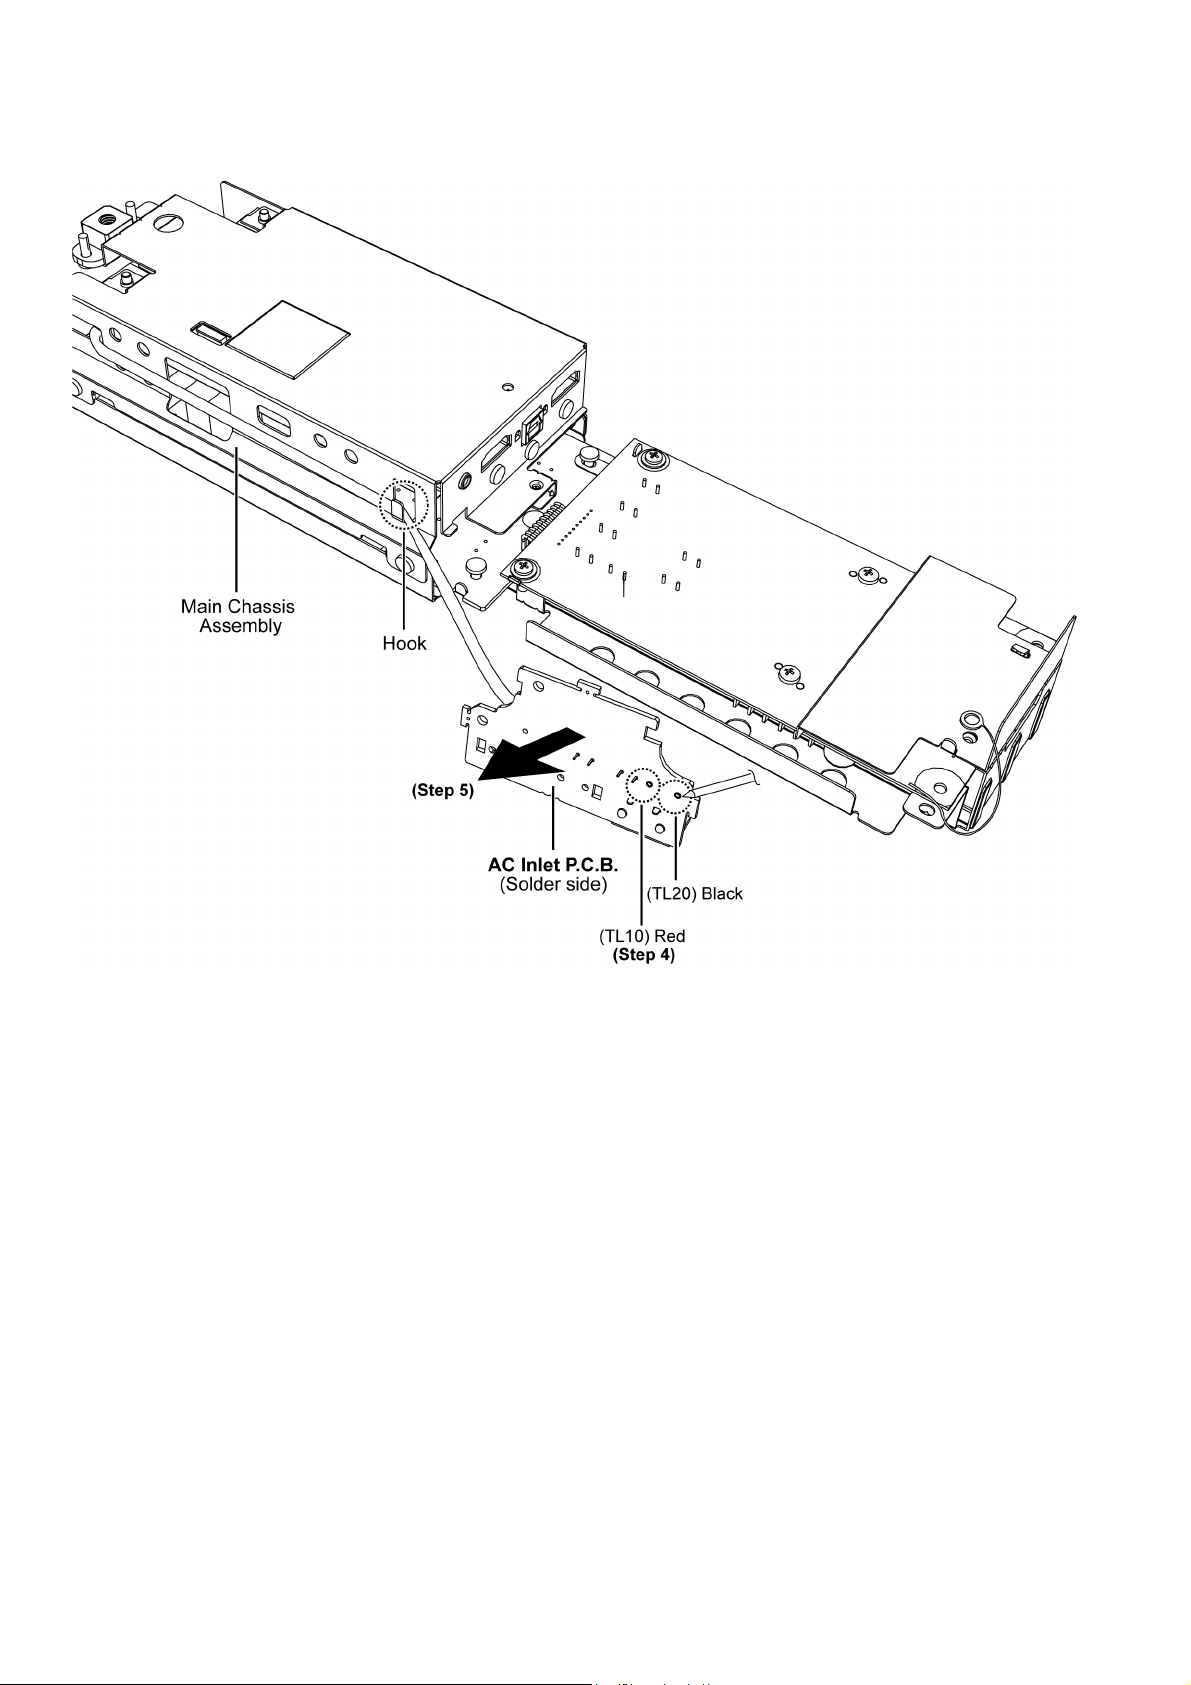
Step 4 : Desolder the wires, black (TL20) and red (TL10).
Step 5 : Remove the AC Inlet P.C.B. as arrow shown.
Caution : During assembling, ensure the cable wire is properly seated onto the hook.
36
Page 37
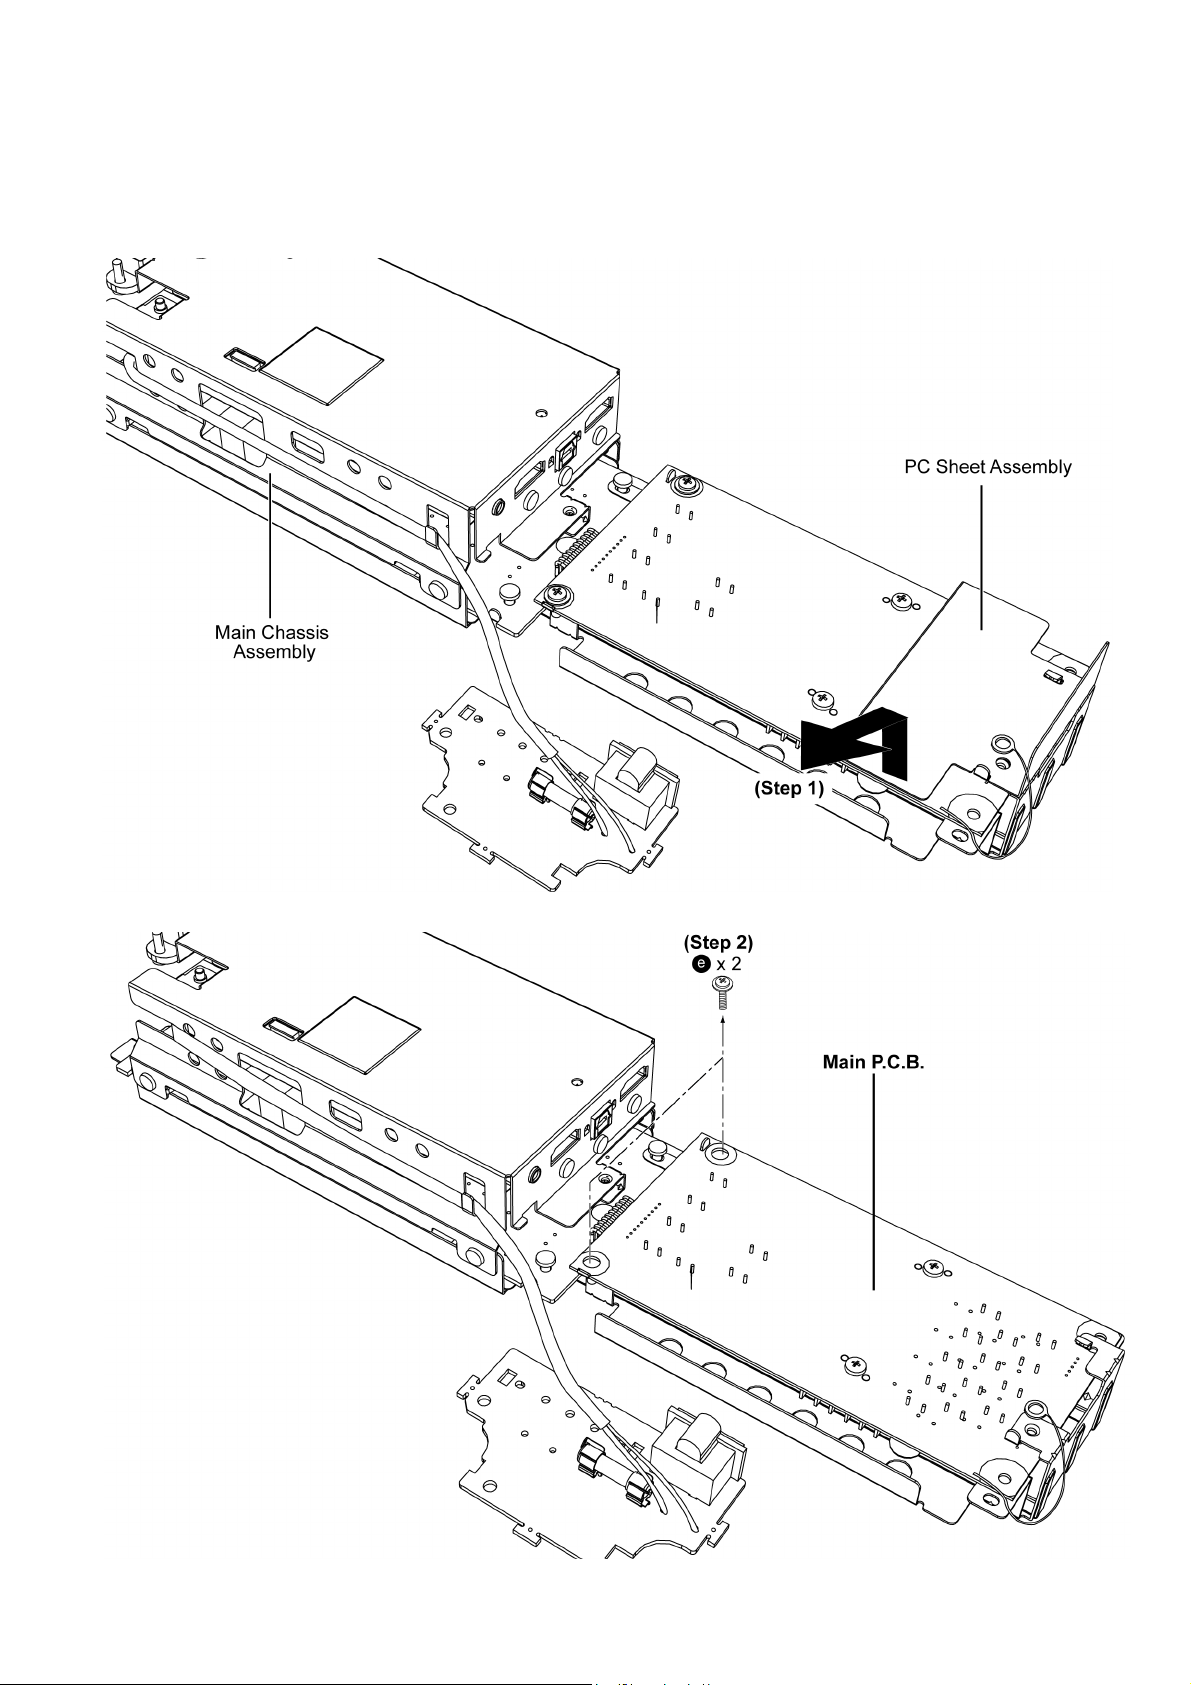
8.11. Disassembly of Main P.C.B.
• Refer to “Disassembly of Back Cabinet Assembly”.
• Refer to “Disassembly of Main Chassis Assembly”.
• Refer to (Step 1) to (Step 2) of “Disassembly of AC Inlet P.C.B.”.
Step 1 : Remove the PC Sheet Assembly as arrow shown.
Step 2 : Remove 2 screws.
37
Page 38
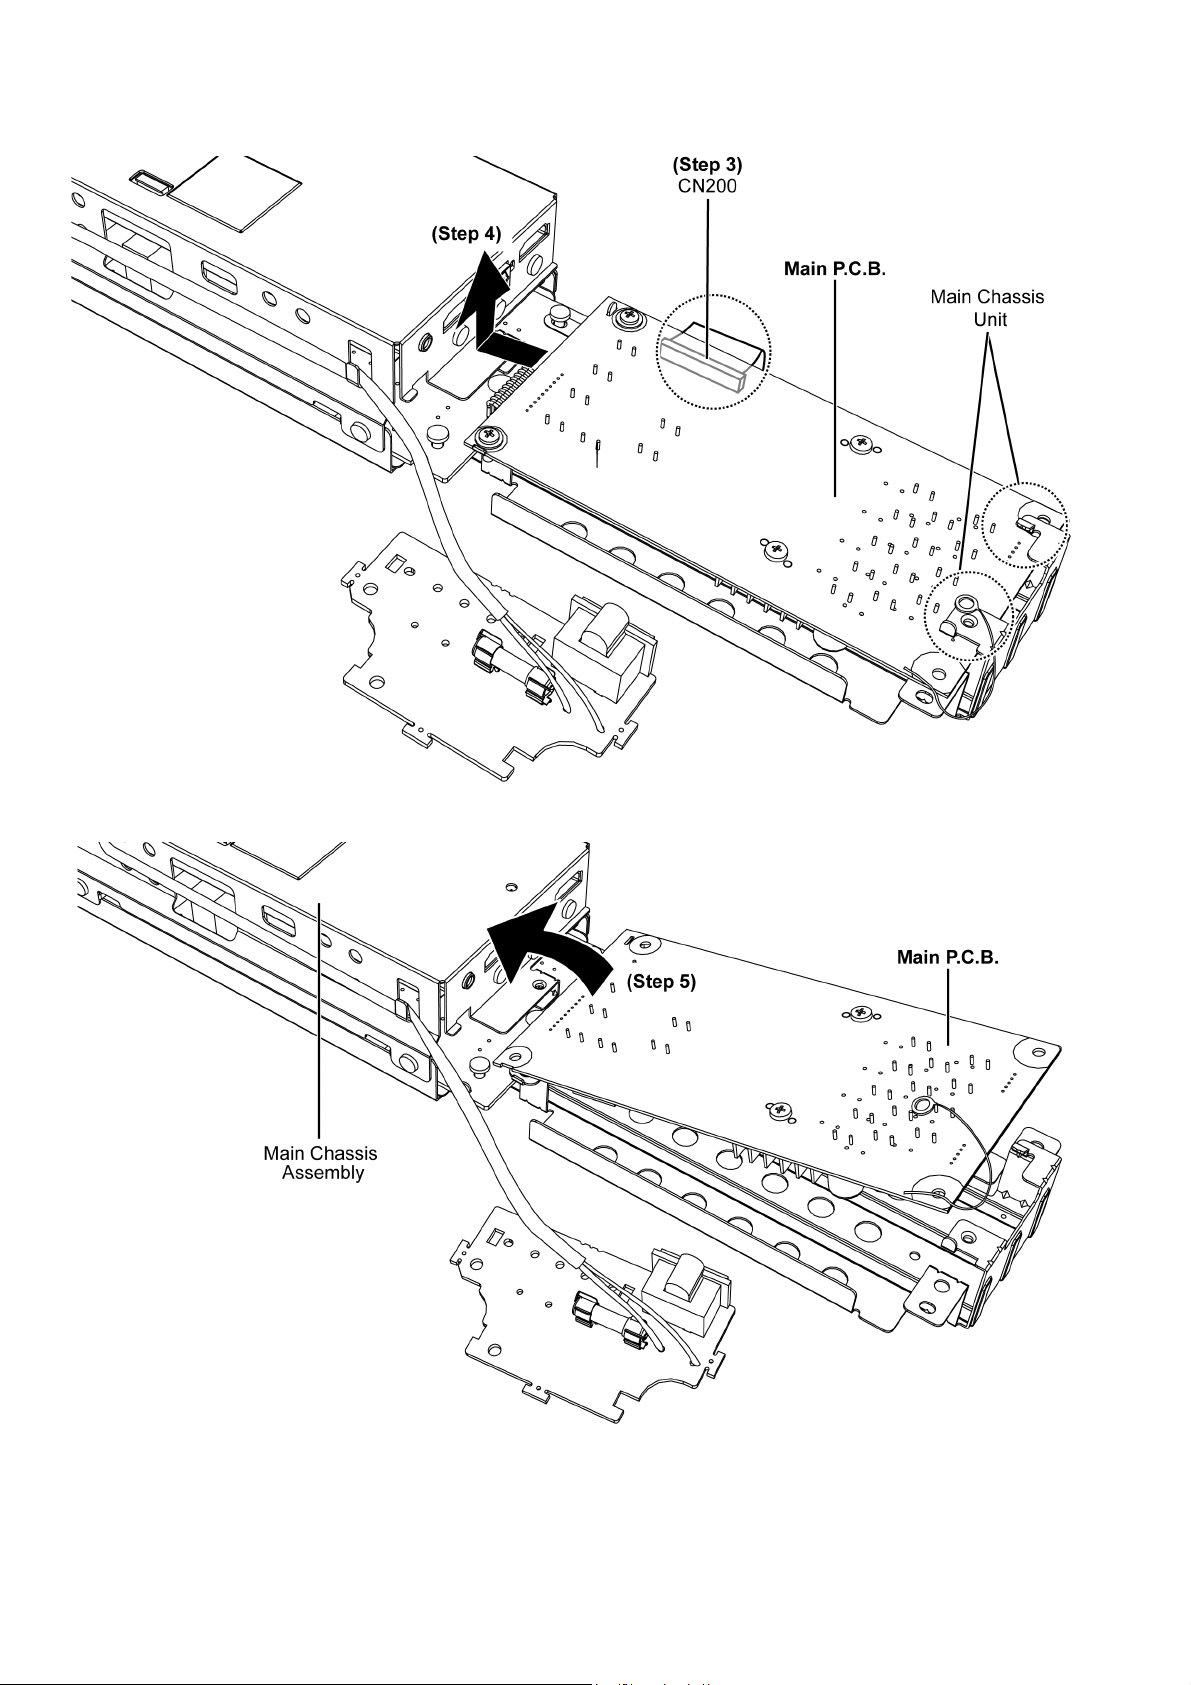
Step 3 : Detach the 50P FFC of the connector (CN200) on Main P.C.B..
Step 4 : Slightly push forward the Main P.C.B. to avoid touching the Main Chassis Unit and lift it up as arrow shown.
Step 5 : Flip the Main P.C.B. to top of the Main Chassis Assembly.
38
Page 39
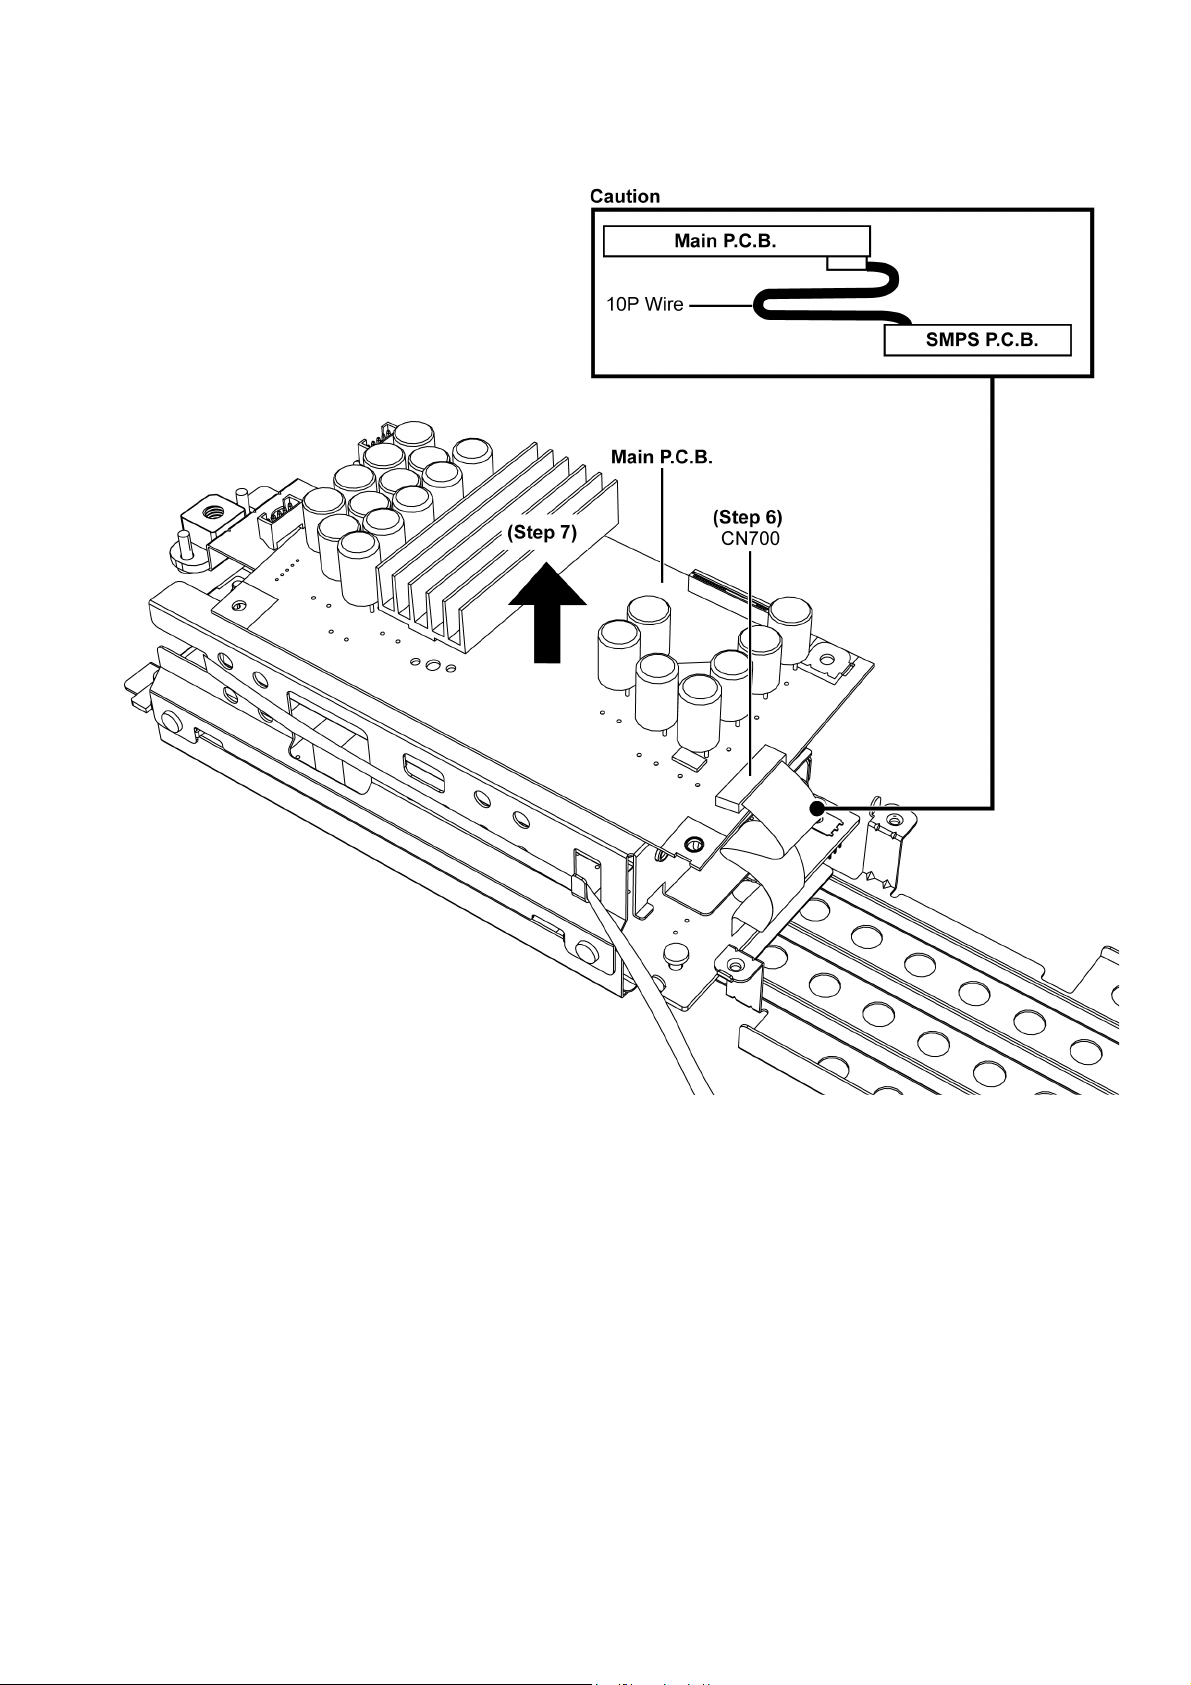
Step 6 : Detach the 10P Cable Wire of the connector (CN700) on Main P.C.B..
Step 7 : Remove the Main P.C.B..
Caution : During assembling, ensure the 10P wire must be properly dressing as diagram shown.
39
Page 40
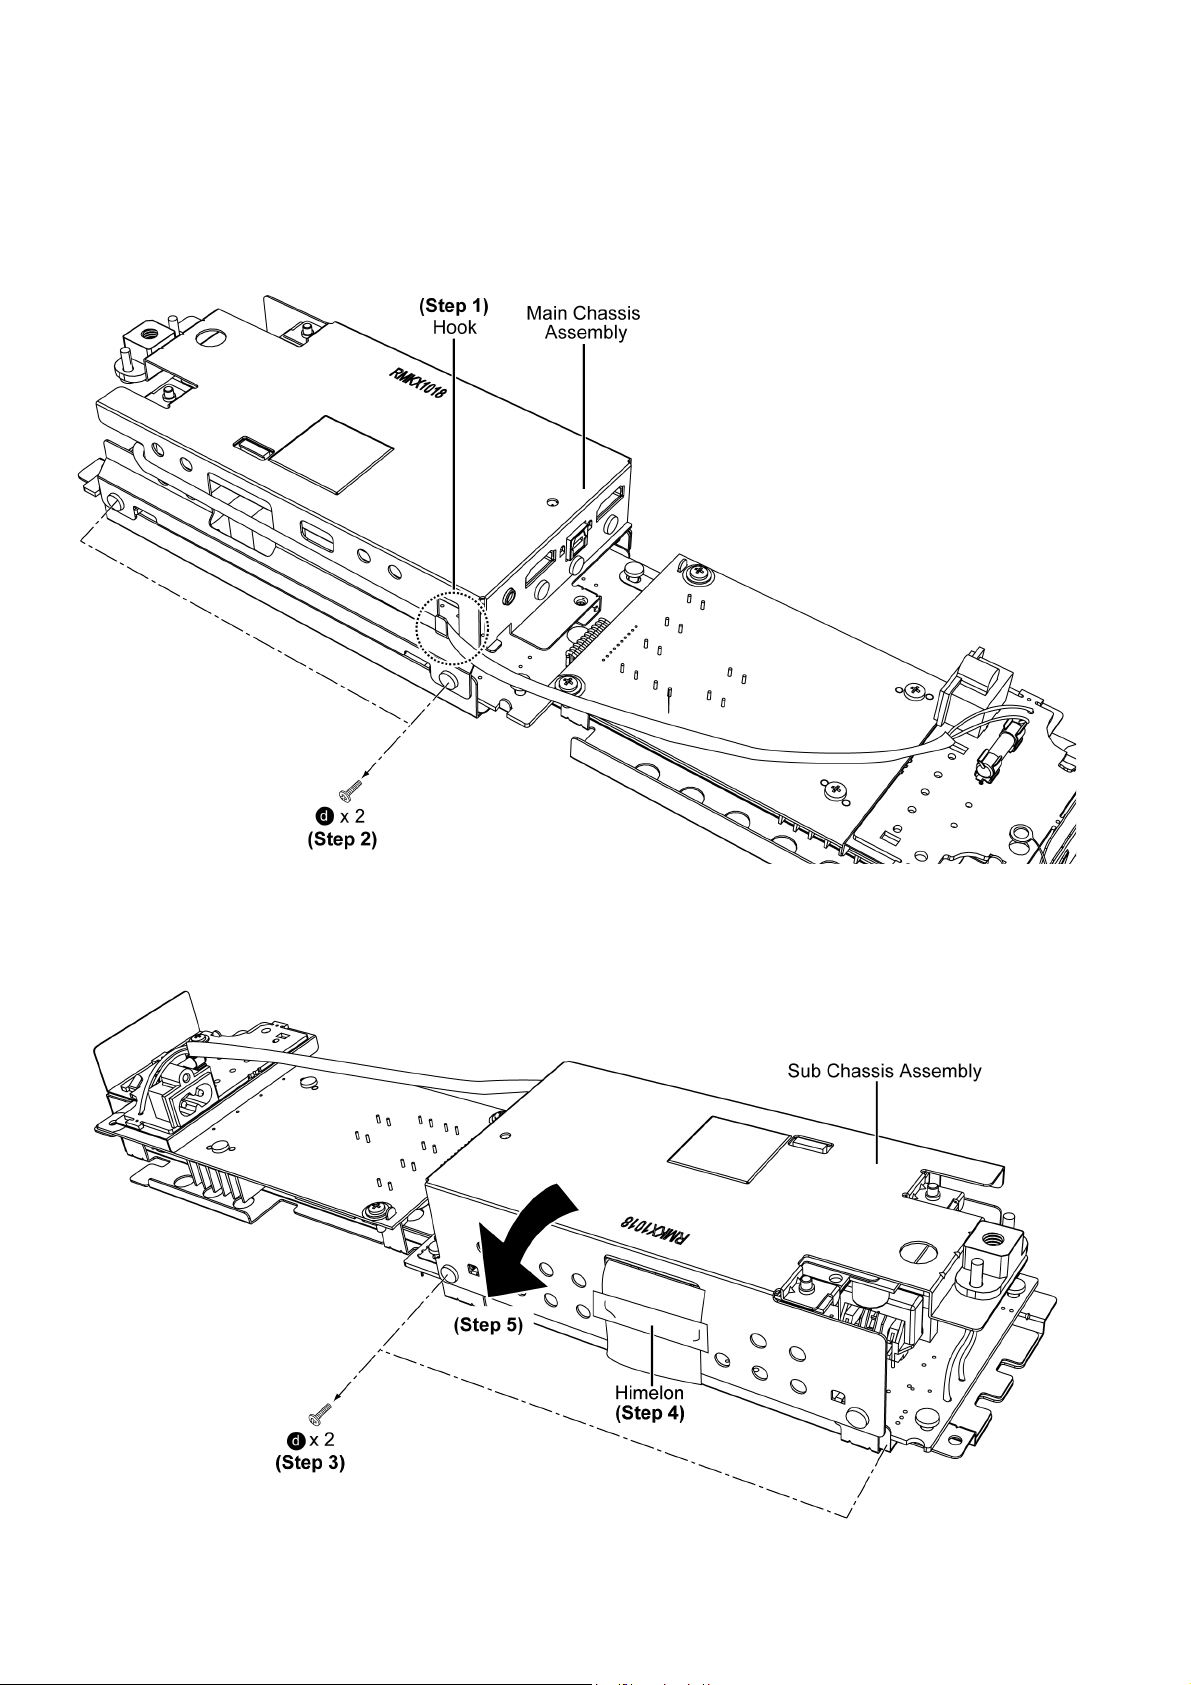
8.12. Disassembly of SMPS P.C.B.
• Refer to “Disassembly of Back Cabinet Assembly”.
• Refer to “Disassembly of Main Chassis Assembly”.
Step 1 : Release the Wire from the hook.
Caution : During assembling, ensure the cable wire is properly slot into the hook.
Step 2 : Remove 2 screws.
Step 3 : Remove 2 screws.
Step 4 : Release the Himelon from Sub Chassis Assembly.
Step 5 : Slightly lift up the Sub Chassis Assembly and place at the side as arrow shown.
Caution : Do not exert too much force as it may damage the FFC.
40
Page 41
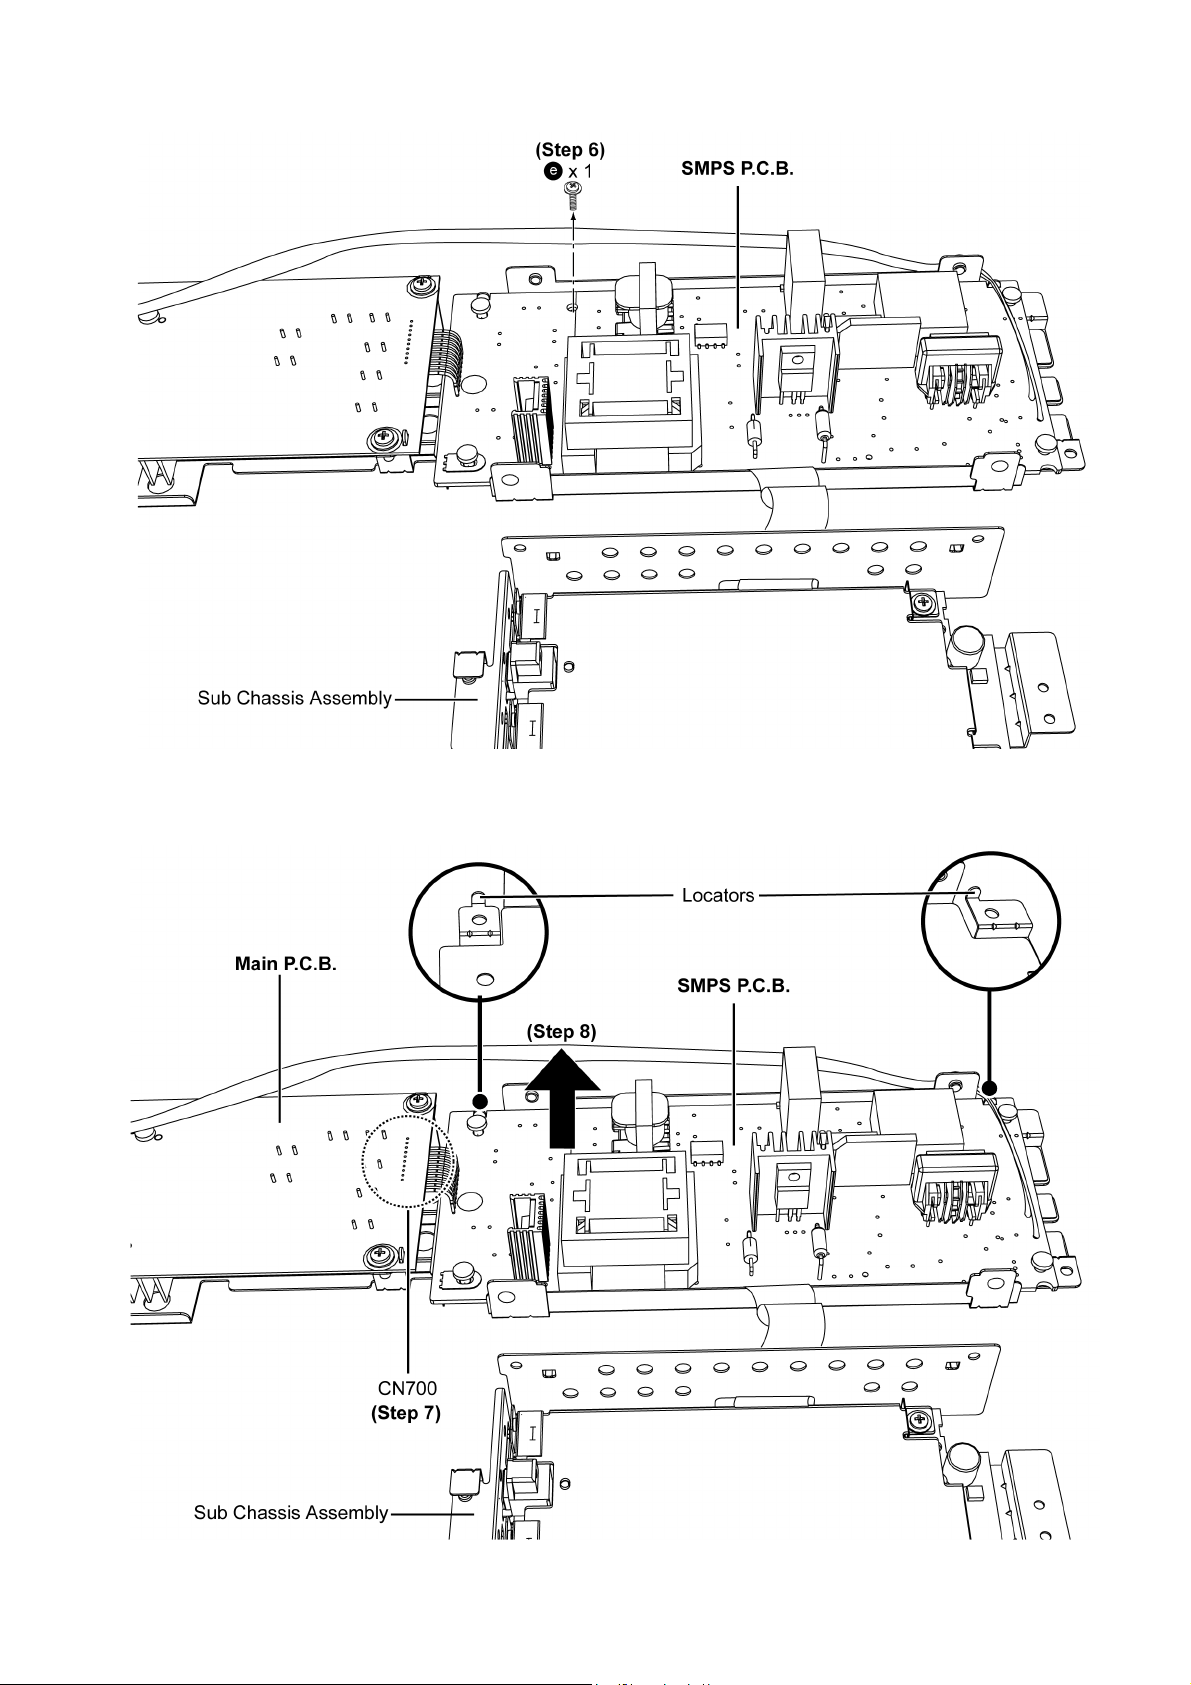
Step 6 : Remove 1 screw.
Step 7 : Detach the 10P Cable Wire of the connector (CN700) on Main P.C.B..
Step 8 : Lift up the SMPS P.C.B..
Caution : During assembling, ensure the SMPS P.C.B. is properly seated onto the locators.
41
Page 42
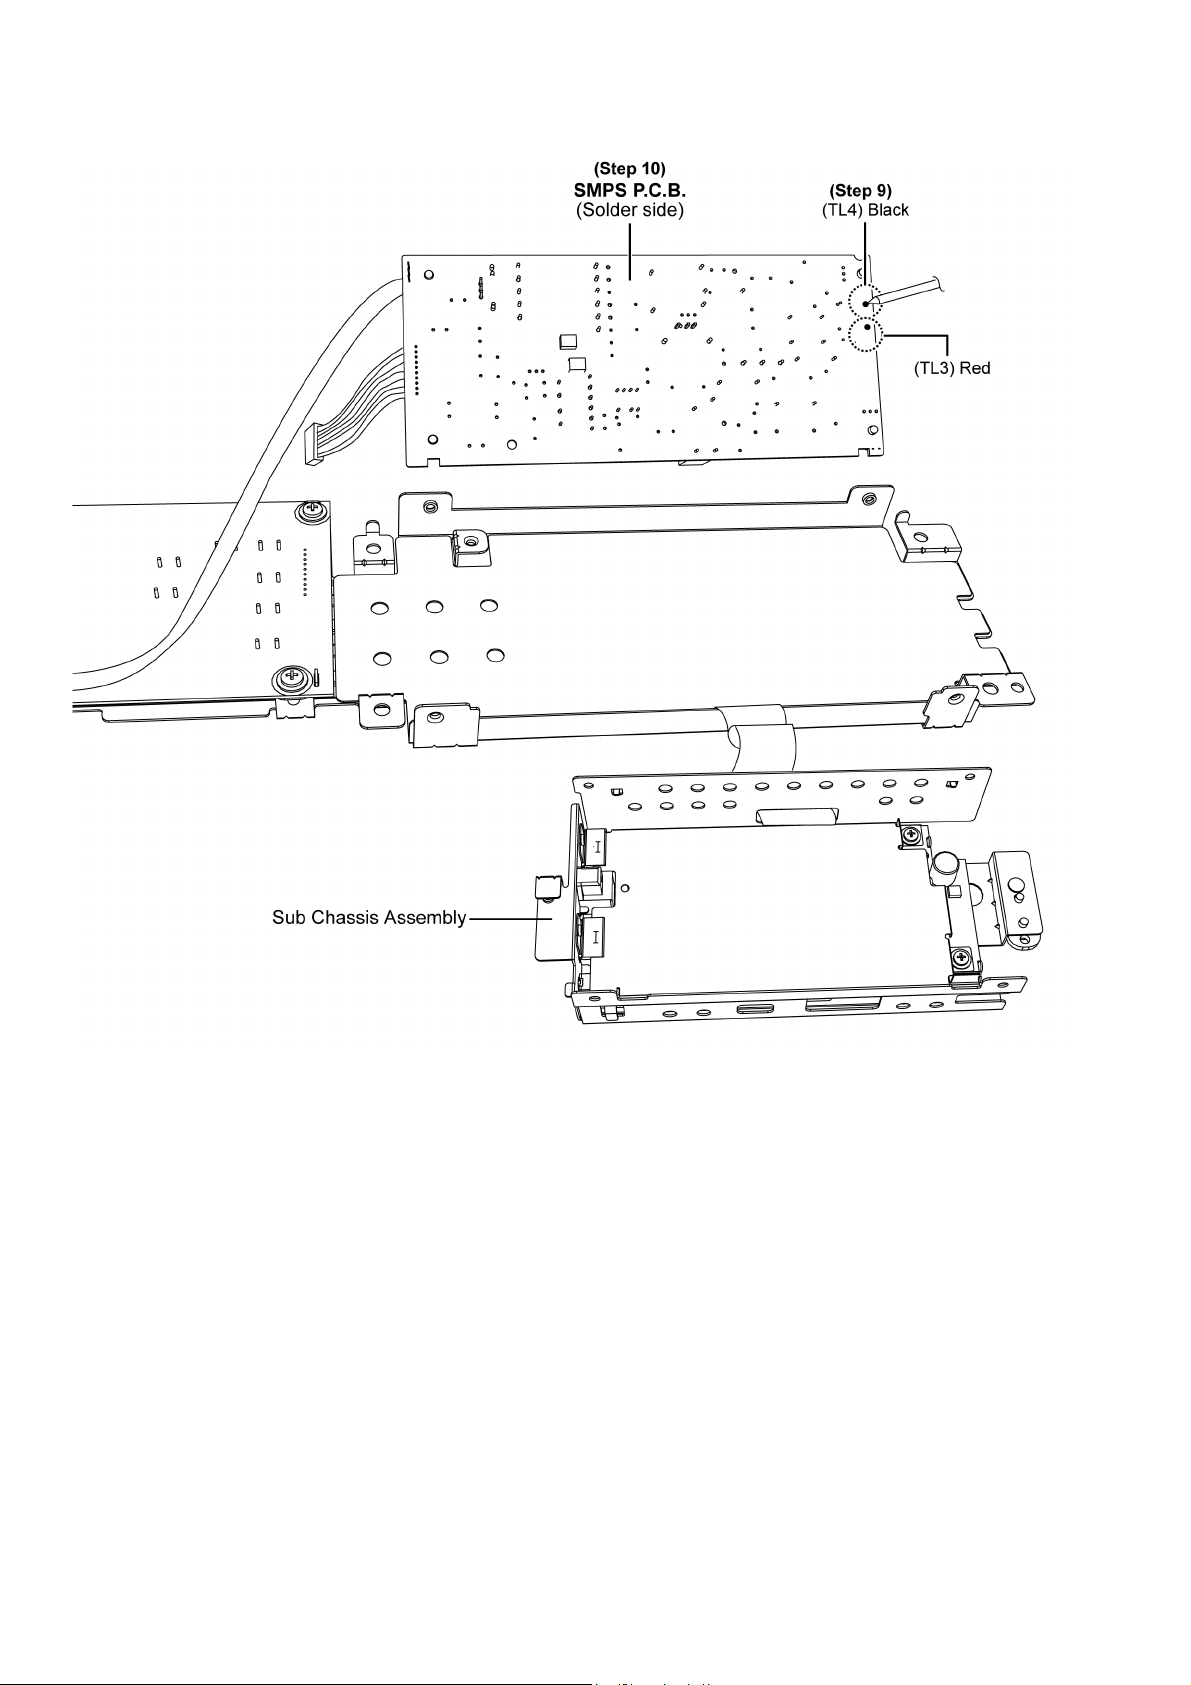
Step 9 : Desolder the wires, black (TL4) and red (TL3).
Step 10 : Remove the SMPS P.C.B..
42
Page 43
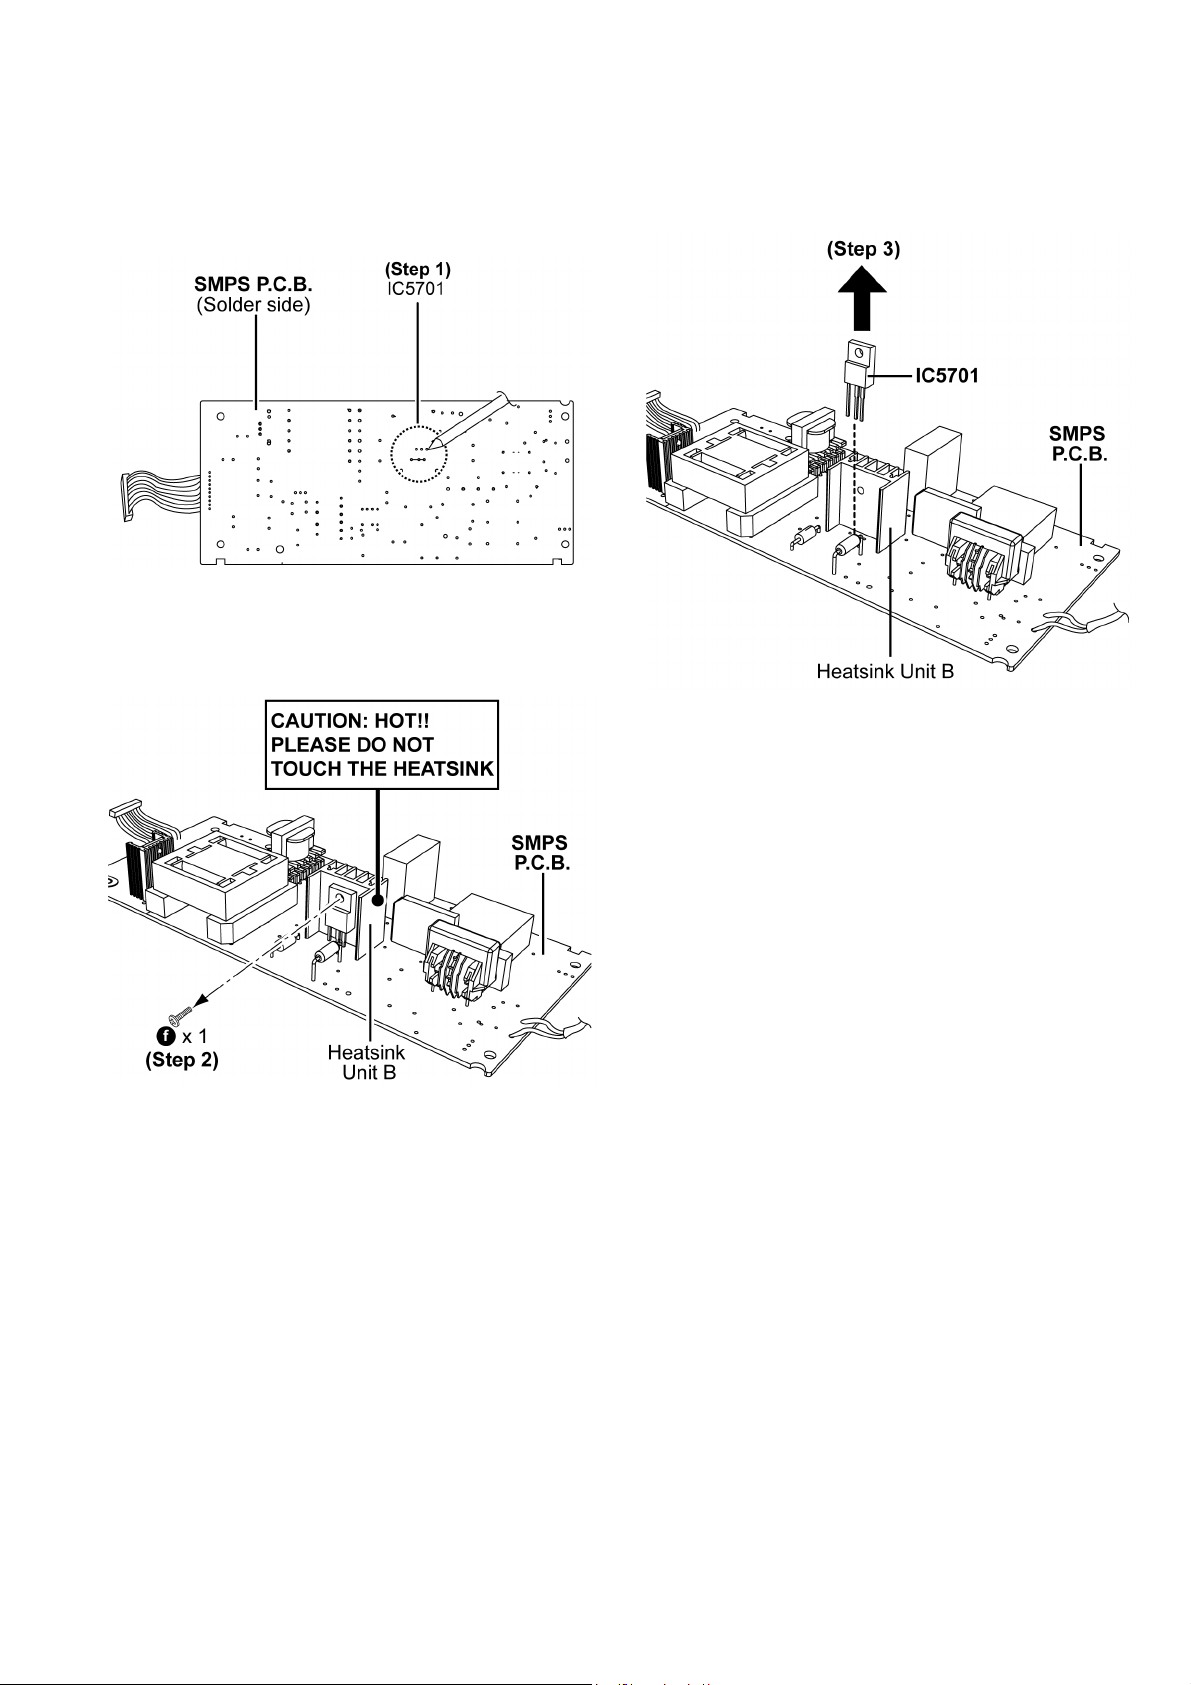
8.13. Replacement of Switch Regulator IC (IC5701)
• Refer to “Disassembly of SMPS P.C.B.”.
8.13.1. Disassembly of Switch Regulator IC (IC5701)
Step 1 : Desolder pins of the Switch Regulator IC (IC5701) on
the solder side of SMPS P.C.B..
Step 2 : Remove 1 screw.
Caution : Avoid touching the Heatsink Unit B due to its
high temperature after prolonged use. Touching it may
lead to injuries.
Step 3 : Remove the Switch Regulator IC (IC5701).
43
Page 44
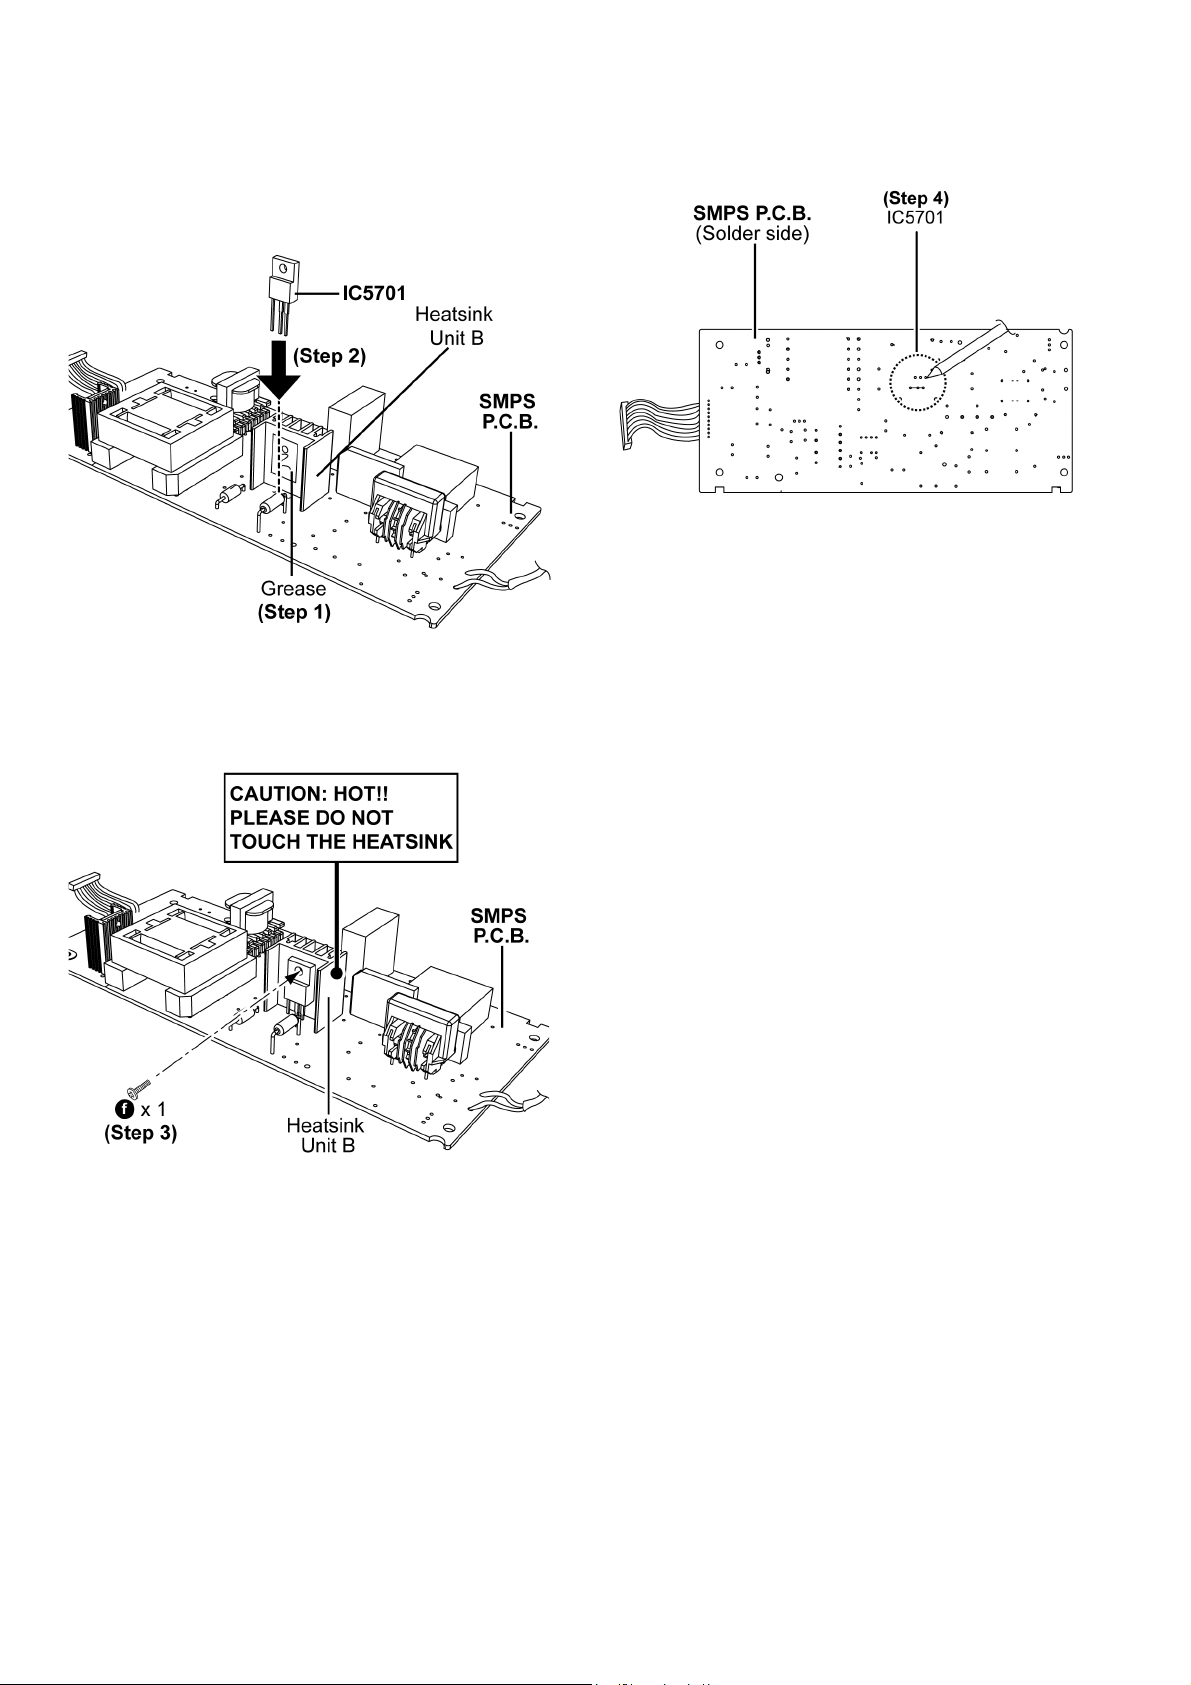
8.13.2. Assembly of Switch Regulator IC (IC5701)
Step 1 : Apply Grease on the Heatsink Unit B.
Step 2 : Mount the Switch Regulator IC (IC5701) onto the
SMPS P.C.B..
Caution : Ensure the pins of Switch Regulator IC (IC5701)
are properly seated on the SMPS P.C.B..
Step 3 : Screw the Switch Regulator IC (IC5701) to the Heat-
sink Unit B.
Caution : Ensure the Switch Regulator IC (IC5701) is tightly
screwed to the Heatsink Unit B.
Step 4 : Solder pins of Switch Regulator IC (IC5701) on the sol-
der side of SMPS P.C.B..
44
Page 45
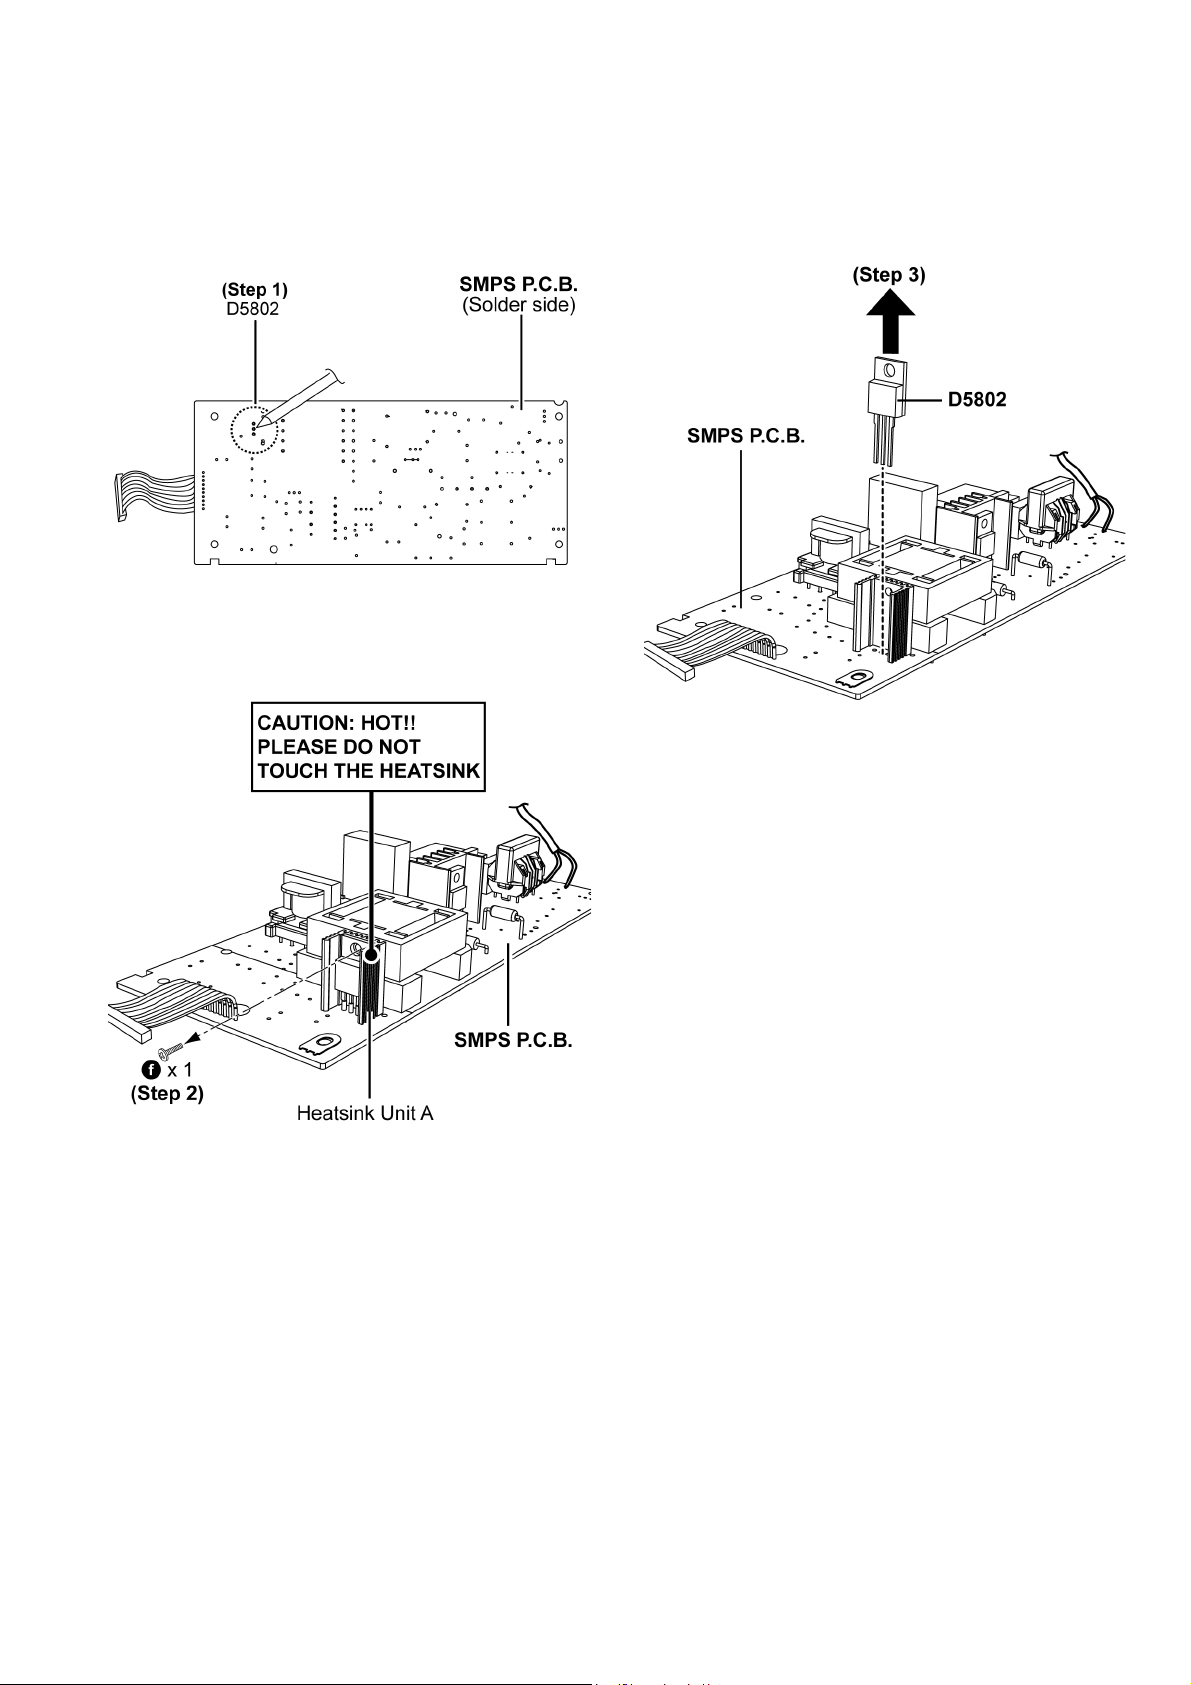
8.14. Replacement of Rectifier Diode (D5802)
• Refer to “Disassembly of SMPS P.C.B.”.
8.14.1. Disassembly of Rectifier Diode (D5802)
Step 1 : Desolder pins of the Rectifier Diode (D5802) on the
solder side of SMPS P.C.B..
Step 2 : Remove 1 screw.
Caution : Avoid touching the Heatsink Unit A due to its
high temperature after prolonged use. Touching it may
lead to injuries.
Step 3 : Remove the Rectifier Diode (D5802) from the Heatsink
Unit A.
45
Page 46
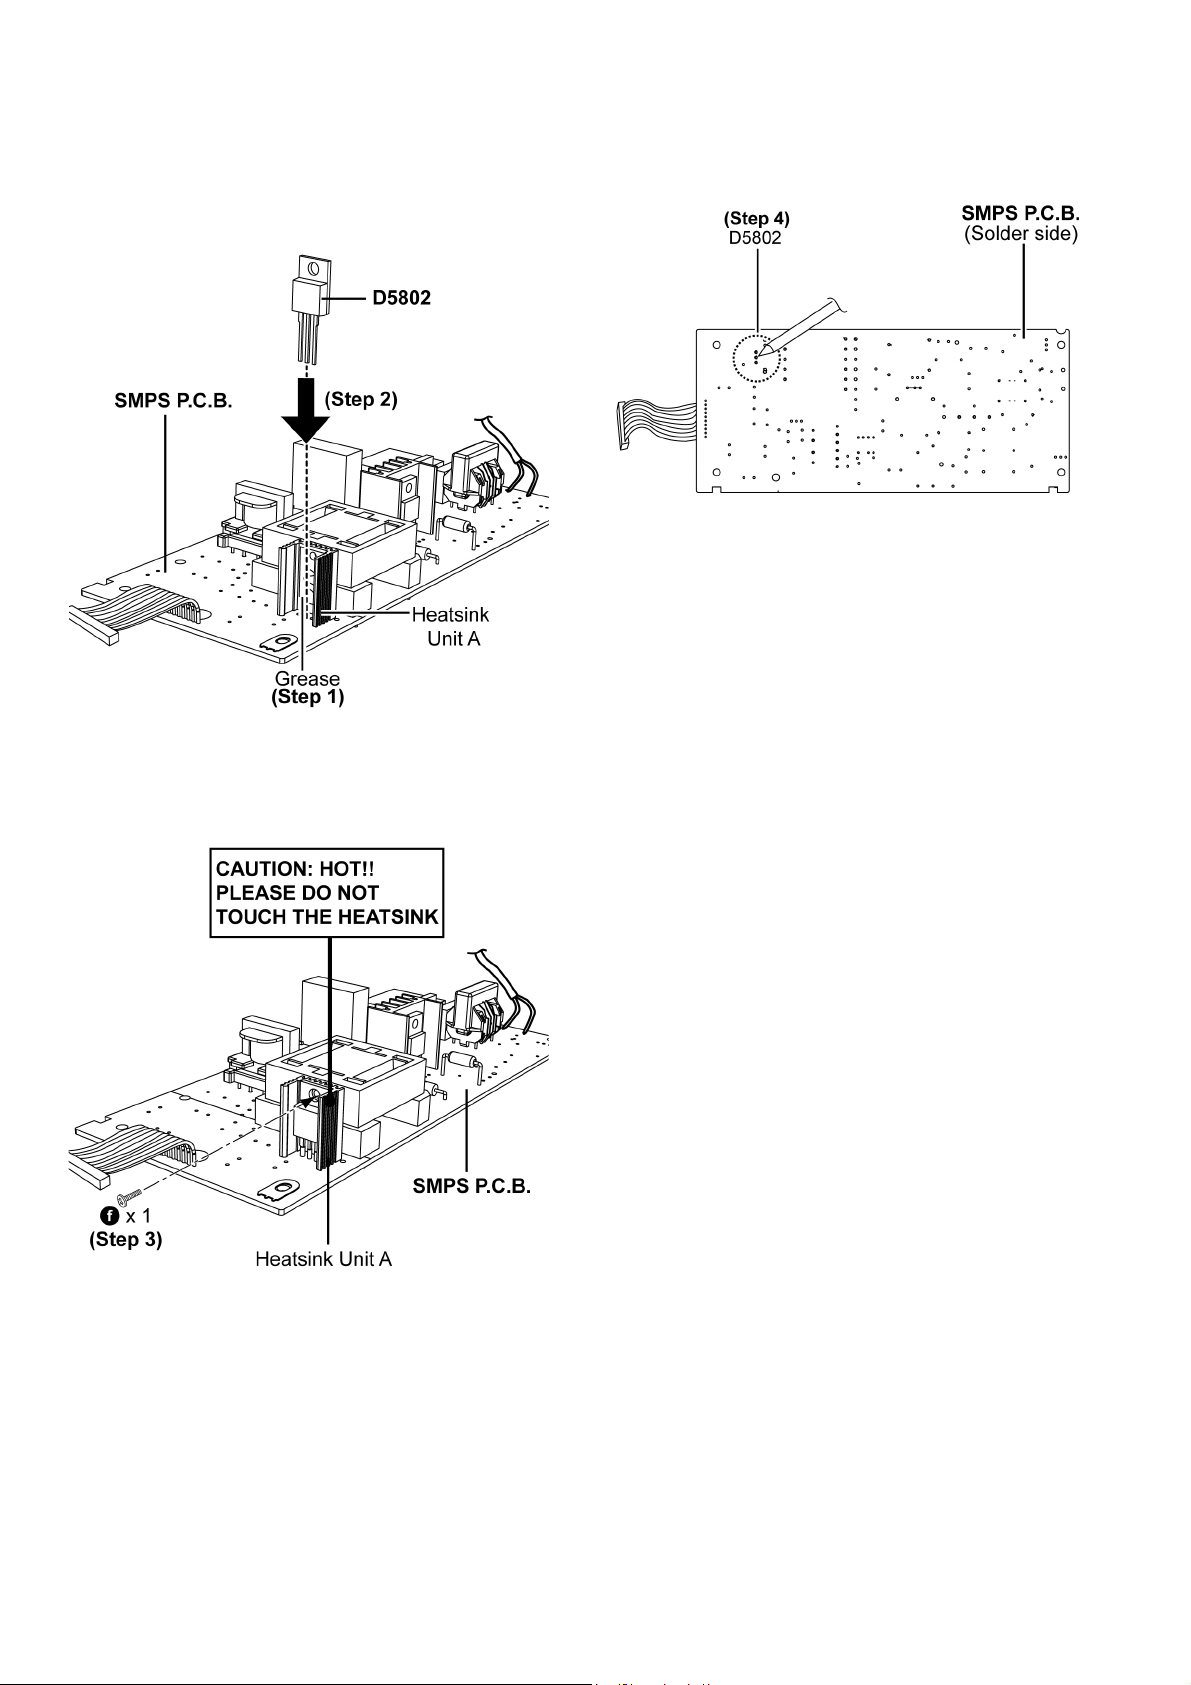
8.14.2. Assembly of Rectifier Diode (D5802)
Step 1 : Apply Grease on the Heatsink Unit A.
Step 2 : Mount the Rectifier Diode (D5802) onto the SMPS
P. C .B . .
Caution : Ensure the pins of Rectifier Diode (D5802) are
properly seated on the SMPS P.C.B..
Step 4 : Solder pins of the Rectifier Diode (D5802) on the sol-
der side of SMPS P.C.B..
Step 3 : Screw the Rectifier Diode (D5802) to the Heatsink Unit
A .
Caution : Ensure the Rectifier Diode (D5802) is tightly
screwed to the Heatsink Unit A.
46
Page 47
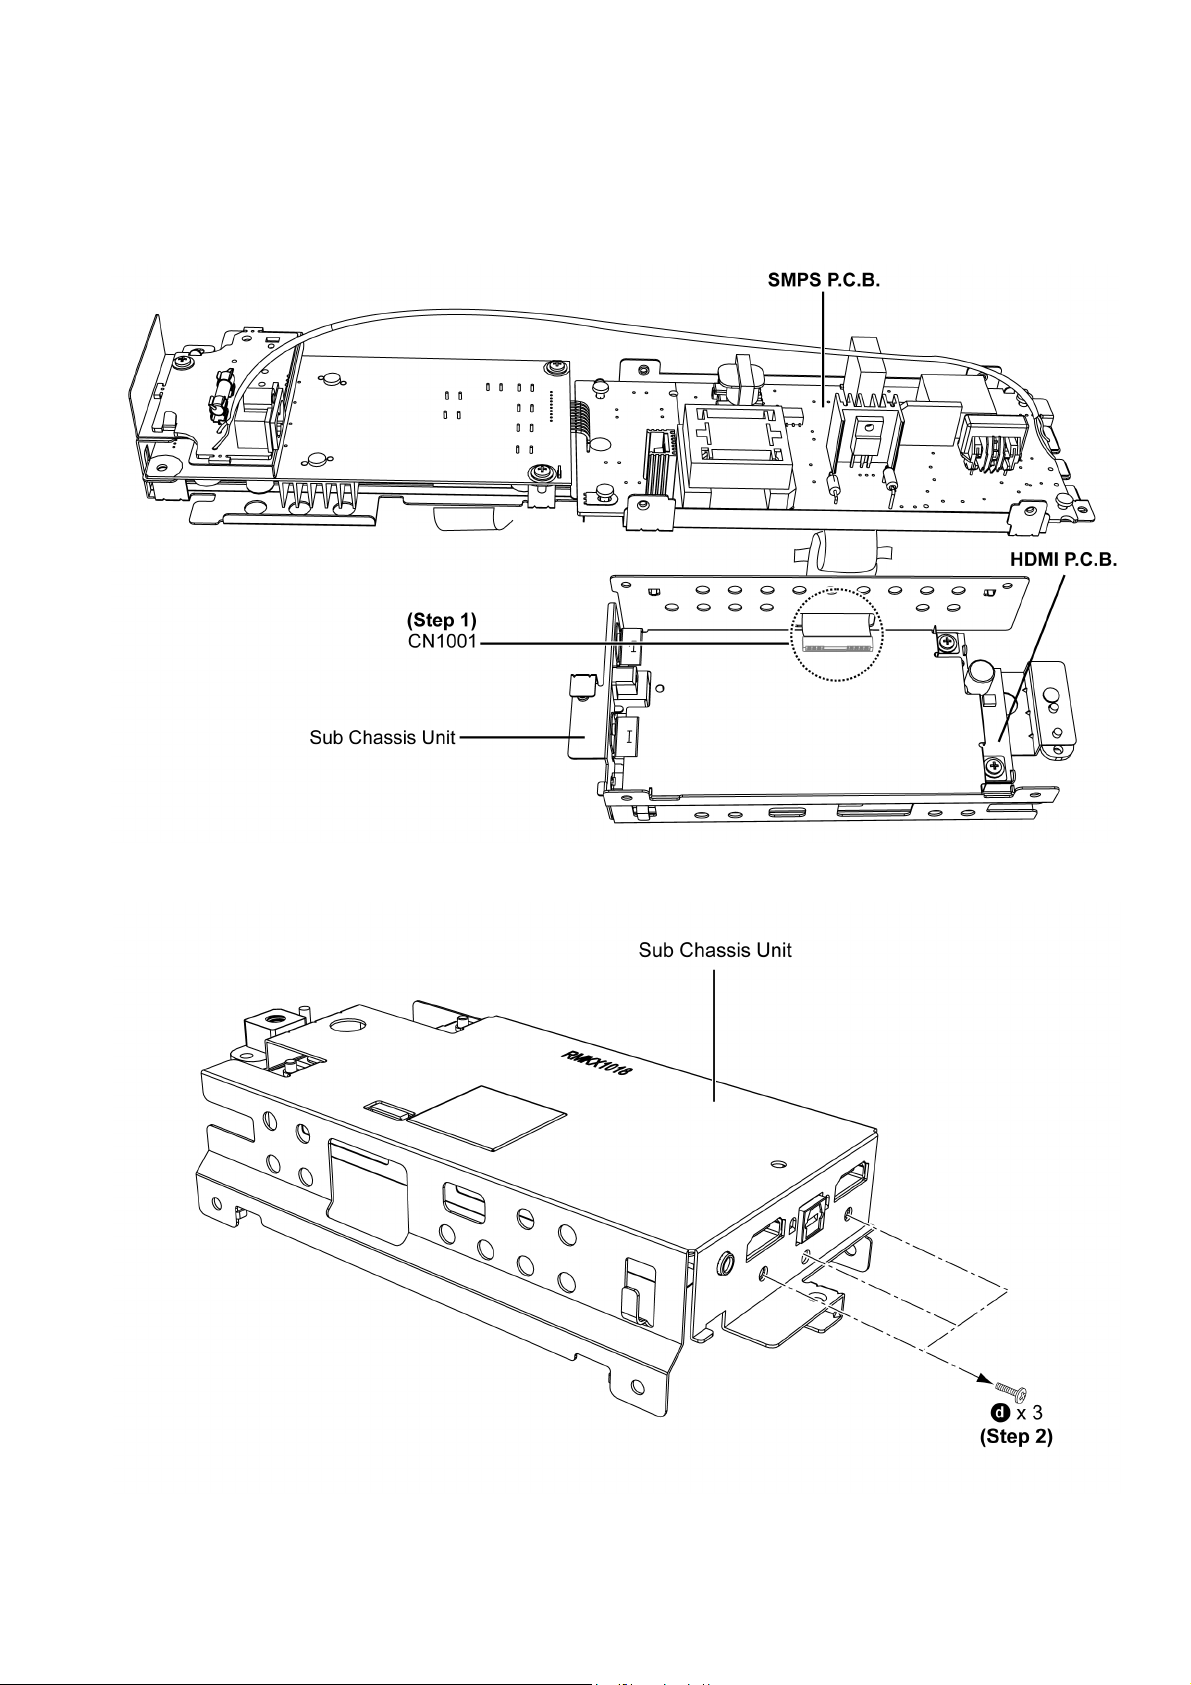
8.15. Disassembly of HDMI P.C.B.
• Refer to “Disassembly of Back Cabinet Assembly”.
• Refer to “Disassembly of Main Chassis Assembly”.
• Refer to (Step 1) - (Step 5) of “Disassembly of SMPS P.C.B.”.
Step 1 : Detach the 50P FFC of the connector (CN1001) on HDMI P.C.B..
Step 2 : Remove 3 screws.
47
Page 48
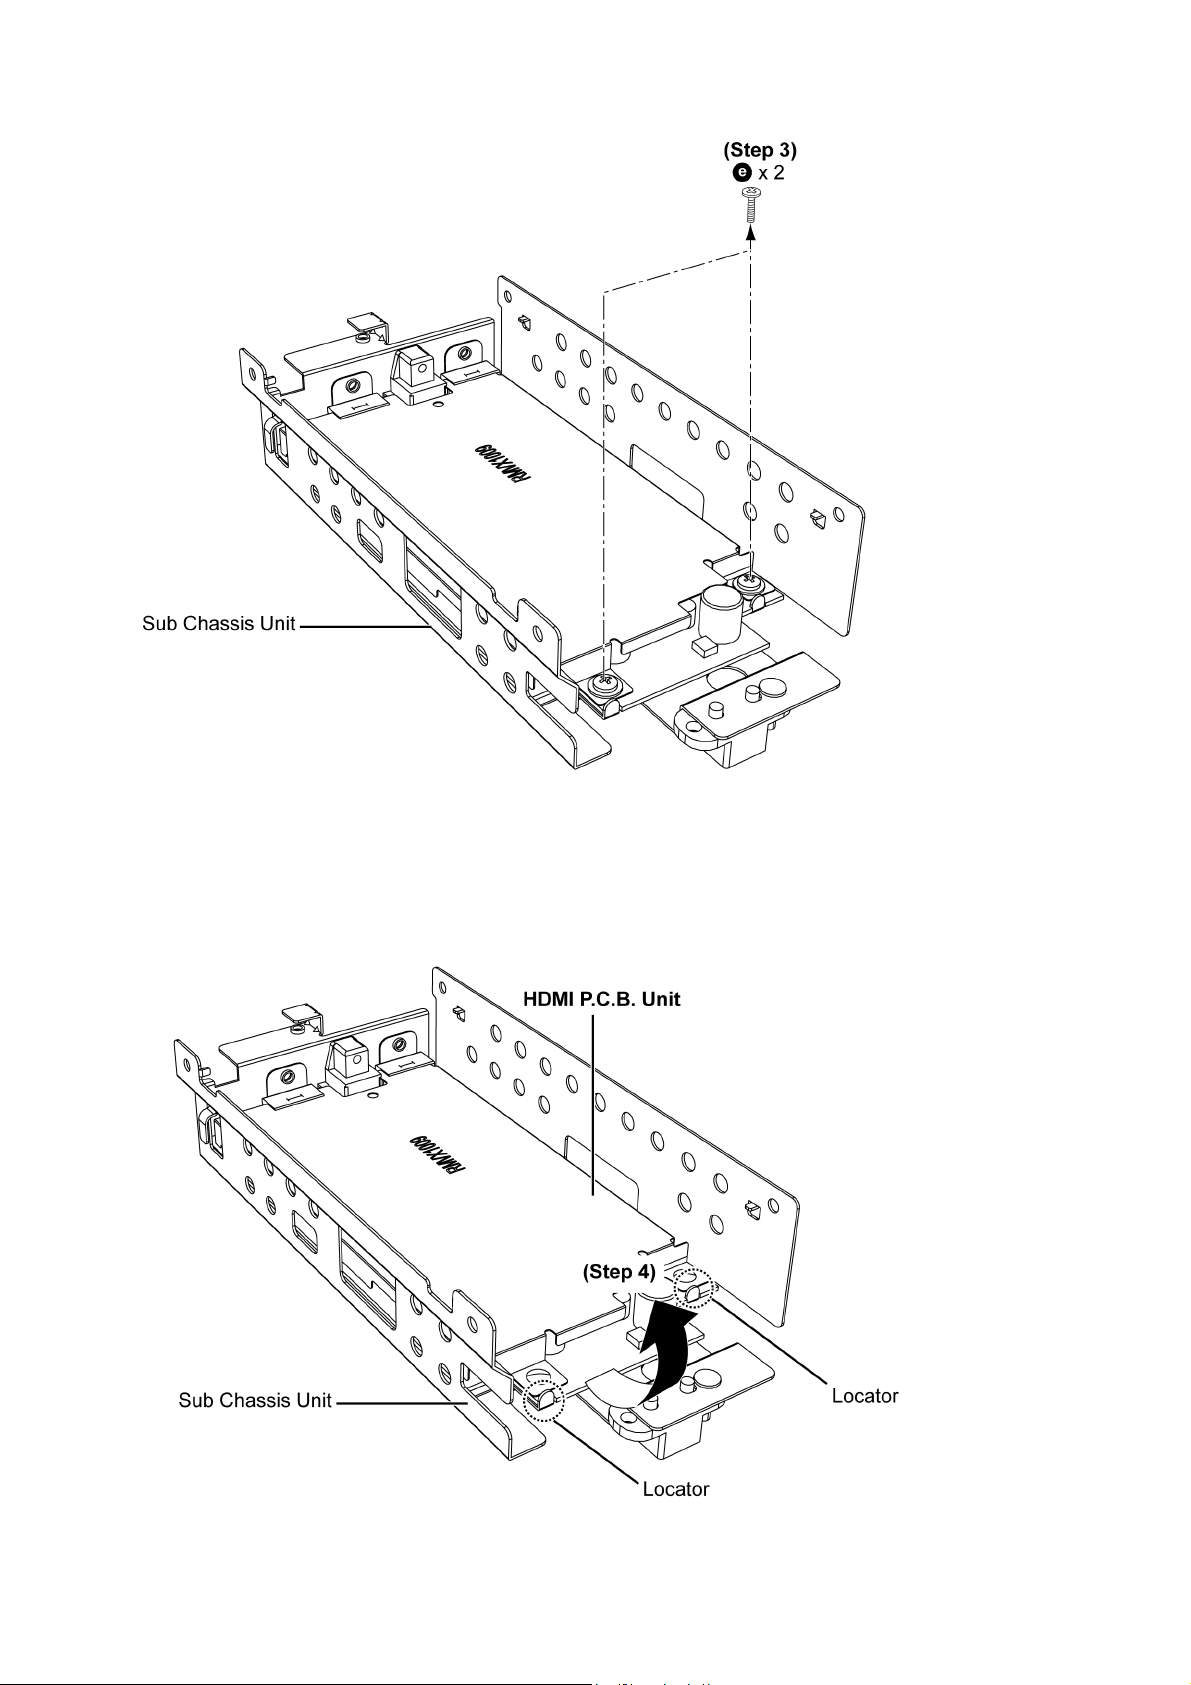
Step 3 : Remove 2 screws.
Step 4 : Lift up the HDMI P.C.B. Unit as arrow shown.
Caution : During assembling, ensure the HDMI P.C.B. Unit is properly seated onto the locators.
48
Page 49
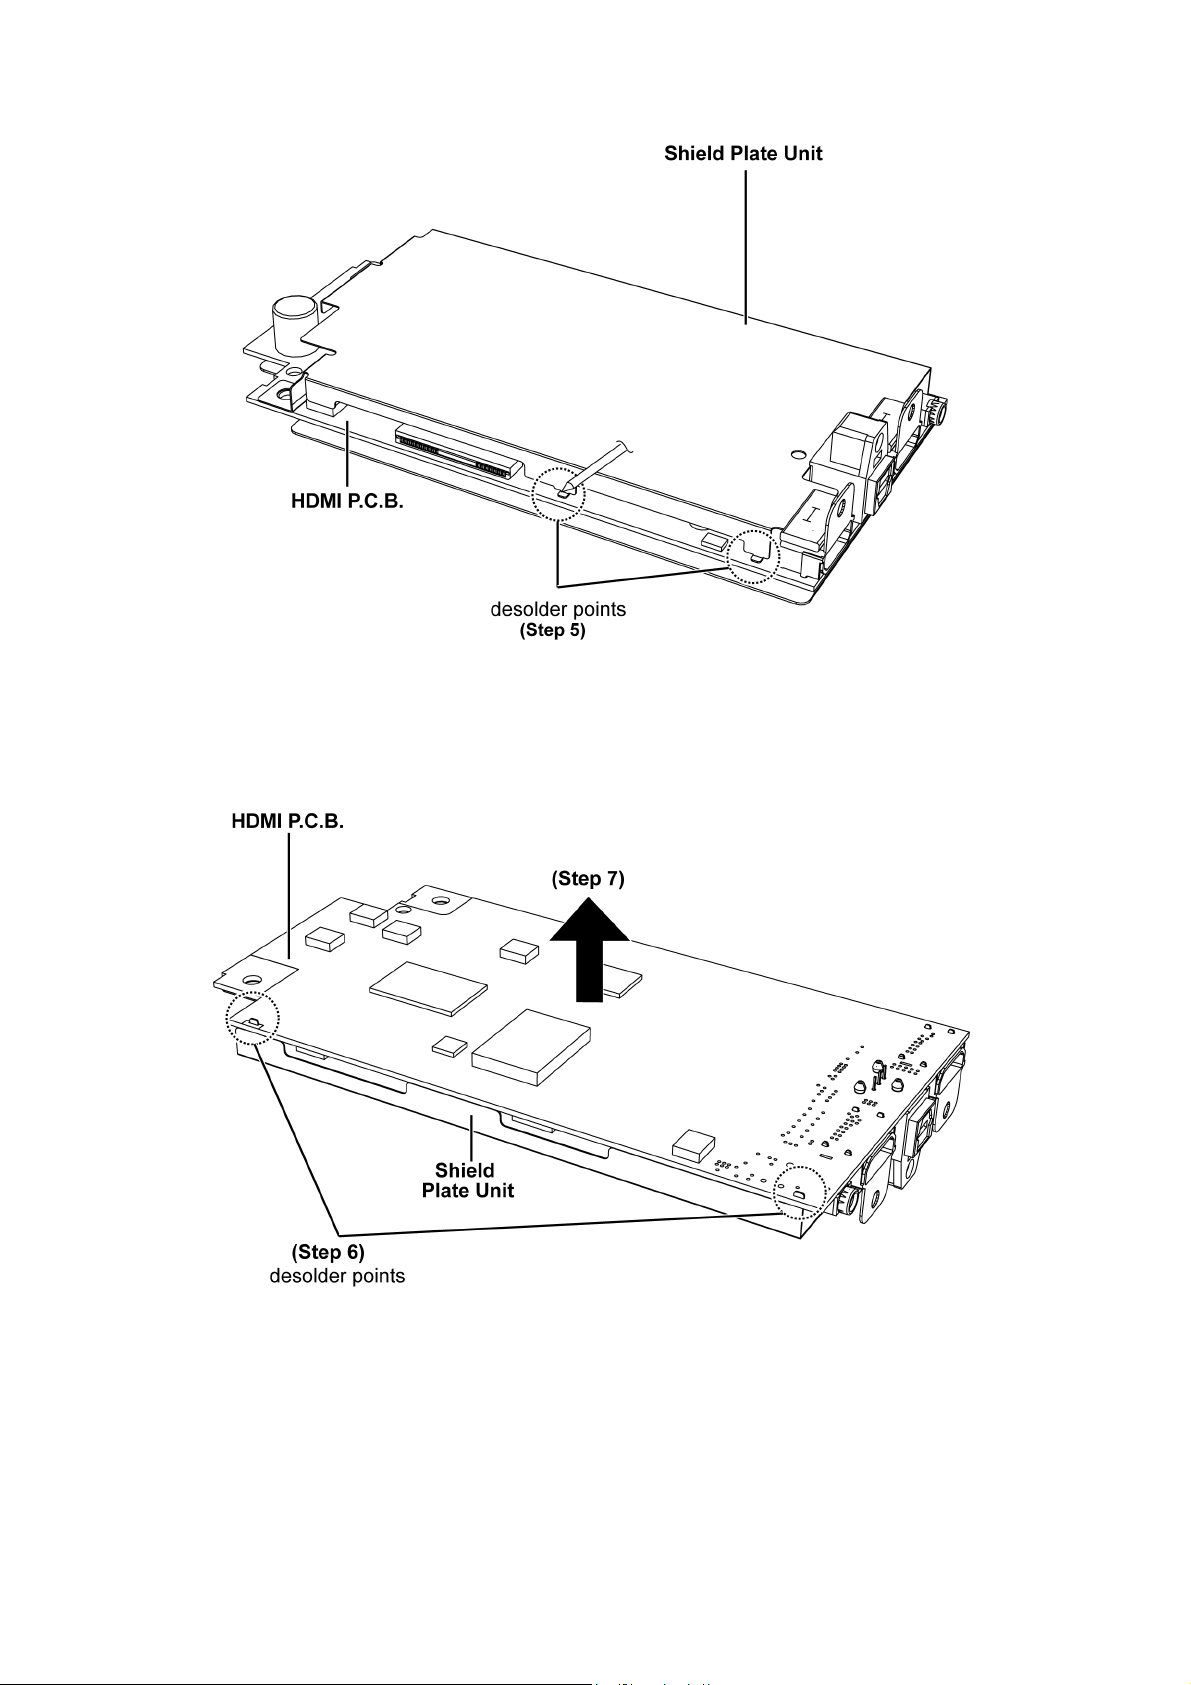
Step 5 : Desolder the 2 legs of Shield Plate Unit.
Step 6 : Desolder the 2 legs of Shield Plate Unit.
Step 7 : Remove the HDMI P.C.B. Chassis as arrow shown.
49
Page 50
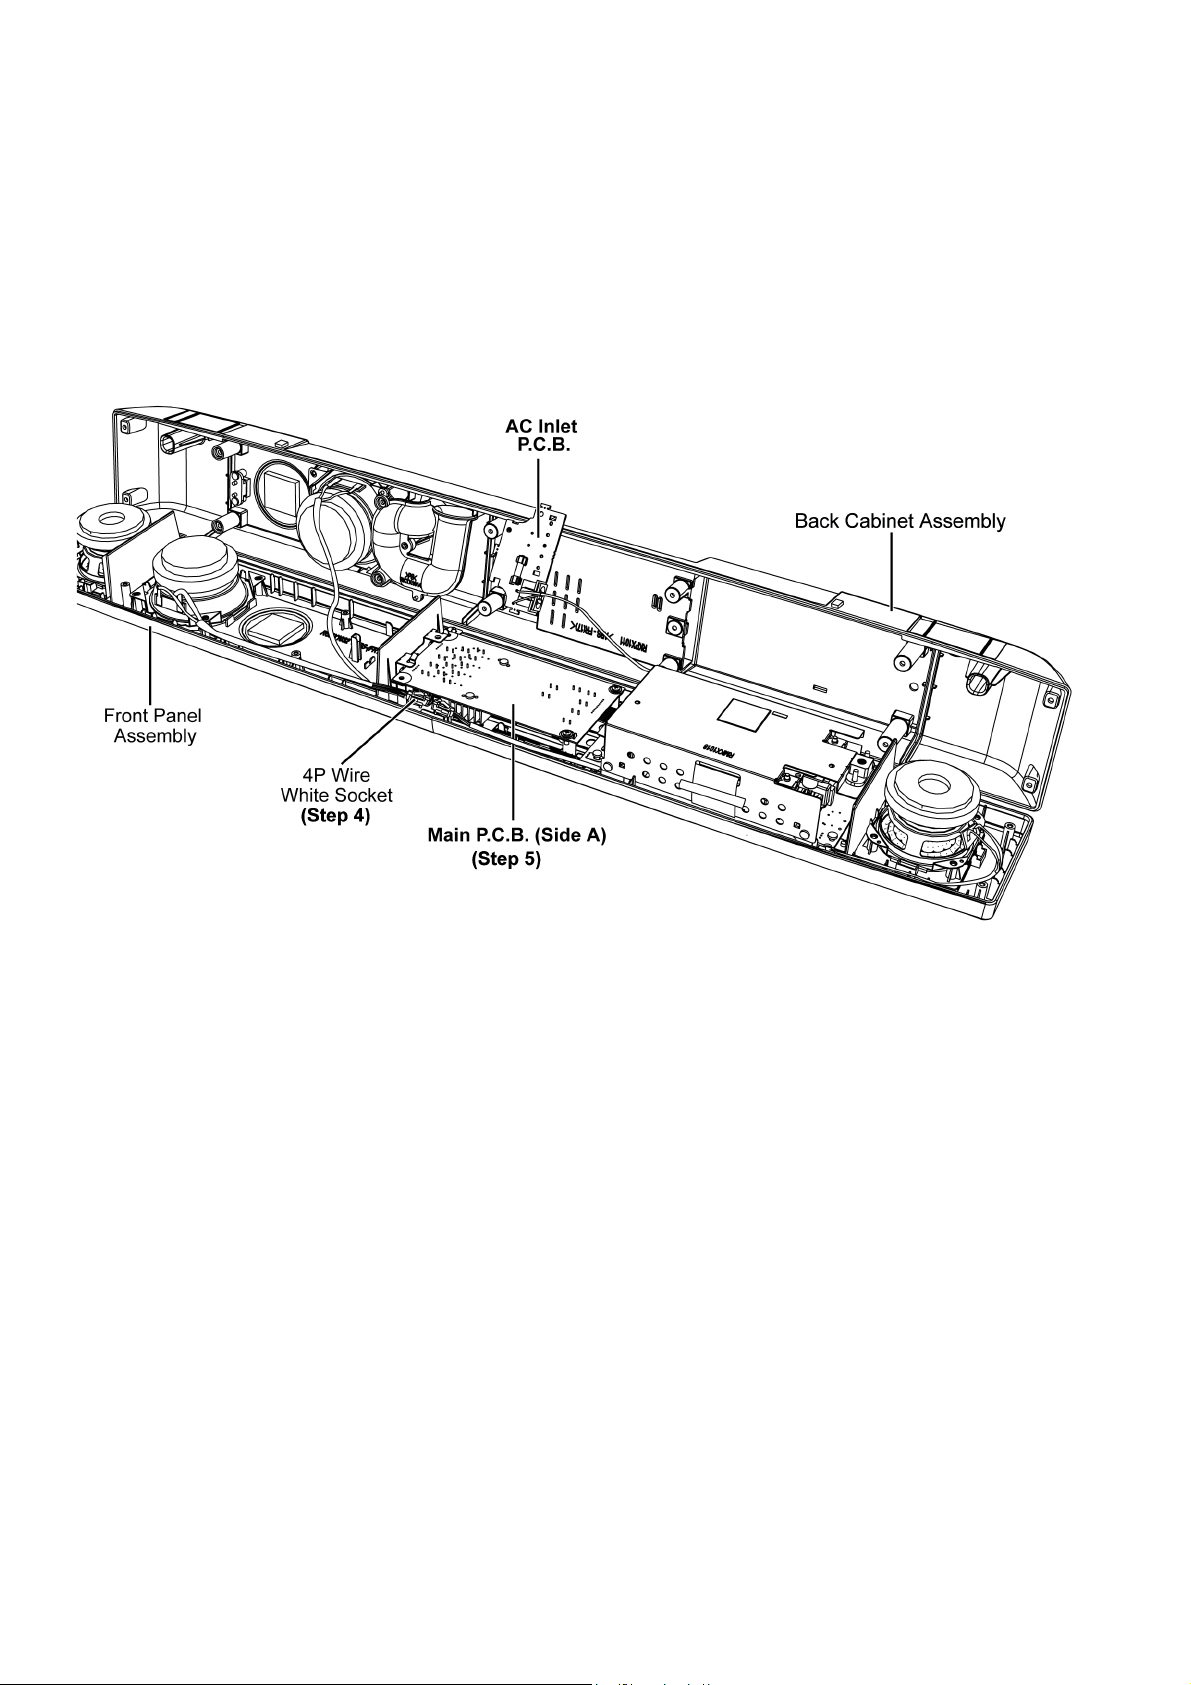
9 Service Position
Note: For description of the disassembly procedures, see the Section 8.
9.1. Checking and Repairing of Main P.C.B. (Side A)
Step 1 : Remove Back Cabinet Assembly.
Step 2 : Remove AC Inlet P.C.B..
Step 3 : Remove the PC Sheet Assembly.
Step 4 : Connect the 4P Wire White Socket.
Step 5 : Main P.C.B. (Side A) can be checked and repaired as diagram shown.
50
Page 51
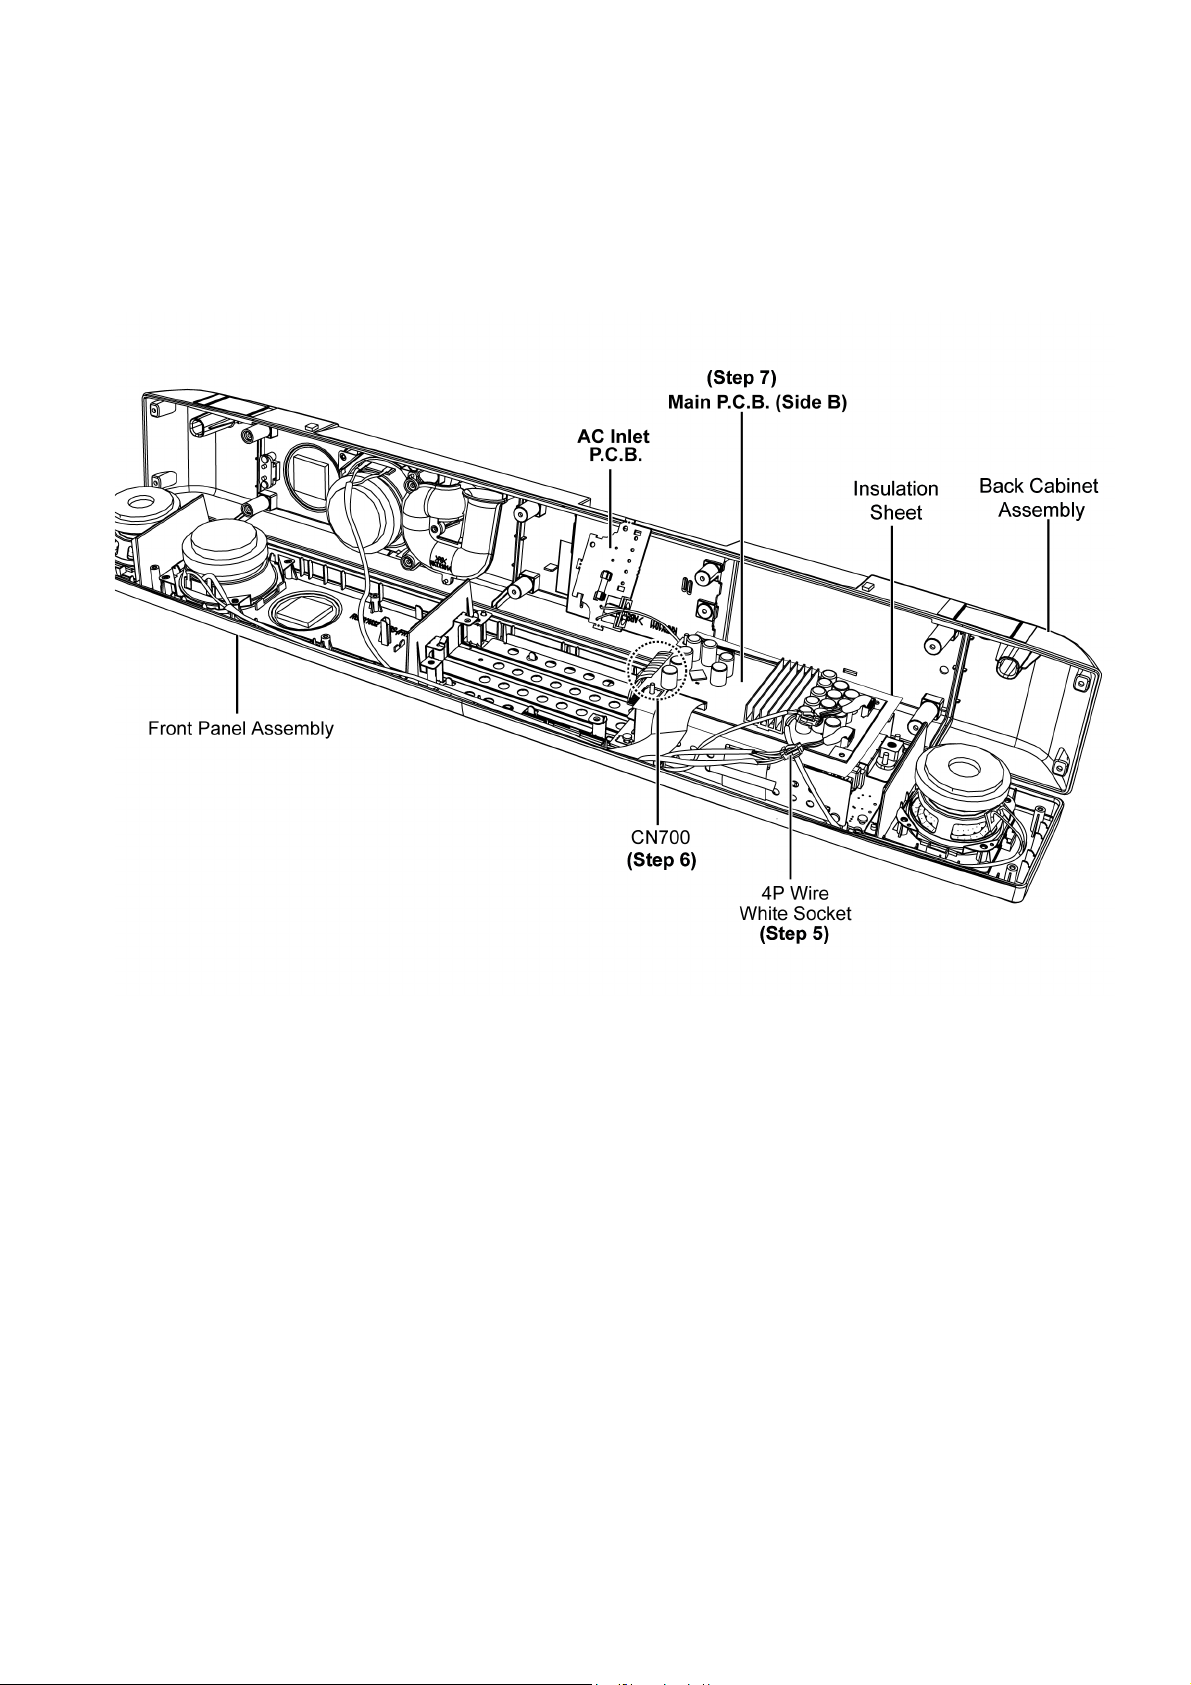
9.2. Checking and Repairing of Main P.C.B. (Side B)
Step 1 : Remove Back Cabinet Assembly.
Step 2 : Remove AC Inlet P.C.B..
Step 3 : Remove the PC Sheet Assembly.
Step 4 : Remove Main P.C.B..
Step 5 : Connect the 4P Wire White Socket.
Step 6 : Connect 10P Cable Wire of connector (CN700) on Main P.C.B..
Step 7 : Main P.C.B. (Side B) can be checked and repaired as diagram shown.
51
Page 52
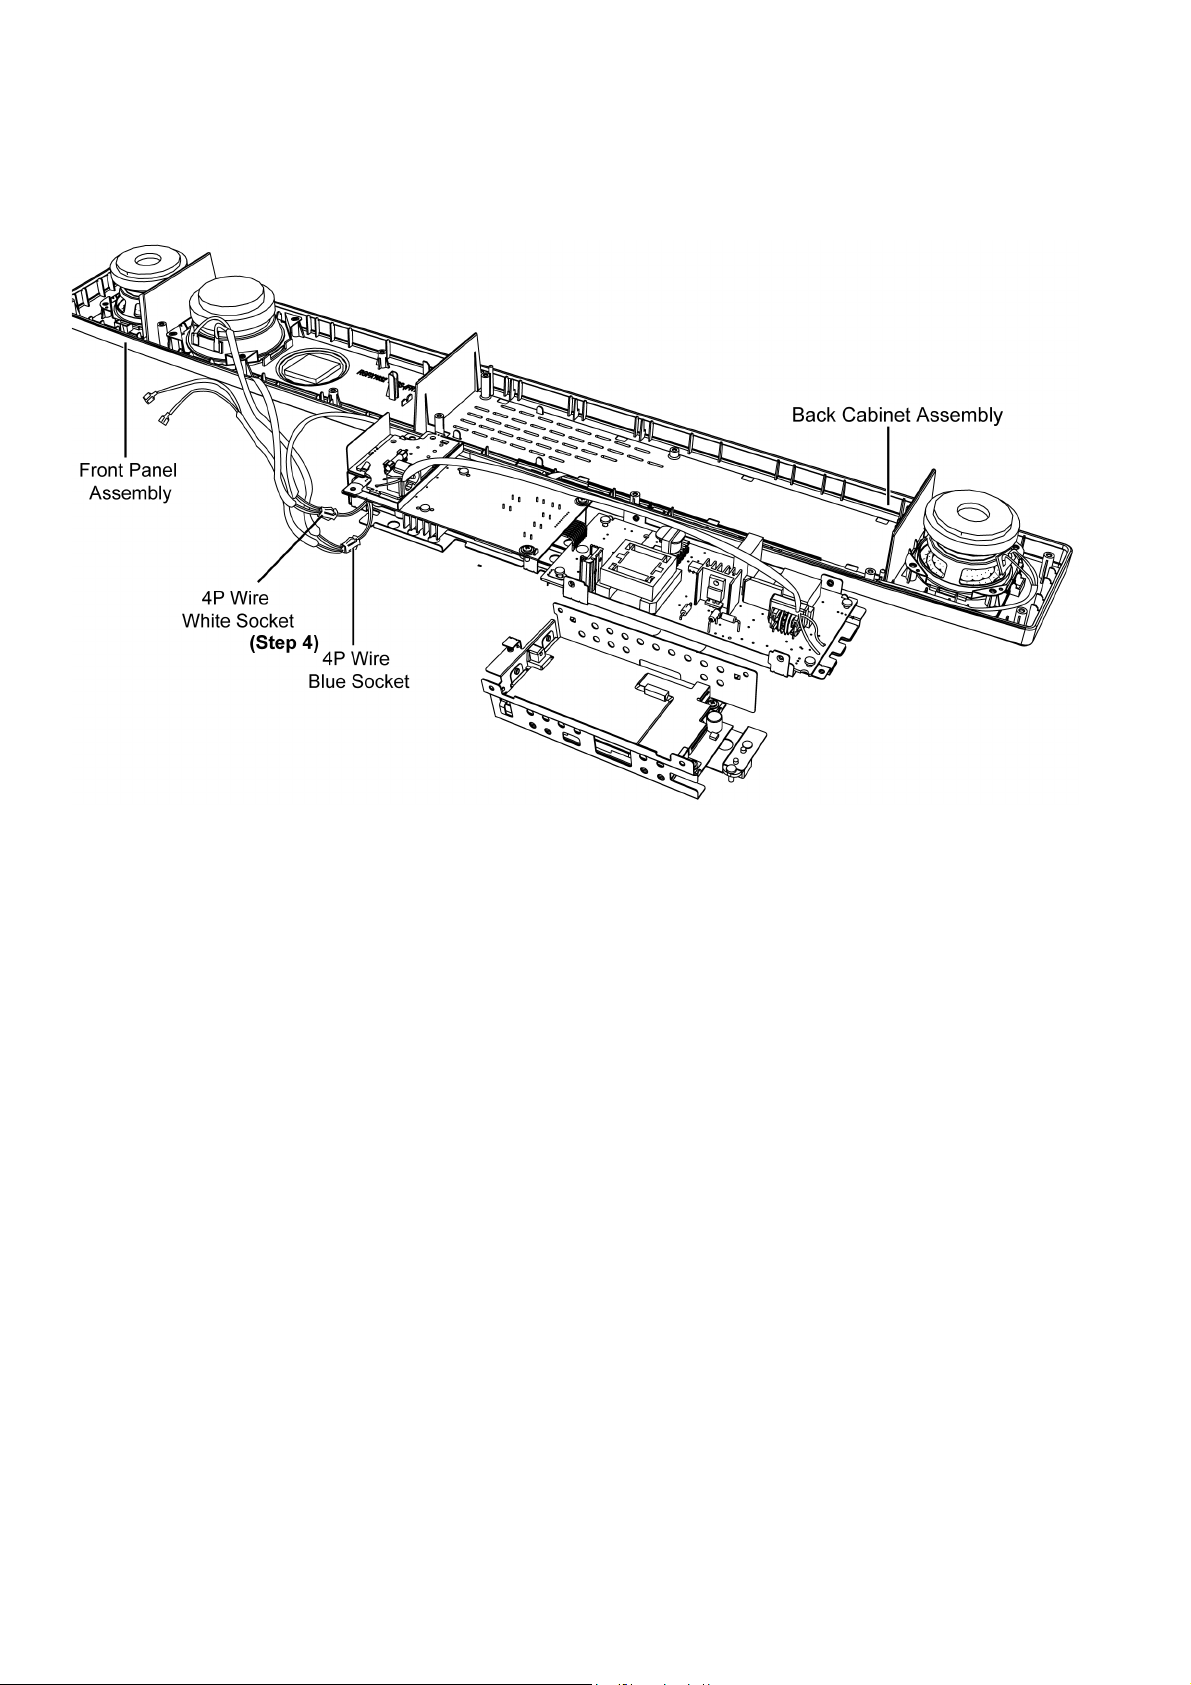
9.3. Checking and Repairing of SMPS P.C.B.
Step 1 : Remove Back Cabinet Assembly.
Step 2 : Remove Main Chassis Assembly.
Step 3 : Remove SMPS P.C.B..
Step 4 : Connect 4P Wire White Socket and 4P Wire Blue Socket.
52
Page 53
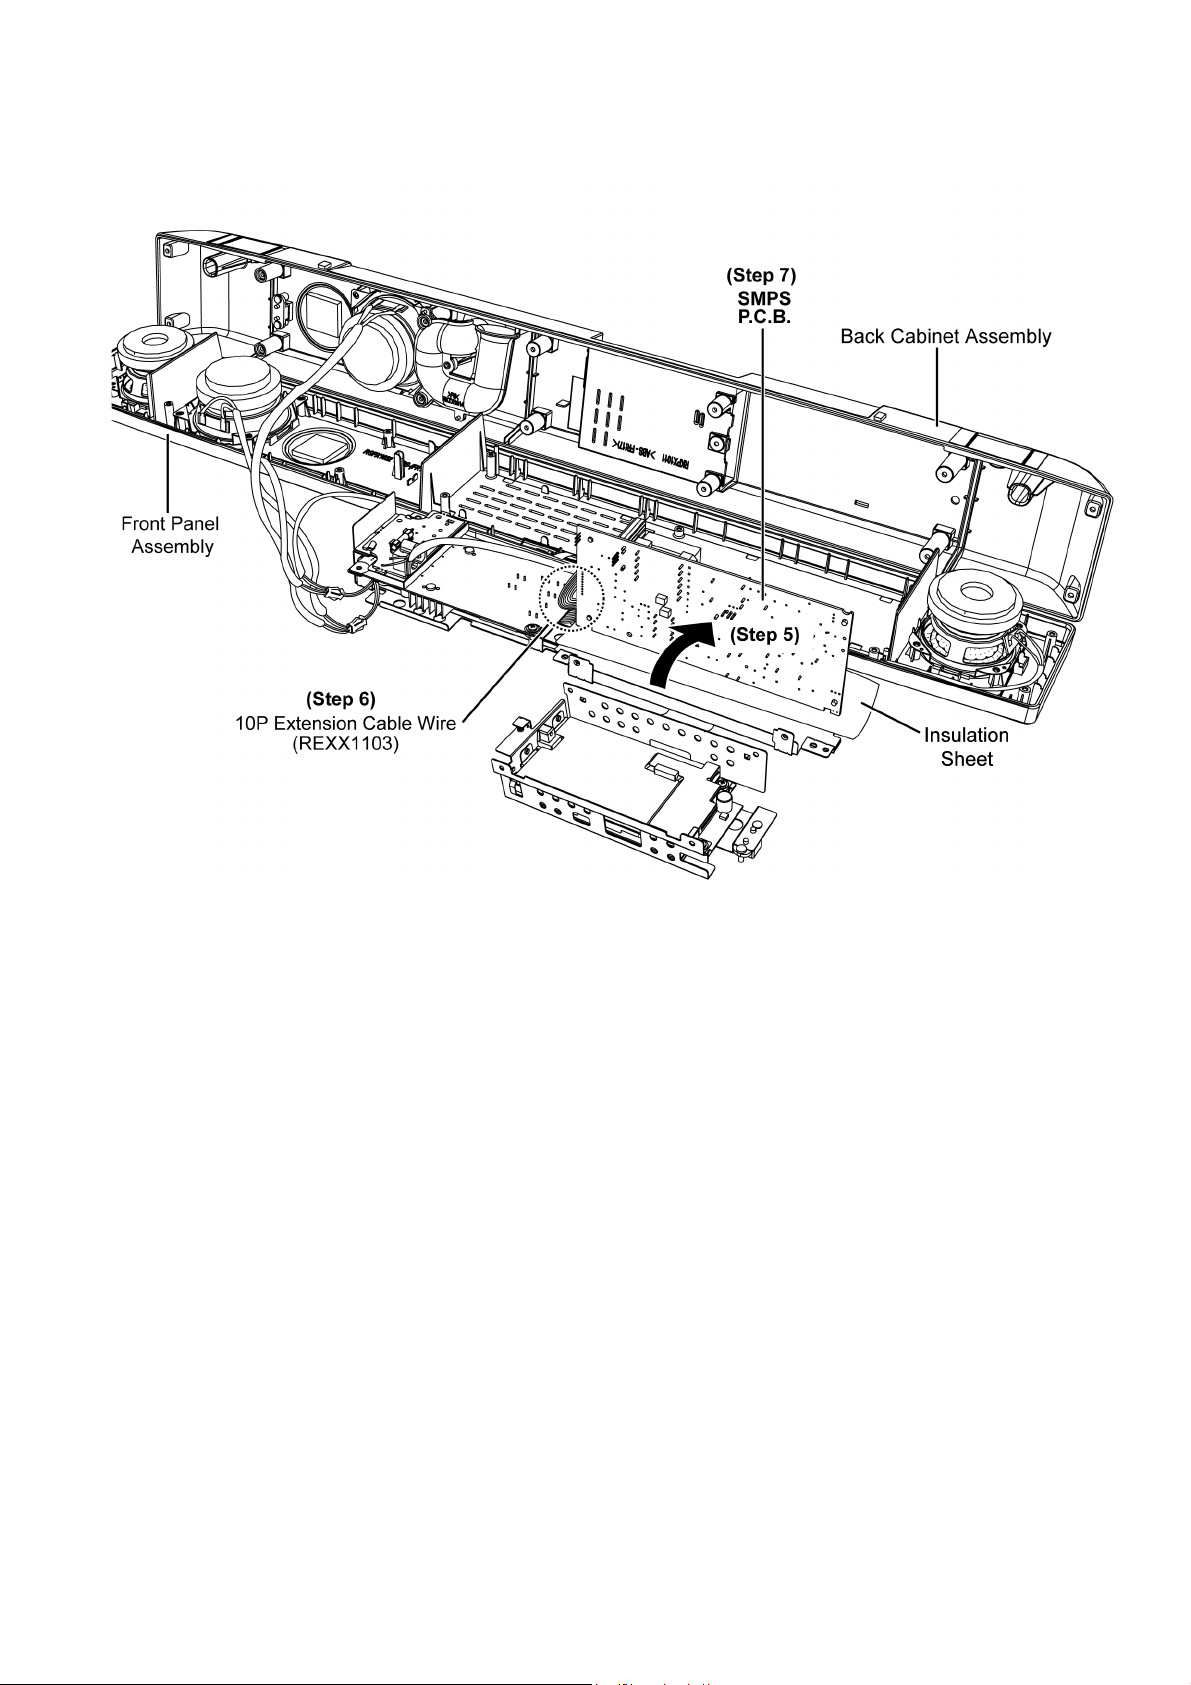
Step 5 : Flip the SMPS P.C.B. as arrow shown.
Step 6 : Connect 10P Cable Wire to connector (CN700) with extension Cable Wire (REXX1103).
Step 7 : SMPS P.C.B. can be checked and repaired as diagram shown.
53
Page 54
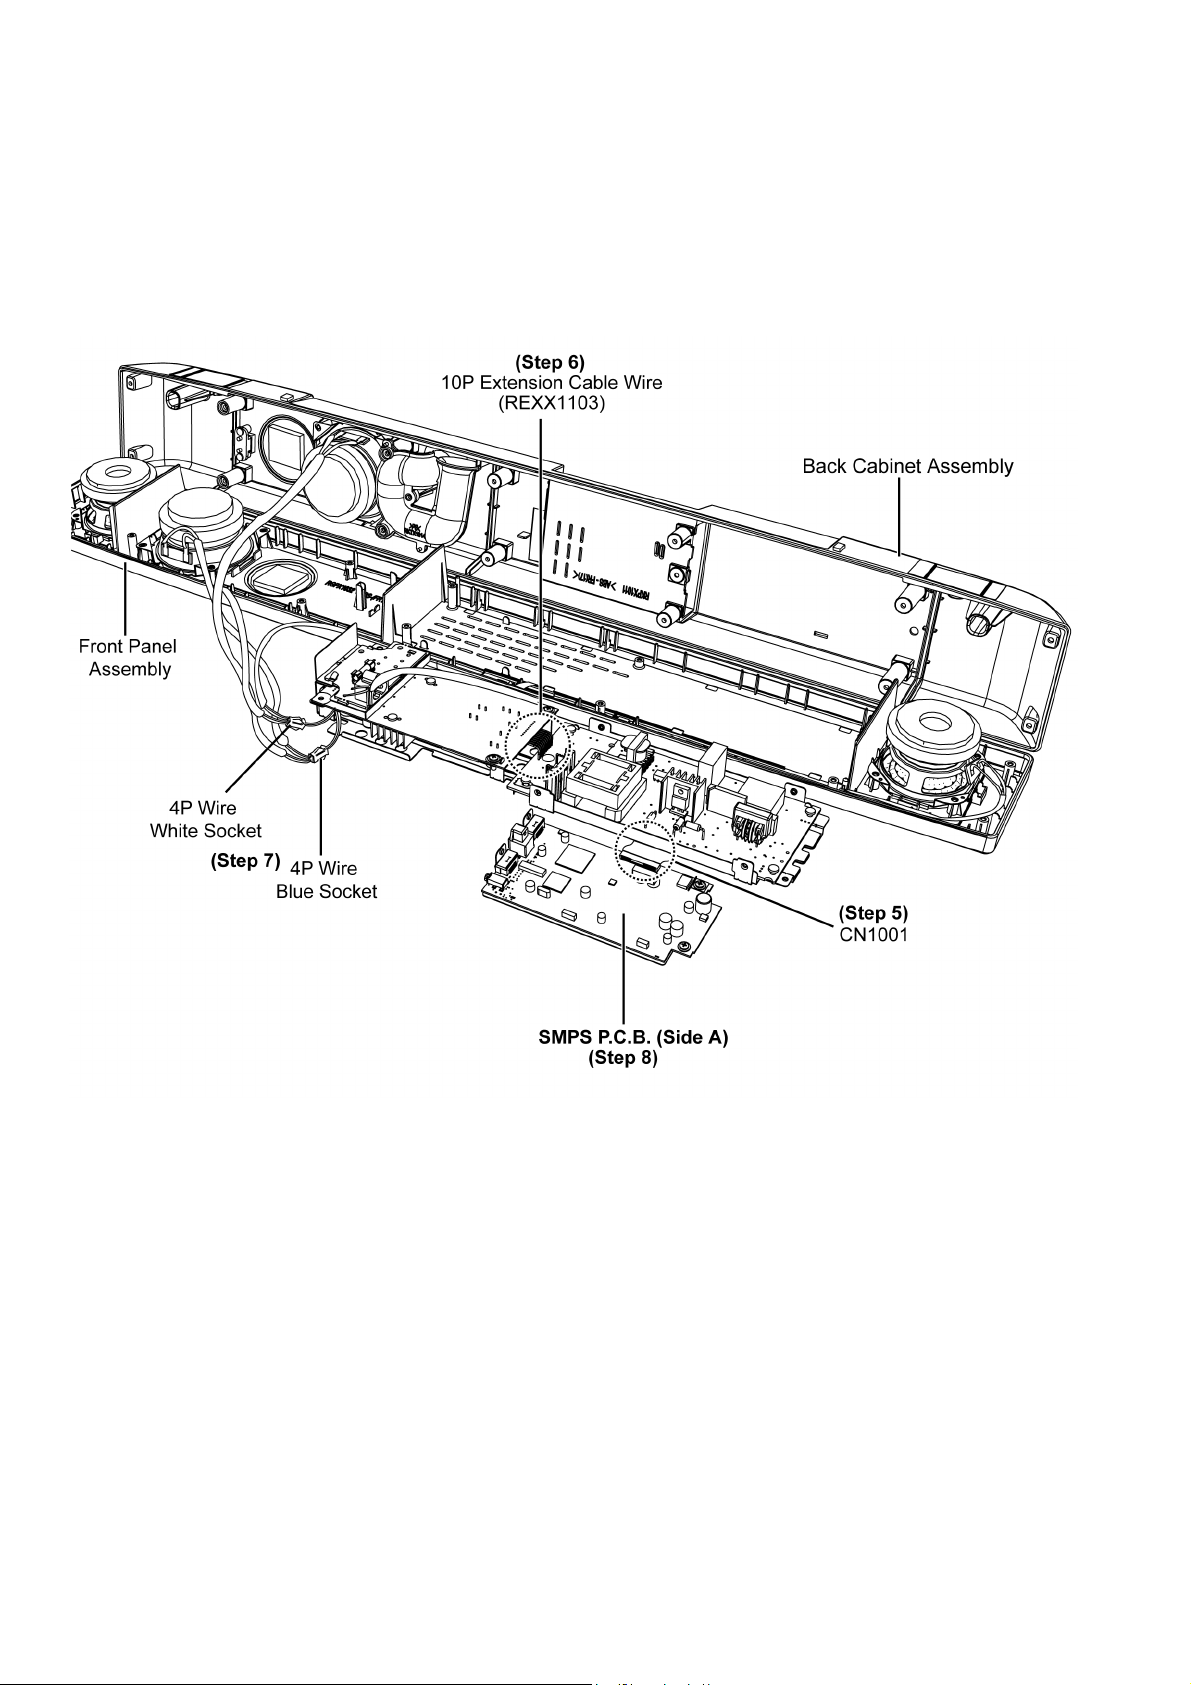
9.4. Checking and Repairing of HDMI P.C.B. (Side A)
Step 1 : Remove Back Cabinet Assembly.
Step 2 : Remove AC Inlet P.C.B..
Step 3 : Remove the PC Sheet Assembly.
Step 4 : Remove the HDMI P.C.B..
Step 5 : Attach the 50P FFC of the connector (CN1001) on HDMI P.C.B..
Step 6 : Connect 10P Cable Wire to connector (CN700) with extension cable wire (REXX1103).
Step 7 : Connect 4P Wire White Socket and 4P Wire Blue Socket.
Step 8 : HDMI P.C.B. (Side A) can be checked and repaired as diagram shown.
54
Page 55
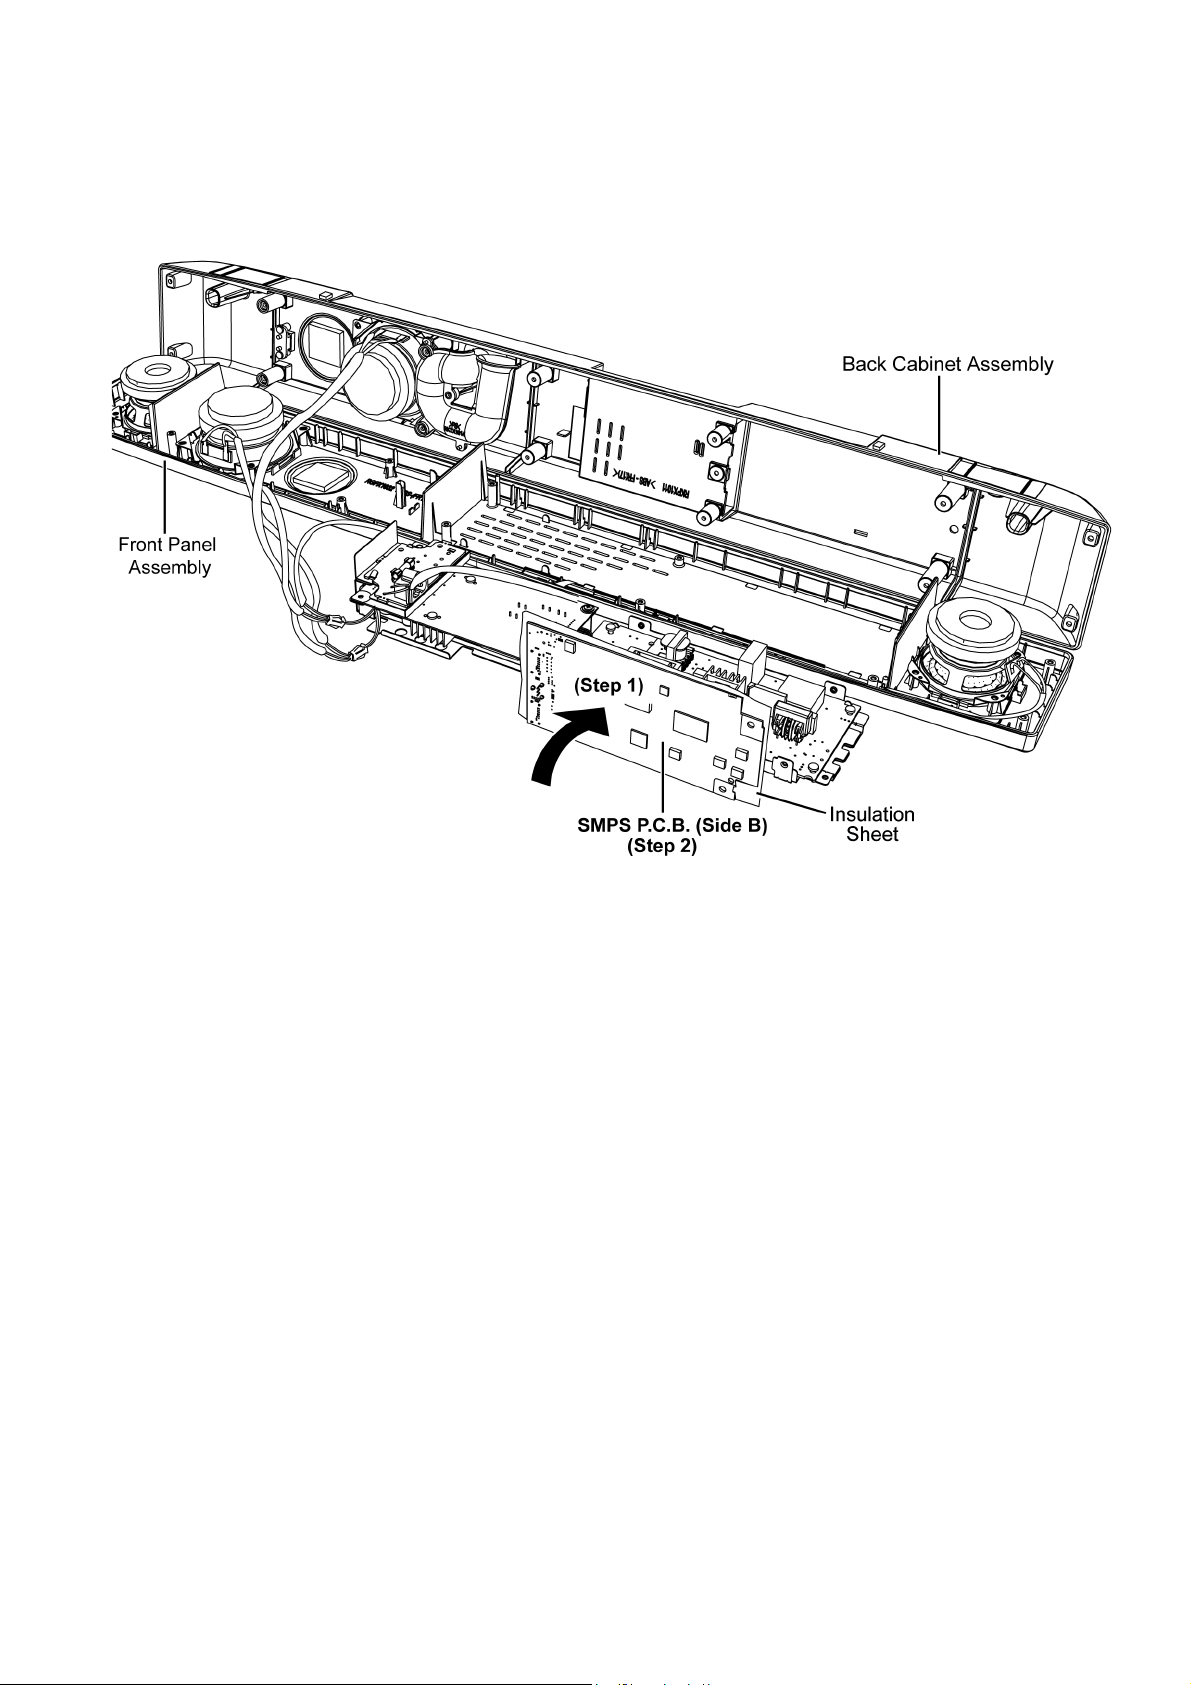
9.5. Checking and Repairing of HDMI P.C.B. (Side B)
• Refer to (Step 1) to (Step 7) of “Checking and Repairing of HDMI P.C.B. (Side A)”.
Step 1 : Flip the HDMI P.C.B. as arrow shown.
Step 2 : HDMI P.C.B. (Side B) can be checked and repaired as diagram shown.
55
Page 56
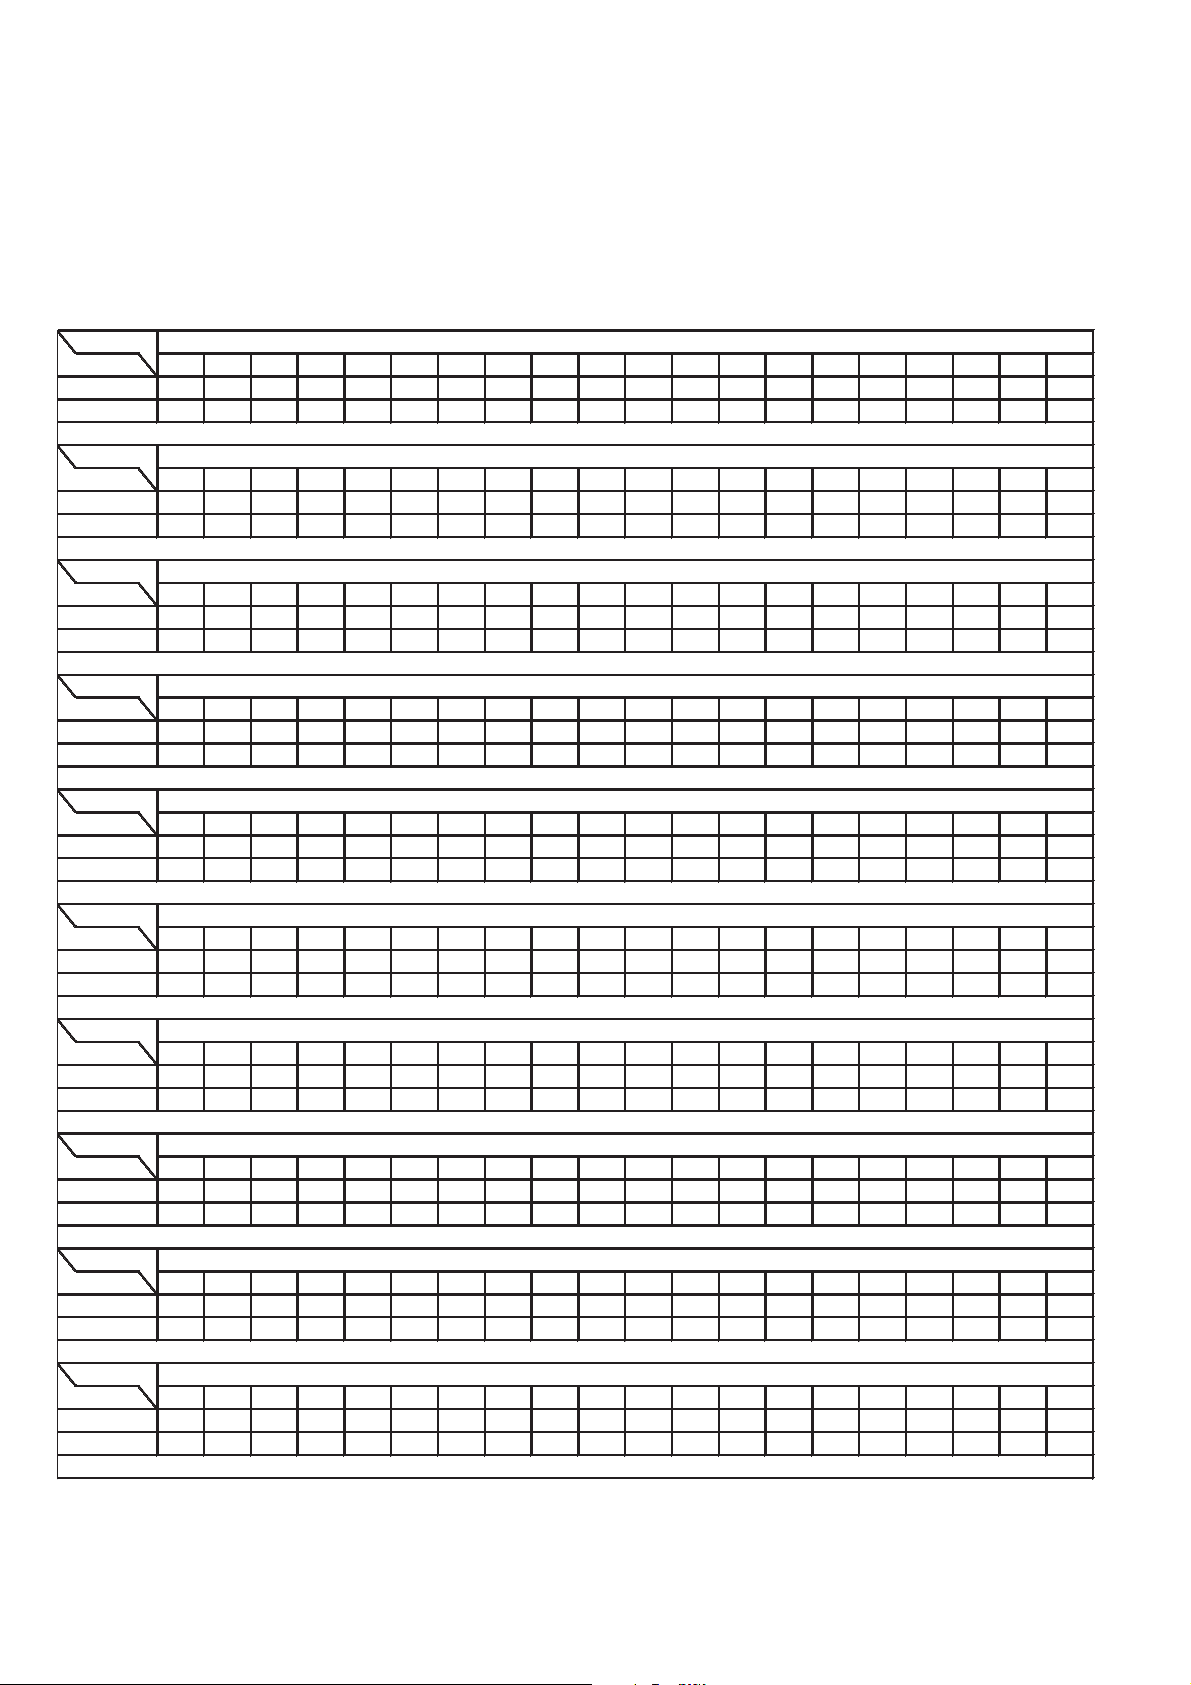
10 Voltage Measurement & Waveform Chart
REF NO.
MODE 1234567891011121314151617181920
CD PLAY 0 0 0 3.4 0 3.2 0 3.4 0 0 0 1.8 0 0 0 1.7 1.7 0.9 0 1.7
STANDBY 0 0 0 3.4 0 3.2 0 3.4 0 0 0 1.8 0 0 0 1.7 1.7 0.9 0 1.7
REF NO.
MODE 21 22 23 24 25 26 27 28 29 30 31 32 33 34 35 36 37 38 39 40
CD PLAY 3.3 1.8 0.2 0.2 0 0.2 0.2 3.4 1.6 1.6 0 1.7 1.7 1.7 0 3.4 3.4 0 0 1.7
STANDBY 3.3 1.8 0.2 0.2 0 0.2 0.2 3.4 1.6 1.6 0 1.7 1.7 1.7 0 3.4 3.4 0 0 1.7
REF NO.
MODE 41 42 43 44 45 46 47 48 49 50 51 52 53 54 55 56 57 58 59 60
CD PLAY 0 1.8 0 0 0 0 0.1 0 0.1 3.3 1.7 1.7 0 1.7 1.8 0 3.3 3.2 3.2 3.2
STANDBY 0 1.8 0 0 0 0 0.1 0 0.1 3.3 1.7 1.7 0 1.7 1.8 0 3.3 3.2 3.2 3.2
REF NO.
MODE 61 62 63 64 65 66 67 68 69 70 71 72 73 74 75 76 77 78 79 80
CD PLAY 3.2 3.4 3.2 3.2 1.8 3.4 0 3.2 3.2 3.2 3.2 3.2 3.4 3.2 3.1 0 3.2 3.2 3.3 1.9
STANDBY 3.2 3.4 3.2 3.2 1.8 3.4 0 3.2 3.2 3.2 3.2 3.2 3.4 3.2 3.1 0 3.2 3.2 3.3 1.9
REF NO.
MODE 81 82 83 84 85 86 87 88 89 90 91 92 93 94 95 96 97 98 99 100
CD PLAY1.93.41.8000003.4000001.800003.4
STANDBY1.93.41.8000003.4000001.800003.4
REF NO.
MODE 101 102 103 104 105 106 107 108 109 110 111 112 113 114 115 116 117 118 119 120
CD PLAY0000003.43.43.43.401.800000003.3
STANDBY0000003.43.43.43.401.800000003.3
REF NO.
MODE 121 122 123 124 125 126 127 128
CD PLAY 3.2 0 0.6 3.4 1.8 0.6 0 3.4
STANDBY 3.2 0 0.6 3.4 1.8 0.6 0 3.4
REF NO.
MODE 1234567891011121314151617181920
CD PLAY 0 1.7 1.7 3.3 0 3.3 2.0 2.0 2.0 2.0 3.4 3.2 0 0 0 0 2.8 2.8 0 0
STANDBY 0 1.7 1.7 3.3 0 3.3 2.0 2.0 2.0 2.0 3.4 3.2 0 0 0 0 2.8 2.8 0 0
REF NO.
MODE 21 22 23 24 25 26 27 28 29 30 31 32 33 34 35 36 37 38 39 40
CD PLAY0005.0000000000000002.00
STANDBY0005.0000000000000002.00
REF NO.
MODE 41 42 43 44 45 46 47 48 49 50 51 52 53 54 55 56 57 58 59 60
CD PLAY 5.0 1.0 0 2.5 0 1.0 0 0 0 0 3.3 0 3.3 0.2 1.7 0 0 0 1.7 1.6
STANDBY 5.0 1.5 0 2.5 0 1.4 0 0 0 0 3.3 0 3.3 0 1.7 0 0 0 1.7 1.7
IC1001
IC1002
SC-HTB10P/PC HDMI P.C.B.
IC1001
IC1002
IC1001
IC1001
IC1002
IC1001
IC1001
IC1001
Note:
• Indicated voltage values are the standard values for the unit measured by the DC electronic circuit tester (high-impedance) with
the chassis taken as standard.
Therefore, there may exist some errors in the voltage values, depending on the internal impedance of the DC circuit tester.
• Circuit voltage and waveform described herein shall be regarded as reference information when probing defect point because it
may differ from actual measuring value due to difference of Measuring instrument and its measuring condition and product itself.
10.1. HDMI P.C.B. (1/6)
56
Page 57
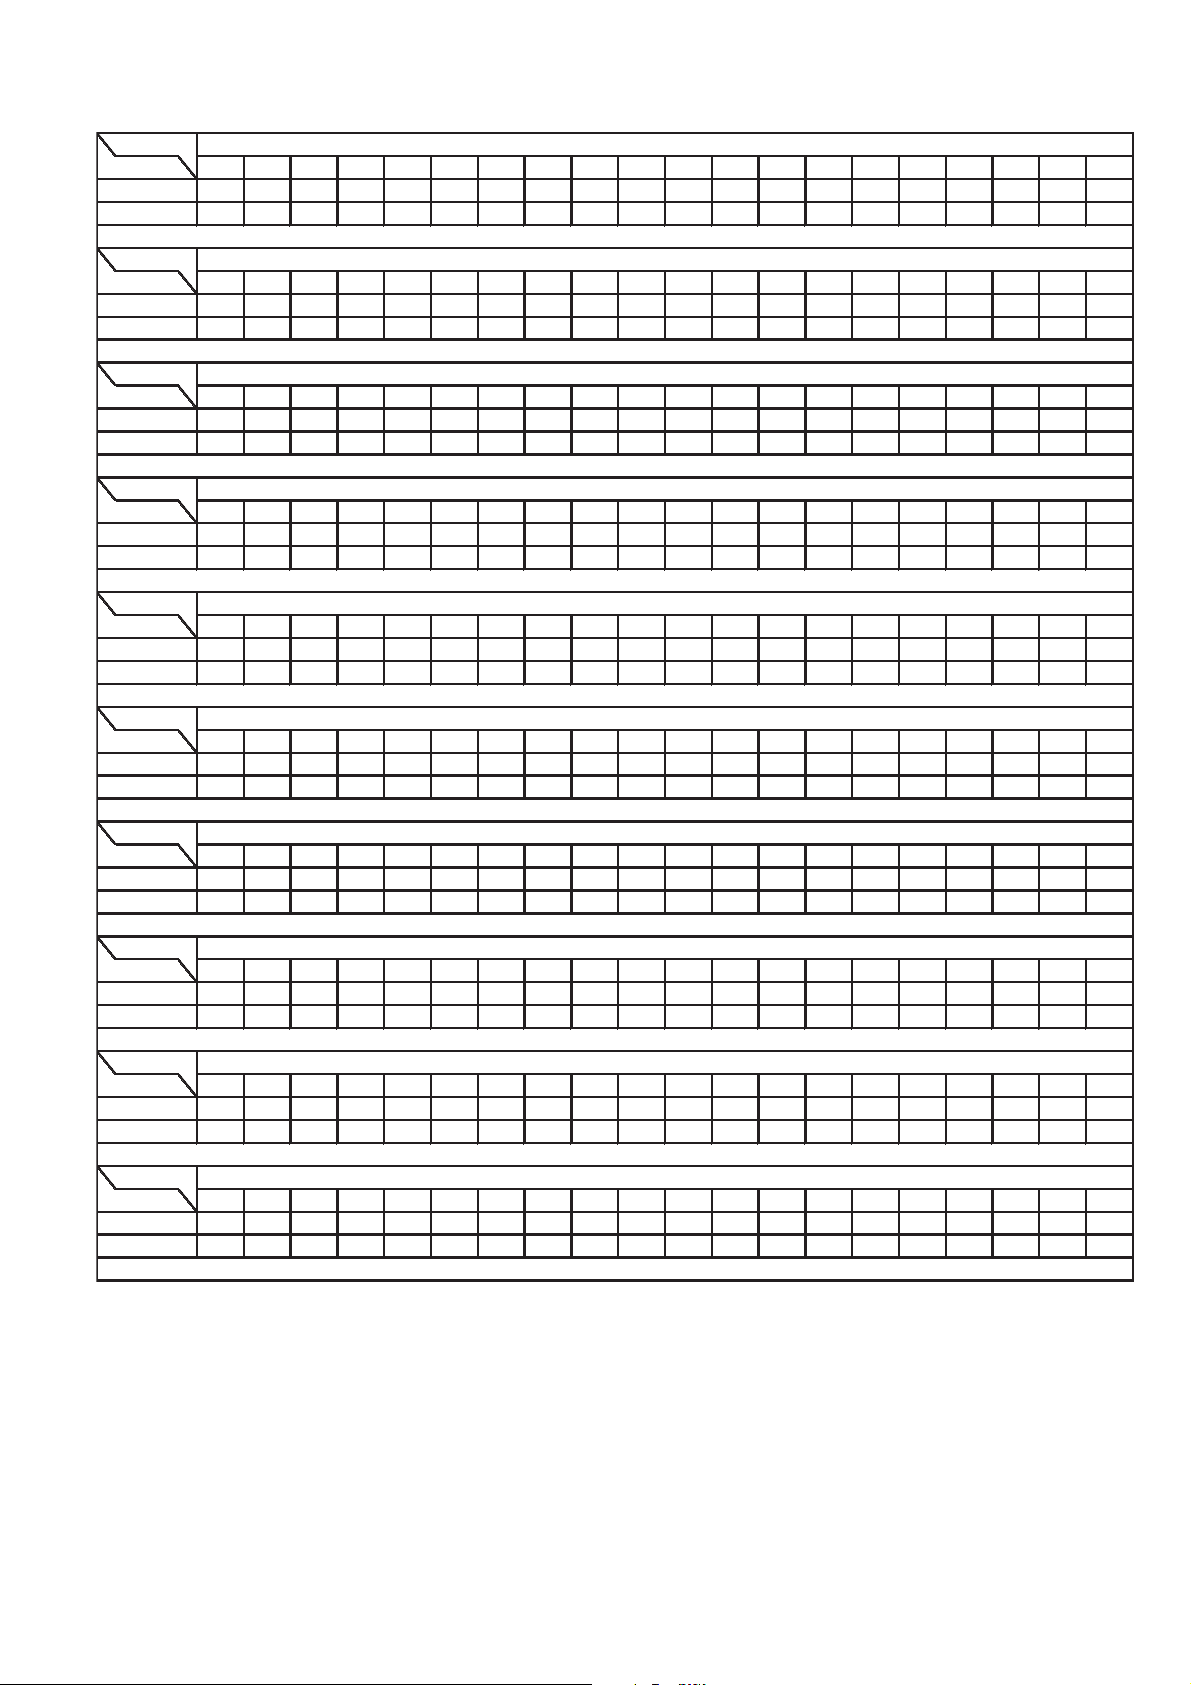
10.2. HDMI P.C.B. (2/6)
REF NO.
MODE 61 62 63 64
CD PLAY 1.7 0.1 0 0.1
STANDBY 1.7 0 0 0
REF NO.
MODE 12345
CD PLAY 3.4 3.4 0 0 0
STANDBY 3.4 3.4 0 0 0
REF NO.
MODE 12345
CD PLAY 5.0 0 4.9 0 3.3
STANDBY 5.0 0 5.0 0 3.3
REF NO.
MODE 123456
CD PLAY 1.7 0 1.7 1.7 3.4 0
STANDBY 1.7 0 1.7 1.7 3.4 0
REF NO.
MODE 1234567891011121314151617181920
CD PLAY 3.3 3.0 1.7 0 3.3 3.3 3.3 3.3 3.3 0 3.3 3.3 3.3 3.2 3.2 3.4 3.4 3.4 0 0
STANDBY 3.3 3.3 2.6 0 3.3 3.3 3.3 3.3 3.3 0 3.3 3.3 3.3 3.4 3.4 3.4 3.4 3.4 0 0
REF NO.
MODE 21 22 23 24 25 26 27 28 29 30 31 32 33 34 35 36 37 38 39 40
CD PLAY 0 0 0 0 3.3 3.3 0 0 0 0 0 0 0 3.4 1.9 3.4 0 3.3 3.3 3.3
STANDBY 0 0 0 0 3.3 3.3 0 0 0 0 0 0 0 3.4 1.9 3.4 0 3.3 3.3 3.3
REF NO.
MODE 41 42 43 44 45 46 47 48 49 50
CD PLAY 0 3.2 3.3 3.3 3.3 3.3 0 3.3 3.3 0
STANDBY 0 3.2 3.3 3.3 3.3 3.3 0 3.3 3.3 0
REF NO.
MODE 1234567891011121314151617181920
CD PLAY 3.3 0 3.3 0 0 3.3 3.3 0 0 0 0 0 3.3 0 0 0 0 0 0 0
STANDBY 3.3 0 3.3 0 0 3.3 3.3 0 0 0 0 0 3.3 0 0 0 0 0 0 0
REF NO.
MODE 1234567891011121314151617181920
CD PLAY 1.2 1.2 0 2.1 3.4 3.3 0 0 0 1.1 1.5 3.2 1.6 0 1.4 3.2 3.2 3.3 3.3 3.3
STANDBY 1.2 1.2 0 2.1 3.4 3.3 0 0 0 1.1 1.5 3.2 1.6 0 1.3 3.2 3.2 3.3 3.3 3.3
REF NO.
MODE 21 22 23 24 25 26 27 28 29 30 31 32 33 34 35 36 37 38 39 40
CD PLAY 3.2 3.2 0 0 0 3.2 3.2 0.7 0.2 0.6 3.2 3.2 0 0 3.1 3.1 0 3.2 3.2 0
STANDBY 3.2 3.2 0 0 0 3.2 3.2 0.7 0.2 0.6 3.2 3.2 0 0 3.1 3.1 0 3.2 3.2 0
IC1005
IC1006
IC2002
SC-HTB10P/PC HDMI P.C.B.
IC1002
IC2002
IC1006
IC1006
IC1008
IC1003
IC1004
57
Page 58
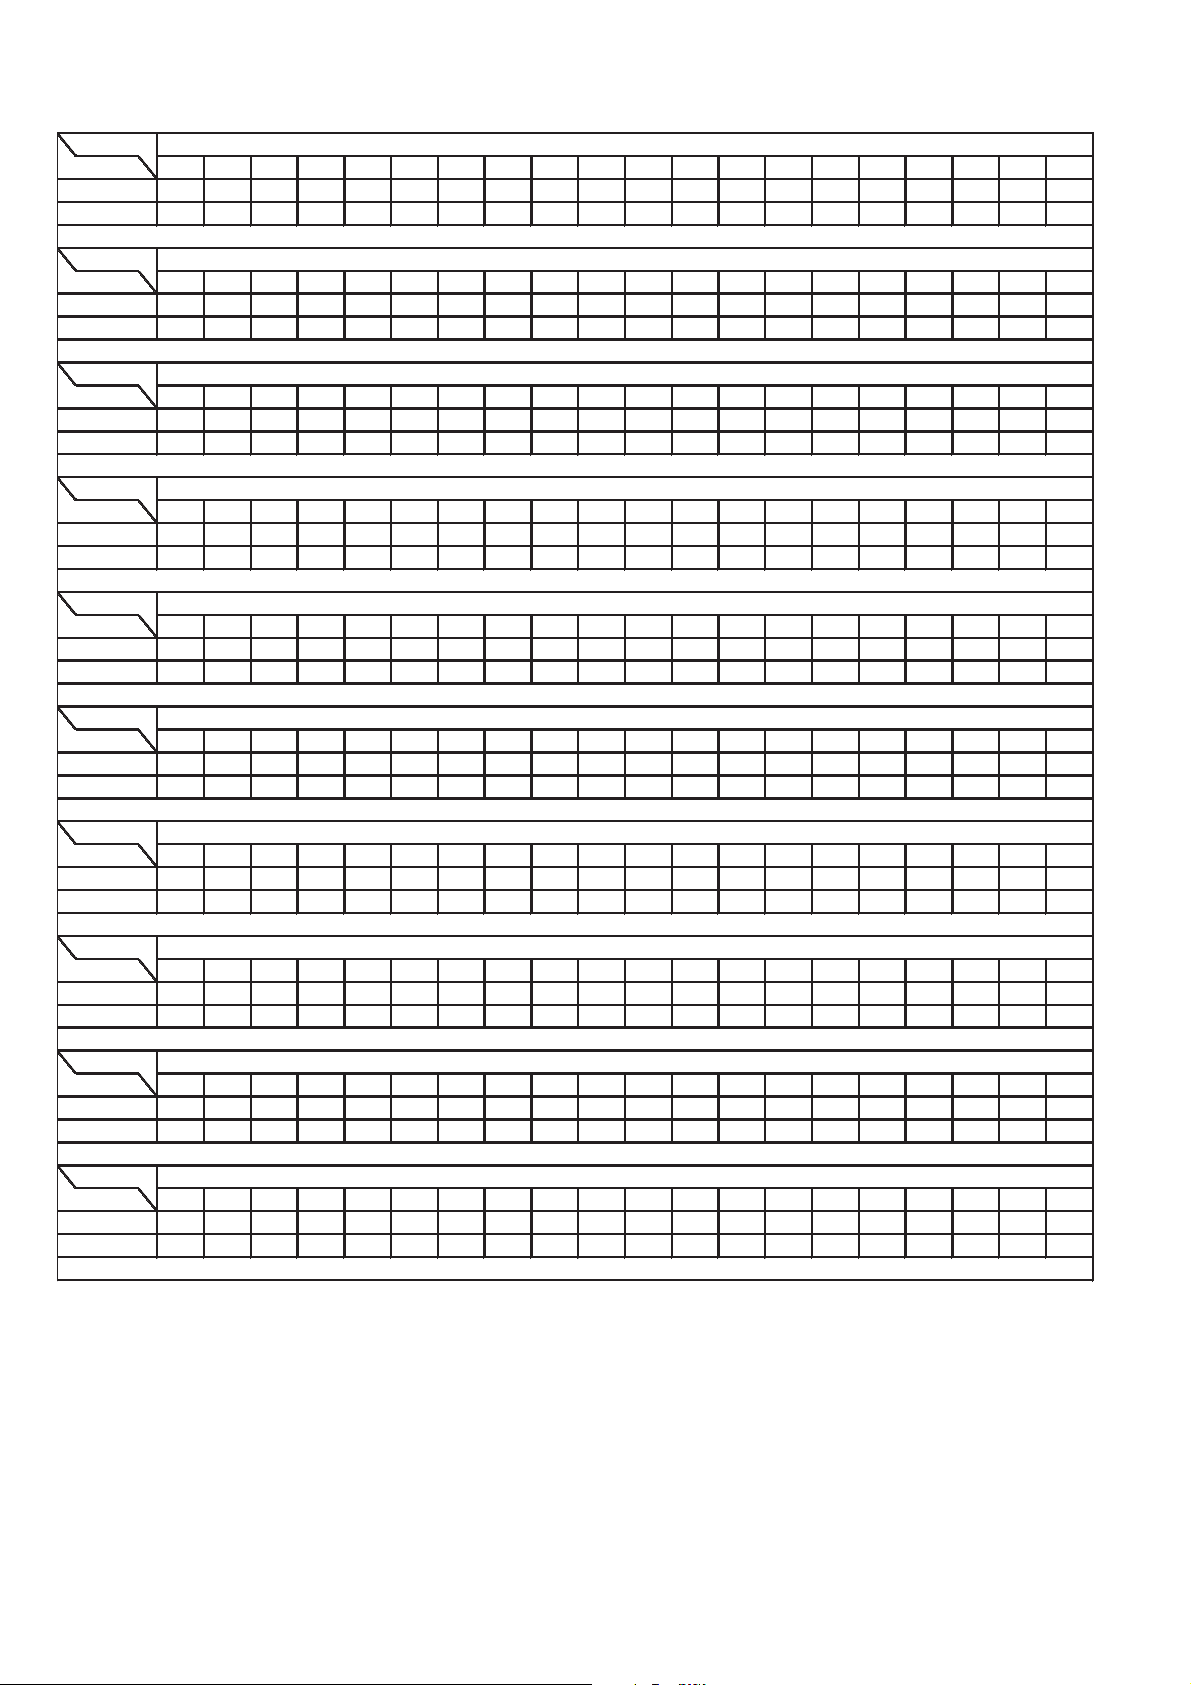
10.3. HDMI P.C.B. (3/6)
REF NO.
MODE 41 42 43 44 45 46 47 48 49 50 51 52 53 54 55 56 57 58 59 60
CD PLAY03.23.21.33.2000000000000000
STANDBY03.23.21.33.2000000000000000
REF NO.
MODE 61 62 63 64 65 66 67 68 69 70 71 72 73 74 75 76 77 78 79 80
CD PLAY 0 3.2 0 0 0 0 3.0 2.9 3.3 3.3 3.4 0 0 3.3 0 0 3.2 3.3 0 0
STANDBY 0 3.2 0 0 0 0 3.0 2.9 3.3 3.3 3.4 0 0 3.3 0 0 3.2 3.3 0 0
REF NO.
MODE 81 82 83 84 85 86 87 88 89 90 91 92 93 94 95 96 97 98 99 100
CD PLAY000000003.43.40001.82.1003.23.20
STANDBY000000003.43.40001.82.1003.23.20
REF NO.
MODE 12345678
CD PLAY 0 0 3.2 0 3.2 3.2 0 3.2
STANDBY 0 0 3.2 0 3.2 3.2 0 3.2
REF NO.
MODE 12345
CD PLAY 3.9 3.2 3.3 0 0
STANDBY 3.9 3.2 3.3 0 0
REF NO.
MODE 1234567891011121314151617181920
CD PLAY 0 1.7 1.7 1.6 0 1.7 0 0.2 0 0 0 0.2 0 1.7 0 1.6 1.6 1.7 0 3.3
STANDBY 0 1.7 1.7 1.6 0 1.7 0 0 0 0 0 0 0 1.7 0 1.6 1.6 1.7 0 3.3
REF NO.
MODE 123456
CD PLAY 1.6 0 1.6 1.6 3.3 1.6
STANDBY 1.6 0 1.6 1.6 3.3 1.6
REF NO.
MODE 1234567891011121314151617181920
CD PLAY1.100000000001.803.3000000
STANDBY1.200000000001.803.3000000
REF NO.
MODE 21 22 23 24 25 26 27 28 29 30 31 32 33 34 35 36 37 38 39 40
CD PLAY 0 0 0 3.3 3.3 0 1.8 1.8 0 1.1 1.1 1.8 1.1 1.1 0 1.1 1.1 1.8 1.1 1.1
STANDBY 0 0 0 3.3 3.3 0 1.8 1.8 0 1.1 1.1 1.8 1.1 1.1 0 1.1 1.1 1.8 1.1 1.1
REF NO.
MODE 41 42 43 44 45 46 47 48 49 50 51 52 53 54 55 56 57 58 59 60
CD PLAY 0 1.8 0 3.3 5 5 5 3.3 3.3 0.3 3.3 3.3 3.3 0 1.8 2.5 2.5 2.5 2.5 2.5
STANDBY 0 1.8 0 3.3 5 5 5 3.3 3.3 0.3 3.3 3.3 3.3 0 1.8 2.5 2.5 2.5 2.5 2.5
IC2003
IC2004
IC2101
SC-HTB10P/PC HDMI P.C.B.
IC2002
IC2101
IC2006
IC2081
IC2101
IC2002
IC2002
58
Page 59
10.4. HDMI P.C.B. (4/6)
REF NO.
MODE 61 62 63 64 65 66 67 68 69 70 71 72 73 74 75 76 77 78 79 80
CD PLAY 2.6 2.6 2.6 1.8 0 3.3 2.6 2.6 2.6 2.6 2.6 2.6 2.6 2.6 2.6 1.8 2.4 1.2 1.3 1.3
STANDBY 2.6 2.6 2.6 1.8 0 3.3 2.6 2.6 2.6 2.6 2.6 2.6 2.6 2.6 2.6 1.8 2.4 1.2 1.3 1.3
REF NO.
MODE 81 82 83 84 85 86 87 88 89 90 91 92 93 94 95 96 97 98 99 100
CD PLAY
1.2 1.3 1.3 1.3
1.3 1.2 0 0 3.3
1.3
1.3 1.3 1.3 1.3 1.3 1.3 1.3 1.3 1.8 0
STANDBY
1.2 1.3 1.3 1.3
1.3 1.2 0 0 3.3
1.3
1.3 1.3 1.3 1.3 1.3 1.3 1.3 1.3 1.8 0
REF NO.
MODE 12345
CD PLAY 2.5 3.2 1.8 0 0
STANDBY 2.5 3.2 1.8 0 0
REF NO.
MODE 12345678
CD PLAY 0 0 0 0 5.0 5.0 5.0 5.0
STANDBY 0 0 0 0 5.0 5.0 5.0 5.0
REF NO.
MODE 1234567891011121314151617181920
CD PLAY 1.3 1.2 1.3 0 0 3.3 1.3
1.3
1.3 1.3 0
1.8
1.3 1.3 1.3 1.3 0 3.3 1.0 0.5
STANDBY 1.3 1.2 1.3 0 0 3.3 1.3
1.3
1.3 1.3 0
1.8
1.3 1.3 1.3 1.3 0 3.3 1.0 0.5
REF NO.
MODE 21 22 23 24 25 26 27 28 29 30 31 32 33 34 35 36 37 38 39 40
CD PLAY 0.5 0 0 1.8 1.8 0 0
0
000
3.3
3.3 3.3 0 0 1.8 3.3 0 0
STANDBY 0.5 0 0 1.8 1.8 0 0
0
000
3.3
3.3 3.3 0 0 1.8 3.3 0 0
REF NO.
MODE 41 42 43 44 45 46 47 48 49 50 51 52 53 54 55 56 57 58 59 60
CD PLAY 0 3.3 0 0 0 3.3 0
0
03.30
0
0 1.8 0 3.3 3.3 3.3 0 3.3
STANDBY 0 3.3 0 0 0 3.3 0
0
03.30
0
0 1.8 0 3.3 3.3 3.3 0 3.3
REF NO.
MODE 61 62 63 64 65 66 67 68 69 70 71 72 73 74 75 76 77 78 79 80
CD PLAY 3.3 3.3 0 3.3 3.3 3.3 0 3.3 3.3 3.3 0 1.8 0 3.3 0 0 0 0 0 1.8
STANDBY 3.3 3.3 0 3.3 3.3 3.3 0 3.3 3.3 3.3 0 1.8 0 3.3 0 0 0 0 0 1.8
REF NO.
MODE 81 82 83 84 85 86 87 88 89 90 91 92 93 94 95 96 97 98 99 100
CD PLAY00000003.33.301.81.801.61.63.33.3003.3
STANDBY00000003.33.301.81.801.61.63.33.3003.3
REF NO.
MODE 101 102 103 104 105 106 107 108 109 110 111 112 113 114 115 116 117 118 119 120
CD PLAY 0 3.3 0 3.3 0 0 1.8 2.8 2.8 2.8 2.8 0 3.3 2.8 2.8 2.8 2.8 0 1.8 2.8
STANDBY 0 3.3 0 3.3 0 0 1.8 2.7 2.7 2.7 2.7 0 3.3 2.7 2.7 2.6 2.7 0 1.8 2.7
IC2232
IC2232
SC-HTB10P/PC HDMI P.C.B.
IC2101
IC2232
IC2232
IC2232
IC2232
IC2101
IC2102
IC2231
59
Page 60
10.5. HDMI P.C.B. (5/6)
REF NO.
MODE 121 122 123 124 125 126 127 128 129 130 131 132 133 134 135 136 137 138 139 140
CD PLAY 2.8 2.8 2.8 0 3.3 2.8 2.8 2.8 2.8 0 1.8 2.8 2.8 1.2 1.3 0 3.3 1.3 1.2 1.3
STANDBY 2.7 2.7 2.7 0 3.3 2.7 2.7 2.7 2.7 0 1.8 2.8 2.7 2.7 1.3 0 3.3 1.3 1.2 1.3
REF NO.
MODE 141 142 143 144
CD PLAY 1.3 0 1.8 1.3
STANDBY 1.3 0 1.8 1.3
REF NO.
MODE 12345
CD PLAY 2.5 3.2 1.8 0 0
STANDBY 2.5 3.2 1.8 0 0
REF NO.
MODE 12345
CD PLAY 6.0 2.5 0 1.2 2.1
STANDBY 6.0 2.5 0 1.2 2.1
REF NO.
MODE 12345
CD PLAY 18.0 3.1 0 1.2 2.1
STANDBY 18.0 3.1 0 1.2 2.1
REF NO.
MODE 12345
CD PLAY 6.0 0 6.0 0 5.2
STANDBY 6.0 0 6.0 0 5.3
REF NO.
MODE ECB 12345 123456
CD PLAY 0 3.4 0 3.1 3.1 3.2
3.5
3.5 5.0 0 0 5.2 5.0 5.2
STANDBY 0 3.4 0 3.2 3.2 3.2
3.5
3.5 5.0 0 0 5.2 5.0 5.2
REF NO.
MODE 12345 123456 12345
CD PLAY
4.8 5.0 4.8 5.0
5.0 5.0 0 0
4.8
5.0 4.8 4.8 5.0 4.8 5.0 5.0
STANDBY
4.8 5.0 4.8 5.0
5.0 5.0 0 0
4.8
5.0 4.8 4.8 5.0 4.8 5.0 5.0
REF NO.
MODE 12345 12345 ECB ECB
CD PLAY 0 0.5 0 3.1 5.0 0 0.5 0 5.0 3.1 0 1.2 0 0 3.3 0
STANDBY 0 0.5 0 3.1 5.0 0 0.5 0 5.0 3.1 0 1.3 0 0 3.3 0
REF NO.
MODE ECB ECB ECB ECB ECB
CD PLAY
000
04.80 0
5.0
002.0002.10
STANDBY
000
04.80 0
5.0
002.0002.10
SC-HTB10P/PC HDMI P.C.B.
QR2001
QR2002
QR2004
QR2231
IC2232
IC4793
IC2232
IC2233
IC4722
IC4724
Q2231
Q2232
Q2233
Q2234
Q2103
Q2108
QR4703
Q2235
Q2236
QR2232
QR4702
60
Page 61
10.6. HDMI P.C.B. (6/6)
REF NO.
MODE E C B
CD PLAY
003.1
STANDBY
003.1
QR4704
SC-HTB10P/PC HDMI P.C.B.
REF NO.
MODE 1 2 3
CD PLAY
3.3 0 5.0
STANDBY
3.3 0 5.0
REF NO.
MODE 1 2 3 4 5 6 7 8 9 10 11 12 13 14 15 16 17 18 19 20
CD PLAY 1.8 0.1 0.8 0.9 0.1 0.1 2.0 0.1 3.3 1.3 3.3 3.3 3.3 3.3 3.3 0 1.9 0 0.5 0.8
STANDBY 1.8 0.1 0.8 0.9 0.1 0.1 1.9 0.1 3.3 1.3 3.3 3.3 3.3 3.3 3.3 0 1.9 0 0 0.9
REF NO.
MODE 21 22 23 24 25 26 27 28 29 30 31 32 33 34 35 36 37 38 39 40
CD PLAY 0 0 0 3.3 3.3 1.7 0 0 0 0 0 0 1.8 0 0 3.3 3.2 0 0 0
STANDBY 0 0 0 3.3 3.3 1.7 0 0 0 0 0 0 1.8 0 0 3.3 3.2 0 0 0
REF NO.
MODE 41 42 43 44 45 46 47 48 49 50 51 52 53 54 55 56 57 58 59 60
CD PLAY 0 0 0 0 0 0 0 1.8 0 0 0 0 3.3 3.3 0 0 0 0 1.3 1.3
STANDBY 0 0 0 0 0 0 0 1.8 0 0 0 0 3.3 3.3 0 0 0 0 1.3 1.4
REF NO.
MODE 61 62 63 64
CD PLAY 1.3 1.3 1.6 0.1
STANDBY 1.3 1.3 1.6 0.1
REF NO.
MODE 1 2 3 4 5 6 7 8 9 10 11 12 13 14 15 16 17 18 19 20
CD PLAY 3.3 3.3 0 0 3.3 0 3.3 0 0 0 0 0 0 0 0 0 3.3 0 0 0
STANDBY 3.3 3.3 0 0 3.3 0 3.3 0 0 0 0 0 0 0 0 0 3.3 0 0 0
REF NO.
MODE 21 22 23 24 25 26 27 28 29 30 31 32 33 34 35 36 37 38 39 40
CD PLAY 3.3 3.3 3.3 10.1 0 20.3 20.3 10.1 0 0 10.2 20.3 10.2 10.2 20.3 10.2 0 0 10.2 20.3
STANDBY 3.3 3.3 3.3 10.1 0 20.3 20.3 10.1 0 0 10.2 20.3 10.2 10.2 20.3 10.2 0 0 10.2 20.3
REF NO.
MODE 41 42 43 44
CD PLAY 20.3 0 10.2 3.3
STANDBY 20.3 0 10.2 3.3
REF NO.
MODE 1 2 3 4 5 6 7 8 9 10 11 12 13 14 15 16 17 18 19 20
CD PLAY 3.3 3.3 0 0 3.3 0 3.3 0 0 0 0 0 0 0 0 0 3.3 0 0 0
STANDBY 3.3 3.3 0 0 3.3 0 3.3 0 0 0 0 0 0 0 0 0 3.3 0 0 0
REF NO.
MODE 21 22 23 24 25 26 27 28 29 30 31 32 33 34 35 36 37 38 39 40
CD PLAY 3.3 3.3 3.3 10.1 0 20.3 20.3 10.1 0 0 10.2 20.3 10.2 10.2 20.3 10.2 0 0 10.2 20.3
STANDBY 3.3 3.3 3.3 10.1 0 20.3 20.3 10.1 0 0 10.2 20.3 10.2 10.2 20.3 10.2 0 0 10.2 20.3
IC107
IC405
IC403
IC403
IC403
IC401
IC401
IC401
IC401
IC405
SC-HTB10P/PC MAIN P.C.B.
10.7. MAIN P.C.B. (1/3)
61
Page 62
10.8. MAIN P.C.B. (2/3)
REF NO.
MODE 41 42 43 44
CD PLAY 20.3 0 10.2 3.3
STANDBY 20.3 0 10.2 3.3
REF NO.
MODE 1234567891011121314151617181920
CD PLAY3.23.21.20.13.40.11.200003.21.601.63.23.203.43.2
STANDBY3.13.11.20.13.40.11.200003.21.601.63.23.203.43.2
REF NO.
MODE 21 22 23 24 25 26 27 28 29 30 31 32 33 34 35 36 37 38 39 40
CD PLAY 0 3.4 3.2 3.4 0 3.2 0 3.2 3.2 3.2 3.2 3.2 0.4 0 0.2 0.6 0.7 0 0 0
STANDBY 3.2 3.4 0 3.4 0 3.2 0 3.2 3.2 3.2 3.2 3.2 0.4 0 0.2 0.6 0.7 0 0 0
REF NO.
MODE 41 42 43 44 45 46 47 48 49 50 51 52 53 54 55 56 57 58 59 60
CD PLAY003.22.10000.82.000003.2000000
STANDBY003.22.10001.22.000003.2000000
REF NO.
MODE 61 62 63 64 65 66 67 68 69 70 71 72 73 74 75 76 77 78 79 80
CD PLAY03.23.2000000.63.43.43.23.203.43.23.43.23.20
STANDBY03.23.2000000.63.43.43.23.203.43.23.43.23.20
REF NO.
MODE 81 82 83 84 85 86 87 88 89 90 91 92 93 94 95 96 97 98 99 100
CD PLAY3.203.40.300003.23.13.53.503.43.4003.33.20
STANDBY3.203.40.300003.23.13.53.503.43.4003.33.20
REF NO.
MODE 12345678
CD PLAY 3.0 3.0 0 0 3.2 3.2 0 3.2
STANDBY 3.1 3.0 0 0 3.1 3.1 0 3.1
REF NO.
MODE 1234
CD PLAY 4.0 6.0 0 0
STANDBY 3.9 6.0 0 0
REF NO.
MODE 123
CD PLAY 3.3 0 6.0
STANDBY 3.3 0 6.0
REF NO.
MODE 12345
CD PLAY 20.0 12.0 0 1.1 2.0
STANDBY 20.0 12.0 0 1.1 2.0
IC604
IC701
SC-HTB10P/PC MAIN P.C.B.
IC405
IC700
IC604
IC605
IC606
IC604
IC604
IC604
62
Page 63
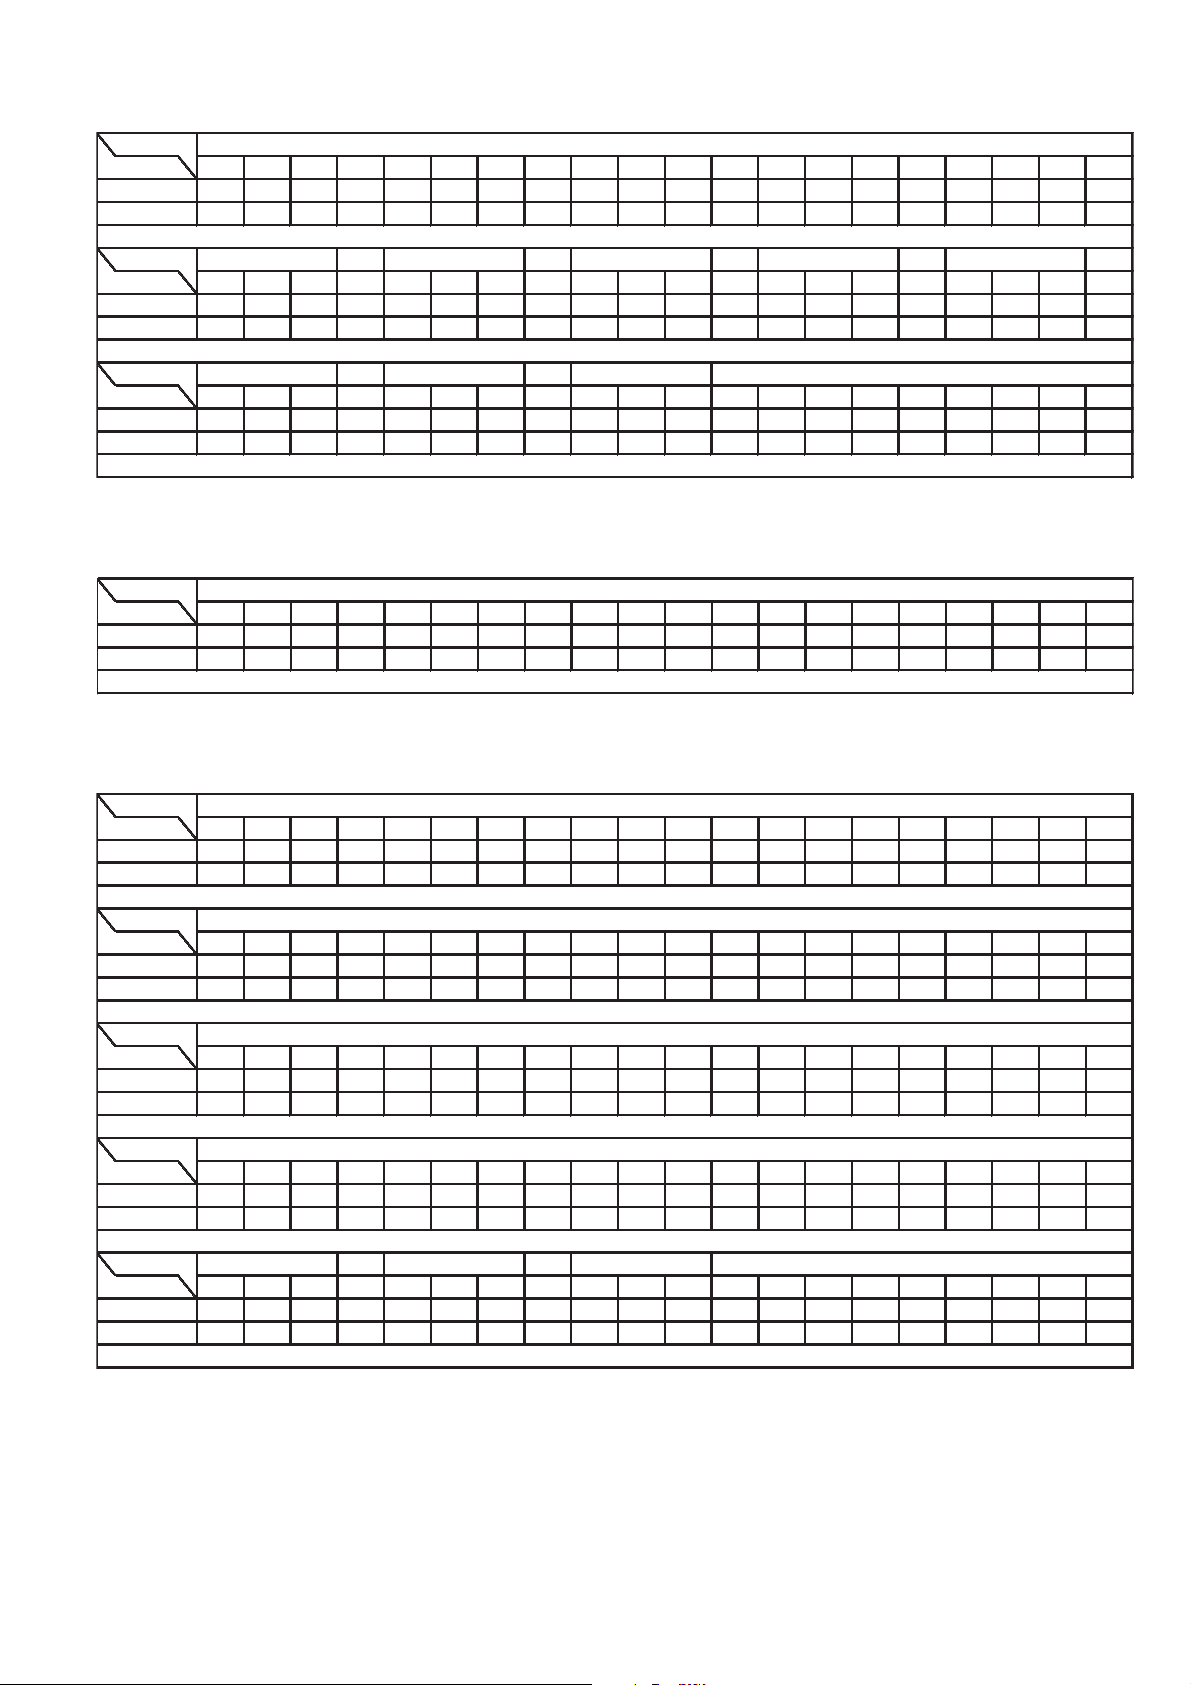
10.9. MAIN P.C.B. (3/3)
REF NO.
MODE 12345
CD PLAY 20.0 5.0 0 1.2 1.9
STANDBY 20.0 5.0 0 1.2 1.9
REF NO.
MODE ECB ECB ECB ECB ECB
CD PLAY
000
16 -0.1 0 10.0 0 10.0 10.0 0 10.0 0 0 0
STANDBY
000
16 -0.1 0 0.3 0 0.3 0.3 0 0.3 0 0 0
REF NO.
MODE ECB ECB ECB
CD PLAY
000
3.2 0 3.2 0 0 0
STANDBY
000
3.2 0 3.2 0 0 0
IC702
QR600
Q501
Q704
SC-HTB10P/PC MAIN P.C.B.
QR601
Q114
Q116
Q500
QR602
REF NO.
MODE 123456789101112131415161718
CD PLAY
003.10
0.5 0.6 0.6 0.1 0.6
4.6
4.6 0.6 0.6 2.0 0 0 0 4.4
STANDBY
003.10
0.5 0.6 0.6 0.1 0.6
4.6
4.6 0.6 0.6 2.0 0 0 0 4.4
SC-HTB10P/PC LED P.C.B.
IC300
REF NO.
MODE 1234567
CD PLAY 159.3 0 0 17.5 0.1 1.3 0.6
STANDBY 159.3 0 0 17.5 0.1 1.3 0.6
REF NO.
MODE 12345678
CD PLAY 6.0 0.8 2.4 12.3 165.0 0 0 0
STANDBY 6.0 0.8 2.4 12.3 165.0 0 0 0
REF NO.
MODE 123
CD PLAY 18.3 2.5 0
STANDBY 18.3 2.5 0
REF NO.
MODE 123
CD PLAY 4.8 2.5 0
STANDBY 4.8 2.5 0
REF NO.
MODE E C B E C B E C B
CD PLAY 6.9 7.8 6.9 0 3.3 0 0 0.1 0.7
STANDBY 6.9 7.8 6.9 0 3.3 0 0 0.1 0.7
SC-HTB10P/PC SMPS P.C.B.
Q5720
Q5841
Q5899
IC5701
IC5799
IC5801
IC5899
10.10. LED P.C.B.
10.11. SMPS P.C.B.
63
Page 64
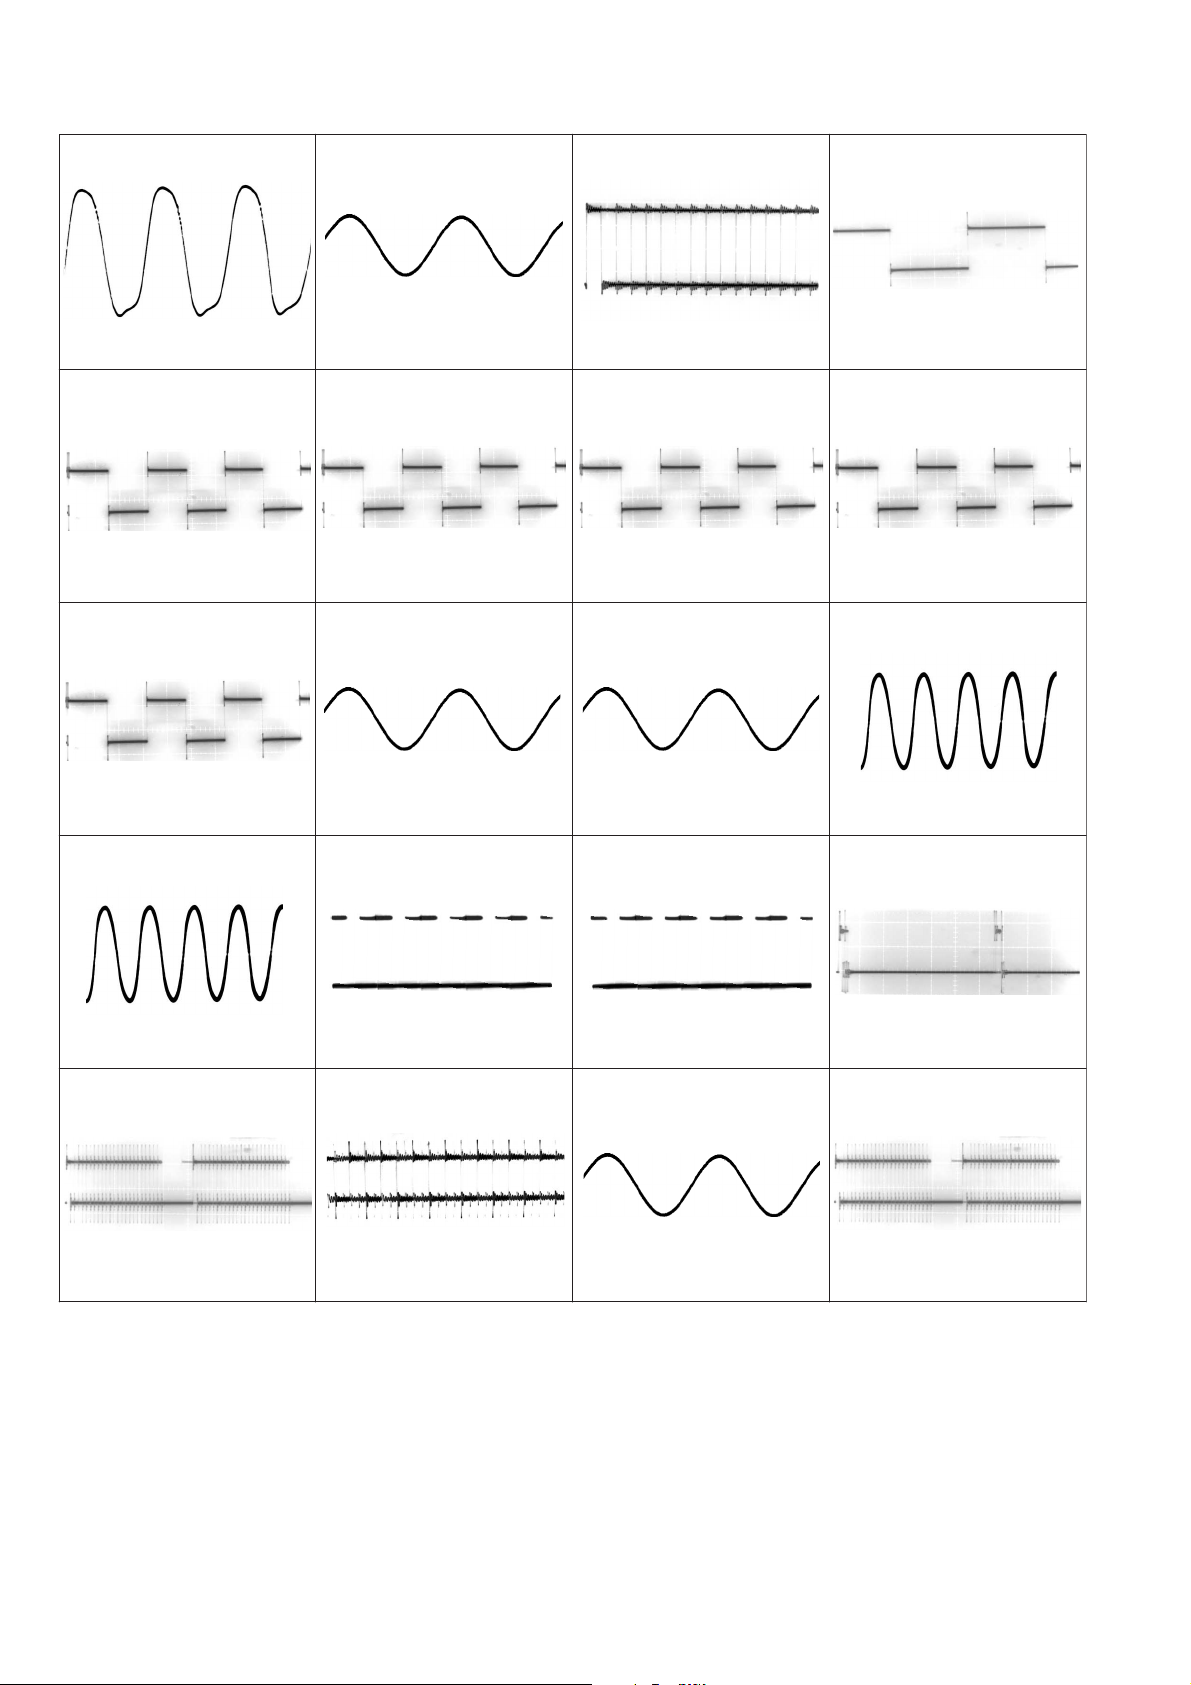
10.12. Waveform Chart (1/2)
WF No. IC401-19 (PLAY)
2Vp-p(20nsec/div)
WF No. IC401-20 (PLAY)
1Vp-p(20nsec/div)
WF No. IC403-6,8,16,18 (PLAY)
6Vp-p(1usec/div)
WF No. IC401-42,43,44,45,46,
47 (PLAY)
6Vp-p(1usec/div)
WF No. IC401-29,31 (PLAY)
3.2Vp-p(500nsec/div)
WF No. IC401-40,41 (PLAY)
6Vp-p(1usec/div)
WF No. IC405-6,8,16,18 (PLAY)
6Vp-p(1usec/div)
WF No. IC403-28,31,36,39 (PLAY)
32Vp-p(1usec/div)
WF No. IC405-28,31,36,39 (PLAY)
32Vp-p(1usec/div)
WF No. IC604-13 (PLAY)
2.6Vp-p(50nsec/div)
WF No. IC604-15 (PLAY)
2Vp-p(50nsec/div)
WF No. IC1001-17 (PLAY)
2Vp-p(20nsec/div)
WF No. IC1001-18 (PLAY)
1.7Vp-p(20nsec/div)
WF No. IC1001-23,24,26,27,
34 (PLAY)
3.4Vp-p(5usec/div)
WF No. IC1001-48 (PLAY)
3.6Vp-p(10usec/div)
WF No. IC1001-49 (PLAY)
6Vp-p(2usec/div)
WF No. IC1001-51 (PLAY)
6.4Vp-p(2usec/div)
WF No. IC1002-44 (PLAY)
8Vp-p(1usec/div)
WF No. IC1002-47 (PLAY)
0.2Vp-p(5msec/div)
WF No. IC1002-54 (PLAY)
6.4Vp-p(2usec/div)
64
Page 65
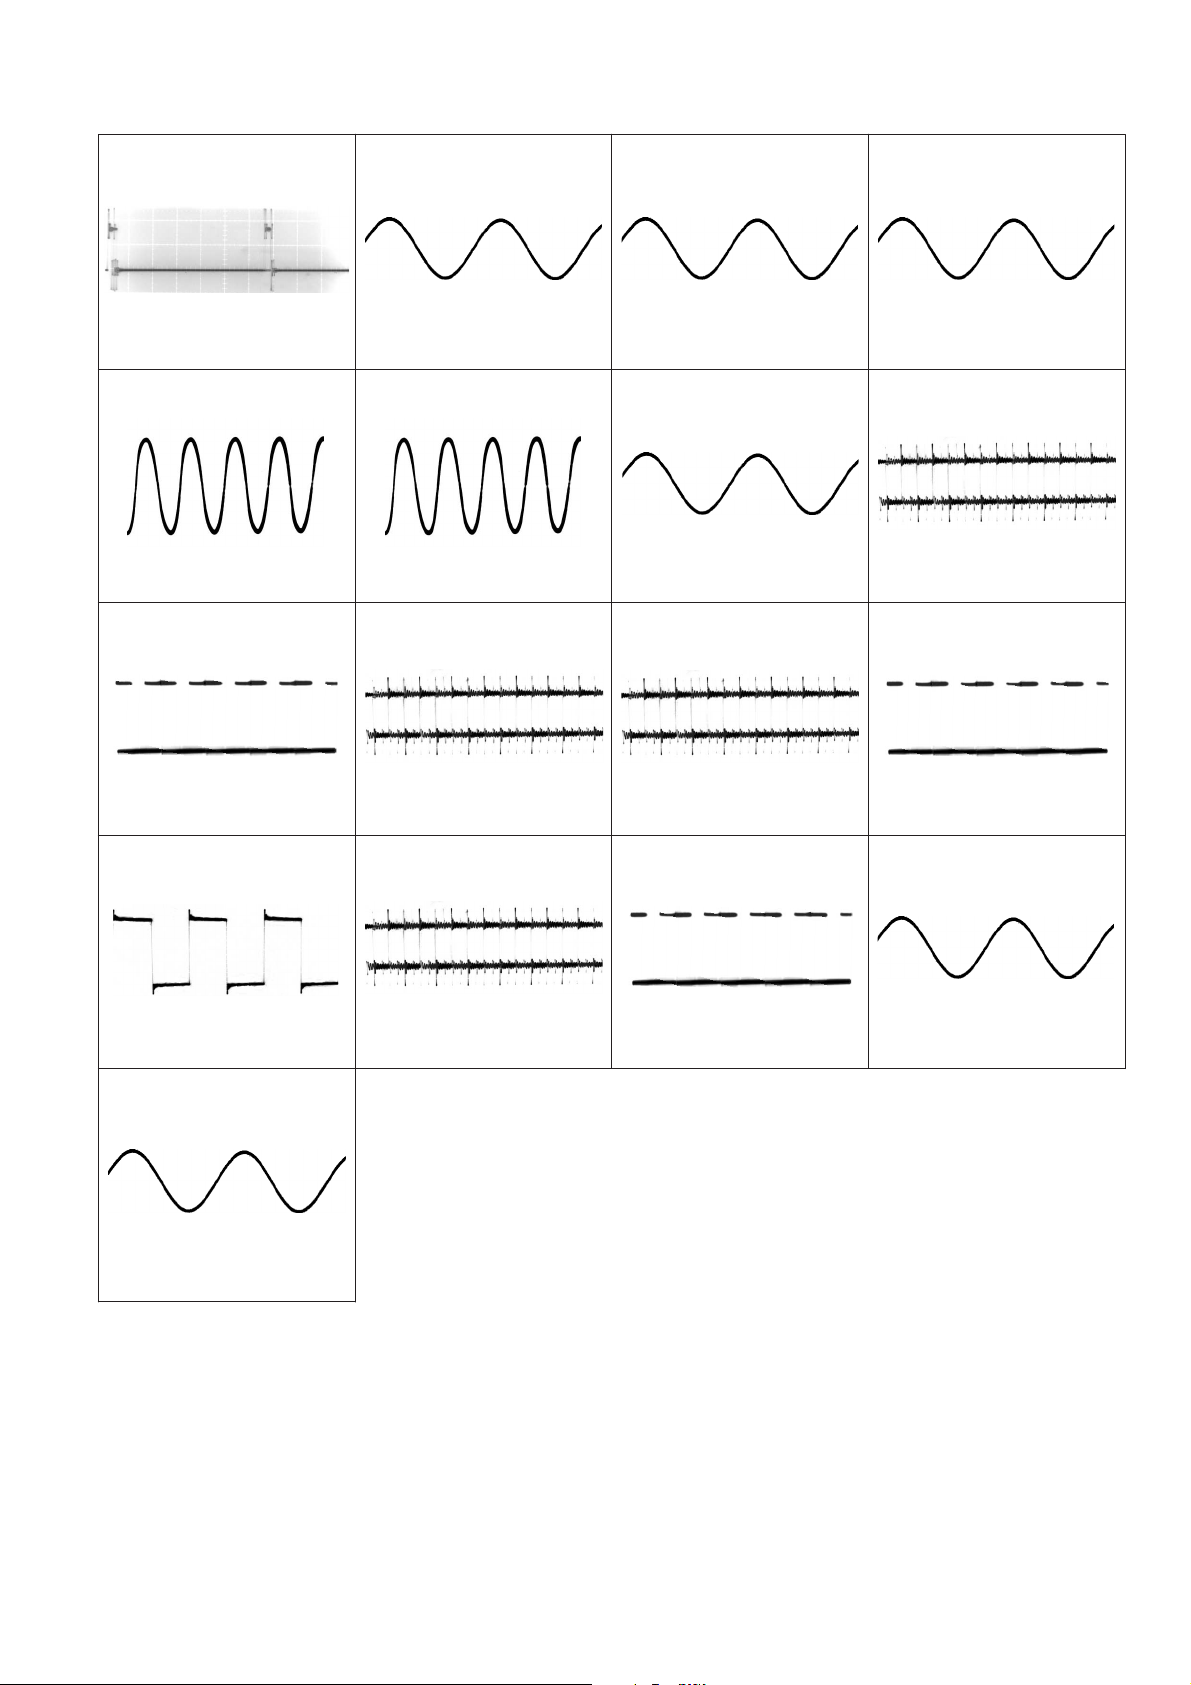
10.13. Waveform Chart (2/2)
WF No. IC1002-64 (PLAY)
4Vp-p(2nsec/div)
WF No. IC2002-10 (PLAY)
0.5Vp-p(10usec/div)
WF No. IC2002-11 (PLAY)
3Vp-p(20usec/div)
WF No. IC2002-13 (PLAY)
3.8Vp-p(100nsec/div)
WF No. IC2002-15 (PLAY)
2.6Vp-p(100nsec/div)
WF No. IC1008-4 (PLAY)
2.4Vp-p(200nsec/div)
WF No. IC1008-6 (PLAY)
3Vp-p(200nsec/div)
WF No. IC2101-4,6,7 (PLAY)
5.2Vp-p(500nsec/div)
WF No. IC2101-8 (PLAY)
3.6Vp-p(5usec/div)
WF No. IC2101-9 (PLAY)
5Vp-p(5usec/div)
WF No. IC2006-3 (PLAY)
6.8Vp-p(1usec/div)
WF No. IC2006-8,12 (PLAY)
3.4Vp-p(5usec/div)
WF No. IC2006-17 (PLAY)
5.2Vp-p(1usec/div)
WF No. IC2232-78 (PLAY)
6Vp-p(1usec/div)
WF No. IC2232-81,82,83,84
(PLAY)
3.4Vp-p(5usec/div)
WF No. IC2232-94 (PLAY)
3Vp-p(20nsec/div)
WF No. IC2232-95 (PLAY)
1Vp-p(20nsec/div)
65
Page 66
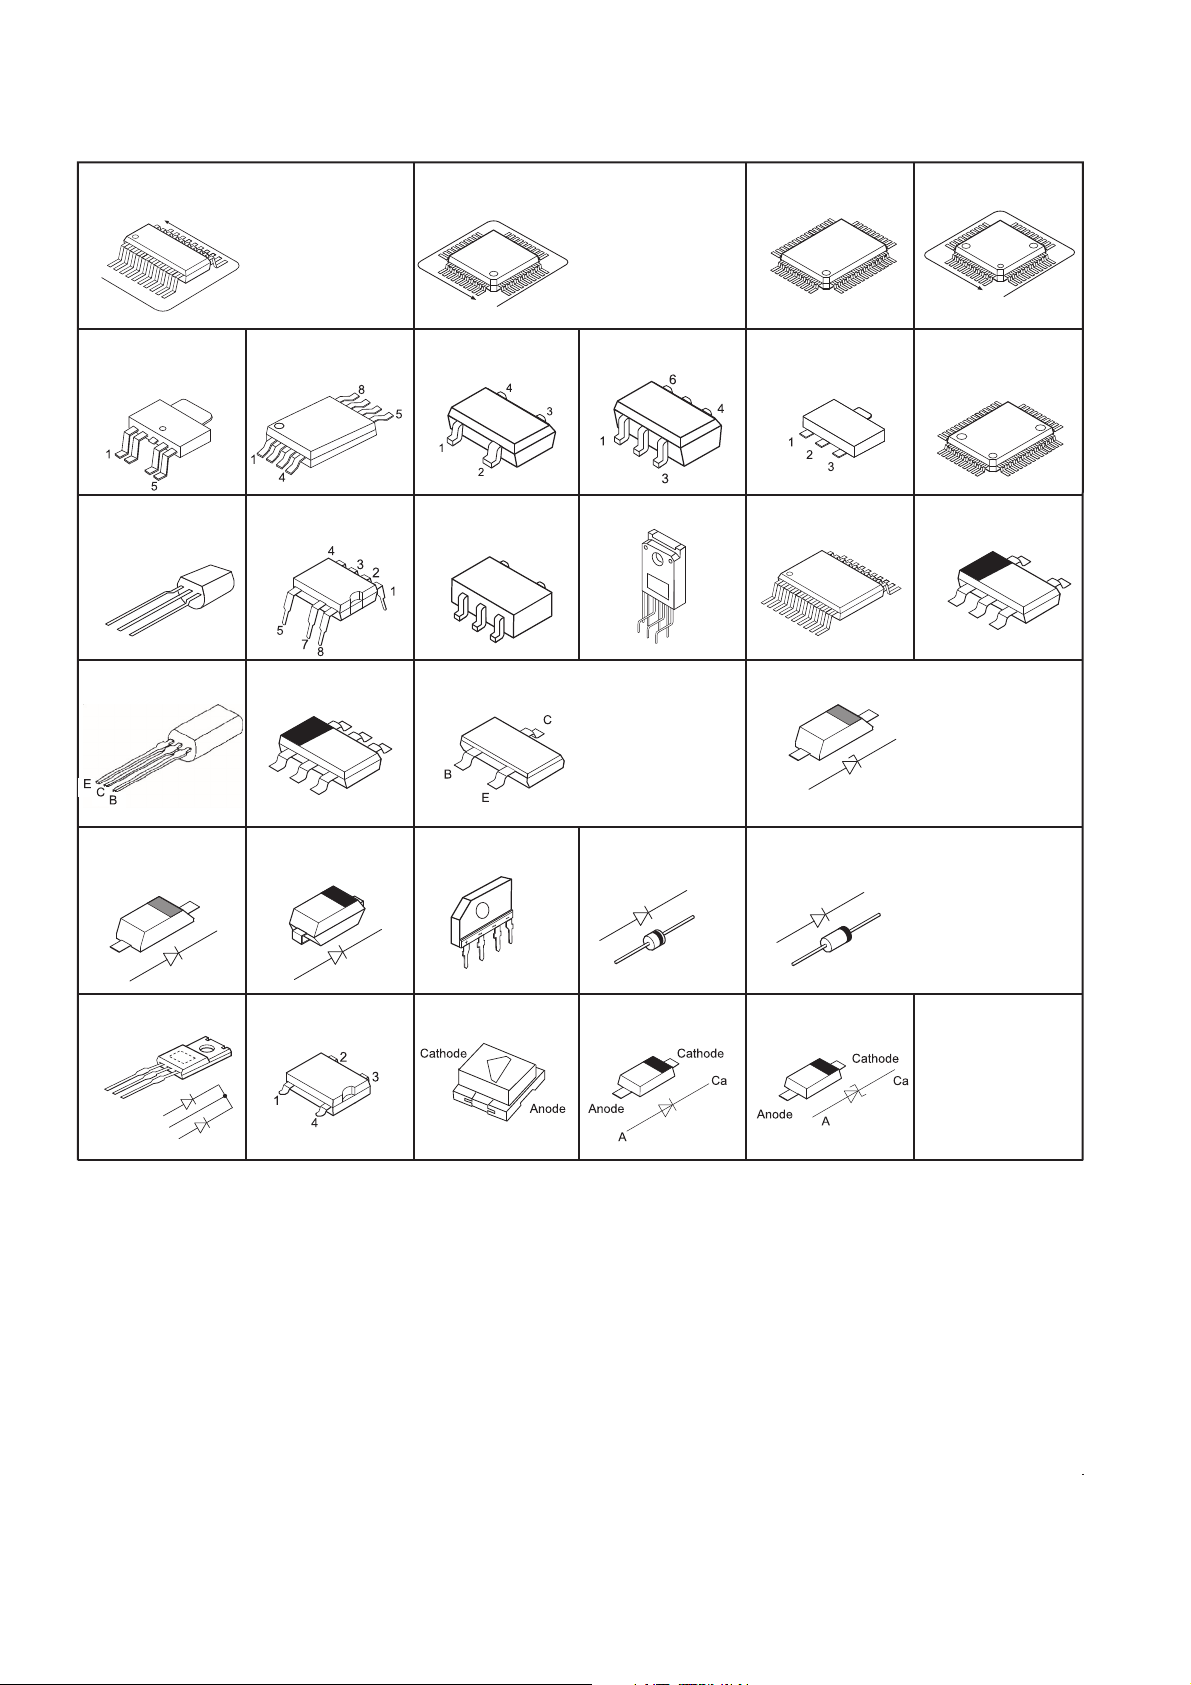
11 Illustration of IC’s, Transistors and Diodes
No.1
No.1
MIP2F20MSSCF
1
4
5
2
3
C0JBAQ000073 (18P)
C0JBAZ001466 (20P)
C1AB00003217 (44P)
C3ABMG000238 (50P)
C0FBZK000013 (64P)
C1AB00002975 (100P)
C1AB00003216 (64P)
C2HBCY000030 (128P)
C0CBCAG00015
C0CBCBG00013
C0DBAYH00005
C0CBABC00117
RFKWMHTB10PA
RFKWMHTB10PB
C3EBEC000047
C3EBEC000060
C0DAEMZ00001
1
3
2
B1ABCF000011
B1ABCF000079
B1ABMF000020
B1ADBL000010
B1GBCFGG0030
B1GBCFJJ0007
B1GBCFNN0004
B1GDCFJJ0008
B0BC012A0264
B0BC018A0267
B0BC020A0267
B0BC030A0264
B0BC5R600003
B0BC6R2A0266
Cathode
Anode
A
Ca
A
Ca
Cathode
Anode
B0EAKT000061
B0EAKT000062
B0EAMM000057
B0HAMP000094
B0JAMF000011
B0HBSM000054 B0EDKT000009 B3AGB0000037
Ca
A
A
Ca
A
A
C0JBAR000396
C0JBAB000986
C0CBCDC00014
C0CBCBC00049
C0EBG0000107
B0JCME000012
B0JCPG000005
Cathode
Anode
A
Ca
2SC3940ARA
C0DAAMH00015 C2CBDD000001 B1CFGD000002
1
7
5
3
B0ACCK000005
B0JCAE000001
B0EBNR000015
MA2J1110GL
MAZ8300GML
Anode
Anode
Anode
Cathode
A
Ca
Cathode
Anode
C1AB00002989 (144P)
No.1
1
38
39
64
65
102
103
128
1
30
31
50
51
80
81
100
1
4
5
2
3
B1HBCFA00003
1
4
6
5
2
3
Cathode
Anode
A
Ca
1
10
11
20
66
Page 67
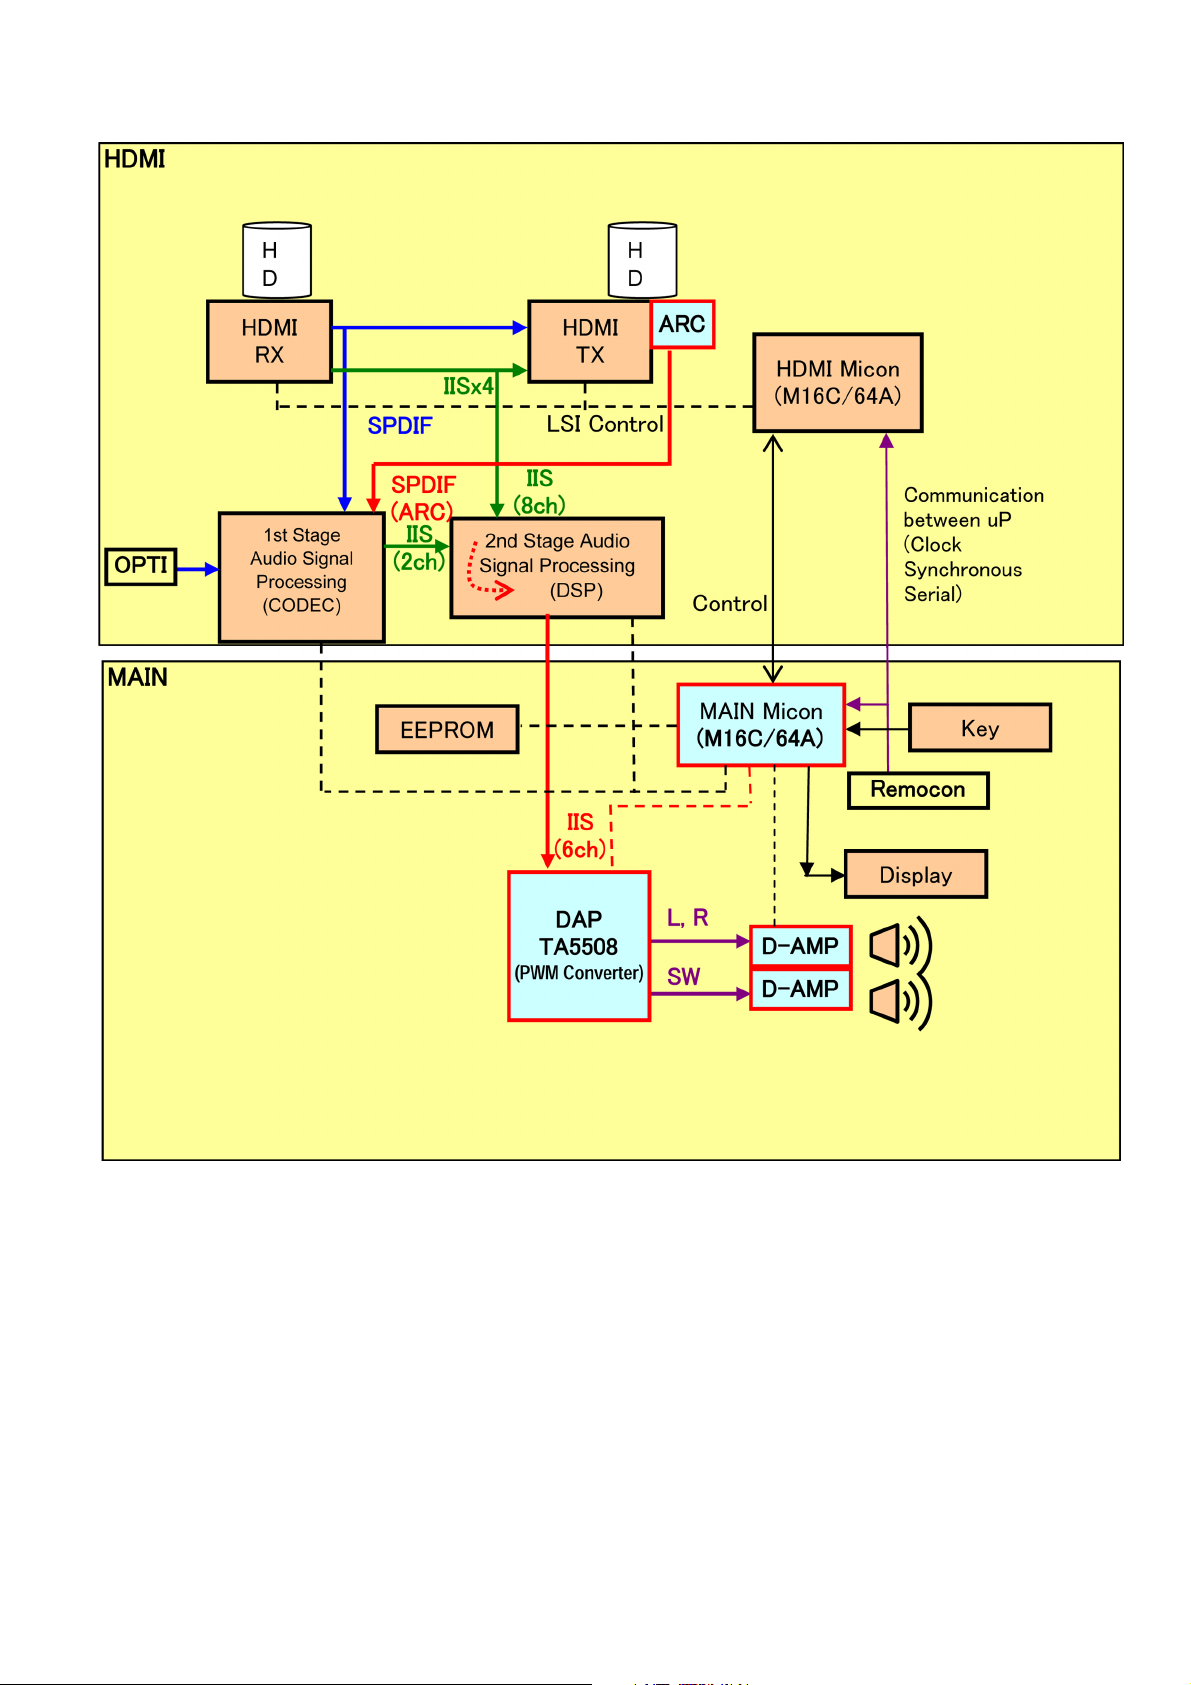
12 Overall Simplified Block
67
Page 68

68
Page 69
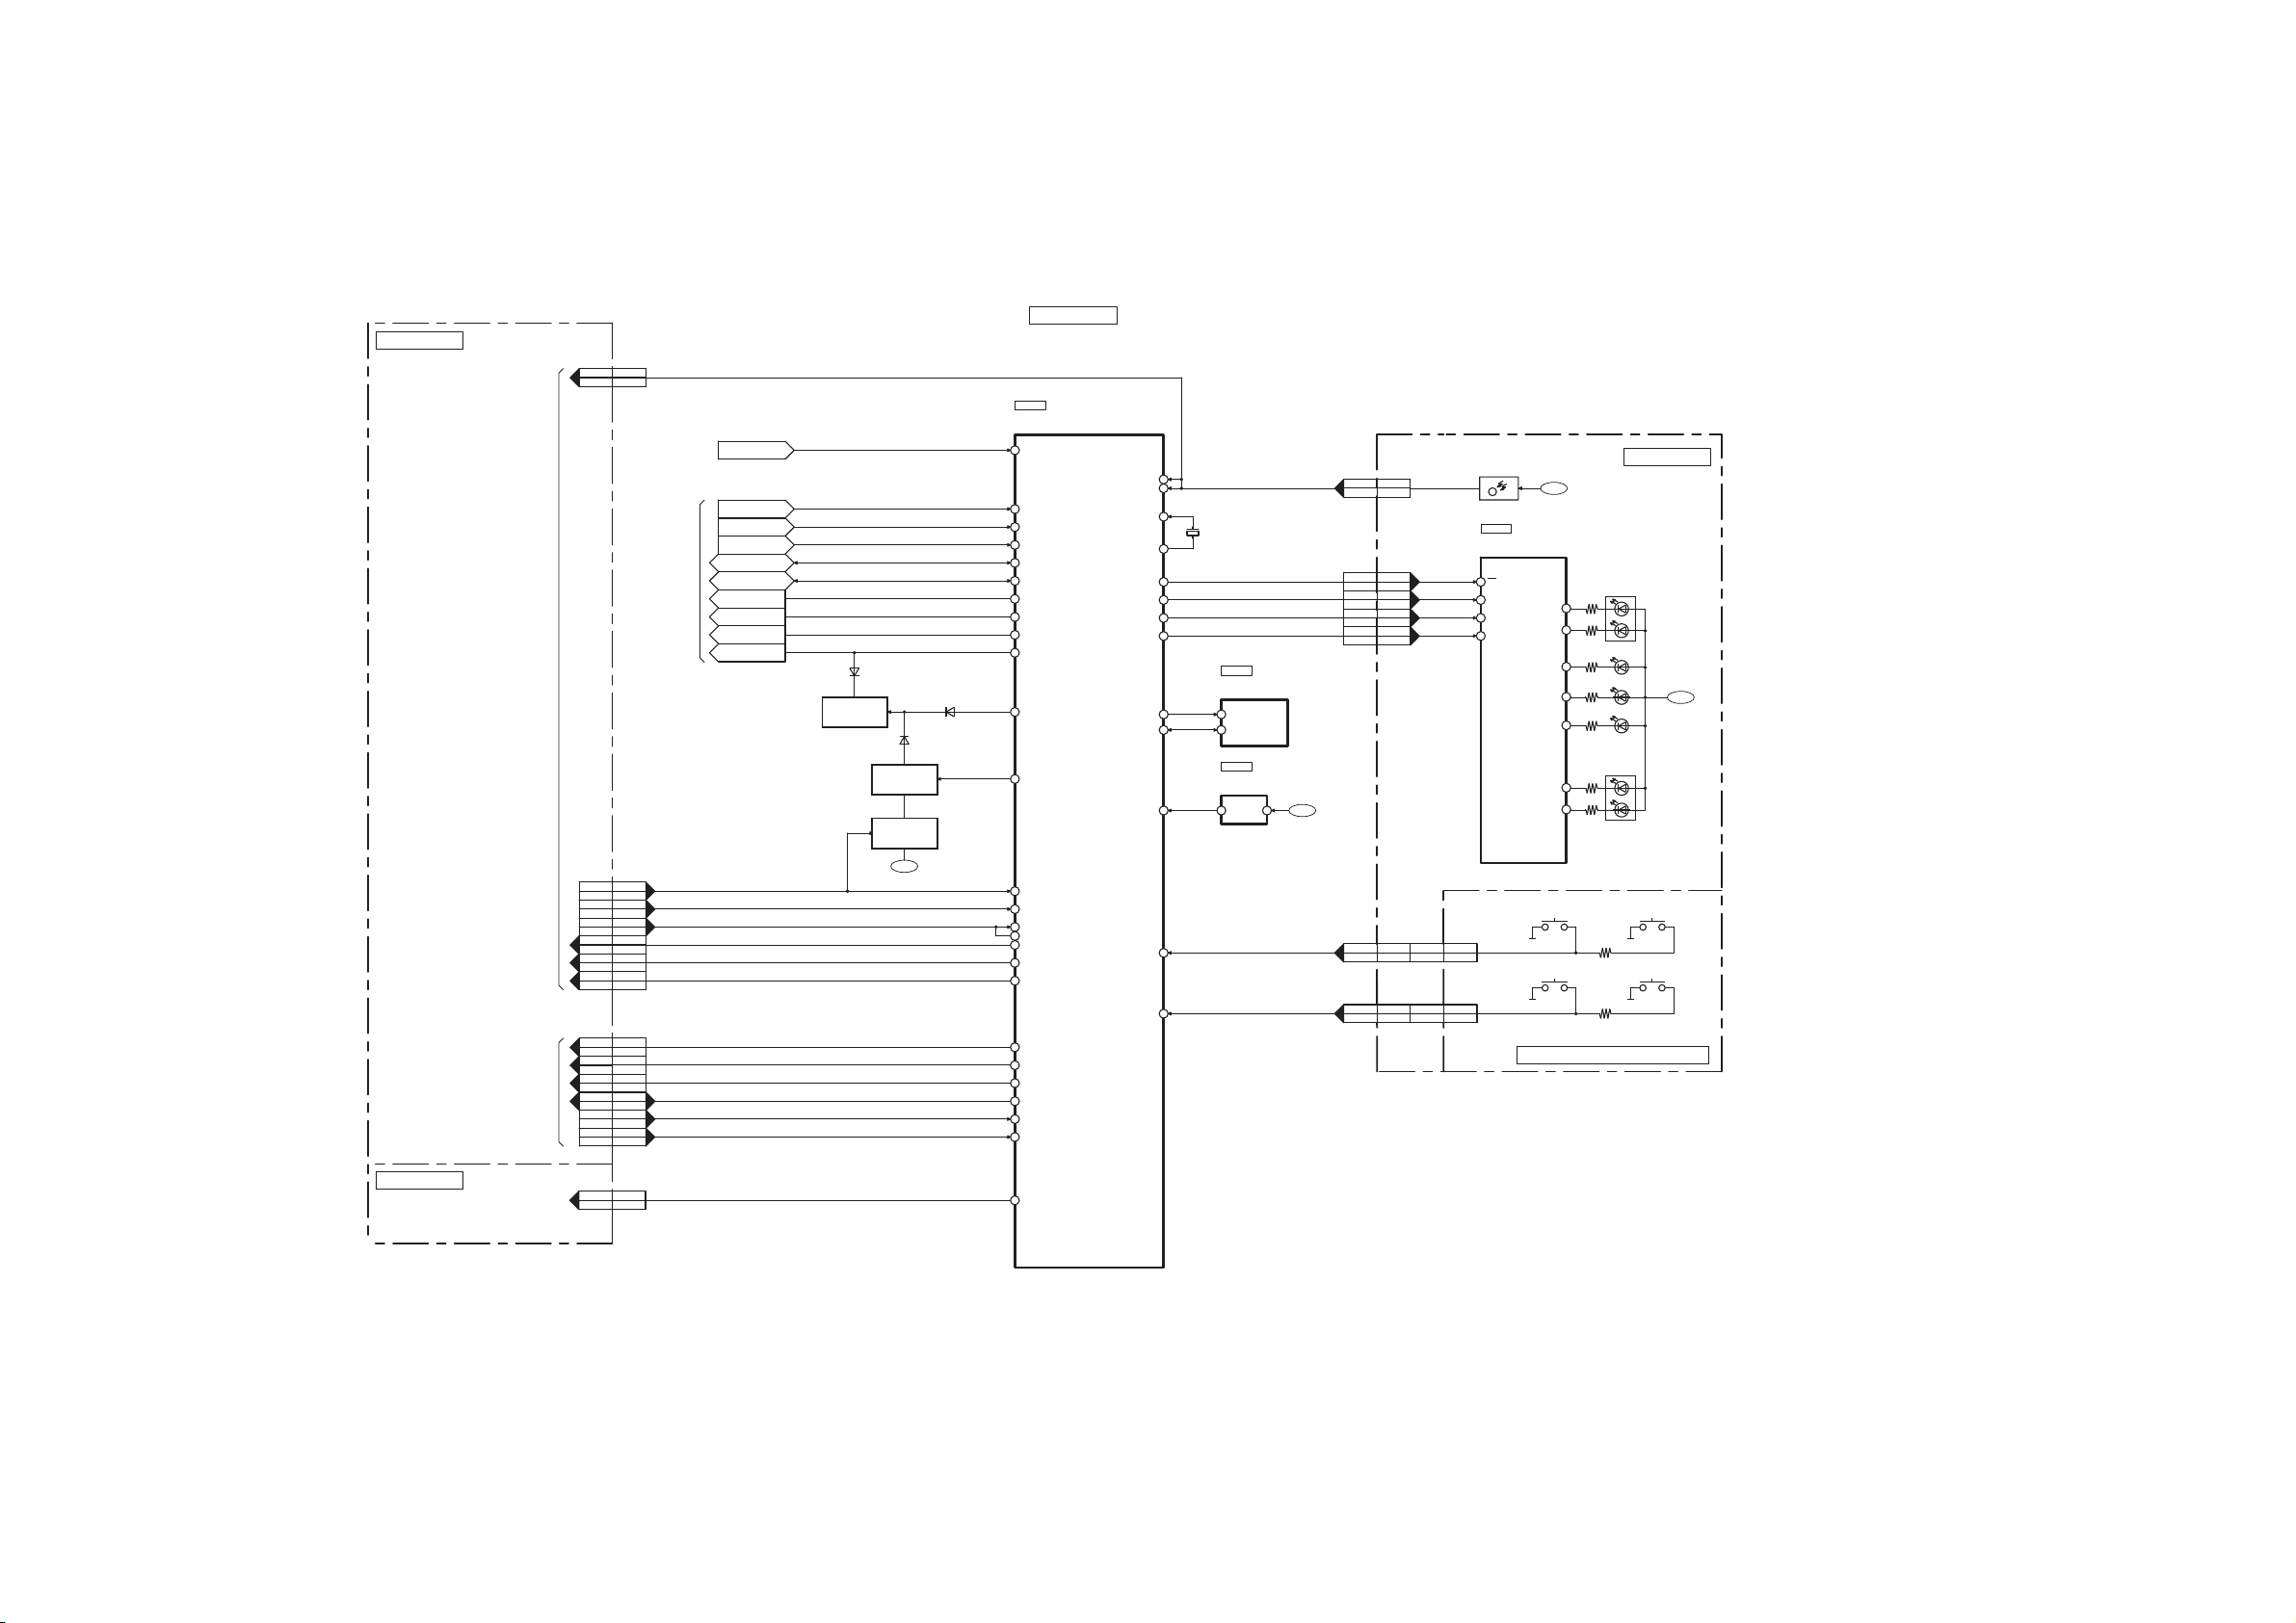
13 Block Diagram
13.1. SYSTEM CONTROL BLOCK DIAGRAM
HDMI P.C.B.
REMOTE
CN200CN1001
3417
FROM
POWER SUPPLY
FROM/TO
AUDIO
FROM/TO
HDMI
CN200CN1001
HDMI MUTE
501
CN200CN1001
M SI
2823
CN200CN1001
PWR CTRL
3219
CN200CN1001
M RESET
2625
CN200CN1001
H SO
2922
CN200CN1001
M CLK
2724
CN200CN1001
RESET CODEC
3615
CN200CN1001
MOSI DSP
474
CN200CN1001
RESET DSP
FROM/TO
AUDIO
483
CN200CN1001
CLK DSP
4110
CN200CN1001
MISO DSP
465
CN200CN1001
DT OUT CODEC
3912
SDET
SD
ECO DAMP
DCDET
VALID
DAP SDA
DAP SCL
DAP RESET
DAP PDN
DAP MUTE
SDET
SD
ECO DAMP
DCDET
VALID
DAP SDA
DAP SCL
DAP RESET
DAP PDN
DAP MUTE
D602
QR600
MUTING
CONTROL
QR602
QR601
MUTING
MUTING
3.3V
D601
D600
MUTE ALL
HDMIMUTE DIS
MAIN P.C.B.
IC604
RFKWMHTB10PA
MICRO PROCESSOR
S DET95
SD53
ECO DAMP93
DC DET94
VALID18
DAP SDA24
DAP SCL22
DAP RESET26
DAP PDN63
DAP MUTE23
MUTE ALL21
HDMIMUTE DIS27
HDMI MUTE48
M SI35
PWR CONTROL47
PWR CTRL89
M RESET43
H SO36
M CLK37
RESET CODEC78
MOSI DSP74
RESET DSP72
CLK DSP69
MISO DSP77
DT OUT CODEC79
REMOTE 5
REMOTE 19
XIN 15
XOUT 13
LED OE 85
LED DI 80
LED CLK 81
LED CS 82
SCL 29
SDA 30
AC SYNC 20
KEY2 91
KEY1 92
LED DI
LED CLK
LED CS
X600
C3EBEC000060
EEPROM
6 SCL
5 SDA
C0EBG0000107
RESET
1 OUT
IC605
IC606
VDD 2
REMOTE REMOCON
6V
KEY2
KEY1
CN350CN300
310
CN350CN300
94
CN350CN300
85
CN350CN300
76
CN350CN300
67
CN350CN300
58
CN350CN300
49
LED OELED OE
LED DATA
LED CLK
LED LCK
CN352*CN351*
11
CN352*CN351*
22
CONTROL SENSOR
Z300
REMOTE
VREF
IC300
C0JBAQ000073
LED DRIVER
OE17
DATA2
CLK3
LCK4
KEY2
KEY1
Q8 13
Q7 12
Q6 11
Q5 10
Q4 9
Q2 7
Q1 6
S303
INPUT SELECTOR
S300
POWER
PANEL TACT SWITCH P.C.B.
LED P.C.B.
D307
D305
D304
D303
D301
S304
VOLUME-
S301
VOLUME+
5V
SMPS P.C.B.
TO
POWER SUPPLY
NOTE: “ * ” REF IS FOR INDICATION ONLY
PCONT
CN700H2016*
83
PCONT90
SC-HTB10P/PC SYSTEM CONTROL BLOCK DIAGRAM
69
Page 70
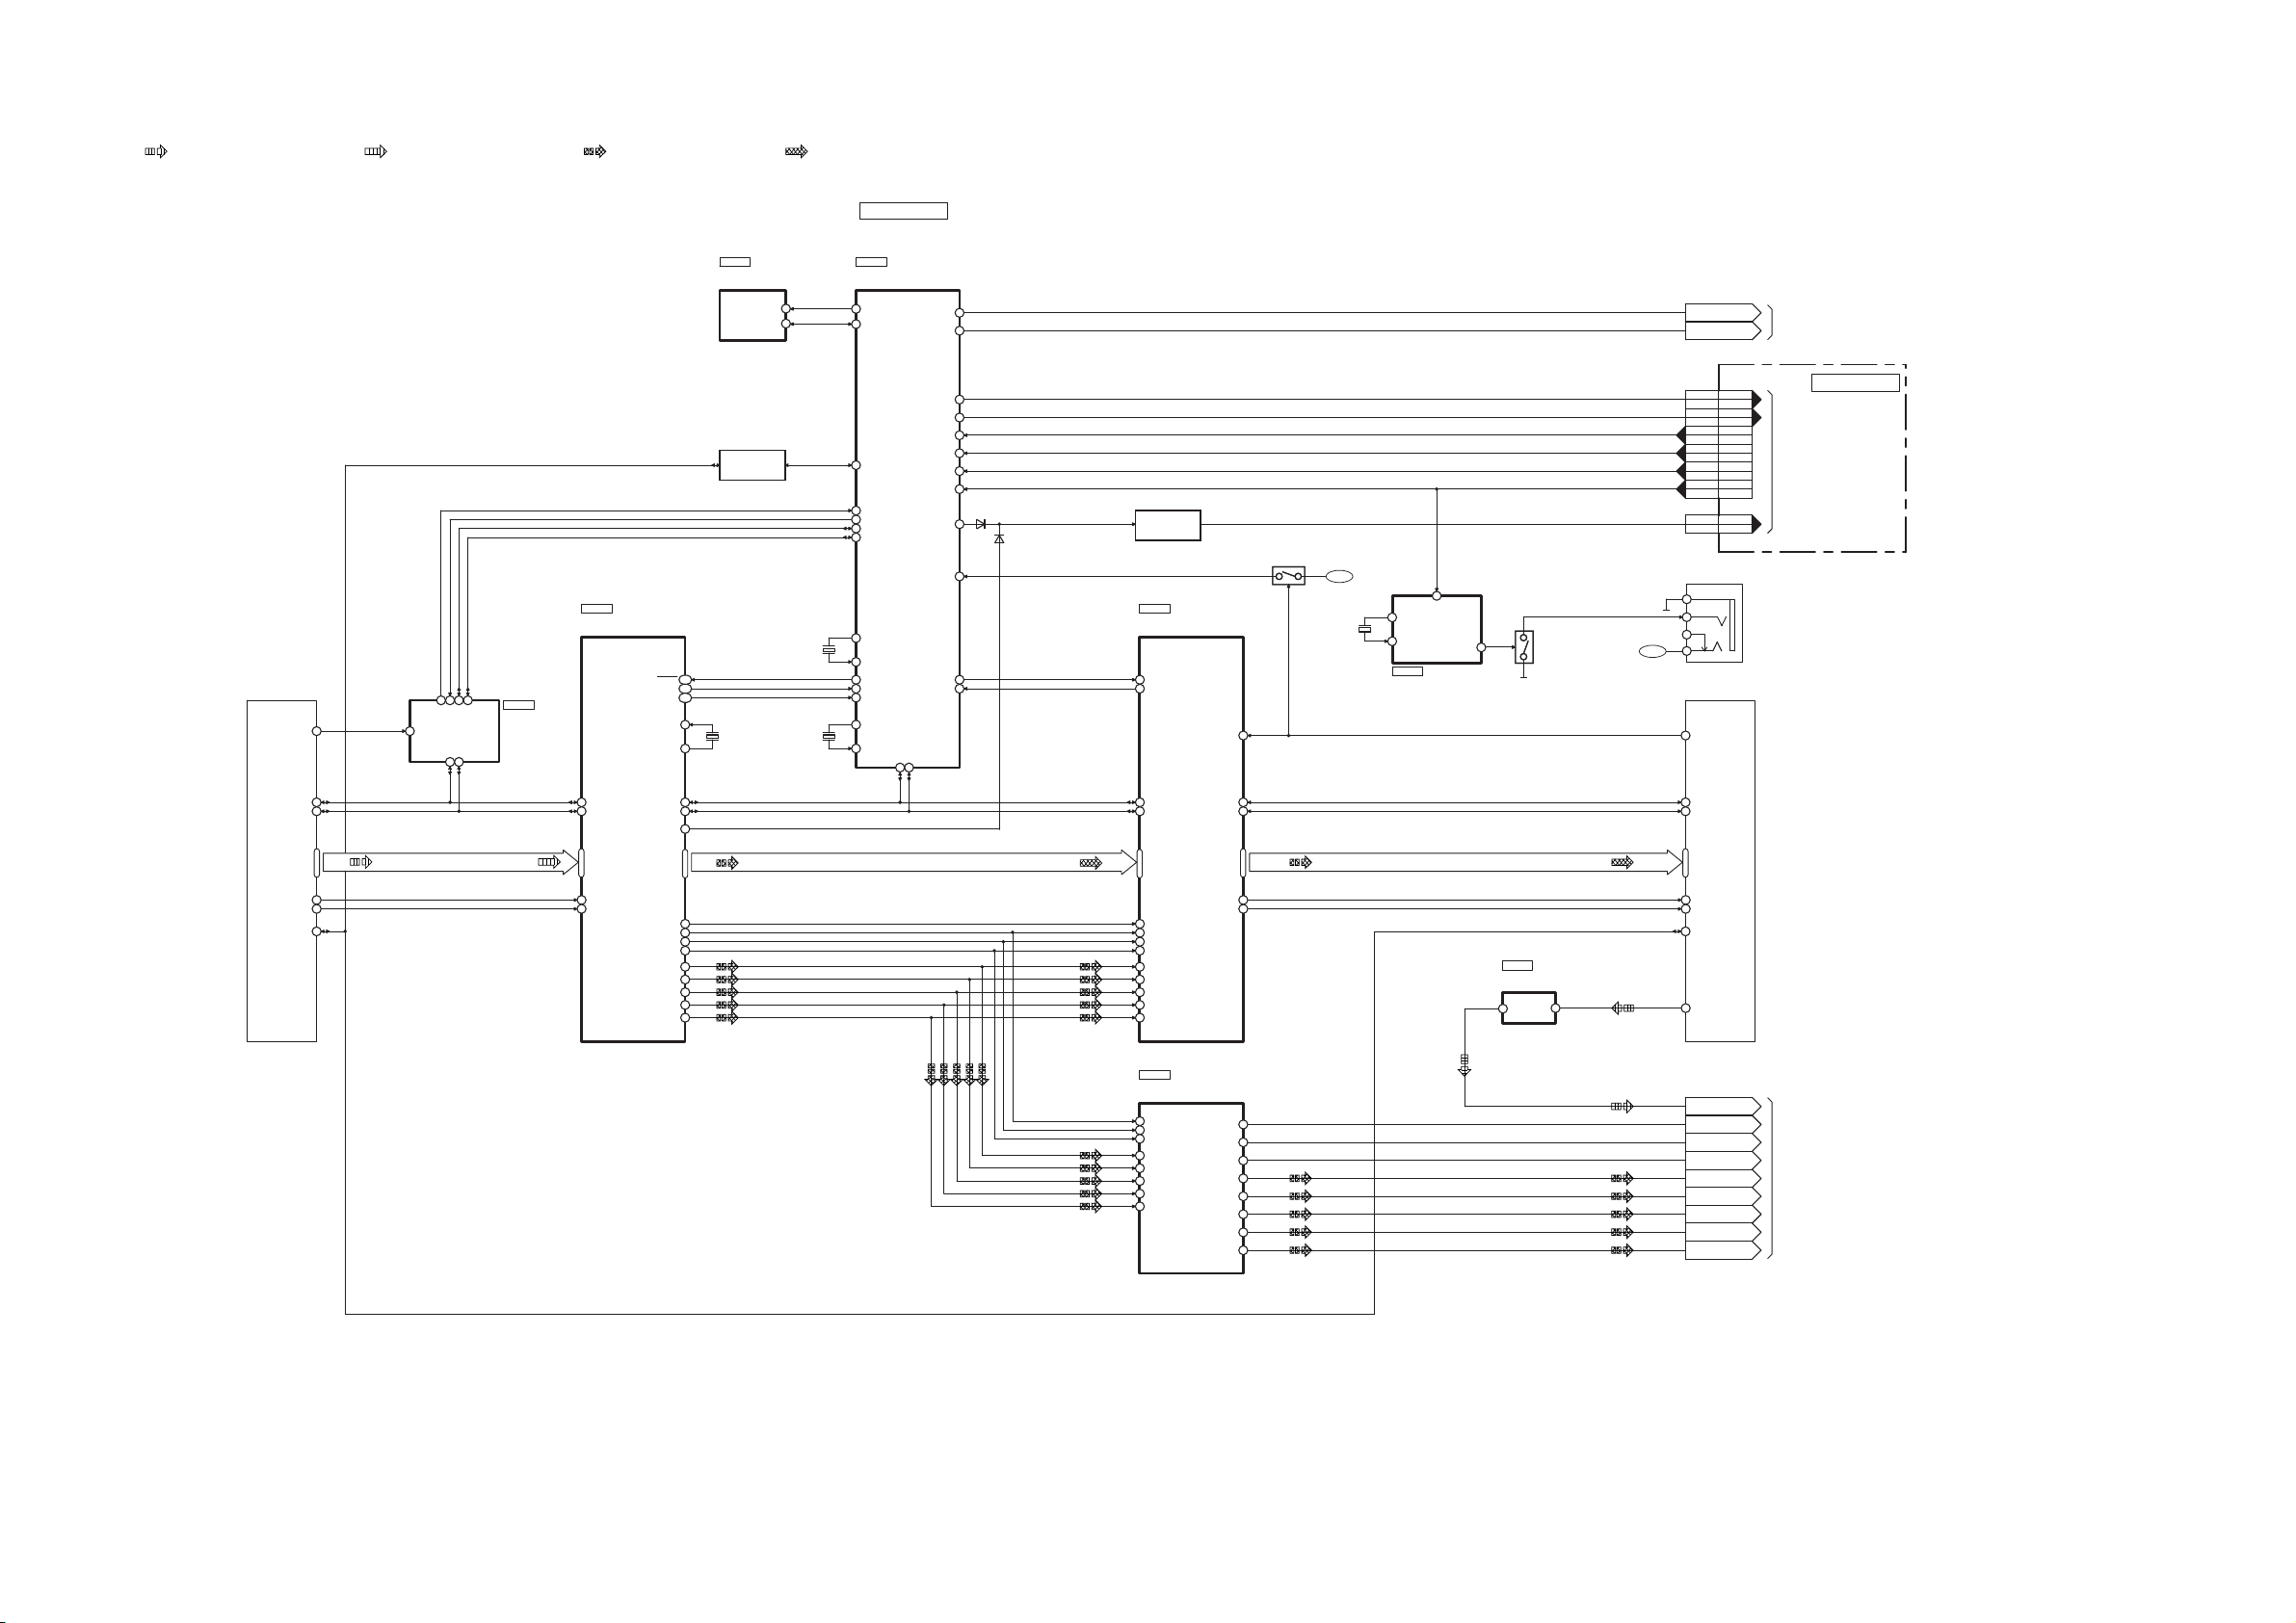
13.2. HDMI BLOCK DIAGRAM
TO AUDIO
TO
POWER SUPPLY
FROM/TO
SYSTEM CONTROL
D2003
D2004
HDMI AV IN
(BD/DVD)
JK2203
HDMI AV OUT
(TO TV(ARC))
Ir SYSTEM
JK2101
HDMI RECEIVER
C1AB00002989
IC2232
EEPROM
C3EBEC000047
IC2003
EEPROM
C3EBEC000047
QR2231,QR2232
Q2231,Q2232
Q2233,Q2234
Q2235,Q2236
IC2231
HDMI TRANSMITTER
C1AB00002975
IC2101
MICRO PROCESSOR
RFKWMHTB10PB
IC2002
MICRO CONTROLLER
C2CBDD000001
IC1008
LOGIC
C0JBAZ001466
IC2006
INVERTER
C0JBAB000986
IC2081
TMDS CLK+
10
HOTPLUG
19
CEC
13
R1XC+58
TMDS CLK- 12 R1XC-57
DSDA128
DSCL129
TXC+
31
2A
3
TMDS CLK+10
TXC- 30 TMDS CLK-12
HEAC+(ARC)14
ODCK 5 IDCK88
2Y4
MCLK 89 MCLK5
CSDA
I2C SDA
26
XTALIN 95
XTALOUT 96
MUTEOUT
73
35
I2C SCL
36
CSDA49
RESET25
25
P1 7
INT24
CSCL
27
SCL 6
SDA 5
DDC SDA
16
DDC SCL
15
TX RESET 38
AMUTE 53
TX INT 19
TX HPD 75
REM 5
SI 29
M RST 68
SO 30
CLK 28
DCDET 54
CSCL48
DSDA
47
HPD 51
P1 3 17
DDC SDA16
CEC13
HOTPLUG19
DSCL
46 DDC SCL15
SCK 86 SCK11
WS 85 WS10
SD0 81
1Y1 18
SD09
SD1 82 SD18
SD2 83 SD27
SD3 84 SD36
SPDIF 78 SPDIF4
1A12
1A24
1A36
1A48
2A111
2A213
2A315
2A417
RESET 100
SCDT 101
INT 102
R1X0- ~ R1X2R1X0+ ~ R1X2+
TC - 2
D0 ~ D35 TC - 1
TX0- ~
TX2-
TX0+ ~
TX2+
TC - 3
X2231 X2001
RX RESET39
IDROM CK22
IDROM DT21
RX SCDT74
CEC I/O17
RX INT20
XOUT13
XIN15
X2002
XCOUT
HDMI MUTE
REMOTE
11
WRITESEL25
RX1 HPD76
RX1 SCL26
RX1 SDA27
XCIN10
X2003
XCOUT4
XCIN6
501
CN200CN1001
3417
CN200CN1001
MCLK
MCLK
DCDET
DCDET
HDMI POWER 42
HDMI POWER
HDMI POWER
ARC
ARC
1Y2 16
BCK
BCK
1Y3
14
LRCK
LRCK
1Y4
12
I2S0
I2S0
I2S1
I2S1
I2S2
I2S2
I2S3
I2S3
IEC958
IEC958
2Y1 9
2Y2
7
2Y3 5
2Y4 3
SC-HTB10P/PC HDMI BLOCK DIAGRAM
: HDMI AUDIO INPUT SIGNAL LINE : HDMI VIDEO INPUT SIGNAL LINE : AUDIO OUTPUT SIGNAL LINE : VIDEO OUTPUT SIGNAL LINE
Q2108
Q2103
SWITCH
QR2004
SWITCH
LEVEL SHIFTER
HDMI SWITCHING
CIRCUIT
QR2001
MUTING
3.3V
3.3V
2625
CN200CN1001
2922
CN200CN1001
M RESET
H SO
2724
CN200CN1001
M CLK
2823
CN200CN1001
M SI
MAIN POWER 43
3219
CN200CN1001
H POWER
MAIN P.C.B.
HDMI P.C.B.
JK4001
1
3
4
2
70
Page 71
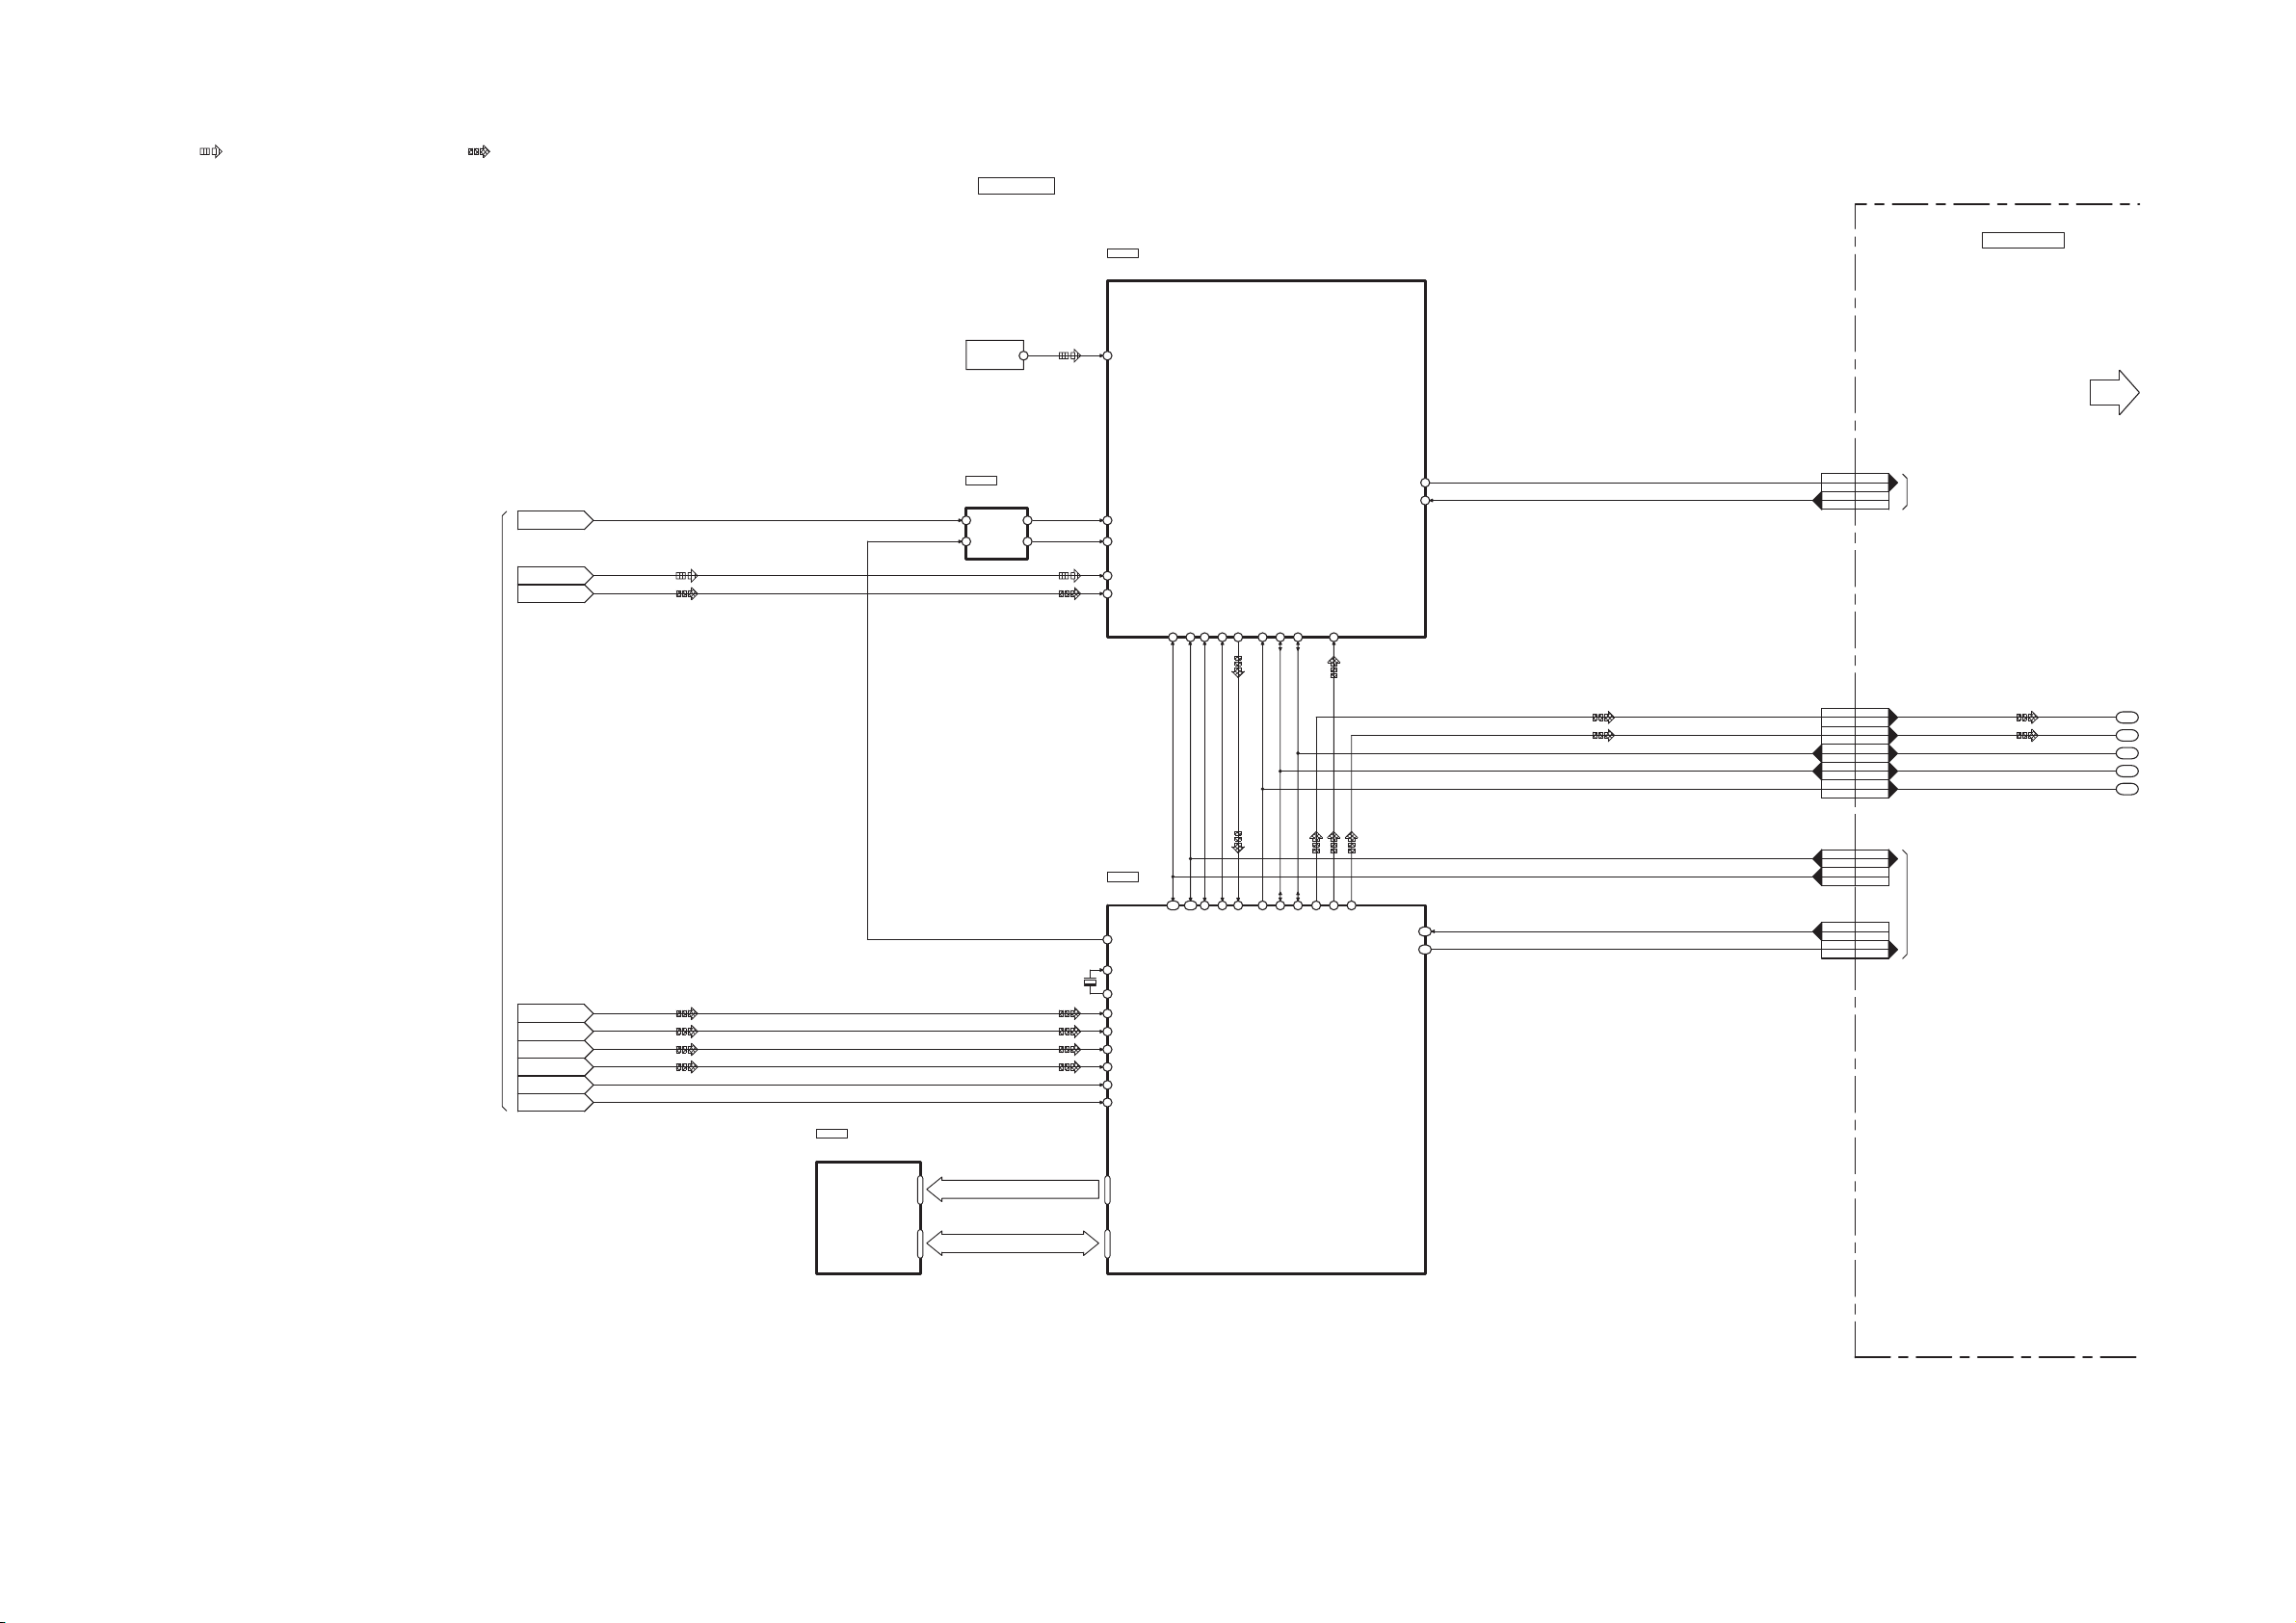
13.3. AUDIO (1/2) BLOCK DIAGRAM
: OPTICAL/HDMI AUDIO INPUT SIGNAL LINE : AUDIO OUTPUT SIGNAL LINE
HDMI P.C.B.
FROM HDMI
MCLK
ARC
IEC958
MCLK
ARC
IEC958
OPTICAL
DIGITAL AUDIO IN
(TV)
JK4101
INPUT 3 42
IC1005
C0JBAR000396
MULTIPLEXER
A6
CH11
COM 4CH03
IC1002
C0FBZK000013
CODEC
RXP7
RXP148
OMCK59
RXP247
IEC 95844
SAI SCCLK
61
SAI SDOUT
RMCK
355
SAI LRCLK
CCLK
CDIN
60
7
954
CX LRCLK
CX SCLK
2
CX SDIN2
64
CDOUT 8
/RST 12
DT OUT CODEC
RESET CODEC
DSP SD1
DSP SD3
DSP SCLK
DSP LRCLK
DSP MCLK
CN200CN1001
3912
CN200CN1001
3615
CN200CN1001
1932
CN200CN1001
1833
CN200CN1001
1635
CN200CN1001
1536
CN200CN1001
1338
FROM/TO
SYSTEM CONTROL
MAIN P.C.B.
TO AUDIO
SECTION (2/2)
DSP SD1
DSP SD3
DSP SCLK
DSP LRCLK
DSP MCLK
1
2
3
4
5
NOTE: “ * ” REF IS FOR INDICATION ONLY
I2S0
I2S1
I2S2
I2S3
BCK
LRCK
I2S0
I2S1
I2S2
I2S3
BCK
LRCK
IC1006
C3ABMG000238
SDRAM
A0 - A10 TC - 4
DQ0 - DQ15 TC - 5
X1000
IC1001
C2HBCY000030
DSP
XTAL OUT16
XTI17
XTO18
DAI DATA027
DAI DATA126
DAI DATA224
DAI DATA323
DAI SCLK129
DAI LRCLK130
123
SCP1 MOSI
126
32
SCP1 CLK
DAI LRCLK2
33
DAI SCLK2
34
DAI DATA4
40
DAO MCLK
54
DAO LRCLK1
52
DAO SCLK1
51
DAO DATA0
48
DAO DATA149DAO DATA2
RESET
SCP1 MISO 124
CLK DSP
MOSI DSP
121
RESET DSP
MISO DSP
CN200CN1001
4110
CN200CN1001
474
CN200CN1001
483
CN200CN1001
465
FROM/TO
SYSTEM CONTROL
SC-HTB10P/PC AUDIO(1/2) BLOCK DIAGRAM
71
Page 72
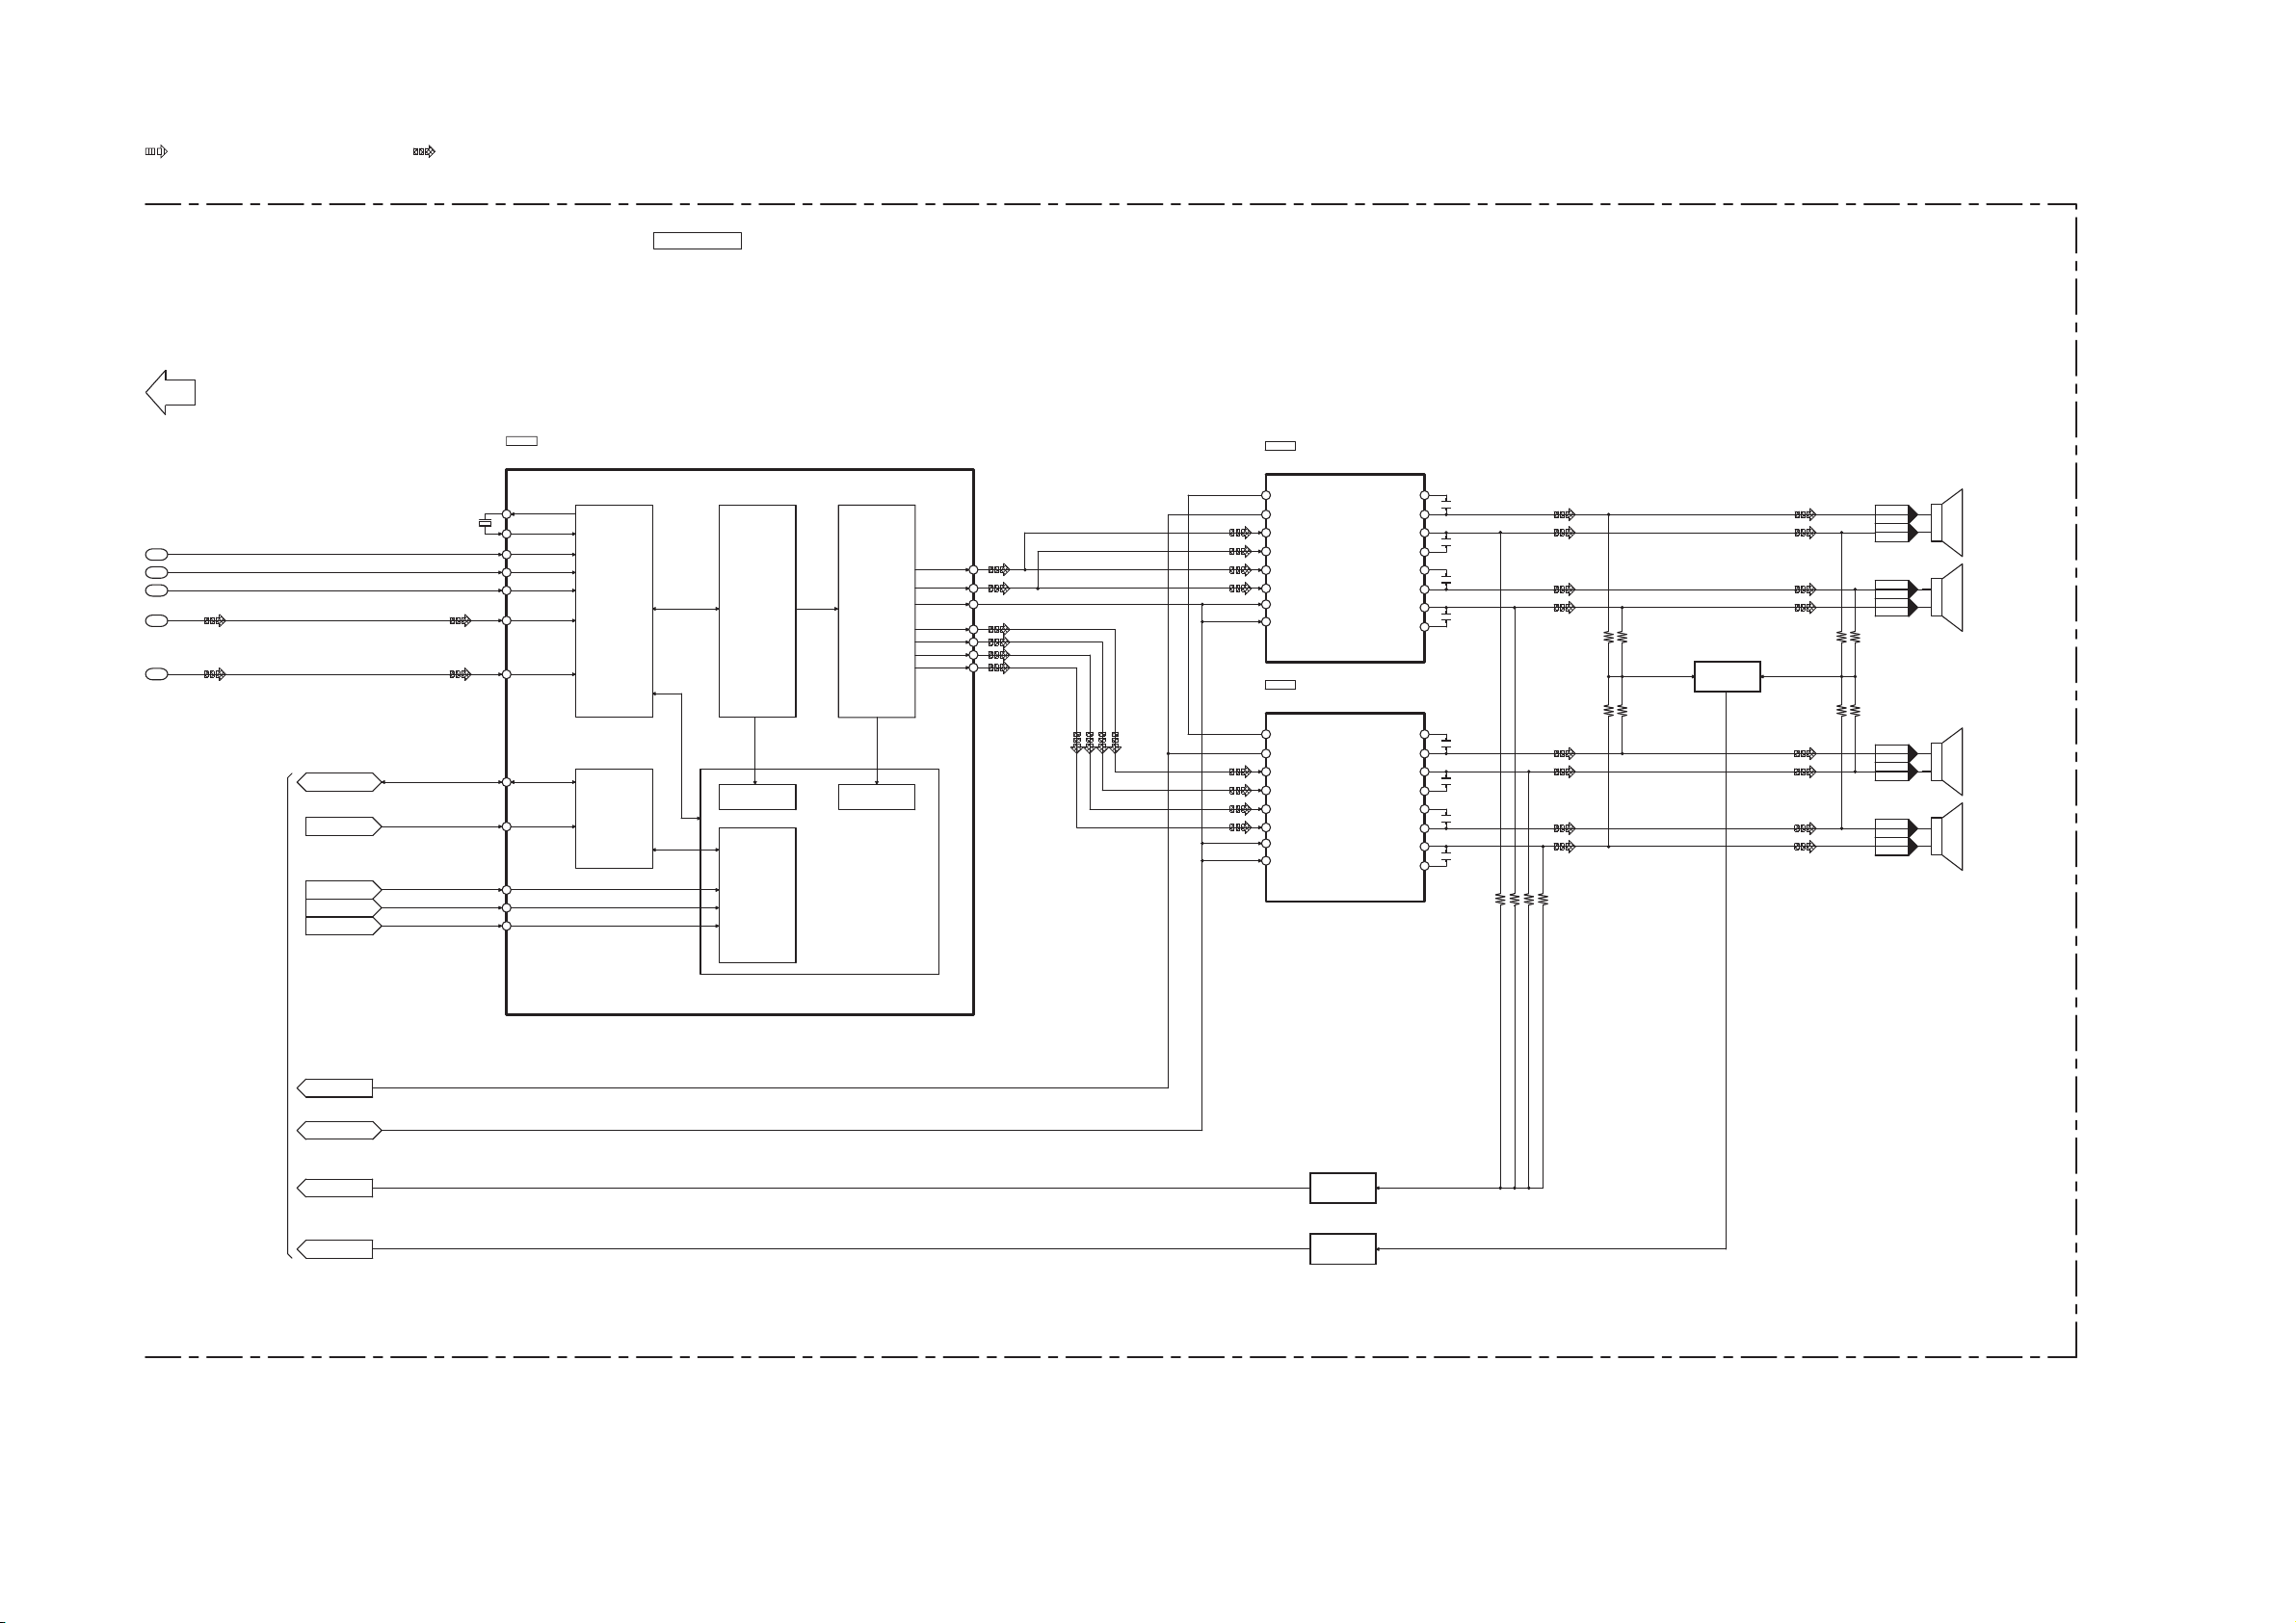
13.4. AUDIO (2/2) BLOCK DIAGRAM
TO AUDIO
SECTION (1/2)
SC-HTB10P/PC AUDIO(2/2) BLOCK DIAGRAM
1
2
3
4
5
: OPTICAL/HDMI AUDIO INPUT SIGNAL LINE : AUDIO OUTPUT SIGNAL LINE
-
+
-
+
-
+
-
+
PWM SECTION
DIGITAL AUDIO
PROCESSOR
CLOCK, PLL &
SERIAL DATAI/F
DEVICE CONTROL
IIC SERIAL
CONTROL I/F
SYSTEM CONTROL
DAP CONTROL PWM CONTROL
PWM SW1+
PWM SW1-
PWM SW2-
PWM SW2+
PWM FR-
PWM FR+
PWM FL-
PWM FL+
VALID VALID
39
PWM M 2
42
PWM P 2
43
PWM M 3
44
PWM P 3
45
PWM M 4
46
PWM P 4
47
2 OTW(L)
5 SD(L)
6 PWM A
8 PWM B
16 PWM C
18 PWM D
7 RST AB(L)
17 RST CD(L)
OUT A
SP SW1-
SP SW1+
SP SW2-
SP SW2+
39
BST A 43
OUT B 36
BST B 34
OUT D 28
BST D 24
OUT C 31
BST C 33
RESET
11
DIGITAL AMPLIFIER
SUBWOOFER 1
SUBWOOFER 2
C1AB00003217
IC403
DIGITAL AUDIO PWM PROCESSOR
C1AB00003216
X400
IC401
PWM FR-
PWM FR+
PWM FL-
PWM FL+
SD
VALID
SD
DAP RESET
PDN
13
DAP PDN
SDA
24
MCLK
63
LRCLK
26
SCLK
DSP MCLK
DSP LRCLK
DSP SCLK
27
DAP SDA
SCL
25
XTL OUT
19
XTL IN
20
DAP SCL
MUTE
14
DAP MUTE
VALID
DC DET
ECO DAMP
2 OTW(L)
5 SD(L)
6 PWM A
8 PWM B
16 PWM C
18 PWM D
7 RST AB(L)
17 RST CD(L)
OUT A
SP FL-
SP FL+
SP FR-
SP FR+
SP PROTCT
39
BST A 43
OUT B 36
BST B 34
OUT D 28
BST D 24
OUT C 31
BST C 33
DIGITAL AMPLIFIER
FRONT
(LEFT)
FRONT
(RIGHT)
C1AB00003217
IC405
SDIN1
31
DSP SD3
SDIN3
29
DSP SD1
4
CN402*
3
CN402*
1
CN402*
2
CN402*
4
CN401*
SP1
SP2
SP3
SP4
3
CN401*
2
CN401*
1
CN401*
FROM/TO
SYSTEM CONTROL
Q500,Q501
SWITCH
Q114,Q116
DC DETECT
ECO SUPLLY
CIRCUIT
DAP SCL
DAP RESET
SD
ECO DAMP
DC DET
DAP PDN
DAP MUTE
DAP SDA
VALID
MAIN P.C.B.
NOTE: “ * ” REF IS FOR INDICATION ONLY
72
Page 73
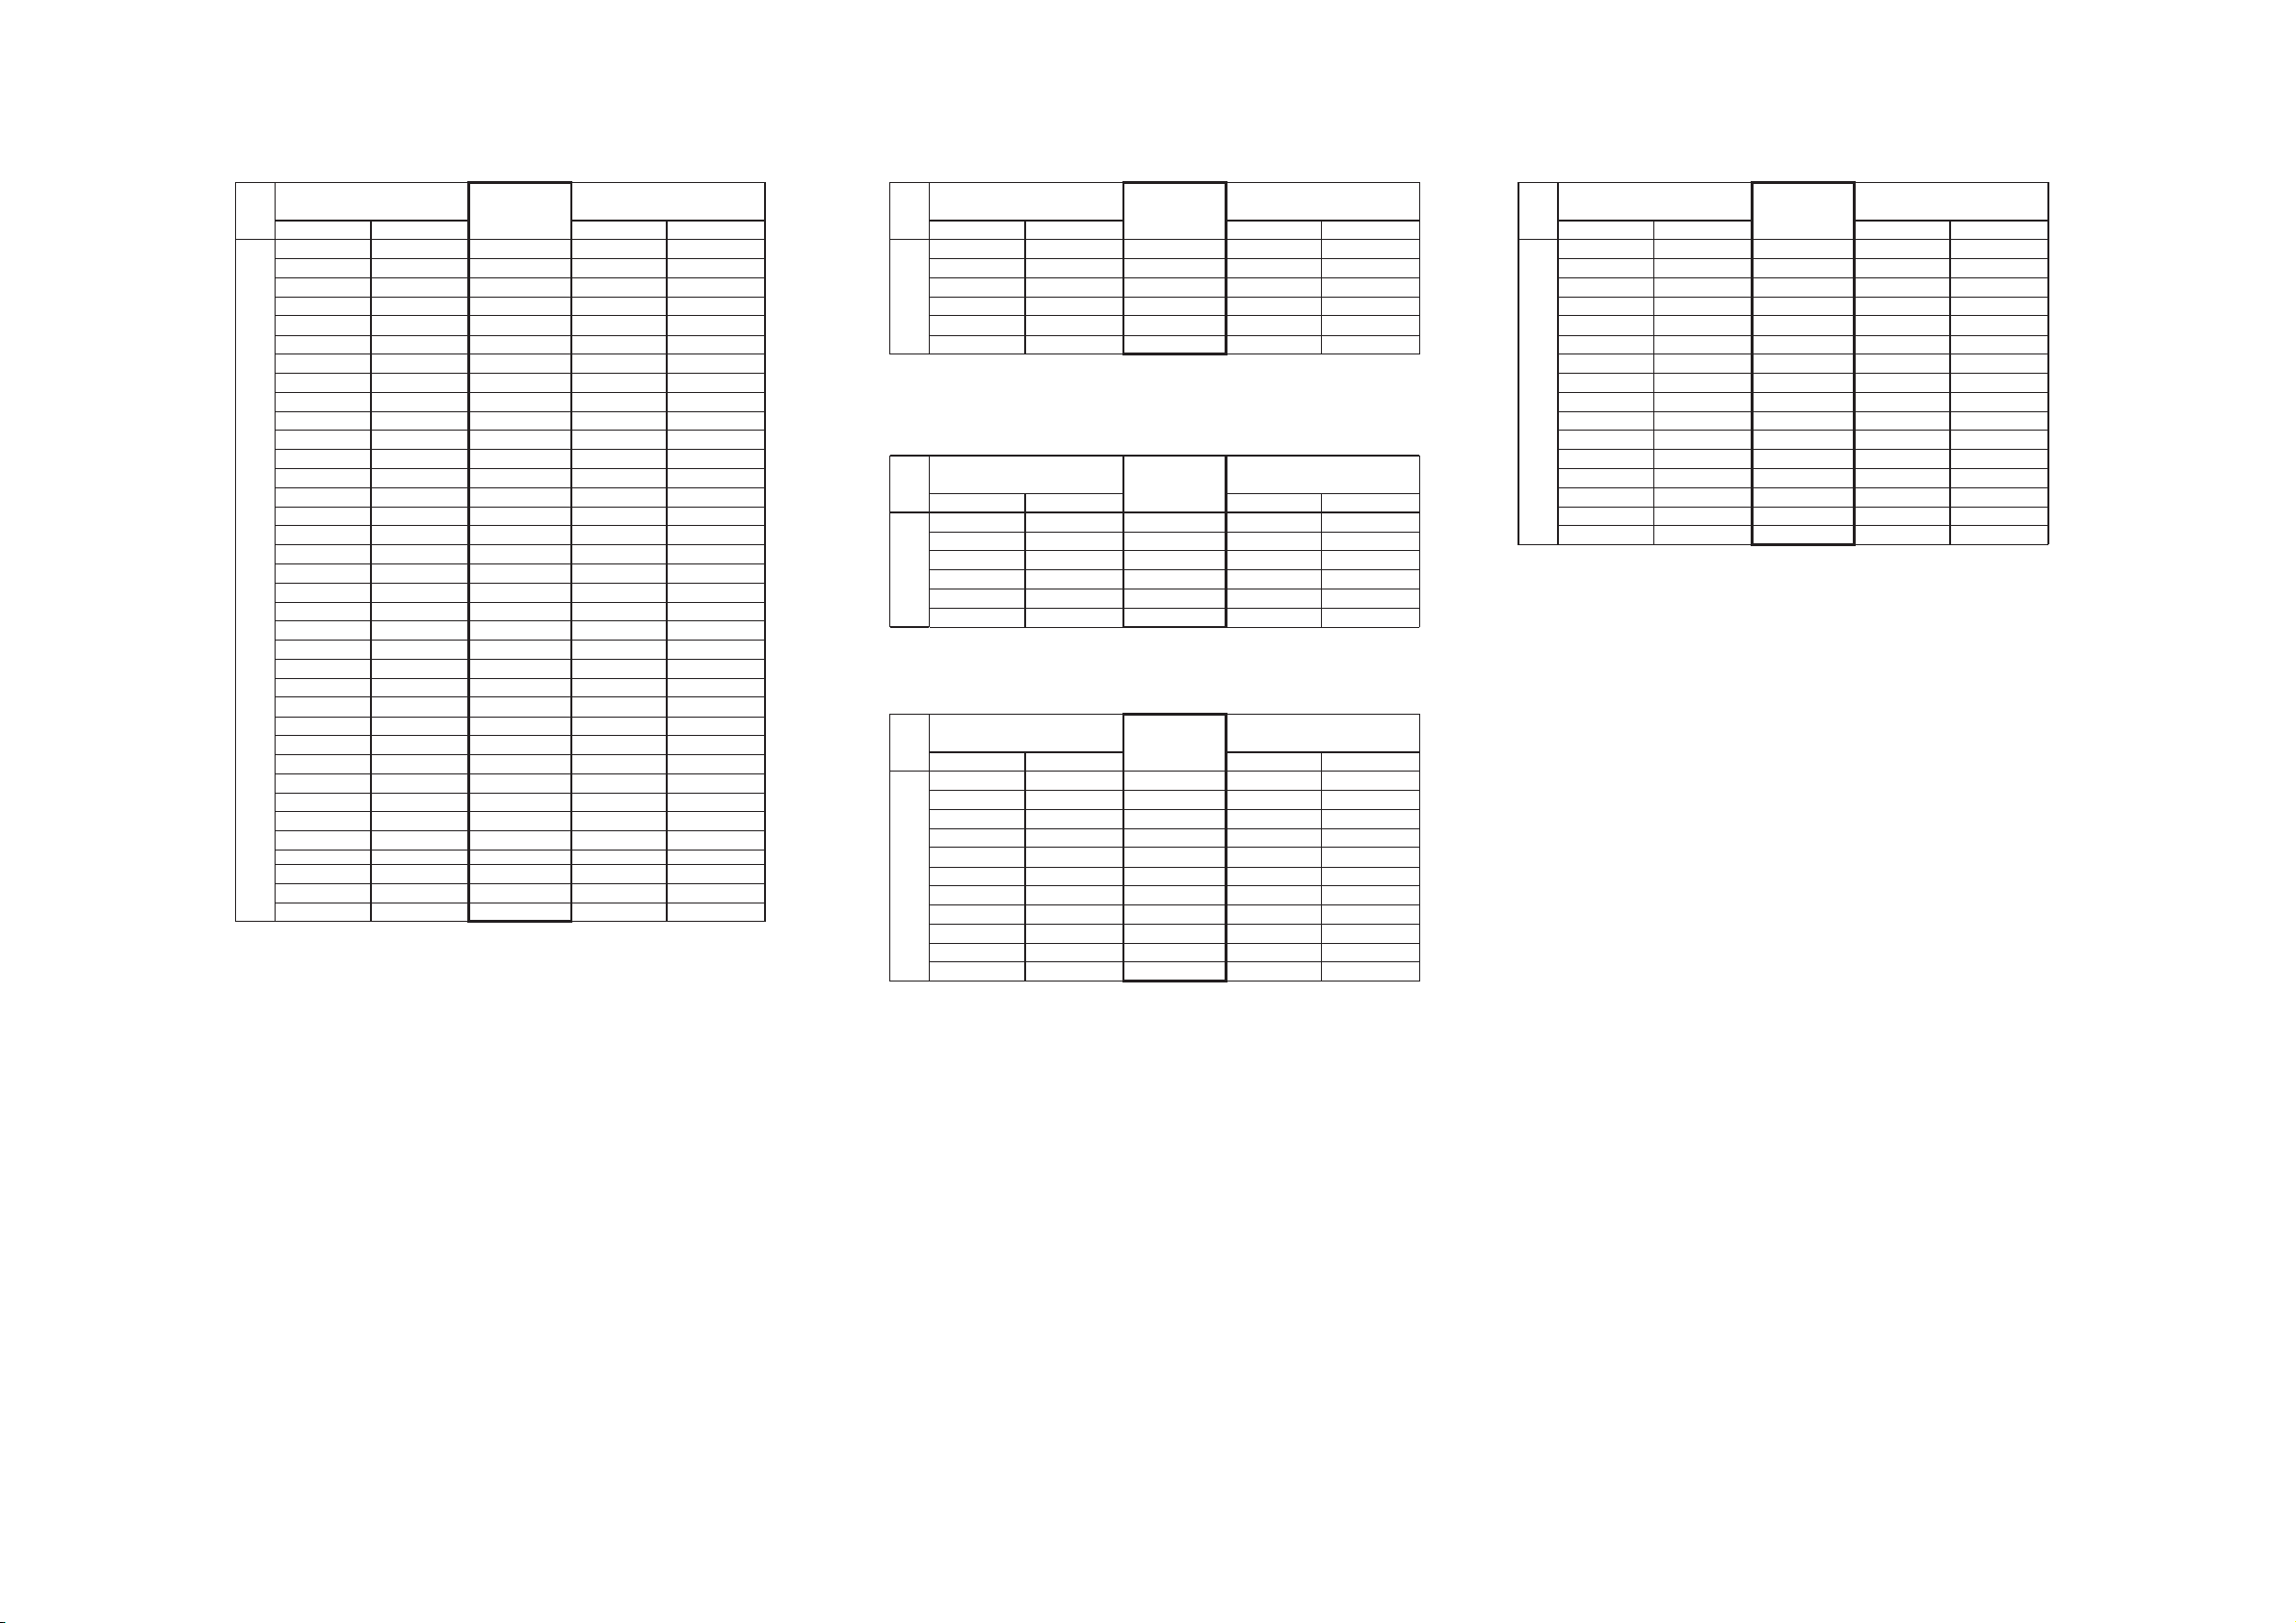
13.5. IC TERMINAL CHART (HDMI/AUDIO)
IC2232
HDMI RECEIVER
SIGNAL NAMETC
Pin NoPort Name Pin No Port Name
Q0 16 D0 98
Q1 15 D1 97
Q2 14 D2 96
Q3 13 D3 95
Q4 10 D4 94
Q5 9 D5 93
Q6 8 D6 92
Q7 7 D7 91
Q8 3 D8 90
Q9 2 D9 86
Q10 1 D10 85
Q11 144 D11 84
Q12 141 D12 83
Q13 140 D13 82
1
Q14 139 D14 81
Q15 138 D15 80
Q16 135 D16 79
Q17 134 D17 78
Q18 133 D18 77
Q19 132 D19 75
Q20 129 D20 74
Q21 128 D21 73
Q22 127 D22 72
Q23 126 D23 71
Q24 123 D24 70
Q25 122 D25 69
Q26 121 D26 68
Q27 120 D27 67
Q28 117 D28 63
Q29 116 D29 62
Q30 115 D30 61
Q31 114 D31 60
Q32 111 D32 59
Q33 110 D33 58
Q34 109 D34 57
Q35 108 D35
IC2101
HDMI TRANSMITTER
D0
D1
D2
D3
D4
D5
D6
D7
D8
D9
D10
D11
D12
D13
D14
D15
D16
D17
D18
D19
D20
D21
D22
D23
D24
D25
D26
D27
D28
D29
D30
D31
D32
D33
D34
D3556
JK2203
HDMI AV IN (BD/DVD)
SIGNAL NAMETC
Pin NoPort Name Pin No Port Name
TMDS D0- 9 R1X0- 61
TMDS D0+ 7 R1X0+ 62
TMDS D1- 6 R1X1- 65
2
TMDS D1+ 4 R1X1+ 66
TMDS D2- 3 R1X2- 69
TMDS D2+ 1 R1X2+
IC2101
HDMI TRANSMITTER
SIGNAL NAMETC
Pin NoPort Name Pin No Port Name
TX0- 33 9
TX0+ 34 7
3
TX1- 36 6
TX1+ 37 4
TX2- 39 3
TX2+
IC1001
DSP
TX0-
TX0+
TX1-
TX1+
TX2-
TX2+40
SIGNAL NAMETC
Pin NoPort Name Pin No Port Name
EXT A0 102 A0 21
EXT A1 101 A1 22
EXT A2 99 A2 23
EXT A3 97 A3 24
EXT A4 96 A4 27
4
EXT A5 93 A5 28
EXT A6 91 A6 29
EXT A7 90 A7 30
EXT A8 88 A8 31
EXT A9 87 A9 32
EXT A10 103 A10
IC2232
HDMI RECEIVER
R1X0-
R1X0+
R1X1-
R1X1+
R1X2-
R1X2+70
HDMI AV OUT (TO TV(ARC))
JK2201
IC1006
SDRAM
TMDS D0-
TMDS D0+
TMDS D1-
TMDS D1+
TMDS D2-
TMDS D2+1
A0
A1
A2
A3
A4
A5
A6
A7
A8
A9
A1020
IC1001
DSP
SIGNAL NAMETC
Pin NoPort Name Pin No Port Name
EXT DQ0 68 DQ0 2
EXT DQ1 65 DQ1 3
EXT DQ2 64 DQ2 5
EXT DQ3 63 DQ3 6
EXT DQ4 61 DQ4 8
EXT DQ5 60 DQ5 9
EXT DQ6 59 DQ6 11
5
EXT DQ7 58 DQ7 12
EXT DQ8 78 DQ8 39
EXT DQ9 77 DQ9 40
EXT DQ10 75 DQ10 42
EXT DQ11 74 DQ11 43
EXT DQ12 72 DQ12 45
EXT DQ13 71 DQ13 46
EXT DQ14 70 DQ14 48
EXT DQ15 69 DQ15
IC1006
SDRAM
DQ0
DQ1
DQ2
DQ3
DQ4
DQ5
DQ6
DQ7
DQ8
DQ9
DQ10
DQ11
DQ12
DQ13
DQ14
DQ1549
73
SC-HTB10P/PC IC TERMINAL CHART (HDMI/AUDIO)
Page 74
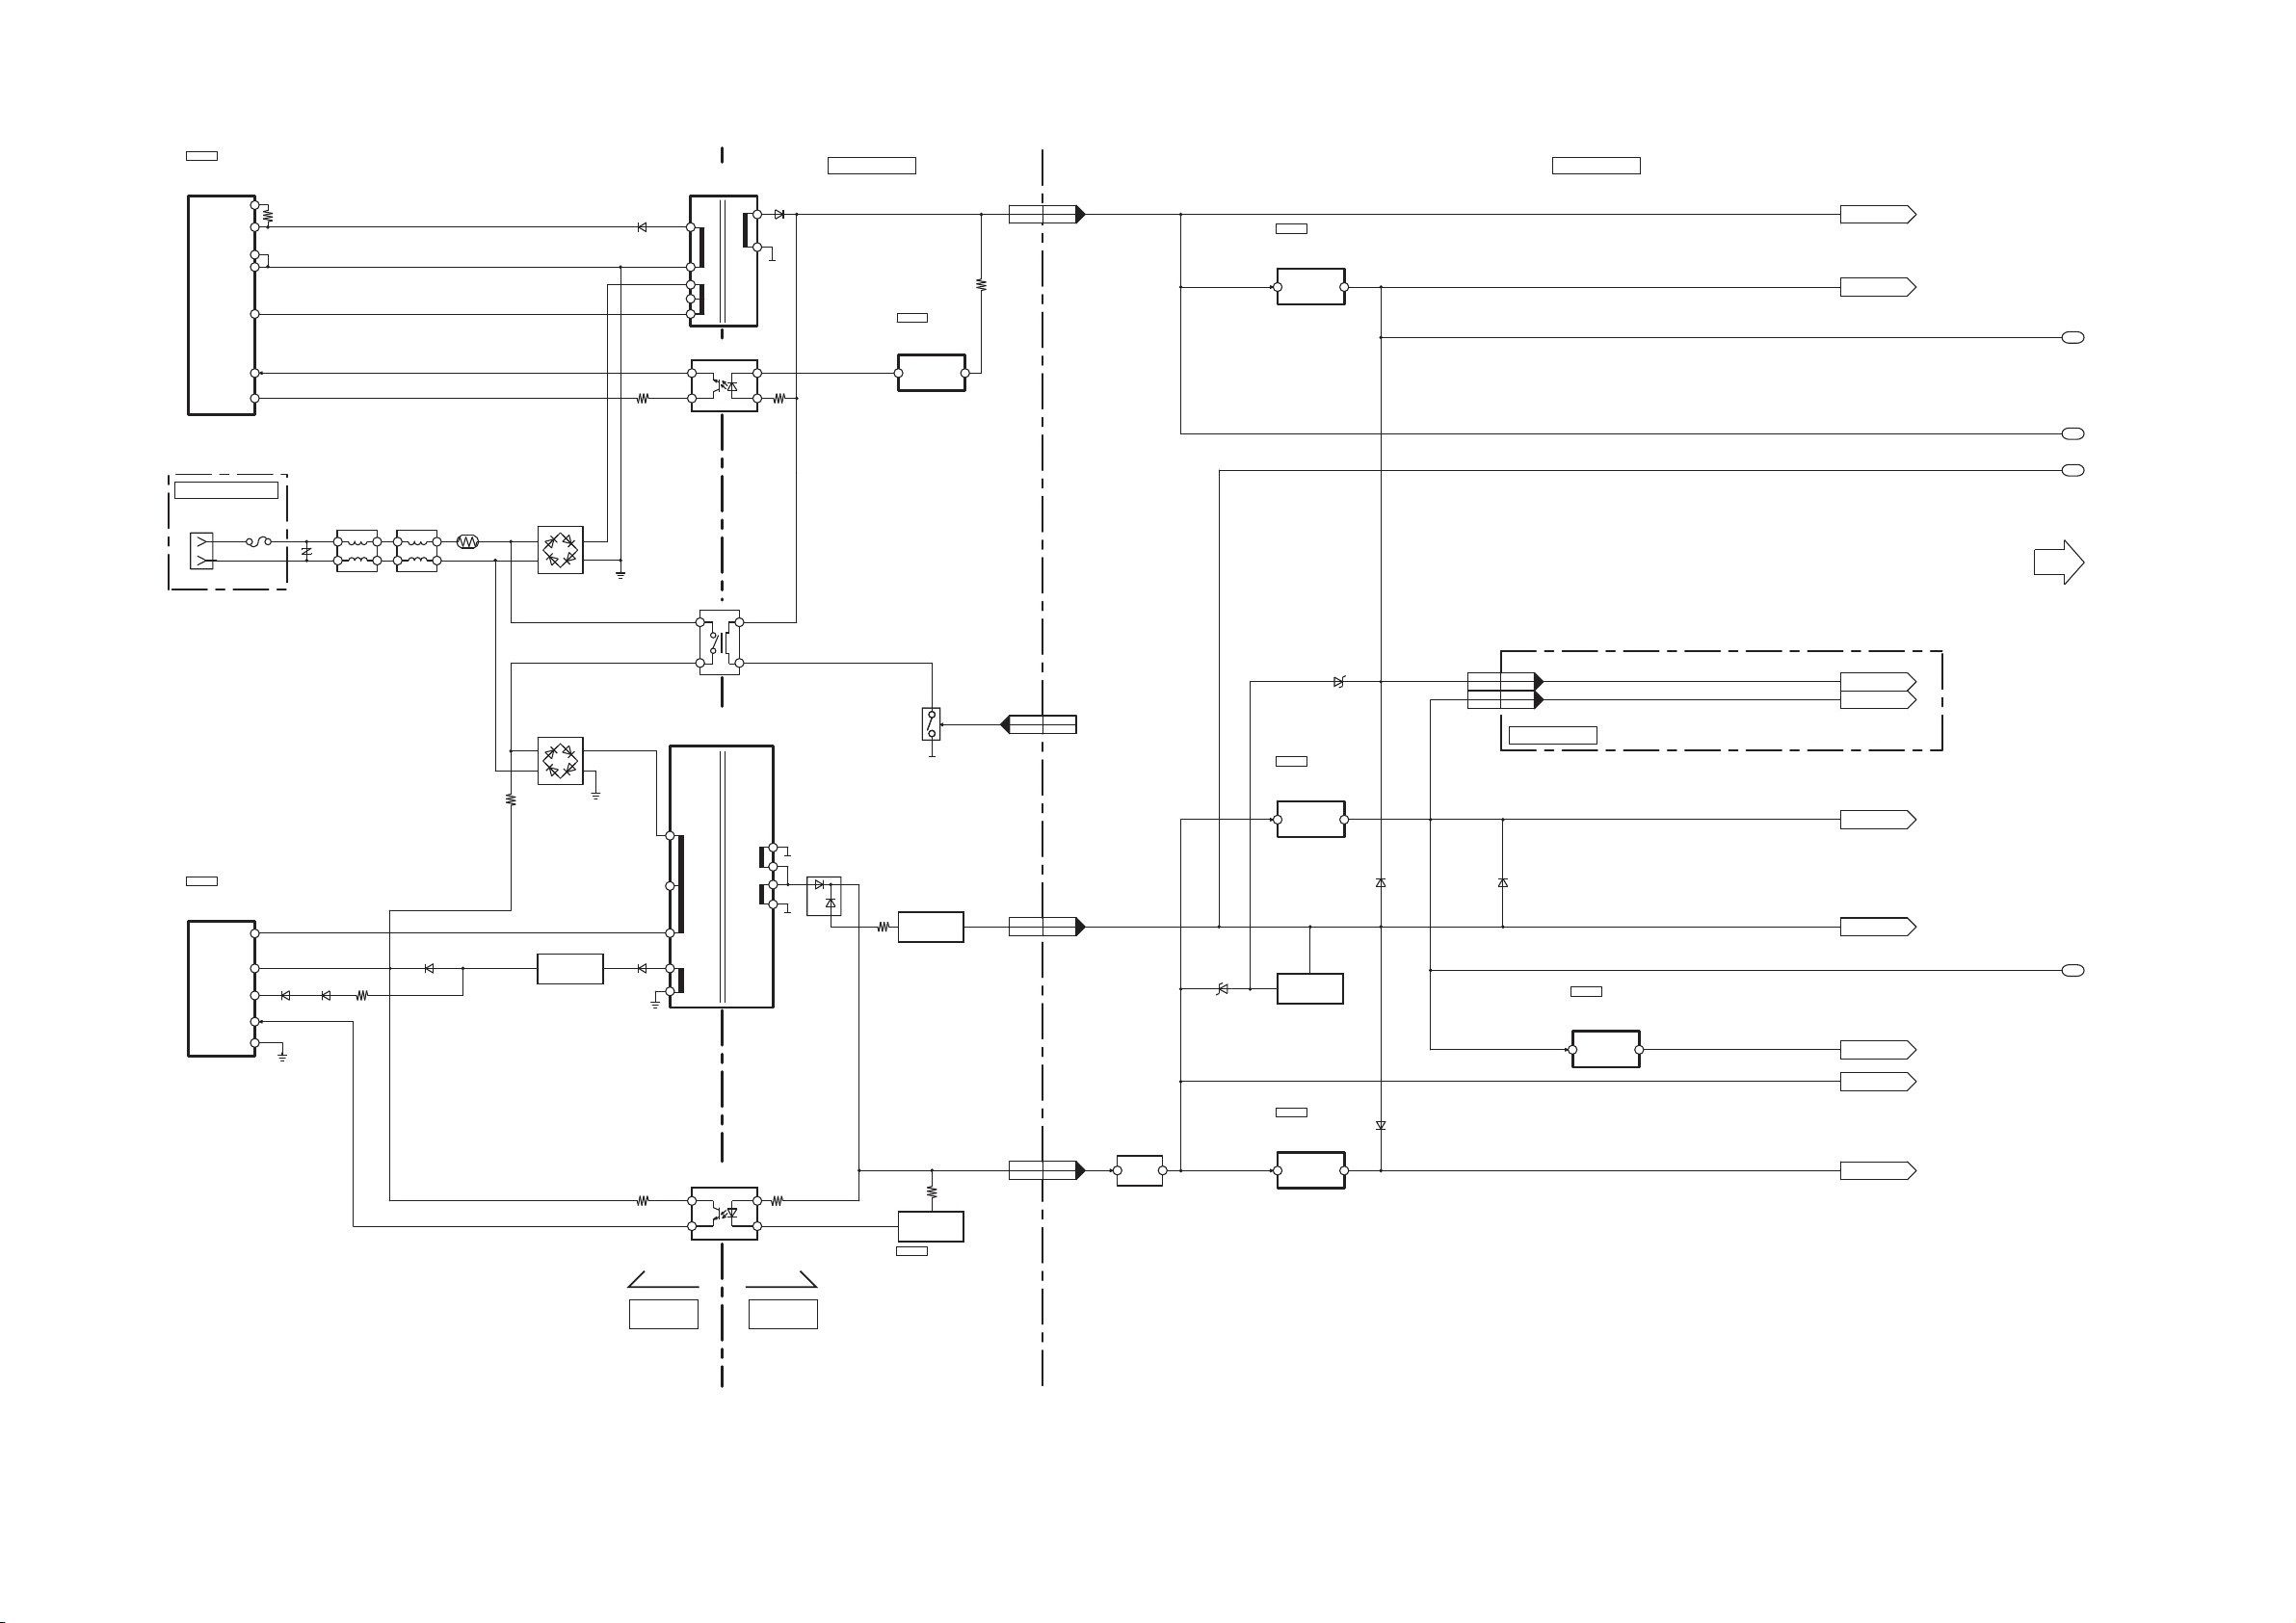
13.6. POWER SUPPLY (1/2) BLOCK DIAGRAM
TO POWER SUPPLY
SECTION (2/2)
1
2
3
4
D704
D703
1,29,10
CN700H2016*
56
CN700H2016*
83
CN700H2016*
VDD(+20V) +20V
101
CN700H2016*
SYS6V
VREF VREF
SYS3.3V
SYS6V
SYS3.3V
SYS3.3V
SYS5V
S8
S7
FB 2
VDD 1
D5
SWITCHING POWER
SUPPLY CONTROL
MIP2F20MSSCF
IC5799
SHUNT
REGULATOR
C0DAEMZ00001
IC5801
5
VCC 4
TR 3
6
3
4
2
1
3
2
1
SUB
TRANSFORMER
T5751
7
4
1
2
10
MAIN
TRANSFORMER
T5703
11
8
9
10
6
5
TH5702
D5799
D5701
RY5701
214
3
D5896
D5798
D5731
D5729
D5802
D5724
D700
D706D701
D5727
PCONT
DCDET
Q5841
DC DETECT
FEED BACK
CIRCUIT
Q5720
REGULATOR
PC5799
FEED BACK
4
3
1
2
PC5720
HOT COLD
FEED BACK
SWITCHING
REGULATOR
C0DAAMH00015
IC5701
VCC 4
OCP/BD 7
FB 6
GND 3
D1
3IN
VOLTAGE
REGULATOR
C0CBABC00117
IC700
OUT 1
3IN
VOLTAGE
REGULATOR
C0CBABC00117
IC107
OUT 1
+12V +12V
1 VIN
SWITCHING
REGULATOR
C0DBAYH00005
IC701
VOUT 2
D5V
1 VIN
SWITCHING
REGULATOR
C0DBAYH00005
IC702
VOUT 2
3.3V
VREF
D5V D5V
5V
12V
DAP3.3V
3.3V
D5V
5V
SDET
SDET
VDD
VDD
IC5899
1C
SHUNT
REGULATOR
C0DAEMZ00001
R2
6V
S DET
FROM
SYSTEM CONTROL
TO
SYSTEM CONTROL
SMPS P.C.B. MAIN P.C.B.
LED P.C.B.
P5701
F1
DZ5701
L5701
4132413
2
L5702
AC INLET
AC INLET P.C.B.
SC-HTB10P/PC POWER SUPPLY(1/2) BLOCK DIAGRAM
Q704
DC DETECT
211
CN350CN300
D5V
11,121,2
CN350CN300
Q5899
SWITCH
21
FP700
BK3.3V
SYS6V
SDET
D5V
NOTE: “ * ” REF IS FOR INDICATION ONLY
74
Page 75
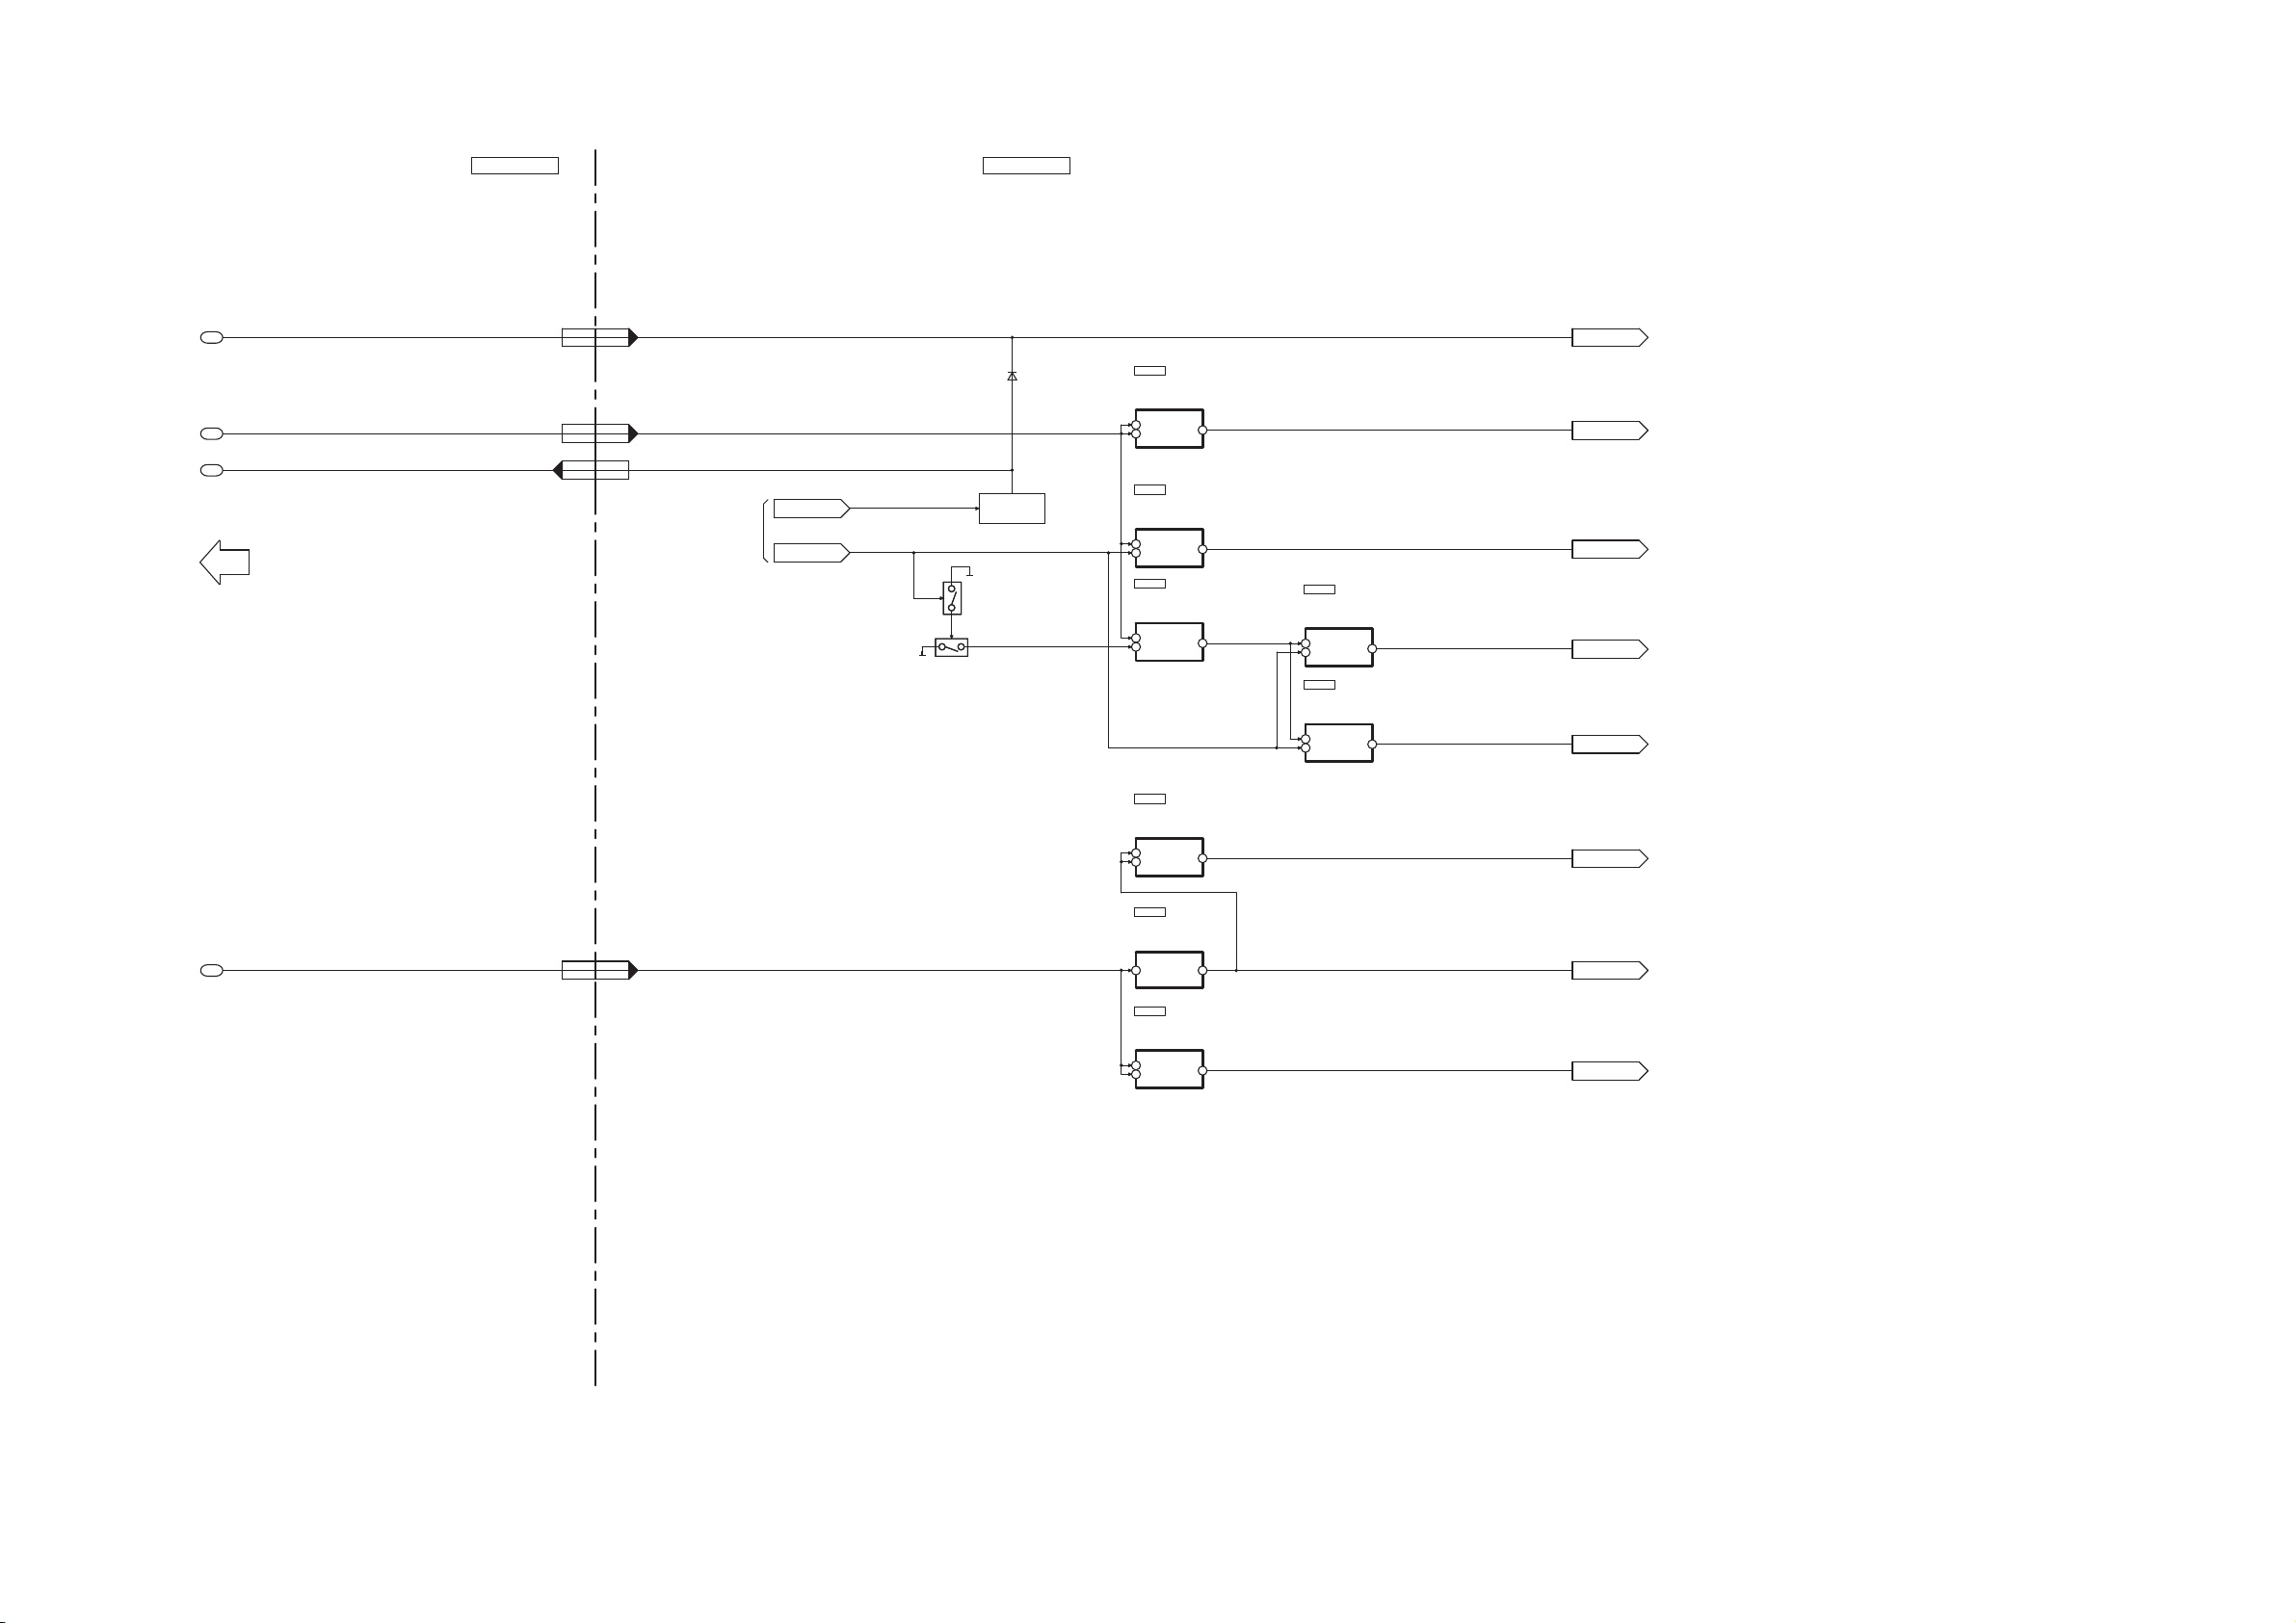
13.7. POWER SUPPLY (2/2) BLOCK DIAGRAM
MAIN P.C.B. HDMI P.C.B.
BK3.3V
1
SYS6V
2
SDET
3
TO POWER SUPPLY
SECTION (1/2)
BK3.3V
CN1001CN200
30,3120,21
D2006
SYS6V
CN1001CN200
48,59,501,2,3
DCDET
CN1001CN200
1635
QR4703
SWITCH
QR4704
SWITCH
DC DETECT
QR2002
DCDET
FROM HDMI
HDMI POWER
IC4793
C0CBCDC00014
VOLTAGE
REGULATOR
1 VIN
VOUT 5
3VC
IC2004
C0CBCBG00013
VOLTAGE
REGULATOR
1IN
OUT 3
2 ON/OFF
IC4722
C0DBAYH00005
SWITCHING
REGULATOR
1 VIN
VOUT 2
5 ON/OFF
IC1003
C0CBCAG00015
VOLTAGE
REGULATOR
1IN
OUT 3
2 ON/OFF
BK5V
SW3.3V
VDD
IC2102
C0CBCAG00015
VOLTAGE
REGULATOR
1IN
OUT 3
2 ON/OFF
IC2233
C0CBCAG00015
VOLTAGE
REGULATOR
1IN
OUT 3
2 ON/OFF
1.8V
SYS1.8V
BK3.3V
BK5V
SW3.3V
SYS1.8V
3.3V
5V
5V
1.8V
1.8V
TO IC2101
1.8V
TO IC2232
VDD
VDD
TO IC1001
D5V
4
NOTE: “ * ” REF IS FOR INDICATION ONLY
IC4724
C0DBAYH00005
SWITCHING
REGULATOR
D5V
5V
CN1001CN200
42,43,447,8,9
1 VIN
IC1004
C0CBCBC00049
VOLTAGE
REGULATOR
1IN
3 ON/OFF
VOUT 2
VOUT 2
D3.3V
VDDA(3.3V)
D3.3V
VDDA(3.3V)
3.3V
3.3V
TO IC1001
SC-HTB10P/PC POWER SUPPLY(2/2) BLOCK DIAGRAM
75
Page 76

76
Page 77
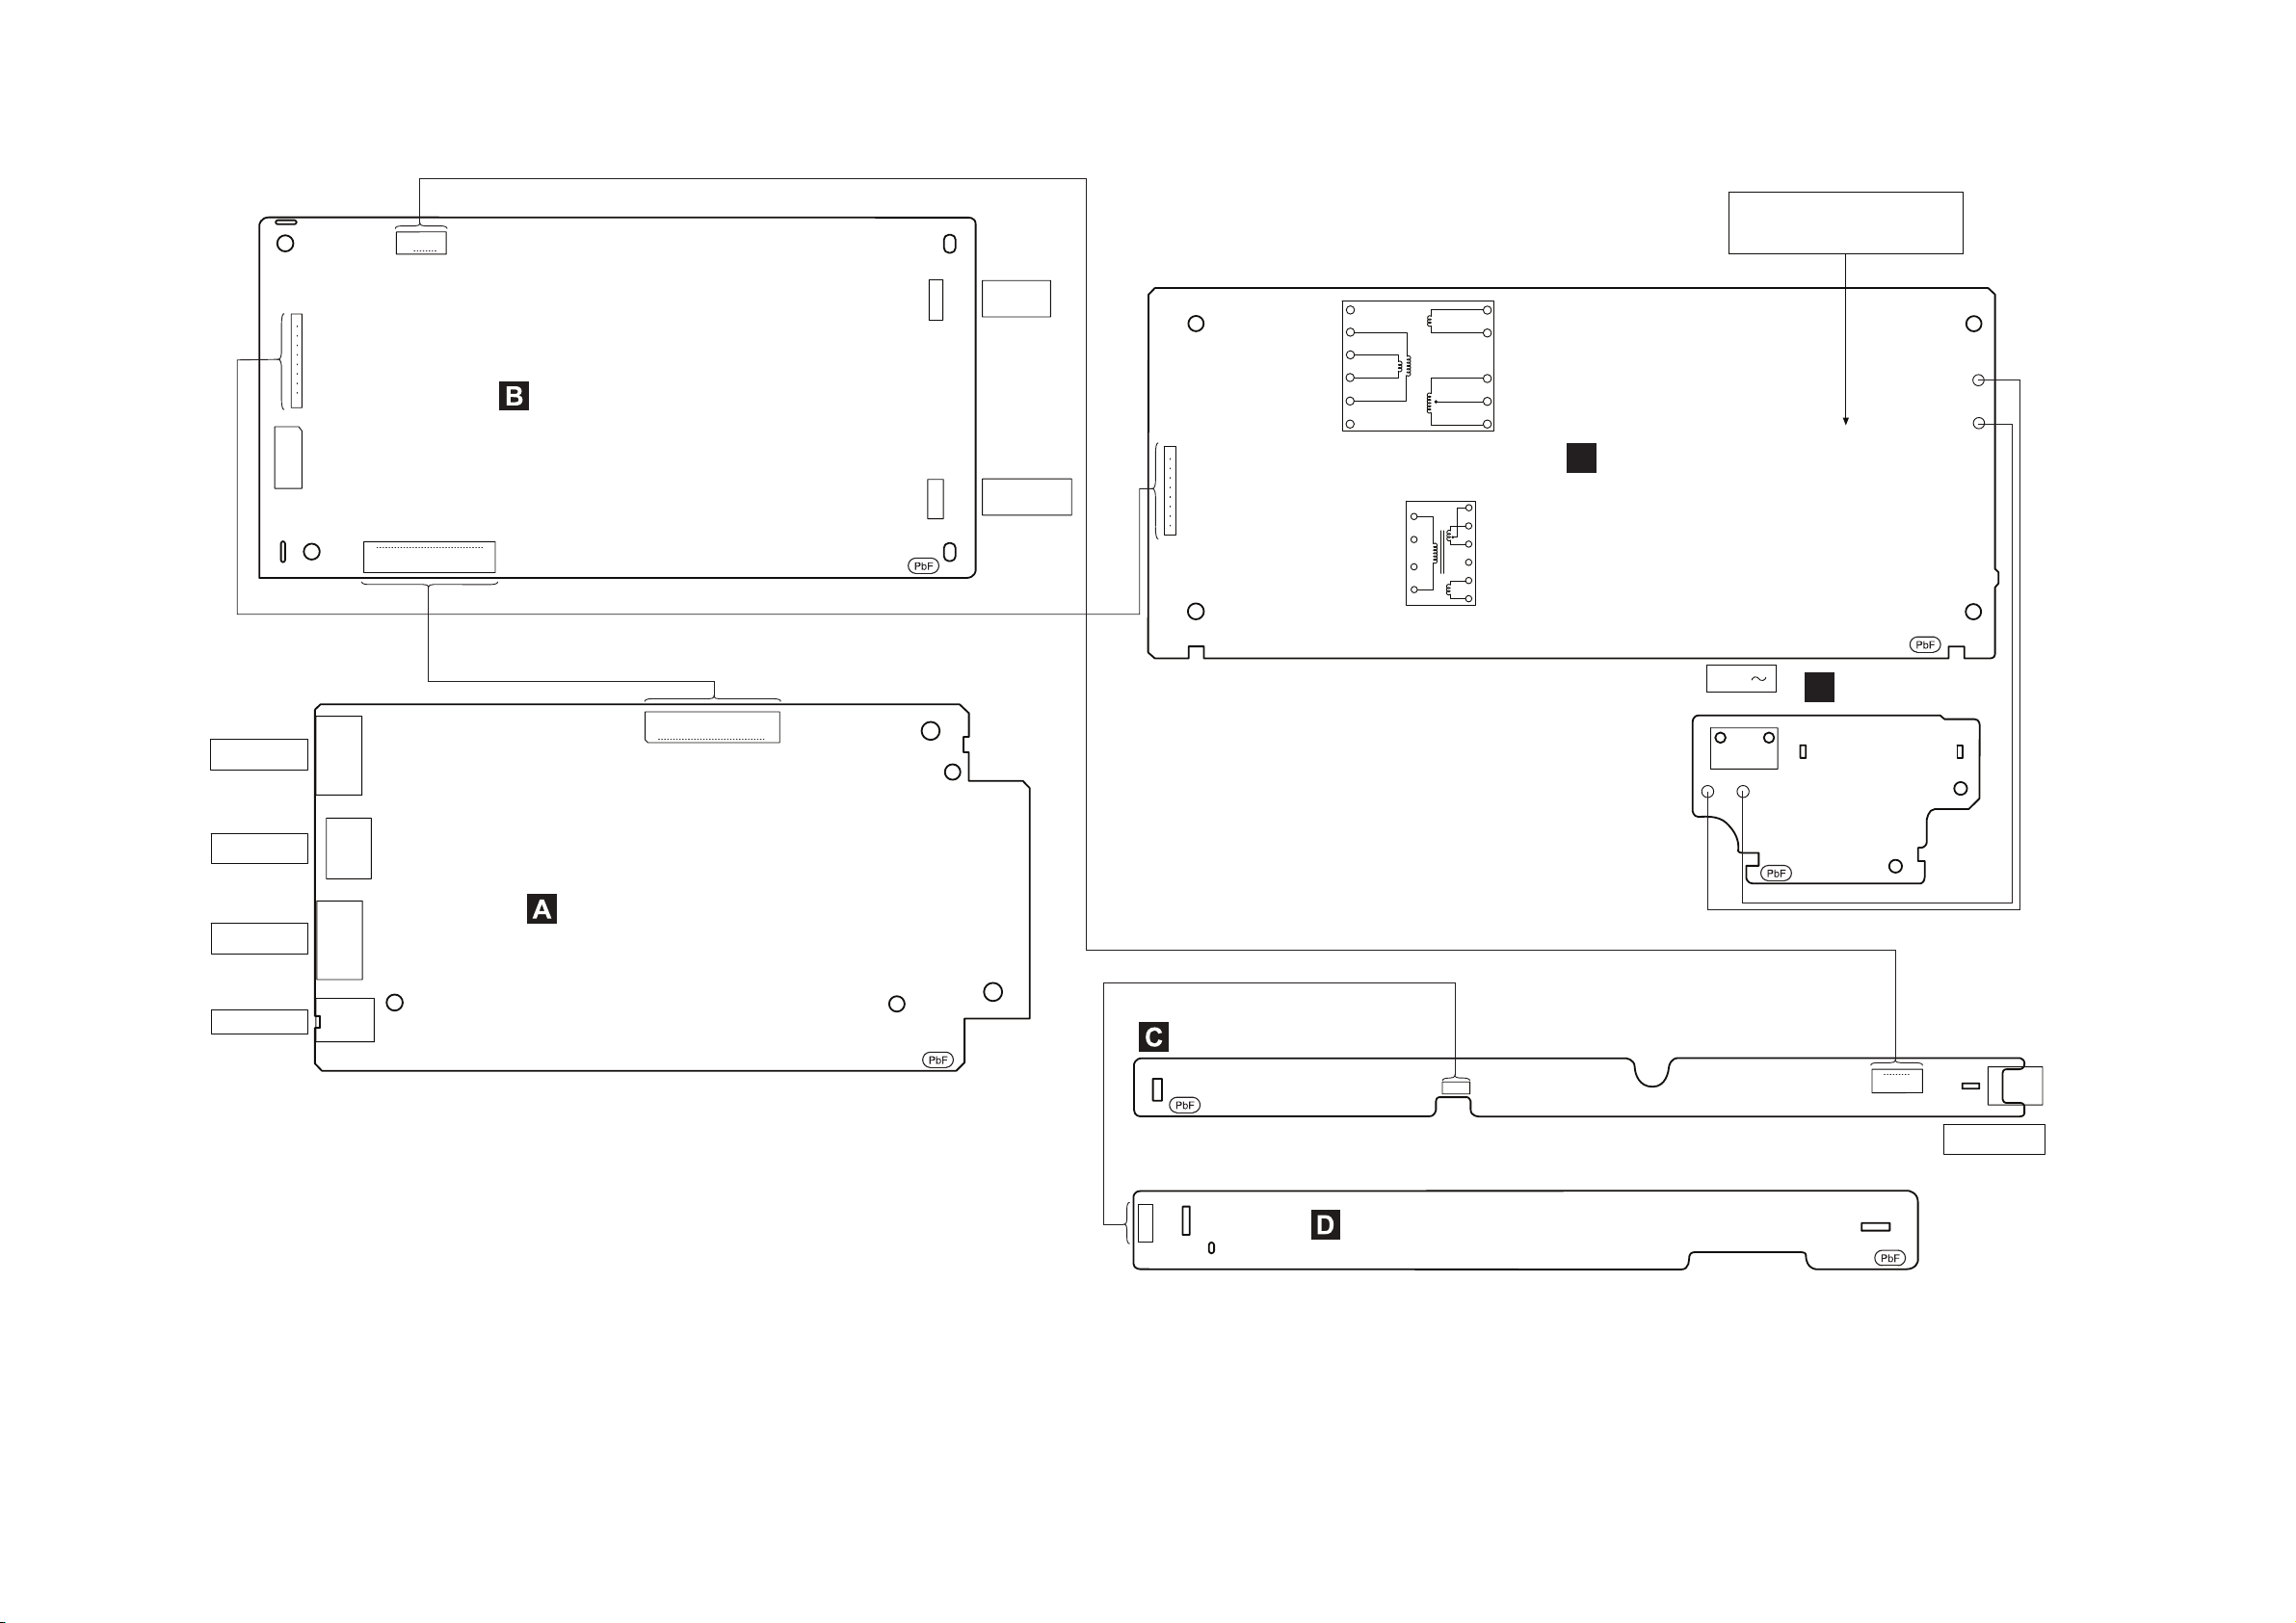
NOTE: “ * ” REF IS FOR INDICATION ONLY.
SC-HTB10P/PC
WIRING CONNECTION DIAGRAM
CN402*
CN401*
TO
SPEAKERS
(FRONT)
(FOR ON BOARD
PROGRAMMING)
CN700
CN600
CN200
CN300
TO
SPEAKERS
(SUBWOOFER)
4
1
2
3
4
1
2
3
1
5
6
2
10
9
10
1
150
112
PANEL TACT SWITCH P.C.B. (SIDE B)
MAIN P.C.B. (SIDE B)
HDMI P.C.B. (SIDE B)
F
SMPS P.C.B.
E
AC INLET P.C.B.
JK4101
OPTICAL DIGITAL
AUDIO IN (TV)
HDMI AV OUT
(TO TV (ARC))
JK2101
JK4001
JK2203
CN1001
1
2
3
19
15
10
5
1
21
4
3
19
15
10
5
1
150
HDMI AV IN
(BD/DVD)
Ir SYSTEM
CN351*
Z300
CN350
123
3
2
1
112
LED P.C.B. (SIDE B)
CN352*
1
2
3
CAUTION
RISK OF ELECTRIC SHOCK
AC VOLTAGE LINE.
PLEASE DO NOT TOUCH THIS P.C.B
(MAIN TRANSFORMER)
T5751
T5703
TL3*
RED
BLK
TL4*
H2016*
(SUB TRANSFORMER)
PRISEC
PRI
SEC
10
7
8
9
6
1
2
3
4
5
12
11
10
9
8
7
6
5
2
1
4
1
10
SOLDER SIDE
SOLDER SIDE
SOLDER SIDE
SOLDER SIDE
SOLDER SIDE
REMOTE CONTROL
SENSOR
TL20*
TL10*
BLK
RED
P5701
120V 60Hz
AC IN
SOLDER SIDE
14 Wiring Connection Diagram
77
Page 78

78
Page 79
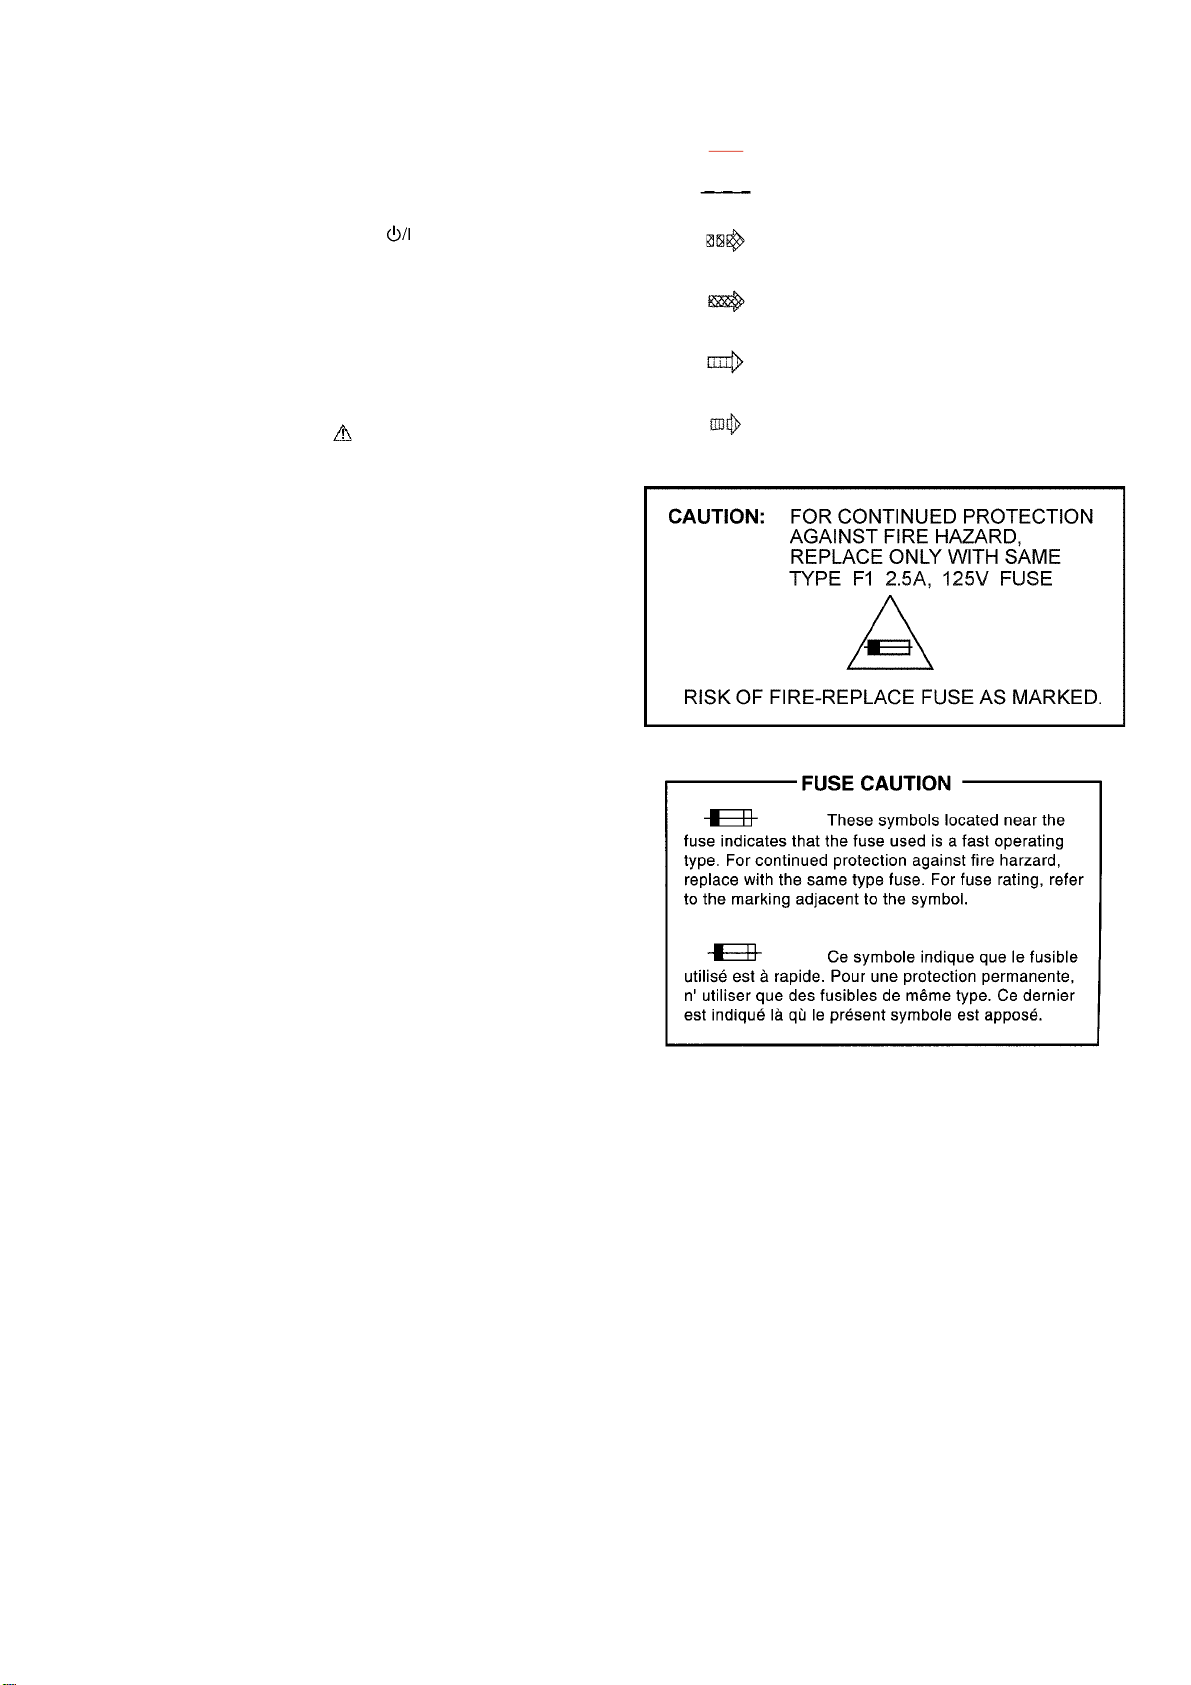
15 Schematic Diagram Notes
(All schematic diagrams may be modified at any time with
the development of new technology)
Notes:
S300:
S301: VOLUME UP switch (VOLUME +).
S303: SELECTOR switch (INPUT SELECTOR).
S304: VOLUME DOWN switch (VOLUME -).
POWER switch ( ).
• Voltage and Signal lines:
: +B signal line
: -B signal line
: Audio Output signal line
: Video Output signal line
• “ * ” REF IS FOR INDICATION ONLY.
• Importance safety notice :
Components identified by ( ) mark have special characteristics important for safety.
Furthermore, special parts which have purposes of fire-retardant (resistors), high-quality sound (capacitors), low-noise
(resistors), etc. are used.
When replacing any of components, be sure to use only
manufacturer's specified parts shown in the parts list.
• Capacitor values are in microfarad(μF) unless specified
otherwise, F=Farad, pF=Pico-Farad
Resistance values are in ohm(Ω), unless specified otherwise, 1K=1,000Ω, 1M=1,000KΩ
: HDMI Video Input signal line
: Optical/HDMI Audio Input signal line
79
Page 80

80
Page 81
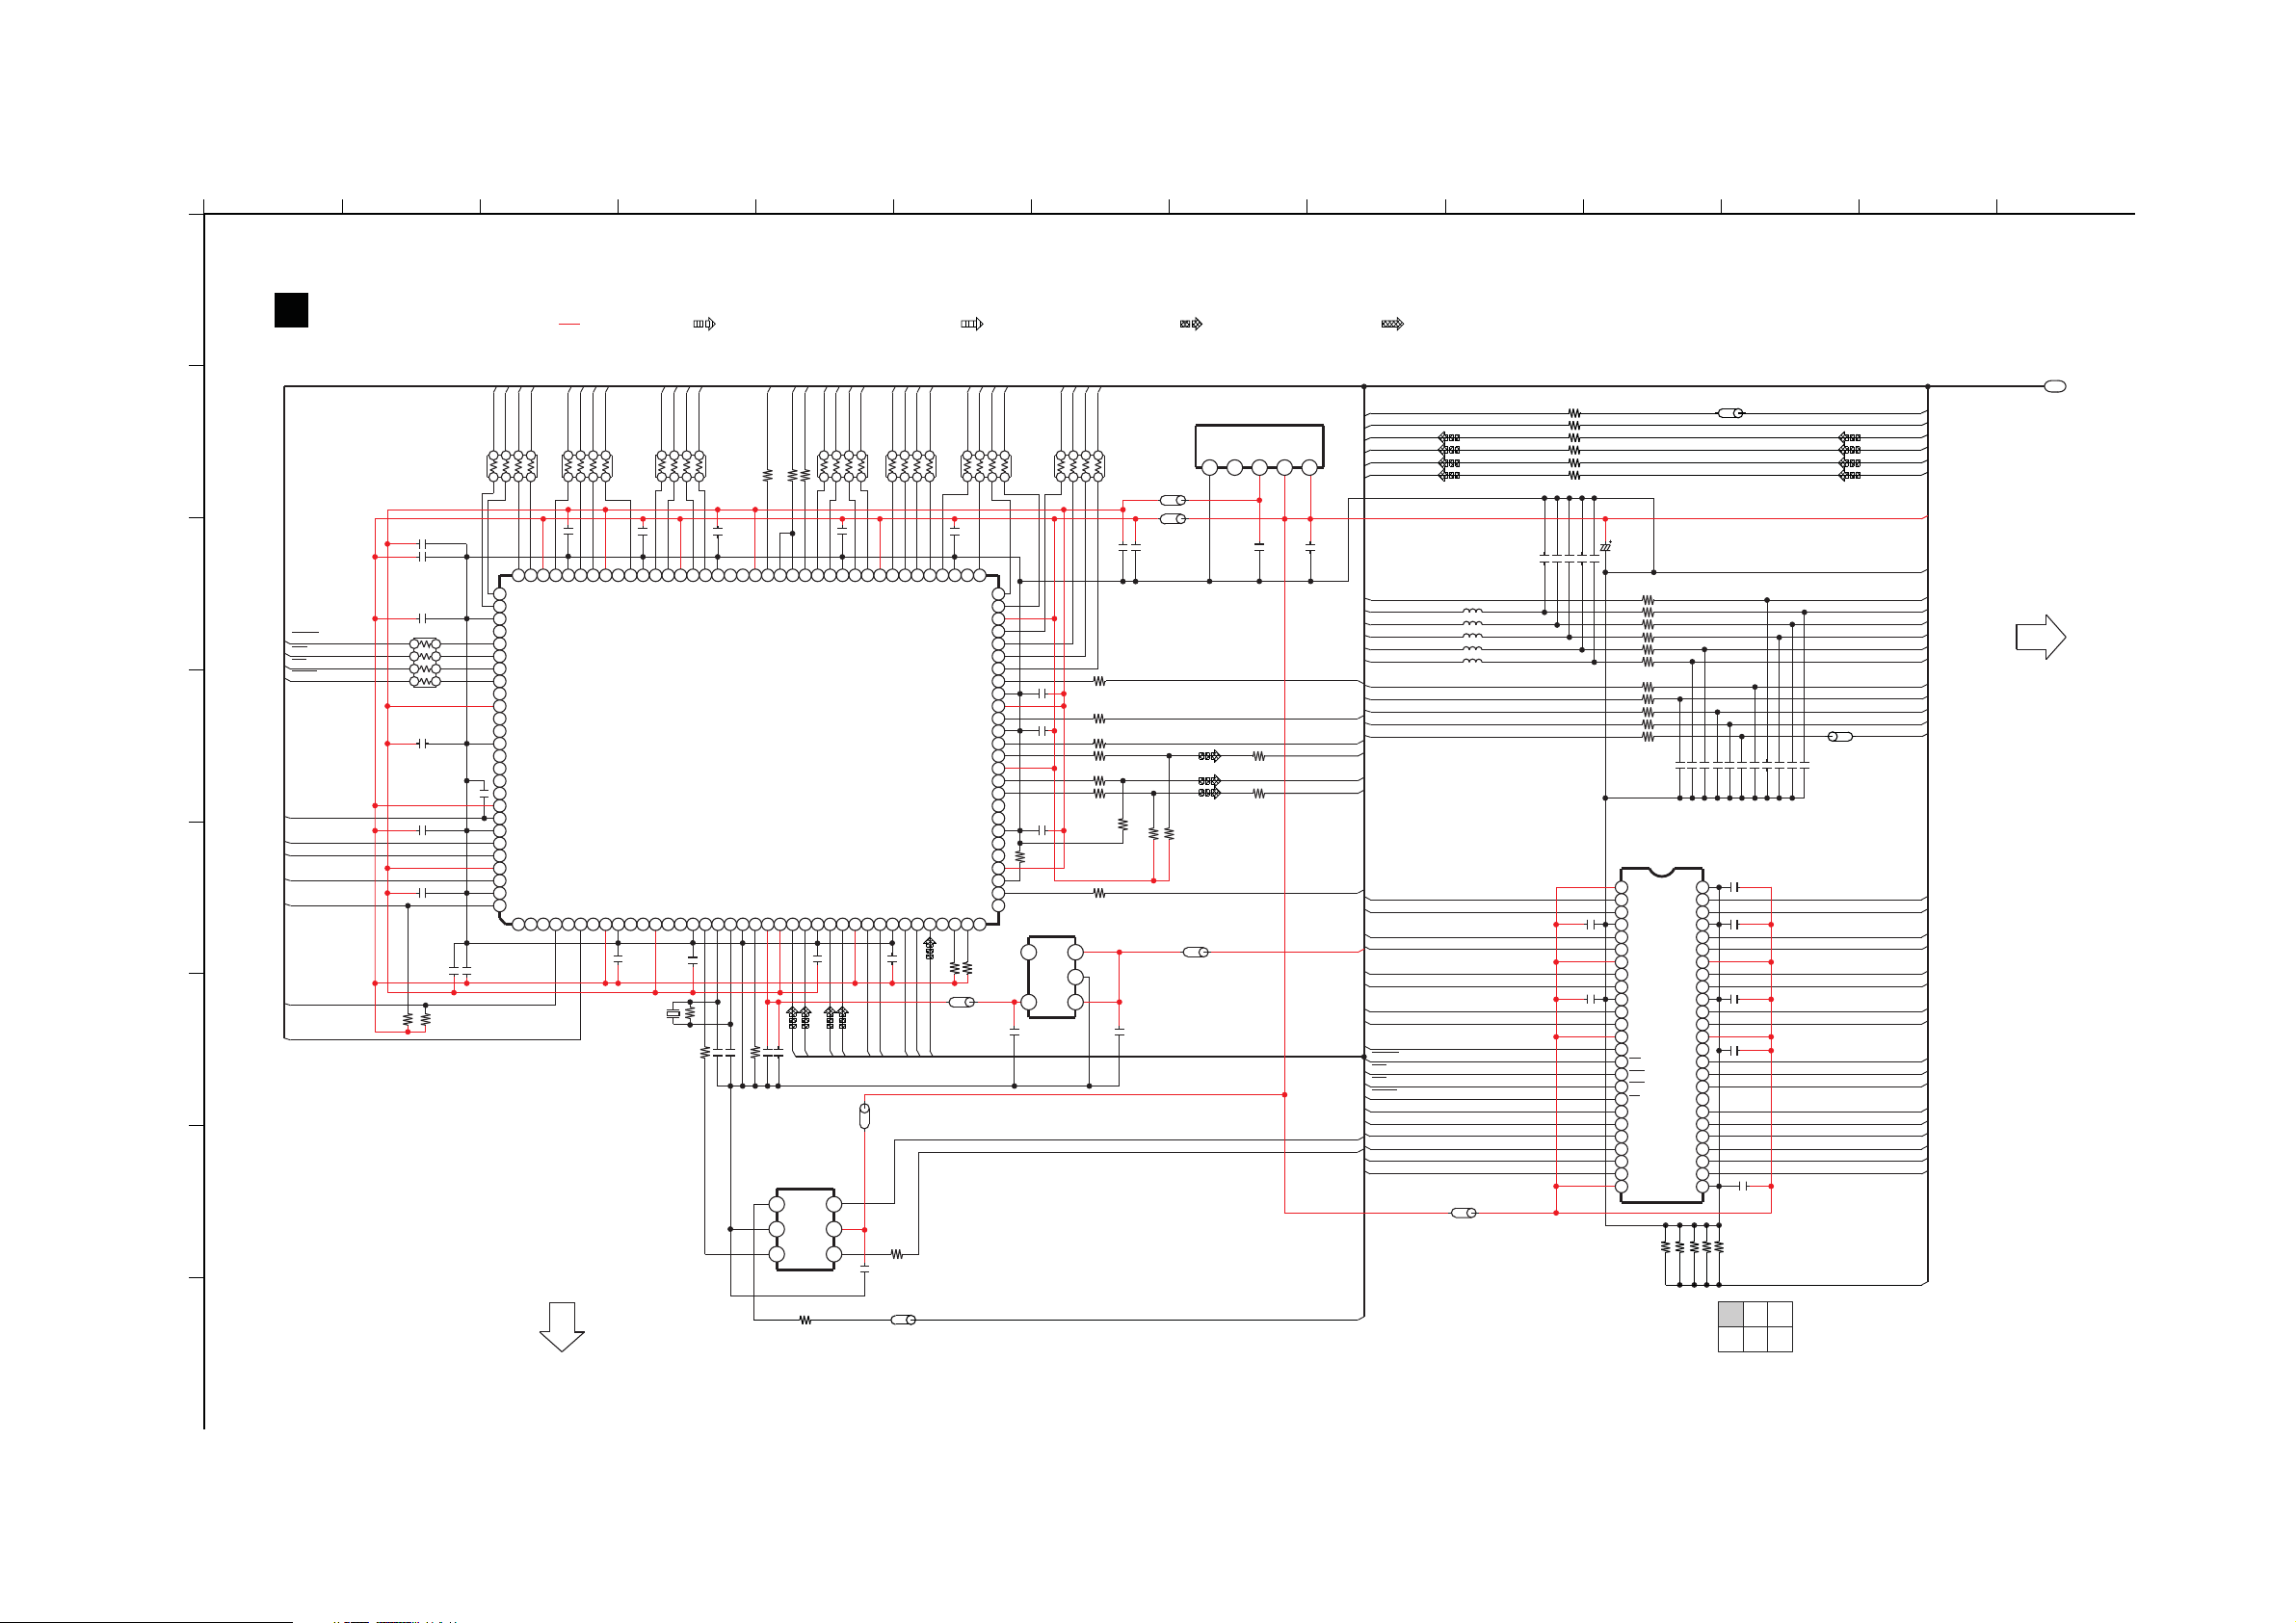
16 Schematic Diagram
A
16.1. HDMI CIRCUIT (1/6)
1
A
SCHEMATIC DIAGRAM - 1
HDMI CIRCUIT
B
C
SD_WE
CAS
RAS
SD_CS
D
DSP_RESET
SCP1_MOSI
SCP1_MISO
CLK
E
F
G
SCP1_BSY
SCP1_IRQ#
SCP1_CS
2 3 4 5 6 7 8 9 10 11 12 13 14
: HDMI VIDEO INPUT SIGNAL LINE
DQ1
DQ2
DQ0
DQ3
865742
13
C1073
GND2
VDD2
GND1
VDD1
TEST
DBCK
37 383433 353130 32 36
0.1
HS3
R1014
3.3K
EE_CS
64
63
62
61
60
59
58
57
56
55
54
53
52
51
50
49
48
47
46
45
44
43
42
41
40
39
RX1007
D1H83304A024
C1072
C1075
C1071
R1025
IC1004
C0CBCBC00049
VOLTAGE REGULATOR
4
5
C1045
10
RX1006
D1H83304A024
EXT_D2
EXT_D3
EXT_D0
GNDIO2
EXT_D15
VDDIO2
EXT_D4
EXT_D5
EXT_D6
EXT_D7
SD_DQM0#
DAO_LRCKL1
GNDIO1
DAO_SCLK1
DAO_DATA0
VDDIO1
DAO_DATA1
DAO_DATA2
DAO1_DATA3
DAO2_LRCLK
DAO2_SCLK
DBDA
DAI_DATA4
UART_TX_EN
3.3K
R1013
LB1002
J0JHC0000021
DQ4
RX1008
13
D1H83304A024
0.1
0.1
0.1
0
NC
ON/OFF
GND
INOUT
DQ7
DQ5
DQ6
865742
R1023
33
R1038
R1037
R1045
R1039
R1031
R1028
3.3K
R1015 82
3
2
1
C1037
1
33
33
33
33
33
C1081 10
C1080 10
: AUDIO OUTPUT SIGNAL LINE : VIDEO OUTPUT SIGNAL LINE
LB1000
J0JHC0000021
LB1001
J0JHC0000021
3.3KR1029
3.3KR1030
LB1006
J0JHC0000021
IC1003
C0CBCAG00015
VOLTAGE REGULATOR
GND
NC
ON/OFF
OUT
4
2135
C1049
10
33R1053
33R1055
IN
C1059
0.1
LDQM
CX_LRCLK
CX_SCLK
DSP_SD1
CX_SDIN2
DSP_SD3
RMCK
RXP1
OMCK
DAI_SCLK1
LRCLK
I2S0
I2S1
I2S2
I2S3
DT_OUT_CODEC
RESET_CODEC
INTREQ_CODEC
CS_CODEC
SCP1_MISO
SCP1_MOSI
SCP1_CS
DSP_RESET
SCP1_BSY
SCPY_IRQ#
CLK
DQ0
DQ1
DQ2
DQ3
5V
DQ4
DQ5
DQ6
DQ7
LDQM
SD_WE
CAS
RAS
SD_CS
BA0
A10
A0
A1
A2
A3
L1000 J0JBC0000014
L1001
J0JBC0000014
L1002
J0JBC0000014
L1003
J0JBC0000014
L1004
J0JBC0000014
LB1008
J0JHC0000021
R2048 100
R2049 100
C1009 100P
C1008 100P
C1010 100P
C1041
0.1
C1043
0.1
100R2047
100R2050
100R2051
100R2052
C4452
4V330
C1007 100P
C1006 100P
R4371 100
R4370 1K
R4369 1K
R4368 1K
R4367 1K
R4366 1K
R4365
R4364 1K
R4363 1K
R4362 1K
R4361 100
C3ABMG000238
1
2
3
4
5
6
7
8
9
10
11
12
13 38
14
15
16
17
18
19
20
21 30
22
23 28
24
25
VDD
DQ0
DQ1
VSSQ
DQ2
DQ3
VDDQ
DQ4
DQ5
VSSQ
DQ6
DQ7
VDDQ
LDQM
WE
CAS
RAS
CS
BA
A10
A0
A2
A3
100
IC1006
SDRAM
R2076 0
C4371 22P
VSS
DQ15
DQ14
VSSQ
DQ13
DQ12
VDDQ
DQ11
DQ10
VSSQ
DQ9
DQ8
VDDQ
UDQM
CLK
CKE
VSSVDD
R2092 0
C4370 22P
50
49
48
47
46
45
44
43
42
41
40
39
NC
37
36
35
34
NC
33
A9
32
A8
31
A7
A6A1
29
A5
A4
27
26
R2093 0
LB2002
J0JBC0000072
C4369 22P
C4367 22P
C4368 22P
C4366 22P
C1039
C1040
C1042
C1038
C1044
0.1
0R2075
R2074 0
BCK_D
LRCK_D
I2S_0_D
I2S_1_D
I2S_2_D
I2S_3_D
D3.3V
DSP_GND
DT_OUT_CODEC_M
RESET_CODEC_M
INTREQ_CODEC_M
CS_CODEC_M
MISO_DSP
MOSI_DSP
RESET_DSP
BUSY_DSP
INTREQ_DSP
LB4108
J0JYC0000096
C4365 22P
C4363 22P
C4364 22P
C4361 22P
C4362 22P
0.1
0.1
0.1
1
CS_DSP
CLK_DSP
DQ15
DQ14
DQ13
DQ12
DQ11
DQ10
DQ9
DQ8
UDQM
SD_CLK
SD_CKE
GND
A9
A8
A7
A6
A5
A4
TO HDMI
SECTION (2/6)
D1H83304A024
C1069
C1070 0.1
R1018
3.3K
C1076
10
C1077
10
C1062
0.1
132
RX1001
C1068
0.1
0.1
C1056
10
R1012
: +B SIGNAL LINE
A2
A4A6A5
A1
865742
10099102101
EXT_A1
RX1003
VDDIO5
A3
865742
13
D1H83304A024
0.1
C1063
9698 97
95 94
GND4
EXT_A4
EXT_A2
EXT_A3
[103] EXT_A10
[104] BA0/EXT_A13
[1] SCP2_CLK
[2] SCP2_MISO
[3] SCP2_MOSI
SCP2_CS#
SCP1_IRQ#
SCP1_CS
SCP2_IRQ#
C1064
0.1
VDD4
EXT_A5
EXT_CS2#
GNDIO7
VDDIO7
DDAC
957631 24 8
10
C1029
0.1
X1000
H0J245500068
RX1004
D1H83304A024
EXT_A6
GNDIO4
VDD7
UART_TXD
1211 14 1513 18 1916 17
A0
A10
BA0
RX1002
13
D1H83304A024
103
104
EXT_A0
105
GNDIO5
106
BA1/EXT_A14
107
SD_WE#
C1028
1000P
C1057
10
108
SD_CAS#
109
SD_RAS#
110
SD_CS#
111
EXT_A15
112
VDD5
113
EXT_A16
114
EXT_A17
115
GND5
116
EXT_A18
117
EXT_A19
118
EXT_OE#
119
EXT_CS1#
120
VDDIO6
121
RESET
122
GNDIO6
123
SCP1_MOSI
SCP1_MISO
124
125
VDD6
SCP1_CLK
126
127
GND6
SCP1_BSY
128
4
8657
3.3K
: HDMI/OPTICAL AUDIO INPUT SIGNAL LINE
13
EXT_A7
UART_RXD
C1030
0.1
R1019
R1021
VDDIO4
UART_CLK
1M
82
A9A7A8
865742
C1065
0.1
85 8487 86 83 8081 76 6869 6567 667375 74 7072 7178 7779829193 92 89 8890
GND3
EXT_A9
EXT_A8
EXT_A11
IC1001
C2HBCY000030
DSP
XTAL_OUT
XTO
XTI
GND7
C1032 33P
C1031 33P
SD_CLK
SD_CKE
333333
R1007
R1008
VDD3
EXT_A12
SD_CLKIN
SD_CLKEN
SD_CLKOUT
VDD8
DAI_DATA3
PLL_REF_RES
GNDA
VDDA(3.3V)
20
10C1058
5.1K
I2S3
R1020
C1033 0.1
IC1005
C0JBAR000396
MULTIPLEXER
CH1
1
GND
3 COMCH0
UDQM
R1009
SD_DQM1#
C1074
I2S2
DQ8
13
C1066
EXT_D9
EXT_D8
DAI_DATA1
GND8
DAI_DATA2
26 28 29272221 24 2523
0.1
I2S1
6A
52
V+
4
DQ9
DQ10
0.1
GNDIO3
DAI_DATA0
I2S0
DQ11
865742
RX1005
D1H83304A024
VDDIO3
EXT_D10
EXT_D11
[65] EXT_D1
[66] EXT_WE
[39] HS4
[40] DAO_MCLK
DAI_SCLK1
VDDIO8
DAI_LRCLK1
C1067
LRCLK
DAI_SCLK1
J0JHC0000021
C1035
0.1
DQ12
13
EXT_D12
GNDIO8
0.1
LB1003
R1024
33
DQ14
DQ15
DQ13
865742
EXT_D13
EXT_D14
DAI_SCLK2
DAI_LRCLK2
SAI_LRCLK
SAI_SCLK
SAI_SDOUT
P1
TO HDMI
SECTION (4/6)
LB2001R2046
100
J0JBC0000072
MCLK_D
H
2/6 3/6
1/6
5/6
4/6 6/6
SC-HTB10P/PC HDMI CIRCUIT
81
Page 82
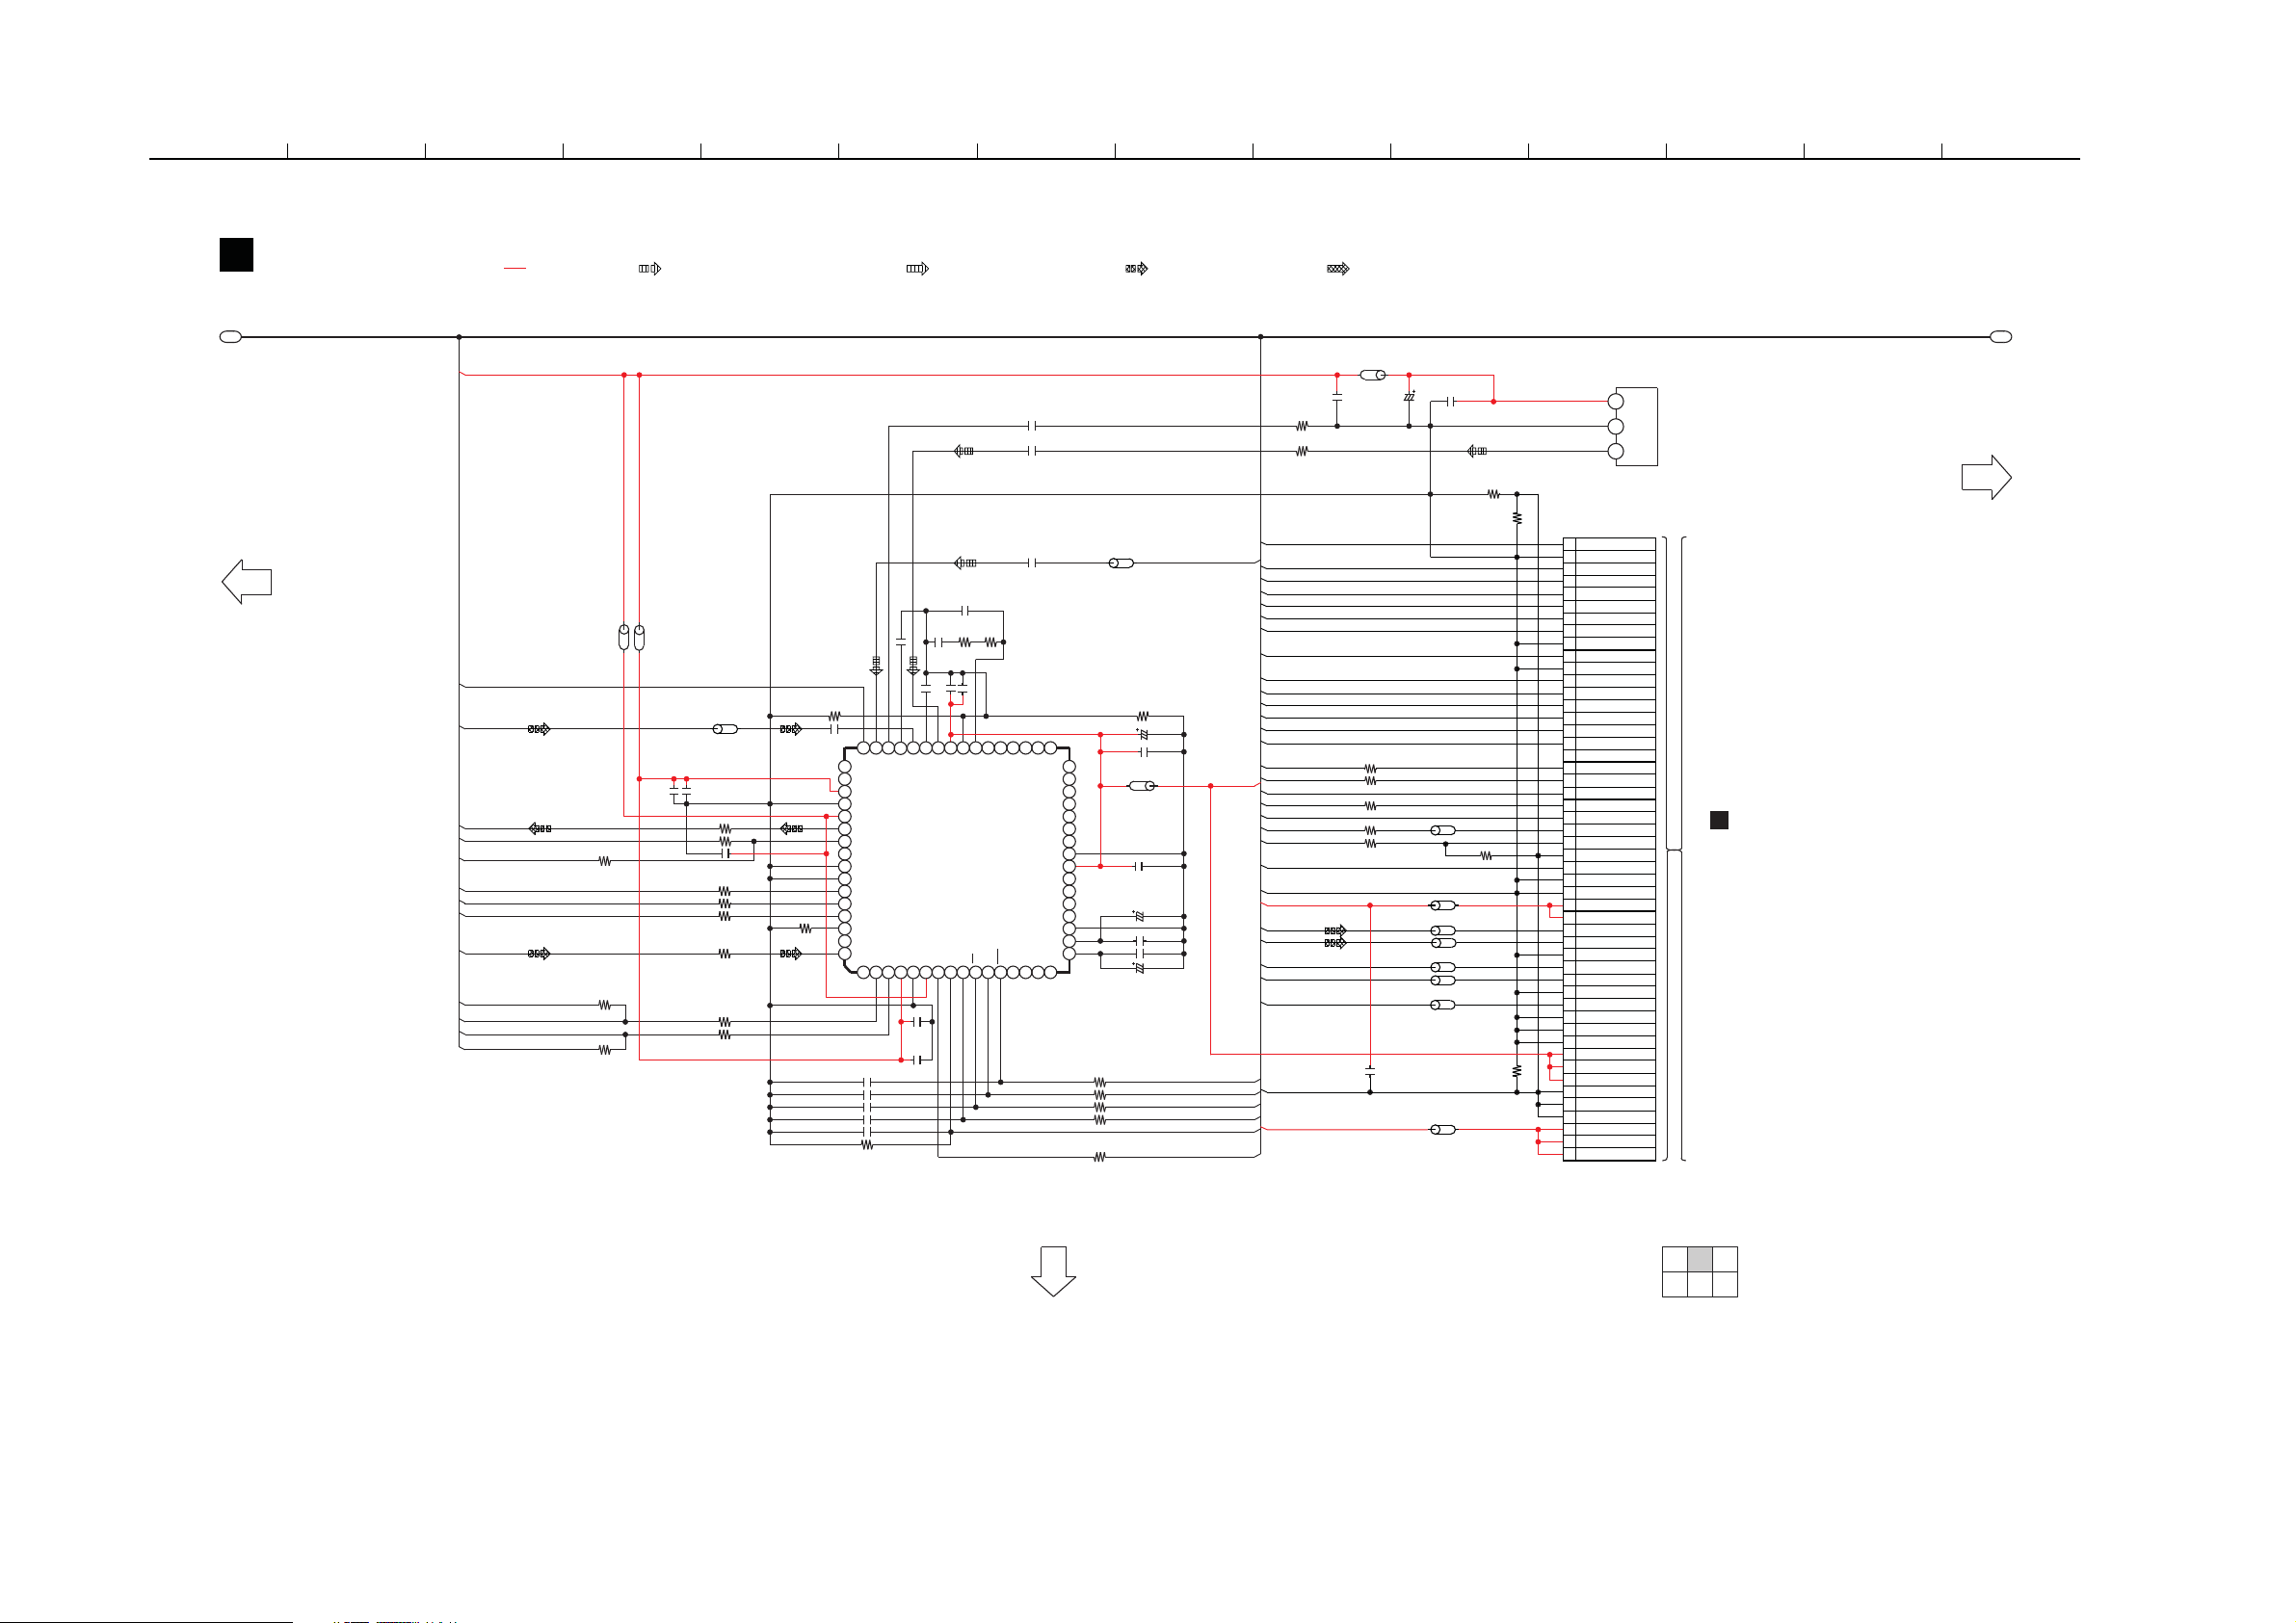
16.2. HDMI CIRCUIT (2/6)
15 16 17 18 19 20 21 22 23 24 25 26 27 28
A
HDMI CIRCUIT
SCHEMATIC DIAGRAM - 2
SC-HTB10P/PC HDMI CIRCUIT
2/6 3/6
5/6
1/6
4/6 6/6
TO HDMI
SECTION (1/6)
TO HDMI
SECTION (5/6)
TO HDMI
SECTION (3/6)
P1P1
B
TO
MAIN CIRCUIT
(CN200)
IN SCHEMATIC
DIAGRAM - 9
1
50
: HDMI/OPTICAL AUDIO INPUT SIGNAL LINE
: HDMI VIDEO INPUT SIGNAL LINE
: AUDIO OUTPUT SIGNAL LINE : VIDEO OUTPUT SIGNAL LINE
: +B SIGNAL LINE
DSP_MCLK
DSP_LRCLK
DSP_SCLK
0.1C1021
6.3V100C1052
C1060 10
SAI_LRCLK
SAI_SCLK
82R1011
R1046 0
33R1010
82R1056
33R1052
82R1036
33R1042
33R1016
33R1017
82R1033
0.1C1036
33R1035
CX_SDIN2
R1032
0
ARC
16V10C1053
C1083
0.01
LB1005
J0JHC0000021
0.01
C1084
0.01
C1085
0.01
C1086
0.01
C1087
2.4K
R1005
150
R1044
C1054
10
0.1
C1025
C1024
0.047
C1023 2200P
0.01
C1026
0.1C1022
4748 4445 4041 36 3335 343839 3743 4246
1
62
63
58
57
60
61
59
64
53
50
49
52
51
55
56
54
879465
23
24
21
18
19
17
20
22
1612 1310 11 1514
23
31
29
30
32
27
28
25
26
C0FBZK000013
IC1002
J0JHC0000021
LB1004LB1007
J0JHC0000021
C1027
0.1
C2015
1
IEC958_D
SAI_SDOUT
C1055
10
CLK
C1012 1000P
100K
R1022
C1016
100P
C1013
100P
C1015
100P
C1014
100P
0.1
C1011
10
C1050
CX_SCLK
CX_LRCLK
RMCK
0.1C1020
50V4.7C1051
100
R1000
DT_OUT_CODEC
CS_CODEC
RESET_CODEC
INTREQ_CODEC
SCP1_MOSI
R1003 1K
1KR1002
R1004 1K
1KR1001
D3.3V
5V
[50] TXR
RXP6
RXP2
RXP3
RXP4
AGND
RXP7
VARX
MUTEC
AOUTA1-
[35] AOUTB1+
AOUTA1+
LPFLT
[49] RXP0
AOUTA2+
AOUTB2+
RMCK
SAI_SDOUT
AOUTB3-
AOUTB3+
ADCIN1
CX_SDOUT
ADCIN2
VA
AOUTA4-
AGND
DGND
AOUTA3-
VLS
AOUTA3+
CX_SDIN3
SAI_LRCLK
CODEC
OMCK
AOUTB4+
AOUTA4+
[18] FILT+
[17] VQ
REFGND
CX_SDIN4
[2] CX_SCLK
[1] CX_SDIN1
AOUTB4-
[3] CX_LRCLK
SAI_SCCLK
CX_SDIN2
VD
CS
INT
RST
VLC
CCLK
AINL+
AINL-
CDIN
AINR-
AINR+
CDOUT
DGND
IEC 958
[34] AOUTB1-
[33] AOUTA2-
VD
RXP1
RXP1
AOUTB2-
OMCK
33R1051
C4104
0.1
0
R4101
LB4101
J0JBC0000014
0
R4102
C4103
6.3V100
2
1
3
JK4101
OPTICAL
DIGITAL AUDIO IN
(TV)
0.01
C4101
VCC
GND
INPUT
0R1026
LB2003
J0JBC0000072
LB2004
J0JCC0000119
HDMI_MUTE
RESET_DSP
MOSI_DSP
MISO_DSP
BUSY_DSP
INTREQ_DSP
CS_DSP
CLK_DSP
DSP_GND
DT_OUT_CODEC_M
CS_CODEC_M
INTREQ_CODEC_M
RESET_CODEC_M
R2094
0
M_SI
H_REQ
H_POWER
H_SO
M_CS
MCLK
REMOTE
DCDET
LB4102
DSP_MCLK
DSP_SCLK
DSP_LRCLK
LB4103
0
R4375
LB2242
J0JHC0000021
M_RST
HDMI_POWER_M
GND
LB4107
LB4104
BK3.3V
LB4105
DSP_SD1
DSP_SD3
LB4106 J0JYC0000096
J0JYC0000096
J0JYC0000096
J0JYC0000096
J0JYC0000096
LB2010 J0JHC0000021
J0JHC0000021
6
7
5
9
47
44
39
40
35
31
27
24
21
20
22
16
15
18
17
11
13
12
10
14
19
23
26
25
30
28
29
34
32
33
38
36
37
43
41
42
46
45
49
48
8
1
3
4
2
50
CN1001
SYS6V
MISO_DSP
H_SO
M_SI
M_CS
+5V
+5V
+5V
H_REQ
M_RST
SYS6V
BK3.3V
BK3.3V
SYS6V
SYS6V
M_CLK
DC_DET
KEY1
REMOTE
CS_DSP
DSP_GND
DSP_GND
CLK_DSP
DSP_GND
DSP_GND
HDMI_GND
DSP_GND
DSP_GND
DSP_GND
DSP_MCLK
DSP_SCLK
DSP_GND
HDMI_GND
HDMI_GND
HDMI_GND
DSP_SD3
DSP_SD1
DSP_GND
DSP_LRCLK
BUSY_DSP
MAIN_POWER
HDMI_POWER
INTREQ_DSP
CS_CODEC_M
RESET_CODEC_M
DT_OUT_CODEC_M
INTREQ_CODEC_M
DSP_GND
MOSI_DSP
HDMI_MUTE
RESET_DSP
R2038 100
R2039 100
R2040 100
R2053 100
R2037 100
R2041 10K
R2090
0
82
Page 83
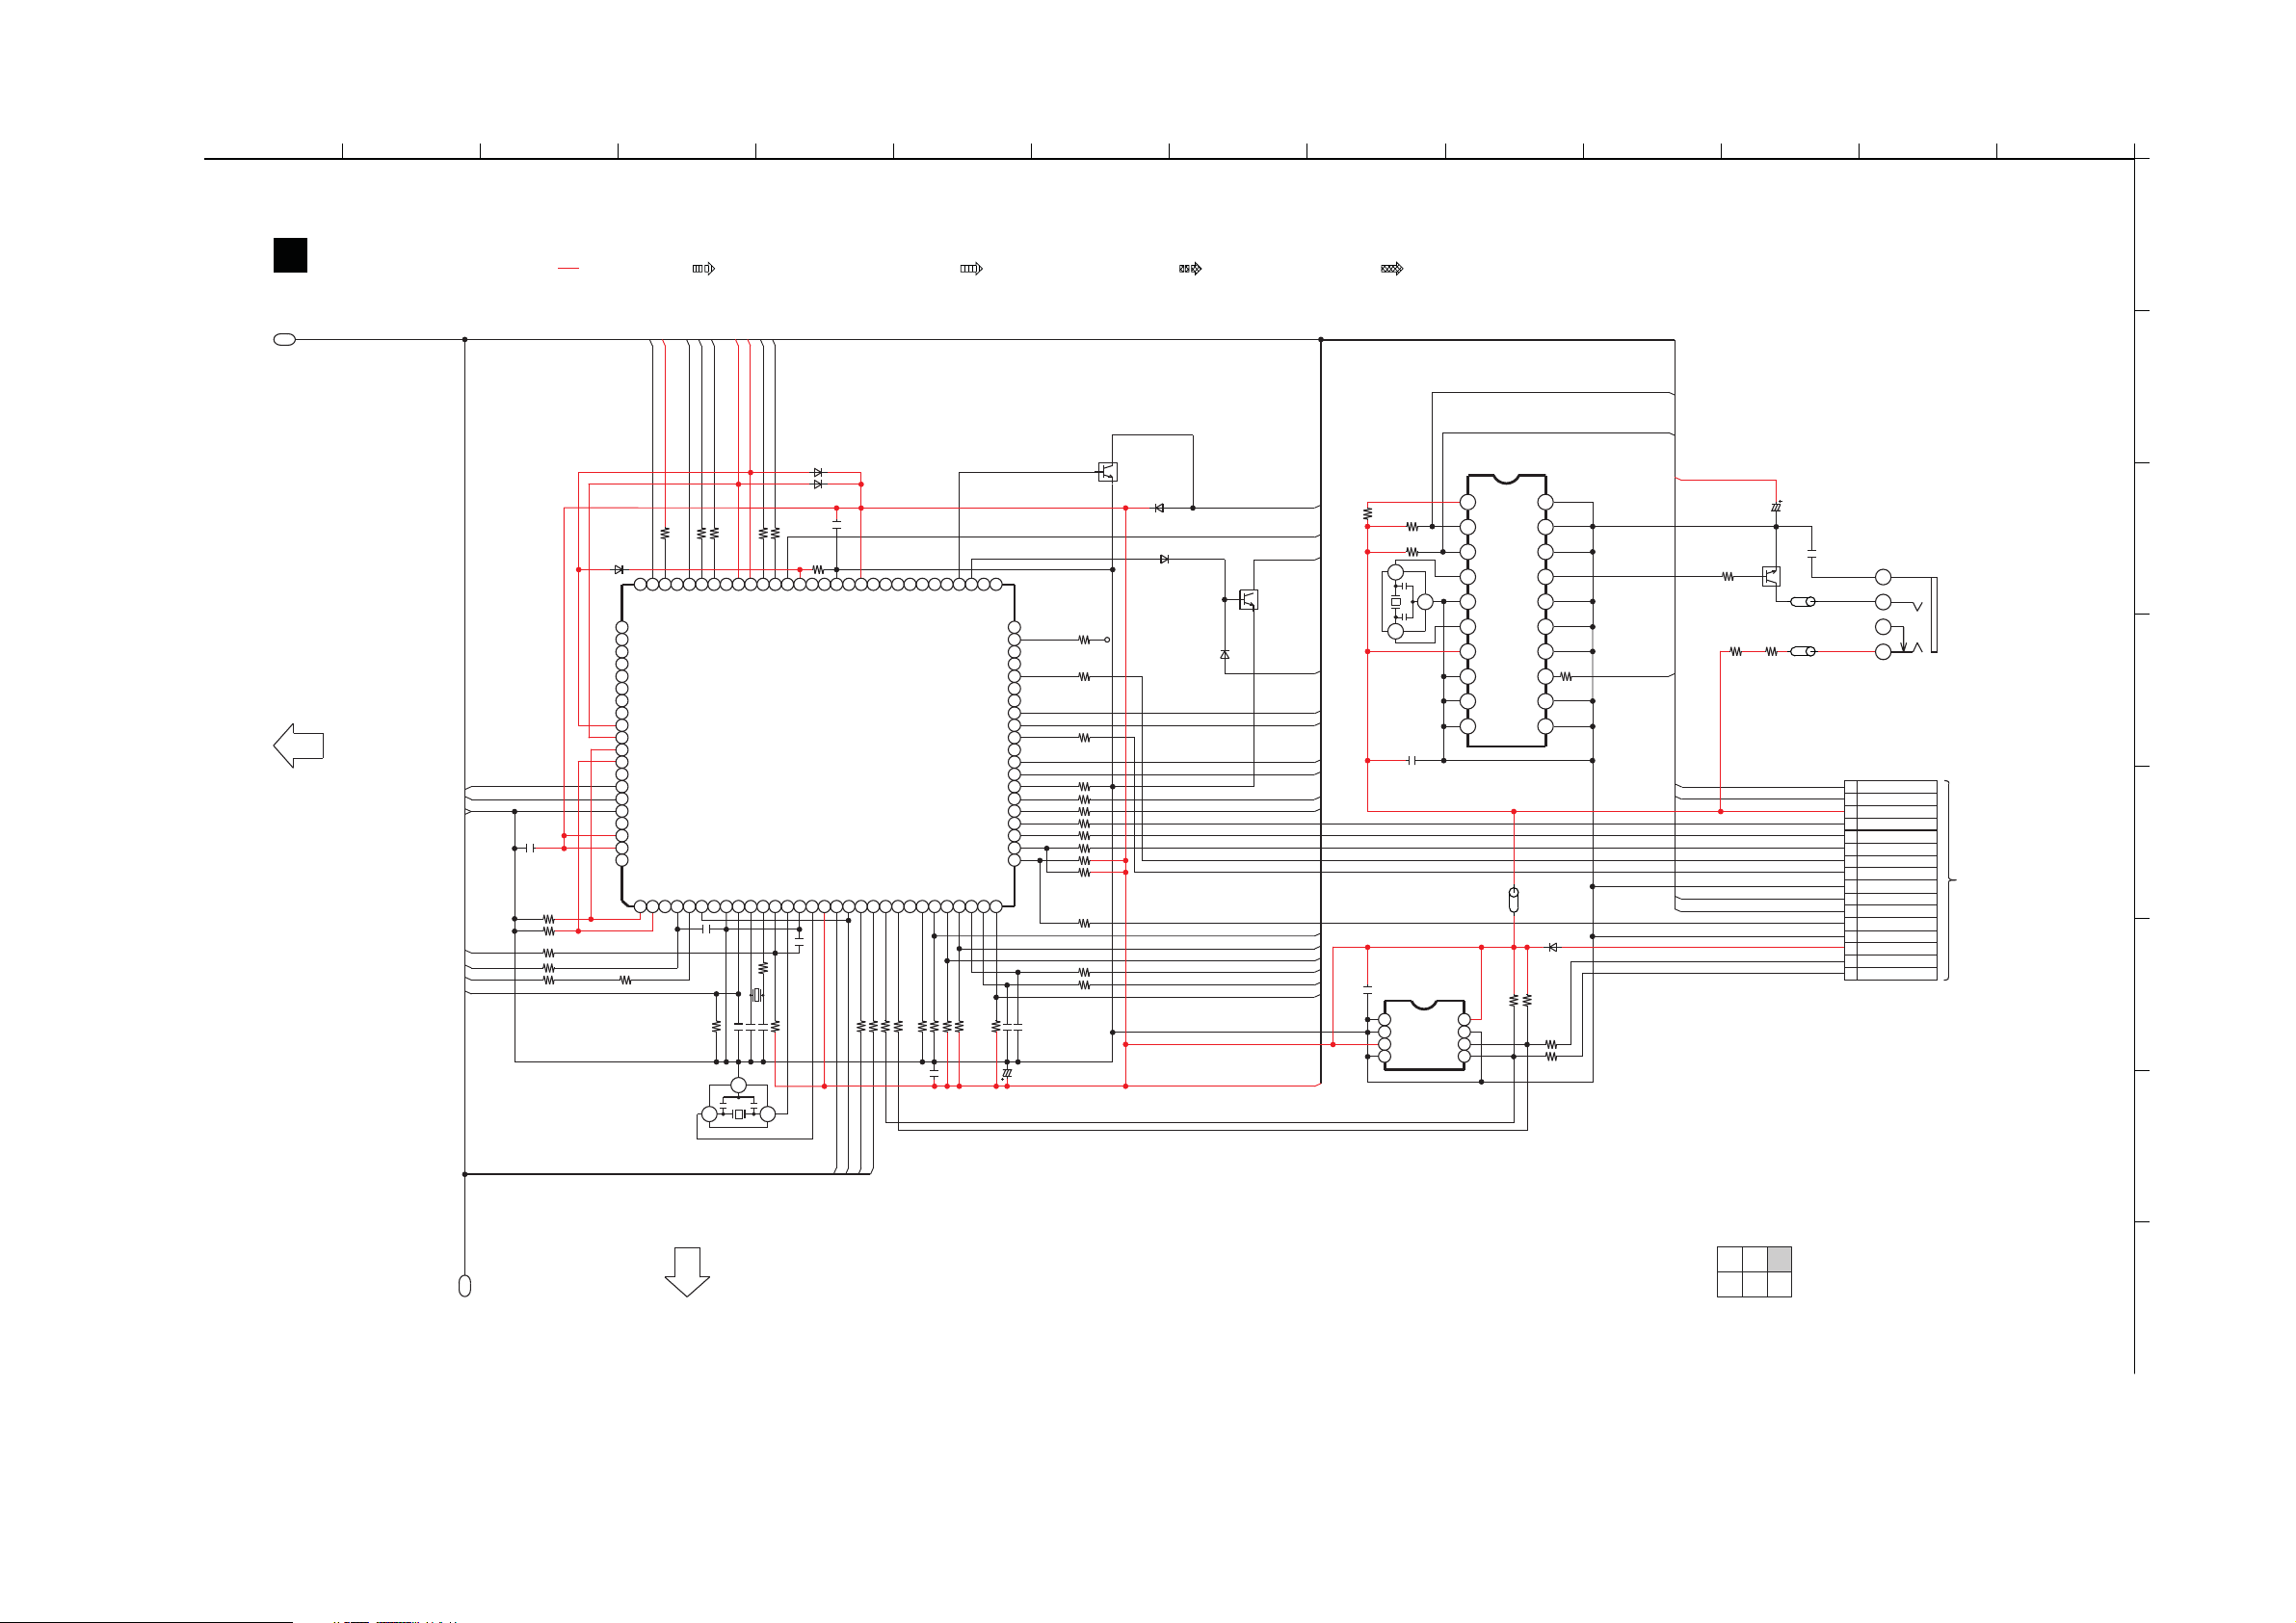
16.3. HDMI CIRCUIT (3/6)
A
29 30 31 32 33 34 35 36 37 38 39 40 41 42
SCHEMATIC DIAGRAM - 3
HDMI CIRCUIT
P1
TO HDMI
SECTION (2/6)
V_CHECK
H_REQ
GND
RESET2
M_CS
REMOTE
CNVSS
C2001
0.1
: +B SIGNAL LINE
B0ACCK000005
100KR2008
100KR2009
1KR2007
1.8KR2001
0R2055
D2009
81
82
83
84
85
86
87
88
89
90
91
92
93
94
95
96
97
98
99
100
STBY_H
SW_3.3V
4.7K
R2209
80 78 767779
NC
STBY_H
NC
NC
NC
NC
NC
NC
NC
RX1_5V_DET
RX0_5V_DET
IN1_5V
NC
V_CHECK
REQ
AVSS
NC
VREF
AVCC
NC
IN1_5V
IN2_5V
3425
1
100R2003
H2D400400018
: HDMI/OPTICAL AUDIO INPUT SIGNAL LINE
RX1_5V
RX0_5V
TX_HPD
RX1_HPD
RX_SCDT
100
100
R2069
SW_INT
TX_HPD
RX0_HPD
RX1_HPD
M_CSNCVSYNC_COUNT
REM
C2002
1000P
X2001
31
TX_DDC_SCL
TX_DDC_SDA
D2001
B0JCAE000001
D2002
B0JCAE000001
C2007
0.1
R2071
100K
R2068
R2066 82
R2067 82
69 67 65 64666870 51
KEY1
RX_SCDT
NC
BYTE
976810
150KR2002
0.1C2003
2
RX1_5V_DET
RX0_5V_DET
XCIN
CNVSS
R2005
47PC2004
NC
M_RST
5V_DET
TX_DDC_CK
TX_DDC_DA
IC2002
RFKWMHTB10PB
MICRO PROCESSOR
XCOUT
VSS
XIN
XOUT
RESET
1614 15 1711 1312
C2006
0.1
1K
X2002
100KR2006
47P
H0J327200172
C2005
NC
VCC1
CEC_IO
VSS
CEC I/O
NC
NC
VCC2
RX_INT
TX_INT
VSYNC_MONI
100R2011
100R2010
TX_INT
RX_INT
VSYNC_M
NC
NC
[50] NC
[49] CEC_OUT
IDROM_DT
IDROM_CK
22 2320 21 26 282724 2518 19
100R2013
100R2012
NCNCNC
NC
C2009
0.1
SW_RST
WRITESEL
R2014 47K
R2015 47K
: HDMI VIDEO INPUT SIGNAL LINE
QR2002
B1GBCFJJ0007
DC DETECT
53555762 60 596163 58 56 54295275 73 717274
NC
NC
NC
DCDET
AMUTE
50
49
NC
48
NC
47
R2019 100
46
Flash_CE
45
HDMI_LEDNC
44
NC
Flash_EPM
RX_RESET
TX_RESET
I2C SCL
I2C SDA
Flash_BUSY
Flash_SCLK
UPCON_SCL
UPCON_SDA
SI
CLK
RX1_SDA
R2017 4.7K
GND
30
NCIN2_5V
R2018 4.7K
43
42
R2021 100
41
40
39
38
R2022 10K
37
R2023 47
36
R2024 47
35
R2025 100
34
R2026 100
33
32
31
R2031 4.7K
SO
R2027 1.8K
R2028 1.8K
1000PC2010
C2012 1000P
C2011
6.3V100
MAIN_POWER
HDMI_POWER
RX1_SCL
R2016 4.7K
1KR2030
100R2034
4.7KR2032
100R2033
D2006
B0ACCK000005
D2003
B0ACCK000005
QR2001
B1GBCFJJ0007
MUTING
D2004
B0ACCK000005
: AUDIO OUTPUT SIGNAL LINE : VIDEO OUTPUT SIGNAL LINE
IC1008
C2CBDD000001
MICRO CONTROLLER
P4_2/VREF
DCDET
M_RST
HDMI_MUTE
AMUTE
H_POWER
HDMI_POWER
RX_RST
TX_RST
I2C_CK
I2C_DT
WRITESEL_0
RX_EDID_DT
RX_EDID_CK
MCLK
M_SI
H_SO
BK3.3V
R1060
C2013
0
1
R1062
4.7K
R1059
4.7K
3
2
1
X2003
H2D100500004
C1018
0.1
IC2003
C3EBEC000047
EEPROM
1
VCCA0
2
3
GND SDA
WPA1
SCLA2
1
MODE
2
/RESET
3
XCOUT
4
AVSS
5
XCIN
6
AVCC
7
P3_7
8
9
P3_5
P3_4
10 11
LB2011
J0JHC0000021
8
7
6
54
R2042
4.7K
20
P1_0
P1_1
19
P1_2
18
P1_3
17
P1_4
16
P1_5
15
P1_6
14
P1_7
13
12
P4_5
P3_3
D2005
B0ACCK000005
R2043
4.7K
R2044
R2045
A
B
C
R1058
100
MODE
RESET1
REMOTE
SYS6V
C4785
10V470
R4374
1K
QR2004
B1ABMF000020
SWITCH
R4373
3.3
J0JCC0000308
R4372
3.3
J0JCC0000308
C4771
0.1
LB4201
LB4200
1
3
4
2
JK4001
Ir SYSTEM
D
RESET1
MODE
RESET2
CNVSS
RESET
1
MODE
2
VCC
3
BUSY
4
5
SLCK
RXD
6
PIN46 (CE)
7
8
PIN41 (EPM)
GND
9
RESET
10
CNVSS
11
TXD
12
GND
13
+3.3V
14
IDROM_CK
15
IDROM_DT
16
CN2001
FOR ON BOARD
PROGRAMMING
E
F
150
150
G
2/6 3/6
TO HDMI
P1
SECTION (6/6)
1/6
5/6
4/6 6/6
SC-HTB10P/PC HDMI CIRCUIT
H
83
Page 84
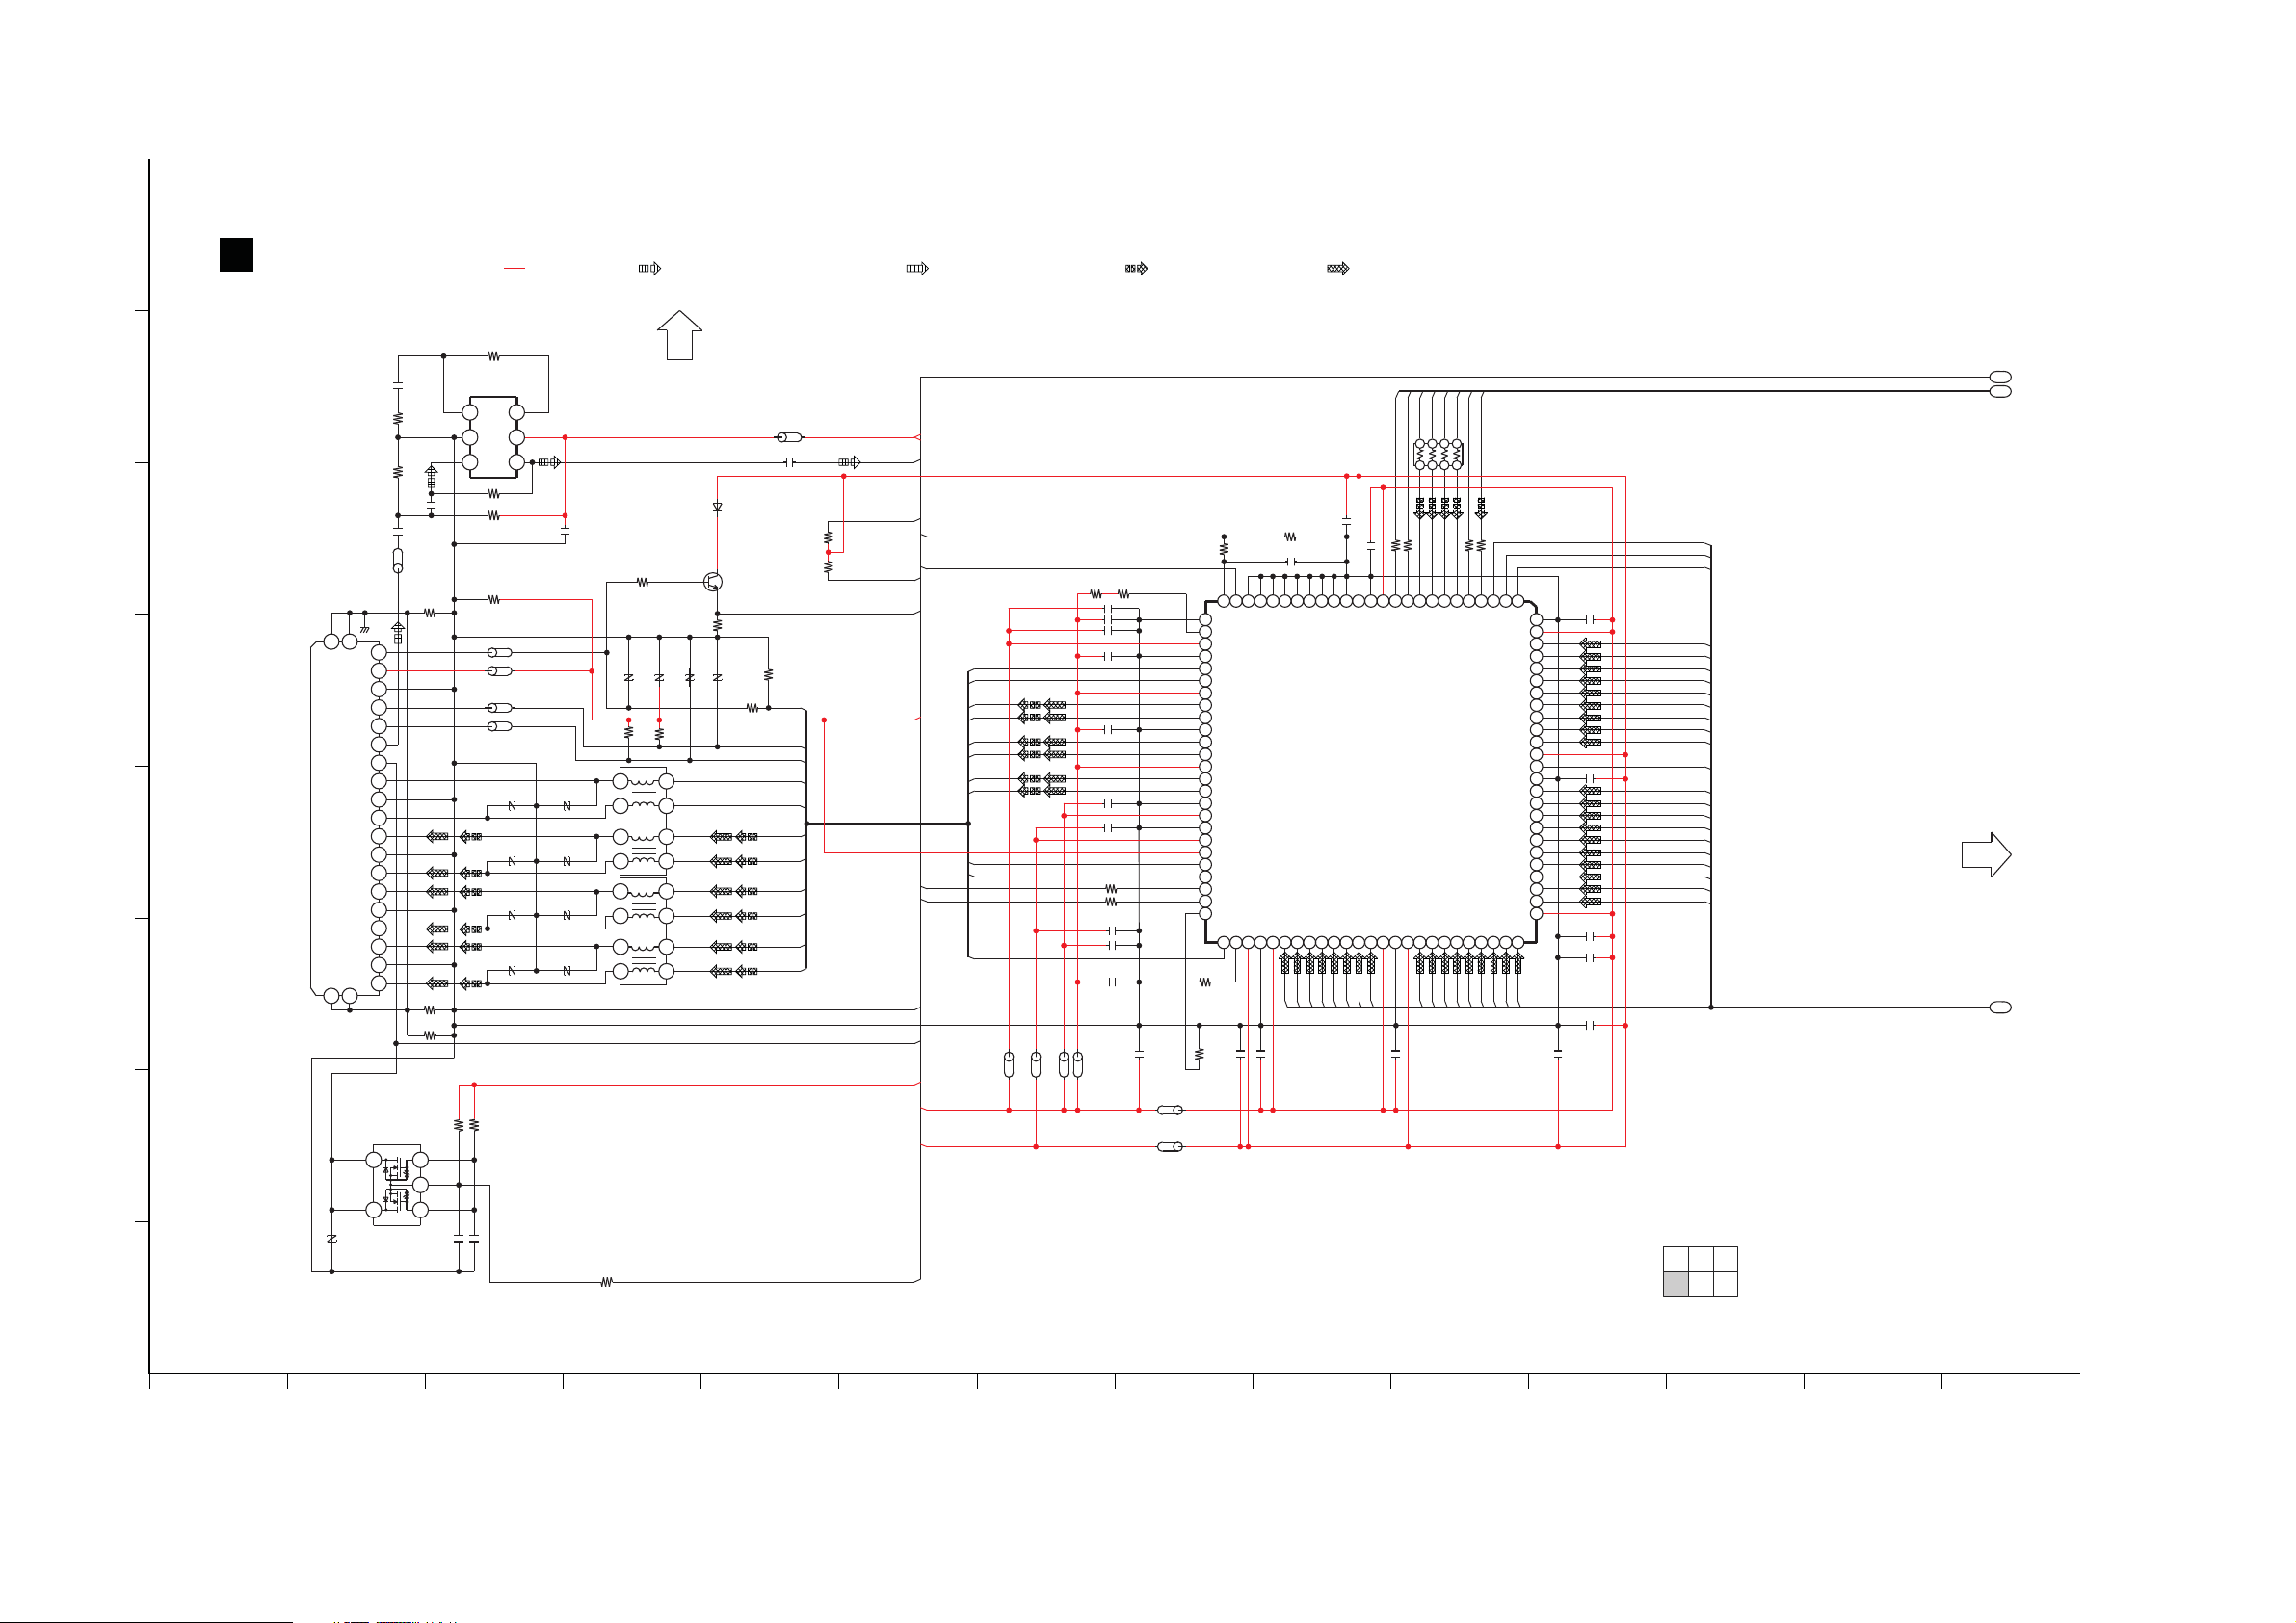
16.4. HDMI CIRCUIT (4/6)
I
1 2 3 4 5 6 7 8 9 10 11 12 13 14
K
L
J
M
O
P
N
A
HDMI CIRCUIT
SCHEMATIC DIAGRAM - 4
SC-HTB10P/PC HDMI CIRCUIT
2/6 3/6
5/6
1/6
4/6 6/6
TO HDMI
SECTION (5/6)
TO HDMI
SECTION (1/6)
P1
P2
P3
: HDMI/OPTICAL AUDIO INPUT SIGNAL LINE : HDMI VIDEO INPUT SIGNAL LINE : AUDIO OUTPUT SIGNAL LINE : VIDEO OUTPUT SIGNAL LINE: +B SIGNAL LINE
D2
D4
D3
D1
D0
I2S_3_H
I2S_1_H
I2S_0_TX
LRCK_TX
I2S_2_H
R2133 47
47R2132
IEC958
MCLK_TX
DE
HSYNC
VSYNC
C2125 0.1
BCK_TX
47R2130
47R2131
865742
13
RX2101
D1H83304A024
0.1C2119
0.1
C2118
R2128
1K
C2117
1000P
4.7K
R2125
R2126
4.7K
D34
D33
D35
D28
D30
D32
D31
D29
C2115 0.1
0.1C2116
0.1C2120
0.1C2121
J0JHC0000021
LB2109
LB2110
J0JHC0000021
0.1C2126
D9
D11
D10
D8
DCLK
D16
D14
D12
D13
D15
D17
D5
D7
D6
D23
D25
D27
D26
D24
D21
D19
D20
D22
79
77
76
78
49
47
48
50
7471 7267 685655 58575251 5453 65 6661 6259 60 6463 7069 73 75
10 8 7912 11
99
100
95
94
96
97
90
91
89
93
92
98
465 213
81
82
80
86
87
88
84
83
85
45
19 17 15 141618
43
23 21 20224124
39
37
33
35
34
29
30
27
26
28
32
31
36
38
25
40
42
44
13
46
IC2101
C1AB00002975
10C2123
10C2124
1.8V
0.1C2122
R2107
1.8K
J0JCC0000119LB2104
J0JCC0000119LB2103
C2277
0
C2280
0
R2073
0
R2101 47K
VA2110
EZJZ0V80008B
VA2111
EZJZ0V80008B
VA2112
EZJZ0V80008B
VA2113
EZJZ0V80008B
J0JCC0000119LB2101
LB2102 J0JCC0000119
R2104
100
R2106
1.8K
6.8K
R2120
6.8K
R2121
10K
R2103
D2101
B0JCAE000001
B1ABCF000079
Q2103
R2102
10K
C2108 10
C2107 0.1
680
R2124
18
R2144
1000PC2109
C2110 1000P
I2C_DT
J0JHC0000021
47R2122
47R2123
I2C_CK
LB2108
J0JHC0000021
LB2107
J0JHC0000021
LB2105
J0JHC0000021
LB2106
BK5V
EZAEG2A50AX
VA2105
EZAEG2A50AX
VA2106
EZAEG2A50AX
VA2107
EZAEG2A50AX
VA2108
EZAEG2A50AX
VA2101
EZAEG2A50AX
VA2102
EZAEG2A50AX
VA2103
EZAEG2A50AX
VA2104
6
5
3
4
J0MAB0000235
L2101
J0MAB0000235
L2102
8
7
1
2
G3 G4
G1G2
5
3
4
7
9
8
6
1
2
10
13
15
17
19
18
16
14
11
12
8
7
1
2
6
5
3
4
TX_DDC_SCL
TX_DDC_SDA
ARC
TX_HPD
1000PC2112
C2111 1000P
10C2106
10C2104
10C2105
0.1C2113
C2114
10
TX_RST
TX_INT
GND
CVCC18
D27
IOVCC33
D30
D31
D28
D29
D13
D9
D10
GND
IDCK
D12
D11
D21
D22
D15
D16
D17
D18
D18
D14
D19
D20
D26
D24
D23
[76] CVCC18
D25
D32
SD0
D7
DE
HSYNC
SD2
SD1
MCLK
SD3
[100] GND
SPDIF
[99] CVCC18
VSYNC
D1
D0
D6
D4
D2
D3
D5
D8
IOVCC33
DL0
SCK
GND
WS
DR0
DCLK
IOVCC33
CVCC18
D33
DR1
HPD
HPD
GND
HPD
TMDS D1-
TMDS D0-
TMDS D0+
D1 GND
CLK GND
CEC
TMDS CLK-
D0 GND
TMDS CLK+
D2 GND
TMDS D2+
TMDS D1+
TMDS D2-
HOT PLUG
+5V POWER
DDC_SDA
HEAC+(ARC)
DDC_SCL
DDC/CEC GND
PVCC2
AGND
TX1+
TX1+
TX1+
TX2+
TX2+
TX2+
AGND
TX2-
TX2-
TX2-
AVCC33
AVCC18
DSDA
DSDA
DSDA
DSCL
DSCL
DSCL
RESET
INT
AGND
PVCC1
TX0-
TX0-
TX0-
TX0+
TX0+
TX0+
TXC-
TXC-
TXC-
TXC+
TXC+
TXC+
AVCC18
AGND
TX1-
TX1-
TX1-
RSVDL
DR2
D35
DL3
DL2
DR3
GND
IOVCC33
DDCPWR5V
CVCC18
DL1
D34
[26] AGND
[27] EXT_SWING
[50] CI2CA
CSCL
CSDA
CEC
SW_3.3V
HDMI TRANSMITTER
SWITCH
47K
R2105
47K
R2129
EZJZ0V80008B
VA2109
R2143 220
R2142 1K
R2141 27K
0.1C2142
3
1
2
4
5
Q2108
B1CFGD000002
LEVEL SHIFTER
CEC_IO
BK3.3V
1D 1G
2DS2G
R2083 10K
R2082 100
J0JHC0000021
LB2082
10
C2085
C2084
0.1
3
1
2
2A
1A
GND
2Y
1Y
VCC
4
6
5
C0JBAB000986
INVERTER
IC2081
10K
R2085
1
C2083
100
R2081
51
R2084
J0JCC0000119
LB2081
0.1
C2082
1
C2081
SW_3.3V
JK2101
HDMI AV OUT
(TO TV(ARC))
330PC2141
84
Page 85
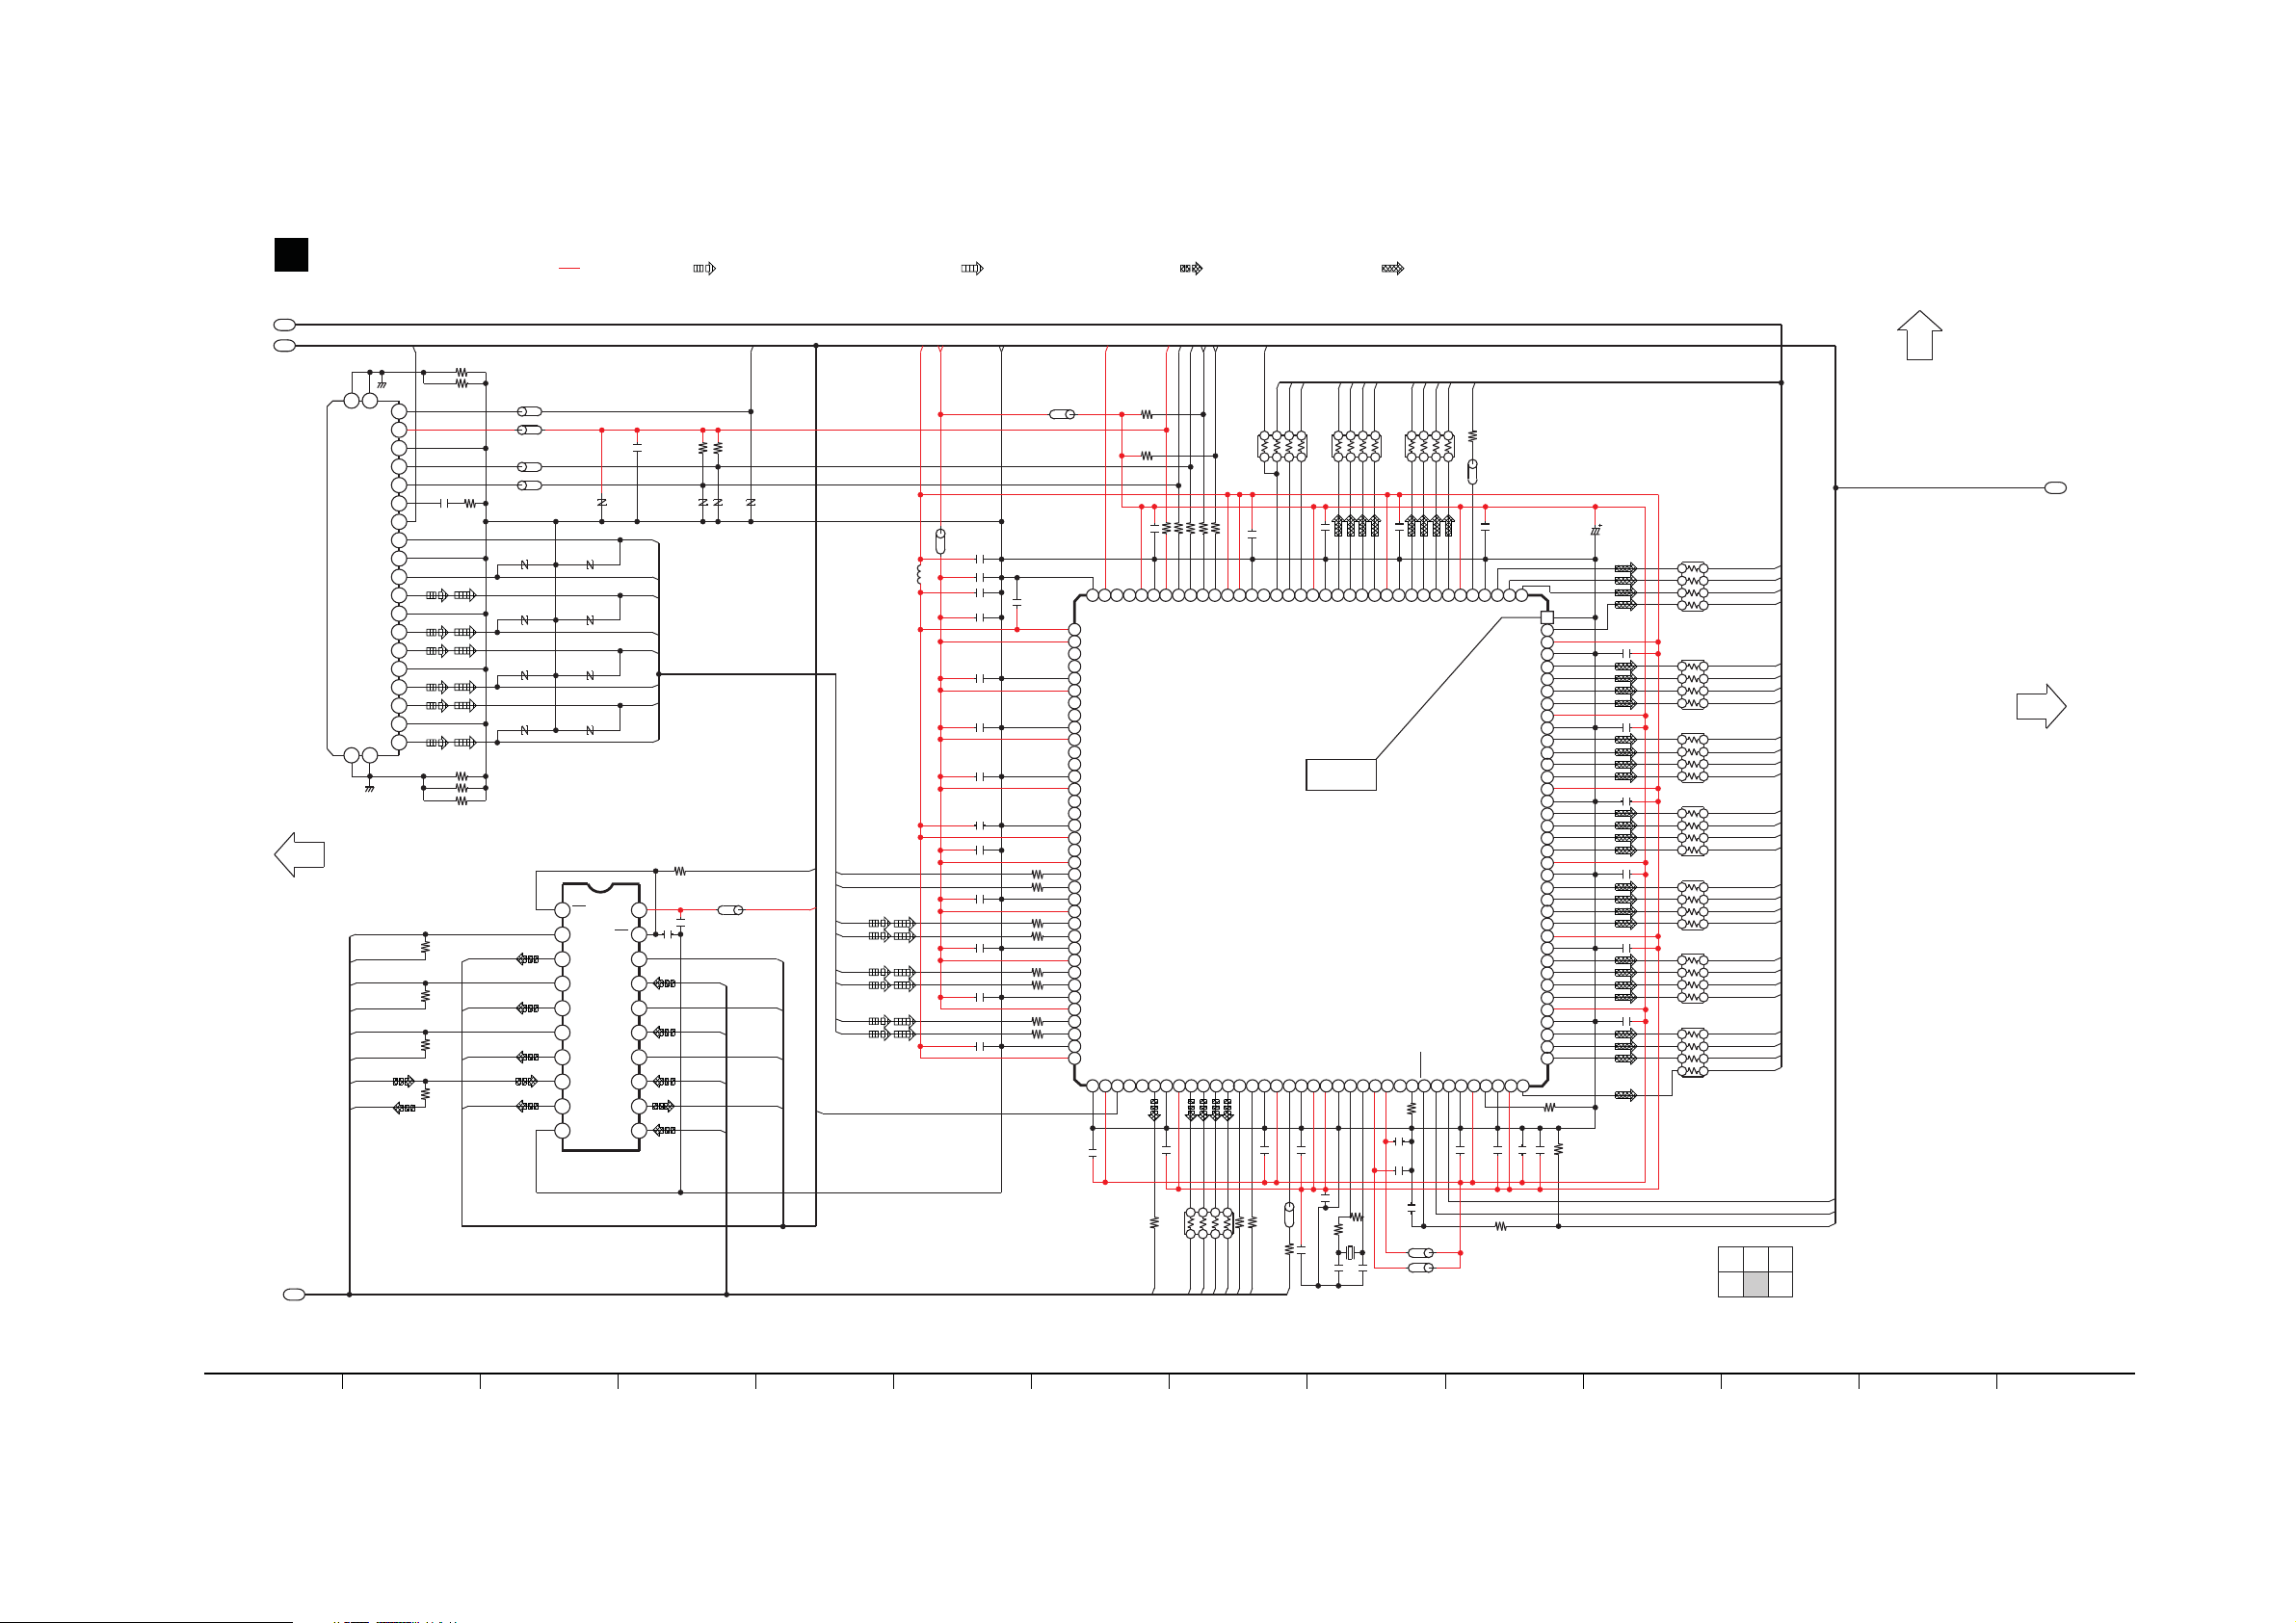
16.5. HDMI CIRCUIT (5/6)
A
SCHEMATIC DIAGRAM - 5
HDMI CIRCUIT
P2
P1
JK2203
HDMI AV IN
(BD/DVD)
P3
G1G2
HOT PLUG
+5V POWER
DDC/CEC GND
DDC_SDA
DDC_SCL
N.C.
CEC
TMDS CLK-
CLK GND
TMDS CLK+
TMDS D0-
D0 GND
TMDS D0+
TMDS D1-
D1 GND
TMDS D1+
TMDS D2-
D2 GND
TMDS D2+
G3 G4
TO HDMI
SECTION (4/6)
MCLK_H
MCLK_TX
BCK_H
BCK_TX
LRCK_H
LRCK_TX
I2S_0_H
I2S_0_TX
: HDMI/OPTICAL AUDIO INPUT SIGNAL LINE : HDMI VIDEO INPUT SIGNAL LINE : AUDIO OUTPUT SIGNAL LINE : VIDEO OUTPUT SIGNAL LINE: +B SIGNAL LINE
TO HDMI
CEC
C2276
0
C2278
0
VA2231
EZAEG2A50AX
VA2232
EZAEG2A50AX
VA2233
EZAEG2A50AX
VA2234
EZAEG2A50AX
J0JCC0000119LB2231
J0JCC0000119LB2232
J0JCC0000119LB2233
J0JCC0000119LB2234
VA2240
EZJZ0V80008B
VA2235
EZAEG2A50AX
VA2236
EZAEG2A50AX
VA2237
EZAEG2A50AX
VA2238
EZAEG2A50AX
1
1OE
1A1
2
3
2Y4
1A2
4
5
2Y3
1A3
6
7
2Y2
1A4
8
9
2Y1
GND
10
IC2006
C0JBAZ001466
LOGIC
C2231
0.1
VCC
2OE
1Y1
2A4
1Y2
2A3
1Y3
2A2
1Y4
2A1
EZJZ0V80008B
R1XC-
R1XC+
R1X0-
R1X0+
R1X1-
R1X1+
R1X2-
R1X2+
20
19
18
17
16
15
14
13
12
11
VA2241
C2018
0.01
R2232
R2063
1K
47K
C2019
EZJZ0V80008B
I2S_3_H
I2S_2_H
I2S_1_H
19
18
17
16
15
14
13
12
11
10
9
8
7
6
5
4
3
2
1
C2283
R2091 0
R2072 0
C2279 0
R2154
47
R2153
47
R2152
47
R2151
47
R2283
511
IEC958_D
I2S_3_D
I2S_2_D
I2S_1_D
VA2242
LB2009
J0JHC0000021
1
IEC958
R2233
100K
HOTPLUG
EZJZ0V80008B
MCLK_D
BCK_D
LRCK_D
I2S_0_D
VA2239
STBY_H
SW_3.3V
AMUTE
G1CR82KA0010
R1XC-
R1XC+
R1X0-
R1X0+
R1X1-
R1X1+
R1X2-
R1X2+
L2231
SYS1.8V
SW_3.3V
LB2235
J0JHC0000021
C2233 10
C2234 10
C2235 1
C2236 0.1
C2239 0.1
C2245 0.1
0.1C2237
0.1C2238
0.1C2240
1C2241
0.1C2242
0.1C2243
0.1C2244
GND
R2270 4.7
R2271 4.7
R2272 4.7
R2273 4.7
R2274 4.7
R2275 4.7
R2276 4.7
R2277 4.7
LB2236
J0JHC0000021
0.1
C2246
DSCL1
DSDA1
I2C_DT
0.1C2248
IOGND
IOVCC33
RSVDNC
SPDIF
IEC958
R1PWR5V
82R2254
82R2253
R2278 82
DSCL1
DSDA1
R1PWR5V
CGND
CVCC18WSSD3
SD0
C2249 0.1
13
RX2231
D1H83304A024
I2S_0_H
I2C_CK
47R2256
47R2255
CSCL
SD1
I2S_2_H
I2S_1_H
CSDA
SD2
CVCC18
865742
I2S_3_H
LRCK_H
VSYNC_M
RX2232
13
D1H83304A024
C2250
CGND
CVCC18
EVNODD
SCK
IOGND
C2251 0.1
82R2260
82R2259
BCK_H
VSYNC
0.1
LB2239
DE
HSYNC
865742
RX2233
13
D1H83304A024
0.1C2254
Q0Q3Q2
DE
IOGND
VSYNC
HSYNC
IOVCC33
THERMAL PAD
IC2232
C1AB00002989
HDMI RECEIVER
IOVCC33
DVCC18
DGND
CVCC18
CGND
MCLK
0.1C2252
0.1
C2255
820
R2262
82
J0JCC0000308
18P
R2261
C2253 1
C2256
MCLK_H
D1
Q1
XTALOUT
R2263
C2257
1M
18P
D2D3D0
865742
XTALIN
XTALVCC
X2231
H0J283500018
RX2234
CVCC18
REGVCC
C2258
1
C2259
1
D5D4D7
D6
865742
13
D1H83304A024
0.1C2260
Q4
Q5
Q7
Q6
CGND
RSVDL
RSVDNC
INT
SCDT
RESET
100101 102103104105 106107108
4.7K
R2264
0.1C2262
1000P
C2261
LB2237
J0JHC0000021
LB2238
J0JHC0000021
RX0_5V
R2257
1.8K
R2258
1.8K
36 35 34 33 3132 30 29 28 27 26 25 24 23 22 21 20 19 18 17 16 15 14 13 12 11 10 9 8 7 6 5 4 3 2 1
AGND
DSCL0
37
38
39
40
41
42
43
44
45
46
47
48
49
50
51
52
53
54
55
56
57
58
59
60
61
62
63
64
65
66
67
68
69
70
71
72
C2247
DSDA0
R0PWR5V
R0XC-
[37] AVCC18
R0XC+
[38] AVCC33
AGND
AVCC33
R0X0-
R0X0+
AGND
AVCC33
R0X1-
R0X1+
AGND
AVCC33
R0X2-
R0X2+
AGND
AVCC18
RSVDNC
AVCC33
R1XC-
R1XC+
AGND
AVCC33
R1X0-
R1X0+
AGND
AVCC33
R1X1-
R1X1+
AGND
AVCC33
[71] AGND
R1X2-
[72] AVCC18
R1X2+
MUTEOUT
RSVDNC
IOVCC33
IOGND
73 74 75 76 77 78 79 80 81 82 83 84 85 86 87 88 89 90 91 92 93 94 95 96 97 98 99
1
R2252
82
DCLK
R2265
J0JDC0000045
0.1C2263
ODCK
IOVCC33
[1] Q10
[109] Q34
IOGND
IOVCC33
R2266 1K
47
LB2243
IOGND
CI2CA
Q8
CGND
C2264 0.1
Q9
CVCC18
CGND
IOVCC33
IOGND
CVCC18
CGND
IOVCC33
IOGND
CVCC18
CGND
IOVCC33
IOGND
CVCC18
C2266 1
C2265
6.3V100
12
4
3
8657
0.1C2271
RX2235
D1H83304A024
RX2236
D1H83304A024
12
3
RX2237
D1H83304A024
12
3
RX2238
D1H83304A024
12
3
RX2239
D1H83304A024
12
3
RX2240
D1H83304A024
12
3
RX2241
D1H83304A024
12
3
4
8657
4
8657
4
8657
4
8657
4
8657
4
8657
T1
Q11
144
143
C2273 0.1
142
Q12
141
Q13
140
Q14
139
Q15
138
137
C2270 0.1
136
Q16
135
134
Q17
133
Q18
132
Q19
131
C2274 0.1
130
Q20
129
Q21
128
Q22
127
126
Q23
125
C2275 0.1
124
Q24
123
122
Q25
121
Q26
120
Q27
119
118
Q28
117
116
Q29
115
Q30
114
Q31
113
C2272 1
112
Q32
111
110
Q33
109
Q35
4.7KR2267
R2269
47K
C2267 1
D8
D9
D10
D11
D12
D13
D14
D15
D16
D17
D18
D19
D20
D21
D22
D23
D24
D25
D26
D27
D28
D29
D30
D31
D32
D33
D34
D35
2/6 3/6
1/6
5/6
4/6 6/6
RX_INT
RX_SCDT
RX_RST
SC-HTB10P/PC HDMI CIRCUIT
SECTION (2/6)
TO HDMI
SECTION (6/6)
P1
15 16 17 18 19 20 21 22 23 24 25 26 27 28
85
Page 86
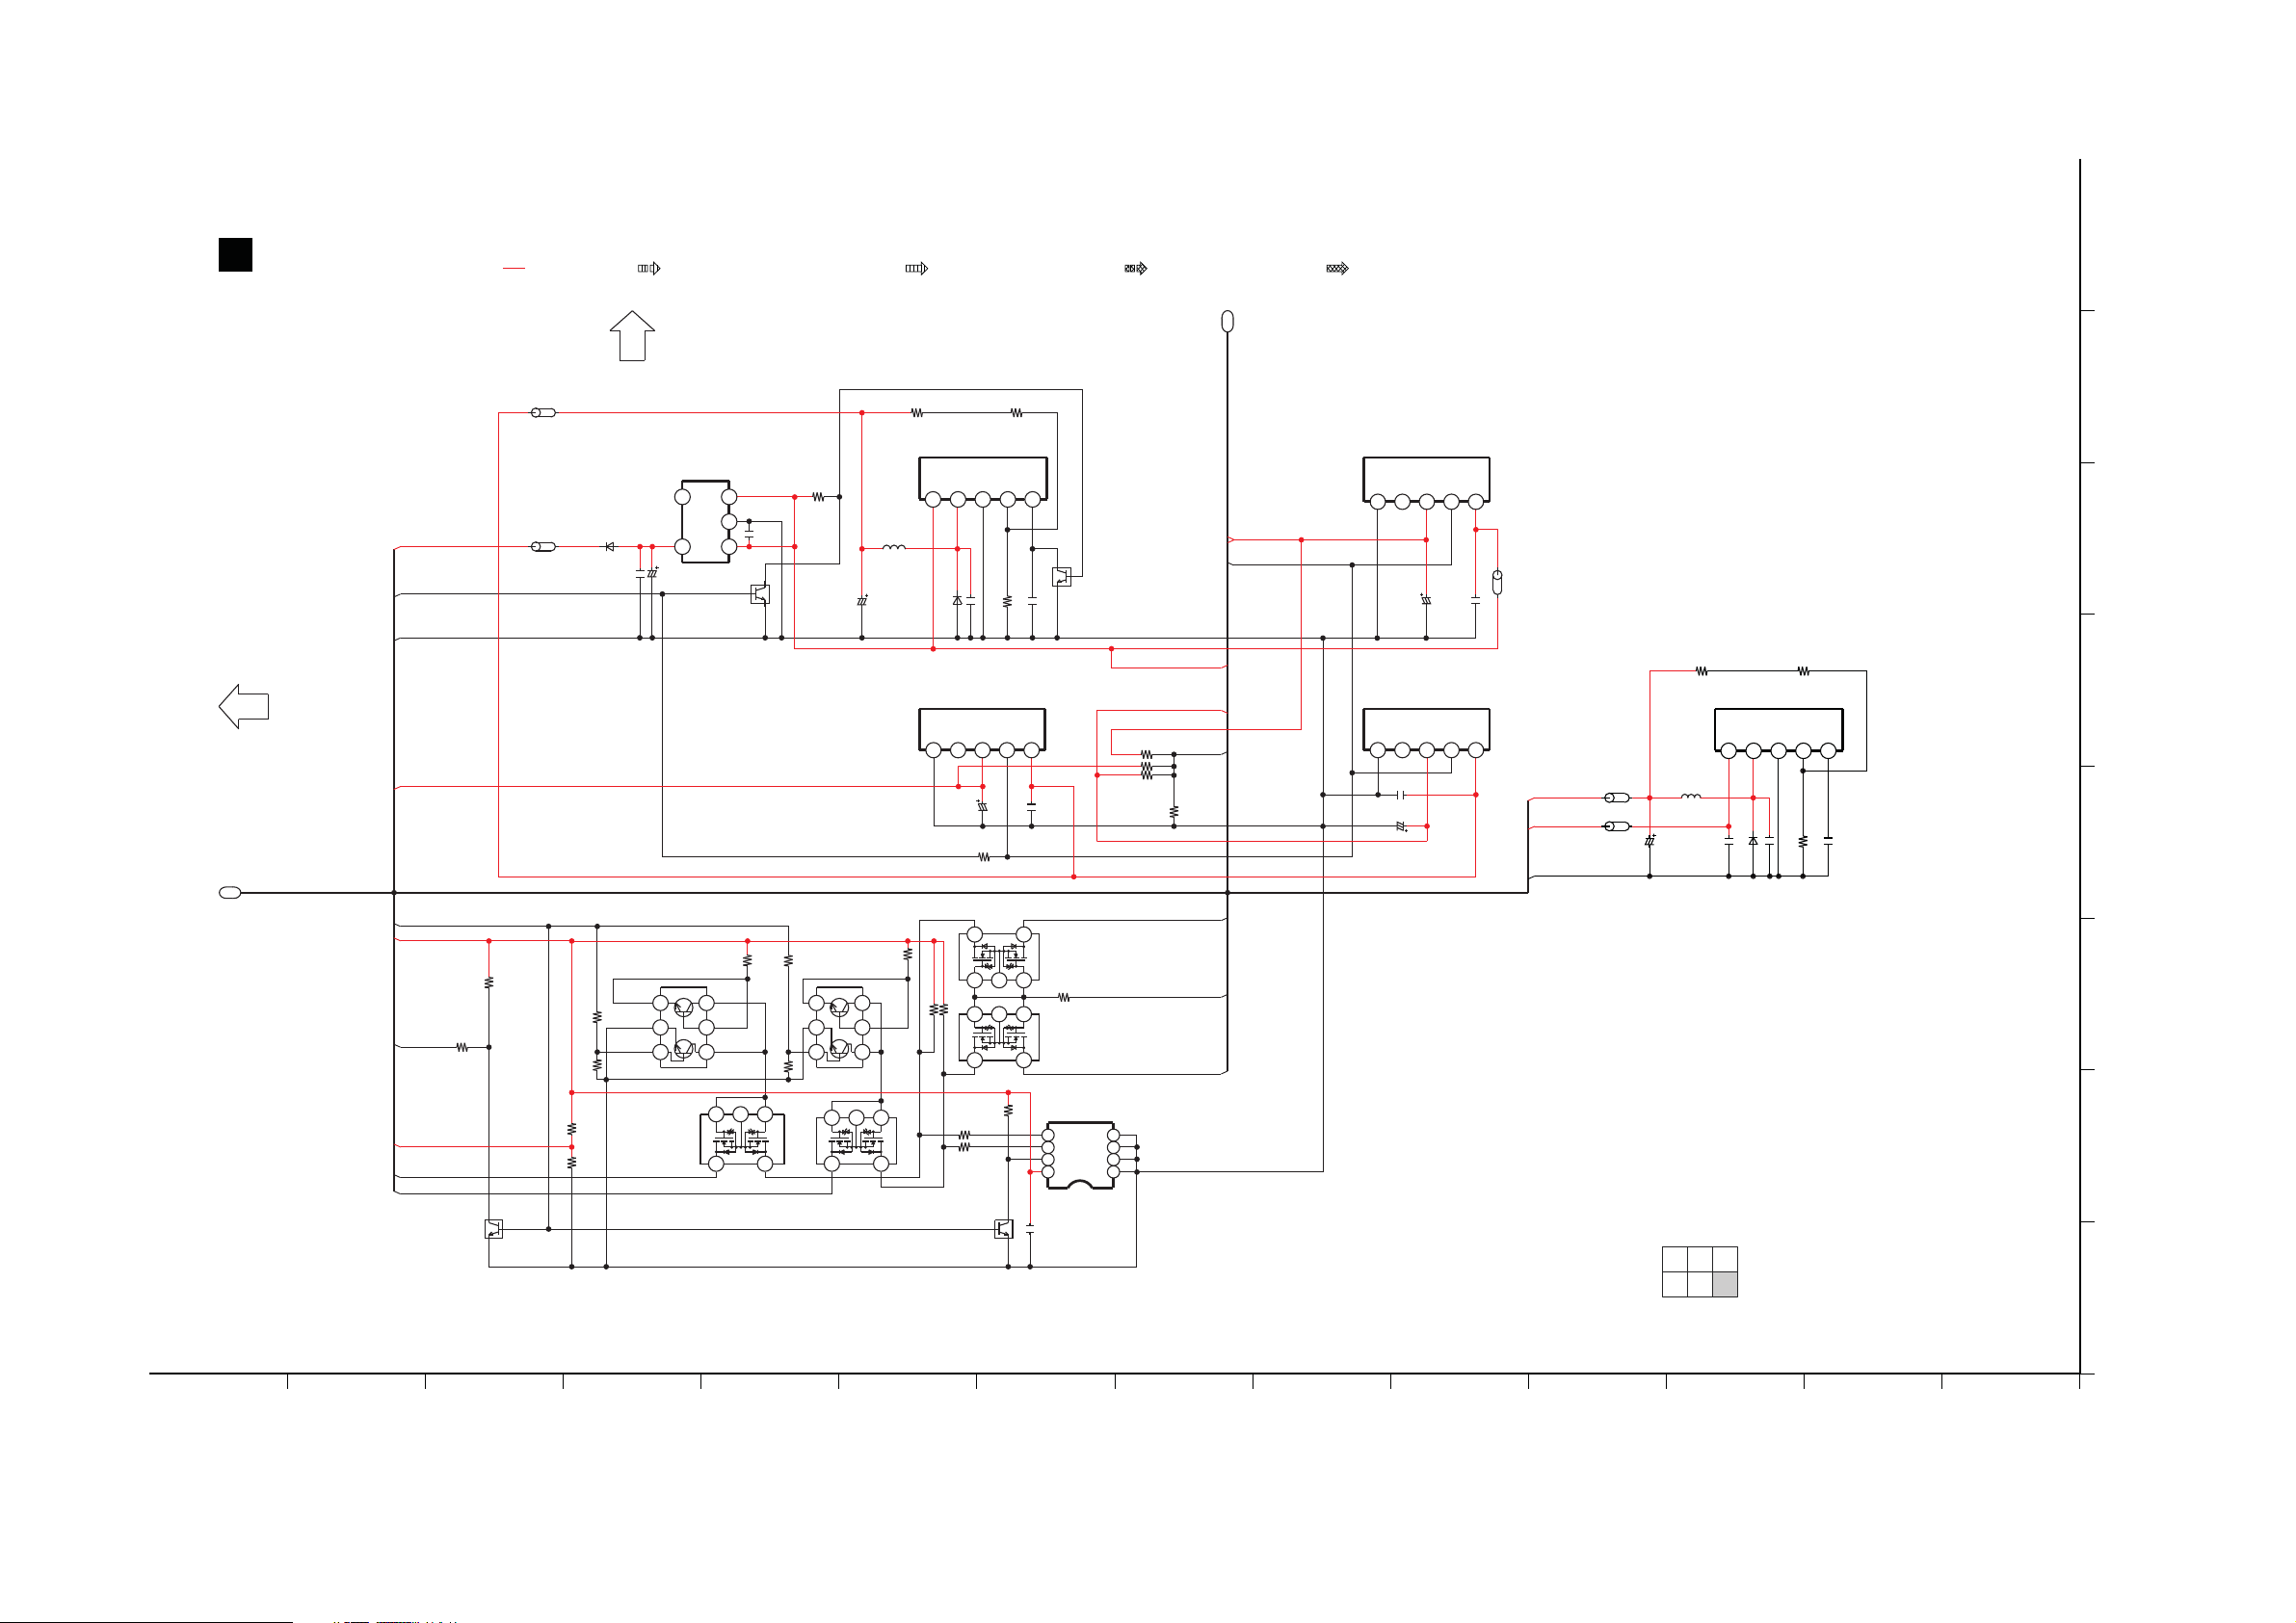
16.6. HDMI CIRCUIT (6/6)
I
K
L
J
M
O
P
N
29 30 31 32 33 34 35 36 37 38 39 40 41 42
A
HDMI CIRCUIT
SCHEMATIC DIAGRAM - 6
SC-HTB10P/PC HDMI CIRCUIT
2/6 3/6
5/6
1/6
4/6 6/6
TO HDMI
SECTION (5/6)
TO HDMI
SECTION (3/6)
P1
P1
: HDMI/OPTICAL AUDIO INPUT SIGNAL LINE : HDMI VIDEO INPUT SIGNAL LINE : AUDIO OUTPUT SIGNAL LINE : VIDEO OUTPUT SIGNAL LINE: +B SIGNAL LINE
J0JHC0000021
LB2240
J0JHC0000021
LB2241
5V
DSP_GND
R4774
15K
R4775
2.7K
L4774
G1C330MA0291
R4776 10K
1000PC4773
0.1
C4769C4768
4V330
C4770
1
42135
IC4724
C0DBAYH00005
SWITCHING REGULATOR
D4774
B0JCPG000005
D3.3V
R2035
100
R2062
18K
15KR2061
C2014
6.3V100
43215
IC2004
C0CBCBG00013
1
C2016
J0JHC0000021
LB2008
0.1
C2268
43215
C0CBCAG00015
IC2233
C2269
4V330
0.1
C2128
C2127
4V330
43215
IC2102
C0CBCAG00015
15KR2060
15KR2059
1.8V
82K
R2237
22K
R2239
22K
R2238
RX1_HPD
RX1_5V
IN
OUT
OUT
GND
NCINON/OFF
OUT
ON/OFF
IN
GND
NC
ON/OFF
GND
DSDA1
DSCL1
NC
HDMI_POWER
SYS1.8V
SYS6V
SW_3.3V
J0JHC0000021
LB2007
BK5V
J0JHC0000021
LB2005
V_CHECK
VOLTAGE REGULATOR
VOLTAGE REGULATOR
VOLTAGE REGULATOR
R1PWR5V
HOTPLUG
QR2232
B1GBCFJJ0007
EEPROM
SWITCH
R2249
1K
R2245
47
R2246
47
Q2234
B1CFGD000002
312
45
Q2232
B1CFGD000002
R2243
10K
R2241
22K
R2242
22K
2
3
1
5
4
6
Q2233
B1HBCFA00003
R2240
10K
5
4
6
Q2231
B1HBCFA00003
2
1
4
3
7
8
5
6
IC2231
C3EBEC000047
312
45
Q2235
B1CFGD000002
Q2236
B1CFGD000002
C2232
1
S
WP
SCL
VCC
SDA
1G
S
1D
2G
2D
312
45
1G
S
1D
2G
2D
312
45
1G
S
1D
2G
2D
1D
1G
A2
A0
A1
GND
2D
2G
LEVEL SHIFTER
LEVEL SHIFTER
LEVEL SHIFTER
LEVEL SHIFTER
SWITCHING
SWITCHING
2
3
1
R2247 47K
47KR2244
47K
R2248
WRITESEL_0
RX_EDID_CK
RX_EDID_DT
15K
R2236
R2235
1K
R2234
100
B1GBCFJJ0007
QR2231
SWITCH
D4726
B0JCME000012
C4793
1
R4763
47K
B1GBCFNN0004
SWITCH
QR4704
C4781
0.1
R4765 10K R4766 330
3
1
2
4
5
IC4793
C0CBCDC00014
VOLTAGE REGULATOR
SWITCHING REGULATOR
42135
IC4722
C0DBAYH00005
HDMI_POWER_M
L4727
G1C330MA0291
6.3V100
C4784
R4767
10K
QR4703
B1GBCFNN0004
SWITCH
1000PC4772
C4782
1
D4727
B0JCPG000005
C4767
4V330
GND
ADJ
VIN
VOUT
VOUT
NC
VIN
VC
GND
ON/OFF
GND
ADJ
VIN
VOUT
ON/OFF
GND
86
Page 87
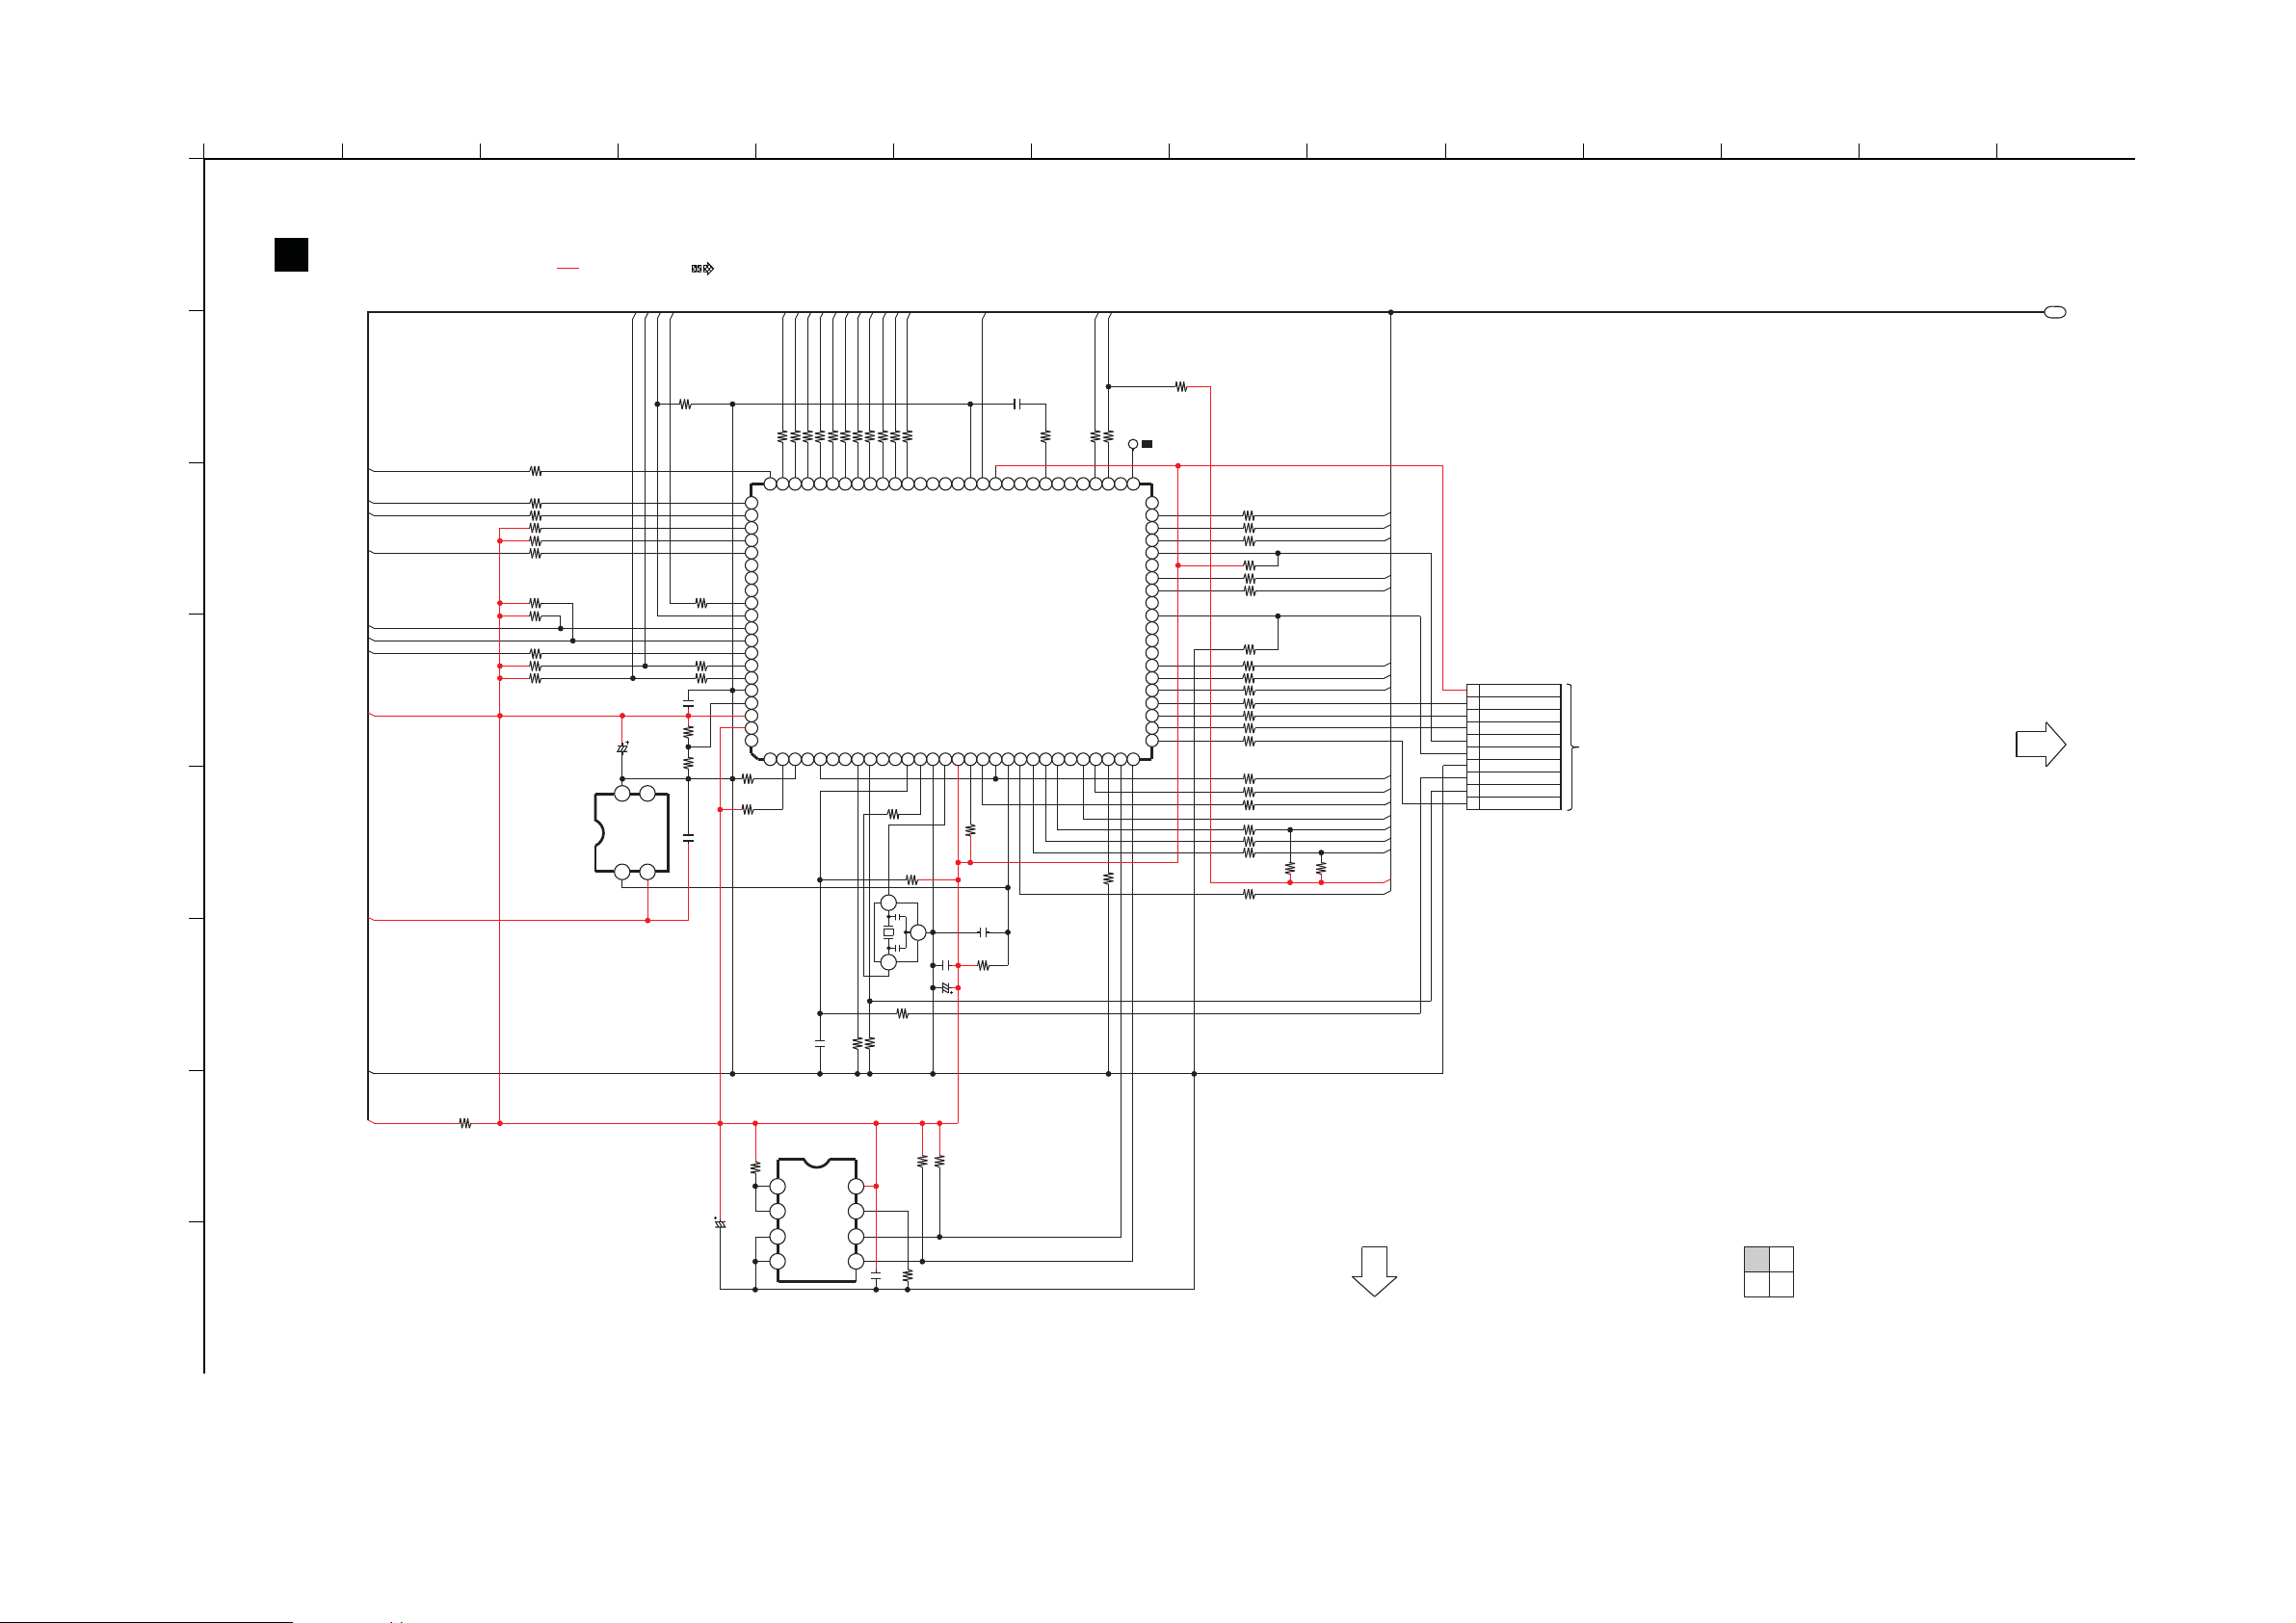
16.7. MAIN CIRCUIT (1/4)
B
1
A
SCHEMATIC DIAGRAM - 7
MAIN CIRCUIT
B
C
D
E
F
2 3 4 5 6 7 8 9 10 11 12 13 14
: +B SIGNAL LINE : AUDIO OUTPUT SIGNAL LINE
NCNCNC
RC_LED
DAP_SDA
DAP_MUTE
PVCONT_ON
100R632
PWR_CONTROL
NC
DAP_RESET
R616
10K
SD
1KR659
53555762 60 596163 58 56 54295275 73 717274
SD
OTW
H_REQ
HDMI_MUTE
PVCONT_ON
PIN 46
NC
M_CS
M_RESET
NC
PIN 41
NC
NC
NC
M_CLK
H_SOS_DET
M_SI
BUSYFILTER
SCLK
RXD
SCL
AMP_POWER
HDMIMUTE_DIS
30
R661
10K
TL
600
NC
50
49
48
47
46
45
44
43
42
41
40
39
38
37
36
35
34
33
32
31
SDA
R624 10K
1KR630
1KR629
1KR628
10KR627
1KR626
1KR625
1KR623
1KR622
1KR621
100R620
100R619
100R618
100R617
100R611
100R689
100R657
100R614
100R613
100R612
R685
100R688
47K
H_REQ
HDMI_MUTE
PWR_CTRL
M_CS
M_RESET
M_CLK
H_SO
M_SI
REMOTE
HDMIMUTE_DIS
VALID
DAP_RESET
DAP_SDA
DAP_MUTE
DAP_SCL
R686
47K
DAP_3.3V
MUTE_ALL
VCC
1
BUSY
2
SLCK
3
RXD
4
PIN46 (CE)
5
PIN41 (EPM)
6
GND
7
RESET
8
CNVSS
9
TXD
10
CN600
FOR ON BOARD PROGRAMMING
TO MAIN
SECTION (2/4)
LED_DI
LED_CLK
LED_CS
LED_OE
KEY2
KEY1
ECO_DAMP
SYS3.3V
SYS6V
DGND
R681 100
R682 100
R683 100
R640 10K
R642 10K
100R684
15KR646
15KR645
100R658
220KR647
R649 10K
IC606
C0EBG0000107
RESET
C603
6.3V100
S_DET
VSS NC
142
DCDET
3
VDDOUT
PCONT
PWR_CTRL
C604
0.1
R651
10K
R652
6.8K
R644
CS_DSP
MOSI_DSP
MISO_DSP
CS_CODEC_M
RESET_CODEC_M
INTREQ_CODEC_M
R608
47K
R603
47K
81
82
83
84
85
86
87
88
89
90
91
92
93
94
95
96
97
98
99
100
DT_OUT_CODEC_M
R675 100
R674 100
80 78 767779
LED_CLK
LED_CS
REG1
REG2
RESET_CODEC
LED_OE
FL_DI
FL_CLK
FL_CS
PWR CTRL
PCONT
KEY2
KEY1
ECO_DAMP
DC_DET
AVSS
VREF
AVCC
NC
W_INT
3425
1
R666 100
R665 100
MISO_DSP
CS_CODEC
REMOTE
W_CL
C606 0.01
R668 100
R667 100
INTREQ_CODEC
[80] LED_DI
[79] DT_OUT_CODEC
[2] W_DET
[1] W_SSB
W-SDO
10K
100R664
1KR648
1KR650
C605
0.01
CLK_DSP
BUSY_DSP
RESET_DSP
INTREQ_DSP
R670 100
R672 100
R673 100
R671 100
R669 100
69 67 65 64666870 51
CS_DSP
RESET_DSP
BYTE
CNVSS
9768
10
H2B100500007
R607
10KR604
R605 150K
BUSY_DSP
R663
680
3
1
X600
CLK_DSP
INTREQ_DSP
RFKWMHTB10PA
MICRO PROCESSOR
RESETNCNC
R606
100K
2
1K
MOSI_DSP
W-SDI
XOUT
NC
VSS
C602
0.1
NCNCNC
IC604
XIN
VCC
1614 15 1711 1312
6.3V1000
DAP_PDN
VSS
NM1
R609
10K
C607
0.01
R610
100K
C600
VCC2
DAP_PDN
REMOTE
VALID
C612
1000P
AC_SYNC
100R636
NCNCNC
[50] HDMI_CTRL
[31] CE
DAP_SCL
MUTE_ALL
22 2320 21 26 282724 2518 19
P1
R679
BK3.3V
G
H
0
R653
4.7K
C608
6.3V100
IC605
C3EBEC000060
EEPROM
A0
VCC
2
A1
WP
A2
SCL
3
VSS SDA
4
10KR655
10KR654
81
7
6
2/4
5
C609
R656
0.01
47K
TO MAIN
SECTION (3/4)
1/4
4/4
3/4
SC-HTB10P/PC MAIN CIRCUIT
87
Page 88
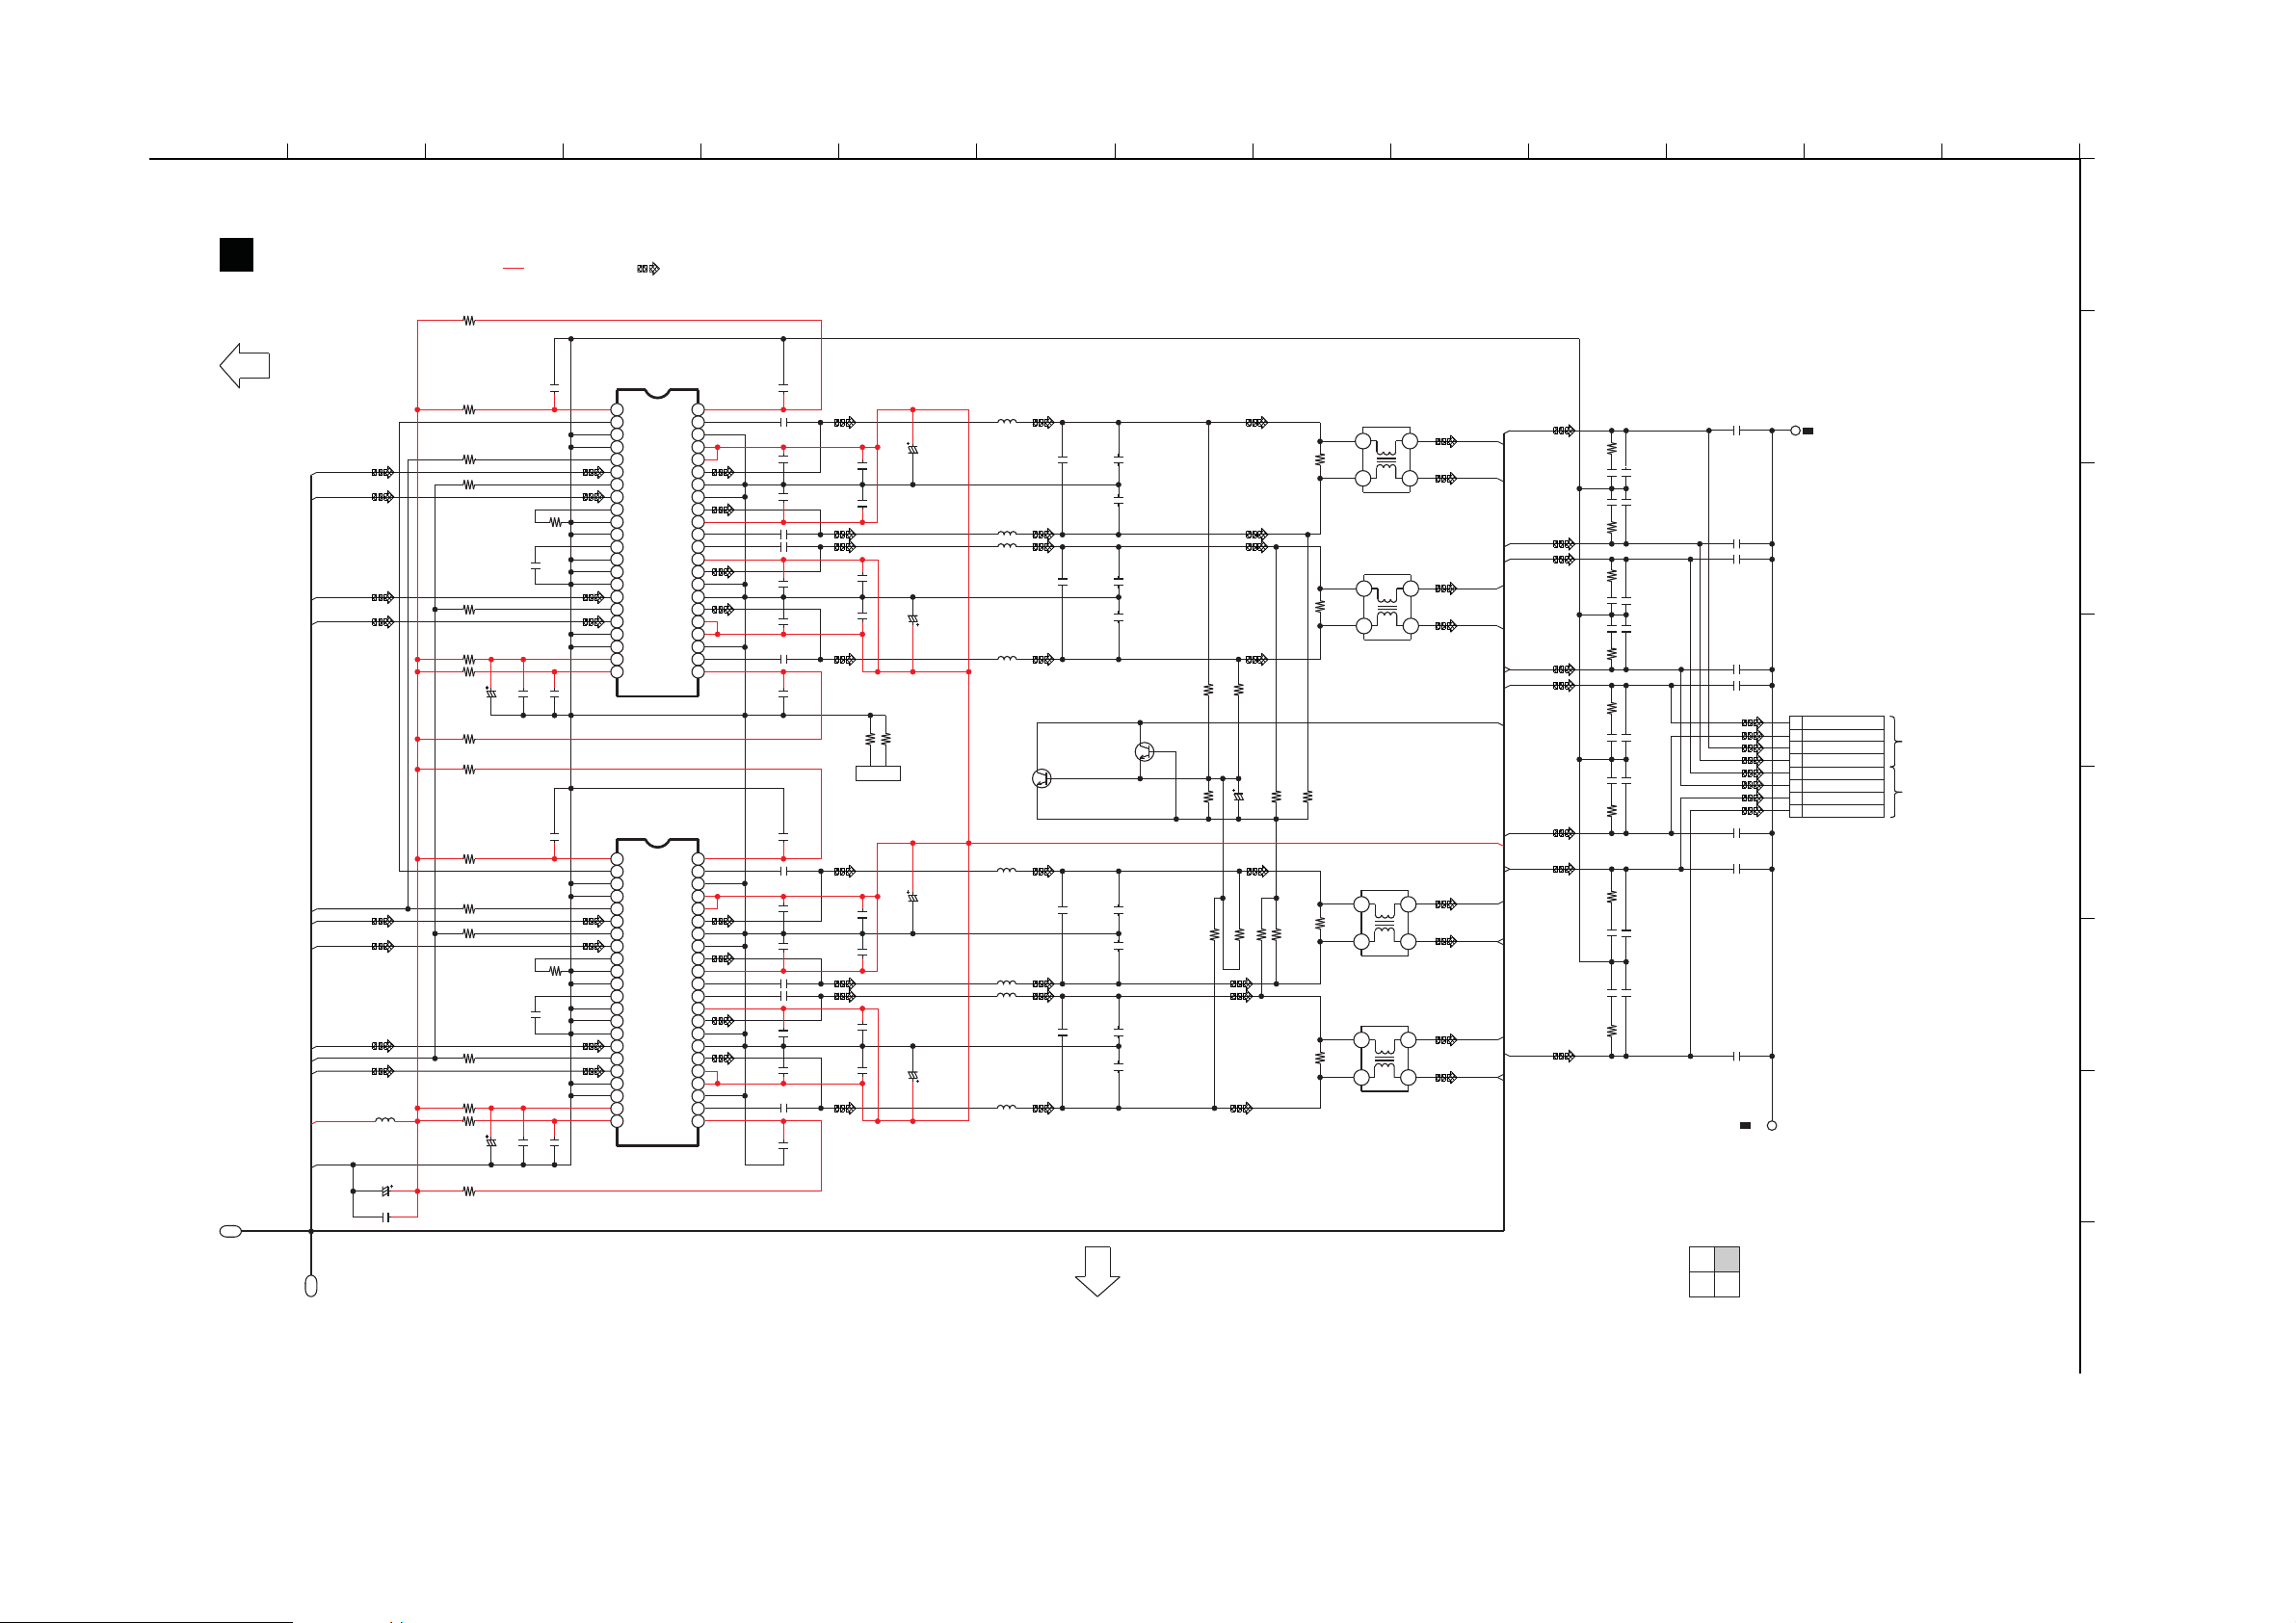
16.8. MAIN CIRCUIT (2/4)
15 16 17 18 19 20 21 22 23 24 25 26 27 28
A
C
D
B
E
G
H
F
B
MAIN CIRCUIT
SCHEMATIC DIAGRAM - 8
SC-HTB10P/PC MAIN CIRCUIT
2/4
4/4
1/4
3/4
TO MAIN
SECTION (1/4)
TO MAIN
SECTION (4/4)
P1
P1
TO SPEAKERS
(FRONT)
TO SPEAKERS
(SUBWOOFER)
: +B SIGNAL LINE : AUDIO OUTPUT SIGNAL LINE
SP_SW1-
R506
3.3
SP_SW2-
C479 0.033
SP_SW2+
SP_FL-
PWM_SW2-
SD
R444 10
C425
0.1
SP_SW2+
3.3
R466
C192
1000P
R524
100K
C191
1000P
B1ABCF000011
Q500
B1ABCF000011
Q501
R523
100K
R520
100K
R521
100K
33K
R522
SP_PROTCT
C164
1000P
3.3
R467
C445
0.01
50V10
C548
C163
1000P
C444
0.01
C490
0.1
C429
0.1
SP_FL+
3.3
R464
3.3
R465
C186
1000P
SP_FL-
VDD
0.1
C501
5.6K
R502
C162
1000P
1000P
C161
C443
0.01
2
43
1
G0B9R5K00007
L414
C442
0.01
C496
25V470
0.1
C502
G0A100H00018
L406
C497
0.1
C493
0.1
C491
1
1
C494
SP_FR+
C187
1000P
R528 100K
C181
1000P
C188
1000P
100KR525
R527 100K
R526 100K
C492 0.033
0.1
C481
R443 10
C426
0.1
10R445
C427
16V10
PWM_FL+
PWM_FL-
R448 100
R449 100
R446 10
R447 10
R428 10
R427 10
C423
0.1
0.033
C464
SP_SW1-
C460
0.1
C477
0.1
SP_SW2-
3.3
R468
R501
5.6K
G0A100H00018
L418
C486
0.1
C166
1000P
C165
1000P
C446
0.01
C480
1
C478
0.1
G0A100H00018
L419
C487
0.1
4
21
3
L412
G0B9R5K00007
C505
25V470
C482
1
C424
0.1
PWM_SW2+
R442 100
C470 0.033
R441
22K
R440 100
R429 100
5.6K
R500
SP_SW1+
L410
G0A100H00018
G0A100H00018
L417
SP_FL+
3.3
R469
C473
0.1
C462
0.1
1
C466
2
43
1
L413
G0B9R5K00007
C472
0.1
25V470
C467
C461
0.1
1
C463
C476 0.033
43
11
9
10
34
36
35
12 33
6
7
5
39
38
41
40
8
37
2322
20
18
16
14
13
15
17
19
31
32
28
26
25
27
30
29
21 24
3
4
2
1
42
44
IC403
DIGITAL AMPLIFIER
C1AB00003217
IC405
DIGITAL AMPLIFIER
C1AB00003217
C447
0.01
PWM_SW1-
PWM_SW1+
SP_FR-
PWM_FR+
0.1
C522
C508
0.1
G0A100H00018
L408
C515
1
C430
0.1
SP_FR+
0.033C510
R452 10
R453 10
PWM_FR-
R451 100
C516
1
C509
0.1
R503
5.6K
G0A100H00018
L409
0.1
C523
2
43
1
G0B9R5K00007
L415
C519
25V470
VALID
C431
0.1
C432
0.1
10R454
C433
16V10
C190
1000P
SP_SW1+
C514
0.1
C189
1000P
SP_FR-
R450
22K
C498 0.033
C507 0.033
C455
0.01 1000P
C171
R507
3.3
C172
1000P
C456
0.01
G0A100H00018
L407
DGND
+12V
NC
OUT_C
BST_C
OUT_D
GND_C
GND_D
NC
OUT_A
BST_A
BST_B
GND_A
OUT_B
GND_B
BST_D
PVDD_D
PVDD_D
PVDD_A
PVDD_B
GVDD_A
PVDD_A
PVDD_C
GVDD_D
NC
M2
NC
NC
M3
M1
GND
NC
VDD
VREG
AGND
PWM_B
PWM_D
PWM_C
SD(L)
PWM_A
OC_ADJ
GVDD_B
OTW(L)
GVDD_C
RST_AB(L)
RST_CD(L)
43
11
9
10
34
36
35
12 33
6
7
5
39
38
41
40
8
37
2322
20
18
16
14
13
15
17
19
31
32
28
26
25
27
30
29
21 24
3
4
2
1
42
44
NC
OUT_C
BST_C
OUT_D
GND_C
GND_D
NC
OUT_A
BST_A
BST_B
GND_A
OUT_B
GND_B
BST_D
PVDD_D
PVDD_D
PVDD_A
PVDD_B
GVDD_A
PVDD_A
PVDD_C
GVDD_D
NC
M2
NC
NC
M3
M1
GND
NC
VDD
VREG
AGND
PWM_B
PWM_D
PWM_C
SD(L)
PWM_A
OC_ADJ
GVDD_B
OTW(L)
GVDD_C
RST_AB(L)
RST_CD(L)
SWITCH
SWITCH
C806
0.47
C807
0.47
C805
0.47
C804
0.47
CN402*
CN401*
SUBW_1+
SUBW_2-
FRONT_L-
FRONT_L+
SUBW_2+
SUBW_1-
FRONT_R+
FRONT_R-
2
1
4
3
2
1
4
3
403
402
CHASSIS
C803
0
0
C802
HEATSINK
C512
0.1
16V33
C441
G0A200D00002
L400
TL
TL
88
Page 89
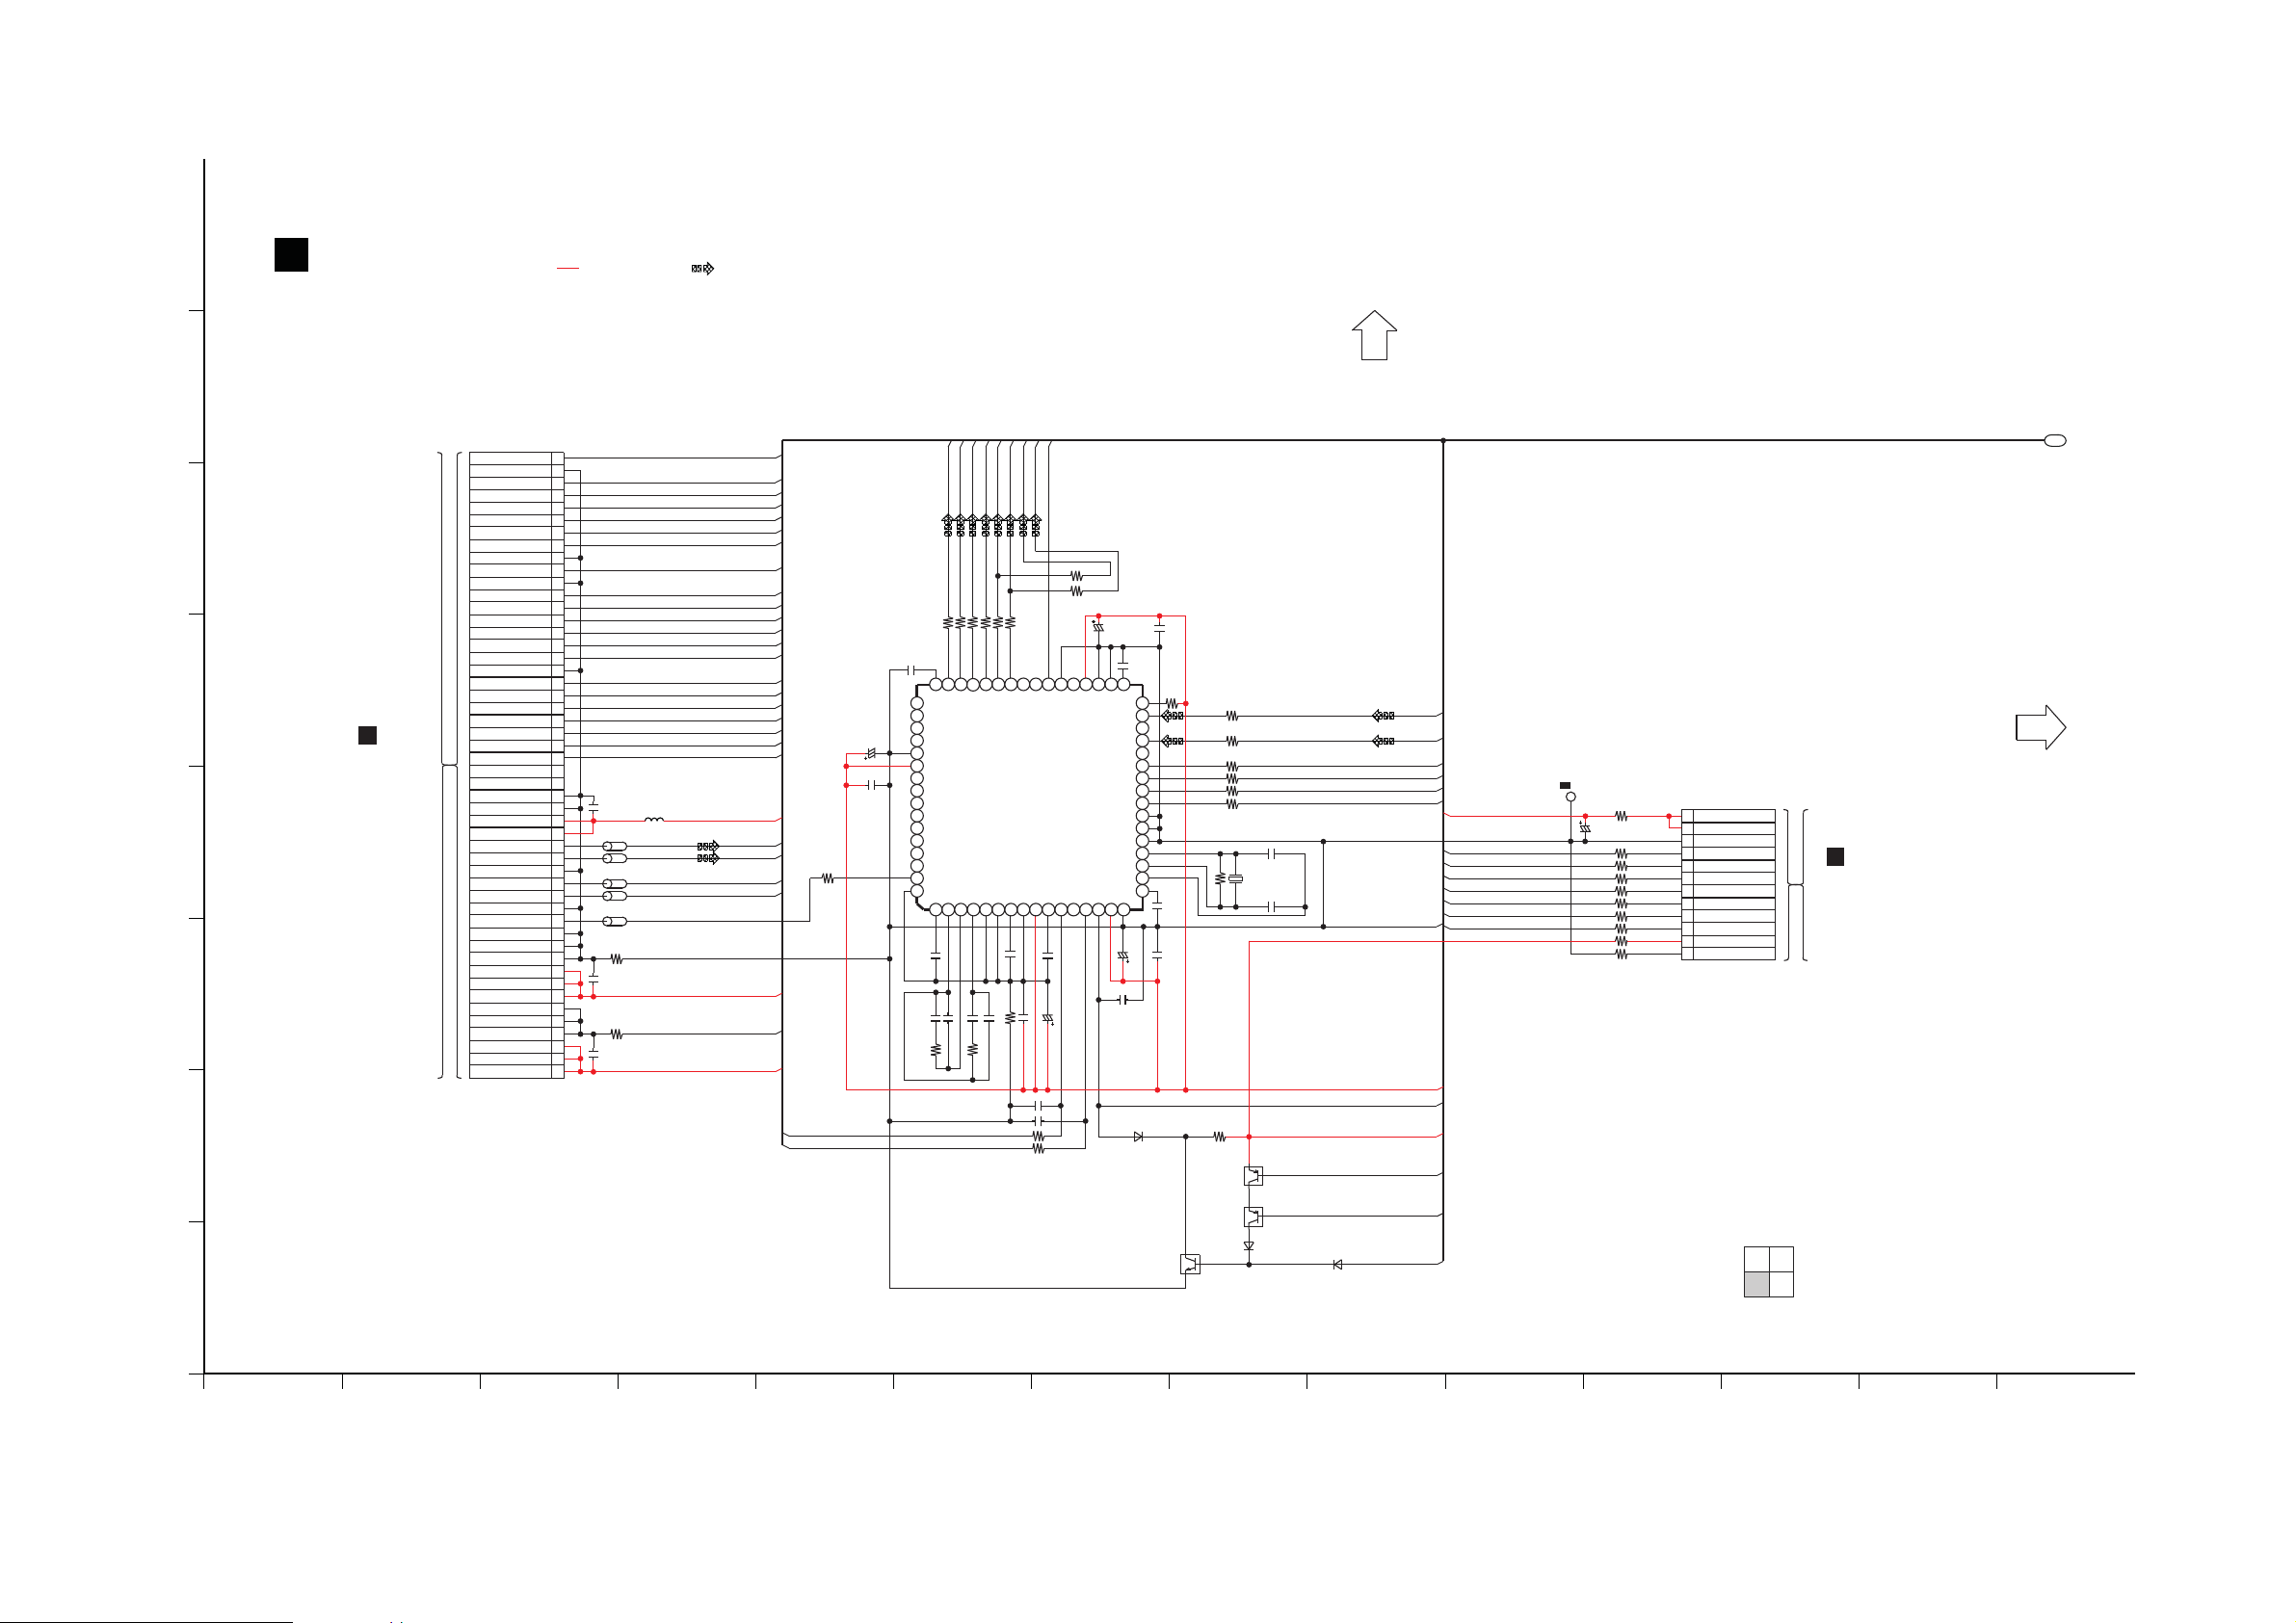
16.9. MAIN CIRCUIT (3/4)
B
C
A
I
SCHEMATIC DIAGRAM - 9
MAIN CIRCUIT
: +B SIGNAL LINE : AUDIO OUTPUT SIGNAL LINE
TO MAIN
SECTION (1/4)
J
CN200
1
K
DT_OUT_CODEC_M
CS_CODEC_M
INTREQ_CODEC_M
RESET_CODEC_M
L
TO
HDMI CIRCUIT
(CN1001)
IN SCHEMATIC
DIAGRAM - 2
MAIN_POWER
HDMI_POWER
M
N
50
HDMI_MUTE
DSP_GND
RESET_DSP
MOSI_DSP
MISO_DSP
BUSY_DSP
INTREQ_DSP
CS_DSP
DSP_GND
CLK_DSP
DSP_GND
DCDET
REMOTE
KEY1(NC)
H_REQ
M_CS
H_SO
M_SI
M_CLK
M_RESET
HDMI_GND
DSP_GND
DSP_GND
BK_3.3V
BK_3.3V
SDIN3 (FL/FR)
SDIN4 (C/SW)
DSP_GND
DSP_SCLK
DSP_LRCLK
DSP_GND
DSP_MCLK
DSP_GND
DSP_GND
DSP_GND
D5V_1
D5V_1
D5V_1
HDMI_GND
HDMI_GND
HDMI_GND
SYS6V
SYS6V
SYS6V
50
49
48
47
46
45
44
43
42
41
40
39
38
37
36
35
34
33
32
31
30
29
28
27
26
25
24
23
C200
0.1
C202
0.1
C201
0.1
R200
R201
G0A200D00002
J0JBC0000072
J0JBC0000072
J0JBC0000072
J0JBC0000072
J0JBC0000072
0
0
L200
22
21
20
R206
19
R205
18
17
R204
16
R203
15
14
R202
13
12
11
10
9
8
7
6
5
4
3
2
1
O
P
HDMI_MUTE
RESET_DSP
MOSI_DSP
MISO_DSP
BUSY_DSP
INTREQ_DSP
CS_DSP
CLK_DSP
DT_OUT_CODEC_M
CS_CODEC_M
INTREQ_CODEC_M
RESET_CODEC_M
S_DET
REMOTE
PWR_CTRL
H_REQ
M_CS
H_SO
M_SI
M_CLK
M_RESET
BK3.3V
DSP_SD1
DSP_SD3
DSP_SCLK
DSP_LRCLK
D5V_1
SYS6V_GND
SYS6V
R495
100
DAP_RESET
DAP_PDN
C406
16V10
C407
0.1
C421
0.1
PWM_FL-
PWM_FL+
PWM_FR+
R418 47
R417 47
4748 4445 4041 36 3335 343839 3743 4246
PWM_M_7
49
PWM_P_7
50
PWM_M_4
PWM_M_8
51
PWM_P_8
52
DVSS_PWM
53
DVDD_PWM
54
PWM_M_5
55
PWM_P_5
56
PWM_M_6
DIGITAL AUDIO PWM PROCESSOR
57
PWM_P_6
58
PWM_HPML
59
PWM_HPPL
60
PWM_HPMR
61
PWM_HPPR
62
MCLK
63
64
PLL_FLTM
1
C400
0.1
0.01
C401
0.1
C414
R400
220
PWM_FR-
PWM_SW1-
PWM_SW1+
PWM_SW2+
47R423
R424 47
R421 47
R422 47
PWM_P_2
PWM_P_3
PWM_M_2
PWM_M_3
[47] PWM_P_4
[48] VR_PWM
IC401
C1AB00003216
[64] RESERVED
[1] VRA_PLL
[2] PLL_FLT_RET
AVSS
AVSS
VRD_PLL
PLL_FLTP
879465
0.1C404
3.3R402
0.1C405
0.1
C403 0.1
C402
220
R401
C451
C452
R435 100
PWM_SW2-
PWM_P_1
PWM_M_1
[33] VR_DIG
[17] VRD_DPLL
AVSS_PLL
AVDD_PLL
15P
15P
1KR436
VALID
R425
R42600
DVSS
VALID
RESET
VBGAP
1000P
C409
C408 16V10
BKND_ERR
HP_SEL
C420
C416
16V10
0.1
C417
0.1
PSVC
32
DVSS
DVSS
DVDD
SDIN1
31
SDIN2
30
29
SDIN3
28
SDIN4
27
SCLK
26
LRCLK
25
SCL
24
SDA
23
RESERVED
RESERVED
22
RESERVED
21
XTL_IN
20
19
XTL_OUT
18
OSC_CAP
17
MUTE
DVSS
DVDD
PDN
1612 1310 11 151423
16V10C410
C453
0.01
D602
B0ACCK000005
QR600
B1GBCFJJ0007
MUTING CONTROL
R414
10K
C412
C411
R410 47
R413 47
R409 82
R408 82
R407 47
R406 47
10PC413
1MR404
X400
H0J135000003
0.1
0.1
R4231
100K
10PC415
QR601
B1GDCFJJ0008
MUTING
QR602
B1GDCFJJ0008
MUTING
D601
B0ACCK000005
D600
B0ACCK000005
DSP_SD3
DSP_SD1
DSP_SCLK
DSP_LRCLK
DAP_SCL
DAP_SDA
DGND
DAP_3.3V
DAP_MUTE
SYS3.3V
HDMI_MUTE
HDMIMUTE_DIS
MUTE_ALL
D5V_2
LED_OE
LED_DI
LED_CLK
LED_CS
KEY2
KEY1
REMOTE
TO MAIN
SECTION (4/4)
TL
303
LB308 0
C303
16V10
LB312 0
LB307 0
LB306 0
LB305 0
LB303 0
LB302 0
LB301 0
LB300 0
CN300
D5V
1
D5V
2
DGND
3
LED_OE
4
LED_DATA
5
6
LED_CLK
LED_CS
7
0LB304
8
KEY2
KEY1
9
REMOTE
10
11
VREF(3.3V)
12
VREFGND
12
TO
LED CIRCUIT
(CN350)
IN SCHEMATIC
DIAGRAM - 11
1
2/4
1/4
4/4
3/4
SC-HTB10P/PC MAIN CIRCUIT
P1
1 2 3 4 5 6 7 8 9 10 11 12 13 14
89
Page 90
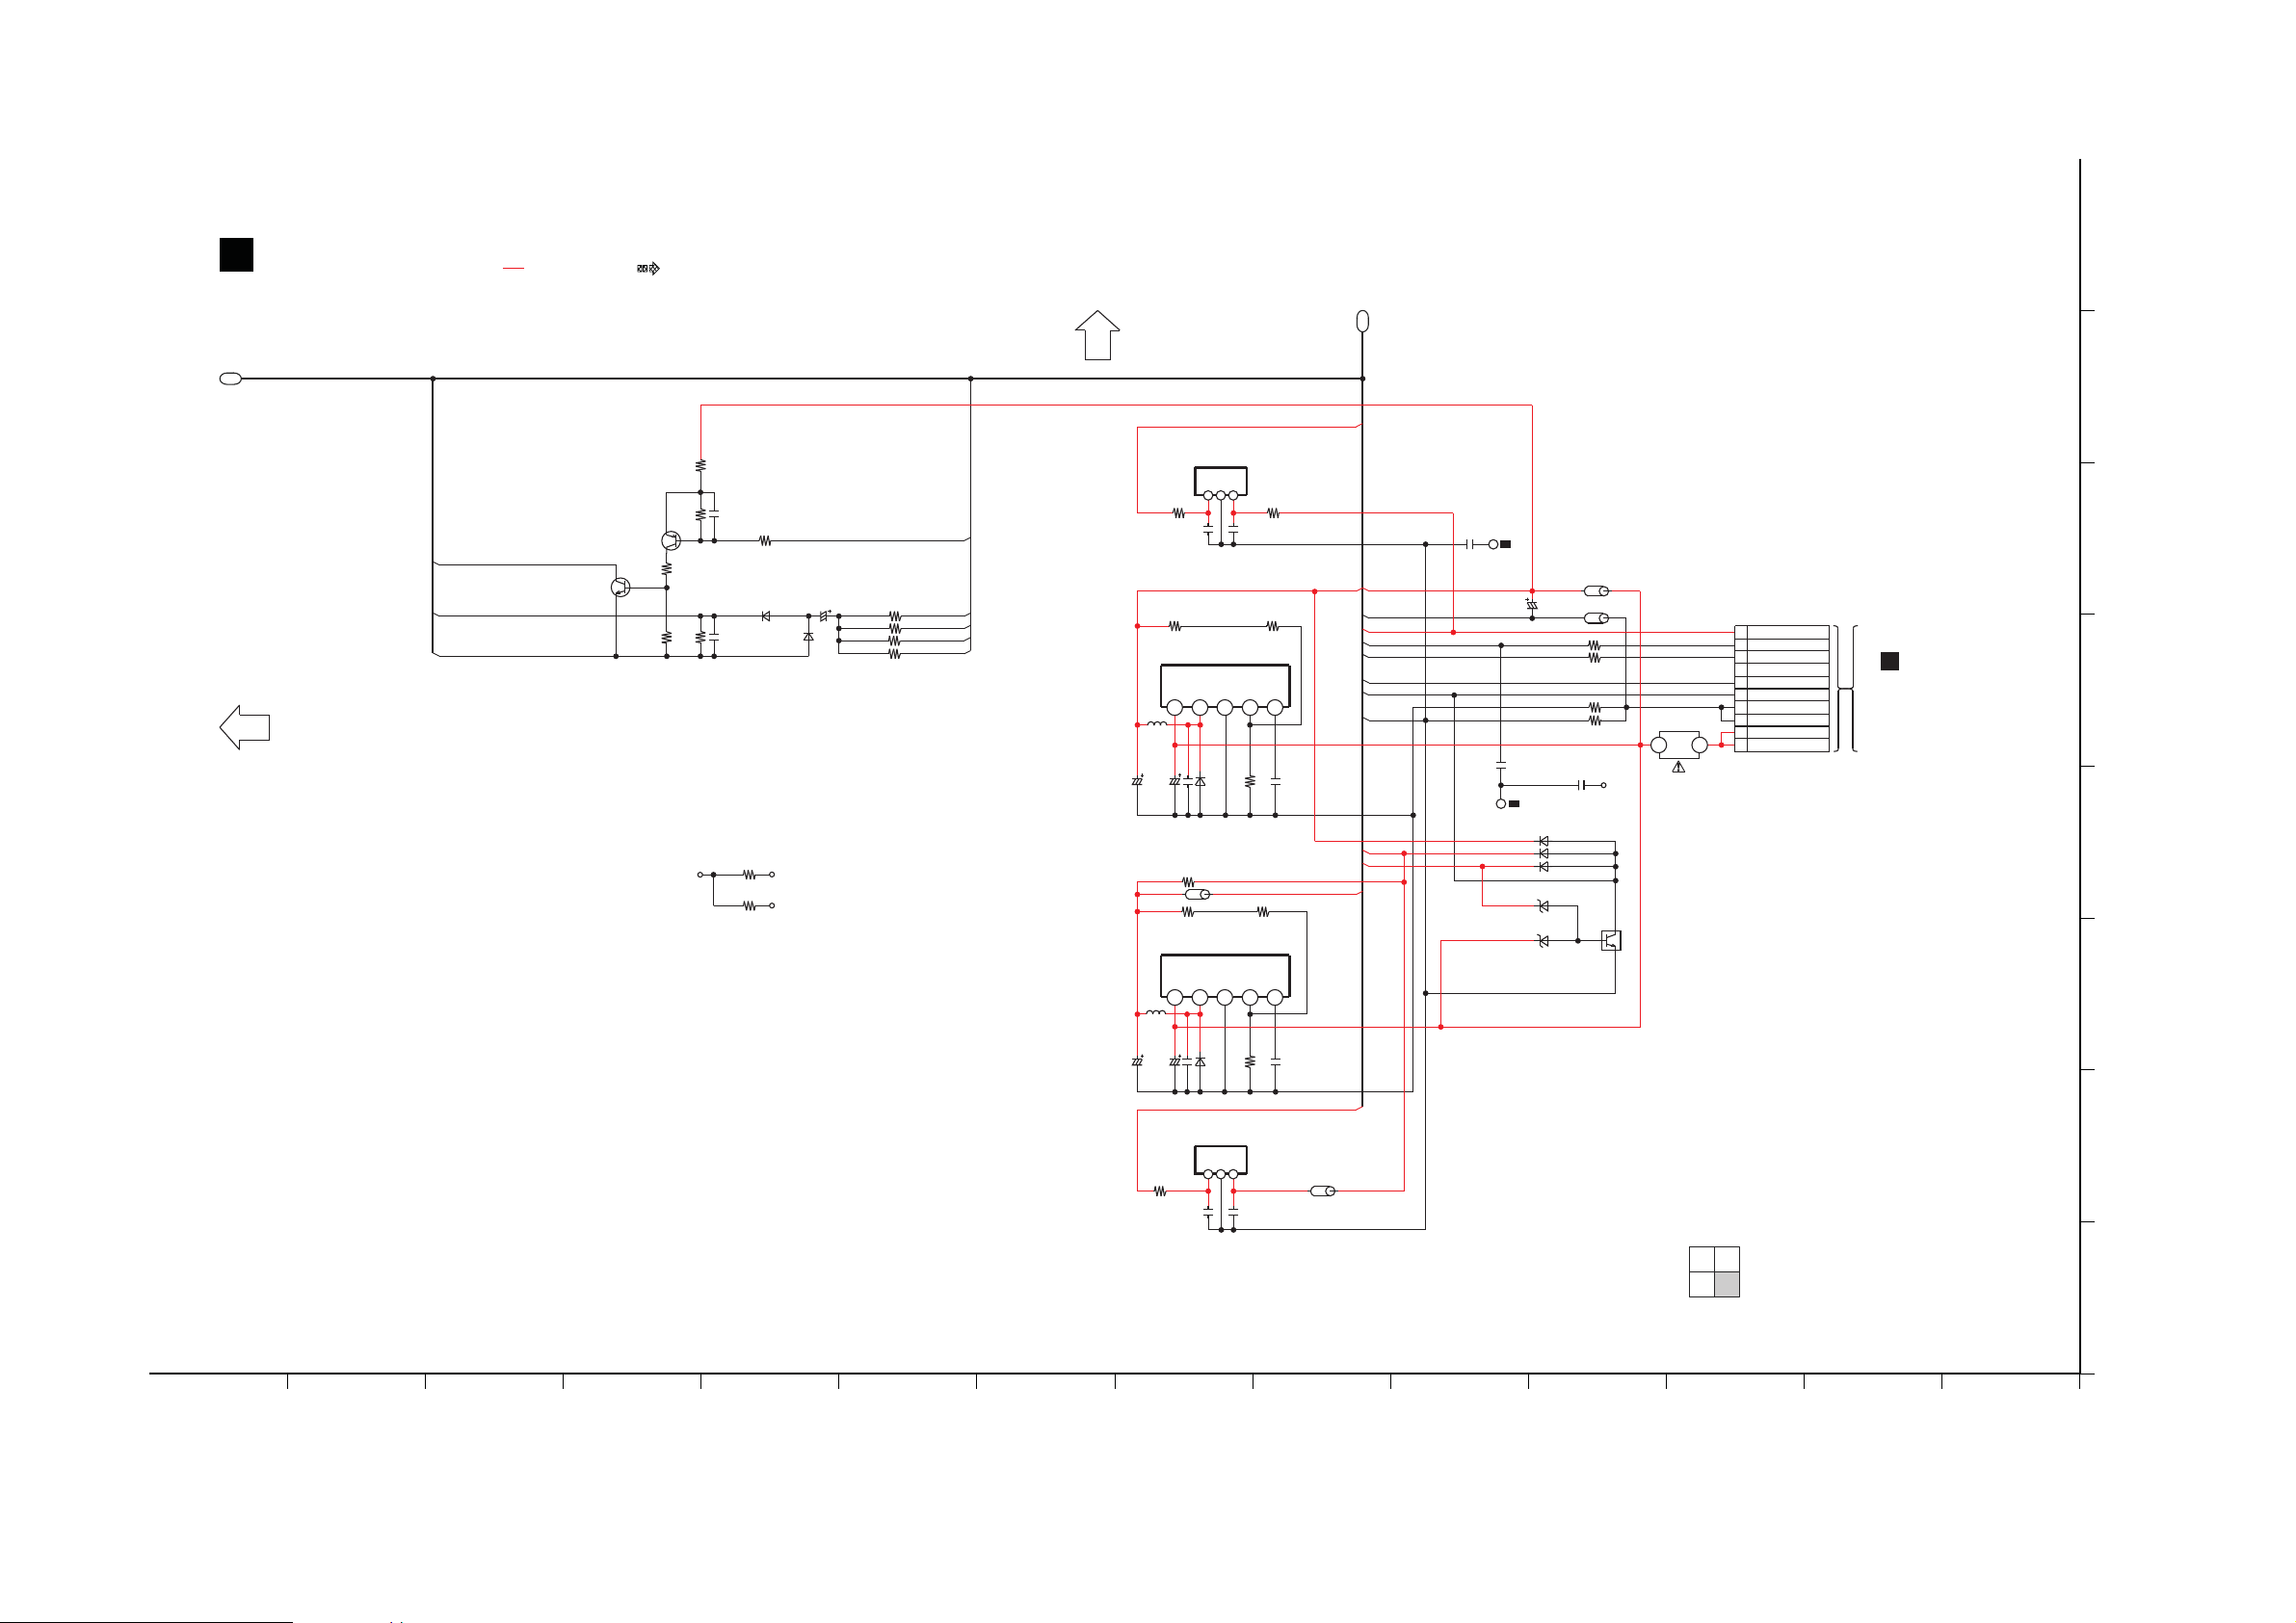
16.10. MAIN CIRCUIT (4/4)
I
K
L
J
M
O
P
N
15 16 17 18 19 20 21 22 23 24 25 26 27 28
B
MAIN CIRCUIT
SCHEMATIC DIAGRAM - 10
SC-HTB10P/PC MAIN CIRCUIT
2/4
4/4
1/4
3/4
TO MAIN
SECTION (3/4)
TO MAIN
SECTION (2/4)
P1
P1
F
TO
SMPS CIRCUIT
(H2016*)
IN SCHEMATIC
DIAGRAM - 12
: +B SIGNAL LINE : AUDIO OUTPUT SIGNAL LINE
702
701
TL
TL
R704 1K
0
0
R700
R712 0
C704
1000P
C703
0.1
R701
6
8
9
7
2
1
4
5
3
10
10
1
CN700
12
FP700
J0JKB0000020
L422
SYS6V
J0JKB0000020
L421
SYS6V_GND
PCONT
DGND
S_DET
PVCONT_ON
C150
25V470
B0JCPG000005
D707
231
IC700
C0CBABC00117
C702
1000P
R709 27K
1000P
C714
R710
10K
LB701
0
1
C701
C709
0.47
R706 27K
R707 10K
R708 3.9K
C712
0.47
L706
G1A330ZA0007
C708
16V10
+12V
SYS3.3V
42135
C700
1
1000PC715
D705
B0JCPG000005
L707
G1A330ZA0007
C713 25V33
C711
6.3V470
C710 25V33
LB700
0
R705 56K
42135
IC701
C0DBAYH00005
SWITCHING REGULATOR
IC702
C0DBAYH00005
SWITCHING REGULATOR
VOLTAGE REGULATOR
J0JBC000072
L426
D704
B0BC030A0264
B0BC012A0264
D703
0R713
J0JBC0000072R714
D5V_1
DAP_3.3V
C418
1
B0ACCK000005D700
Q704
B1GBCFGG0030
DC DETECT
B0ACCK000005D706
B0ACCK000005D701
L427
0
BK3.3V
D5V_2
C419
1
VDD
GND
ON/OFF
+20V
3A
+20V
PGND
PCONT
SYS6V
PGND
DC_DET
SYS6VGND
ECO_CTRL
SYNC (HDMI_CTRL)
CHASSIS
VIN
IN
ADJ
GND ADJ
ON/OFF
GND
GND
VOUT
OUT
231
IC107
C0CBABC00117
VOLTAGE REGULATOR
IN
GND
OUT
VIN
VOUT
SP_FL+
SP_SW2+
SP_SW1+
R176 5.6K
R175
5.6K
R174 5.6K
SP_FR+
SP_PROTCT
R184 5.6K
4.7K
R236
50V1
C151
D119
B0ACCK000005
D118
B0ACCK000005
220K
R180
B1ABCF000011
DC DETECT
DC DETECT
Q114
R587
56K
R178
47K
Q116
B1ADBL000010
C158
0.1220K
R179
C153
0.1100K
R168
ECO_DAMP
DCDET
GND
K100
0
K103
0
90
Page 91
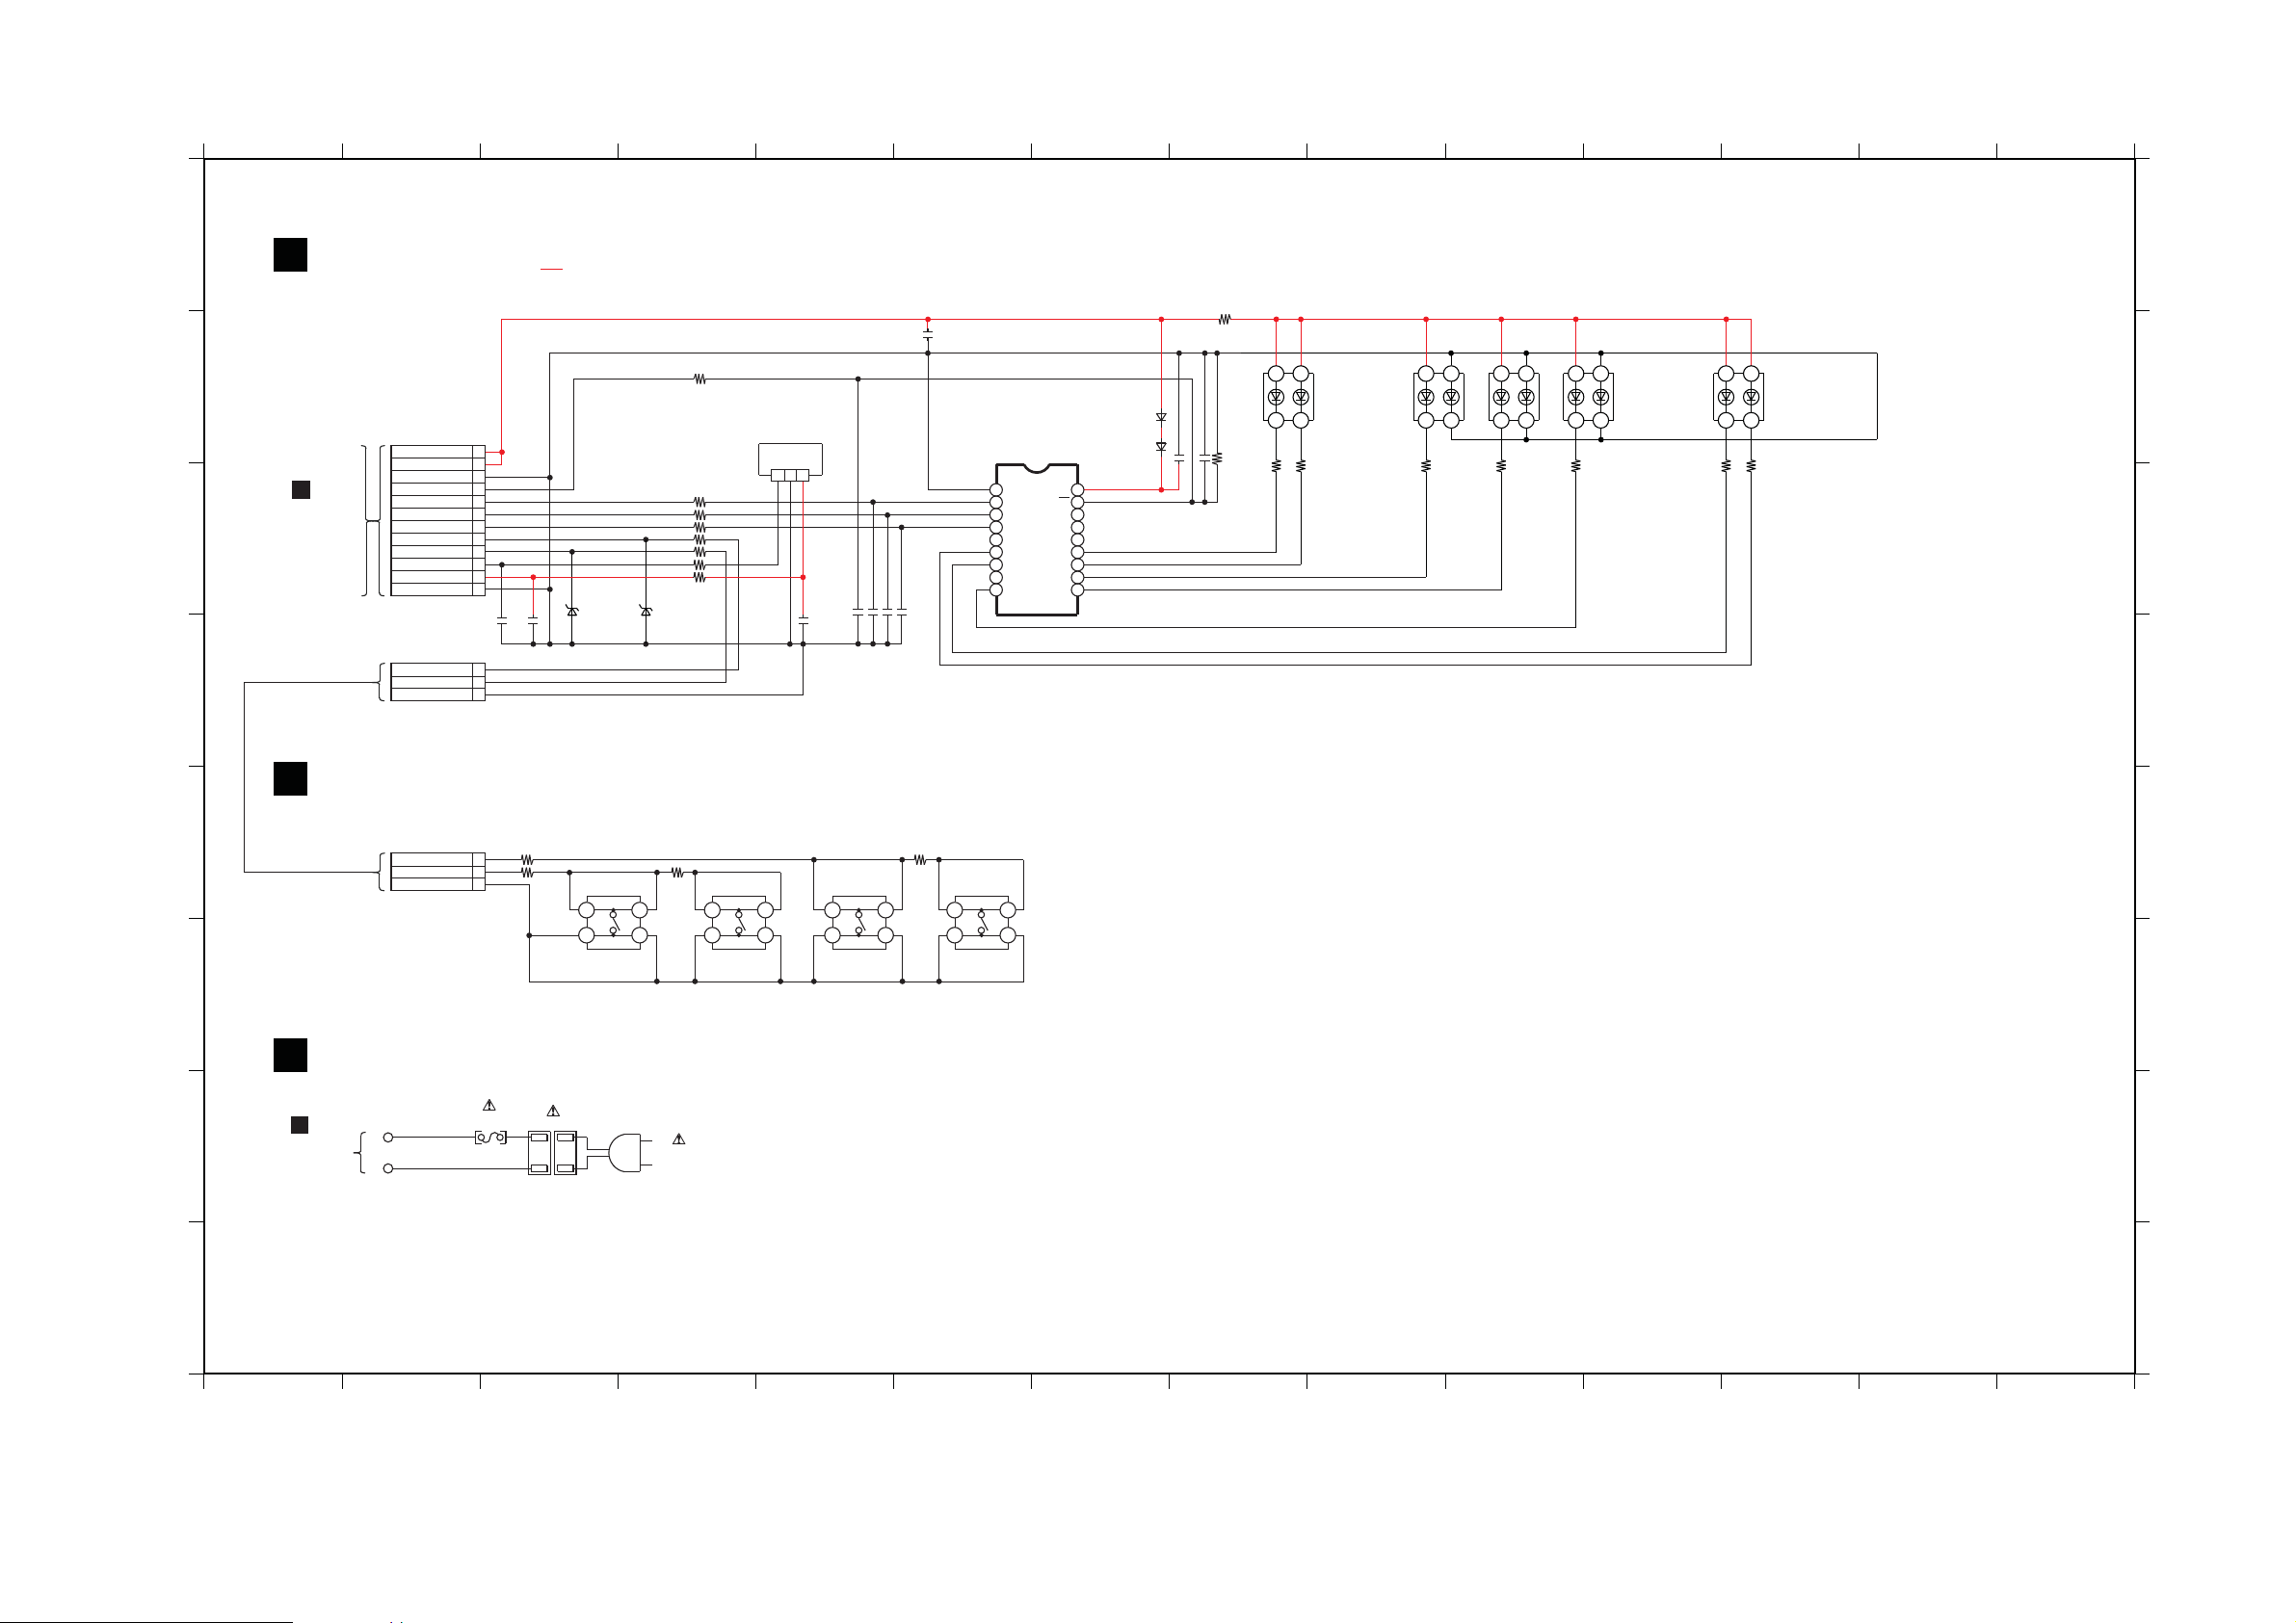
16.11. LED CIRCUIT, PANEL TACT SWITCH CIRCUIT, AC INLET CIRCUIT
C
D
E
B
F
1
A
SCHEMATIC DIAGRAM - 11
LED CIRCUIT
B
TO
MAIN CIRCUIT
(CN300)
C
D
IN SCHEMATIC
DIAGRAM - 9
2 3 4 5 6 7 8 9 10 11 12 13 14
: +B SIGNAL LINE
R385
0
C357
0.1
D307
B3AGB0000037
R372
200
13
24
R369
1K
100R351
D321
VDD
Q11
Q10
OE
Q9
Q8
Q7
Q6
Q5
18
17
16
15
14
13
12
11
10
B0ACCK000005
D320
B0ACCK000005
1C356
100PC354
10KR381
Z300
B3RAC0000019
CN350
1
12
CN351*
D5V
D5V
VREFGND
LED_OE
LED_DATA
LED_CLK
LED_LCK
KEY2
KEY1
REMOCON
VREF
VREFGND
KEY2
KEY1
VREFGND
12
11
10
9
8
7
6
5
4
3
2
1
C358
100P
1
2
3
C359
100P
D400
B0BC5R600003
R382 0
R383 0
R355 47
D401
B0BC5R600003
REMOTE CONTROL SENSOR
100R352
100R353
100R354
0R384
132
GND
RE
VDD
100PC351
100PC350
100PC352
C355
1
100PC353
IC300
C0JBAQ000073
LED DRIVER
1
VSS
2
DATA
CLK
3
LCK
4
Q0
5
Q1
6
Q2
7
Q3
8
Q4
9
D305
B3AGB0000037
R367
200
13
24
D304
B3AGB0000037
R365
200
13
24
D303
B3AGB0000037
R363
200
D301
B3AGB0000037
R361
200
13
24
R360
1K
13
24
A
B
C
D
PANEL TACT SWITCH CIRCUIT
E
CN352*
KEY2
KEY1
VREFGND
R370
R371
100
100
S300
POWER INPUT SELECTOR VOLUME -VOLUME +
R357
56K
S301
21
43
S303
21
43
R356
3.3K
21
43
21
43
S304
1
2
3
F
E
F
AC INLET CIRCUIT
(RED)
TO
G
SMPS CIRCUIT
IN SCHEMATIC
DIAGRAM - 12
TL10*
TL20*
(BLK)
H
F1
2.5A 125V
P5701
ZA5701ZA5702
AC IN
120V 60Hz
SC-HTB10P/PC LED / PANEL TACT SWITCH / AC INLET CIRCUIT
G
H
1 2 3 4 5 6 7 8 9 10 11 12 13 14
91
Page 92
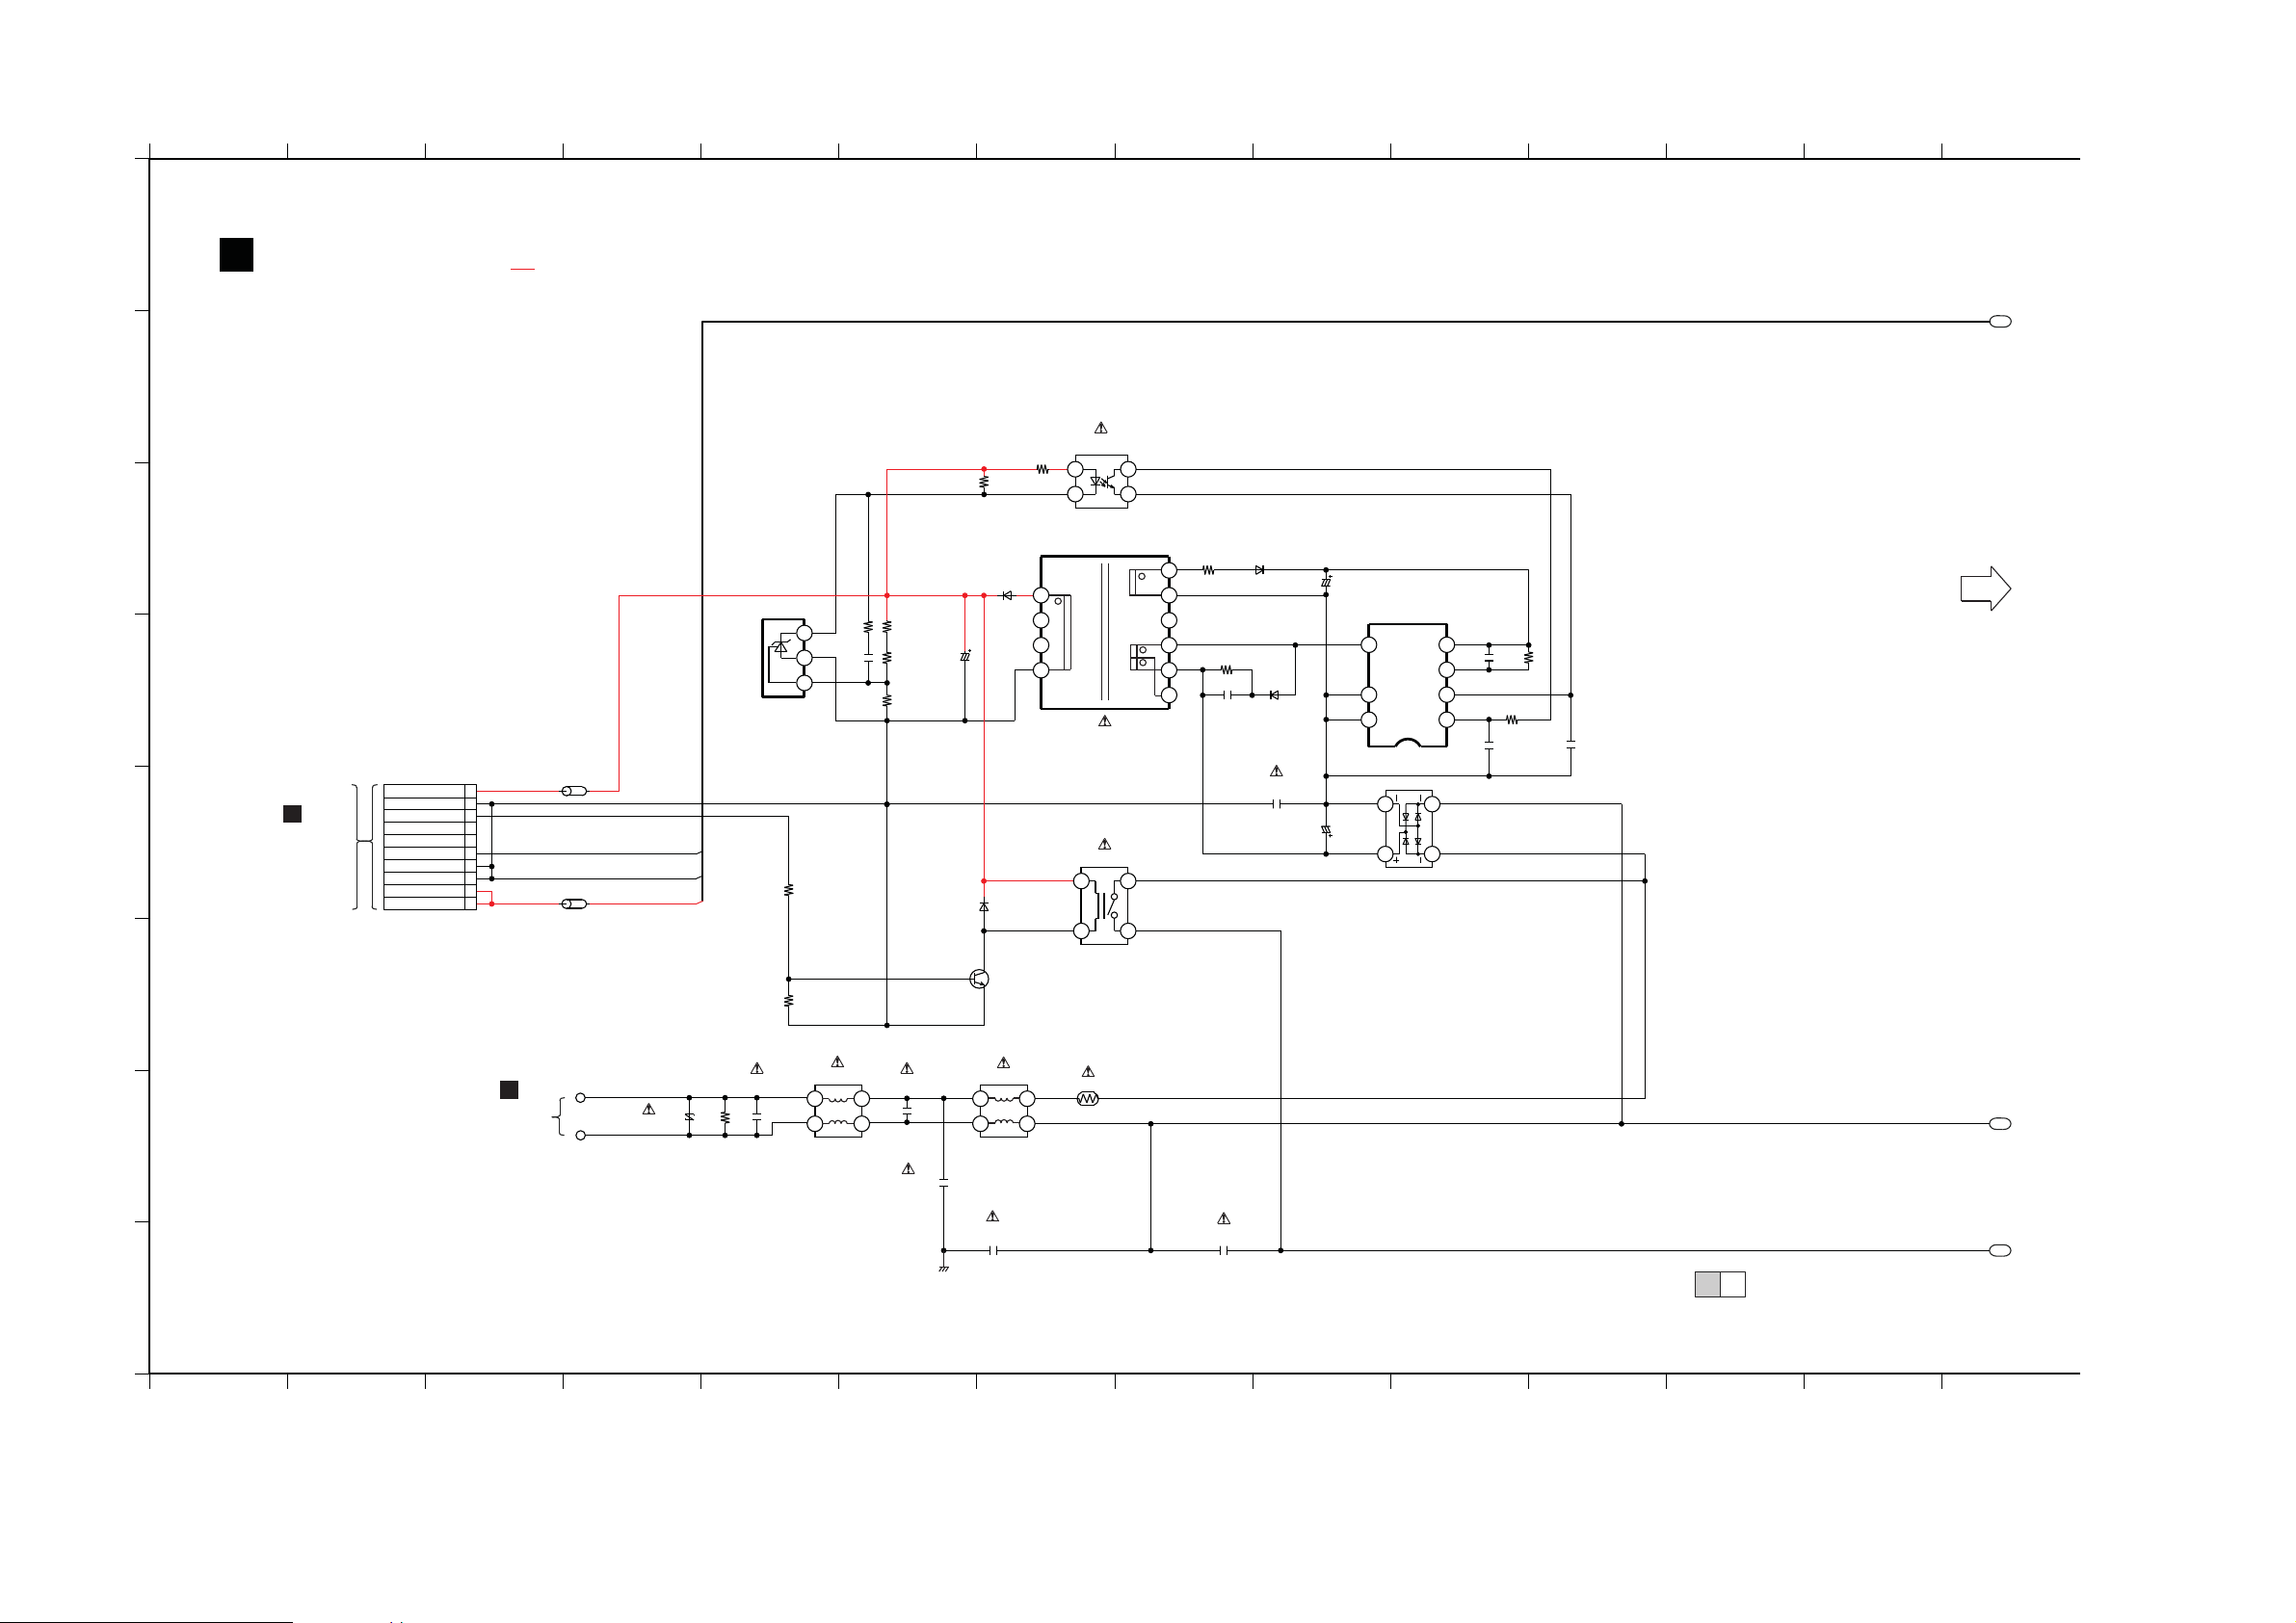
16.12. SMPS CIRCUIT (1/2)
A
1
2 3 4 5 6 7 8 9 10 11 12 13 14
1 2 3 4 5 6 7 8 9 10 11 12 13 14
C
D
B
E
G
H
F
F
SMPS CIRCUIT
SCHEMATIC DIAGRAM - 12
SC-HTB10P/PC SMPS CIRCUIT
2/21/2
TO SMPS
SECTION (2/2)
2
1
P1
B
TO
MAIN CIRCUIT
(CN700)
IN SCHEMATIC
DIAGRAM - 10
: +B SIGNAL LINE
E
TO
AC INLET
CIRCUIT IN
SCHEMATIC
DIAGRAM - 11
D5896
B0JAMF000011
R5890
2.2K
D5798
B0EAMM000057
R5798
100
C5798
50V10
R5894
330
4
3
1
2
PC5799
3
2
4
1
L5702
ELF19H010A
C5701
3
2
4
1
ELF15N007A
L5701
TH5702
D4CAA5R10001
3.9M
R5701
F1BAF1020020
1000P
C5708
F1BAF1020020
C5704
1000P
TL3*
TL4*
DZ5701
ERZV10V511CS
B1ABCF000011
SWITCH
Q5899
R5898
4.7K
R5899
47K
0.1
C5796
D5793
B0HAMP000094
C5790
2200P
R5786
200K
330K
R5795C5795
1000P
7
8
5
1
2
4
3
IC5799
MIP2F20MSSCF
SWITCHING POWER SUPPLY CONTROL
C5799
400V6.8
470P
C5797
R5797
15K
9
10
7
8
2
1
6
5
4
3
ETS19AB2A6AG
SUB TRANSFORMER
T5751
C5706
1000P
F1BAF1020020
D5899
B0ACCK000005
4
31
2
K6B1AEA00003
RY5701
4
3
1
2
B0EDKT000009
D5799
J0JKB0000020
L5800
A
R
3
2
C
1
C0DAEMZ00001
SHUNT REGULATOR
IC5899
R5892
4.7K
C5899
1000
R5893
39K
33K
R5891
R5895
15K
C5898
0.1
DCDET
6
8
9
7
2
1
1
10
4
5
3
10
H2016*
VDD
GND
L5801
G0A101ZA0045
(BLK)
(RED)
D VCC
S FB
S VDD
TR
B3PBA0000402
FEED BACK
SYNC
SYS5V
GND
GND
DCDET
PCONT
SYS5VGND
VDD (+20V)
VDD (+20V)
ECO CTL
F0CAF104A105
0.1
C5702
F0CAF104A105
0.1
C5703
F0CAF104A105
0.1
GND
92
Page 93
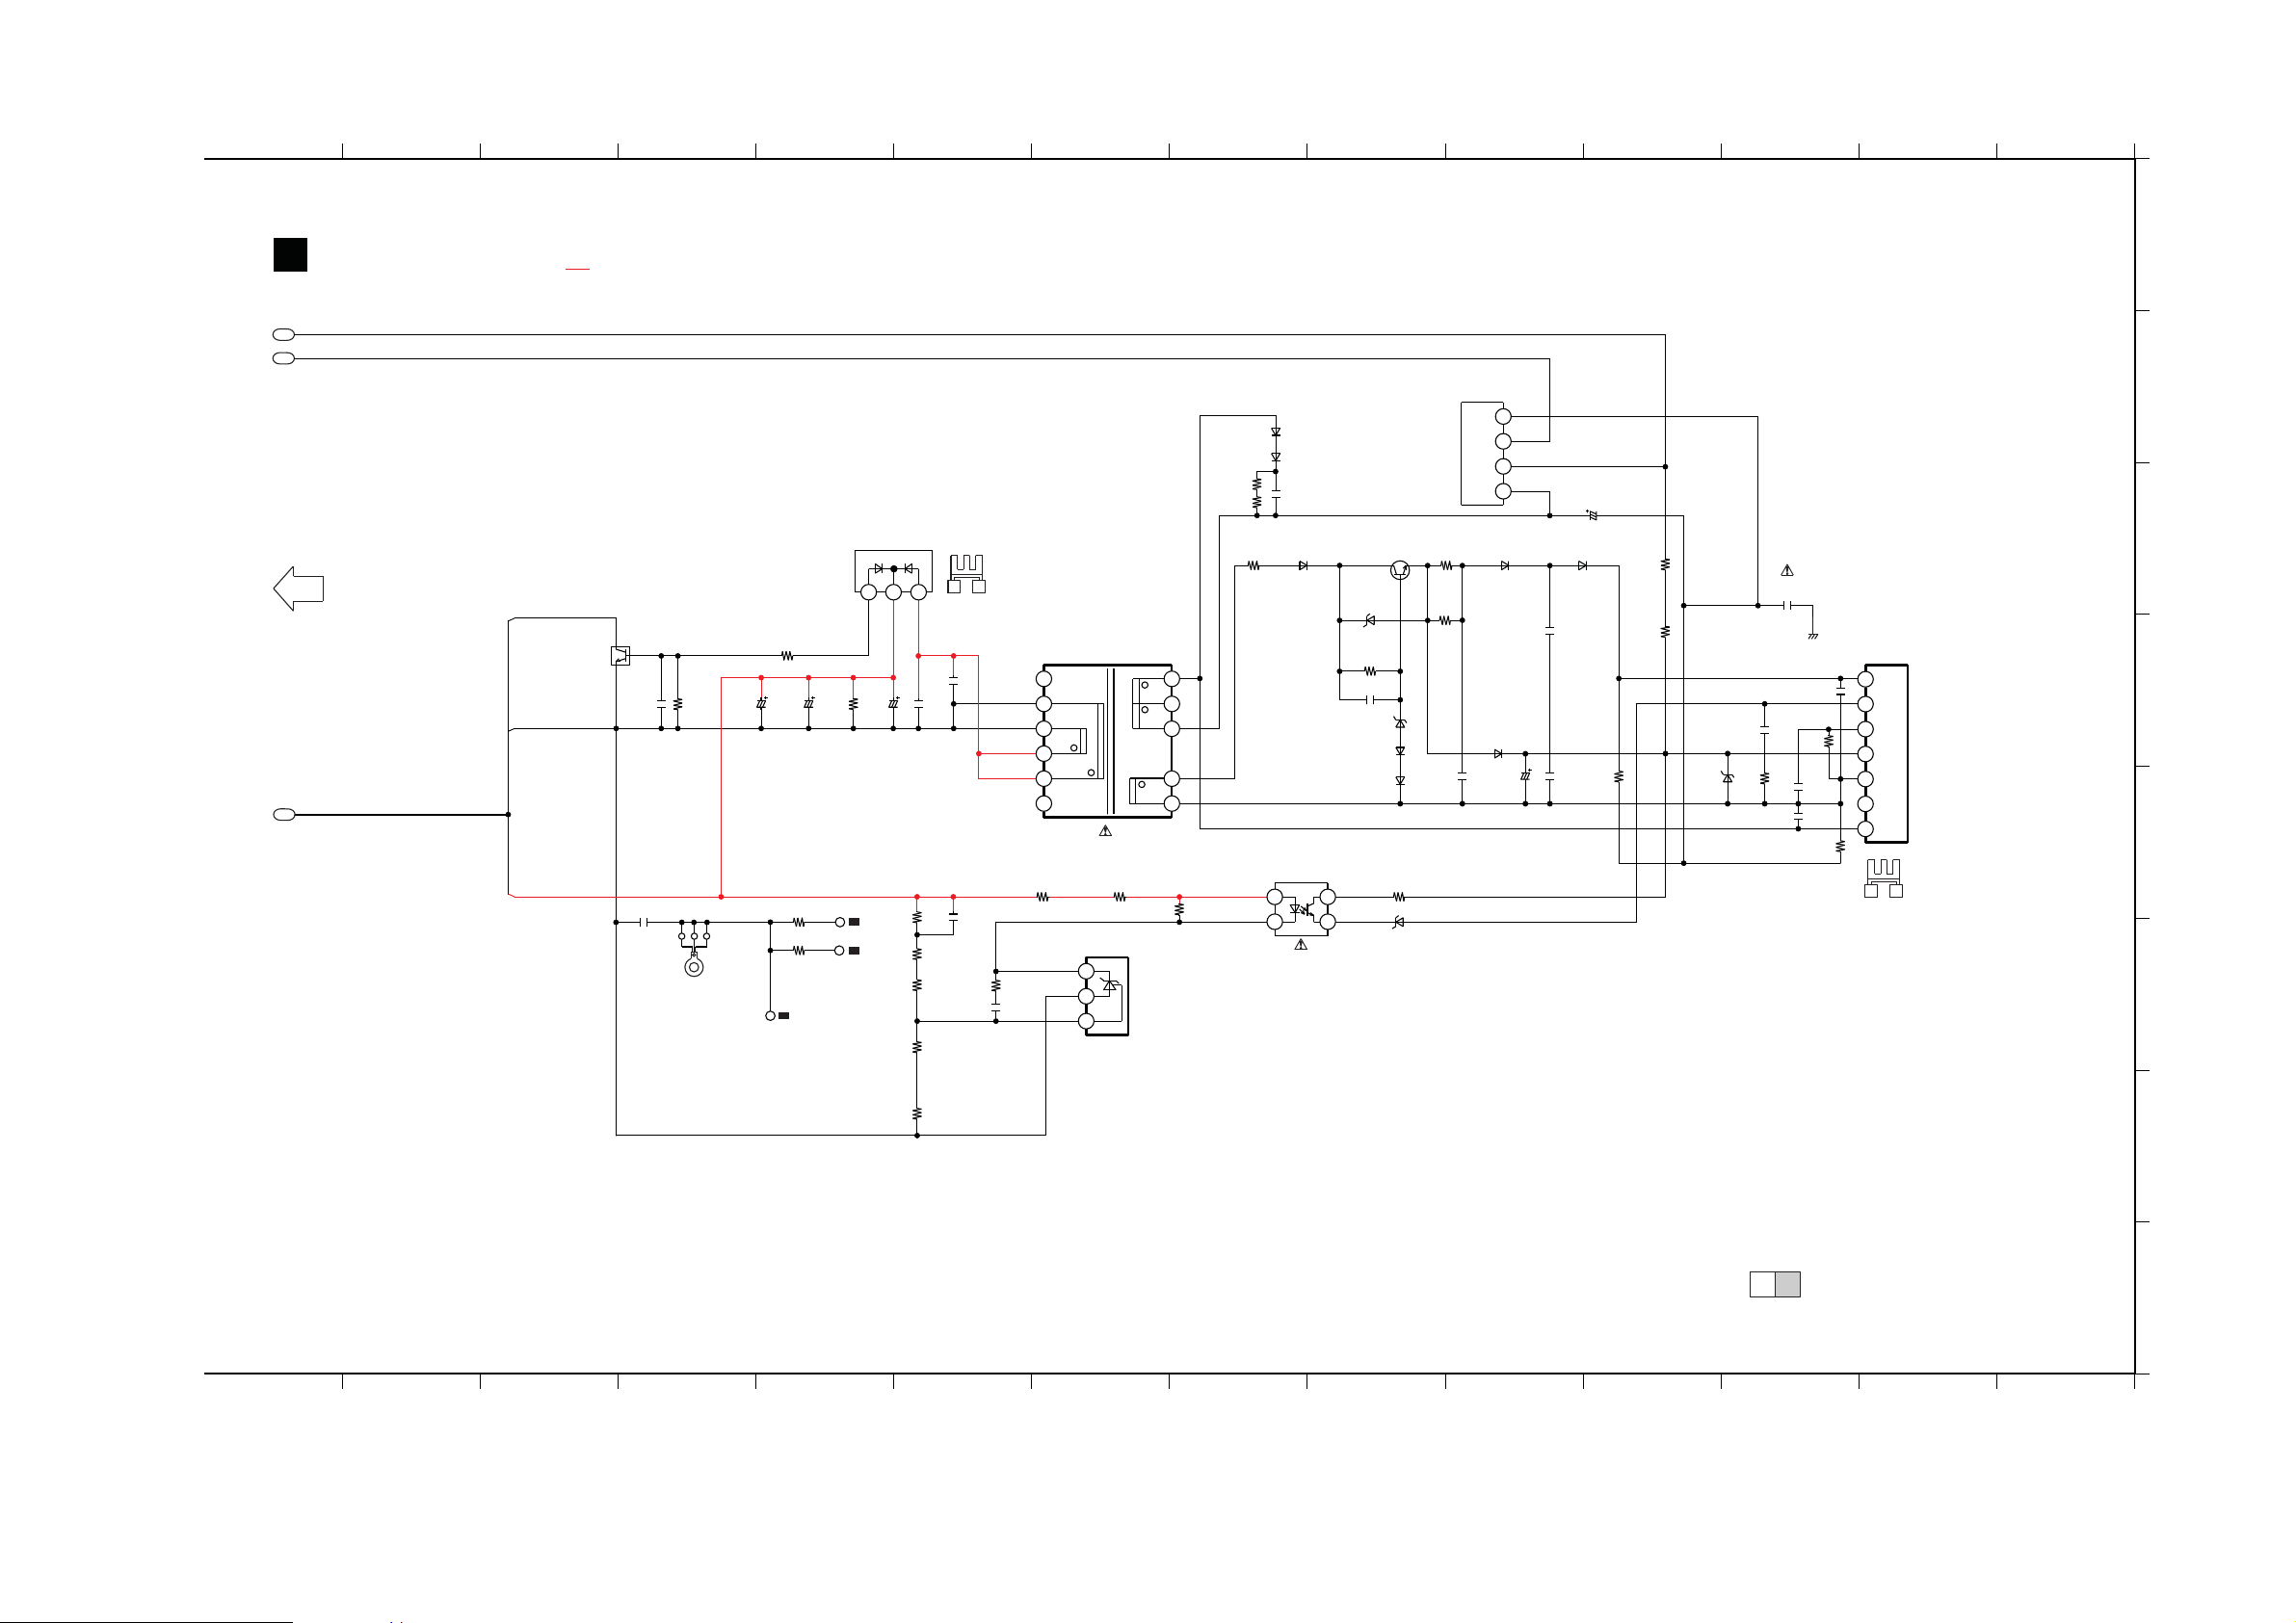
16.13. SMPS CIRCUIT (2/2)
F
15 16 17 18 19 20 21 22 23 24 25 26 27 28
SCHEMATIC DIAGRAM - 13
SMPS CIRCUIT
1
2
TO SMPS
SECTION (1/2)
P1
DCDET
GND
VDD
: +B SIGNAL LINE
Q5841
B1GBCFGG0030
DC DETECT
C5843
1
C5800
0.01
R5842
1.5K
21
ZJ5803
C5845
25V470 25V470
3
R5843
2.2K
C5844
TL
A
D5701
B0EBNR000015
D5700
B0EAKT000061
D5703
B0EAKT000062
R5702
100K
C5713
100K
R572022D5731
B0EAMM000057
1
2
B3PBA0000402
0.01
PC5720
FEED BACK
2SC3940ARA
D5721
B0BC010A0007
D5722
B0BC018A0267
MA2J1110GL
MA2J1110GL
4
3
Q5720
REGULATOR
R5721
10K
C5720
1000P
D5726
D5723
R5730
D5725
B0BC6R2A0266
R5722
2K
R5725
2K
C5721
220P
1K
R5703
D5802
B0HBSM000054
R5834
C5808
2.2K
25V470
0
K1
K3
11
TL
5
0
TL
7
312
C5839
0.01
C5801
0.01
R5802
12K
R5803
1.5K
R5804
1.5K
R5801
2.7K
HEATSINK*
C5810
0.1
G2G1
6
5
4
V1
2
1
V2
R5808
330
2.2K
R5806
15K
C5818
0.1
7
GND
8
GND
9
10
11
+25V
12
ETS28BH1E5BC
MAIN TRANSFORMER
R5809
330
C0DAEMZ00001
SHUNT REGULATOR
T5703
C
1
3
A
2
R
IC5801
R5807
4
3
2
~-~
1
+
D5724
MA2J1110GL
D5729
B0EAMM000057
C5726
50V10
C5711
250V100
D5727
MA2J1110GL
C5727
2200P
C5722
2200P
R5732
100
R5723
33K
R5724
33K
D5732
MAZ8300GML
C5700
F1BAF2220023
2200P
C5725
0.1
K5721
0
GND
C0DAAMH00015
SWITCHING REGULATOR
C5723
470P
R5733
47K
C5730
1
C5747
560P
R5726
0.27
IC5701
OCP/BD
7
6
FB
5
OLP/SS
VCC
4
GND
3
2
S
D
1
HEATSINK*
G2G1
B
C
D
E
F
R5817
0
2/21/2
SC-HTB10P/PC SMPS CIRCUIT
15 16 17 18 19 20 21 22 23 24 25 26 27 28
93
G
H
Page 94

94
Page 95
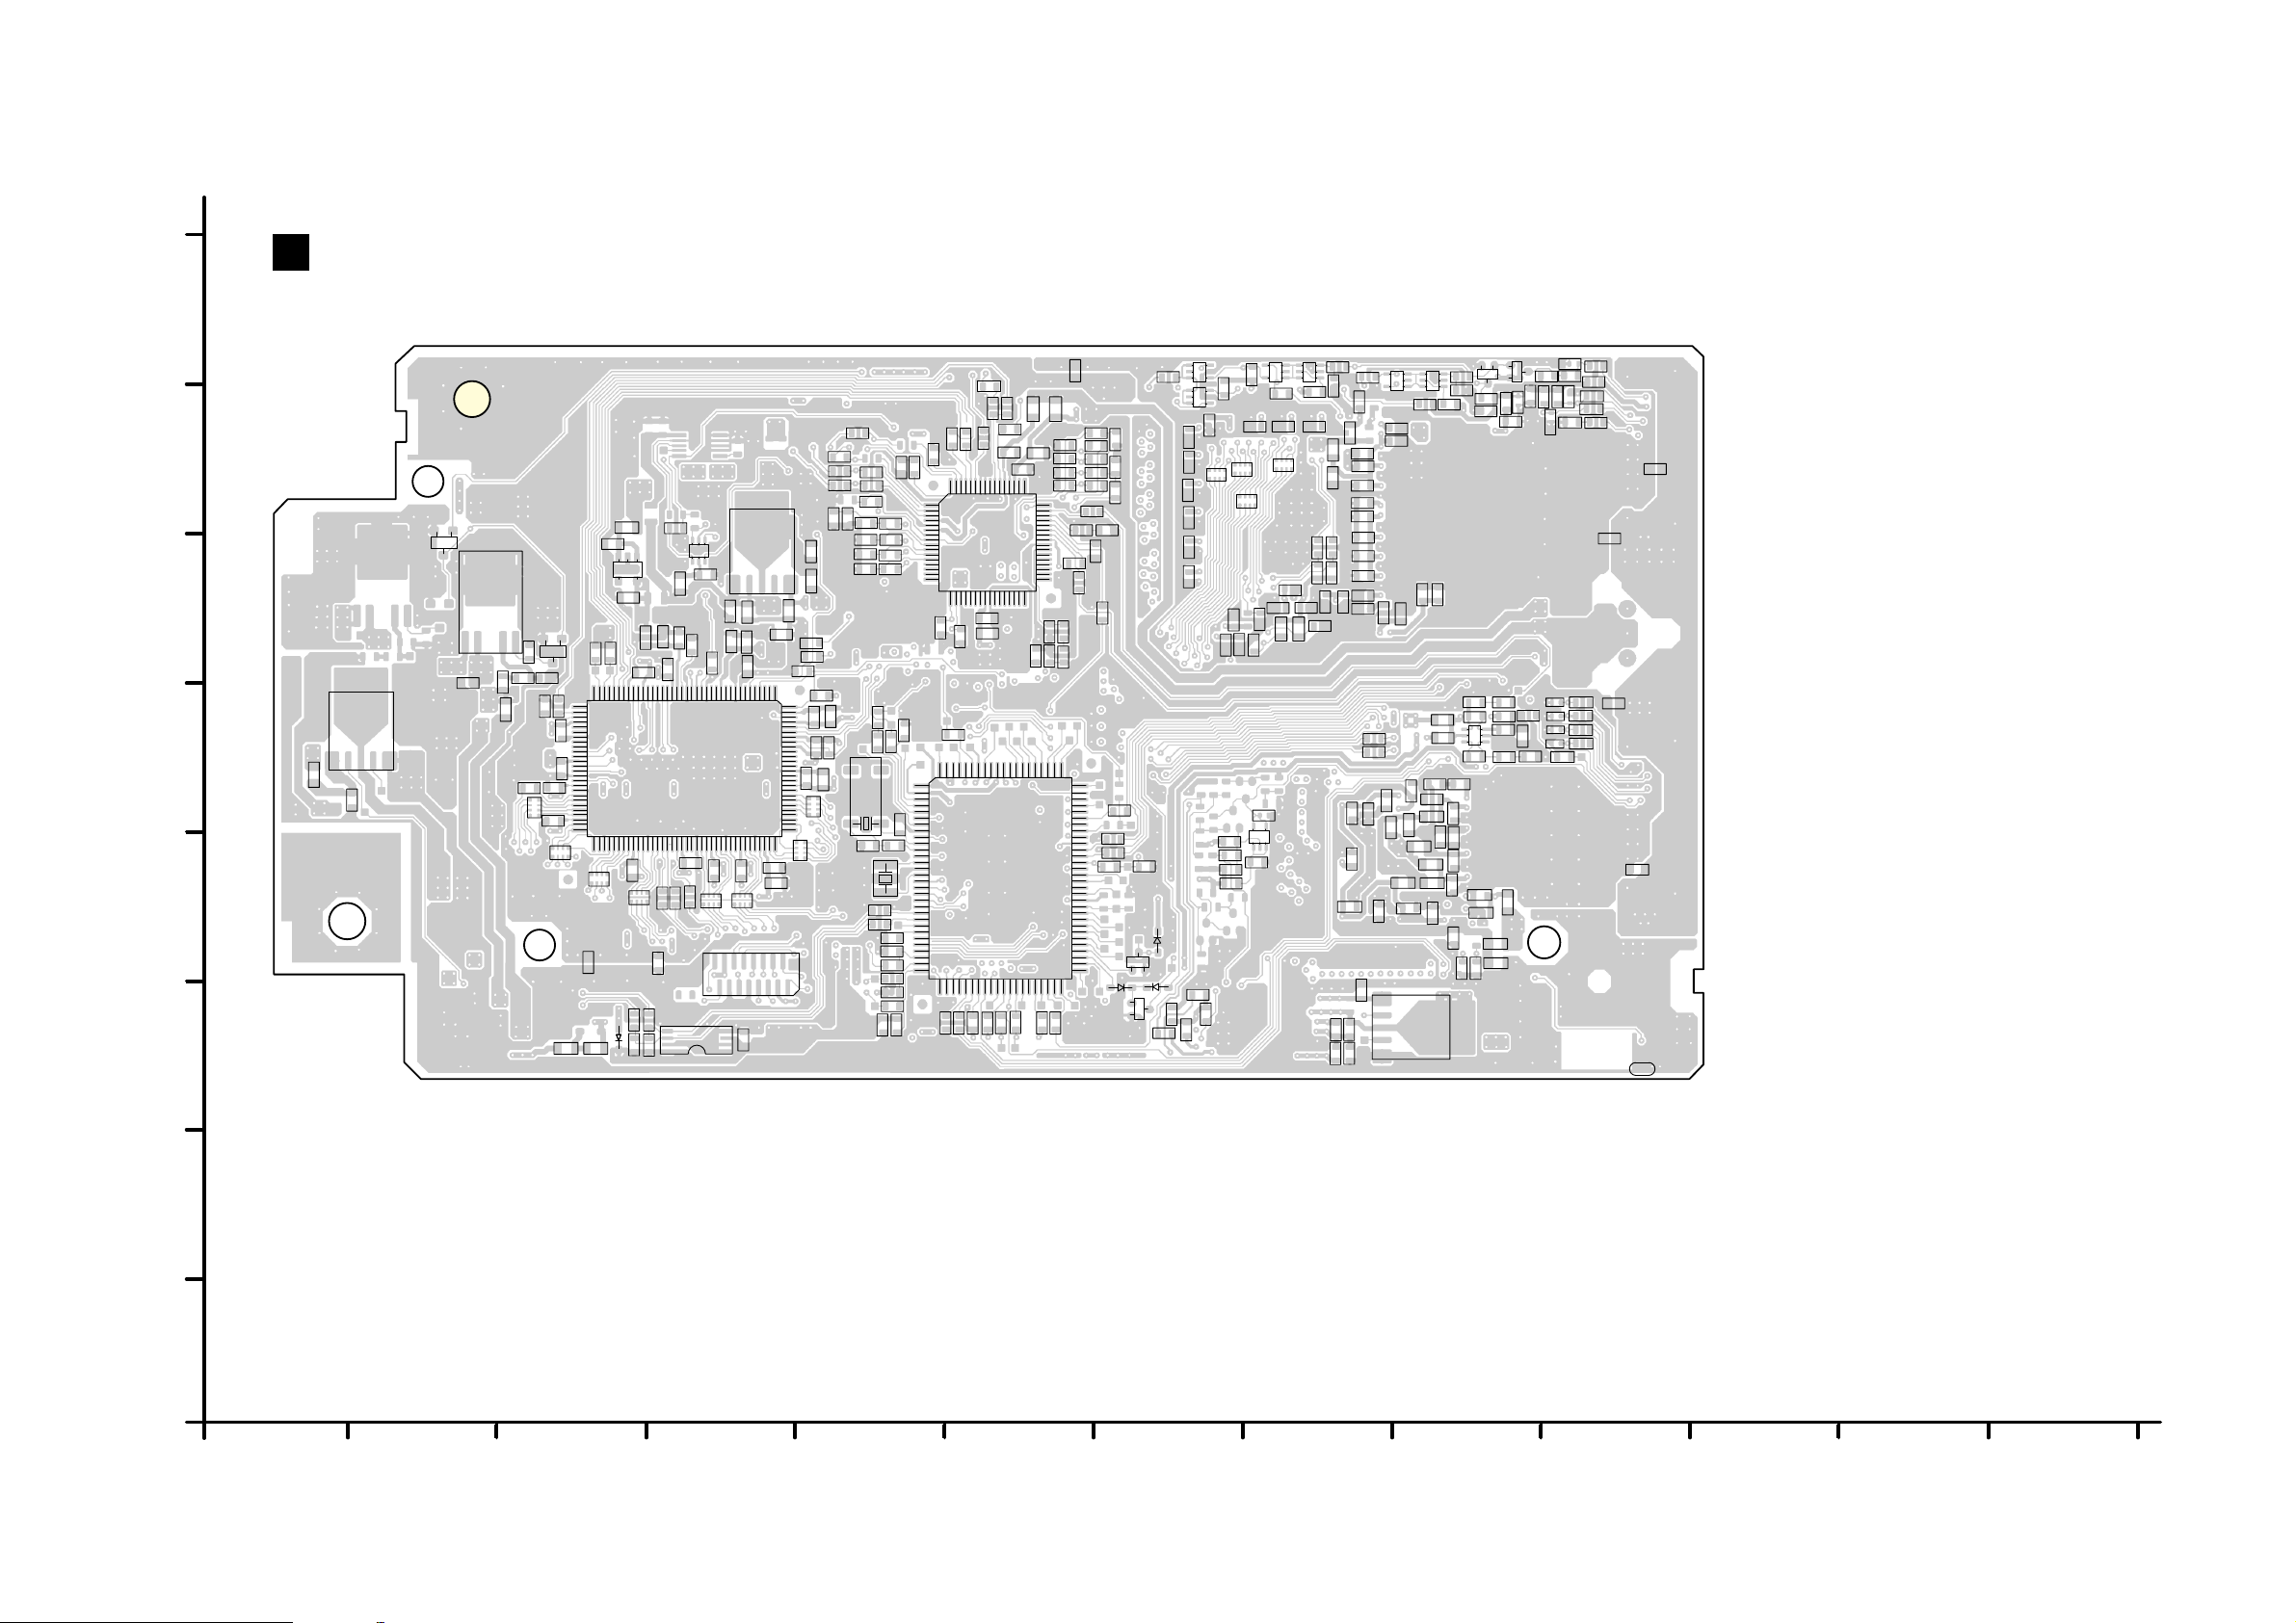
17 Printed Circuit Board
17.1. HDMI P.C.B. (SIDE A)
A
HDMI P.C.B. (REPX0840A)
H
G
F
E
D
C
LB2008
IC2004
32415
C2016
QR4704
E
C
C2255
C2260
C2142
R2247
VA2109
5
123
Q2234
R2267
C2258
5
4
R2253
C2254
RX2232
C2249
Q2108
34
2
1
C2264
LB2237
Q2233
4
5
6
C2250
C2247
LB2238
R2243
C2259
3
2
1
R2256
R2258
R2241
C2267
R2242
LB2235
C2234
R2255
R2257
R2060
R2061
C2125
C2253
LB2236
C2237
C2238
C2239
C2240
C2241
C2242
C2243
C2244
C2245
C2235
C2122
C2126
R2059
R2062
R2254
C2248
R2130
R2131
C2128
C2123
1
2
3
4
5
Q2232
4
5
C2246
C2236
L2231
C2119
C2121
C2114
LB2109
3
2
1
C2233
C2120
IC2102
C2118
LB2108
C2106
Q2231
4
5
6
R2278
C2108
LB2106
C2105
LB2107
C2266
R2144
LB2082
C2085
C2116
R2240
C2262
3
2
1
C2107
R2238
R2239
R2124
C2109
C2111
C2110
C2112
C2115
QR2232
C2084
R2083
4
5
6
R2085
C2113
C2104
R2125
E
R2248
C2232
R2126
C
B
3
2
1
IC2081
LB2110
C2124
LB2004
R2082
C2082
C2083
QR2231
B
E
R2236
R2237
LB2105
C
VA2240
C2081
R2081
R2084
C2231
R2235
R2232
VA2110
VA2111
VA2112
VA2113
VA2239
R2233
VA2241
LB2081
R2234
R2283
VA2242
LB2101
LB2102
LB2104
LB2103
LB2231
LB2232
LB2233
LB2234
C2283
C2278
C2279
C2280
PbF
R2091
0687A
0687A
Q2236
5
1
2
C1083
R2067
R2066
C1006
C1007
L1003
R2069
QR2002
D2003
QR2001
R2249
4
3
5
1
R2244
2
4
3
Q2235
C2263
C2271
RX2234
RX2235
C2272
C2274
RX2233
C2275
C2273
C2270
C2251
C2252
C2141
D2006
C1018
R1062
R1060
R1059
R2143
R2141
R2142
R2041
C
E
B
D2004
B
C
E
R2209
LB1007
C1055
4950556064
R1026
45 50
R2019
48
45
40
35
33
C1023
C1024
LB1004
C4371
C4370
C4369
C4368
81859095
R2030
C1026
R1044
R1005
C1085
R2090
C1084
C1087
L1004
R4364
R4366
R4367
R4363
80
75
70
65
60
55
51
R4102
C1086
R2037
LB4102
R1010
R1056
R1055
R1053
R1051
R1016
R1052
R1017
R1000
C1015
C1016
LB1006
R1013
D2005
R1024
123
IC1005
12
3
54
C1067
LB1002
C1058
LB1003
C1033
C1074
C1045
IC1003
65
4
C1035
R1020
R1021
C1059
LB1001
C1081
C1030
C1029
10152025303538
32415
C1057
15
IC1001
100 102
C1062
C1063
C1064
C1077
RX1003
16 10 2
45
C2013
1
C1066
RX1005
R2044
R2043
R2045
R2042
R4375
R1009
8
R1008
C1065
R1007
RX1004
CN2001
(FOR ON BOARD PROGRAMMIG)
IC2003
B
C1037
IC1004
IC4722
QR4703
B
E
54321
C4772
R4765
LB2005
R4766
C4782
R4767
R1023
RX1008
R1014
C
39
40
R1015
R1025
45
C1071
50
C1075
55
C1072
60
C1073
64
65 70 75 80 85 90 95
RX1007
RX1006
R2076
R4373
R4372
R1022
C1014
C1013
C1049
C1012
LB1000
C1080
R1030
R1029
R1012
R1018
128
125
C1056
C1070
120
X2002
C1028
C1069
116
C1068
C1076
110
RX1001
105
103
1515
RX1002
C2005
R2012
R2013
X2001
R1001
R1002
R1003
R1004
R2055
R2003
R2014
C2012
R2027
R2028
C2010
R2038
R2005
C2015
R2001
R1028
C2002
C2004
R2018
R1042
1
5
10
15
16
1
5
10
15
20
25
30
R1046
100
31 35 40
R1036
R1011
17
20 25 30 32
C1020
C1021
R2039
R2023
R2024
R1033
IC1002
C1022
C1060
IC2002
R2022
R2021
R1035
C1036
R2035
C1027
R2040
B
A
(SIDE A)
1
SC-HTB10P/PC
HDMI P.C.B.
2
3
4
5
6
7
8
9
10 1 12 13
1
95
Page 96
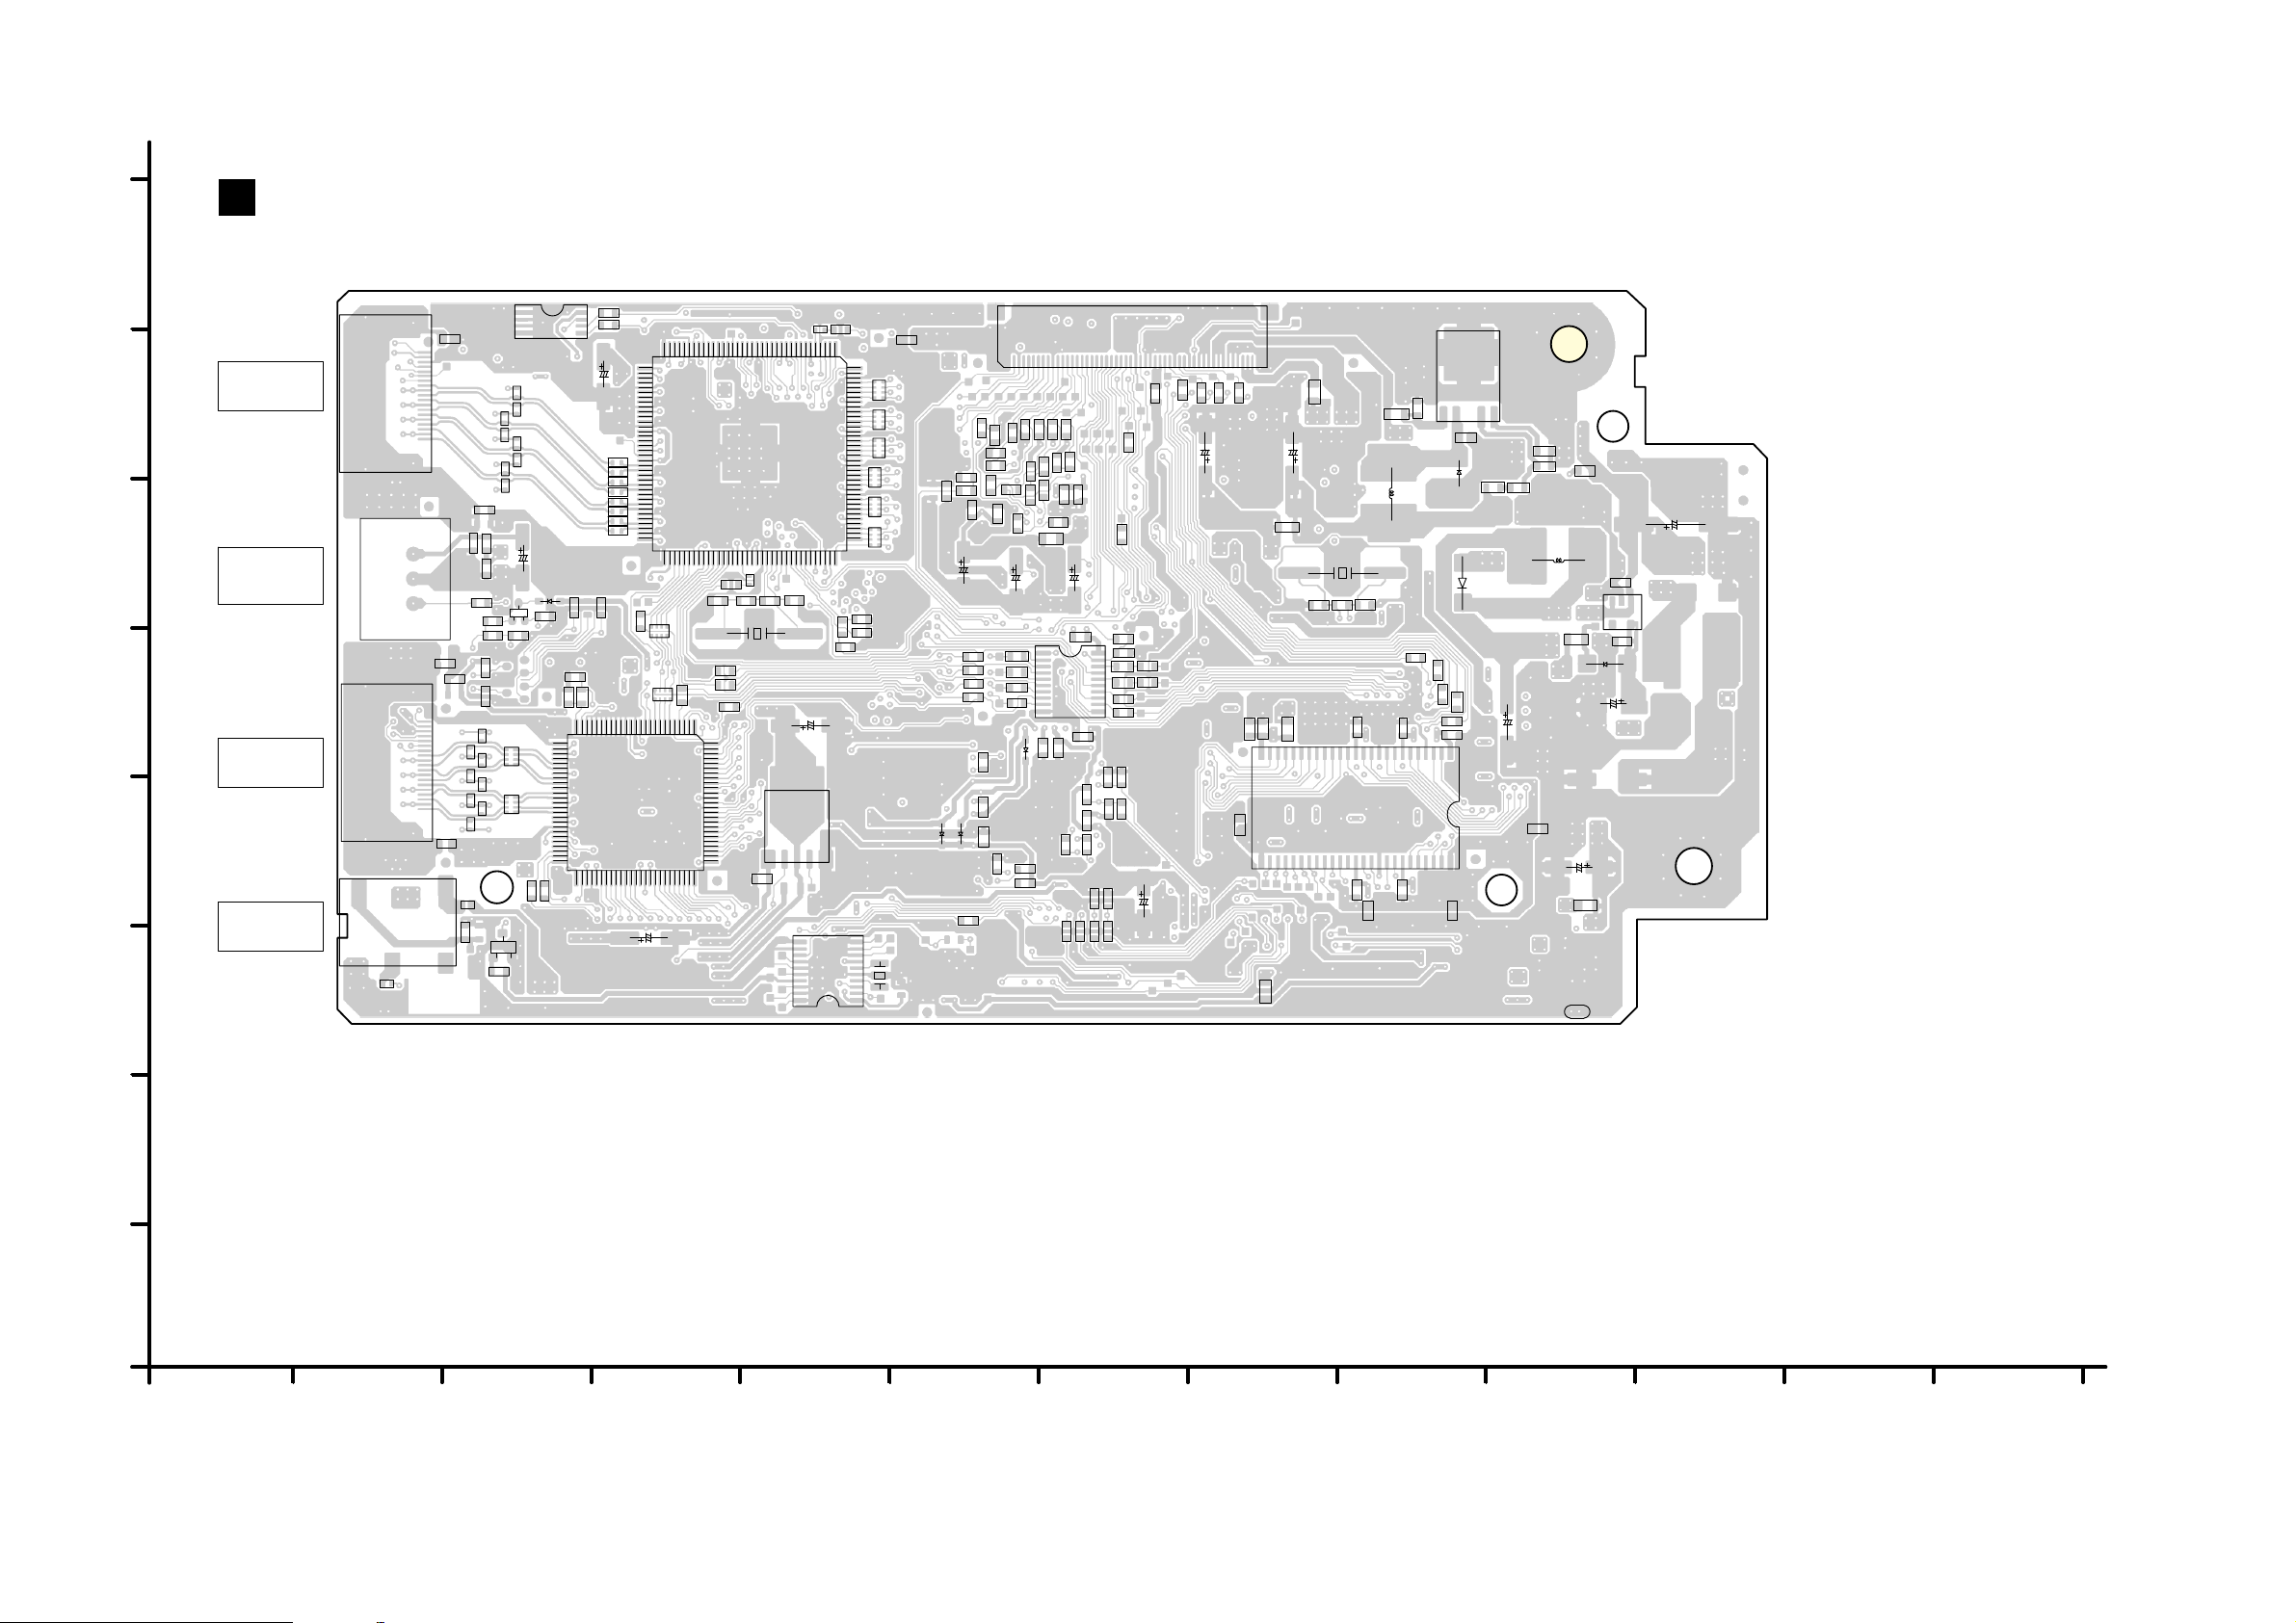
1
1
2
3
4
5
6
7
8
9
A
B
C
D
E
F
G
H
10 1 12 13
A
HDMI P.C.B. (REPX0840A)
SC-HTB10P/PC
HDMI P.C.B.
(SIDE B)
0687A
0687A
C1025
R2011
R2048
R2010
R2006
LB4101
R2264
C2006
R2033
R4362
LB2241
VA2104
R4369
R2259
C4362
JK4101
OPTICAL
DIGITAL
AUDIO IN (TV)
R1058
C2268
R2252
C1039
R4370
R2068
C4366
IC2101
C1010
C2127
D4727
C4364
C4793
C1038
C2117
QR2004
R2266
LB2003
C2018
VA2102
R2015
C1031
R2105
JK2101
R4361
C1040
D2001
C2014
X1000
LB2007
C4361
L4774
C4104
LB1008
R2071
L2102
R2261
C1032
R2047
R2031
C1008
R4368
C4784
L1002
LB1005
R2049
R2106
R2103
C2011
R4101
IC4724
D2002
LB2240
R4774
R2152
C2269
LB2001
R4365
C1042
C4103
R2050
VA2101
Q2103
C2009
R2133
VA2103
R4371
R2121
X2003
R2101
R2017
IC4793
R4374
VA2106
C1051
IC1008
C1054
R2032
C2001
C1052
R2128
D4774
R2122
C4769
C1050
R2025
D2009
R2151
RX2101
R2104
R2269
JK4001
C4365
D4726
C4785
R2153
C4781
R2034
R2102
R2260
RX2231
C1044
C1043
L1000
C1011
R2002
R4776
IC2233
C4363
R2026
L2101
C1053
R2123
C2019
C4770
IC1006
R4775
JK2203
R2051
R2120
R2107
C4101
R2129
D2101
L1001
R2046
R2063
VA2108
L4727
C4367
R2132
R1019
R1032
R2016
VA2105
R2154
C1041
VA2107
R2007
C1009
C2007
LB2009
IC2006
C2261
C2003
R2052
LB2002
LB2242
C2277
C2276
R1045
R1037
R1038
R1039
R1031
R4763
R2265
X2231
C2256
R2262
C2257
R2263
IC2231
R2246
R2245
LB2010
R2053
C2265
R2271
R2270
R2272
R2273
R2274
R2275
R2276
R2277
RX2241
RX2240
RX2239
RX2238
RX2237
RX2236
IC2232
VA2234
VA2238
VA2233
VA2237
VA2232
VA2236
VA2231
VA2235
R2008
R2009
CN1001
LB2243
LB2239
R2092
R2093
R2094
C4773
R2072
R2073
R2074
R2075
C4767
C4768
C4452
1
2
3
19
15
10
5
1
54321
54
123
1
5
10
11
15
20
12
34
34251
1510152025
26 30 35 40 45 50
19
15
10
5
1
1
5
10
11
15
20
37
40
45
50
55
60
65
70
72
73 75 80 85 90 95
100 105 108
109
113
119
125
130
135
140
144
1 5 10 15 20 25 30 35 40 5045
LB2011
LB4103
LB4104
LB4106
LB4105
LB4107
LB4108
LB4200
LB4201
C4771
B
C
E
HDMI AV IN
(BD/DVD)
Ir SYSTEM
HDMI AV OUT
(TO TV (ARC))
PbF
BCE
1
5
10
15
20
25
30
35
36
1510152025
26
30
35
40
45
50
51 55 60 65 70 75
76
80
85
90
95
100
1
4
5
8
17.2. HDMI P.C.B. (SIDE B)
96
Page 97
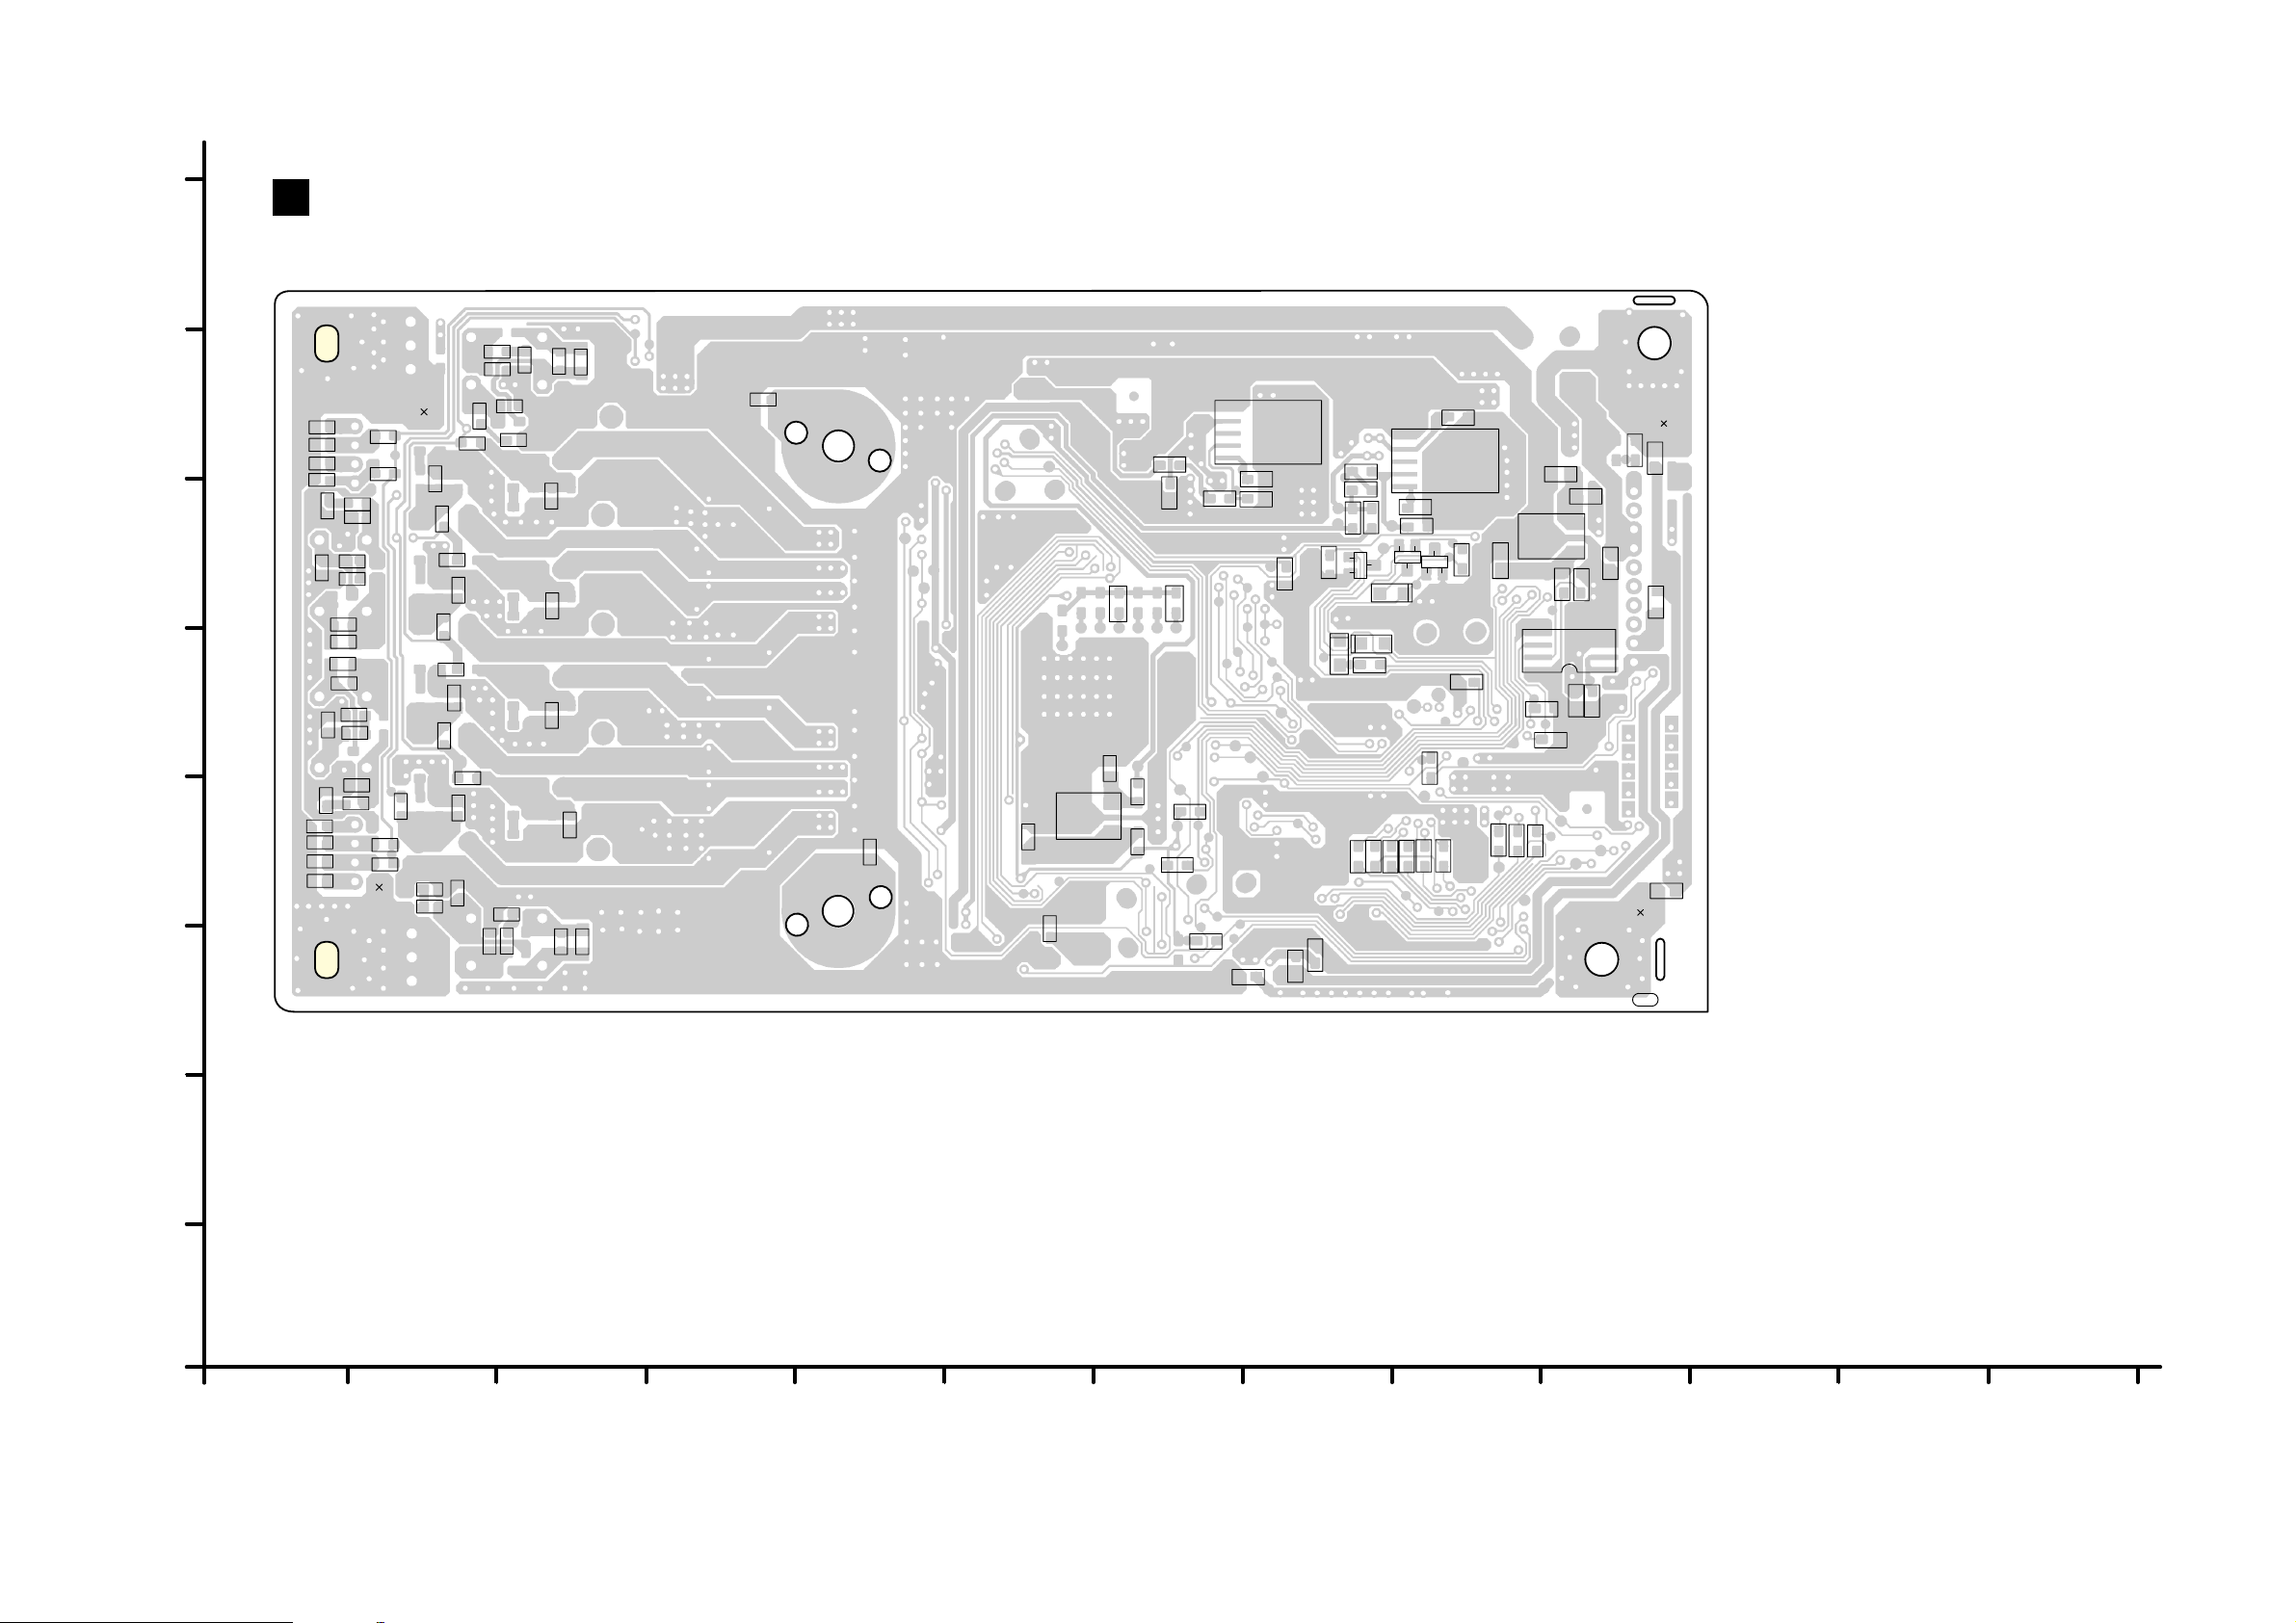
17.3. MAIN P.C.B. (SIDE A)
B
MAIN P.C.B. (REPX0839AA)
H
R468
C165
TL403
TL402
R176
R184
R520
R175
R174
C444
R466
R469
R527
C502
R525
R526
C523
R528
R521
C473
R524
R523
C487
C163
C164
G
F
E
D
C191
C192
C186
C181
R464
C442
C161
R465
C162
C443
R503
C807
C804
R500
C455
C171
R506
C172
R507
C456
C190
C189
C188
C187
C
C446
R502
C806
C166
C447
C501C522
C472
C486
C445
R467
C805
R501
C803
R705
K103
C419
IC107
2
C802
C418
C512
L426
1
3
L427
1
3
IC701
5
C715
K100
R686
R685
C709
R707
R706
R679
R661
R200
R708
R709
R713
R714
E
QR601
B
C
R4231
QR602
E
D601
D602
D600
R688
R669
R665
R668
C201
R201
C714
1
IC702
3
5
C712
R710
B
C
R670
B
QR600
R704
R671
R689
E
R610
R672
C
C701
IC700
C700
R621
LB701
1
2
3
R656
LB700
5
IC605
8
C609
R654
R622
R653
R655
R623
TL702
C703
C704
R701
R712
4
1
C702
TL701
PbF
0686AA
0686AA
B
A
(SIDE A)
1
SC-HTB10P/PC
MAIN P.C.B.
2
3
4
5
6
7
8
9
10 1 12 13
1
97
Page 98
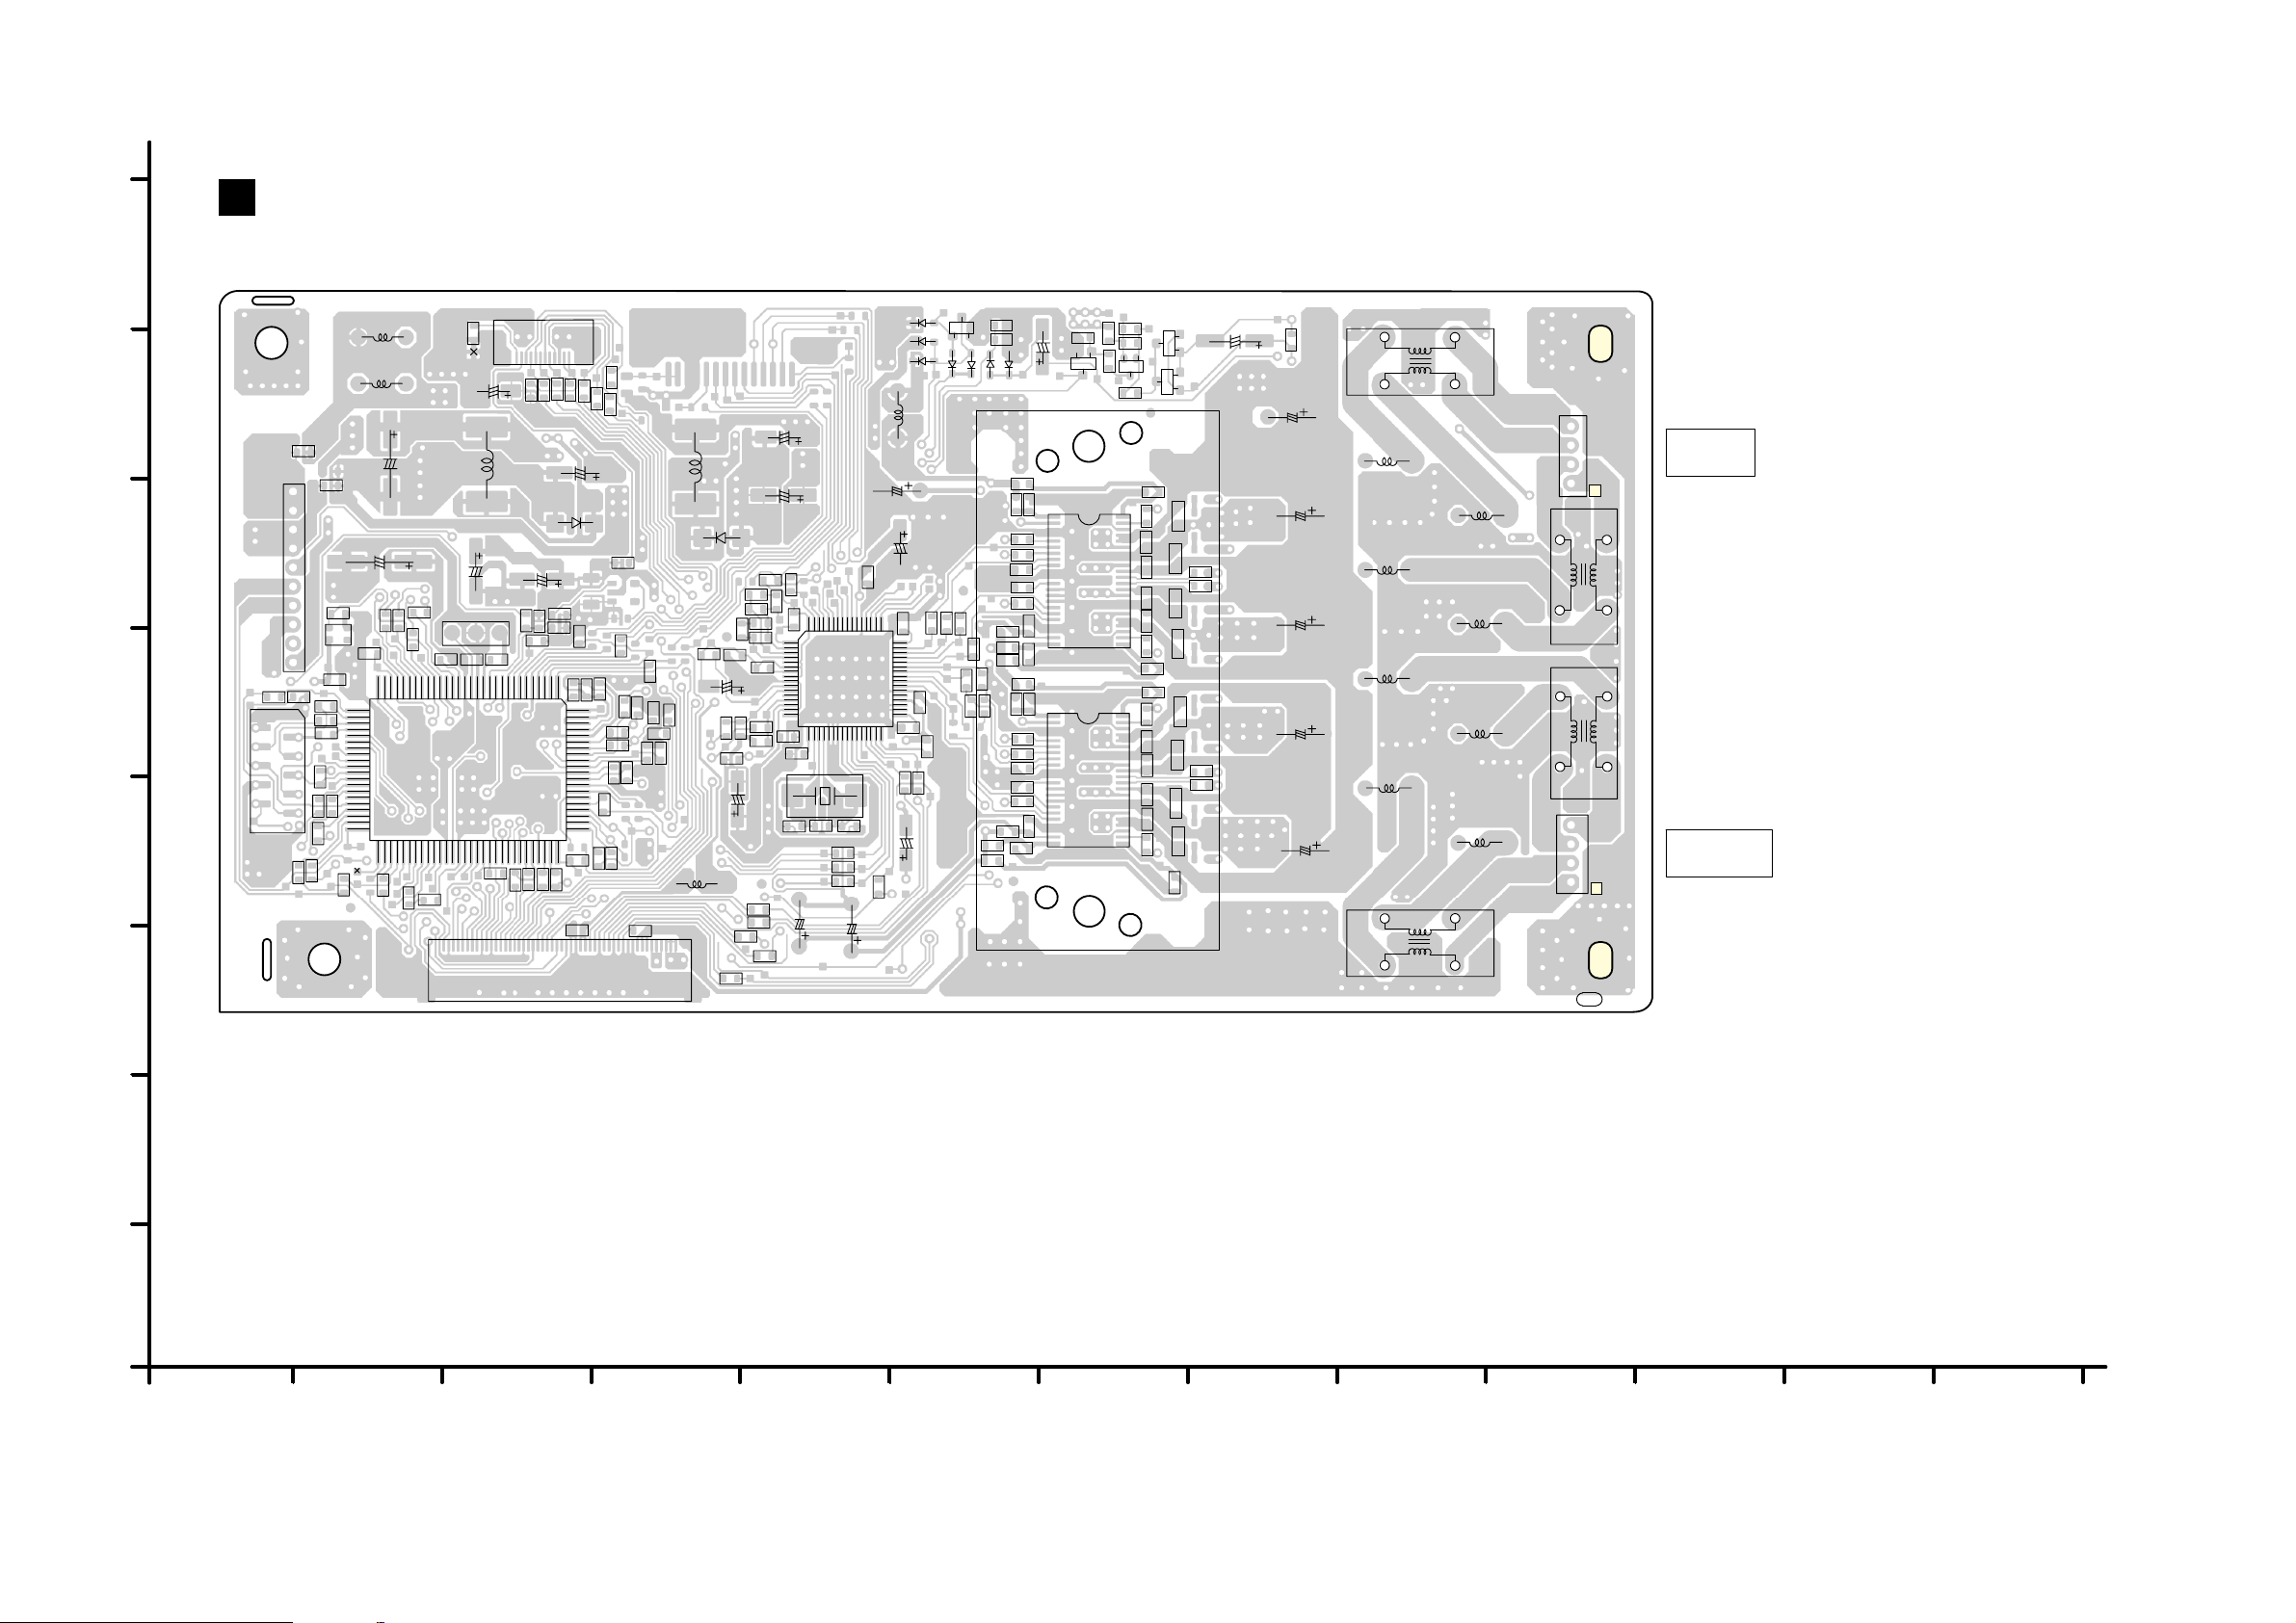
1
1
2
3
4
5
6
7
8
9
A
B
C
D
E
F
G
H
10 1 12 13
B
MAIN P.C.B. (REPX0839AA)
SC-HTB10P/PC
MAIN P.C.B.
NOTE: " * " REF IS FOR INDICATION ONLY.
(SIDE B)
0686AA
0686AA
IC403
C461
C462
C463
C466
C477
C478
C480
C482
C490
C460
C479
HEATSINK
C476
C470
C464
C492
C498
C507
C510
C481
C514
C516
C515
C509
C508
C491
C494
C497
C493
IC405
L413
L414
L415
L412
C505
C467
C496
L409
L406
L407
L408
L417
L410
L419
L418
R180
C158
R179
Q116
R178
R587
Q114
C548
Q500
Q501
R236
C519
C423
R428
R427
R429
R440
R441
C424
R442
R444
C426
C425
R454
C431
C432
R452
R453
R451
C430
R450
R449
R448
R446
R447
C429
C151
C150
CN402*
CN401*
TO
SPEAKERS
(FRONT)
R443
R445
R421
R422
R423
R424
R426
R425
Q704
D701
D119
D118
C153
R168
R522
D703
R409
R410
R413
C420
R417
D704
D700
D706
L400
C433
C407
C406
C421
R414
C416
C417
R418
C441
C427
C410
R407
R406
X400
R408
C415
C413
R404
R673
C612
R636
R632
R659
R682
L200
R684
R681
R683
R630
R629
R628
R626
R625
R644
R664
R624
TL600
(FOR ON BOARD
PROGRAMMING)
R675
C451
C453
C411
C452
R436
C412
C404
R402
C403
C400
R495
IC401
C414
C402
C401
R400
R401
C405
C408
R435
C409
R642
R640
C604
R648
R650
R647
R649
R646
R645
R658
R611
R603
R604
R651
R652
R627
R657
R620
R619
R618
R617
R609
R614
C602
R663
C605
IC606
L421
L422
CN700
L706
L707
D707
D705
C711
LB308
LB307
LB306
LB305
LB304
LB303
LB302
LB301
LB300
C608
X600
FP700
C710
C713
R606
R612
R613
R605
R607
C606
C607
LB312
C600
C603
R616
3A
R700
IC604
CN600
R608
C708
C303
TL303
R204
R205
R206
R203
R202
C200
C202
CN200
R666
R667
R674
CN300
R
B
PbF
B
C
E
B
C
E
B
C
E
B
C
E
B
C
E
TO
SPEAKERS
(SUBWOOFER)
44
40
35
30
25
2322
20
15
10
5
1
44
40
35
30
25
2322
20
15
10
5
1
4
3
2
1
4
3
2
1
4
3
2
1
4
3
2
1
4-SUB_1-
1-SUB_2-
2-SUB_2+
3-SUB_1+
4-FL-
1-FR+
2-FR-
3-FL+
15
1015202530
51 55
60
65 70 75 80
31
35
40
45
50
81
85
90
95
100
1
5
10
15
16
17 20 25 30 32
33
35
40
45
48
4950556064
1
5
6
2
10
9
1
2
3
4
10
1
2
3
4
5
6
7
8
9
1
2
3
151015202530354050
45
10
5 112
17.4. MAIN P.C.B. (SIDE B)
98
Page 99
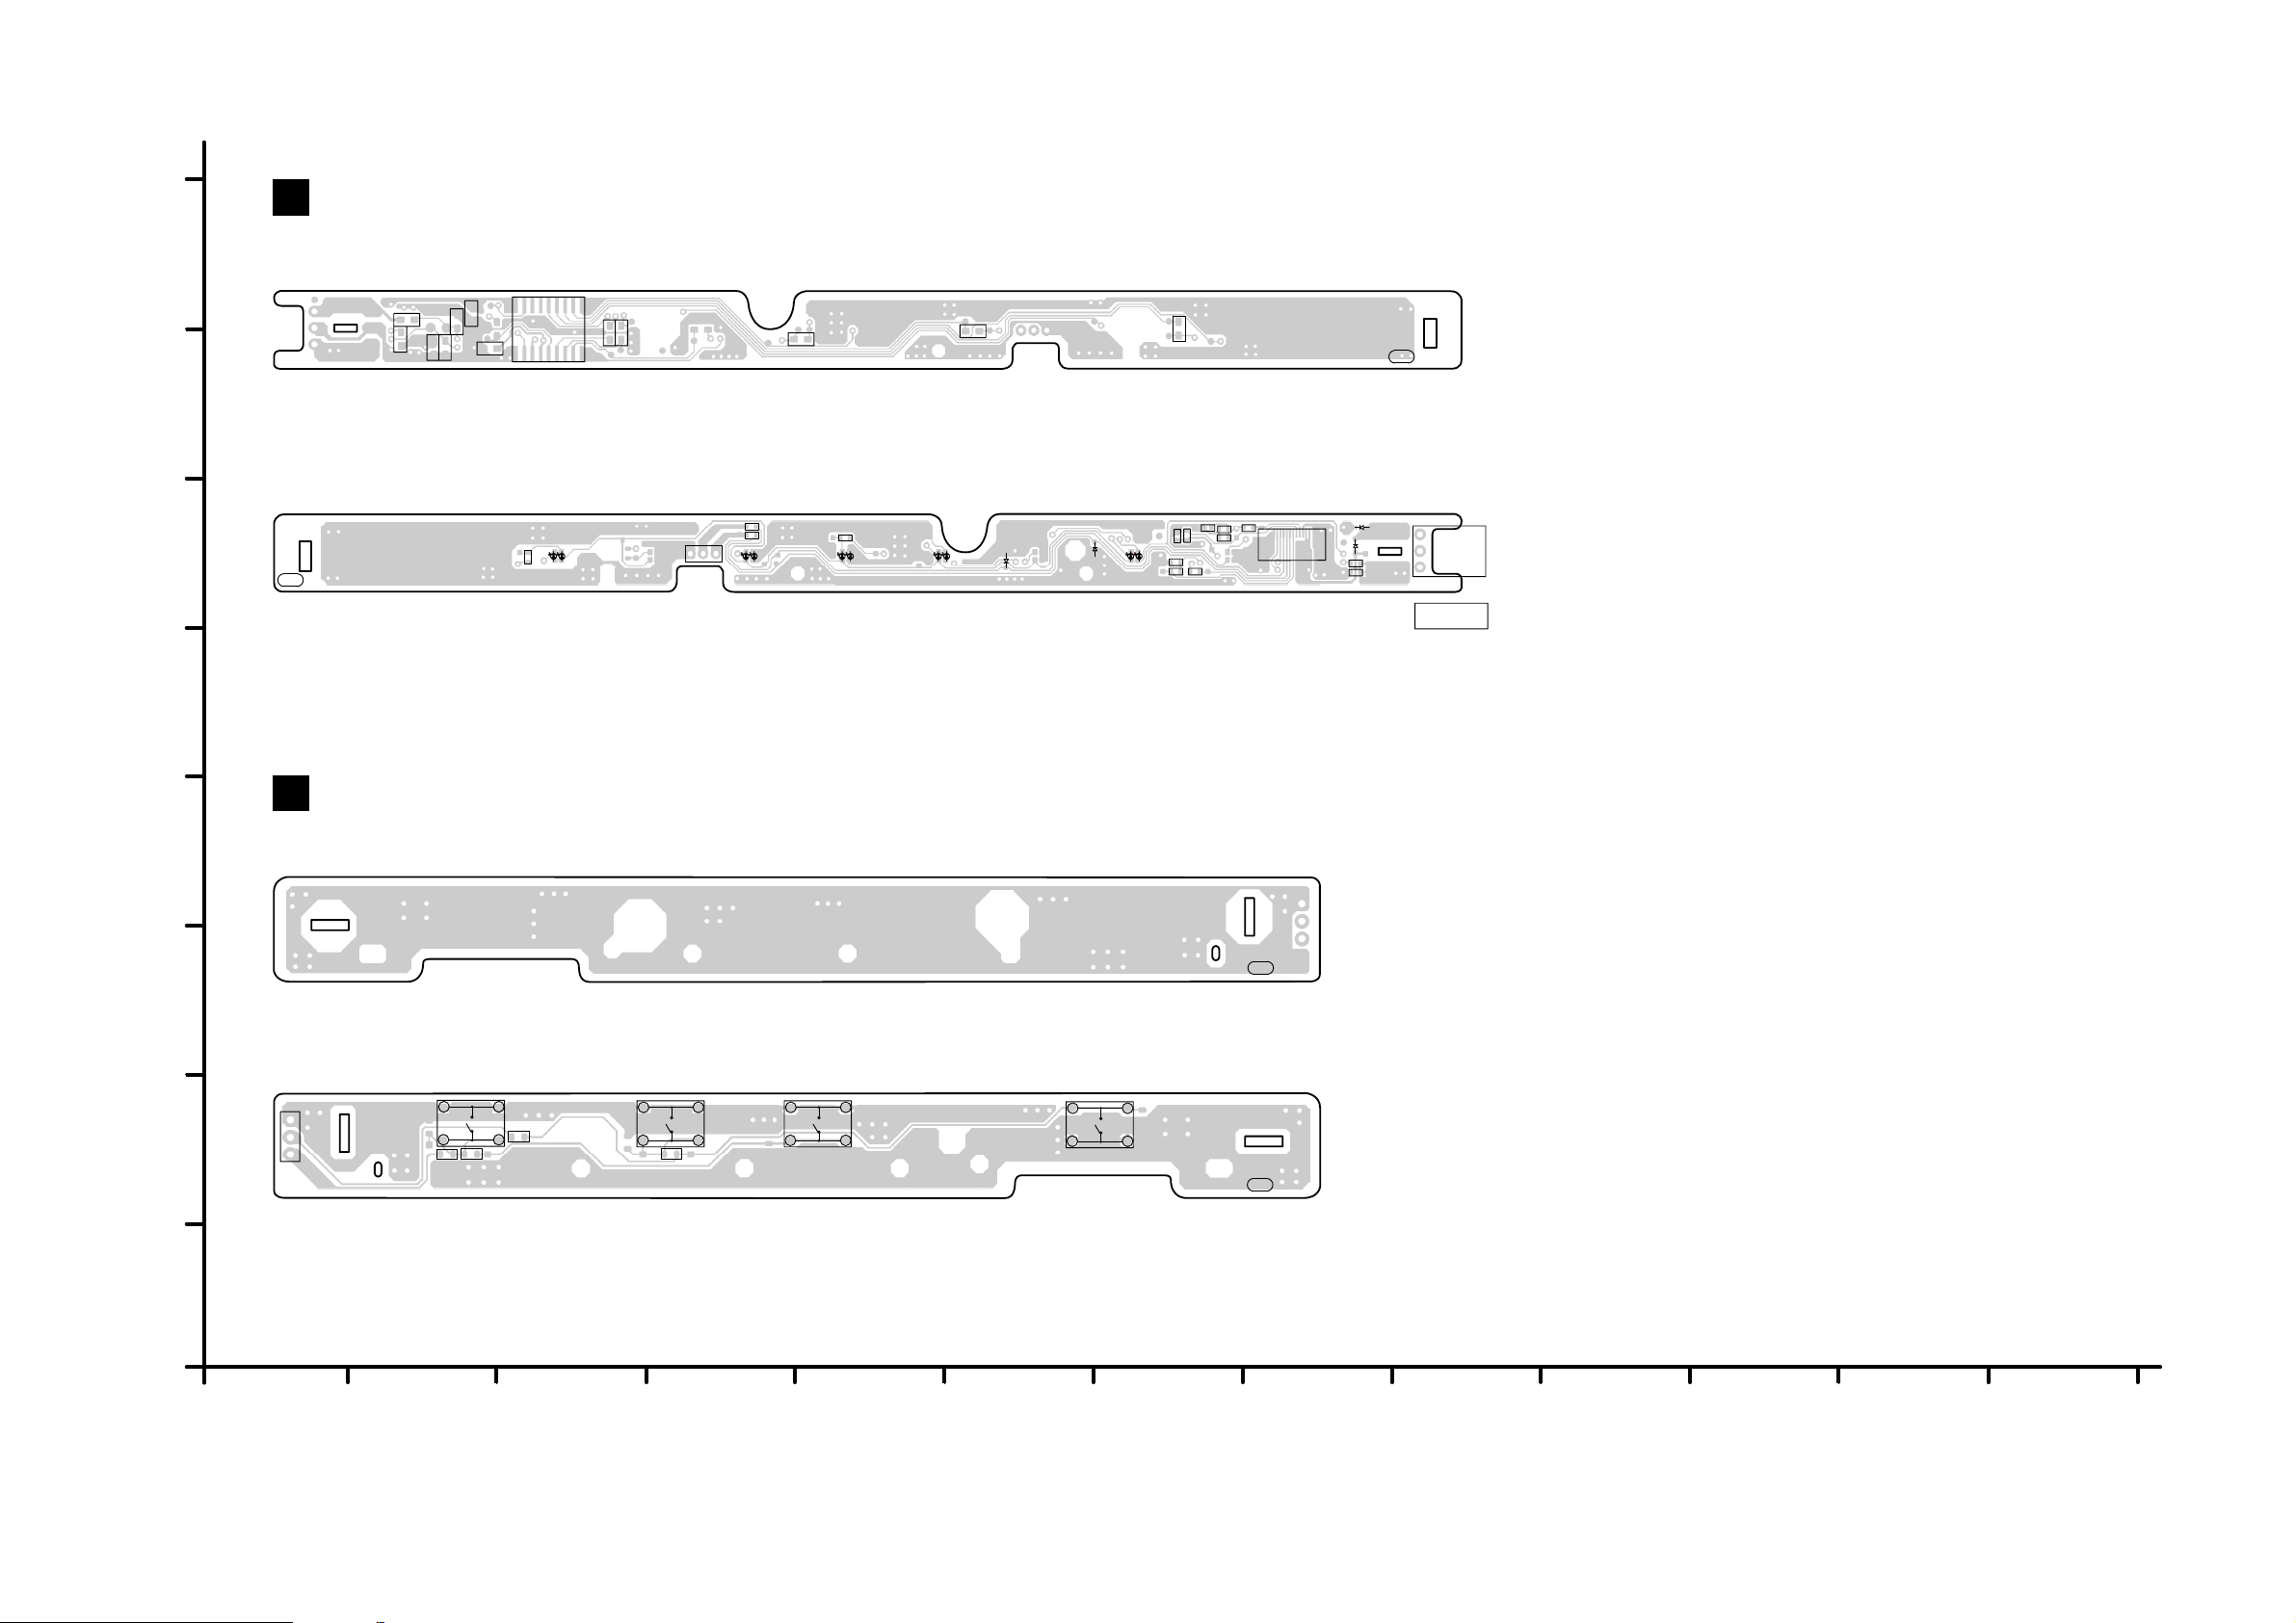
17.5. LED P.C.B. / PANEL TACT SWITCH P.C.B.
C
LED P.C.B. (REPX0839AB)
H
G
F
E
D
R384
R385
C357
C359
C358
C356
C353
18 1015
IC300
15
R361
R360
9
(SIDE A)
CN351*
123
D305
PbF
0686AB
0686AB
R369
4
123
D307
(SIDE B)
D
PANEL TACT SWITCH P.C.B. (REPX0839AB)
D303
R367
4
123
D400
D401
D301
R363
R383
R382
4
123
R365
D304
4
123
R372
PbF
0686AB
0686AB
R381
R351
C354
C351
C352
R353 R354
R352
2
4
3
1
C350
1
CN350
5
D320
12
10
C355
D321
R355
1
2
3
Z300
SENSOR
C
B
A
(SIDE A)
CN352*
3
2
1
R370
34
S303
(INPUT SELECTOR)
R371
1
2
R356
(SIDE B)
NOTE: " * " REF IS FOR INDICATION ONLY.
1
2
3
PbF
0686AC
0686AC
S301
34
(VOLUME +)
1
2
R357
2
S304
34
(VOLUME -)
1
1
3
S300
(POWER)
2
4
PbF
0686AC
0686AC
SC-HTB10P/PC
LED / PANEL TACT SWITCH P.C.B.
4
5
6
7
8
9
10 1 12 13
1
99
Page 100
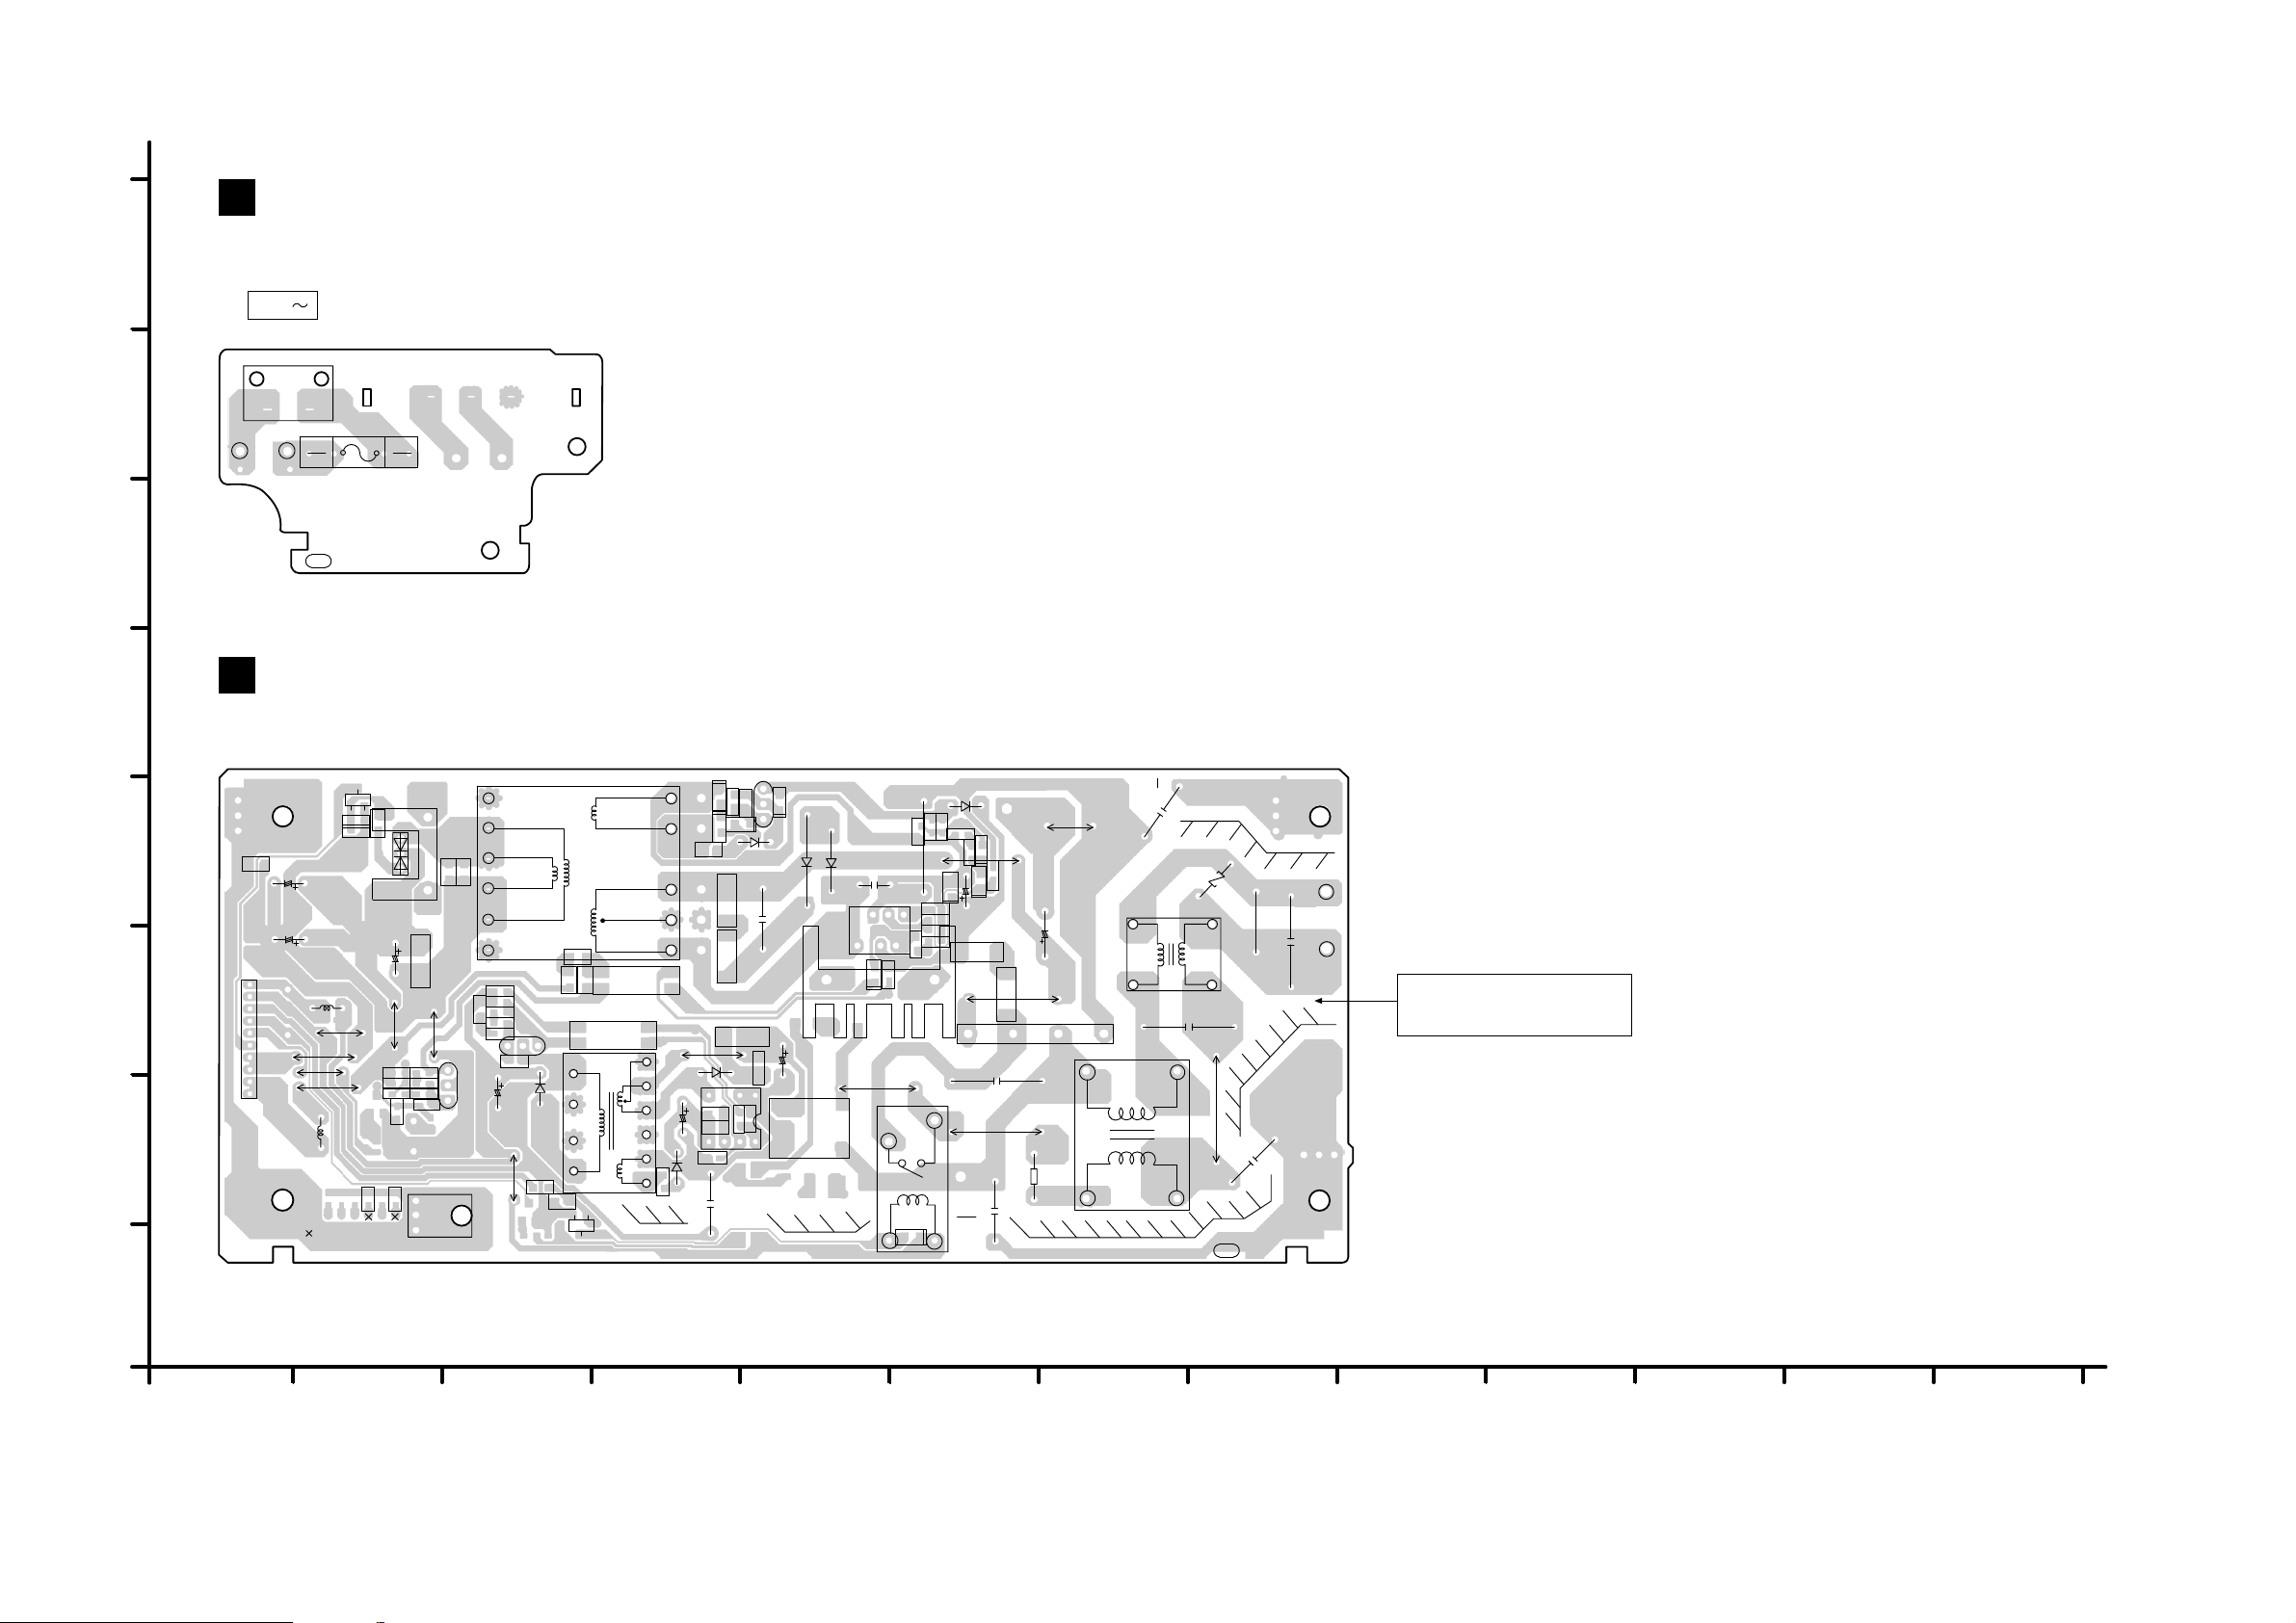
1
1
2
3
4
5
6
7
8
9
A
B
C
D
E
F
G
H
10 1 12 13
F
SMPS P.C.B. (REPX0841A)
SC-HTB10P/PC
AC INLET / SMPS P.C.B.
NOTE: " * " REF IS FOR INDICATION ONLY.
E
AC INLET P.C.B. (REPX0841A)
0691AA
0691AA
PbF
0691AB
0691AB
C5797
R5801
R5899
R5898
R5895
R5894
R5893
R5892
R5891
R5890
R5843
R5842
R5834
R5817
R5809
R5808
R5807
(MAIN TRANSFORMER)
R5806
R5804R5803
R5802
R5798
R5797
R5795
R5786
R5733
R5732
R5730
R5725
R5724
R5723
R5722
R5721
R5720
R5703R5702
Q5899
Q5841
PC5799
PC5720
K5721
HEATSINK
D5899
D5799
D5732
D5727
D5726
D5725
D5724
D5723
D5722
D5721
C5898
C5843
HEATSINK
C5818
C5810
C5800
C5796
C5795
C5790
C5730
C5727
C5725
C5723
C5722
C5721
C5720
C5801
C5839
K1..HTB10
K3..P/PC
TL11
TL5TL7
W16
C5704
D5802
W13
W9
W15
W14
W12
W11
W6
W10
TH5702
T5751
T5703
RY5701
R5726
R5701
Q5720
L5701
IC5899
IC5801
IC5799
IC5701
DZ5701
D5896
D5798
D5793
D5731
D5729
D5703
D5701
D5700
C5899
C5808
C5799
C5798
C5747
C5726
C5713
C5708
C5706
C5700
C5701
C5702
C5703
K5712
L5702
TL3*
RED
BLK
TL4*
C5844
W5
W3
H2016*
C5711
C5845
W4
ZJ5803
W1
L5800
L5801
(SUB
TRANSFORMER)
TL20*
TL10*
ZA5701
2.5A 125V
ZA5702
F1
BLK
RED
P5701
120V 60Hz
AC IN
BCE
BCE
2
3
1
231
B
C
E
4
32
1
2
1
4
3
4
3
2
1
1
4
3
2
CAUTION
RISK OF ELECTRIC SHOCK
AC VOLTAGE LINE.
PLEASE DO NOT TOUCH THIS P.C.B
PRISEC
PRI
SEC
PbF
10
7
8
9
6
1
2
3
4
5
12
11
10
9
8
7
6
5
2
1
4
14
58
76543
1
+1
-4
~3
~2
1
2
3
4
5
6
7
8
9
10
3
1
2
4
32
1
+1
-4
~3
~2
17.6. AC INLET P.C.B. / SMPS P.C.B.
100
 Loading...