

Panasonic SC-HC35DB Operating Instructions
EB
Operating Instructions
Compact Stereo System
Model No. SC-HC55DB
SC-HC35DB
Dear customer
Thank you for purchasing this product.
For optimum performance and safety, please read these instructions carefully.
Please keep this manual for future reference.
Included Installation Instructions (> 3, 7)
The installation should never be done by any other than a qualified installation specialist.
Before commencing work, carefully read these installation instructions and the operating instructions to ensure that
installation is performed correctly.
(Please keep these instructions. You may need them when maintaining or moving this unit.)
Model number suffix “EB” denotes UK model.
RQTX1262-1B
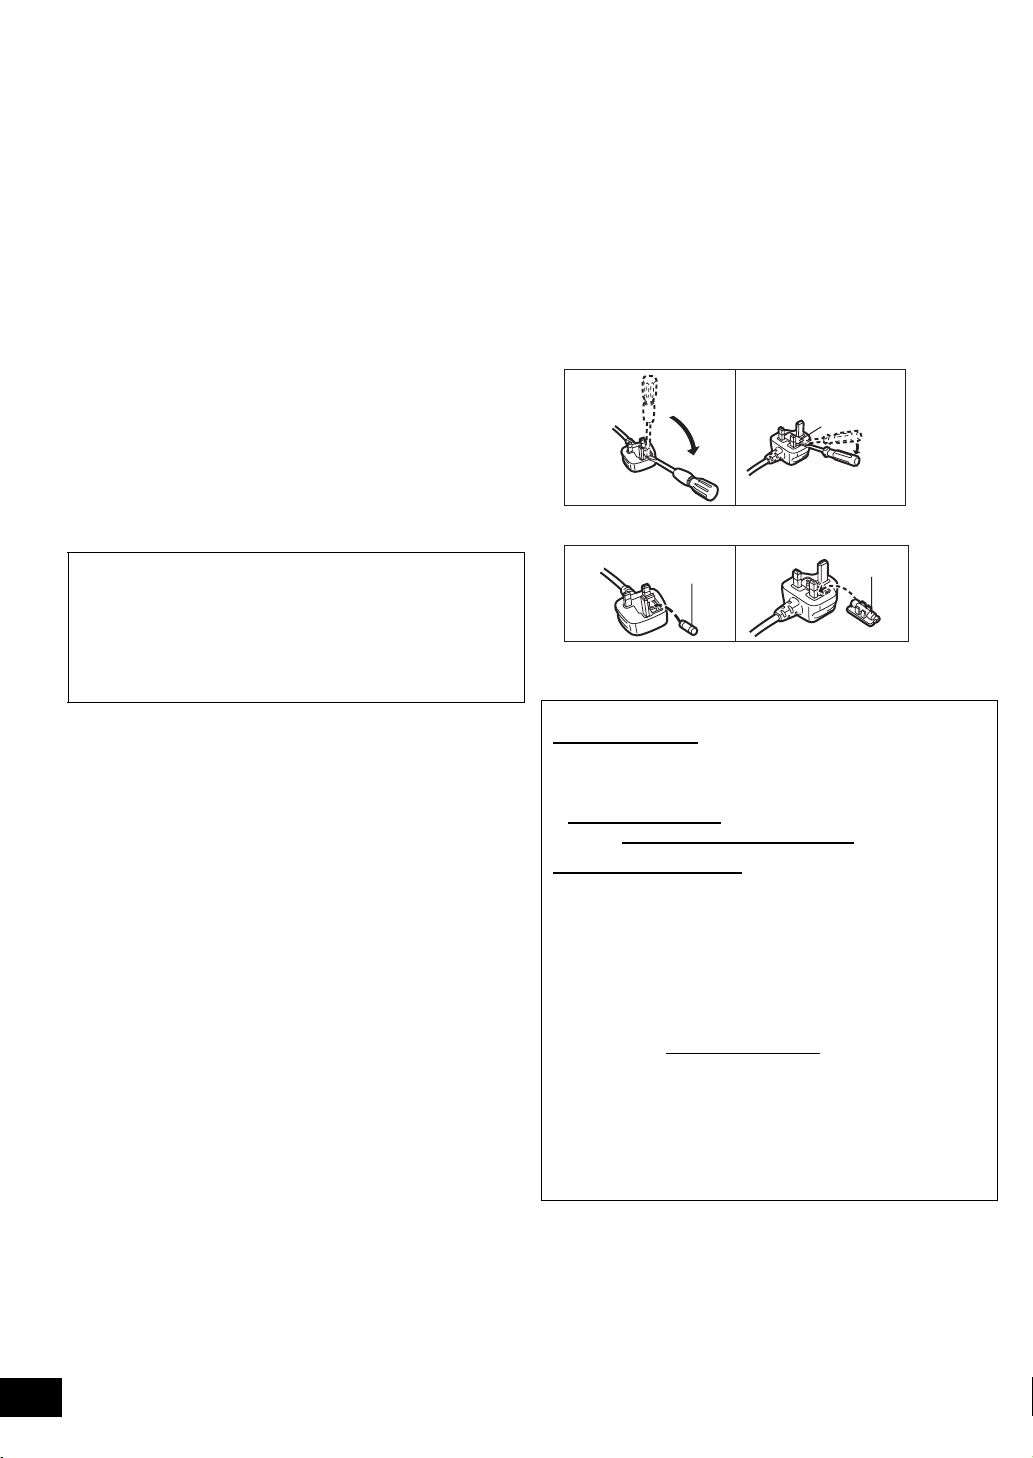
Caution for AC Mains Lead
Figure A Figure B
Fuse
(5 ampere)
Fuse
(5 ampere)
For your safety, please read the following text carefully.
This appliance is supplied with a moulded three pin mains plug
for your safety and convenience.
A 5-ampere fuse is fitted in this plug.
Should the fuse need to be replaced please ensure that the
replacement fuse has a rating of 5-ampere and that it is
approved by ASTA or BSI to BS1362.
Check for the ASTA mark Ï or the BSI mark Ì on the body of
the fuse.
If the plug contains a removable fuse cover you must ensure that
it is refitted when the fuse is replaced.
If you lose the fuse cover the plug must not be used until a
replacement cover is obtained.
A replacement fuse cover can be purchased from your local
dealer.
CAUTION!
IF THE FITTED MOULDED PLUG IS UNSUITABLE FOR THE
SOCKET OUTLET IN YOUR HOME THEN THE FUSE SHOULD
BE REMOVED AND THE PLUG CUT OFF AND DISPOSED OF
SAFELY.
THERE IS A DANGER OF SEVERE ELECTRICAL SHOCK IF THE
CUT OFF PLUG IS INSERTED INTO ANY 13-AMPERE SOCKET.
If a new plug is to be fitted please observe the wiring code as
stated below.
If in any doubt please consult a qualified electrician.
IMPORTANT
The wires in this mains lead are coloured in accordance with the
following code:
Blue: Neutral, Brown: Live.
As these colours may not correspond with the coloured markings
identifying the terminals in your plug, proceed as follows:
The wire which is coloured Blue must be connected to the
terminal which is marked with the letter N or coloured Black or
Blue.
The wire which is coloured Brown must be connected to the
terminal which is marked with the letter L or coloured Brown or
Red.
WARNING: DO NOT CONNECT EITHER WIRE TO THE
EARTH TERMINAL WHICH IS MARKED WITH THE LETTER
E, BY THE EARTH SYMBOL Ó OR COLOURED GREEN OR
GREEN/YELLOW.
THIS PLUG IS NOT WATERPROOF–KEEP DRY.
Before use
Remove the connector cover.
How to replace the fuse
The location of the fuse differ according to the type of AC mains
plug (figures A and B). Confirm the AC mains plug fitted and
follow the instructions below.
Illustrations may differ from actual AC mains plug.
1. Open the fuse cover with a screwdriver.
Figure A Figure B
Fuse cover
2. Replace the fuse and close or attach the fuse cover.
Sales and Support Information
Customer Care Centre
≥ For customers within the UK: 0844 844 3852
≥ For customers within Ireland: 01 289 8333
≥ Visit our website for product information
www.panasonic.co.uk
≥ E-mail: customer.care@panasonic.co.uk
Direct Sales at Panasonic UK
≥ For customers: 0844 844 3856
≥ Order accessory and consumable items for your product
with ease and confidence by phoning our Customer Care
Centre
Monday–Thursday 9:00 a.m.–5:30 p.m.,
Friday 9:30 a.m.–5:30 p.m.
(Excluding public holidays)
≥ Or go on line through our Internet Accessory ordering
application at www.pas-europe.com
≥ Most major credit and debit cards accepted.
≥ All enquiries transactions and distribution facilities are
provided directly by Panasonic UK.
≥ It couldn’t be simpler!
≥ Also available through our Internet is direct shopping for a
wide range of finished products, take a browse on our
website for further details.
.
RQTX1262
2
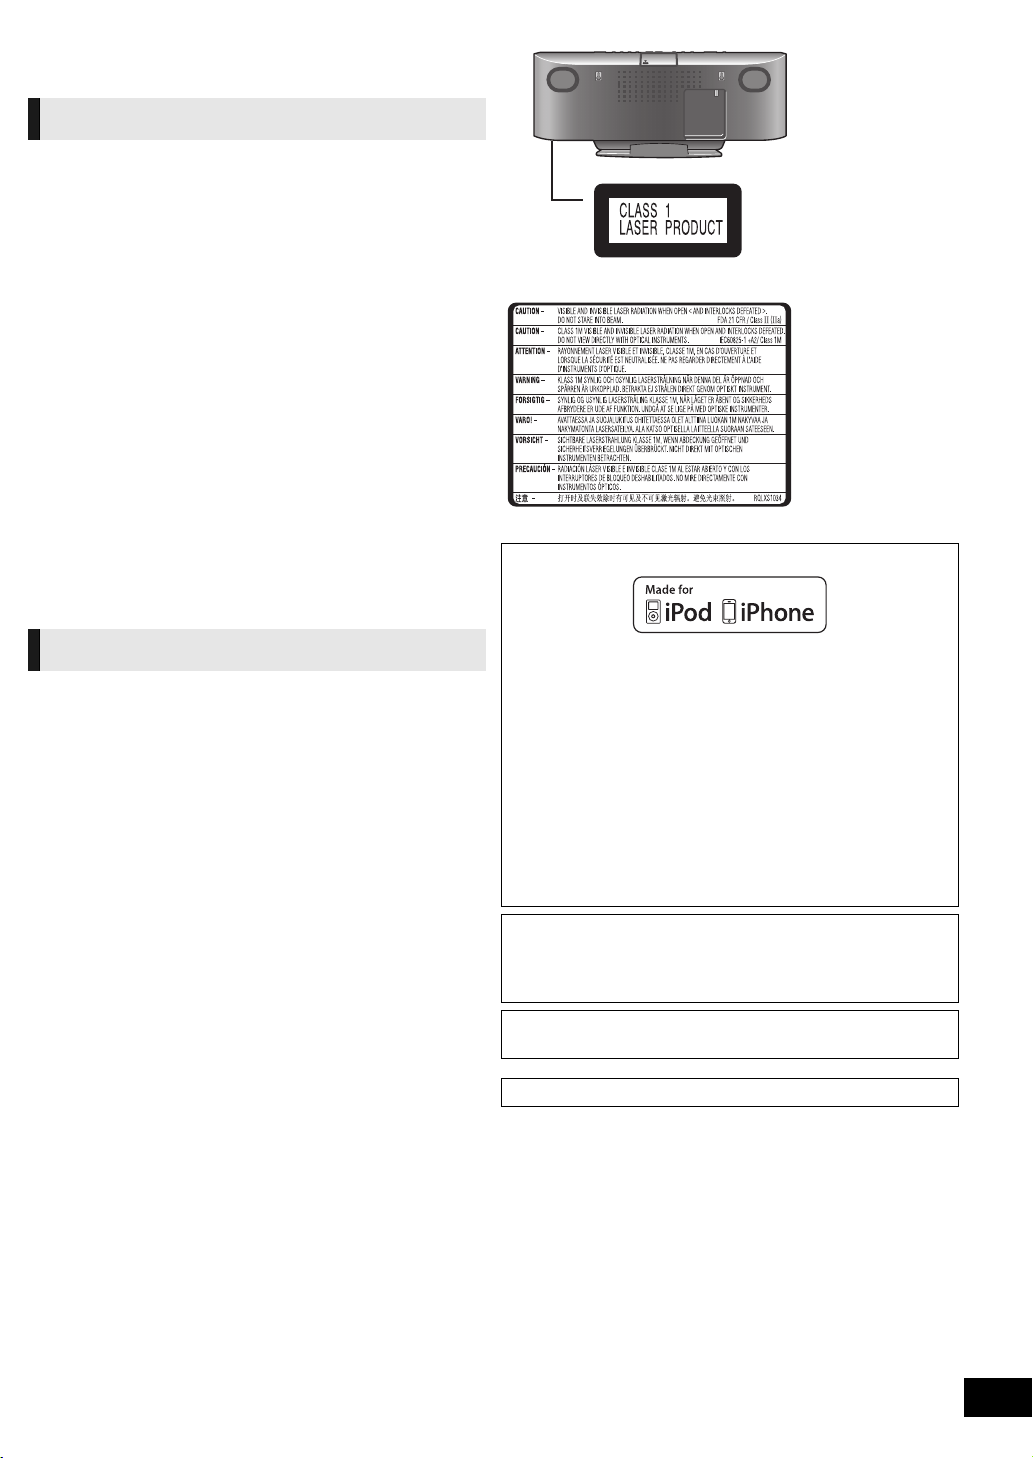
Safety precautions
(Bottom of product)
(Inside of product)
WARNING
Unit
≥ To reduce the risk of fire, electric shock or product damage,
– Do not expose this unit to rain, moisture, dripping or
splashing.
– Do not place objects filled with liquids, such as vases, on
this unit.
– Use only the recommended accessories.
– Do not remove covers.
– Do not repair this unit by yourself. Refer servicing to
qualified service personnel.
– Do not let metal objects fall inside this unit.
– Do not place heavy items on this unit.
AC mains lead
≥ To reduce the risk of fire, electric shock or product damage,
– Ensure that the power supply voltage corresponds to the
voltage printed on this unit.
– Insert the mains plug fully into the socket outlet.
– Do not pull, bend, or place heavy items on the lead.
– Do not handle the plug with wet hands.
– Hold onto the mains plug body when disconnecting the plug.
– Do not use a damaged mains plug or socket outlet.
≥ Install this unit so that the AC mains lead can be unplugged
from the socket outlet immediately if any problem occurs.
CAUTION
Unit
≥ This unit utilizes a laser. Use of controls or adjustments or
performance of procedures other than those specified herein
may result in hazardous radiation exposure.
≥ Do not place sources of naked flames, such as lighted
candles, on this unit.
≥ This unit may receive radio interference caused by mobile
telephones during use. If such interference occurs, please
increase separation between this unit and the mobile
telephone.
≥ This unit is intended for use in moderate climates.
Placement
≥ Place this unit on an even surface.
≥ To reduce the risk of fire, electric shock or product damage,
– Do not install or place this unit in a bookcase, built-in cabinet
or in another confined space. Ensure this unit is well
ventilated.
– Do not obstruct this unit’s ventilation openings with
newspapers, tablecloths, curtains, and similar items.
– Do not expose this unit to direct sunlight, high temperatures,
high humidity, and excessive vibration.
Batteries
≥ Danger of explosion if battery is incorrectly replaced. Replace
only with the type recommended by the manufacturer.
≥ Mishandling of batteries can cause electrolyte leakage and
may cause a fire.
– Do not heat or expose to flame.
– Do not leave the battery(ies) in a car exposed to direct
sunlight for a long period of time with doors and windows
closed.
– Do not take apart or short circuit.
– Do not recharge alkaline or manganese batteries.
– Do not use batteries if the covering has been peeled off.
– Remove batteries if you do not intend to use the remote
control for a long period of time. Store in a cool, dark place.
≥
When disposing the batteries, please contact your local
authorities or dealer and ask for the correct method of disposal.
“Made for iPod” and “Made for iPhone” mean that an
electronic accessory has been designed to connect
specifically to iPod, or iPhone, respectively, and has been
certified by the developer to meet Apple performance
standards.
Apple is not responsible for the operation of this device or its
compliance with safety and regulatory standards.
Please note that the use of this accessory with iPod, or
iPhone may affect wireless performance.
iPhone, iPod, iPod classic, iPod nano, and iPod touch are
trademarks of Apple Inc., registered in the U.S. and other
countries.
The Bluetooth
SIG, Inc. and any use of such marks by Panasonic
Corporation is under license. Other trademarks and trade
names are those of their respective owners.
MPEG Layer-3 audio coding technology licensed from
Fraunhofer IIS and Thomson.
Product Identification Marking is located on bottom of the unit.
®
word mark and logos are owned by Bluetooth
RQTX1262
3
[HC55]
1177
Declaration of Conformity (DoC)
Hereby, “Panasonic Corporation” declares that this
product is in compliance with the essential requirements
and other relevant provisions of Directive 1999/5/EC.
Customers can download a copy of the original DoC to
our R&TTE products from our DoC server:
http://www.doc.panasonic.de
Contact to Authorised Representative: Panasonic
Marketing Europe GmbH,
Panasonic Testing Centre, Winsbergring 15, 22525
Hamburg, Germany
This product is intended to be used in the following
countries.
GB, IE
This product is intended for general consumer.
(Category 3)
(For Ireland)
Gaeilge
Dearbhú Comhréireachta (DoC)
Leis seo, dearbhaíonn “Panasonic Corporation” go bhfuil
an táirge seo i gcomhréir le riachtanais riachtanacha agus
forálacha ábhartha eile den Treoir 1999/5/EC.
Féadfaidh custaiméirí coip dár nDearbhú Comhréireachta
(DoC) bunaidh dár dtáirgí R&TTE ónár bhfreastalaí um
Dhearbhú Comhréireachta (DoC):
http://www.doc.panasonic.de
Mionsonraí Teagmhála Ionadaí Údaraithe: Panasonic
Marketing Europe GmbH,
Panasonic Testing Centre, Winsbergring 15, 22525
Hamburg, An Ghearmáin
Tá an táirge seo ceaptha chun a úsáid sna tíortha seo a
leanas.
GB, IE
Tá an táirge seo ceaptha don ghnáth-thomhaltóir.
(Catagóir 3)
About descriptions in these operating instructions
≥ Operations in these instructions are described using remote
control, but you can do the operations with the main unit if the
controls are the same.
Your unit may not look exactly as illustrated.
≥
These operating instructions are applicable to models
SC-HC55DB and SC-HC35DB. Unless otherwise indicated,
illustrations in these operating instructions are of SC-HC55DB.
[HC55] :indicates features applicable to SC-HC55DB only.
[HC35] :indicates features applicable to SC-HC35DB only.
≥ Pages to be referred to are indicated as “> ±±”.
≥ [CD] :indicates CD-DA (except MP3).
[MP3] :indicates MP3 files.
RQTX1262
4
Accessories Table of contents
Place this side in before the other side.
Lens
Check the supplied accessories before using this unit. Caution for AC Mains Lead ...................................................2
∏ 1 Remote control
([HC55] N2QAYB000643)
([HC35] N2QAYB000641)
∏ 1 Battery for remote
control
Wall mounting accessories
∏ 2 Safety holders E
(RFA3327)
∏ 2 Safety holder screws C
(Black)
(XSN4+8FJK)
∏ 2 Wall mount brackets
(RMQX1082-K)
∏ 1 DAB antenna
(N1EADY000001)
∏ 1 AC mains lead
(K2CZ3YY00005)
∏ 1 Safety holder D
(RGQ0632-K)
∏ 1 Safety holder screw B
(Silver)
(XSN3+10FJ)
∏ 2 Rear pads
(RKA0252-K)
Safety precautions.................................................................3
Accessories............................................................................5
Unit and media care...............................................................5
Connections ...........................................................................6
Attaching the unit to a wall (optional)..................................7
Control reference guide ......................................................10
Opening/Closing the sliding door ......................................11
Disc operations .................................................................... 11
Radio operations .................................................................13
Sound adjustment ...............................................................13
Timer .....................................................................................13
DAB operations....................................................................14
Listening to audio from iPod or iPhone.............................17
[HC55] Using a Bluetooth
Listening to audio from a USB device ...............................20
Others ...................................................................................20
Troubleshooting...................................................................21
Specifications.......................................................................23
®
compatible device ...................18
≥ Product numbers correct as of February 2011. These may be
subject to change.
≥ Do not use AC mains lead with other equipment.
Unit and media care
Pull out the AC mains lead from the outlet before maintenance.
∫ Clean this unit with a soft, dry cloth
≥ When dirt is heavy, wring the cloth moistened in water tightly to
wipe the dirt, and then wipe it with a dried cloth.
≥ When cleaning the speaker covers, use a fine cloth.
Do not use tissues or other materials (towels, etc.) that can fall
apart. Small grains may get stuck inside the speaker cover.
≥ Never use alcohol, paint thinner or benzine to clean this unit.
≥ Before using chemically treated cloth, carefully read the
instructions that came with the cloth.
∫ Maintenance of the lens
≥ Clean the lens regularly to prevent malfunctions. Use a
blower to remove dust and a cotton swab if it is extremely
dirty.
≥ You cannot use a CD type lens cleaner.
≥ Do not leave the sliding door open for prolonged periods of
time. This will cause the lens to get dirty.
≥ Be careful not to touch the lens with your fingers.
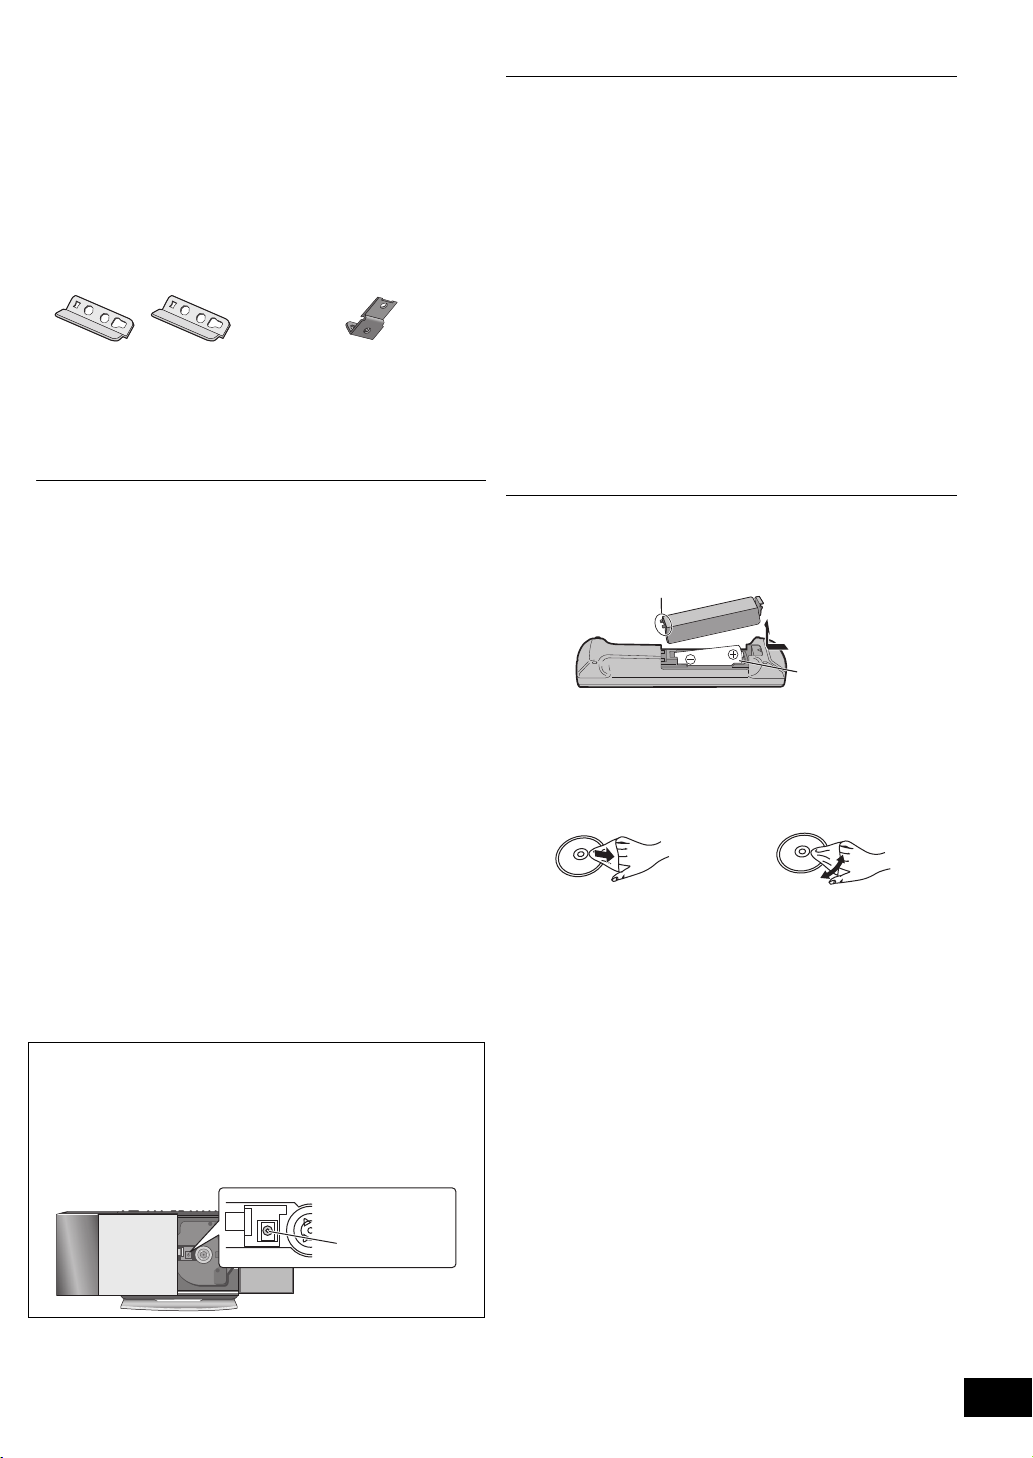
∫ The remote control information
Insert so the poles (i and j) match those in the remote
control.
R6/LR6, AA
≥ Use alkaline or manganese batteries.
∫ Clean discs
DO DO NOT
Wipe with a damp cloth and then wipe dry.
∫ Disc handling precautions
≥ Handle discs by the edges to avoid inadvertent scratches or
fingerprints on the disc.
≥ Do not attach labels or stickers to discs.
≥ Do not use record cleaning sprays, benzine, thinner, static
electricity prevention liquids or any other solvent.
≥ Do not use the following discs:
jDiscs with exposed adhesive from removed stickers or
labels (rented discs etc.).
jDiscs that are badly warped or cracked.
jIrregularly shaped discs, such as heart shapes.
RQTX1262
5
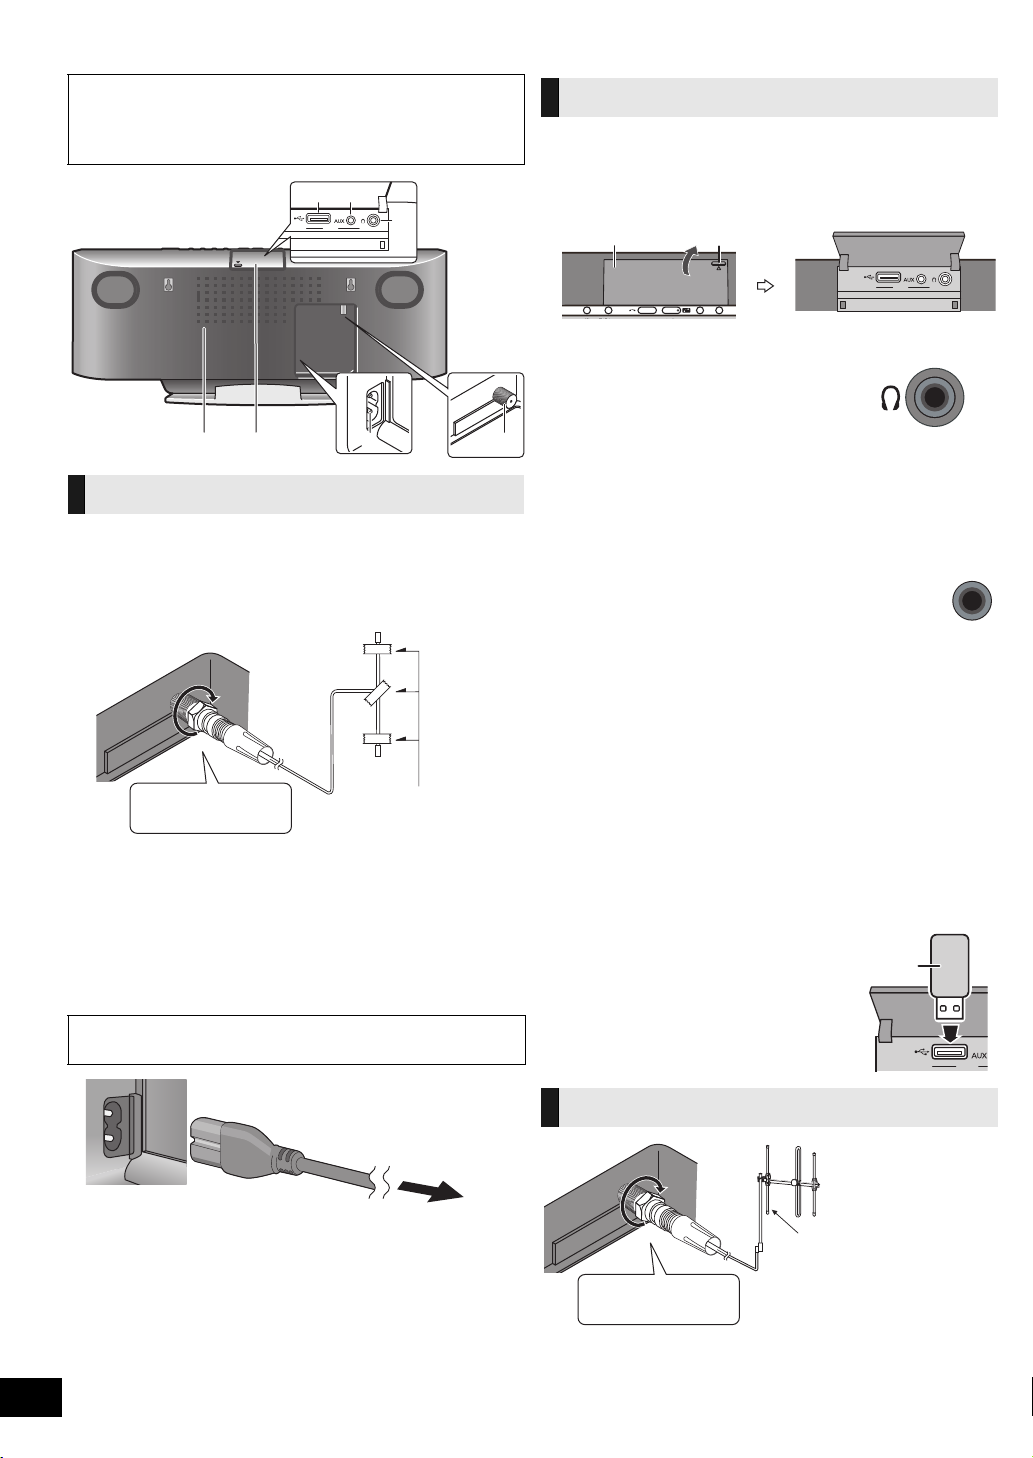
Connections
Back View
Exhaust holes
Be sure to fully
tighten the screw.
Adhesive tape
To household mains socket
Power consumption in standby
mode:
Approx. 0.2 W
ユヹヵノリワ
Projecting part
EXT-IN AUX
Headphone/USB cover
ユヹヵノリワ
DAB outdoor antenna
(not supplied)
Be sure to fully
tighten the screw.
∫ Notes on speakers
≥ These speakers do not have magnetic shielding. Do not place
them near a television, personal computer or other devices easily
influenced by magnetism.
ユヹヵノリワ
Basic Connections
1 Connect the DAB antenna to receive FM
radio and DAB (Digital Audio Broadcasting).
The cross bar of the “T” should be kept firmly stretched. Find
a good position with good reception.
≥ Tape the antenna to a wall or column, in a position with the
least amount of interference.
≥ Please refer to “Checking the DAB signal reception quality”
(> 15).
2 Connect the AC mains lead.
Connect the AC mains lead after all other connections
are complete.
Turn the unit on after a few seconds.
READ THE CAUTION FOR THE AC MAINS LEAD ON
PAGE 2 BEFORE CONNECTION.
Additional Connections
Open the EXT-IN AUX/Headphone/USB cover to connect headphones,
USB devices or external music devices (e.g. MP3 player).
Push the projecting part to open the cover A.
Top V i e w
∫ Connect the headphones (not supplied)
Reduce the volume level and connect the
headphones.
Plug type: ‰3.5 mm stereo B
≥
Listening at full volume for long periods may damage the user’s ears.
≥
To prevent hearing damage, avoid listening for prolonged periods of time.
Excessive sound pressure from earphones and headphones can
cause hearing loss.
∫
Connect an external music device (for AUX mode)
1 Plug the audio cable (not supplied) into
the EXT-IN AUX jack C.
Plug type: ‰3.5 mm stereo
2 Press [EXT-IN, RADIO] repeatedly to
select “AUX” and start playback on the
connected device.
You can select the sound input level of the external device.
[HC55] 1 Press [SOUND] repeatedly to select “INPUT
LEVEL”.
2 Press [2, 1] to select “HIGH” or “NORMAL”.
[HC35] Press [INPUT LEVEL] repeatedly to select “HIGH” or
“NORMAL”.
≥
Switch the equalizer off or turn the volume of the external device down to
reduce the input signal. High level of input signal will distort the sound.
≥ For details, refer to the instruction manual of the other equipment.
≥ Cables and devices are not supplied.
∫ Connect the USB device (not supplied)
1 Reduce the volume level and plug the
USB device A into the USB terminal
D.
2 Press [EXT-IN, RADIO] repeatedly to
select “USB” and start playback.
(> 20)
AUX
RQTX1262
6
DAB outdoor antenna (Optional)
≥ Use DAB outdoor antenna for better reception.
≥ The antenna should only be installed by a competent
technician.
≥ Never use the outdoor antenna during lightning storm.
≥ Please refer to “DAB operations” (> 14).
Attaching the unit to a wall (optional)
Installation accessories
∫ Supplied accessories
≥ 1 Safety holder screw B (Silver)
≥ 2 Safety holder screws C (Black)
≥ 1 Safety holder D (> 5)
≥ 2 Safety holders E (> 5)
≥ 2 Wall mount brackets
≥ 2 Rear pads
∫ Commercially available accessories
(not supplied)
≥ 4 Wall bracket fixing screws F
≥ 1 Safety holder fixing screw G
≥ Keep the wall mount brackets out of reach of children
to prevent swallowing.
≥ Keep the rear pads out of reach of children to prevent
swallowing.
≥ Keep the screws out of reach of children to prevent
swallowing.
≥ Keep the safety holder out of reach of children to
prevent swallowing.
≥ Use screws with a nominal diameter of ‰4 mm, which are suitable
to the material of the wall (e.g., wood, steel, concrete, etc.)
Safety precautions
WARNING!
≥ Only a qualified building contractor shall install or
uninstall this unit.
– Improper installation may cause the unit to fall, resulting in
injury.
≥ To prevent injury, the unit must be securely attached to the
wall in accordance with the installation instructions.
≥ Do not install the unit where it cannot support the load.
– If the mounting parts are not strong enough, this may cause
the unit to fall, resulting in injury.
≥ Do not use installation methods other than instructed.
– This may cause the unit to fall and be damaged, resulting in
injury.
≥ Do not install the unit at locations other than vertical walls.
– This may cause the unit to fall and be damaged, resulting in
injury.
≥ Take the safety factor for mounting strength into account.
– Insufficient strength will cause the unit to fall, resulting in
injury.
≥ The wall on which the unit is to be attached to should be
capable of supporting 33 kg per screw.
– Insufficient strength of the walls will cause the unit to fall in
the long run.
≥ Do not disassemble or modify the wall-mounting hanger.
– This will cause the unit to fall and be damaged, resulting in
injury.
CAUTIONS!
≥ Do not install this unit at humid or dusty locations, or
locations where airborne grease or steam may come into
contact with the unit, or under an air conditioner where
water may drip onto the unit.
– This may have negative impact on the unit, resulting in fire or
electric shock.
≥ Secure enough space of more than 30 cm above the main
unit and more than 10 cm on the left and right sides
respectively. Keep space between the wall and rear of the
unit clear of obstructions.
– Blocking the exhaust holes on the main unit may result in fire.
≥ Use the designated components for installation.
– Otherwise, the main unit may fall and be damaged, resulting
in injury.
≥ Prevent the mounting screws or AC mains lead from
coming into contact with metal parts inside the wall during
installation.
– Failure to do so may cause electric shock.
≥ When removing the main unit, remove the wall mounting
screws as well.
– Otherwise the wall mounting screws may hit a person and
lead to injury.
≥ Install the unit at a height where the USB port and
operation buttons can be seen for safe operation.
– Operating at improper position may cause the unit to fall and
be damaged, resulting in injury.
∫ Notes on installation
≥ Before installation, read the “Safety precautions” and
“Wall mount instructions” for correct installation.
≥ For optimal performance and to prevent potential
problems, do not install this unit:
– at locations other than vertical walls.
– near a sprinkler or a sensor.
– near high-voltage lines or power sources.
– near heating device.
– at locations where the unit is subject to vibration or impact.
– near sources of magnetism, heat, vapour, airborne grease,
etc.
– at locations where there may be water droplets (e.g. under an
air conditioner).
≥ Do not install this unit under ceiling lights (e.g. spotlight,
halogen light, etc.).
– Failure to do so may bend the cabinet or lead to damage
caused by high heat.
≥ Use a proper installation method that suits the structure
and material of the wall.
≥ Use a soft blanket or cloth to prevent damage to the
product or floor during installation.
≥ When tightening screws, make sure the screws are not
loosely-tightened or overtightened.
≥ Secure a safe surrounding area and pay attention to safety
during installation.
≥ Panasonic is not liable for incidental or consequential
damages resulting from improper installation or operation.
RQTX1262
7
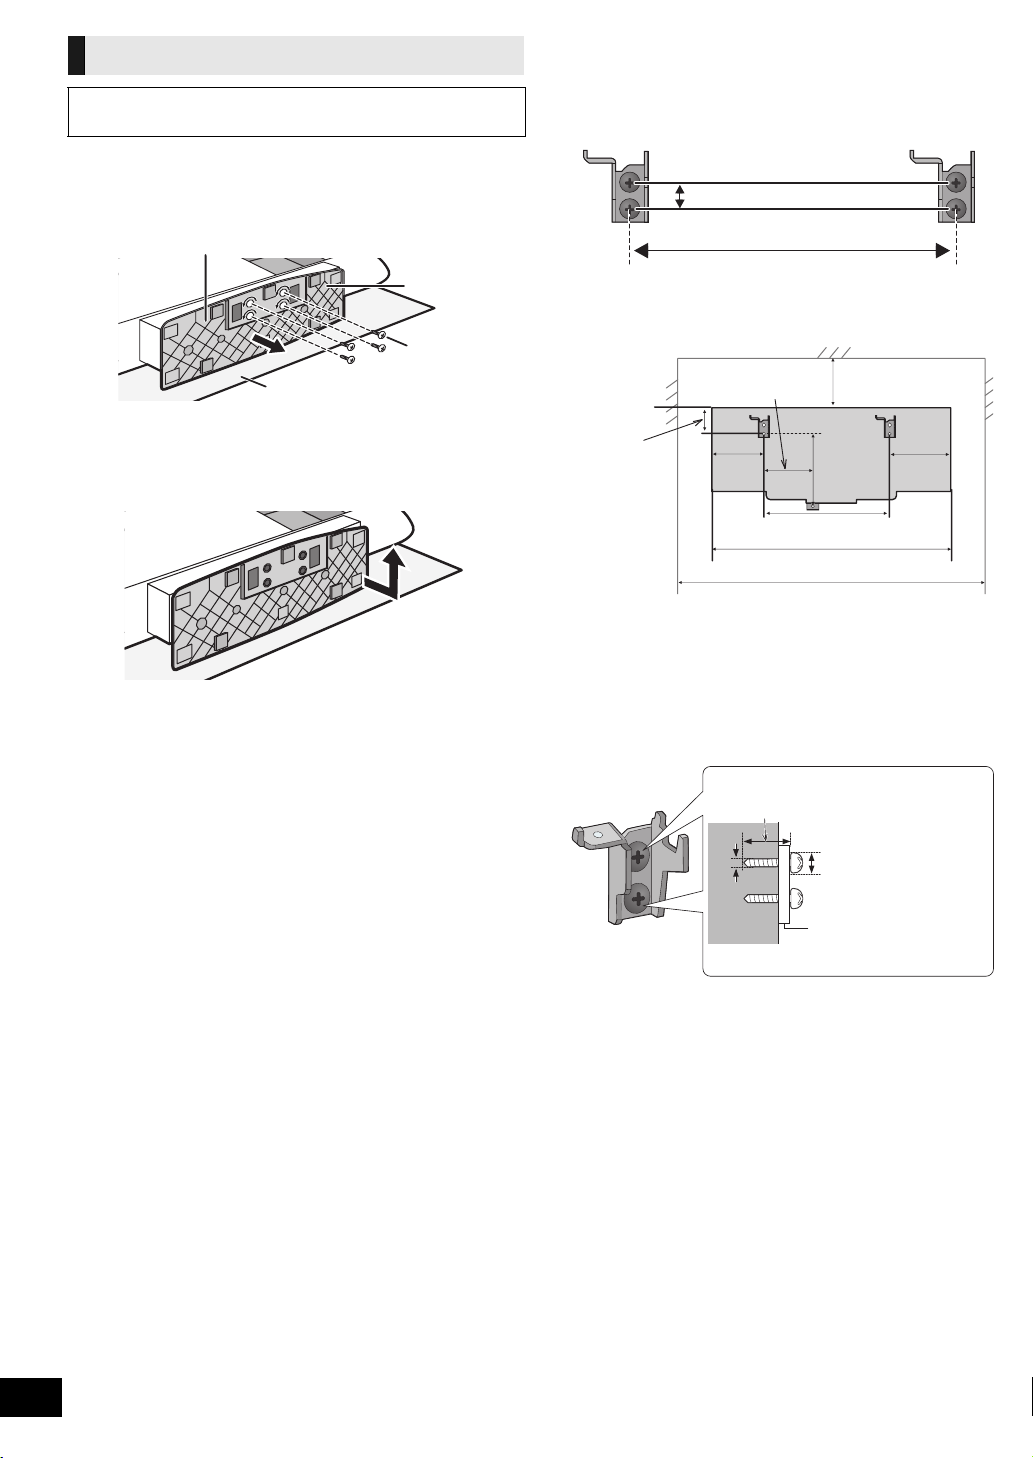
Wall mount instructions
Bottom of main unit
Stand
Soft blanket or cloth
Fixing screw A
229 mm
12.5 mm
300 mm
480 mm
48.5 mm
229 mm
680 mm
89 mm
133 mm
139 mm
118 mm
At least 30 mm
7.5 mm to 9.4 mm
4 mm
Wall mount bracket
Before installation, turn the unit off and disconnect the
AC mains lead from the household mains socket.
1 Detach the stand from the unit.
1 Unscrew the fixing screw A (4 pieces) at the bottom
of the unit.
2 Gently pull the bottom of the stand and slide the
stand off the unit.
≥ Keep the removed screws and stand in a safe place.
2 Measure and mark the position of the wall
mount brackets (Both sides).
≥ Use figures below to identify the screwing positions.
The position to attach the wall mount brackets
Space required
RQTX1262
8
3 Attach the wall mount bracket to the wall with 2
screws F
≥ Use a spirit level to ensure both wall mount brackets are level.
≥ Use a screw which is strong enough to support the weight of at
least 33 kg.
. (Both sides)
 Loading...