

Panasonic RX-DS16 User Manual
PorWbte Stereo CD System
RX-DSI6
Operating Instructions
(IBi
OMITJU. «joro
y -Al' i; « c P. "i.- -s "S' « c. ■ ■* -I r. n ’rf: »tf- -Ai'*' w «N» J
„. ..
..........
; ,•>. ':4 'ty“': w V ■.*^_L_- ^-' ■^':
Sr ■ ■?- A" ^ ’| ÌP i” • -J «-■ “- ■ • S' *
f
•J:'
j !l2* ?r
•V ..i' tr- V ir y Ì- - ^
1 -¿f '-i S’, rt f ii iJ C •&' 5
3j à 5 ^ ^ V '¿i a ■*-
./^--'* ,L f
i- --. -Id- •’■T '•.-^ "i^**r.'' ■■-'
'at
> ^ ••££ ir^ *> s- &'■ -.=—w ;:* • iff f!^ ■!'•
tt. :3 j>. -;i- iJ '■;ì: ^^ ^ *
’i •'>‘j 1? o li -:>■ '-t'■*.•■* •*•
13 'i 5 A J a /• ,-j- r-' 1;' 'V; Jf ^ *-v‘
; !^V- IV' .1 i* « V d «I.L., ^ ■’t £> *1 ■?
J if ..^ ¿¿- a? , t?' ij, < ‘
A
i[3 ■'’if, ~'. ■*». ■S" A'. <S..-iA.'^
-., -^ ~ *- .'- O.- '.^ i^' • !
W i
,ti - •ii' l;; i;^- 'ìt?: -*a: A.. &.■■•;?■:■ l^f <1
• -è- 'i. "■> ■'■ i- .d ’Oi tir - 3?" -" ''■' f
'’’t ••u'" ■;lÌ 'ÌTu'-t 't; ' V :ii-»*>J' "f.s. r*- "TiV •!■<■ • ,?f '^" •“
'■”p:-‘. ¿e—■■• -k 'i >'■ . ..’ii' Ji' 'r.v '4^ -■«: • «3 r> 1,
;i i*' -.• •:':-,i5 ■■^f -I'j ,ti. •i'j L^u -:> - a' ■<i^ 'H .¿i .--
'y:’"'-»Ed’' i .V ^ -i.’- - W •’•'f i| fl. ji ■;i •
.; .-\r••>- L‘’ d. lie o '-"• -J ,•■" ir b t '■■i ■•¿i'-
t-.'*-'i -iJ „«. -i ■?!- is- ij g ".^j ;.5 -A 'V »• *i i» •
e. 3 x- '& V ,-Si -4 1> -ii '-JS -iJ er Ù t T,'
H •-:•■ '¿. ’Ll V <i, p K- ’■■■ -j- -5- “H y M i} -k
jZji' , dj; -iTt - -ie i? a p 'j •->'• .t- si ■? . ^ p
i is,. '.j P 'a' i>r X. ■«, ?;■ »1 § -s. ^ > E i
fi? 5 . ¿1 -s ft A' V x.\_ ^ -R 5\ p *. -J
;j ti > I'i ¥ 5i " «:■ ’A ■>”
S ^ ^ »,■>■ KJ ’iLf -ii V * J fi ’ s'. V -<2
i' :5 s' ^ ifl .iX ’' ij :s.r ■'ii '‘i- -i hTCLjL-
,.:: J' J- 'ii V ^ ^ 'J .
S "x-^a ’: k' ‘"I ' -'Tiifii .A. ■ -»d "i-
-■jm- ^ J!^' -•:■ ■*? .ii' . ■**_A"'' -f
’W
1.1* ’»■ .Xr ¿Ì ^ ^-r , to f J/ ,1.
’i -4 a -33 <j 2i jj .¡U it tf- a *
l?L/ •& XI 'f -a Cf "i -ii V -K .
it ’x- » i - -X 0 tì li' .■¥. p LL’ a c-
a-' ^ ;ra ^ S w :•■' '> -P" .'(• .i’2 f If -'
' -4 7V’ 4 jV ■ 0 111 fS li y ■p ■-'- «- ’•i '^'
: '.^ .-j V h 'B H -y-L -:y > si r ?;- .i<?-^ s. k> -
tl 'V ^ si -i -'t- P .id- lij 'ts y iJ 1^ ' ' 3
i' .1
£i.T .*si; ,,-v -i ..|- j c"-i^-> ,-v^i?-.,
••-C. .-: j M- ■'3 - '.t.-p- i*.-I -i"'
[3: I'T- .,'.,T - •) - •%■ p, 'll- p, ---^ c - - ry - i? - a
-i ft - - . li i •> 3. Vs rj ' r I» T .' Ì T d »?
y 1. V - . i i -■•- • te .r i'i > •;+ ■•*’: -’■- N ■x 9. -X
p ti*. "Si -¿4 -V 35- ^.. -^ Èi iP >4 -14 *-i^ .¡a
^ ii- .«3^ 1'-- -i <> iii it" 'Tp. i’ A il J>: ■*
1» :>. si,. £, ..d' * l; =a; ii t;i A ’' -S’ Ì-’.yjf^ A -is V
1 A' ,:,-r -if- ^ ^ • ■■’ --^ ^'’■. .'.^; '-». ■-■‘-'A.'f’i "'^■. “f-.,'' "' '
i‘-^ --• ■ -il' 't' ''Ù' ''y'^^i-%1 ■ i^' ' ''■s''-
: f'*-7f" • >? jW .:T i-s. .:i -.T- .--s\, ■'-
-V i. ,7- ,-' r- 3< li' V) V ■y? -C U’ ..-,i ■
• V ..Mk -i ii .^.. "w ’?> ¿x.,.- I*
iii ’ I iSt ti ■ (1* xi r ;;;4s, • •</ '■A
..k^’^-'-ri -'/ s. 4* iSn-. 4 p's, ZH p' 2 *, U
li ig: rS jS ^ ^ •y- >5 ¿i ^4 s -s s- -Li
fi i.;: r:i -;tf > S- 3* -i et I: flf
t
• “f 'i- S- -J #1 5/- ■/ 1/ -t. '.'i -i. b I /1 r-s i.
.................................
5
•^. .:3 ■a
f] ii -il iJ .Vs-. s> 3 « » -
E ■fi' ■&' '2 . -ii." 'll • ^ fi' ;?-■ rf
iIm tS ci =5. -'J- ■^ •'' +•' p!-
& y ' ft '*' It' }■ ?
■ei.
■■ ÌjVì?;3-J.'>!ÌC>i)ìì
___
1. ." ’■
■Ji
oy
■C:' ■'H S ' > fe" ii^' ■■■«
4
.5' a
S;.
•iii o.
■ .a
i—i: •
■X ^ i(
< a A ' ,>
C. . • if f! > 3j
k.
-i' <
‘''.1
z' k- 'V P .¿. 3 is- c? P'--i ^ iJ « j,. p H.
•:S
J4- T:. . «i, J!i. p- ih. Vi rV '¿eS .3 W *• -«.', {)
____
..s i:ti P tiid .£•-„ -'-.-.7S-. -¿.I ^ « •’I
li
’■ •■ _. .- -•■ :
- r- --i* '■-- .-.K ii f J
• ;a 5;. !irt- ^ * '1.. ' “tp V n w V ' ’
-9-'■•i''-f' :i' -te -i/i i'è A -3-j M-,
'96
I »' i- a It s 5;' u. -rt. j 4 f ij. É. '^
• S - -i 4. j X) 5^ ■! •->' -i- • Vp • it y J, ^
¿-. :4 . -t! . . i • '■ i i -Li; * -^ • Js Ts :i if S A ■•
t.
t t .A Ì» iii Si ii'j ix Ti- i? •■» «' s,
h-' S; tJ'. a [*■ :^ ■-';} ^.-^' ■
^
-y a ¿1 p.
■*f-
-.1 Si
' -w. >
-f’ 6!.
& -ei -4
•• T ►!. d f
'■asxj
ft- it.
'f . ii --r
[P]®
id ^. lè- i ;i i
V ■ s- =r^' 4 «- >p; 1
. .' .'. .
ilw'iestw
R<3rT43»tSt-P

Table of Contents
Dear Customer
Thank you for purchasing this product.
For optimum performance and safety, please read these instructions
carefully.
The mode) number and serial number of this product can be
found on either the back or the bottom of the unit.
Please note them in the space provided below and keep for
future reference.
MODEL NUMBER
SERIAL NUMBER
User memo:
DATE OF PURCHASE
DEALER NAME
DEALER ADDRESS —
TELEPHONE NUMBER
CAUTION !
THIS PRODUCT UTILIZES A LASER.
USE OF CONTROLS OR ADJUSTMENTS OR PERFORM
ANCE OF PROCEDURES OTHER THAN THOSE SPECIFIED
HEREIN MAY RESULT IN HAZARDOUS RADIATION EXPO
SURE
DO NOT OPEN COVERS AND DO NOT REPAIR YOURSELF.
REFER SERVICING TO QUALIFIED PERSONNEL.
_______
RX-DS16
Before use
Supplied accessories..................................................2
Precautions.............................................................*.
Power sources.............................................................4
Using a household AC outlet
Using batteries
Memory back-up batteries
Location of controls................................................ 5
Changing the sound quality
Adjusting the deep-bass (XBS)
One-touch play
To listen through headphones...................................6
Presetting radio broadcasts.......................................7
Listening to radio broadcasts....................................8
Listening to programmed stations (Preset tuning).8
Listening to broadcast stations which have not
been programmed (Manual tuning)
Listening to CDs..........................................................9
Sequential play
Repeat play and random play
Program play
Listening to tapes
Before recording
Recording from radio broadcasts
Recording from CDs
...............
..........................
................
.......................................
.............
............................................................
..........
...........................
...............
........................
.....................................................
...................................................
............
.................................................
.....10
12
..............
...
4
4
11
12
12
3
4
5
5
6
8
9
9
CAUTION :
TO PREVENT ELECTRIC SHOCK MATCH WIDE BLADE OF
PLUG TO WIDE SLOT, FULLY INSERT.
WARNING:
TO REDUCE THE RISK OF FIRE, ELECTRIC SHOCK OR
PRODUCT DAMAGE, DO NOT EXPOSE THIS APPLIANCE TO
RAIN, splashing, DRIPPING OR MOISTURE.
The following mark and symbols are located on bottom of the unit.
CAUTION
RISK OF ELECTRIC SHOCK
A
CAUTION: TO REDUCE THE RISK OF ELECTRIC
A
SHOCK, DO NOT REMOVE SCREWS.
NO USER-SERVICEABLE PARTS
INSIDE.
REFER SERVICING TO QUALIFIED
SERVICE PERSONNEL.
The lightning flash with arrowhead symbol, within
an equilateral triangle, is intended to alert the user
to the presence of uninsulated “dangerous voltage”
within the product’s enclosure that may be of
sufficient magnitude to constitute a risk of electric
shock to persons.
DO NOT OPEN
I
A
Using the sleep timer................................................13
Maintenance...............................................................13
Concerning CDs
Concerning cassette tapes
Listening caution................................................ .....15
Technical specifications..........................................:15
Product service
Troubleshooting guide
Supplied accessories
0
AC power supply cord (polarized)
□
(SJA172)
........................................................
......................................
.........................................................
...............................
Please check and identify the supplied
accessories.
Use numbers indicated in parentheses when
asking for replacement parts.
(Onfy for U.S.A.)
To order accessories call PASC Accessory
Dept. 1-800-211-7262.
Backcover
14
14
15
1 pc.
A
The exclamation point within an equilateral triangle
is intended to alert the user to the presence of
important Operating and maintenance (servicing)
instructions in the literature accompanying the
appliance.

Precautions
Before using this unit please read these operating instructions care
fully. Take special care to follow the warnings indicated on the unit
itself as well as the safety suggestions listed below.
Afterwards keep them handy for future reference.
Safety
1. Power Source—^The unit should be connected to power supply
only of the type described in the operating instructions or as
marked on the unit.
2. Polarization—If the unit is equipped with a polarized AC power
plug (a plug having one blade wider than the other), that plug
will fit into the AC outlet only one way. TTiis is a safety feature.
If you are unable to insert the plug fully into the outlet, try
reversing the plug. If the plug should still fail to fit, contact your
electrician to replace your obsolete outlet. Do not defeat the safety
purpose of the polarized plug.
3. Power Cord Protection—AC power supply cords should be
routed so that they are not likely to be walked on or pinched by
items placed upon or against them. Never take hold of the plug
or cord if your hand is wet, and always grasp the plug body
when connecting or disconnecting it.
4. Nonuse Periods—When the unit is not used, turn the power off.
When left unused for a long period of time, the unit should be
unplugged from the household AC outlet.
Installation
Maintenance
Clean the cabinet, panel and controls with a soft cloth lightly moist
ened with mild detergent solution.
Do not use any type of abrasive pad, scouring powder or solvent
such as alcohol or benzine.
Service
1. Damage Requiring Service—The unit should be serviced by
qualified service personnel when:
(a) The AC power supply cord or the plug has been damaged; or
(b) Objects have fallen or liquid has been spilled into the unit; or
(c) The unit has been exposed to rain; or
(d) The unit does not appear to operate normally or exhibits a
marked change in performance; or
(e) The unit has been dropped, or the enclosure damaged.
2. Servicing—^The user should not attempt to service the unit beyond
that described in the operating instructions. All other servicing should
be referred to an authorized service personnel.
(Only for U.S.A.)
Call 1-800-211-7262 for the address of an authorized factory
servicenter,
THE FOLLOWING APPLIES ONLY IN THE U.S.A.:
CAUTION:
Environment
1. Water and Moisture—Do not use this unit near water—for ex
ample, near a bathtub, washbowl, swimming pool, or the like.
Damp basements should also be avoided.
2. Condensation—Moisture may form on the lens in the following
conditions...
•immediately after a heater has been turned on.
•in a steamy or very humid room.
• when the unit is suddenly moved from a cold environment to
a warm one.
If moisture forms inside this unit, it may not operate properly.
To correct this problem, turn on the power and wait about one
hour for the moisture to evaporate.
3. Heat—The unit should be situated away from heat sources such
as radiators and the like. It also should not be placed in tempera
tures less than 5°C (41 °F) or greater than 35°C {95®F).
Placement
1. Ventilation—The unit should be situated so that its location or
position does not interfere with its proper ventilation. Allow 10
cm (4” ) clearance from the rear of the unit.
2-, Foreign Material—Care should be taken so that objects do not
fall into and liquids are not spilled into the unit. Do not subject
this unit to excessive smoke, dust, mechanical vibration, or shock,
3. Magnetism—The unit should be situated away from equipment
or devices that generate strong magnetic fields.
4. Stacking—Do not place heavy objects, other than system com
ponents, on top of the unit,
5. Surface—Place the unit on a flat, level surface,
6. Carts and Stands—The unit should be used only
with a cart or stand that is recommended by the
manufacturer. The unit and cart combination
should be moved with care. Quick stops, exces
sive force, and uneven surfaces may cause the
unit and cart combination to overturn,
7. Wall or Ceiling Mounting—The unit should not be mounted to
a wall or ceiling, unless specified in this operating instructions.
This equipment has been tested and found to comply with the
limits for a Class B digital device, pursuant to Part 15 of the
FCC Rules.
These limits are designed to provide reasonable protection
against harmful interference in a residential installation. This
equipment generates, uses and can radiate radio frequency en
ergy and, if not installed and used In accordance with the
instructions, may cause harmful interference to radio commu
nications. However, there is no guarantee that interference will
not occur in a particular installation. If this equipment does
cause harmful interference to radio or television reception,
which can be determined by turning the equipment off and on,
the user is encouraged to tiy to correct the interference by one
of the following measures:
• Reorient or relocate the receiving antenna,
• Increase the separation between the equipment and receiver.
• Connect the equipment into an outlet on a circuit different
from that to which the receiver is connected.
• Consult the dealer or an experienced radio/TV technician
for help.
FCC Notice: Tlais system complies with new Part 15, except for
the radio receiver, which complies with old Part 15, Subpart C
of the FCC Rules. Operation is subject to the following two
conditions: (1) This device may not cause harmful interference,
and (2) this device must accept any interference received, in
cluding interference that may cause undesirable operation. The
radio receiver is not subject to above item (2).
Any unauthorized changes or modifications to this equipment
would void the user's authority to operate this device.
I
I
GQ
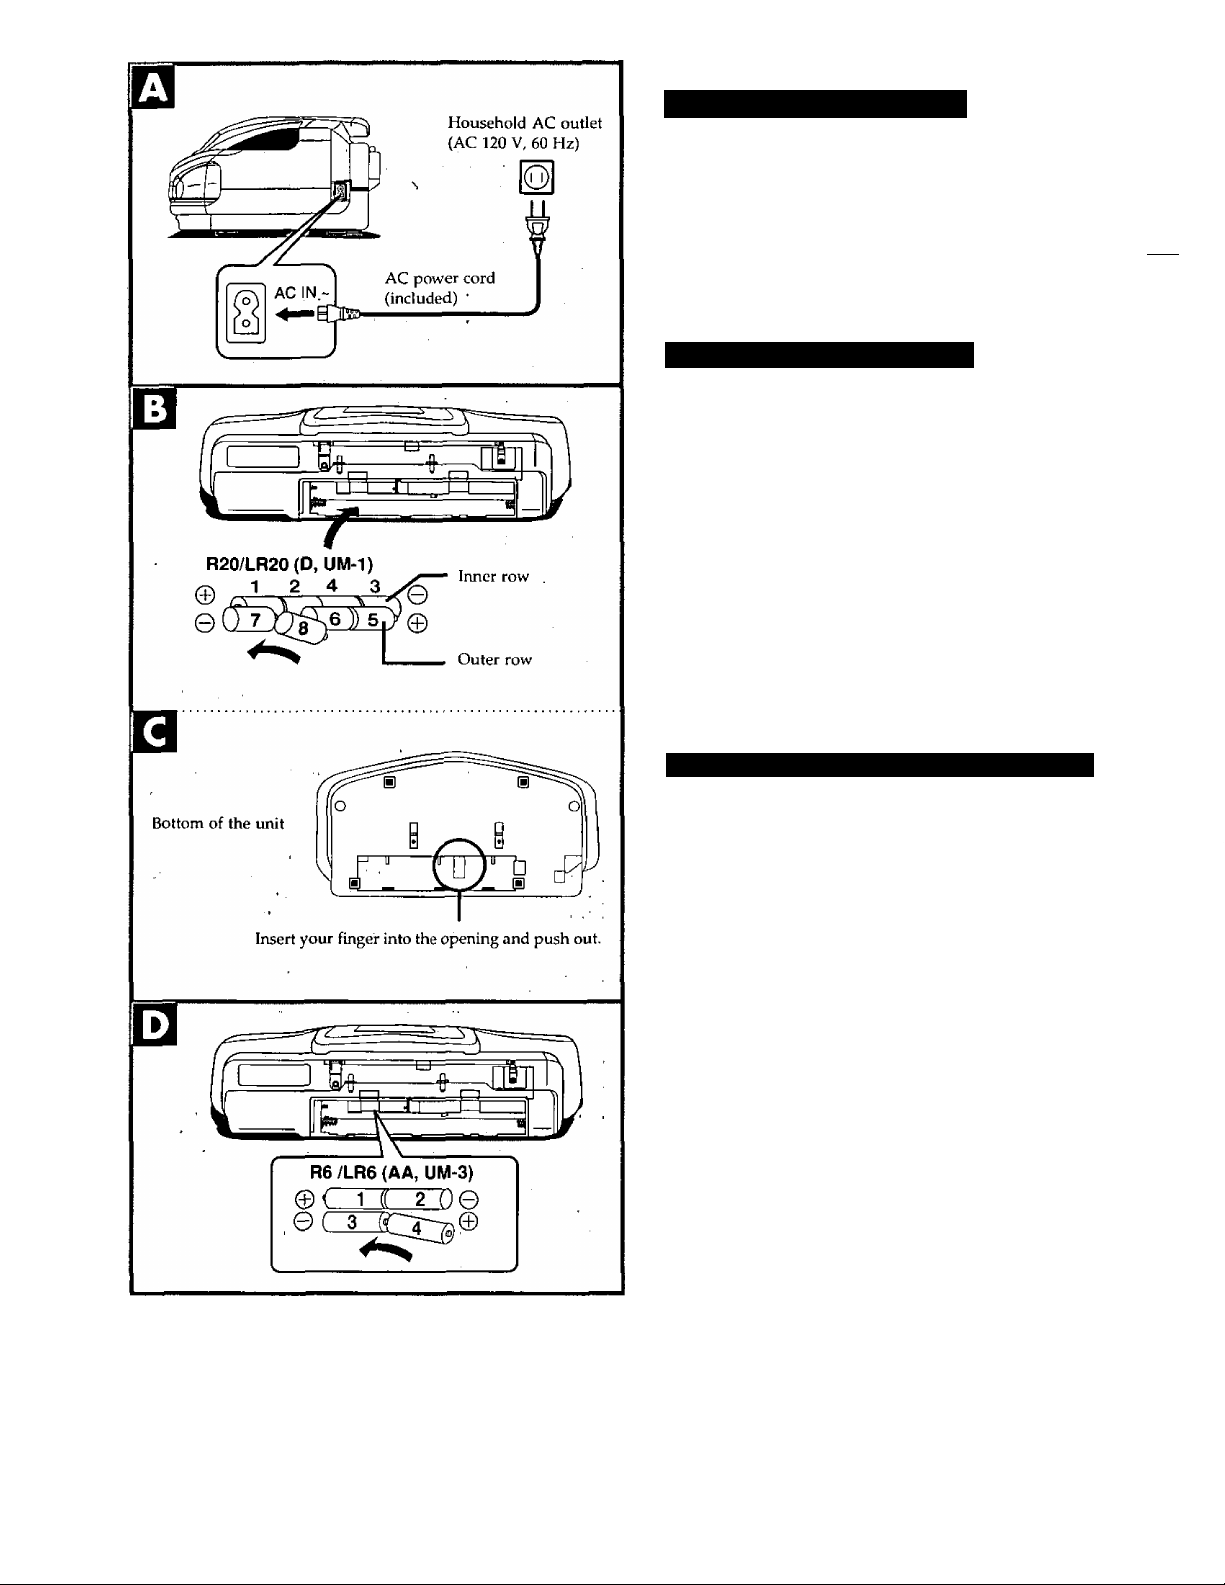
Power sources
Using a household AC outlet
Connect the included AC power cord to the AC IN~ socket of the unit
and your household AC outlet.
I
J
• Before connecting or disconnecting the AC power cord to the unit,
make sure the unit is switched off by pressing mjj^/QFF. (If the
tape is travelling, press ■/— STOP/EJECT as well.)
3
• If the unit is not going to be used for a prolonged period of time,
disconnect the AC power cord to conserve power.
Using batteries (not included)
Disconnect the AC power cord from the AC IN-- socket of the unit,
and insert eight R20/LR20 (D, UM-1, not included) batteries in the
illustrated order.
When to replace the batteries
When the batteries are weak:
The unit automatically turns itself off, then "U01" and " " appear
on the display.
Be sure to replace all batteries with new ones.
How to remove the batteries B
Remove batteries by inserting your finger into opening on the bottom
of the unit and pushing out.
Memory back-up batteries (not included)
In the event of a power failure, or if the AC power cord is disconnected
from the household AC outlet (during AC operation), or should the
batteries fail, the memory back-up batteries will preserv^e the preset
memory of this unit.
Battery installation Q
Insert four R6/LR6 (AA, UM-3, not included) batteries into the battery
compartment, making sure that the batteries are installed in the
designated numerical order and that the proper polarities are
maintained.
• The life of the memory back-up batteries can be prolonged by
keeping the AC power cord plugged In the household AC outlet
at all times.
• When disainnecting the AC power cord, switch off the power first by
pressing UiU3/0FF. (If the tape is travelling, press STOP/EJECT
as well.) The life of the memory back-up batteries is reduced if the AC
power cord is di^nnected from a household AC outlet with the power
still supplied.
Battery removal
Lift the negative end of the number 4 battery to remove batteries.
Battery life
The life of the memory back-up batteries is about one year.
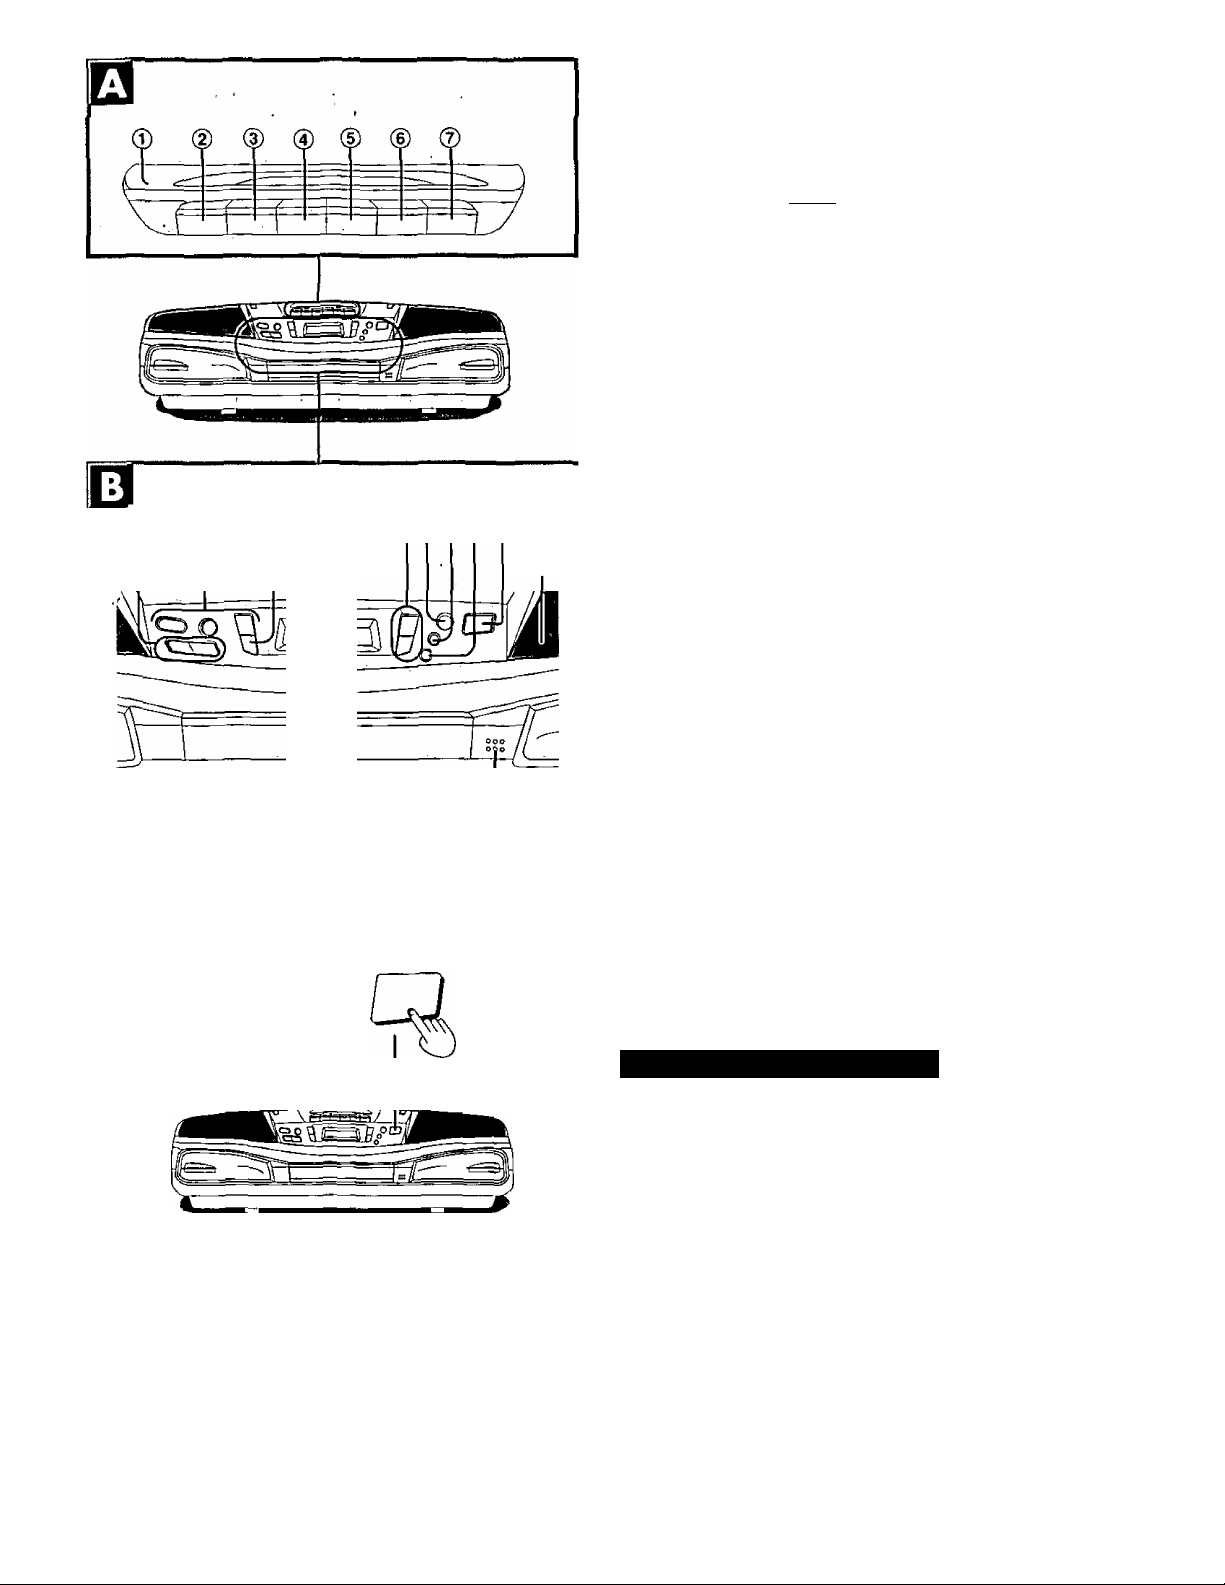
Location of controls
(I) (I) ® ® ®
. ®
□
Number
® Deck (Record! ng/ptayback)
d) Recording button (• [recH
© Piayback button (► PLAY)
@ Rewind/review button (◄◄ REW/REV)
® Fast forward/cue button (►► FF/CUE)................................11
® Stop/eject button (l/± STOP/EJECT)
® Pause button (II PAUSE)
® Tuning/CD skip, search buttons
(TUNBSKIP/SEARCH +/►►!)
Function select buttons
®
* Tape/power standby button ( iQ2§/OFF)
Press to switch the unit from on to standby mode or vice versa.
In standby mode, the unit is still consuming a small amount of power.
‘ Tuner/band button (BAND)...............................................6-8
• CD piay/pause button (►/!!)....................................6, 9,10
® CD stop/program ciear, tuning mode seiect button
(■ CLEARn'UNE MODE)
® Dispiay pane!
® Volume control buttons (VOLUME +, -)
® Sleep timer button (SLEEP)...........................................13
© CD program, tuner preset button
(MEMORY)
@ Stereo/monaural, beat proof button
(FM MODE/BP)..............................................................8, 12
CD play mode select button
(CD PLAY MODE)...............................................................9
@ XBS button (XBS)
® Speaker
® CD tray
® CD tray open button (£ CD OPEN)
Designation
...................................................
........................ ......................
................................
......................................................
...............................................
....................................
.................................................................
..................................
Reference page
6,11
..............................
6,11
...............
.......................
;...............................7,10
..........
.......................
8, 9, 11
7-10
4, 6
8-10
9,12
12
11
11
I
$
I
GO
5
t/ It I
'' J,l -I
U It )
-L' "f
(?TFr
XBS
Changing the sound quality
Adjusting the deep-bass (XBS)
When the XBS level control is adjusted, the level of the dynamic low
frequency sound range is boosted.
Press XBS.
Every time you press the button: XBS *->■ XBS OFF
B
 Loading...