

Page 1
Operating Instructions
5.8 GHz USB Adaptor
Model No. KX-TGA595AL
This unit is an accessory unit for use with the Panasonic cordless telephone
KX-TG5961AL/KX-TG5971AL/KX-TG5976AL. You must install the Skype
software to your computer and register this unit with your base unit before
Skype feature can be used on your handset.
What is Skype?
Skype is a programme for making free calls over the Internet to anyone else who also
has Skype. It is free and easy to download and use, and works with most computers.
You can get the Skype software and detailed information from the following website:
http://www.skype.com/
Important:
L�To use Skype, the USB adaptor KX-TGA595AL must be connected to a computer
which is active and connected to the Internet using broadband connection.
L�Installation, configuration, and operation explanations for Skype software are not
included in these operating instructions. For more information, refer to the online
manual for Skype software.
L�Skype is not a replacement for your ordinary telephone and cannot be used for
emergency calling.
L�For information about Skype, please visit the Skype homepage:
http://www.skype.com/
Please read these Operating Instructions before using the unit and save for
future reference.
Page 2

Table of Contents
Introduction
Feature highlights ............................................................................................................3
Accessory information .....................................................................................................3
For best performance ......................................................................................................4
Preparation
Controls ...........................................................................................................................5
Symbols and screen shots used in these operating instructions .....................................5
System requirements for your computer .........................................................................6
Connecting to a computer ...............................................................................................6
Installing and setting up the USB Adaptor Utility .............................................................8
Confirming the USB adaptor works properly ...................................................................
Soft key and display menus ..........................................................................................10
Deregistering the USB adaptor .....................................................................................10
Uninstalling the USB Adaptor Utility ..............................................................................
10
Using the USB Adaptor
Entering the IP phone mode ..........................................................................................11
Making internet calls ......................................................................................................12
Answering internet calls ................................................................................................13
Useful features during an internet call ...........................................................................14
Using the History (Call list) ............................................................................................15
Selecting the IP ringer tone ...........................................................................................15
9
Useful Information
Troubleshooting .............................................................................................................16
Important information ....................................................................................................18
Specifications ................................................................................................................
2
19
Page 3

Introduction
Thank you for purchasing the Panasonic 5.8 GHz USB Adaptor.
We recommend keeping a record of the following information for future reference.
Serial No. Date of purchase
(found on the bottom of the unit)
Name and address of dealer
Attach your purchase receipt here.
Feature highlights
Internet telephone
By connecting the USB adaptor to your computer installed with Skype software and USB
Adaptor Utility, you can make and answer internet telephone calls using the cordless
handset of your GIGARANGE® cordless telephone.
If you do not have the Skype software, download it from the Skype homepage:
http://www.skype.com/
Accessory information
Included parts
USB adaptor Wall mounting adaptor CD-ROM
3
Page 4

Introduction
For best performance
Location/avoiding noise
This unit communicates using radio
waves.
For maximum distance and noise-free
operation, we recommend the following:
L�Placing the product away from electrical
appliances.
L�Raising the antenna vertically.
Environment
L�Keep the product away from electrical
noise generating devices, such as
fluorescent lamps and motors.
L�The product should be kept free
from excessive smoke, dust, high
temperature, and vibration.
L�The product should not be exposed to
direct sunlight.
L�Do not place heavy objects on top of the
product.
L�When you leave the product unused for
a long period of time, disconnect the
product from the computer.
L�The product should be kept away from
heat sources such as heaters, kitchen
stoves, etc. It should not be placed in
rooms where the temperature is less
than 5 °C or greater than 40 °C. Damp
basements should also be avoided.
L�The maximum data transferring
distance may be shortened when the
product is used in the following places:
Near obstacles such as hills, tunnels,
underground, near metal objects such
as wire fences, etc.
L�Operating near 5.8 GHz electrical
appliances may cause interference.
Move away from the electrical
appliances.
Connections
L�Connect the USB adaptor to a USB
port on your computer. For optimum
performance, do not connect more than
one USB adaptor to a single computer
or the USB adaptor to your computer
via a hub.
L�The USB adaptor may not turn off and
may consume electricity regardless
of whether your computer is turned
off or in sleep mode. By connecting/
disconnecting the USB adaptor from an
active computer, the USB adaptor will
turn on/off. We recommend when you
are not using the internet telephone,
that you disconnect the USB adaptor
from your computer.
Routine care
L�Wipe the outer surface of the product
with a soft moist cloth. Do not use
benzine, thinner, or any abrasive
powder.
4
Page 5
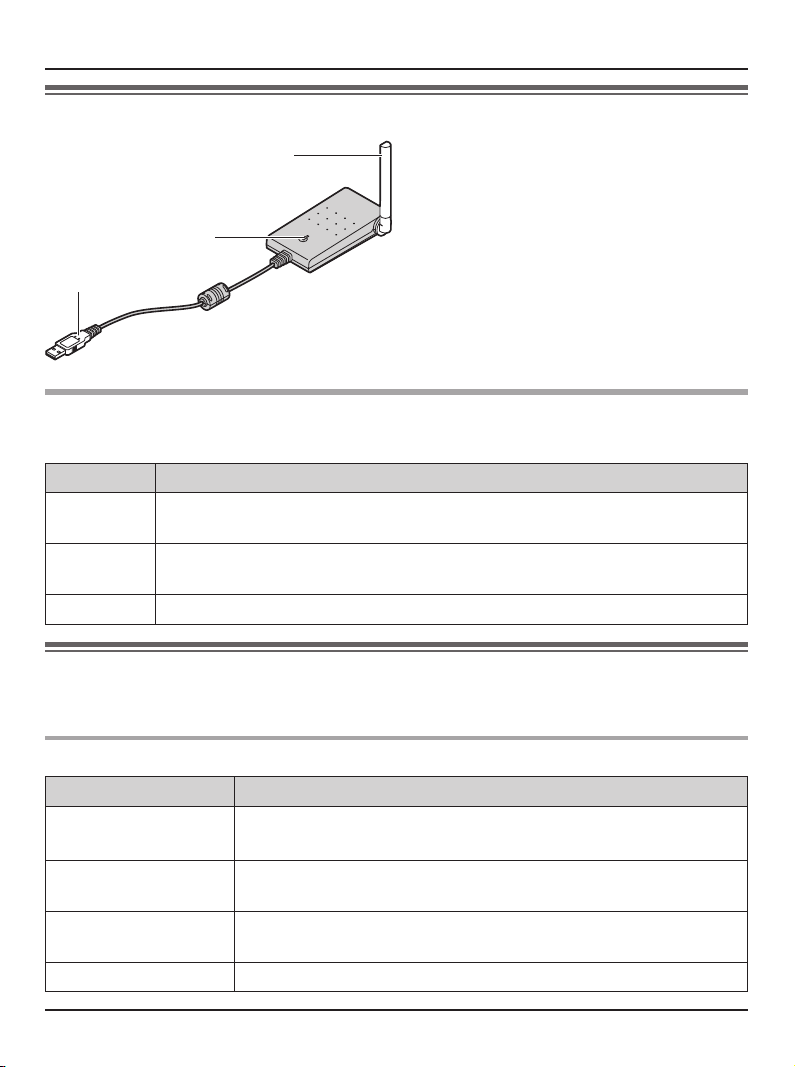
Controls
Preparation
A
B
C
A Antenna
B Status indicator
C USB plug
Status indicator
The status indicator indicates the USB adaptor status.
Indicator Status
Flashing USB adaptor is receiving power from the computer but link to the base
unit, Skype software or USB Adaptor Utility has not been established.
Light on USB adaptor is receiving power from the computer and has link with your
base unit, ready to use.
Light off USB adaptor is off (not receiving power from the computer).
Symbols and screen shots used in these operating
instructions
Symbols used for operations
Symbol Meaning
Example: “Contacts
Example: {MENU} The words in the brackets indicate button names including soft
Example: [OK] The words in the brackets indicate button names on your
i
”
Press {^} or {V} to select the words in quotations shown on
the display.
key names on your handset and base unit.
computer.
Proceed to the next operation.
5
Page 6
Preparation
Screen shots used for operations
L�The screen shots in these instructions are for Microsoft® Windows® XP and are
included for reference only.
L�The screen shots in these instructions may differ slightly from the screen shown on
your computer.
System requirements for your computer
The following system requirements must be met in order to use the USB Adaptor Utility.
Item Description
Operating System Microsoft Windows 2000 or Microsoft Windows XP
CPU Intel® Pentium® 1 GHz or faster
RAM 256 MB
HDD 50 MB available disk space
Resolution 800 x 600 or higher resolution display
Others USB interface (1.1)
CD-ROM drive
Video adaptor with High Colour (16 bit) or higher
Panasonic cordless telephone KX-TG5961AL/KX-TG5971AL/
KX-TG5976AL
Skype software (Skype 2.0 or later)
Internet connection: Broadband, e.g. DSL
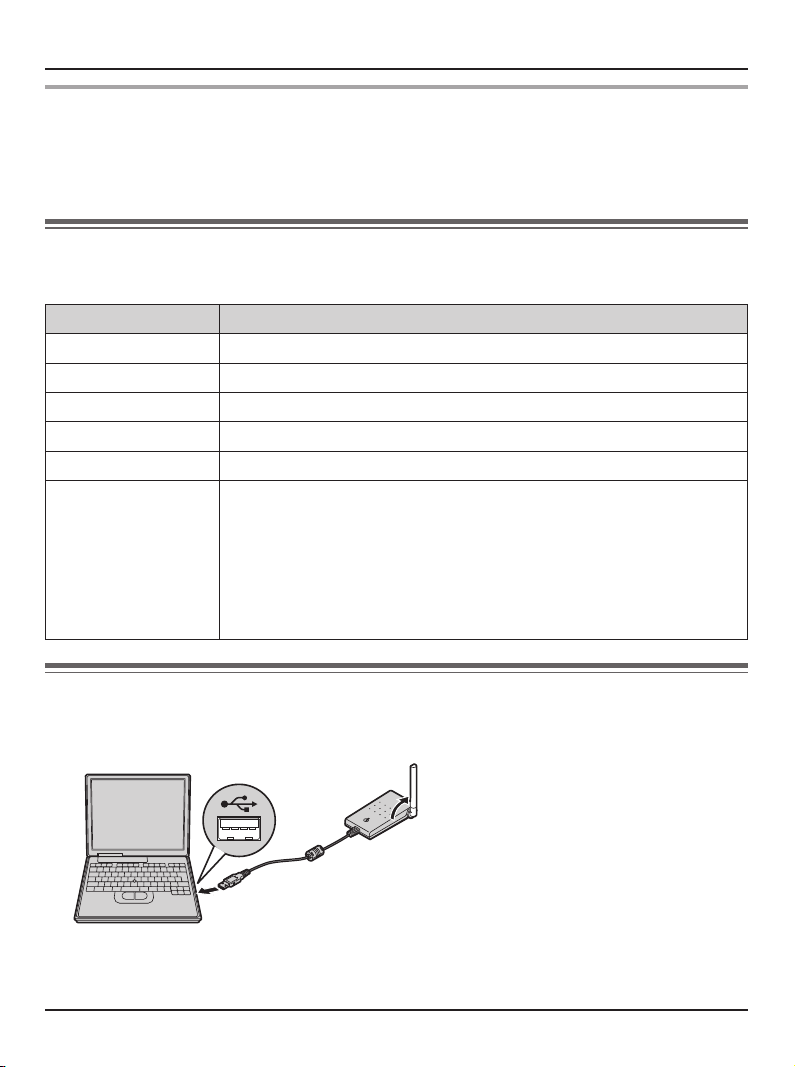
Connecting to a computer
Connect the USB adaptor to the USB port of your computer.
Raise the antenna.
L�The USB adaptor receives power from the USB port.
6
Page 7

Preparation
Wall mounting
The USB adaptor can be mounted on the
flat surface such as a wall by using the
wall mounting adaptor.
Note:
L�For USB adaptor location information,
see page 4.
1 Peel off the protection sheet and attach
the wall mounting adaptor to the flat
surface firmly.
L�The arrow mark on the wall mounting
adaptor should face upward.
Arrow mark
Protection sheet
2 Insert the hooks on the wall mounting
adaptor into the holes on the USB
adaptor and slide the adaptor down
until it is secure.
Mounting without the wall mounting
adaptor
Drive the screws (not included) into the
flat surface such as a wall using the wall
mount template as a guide, then mount
the USB adaptor securely on the screws.
Screws (not included)
55 mm
Wall mount template
55 mm
Holes
Hooks
7
Page 8

Preparation
Installing and setting up
the USB Adaptor Utility
Before you use the USB adaptor, you
must install the USB Adaptor Utility from
the included CD-ROM to a computer
installed with the Skype software, and
register the USB adaptor to the base unit.
The USB adaptor is registered as an
extension device of the base unit. Only
one USB adaptor can be registered to the
base unit.
Before you start to install the USB
Adaptor Utility, make sure that:
– Skype software has been already
installed in your computer.
– Your computer is being connected to
the Internet correctly and active Skype
icon ( ) is displayed in the system
tray (page 9).
– The base unit and handset are powered
up nearby and are not being used.
– USB adaptor KX-TGA595AL is being
connected to the USB port on your
computer and the status indicator is
flashing.
These preparation will make your
installation simple and smooth. You
should complete your installation in less
than 2 minutes.
Important:
L�If the Skype software is not installed
to your computer, install the Skype
software beforehand.
L�Before installing the USB Adaptor Utility,
please be sure to back up the system
settings of your computer.
L�At the end of installation, you may
perform a Skype test call on your
handset (page 9).
1 Start Windows and the Skype software,
and exit all other applications.
L�You must be logged in as an
administrator in order to install the
USB Adaptor Utility.
L�Confirm that the Skype status is
online.
2 Connect the USB adaptor to your
computer (page 6).
3 Insert the included CD-ROM into your
CD-ROM drive.
4 After the installer has started, follow
the on-screen instructions until all files
have been installed.
L�If the installer does not start
automatically:
Click [Start], then choose [Run...].
Type “D:
drive letter of your CD-ROM drive).
Click [OK]. (If you are not sure what
the drive letter is for your CD-ROM
drive, use Windows Explorer and
look for the CD-ROM drive.)
\setup” (where “D:” is the
8
Page 9

5 When installation is complete, the
USB adaptor setup window is opened.
Remove the included CD-ROM from
your CD-ROM drive.
6 Follow the on-screen instructions to set
up the USB adaptor.
L�When the setting up is complete,
you are ready to use the internet
telephone.
Note:
L�If the following window appears, check
[Allow this program to use Skype],
then click [OK].
Preparation
Confirming the USB
adaptor works properly
Click the USB Adaptor Utility icon ( ) in
the system tray.
The setup programme starts checking the
configuration of the USB adaptor. If the setup
programme finds errors in the configuration,
follow the on-screen instructions. When the
configuration is complete, you are ready to
use the internet telephone.
In case you encounter any difficulty, please
refer to “Troubleshooting” on page 16.
Note:
L�Colour of the USB Adaptor Utility icon in
the system tray indicates the status of
the USB adaptor configuration.
Colour
Status
Blue Internet telephone is available.
Gray Internet telephone is not available.
(Refer to “Troubleshooting” on page 16
or click [Help] to view “Troubleshooting”
on your web browser.)
L�If the USB Adaptor Utility icon does not
appear, refer to the troubleshooting
section (page 16).
L�To perform a Skype test call:
1. {IP PHONE} (right soft key) i
“Contacts” i {SELECT}
2. “Echo/Sound T” i {C}/{CALL}
To quit the USB Adaptor Utility
Right-click the USB Adaptor Utility icon in
the system tray, then select
L�To restart the USB Adaptor Utility, click
[Start], then select [All Programs] –
[Panasonic] – [USB Adaptor Utility
(KX-TGA595)] – [USB Adaptor Utility].
(For Windows 2000, click [Programs]
instead of [All Programs].)
[Exit].
9
Page 10

Preparation
Soft key and display
menus
After setting up the USB adaptor, {C}
(Phonebook) on the right soft key on the
handset is changed to {IP PHONE}.
To enter the phonebook, press
{MENU} (middle soft key) then select
“Phonebook”.
Display menus of KX-TGA591AL *1
(1.5 inch colour display handset)
After setting up the USB adaptor, the
display menus will be changed as follows:
Set date & time” is replaced with
– “
“Phonebook”.
– “
Set date & time” moves to the
sub-menu of “Initial setting”.
(Example: Registered to KX-TG5976AL)
Set date & time
*1 KX-TGA591AL is the same handset
supplied with the KX-TG5976AL .
10
Phonebook
Deregistering the USB
adaptor
You can cancel a registered USB adaptor.
Right-click the USB Adaptor Utility icon
) in the system tray, then select [Tool]
(
– [Deregistration].
Note:
L�You can cancel registration by using the
base unit.
1. Press and hold {INTERCOM} until
the IN USE indicator flashes.
2. Press and hold {*} until a beep
sounds.
Uninstalling the USB
Adaptor Utility
■ For Windows XP users:
1 Click [Start], then click [Control
Panel].
2 Click [Add or Remove Programs].
3 Select [Panasonic USB Adaptor
Utility] from the list.
4 Click [Remove], then follow the
on-screen instructions.
■ For Windows 2000 users:
1 Click [Start], point to [Settings], then
click [Control Panel].
2 Double-click [Add/Remove
Programs].
3 Select [Panasonic USB Adaptor
Utility] from the list.
4 Click [Change/Remove], then follow
the on-screen instructions.
Page 11

Entering the IP phone
I P PHONE
mode
Press {IP PHONE} (right soft key) on the
handset to enter the IP phone mode.
L�
appears on the handset display.
The IP phone mode consists of the
following menus:
Using the USB Adaptor
Important:
L�Do not change any Skype settings using
the computer while the handset is in the
IP phone mode. If you have changed
the settings, quit the USB Adaptor Utility
and restart it (page 9).
Missed call *1
{V} {^}
Contacts
{V} {^}
Call List
{V}
*1: This menu will appear only when
internet calls are not answered.
“Missed call”:
You can view call information of the
missed calls.
“Contacts”:
You can view the Skype Contact list, or
make internet calls from it.
“Call List”:
You can view the Skype History in which
call information of incoming and outgoing
internet calls is logged.
“Dial”:
You can make regular phone calls using
SkypeOut.
{V} {^}
Dial
{^}
To exit the IP phone mode, press
{OFF}.
11
Page 12

Using the USB Adaptor
Making internet calls
Calling from the Contact list
You can make an internet call by selecting
a Skype name from the Skype Contact
list.
You must add Skype names in the
Contact list beforehand by using your
computer.
1 {IP PHONE} (right soft key) i
“Contacts” i {SELECT}
2 Press {^} or {V} to select the desired
Skype name.
L�Skype name and its current status
icon is displayed.
Icon Status
Online
Offline
Skype Me
4 When you finish talking, press {OFF}
or place the handset on the base unit
or charger.
Note:
L�You cannot select items from the
handset phonebook, redial list and caller
list.
Using the speakerphone
1 During a conversation, press {s} to
turn on the speakerphone.
L�Speak alternately with the other
party.
2 When you finish talking, press {OFF}.
Note:
L�Use the speakerphone in a quiet
environment.
L�To switch back to the receiver, press
{C}.
Adjusting the receiver/speaker volume
Press {^} or {V} repeatedly while talking.
Away
Do Not Disturb
Voicemail
SkypeOut
Not Available
L�You can search the desired Skype
name by pressing the dialling button
that corresponding to the first letter.
3 {C}/{CALL}
12
Page 13

Using the USB Adaptor
I P PHONE
Making regular phone calls
(SkypeOut)
SkypeOut is a way to make calls from
Skype to persons who use telephone
lines or mobile phones. Making SkypeOut
calls is not free of charge. Before using
the SkypeOut, purchase the Skype credit
on your Skype account page. For more
information about SkypeOut, see the
Skype website (http://www.skype.com/).
1 {IP PHONE} (right soft key) i “Dial”
i {SELECT}
2 Enter the phone number in the
following way (even for local calls):
“country code”+“area code”+
“local phone number”
Example (using the country code “61”
for calling Australia):
61 2 1234 5678
L�In case of some countries, delete “0”
at the first digit of the area code.
L�To correct a digit, press {CLEAR}.
3 {C}/{CALL}
4 When you finish talking, press {OFF}
or place the handset on the base unit
or charger.
Note:
L�You do not need to enter the
international prefix (“+” or “0011”, etc.)
because “+” is automatically added
to the phone number when dialling.
For this reason, “+” is displayed in the
dialled phone number when you view
the Call list.
Answering internet calls
If you receive an internet call, you will
hear an IP ringer tone from the handset
and
display.
1 Lift the handset and press {C} or
2 When you finish talking, press {OFF}
Note:
L�You can change the IP ringer tone (page
15).
L�When an internet call is received, the
base unit does not ring and you cannot
answer it by using the base unit.
L�When an internet call is received while
you are in the “Do Not Disturb” mode of
the online status, the handset does not
ring.
L�Caller ID feature does not work for
internet calls.
Auto talk
This feature allows you to answer a call
by simply lifting the handset off the base
unit or charger. You do not need to press
{C}. To activate this feature, see the
operating instructions included with the
base unit.
will flash on the handset
{s}.
L�You can also answer the call by
pressing any button except {^}, {V},
{<}, {>}, {OFF}, right or middle soft
key.
(Any key talk feature)
or place the handset on the base unit
or charger.
13
Page 14

Using the USB Adaptor
Temporary ringer off
While the handset is ringing for an internet
call, you can turn the ringer off temporarily
by pressing {~} or {OFF}.
Missed calls
If an internet call is not answered, “IP
missed call” is shown on the handset
display. To see who called while you were
out:
1 {IP PHONE} (right soft key) i
“Missed call” i {SELECT}
2 Press {V} to view from the most recent
missed call, or {^} to view from the
oldest missed call.
L�To call the displayed item, press
{C} or {CALL}.
L�To play the displayed Voicemail
message, press {PLAY}.
Note:
L�Once you have viewed a missed call or
played a Voicemail message, it will not
be displayed the next time you enter the
missed call list.
Useful features during
an internet call
HOLD button
This feature allows you to put an internet
call on hold.
Press {HOLD} during an internet call.
L�To release the hold, press {C}.
Mute
While mute is turned on, you can hear
the other party, but the other party cannot
hear you.
To mute your voice, press {MUTE}.
L�To return to the conversation, press
{MUTE}.
Answering another internet call
This feature allows you to receive or
reject another internet call while you are
already talking on the IP phone.
If you receive an internet call while on the
IP phone, you will hear an incoming call
tone.
Press {IP PHONE} to end the first call
and answer the 2nd call.
L�To reject the 2nd call, press {REFUSE}.
14
Page 15

Using the USB Adaptor
Using the History
(Call list)
Call information of incoming and outgoing
internet calls is logged in the Skype
History by the most recent internet call
to the oldest. If you receive the Skype
Voicemail, it will be recorded in the History
along with call information. You can view
the History by using the handset, and you
can call or play the Voicemail by selecting
the item in the list.
1 {IP PHONE} (right soft key) i
“Call List” i {SELECT}
2 Press {V} to search in the incoming
call list from the most recent call, or {^}
to search from the oldest call.
L�You can change the list by pressing
the right soft key as follows;
Incoming call list
{OUT.CALL}
Outgoing call list
{VM}
IN.CALL
Voicemail list
{
}
Selecting the IP ringer
tone
You can change the IP ringer tone heard
when an internet call is received. The
default setting is “Tone 2”.
1 {MENU} (middle soft key) i
{#}{1}{6}{9}
2 Select the desired item. i {SELECT}
Tone &
Melody
Custom
ring
3 Select the desired ringer tone. i
{SAVE} i {OFF}
Pre-installed tone and
melodies
Songs you stored in the
handset
3 To call to the displayed item, press
{C} or {CALL}.
To play the displayed Voicemail
message, press {PLAY}. To stop
playing the message, press {STOP}.
4 When you finish talking or playing,
press {OFF} or place the handset on
the base unit or charger.
Note:
L�You cannot edit or erase call information
in the list by using the handset.
15
Page 16

Useful Information
Troubleshooting
Problem Cause & solution
The USB adaptor does not
work.
(The USB Adaptor Utility
icon ( ) is indicated in
gray.)
The USB Adaptor Utility
does not start when my
computer is started up.
(The USB Adaptor Utility
icon ( ) does not appear
in the system tray.)
L�Make sure the USB plug is connected properly to your
computer.
L�The USB adaptor may not work properly depending on
the power supply of your computer’s USB port. If this is
the case and your computer has multiple USB ports, we
recommend that you try other USB ports.
L�The USB adaptor is too far from the base unit. Move
closer to the base unit.
L�Skype software is not activated. Start the software.
L�Your base unit is turned off. Confirm the connection.
L�The registration may be cancelled from the base unit.
Set up and register the USB adaptor to the base unit
again (“Confirming the USB adaptor works properly” on
page 9).
L�If you are still having problems, deregister the USB
adaptor (page 10) and uninstall the USB Adaptor Utility
(page 10) then reinstall it (page 8).
If you cannot reinstall the USB Adaptor Utility because
of a registration error, perform the following operations:
1) Press and hold
the IN USE indicator flashes.
2) Press and hold
3) Follow the on-screen instructions.
L�Start the Utility manually. Click [Start], then select
[All Programs] – [Panasonic] – [USB Adaptor Utility
(KX-TGA595)] – [USB Adaptor Utility].
(For Windows 2000, click [Programs] instead of
[All Programs].)
L�After you have started the USB Adaptor Utility, you
can enable the Auto Startup feature to make sure the
USB Adaptor Utility starts each time your computer is
started up. To enable Auto Startup, right-click on the
USB Adaptor Utility icon in the system tray and insert a
check mark next to [Auto Startup].
{INTERCOM} on the base unit until
{8} until a beep sounds.
16
Page 17

Useful Information
Problem Cause & solution
I cannot read the language
displayed by the USB
Adaptor Utility.
I cannot make an internet
call.
I cannot receive internet
calls.
I cannot register the USB
adaptor.
Some names displayed
in the Contact list or
History on the handset are
different from ones on your
computer.
L�For other troubleshooting, refer to the base unit’s operating instructions or visit:
http://panasonic.co.jp/pcc/cs/en/telecom/tel/download.htm.
L�You can change the application’s display language
to English, French, or Spanish. Select the desired
language from the pull-down menu on the upper right of
the USB adapter setup window.
L�While another handset user is making an outside call,
you cannot make an internet call. Try again later.
L�While other handset users are making a conference
call, you cannot receive internet calls.
L�While the cordless camera is in use, you cannot receive
internet calls.
L�8 handsets or devices have already been registered
to the base unit. A previously deregistered extension
number is still retained in the base unit. To register the
USB adaptor, erase the unnecessary extension number
by using the base unit.
L�The handset displays Skype name when characters
such as “á” or “ó” that you cannot enter using the
handset are included in its name (refer to “Character
table for entering names” in the base unit’s operating
instructions).
17
Page 18

Useful Information
Important information
Medical
L�Consult the manufacturer of any
personal medical devices, such
as pacemakers or hearing aids, to
determine if they are adequately
shielded from external RF (radio
frequency) energy. (The product
operates in the frequency range of
5.76 GHz to 5.84 GHz, and the power
output is 200 mW (max.).) Do not use
the product in health care facilities if any
regulations posted in the area instruct
you not to do so. Hospitals or health
care facilities may be using equipment
that could be sensitive to external RF
energy.
Important security notice
L�Panasonic cannot accept any liability or
provide warranty for security problems
occurring in the following cases:
− when the internet security settings
were not set during use,
− when VoIP (Voice over Internet
Protocol) communication software
was used,
− when software not provided by
Panasonic was used.
Warning
L�This cordless telephone system does
not incorporate provision for secrecy of
conversations. Appropriately tuned radio
equipment and other cordless telephone
systems in close proximity may be used
by a third party to monitor and possibly
interrupt conversations in progress
when this system is on radio operation.
Notice
L�Please ensure that a separate
telephone, not dependent on local
power, is available for emergency use.
L�When a failure occurs which results in
the internal parts becoming accessible,
disconnect the USB plug immediately
and return the product to an authorised
service centre.
L�This equipment has been tested
and found to comply with AS/NZS
3548: 1995 limits for electromagnetic
interference. Any modifications to any
part of the system or to any peripherals
may void the EMC compliance of the
system or the peripherals.
Important
L�Panasonic cannot accept any liability or
provide warranty for the Skype software.
18
Page 19

Useful Information
Specifications
Operating environment 5 °C – 40 °C
Frequency 5.76 GHz – 5.84 GHz
Dimensions Approx. height 24 mm x width 71 mm x depth 111 mm
Mass (Weight)
Power consumption Standby: Approx. 0.5 W
Power output 200 mW (max.)
Power supply 5 V DC (USB powered)
Interface USB: 1.1
Note:
L�Design and specifications are subject to change without notice.
L�The illustrations in these instructions may vary slightly from the actual product.
L�Software features and appearance are subject to change without notice.
Trademarks
L�Microsoft and Windows are either registered trademarks or trademarks of Microsoft
Corporation in the United States and/or other countries.
L�Intel and Pentium are either trademarks or registered trademarks of Intel Corporation
or its subsidiaries in the United States and other countries.
L�Microsoft product screen shots reprinted with permission from Microsoft Corporation.
L�Skype is a registered brand or trademark of Skype technology in the United States
and/or other countries.
L�All other trademarks identified herein are the property of their respective owners.
Approx. 120 g
Maximum: Approx. 1.0 W
19
Page 20

Customer Support Centre Tel. No.: 132600 or website www.panasonic.com.au
N52
Sales Department:
Panasonic Australia Pty. Limited
Austlink Corporate Park, 1 Garigal Road, Belrose NSW 2085, Australia
Manufacturer:
Panasonic Communications Co., Ltd.
1-62, 4-chome, Minoshima, Hakata-ku, Fukuoka 812-8531, Japan
Copyright:
This material is copyrighted by Panasonic Communications Co., Ltd., and may be
reproduced for internal use only. All other reproduction, in whole or in part, is prohibited
without the written consent of Panasonic Communications Co., Ltd.
© 2006 Panasonic Communications Co., Ltd. All Rights Reserved.
PQQX15456ZA
SM0406SH0
 Loading...