

Page 1
5.8 GHz Optional Cordless Handset
)
Model No.
KX-TGA520C
Installation Manual
PLEASE READ BEFORE USE AND SAVE.
This handset is an accessory cordless handset, for use with Panasonic base units
KX-TG5200C/KX-TG5202C/KX-TG5230C/KX-TG5240C/KX-FPG391C. This installation
manual only describes the steps necessary to start up the handset. Please read the base
unit operating instructions for further details.
Accessories (included)
A Charger Unit . . . . . . . . . . . . . . . . . .one
A Handset Cover. . . . . . . . . . . . . . . . .one
For assistance, please call 1-800-561-5505 or visit us at www.panasonic.ca
Contents
Installation . . . . . . . . . . . . . . . . . . . . . . . 1
Registration . . . . . . . . . . . . . . . . . . . . . . 3
Belt Clip . . . . . . . . . . . . . . . . . . . . . . . . . 4
Wall Mounting . . . . . . . . . . . . . . . . . . . . 4
A Battery . . . . . . . . . . . . . . . . . . . . . . .one
A Belt Clip . . . . . . . . . . . . . . . . . . . . . .one
Optional Headset. . . . . . . . . . . . . . . . . 5
Important Information/
Safety Instructions . . . . . . . . . . . . . . 6
Warranty . . . . . . . . . . . . . . . . . . . . . . . 8
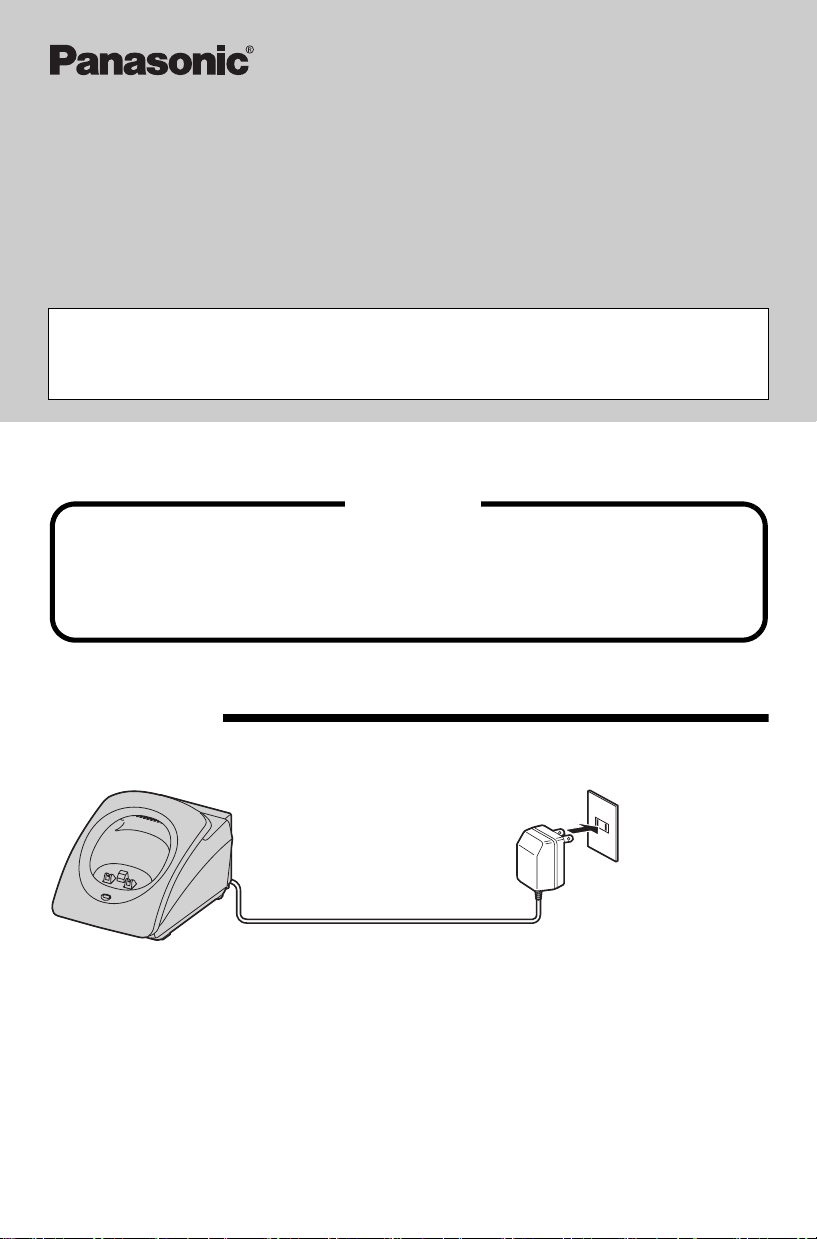
Installation
Connecting the Charger unit
Power Outlet
(AC 120 V, 60 Hz
AC Adaptor
• USE ONLY WITH Panasonic AC ADAPTOR KX-TCA1.
• The AC adaptor must remain connected at all times. (It is normal for the adaptor to feel
warm during use.)
– 1 –
PQQX14110ZA S0404-0
Page 2
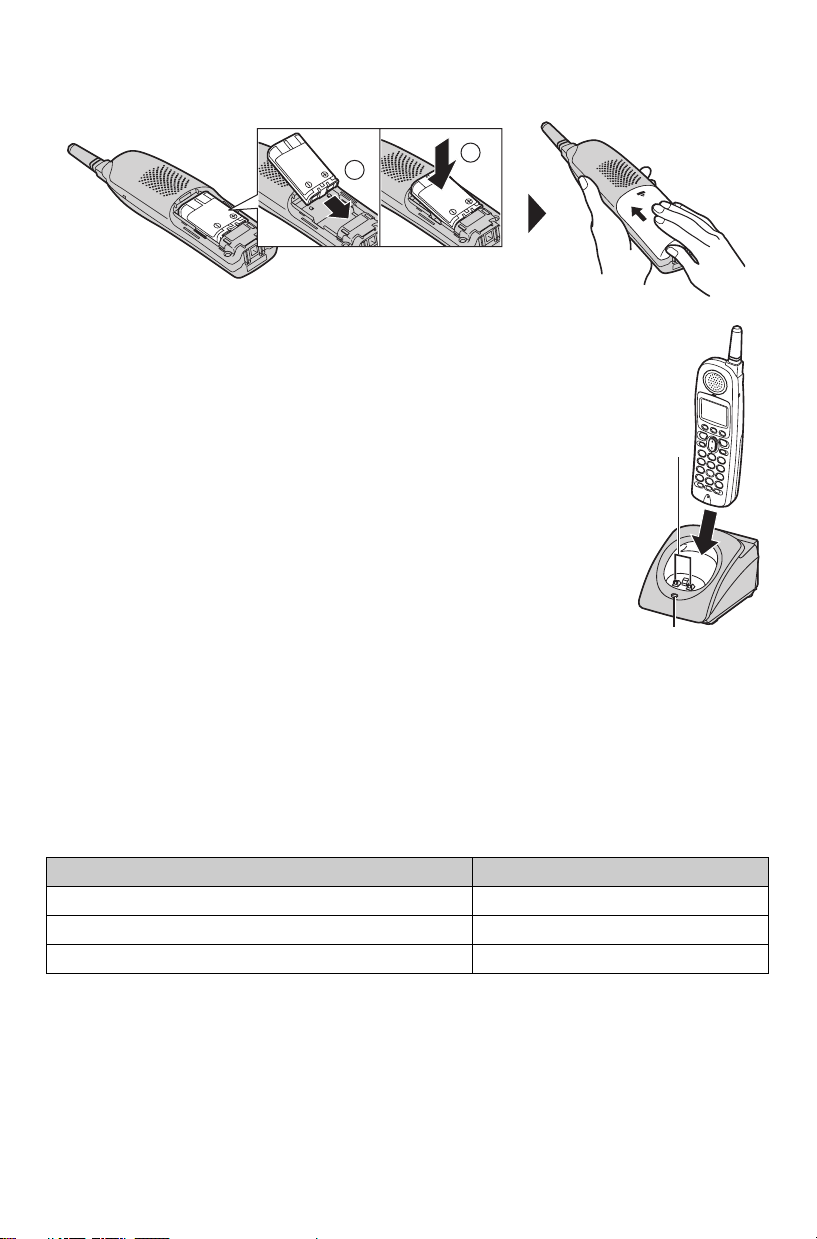
Installing the battery
Insert the battery (1) and press it down until it snaps into the compartment (2).
Close the cover.
1
2
Charging the battery
Place the handset on the charger and
charge for 6 hours before initial use.
Repeat charging will require approximately
the same amount of charging time (6 hours)
if the battery is depleted completely.
• The unit beeps once, the CHARGE indicator
lights and “Charging” is displayed.
• When the battery is fully charged, “Charge
completed” is displayed if there are no new
calls in the Caller List.
• Recharge the battery when:
—“Recharge battery” is displayed on the
handset,
3” flashes, or
—“
— the handset beeps intermittently while it is in use.
• If the battery has been discharged, the handset will display “Charge for 6 HRS” and
“
4” when you place the handset on the charger. The handset will not work unless the
battery is charged. Continue charging.
Charge Contacts
CHARGE Indicator
Handset battery information
After your Panasonic battery is fully charged, you can expect the following performance:
Operation Operating time
While in use (TALK) Up to 5 hours
While not in use (Standby) Up to 11 days
While using the Clarity Booster feature Up to 3 hours
• Clean the charge contacts of the handset and the charger with a soft, dry cloth
once a month. Clean more often if the unit is subject to grease, dust or high
humidity, otherwise, the battery may not charge properly.
– 2 –
Page 3

Registration
OK
BACK
L
This cordless handset must be registered to a KX-TG5200C/KX-TG5202C/KX-TG5230C/
KX-TG5240C/KX-FPG391C base unit. The handset will be assigned the extension number
at registration. Only one handset can be registered at a time. Charge the battery fully.
Make sure the base unit and the other handsets are not being used.
handset and base unit nearby during registration.
Have both the
[-]
1
OK
”,
OK
CHARGE Indicator
*LOCATOR Button
Press LOCATOR
on base unit
for 3 sec.
Then press OK
BACK
To operate “
press the right soft key.
• Base unit model shown here is KX-TG5240C.
* The location of the LOCATOR button varies by base unit model.
KX-TG5200C/KX-TG5202C: LOCATOR [ ], [], [], [] or []
KX-TG5230C/KX-TG5240C/KX-FPG391C: [LOCATOR/INTERCOM/TRANSFER]
The handset display shows the instructions as shown on the
right.
Press LOCATOR
on base unit
for 3 sec.
Then press OK
FRAN
BACK
Ç.
1 Base unit: Press and hold the *LOCATOR button for 3 seconds.
• The CHARGE indicator flashes. After the CHARGE indicator starts flashing, the rest of
the procedure must be completed within 1 minute.
• On the KX-FPG391C, “HS REGISTRATION” is displayed.
2 Handset:
(1) Press the soft key ( ).
OK
IN USE
SPI
PRIVACY
Handset
1
L
OK
-
]
Registering
(2) Wait until a long beep sounds and the display
shows the new extension number.
• Registration is complete.
e.g. Extension number 2
IN USE
SPI
PRIVACY
Handset [2]
Registered
• The registered number “[1]” to “[4]” is shown on the top right of the display.
• You can stop registration by pressing [OFF] on the handset and pressing the *LOCATOR
button on the base unit.
• If you try to register this handset to the KX-TG6500C base unit, “Wrong handset
Refer to manual” is displayed. The base units for this handset are mentioned above.
To cancel the handset registration, please see your base unit Operating Instructions.
– 3 –
1
2
]
Page 4

Selecting the display language
You can select either “English” or “Français” (French) as the display language. The factory
preset is “English”.
Press [MENU] N [d] or [B] to select “Initial setting” N Soft key ( ) N
N [d] or [B] to select “Change language” N
to select “Français”, or soft key ( ) to select “English” N Soft key ( ) for
French, or soft key ( ) for English
SAVE
ENGLISH
N
Soft key ( ) N Soft key ( )
[OFF]
SELECT
SELECT
FRANÇ.
SAUV
.
Belt Clip
You can hang the handset on your belt or pocket using the included belt clip.
To attach the belt clip To remove the belt clip
While pressing the top of the clip (1),
pull the right edge in the direction of the
arrow (
2).
B
A
Wall Mounting
The charger can be wall mounted. Connect the AC adaptor. Install screws using the wall
template (see below). Mount the charger (A). Slide it down (B), then slide down to the
C
right (
) until it is secured.
2.45 cm
31
⁄32")
(
2.45 cm
31
⁄32")
(
Screws
(not included)
To P o w e r
Outlet
Wall Template
A
B
C
– 4 –
Page 5

Optional Headset
Connecting an optional headset to the handset allows hands-free phone conversation.
Please only use a Panasonic KX-TCA86, KX-TCA91 or KX-TCA92 headset.
Connecting an optional headset
Open the headset jack cover and insert the headset plug into the headset jack as shown
below.
Headset Jack
• Headset sold separately. Model shown here is KX-TCA86.
– 5 –
Page 6

Important Information/Safety Instructions
NOTICE:
Operation is subject to the following two conditions: (1) this device may not cause
interference, and (2) this device must accept any interference, including interference that
may cause undesired operation of the device.
Privacy of communications may not be ensured when using this telephone.
Operating near 5.8 GHz electrical appliances may cause interference. Move away from the
electrical appliances.
The term
radio technical specifications were met.
Take special care to follow the safety suggestions listed below.
“IC:” before the radio certification number only signifies that Industry Canada
Safety
1) The unit should be connected to a power supply only of the type described in the
operating instructions or as marked on the unit.
2) When left unused for a long period of time, the unit should be unplugged from the
household AC outlet.
Installations
Environment
1) Do not use this unit near water — for example, near a bathtub, washbowl, sink, etc.
Damp basements should also be avoided.
2) The unit should be kept away from heat sources such as radiators, kitchen ranges, etc. It
also should not be placed in rooms where the temperature is less than 5
greater than 40
3) The AC adaptor is used as the main power source. Ensure that the AC outlet is located/
installed near the unit and is easily accessible.
°C (104°F).
°C (41°F) or
Placement
1) Do not place heavy objects on top of this unit.
2) Care should be taken so that objects do not fall onto, and liquids are not spilled into, the
unit. Do not subject this unit to excessive smoke, dust, mechanical vibration or shock.
3) Place the unit on a flat surface.
For best performance
1) If noise prevents the conversation from being understood on the handset, approach the
base unit to lessen the noise.
2) The handset should be used at the HIGH volume setting when the reception is poor.
3) The handset should be fully recharged on the charger when “Recharge battery” is
displayed and/or “
4) The handset antenna should not be touched during use because of its high sensitivity.
5) The maximum calling distance may be shortened when the unit is used in the following
places: Near obstacles such as hills, tunnels, underground, near metal objects such as
wire fences, etc.
3” flashes on the display.
– 6 –
Page 7

Medical
Consult the manufacturer of any personal medical devices, such as pacemakers or hearing
aids, to determine if they are adequately shielded from external RF (radio frequency)
energy. (The unit operates in the frequency range of 5760 MHz to 5840 MHz, and the
power output level can range from 0.25 watts to 0.5 watts.) Do not use the unit in health
care facilities if any regulations posted in the area instruct you not to do so. Hospitals or
health care facilities may be using equipment that could be sensitive to external RF (radio
frequency) energy.
A nickel metal hydride battery that is recyclable powers the product you
have purchased. Please call 1-800-8-BATTERY for information on how to
recycle this battery
.
WARNING:
TO PREVENT FIRE OR SHOCK HAZARD, DO NOT EXPOSE THIS PRODUCT
TO RAIN OR ANY TYPE OF MOISTURE.
If there is any trouble, disconnect the unit from the telephone line and connect a known
working phone. If the known working phone operates properly, have your unit repaired by
one of the specified authorized Panasonic Factory Servicentres. If the known working
phone does not operate properly, consult your telephone company.
– 7 –
Page 8

Panasonic Canada Inc.
5770 Ambler Drive, Mississauga, Ontario L4W 2T3
PANASONIC PRODUCT—LIMITED WARRANTY
Panasonic Canada Inc. warrants this product to be free from defects in material and
workmanship and agrees to remedy any such defect for a period as stated below from the
date of original purchase.
Telephone Accessory/Product —One (1) year, parts and labour
FRS (Family Radio Service) Product —One (1) year, parts and labour
LIMITATIONS AND EXCLUSIONS
This warranty does not apply to products purchased outside Canada or to any product which
has been improperly installed, subjected to usage for which the product was not designed,
misused or abused, damaged during shipping, or which has been altered or repaired in any
way that affects the reliability or detracts from the performance, nor does it cover any product
which is used commercially. Dry cell batteries are also excluded from coverage under this
warranty. Rechargeable batteries are warranted for ninety (90) days from date of original
purchase.
This warranty is extended to the original end user purchaser only. A purchase receipt or other
proof of date of original purchase is required before warranty service is performed.
THIS EXPRESS, LIMITED WARRANTY IS IN LIEU OF ALL OTHER WARRANTIES,
EXPRESS OR IMPLIED, EXCLUDING ANY IMPLIED WARRANTIES OF
MERCHANTABILITY OR FITNESS FOR A PARTICULAR PURPOSE.
IN NO EVENT WILL PANASONIC CANADA INC. BE LIABLE FOR ANY SPECIAL,
INDIRECT OR CONSEQUENTIAL DAMAGES.
In certain instances, some jurisdictions do not allow the exclusion or limitation of incidental or
consequential damages, or the exclusion of implied warranties, so the above limitations and
exclusions may not be applicable.
WARRANTY SERVICE
For product operation and information assistance, please contact your Dealer or our
Customer Care Centre at:
Telephone #: (905) 624-5505 Fax #: (905) 238-2360 Web: www.panasonic.ca
For product repairs, please contact one of the following:
• Your Dealer who will inform you of an authorized Servicentre nearest you.
• Our Customer Care Centre at (905) 624-5505 or www.panasonic.ca
• A Panasonic Factory Servicentre listed below:
Richmond, British Columbia Calgary, Alberta
Panasonic Canada Inc. Panasonic Canada Inc.
12111 Riverside Way 6835-8
Richmond, BC V6W 1K8 Calgary, AB T2E 7H7
Tel: (604) 278-4211 Tel: (403) 295-3955
Fax: (604) 278-5627 Fax: (403) 274-5493
Mississauga, Ontario Lachine, Québec
Panasonic Canada Inc. Panasonic Canada Inc.
5770 Ambler Dr. 3075, rue Louis A. Amos
Mississauga, ON L4W 2T3 Lachine, QC H8T 1C4
Tel: (905) 624-8447 Tel: (514) 633-8684
Fax: (905) 238-2418 Fax: (514) 633-8020
th
St. N. E.
Carefully pack and send prepaid, adequately insured and preferably in the original carton.
Include details of the defect claimed, and proof of date of original purchase.
Panasonic Canada Inc.
5770 Ambler Drive, Mississauga, Ontario L4W 2T3
© 2004 Panasonic Communications Co., Ltd. All Rights Reserved.
– 8 –
IF YOU SHIP THE PRODUCT TO A SERVICENTRE
 Loading...