

Panasonic KXL-783M User Manual
Panasonic
8X PORTABLE CD-ROM Player
Model No.
KXL-783M
Operating Instructions
Rease read this manual before useig aixf store In a tele piece kx Mure
^ererx£.

Thank you for purchasing the Panasonic 8X PORTABLE CD-ROM Player KXL-783M.
WARNING
•The power source voltage of the AC adaptor is listed on the nameplate.
Plug the AC adaptor only into an outlet with the proper voltage.
•To prevent fire or shock hazard, do not expose this product to rain or any type of
moisture.
CAUTION
•When you operate this equipment, the mains socket-outlet should be near the
equipment and should be easily accessible.
•To prevent the SCSI interface connector from static electricity damage, before you
touch it, discharge any static electricity from your hands by touching a grounded metal
surface, such as the screw on the plate cover of an electrical outlet.
CAUTION FOR LASER
This product utilizes a laser.
Use of control, adjustment or performance of procedures other than those specified
herein may result in hazardous radiation exposure.
Do not open covers and do not repair yourself. Refer servicing to qualified personnel.
Laser diode properties
Material
Laser output Less than 52.65 pW
Wave length
Emission duration
(This output is the value measured at the distance of 200 mm from the objective lens
surface.)
The serial number of this unit may be found on the label located at the bottom of the unit.
Write this number below and keep this book along with your proof of purchase to serve
as a permanent record of your purchase or for future reference.
For warranty service you may be required to show your proof of purchase records.
MODEL NO. KXL-783M NAME OF DEALER
SERIAL NO.
GaAIAs
790 nm
Continuous
DATE OF PURCHASE

FOR USERS IN UNITED STATES ONLY
This equipment has been tested and found to comply with the limits for a Class B digital
device, pursuant to Part 15 of FCC Rules. These limits are designed to provide
reasonable protection against harmful interference in a residential installation.
This equipment generates, uses and can radiate radio frequency energy and, if not
installed and used in accordance with the instructions, may cause harmful interference
to radio communications.
However, there is no guarantee that interference will not occur in a particular
installation. If this equipment does cause harmful interference to radio or television
reception, which can be determined by turning the equipment off and on, the user is
encouraged to try to correct the interference by one or more of the following measures:
•Reorient or relocate the receiving antenna.
•Increase the separation between the equipment and receiver.
•Connect the equipment into an outlet on a circuit different from that to which the
receiver is connected.
•Consult the dealer or an experienced radio/TV technician for help.
The user may find the booklet “Something About Interference” available from FCC local
regional offices helpful.
FCC Warning: To assure continued FCC emission limit compliance, the user must use
only the recommended shield interfacing cable when connecting to a host computer.
Also, any unauthorized changes or modifications to this equipment would void the users
authority to operate this device.
* •
•Certain audio features of this product manufactured under a license from Deeper
Products, Inc.
Spatializer® and the circle-in-square device are trademarks owned by Desper
Products, Inc.
• FWB, CD-ROM ToolKIt™, CDT Remote™ and the FWB logo are trademarks of FWB
Software, LLC.
•Apple, PowerBook, Macintosh, QuickTime, AppleLink, Finder and Apple logo are
trademarks of Apple Computer, Inc.
• Photo CD is a trademark of Eastman Kodak Company.
•Adobe Photoshop is a trademark of Adobe System, Inc., which may be registered in
certain jurisdictions.
All other brands and product names are trademarks or registered trademarks of their
respective companies.
Specifications given in these Operating Instructions are subject to change without notice.
All Rights Reserved, © COPYRIGHT 1996 KYUSHU MATSUSHITA ELECTRIC CO.,
LTD.

Features:
*8X external CD-ROM drive (transfer rate Max. 1200 KB/s with AC
adaptor).
► Operates on a compact lightweight universal voltage AC adaptor
([^ P. 9), optional rechargeable battery (KXL-D30) (o^ P. 27) or six (6)
“AA ” size alkaline batteries (not suppUed) {(@r P. 30).
' Can be connected to a PowerBook with supplied SCSI cable {(ßr P. 10).
' Can be connected to a Desktop Macintosh with purchase of SCSI cable
(D-sub25 pin <-> half-pitch 50 pin) for Macintosh (o^ P. 11).
' Both CD-ROM and audio CD can be played when connected to your
Macintosh (m’ P. 19).
► Can be used as a portable personal audio CD player (o^ P. 17).
* Supports CD-ROM, CD-ROM XA, CD-DA (Audio CD), Photo CD
(Multisession compatible), CD Extra.
*SPATIALIZER delivers 3-Dlmenslonal stereo surround sound.
Expands the sound from two conventionai speakers.
*PC sound can be heard through the built-in stereo speakers of the
player with the supplied stereo audio cable connected (isr P. 25).
► SCSI-2 Software Command compatible.
► Can be used as Boot Device-System Startup from CD-ROM P. 21).
Important:
■ Please use CD-ROMs
with the marking below.
n COMPACT
Please use audio CDs
with the marking below.
n COMPACT
(olDgE
DIGITAL AUDIO

^10
Before Use
Preparation & Connection
Operation
Using Battery
Accessories
Precautions .......................................................6
Part Names.........................................................7
Connecting the AC adaptor..............................9
Connecting the Player to Macintosh .... 10
For PowerBook.............................................10
For Desktop Macintosh
Software Installation
Before installing software .................................12
Installation.....................................................13
Inserting/Removing a CD
Using the Player Independently
Playing an audio CD.....................................17
Using the Player with Macintosh
Playing a CD-ROM
Starting up Macintosh from a CD-ROM . . 21
Playing an audio CD.....................................21
Listening to PC sound through the player . 25
Details of CD-ROM ToolKit ..............................26
Using Rechargeable Battery (option).... 27
Installing rechargeable battery
Charging rechargeable battery
Refreshing rechargeable battery..................29
Replacing rechargeable battery
Using Alkaline Batteries (not supplied) . . 30
......................................................
................................
...................................
...........................
...................
...............
.......................................
.....................
.....................
...................
11
12
16
19
20
27
28
29
17
6
m
□
Troubleshooting
&Maintenance
Technical
Information
Appendix
Troubleshooting
Maintenance
SCSI ID Number and Terminator Setting . . 37
Specifications..............................................38
End-User License Agreement
Index.............................................................42
Option...............................................back cover
............................................
................................................
....................
31
36
40

■ Accessories
Make sure that the following accessories are included with the player. If anything is
missing, contact your dealer immediately.
AC adaptor((or P. 9)
^The Model No. of AC
adaptor is written on the
s bottom of the player,
Precautions
Setup disk
(0^ P. 12, 13)
[Before opening
the packet,
please read P. 40.]
SCSI cable
{for PowerBook)
{(Sr P. 10)
•Operating instructions
•Warranty card
•Do not place heavy
objects on the player.
• Do not shake or subject
to intense vibration.
Audio cable
P. 25)
•Keep disc cover closed to protect from dust.
•Do not play CD-ROM/audio CD while transporting.
• Do not use near any appliance that may cause vibration.
• Do not expose the
player to direct sunlight
or extreme heat.
Especially do not leave
it in a hot automobile.
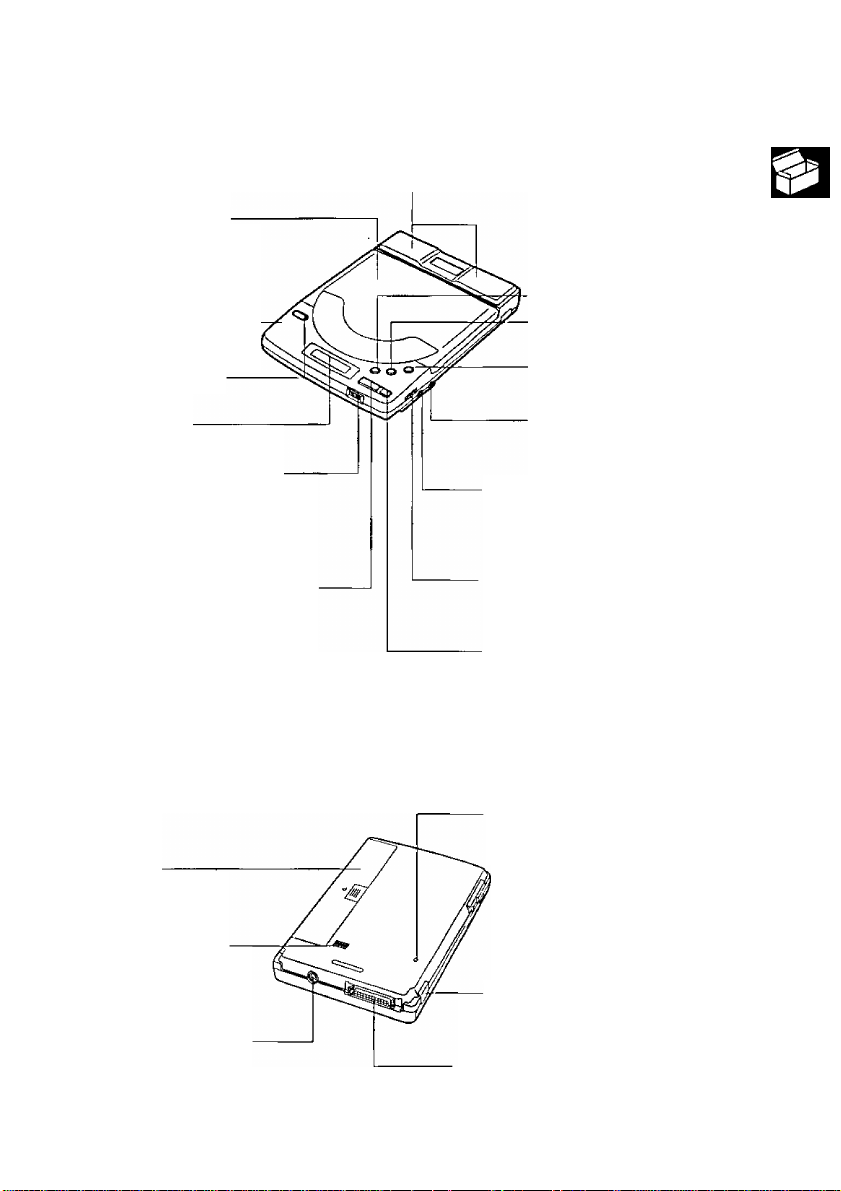
Top/Sidé view
Built-in speakers (et P. 17, 25)
Disc cover ((BT P. 16)
LOCK switch ((BT P. 16)
Locks the disc cover by
moving the Lock switch
toward the rear of the
player.
----------------------
OPEN button (G5r P. 16)
opens the disc cover.
Display ((BT P. 8)
VOLUME control {[E^ P. 17)
Adjusts the volume of the
built-in speakers or headphones
(not supplied) attached to the
PHONES jack (0~10).
MI/CHG
----------------------------
(PLAY/PAUSE/CHARGE button)
Starts/pauses audio CD playback
(o^ P.17,18) or charges the
optional rechargeable battery by
pressing this button ([B^ P. 28).
Rear/Bottom view
MODE button {(^ P. 18) O
M-4 (Reverse skip/search n
button) (Q3r P. 18) S£.
(Forward skip/search ^
button) (E^ P. 18) o
LINE IN jack (et P. 25) |-
Connects the supplied audio
cable.
PHONES jack [(^] {(^ P. 17, 25)
Connects your headphones or
external speaker system (not
supplied).
SPATIALIZER effect switch
((®- P. 17, 25)
Adjusts the 3-0 sound effect level.
■ (STOP button)
(o^ P. 16, 18, 19)
>
o
o
(D
(n
»
0>
:x
Battery cover
(t^ P. 27, 29, 30)
DIP switch {(^ P. 37)
Sets the SCSI ID number.
Sets the terminator ON or
OFF.
DC IN jack
[DC IN 13V
(ET P. 9)
RESET switch P. 31)
Press this if buttons/switches do
not function.
POWER switch [POWER 6/1 ]
(ET P. 17, 19)
Turns the power on/off.
SCSI interface connector [O- SCSI]
Connects the SCSI cable
{ET P. 10, 11).

Display messages
Message/Indication
no c n
I I
an
no d ! SC
-AUDIO DISC ONLY-
n nnnn
U 1 uu-uu
nn r
u> I c
Description
The dise cover is open.
When CD-ROM is inserted, a message “on” is displayed.
While CD-ROM or audio CD is first being recognized,
“on” blinks.
CD is not inserted, or the inserted CD is not recognized
because either the CD is placed with the label side facing
down, or it is damaged, dirty, wet, etc.
When CD-ROM data is being transferred, a blinking
message “BUSY” appears.
With a CD-ROM {Data CD) inserted in the player, if you
»■itqHg N#4 MN MODE
press r I. 0-0 Of O - a blinking message
“AUDIO DISC ONLY” appears. These buttons function
only for stand alone audio CD playback.
•Displayed when an audio CD is recognized.
• ¿is pressed when an audio CD is being played on the
player.
Pressing q changes the audio CD playback mode. This
button functions only for stand alone audio CD playback.
The modes are outlined below.
---------
► [ ONE ] ------------------► [ ALL ]
(Repeats one track)
(Repeats all tracks)
---------
— (Normal mode) ^
rs nd
rand
(Repeats at random)
When the battery is low, this blinking indication appears.
This blinking indication appears while the rechargeable
HC
tS3
c
battery (option) is being charged.
8

/V
'ofs ioi io]
Connect the supplied AC adaptor.
Caution:
•Use only the supplied AC adaptor, since other adaptors could dannage the player.
Note:
• If the player is not going to be used for an extended period, unplug the AC adaptor
from both the player and AC outlet to save power consumption. {Approximately 1 W
of power is consumed when the player is OFF and the AC adaptor is connected with
120 V outlet.)
O
o
3
3
(D
o
CQ
3"
o
>
O
fi)
a
u
■a
■ Power Save Function:
The player enters the Power Save mode under the following conditions to save power.
While in the lower consumption mode the laser and spindle motor turn off.
•When using with Macintosh, and no command is sent to the player from the Macintosh
for more than 4 minutes. (The player automatically re-activates when it receives a
command from the Macintosh.)
•When using the player independently, the player is paused, and no button of the player
is pressed for more than 4 minutes. (The player automatically re-activates when a button
on the player is pressed.)
/d
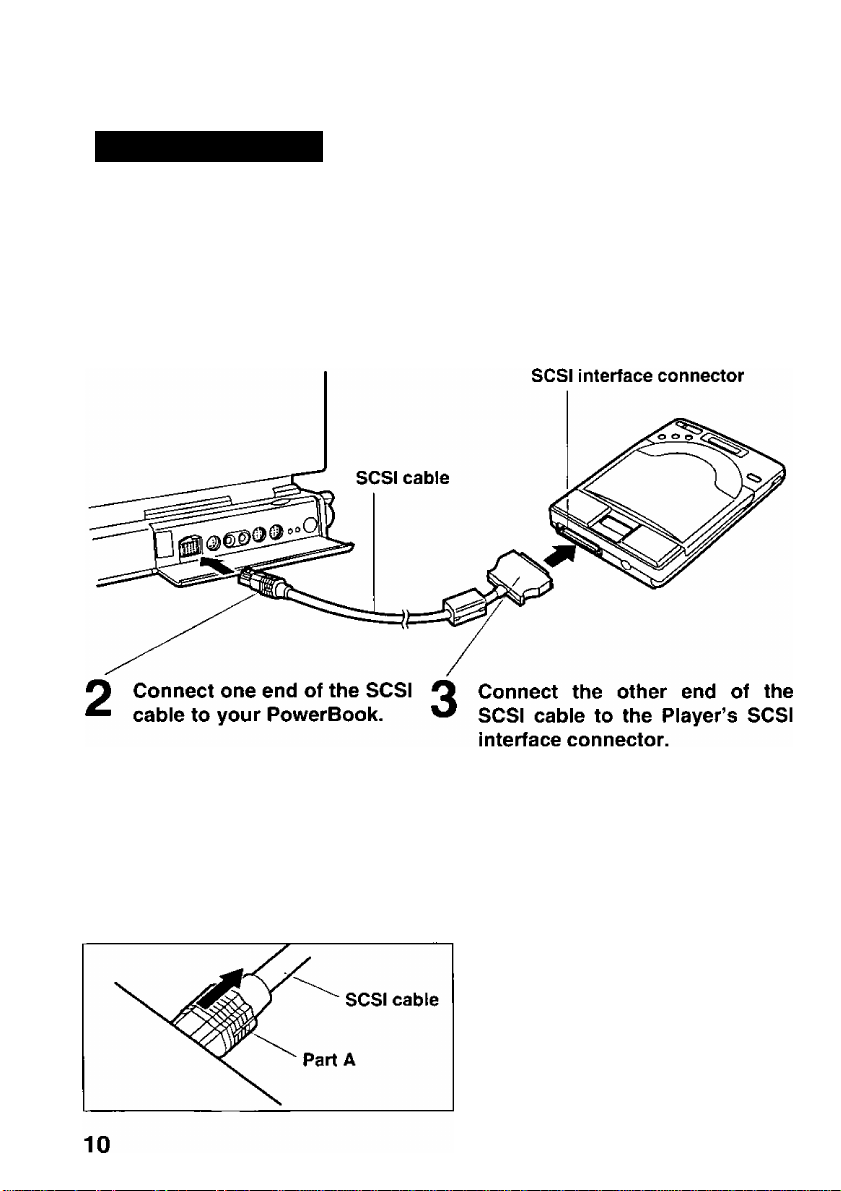
For PowerBook
Note:
•Use only the supplied SCSI cable with this player.
^ Make sure both the player and the PowerBook are off.
<Example>
Note:
• Make sure that the terminator is
set to ON ((BT P. 37).
Disconnecting SCSi cabie from PowerBook:
Hold the part A of the SCSI cable and
pull it outward.
Note:
• Do not pull on the SCSI cable.

For Desktop Macintosh
For connection, a commercial SCSI cable for Macintosh is required.
Cautions for a SCSI cable:
•Use a shielded SCSI cable of 1 m (3.2 ft.) or shorter.
• Plug D-Sub25 pin end into Desktop Macintosh and the half-pitch 50 pin end into the
player.
First make sure both the player and the Desktop Macintosh are off.
<Example>
o
o
3
3
(D
O
5’
ta
o
0)
T3
o
€
(D
“T
CD
O
o
s:
o
(D
tfl
(not supplied) •Make sure that the terminator is
set to ON {{sr P. 37).
S
o
■D
■ Daisy chain connection:
You can connect this player to other SCSI devices (up to seven devices). Make sure that
each SCSI device has different SCSI ID number.
For the setting of SCSI ID number and terminator of this player, refer to “SCSI ID Number
and Terminator Setting” (ET P.37).
Since the player has only one SCSI connector, it must be the last device in the daisy chain.
In this case, set the terminator to ON.
11

Before installing software
To use the player with your Macintosh, you must install driver software on your Macintosh.
Make sure that you have connected the player to your Macintosh, then turn on the
player and your Macintosh.
System requirement
The Setup disk can be used only in Macintosh with a 3.5" floppy disk drive.
Hardware and Software requirements are:
•Macintosh Plus or later
•System 6.0.4 or later {System 7 or later is recommended)
•4 MB of RAM or greater (More is helpful)
•Disk caching requires 1.5 MB of free contiguous hard disk space {More is helpful)
Making back-up copy
Before installation, it is recommended that you make a back-up copy and store the original
in a safe place. To make a back-up copy, refer to your Macintosh manual.
Disabling old CD-ROM device driver
Before installation, you must disable any previously installed CD-ROM device driver
software on your Macintosh to load and activate this software smoothly.
To disable Apple’s or any third-party device driver, simply drag the file from the System
folder and restart your Macintosh.
12
IMMÈiSsoû
Installation
Notes:
•Before proceeding with the installation, restart your Macintosh with all Extensions
off, making sure to disable any virus protection software.
•The installation will place Foreign File Access, Audio CD Access, High Sierra File
Access, and ISO 9660 File Access into the Extensions Folder inside your System
Folder. If these files have already been placed into the Folder, they will be re-written.
Insert the supplied Setup disk into the floppy drive.
1
The CD-ROM Toolkit window will automatically appear.
“Read Me for Panasonic” File describes the information which is not mentioned
in this manual. Please read it when it is necessary.
2 Double click the “CD-ROM ToolKir'^ Installer” icon.
The CD-ROM Toolkit Installer dialog will appear.
0 Ciick [Continue].
The following screen will appear.
m
(/>
o
€
Û)
o
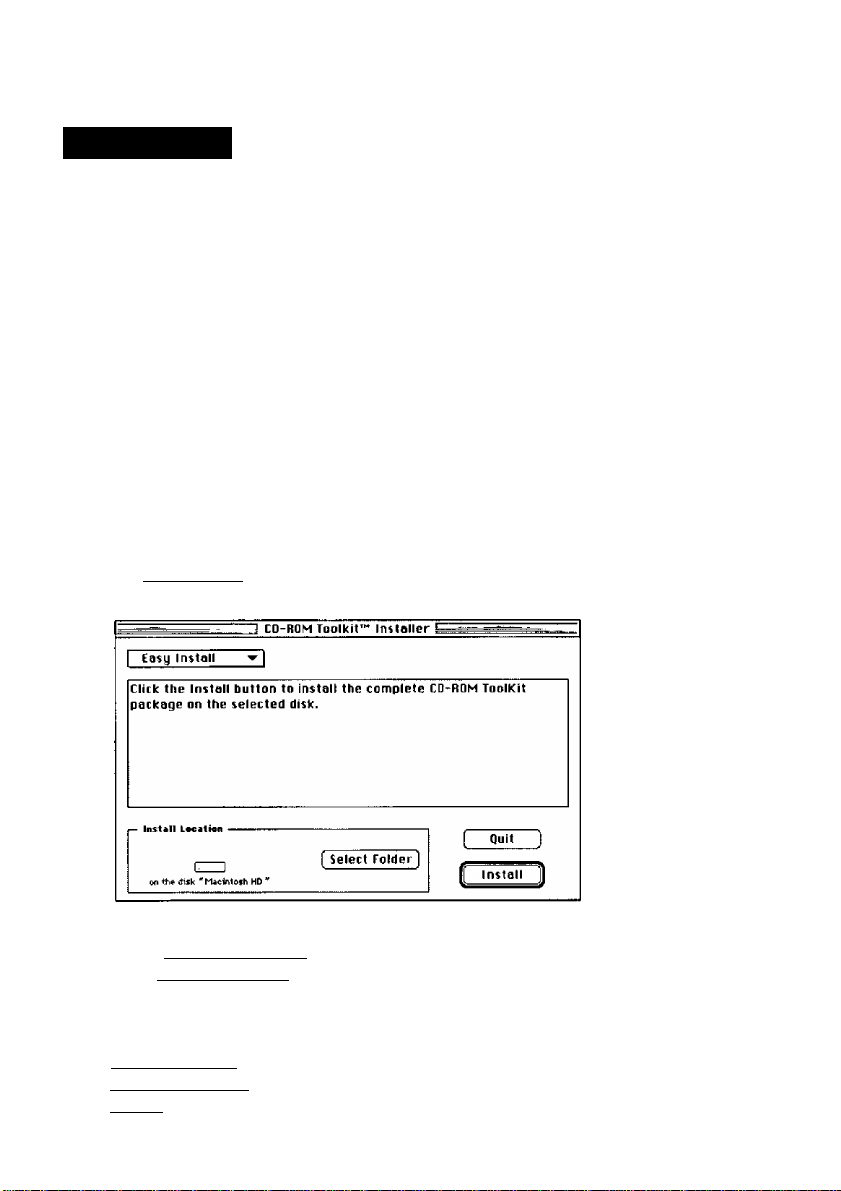
Easy Install, Custom Install or Remove can be selected.
Click I Easy Install I and select which you want.
Easy Install
Custom Install . .Only the files you specify will be installed.
Remove ........
(Select Folder] . .A destination folder for CD-ROM Toolkit can be specified.
(Quit)
......
.................
All files relating to CD-ROM Toolkit that on the Setup disk will
be installed.
.
.Any installed CD-ROM Toolkit will be removed.
Installation will be stopped.
13

^síMmKsOMMMSsoo
Click [ InstalT).
The following screen will appear.
Pleave perton&lize your copy of CD-ROM ToolKit'":
Nome: Please enter your name
Organizotlon: [inter your organization's name
Serial Serial Number from back of disk
g Personalize CD-ROM ToolKit if you are running it for the first time.
Name, Organization and Serial # “M53006585" must be entered.
Click [OK].
The following message will appear.
Installation was successful. If you are finished,
ciick Quit to ieaue the Instatier. if you wish to
O
perform additional installations, click Continue.
□
[ Cancel
Continue ]
If you click [Continue], return to “CD-ROM ToolKit™ Installer" screen
P. 13).
y Click iolml.
g Restart your computer.
The original Setup disk will be ejected automatically.
Note:
•Store the original Setup disk in a safe place.
0 Open the Control Panel from Apple (||) Menu.
14
 Loading...