

Panasonic KX-FP141E User Manual

Operating Instructions
Compact Plain Paper Fax
Model No. KX-FP141E
Compact Plain Paper Fax
This pictured model is KX-FP141.
with Digital Answering System
Model No. KX-FP145E
Please read these Operating
Instructions before using the unit
and save for future reference.
These models are designed to
be used only in the United
Kingdom and Ireland.

Location of Controls
N
How to use the operating instructions
When following operating instructions, always keep the front cover page (next page) open so that you will
find easy reference to the buttons.
OPE
I

Location of Controls
Please keep this page open when following operating instructions.
For a description of each button, see page 11.
KX-FP141
KX-FP145
AB
JQRPNI
KLM
AB CD GH
E F
F
MONITOR
S
MIC
DIGITAL
SP-PHONE
JQONI
KLM
Keys (Listed in alphabetical order)
AUTO ANSWER F MENU N RECORD C
BROADCAST A MONITOR P REDIAL R
CALLER ID B MUTE S SET J
COPY I NAVIGATOR M SLOW G
DIGITAL SP-PHONE O PAUSE R START J
ERASE D PLAY MESSAGES E STOP K
FAX/START J QUICK H VOLUME M
HELP L RECALL Q
R
S
II

Thank you for purchasing a Panasonic fax machine.
Things you should keep a record of
Attach your sales receipt here.
For your future reference
Date of purchase
Serial number (found on the rear of the unit)
Dealer’s name and address
Dealer’s telephone number
Caution:
L Note that the images of copied or received documents will remain on the used ink film. Use discretion
when disposing of the used ink film.
L Do not rub or use an eraser on the printed side of recording paper, as the print may smear.
L In the event of problems, you should contact your equipment supplier in the first instance.
L This equipment is designed for use on the UK and Republic of Ireland analogue telephone network.
Declaration of Conformity:
We, Panasonic Communications Co., Ltd., declare that this equipment is in compliance with the essential
requirements and other relevant provisions of Directive 1999/5/EC.
If you want to get a copy of the original Declaration of Conformity of our products which relates to the
R&TTE, please contact to our web address:
http://doc.panasonic-tc.de
Note:
L The suffix in the model number will be omitted in these instructions.
L Most figures shown in these operating instructions are based on a KX-FP141.
Copyright:
L This manual is copyrighted by Panasonic Communications Co., Ltd. (PCC) and its licensee. Under
the copyright laws, this manual may not be reproduced in any form, in whole or part, without the prior
written consent of PCC and its licensee.
© Panasonic Communications Co., Ltd. 2003
2

Important Instructions
Important InstructionsSafety Instructions
Important safety instructions
When using this unit, basic safety precautions
should always be followed to reduce the risk of
fire, electric shock, or personal injury.
1. Read and understand all instructions.
2. Follow all warnings and instructions marked
on this unit.
3. Unplug this unit from power outlets before
cleaning. Do not use liquid or aerosol
cleaners. Use a damp cloth for cleaning.
4. Do not use this unit near water, for example
near a bathtub, wash bowl, kitchen sink, etc.
5. Place the unit securely on a stable surface.
Serious damage and/or injury may result if
the unit falls.
6. Do not cover slots and openings on the unit.
They are provided for ventilation and
protection against overheating. Never place
the unit near radiators, or in a place where
proper ventilation is not provided.
7. Use only the power source marked on the
unit. If you are not sure of the type of power
supplied to your home, consult your dealer or
local power company.
8. For safety purposes this unit is equipped with
a grounded plug. If you do not have this type
of outlet, please have one installed. Do not
defeat this safety feature by tampering with
the plug.
9. Do not place objects on the mains lead.
Install the unit where no one can step or trip
on the cord.
10.Do not overload power outlets and extension
cords. This can result in the risk of fire or
electric shock.
11.Never push any objects through slots in this
unit. This may result in the risk of fire or
electric shock. Never spill any liquid on the
unit.
12.To reduce the risk of electric shock, do not
disassemble this unit. Take the unit to an
authorised service centre when service is
required. Opening or removing covers may
expose you to dangerous voltage or other
risks. Incorrect reassembly can cause
electric shock when the unit is subsequently
used.
13.Unplug this unit from power outlets and refer
servicing to an authorised service centre
when the following conditions occur:
A. When the mains lead is damaged or
frayed.
B. If liquid has been spilled into the unit.
C. If the unit has been exposed to rain or
water.
D. If the unit does not work normally by
following the operating instructions.
Adjust only controls covered by the
operating instructions. Improper
adjustment may require extensive work
by an authorised service centre.
E. If the unit has been dropped or physically
damaged.
F. If the unit exhibits a distinct change in
performance.
14.During thunderstorms, avoid using
telephones except cordless types. There may
be a remote risk of an electric shock from
lightning.
15.Do not use this unit to report a gas leak, when
in the vicinity of the leak.
SAVE THESE
INSTRUCTIONS
CAUTION:
Installation
L Never install telephone wiring during a
lightning storm.
L Never install telephone sockets in wet
locations unless the socket is specifically
designed for wet locations.
L Never touch uninsulated telephone wires or
terminals unless the telephone line has been
disconnected at the network interface.
L Use caution when installing or modifying
telephone lines.
L Do not touch the plug with wet hands.
WARNING:
L To prevent the risk of fire or electrical shock,
do not expose this product to rain or any type
of moisture.
3

Important Instructions
For best performance
L Keep the unit away from electrical noise
generating devices, such as fluorescent
lamps and motors.
L The unit should be kept free from dust, high
temperature and vibration.
L The unit should not be exposed to direct
sunlight.
L Do not place heavy objects on top of this unit.
L Wipe the outer surface of the unit with a soft
cloth. Do not use benzine, thinner, or any
abrasive powder.
L Do not use this unit near liquid-for example,
near a bathtub, washbowl, sink, etc. Damp
basements should also be avoided. The unit
should be kept away from heat sources such
as heaters, kitchen stoves, etc. It also should
not be placed in rooms where the
temperature is less than 5°C or greater than
35°C.
L Store unused paper in the original packaging,
in a cool and dry place. Not doing so may
affect print quality.
4

Important Information
Important Information
Important Information
The connection to the telecommunication
systems must not be hard wired and must be
unplugged before the earth is disconnected.
Method of connection
This apparatus is connected to the exchange
line or PABX/PMBX extension by the new
standard British Telecom plug and socket.
Arrangements for provision of this type of
termination can be made through the nearest
British Telecom Sales Office.
This apparatus may be connected to the
following types of installation.
a) For connection to the public switched
telephone network (PSTN) and
compatible (Private Branch Exchange),
which use DTMF signalling. (Please
consult your supplier for an up to date list
of compatible PBX’s.)
b) The apparatus can be used on extension
sockets connected to a direct exchange
line (D.E.L.).
c) This apparatus is suitable for connection
to the telecommunication system directly
or via compatible private branch exchange
as an extension. The supplier of the
apparatus should be consulted for an up
to date list of PBX’s with which the
apparatus is compatible.
NOTES:
● If you experience any problems with the
normal use of your apparatus, you should
unplug it from the telephone outlet and
connect a known working telephone in its
place. If the known working telephone still
gives problems, then please contact the
customer service department of your PSTN
operator (e.g. BT etc.). If it operates
properly, then the problems are likely to be
a fault in your apparatus. In this case,
consult your supplier for advice.
● Your PSTN operator may charge you if
they attend a service call that is not due to
apparatus supplied by them.
It cannot be guaranteed that the apparatus
will operate under all possible conditions of
connection to compatible PBX’s.
● This apparatus is suitable for connection to
a PBX with or without initial proceed
indication.
● This apparatus is suitable for connection to
a PBX with or without secondary proceed
indication.
Any cases of difficulty should be referred in
the first instance to the supplier of the
apparatus.
d) The apparatus must not be connected in
the following manner:
–As an extension to a pay phone
–As a party line with shared service
5
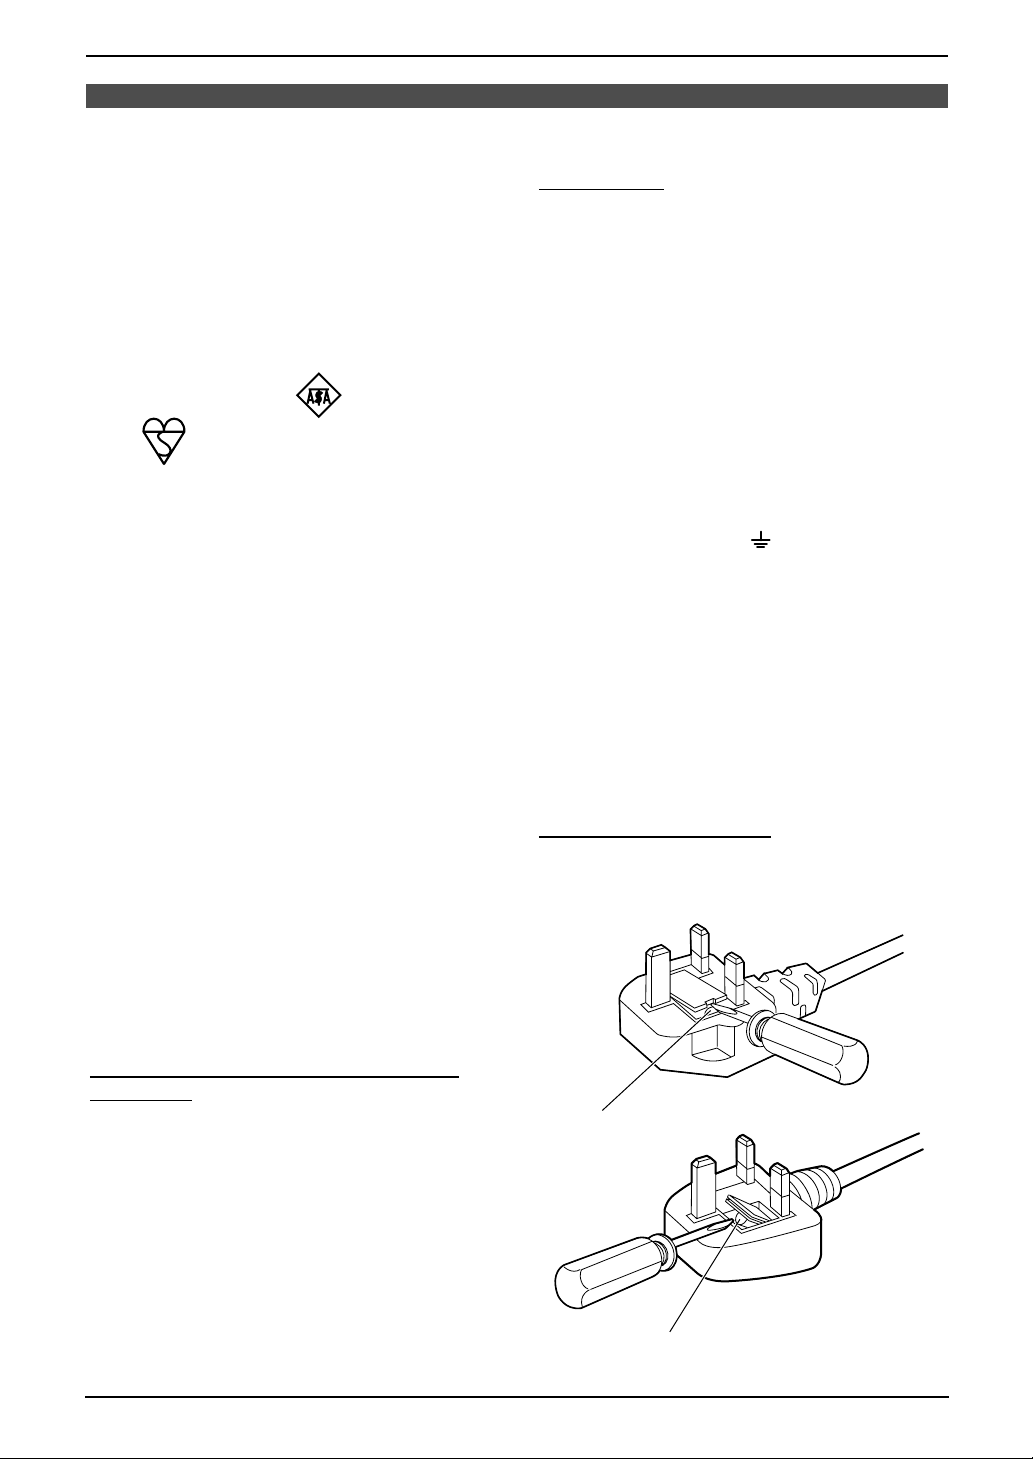
Fitting a Plug to the Mains Lead
Fitting a Plug to the Mains Lead
Fitting a plug to the mains lead
This appliance is supplied with a moulded
three pin mains plug for your safety and
convenience.
A 5 amp fuse is fitted in this plug.
Should the fuse need to be replaced please
ensure that the replacement fuse has a
rating of 5 amps and that it is approved by
ASTA or BSI to BS1362.
Check for ASTA mark or the BSI
mark on the body of the fuse.
If the plug contains a removable fuse cover
you must ensure that it is refitted when the
fuse is replaced.
If you lose the fuse cover the plug must not
be used until a replacement cover is
obtained.
A replacement fuse cover can be purchased
from your local Panasonic dealer.
IF THE FITTED MOULDED PLUG IS
UNSUITABLE FOR THE SOCKET OUTLET
IN YOUR HOME THEN THE FUSE
SHOULD BE REMOVED AND THE PLUG
CUT OFF AND DISPOSED OF SAFELY.
THERE IS A DANGER OF SEVERE
ELECTRICAL SHOCK IF THE CUT OFF
PLUG IS INSERTED INTO ANY 13 AMP
SOCKET.
IMPORTANT:
The wires in this mains lead are coloured in
accordance with the following code:
Green-and-Yellow: Earth
Blue: Neutral
Brown: Live
As the colours of the wire in the mains lead
of this appliance may not correspond with
the coloured markings identifying the
terminals in your plug, proceed as follows.
The wire which is coloured GREEN-ANDYELLOW must be connected to the terminal
in the plug which is marked with the letter E
or by the Earth symbol or coloured
GREEN or GREEN-AND-YELLOW.
The wire which is coloured BLUE must be
connected to the terminal in the plug which
is marked with the letter N or coloured
BLACK.
The wire which is coloured BROWN must be
connected to the terminal in the plug which
is marked with letter L or coloured RED.
How to replace the fuse: Open the fuse
compartment with a screwdriver and replace
the fuse (and fuse cover).
If a new plug is to be fitted please observe
the wiring code as shown below.
If in any doubt please consult a qualified
electrician.
WARNING: THIS APPLIANCE MUST BE
EARTHED.
6
FUSE
FUSE

Table of Contents
1. Table of Contents
1. Introduction and
Installation
Accessories
1.1 Included accessories..........................9
1.2 Accessory information ......................10
1.3 Extension telephone adaptor for UK
(KX-FP141 only)...............................10
Finding the Controls
1.4 Overview ..........................................11
1.5 Description of buttons....................... 11
Installation
1.6 Ink film .............................................. 12
1.7 Handset cord .................................... 14
1.8 Paper tray .........................................14
1.9 Recording paper...............................15
2. Preparation
Connections
2.1 Connections .....................................16
Help Button
2.2 Help function ....................................17
Vo lu me
2.3 Adjusting volume ..............................17
Initial Programming
2.4 Date and time ................................... 18
2.5 Your logo........................................... 19
2.6 Your fax number ...............................20
3. Telephone
Automatic Dialling
3.1 Storing names and telephone numbers
into the navigator directory ............... 21
3.2 Making a phone call using the navigator
directory............................................ 22
3.3 RECALL button (to use the recall
feature) .............................................22
Recording
3.4 Recording a telephone conversation
(KX-FP145 only)...............................22
Caller ID
3.5 Caller ID service ...............................23
3.6 Viewing and calling back using caller
information........................................ 24
3.7 Storing caller information into the
navigator directory............................25
4. Fax
Sending Faxes
4.1 Sending a fax manually .................... 26
4.2 Documents you can send.................27
4.3 Sending a fax using the navigator
directory............................................ 28
4.4 Broadcast transmission ....................28
Receiving Faxes
4.5 Selecting the way to use your fax
machine............................................30
4.6 Receiving a fax manually – {AUTO
ANSWER} OFF................................ 31
4.7 Receiving a fax automatically – {AUTO
ANSWER} ON .................................32
4.8 Using the unit with an answering
machine (KX-FP141 only) ................ 33
4.9 Receive polling (retrieving a fax placed
on another fax machine)................... 33
4.10 Junk fax prohibitor (preventing fax
reception from undesired callers) .....34
5. Copy
Copying
5.1 Making a copy .................................. 35
6. Answering Device (KXFP145 only)
Greeting
6.1 Recording your greeting message....37
Memo Message
6.2 Leaving a message for others or
yourself.............................................37
Incoming Messages
6.3 Listening to recorded messages ......38
Remote Operation
6.4 Operating from a remote location.....39
Voice Mailbox
6.5 Allowing callers to leave private
messages ......................................... 41
6.6 Recording your mailbox greeting
messages ......................................... 41
6.7 Listening to recorded mailbox
messages ......................................... 42
6.8 Listening to recorded mailbox
messages from a remote location .... 43
Option
6.9 Transferring recorded messages to
another telephone ............................43
7. Programmable Features
Features
7.1 Programming....................................45
7.2 Basic features................................... 46
7.3 Advanced features............................ 47
7.4 Direct commands for programming
features.............................................50
7

Table of Contents
8. Help
Error Messages
8.1 Error messages – Reports ...............53
8.2 Error messages – Display ................53
Frequently Asked Questions
8.3 When a function does not work, check
here .................................................. 55
Jams
8.4 Recording paper jams ......................59
8.5 Document jams – sending................61
Cleaning
8.6 Recording paper feeder cleaning ..... 62
8.7 Document feeder/scanner glass
cleaning ............................................ 63
8.8 Thermal head cleaning.....................64
9. General Information
Printed Reports
9.1 Reference lists and reports ..............65
Specifications
9.2 Technical data about this product ..... 66
Guarantee
9.3 Condition of guarantee .....................68
10.Index
10.1 Index................................................ 69
8

1Int roduction and Installation
1.1 Included accessories
1. Introduction and Installation
No. Item Part number
1 Mains lead PFJA03A005Y 1 ----------
2 Telephone line cord PQJA87S 1 for UK
3 Handset PFJXH0530Z 1 ----------
4 Handset cord PFJA04C001Z 1 ----------
5 Paper tray PFZXFP141E 1 ----------
6 Starter ink film (10 metres long) ---------- 1 prints about 30 A4-sized
7 Operating instructions PFQX1884Z 1 ----------
8 Quick installation guide PFQW2015Z 1 ----------
*1 Part numbers are subject to change without notice.
*2 For replacement film, see page 10.
Note:
L If any items are missing or damaged, check with the place of purchase.
L Save the original carton and packing materials for future shipping and transportation of the unit.
12345
*1
Quantity Specifications
*2
pages.
678
9

1. Introduction and Installation
1.2 Accessory information
1.2.1 Sales and Support Information
Customer Care Centre
L For UK customers: 08701 580560
L For Republic of Ireland customers: 01 289 8333
L Visit our website for product information
L E-mail: customer.care@panasonic.co.uk
Direct Sales at Panasonic UK
L Order accessory and consumable items for your product with ease and confidence by phoning our
Customer Care Centre Monday - Friday 9:00am - 5:30pm (Excluding public holidays).
L Or go on line through our Internet Accessory ordering application at www.panasonic.co.uk
L Most major credit and debit cards accepted.
L All enquires transactions and distribution facilities are provided directly by Panasonic UK Ltd.
L It couldn’t be simpler!
L Also available through our Internet is direct shopping for a wide range of finished products, take a
browse on our website for further details.
Model No. Item Specifications/Usage
KX-FA54X Replacement film
*1
2 rolls – 216 mm × 35 m (Each roll will print
about 105 A4-sized pages.)
*1 We recommend that you buy a full-size replacement film for continuous use of your unit. Please use
genuine Panasonic replacement film. The ink film is not reusable. Do not rewind and use the ink
film again.
1.3 Extension telephone adaptor for UK (KX-FP141 only)
When using the unit with an external answering machine (page 33), please purchase an extension
telephone adaptor (e.g., PQJA10058Z) by contacting one of the following:
– www.panasonic.co.uk
– Panasonic Customer Care Centre on Telephone number 08701 580560
– local Panasonic authorised dealer
To telephone line cord of
external telephone or telephone
To [EXT] socket
S
b1
a1
E
(contact side)
a1, b1: Line
S : Shunt
E : Earth Recall (This function is not provided on this fax machine.)
answering machine
N. C
b1
S
A
E
a1
N. C
(view: A)
10

Finding the Controls
1. Introduction and Installation
1.4 Overview
1543762
9j8lmk
*The pictured model is KX-FP145.
1 Speaker
2 Document guides
3 Paper tray
4 Recording paper support
5 Recording paper entrance
6 Recording paper exit
7 Tension plate
8 Front cover
9 Document exit
j Microphone (KX-FP145 only)
k Document entrance
l Green button (Back cover release button)
m Back cover
Note:
L Remove all the blue shipping tapes before
installation.
1.5 Description of buttons
L Keep the front cover page open for button
locations.
A {BROADCAST}
L To transmit a document to multiple parties
(page 29).
B {CALLER ID}
L To use Caller ID service (page 24, 25).
C {RECORD} (KX-FP145 only)
L To record messages (page 37).
D {ERASE} (KX-FP145 only)
L To erase messages (page 37, 38).
E {PLAY MESSAGES} (KX-FP145 only)
L To play messages (page 38).
F {AUTO ANSWER}
L To turn ON/OFF the auto answer setting
(page 30).
G {SLOW} (KX-FP145 only)
L To slow down message playback (page
38).
H {QUICK} (KX-FP145 only)
L To speed up message playback (page
38).
I {COPY}
L To initiate copying (page 35).
J {FAX/START}{SET}
L To initiate fax transmission or reception.
L To store a setting during programming.
K {STOP}
L To stop an operation or programming.
L {HELP}
L To print a quick reference (page 17).
M {NAVIGATOR}{VOLUME}
L To adjust volume (page 17).
L To search for a stored item (page 22, 28).
L To select features or feature settings
during programming (page 45).
L To navigate to the next operation.
N {MENU}
L To initiate or exit programming.
O {DIGITAL SP-PHONE} (KX-FP145 only)
L For speakerphone operation (page 22).
P {MONITOR} (KX-FP141 only)
L To initiate dialling without lifting the
handset.
Q {RECALL}
L To access special telephone services
such as call waiting (page 22) or for
transferring extension calls.
11

1. Introduction and Installation
R {REDIAL}{PAU SE }
L To redial the last number dialled. If the line
is busy when you make a phone call using
the {MONITOR} (KX-FP141)/{DIGITAL
SP-PHONE} (KX-FP145) button, the unit
will automatically redial the number up to
5 times.
L To insert a pause during dialling.
S {MUTE}
L To mute your voice to the other party
during a conversation. Press this button
again to resume the conversation.
Installat ion
1.6 Ink film
1.6.1 Installing the ink film
1 Open the front cover by pulling up the centre
part.
2 Release the back cover by pushing the green
button (1).
1
3 Open the back cover.
4 Insert the front ink film roll by inserting its
blue gear (1) into the left slot of the unit (2).
Insert the rear ink film roll (3).
L The ink film is safe to touch, and will not
rub off on your hands like carbon paper.
12

1. Introduction and Installation
L Make sure the blue gear (1) and white
gear (4) are installed as shown.
4
3
1
2
5 Turn the blue gear (1) in the direction of the
arrow until the ink film is tight (2).
L Make sure that the ink film is wrapped
around the blue core (3) at least once.
Correct
1 turn
Tight
3
Incorrect
The ink film is not wrapped around the
blue core.
Slack/Crease
Reverse
6 Close the back cover securely by pushing
down on the notched area at both ends (1).
1
1
7 Close the front cover securely.
2
13

1. Introduction and Installation
1.6.2 Replacing the ink film
The included film roll is a starter ink film. To
ensure that the unit operates properly, we
recommend the use of Panasonic replacement
film. See page 10 for accessory information.
L We cannot be responsible for any damage to
the unit or degradation of print quality which
may occur from the use of non-Panasonic
replacement film.
Important:
L Remove the recording paper and the
paper tray beforehand, or the paper may
misfeed or jam.
1 Open the covers (see steps 1 to 3 on page
12).
1.7 Handset cord
Connect the handset cord (1).
2 Remove the used core (1) and used ink film
(2).
1
2
3 Remove the stoppers (1) and tags (2) from
the new ink film (3).
2
1
1
3
4 Insert the ink film and close the covers (see
steps 4 to 7 on page 12).
1
1.8 Paper tray
Insert the tabs (1) on the paper tray (2) into the
slots on the back of the unit (3).
2
1
3
5 Install the paper tray (page 14), then insert
the recording paper (page 15).
14

1.9 Recording paper
The unit can hold up to 30 sheets of 80 g/m2
paper.
Please read the note on page 67 for important
information on recording paper.
1 Pull the tension plate forward (1).
1
2 Fan the paper to prevent paper jams.
1. Introduction and Installation
4 Push the tension plate back (1).
1
L If the paper is not inserted correctly,
readjust the paper, or the paper may jam.
Correct Incorrect
3 Insert the paper, print-side down (1).
L The paper should not be over the tab
(2).
2
1
15
2. Preparation
2Pr eparationConnections
2.1 Connections
KX-FP141 only
Connect to [LINE].
Mains lead
Telephone
line cord
To Household
Mains Supply
(220–240 V, 50 Hz)
To telephone network
L If you use the unit with a computer and your
internet provider instructs you to install a
filter, please connect it as follows.
To telephone
Telephone
line cord
Filter
Telephone line cord
network
Caution:
L The mains lead must remain connected at
all times.
L Never install telephone wiring during a
lightning storm.
L When you operate this product, the power
outlet should be near the product and
easily accessible.
L Be sure to use the telephone line cord
included in this unit.
L Do not extend the telephone line cord.
Note:
L If any other device is connected on the same
line, this unit may disturb the network
condition of the device.
L If you want to connect an answering machine
to this unit, see page 33 (KX-FP141 only).
L Do not connect an answering machine to the
same telephone line. If connected, set the
automatic answer feature to OFF by pressing
{AUTO ANSWER} repeatedly (KX-FP145
only).
16

2. Preparation
Help Button
2.2 Help function
The unit contains helpful information which can
be printed for quick reference.
Basic settings:
How to set the date, time, your logo and fax
number.
Feature list:
How to program the features.
Directory:
How to store names and numbers in the
navigator directory and how to dial them.
TAD operation (KX-FP145 only):
How to use the answering device.
Fax receiving:
How to set the unit to receive faxes.
Copier:
How to use the copier function.
Reports:
List of available reports.
Caller ID:
How to use the Caller ID service.
Volu me
2.3 Adjusting volume
{
SET} {A}{B}
2.3.1 Ringer volume
4 levels (high/medium/low/off) are available.
While the unit is idle, press {A} or {B}.
L If any documents are in the document
entrance, you cannot adjust the volume.
Confirm that there are no documents in the
entrance.
To turn the ringer OFF
1. Press {B} repeatedly to display “RINGER
OFF= OK?”.
2. Press {SET}.
L When a call is received, the unit will not ring
and will display “INCOMING CALL”.
L To turn the ringer back ON, press {A}.
{SET}{HELP}
{<}{>}
1 Press {HELP}.
2 Press {<} or {>} repeatedly to display the
desired item.
3 Press {SET}.
L The selected item will be printed.
Ringer pattern
L You can select one of three ringer patterns
(feature #17, page 46).
2.3.2 Monitor/Speaker volume
8 levels (high to low) are available.
While using the monitor/speakerphone, press
{A} or {B}.
2.3.3 Voice guidance volume
(KX-FP145 only)
9 levels (high to off) are available.
While listening to voice guidance, press {A}
or {B}.
2.3.4 Answering device volume
(KX-FP145 only)
9 levels (high to off) are available.
While listening to recorded messages, press
{A} or {B}.
17

2. Preparation
Initial Programming
2.4 Date and time
You must set the date and time.
{SET}{MENU}
{<}{>}
1 Press {MENU}.
SYSTEM SETUP
PRESS NAVI.[()]
2 Press {<} or {>} repeatedly to display the
following.
SET DATE & TIME
PRESS SET
Note:
L This information will be printed on each page
transmitted from your unit.
L The accuracy of the clock is approximately
±60 seconds a month.
To correct a mistake
Press {<} or {>} to move the cursor to the
incorrect number, and make the correction.
3 Press {SET}.
L Cursor (|) will appear on the display.
D:|01/M:01/Y:03
TIME: 12:00AM
4 Enter the current day/month/year by
selecting 2 digits for each.
Example: 10 August, 2003
Press {1}{0} {0}{8} {0}{3}.
D:10/M:08/Y:03
TIME: |12:00AM
5 Enter the current hour/minute by selecting 2
digits for each. Press {*} to select “AM” or
“PM”.
Example: 3:15PM (12 hour clock entry
only)
1. Press {0}{3} {1}{5}.
D:|10/M:08/Y:03
TIME: 03:15AM
2. Press {*} repeatedly to display “PM”.
D:|10/M:08/Y:03
TIME: 03:15PM
6 Press {SET}.
L The next feature will be displayed.
7 Press {MENU} to exit the program.
18

2.5 Your logo
The logo can be your company, division or name.
2. Preparation
Keys Characters
{7} PQRSpqr s 7
{8} TUVt uv 8
{9} WX Y Z w x y z 9
{0} 0( ) <>! " #$
%& ¥ @ @^ ’ →
{#} To change capital or lower-
case letter.
{RECALL} Hyphen button
{MENU}{STOP}
{SET}{RECALL}
{<}{>}{A}{B}
{MUTE}
1 Press {MENU}.
SYSTEM SETUP
PRESS NAVI.[()]
2 Press {<} or {>} repeatedly to display the
following.
YOUR LOGO
PRESS SET
3 Press {SET}.
L Cursor (|) will appear on the display.
LOGO=|
4 Enter your logo, up to 30 characters. See the
character table on page 19 for details.
5 Press {SET}.
L The next feature will be displayed.
6 Press {MENU} to exit the program.
Note:
L This information will be printed on each page
transmitted from your unit.
To select characters with the dial keypad
Keys Characters
{1} 1[ ] { } +– /=
{MUTE} Insert button
{STOP} Delete button
Note:
L To enter another character located on the
same number key, press {>} to move the
cursor to the next space.
To enter your logo
Example: “BILL”
1. Press {2} 2 times.
LOGO=|B
2. Press {4} 3 times.
LOGO=B|I
3. Press {5} 3 times.
LOGO=BI|L
4. Press {>} to move the cursor to the next
space and press {5} 3 times.
LOGO=BIL|L
To change capital or lower-case letters
Pressing the {#} key will change to capital or
lower-case alternately.
1. Press {2} 2 times.
LOGO=|B
,._`:;?|
{2} ABCab c 2
{3} DEF d e f 3
{4} GHI g h i 4
{5} JKLj kl 5
{6} MNOmn o 6
2. Press {4} 3 times.
LOGO=B|I
3. Press {#}.
LOGO=B|i
19

2. Preparation
4. Press {5} 3 times.
LOGO=Bi|l
To correct a mistake
Press {<} or {>} to move the cursor to the
incorrect character, and make the correction.
To delete a character
Press {<} or {>} to move the cursor to the
character you want to delete and press {STOP}.
To insert a character
1. Press {<} or {>} to move the cursor to the
position to the right of where you want to
insert the character.
2. Press {MUTE} to insert a space and enter
the character.
To select characters using {A} or {B}
Instead of pressing the dial keys, you can select
characters using {A} or {B}.
1. Press {A} or {B} repeatedly to display the
desired character.
2. Press {>} to move the cursor to the next
space.
L The character displayed is inserted.
3. Return to step 1 to enter the next character.
2.6 Your fax number
{MENU}{STOP}
{SET}{RECALL}
1 Press {MENU}.
2 Press {<} or {>} repeatedly to display the
following.
3 Press {SET}.
L Cursor (|) will appear on the display.
4 Enter your fax number, up to 20 digits.
{<}{>}
SYSTEM SETUP
PRESS NAVI.[()]
YOUR FAX NO.
PRESS SET
NO.=|
Example: NO.=1234567|
Display order of characters
Capital
alphabet
Number
Symbol
Lower-case
alphabet
: Pressing {A}
: Pressing {B}
5 Press {SET}.
L The next feature will be displayed.
6 Press {MENU} to exit the program.
Note:
L This information will be printed on each page
transmitted from your unit.
L The {*} button enters a “+” and the {#}
button enters a space.
Example: +234 5678
Press {*}{2}{3}{4}{#}{5}{6}{7}{8}.
L To enter a hyphen in a telephone number,
press {RECALL}.
To correct a mistake
Press {<} or {>} to move the cursor to the
incorrect number, and make the correction.
To delete a number
Press {<} or {>} to move the cursor to the
number you want to delete and press {STOP}.
20

3TelephoneAutomatic Dialling
3.1 Storing names and
telephone numbers into
the navigator directory
For rapid access to frequently dialled numbers,
the unit provides the navigator directory (100
items).
L You can also send faxes using the navigator
directory (page 28).
{ERASE}
{MENU}{STOP}
{SET}
1 Press {MENU} repeatedly to display
“DIRECTORY SET”.
2 Press {*}.
{<}{>}{A}{B}
3. Telephone
To delete a character/number
Press {<} or {>} to move the cursor to the
character/number you want to delete, and press
{STOP}.
3.1.1 Editing a stored item
1 Press {>}.
2 Press {A} or {B} repeatedly to display the
desired item.
3 Press {MENU}.
4 Press {*}.
L If you do not need to edit the name, skip
to step 6.
5 Edit the name (see the storing procedure on
page 21 for instructions).
6 Press {SET}.
L If you do not need to edit the telephone
number, skip to step 8.
7 Edit the telephone number. For further
details, see the storing procedure on page
21.
8 Press {SET}.
3.1.2 Erasing a stored item
3 Enter the name, up to 10 characters (see
page 19 for instructions).
4 Press {SET}.
5 Enter the telephone number, up to 30 digits.
6 Press {SET}.
L To program other items, repeat steps 3 to
6.
7 Press {MENU}.
Helpful hints:
L You can confirm the stored items in the
telephone number list (page 65).
Note:
L If “SPACE= 5 DIRS.” is displayed, you can
store only 5 more items.
L A hyphen or a space entered in a telephone
number counts as 2 digits.
To correct a mistake
Press {<} or {>} to move the cursor to the
incorrect character/number, and then make the
correction.
1 Press {>}.
2 Press {A} or {B} repeatedly to display the
desired item.
3 Press {MENU}.
4 Press {#}.
L To cancel erasing, press {STOP}.
5 Press {SET}.
Another method to erase a stored item
(KX-FP145 only)
1. Press {>}.
2. Press {A} or {B} repeatedly to display the
desired item.
3. Press {ERASE}.
4. Press {SET}.
21
 Loading...