

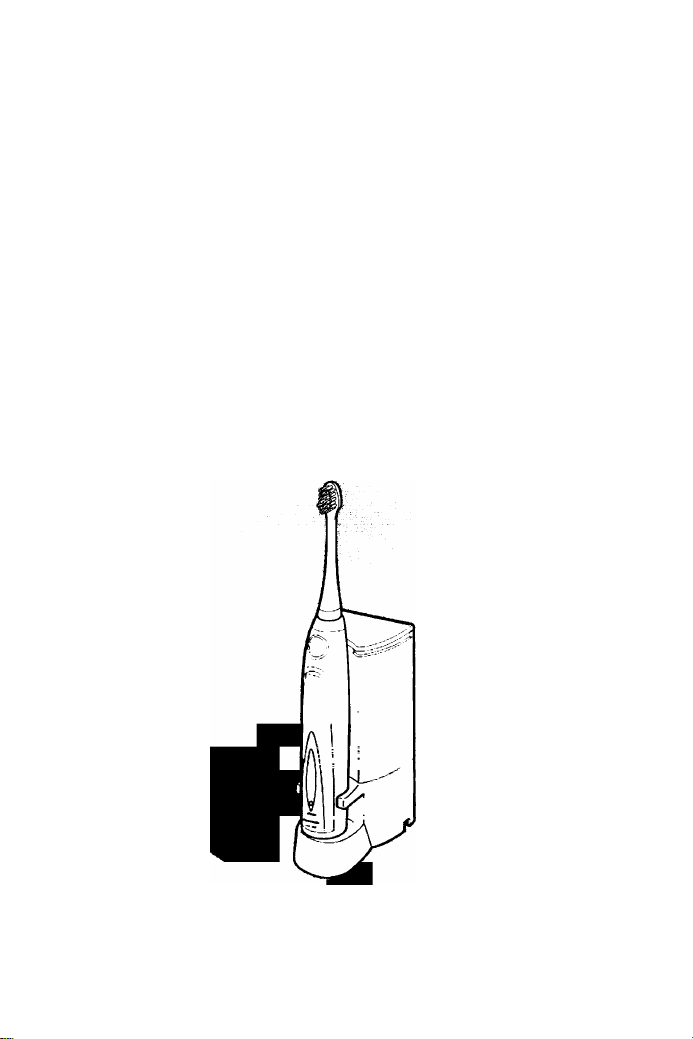
Page 1
Panason¡d
Operating Instructions
Manual de instrucciones
Electric Toothbrush
Cepillo de dientes eléctrico
Model No. EW1000
Modelo No. EW1000
Before operating this device, please read these instructions completely and save this manual for future use.
Antes de emplear este cepillo, lea completamente estas instrucciones y
guarde este manual por si tiene que consultarlo en el futuro.
Page 2

Index/Indice
English
IMPORTANT SAFEGUARDS
SAFETY PRECAUTIONS
PARTS IDENTIFICATION
BEFORE USE
HOW TO USE
TIPS ON USE
AFTER USE
MAINTENANCE
TROUBLESHOOTING
SPECIFICATIONS
DISPOSAL OF THE PRODUCT
Español
NORMAS DE SEGURIDAD IMPORTANTES
PRECAUCIONES DE SEGURIDAD
IDENTIFICACIÓN DE LAS PARTES
ANTES DE UTILIZAR EL APARATO
CÓMO UTILIZAR EL APARATO
CONSEJOS PARA UTILIZAR EL APARATO
DESPUES DE UTILIZAR EL APARATO
MANTENIMIENTO
SOLUCIÓN DE PROBLEMAS
ESPECIFICACIONES
PARA TIRAR EL APARATO
3
4
5
6
7
8
9
10
11
13
14
15
16
17
18
19
20
21
22
23
25
26
Page 3

Thank you for purchasing the Panasonic Electric Toothbrush EWIOOO
For optimunn performance and safety, please read these instructions
carefully
IMPORTANT SAFEGUARDS
When using electrical products, especially when children are present, basic
safety precautions should always be followed, including the following
READ ALL INSTRUCTIONS BEFORE USING
DANGER — To reduce the risk of electrocution
1 Do not use while bathing
2 Do not place or store product where it can fall or be pulled into a tub or
sink
3 Do not place in or drop into water or other liquid
4 Do not reach for a product that has fallen into water Unplug
immediately
WARNING — To reduce the risk of burns, electrocution, fire, or injury to
persons
1 Close supervision is necessary when this product is used by, on, or
near children or invalids
2 Use this product only for its intended use as described in this manual
Do not use attachments not recommended by the manufacturer
3 Never operate this product if it has a damaged cord or plug, if it is not
working properly, if it has been dropped or damaged, or dropped into
water Return the product to a service center for examination and
repair
4 Keep the cord away from heated surfaces
5 Never use while sleeping or drowsy
6 Never drop or insert any object into any opening
7 Do not use outdoors or operate where aerosol (spray) products are
being used or where oxygen is being administered
SAVE THESE INSTRUCTIONS
Page 4

SAFETY PRECAUTIONS
WARNING — To avoid risk of injury
1. People who use pacemakers or other internal electronic medical devices
should consult their physician before using this product. Use of the
product may interfere with the operation of such devices and result in a
dangerous medical occurrence.
2. This product should not be used by infants, by invalids, or by those who
have limited sensation inside their mouth.
3. Do not brush loose dentures or teeth that are under dental treatment.
Also, keep the brush away from any sores or other sensitive areas inside
the mouth. Failure to observe these precautions may aggravate the
condition.
4. Do not use this toothbrush with toothpaste that contains a large amount
of abrasives for removing stains from teeth, or with toothpaste that
contains a lot of whitening agents. Failure to observe these precautions
may damage your teeth or gums.
5. People with tooth or gum disease or people receiving oral treatment
should consult their dentist before use.
6. People who experience tooth or gum pain may not be able to use this
device and should consult their dentist.
7. You may experience bleeding of the gums for the first 2 or 3 days of
using this toothbrush, but such bleeding should stop. If the bleeding
persists for more than a week, stop using this toothbrush and consult
your dentist.
Page 5
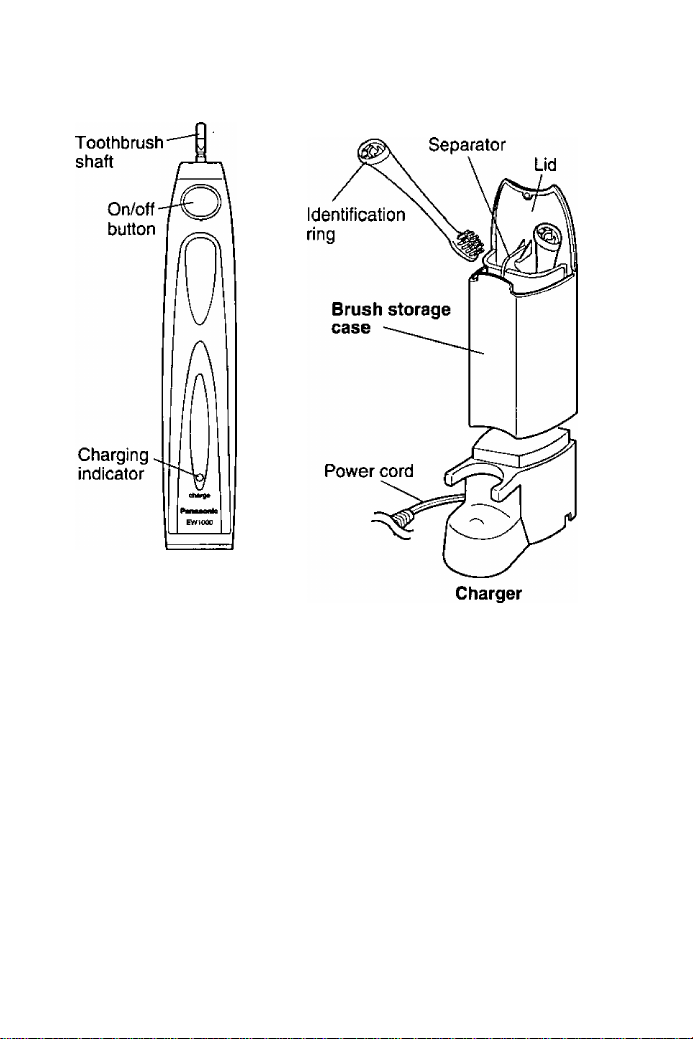
PARTS IDENTIFICATION
Main unit
Accessories
Brush head (2)
Page 6

BEFORE USE
Place the cord in either the right or left cord guide, depending on where the
charger wili be placed.
CAUTION:
• Do not use the charger in a shower stall or other
area with running water that can come in direct
contact with the charger.
• Do not remove the plug from the electrical outlet
with wet hands.
• Be sure to use only a 100-240 VAC power
supply.
Charging
Be sure to charge the main unit for at least 15
hours:
1) before using for the first time;
2) when you have not used the toothbrush for more
than three months; or
3) if the toothbrush runs out of power during use.
Be sure to turn off the toothbrush before charging.
Place the toothbrush upright in the charger.
• The charging indicator will light up.
• The toothbrush charges whenever it is placed in
the charger.
• The indicator light does not go off even after the
toothbrush is fully charged.
• The toothbrush will provide about 50 minutes of
use when the battery is fully charged.
• The operating duration will become shorter as the
battery gets older.
CAUTION;
Do not leave metal objects, such as coins or paper clips, on top of the
charger. They may become very warm.
NOTE:
• During charging, the toothbrush will get warm, but this is normal.
• Use only the exclusive charger provided.
• If the toothbrush operates only for a short time after being fully charged,
this means that the battery is nearing the end of its life cycle. Take the
unit to an authorized service center to have the battery replaced.
Page 7
HOW TO USE
This high-speed, vibrating, electric toothbrush is different from conventional
electric toothbrushes. Therefore:
• You only need to lightly press the bristles against your teeth for brushing,
• When first using this product, some people experience a tickling or
tingling sensation caused by the high-speed vibrations,
The sensation should subside after you use the toothbrush several more
times.
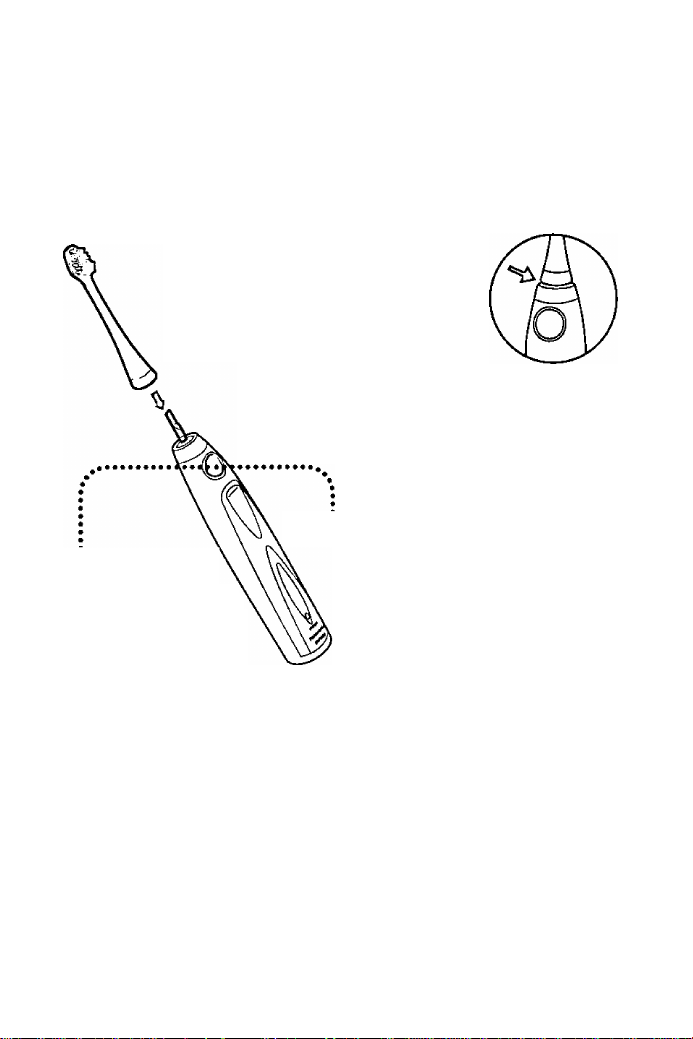
1. Place the brush head firmly onto the
toothbrush shaft.
• There is a small space between
the brush and the main unit. This
is normal and is necessary for the
head to vibrate properly.
2. Apply toothpaste to the toothbrush. Then
place the toothbrush in your mouth before
turning the power on to prevent the tooth
paste from spattering.
3. Press the on/off button for at least
4. When you have
finished brushing,
press the on/off button
to turn off the power.
• To prevent foam from
spattering, turn the
toothbrush off before
removing it from your mouth.
1 second to turn on the toothbrush.
• When the toothbrush first starts,
the “gentle-starf function causes it
take about 2 seconds to reach its
normal speed.
Brushing duration notification timer
The toothbrush stops temporarily after 2 minutes of use, and starts again.
This reminds you that you should brush your teeth for about 2 minutes.
PRECAUTION:
You may experience bleeding of the gums for the first 2 or 3 days of using
this toothbrush, but such bleeding should stop. If the bleeding persists for
more than a week, stop using this toothbrush and consult your dentist.
Page 8
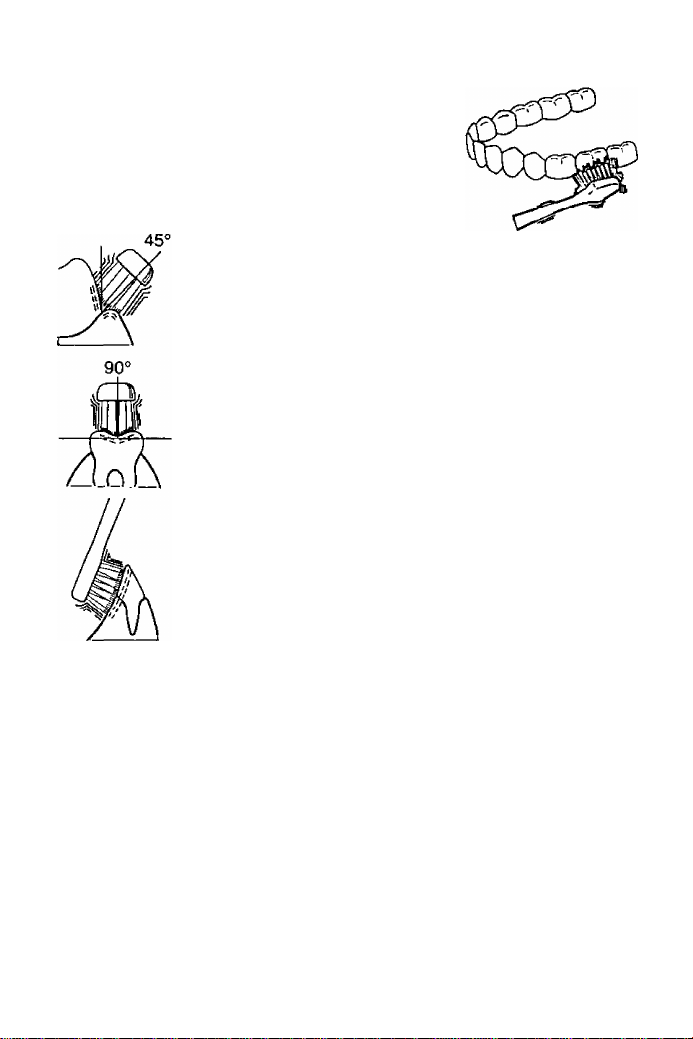
TIPS ON USE
Brush carefully between teeth or around teeth that
are not straight.
Place the bristles of the toothbrush gently against
your teeth.
Between teeth and gums:
• Place the bristles at 45°.
Brush the chewing surface of teeth:
• Brush at a 90-degree angle.
Brush the back of teeth or where teeth are not straight:
• Brush vertically.
• Move the toothbrush to match the angle of the teeth.
CAUTION:
• Do not press the brush hard where the teeth meet the gums. Do not keep
the brush in one spot for a long time. Doing so may damage the teeth or
gums. People with severe tooth or gum diseases should consult their
dentist before using this product.
• Allow only the bristles, not the plastic head, to touch your teeth. Failure to
observe this precaution may damage the teeth or gums.
NOTE:
Replacing the brush head every 3 months is recommended.
If the bristles are bent to one side, the toothbrush is not very effective for
brushing. Replace the brush with a new one when the bristles are bent or
worn.
Page 9

AFTER USE
Toothbrush
1 Wash the toothbrush with water and shake well to remove the water
2 Return the brush to the brush storage case
3 Use a cloth to wipe off the mam unit Wash hard-to-remove stains with
water
• Do not submerge the mam unit in
water for a long time
• After washing with water, wipe dry
with a cloth
• Do not scratch or damage the water
proof rubber seal Doing so may allow
water to seep inside and damage the
mam unit
4 Place the mam unit on the charger
If the identification ring comes off, put it back on as shown
• Do not forcibly pull the identification ring
since It can break easily
• Using the toothbrush without the
identification ring has no effect on
performance, the ring ts simply for user
Identification purposes
Page 10

MAINTENANCE
CAUTION
Be sure to remove the power plug from the electrical outlet before cleaning
the product Failure to do so may result in electrical shock or other injury
Brush storage case
1 Remove the brush storage case from the charger
2 Remove the separator
Charger
Use a cloth to wipe off the charger
• If cleaning requires a detergent, use a mild, neutral cleanser
• Do not use harsh chemicals such as thinner, benzene or alcohol as these
will discolor the surface
About once a year wipe the prongs of the power plug with a dry cloth
CAUTION
• Do not wash or submerge the charger in water
• Clean the power plug periodically Dirt and dust buildup may cause
electrical shock or reduce the effectiveness of the insulation, thus
resulting in overheating and a fire
10
Page 11

TROUBLESHOOTING
Problem
The toothbrush does
not operate even
when the power is
turned on.
After turning on the
power, the toothbrush
vibration speed
increases gradually.
After 2 minutes of use
the toothbrush stops
temporarily and starts
again.
The toothbrush
operates oniy for a
short period of time
even immediateiy
after being charged.
Possible cause
You did not push the
on/off button long
enough.
This is normal
operation of the
gentle-start function.
(See page 7.)
The timer is remind
ing you that you have
been brushing for 2
minutes.
(See page 7.)
The main unit was
not positioned
straight up in the
charger and was
unable to charge.
(See page 6.)
The battery has
reached the end of its
life cycle (about 3
years).
Remedy
Not a malfunction. Press
the on/off button for at least
1 second.
Not a malfunction. Continue
using.
Not a malfunction. Continue
using.
Stand the main unit up
straight so that the bottom
touches the charging base.
Take the unit to an
authorized service center to
have the battery replaced.
(Do not attempt to replace
the battery yourself since
you may damage the unit's
waterproofing or internal
mechanisms.)
The toothbrush
doesn’t operate.
You have just pur
chased the product or
have not used it for
more than 3 months.
Charge the main unit for at
least 15 hours. (See page
6.)
11
Page 12

TROUBLESHOOTING
Problem Possible cause
The direction of the
brush movement
changes. (The brush
head moves from
side to side.)
The toothbrush is not
working properly. (For
example, its movement is uneven.)
If the device still does not function properly, stop using it and contact an
authorized service center.
WARNING:
Do not disassemble the product at any time other than when disposing of it.
Doing so may result in short circuit, fire, or injury.
For repair or maintenance (such as battery replacement), take the product
to an authorized service center.
Remedy
Not a malfunction.
Remove the brush head
once and put it back to the
right position.
Place the main unit in the
charger for more than
1 second, then turn it on
again to see if it operates
properly.
12
Page 13

SPECIFICATIONS
Power source:
Motor voltage:
Charging time:
Household use
Replacement brush EW0910 {2 brush heads)
100-240 VAC
50-60 Hz
1.2 V DC
15 hours
13
Page 14

DISPOSAL OF THE PRODUCT
A nickel metal hydride battery that is recyclable powers the product you
have purchased. Please call 1-800-8-BATTERY for information on how to
recycle this battery,
WARNING:
Do not disassemble the product at any time other than when disposing of it.
Failure to observe this point may result in short circuit, fire, or injury.
For repair or maintenance (such as battery replacement), take the product
to an authorized senrice center.
Removing the Ni-MH battery before disposing of the product
• Before removing the battery, be sure to completely drain the unit of
power.
• Use a screwdriver to loosen the screw on the bottom of the product.
• While holding the toothbrush shaft, remove the screw then remove the
parts indicated by numbers ®, (D, and d) in the diagram.
• Be careful not to short-circuit the negative and positive poles of the
battery.
This diagram is NOT
an explanation for
repair purposes.
Bottom of main unit
14
Nickel-metal
hydride battery
Press the two clips inward and
pull out from the main unit.
Page 15

Gracias рог haber adquirido el cepillo de dientes eléctrico Panasonic
modelo EW1000. Para obtener un rendimiento y seguridad óptimos, lea
atentamente estas instrucciones.
NORMAS DE SEGURIDAD
IMPORTANTES
Cuando se utilicen aparatos eléctricos, especialmente estando presentes
niños, deberán tomarse siempre precauciones de seguridad básicas,
incluyendo las siguientes:
LEA TODAS LAS INSTRUCCIONES ANTES DEL
EMPLEO
PELIGRO — Para reducir el riesgo de electrocución:
1. No lo utilice mientras se baña.
2. No coloque ni guarde el aparato donde pueda caer o ser empujado al
interior de una bañera o fregadero.
3. No lo meta ni lo deja caer al agua u otro líquido.
4. No tome el aparato si ha caído al agua. Desenchúfelo inmediatamente.
ADVERTENCIA — Para reducir el riesgo de quemaduras,
electrocución, incendio o heridas en personas:
1. Cuando este aparato sea utilizado por niños o inválidos, con ellos o
cerca de ellos, será necesario supervisarlos de cerca.
Utilice este aparato sólo con el fin para el cual ha sido diseñado, como
2.
se describe en este manual.
No utilice accesorios que no hayan sido recomendados por el
fabricante.
No utilice nunca este aparato si el cable o la clavija están dañados, si
3.
no funciona correctamente, si ha caído al suelo o se ha dañado, o si ha
caído al agua. Devuelva el aparato a un centro de servicio para que lo
examinen y reparen.
Mantenga el cable alejado de las superficies calientes.
No utilice nunca el aparato mientras está acostado o adormilado.
No deje caer ni inserte nunca ningún objeto en ninguna de sus
aberturas.
No lo utilice en exteriores, donde estén utilizándose productos en
aerosol (atomizador) o donde esté administrándose oxígeno.
GUARDE ESTAS INSTRUCCIONES
15
Page 16

PRECAUCIONES DE SEGURIDAD
ADVERTENCIA — Para evitar riesgos de que se produzcan heridas
1 Las personas que utilizan marcapasos u otros aparatos médicos
electrónicos internos deberán consultar a su medico antes de utilizar
este aparato La utilización de este aparato puede interferir con el
funcionamiento de esos productos y constituir un peligro grave
2 Este aparato no deberá ser utilizado por niños, por inválidos ni por
aquellas personas que tengan una sensibilidad limitada en el interior de
sus bocas
3 No cepille dentaduras postizas flojas ni dientes que se encuentren bajo
tratamiento dental Evite también cualquier llaga u otras partes sensibles
de la boca La condición podra agravarse si no se siguen estas
precauciones
4 No utilice este cepillo con pasta de dientes que contenga gran cantidad
de abrasivos para eliminar manchas de los dientes, ni tampoco con
aquellas pastas de dientes que contengan muchos agentes blanquea
dores Si no sigue estas precauciones podra lastimar sus dientes o
encías
5 Las personas con dientes o encías enfermos o las que esten recibiendo
tratamiento oral deberán consultar a su dentista antes de utilizar este
aparato
6 Las personas que sientan dolor de dientes o encías tal vez no puedan
utilizar este aparato y deberán consultar a su dentista
7 Durante los 2 ó 3 primeros días de utilizar este aparato es posible que
sangre por las encías, pero pronto deberá dejar de sangrar Si sigue
sangrando durante mas de una semana al utilizar este aparato, deje de
utilizarlo y consulte a su dentista
16
Page 17

IDENTIFICACION DE LAS PARTES
Unidad pnnctpal
Accesorio
A
Cabeza del cepillo (2)
17
Page 18

ANTES DE UTILIZAR EL APARATO
Coloque el cable en su guía derecha o izquierda, dependiendo del lugar de
colocación del cargador.
PRECAUCIÓN:
• No utilice el cargador en un estante de ducha ni
en otro lugar con agua corriente que pueda
entrar en contacto directo con el cargador.
• No desconecte la clavija de la toma de corriente
eléctrica con las manos mojadas.
• Asegúrese de utilizar solamente una alimenta
ción de CA 100-240 V.
Carga
Asegúrese de cargar la unidad principal durante un
mínimo de 15 horas:
1) antes de utilizarla por primera vez;
2) cuando no haya utilizado el cepillo de dientes
durante más de tres meses; o
3) si el cepillo de dientes se queda sin alimentación
eléctrica durante la utilización.
Asegúrese de apagar el cepillo de dientes antes de
hacer la carga.
Coloque el cepillo de dientes en posición vertical en
el cargador.
• El indicador de carga se encenderá,
• El cepillo de dientes se carga siempre que está
colocado en el cargador.
• La luz del indicador no se apaga incluso después
de haberse cargado completamente el cepillo de
dientes.
• El cepillo de dientes funcionará durante unos 50 minutos cuando la
batería esté completamente cargada.
• El tiempo de funcionamiento se reducirá al envejecer la batería.
PRECAUCIÓN:
No deje objetos metálicos como, por ejemplo, monedas o clips para papel
encima del cargador porque podrán calentarse mucho.
NOTAS:
• Durante la carga, el cepillo de dientes se calentará, pero esto es normal.
• Utilice solamente el cargador exclusivo suministrado.
• Si el cepillo de dientes sólo funciona durante poco tiempo después de
haber sido cargado completamente, esto significa que la batería estará a
punto de terminar su ciclo de vida. Lleve la unidad a un centro de servicio
autorizado para que le reemplacen la batería.
18
Page 19

CÓMO UTILIZAR EL APARATO
Este cepillo de dientes eléctrico, vibrador y de alta velocidad es diferente
de los cepillos de dientes eléctricos convencionales. Por lo tanto:
• Sólo necesita presionar ligeramente la cerda contra sus dientes para
cepillarlos.
• Cuando se utilice por primera vez este aparato, algunas personas
experimentarán una sensación de cosquilleo u hormigueo causado por
las vibraciones a alta velocidad.
Esta sensación disminuirá después de haber utilizado el cepillo de
dientes varias veces más.
1. Coloque firmemente la cabeza del
cepillo en el eje del cepillo de dientes.
• Entre el cepillo y la unidad principal
queda un pequeño espacio. Esto es
normal y necesario para que la
cabeza vibre correctamente.
2. Ponga pasta de dientes en el cepillo de
dientes. Luego ponga el cepillo de dientes
en su boca antes de encenderlo para
impedir salpicar la pasta de dientes.
4. Cuando termine
de cepillarse los
dientes, presione el
botón de encendido/
apagado para apagar
el cepillo de dientes.
• Para impedir salpicar la
espuma, apague el cepillo
de dientes antes de sacarlo
de su boca.
Temporízador de aviso de la duración del cepillado
El cepillo de dientes se para temporalmente después de funcionar durante
2 minutos y luego empieza a funcionar de nuevo. Esto sirve para
recordarte que deberá cepillarse los dientes durante unos 2 minutos.
PRECAUCIÓN:
Durante los 2 ó 3 primeros días de utilizar este aparato es posible que
sangre por las encías, pero pronto deberá dejar de sangrar. Si sigue
sangrando durante más de una semana al utilizar este aparato, deje de
utilizarlo y consulte a su dentista.
3. Presione el botón de encendido/
apagado durante un mínimo de
1 segundo para encender el cepillo
de dientes.
• Cuando el cepillo de dientes
empiece a funcionar, la función de
“inicio suave” hará que éste tarde
unos 2 segundos en alcanzar su
velocidad normal.
19
Page 20

CONSEJOS PARA UTILIZAR EL APARATO
Cepille cuidadosamente entre los dientes o
alrededor de los dientes que no estén derechos.
Coioque suavemente ias cerdas dei cepillo de
dientes contra sus dientes.
Entre los dientes y las encías:
• Coloque las cerdas a 45°.
Cepille la superficie de mascar de los dientes:
• Cepille con un ángulo de 90°.
Cepille la parte posterior de los dientes o donde éstos no
estén derechos.
• Cepille vertical mente.
• Mueva el cepillo de dientes para que concuerde con el
ángulo de los dientes.
PRECAUCION:
• No presione con fuerza el cepillo donde los dientes se unen con las
encías. No mantenga el cepillo en un mismo punto durante mucho
tiempo. Esto podría dañar los dientes o las encías. Las personas con
enfermedades graves en los dientes o en las encías deberán consultar a
su dentista antes de utilizar este aparato.
• Permita que sólo sean las cerdas, no la cabeza de plástico, las que toquen
sus dientes. Si no toma esta precaución podrá dañar sus dientes o encías.
NOTA:
Se recomienda cambiar la cabeza dei cepillo cada 3 meses.
Si las cerdas están inclinadas hacia un lado, el cepillo no será muy eficaz
para cepillar los dientes. Reemplace el cepillo por otro nuevo cuando las
cerdas estén dobladas o desgastadas.
20
Page 21

DESPUES DE UTILIZAR EL APARATO
Cepillo de dientes
1. Lave el cepillo de dientes con agua y sacúdaio bien para eliminar el
agua.
2. Ponga el cepillo en su caja para guardarlo.
3. Utilice un paño para limpiar la unidad principal. Pase con fuerza el paño
para eliminar las manchas.
• No sumerja la unidad principal en
agua durante mucho tiempo.
• Después de lavar el aparato con
agua, séquelo pasando un paño.
• No arañe ni dañe el sello de goma
hermético al agua. De lo contrario
entrará agua en la unidad y ésta se
dañará.
4. Ponga la unidad principal en el
cargador.
Si se desprende el anillo de identificación, vuelva a colocarlo como se
muestra en la ilustración.
• No tire a la fuerza del anillo de identifi
cación porque éste se puede romper
fácilmente.
* La utilización del cepillo de dientes sin el
anillo de identificación no causa ningún
efecto en el rendimiento; el anillo tiene
simplemente la finalidad de servir como
identificación para el usuario.
21
Page 22

MANTENIMIENTO
PRECAUCIÓN:
Asegúrese de desconectar la clavija de alimentación de ta toma de
corriente antes de limpiar el aparato. De no hacerlo podría producirse una
descarga eléctrica u otras heridas.
Caja para guardar el cepillo
1. Retire del cargador la caja para guardar el cepillo.
2. Retire el separador.
__________________________________
Utilice un paño para limpiar el cargador.
• Si se necesita detergente para limpiar, utilice uno que sea suave y neutro.
• No utilice productos químicos fuertes como, por ejemplo, diluyente,
bencina o alcohol porque éstos harán que la superficie pierda su color.
Limpie las patillas de la clavija de alimentación con un paño seco una vez
al año aproximadamente.
PRECAUCIÓN:
• No lave ni sumerja el cargador en agua.
• Limpie periódicamente la clavija de alimentación. La acumulación de
polvo y suciedad puede causar descargas eléctricas o reducir la eficacia
del aislamiento, lo que a su vez puede producir recalentamiento o un
incendio.
22
Page 23

SOLUCION DE PROBLEMAS
Problema
El cepillo de dientes
no funciona a pesar
de encenderlo
Después de encender
el cepillo de dientes,
la velocidad de la
vibración aumenta
poco a poco
Después de funcionar
durante 2 minutos, el
cepillo de dientes se
detiene temporalmente
y luego empieza a
funcionar de nuevo
El cepillo de dientes
solo funciona durante
poco tiempo incluso
inmediatamente
después de haberlo
cargado
El cepillo de dientes
no funciona
Causa posible
No presiono el botón de
encendido/apagado
durante el tiempo
suficiente
Esta es la operación
normal de la función de
inicio suave
(Consulte la pagina 18)
El temporizador le está
recordando que ha
estado cepillándose los
dientes durante 2
minutos
(Consulte la página 18 )
La unidad principal no
se coloco en posición
vertical en el cargador
y no se pudo cargar
(Consulte la pagina 17)
La batería ha llegado al
final de su ciclo de vida
Util (unos 3 años)
Acaba de comprar el
aparato o no lo ha
utilizado durante más
de 3 meses
Remedio
No es una falla de
funcionamiento Presione
el botón de encendido/
apagado durante
1 segundo como mínimo
No es una falla de
funcionamiento Continue
utilizando el aparato
No es una falla de
funcionamiento Continue
utilizando el aparato
Coloque en posición
vertical la unidad principal
de forma que la parte
inferior toque la base de
carga
Lleve la unidad a un
centro de servicio auto
rizado para que le
reemplacen la batería
(No intente reemplazar la
batería usted mismo
porque podría dañar el
materia! impermeable o
los mecanismos internos
de la unidad}
Cargue la unidad principal
durante un mínimo de 15
horas
(Consulte la página 17 )
23
Page 24

SOLUCION DE PROBLEMAS
Problema Causa posible
El sentido de movi
miento del cepillo
cambia (La cabeza
del cepillo se mueve
de lado a lado)
El cepillo de dientes
no funciona correcta-
mente (Por ejemplo.
su movimiento resulta
irregular)
Si el aparato sigue sin funcionar correctamente, deje de utilizarlo y
póngase en contacto con un centro de servicio autorizado
ADVERTENCIA
No desarme el aparato en ningún otro momento que no sea el elegido para
tirarlo En caso contrario podra producirse un cortocircuito, incendio o
heridas
Para realizar trabajos de reparación o mantenimiento (como reemplazar la
batería, por ejemplo), lleve el aparato a un centro de servicio autorizado
Remedio
No es una falla de
funcionamiento
Retire la cabeza del
cepillo una vez y vuelva
a ponerla en la posición
correcta
Ponga la unidad principal
en el cargador durante
más de 1 segundo, y
luego enciéndala de
nuevo para ver si
funciona correctamente
24
Page 25

ESPECIFICACIONES
Alimentación: CA 100-240 V
Voltage del motor: 1,2 V CC
Tiempo de carga: 15 horas
Uso en el hogar
Cepillo de recambio EW0910 {2 cabezas de cepillos)
50-60 H2
25
Page 26

PARA TIRAR EL APARATO
El aparato que usted ha comprado funciona con una batería de hidruro
metálico de níquel reciclable. Llame a 1-800-8-BATTERY para obtener
información sobre cómo reciclar esta batería.
ADVERTENCIA:
No desarme el aparato en ningún otro momento que no sea el elegido para
tirarlo. Si no tiene este punto en cuenta podrá producirse un cortocircuito,
incendio o heridas.
Para realizar trabajos de reparación o mantenimiento (como reemplazar la
batería, por ejemplo), lleve el aparato a un centro de servicio autorizado.
Extracción de la batería de Ni-MH antes de tirar este aparato
• Antes de retirar la batería, asegúrese de descargarla completamente.
• Utilice un destornillador para aflojar el tornillo de la parte inferior del
aparato.
• Mientras sujeta el eje del cepillo de dientes, retire primero el tornillo y
luego las partes indicadas por los números d), (D y Cl) en el diagrama.
• Tenga cuidado de no cortocircuitar los polos negativo y positivo de la
batería.
Este diagrama NO
constituye ninguna
explicación con fines
de reparación.
Parte Inferior de
la unidad principal
26
Batería de hidruro
metálico de níquel
Presione las dos presillas
hacia adentro y saque la
parte de la unidad principal.
Page 27

27
Page 28

IN USA CONTACT:
Panasonic Consumer Electronics Company
One Panasonic Way 2F-3 Secaucus, New Jersey 07094
IN PUERTO RICO CONTACT:
Panasonic Sales Company Division of Matsushita Eiectric of
Puerto Rico, Inc-
San Gabriel Industrial Park 65th Infantry Avenue KM9.5 Carolina
Puerto Rico 00630
Service*Assistance*Accessories
Call 1-800-338-0552 {in USA)
www.panasonic.conn/personalcare
No. 1 EN ES (USA)
Printed in Japan/Impreso en Japôn
 Loading...