

Page 1

English 2
Espanõl 8
Before operating this unit, please read these instructions completely.
Operating Instructions
Beard/Hair Trimmer
Model No. ER2405
Page 2

English
IMPORTANT SAFETY INSTRUCTIONS
When using an electrical appliance, basic
precautions should always be followed, including
the following:
Read all instructions before using this appliance.
DANGER
1. Do not reach for an appliance that has fallen
into water. Unplug immediately.
2. Charger unit is not for immersion or for use in
shower.
3. Do not place or store appliance where it can fall
or be pulled into a tub or sink. Do not place in
or drop into water or other liquid. Always return
hand unit to wall unit after using.
4. Except when charging, always unplug this
appliance from the electrical outlet immediately
after using.
5. Unplug this appliance before cleaning.
6. Do not use an extension cord with this
appliance.
WARNING
1. Close supervision is necessary when this
appliance is used by, on, or near children or
invalids.
2. Use this appliance only for its intended use as
described in this manual. Do not use
2
To reduce the risk of electric
shock:
To reduce the risk of burns, fire,
electric shock, or injury to persons:
attachments not recommended by the
manufacturer.
3. Never operate this appliance if it has a
damaged cord or plug, if it is not working
properly, if it has been dropped or damaged, or
dropped into water. Return the appliance to a
service center for examination and repair.
4. Keep the cord away from heated surfaces.
5. Never drop or insert any object into any
opening.
6. Do not use outdoors or operate where aerosol
(spray) products are being used or where
oxygen is being administered.
7. Do not use this appliance with a damaged or
broken comb, as facial injury may occur.
8. Periodically inspect the wall unit for secure
mounting.
SAVE THESE INSTRUCTIONS
Page 3

Cautions for cleaning
5
4
3
2
1
Important
Cautions for charging
Dry the appliance completely before charging it.
•
Charge the appliance at temperatures between 0 °C (32 °F) and
•
40 °C (104 °F) where it will not be exposed to direct sunlight or other
heat sources.
Charging should not be continued for more than 48 hours as it may
•
damage the battery.
The appliance may become warm during operation and charging.
•
This is normal.
The charging base is intended to be correctly oriented in a vertical or
•
floor mount position.
Cautions for charging base
Only use the charging base included specifically designed for this model.
•
Keep the charging base away from water and handle it only with dry
•
The housing should not be taken apart as this can affect the
•
watertight construction of the appliance.
Wash the appliance in tap water. Salt water, boiling water and
•
cleaning products that are designed for toilets, bathrooms or kitchen
appliances should not be used. The appliance should be submerged
in tap water for a short time only.
Clean the housing only with a soft cloth slightly dampened with tap
•
water or soapy tap water. Caustic cleaners such as benzine or
bleach should not be used.
Specifications
Power source: See the name plate on the product.
Motor voltage: 1.2 V DC
Charging time: 8 hours
This product is intended for household use only.
English
hands.
Store the charging base in a dry area where it is protected from damage.
•
The supply cord cannot be replaced. If the cord is damaged, the
•
appliance should be scrapped.
Cautions for use and storage
Turn off the appliance before changing the trimming length or
•
removing the comb attachment.
This appliance is not intended for use by persons (including children)
•
with reduced physical, sensory or mental capabilities, or lack of
experience and knowledge, unless they have been given supervision
or instruction concerning use of the appliance by a person
responsible for their safety. Children should be supervised to ensure
that they do not play with the appliance.
Moving parts should not be tampered with.
•
The appliance should not be used on animals.
•
The appliance should not be disassembled. Take it to a qualified
•
serviceperson when service or repair is required.
The appliance should be stored in a place that is not exposed to
•
direct sunlight or near a heater or other source of heat.
Parts identification
A Main body
1 Mounting hook
2 Trimming length
indicator
3 Switch
4 Charge indicator lamp
B Blade block
5 Cleaning lever
6 Moving blade
7 Stationary blade
C Comb attachment
D Charging base (RE9-25)
8 Oil holder
9 Cleaning brush holder
E Oil
F Cleaning brush
3
Page 4
4
English
25mm
28mm
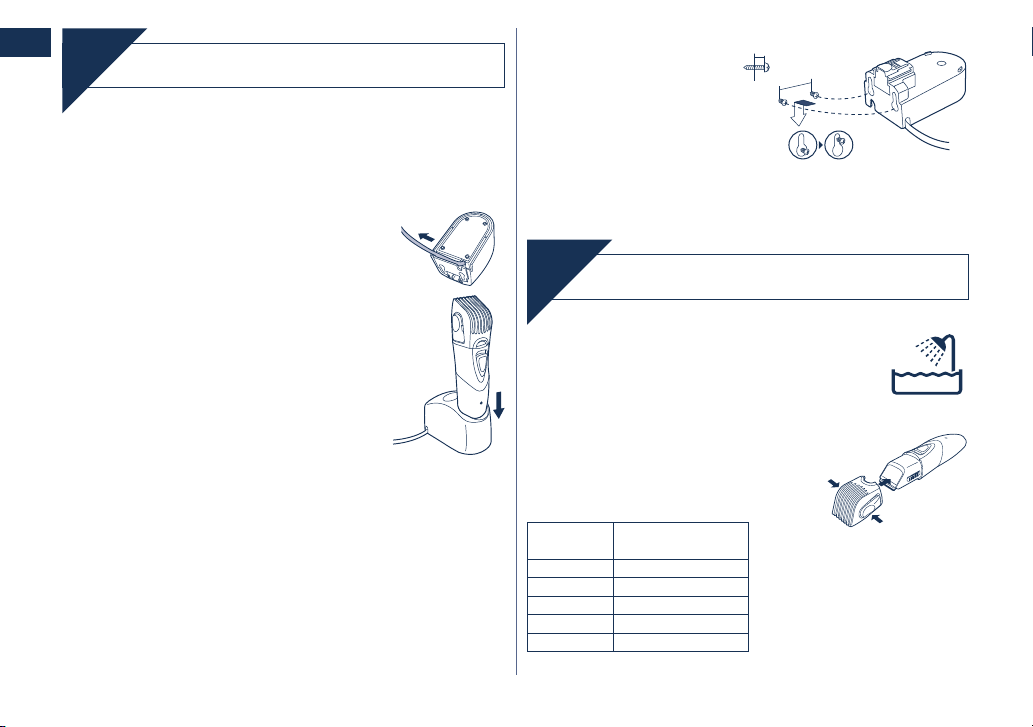
Place the trimmer on the charging base when storing or charging
it.
You can fully charge the trimmer in 8 hours if it is losing speed.
The oil and the cleaning brush also can be placed in their
respective holders in the charging base.
Storing and charging the trimmer
Store
1. Pass the power cord through one of the
cord guides on the right or left.
2. Plug the power cord into a household
outlet and place the charging base on a
flat surface.
3. Turn off the trimmer and insert it in the
charging base as illustrated.
The charge indicator lamp lights and stays
•
on until the trimmer is removed from the
charging base.
A full charge supplies enough power for
•
approximately 10 trims (5 minutes per trim
for a normal beard).
Charge the trimmer for at least 16 hours
•
when charging it for the first time or when it
has not been used for more than 6 months.
If the shape of the plug does not fit the
•
power outlet, use an attachment plug
adaptor of the proper configuration.
Fixing the charging base to the wall
1. Attach two screws to the wall
as illustrated.
Do not attach the charging
•
base above the sink as it
may fall into the water.
Screws are sold separately.
•
Use screws of 2.7 mm to
3.1 mm in diameter.
2. Hook the charging base onto these screws.
3. Plug the power cord into a household outlet.
Using the trimmer
Use
The following is the symbol for a wet trimmer. The
symbol means the hand-held part may be used in a
bath or shower.
Trimming your moustache
1.
Apply a few drops of the oil to the blades.
2. Grasp the sides of the comb
attachment and move it to the
desired trimming length (between
3 mm and 15 mm).
Indicator Trimming length
1 3 mm (1/8˝)
2 6 mm (1/4˝)
3 9 mm (3/8˝)
4 12 mm (1/2˝)
5 15 mm (5/8˝)
Page 5
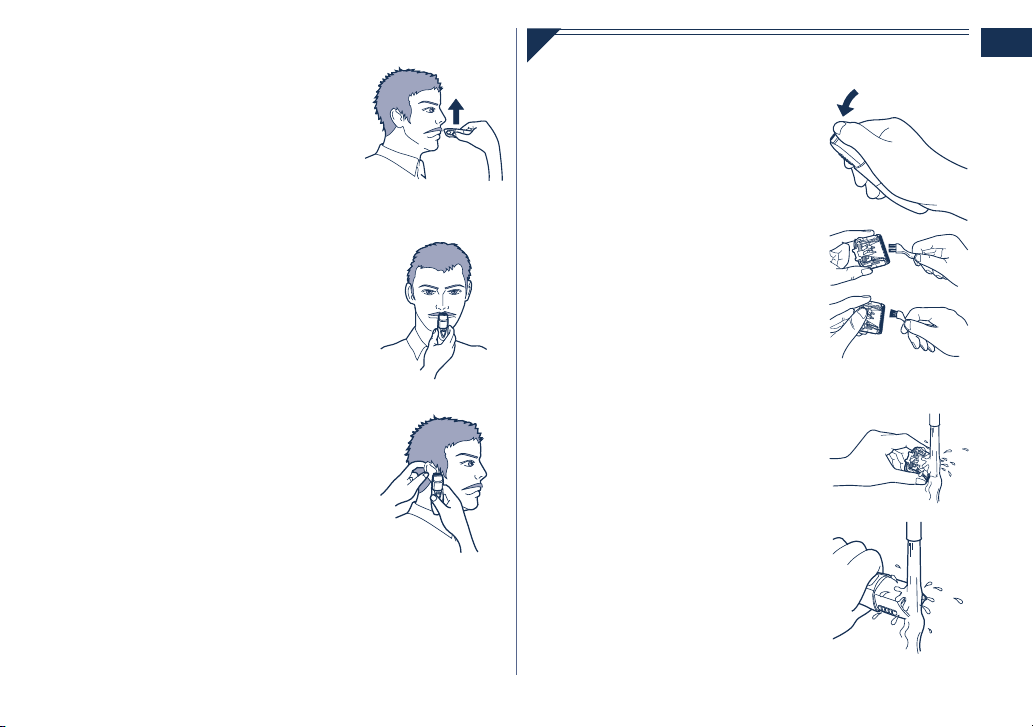
3. Slide the switch on the main body upwards to turn on
the trimmer.
4. Move the trimmer upwards with the
switch on the main body facing
downwards as illustrated.
Shaping your moustache
1. Remove the comb attachment and
turn on the trimmer.
2. Trim around your moustache.
Shaping your sideburns
1. Remove the comb attachment and
turn on the trimmer.
2. Place the trimmer at a right angle to
your skin and cut your sideburns.
Trimming your body hair
You can also trim your body hair.
Cleaning the trimmer
Using the cleaning brush
1. Remove the comb attachment.
2. Hold the main body, place your
thumb against the blades and then
push them away from the main
body.
3. Brush off any hair trimmings from
the main body and from around the
blade.
4. Brush any hair trimmings out from
between the stationary blade and
the moving blade while pressing
down the cleaning lever to raise the
moving blade.
Washing with water
1. Remove the blade.
2. Rinse off any hair trimmings that are
sticking to the blades with running
water.
3. Rinse out any hair trimmings that
are inside the trimmer with running
water.
English
5
Page 6

6
English
4. Gently shake the trimmer 4 or 5 times and then wipe off
R B R C
N i- M H
TM
any water drops from the trimmer and the blade.
5. Place the trimmer on a towel with the switch on the
main body facing downwards to let it dry fully.
Lubrication
Lubricate the blades before using them or
after cleaning them.
1. Apply a drop of the oil to the points
indicated by the arrows.
Remounting the blade
1. Fit the mounting hook into the blade
mounting on the trimmer and then push
in until it clicks.
Blade life
Blade life varies according to the frequency and length of use of
the trimmer.
For example, the blade life is approximately 3 years when using
the trimmer for 5 minutes 10 times a month. Replace the blades if
cutting efficiency reduces substantially despite proper
maintenance.
Battery life
Battery life varies according to the frequency and length of use of
the appliance. For example, the battery life is approximately 3
years when the battery is charged 3 times a month.
The appliance should not be left for more than 6 months without
charging it. The charge drains from the battery and the battery life
may be shortened.
Removing the built-in rechargeable battery
ATTENTION
A nickel metal hydride battery that is recyclable powers the
product you have purchased. Please call 1-800-8-BATTERY for
information on how to recycle this battery.
WARNING:
Do not attempt to replace the battery for the purpose of reusing
the trimmer. This could result in the risk of fire or electric shock.
The battery in this trimmer is not intended to be replaced by
consumers.
However, the battery may be replaced at an authorized service
center. The procedure described below is intended only for
removal of the rechargeable battery for the purpose of proper
disposal.
Remove the battery as illustrated.
Fully discharge the battery.
•
Be careful not to short the + and – terminals of the battery after
•
removing it.
Page 7

FOR YOUR CONVENIENCE, WE HAVE ESTABLISHED A TOLLFREE (IN USA ONLY) NATIONAL ACCESSORY PURCHASE
HOT LINE AT 1-800-332-5368.
7
English
Page 8

INSTRUCCIONES DE SEGURIDAD IMPORTANTES
Al utilizar un dispositivo eléctrico, deben seguirse
siempre unas precauciones básicas que incluyen
las siguientes:
Lea todas las instrucciones antes de utilizar este
dispositivo.
PELIGRO
1. No intente alcanzar un dispositivo que se haya
caído al agua. Desenchúfelo inmediatamente.
2. El cargador no debe sumergirse ni utilizarse en
la ducha.
3. No coloque ni guarde el dispositivo donde
pueda caerse en una bañera o lavabo. No lo
coloque ni lo deje caer en agua o algún otro
líquido. Siempre regréselo a la unidad para
pared después de utilizarlo.
4. Excepto cuando lo esté cargando, desenchufe
siempre este aparato de la toma eléctrica tras
utilizarlo.
5. Desenchufe este dispositivo antes de limpiarlo.
6. No utilice un alargador con este dispositivo.
ADVERTENCIA
Español
1. Es necesaria una supervisión cercana cuando
el dispositivo sea utilizado por o cerca de niños
o minusválidos.
2. Utilice este dispositivo solamente para el uso
8
Para reducir el riesgo de
descargas eléctricas:
Para reducir el riesgo de quemaduras, fuego,
descargas eléctricas o daños personales:
para el que se ha diseñado como se describe
en este manual. No utilice ningún accesorio no
recomendado por el fabricante.
3. Nunca utilice el dispositivo si tiene el cordón o
el enchufe dañado, si no funciona
correctamente, o si se ha caído, dañado o
mojado. Devuelva el dispositivo a un centro de
servicio para examinarlo y repararlo.
4. Mantenga el cable alejado de las superficies
calientes.
5. Nunca deje caer ni introduzca ningún objeto
por cualquier abertura.
6. No utilice la afeitadora en exteriores o donde se
estén utilizando aerosoles (spray) o donde se
esté administrando oxígeno.
7. No utilice el dispositivo con un accesorio de
peinado averiado o roto, ya que podría
provocar lesiones en el rostro.
8. Inspeccione periódicamente la unidad para
pared por seguridad.
GUARDE ESTAS INSTRUCCIONES
Page 9

5
4
3
2
1
Importante
Precauciones para la carga
Seque el aparato completamente antes de cargarlo.
•
•
No cargue el aparato en temperaturas por debajo de 0 °C (32 °F) o
por encima de 40 °C (104 °F), o donde pueda estar expuesto a la
luz solar directa u otras fuentes de calor.
No cargue por más de 48 horas ya que podría averiarse la batería.
•
El aparato podría calentarse durante su funcionamiento y la carga.
•
Esto es normal.
El adaptador está preparado para orientarlo correctamente en una
•
posición vertical o en el suelo.
Precauciones para el cargador
No intente utilizar cualquier cargador que no sea el incluido el cual
•
está diseñado especícamente para este modelo Utilice
exclusivamente el cargador incluido.
Mantenga el cargador lejos del agua y manéjelo solamente con las
•
manos secas.
Almacene el cargador en un área seca donde esté protegido contra daños.
•
El cable de alimentación no se puede sustituir. Si el cable se dañara,
•
el aparato se debe desechar.
Precauciones para el uso y almacenamiento
Apague el aparato antes de cambiar la longitud de corte o quitar el
•
accesorio de peinado.
Este aparato no debe ser utilizado por personas (incluyendo niños)
•
con capacidades físicas, sensoriales o mentales reducidas, o con falta
de conocimiento y experiencia, a menos que se encuentren bajo
supervisión o bajo instrucciones sobre el uso del aparato de una
persona responsable de la seguridad. Supervise a los niños pequeños
para asegurarse de que no se encuentren próximos al aparato.
No interferir con las piezas movibles.
•
No lo use en animales.
•
No desmonte el aparato. Cuando requiera servicio o reparación
•
llévelo con una persona cualicada.
No almacene el aparato en un lugar expuesto a la luz solar directa o
•
cerca de un calentador u otras fuentes de calor.
Precauciones para la limpieza
•
No quite la carcasa ya que esto podría afectar la construcción
térmica del aparato.
•
Lave el aparato con agua corriente. No utilice agua salada o
hervida. También, no utilice productos de limpieza que son para
utilizarse en retretes, baños o con aparatos de cocina. No sumergir
el aparato en agua durante un largo periodo de tiempo.
•
Limpie la carcasa solamente con un paño suave ligeramente mojado
con agua corriente o jabonosa. No utilice un limpiador cáustico tal
como bencina o lejía.
Especicaciones
Fuente de alimentación: Ver placa identicatoria sobre el producto.
Voltaje del motor: 1.2 V DC
Tiempo de carga: 8 horas
Este producto está destinado solamente para su uso doméstico.
Identicación de las partes
A
Cuerpo principal
1
Gancho de montaje
2
Indicador de longitud de
corte
3
Interruptor
4
Luz indicadora de carga
B
Bloqueo de cuchilla
5
Palanca de limpieza
6
Cuchilla movible
7
Cuchilla estacionaria
C
Accesorio de peinado
D
Cargador (RE9-25)
8
Base para aceite
9
Base para el cepillo de
limpieza
E
Aceite
F
Cepillo de limpieza
9
Español
Page 10

10
Español
Almacenamiento y carga del recortador
25mm
28mm
Almacenamiento
Coloque el recortador en el cargador al almacenarlo o cargarlo.
Puede cargar el recortador completamente en 8 horas si pierde
velocidad.
El aceite y el cepillo de limpieza pueden colocarse en sus bases.
1. Pase el cable de suministro eléctrico a
través de una de las guías para cable a la
derecha o izquierda.
Fijación del cargador en la pared
1. Monte dos tornillos a la pared
como se muestra.
No monte el cargador sobre el
•
lavabo ya que es posible que
se caiga al agua.
Los tornillos se venden por
•
separado. Utilice tornillos de
2,7 mm a 3,1 mm de diámetro.
2. Enganche el cargador con estos tornillos.
3. Enchufe el cable de suministro eléctrico en una toma de corriente
doméstica.
2. Enchufe el cable de suministro eléctrico en
una toma de corriente y coloque el cargador
sobre una supercie plana.
3. Apague el recortador e insértelo en el
cargador como se muestra.
La luz indicadora de carga se ilumina y
•
permanece así hasta que el recortador sea
retirado del cargador.
Una carga completa suministra suciente
•
alimentación para aproximadamente 10 recortes
(5 minutos por recorte para una barba normal).
Cargue el recortador por al menos 16 horas
•
cuando lo cargue por primera vez o cuando no
haya sido utilizado por más de 6 meses.
Si la forma de la clavija no encaja con la toma
•
de corriente, utilice un adaptador de clavija para
la conguración apropiada.
Utilización del cortapatillas
Uso
El siguiente es el símbolo para un recortador en mojado.
El símbolo indica que el dispositivo manual puede
utilizarse en un baño o ducha.
Recorte del bigote
1. Aplique unas cuantas gotas de aceite a
las cuchillas.
2. Coja el accesorio de peinado por los
lados y muévalo a la longitud de corte
deseada (entre 3 mm y 15 mm).
Indicador Longitud de corte
1 3 mm (1/8˝)
2 6 mm (1/4˝)
3 9 mm (3/8˝)
4 12 mm (1/2˝)
5 15 mm (5/8˝)
Page 11

3. Deslice el interruptor en el cuerpo principal hacia arriba para
encender el recortador.
4. Mueva el recortador hacia arriba con el
interruptor en el cuerpo principal viendo
hacia abajo como se muestra.
Darle forma al bigote
1. Retire el accesorio de peinado y
encienda el recortador.
2. Recorte alrededor del bigote.
Darle forma a las patillas
1. Retire el accesorio de peinado y
encienda el recortador.
2. Coloque el recortador en ángulo recto
con su piel y corte las patillas.
Recorte del bello de su cuerpo
Puede también recortar el bello de su cuerpo.
1. Retire el accesorio de peinado.
2. Sostenga el cuerpo principal, coloque
3. Cepille y quite cualquier recorte de
4. Cepille y quite cualquier recorte de
1. Retire la cuchilla.
2. Enjuague y quite cualquier recorte de
3. Enjuague y quite cualquier recorte de
Limpieza del recortador
Uso del cepillo de limpieza
sus dedos contra las cuchillas y
enseguida apártelos del cuerpo
principal.
cabello del cuerpo principal y alrededor
de la cuchilla.
cabello entre la cuchilla estacionaria y
la movible presionando hacia abajo la
palanca de limpieza para alcanzar la
cuchilla movible.
Lavado con agua
cabello que se encuentre atorado en las
cuchillas con agua corriente.
cabello que se encuentre dentro del
recortador con agua corriente.
11
Español
Page 12

12
Español
4. Sacuda suavemente el recortador 4 o 5 veces y después
R B R C
N i- M H
TM
seque los residuos de agua del recortador y de la cuchilla.
5. Coloque el recortador en una toalla con el interruptor en el
cuerpo principal viendo hacia abajo para secarlo por
completo.
Lubricación
Lubrique las cuchillas antes de utilizarlas o
después de limpiarlas.
1. Aplique una gota del aceite en los puntos
indicados con las echas.
Retirar la batería recargable interna
ATENCIÓN:
El producto que ha comprado se alimenta con una batería de níquel
metal hidruro reciclable. Llame al teléfono 1-800-8-BATTERY para
obtener información acerca de cómo reciclar esta batería.
Reinstalación de la cuchilla.
1. Coloque el gancho de montaje en la
montura de la cuchilla en el recortador y
después empújelo hasta que haga clic.
Duración de la cuchilla
La duración de la cuchilla varía de acuerdo con la frecuencia de uso del
recortador.
Por ejemplo, la duración de la cuchilla es aproximadamente de 3 años
cuando utiliza el recortador por 5 minutos 10 veces al mes. Sustituya las
cuchillas si la eciencia de corte reduce a pesar de un mantenimiento
adecuado.
Duración de la batería
La duración de la batería varía de acuerdo con la frecuencia de uso del
aparato. Por ejemplo, la duración de la batería es aproximadamente de 3
años cuando se carga 3 veces al mes.
No deje el recortador por más de 6 meses sin cargarlo. La carga podría
agotarse y la duración de la batería podría acortarse.
ADVERTENCIA:
No intente sustituir la batería con la intención de volver a utilizar el
recortador. Podría provocar un incendio o sufrir una descarga
eléctrica.
La batería de este recortadpr no está destinada a ser sustituida por el
usuario. Sin embargo, la batería puede ser reemplazada en un centro
autorizado. El procedimiento que se describe a continuación sólo sirve
para quitar la batería recargable con vistas a desecharla de manera
adecuada.
Quite la batería tal y como se indica.
Descargue la batería por completo.
•
Tenga la precaución de no cortocircuitar los terminales + y – de la
•
batería tras extraerla.
Page 13

PARA SU CONVENIENCIA, AHORA DISPONEMOS DE UNA LÍNEA
NACIONAL DE LLAMADA GRATIS PARA LA COMPRA DE
ACCESORIOS (SOLEMENTE EN USA); LLAME AL 1-800-332-5368.
13
Español
Page 14

14
MEMO
Page 15

MEMO
15
Page 16

IN USA CONTACT:
Panasonic Consumer Electronics Company
One Panasonic Way 2F-3 Secaucus, NJ 07094
IN PUERTO RICO CONTACT:
Panasonic Puerto Rico, Inc.
San Gabriel Industrial Park 65th Infantry Avenue KM9.5
Carolina, Puerto Rico 00630
En México:
Panasonic de México, S.A de C.V.
México D.F.
Moras No. 313 Col. Tlacoquemecatl del Valle Del. Benito Juarez,
Mexico, D.F, C.P.03200 R.F.C PME-780907754 Tel: 54-88-10-00
• Assistance • Accessories
Service
Call 1-800-338-0552 (In USA)
http://www.panasonic.com/shavers/
http://www.panasonic.com/consumersupport/
No.1 EN ES (U.S.A.) Printed in China
 Loading...