

Page 1

DV STUDIO Version 3.1E
DV STUDIO Version 3.1E-LE
DV STUDIO Version 3.1E-SE
Operating Instructions
As well as reading this manual carefully, please use it properly.
If required, please take a printout.
VQT9885
Page 2

<Contents>
DV STUDIO 3
Before starting DV STUDIO 3 ............................................................................ 3
Enjoying the DV STUDIO 3 .....................................................................................................3
Connecting ..............................................................................................................................4
Starting the DV STUDIO 3 ......................................................................................................5
Closing the DV STUDIO 3 .......................................................................................................5
DV STUDIO 3 screen ..............................................................................................................6
Operation Ⅰ (Picture acquisition)....................................................................... 7
Play Mode ...............................................................................................................................7
Acquiring still pictures .............................................................................................................9
Automatically acquiring still pictures .....................................................................................10
Setting up Autoacquire ..........................................................................................................11
Camera Mode .......................................................................................................................12
Acquiring still pictures from movie camera ............................................................................13
Automatically acquiring still pictures from movie camera ......................................................14
Card Playback Mode .............................................................................................................15
Acquiring pictures from Memory Card ...................................................................................16
Automatically acquiring pictures from Memory Card .............................................................17
Simple pictures ......................................................................................................................18
Search ...................................................................................................................................19
Operation Ⅱ (Image Operation and Editing).................................................... 20
Image display ........................................................................................................................20
Working with pictures ............................................................................................................22
DV Image Setup ....................................................................................................................24
Changing the picture format ..................................................................................................25
Enlarging picture ...................................................................................................................26
Search ...................................................................................................................................27
Slide Show ............................................................................................................................29
Print ....................................................................................................................................... 31
Useful information ............................................................................................ 33
Display bar ............................................................................................................................33
Context menu ........................................................................................................................35
Menu screen .........................................................................................................................36
Troubleshooting (Q&A) .........................................................................................................38
Others ...................................................................................................................................39
2
Page 3
Before starting DV STUDIO 3
Enjoying the DV STUDIO 3
DV STUDIO 3
Before starting DV STUDIO 3
Enjoying the DV STUDIO 3
DV STUDIO 3
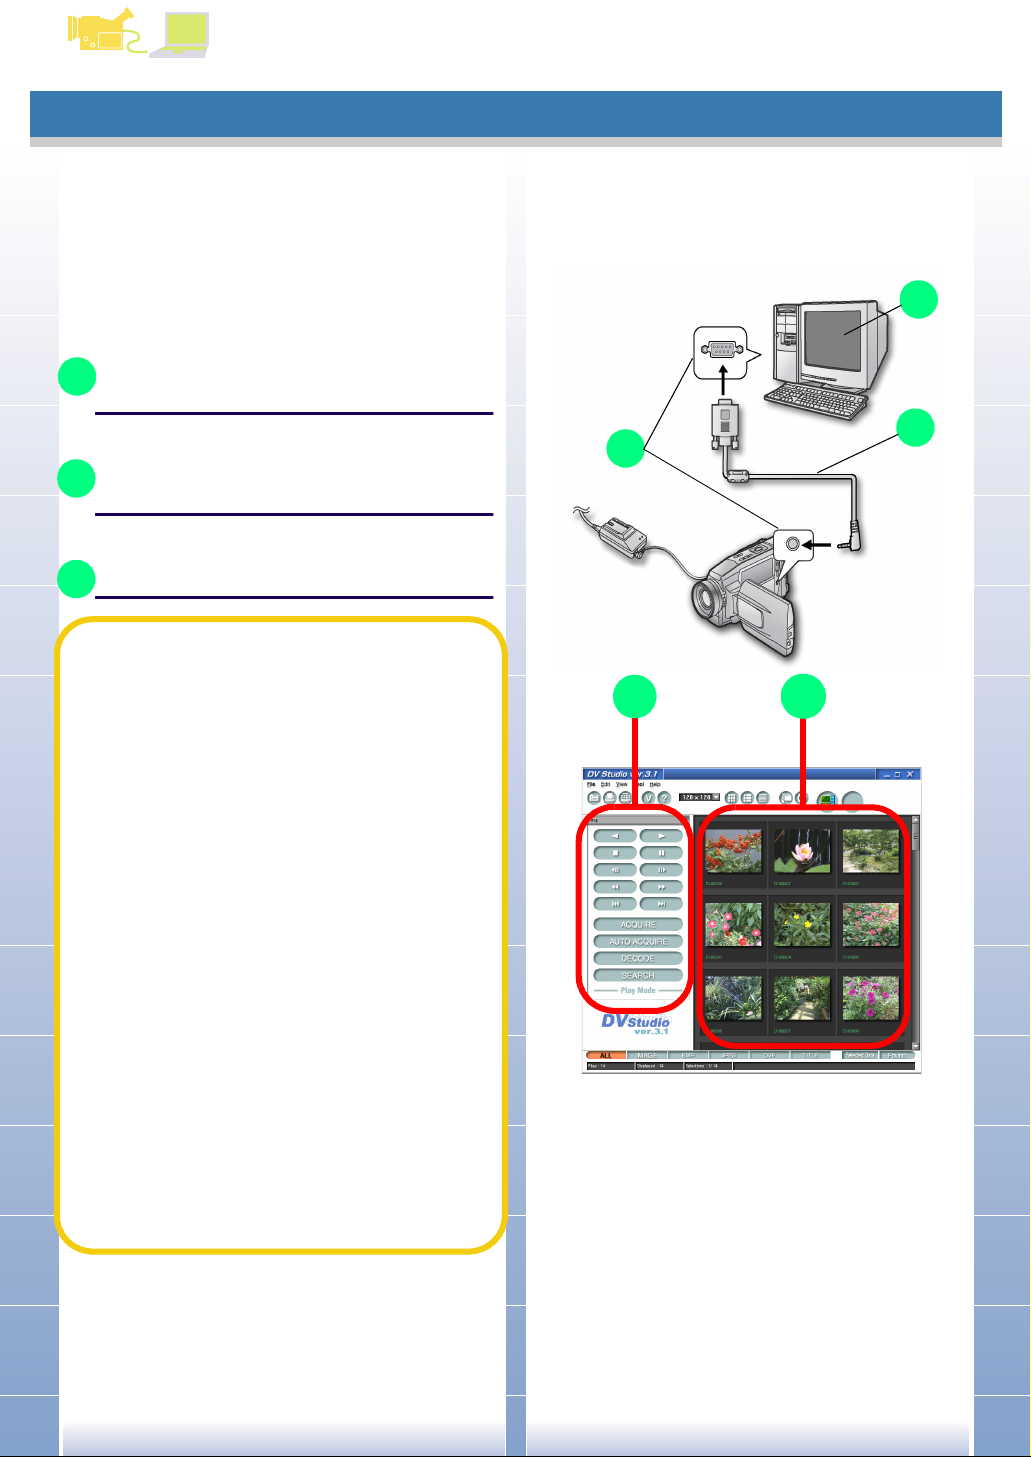
Before using the DV STUDIO 3, the sequence of operations
is briefly explained.
1.
Connecting the personal computer and movie
camera (P4)
2.
Acquiring pictures from movie camera into
personal computer (P7, 12, 15)
3.
Activate DV STUDIO 3 (P20 ~ 32)
Select the method of picture acquisition based on the
movie camera mode
• Play Mode (P7)
• Camera Mode (P12)
• Card Playback Mode
Displayed message content varies
A
※
1
(P15)
with the mode
1
A
3
2
B
Display the acquired picture
B
With Autoacquire function, the following type of picture
acquisition is possible
• Acquiring Photoshot picture (P11)
• Acquiring at regular intervals (P11)
• Acquiring with [Fast Preview Mode] (P18)
Acquired picture can be activated as follows
• Picture can be converted into JPEG or BMP format, edited
and processed. (P25)
• Picture displayed can be enjoyed in slide show.
• Picture or folder index can be printed. (P31, 32)
• Picture can also be activated as tape or Memory Card
index. (P19)
※ 1 In DV STUDIO Version 3.1E-SE, image cannot be
acquired in Card Playback Mode.
※ 2 In DV STUDIO Version 3.1E-LE, Auto Acquire feature
and SlideShow feature are not available.
2
※
2
※
(P29)
3
Page 4
Before starting DV STUDIO 3
Connecting
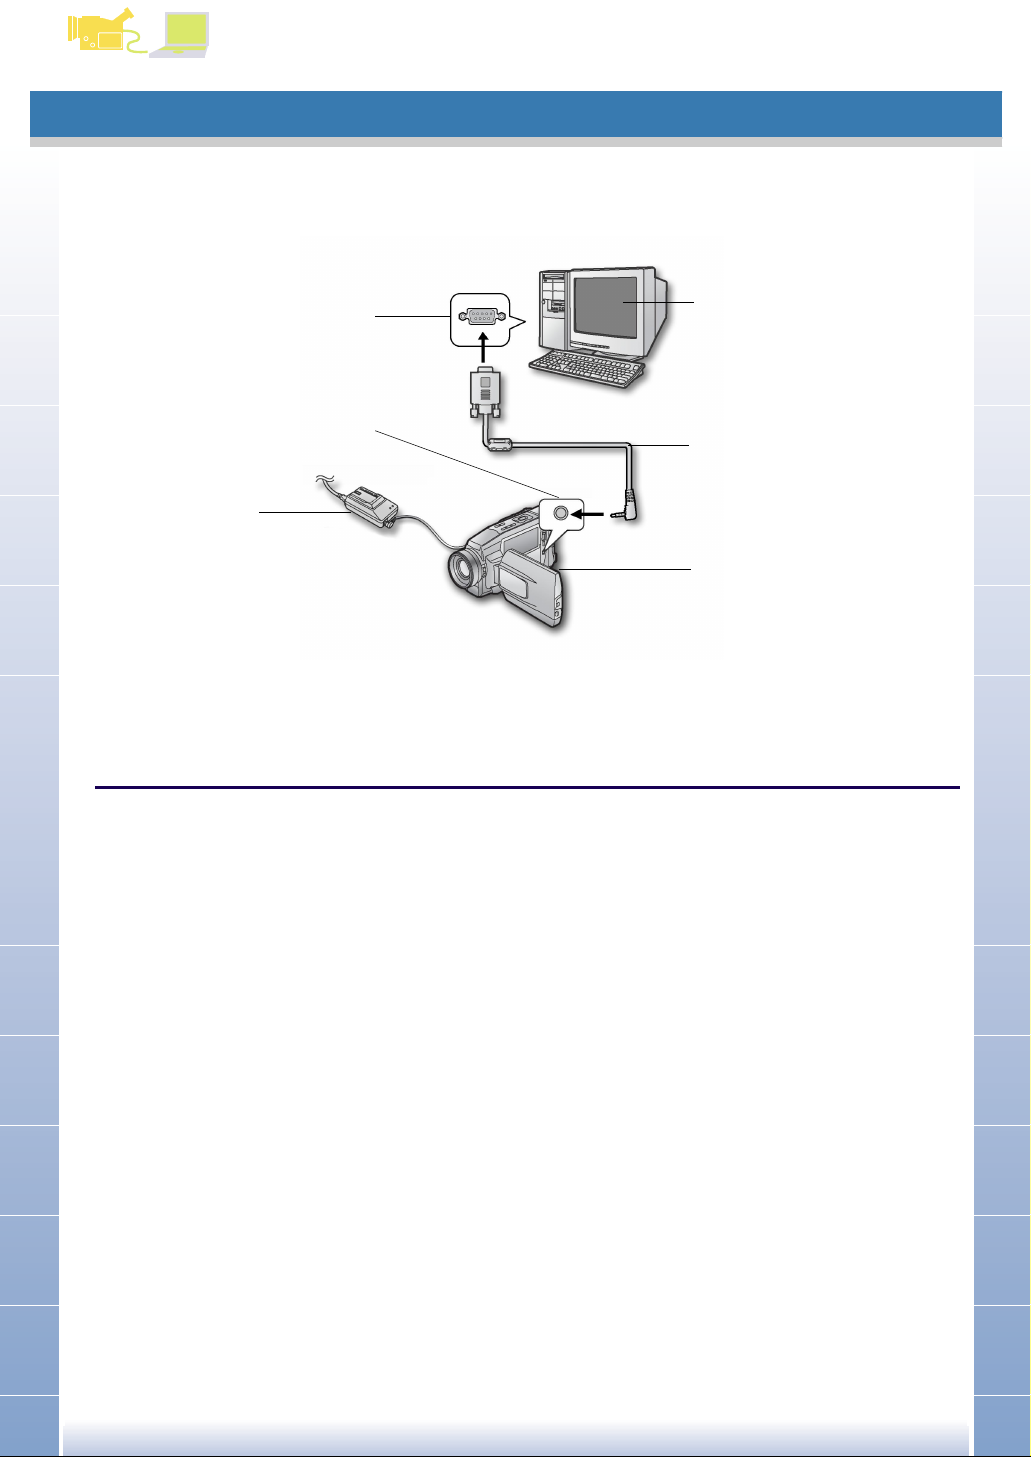
Connecting
Your movie camera can be connected to a personal computer having a serial port (D-sub 9-pin RS-232C connector).
Before making these connections, turn off all of the devices which are to be connected.
DV STUDIO 3
①
②
④
⑤
③
⑥
① Serial port (D-sub 9-pin RS-232C connector) ⑤ Interface cable (4-9 pins)
② Digital still picture terminal ⑥ Movie camera
③ AC adaptor
④ Personal computer
1.
Personal computer and the movie camera are set up as shown in the picture
• Please do not remove the interface cable when DV STUDIO 3 is being used. The software may not function properly.
Further, there is also the risk of causing damage to the transmitted data.
• When using DV STUDIO 3, it is recommended to use AC adaptor (sold separately) as power source for movie camera.
Furthermore, even when connecting to the Notebook personal computer, please do not use battery, but use only the AC
adaptor.
• When the movie camera and the personal computer can not be connected read [Troubleshooting (Q&A)]. (P38)
• For the operating environment, please see Installation Manual.
4
Page 5
Before starting DV STUDIO 3
Starting the DV STUDIO 3
DV STUDIO 3
Starting the DV STUDIO 3
Before starting the DV STUDIO 3, establish the connection
between movie camera and personal computer. For details,
please refer to P4.
When personal computer and movie camera have been
connected, please perform the operations as indicated
below.
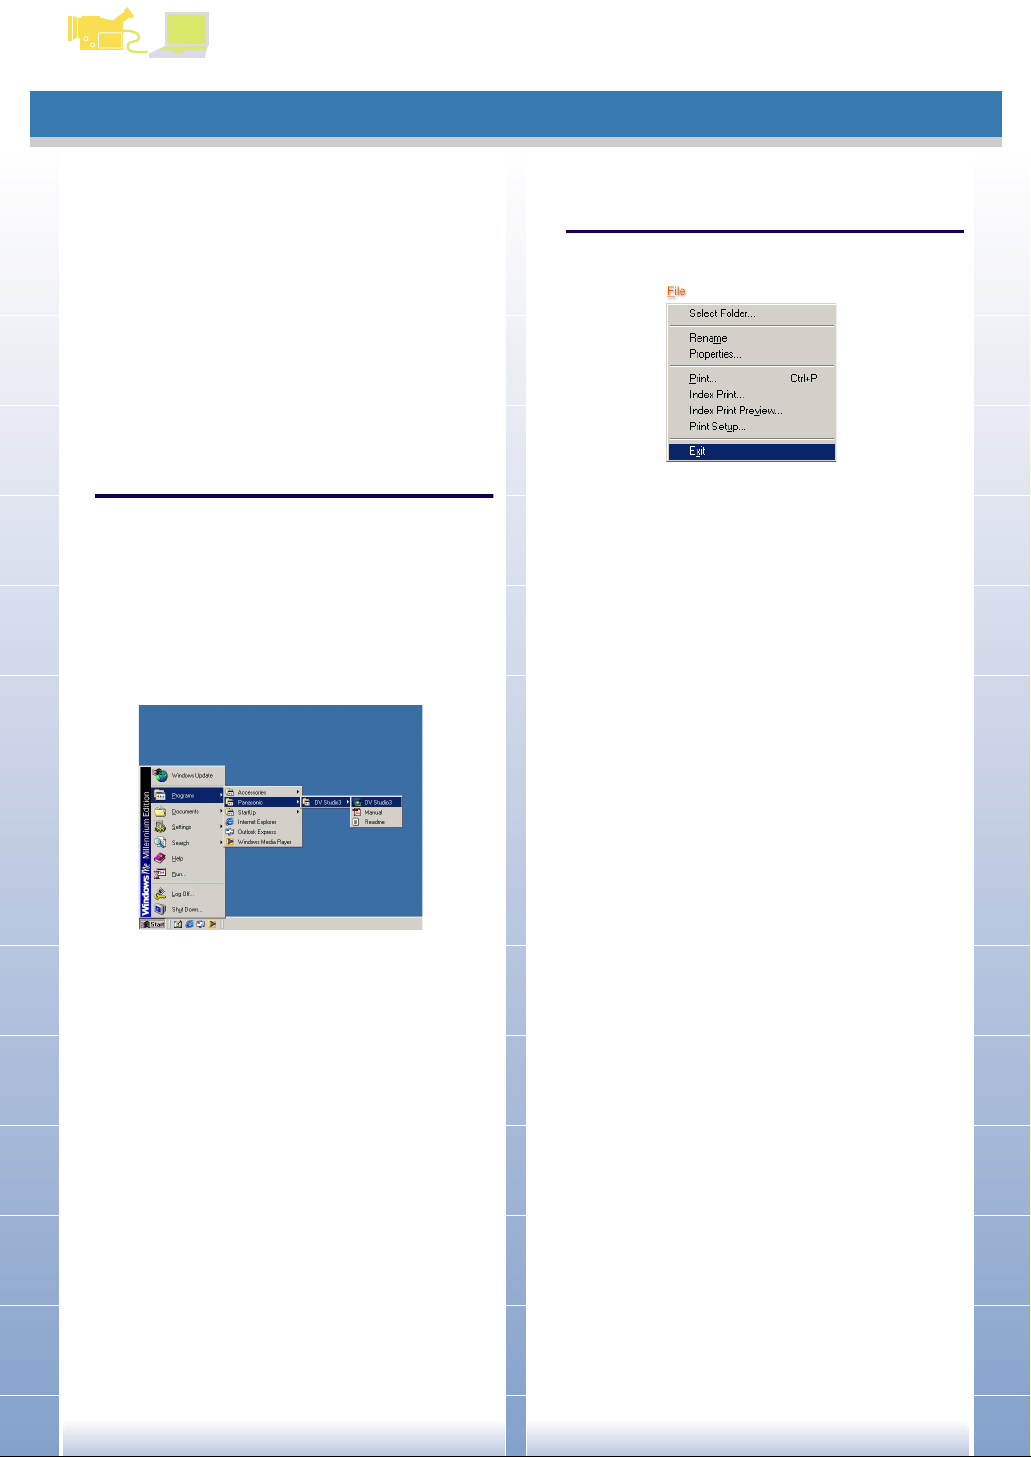
1.
Click on [Start] >>> [Programs] >>>
[Panasonic] >>> [DV Studio3] >>> [DV
Studio3]
■■■■ For Windows XP
Click on [Start] >>> [All Programs] >>>
[Panasonic] >>> [DV Studio3] >>> [DV
Studio3]
Before using for the first time, click on [Start] >>>
[Programs] >>> [Panasonic] >>> [DV Studio3] >>>
[Readme], and please read supplementary instructions
or update information.
■ For Windows XP
Before using for the first time click on [Start] >>> [All
Programs] >>> [Panasonic] >>> [DV Studio3] >>>
[Readme], and please read supplementary instructions
or update information.
Closing the DV STUDIO 3
1.
Click on [File] >>> [Exit]
DV STUDIO 3 may also be closed by clicking on the [ x ]
in the top right-hand corner.
• During initial Start up, error messages may appear.
Click on [Yes], and continue with the start up
operation.
• It is also possible to start by double clicking on the DV
Studio3 shortcut icon in the Desktop.
5
Page 6
Before starting DV STUDIO 3
DV STUDIO 3 screen
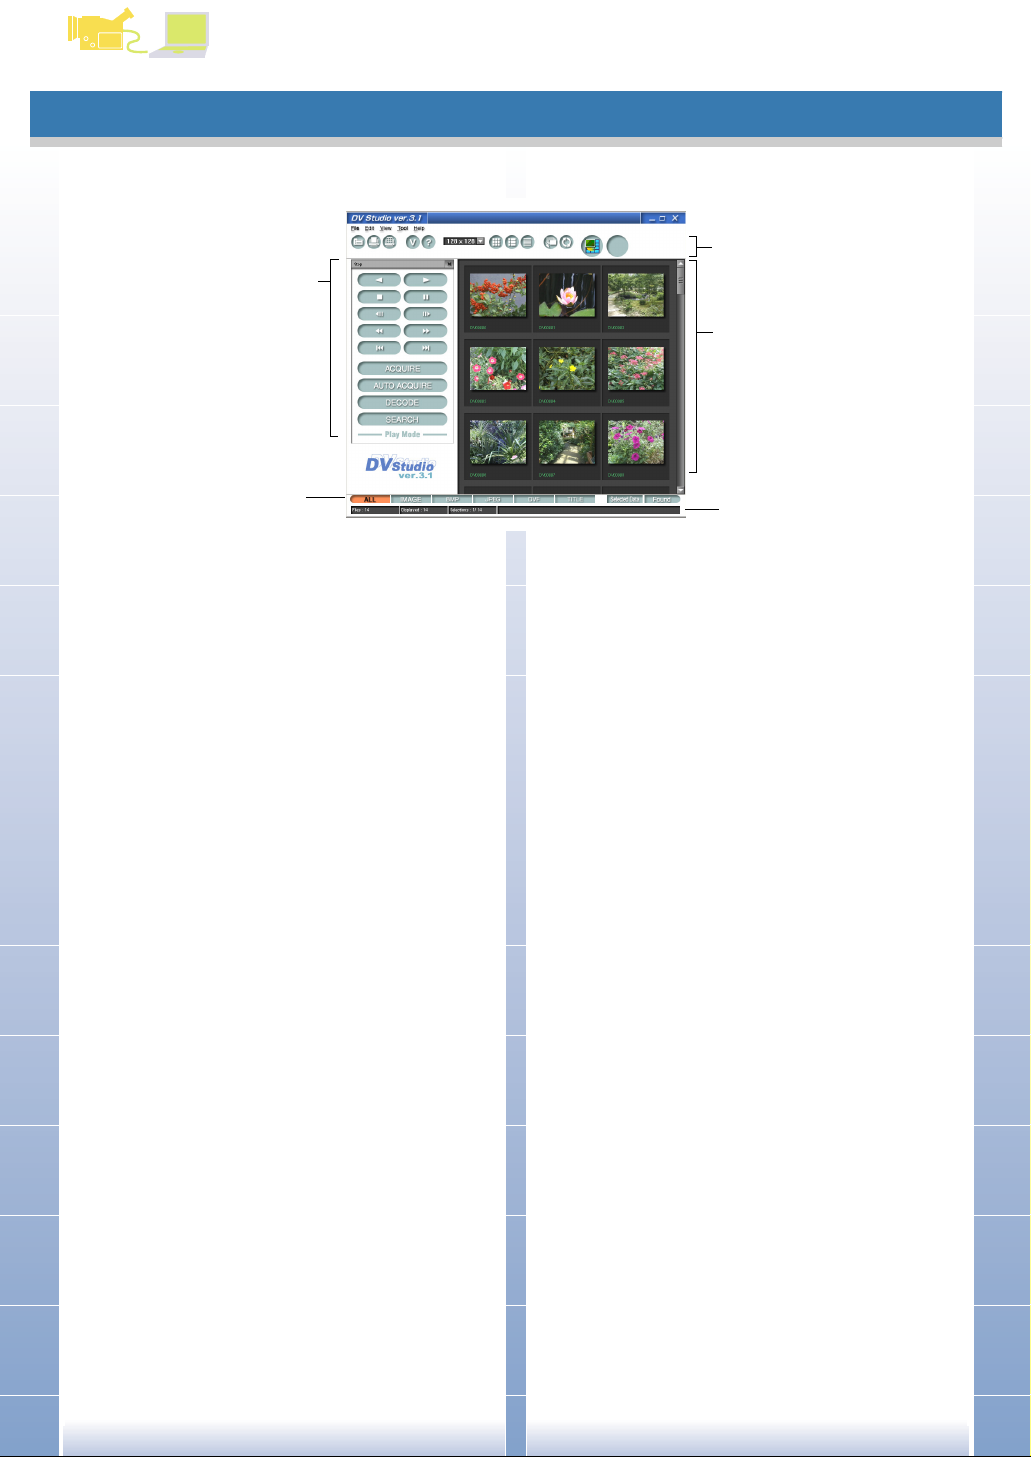
DV STUDIO 3 screen
1
DV STUDIO 3
3
4
2
[DV Control Bar]
1
Operates the connected movie camera. Picture
acquisition, or zooming of acquired picture and
searching are done. (P7, 12, 15)
[View Type Bar]
2
The type of picture displayed in the picture display
section can be selected. Only the selected type of
picture is displayed. (P34)
[Toolbar]
3
Various types of operations can be performed by
clicking on relevant buttons. (P33)
Picture display section
4
BMP, JPEG, DVF, TITLE files in the folder are displayed
by thumbnail. Other files are displayed as icons. It is
also possible to display file data.
• If there are many files in the folder, it may take time till
the thumbnails are displayed.
[Status Bar]
5
Information such as the registered picture files number,
display number, currently selected file number etc. is
displayed. (P34)
• Apart from picture display section, it is possible to select
Display/Hide from the [View] menu.
• Depending on the personal computer used, there may be
instances where scrolling with the mouse wheel may not
be possible in the picture display section.
5
6
Page 7
Operation ⅠⅠⅠⅠ (Picture acquisition)
Play Mode
Operation ⅠⅠⅠⅠ (Picture acquisition)
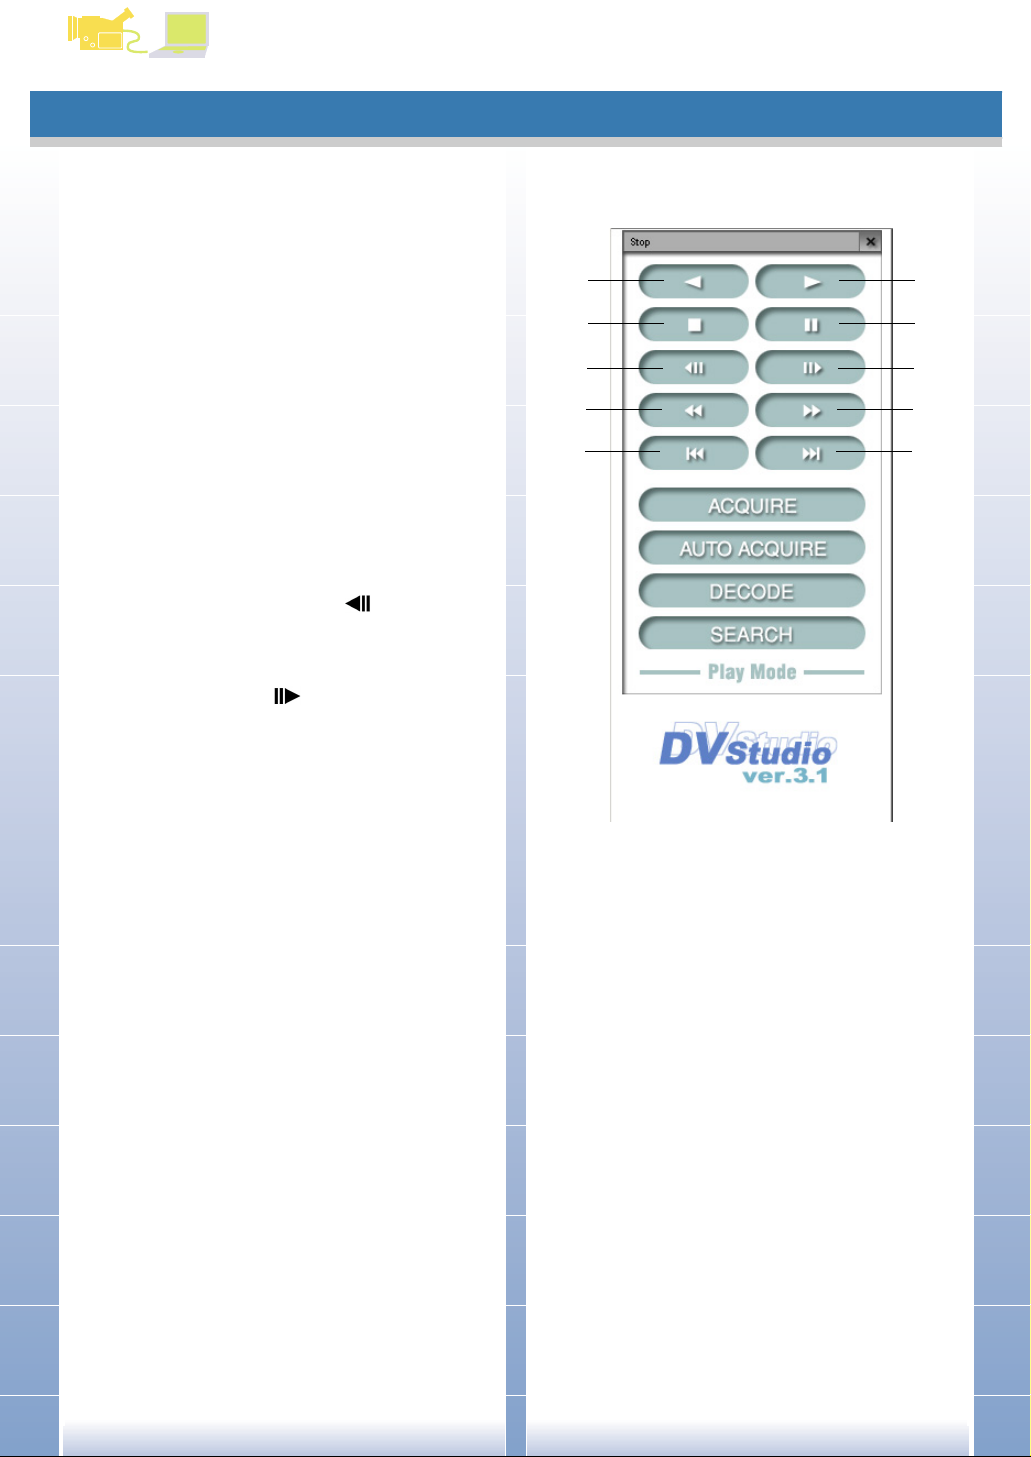
Play Mode
Operation
A feature that does not correspond to the connected movie
camera cannot be used.
1 Reverse Playback button [ 2 ]
Playback button [ 1 ]
2
DV STUDIO 3
1 2
3
5
7
4
6
8
3 Stop button [ ■ ]
Still button [ ; ]
4
Stops the Tape Mode, and changes to Still Picture
Playback Mode.
5 Reverse Still Advance button [ ]
If pressed during still picture playback, the picture can
be made to go back by one frame.
6 Still Advance button [ ]
If pressed during still picture playback, the picture can
be made to advance by one frame.
7 Rewind button [ 6 ]
Rewinds the tape.
If pressed during playback, the tape will rewind and
playback.
8 Fast Forward button [ 5 ]
Advances the tape forward.
If pressed during playback, the tape is made to
advance, and playback.
Reverse Photoshot Search button [ : ]
9
Searches for the Photoshot recorded picture towards
the start.
9
10
10 Photoshot Search button [ 9 ]
Searches for the Photoshot recorded picture towards
the end.
7
Page 8

Operation ⅠⅠⅠⅠ (Picture acquisition)
Play Mode
11 [ACQUIRE] button
Acquires picture from tape.
DV STUDIO 3
12 [AUTO ACQUIRE] button
Based on [Auto Acquire Settings], picture from tape is
acquired automatically. (P11)
(This is not displayed in DV STUDIO Version 3.1ELE)
[DECODE] button
13
Picture is magnified and displayed. (P26)
(For magnification of simple pictures, please see P18)
It is also possible to magnify a picture by double
clicking the picture. (Pictures in BMP, JPEG etc.
formats are enlarged by relevant applications and
displayed)
14 [SEARCH] button
Finds the recorded location in the tape for the picture
that has been acquired to the personal computer.
(Please insert the tape containing the recorded
picture to be searched for in the movie camera)
Begin tape playback from the picture location found.
About the method of searching, please see P19.
15 Movie camera status display
Displays the status of the connected movie camera.
• The power supply to the movie camera is automatically cut
off after a given time. Even if the power supply is replaced,
when movie camera and personal computer can not be
connected read [Troubleshooting (Q&A)]. (P38)
15
11
12
13
14
8
Page 9
Operation ⅠⅠⅠⅠ (Picture acquisition)
Acquiring still pictures
DV STUDIO 3
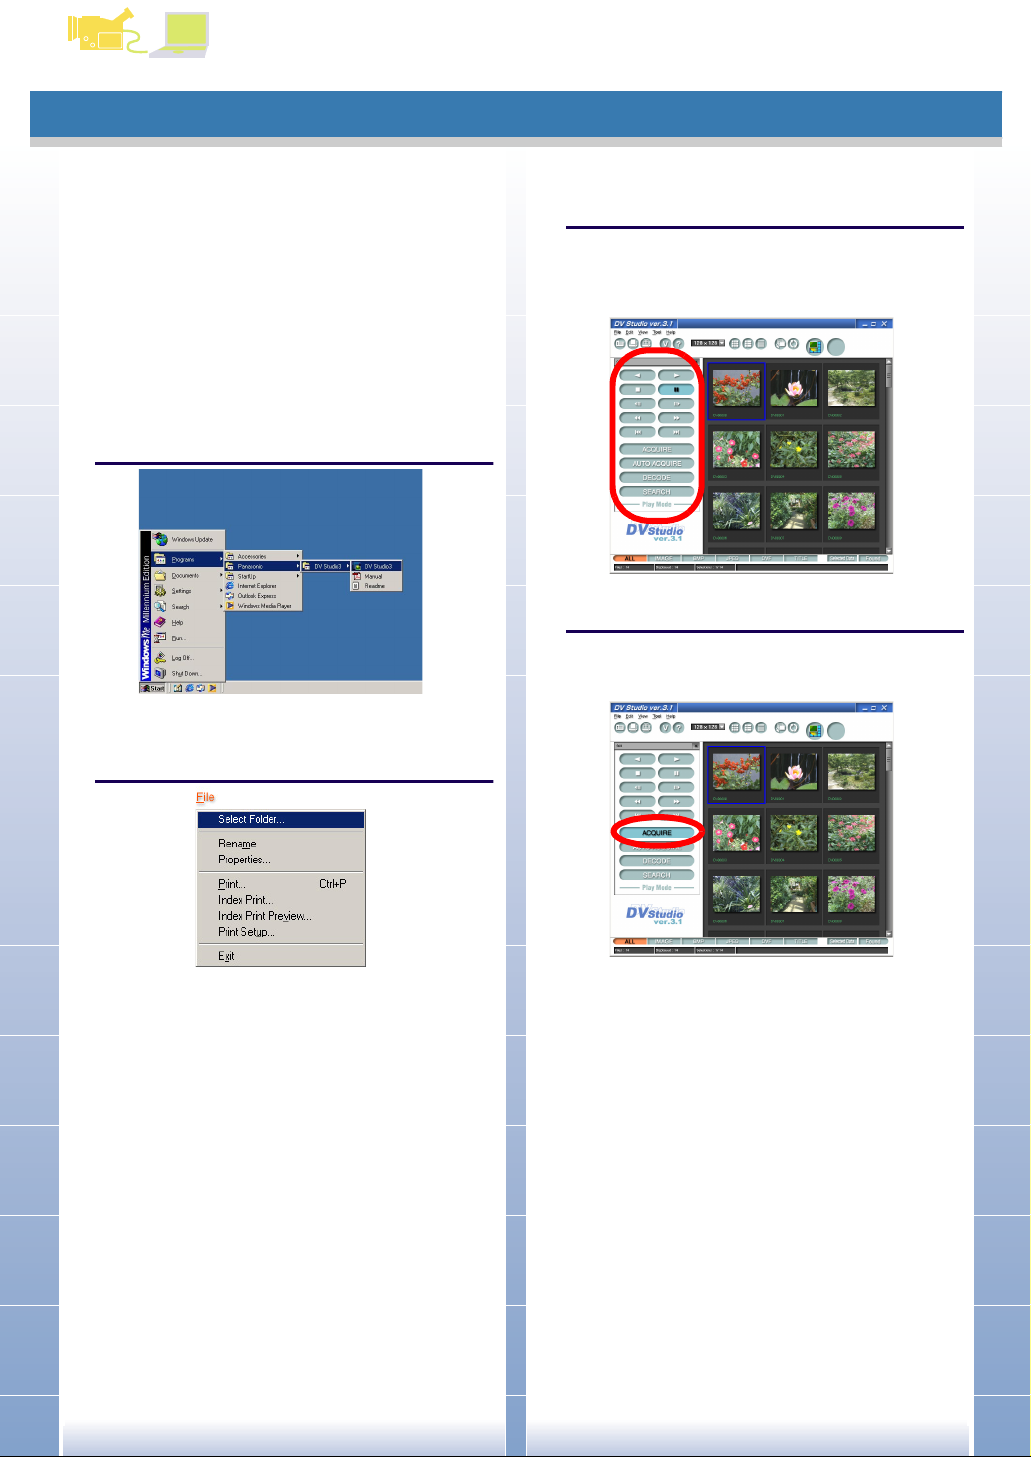
Acquiring still pictures
(Play Mode)
The pictures which are recorded in the movie camera tape
are acquired into the personal computer as still pictures. The
picture acquisition methods include the [ACQUIRE] method
of acquiring and [AUTO ACQUIRE] method of automatic
acquire for the selected picture.
Beforehand, please load the tape (which contains the
picture to be acquired) into the movie camera, and connect
to the personal computer.
1.
Set the movie camera to Play Mode, and start
the DV STUDIO 3
2.
Click [File] >>> [Select Folder] in the menu,
and select the folder in which the picture is to
be saved
3.
The picture that is to be acquired is searched
for with the operation button, and set to still
picture playback (P7)
• The tape is played by clicking on the Playback button [
1 ], and at the location of the picture to be acquired,
click on the still button [ ; ] and set to still picture
playback.
4.
Click on the [ACQUIRE] button
Picture acquisition begins.
If acquisition is finished, the acquired picture is
displayed in the picture display section.
In the picture display section, the pictures in the
selected folder are displayed.
• When the DV STUDIO 3 is started, select the previous
opened folder. The pictures in the folder are displayed
in the picture display section.
• To create a new folder, please see P22.
• To cancel acquisition, click on [Cancel].
• Information such as Date etc. in movie camera is not
displayed.
• Acquisition of picture containing digital playback effect
is not possible.
• Even with movie cameras provided with title function,
acquisition is not possible for pictures in which title or
illustration frame have been added to the picture in the
tape.
In DV STUDIO 3, playback picture is not displayed.
Please check with the finder or monitor in the movie
camera.
9
Page 10
Operation ⅠⅠⅠⅠ (Picture acquisition)
Automatically acquiring still pictures
DV STUDIO 3
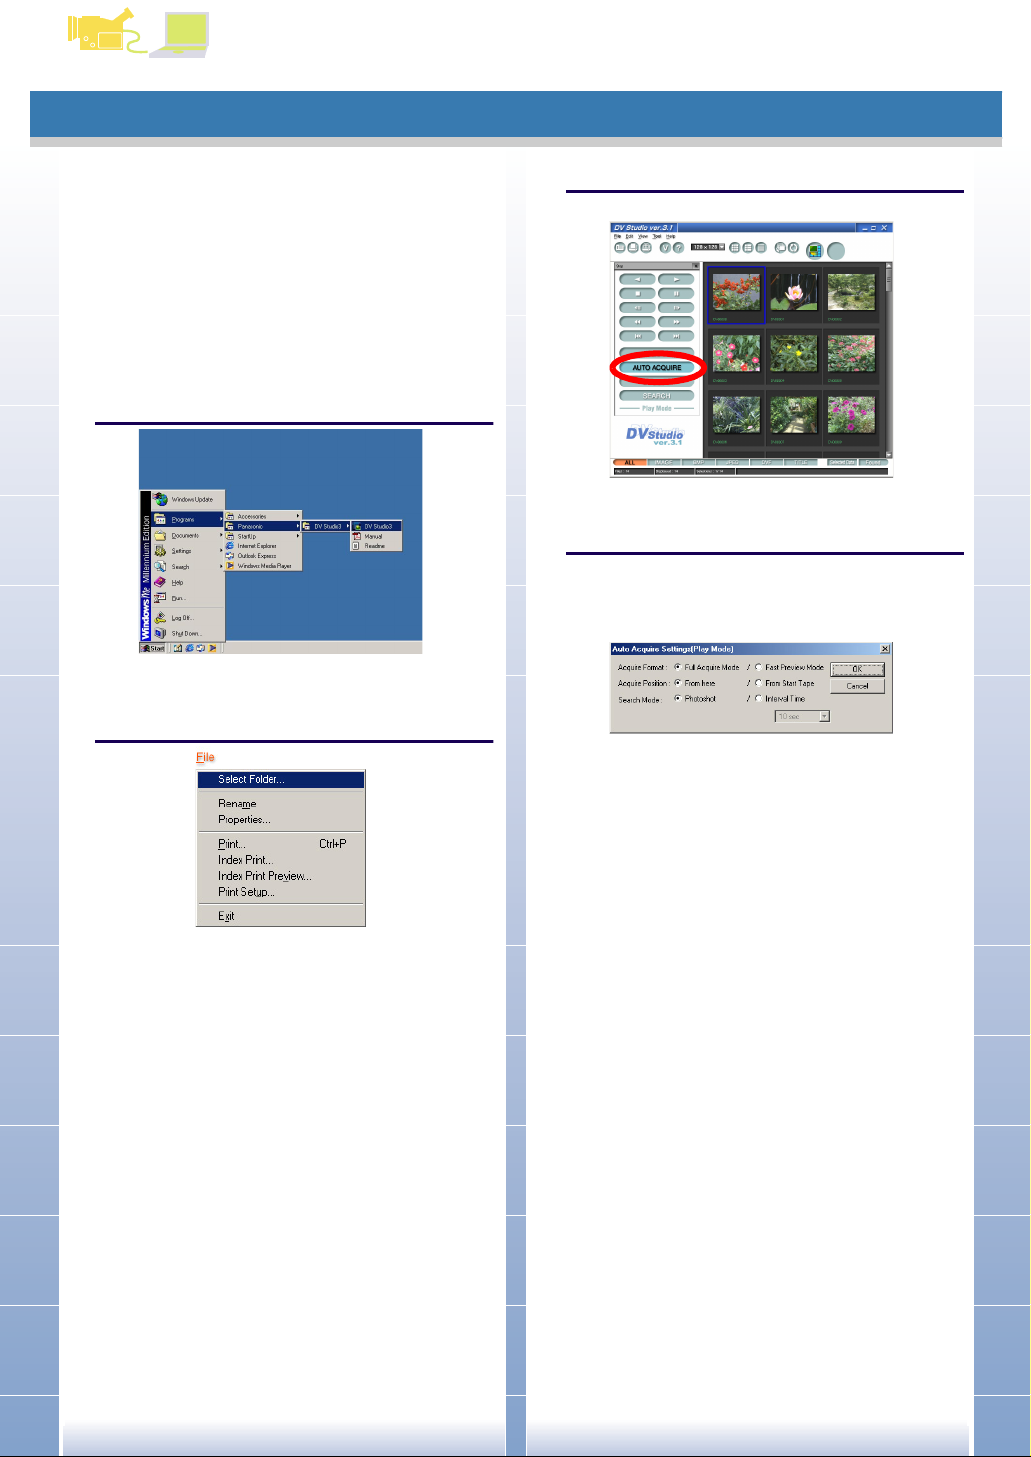
Automatically acquiring still pictures
(Play Mode)
Picture can be acquired in the format set.
Beforehand, please load the tape (which contains the
picture to be acquired) into the movie camera, and connect
to the personal computer.
(This feature is not available in DV STUDIO Version 3.1ELE)
1.
Set the movie camera to Play Mode, and start
the DV STUDIO 3
2.
Click [File] >>> [Select Folder] in the menu,
and select the folder in which the picture is to
be saved
3.
Click on [AUTO ACQUIRE] button
[Auto Acquire Settings(Play Mode)] screen is displayed.
4.
Set up the automatic acquire (P11), click on
[OK] button
As per the selection, the picture is automatically
acquired.
The acquired picture is added in order to the picture
display section.
In the picture display section, the pictures in the
selected folder are displayed.
• When the DV STUDIO 3 is started, select the previous
opened folder. The pictures in the folder are displayed
in the picture display section.
• To create a new folder, please see P22.
• During automatic acquire set up, if [From here] is to be
chosen in [Acquire Position], first please play back the
Still Picture to the location from where the acquisition
will begin.
• To cancel acquisition, click on [Cancel].
• During the interval time slight errors may occur.
• On starting the automatic acquire, it is possible that the
first picture cannot be acquired.
• Acquisition of picture containing digital playback effect
is not possible.
10
Page 11

Operation ⅠⅠⅠⅠ (Picture acquisition)
Setting up Autoacquire
DV STUDIO 3
Setting up Autoacquire
(Play Mode/Camera Mode/Card Playback
Mode)
Based on the movie camera mode, the selectable items may
be different.
[Acquire Format]:
[Full Acquire Mode]
Acquires the still picture standard data. Extension is
.dvf.
[Fast Preview Mode]
Acquires brief picture data for display. Extension is .dcf.
For simple picture details, please see P18.
• Regarding simple picture formats, it is possible to
acquire picture in shorter time as simple image data for
the purpose of display.
• If thumbnail picture is displayed in 96x96 or 128x128
size, the simple picture displayed is smaller than the
other pictures.
[Search Mode]:
(This function is not available in Card Playback Mode)
[Photoshot]
Searches for the picture taken by Photoshot, or the still
picture copied to the tape from the Memory Card, and
performs acquisition.
[Interval Time]
At intervals specified by clicking on [ ▼ ], acquisition of
picture occurs.
Play Mode can be selected from 10 seconds, 20
seconds, 30 seconds, 1 minute, 2 minutes, 3 minutes, 5
minutes.
Camera Mode can be selected from 1 minute, 2
minutes, 3 minutes, 5 minutes, 10 minutes.
(Slight errors may occur during interval time)
• Please set the [Counter Mode] in the movie camera menu
to other than [Counter memory]. If it is in [Counter Mode],
the tape may stop during acquire when the counter is at
[0:00.00].
[Acquire Position]:
[From here]
Autoacquiring of picture will start from the current tape
position.
In Card Playback Mode, autoacquiring will start from the
currently displayed picture.
[From Start Tape/From Start Card]
After rewinding the tape fully, automatic acquire of
picture begins.
In Card Playback Mode, automatic acquire begins
starting from the first picture recorded in the Memory
Card.
11
Page 12
Operation ⅠⅠⅠⅠ (Picture acquisition)
Camera Mode
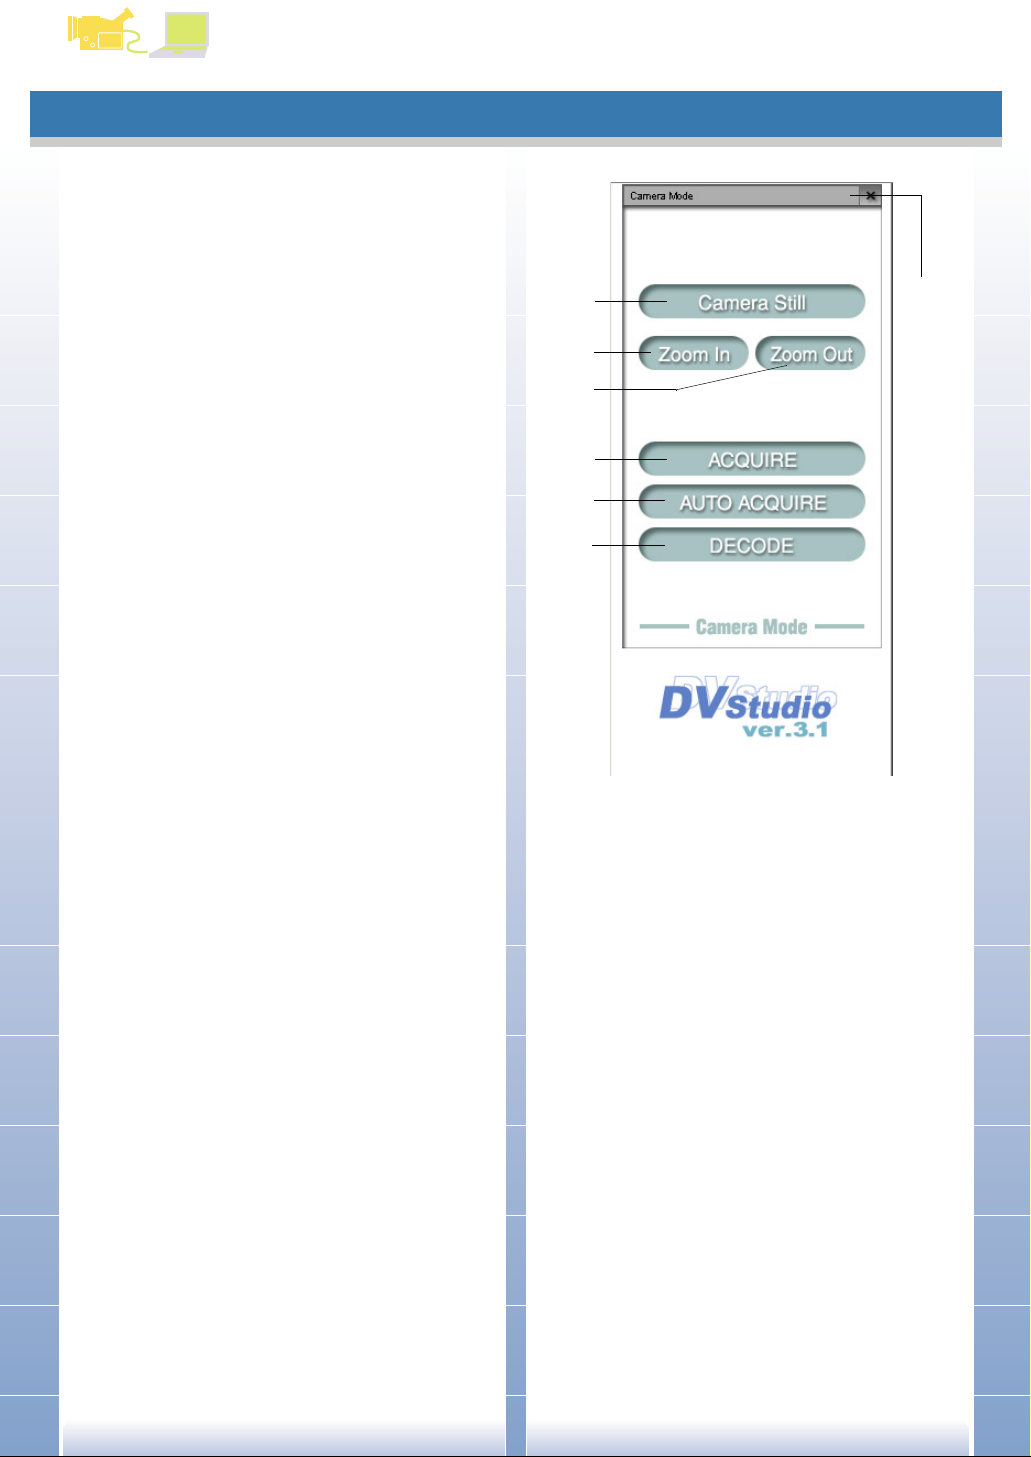
Camera Mode
Operation
[Camera Still] button
1
Set the movie camera to Still Picture status.
On clicking again, returns to the shooting mode.
DV STUDIO 3
1
7
[Zoom In] button
2
On clicking, the picture displayed is enlarged.
[Zoom Out] button
3
On clicking, the picture is displayed in wide angle.
[ACQUIRE] button
4
Picture taken with movie camera is acquired.
[AUTO ACQUIRE] button
5
Based on the [Auto Acquire Settings], the picture taken
in the movie camera is automatically acquired. (P11)
(This is not displayed in DV STUDIO Version 3.1E-LE)
[DECODE] button
6
Picture is magnified and displayed. (P26)
It is also possible to magnify a picture by double clicking
the picture. (Pictures in BMP, JPEG etc. formats are
enlarged by relevant applications and displayed)
It is not possible to magnify simple pictures in Camera
Mode.
Movie camera status display
7
Displays the status of the connected movie camera.
• When acquiring pictures in this mode, please remove the
tape and Memory Card from the movie camera.
If tape or Memory Card is present, the power supply to the
movie camera is automatically cut off after a given time.
Even if the power supply is replaced, after being
automatically cut off after a given time, when movie
camera and personal computer can not be connected read
[Troubleshooting (Q&A)]. (P38)
• In this mode, please set the Demo mode in the movie
camera to [OFF].
2
3
4
5
6
(Note)
• Depending on the type of the movie camera, acquiring
image in Camera Mode may not be possible, or [Zoom In]/
[Zoom Out] feature may not function.
12
Page 13

Operation ⅠⅠⅠⅠ (Picture acquisition)
Acquiring still pictures from movie camera
DV STUDIO 3
Acquiring still pictures from movie
camera
(Camera Mode)
If the movie camera is set to Camera Mode, the pictures
taken with the movie camera can be acquired as still
pictures to the personal computer.
Beforehand, connect movie camera and personal computer.
Set the movie camera to Camera Mode, and
1.
start DV STUDIO 3
Click [File] >>> [Select Folder] in the menu,
2.
and select the folder in which the picture is to
be saved
Get the picture taken in the movie camera, and
3.
click on [Camera Still] button
The picture currently being taken changes to Still Picture
condition.
On clicking again, it returns to normal picture shooting.
Click the [ACQUIRE] button
4.
In the picture display section, the pictures in the
selected folder are displayed.
• When the DV STUDIO 3 is started, select the previous
opened folder. The pictures in the folder are displayed
in the picture display section.
• To create a new folder, please see P22.
Picture acquisition begins.
If acquisition is finished, the acquired picture is
displayed in the picture display section.
• To cancel acquisition, click on [Cancel].
• Information such as Date etc. in movie camera is not
displayed.
• When the Progressive Photoshot function in the movie
camera is set to [Auto], pictures without Progressive
Photoshot effect may get acquired depending on the
condition. For details, please refer to the movie
camera user manual.
13
Page 14

Operation ⅠⅠⅠⅠ (Picture acquisition)
Automatically acquiring still pictures from movie camera
DV STUDIO 3
Automatically acquiring still pictures
from movie camera
(Camera Mode)
Pictures taken with the movie camera can be acquired as
still pictures to the personal computer.
Beforehand, connect movie camera and personal computer.
(This feature is not available in DV STUDIO Version 3.1ELE)
Set the movie camera to Camera Mode, and
1.
start DV STUDIO 3
Click [File] >>> [Select Folder] in the menu,
2.
and select the folder in which the picture is to
be saved
Display the picture in the movie camera. Click
3.
on the [AUTO ACQUIRE] button
[Auto Acquire Settings(Camera Mode)] screen is
displayed.
Set the [Interval Time] and (P11) click on the
4.
[OK] button
At set intervals of time, picture is acquired automatically.
The acquired picture is added in order to the picture
display section.
• For details on setting up of autoacquire, please see
P11.
• To cancel acquisition, click on [Cancel].
In the picture display section, the pictures in the
selected folder are displayed.
• When the DV STUDIO 3 is started, select the previous
opened folder. The pictures in the folder are displayed
in the picture display section.
• To create a new folder, please see P22.
14
Page 15

Operation ⅠⅠⅠⅠ (Picture acquisition)
Card Playback Mode
Card Playback Mode
Operation
DV STUDIO 3
Single image [Prev] button
1
On clicking, returns to the previous picture.
During multi-image display, the frame selection moves
to the previous picture.
Single image [Next] button
2
On clicking, advances to the next picture.
During multi-image display, the frame selection moves
to the next picture.
Multi-image [Prev] button
3
On clicking, returns to the previous multi-image display.
Multi-image [Next] button
4
On clicking, advances to the next multi-image display.
[Multi-image ON/OFF] button
5
Screen can be changed to multi-image display. (By
clicking again, returns to the original display)
[ACQUIRE] button
6
Acquires the still picture from the Memory Card.
[AUTO ACQUIRE] button
7
Based on [Auto Acquire Settings], picture from tape is
acquired automatically. (P11)
(This is not displayed in DV STUDIO Version 3.1E-LE)
[DECODE] button
8
Picture is magnified and displayed. (P26)
(For magnification of simple pictures, please see P18)
It is also possible to magnify a picture by double clicking
the picture. (Pictures in BMP, JPEG etc. formats are
enlarged by relevant applications and displayed)
[SEARCH] button
9
Searches the recorded location in the Memory Card for
the picture that has been acquired to the personal
computer. (Please insert the tape containing the
recorded picture to be searched for in the movie
camera)
About the method of searching, please see P19.
Movie camera status display
10
Displays the status of the connected movie camera.
1
10
2
3
4
5
6
7
8
9
• The power supply to the movie camera is automatically cut
off after a given time. Even if the power supply is replaced,
when movie camera and personal computer can not be
connected read [Troubleshooting (Q&A)]. (P38)
15
Page 16

Operation ⅠⅠⅠⅠ (Picture acquisition)
Acquiring pictures from Memory Card
DV STUDIO 3
Acquiring pictures from Memory Card
(Card Playback Mode)
When the movie camera is set to Card Playback Mode, the
still picture recorded in the Memory Card can be acquired to
personal computer.
Beforehand, please load the Memory Card (which contains
the picture to be acquired) into the movie camera, and
connect to the personal computer.
(This feature is not available in DV STUDIO Version 3.1ESE)
Set the movie camera to Card Playback Mode,
1.
and start DV STUDIO 3
Click [File] >>> [Select Folder] in the menu,
2.
and select the folder in which the picture is to
be saved
Using the operation buttons, select the picture
3.
to be acquired (P15)
• With Single image Using [Prev]/[Next] button, pictures
can be moved back or advanced sequentially by 1
image. When the number of recorded images in the
Memory Card is high, Multi-image display can be used
by clicking on the [Multi-image ON/OFF] button. At a
time 6 pictures can be displayed, and using the Multiimage [Prev]/[Next] button, pictures can be searched
by moving back or advancing in units of 6 pictures
each.
(Depending on the model, 9 picture display is also
possible in Multi-image)
Click on the [ACQUIRE] button
4.
Image acquisition begins.
In the picture display section, the pictures in the
selected folder are displayed.
• When the DV STUDIO 3 is started, select the previous
opened folder. The pictures in the folder are displayed
in the picture display section.
• To create a new folder, please see P22.
16
If acquisition is finished, the acquired picture is
displayed in the picture display section.
• To cancel acquisition, click on [Cancel].
• Information such as Date etc. in movie camera is not
displayed.
• When the movie camera is in slide playback status,
picture acquisition is not possible.
Page 17

Operation ⅠⅠⅠⅠ (Picture acquisition)
Automatically acquiring pictures from Memory Card
DV STUDIO 3
Automatically acquiring pictures from
Memory Card
(Card Playback Mode)
Still pictures recorded in the Memory Card can be acquired
to the personal computer in the established format.
Beforehand, please load the Memory Card (which contains
the picture to be acquired) into the movie camera, and
connect to the personal computer.
(This feature is not available in DV STUDIO Version 3.1ELE, SE)
Set the movie camera to Card Playback Mode,
1.
and start DV STUDIO 3
Click [File] >>> [Select Folder] in the menu,
2.
and select the folder in which the picture is to
be saved
Click on [AUTO ACQUIRE] button
3.
[Auto Acquire Settings(Card Playback Mode)] screen is
displayed.
Set up the automatic acquire (P11) and click
4.
on [OK] button
As per the selection, the picture is automatically
acquired.
The acquired picture is added in order to the picture
display section.
• When selecting [From here] for [Acquire Position]
during automatic acquire set up, please select the
picture from where the acquisition is to begin.
• For details on setting up of autoacquire, please see
P11.
• To cancel acquisition, click on [Cancel].
• When the movie camera is in slide playback status,
picture acquisition is not possible.
In the picture display section, the pictures in the
selected folder are displayed.
• When the DV STUDIO 3 is started, select the previous
opened folder. The pictures in the folder are displayed
in the picture display section.
• To create a new folder, please see P22.
17
Page 18

Operation ⅠⅠⅠⅠ (Picture acquisition)
Simple pictures
Simple pictures
If [Fast Preview Mode] is selected with automatic acquire, it
is possible to acquire pictures more rapidly as simple image
data for the purpose of display.
Regarding the acquired simple image data, if [DECODE]
button on the [DV Control Bar] is clicked, the location in the
tape or the card in which the original picture has been
recorded is searched on the movie camera, and the
acquisition begins as standard image.
The image, after the acquisition, is displayed in enlarged
size.
(Even if the simple image is double-clicked, the image, after
acquisition is still displayed in enlarged size)
DV STUDIO 3
• Please insert the tape or the Memory Card, containing the
recorded image that is to be displayed in enlarged size,
into the movie camera.
• There may be instances wherein simple pictures displayed
are smaller than other images.
• The extension for simple pictures is .dcf.
• Please do not change the names of simple pictures.
Enlargement or search may become impossible.
• To find standard images in Fast Preview Mode, for
distinguishing recorded date and time, if the built-in clock
was not configured at the time of shooting with the movie
camera, decoding from Fast Preview Mode may not be
possible.
• For enlarging pictures other than simple picture formats,
please see P26.
Simple picture data will get deleted if the selected filter
is modified or if DV STUDIO 3 is closed. For the required
picture, please click on the [DECODE] button, acquire
with the standard picture and restore.
• Simple pictures are not deleted even if tape or Memory
Card is removed.
18
Page 19

Operation ⅠⅠⅠⅠ (Picture acquisition)
Search
Search
The location of recording in the movie camera tape or
Memory Card for the picture that has been acquired to the
personal computer can be searched for. It can be activated
as the tape or Memory Card index.
Select the picture to be found
1.
Insert the tape or Memory Card containing the recorded
picture to be searched for in the movie camera and set
the mode.
Click on the [SEARCH] button on the DV
2.
Control Bar
DV STUDIO 3
The search for the picture location begins.
For Play Mode, tape playback begins from the location
of the picture searched for.
• Only one picture can be searched for at a time.
• To cancel search, click on [Cancel].
• For tapes with unrecorded portion, search feature may
not function properly.
• If the status of the tape or Memory Card is changed
with respect to that at the time of acquisition, then the
search feature may not function properly.
• [Search] may also be selected from the context menu
by right-clicking on the picture.
19
Page 20

Operation ⅡⅡⅡⅡ (Image Operation and Editing)
Image display
Operation ⅡⅡⅡⅡ (Image Operation and Editing)
DV STUDIO 3
Image display
Changing the display format of
the picture display section
Select the display format from [View] >>>
1.
[Image View Type]
[Thumbnail]:
Thumbnail and file name are displayed.
• It is also possible to display by clicking on [ ] in the
Toolbar.
[File Data]:
Picture and file name, file size, type, latest date modified,
size of the picture, and number of colours used in the picture
are displayed.
• It is also possible to display by clicking on [ ] in the
Toolbar.
Changing the display size of
thumbnail
Select the display size from [View] >>> [Image
1.
Size]
• 5 types of sizes can be selected.
• Size can also be selected by clicking on [ ▼ ] on the
Toolbar.
Changing the arrangement of
pictures
Select the display order from [View] >>> [Sort]
1.
[Details]:
File name, size, type, time of modification, picture data
(picture size, number of colours used in the picture) are
summarily displayed.
• It is also possible to display by clicking on [ ] in the
Toolbar.
20
The arrangement of the order of display changes.
• Selection can be made from [File Name], [File Type],
[File Size], [File Date], [in Descending Order].
• By checking on [in Descending Order], the chosen
display order is displayed in descending order.
Page 21

Operation ⅡⅡⅡⅡ (Image Operation and Editing)
Image display
DV STUDIO 3
Display only selected picture
Select the image format for display from
1.
[View] >>> [Image Format]
The pictures of the selected format only are displayed.
[ALL]:
Displays the whole picture. (Pictures that can not be
displayed in thumbnail are displayed in picture image)
[IMAGE]:
Displays pictures which can be displayed in thumbnail
format in DV STUDIO 3.
Refreshing folder display
After copying or moving a picture, please refresh the folder
display.
Click on [View] >>> [Refresh]
1.
• Refreshing can be done by clicking on [ ] on the
Toolbar.
[BMP]:
Displays pictures of BMP format (file extension .bmp).
[JPEG]:
Displays pictures of JPEG format (file extension .jpg).
[DVF]:
Displays pictures of video format. (saved in this format if
acquired with DV STUDIO 3)
[TITLE]:
Displays the title picture (file extension .TTL) of the movie
camera.
[Selected Image]:
Displays the selected picture.
[Found]:
Displays the picture found during search.
• Display type can also be selected by clicking on the button
[View Type Bar] (P34).
21
Page 22

Operation ⅡⅡⅡⅡ (Image Operation and Editing)
Working with pictures
DV STUDIO 3
Working with pictures
Select the picture
Click on [File] >>> [Select Folder], select the
1.
folder containing the picture to be displayed
on the [Selected Folder] screen, and click on
the [OK] button
Create new folder
Click on [File] >>> [Select Folder], and on the
1.
[Selected Folder] screen, click [Create] button
A new folder is created at the specified location.
Change the picture name
Select the picture whose name is to be
1.
changed, and click on [File] >>> [Rename]
from the menu
The list of pictures in the folder is displayed in the picture
display section.
Click on the desired picture to select it
2.
The selected picture will be enclosed in a frame.
Selecting multiple pictures:
Selected by holding the [Ctrl] key and clicking.
Selecting a series of multiple pictures:
Selected by holding the [Shift] key, and click on the first
and last picture.
Selecting all displayed pictures:
Click on [Edit] >>> [Select All] in the menu.
Cancelling the selection:
Click on [Edit] >>> [Deselect All] in the menu.
Inverting selected and unselected pictures:
Click on [Edit] >>> [Invert Selection] in the menu.
Enter the file name, and click on [OK] button
2.
• It is also possible to change the picture name by rightclicking on the picture, and select [Rename] from the
context menu.
• It is also possible to change the file name by clicking
on the picture file name displayed in the picture display
section.
22
Page 23

Operation ⅡⅡⅡⅡ (Image Operation and Editing)
Working with pictures
DV STUDIO 3
Copying the picture to a
different folder
Select the picture to be copied, and click on
1.
[Edit] >>> [Copy] from the menu
Select the target copy folder with [File] >>>
2.
[Select Folder], and click on [OK] button
Pictures in the selected folder are displayed.
Click on [Edit] >>> [Paste]
3.
Moving a picture to a different
folder
Deleting a picture
Select the picture to be deleted, and click on
1.
[Edit] >>> [Delete] from the menu
A message confirming file deletion is displayed.
Click on [Yes]
2.
• Deletion can also be done by pressing the [Delete]
key.
• Deleted images are moved into [Recycle Bin] in
Windows, and cannot be recovered by performing
[Edit] >>> [Undo].
Rotating a picture
Select the picture to be modified by clicking
1.
on it, then select the direction of rotation or
angle from [Tool] >>> [Rotate] from the menu
Select the picture to be moved, and click on
1.
[Edit] >>> [Cut] from the menu
Select the target folder for moving with [File]
2.
>>> [Select Folder], and click on [OK] button
Pictures in the selected folder are displayed.
Click on [Edit] >>> [Paste]
3.
• The moved picture cannot be returned to the original
folder by performing [Edit] >>> [Undo].
Rotates the pictures to the right by 90°, 180° or 270°.
• It is also possible to right-click on the picture, and
select [Rotate] from the context menu.
• If a DVF format picture is rotated, it is created in BMP
format.
23
Page 24

Operation ⅡⅡⅡⅡ (Image Operation and Editing)
DV Image Setup
DV Image Setup
Conversion of a picture acquired in the personal computer
into BMP or JPEG format can be done using the following
procedure.
Select [Tool] >>> [DV Image Setup] from menu
1.
[DV Image Setup] screen is displayed.
Set up as required, and click on [OK] button
2.
DV STUDIO 3
[Still Picture Filter]:
The notches formed in the outline of the picture when a
moving picture is regenerated as a still picture and acquired
are corrected. This is effective when converting from DVF
picture format.
[Fine Frame]
Detect drift between 2 fields in 1 frame and correct so as
to minimize the effect in case of drift. If the drift is less,
the resolution of the frame is preserved by using 2 fields.
This is the normal setting.
[Standard filter]
Irrespective of drift in the picture, the drift is corrected
based on the top and bottom line data.
If set to [No filter], pictures having drifts are not correct and it
may become noticeable.
[Cut Black Bar]:
A black frame may appear in the acquired picture at top and
bottom right and left. These black frames can be erased by
dot units. Frame correction values can be entered from 0 to
50.
24
Page 25

Operation ⅡⅡⅡⅡ (Image Operation and Editing)
Changing the picture format
DV STUDIO 3
Changing the picture format
Changes the format of the selected picture.
Picture formats that can be changed are only the BMP,
JPEG, and DVF formats.
Click on the picture to be changed and select
1.
the desired format from [Tool] >>> [Image
Format Conversion] from the menu
The converted picture is displayed in the picture display
section.
• It is also possible to select multiple pictures. (P22)
DVF format:
Format of the pictures acquired from movie camera.
The file size is about 1/7 of BMP.
BMP format:
Usual style of format of pictures used in Windows.
JPEG format:
A Data compression format being generally widely used
in digital camera.
DVC JPEG format:
JPEG format which can be played in all Panasonic
movie cameras provided with card slot.
• It is also possible to select by right-clicking on the
picture, and selecting [Image Format Conversion] from
the context menu.
[DVC JPEG setting]
When converting images that are not of 640x480 size to
DVC JPEG format, [DVC JPEG setting] screen is displayed.
After setting up [Size setting] and [Color
1.
setting for outside margin], click on [OK]
button
[Size setting] for images larger than 640x480
[640x480]:
Converts image to 640x480
[Align to 640x480]
Shrinks pictures to 640x480 size
[Length-to-width ratio fixed]
The picture is shrunk to 640x480 size while maintaining
the height-to-width ratio, and outside the 640x480
margin, blank space is inserted. The colour of the blank
space can be set by clicking on the [Change of color]
button.
[Cut in 640x480]
Cuts the middle portion of the image to the standard
640x480 size.
[No resizing]:
Change in size does not occur.
[Size setting] for images smaller than 640x480
[640x480]:
Converts image to 640x480
[Align to 640x480]
Decodes to 640x480
[Length-to-width ratio fixed]
The picture is enlarged to 640x480 size while
maintaining the height-to-width ratio, and outside the
640x480 margin, blank space is inserted. The colour of
the blank space can be set by clicking on the [Change of
color] button.
[Cut in 640x480]
[No resizing]:
Change in size does not occur.
25
Page 26

Operation ⅡⅡⅡⅡ (Image Operation and Editing)
Enlarging picture
DV STUDIO 3
Enlarging picture
On selecting the picture and clicking the [DECODE] button,
the picture is displayed in enlarged size. It is possible to
change the save format (to BMP or JPEG format) or change
the save location of the picture that has been displayed in
enlarged size.
Select the picture to be enlarged by clicking
1.
on it, and click on the [DECODE] button on the
DV Control Bar
[Preview] Window opens, and the enlarged picture is
displayed.
• It is also possible to select multiple pictures. (P22)
• Operation of the [DECODE] button and double clicking on
the picture result in same operation. Both activate the
related application, display enlarged size (in case of BMP
and JPEG formats). In case of DVF format picture files,
[Preview] is displayed in enlarged size.
• Pictures that can be enlarged are those of DVF, BMP, and
JPEG formats. If a simple picture (DCF format) is selected
and the [DECODE] button is clicked, the location in the
tape or Card in which the original picture was recorded by
the movie camera is searched, and after acquiring as the
standard picture (DVF format), is displayed in enlarged
size. (P18)
Saving picture under different name
Select [File] >>> [Save As] from the [Preview] screen menu
to display picture save screen, choose the folder in which to
be saved, the file name in which to be saved and the format
for saving, and click on the [Save] button.
(When selecting the JPEG format, [Jpeg Option] screen for
specifying the picture quality is displayed. Specify the
picture quality, and click on the [OK] button)
• When changing multiple files to the same save format,
[Image Format Conversion] function is convenient. (P25)
[Preview] Screen menu
[File] menu
[Open]
Opens a new file.
[Save As]
Saves the picture.
[Print]
Prints the picture.
[Print Setup]
Set up the printer for printing.
[Exit]
Closes the Preview screen.
[Edit] menu
[Undo]
Cancels the immediately previous operation.
[Copy]
Copies pictures.
[Select All]
Selects all pictures.
[Resize]
Changes the display size of the pictures.
26
[Config] menu
Please refer [DV Image Setup] (P24).
[Help] menu
Displays the version information of the Preview.
Page 27

Operation ⅡⅡⅡⅡ (Image Operation and Editing)
Search
DV STUDIO 3
Search
Searches by file name
Searches for the file according to the specified search
condition.
Selects and displays the folder in which the file searched for
has been saved.
Click on [Tool] >>> [Find] >>> [Find by Name]
1.
from the menu
[Find File Name] screen is displayed.
Specify various search conditions, and click
2.
on the [Find Now] button
[Not Inclusive]
Search for the text not included in the search data.
[Perfect Match]
Search for exact match with the text included in the
search data.
The search results are cleared by selecting [Tool] >>> [Clear
Finding]. Go back to the displayed ordinary picture range,
select the type of picture in the [View Type Bar] (P34) at the
bottom of the screen.
[Find Data]:
Input the name of the file to be found.
[Find in]:
Specify the target file for search.
[Displayed Data]
Start search from the picture currently displayed.
[Found Data]
Files of search result are further searched with the
subject.
[Add to Found Data from Displayed Data]
Search from the picture currently displayed, and add to
earlier search result.
[Search Method]:
Specify the method of search
[Inclusive]
Search for the text included in the search data.
27
Page 28

Operation ⅡⅡⅡⅡ (Image Operation and Editing)
Search
DV STUDIO 3
Search based on date
Searches for the file by specified date or as per
corresponding search condition.
Selects and displays the folder in which the file searched for
has been saved.
Click on [Tool] >>> [Find] >>> [Find by Date]
1.
from the menu
[Find Date] screen is displayed.
Specify various search conditions, and click
2.
on the [Find Now] button
select the type of picture in the [View Type Bar] (P34) at the
bottom of the screen.
[Date Found]:
Input the date range of the file for searching.
[Find in]:
Specify the target file for search.
[Displayed Data]
Start search from the picture currently displayed.
[Found Data]
Files of search result are further searched with the
subject.
[Add to Found Data from Displayed Data]
Search from the picture currently displayed, and add to
earlier search result.
[Search Method]:
Specify the method of search
[Within Range]
Search by the date range enter using [Date Found].
[Outside Range]
Search beyond the date range enter using [Date Found].
The search results are cleared by selecting [Tool] >>> [Clear
Finding]. Go back to the displayed ordinary picture range,
28
Page 29

Operation ⅡⅡⅡⅡ (Image Operation and Editing)
Slide Show
DV STUDIO 3
Slide Show
The selected pictures are displayed in a slide show on the
personal computer screen (each picture is briefly displayed
in sequence).
Pictures that can be used in a slide show are of BMP, JPEG,
and DVF formats.
(This feature is not available in DV STUDIO Version 3.1ELE)
Click on [View] >>> [SlideShow] from the
1.
menu
[Read Image Setup] screen is displayed.
• It is also possible to start the Slide Show by clicking on
[ ] in the Toolbar.
Select the image to read, and click on [OK]
2.
button
Set the play time on the [Set play time] screen
3.
by click on the seconds for display at the top
right for each image, and click on [OK] button
• For details about configuring play time, please see
P30.
Click on the [Config] button on the
4.
[SlideShow] screen to display the [SlideShow
setting] screen, configure as required, and
click on [OK] button
Return to [SlideShow] screen.
• For details about configuring the Slide Show, please
see P30.
[SlideShow] screen is displayed.
• To set up the selected image as read image, please
select the picture beforehand.
Click on the [Start] button
5.
Slide show begins.
• To close the slide show, click on [ x ] in the top righthand corner.
• Pictures from the picture display section can be also
added by dragging and dropping on to the [SlideShow]
screen.
• The order can be changed by dragging and dropping
the pictures in the [SlideShow] screen.
29
Page 30

Operation ⅡⅡⅡⅡ (Image Operation and Editing)
Slide Show
DV STUDIO 3
[Set play time] screen
[Play time]:
The play time is setup by clicking on [ ▲ ], [ ▼ ].
[Apply All]:
The setup play time is applied to all pictures.
[Cancel]:
Cancel the setting.
• Depending on the size of the picture displayed, the picture
may be displayed longer than the play time set.
• Play time that can be set up for the slide show is 0 - 99
seconds.
[SlideShow setting] screen
[SlideShow] Screen menu
[File] menu
[Add]
Pictures are added to the SlideShow.
[Exit]
Closes the SlideShow screen.
[Edit] menu
[Undo]
Cancels the immediately previous operation.
[Cut]
Cuts the picture.
[Delete]
Deletes the picture.
[Paste]
Picture that is cut or a copied picture can be pasted to
the desired location.
[Config] menu
Displays the [SlideShow setting] screen.
[Help] menu
Displays the version information of the SlideShow.
[Slide Switch Method]:
Sets up method of interchanging pictures in slide show.
[Automatic Switch by Timer]
Pictures change automatically at specified time
intervals.
[Repeat]
By putting a check mark here, the slide show is
repeated.
[Apply All]
When setting identical play times for all pictures, set the
time by putting a check mark here.
[Switch by Mouse Click]
Pictures change with mouse click. Right-click the mouse
to display next slide, and Left-click the mouse to display
the previous slide.
[Slide Image Size]:
Select the size of picture for slideshow.
[Original Image Size]
Slideshow is done in the original size of the picture.
[VGA Size]
Slideshow is done in the VGA size (640x480).
[Desktop Size]
Slideshow is done in the desktop size.
[Background Color Setting]:
By clicking on [ ▼ ], the background colour during slide
show display is chosen.
Selection can be made from 4 colours, namely, [BLACK],
[WHITE], [LIGHT GRAY], [GRAY].
30
Page 31

Operation ⅡⅡⅡⅡ (Image Operation and Editing)
DV STUDIO 3
Print
Printing a picture
Selected picture is printed.
Select the picture to be printed
1.
Click on [File] >>> [Print Setup] from menu
2.
Set up as required and click on [OK] button
4.
Printing takes place.
• Printing can also be done by clicking on [ ] in the
Toolbar.
• Due to small picture display data for simple pictures,
the picture quality may become grainy if printed.
Set up the printer.
• The printer set up varies with the printer. Please refer
to Printer manual.
Click on [File] >>> [Print] from menu
3.
Printing set up screen is displayed.
31
Page 32

Operation ⅡⅡⅡⅡ (Image Operation and Editing)
Print
DV STUDIO 3
Printing display picture index
(Index Print)
Recorded pictures that are being displayed are printed in
index format.
Display the pictures for index printing, and
1.
click on [File] >>> [Index Print Preview] in the
menu
Index preview screen is displayed.
• Click on the [View Type Bar] at the bottom of the
screen to display the picture to be printed.
• When not confirming the print contents displayed in
the preview screen, select [File] >>> [Index Print].
Confirm the preview screen, and click on
2.
[Print]
Set up as required and click on [OK] button
3.
Printing takes place.
• The printer set up varies with the printer. Please refer
to Printer manual.
• It is also possible to print the index by clicking on [ ]
in the Toolbar.
• Due to small picture display data for simple pictures,
the picture quality may become grainy if printed.
Menu of the index-printing preview screen
[Print] screen is displayed.
[Print]:
Prints the index.
[Next Page]:
Displays next page.
[Prev Page]:
Displays previous page.
[One Page] / [Two Page]:
Displays as 1 page (or 2 pages).
[Zoom In]:
Magnifies picture display.
[Zoom Out]:
Decreases picture display.
[Close]:
Closes the index print preview screen.
32
Page 33

Useful information
Display bar
Useful information
Display bar
[Toolbars]
To display the Toolbar, enter a check mark in [View] >>>
[Toolbars]. To hide the bar, remove the check mark.
1 2 3 4 5 6 7 8 9 10 11 12 13
DV STUDIO 3
• Standard Bar
Displays file data and image data for the selected
1
picture.
Prints the selected picture. (P31)
2
Prints the displayed thumbnail image in index
3
format. (P32)
• Help Bar
Displays the DV STUDIO 3 version information.
4
Starts the handle instructions in PDF format (the
5
present manual) of DV STUDIO 3.
• View Format Bar
Thumbnail display of picture is set up by clicking
6
▼ ]. (P20)
on [
Picture is displayed in thumbnail form. (P20)
7
Picture is displayed in the form of thumbnail and
8
data. (P20)
Detailed information of the format is displayed. In
9
this format, picture is not displayed. (P20)
• Tool Bar
Starts the Slideshow. (P29)
10
(This is not displayed in DV STUDIO Version
3.1E-LE)
The display contents of the picture display
11
section (folder display) is refreshed with latest
information. (P21)
• Launcher Bar
The icon of the application software that is to be
12
registered is dragged and dropped. During
initial setup, Preview Version 1.10E has been
setup. Different applications can be registered.
The icon of the application software that is to be
13
registered is dragged and dropped.
33
Page 34

Useful information
Display bar
[View Type Bar]
The type of picture displayed in the picture display section
can be selected.
ALL:
Displays the whole picture. (Pictures that can not be
displayed in thumbnail are displayed in picture image)
Image:
Displays pictures which can be displayed in thumbnail form
in DV STUDIO 3.
BMP:
Displays pictures of BMP format (file extension .bmp).
JPEG:
Displays pictures of JPEG format (file extension .jpg).
DVF:
Displays pictures of video format.
TITLE:
Displays title picture of movie camera (file extension .TTL).
Selected Data:
Deletes the selected picture.
Found:
Displays the picture found during search.
DV STUDIO 3
[Status Bar]
Information such as the registered picture files number,
display number, currently selected file number etc. is
displayed.
Files:
Displays the number of files saved in the selected folder.
Displayed:
Displays the number of files in the picture display section.
Selections:
Shows the number of files selected among the displayed
files.
34
Page 35

Useful information
Context menu
Context menu
When the mouse pointer is on the picture displayed in the
picture display section, the context menu is displayed by
right-clicking.
[Rename]:
Changes the file name of the picture. (P22)
[Properties]:
Displays the file information and picture data of the
picture. (P36)
[Cut]:
Cuts the picture. (P23)
[Copy]:
Copies the picture. (P23)
[Delete]:
Deletes the picture. (P23)
[Paste]:
Picture that is cut or a copied picture can be pasted to
the desired location. (P23)
[Image Format Conversion]:
Converts the image format. (P25)
[Rotate]:
Rotates the pictures to the right by 90°, 180° or 270°.
(P23)
[Open]:
Opens the picture with a related application.
[Search]:
Search the recorded location of the picture in the
memory card and the tape. (P19)
[Set As Wallpaper]:
Picture becomes a wallpaper on the desktop of the
personal computer.
DV STUDIO 3
35
Page 36

Useful information
Menu screen
DV STUDIO 3
Menu screen
[File] menu
[Select Folder]:
To change the displayed picture, or the folder in which
the picture has been saved, select the folder in the
[Select Folder] screen.
By clicking [Create] a new folder is created. (P22)
[Rename]:
To change the file name of the selected picture, enter
the file name in the [Rename] screen. (P22)
[Properties]:
Displays the file information and picture information for
the selected picture.
[Print]:
Prints the selected picture. (P31)
[Index Print]:
Currently displayed registered picture is printed in index
form. (P32)
[Index Print Preview]:
Displays the print image of the index print. (P32)
[Print Setup]:
Set up the printer for printing. (P31, 32)
[Exit]:
Closes the DV STUDIO 3. (P5)
[Edit] menu
Edits the picture displayed in the picture display section.
[Undo]:
Cancels the immediately previous operation.
[Cut]:
Cuts the selected picture. To move the location of the
picture, the cut picture is pasted in the desired location.
(P23)
[Copy]:
Copies the selected picture. (P23)
[Delete]:
Deletes the selected picture. The picture that has been
deleted is shortened and moved. (P23)
[Paste]:
Picture that is cut or a copied picture can be pasted to
the desired location. (P23)
[Select All]:
All the displayed pictures are selected. (P22)
[Deselect All]:
Specified selection is completely cancelled. (P22)
[Invert Selection]:
Selected and non-selected picture are inverted. (P22)
36
Page 37

Useful information
Menu screen
DV STUDIO 3
[View] menu
[Toolbars]:
Displayed Toolbar can be selected. Displayed if a check
mark is inserted. (P33)
[View Type Bar]:
On inserting the check mark, displays the [View Type
Bar]. (P34)
[Status Bar]:
On inserting the check mark, displays the [Status Bar].
(P34)
[DV Control Bar]:
On inserting the check mark, displays the [DV Control
Bar]. (P6)
[Image View Type]:
Selects the method of image display. (P20)
[Image Size]:
Selects the thumbnail picture size. (P20)
[Sort]:
Sorts the image according to the selection condition.
(P20)
[Image Format]:
Selects the type of image for display, and displays only
the selected type of images. (P21)
[SlideShow]:
Starts the Slideshow. Depending on the set up, the
method of picture change is selected. (P29)
[Refresh]:
The display contents of the picture display section
(folder display) is refreshed with latest information. (P21)
[Tool] menu
[Find]:
Searches the picture. (P27, 28)
[Clear Finding]:
Clears the search results. (P27, 28)
[Image Format Conversion]:
Converts the image format. (P25)
[Rotate]:
Rotates the pictures to the right by 90°, 180° or 270°.
Rotates the picture. (P23)
[DV Image Setup]:
To convert pictures into BMP or JPEG etc. formats, valid
set up can be made. (P24)
[Connection]:
Connect personal computer and movie camera. (P38)
[Beep Sound]:
By inserting a check mark, sound is generated when a
button is clicked.
[Help] menu
[Operation Manual]:
Activates the PDF format Operation Manual (the present
manual). To view it, Adobe Acrobat Reader 4.0 or higher
is needed.
[About DV Studio3]:
Displays the version information.
37
Page 38

Useful information
Troubleshooting (Q&A)
Troubleshooting (Q&A)
Q Communication between movie camera and
personal computer is terminated.
• Click on [Tool] >>> [Connection] in the menu, and
restore the connection.
• After having removed the cable from the movie
camera, restore the power supply to the movie
camera, once again attach the cable to the movie
camera, click on [Tool] >>> [Connection] from the
menu, and restore the connection.
• Depending on the working of the OS, or on other
programmes running at that time, it may be possible
that the communication with the movie camera may
not be satisfactory. In such cases, close that operation
or the programme, and restart the DV STUDIO 3.
Q If mega pixel pictures or high quality pictures taken
in Camera Mode are acquired to the personal
computer, pictures will become grainy.
• Pictures acquired from movie camera, such as mega
pixel images recorded in Memory Card and even
images of resolution 640x480 or more, will have a
resolution equal to 640x480. Please check during
picture acquire.
Q During picture acquire, if [DV data acquire failed.]
appears, then the acquisition is not possible.
• Please check whether the power supply to movie
camera is cut.
• Depending on the condition of recording onto the tape,
acquisition may not be possible. Please change the
acquisition location a little, and try again.
• Close DV STUDIO 3, restart, and try.
DV STUDIO 3
38
Page 39

Useful information
Others
Others
File formats that can be displayed with DV STUDIO 3
• BMP file (BMP other than 24 bit or compressed type
are excluded)
• JPEG file
• DVC JPEG file
• TITLE file
• DV format file
DVF: DVF format file created in DV STUDIO 3
DCF: Simple picture file for display
DV format files made with DV STUDIO 1, 2 can also
be used.
DVP format file
DVP is a file in which information is written for managing
the pictures acquired with DV STUDIO 3.
Please do not delete or move.
DV STUDIO 3
39
 Loading...