

Page 1

Operating Instructions
DVD Recorder
Model No. DMR-ES35V
TM
Please read the operating instructions, the safety notes and the notes on setting up the unit on page 3 before connecting,
operating or setting up the unit.
Page 2

Contents
Page
Safety precautions
Information on the unitt
Licence information 4
Before you start
Included accessories 5
Inserting batteries 5
Remote Control
Front Panel
On-screen displays 8
Rear Panel
Connections
Connection with 21-pin Scart cable 10
Connection with Audio/Video cable 10
Connection with S VIDEO-cable 11
Settings
Country 11
Auto-Setup 11
Download from TV with Q Link 11
TV Aspect 11
Setting the date and time 11
External units
Connection of Set Top Box
or satellite receiver
Connecting a decoder 12
Connecting an analogue amplifier
Connecting a digital amplifier
Connecting
Connecting
COMPONENT VIDEO OUT
Connecting a TV with
COMPONENT VIDEO input sockets
Progressive television picture
STATUS displays
Screen information, Symbols 15
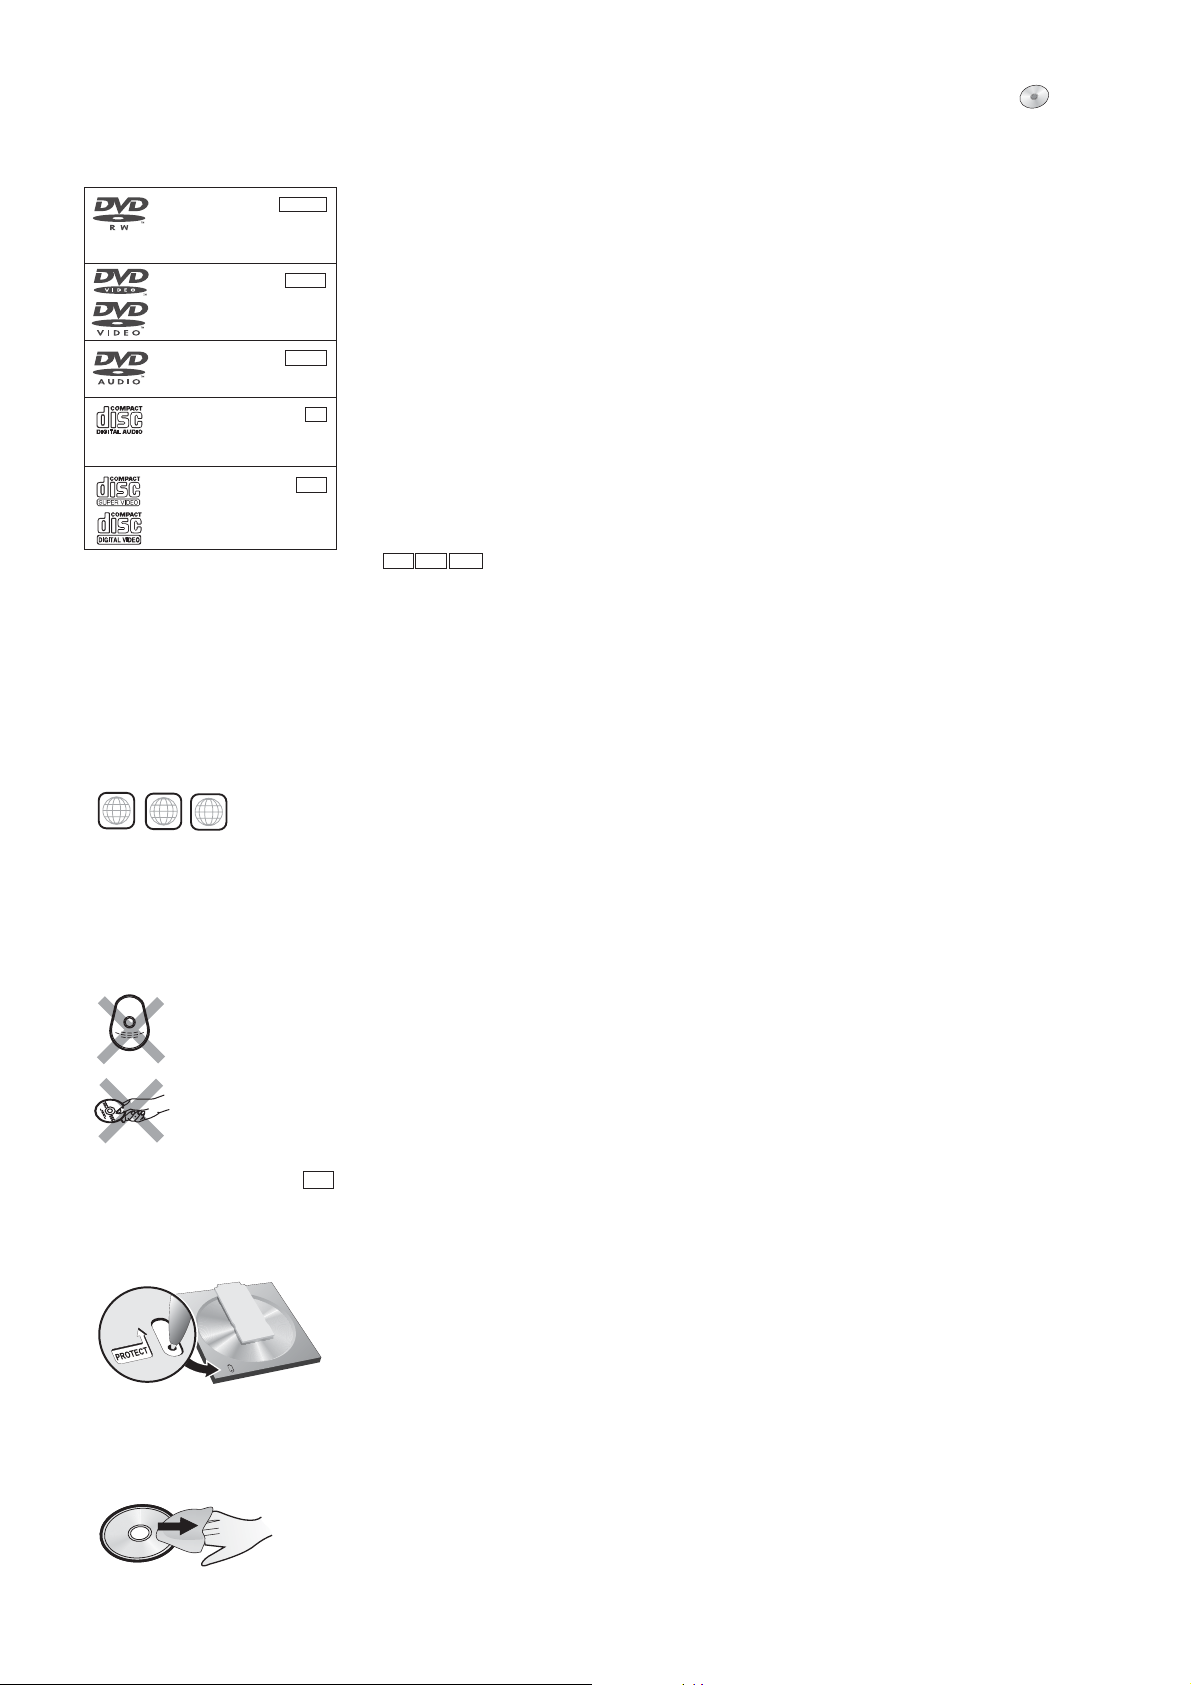
Disc formats
Playback and recording discs 16
Playback discs 17
Handling discs 17
Playback (DVD)
Preparation, Playback 18
Playback of a selected title 18
Playback starts automatically 18
Selecting programmes/titles for playback 18
Finalising 18
Pausing playback 19
Stopping playback 19
Saving the playback position 19
Slow-motion playback 19
Fast forward 19
Dividing a recording into chapters
Skipping 19
MANUAL SKIP 19
Frame playback 19
to AV3 (e.g. camcoder) 13
to DV IN 13
6-7
10-11
12-14
16-17
18-20
3
TIME SLIP 20
Delayed playback 20
4
Quick View (PLAY/x1.3) 20
Simultaneous recording and playback 20
Changing the audio channel 20
5
Playback (VHS)
Preparation 21
Playing a video cassette
Repeat playback
Stopping playback 21
8
Pausing playback 21
Slow-motion playback
Frame playback
Forwards/backwards search
9
Fast forward/Jet rewind 21
JET REW 21
VHS Index Search System (VISS) 21
S-VHS Quasi Playback (SQPB) 22
Manual tracking 22
Automatic tracking 22
11
Handling video cassettes 22
Write-protecting cassettes 22
Cleaning video heads 22
Recording
Before recording 23
Disc Protection,CPRM 23
Formatting 23
12
For recording 23
Record 24
Pause the recording 24
DVD recording of TV programmes 24
13
Changing the recording mode 24
13
VHS recording of TV programmes 24
The approx. time remaining on the cassette 24
Specifying a time as the recording duration
DVD playback during recording
14
Direct TV recording 25
14
Recording from an external unit
Selecting the sound track to record
14
for programmes with dual-channel sound
Recording in dual-channel audio
15
FUNCTIONS
Notes on the menus 26
Entering text 27
DIRECT NAVIGATOR
Overview of DIRECT NAVIGATOR 28
Launching the DIRECT NAVIGATOR menu 28
Delete 28
Properties 28
Editing titles in the SUB MENU 29
Editing chapters in the SUB MENU 30
DivX playback
MP3 playback
JPEG/TIFF playback
Recording
19
Manual programming 34
VPS/PDC feature 34
Autom. SP/LP switching
Drive 34
Page
21-22
21
21
21
21
21
23-25
25
25
25
25
25
26-53
28-30
31
32
33
34
34
Page
Checking or changing timer recordings
Timer Off/On 35
Delete 35
Stop Recording 35
Timer recording via external units
Delete
Deleting titles and pictures 37
Properties 37
Set up Protection/Cancel Protection 37
Copy
Copying with a copy list 38
Time-triggered copying 39
COPYING
Copying from VHS to DVD 40
Finalising 40
Copying from DVD to VHS 40
ShowView Record
ShowView Record 41
Playlists
Creating a playlist 42
Launching the Playlists menu 43
Editing playlists in the SUB MENU 43
Editing chapters in the SUB MENU 44
Flexible Rec
Flexible recording mode (FR) 45
DV Auto Rec
Recording via DV input 45
Manual recording via DV input 45
Setup
Tuning 46-47
Disc, List of language codes 47
Picture 48
Sound 49
Display 49
Connection 50
AV-Link function 50
VHS 51
Others 51
DVD Management
Disc Name 52
Disc Protection 52
Delete all Titles 52
Format Disc 52
Auto-Play Select 53
Finalise 53
Close First Layer 53
Create Top Menu 53
Picture and sound settings
If you need help
Specifications
Index
35
36
37
38-39
40
41
42-44
45
45
46-51
52-53
54-55
56-58
59
last page
2
Page 3
Safety precautions
Install this in a horizontal
position. Do not place anything
heavy on it.
Keep this away from high
temperatures and avoid changes
in temperatures.
Keep away from liquids, humidity
and dust.
Back of product,
see page 9.
På baksiden
av produktet
(Norsk).
Laitteen takaosa
(Fin).
Inside of product
Produktets innside
(Norsk)
Tuotteen sisällä
(Fin)
device
device
LUOKAN 1 LASERLAITE / KLASS 1 LASER APPARAT
Voltage:
AC mains lead protection
Only use power sources complying with the specifications for this device.
: m
Ensure the AC ains lead is connected correctly and not
damaged. Poor connection and lead damage can cause fire or electric shock.
Never
Service:
attempt to repair this unit by yourself. If a problem occurs that is not
described in these operating instructions, disconnect the power supply and contact your
dealer or an authorised after sales service centre.
WARNING:
TO REDUCE THE RISK OF FIRE, ELECTRIC SHOCK OR PRODUCT DAMAGE, DO NOT EXPOSE
THIS APPARATUS TO RAIN, MOISTURE, DRIPPING OR SPLASHING AND THAT NO OBJECTS
FILLED WITH LIQUIDS, SUCH AS VASES, SHALL BE PLACED ON THE APPARATUS.
CAUTION!
!
DO NOT INSTALL OR PLACE THIS UNIT INA BOOKCASE, BUILT-IN CABINET OR IN
ANOTHER CONFINED SPACE. ENSURE THE UNIT IS WELL VENTILATED. TO PREVENT
RISK OF ELECTRIC SHOCK OR FIRE HAZARD DUE TO OVERHEATING, ENSURE THAT
CURTAINS AND ANY OTHER MATERIALS DO NOT OBSTRUCT THE VENTILATION VENTS.
!
DO NOT OBSTRUCT THE UNIT’S VENTILATION OPENINGS WITH NEWSPAPERS,
TABLECLOTHS, CURTAINS, AND SIMILAR ITEMS.
!
DO NOT PLACE SOURCES OF NAKED FLAMES, SUCH AS LIGHTED CANDLES, ON THE UNIT.
!
DISPOSE OF BATTERIES IN AN ENVIRONMENTALLY FRIENDLY MANNER.
CAUTION!
THIS PRODUCT UTILIZES A LASER. USE OF CONTROLS OR ADJUSTMENTS OR
PERFORMANCE OF PROCEDURES OTHER THAN THOSE SPECIFIED HEREIN MAY RESULT
IN HAZARDOUS RADIATION EXPOSURE. DO NOT OPEN COVERS AND DO NOT REPAIR BY
YOURSELF. REFER SERVICING TO QUALIFIED PERSONNEL.
THIS UNIT IS INTENDED FOR USE IN MODERATE CLIMATES.
This product may receive radio interference caused by mobile telephones during use. If such
interference is apparent, please increase separation between the product and the mobile telephone.
Sikkerhetsinstrukser (Norsk)
ADVARSEL:
FOR Å REDUSERE FAREN FOR BRANN, ELEKTRISK STØT
ELLER SKADER PÅ PRODUKTET, MÅ DETTEAPPARATET IKKE
UTSETTES FOR REGN, FUKTIGHET, VANNDRÅPER ELLER
VANNSPRUT. DET MÅ HELLER IKKE PLASSERES GJENSTANDER
FYLT MED VANN, SLIK SOM BLOMSTERVASER, OPPÅ APPARATET.
ADVARSEL!
!
APPARATET MÅ IKKE PLASSERES I EN BOKHYLLE, ET
INNEBYGGET KABINETT ELLER ET ANNETLUKKETSTED HVOR
VENTILASJONSFORHOLDENE ER UTILSTREKKELIGE. SØRG
FOR AT GARDINER ELLER LIGNENDE IKKE FORVERRER
VENTILASJONSFORHOLDENE,
SJOKK ELLER BRANN FORÅRSAKET AV OVERHETING UNNGÅS.
!
APPARATETS VENTILASJONSÅPNINGER MÅ IKKE DEKKES TIL
MED AVISER, BORDDUKER, GARDINER OG LIGNENDE.
!
PLASSER IKKE ÅPEN ILD, SLIK SOM LEVENDE LYS, OPPÅ
APPARATET.
!
BRUKTE BATTERIER MÅ KASSERES UTEN FARE FOR MILJØET.
ADVARSEL!
DETTE PRODUKTET ANVENDER EN LASER. BETJENING AV
KONTROLLER, JUSTERINGER ELLER ANDRE INNGREP ENN
DE SOM ER BESKREVET I DENNE BRUKSANVISNING, KAN FØRE
TIL FARLIG BESTRÅLING. DEKSLER MÅ IKKE ÅPNES, OG
FORSØK ALDRI ÅREPAREREAPPARATET PÅEGENHÅND. ALT
SERVICE OG REPARASJONSARBEID MÅ UTFØRESAV
KVALIFISERT PERSONELL.
DETTE APPARATET ER BEREGNET TILBRUK UNDER
MODERATE KLIMAFORHOLD.
Dette apparatet kan under bruk fange opp høyfrekvente
forstyrrelser forårsaket av en mobiltelefon som benyttes i
nærheten. Hvis slik forstyrrende påvirkning konstateres, bør
mobiltelefonen benyttes på større avstand fra dette apparatet.
Utstyret bør plasseres i nærheten avAC-stikkontakten, og
støpslet må være lett tilgjengelig hvis det skulle oppstå problemer.
SÅ RISIKO FOR ELEKTRISK
The socket outlet shall be installed near the equipment and easily accessible or the mains plug
or an appliance coupler shall remain readily operable.
The model and serial number of this product can be found on the
back of the unit. Please note them and keep for future reference.
Model No. Serial No.
Norsk: Apparatet bør stilles opp i nærheten av
stikkontakten på en slik måte at man uhindret får
tilgang til nettpluggen hvis det skulle oppstå en feil.
Plasser apparatet horisontalt.
Ikke plasser tunge
gjenstander på apparatet.
Ikke utsett apparatet for
høye temperaturer og
temperatursvingninger.
Beskytt apparatet mot
væske, fuktighet og støv.
Finnish: Laite tulisi sijoittaa
verkkopistorasian lähelle siten, että
verkkopistokkeeseen päästään
häiriötapauksessa varmasti esteettömästi
käsiksi.
Aseta laite vaakasuoraan.
Älä aseta raskaita esineitä
laitteen päälle.
Suojaa laite
korkeiltalämpötiloilta ja
lämpötilaheilahteluilta.
Suojaa laite nesteiltä,
kosteudelta ja pölyltä.
Turvallisuusohjeita (Finnish)
VAROITUS:
TULIPALO-,SÄHKÖISKUVAARAN TAI TUOTETTAKOHTAAVAN
MUUN VAHINGON VÄHENTÄMISEKSI EILAITETTA SAA
ALTISTAA SATEELLE, KOSTEUDELLE, VESIPISAROILLETAI
ROISKEELLE, EIKÄ NESTETTÄSISÄLTÄVIÄ ESINEITÄ,KUTEN
ESIMERKIKSI MALJAKOITA, SAA ASETTAA LAITTEENPÄÄLLE.
VAROITUS!
!
ÄLÄ ASENNA TAI LAITA TÄTÄ LAITETTA KABINETTITYYPPISEEN
KIRJAKAAPPIIN TAI MUUHUN SULJETTUUN TILAAN, JOTTA
TUULETUS ONNISTUISI. VARMISTA, ETTÄ VERHO TAI MIKÄÄN
MUU MATERIAALI EI HUONONNA TUULETUSTA, JOTTA
VÄLTETTÄISIIN YLIKUUMENEMISESTA JOHTUVA SÄHKÖISKUTAI TULIPALOVAARA.
!
ÄLÄ PEITÄ LAITTEEN TUULETUSAUKKOJA SANOMALEHDELLÄ,
PÖYTÄLIINALLA, VERHOLLA TAI
MUULLA VASTAAVALLA ESINEELLÄ.
!
ÄLÄ ASETA PALAVAA KYNTTILÄÄ TAI MUUTA AVOTULEN
LÄHDETTÄ LAITTEEN PÄÄLLE.
!
HÄVITÄ PARISTOT LUONTOA VAHINGOITTAMATTOMALLA TAVALLA.
VAROITUS!
LAITTEEN KÄYTTÄMINEN MUULLA KUIN TÄSSÄ
KÄYTTÖOHJEESSA MAINITULLATAVALLA
SAATTAA ALTISTAAKÄYTTÄJÄN
TURVALLISUUSLUOKAN 1 YLITTÄVÄLLE
NÄKYMÄTTÖMÄLLE LASERSÄTEILYLLE.
TÄMÄ LAITE ON TARKOITETTU KÄYTETTÄVÄKSI
LEUDOSSA ILMASTOSSA.
Tämä tuotteen toimintaan saattaa tulla häiriöitä lähellä
olevasta matkapuhelimesta. Mikäli matkapuhelimesta
johtuvia häiriöitä ilmenee, siirrä matkapuhelin
mahdollisimman kauas laitteesta jotta häiriöt poistuvat.
Laite tulee asettaa lähelle verkkopistorasiaa ja pistokkeen täytyy
olla sellaisessa asennossa, että siihen on helppo tarttua ongelman
sattuessa.
3
Page 4
Information on the unit
DivX-compatible
DivX files can be played back from CD-R/CD-RW and DVD-R.
Quick start
You can record to DVD-RAM about one second after switching on the unit.
COPYING
With the push of a button, you can copy the content of a VHS cassette to a disc or
vice versa.
DV interface
You can connect your digital camcorder directly to this unit via the DV IN connection.
This way it’s easy to cop your movies.y
Licence information
This product incorporates copyright protection technology that is protected by U.S.
patents and other intellectual property rights. Use of this copyright protection
technology must be authorized by Macrovision, and is intended for home and other
limited viewing uses only unless otherwise authorized by Macrovision. Reverse
engineering or disassembly is prohibited.
Dolby Digital
Method of encoding digital signals. The signals are very much compressed in the
process to enable recordings of large volumes of data.
Manufactured under license from Dolby Laboratories. Dolby and the double-D symbol
are trademarks of Dolby Laboratories.
DTS (Digital Theater Systems)
Sound system used in cinemas or movie theaters all over the world. "DTS" and "DTS
2.0 + Digital Surround" are trademarks of Digital Theater Systems, Inc.
MP3 MPEG 1 Audio Layer 3or is a file compression format used for digital audio
files. It provides files of an extremely small size and may cause a consequential loss
of quality. MPEG Layer-3 audio decoding technology licensed from Fraunhofer IIS
and Thomson multimedia.
-If you see this symbol-
Information on Disposal for Users of Waste Electrical & Electronic Equipment
(private households)
This symbol on the products and/or accompanying documents means
that used electrical and electronic products should not be mixed with
general household waste.
For proper treatment, recovery and recycling, please take these
products to designated collection points, where they will be accepted
on a free of charge basis. Alternatively, in some countries you may be
able to return your products to your local retailer upon the purchase
of an equivalent new product.
Disposing of this product correctly will help to save valuable
resources and prevent any potential negative effects on human health
and the environment which could otherwise arise from inappropriate
waste handling.
Please contact your local authority for further details of your nearest
designated collection point.
Penalties may be applicable for incorrect disposal of this waste, in
accordance with national legislation.
For business users in the European Union
If you wish to discard electrical and electronic equipment, please contact your dealer
or supplier for further information.
Information on Disposal in other Countries outside the European Union
This symbol is only valid in the European Union.
If you wish to discard this product, please contact your local authorities or dealer
and ask for the correct method of disposal.
4
Page 5
Before you start
Dear customer
Thank you for your trust and your decision to purchase this top-quality device.
Panasonic is one of the leading manufacturers of entertainment electronics devices.
We are sure that you will be completely satisfied with this device.
Matsushita Electric Industrial Co., Ltd.
http://www.panasonic.co.jp/global/
R6/LR6, AA
DVD/VHS
DRIVE
SELECT
1
4
7
RESET
SKIP/INDEX
STOP
TIMESLIP/ JET REW
R
O
T
A
G
I
V
A
N
T
C
E
R
I
D
SUB MENU
S
DISPLAY
AUDIO
A
REC
RECMODE
TV
AV
2
5
8 9
0
PAUSE
C
/
G
O
R
P
ENTER
B
CH
TRACKING/V-LOCK
3
6
INPUT
SELECT
SLOW/SEARCH
REW
MANUALSKIP
H
E
C
K
CREATE
CHAPTER
C
EXTLINK
ShowView
PLAY
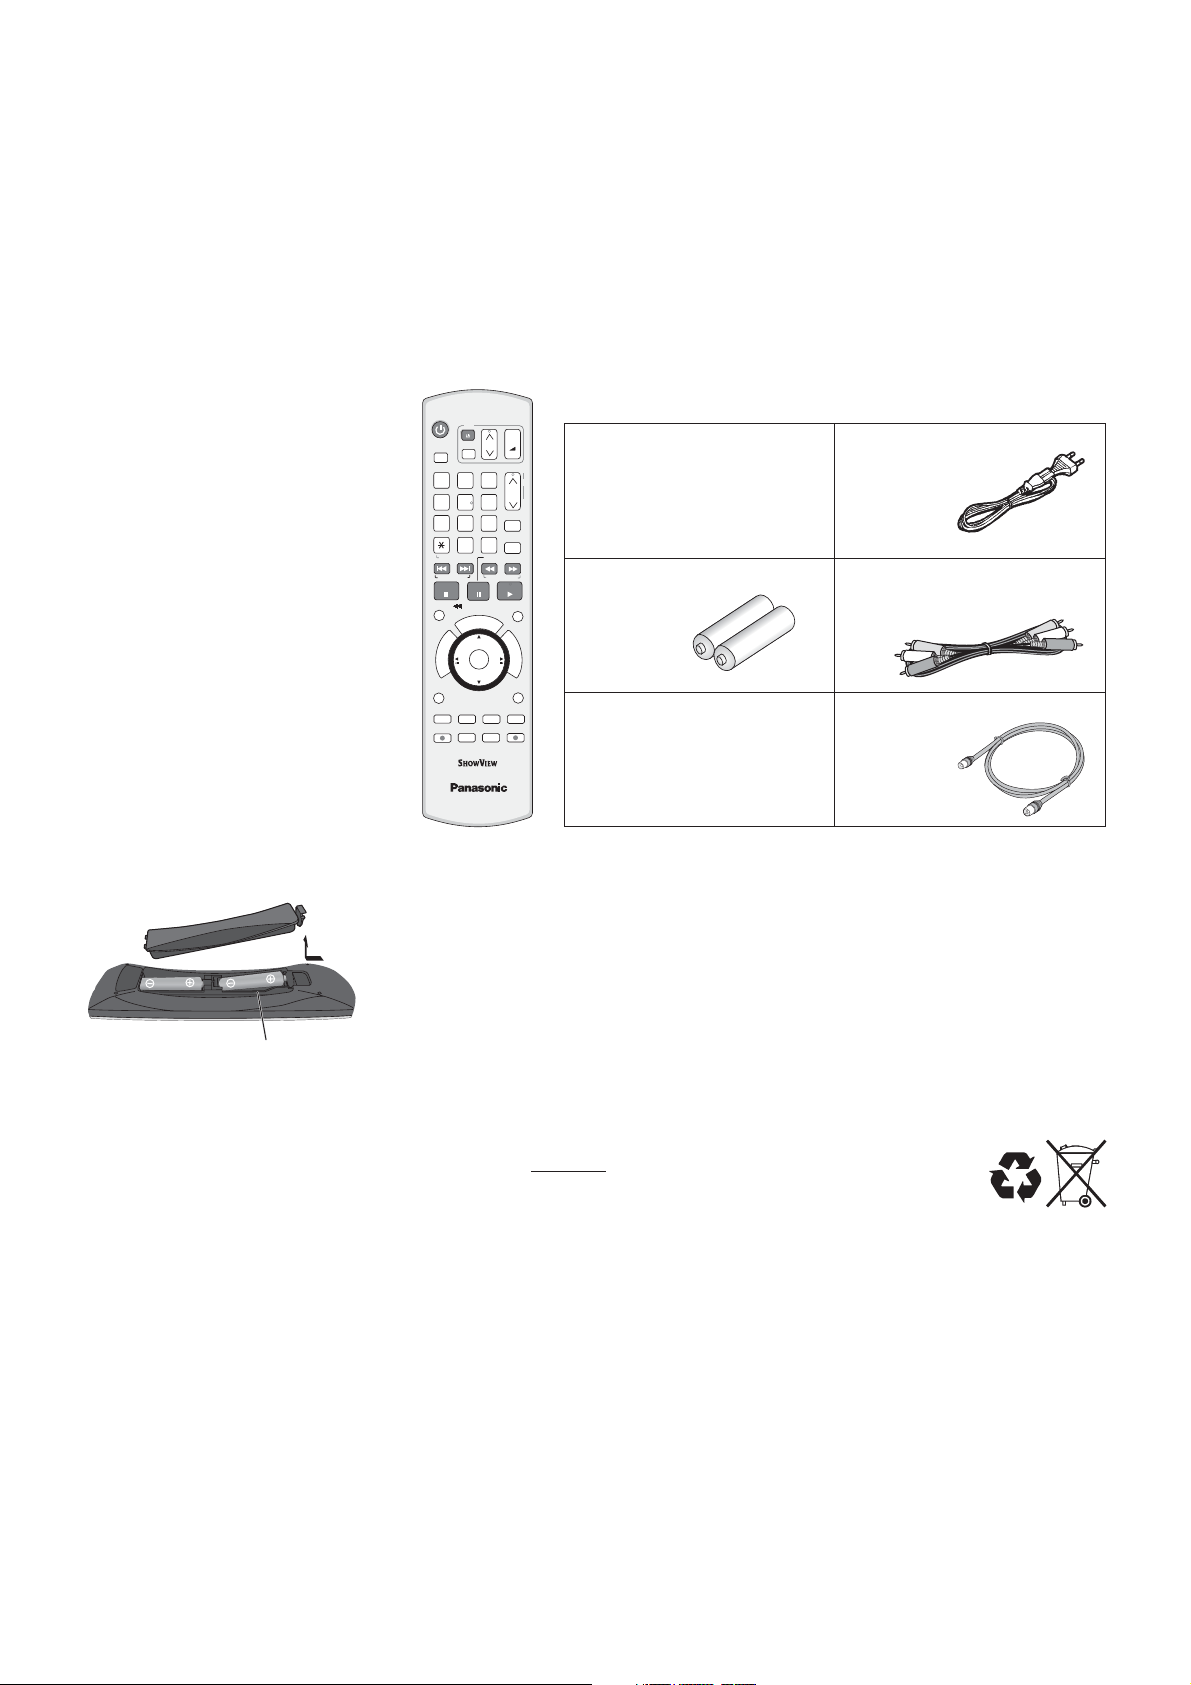
Included accessories
+
VOLUME
_
CH
DELETE
FF
Remote Control
EUR7659YF0
+
-
Batteries
AA, UM3 or R6
F
U
N
C
T
I
O
N
S
RETURN
STATUS
DIRECTTV REC
Operating Instruction
AC Mains Lead
RJA0043-1C
Audio/Video cable
K2KA6BA00003
RF Coaxial cable
K1TWACC00001
Guarantee Card
DVD/TV
Inserting batteries
The batteries last for about a year, depending on how often you use the remote
control unit.
!
Do not mix old with new batteries, or batteries of different types.
!
Only use batteries without any harmful substances (lead, cadmium, mercury).
!
Do not use rechargeable type batteries.
!
Remove the batteries if the remote control unit will remain unused for longer
periods of time
!
Do not heat or short-circuit the batteries.
!
Immediately remove used-up batteries and replace with batteries of type AA, UM3
.
or R6.
!
Be sure to put in the batteries the right way round + and -.
Dispose of , packaging material and the unit according to
batteries
statutory regulations.
They must not be thrown into the household refuse.
5
Page 6
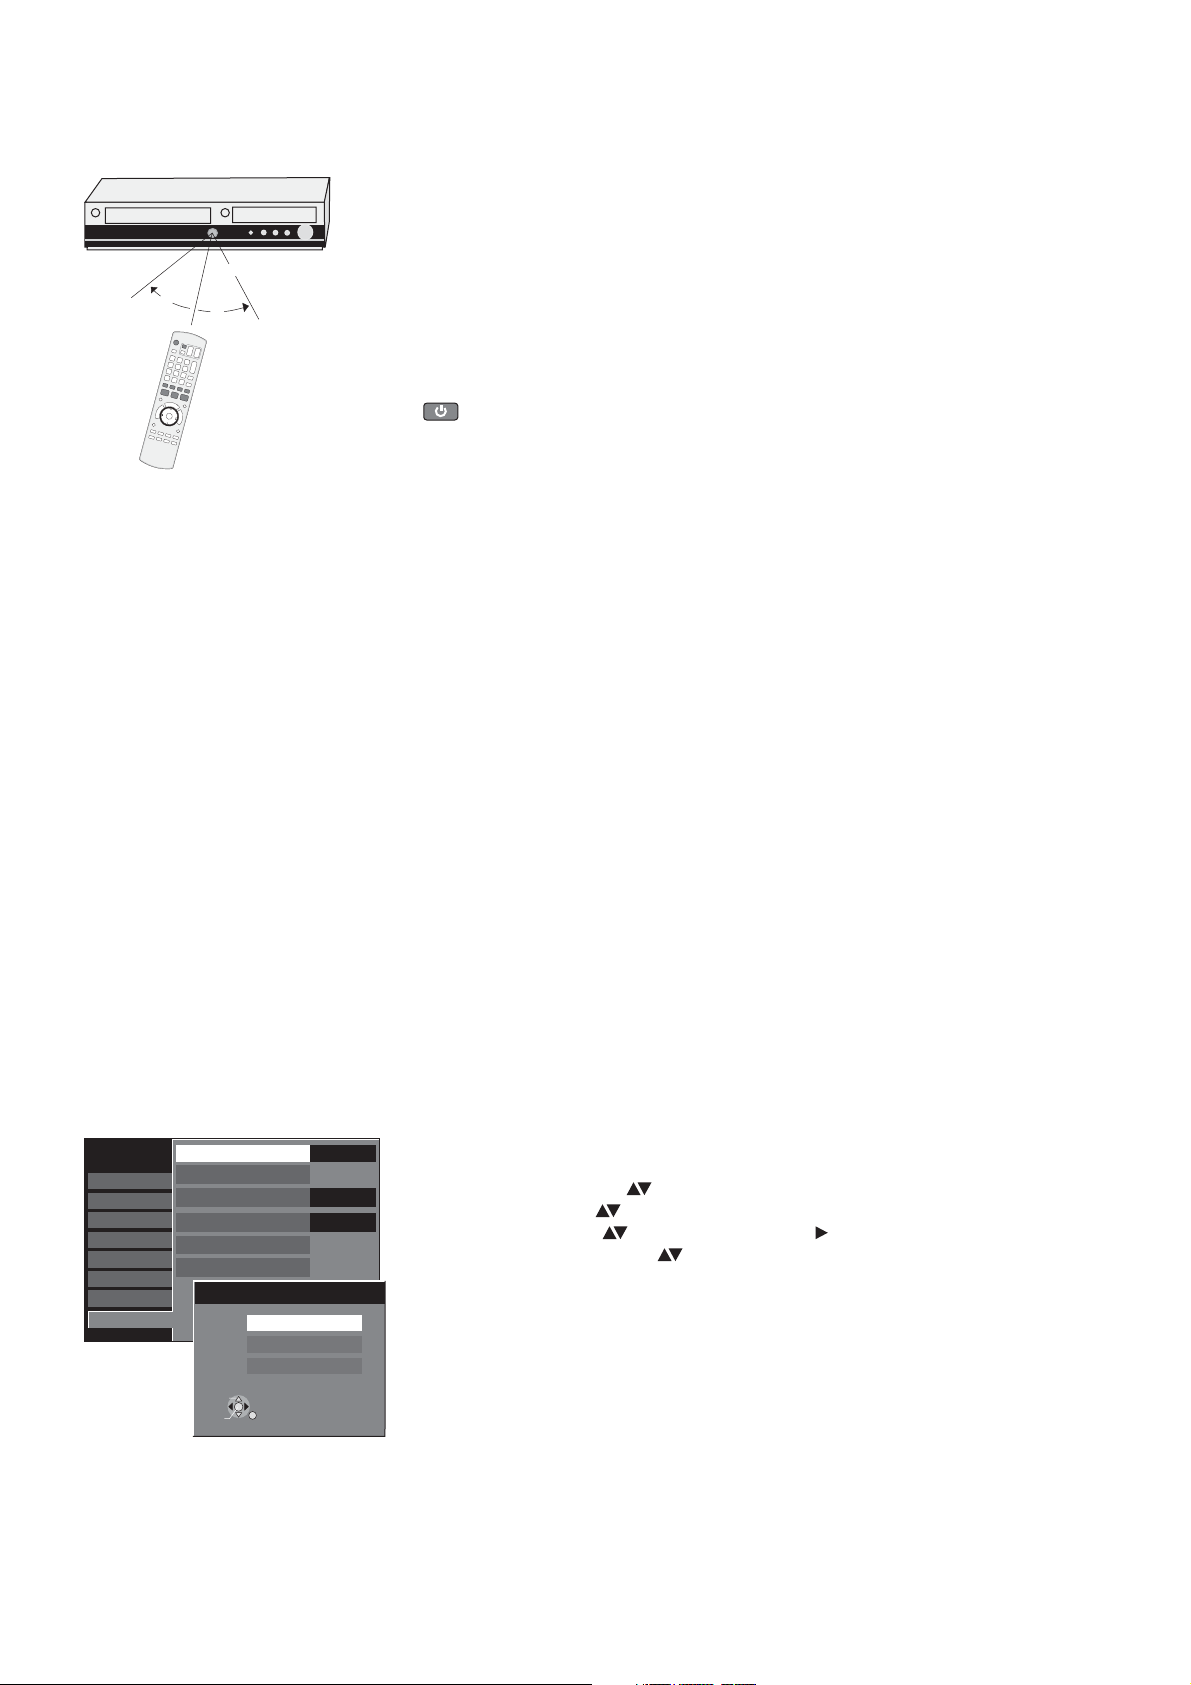
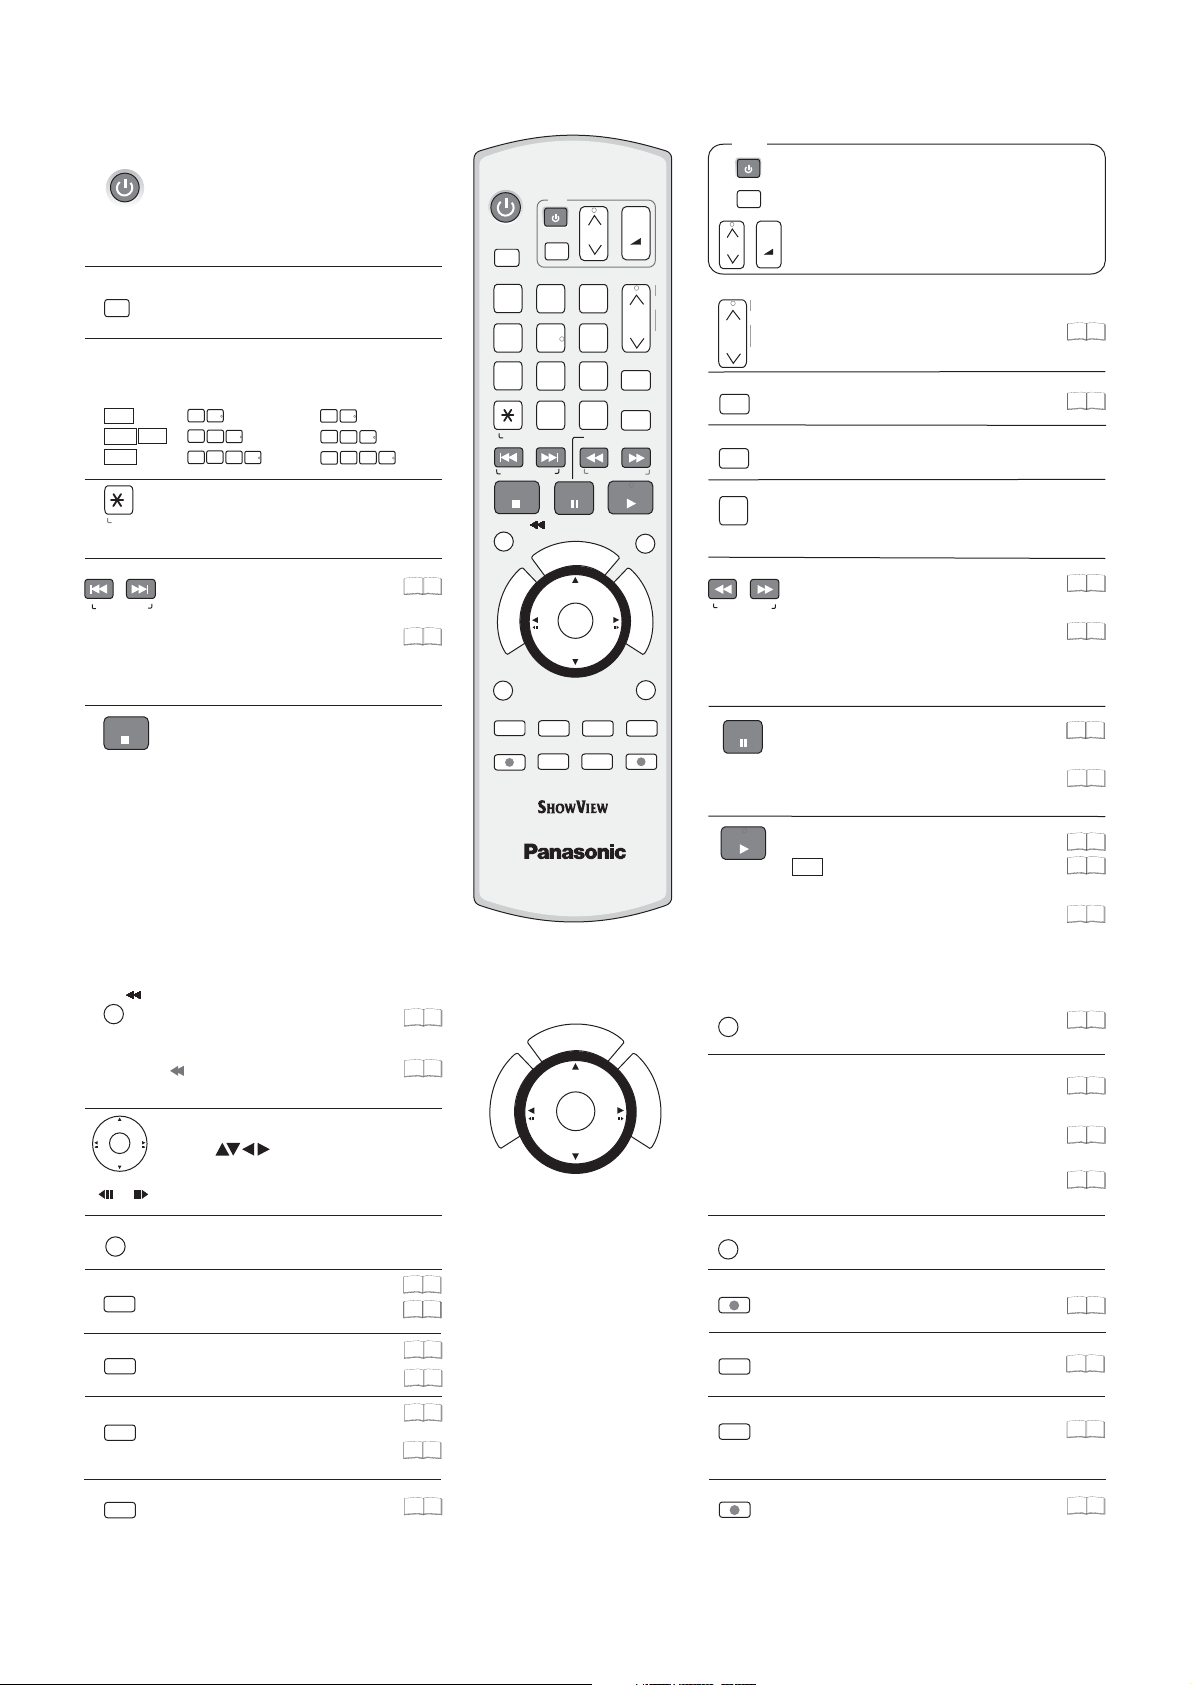
Remote Control
Remote control signal sensor
7m
30°
30°
Point the remote control at the sensor of the unit. Avoid obstacles along the
transmission path. The maximum reach of the remote control is 7 metres directly in
front of the unit. Make sure that the transmission window and the sensor on the unit
are clean. The process can be impaired by direct sunlight and glass cabinet doors.
Child protection
You can lock the buttons on the unit and the remote control.
!
Press and hold the and buttons until [ ] appears in the
RETURN ENTER X HOLD
display. The buttons on the unit are locked.
!
To unlock the child protection, repeat the process until disappears.
[]X HOLD
Operating a television
Change the code on the remote control to control your TV.
!
Press and hold the on and off button.
!
Enter the two-digit code for your television.
Trademark Code
Panasonic 01-04,45
AIWA 35
AKAI 27,30
BLAUPUNKT 09
BRANDT 10,15
BUSH 05,06
CURTIS 31
DESMET 05,31,33
DUAL 05,06
ELEMIS 31
FERGUSON 10
GOLDSTAR/LG 31
TV
Trademark Code
GOODMANS 05,06,31
GRUNDIG 09
HITACHI 22,23,31,40-42
INNO HIT 34
IRRADIO 30
ITT 25
JVC 17,39
LOEWE 07
METZ 28,31
MITSUBISHI 06,19,20
MIVAR 24
NEC 36
Trademark Code
NOKIA 25-27
NORDMENDE 10
ORION 37
PHILIPS 05,06
PHONOLA 31,33
PIONEER 38
PYE 05,06
RADIOLA 05,06
SABA 10
SALORA 26
SAMSUNG 31,32,43
SANSUI 05,31,33
Trademark Code
SANYO 21
SBR 06
SCHNEIDER 05,06,29-31
SELECO 06,25
SHARP 18
SIEMENS 09
SINUDYNE 05,06,33
SONY 08
TELEFUNKEN 10-14
THOMSON 10,15,44
TOSHIBA 16
WHITE WESTINGHOUSE
05,06
Some television models of the listed brands (e.g. older Panasonic units) cannot be
controlled via the remote control.
Setup
Tuning
Disc
Picture
Sound
Display
Connection
VHS
Others
Remote Control
Clock
Power Save
Quick Start
DivX Registration
Initialize
Remote Control
TAB
SELECT
ENTER
RETURN
SELECT
DVD 1
DVD 2
DVD 3
DVD 1
Off
On
Switching to AV input on your Panasonic television
!
Press .
AV
Switches between TV reception and AV input each time the button is pressed.
Setting up the remote control
If you are using another Panasonic unit at the same location, change the setting of
the remote control so that you can operate the units independently of each other.
Set up the remote control for the unit.
!
Press .
!
!
!
!
FUNCTIONS
Select [To Others] with and confirm with .
Select [Setup] with and confirm with .
Select [Others] with , [Remote Control] with and confirm with .
Select [DVD 1, 2 or 3] with and confirm with .
ENTER
ENTER
ENTER
ENTER
Apply the selected setting [DVD 1, 2 or 3] to the remote control.
!
Press and hold and press the appropriate number button 1, 2 or 3 for at
ENTER
least 2 seconds.
!
Exit the menu with .
RETURN
If the remote control setting does not match that of the unit, [DVD 1, 2 or 3] appears
on the unit’s display.
!
Press and press the appropriate number key 1, 2 or 3 simultaneously for
ENTER
at least 2 seconds.
If you want to operate two units independently of each other using the same
remote control, then change the the remote control setting.
6
Page 7
Remote Control
DVD/VHS
Standby/on switch
Press to switch the unit from on to
standby mode or vice versa. In standby
mode, the unit is still consuming a small
amount of power.
DRIVE
SELECT
DRIVE SELECT
Select the DVD or VHS drive.
Direct entry using the number buttons
Selection of channels, title numbers, etc.
0
VCD
JPEG
JPEG
MP3
5
5:
0
0
5
5:
0
0
0
5:
15:
15:
5
15:
Delete a function.
RESET
VHS: RESET = Reset the tape counter.
SKIP = Skip chapters, titles or
SKIP/INDEX
pictures.
VHS: INDEX = Find the beginning of a
recording.
STOP
Stop a recording or playback.
VHS: Stop jet rewind.
Press for more than 3 seconds to
eject the cassette.
TV
DVD/VHS
TV
DRIVE
SELECT
AV
1
2
5
4
8
7
5
1
0
5
1
5
0
1
0
19
99
21
99
SUB MENU
0
RESET
SKIP/INDEX
STOP
PAUSE
TIME SLIP/ JET REW
G
O
R
P
R
O
T
A
G
I
V
A
N
T
ENTER
C
E
R
I
D
S
DISPLAY
AUDIO
A
B
REC
REC MODE
DVD/TV
C
/
CH
TRACKING/V-LOCK
3
6
ShowView
9
DELETE
INPUT
SELECT
SLOW/SEARCH
REW
PLAY
MANUAL SKIP
H
E
C
K
CREATE
CHAPTER
C
DIRECT TV REC
EXT LINK
+
VOLUME
_
CH
FF
F
U
N
C
T
I
O
N
S
RETURN
STATUS
+
-
CH
TRACKING/V-LOCK
CH
ShowView
DELETE
INPUT
SELECT
SLOW/SEARCH
REW
PAUSE
Switch the TV on and off.
Select the AV input on the TV set.
AV
+
CH
= Select the programme position on the TV set.
VOLUME
VOLUME
_
CH = Programme selection button
+
VHS: Optimise the
-
playback picture.
= TV volume control.
=TRACKING/V-LOCK+/-
ShowView Record menu
Delete a title.
Switch button to switch AV input between
tuner,AV1,AV2, AV3 (front) and DV IN.
SLOW
= Slow-motion playback
FF
VHS
SEARCH
:REW
FF
REW
FF
Search during playback.
=
= Jet rewind
= Fast forward from mode.
STOP
=Rewind
= Forward search during playback.
Pause a recording or playback.
VHS: Press and hold for more than 2 seconds
for slow-motion playback.
PLAY
Start playback.
RAM
Quick View
: You can increase the
playback speed.
VHS:Playback or repeat playback
22
99
41
99
.
19
99
21
99
19
99
21
99
18
99
20
99
21
99
You can also switch on the unit from Standby mode using the , and buttons.DIRECT NAVIGATOR PROG/CHECK ShowView
TIME SLIP/ JET REW
DVD TIME SLIP: = Select the time frame.
VHS: JET REW = Jet rewind to the
beginning of the tape.
ENTER
Direction buttons in the menu guide.
Select groups or titles.
Frame or slow-motion playback.
SUB MENU
S
AUDIO
Launch the sub-menu.
Select the audio channel/soundtrack
A
A = Delete selected stations.
Menu guide
DISPLAY
DVD only: Picture and sound settings.
B
B = Insert station.
Menu guide
CREATE
CHAPTER
DVD only: Divide a recording into
C
chapters.
C = Move selected stations.
20
99
21
99
O
T
A
G
I
V
A
N
T
C
E
R
I
D
H
C
/
E
G
C
K
O
R
P
R
ENTER
F
U
ENTER = Select or save
a setting.
20
99
46
54
99
46
99
19
99
46
99
MANUAL SKIP
N
C
T
I
O
N
S
PROG/CHECK = Check or change a Timer recording
DVD only: Jump ahead 30 seconds.
DIRECT NAVIGATOR
FUNCTIONS = Launch the selection menu.
RETURN
Return to the previous menu.
REC
Recording
REC MODE
EXT LINK
Record mode button ( )XP, SP, LP, EP
Timer Recording with external recording
control.
Menu guide
STATUS
Detailed information appears on
15
99
DIRECT TV REC
Direct TV recording to DVD and VHS.
the screen.
= e Title View.Launches th
19
99
35
99
18
99
26
99
24
99
24
99
36
99
25
99
7
Page 8
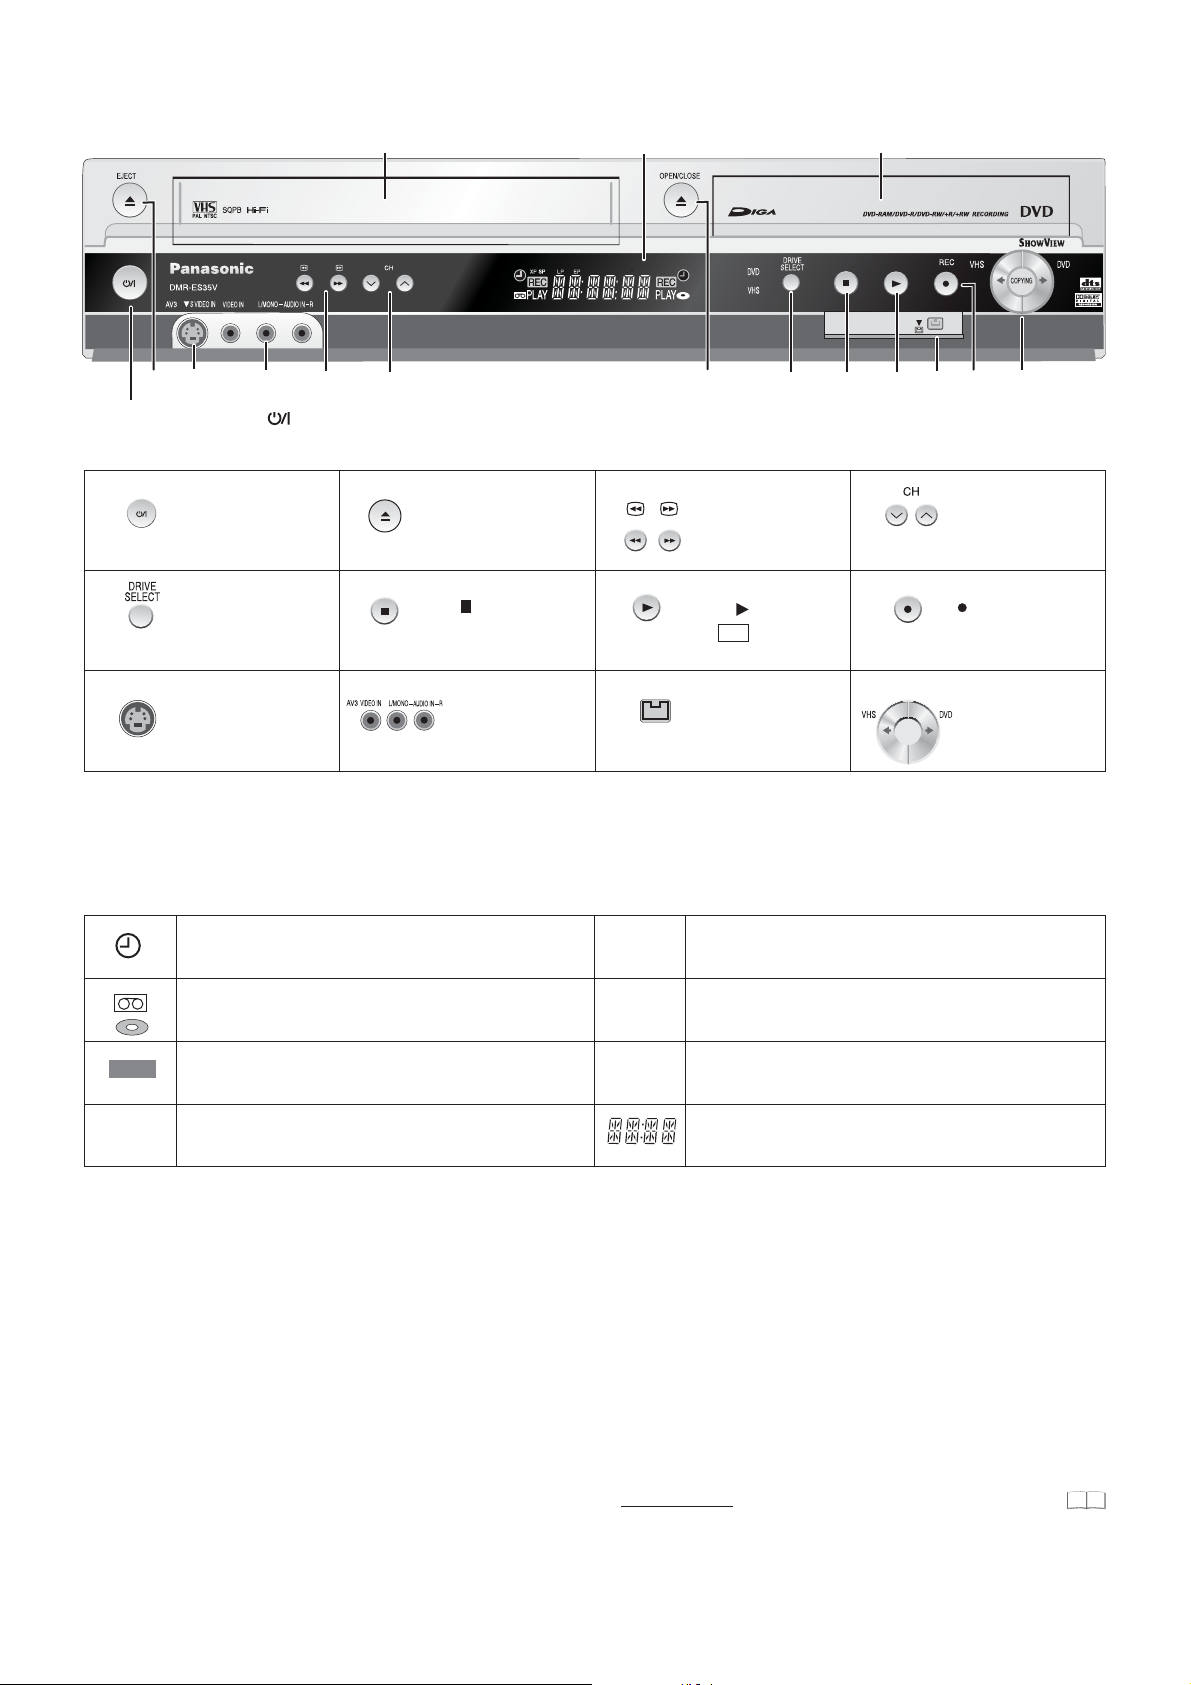
Front Panel
.
Display
3
7
11
EXT-L
2
Forward/rewind
Search during playback.
PLAY : Playback
RAM
Quick View
DV input
5
Cassette Compartment
VHS
2
9
1
Standby/On switch : Press to switch the unit from on to standby mode or vice versa. In standby mode, the unit is still consuming a small
amount of power. Switching this unit into standby mode does not disconnect it from the mains.
1
Standby/On switch
5
Drive select
VHS or DVD
9
S VIDEO input AV3
10
34
2
EJECT: Eject the cassette
OPEN/CLOSE:Openand
close the
6
STOP
10
disc tray.
AV3 input terminal
Disc Tray
6711
4
8
12
COPYING
8
12
Channel select button
: RecordREC
Copy
Display
Shows Timer standby or Timer recording.
The inserted medium is being shown.
REC
PLAY
Other messages
PLEASE WAIT
DVD 1, 2, 3
SETUP
READ
No READ Disc cannot be read.
FINAL
No CASSETTE
No DISC
PROTECT
RETURN
JETREW
OFF0:30
REPEAT
The selected drive is recording.
Flashes shortly before a Timer recording starts.
The selected drive is playing.
Please wait.
Wrong remote control code.
You are in the Setup menu.
Disc is being read.
DVD is being finalised.
No cassette has been inserted.
No disc has been inserted
Disc is write-protected.
Cancellation of a function.
A cassette is being jet-rewound.
The recording time is set to 30 minutes.
Repeat playback is on.
XP, SP
LP, EP
DVD
VHS
EXT-L
START
COPY
STOP
PROG FULL
UNSUPPORT
UNFORMAT
X HOLD
.
Error messages
Recording mode / All on:
Flexible recordings/timer recordings.
The selected drive is being displayed.
External-Link: ATimer recording is being made from an
external unit.
Current time, recording/playback counter, various messages.
A function (copying) is beginning.
Copying is taking place.
A function has been stopped (copying).
All 16 timer programme positions are full.
Disc format is not supported.
Disc is unformatted.
Child protection is active.
FR mode
56
99
8
Page 9

Rear Panel
RF IN
AC IN
1
1
3
AUDIO O UT
5
AV2 (DECODER/EXT)
7
L
OPTICAL
AC IN~ = Power supply
R
OUT
AUDIO
3
2
VIDEO OUT
4
AV2(DECODER/EXT)
5
2
Connection for the power cable.
L
4
Audio output, right/left channel Video output
R
AV2 (DECODER/EXT) = 21-pin Scart socket
External unit connection
S VIDEO OUT
S VIDEO output socket
6
8
VIDEO OUT
AV1 (TV)
Y
P
B
P
R
COMPONENTVIDEO OUT
OUT
S VIDEO
AV1 (TV)
6
7
OPTICAL
Digital audio output
AV1 (TV) = 21-pin Scart socket
TV connection
COMPONENT VIDEO OUT
Y
= Luminance signal (brightness signal)
P
= Chrominance signal (colour difference)
B
P
= Chrominance signal (colour difference)
R
Y
P
B
P
R
RF OUT
8
9
10
9
RF OUT
Aerial output
10
RF IN
Aerial input
The outputs of 2, 3, 4, 7 and 8 are dedicated to modules of digital signal processing (DVD).
The video and audio outputs of 5 and 6 are dedicated to modules of digital (DVD) or analogue (VHS) signal processing.
Both groups of outputs are used for analogue and digital sources. But there are limitations, e.g.: During recording or scheduled recording on DVD, the VHS
playback is only possible on outputs of 5 and 6.
For a conventional tube television, we recommend using the Scart socket.
You retain a high-quality RGB video picture with an RGB-compatible television.
!
If you want to use a progressive-capable LCD/plasma television or LCD projector, connect it to COMPONENT VIDEO OUT to get a high quality
progressive video picture.
9
Page 10
Connections
21-pin Scart socket AV1 (TV)
OPTICAL
DIGITALAUDIOOUT
AC IN
AC IN~
4 AC Mains lead
VT
AUDIO
(PCM/BITSTREAM)
Aerial input
4 AC Mains lead
Aerial
1
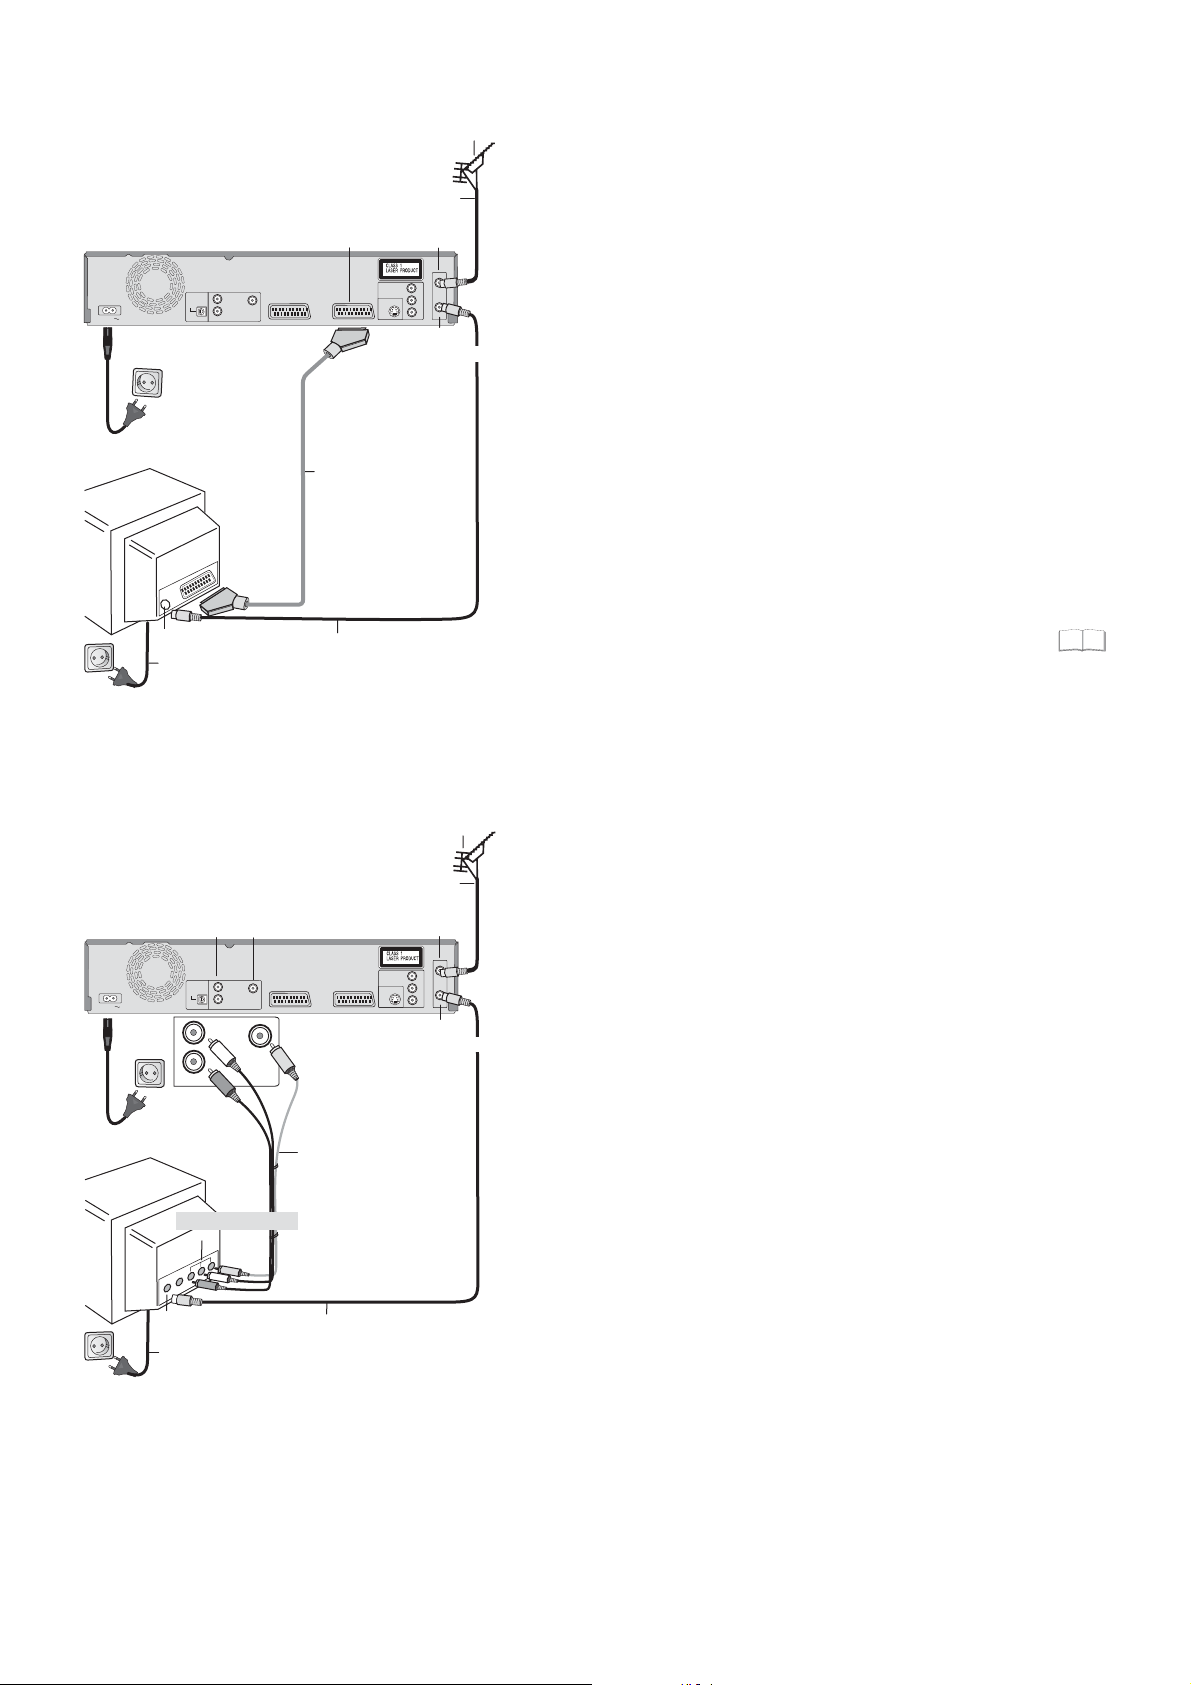
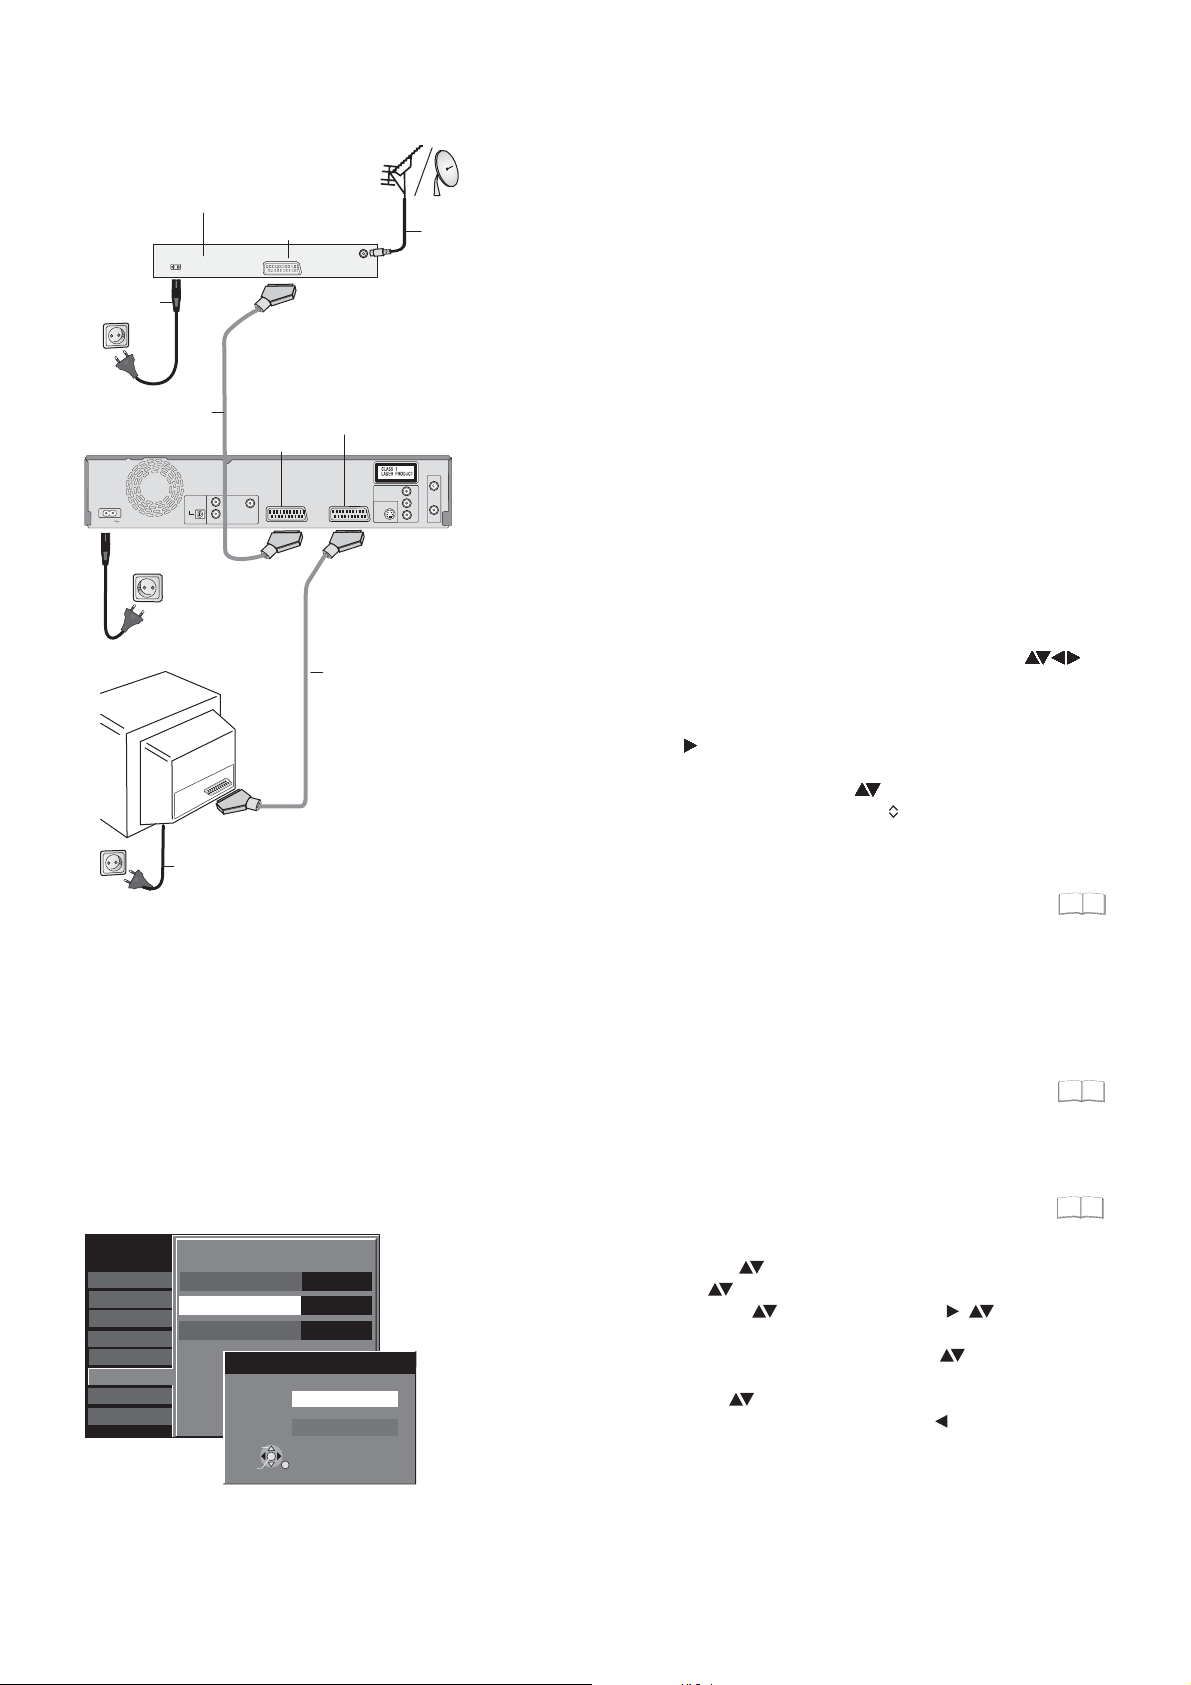
Connection with 21-pin Scart cable (not provided)
Aerial infeed line
RF IN
Aerial input
RFIN
COMPONENTVIDEOOUT
L
R
VIDEOOUT
OUT
AV2(DECODER/EXT)
AV1(TV)
OUT
SVIDEO
Aerial output
Y
P
B
P
R
RFOUT
RF OUT
You need a fully wired 21-pin Scart cable for this optimal connection
type.
Disconnect all units from the power supply system.
1
Connect the aerial to RF IN (Aerial input) of the DVD Recorder.
Connect RF OUT (Aerial output) of the DVD Recorder with the
2
aerial input of the TV.
Connect the AV1 socket (21-pin Scart socket) of the DVD Recorder
3
with the Scart input of the TV.
3 21-pin Scart cable
4
Necessary for TV
with Q Link
Connect the DVD Recorder and the television to the power supply
system.
If your television supports Q Link, use a fully wired 21-pin Scart
cable to connect it to the TV. The stations are automatically
downloaded through [Download from TV].
If your television supports RGB, set the AV1 Output to RGB 1
2 RF Coaxial cable
or RGB 2 in the Setup menu.
50
AC IN
AC IN~
4 AC Mains lead
VT
Aerial input
4 AC Mains lead
AUDIO-
VIDEO-
Output
Output
L
OPTICAL
R
VIDEOOUT
DIGITALAUDIOOUT
OUT
AUDIO
(PCM/BITSTREAM)
L
R
VIDEO OUT
OUT
AUDIO
Audio/Video input
Aerial infeed line
AV2(DECODER/EXT)
AV1(TV)
3 Audio/Video cable
Video
Yellow
L
White
R
Red
2 RF Coaxial cable
Aerial input
COMPONENTVIDEOOUT
OUT
SVIDEO
Aerial output
Aerial
1
RF IN
RFIN
Y
P
B
P
R
RFOUT
RF OUT
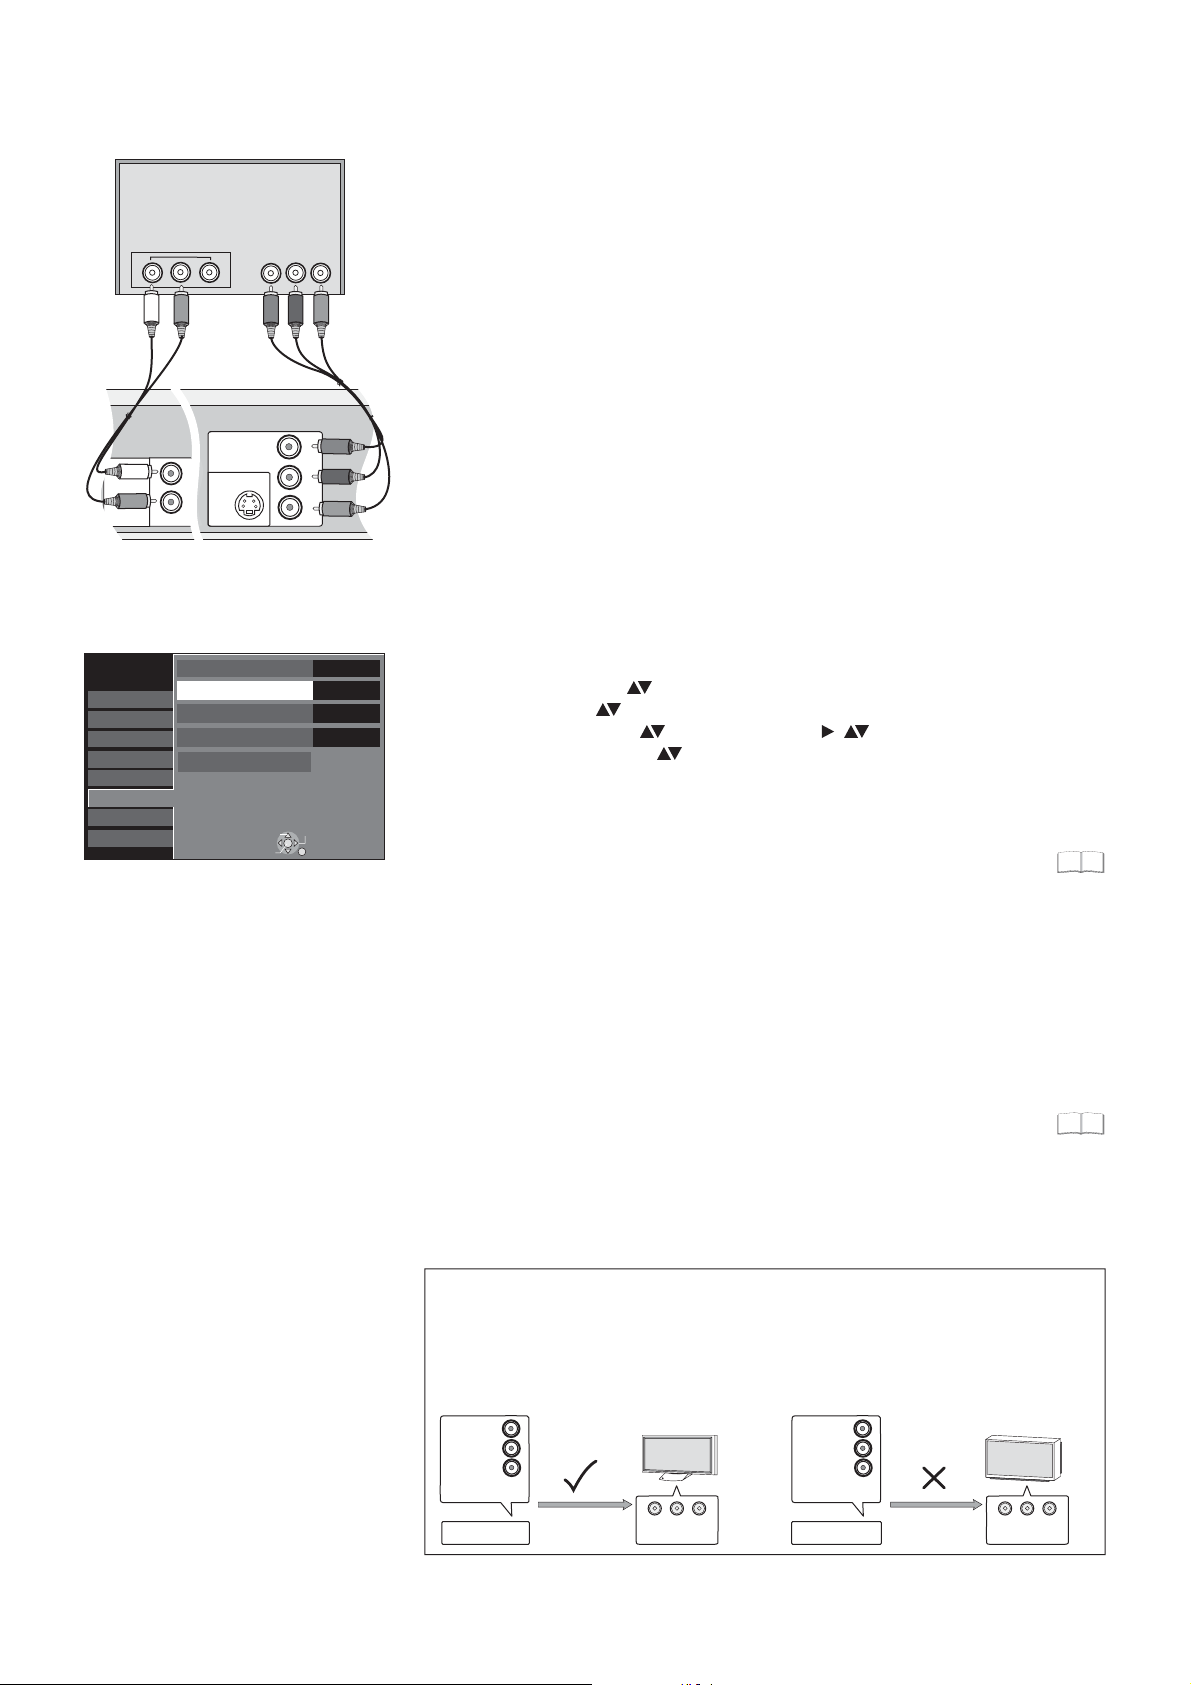
Connection with Audio/Video cable
You can use this frequently used standard connection with the
provided accessories.
Disconnect all units from the power supply system.
1 Connect the aerial to RF IN (Aerial input) of the DVD Recorder.
2
Connect RF OUT (Aerial output) of the DVD Recorder with the
Aerial input of the TV.
3
Connect the AUDIO OUT (L/R) and VIDEO OUT of the DVD
Recorder with the Audio
4
Connect the DVD Recorder and the television to the power supply
system.
/Video input of the television.
10
Page 11
Connections
AUDIO-output
OPTICAL
DIGITALAUDIOOUT
OUT
AC IN
AC IN~
4 AC Mains lead
VT
AUDIO
(PCM/BITSTREAM)
L
R
OUT
AUDIO
S VIDEO-input
Audio input
L
R
VIDEOOUT
VIDEO OUT
S VIDEO-output
SVIDEO
AV2(DECODER/EXT)
3 Audio cable
LRWhite
Red
Aerial infeed line
Aerial input
COMPONENTVIDEOOUT
Y
P
B
OUT
SVIDEO
P
R
OUT
AV1(TV)
RF OUT
Aerial output
3 S VIDEO-
cable
Aerial
1
RF IN
RFIN
RFOUT
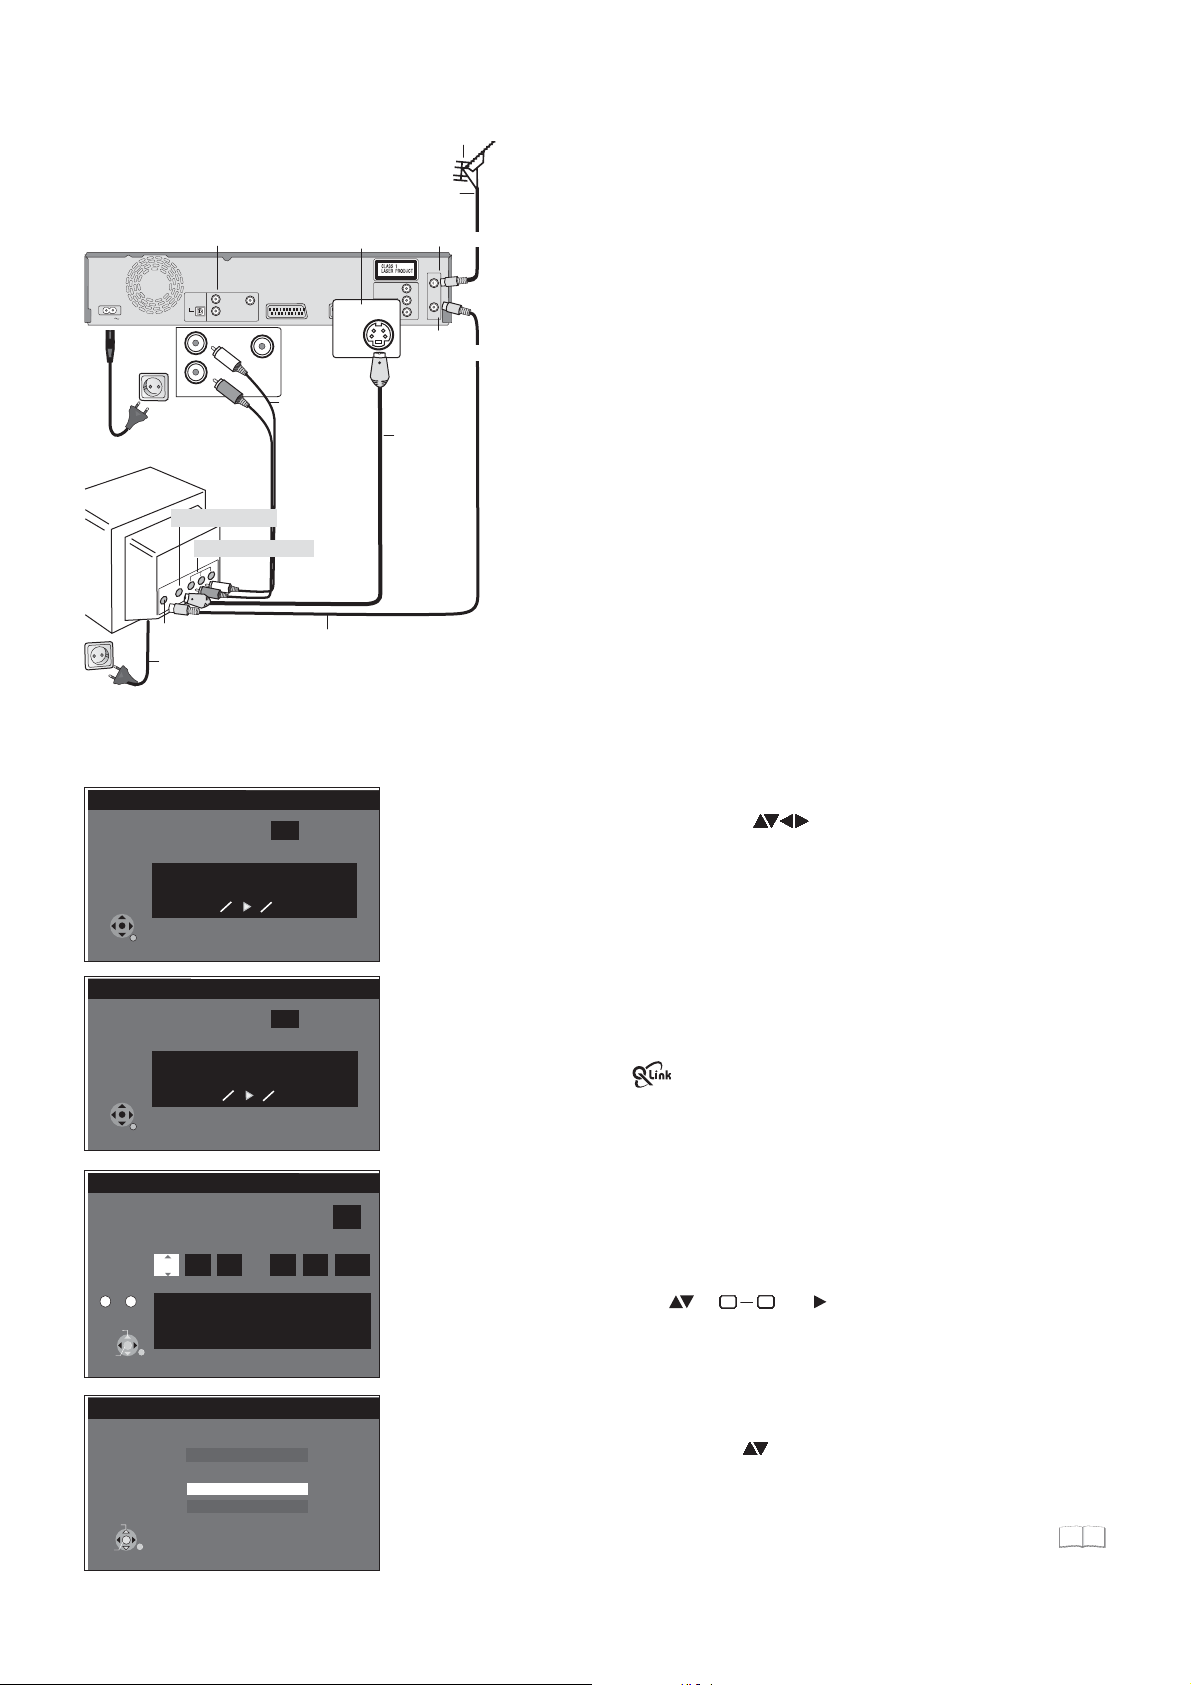
Connection with S VIDEO-cable (not provided)
Depending on the television, the connection with the S VIDEO cable
results in a higher quality picture than the connection with an Audio/
Video cable.
Disconnect all units from the power supply system.
1
Connect the aerial to RF IN (Aerial input) of the DVD Recorder.
Connect RF OUT (Aerial output) of the DVD Recorder with the
2
aerial input of the TV.
Connect AUDIO OUT (L/R) and S VIDEO OUT of the DVD Recorder
3
with the S VIDEO and audio input of the TV.
4
Connect the DVD Recorder and the television to the power supply
system.
RETURN
RETURN
Number
0
--
CHANGE
ENTER
Aerial input
4 AC Mains lead
Auto-Setup
Ch
Auto-Setup in progress. Please wait.
RETURN : to cancel
Download from TV
Pos
Download in progress. Please wait.
RETURN : to cancel
Clock
Time
0 00 00 1 1 2006:: ..
9
Clock cannot be set automatically.
Please set the clock manually.
ENTER : store RETURN : leave
RETURN
4
4
Automatic
Date
2 RF Coaxial cable
Settings
!
!
Country
Download from TV with
If your television is equipped with the Q Link feature, the stations are downloaded
through the transfer of the station table.
In order to be able to use Q Link, the unit must be connected to a TV with Q Link or
a similar feature via a fully wired 21-pin Scart cable.
Off
Setting the date and time
If the Date and Time are not transferred via a television station, the Clock menu
appears.
!
!
An incorrect date or time affects the programmed recording of television programmes
(observe summer and winter time).
Switch on your television and select the channel.
Switch on the unit using the .Standby/OnAVbutton
!
Select the corresponding country with and confirm with .ENTER
For models: If you select Schweiz, Suisse or Svizzera, the Power Save menu
EC
appears after auto setup. If you select Power Save [On], the unit’s power consumption
reduced to a minimum in Standby mode.
Auto-Setup
The auto setup saves all avaiable television stations and takes approx. 5 minutes.
If the station also broadcasts Date and Time, the time will be set automatically.
If the automatically set time does not match the current time, you can set it manually.
(Registered trademark of Panasonic)
9
Change or and
Confirm the change with .
Time and Date with .
ENTER
090909090909090909090909090909090909090909090909090909090909090909090909090909090909090909090909090909090909090909090909090
SELECT
ENTER
16:9 WIDE TV
4:3 TV
RETURN
TV Aspect
16:9
4:3
Letterbox
TV Aspect
!
Select .the desired screen format with and confirm with ENTER
Auto setup for your unit is complete. The availability of stations may differ regionally.
The completeness of the downloaded stations can be checked in the menu.Setup
46
11
Page 12
External units
External device
AC Mains lead
21-pin Scart cable
(DECODER/EXT)
L
OPTICAL
R
DIGITALAUDIOOUT
OUT
AC IN
AC IN~
AC Mains lead
VT
AUDIO
(PCM/BITSTREAM)
AC Mains lead
21-pin Scart socket
21-pin Scart sockets
AV2
VIDEOOUT
AV2(DECODER/EXT)
AV1 (TV)
COMPONENTVIDEOOUT
Y
P
B
OUT
SVIDEO
P
AV1(TV)
R
21-pin Scart cable
Aerial
infeed line
RFIN
RFOUT
Connection of Set Top Box or satellite receiver
If you receive your television programme via a Set Top Box (DVB-T)
or a satellite receiver (digital/analogue), connect your DVD Recorder
as a downstream unit.
Disconnect all units from the power supply system.
1
Connect the AV1 socket (21-pin Scart socket) of the DVD Recorder
with the Scart input of the television unit.
Connect the external unit with a 21-pin Scart cable to the AV
2
2
connection of the DVD Recorder.
Connect the aerial
3
(DVB-T or SAT) to the aerial input of the
external unit.
4
Connect the DVD Recorder, the TV and the external unit to the
power supply system
5
Switch on the external unit, the TV and the DVD Recorder.
!
Switch your TV to the AV channel.
!
Select the appropriate country from the Country menu with
and confirm with .
!
[Auto-Setup] follows automatically and it ends with the note:
ENTER
[No stations found !].
!
Select [No] with and confirm with .
ENTER
The available stations are downloaded from the external unit.
!
Select the desired screen format with and confirm with .
!
Switch the DVD Recorder to AV2 with . You see the television
CH
ENTER
picture from the external unit.
The date and time are not set automatically.
Set them manually.
99
11
Tuning
Disc
Picture
Sound
Display
Connection
VHS
Others
12
Setup
AV2 Settings
AV2 Input
AV2 Connection
Ext Link
SELECT
ENTER
Video
Ext Link 2
AV2 Connection
Decoder
Ext
RETURN
Ext
Connecting a decoder
1 Connect the
DVD Recorder as described under Connection
with 21-pin Scart cable.
Connect the decoder to with an additional
2 AV2 (DECODER/EXT)
21-pin Scart cable
.
In the connection to the Auto Setup, change the setting for the
AV2 socket in the [Setup] menu.
!
Press .
!
!
!
!
!
!
FUNCTIONS
Select [To Others] with and confirm with .
Select [Setup] with and confirm with .
ENTER
ENTER
Select [Connection] with , [AV2 Settings] with ,
and confirm with .
ENTER
In the next screen, select [AV2 Connection] with and
confirm with .
Select [Decoder] with and confirm with .
Press and return to [Connection] with .
Press multiple times to return to the television picture.
ENTER
ENTER
RETURN
RETURN
9910
9950
Page 13

External units
Amplifier (example)
AUDIO IN
LR
Audio cable
L - White
R - Red
Amplifier (example)
OPTICAL
Optical digital audio cable
DIGITALAUDIOOUT
(PCM/BITSTREAM)
OPTICAL
DIGITALAUDIOOUT
(PCM/BITSTREAM)
For all connections described:
Before you connect cables, make sure that all units are switched off.
Switch on the units after you have connected the cables.
Connecting an analogue amplifier or an analogue system component
In order to enjoy stereo or Dolby Pro Logic, connect a corresponding amplifier
or an analogue audio component.
!
L
R
OUT
AUDIO
Connect the AUDIO OUT (L/R) output e.g. with a Dolby Pro Logic amplifier.
!
Connect the audio cable according to the colours and markings on the
connection sockets (white/L, red/R).
Connecting a digital amplifier or a digital system component
If an amplifier equipped with Dolby Digital, DTS or an MPEG-decoder is connected,
a DVD-Video-Disc with multi-channel surround sound can be played back.
L
R
OUT
AUDIO
!
Connect an amplifier with a Dolby Digital, DTS or an MPEG decoder.
!
Use an Optical digital audio cable.
!
Change the [Digital Audio Output] setting in the Setup menu Audio according
49
to your connected digital amplifier.
!
Select audio channel (M1) or (M2) on the external unit.
You cannot use
DTS Digital Surround decoders that are not suitable for DVD.
S VIDEO-cable
Push the jack all the way into the
socket with this side facing up.
AV3 S VIDEO IN VIDEO IN L/MONO AUDIO IN R
Audio cable
L - White
R - Red
AV3 S VIDEO IN VIDEO IN L/MONO AUDIO IN R
Audio/Video cable
Video - Yellow
L - White
R - Red
Connect this unit to a device with
a DTS decoder in order to be able
to play DVDs with this symbol.
Connect an amplifier with built-in Dolby Digital
This device can playback stereo
sound in Dolby Digital (2 channels).
decoder in order to be able to enjoy Surround
Sound.
Connection to AV3 (e.g. camcorder)
If the audio output of the other unit is mono, connect it to the L/MONO socket.
Both the left and the right channel will be recorded.
!
Select one of the two connection options.
The connection with S VIDEO cable and audio cable (L/R) delivers the best quality.
Connection to DV IN
DV means digital video and is a video standard.
You can connect a DV-compatible camcorder to the DVD Recorder. The DV IN
connection is available for this purpose.
Digital satellite tuners and digital VHS video recorders are not compatible with this unit.
The DVD Recorder cannot be controlled via an external unit that is connected to the
DV IN socket.
Before you connect the DV cable, make sure that all units are switched off.
After you have connected the cable, switch on the units.
!
Connect the DV output of the DV unit (e.g. digital camcorder) with the
DV input socket of the DVD Recorder. Use a DV cable.
!
After you have connected the cable, switch on both units.
It is not possible to copy to a VHS cassette
via DV IN..
The DV input of this unit is only intended for DV units. For example, a computer
cannot be connected. Some DV units do not allow for proper input of the picture
and sound signal.
13
Page 14
COMPONENT VIDEO OUT
TV
Audio cable
L - White
R - Red
DIGITALAUDIOOUT
(PCM/BITSTREAM)
Setup
Tuning
Disc
Picture
Sound
Display
Connection
VHS
Others
Audioinput L/R
L
R
OUT
AUDIO
TV Aspect
Progressive
TV System
AV1 Output
AV2 Settings
COMPONENTVIDEO OUT
OUT
S VIDEO
COMPONENT
VIDEO IN
YPPBR
SELECT
TAB
ENTER
Video cable
Y
P
B
P
R
Video
RETURN
YPB PR -
4:3
On
PAL
Green
Blue
Red
COMPONENT VIDEO OUT socket
The sockets can be used for INTERLACE or PROGRESSIVE output and deliver a
clearer picture than the S VIDEO OUT socket.
Connections via these sockets output the colour difference signals (P /P ) and the
BR
brightness signal (Y) separately.
Colours can be reproduced true to the original colour.
The properties of the COMPONENT VIDEO input socket are dependent on the
TV or screen.
!
Connect the COMPONENT VIDEO OUT sockets of the unit with the
COMPONENT VIDEO IN of the TV unit. Use a Video cable.
!
Always connect sockets with the same colour.
!
Connect the audio cables to the corresponding audio input sockets on the TV.
Connecting a TV with COMPONENT VIDEO input sockets
If your TV with LCD or plasma screen supports the progressive process, connect it
to the COMPONENT VIDEO OUT sockets.
If you want to enjoy full progressive video, set Progressive to [On].
!
!
!
!
!
!
FUNCTIONS
Press .
Select [To Others] with and confirm with .
Select [Setup] and confirm with .
Select [Connection] , [Progressive] with and confirm with .
with
with ,
Select the option [On] with and confirm with .
Press multiple times to return to the television picture.
RETURN
ENTER
ENTER
ENTER
ENTER
If the AV1 Output setting in the Setup menu is set to [RGB 1/2 ( without component )],
there is no output to the COMPONENT VIDEO OUT sockets.
Set this option to [Video ( with component )].
50
If the unit is connected to the TV via the S VIDEO OUT or the AV1 socket,
output is Interlace regardless of the settings
.
Progressive television picture
The progressive picture aspect ratio (height to width) is set to 16:9. DVD-Video with
a of 16:9 is properly displayed. However, video material with an
picture aspect ratio
image page ratio of 4:3 is shown stretched from right to left. If it is possible to adjust
the on your television, select the setting [Progressive - On].
picture aspect ratio
With a normal television, the progressive output can cause the picture to flicker,
even if the television is progressive-compatible.
Select the setting [Progressive - Off].
50
Progressive-compatible televisions (PAL)
LCD/plasma television or LCD projector
If progressive output is used, videos can be viewed
in High Resolution, for example from DVD-Video.
COMPONENT VIDEO OUT on this unit is connected
with the COMPONENT VIDEO IN on the television.
Select the [Progressive - On] setting.
COMPONENT
VIDEO OUT
COMPONENTVIDEO OUT
DVD-Recorder
Y
P
B
P
R
Progressive output
COMPONENT
VIDEO IN
Conventional televisions
On a normal television, Progressive output can
cause flickering even if the television is
Progressive-compatible.
Select the [Progressive - Out] setting.
COMPONENT
VIDEO OUT
COMPONENTVIDEO OUT
COMPONENT
VIDEO OUT
DVD-Recorder
R
Y
P
B
P
Progressive output
COMPONENT
VIDEO IN
14
Page 15
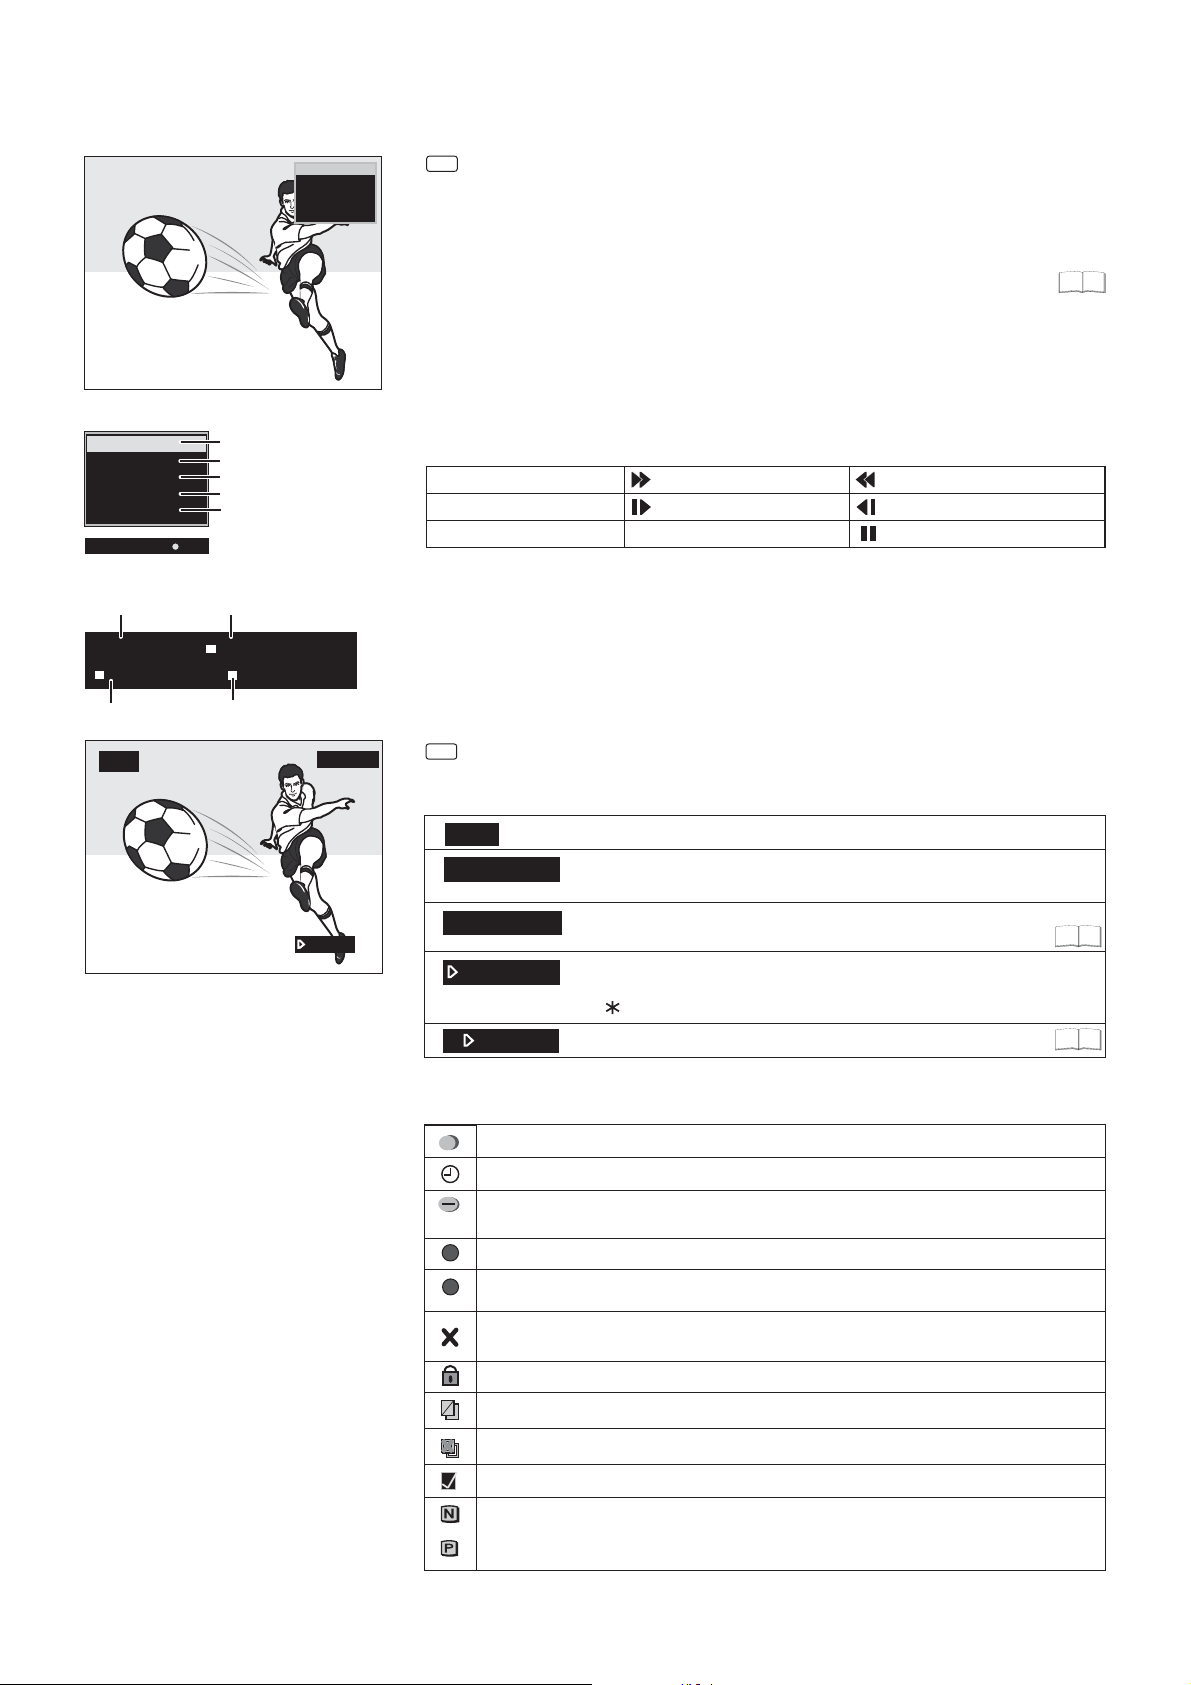
STATUS displays
DVD-RAM
Status displays
DVD-RAM
PLAY
ZDF
Stereo
LR
VHS REC
Status displays for other drive.
6
10:07:21 1.12. Remain 0:50 SP
T14 0:05.14 SP
8
VHS
1
2
3
4
5
7
Detail information
T14 0:05.14 SP
9
PLAY
LR
LR SP
STATUS
Screen information
!
Press .
!
STATUS
Press again. Depending on the function, e.g. PLAY, REC or REC PLAY,
STATUS
the display changes each time the button is pressed.
!
Also press to exit the display.
STATUS
You can switch off the status displays in the Setup menu.
1: Current medium
2: Current recording, playback mode and remaining time
3: Current station
4: Sound type: Stereo = a stereo transmission is currently being received.
M1/M2 = a 2-channel transmission is currently being received.
M1 = a single-channel NICAM transmission is being received.
5: Sound mode: LR, L, R: the soundtrack can be changed with the button.AUDIO
Record
REC
PAU SE
PLAY
Pause
Playback
Fast forward (5 stages)
Slow motion (5 stages)
PLAY/x1.3
Quick View
Rewind (5 stages)
Slow-motion rewind (5 stages)
Pause playback
6: Current date and time
7: Available recording time and recording mode: e.g. 0:50 SP shows 50 minutes in
SP mode.
8: Title number: shows the recording mode and the elapsed play time of the title.
: Current tape counter.
VHS
9: Title number: shows the recording mode and the recording time of the title.
STATUS
VHS screen information
!
Press me the button is pressed, the display
STATUS during playback. Each ti
switches between tape counter and remaining tape time
49
0:21.29
VHS
LR SP
REMAIN: 0:24
0:21.29
R
0:21.29
Symbols
The title is being recorded.
Shows a Timer programming.
A daily or weekly Timer recording was stopped. The icon disappears when
next Timer recording starts.
W
The title overlaps other recordings.
F
The disc was full so the programme failed to record.
The programme cannot be played due to damaged data or could not
be recorded for another reason.
The title is write-protected.
The programme was copy-protected; the title was not recorded.
Current medium
LR L R AUDIO
, , : The soundtrack can be changed with the button.
SP
: Selected recording mode.
Remaining tape time: The display depends on the
correct setting of the tape length.
Tape counter: It is automatically set to 0:00.00 when a video
cassette is inserted.
Use to reset the counter to 0:00.00./ RESET
Repeat
51
21
Title that can only be copied once.
The title has been selected.
The title or the playlist was recorded with a TV system other than the one currently
NTSC
selected. Title and playback lists with these markings cannot be played back.
To playback this title/playlist, switch your TV system.
PAL
15
Page 16
Disc formats
DVD-RAM: DVD Video Recording format
DVD-RAM
4.7 GB 12 cm
9.4 GB 12 cm
2.8 GB 8 cm
rewritable
RAM
DVD
Playback and recording discs
DVD-RAM
The DVD-RAM can be compared with the hard disk and can be written to 100,000 times
on average. The disc can only be played on DVD-RAM-compatible players.
The recording occurs in DVD Video Recording format (VR). Movies and parts of movies can
be edited and deleted. The deletion of movies frees previously used storage space.
The creation of playlists does not require any additional storage space.
Dual-channel sound and 16:9 format are supported in addition to the TIME SLIP. function
A DVD-RAM with Cartridge is write-protected and is CPRM-compatible.
DVD Video Recording format (VR)
This format enables recording and playback.
Digital programmes limited to "one-time recording" can be recorded to a CPRM-compatible
disc. You can record to a CPRM-compatible DVD-RAM.
Playback is only possible with a compatible DVD player. Use a DVD-RAM to record in
DVD Video Recording format.
DVD-R: DVD-Video format
+R : +VR format
DVD-R
4.7 GB 12 cm
1.4 GB 8 cm
writable
+R
--
4.7 GB 12 cm
writable
DVD-RW : DVD-Video format
+RW : +VR format
DVD-RW
4.7 GB, 12 cm
1.4 GB, 8 cm
rewritable
--
+RW
4.7 GB, 12 cm
1.4 GB, 8 cm
rewritable
-RW
+RW
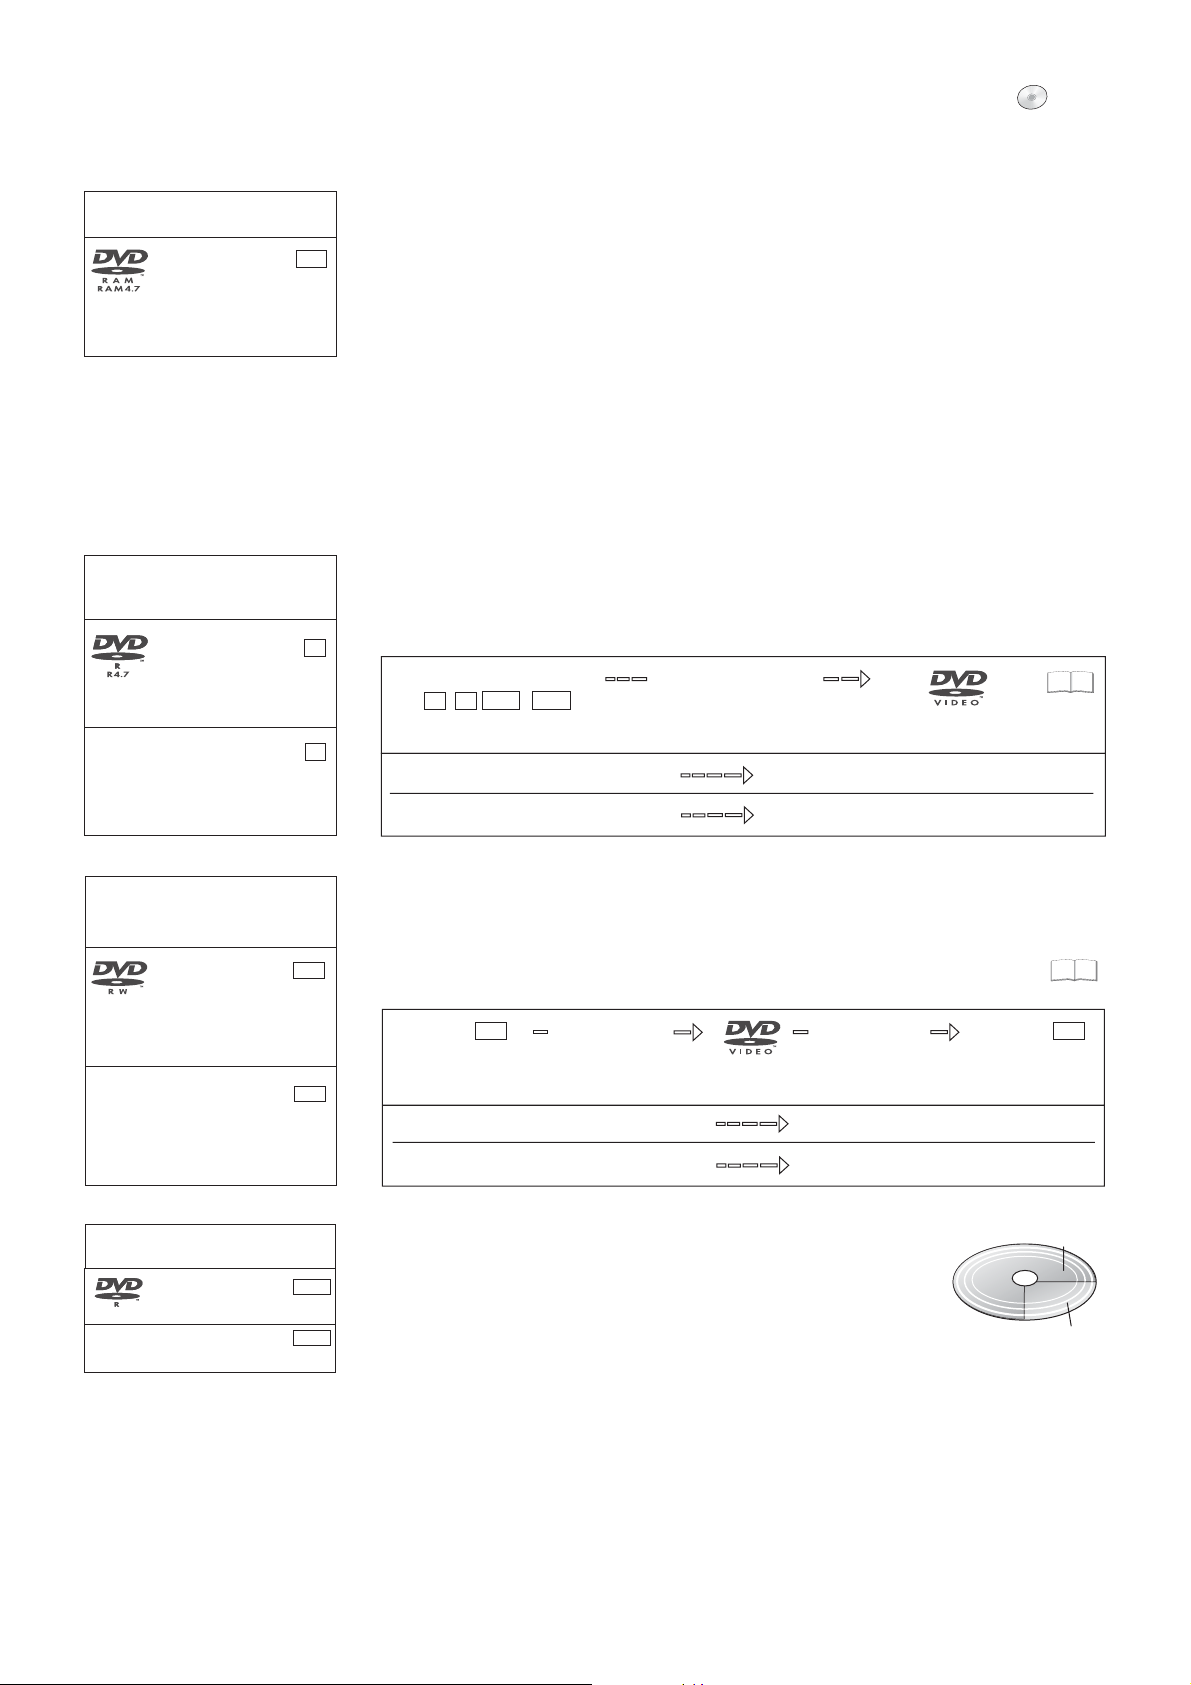
DVD-R/+R (Recordable)
The DVD-R/+R can only be recorded once. Movies or parts of them can be deleted during
processing, but storage space is still taken up and cannot be used for other movies.
Through finalisation, the DVD-R/+R becomes DVD-V that can be played on other units.
-R
DVD-R/+R/-R DL/+R DL
-R DL
-R
+R
+R DL
Finalisation
On the recording unit
9953
18
The movies can no longer be edited after finalisation.
+R
Recording with this recorder
Recording with another unit
Playback on another unit
Playback on this recorder
DVD-RW/+RW (Rewritable)
DVD-RW/+RW is rewritable and erasable. You must delete it completely to be able to
rewrite it again. Through finalisation, the DVD-RW becomes a DVD-V that can be played
on other units. A finalised DVD-RW can be reformatted and rewritten. Formatting deletes
all data!
A DVD+RW becomes a DVD-V by creating a Top Menu.
DVD-RW
-RW
Finalisation
Formatting
DVD-RW
9953
-RW
On the recording unit
The movies can no longer be edited after finalisation.
Recording with this recorder
Recording with another unit
Playback on another unit
Playback on this recorder
DVD-R DL: DVD-Video format
+R DL : +VR format
DVD-R DL
RDL
8.5 GB 12 cm, writable
--
+R DL
8.5 GB 12 cm,writable
16
-R DL
+R DL
DVD-R DL/+R DL (Double Layer DVD/Dual Layer DVD)
2nd Layer
The data are saved on two parallel layers. They have more space
available. If the laser changes layers during playback, brief interruptions
to the image and sound may occur.
You cannot switch layers during a recording. The recording stops when
the storage space on the first Layer is full. You must close the first Layer
1st Layer
to be able to record on the second Layer.
DVD-Video format (V)
This recording format is the standard DVD-Video. Digital programmes that are limited to
"one-time recording" cannot be recorded. Not for recording and playback of still pictures.
+VR format
Digital programmes limited to "one-time recording" can not be recorded. Not for recording
and playback of still pictures.
Page 17
Disc formats
DVD-RW
(DVD-VR format)
12 cm/ 8 cm, playable only
DVD-Video
12 cm/ 8 cm, playable only
-RW VR
()
DVD-V
DVD
Playback discs
A DVD-RW that was recorded on another DVD recorder is played back in DVD-VR format
on this unit. Programmes limited on "one-time recording" can be played back if recorded to
a CPRM-compatible disc. If you format the disc, you can record and play it in DVD-Video
format with this unit.
High-quality video and music discs.
DVD-Audio
12 cm/ 8 cm, playable only
CD
CD-R/RW
12 cm/ 8 cm, playable only
--
Video CD
CD-R/RW
12 cm/ 8 cm, playable only
DVD-A
CD
VCD
Regional codes
2
3
2
4
DVD-Videos with the regional code 2 or
ALL can be played with this unit. The
code is listed on the backside of the unit.
England and Continental Europe: 2.
DVD-Video only
ALL
Digital-quality music discs. Playback in dual-channel sound.
Music and audio recordings, music in MP3 format, pictures in JPEG and TIFF format.
Music and video recordings.
SVCD in compliance with IEC62107.
DivX MP3 JPEG
You can play DivX, MP3 and JPEG/TIFF data from a finalised CD-R, CD-RW
or DVD-R. Depending on the recording conditions, playback may nonetheless be faulty.
Some DVD-Audio discs with multi-channel sound are designed by the manufacturer to
prevent inter-mixing on the entire disc or at certain places. Depending on the disc type,
the regional code and the recording conditions, it may not be possible to play the discs
in some cases.
See the jewel case for more information.
Non playable discs
- 2.6 GB and 5.2 GB DVD-RAM, 12 cm.
- 3.95 GB and 4.7 GB DVD-R for Authoring.
- DVD-R that was recorded in DVD Video Recording format (VR).
- DVD-R (V), DVD-R DL, DVD-RW (V), +R, +R DL that was recorded on another unit and
not finalised.
- Blu-ray, DVD-ROM, +R (8 cm), CD-ROM, CDV, CD-G, photo CD, CVD, SACD, MV disc,
PD, “Chaoji VCD” that can be purchased in stores, including CVD, DVCD and SVCD
that are not IEC62107-compliant, etc.
Only play round discs.
Do not touch the disc
recording surface.
Cartridge discs
RAM
With active write protection, you can
neither record to the disc nor edit or
delete content.
Cartridge write protection
Remove the 8-cm disc from the
cartridge before using it with this unit.
Handling discs
If the surface of a disc, which has no Cartridge or was removed from one, is scratched, dirty,
dusty or has finger prints, playback or processing can be impaired. Such impairments can
also occur when the disc is placed back in the Cartridge.
Note: Only write on the label side of the disc. Use a soft, oil-based felt-tip pen. Do not use
a ball-point pen or any other hard writing instrument. Do not affix stickers or labels to the
disc. When not in use, put the disc in its case or Cartridge.
Cleaning the DVD-RAM
Clean the disc with a special DVD-RAM cleaner (optional) and read the cleaner
instructions throughly before use. Bad scratches and stubborn dirt may not be able to be
removed so that recording, editing or playback is still compromised even after cleaning.
The disc should then no longer be used.
Do not use benzine, alcohol, water, cleaning sprays, household cleaners or other solvents.
DVD lens cleaner (RP-CL720E)
Compatible models: Only for Panasonic's DVD recorders.
Do NOT use this cleaner with any other Panasonic DVD products or with the DVD products of
any other companies since doing so may damage the products.
Cleaning DVD-Videos, Video-CDs and CDs
Wipe with a moist and then with a dry cloth.
17
Page 18
Playback
DVD
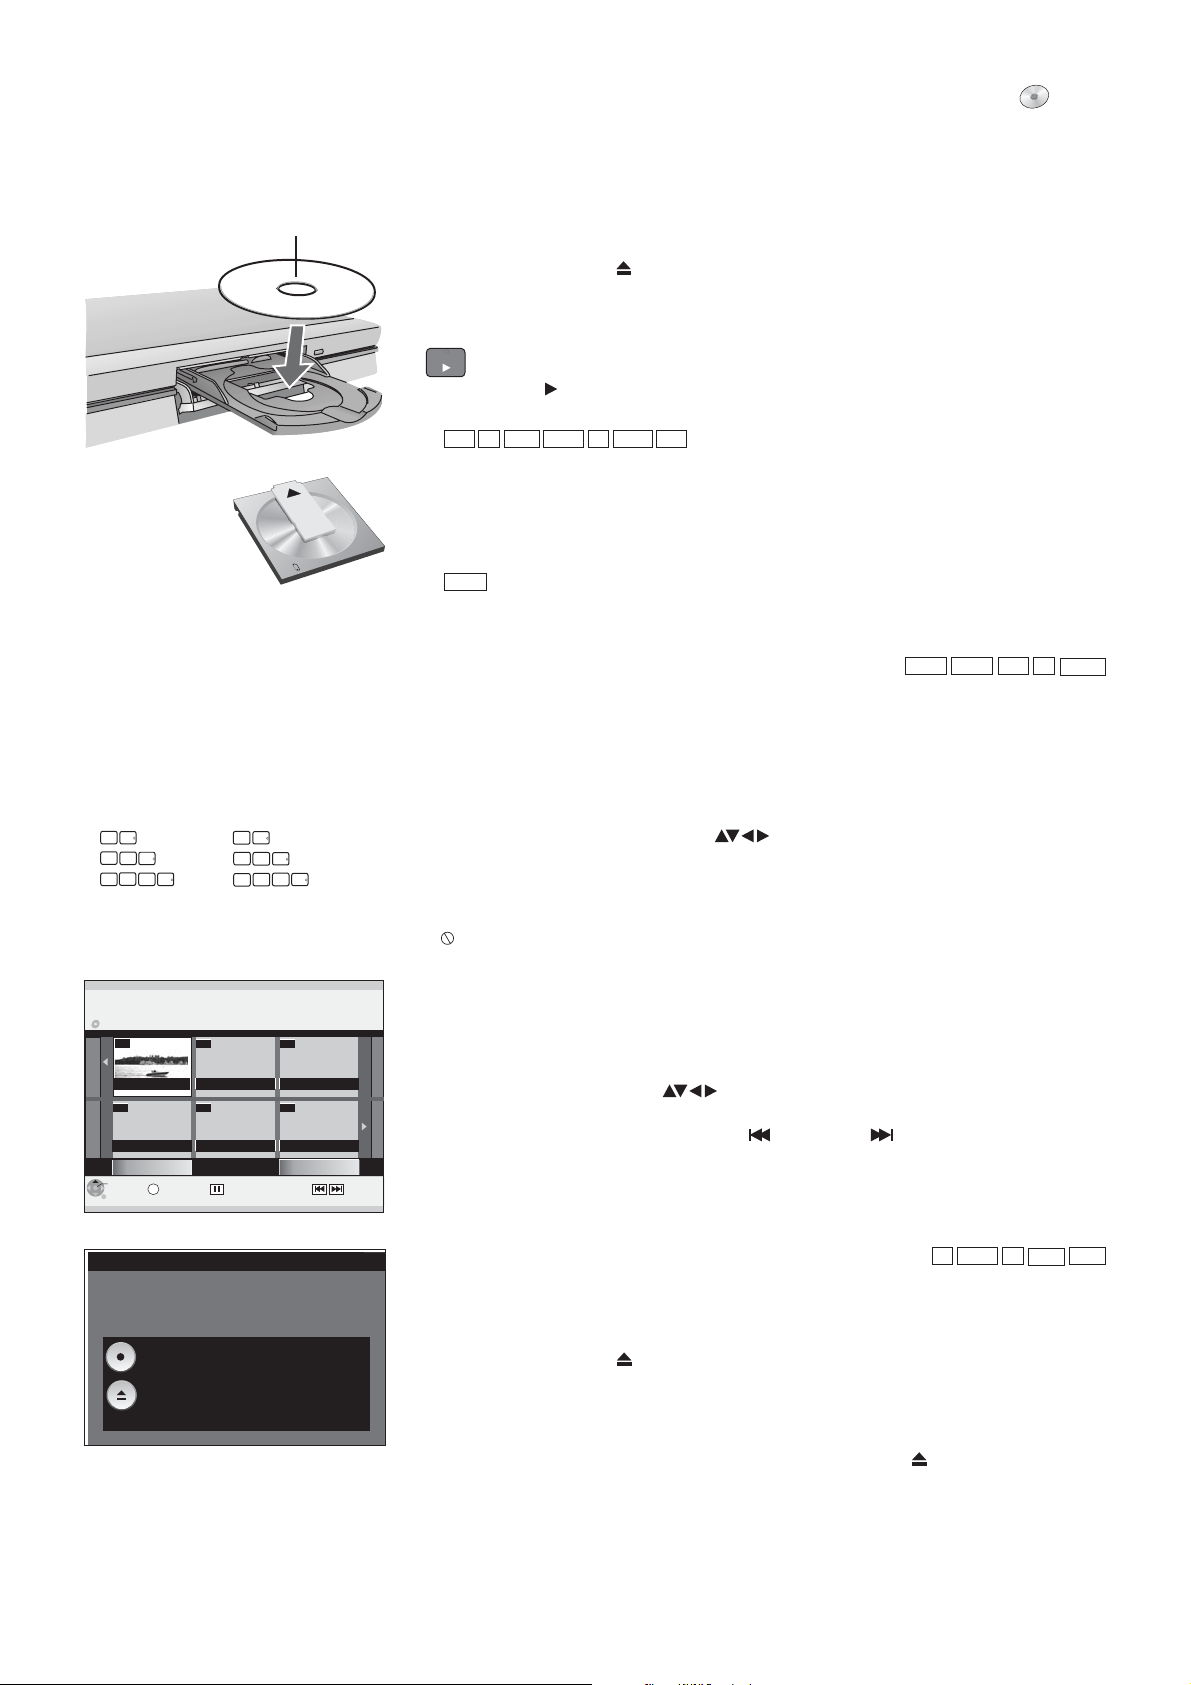
Insert with label facing upwards. In the case
of double-sided discs, the label of the side
that you want to play should be facing
upwards.
Insert a Cartridge disc
in the direction of the
arrow, label facing
upwards.
Preparation
!
Switch on your television and select the appropriate AV channel.
!
Switch on the DVD Recorder.
!
Press on the unit to open the disc tray.
!
OPEN/CLOSE
Insert a disc in the disc tray and close it.
It may take some time to read the disc!
PLAY
Playback
!
PLAY
Press to start playback.
Playback begins with the last title recorded.
RAM
-R DL
-RW(V)
+R
-R
+R DL
+RW
Disc playback stops when a Timer recording starts.
Playback of a selected title
!
During playback, use the number buttons to select the desired title, chapter or
piece and confirm with .
DVD-A
When the screen saver is shown, you can enter a group number. On some
ENTER
discs, this function is only available when playback stops.
Playback starts automatically
DVD-A
DVD-V
VCD
CD
-R(MP3)
Playback always starts at the beginning of the disc. If the disc has its own disc menu,
then this is displayed. The operation of the disc menu depends on the inserted disc.
Direct input via the number buttons
0
5
5:
0
0
5
5:
0
0
0
5:
DIRECT NAVIGATOR
DVD-RAM
5
Title View
07
ZDF 12.9. THU
--
Previous
ENTER
RETURN
Finalize the disc so that it can be played
on other DVD players.
Note: Recording or Editing is not possible
after finalizing. This may take up to 9 min.
--
--
S
SUB MENU
Finalize
Press the REC button to start finalize.
Press the OPEN/CLOSE button to exit.
This disc cannot be played on other
DVD players without finalizing.
1
15:
0
15:
0
15:
Page 02/02
Select
5
5
1
5
0
1
--
--
Next
Previous Next
Due to the programme structure determined by the manufacturer, all described
functions may not be available.
!
In the case of VCD, use the number buttons to select the number of the title.
!
In the case of DVD-A/DVD-V, use or the number buttons to select a title
and confirm with .ENTER
Use the following buttons to launch the disc menu again:
DVD-V: , DVD-A: , VCD:SUB MENU DIRECT NAVIGATOR RETURN
If appears on the television unit, the procedure is interrupted by the unit or the disc.
Selecting programmes/titles for playback
Use the button to launch the menu during playback, recording
and in mode.
!
!
!
Finalising
DIRECT NAVIGATOR
STOP
DIRECT NAVIGATOR
Press .
Select the desired title with and confirm with . Playback starts.
RETURN
Press to exit the menu.
You can select other pages with Previous or Next.
SKIP
ENTER
-RW(V)
-R +R
-R DL
+R DL
Auto finalisation is always offered before an unfinalised disc is ejected. You can only
play an unfinalised disc on this DVD Recorder.
!
!
!
OPEN/CLOSE
Press on the unit.
REC
Press on the unit to start the finalisation.
After successful finalisation, the disc is ejected automatically.
It can now be played on any DVD unit.
!
If you do not want to finalise the disc, press on the unit again.OPEN/CLOSE
18
Page 19

Playback
DVD
PAUSE
Pausing playback
!
!
STOP
!
!
Saving the playback position
!
!
!
PAUSE
Press to pause playback.
PAUSE
Press again to resume playback.
Stopping playback
STOP
Press .
Playback stops and the television picture appears.
During playback of DVD-A, DVD-V, VCD and CD press twice to return to the
STOP
television picture.
STOP
Press during playback. The unit saves the position.
PLAY
Press to resume playback from the saved position.
To cancel the function, press several times.
STOP
This function is not available if playback was started from DIRECT NAVIGATOR
or from Playlists.
SLOW/SEARCH
Slow-motion playback
!
SLOW/SEARCH PAUSE
Press in mode.
The speed can be controlled in 5 levels. With some disc formats, the
PAUSE
function is switched on after 5 minutes.
!
Press to resume normal playback.
PLAY
VCD
Forwards only. Moving pictures only.
SLOW/SEARCH
DVD-A
Fast forward
!
SLOW/SEARCH
Press during playback.
Each time the button is pushed, the fast foward speed increases by one level up to
a maximum of five levels.
!
Press to resume playback.
PLAY
The sound is only output at the first fast-foward speed.
With DVD-Audio (except for moving pictures), CDs and MP3s, the sound is output
at all fast-forward speeds.
CREATE
CHAPTER
C
Dividing a recording into chapters
!
!
CREATE CHAPTER
Press during playback.
During playback, press or to skip a chapter.
SKIP/INDEX
Press during playback or mode to skip chapters, titles or
Skipping
SKIP PAUSE
SKIP SKIP
pictures.
With DVD-Rs and CDs (DivX), you can only skip backwards.
Not
CD
RAM
MANUAL SKIP
MANUAL SKIP
!
MANUAL SKIP
Press during playback.
Playback jumps forward approx. 30 seconds.
Frame playback
!
Press in .
PAUSE mode
Each time the button is pressed, the next or the previous frame is displayed.
!
Press to resume playback.
PLAY
VCD
Forwards only. Moving pictures only.
DVD-A
Not
Not
CD
CD
19
Page 20

Playback
DVD
Stop Recording
Timer recording in progress.
Stop this timer recording ?
It will be cancelled if you stop.
Stop Recording
SELECT
ENTER
Cancel
RETURN
0 min
TIME SLIP/ JET REW
TIME SLIP
!
!
TIME SLIP
Press during playback.
Use to select the time span by which playback is to jump forward or backward.
Not
Each time the button is pressed, the time span increases or decreases in minute
increments.
For recordings that are longer than 10 minutes, the time span increases or
decreases in 10-minute increments when the button is held down longer.
!
Press to confirm the selected time.
ENTER
Delayed playback
Playback can be started while the unit is still recording. You can watch the recording
without stopping the current recording.
!
Press to end playback.
!
STOP
After 2 seconds, press again to stop the recording.
STOP
If a Timer recording is to be stopped, use to select [Stop Recording] and confirm
with .ENTER
PLAY
Quick View
(PLAY/x1.3)
You can increase the playback speed without negative effects on the sound.
!
Press and hold during playback.
!
Press again to return to normal speed.
PLAY
PLAY
With a digital connection, playback is in PCM.
Quick View is paused if you press or the playback of a programme
PAUSE
begins, which was not recorded with Dolby Digital. Quick View does not function
during simultaneous recording and playback in XP or FR mode.
CD
RAM
RAM
H
C
E
/
C
G
K
O
R
P
R
O
T
A
G
I
V
A
N
T
ENTER
C
E
R
I
D
F
U
N
C
T
I
O
N
S
Simultaneous recording and playback
You can play a different title during the current recording.
Recording to DVD-RAM - Playback from DVD-RAM
!
Press during the recording or Timer recording. The title view
DIRECT NAVIGATOR
appears.
!
Select a title with and confirm with .
ENTER
Playback of the selected title begins.
!
Use to end playback.
STOP
Playback during recording standby does not affect Timer recordings. Recording
begins at the programmed time.
Recording to DVD - Playback from VHS
!
Select the VHS drive with .
!
!
PLAY
Select to start playback.
STOP
Select to end playback.
DRIVE SELECT
Recording to VHS - Playback from DVD
!
Select the DVD drive with .
!
!
DIRECT NAVIGATOR
Select .
Select a title with and confirm with .
DRIVE SELECT
ENTER
Playback of the selected title starts.
!
Select to end playback.
STOP
Changing the audio channel
AUDIO
A
For disc formats RAM, -RW(VR), -R , CD(DivX), VCD(DivX)
!
Press during playback.AUDIO
DISPLAY
B
For disc formats DVD-A, DVD-V
!
Press during playbackDISPLAY .
!
Depending on the disc, select the audio channel or the sound track.
LR L R
20
Page 21

Playback
VHS
Preparation
!
Switch on the DVD Recorder and use to select the VHS drive.
!
Enter a recorded video cassette.
PLAY
Playing a video cassette
!
PLAY
Press to start playback.
Playback starts automatically if a video cassette was inserted and its writeprotection strip was removed.
DRIVE SELECT
The tape automatically rewinds when the end
is reached. This function is not available
during a timer recording.
Repeat playback
The video recorder repeats the recording until the end is reached.
!
PLAY
Press for more than 5 seconds. R and the tape play time or remaining
tape play time appears on the screen.
STOP
Stopping playback
!
PAUS E
!
Slow-motion playback
!
!
STOP
Press .
Pausing playback
PAUSE
Press during playback.
PAUSE
Press again to resume playback.
during playback
Press for more than 2 seconds.
PAUSE
Press to resume playback.
PLAY
Slow-motion playback is automatically cancelled after 10 minutes.
Frame playback
!
Press .
!
PAUSE
Press to resume playback.
PLAY
during playback
Frame playback is automatically cancelled after 5 minutes.
SLOW/SEARCH
REW
!
Press or during playback.
Forwards or backwards search
FF
Press the button twice (JET SEARCH) to increase the search speed. If you press and
hold the button, the search starts for the length that the button is pressed.
!
Press to resume playback.
PLAY
The forwards/backwards search is cancelled after 10 minutes.
FF REWFast forward / Jet rewind
!
STOP
In mode, press or
!
STOP
Press to end the forward/rewind function.
.
JET REW
To quickly rewind to the beginning of the cassette.
Approx. 50 seconds for a E180 cassette.
Depending on the video cassette or the operating condition, the rewind speed may
vary.
If the tape rewinds to the beginning, the counter is reset to 0:00.00.
SKIP/INDEX
This unit records special index signals to the cassette tape for each recording. The
VHS Index Search System (VISS)
index search function uses these signals to quickly find the beginning of the desired
recording. Up to 20 index signals can be used.
!
Press during playback or in mode
INDEX STOP
.
tape fowards/ tape rewinds. If an index signal was found, the unit
automatically begins playback. With each push of the button, the number of jumps
is increased.
!
Press
STOP
to end the search.
If the index signals are too close together, the feature may fail. The recordings
should be at least 5 minutes long.
21
Page 22

Playback
VHS
S-VHS Quasi Playback (SQPB)
It is possible to play cassettes that were recorded on an S-VHS unit. The picture
quality is the same as a VHS recording. Depending on the video tape used, slight
picture distortions may occur.
An S-VHS recording is not possible with this unit.
Manual tracking
The unit sets tracking automatically. If a cassette was recorded on another unit, it may
be necessary to set tracking manually.
The picture shows interference or is blurred during playback.
!
During normal playback or in slow motion, press until the
blurriness disappears.
If freeze frames are blurry, first switch the unit to slow motion and then adjust the
tracking.
Tracking cannot be controlled on some video cassettes. This does not indicate
functional problems.
Automatic tracking
!
Press and at the same time to return to automatic
TRACKING/V-LOCK + -
tracking.
On some TVs, the picture can move up or down when special playback functions
are used.
This does not indicate functional problems.
TRACKING/V-LOCK +/-
Handling video cassettes
If the video cassette is not in use, remove it from the unit and store it in its jacket.
Avoid recording on the same tape section multiple times in order to avoid wearing
out the video tape prematurely.
Carefully insert the cassette into the video recorder to avoid damage.
Do not expose the video cassette to high humidity, temperature or dust particles.
Do not store the video cassette near magnetic waves, such as television sets.
Do not use defective cassettes and do not try to repair them.
Do not open the housing or the protective flap on the front side of the cassette and
do not touch the tape.
Use high-quality name-brand cassettes, such as those made by Panasonic.
When playing cassettes recorded on another VHS-Recorder, there may be a slight
decrease in picture quality.
Write-protecting cassettes
Remove the write-protection tab to protect cassettes from accidentally being erased.
If you want to record to a protected cassette, cover the gap with adhesive tape.
Cleaning video heads
Use a cleaning tape to clean the video heads.
22
Page 23

Recording
Maximum number of recordable titles
DVD
Before recording
You can record to DVD-RAM, DVD-R, DVD-RW, -R DL, +R DL, +R or +RW with
this unit. DVD-R/-RW is the most common medium.
DVD-Video format is used to record to discs. The format is compatible with most
DVD-Video players and DVD-ROM drives in computers.
RAM
-R DL
-RW(V)
-R
99
+R DL
+RW
+R
49
Programmes in 16:9 format are recorded in
4:3 format.
16:9 format is used to record to RAM.
Titles in PAL or NTSC format can be displayed
on the following TV sets:
TV type
Multi system TV
NTSC-TV
PAL-TV
Disc
PAL
NTSC
PAL
NTSC
PAL
NTSC
Yes/No
Yes
Yes
Yes
Yes
Yes
No
(PAL60)
Disc Protection
Protect your recordings from accidental deletion or overwriting.
Title: Recordings: The entire disc:
37
99
29
52
If you activated write-protection, remove it before processing.
Conventional DVD-Vs are usually equipped with copy protection and cannot be copied.
RAM
CPRM (Content Protection for Recordable Media)
This unit is compatible with the CPRM copy-protection system for recorable media.
When using a CPRM-compatible disc, a digital programme can be recorded once.
Programmes broadcast with this copy-protection system cannot be recorded to
DVD-R or 2.8 GB DVD-RAM.
Formatting
52
If using an unformatted disc, you must format it before the first recording.
Formatting prepares the media, such as a recordable DVD-RAM, for recording.
All data is irreversibly erased.
For recording
The recording is saved to free areas on the disc. If there is no more space left
on the disc, you must delete recordings or use a new disc.
Continuous recording or playback of both sides of a double-sided disc is not
possible. After the end of the recording, the unit needs approx. 30 seconds to
record data for recording management.
99
XP
SP
LP
EP (6 hours)*
Picture quality
EP (8 hours)
Recording duration
* Only if Recording time in EP mode is set
to [EP ( 6 Hours )] in the Setup menu.
Discs suitable for recording
Rewritable
RAM
x2
x3
x5
-RW +RW
x1
x2
x4
x2.4
x4
x8*
x6
Writable
-R +R
x1
x4
x8
x16
x2.4
x4
x8
x16
-R DL
x4
* Playback only
Under certain circumstances, digital sound signals may not be recorded in their
original format.Digital programmes limited to "one-time recording" can only be
recorded to 12-cm DVD-RAM.
Recording a 90-minute title to a disc with 4.7 GB of storage space.
Free storage space
XP
Max. 60 min.
SP
120 min.Max.
LP
240 min.Max.
EP(6 hours)
360 min.Max.
EP (8 hours)
480 min.Max.
It is not possible to record a 90-minute title in XP mode.
The available storage space is used optimally in FR mode. The title is recorded in the
47
best possible quality.
99
+R DL
x2.4
FR
Max. 480 min.
23
Page 24

Recording
DVD VHS
You cannot record to DVD and VHS at the same time.
DVD: Insert a disc.
If you activated write protection, cancel it.
VHS: Insert a video cassette with an intact write-protection tab.
!
Press
!
!
!
!
REC
!
PAUSE
!
!
VHS STOP: If the recording is paused for more than 5 minutes, the unit switches to
mode.
FUNCTIONS.
In the Setup menu, select the appropriate tape length under VHS.
Confirm with .
Press multiple times to return to the television picture.
ENTER
RETURN
Select the DVD or VHS drive with DRIVE SELECT.
Record
Press to start a recording.
REC
After the recording is complete, it takes some time for the unit to process the unit
control information.
Pause the recording
PAUSE
Press to pause the recording.
PAUSE REC
Press again or to resume recording.
The title is not divided.
RAM
51
Approx. recording times in hours
9.4 GB
2
4
8
12
16
-R,-RW
+R, +RW
4.7 GB
1
2
4
6
8
XP
SP
LP
EP: 6 h
EP: 8 h
DVD-RAM
4.7 GB
1
2
4
6
8
Approx. recording times in hours
-R DL
+R DL
8.5 GB
Total
XP
SP
LP
EP: 6h
EP: 8h
1st Layer
1:45
3:30
7:00
10:45
14:15
0:55
1:50
3:40
5:30
7:25
2nd Layer
0:50
1:40
3:20
5:15
6:50
It is not possible to record continuously
from the first layer to the second layer.
Recording time for E-240 cassettes
-Normal mode: approx. 4 hrs.
SP
-Long-play mode: approx. 8 hrs.
LP
-Extra long-play mode: approx. 12 hrs.
EP
Use SP if you value a high-quality picture.
DVD recording of TV programmes
!
Select the station with .or the number buttons
!
Select the recording mode with .
CH
REC MODE
Switch between SP, LP, EP and XP with each push of the button.
!
Press to start the recording.
!
Select to stop the recording.
REC
STOP
If you resume recording, a new title will be created.
!
Press again to resume recording.
REC
You can play VHS cassettes while recording. The recording to DVD is not impaired.
RAM
With you can switch the incoming audio channel during the recording.
AUDIO,
It has no effect on the recorded audio channel.
REC MODE
Changing the recording mode
!
REC MODE PAUSE STOP
Press in or mode.
Switch between SP, LP, EP and XP (XP only with DVD) each time the button is
pressed. The material is recorded as a separate title with each switch.
RAM
With the [EP mode ( 8Hours )] setting, playback on DVD-RAM-compatible
DVD players may not be possible.
Select [EP mode ( 6Hours )].
VHS recording of TV programmes
!
Select the station with or the number buttons.
!
Select the tape speed with .
CH
REC MODE
Switch between SP, LP and EP each time the button is pressed.
!
Press to start the recording.
!
Select to stop the recording.
!
Press again to resume recording.
REC
STOP
REC
You can playback discs while recording. The recording to VHS are not impaired.
When using an S-VHS cassette, the recording is in conventional VHS.
47
24
Page 25

Recording
DVD VHS
Specifying a time as the recording duration
This function is not available for Timer Recordings.
!
Press on the unit during recording.
The recording time changes each time the button is pressed on the unit display:
OFF 0:30 1:00 1:30 2:00 3:00 4:00 OFF
!
Press . The recording is paused and the time setting is deleted.
The unit switches itself off at the end of the recording if no functions are being
executed on another drive. This function is not possible during a Timer- or Ext Link
recording.
DVD: This function is not possible with Flexible Rec. If the channel or recording
mode (XP, SP, LP, EP) is changed while recording is paused, the time is deleted.
VHS: If the tape speed is changed during the recording, a slight picture distortion
will occur at that point.
REC
STOP
S VIDEO-cable
AV3 S VIDEO IN VIDEO IN L/MONO AUDIO IN R
Audio cable
L - White
R - Red
AV3 S VIDEO IN VIDEO IN L/MONO AUDIO IN R
DVD playback during recording
During the recording, you can the playback from the beginning of the programme.
!
PLAY
Press during recording or Timer Recording
At least 2 second must have elapsed since the beginning of the recording.
DIRECT TV REC
Direct TV recording
If your TV is equipped with Q Link, you can record a TV programme that you are
currently watching. Other settings are not necessary. The recorder automatically
switches to the appropriate station.
It works to the selected drive when the button is pressed.
!
Press for 3 seconds. Recording begins.
!
DIRECT TV REC
Press to stop the recording.
STOP
Recording from an external unit, e.g. a camera
!
Connect the external unit to the AV3 input sockets on the front side of the unit.
!
Select one of the two connection options.
The S VIDEO-cable and audio cable (L/R) connection delivers the best quality.
You cannot receive signals from PCs with this unit.
Recording to VHS: Insert a video cassette with an intact write-protection tab.
!
Select the VHS drive with DRIVE SELECT.
!
Select the recording mode with
!
STOP INPUT SELECT
In mode, use to select input channel AV3.
!
!
!
!
!
!
PLAY
Press .
At the point where you wish to start recording press .
Press .
REC
Start playback on the external unit.
Then press to start the recording.
Use to stop the recording.
PAUSE
STOP
REC MODE.
PAUSE
RAM
Audio/Video cable
Video - Yellow
L - White
R - Red
Recording in dual-channel audio
On DVD-RAM, both channels of a programme
in dual-channel sound are recorded.
Use to switch between the two recorded
AUDIO
sound tracks.
Recording to DVD: Insert a recordable disc.
If you activated the write protection, cancel it.
!
Select the DVD drive with
!
Select recording mode with .
!
STOP INPUT SELECT
In -mode use to select input channel AV3.
!
Start playback on the external unit.
!
Press at the point where you want to start the recording.
!
Use to stop the recording.
REC
STOP
DRIVE SELECT.
REC MODE
Selecting the sound track to record for programmes with dual-channel sound
!
Before recording, select Sound setting Bilingual Audio Selection [M1] or [M2]
in the Setup menu.
Select [M1] or [M2] on an external unit before recording.
!
If the output signal of the external unit is an NTSC signal, set the TV System
to [NTSC] in the Setup menu.
Not
RAM
RAM
49
50
25
Page 26

FUNCTIONS
O
R
P
R
O
T
A
G
I
V
A
N
T
C
E
R
I
D
DVD-RAM
FUNCTIONS
Playback
Recording
Delete
Copy
To Others
ENTER
RETURN
H
C
E
/
C
G
K
ENTER
Disc Protection Off
Schreibschutz Aus
DVD VHS
You can access the main functions via FUNCTIONS.
F
U
N
C
T
I
O
N
S
The illustrations show DVD-RAM menus. The menu entries may differ depending on
the disc or the medium.
!
FUNCTIONS
Press . During Recording or Timer Recording, some menus have a grey
background and cannot be selected.
!
Select a menu with and confirm with .
!
Select the following page with [To Others] and confirm with .
RETURN
Press to return to the first page.
!
FUNCTIONS
Press to exit the selection menu.
Playback
Recording
Delete
Copy
DIRECT NAVIGATOR menu
Timer programming in the Timer Recording menu
DELETE Navigator
Copy menu
ENTER
ENTER
28
34
38
37
FUNCTIONS
DVD-RAM
Playback
Recording
Delete
Copy
To Others
ENTER
RETURN
Disc Protection Off
Schreibschutz Aus
ShowView Record
Playlists
Flexible Rec
DV Auto Rec
Setup
DVD Management
TAB
SELECT
CHANGE
ENTER
TAB
: Select submenu with .
SELECT
: Select setting or option.
CHANGE
ENTER
RETURN
:Change the option
: Select or save a setting.
: Back to the previous screen.
RETURN
Exit a menu.
ShowView Record
Playlists
Flexible Rec
DV Auto Rec
Setup
DVD Management
ShowView Record menu
Playlists menu
Record in FR-Modus
Record the DV signal
Change the unit setup
Format and finalise discs, write-protection
41
42
45
45
46
52
The FUNCTIONS menu cannot be launched during playback.
Stop playback with .STOP
Notes on the menus
Selecting a title or chapter
!
Select a title or chapter with or .
9
090909090909090909090909090909090909090909090909090909090909090909090909090909090909090909090909090909090909090909090909090
Selecting other pages
!
DVD
0
Select [Previous] or [Next] with and confirm with .
ENTER
Cancelling a function
!
Depending on the specific entry, select [No] or [Cancel] with and confirm
ENTER
with .
You can also cancel a function with .
RETURN
Starting playback
!
Start playback of the selected title or chapter with .
ENTER
26
For faster processing
In addition to fast forward, slow motion playback and frame playback, there are other
function available for faster processing.
Jump to the beginning/end of a title/chapter with and .
Find the position for a marking with , , ,
MANUAL SKIP
or .
You can jump between set markers with .
SKIP SLOW/SEARCH TIME SLIP
SKIP
PAUSE SKIP
Editing several elements
You can process several chapter or titles at the same time.
Functions such as Copy, Set up Protection or Delete are marked with the symbol .
!
Select the desired title with and press PAUSE .
A check appears. Repeat this process to select other titles.
!
Press again to clear the selection.PAUSE
Page 27

FUNCTIONS
DVD VHS
Programme Name
TERRALUNA_
Delete
Add to List
List Names
Set
SELECT
RETURN
ENTER
Enter Name
TERRALUNA_
Top Menu
Preview
TERRALUNA
A
Standard Characters
1
34567 98
1
2
2
C
A
B
3
F
E
D
4
G
I
H
5
L
J
K
6
N
M
O
7
R
Q
P
8
V
U
T
9
X
Y
W
,
?
.
0
Standard Characters
A
1
34567 98
1
2
2
C
A
B
3
F
E
D
4
G
I
H
5
L
J
K
S
Z
!
Space
a
de
g
j
mn
p
t
w
"
a
de
g
j
b
h
k
q
u
x
'
B
b
h
k
B
Other Characters
c
+
-
/
f
=
i
$
#
l
<
>
]
[
o
(
r
s
}
{
v
y
z
\
:
;
`
Other Characters
c
+
-
/
f
=
i
$
#
l
<
>
Entering text
You can give titles to your programmes or discs in the different menus and while
0
*
%
&
@
_
)
-
|
^
setting up the Timer Recording.
Entering a title or disc name using the menu
!
Select the desired character with and confirm with .
ENTER
By inserting spaces, hyphen or dashes, you can enter the title you want. Select
PAUSE
!
Press to apply the name/title.
Use buttons and to switch between [Standard Characters] and
to delete a letter.
STOP
AB
[Other Characters].
Enter a title using the number buttons, e.g.: the letter "R"
!
Press [7] to switch to the 7th line.
!
Press [7] twice to select "R" and confirm with .
Top Menu Preview
0
*
%
&
@
Select the setting Enter Name from DIRECT NAVIGATOR, the Top Menu Preview
appears additionally. The later representation of the title is displayed. Insert, if
necessary spaces, hyphens or dashes in order to display the title according to your
desire.
ENTER
-RW(V)
-R +R
-R DL
+R DL
+RW
Working with List Names
In the case of recurring programmes, save time entering the title by saving it in the
title list.
List Names
01 ASTRA
02
SELECT
ENTER
TERRALUNA
RETURN
S
SUB MENU
Delete Name
Save a disc name or title in List Names
!
After entering a title, press .
!
In the next screen, select [Add] with and confirm with .
SKIP
ENTER
Using a disc name or title from List Names
!
Open List Names with .
!
Select the disc names or title with and press .
!
Press to apply the name/title.
STOP
SKIP
ENTER
Deleting a disc name or title from the List Names
!
Open List Names with .
!
Select the title or name with and press .
!
Confirm [Delete Name] with .
!
In the next screen, select [Delete] with and confirm with .
SKIP
SUB MENU
ENTER
ENTER
27
Page 28

FUNCTIONS
DVD
FUNCTIONS
DIRECT NAVIGATOR
DVD-RAM
07
ZDF 6. 3. MON
--
Previous
ENTER
S
RETURN
Delete
Properties
Edit
Chapter View
Title View
--
--
SUB MENU
Page 02/02
Select
--
--
Next
Previous Next
Playback
DIRECT NAVIGATOR
Overview of DIRECT NAVIGATOR
You can archive, edit or start playback after selecting a title in DIRECT NAVIGATOR.
The DIRECT NAVIGATOR cannot be called if the VHS drive is selected.
Title View
SUB MENU
S
Delete
Properties
Edit
Chapter View
ENTER
ENTER
Enter Name
Set up Protection
Cancel Protection
Partial Delete
Change Thumbnail
Divide Title
Editing is not possible
during recording.
Chapter View
SUB MENU
S
Delete Chapter
Create Chapter
Combine Chapters
Title View
Launching the DIRECT NAVIGATOR menu
!
!
FUNCTIONS
Press .
Confirm [Playback] with .
ENTER
The DIRECT NAVIGATOR menu appears.
Playback
!
Select a title with and start playback with .ENTER
Edit
!
Press to edit a title.
!
SUB MENU
Select the desired option with and confirm with .
ENTER
Remaining Time
Delete
Properties
Terra X
ENTER
Delete
SELECT
ENTER
Time 0:45
Rec time 0:01(SP)
Time 16:40
0:30(SP)
Cancel
RETURN
RETURN
Terra X
Date 10.3.2006 FRI
Name ARTE
Corresponding chapter of playlists will be deleted.
No. 03
Date 10.3.2006 FRI
Name ARTE
Delete
Not
When you execute this process, the title will be deleted and cannot be restored.
!
Confirm [Delete] with .
!
Select [Delete] with and confirm with .
ENTER
ENTER
The available recording time may remain the same after deleting a short title.
In the case of a DVD-RAM, the storage space of a deleted title becomes available
for a new recording. With other discs, the storage space is not released by deleting
titles.
Properties
Information on the title, such as name, date and time, is displayed.
!
Select [Properties] with and confirm with .
ENTER
Editing several elements
Select the desired title with and press .
PAUSE
A check appears. Repeat this process to select other titles.
Press again to clear the selection.
PAUSE
-RW
(
)
VR
28
Page 29

FUNCTIONS
DVD
FUNCTIONS
Delete
Properties
Edit
Chapter View
DIRECT NAVIGATOR Partial Delete
DVD-RAM
03 Terra X
--:--.-- --:--.--
Terra X
Date 10.3.2006 FRI
Name ARTE
Remaining time
Corresponding chapter of playlists will be deleted.
Delete
DIRECT NAVIGATOR
DVD-RAM
DIRECT NAVIGATOR
DVD-RAM
Change Thumbnail
03 Terra X
Change
--:--.--
Divide Title
03 Terra X
Terra X
Date 10.3.2006 FRI
Name ARTE
Once divided, this title cannot be
recombined.
Divide
Enter Name
Set up Protection
Cancel Protection
Partial Delete
Change Thumbnail
Divide Title
PLAY
Start
Partial Delete
Time 16:40
SELECT
ENTER
RETURN
PLAY
Start play and select the image
of a thumbnail.
PLAY
Divide
Divide Title
Time 16:40
SELECT
ENTER
RETURN
Start
End
Next
Exit
0:00.35
End
2:00 SP()
Cancel
Change
Exit
0:00.35
Preview
Divide
Exit
0:00.35
Cancel
Playback
DIRECT NAVIGATOR
Editing titles in the SUB MENU
!
Select [Edit] with and confirm with .
!
In the submenu, select the desired option with confirm with .
Enter Name
ENTER
ENTER
Not
-RW
(
)
VR
Enter or change the title of the programmes.
The full name is displayed in the Properties submenu.
Set up Protection
!
Select [Yes] with and confirm with . is displayed.
ENTER
Cancel Protection
!
Select [Yes] with and confirm with . disappears.
ENTER
RAM
RAM
+R+R DL
+R+R DL
Partial Delete
Make sure that you really want to delete parts of the recording.
!
At the desired start point, confirm [Start] with .
!
At the desired end point, confirm [End] with .
!
If you want carry out the deletion, select [Exit] with and confirm with .
!
In the next screen, select [Delete] with and confirm with .
ENTER
ENTER
ENTER
ENTER
You exit the menu after the deletion.
!
To delete other parts, confirm [Next] with .
!
Select [Delete] with and confirm with .
ENTER
ENTER
After each deletion, you can select the next start and end point.
!
To exit the menu, select [Exit] with and press .
ENTER
You may not be able to identify a start and end point if they less than 3 seconds
apart or if recorded image is a still picture. The unit switches to mode at
PAUSE
the end of the title. The available recording time on the disc may remain the same
after deletion.
Change Thumbnail
Not
You can select any position in a title as the thumbnail for the title view.
!
!
!
PLAY
Press to start playback.
At the position which is to be displayed as the new thumbnail, confirm [Change]
with . The select thumbnail is displayed.
ENTER
Confirm [Exit] with . The selected thumbnail is displayed in the title view.
ENTER
Divide Title
You can divide a selected title. A divided title cannot be put joined together again.
!
At the position where the title is to be divided, confirm [Divide] with .
!
Confirm [Preview] with . A section will be played back from 10 seconds
ENTER
ENTER
before to 10 seconds after the dividing point.
!
Confirm [Exit] with .
!
In the next screen, select [Divide] with and confirm with .
ENTER
ENTER
A short section of the recording right before the dividing point may be lost. The
divided titles retain the name of the original title.
You cannot use this function if the resulting sections are extremely short or if you
have saved more than 99 titles to DVD-RAM.
You can jump to the beginning/end of a title/chapter with and .
Find the position for a marker with , ,
TIME SLIP MANUAL SKIP
,or.
You can jump between set markers with .
SKIP SLOW/SEARCH
SKIP
PAUSE SKIP
Editing several elements
Select the desired title with and press .
PAUSE
A check appears. Repeat this process to select other titles.
Press again to clear the selection.
PAUSE
-RW
27
+RW
+RW
RAM
(
VR
RAM
99
)
29
Page 30

FUNCTIONS
DVD
FUNCTIONS
Delete
Properties
Edit
Chapter View
DIRECT NAVIGATOR Chapter View
DVD-RAM
01 EUROSPORT 11. 3. SAT
001
0:00.58
0:00.58 0:01.30
--- ---
Previous
002 003 004
Delete Chapter
Create Chapter
Combine Chapters
Title View
0:01.45
---------
---
Page 01/01
Playback
DIRECT NAVIGATOR
Editing chapters in the SUB MENU
!
Press .
!
!
!
!
!
!
!
0:03.10
---
---
Next
Delete Chapter
!
Create Chapter
FUNCTIONS
Confirm [Playback] with .
ENTER
Select the desired title with in the Title View menu.
Press .SUB MENU
Select [Chapter View] with and confirm with .
ENTER
Select the desired chapter with .
Press .
SUB MENU
Select the desired option with in the submenu and confirm with .
Select [Delete] with and confirm with .
ENTER
ENTER
RAM
RAM
Divide the title into chapters. Determine the points where a new chapter needs to
begin. The chapters can be selected later during playback with .
!
!
!
ENTER
Press at the position where you want to create the chapter.
Repeat this step to create additional chapters.
Select [Exit] with and confirm with .
ENTER
SKIP
A short section right before the dividing point may be lost.
Combine Chapters
Selected Chapter
001
Combine chapters.
Combine
SELECT
ENTER
Following Chapter
002
Cancel
RETURN
Combine Chapters
!
Select [Combine] with and confirm with .
ENTER
The selected chapter is combined with the following chapter.
Title View Return to Title View
RAM
RAM
30
You can jump to the beginning/end of a title/chapter with and .
Find the position for a marker with , ,
TIME SLIP MANUAL SKIP
,or.
You can jump between set markers with .
SKIP SLOW/SEARCH
SKIP
PAUSE SKIP
Editing several elements
Select the desired title with and press .
PAUSE
A check appears. Repeat this process to select other titles.
Press again to clear the selection.
PAUSE
Page 31

FUNCTIONS
DivX Menu
DVD(DivX)
No. Name of Title Tree
001 AdrianaEvans_7Days.avi
002 Madagascar - HD.avi
003 Transporter2.avi
ENTER
RETURN
DivX Menu
DVD(DivX)
ENTER
RETURN
Folder1 : DivX - Inhalt
Page 001/001 Total Title : 003
Folder
26 Sep 2003
DivX - ...
JPEG - ...
MP3 - ...
Play mode is set to DivX
To play another type of file,
select the file type
from Menu in FUNCTIONS.
ENTER
RETURN
01/1
DVD
DivX playback
DivX (Direct-Video-eXpress) is a format for saving compressed audio and video data
and is developed by . It is based on MPEG-4, but saves in a much
DivXNetworks
more compact manner to approx. one-tenth the size of the uncompressed file format
with satisfactory quality. Thus, the content of a DVD (approx. 8 GB) can be saved to
a conventional CD-ROM (650 MB) in DivX format.
DivX files must always be played with the version with which they were compressed,
since newer DivX versions are not compatible with older versions.
Starting playback
The disc only contains DivX data:
!
!
PLAY
Press .
Select a title with and confirm with .
ENTER
Playback begins.
Selecting a Folder
!
Press to switch to [Tree].
!
Select the desired Folder with and confirm with .
ENTER
The contents of the selected Folder are displayed.
In addition to DivX data, the disc also contains MP3- and/or JPEG data:
!
Confirm the message regarding the preset play mode with .
!
!
PLAY
Press .
Select a title with and confirm with .
ENTER
ENTER
Playback begins.
Repeat playback of DivX titles is not possible. During playback, you cannot launch
titles using the number buttons.
-R
CD
If you do not want to play DivX data, change
the presetting in the FUNCTIONS menu to
the desired format.
32
DivX Format
Playable discs:
Maximum number DivX files:
DivX file format:
DivX version:
Maximum number of files:
DVD-R, CD-R/RW
200
".DIVX", ".divx", ".AVI", ".avi"
3.11, 4.x, 5.x
4000
(MP3, JPEG, DivX and other file types)
Maximum number of folders:
300
(Including master folder)
Video
Number of streams: up to 1
Codec: DIV3, DIV4, DIVX, DV50
Picture size: from 32 x 32 to 720 x 576
Pictures per second: up to 30 fps
Audio
Number of streams: up to 8
Format: MP3, MPEG, Dolby Digital
Multi-channel: Dolby Digital is possible.
MPEG multi is converted to 2 ch
The sequence of files shown by this unit can
differ from that on other units or computers.
GMC (Global Motion Compensation) is not
supported.
A warning message appears if a Timer recording is programmed.
CD-R/CD-RW/DVD-R with DivX-, JPEG-, MP3 data can only be read. A disc that only
contains DivX-, JPEG-, MP3 files from a PC can be played. If the disc contains titles
in DVD Video Recording format (VR) and PC data, only the titles in VR format can be
played back.
Playing DivX with limited playback options
-R
DivX Video On Demand is encrypted for copyright reasons. Register the unit in order
to be able to play encrypted titles. Follow the online instructions during registration.
You will need the registration code of the unit.
After you have played an encrypted title for the first time, a new registration code
appears in the DivX Registration menu. Do use this new registration code to
not
purchase other encrypted titles. If you obtain and play titles with this second code,
the registration for the first code will expire. The titles obtained with it can no longer
be played.
If you acquire a registration code which does not belong to this unit, you cannot play
the contents.
!
!
!
PLAY
Press .
Select a title with and confirm with .
ENTER
The number of playback options for this title is displayed. It ends with
Select [Yes] with .
and confirm with
ENTER
0.
Playback begins.
It is not possible to save a playback position
not
Do press the following buttons during playback:
DVD/VHS STOP SKIP SLOW/SEARCH.
,, ,
.
The number of playback options is reduced by 1 each time.
Official DivX CertifiedTM product.
Plays DivX®5, DivX®4, DivX®3, and DivX® VOD video content (in
compliance with DivX CertifiedTM technical requirements).
DivX, DivX Certified, and associated logos are trademarks of DivXNetworks, Inc. and
are used under license.
CD
51
31
Page 32

FUNCTIONS
Menu
Select file type.
DivX
MP3
JPEG
ENTER
RETURN
DVD
MP3 playback
This unit can play MP3 that were recorded with a computer. Files are captured as
tracks and folders as groups.
"TOTAL" includes all pieces in all groups on the disc.
In addition to MP3 data, the disc also contains JPEG and/or JPEG data:
After a disc is inserted, a message appears regarding the preset playback mode.
!
Confirm the message with .
!
!
FUNCTIONS ENTER
Press and confirm [Menu] with .
Select the desired file type with and confirm with .
ENTER
ENTER
-R
CD
Menu
G1
T1
TOTAL
1/ 12
Number
0 9
-Prev.
Next
SELECT
ENTER
RETURN
Menu
G1
T1
TOTAL
1/ 12
Number
0 9
--
SELECT
ENTER
RETURN
No. Group
1 : Set me Free
Total
01 - Only Truth
1
02 - Set Me Free
2
3
03 - More Precious
4
04 - Not My Will
5
05 - My Lord And My God
6
06 - Lead Me To Rest
7
07 - Nobody But Jesus
8
08 - Special Kind Of Love
09 - Long Way To Go
9
10 - Hush
10
26 Sep 2003
DCIM
Acapella MP3
Instrumental (WMA)
Track
Page 001/002
Tree
()
Set Me Free
Piano
Tree
G1/1
Starting playback
!
!
DIRECT NAVIGATOR
Press to launch the Menu screen.
Select the desired track with or and confirm with . Playback takes
0
9
ENTER
place up to the last track in the selected group.
!
STOP
Press to end playback.
DIRECT NAVIGATOR RETURN
Use or to exit the screen.
Browse through the pages with . The lists of groups follow one after the
SKIP
other.
Shows the track currently being
played
: Group number
G
: Track number in the group
T
: Selected track number/
TOTAL
Total number of tracks numbers
: Selected group number
No.
: Selected group name
Group
Selecting a group
!
Press to switch to the Tree menu.
!
Select the desired group with and confirm with .
ENTER
The contents of the selected group are displayed.
32
Root
001 (Folder=Group)
001 track.mp3 (File=Track)
002 track.mp3
003 track.mp3
002 Group
001 track.mp3
002 track.mp3
003 track.mp3
Playback sequence
Root
P0000001.jpg
P0000002.jpg
002 Folder
P0000003.jpg
P0000004.jpg
P0000005.jpg
003 Folder
P0000006.jpg
P0000007.jpg
P0000008.jpg
Playback sequence
The unit can process maximum 4000 files/tracks (MP3, JPEG, DivX and other file types) and 300
folders/groups (including master directory) from DVD-R and CD-R/RW.
-R
MP3 folder structure
CD
The files must have the suffix ".mp3" or ".Mp3". During the recording, give the folders and file names
3-digit prefix numbers to stipulate the preferred playback sequence. Latin letters and Arabic characters
are displayed correctly. Under certain circumstances, it is possible that other characters are not
displayed correctly. ID3 tags or packet writing are not supported.
Playable discs:
Maximum number of MP3 files:
MP3 format:
DVD-R, CD-R/RW
3000
the discs must correspond to ISO9660 Level 1 or 2 formats apart from extended formats
and Joliet.
Compatible compression rate:
Compatible scanning rate
JPEG folder structure
between 32 kbps and 320 kbps
: 16 kHz, 22,05 kHz, 24 kHz, 32 kHz, 44,1 kHz and 48 kHz
-R
CD
The files must have the suffix ".jpg", ".JPG", ".tif" or ".TIF". A folder with all numbers “0” (e.g.
DCIM000), cannot be shown. Depending on the recording status, it may not be possible to play the disc.
Package Writing or MOTION JPEG are not supported.
JPEG format:
the discs must correspond to the ISO9660 Level 1 or 2 formats apart from extended
formats and Joliet.
Playable discs:
Maximum number of JPEG files:
File format
Number of pixels
DVD-R, CD-R/RW
3000
: JPEG, TIFF (uncompressed RGB Chunky Format).
: 34x34 to 6144x4096 (sub-scanning 4:2:2 or 4:2:0).
Page 33

FUNCTIONS
JPEG/TIFF playback
DVD
-R
CD
If TIFF still pictures are played back or if
there are a lot of files, sessions and/or
folders, it can take a relatively long time to
display the data.
Menu
Select file type.
DivX
MP3
JPEG
ENTER
RETURN
JPEG Menu Picture (JPEG) View
DVD (JPEG)
Folder
0001
ENTER
RETURN
JPEG - Content
0002 0004
Previous
0003
------------
------------
Seite 001/001
----
----
Nächste
Rotate RIGHT
Rotate LEFT
Zoom out
ENTER
RETURN
JPEG (Joint Photographic Experts Group), a system for compressing/decoding colour
still pictures. Despite strong compression, there is only a slight loss of picture quality.
TIFF (Tag Image File Format), a system for compressing/decoding colour still pictures.
It enables digital cameras and other units to save high-quality pictures.
If your disc contains other formats such as MP3 or DivX in addition to JPEG, a
message regarding the preset play mode will appear after the disc has been inserted.
!
Confirm the message with .
!
!
FUNCTIONS ENTER
Press and confirm [Menu] with .
Select the desired file type with and confirm with .
ENTER
ENTER
Picture playback
!
Press .DIRECT NAVIGATOR
!
Select the desired picture with or and start playback with .
!
End playback with or .
STOP DIRECT NAVIGATOR
0
9
ENTER
Rotate pictures
!
!
Zoom in/Zoom out
!
!
!
SUB MENU
Press during playback.
Select the desired setting with and confirm with .
ENTER
(Only available for pictures smaller than 640 x 480 pixels.)
Press during playback.
SUB MENU
Select [Zoom in] with and confirm with .
To switch back to the original size, confirm [Zoom out] with .
ENTER
ENTER
The rotation and zooming of pictures is not saved.
13:30:49 6. 3.
Date 6. 3. 2006 No. 1/ 1
JPEG Menu Picture (JPEG) View
DVD(JPEG)
Folder
0001
Previous
ENTER
RETURN
JPEG - Content
0003
0002 0004
------------
Start Slide Show
Slide Interval
Set display interval for Slide Show.
Display interval
------------
Seite 001/001
Slide Interval
Press ENTERto set.
SELECT
ENTER
RETURN
5sec.
Display picture properties
!
During playback, press twice to launch the display.
!
STATUS
Press again to exit the display.
STATUS
Select folder
!
Select [Folder] with and confirm with .
!
In the next menu, select the desired folder with and confirm with .
----
----
Start Slide Show
ENTER
ENTER
The pictures in the selected folder are automatically played back one after the other.
Next
The slide show ends after the last picture. The pictures in the folder are played in the
selected display interval.
!
Select [Folder] with .
!
Press .
!
SUB MENU
Select the desired option with and confirm with .
ENTER
Slide Interval
The display duration for each picture is determined with Display interval.
!
Select the display interval for the individual pictures with .
!
Confirm with .
ENTER
33
Page 34

FUNCTIONS
DVD VHS
FUNCTIONS
Timer
Recording
Timer
Recording
Timer
Recording
Remain DVD 2:00 SP
VHS --:-- -- 12:40:46 24. 2. FRI
Name Date Start Stop PDCMode
- -:- -
- -.- -.- - -
Please set Channel.
ENTER
RETURN
Remain DVD 2:00 SP
VHS --:-- -- 12:40:46 24. 2. FRI
Name Date Start Stop Drive PDCMode
3 Euros 11.03. SAT 14:00 16:00
Press ENTERto input a programme name.
ENTER
RETURN
Remain DVD 2:00 SP
- -:- -
Ü
Delete
Drive
---
SP
Programme Name
0
DVD
Programme Name
12:40:46 24. 2. FRIVHS --:-- --
VPS
---
9
Number
VPS
On
SP
The remaining time of a VHS cassette will
only be displayed after using a function like
playback, fast forward or such.
If you did not insert a cassette or disc,
the following message appears:
Timer Recording
This programme has been stored.
Insert a recordable cassette.
Cannot set timer standby mode.
ENTER
RETURN
Recording
Manual programming
Make sure that there is a recordable disc or cassette in the selected drive.
Otherwise, the timer recording will not run.
!
!
FUNCTIONS
Press .
Select [Recording] with and confirm with .
ENTER
The Timer Recording screen appears.
!
Confirm [New Timer Programme] with .
!
Switch to the next entry with and change the setting with .
ENTER
Name : Select the programme position/name of the TV station with .
Date : One-time, daily or weekly programming.
Start/Stop : Start time/end of recording. If you press and hold the buttons,
the time increases/decreases in 30-minute intervals. You can also use
the number buttons for these entries.
Drive : Select the drive.
Mode : Recording mode DVD: XP, LP, EP, SP, FR. If you selected VPS/PDC
[On], recording mode FR is not possible.
: Recording mode VHS: SP, LP, EP, AUTO
VPS/PDC : [On] [Off/–]: If you selected [On], timer programmings will only be
deleted from the list two days after recording.
!
To enter the title of the recording, select [Programme Name] with and confirm
ENTER
with .
!
Enter the desired name in the Programme Name menu.
!
Press to apply the name.
STOP
!
After you have made your changes, save the programming with .
!
To enter other programmes, select [New Timer Programme].
ENTER
The unit automatically switches to timer mode at the start time.
REC flashes in the unit's display one minute before the recording is set to start.
A timer recording does not start while a disc is being formatted, deleted or finalised.
The recording begins afterwards.
RAM
If you programmed the timer programmes one after the other in sequential
order, the first few seconds of the second timer recording are not recorded.
With other types of discs, it is approx. 30 seconds.
If you receive your TV programme via a Set Top Box (DVB-T) or a satellite receiver
(digital/analogue):
On the external unit, select the station with the programme that you want to record.
The station must not be changed during the recording.
It is always the programme on this set station which is recorded.
Name : Select AV2 as the name of the TV station with .
VPS/PDC : This feature cannot be used.
9927
34
VPS/PDC feature
If the broadcaster sends VPS/PDC signals, the beginning and end of a recording are
synchronised with the current broadcast time. The programme start time must be
correctly set to the VPS/PDC start time listed in the magazine.
Automatic SP/LP switching during a VHS recording
AUTO: If there is insufficient recoding time left on a video cassette, the SP/LP function
switches the video recording speed to LP; NTSC to EP. This ensures that the
programme is recorded in full. Should the remaining recording time on the video
cassette still not be sufficient even in LP mode, then the programme will not be recorded
in full. Automatic switching to EP mode is not possible.
Drive space
OK
: There is sufficient storage space available for the programmed recording.
— : Storage space will not be calculated.
: The existing storage space is displayed for daily or weekly recordings.
(Date)
: The disc was not inserted, it is write-protected or there is insufficient storage
!
space available.
Page 35

FUNCTIONS
DVD VHS
H
C
/
E
G
C
O
K
R
P
Check the settings and correct them if necessary.
!
Press .
Checking or changing
!
Select the desired timer programming with and press .
!
Select the position that you want to change with and confirm with .
Programmes that are currently being recorded cannot be changed.
Checking or changing timer recordings
PROG/CHECK
ENTER
ENTER
Timer
Recording
Remain DVD 2:00 SP
VHS --:-- -- 12:40:46 24. 2. FRI
No. Mode
Name Date Start Stop Drive
01 ZDF 6. 3.MON 17:00 17:15 DVD SP Off OK
02 ARTE 10.3. MON 20:45 21:30 DVD SP Off OK
ENTER
RETURN
New Timer Programme
S
SUB MENU
Ü
Delete
Delete
Timer Off
Stop Recording
VPS
PDC
A
Drive
space
Timer Off
Timer Off/On
If you have regular e.g. weekly timer programmings, you can suspend the recording
if you wish to record another programme at the same time, for example.
Your timer programming is retained. You do not need to delete and re-enter it later.
The recording is suspended just once.
!
Select the desired timer programming with .
!
Press .
!
!
!
SUB MENU
Select [Timer Off] and confirm with .
To switch the timer back on, press .
Select [Timer On] and press .
ENTER
SUB MENU
ENTER
You can also press the button to interrupt or switch on a timer programming.A
If you want to interrupt a weekly timer programming for a longer period, delete it
using .
Delete
!
Select the desired timer programming with .
!
Press .
!
SUB MENU
Select [Delete] and confirm with .
ENTER
Programmes that are currently being recorded cannot be deleted. First stop the
recording.
You can also delete a timer programming using .
Stop Recording
You can stop a current timer recording.
!
Select the current timer recording with .
!
!
SUB MENU
Press .
Select [Stop Recording] and confirm with .
ENTER
The timer recording ends and is thereby deleted.
If you stop a regular timer programming (e.g. a weekly recording), it is marked as
stopped and not deleted.
The programming is retained for the following recordings.
Description of the symbols on page 15.
35
Page 36

FUNCTIONS
DVD VHS
Setup
Tuning
Disc
Picture
Sound
Display
Connection
VHS
Others
AV2 Settings
AV2 Input
AV2 Connection
Ext Link
SELECT
ENTER
RETURN
Ext Link
Ext Link 1
Ext Link 2
Video
Ext
Ext Link 2
Timer recording via external units
Setting for external units (EXT LINK)
EXT LINKYou control the recording function via an external unit (e.g. a receiver) with .
Connect the unit to the AV2 socket with a 21-pin Scart cable.
!
!
!
!
!
!
FUNCTIONS ENTER
Press , select [To Others] with and press .
Select [Setup] with and press .
Select [Connection] with and [AV2 Settings] with , and press .
Select [Ext Link] with and confirm with .
Select [Ext Link 1] or [Ext Link 2] with and confirm with .
RETURN
Press multiple times to return to the television picture.
Ext Link 1
: For digital receivers that send a special recording control signal, e.g.
ENTER
ENTER
ENTER
ENTER
the F.U.N. receiver (TU-DSF41).
Ext Link 2
: External recording control for satellite or digital receivers (video signal).
The Ext Link 2 setting cannot be used if the input signal is in NTSC format.
The beginning of the recording may not be recorded correctly.
Recording programming on an external unit
The programming for a timer recording takes place on an external unit. Read the
operating instructions for your external unit.
Switching the DVD Recorder to recording standby mode
!
Select recording drive DVD or VHS with .
!
EXT LINK
Press .
Recording standby mode for -controlled recordings is activated. The
EXT LINK
DRIVE SELECT
selected drive and EXT-L appear on the display.
The recording begins if an appropriate signal is received from a connected unit.
As long as this signal is transmitted by the external unit, the selected drive
will record it.
Switching off recording standby mode
!
Press to switch off recording standby mode.
EXT LINK
EXT-L disappears from the display.
Prematurely cancelling recording
!
Stop the transfer of the recording signal on the external unit.
!
Press to switch off recording standby mode.
EXT LINK
EXT-L disappears from the display.
36
Page 37

FUNCTIONS
DVD
FUNCTIONS
NAVIGATOR LÖSCHEN Titelansicht
DELETE Navigator Title View
DVD-RAM
01
ZDF 6. 3. MON
--
Previous
ENTER
RETURN
Properties
Edit
S
SUB MENU
02
--
Page 01/01
03
--
Next
Select
Set up Protection
Cancel Protection
Delete
Deleting titles and pictures
You can delete titles or write-protect recordings so that they are not accidentally
deleted or overwritten.
!
Press .
!
!
!
FUNCTIONS
Select [Delete] with and confirm .
Select the title that you want to delete with and confirm with .
Select [Delete] with and confirm with .
ENTERwith
ENTER
ENTER
Deleted titles cannot be restored later on.
!
Press to edit a title.SUB MENU
Properties
Information on a title is displayed, such as name, date and time.
!
Confirm [Properties] with .
ENTER
Set up Protection/Cancel Protection
!
Select [Edit] with and confirm with .
!
Select the desired option with and confirm with .
!
Select [Yes] with and confirm with .
ENTER
ENTER
ENTER
Editing several elements
Select the desired title with and press .
PAUSE
A check appears. Repeat this process to select other titles.
Press again to clear the selection..
PAUSE
37
Page 38

FUNCTIONS
DVD VHS
FUNCTIONS
Copy
Cancel All
Copy Direction
1
DVD
Copy Mode
2
VIDEO
Create List
3
Start Copying
Copy Direction
1
Copy Mode
2
Create List
3
Source
VHS
SP
0
Destination
Select the copy direction
Source
Destination
Press to change
DVD
VHS
ENTER
the setting.
Format
Recording Mode
Press to change
ENTER
the setting.
Destination Remaining: 1:59
No. Size Name of item
01 0:12 SP (12%) Terra X
02 0:12 SP (12%) heute
New item (Total = 2)
Size: 0:24( 24%)
DVD
VHS
VIDEO
SP
Copy
+RW(V)
Copying with a copy list
!
!
!
FUNCTIONS
Press .
Select [Copy] with and confirm with .
ENTER
Select the desired option with .
RAM
-RW(VR)
Cancel All
All created settings are cancelled!
!
Select [Yes] with and confirm with .
ENTER
1 Copy Direction
!
Select [Source] with and confirm with .
!
Select DVD with and confirm with . The destination drive is detected
ENTER
ENTER
automatically.
!
Return to [Copy Direction] with and select [Copy Mode] with .
2 Copy Mode
!
Select [Recording Mode] with and confirm with .
!
Select the desired recording mode [SP, LP, EP; NTSC: SP, EP] with and
confirm with . The format is detected automatically.
!
Return to [Copy Mode] with and select [Create List] with .
ENTER
ENTER
3 Create List
You can create a copy list from existing titles/playlists.
!
Select [New Item] with and confirm with .
!
In the Create List screen, select the desired title with and confirm with .
ENTER
ENTER
The title is saved in the copy list.
!
Press to edit the select element of the copy list.
SUB MENU
VHS
Delete All
Add
Delete
Move
Create List
DVD-RAM
001
ZDF 12.9. THU
TERRALUNA
004
Previous
ENTER
RETURN
002
SAT1 23.9. FRI ZDF 1.10. FRI
AUTOMARKT
---
Properties
S
SUB MENU
Other View
Create copy list.
Seite 01/01
Auswählen
Page 01/01
A
VIDEO
003
---
Next
B
Playlists
Deleting all elements
You can delete all elements of the copy list.
!
Confirm [Delete All] with .
!
In the next screen, select with [Yes] and confirm with .
ENTER
ENTER
Editing individual elements
!
Select the desired option with and confirm with .ENTER
Add: Select the desired title with and confirm with .
: Select [Yes] with and confirm with .
Delete ENTER
: Select a new position with and confirm with .
Move ENTER
!
Return to [Create List] with and select [Start Copying] with .
ENTER
Start Copying
!
!
!
ENTER
Press to start copying.
Select [Yes] with and confirm with .
RETURN
Press for 3 seconds to stop copying.
ENTER
You can display the recording properties in the Create List screen or switch between
VIDEO and Playlists.
!
Press .SUB MENU
Display properties
!
Confirm [Properties] with .ENTER
Other View
!
Select [Other View] with and confirm with .
!
Confirm Playlists or VIDEO with .
ENTER
ENTER
You can also switch between VIDEO and Playlists with the and buttons.AB
38
Editing several elements
Select the desired title with and press .
PAUSE
A check appears. Repeat this process to select other titles.
Press again to clear the selection.
PAUSE
Page 39

FUNCTIONS
DVD VHS
FUNCTIONS
Copy
Cancel All
Copy Direction
1
VHS
Copy Mode
2
VHS-Video
Copy Time
3
Start Copying
Copy Direction
1
Copy Mode
2
Copy Time
3
Source
DVD
SP
Destination
Off
Select the copy direction.
Source
Destination
Press to change
the setting.
Format
Recording Mode
Press to change
the setting.
Time Setting
Press to change
the setting.
Time Setting
Copy Time
Press to change
the setting.
ENTER
ENTER
ENTER
ENTER
VHS
DVD
VHS
DVD
VHS-Video
SP
Off
On
2:00
Copy
VHS
-RW(V)
-R
-R DL
Time-triggered copying
!
!
!
FUNCTIONS
Press .
Select [Copy] with and confirm with .
ENTER
Select the desired option with .
VHS
S-VHS
DVD-V
RAM
Cancel All
All created settings are cancelled!
!
Select [Yes] with and confirm with .
ENTER
1 Copy Direction
!
Select [Source] with and confirm with .
!
Select VHS or DVD with and confirm with . The destination drive is
ENTER
ENTER
detected automatically.
!
Return to [Copy Direction] with and select [Copy Mode] with .
2 Copy Mode
!
Select [Recording Mode] with and confirm with .
!
Select the desired recording mode [XP, SP, LP, EP or FR] with and confirm
with . The format is detected automatically.
ENTER
!
Return to [Copy Mode] with and select [Copy Time] with .
ENTER
3 Copy Time
!
Select [Time Setting] with and confirm with .
!
Select [On] or [Off] with and confirm with .
[On]: Select [Copy Time] with and confirm with .
Change the time setting with and confirm with .
ENTER
ENTER
ENTER
ENTER
[Off]: When the copy time is switched off, the entire disc is copied if there is
sufficient space on the destination drive.
!
Return to [Copy Time] with and select [Start Copying] with .
Recording mode FR and time setting [Off]
Copying starts after the tape rewinds to the beginning. Titles are automatically
created for each index signal.
+R DL
+R
Start copying only.
Cannot play the disc on other DVD players.
Timer Recording does not work during this operation.
Copy & Finalize
Finalizing is to enable the disc to be played on
other DVD players.
Copy Only
Start Copying
!
!
Finalising
ENTER
Press to start copying.
Select [Yes] with and confirm with .
ENTER
-RW(V)
-R +R
-R DL
Before copying starts, you can select whether you want to finalise the disc after
copying.
!
Confirm [Copy Only] with if the disc just needs to be copied.
!
Select [Copy&Finalize] with and confirm with if the disc needs to be
ENTER
ENTER
finalised after copying.
Finalisation cannot be cancelled.
!
Press for 3 seconds to end copying.RETURN
The screen displays are also recorded during copying. In the case of a DVD-Video,
the original picture and sound quality may not be fully achieved.
+R DL
39
Page 40

COPYING
DVD VHS
On the front of the unit
COPYING
Copy
Do you want to finalize the disc
after copying completes ?
Finalizing is to allow the disc to be played on
other DVD players. The disc becomes play-only.
Press REC to start finalizing after
copying completes.
Press PLAY to start copying only.
Press STOP to cancel copying.
COPYING
You can copy the contents of a cassette to disc or the contents of a disc to cassette
at the push of a button.
COPYING of a disc starts with the first title and copies till the end of the disc.
COPYING VHS to DVD starts at the selected position and copies till the end of the
cassette.
If you start from DVD to VHS during playback, the current title and all
COPYING
subsequent titles up to the end of the disc are copied.
Copying from VHS to DVD
VHS
S-VHS
RAM
-RW(V)
-R +R
-R DL
+R DL
Insert a video cassette and a recordable disc.
!
Select the VHS drive with .
!
Find the desired start position on the VHS cassette.
!
Select the DVD drive with .
!
Select the recording mode (XP, SP, LP, EP) for DVD with .
-RW(V)
RAM
!
Press for the desired copy direction.
Select the desired audio channel for dual channel sound with .AUDIO
COPYING DVD
DRIVE SELECT
DRIVE SELECT
REC MODE
START flashes on the unit’s display.
!
COPYING DVD
Press for approx. 3 seconds.
START disappears from the display and copying begins.
!
To cancel , press or for 3 seconds.
Finalising
COPYING STOP RETURN
-RW(V)
-R +R
-R DL
Before copying starts, you can select whether you want to automatically finalise the
disc after copying.
!
Press if the disc only needs to be copied.
!
PLAY
Press if the disc needs to be finalised after copying.
REC
Finalisation cannot be cancelled.
!
Press to stop copying.
STOP
+RW
+R DL
Copying from DVD to VHS
RAM
-R +R
-RW(V)
-RW(VR)
-R DL
+R DL
+RW
Insert a disc and a recordable video cassette.
!
Select the VHS drive with .
!
Find the desired start position on the VHS cassette.
!
Select the recording mode (SP, LP, EP; NTSC: SP, EP) for VHS with .
!
Select the DVD drive with .
-RW(V)
RAM
!
Press for the desired copy direction.
Select the desired audio channel for dual channel sound with .AUDIO
COPYING VHS
DRIVE SELECT
REC MODE
DRIVE SELECT
START flashes on the unit’s display.
!
Press for approx. 3 seconds.
COPYING VHS
START disappears and copying starts.
!
COPYING STOP RETURNTo stop , press or for 3 seconds.
VHS
40
Page 41

FUNCTIONSFUNCTIONS
DVD VHS
FUNCTIONS
ShowView
Record
ENTER
RETURN
Timer
Recording
3 Euros 11.03.SAT 14:00 16:00
Remain DVD 0:02 SP
VHS --:-- -- 12:40:46 24. 2. FRI
Input ShowViewNumber 0-9,and press ENTER.
Remain DVD 0:02 SP
VHS --:-- -- 12:40:46 24. 2. FRI
Name Date Start Stop Drive PDCMode
Press ENTERto store the programme.
ENTER
RETURN
Ü
Delete
To Others
0
DVD
SP
Programme Name
9
Number
VPS
Off
ShowView Record
ShowView Record
Entering a ShowView number causes the data for programmes provided by
broadcasters to be saved. The appropriate codes can be found in newspapers and
TV guides.
You can programme up to 16 programmes per month in advance.
!
!
!
!
FUNCTIONS
Press .
Select [To Others] with and confirm with .
Confirm [ShowView Record] with .
ENTER
ENTER
Enter the ShowView number with the number buttons.
Delete a number with .
!
Confirm the ShowView number with .
ENTER
The Timer Recording screen appears with the transferred data. Missing or incorrectly
transferred data can be corrected as described on page 34.
!
Press to save the programme.ENTER
TM
is a trademark of Gemstar Development Corporation.
The S V system is manufactured under licence from Gemstar Development
HOW IEW
Corporation.
41
Page 42

FUNCTIONS
DVD
FUNCTIONS
Playlists
DVD-RAM
01
ZDF 6. 3. MON
--
Previous
ENTER
RETURN
Playlist View
S
SUB MENU
--
Create
--
Page 01/01
Select
To Others
--
--
Next
Playlists
Use this function to edit your movies/recordings made by a recorder or camcorder.
You can remove unwanted scenes (e.g. commercials) or change the sequence.
You can also divide your recordings (titles) into chapters.
You can create a playlist with your favourite chapters and edit this later.
Source Title:
Source Chapter:
Chapter 1
Chapter 1
of Title 2
Title 1
Chapter 2 Chapter 3 Chapter 4
Chapter 3
of Title1
Chapter 4
of Title 1
Playlists
Chapter 1 Chapter 2 Chapter 3
Chapter 2
of Title 2
Title 2
Chapter 1
of Title 1
Insert a recorded disc.
If you activated write-protection, deactivate it.
!
!
!
FUNCTIONS
Press .
Select [To Others] with and confirm with .
Select [Playlists] with and confirm with .
ENTER
ENTER
Creating a playlist
You can create a playlist from both source titles and source chapters.
!
Select the free field [Create] with and confirm with .ENTER
RAM
RAM
Playlists
Playlists
Playlists
Create
DVD-RAM
02 EUROSPORT 11. 3. SAT Motors
Source Title
01
02 03 04
Source Chapter
DVD-RAM
DVD-RAM
Source Title
Source Chapter
Chapters in Playlists
ENTER
RETURN
Create Source Chap.
01
Create
02 EUROSPORT 11. 3. SAT Motors
01
02
002 003
001
001
001
002
S
SUB MENU
Create Chapter
---------
PLAY
03
---
Press RETURN to exit.
Page 01/01
Seite 001/001
---
Create
Exit
0:00.35
Page 01/01
04
Page 001/001
---
Page 001/001
---
1
Selecting a Source Title
!
Select the desired source title with and press .
!
Confirm [Create Chapter] with .
ENTER
SUB MENU
A complete source title can be inserted directly into Chapters in Playlists
with .ENTER
Creating a
2
!
Select the chapter section with . The length of the chapter sections
Source Chapter
ENTER
is displayed as a time entry.
!
Stop playback with .
!
Locate the position for an exact chapter marker with .
!
Select [Exit] with and confirm with .
3
Inserting a chapter into the playlist
!
Switch from Source Title to Source Chapter with .
!
Select a source chapter that you want to add to the playlist with and
confirm with .
!
Select the position where the source chapter should be inserted into the
Chapters in Playlists with and confirm with .
PAUSE
ENTER
ENTER
ENTER
You cannot select a position when inserting the first chapter.
Repeat step 3 to add another chapter.
!
Return to the Playlist View with .
RETURN
You can also insert a Source Title as a chapter into the playlist.
!
Select a Source Title with and confirm with .
!
Select the position where the Source Title should be inserted in Chapters in
Playlists with and confirm with .
ENTER
ENTER
42
Jump to the beginning end of a title chapter with and .
Locate the position for a marker with , ,
TIME SLIP MANUAL SKIP
,or.
You can jump between set markers with .
/ / PAUSE SKIP
SKIP SLOW/SEARCH
SKIP
Page 43

FUNCTIONS
DVD
FUNCTIONS
Delete
Properties
Edit
Chapter View
Delete
Terra X
No. 03
Chaptersl 005
Delete
Delete playlists ?
SELECT
ENTER
RETURN
Properties
Date 10.3.2006 FRI
Total 1:15.35
Cancel
To Others
Playlists
Launching the Playlists menu
!
Press .FUNCTIONS
!
Select [To Others] with and confirm with .
!
Select [Playlists] with and confirm with .
ENTER
ENTER
Playback
!
Select a playlist with and start playback with .ENTER
Edit
!
Select a playlist with .
!
Press .SUB MENU
Delete
This procedure deletes the playlist and it cannot be restored.
The source titles are retained.
!
Confirm [Delete] with .
!
Select [Delete] with and confirm with .
ENTER
ENTER
Properties
Information on the playlist, such as chapter, date and time, is displayed.
!
Select [Properties] with and confirm with .
ENTER
RAM
RAM
-RW(VR)
RAM
-RW(VR)
Delete
Properties
Edit
Chapter View
Playlists
DVD-RAM
01
ENTER
RETURN
Create
Copy
Enter Name
Change Thumbnail
Change Thumbnail
PLAY
Change
Start play and select the image
--:--.--
of a thumbnail.
Change
Exit
0:00.02
Editing playlists in the SUB MENU.
!
Select [Edit] with and confirm with .
!
Select the desired option in the sub menu.
ENTER
Create
Please read Creating a playlist.
Copy
!
Select [Copy] with and confirm with .
ENTER
Enter Name
Change or enter the title of the programme. If you enter a long name, it is only
partially displayed.
Change Thumbnail
You can select any position in a title as the thumbnail for the Playlist View.
!
!
!
PLAY
Press to start playback.
At the position to be displayed as the new thumbnail, confirm [Change] with
ENTER
Confirm [Exit] with .
. The selected thumbnail is displayed.
ENTER
The selected thumbnail is added to the Playlist View.
Jump to the beginning end of a title chapter with and .
Locate the position for a marker with , ,
TIME SLIP MANUAL SKIP
,or.
You can jump between set markers with .
/ / PAUSE SKIP
SKIP SLOW/SEARCH
SKIP
Editing several elements
Select the desired title with and press .
PAUSE
A check appears. Repeat this process to select other titles.
Press again to clear the selection.
PAUSE
RAM
27
99
43
Page 44

FUNCTIONS
DVD
FUNCTIONS
Delete
Properties
Edit
Chapter View
Playlists
DVD-RAM
02 11. 3. SAT 3:27
001
002 004
3:27.01
Playlists
Add Chapter
DVD-RAM
02 EUROSPORT 11. 3. SAT Motors
Source Title
01
02 03
Source Chapter
001
Chapters in Playlist
--- ---
Chapter View
0:01.30
To Others
Add Chapter
Move Chapter
Create Chapter
Combine Chapters
Delete Chapter
Playlist View
003
0:01.45
0:03.10
---
---------
Page 01/01
04
Page 001/001
---
------
---
Page 001/001
---
Playlists
Editing chapters in the SUB MENU
!
!
!
!
!
!
!
!
FUNCTIONS
Press .
Use [To Others] with and confirm with .
Select [Playlists] with and confirm with .
ENTER
ENTER
Select a playlist in the Playlist View with .
SUB MENU
Press .
Select [Chapter View] with and confirm with .
Select the desired chapter with and press again.
Select the desired option in the sub menu with confirm with .
ENTER
SUB MENU
ENTER
Add Chapter
You can create a new chapter from the Source Title.
!
Select a Source Title with and press .
!
Select a Source Chapter with and confirm with .
ENTER
Cancel the process with .
!
Select the position where the chapter is to be inserted with and confirm with
ENTER
!
Repeat the steps to add another chapter.
.
You can select other source titles with .
!
Exit the menu with .
RETURN
RAM
Playlists
DVD-RAM
01
Selected Chapter
Combine
Create Chapter
Combine Chapters
001
Combine chapters.
PLAY
Following Chapter
002
Cancel
Create
Exit
0:00.35
Move Chapter
!
Select the position where the chapter is to be moved to with and confirm
with .
ENTER
Create Chapter
Divide the title into chapters. Identify the points where a new chapter is to start.
The chapters can be selected later during playback with .
!
ENTER
Press at the position where you want to create the chapter. Repeat this
SKIP
step to create a chapter at another location.
!
Select [Exit] with and confirm with .
ENTER
A short section of the recording right before the separation point may be lost.
Combine Chapters
!
Select [Combine] with and confirm with .
ENTER
The selected chapter is combined with the next chapter.
Delete Chapter
!
Select [Delete] with and confirm with
ENTER.
The original title is not deleted when the chapter is deleted.
Playlist View: Return to Playlist View.
44
Jump to the beginning end of a title chapter with and .
Locate the position for a marker with , ,
TIME SLIP MANUAL SKIP
,or.
You can jump between set markers with .
/ / PAUSE SKIP
SKIP SLOW/SEARCH
SKIP
Editing several elements
Select the desired title with and press .
PAUSE
A check appears. Repeat this process to select other titles.
Press again to clear the selection.
PAUSE
Page 45

FUNCTIONS
DVD
FUNCTIONS
Flexible Rec
Record in FR mode.
Maximum rec. time
Set rec. time
Start
SELECT
To Others
7 Hour 51 Min.
7 Hour 51 Min.
Cancel
RETURN
When a timer recording starts, recording in
FR mode is cancelled.
FUNCTIONS
DV Auto Rec
Model of DV
Remain
Start DV automatic recording ?
Rec
SELECT
ENTER
To Others
Panasonic
NV-DX100
3:50 (LP)
Cancel
RETURN
With a DVD-RAM, the DV Auto Rec. screen
appears after connecting the unit.
!
Select [Rec to DVD] with and confirm
with .ENTER
!
Confirm [Recording] with .
ENTER
Recording begins.
DV Auto Rec
DV unit is connected.
Record from the DV unit ?
Flexible Rec
Flexible recording mode (FR)
The unit calculates the best possible recording quality between XP and EP.
It is adjusted for the space available on the disc.
This function is not available during an EXT LINK recording.
!
Select the station with or the number buttons.
!
!
!
!
!
!
!
!
FUNCTIONS
Press .
Select [To Others] with and confirm with .
Select [Flexible Rec] with and confirm with .
Select [Hour] or [Min.] with and change the recording time with .
Go back to [Set rec. time] with .
Select [Start] with , and confirm with . Recording begins.
STOP
Press to cancel the recording before it has ended.
The channel and recording mode cannot be changed in mode.
CH
ENTER
ENTER
ENTER
PAUSE
Displaying the available recording time
!
STATUS
Press multiple times.
DV Auto Rec
Recording via DV input
RAM
-RW(V)
-R +R
It is not possible to copy from DV IN to VHS cassette. The programmes (e.g. via a
digital video unit) are recorded as one title.
RAM
Each time the picture is interrupted, a chapter is created and a playlist is
automatically created.
Switch off this unit and the DV unit (e.g. digital camcorder) before you connect it to
the DV socket.
If the VHS drive is selected, change to the DVD drive with .DRIVE SELECT
!
In the Setup menu under Audio Mode for DV Input, select [Stereo 1/2]
or [Mix].
!
Set the DV unit to Pause at the desired start position.
!
!
!
!
!
!
!
REC MODE
Press to select the recording mode SP, LP, EP, XP.
FUNCTIONS
Press .
Select [To Others] with and confirm with .
Select [DV Auto Rec] with and confirm with .
Confirm [Rec] with . Recording begins.
ENTER
Confirm the message at the end of the recording with .
To prematurely stop the recording, press . Confirm the message to
prematurely stop the recording with or .
ENTER RETURN
ENTER
ENTER
ENTER
STOP
+RW
49
Rec to DVD
SELECT
ENTER
DVD-RAM
DV AUTO REC
DV
LR
Cancel
RETURN
Manual recording via DV input
!
Start playback on your external DV unit.
!
Press Pause at the desired start position.
!
Select the DV channel with .
!
Select the recording mode with .
!
Press on the DVD Recorder.
!
Start playback on the external DV unit.
!
End the recording on the DVD Recorder with .
!
End playback on the DV unit.
REC
INPUT SELECT
REC MODE
STOP
RAM
-RW(V)
-R +R
-R DL
+R DL
+RW
Recording cannot be cancelled with .PAUSE
This unit cannot be controlled from a connected DV unit. The DV input of this unit is
only designed for DV units. (A computer etc. cannot be displayed.) The name of the
DV unit may not be displayed correctly. Some DV units do not enable proper input of
the picture and sound signal. The date and time information on the tape in the DV
unit is not recorded. Simultaneous recording and playback is not possible.
45
Page 46

FUNCTIONS
DVD VHS
FUNCTIONS
Setup
Tuning
Disc
Picture
Sound
Display
Connection
VHS
Others
SELECT
ENTER
RETURN
Delete
Move
Add
A B C
Manual
Tuning
CHANGE
ENTER
Manual
Auto-Setup Restart
Download from TV
Manual Tuning
Pos Name Ch
1 ARD 7
2ZDF 4
3 RTL 12
4SAT1 11
5 PRO7 95
6 ----- --7 ----- --8 ----- --9 ----- ---
10 ----- ---
RETURN
0
--
9
RETURN : le ave
ENTER : store
TAB
SELECT
ENTER
Pos Name Ch
11 ----- --12 ----- --13 ----- --14 ----- --15 ----- --16 ----- --17 ----- --18 ----- --19 ----- --20 ----- ---
Pos
Name
Channel
Fine Tuning
Video System
Mono
TV Guide
Title Page
To Others
RETURN
1
ARD
21
Auto
Auto
Off
301
301
Setup
Setup menu overview
!
!
!
!
!
!
FUNCTIONS
Press .
Select [To Others] with and confirm with .
Select [Setup] with and confirm with .
ENTER
ENTER
Select the desired sub menu with and switch to setup with .
Select the desired setting with and confirm with .
Select the desired option with and confirm with .
ENTER
ENTER
Follow the menu guide. The unit saves your settings.
!
Press multiple times to exit the menus.
RETURN
Tuning
Manual
Entering a new television station
!
Select a free station location with and confirm with .
!
Enter the channel with or .
!
The channel tuning starts. Wait a moment until the desired station is set and
confirm the setting with .
ENTER
9
0
ENTER
Interference to the picture may be minimised with Fine Tuning.
Options available for tuning the channels
Pos
Name
Channel
Fine Tuning
Video System
Mono
Title Page
[1-99]
[A-Z, 0-9, -, +, ]
*
[1-99]
[Auto] [Man.] [Man.]
[Auto] [PAL] [SECAM]
.
[On] [Off]
[100-899]
Station position in the station table.
ENTER
ENTER
Set the station name.
Set the channel.
ENTER
Fine tune picture .interference
ENTER
Set the telelvision system.
ENTER
Switch from stereo to mono
ENTER
Select the video text page which supplies
ENTER
the station information.
ENTER
46
Manual
Tuning
CHANGE
ENTER
RETURN
RETURN : le ave
ENTER : store
Pos
Name
Channel
Fine Tuning
Video System
Mono
TV Guide
Title Page
ARD
Auto
Auto
Off
301
301
1
7
Changing the name of the television station
!
Select the name of the television station with and confirm with .
!
Select [ ] with and the name field with .
The cursor jumps to the first letter .
!
Change the letter with .
!
Select the next letter with , .
!
Press The new name is saved in the station table.
Name
ENTER
A
RD
R
AD
.
ENTER
Deleting television stations
!
Select the station that you want to delete with .
!
Press th button to delete the station.
e A
The station position settings are deleted.
Inserting a new station position
If the station table was not created with Q Link or a similar feature.
!
Select the station position before which the new station position is to be inserted
with .
!
Press the station position is inserted.
button. A newB
Moving television stations
If the station table was not created with Q Link or a similar feature.
!
Select the station that you want to move with .
!
Press the
!
Select a new position with and confirm with .ENTER
button.C
Page 47

FUNCTIONS
DVD VHS
FUNCTIONS
Auto-Setup Restart
Warning--all stored tuning data
will be lost !
Do you want to proceed ?
Yes
Download from TV
Warning--all currently
stored stations will be
replaced by new ones !!
Yes
Setup
Tuning
Disc
Picture
Sound
Display
Connection
VHS
Others
Settings for Playback
Ratings
DVD-Audio Video mode Playback
Soundtrack
Subtitle
Menus
SELECT
ENTER
To Others
No
No
RETURN
Level 8
Off
English
Automatic
English
Setup
Tuning
Auto-Setup Restart
Auto-Setup Restart
!
Select [Yes] with and confirm with . The station search begins.
!
To cancel the process, select [No] with and confirm with or press .
!
Download from TV
!
!
!
RETURN
Press to prematurely end the station search.
Tuning
Download from TV
(with Q Link or similar functions)
Select [Yes] with and confirm with . Data transfer begins.
To cancel the procedure, use to select [No] and confirm with or
press .
RETURN
To prematurely end the data transfer, press .
Disc
Setting
Ratings
ENTER
ENTER
RETURN
ENTER
[8] [1-7] [0]
ENTER RETURN
ENTER
Option
You can restrict the playback of DVD-Video after entering a password.
Allows all titles.
8
Prevents the playback of DVD-Video with the registered security levels.
1-7
Blocks all titles.
0
Changing the security level
Unlock Recorder
Change Password
Change Level
Temporary Unlock
Return to level 8
Change the password
Change the authorisation level
You can temporarily authorise a disc for playback.
The security level is retained if you switch to standby or open the disc tray.
ENTER
ENTER
ENTER
Setup
Tuning
Settings for Recording
Recording time in EP mode
Disc
Picture
Sound
Display
Connection
VHS
Others
List of language codes
A
bkhazian 6566
Afar 6565
Afrikaans 6570
Albanian 8381
Ameharic 6577
Arabic 6582
Armenian 7289
Assamese 6583
Aymara 6589
Azerbaijani 6590
ashkir 6665
B
Basque 6985
Bengali 6678
Bhutani 6890
Bihari 6672
Breton 6682
Bulgarian 6671
EP (8Hours)
ENTER
Burmese 7789
Byelorussian 6669
ambodian 7577
C
Catalan 6765
Chinese 9072
Corsican 6779
Croatian 7282
Czech 6783
anish 6865
D
Dutch 7876
nglish 6978
E
Esperanto 6979
Estonia 6984
aroese 7079
F
Fiji 7074
Finnish 7073
French 7082
DVD-Audio Video mode Playback
[On] [Off]
On: You want to play DVD-Video content from a DVD-Audio. If you change the disc or
switch off the unit, the setting is reset to [Off].
Soundtrack Subtitle Menus
DVD-V
Select the language for audio, subtitles and disc menus.
Under [Other], enter the language code for another language.
Recording time in EP mode
[EP ( 6Hours )] [EP ( 8Hours )]
Select the maximum number of hours for recording in EP mode.
EP ( 6 Hours )
EP (8 Hours )
Frisian 7089
alician 7176
G
Georgian 7565
German 6869
Greek 6976
Greenlandic 7576
Guarani 7178
Gujarati 7185
ausa 7265
H
Hebrew 7387
Hindi 7273
Hungarian 7285
celandic 7383
I
Indonesian 7378
Interlingua 7365
Irish 7165
Italian 7384
apanese 7465
J
: Recording time on a 4.7 GB disc.
: Recording time on a 4.7 GB disc. The sound quality is lower.
Javanese 7487
annada 7578
K
Kashmiri 7583
Kazakh 7575
Kirghiz 7589
Korean 7579
Kurdish 7585
aotian 7679
L
Latin 7665
Latvian 7686
Lingala 7678
Lithunian 7684
acedonian 7775
M
Malagasy 7771
Malay 7783
Malayalam 7776
Maltese 7784
Maori 7773
Marathi 7782
Moldavian 7779
Mongolian 7778
auru 7865
N
Nepali 7869
Norwegian 7879
riya 7982
O
ashto 8083
P
Persian 7065
Polish 8076
Portuguese 8084
Punjabi 8065
uechua 8185
Q
haeto-Rom. 8277
R
Romanian 8279
Russian 8285
amoan 8377
S
Sanskrit 8365
Scots Gaelic 7168
Serbian 8382
Serbo-Croat. 8372
Shona 8378
Sindhi 8368
Singhalese 8373
Slovac 8375
Slovenian 8376
Somali 8379
Spanish 6983
Sundanese 8385
Swahili 8387
Swedish 8386
agalog 8476
T
Tajik 8471
Tamil 8465
Tatar 8484
Telugo 8469
Thai 8472
Tibetan 6679
Tigrinya 8473
Tonga 8479
Turkish 8482
Turkmen 8475
Twi 8487
U
Urdu 8582
Uzbek 8590
V
Volapük 8679
W
Wolof 8779
X
Y
Yoruba 8979
Z
krainian 8575
ietnamese 8673
elsh 6789
hosa 8872
iddish 7473
ulu 9085
47
Page 48

FUNCTIONS
DVD VHS
FUNCTIONS
Setup
Tuning
Disc
Picture
Sound
Display
Connection
VHS
Others
Comb Filter
Still Mode
TAB
To Others
SELECT
RETURN
On
Automatic
Setup
Picture
Comb Filter
On
: The picture is clear and contour-rich. The setting is always set to [On] if you
selected [TV System - NTSC].
Off
: If the picture to be recorded is distorted.
Still Mode
Select how the still picture should be displayed.
: Select this function if the picture is distorted with the setting [Automatic].
Field
: Select this function if small text or line structures are not displayed clearly
Frame
with the setting [Automatic].
A full picutre is made up of 2 half pictures. The picture can appear blurry, but the overall
quality is very good.
A half picture only contains half the information of a full picutre and the picture quality
is poorer.
Setting
ENTER
[On] [Off]
[Automatic] [Field] [Frame]
Option
ENTER
48
Page 49

FUNCTIONS
DVD VHS
FUNCTIONS
Setup
Tuning
Disc
Picture
Sound
Display
Connection
VHS
Others
Setup
Tuning
Disc
Picture
Sound
Display
Connection
VHS
Others
To Others
Dynamic Range Compression
Bilingual Audio Selection
Digital Audio Output
Audio Mode for DV Input
TAB
SELECT
ENTER
Digital Audio Output
PCM Down Conversion
Dolby Digital
DTS
MPEG
Dolby Digital
SELECT
Bitstream
ENTER
RETURN
PCM
SELECT
ENTER
RETURN
Stereo 1
RETURN
Bitstream
Bitstream
Off
M1
Off
PCM
Setup
Sound
Setting
Dynamic Range Compression
ENTER
DVD-V
Option
[On] [Off] (Dolby Digital Only)
ENTER
On: The level of quieter passages increases and the level of louder passages
decreases. The audio can be clearly understood even when the volume is lowered.
Bilingual Audio Selection
-RW(V)
+R
+R DL
-R
-R DL
+RW
[M 1] [M 2]
If you want to record programmes that are broadcast in dual-channel sound, you can
select between the original language [M1] or another available language [M2]. If you
are copying from an external source or from a tape position, select the sound track on
the other unit.
Digital Audio Output
[PCM Down Conversion]
[Dolby Digital] [DTS] [MPEG]
Select the appropriate setting if you have connected an external unit to the
DIGITALAUDIO OUT of the DVD Recorder.
PCM Down Conversion
[On] [Off]
Select the audio output mode for a scan frequency of 96 kHz or 88.2 kHz. Despite this
setting, signals are converted to 48 kHz or 44.1 kHz if they have a scan frequency over
96 kHz or 88.2 kHz or if the disc is copy-protected.
: The connected unit cannot process signals with a scan frequency of 96 kHz or
On
88.2 kHz. Signals are converted with 48 kHz or 44.1 kHz.
: The connected unit can process signals with a scan frequency of 96 kHz or 88.2
Off
kHz. Signals are output as 96 kHz or 88.2 kHz.
Setup
Tuning
Disc
Picture
Sound
Display
Connection
VHS
Others
Language
On-Screen Messages
Grey Background
FL Display
SELECT
TAB
RETURN
English
Automatic
On
Bright
Dolby Digital, DTS, MPEG
Bitstream
PCM
: The connected unit can decode the corresponding signal.
: If the connected unit cannot decode the corresponding signal, the setting must be
[Bitstream] [PCM]
changed to [PCM]. Otherwise, the loud noise can lead to damage to your hearing or
loudspeakers. Make the necessary changes depending on your audio system.
Audio Mode for DV Input
-R
-R DL
-RW(V)
+R DL
+R
[Stereo 1] [Stereo 2] [Mix]
+RW
Select the audio type when copying from the DV input.
: Original sound; : Voice-over, : Original sound + voice-overStereo 1 Stereo 2 Mix
Display
Language
Setting
ENTER
Option
[English]
Select the menu language.
On-Screen Messages
[Automatic] [Off]
Automatic: The on-screen displays are displayed on the screen.
Grey Background
[On] [Off]
ENTER
On: The grey background is displayed when there is no television reception.
FL Display
[Bright] [Dim] [Automatic]
Dim: Changes the brightness of the display on the unit.
Automatic: The display goes dark during playback. It lights up again when a button is
pushed. If the unit is switched off, the display turns off.
49
Page 50

FUNCTIONS
DVD VHS
SELECT
ENTER
To Others
4:3
Off
PAL
Video
TAB
RETURN
FUNCTIONS
Setup
Tuning
Disc
Picture
Sound
Display
Connection
VHS
Others
TV Aspect
Progressive
TV System
AV1 Output
AV2 Settings
AV-Link function
Switching between television reception and
the signal from the DVD Recorder. This
function is only possible if the AV1 Output is
set to [Video ( with component )] or
[RGB 2 ( without component )].
DVD recorder signal: Press + .
ENTER 0
DVD appears on the display.
Television reception: Press the buttons again.
TV appears on the display.
Setup
Connection
TV Aspect
Setting
ENTER
[16:9] [4:3] [Letterbox]
Option
ENTER
Select the TV screen format of your television. Programmes in 16:9 format are recorded
in 4:3 format. 16:9 format is used to record to RAM.
: Black bars appear on the upper and lower edges of the screen.Letterbox
Progressive
[On] [Off]
On: The signal is displayed in full-picture quality using COMPONENT VIDEO OUT.
TV System
PAL
: You connect the unit to a PAL- or multi-system television. Programmes that were
[PAL] [NTSC]
recorded with NTSC are played as PAL60.
NTSC
: You connect the unit to an NTSC television. Programmes that were recorded
with NTSC are played as NTSC.
[Video ( with component )]
AV1 Output
[RGB 1 ( without component )]
[RGB 2 ( without component )]
Video ( with component ): Factory-default settings
RGB 1 : RGB output is available all the time while this unit is on.( without component )
RGB 2 : RGB output is available only during or on-screen display.
( without component )
If RGB 1 or 2 is set, there is no signal available on COMPONENT VIDEO OUT.
Setup
Tuning
Disc
Picture
Sound
Display
Connection
VHS
Others
AV2 Settings
AV2 Input
AV2 Connection
Ext Link
SELECT
ENTER
SELECT
ENTER
AV2 Input
Video
S Video
RETURN
RETURN
Video
Ext
Ext Link 2
AV2 Settings
AV2 Input
AV2 Connection
Perform the settings in the
following submenus for the
connected unit.
Ext Link
AV2 Input
[Video] [S Video]
Video, S Video: The input is switched to the selected signal.
AV2 Connection
Decoder
When a decoder is connected.
[Decoder] [Ext]
Ext:: When a satellite receiver is connected etc.
Ext Link
Ext Link 1
: For digital receivers that send a special recording control signal, for
[Ext Link 1] [Ext Link 2]
example, the F.U.N. receiver (TU-DSF41)
Ext Link 2
: External recording control for satellite or digital receivers (video signal).
50
Page 51

FUNCTIONS
DVD VHS
FUNCTIONS
SETUP
Setup
Sendertabelle
Tuning
Disc
Disc
Video
Picture
Audio
Sound
Display
Display
Anschluss
Connection
VHS
VHS
Sonstige
Others
Setup
Tuning
Disc
Picture
Sound
Display
Connection
VHS
Others
Bandlänge
Tape Length
Wiedergabe-System
Playback Colour System
SQPB
SQPB
SELECT
SELECT
TAB
TAB
RETURN
RETURN
Remote Control
Clock
Power Save
Quick Start
DivX Registration
Initialize
SELECT
TAB
RETURN
To Others
Auto(E-240)
Auto (E-240)
Automatisch
Automatic
Automatisch
Automatic
DVD 1
Off
On
Setup
ENTER
SoVHS
VHS
Tape Length
Einstellung
Setting
ENTER
Option
Option
[Auto (E-240)] [E-195] [E-260] [E-300]
Setting for the tape length of the cassette in use.
Playback Colour System
Automatic
PAL
MESECAM
: Differentiates between PAL and MESECAM.
: If the PAL system is used.
: If the MESECAM system is used.
SQPB
Automatic
On
Off
: The unit detects the recording type.
: Playback of an S-VHS cassette in quasi S-VHS format.
: Playback of recordings in VHS format.
Others
Setting
ENTER
Remote Control
[Automatic] [PAL] [MESECAM]
[Automatic] [On] [Off]
Option
[DVD 1] [DVD 2] [DVD 3]
Change the code of the remote control so that you can simultaneously
operate another Panasonic DVD unit.
Clock
Set the date and time.
Power Save
[On] [Off]
6
ENTER
ENTER
ENTER
11
DivX Registration
DivX(R)Video On Demand
Your registration code is : 9X34TTKW
To learn more visit www.divx.com/vod
ENTER
RETURN
On
: Power-save feature in Standby mode.
The brightness of the display field in power-save mode cannot be changed.
The Quick Start setting is set to [Off]. If you want to connect an external unit via the
AV2 Scart socket, the DVD Recorder must be switched back on from Standby mode.
Off
: The brightness of the display field can be changed.
Quick Start
[]On] [Off
On: The unit switches on from Standby mode in approx. 1 second.
In Standby mode, more power is used and Power Save is set to [Off].
DivX Registration
In order play purchased or borrowed DivX files on this unit, you need the individual
registration code for the unit. The code is displayed here. Please write it down.
Initialize
[Shipping Condition] [Default Settings]
Shipping Condition: All settings, except for the security levels with the associated
password and the time settings are reset to the factory-default settings.
Default Settings: All settings, except for the programmed channels, time, country,
language and disc-language settings, the security levels including password and the
remote control code are reset to the factory-default settings.
51
Page 52

FUNCTIONS
DVD
FUNCTIONS
DVD
Management
DVD-RAM
SELECT
ENTER
Titles 1 Remain 0:59(LP)
Used 0:01
Disc Name
Disc Protection
Delete all titles
Format Disc
RETURN
Delete all titles
All titles and playlists will be deleted.
Is it OK to start deleting all titles ?
Yes
To Others
No
DVD Management
If you activated write-protection, deactivate it.
!
!
!
Off
!
!
FUNCTIONS
Press .
Select [To Others] with and confirm with .
Select [DVD Management] with and confirm with .
Select the desired menu with and confirm with .
Return to the FUNCTIONS menu with .
ENTER
ENTER
ENTER
FUNCTIONS
Disc Name
!
Enter the name. The name is displayed in the DVD Management.
RAM
27
99
You cannot name a disc after it has been finalised.
Disc Protection
RAM
This procedure makes it possible to activate or deactivate write-protection.
!
Select [Yes] with and confirm with .
ENTER
Disc Protection On: The padlock is closed.
!
To deactivate write-protection, select [Yes] with and confirm with .
ENTER
Disc Protection Off: The padlock is opened.
Delete all Titles
!
Confirm [Delete all Titles] with .
!
In the next screen, select [Yes] with and confirm with .
!
In the security question, select [Start] with and confirm with .
ENTER
ENTER
ENTER
RAM
All titles and playlists are deleted and cannot be restored. Protected discs or titles
cannot be deleted.
Format Disc
All contents will be deleted even if protected.
Start formatting ?
Start
Cancel
Do not unplug the unit while the disc is being
formatted or finalised.
Format Disc
RAM
-RW(V)
+RW
-RW(VR)
+R
+R DL
Only for new discs
Some discs are not formatted. They must be formatted before they can be used in
this unit. The formatting process deletes all data from the disc. The estimated
duration of the formatting process is displayed in the menu.
!
Select [Yes] with and confirm with .
!
Select [Start] with and confirm with . The formatting process begins.
ENTER
ENTER
A message appears upon completion.
!
Press .
!
ENTER
Press to stop the formatting process.
RETURN
Formatting can be cancelled and restarted. The formatting process deletes all data,
including the recordings created with this unit.
52
Page 53

FUNCTIONS
DVD
FUNCTIONS
DVD
Management
SELECT
ENTER
Titles 1 Remain 0:59(LP)
+R DL
Used 0:01 of the fi rst laye r
Disc Name
Auto-Play Select
Finalize
Close First Layer
RETURN
Finalize
Finalizing is necessary for compatible
playback. It will take approximately 4 minutes.
Finalize the disc ?
Yes
Close First Layer
The first layer will be non-recordable
after this operation.
It will take approximately 24 min.
Close the first layer ?
To Others
No
Top Menu
DVD Management
Auto-Play Select
-RW(V)
-R +R
-R DL
+R DL
+RW
Before finalisation, you can select whether playback should start from the beginning
of the disc or whether it should be lauched from a disc menu.
!
Select [Top Menu] or [Title 1] with and confirm with .
ENTER
If [Top Menu] is selected, the disc menu appears first.
If [Title 1] is selected, playback begins at the beginning of the disc.
Finalize
-RW(V)
-R +R
-R DL
+R DL
The discs become DVD-Videos in DVD-Video format through finalisation. They can be
played on all DVD Players that record DVD-Video format.
!
Select [Yes] with and confirm with .
!
Select [Start] with and press . The finalisation process begins. A message
ENTER
ENTER
is displayed upon completion.
!
Press .
ENTER
You can only finalise DVDs that were recorded on this unit. You can no longer record
to DVDs that have already been finalised. A finalised DVD-RW can be recorded again
after it is reformatted.
-R DL
Close First Layer
+R DL
The second Layer can only be recorded after the first Layer has been written and
finalised.
!
To close the first Layer, select [Yes] with and confirm with .
!
Select [Start] and confirm with .
ENTER
ENTER
DVD
Management
+RW
SELECT
ENTER
RETURN
Yes
Titles 1 Remain 0:59(LP)
Used 0:01
Disc Name
Auto-Play Select
Create Top Menu
Format Disc
No
Top Menu
Create Top Menu
With a DVD+RW, you have the option of creating a Top Menu.
The Top Menu created can be used for playback on another DVD-Player.
!
Select [Create Top Menu] with and confirm with .
!
In the following menu, select [Yes] with and confirm with .
!
Select [Start] with and confirm with . The Top Menu is created.
ENTER
ENTER
ENTER
The procedure concludes with the message: Top Menu was created.
Return to DVD Management with .
ENTER
+RW
53
Page 54

Picture and sound settings
DVD
DISPLAY menus contain information on the disc or the unit. With DVD-Videos, you can use the repeat function, change subtitles
and the angle, change the picture and sound settings for DVD playback. Depending on the status of the unit (playback, STOP),
there are some entries that cannot be selected or changed.
DISPLAY
B
!
Press to launch the menu.
!
DISPLAY
Press again to exist the menu.
DISPLAY
Disc
Play
Picture
Sound
Other
Soundtrack
Subtitle
Audio channel
1 DEU
Digital 2/0ch
1 DEU
Off
LR
Subtitles, sound track and recording angle can only be selected if they were recorded on the disc. For some discs, they can only
be changed via the disc menus. When bilingual recordings are played back, "1+1 ch" is displayed.
Disc
Option
Soundtrack
Subtitle
Setting
Soundtrack lang.
Sound properties
[On] [Off]
Language
DVD-A DVD-V
Select the sound and the language.
RAM
-R DL
-RW(V)
+R
+R DL
-R
+RW
-RW(VR)
The disc sound properties are displayed.
LPCM/PPCM/Dolby Digital, DTS and MPEG: signal type, ch (channel):
number of channals, k (kHz): scan frequency, b (bit): number of bits
VCD
DivX
Select the audio channel.
DVD-A DVD-V
Switch subtitles on or off, select the language.
RAM
-R DL
-RW(V)
+R
+R DL
-R
+RW
-RW(VR)
Only for discs with the Subtitle On/Off setting. The Subtitle On/Off setting
cannot be recorded with this unit.
VCD
Switch subtitles on or off, select the number of the subtitle.
ENG: English
FRA : French
DEU: German
ITA : Italian
ESP : Spanish
NLD : Dutch
SVE : Swedish
NOR: Norwegian
DAN: Danish
POR: Portuguese
RUS: Russian
JPN : Japanese
CHI : Chinese
KOR: Korean
MAL: Malay
VIE : Vietnamese
* Others: Enter the appropriate language code.
THA : Thai
POL : Polish
CES : Czech
SLK : Slovak
HUN: Hungarian
FIN : Finnish
* : Others
47
99
54
Audio Channel
Source select
Angle
Still Picture
PBC
L+R/L/R
[Automatic]
[Progressive]
[Interlace]
[Slide Show]
[Page]
-RW(VR)
RAM
VCD
DivX
Change audio during playback.
DivX
The unit detects whether the DivX content was recorded as full or half
picture.
The picture may look blurry, but the overall quality is very good.
Contains only half the information of a full picture (Interlace) and the
picture quality is poorer.
DVD-A DVD-V
Select another recording angle.
DVD-A
Select the still image playback type.
Disc playback in the original sequence.
Select the still image number and playback.
RANDOM: Playback in random order.
Return to the standard page: Select [Return] and press .ENTER
VCD
DivX
PBC shows whether the menu playback control is on/off.
Page 55

Picture and sound settings
DVD
Play
Picture
Option
Repeat Play
Option
Playback NR
Progressive
Transfer.
Setting
[On] [Off]
The function is only available if the elapsed time is displayed.
VCD
CD
Track All Off
RAM
-R +R
-R DL
-RW(V)
+R DL
+RW
DVD-V
-RW(VR)
Title Chapter Off
MP3
DVD-A
Track Group Off
During playback of a playlist
PL (Playlists) Off
If the Video-CD has playback control, select a track in mode
STOP
with the number buttons.
Setting
[On] [Off]
[On] [Off]
Reduces screen interference.
Select [On] to activate full picture output.
[Progressive - On] Select the appropriate conversion method for full-picture output.
PAL output signal
[Auto] Film and video content is detected and converted appropriately.
[Video] If problems occur with the [Auto] setting.
[Film] Select Video or Film if the video content is is not displayed correct
with the Auto setting.
RAM
-RW(VR)
Sound
Other
Copy NR
Option
V.S.S.
Dialog Enhancer
Option
[Automatic]
[On]
[Off]
Setting
[Natural]
[Emphasis]
[Off]
[On] [Off]
Setting
Setting
NTSC output signal
[Auto 1] Film and video content is detected and converted appropriately.
[Auto 2] Movies with different picture frequencies are converted
[Video] If content does not display correct with the [Auto 1] or [Auto 2]
settings.
Reduces noise during tape recording.
Only for AV1, AV2, AV3 or DV.
Only with picture input from a video cassette.
Noise reduction is activated for video input.
The input signal can be recorded unchanged.
RAM
-R DL
-RW(V)
+R
-R
+R DL
+RW
DVD-A DVD-V
-RW(VR)
Surround sound effect with 2 front speakers. Only with Dolby Digital with
2 or more channels. Switch off V.S.S. if this causes problems. V.S.S. does
not work with recordings in dual-channel sound.
RAM
-R DL
-RW(V)
+R
-R
+R DL
+RW
DVD-A DVD-V
-RW(VR)
DivX
Dolby Digital, only with 3 or more channels, including a center channel.
The volume is increased so that dialogue is easier to understand.
Position
[1-5]
Position of the OSD displays on the screen.
55
Page 56

If you need help
CUSTOMER SERVICE
ERROR MESSAGES
The error code H , U
or F appears.
Error code U59
Should problems occur, please try to resolve them by referring to the error sources
described here. If this does not help, you should contact your dealer or customer
service.
Normal disc revolution sounds, atmospheric interference during reception, picture
interference while fast-forwarding and limited reception of the satellite programs
are not signs of a defective unit.
If the disc cannot be played due to poor quality, try it again with a disc from
Panasonic.
î
The unit is malfunctioning.
î
The numbers following H, U or F indicate the status of the unit.
!
Switch the unit to Standby mode with .
If the unit does not switch to Standby mode, press for approx. 10 seconds or
/I
/I
unplug it for a minute and then plug it back in.
!
Press to switch on the unit. If this does not solve the problem, contact customer
/I
service with the displayed error code.
î
The unit is hot and switches to Standby mode for safety reasons.
î
Wait approx. 30 minutes until the message disappears. Place the unit in a well
ventilated location. Do not block the vents at the back of the unit.
Page
Error code U88
HARD ERR
The unit automatically switches
to Standby mode.
FUNCTION
Unit not functioning.
The disc cannot be ejected.
î
A problem occurred during recording or playback of a disc.
The unit is not defective, but is performing a restore procedure.
Wait until the error message disappears from the display.
î
The unit is not functioning properly.
!
Switch the unit off and back on again.
If this does not solve the problem, contact customer service.
î
One of the unit’s safety devices may have been activated.
!
Press to switch on the unit.
î
Check the connection to the power supply.
î
The unit is in Standby mode for a Timer programming via external units. EXT-L
/I
appears in the display.
!
Press to switch off recording standby mode.
!
EXT LINK
To cancel a recording prematurely, stop the transfer of the recording signal on the
external unit.
!
Press to switch off recording standby mode.
EXT LINK
î
The unit is currently recording.
!
With the unit switched off, press and on the unit at the same time
STOP CH
and hold for about 5 seconds. Contact your dealer.
î
The above procedure cannot be executed if child protection is activated.
!
Switch off child protection.
36
6
56
Page 57

If you need help
Page
PICTURE
No picture.
There is picture interference.
Television reception worsens
when the unit is connected.
The TV picture format is not
set correctly.
The picture flickers.
No on-screen messages.
SOUND
No sound. Distorted sound.
Volume set to quiet.
î
Check the connection to the TV, e.g. AV1.
î
The PROGRESSIVE output is activated, but the connected TV is not
progressive-capable.
!
Press and hold and on the unit at the same time for more than
5 seconds. The function is switched to half-picture (INTERLACE).
î
The [TV System] setting does not match that on the disc.
!
In mode, press and hold and on the unit for more
STOP STOP OPEN/CLOSE
than 5 seconds. This switches the unit from PAL to NTSC or vice versa.
î
Check the antenna connection and the alignment of your antenna.
You may need to use a signal amplifier.
î
Check the [TV Aspect] setting in the Connection Setup menu.
î
Adjust the picture. Read the operating instructions for the TV.
î
Change the [On-Screen Messages] setting the Display Setup menu.
î
Check the connections.
î
If you connected an amplifier, check the input mode.
î
Switch off the V.S.S. function if it causes problems.
STOP PLAY
10
14
14
50
50
49
13
55
It is not possible to hear the
desired sound type.
The sound cannot be set for
stereo or NICAM broadcasts.
REMOTE CONTROL
No functions.
The TV cannot be operated.
DISPLAY
The display light is weak.
"0:00" blinks on the unit display.
!
Press to select the desired sound type.
!
î
î
î
î
î
î
î
î
î
î
AUDIO
Change the appropriate setting in the Sound Setup menu.
The sound cannot be switched on some discs.
Connect external devices with audio cables even if you use a digital connection.
You can change the sound type when using DVD-RAM.
An incorrect remote control code was selected.
Check the batteries.
Point the remote control at the sensor on the unit.
Child protection has been activated.
An incorrect remote control code was selected.
Change the [FL Display] setting in the Display Setup menu.
No time. Set the time in the Others [Clock] Setup menu.
49
13
6
5
6
6
6
49
11
57
Page 58

If you need help
Page
PLAYBACK
Playback does not start.
DVD-Video will not play.
No reaction when.PLAY is
pressed
A title or chapter is not played
back after being selected.
Soundtrack/subtitles cannot be
selected or do not match the
language selected in the Setup
menu.
The angle cannot be changed.
You forgot your security password.
î
No disc or video cassette inserted.
î
The disc is dirty or badly scratched.
î
You inserted a disc that is not suitable for playback.
î
You inserted a blank disc.
î
Some DVD-Videos cannot be played if the security level has been changed.
î
appears on the screen.
disc.
î
Child protection has been activated.
î
Some titles or chapters of DVD-Videos are not played back if the security level
has been changed.
î
The subtitles were not recorded on the disc or are not switched on.
î
The languages were not recorded on the disc.
î
You may need to use the disc menu to select the languages.
î
The angle perspective can only be changed for scenes that were recorded from
different angles.
!
Select the DVD drive and, while the disc tray is open, press and hold and
PLAY
on the unit for at least 5 seconds.
The procedure is being prevented by the unit or the
REC
16
47
18
6
47
47
54
18
54
RECORDING
Cannot record.
Some or all recorded programmes
were lost.
Timer Recording
is not functioning.
Timer Recording
cannot be cancelled.
î
The video cassette is write-protected.
î
Check whether the inserted disc is suitable for recording.
î
The disc is not formatted. Format the disc.
î
The write-protection device on the cartridge is set to "PROTECT".
Deactivate the write-protection.
î
Deactivate the write-protection in the DVD Management menu.
î
The material that you want to record is copy-protected. The number of possible
copies is limited with some programmes.
î
Discs containing PAL and NTSC signals cannot be recorded.
î
If there is a power cut during recording or processing, or if the unit is unplugged
from the power supply, the programme may be lost or the disc may be damaged.
Reformat the disc or use a new disc.
î
The Timer programming is defective, different Timer programmes overlap each
other. Correct the programming.
î
Check the clock setting.
!
With an -controlled recording via an external unit, press .
The EXT-L display disappears.
î
If you want to cancel the recording prematurely, stop the transfer of recording
signal on the external unit. Press to switch off recording standby.EXT LINK
EXT LINK EXT LINK
22
52
52
23
52
35
51
36
EXTERNAL INPUT
Video or audio is not recorded
from an external unit.
58
î
The external unit is not connected correctly.
î
The incorrect input channel AV2, AV3 or DV IN was selected.
12
13
Page 59

Specifications
Power supply
Power consumption
Recording format DVD-RAM: DVD Video Recording format
Recording discs
Playback discs
Playback discs DVD-Video, DVD-Audio, CD-Audio (CD-DA), Video-CD,
LASER specification LASER product of class 1
Wave length: 662 nm for DVD, 780 nm for CD
Laser output: No dangerous radiation due to the safety device.
Norsk: Bølgelengde: 662 nm (DVD), 780 nm (CD)
Optical pick-up: System with 1 lens, 2 integration units
Other Regional code: 2
DV input IEEE 1394 Standard (4-pin)
TV system PAL: 625/50 / SECAM (input only) NTSC: 525/60 TV system PAL/SECAM: 625/50 NTSC: 525/60
Video interface
Input
AV1 SCART Video: 1 Vp-p
AV2 SCART Video: 1 Vp-p, Y: 1 Vp-p C: 0.3 Vp-p (PAL-Burst),
AV3 VIDEO Video: 1 Vp-p
AV3 S VIDEO Y: 1 Vp-p, C: 0,3 Vp-p (PAL-Burst)
Output
AV1 SCART Video: 1 Vp-p; RGB: 0,7 Vp-p (625/50) only DVD
AV2 SCART Video: 1 Vp-p
VIDEO Video: 1 Vp-p
S VIDEO Y: 1 Vp-p, C: 0,3 Vp-p (PAL-Burst)
COMPONENTVIDEOOUT Y:1Vp-p, P :0,7Vp-p,P : 0,7Vp-p (PAL: 625i/625p,NTSC:525i/525p)
Audio interface
Recording System:
Input
AV1 SCART Standard: 0.5 Vrms, full scale: 2 Vrms at 1 kHz
AV2 SCART Standard: 0.5 Vrms, full scale: 2 Vrms at 1 kHz
AV3AUDIO Standard: 0.5 Vrms, full scale: 2 Vrms at 1 kHz
Output
AV1 SCART Standard: 0.5 Vrms, full scale: 2 Vrms at 1 kHz
AV2 SCART Standard: 0.5 Vrms, full scale: 2 Vrms at 1 kHz
AUDIO Standard: 0.5 Vrms, full scale: 2 Vrms ar 1 kHz
OPTICAL Optical connection (PCM, Dolby Digital, DTS, MPEG)
Tuner An integrated tuner (for both DVD and VCR)
Tuner system PAL-BGH, SECAM-BG
Channel area VHF: CH E2-E12 A-H2 (Italy), UHF: CH 21-69
Quick Start for Recording
1 sec Quick Start for Recording on DVD-RAM (when connecting to TV using SCART, Component Video, Video or S-Video terminals)
From power off mode, recording on DVD-RAM starts about 1 sec after first pressing and then sequentially pressing .
Note:The values given for weight and dimension are approximate values. Specifications can change without notice.
: AC 220V-240V 50 Hz
: 26 W (approx.2Winpower save mode)
DVD
DVD-R: DVD-Video format, MP3, JPEG, DivX
DVD-R DL: DVD-Video format
DVD-RW: DVD-Video format, DVD Video Recording format
+R, +RW, +R DL
DVD-RAM: Ver.2.0, Ver.2.1 /3X Rev.1.0,
Ver.2.2 /5X Rev.2.0
DVD-R: for General
Ver.2.0, Ver.2.0 /4X Rev.1.0,
Ver.2.x /8X Rev.3.0,
Ver.2.x/16X Rev.6.0
DVD-R DL: Ver.3.0, DL Ver.3.x/4X Rev.1.0
DVD-RW: Ver.1.1, Ver.1.x /2X Rev.1.0,
Ver.1.x /4X Rev.2.0, Ver.1.x/6X Rev.3.0
DVD+R: Ver.1.0, Ver.1.1, Ver.1.2, Ver.1.3
DVD+R DL: Ver.1.0
DVD+RW: Ver.1.1, Ver.1.2/4X
CD-R/RW (CD-DA, Video CD, SVCD, MP3/JPEG/DivX
formatted discs), SVCD that are IEC62107-compliant
Laserstyrke: Ingen farlig stråling sendes ut.
Input impedance: 75 Ohm.
For 75 Ohm termination.
BR
Dolby Digital 2ch
Input impedance: more than 10 kOhm.
The output impedance of each output socket is less
than 1 kOhm.
CATV: S01-S05 (S1-S3), S1-S20 (M1-U10), S21-S41
(Quick Start: [On])
Dimensions
Weight
Operating temperature
Operating humidity
: approx. 430 mm (W) x 84 mm (H) x 351 mm (D)
: approx. 5.4 kg
: 5°C - 40°C
: 35% - 80% RH (no condensation)
VHS
Recording format VHS video cassette system standard with FM audio
Video and sound heads4 rotating video heads, 2 rotating Hi-Fi heads
Recording mode
Recording time
Video Data
Horizontal Resolution SP: morethan 240 lines
Signal to Noise Ratio SP: more than 43 dB, LP: more than 40 dB,
Frequency Response SP, LP: 0 ±2 dBat 2 MHz (0dB at 0.1 MHz),
Audio Data
Dynamic Range HiFi: more than 90 dB (Cinch)
Frequency Response HiFi: 20 Hz-20 kHz (0 ±3 dB)
Signal-to-noise ratio HiFi: more than 65 dB
Cross talk more than 50 dB at 1 kHz (HiFi)
Wow and Flutter HiFi: Less than 0.005 Wrms
Standby/On REC
(PAL, MESECAM, NTSC, )
1 fixed head for normal audio
PAL/MESECAM:SP: 23.39 mm/s 240 min.
LP: 11.7 mm/s 480 min.
EP: 7.8 mm/s 720 min.
NTSC: SP: 33.35 mm/s 168 min.
EP: 11.12 mm/s 505 min.
(for E-240 cassettes)
EP: more than 38 dB
EP: 0 ±3 dB at 2 MHz (0 dB at 0.1 MHz)
Normal: SP: 80 Hz-8 kHz (-1 ±5 dB)
LP: 80 Hz-5 kHz (0 ±5 dB)
EP: 80 Hz-3 kHz (0 ±5 dB)
Normal:SP: more than 43 dB, LP, EP: more than 41 dB
Normal: SP: 0.2% max. LP, EP: 0.4% max.
59
Page 60

Index
Page
A
C IN 9,10,11
Angle 54
Audio Channel 20,54
Audio Mode for DV Input 49
Auto Finalise 18
Auto-Play 53
Auto-Setup Restart 47
AV1 Output 9,50
AV2 Connection 50
AV2 Input 50
AV-in NR 55
AV-Link 50
B
ilingual Audio Selection 49
Bitstream 49
C
amcorder 13,45
Cartridge Discs 17
Changing batteries 5
Chapter (DIRECT NAVIGATOR) 30
Chapter (Playlists) 44
Child protection 6
Code of remote control 6,51
Comb Filter 48
COMPONENT VIDEO OUT 9,14,50
Copy Direction 38,39
Copy Mode 38,39
Copy Time 39
COPYING 4,40
Country 11
CPRM 23
Create List 38
ate 11,51
D
Decoder 12,50
Default Settings 51
Delete (cassette) 22
Delete (chapter) 30,44
Delete (partial) 29
Delete (Playlists) 43
Delete (Timer) 35
Delete (title) 28,37,52
Delete (TV stations) 46
Dialog Enhancer 55
Digital Audio Output 49
Disc Name 27,52
Disc Protection (Cartridge) 17
Disc Protection (Disc) 52
Disc Protection (Recording) 29,37
Disc Protection (VHS) 22
DivX 4,31
DivX Registration 51
DivX Video On Demand 31,51
Dolby Digital 4,13,49,55
Double-Layer-DVD/Dual Layer DVD 16
Download from TV 11,47
Page
DTS 4,13,49
Dual-channel sound 25
DV IN 13,45
DVD Video Recording format (VR) 16
DVD-Audio Video mode Playback 47
DVD-Video format (V) 16
Dynamic Range Compression 49
xt Link 36,50
E
ield 48
F
Finalising 16,39,40,53
Fine Tuning 46
FL Display 49
Flexiblle Rec mode 45
Folder 32,33
Formatted 16,23,52
Frame 48
rey Background 49
G
nterlace 14
I
Initialize 51
ET REW 21
J
JET SEARCH 21
JPEG 33
anguage 49
L
Language codes 47
LASER 3
Layer 16,53
Letterbox 11,50
LPCM 54
enus 47
M
MESECAM 51
Mono 46
MP3 4,32
MPEG 4,49,54
TSC 23,25,50
N
n-Screen Messages 49
O
OPTICAL 9,13
Optical digital audio cable 13
AL 23,50,51
P
PBC 54
PCM Down Conversion 49
Playback Colour System 51
Playback discs 17
Playback NR 55
Position 55
Power Save 11,51
Programme Name 27
Progressive 14,50,55
Page
Link 10,46,47
Q
Quick Start 51
Quick View 20
atings ( Temporary Unlock) 47
R
Ratings (Change Level) 47
Ratings (Change Password) 47
Ratings (Unlock Recorder) 47
Recording discs 16,23
Recording mode 24
Recording time 23,24
Recording time in EP mode 23,47
Regional codes 17
Repeat Play 55
RGB 50
VIDEO 9,11
S
S Video 50
Satellite receiver 12,50
Set Top Box 12
Shipping Condition 51
ShowView 41
Slide Show 54
Sound properties 54
Soundtrack 47,54
Soundtrack language 54
Source Chapter 42
Source select 54
Source Title 42
SP/LP switching 34
SQPB 22,51
Still Mode 48
STILL P 54
Subtitle 47,54
Subtitle language 54
ape Length 51
T
TIFF 33
Time 11,51
TIME SLIP 20
Title Page 46
Top Menu 53
Tracking 22
TRACKING/V-LOCK 22
Tranfer. 55
TV Aspect 11,50
TV Codes 6
TV System 50
.S.S. 55
V
VHS Index Search System (VISS) 21
Video 50
Video System 46
VPS/PDC 34
RQTD0196_A_en_F06C06_1
 Loading...