

Panasonic dmr-eh75 Operation Manual
Operating Instructions
DVD Recorder
Model No. DMR-EH75V
Getting startedRecordingPlaying backEditingCopyingConvenient
Dear Customer
Thank you for purchasing this product. For optimum performance
and safety, please read these instructions carefully.
Before connecting, operating or adjusting this product, please read
the instructions completely.
Please keep this manual for future reference.
Region number supported by this unit
Region numbers are allocated to DVD players and DVD-Video
according to where they are sold.
≥The region number of this unit is “1”.
≥The unit will play DVDs marked with labels containing “1” or
“ALL”.
Example:
1 ALL
P
1
2
4
If you have any questions contact
1-800-211-PANA (7262)
The warranty can be found on page 95.
La guía rápida en español se encuentra en la página 97–103.
RQT8346
RQT8346-P
Getting started
functions
ReferenceEspañol
CAUTION!
THIS PRODUCT UTILIZES A LASER.
USE OF CONTROLS OR ADJUSTMENTS OR PERFORMANCE
OF PROCEDURES OTHER THAN THOSE SPECIFIED HEREIN
MAY RESULT IN HAZARDOUS RADIATION EXPOSURE.
DO NOT OPEN COVERS AND DO NOT REPAIR YOURSELF.
REFER SERVICING TO QUALIFIED PERSONNEL.
WARNING:
TO REDUCE THE RISK OF FIRE, ELECTRIC
SHOCK OR PRODUCT DAMAGE, DO NOT EXPOSE
THIS APPARATUS TO RAIN, MOISTURE,
DRIPPING OR SPLASHING AND THAT NO
OBJECTS FILLED WITH LIQUIDS, SUCH AS
VASES, SHALL BE PLACED ON THE APPARATUS.
(Inside of product)
CAUTION
RISK OF ELECTRIC SHOCK
DO NOT OPEN
CAUTION: TO REDUCE THE RISK OF ELECTRIC
SHOCK, DO NOT REMOVE SCREWS.
NO USER-SERVICEABLE PARTS INSIDE.
REFER SERVICING TO QUALIFIED
SERVICE PERSONNEL.
The lightning flash with arrowhead symbol, within
an equilateral triangle, is intended to alert the
user to the presence of uninsulated “dangerous
voltage” within the product’s enclosure that may
be of sufficient magnitude to constitute a risk of
electric shock to persons.
The exclamation point within an equilateral
triangle is intended to alert the user to the
presence of important operating and
maintenance (servicing) instructions in the
literature accompanying the appliance.
CAUTION!
DO NOT INSTALL OR PLACE THIS UNIT IN A BOOKCASE,
BUILT-IN CABINET OR IN ANOTHER CONFINED SPACE.
ENSURE THE UNIT IS WELL VENTILATED. TO PREVENT
RISK OF ELECTRIC SHOCK OR FIRE HAZARD DUE TO
OVERHEATING, ENSURE THAT CURTAINS AND ANY OTHER
MATERIALS DO NOT OBSTRUCT THE VENTILATION VENTS.
Note to CATV system installer:
This reminder is provided to call the CATV system installer’s
attention to Article 820-40 of the NEC that provides guidelines for
proper grounding and, in particular, specifies that the cable
ground shall be connected to the grounding system of the
building, as close to the point of cable entry as practical.
The socket outlet shall be installed near the equipment and easily
accessible. The mains plug of the power supply cord shall remain
readily operable. To completely disconnect this apparatus from
the AC Mains, disconnect the power supply cord plug from AC
receptacle.
FCC Note:
This equipment has been tested and found to comply with the
limits for a Class B digital device, pursuant to Part 15 of the FCC
Rules. These limits are designed to provide reasonable protection
against harmful interference in a residential installation. This
equipment generates, uses, and can radiate radio frequency
energy and, if not installed and used in accordance with the
instructions, may cause harmful interference to radio
communications. However, there is no guarantee that interference
will not occur in a particular installation. If this equipment does
cause harmful interference to radio or television reception, which
can be determined by turning the equipment off and on, the user is
encouraged to try to correct the interference by one or more of the
following measures:
≥Reorient or relocate the receiving antenna.
≥Increase the separation between the equipment and receiver.
≥Connect the equipment into an outlet on a circuit different from
that to which the receiver is connected.
≥Consult the dealer or an experienced radio/TV technician for
help.
FCC Caution: To assure continued compliance, follow the
attached installation instructions and use only shielded interface
cables when connecting to peripheral devices.
Any changes or modifications not expressly approved by the party
responsible for compliance could void the user’s authority to
operate this equipment.
This device complies with Part 15 of the FCC Rules. Operation is
subject to the following two conditions: (1) This device may not
cause harmful interference, and (2) this device must accept any
interference received, including interference that may cause
undesired operation.
Responsible Party:
Panasonic Corporation of North America
One Panasonic Way
Secaucus, NJ 07094
Telephone No.: 1-800-211-7262
2
RQT8346
IMPORTANT SAFETY INSTRUCTIONS
Read these operating instructions carefully before using the unit. Follow the safety instructions on the unit and the applicable safety instructions
listed below. Keep these operating instructions handy for future reference.
1) Read these instructions.
2) Keep these instructions.
3) Heed all warnings.
4) Follow all instructions.
5) Do not use this apparatus near water.
6) Clean only with dry cloth.
7) Do not block any ventilation openings. Install in accordance
with the manufacturer’s instructions.
8) Do not install near any heat sources such as radiators, heat
registers, stoves, or other apparatus (including amplifiers) that
produce heat.
9) Do not defeat the safety purpose of the polarized or groundingtype plug. A polarized plug has two blades with one wider than
the other. A grounding-type plug has two blades and a third
grounding prong. The wide blade or the third prong are
provided for your safety. If the provided plug does not fit into
your outlet, consult an electrician for replacement of the
obsolete outlet.
10) Protect the power cord from being walked on or pinched
particularly at plugs, convenience receptacles, and the point
where they exit from the apparatus.
11) Only use attachments/accessories specified by the
manufacturer.
12) Use only with the cart, stand, tripod, bracket, or
table specified by the manufacturer, or sold with
the apparatus. When a cart is used, use caution
when moving the cart/apparatus combination to
avoid injury from tip-over.
13) Unplug this apparatus during lightning storms or
when unused for long periods of time.
14) Refer all servicing to qualified service personnel. Servicing is
required when the apparatus has been damaged in any way,
such as power-supply cord or plug is damaged, liquid has been
spilled or objects have fallen into the apparatus, the apparatus
has been exposed to rain or moisture, does not operate
normally, or has been dropped.

Table of contents
Getting started
IMPORTANT SAFETY INSTRUCTIONS ........................................ 2
Table of contents ........................................................................... 3
≥About descriptions in these operating instructions ........................ 4
HDD, disc and card information ................................................... 5
≥HDD and discs you can use for recording and play ...................... 5
≥Discs that cannot be played .......................................................... 6
≥Play-only discs [12 cm (5z)/8 cm (3z)]............................................ 7
≥Cards you can use on this unit...................................................... 7
≥Regarding DivX discs, MP3 discs and
still pictures (JPEG, TIFF)............................................................. 8
Important notes for recording ...................................................... 9
HDD (Hard disk drive) handling care ......................................... 10
Unit care........................................................................................ 11
Disc and card handling ............................................................... 11
Video cassette information ......................................................... 11
Inserting a disc............................................................................. 12
Inserting a video cassette........................................................... 12
Inserting/Removing the SD card ................................................ 12
Accessories.................................................................................. 13
The remote control ...................................................................... 13
Control reference guide .............................................................. 14
≥Remote control............................................................................ 14
≥FUNCTIONS window .................................................................. 14
≥Main unit...................................................................................... 15
≥The unit’s display......................................................................... 15
STEP 1 Connection...................................................................... 16
≥If your television does not have AUDIO/VIDEO terminals,
an RF modulator is necessary..................................................... 19
≥If the antenna connector doesn’t match ...................................... 20
≥DVD output and DVD/VHS output............................................... 20
≥To enjoy even higher picture quality............................................ 21
≥Connecting an amplifier or system component ........................... 21
≥Connecting with an
HDMI (High Definition Multimedia Interface) terminal ................. 22
≥Control with HDMI (HDAVI Control) ............................................ 22
STEP 2 Setting up the TV Guide On Screen
STEP 3 Downloading................................................................... 25
STEP 4 Set up to match your television and
the unit’s remote control ........................................................... 26
≥Selecting television type.............................................................. 26
≥Television operation .................................................................... 26
≥When other Panasonic products respond to
this remote control....................................................................... 26
®
system............... 23
Recording
Note about recording................................................................... 27
≥HDD and discs ............................................................................ 27
- FR (Flexile Recording).............................................................. 27
- When the format confirmation screen is displayed ................... 27
- When remove a recorded disc.................................................. 27
- Recording modes and approximate recording times ................ 28
≥VHS ............................................................................................. 28
- Recording mode ....................................................................... 28
≥HDD, discs and VHS ................................................................... 28
- To specify a time to stop recording—
One Touch Recording............................................................... 28
- Watching the TV while recording.............................................. 28
Recording television programs.................................................. 29
≥Recording television programs.................................................... 29
≥Selecting audio to record ............................................................ 30
≥Flexible Recording mode (FR) .................................................... 30
≥Playing while you are recording .................................................. 31
- Playing from the beginning of the title you are recording—
Chasing playback ..................................................................... 31
- Playing a title previously recorded while recording—
Simultaneous rec and play ....................................................... 31
Scheduled recording................................................................... 32
- Using the TV Guide On Screen
make scheduled recordings...................................................... 32
- Manually programming scheduled recordings .......................... 33
- Using VCR Plusi system to make scheduled recordings........ 33
≥Check, change or delete a program ............................................ 34
Utilizing the TV Guide On Screen
≥Using the LISTINGS Service to set scheduled recording and
scheduled reminder..................................................................... 36
- To make scheduled recording .................................................. 36
- To make scheduled reminder ................................................... 36
®
system to
®
system................................ 35
- Other Episode Options ..............................................................36
≥Using the SEARCH Service to search TV programs by genre,
keyword, etc.................................................................................37
- To search TV programs by genre..............................................37
- To search TV programs by new keyword ..................................37
- To search TV programs by saved keyword ...............................37
≥Using SETUP Service to change the settings of
the TV Guide On Screen
- Access to the TV Guide On Screen
“Change system settings”..........................................................38
- Customizing the channel lineup –
“Change channel display”..........................................................38
- Change the initial settings–“Change default options”................38
- Display progress in getting TV Guide On Screen data–
“Display setup progress”............................................................39
≥Using SCHEDULE Service to check, change or
delete a program set for scheduled recording or
scheduled reminder manually ......................................................39
- To change the previously set scheduled recording or
scheduled reminder ...................................................................39
- Other Schedule Options ............................................................39
- History Options..........................................................................39
®
system................................................38
®
system setup screen–
Playing back
Playing recorded video contents/Playing play-only discs .......40
- Selecting recorded programs (titles) to play–
Direct Navigator.........................................................................40
≥Operations during play.................................................................41
≥Simple editing operations during play ..........................................42
≥Changing audio during play .........................................................42
≥Status messages..........................................................................42
Playing DivX discs, MP3 discs and
still pictures (JPEG/TIFF)............................................................43
≥Selecting file type to play .............................................................43
- To select file type.......................................................................43
≥Playing DivX discs........................................................................43
- Using the tree screen to find a folder.........................................43
- About DivX VOD content ...........................................................44
≥Playing MP3 discs........................................................................44
- Using the tree screen to find a group ........................................44
≥Playing still pictures......................................................................44
≥Useful functions during still picture play.......................................45
Using on-screen menus ...............................................................46
- Common procedures .................................................................46
- Disc menu–Setting the disc content ..........................................46
- Play menu–Change the play sequence .....................................46
- Video menu–Change the picture quality....................................47
- Audio menu–Change the sound effect ......................................47
- Other menu–Change the display position .................................47
Delete Navigator to delete titles ..................................................47
≥Deleting titles or pictures during play...........................................47
Playing a video cassette ..............................................................48
≥Operations....................................................................................48
≥Adjusting the playback picture .....................................................49
- Manual tracking .........................................................................49
- Vertical locking adjustment........................................................49
≥VHS Index Search System (VISS) ...............................................49
≥Changing audio ............................................................................49
≥Auto Bilingual Choice Function ....................................................49
≥S-VHS Quasi Playback (SQPB)...................................................49
≥Various on-screen display indications..........................................50
Editing
Editing titles/chapters ..................................................................51
≥Editing titles/chapters and playing chapters.................................51
≥Title operations.............................................................................52
≥Chapter operations.......................................................................52
Creating, editing and playing playlists.......................................53
≥Creating playlists..........................................................................53
≥Editing and playing playlists/chapters ..........................................54
≥Playlist operations ........................................................................54
≥Chapter operations.......................................................................54
Editing still pictures .....................................................................55
≥Album and picture operation ........................................................55
Table of contents
3
RQT8346

Table of contents
Copying
Note about copying......................................................................56
- Before copying...........................................................................57
Copying titles or playlists ............................................................59
≥Copy Navigator ............................................................................59
≥One Touch Copy ..........................................................................60
- HDD l DVD or VHS .................................................................60
-VHS l HDD or DVD .................................................................61
-DVD l HDD ..............................................................................61
-DVD l VHS ..............................................................................61
≥Copying using the copying list—
Advanced Copy (Create List) .......................................................62
- Copy Navigator/Copying list icons and functions.......................63
≥Copying MPEG2 moving pictures from an SD card—
Copy video (MPEG2) ...................................................................63
≥Copying a video cassette or DVD-Video [finalized DVD-R,
-R DL, DVD-RW (DVD-Video format), +R, +R DL] —
Advanced Copy (Time Limit)........................................................64
Copying still pictures...................................................................66
≥Copying using the copying list......................................................66
≥Copying all the still pictures on a card—Copy all Pictures ...........67
Recording from a video cassette recorder.................................68
≥Manual recording .........................................................................68
≥DV camcorder recording (DV Camcorder Rec.)...........................69
Convenient functions
HDD, disc and card management................................................70
≥Common procedures....................................................................70
≥Setting the protection—Disc Protection .......................................70
- Cartridge-protection...................................................................70
≥Providing a name for a disc—Disc Name.....................................70
≥Deleting all titles and playlists—Delete All Titles..........................71
≥Deleting all the contents of a disc or card—Format .....................71
≥Selecting the background style—Top Menu style ........................72
≥Selecting whether to show the Top Menu first—
Playback will start with: ................................................................72
≥Enabling discs to be played on other equipment—Finalize..........72
≥Creating Top Menu—Create DVD Top Menu ..............................72
Entering text..................................................................................73
Changing the unit’s settings .......................................................74
≥Common procedures....................................................................74
≥Summary of settings ....................................................................74
- Changing the speaker setting to suit your speaker....................78
Channel/Clock settings when
TV Guide On Screen
≥Auto channel/clock settings..........................................................79
- Adjust Time Zone.......................................................................79
≥Channel captions .........................................................................80
≥VCR Plusr Channel Setting ........................................................80
®
system is not used.................................79
Reference
Frequently asked questions ........................................................81
Messages.......................................................................................83
Troubleshooting guide.................................................................85
Specifications ...............................................................................92
Glossary ........................................................................................93
Product Service ............................................................................94
- Product information....................................................................94
Limited Warranty ..........................................................................95
Index ..............................................................................................96
Guía de referencia rápida en español
(Spanish Quick Reference) ..........................................................97
About descriptions in these operating
instructions
≥Pages to be referred to are indicated as (l ±±).
≥These operating instructions describe operations mainly using the
remote control.
≥The contents of the screens used in these instructions may not
necessarily match what you will see on your screen.
≥The displays shown in these instructions are examples. The actual
displays depend on the disc etc.
4
RQT8346
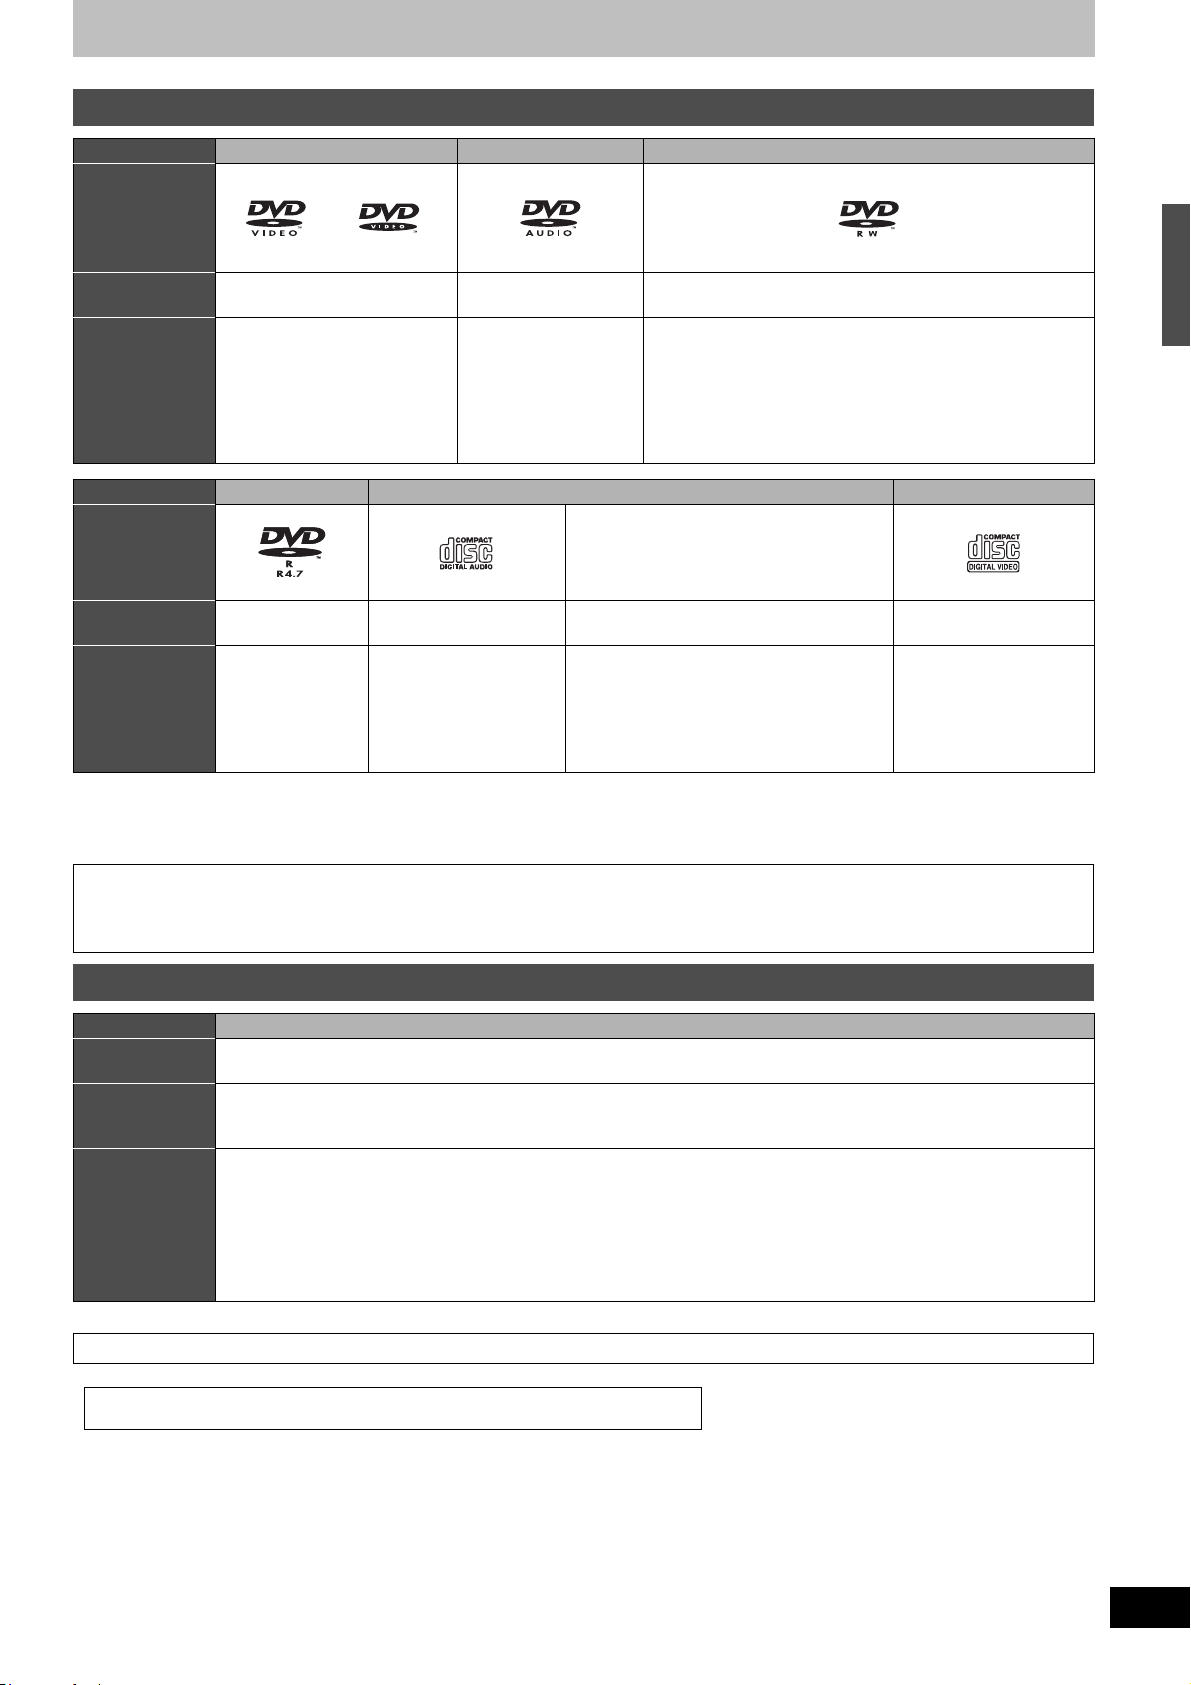
HDD, disc and card information
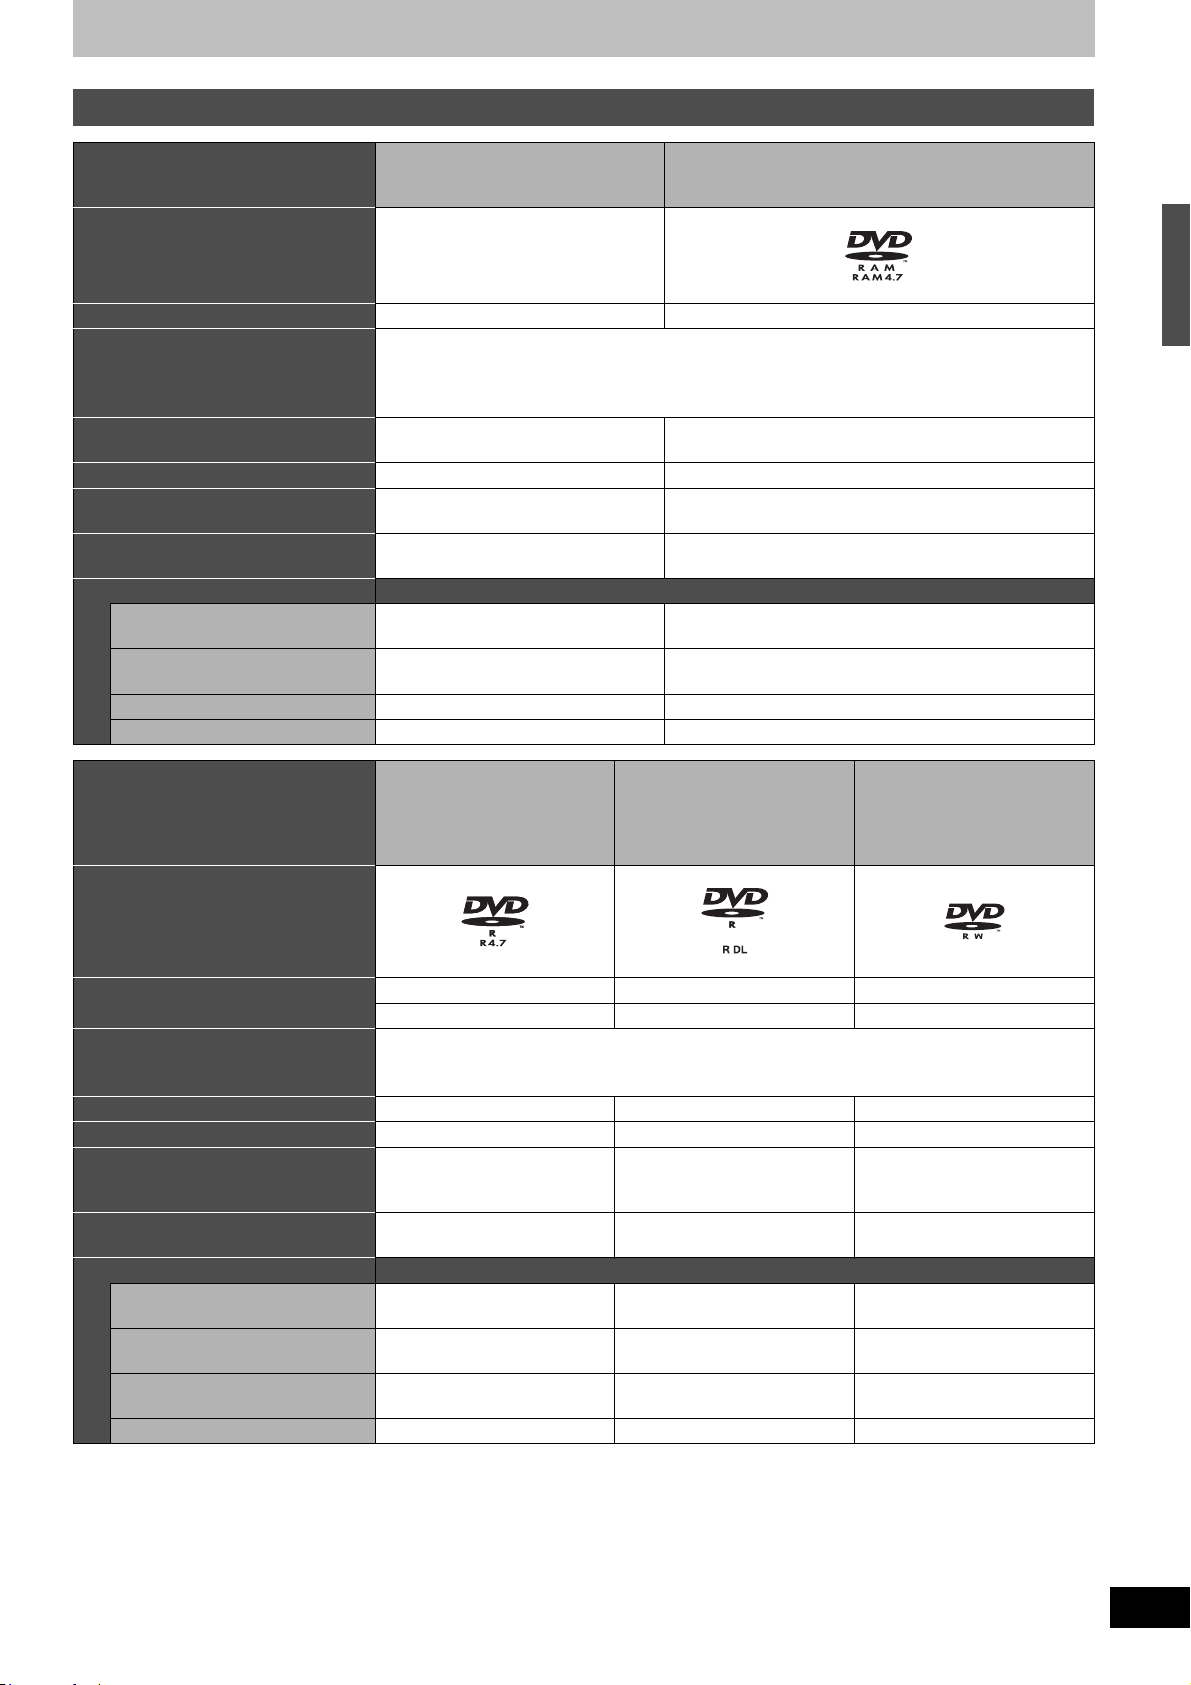
HDD and discs you can use for recording and play
DVD-RAM
≥4.7 GB/9.4 GB, 12 cm (5z)
≥2.8 GB, 8 cm (3z)
Disc type
Hard disk drive (HDD)
≥80 GB
Logo –
Indicated in these instructions with [HDD] [RAM]
DVD Video Recording format
Recording format
Data that can be recorded and played
Re-writable
Play on other players
Usable high speed recording disc
type
¢1
¢2
¢3
What you can do on this unit
Recording broadcasts that allow one
copy
Recording both Main and SAP for
MTS broadcast
¢4
Recording 16:9 aspect picture
Creating and editing playlists Yes Yes
This is a recording method which allows you to record and edit television broadcasts and so on.
≥You can delete unwanted parts of a title, create playlists, etc.
≥Digital broadcasts that allow “One time only recording” can be recorded to a CPRM compatible disc.
Video
Still pictures
Video
Still pictures
Yes Yes
– Only on DVD-RAM compatible players
(It is not possible to finalize the disc.)
– Up to 5X recording speed discs
Yes Yes [CPRM (l 93) compatible discs only]
¢5
Yes
¢4
Yes
¢5
Yes
Yes
Table of contents/HDD, disc and card information
¢5
¢5
DVD-R DL
Disc type
DVD-R
≥4.7 GB, 12 cm (5z)
≥1.4 GB, 8 cm (3z)
(dual layer on single side)
≥You cannot directly record to
a DVD-R DL disc on this unit
DVD-RW
≥4.7 GB, 12 cm (5z)
≥1.4 GB, 8 cm (3z)
(l 9)
Logo
Indicated in these instructions with
[-R] before finalization [-R[DL] before finalization [-RW‹V›] before finalization
[DVD-V] after finalization [DVD-V] after finalization [DVD-V] after finalization
DVD-Video format
Recording format
Data that can be recorded and played Video Video Video
Re-writable
Play on other players
Usable high speed recording disc
type
¢1
¢2
¢3
What you can do on this unit
Recording broadcasts that allow one
copy
Recording both Main and SAP for
MTS broadcast
¢4
Recording 16:9 aspect picture
Creating and editing playlists No No No
This recording method is the same as commercially available DVD-Video.
≥Digital broadcasts that allow “One time only recording” cannot be recorded.
No No Yes
Only after finalizing the disc.
(l 72, 93)
Only on DVD-R DL compatible
players after finalizing the disc.
(l 72, 93)
Only after finalizing the disc.
(l 72, 93)
Up to 16X recording speed discs Up to 4X recording speed discs Up to 6X recording speed discs
No No No
No [Only one is recorded. l 76,
Multi-channel TV Sound (MTS)]
¢4
No (The picture is recorded in
4:3 aspect.)
No [Only one is recorded. l 76,
Multi-channel TV Sound (MTS)]
No (The picture is recorded in
4:3 aspect.)
No [Only one is recorded. l 76,
Multi-channel TV Sound (MTS)]
No (The picture is recorded in
4:3 aspect.)
(continued on the next page)
5
RQT8346
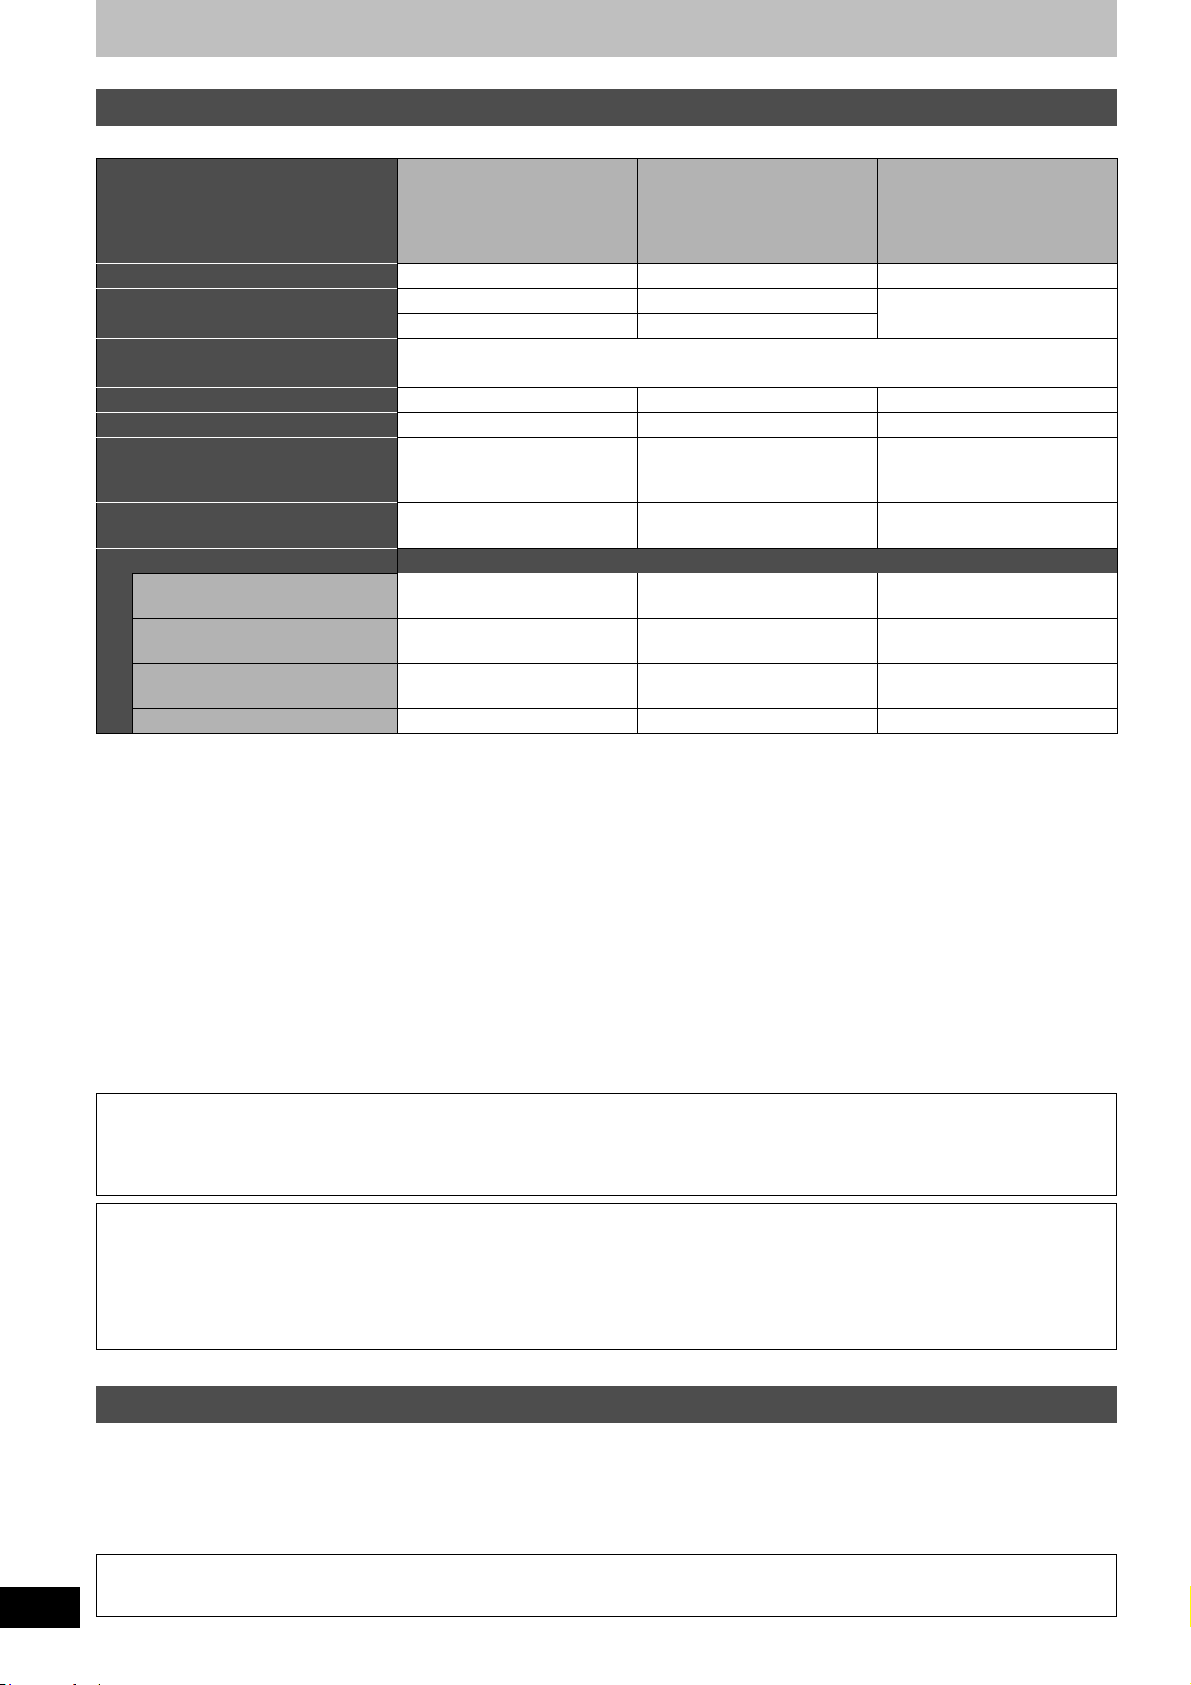
HDD, disc and card information
HDD and discs you can use for recording and play
(continued)
(double layer on single side)
≥You cannot directly record to
a +R DL disc on this unit
Disc type
¢6
rR
≥4.7 GB, 12 cm (5z)
(l 9)
Logo –––
Indicated in these instructions with
[+R] before finalization [+R[DL] before finalization
[DVD-V] after finalization [DVD-V] after finalization
Recording format
≥Digital broadcasts that allow “One time only recording” cannot be recorded.
Data that can be recorded and played Video Video Video
Re-writable
Play on other players
Usable high speed recording disc
type
¢1
¢2
¢3
Only after finalizing the disc.
Up to 16X recording speed discs Up to 2.4X recording speed
No No Yes
Only on +R DL compatible
(l 72, 93)
players after finalizing the disc.
What you can do on this unit
Recording broadcasts that allow one
copy
Recording both Main and SAP for
MTS broadcast
Recording 16:9 aspect picture
¢4
¢4
No [Only one is recorded. l 76,
Multi-channel TV Sound (MTS)]
No (The picture is recorded in
No No No
No [Only one is recorded. l 76,
Multi-channel TV Sound (MTS)]
No (The picture is recorded in
4:3 aspect.)
Creating and editing playlists No No No
¢1 The amount of the recordable disc space doesn’t increase even if the program is deleted when you use one time recording disc.
(l 28, Recording modes and approximate recording times)
¢2 [RAM] Can be played on Panasonic DVD recorders and DVD-RAM compatible DVD players.
If you play a DVD-R DL or +R DL, use compatible equipment.
¢3 The high-speed recording discs listed here are compatible with this unit. However, this is not the copy speed.
¢4 For further information (l 9, Important notes for recording)
¢5 When “
¢6
Recording for High-Speed Copying
+R discs recorded with this unit and +R discs recorded with another Panasonic DVD recorder may be incompatible. However, discs that are
” is set to “Off” (l 75).
(The default setting is “On”.)
finalized are compatible and can be played.
¢7 You can play 8X recording speed discs recorded on another equipment.
We recommend using Panasonic discs and cards. We also recommend using DVD-RAM discs with cartridges to protect them from scratches and dirt.
≥
≥
You may not be able to record depending on the condition of the discs and you may not be able to play them due to the condition of the recording.
≥You cannot record programs that allow “One time only recording” to CPRM compatible DVD-R and DVD-RW on this unit. You can record other
programs as DVD-Video format.
Note
When “Recording for High-Speed Copying” is set to “On”, the restrictions on secondary audio recording etc. are also applied to DVD-RAM. Turn
≥
this setting “Off” if high speed copy to DVD-R, etc. is not necessary when recording a program (
Finalize
A process that makes playing recorded disc possible on equipment that can play such media. After finalizing, the disc becomes play-only and
you can no longer record or edit. (l 72)
Formatting
Formatting is the process of making a disc (such as DVD-RAM, etc.) recordable on recording equipment. (l 71)
You cannot directly record to a DVD-R DL and +R DL discs on this unit.
Record to the HDD and then copy to the disc.
When playing DVD-R DL (Dual Layer, single-sided) and +R DL (Double Layer, single-sided)
DVD-R DL (Dual Layer, single-sided) and +R DL (Double Layer, single-sided) discs have two writable layers on one side. If there is not enough
space on the first layer to record a program, the remaining portion of the program is recorded on the second layer. When playing a title recorded
on both layers, the unit automatically switches between layers and plays the title in the same way as a normal program. However, video and
audio may momentarily cut out when the unit is switching layers.
∫ Recording modes and approximate recording times l 28
rR DL
rVR format
(l 72, 93)
discs
4:3 aspect.)
l
75). (The default setting is “On”.)
rRW
[+RW]
Ye s
(It is not possible to finalize the
disc.)
Up to 4X recording speed
discs
¢7
No [Only one is recorded. l 76,
Multi-channel TV Sound (MTS)]
No (The picture is recorded in
4:3 aspect.)
6
RQT8346
Discs that cannot be played
≥2.6/5.2 GB DVD-RAM, 12 cm (5z)
≥3.95/4.7 GB DVD-R for Authoring
≥DVD-R recorded in DVD Video Recording format
≥DVD-R (DVD-Video format), DVD-R DL, DVD-RW (DVD-Video
format), +R, +R DL recorded on another unit and not finalized
(l 72, Finalize)
Note about using a DualDisc
≥The digital audio content side of a DualDisc does not meet the technical specifications of the Compact Disc Digital Audio (CD-DA) format so
play may not be possible.
≥PAL discs (you can still play the audio on DVD-Audio)
≥DVD-Video with a region number other than “1” or “ALL”
≥Blu-ray
≥DVD-ROM, +R 8 cm (3z), CD-ROM, CDV, CD-G, Photo CD, CVD,
SVCD, SACD, MV-Disc, PD, etc.
Play-only discs [12 cm (5z)/8 cm (3z)]
Disc type DVD-Video DVD-Audio DVD-RW (DVD Video Recording format)
Logo
Indicated in these
instructions with
Instructions High quality movie and music
discs
[DVD-V] [DVD-A] [-RW‹VR›]
High fidelity music discs
≥Played on this unit in
2 channels
DVD-RW
≥You can play programs that allow “One time only recording” if
¢
recorded on another DVD Recorder
they have been recorded to a CPRM compatible disc.
≥By formatting (l 71) the disc, you can record to it in
DVD-Video format and play it on this unit.
≥It may be necessary to finalize the disc on the equipment
used for recording.
Disc type DVD-R CD Video CD
Logo –
Indicated in these
instructions with
Instructions
DivX [CD] DivX, MP3 and JPEG/TIFF [VCD]
¢
≥DVD-R
with
video recorded in
DivX
Recorded audio and music
(including CD-R/RW
¢
)
¢
≥CD-R
and CD-RW¢ with video recorded in
DivX
¢
≥CD-R
and CD-RW¢ with music recorded in
MP3 (l 44)
¢
and CD-RW¢ with still pictures
≥CD-R
Recorded music and video
(including CD-R/RW
¢
)
recorded in JPEG and TIFF
¢ Close the session after recording. Play may be impossible on some discs due to the condition of the recording.
≥The producer of the disc can control how discs are played. So you may not always be able to control play as described in these operating
instructions. Read the disc’s instructions carefully.
≥Operation and sound quality of CDs that do not conform to CD-DA specifications (copy control CDs, etc.) cannot be guaranteed.
Regarding DVD-Audio
Some manufacturers do not allow down-mixing, therefore some multi-channel DVD-Audio will prevent down-mixing (l 93) of all or part of their
contents. Tracks that are prevented from being down-mixed will not play properly on this unit (e.g. audio is played from the front two channels
only). Refer to the disc’s jacket for more information.
HDD, disc and card information
Cards you can use on this unit
Type SD Memory Card/miniSDTM Card¢/MultiMediaCard
Indicated in these
instructions with
Data that can be
recorded and
played
Instructions You can insert directly into the SD card slot.
¢ A miniSD
TM
card adaptor included with the miniSDTM card is necessary.
≥You can play and copy still pictures taken on a digital camera, etc. (l 43, 66).
≥You can set the DPOF (Digital Print Order Format) for automatic printing on your home printer or at a photo developing
store (l 55, 93).
≥MPEG2 moving pictures shot with a Panasonic SD Video camera, etc. can be copied to the HDD or DVD-RAM. (l 63)
≥MPEG2 moving pictures cannot be played directly from the SD card.
Compatible with: FAT12 or FAT16
Suitable SD Memory Cards
≥You can use SD Memory Cards with the following capacities (from 8 MB to 2 GB).
8 MB, 16 MB, 32 MB, 64 MB,
128 MB, 256 MB, 512 MB, 1 GB, 2 GB (Maximum)
≥Useable memory is slightly less than the card capacity.
≥Please confirm the latest information on the following website.
http://panasonic.co.jp/pavc/global/cs
(This site is in English only.)
≥If the SD Memory Card is formatted on other equipment, the time spent for recording may become longer. Also if the SD Memory Card is
formatted on a PC, you may not be able to use it on this unit.
In these cases, format the card on this unit (l 71,
≥This unit supports SD Memory Cards formatted in FAT12 system and FAT16 system based on SD Memory Card Specifications.
≥We recommend using a Panasonic SD card.
93
).
[SD]
Still pictures
Video (MPEG2)
7
RQT8346
HDD, disc and card information
[RAM] [CD] [SD]
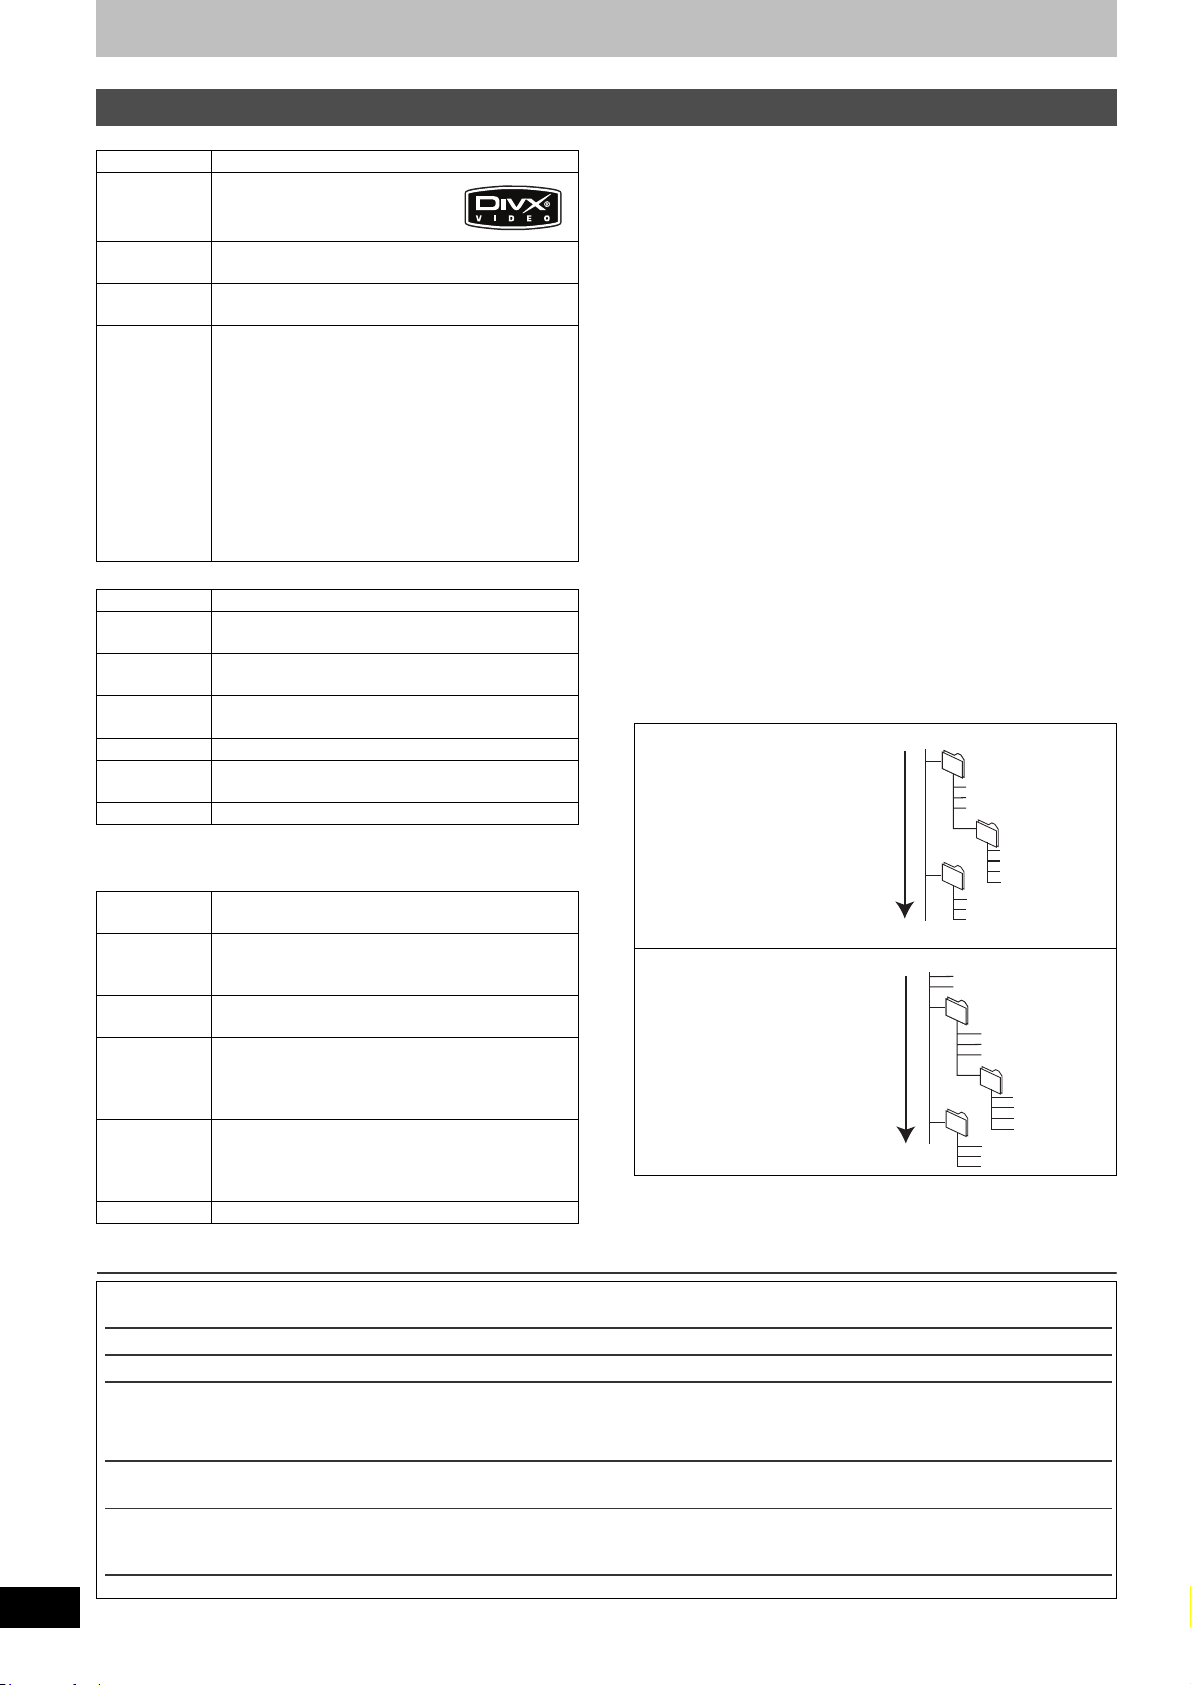
Regarding DivX discs, MP3 discs and still pictures (JPEG, TIFF)
DivX
Playable discs [-R] [CD]
File format DivX
≥Files must have the extension
“.DIVX”, “.divx”, “.AVI” or “.avi”.
Number of
folders
Number of files
Maximum number of folders recognizable: 300
folders (including the root folder)
Maximum number of DivX files recognizable¢1:
200 files
Support
version
DivX ver.3.11, 4.x, 5.x
≥Video
- Number of stream: Up to 1
- Codec: DIV3, DIV4, DIVX, DV50
- Picture size: 32k32 to 720k576
- FPS (Frame Per Second): Up to 30 fps
≥Audio
- Number of stream: Up to 8
- Format: MP3, MPEG, AC3
- Multi channel: AC3 is possible. MPEG multi is
2 ch conversion.
GMC (Global Motion Compensation) is not supported.
MP3
Playable discs [CD]
File format MP3
≥Files must have the extension “.mp3” or “.MP3”.
Number of
folders (groups)
Number of
files (tracks)
Maximum number of folders (groups) recognizable:
99 folders (groups) (including the root folder)
Maximum number of files (tracks) recognizable
¢1
999 files (tracks)
Bit rates 32 kbps to 320 kbps
Sampling
16 kHz/22.05 kHz/24 kHz/32 kHz/44.1 kHz/48 kHz
frequency
ID3 tags not compatible
≥If there is a large amount of still picture data etc. within a MP3 file,
play may not be possible.
Still pictures (JPEG, TIFF
Playable discs
[HDD] [RAM] [SD] [CD]
¢2
)
and cards
File format
JPEG, TIFF (non-compressed RGB chunky format)
≥Files must have the extension “.jpg”, “.JPG”, “.tif”
or “.TIF”.
Number of
pixels
Number of
folders
between 34k34 and 6144k4096 pixels
(Sub sampling is 4:2:2 or 4:2:0)
[CD] Maximum number of folders recognizable:99
folders (including the root folder)
[HDD] [RAM] [SD] This unit can handle a maximum
of 300 folders (including higher folders)
¢
Number of
files
[CD]
Maximum number of files recognizable
files
1
:999
[HDD] [RAM] [SD] This unit can handle a maximum
of 3000 files
MOTION JPEG
not compatible
¢1 Total number of recognizable file including MP3, JPEG, DivX
and other type of files is 4000.
:
¢2 Operation may take time to complete when playing TIFF format
still pictures, or when there are many files and/or folders, some
files may not display or be playable.
[CD]
≥Compatible formats: ISO9660 level 1 or 2 (except for extended
formats), Joliet
≥This unit is compatible with multi-session but reading or play of the
disc may take time if there are a lot of sessions.
≥Operation may take time to complete when there are many files
(tracks) and/or folders (groups) and some files (tracks) may not
display or be playable.
≥English alphabet and Arabic numerals are displayed correctly.
Other characters may not be displayed correctly.
≥The display order on this unit may differ from how the order is
displayed on a computer.
Depending on how you create the disc (writing software), files (tracks)
≥
and folders (groups) may not play in the order you numbered them.
≥This unit is not compatible with packet-write format.
≥Depending on the recording conditions, the disc may not play.
[HDD] [RAM] [SD]
≥Compatible formats: DCF
digital camera, etc.)
¢3 Design rule for Camera File system: unified standard
established by Japan Electronics and Information Technology
Industries Association (JEITA).
You can play MP3 and still pictures (JPEG/TIFF) on this unit by
making folders as shown below. However depending on how
you create the disc (writing software), play may not be in the
order you numbered the folders.
[CD]
Structure of MP3 folders
Prefix with 3-digit numbers
in the order you want to play
them.
Structures of still pictures
Files inside a folder are
displayed in the order they
were updated or taken.
≥[CD] When the highest
level folders are “DCIM”
folders, they are displayed
first on the tree.
¢3
compliant (Content recorded on a
Root
Order of play
Root
Order of play
001
003 group
P0000001.jpg
P0000002.jpg
001
004 folder
(folder=group)
001
001track.mp3
002track.mp3
003track.mp3
002 group
001track.mp3
002track.mp3
003track.mp3
004track.mp3
001track.mp3
002track.mp3
003track.mp3
002 folder
P0000003.jpg
P0000004.jpg
P0000005.jpg
003 folder
P0000010.jpg
P0000011.jpg
P0000012.jpg
(file=track)
P0000006.jpg
P0000007.jpg
P0000008.jpg
P0000009.jpg
8
RQT8346
Manufactured under license from Dolby Laboratories.
“Dolby” and the double-D symbol are trademarks of Dolby Laboratories.
“DTS” and “DTS 2.0 i Digital Out” are trademarks of Digital Theater Systems, Inc.
U.S. patent Nos. 4,631,603, 4,577,216, 4,819,098 and 4,907,093.
Official DivX Certified
®
Plays DivX
5, DivX
TM
®
4, DivX
product.
®
3, and DivX® VOD video content (in compliance with DivX Certified™ technical requirements).
DivX, DivX Certified, and associated logos are trademarks of DivXNetworks, Inc. and are used under license.
≥SD logo is a trademark.
≥Portions of this product are protected under copyright law and are provided under license by ARIS/SOLANA/4C.
This product incorporates copyright protection technology that is protected by U.S. patents and other intellectual property rights. Use of this
copyright protection technology must be authorized by Macrovision, and is intended for home and other limited consumer uses only unless
otherwise authorized by Macrovision. Reverse engineering or disassembly is prohibited.
HDMI, the HDMI logo and High-Definition Multimedia Interface are trademarks or registered trademarks of HDMI Licensing LLC.
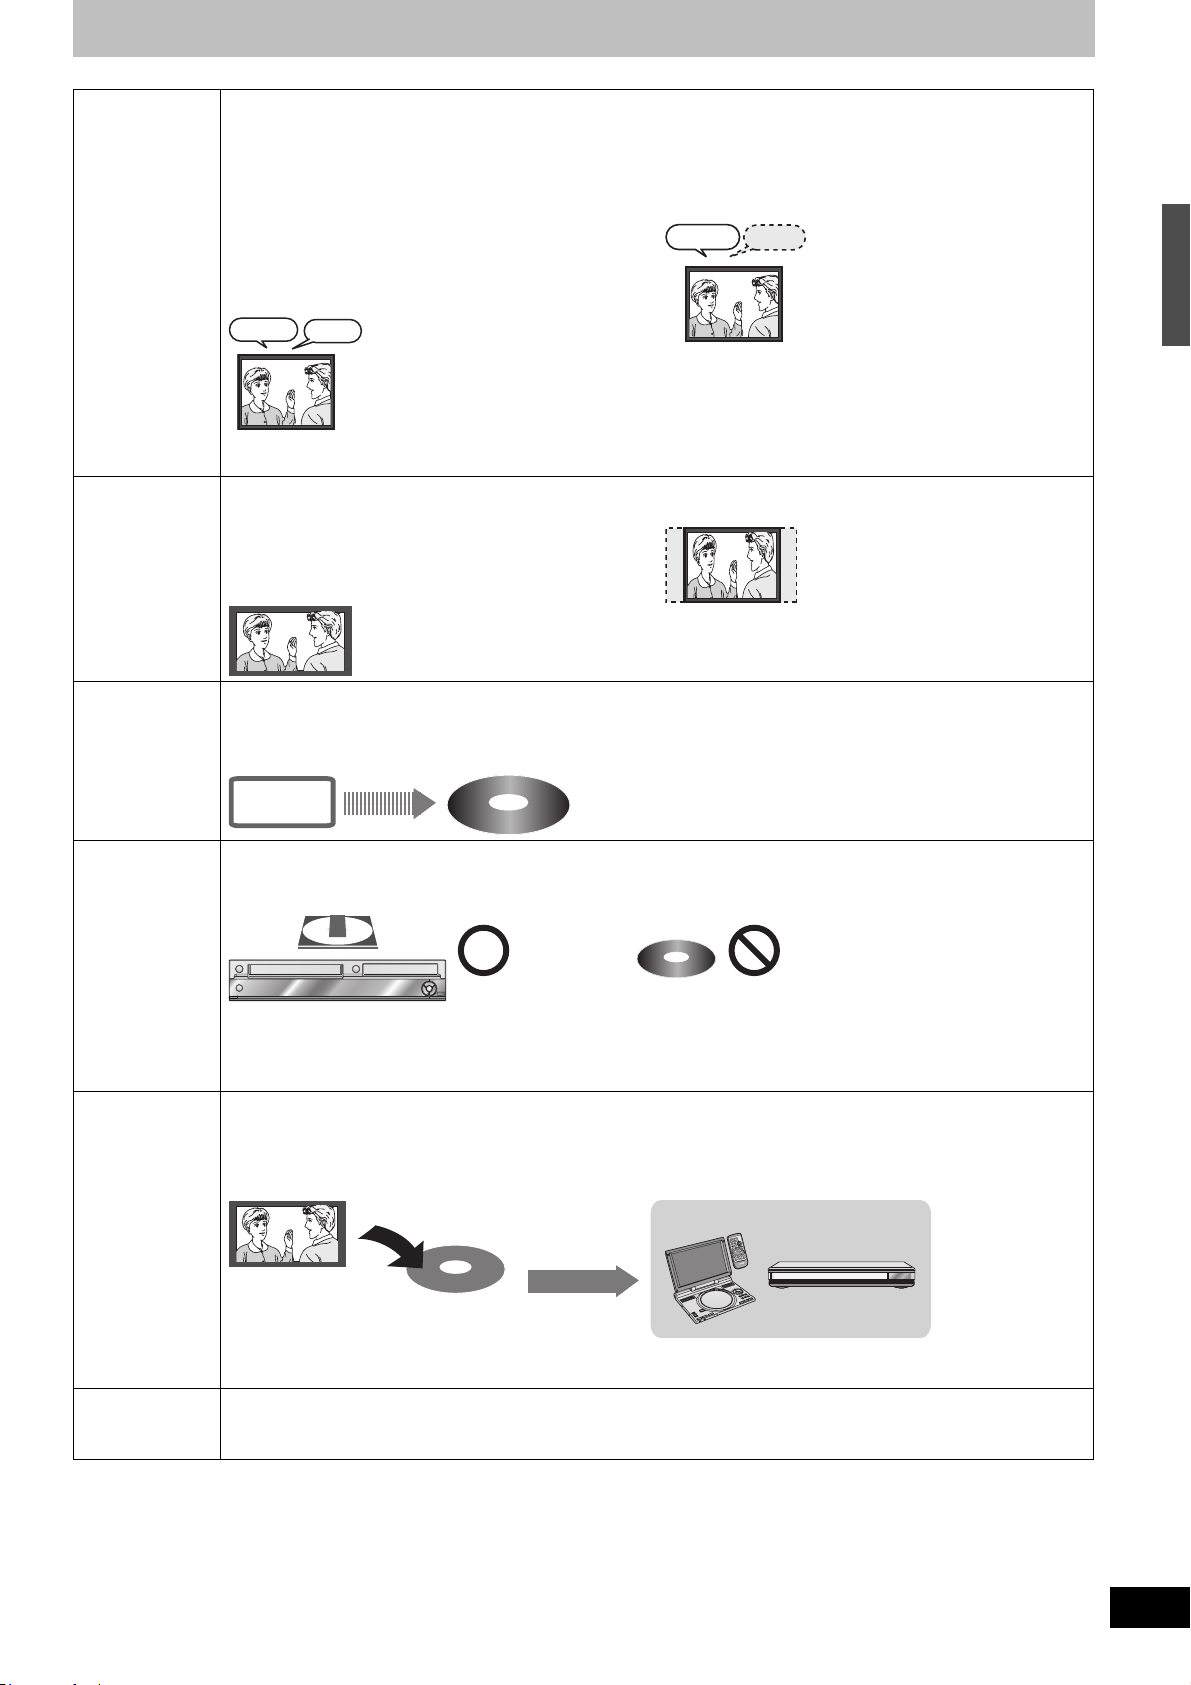
Important notes for recording
Recording of
MTS
broadcasting
Recording of
Widescreen
broadcasting
[HDD] [RAM]
Both Main and SAP audio can be recorded.
You can change the audio during playback. (l 42,
Changing audio during play)
However in the following cases, select whether to record the
Main or SAP audio:
- Recording or copying sound in LPCM (l 76, Audio for
XP Recording)
- “Recording for High-Speed Copying” is set to “On”
(The default setting is “On”.l 75)
Main
Hello
SAP
Hola
≥If you record from external equipment
- Select both “Main” and “SAP” on the external equipment.
[HDD] [RAM]
Recorded in 16:9 aspect (Widescreen)
¢
¢ When “Recording for High-Speed Copying” is set to “Off”
≥When “Recording for High-Speed Copying” is set to “On”,
16:9 aspect programs are recorded in 4:3 aspect.
(The default setting is “On”.l 75)
[-R] [-R[DL] [-RW‹V›] [+R] [+R[DL] [+RW]
Select the Main or SAP audio before recording or
copying
[l 76, Multi-channel TV Sound (MTS)]
The selected audio only is recorded or copied.
Main
Hello
≥If you record from external equipment
- Select “Main” or “SAP” on the external equipment.
[-R] [-R[DL] [-RW‹V›] [+R] [+R[DL] [+RW]
Recorded or copied in 4:3 aspect
HDD, disc and card information/Important notes for recording
Copying titles
in high speed
mode from the
HDD to DVD-R,
etc.
Recording of
digital
broadcasting
Playing the disc
on other DVD
players
Set “Recording for High-Speed Copying” to “On” before recording to the HDD (l 75).
(The default setting is “On”.)
You can copy titles in high speed mode (l 57); however, the above settings are necessary before recording to the HDD.
Record to the HDD
HDD
High speed copy to DVD-R, etc.
It is not possible to record digital broadcasts that allow “One time only recording” onto DVD-R, DVD-RW, +R, +RW or
8 cm (3z) DVD-RAM discs. Use the HDD or CPRM (l 93) compatible DVD-RAM.
[HDD] [RAM] CPRM compatible discs only.
[-R] [-RW‹V›] [+R] [+RW]
≥“One time only recording” titles can only be transferred from the HDD to CPRM compatible DVD-RAM (They are deleted
from the HDD). They cannot be copied.
≥Even when copying to videotape the title may not be copied correctly because of the copy guard.
≥You cannot copy a playlist created from “One time only recording” titles.
[-R] [-R[DL] [-RW‹V›] [+R] [+R[DL]
The disc must be finalized after recording or copying (l 72).
It is necessary to finalize DVD-R, etc. on this unit after recording or copying titles to them. You can then play them as a
commercially sold DVD-Video. However, the discs become play-only and you can no longer record or copy.
¢
¢ You can record and copy again if you format DVD-RW.
Record to DVD-R, etc.
Finalize
Play on other DVD equipment
E
D
O
M
Y
A
L
P
P
U
T
E
S
Í
1
;
∫
Y
A
L
P
S
I
D
U
N
E
M
P
O
T
N
R
U
B
T
U
E
S
R
U
E
N
L
E
T
I
M
T
E
L
G
N
A
O
I
D
U
A
D
N
U
O
R
L
R
E
U
C
S
.
N
A
A
C
23
1
0
1
S
6
5
4
0
89
7
9
:
E
M
5
U
L
O
V
6
E
r
G
A
P
UP
s
O
R
G
G
H
C
1
2 3 4 5
Í /I Í
CD SEQUENTIAL
DOUBLE RE-MASTER
H
C
R
A
E
S
R
E
T
N
E
L
O
V
Y
A
L
P
S
I
D
U
N
E
M
P
O
T
N
R
U
T
E
R
N
O
U
N
E
M
F
F
D
C
I
N
9
V
O
N
E
P
O
D
N
U
O
R
R
T
A
SU
.
E
A
P
E
E
R
D
O
M
R
O
T
I
N
O
M
E
D
O
M
E
R
U
T
C
I
P
;∫1:/65/9
DISC
DISC EXCHANGE DISC SKIP<OPEN/CLOSE
[+RW]
We recommend you create the menu before playing a +RW. (l 72, Creating Top Menu—Create DVD Top Menu)
Recording to
DVD-R DL and
You cannot directly record to DVD-R DL and +R DL discs on this unit.
Record to the HDD and then copy to the disc.
+R DL
≥It is not possible to record to two drives simultaneously.
≥It is not possible to record continuously from one side of a double sided disc to the other. You will need to eject the disc and turn it over.
9
RQT8346
HDD (Hard disk drive) handling care
The HDD is a high precision recording instrument and because of its long recording capability and high speed operation it is a very special device
that is easily susceptible to damage.
As a basic rule, save important content to a disc as backup.
∫ The HDD is a device that is not built to withstand vibration/shock or dust
Depending on the setup environment and handling of the HDD some content may become damaged and play and recording may no longer be
possible. Especially during operation, do not subject the unit to any vibration, shock, or remove the AC power plug from the household AC outlet.
In the event of a power failure during recording or play, the content may be damaged.
∫ The HDD is a temporary storage device
The HDD is not an everlasting storage device for recorded content. Use the HDD as a temporary storage place for one-off viewing, editing, or
saving recorded content to a disc.
∫ Immediately save (backup) all content as soon as you feel there may be a problem with the HDD
If there is an irregularity within the HDD, repetitive strange sounds or problems with picture (block noise, etc.) may result. Using the HDD in this
condition may worsen the problem and in the worst case the HDD may no longer become usable. As soon as you notice this type of problem,
copy all content to disc and request service. Recorded content (data) on an HDD that has become unusable is unrecoverable.
≥When the HDD has been automatically placed in the SLEEP mode (l below), or the unit is turned on or off, there may be an unexpected sound.
This does not indicate a problem with this unit.
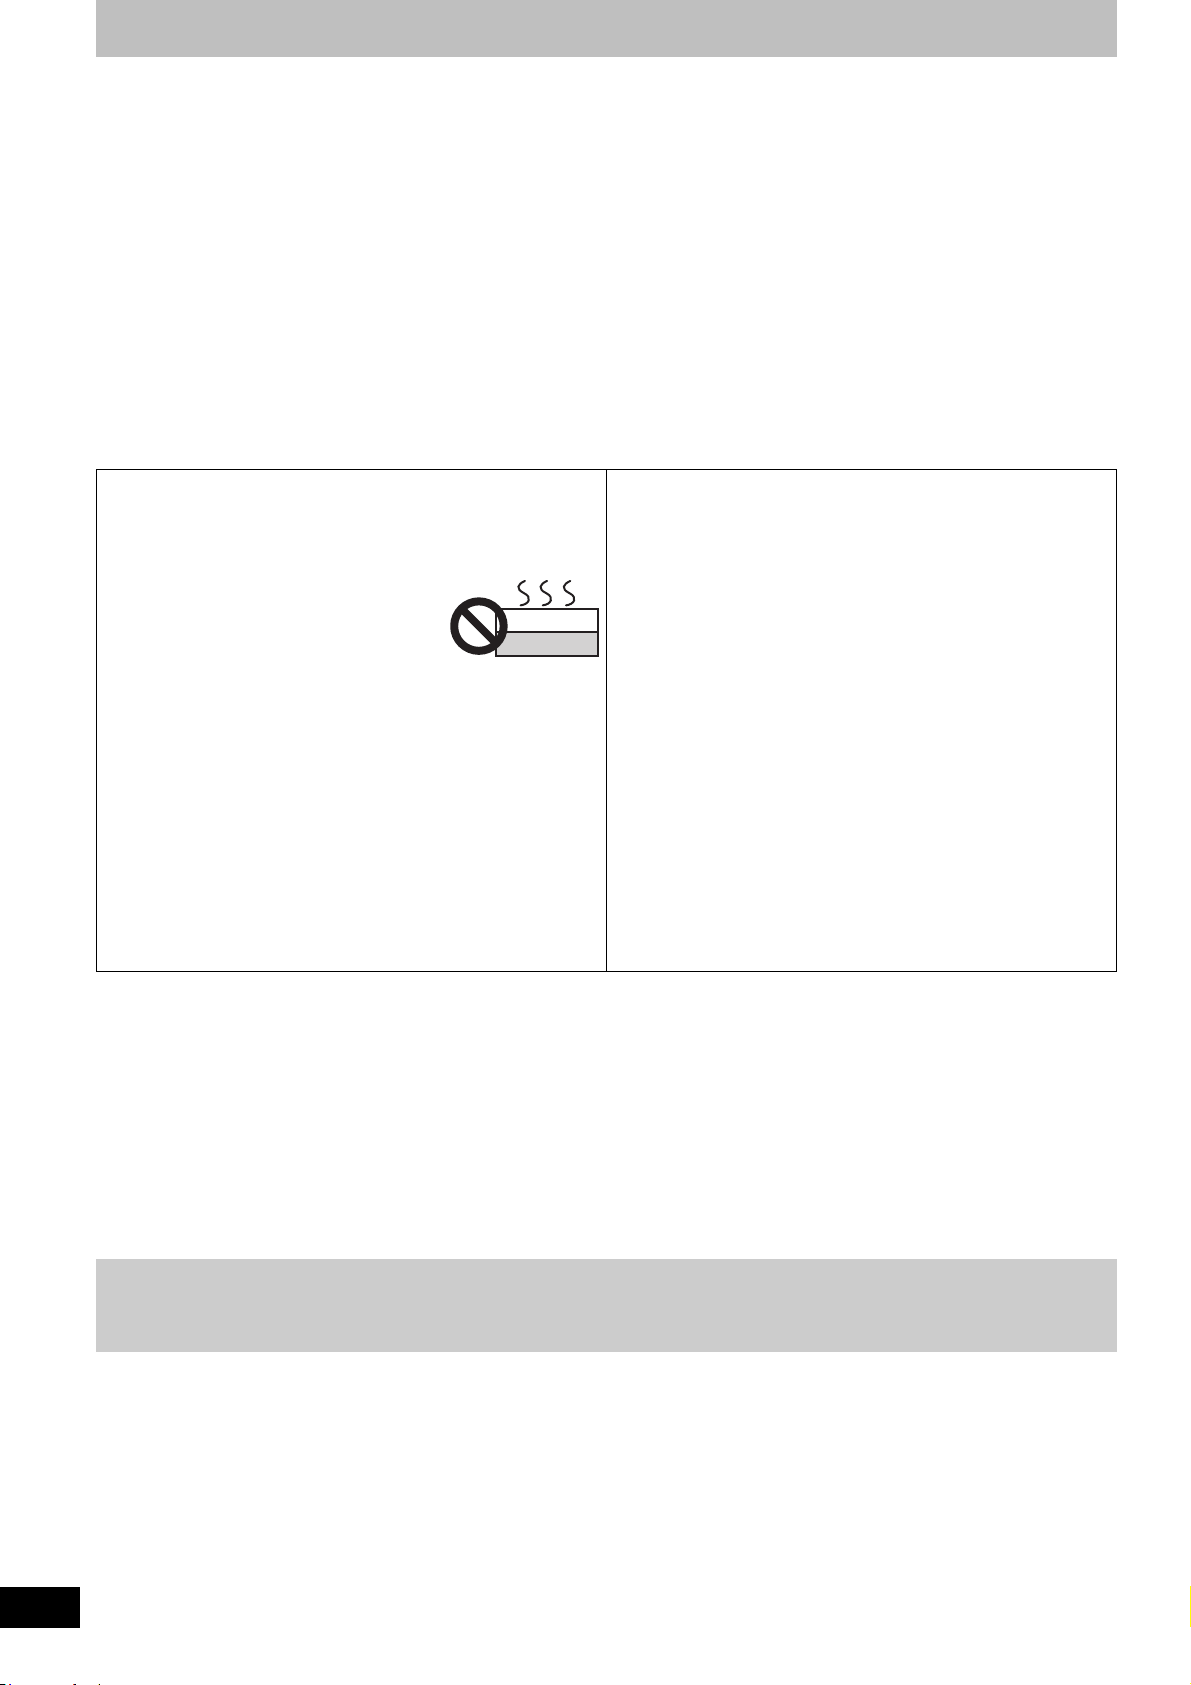
∫ Setup precautions
≥Do not place in an enclosed area where the rear cooling fan and
the cooling vents on the side are covered up.
≥Place the unit on a surface that is flat and not subject to
vibration or impact.
≥Do not place on anything that generates
heat like a video cassette recorder, etc.
≥Do not place in an area often subject to
temperature changes.
≥Place in an area where condensation does not
occur. Condensation is a phenomenon where moisture forms on a
cold surface when there is an extreme change in temperature.
Condensation may cause internal damage to the unit.
≥Conditions where condensation may occur
- When there is an extreme change in temperature (moving from a
very hot location to a very cold location, or vice versa, or when
subjected to an air conditioner or when cooled air directly impacts
the unit.) When the HDD (warms during operation) is subjected to
cold air, condensation may form on the inside of the HDD and may
cause damage to the HDD heads, etc.
- When there is high humidity or a lot of steam in the room.
- During the rainy season.
In the above situation, without turning the unit on, let the unit adjust
to the room temperature and wait 2–3 hours until condensation is gone.
This unit
VCR
∫ Cigarette smoke, etc. causes malfunction or
breakdown
The unit may breakdown if cigarette smoke or bug spray/vapor, etc.
gets inside the unit.
∫ While operating
≥Do not move the unit or subject to vibration or impact. (The HDD may
become damaged.)
≥Do not remove the AC power plug from the household AC outlet, or
flip the power breaker switch.
While the unit is on, the HDD is rotating at high speed. Sound or
movement due to rotation is normal.
∫ When moving the unit
1 Turn the unit off. (Wait until “BYE” disappears from the display.)
2 Remove the AC power plug from the household AC outlet.
3 Move only after the unit has come to a complete stop (approx. 2
minutes) in order to avoid subjecting to vibration and shock. (Even
after turning the unit off, the HDD continues operating for a short
time.)
∫ HDD recording time remaining
This unit records using a VBR (Variable bit rate) data compression system to vary recorded data segments to match video data segments which
may cause differences in the displayed amount of time and space remaining for recording.
If the remaining amount of time is insufficient, delete any unwanted titles to create enough space before you start recording. (Deleting a playlist
will not increase the amount of time.)
10
RQT8346
∫
When “SLEEP” appears in the display
The HDD has been automatically placed in the SLEEP mode. (The HDD continues to rotate at high speed while the unit is on. In order to extend
the life of the HDD, the HDD will be placed in the SLEEP mode if no operation has been performed for 30 minutes while there is no disc on the
disc tray.)
≥While in SLEEP mode play or recording may not begin right away because the HDD takes time to be re-activated.
≥When not using the unit, we recommend removing the disc in the tray in order to set the HDD to the SLEEP mode.
∫ Indemnity concerning recorded content
Panasonic does not accept any responsibility for damages directly or indirectly due to any type of problems that result in loss of recording or
edited content (data), and does not guarantee any content if recording or editing does not work properly. Likewise, the above also applies in a
case where any type of repair is made to the unit (including any other non-HDD related component).
Unit care
The precision parts in the unit are readily affected by the
environment, especially temperature, humidity, and dust.
Cigarette smoke also can cause malfunction or breakdown.
To clean the unit, wipe with a soft, dry cloth.
≥Never use alcohol, thinner or benzine to clean the unit.
≥Before using chemically treated cloth, carefully read the
instructions that came with the cloth.
Observe the following points to ensure continued listening and
viewing pleasure.
Dust and dirt may adhere to the unit’s lens over time, making it
impossible to record or play discs.
Use the DVD lens cleaner (RP-CL720PP) about once every year,
depending on frequency of use and the operating environment.
Carefully read the lens cleaner’s instructions before use.
Disc and card handling
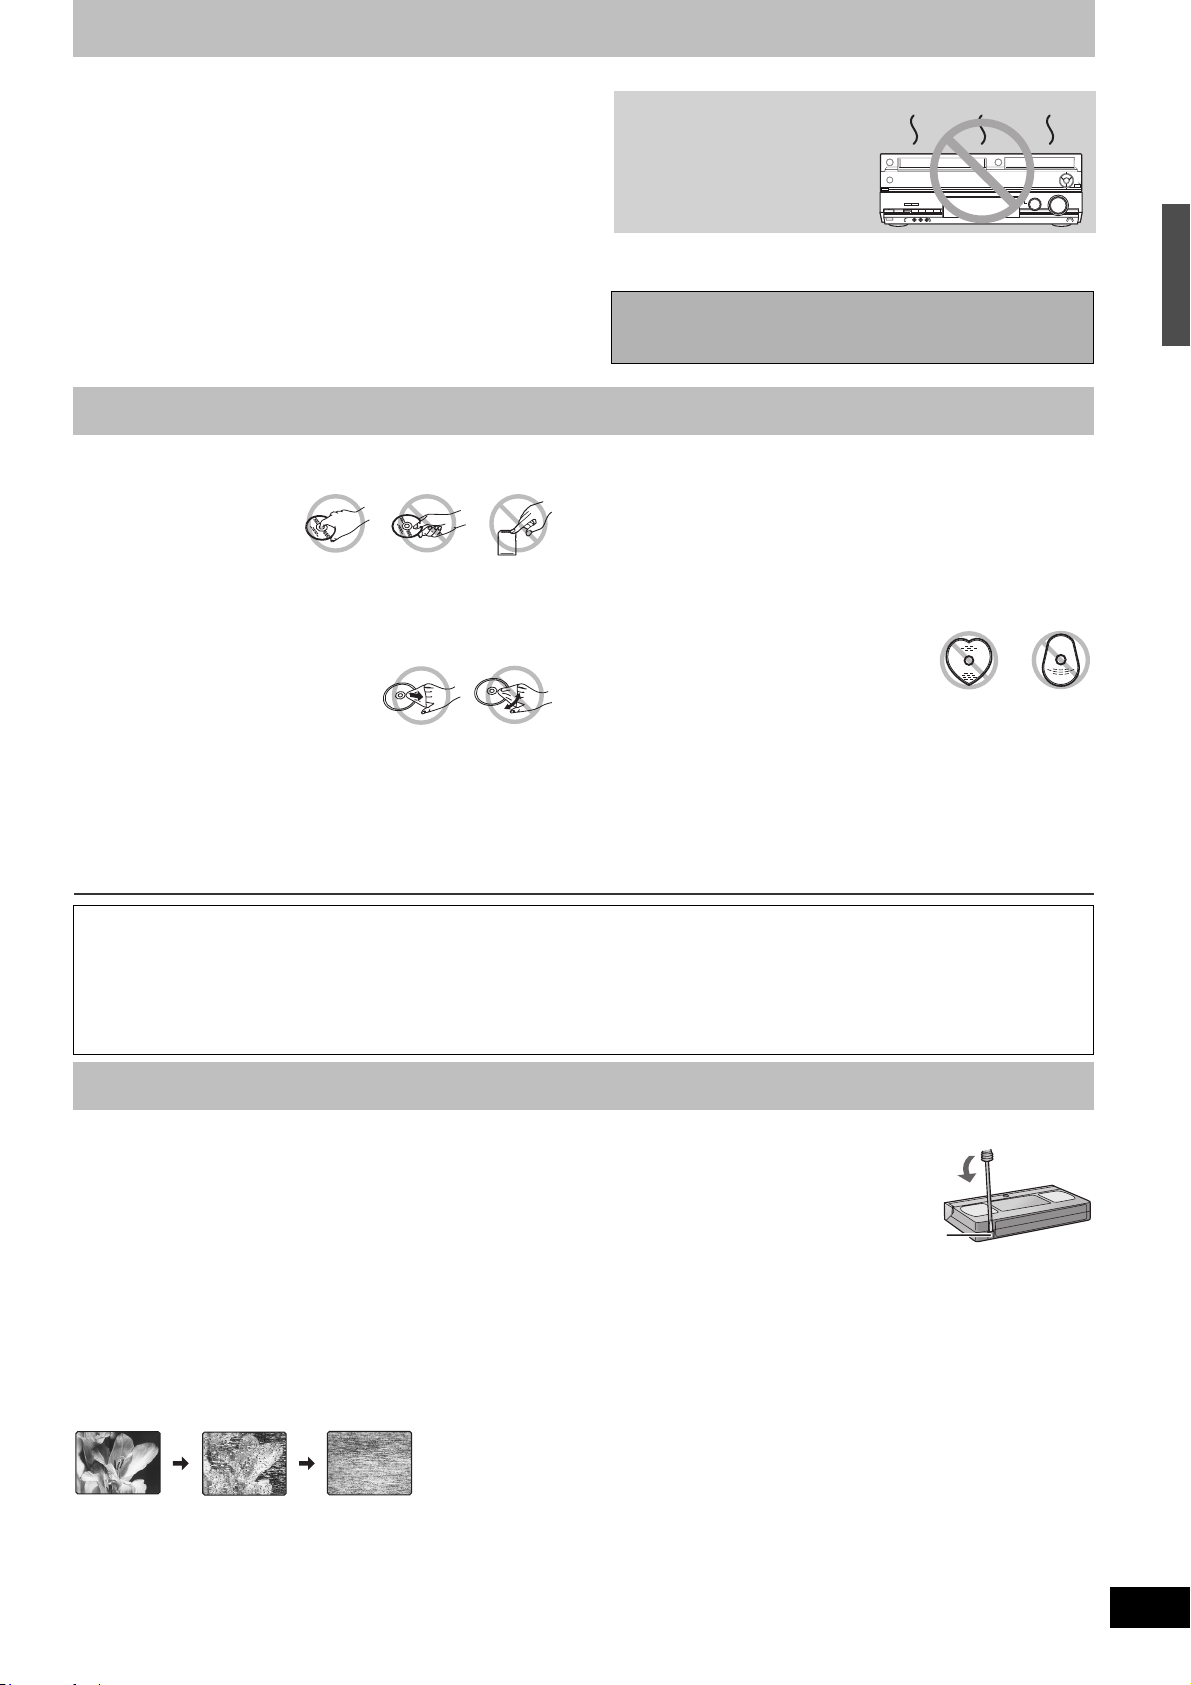
Do not place the unit on
amplifiers or equipment
that may become hot.
The heat can damage the unit.
Note
≥Do not obstruct the rear panel’s internal cooling fan.
Before moving the unit, ensure the disc tray is empty.
Failure to do so will risk severely damaging the disc and the
unit.
∫ How to hold a disc or card
Do not touch the recorded surface or the terminal surface.
∫ Concerning non-cartridge discs
Be careful about scratches and dirt.
∫ If there is dirt or condensation on the disc
Wipe with a damp cloth and then wipe dry.
∫ Handling precautions
≥Do not attach labels or stickers to discs. (This may cause disc
warping and un-balanced rotation, rendering it unusable.)
≥Write on the label side of the disc only with a soft, oil-based felt
pen. Do not use ballpoint pens or other hard writing implements.
≥Do not use record cleaning sprays, benzine, thinner, static
electricity prevention liquids or any other solvent.
The manufacturer accepts no responsibility and offers no compensation for loss of recorded or edited material due to a problem with
the unit or recordable media, and accepts no responsibility and offers no compensation for any subsequent damage caused by such
loss.
Examples of causes of such losses are
≥A disc recorded and edited with this unit is played in a DVD Recorder or computer disc drive manufactured by another company.
≥A disc used as described above and then played again in this unit.
≥A disc recorded and edited with a DVD Recorder or computer disc drive manufactured by another company is played in this unit.
≥Do not use scratch-proof protectors or covers.
≥Do not expose the terminals of the card to water, garbage or other
strange things.
≥Do not drop, stack, or impact discs. Do not place objects on them.
≥Do not use the following discs:
- Discs with exposed adhesive from removed stickers or labels
(rental discs etc.).
- Discs that are badly warped or cracked.
- Irregularly shaped discs, such as heart shapes.
≥Do not place in the following areas:
- In direct sunlight.
- In very dusty or humid areas.
- Near a heater.
- Locations susceptible to significant differences in temperature
(condensation can occur).
- Where static electricity or electromagnetic waves occur.
≥To protect discs from scratches and dirt, return them to their cases
or cartridges when you are not using them.
HDD (Hard disk drive) handling care/Unit care/Disc and card handling/Video cassette information
Video cassette information
∫ Video cassettes
≥Break off the video cassette’s tab to prevent accidental erasure. Cover the hole with tape when you want to
use the video cassette for recording again.
≥You can use video cassettes with the VHS and S-VHS marks, but the unit is unable to make full use of the
characteristics of S-VHS video cassettes.
Tab
∫ Video cassette care
≥Poor quality or damaged video cassettes can cause the heads to become dirty and malfunction. Store your video cassettes carefully and
discard them when they become dirty or damaged.
≥Never use video cassettes on which juice has been spilled or those that are extremely damaged since this will not only cause the heads to
become dirty, but will also make the unit malfunction.
∫ Maintenance
Cleaning the video heads
Dirt on the video heads can cause poor recording and play.
If the picture does not improve, use an optional head-cleaning cassette (part number NV-TCL30PT). If the problem persists, seek advice from a
qualified service person.
11
RQT8346

Inserting a disc
[1] Press [<, OPEN/CLOSE] on the main unit to
open the tray.
≥You can insert a cartridge or non-cartridge disc.
[2] Press [<, OPEN/CLOSE] on the main unit to
close the tray.
Note
≥A double-sided disc should be loaded with the side you want to
record/play facing down.
≥It is not possible to record or play continuously from one side of a
double-sided disc to the other. You will need to eject the disc and
turn it over.
≥When using 8 cm (3q) DVD-RAM or 8 cm (3q) DVD-R, remove the
disc from the cartridge.
Automatic drive select function
[RAM] [Only for discs with the write-protect tab on the cartridge set to
“PROTECT” (l 70, Cartridge-protection)] [DVD-V] [DVD-A] [VCD] [CD]
≥If the unit is stopped or recording to the HDD or VHS, it
automatically switches to the DVD drive when a disc is inserted.
≥If you eject a disc and close the disc tray, the HDD drive is
automatically selected.
Non-cartridge disc
(1)
(1) Insert label-up.
(2) Insert fully so it clicks into place.
(3) Insert label-up with the arrow facing in.
Inserting a video cassette
The surface on which you can see a roll of tape should face up.
Insert a video cassette.
≥The unit is automatically turned on.
≥Play starts automatically if you insert a video cassette with the tab removed.
For main unit
≥Press [<, EJECT] on the main unit.
For remote control
≥Press [DRIVE SELECT] to select VHS drive and then press and hold [∫, STOP] for about 3 or more
seconds.
Cartridge disc
(2)
(3)
Inserting/Removing the SD card
When the card indicator (“SD”) on the unit’s display is flashing, the card is being read from or written to. Do not turn off the unit or remove the
card. Such action may result in malfunction or loss of the card’s contents.
≥Inserting foreign objects can cause a malfunction.
≥You can use SD Memory Cards with capacities from 8 MB to 2 GB (l 7).
Inserting the card
Press on the center of the
Opening the cover
Press down.
Automatic drive select function
≥If you insert an SD card while the unit is stopped, the “SD Card Operations” screen is displayed. Select an item and press [ENTER] to switch to
the SD drive (l 44, 66).
If you remove an SD card, the HDD drive is automatically selected.
card until it clicks into place.
Insert the card label up with the cut-off corner on the right.
If you are using a
TM
miniSD
it into the miniSD
card adaptor that
comes with the card.
Insert and remove this
adaptor from the unit.
card, insert
TM
ADAPTER
Keep the small memory cards such as the SD Memory Card out of reach of children. If swallowed, seek
medical advice immediately.
Removing the card
(1) Press on the center of
the card.
(2) Pull it straight out.
Closing the cover
Press up.
12
RQT8346
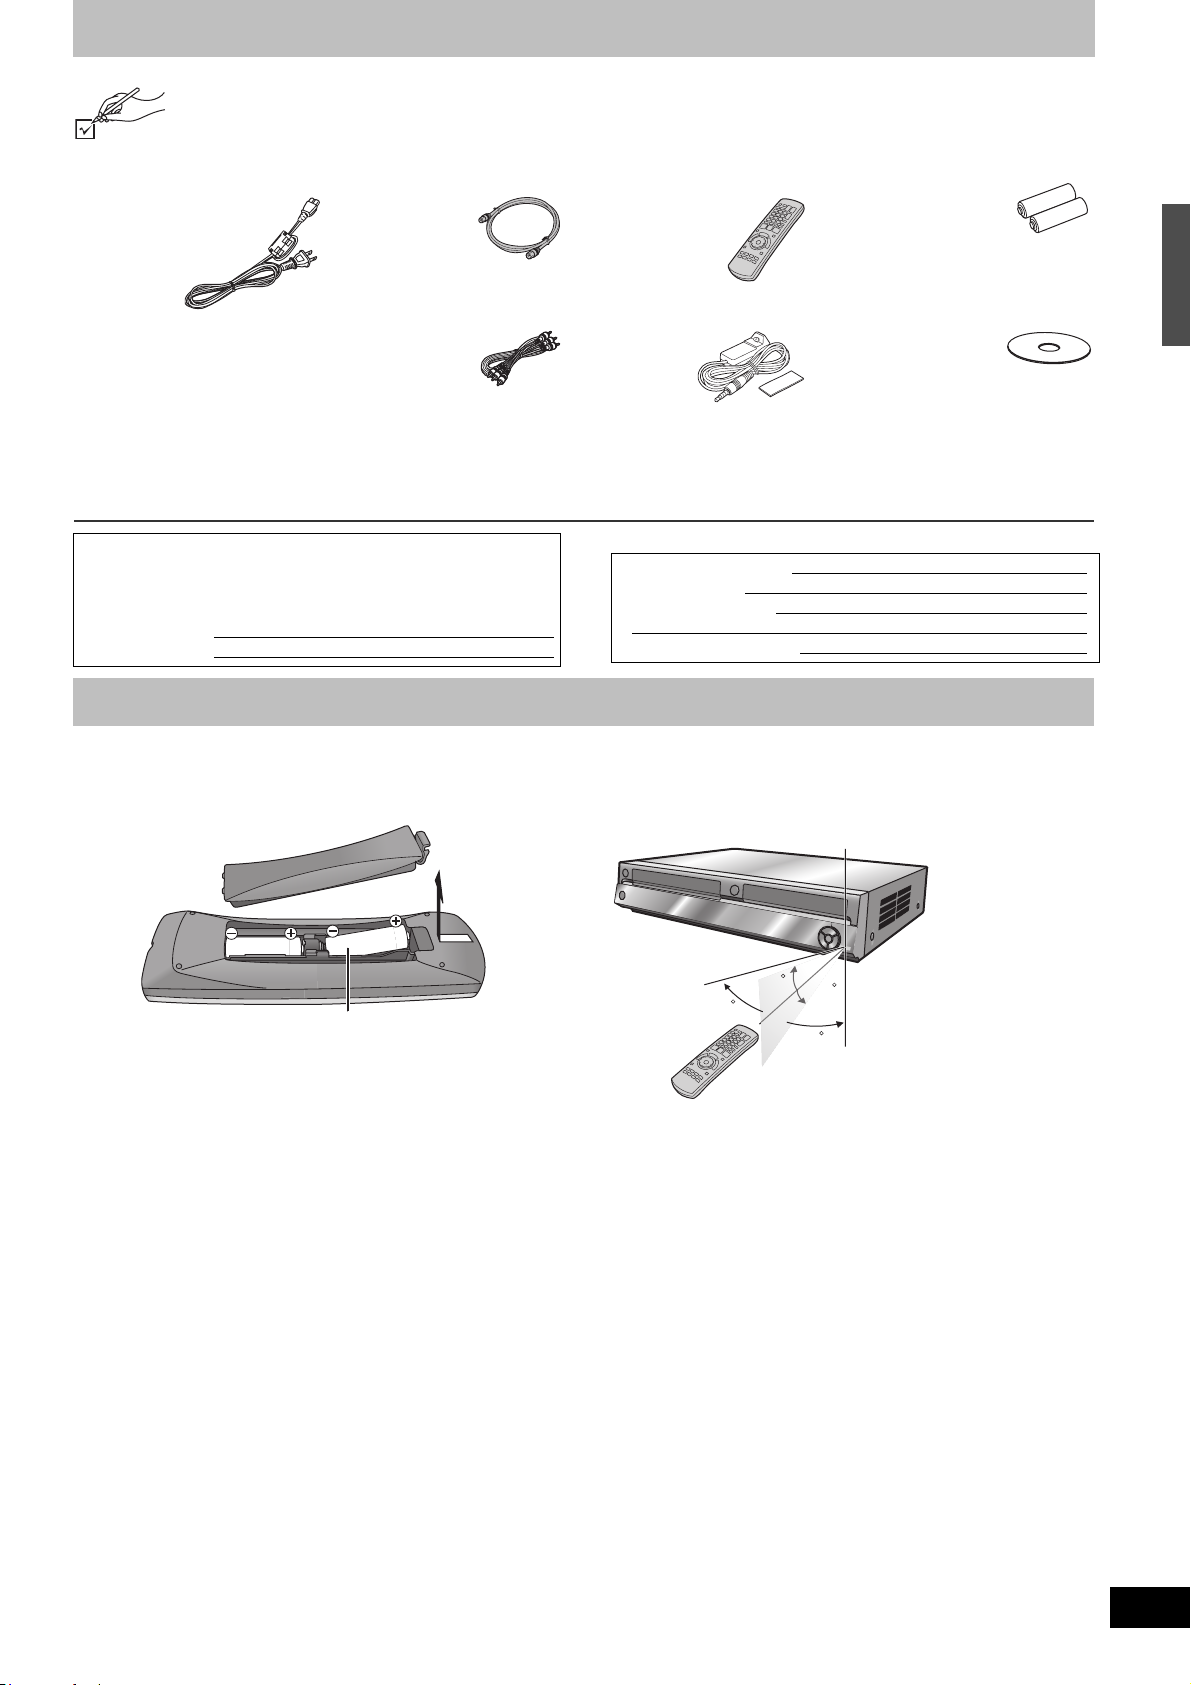
Accessories
Please check and identify the supplied accessories. Use product numbers indicated in parentheses when asking for replacement
parts. (Product numbers correct as of January 2006. These may be subject to change.)
To order accessories, refer to “Accessory Purchases” on page 95.
∏ 1 AC power supply cord
(VFA0461)
≥For use with this unit only.
Do not use it with other
equipment.
Also, do not use cords for
other equipment with this
unit.
Product Registration Card
Please complete and return the included product registration card, or register via the Internet at:
http://www.prodreg.com/panasonic/
The model number and serial number of this product can be found
on either the back or the bottom of the unit.
Please note them in the space provided below and keep for future
reference.
MODEL NUMBER DMR-EH75V
SERIAL NUMBER
∏ 1 75 ≠ coaxial cable
(K2KZ2BA00001)
∏ 1 Audio/Video cable
(K2KA6BA00003)
∏ 1 Remote control
(EUR7659Y90)
∏ 1 IR Blaster
(K2ZZ04C00001)
User memo:
DATE OF PURCHASE
DEALER NAME
DEALER ADDRESS
TELEPHONE NUMBER
The remote control
∏ 2 Batteries for the remote control
R6 size
∏ 1DVD-RAM disc
∫ Batteries
≥Insert so the poles (i and j) match those in the remote control.
≥When closing the lid, insert it from the j (minus) side.
≥Do not use rechargeable type batteries.
R6/LR6, AA
Do not:
≥mix old and new batteries.
≥use different types at the same time.
≥heat or expose to flame.
≥take apart or short circuit.
≥attempt to recharge alkaline or manganese batteries.
≥use batteries if the covering has been peeled off.
Mishandling of batteries can cause electrolyte leakage which can
damage items the fluid contacts and may cause a fire.
Remove if the remote control is not going to be used for a long
period of time. Store in a cool, dark place.
Note
≥If you cannot operate the unit or TV using the remote control after
changing the batteries, please re-enter the codes (l 26).
∫ Use
Aim at the sensor, avoiding obstacles, at a maximum range of 7 m
(23 feet) directly in front of the unit.
Remote control signal sensor
20
30
Note
≥Keep the transmission window and the unit’s sensor free from
dust.
≥Operation can be affected by strong light sources, such as direct
sunlight, inverter fluorescent lamps, and the glass doors on
cabinets.
20
30
7 m (23 feet) directly in front of the unit
Inserting a disc/Inserting a video cassette/Inserting/Removing the SD card/Accessories/The remote control
13
RQT8346
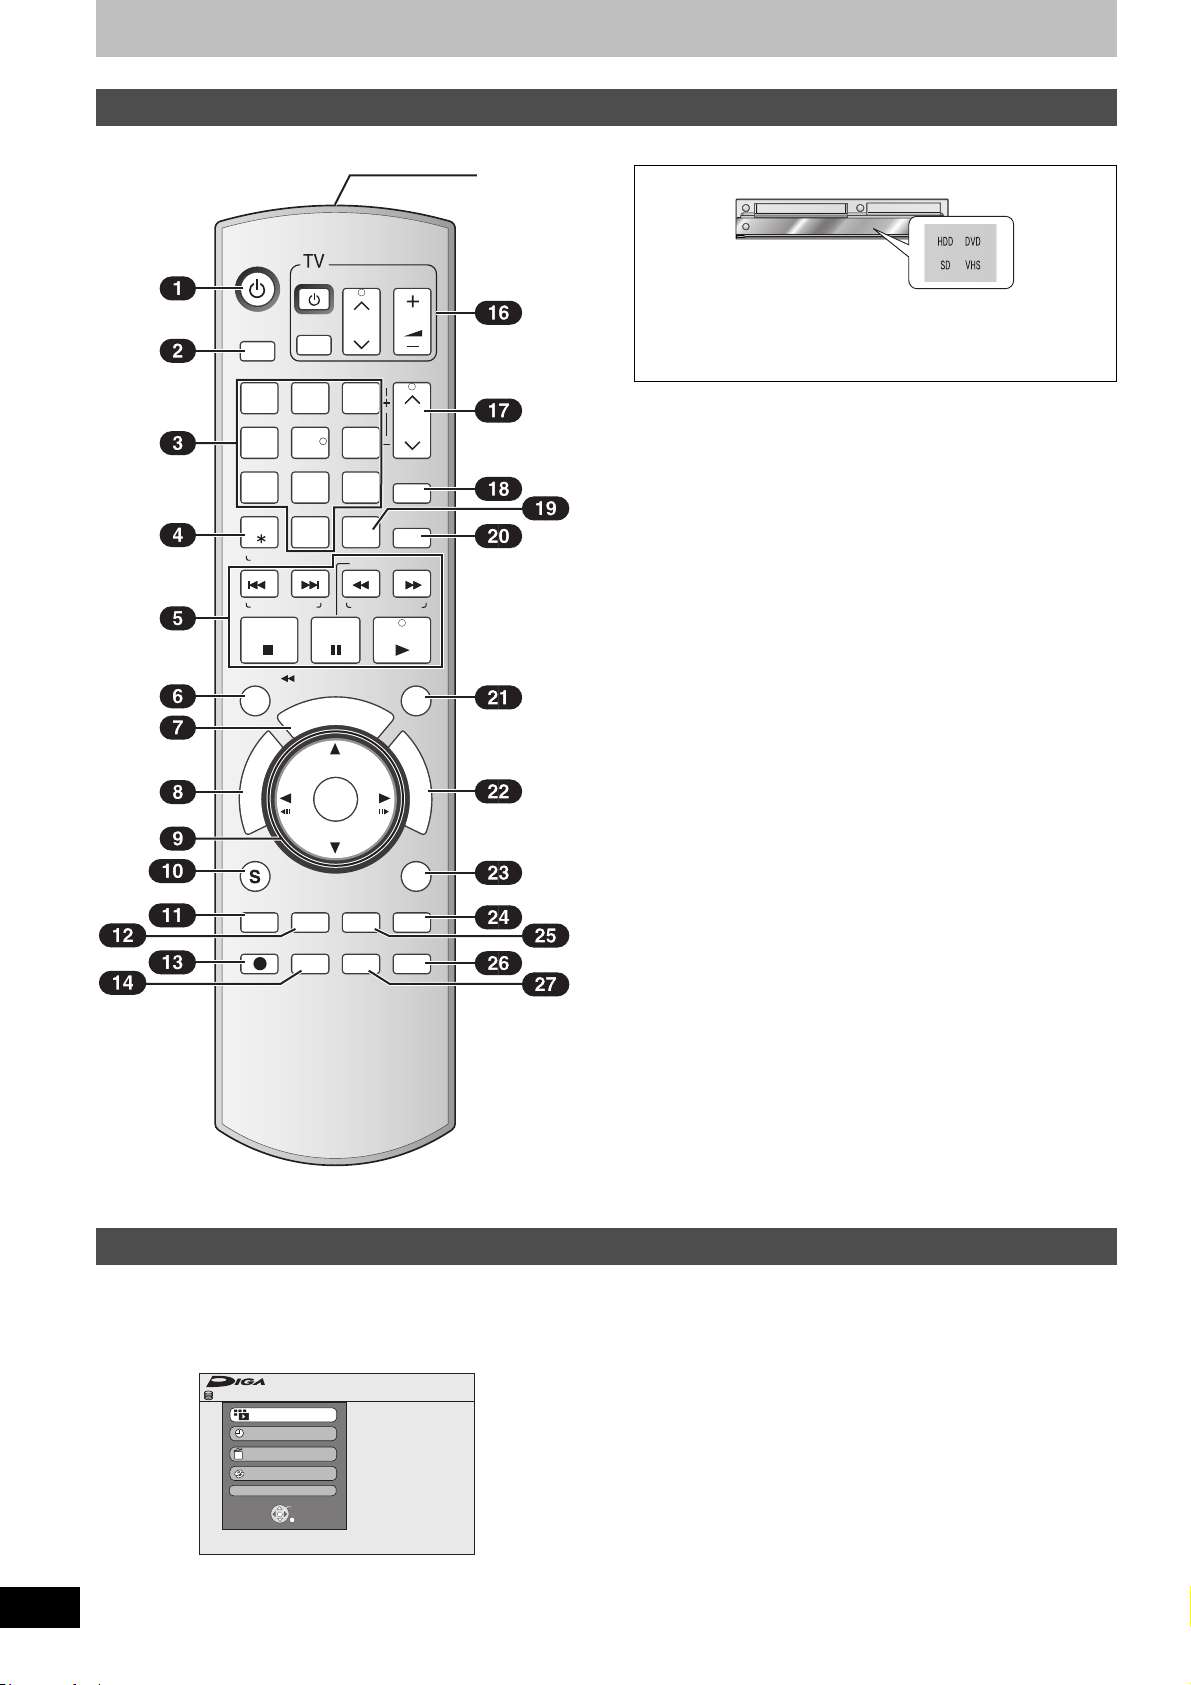
Control reference guide
Remote control
Instructions for operations are generally described using the remote control.
DVD/VHS
POWER
POWER
DRIVE
SELECT
TV/VIDEO
1
4
7
CANCEL
RESET
SKIP/
INDEX
TIME SLIP
/
JET REW
R
O
T
A
G
I
V
A
N
T
C
E
R
I
D
SUB MENU
DISPLAYAUDIO
AB
REC MODE
REC
2
5
8
0
PAUSESTOP
V
T
ENTER
U
G
VOLUME
CH
TRACKING/V-LOCK/PAGE
TRACKING/V-LOCK/PAGE
3
CH
6
VCR Plus+
9
DELETE
INPUT
SELECT
SLOW/SEARCH
REW
FF
PLAY
SCHEDULE
I
D
E
F
U
N
C
T
I
O
N
S
RETURN
CREATE
Info
CHAPTER
CM SKIP
STATUS
(15)
∫ [DRIVE SELECT] button
Before performing operations, press [DRIVE SELECT] to
make sure that the correct drive is selected.
The drive indicator of the selected drive lights up on the
main unit.
(1) Turn the unit on. . . . . . . . . . . . . . . . . . . . . . . . . . . . . . . . l 23
(2) Select drive (HDD, DVD, SD or VHS) . . . . . . . . . . . . l above
(3) Select channels and title numbers etc./Enter numbers
(4) Cancel/Reset the tape counter
(5) Basic operations for recording and play
(6) Skip the specified time/ . . . . . . . . . . . . . . . . . . . . . . . . . l 42
Jet rewind button (JET REW). . . . . . . . . . . . . . . . . . . . . l 48
(7) Show program listings
(TV Guide On Screen
(8) Show Direct Navigator/Top menu . . . . . . . . . . . . . . l 40, 51
(9) Selection/Enter, Frame-by-frame. . . . . . . . . . . . . . . . . . l 41
(10)Show sub menu. . . . . . . . . . . . . . . . . . . . . . . . . . . . . l 36, 51
(11)Select audio/ . . . . . . . . . . . . . . . . . . . . . . . . . . . . l 30, 42, 49
[A] for Direct Navigator . . . . . . . . . . . . . . . . . . . . . . . . . l 40
(12)Show on-screen menu/. . . . . . . . . . . . . . . . . . . . . . . . . . l 46
[B] for Direct Navigator . . . . . . . . . . . . . . . . . . . . . . . . . l 44
(13)Start recording . . . . . . . . . . . . . . . . . . . . . . . . . . . . . . . . l 29
(14)Change recording mode. . . . . . . . . . . . . . . . . . . . . . . . . l 29
(15)Transmit the remote control signal
(16)Television operations . . . . . . . . . . . . . . . . . . . . . . . . . . . l 26
(17)Channel select/ . . . . . . . . . . . . . . . . . . . . . . . . . . . . . . . . l 29
Change pages in the TV GUIDE system/ . . . . . . . . . . . l 32
TRACKING/V-LOCK . . . . . . . . . . . . . . . . . . . . . . . . . . . . l 49
(18)Show VCR Plus
(19)Input select (IN1, IN2, IN3 or DV) . . . . . . . . . . . . . . . . . . l 68
(20)Delete items. . . . . . . . . . . . . . . . . . . . . . . . . . . . . . . . . . . l 47
(21)Show scheduled recording list . . . . . . . . . . . . . . . . . . . l 34
(22)Show FUNCTIONS window . . . . . . . . . . . . . . . . . . . l below
(23)Return to previous screen
(24)Changing the size of information window/
Displays help information . . . . . . . . . . . . . . . . . . . . . . . l 35
(25)Create chapters. . . . . . . . . . . . . . . . . . . . . . . . . . . . . . . . l 42
(26)Skip a minute forward. . . . . . . . . . . . . . . . . . . . . . . . . . . l 42
(27)Show status messages . . . . . . . . . . . . . . . . . . . . . . l 42, 50
Note
≥Buttons such as the [¥, REC] button do not protrude as much as
other buttons to stop them from being pressed accidentally.
≥The word “button” is not used in these operating instructions so
“Press the [ENTER] button.” is shown as “Press [ENTER].”
≥You can use this remote control to operate your TV if you set the
TV manufacturer code (l 26).
®
system) . . . . . . . . . . . . . . . . . . . l 32
i screen . . . . . . . . . . . . . . . . . . . . . . . . l 33
14
RQT8346
FUNCTIONS window
By using the FUNCTIONS window you may access the main functions quickly and easily. For example, when you want to delete a title with
Delete Navigator, or copy a title with Copy Navigator, etc. (l 47, 59)
[1] While stopped
Press [FUNCTIONS].
FUNCTIONS
ENTER
RETURN
Available Space :
HDD
Playback
Program
Delete
Copy
Other Functions
Functions displayed depend on the selected drive or type of
disc.
89:36 SP
[2] Press [3, 4] to select an item and then press
[ENTER].
If you select “Other Functions”, press [3, 4] to select an item
and then press [ENTER].
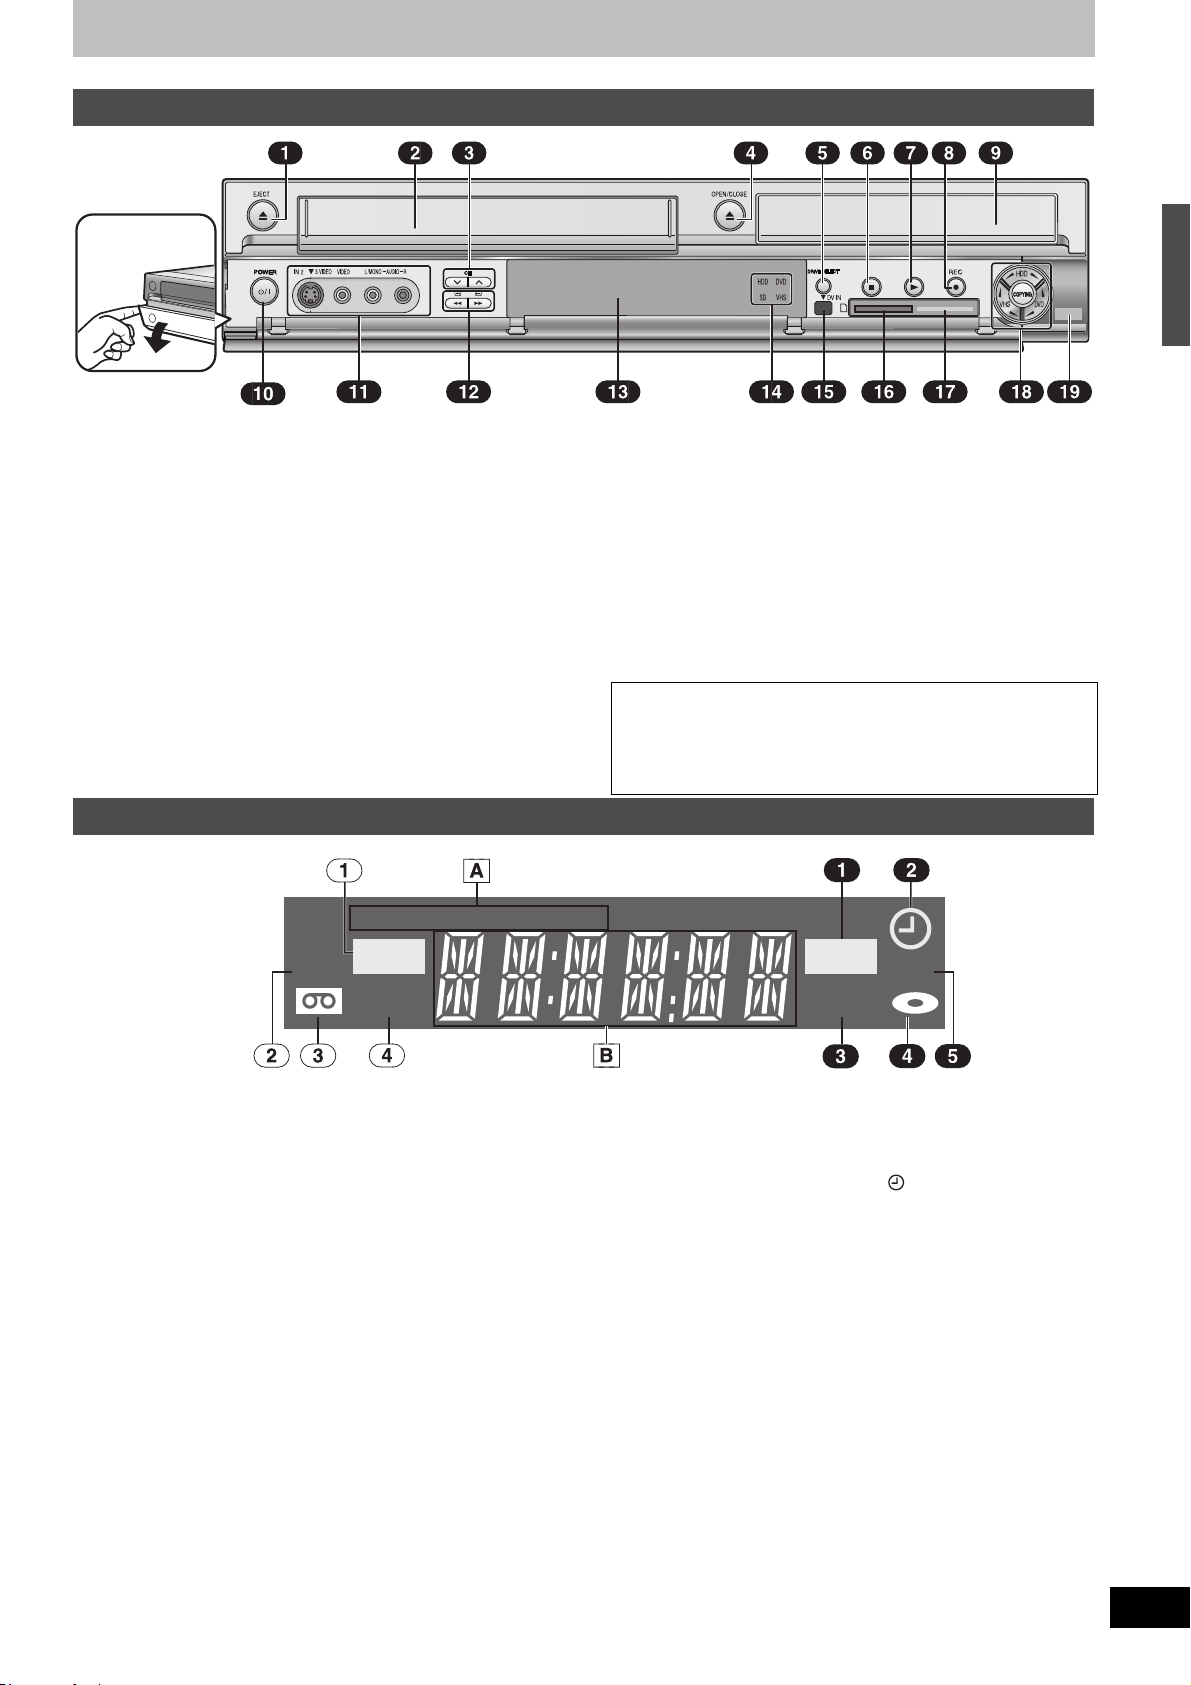
Main unit
Pull open with
your finger.
Control reference guide
(1) Cassette eject button (<, EJECT) . . . . . . . . . . . . . . . . . l 12
(2) Cassette compartment
(3) Channel select (CH, X, W) . . . . . . . . . . . . . . . . . . . . . . . l 29
(4) Open/close disc tray (<, OPEN/CLOSE). . . . . . . . . . . . l 12
(5) Select drive . . . . . . . . . . . . . . . . . . . . . . . . . . . . . . . . . . . l 14
≥Drive changes each time you press [DRIVE SELECT].
(6) Stop (∫) . . . . . . . . . . . . . . . . . . . . . . . . . . . . . . . . . . . l 29, 41
(7) Start play (1). . . . . . . . . . . . . . . . . . . . . . . . . . . . . . . l 40, 48
(8) Start recording/Specify the time to stop recording
(¥, REC) . . . . . . . . . . . . . . . . . . . . . . . . . . . . . . . . . . . l 28, 29
(9) Disc tray . . . . . . . . . . . . . . . . . . . . . . . . . . . . . . . . . . . . . . l 12
(10)POWER button (Í/I, POWER) . . . . . . . . . . . . . . . . . . . . l 23
≥Press to switch the unit from on to standby mode or vice
versa. In standby mode, the unit is still consuming a small
amount of power.
(11)Connectors for external equipment (IN2) . . . . . . . . . . . l 68
(12)DVD–Search, VHS–REW/FF buttons
(V/6, 5/W) . . . . . . . . . . . . . . . . . . . . . . . . . . . l 41, 48
The unit’s display
XP SP LP EP VP
VHS
REC
PLAY
(13)The unit’s display. . . . . . . . . . . . . . . . . . . . . . . . . . . . l below
(14)Drive indicator (HDD/DVD/SD/VHS) . . . . . . . . . . . . . . . . l 14
(15)Connector for a
digital video (DV) camcorder (DV IN) . . . . . . . . . . . . . . . l 69
(16)SD card slot . . . . . . . . . . . . . . . . . . . . . . . . . . . . . . . . . . . l 12
(17)Power indicator
≥This lights up blue when you turn the unit on. It goes off if you
set “FL Display” to “Dim” or “Automatic”.
(18)One Touch Copy operation button . . . . . . . . . . . . . . . . . l 60
(19)Remote control signal sensor. . . . . . . . . . . . . . . . . . . . . l 13
IR Blaster signal sensor . . . . . . . . . . . . . . . . . . . . . . . . . l 17
Rear panel terminals (l 16)
∫ Off Timer
The unit automatically switches to standby when it has not been
used for about 6 hours.
You can turn this feature off or change the time to 2 hours.
(l 74, “Off Timer”)
REC
SD
PLAY
HDD/DVD/VHS
[A] Recording mode indicator
HDD/DVD:
XP, SP, LP, EP: (l 28)
XP SP LP EP (all on): FR mode (l 30)
VHS:
¢
, EP, VP: (l 28)
SP, LP
¢ Playback only
HDD/DVD/SD/VHS
[B] Main display
≥Digital Clock, Counter, etc.
VHS
(1) Recording indicator
On: During recording
Flashes: During pause recording
(2) VHS indicator
(3) Tape indicator
(4) Playing indicator
HDD/DVD/SD
(1) Recording indicator
On: During recording
Flashes: During pause recording
(2) Scheduled recording indicator ( ) (l 32)
≥The scheduled recording indicator lights only when the unit’s
power is off.
On:
When a scheduled recording program is registered and
recordable disc is inserted.
Flashes:
The scheduled recording indicator flashes when the unit cannot
start (e.g. there is no disc, etc.) the scheduled recording.
(3) Playing indicator
(4) Disc indicator
(5) SD card indicator
15
RQT8346
STEP 1 Connection
This section includes diagrams of six common methods of connection (
[A]
to
[F], l
16–18).
Please connect using the one that best suits you.
≥Visit Panasonic’s homepage for more information about connection methods. (This is in English only.)
http://www.panasonic.com/consumer_electronics/dvd_recorder/dvd_connection.asp
≥Before connection, turn off all equipment and read the appropriate operating instructions.
When using a cable service or satellite service.
≥You need to subscribe to a cable TV or satellite service to enjoy viewing their programming.
≥Consult your service provider regarding appropriate cable box or satellite receiver.
∫ RF OUT terminal
The picture and sound signal from this unit does not go through the
RF OUT terminal to the television.
Make sure you connect one of the following terminals on this unit to
the television: the AUDIO/VIDEO OUT terminal, the S VIDEO OUT
terminal, the COMPONENT VIDEO OUT terminal or HDMI AV OUT
Connect the unit directly to the television
(Connection [B], [D], [F])
Video signals fed through video cassette recorders will be affected
by copyright protection systems and the picture will not be shown
correctly on the television.
terminal.
≥Refer to page 20 if the antenna connector doesn’t match.
Television
∫ .When the unit is not to be used for a long time
To save power, unplug it from the household AC outlet. This unit
consumes a small amount of power, even when it is turned off
(approx. 16 W
).
This unit
Note that the program listings are not downloaded while the unit is
unplugged.
VCR
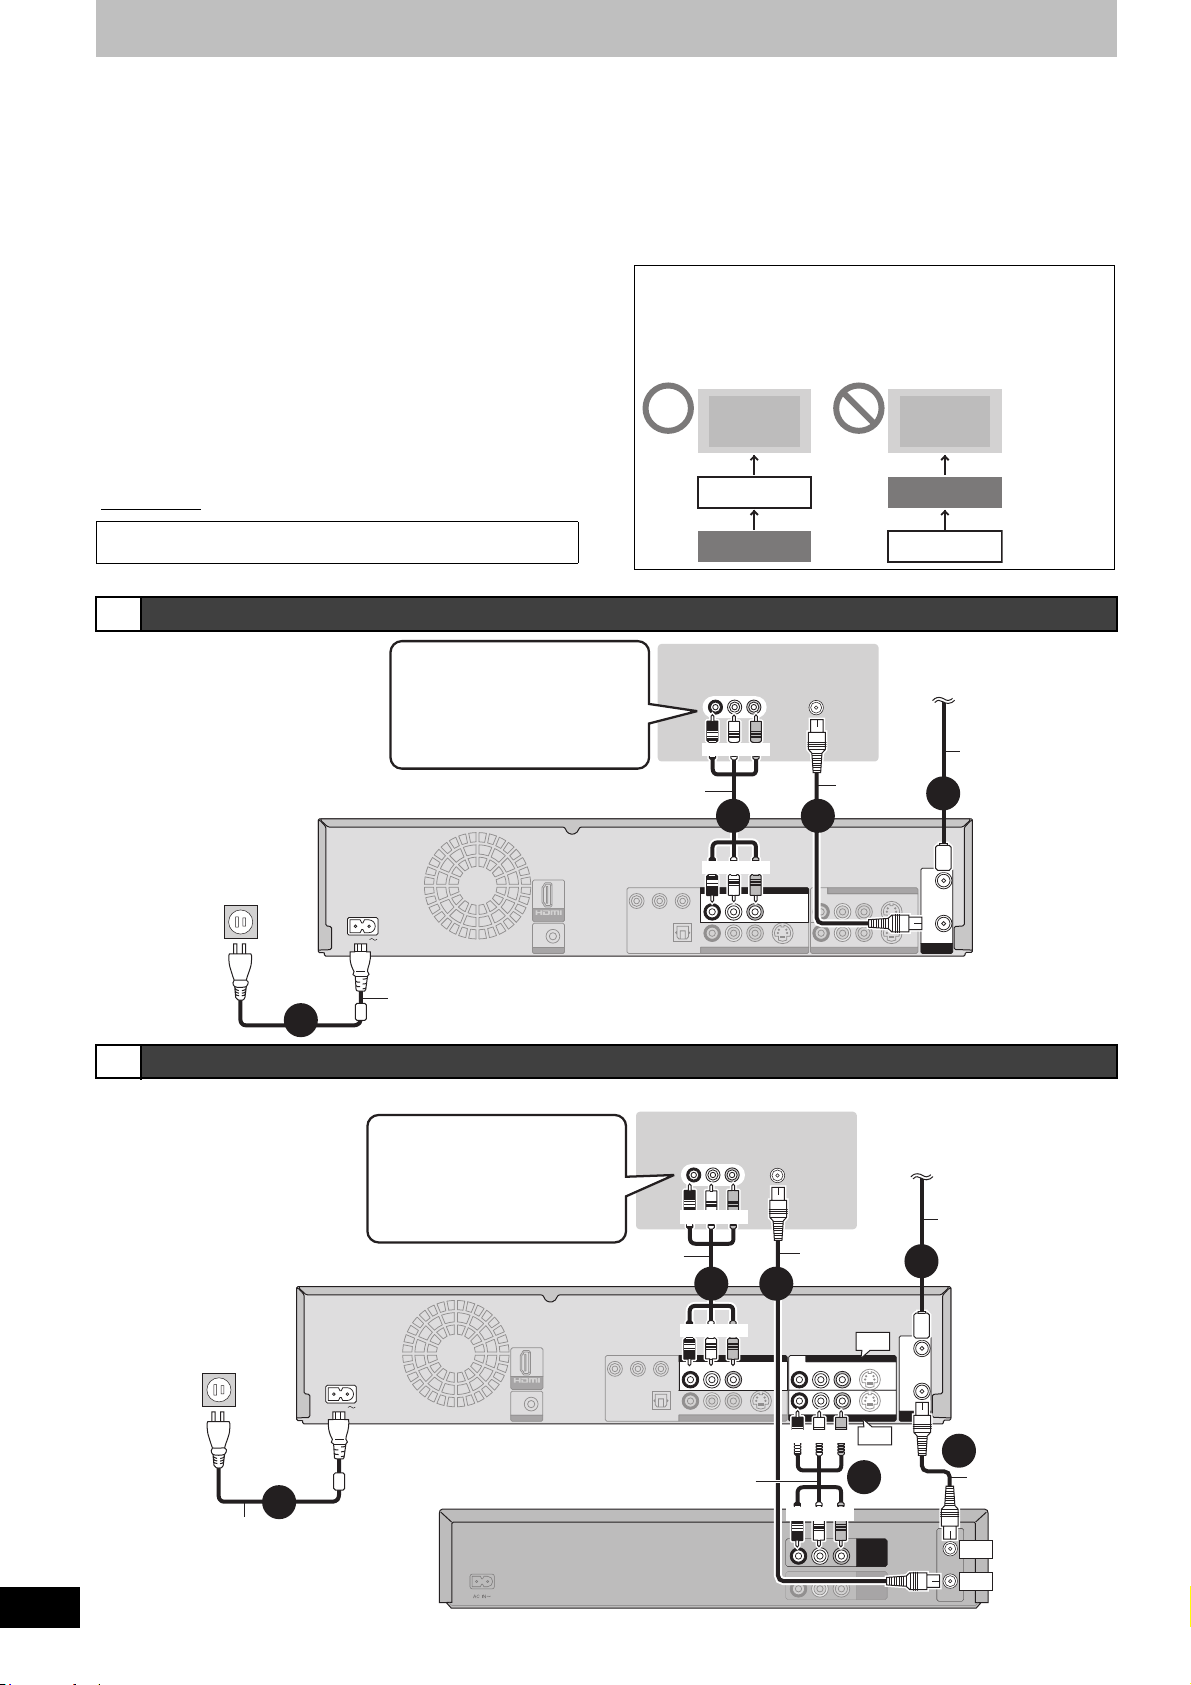
A Connection with a television
VIDEO IN
Television
VHF/UHF
RF IN
≥If your television does not
have AUDIO/VIDEO terminals
(l 19, [a]).
≥If you enjoy higher picture
quality. (l 21, 22)
Audio/Video cable (included)
AUDI O IN
R L
Red White Yellow
3 2
Television
This unit
Cable from wall or
antenna signal
75 ≠ coaxial
cable
(included)
VCR
75 ≠ coaxial
cable
1
16
RQT8346
To household AC outlet
(AC 120 V, 60 Hz)
AC IN
Y
AV OUT
G-LINK
PR
P
B
COMPONENT VIDEO OUT
OPTICAL
DIGITAL AUDIO OUT
(PCM/BITSTREAM)
Red White Yellow
DVD/VHS COMMON OUT
DVD/VHS COMMON OUT
R-AUDIO-L VIDEO
R-AUDIO-L VIDEO S VIDEO
R-AUDIO-L VIDEO S VIDEO
DVD PRIORITY OUT
R-AUDIO-L VIDEO
R-AUDIO-L
VIDEO
IN3
S VIDEO
S VIDEO
IN1
AC power supply cord (included)
4
Connect only after all other connections are complete.
B Connection with a television and video cassette recorder
The connection will allow the video cassette recorder to be used for playback and recording when this unit is turned off.
≥If your television does not
have AUDIO/VIDEO terminals
(l 19, [b]).
AUDI O IN
R L
VIDEO IN
Television
VHF/UHF
RF IN
Cable from wall or
antenna signal
≥If you enjoy higher picture
quality. (l 21, 22)
Audio/Video cable (included)
Red White Yellow
75 ≠ coaxial
cable
1
4 3
To household AC outlet
(AC 120 V, 60 Hz)
AC IN
6
AC power supply cord (included)
Connect only after all other connections
are complete.
Y
AV OUT
G-LINK
Audio/Video cable
PR
P
B
COMPONENT VIDEO OUT
OPTICAL
DIGITAL AUDIO OUT
(PCM/BITSTREAM)
Red White Yellow
DVD/VHS COMMON OUT
DVD/VHS COMMON OUT
R-AUDIO-L VIDEO S VIDEO
R-AUDIO-L VIDEO
R-AUDIO-L VIDEO S VIDEO
DVD PRIORITY OUT
IN3
IN3
R-AUDIO-L VIDEO
R-AUDIO-L VIDEO S VIDEO
R-AUDIO-L VIDEO S VIDEO
R-AUDIO-L
VIDEO
IN1
IN1
Red White Yellow
5
Red White Yellow
R-AUDIO-L VIDEO
R-AUDIO-L VIDEO
IN3
IN1
OUT
IN
S VIDEO
S VIDEO
RF
RF
IN
IN
RF
RF
OUT
OUT
VHF/UHF
VHF/UHF
RF
RF
IN
IN
RF
RF
OUT
OUT
This unit
VHF/UHF
VHF/UHF
75 ≠ coaxial
cable
This unit
2
75 ≠ coaxial
cable (included)
VHF/UHF
RF IN
IN
OUT
VHF/UHF
RF OUT
Video cassette
recorder
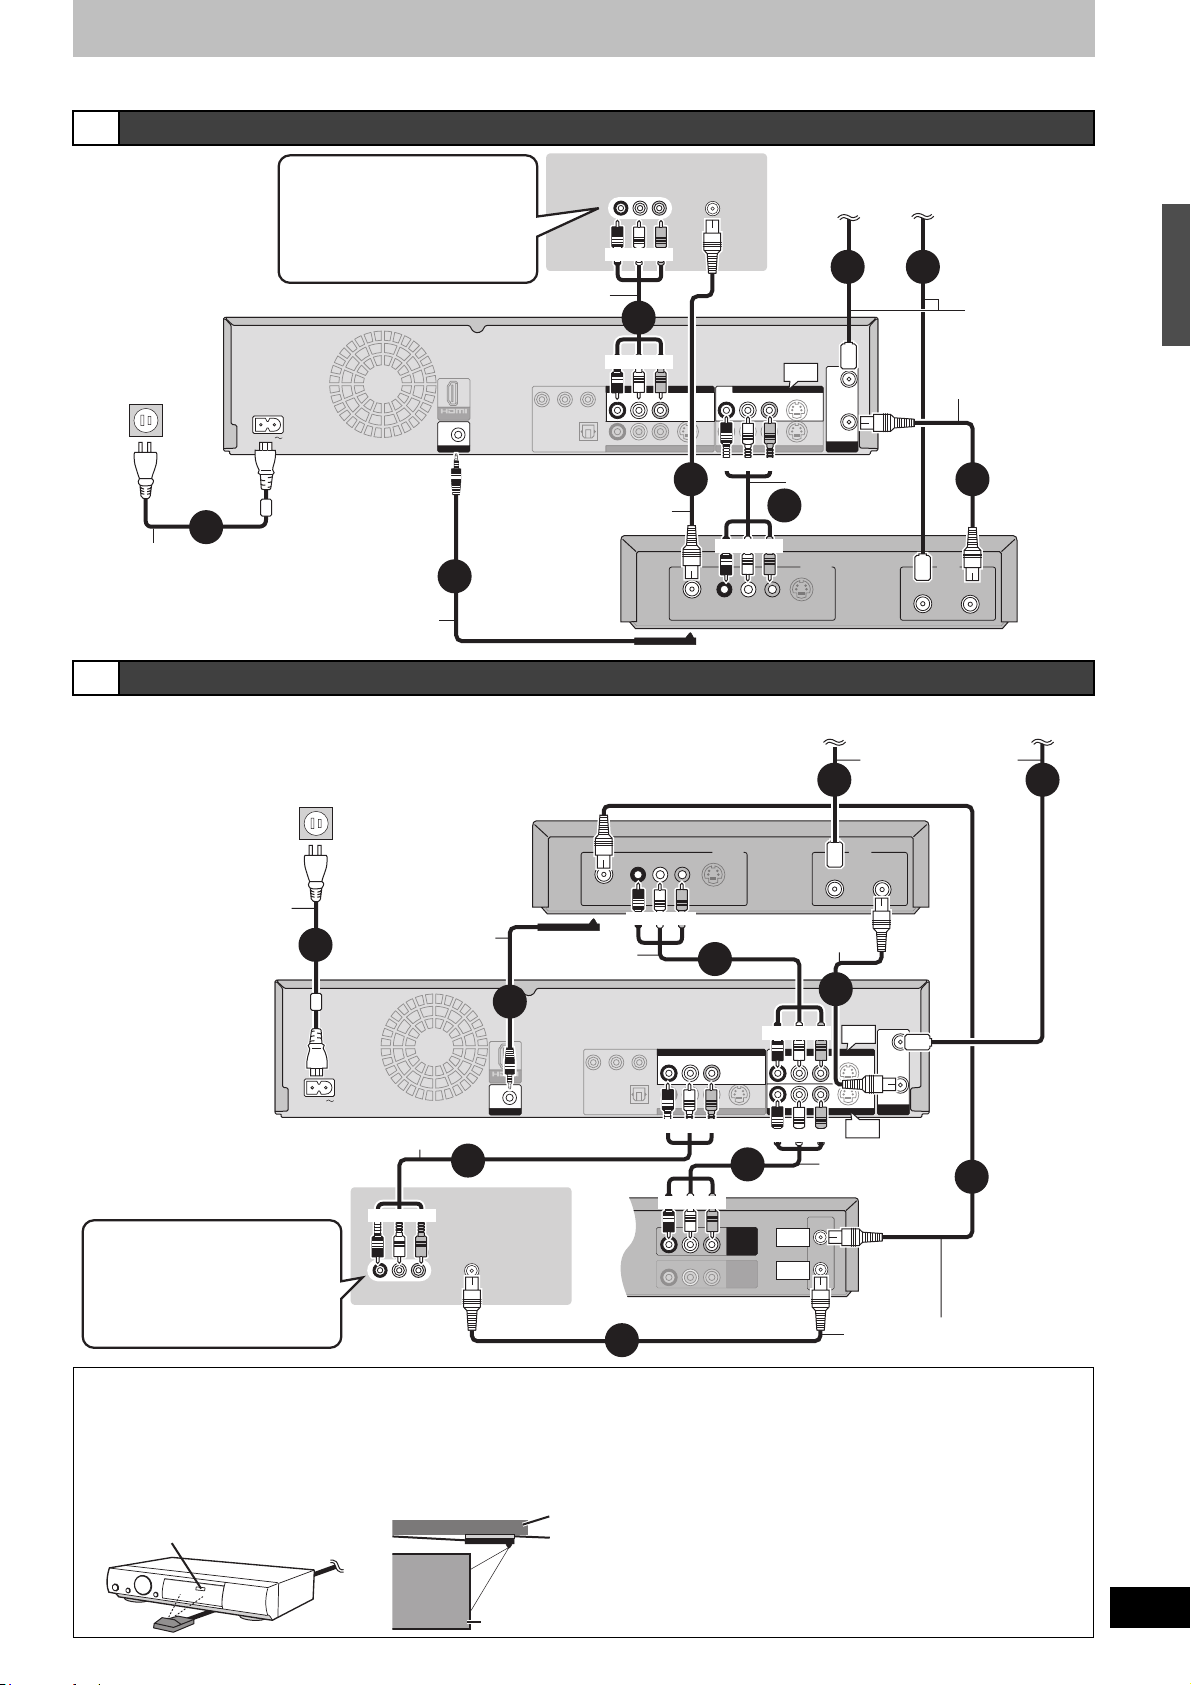
DirecTV/DISH Network service is only available in the United States.
VHF/UHF
RF IN
VHF/UHF
RF OUT
IN
OUT
OUT
R-AUDIO-L VIDEO
IN
R-AUDIO-L VIDEO
C Connection with a television and cable box or DirecTV receiver
Cable from
wall or
antenna signal
This unit
≥If your television does not have
AUDIO/VIDEO terminals
(l 19, [d]).
≥If you enjoy higher picture
quality. (l 21, 22)
Audio/Video cable (included)
AUDI O IN
VIDEO IN
R L
Red White Yellow
Television
VHF/UHF
RF IN
4
To household
AC outlet
(AC 120 V, 60 Hz)
AC IN
8
AC power supply cord (included)
Connect only after all other
connections are complete.
IR Blaster (included)
See below Cable box or DirecTV receiver
AV OUT
G-LINK
G-LINK
7
Y
75 ≠ coaxial cable
PR
P
B
COMPONENT VIDEO OUT
OPTICAL
DIGITAL AUDIO OUT
(PCM/BITSTREAM)
Red White Yellow
DVD/VHS COMMON OUT
DVD/VHS COMMON OUT
R-AUDIO-L VIDEO
R-AUDIO-L VIDEO S VIDEO
R-AUDIO-L VIDEO S VIDEO
DVD PRIORITY OUT
Red White Yellow
3
Red White Yellow
RF
IN3
IN3
IN3
R-AUDIO-L VIDEO S VIDEO
R-AUDIO-L VIDEO
R-AUDIO-L
VIDEO
IN1
Audio/Video cable
6
VIDEO
R L
AUDI O
S-VIDEO
S VIDEO
S VIDEO
OUT
RF
RF
IN
IN
RF
RF
OUT
OUT
VHF/UHF
VHF/UHF
Satellite antenna
(satellite receiver only)
STEP 1 Connection
12
75 ≠ coaxial
cable
75 ≠ coaxial
cable (included)
5
IN
Satellite Cable
D
Connection with a television, video cassette recorder and cable box or DirecTV receiver
Cable from wall or
antenna signal
RF
RF
IN
IN
RF
RF
OUT
OUT
VHF/UHF
VHF/UHF
6
To household AC outlet
(AC 120 V, 60 Hz)
AC power supply cord
(included)
Connect only after all other
connections are complete.
This unit
10
AC IN
≥If your television does not have
AUDIO/VIDEO terminals
Cable box or DirecTV receiver
IR Blaster
(included)
See below
Audio/Video
cable
9
AV OUT
G-LINK
G-LINK
Audio/Video cable (included)
4
VIDEO IN
Television
VHF/UHF
RF IN
Red White Yellow
AUDIO IN
R L
Satellite antenna (satellite receiver only)
1 2
OUT
Satellite Cable
RF
VIDEO
R L
AUDIO
Red White Yellow
S-VIDEO
75 ≠ coaxial
cable (included)
7
5
Red White Yellow
IN3
P
B
Y
COMPONENT VIDEO OUT
OPTICAL
DIGITAL AUDIO OUT
(PCM/BITSTREAM)
DVD/VHS COMMON OUT
DVD/VHS COMMON OUT
PR
R-AUDIO-L VIDEO
R-AUDIO-L VIDEO S VIDEO
R-AUDIO-L VIDEO S VIDEO
DVD PRIORITY OUT
Red White Yellow
Red White Yellow
8
IN3
R-AUDIO-L VIDEO S VIDEO
R-AUDIO-L VIDEO
R-AUDIO-L VIDEO S VIDEO
R-AUDIO-L
VIDEO
IN1
IN1
Red White Yellow
Audio/Video
cable
75 ≠ coaxial cable
IN
IN3
S VIDEO
S VIDEO
IN1
(l 19, [c]).
≥If you enjoy higher picture
quality. (l 21, 22)
Video cassette recorder
3
75 ≠ coaxial cable
Why should I connect the IR Blaster?
The IR Blaster is necessary for operating a cable box or DirecTV receiver with this unit’s remote control. Additionally, if the IR Blaster is not
correctly connected or set up, you cannot make scheduled recordings or download program listings.
Setting the IR Blaster
Place the IR Blaster in front of the signal sensor of the cable box or DirecTV receiver.
Read the cable box or DirecTV receiver
operating instructions regarding
positioning of the signal sensor.
If necessary, use the double sided adhesive tape (included) to secure the IR Blaster to a flat surface.
e.g. Television stand surface
If you peel off the adhesive tape, the surface may become damaged.
Once you have confirmed the cable box or DirecTV receiver is
operating correctly, secure it by attaching the adhesive tape.
Cable box or DirecTV receiver
17
RQT8346
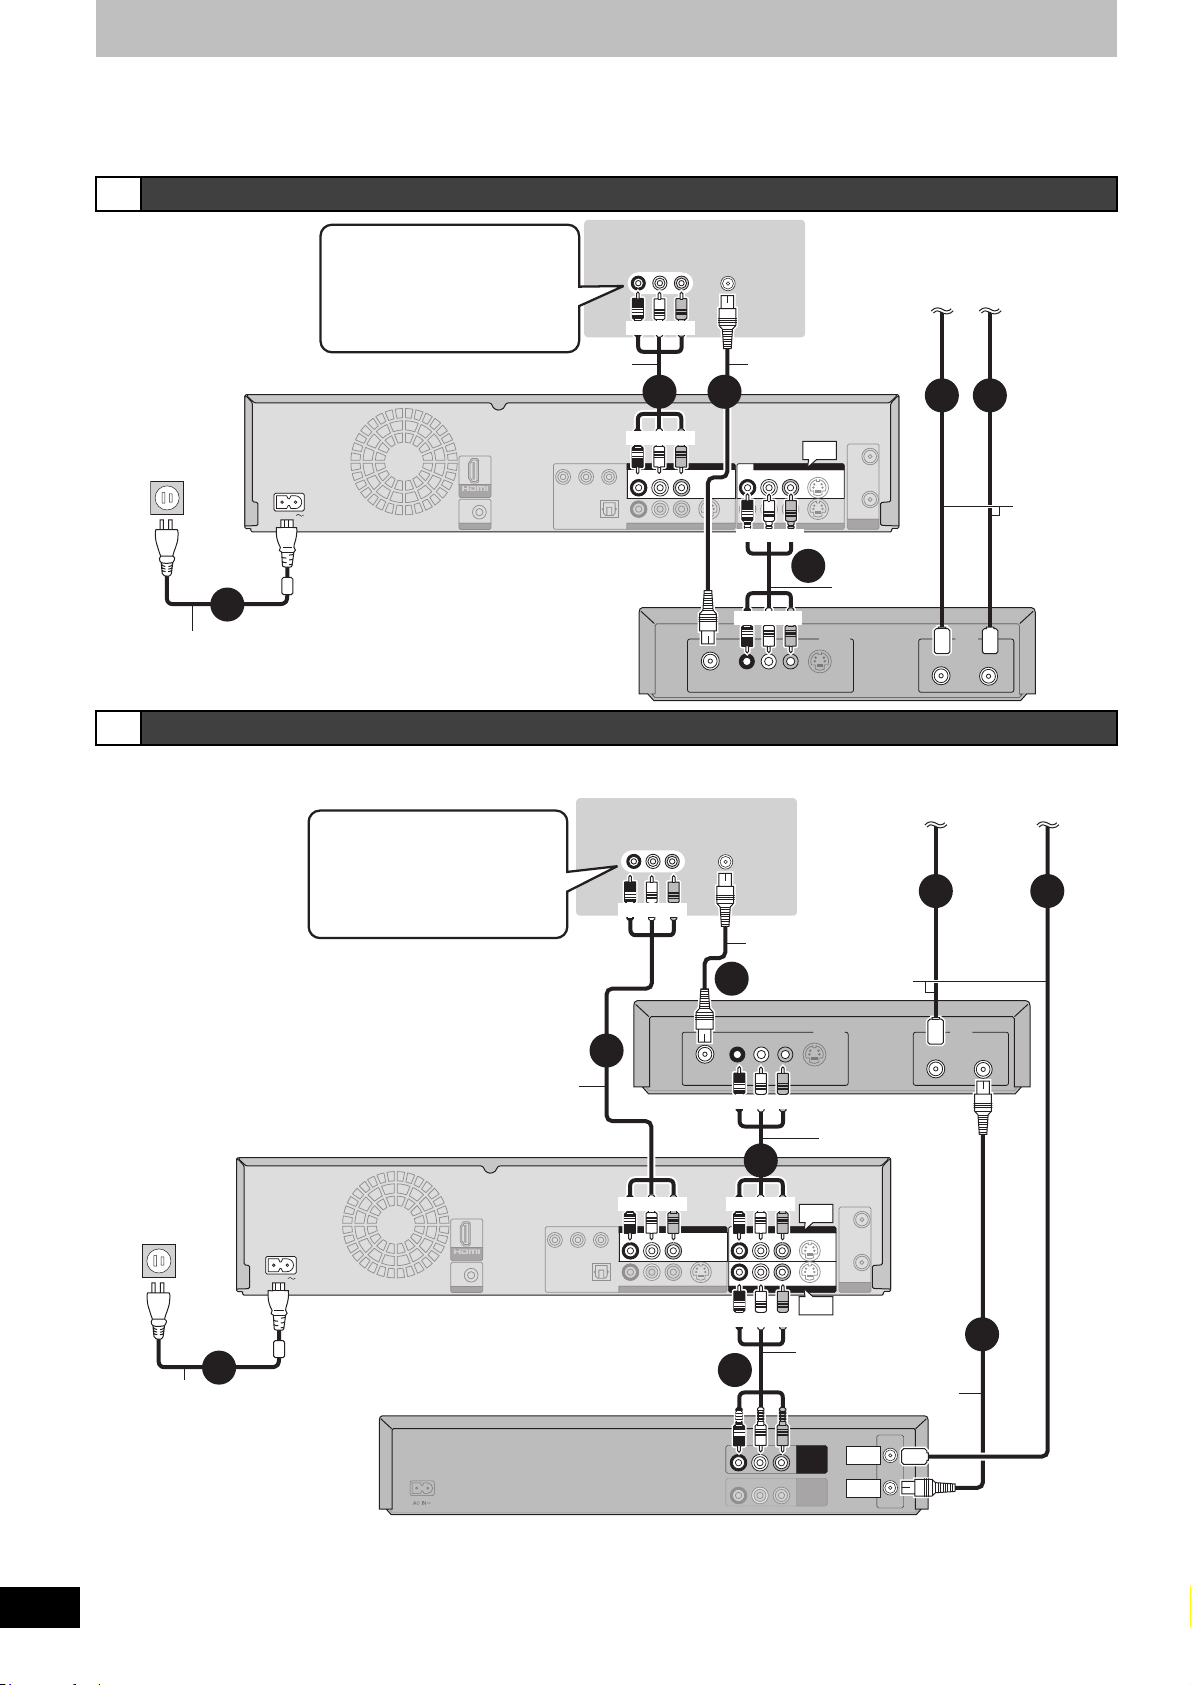
STEP 1 Connection
Program listings for satellite services other than DirecTV cannot be received. Without this information, program-based
recordings cannot be made. However, recordings can still be set manually.
You can use the DISH Network TV Guide to make scheduled recordings on this unit.
DirecTV/DISH Network service is only available in the United States.
E Connection with a television and satellite receiver other than DirecTV
≥If your television does not have
AUDIO/VIDEO terminals
(l 19, [e]).
≥If you enjoy higher picture
quality. (l 21, 22)
This unit
To household
AC outlet
(AC 120 V, 60 Hz)
AC IN
6
AC power supply cord (included)
Connect only after all other connections
are complete.
Audio/Video cable (included)
P
B
Y
AV OUT
G-LINK
COMPONENT VIDEO OUT
OPTICAL
DIGITAL AUDIO OUT
(PCM/BITSTREAM)
Satellite receiver
AUDI O IN
R L
Red White Yellow
4
Red White Yellow
DVD/VHS COMMON OUT
DVD/VHS COMMON OUT
PR
R-AUDIO-L VIDEO S VIDEO
R-AUDIO-L VIDEO
R-AUDIO-L VIDEO S VIDEO
DVD PRIORITY OUT
VIDEO IN
RF
Television
VHF/UHF
RF IN
75 ≠ coaxial
cable (included)
3
R-AUDIO-L VIDEO
R-AUDIO-L VIDEO S VIDEO
R-AUDIO-L
Red White Yellow
Red White Yellow
R L
AUDIO
IN3
IN3
VIDEO
IN1
VIDEO
5
IN3
RF
IN
S VIDEO
RF
OUT
S VIDEO
VHF/UHF
Audio/Video
cable
OUT
S-VIDEO
Satellite
antenna
Cable from wall or
antenna signal
1 2
75 ≠ coaxial
cable
IN
Satellite Cable
F
Connection with a television, video cassette recorder and satellite receiver other than DirecTV
The connection will allow the video cassette recorder to be used for playback and recording when this unit is turned off.
Satellite
antenna
≥If your television does not have
AUDIO/VIDEO terminals
AUDI O IN
R L
VIDEO IN
Television
VHF/UHF
RF IN
(l 19, [f]).
≥If you enjoy higher picture
quality. (l 21, 22)
Red White Yellow
1 2
75 ≠ coaxial
cable (included)
75 ≠ coaxial cable
3
This unit
Audio/Video cable (included)
OUT
4
RF
VIDEO
R L
AUDI O
Red White Yellow
S-VIDEO
Satellite receiver
Audio/Video cable
IN
Satellite Cable
5
To household
AC outlet
(AC 120 V, 60 Hz)
AC IN
8
AC power supply cord (included)
Connect only after all other
connections are complete.
PR
P
B
Y
AV OUT
G-LINK
COMPONENT VIDEO OUT
OPTICAL
DIGITAL AUDIO OUT
(PCM/BITSTREAM)
Video cassette recorder
Red White Yellow
DVD/VHS COMMON OUT
DVD/VHS COMMON OUT
R-AUDIO-L VIDEO S VIDEO
R-AUDIO-L VIDEO
R-AUDIO-L VIDEO S VIDEO
DVD PRIORITY OUT
Red White Yellow
IN3
IN3
R-AUDIO-L VIDEO
R-AUDIO-L VIDEO S VIDEO
R-AUDIO-L VIDEO S VIDEO
R-AUDIO-L
VIDEO
IN1
IN1
Red White Yellow
6
R-AUDIO-L VIDEO
R-AUDIO-L VIDEO
IN3
RF
IN
S VIDEO
RF
OUT
S VIDEO
VHF/UHF
IN1
Audio/Video cable
75 ≠ coaxial cable
VHF/UHF
RF IN
IN
OUT
OUT
IN
VHF/UHF
RF OUT
7
Cable from wall or
antenna signal
18
RQT8346
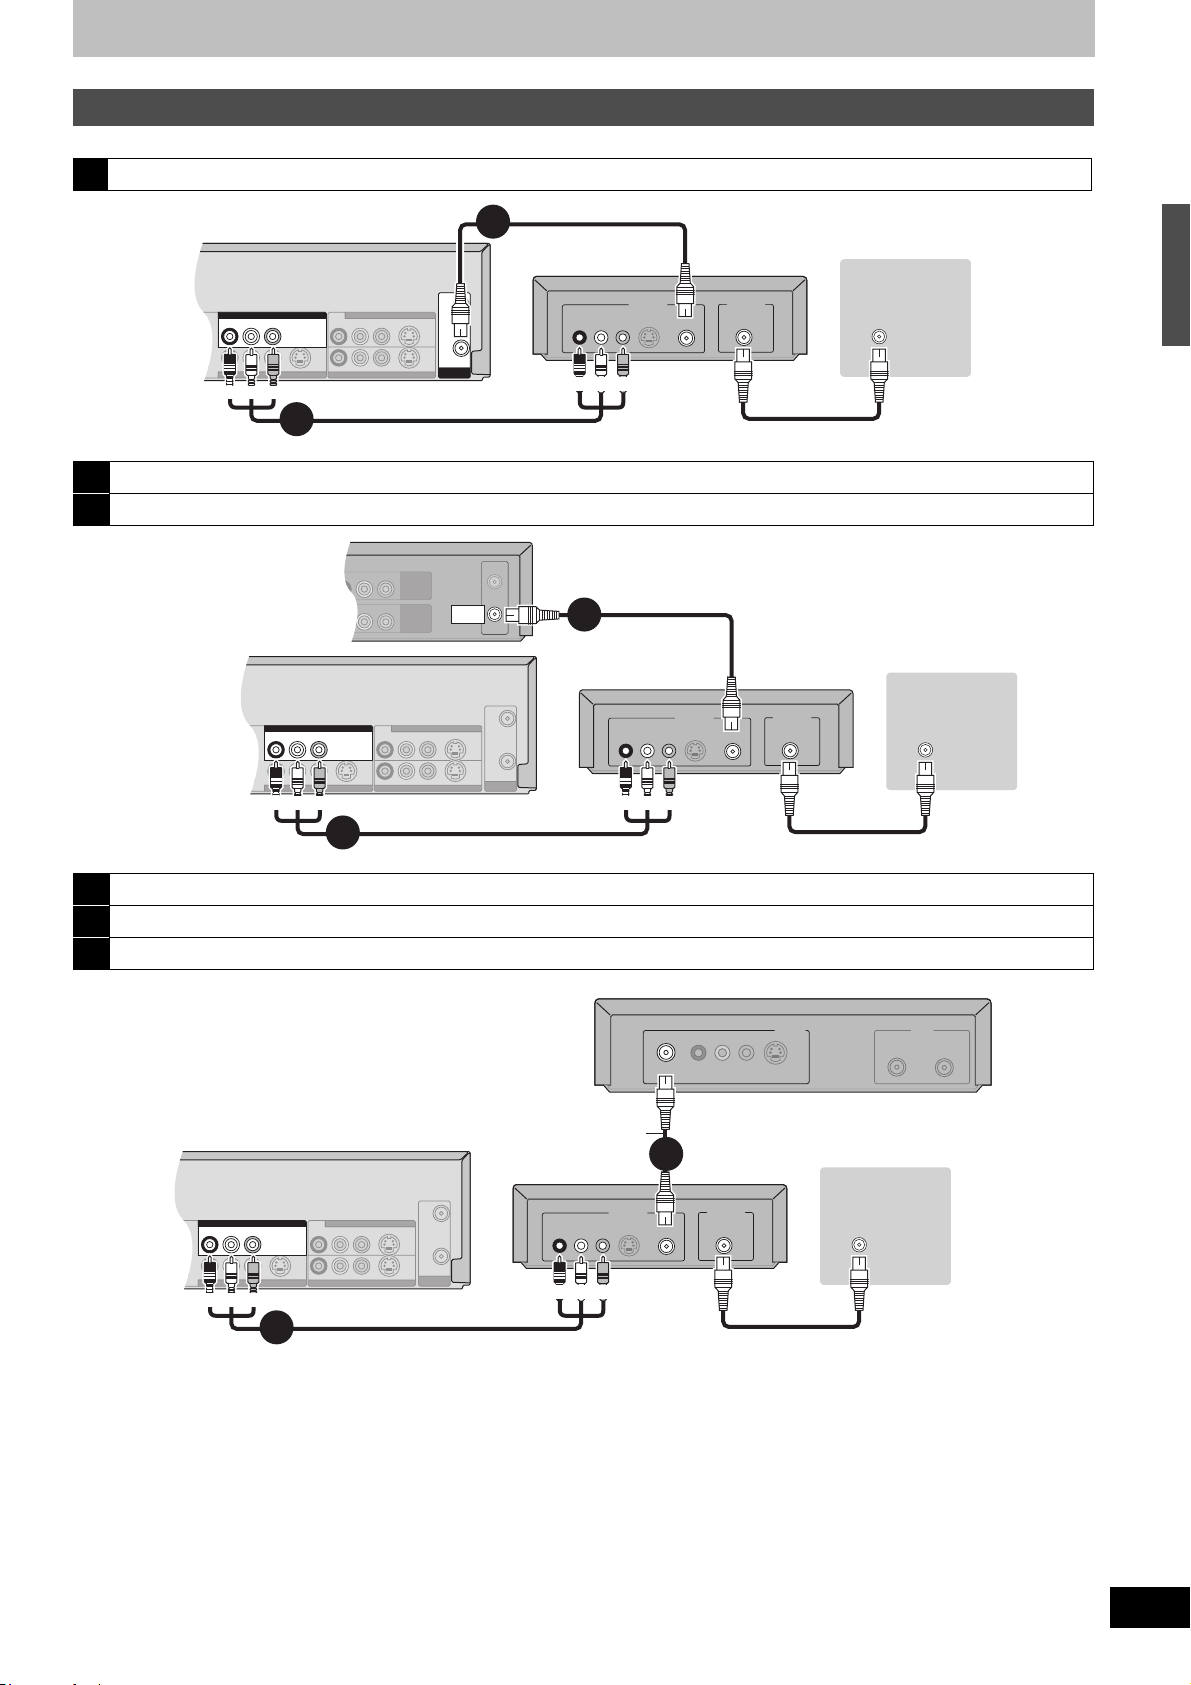
If your television does not have AUDIO/VIDEO terminals, an RF modulator is necessary
PR
DVD/VHS COMMON OUT
DVD PRIORITY OUT
R-AUDIO-L VIDEO S VIDEO
R-AUDIO-L VIDEO S VIDEO
R-AUDIO-L
R-AUDIO-L VIDEO
VIDEO
S VIDEO
S VIDEO
IN1
IN3
RF
OUT
VHF/UHF
RF
IN
DVD/VHS COMMON OUT
R-AUDIO-L VIDEO
VHF/UHF
RF
OUT
RF
IN
PR
VIDEO OUT
DVD/VHS COMMON OUT
DVD PRIORITY OUT
R-AUDIO-L VIDEO S VIDEO
R-AUDIO-L VIDEO S VIDEO
R-AUDIO-L
R-AUDIO-L VIDEO
VIDEO
S VIDEO
S VIDEO
IN1
IN3
RF
OUT
VHF/UHF
RF
IN
DVD/VHS COMMON OUT
R-AUDIO-L VIDEO
VHF/UHF
RF IN
VHF/UHF
RF OUT
OUT
OUT
R-AUDIO-L VIDEO
IN
R-AUDIO-L VIDEO
PR
VIDEO OUT
DVD/VHS COMMON OUT
DVD PRIORITY OUT
R-AUDIO-L VIDEO S VIDEO
R-AUDIO-L VIDEO S VIDEO
R-AUDIO-L
R-AUDIO-L VIDEO
VIDEO
S VIDEO
S VIDEO
IN1
IN3
RF
OUT
VHF/UHF
RF
IN
DVD/VHS COMMON OUT
R-AUDIO-L VIDEO
The circled numbers in the illustration refer to connection “[A]” to “[F]”. Also connect all other cables as well.
Connection with a television (l 16, [A])
a
75 ≠ coaxial cable (included)
This unit
2
RF modulator
AUDIO
VIDEOR L
IN
S-VIDEO
Television
OUT
RF
RF
VHF/UHF
RF IN
STEP 1 Connection
Red White Yellow
3
Audio/Video cable (included)
Connection with a television and video cassette recorder (l 16, [B])
b
Connection with a television, video cassette recorder and cable box or DirecTV receiver (l 17, [D])
c
Red White Yellow
75 ≠ coaxial cable
Video cassette recorder
75 ≠ coaxial cable
3
This unit
Red White Yellow Red White Yellow
4
Audio/Video cable (included)
Connection with a television and cable box or DirecTV receiver (l 17, [C])
d
Connection with a television and satellite receiver other than DirecTV (l 18, [E])
e
Connection with a television, video cassette recorder and satellite receiver other than DirecTV (l 18, [F])
f
RF modulator
AUDIO
IN
S-VIDEO
VIDEOR L
OUT
RF
Cable box or Satellite receiver
RF
75 ≠ coaxial cable
Television
VHF/UHF
RF IN
OUT
VIDEO
R L
RF
AUDI O
This unit
Red White Yellow
4
Audio/Video cable (included)
75 ≠ coaxial cable (included)
RF modulator
AUDIO
Red White Yellow
IN
S-VIDEO
VIDEOR L
3
RF
S-VIDEO
Television
OUT
RF
75 ≠ coaxial cable
VHF/UHF
RF IN
IN
Satellite Cable
19
RQT8346
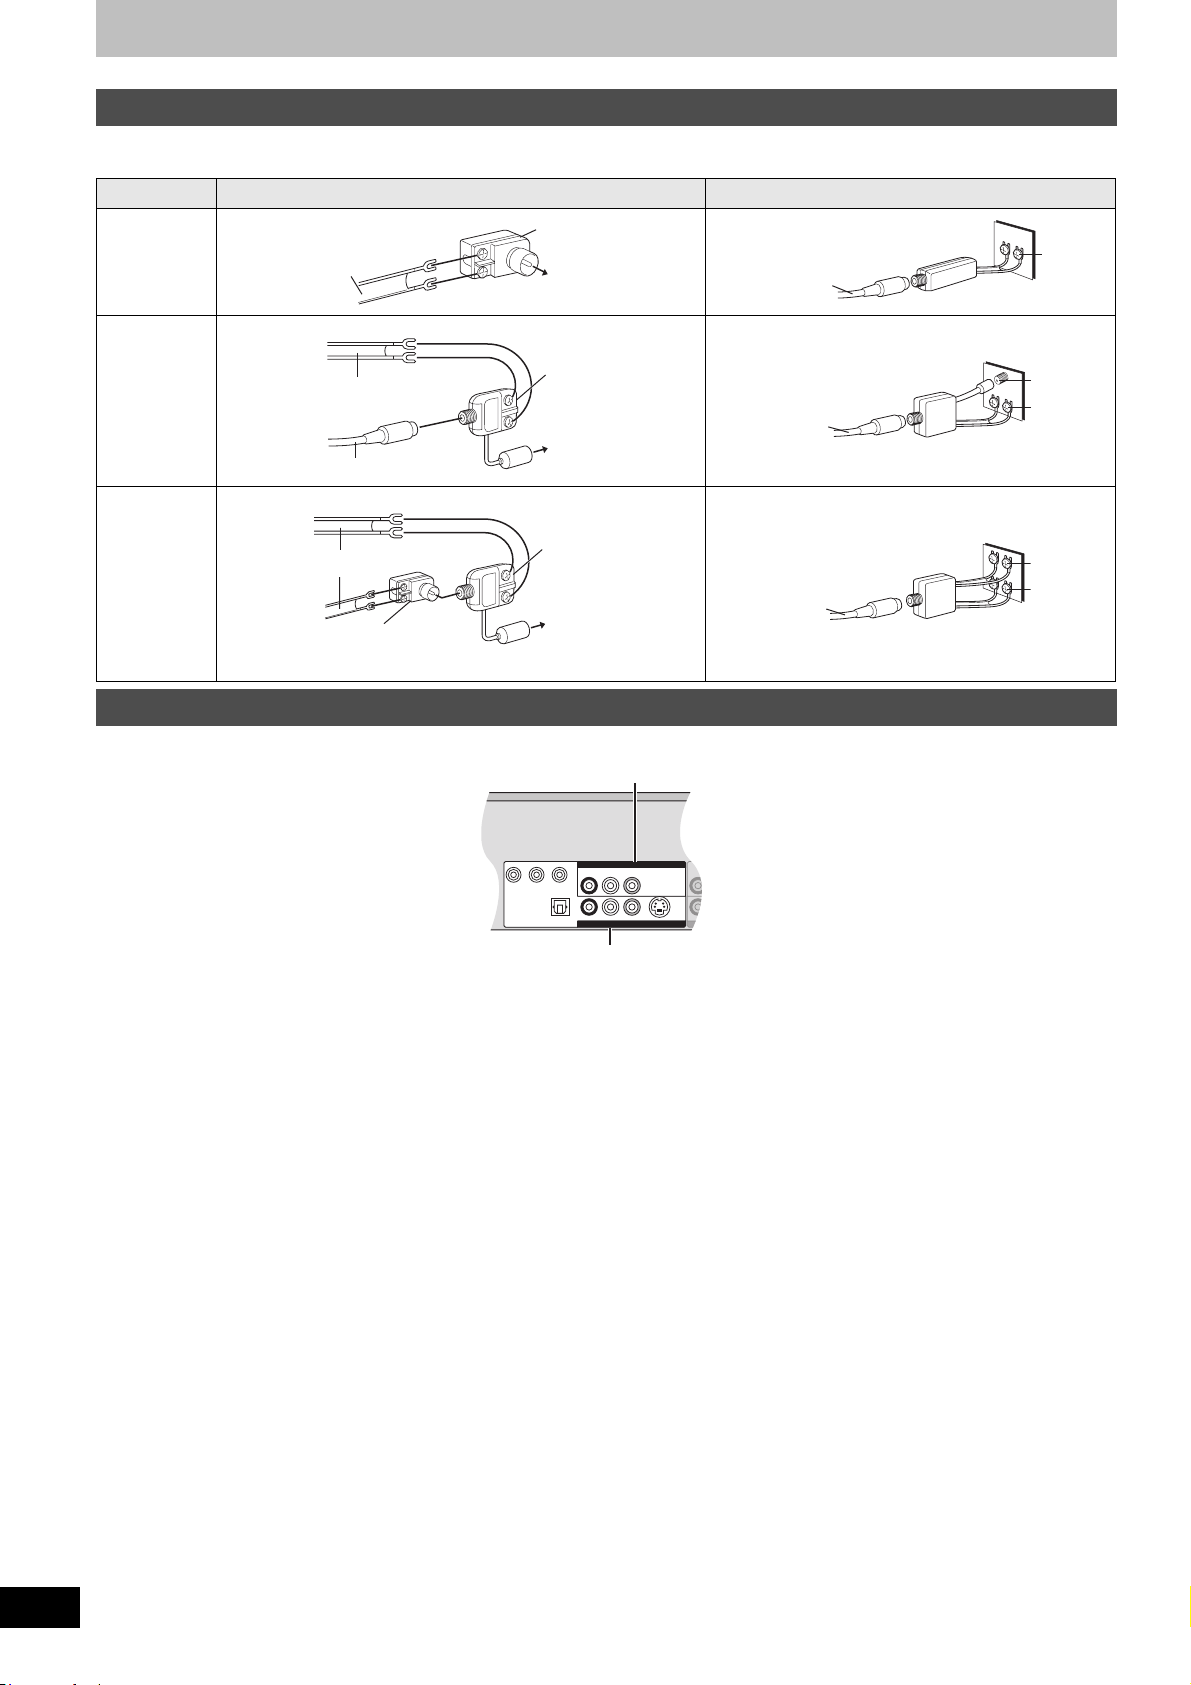
STEP 1 Connection
Y
P
B
PR
OPTICAL
COMPONENT VIDEO OUT
DIGITAL AUDIO OUT
(PCM/BITSTREAM)
DVD/VHS COMMON OUT
DVD OUT
R-AUDIO-L VIDEO S VIDEO
R-AUDIO-L VIDEO S VIDEO
R-A
R-A
DVD/VHS COMMON OUT
R-AUDIO-L VIDEO
DVD PRIORITY OUT
Y
P
B
PR
OPTICAL
COMPONENT VIDEO OUT
DIGITAL AUDIO OUT
(PCM/BITSTREAM)
R-AUDIO-L VIDEO S VIDEO
If the antenna connector doesn’t match
Use one of the following connections to suit the antenna lead to the unit’s RF IN terminal, and the 75 ≠ coaxial cable to the antenna terminals on
the equipment (television etc.). Refer to other equipment’s operating instructions.
Type This unit Other equipment (television etc.)
A twin lead
from the antenna
(Flat) Twin lead
300 ≠ cable
300 to 75 ≠
transformer
To the unit’s
RF IN terminal
75 to 300 ≠ transformer
75 ≠ coaxial cable
VHF
or
UHF
Television
A twin lead
and a
coaxial plug
from the antenna
VHF/UHF band mixer
(Flat) Twin lead 300 ≠ cable
To the unit’s
RF IN terminal
(Round) 75 ≠ coaxial cable
Two twin
leads
from the antenna
VHF/UHF band mixer
(Flat) Twin lead 300 ≠ cable
To the unit’s
300 to 75 ≠ transformer
RF IN terminal
DVD output and DVD/VHS output
The unit has DVD/VHS COMMON output terminals and DVD PRIORITY output terminals.
DVD/VHS COMMON output
VHF/UHF band separator
75 ≠ coaxial cable
VHF/UHF band separator
75 ≠ coaxial cable
VHF
UHF
Television
VHF
UHF
Television
DVD PRIORITY output
DVD/VHS COMMON OUT
≥For DVD/VHS COMMON output terminals, both DVD and VHS signals can be output.
DVD PRIORITY OUT
≥You can also playback a tape with the DVD PRIORITY output terminal except while recording, or making a scheduled recording, on the DVD.
20
RQT8346
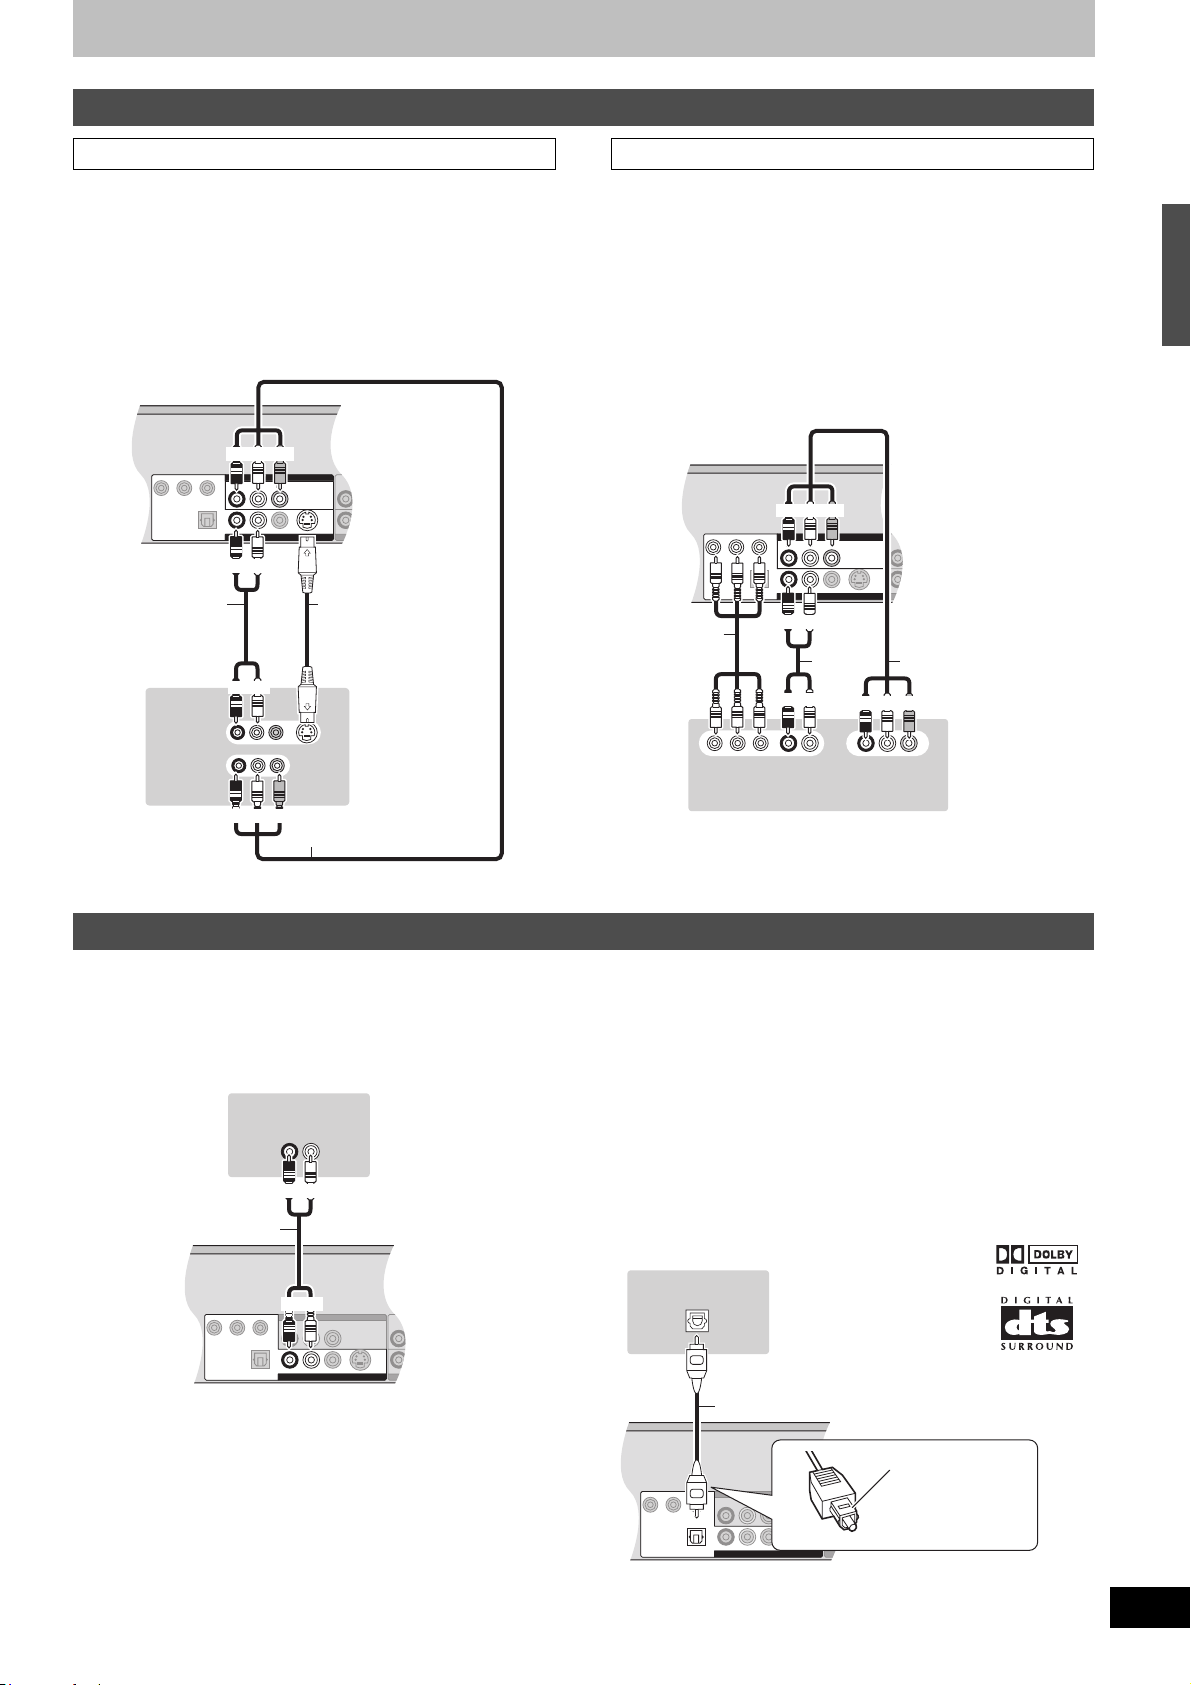
To enjoy even higher picture quality
Y
P
B
PR
OPTICAL
COMPONENT VIDEO OUT
DIGITAL AUDIO OUT
(PCM/BITSTREAM)
DVD/VHS COMMON OUT
DVD OUT
R-AUDIO-L VIDEO
R-AUDIO-L VIDEO S VIDEO
R-A
R-A
DVD PRIORITY OUT
Y
P
B
PR
OPTICAL
COMPONENT VIDEO OUT
DIGITAL AUDIO OUT
(PCM/BITSTREAM)
R-AUDIO-L VIDEO S VIDEO
DVD/VHS COMMON OUT
R-AUDIO-L VIDEO
Y
P
B
PR
OPTICAL
COMPONENT VIDEO OUT
DIGITAL AUDIO OUT
(PCM/BITSTREAM)
DVD/VHS COMMON OUT
DVD OUT
R-AUDIO-L VIDEO
R-AUDIO-L VIDEO S VIDEO
R-A
R-A
DVD PRIORITY OUT
Y
P
B
PR
OPTICAL
COMPONENT VIDEO OUT
DIGITAL AUDIO OUT
(PCM/BITSTREAM)
R-AUDIO-L VIDEO S VIDEO
DVD/VHS COMMON OUT
R-AUDIO-L VIDEO
Y
P
B
PR
OPTICAL
COMPONENT VIDEO OUT
DIGITAL AUDIO OUT
(PCM/BITSTREAM)
DVD/VHS COMMON OUT
DVD OUT
R-AUDIO-L VIDEO
R-AUDIO-L VIDEO S VIDEO
R-A
R-A
DVD PRIORITY OUT
Y
P
B
PR
OPTICAL
COMPONENT VIDEO OUT
DIGITAL AUDIO OUT
(PCM/BITSTREAM)
R-AUDIO-L VIDEO S VIDEO
Y
P
B
PR
OPTICAL
COMPONENT VIDEO OUT
DIGITAL AUDIO OUT
(PCM/BITSTREAM)
DVD/VHS COMMON OUT
DVD OUT
R-AUDIO-L VIDEO
R-AUDIO-L VIDEO S VIDEO
R-A
R-A
DVD PRIORITY OUT
Y
P
B
PR
OPTICAL
COMPONENT VIDEO OUT
DIGITAL AUDIO OUT
(PCM/BITSTREAM)
R-AUDIO-L VIDEO S VIDEO
Connecting to the S VIDEO IN terminal
The S VIDEO OUT terminal achieves a more vivid picture than the
VIDEO OUT terminal. (Actual results depend on the television.)
After completing After completing “Connection with a television”
(l 16), “Connection with a television and cable box or DirecTV
receiver” (l 17) or “Connection with a television and satellite
receiver other than DirecTV” (l 18), connect the S Video cable in
illustrated below.
Usually you can watch a picture from INPUT2 terminal. When you
want to playback VHS while recording on DVD, change to INPUT1
terminal.
This unit
Red White Yellow
Red White
Audio cable S Video cable
Red White
AUDI O IN
INPUT2
INPUT1
AUDI O IN
Television
Red White Yellow
¢ For how to connect the Audio/Video cable (l 16, [A]), (l 17, [C])
or (l 18, [E])
S VIDEO IN
R L
VIDEO IN
R L
VIDEO IN
Connected Audio/Video
cable (included)
¢
Connecting to the COMPONENT VIDEO IN terminals
These terminals can be used for either interlace or progressive
output (l 94) and provide a purer picture than the S VIDEO OUT
terminal.
After completing “Connection with a television” (l 16), “Connection
with a television and cable box or DirecTV receiver” (l 17) or
“Connection with a television and satellite receiver other than
DirecTV” (l 18), connect the COMPONENT VIDEO cable in
illustrated below.
Usually you can watch a picture from COMPONENT VIDEO INPUT
terminal. When you want to playback VHS while recording on DVD,
change to INPUT1 terminal.
≥Connect to terminals of the same color.
This unit
Red White Yellow
VIDEO IN
Red White
Red White
R L
AUDIO IN
Audio
cable
Connected Audio/Video
cable (included)
Red White Yellow
VIDEO IN
R L
AUDI O IN
INPUT1
¢
Component
video cable
COMPONENT
Television
¢ For how to connect the Audio/Video cable (l 16, [A]), (l 17, [C])
or (l 18, [E])
STEP 1 Connection
Connecting an amplifier or system component
∫ Connection to a stereo amplifier ∫ Connecting an amplifier with a digital input
terminal
≥When connecting this unit to a television with an HDMI cable, set
“HDMI Audio Output” to “Off” in the Setup menu (l 77).
≥To enjoy multi-channel surround sound DVD-Video, connect an
Amplifier’s rear panel
AUDI O IN
R L
Red White
Audio cable
Red White
This unit
To DVD OUT
or
amplifier with a built-in decoder displaying these logo marks using
an optical digital audio cable and change the settings in “Digital
Audio Output” (l 76).
≥Before purchasing an optical digital audio cable, check the terminal
shape of the connected equipment.
≥You cannot use DTS Digital Surround decoders not suited to DVD.
≥Even if using this connection, output will be only 2 channels when
playing DVD-Audio.
Amplifier’s rear panel
OPTICAL IN
Optical digital audio cable
Do not bend sharply when
connecting.
Insert fully, with
this side facing up.
This unit
21
RQT8346
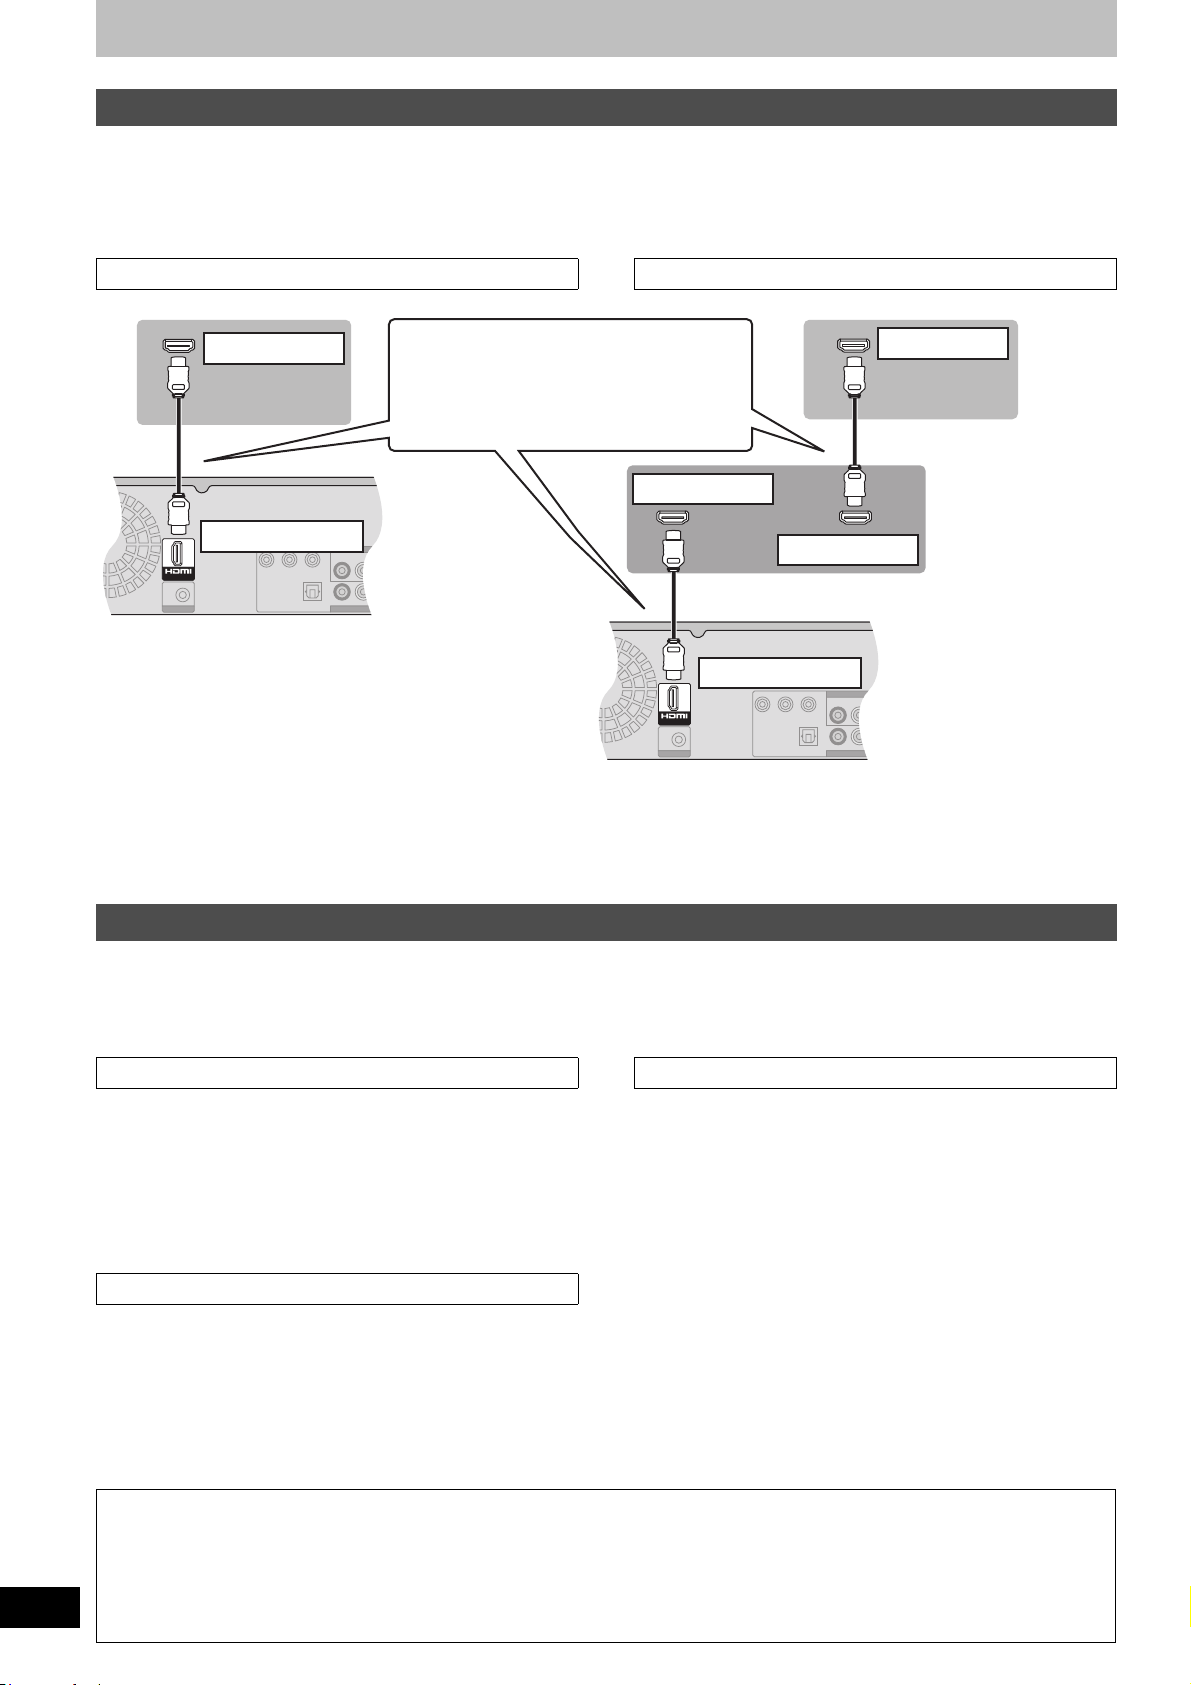
STEP 1 Connection
G-LINK
Y
P
B
PR
OPTICAL
COMPONENT VIDEO OUT
DIGITAL AUDIO OUT
(PCM/BITSTREAM)
DVD/VHS COMM
DVD PRIORITY OU
R-AUDIO-L VIDEO
R-AUDIO-L VIDEO
AV OUTAV OUT
G-LINK
Y
P
B
PR
OPTICAL
COMPONENT VIDEO OUT
DIGITAL AUDIO OUT
(PCM/BITSTREAM)
DVD/VHS C
DVD PRIORIT
R-AUDIO-L VID
R-AUDIO-L VID
AV OUTAV OUT
Connecting with an HDMI (High Definition Multimedia Interface) terminal
HDMI is the next-generation interface for digital devices. When connected to an HDMI compatible unit, an uncompressed digital audio and video
signal is transmitted. You can enjoy high quality, digital video and audio with just one cord. When connecting to an HDMI-compatible HDTV (High
Definition Television), the output can be switched to 1080i or 720p HD video.
Set the following:
From the Setup menu (l 77), “HDMI Video Output” and “HDMI Audio Output” to “On”.
≥Please use HDMI cables that have the HDMI logo (as shown on the cover).
Connecting to a TV Connecting to an amplifier
Television
Television
HDMI IN
HDMI cable
Please use a cable 5.0 m (16
length for stability and prevention of
deterioration in video quality.
This unit
HDMI AV OUT
≥
If connecting to equipment incompatible with CPPM (Content
Protection for Prerecorded Media) (
l
93), copy-protected
DVD-Audio cannot be output through the HDMI terminal. Connect the
audio cables (red, white) to the corresponding audio input terminals.
≥If you are connecting to equipment that is only compatible with
2 channel output, audio with 3 channels or more will be down
mixed (l 93) and output as 2 channels. (Some discs cannot be
down mixed.)
≥For units compatible with HDCP (High-Bandwidth Digital Content
Protection) copyright protection that are equipped with a digital DVI
input terminal (PC monitors, etc.):
Depending on the unit, images may not display property or at all when
connecting with a DVI/HDMI switching cable. (Audio cannot be output.)
HDMI IN
2
/5 feet) or less in
HDMI IN
HDMI OUT
Amplifier’s rear panel
This unit
HDMI AV OUT
≥If the speaker setup cannot be completed on the amplifier, then
use the “HDMI Connection Speakers Setting” setting (l 77).
≥
If connecting to equipment incompatible with CPPM (Content
Protection for Prerecorded Media) (
l
93), copy-protected DVD-Audio
cannot be output through the HDMI terminal. Connect to the amplifier
with an optical digital cable or audio cables (red and white).
22
RQT8346
Control with HDMI (HDAVI Control)
If connecting with a Panasonic television equipped with the HDAVI function, you can use this convenient function to control both the recorder and the television.
After connecting the unit to a television using an HDMI cable, set “Ctrl with HDMI” to “On”. (l 77)
≥Depending on the cable used, this function may not be possible.
For the connection to be completed and activate correctly, turn on all HDAVI Control compatible equipment and select this unit’s input
channel on the connected television. Also when the connection or settings are changed, repeat this procedure.
Automatic input switching
When the following operations are performed the television will
automatically switch the input channel and displays the
corresponding action.
≥When play starts on the unit
≥When an action that uses the display screen is performed (e.g.,
Direct Navigator screen, schedule recording screen)
Note
≥When the unit is recording on the DVD drive, the output does not
automatically switch even if when you operate the VHS.
Power on link
The television automatically turns on and the corresponding display
appears when the following operations are performed with the
television in standby mode.
≥When play starts on the unit
≥When an action that uses the display screen is performed (e.g.,
Direct Navigator screen, schedule recording screen)
Note
≥When the unit is recording on the DVD drive, the television does
not automatically turn on even if when you operate the VHS.
Equipment compatible with and equipment scheduled to be compatible with HDAVI Control (as of January 2006).
Plasma TVs: TH-42/50/58PX600, TH-37/42/50PX60, TH-58PX60,TH-42PD60, TH-42/50PX6
LCD TVs: TC-26/32LX600, TC-23/26/32LX60, TC-26/32LE60
LCD projection TVs: PT-52/56/61LCX66
Receiver: SA-XR57P
≥The HDAVI Control function will only work if you can connect this unit with Panasonic equipment equipped with the HDAVI control function.
Before purchasing equipment, confirm that it has the HDAVI Control function.
Power off link
When the television is turned off, this unit is also automatically turned off.
The unit automatically turns off even if the FUNCTIONS screen, the
status message or the on-screen menu is displayed, during playback
or when the unit is only scheduled recording.
Note
≥Even if the television is turned off, the unit will not turn off at the
same time in the following conditions:
- When you pressed [¥, REC] and the unit is recording.
- When copying
- When finalizing
For your reference
≥When [1, PLAY] is pressed on this unit for “automatic input
switching” or “power on link”, the playback is not immediately
displayed on the screen and it may not be possible to watch the
contents from where playback starts.
In this case, press [:, SKIP] or [6, SLOW/SEARCH] to go
back to where playback started.
When the DIGITAL AUDIO OUT (Optical) terminal is used for audio
≥
output and the unit is connected to the television with a HDMI cable,
set “HDMI Audio Output” to “Off” in the setup menu. (
l
77)
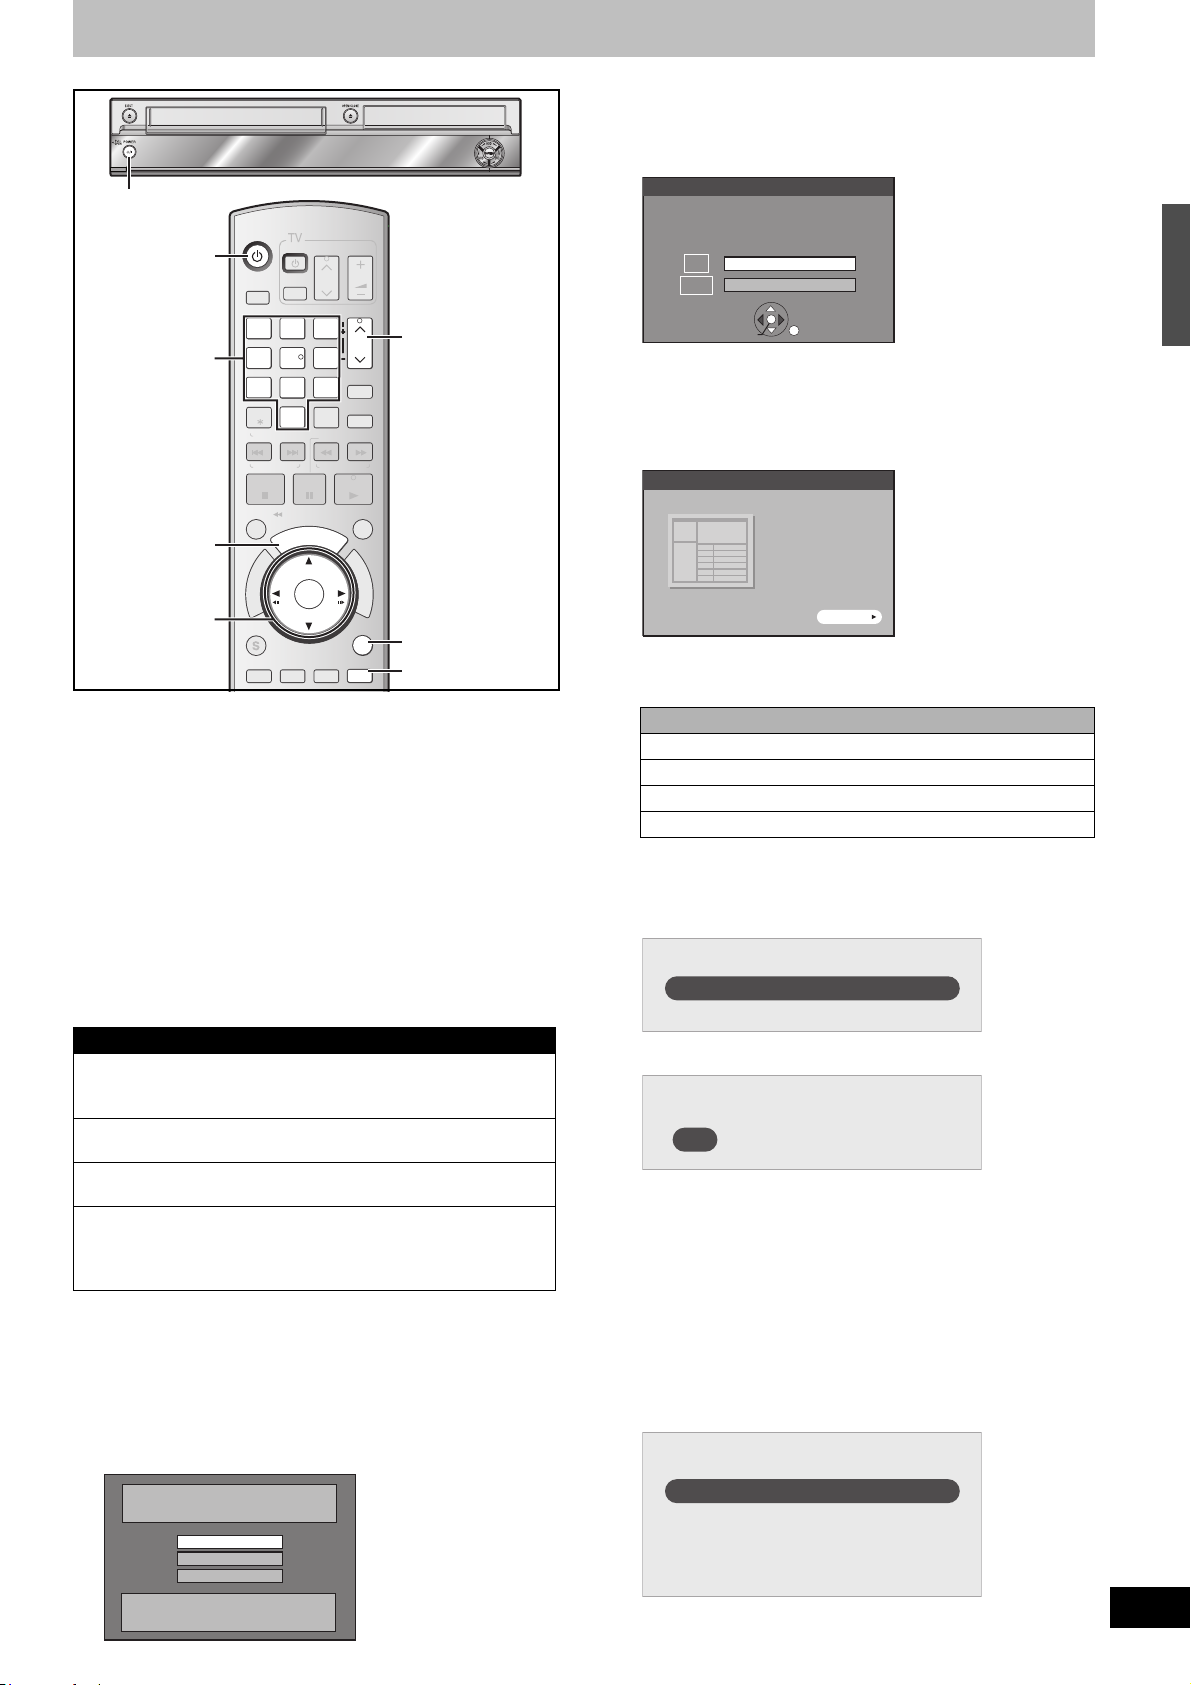
STEP 2 Setting up the TV Guide On Screen® system
RESET
[2] Press [3, 4] to select the language and then
press [ENTER].
≥If you make a mistake, press [RETURN] to return to an earlier
screen.
POWER Í/ l
DVD/VHS
DVD/VHS
POWER
POWER
DRIVE
SELECT
1
1
4
4
7
7
CANCEL
RESET
SKIP/
INDEX
TIME SLIP
/
R
O
T
A
G
I
V
A
N
T
C
E
R
I
D
SUB MENU
AB
POWER
TV/VIDEO
2
2
5
5
8
8
0
0
PAU S ESTOP
JET REW
U
G
U
G
V
V
T
T
ENTER
ENTER
DISPLAYAUDI O
VOLUME
CH
TRACKING/V-LOCK/PAGETRACKING/V-LOCK/PAGE
TRACKING/V-LOCK/PAGE
TRACKING/V-LOCK/PAGE
3
3
CH
CH
6
6
VCR Plus+
9
9
DELETE
INPUT
SELECT
SLOW/SEARCH
REW
FF
PLAY
SCHEDULE
I
D
I
D
E
E
F
U
N
C
T
I
O
N
S
RETURN
RETURN
CREATE
Info
Info
CHAPTER
PAG E W
RETURN
Info
,
X
Í
Numbered
buttons
TV GUIDE
3,4,2,1
ENTER
After plugging the unit into your household AC outlet and then
pressing [Í, DVD/VHS POWER] to turn the unit on for the first time,
the unit starts language, TV aspect type and TV Guide On Screen
system setup.
TV Guide On Screen® system
This unit features the TV Guide On Screen® system that provides an
8-day grid of TV programs available in your area. Use the TV Guide
On Screen
R
system to choose TV programs and simplify the
recording of your favorite TV shows (l 32, 35–39). Best of all this
service is free!
≥The first few days of listings usually appear within 24 hours after a
successful Setup. It may take up to six days for the full eight days
of program listings to appear.
≥In order to cool the circuits used when downloading the program
listings, the cooling fan may sometimes operate when the unit is
turned off. This is not a malfunction.
IMPORTANT
≥The TV Guide On Screen® system must be set up whether it
is then used or not. You cannot use the scheduled
recording feature unless this setup is completed.
≥TV Guide On Screen system is supported by selected DISH
network and DirecTV receivers, using 480i mode.
≥DirecTV/DISH Network service is only available in the
United States.
≥If you are using a satellite service other than DirecTV, you
cannot receive the program listings on this unit. Without
this information, program-based recordings cannot be
made. However, recordings can still be set manually.
Preparation
Turn on the television and select the appropriate video
input to suit the connections to this unit.
≥When using the cable box or DirecTV receiver, check the following.
- Make sure the IR Blaster is connected and positioned properly
(l 17).
- Make sure the cable box or DirecTV receiver is turned on.
[1] Press [Í, DVD/VHS POWER].
Select Language
Seleccione el idioma
Sélection de Langue
English
Español
Français
Press ENTER
Pulse ENTER
Appuyer sur ENTER
[3] Press [3, 4] to select “4:3 TV” or “16:9
Widescreen TV” and then press [ENTER].
TV Guide setup begins.
≥Only English is displayed in the TV Guide On Screen®
Press [ENTER].
Following the on-screen messages, input the operating
environment for your television.
®
≥Select “Next” and then press [ENTER] to go to the next screen.
≥Select “Back” and then press [ENTER] to return to the previous
[4] Set the country (USA/Canada)
[5] Set the ZIP (Postal) code
[6] Set the service(s) being used.
≥You can select up to 2 services.
≥If you selected “Cable with a Cable Box” or “DirecTV”, then
≥If you cannot choose the service you use, then select
To learn more about the setup contents of various services, see
the list on the next page.
Aspect Ratio Selection
Select TV type and press ENTER.
(Please refer to Operation lnstraction
4:3
16:9
system. Other languages cannot be displayed.
TV Guide On Screen interactive program guide
TV made easy.
Just press ENTER on your remote to begin!
Basic operations of the remote control
To highlight selection > [3, 4, 2, 1]
To confirm > Press [ENTER]
To view help information > Press [Info]
To enter numbers > Press the numbered buttons
screen.
Which country is your DVD Recorder located in?
USA
Canada
Please enter the 5-digit ZIP Code where your DVD Recorder is located:
= = = = =
Press [3, 4] to select the service being used and press
[ENTER]. If you want to select 2 services, press [3, 4] to
select one more service and press [ENTER].
also set and select “Antenna”.
“Antenna”, and continue. Then, after exiting the “Set Clock and
Channels Automatically” screen in step 8, press [ENTER],
continue and press [RETURN]. After this step, perform “Set
Clock Manually”. (l 25)
Please select which service(s) you would like your TV Guide On Screen™ to
support (check all that apply):
Antenna
Cable without a Cable Box
Cable with a Cable Box
DirecTV
DISH Network
for details)
4:3 TV
16:9 Widescreen TV
ENTER
START
®
23
RQT8346
system
STEP 1 Connection/STEP 2 Setting up the TV Guide On Screen

STEP 2 Setting up the TV Guide On Screen® system
Refer to the control reference on page 23.
Please perform setup by following all instructions that apply to your current service.
DirecTV/DISH Network service is only available in the United States.
Service Set the following
Antenna
≥You cannot select both “Antenna” and “Cable without a Cable Box”.
≥Further setup is not necessary.
Cable without a
Cable Box
1 Cable box connection channel (“RF, Channel 2”/ “RF, Channel 3”/ “RF, Channel 4”/ “IN3”)
- Select “IN3”.
(If you are connecting the cable box to this unit’s RF terminal, select “RF, Channel 2”, “RF, Channel 3” or
“RF, Channel 4”, according to the cable box setting.)
2 Are you using a digital service package?
Select “Yes”, “No” or “I don’t know”.
3 Check how the channels are input.
Select how your current cable box inputs 2, 3, and 4-digit numbered channels.
4 Cable box brand
- Move down with [4] for more brands.
- You can also press [PAGE W] or [PAGE X] to skip several lines.
- Select “Not Listed” if you cannot find your brand on the list.
Cable with a
Cable Box
5 IR signal code
- Make sure your cable box is set to the channel that appears on screen and then press [ENTER].
The unit begins trying various IR codes to see which one communicates properly with your cable box. It’s quite
common for this phase of the setup to be repeated numerous times.
DirecTV
Is your cable box now tuned to channel 09?
Yes
No
Test this code again
- If the cable box has changed to channel 09, select “Yes”.
- If the cable box is still set to the same channel, select “No”. Repeat this step until the cable box changes to
channel 09.
If you want to try the code again for some reason, e.g., you accidentally moved the IR Blaster, select “Test this
code again”.
1 Satellite receiver connection channel (“RF, Channel 2”/ “RF, Channel 3”/ “RF, Channel 4”/ “IN3”)
- Select “IN3”.
(If you are connecting the satellite receiver to this unit’s RF terminal, select “RF, Channel 2”, “RF, Channel 3” or
“RF, Channel 4”, according to the satellite receiver setting.)
2 Check how the channels are input.
Select how your current DirecTV receiver inputs 2, 3, and 4-digit numbered channels.
3 Satellite receiver brand
- Move down with [4] for more brands.
- You can also press [PAGE W] or [PAGE X] to skip several lines.
4 IR signal code
- Turn your satellite receiver ON and then press [ENTER].
If you are watching DirecTV in 4:3 aspect with the side panel, set the side panel to “Off” on the DirecTV
receiver in order to correctly receive the program listings.
The unit begins trying various IR codes to see which one communicates properly with your satellite receiver. It’s
quite common for this phase of the setup to be repeated numerous times.
Did your satellite receiver change channels?
24
RQT8346
Yes
No
Test this code again
Look at the display of the DirecTV receiver.
- If the channel display changes, then select “Yes”.
- If the satellite receiver is still set to the same channel, select “No”. Repeat this step until the satellite receiver
changes the channel.
If you want to try the code again for some reason, e.g., you accidentally moved the IR Blaster, select “Test this
code again”.
≥Satellite receiver connection channel (“RF, Channel 2”/ “RF, Channel 3”/ “RF, Channel 4”/ “IN3”)
- Select “IN3”.
DISH Network
(If you are connecting the satellite receiver to this unit’s RF terminal, select “RF, Channel 2”, “RF, Channel 3” or
“RF, Channel 4”, according to the satellite receiver setting.)
You cannot use the IR Blaster included with this unit.
You cannot set other equipment.
Once setup is finished l 25, Step 7, Confirm the settings.
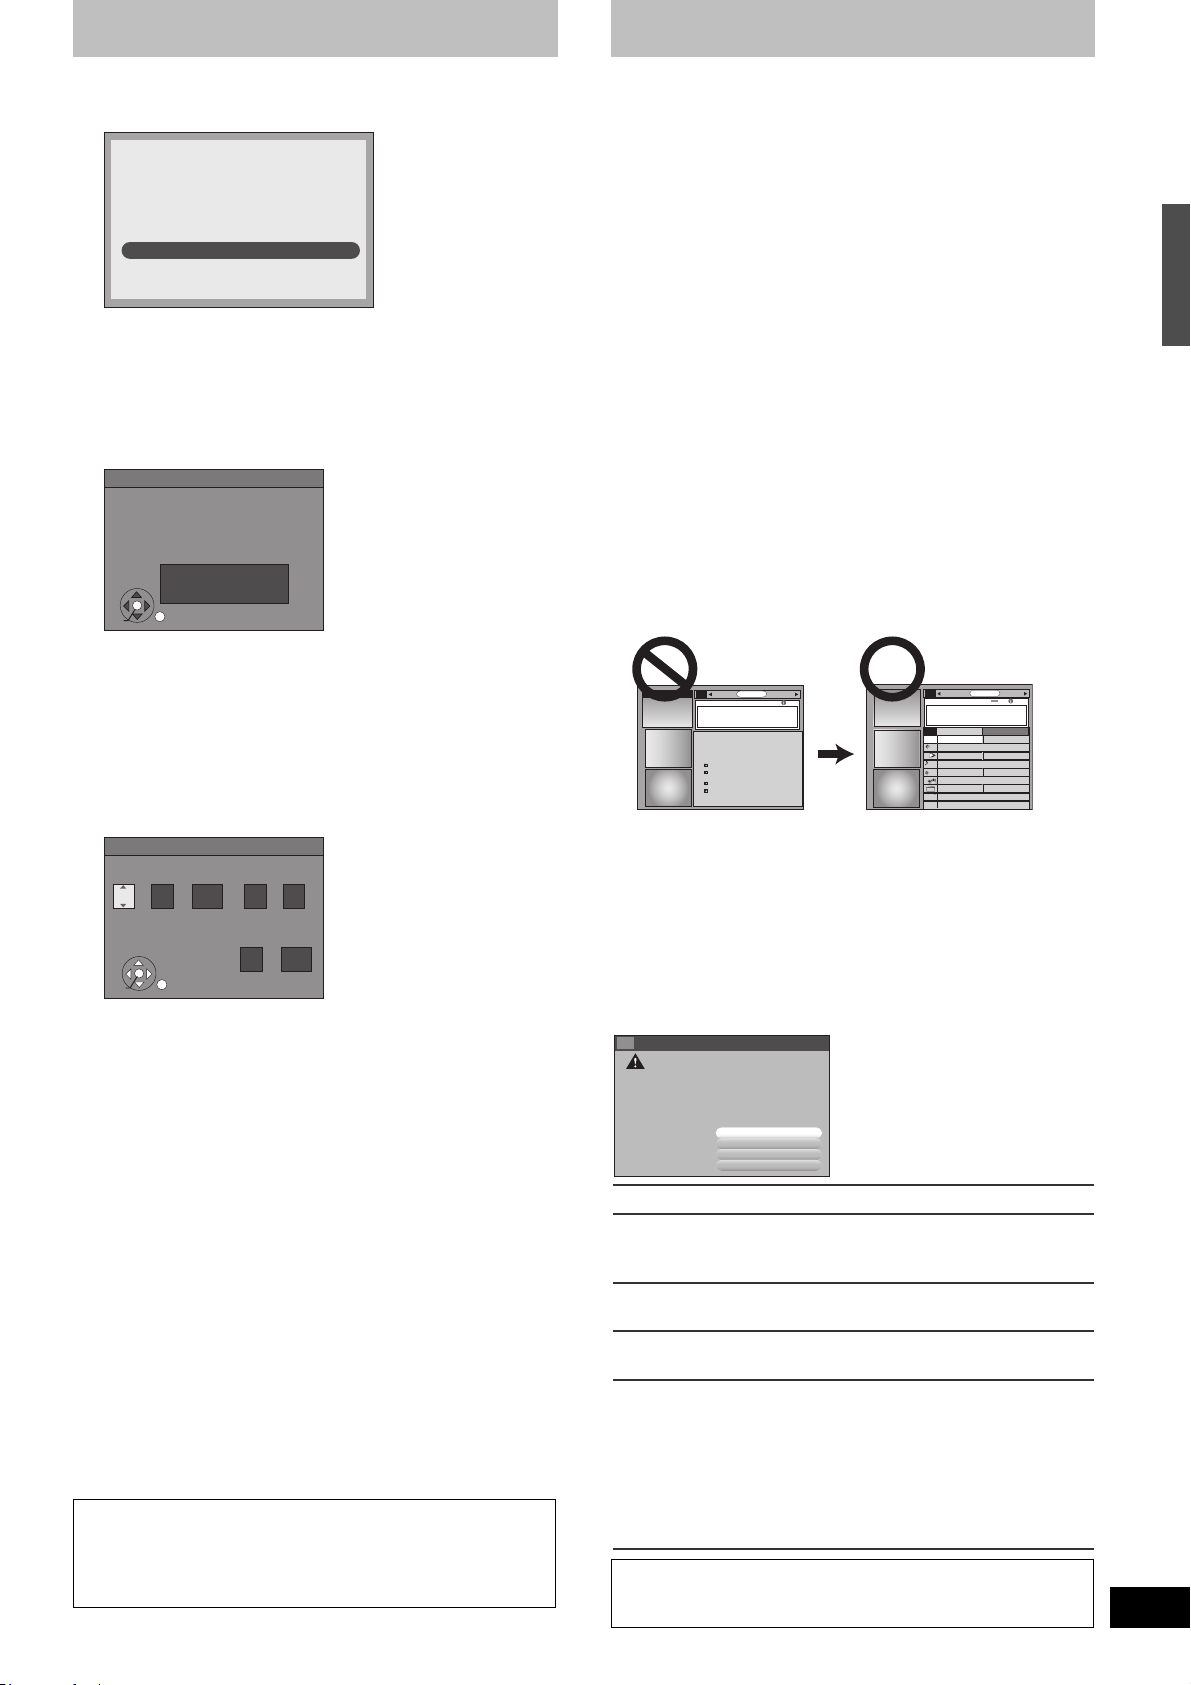
STEP 3 Downloading
TODAY
[7] Confirm the settings.
e.g.,
ZIP
Code - 11111 (USA)
Cable on "RF"
Are the above settings correct?
Yes, continue setup process.
No, repeat setup process
If the information is correct, select “Yes, continue setup process”.
≥
≥If the information is not correct, select “No, repeat setup
process” to start the setting again.
[8] Press [ENTER].
Depending on the equipment that you connected, one of the
following screens appears.
“Set Clock and Channels Automatically” screen
Set Clock and Channels Automatically
Connect antenna or Cable TV to RF IN.
If you use a cable box, then tune it to
your local PBS channel, When done,
please press ENTER.
ENTER
Press [ENTER].
The unit starts setting channels automatically. This takes a few
minutes. The unit then proceeds with setting the clock
automatically. The time is displayed when finished.
A television reception screen or a blue background screen is displayed.
If there is an error while setting the channels and/or clock
automatically, the “Set Clock Manually” screen (l below) is
automatically displayed.
“Set Clock Manually” screen
Set Clock Manually
Month Day Year
/ :
1
/
1
ENTER
[1] Press [2, 1] to select the item you want to change and
then press [3, 4] to change the setting.
≥DST (Daylight Saving Time): On or Off
If you select “On”, the clock is advanced one hour starting
at 2 a.m. on the first Sunday in April and ending at 2 a.m.
on the last Sunday in October.
≥Time Zone shows the time difference from Greenwich
Mean Time (GMT).
EST (Eastern Standard Time) l GMT j5
CST (Central Standard Time) l GMT j6
MST (Mountain Standard Time) l GMT j7
PST (Pacific Standard Time) l GMT j8
AST (Alaska Standard Time) l GMT j9
HST (Hawaii Standard Time) l GMT j10
[2] Press [ENTER].
A television reception screen or a blue background screen is
displayed. The clock starts.
Regarding DST (Daylight Saving Time)
Legal revision is expected to change the DST period in 2007.
When you use the unit with DST on, the change may cause the
unit’s clock to go behind the actual time. Check the DST setting in
“Set Clock Manually” in the “Setup menu” (
reset the clock precisely if you are using this function. This setting
is only for when TV Guide On Screen
When you want to change the TV Guide settings after moving, etc.,
please perform setup steps 1 and 2 on
listings will be erased.)
After completing steps 1 and 2, please perform TV Guide setup
again from the beginning.
2000
SAT AM
DST Time Zone
Off
Hour Minute
12 00
EST
l
74), set DST off and
®
system is not used. (l79)
page 79
. (The program
Refer to the control reference on page 23.
If you are using a satellite service other than DirecTV, you
cannot receive the program listings on this unit.
[1] Press [Í, DVD/VHS POWER]. (The unit turns
off, then wait 24 hours.)
“BYE” appears briefly. This shows the unit is in standby mode.
The unit is now ready to download the program listings.
No damage will occur if the unit is used sooner, but the channel
line-up and program listings may not have been fully
downloaded.
Check the following again, so the downloading will not fail.
If you connect a cable box or a DirecTV receiver,
≥the output terminal of the cable box or DirecTV receiver is
connected to this unit’s RF IN or IN3 terminal (l 17)
≥the IR Blaster is correctly connected and installed (l 17)
≥the cable box or DirecTV receiver is turned on
[2] Press [TV GUIDE].
≥If you find “TV Guide On Screen Setup Progress” displayed on the
television, the unit has not yet downloaded the TV Guide On
®
Screen
data.
≥If you press [TV GUIDE] without completing setup, the start setup
screen will appear. If you want to complete TV Guide setup select
“Start setup”.
≥This unit may download more than one channel line-up. Follow the
on-screen instructions and select one of these.
SEARCHSCHEDULE
SETUP
SCHEDULESEARCH
INFO
TV Guide On Screen Setup Progress
Note: It may take up to 24 hours to start receiving listings.
STEP
search for time
search for TV stations
with TV Guide data
search for channel lineup
listings transmission
STATUS
In Progress
In Progress
In Progress
In Progress
For updating data
Leave the unit in standby mode when you are not using it. The unit
will download the necessary data to maintain the program listings
while it is in standby mode.
Note
Some Setup menus no longer need to be set after this unit
downloads the program listings. These menus turn grey and
become un-selectable. (l 74)
If you press [TV GUIDE] and the following screen appears, then
the unit has not been able to obtain data for 3 days or more.
?????????????????????????????????????????????
??????????????????????????????????????????????
??????????????????????????????????????
??????????????????????????????????????????????
????????????????????????????????????????????
????????????????????????????????????????
??????????????????
???????????????????
????????????????
??????????????????
Exit Guide
Stop Search
Timer Recording
Change System Settings
Exit Guide: Return to the television reception screen.
Stop Search: Stop downloading the data. (However the
unit will automatically stop downloading
the data 5 days after it first started.)
Search Again: Restart the data download when it has
stopped
Timer Recording: Set for scheduled recording manually
(l 33)
Change System Settings:Set the TV Guide settings again.
≥In step 6, if you selected “Antenna” or
“Cable without a Cable Box” to use
simultaneously with another service,
then you may need to select either
“Antenna” or “Cable without a Cable
Box” only (l 23). You will now be able to
watch broadcasts with this unit.
If further assistance is needed,
Contact Panasonic’s Customer Call Center at
1-800-211-PANA (7262).
LISTINGS
8:00 8:30
87
NWGB
TODAY
8:00PM
Last
Channel
pTV
TV
NWBG
ducation
BOX
ANiMe
Network
PBS
INFO
8:30PM
®
25
RQT8346
system/STEP 3 Downloading
STEP 2 Setting up the TV Guide On Screen
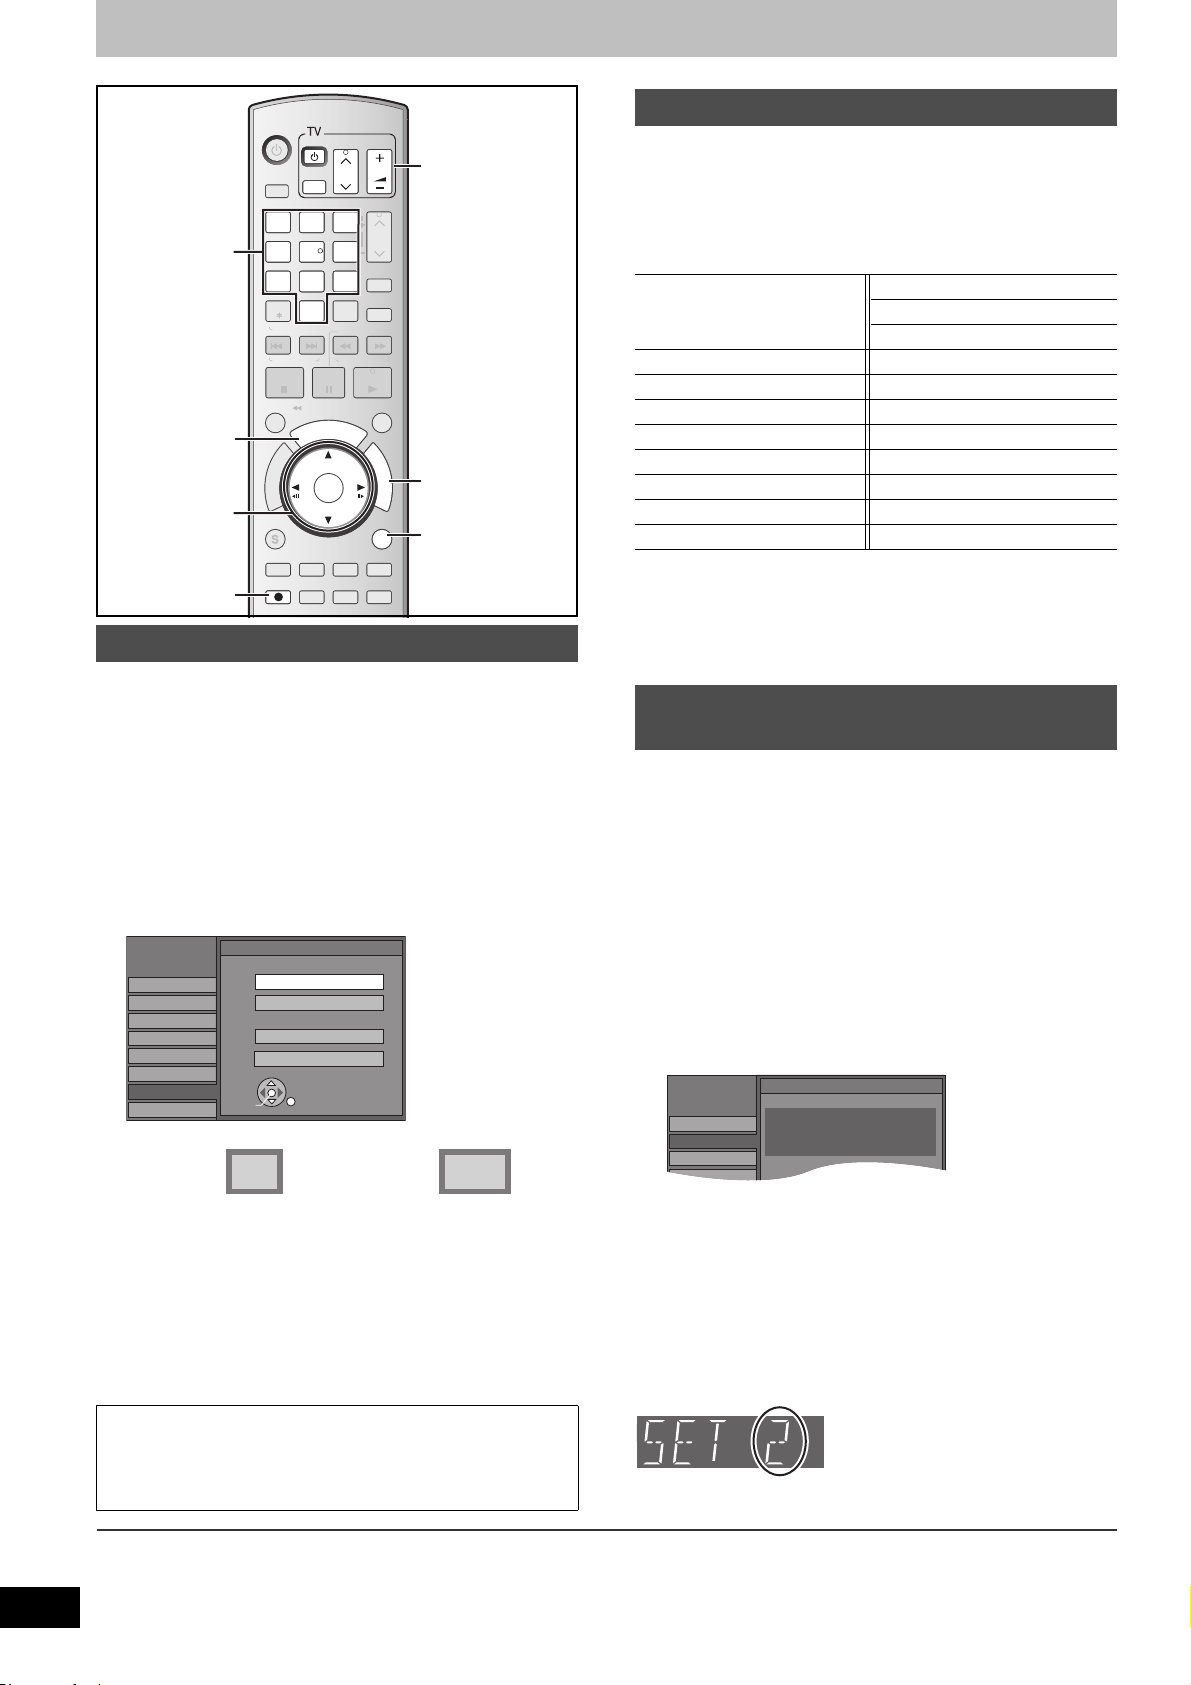
STEP 4 Set up to match your television and the unit’s remote control
RESET
Disc
Setup
Remote Control Code
Press “±” and “ENTER” together
for more than 2 seconds on the remote.
Channel
Setup
Disc
DVD/VHS
POWER
POWER
POWER
VOLUME
VOLUME
CH
DELETE
FF
F
F
U
U
N
N
C
C
T
T
I
I
O
O
N
N
S
S
RETURN
RETURN
Info
CM SKIP
TV operation
buttons
FUNCTIONS
RETURN
Numbered
buttons
TV GUIDE
3,4,2,1
ENTER
¥
DRIVE
SELECT
1
1
4
4
7
7
CANCEL
RESET
SKIP/
INDEX
TIME SLIP
/
R
O
T
A
G
I
V
A
N
T
C
E
R
I
D
SUB MENU
AB
REC
REC
CH
CH
TV/VIDEO
TV/VIDEO
3
3
2
2
6
6
5
5
9
9
8
8
INPUT
SELECT
0
0
SLOW/SEARCH
PAU S ESTOP
JET REW
U
U
G
G
I
I
D
D
V
V
T
T
ENTER
ENTER
CREATE
DISPLAYAUDI O
CHAPTER
REC MODE
STATUS
TRACKING/V-LOCK/PAGE
TRACKING/V-LOCK/PAGE
VCR Plus+
REW
PLAY
SCHEDULE
E
E
Selecting television type
This setting allows you to select the type of television connected.
[1] While stopped
Press [FUNCTIONS].
[2] Press [3, 4] to select “Other Functions” and
then press [ENTER].
[3]
Press [3,4] to select “Setup” and then press
[ENTER].
[4] Press [3, 4] to select “TV Screen” and then
press [1].
[5] Press [3, 4] to select “TV Type” and then
press [ENTER].
Setup
Channel
Setup
Disc
Video
Audio
Display
TV Screen
VHS
ENTER
≥Aspect 4:3/Aspect 16:9:
TV Type
4:3 TV
Aspect 4:3 & 480i
Aspect 4:3 & 480p
16:9 Aspect (Widescreen TV)
Aspect 16:9 & 480i
Aspect 16:9 & 480p
Television operation
You can operate the TV through the unit’s remote control.
Point the remote control at the television
While pressing [Í, TV POWER] enter the code
with the numbered buttons.
e.g., 0250: [0] > [2] > [5] > [0]
Manufacturer and Code No.
Panasonic
National
QUASAR
FISHER 0154 SANYO 0154
GE 0047 SHARP 0165/0093
GOLDSTAR 0178/0457/0317 SONY 0000
HITACHI 0145 SYLVANIA 0054
JVC 0053 THOMSON 0047
LG 0178/0457/0317 TOSHIBA 0156
MAGNAVOX 0054 ZENITH 0017
MITSUBISHI 0150
Test by turning on the television and changing channels.
≥Repeat the procedure until you find the code that allows correct
operation.
≥If your television brand is not listed or if the code listed for your
television does not allow control of your television, this remote
control is not compatible with your television.
0250/0051 PHILIPS (RC-5) 0054
RCA 0047
SAMSUNG 0060/0587/0702
When other Panasonic products respond
to this remote control
Change the remote control code on the main unit and the remote
control (the two must match) if you place other Panasonic products
close together.
Use “1”, the factory set code, under normal circumstances.
After performing steps 1 to 3 (l left)
[4] Press [3, 4] to select “Setup” and then press
[1].
[5] Press [3, 4] to select “Remote Control Code”
and then press [ENTER].
[6] Press [3, 4] to select the code (Set Code 1,
Set Code 2, or Set Code 3) and then press
[ENTER].
≥The code on the unit has been set.
26
RQT8346
4:3 16:9
4:3 standard aspect television 16:9 widescreen television
≥480p/480i:
- Select “480p” if the television is compatible with progressive
output.
- Select “480i” if the television is not compatible with
progressive output or you are unsure about television
compatibility.
[6] Press [3, 4] to select the item and then press
[ENTER].
When connected to a 4:3 standard aspect television
To change how a DVD-Video or DVD-RAM widescreen picture is
shown on a 4:3 standard aspect television
l 77, “4:3 TV Settings for DVD-Video” or “4:3 TV Settings for
DVD-RAM”
To return to the previous screen
Press [RETURN].
[7] While pressing [ENTER], press and hold the
numbered button ([1], [2] or [3]) for more than
2 seconds.
≥The code on the remote control has been set.
[8] Press [ENTER].
∫ When the following indicator appears on the
unit’s display and you are unable to operate the
unit
The unit’s remote control code
Press and hold [ENTER] and the indicated number button at the
same time for more than 2 seconds.
To exit the screen
Press [RETURN] several times.

Recording
Finalizing is necessary to enable playback
of the disc on compatible DVD players.
Once finalized, titles cannot be added to the disc.
It will take approximately
±
minutes. Start ?
Make compatible for playback on other DVD players ( Finalize )
Press ”REC” to start finalizing.
Press the OPEN/CLOSE button to postpone
finalizing. The disc can be played only on
this unit. You can Finalize it later.
Note about recording
HDD and discs
∫ FR (Flexile Recording)
The unit automatically selects a recording rate between XP and EP
(8H) that will enable the recordings to fit in the remaining disc space
with the best possible recording quality.
≥You can set FR (Flexible Recording) mode when copying (l 59,
60, 64) or programming scheduled recordings (l 36, To make
scheduled recording) or Flexible recording (l 30).
∫ Using “Flexible Recording” is convenient in
these kinds of situations.
[RAM] [-R] [-RW‹V›] [+R] [+RW]
≥When the amount of free space on the disc makes selecting an
appropriate recording mode difficult
≥When you want to record a long program with the best picture
quality
[HDD]
≥When you want to record a title to HDD so that it can then be
copied to fit one 4.7 GB disc perfectly.
You do not need to edit the recorded title, or change the recording
mode when copying, to fit the disc space.
e.g., Recording a 90 minutes program to disc
If you select XP mode, the program will not fit one disc.
A second disc is necessary for
4.7 GB
DVD-RAM
4.7 GB
DVD-RAM
If you select SP mode, the program will fit one disc.
30 minutes of the program.
Another disc is necessary.
∫ When the format confirmation screen is
displayed
[RAM] [-RW‹V›] [+R] [+R[DL] [+RW]
When you insert a new disc or a disc recorded on a computer or
other equipment, a format confirmation screen is displayed. Format
the disc to use it. However, all the recorded contents are deleted.
Format
This disc is not formatted properly.
Do you want to format the
disc in DVD Management?
NoYe s
ENTER
Press [2] to select “Yes” and then press [ENTER].
≥Several steps are necessary to format a disc. Refer to “Deleting all
the contents of a disc or card—Format” (l 71)
∫ When remove a recorded disc
[-R] [-R[DL] [-RW‹V›] [+R] [+R[DL]
When you press [<, OPEN/CLOSE] on the main unit while stopped:
The following screen appears when you have not processed the disc
for play on other equipment.
4.7 GB
DVD-RAM
4.7 GB
DVD-RAM
However there will be 30 minutes
remaining disc space.
If you select “Flexible Recording” the
program will fit one disc perfectly.
∫ When finalizing the disc
Press [¥, REC] on the main unit.
≥You cannot stop this process once you have started it.
≥If you want to set the background, play menu select or providing a
disc name, select “Top Menu Style”, “Playback will start with:”
(l 72) or “Disc Name” (l 70) in “DVD Management” before
finalizing.
∫ When opening the tray without disc finalization
Press [<, OPEN/CLOSE]
on the main unit.
1 Sec. Quick Start for Recording & EPG Display
(When connecting to a TV using the Video or S-Video terminal)
From the power on state, recording starts about 1 second¢ after
¥
, REC] is pressed. If [TV GUIDE] is pressed while the unit is off, the
[
Electronic Program Guide (EPG) starts being displayed in less than
1 second, with the full EPG being displayed in about 1.5 seconds.
¢ Only when recording to the HDD or DVD-RAM
STEP 4 Set up to match your television and the unit’s remote control/Note about recording
27
RQT8346

Note about recording
∫ Recording modes and approximate recording times
Depending on the content being recorded, the recording times may become shorter than indicated.
Recording Mode
XP (High picture quality
recording mode)
SP (Standard recording
mode)
LP (Long recording
mode)
EP (Extra long
recording mode)
FR (Automatic mode
selection)
¢1 It is not possible to record or play continuously from one side of a double sided disc to the other.
¢2 When “Recording Time in EP Mode” is set to “EP-Extended Play (6H)” in the Setup menu (l 75).
The sound quality is better when using “EP-Extended Play (6H)” than when using “EP-Extended Play (8H)”.
¢3 You cannot record directly to these discs with this unit. The table shows the recording time when copying.
¢4 When recording to the HDD in FR mode (recordings 5 hours or longer) or EP mode, you cannot perform high-speed copy to +R, +R DL or
+RW discs.
≥[RAM] When recording to DVD-RAM using EP (8H) mode, play may not be possible on DVD players that are compatible with DVD-RAM. Use EP
(6H) mode if playback may be on other equipment.
¢4
¢4
HDD
(80 GB)
17 h 1 h 2 h 1 h 1 h 45 min 1 h 45 min
34 h 2 h 4 h 2 h 3 h 35 min 3 h 35 min
68 h 4 h 8 h 4 h 7 h 10 min 7 h 10 min
142 h (106 h¢2)8 h (6h¢2) 16 h (12 h¢2)8 h (6h
142 h maximum 8 h maximum
Single-sided
(4.7 GB)
VHS
DVD-RAM
Double-sided
8 h
(9.4 GB)
maximum
one side
HDD, discs and VHS
DVD-R/DVD-RW/
¢1
for
+R/+RW
(4.7 GB)
¢2
)
8 h maximum 14 h 20 min
DVD-R DL
(8.5 GB)
14 h 20 min
(10 h 45 min)
¢3
Cannot copy
Approximately 9 h
with video quality
equivalent to LP
+R DL
(8.5 GB)
mode
¢3
∫ Recording mode
SP: You can record the length shown on the tape.
EP: 3 times the length of SP mode.
VP: 5 times the length of SP mode.
≥To have a longer recording capacity, select “EP” or “VP”.
≥If the image quality is important to you or if you wish to store the
tape for a long period, select “SP”.
≥The unit can play tapes recorded in LP mode on other equipment.
VP mode:
≥A tape recorded in VP mode by the unit cannot be played
back by other VCRs. It is recommended to distinguish it
from other tapes by writing “VP” on the tape label, etc.
≥It takes more time for automatic tracking to work when playing
tapes recorded with VP mode, and it may not work at all with
some tapes. Do tracking manually if this is the case (l 49)
Note
≥Even if the video cassette you use is labeled “S-VHS”, it is not
possible to record in the S-VHS system with the unit. It
records in the normal VHS system.
≥You cannot change channels while recording. You can change
channels while in pause mode.
≥When recording is paused for 5 or more minutes, the unit returns
to stop mode.
∫ To display the approximate remaining tape time
When you insert a tape, “– –” appears on the unit’s display.
To display the approximate remaining tape time, fast-forward or
rewind the tape.
[1] Select “Select Tape Length” from the “VHS” tab and select the
corresponding tape length. (l 77)
[2] Press [STATUS] several times.
The unit’s display changes as follows each time [STATUS] is
pressed.
Input channel ) Counter ) Remaining tape time
^-----------------------------------------------------------}
≥The remaining tape time may not be displayed correctly depending
on the tape used.
∫ To specify a time to stop recording—One
Touch Recording
[HDD] [RAM] [-R] [-RW‹V›] [+R] [+RW] [VHS]
Preparation
≥Press [DRIVE SELECT] to select the recording drive (HDD, DVD or
VHS).
- The “HDD”, “DVD” or “VHS” indicator lights up on the unit.
During recording
Press [¥, REC] to select the recording time.
≥You can also press [¥, REC] on the main unit.
≥You can specify up to 4 hours later.
≥The unit display changes as shown below.
Counter (Cancel) # OFF 0:30 # OFF 1:00 # OFF 1:30
^------- OFF 4:00 ! OFF 3:00 ! OFF 2:00 !----------}
≥This does not work during scheduled recordings (l 32) or while
using Flexible Recording (l 30).
≥If you change the channel or recording mode while recording is
paused, the time specified to stop recording is canceled. (Except
[VHS])
To cancel
Press [¥, REC] several times until the counter appears.
≥The time to stop recording is canceled; however, recording
continues.
To stop recording partway
Press [∫, STOP].
∫ Watching the TV while recording
[HDD] [RAM] [-R] [-RW‹V›] [+R] [+RW] [VHS]
Preparation
≥Press [TV/VIDEO] to change the input mode to TV.
Press TV’s [CH, W, X] to select the desired TV
channel.
For your reference
≥You can also do this if the unit is making a scheduled recording.
≥The recording is unaffected.
28
RQT8346
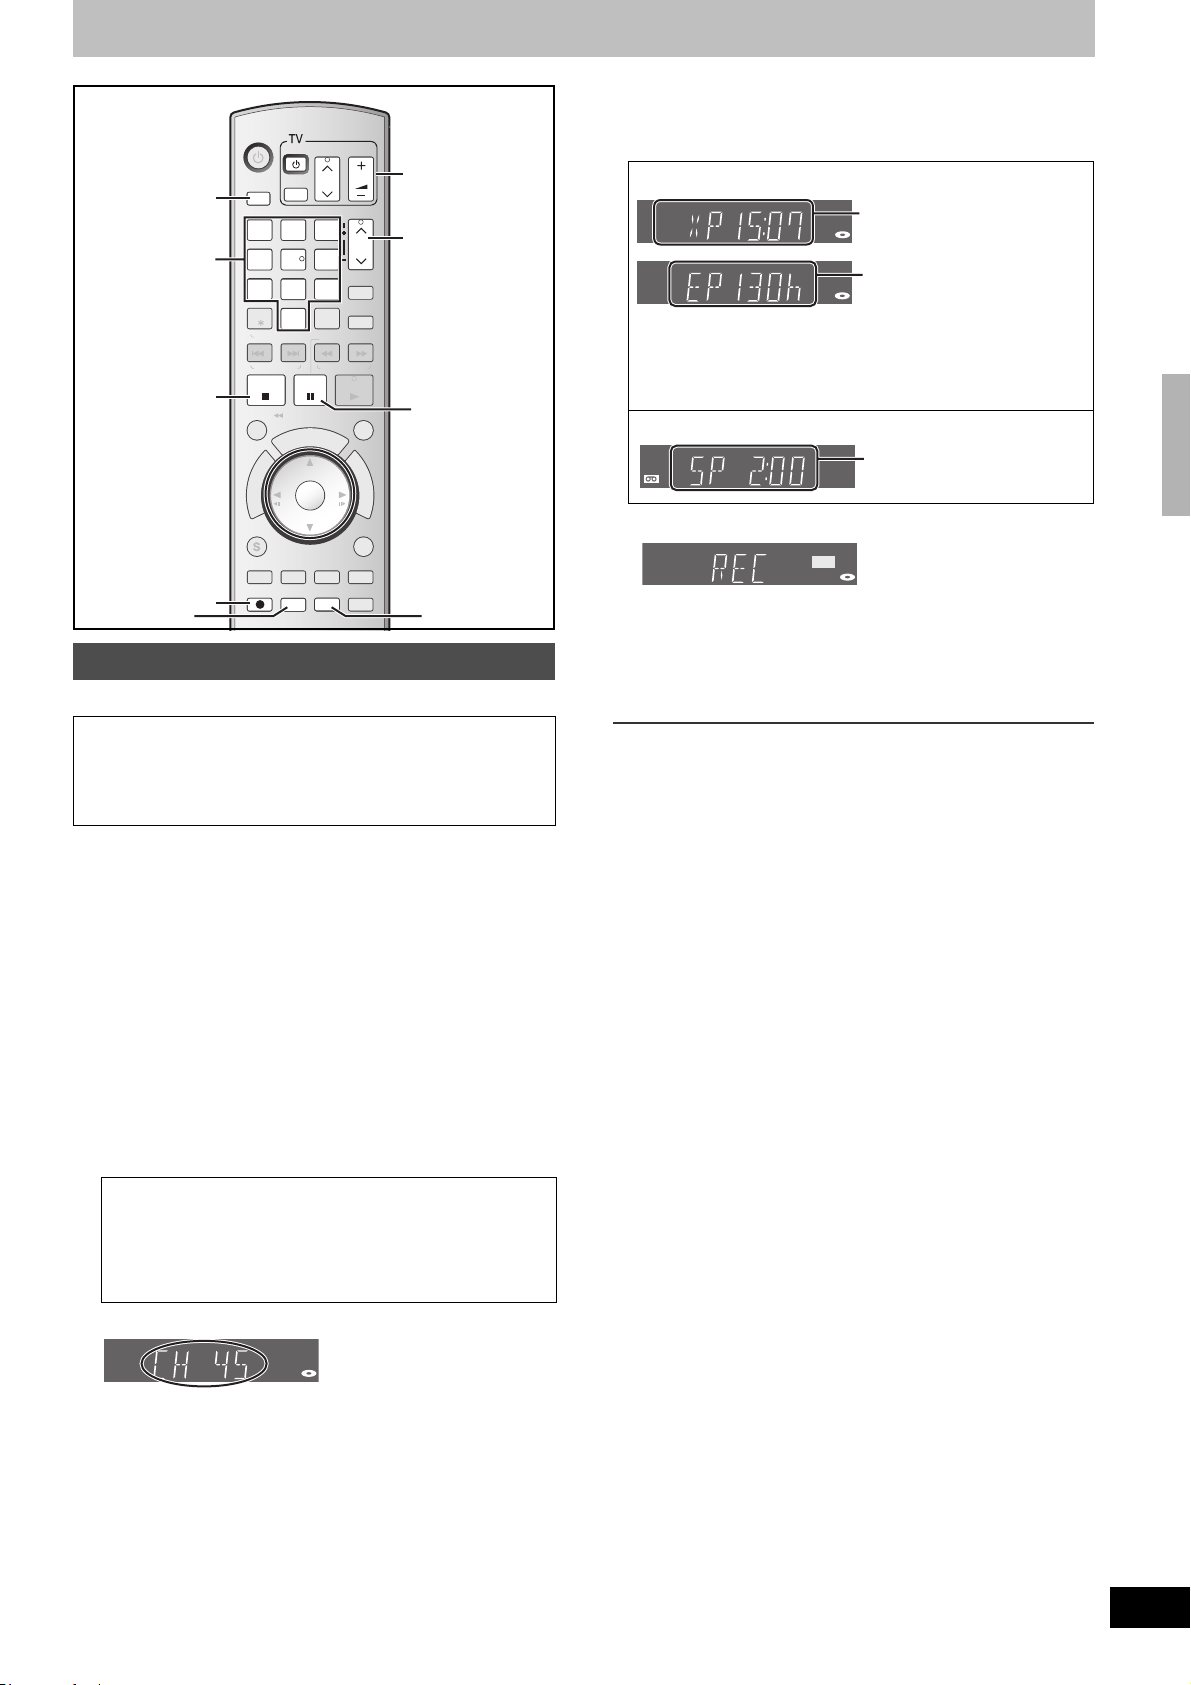
Recording television programs
RESET
DVD/VHS
POWER
POWER
POWER
DRIVE
DRIVE SELECT
Numbered
buttons
∫
¥
DRIVE
SELECT
SELECT
1
1
4
4
7
7
CANCEL
RESET
SKIP/
STOP
TIME SLIP
I
V
A
N
T
C
E
R
I
SUB MENU
AB
REC
REC
TV/VIDEO
TV/VIDEO
INDEX
/
JET REW
R
O
T
A
G
D
DISPLAYAUDIO
REC MODE
REC MODE
2
2
5
5
8
8
0
0
V
T
PAU S ESTOP
PAU S E
U
G
ENTER
CH
CH
TRACKING/V-LOCK/PAGE
TRACKING/V-LOCK/PAGE
TRACKING/V-LOCK/PAGETRACKING/V-LOCK/PAGE
3
3
6
6
VCR Plus+
9
9
INPUT
SELECT
SLOW/SEARCH
REW
PLAY
SCHEDULE
I
D
E
CREATE
CHAPTER
STATUS
STATUS
REC MODE
Recording television programs
[HDD] [RAM] [-R] [-RW‹V›] [+R] [+RW] [VHS]
You can record up to:
≥[HDD] 500 titles on HDD (When continuously recording for long
durations, titles are automatically divided every 8 hours.)
≥[RAM] [-R] [-RW‹V›] 99 titles on a disc
≥[+R] [+RW] 49 titles on a disc
Preparation
≥Turn on the television and select the appropriate video input to suit
the connections to this unit.
≥Turn on this unit.
See also the notes “Important notes for recording” (l 9) and
“Note about recording” (l 27).
Note
≥It is not possible to record to two drives simultaneously.
≥[+RW] You can create a Top Menu using “Create DVD Top Menu”
(l 72).
Recording or editing on the disc may delete the menu. In that case,
create the menu again.
[1] Press [DRIVE SELECT] to select the recording
drive (HDD, DVD or VHS).
The “HDD”, “DVD” or “VHS” indicator lights up on the unit.
If you selected the DVD drive
insert a disc. (l12)
If you selected the VHS drive
insert a video cassette with an intact
accidental erasure prevention tab. (
VOLUME
VOLUME
CH
CH
DELETE
FF
F
U
N
C
T
I
O
N
S
RETURN
Info
CM SKIP
TV operation
buttons
CH, W, X
;
STATUS
l12)
[3] Press [REC MODE] to select the recording
mode [HDD/discs (XP, SP, LP, or EP) /
VHS (SP, EP or VP)].
∫ HDD/discs
XP
REC
EP
REC
≥When there is over 100 hours available, the remaining
recording time is displayed in hourly units.
≥When XP mode is selected, you can also record sound using
LPCM (l 76).
Remaining time on the disc
REC
(XP mode: 15 hours 7 minutes)
Remaining time on the disc
REC
(EP mode: approximately
130 hours)
h: Hour
∫ VHS
REC
SP
Remaining time on the tape
REC
(SP mode: 2 hours)
[4] Press [¥, REC] to start recording.
XP
REC
REC
e.g., HDD
Recording will take place on open space on the HDD or on disc.
Data will not be overwritten.
≥You cannot change the channel or recording mode during
recording. You can change the channel or recording mode
while paused; however, the recording will then be as a
separate title.
≥You can record while the unit is in standby for scheduled
recording, but once the time for the scheduled recording to begin is
reached, any recording taking place will stop and the scheduled
recording will begin.
∫ To pause recording
Press [;, PAUSE].
Press again to restart recording.
You can also press [¥, REC] to restart.
≥[HDD] [RAM] [-R] [-RW‹V›] [+R] [+RW] (Title is not split into separate
titles.)
∫ To stop recording
Press [∫, STOP].
≥From the start to the end of the recording is called one title.
≥[-R] [-RW‹V›] [+R] [+RW] It takes about 30 seconds for the unit to
complete recording management information after recording
finishes.
≥If the program is listed in the program listings (l 36), its name is
automatically made the title name after recording. (The recorded
title must be more than 3 minutes.)
In order to play DVD-R, DVD-RW (DVD-Video format) and +R
(recorded with this unit) on other DVD players, it is necessary
to finalize them (l 72).
Note about recording/Recording television programs
[2] Press [CH, W, X] to select the channel.
SP
REC
To select with the numbered buttons:
Antenna Mode
e.g., 5: [0] ) [5]
15: [1] ) [5]
≥[VHS] The “DV” channel can be selected however it cannot be
recorded.
≥Select the audio to record (l 30).
REC
e.g., HDD
CableTV, Satellite Channel
e.g., 5: [0] ) [0] ) [0] ) [5]
15: [0] ) [0] ) [1] ) [5]
115: [0] ) [1] ) [1] ) [5]
1115: [1] ) [1] ) [1] ) [5]
29
RQT8346

Recording television programs
RESET
DVD/VHS
POWER
POWER
DRIVE
DRIVE SELECT
∫
DIRECT
NAVIGATOR
3,4,2,1
ENTER
AUDIO
DRIVE
SELECT
SELECT
1
4
7
CANCEL
RESET
SKIP/
STOP
TIME SLIP
G
G
I
I
V
V
A
A
N
N
T
T
C
C
E
E
R
R
I
I
D
D
SUB MENU
AUDI O
AB
A
REC
TV/VIDEO
INDEX
/
JET REW
R
R
O
O
T
T
A
A
DISPLAYAUDIO
REC MODE
2
5
8
0
T
PAU S ESTOP
G
V
ENTER
ENTER
CH
TRACKING/V-LOCK/PAGE
TRACKING/V-LOCK/PAGE
3
6
9
INPUT
SELECT
SLOW/SEARCH
REW
U
I
D
E
CREATE
CHAPTER
STATUS
STATUS
Selecting audio to record
[HDD] [RAM]
Press [AUDIO].
[.
Stereo: Main audio (stereo)
l
v
l
l
SAP Audio: Secondary audio program (SAP)
l
v
l
a-
Mono: Main audio (monaural)
HDD Hard-Drive
CH 12
((
Stereo
≥If the broadcast is “MonoiSAP”, audio will
be monaural even if you select Stereo mode.
≥If recorded in SAP mode, main audio is also
recorded.
≥Select “Mono” if reception is poor during a
stereo broadcast.
e.g., “Stereo” is selected.
“((” appears when the unit is receiving
the audio type you selected.
VOLUME
CH
VCR Plus+
DELETE
FF
PLAY
PLAY
SCHEDULE
F
F
U
U
N
N
C
C
T
T
I
I
O
O
N
N
S
S
RETURN
RETURN
Info
CM SKIP
1
FUNCTIONS
RETURN
STATUS
Flexible Recording mode (FR)
[HDD] [RAM] [-R] [-RW‹V›] [+R] [+RW]
The unit sets the best possible picture quality that fits the recording
within the remaining disc space. The recording mode becomes FR
mode.
Preparation
≥Select the channel or the external input (IN1, IN2, IN3 or DV) to
record.
≥Press [DRIVE SELECT] to select the recording drive (HDD or DVD).
[1] While stopped
Press [FUNCTIONS].
[2] Press [3, 4] to select “Other Functions” and
then press [ENTER].
[3] Press [3, 4] to select “Flexible Recording” and
then press [ENTER].
Flexible Recording
Record in FR mode.
Max recording time
Set recording time
Start Cancel
8 Hour 00 Min.
8 Hour 00 Min.
[4] Press [2, 1] to select “Hour” and “Min.” and
then press [3, 4] to set the recording time.
≥You can also set the recording time with the numbered
buttons.
≥Maximum recording time is 8 hours.
[5] Press [3, 4, 2, 1] to select “Start” and then
press [ENTER].
≥Recording starts.
≥All the recording modes from XP to EP appear in the display.
To exit the screen without recording
Press [RETURN].
To stop recording partway
Press [∫, STOP].
To show the remaining time
Press [STATUS].
Maximum recording time
This is the maximum
recording time in FR mode.
e.g., HDD
HDD Hard-Drive
Rec. 0:59
CH 71
Stereo
Remaining
time
30
RQT8346
≥If you change the sound setting while recording, the recorded
sound will also change.
Note
You cannot change the audio type in the following cases while the
unit is stopped, whichever drive is selected.
≥While a disc other than DVD-RAM is inserted.
≥When “Recording for High-Speed Copying” is set to “On” (l 75).
(The default setting is “On”.)
≥When the recording mode is XP and “
Audio for XP Recording
” is set
to “LPCM” (l 76).
[-R] [-RW‹V›] [+R] [+RW]
[HDD] [RAM] (When recording sound in LPCM)
[HDD] [RAM] (When “Recording for High-Speed Copying” is set to
“On”)
Select the audio [Main or Secondary Audio
Program (SAP)] in “Multi-channel TV Sound
(MTS)” in the Setup menu. (
l76)
 Loading...