

Panasonic DMP-BD85 User Manual
Operating Instructions
Blu-ray Disc Player
Model No. DMP-BD85
Dear customer
Thank you for purchasing this product.
For optimum performance and safety, please read these instructions carefully.
Before connecting, operating or adjusting this product, please read the instructions completely.
Please keep this manual for future reference.
GN GC GA
VQT2H83
CAUTION!
THIS PRODUCT UTILIZES A LASER.
USE OF CONTROLS OR ADJUSTMENTS OR PERFORMANCE
OF PROCEDURES OTHER THAN THOSE SPECIFIED HEREIN
MAY RESULT IN HAZARDOUS RADIATION EXPOSURE.
DO NOT OPEN COVERS AND DO NOT REPAIR YOURSELF.
REFER SERVICING TO QUALIFIED PERSONNEL.
WARNING:
TO REDUCE THE RISK OF FIRE, ELECTRIC SHOCK OR
PRODUCT DAMAGE,
≥ DO NOT EXPOSE THIS APPARATUS TO RAIN, MOISTURE,
DRIPPING OR SPLASHING AND THAT NO OBJECTS FILLED
WITH LIQUIDS, SUCH AS VASES, SHALL BE PLACED ON
THE APPARATUS.
≥ USE ONLY THE RECOMMENDED ACCESSORIES.
≥ DO NOT REMOVE THE COVER (OR BACK); THERE ARE NO
USER SERVICEABLE PARTS INSIDE. REFER SERVICING TO
QUALIFI ED SERVICE PERSON NEL.
CAUTION!
≥DO NOT INSTALL OR PLACE THIS UNIT IN A BOOKCASE,
BUILT-IN CABINET OR IN ANOTHER CONFINED SPACE.
ENSURE THE UNIT IS WELL VE NTILATED. TO PREVENT RISK
OF ELECTRIC SHOCK OR FIRE HAZARD DUE TO
OVERHEATING, ENSURE THAT CURTAINS AND ANY OTHER
MATERIALS DO NOT OBSTRUCT THE VENTILATION VENTS.
≥DO NOT OBSTRUCT THE UNIT’S VENTILATION OPENINGS
WITH NEWSPAPERS, TABLECLOTHS, CURTAINS, AND
SIMILAR I TEMS.
≥DO NOT PLACE SOURCES OF NAKED FLAMES, SUCH AS
LIGHTED CANDLES, ON THE UNIT.
≥DISPOSE OF BATTERIES IN AN ENVIRONMENTALLY
FRIENDLY MANNER.
CAUTION
Danger of explosion if battery is incorrectly replaced.
Replace only with the same or equivalent type
recommended by the manufacturer. Dispose of used
batteries according to the manufacturer’s instructions.
This product may receive radio interference caused by
mobile telephones during use. If such interference is
apparent, please increase separation between the product
and the mobile telephone.
The socket outlet shall be installed near the equipment and
easily accessible.
The mains plug of the power supply cord shall remain
readily operable.
To completely disconnect this apparatus from the AC Mains,
disconnect the power supply cord plug from AC receptacle.
[For[Australia[and[New[Zealand]
THIS UNIT IS INTENDED FOR USE IN MODERATE
CLIMATES.
[For]Asia]and]Middle]East]
THIS UNIT IS INTENDED FOR USE IN TROPICAL
CLIMATES.
Caution for AC Mains Lead
(For Saudi Arabia)
For your safety, please read the following text carefully.
This appliance is supplied with a moulded three pin mains
plug for your safety and convenience.
A 5-ampere fuse is fitted in this plug.
Should the fuse need to be replaced please ensure that the
replacement fuse has a rating of 5-ampere and that it is
approved by ASTA or BSI to BS1362.
Check for the ASTA mark Ï or the BSI mark Ì on the body
of the fuse.
If the plug contains a removable fuse cover you must ensure
that it is refitted when the fuse is replaced.
If you lose the fuse cover the plug must not be used until a
replacement cover is obtained.
A replacement fuse cover can be purchased from your local
dealer.
CAUTION!
IF THE FITTED MOULDED PLUG IS UNSUITABLE FOR
THE SOCKET OUTLET IN YOUR HOME THEN THE
FUSE SHOULD BE REMOVED AND THE PLUG CUT
OFF AND DISPOSED OF SAFELY.
THERE IS A DAN GER OF SEVERE ELECTRICAL
SHOCK IF THE CUT OFF PLUG IS INSERTED INTO
ANY 13-AMPERE SOCKET.
If a new plug is to be fitted please observe the wiring code as
stated below.
If in any doubt please consult a qualified electrician.
IMPORTANT
The wires in this mains lead are coloured in accordance with
the following code:
Blue: Neutral, Brown: Live.
As these colours may not correspond with the coloured markings
identifying the terminals in your plug, proceed as follows:
The wire which is coloured Blue must be connected to the terminal
which is marked with the letter N or coloured Black or Blue.
The wire which is coloured Brown must be connected to the
terminal which is marked with the letter L or coloured Brown
or Red.
WARNING: DO NOT CONNECT EITHER WIRE TO
THE EARTH TERMINAL WHICH IS MARKED WITH
THE LETTER E, BY THE EARTH SYMBOL Ó OR
COLOURED GREEN OR GREEN/YELLOW.
THIS PLUG IS NOT WATERPROOF—KEEP DRY.
Before use
Remove the connector cover.
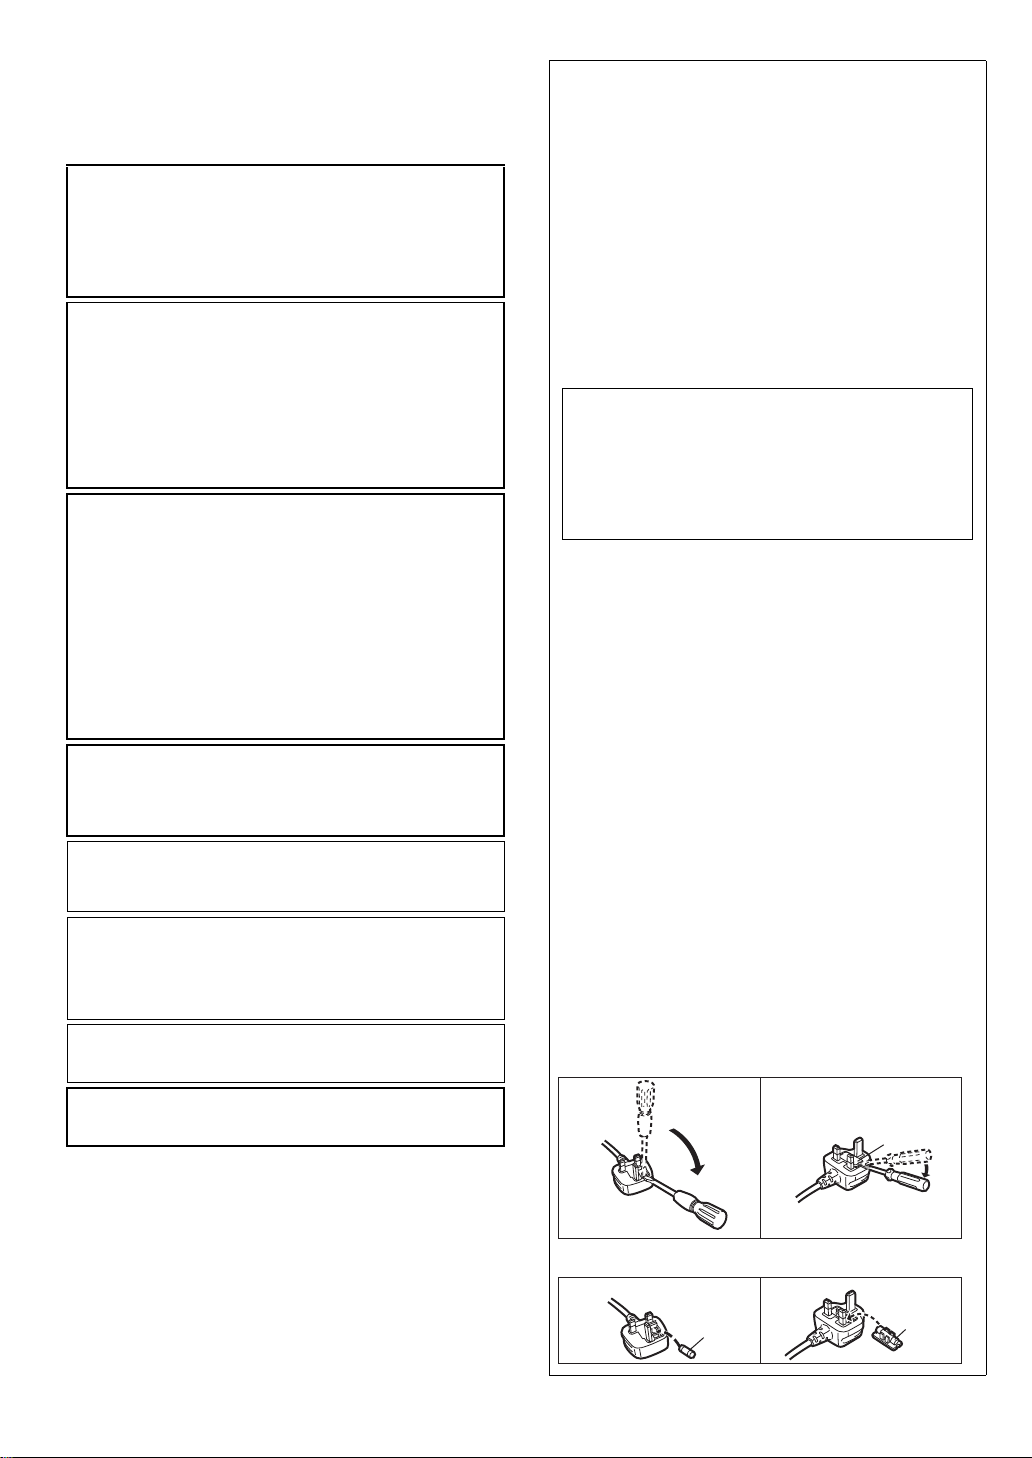
How to replace the fuse
The location of the fuse differ according to the type of AC
mains plug (figures A and B). Confirm the AC mains plug
fitted and follow the instructions below.
Illustrations may differ from actual AC mains plug.
1. Open the fuse cover with a screwdriver.
Figure A
Figure B
Fuse cover
2
VQT2H83
2. Replace the fuse and close or attach the fuse cover.
Figure A Figure B
Fuse
(5 ampere)
Fuse
(5 ampere)

Table of contents
Getting started
Caution for AC Mains Lead . . . . . . . . . . .2
Accessory. . . . . . . . . . . . . . . . . . . . . . . . .4
Unit and media care . . . . . . . . . . . . . . . . .4
Control reference guide . . . . . . . . . . . . . .5
Playable discs/Cards/USB devices . . . . .6
Connections and settings
STEP 1 : Connecting to a TV . . . . . . . . . .8
STEP 2 : Connecting to
an amplifier/receiver . . . . . . . .9
STEP 3 : Connecting to
a broadband network. . . . . . .10
STEP 4 : Connecting AC mains lead . . .11
STEP 5 : Setting. . . . . . . . . . . . . . . . . . .12
STEP 6 : Reprogramming the remote
control . . . . . . . . . . . . . . . . . .14
Reference
Troubleshooting guide. . . . . . . . . . . . . . 32
Messages . . . . . . . . . . . . . . . . . . . . . . . 34
Audio Information . . . . . . . . . . . . . . . . . 35
About MP3/JPEG/DivX/AVCHD/MPEG2
files . . . . . . . . . . . . . . . . . . . . . . . . . . . . 37
Specifications . . . . . . . . . . . . . . . . . . . . 39
Supplemental information . . . . . . . . . . . 40
Glossary . . . . . . . . . . . . . . . . . . . . . . . . 41
Safety precautions. . . . . . . . . . . . . . . . . 43
Index . . . . . . . . . . . . . . . . . . . . .Backcover
About descriptions in these operating
instructions
≥ Instructions for operations are generally described
using the remote control.
Firmware updating (> 14)
Getting startedConnections and settingsPlaybackSettingsReference
Playback
Inserting or removing a media . . . . . . . .15
FUNCTION menu. . . . . . . . . . . . . . . . . .15
Playing video contents . . . . . . . . . . . . . .16
Playing still pictures . . . . . . . . . . . . . . . .20
Playing music. . . . . . . . . . . . . . . . . . . . .21
Linked operations with the TV
™
(VIERA Link “HDAVI Control
Enjoying VIERA CAST
™
”) . . . . . . .22
. . . . . . . . . . . . .23
DLNA feature . . . . . . . . . . . . . . . . . . . . .24
Settings
Playback menu. . . . . . . . . . . . . . . . . . . .26
Setup menu . . . . . . . . . . . . . . . . . . . . . .28
VQT2H 83
3
Getting started
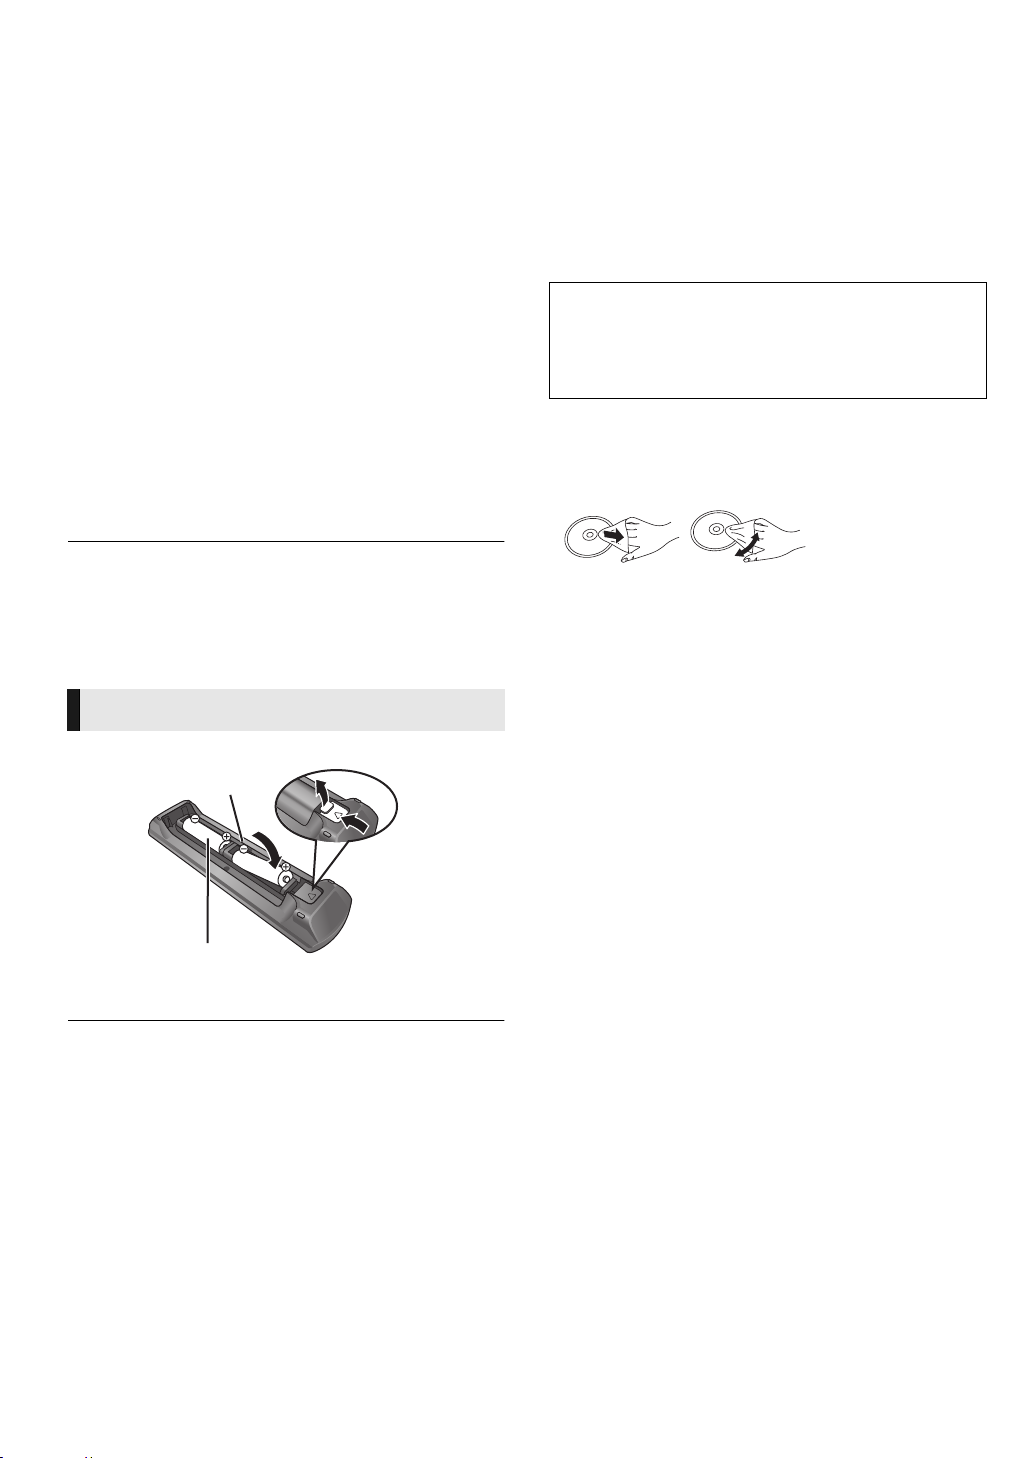
(Alkaline or manganese batteries)
DO
DO NOT
Accessory
Unit and media care
Check the supplied accessories before using this unit.
[For[Australia[and[New[Zealand]
1 Remote control (N2QAKB000082)
2 Batteries for remote control
1 AC mains lead
1 Audio/Video cable
1 Wireless LAN Adaptor (DY-WL10*
(C5ZZZ0000049)
1 USB extension cable (DY-WL10*
(K2KYYYY00064)
[For\Middle\East\and\Asia[
1 Remote control (N2QAKB000082)
2 Batteries for remote control
1 Audio/Video cable
2 AC mains lead*
*1
See page 11 for more information.
*2
DY-WL10 is supplied as a kit containing Wireless LAN Adaptor
(C5ZZZ0000049) and USB extension cable (K2KYYYY00064), also
available for sale as an optional accessory.
≥ Product numbers correct as of February 2010. These may be subject to
change.
≥ Do not use AC mains lead and Wireless LAN Adaptor with other
equipment. Wireless LAN Adaptor is not designed to use with PC.
≥ MAC address is stated on the bottom of Wireless LAN Adaptor.
1
2
)
2
)
Using the remote control
Insert so the poles (i and j) match those in the remote control.
∫ Clean this unit with a soft, dry cloth
≥ Never use alcohol, paint thinner or benzine to clean this
unit.
≥ Before using chemically treated cloth, carefully read the
instructions that came with the cloth.
∫ Clean the lens with the lens cleaner
Lens cleaner: RP-CL720E
≥ This lens cleaner may not be for sale depending on the
region.
≥ This lens cleaner is primarily for use on Panasonic DVD
recorders (DIGA), but it is also suitable for use on this
unit.
∫ Clean discs
Wipe with a damp cloth and then wipe dry.
∫ Disc and card handling precautions
≥ Handle discs by the edges to avoid inadvertent scratches or
fingerprints on the disc.
≥ Do not attach labels or stickers to discs.
≥ Do not use record cleaning sprays, benzine, thinner, static
electricity prevention liquids or any other solvent.
≥ Clean any dust, water, or foreign matter from the terminals
on the rear side of the card.
≥ Do not use the following discs:
– Discs with exposed adhesive from removed stickers or
labels (rented discs etc).
– Discs that are badly warped or cracked.
– Irregularly shaped discs, such as heart shapes.
R6/LR6, AA
Point it at remote control signal sensor on this unit. (> 5)
Mishandling of batteries can cause electrolyte leakage which can damage
items the fluid contacts and may cause a fire.
≥ Do not mix old and new batteries or different types at the same time.
≥ Do not heat or expose to flame.
≥ Do not leave the battery(ies) in an automobile exposed to direct sunlight
for a long period of time with doors and windows closed.
≥ Do not take apart or short circuit.
≥ Do not attempt to recharge alkaline or manganese batteries.
≥ Do not use batteries if the covering has been peeled off.
Remove batteries if the remote control is not going to be used for a long
period of time. Store in a cool, dark place.
4
VQT2H83
∫ To dispose or transfer this unit
The unit may keep the user settings information in the unit. If
you discard this unit either by disposal or transfer, then follow
the procedure to return all the settings to the factory presets to
delete the user settings. (> 32, “To return all settings to the
factory preset.”)
≥ The operation history may be recorded in the memory of
this unit.
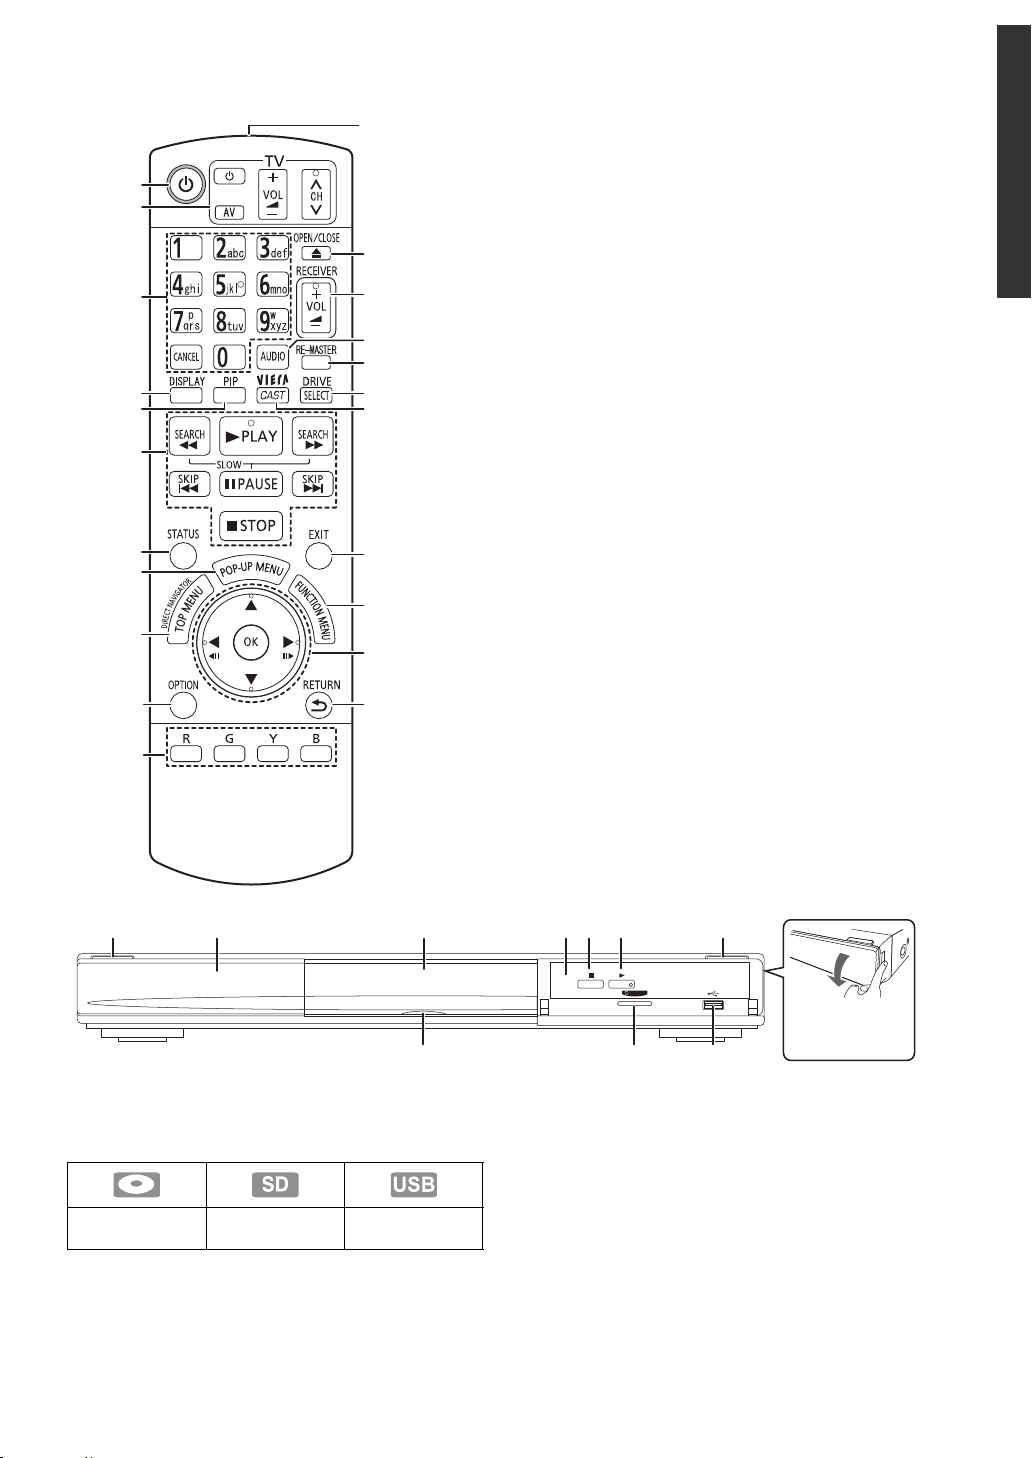
Control reference guide
SD CARD
Pull to flip down
the front panel.
1 Standby/on switch (Í/I) (> 12)
Press to switch the unit from on to standby mode or vice
versa. In standby mode, the unit is still consuming a small
amount of power.
2 Display
The indicator blinks when reading data from a disc, a card
or a USB device, or writing data to a card.
3 Disc tray (> 15)
4 Remote control signal sensor
Distance: Within approx. 7 m
Angle: Approx. 20e up and down, 30e left and right
5Stop (> 16)
6 Start play (> 16)
7 Open or close the disc tray (> 15)
8 SD Card LED
≥ It is possible to set the LED to turn on/off. (> 30)
9SD card slot (> 15)
10 USB port (> 15)
≥ There is another port at the back of the main unit.
Two USB ports cannot be used simultaneously.
[For[Australia[and[New[Zealand]
USB ports can be used simultaneously only with the
supplied Wireless LAN Adaptor (> 10).
Rear panel terminals (> 8–11)
Disc indicator SD card indicator
USB device
indicator
10
11
12
1
2
13
3
14
15
16
4
5
17
18
6
7
19
8
20
9
21
22
1 Turn the unit on and off (> 12)
2 TV operation buttons (> 14)
You can operate the TV through the unit’s remote control.
[Í TV] : Turn the television on and off
[AV] : Switch the input select
[ijVOL] : Adjust the volume
[WXCH] : Channel select
3 Select title numbers, etc./Enter numbers or characters
(> 23)
[CANCEL] : Cancel
4 Show playback menu (> 26)
5 Switch on/off Secondary Video (Picture-in-picture) (> 18)
6 Basic playback control buttons (> 16)
7 Show status messages (> 16)
8 Show Pop-up menu (> 16)
9 Show Top menu/DIRECT NAVIGATOR (> 16)
10 Show OPTION menu (> 17)
11 Coloured buttons (red, green, yellow, blue)
These buttons are used when;
≥ Operating a BD-Video disc that includes Java
applications (BD-J).
≥ Displaying “Title View” and “Album View” screens.
(> 20)
≥ Operating contents of VIERA CAST. (> 23)
12 Transmit the remote control signal
13 Open or close the disc tray (> 15)
TM
CAUTION
Do not place objects in front of the unit. The disc tray may
collide with objects when it is opened, and this may cause
injury.
14 Adjust the volume of an amplifier/receiver.(> 14)
15 Select audio (> 16)
16 Reproduce more natural audio (> 17)
17 Select drive (BD/DVD/CD, SD card or USB device)
(> 15)
18 Displays the Home screen of the VIERA CAST (> 23)
19 Exit the menu screen
20 Show FUNCTION menu (> 15)
21 Selection/OK, Frame- by-frame (> 16)
22 Return to previous screen
Getting started
1 72 3
5 64
SD CARD
8 9 10
VQT2H 83
5
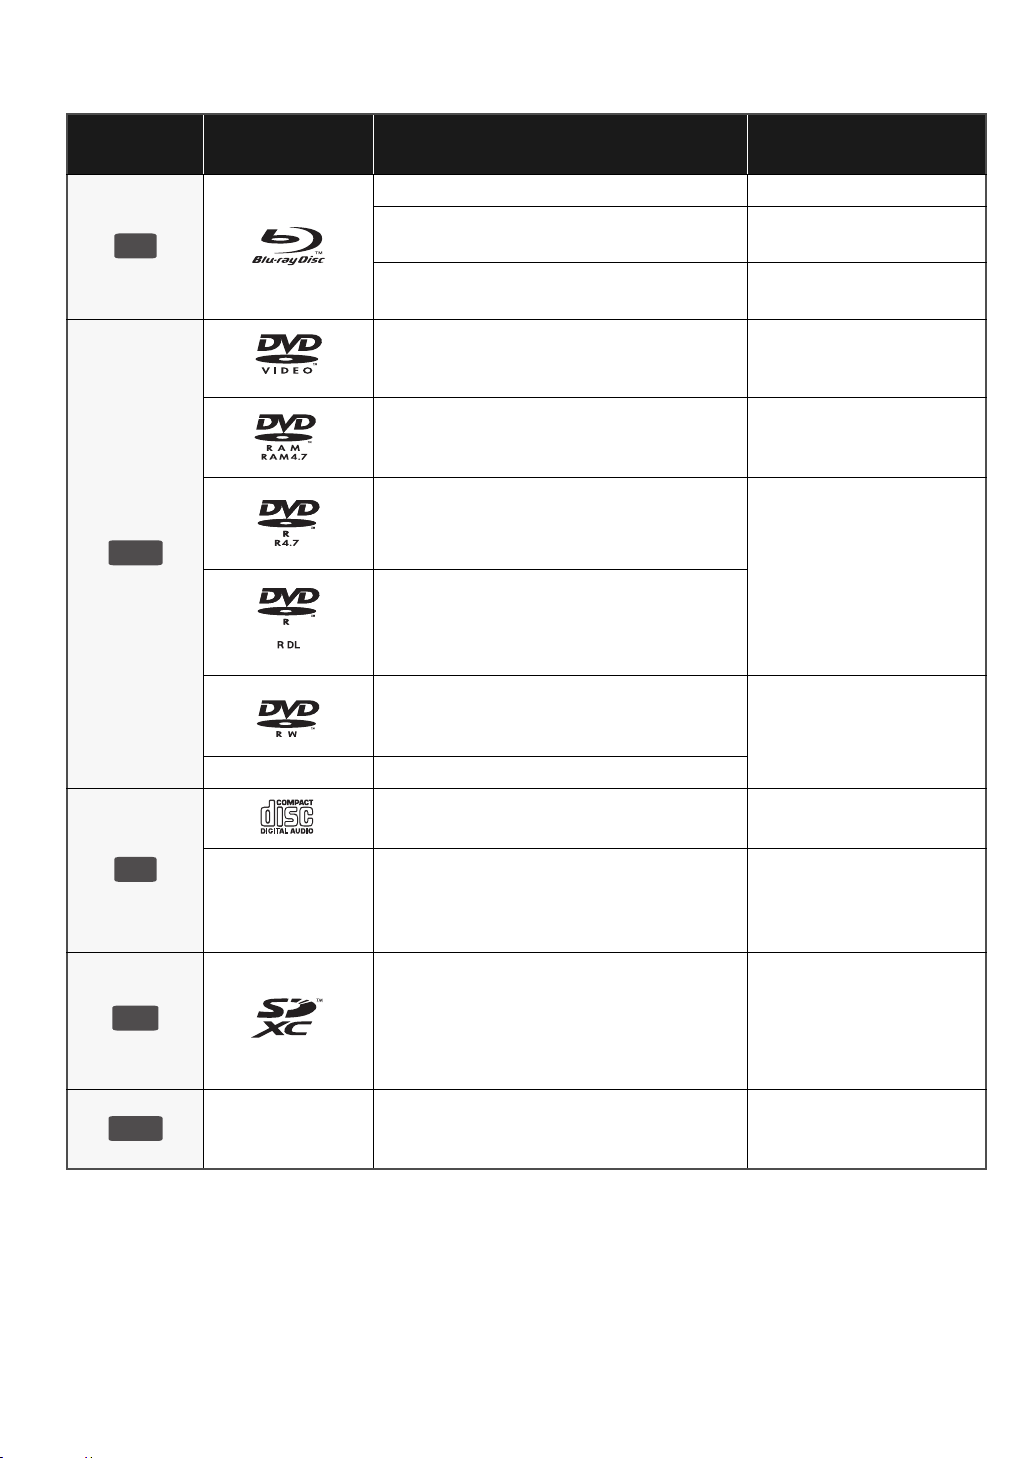
Playable discs/Cards/USB devices
DVD
SD
USB
Type
BD
Logo
examples
Type detail Playable contents*
BD-Video Video
BD-RE
BD-R
DVD-Video Video
DVD-RAM
DVD-R
DVD-R DL
Video
JPEG
Video
®
DivX
Video
AVCHD
JPEG
Video
AVCHD
DivX
MP3
JPEG
DVD-RW
—
+R/+RW/+R DL
Music CD Music [CD-DA]
CD
—
CD-R
CD-RW
SD Memory Card (from 8 MB to 2 GB)
(Including miniSD Card and microSD Card)
SDHC Memory Card (from 4 GB to 32 GB)
(Includes microSDHC Card)
SDXC Memory Card (48 GB, 64 GB)
(Includes microSDXC Card)
—
* See page 7, 37–38 for more information on the types of content that can be played.
USB device
(up to 128 GB)
Video
AVCHD
DivX
Music [CD-DA]
MP3
JPEG
MPEG2
AVCHD
JPEG
DivX
MP3
JPEG
6
VQT2H83
∫ Discs that cannot be played in this unit
Any other disc that is not specifically supported or
previously described.
≥ 2.6 GB and 5.2 GB DVD-RAM
≥ DVD-RAM that cannot be removed from their cartridges
≥ Super Audio CD
≥ Photo CD
≥ DVD-Audio
≥ Video CD and Super Video CD
≥ WMA discs
≥ HD DVD
∫ Finalize
DVD-R/RW/R DL, +R/+RW/+R DL and CD-R/RW recorded by
a recorder, etc. needs to be finalized by the recorder to play
on this unit. Please refer to the recorder’s instructions.
∫ BD-Video
This unit supports high bit rate audio (Dolby Digital Plus,
Dolby TrueHD, DTS-HD High Resolution Audio and DTS-HD
Master Audio) adopted in BD-Video. In order to enjoy these
audio formats, refer to page 35.
Getting started
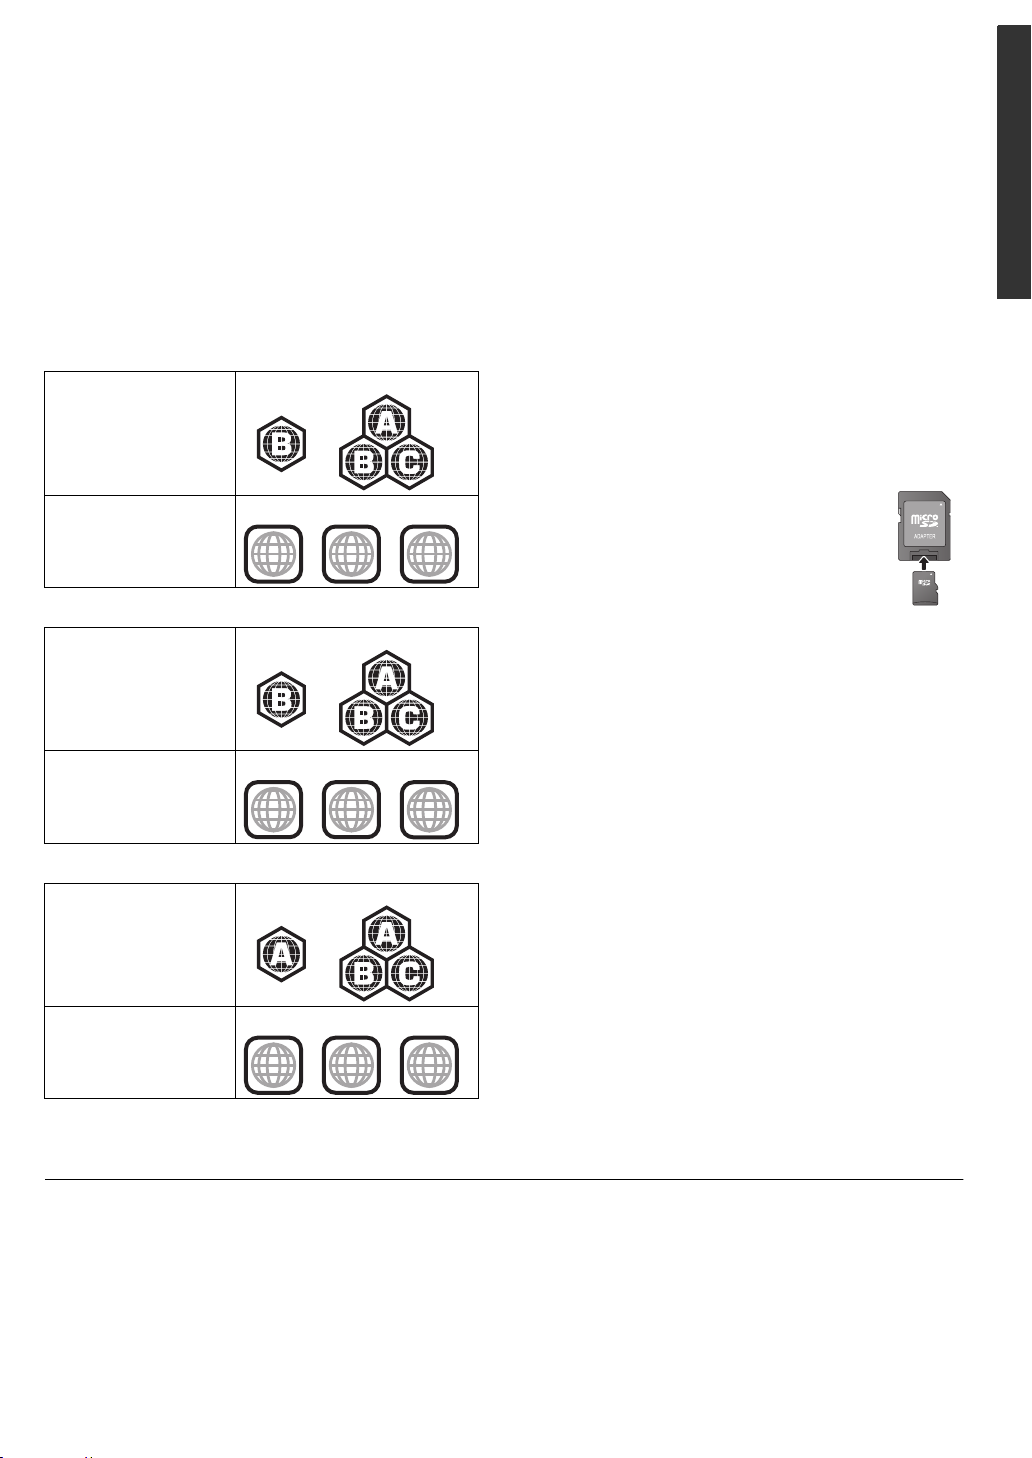
∫ Region management information
[For[Australia[and[New[Zealand]
BD-Video:
This unit plays BD-Video
marked with labels
containing the region
code “B”.
DVD-Video:
This unit plays DVD-Video
marked with labels
containing the region
number “
[For]Middle]East]
BD-Video:
This unit plays BD-Video
marked with labels
containing the region
code “B”.
DVD-Video:
This unit plays DVD-Video
marked with labels
containing the region
number “
[For[Asia]
BD-Video:
This unit plays BD-Video
marked with labels
containing the region
code “A”.
4
2
” or “
” or “
ALL
ALL
”.
”.
Example:
Example:
4 ALL
Example:
Example:
2
Example:
ALL
∫ Music CD
Operation and sound quality of CDs that do not conform to
CD-DA specifications (copy control CDs, etc.) cannot be
guaranteed.
∫ SD card
≥ MiniSD Cards, microSD Cards, microSDHC
Cards and microSDXC Cards can be used, but
must be used with an adaptor card. These are
2
3
4
2
3
4
usually supplied with such cards, or otherwise
customer provided.
≥ Keep the Memory Card out of reach of children
to prevent swallowing.
≥ To protect the card’s contents, move the record
prevention tab (on the SD card) to “LOCK”.
≥ This unit is compatible with SD Memory Cards that meet SD
Card Specifications FAT12 and FAT16 formats, as well as
SDHC Memory Cards in FAT32 format (Does not support
long file name.) and SDXC Memory Cards in exFAT.
≥ If the SD card is used with incompatible computers or
devices, recorded contents may be erased due to the card
being formatted etc.
≥ Useable memory may be slightly less than the card
capacity.
∫ USB device
≥ This unit supports connecting a USB memory, digital
camera and video camera produced by Panasonic, etc. It is
not warranted that all USB devices will work with this unit.
≥ This unit does not support USB device charging.
≥ FAT12, FAT16 and FAT32 file systems are supported.
≥ This unit supports USB 2.0 High Speed.
”.
Example:
3 ALL
∫ BD-RE, BD-R
2
3
4
Discs recorded in DR mode using Panasonic Blu-ray Disc
recorders may not playback the audio etc., correctly.
VQT2H83
DVD-Video:
This unit plays DVD-Video
marked with labels
containing the region
number “
≥ It may not be possible to play the above media in some cases due to the type of media, the condition of the recording, the recording method and how the files
≥ The producers of the disc can control how discs are played. So you may not always be able to control play as described in these operating instructions. Read
3
” or “
ALL
were created.
the disc’s instructions carefully.
7
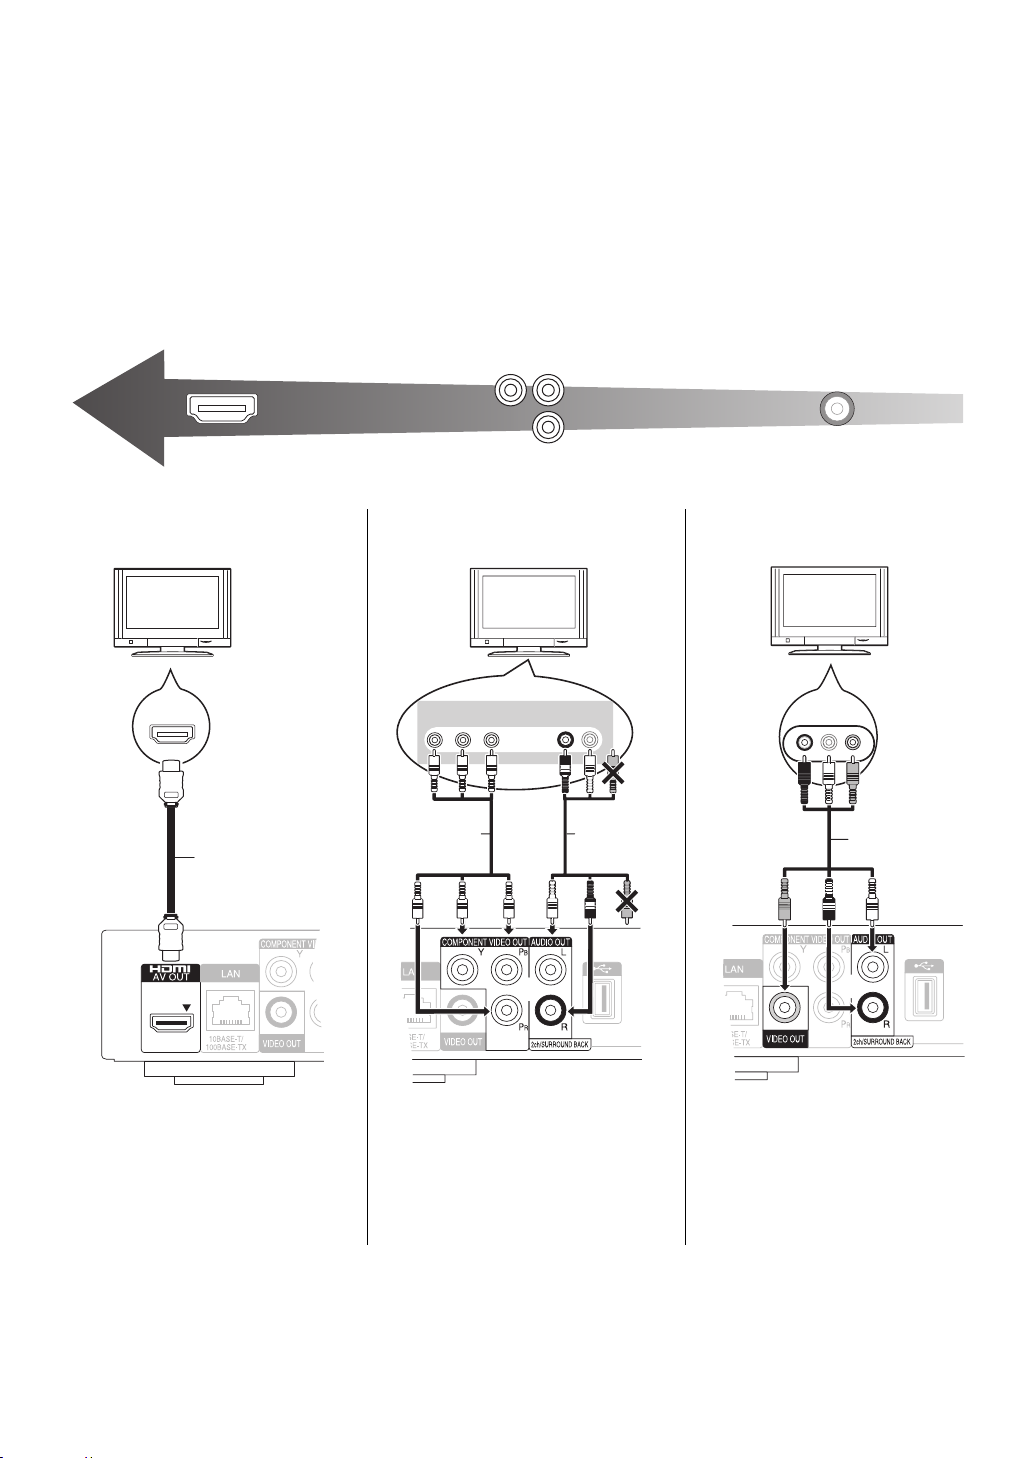
STEP 1 : Connecting to a TV
Highest Quality
(VIDEO)
Standard Quality
(VIDEO)
HDMI IN
HDMI cable
COMPONENT
VIDEO IN
AUDIO IN
R L
Component
Video cable
Audio/Video
cable
(supplied)
Audio/Video cable
(supplied)
≥ Do not place the unit on amplifiers/receiver or equipment
that may become hot. The heat can damage the unit.
≥ Before making any connections we suggest you temporarily
disconnect all the units from AC power.
≥ Do not connect video signals through a video recorder. Due
to copy guard protection the picture may not be displayed
properly.
≥ Refer to page 36, about recommended settings for each
≥ Please use High Speed HDMI Cables that have the HDMI
logo (as shown on the cover). It is recommended that you
use Panasonic’s HDMI cable. When outputting 1080p
signal, please use HDMI cables 5.0 meters or less.
Recommended part number:
RP-CDHS15 (1.5 m), RP-CDHS30 (3.0 m),
RP-CDHS50 (5.0 m), etc.
piece of connected equipment.
∫ Via an HDMI AV OUT terminal ∫ Via a COMPONENT VIDEO
OUT terminal
∫ Via a VIDEO OUT terminal
≥ The HDMI connection supports
VIERA Link “HDAVI Control” (> 22)
when used with a compatible
Panasonic TV.
≥ Set “HDMI Video Mode” and “HDMI
Audio Output” to “On” (> 30).
≥ Connect terminals of the same
colour.
≥ Set “Component Resolution” to
“576p/480p”, “720p” or “1080i”.
(> 30)
≥ Set “HDMI Video Mode” to “Off”
(> 30).
AUDIO IN
R L
VIDEO IN
≥ Connect terminals of the same
colour.
8
VQT2H83
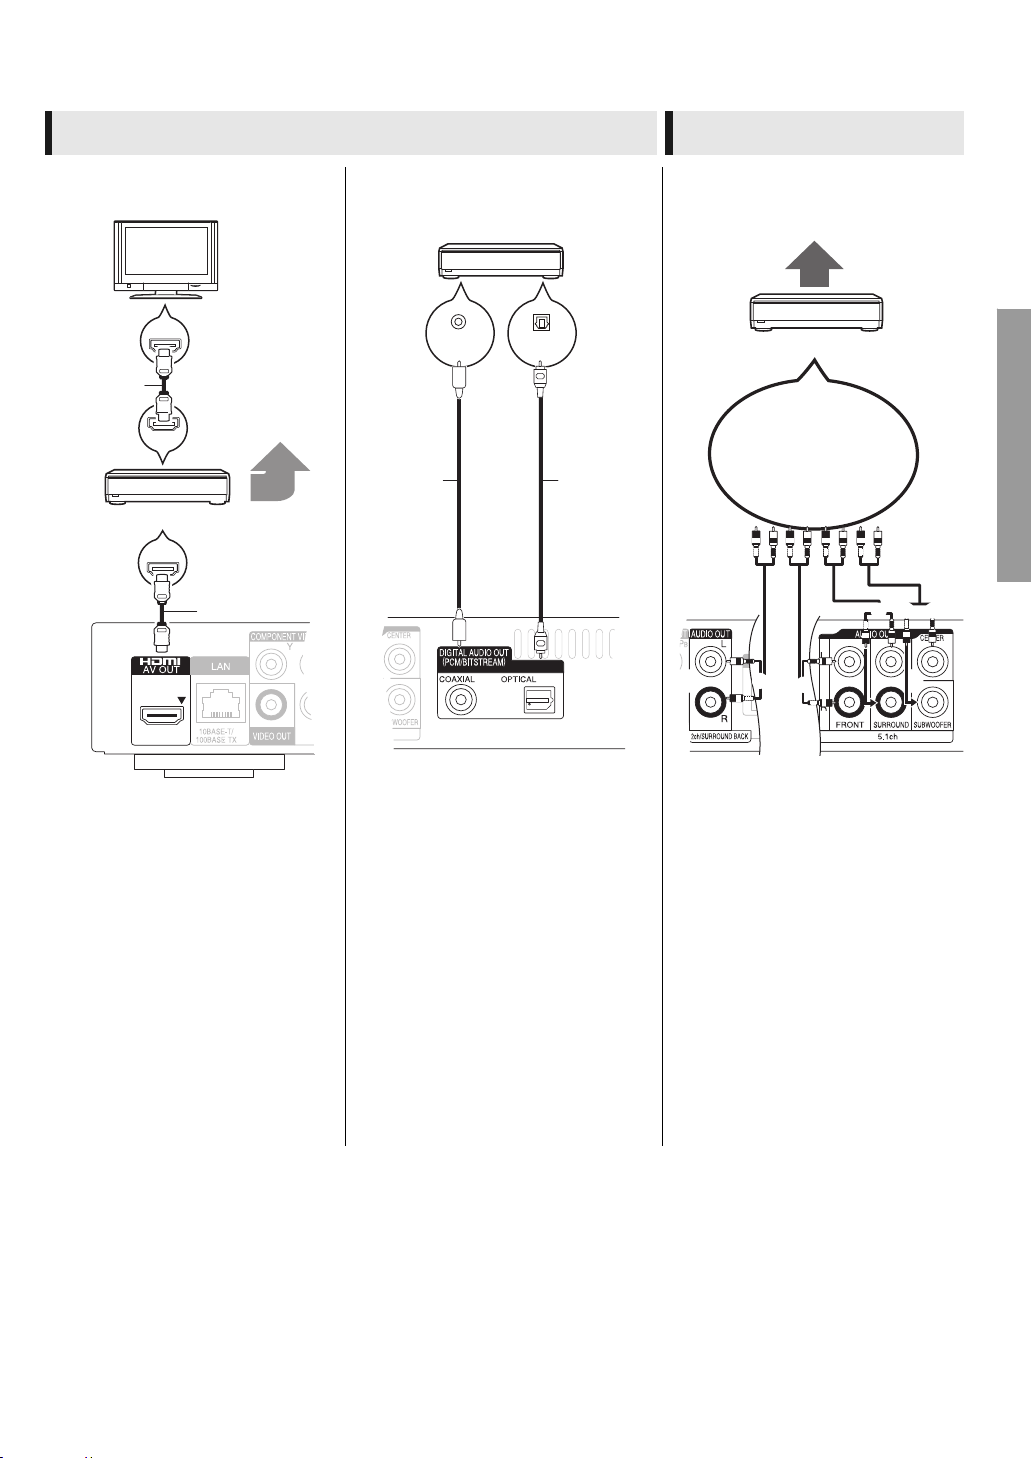
STEP 2 : Connecting to an amplifier/receiver
HDMI IN
Multi channel
speakers
Amplifier/receiver
HDMI cable
HDMI cable
COAXIAL IN
OPTICAL IN
Amplifier/receiver
Coaxial
cable
Optical
cable
OR
Connect Audio cables to
terminals corresponding
to the speakers you have
connected.
Multi channel speakers
Amplifier/receiver
Digital Audio Analogue Audio
∫ Via an HDMI AV OUT terminal ∫ Via a COAXIAL or OPTICAL
terminal
HDMI IN
HDMI OUT
HDMI IN
∫ Via a 5.1/7.1ch AUDIO OUT
terminal
Connections and settings
≥ The HDMI connection supports
VIERA Link “HDAVI Control” (> 22)
when used with a compatible
Panasonic TV.
≥ Set “HDMI Video Mode” and “HDMI
Audio Output” to “On” (> 30).
≥ Set “Digital Audio Output” depending
on the used terminal and connected
amplifier/receiver (> 29).
≥ When connecting a TV (> 8) with
HDMI AV OUT terminal, set “HDMI
Audio Output” to “Off” (> 30).
≥ Set “Digital Audio Output” depending
on the used terminal and connected
amplifier/receiver (> 29).
Cable connections
a Surround back speaker (L/R)
(Only for 7.1ch AUDIO OUT)
b Front speaker (L/R)
c Surround speaker (L/R)
d Subwoofer
e Centre speaker
≥ Set “Analog Audio Output” to “7.1ch”
or “2ch (Downmix) + 5.1ch”,
depending on the used terminal
(> 30 ).
≥ You can set the “Analog Audio
Output” from the “Easy Setting”
(> 12 ).
≥ When connecting equipment with
HDMI AV OUT terminal, set “HDMI
Audio Output” to “Off” (> 30).
9
VQT2H 83
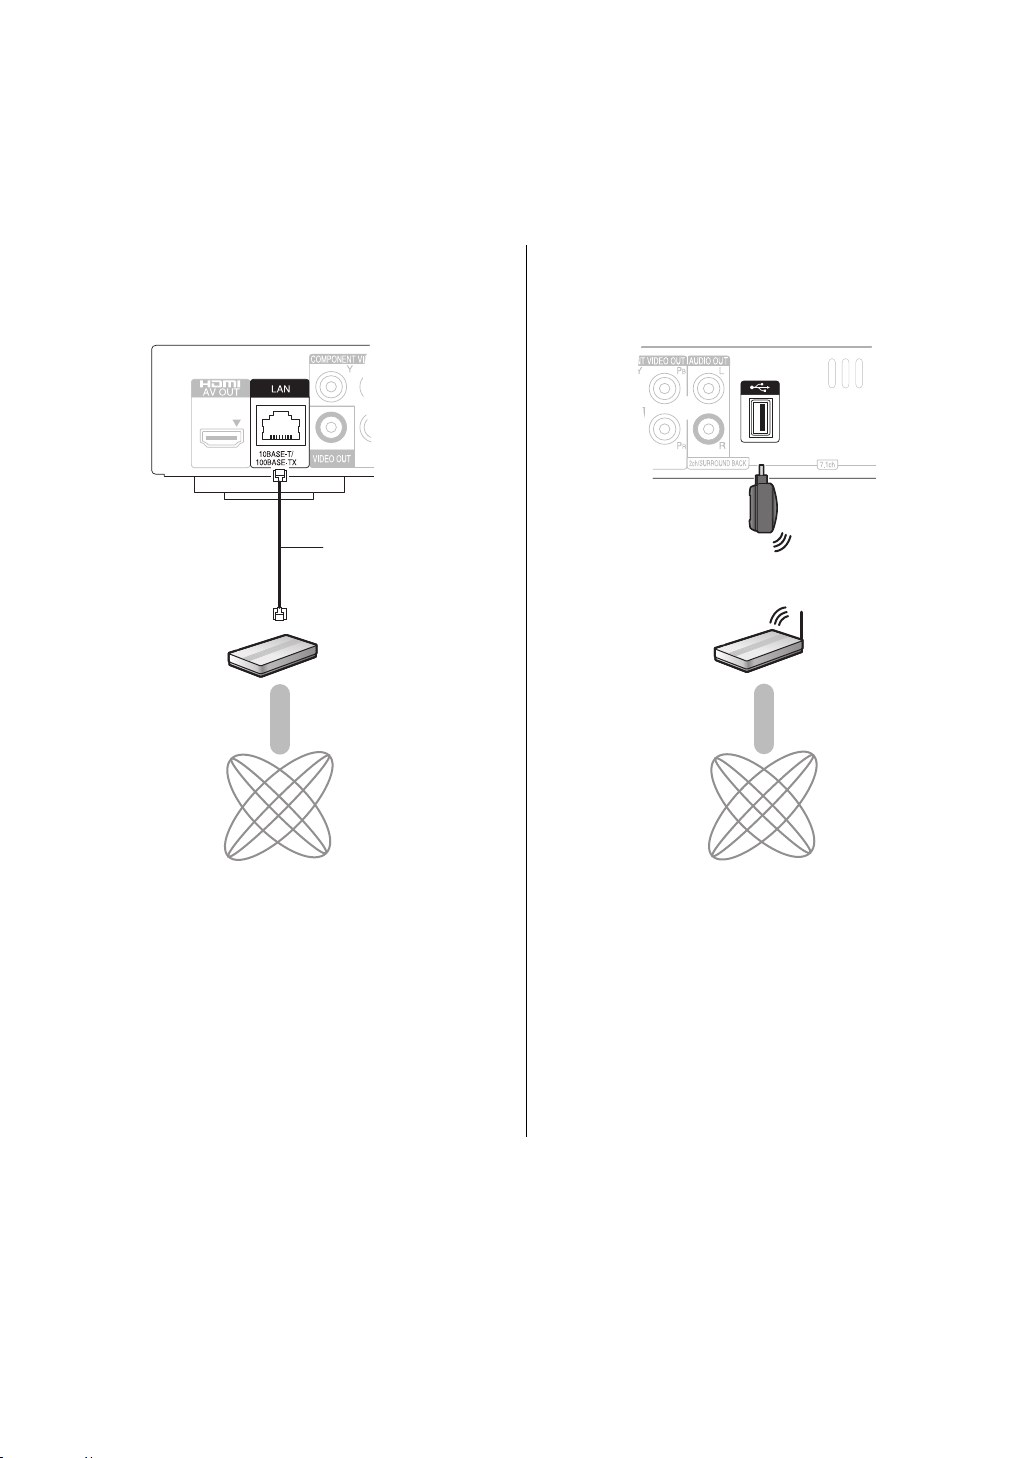
STEP 3 :
Broadband router,
etc.
LAN Cable
(Straight)
Internet
Wireless router
(Access point), etc.
Wireless LAN Adaptor
(supplied)
Internet
Connecting to a broadband network
The following services can be used when this unit is
connected to broadband.
≥ Firmware can be updated (> 14)
≥ You can enjoy BD-Live (> 18)
≥ You can enjoy VIERA CAST (> 23)
≥ DLNA feature (> 24)
∫ Using LAN (ethernet) cable
For details about connection method, refer to the instructions
supplied with the connected equipment.
[For[Australia[and[New[Zealand]
∫ Using Wireless LAN Adaptor DY-WL10
≥ Use shielded LAN cables when connecting to peripheral
devices.
≥ Inserting any cable other than a LAN cable in the LAN
terminal can damage the unit.
10
VQT2H83
≥ Wireless LAN Adaptors other than the supplied Wireless
LAN Adaptor cannot be used.
≥ When connection conditions are poor, use the supplied
USB extension cable to connect the Wireless LAN Adaptor
provided with this unit.
≥ Do not use any other USB extension cables except the
supplied one.
≥ For up to date compatibility information on your Wireless
router (Access Point) refer to
http://panasonic.jp/support/global/cs/
≥ The unit is not compatible with public wireless LAN services
provided in airports, stations, cafes etc.

[For[Australia[and[New[Zealand]
To a household mains socket
Precautions of Wireless LAN Adaptor
The following limits are in place regarding the usage of this device. You must
be aware of these limits before using this device.
Panasonic will in no way be responsible for any incidental damage which
may arise due to a failure to obey these limits, or to any condition of use or
disuse of this device.
≥ Do not use this device to connect to any wireless network for wh ich
you do not have usage rights.
During automatic searches in a wireless network environment, wireless
networks (SSID*) for which you do not have usage rights may be
displayed; however, using these networks may be regarded as illegal
access.
* An SSID (Service Set IDentification) is a name used by wireless LAN to
identify a particular network. Transmission is pos sible if the SSID
matches for both devices.
≥ Data transmitted and received over radio waves may be intercepted
and monitored.
≥ This wireless LAN adaptor contains delicate electronic components.
Please use this adaptor in the manner in which it was intended and follow the
following points.
–Do not expose the adaptor to high temperatures or direct sunlight.
–Do not bend, or subject the adaptor to strong impacts.
–Keep the adaptor away from moisture.
–Do not disassemble or alter the adaptor in any way.
–Do not attempt to install the adaptor in any incompatible device.
≥ Wireless LAN Adaptor is prohibited from export or bringing into nations*
upon which the United States place embargoes. Wireless LAN Adaptor is
subject to Export Administration Regulations (EAR) due to the installation
of encryption device made in the United States.
(Current as of November 2009)
* Cuba, Iran, Syria, North Korea, Sudan etc.
STEP 4 : Connecting AC
mains lead
AC mains lead (supplied)
[For]Middle]East]
Use the AC mains lead that matches the socket for the
area you live in.
[For\Saudi\Arabia[
BE SURE TO READ THE
CAUTION FOR THE AC MAINS
LEAD ON PAGE 2 BEFORE
CONNECTION.
Connections and settings
[For[Asia]
AC mains lead with a label is for Thailand.
AC mains lead without a label is for areas other than
Thailand.
≥ This unit consumes a small amount of AC power (“Quick
Start”: “Off”, approx. 0.2 W) even when turned off. In the
interest of power conservation, if you will not be using this
unit for an extended period of time, it can be disconnected.
11
VQT2H 83
STEP 5 : Setting
OK
RETURN
Network Easy Setting (Connection Test)
Wired
Wireless
Select a connection mode.
Current setting : Wired
LAN cable connection:
Connect a LAN cable to the unit and select “Wired”.
Wireless LAN connection:
Connect the Wireless LAN Adaptor (DY-WL10) to the USB
port and select “Wireless”.
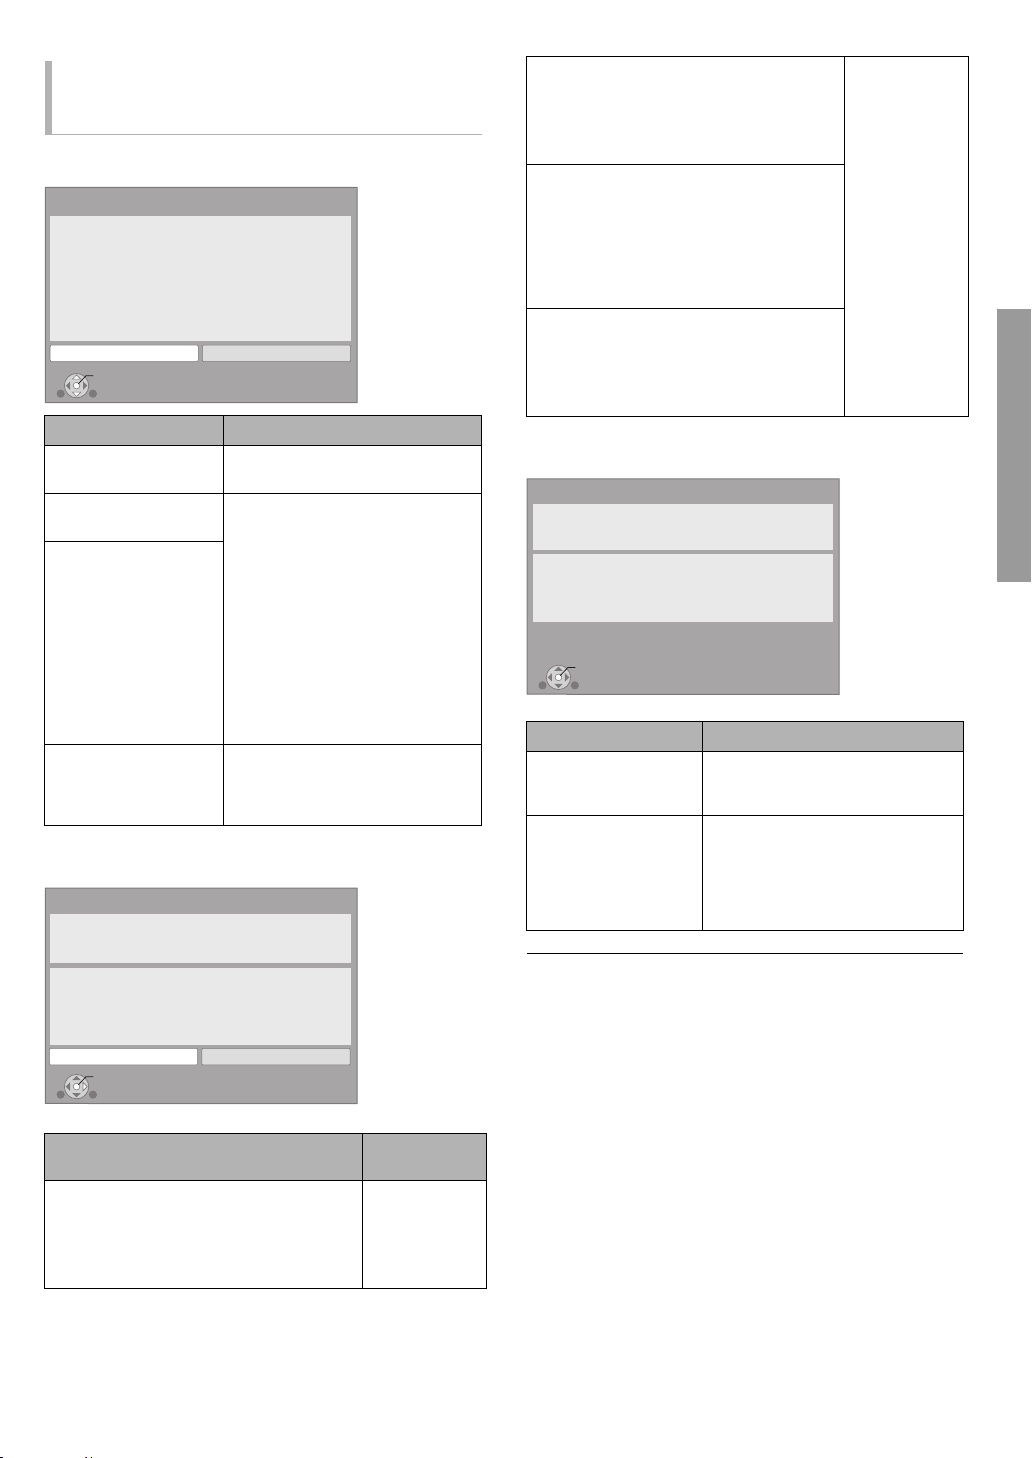
Access Point Connection Setting
Select a connection method for access to
Wireless LAN.
Please refer to the operating instructions of
the access point about connection methods.
WPS (PUSH button)
Search for access point
e.g.
Access Point Connection Setting
Reception
Select an access point to connect with.
To search for access point again, please
select "Search again" below.
SSID
XXXXXXXXXX
XXXXXXXXXX
XXXXXXXXXX
XXXXXXXXXX
XXXXXXXXXX
XXXXXXXXXX
XXXXXXXXXX
XXXXXXXXXX
Search again
SSID
Wireless type
Authentication type
Encryption type
:XXXXXXXXXXXXXXX
:802.11n/g/b (2.4GHz)
:WPA-PSK
:AES
Access Point Connection Setting
WPA2-PSK (AES/TKIP)
WPA-PSK (AES/TKIP)
Open/Shared Key (WEP)
Open system
Select authentication type.
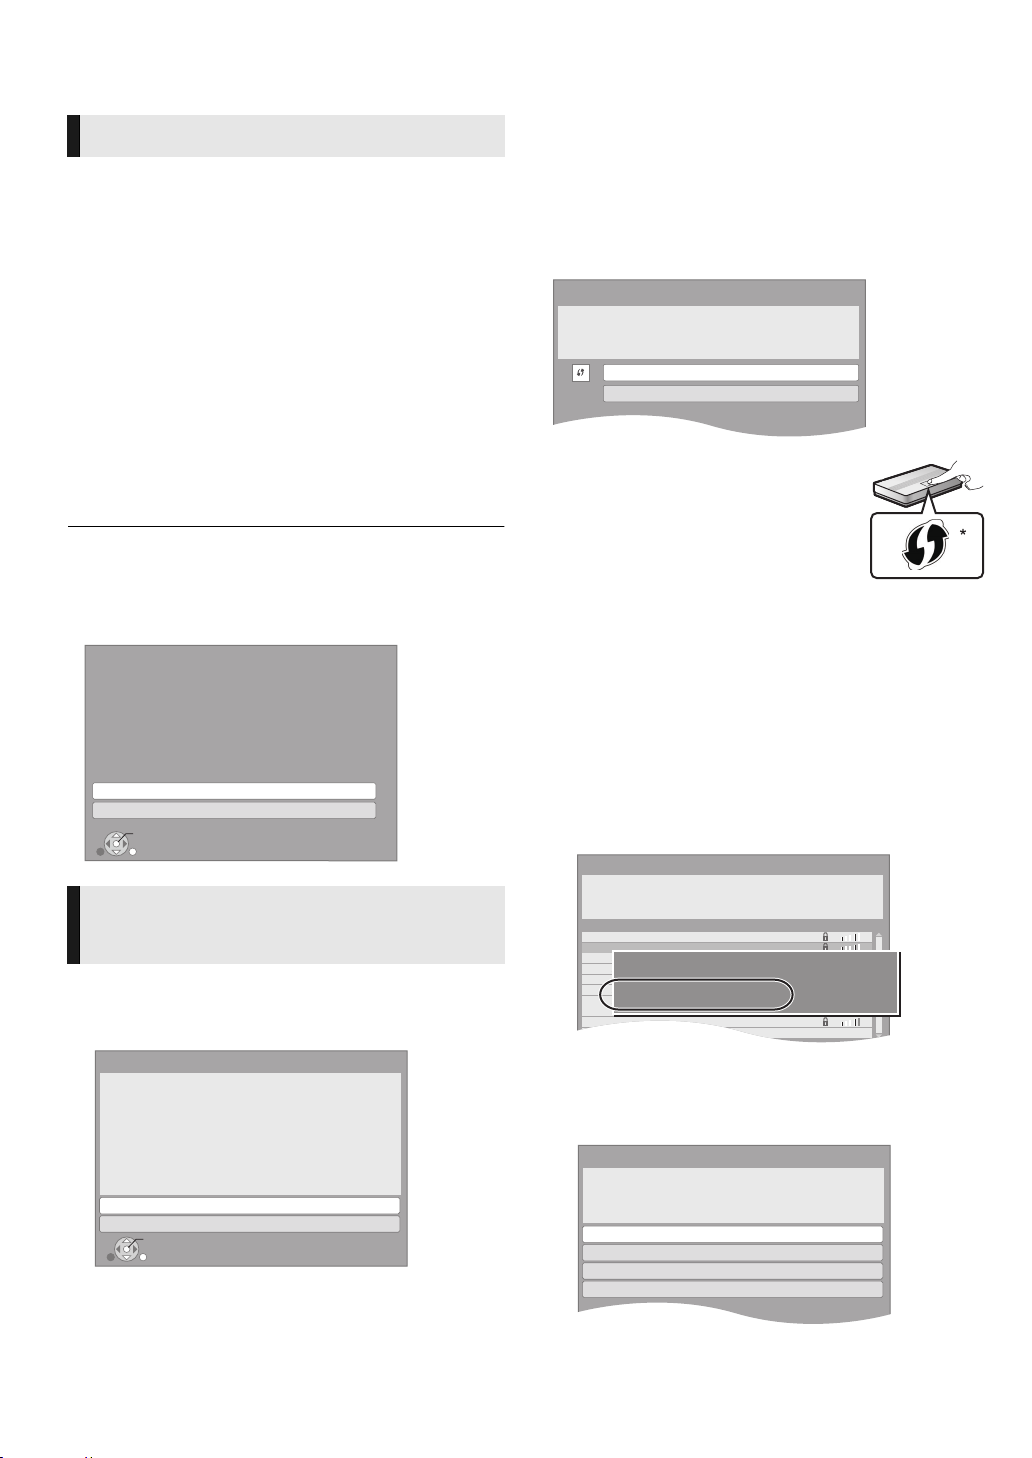
Easy Setting
After connecting your new player for the first time and
pressing [Í], a screen for the basic settings will appear.
Preparation
Turn on the television and select the appropriate video
input on the television.
1 Press [Í].
Setup screen appears.
If this unit is connected to a Panasonic TV (VIERA)
supporting HDAVI Control 2 or later via an HDMI cable, then
the setting information on the TV is acquired by this TV.
2
Follow the on-screen instructions and make
3,4
the settings with [
“On-Screen Language” [For[Asia], “TV Aspect”, “Analog
Audio Output” and “Quick Start” are set.(> 29 – 31)
After completing “Easy Setting”, you can perform “Network
Easy Setting”.
≥You can perform this setup anytime by selecting “Easy Setting” in the
Setup menu. (> 31)
≥ You can also change these settings individually. (> 29 – 31)
≥ Initial setting is set to “2ch (Downmix) + 5.1ch”, so you will need to select
“7.1ch” if using the 7.1ch output.
Analog Audio Output
Set unit’s analog audio output.
Select “7.1ch” only when connected to an
audio receiver through 7.1ch analog
connections.
Otherwise, select “2ch (Downmix) + 5.1ch”.
2ch (Downmix) + 5.1ch
7.1ch
OK
RETURN
] and press [OK].
∫ “Wireless” connection
If you select “Wireless” and “Wireless LAN Adaptor is not
connected.” is displayed, check that the Wireless LAN
Adaptor is fully inserted. Alternatively, disconnect and
reconnect it. If there is still no change in the display, consult
your dealer for advice.
Select “WPS (PUSH button)” or “Search for
access point” and then follow the on-screen
instructions and make the settings.
WPS (PUSH button):
If your Wireless router (Access point)
supports WPS (PUSH button), you can
easily perform the settings by pressing WPS
button on it.
WPS (Wi-Fi Protected Setup) is a standard that
facilitates settings relating to the connection
and security of wireless LAN devices.
1 Press WPS button or corresponding button of Wireless
router (Access point) until the lamp starts flashing.
≥ For details, refer to the operating instruction of Wireless
router (Access point).
2 Press [OK].
* Wi-Fi Protected Setup-compatible Wireless router (Access point) may
have the mark.
Search for access point:
Available Wireless routers (Access points) are searched and
listed. You can select the one to use from the list.
1 Press [3, 4] to select SSID of Wireless router (Access
point) you want to connect with. Then press [OPTION] to
show information of the selected router, make a note of
the authentication and encryption type.
Network Easy Setting
For Australia and New Zealand
After completing “Easy Setting”, you will be asked to perform
“Network Easy Setting”.
Select “Wired” or “Wireless” and press [OK].
∫ “Wired” connection
Follow the on-screen instructions to make your connection settings.
≥ When you experience problems (> 13)
12
VQT2H83
≥ If you can not find the SSID, select “Search again”.
2 Press [RETURN] and then press [OK].
Then select an item on the following screen which
corresponds to the authentication type noted down in step
1 above.
Follow the on-screen instructions to make the settings.
≥ Input your encryption key code in “Encryption Key”
supplied with your Wireless router (Access point).
When you experience
OK
Network Easy Setting (Internet Connection Test)
Complete.
- Connection to the Internet : Fail(B019)
Failed the connection test.
Cannot find the server.(B019)
Please refer to the operating instructions for the cause
of the error and the solution for it.
Press [OK].
problems with settings
Access Point Connection Setting
Access Point Connection Setting
Failed to connect to the access point.
A conflict with other devices occurred.
Do you wish to setup Access Point
Connection Setting again ?
Yes No
OK
Display Check the following
A conflict with another
device occurred.
A time out error
occurred.
An authentication error
or a time out error
occurred.
A device error
occurred.
Network Easy Setting (Connection Test)
Network Easy Setting (Connection Test)
Complete.
1. LAN cable connection
2. IP address setting
3. Connection to gateway
LAN cable is not connected.
Please check the connection.
Select “Yes” and press [OK] to check network
connection again.
Select “No” and press [OK] to finish Network
Easy Setting.
Yes No
OK
1. LAN cable connection or
Connection to access point
2. IP address setting :Fail
3. Connection to gateway :Fail
≥ Please wait a few moments, and
then try again.
≥ Setting of the Wireless router
(Access point) for MAC Address
etc.
≥ The signal may be weak. Using
the supplied USB extension
cable, adjust the position of the
Wireless LAN Adaptor. Do not
use any other USB extension
cables except the supplied one.
≥ The SSID and the encryption
key of the Wireless router
(Access point).
≥ Please wait a few moments, and
then try again.
≥ Connection of Wireless LAN
Adaptor
If there is no improvement in
symptom, consult your dealer.
: Fail
: Fail
: Fail
Display
:Fail
Check the
following
≥ Connection of
the LAN
cables
(> 10)
1. LAN cable connection or
Connection to access point
:Pass
2. IP address setting :Fail
3. Connection to gateway :Fail
1. LAN cable connection or
Connection to access point
:Pass
≥ Connection
and settings
of the hub
and router
≥ Settings of
“IP Address /
DNS
Settings”
(> 31)
:Home
2. IP address setting
network
available
3. Connection to gateway :Fail
1. LAN cable connection or
Connection to access point
:Pass
2. IP address setting :Pass
3. Connection to gateway :Fail
Network Easy Setting (Internet Connection Test)
Display Check the following
Cannot find the server.
(B019)
≥ “Primary DNS” and “Secondary
DNS” settings of “IP Address /
DNS Settings” (> 31)
≥ The server may be busy or the
Failed to connect to
the server.
(B020)
service may have been
suspended. Please wait a few
moments, and then try again.
≥ Settings of “Proxy Server
Settings” (> 31) and the router
≥ Refer to the operating instructions of the hub or router.
≥ You can perform this setup anytime by selecting “Network Easy Setting” in
the Setup menu. (> 31)
≥ You can redo these settings individually using “Network Settings”. (> 31)
≥ Do not connect to a wireless network for which you do not have usage
rights. Wireless networks for which you do not have usage rights (SSID)
may appear during the automatic search for a wireless network
environment. However, if you connect, there is a risk that it will be
regarded as illegal access.
≥ After performing network settings on this unit, the settings (encryption
level, etc.) of the Wireless router (Access point) might change.
When you have trouble getting online on your PC, perform the network
settings on your PC in accordance with the settings of W ireless router
(Access point).
Connections and settings
13
VQT2H 83
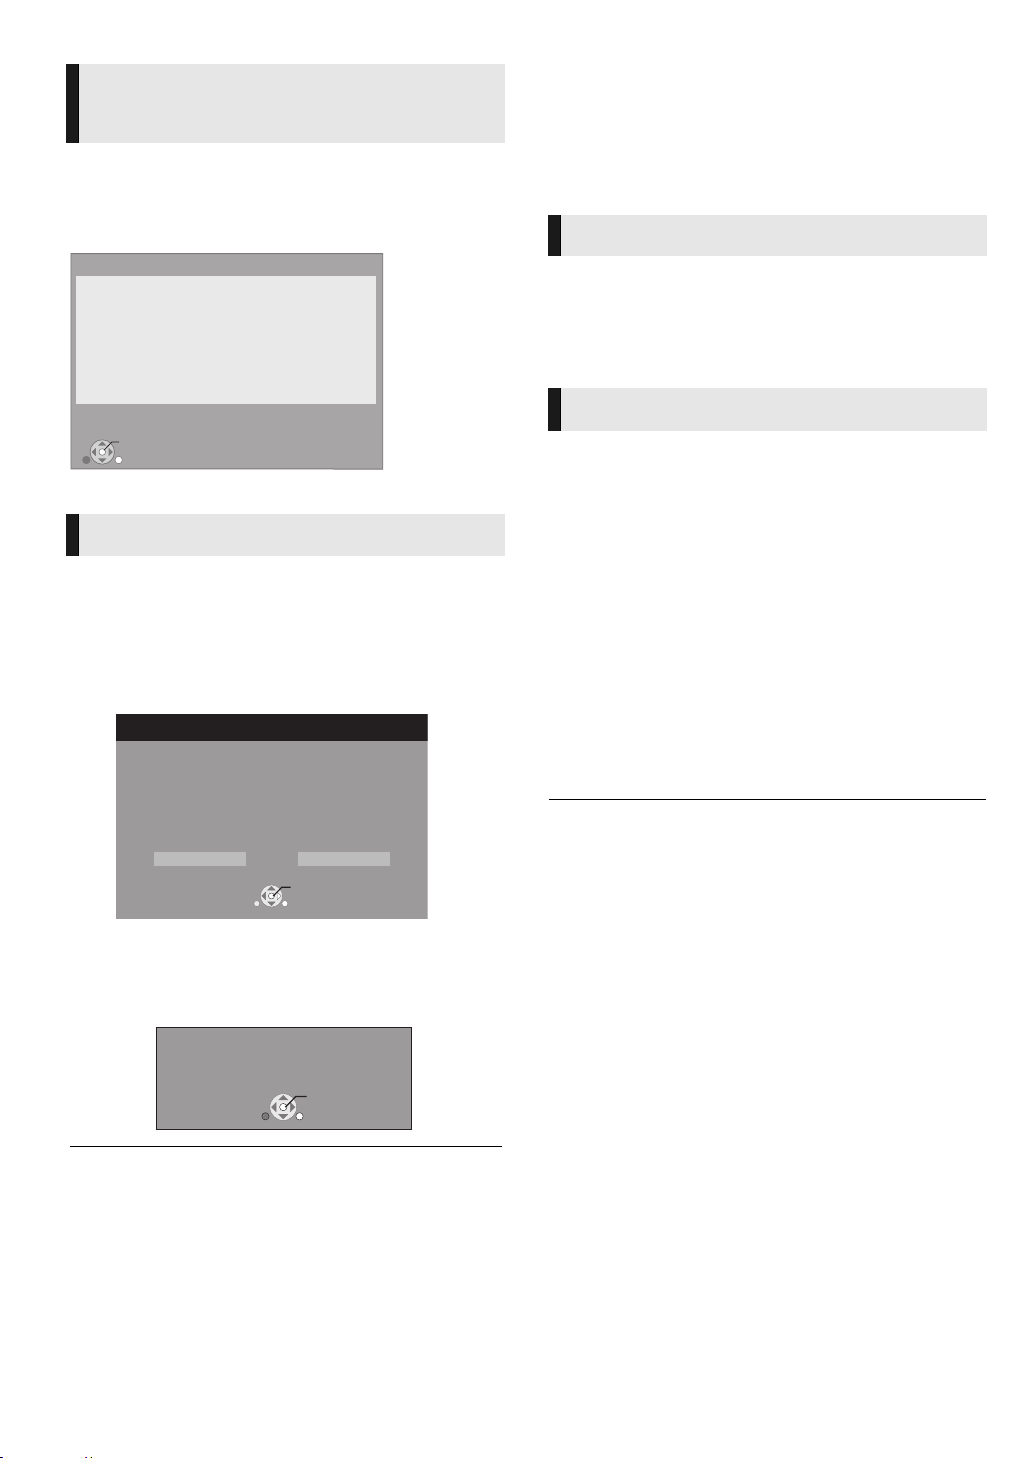
Network Easy Setting
OK
RETURN
Network Easy Setting (Connection Check)
LAN setup and testing of home network and Internet
connections are required for Internet functions
(BD-Live etc.).
Broadband Internet connection is necessary for
BD-Live.
Is a LAN cable already connected ?
Please refer to the operating instructions about network
connection.
Press [OK] to proceed.
Firmware Update
Latest Online Version: x.xx
Current Installed Version: x.xx
Do you want to start firmware update?
For the update information, please visit the
following website:
http://panasonic.net/support/
RETURN
OK
Yes No
STEP 6 :
For Middle East and Asia
After completing “Easy Setting”, you can continuously perform
“Network Easy Setting”.
Follow the on-screen instructions and make
2,1
the settings with [
≥ When you experience problems (> 13)
] and press [OK].
Firmware updating
Occasionally, Panasonic may release updated firmware for
this unit that may add or improve the way a feature operates.
These updates are available free of charge.
This unit is capable of checking the fir mware automatically
when connected to the Internet via a broadband connection.
When a new firmware version is available, the following
screen is displayed.
Reprogramming the
remote control
For other Panasonic products
If you have more than one Panasonic player/recorder and the
remote control operates both products at once, you will need
to change the remote control code on one product to prevent
this occurrence. After changing the remote control code on
this product, you will need to change the code of the remote
control. (> 31, “Remote Control”)
For TV or amplifier/receiver
You can operate the TV or amplifier/receiver using the unit’s
remote control.
1 For televisions
Input the 2-digit code (> 40) with the
numbered buttons while pressing [Í TV].
For amplifiers/receivers
Input the 2-digit code (> 40) with the
numbered buttons while pressing
[RECEIVER j VOL].
e.g., 01: [0] B [1]
2 Test by turning on the television or
adjusting the volume of the amplifier/
receiver.
DO NOT DISCONNECT the unit from the AC power or
perform any operation while the update takes place.
After the firmware is installed, “FINISH” will be displayed on
the unit’s display. Unit will restart and the following screen will
be displayed.
The firmware has been updated.
Current Installed Version:
≥ You can perform update anytime by selecting “Firmware Update” in the
Setup menu. (> 31)
≥ If downloading on this unit fails or this unit is not connected to the
Internet, then you can download the latest firmware from the
following website and burn it to a CD-R to update the firmwa re.
http:/ /panasonic.jp /support/glo bal/cs/
(This site is in English only.)
To show the firmware version on this unit. (> 31, “System
Information”)
≥
Downloading will require several minutes. It may take longer or may not work
properly de pending on th e connection envir onment .
≥ If you do not want to check for the latest firmware version, se t “Automatic
Update Check” to “Off”. (> 31)
14
VQT2H83
OK
RETURN
x.xx
≥ If your television or amplifier/receiver brand has more than one code
listed, select the one that allows correct operation.
 Loading...