

PANASONIC DMPBD75EG User Manual
Model No. DMP-BD75
Basic Operating Instructions
Blu-ray DiscTM Player
Mode d’emploi de base
Lecteur de Blu-ray Disc
TM
Istruzioni per l’uso di base
Lettore Blu-ray Disc
TM
Instrucciones básicas de funcionamiento
Reproductor de Blu-ray Disc
TM
Beknopte gebruiksaanwijzing
Blu-ray DiscTM speler
Grundläggande bruksanvisning
Blu-rayTM -skivspelare
Vejledning i den
grundlæggende betjening
Blu-rayTM -diskafspiller
Základní Návod k použití
Přehrávač disků Blu-ray
TM
Kezelési utasítás kezdőknek
Blu-rayTM lemez lejátszó
Skrócona instrukcja obsługi
Odtwarzacz płyt Blu-ray
TM
Perusasetukset Käyttöohjeet
Blu-rayTM levysoitin
English
Français
Italiano
Español
Nederlands
Svenska
Dansk
Česky
EG
Magyar
Polski
Suomi
VQT3A95

Dear customer
Thank you for purchasing this product.
For optimum performance and safety, please read these
instructions carefully.
Before connecting, operating or adjusting this product,
please read the instructions completely.
Please keep this manual for future reference.
Table of contents
Getting started
Reading the Operating Instructions
(PDF format) . . . . . . . . . . . . . . . . . . . . . . . . . . . . . 2
Safety precautions . . . . . . . . . . . . . . . . . . . . . . . . . 3
Accessories . . . . . . . . . . . . . . . . . . . . . . . . . . . . . . 3
Playable discs/USB devices . . . . . . . . . . . . . . . . . 4
Reading the Operating
Instructions
(PDF format)
∫ For Windows
1 Turn the PC on and insert the CD-ROM containing the
Operating Instructions (supplied).
2 Select the desired language and then click [Operating
Instructions] to install.
3 Double click the “BD75EG Operating Instructions”
shortcut icon on the desktop.
When the Operating Instructions (PDF format) will not
open
You will need Adobe Acrobat Reader 5.0 or later or Adobe
Reader 7.0 or later to browse or print the Operating
Instructions (PDF format).
Download and install a version of Adobe Reader that you
can use with your OS from the following Web Site.
http://get.adobe.com/reader/otherversions
Connections and settings
STEP 1 : Connecting to a TV . . . . . . . . . . . . . . . . 6
STEP 2 : Connecting to an amplifier/receiver . . . . 6
STEP 3 : Connecting to a broadband network . . . 7
STEP 4 : Settings . . . . . . . . . . . . . . . . . . . . . . . . . 7
Playback
Inserting or removing media . . . . . . . . . . . . . . . . . 8
HOME menu . . . . . . . . . . . . . . . . . . . . . . . . . . . . . 8
Playing video contents. . . . . . . . . . . . . . . . . . . . . . 9
Linked operations with the TV
(VIERA Link “HDAVI Control™”) . . . . . . . . . . . . . 10
Specifications . . . . . . . . . . . . . . . . . . . . . . . . . . . 10
Please also refer to Operating
Instructions (PDF format) recorded on
the CD-ROM containing the Operating
Instructions (supplied).
Operating Instructions (PDF format) cannot be played
back on the player itself.
You can learn about advanced operation methods and
check the Troubleshooting.
To dispose or transfer this unit
The unit may keep the user settings information in the unit.
If you discard this unit either by disposal or transfer, then
follow the procedure to return all the settings to the factory
presets to delete the user settings.
≥ The operation history may be recorded in the memory of
this unit.
If using the following OS
– Windows 2000 SP4
– Windows XP SP3
– Windows Vista SP2
–Windows 7
Insert the CD-ROM containing the Operating Instructions
(supplied), click [Adobe(R) Reader(R)] and then follow the
messages on the screen to install.
To uninstall the Operating Instructions (PDF format)
Delete the PDF file from the “Program Files\Panasonic\DMP\”
folder.
≥ When the contents in the Program Files folder cannot be
displayed, click the [Show the contents of this folder] to
display them.
∫ For Macintosh
1 Turn the PC on and insert the CD-ROM containing the
Operating Instructions (supplied).
2 Open the “Manual” folder in “VFF0703” and then copy
the PDF file with the desired language inside the folder.
3 Double click the PDF file to open it.
About descriptions in these operating
instructions
≥ Instructions for operations are generally described using
the remote control.
d
Getting started
VQT3A95
(2)
2
Safety precautions
(Alkaline or
manganese batteries)
WARNING
Unit
≥ To reduce the risk of fire, electric shock or product
damage,
– Do not expose this unit to rain, moisture, dripping or
splashing.
– Do not place objects filled with liquids, such as vases,
on this unit.
– Use only the recommended accessories.
– Do not remove covers.
– Do not repair this unit by yourself. Refer servicing to
qualified service personnel.
– Do not let metal objects fall inside this unit.
– Do not place heavy items on this unit.
AC mains lead
≥ To reduce the risk of fire, electric shock or product
damage,
– Ensure that the power supply voltage corresponds to the
voltage printed on this unit.
– Insert the mains plug fully into the socket outlet.
– Do not pull, bend, or place heavy items on the lead.
– Do not handle the plug with wet hands.
– Hold onto the mains plug body when disconnecting the
plug.
– Do not use a damaged mains plug or socket outlet.
≥ Install this unit so that the AC mains lead can be
unplugged from the socket outlet immediately if any
problem occurs.
CAUTION
Unit
≥ This unit utilizes a laser. Use of controls or adjustments or
performance of procedures other than those specified
herein may result in hazardous radiation exposure.
≥ Do not place sources of naked flames, such as lighted
candles, on this unit.
≥ This unit may receive radio interference caused by mobile
telephones during use. If such interference occurs, please
increase separation between this unit and the mobile
telephone.
≥ This unit is intended for use in moderate climates.
Placement
≥ Place this unit on an even surface.
≥ To reduce the risk of fire, electric shock or product
damage,
– Do not install or place this unit in a bookcase, built-in
cabinet or in another confined space. Ensure this unit is
well ventilated.
– Do not obstruct this unit’s ventilation openings with
newspapers, tablecloths, curtains, and similar items.
– Do not expose this unit to direct sunlight, high
temperatures, high humidity, and excessive vibration.
Batteries
≥ Danger of explosion if battery is incorrectly replaced.
Replace only with the type recommended by the
manufacturer.
≥ Mishandling of batteries can cause electrolyte leakage
and may cause a fire.
– Do not mix old and new batteries or different types at the
same time.
– Do not heat or expose to flame.
– Do not leave the battery(ies) in a car exposed to direct
sunlight for a long period of time with doors and
windows closed.
– Do not take apart or short circuit.
– Do not recharge alkaline or manganese batteries.
– Do not use batteries if the covering has been peeled off.
– Remove batteries if you do not intend to use the remote
control for a long period of time. Store in a cool, dark
place.
≥ When disposing the batteries, please contact your local
authorities or dealer and ask for the correct method of
disposal.
Accessories
Check the supplied accessories before using this unit.
1 Remote control
(N2QAYB000577)
2 Batteries for remote control
1 AC mains lead
1 CD-ROM
≥ Product numbers provided in these operating instructions correct as of
January 2011. These may be subject to change.
≥ Do not use AC mains lead with other equipment.
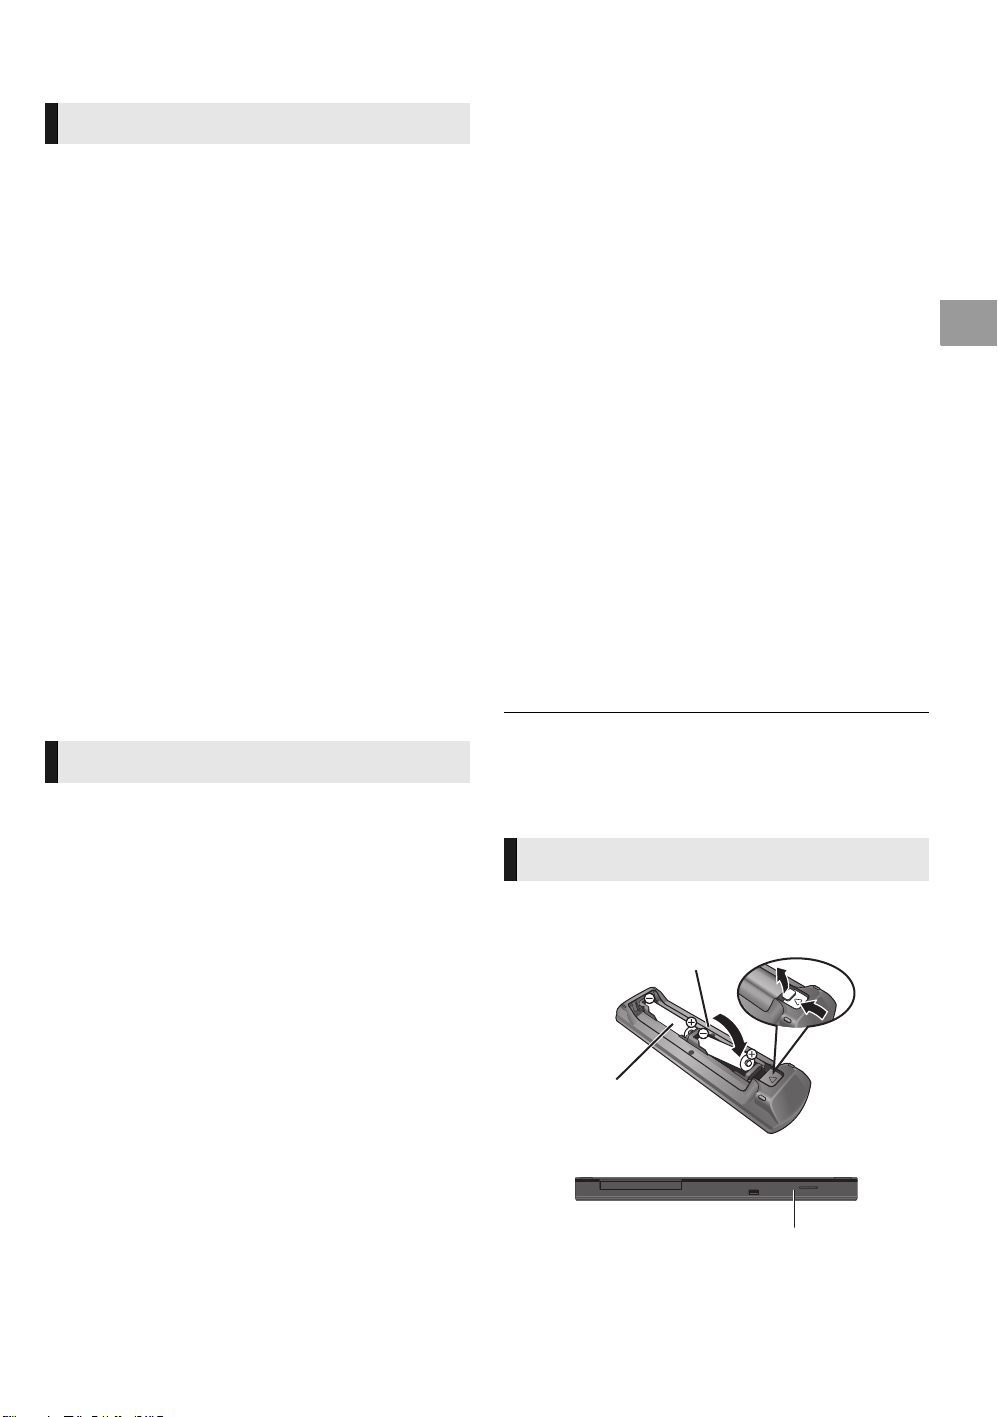
Using the remote control
Insert so the poles (i and j) match those in the remote
control.
R6/LR6, AA
Point it at remote control signal sensor on this unit.
English
VQT3A95
(3)
3
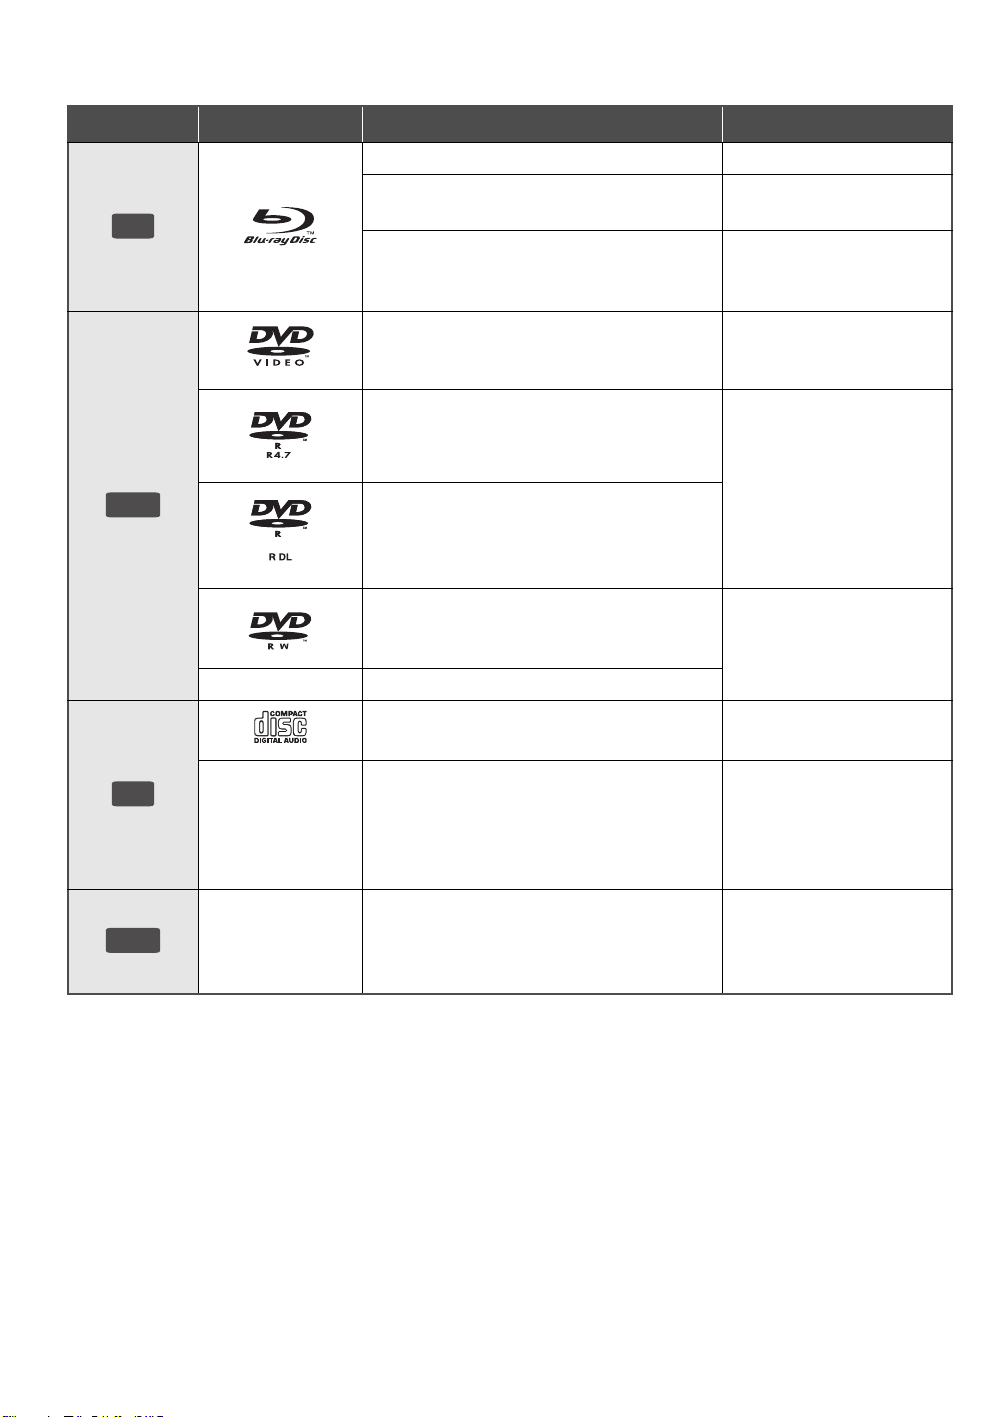
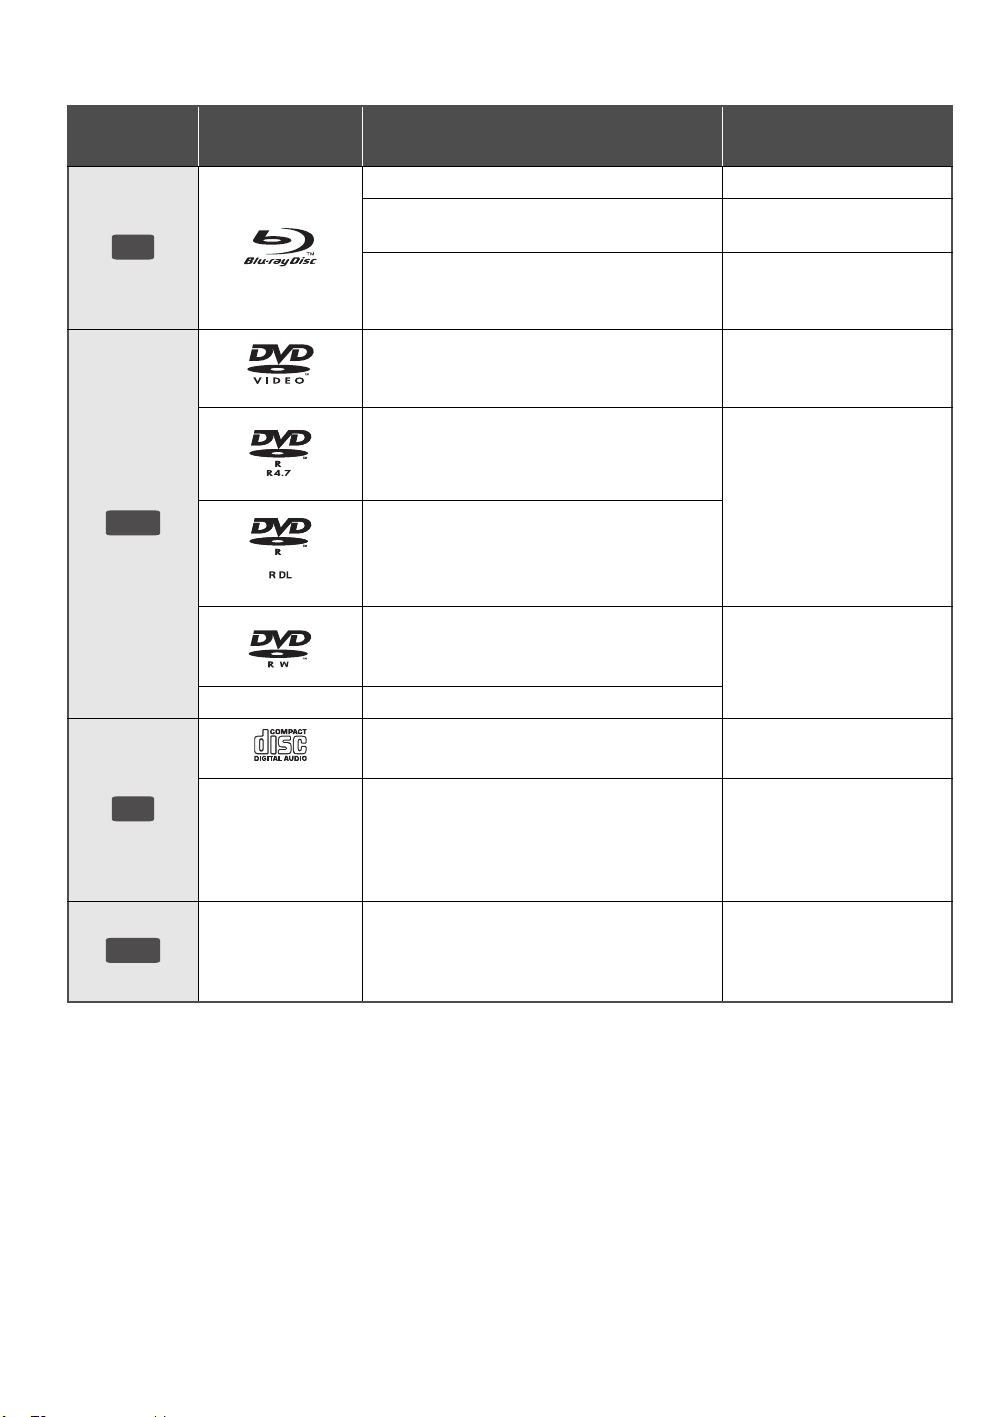
Playable discs/USB devices
DVD
USB
Device Disc markings Device types Contents format
BD-Video
BD-RE
BD
BD-R
Video
Video
JPEG
Video
DivX
MKV
®
CD
DVD-Video
DVD-R
Video
Video
AVCHD
®
DivX
MKV
DVD-R DL
DVD-RW
MP3
JPEG
Video
AVCHD
—
—
+R/+RW/+R DL
Music CD
CD-R
CD-RW
Music [CD-DA]
®
DivX
MKV
Music [CD-DA]
MP3
JPEG
®
DivX
—
USB devices
(up to 2 TB)
MKV
MP3
JPEG
VQT3A95
(4)
4

∫ Discs that cannot be played by this
unit
≥ DVD-RAM
≥ Super Audio CD
≥ Photo CD
≥ DVD-Audio
≥ WMA discs
≥ DivX Plus HD discs
≥ HD DVD
∫ Region management information
BD-Video
This unit plays BD-Video marked with labels containing the
region code “B”.
Example:
DVD-Video
This unit plays DVD-Video marked with labels containing the
region number “2” or “ALL”.
Example:
2
2
ALL
3
5
∫ Finalize
DVD-R/RW/R DL, +R/+RW/+R DL and CD-R/RW recorded
by a recorder, etc. needs to be finalized by the recorder to
play on this unit. Please refer to the recorder’s instructions.
∫ BD-Video
≥ This unit supports high bit rate audio (Dolby Digital Plus,
Dolby TrueHD, DTS-HD High Resolution Audio and
DTS-HD Master Audio) adopted in BD-Video.
– If “Dolby D/Dolby D +/Dolby TrueHD” is set to “PCM”,
the maximum possible number of Dolby sound is 2ch
PCM. ([HOME]>“Setup”>“Player
Settings”>“Sound”>“Digital Audio Output”)
∫ Music CD
Operation and sound quality of CDs that do not conform to
CD-DA specifications (copy control CDs, etc.) cannot be
guaranteed.
∫ USB device
≥ This unit does not guarantee connection with all USB
devices.
≥ This unit does not support USB device charging.
≥ FAT12, FAT16 and FAT32 file systems are supported.
≥ This unit supports USB 2.0 High Speed.
≥ This unit can support an HDD formatted to FAT32.
Some types of HDD may require the use of its external
power supply unit.
∫ BD-RE, BD-R
Discs recorded in DR mode using Panasonic Blu-ray Disc
recorders may not playback the audio etc., correctly.
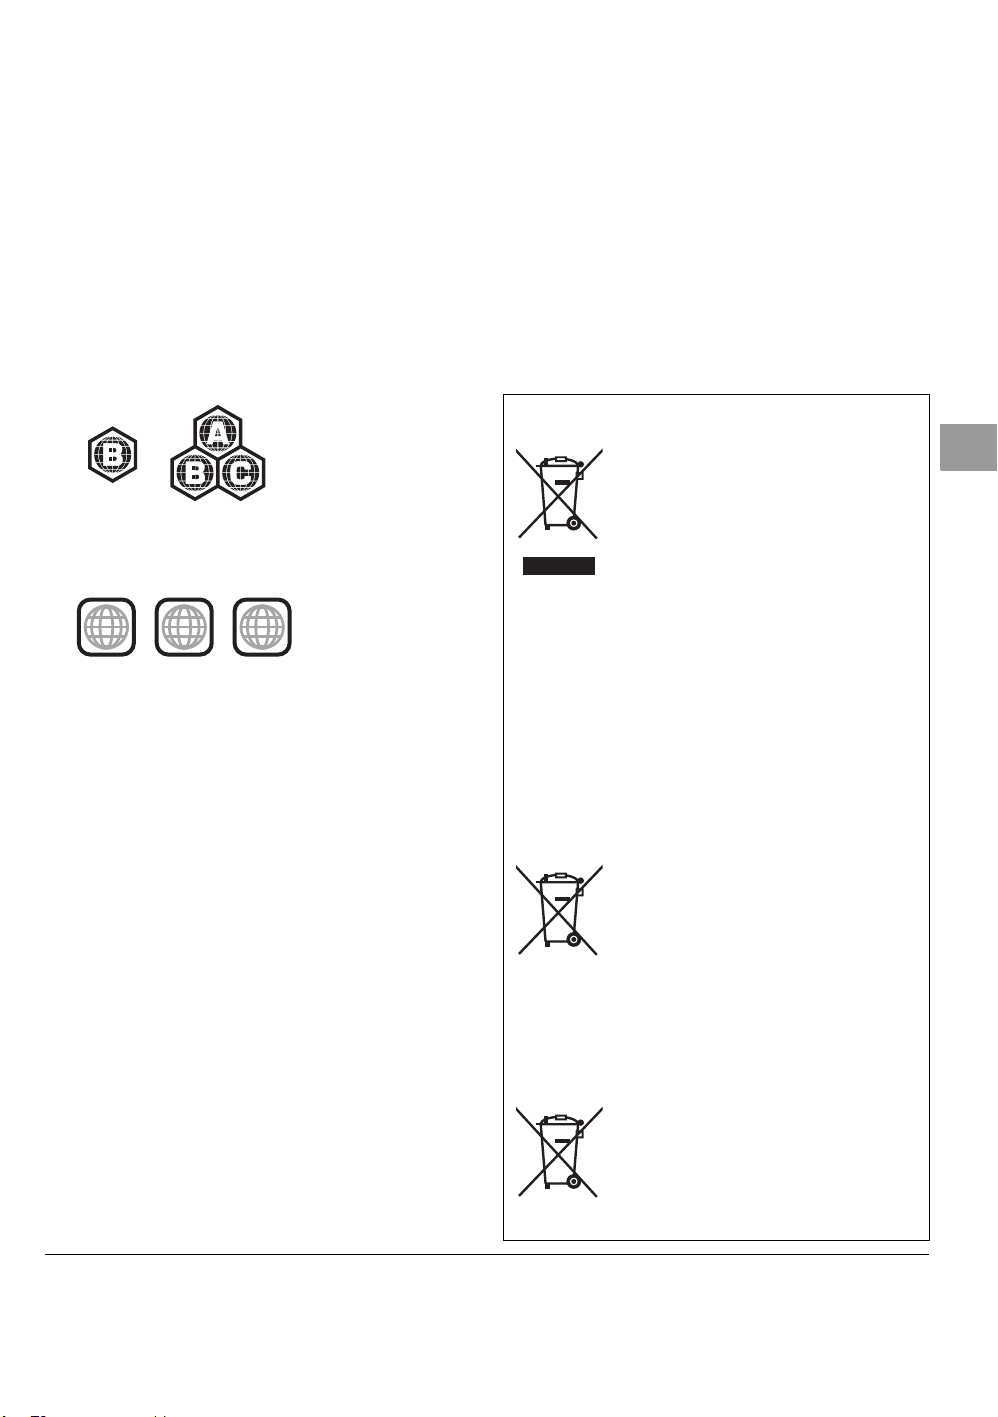
Information for Users on Collection and Disposal of
Old Equipment and used Batteries
These symbols on the products,
packaging, and/or accompanying
documents mean that used electrical and
electronic products and batteries should
not be mixed with general household
waste.
For proper treatment, recovery and
recycling of old products and used
batteries, please take them to applicable
collection points, in accordance with your
2002/96/EC and 2006/66/EC.
By disposing of these products and batteries correctly,
you will help to save valuable resources and prevent any
potential negative effects on human health and the
environment which could otherwise arise from
inappropriate waste handling.
For more information about collection and recycling of
old products and batteries, please contact your local
municipality, your waste disposal service or the point of
sale where you purchased the items.
Penalties may be applicable for incorrect disposal of this
waste, in accordance with national legislation.
European Union. If you wish to discard these items,
please contact your local authorities or dealer and ask for
the correct method of disposal.
Cd
national legislation and the Directives
For business users in the European
Union
If you wish to discard electrical and
electronic equipment, please contact your
dealer or supplier for further information.
[Information on Disposal in other
Countries outside the European Union]
These symbols are only valid in the
Note for the battery symbol (bottom
two symbol examples):
This symbol might be used in combination
with a chemical symbol. In this case it
complies with the requirement set by the
Directive for the chemical involved.
English
≥ It may not be possible to play the above media in some cases due to the type of media, the condition of the recording, the recording method and how the
files were created.
≥ The producers of the disc can control how discs are played, so you may not always be able to control play as described in these operating instructions.
Read the disc’s instructions carefully.
VQT3A95
(5)
5
Connections and settings
HDMI IN
HDMI cable
HDMI IN
HDMI IN
HDMI IN
(ARC)
HDMI OUT
(ARC)
Multi channel
speakers
Amplifier/receiver
HDMI cable
HDMI cable
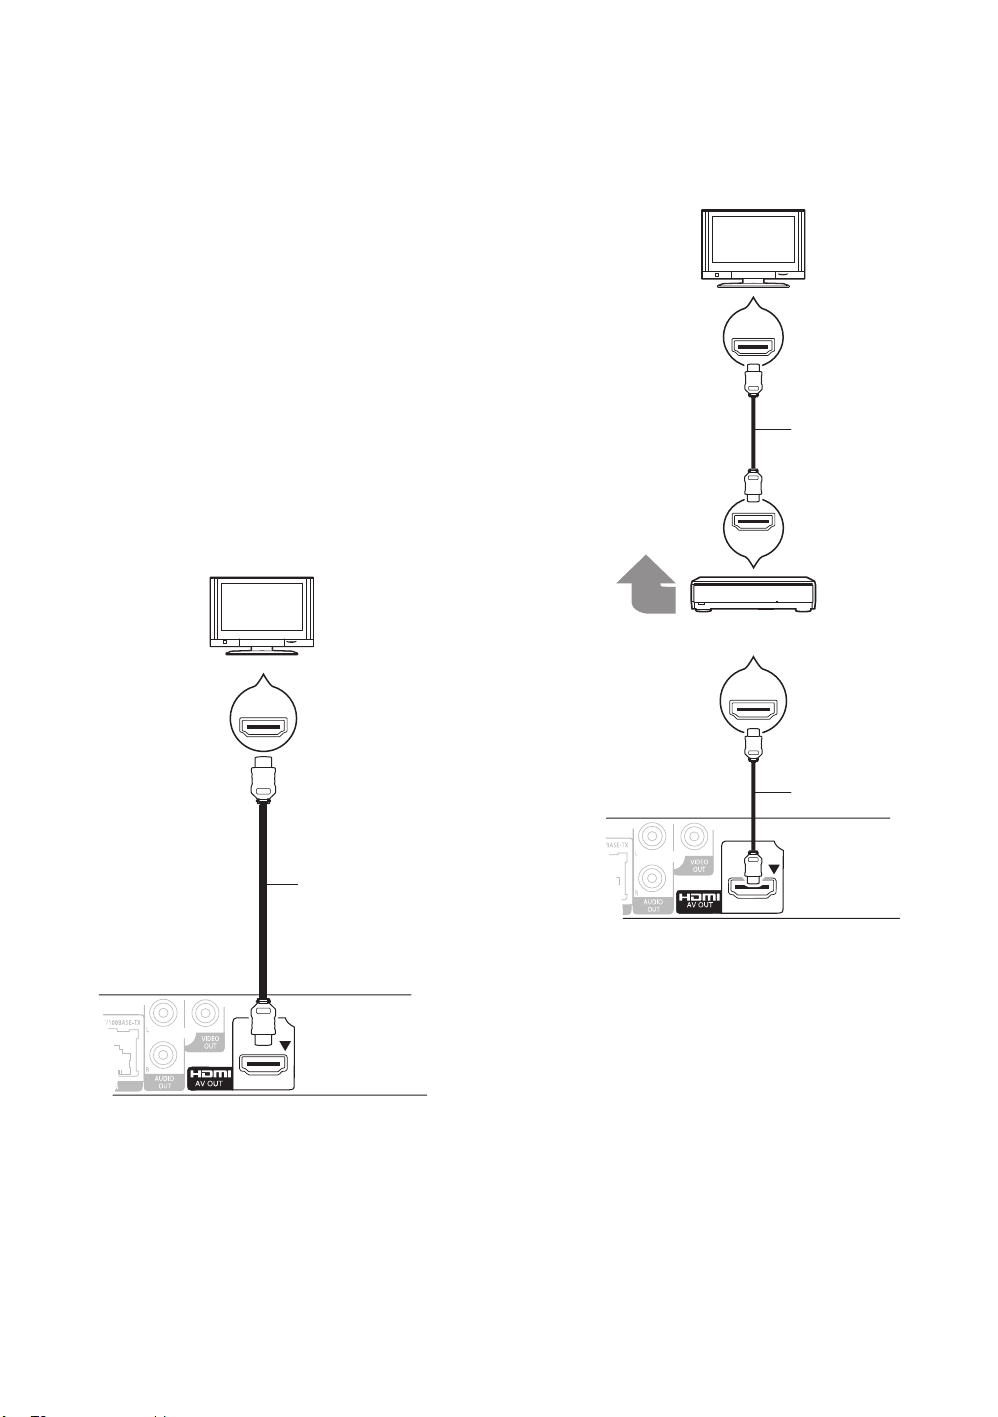
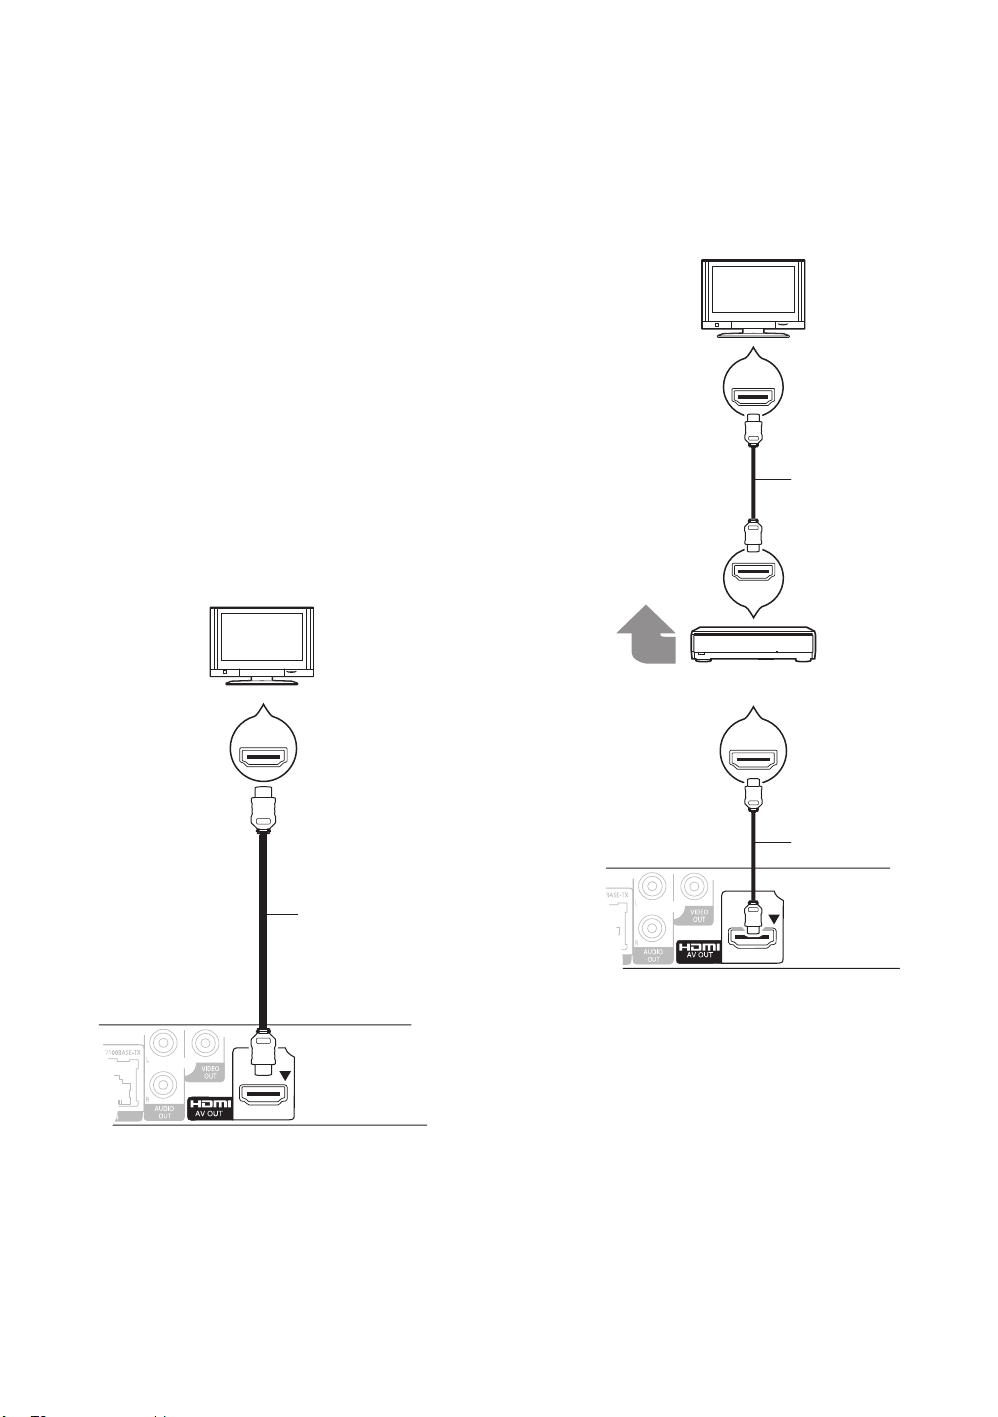
STEP 1 : Connecting to
STEP 2 : Connecting to
a TV
≥ Do not place the unit on amplifiers/receivers or equipment
that may become hot. The heat can damage the unit.
≥ Before making any connections we suggest you
temporarily disconnect all the units from AC power.
≥ Do not connect video signals through a video recorder.
Due to copy guard protection the picture may not be
displayed properly.
≥ Please use High Speed HDMI Cables that have the HDMI
logo (as shown on the cover). It is recommended that you
use Panasonic’s HDMI cable. When outputting 1080p
signal, please use HDMI cables 5.0 meters or less.
Recommended part number (High Speed HDMI Cable):
RP-CDHS15 (1.5 m), RP-CDHS30 (3.0 m),
RP-CDHS50 (5.0 m), etc.
∫ Via an HDMI AV OUT terminal
(High quality)
an amplifier/receiver
≥ Set “HDMI Audio Output” to “On”
([HOME]>“Setup”>“Player Settings”>“TV / Device
Connection”>“HDMI Connection”).
≥ The HDMI connection supports VIERA Link “HDAVI
Control” (> 10).
≥ Set “HDMI Audio Output” to “On”
([HOME]>“Setup”>“Player Settings”>“TV / Device
Connection”>“HDMI Connection”).
≥ Set “Digital Audio Output” depending on the connected
amplifier/receiver ([HOME]>“Setup”>“Player
Settings”>“Sound”).
≥ The HDMI connection supports VIERA Link “HDAVI
Control” (> 10).
≥ When using the TV or amplifier/receiver that does not
have the indication of “(ARC)” (non-ARC-compatible) on
the HDMI terminal, in order to enjoy TV’s sound by
amplifier/receiver it is also required to connect the
amplifier/receiver and TV using an optical digital cable.
VQT3A95
(6)
6
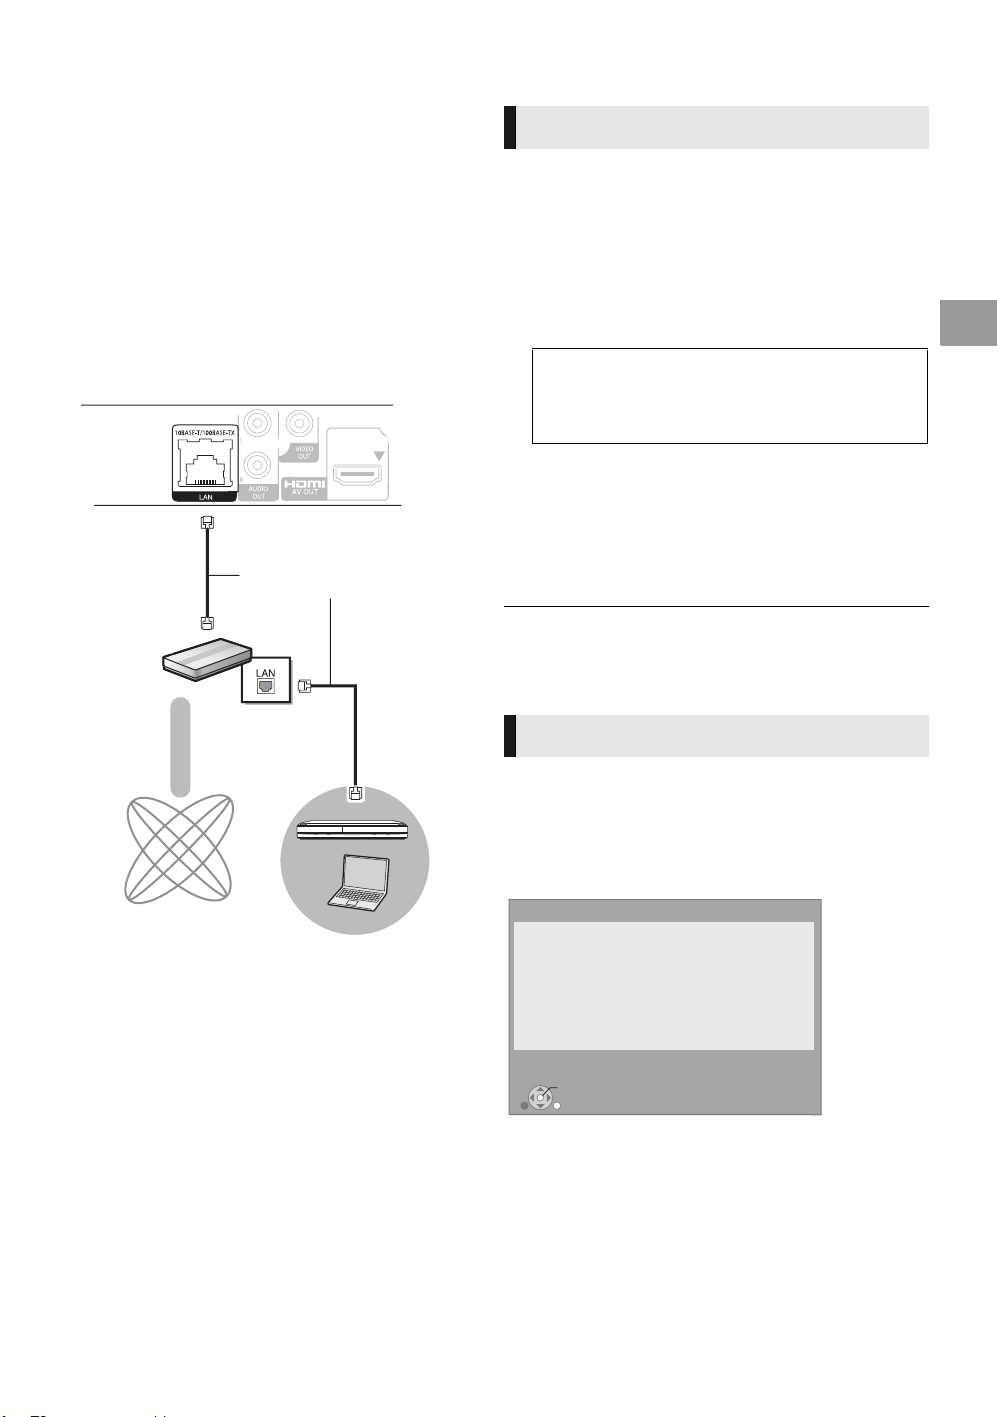
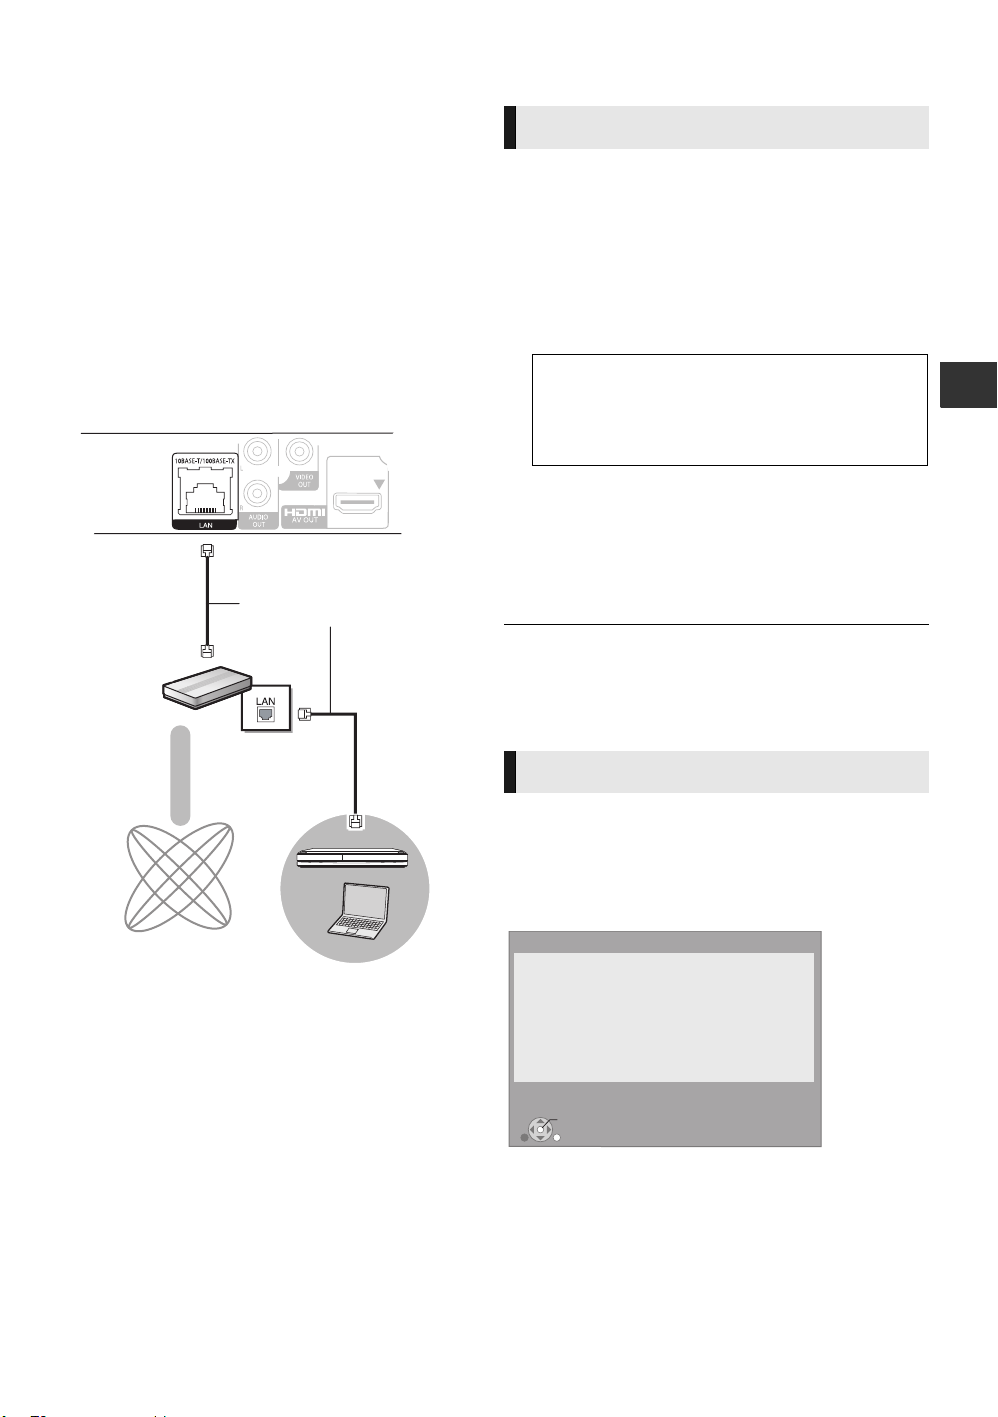
STEP 3 : Connecting to
Broadband router,
etc.
Internet
LAN Cable
DLNA Certified
media server
OK
RETURN
Network Easy Setting
LAN setup and testing of home network and Internet
connections are required for Internet functions
(BD-Live etc.).
Broadband Internet connection is necessary for BD-Live.
Is a LAN cable already connected ?
Please refer to the operating instructions about network
connection.
Press [OK] to proceed.
STEP 4 : Settings
a broadband network
The following services can be used when this unit is
connected to broadband.
– Firmware can be updated
– You can enjoy BD-Live
– You can access other devices
For details about connection method, refer to the
instructions supplied with the connected equipment.
∫ LAN cable connection
Easy Setting
After connecting your new player for the first time and
pressing [Í], a screen for the basic settings will appear.
Preparation
Turn on the television and select the appropriate video
input on the television.
1 Press [Í].
Setup screen appears.
Standby/on switch (Í/I)
Press to switch the unit from on to standby mode or
vice versa. In standby mode, the unit is still
consuming a small amount of power.
2 Follow the on-screen instructions and
make the settings with [3, 4] and press
[OK].
After completing “Easy Setting”, you can perform “Network
Easy Setting”.
≥ You can perform this setup anytime by selecting “Easy Setting” in the
Setup menu. ([HOME]
>“Setup”>“Player Settings”>“Others”)
English
≥ Use category 5 or above straight LAN cables (STP) when
connecting to peripheral devices.
≥ Inserting any cable other than a LAN cable in the LAN
terminal can damage the unit.
Network Easy Setting
After completing “Easy Setting”, you can continue with
“Network Easy Setting”.
Follow the on-screen instructions and make
the settings with [3, 4, 2, 1] and press
[OK].
VQT3A95
(7)
7
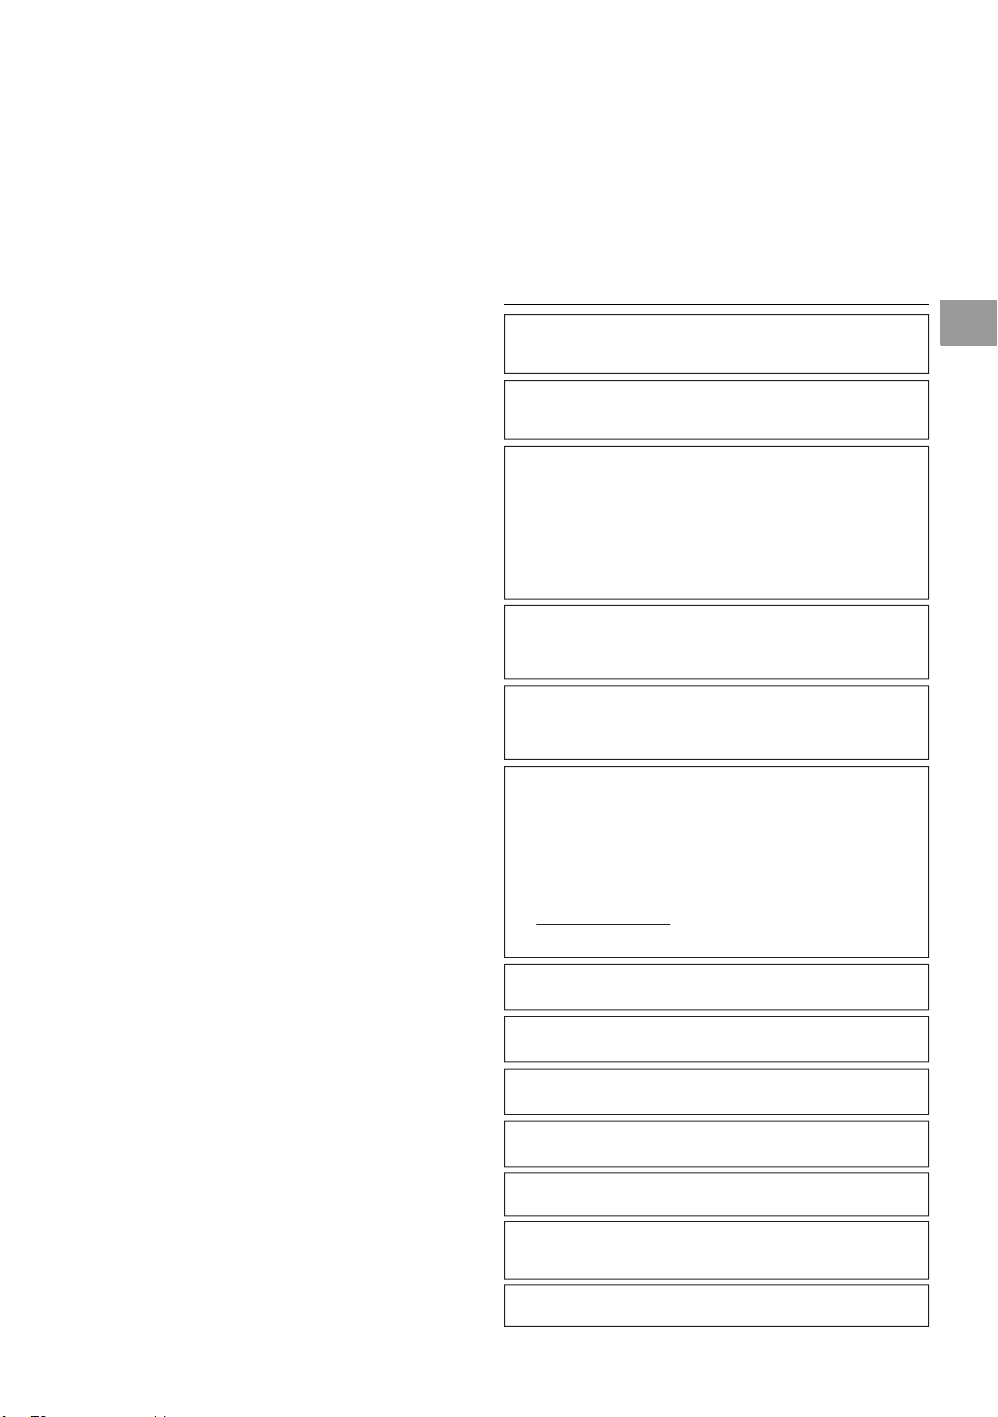
Playback
MusicPhotos
Videos
Blu-ray Disc Player
HOME
Setup
MEDIA
SERVER
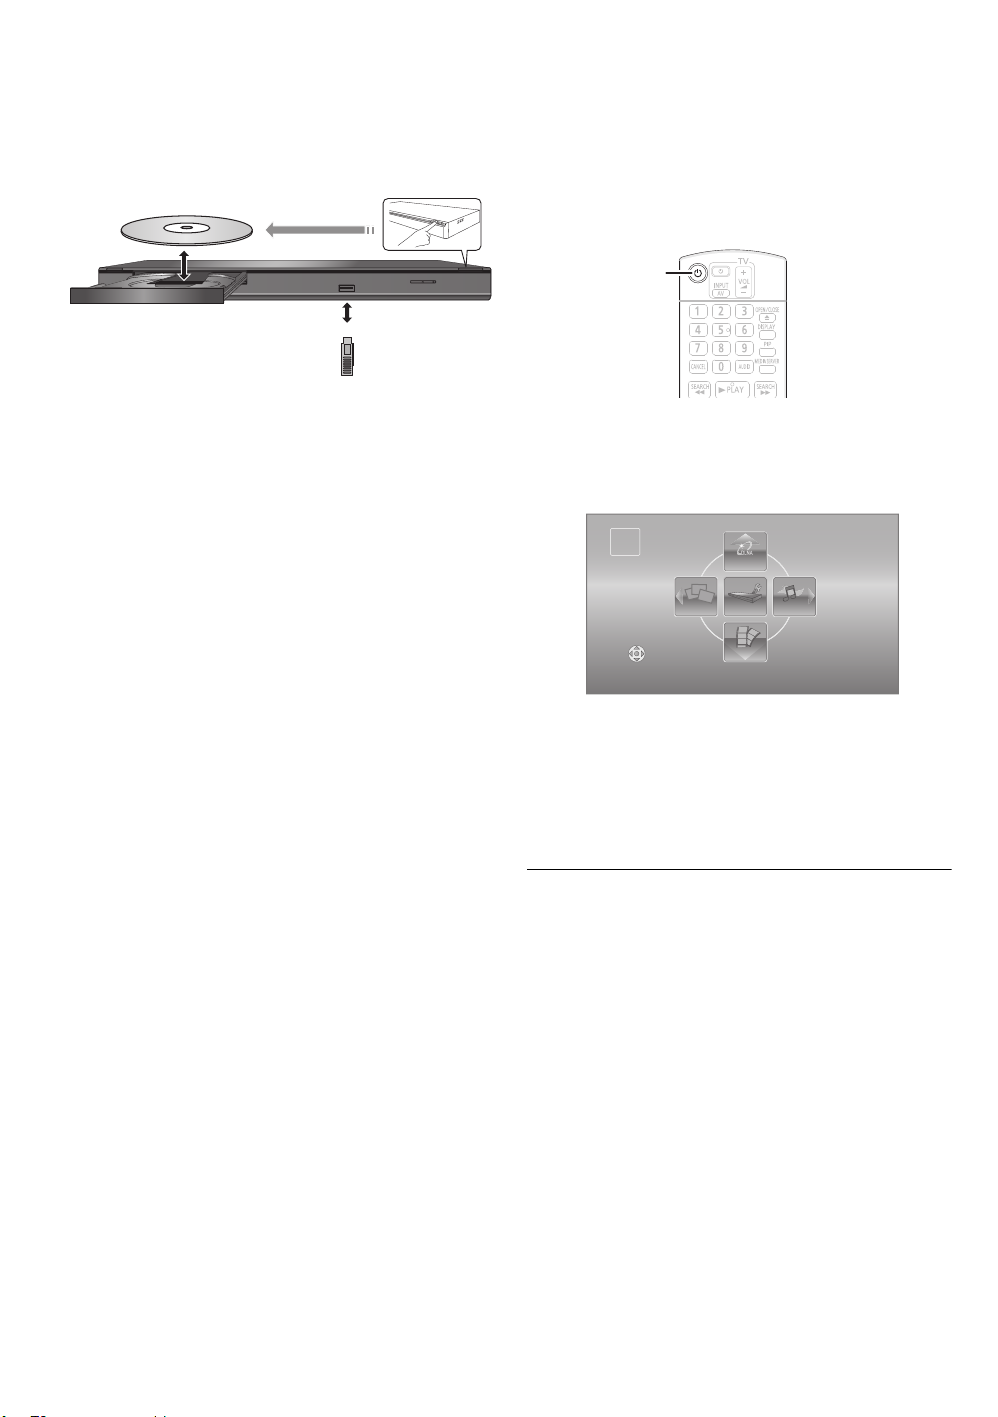
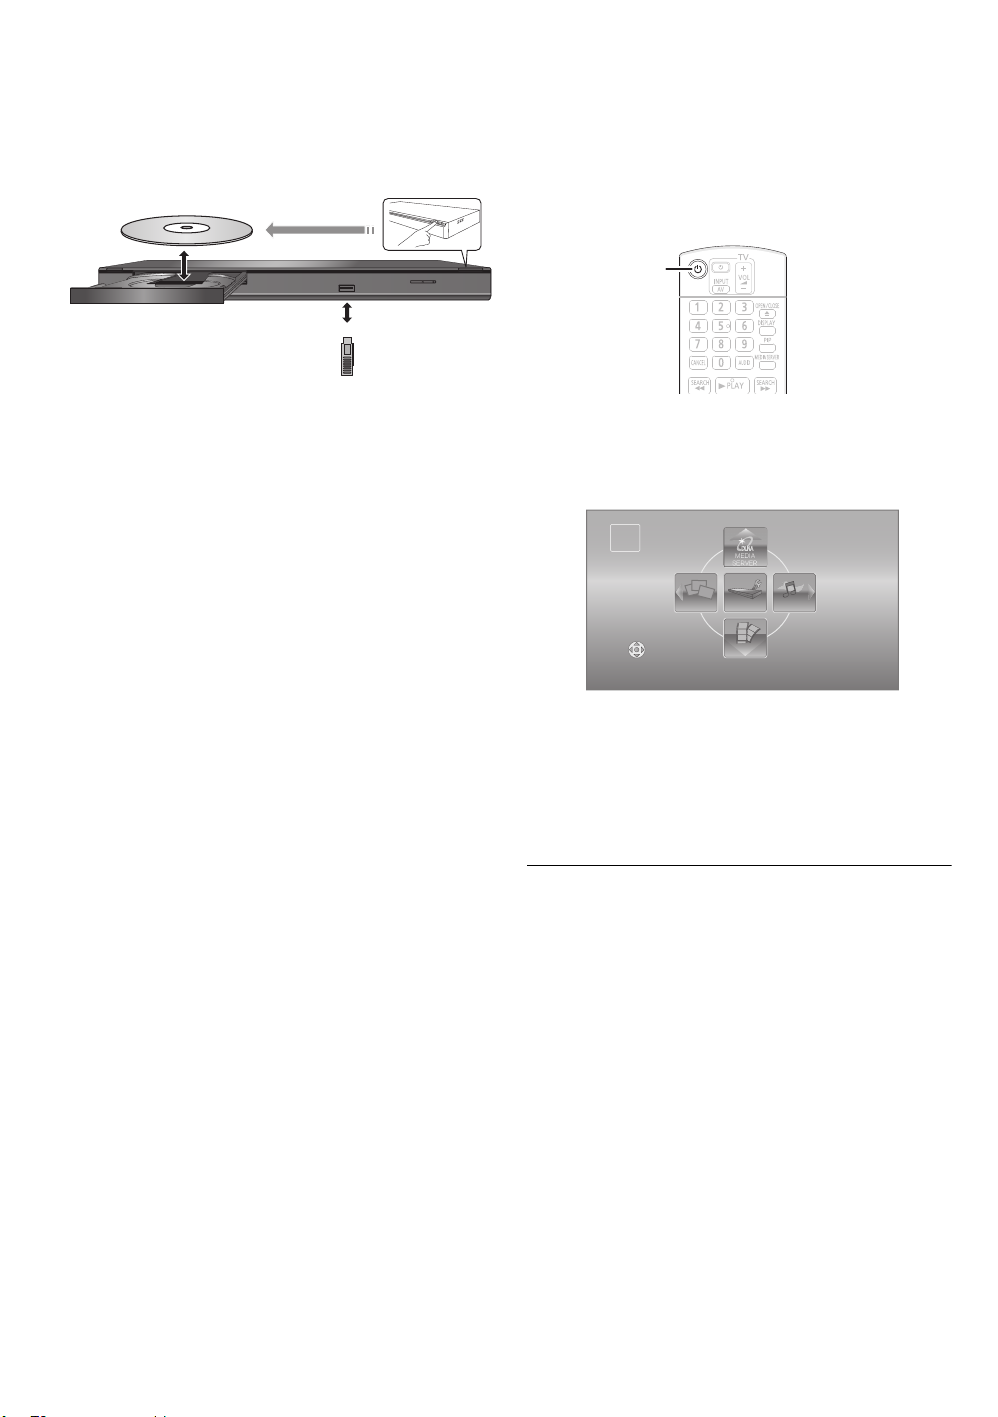
Inserting or removing
HOME menu
media
≥ When inserting a media item, ensure that it is facing the
right way up.
≥ If you connect a Panasonic product with a USB
connection cable, the setup screen may be displayed on
the connected equipment. For details, refer to the
instructions for the connected equipment.
Major functions of this unit can be operated from the HOME
menu.
Preparation
Turn on the television and select the appropriate video input
on the television.
1
1 Press [Í] to turn on the unit.
2 Press [OK] or [3, 4, 2, 1] to select the
item.
≥ When a media is inserted, contents selection screen
for that media is displayed.
≥ If there are any other items, repeat this step.
≥ To return to HOME menu, select “HOME” or press
[RETURN] several times.
To show the HOME menu
Press [HOME].
≥ Items to be displayed may vary with the media.
≥ Where necessary, set “Mixed Data Disc Option” when using a disc with
both data files (MP3, JPEG, DivX, MKV) and Video.
([HOME]
>“Setup”>“Player Settings”>“Disc”)
VQT3A95
(8)
8

Playing video contents
BD
DVD
CD
USB
1 Insert the media.
When the contents menu is displayed, press
[3, 4, 2, 1] to select the item. (> 8)
2 Press [3, 4] to select the title and press
[OK].
∫ To show menus
You can display Top Menu, DIRECT NAVIGATOR or Pop-up
Menu.
Press [TOP MENU] or [POP-UP MENU].
≥ Press [3, 4, 2, 1] to select the item and press [OK].
Other operations during play
These functions may not work depending on the media and
contents.
Stop
Press [∫STOP].
The stopped position is memorized.
Resume play function
Press [1PLAY] to restart from this position.
≥ The position is cleared if the tray is opened or you press
[∫STOP] several times to display “StOP” on the unit’s
display.
≥ On BD-Video discs including BD-J, the resume play
function does not work.
Pause
English
≥ Signal from PAL discs is output as PAL. Signal from NTSC discs is
output as “NTSC” or “PAL60”. You can select “NTSC” or “PAL60” in
“NTSC Contents Output” for NTSC discs. ([HOME]
Settings”
≥ DISCS CONTINUE TO ROTATE WHILE MENUS ARE DISPLAYED.
≥ Depending on media and contents, the display may change or may not
≥ DivX and MKV: Successive play is not possible.
≥ It is not possible to playback AVCHD and MPEG2 video which have
≥ To save on electricity, the unit is turned off automatically if there is no
>“Picture”)
Press [∫STOP] when you have finished playback to protect the unit’s
motor, your television screen and so on.
appear.
been dragged and dropped, copied and pasted to the media.
button operation for about 30 minutes when not playing back (such as
when paused, displaying the menu, displaying still pictures, etc.).
>“Setup”>“Player
Press [;PAUSE].
≥ Press [;PAUSE] again or [1PLAY] to restart play.
Search/Slow-motion
Search
While playing, press [SEARCH6] or
[SEARCH5].
≥ Music and MP3: The speed is fixed to a single step.
Slow-motion
While paused, press [SEARCH5].
The speed increases up to 5 steps.
≥ Press [1PLAY] to revert to normal playback speed.
Skip
While playing or paused, press [:] or
[9].
Skip to the title, chapter or track you want to play.
≥ Each press increases the number of skips.
Frame-by-frame
While paused, press [1] (;1).
≥ Press and hold to change in succession forward.
≥ Press [1PLAY] to revert to normal playback speed.
Changing audio
Press [AUDIO].
You can change the audio channel number or soundtrack
language, etc.
VQT3A95
(9)
9

Linked operations with
Specifications
the TV
(VIERA Link “HDAVI Control™”)
What is VIERA Link “HDAVI Control”?
VIERA Link “HDAVI Control” is a convenient function
that offers linked operations of this unit, and a
Panasonic TV (VIERA) or other device under “HDAVI
Control”.
You can use this function by connecting the
equipment with an HDMI cable. See the operating
instructions for connected equipment for operational
details.
Preparation
1 Set “VIERA Link” to “On” ([HOME]>“Setup”>“Player
Settings”>“TV / Device Connection”>“HDMI
Connection”).
(The default setting is “On”.)
2 Set the “HDAVI Control” operations on the connected
equipment (e.g., TV).
3 Turn on all “HDAVI Control” compatible equipment and
select this unit’s input channel on the connected TV so
that the “HDAVI Control” function works properly.
Also when the connection or settings are changed,
repeat this procedure.
Signal system: PAL/NTSC
Operating temperature range:
Operating humidity range:
Video output: 1.0 Vp-p (75 ≠)/Pin jack:1 system
Audio output: 2 Vrms (1 kHz, 0 dB)/Pin jack
Number of connectors : 2 channel:1 system
HDMI AV output: Type A (19 pin) : 1 system
This unit supports “HDAVI Control 1” function.
USB slot: USB2.0 : 1 system
Ethernet: 10BASE-T/100BASE-TX : 1 system
LASER Specification
Class 1 LASER Product:
Wave length:
Laser power:No hazardous radiation is emitted with the
Power supply: AC 220 to 240 V, 50 Hz
Power consumption: Approx. 12 W
Power consumption in standby mode:
Power consumption in quick start standby mode:
Dimensions (WkDkH) Including the projecting parts:
Mass: Approx. 1.6 kg
Specifications are subject to change without notice.
10 % to 80 % RH (no condensation)
790 nm (CDs)/655 nm (DVDs)/405 nm (BDs)
430 mmk185 mmk35 mm
i5 oC to i35 oC
safety protection
Approx. 0.2 W
Approx. 3.6 W
Automatic input switching
Power on link
When play starts on the unit, the TV will automatically switch
the input channel and display the corresponding action.
Additionally when the TV is off, the TV will automatically turn
on.
Power off link
All connected equipment compatible with “HDAVI Control”,
including this unit, automatically turns off when you switch
the television off.
≥ This unit supports “HDAVI Control 1” function.
This standard is compatible with Panasonic’s conventional HDAVI
equipment.
≥ VIERA Link “HDAVI Control”, based on the control functions provided by
HDMI which is an industry standard known as HDMI CEC (Consumer
Electronics Control), is a unique function that we have developed and
added. As such, its operation with other manufacturers’ equipment that
supports HDMI CEC cannot be guaranteed.
≥ Please refer to individual manuals for other manufacturers’ equipment
supporting VIERA Link function.
10
(10)
VQT3A95
This product incorporates the following software:
For the software categorized as (3) and (4), please refer to the terms
and conditions of GPL v2 and LGPL v2.1, as the case may be at
http://www.gnu.org/licenses/old-licenses/gpl-2.0.html and
http://www.gnu.org/licenses/old-licenses/lgpl-2.1.html.
In addition, the software categorized as (3) and (4) are copyrighted by
several individuals. Please refer to the copyright notice of those
individuals at
http://www.am-linux.jp/dl/AWBP11
The GPL/LGPL software is distributed in the hope that it will be useful,
but WITHOUT ANY WARRANTY, without even the implied warranty of
MERCHANTABILITY or FITNESS FOR A PARTICULAR PURPOSE.
At least three (3) years from delivery of products, Panasonic will give to
any third party who contacts us at the contact information provided
below, for a charge no more than our cost of physically performing
source code distribution, a complete machine-readable copy of the
corresponding source code covered under GPL v2/LGPL v2.1.
Contact Information
cdrequest@am-linux.jp
Source code is also freely available to you and any other member of
the public via our website below.
http://www.am-linux.jp/dl/AWBP11
the software developed independently by or for Panasonic
Corporation,
the software owned by third party and licensed to Panasonic
Corporation,
the software licensed under the GNU General Public License,
Version 2 (GPL v2),
the software licensed under the GNU LESSER General Public
License, Version 2.1 (LGPL v2.1) and/or,
open sourced software licensed under its applicable license terms
including but not limited to
ICU License, c-arse license.
(1)
(2)
(3)
(4)
(5)
For Open Source Software Programs categorized as (5), please refer
to the applicable license terms listed below and/or included in the
“License” menu on Product.
ICU License - ICU 1.8.1 and later
COPYRIGHT AND PERMISSION NOTICE
Copyright (c) 1995-2010 International Business Machines Corporation
and others
All rights reserved.
Permission is hereby granted, free of charge, to any person obtaining a
copy of this software and associated documentation files (the
“Software”), to deal in the Software without restriction, including without
limitation the rights to use, copy, modify, merge, publish, distribute,
and/or sell copies of the Software, and to permit persons to whom the
Software is furnished to do so, provided that the above copyright
notice(s) and this permission notice appear in all copies of the
Software and that both the above copyright notice(s) and this
permission notice appear in supporting documentation.
THE SOFTWARE IS PROVIDED “AS IS”, WITHOUT WARRANTY OF
ANY KIND, EXPRESS OR IMPLIED, INCLUDING BUT NOT LIMITED
TO THE WARRANTIES OF MERCHANTABILITY, FITNESS FOR A
PARTICULAR PURPOSE AND NONINFRINGEMENT OF THIRD
PARTY RIGHTS. IN NO EVENT SHALL THE COPYRIGHT HOLDER
OR HOLDERS INCLUDED IN THIS NOTICE BE LIABLE FOR ANY
CLAIM, OR ANY SPECIAL INDIRECT OR CONSEQUENTIAL
DAMAGES, OR ANY DAMAGES WHATSOEVER RESULTING FROM
LOSS OF USE, DATA OR PROFITS, WHETHER IN AN ACTION OF
CONTRACT, NEGLIGENCE OR OTHER TORTIOUS ACTION,
ARISING OUT OF OR IN CONNECTION WITH THE USE OR
PERFORMANCE OF THIS SOFTWARE.
Except as contained in this notice, the name of a copyright holder shall
not be used in advertising or otherwise to promote the sale, use or
other dealings in this Software without prior written authorization of the
copyright holder.
All trademarks and registered trademarks mentioned herein are the
property of their respective owners.
c-arse license
Copyright 1998 by the Massachusetts Institute of Technology.
Permission to use, copy, modify, and distribute this software and its
documentation for any purpose and without fee is hereby granted,
provided that the above copyright notice appear in all copies and that
both that copyright notice and this permission notice appear in
supporting documentation, and that the name of M.I.T. not be used in
advertising or publicity pertaining to distribution of the software without
specific, written prior permission.
M.I.T. makes no representations about the suitability of this software
for any purpose. It is provided “as is” without express or implied
warranty.
Java and all Java-based trademarks and logos are trademarks or
registered trademarks of Sun Microsystems, Inc. in the United States
and other countries.
Manufactured under license from Dolby Laboratories.
Dolby and the double-D symbol are trademarks of Dolby Laboratories.
Manufactured under license under U.S. Patent #’s: 5,451,942;
5,956,674; 5,974,380; 5,978,762; 6,226,616; 6,487,535; 7,392,195;
7,272,567; 7,333,929; 7,212,872 & other U.S. and worldwide patents
issued & pending.
DTS and the Symbol are registered trademarks, & DTS-HD, DTS-HD
Master Audio | Essential and the DTS logos are trademarks of DTS, Inc.
Product includes software.
© DTS, Inc. All Rights Reserved.
This item incorporates copy protection technology that is protected by
U.S. patents and other intellectual property rights of Rovi Corporation.
Reverse engineering and disassembly are prohibited.
HDMI, the HDMI Logo, and High-Definition Multimedia Interface are
trademarks or registered trademarks of HDMILicensing LLC in the
United States and other countries.
This product is licensed under the AVC patent portfolio license and
VC-1 patent portfolio license for the personal and non-commercial use
of a consumer to (i) encode video in compliance with the AVC Standard
and VC-1 Standard (“AVC/VC-1 Video”) and/or (ii) decode AVC/VC-1
Video that was encoded by a consumer engaged in a personal and
non-commercial activity and/or was obtained from a video provider
licensed to provide AVC/VC-1 Video. No license is granted or shall be
implied for any other use. Additional information may be obtained from
MPEG LA, LLC.
See http://www.mpegla.com.
HDAVI Control™ is a trademark of Panasonic Corporation.
“AVCHD” and the “AVCHD” logo are trademarks of Panasonic
Corporation and Sony Corporation.
“DVD Logo” is a trademark of DVD Format/Logo Licensing Corporation.
MPEG Layer-3 audio coding technology licensed from Fraunhofer IIS
and Thomson.
DivX
®
, DivX Certified® and associated logos are trademarks of DivX,
Inc. and are used under license.
Windows is a trademark or a registered trademark of Microsoft
Corporation in the United States and other countries.
DLNA, the DLNA Logo and DLNA CERTIFIED are trademarks, service
marks, or certification marks of the Digital Living Network Alliance.
VQT3A95
(11)
English
11
Cher client
Merci d’avoir fait l’achat de cet appareil.
Pour des performances et une sécurité optimales, lire
attentivement ces instructions.
Avant de brancher, de faire fonctionner ou de régler
l’appareil, lire attentivement la totalité de ce mode d’emploi.
Veuillez conserver ce mode d’emploi pour une consultation
ultérieure.
Table des matières
Prise en main
Lire le Mode d’emploi (format PDF). . . . . . . . . . . . 2
Mesures de précaution . . . . . . . . . . . . . . . . . . . . . 3
Accessoires . . . . . . . . . . . . . . . . . . . . . . . . . . . . . . 3
Disques/clés USB utilisables. . . . . . . . . . . . . . . . . 4
Connexion et réglage
ÉTAPE 1: Connexion à un téléviseur . . . . . . . . . . 6
ÉTAPE 2: Connexion à un
amplificateur/récepteur . . . . . . . . . . . . . 6
ÉTAPE 3: Connexion à un réseau
à large bande passante . . . . . . . . . . . . 7
ÉTAPE 4: Réglage . . . . . . . . . . . . . . . . . . . . . . . . 7
Lecture
Lire le Mode d’emploi
(format PDF)
∫ Pour Windows
1 Allumez l’ordinateur et introduisez le CD-ROM
contenant le mode d’emploi (fourni).
2 Sélectionnez la langue désirée et cliquez sur [Mode
d’emploi] pour l’installer.
3 Double-cliquez sur l’icône de raccourcis du “BD75EG
Mode d’emploi” située sur le bureau.
Si le mode d’emploi (format PDF) ne s’ouvre pas
Vous aurez besoin d’Adobe Acrobat Reader 5.0 ou
supérieur ou d’Adobe Reader 7.0 ou supérieur pour afficher
ou imprimer le mode d’emploi (format PDF).
Téléchargez et installez une version d’Adobe Reader qui
peut être utilisée avec votre SE à partir du site web suivant.
http://get.adobe.com/reader/otherversions
En utilisant les SE suivants
– Windows 2000 SP4
– Windows XP SP3
– Windows Vista SP2
–Windows 7
Introduisez le CD-ROM contenant le mode d’emploi (fourni),
cliquez sur [Adobe(R) Reader(R)] puis suivez les
instructions des messages à l’écran pour l’installer.
Pour désinstaller le mode d’emploi (format PDF)
Supprimez le fichier PDF du dossier
“Program Files\Panasonic\DMP\”.
≥ Si le contenu du dossier Program Files ne s’affiche pas,
cliquez sur [Show the contents of this folder] pour
l’afficher.
Insérer ou enlever un support . . . . . . . . . . . . . . . . 8
Menu ACCUEIL . . . . . . . . . . . . . . . . . . . . . . . . . . . 8
Lire des contenus vidéo. . . . . . . . . . . . . . . . . . . . . 9
Opérations liées avec le téléviseur
(VIERA Link “HDAVI Control
™
”). . . . . . . . . . . . . . 10
Caractéristiques. . . . . . . . . . . . . . . . . . . . . . . . . . 10
Veuillez vous référer également au
mode d’emploi (format PDF) enregistré
sur le CD-ROM contenant le mode
d’emploi (fourni).
Le Mode d’emploi (format PDF) ne peut être relu sur le
lecteur.
Vous pouvez y trouver les méthodes d’utilisation avancées
et contrôler les instructions de dépannage.
En cas d’élimination ou de cession de cet appareil
Cet appareil peut conserver les informations de réglage
d’utilisateur. Si vous vous débarrassez de cet appareil en
le jetant ou en le cédant, suivez la procédure du retour de
tous les réglages de préréglage en usine pour effacer les
réglages d’utilisateur.
≥ L’historique de l’exploitation peut être enregistré dans la
mémoire de cet appareil.
Prise en main
Les instructions pour l’exploitation font en
général référence aux commandes de la
télécommande.
≥ Les instructions pour l’exploitation font en général
référence aux commandes de la télécommande.
∫ Pour Macintosh
1 Allumez l’ordinateur et introduisez le CD-ROM
contenant le mode d’emploi (fourni).
2 Ouvrez le dossier “Manual” dans “VFF0703” puis copiez
le fichier PDF de la langue désirée dans le dossier.
3 Double-cliquez sur le fichier PDF pour l’ouvrir.
VQT3A95
(12)
2

Mesures de précaution
(Piles alcalines ou au
manganèse)
AVERTISSEMENT
Appareil
≥ Pour réduire les risques d’incendie, d’électrocution ou de
dommages au produit,
– N’exposez pas cet appareil à la pluie, l’humidité,
l’égouttement ou l’éclaboussement.
– Ne placez pas d’objets remplis d’eau, tels que des
vases, sur l’appareil.
– Utiliser exclusivement les accessoires préconises.
– Ne retirez pas les caches.
– Ne réparez pas l’appareil vous-même. Confiez
l’entretien a un personnel qualifié.
– Ne laissez pas d’objets métalliques tomber dans cet
appareil.
– Ne pas placer d’objets lourds sur cet appareil.
Cordon d’alimentation secteur
≥ Pour réduire les risques d’incendie, d’électrocution ou de
dommages au produit,
– Assurez-vous que la puissance du voltage fourni
correspond au voltage inscrit sur l’appareil.
– Branchez la prise secteur dans la prise électrique.
– Ne pas tirer, plier ou placer des objets lourds sur le cordon.
– Ne manipulez pas la prise avec les mains mouillées.
– Tenez le corps de la prise secteur en la débranchant.
– N’utilisez pas de prise secteur ni de prise de courant
endommagée.
≥ Installez l’appareil de manière à ce que le câble secteur
puisse être immédiatement débranché de la prise de
courant si un problème survient.
Piles
≥ Il y a un danger d’explosion si la pile n’est pas
correctement remplacée. Remplacez uniquement par le
type recommandé par le fabricant.
≥ Manipuler de façon incorrecte les piles peut causer une
fuite d’électrolyte ainsi qu’un incendie.
– Ne mélangez pas d'anciennes et de nouvelles piles ou
des piles de différents types.
– Ne chauffez pas et n’exposez pas les piles à une
flamme.
– Ne laissez pas la (les) pile(s) dans un véhicule exposé
directement aux rayons du soleil pendant un long
moment avec fenêtres et portières fermées.
– Ne pas démonter ou court-circuiter les piles.
– Ne rechargez pas des piles alcalines ou au manganèse.
– Ne pas utiliser des piles dont le revêtement a été
enlevé.
– Retirez les piles si vous n’avez plus l’intention d’utiliser
la télécommande pendant une longue période.
Rangez-les dans un endroit sombre et frais.
≥ Pour jeter les piles, veuillez contacter les autorités locales
ou votre revendeur afin de connaître la procédure
d’élimination à suivre.
Accessoires
Contrôlez les accessoires fournis avant d’utiliser cet
appareil.
1 Télécommande
(N2QAYB000577)
2 Piles pour la télécommande
1 Cordon d’alimentation secteur
1 CD-ROM
Français
ATTENTION
Appareil
≥ Cet appareil utilise un laser. L’utilisation de commandes
ou de réglages ou l’exécution de procédures autres que
celles spécifiées ici peuvent provoquer une exposition à
des radiations dangereuses.
≥ Ne placez pas de sources de flammes vives telles que
bougies allumées sur cet appareil.
≥ Cet appareil peut être perturbé par des interférences
causées par des téléphones mobiles pendant l’utilisation.
En présence de telles interférences, éloignez le téléphone
mobile de cet appareil.
≥ Cet appareil est destiné aux climats tempérés.
Emplacement
≥ Placez cet appareil sur une surface plane.
≥ Pour réduire les risques d’incendie, d’électrocution ou de
dommages au produit,
– N’installez pas et ne placez pas cet appareil dans une
bibliothèque, un placard ni dans aucun autre espace
réduit. Assurez-vous que l’appareil est bien ventilé.
– Ne bouchez pas les ouvertures d’aération de cet
appareil avec des journaux, nappes, rideaux ou objets
similaires.
– N’exposez pas cet appareil directement aux rayons du
soleil, à des températures élevées, à une humidité
élevée ni à des vibrations excessives.
≥ Les numéros de produits fournis dans ce manuel d’utilisation sont
corrects à partir de janvier 2011. Cela peut être soumis à des
changements.
≥ N’utilisez pas de cordon d’alimentation avec d’autres appareils.
Utiliser la télécommande
Insérez-les de telle sorte que les pôles (i et j)
correspondent à ceux de la télécommande.
R6/LR6, AA
Pointez-le vers la cellule de réception du signal de
commande à distance sur cet appareil.
VQT3A95
(13)
3

Disques/clés USB utilisables
DVD
USB
Appareil
BD
Marquage sur
disque
—
Types d’appareil
BD-Vidéo Vidéo
BD-RE
BD-R
DVD-Vidéo Vidéo
DVD-R
DVD-R DL
DVD-RW
+R/+RW/+R DL
Format des
contenus
Vidéo
JPEG
Vidéo
®
DivX
MKV
Vidéo
AVCHD
®
DivX
MKV
MP3
JPEG
Vidéo
AVCHD
CD
CD musicaux [CD-DA] musicaux
®
DivX
—
CD-R
CD-RW
MKV
[CD-DA] musicaux
MP3
JPEG
®
DivX
—
Dispositif USB
(jusqu’à 2 To)
MKV
MP3
JPEG
VQT3A95
(14)
4
∫ Impossible de lire les disques
≥ DVD-RAM
≥ CD Super Audio
≥ CD de Photos
≥ DVD-Audio
≥ Disques WMA
≥ Disques DivX Plus HD
≥ HD DVD
∫ Information de gestion de région
BD-Vidéo
Cet appareil peut reproduire les disques BD-Vidéo portant
une étiquette avec le code de région “B”.
Exemple:
DVD-Vidéo
Cet appareil peut reproduire les disques DVD-Vidéo portant
une étiquette avec le numéro de région “2” ou “ALL”.
Exemple:
2
2
ALL
3
5
∫ Finalisation
Les DVD-R/RW/R DL, +R/+RW/+R DL et CD-R/RW
enregistrés par un graveur, etc. doivent être finalisés par le
graveur pour être lus sur cet appareil. Veuillez consulter les
instructions du graveur.
∫ BD-Vidéo
≥ Cet appareil peut décoder un audio à débit binaire élevé
(Dolby Digital Plus, Dolby TrueHD, DTS-HD High
Resolution Audio et DTS-HD Master Audio) adopté par le
BD-Vidéo.
– Si “Dolby D/Dolby D +/Dolby TrueHD” est réglé sur
“PCM”, le nombre maximum possible de son Dolby est
2c. PCM. ([HOME]>“Configuration”>“Réglages
lecteur”>“Audio”>“Sortie audio numérique”)
∫ CD musicaux
Le fonctionnement et la qualité sonore des CD qui
n'obéissent pas aux caractéristiques CD-DA (contrôle de
copie des CD, etc.) ne peuvent être garantis.
∫ Clé USB
≥ Cet appareil ne garantit pas la connexion avec tous les
dispositifs USB.
≥ Cet appareil ne prend pas en charge le chargement des
dispositifs USB.
≥ Les systèmes fichiers FAT12, FAT16 et FAT32 ne sont pas
pris en charge.
≥ Cet appareil supporte une clé USB 2.0 à Haute Vitesse.
≥ Cet appareil prend en charge un DD formaté en FAT32.
Certains types de DD peuvent nécessiter l’utilisation de
leur bloc d’alimentation externe.
∫ BD-RE, BD-R
Les disques enregistrés en mode DR avec des graveurs de
disques Blu-ray Panasonic ne peuvent pas lire
convenablement l’audio, etc.
Avis aux utilisateurs concernant la collecte et
l’élimination des piles et des appareils électriques et
électroniques usagés
Apposé sur le produit lui-même, sur son
emballage, ou figurant dans la
documentation qui l’accompagne, ce
pictogramme indique que les piles et
appareils électriques et électroniques
usagés doivent être séparés des ordures
ménagères.
Afin de permettre le traitement, la
piles et des appareils usagés, veuillez les porter à l’un des
points de collecte prévus, conformément à la législation
nationale en vigueur ainsi qu’aux directives 2002/96/CE et
2006/66/CE.
En éliminant piles et appareils usagés conformément à la
réglementation en vigueur, vous contribuez à prévenir le
gaspillage de ressources précieuses ainsi qu’à protéger la
santé humaine et l’environnement contre les effets
potentiellement nocifs d’une manipulation inappropriée des
déchets.
Pour de plus amples renseignements sur la collecte et le
recyclage des piles et appareils usagés, veuillez vous
renseigner auprès de votre mairie, du service municipal
d’enlèvement des déchets ou du point de vente où vous
avez acheté les articles concernés.
Le non-respect de la réglementation relative à l’élimination
des déchets est passible d’une peine d’amende.
[Information relative à l’élimination des déchets dans
les pays extérieurs à l’Union européenne]
Ce pictogramme n’est valide qu’à l’intérieur de l’Union
européenne. Pour connaître la procédure applicable dans les
pays hors Union Européenne, veuillez vous renseigner auprès
des autorités locales compétentes ou de votre distributeur.
Cd
la Directive relative au produit chimique concerné.
valorisation et le recyclage adéquats des
Pour les utilisateurs professionnels au
sein de l’Union européenne
Si vous souhaitez vous défaire de pièces
d’équipement électrique ou électronique,
veuillez vous renseigner directement auprès
de votre détaillant ou de votre fournisseur.
Note relative au pictogramme à
apposer sur les piles (voir les 2
exemples ci-contre)
Le pictogramme représentant une poubelle
sur roues barrée d’une croix est conforme à
la réglementation. Si ce pictogramme est
combiné avec un symbole chimique, il
remplit également les exigences posées par
Français
≥ Dans certains cas, la lecture du support ci-dessus pourrait être impossible en raison du type de support, de la condition de l’enregistrement, de la
méthode d’enregistrement et de la manière selon laquelle les fichiers ont été créés.
≥ Les producteurs du disque peuvent contrôler la manière dont les disques sont lus. Ainsi, vous pouvez ne pas toujours être en mesure de contrôler la
lecture tel que décrite dans les présentes consignes d'utilisation. Veuillez lire attentivement les instructions relatives à l'utilisation du disque.
VQT3A95
(15)
5
Connexion et réglageConnexion et réglage
HDMI IN
Câble HDMI
HDMI IN
HDMI IN
HDMI IN
(ARC)
HDMI OUT
(ARC)
Haut-parleurs
multicanaux
Amplificateur/récepteur
Câble HDMI
Câble HDMI
ÉTAPE 1: Connexion à
ÉTAPE 2: Connexion à
un téléviseur
≥ Ne placez pas l'appareil sur un amplificateur ou un autre
appareil qui pourrait se réchauffer. La chaleur pourrait
endommager l'appareil.
≥ Avant toute connexion, nous vous suggérons de
déconnecter temporairement tous les appareils de
l'alimentation.
≥ N’effectuez pas la connexion à travers le caméscope.
Du fait de la protection anti-copie, l'image pourrait ne pas
s'afficher correctement.
≥ Veuillez utiliser des câbles haute définition HDMI portant
le logo HDMI (tel qu'il figure sur la couverture). Il est
conseillé d'utiliser un câble HDMI Panasonic. Quand vous
sortez le signal 1080p, utilisez des câbles HDMI d'une
longueur inférieure ou égale à 5,0 mètres.
Numéro d’élément recommandé (Câble HDMI High
Speed):
RP-CDHS15 (1,5 m), RP-CDHS30 (3,0 m),
RP-CDHS50 (5,0 m), etc.
∫ Par une prise HDMI AV OUT
(Haute qualité)
un amplificateur/
récepteur
≥ Réglez “Sortie audio HDMI” sur “Oui”
([HOME]>“Configuration”>“Réglages
lecteur”>“Connexion TV / Appareil”>“Connexion HDMI”).
≥ La connexion HDMI prend en charge VIERA Link “HDAVI
Control” (> 10).
≥ Réglez “Sortie audio HDMI” sur “Oui”
([HOME]>“Configuration”>“Réglages
lecteur”>“Connexion TV / Appareil”>“Connexion HDMI”).
≥ Réglez “Sortie audio numérique” en fonction de
l'amplificateur/récepteur connecté
([HOME]>“Configuration”>“Réglages lecteur”>“Audio”).
≥ La connexion HDMI prend en charge VIERA Link “HDAVI
Control” (> 10).
≥ Lorsqu’on utilise un téléviseur ou un amplificateur/
récepteur qui ont une prise HDMI sans l’indication “(ARC)”
(non compatible ARC), afin de bénéficier du son du
téléviseur par l’amplificateur/récepteur il faut
nécessairement connecter l’amplificateur/récepteur et le
téléviseur à l’aide d’un câble optonumérique.
VQT3A95
(16)
6
ÉTAPE 3: Connexion à
Routeur de bande
large passante, etc.
Internet
Câble LAN
Serveur de média
certifié DLNA
OK
RETURN
Réglage facile du réseau
La configuration LAN et un test de connexion du réseau
domestique et d'Internet sont requis pour les fonctions
Internet (BD-Live, etc.).
Une connexion Internet haut débit est nécessaire pour le
BD-Live.
Un câble LAN est-il déjà connecté ?
Veuillez vous référer aux instructions d'utilisation.
Appuyer sur [OK] pour procéder.
ÉTAPE 4: Réglage
un réseau à large
bande passante
Ces services peuvent être utilisés quand cet appareil est
connecté à un réseau à large bande passante.
– Le logiciel peut être mis à jour
– Vous pouvez profiter de BD-Live
– Vous pouvez accéder à un autre appareil
Pour de plus amples détails sur la méthode de connexion,
consultez les instructions fournies avec l’appareil connecté.
∫ Câble de connexion LAN
Réglage facile
Après avoir connecté pour la première fois votre nouveau
lecteur et avoir appuyé sur [Í], un écran pour les réglages
de base s’affiche.
Préparation
Allumez le téléviseur et sélectionnez l’entrée vidéo
appropriée sur l’appareil.
1 Appuyez sur [Í].
L’écran d’installation apparaît.
Interrupteur d’attente/marche (Í/I)
Appuyez pour faire basculer l’appareil du mode
allumé au mode de veille ou vice versa. En mode de
veille, l’appareil continue de consommer une petite
quantité d’énergie.
2 Suivez les instructions à l’écran et
effectuez les réglages avec [3, 4], puis
appuyez sur [OK].
Après avoir complété le “Réglage facile”, vous pouvez
effectuer le “Réglage facile du réseau”.
≥ Vous pouvez à tout moment effectuer ce réglage en sélectionnant
“Réglage facile” dans le menu Configuration. ([HOME]
“Configuration”
> “Réglages lecteur” > “Autres”)
>
Français
≥ Utilisez des câbles LAN droits de catégorie 5 ou
supérieure (STP) pour connecter les appareils
périphériques.
≥ L’insertion d’un câble autre que le câble LAN dans la prise
LAN peut endommager l’appareil.
Réglage facile du réseau
Après avoir terminé la “Réglage facile”, vous serez amené à
effectuer la “Réglage facile du réseau”.
Suivez les instructions à l’écran et effectuez
les réglages avec [3, 4, 2, 1] puis
appuyez sur [OK].
VQT3A95
(17)
7
Lecture
MusiquePhotos
Vidéos
Réseau
Lecteur de Blu-Ray Disc
ACCUEIL
Configuration
MEDIA
SERVER
Insérer ou enlever un
Menu ACCUEIL
support
≥ Lorsque vous introduisez un support, assurez-vous que le
bon côté est dirigé vers le haut.
≥ Si vous connectez un produit Panasonic avec un câble de
connexion USB, l’écran de réglage peut s’afficher sur
l’équipement connecté. Pour de plus amples détails,
consultez les instructions de l’équipement connecté.
Les fonctions principales de cet appareil peuvent être
gérées du menu ACCUEIL.
Préparation
Allumez le téléviseur et sélectionnez l’entrée vidéo
appropriée sur l’appareil.
1
1 Appuyez [Í] pour allumer l’appareil.
2 Appuyez sur [OK] ou [3, 4, 2, 1] pour
sélectionner l’option.
≥ Si un support est en place, l’écran de sélection des
contenus pour ce support s’affiche.
≥ S’il y a d’autres éléments, répétez cette étape.
≥ Pour revenir au menu ACCUEIL, sélectionnez
“ACCUEIL” ou appuyez sur [RETURN] plusieurs fois.
Pour afficher le menu ACCUEIL
Appuyez sur [HOME].
≥ Les éléments à afficher peuvent varier en fonction du support.
≥ Lorsque nécessaire, réglez “Disque mixte” pour utiliser un disque avec
des fichiers de données (MP3, JPEG, DivX, MKV) ainsi que Vidéo.
([HOME]
>“Configuration”>“Réglages lecteur”>“Disque”)
VQT3A95
(18)
8

Lire des contenus vidéo
BD
DVD
CD
USB
Autres opérations pendant la
lecture
1 Insérez le support.
Lorsque le menu des contenus s’affiche, appuyez sur
[3, 4, 2, 1] pour sélectionner l’élément. (> 8)
2 Appuyez sur [3, 4] pour sélectionner le
titre puis appuyez sur [OK].
∫ Pour afficher des menus
Vous pouvez afficher Menu principal, DIRECT NAVIGATOR
ou Menu Pop-up.
Appuyez sur [TOP MENU] ou [POP-UP MENU].
≥ Appuyez sur [3, 4, 2, 1] pour sélectionner l'élément et
appuyez sur [OK].
≥ Le signal provenant des disques PAL sort comme PAL. Le signal
provenant des disques NTSC sort comme “NTSC” ou “PAL60”. Vous
pouvez sélectionner “NTSC” ou “PAL60” sous “Sortie Contenu NTSC”
pour les disques NTSC. ([HOME]
lecteur”
≥ LES DISQUES CONTINUENT DE TOURNER PENDANT QUE LES
≥ En fonction du support et des contenus, l’écran peut c hanger ou peut ne
≥ DivX et MKV: Les lectures successives ne sont pas possibles.
≥ Il n’est pas possible de lire des vidéos AVCHD et MPEG2 qui ont été
≥ Pour économiser de l’électricité, l’alimentation s’éteint automatiquement
> “Vidéo”)
ELEMENTS DU MENU S’AFFICHENT. Appuyez sur [∫STOP] une fois
que vous avez terminé la lecture, afin de protéger le moteur de
l'appareil, l'écran de votre téléviseur, etc.
pas apparaî tre.
extrait et supprimé, copié et collé sur le support.
si aucune touche n‘est utilisée pendant environ 30 minutes
lorsqu’aucune lecture n’est effectuée (par exemple pendant la pause,
l’affichage du menu, l’affichage des photos, etc.).
> “Configuration” > “Réglages
Ces fonctions pourraient ne pas fonctionner en fonction du
support et des contenus.
Arrêt
Appuyez sur [∫STOP].
La position d'arrêt est mémorisée.
Reprendre la fonction de lecture
Appuyez sur [1PLAY] pour reprendre la lecture à partir de
cette position.
≥ L'effacement de la position survient si le tiroir est ouvert ou
si vous appuyez sur [∫STOP] plusieurs fois pour afficher
“StOP” sur l'appareil.
≥ Sur les disques BD-Vidéo, y compris BD-J, la fonction
de reprise lecture ne fonctionne pas.
Pause
Appuyez sur [;PAUSE].
≥ Appuyez sur [;PAUSE] à nouveau ou sur [1PLAY] pour
reprendre la lecture.
Rechercher/Ralenti
Rechercher
Lors de la lecture, appuyez sur [SEARCH6] ou
5
[SEARCH
≥ Musique et MP3: la vitesse est fixée à une simple étape.
Ralenti
Pendant une pause, appuyez sur
[SEARCH5].
La vitesse augmente jusqu'à 5 étapes.
≥ Appuyez sur [1PLAY] pour revenir à la vitesse de lecture
normale.
].
Français
Sauter
Pendant la lecture ou en cours de pause,
appuyez sur [:] ou [9].
Passez au titre, chapitre, ou piste que vous voulez lire.
≥ Chaque appui augmente le nombre de sauts.
Image par image
Pendant une pause, appuyez sur [1] (;1).
≥ Maintenez la touche pour avancer image par image.
≥ Appuyez sur [1PLAY] pour revenir à la vitesse de lecture
normale.
Changement d’audio
Appuyez sur [AUDIO].
Vous pouvez modifier le numéro de canal audio ou la langue
de la bande-son, etc.
VQT3A95
(19)
9

Opérations liées avec le
Caractéristiques
téléviseur
(VIERA Link “HDAVI Control™”)
Qu’est-ce que VIERA Link “HDAVI
Control”?
Le VIERA Link “HDAVI Control” est une fonction
pratique qui offre les opérations liées entre cet
appareil, et un téléviseur Panasonic (VIERA) ou un
autre appareil sous “HDAVI Control”.
Vous pouvez utiliser cette fonction en branchant
l’équipement à l’aide d’un câble HDMI. Se reporter
aux consignes d’utilisation de l’appareil branché
pour les détails relatifs au fonctionnement.
Préparation
1 Réglez “VIERA Link” sur “Oui” ([HOME] >
“Configuration” > “Réglages lecteur” > “Connexion TV /
Appareil”>“Connexion HDMI”).
(Le réglage par défaut est “Oui”.)
2 Réglez les “HDAVI Control” opérations sur l’équipement
branché (le téléviseur par exemple).
3 Allumez tous les “HDAVI Control” appareils compatibles
et sélectionnez le canal d’entrée de cette unité sur le
téléviseur branché de sorte que la fonction “HDAVI
Control” marche correctement.
De plus, lorsque le branchement ou les réglages
sont modifiés, reprenez ce procédé.
Système du signal: PAL/NTSC
Plage de température de fonctionnement:
Plage d’humidité de fonctionnement:
10 % à 80 % d’humidité relative (sans condensation)
Sortie vidéo: 1,0 Vp-p (75 ≠)/Broche:1 système
Sortie audio: 2 Vrms (1 kHz, 0 dB)/Broche
Nombre de connecteurs: 2 canaux:1 système
Sortie AV HDMI: Type A (19 broches) : 1 système
Cet appareil prend en charge la fonction “HDAVI Control 1”.
Port USB: USB2.0: 1système
Ethernet: 10BASE-T/100BASE-TX:1 système
Caractéristique LASER
Produit LASER de Classe 1:
Longueur d’onde: 790 nm (CDs)/655 nm (DVDs)/405 nm (BDs)
Energie laser: Aucune radiation dangereuse n’est émise
avec la protection de sécurité
Alimentation: Secteur 220 à 240 V, 50 Hz
Consommation électrique: Environ 12 W
Consommation électrique en mode veille:
Consommation électrique en mode veille du démarrage rapide:
Dimensions (LkPkH) y compris les parties en saillie:
430 mmk185 mmk35 mm
Masse: Environ 1,6 kg
Les spécifications sont sujettes à modifications sans
préavis.
i5 oC à i35 oC
Environ 0,2 W
Environ 3,6 W
Basculement de l’entrée
automatique
Allumer le lien
Lorsque la lecture démarre sur l’appareil, le téléviseur
commute automatiquement le canal d’entrée et affiche
l’action correspondante.
De plus, lorsque le téléviseur est éteint, il se rallumera
automatiquement.
Eteindre le lien
Tous les équipements compatibles connectés avec “HDAVI
Control”, y compris cette unité, s’éteignent automatiquement
lorsque vous éteignez le téléviseur.
≥ Cet appareil prend en charge la fonction “HDAVI Control 1”.
Cette norme est compatible avec un appareil Panasonic HDAVI
habituel.
≥ VIERA Link “HDAVI Control”, sous la base des fonctions de commande
fournies par HDMI qui est une norme industrielle connue sous le nom
de HDMI CEC (Consumer Electronics Control), est une fonction unique
que nous avons mis au point et ajouté. Ainsi, son fonctionnement avec
l'appareil des autres fabricants qui prennent en charge HDMI CEC ne
peut être garanti.
≥ Veuillez consulter les manuels individuels pour la fonction de prise en
charge de l'appareil commercialisé par les autres fabricants VIERA Link.
10
(20)
VQT3A95
This product incorporates the following software:
For the software categorized as (3) and (4), please refer to the terms
and conditions of GPL v2 and LGPL v2.1, as the case may be at
http://www.gnu.org/licenses/old-licenses/gpl-2.0.html and
http://www.gnu.org/licenses/old-licenses/lgpl-2.1.html.
In addition, the software categorized as (3) and (4) are copyrighted by
several individuals. Please refer to the copyright notice of those
individuals at
http://www.am-linux.jp/dl/AWBP11
The GPL/LGPL software is distributed in the hope that it will be useful,
but WITHOUT ANY WARRANTY, without even the implied warranty of
MERCHANTABILITY or FITNESS FOR A PARTICULAR PURPOSE.
At least three (3) years from delivery of products, Panasonic will give to
any third party who contacts us at the contact information provided
below, for a charge no more than our cost of physically performing
source code distribution, a complete machine-readable copy of the
corresponding source code covered under GPL v2/LGPL v2.1.
Contact Information
cdrequest@am-linux.jp
Source code is also freely available to you and any other member of
the public via our website below.
http://www.am-linux.jp/dl/AWBP11
the software developed independently by or for Panasonic
Corporation,
the software owned by third party and licensed to Panasonic
Corporation,
the software licensed under the GNU General Public License,
Version 2 (GPL v2),
the software licensed under the GNU LESSER General Public
License, Version 2.1 (LGPL v2.1) and/or,
open sourced software licensed under its applicable license terms
including but not limited to
ICU License, c-arse license.
(1)
(2)
(3)
(4)
(5)
For Open Source Software Programs categorized as (5), please refer
to the applicable license terms listed below and/or included in the
“License” menu on Product.
ICU License - ICU 1.8.1 and later
COPYRIGHT AND PERMISSION NOTICE
Copyright (c) 1995-2010 International Business Machines Corporation
and others
All rights reserved.
Permission is hereby granted, free of charge, to any person obtaining a
copy of this software and associated documentation files (the
“Software”), to deal in the Software without restriction, including without
limitation the rights to use, copy, modify, merge, publish, distribute,
and/or sell copies of the Software, and to permit persons to whom the
Software is furnished to do so, provided that the above copyright
notice(s) and this permission notice appear in all copies of the
Software and that both the above copyright notice(s) and this
permission notice appear in supporting documentation.
THE SOFTWARE IS PROVIDED “AS IS”, WITHOUT WARRANTY OF
ANY KIND, EXPRESS OR IMPLIED, INCLUDING BUT NOT LIMITED
TO THE WARRANTIES OF MERCHANTABILITY, FITNESS FOR A
PARTICULAR PURPOSE AND NONINFRINGEMENT OF THIRD
PARTY RIGHTS. IN NO EVENT SHALL THE COPYRIGHT HOLDER
OR HOLDERS INCLUDED IN THIS NOTICE BE LIABLE FOR ANY
CLAIM, OR ANY SPECIAL INDIRECT OR CONSEQUENTIAL
DAMAGES, OR ANY DAMAGES WHATSOEVER RESULTING FROM
LOSS OF USE, DATA OR PROFITS, WHETHER IN AN ACTION OF
CONTRACT, NEGLIGENCE OR OTHER TORTIOUS ACTION,
ARISING OUT OF OR IN CONNECTION WITH THE USE OR
PERFORMANCE OF THIS SOFTWARE.
Except as contained in this notice, the name of a copyright holder shall
not be used in advertising or otherwise to promote the sale, use or
other dealings in this Software without prior written authorization of the
copyright holder.
All trademarks and registered trademarks mentioned herein are the
property of their respective owners.
c-arse license
Copyright 1998 by the Massachusetts Institute of Technology.
Permission to use, copy, modify, and distribute this software and its
documentation for any purpose and without fee is hereby granted,
provided that the above copyright notice appear in all copies and that
both that copyright notice and this permission notice appear in
supporting documentation, and that the name of M.I.T. not be used in
advertising or publicity pertaining to distribution of the software without
specific, written prior permission.
M.I.T. makes no representations about the suitability of this software
for any purpose. It is provided “as is” without express or implied
warranty.
Java toutes les marques de commerce et les logos basés sur Java sont
des marques déposées de Sun Microsystems, Inc. aux États-Unis et
dans les autres pays.
Fabriqué sous licence de Dolby Laboratories. Le terme Dolby et le sigle
double D sont des marques commerciales de Dolby Laboratories.
Fabriqués sous licence couverte par brevet américain n°: 5,451,942;
5,956,674; 5,974,380; 5,978,762; 6,226,616; 6,487,535; 7,392,195;
7,272,567; 7,333,929; 7,212,872 et autres brevets américains et
mondiaux délivrés et en cours de délivrance.
Le DTS et le symbole sont des marques déposées et DTS-HD,
DTS-HD Master Audio | Essential et les logos DTS sont des marques
de commerce de DTS, Inc.
Ce produit comprend un logiciel.
© DTS, Inc. Tous droits réservés.
Cet élément intègre une technologie de protection contre la copie qui
est protégée par des brevets des États-Unis et par les droits de
propriété intellectuelle de Rovi Corporation. Le démontage et le
désassemblage sont interdits.
HDMI, le logo HDMI et High-Definition Multimedia Interface sont des
marques déposées ou enregistrées de HDMI Licensing LLC aux
Etats-Unis et dans d’autres pays.
Ce produit est commercialisé dans le cadre de la licence de portefeuille
de brevet AVC et de la licence de portefeuille de brevet VC-1 pour une
utilisation personnelle et non commerciale par un consommateur, en
vue (i) d’encoder une vidéo conformément à la norme AVC et à la
norme VC-1 (“AVC/VC-1 Video”) et/ou (ii) de décoder une vidéo
AVC/VC-1 précédemment encodée par un consommateur dans le
cadre d’une activité personnelle et non commerciale et/ou obtenue
auprès d’un fournisseur vidéo autorisé à commercialiser des vidéos
AVC/VC-1. Aucune licence n’est accordée ni implicite pour toute autre
utilisation. Pour plus d’informations, veuillez contacter MPEG LA, LLC.
Consultez le site http://www.mpegla.com.
HDAVI Control™ est une marque de commerce de Panasonic
Corporation.
“AVCHD” et le logo “AVCHD” sont des marques commerciales de
Panasonic Corporation et Sony Corporation.
“DVD Logo” est une marque commerciale de DVD Format/Logo
Licensing Corporation.
Technologie d’encodage du son MPEG Layer-3 brevetée par
Fraunhofer IIS et Thomson.
DLNA, the DLNA Logo and DLNA CERTIFIED are trademarks, service
marks, or certification marks of the Digital Living Network Alliance.
DivX®, DivX Certified® et les logos associés sont des marques
commerciales de DivX, Inc. et sont utilisés sous licence.
®
DivX
, DivX Certified® and associated logos are trademarks of DivX, Inc.
and are used under license.
Windows est une marque commerciale ou une marque déposée de
Microsoft Corporation aux Etats-Unis et dans les autres pays.
VQT3A95
(21)
Français
11
Caro Cliente
Grazie per l’acquisto di questo prodotto.
Per ottenere prestazioni ottimali e per ragioni di sicurezza,
consigliamo di leggere con attenzione le istruzioni.
Prima di collegare, far funzionare o regolare l’apparecchio,
leggere completamente queste istruzioni. Conservare poi
questo manuale per riferimenti futuri.
Indice
Lettura delle istruzioni
per l’uso (formato PDF)
∫ Per Windows
1 Accendere il PC e inserire il CD-ROM contenente le
istruzioni per l’uso (in dotazione).
2 Selezionare la lingua desiderata, quindi fare clic su
[Istruzioni d’uso] per installare.
3 Fare doppio clic sull’icona del collegamento “BD75EG
Istruzioni d’uso” sul desktop.
Per cominciare
Lettura delle istruzioni per l’uso (formato PDF) . . . 2
Precauzioni di sicurezza . . . . . . . . . . . . . . . . . . . . 3
Accessori . . . . . . . . . . . . . . . . . . . . . . . . . . . . . . . . 3
Dischi/Dispositivi USB riproducibili . . . . . . . . . . . . 4
Connessione e impostazione
FASE 1: Collegamento alla TV . . . . . . . . . . . . . . . 6
FASE 2: Collegamento ad un
amplificatore/ricevitore . . . . . . . . . . . . . . 6
FASE 3: Collegamento ad una rete
a banda larga . . . . . . . . . . . . . . . . . . . . . 7
FASE 4: Impostazioni . . . . . . . . . . . . . . . . . . . . . . 7
Riproduzione
Inserimento o rimozione di un supporto . . . . . . . . 8
Menu HOME . . . . . . . . . . . . . . . . . . . . . . . . . . . . . 8
Riproduzione di contenuti video . . . . . . . . . . . . . . 9
Operazioni collegate con la TV
(VIERA Link “HDAVI Control™”) . . . . . . . . . . . . . 10
Specifiche tecniche . . . . . . . . . . . . . . . . . . . . . . . 10
Consultare anche le Istruzioni d’uso (in
formato PDF) registrate sul CD-ROM
contenente le istruzioni d’uso (in
dotazione).
Le istruzioni per l’uso (formato PDF) non possono
essere riprodotte sul lettore stesso.
Qui è possibile ottenere informazioni sulle metodologie
operative avanzate e controllare la sezione Ricerca guasti.
Quando le istruzioni per l’uso (in formato PDF) non si
aprono
Per leggere o stampare le istruzioni per l’uso in formato PDF
è necessario Adobe Acrobat Reader 5.0 o versioni
successive o Adobe Reader 7.0 o versioni successive.
Scaricare e installare una versione di Adobe Reader
utilizzabile con il proprio sistema operativo dal seguente sito
Web.
http://get.adobe.com/reader/otherversions
Se si utilizza il seguente sistema operativo
– Windows 2000 SP4
– Windows XP SP3
– Windows Vista SP2
–Windows 7
Inserire il CD-ROM contenente le istruzioni per l’uso (in
dotazione), fare clic su [Adobe(R) Reader(R)], quindi
seguire i messaggi su schermo per l’installazione.
Per disinstallare le istruzioni per l’uso (in formato PDF)
Eliminare il file PDF dalla cartella
“Program Files\Panasonic\DMP\”.
≥ Quando non è possibile visualizzare il contenuto della
cartella Program Files, fare clic su [Show the contents of
this folder] per visualizzarli.
∫ Per Macintosh
1 Accendere il PC e inserire il CD-ROM contenente le
istruzioni per l’uso (in dotazione).
2 Aprire la cartella “Manual” in “VFF0703”, quindi copiare
il file PDF con la lingua desiderata all’interno della
cartella.
3 Fare doppio clic sul file PDF per aprirlo.
Per lo smaltimento o trasferimento di questa
unità
Questa unità può mantenere le informazioni delle
impostazioni dell'utente. In caso di smaltimento o
trasferimento di questa unità, è consigliabile seguire la
procedura per ripristinare tutte le impostazioni di fabbrica
cancellando le impostazioni dell'utente.
≥ Nella memoria di questa unità può essere registrata la
storia delle operazioni.
Descrizioni contenute in queste istruzioni
operative
≥ Le istruzioni per le varie operazioni sono in generale per
il telecomando.
Per comi nciare
VQT3A95
(22)
2

Precauzioni di sicurezza
R6/LR6, AA
(Batterie alcaline o al
manganese)
ATTENZIONE
Unità
≥ Per ridurre il rischio d’incendio, folgorazioni o danni
all’unità,
– Non esporre questa unità alla pioggia, umidità,
gocciolamenti o spruzzi.
– Non posare oggetti contenenti liquidi, come un vaso di
fiori, su questa unità.
– Utilizzare solo gli accessori consigliati.
– Non rimuovere le coperture.
– Non riparare quest’unità da soli. Per qualsiasi
riparazione rivolgersi a un tecnico qualificato.
– Non introdurre oggetti metallici all’interno di questa
unità.
– Non appoggiare oggetti pesanti su questa unità.
Cavo di alimentazione CA
≥ Per ridurre il rischio d’incendio, folgorazioni o danni
all’unità,
– Accertarsi che la tensione di alimentazione corrisponda
a quella indicata su questa unità.
– Inserire fino in fondo la spina del cavo di alimentazione
nella presa.
– Non tirare, piegare, o appoggiare oggetti pesanti sul
cavo di alimentazione.
– Non maneggiare la spina con le mani bagnate.
– Tenere la spina del cavo di alimentazione tra le dita
quando la si scollega.
– Non utilizzare una spina o una presa di rete
danneggiate.
≥ Installare l'unità in modo che sia possibile scollegare
immediatamente il cavo dell'alimentatore CA dalla presa di
rete in caso di problemi.
AVVERTENZA
Batterie
≥ Se la batteria viene sostituita in modo non corretto esiste il
rischio che esploda. Sostituirla esclusivamente con una
del tipo consigliato dal produttore.
≥ L’uso scorretto delle batterie può causare perdite di
elettrolito e causare incendi.
– Non utilizzare batterie nuove e vecchie o batterie di tipi
diversi insieme.
– Non riscaldare o esporre a fiamme le batterie.
– Non lasciare la batteria/le batterie per lungo tempo
all'interno dell'auto, esposte alla luce solare diretta e con
le porte e i finestrini chiusi.
– Non aprire o mettere in corto le batteria.
– Non ricaricare batterie alcaline o al manganese.
– Non usare batterie la cui guaina non è intatta.
– Rimuovere le batterie se si prevede di non utilizzare il
telecomando per lungo tempo. Conservarle in un luogo
fresco ed asciutto.
≥ Quando si smaltiscono le batterie, contattare le autorità
locali o il rivenditore e chiedere informazioni sul metodo
corretto di smaltimento.
Accessori
Controllare gli accessori forniti in dotazione prima di
utilizzare questa unità.
1 Telecomando
(N2QAYB000577)
2 Batterie per il telecomando
1 Cavo di alimentazione CA
1 CD-ROM
≥ Codici prodotto forniti in queste istruzioni per l’uso aggiornati a gennaio
2011. Possono essere soggetti a modifiche.
≥ Non utilizzare il cavo di alimentazione CA con altri apparecchi.
Italiano
Unità
≥ Questa unità utilizza un laser. L’uso di apparecchi di
controllo o di regolazione, o procedure di utilizzazione
diverse da quelle indicate in questo manuale di istruzioni,
possono causare l’esposizione a radiazioni pericolose.
≥ Non mettere sull’unità sorgenti di fiamme nude, come
candele accese.
≥ Durante l’uso, questa unità potrebbe essere soggetta
all’interferenza radio causata dal cellulare. Se si dovesse
verificare tale interferenza, aumentare la distanza tra
questa unità e il cellulare.
≥ Questa unità è progettata per l’uso nei paesi con clima
mite.
Collocazione
≥ Collocare questa unità su una superficie piana.
≥ Per ridurre il rischio d’incendio, folgorazioni o danni
all’unità,
– Per mantenere una buona ventilazione, non installare o
sistemare questa unità in uno scaffale dei libri,
armadietto incorporato od altro spazio ristretto.
– Non ostruire le aperture di ventilazione di questa unità
con giornali, tovaglie, tende ed altri oggetti simili.
– Non esporre questa unità alla luce diretta del sole, a
temperature elevate, a eccessiva umidità e a forti
vibrazioni.
Uso del comando a distanza
Inserire in modo che i poli (i e j) corrispondano a quelli
indicati nel telecomando.
Puntarlo verso il sensore del segnale del telecomando di
quest’unità.
VQT3A95
(23)
3
Dischi/Dispositivi USB riproducibili
DVD
USB
Dispositivo
BD
Marchi sul
disco
—
Tipi di dispositivo Formato contenuti
BD-Video Video
BD-RE
BD-R
DVD-Video Video
DVD-R
DVD-R DL
DVD-RW
+R/+RW/+R DL
Video
JPEG
Video
®
DivX
MKV
Video
AVCHD
®
DivX
MKV
MP3
JPEG
Video
AVCHD
CD
CD musicale Musica [CD-DA]
®
DivX
—
CD-R
CD-RW
MKV
Musica [CD-DA]
MP3
JPEG
®
DivX
—
Dispositivo USB
(fino a 2 TB)
MKV
MP3
JPEG
VQT3A95
(24)
4
∫ Dischi che non possono essere
2
ALL
3
5
2
riprodotti
≥ DVD-RAM
≥ Super Audio CD
≥ Foto CD
≥ DVD-Audio
≥ Dischi WMA
≥ Dischi DivX Plus HD
≥ HD DVD
∫ Informazioni sulla gestione delle
regioni
BD-Video
Questa unità può riprodurre BD-Video contrassegnati con
etichette contenenti il codice di regione “B”.
Esempio:
DVD-Video
Questa unità può riprodurre DVD-Video contrassegnati con
etichette contenenti il numero di regione “2” o “ALL”.
Esempio:
∫ Finalizzazione
DVD-R/RW/R DL, +R/+RW/+R DL e CD-R/RW registrati da
un masterizzatore, ecc. devono essere finalizzati dal
masterizzatore stesso per essere riprodotti su questa unità.
Consultare le istruzioni del produttore del masterizzatore.
∫ BD-Video
≥ Questa unità supporta l’audio ad alto bit rate (Dolby Digital
Plus, Dolby TrueHD, DTS-HD High Resolution Audio e
DTS-HD Master Audio) adottato nei BD-Video.
– Se “Dolby D/Dolby D +/Dolby TrueHD” è impostato su
“PCM”, il numero massimo di canali possibile per il
suono in formato Dolby è 2ch PCM.
([HOME]>“Impostazioni”>“Impostazioni
Lettore”>“Audio”>“Uscita Audio Digitale”)
∫ CD musicale
ll funzionamento e la qualità audio del CD non conformi alle
specifiche CD-DA (CD copia controllo, ecc) non possono
essere garantiti.
∫ Dispositivo USB
≥ Non è garantito che questa unità possa essere collegata a
tutti i dispositivi USB.
≥ Questa unità non supporta la messa in carica dei
dispositivi USB.
≥ Sono supportati i file system FAT12, FAT16 e FAT32.
≥ Questa unità supporta USB 2.0 ad Alta Velocità.
≥ Questa unità è in grado di supportare un HDD formattato
con il FAT32.
Alcuni tipi di HDD possono richiedere l'utilizzo di un'unità
di alimentazione esterna.
∫ BD-RE, BD-R
Quando si riproducono dischi registrati in modalità DR
utilizzando dei masterizzatori per dischi Blu-ray Panasonic,
è possibile che l'audio non venga riprodotto correttamente, o
che si verifichino problemi analoghi.
Informazioni per gli utenti sulla raccolta e l’eliminazione
di vecchie apparecchiature e batterie usate
Questi simboli sui prodotti, sull’imballaggio,
e/o sulle documentazioni o manuali
accompagnanti i prodotti indicano che i
prodotti elettrici, elettronici e le batterie usate
non devono essere buttati nei rifiuti
domestici generici.
Per un trattamento adeguato, recupero e
vi preghiamo di portarli negli appositi punti di raccolta,
secondo la legislazione vigente nel vostro Paese e le
Direttive 2002/96/EC e 2006/66/EC.
Smaltendo correttamente questi prodotti e le batterie,
contribuirete a salvare importanti risorse e ad evitare i
potenziali effetti negativi sulla salute umana e sull’ambiente
che altrimenti potrebbero verificarsi in seguito ad un
trattamento inappropriato dei rifiuti.
Per ulteriori informazioni sulla raccolta e sul riciclaggio di
vecchi prodotti e batterie, vi preghiamo di contattare il vostro
comune, i vostri operatori per lo smaltimento dei rifiuti o il
punto vendita dove avete acquistato gli articoli.
Sono previste e potrebbero essere applicate sanzioni
qualora questi rifiuti non siano stati smaltiti in modo corretto
ed in accordo con la legislazione nazionale.
[Informazioni sullo smaltimento rifiuti in altri Paesi
fuori dall’Unione Europea]
Questi simboli sono validi solo all’interno dell’Unione
Europea. Se desiderate smaltire questi articoli, vi
preghiamo di contattare le autorità locali od il rivenditore
ed informarvi sulle modalità per un corretto smaltimento.
Cd
riciclaggio di vecchi prodotti e batterie usate,
Per utenti commerciali nell’Unione
Europea
Se desiderate eliminare apparecchiature
elettriche ed elettroniche, vi preghiamo di
contattare il vostro commerciante od il
fornitore per maggiori informazioni.
Nota per il simbolo delle batterie
(esempio con simbolo chimico
riportato sotto il simbolo principale):
Questo simbolo può essere usato in
combinazione con un simbolo chimico
caso è conforme ai requisiti indicati dalla Direttiva
per il prodotto chimico in questione.
;
in questo
Italiano
≥ Potrebbe non essere possibile riprodurre i supporti di cui sopra in alcuni casi a causa del tipo di supporto stesso, delle condizioni della registrazione, del
metodo di registrazione e del modo in cui i file sono stati creati.
≥ I produttori dei dischi possono verificare in che modo vengono riprodotti i dischi. Potrebbe quindi non essere sempre possibile controllare la riproduzione
come descritto in queste istruzioni. Leggere le istruzioni con attenzione.
VQT3A95
(25)
5
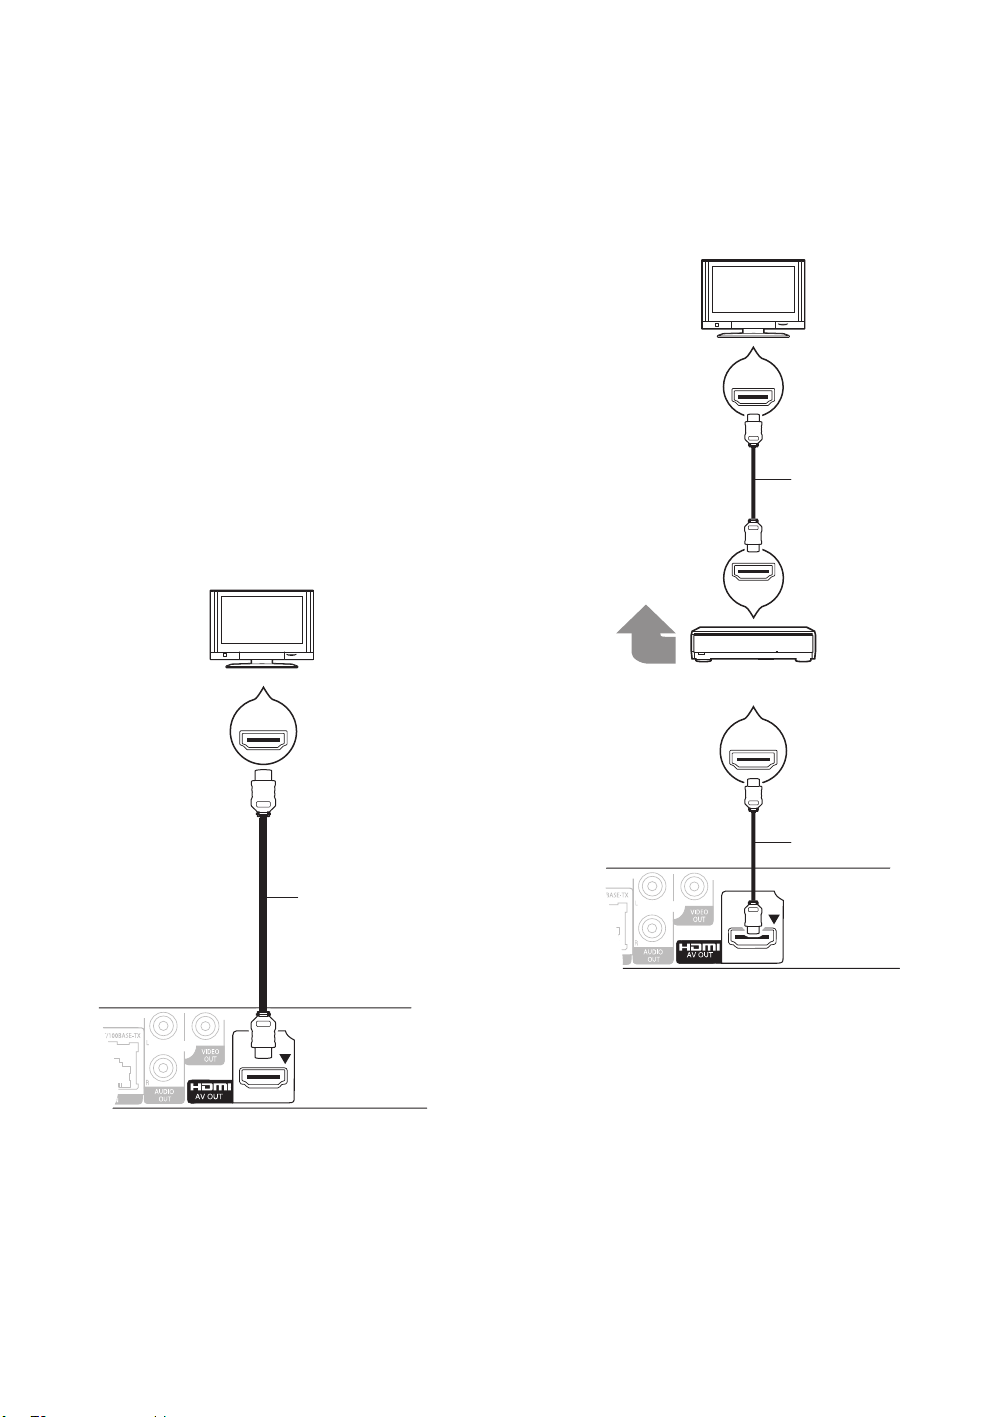
Connessione e impos tazione
HDMI IN
Cavo HDMI
HDMI IN
HDMI IN
HDMI IN
(ARC)
HDMI OUT
(ARC)
Altoparlanti
multi-canale
Amplificatore/ricevitore
Cavo HDMI
Cavo HDMI
FASE 1: Collegamento
FASE 2:
Collegamento
alla TV
≥ Non posizionare l’unità su amplificatori o apparecchi che
potrebbero riscaldarsi. Il calore può danneggiare l’unità.
≥ Prima di effettuare un qualsiasi collegamento, è
consigliabile scollegare temporaneamente l’alimentazione
CA di tutte le unità.
≥ Non collegare tramite il videoregistratore a cassette. A
causa della protezione della copia, l'immagine potrebbe
non essere visualizzata correttamente.
≥ Si prega di utilizzare cavi HDMI a elevata velocità con il
logo HDMI (come indicato sulla copertina). Si consiglia di
servirsi del cavo HDMI della Panasonic. Quando si emette
in uscita il segnale 1080p, si consiglia di utilizzare cavi
HDMI da 5,0 metri o meno.
Codice componente consigliato (cavo HDMI ad alta
velocità):
RP-CDHS15 (1,5 m), RP-CDHS30 (3,0 m),
RP-CDHS50 (5,0 m), ecc.
∫ Tramite un terminale HDMI AV OUT
(Alta qualità)
ad un amplificatore/
ricevitore
≥ Impostare “Uscita audio HDMI” su “On”
([HOME]>“Impostazioni”>“Impostazioni
Lettore”>“Collegamento TV / dispositivo”>“Connessione
HDMI”).
≥ Il collegamento HDMI supporta VIERA Link “HDAVI
Control” (> 10).
≥ Impostare “Uscita audio HDMI” su “On”
([HOME]>“Impostazioni”>“Impostazioni
Lettore”>“Collegamento TV / dispositivo”>“Connessione
HDMI”).
≥ Impostare “Uscita Audio Digitale” a seconda
dell’amplificatore/ricevitore collegato
([HOME]>“Impostazioni”>“Impostazioni
Lettore”>“Audio”).
≥ Il collegamento HDMI supporta VIERA Link “HDAVI
Control” (> 10).
≥ Quando si utilizza un televisore o un amplificatore/
ricevitore privo dell'indicazione “(ARC)” (e che quindi non
è compatibile con ARC) sul terminale HDMI, per ascoltare
l'audio del televisore attraverso l'amplificatore/ricevitore è
anche necessario collegare l'amplificatore/ricevitore al
televisore tramite un cavo digitale a fibre ottiche.
VQT3A95
(26)
6
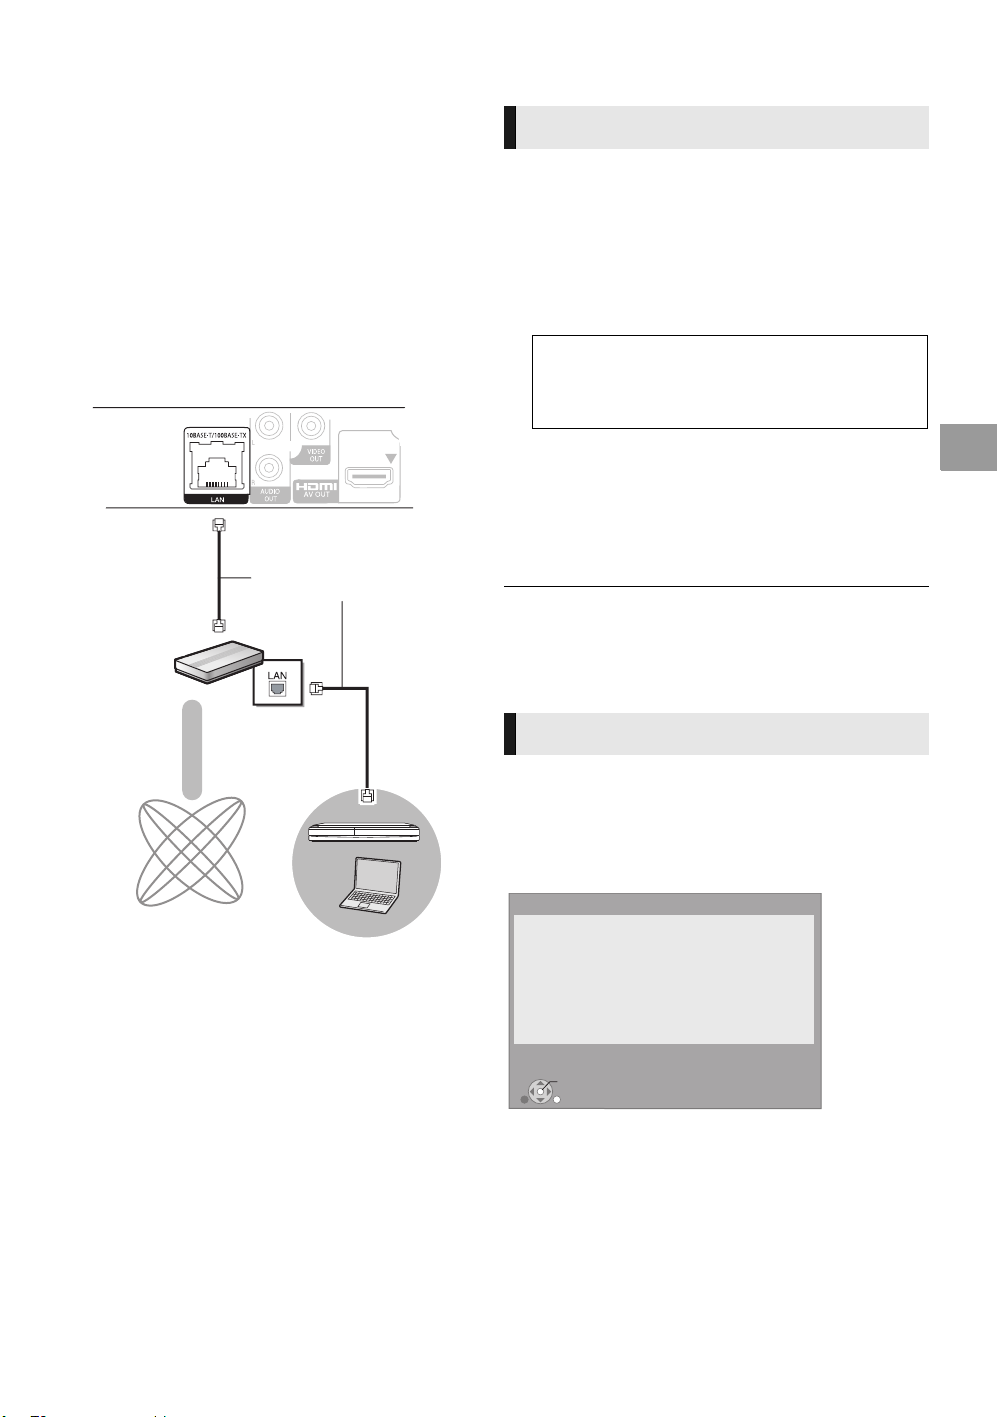
FASE 3: Collegamento
Router a banda larga,
ecc.
Internet
Cavo LAN
Media server
certificato DLNA
OK
RETURN
Impostazione Rapida Rete
Le funzioni Internet ( BD-Live ecc. ) richiedono la
configurazione LAN e il test della rete domestica e delle
connessioni internet.
Per BD-Live è necessaria una connessione Internet a banda
larga.
Il cavo LAN è già connesso ?
Far riferimento alle istruzioni d'uso per quanto riguarda
la connessione di rete.
Premi [OK] per procedere.
FASE 4: Impostazioni
ad una rete a banda
larga
Quando questa unità è collegata ad una banda larga,
possono essere utilizzati i servizi seguenti.
– È possibile aggiornare il firmware
– È possibile utilizzare BD-Live
– È possibile accedere a un altro dispositivo
Per maggiori dettagli sui metodi di collegamento, consultare
le istruzioni fornite con gli apparecchi collegati.
∫ Cavo di collegamento LAN
Impostazione rapida
Dopo che si è collegato per la prima volta il nuovo lettore e si è premuto
[
Í
], verrà visualizzata una schermata per le impostazioni di base.
Preparazione
Accendere il televisore e selezionare l’entrata video
adatta sul televisore.
1 Premere [Í].
Viene visualizzata la schermata di installazione.
Interruttore standby/accensione (Í/I)
Premere per passare dalla modalità on a standby o
viceversa. Nella modalità standby l'unità consuma un
piccolo quantitativo di energia.
2 Seguire le istruzioni sullo schermo ed
effettuare le impostazioni con [3, 4],
quindi premere [OK].
Dopo aver completato l’operazione “Impostazione rapida”, è
possibile effettuare l’operazione “Impostazione Rapida Rete”.
≥ È possibile eseguire questa installazione in qualsiasi momento
scegliendo “Impostazione rapida” dal Menu di installazione. ([HOME]
“Impostazioni”
> “Impostazioni Lettore” > “Altro”)
>
Italiano
≥ Utilizzare soltanto cavi LAN diretti di categoria 5 o
superiore (STP) per collegarsi alle periferiche.
≥ L’inserimento di un cavo che non sia il cavo della LAN nel
terminale della LAN può danneggiare l'unità.
Impostazione Rapida Rete
Dopo aver completato “Impostazione rapida”, verrà chiesto
di effettuare “Impostazione Rapida Rete”.
Seguire le istruzioni sullo schermo ed
effettuare le impostazioni con [3, 4, 2, 1],
quindi premere [OK].
VQT3A95
(27)
7

Riproduzione
MusicaImmagini
Video
Rete
Lettore Blu-ray Disc
HOME
Impostazioni
MEDIA
SERVER
Inserimento o rimozione
Menu HOME
di un supporto
≥ Quando si inserisce un supporto, assicurarsi che non sia
messo sottosopra.
≥ Se si collega un prodotto Panasonic con un cavo di
collegamento USB, si potrebbe visualizzare la schermata
di setup sull'apparecchio collegato. Per maggiori dettagli,
consultare le istruzioni dell'apparecchio collegato.
Le principali funzioni di questa unità possono essere
controllate dal menu HOME.
Preparazione
Accendere il televisore e selezionare l'entrata video adatta
sul televisore.
1
1 Premere [Í] per accendere l'unità.
2 Premere [OK] o [3, 4, 2, 1] per
selezionare una voce.
≥ Quando si inserisce un supporto, verrà visualizzata
una schermata per la selezione dei contenuti di tale
supporto.
≥ Se vi sono altre voci, ripetere questo passaggio.
≥ Per tornare al menu HOME, selezionare “HOME”
oppure premere più volte [RETURN].
Per visualizzare il menu HOME
Premere [HOME].
≥ Gli oggetti da visualizzare possono variare a seconda del file
multimediale.
≥ Se necessario, attivare “Opzione Disco Dati Misti” quando si utilizza un
disco contenente sia file di dati (MP3, JPEG, DivX, MKV) che video.
([HOME]
>“Impostazioni”>“Impostazioni Lettore”>“Disco”)
VQT3A95
(28)
8

Riproduzione di
BD
DVD
CD
USB
Altre operazioni durante la
contenuti video
1 Inserire il supporto.
Quando viene visualizzato il menu dei contenuti,
premere [3, 4, 2, 1] per selezionare la voce. (> 8)
2 Premere [3, 4] per selezionare il titolo,
quindi premere [OK].
∫ Per visualizzare i menu
E’ possibile visualizzare Menu principale, DIRECT
NAVIGATOR o Menu a comparsa.
Premere [TOP MENU] o [POP-UP MENU].
≥ Premere [3, 4, 2, 1] per selezionare l'elemento e
premere [OK].
≥
Il segnale dai dischi PAL viene visualizzato come PAL. Il segnale dai dischi
NTSC viene visualizzato come “NTSC” o “PAL60”. È possibile selezionar e
“NTSC” o “PAL60” in “Output contenuti NTSC” per i dischi NTSC.
([HOME]>“Impostazioni”>“Impostazioni Lettore”>“Immagine”)
≥
I DISCHI CONTINUANO A GIRARE MENTRE VENGONO VISUALIZZATI I
MENU. Premere [
proteggere il motore dell'unità, lo schermo del televisore e così via.
≥ A seconda del supporto e dei contenuti, il display può cambiare o non
apparire.
≥ DivX e MKV: La riproduzione successiva non è possibile.
≥ Non è possibile riprodurre video MPEG2 e AVCHD che siano stati
copiati mediante trascinamento, o copiati e incollati sul supporto.
≥ Per risparmiare corrente, l'unità si spegne automaticamente se non
vengono premuti tasti per circa 30 minuti quando non è in corso una
riproduzione (ad esempio quando l'unità è in pausa, quando viene
visualizzato il menu, quando vengono visualizzate delle immagini fisse,
ecc.).
∫
STOP] quando la riproduzione è terminata per
riproduzione
Queste funzioni potrebbero non essere disponibili a
seconda del supporto e dei contenuti.
Stop
Premere [∫STOP].
La posizione di arresto è stata memorizzata.
Riprendere la riproduzione
Premere [1PLAY] per ripartire da questa posizione.
≥ La posizione viene cancellata se si apre il vassoio o se si
preme [∫STOP] diverse volte per visualizzare “StOP” sul
display dell'unità.
≥ Sui dischi BD-Video compresi i BD-J, la funzione di
ripristino della riproduzione non funziona.
Pausa
Premere [;PAUSE ].
≥ Premere nuovamente [;PAUSE] o [1PLAY] per
riprendere la riproduzione.
Ricerca/Moviola
Ricerca
In fase di riproduzione, premere
[SEARCH6] o [SEARCH5].
≥ Musica e MP3: La velocità è fissa.
Moviola
In pausa, premere [SEARCH5].
La velocità aumenta fino a 5 volte.
≥ Premere [1PLAY] per tornare alla velocità di riproduzione
normale.
Italiano
Salta
Durante la riproduzione o la pausa, premere
[:] o [9].
Saltare al titolo, capitolo o traccia che si vuole riprodurre.
≥ Ogni pressione aumenta il numero di salti.
Frame dopo frame
In pausa, premere [1] (;1).
≥ Tenere premuto per cambiare in successione in avanti.
≥ Premere [1PLAY] per tornare alla velocità di riproduzione
normale.
Cambio dell’audio
Premere [AUDIO].
È possibile cambiare il numero del canale audio o la lingua
della traccia audio, ecc.
VQT3A95
(29)
9

Operazioni collegate
Specifiche tecniche
con la TV
(VIERA Link “HDAVI Control™”)
Cos’è VIERA Link “HDAVI Control”?
VIERA Link “HDAVI Control” è una comoda funzione
che offre operazioni sincronizzate tra questa unità ed
un televisore Panasonic (VIERA) o altro dispositivo
sottoposto a “HDAVI Control”.
È possibile utilizzare questa funzione collegando la
strumentazione con un cavo HDMI. Consultare le
istruzioni di funzionamento dei dispositivi collegati
per le istruzioni di funzionamento.
Preparazione
1 Impostare “VIERA Link” su “On” ([HOME] >
“Impostazioni” > “Impostazioni Lettore” >
“Collegamento TV / dispositivo”>“Connessione HDMI”).
(L’impostazione predefinita è “On”.)
2 Impostare le operazioni “HDAVI Control” sulla
strumentazione collegata (ad esempio TV).
3 Accendere tutta la strumentazione “HDAVI Control”
compatibile e selezionare il canale di entrata di questa
unità sulla TV collegata di modo che la funzione “HDAVI
Control” funzioni correttamente.
Ripetere questa procedura anche quando il
collegamento o le impostazioni vengono modificate.
Sistema di segnali: PAL/NTSC
Range temperatura di funzionamento:
Range umidità di funzionamento:
da 10 % a 80 % UR (senza condensa)
Uscita video: 1,0 Vp-p (75 ≠)/Jack:1 sistema
Uscita audio: 2 Vrms (1 kHz, 0 dB)/Jack
Numero di connettori: 2 canali:1 sistema
Uscita HDMI AV: Tipo A (19 pin): 1 sistema
Questa unità supporta la funzione “HDAVI Control 1”.
Slot USB: USB2.0: 1sistema
Ethernet: 10BASE-T/100BASE-TX:1 sistema
Specifiche tecniche LASER
Prodotto LASER di Classe 1:
Lunghezza d’onda:
790 nm (CDs)/655 nm (DVDs)/405 nm (BDs)
Potenza laser: Con la protezione di sicurezza non
vengono emesse radiazioni pericolose
Alimentazione: CA da 220 a 240 V, 50 Hz
Consumo: Circa 12 W
Consumo in modalità di attesa (standby):
Consumo in modalità di attesa avvio rapido:
Dimensioni (LkPkA) Incluse le parti sporgenti:
430 mmk185 mmk35 mm
Massa: Circa 1,6 kg
Le specifiche sono soggette a variazioni senza preavviso.
i5 oC a i35 oC
Circa 0,2 W
Circa 3,6 W
Cambio automatico di input
Collegamento accensione
Quando ha inizio la riproduzione sull'unità, il televisore
passerà automaticamente al canale di ingresso appropriato
e visualizzerà l'azione corrispondente.
Se il televisore è spento, inoltre, si accenderà
automaticamente.
Collegamento spegnimento
Tutti i dispositivi compatibili collegati con “HDAVI Control”,
compresa questa unità, si spengono quando viene spento il
televisore.
≥ Questa unità supporta la funzione “HDAVI Control 1”.
Questo standard è compatibile con gli apparecchi HDAVI convenzionali
di Panasonic.
≥ VIERA Link “HDAVI Control”, basato sulle condizioni di controllo fornite
da HDMI, standard industriale noto sotto il nome di HDMI CEC
(Consumer Electronics Control), è una funzione unica che abbiamo
sviluppato e aggiunto. In quanto tale, il suo funzionamento con
dispositivi realizzati da altri produttori HDMI CEC non può essere
garantito.
≥ Si prega di consultare i singoli manuali per le funzioni supportate da
dispositivi realizzati da altri VIERA Link produttori.
10
(30)
VQT3A95
 Loading...