

Page 1
F566767
01/13
PRODUCT OVERVIEW PRODUCT OVERVIEW
14 15 17
ENGLISH
TABLE OF CONTENTS
Product Overview
Remote Control Preparation
Operations
How to Select the Timer
Daily Timer Setting
Weekly Timer Setting
Troubleshooting
© Panasonic HA Air-Conditioning (M) Sdn. Bhd. 2008.
Unauthorized copying and distribution is a violation
of law.
Panasonic Corporation
Website: http://panasonic.net/
2
3
4
5
6
7~8
8
User Manual
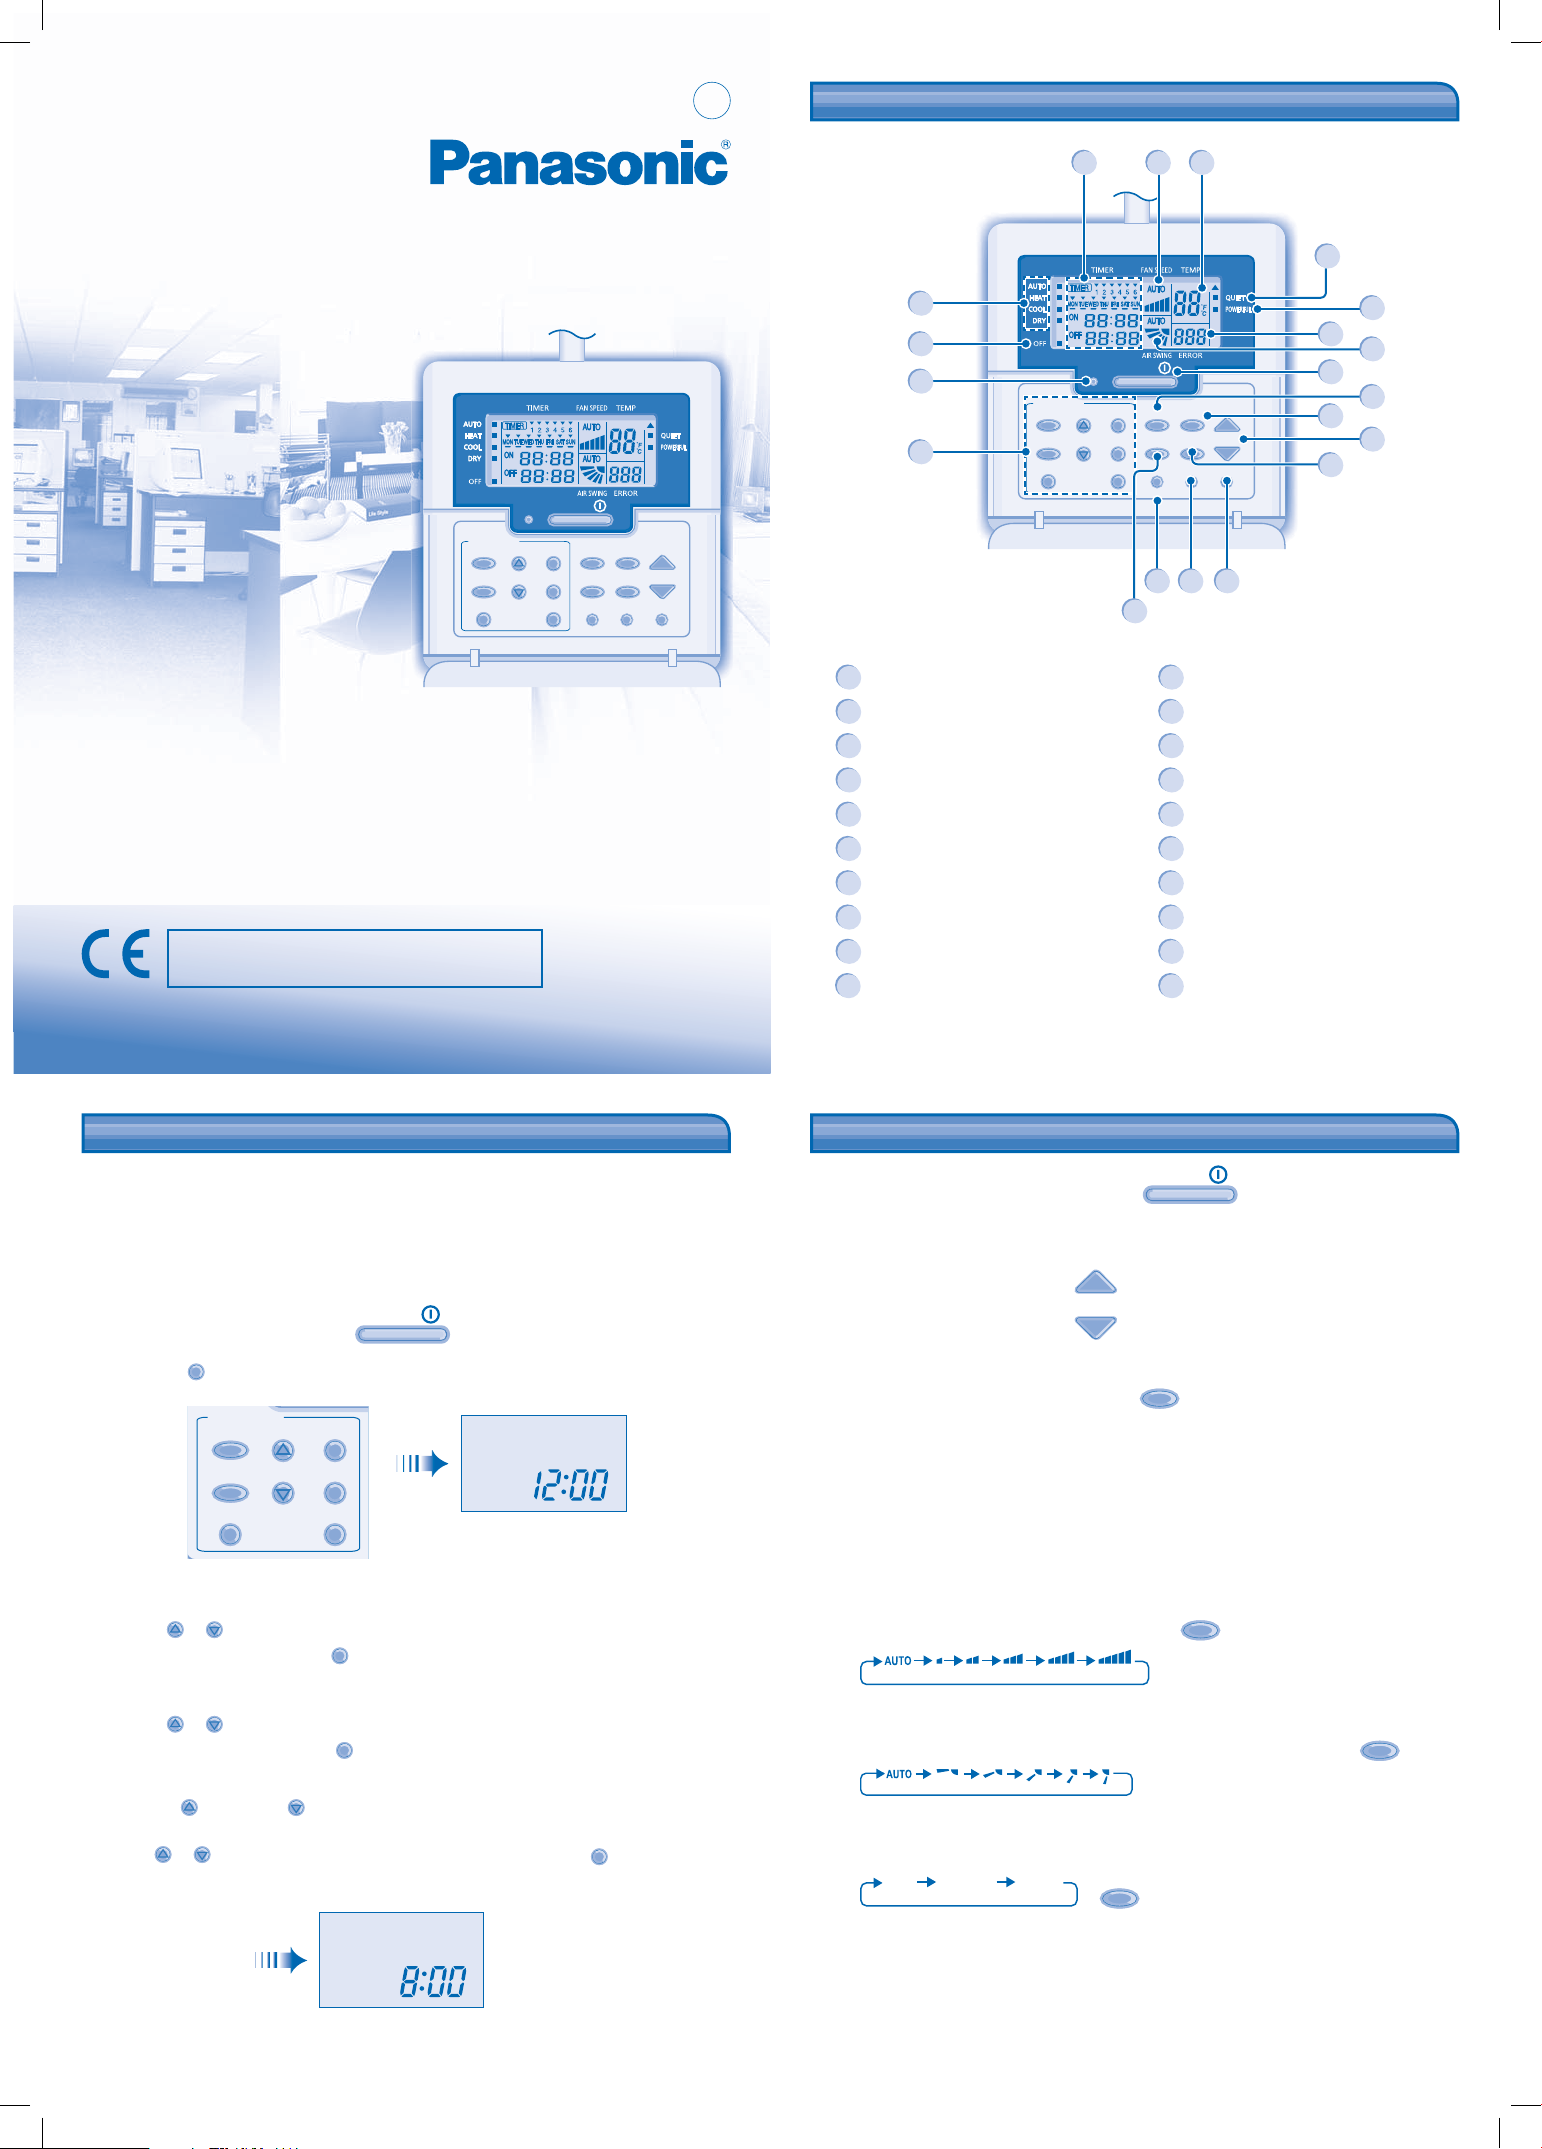
Wired Remote Control
/
ON
OFF
TIMER/CLOCK
MODE
OFF/ON
DOWN
SELECTUP
SET
CANCELCLOCK
MODE
FAN SPEED
QUIET/
AIR SWING
POWERFUL
AC RC
CHECK RESET
CZ - RD52CP
TEMP
13
12
1
8
Operation LED
1
OFF/ON Button
2
Temperature Setting Button
3
Operation Mode Button
4
Fan Speed Button
5
Airfl ow Direction Selection Button
6
Quiet/Powerful Operation Button
7
Timer Setting Button Group
8
Check Button
9
Air Conditioner Reset Button
10
TIMER/CLOCK
MODE
OFF/ON
DOWN
OFF
SELECTUP
SET
CANCELCLOCK
/
ON
FAN SPEED
AIR SWING
CHECK RESET
6
11
12
13
14
15
16
17
18
19
20
18
20
2
MODE
QUIET/
TEMP
POWERFUL
AC RC
11
109
Remote Control Reset Button
OFF Indicator
Operation Mode Selection Indicators
Timer/Clock Setting Display
Fan Speed Display
Airfl ow Direction Setting Display
Temperature Setting Display
Quiet Operation Indicator
Powerful Operation Indicator
System Error Display
4
7
19
16
5
3
2
SETTING CURRENT DAY AND TIME
The current day and time need to be set when you turn on the power for the fi rst time or after a long time has
elapsed since the power was last turned on.
The current time becomes the standard time for all the Timer operations.
Set the current time and day accurately.
Example: Current Day is Wednesday and Current Time is 8:00
/
ON
1 Turn on the power supply
2 Press
CLOCK
TIMER/CLOCK
MODE
OFF
SELECTUP
MON
OFF/ON
DOWN
SET
CANCELCLOCK
“MON” and “12:00” will be
blinking
3 Select Current Day
Press UP or
To confi rm the selected day, press
DOWN
to select current day. (Refer to the above example; select WED)
SET
.
4 Select Current Time
Press UP or
To confi rm the selected time, press
Note:
- Press
- If UP or
DOWN
faster.
to select current time. (Refer to the above example; select 8:00)
UP
to increase or
DOWN
is not pressed for 30 seconds during the day or time setting or if
SET
.
DOWN
to decrease (1-minute step) or hold the button to change the time
setting at that moment is confi rmed and setting will end.
Final CLOCK Display
WED
SET
is pressed, the
OPERATIONS OPERATIONS REMOTE CONTROL PREPARATION REMOTE CONTROL PREPARATION
/
ON
QUIET/
POWERFUL
OFF
MODE
FAN SPEED
1 TO TURN ON OR OFF THE UNIT
• Please be aware of the OFF indication on the remote control display to prevent the unit from
starting/stopping improperly.
• For normal operation, OFF indicator shown on remote control display when the unit is turn off.
2 TO SET TEMPERATURE
TEMP
• Selection range: 16°C ~ 30°C.
3 TO SELECT OPERATION MODE
AUTO mode - For your convenience
• Unit selects operation mode according to temperature setting, outdoor and room temperature.
HEAT mode - To enjoy warm air
• Unit takes a while to warm up.
COOL mode - To enjoy cool air
DRY mode - To dehumidify the environment
• Unit operates at low fan speed to give a gentle cooling operation.
• During soft dry operation, the indoor fan operates at a low fan speed.
• The louvers movement might not align with the remote control display.
4 TO SELECT FAN SPEED (5 options)
• For AUTO, the indoor fan speed is automatically adjusted according to the operation mode.
5 TO ADJUST VERTICAL AIRFLOW DIRECTION (5 options)
• Keeps the room ventilated.
• If AUTO is set, the louvers swing up/down automatically.
• In heat mode, the air blows horizontally for a while, then starts to blow downwards.
6
QUIET - TO ENJOY QUIET ENVIRONMENT
• This operation reduces airfl ow noise.
POWERFUL NORMALQUIET
AIR SWING
“:” will be blinking
POWERFUL - TO ACHIEVE TEMPERATURE QUICKLY
34
F566767-OSTH0901-01_1EN.indd 1F566767-OSTH0901-01_1EN.indd 1 1/13/2009 11:06:31 AM1/13/2009 11:06:31 AM
Page 2

HOW TO SELECT THE TIMER HOW TO SELECT THE TIMER
DAILY TIMER SETTING DAILY TIMER SETTING
2 types of Timer mode can be selected on the remote control.
- Daily Timer
- Weekly Timer
- Daily timer and weekly timer could not be set at the same time.
- Select one of these Timers for your convenience.
How to Change the Display
TIMER/CLOCK
MODE
OFF/ON
DOWN
SELECTUP
Press
SET
CANCELCLOCK
- Press once to change the display from CLOCK to Timer or vice-versa.
- Press for more than 4 seconds to change the display from Daily Timer to Weekly Timer or vice-versa.
Daily Timer Display
Lights up if Timer operation is selected
ON Timer
To automatically
switch “ON”
the unit
OFF Timer
To automatically switch “OFF” the unit
Weekly Timer Display
Lights up if Timer operation is selected
ON Timer
To automatically switch “ON” the unit
Day to be selected
Time to be selected
(10 minutes step)
6 different programs can be set
in a day (1 ~ 6)
Indicates the selected day
Indicates the next timer operation day
Time to be selected
(10 minutes step)
OFF Timer
To automatically switch “OFF” the unit
►How to Set Daily Timer
- You can set ON timer only or OFF timer only or both ON and OFF timer in a day.
1 Change Display
Press Timer
2 Press Timer
Example: To turn ON the unit at 09:00
Press Timer
Press UP or
Or press
Example: To turn OFF the unit at 18:30
Press Timer
Press UP or
Or press
Note:
• When ON timer is set, the unit may start early before the actual set time in order to achieve the
desired temperature on time.
• Timer operation is based on the clock set in the remote control and repeats daily once set.
For clock setting, please refer to Remote Control preparation.
• The timer closest to the current time will be activated fi rst.
• If timer is cancelled manually or due to power failure, you can restore the previous setting by
pressing
Final Display of Daily Timer:
TIMER
ON
Only ON Timer is selected.
The unit will automatically
switch ON at 9:00.
MODE
to change the display to daily timer.
OFF/ON
to select ON or OFF timer.
OFF/ON
to select ON timer.
DOWN
to select the desired time, then press
CANCEL
if you do not want any setting for ON Timer.
OFF/ON
to select OFF timer.
DOWN
to select the desired time, then press
CANCEL
if you do not want any setting for OFF Timer.
SET
.
TIMER
OFF
Only OFF Timer is selected.
The unit will automatically
switch OFF at 18:30.
SET
to confi rm the selected time.
SET
to confi rm the selected time.
TIMER
ON
OFF
Both ON and OFF Timer are
selected.
WEEKLY TIMER SETTING WEEKLY TIMER SETTING
►How to Set Weekly Timer
- You can set the Timer for each day of the week (Monday to Sunday) with 6 programs per day.
- ON Timer can be set together with your desired temperature and this temperature will be used
continuously.
- Same timer program cannot be set in the same day.
- You may also select collective days with same timer setting.
- Promotes energy saving by allowing you to set up to 6 programs in any given day.
Day and Timer Set Up Method
1. Press Timer
2. Press Timer UP or
3. Press
4. “1” will be blinking, press
5. Press Timer
6. Press Timer UP or
If you want to set the timer together with your desired temperature, press
7. Press
• After 2 seconds, the display will move to the next program. Repeat steps 4 to 7 to set programs 2 to 6.
• During timer setup, if no button is pressed within 30 seconds, or if the
that moment is confi rmed and timer setup is ended.
Check Current Timer Program
Perform the steps below to check the timer program for a particular day.
1. Press Timer
2. Press
3. Press Timer UP or
4. Press Timer UP or
Modify Current Timer Program or Add New Timer Program
1. Press Timer
2. Press
3. Press Timer UP or
4. Perform steps 4 to 7 of “Day and Timer Set Up Method” to modify existing timer program, or add any timer
program.
MODE
for 4 seconds to change display to weekly timer.
DOWN
SELECT
to confi rm your selection.
SET
to confi rm program 1. The selected day will be highlighted with .
MODE
SELECT
to enter day setting.
MODE
SELECT
to enter day setting.
to select your desired day.
SELECT
OFF/ON
to select ON or OFF timer.
DOWN
to set program 1.
to select your desired time.
to enter timer mode.
DOWN
until your desired day is shown, press
DOWN
to check the set programs.
to enter timer mode.
DOWN
until your desired day is shown.
SET
button is pressed, the setting at
SELECT
to confi rm your selection.
TEMP
to select the temperature.
56
Cancel Current Timer Program
Perform the steps below to cancel the timer program for a particular day.
TIMER/CLOCK
MODE
OFF/ON
DOWN
SELECTUP
SET
CANCELCLOCK
1,3
2
4
SELECT
1. Press
2. Press Timer UP or
3. Press
4. Press Timer UP or
Press
to enter day.
SELECT
to enter program setting.
CANCEL
to cancel the program, will disappear.
DOWN
until your desired day is shown.
DOWN
until your desired day is shown.
For example, if you want to set:
A - Monday to Friday: Unit ON at 09:00 with 20°C (program 1) & unit OFF at 18:30 (program 2).
B - Only Wednesday: Add timer to turn OFF the unit at 12:30 (program 3) and turn ON the unit at 13:30
■
To set A (Monday to Friday – Collective day setting)
To set the time, please refer to steps 1 to 7 of “Day and Timer Set Up Method” on page 7.
Program 1 – select ON, set desired time to 9:00 and desired temperature to 20°C.
Program 2 – select OFF and set desired time to 18:30.
Program 3 ~ 6 – no timer program set, press
■
To set B (Wednesday – add new timer program)
1. Press Timer
2. Press Timer
3. Press Timer UP or
4. Perform steps 4 to 7 of “Day and Timer Set Up Method” to add program 3 and program 4.
Note: Timer that has setting nearest to the current time and day will be activated first.
Disable & Enable Weekly Timer
• To disable weekly timer setting, press
• To enable previous weekly timer setting, press
(program 4).
MODE
to enter timer mode.
SELECT
to enter day setting.
DOWN
until “WED” is selected, press
MODE
, then press
MODE
or wait 30 seconds to exit weekly timer.
SELECT
to confi rm your selection.
CANCEL
.
MODE
, then press
SET
.
TROUBLESHOOTING TROUBLESHOOTING
The following symptoms occur when abnormality occurs during operation.
• The unit stops and operation LED OFF.
• OFF indicator does not shown on remote control display.
When abnormality occurs, use remote control to retrieve error code.
OFF
/
ON
OFF
TIMER/CLOCK
MODE
OFF/ON
DOWN
SELECTUP
FAN SPEED
SET
AIR SWING
CANCELCLOCK
78
Indicator
Operation
LED
2
1,3
CHECK
Ensure the operation LED is in OFF condition.
1. Press for 5 seconds.
UP
DOWN
or
2. Press
. If error code and abnormality can be
identifi ed, the operation LED will be ON continuously, then jot
down the error code.
3. Press for 5 seconds to quit checking.
4. Reveal the error code to authorized dealer.
Printed in China
OSTH0901-01
F566767-OSTH0901-01_1EN.indd 2F566767-OSTH0901-01_1EN.indd 2 1/13/2009 11:06:43 AM1/13/2009 11:06:43 AM
 Loading...