


Save These Instructions
Conserver ce mode d’emploi
Bewahren Sie bitte diese
Bedienungsanleitung auf.
Conservate queste istruzioni
Guarde estas instruções
Φυλάξτε τις Οδηγίες αυτές
Guarde estas instrucciones
Сохраните эту инструкцию
Збережіть ці інструкції
CZ-ESWC2
•
Schedule Timer
Temporisateur
Zeitplangeber
Timer programmatore
Temporizador
Χρονοδιακόπτης προγραμματισμού ΕΓΧΕΙΡΙΔΙΟ ΟΔΗΓιΩΝ
Temporizador de programas
INSTRUCTION MANUAL
•
MODE D’EMPLOI
•
BEDIENUNGSANLEITUNG
•
ISTRUZIONI PER L’USO
•
MANUAL DE INSTRUÇÕES
•
•
MANUAL DE INSTRUCCIONES
EN
FR
DE
IT
PT
GR
ES
Таймер ИНСТРУКЦИЯ ПО ЭКСПЛУАТАЦИИ
Таймер ПОСІБНИК КОРИСТУВАЧА
85464609078011
•
•
Panasonic Corporation
RU
UA

Contents
page
Product Information .......................................................................................EN-2
Alert Symbols ................................................................................................EN-2
Installation Location .......................................................................................EN-3
Electrical Requirements.................................................................................EN-3
Safety Instructions .........................................................................................EN-3
Names and Functions of Parts ......................................................................EN-4
Using the Schedule Timer .............................................................................EN-5
Setting the Present Time .......................................................................EN-6
Setting Today’s Day of the Week ...........................................................EN-7
Setting Up Programmed Operations .....................................................EN-8
Setting Errors ......................................................................................EN-10
How to Check Program Times .............................................................EN-11
How to Copy Program Times ...............................................................EN-12
How to Set Holidays in a Scheduled Week of Operation .....................EN-16
How to Disable the Timer Operation ....................................................EN-17
How to Clear Programs .......................................................................EN-18
Important Information to Remember ...........................................................EN-19
Troubleshooting ...........................................................................................EN-21
Product Information
If you have problems or questions concerning your Air Conditioner, you will
need the following information. Model and serial numbers are on the nameplate
on the bottom of the cabinet.
Model No. Serial No.
Date of purchase
Dealer’s address
Phone number
Alert Symbols
The following symbols used in this manual, alert you to potentially
dangerous conditions to users, service personnel or the appliance:
EN-2
This symbol refers to a hazard or unsafe
practice which can result in severe personal
injury or death.
This symbol refers to a hazard or unsafe
practice which can result in personal injury
or product or property damage.

Installation Location
We recommend that this schedule timer be installed properly by •
qualifi ed installation technicians in accordance with the Installation
Instructions provided with the schedule timer.
Do not install the schedule timer where there are fumes or •
fl ammable gases, or in an extremely humid space such as a
greenhouse.
Do not install the schedule timer where excessively high heat-•
generating objects are placed.
Electrical Requirements
All wiring must conform to the local electrical codes. Consult your dealer or a 1.
qualifi ed electrician for details.
Wiring must be done by a qualifi ed electrician.2.
To warm up the system, the power mains must
be turned on at least fi ve (5) hours before
operation. Leave the power mains ON unless
you will not be using this appliance for an
extended period.
Safety Instructions
Read this Instruction Manual carefully before using this schedule •
timer. If you still have any diffi culties or problems, consult your dealer
for help.
The air conditioner is designed to give you comfortable room •
conditions. Use this only for its intended purpose as described in this
Instruction Manual.
Never touch the unit with wet hands.•
Never use or store gasoline or other fl ammable vapor or liquid near •
the air conditioner — it is very dangerous.
The air conditioner has no ventilator for intaking fresh air from •
outdoors. You must open doors or windows frequently when you
use gas or oil heating appliances in the same room, which consume
a lot of oxygen from the air. Otherwise there is a risk of suffocation
in an extreme case.
Do not turn the air conditioner on and off from the power mains •
switch. Use the ON/OFF operation button.
Do not stick anything into the air outlet of the outdoor unit. This is •
dangerous because the fan is rotating at high speed.
Do not let children play with the air conditioner.•
Do not cool or heat the room too much if babies or invalids are present.•
EN
EN-3
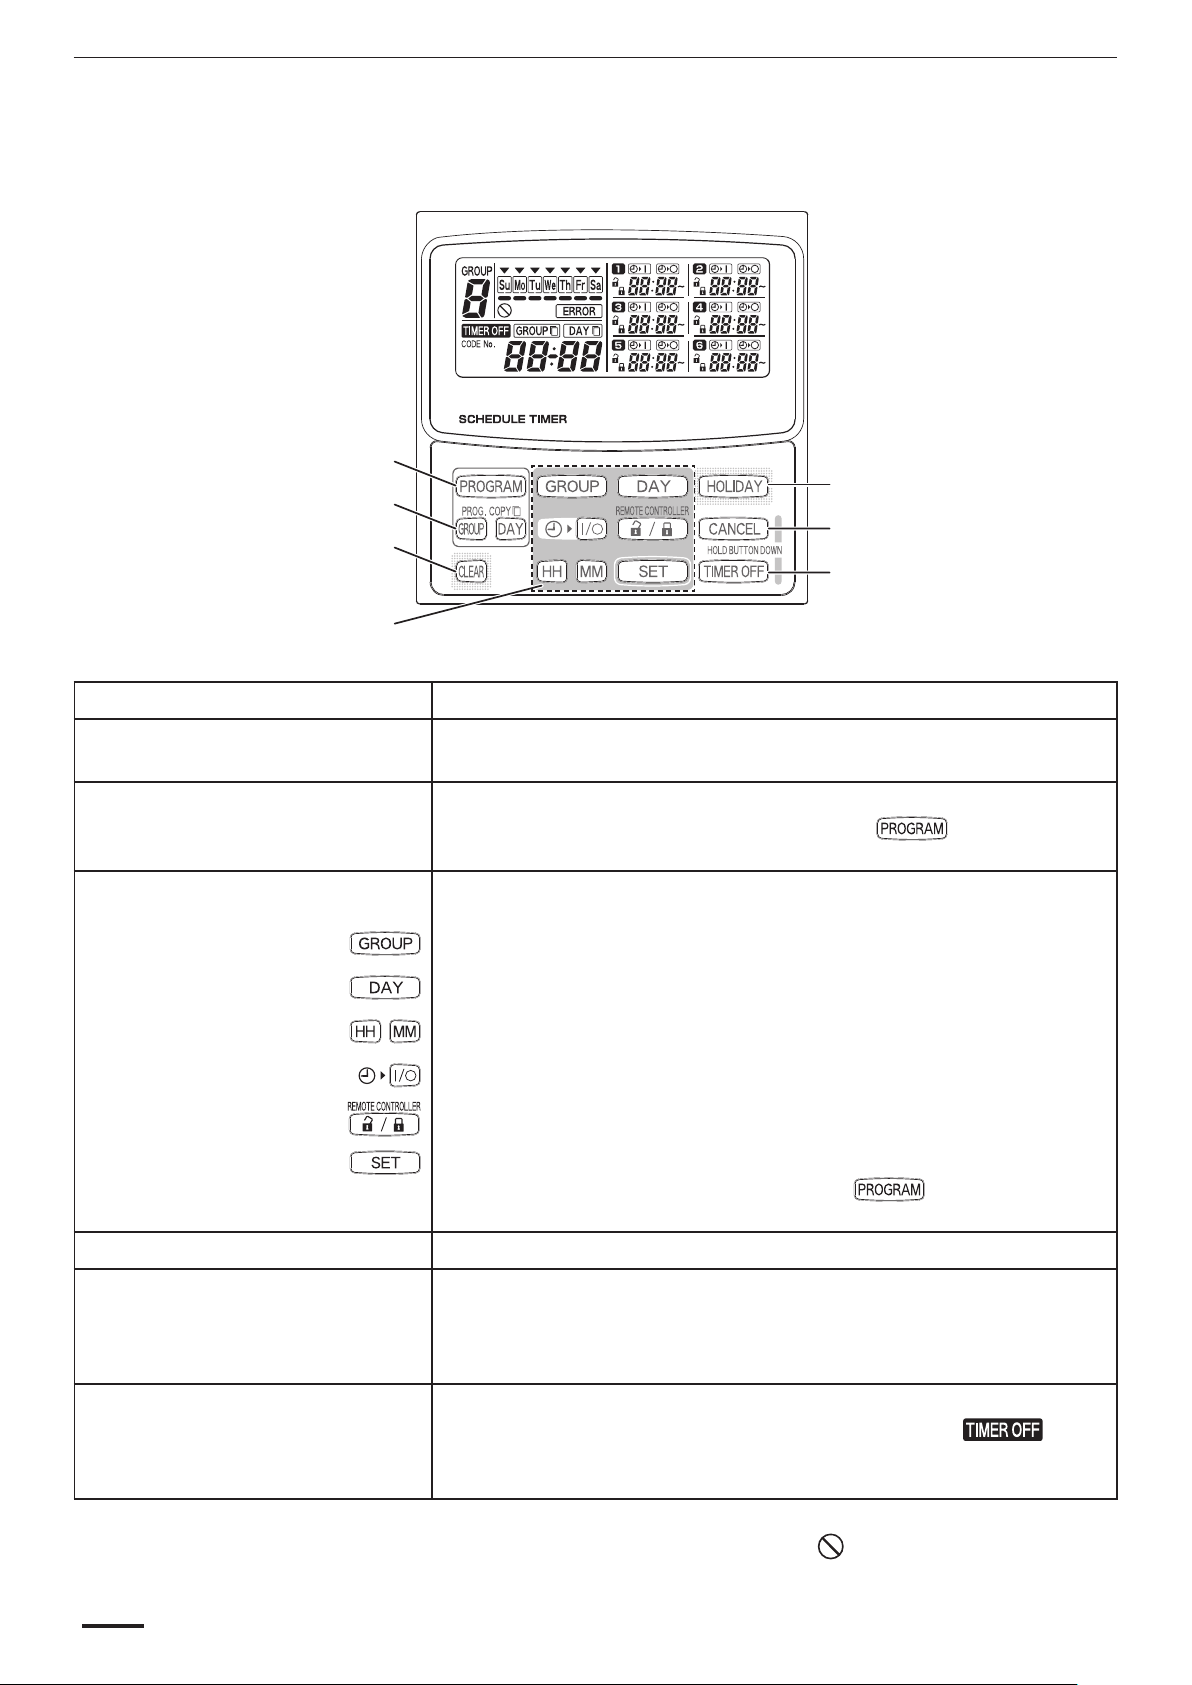
Operating Buttons
A: PROGRAM button
B: PROG. COPY buttons
C: CLEAR button
D: Setting buttons
Names and Functions of Parts
E: HOLIDAY button
F: CANCEL button
G: TIMER OFF button
A: PROGRAM button Use to start setting programs and to enter program settings.
B: PROG. COPY buttons Use to copy programs to groups or specifi c days in a schedule. (Refer to
page EN-12)
C: CLEAR button Press to clear the settings of the currently displayed program.
The current program is not cleared unless the • button is pressed
after pressing the CLEAR button.
D: Setting buttons Use to make program settings and to set the present time.
Press to set groups for programmed operation.
Press to set today’s day and days of programmed operation.
Press to set the present time and times used in programmed operation.
Use to start/stop indoor units via the timer.
Use to enable/disable remote controller operation via the timer.
Use to set programmed operation trigger time.
Program settings are not entered unless the • button is pressed at
the end of setting operations.
E: HOLIDAY button Press to set and cancel holidays during a scheduled week of operation.
F: CANCEL button Press to cancel the current program setting operation, copying operation or
holiday setting operation. When the CANCEL button is held down for 2
seconds, the current setting operation or copying operation is canceled and
the normal display returns.
G: TIMER OFF button Press to turn the timer OFF when timer operation will not be used for a long
period of time. When this button is held down for 2 seconds,
appears on the display. Programs cannot be run until the button is again held
down for 2 seconds.
Some of the above features are disabled when the unit is installed. If the •
button of a disabled feature is pressed, appears on the display.
For more information, contact your dealer.
EN-4

Display
AB C D
F
G
H
IJ
A: Today’s day of the week
()
B: Program schedule
indication
C: Holiday schedule indication
()
D: ERROR indication Displayed when a mistake is made during timer setting.
E: Timer program Displays set timer programs. Also, indicates the copy source/destination
F: Group No. Up to 8 groups can be selected and displayed.
()
Indicates today’s day of the week.
Appears under days that are scheduled for program operation.
Appears around scheduled holidays. (Refer to page EN-16)
during group program copying.
E
G: (Disabled Feature)
indication
H: TIMER OFF indication Displayed when the timer has been turned OFF.
I: Copy mode indication Displayed when copying a program into a group or day of the schedule.
J: Present time Displays the present time on a 24-hour clock. Also, displays settings in the
Displayed if the selected feature was disabled during installation.
various setting modes.
Using the Schedule Timer
To use the schedule timer, follow the steps below.
STEP 1 Turn ON power to the air conditioner.
Turn ON power to the air conditioner connected to the schedule timer. The schedule timer •
performs initial communications with the indoor units, during which blinks on the display.
NOTE
Do not turn off the power mains in heating and cooling seasons. (This keeps the crankcase heater
electricity turned on, which protects the compressor at startup.) If the air conditioner has been OFF
for a long period of time, turn on power 5 hours before starting operation.
EN
STEP 2 Make the initial settings of the schedule timer.
Set the present time and today’s day of the week. (Refer to page EN-6)•
STEP 3 Set up programs of the schedule timer.
Make settings for programmed operation. (Refer to page EN-8)•
EN-5
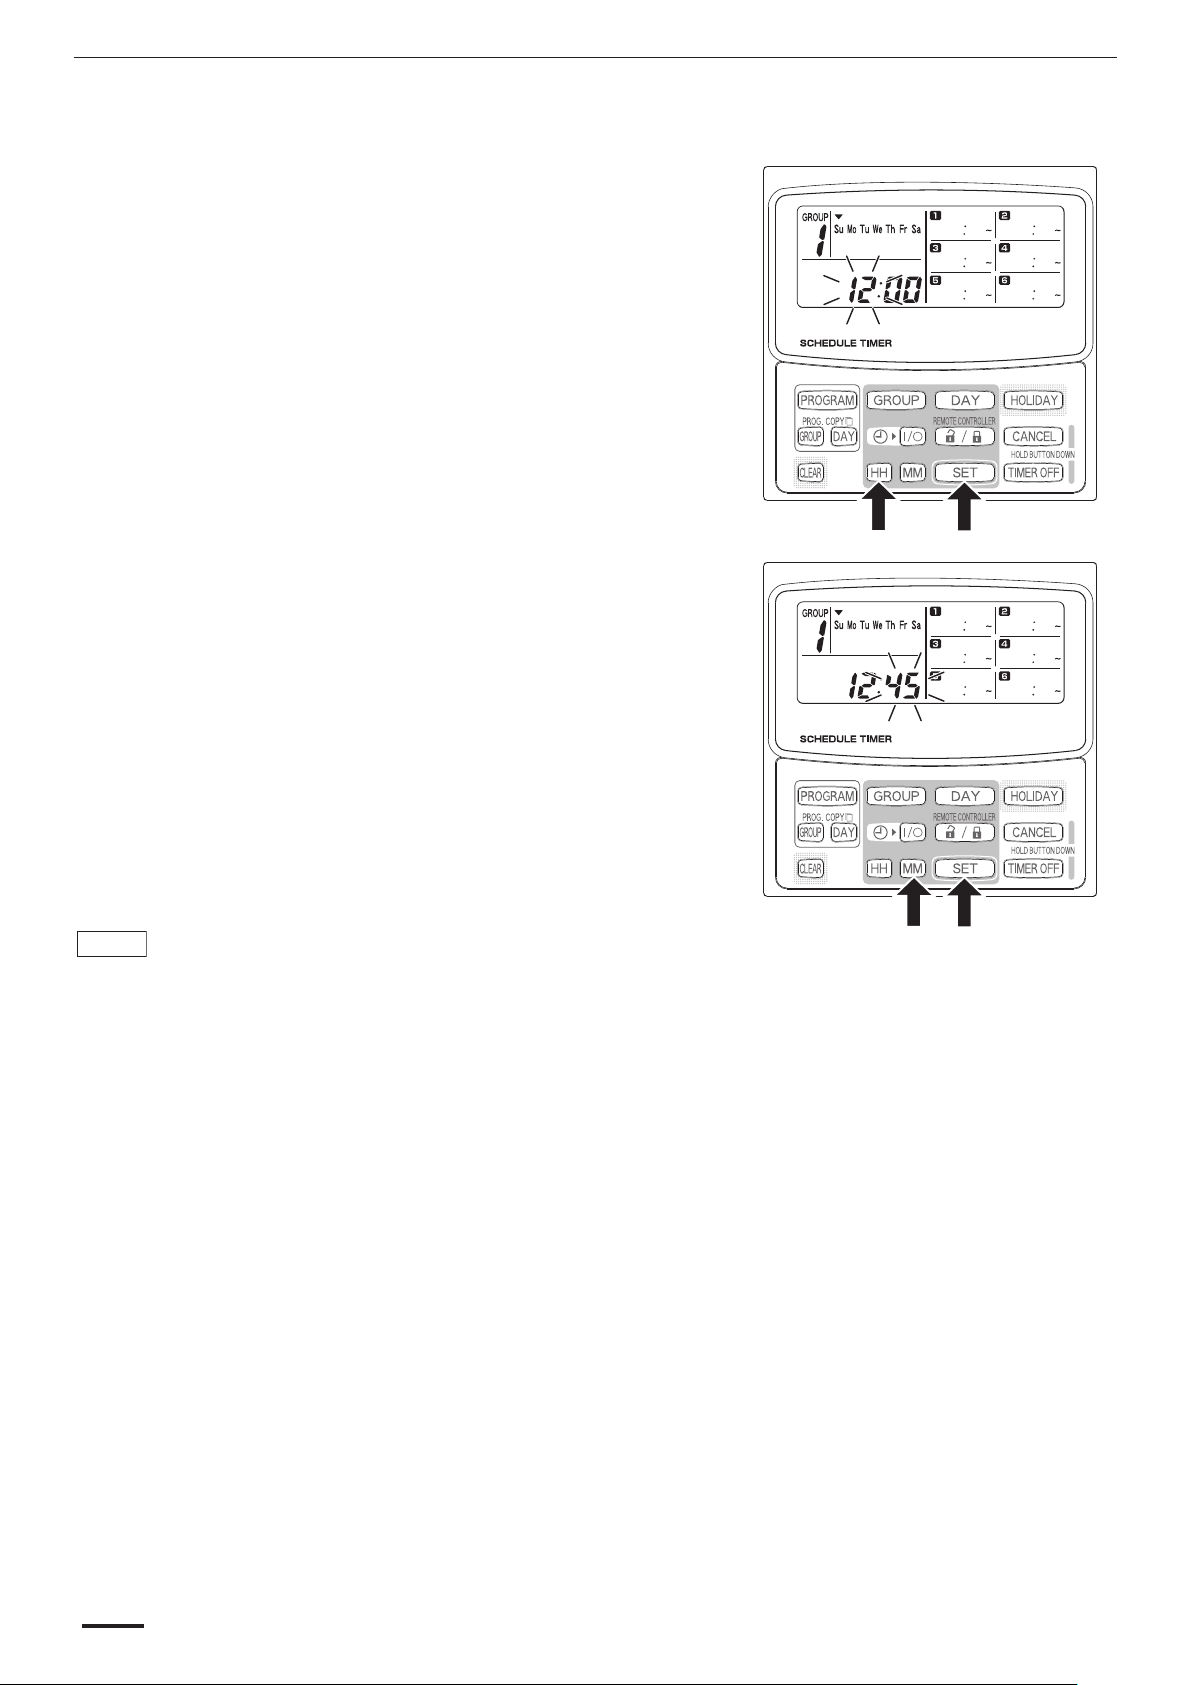
Setting the Present Time
Set the present time. (Example: When the present time is 12:45)
STEP 1 Hold down the SET button and press the HH button to
set the hour.
The hour increases one hour at a time with each single •
press of the HH button while the SET button is held
down.
The hour scrolls rapidly when both the SET button and •
HH button are held down. (Example: To set 12:00,
release the HH button when “12” is displayed.)
When the SET button is released, the hour is set and •
the indication changes from blinking to lighting.
STEP 2 Hold down the SET button and press the MM button to
set the minutes.
The minutes increase one minute at a time with each •
single press of the MM button while the SET button is
held down.
The minutes scroll rapidly when both the SET button •
and MM button are held down. (Example: To set 00:45,
release the MM button when “45” is displayed.)
When the SET button is released, the minutes are set •
and the indication changes from blinking to lighting.
NOTE
Pressing just the HH or MM button does not change the time.•
EN-6
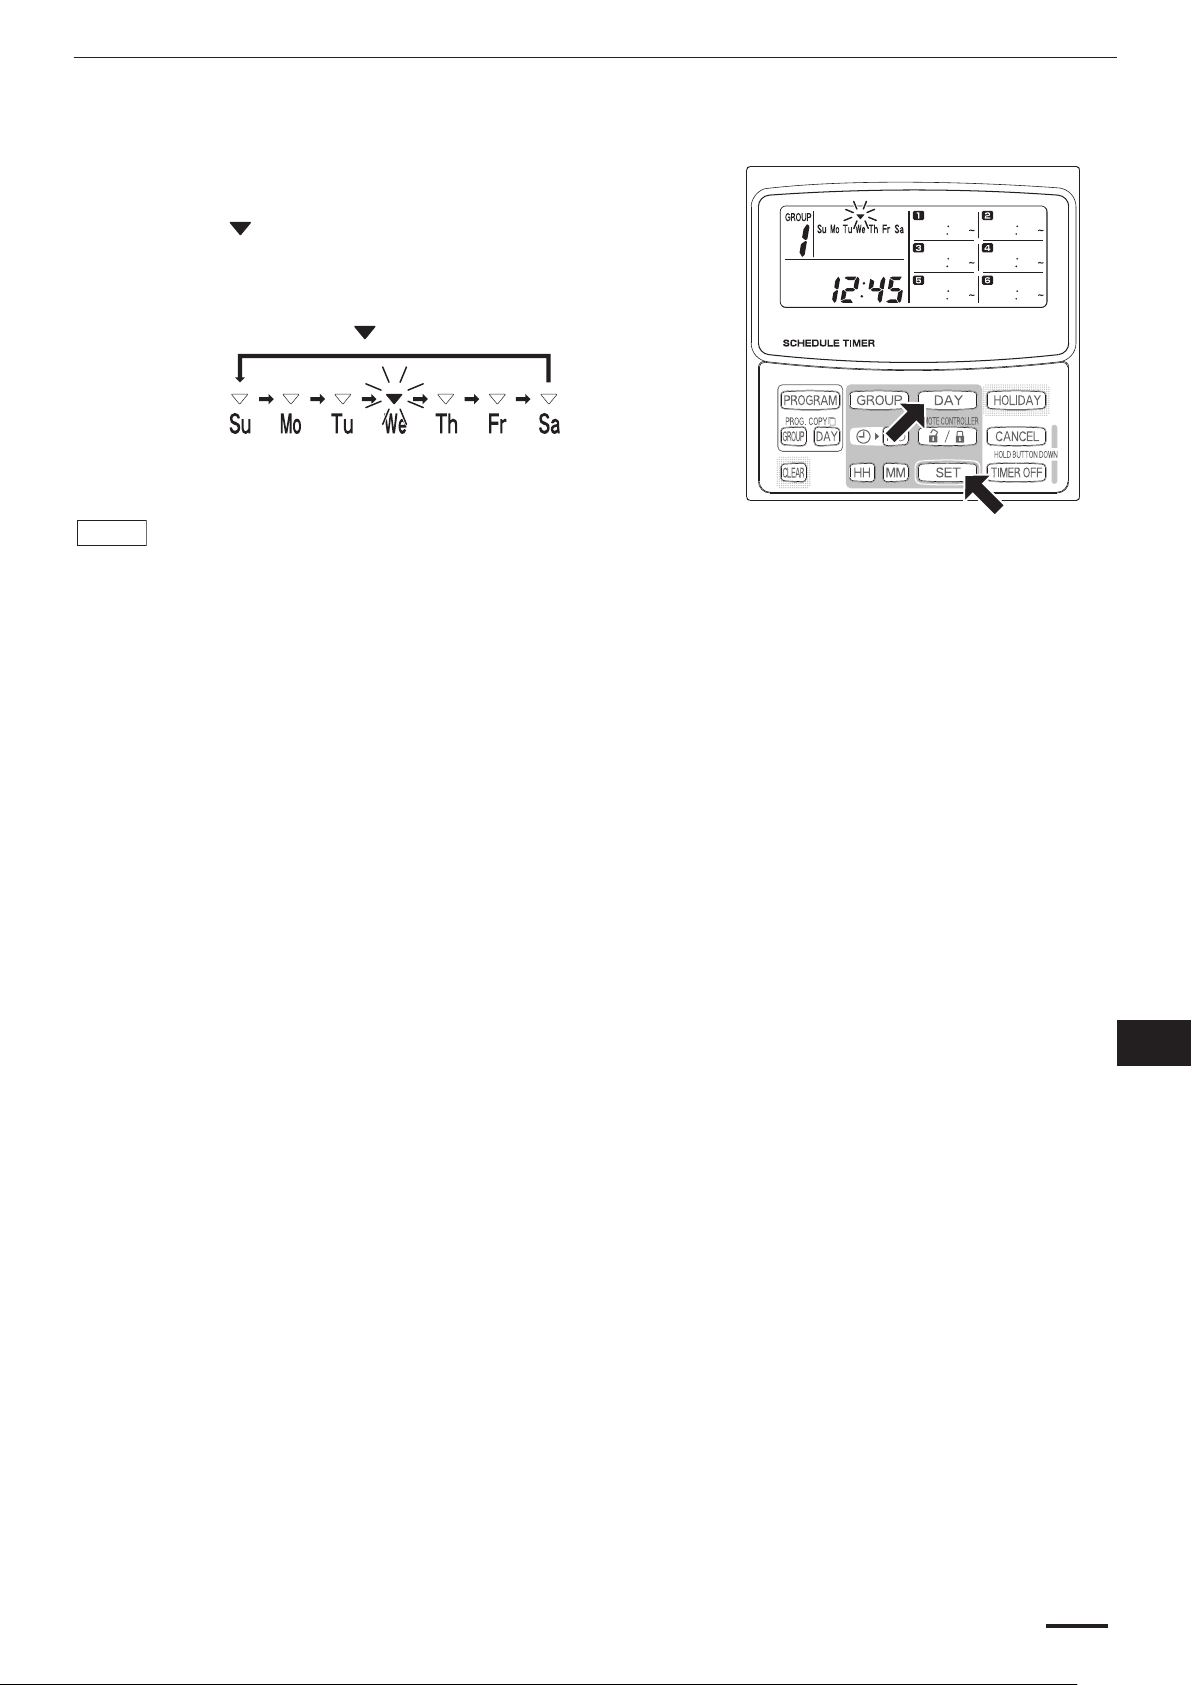
Setting Today’s Day of the Week
Set today’s day of the week. (Example: When today is Wednesday)
STEP 1 Hold down the SET button and press the DAY button
to set today’s day of the week.
• blinks and moves one day at a time across the days
of the week with each single press of the DAY button
while the SET button is held down.
When the SET button is released, the day of the week •
is set and the changes from blinking to lighting.
NOTE
Pressing just the DAY button does not change the day of the week.•
EN
EN-7

Setting Up Programmed Operations
Correctly set the present time and today’s day of the week.
Unless both are correctly set, the programs will not run as expected.
Up to 6 programmed operations can be set per day for each group and day •
of the week.
A combination of the below operations can be set for each timer program.•
Air conditioner starting/stopping –
Remote controller operation enable/disable *1 –
To change the settings of an existing program, use the same below •
procedure used to set up a new program.
*1 The remote controller operation enable/disable setting is disabled
depending on installation conditions. If so, appears on the display when
the button is pressed.
For more information, contact your dealer.
STEP 1 Press the PROGRAM button to select a group.
When the PROGRAM button is pressed, the group •
No. and today’s day of the week start blinking and the
present time indication changes to a blinking “PG-1”.
Press the GROUP button to select a group for •
programmed operation and then press the SET
button.
Example settings
NOTE
Group selection is disabled depending on installation •
conditions. If so, proceed to the next step.
The number of selectable groups is set during •
installation.
STEP 2 Press the DAY button and select a day of the week for
programmed operation.
When the SET button is pressed, the program •
schedule marker
lighting and, at the same time, the time set in program
starts blinking. Also, the present time indication
changes to a blinking “PG-2”.
NOTE
The currently selected day of the week blinks slowly at •
this time.
()
changes from blinking to
EN-8
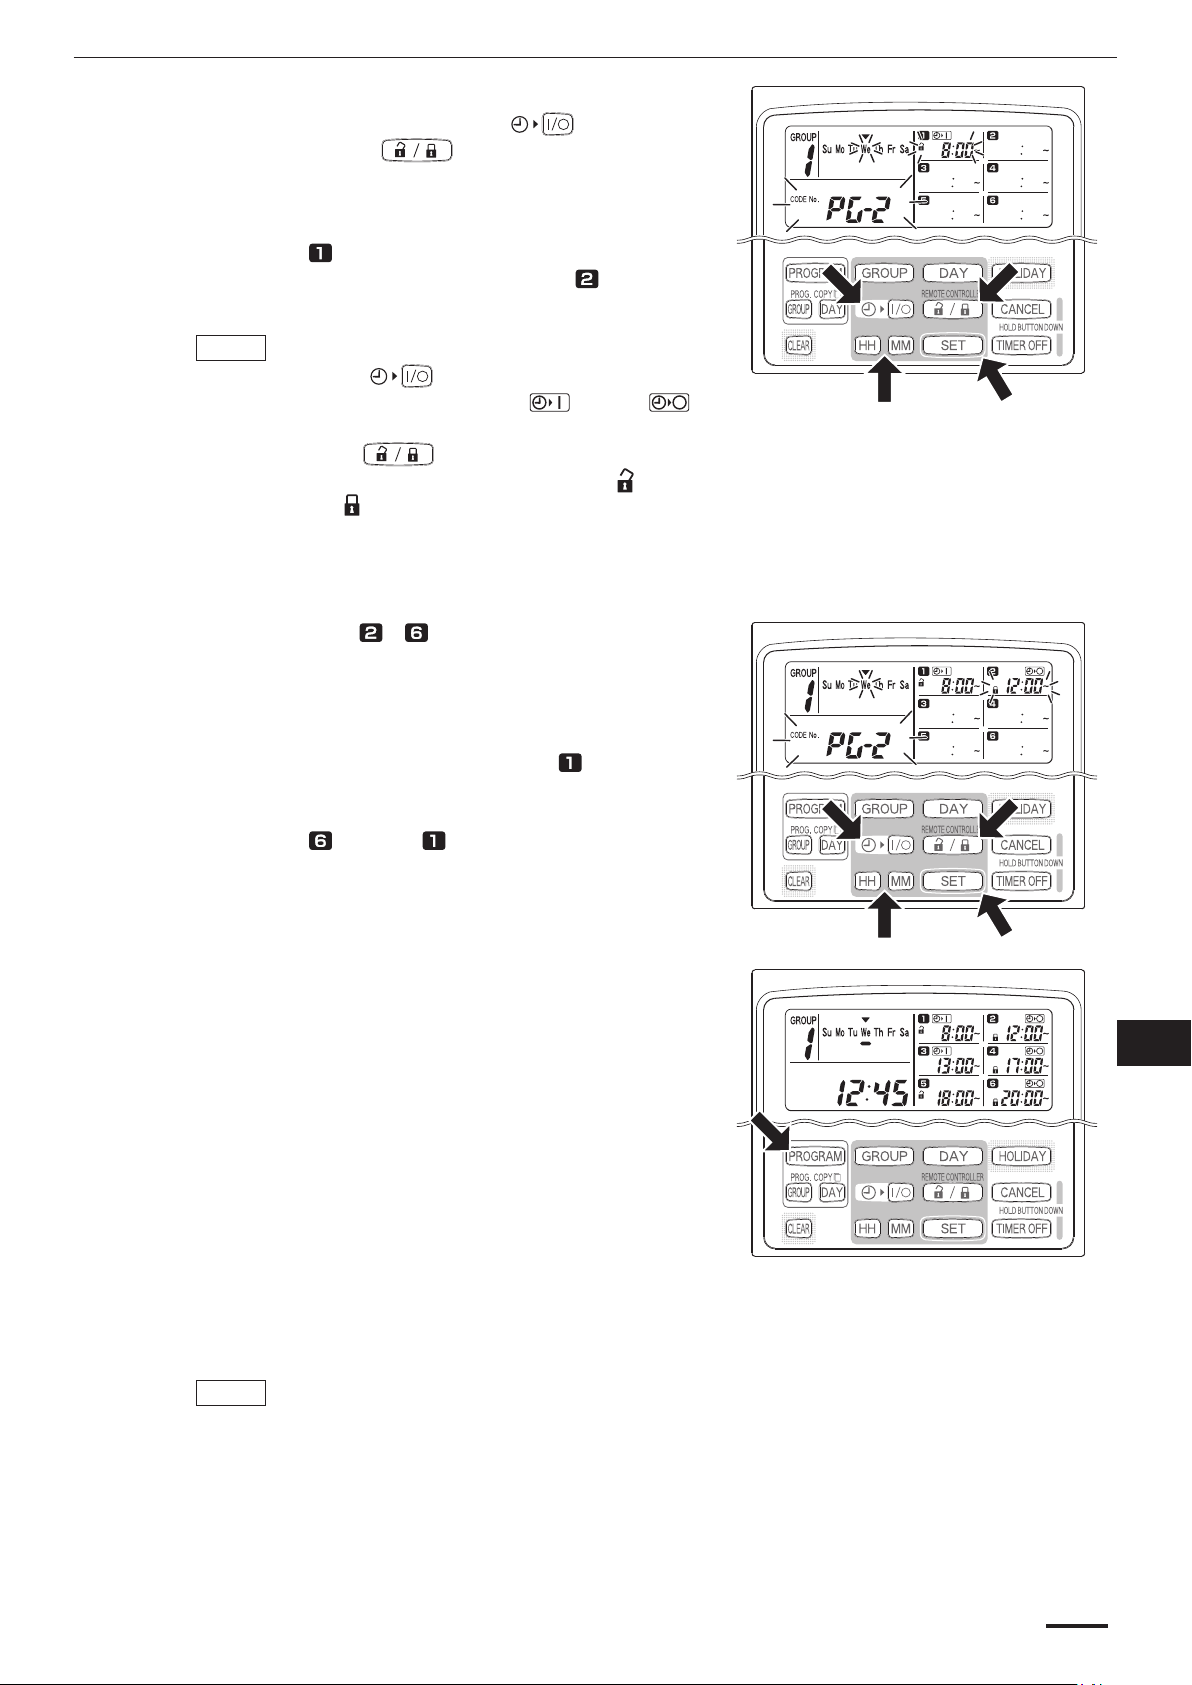
STEP 3 Set up the program and press the SET button.
Select timer operation with the •
OFF) button and
enable/disable) button. Then, set the trigger time with
the HH and MM buttons, and press the SET button.
When the SET button is pressed, the time set in •
program
the same time, the time set in program starts
blinking.
NOTE
Every time the • button is pressed, the timer
indication changes in the order of (ON) →
(OFF) → no indication.
Every time the • button is pressed, the remote
controller indication changes in the order of
(enabled) → (disabled) → no indication.
The remote control operation enable/disable setting is •
disabled depending on installation conditions. In this
case, only timer ON/OFF can be set.
STEP 4 Set up programs ~ in the same way.
When the SET button is pressed, settings are •
automatically arranged in the order of earliest time
fi rst.
If the SET button is pressed without any new settings •
being made in the program, program
blinking again and settings can be changed.
Similarly, if the SET button is pressed after setting up •
program , program starts blinking again.
changes from blinking to lighting and, at
(remote controller operation
(timer ON/
starts
STEP 5 Press the PROGRAM button.
Program settings are entered and the normal display •
returns.
STEP 6 Set up programmed operation for other groups and days of the week in the same way.
Programs that have already been set up can be copied into other groups and days of the week. (Refer
to page EN-12)
NOTE
A “0:00” time setting is interpreted to mean 12:00 midnight.•
To cancel program settings during program setup (while “PG-1” or “PG-2”is blinking on the •
display), hold down the CANCEL button for more than 2 seconds. The normal display
returns.
If settings are canceled without pressing the PROGRAM button, settings are not entered.•
EN
EN-9

Setting Errors
If time is set as shown below while setting up a program, “ERROR” is displayed (the indication blinks).
Therefore, correct the time setting.
If Program Times Are the Same
STEP 1 Every time the SET button is pressed, the setting mode switches between programmed operations of
the same time setting ( and in the above example), therefore select the time setting to correct.
STEP 2 Change the time setting with the HH and MM buttons so that the times are no longer the same.
STEP 3 Press the SET button and check “ERROR” is not displayed.
STEP 4 Press the PROGRAM button to end the setting mode.
Example Time Settings That Do Not Cause Errors
The below time settings do not generate an error.
1) When ON and OFF times are staggered 2) When OFF time is earlier than ON time
EN-10
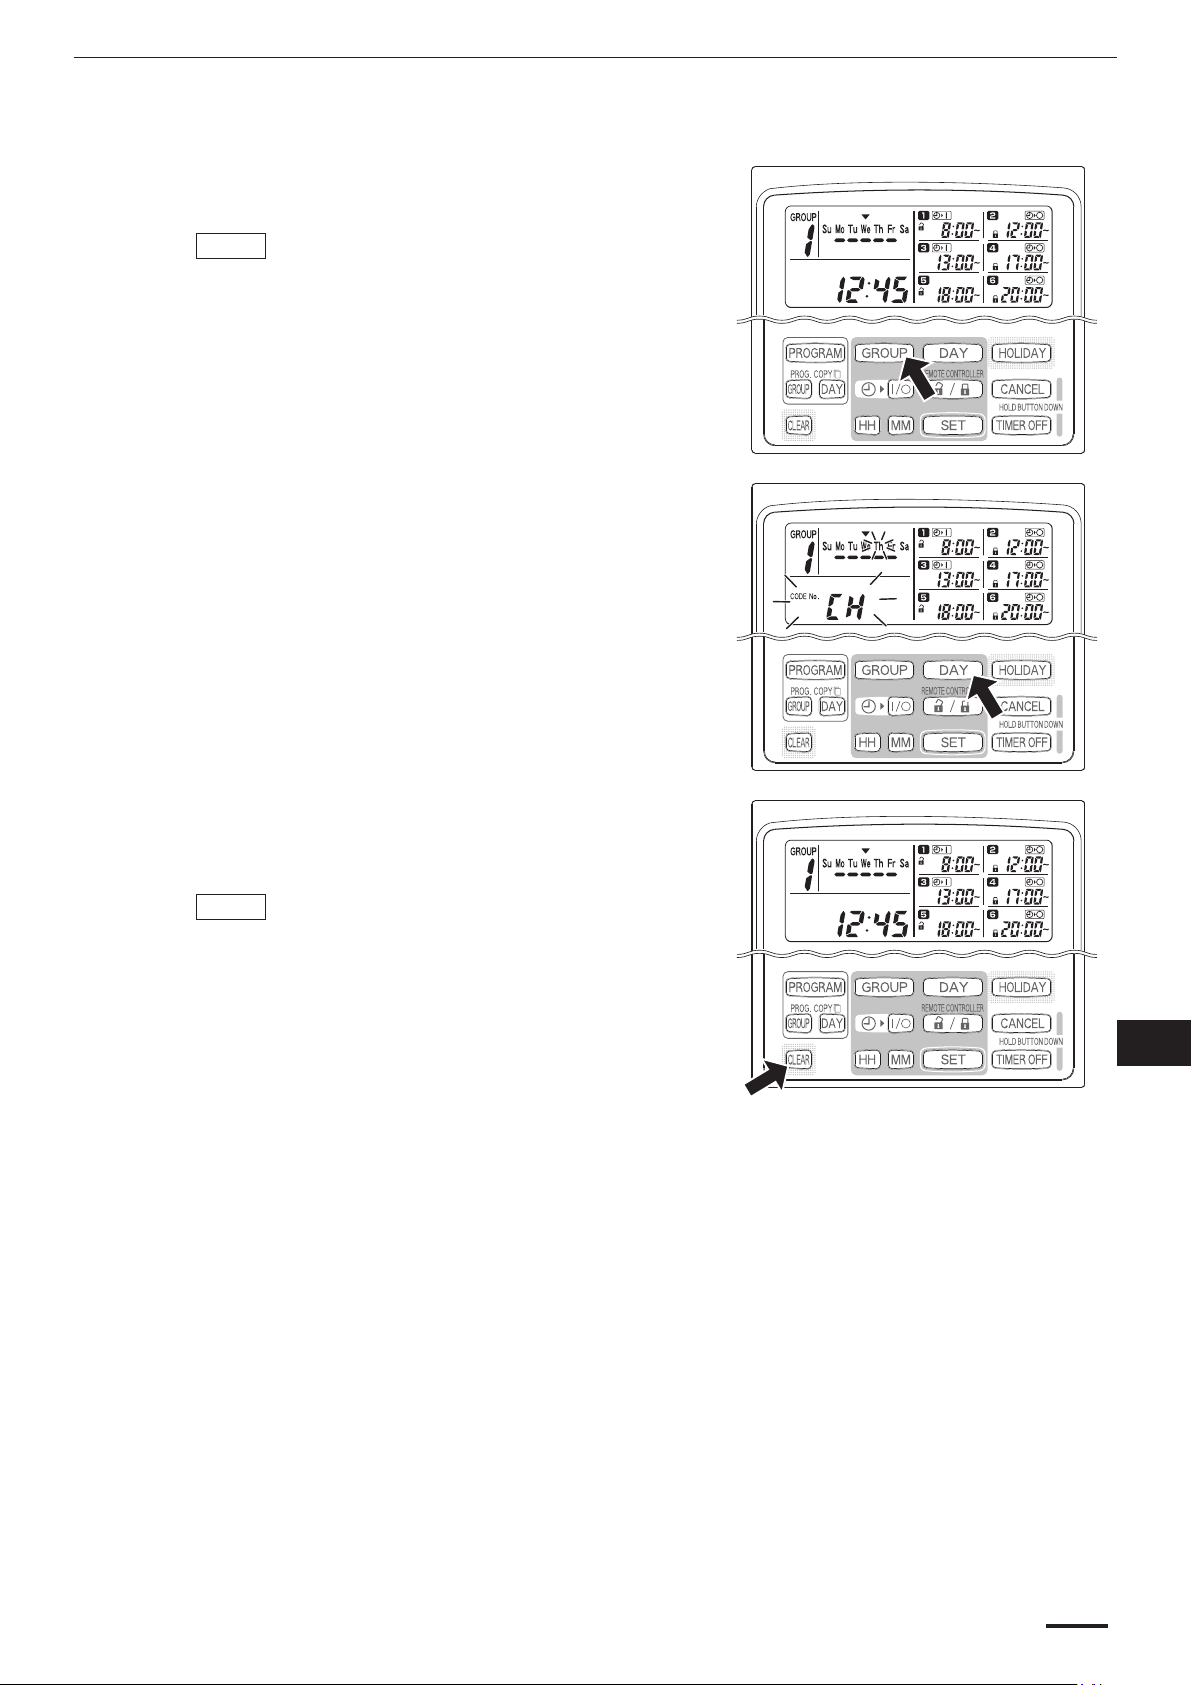
How to Check Program Times
You can check the programmed times for each group and day of the week.
STEP 1 Press the GROUP button and select a group whose
time you want to check.
NOTE
Group selection is disabled depending on •
installation conditions. If so, proceed to the next
step.
STEP 2 Press the DAY button.
When the DAY button is pressed the fi rst time, •
tomorrow’s day of the week starts blinking and the
program settings for tomorrow are displayed.
Every time the DAY button is pressed, the program •
settings change in order of the days of the week.
Pressing the GROUP button displays the program •
settings of another group on that same day.
STEP 3 End checking.
Press the CLEAR button. The normal display •
returns.
NOTE
Holding down the CANCEL button for more than 2 •
seconds also returns the normal display.
EN
EN-11

How to Copy Program Times
You can copy the already set program of one day into another day (Day Program Copying), as well as copy the entire
week programmed for one group into another group (Group Program Copying).
Example of Day Program Copying
(Copying Monday’s program into Tuesday)
How to Copy Day Programs
STEP 1 Press the PROG. COPY DAY button.
The group No. and the • over today’s day start
blinking and “CP-1” starts blinking in the present
time display area. In this state, select a group in
which to copy day programs, using the GROUP
button.
Example of Group Program Copying
(Copying group No. 1’s program into group No. 2)
STEP 2 Select a source day program to copy.
Every time the DAY button is pressed, the •
moves across the days of the week display,
therefore select a day of the week that will serve as
the copy source.
Once having selected the copy source day, press •
the SET button to set it. The display changes to key
you to select a copy destination day.
STEP 3 Select a copy destination day.
When the schedule timer is ready for you to select a •
copy destination day, “CP-2” starts blinking in the
present time display area, while the selected copy
source day blinks in the days of the week.
Therefore, select a day of the week as the copy
destination, using the DAY button.
EN-12
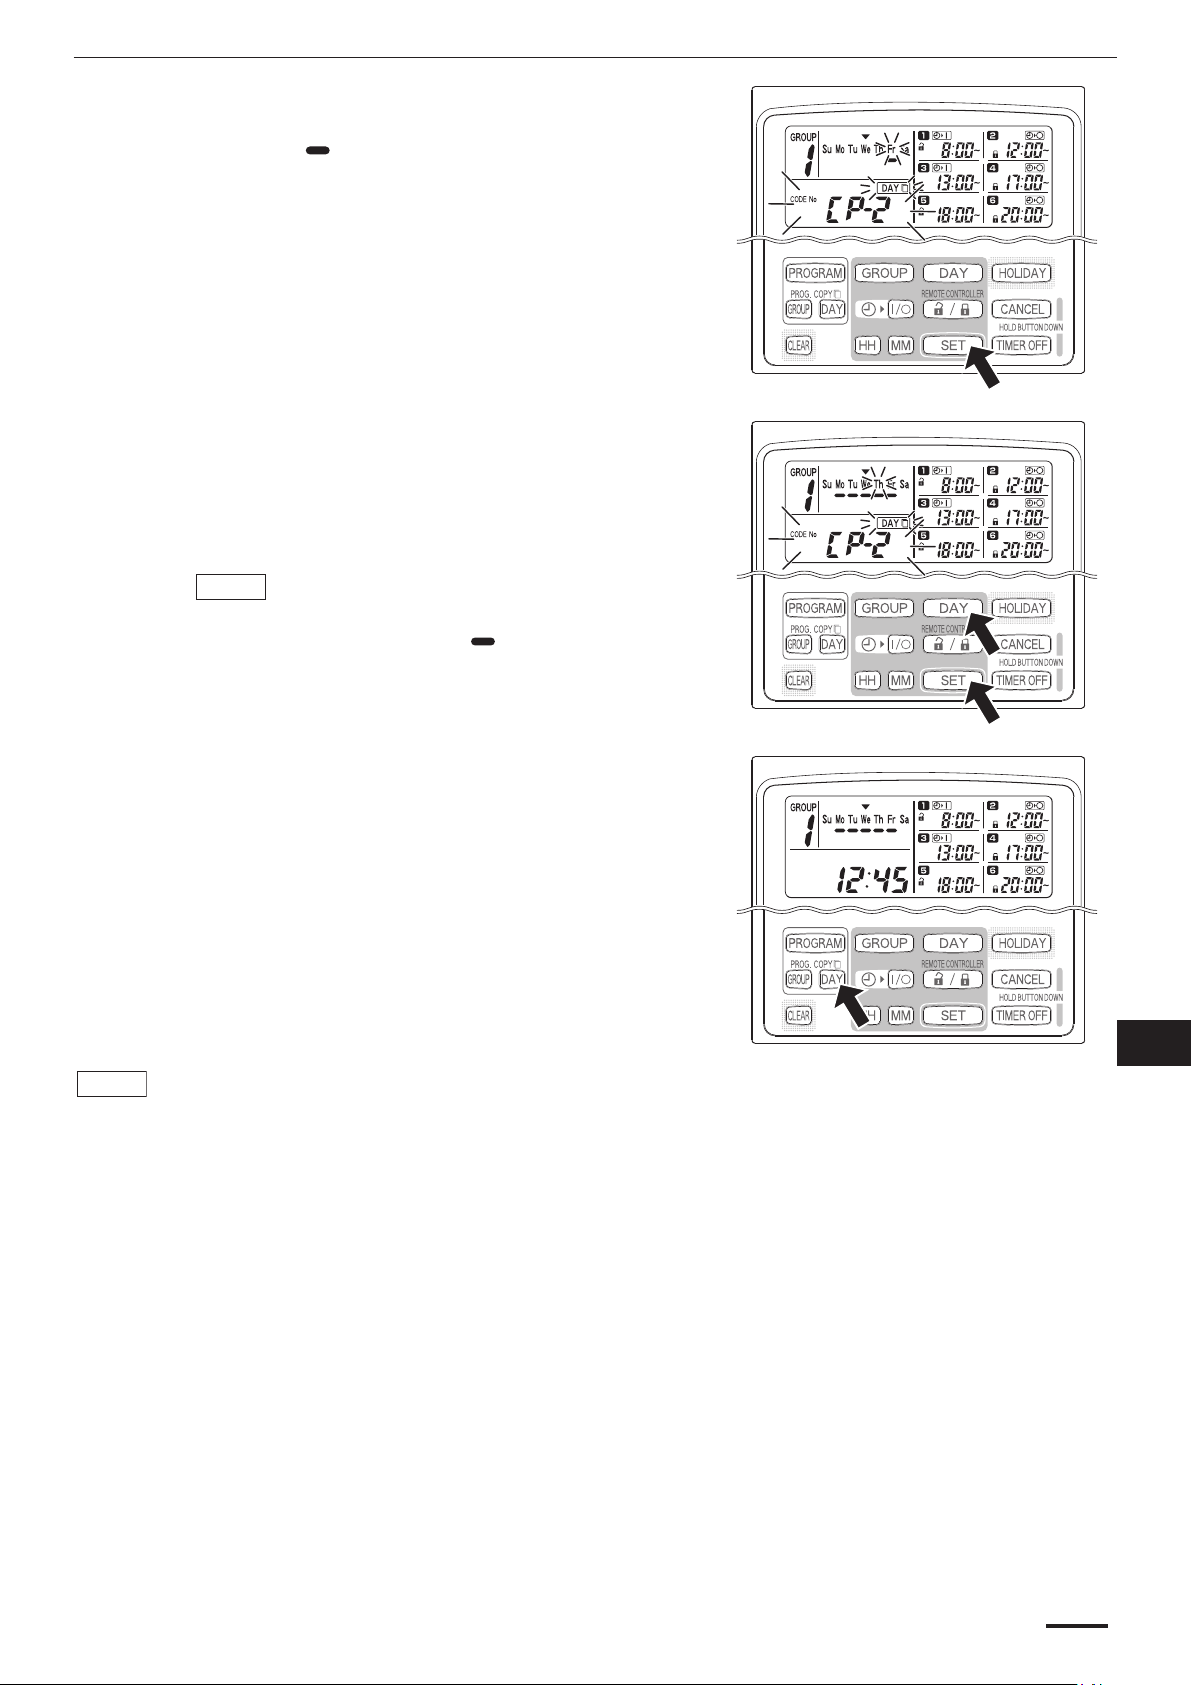
STEP 4 Press the SET button to copy.
Press the SET button and the program schedule •
()
marker
STEP 5 Select other copy destination days if desired.
You can copy the selected source day program into •
other days by repeatedly pressing the DAY button to
select a day of the week followed by the SET button
to set it.
NOTE
Pressing the CLEAR button extinguishes the •
program schedule marker
copy operation.
will be displayed.
()
and cancels the
STEP 6 Press the PROG. COPY DAY button to enter the
copied program in the selected days.
The normal display returns.•
NOTE
If a program already exists in the copy destination day, the newly copied program overwrites the existing •
program.
If you accidentally copy over a program in the day program copy mode, holding down the CANCEL •
button for more than 2 seconds returns the program to the point prior to pressing the PROG. COPY DAY
button in STEP 1. (All changes and copy operations made up until that point are cleared.)
EN
EN-13

How to Copy Group Programs
STEP 1 Press the PROG. COPY GROUP button.
“CP-1” starts blinking in the present time display •
area and “CP” (copy) starts blinking in the program
area to indicate the copy source.
STEP 2 Select a source group program to copy.
Select a copy source group using the GROUP •
button.
Once having selected the copy source group, press •
the SET button to set it. The display changes to key
you to select a copy destination group.
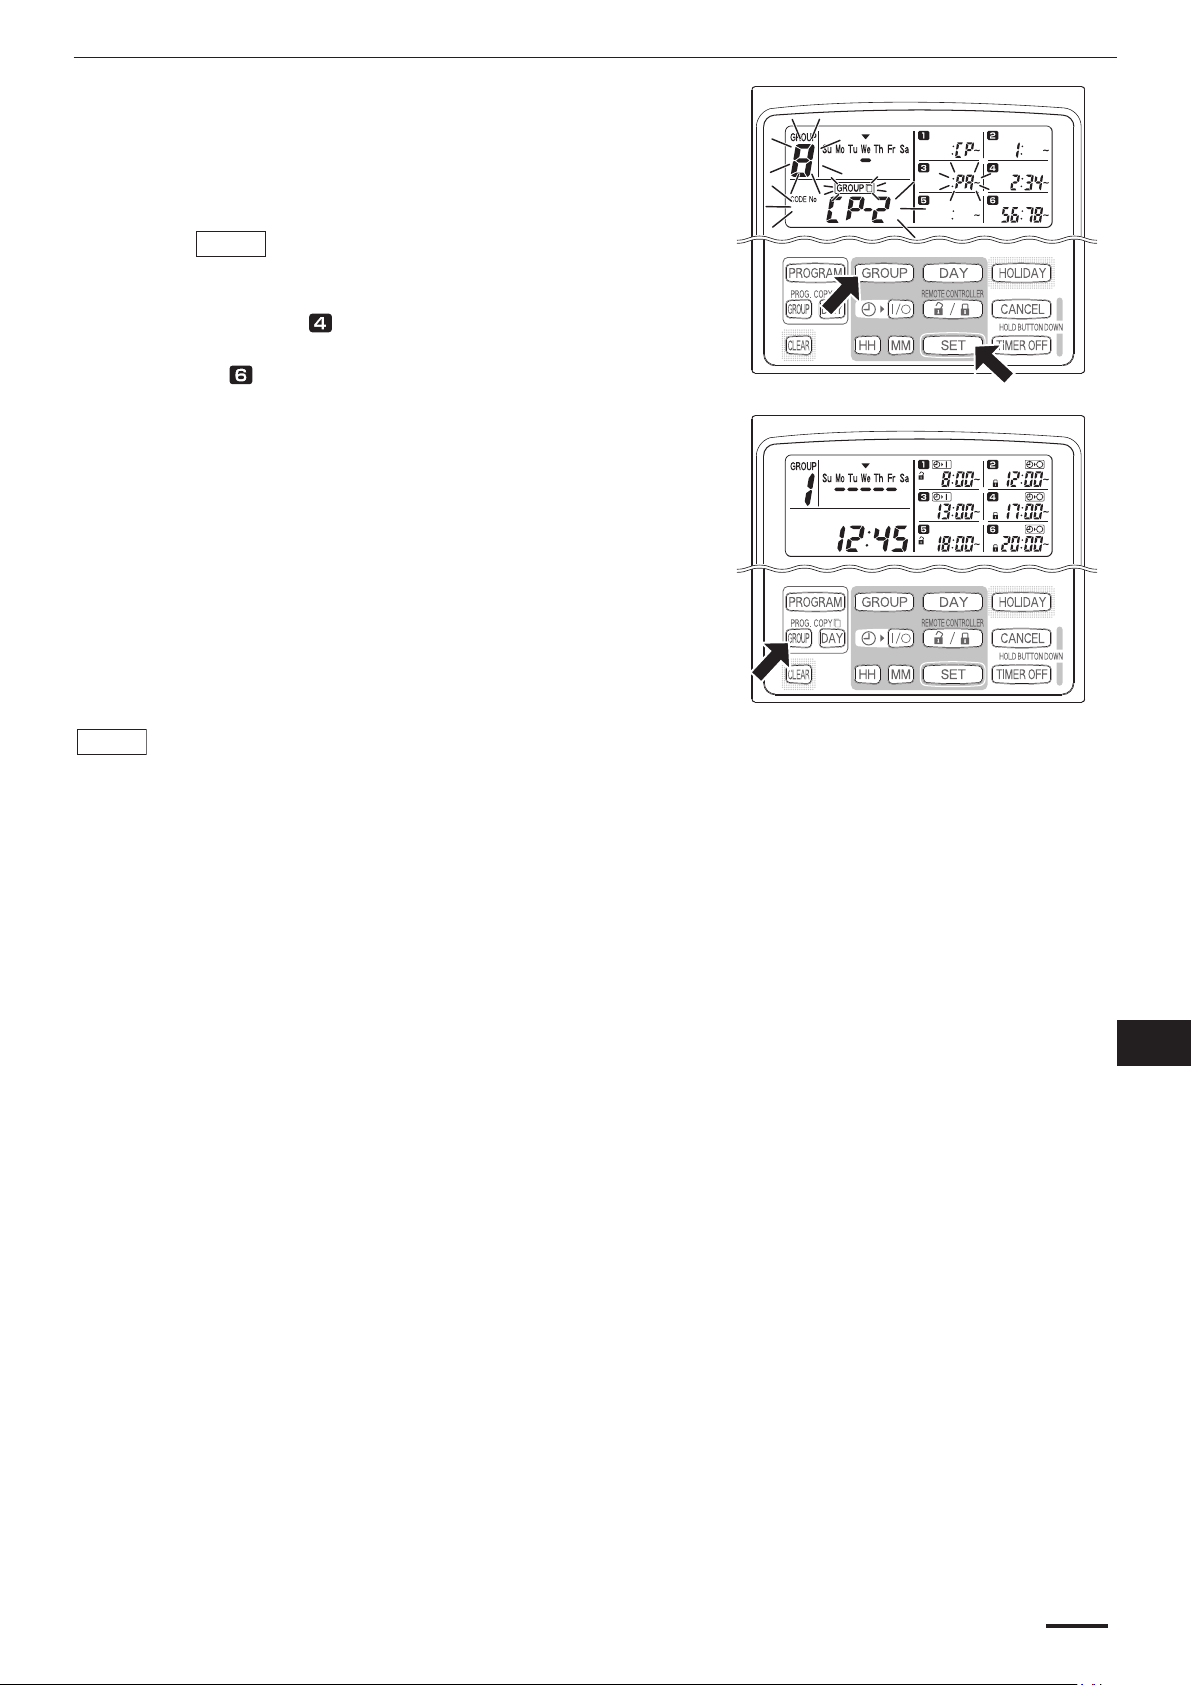
STEP 3 Select a copy destination group.
After pressing the SET button, “CP-2” starts blinking •
in the present time display area, the copy source
group No. set appears in the program area, and
“PA” (paste) starts blinking in the program area
to indicate the copy destination.
Select a copy destination group using the GROUP •
button.
STEP 4 Enter the selected copy destination group.
When the SET button is pressed, the number of the •
copy destination group appears in the program No.
area.
NOTE
If a group from numbers 1 to 4 was selected as the •
copy destination group, that number appears in the
program
was selected, that number appears in the program
area.
area. If a group from numbers 5 to 8
EN-14
STEP 5 Select other copy destination groups if desired.
You can copy the selected source group programs •
into other groups by repeatedly pressing the
GROUP button to select a group followed by the
SET button to set it.
NOTE
If a group from numbers 1 to 4 was selected as the •
copy destination group, that number appears in the
program area. If a group from numbers 5 to 8
was selected, that number appears in the program
area.
STEP 6 Press the PROG. COPY GROUP button to enter the
copied programs in the selected groups.
The normal display returns.•
NOTE
If a program already exists in the copy destination group, the newly copied program overwrites the •
existing program.
If you accidentally copy over a program in the group program copy mode, holding down the CANCEL •
button for more than 2 seconds returns the program to the point prior to pressing the PROG. COPY
GROUP button in STEP 1. (All changes and copy operations made up until that point are cleared.)
EN
EN-15

How to Set Holidays in a Scheduled Week of Operation
Operations programmed for a specifi c day during the week can be temporarily disabled by setting that day as a
holiday.
When the set holiday passes, the holiday setting is canceled and operation is resumed as programmed the •
following week.
Holidays can be selected for the week starting from today’s day. If today is selected as a holiday, the holiday •
setting is canceled from the next programmed operation. (Depending on the program, if the program is currently
running, the program may not stop.)
Example Setting
Today is Thursday and Friday
is set as a holiday.
STEP 1 Press the GROUP button to select a group to go on
holiday.
NOTE
Depending on installation conditions, group •
selection is disabled or set so that all groups are
automatically selected for the holiday feature. If so,
proceed to the next step.
STEP 2 Press the HOLIDAY button.
“HL” starts blinking in the present time display area •
and today’s day of the week starts blinking.
When Friday comes, the
program set for that day does
not run.
When Saturday comes,
Friday’s holiday setting is
canceled.
STEP 3 Select a day as the holiday using the DAY button,
and press the SET button.
A “ • ” appears over the selected holiday.
To select other holidays, select a day using the DAY •
button and set it with the SET button.
If you made a mistake or want to cancel a holiday, •
press the CLEAR button.
EN-16
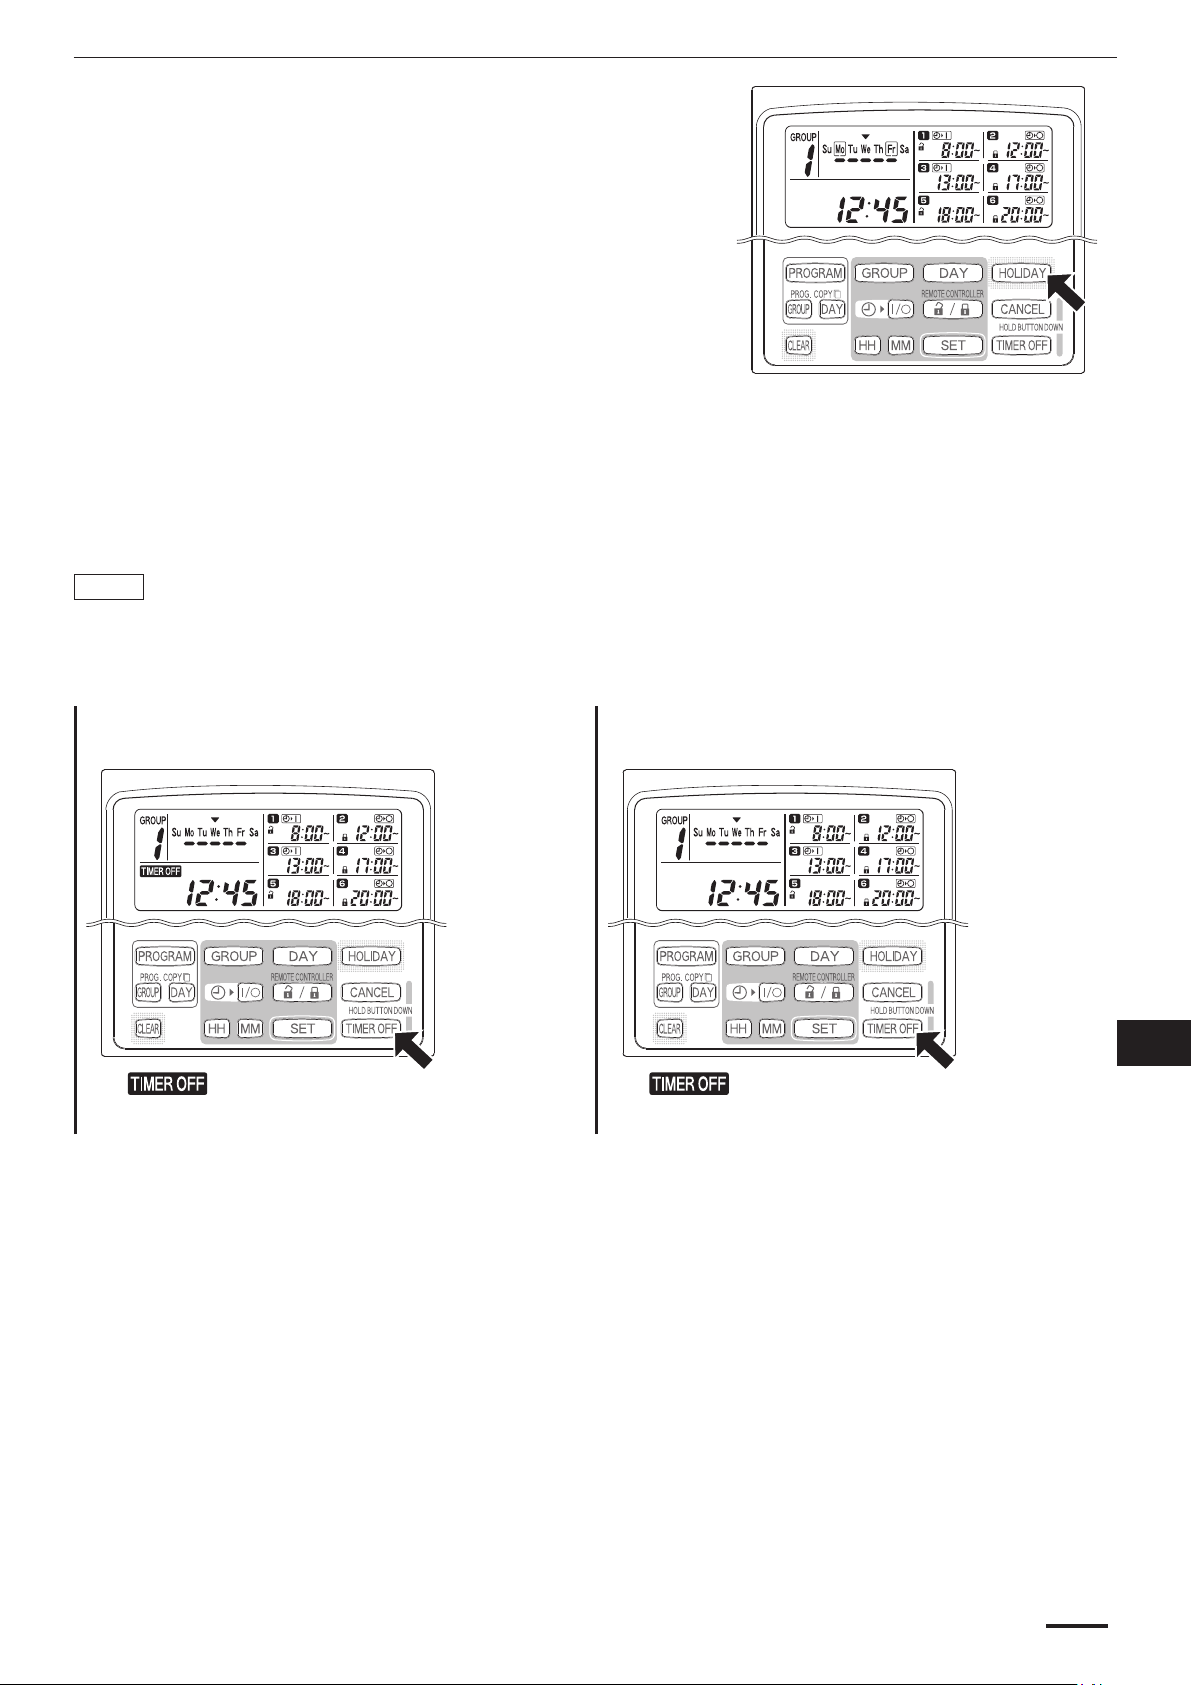
STEP 4 Press the HOLIDAY button to enter the holiday.
The normal display returns.•
How to Disable the Timer Operation
To halt programmed operation for one week or more, you can disable all timer programs.
Once the timer has been disabled, programmed operations are not run until the below procedure is performed.•
NOTE
During installation, the remote controller may be set to disable the timer for individual groups. In this state, the •
timer is disabled only for the selected group, therefore press the GROUP button to confi rm which group is
selected.
Hold down the TIMER OFF button for more than
2 seconds
• appears on the display. The timer is
disabled from the next scheduled program.
To turn the timer back ON, hold down the TIMER
OFF button for more than 2 seconds
EN
• goes out and the timer is enabled
from the next scheduled program.
EN-17

How to Clear Programs
Press the PROGRAM button.
To cancel specifi c days To cancel individual programs on specifi c days
When the PROGRAM button is pressed, the group No. and the •
present day of the week start blinking and the present time
indication changes to a blinking “PG-1”.
Press the GROUP button to select a group to clear.•
NOTE
Group selection may be disabled during installation. If so, •
proceed to the next step.
Holding down the CANCEL button for more than 2 seconds •
returns the program to the point prior to pressing the PROGRAM
button. (All operations made up until that point are cleared.)
Select a day to cancel using the DAY button •
and press the CLEAR button. All settings in
programmed operations through are
cleared. The display appears as shown above.
Press the PROGRAM button to enter the clear •
operation. The normal display returns without
the program schedule marker
the days of the week.
()
underneath
Select a day and press the SET button. •
Programmed operations through start
blinking in rotation, therefore press the CLEAR
button when the programmed operation to clear
starts blinking. (The remaining programmed
operations are automatically arranged in the
order of earliest time fi rst.)
Press the PROGRAM button to enter the clear •
operation. The normal display returns.
Example:
Display after clearing
programmed operation
above
EN-18

Important Information to Remember
1. Schedule Timer and Air Conditioner Operation
Air conditioners operate either according to operations programmed from the schedule timer (starting/stopping and
remote control operation enable/disable) or according to a connected remote controller or system controller.
Schedule timer settings (Example)
Operation without system controller operation
If remote controller operation is enabled, the air conditioner can be started/stopped from the remote controller. •
(The air conditioner responds to the most recently pressed button.)
8:00 12:00 17:00 20:0013:00 18:00
Stopped
Stopped Stopped
Air conditioner
operation
Remote controller
operation
*1
*1 Whether remote controller operation is enabled or disabled depends on the setting of
the previous day.
*2 Since remote controller operation is disabled, operation remains disabled.
*3 The remote controller remains disabled the next day and thereafter until it is enabled in
the remote controller operation enable/disable setting.
Running
Enabled
Operation with system controller operation
If remote controller operation is enabled, the air conditioner can be started/stopped from the remote controller. •
(The air conditioner responds to the most recently pressed button.)
The remote controller operation enable/disable set from the system controller (Centralized control 1 to 4) is •
canceled according to programmed operations.
Operation from the system controller
[Stop + RC operation disable]
Running
Disabled
Enabled
*2
[Stop + RC operation enable]
Disabled
*3
EN
Air conditioner
operation
Remote controller
operation
00:0200:7100:2100:8 13:00 18:00
Stopped StoppedRunning Running Stopped
Disabled
Enabled Enabled Enabled
Disabled Disabled
*1
*1 Whether remote controller operation is enabled or disabled depends on the setting of
the previous day.
EN-19

2. Power Outages
If the air conditioner is running when power is lost, the air conditioner remains OFF when power is restored. Also, if
remote controller operation was disabled when power was lost, it is enabled for a few minutes when power is
restored.
Programmed operations scheduled for times that come after power is restored run as usual.•
Program settings are retained in the non-volatile memory of the schedule timer, therefore they are not cleared in •
the event of a power outage. Also, the present time and today’s day of the week are retained for a maximum of
100 hours by the internal battery.
Schedule timer settings (Example)
Operation when power is not lost
8:00 12:00 17:00 20:0013:00 18:00
Stopped
Stopped Stopped Stopped
Air conditioner
Running
Running Running
operation
Remote controller
operation
*1
Enabled
Disabled
*1 Whether remote controller operation is enabled or disabled depends on the setting of
the previous day.
Operation when power is lost at 15:00 and subsequently restored
Power lost here.
15:00
Air conditioner
operation
Remote controller
operation
Stopped
*1
Running
Enabled Enabled
Stopped
Running Running
Disabled Disabled Disabled
Enabled
00:7100:2100:8
Stopped Stopped
20:0013:00 18:00
Power outage
Disabled
EN-20
*2
*1 Whether remote controller operation is enabled or disabled depends on the setting of
the previous day.
*2 Remote controller operation is enabled for a few minutes after power is restored.

Troubleshooting
Before requesting servicing, check the following.
Trouble Cause/Remedy
blinks on the display. The schedule timer is performing initial
communications with connected indoor units. Wait for
communications to fi nish.
Air conditioners do not operate as scheduled when
the set time comes.
Air conditioners can be started and stopped from
the remote controller even though the program
disables remote controller operation.
blinks in the present time display area. Power to the air conditioner was lost for a long period
Check before requesting servicing
The timer has been disabled. (Refer to page EN-17)
A holiday has been scheduled. (Refer to page EN-16)
Power to the air conditioner was lost and
subsequently restored. (Refer to page EN-20)
of time. Set the present time and today’s day of the
week again. (Refer to pages EN-6 and EN-7)
If trouble persists despite taking the above action, stop the schedule timer, turn off the unit and report the serial
number and problem to your dealer. Never service the unit yourself as this is dangerous.
EN
EN-21

Table des matières
page
Informations sur le produit .............................................................................FR-2
Symboles d’avertissement .............................................................................FR-2
Emplacement d’installation ............................................................................ FR-3
Instructions relatives à l’alimentation ............................................................. FR-3
Conseils de sécurité ...................................................................................... FR-3
Noms et fonctions des pièces ........................................................................FR-4
Utilisation du temporisateur ...........................................................................FR-5
Réglage de l’heure actuelle ...................................................................FR-6
Réglage du jour de la semaine .............................................................. FR-7
Confi gurer des opérations programmées ..............................................FR-8
Erreurs de réglage ............................................................................... FR-10
Vérifi cation des heures de programmation .......................................... FR-11
Copie des heures de programmation .................................................. FR-12
Régler les jours fériés pour une semaine d’opération programmée .... FR-16
Désactivation du temporisateur ...........................................................FR-17
Effacer des programmations ...............................................................FR-18
Informations importantes à retenir ............................................................... FR-19
Dépannage .................................................................................................. FR-21
Informations sur le produit
Pour tout problème ou toute question relatifs au climatiseur, il faudra les
informations ci-dessous. Les numéros de série et de modèle fi gurent sur la
plaque signalétique placée sur le fond du coffret.
No. modèle
Date d’achat
Adresse du concessionnaire
No. série
Numéro de téléphone
Symboles d’avertissement
Les symboles suivants utilisés dans ce manuel avertissent d’un danger
potentiel pour l’utilisateur, le personnel d’entretien ou l’appareil :
FR-2
Ce symbole signale un danger ou des
opérations dangereuses qui risquent
d’entraîner des blessures physiques graves,
ou mortelles.
Ce symbole signale un danger ou des
opérations dangereuses qui risquent
d’entraîner des blessures physiques ou des
dommages matériels, notamment de
l’appareil.

Emplacement d’installation
Il est recommandé de faire installer ce temporisateur par un technicien •
qualifi é et conformément aux instructions fournies avec l’appareil.
Ne pas installer le temporisateur dans un endroit où existent des •
émanations gazeuses ou des gaz infl ammables ou dans un endroit
très humide comme une serre.
Ne pas installer le temporisateur où se trouvent des objets •
dégageant une très forte chaleur.
Instructions relatives à
l’alimentation
Tous les câbles doivent respecter les codes électriques locaux. Pour les 1.
détails, consulter son magasin ou un électricien qualifi é.
Les raccordements devront être confi és à un électricien qualifi é.2.
Pour chauffer le système, il doit être mis sous
tension au moins cinq (5) heures avant son
fonctionnement. Laissez le système sous
tension, en position ON, sauf si vous n’allez
pas l’utiliser pendant une période de temps
importante.
Conseils de sécurité
Lire attentivement ce mode d’emploi avant de faire fonctionner le •
temporisateur. Si l’on rencontre des diffi cultés ou des problèmes,
consulter son concessionnaire.
Le climatiseur est conçu pour créer un environnement confortable •
chez soi. Ne l’utiliser qu’aux fi ns pour lesquelles il a été prévu, en
suivant les instructions de ce manuel.
Ne jamais toucher l’unité avec des mains humides.•
Ne jamais utiliser ni entreposer d’essence ni aucune autre vapeur •
ou liquides infl ammables près du climatiseur — cela serait
extrêmement dangereux.
Le climatiseur ne possède pas de ventilateur d’admission d’air frais •
extérieur. Il faudra donc ouvrir fréquemment les portes ou les
fenêtres si l’on utilise dans la même pièce des appareils de
chauffage à gaz ou au mazout, qui consomment beaucoup
d’oxygène. Sinon, il y aurait risque d’asphyxie dans les cas
extrêmes.
Ne pas mettre le climatiseur sous et hors tension à l’aide de •
l’interrupteur d’alimentation du système. Utiliser le bouton de
marche/arrêt de fonctionnement (ON/OFF).
Ne rien introduire dans la sortie d’air de l’élément extérieur. Cela est •
très dangereux car le ventilateur marche à grande vitesse.
Ne pas laisser les enfants jouer avec le climatiseur.•
Ne pas trop refroidir ou chauffer une pièce où se trouvent des bébés ou •
des malades.
FR
FR-3

Boutons de fonctionnement
A : Bouton PROGRAM
(Programmer)
B : Boutons PROG. COPY
(Programmer Copier)
C : Bouton CLEAR (Effacer)
D : Boutons de réglage
Noms et fonctions des pièces
E : Bouton HOLIDAY
(Jour férié)
F : Bouton CANCEL (Annuler)
G : Bouton TIMER OFF
(Temporisateur désactivé)
A : Bouton PROGRAM
(Programmer)
B : Boutons PROG. COPY
(Programmer Copier)
C : Bouton CLEAR (Effacer) Appuyer sur ce bouton pour effacer les paramètres de la programmation
D : Boutons de réglage Utiliser pour confi gurer les paramètres de programmation et l’heure actuell e.
E : Bouton HOLIDAY
(Jour férié)
F : Bouton CANCEL (Annuler) Appuyer sur ce bouton pour annuler la confi guration de la programmation en
G : Bouton TIMER OFF
(Temporisateur désactivé)
Utiliser pour confi gurer des programmations et pour saisir les paramètres.
Utiliser pour copier des programmations vers des groupes ou des jours
spécifi ques dans un calendrier. (Voir à la page FR-12)
affi chée actuellement à l’écran.
La programmation actuelle n’est pas effacée, sauf si le bouton •
est activé après avoir appuyé sur le bouton CLEAR (Effacer).
Appuyer sur ce bouton po ur défi nir des groupes pour des opérations programmées.
Appuyer sur ce bouton pour confi gurer la date du jour et les jours des
opérations programmées.
Appuyer sur ce bouton pour confi gurer l’heure actuelle et les heures utilisées
pour les opérations programmées.
Utiliser ce bouton pour démarrer/arrêter des unités intérieures via le temporisateur
Utiliser ce bouton pour activer/désactiver le fonctionnement de la
télécommande via le temporisateur.
Utiliser ce bouton pour confi gurer l’heure de déclenchement des opérations
programmées.
Les paramètres de programmation ne sont pas entrés, sauf si le bouton •
est activé à la fi n des opérations de réglage.
Appuyer sur ce bouton pour confi gurer et annuler des jours fériés pendant
une semaine d’opération programmée.
cours, l’opération de copie ou l’opération de réglage des jours fériés. Lorsque
le bouton CANCEL (Annuler) est maintenu enfoncé pendant 2 secondes,
l’opération de réglage ou de copie en cours est annulée et l’affi chage normal
est restauré.
Appuyer sur ce bouton pour désactiver le temporisateur si celui-ci ne sera
pas utilisé pendant une longue période. Lorsque ce bouton est maintenu
enfoncé pendant 2 secondes, apparaît à l’écran. Les
programmations ne peuvent être exécutées aussi longtemps que ce bouton
n’est pas à nouveau maintenu enfoncé pendant 2 secondes.
Certaines des fonctions ci-dessus seront désactivées lors de l’installation de •
l’unité. Si le bouton d’une fonction désactivée est activé, apparaît à
l’écran.
Contacter le revendeur pour obtenir davantage d’informations.
.
FR-4

Affi chage
A : Jour de la semaine en
()
cours
B : Indicateur de
programmation dans le
calendrier
C : Indicateur de jour férié
dans le calendrier
D : Indicateur ERROR
(erreur)
E : Programmation du
temporisateur
()
()
AB C D
F
G
H
IJ
Indique le jour de la semaine en cours.
Apparaît sous les jours programmés d’exécution d’une programmation.
Apparaît pour les jours fériés programmés. (Voir à la page FR-16)
S’affi che lorsqu’une erreur est commise pendant le réglage du
temporisateur.
Affi che les programmations confi gurées dans le temporisateur. Indique
également la source/destination pour la copie des groupes de
programmations.
E
F : Numéro de groupe Jusqu’à 8 groupes peuvent être sélectionnés et affi chés.
G : Indicateur (de fonction
désactivée)
H : Indicateur TIMER OFF
(Temporisateur désactivé)
I : Indicateur du mode de copie S’affi che lors de la copie de programmations vers un groupe ou un jour du
J : Heure actuelle Affi che l’heure actuelle sur une horloge au format 24 heures. Affi che
S’affi che si la fonction sélectionnée est désactivée pendant l’installation.
S’affi che lorsque le temporisateur est désactivé.
calendrier.
également les paramètres pour les différents modes de réglage.
Utilisation du temporisateur
Pour utiliser le temporisateur, procéder comme suit :
ÉTAPE 1 Allumer le climatiseur.
Mettre le climatiseur connecté au temporisateur sous tension. Le temporisateur exécute les •
communications initiales avec les unités intérieures, au cours desquelles clignote à
l’écran.
FR
REMARQUE
Ne pas couper l’alimentation secteur pendant les saisons de chauffage et de refroidissement.
(L’électricité dans la résistance de chauffage du carter est ainsi maintenue et permet de protéger le
compresseur au démarrage.) Si le climatiseur est resté hors tension pendant une longue période,
le mettre sous tension 5 heures avant de l’utiliser.
ÉTAPE 2 Effectuer le réglage initial du temporisateur.
Confi gurer l’heure et le jour de la semaine en cours. (Voir à la page FR-6)•
ÉTAPE 3 Confi gurer des programmations dans le temporisateur.
Confi gurer les paramètres pour les opérations programmées. (Voir à la page FR-8)•
FR-5

Réglage de l’heure actuelle
Permet de régler l’heure actuelle. (Exemple : Si l’heure actuelle est 12:45)
ÉTAPE 1 Maintenir le bouton SET enfoncé et appuyer sur le
bouton HH pour régler l’heure.
L’heure est incrémentée d’une heure chaque fois que le •
bouton HH est activé lorsque le bouton SET est
maintenu enfoncé.
L’heure défi le rapidement lorsque les boutons SET et •
HH sont tous les deux maintenus enfoncés. (Exemple :
Pour régler l’heure sur 12:00, relâcher le bouton HH
quand « 12 » est affi ché.)
Lorsque le bouton SET est relâché, l’heure est réglée •
et l’indicateur clignotant est allumé en permanence.
ÉTAPE 2 Maintenir le bouton SET enfoncé et appuyer sur le
bouton MM pour régler les minutes.
Les minutes sont incrémentées d’une minute chaque •
fois que le bouton MM est activé lorsque le bouton SET
est maintenu enfoncé.
Les minutes défi lent rapidement lorsque les boutons •
SET et MM sont tous les deux maintenus enfoncés.
(Exemple : Pour régler les minutes sur 00:45, relâcher
le bouton MM quand « 45 » est affi ché.)
Lorsque le bouton SET est relâché, les minutes sont •
réglées et l’indicateur clignotant est allumé en
permanence.
REMARQUE
L’heure n’est pas modifi ée si seul le bouton HH ou le bouton MM est activé.•
FR-6

Réglage du jour de la semaine
Permet de régler le jour de la semaine en cours. (Exemple : Si le jour d’aujourd’hui est mercredi)
ÉTAPE 1 Maintenir le bouton SET (Régler) enfoncé et appuyer
sur le bouton DAY (Jour) pour régler le jour de la
semaine.
• clignote et est incrémenté d’un jour à la fois chaque
fois que le bouton DAY est activé lorsque le bouton
SET est maintenu enfoncé.
Lorsque le bouton SET est relâché, le jour de la •
semaine est réglé et l’indicateur clignotant est
allumé en permanence.
REMARQUE
Le jour de la semaine n’est pas modifi é si seul le bouton DAY est activé.•
FR-7
FR

Confi gurer des opérations programmées
Régler correctement l’heure et le jour de la semaine en cours.
Les programmations ne seront pas exécutées comme prévu si l’heure et
la date ne sont pas correctement réglées.
Jusqu’à 6 opérations programmées peuvent être confi gurées par jour pour •
chaque groupe et jour de la semaine.
Une combinaison des opérations ci-dessous peut être confi gurée pour •
chaque programmation du temporisateur.
Démarrage/arrêt du climatiseur –
Activation/désactivation de la télécommande *1 –
Pour modifi er les paramètres d’une programmation existante, utiliser la •
procédure ci-dessous, identique à la procédure utilisée pour confi gurer des
nouvelles programmations.
*1 Le paramètre d’activation/désactivation de la télécommande est désactivé en fonction des conditions
d’installation. Si tel est le cas, apparaît sur l’écran lorsque le bouton est activé.
Contacter le revendeur pour obtenir davantage d’informations.
ÉTAPE 1 Appuyer sur le bouton PROGRAM (Programmer)
pour sélectionner un groupe.
Lorsque le bouton PROGRAM est activé, le numéro •
de groupe et le jour de la semaine en cours
commencent à clignoter, et l’heure actuelle clignote et
affi che « PG-1 ».
Appuyer sur le bouton GROUP (Groupe) pour •
sélectionner un groupe pour l’opération programmée,
et appuyer ensuite sur le bouton SET (Régler).
Exemple de paramètres
REMARQUE
La sélection de groupes est désactivée en fonction •
des conditions d’installation. Si tel est le cas, passer à
l’étape suivante.
Le nombre de groupes pouvant être sélectionnés est •
confi guré lors de l’installation.
ÉTAPE 2 Appuyer sur le bouton DAY et sélectionner le jour de
la semaine de l’opération programmée.
Lorsque le bouton SET est activé, l’indicateur •
clignotant
calendrier s’allume en permanence et, au même
moment, l’heure réglée dans se met à clignoter.
De plus, l’indicateur de l’heure actuelle se met à
clignoter et affi che « PG-2 ».
REMARQUE
Le jour de la semaine sélectionné clignote lentement •
à cet instant.
()
de la programmation dans le
FR-8

ÉTAPE 3 Confi gurer la programmation et appuyer sur le
bouton SET.
Sélectionner le mode de fonctionnement du •
temporisateur à l’aide du bouton (Marche/
Arrêt du temporisateur) et du bouton
(Activation/Désactivation de la télécommande).
Régler ensuite l’heure de déclenchement à l’aide des
boutons HH et MM, puis appuyer sur le bouton SET.
Lorsque le bouton SET est activé, l’heure défi nie •
clignotante dans la programmation
permanence et, au même moment, l’heure réglée
dans se met à clignoter.
REMARQUE
Chaque fois que le bouton • est activé,
l’indicateur du temporisateur change dans l’ordre
(Marche) → (Arrêt) → aucune indication.
Chaque fois que le bouton • est activé,
l’indicateur de la télécommande change dans l’ordre
(Activée) → (Désactivée) → aucune indication.
Le paramètre d’activation/désactivation de la •
télécommande est désactivé en fonction des
conditions d’installation. Dans ce cas, seuls les
modes marche/arrêt du temporisateur peuvent être
défi nis.
s’allume en
ÉTAPE 4 Confi gurer les programmations ~ de la même
manière.
Lorsque le bouton SET est activé, les paramètres sont •
organisés automatiquement en commençant par
l’heure au plus tôt.
Si le bouton SET est activé sans qu’aucun nouveau •
paramètre de programmation ne soit confi guré, se
met à nouveau à clignoter et les paramètres peuvent
être modifi és.
De même, si le bouton SET est activé après avoir •
confi gurer , se met à nouveau à clignoter.
ÉTAPE 5 Appuyer sur le bouton de programmation
(PROGRAM).
Les paramètres de programmation sont entrés et •
l’affi chage normal est restauré.
FR
ÉTAPE 6 Confi gurer des opérations programmées pour d’autres groupes et jours de la même manière.
Les programmations déjà confi gurées peuvent être copiées vers d’autres groupes et jours de la
semaine. (Voir à la page FR-12)
REMARQUE
L’heure « 0:00 » est interprétée comme étant minuit.•
Pour annuler les paramètres d’une programmation pendant la confi guration de celle-ci •
(lorsque « PG-1 » ou « PG-2 » clignote à l’écran), maintenir le bouton CANCEL (Annuler)
enfoncé pendant 2 secondes au moins. L’affi chage normal est restauré.
Si les paramètres sont annulés sans activer le bouton PROGRAM (Programmer), les paramètres •
ne sont pas entrés.
FR-9

Erreurs de réglage
Si l’heure est réglée comme affi ché ci-dessous lors de la confi guration d’une programmation, « ERROR » apparaît
(l’indicateur
clignote). Le réglage de l’heure doit alors être corrigé.
Si des heures de programmation sont identiques
ÉTAPE 1 Chaque fois que le bouton SET est activé, le mode de réglage passe en revue les opérations
programmées ayant une heure identique ( et dans l’exemple ci-dessus), et un réglage
approprié peut alors être sélectionné.
ÉTAPE 2 Modifi er le réglage des heures à l’aide des boutons HH et MM, de telle manière que les heures soient
différentes.
ÉTAPE 3 Appuyer sur le bouton SET et s’assurer que « ERROR » n’est plus affi ché.
ÉTAPE 4 Appuyer sur le bouton PROGRAM (Programmer) pour quitter le mode de réglage.
Exemple de réglages des heures ne causant pas d’erreur
Les réglages ci-dessous ne génèrent aucune erreur.
1) Lorsque les heures de démarrage et d’arrêt sont
échelonnées
2) Lorsque l’heure d’arrêt est antérieure à l’heure
de démarrage
FR-10

Vérifi cation des heures de programmation
Les heures de programmation de chaque groupe et jour de la semaine peuvent être vérifi ées.
ÉTAPE 1 Appuyer sur le bouton GROUP (Groupe) et
sélectionner le groupe dont l’heure doit être
vérifi ée.
REMARQUE
La sélection de groupes est désactivée en fonction •
des conditions d’installation. Si tel est le cas, passer
à l’étape suivante.
ÉTAPE 2 Appuyer sur le bouton DAY (Jour).
Lorsque le bouton DAY est activé pour la première •
fois, le jour de la semaine suivant (le lendemain) se
met à clignoter et les paramètres de programmation
pour ce jour s’affi chent.
Chaque fois que le bouton DAY est activé, les •
paramètres de programmation changent dans
l’ordre des jours de la semaine.
L’activation du bouton GROUP permet d’affi cher les •
paramètres de programmation pour un autre groupe
du même jour.
ÉTAPE 3 Terminer la vérifi cation.
Appuyer sur le bouton CLEAR (Effacer). L’affi chage •
normal est restauré.
REMARQUE
L’affi chage normal est également restauré lorsque le •
bouton CANCEL (Annuler) est maintenu enfoncé
pendant 2 secondes au moins.
FR
FR-11

Copie des heures de programmation
Les programmations confi gurées pour un jour peuvent être copiées vers un autre jour (Copie des programmations
d’un jour), et une semaine entière programmée pour un groupe peut être copiée vers un autre groupe (Copie des
programmations d’un groupe).
Exemple de copie des programmations d’un jour
(Copier les programmations de lundi vers mardi)
Copie des programmations d’un jour
ÉTAPE 1 Appuyer sur le bouton PROG. COPY DAY.
Le numéro de groupe et • de la date du jour se
mettent à clignoter, de même que « CP-1 » dans la
zone d’affi chage de l’heure actuelle. Sélectionner
maintenant un groupe dans lequel les
programmations d’un jour doivent être copiées en
utilisant le bouton GROUP.
Exemple de copie des programmations d’un
groupe
(Copier les programmations du groupe 1 vers le
groupe 2)
ÉTAPE 2 Sélectionner les programmations du jour source à
copier.
Chaque fois que le bouton DAY (Jour) est activé, •
se déplace au travers de l’affi chage des jours
de la semaine, et le jour de la semaine désiré peut
être sélectionné comme source pour la copie.
Une fois le jour source choisi, appuyer sur le bouton •
SET pour le sélectionner. L’affi chage change pour
permettre de sélectionner le jour de destination de
la copie.
ÉTAPE 3 Sélectionner le groupe de destination de la copie.
Lorsque le temporisateur est prêt pour la sélection •
d’un jour de destination pour la copie, « CP-2 » se
met à clignoter dans la zone d’affi chage de l’heure
actuelle, et le jour de copie source clignote dans
l’affi chage de la semaine. Sélectionner alors un jour
de la semaine comme destination de la copie en
utilisant le bouton DAY.
FR-12

ÉTAPE 4 Appuyer sur le bouton SET pour lancer la copie.
Appuyer sur le bouton SET pour affi cher l’indicateur •
()
de la programmation dans le calendrier
ÉTAPE 5 Sélectionner d’autres jours de destination pour la
copie, le cas échéant.
La programmation source sélectionnée peut être •
copiée vers d’autres jours en appuyant plusieurs
fois sur le bouton DAY pour choisir un jour de la
semaine, suivi du bouton SET pour sélectionner ce
jour.
REMARQUE
Appuyer sur le bouton CLEAR (Effacer) efface •
l’indicateur de la programmation dans le calendrier
()
et annule l’opération de copie.
.
ÉTAPE 6 Appuyer sur le bouton PROG. COPY DAY (Copier le
jour) pour entrer la programmation copiée dans les
jours sélectionnés.
L’affi chage normal est restauré.•
REMARQUE
Si la programmation existe déjà pour le jour de destination de la copie, la programmation copiée •
remplace la programmation existante.
Si une programmation est remplacée par accident en mode de copie des programmations d’un jour, •
maintenir la touche CANCEL (Annuler) pendant 2 secondes au moins pour restaurer les paramètres de
programmation tels qu’ils étaient avant d’appuyer sur le bouton PROG. COPY DAY lors de l’ÉTAPE 1.
(Toutes les opérations de modifi cation et de copie réalisées jusqu’à cet instant sont annulées.)
FR
FR-13

Copie des programmations d’un groupe
ÉTAPE 1 Appuyer sur le bouton PROG. COPY GROUP
(Copier le groupe).
« CP-1 » commence à clignoter dans la zone •
d’affi chage de l’heure actuelle, et « CP » (copier) se
met à clignoter dans la zone de programmation
pour indiquer la source de la copie.
ÉTAPE 2 Sélectionner les programmations du groupe
source à copier.
Sélectionner un groupe source pour la copie en •
utilisant le bouton GROUP.
Une fois le groupe source choisi, appuyer sur le •
bouton SET pour le sélectionner. L’affi chage change
pour permettre de sélectionner le groupe de
destination de la copie.
ÉTAPE 3 Sélectionner le groupe de destination de la copie.
Après avoir appuyé sur le bouton SET, « CP-2 » •
commence à clignoter dans la zone d’affi chage de
l’heure actuelle, le numéro du groupe source à
copier apparaît dans la zone de programmation ,
et « PA » (coller) se met à clignoter dans la zone de
programmation pour indiquer la destination de
la copie.
Sélectionner le groupe de destination de la copie en •
utilisant le bouton GROUP.
ÉTAPE 4 Entrer le groupe de destination sélectionné pour la
copie.
Lorsque le bouton SET est activé, le numéro du •
groupe de destination de la copie apparaît dans la
zone du numéro de la programmation.
REMARQUE
Si un groupe dont le numéro est compris entre 1 et •
4 est sélectionné comme groupe de destination de
la copie, le numéro de ce groupe apparaît dans la
zone de programmation . Si un groupe dont le
numéro est compris entre 5 et 8 est sélectionné, le
numéro de ce groupe apparaît dans la zone de
programmation .
FR-14

ÉTAPE 5 Sélectionner d’autres groupes de destination pour
la copie, le cas échéant.
La programmation source sélectionnée peut être •
copiée vers d’autres groupes en appuyant plusieurs
fois sur le bouton GROUP pour choisir un groupe,
suivi du bouton SET pour le sélectionner.
REMARQUE
Si un groupe dont le numéro est compris entre 1 et •
4 est sélectionné comme groupe de destination de
la copie, le numéro de ce groupe apparaît dans la
zone de programmation . Si un groupe dont le
numéro est compris entre 5 et 8 est sélectionné, le
numéro de ce groupe apparaît dans la zone de
programmation .
ÉTAPE 6 Appuyer sur le bouton PROG. COPY GROUP
(Copier le groupe) pour entrer les programmations
copiées dans les groupes sélectionnés.
L’affi chage normal est restauré.•
REMARQUE
Si la programmation existe déjà pour le groupe de destination de la copie, la programmation copiée à •
nouveau remplace la programmation existante.
Si une programmation est remplacée par accident en mode de copie des programmations d’un groupe, •
maintenir la touche CANCEL (Annuler) pendant 2 secondes au moins pour restaurer les paramètres de
programmation tels qu’ils étaient avant d’appuyer sur le bouton PROG. COPY GROUP lors de l’ÉTAPE 1.
(Toutes les opérations de modifi cation et de copie réalisées jusqu’à cet instant sont annulées.)
FR
FR-15

Régler les jours fériés pour une semaine d’opération programmée
Les opérations programmées pour un jour spécifi que de la semaine peuvent être provisoirement désactivées en
défi nissant ce jour comme étant un jour férié.
Lorsque le jour férié défi ni est passé, le paramètre du jour férié est annulé et les opérations programmées •
reprennent leur cours normal la semaine suivante.
Les jours fériés peuvent être sélectionnés pour la semaine commençant à la date du jour. Si la date du jour est •
sélectionnée comme jour férié, le paramètre de jour férié est annulé pour l’opération programmée suivante. (Une
programmation en cours d’exécution peut ne pas s’arrêter ; cela dépend de la programmation même.)
Exemple de réglage
Le jour d’aujourd’hui est jeudi
et vendredi est réglé comme
étant un jour férié.
ÉTAPE 1 Appuyer sur le bouton GROUP pour sélectionner
un groupe à défi nir comme jour férié.
REMARQUE
En fonction des conditions d’installation, la sélection •
des groupes peut être désactivée ou activée de telle
manière que les groupes sont sélectionnés
automatiquement pour la fonction de jour férié. Si
tel est le cas, passer à l’étape suivante.
ÉTAPE 2 Appuyer sur le bouton HOLIDAY (Jour férié).
« HL » commence à clignoter dans la zone •
d’affi chage de l’heure actuelle, de même que le jour
de la semaine en cours.
La programmation
configurée pour vendredi ne
sera pas exécutée.
Le paramètre de jour férié du
vendredi s’annule le samedi.
ÉTAPE 3 Sélectionner le jour férié en utilisant le bouton DAY,
et appuyer sur le bouton SET.
Un « • » apparaît sur le jour férié sélectionné.
Pour sélectionner d’autres jours fériés, choisir un •
jour à l’aide du bouton DAY, et le sélectionner avec
le bouton SET.
En cas d’erreur ou si le jour férié doit être annulé, •
appuyer sur le bouton CLEAR (Effacer).
FR-16

ÉTAPE 4 Pour entrer le jour férié, appuyer sur le bouton
HOLIDAY.
L’affi chage normal est restauré.•
Désactivation du temporisateur
Pour stopper une opération programmée pour une ou plusieurs semaines, toutes les programmations du
temporisateur peuvent être désactivées.
Une fois le temporisateur désactivé, les opérations programmées ne sont exécutées que lorsque la procédure ci-•
dessous réalisée.
REMARQUE
Pendant l’installation, la télécommande peut être confi gurée pour désactiver le temporisateur pour des groupes •
individuels. Si tel est le cas, le temporisateur n’est désactivé que pour le groupe sélectionné, et le groupe
sélectionné peut alors être confi rmé en appuyant sur le bouton GROUP.
Maintenir le bouton TIMER OFF (Temporisateur
désactivé) pendant 2 secondes au moins.
• apparaît à l’écran. Le temporisateur
est désactivé à partir de la programmation
suivante.
Pour activer à nouveau le temporisateur,
maintenir le bouton TIMER OFF pendant 2
secondes au moins.
FR
• disparaît et le temporisateur est
activé à partir de la programmation suivante.
FR-17

Effacer des programmations
Appuyer sur le bouton de programmation (PROGRAM).
Pour annuler des jours spécifi ques Pour annuler des programmations
Lorsque le bouton PROGRAM est activé, le numéro de groupe et •
le jour de la semaine en cours commencent à clignoter, et
l’heure actuelle change et « PG-1 » clignote.
Appuyer sur le bouton GROUP pour sélectionner un groupe à •
effacer.
REMARQUE
La sélection de groupes peut être désactivée pendant •
l’installation. Si tel est le cas, passer à l’étape suivante.
Maintenir le bouton CANCEL (Annuler) enfoncé pendant 2 •
secondes au moins permet de rétablir l’état de la programmation
tel qu’il était avant d’appuyer sur le bouton PROGRAM. (Toutes
les opérations réalisées à ce point sont annulées.)
individuelles pour des jours spécifi ques
Sélectionner le jour à annuler à l’aide du •
bouton DAY (Jour), et appuyer sur le bouton
CLEAR (Effacer). Tous les paramètres des
opérations programmées à sont
effacés. L’écran apparaît tel qu’illustré cidessus.
Pour entrer dans l’opération d’effacement, •
appuyer sur le bouton PROGRAM. L’affi chage
normal est restauré, sans l’indicateur de
programmation
semaine.
()
situé sous les jours de la
Sélectionner un jour et appuyer sur le bouton •
SET. Les opérations programmées à se
mettent à clignoter tout à tour, et le bouton
CLEAR (Effacer) peut être activé dès que
l’opération programée à effacer clignote. (Les
opérations programmées restantes sont
organisées automatiquement, en commençant
par l’heure au plus tôt.)
Pour entrer dans l’opération d’effacement, •
appuyer sur le bouton PROGRAM. L’affi chage
normal est restauré.
Exemple :
Écran tel qu’il apparaît après
avoir effacé l’opération
programmée ci-dessus.
FR-18

Informations importantes à retenir
1. Fonctionnement du temporisateur et du climatiseur
Les climatiseurs fonctionnent sur base des opérations programmées à partir du temporisateur (démarrage/arrêt et
activation/désactivation de la télécommande), ou sur base d’une télécommande ou d’un contrôleur système
connectée.
Paramètres du temporisateur (Exemple)
Fonctionnement sans contrôleur système
Si la télécommande est activée, le climatiseur peut être démarré ou arrêté à partir de celle-ci. (Le climatiseur •
répond au bouton ayant été activé en dernier.)
8:00 12:00 17:00 20:0013:00 18:00
Arrêté ArrêtéArrêté
Fonctionnement du
climatiseur
Fonctionnement de la
télécommande
*1
*1 L’activation ou la désactivation du fonctionnement de la télécommande dépend du
réglage du jour précédent.
*2 Le fonctionnement de la télécommande étant désactivé, les opérations sont également
désactivées.
*3 La télécommande reste désactivée le jour suivant et les jours d’après, jusqu’à ce que le
paramètre de fonctionnement de la télécommande soit activé.
Opérationnel Opérationnel
Activée ActivéeDésactivée
Fonctionnement avec un contrôleur système
Si la télécommande est activée, le climatiseur peut être démarré ou arrêté à partir de celle-ci. (Le climatiseur •
répond au bouton ayant été activé en dernier.)
Le paramètre d’activation/désactivation du fonctionnement de la télécommande défi ni dans le contrôleur système •
(Commandes centralisées 1 à 4) est annulé en fonction des opérations programmées.
Fonctionnement à partir du contrôleur système
[Arrêter + Désactiver l’opération de la télécommande]
[Arrêter + Activer l’opération de la télécommande]
Désactivée
*3
*2
FR
Fonctionnement du
climatiseur
Fonctionnement de la
télécommande
00:0200:7100:2100:8 13:00 18:00
Arrêté ArrêtéArrêtéOpéra-
tionnel
Désactivée
Opérationnel
Désactivée Désactivée
ActivéeActivée
Activée
*1
*1 L’activation ou la désactivation du fonctionnement de la télécommande dépend du
réglage du jour précédent.
FR-19

2. Coupure de courant
Si le courant est coupé alors que le climatiseur est en marche, ce dernier reste à l’arrêt lorsque le courant est rétabli.
De plus, si le fonctionnement de la télécommande était désactivé au moment de la coupure de courant, celui-ci est
activé pendant quelques minutes lorsque le courant est rétabli.
Les opérations programmées prévues pour des heures postérieures à la coupure de courant seront exécutées •
normalement.
Les paramètres de programmation sont conservés dans la mémoire non volatile du temporisateur ; ils ne sont •
donc pas effacés lorsqu’une coupure de courant survient. De plus, l’heure actuelle et le jour de la semaine en
cours sont également conservés pour un maximum de 100 heures par la batterie interne.
Paramètres du temporisateur (Exemple)
Fonctionnement lorsque l’alimentation n’est pas coupée
8:00 12:00 17:00 20:0013:00 18:00
Arrêté ArrêtéArrêté
Arrêté
Fonctionnement du
Opérationnel Opérationnel
climatiseur
Fonctionnement de la
télécommande
*1
Activée
Désactivée
*1 L’activation ou la désactivation du fonctionnement de la télécommande dépend du
réglage du jour précédent.
Fonctionnement lorsque l’alimentation est coupée à 15:00 et restaurée ensuite
Alimentation coupée à cet instant.
15:00
00:7100:2100:8
Fonctionnement du
climatiseur
Fonctionnement de la
télécommande
Arrêté
*1
Opérationnel Opération-
Activée ActivéeDésactivée
Arrêté
Arrêté
nel
Désactivée
Coupure de courant
*2
Opérationnel
Activée
20:0013:00 18:00
Opérationnel
Désactivée
Arrêté
Désactivée
FR-20
*1 L’activation ou la désactivation du fonctionnement de la télécommande dépend du
réglage du jour précédent.
*2 Le fonctionnement de la télécommande est activé pour quelques minutes
lorsque le courant est rétabli.

Dépannage
Effectuer les vérifi cations suivantes avant de contacter le service d’assistance technique.
Panne Cause/Remède
clignote à l’écran. Le temporisateur exécute les communications
initiales avec les unités intérieures connectées.
Attendre la fi n des communications.
Les climatiseurs ne fonctionnent pas comme
prévu à l’instant programmé.
Les climatiseurs peuvent être démarrés/arrêtés à
partir du contrôleur système, bien que la
programmation ait désactivé le fonctionnement de
la télécommande.
clignote dans la zone d’affi chage de
l’heure actuelle.
À vérifier avant de contacter le service d’assistance technique
Le temporisateur est désactivé. (Voir à la page FR-17)
Un jour férié a été programmé. (Voir à la page FR-16)
L’alimentation du climatiseur a été coupée puis
restaurée. (Voir à la page FR-20)
L’alimentation du climatiseur a été coupée pendant
une longue période. Reconfi gurer l’heure et le jour de
la semaine en cours. (Voir les pages FR-6 et FR-7)
Si le problème persiste après avoir appliqué les actions suggérées, arrêter le temporisateur, éteindre l’unité et
contacter le revendeur en lui indiquant le numéro de série de l’unité et le problème associé. En raison du danger que
cela représente, ne jamais tenter d’entretenir l’unité soi-même.
FR
FR-21

Inhalt
Seite
Produkt-Information ....................................................................................... DE-2
Wichtige Symbole ..........................................................................................DE-2
Aufstellungsort ............................................................................................... DE-3
Elektrische Erfordernisse...............................................................................DE-3
Sicherheitsvorschriften ..................................................................................DE-3
Bezeichnungen und Funktionen der Teile ......................................................DE-4
Verwendung des Zeitplangebers ...................................................................DE-5
Einstellen der aktuellen Uhrzeit .............................................................DE-6
Einstellen des heutigen Wochentags ....................................................DE-7
Erstellen von programmierten Betriebsvorgängen ................................DE-8
Einstellungsfehler ................................................................................DE-10
Überprüfen der Programmzeiten .........................................................DE-11
Kopieren von Programmzeiten ............................................................DE-12
Einstellen eines Feiertags in einer geplanten Betriebswoche .............DE-16
Deaktivierung des Zeitplangeber-Betriebs ..........................................DE-17
Löschen von Programmen ..................................................................DE-18
Wichtige Informationen, die Sie sich merken sollten ...................................DE-19
Störungssuche ............................................................................................DE-21
Produkt-Information
Falls Probleme oder Fragen zu Ihrem Klimagerät auftreten sollten, werden die
folgenden Angaben benötigt. Die Modell- und die Seriennummer befi nden sich
auf dem Typenschild an der Unterseite des Gehäuses.
Modellnummer Seriennummer
Kaufdatum
Anschrift des Fachhändlers
Telefonnummer
Wichtige Symbole
In dieser Bedienungsanleitung werden die folgenden Symbole verwendet,
um Benutzer und Kundendienstpersonal auf die Gefahr von Verletzungen
bzw. Sachschäden und eine mögliche Beschädigung des Gerätes
hinzuweisen:
Dieses Symbol warnt vor einer Gefahr oder
vor unsachgemäßem Betrieb, wodurch
Verletzungen mit möglicherweise tödlichem
Ausgang entstehen können.
DE-2
Dieses Symbol warnt vor einer Gefahr oder
vor unsachgemäßem Betrieb, die zu
Verletzungen, einer Beschädigung des
Gerätes und anderen Sachschäden führen
können.

Aufstellungsort
Wir empfehlen, diesen Zeitplangeber von einem qualifi zierten •
Montagetechniker gemäß der dem Zeitplangeber beigefügten
Montageanleitung richtig installieren zu lassen.
Diesen Zeitplangeber nicht an einem Ort installieren, an dem •
Dämpfe oder entfl ammbare Gase auftreten, oder an einem extrem
feuchten Ort, z. B. in einem Gewächshaus.
Diesen Zeitplangeber nicht an einem Ort installieren, an dem sich •
starke Wärme erzeugende Geräte befi nden.
Elektrische Erfordernisse
Die gesamte Verdrahtung muss in Übereinstimmung mit dem örtlichen 1.
Elektrizitätsgesetz erfolgen. Einzelheiten erfahren Sie von Ihrem
Fachhändler oder einem qualifi zierten Elektriker.
Die Verdrahtung muss von einem qualifi zierten Elektriker vorgenommen 2.
werden.
Um das Gerät warmlaufen zu lassen, muss die
Stromversorgung mindestens fünf (5) Stunden
vor dem Betrieb eingeschaltet werden. Lassen
Sie die Stromversorgung eingeschaltet, es sei
denn, dass Sie das Gerät für lange Zeit nicht zu
verwenden beabsichtigen.
Sicherheitsvorschriften
Vor Inbetriebnahme des Zeitplangebers sollten Sie diese •
Bedienungsanleitung aufmerksam durchlesen. Falls Sie danach immer
noch irgendwelche Schwierigkeiten oder Fragen haben sollten,
wenden Sie sich bitte an Ihren Fachhändler.
Das Klimagerät ist so konstruiert, dass es für ein angenehmes •
Raumklima sorgt. Verwenden Sie dieses Gerät nur für seinen
beabsichtigten Zweck, gemäß der Beschreibung in dieser
Bedienungsanleitung.
Fassen Sie das Gerät nie mit nassen Händen an.•
Auf keinen Fall Benzin oder andere entfl ammbare Gase oder •
Flüssigkeiten in der Nähe des Klimageräts verwenden oder lagern
— Explosionsgefahr!
Das Klimagerät besitzt keinen Ventilator zum Ansaugen von •
Frischluft. Werden Gas- und Ölheizgeräte, die viel Sauerstoff
verbrauchen, im gleichen Raum betrieben, so müssen Fenster und
Türen häufi g geöffnet werden, um die Luft im Raum zu erneuern.
Anderenfalls besteht in extremen Fällen Erstickungsgefahr!
Schalten Sie das Klimagerät nicht mit Hilfe des Netztrennschalters •
ein und aus. Verwenden Sie dazu grundsätzlich die Betriebstaste
(ON/OFF).
Stecken Sie keine Gegenstände in den Luftauslass der •
Außeneinheit. Dies ist gefährlich, weil das Gebläse mit hoher
Drehzahl rotiert.
Lassen Sie nicht zu, dass Kinder mit dem Klimagerät spielen.•
Achten Sie stets darauf, den Raum nicht zu stark zu kühlen oder •
heizen, wenn Kleinkinder oder Kranke anwesend sind.
DE
DE-3

Bezeichnungen und Funktionen der Teile
Betriebstasten
A: Taste PROGRAM
B: Tasten PROG. COPY
C: Taste CLEAR
D: Einstellungstasten
A: Taste PROGRAM Verwenden Sie diese Taste, um Einstellungsprogramme zu starten und
Programmeinstellungen einzugeben.
B: Tasten PROG. COPY Verwenden Sie diese Taste, um Programme zu Gruppen oder bestimmte Tage
in einem Zeitplan zu kopieren. (Siehe Seite DE-12)
C: Taste CLEAR Drücken Sie diese Taste, um die Einstellungen des gegenwärtig angezeigten
Programms zu löschen.
Das gegenwärtig angezeigte Programm wird nicht gelöscht, falls Sie nicht •
die Taste drücken, nachdem Sie die Taste CLEAR gedrückt haben.
D: Einstellungstasten Verwenden Sie diese Tasten, um Programmeinstellungen durchzuführen und
die aktuelle Uhrzeit einzustellen.
Drücken Sie diese Taste, um Gruppen für den Programmbetrieb einzustellen.
Drücken Sie diese Taste, um den heutigen Wochentag und die Tage des
Programmbetriebs einzustellen.
Drücken Sie diese Tasten, um die aktuelle Uhrzeit und die im Programmbetrieb
zu verwendenden Zeiten einzustellen.
Verwenden Sie diese Tasten, um den Betrieb der Innengeräte mit dem
Zeitplangeber zu starten/stoppen.
Verwenden Sie diese Taste, um den Fernbedienungsbetrieb über den
Zeitplangeber zu aktivieren/deaktivieren.
Verwenden Sie diese Taste, um die Zeit zum Auslösen des
Programmbetriebs einzustellen.
Die Programmeinstellungen werden nicht eingegeben, falls Sie nach •
Abschluss des Einstellungsbetriebs nicht die Taste drücken.
E: Taste HOLIDAY Drücken Sie diese Taste, um die Feiertage beim Einstellen des
Betriebswochenzeitplans einzustellen bzw. zu löschen.
F: Taste CANCEL Drücken Sie diese Taste, um den gegenwärtigen
Programmeinstellungsbetrieb, Kopierbetrieb oder Feiertageinstellungsbetrieb
aufzuheben. Wenn Sie die Taste CANCEL 2 Sekunden lang gedrückt halten,
wird der gegenwärtige Einstellungs- oder Kopierbetrieb aufgehoben, und das
Anzeigenfeld kehrt auf die normale Anzeige zurück.
G: Taste TIMER OFF Drücken Sie diese Taste, um den Zeitplangeber auszuschalten, wenn der
Zeitplangeber über längere Zeit nicht verwendet werden soll. Wenn Sie diese
Taste 2 Sekunden lang gedrückt halten, erscheint die Anzeige auf
dem Anzeigenfeld. Programme können nicht durchgeführt werden, bis Sie die
Taste erneut 2 Sekunden lang gedrückt halten.
Einige der obigen Funktionen werden bei der Installation des Gerätes •
deaktiviert. Falls Sie die Taste einer deaktivierten Funktion drücken,
erscheint die Anzeige auf dem Anzeigenfeld.
Weitere Hinweise erhalten Sie bei Ihrem Fachhändler.
E: Taste HOLIDAY
F: Taste CANCEL
G: Taste TIMER OFF
DE-4

Anzeigenfeld
AB C D
F
G
H
IJ
A: Heutiger Wochentag
B: Programmplan-Anzeige
()
C: Feiertagsplan-Anzeige
()
D: Anzeige ERROR Wird angezeigt, falls bei der Durchführung der Zeitplangebereinstellung ein
E: Zeitplangeber-Programm Zeigt die eingestellten Zeitplangeber-Programme an. Zeigt auch
F: Gruppennummer Bis zu 8 Gruppen können gewählt und angezeigt werden.
()
Zeigt den heutigen Wochentag an.
Wird unter den Tagen angezeigt, die für den Programmbetrieb gewählt
wurden.
Umgibt die geplanten Feiertage. (Siehe Seite DE-16)
Fehler aufgetreten ist.
Kopierausgangs/-zieltag beim Gruppenprogrammkopieren an.
E
G: Anzeige (Deaktivierte
Funktion)
H: Anzeige TIMER OFF Wird angezeigt, wenn der Zeitplangeber ausgeschaltet wurde.
I: Kopiermodus-Anzeige Wird angezeigt, wenn ein Programm in eine Gruppe oder ein Tag des
J: Aktuelle Uhrzeit Zeigt die aktuelle Uhrzeit auf einer 24-Stunden-Uhr an. Zeigt auch die
Wird angezeigt, wenn die gewählte Funktion während der Installation
deaktiviert wurde.
Zeitplans kopiert wird.
Einstellungen in den verschiedenen Einstellungsmodi an.
Verwendung des Zeitplangebers
Um den Zeitplangeber zu verwenden, sind die folgenden Schritte durchzuführen.
SCHRITT 1 Schalten Sie das Klimagerät ein.
Schalten Sie das Klimagerät, das an den Zeitplangeber angeschlossen ist, ein. Der •
Zeitplangeber führt die anfänglichen Kommunikationsvorgänge mit den Inneneinheiten durch;
während dieser Zeit blinkt die Anzeige auf dem Anzeigenfeld.
ZUR BEACHTUNG
Schalten Sie die Stromversorgung in den Jahreszeiten für Heizen und Kühlen nicht aus. (Dadurch
bleibt die Stromversorgung der Kurbelgehäuseheizung eingeschaltet, sodass der Kompressor beim
Einschalten geschützt wird.) Falls das Klimagerät über einen langen Zeitraum ausgeschaltet war,
schalten Sie die Stromversorgung 5 Stunden vor Betriebsbeginn ein.
DE
SCHRITT 2 Führen Sie die anfänglichen Einstellungen des Zeitplangebers ein.
Stellen Sie die aktuelle Uhrzeit und den heutigen Wochentag ein. (Siehe Seite DE-6)•
SCHRITT 3 Erstellen Sie Programme für den Zeitplangeber.
Führen Sie die Einstellungen für den programmierten Betriebsvorgang durch. (Siehe Seite DE-8)•
DE-5

Einstellen der aktuellen Uhrzeit
Stellen Sie die aktuelle Uhrzeit ein. (Beispiel: Wenn die aktuelle Uhrzeit 12:45 Uhr ist)
SCHRITT 1 Halten Sie die Taste SET gedrückt und drücken Sie die
Taste HH, um die Stunde einzustellen.
Die Minuteneinstellung nimmt mit jedem Drücken der •
Taste HH, bei gleichzeitigem Gedrückthalten der Taste
SET, um eine Stunde zu.
Die Minuteneinstellung ändert sich schneller, wenn •
sowohl die Taste SET als auch die Taste HH gedrückt
gehalten werden. (Beispiel: Um 12:00 einzustellen,
geben Sie die Taste HH frei, wenn „12“ angezeigt wird.)
Wenn Sie die Taste SET freigeben, wird die Stunde •
eingestellt, und die Anzeige hört zu blinken auf und
leuchtet.
SCHRITT 2 Halten Sie die Taste SET gedrückt und drücken Sie die
Taste MM, um die Minuten einzustellen.
Die Minuteneinstellung nimmt mit jedem Drücken der •
Taste MM, bei gleichzeitigem Gedrückthalten der Taste
SET, um eine Minute zu.
Die Minuteneinstellung ändert sich schneller, wenn •
sowohl die Taste SET als auch die Taste MM gedrückt
gehalten werden. (Beispiel: Um 00:45 einzustellen,
geben Sie die Taste MM frei, wenn „45“ angezeigt
wird.)
Wenn Sie die Taste SET freigeben, werden die Minuten •
eingestellt, und die Anzeige hört zu blinken auf und
leuchtet.
ZUR BEACHTUNG
Wenn Sie nur die Taste HH oder MM drücken, ändert sich die eingestellte Uhrzeit nicht.•
DE-6

Einstellen des heutigen Wochentags
Stellen Sie den heutigen Wochentag ein. (Beispiel: Wenn heute Mittwoch ist)
SCHRITT 1 Halten Sie die Taste SET gedrückt und drücken Sie die
Taste DAY, um den heutigen Wochentag einzustellen.
Die Anzeige •
Drücken der Taste DAY, bei gleichzeitigem
Gedrückthalten der Taste SET, um einen Tag in der
Liste der Wochentage weiter.
Wenn Sie die Taste SET freigeben, wird der •
Wochentag eingestellt, und die Anzeige hört zu
blinken auf und leuchtet.
ZUR BEACHTUNG
Wenn Sie nur die Taste DAY drücken, ändert sich den eingestellte Wochentag nicht.•
blinkt und bewegt sich mit jedem
DE-7
DE

Erstellen von programmierten Betriebsvorgängen
Stellen Sie die aktuelle Uhrzeit und den heutigen Wochentag korrekt ein.
Falls nicht beide Einstellungen korrekt durchgeführt sind, werden die
Programme nicht wie erwartet durchgeführt.
Für jede Gruppe und jeden Wochentag können bis zu 6 programmierte •
Betriebsvorgänge pro Tag eingestellt werden.
Für jedes Zeitplangeber-Programm kann eine Kombination der unten •
angeführten Betriebsvorgänge eingestellt werden.
Starten/Stoppen des Klimageräts –
Aktivierung/Deaktivierung des Fernbedienungsbetriebs *1 –
Um die Einstellungen eines bestehenden Programms zu ändern, führen •
Sie dasselbe, unten angeführte Verfahren durch, das auch zur Erstellung
eines neuen Programms verwendet wird.
*1 Je nach den Installationsbedingungen ist die Einstellung zur Aktivierung/Deaktivierung des
Fernbedienungsbetriebs ggf. deaktiviert. In diesem Fall erscheint die Anzeige auf dem Anzeigenfeld, wenn
Sie die Taste drücken.
Weitere Hinweise erhalten Sie bei Ihrem Fachhändler.
SCHRITT 1 Drücken Sie die Taste PROGRAM, um eine Gruppe zu
wählen.
Wenn Sie die Taste PROGRAM drücken, beginnen •
die Anzeigen der Gruppennummer und des heutigen
Wochentags zu blinken, und die Anzeige der aktuellen
Uhrzeit wechselt auf die blinkende Anzeige „PG-1“.
Drücken Sie die Taste GROUP, um eine Gruppe für •
den Programmbetrieb zu wählen, und drücken Sie
dann die Taste SET.
Einstellungsbeispiele
ZUR BEACHTUNG
Je nach den Einstellungsbedingungen ist die •
Gruppenwahlfunktion ggf. deaktiviert. Gehen Sie in
diesem Fall zum nächsten Schritt weiter.
Die Anzahl der wählbaren Gruppen wird während der •
Installation eingestellt.
SCHRITT 2 Drücken Sie die Taste DAY, um einen Wochentag für
den Programmbetrieb zu wählen.
Wenn Sie die Taste SET drücken, hört die •
Programmplan-Markierung
leuchtet, und gleichzeitig beginnt die in Programm
eingestellte Zeit zu blinken. Außerdem wechselt auch
die Anzeige der aktuellen Uhrzeit auf die blinkende
Anzeige „PG-2“.
ZUR BEACHTUNG
Dann blinkt der gegenwärtig gewählte Wochentag •
langsam.
()
zu blinken auf und
DE-8

SCHRITT 3 Erstellen Sie das Programm, und drücken Sie die
Taste SET.
Wählen Sie den Zeitplangeber-Betrieb mit der Taste •
(Zeitplangeber EIN/AUS) und der Taste
(Aktivieren/Deaktivieren des
Fernbedienungsbetriebs). Stellen Sie dann die
Betriebsauslösezeit mit den Taste HH und MM ein,
und drücken Sie die Taste SET.
Wenn Sie die Taste SET drücken, hört die in •
Programm eingestellte Zeit zu blinken auf und
leuchtet, und gleichzeitig beginnt die in Programm
eingestellte Zeit zu blinken.
ZUR BEACHTUNG
Jedes Mal, wenn Sie die Taste • drücken,
wechselt die Zeitplangeber-Anzeige in der folgenden
Reihenfolge: (EIN) → (AUS) → keine
Anzeige.
Jedes Mal, wenn Sie die Taste • drücken,
wechselt die Fernbedienungsanzeige in der folgenden
Reihenfolge: (aktiviert) → (deaktiviert) → keine
Anzeige.
Je nach den Installationsbedingungen ist die •
Einstellung zur Aktivierung/Deaktivierung des
Fernbedienungsbetriebs ggf. deaktiviert. In diesem
Fall kann nur die Ein-/Ausschaltfunktion des
Zeitplangebers verwendet werden.
SCHRITT 4 Stellen Sie die Programme - auf dieselbe Weise
ein.
Wenn Sie die Taste SET drücken, werden die •
Einstellungen automatisch in der Reihenfolge ihrer
Einstellung angeordnet, beginnend mit den frühesten
Einstellungen.
Falls Sie die Taste SET drücken, ohne neue •
Einstellungen im Programm durchzuführen, beginnt
die Programmanzeige erneut zu blinken und die
Einstellungen können geändert werden.
Ebenso beginnt die Programmanzeige • erneut zu
blinken, falls Sie die Taste SET drücken, nachdem Sie
das Programm erstellt haben.
SCHRITT 5 Drücken Sie die Taste PROGRAM.
Die Programmeinstellungen werden eingegeben, und •
das Anzeigenfeld kehrt auf die normale Anzeige
zurück.
DE
SCHRITT 6 Erstellen Sie programmierte Betriebsvorgänge für andere Gruppen und Wochentage auf
dieselbe Weise.
Bereits erstellte Programme können in andere Gruppen und Wochentage kopiert werden. (Siehe Seite DE-12)
ZUR BEACHTUNG
Die Zeiteinstellung „0:00“ bedeutet Null Uhr (Mitternacht).•
Um die Programmeinstellungen während der Programmerstellung zu löschen (während die •
Anzeige „PG-1“ oder „PG-2“ auf dem Anzeigenfeld blinkt), halten Sie die Taste CANCEL
länger als 2 Sekunden gedrückt. Das Anzeigenfeld kehrt auf die normale Anzeige zurück.
Falls Sie Einstellungen löschen, ohne die Taste PROGRAM zu drücken, werden die Einstellungen •
nicht eingegeben.
DE-9

Einstellungsfehler
Falls Sie die Zeit wie unten gezeigt einstellen, wenn Sie ein Programm erstellen, wird „ERROR“ angezeigt (die
Anzeige
blinkt). Korrigieren Sie daher die Zeiteinstellung.
Falls die Programmzeiten gleich sind
SCHRITT 1 Jedes Mal, wenn Sie die Taste SET drücken, wechselt der Einstellungsmodus zwischen den
programmierten Betriebsvorgängen derselben Zeiteinstellung ( und im obigen Beispiel),
weshalb Sie die Zeiteinstellungsfunktion wählen sollten, um die Einstellung zu korrigieren.
SCHRITT 2 Ändern Sie die Zeiteinstellung mit den Tasten HH und MM, damit die eingestellten Zeiten nicht mehr
gleich sind.
SCHRITT 3 Drücken Sie die Taste SET und überprüfen Sie, dass die Anzeige „ERROR“ nicht mehr angezeigt
wird.
SCHRITT 4 Drücken Sie die Taste PROGRAM, um den Einstellungsmodus zu beenden.
Beispielen von Zeiteinstellungen, bei denen keine Störung auftritt
Bei den unten angeführten Zeiteinstellungen tritt keine Störung auf.
1) Wenn Ein- und Ausschaltzeit versetzt sind 2) Wenn die Ausschaltzeit vor der Einschaltzeit
liegt
DE-10

Überprüfen der Programmzeiten
Sie können die für jede Gruppe und jeden Wochentag programmierten Zeiten überprüfen.
SCHRITT 1 Drücken Sie die Taste GROUP und wählen Sie die
Gruppe, deren Zeit Sie überprüfen möchten.
ZUR BEACHTUNG
Je nach den Einstellungsbedingungen ist die •
Gruppenwahlfunktion ggf. deaktiviert. Gehen Sie in
diesem Fall zum nächsten Schritt weiter.
SCHRITT 2 Drücken Sie die Taste DAY.
Wenn Sie die Taste DAY zum ersten Mal drücken, •
beginnt die Anzeige des morgigen Wochentags zu
blinken und die Programmeinstellungen für morgen
werden angezeigt.
Jedes Mal, wenn Sie die Taste DAY drücken, •
wechseln die Programmeinstellungen in der
Reihenfolge der Wochentage.
Drücken Sie die Taste GROUP, damit die •
Programmeinstellungen einer anderen Gruppe
desselben Wochentags angezeigt werden.
SCHRITT 3 Beenden Sie die Überprüfung.
Drücken Sie die Taste CLEAR. Das Anzeigenfeld •
kehrt auf die normale Anzeige zurück.
ZUR BEACHTUNG
Wenn Sie die Taste CANCEL länger als 2 Sekunden •
gedrückt halten, kehrt das Anzeigenfeld ebenfalls
auf die normale Anzeige zurück.
DE
DE-11

Kopieren von Programmzeiten
Sie können das bereits erstellte Programm eines Wochentages in einen anderen Wochentag kopieren (Kopieren
eines Wochentag-Programms); ebenso auch das gesamte Wochenprogramm einer Gruppe in eine andere Gruppe
(Kopieren eines Gruppen-Programms).
Beispiel für das Kopieren eines WochentagProgramms
(Kopieren des Montag-Programms in das DienstagProgramm)
Kopieren von Wochentag-Programmen
SCHRITT 1 Drücken Sie die Taste PROG. COPY DAY.
Die Gruppennummer und • die Anzeige über dem
heutigen Wochentag beginnen zu blinken, und die
Anzeige „CP-1“ beginnt im Anzeigebereich für die
aktuelle Uhrzeit zu blinken. Wählen Sie dann eine
Gruppe, in die Sie die Wochentag-Programme
kopieren möchten, mit Hilfe der Taste GROUP.
Beispiel für das Kopieren eines GruppenProgramms
(Kopieren des Programms von Gruppe 1 in das
Programm von Gruppe 2).
SCHRITT 2 Wählen Sie ein Ausgangswochentag-Programm,
das kopiert werden soll.
Jedes Mal, wenn Sie die Taste DAY drücken, •
bewegt sich die Anzeige über die Anzeige der
Wochentage. Somit können Sie den Wochentag
wählen, aus dem Sie ein Programm kopieren
möchten.
Nachdem Sie den Ausgangswochentag, aus dem •
kopiert werden soll, gewählt haben, drücken Sie die
Taste SET, um diesen Tag einzustellen. Das
Anzeigenfeld schaltet um, um Ihnen die Wahl des
Kopier-Zielwochentags zu ermöglichen.
SCHRITT 3 Wählen Sie den Kopier-Zielwochentag.
Wenn der Zeitplangeber in der Lage ist, Ihnen die •
Wahl eines Kopier-Zielwochentags zu ermöglichen,
beginnt die Anzeige „CP-2“ im Anzeigebereich für
die aktuelle Uhrzeit zu blinken, während der
gewählte Ausgangswochentag in der Anzeige der
Wochentage blinkt. Wählen Sie dann mit Hilfe der
Taste DAY einen Wochentag als den
Zielwochentag.
DE-12

SCHRITT 4 Drücken Sie die Taste SET, um den Kopiervorgang
durchzuführen.
Drücken Sie die Taste SET, dann wird die •
()
Programmplan-Markierung
SCHRITT 5 Wählen Sie, falls erwünscht, weitere Kopier-
Zielwochentage.
Sie können das gewählte Ausgangswochentag-•
Programm in das Programm weiterer Wochentage
kopieren, indem Sie wiederholt die Taste DAY
drücken, um einen Wochentag zu wählen, und dann
die Taste SET, um den Wochentag einzustellen.
ZUR BEACHTUNG
Drücken Sie die Taste CLEAR, damit die •
Programmplan-Markierung
Kopiervorgang abgebrochen wird.
angezeigt.
()
erlischt und der
SCHRITT 6 Drücken Sie die Taste PROG. COPY DAY, um das
kopierte Programm in die gewählten Wochentage
einzugeben.
Das Anzeigenfeld kehrt auf die normale Anzeige •
zurück.
ZUR BEACHTUNG
Enthält der Kopier-Zielwochentag bereits ein Programm, so wird dieses durch das neu kopierte •
Programm überschrieben.
Sollten Sie versehentlich ein Programm in der Betriebsart zum Kopieren eines Wochentag-Programms •
kopieren, halten Sie die Taste CANCEL länger als 2 Sekunden gedrückt, um das Programm an den Punkt
zurückzustellen, den es vor dem Drücken der Taste PROG. COPY DAY in SCHRITT 1 innehatte. (Alle
Änderungen und Kopiervorgänge, die bis zu diesem Punkt durchgeführt wurden, werden gelöscht.)
DE
DE-13

Kopieren von Gruppen-Programmen
SCHRITT 1 Drücken Sie die Taste PROG. COPY GROUP.
Die Anzeige „CP-1“ beginnt im Anzeigebereich für •
die aktuelle Uhrzeit zu blinken, und die Anzeige
„CP“ (Kopieren) beginnt im Programmbereich
zu blinken, um die Kopier-Ausgangsgruppe
anzuzeigen.
SCHRITT 2 Wählen Sie ein Ausgangsgruppen-Programm, das
kopiert werden soll.
Wählen Sie eine Kopier-Ausgangsgruppe mit Hilfe •
der Taste GROUP.
Nachdem Sie die Kopier-Ausgangsgruppe gewählt •
haben, drücken Sie die Taste SET, um die Gruppe
einzustellen. Das Anzeigenfeld schaltet um, um
Ihnen die Wahl der Kopier-Zielgruppe zu
ermöglichen.
SCHRITT 3 Wählen Sie eine Kopier-Zielgruppe.
Nachdem Sie die Taste SET gedrückt haben, •
beginnt die Anzeige „CP-2“ im Anzeigebereich für
die aktuelle Uhrzeit zu blinken, die Nummer der
eingestellten Kopier-Ausgangsgruppe wird im
Programmbereich angezeigt, und die Anzeige
„PA“ (Einfügen) beginnt im Programmbereich zu
blinken, um die Kopier-Zielgruppe anzuzeigen.
Wählen Sie eine Kopier-Zielgruppe mit Hilfe der •
Taste GROUP.
SCHRITT 4 Geben Sie die gewählte Kopier-Zielgruppe ein.
Wenn Sie die Taste SET drücken, wird die Nummer •
der Kopier-Zielgruppe im ProgrammnummerBereich angezeigt.
ZUR BEACHTUNG
Falls Sie eine Gruppe mit der Nummer 1 bis 4 als •
Kopier-Zielgruppe gewählt haben, wird die Nummer
dieser Gruppe im Programmbereich
Falls Sie eine Gruppe mit der Nummer 5 bis 8 als
Kopier-Zielgruppe gewählt haben, wird die Nummer
dieser Gruppe im Programmbereich angezeigt.
angezeigt.
DE-14

SCHRITT 5 Wählen Sie, falls erwünscht, weitere Kopier-
Zielgruppen.
Sie können die gewählten Ausgangsgruppen-•
Programme in das Programm weiterer Gruppen
kopieren, indem Sie wiederholt die Taste GROUP
drücken, um eine Gruppe zu wählen, und dann die
Taste SET, um die Gruppe einzustellen.
ZUR BEACHTUNG
Falls Sie eine Gruppe mit der Nummer 1 bis 4 als •
Kopier-Zielgruppe gewählt haben, wird die Nummer
dieser Gruppe im Programmbereich angezeigt.
Falls Sie eine Gruppe mit der Nummer 5 bis 8 als
Kopier-Zielgruppe gewählt haben, wird die Nummer
dieser Gruppe im Programmbereich angezeigt.
SCHRITT 6 Drücken Sie die Taste PROG. COPY GROUP, um die
kopierten Programme in die gewählten Gruppen
einzugeben.
Das Anzeigenfeld kehrt auf die normale Anzeige •
zurück.
ZUR BEACHTUNG
Enthält die Kopier-Zielgruppe bereits ein Programm, so wird dieses durch das neu kopierte Programm •
überschrieben.
Sollten Sie versehentlich ein Programm in der Betriebsart zum Kopieren eines Gruppen-Programms •
kopieren, halten Sie die Taste CANCEL länger als 2 Sekunden gedrückt, um das Programm an den Punkt
zurückzustellen, den es vor dem Drücken der Taste PROG. COPY GROUP in SCHRITT 1 innehatte. (Alle
Änderungen und Kopiervorgänge, die bis zu diesem Punkt durchgeführt wurden, werden gelöscht.)
DE
DE-15

Einstellen eines Feiertags in einer geplanten Betriebswoche
Die Betriebsvorgänge, die für einen bestimmten Wochentag programmiert wurden, können vorübergehend
deaktiviert werden, indem dieser Tag als Feiertag eingestellt wird.
Wenn der eingestellte Feiertag verstrichen ist, wird die Feiertag-Einstellung gelöscht, und der Betrieb wird •
nächste Woche wie programmiert fortgesetzt.
Die Feiertage können für eine Woche beginnend mit dem heutigen Tage gewählt werden. Wird der heutige Tag •
als Feiertag gewählt, wird die Feiertag-Einstellung ab dem nächsten programmierten Betriebsvorgang
aufgehoben. (Je nach dem Programm wird, falls ein Programm gegenwärtig läuft, dieses Programm ggf. nicht
gestoppt.)
Einstellungsbeispiel
Heute ist Donnerstag, und
Freitag wird als ein Feiertag
eingestellt.
SCHRITT 1 Drücken Sie die Taste GROUP, um eine Gruppe für
die Feiertag-Einstellung zu wählen.
ZUR BEACHTUNG
Je nach den Installationsbedingungen ist die •
Gruppenwahl deaktiviert oder eingestellt, sodass
alle Gruppen automatisch für die Feiertag-Funktion
gewählt werden. Gehen Sie in diesem Fall zum
nächsten Schritt weiter.
SCHRITT 2 Drücken Sie die Taste HOLIDAY.
Die Anzeige „HL“ beginnt im Anzeigebereich für die •
aktuelle Uhrzeit zu blinken, und dann beginnt die
Anzeige des heutigen Wochentags zu blinken.
Sobald es Freitag wird, läuft
das für diesen Tag
eingestellte Programm nicht.
Wird es Samstag, wird die
Feiertag-Einstellung für
Freitag gelöscht.
SCHRITT 3 Wählen Sie einen Tag mit der Taste DAY als
Feiertag, und drücken Sie dann die Taste SET.
Ein Kasten „ • “ erscheint über dem gewählten
Feiertag.
Um weitere Feiertage zu wählen, wählen Sie einen •
Tag mit der Taste DAY, und stellen Sie ihn dann mit
der Taste SET ein.
Falls Ihnen ein Fehler unterlaufen ist oder Sie einen •
Feiertag löschen möchten, drücken Sie die Taste
CLEAR.
DE-16

SCHRITT 4 Drücken Sie die Taste HOLIDAY, um den Feiertag
einzugeben.
Das Anzeigenfeld kehrt auf die normale Anzeige •
zurück.
Deaktivierung des Zeitplangeber-Betriebs
Um den programmierten Betrieb eine Woche oder länger zu stoppen, können Sie alle Zeitplangeber-Programme
deaktivieren.
Nachdem der Zeitplangeber deaktiviert wurden, laufen die programmierten Betriebsvorgänge nicht ab, bis das •
untenstehende Verfahren durchgeführt wird.
ZUR BEACHTUNG
Während der Installation wird die Fernbedienung ggf. so eingestellt, dass der Zeitplangeber für einzelne Gruppen •
deaktiviert wird. Im gegebenen Zustand ist der Zeitplangeber nur für die gewählte Gruppe deaktiviert, weshalb
Sie die Taste GROUP drücken sollten, um die Wahl der gewünschten Gruppe zu bestätigen.
Halten Sie die Taste TIMER OFF länger als 2
Sekunden gedrückt.
• Die Anzeige erscheint auf dem
Anzeigenfeld. Der Zeitplangeber wird ab dem
nächsten geplanten Programm deaktiviert.
Um den Zeitplangeber erneut einzuschalten,
halten Sie die Taste TIMER OFF länger als 2
Sekunden gedrückt.
• Die Anzeige erlischt, und der
Zeitplangeber ist ab dem nächsten geplanten
Programm aktiviert.
DE
DE-17

Löschen von Programmen
Drücken Sie die Taste PROGRAM.
Um bestimmte Tage zu löschen Löschen von einzelnen Programmen an
Wenn Sie die Taste PROGRAM drücken, beginnen die Anzeigen •
der Gruppennummer und des heutigen Wochentags zu blinken,
und dann wechselt die Anzeige der aktuellen Uhrzeit auf die
blinkende Anzeige „PG-1“.
Drücken Sie die Taste GROUP, um eine zu löschende Gruppe zu •
wählen.
ZUR BEACHTUNG
Gegebenfalls wird die Gruppenwahl-Funktion wird während der •
Installation deaktiviert. Gehen Sie in diesem Fall zum nächsten
Schritt weiter.
Halten Sie die Taste CANCEL länger als 2 Sekunden gedrückt, •
damit das Programm auf den Punkt zurückkehrt, den es vor dem
Drücken der Taste PROGRAM innehatte. (Alle bis zu diesem
Punkt durchgeführten Betriebsvorgänge werden gelöscht.)
bestimmten Tagen
Wählen Sie den zu löschenden Tag mit der •
Taste DAY, und drücken Sie dann die Taste
CLEAR. Alle Einstellungen in der
programmierten Betriebsvorgängen bis
werden gelöscht. Das Anzeigenfeld sieht wie
oben gezeigt aus.
Drücken Sie die Taste PROGRAM, um den zu •
löschenden Betriebsvorgang einzugeben. Das
Anzeigenfeld kehrt auf die normale Anzeige
zurück, ohne dass die ProgrammplanMarkierung unter den Wochentagen
angezeigt wird.
Wählen Sie einen Tag und drücken Sie die •
Taste SET. Die Anzeigen der programmierten
Betriebsvorgänge bis beginnen
nacheinander zu blinken; drücken Sie daher die
Taste CLEAR, wenn die Anzeige des
programmierten Betriebsvorgangs, den Sie
löschen möchten, zu blinken beginnt. (Die
restlichen programmierten Betriebsvorgänge
werden automatisch angeordnet, beginnend
mit den frühesten programmierten Vorgängen.)
Drücken Sie die Taste PROGRAM, um den zu •
löschenden Betriebsvorgang einzugeben. Das
Anzeigenfeld kehrt auf die normale Anzeige
zurück.
Beispiel:
Anzeigenfeld, nachdem der oben
programmierte Betriebsvorgang
gelöscht wurde
DE-18

Wichtige Informationen, die Sie sich merken sollten
1. Zeitplangeber und Betrieb des Klimageräts
Klimageräte laufen entweder gemäß den Betriebsvorgängen, die mit dem Zeitplangeber programmiert wurden
(Starten/Stoppen und Aktivieren/Deaktivieren des Fernbedienungsbetriebs) oder gemäß einer angeschlossenen
Fernbedienung bzw. System-Steuereinheit.
Zeitplangeber-Einstellungen (Beispiel)
Betrieb ohne System-Steuereinheit
Falls den Fernbedienungsbetrieb aktiviert ist, kann der Betrieb des Klimageräts mittels der Fernbedienung •
gestartet/gestoppt werden. (Die Fernbedienung spricht auf die zuletzt gedrückte Taste an.)
8:00 12:00 17:00 20:0013:00 18:00
Gestoppt GestopptGestoppt
Klimagerätbetrieb
Fernbedienungsbetrieb
*1
In Betrieb In Betrieb
Aktiviert AktiviertDeaktiviert
*2
*1 Ob der Fernbedienungsbetrieb aktiviert oder deaktiviert ist, hängt von der Einstellung
des vorigen Tages ab.
*2 Da der Fernbedienungsbetrieb deaktiviert ist, bleibt der Betrieb deaktiviert.
*3 Die Fernbedienung bleibt am nächsten Tag und nachfolgenden Tagen deaktiviert, bis
sie in der Einstellung zum Aktivieren/Deaktivieren des Fernbedienungsbetriebs
aktiviert wird.
Betrieb mit System-Steuereinheit
Falls den Fernbedienungsbetrieb aktiviert ist, kann der Betrieb des Klimageräts mittels der Fernbedienung •
gestartet/gestoppt werden. (Die Fernbedienung spricht auf die zuletzt gedrückte Taste an.)
Die mittels der System-Steuereinheit durchgeführte Aktivierung/Deaktivierung des Fernbedienungsbetriebs •
(Zentralisierte Steuerung 1 bis 4) wird entsprechend den programmierten Betriebsvorgängen aufgehoben.
Betrieb mit der System-Steuereinheit
[Stopp + Fernbedienungsbetrieb deaktiviert]
[Stopp + Fernbedienungsbetrieb aktiviert]
Deaktiviert
*3
DE
Klimagerätbetrieb
Fernbedienungsbetrieb
00:0200:7100:2100:8 13:00 18:00
Gestoppt GestopptGestoppt
In
Betrieb
Deaktiviert
In Betrieb
Deaktiviert Deaktiviert
AktiviertAktiviert
Aktiviert
*1
*1 Ob der Fernbedienungsbetrieb aktiviert oder deaktiviert ist, hängt von der Einstellung
des vorigen Tages ab.
DE-19

2. Stromausfall
Falls das Klimagerät eingeschaltet ist, wenn die Stromversorgung unterbrochen wird, bleibt es ausgeschaltet, wenn
die Stromversorgung wiederhergestellt ist. Falls der Fernbedienungsbetrieb deaktiviert war, als die Stromversorgung
unterbrochen wurde, wird er einige Minuten lang aktiviert, nachdem die Stromversorgung wiederhergestellt ist.
Programmierte Betriebsvorgänge, die für Uhrzeiten nach der Wiederherstellung der Stromversorgung geplant •
sind, laufen wie gewöhnlich ab.
Programmeinstellungen bleiben im nichtfl üchtigen Speicher des Zeitplangebers gespeichert und werden daher •
im Falle eines Stromausfalls nicht gelöscht. Außerdem bleiben auch die Einstellungen der aktuellen Uhrzeit und
des heutigen Wochentags dank der internen Batterie maximal 100 Stunden lang erhalten.
Zeitplangeber-Einstellungen (Beispiel)
Betrieb, wenn die Stromversorgung nicht unterbrochen wird.
8:00 12:00 17:00 20:0013:00 18:00
Gestoppt GestopptGestoppt
Gestoppt
Klimagerätbetrieb
Fernbedienungsbetrieb
*1
Aktiviert
In BetriedIn Betried
Deaktiviert
In Betrieb
Aktiviert
*1 Ob der Fernbedienungsbetrieb aktiviert oder deaktiviert ist, hängt von der Einstellung
des vorigen Tages ab.
Betrieb, wenn die Stromversorgung um 15:00 Uhr unterbrochen und anschließend
wiederhergestellt wird.
Stromversorgung hier
unterbrochen.
15:00
8:00 12:00 17:00 20:0013:00 18:00
Klimagerätbetrieb
Fernbedienungsbetrieb
Gestoppt
*1
In Betrieb In Betrieb
Aktiviert AktiviertDeaktiviert Deaktiviert
Gestoppt
Gestoppt
Deaktiviert
Stromausfall
In Betrieb
Deaktiviert
Gestoppt
DE-20
*2
*1 Ob der Fernbedienungsbetrieb aktiviert oder deaktiviert ist, hängt von der Einstellung
des vorigen Tages ab.
*2 Der Fernbedienungsbetrieb wird einige Minuten lang aktiviert, nachdem die
Stromversorgung wiederhergestellt ist.

Störungssuche
Überprüfen Sie bitte die folgenden Punkte, bevor Sie den Kundendienst anfordern.
Störung Ursache/Abhilfe
Die Anzeige blinkt auf dem Anzeigenfeld. Der Zeitplangeber führt die anfänglichen
Kommunikationsvorgänge mit den angeschlossenen
Inneneinheiten durch. Warten Sie, bis der
Kommunikationsvorgang abgeschlossen ist.
Die Klimagerät funktionieren nicht wie geplant,
wenn die eingestellte Zeit erreicht ist.
Der Betrieb der Klimageräte kann mit der
Fernbedienung gestartet und gestoppt werden,
selbst wenn das Programm den
Fernbedienungsbetrieb deaktiviert.
Die Anzeige blinkt im Anzeigebereich für
die aktuelle Uhrzeit.
Zu überprüfen, bevor Sie den Kundendienst anfordern
Der Zeitplangeber wurde deaktiviert. (Siehe Seite DE-17)
Ein Feiertag wurde geplant. (Siehe Seite DE-16)
Die Stromversorgung des Klimageräts wurde
unterbrochen und anschließend wieder hergestellt.
(Siehe Seite DE-20)
Die Stromversorgung des Klimageräts wurde über
längere Zeit unterbrochen. Stellen Sie die aktuelle
Uhrzeit und das heutige Datum erneut ein. (Siehe
Seite DE-6 und DE-7)
Treten selbst nach Durchführung der obigen Abhilfemaßnahmen weiterhin Störungen auf, stoppen Sie den
Zeitplangeber, schalten Sie das Gerät aus, und melden Sie Ihrem Fachhändler die Seriennummer und die Art der
Störung. Warten Sie das Gerät nie selbst, da dies gefährlich ist.
DE
DE-21

Indice
Pagina
Informazioni sul prodotto ................................................................................. IT-2
Simboli di avvertimento ...................................................................................IT-2
Luogo di installazione ...................................................................................... IT-3
Requisiti elettrici ..............................................................................................IT-3
Istruzioni di sicurezza ...................................................................................... IT-3
Nomi e funzioni delle parti ............................................................................... IT-4
Uso del timer programmatore .......................................................................... IT-5
Impostazione dell’ora corrente ................................................................ IT-6
Impostazione del giorno odierno della settimana .................................... IT-7
Impostazione delle operazioni programmate...........................................IT-8
Errori di impostazione ............................................................................ IT-10
Come controllare le ore dei programmi ................................................. IT-11
Come copiare le ore dei programmi ...................................................... IT-12
Modo di impostare i giorni di ferie nel funziomento del programma
settimanale ............................................................................................ IT-16
Come disabilitare il funzionamento del timer ......................................... IT-17
Come cancellare i programmi ...............................................................IT-18
Informazioni importanti da ricordare .............................................................. IT-19
Soluzione dei problemi .................................................................................. IT-21
Informazioni sul prodotto
In caso di diffi coltà o se si hanno dei dubbi riguardo al condizionatore d’aria,
sono necessarie le informazioni seguenti. I numeri del modello e di serie si
trovano sulla targhetta di identifi cazione, sulla parte inferiore dell’armadio.
Nr. del modello Nr. di serie
Data di acquisto
Indirizzo del rivenditore
Numero di telefono
Simboli di avvertimento
I simboli seguenti sono usati in questo manuale per mettere in guardia
l’utente e il personale di servizio circa le condizioni potenzialmente
pericolose per gli utenti, il personale di servizio o l’apparecchiatura:
IT-2
Questo simbolo si riferisce a pericoli o a
interventi poco sicuri che possono causare
gravi lesioni personali o la morte.
Questo simbolo si riferisce a pericoli o a
interventi poco sicuri che possono
provocare lesioni personali o danneggiare il
prodotto stesso o altre cose.

Luogo di installazione
Si raccomanda di far installare questo timer programmatore da tecnici •
qualifi cati per l’installazione seguendo le istruzioni di installazione
fornite con il timer programmatore.
Non installare il timer programmatore dove ci sono fumi o gas •
infi ammabili, o in un posto molto umido come una serra.
Non installare il timer programmatore dove sono collocate •
apparecchiature che generano un calore eccessivo.
Requisiti elettrici
Tutti gli allacciamenti elettrici devono essere conformi alle normative 1.
elettriche locali. Per i dettagli consultare il rivenditore o un elettricista
specializzato.
Gli allacciamenti elettrici devono essere eseguiti da un elettricista 2.
specializzato.
Per riscaldare il sistema occorre accendere
l’interruttore principale almeno cinque (5) ore
prima della messa in funzione. L’interruttore
principale dell’alimentazione di rete va lasciato
acceso (ON), a meno che non si preveda di non
utilizzare l’apparecchio per un periodo di
tempo prolungato.
Istruzioni di sicurezza
Leggere attentamente questo manuale di istruzioni prima di usare •
questo timer programmatore. In caso di dubbi o problemi, rivolgersi al
proprio rivenditore.
Questo condizionatore d’aria è progettato per rendere confortevoli le •
condizioni ambientali della vostra stanza. Utilizzarlo soltanto per lo
scopo previsto, come descritto in questo manuale di istruzioni.
Mai toccare l’unità con le mani bagnate.•
Mai usare o conservare benzina o altri vapori o liquidi infi ammabili •
vicino al condizionatore, perché ciò è molto pericoloso.
Questo condizionatore d’aria non ha una ventola di aspirazione •
dell’aria fresca dall’esterno. Occorre pertanto aprire frequentemente
le porte e le fi nestre se si utlizzano apparecchiature di
riscaldamento a gas o cherosene nella stessa stanza, perché
consumano molto ossigeno. In caso contrario, potrebbe esserci
pericolo di asfi ssia.
Non accendere e spegnere il condizionatore d’aria mediante •
l’interruttore principale. Usare sempre il pulsante di accensione/
spegnimento (ON/OFF).
Non inserire alcun oggetto nell’uscita d’aria dell’unità esterna. Ciò è •
molto pericoloso perché la ventola gira ad alta velocità.
Non lasciar giocare i bambini con il condizionatore d’aria.•
Non raffreddare o riscaldare eccessivamente la stanza in presenza di •
bambini molto piccoli o di invalidi.
IT
IT-3

Nomi e funzioni delle parti
Pulsanti di funzionamento
A: Pulsante PROGRAM
B: Pulsanti PROG. COPY
C: Pulsante CLEAR
D: Pulsanti di impostazione
A: Pulsante PROGRAM Usare per iniziare l’impostazione dei programmi e per immettere le
impostazioni dei programmi.
B: Pulsanti PROG. COPY Usare per copiare i programmi su gruppi o giorni specifi ci in
programmazione. (Vedere a pagina IT-12)
C: Pulsante CLEAR Premere per cancellare le impostazioni del programma attualmente
visualizzato.
Il programma attuale non viene cancellato se non si preme il pulsante •
dopo aver premuto il pulsante CLEAR.
D: Pulsanti di impostazione Usare per effettuare le impostazioni dei programmi e per impostare l’ora
corrente.
Premere per impostare i gruppi per il funzionamento programmato.
Premere per impostare il giorno odierno e i giorni del funzionamento
programmato.
Premere per impostare l’ora corrente e le ore usate nel funzionamento
programmato.
Usare per avviare/arrestare le unità esterne tramite il timer.
Usare per abilitare/disabilitare il funzionamento con il telecomando tramite il
timer.
Usare per impostare l’ora di attivazione del funzionamento programmato.
Le impostazioni dei programmi non vengono immesse se non si preme il •
pulsante alla fi ne delle operazioni di impostazione.
E: Pulsante HOLIDAY Premere per impostare e annullare i giorni di vacanza durante una settimana
programmata di funzionamento.
F: Pulsante CANCEL Premere per annullare l’operazione attuale per l’impostazione dei
programmi, l’operazione di copia o l’operazione per l’impostazione del giorno
di vacanza. Quando si mantiene premuto il pulsante CANCEL per 2 secondi,
l’operazione attuale per l’impostazione o l’operazione di copia viene
annullata e ritorna il display normale.
G: Pulsante TIMER OFF Premere per disattivare (OFF) il timer quando non si intende utilizzare
l’operazione con il timer per un lungo periodo di tempo. Quando si mantiene
premuto questo pulsante per 2 secondi, sul display appare . I
programmi non possono entrare in funzione fi nché si preme di nuovo il
pulsante per 2 secondi.
Alcune delle suddette funzioni sono disabilitate quando si installa l’unità. Se •
si preme il pulsante di una funzione disabilitata, sul display appare .
Per maggiori informazioni, rivolgersi al proprio rivenditore.
E: Pulsante HOLIDAY
F: Pulsante CANCEL
G: Pulsante TIMER OFF
IT-4

Display
AB C D
F
G
H
IJ
A: Giorno odierno della
settimana
B: Indicazione di
programmazione per
operazione
C: Indicazione di
programmazione per giorni
di ferie
D: Indicazione ERROR È visualizzata quando si commette un errore durante l’impostazione del
E: Programma del timer Visualizza i programmi impostati del timer. Inoltre indica la sorgente/
()
()
()
Indica il giorno odierno della settimana.
Appare sotto i giorni che sono programmati per operazione.
Appare intorno ai giorni di ferie programmati. (Vedere a pagina IT-16)
timer.
destinazione della copia durante la copia dei programmi per gruppi.
E
F: Nr. del gruppo Si possono selezionare e visualizzare fi no a 8 gruppi.
G: Indicazione (funzione
disabilitata)
H: Indicazione TIMER OFF È visualizzata quando il timer è stato disattivato (OFF).
I: Indicazione del modo di
copia
J: Ora corrente Visualizza l’ora corrente su un orologio a 24 ore. Inoltre visualizza le
È visualizzata se la funzione selezionata era disabilitata durante
l’installazione.
È visualizzata quando si copia un programma in un gruppo o un giorno della
programmazione.
impostazioni nei vari modi di impostazione.
Uso del timer programmatore
Per utilizzare il timer programmatore, osservare i seguenti passi.
PASSO 1 Accendere (ON) il condizionatore d’aria.
Accendere (ON) il condizionatore d’aria collegato al timer programmatore. Il timer •
programmatore esegue le comunicazioni iniziali con le unità interne, durante le quali
lampeggia sul display.
IT
NOTA
Non disattivare l’interruttore principale di rete durante le stagioni in cui si usa il riscaldamento o il
raffreddamento. (Ciò mantiene acceso il riscaldatore del basamento, che protegge il compressore
all’avvio.) Se il condizionatore d’aria è stato spento (OFF) per un lungo periodo di tempo,
accenderlo 5 ore prima di iniziare il funzionamento.
PASSO 2 Effettuare le impostazioni iniziali del timer programmatore.
Impostare l’ora corrente e il giorno odierno della settimana. (Vedere a pagina IT-6)•
PASSO 3 Impostare i programmi del timer programmatore.
Effettuare le impostazioni per il funzionamento programmato. (Vedere a pagina IT-8)•
IT-5

Impostazione dell’ora corrente
Impostare l’ora corrente. (Esempio: Quando l’ora corrente è 12:45)
PASSO 1 Mantenere premuto il pulsante SET e premere il
pulsante HH per impostare l’ora.
Ad ogni singola pressione del pulsante HH l’ora •
aumenta di un’ora per volta mentre si mantiene
premuto il pulsante SET.
L’ora scorre rapidamente quando si mantengono •
premuti entrambi i pulsanti SET e HH. (Esempio: Per
impostare 12:00, rilasciare il pulsante HH quando si
visualizza “12”.)
Quando si rilascia il pulsante SET, l’ora viene •
impostata e l’indicazione che lampeggia cambia
rimanendo illuminata.
PASSO 2 Mantenere premuto il pulsante SET e premere il
pulsante MM per impostare i minuti.
Ad ogni singola pressione del pulsante MM i minuti •
aumentano di un minuto per volta mentre si mantiene
premuto il pulsante SET.
I minuti scorrono rapidamente quando si mantengono •
premuti entrambi i pulsanti SET e MM. (Esempio: Per
impostare 00:45, rilasciare il pulsante MM quando si
visualizza “45”.)
Quando si rilascia il pulsante SET, i minuti vengono •
impostati e l’indicazione che lampeggia cambia
rimanendo illuminata.
NOTA
Premendo solo il pulsante HH o MM l’ora non si cambia.•
IT-6

Impostazione del giorno odierno della settimana
Impostare il giorno odierno della settimana. (Esempio: Quando oggi è mercoledì)
PASSO 1 Mantenere premuto il pulsante SET e premere il
pulsante DAY per impostare il giorno odierno della
settimana.
Ad ogni singola pressione del pulsante DAY •
lampeggia e si sposta di un giorno per volta lungo i
giorni della settimana mentre si mantiene premuto il
pulsante SET.
Quando si rilascia il pulsante SET, il giorno della •
settimana viene impostato e che lampeggia cambia
rimanendo illuminato.
NOTA
Premendo solo il pulsante DAY il giorno non si cambia.•
IT-7
IT

Impostazione delle operazioni programmate
Impostare correttamente l’ora corrente e il giorno odierno della
settimana.
Se entrambi non sono impostati correttamente, i programmi non
funzioneranno nel modo previsto.
Si possono impostare fi no a 6 operazioni programmate al giorno per •
ciascun gruppo e giorno della settimana.
Una combinazione delle seguenti operazioni può essere impostata per •
ciascun timer programmatore.
Avvio/arresto del condizionatore d’aria –
Operazione per abilitare/disabilitare il funzionamento del telecomando *1 –
Per cambiare le impostazioni di un programma esistente, usare lo stesso •
procedimento che segue usato per impostare un programma nuovo.
*1 L’impostazione per abilitare/disabilitare il funzionamento del telecomando è disabilitata a seconda delle
condizioni di installazione. In questo caso sul display appare quando si preme il pulsante .
Per maggiori informazioni, rivolgersi al proprio rivenditore.
PASSO 1 Premere il pulsante PROGRAM per selezionare un
gruppo.
Quando si preme il pulsante PROGRAM, il numero •
del gruppo e il giorno odierno della settimana iniziano
a lampeggiare e l’indicazione dell’ora corrente cambia
a “PG-1” che lampeggia.
Premere il pulsante GROUP per selezionare un •
gruppo per il funzionamento programmato e quindi
premere il pulsante SET.
Impostazioni di esempio
NOTA
La selezione del gruppo è disabilitata a seconda delle •
condizioni di installazione. In questo caso procedere
al passo successivo.
Il numero di gruppi selezionabili è impostato durante •
l’installazione.
PASSO 2 Premere il pulsante DAY e selezionare un giorno della
settimana per il funzionamento programmato.
Quando si preme il pulsante SET, il marcatore di •
programmazione del programma
cambia rimanendo illuminato e, contemporaneamente,
l’ora impostata nel programma inizia a
lampeggiare. Inoltre l’indicazione dell’ora corrente
cambia a “PG-2” che lampeggia.
NOTA
A questo punto il giorno della settimana attualmente •
selezionato lampeggia lentamente.
()
che lampeggia
IT-8

PASSO 3 Impostare il programma e premere il pulsante SET.
Selezionare il funzionamento con il timer con il •
pulsante
(ON/OFF)) e il pulsante
abilitare/disabilitare il funzionamento del
telecomando). Quindi impostare l’ora di attivazione
con i pulsanti HH e MM e premere il pulsante SET.
Quando si preme il pulsante SET, l’ora impostata nel •
programma
illuminata e, contemporaneamente, l’ora impostata nel
programma inizia a lampeggiare.
NOTA
Ad ogni pressione del pulsante • , l’indicazione
del timer cambia nell’ordine di (ON)
(OFF) → nessuna indicazione.
Ad ogni pressione del pulsante • , l’indicazione
del telecomando cambia nell’ordine (abilitato) →
(disabilitato) → nessuna indicazione.
L’impostazione per abilitare/disabilitare il •
funzionamento del telecomando è disabilitata a
seconda delle condizioni di installazione. In questo
caso soltanto il timer di accensione/spegnimento (ON/
OFF) può essere impostato.
(timer di accensione/spegnimento
(operazione per
che lampeggia cambia rimanendo
→
PASSO 4 Impostare i programmi ~ allo stesso modo.
Quando si preme il pulsante SET, le impostazioni •
vengono disposte automaticamente nell’ordine
dall’ora che è più presto al primo posto.
Se si preme il pulsante SET senza aver eseguito •
alcuna impostazione nuova nel programma, il
programma inizia di nuovo a lampeggiare e le
impostazioni possono essere cambiate.
In modo simile, se si preme il pulsante SET dopo aver •
impostato il programma , il programma inizia di
nuovo a lampeggiare.
PASSO 5 Premere il pulsante PROGRAM.
Le impostazioni del programma vengono immesse e •
ritorna il display normale.
IT
PASSO 6 Impostare allo stesso modo il funzionamento programmato per altri gruppi e giorni della
settimana.
I programmi che sono già stati impostati possono essere copiati in altri gruppi e giorni della settimana.
(Vedere a pagina IT-12)
NOTA
Una impostazione dell’ora su “0:00” è interpretata come 12:00 mezzanotte.•
Per annullare le impostazioni dei programmi durante l’impostazione dei programmi •
(mentre “PG-1” o “PG-2”lampeggia sul display), mantenere premuto il pulsante
CANCEL per più di 2 secondi. Ritorna il display originale.
Se le impostazioni vengono annullate senza premere il pulsante PROGRAM, le impostazioni non •
sono immesse.
IT-9

Errori di impostazione
Se l’ora viene impostata come è mostrato sotto durante l’impostazione di un programma, si visualizza “ERROR”
(l’indicazione
lampeggia). Perciò correggere l’impostazione dell’ora.
Se le ore dei programmi sono le stesse
PASSO 1 Ad ogni pressione del pulsante SET, il modo di impostazione cambia tra le operazioni programmate
dell’impostazione alla stessa ora ( e nell’esempio sopra), perciò selezionare l’impostazione
dell’ora per correggere.
PASSO 2 Cambiare l’impostazione dell’ora con i pulsanti HH e MM in modo che le ore non siano più le stesse.
PASSO 3 Premere il pulsante SET e controllare che “ERROR” non sia visualizzato.
PASSO 4 Premere il pulsante PROGRAM per terminare il modo di impostazione.
Impostazioni dell’ora di esempio che non causano errori
Le seguenti impostazioni dell’ora non generano un errore.
1) Quando le ore di accensione (ON) e di
spegnimento (OFF) sono scaglionate.
2) Quando l’ora di spegnimento (OFF) è prima
dell’ora di accensione (ON).
IT-10

Come controllare le ore dei programmi
È possibile controllare le ore programmate per ciascun gruppo e giorno della settimana.
PASSO 1 Premere il pulsante GROUP e selezionare un
gruppo di cui si desidera controllare l’ora.
NOTA
La selezione del gruppo è disabilitata a seconda •
delle condizioni di installazione. In questo caso
procedere al passo successivo.
PASSO 2 Premere il pulsante DAY.
Quando si preme il pulsante DAY la prima volta, il •
giorno corrispondente a domani della setiimana
inizia a lampeggiare e si visualizzano le
impostazioni del programma per domani.
Ad ogni pressione del pulsante DAY, le impostazioni •
del programma cambiano nell’ordine dei giorni della
settimana.
Premendo il pulsante GROUP si visualizzano le •
impostazioni del programma di un altro gruppo in
quello stesso giorno.
PASSO 3 Terminare il controllo.
Premere il pulsante CLEAR. Ritorna il display •
originale.
NOTA
Mantenendo premuto il pulsante CANCEL per più di •
2 secondi si fa anche ritornare il display normale.
IT
IT-11

Come copiare le ore dei programmi
È possibile copiare il programma già impostato di un giorno su un altro giorno (copia del programma giornaliero) ed
è anche possibile copiare l’intera settimana programmata per un gruppo su un altro gruppo (copia del programma
per il gruppo).
Esempio di copia del programma giornaliero
(Copia del programma di lunedì su martedì)
Modo di copiare i programmi giornalieri
PASSO 1 Premere il pulsante PROG. COPY DAY.
Il numero del gruppo e • sul giorno odierno
iniziano a lampeggiare e “CP-1” inizia a
lampeggiare nell’area di visualizzazione dell’ora
corrente. In questo stato, selezionare un gruppo in
cui copiare i programmi giornalieri, usando il
pulsante GROUP.
Esempio di copia del programma per il gruppo
(Copia del programma per il gruppo nr. 1 sul
gruppo nr. 2)
PASSO 2 Selezionare un programma giornaliero di sorgente
da copiare.
Ad ogni pressione del pulsante DAY, • si sposta
lungo il display dei giorni della settimana, perciò
selezionare un giorno della settimana che servirà
come sorgente di copia.
Dopo aver selezionato il giorno di sorgente per la •
copia, premere il pulsante SET per impostarlo. Il
display cambia per indirizzarvi a selezionare un
giorno di destinazione per la copia.
PASSO 3 Selezionare un giorno di destinazione per la copia.
Quando il timer programmatore è pronto per •
selezionare un giorno di destinazione della copia,
“CP-2” inizia a lampeggiare nell’area di
visualizzazione dell’ora corrente, mentre il giorno
selezionato di sorgente della copia lampeggia nei
giorni della settimana. Quindi selezionare un giorno
della settimana come la destinazione della copia,
usando il pulsante DAY.
IT-12

PASSO 4 Premere il pulsante SET per copiare.
Premere il pulsante SET e il marcatore di •
programmazione del programma
PASSO 5 Selezionare altri giorni di destinazione della copia
se si desidera.
È possibile copiare il programma selezionato del •
giorno di sorgente su altri giorni premendo
ripetutamente il pulsante DAY per selezionare un
giorno della settimana seguito dal pulsante SET per
impostarlo.
NOTA
Premendo il pulsante CLEAR si cancella il •
marcatore di programmazione del programma
e si annulla l’operazione di copia.
()
si visualizza.
()
PASSO 6 Premere il pulsante PROG. COPY DAY per
immettere il programma copiato nei giorni
selezionati.
Ritorna il display normale.•
NOTA
Se esiste già un programma nel giorno di destinazione della copia, il programma appena copiato •
sovrascrive il programma esistente.
Se accidentalmente si copia su un programma nel modo di copia del programma giornaliero, •
mantenendo premuto il pulsante CANCEL per più di 2 secondi si fa ritornare il programma al punto
precedente alla pressione del pulsante PROG. COPY DAY al PASSO 1. (Tutti i cambiamenti e le operazioni
di copia eseguite fi no a quel punto vengono cancellate.)
IT
IT-13

Modo di copiare i programmi dei gruppi
PASSO 1 Premere il pulsante PROG. COPY GROUP.
“CP-1” inizia a lampeggiare nell’area di •
visualizzazione dell’ora corrente e “CP” (copia)
inizia a lampeggiare nell’area del programma
per indicare la sorgente della copia.
PASSO 2 Selezionare un programma del gruppo di sorgente
per copiare.
Selezionare un gruppo di sorgente per la copia •
usando il pulsante GROUP.
Dopo aver selezionato il gruppo di sorgente per la •
copia, premere il pulsante SET per impostarlo. Il
display cambia per indirizzarvi a selezionare un
gruppo di destinazione per la copia.
PASSO 3 Selezionare un gruppo di destinazione per la copia.
Dopo aver premuto il pulsante SET, “CP-2” inizia a •
lampeggiare nell’area di visualizzazione dell’ora
corrente, il numero impostato del gruppo di
sorgente per la copia appare nell’area del
programma e “PA” (incolla) inizia a lampeggiare
nel programma per indicare la destinazione per
la copia.
Selezionare un gruppo di destinazione per la copia •
usando il pulsante GROUP.
PASSO 4 Immettere il gruppo selezionato di destinazione per
la copia.
Quando si preme il pulsante SET, il numero del •
gruppo di destinazione per la copia appare nell’area
del numero di programma.
NOTA
Se un gruppo dai numeri 1 a 4 è stato selezionato •
come il gruppo di destinazione per la copia, quel
numero appare nell’area del programma
gruppo dai numeri 5 a 8 è stato selezionato, quel
numero appare nell’area del programma
. Se un
.
IT-14

PASSO 5 Selezionare altri gruppi di destinazione della copia
se si desidera.
È possibile copiare i programmi selezionati del •
gruppo di sorgente su altri gruppi premendo
ripetutamente il pulsante GROUP per selezionare
un gruppo seguito dal pulsante SET per impostarlo.
NOTA
Se un gruppo dai numeri 1 a 4 è stato selezionato •
come il gruppo di destinazione per la copia, quel
numero appare nell’area del programma . Se un
gruppo dai numeri 5 a 8 è stato selezionato, quel
numero appare nell’area del programma .
PASSO 6 Premere il pulsante PROG. COPY GROUP per
immettere i programmi copiati nei gruppi
selezionati.
Ritorna il display normale.•
NOTA
Se esiste già un programma nel gruppo di destinazione della copia, il programma appena copiato •
sovrascrive il programma esistente.
Se accidentalmente si copia su un programma nel modo di copia del programma del gruppo, •
mantenendo premuto il pulsante CANCEL per più di 2 secondi si fa ritornare il programma al punto
precedente alla pressione del pulsante PROG. COPY GROUP al PASSO 1. (Tutti i cambiamenti e le
operazioni di copia eseguite fi no a quel punto vengono cancellate.)
IT
IT-15

Modo di impostare i giorni di ferie nel funziomento del programma
settimanale
Le operazioni programmate per un giorno specifi co durante la settimana possono essere disabilitate
temporaneamente impostando quel giorno come un giorno di ferie.
Quando il giorno di ferie passa, l’impostazione dei giorni di ferie viene annullata e il funzionamento riprende •
come è programmato la settimana seguente.
I giorni di ferie possono essere selezionati per la settimana che inizia dal giorno odierno. Se oggi è selezionato •
come un giorno di ferie, l’impostazione dei giorni di ferie viene annullata dal funzionamento programmato
successivo. (A seconda del programma, se il programma è attualmente in funzione, il programma potrebbe non
arrestarsi.)
Impostazione di esempio
Oggi è giovedì e venerdì è
impostato come un giorno di
ferie.
PASSO 1 Premere il pulsante GROUP per selezionare un
gruppo da impostare per i giorni di ferie.
NOTA
A seconda delle condizioni di installazione, la •
selezione del gruppo è disabilitata o impostata in
modo che tutti i gruppi siano selezionati
automaticamente per la funzione dei giorni di ferie.
In questo caso procedere al passo successivo.
PASSO 2 Premere il pulsante HOLIDAY.
“HL” inizia a lampeggiare nell’area di •
visualizzazione dell’ora corrente e il giorno odierno
della settimana inizia a lampeggiare.
Quando arriva venerdì, il
programma impostato per
quel giorno non funziona.
Quando arriva sabato,
l’impostazione del giorno di
ferie per venerdì viene
annullata.
PASSO 3 Selezionare un giorno come il giorno di ferie
usando il pulsante DAY e premere il pulsante SET.
Un “ • ” appare sul giorno di ferie selezionato.
Per selezionare altri giorni di ferie, selezionare un •
giorno usando il pulsante DAY e impostarlo con il
pulsante SET.
Se si è commesso un errore o si desidera annullare •
un giorno di ferie, premere il pulsante CLEAR.
IT-16

PASSO 4 Premere il pulsante HOLIDAY per immettere il
giorno di ferie.
Ritorna il display originale.•
Come disabilitare il funzionamento del timer
Per arrestare il funzionamento programmato per una settimana o più, è possibile disabilitare tutti i programmi del
timer.
Dopo aver disabilitato il timer, le operazioni programmate non entrano in funzione fi nché viene eseguito il •
seguente procedimento.
NOTA
Durante l’installazione, il telecomando può essere impostato per disabilitare il timer per i gruppi singoli. In questo •
stato, il timer è disabilitato soltanto per il gruppo selezionato, perciò premere il pulsante GROUP per confermare
quale gruppo è selezionato.
Mantenere premuto il pulsante TIMER OFF per
più di 2 secondi.
• appare sul display. Il timer è
disabilitato dal programma successivo
programmato.
Per riattivare (ON) il timer, mantenere il pulsante
TIMER OFF per più di 2 secondi.
• si spegne e il timer viene abilitato dal
programma successivo programmato.
IT
IT-17

Come cancellare i programmi
Premere il pulsante PROGRAM.
Per annullare giorni specifi ci Per annullare programmi singoli in giorni
Quando si preme il pulsante PROGRAM, il numero del gruppo e •
del giorno corrente della settimana iniziano a lampeggiare e
l’indicazione dell’ora corrente cambia a “PG-1” che lampeggia.
Premere il pulsante GROUP per selezionare un gruppo da •
cancellare.
NOTA
La selezione del gruppo può essere disabilitata durante •
l’installazione. In questo caso procedere al passo successivo.
Mantenendo premuto il pulsante CANCEL per più di 2 secondi si •
fa ritornare il programma al punto precedente alla pressione del
pulsante PROGRAM. (Tutte le operazioni eseguite fi no a quel
punto vengono cancellate.)
specifi ci
Selezionare un giorno da annullare usando il •
pulsante DAY e premere il pulsante CLEAR.
Tutte le impostazioni nelle operazioni
programmate da a vengono cancellate.
Il display appare come è mostrato sopra.
Premere il pulsante PROGRAM per immettere •
l’operazione di cancellazione. Il display
normale ritorna senza il marcatore di
programmazione del programma
giorni della settimana.
sotto i
()
Selezionare un giorno e premere il pulsante •
SET. Le operazioni programmate da a
iniziano a lampeggiare a rotazione, perciò
premere il pulsante CLEAR quando
l’operazione programmata da cancellare inizia
a lampeggiare. (Le operazioni programmate
rimanenti vengono disposte automaticamente
nell’ordine dall’ora più presto al primo posto.)
Premere il pulsante PROGRAM per immettere •
l’operazione di cancellazione. Ritorna il display
originale.
Esempio:
Display dopo aver cancellato
l’operazione programmata
sopra
IT-18

Informazioni importanti da ricordare
1. Funzionamento del timer programmatore e del condizionatore d’aria
I condizionatori d’aria funzionano sia secondo le operazioni programmate dal timer programmatore (avvio/arresto e
operazione per abilitare/disabilitare il funzionamento con il telecomando) che secondo un telecomando o un
controllore del sistema collegato.
Impostazioni del timer programmatore (Esempio)
Funzionamento senza l’operazione del controllore del sistema
Se il funzionamento del telecomando è abilitato, il condizionatore d’aria può essere avviato/arrestato dal •
telecomando. (Il condizionatore d’aria risponde al pulsante premuto più recentemente.)
8:00 12:00 17:00 20:0013:00 18:00
In arresto In arrestoIn arresto
Funzionamento del
condizionatore d’aria
Funzionamento del
telecomando
*1
*1 Se il funzionamento del telecomando è abilitato o disabilitato dipende
dall’impostazione del giorno precedente.
*2 Poiché il funzionamento del telecomando è disabilitato, il funzionamento rimane
disabilitato.
*3 Il telecomando rimane disabilitato il giorno successivo e in seguito fi nché viene abilitato
nell’impostazione per abilitare/disabilitare il funzionamento del telecomando.
In funzione In funzione
Abilitato AbilitatoDisabilitato Disabili-
Funzionamento con l’operazione del controllore del sistema
Se il funzionamento del telecomando è abilitato, il condizionatore d’aria può essere avviato/arrestato dal •
telecomando. (Il condizionatore d’aria risponde al pulsante premuto più recentemente.)
L’impostazione per abilitare/disabilitare il funzionamento del telecomando dal controllore del sistema (Controllo •
centralizzato da 1 a 4) viene annullata secondo le operazioni programmate.
Funzionamento dal controllore del sistema
[Arresto + impostazione per disabilitare il funzionamento RC]
[Arresto + impostazione per abilitare il funzionamento RC]
tato *3
*2
IT
Funzionamento del
condizionatore d’aria
Funzionamento del
telecomando
In arresto In arrestoIn arresto
In
funzione
Disabilitato
In funzione
Disabilitato Disabilitato
AbilitatoAbilitato
Abilitato
*1
*1 Se il funzionamento del telecomando è abilitato o disabilitato dipende
dall’impostazione del giorno precedente.
00:0200:7100:2100:8 13:00 18:00
IT-19

2. Interruzione di corrente
Se il condizionatore d’aria è in funzione quando viene tolta la corrente, il condizionatore d’aria rimane spento (OFF)
quando la corrente viene ripristinata. Inoltre, se il il funzionamento del telecomando era disabilitato quando è stata
tolta la corrente, viene abilitato per alcuni minuti quando la corrente viene ripristinata.
Le operazioni di programmi programmate per ore che vengono dopo il ripristino della corrente funzionano come •
al solito.
Le impostazioni dei programmi sono conservate nella memoria non volatile del timer programmatore, perciò non •
vengono cancellate in caso di un’interruzione della corrente. Inoltre l’ora corrente e il giorno odierno della
settimana sono conservati per un massimo di 100 ore dalla batteria interna.
Impostazioni del timer programmatore (Esempio)
Funzionamento quando non viene tolta la corrente
8:00 12:00 17:00 20:0013:00 18:00
In arresto In arrestoIn arresto
In arresto
Funzionamento del
In funzione In funzione
In funzione
condizionatore d’aria
Funzionamento del
telecomando
*1
Abilitato
Disabilitato
Abilitato
*1 Se il funzionamento del telecomando è abilitato o disabilitato dipende
dall’impostazione del giorno precedente.
Funzionamento quando viene tolta la corrente alle 15:00 e in seguito viene ripristinata
La corrente è stata tolta qui.
15:00
00:7100:2100:8
Funzionamento del
condizionatore d’aria
Funzionamento del
telecomando
In arresto
*1
In funzione In funzione
Abilitato AbilitatoDisabilitato Disabili-
In arresto
In arresto
corrente
Interruzione di
Disabilitato
In funzione
*2
Disabilitato
20:0013:00 18:00
In arresto
tato
IT-20
*1 Se il funzionamento del telecomando è abilitato o disabilitato dipende
dall’impostazione del giorno precedente.
*2 Il funzionamento del telecomando è abilitato per alcuni minuti dopo che la
corrente viene ripristinata.

Soluzione dei problemi
Prima di richiedere l’assistenza, controllare i seguenti punti.
Problema Causa/Rimedio
che lampeggia sul display. Il timer programmatore sta eseguendo le
comunicazioni iniziali con le unità interne collegate.
Attendere che le comunicazioni fi niscano.
I condizionatori d’aria non funzionano secondo la
programmazione quando arriva l’ora impostata.
I condizionatori d’aria possono essere avviati e
arrestati dal telecomando anche se il programma
disabilita il funzionamento del telecomando.
lampeggia nell’area di visualizzazione
dell’ora corrente.
Controllare prima di richiedere l’assistenza
Il timer è stato disabilitato. (Vedere a pagina IT-17)
È stato programmato un giorno di ferie. (Vedere a
pagina IT-16)
La corrente al condizionatore d’aria è stata tolta e in
seguito ripristinata. (Vedere a pagina IT-20)
La corrente al condizionatore d’aria è stata tolta per
un lungo periodo di tempo. Impostare di nuovo l’ora
corrente e la data odierna. (Vedere le pagine IT-6 e
IT-7)
Se il problema persiste nonostante aver eseguito il rimedio suddetto, arrestare il timer programmatore, spegnere
l’unità e comunicare il numero di serie e il problema al proprio rivenditore. Non provvedere alla manutenzione da soli
poiché ciò è pericoloso.
IT
IT-21

Índice
Pagina
Informações sobre o produto ..........................................................................PT-2
Símbolos de alerta .........................................................................................PT-2
Localização da instalação ..............................................................................PT-3
Requisitos eléctricos.......................................................................................PT-3
Instruções de segurança ................................................................................PT-3
Nomes e funções das peças ..........................................................................PT-4
Utilizar o temporizador....................................................................................PT-5
Defi nir a hora actual ...............................................................................PT-6
Defi nir o dia da semana .........................................................................PT-7
Confi gurar as operações programadas ..................................................PT-8
Erros de defi nição ................................................................................PT-10
Como verifi car horas dos programas ...................................................PT-11
Como copiar as horas dos programas .................................................PT-12
Como defi nir férias numa semana de operação planeada ...................PT-16
Como desactivar a operação do temporizador ....................................PT-17
Como apagar os programas .................................................................PT-18
Informações importantes a não esquecer ....................................................PT-19
Resolução de problemas ..............................................................................PT-21
Informações sobre o produto
Se tem alguma questão ou problema respeitante ao seu aparelho de ar
condicionado vai necessitar da informação que se segue. O número do modelo
e da série encontram-se na placa identifi cadora na parte inferior do aparelho.
Número do modelo Número de série
Data de compra
Endereço do concessionário
Telefone
Símbolos de alerta
Os símbolos que se seguem são utilizados neste manual para o alertar
sobre condições potencialmente perigosas para os utilizadores, pessoal
de manutenção ou o próprio aparelho:
PT-2
Este símbolo refere-se a um perigo ou mau
manuseamento que pode resultar em
ferimentos pessoais severos ou morte.
Este símbolo refere-se a um perigo ou mau
manuseamento que pode resultar em
ferimentos pessoais, danos ao produto ou
aos objectos que o cercam.

Localização da instalação
Recomendamos que este temporizador seja instalado adequadamente •
por um técnico de instalação qualifi cado de acordo com as instruções
de instalação fornecidas com o temporizador.
Não instale o temporizador num local em que haja fumos ou gases •
infl amáveis, ou num local extremamente húmido, como uma estufa.
Não instale o temporizador junto de objectos geradores de calor.•
Requisitos eléctricos
Todas as ligações devem estar de acordo com os requisitos eléctricos 1.
locais. Consulte o seu concessionário ou um electricista qualifi cado para
mais detalhes.
As ligações devem ser feitas por um electricista qualifi cado.2.
Para aquecer o sistema, tem de o ligar à
corrente eléctrica pelo menos cinco (5) horas
antes de o utilizar. Mantenha o aparelho ligado
à corrente eléctrica excepto se não o pretender
utilizar durante uma período de tempo
prolongado.
Instruções de segurança
Leia este manual de instruções cuidadosamente antes de utilizar este •
temporizador. Se ainda tiver algumas difi culdades ou problemas
consulte o seu concessionário.
Este aparelho tem por fi nalidade oferecer-lhe condições confortáveis •
na sala. Utilize-o apenas para esse fi m como descrito neste Manual de
Instruções.
Não toque na unidade com as mãos molhadas.•
Nunca utilize ou armazene gasolina ou outros vapores ou líquidos •
infl amáveis perto do aparelho de ar condicionado — é muito
perigoso.
Este aparelho de ar condicionado não tem ventilador para retirar ar •
fresco do exterior. Deve abrir frequentemente portas e janelas
quando utiliza aquecimentos a gás ou óleo na mesma sala, pois
estes consomem grande quantidade de oxigénio do ar. De outra
maneira, em casos extremos, podem ocorrer casos de sufocação.
Não ligue e desligue o aparelho de ar condicionado utilizando o •
interruptor principal. Use o botão de operação ON/OFF.
Não coloque nada na saída de ar da unidade exterior. É muito •
perigoso devido à alta velocidade de rotação do ventilador.
Não deixe crianças brincar com o aparelho de ar condicionado.•
Não arrefeça ou aqueça demasiado o sala quando estiverem presentes •
bebés ou pessoas inválidas.
PT
PT-3

Nomes e funções das peças
Botões de operação
A: Botão PROGRAM
B: Botões PROG. COPY
C: Botão CLEAR
D: Botões de definição
A: Botão PROGRAM Utilize este botão para defi nir os programas e introduzir as defi nições dos
programas.
B: Botões PROG. COPY Utilize este botão para copiar programas para grupos ou dias específi cos
num horário. (Consulte a página PT-12)
C: Botão CLEAR Prima este botão para apagar as defi nições do programa apresentado
actualmente.
O programa actual não é apagado, excepto se premir o botão •
depois de premir o botão CLEAR.
D: Botões de defi nição Utilize este botão para fazer defi nições dos programas e acertar a hora actual.
Prima este botão para defi nir os grupos para a operação programada.
Prima este botão para defi nir o dia da semana e os dias da operação
programada.
Prima este botão para acertar a hora actual e as horas utilizadas na
operação programada.
Utilize este botão para iniciar/parar as unidades internas através do
temporizador.
Utilize este botão para activar/desactivar a operação do telecomando através
do temporizador.
Utilize este botão para defi nir a hora de activação da operação programada.
As defi nições dos programas não são introduzidas, excepto se premir o •
botão no fi m das operações de defi nição.
E: Botão HOLIDAY Prima este botão para defi nir e cancelar férias durante uma semana de
operação planeada.
F: Botão CANCEL Prima este botão para cancelar a operação da defi nição do programa actual,
a operação de cópia ou a operação de defi nição de férias. Quando premir
sem soltar o botão CANCEL durante 2 segundos, a operação de cópia ou da
defi nição actual é cancelada e reaparece o visor normal.
G: Botão TIMER OFF Prima este botão para desligar o temporizador quando não o utilizar durante
um longo período de tempo. Quando premir sem soltar este botão durante
2segundos,
executados até voltar a premir sem soltar o botão durante 2 segundos.
Algumas das funcionalidades acima são desactivadas quando desligar a •
unidade. Se premir o botão de uma funcionalidade desactivada,
aparece no visor.
Para mais informações, contacte o seu revendedor.
aparece no visor. Os programas não podem ser
E: Botão HOLIDAY
F: Botão CANCEL
G: Botão TIMER OFF
PT-4

Visor
AB C D
F
G
H
IJ
A: Dia da semana
B: Indicação do horário dos
programas
C: Indicação do horário de
()
férias
D: Indicação ERROR Aparece quando ocorrer um erro durante a defi nição do temporizador.
E: Programa do temporizador Mostra os programas do temporizador defi nidos. Indica também a origem/
F: Nº de grupo É possível mostrar e seleccionar até 8 grupos.
G: Indicação (Função
desactivada)
()
()
Indica o dia da semana.
Aparece por baixo dos dias com programas planeados.
Aparece à volta das férias planeadas. (Consulte a página PT-16)
destino da cópia durante a cópia de programas de grupo.
Aparece se desactivar a funcionalidade seleccionada durante a instalação.
E
H: Indicação TIMER OFF Aparece quando desligar o temporizador.
I: Indicação do modo de
cópia
J: Hora actual Mostra a hora actual num relógio de 24 horas. Mostra também as defi nições
Aparece quando copiar um programa para um grupo ou dia do horário.
nos vários modos de defi nição.
Utilizar o temporizador
Para utilizar o temporizador, siga os passos apresentados em seguida.
PASSO 1 Ligue o aparelho de ar condicionado.
Ligue o aparelho de ar condicionado ligado ao temporizador. O temporizador efectua a •
comunicação inicial com as unidades internas, durante a qual
NOTA
Não desligue a corrente eléctrica nos períodos de aquecimento e arrefecimento. (Este
procedimento mantém o aquecedor do cárter ligado, que protege o compressor no arranque.) Se o
aparelho de ar condicionado estiver desligado durante um longo período de tempo, ligue a corrente
5 horas antes de utilizar o aparelho.
pisca no visor.
PT
PASSO 2 Efectue as defi nições iniciais do temporizador.
Defi na a hora actual e o dia da semana. (Consulte a página PT-6)•
PASSO 3 Confi gure os programas do temporizador.
Efectue as defi nições da operação programada. (Consulte a página PT-8)•
PT-5

Defi nir a hora actual
Defi na a hora actual. (Exemplo: Quando a hora actual for 12:45)
PASSO 1 Prima sem soltar o botão SET e prima o botão HH para
defi nir a hora.
A hora aumenta uma hora cada vez que tocar no botão •
HH enquanto estiver a premir sem soltar o botão SET.
A hora desloca-se rapidamente quando premir sem •
soltar os botões SET e HH. (Exemplo: Para defi nir
12:00, liberte o botão HH quando aparecer “12”.)
Quando libertar o botão SET, a hora é defi nida e a •
indicação muda de intermitente para acesa.
PASSO 2 Prima sem soltar o botão SET e prima o botão MM
para defi nir os minutos.
Os minutos aumentam um minuto cada vez que tocar •
botão MM enquanto estiver a premir sem soltar o botão
SET.
Os minutos deslocam-se rapidamente quando premir •
sem soltar os botões SET e MM. (Exemplo: Para
defi nir 00:45, liberte o botão MM quando aparecer
“45”.)
Quando libertar o botão SET, os minutos são defi nidos •
e a indicação muda de intermitente para acesa.
NOTA
O botão HH ou MM não altera a hora.•
PT-6

Defi nir o dia da semana
Defi na o dia da semana. (Exemplo: Quando for Quarta-feira)
PASSO 1 Prima sem soltar o botão SET e prima o botão DAY
para defi nir o dia da semana.
• pisca e move um dia da semana cada vez que
tocar no botão DAY enquanto estiver a premir sem
soltar o botão SET.
Quando libertar o botão SET, o dia da semana é •
defi nido e a indicação muda de intermitente para
acesa.
NOTA
O botão DAY não altera o dia da semana.•
PT-7
PT

Confi gurar as operações programadas
Defi na correctamente a hora actual e o dia da semana.
Se não estiverem defi nidos correctamente, os programas não serão
executados conforme previsto.
É possível defi nir até 6 operações programadas por dia para cada grupo e •
dia da semana.
É possível defi nir uma combinação das operações apresentadas em •
seguida para cada programa do temporizador.
Ligar/desligar o aparelho de ar condicionado –
Activar/desactivar o telecomando *1 –
Para alterar as defi nições de um programa existente, utilize o procedimento •
utilizado para confi gurar um programa novo.
*1 A defi nição de activação/desactivação do telecomando é desactivada
conforme as condições de instalação. Se estiver, aparece no visor quando premir o botão .
Para mais informações, contacte o seu revendedor.
PASSO 1 Prima o botão PROGRAM para seleccionar um
grupo.
Quando premir o botão PROGRAM, o nº de grupo e o •
dia da semana começam a piscar e a indicação da
hora actual muda para um “PG-1” intermitente.
Prima o botão GROUP para seleccionar um grupo •
para operação programada e, em seguida, prima o
botão SET.
Exemplos de defi nições
NOTA
A selecção de grupos é desactivada conforme as •
condições de instalação. Se estiver, vá para o passo
seguinte.
O número de grupos seleccionáveis é defi nido •
durante a instalação.
PASSO 2 Prima o botão DAY e seleccione um dia da semana
para a operação programada.
Quando premir o botão SET, o marcador do horário •
de programas
e, em simultâneo, a hora defi nida no programa
começa a piscar. A indicação da hora actual muda
para um “PG-2” intermitente.
NOTA
O dia da semana seleccionado actualmente pisca •
lentamente neste momento.
()
muda de intermitente para aceso
PT-8

PASSO 3 Confi gure o programa e prima o botão SET.
Seleccione a operação do temporizador com o botão •
(temporizador ligado/desligado) e o botão
(activação/desactivação do telecomando).
Defi na o tempo de accionamento com os botões HH e
MM e prima o botão SET.
Quando premir o botão SET, a hora defi nida no •
programa
simultâneo, a hora defi nida no programa começa
a piscar.
NOTA
Sempre que premir o botão • , a indicação do
temporizador muda pela seguinte ordem: (ON)
(OFF) → sem indicação.
→
Sempre que premir o botão • , a indicação do
telecomando muda pela seguinte ordem:
(activado) → (desactivado) → sem indicação.
A defi nição de activação/desactivação é desactivada •
conforme as condições de instalação. Neste caso, só
pode defi nir Timer ON/OFF.
PASSO 4 Confi gure os programas ~ da mesma forma.
Quando premir o botão SET, as defi nições são•
dispostas automaticamente por ordem.
Se premir o botão SET sem efectuar qualquer •
defi nição nova no programa, o programa
recomeça a piscar e as defi nições podem ser
alteradas.
Se premir o botão SET depois de confi gurar o •
programa , o programa recomeça a piscar.
muda de intermitente para acesa e, em
PASSO 5 Prima o botão PROGRAM.
As defi nições do programa são introduzidas e volta ao •
visor normal.
PASSO 6 Confi gure a operação programada para outros grupos e dias da semana da mesma forma.
Os programas já confi gurados podem ser copiados para outros grupos e dias da semana. (Consulte a
página PT-12)
NOTA
A defi nição de hora “0:00” é interpretada como meia-noite.•
Para cancelar as defi nições dos programas durante a confi guração dos programas •
(enquanto “PG-1” ou “PG-2” estiver a piscar no visor), prima sem soltar o botão CANCEL
durante mais de 2 segundos. Reaparece o visor normal.
Se cancelar as defi nições sem premir o botão PROGRAM, as defi nições não são introduzidas.•
PT
PT-9

Erros de defi nição
Se defi nir a hora como apresentado em seguida durante a confi guração de um programa, aparece a mensagem
“ERROR” (a indicação
pisca). Por isso, corrija a defi nição da hora.
Se as horas dos programas forem iguais
PASSO 1 Sempre que premir o botão SET, o modo de defi nição comuta entre operações programadas com a
mesma defi nição de hora ( e no exemplo acima). Por isso, seleccione a defi nição de hora que
pretende corrigir.
PASSO 2 Altere a defi nição de hora com os botões HH e MM para que as horas não fi quem iguais.
PASSO 3 Prima o botão SET e verifi que se a mensagem “ERROR” não aparece.
PASSO 4 Prima o botão PROGRAM para fechar o modo de defi nição.
Exemplos das defi nições das horas que não provocam erros
As defi nições das horas apresentadas em seguida não geram um erro.
1) Quando as horas de activação e desactivação
são alternadas
2) Quando a hora de desactivação é mais cedo do
que a hora de activação
PT-10

Como verifi car horas dos programas
Pode verifi car as horas programadas para cada grupo e dia da semana.
PASSO 1 Prima o botão GROUP e seleccione um grupo cuja
hora pretenda verifi car.
NOTA
A selecção de grupos é desactivada conforme as •
condições de instalação. Se estiver, vá para o
passo seguinte.
PASSO 2 Prima o botão DAY.
Quando premir o botão DAY pela primeira vez, o dia •
seguinte da semana começa a piscar e aparecem
as defi nições do programa para amanhã.
Sempre que premir o botão DAY, as defi nições do •
programa mudam sequencialmente por dia da
semana.
Se premir o botão GROUP, as defi nições do •
programa de outro grupo no mesmo dia aparecem
no visor.
PASSO 3 Termine a verifi cação.
Prima o botão CLEAR. Reaparece o visor normal.•
NOTA
Se premir sem soltar o botão CANCEL durante •
mais de 2 segundos, volta também ao visor normal.
PT
PT-11

Como copiar as horas dos programas
É possível copiar o programa já defi nido de um dia para outro dia (Cópia do programa do dia), assim como copiar a
semana completa programada para outro grupo (Cópia do programa do grupo).
Exemplo da cópia do programa do dia
(Copiar o programa de Segunda-feira para Terçafeira)
Como copiar programas do dia
PASSO 1 Prima o botão PROG. COPY DAY.
O nº do grupo e o dia • da semana começam a
piscar e “CP-1” começa a piscar na área de
visualização da hora actual. Neste estado,
seleccione um grupo em que possa copiar
programas do dia com o botão GROUP.
Exemplo da cópia de programa do grupo
(Copiar o programa do grupo nº 1 para o grupo
nº2)
PASSO 2 Seleccione um programa do dia de origem para
copiar.
Sempre que premir o botão DAY, • move-se no
visor dos dias da semana. Por isso, seleccione um
dia da semana que servirá como origem da cópia.
Assim que seleccionar o dia de origem da cópia, •
prima o botão SET para o defi nir. O visor muda para
seleccionar um dia de destino da cópia.
PASSO 3 Seleccione um dia de destino da cópia.
Quando o temporizador estiver preparado para •
seleccionar um dia de destino da cópia, “CP-2”
começa a piscar na área de visualização da hora
actual, enquanto o dia de origem da cópia pisca nos
dias da semana. Por isso, seleccione um dia da
semana como o destino da cópia com o botão DAY.
PT-12

PASSO 4 Prima o botão SET para copiar.
Prima o botão SET e aparece o marcador do •
()
horário de programas
PASSO 5 Seleccione outros dias de destino de cópia, se
pretendido.
Pode copiar o programa do dia de origem •
seleccionado para outros dias, premindo várias
vezes o botão DAY para seleccionar um dia da
semana e, em seguida, o botão SET para o defi nir.
NOTA
Se premir o botão CLEAR, desliga o marcador do •
horário de programas
cópia.
.
()
e cancela a operação de
PASSO 6 Prima o botão PROG. COPY DAY para introduzir o
programa copiado nos dias seleccionados.
Reaparece o visor normal.•
NOTA
Se um programa já existir no dia de destino da cópia, o programa copiado recentemente substitui o •
programa existente.
Se copiar acidentalmente um programa no modo de cópia de programas do dia e premir o botão •
CANCEL mais de 2 segundos, o programa volta ao ponto antes de premir o botão PROG. COPY DAY no
passo 1. (Todas as alterações e operações de cópia efectuadas até esse ponto são apagadas.)
PT
PT-13

Como copiar programas de grupo
PASSO 1 Prima o botão PROG. COPY GROUP.
“CP-1” começa a piscar na área de visualização da •
hora actual e “CP” (cópia) começa a piscar na área
de programas
PASSO 2 Seleccione um programa do grupo de origem para
copiar.
Seleccione um grupo de origem da cópia com o •
botão GROUP.
Assim que seleccionar o grupo de origem da cópia, •
prima o botão SET para o defi nir. O visor muda para
seleccionar um grupo de destino da cópia.
para indicar a origem da cópia.
PASSO 3 Seleccione um grupo de destino da cópia.
Depois de premir o botão SET, “CP-2” começar a •
piscar na área de visualização da hora actual, o nº
do grupo de origem da cópia aparece na área do
programa e “PA” (colar) começa a piscar na
área do programa para indicar o destino da
cópia.
Seleccione um grupo de destino da cópia com o •
botão GROUP.
PASSO 4 Introduza o grupo de destino da cópia
seleccionado.
Quando premir o botão SET, o número do grupo de •
destino da cópia aparece na área do nº de
programa.
NOTA
Se seleccionar um grupo dos números de 1 a 4 •
como o grupo de destino da cópia, o número
aparece na área do programa
um grupo dos números de 5 a 8 como o grupo de
destino da cópia, o número aparece na área do
programa .
. Se seleccionar
PT-14

PASSO 5 Seleccione outros grupos de destino da cópia, se
pretendido.
Pode copiar os programas do grupo de origem •
seleccionado para outros grupos, premindo várias
vezes o botão GROUP para seleccionar um grupo
e, em seguida, o botão SET para o defi nir.
NOTA
Se seleccionar um grupo dos números de 1 a 4 •
como o grupo de destino da cópia, o número
aparece na área do programa . Se seleccionar
um grupo dos números de 5 a 8 como o grupo de
destino da cópia, o número aparece na área do
programa .
PASSO 6 Prima o botão PROG. COPY GROUP para introduzir
os programas copiados nos grupos seleccionados.
Reaparece o visor normal.•
NOTA
Se um programa já existir no grupo de destino da cópia, o programa copiado recentemente substitui o •
programa existente.
Se copiar acidentalmente um programa no modo de cópia de programas do grupo e premir o botão •
CANCEL mais de 2 segundos, o programa volta ao ponto antes de premir o botão PROG. COPY GROUP
no passo 1. (Todas as alterações e operações de cópia efectuadas até esse ponto são apagadas.)
PT
PT-15

Como defi nir férias numa semana de operação planeada
É possível defi nir as operações programadas para um dia específi co durante a semana, defi nindo esse dia como
férias.
Quando as férias defi nidas passarem, a defi nição de férias é cancelada e a operação é retomada como •
programada na semana seguinte.
É possível seleccionar férias para a semana começada a partir de hoje. Se seleccionar hoje como férias, a •
defi nição de férias é cancelada a partir da operação programada seguinte. (Dependendo do programa, se o
programa já estiver em execução, o programa pode não parar.)
Exemplo de defi nição
Hoje é Quinta-feira e Sextafeira é definida como férias.
PASSO 1 Prima o botão GROUP para seleccionar um grupo
para ir para férias.
NOTA
Dependendo das condições de instalação, a •
selecção de grupo é desactivada ou defi nida para
que todos os grupos sejam seleccionados
automaticamente para a função de férias. Se
estiver, vá para o passo seguinte.
PASSO 2 Prima o botão HOLIDAY.
“HL” começa a piscar na área de visualização da •
hora actual e o dia da semana começa a piscar.
Quando chegar a Sexta-feira,
o programa definido para
esse dia não é executado.
Quando chegar a Sábado, a
definição de férias de Sextafeira é cancelada.
PASSO 3 Seleccione um dia como férias com o botão DAY e
prima o botão SET.
“ • ” aparece nas férias seleccionadas.
Para seleccionar outras férias, seleccione um dia •
com o botão DAY e defi na-o com o botão SET.
Se cometer um erro ou quiser cancelar as férias, •
prima o botão CLEAR.
PT-16

PASSO 4 Prima o botão HOLIDAY para introduzir as férias.
Reaparece o visor normal.•
Como desactivar a operação do temporizador
Para parar a operação programada durante uma semana ou mais, pode desactivar todos os programas do
temporizador.
Assim que desactivar o temporizador, as operações programadas não são executadas até efectuar o •
procedimento apresentado em seguida.
NOTA
O telecomando pode ser defi nido para desactivar o temporizador para grupos individuais durante a instalação. •
Neste estado, o temporizador só é desactivado para o grupo seleccionado. Por isso, prima o botão GROUP para
confi rmar o grupo seleccionado.
Prima sem soltar o botão TIMER OFF durante
mais de 2 segundos
• aparece no visor. O temporizador é
desactivado a partir do próximo programa
planeado.
Para voltar a ligar o temporizador, prima sem
soltar o botão TIMER OFF durante mais de 2
segundos
• desliga-se e o temporizador é
activado a partir do próximo programa planeado.
PT
PT-17

Como apagar os programas
Prima o botão PROGRAM.
Para cancelar dias específi cos Para cancelar programas individuais em dias
Quando premir o botão PROGRAM, o nº de grupo e o dia da •
semana começam a piscar e a indicação da hora actual muda
para um “PG-1” intermitente.
Prima o botão GROUP para seleccionar um grupo para apagar.•
NOTA
A selecção de grupos pode ser desactivada durante a •
instalação. Se estiver, vá para o passo seguinte.
Se premir o botão CANCEL durante mais de 2 segundos, o •
programa volta ao ponto anterior antes de premir o botão
PROGRAM. (Todas as operações realizadas até esse ponto são
apagadas.)
específi cos
Seleccione um dia para cancelar com o botão •
DAY e prima o botão CLEAR. Todas as
defi nições das operações programadas de
a são apagadas. O visor aparece como
apresentado acima.
Prima o botão PROGRAM para introduzir a •
operação de eliminação. O visor normal volta
sem o marcador do horário de programas
por baixo dos dias da semana.
()
Seleccione um dia e prima o botão SET. As •
operações programadas de a
começam a piscar em rotação. Por isso, prima
o botão CLEAR quando a operação
programada para apagar começar a piscar. (As
restantes operações programadas são
dispostas automaticamente por ordem.)
Prima o botão PROGRAM para introduzir a •
operação de eliminação. Reaparece o visor
normal.
Exemplo:
Visor depois de apagar a
operação programada acima
PT-18

Informações importantes a não esquecer
1. Operação do aparelho de ar condicionado e do temporizador
Os aparelhos de ar condicionado funcionam de acordo com as operações programadas com o temporizador (ligar/
desligar e activar/desactivar o telecomando) ou um telecomando ligado, ou controlador do sistema.
Defi nições do temporizador (Exemplo)
Operação sem controlador do sistema
Se activar o telecomando, é possível ligar/desligar o aparelho de ar condicionado a partir do telecomando. (O •
aparelho de ar condicionado responde ao botão premido mais recentemente.)
8:00 12:00 17:00 20:0013:00 18:00
Desactivada DesactivadaDesactivada
Operação do aparelho
de ar condicionado
Operação do
telecomando
*1
*1 A activação ou a desactivação da operação do telecomando depende da defi nição do
dia anterior.
*2 Como a operação do telecomando é desactivada, a operação continua desactivada.
*3 O telecomando permanece desactivado no dia seguinte e até activar a defi nição de
activação/desactivação do telecomando.
Em execução Em execução
Activada ActivadaDesactivada
Operação com o controlador do sistema
Se activar o telecomando, é possível ligar/desligar o aparelho de ar condicionado a partir do telecomando. (O •
aparelho de ar condicionado responde ao botão premido mais recentemente.)
A defi nição de activação/desactivação do telecomando (Controlo centralizado de 1 a 4) é cancelada de acordo •
com as operações programadas.
Operação a partir do controlador do sistema
[Paragem + operação RC desactivada]
Desactivada *3
*2
[Paragem + operação RC activada]
Operação do aparelho
de ar condicionado
Operação do
telecomando
00:0200:7100:2100:8 13:00 18:00
Desactivada
Em
execução
Desactivada
Desactivada
Em
execução
Desactivada
Desactivada Desactivada
ActivadaActivada
Activada
*1
*1 A activação ou a desactivação da operação do telecomando depende da defi nição do
dia anterior.
PT-19
PT

2. Falha eléctrica
Se o aparelho de ar condicionado estiver a trabalhar durante uma falha eléctrica, o aparelho de ar condicionado
continua desligado quando a corrente eléctrica for restaurada. Se a operação do telecomando for desactivada
durante uma falha eléctrica, é activada alguns minutos após a restauração da corrente eléctrica.
As operações programadas planeadas para horas após a restauração da corrente eléctrica são executadas •
normalmente.
As defi nições dos programas são retidas na memória não volátil do temporizador. Por isso, não são apagadas no •
caso de uma falha eléctrica. A hora actual e o dia da semana são retidos durante um máximo de 100 horas
através da bateria interna.
Defi nições do temporizador (Exemplo)
Operação sem perda de corrente eléctrica
8:00 12:00 17:00 20:0013:00 18:00
Desactivada Desacti-
Operação do aparelho
de ar condicionado
Desactivada
Em execução Em execução
Desactivada
vada
Em
execução
Operação do
telecomando
*1
Activada
Desactivada
Activada
*1 A activação ou a desactivação da operação do telecomando depende da defi nição do
dia anterior.
Operação quando a corrente eléctrica é perdida às 15:00 e restaurada subsequentemente
Falha eléctrica aqui.
15:00
Desactivada
Operação do aparelho
de ar condicionado
Operação do
telecomando
*1
Desactivada
Em execução Em
execução
Activada
00:7100:2100:8
Desactivada
Desacti-
Falha eléctrica
vada
execução
Activada -itcaseDadavitcaseD
20:0013:00 18:00
Em
*2
*1 A activação ou a desactivação da operação do telecomando depende da defi nição do
dia anterior.
*2 A operação do telecomando é activada alguns minutos após a restauração da
corrente eléctrica.
Desactivada
Desactivada
vada
PT-20
 Loading...