

Page 1
CAR DVD PLAYER/RECEIVER
DVD RECEIVER WITH FULL DOT MATRIX DISPLAY
CQ-D7400W
CAR DVD PLAYER/RECEIVER
Operating Instructions
≥ Please read these instructions carefully before using this product and save this manual for future use.
Page 2
Features
DVD Video Player
DVD video, Video CD, and Music CD Playback
MP3 Playback from CD-R/RW discs
Support for 5.1 channel surround
systems (Dolby Digital and dts)
This player is equipped with Dolby Digital and dts
decoders, so by simply adding 6 speakers (2
channels in front on the right and left, 1 center
channel, 2 channels in the rear on the right and left,
and a 0.1 sub-woofer channel) and a monitor to the
system, playback in 5.1 channel surround sound
with an ultra realistic feel is possible.
※The center speaker and sub-woofer require a
separate external amplifier.
Built-in Dolby Pro Logic II decoder
Dolby Pro Logic II can decode and playback in 5.1 channel sound DVD videos recorded with
the sound on 2 channels, music CDs, MP3 files, radio or virtually any stereo source.
This player allows you to select from the 3 modes of MOVIE, MUSIC or MATRIX.
In addition, in MUSIC mode, you can adjust the 3 parameters of PANORAMA, DIMENSION
and CENTER WIDTH. (page 44)
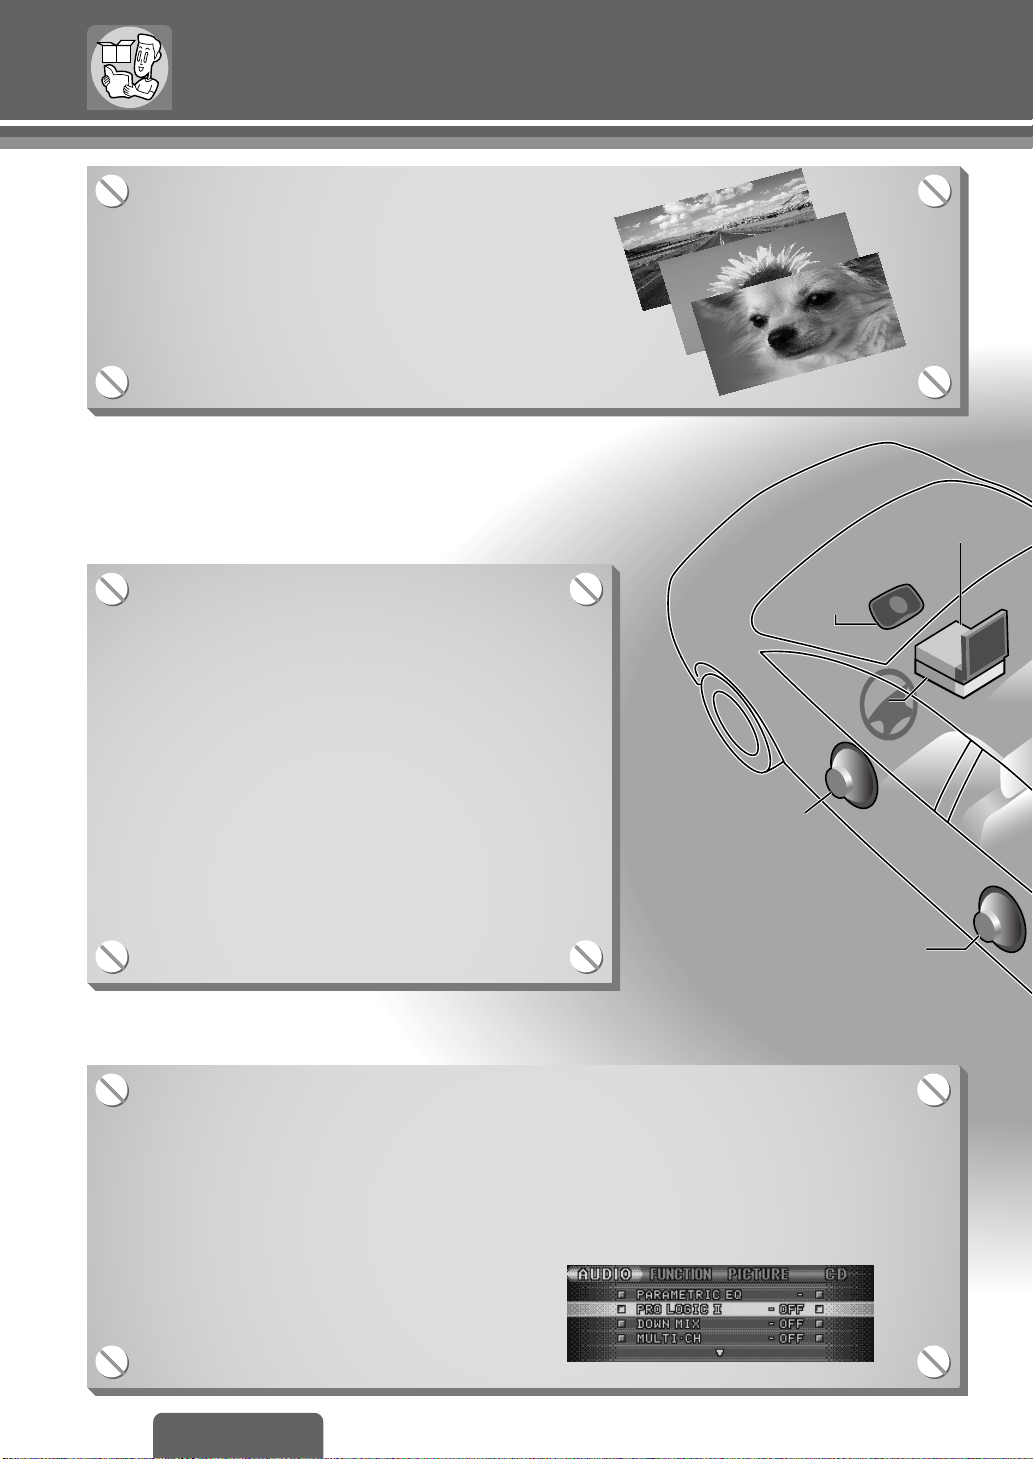
DVD Receiver
CQ-D7400W
In-Dash Monitor
CY-TV7200W (option)
Surround speaker
CJ-DD173 (option)
Front speaker
Center speaker
EAB-CF2 (option)
DVD Receiver
CQ-D7400W
In-Dash Monitor
CY-TV7200W (option)
Surround speaker
CJ-DD173 (option)
Front speaker
Center speaker
EAB-CF2 (option)
2
CQ-D7400W
Page 3
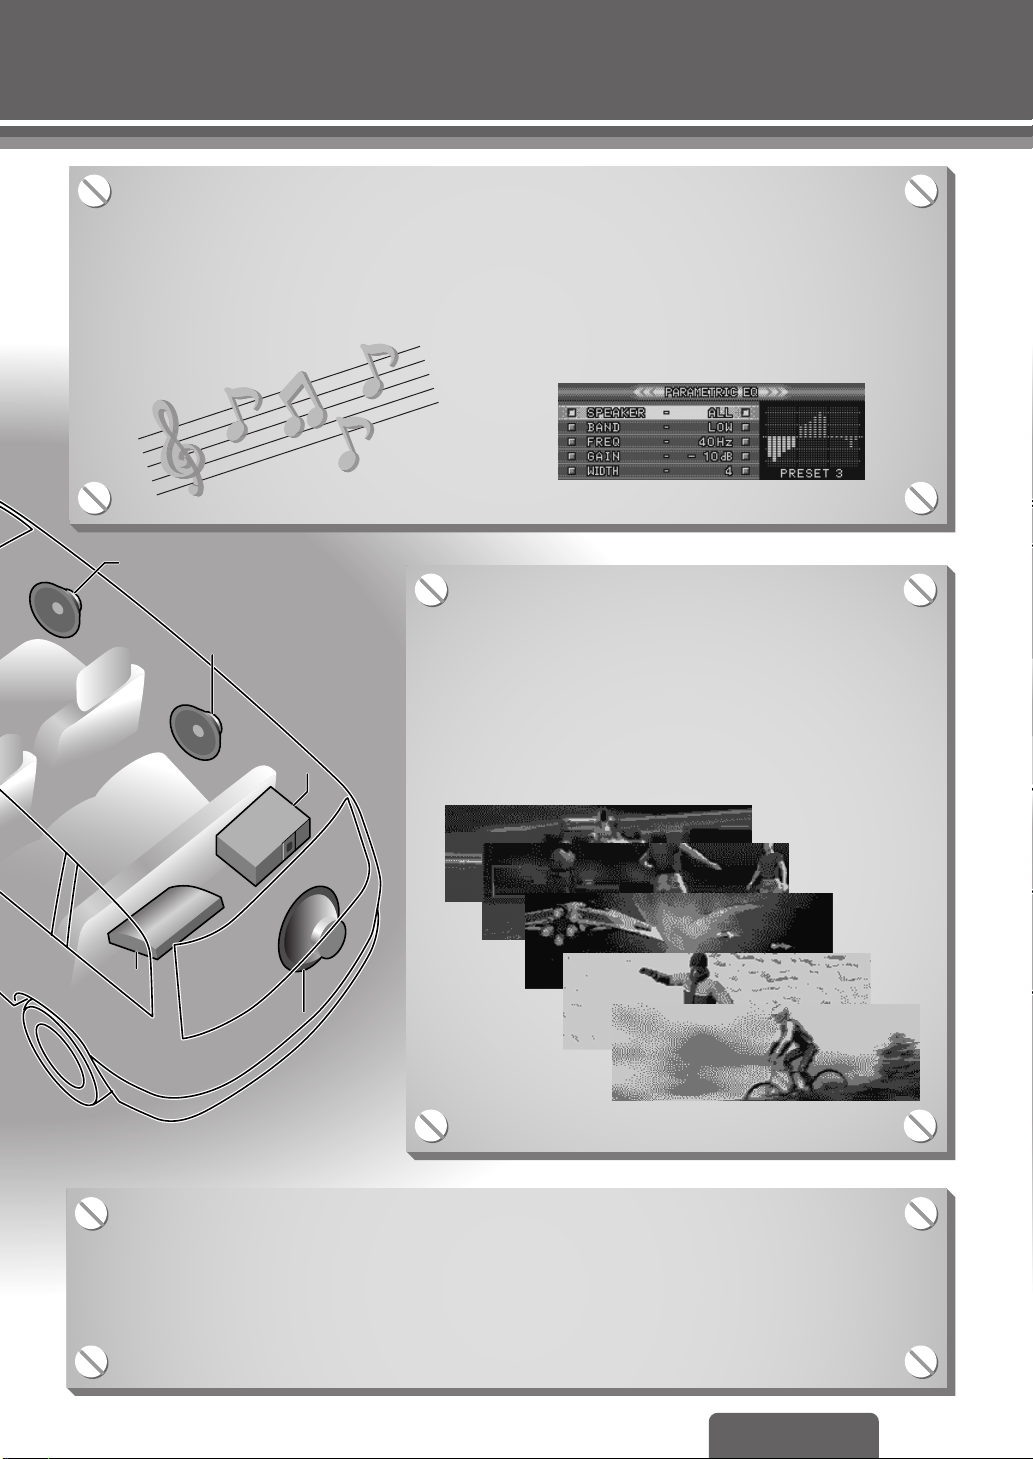
Built-in 3-band parametric equalizer
Since you can fine-tune the center frequency you want to emphasize, the WIDTH
(the level of the peaks on the equalizer curve), and the GAIN (increase/decrease
adjustment) on 3 bands - HIGH, MID and LOW, the sound quality can be precisely
adjusted to suit the characteristics of the vehicle’s interior. (page 42)
Front speaker
Front speaker
External
External
amplifiers
amplifiers
(option)
(option)
Surround speaker
Surround speaker
CJ-DD173 (option)
CJ-DD173 (option)
CD changer
CD changer
CX-DP880
CX-DP880
(option)
(option)
Subwoofer
Subwoofer
CJ-SFW300D
CJ-SFW300D
(option)
(option)
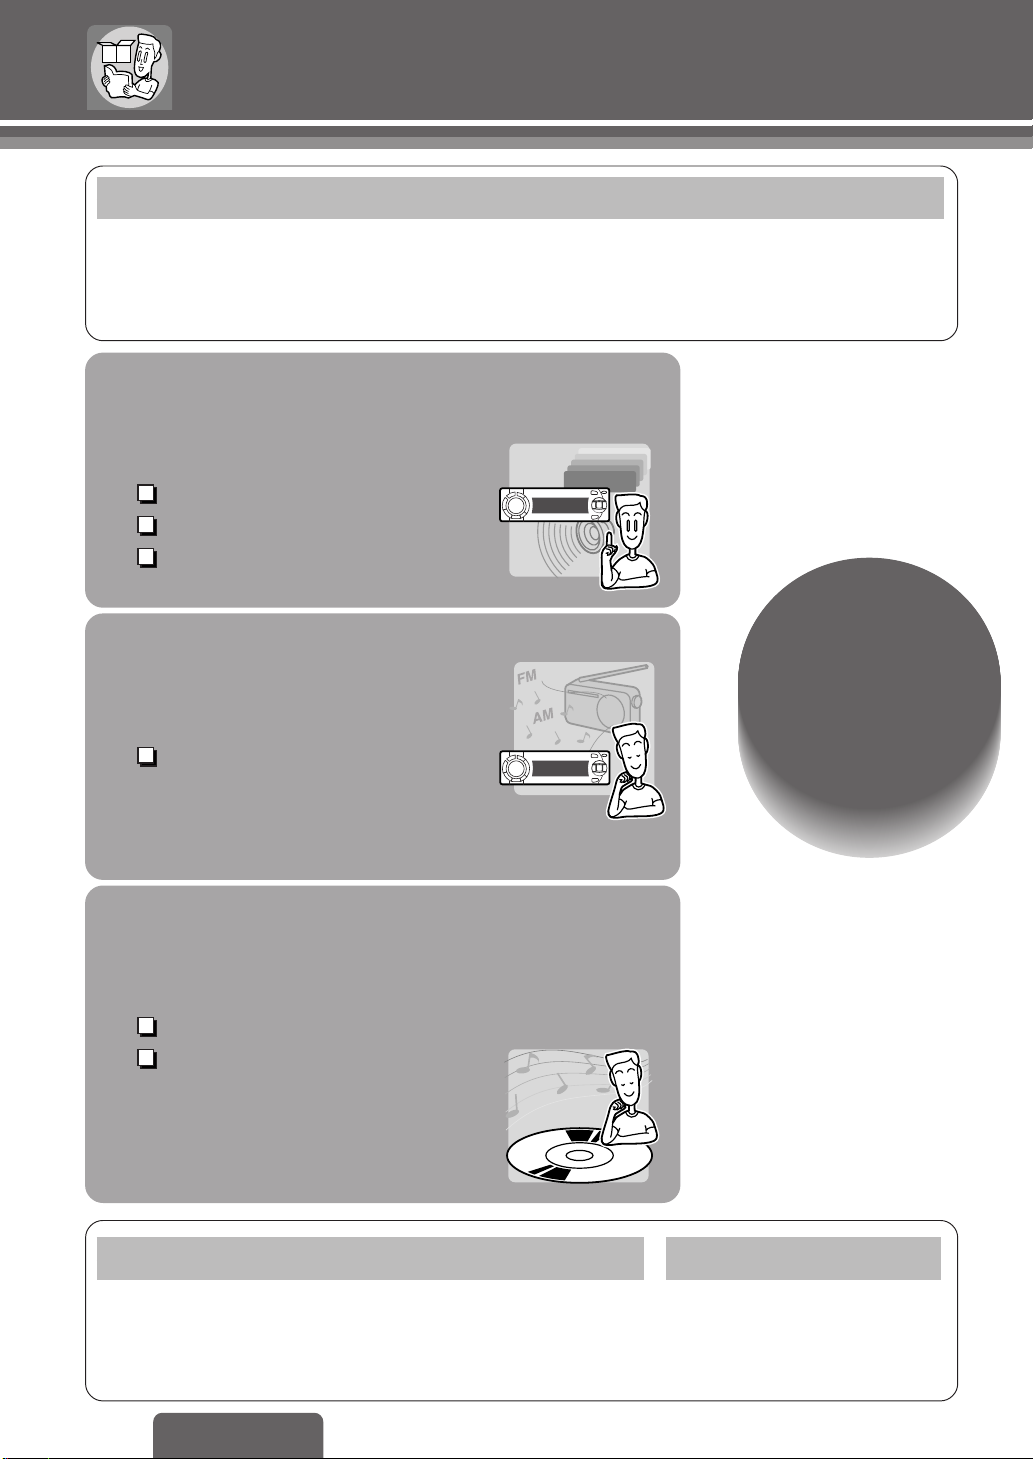
High Definition 3DDM
Display
The smooth and beautiful 4-tone expressions allow
you to enjoy colorful 3D graphics patterns.
You can select from 5 patterns of background screens
according to your preferences.
Other Features
CD-changer control
Direct Memory
18 FM and 6 AM presets with preset scan
(page 32)
(page 18)
(page 18)
3
CQ-D7400W
Page 4
Contents
Preparation
❏ For Your Safety (6)
❏ Reminders (9)
❏ Meaning of Symbols (10)
❏ Discs that can be Played Back (12)
Common Operations
Common Operations
❏ Accessories/
Remote Control Unit Preparation (13)
❏ Names and Functions of Parts (14)
Page 16
Power, SOURCE, VOLUME
Display Change
Mute/Attenuation
Radio
Radio
Page 18
Manual Preset Memory,
Auto Preset Memory (APM),
Preset Station Calling,
≥
Direct Memory (D
M)
Basic
Operations
Page 16
Disc Operations
Disc Operations
Page 20
Selecting a Menu Item
Stop, Chapter/Track/Folder/
File Selection,
Fast Forward/Fast Reverse,
Pause
When Required
❏ Troubleshooting (52)
❏ Notes on MP3 (60)
❏ Notes on Disc (62)
❏ Definition of Terms (63)
4
CQ-D7400W
❏ Language Code List (69)
❏ Specifications (70)
❏ After-Sales Service (71)
Installation
❏ Before installing and wiring the
player (64)
❏ Installation (65)
❏ Electrical Connections (66)
Page 5
Advanced
Operations
Page 23
Disc Operations Page 23
❏ Slow Playback, Direct title/chapter/track/folder Selection
❏ Switching the Subtitle Language/the Audio Language/
the Angle/between Stereo and Monaural
❏ DVD Menu, Title Menu, Dynamic range compression
❏ On-Screen Displays (OSD), Switching the text display
❏ Random Play, Folder Random Play, Scan Play,
Track/File Repeat Play, Chapter/Folder Repeat Play
CD Changer control Page 30
❏ Random/Disc Random Play, Scan/Disc Scan Play,
Repeat/Disc Repeat Play
DVD settings Page 34
Settings
Page 34
❏ Setting the Menu Language/Subtitle Language/Audio
Language, Setting the connected monitor’s aspect ratio,
Setting the video format, Setting On-Screen Messages,
Producing Audio that is audible at low volumes
Audio settings Page 36
Speaker settings
❏ Setting the absence/presence and size of each speaker,
Adjusting the output balance of each speaker, Adjusting
the Timing with which the Audio from Each Speaker
Reaches the Listener’s Positon
Sound settings
❏ How to adjust the sound quality to center on a particular
frequency, Changing 2 channel audio to 5.1 channel
Surround Playback, Changing Dolby Digital/dts audio to
2 channel Stereo Playback, Changing 2 channel Dolby
Digital and dts audio to 5.1 channel Surround Playback
Function settings Page 48
❏ Mute/Attenuation, Navigation mute level,
Button Operation Sound, Setting AUX input level
Picture (Display) settings Page 50
❏ Background Display Switching, Contrast, Clock adjustment
❏ Dimmer
CQ-D7400W
5
Page 6
For Your Safety
The following provides an explanation of rules that should always be observed in order to prevent harm to
the user and to others and to prevent damage to your property.
The level of damage and risk that may occur when a rule is ignored and the player is used improperly is divided
■
into the following categories.
Warning
Caution
■The types of rules are divided into the following categories.
(The following is only a portion of the picture marks.)
This mark indicates that, “There is a risk of serious injury or death.”
This mark indicates that, “There is a risk of injury or physical damage.”
This type of picture mark indicates something that you should not
do, i.e. “Forbidden.”
This picture mark indicates something that you must do, i.e.
“Compulsory.”
Warnings
Do not operate the player while driving
Do not focus on the image or display
Forbidden
Operating the player while driving or focusing
on the image or display could cause traffic
accidents due to inattention to what is in front
of you.
Always operate the player after bringing the
car to a stop in a safe place.
Do not use the player when it is broken
or there is some abnormality
In the unlikely event that the player breaks
(such as when no image is displayed or there is
no sound) or there is some abnormality (such
Forbidden
as when a foreign object is inside the player,
water was spilled on it, smoke comes out or the
player makes a strange smell), immediately
stop using the player and be sure to contact the
store from which you purchased your player or
a nearby service center.
Continuing to use the player in that condition
could cause accidents, fire or electrical shock.
Do not leave the remote control lying around
Forbidden
Do not attach an “MP3” file extension
to non-MP3 files
Forbidden
Store batteries where small children
cannot reach them
At the time of operation
If the remote control gets underfoot
and slides under the brake pedal and
such while you are driving, this could
interfere with your driving and lead to
a traffic accident.
<At the time of file creation>
The player will mistakenly play the file as
an MP3 file, which may cause a loud
noise that could damage your ears or
damage the speakers and such.
There is a risk that children could
swallow the batteries.
If a child does swallow a battery,
contact your doctor immediately.
6
CQ-D7400W
Page 7
Be sure to observe these rules.
Warnings
Never use the car’s safety equipment
for installing or grounding the player
Using the bolts, nuts and screws of the car’s
safety equipment (steering and brake systems,
fuel tank, etc.) could cause accidents.
Forbidden
Be sure to use fuses with the prescribed capacity
Have a professional technician replace the fuses
Use in DC 12V
Follow the instructions and only use the
accessories provided with the player and the
specified parts.
Using fuses that exceed the prescribed
capacity could cause the player to start
smoking, ignite or otherwise malfunction.
For replacement and repair of fuses,
contact the store from which you purchased
your player or a nearby service center.
-
grounded vehicles
This player is only for DC 12V
grounded vehicles. It cannot be used
in DC 24V vehicles (such as large
trucks, diesel vehicles designed for
cold climates, etc.).
Using this player in such vehicles
could cause fire or other malfunction.
-
At the time of installation
Do not disassemble, repair or modify
the player
Do not disassemble, repair or modify
the player, or cut the cord to connect
it to the power supply for another
Disassembly
Forbidden
device. This could cause fire, electrical
shock or other malfunction.
Run the cords so that they do not
interfere with driving or with entering
or exiting the car
Run the cords so that they do not
wrap around the steering wheel,
gearshift, brake pedal, etc. or around
your legs, and secure all the cords
together. Not doing so could cause
accidents or injury.
Be sure to disconnect the battery’s terminal while wiring and installing the player
Doing the wiring and installation with
-
the battery’s
connected could cause electrical
shock and injury due to a short
circuit accidents.
terminal still
Install the player after checking the
position of the car’s pipes, tank and
electrical wiring
When opening holes in the car body to
install the player, be careful not to
touch or interfere with the pipes, tank
or electrical wiring.
Doing so could cause fire or accidents.
Follow the instructions to install and
wire the player
Not following the instructions to
properly install and wire the player
could cause accidents or fire.
For safety reasons, always connect
the side brake cord to use the player
If the instructions are not followed to
properly wire the player, the safety
features may not operate, leading to
traffic accidents.
7
CQ-D7400W
Page 8
For Your Safety
Be sure to observe these rules.
Cautions
Do not put hands or fingers inside
moving parts or in the disc loading slot
Inserting hands or fingers could
cause injury or malfunction.
Be particularly careful that children
Forbidden
Do not use the player where it will get wet,
or where there is a lot of moisture or dust
Forbidden
Proper Use of the Batteries
Forbidden
follow this rule.
This could cause the player to start
smoking or ignite, or cause electrical
shock or other malfunction in some cases.
In particular, take care that the player
will not get wet when the car is washed
or when it rains.
Ruptured and leaking batteries can cause fire and injury, and can pollute the surroundings.
●
Only use the specified batteries.
●
Do not recharge, disassemble, deform or heat the batteries. Do not put them in fire or water.
Do not place them in contact with metal objects.
●
Do not leave the batteries or the remote control containing the batteries in places where
the temperature is extremely high (such as inside cars with all the windows closed,
or inside the car trunk, places where the sun shines directly on it, or near the heater).
●
Insert the batteries with the + and - ends as shown on the battery case.
●
Immediately replace used up batteries.
●
When not using the remote control for a long period of time, remove the batteries.
●
Insulate the batteries when disposing of or storing them. (Put them in a plastic bag or
wrap them with tape or something.)
At the time of operation
Do not put foreign objects inside the player
Putting metal objects or things that
burn easily inside the main unit could
cause short circuits or insulation failure,
Forbidden
leading to fire, electrical shock or other
malfunction. Be particularly careful that
children follow this rule.
Use the player at the proper volume setting
Driving when you are unable to
hear sounds around you or from
outside the car can cause accidents.
Disposal of the batteries
●
Obey local ordinances.
Cautions
At the time of installation
Always use the accessories provided with the player and the specified parts
Using parts other than those specified could damage the inside of the player or cause
the player to not be securely fastened and thus come loose, which could cause accidents,
malfunction or fire.
8
CQ-D7400W
Page 9
Do not damage the cords
Wire breaks and short circuits can cause electrical shock or fire.
●
Run the cords so that they do not get tangled in the moving parts (such as the seat rails),
screws or car body.
●
Forbidden
Do not damage, pull too hard, fold, twist, or work on the cords.
Do not place the cords near heating appliances or put heavy objects on the cords.
Cautions
At the time of installation
Do not block the player’s vent hole or
heat sink
Heat will build up inside the player
and could cause it to ignite or
otherwise malfunction.
Forbidden
Have a professional technician wire
and install the player
Professional skill and experience is
required to wire and install the player.
For safety’s sake, always ask the store
from which you purchased the player
to install and wire it for you.
Reminders
Always use the player with the side brake cord connected.
While the car is moving, DVD video/video CD images will not be output; it will be sound only.
Even when the car is stopped, images will not be output unless the side brake is on. (Safety feature)
Do not use the player except as an in-car system
●
Use of the player other than as an in-car system (for example, using it in pleasure boats or in the outdoors)
may cause the player to start smoking or ignite, or cause electrical shock, injury or malfunction.
Use the player with the car engine on
●
Using the player for a long time with the car engine off will run down the car battery.
When connecting the player to other devices
●
Carefully read the instruction manual for the device to be connected, and do the wiring properly.
When using a cell phone
●
Noise may occur depending on the position in which the cell phone is placed and the direction it points in.
Keep cell phones as far away from this player as possible.
Indemnification
●
Panasonic is not responsible in any way for damage that occurs due to fire, earthquakes, actions by third parties,
other accidents, the customer’s willfulness, negligence, misuse or use under other abnormal conditions.
●
Panasonic is not responsible in any way for incidental damage (such as loss of business profits, changes or
fading in memory contents) that occurs from use of or the inability to use this product.
CQ-D7400W
9
Page 10
Meaning of Symbols
CAR DVD PLAYER/RECEIVER
This manual uses its own form of illustrations and methods
of description to indicate the operating procedures and provide
information.
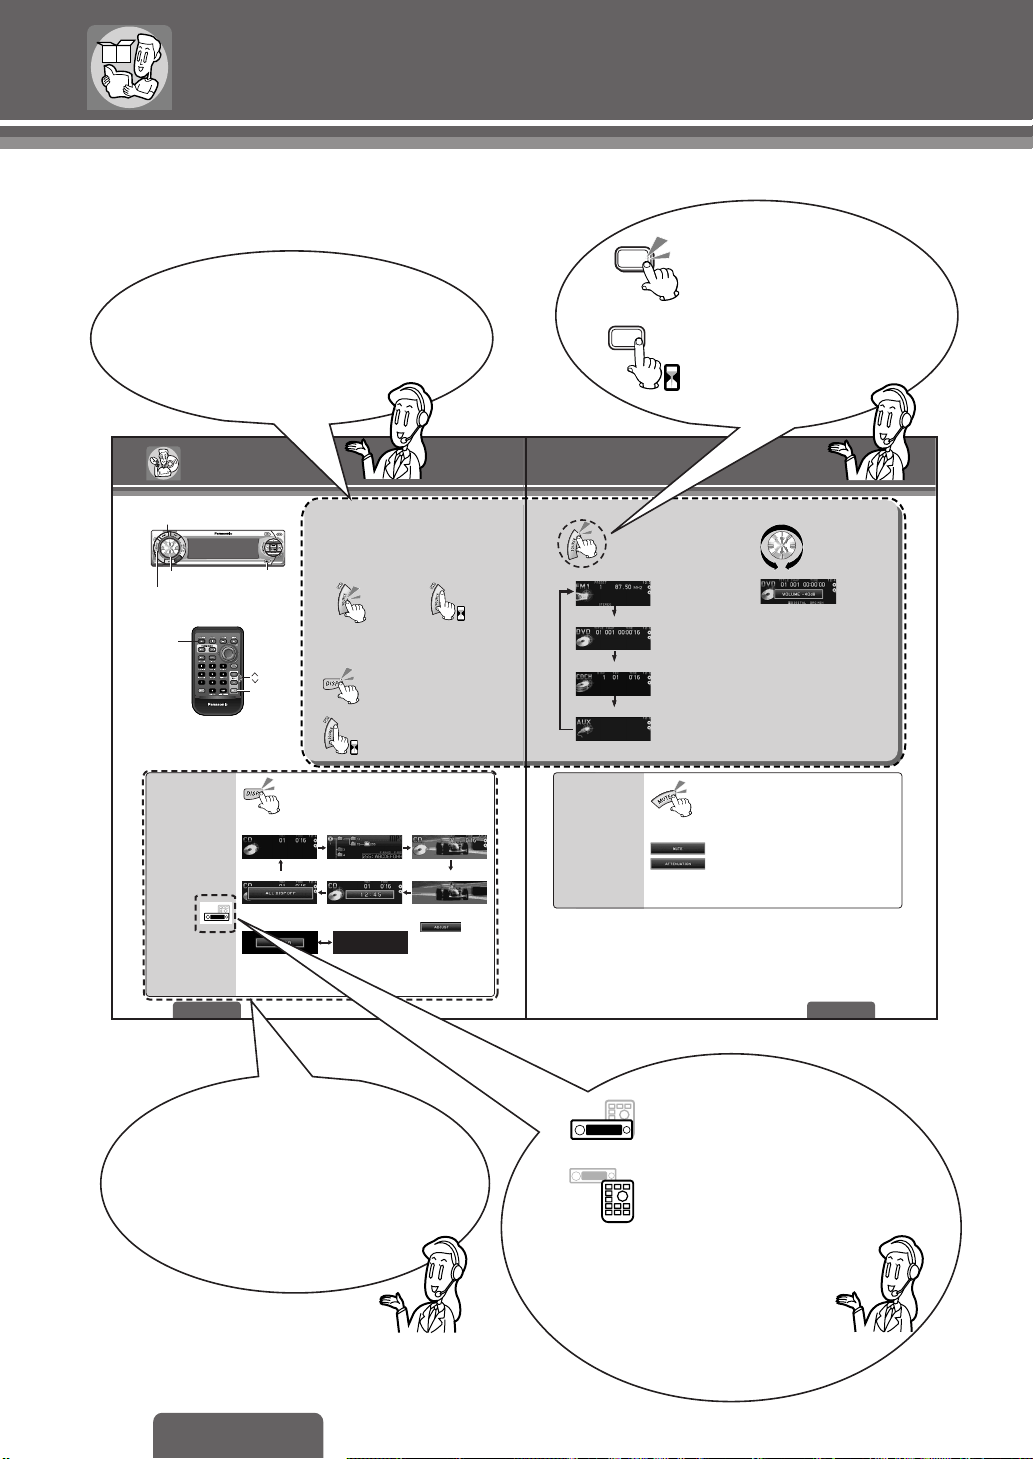
Indicates pressing a button.
Indicates pressing a button
for an extended period of time.
2 sec.
In each section, the main operations are
described inside this box.
Start reading here if you want to use the
product immediately.
Various functions other than the main
functions in the above-mentioned box
are described here.
Read this area to learn how to get the
most out of the unit.
This can only be controlled
through the main unit.
This can only be controlled
through the remote control
unit.
Operations with neither mark can be
performed either directly on the
main unit or using the remote
control unit.
Common Operations
MUTE
VOLUME
PWR (Power), SOURCE
PWR
(Power),
SOURCE
Display
Change
16
Preparation:
≥
Turn the car’s ignition switch ACC or ON.
≥
Turn the monitor switch to ON.
≥
Check the monitor connection setting. (page 67)
DISP (Display)
VOL (Volume)
MUTE
CAR DVD PLAYER/RECEIVER
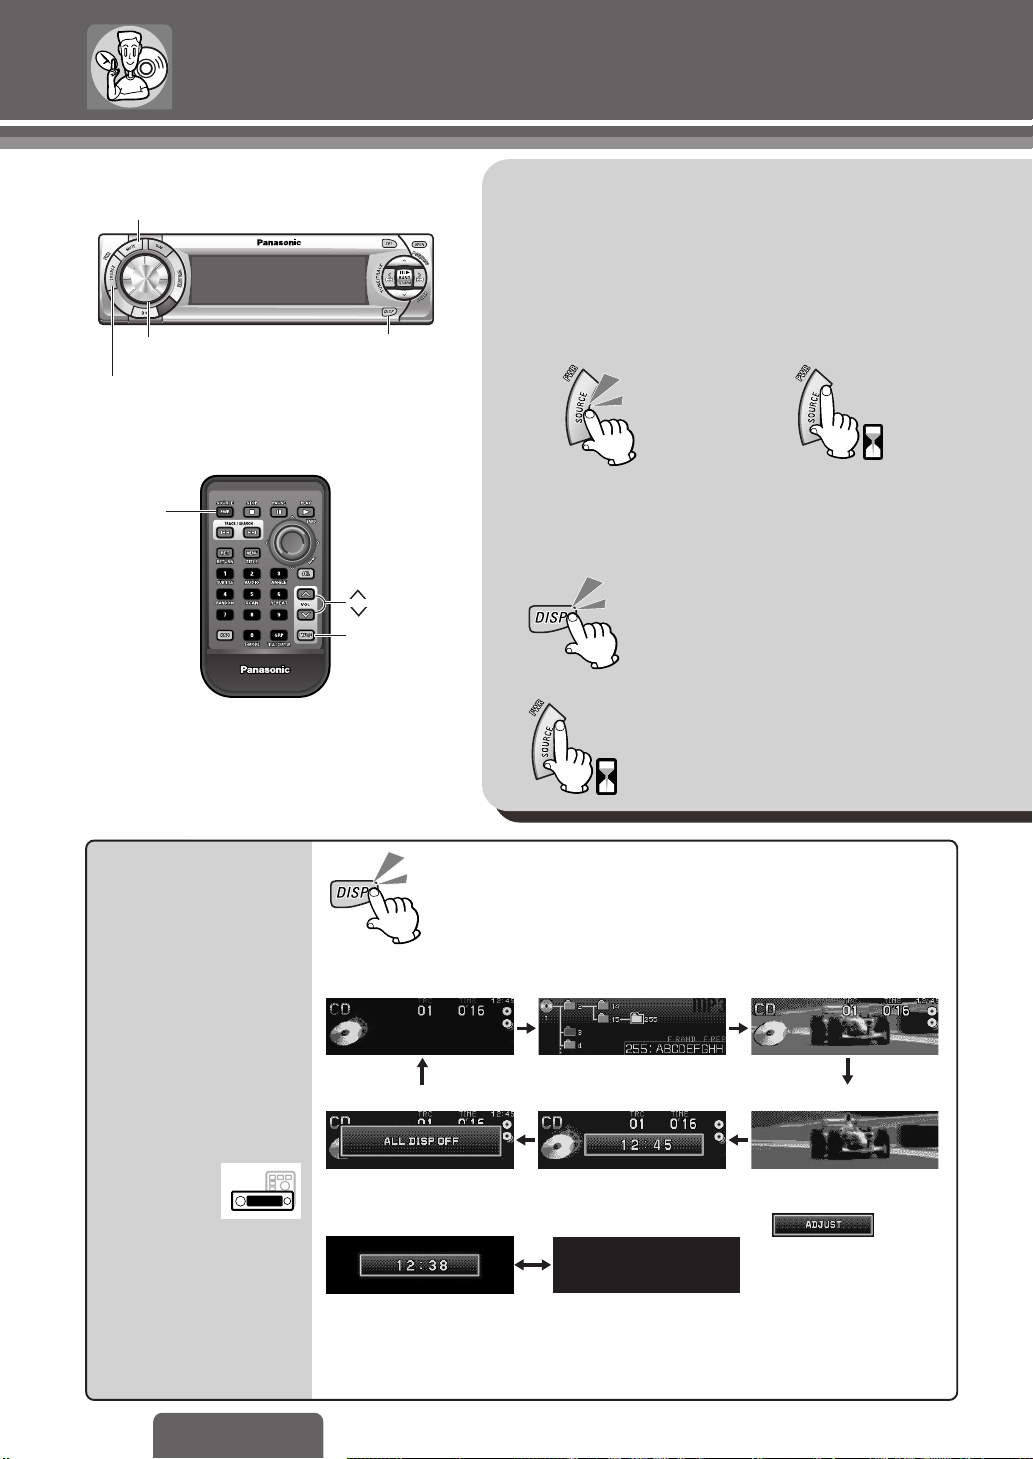
When the power is ON
Regular mode Folder layer (MP3 only)
Display off* Clock (24-hour system) Background
When the power is OFF
Clock display Display off
* Not only the display area, but also the lighting is turned
off. In addition, when a valid button is pressed while
the lighting is off, the lighting and the display turn on
and then turn off again after approximately 5 seconds.
CQ-D7400W
Power [PWR]
ON: OFF:
Note:
≥
When the power is switched on for the first time, a
demonstration display appears.
To cancel the demonstration display
To display the demonstration again
[when the power is off]
4 sec.
2 sec.
Regular mode r Background
Note:
≥
will be
displayed when the
clock is not adjusted.
≥
There are five kinds of
background displays.
It can be selected in
PICTURE mode. (page 50)
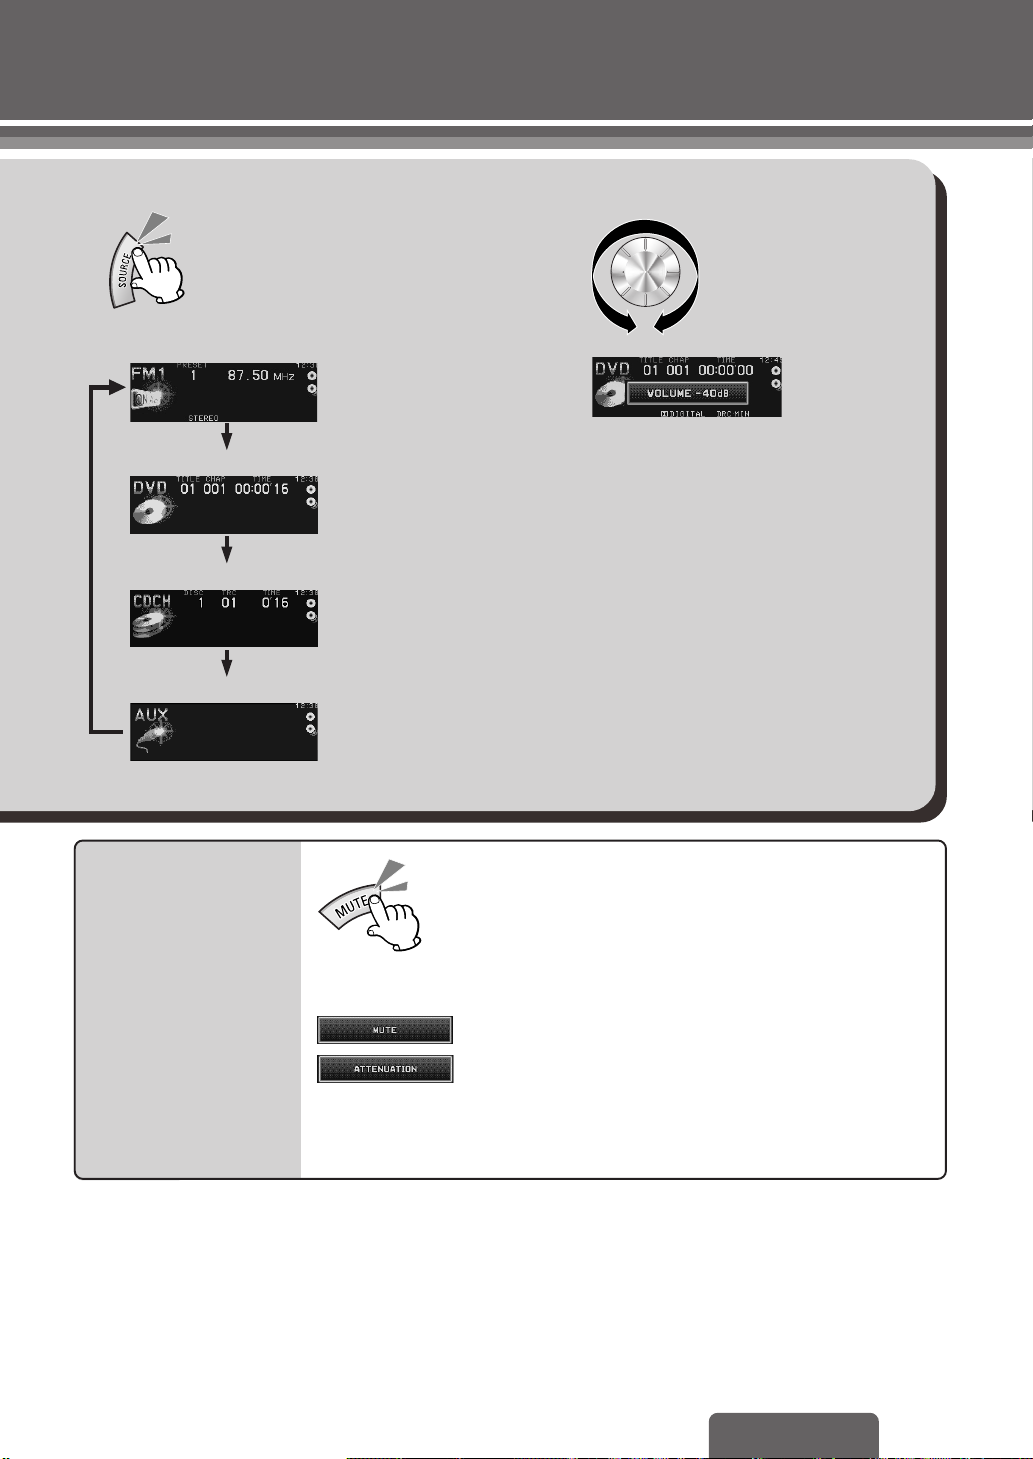
SOURCE VOLUME [VOL "#]
UPDOWN
Radio (AM/FM)
Disc (DVD/Video CD/CD/MP3)
CD changer
AUX (Auxiliary source)
Mute/
Attenuation
(Ex. FM)
(Ex. DVD)
(When a CD changer
is connected.)
(Auxiliary source)
Decreasing volume range is adjustable by setting. (page 48)
Default: j40 dB
Setting range: j82 dB to 0 dB
Note:
≥
The sound level for each source is stored in the
memory. (There is one volume setting for AM
radio band and one volume setting for FM radio
band.)
No sound.
Decrease the volume by j20 dB.
CQ-D7400W
17
10
CQ-D7400W
Page 11
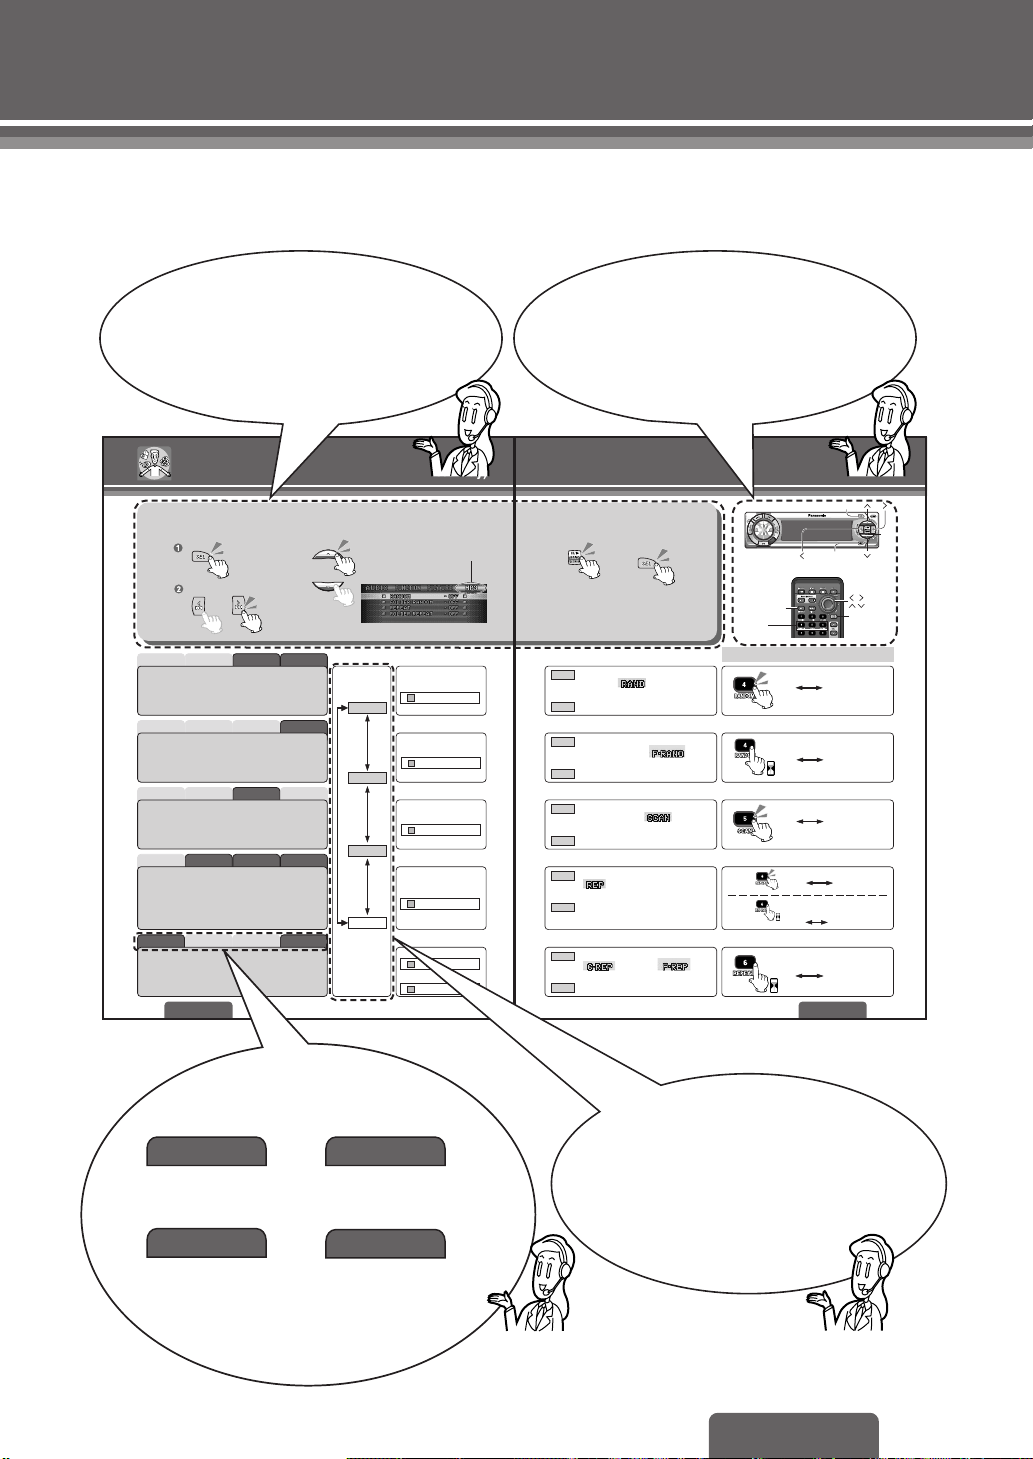
On the pages pertaining to settings,
procedures common to all items are
described in this box.
The positions of the buttons used on
each two-page view are shown for both
the main unit and the remote control.
Disc Operations
Menu (MODE)
1
(During playback)
Select “DVD/VCD/CD/MP3”.
Random Play
Folder Random Play
Scan Play
Track/File Repeat Play
Chapter/Folder Repeat Play
28
CQ-D7400W
(Random/Scan/Repeat Play)
Submenu
2
MP3CDVideo CDDVD Video
MP3CDVideo CDDVD Video
T
MP3CDVideo CDDVD Video
MP3CDVideo CDDVD Video
MP3CDVideo CDDVD Video
MODE
(The name of the mode currently
selected will be displayed.)
(Example: MP3)
AUDIO
FUNCTION
PICTURE
*
MODE
* The name of
the mode
currently
selected will
be displayed.
Select
Select
Select
Select
Select (DVD video)
Select (MP3)
RANDOM
FOLDER RANDOM
SCAN
REPEAT
CHAPTER REPEAT
FOLDER REPEA
Setting
3
All the tracks (files) play in a random
ON
sequence. lights.
CancelOFF
All the files on the current folder play in
ON
a random sequence.
OFF
Cancel
The first 10 seconds of each track
ON
plays in sequence. lights.
Cancel
OFF
Repeat the current track/file.
ON
lights.
Cancel
OFF
Repeat the current folder.
ON
lights.
Cancel
OFF
Finish the
4
setting.
Note:
Press [DISP] on the main
unit or [RET] on the remote
control unit to return to the
regular mode.
lights.
(DVD video)/ (MP3)
SEL(Select)
DISP(Display)
RET[RETURN]
4[RANDOM]
5[SCAN]
6[REPEAT]
Direct operation on the remote control unit
Each time the button is pressed;
ON OFF
Each time the button is pressed
and held for 2 seconds;
ON OFF
2 sec.
Each time the button is pressed;
ON OFF
(Except
Video CD)
(Video CD
only)
2 sec.
Each time the button is pressed
and held for more than 2 seconds;
ON OFF
2 sec.
SEL(Select)
Each time the button is pressed;
ON OFF
Each time the button is pressed and
held for more than 2 seconds;
ON OFF
CQ-D7400W
SET
29
The discs corresponding to each
action are shown.
DVD Video
DVD video
compatible
CD
Video CD
Video CD
compatible
MP3
CD compatible Disc with MP3 data
(CD-R,CD-RW)
compatible
Indicates that each time you
press the button, the display
changes as shown.
11
CQ-D7400W
Page 12
Discs that can be Played Back
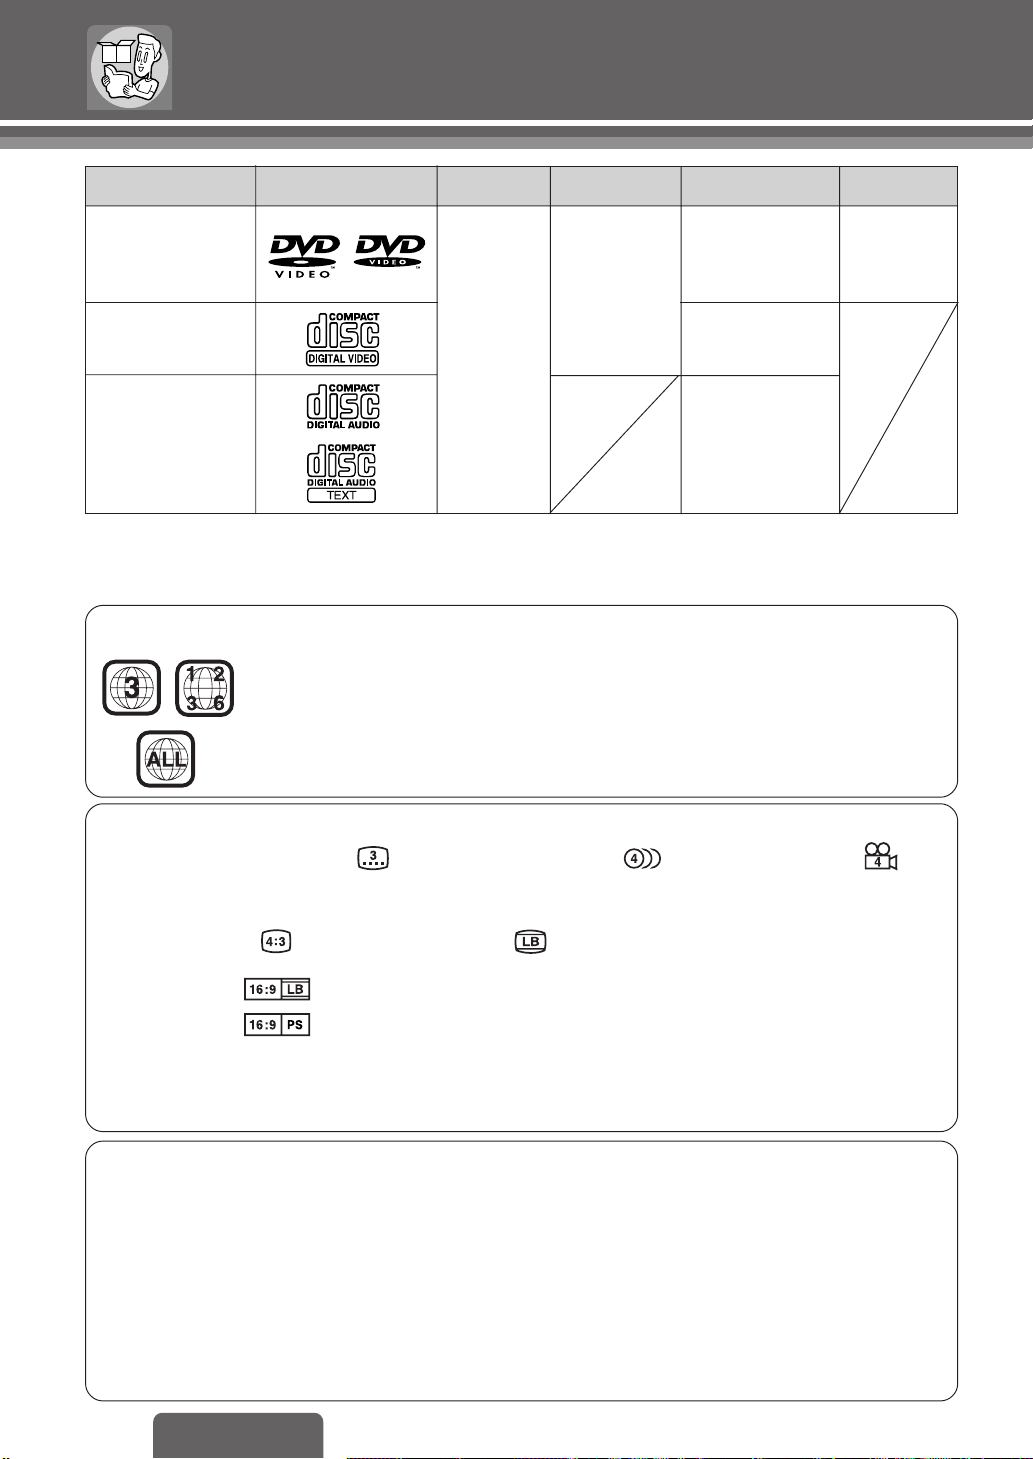
Disc Mark (logo) Video formatDisc size Audio format Region No.
DVD video
NTSC
Video CD
CD, CD TEXT
Note:
≥ With MP3s, only those files whose data is written in CD can be played back.
≥ About CD-Rs and CD-RWs, refer to “Notes on CD-Rs/RWs” on page 62.
Example:
❐ Region Management Information
This product is designed and manufactured to respond to the Region Management
Information that is recorded on a DVD disc. If the Region number described on the DVD
disc does not correspond to the Region number of this product, this product cannot play
this disc.
The Region number for this product is “3” and “ALL”.
12 cm
LPCM, MPEG 1,
MPEG 2, dts,
Dolby Digital
LPCM (CD-DA)
MPEG 1
LPCM (CD-DA)
MP3, dts
3
ALL
❐ Symbols used on jackets (Examples of such symbols include)
≥ Number of subtitle languages ≥ Number of audio tracks ≥ Number of angles
The numbers indicate the number of languages, tracks, angles, etc., recorded on the disc.
Screen size (H:V aspect ratio)
≥ 4:3 standard size ≥ Letterbox (page 63)
≥ 16:9 wide size :Play back in letterbox format on a standard screen (4:3).
:Play back in “Pan & Scan” (page 63) format on a standard screen (4:3).
Note:
≥ The size of the image that is displayed on the screen depends on the screen mode of the monitor, and on
screen size for the content on the disc.
❐ The following discs cannot be played back on this product.
≥ DVD-Audio
≥ DVD-ROM ≥ DVD-R ≥ DVD-RAM ≥ DVD+RW ≥ DVD-RW ≥ SVCD
≥ VSD ≥ CVD ≥ CD-G ≥ CD-ROM (except MP3)
≥ CD-RW (except MP3 and CD-DA) ≥ CD-R (except MP3 and CD-DA) ≥ SACD ≥ photo CD
≥ CDV ≥ Divx Video Discs ≥ CD-EXTRA (audio-only playback possible)
≥ Discs recorded in PAL format, others
≥ DVDs with a region number other than “3” or “ALL”
≥ Playing back a photo CD disc with this unit could damage the data that is recorded on the disc.
12
CQ-D7400W
Page 13
Accessories/Remote Control Unit Preparation
CAR DVD PLAYER/RECEIVER
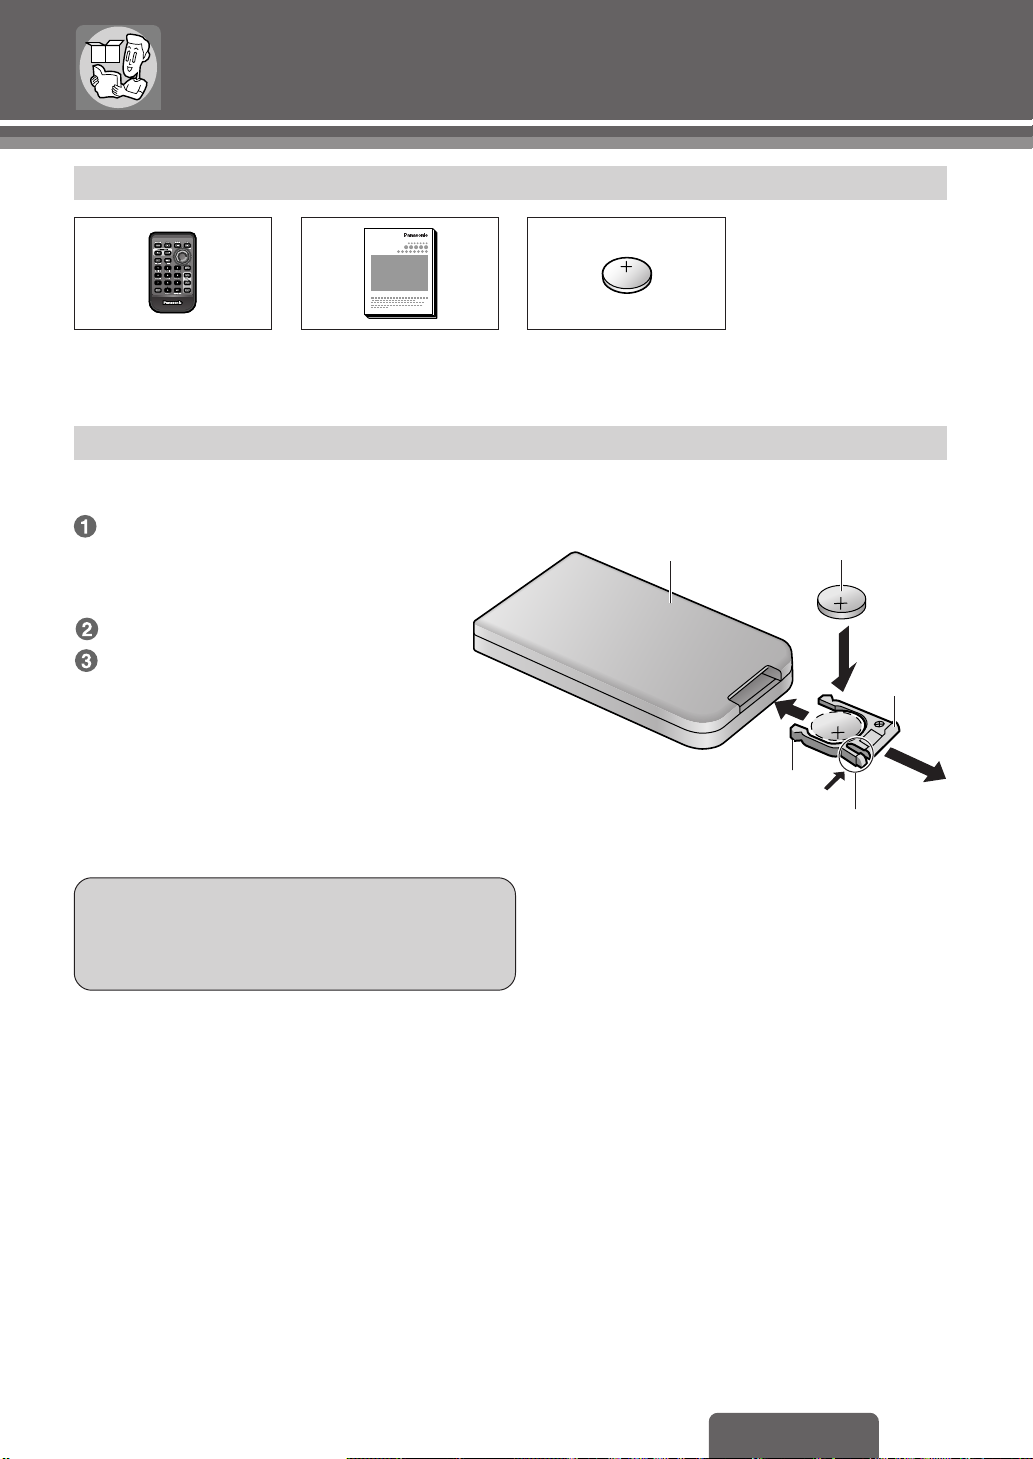
Accessories
≥ Installation hardware
(screws, cords, etc. )
(page 64)
CAR DVD PLAYER/RECEIVER
≥ Remote control unit (1)
≥ Operating instructions
(1)
Remote Control Unit Preparation
Battery Installation
Remove the battery holder.
Pull the battery holder by the position B
while pushing position A in the direction
indicated by the arrow.
Install the battery on the battery holder.
Insert the battery holder back into its
original position.
Battery Notes
≥ Battery type: Panasonic lithium battery (CR2025)
(included)
≥ Battery life: Approximately 6 months with normal use
(at room temperature)
Caution:
≥Improper use of batteries may cause overheating,
an explosion or ignition, resulting in injury or a
fire. Battery leakage may damage the unit.
≥ Lithium battery
(CR2025) (1)
Back side
3
Battery holder
Lithium battery
(included)
2
Position B
1
Position A
≥ Remove and dispose of an old battery immediately.
≥ Do not disassemble or short the battery. Do not throw
a battery into a fire.
≥ Keep batteries away from children to avoid the risk of
accidents.
≥ Be careful to observe proper local disposal rules when
you dispose of batteries.
Point the remote control unit at the main unit’s sensor.
13
CQ-D7400W
Page 14
Names and Functions of Parts
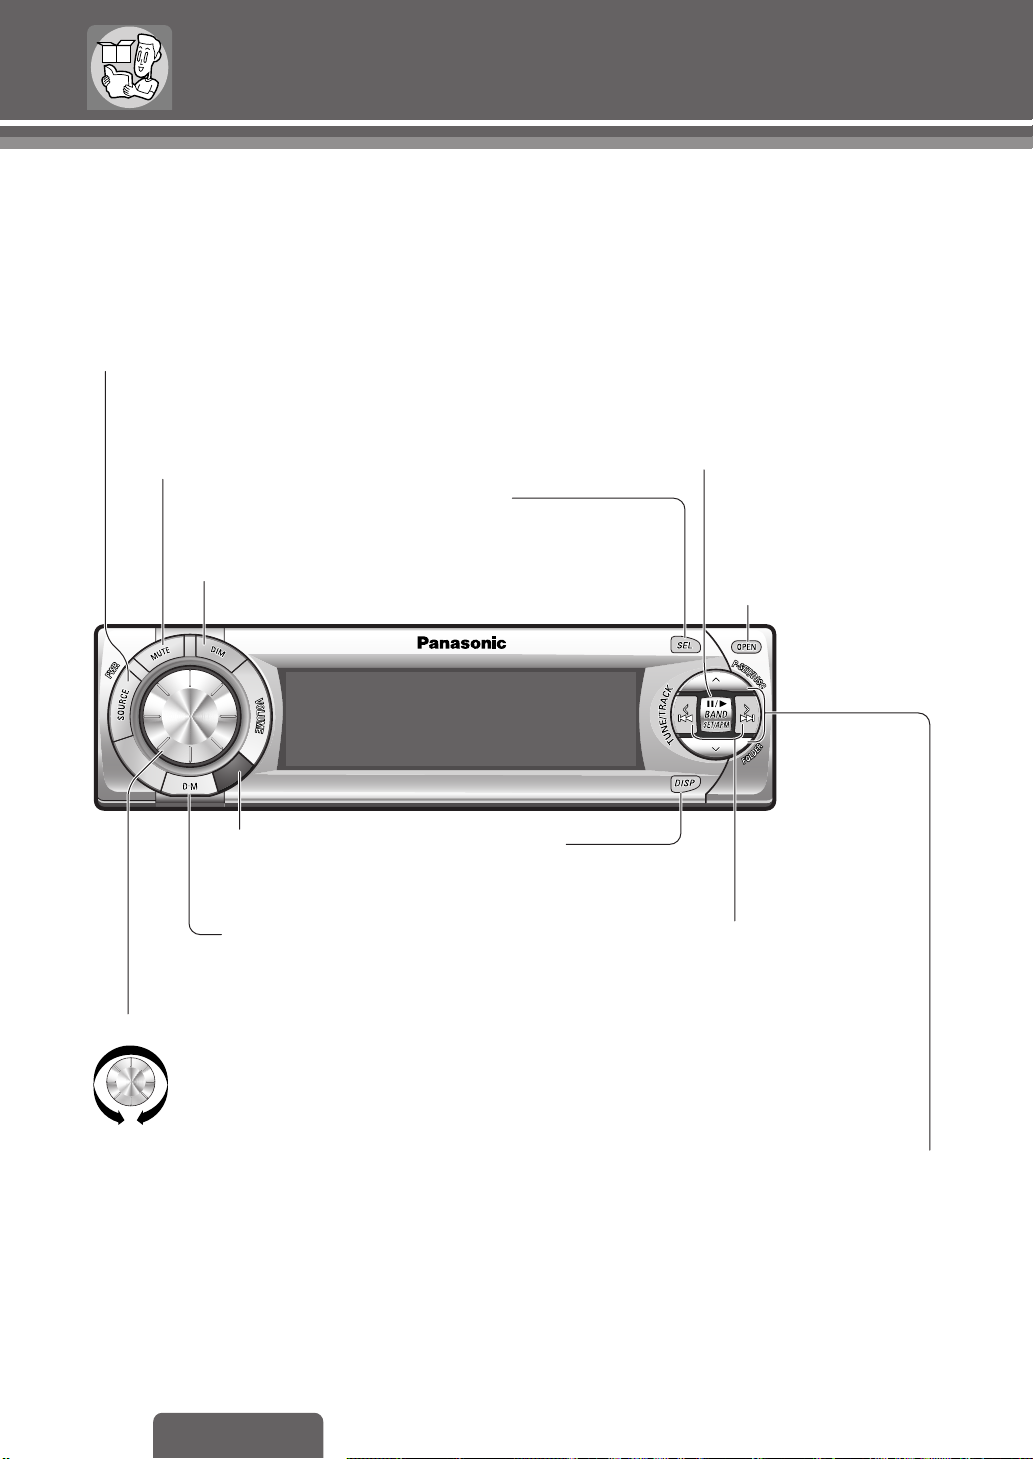
Main unit
❐ Front panel
[PWR] (Power),
[SOURCE] (Source)
≥ Power on/off
≥ Selects the audio source.
[MUTE] (ATTENUATION)
≥ Muting or attenuation
[DIM] (Dimmer)
≥ Sets the brightness
of the display.
Remote control
signal sensor
;], [1], [BAND], [SET], [APM] (Auto Preset Memory)
[
≥ Pause
≥ Disc Playback
≥ Band selection
≥ Switches the random/scan/repeat playback to On/Off.
≥
Finalizes the setting item in Audio/Function/Picture setting mode.
≥ Scrolls the text.
≥ Stores presets automatically.
[SEL] (Select)
≥ Displays the Audio/Function/
Picture menu.
≥ Sets the audio and other function.
≥ Enters the memory clear setup.
[DISP] (Display)
≥ Switches the display pattern.
≥ Displays the title.
[OPEN]
≥ Opens the panel.
14
[VOLUME]
[D.M] (Direct Memory)
≥ Memorizes the station to
the Direct Memory area.
≥ Ajusts the volume.
CQ-D7400W
[TUNE], [$], [9], [TRACK], [%], [:]
≥ Selects the frequency/chapter/
track/file.
≥ Fast forward/fast reverse
≥ Slow playback (9 only)
≥ Selects items when making
Audio/Picture/Function settings.
≥ Selects the menu.
•
[P
SET] (Preset), [DISC], [FOLDER], [#], ["]
≥ Preset memory/preset station calling.
≥ Selects the disc in the changer.
≥ Selects the disc in the changer folder.
≥ Selects items when making settings.
≥ Clock setting
Page 15
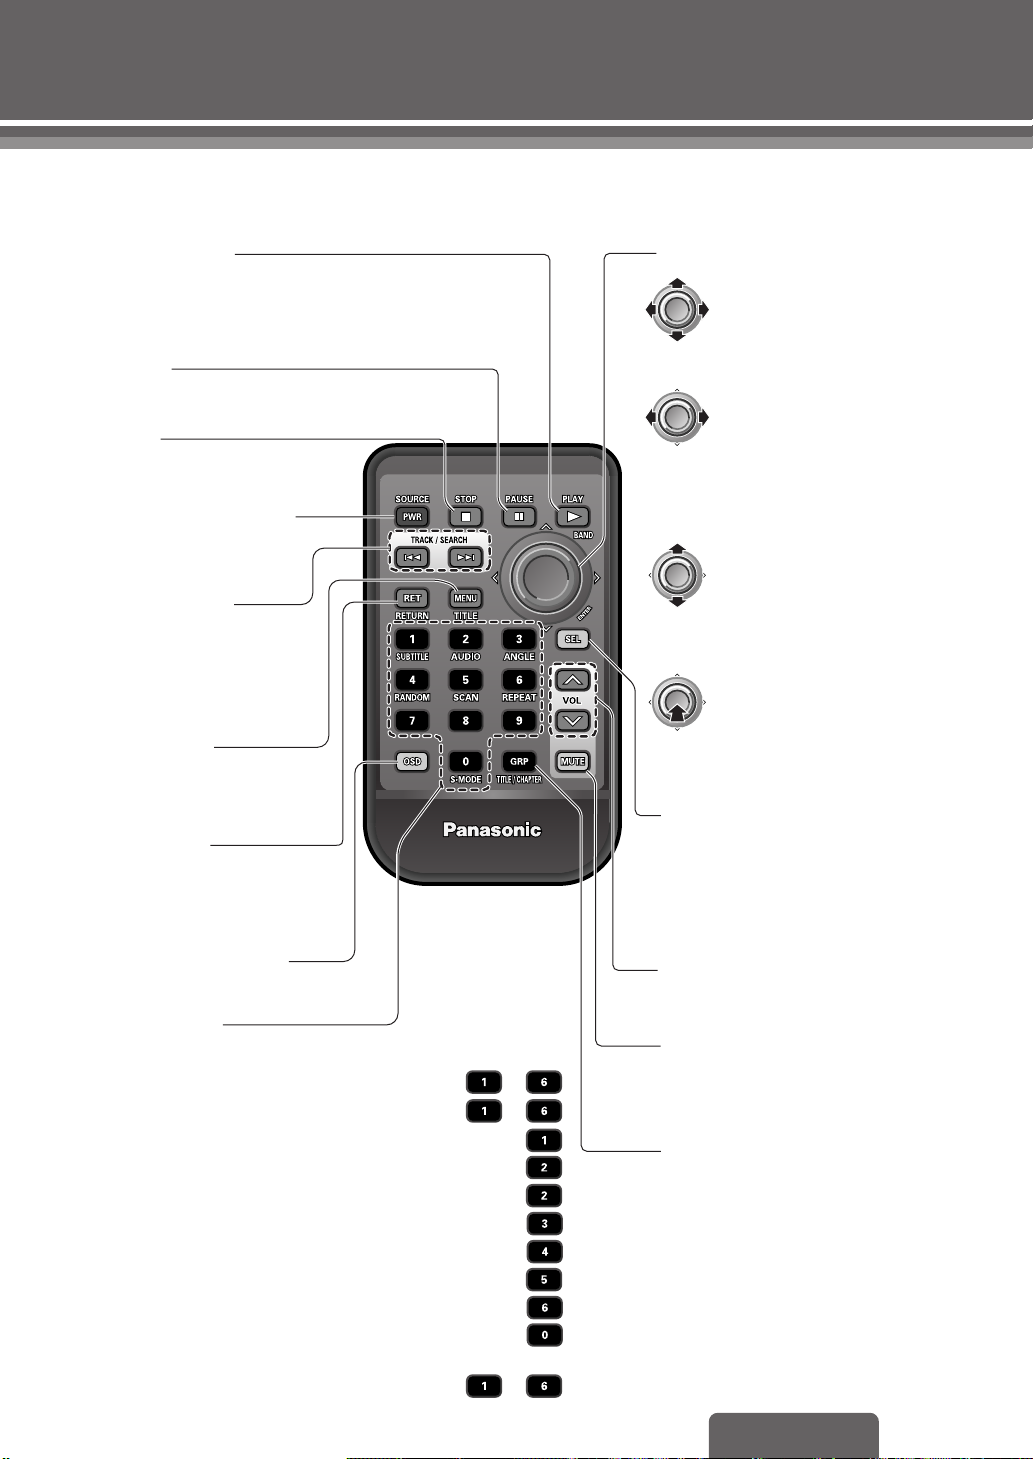
❐ Remote control unit
CAR DVD PLAYER/RECEIVER
Point the remote control unit at the main unit’s sensor. (page 14)
1], [BAND]
[PLAY
≥
Disc Playback
≥
Band selection
≥
Stores presets automatically.
[PAUSE ;]
≥
Pause
[STOP ∫]
≥
Stop
[PWR] (Power), [SOURCE]
≥
Power on/off
≥
Selects the audio source.
[TRACK/SEARCH],
[:9]
≥
Selects the chapter/track/file.
≥
Fast forward/fast reverse
≥
Slow playback (
9
only)
[MENU], [TITLE]
≥
Displays the Main Menu.
≥
Displays DVD/Title Menu.
[RET] (RETURN)
≥
Returns to the previous state.
≥
Returns to normal mode during
settings.
CAR DVD PLAYER/RECEIVER
[ENTER], ["], [#], [%], [$] (Push)
≥
Selects items of DVD/Title
menu.
≥
Selects the folder.
≥
Folder selection
≥
Adjusts the frequency.
≥
Switches the display.
≥
Selects the menu.
≥
Selects items when making
Audio/Picture/Function
settings.
≥
Selects the disc in the
changer/folder.
≥
Selects items when making
settings.
≥
Clock setting
≥
Finalizes the selection.
≥
Switch the random/scan/
Push
repeat playback to On/Off.
≥
Scrolls the text.
[SEL] (Select)
≥
Displays the Audio/Function/
Picture menu.
≥
Sets the audio and other function.
≥
Enters the memory clear setup.
[OSD] (On Screen Display)
≥
Switches OSD to on/off.
Numeric buttons
≥
Direct title/chapter/track/folder selection
≥
Manual preset memory.
≥
Select preset stations.
≥
Switches the subtitle language (SUBTITLE).
≥
Switches the audio language (AUDIO).
≥
Switches between stereo and monaural.
≥
Switches the angle (ANGLE).
≥
Track/Folder/Disc random play (RANDOM)
≥
Track/Disc scan play.(SCAN)
≥
Repeats the chapter/folder/track/file/disc
≥
Switches Dynamic range compression.
≥
Preset memory/preset calling of
Parametric equalizer.
......................................
.........................................
..........................................
............................................
..........................................
〜
〜
..................
..........................
........................
...................
(REPEAT)
.........................
.
........
〜
[VOL "#] (Volume)
≥
Adjusts the volume.
[MUTE]
(ATTENUATION)
≥
Muting or attenuation
[GRP]
(TITLE/CHAPTER)
≥
Direct title/chapter/folder selection
CQ-D7400W
15
Page 16
CAR DVD PLAYER/RECEIVER
MUTE
VOLUME
Common Operations
Preparation:
≥ Turn the car’s ignition switch ACC or ON.
≥ Turn the monitor switch to ON.
≥ Check the monitor connection setting. (page 67)
Power [PWR]
DISP (Display)
PWR (Power), SOURCE
PWR
(Power),
SOURCE
CAR DVD PLAYER/RECEIVER
ON: OFF:
Note:
≥ When the power is switched on for the first time, a
demonstration display appears.
VOL (Volume)
MUTE
When the power is ON
Regular mode Folder layer (MP3 only)
To cancel the demonstration display
To display the demonstration again
[when the power is off]
4 sec.
2 sec.
Regular mode r Background
Display
Change
16
CQ-D7400W
Display off* Clock (24-hour system) Background
When the power is OFF
Clock display Display off
* Not only the display area, but also the lighting is turned
off. In addition, when a valid button is pressed while
the lighting is off, the lighting and the display turn on
and then turn off again after approximately 5 seconds.
Note:
≥ will be
displayed when the
clock is not adjusted.
≥ There are five kinds of
background displays.
It can be selected in
PICTURE mode. (page 50)
Page 17
SOURCE VOLUME [VOL "#]
UPDOWN
Radio (AM/FM)
(Ex. FM)
Default: j40 dB
Disc (DVD/Video CD/CD/MP3)
Setting range: j82 dB to 0 dB
CD changer
AUX (Auxiliary source)
Mute/
Attenuation
(Ex. DVD)
(When a CD changer
is connected.)
(Auxiliary source)
Decreasing volume range is adjustable by setting. (page 48)
Note:
≥ The sound level for each source is stored in the
memory. (There is one volume setting for AM
radio band and one volume setting for FM radio
band.)
No sound.
Decrease the volume by j20 dB.
CQ-D7400W
17
Page 18
Radio
CAR DVD PLAYER/RECEIVER
SOURCE
D.M
(Direct
Memory)
SOURCE
Numeric
buttons
Manual
Preset
TUNE
BAND, APM
(Auto preset
memory)
CAR DVD PLAYER/RECEIVER
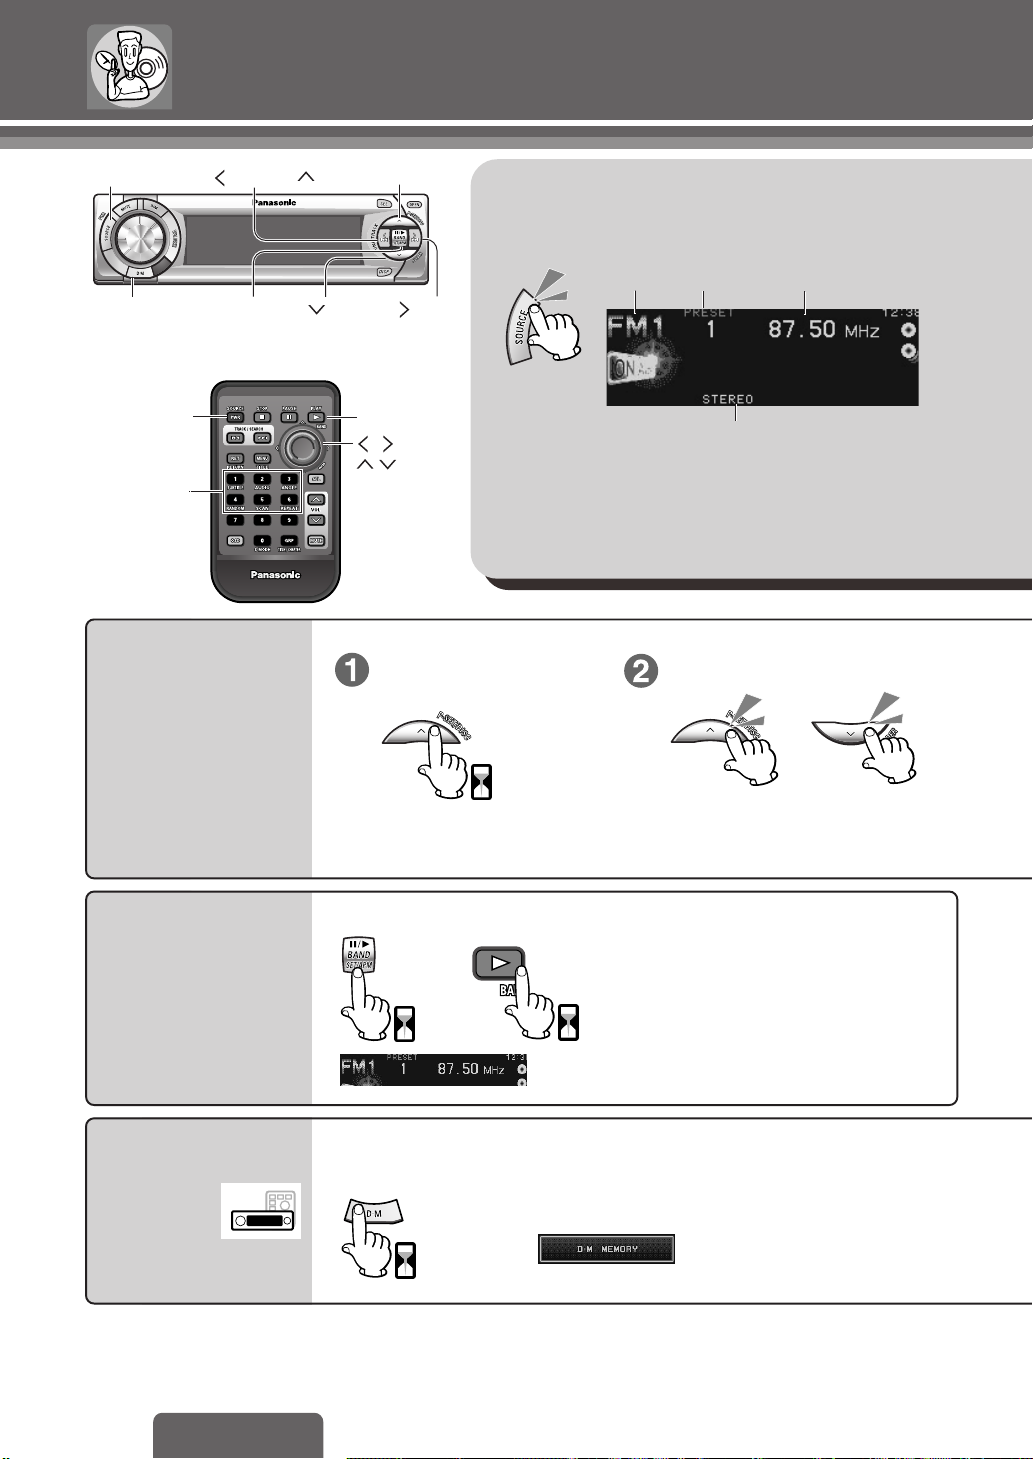
P≥SET(Preset)
Radio Mode
1
P≥SET
(Preset)
After selecting a band and frequency...
TUNE
BAND
Set preset mode. Select a preset number.
Band Preset number Frequency
FM stereo indicator
Memory
Manually save a station in
the preset memory.
Auto Preset
Memory (APM)
Automatically save stations
with good reception in the
preset memory.
Direct Memory
2 sec.
After selecting a band ...
or
2 sec.
2 sec.
■ Memorize (Default: 87.50 MHz)
After selecting a band and frequency...
≥ The 6 strongest available stations will
be automatically saved in the
memory under preset number 1 to 6.
≥ Once set, the preset stations are
sequentially scanned for 5 seconds
each. <Preset scan>
Preset number (1 to 6)
≥ Frequency setting can be performed
even after selecting a preset number.
(D≥M)
≥ Frequency blinks once and is saved in the memory.
Your favorite radio station
can be memorized in [D≥M].
Note:
≥ Up to 6 stations each can be saved in the FM1, FM2, FM3 and AM preset station memories.
≥ Existing saved stations are overwritten with new stations after following this procedure.
2 sec.
18
CQ-D7400W
Page 19
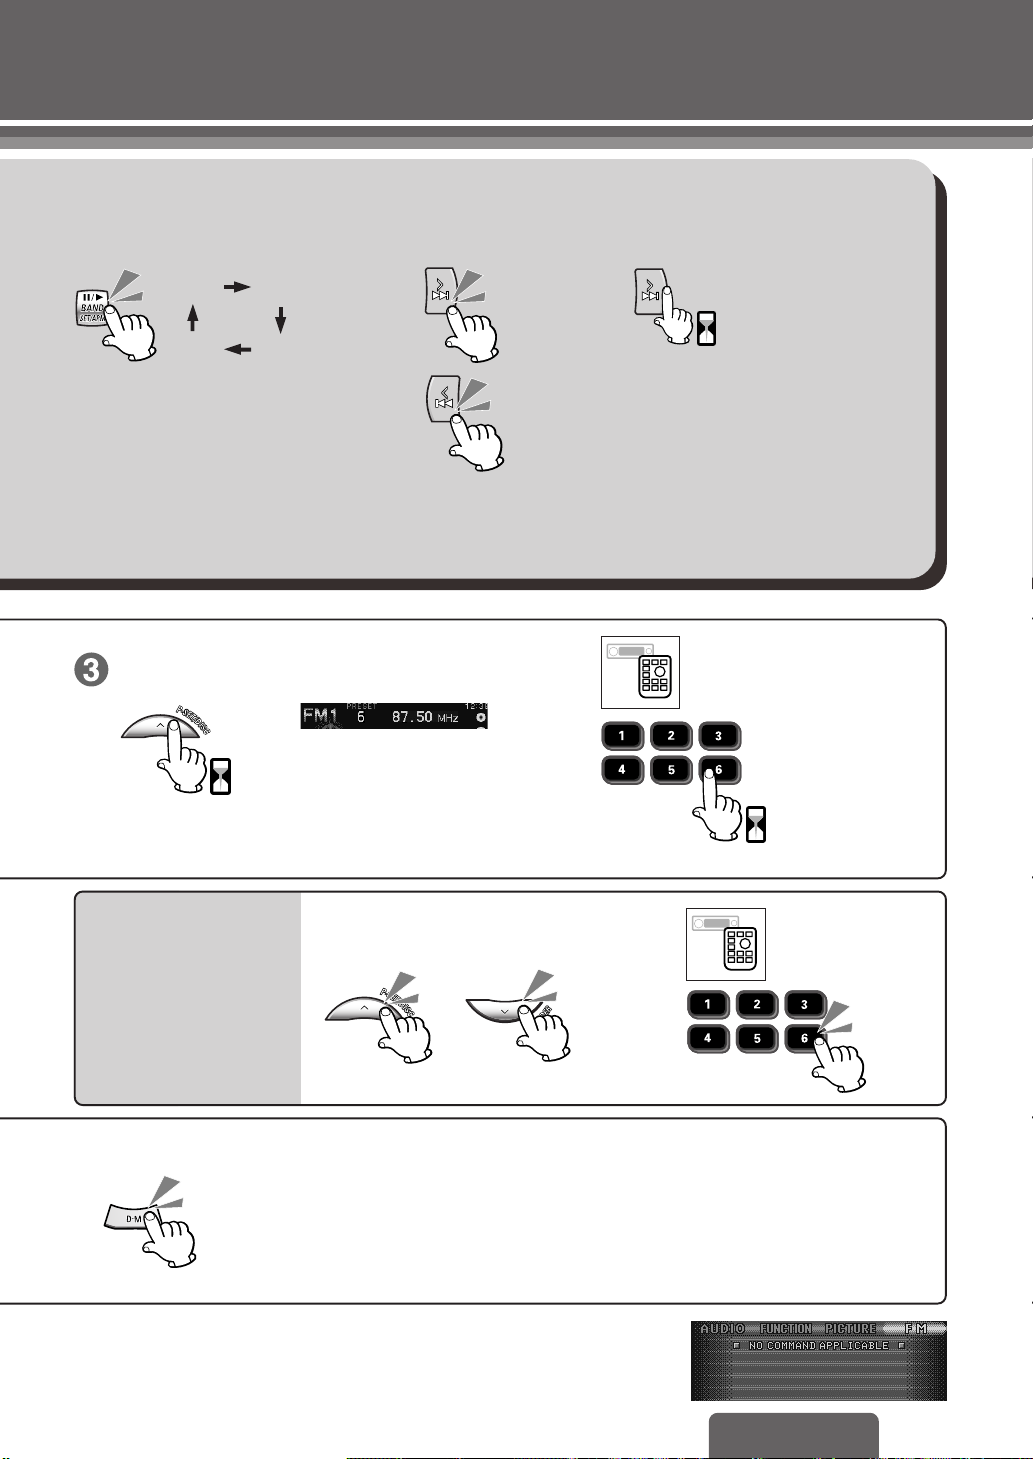
Band Tuning
2 sec.
23
Seeking
FM1 FM2
Memorize.
2 sec.
FM3AM
≥ The display blinks once, and a
receiving station is saved in the
memory.
:UP
0.5 sec.
:DOWN
After selecting a band
and a frequency...
(Example: 6)
After selecting a band ...
Preset
Select a preset number.
Station
Calling
The stored station is received.
■ Recalling the Direct Memory
Note:
≥ You can recall the direct memory even when the power is off.
Note:
≥ When pressing [SEL] in radio mode, the following display appears.
This is because radio mode does not have any menu settings.
(Example: 6)
19
CQ-D7400W
Page 20
Disc Operations
CAR DVD PLAYER/RECEIVER
SOURCE
SOURCE
RET
[RETURN]
CAR DVD PLAYER/RECEIVER
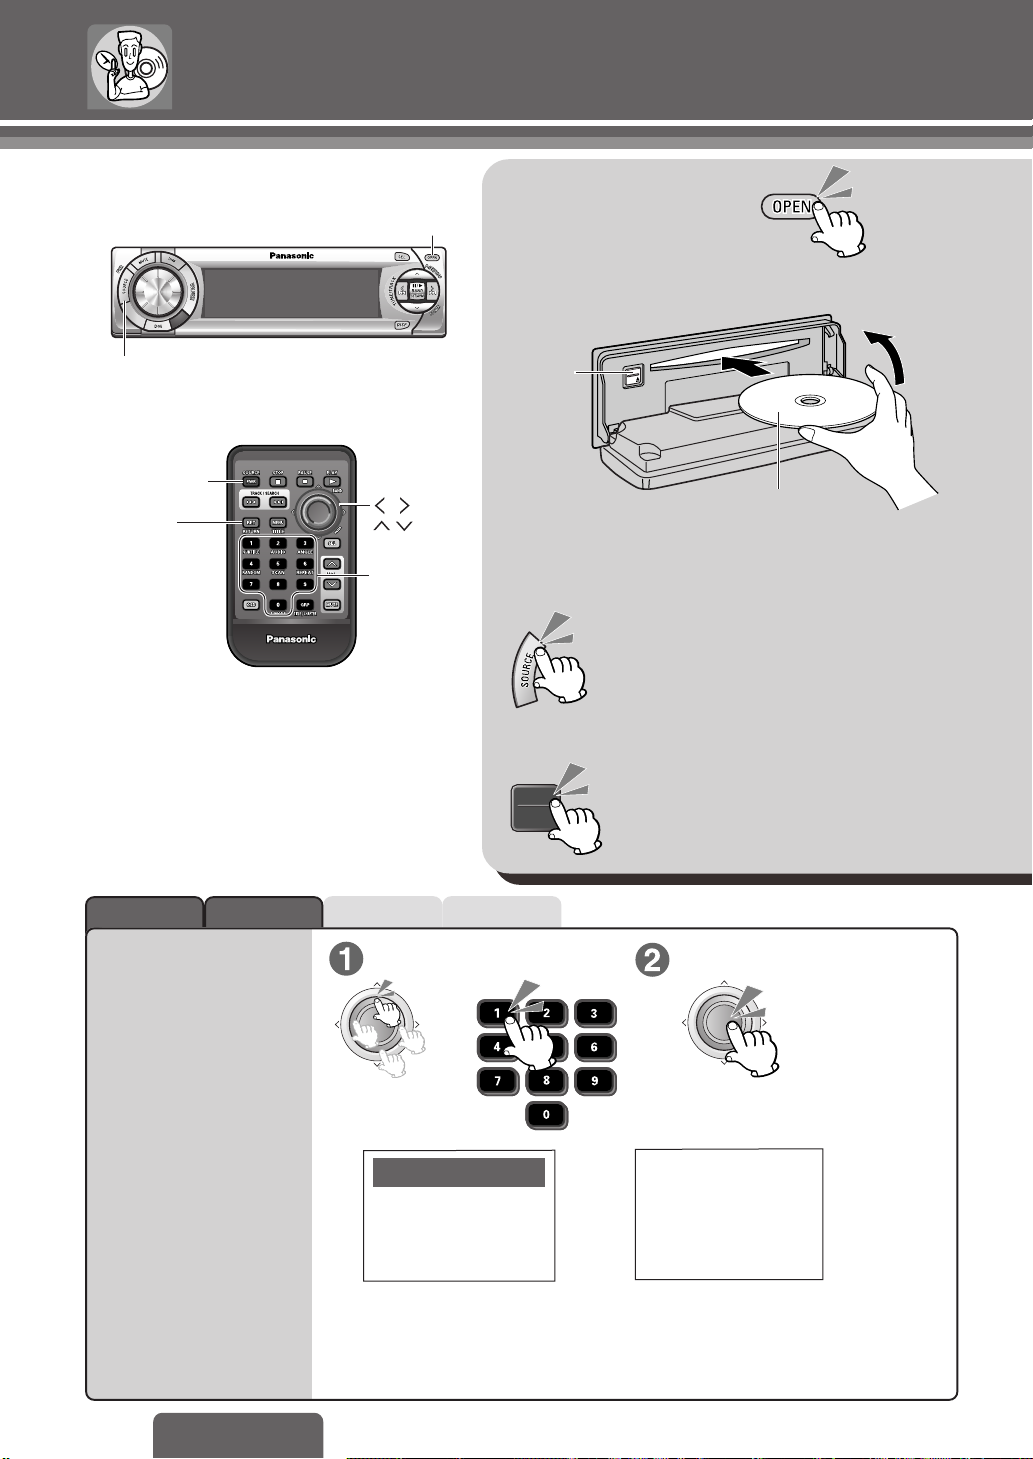
OPEN
ENTER
Numeric
buttons
After opening the panel,
Insert the disc.
<(eject)
≥ Playback starts automatically.
≥ Close the panel manually.
When a disc is already in the player
Ejecting a disc
DVD
Label side
Press repeatedly until it reaches disc
playback mode.
Close
Selecting
a Menu Item
20
CQ-D7400W
DVD <
MP3CDVideo CDDVD Video
Select Item. Finalize selection.
or
R
E
T
N
E
DVD MENU
1. SUBTITLE
2. AUDIO
Select your favorite music.
1. Love Supremes
2. Impressions
3. In a Sentimental Mood
3. ANGLE
≥ Pressing [RET] while a video CD with PBC is being played may
cause you to return to the previous menu screen.
≥ Operations vary according to the disc. For details, refer to the guide
provided with the disc.
R
E
T
N
E
Video CD
Number:
Page 21
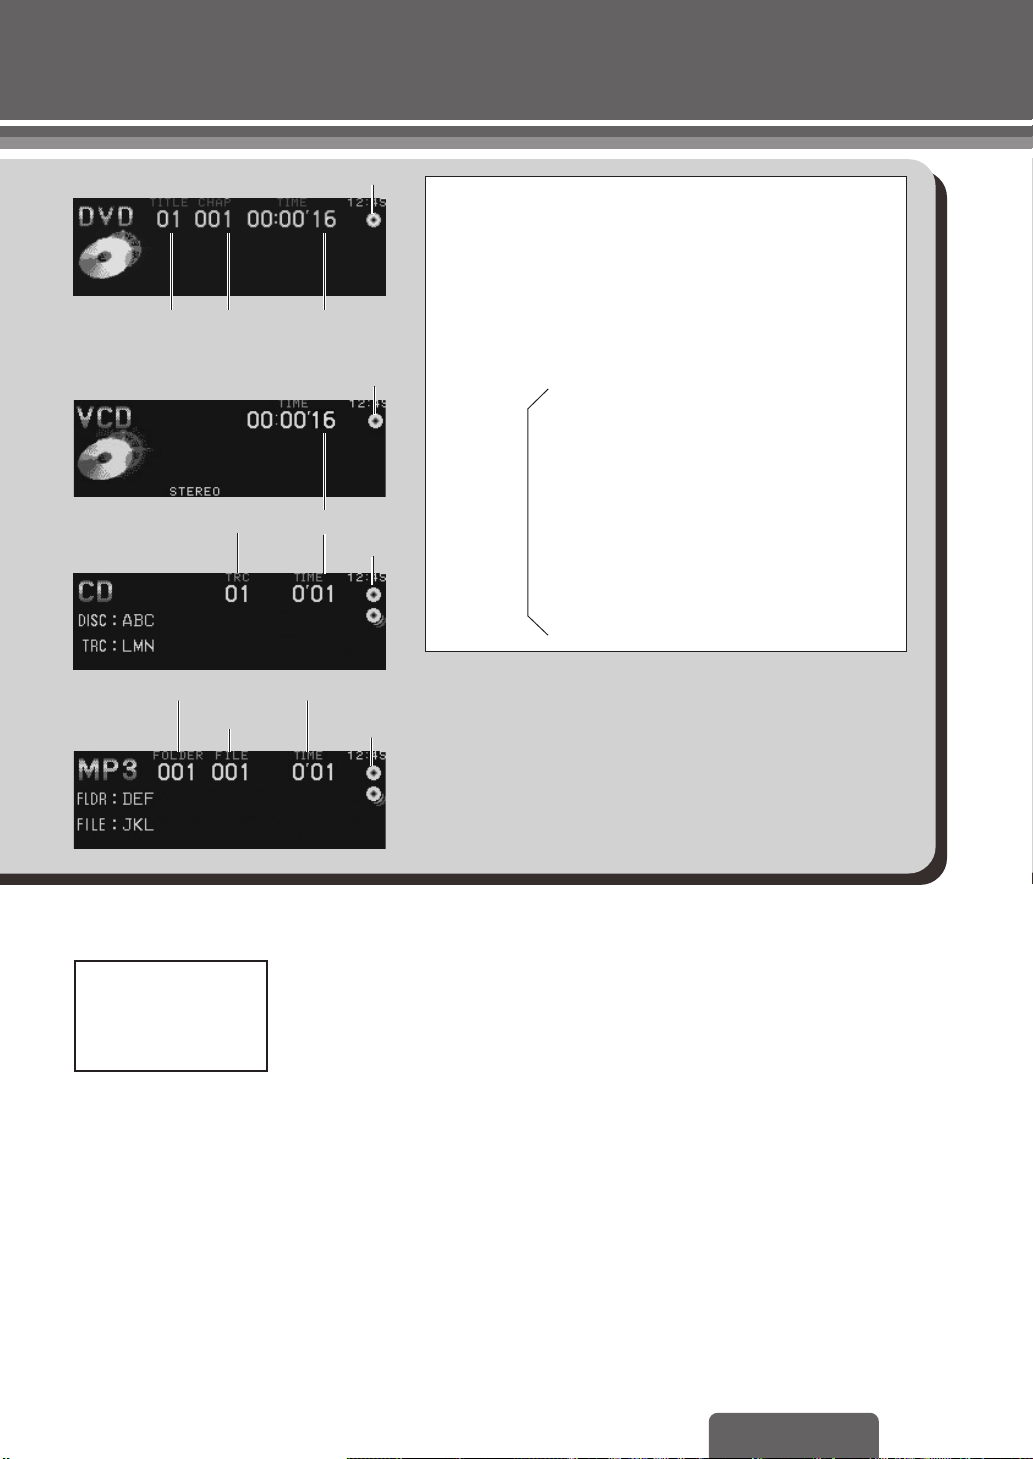
DVD video
Title number
Video CD
CD
Chapter
number
Playback
time
Playback timeTrack number
¡
¡
¡
Caution:
≥ Available discs: DVD video, Video CD, CD, CD-DA data
recorded CD-R and CD-RW, and MP3 data recorded CD
media (CD-ROM, CD-R, CD-RW).
≥ Before loading a disc, check to make sure that a disc is
not already loaded.
≥ Refer to page 62 about notes on CD-Rs/RWs.
≥ Refer to page 60 about notes on MP3.
≥ use irregularly shaped discs.
≥ push the front panel down or place
objects on it while it is open.
≥ use discs that have a seal or label
≥ Do not:
attached.
≥ pinch your finger or hand in the front
panel.
≥ insert foreign matter into the disc slot.
≥ watch the scroll display while driving a
car. (page 27)
Folder number
Playback time
File number
MP3
Screen while driving the car
Warning
When driving please enjoy sound only
Only a message as shown above is
displayed on the screen while driving
the car. Only audio is enabled.
¡ Lights when the disc is loaded.
Do not insert a disc when this indicator lights.
¡
Note:
≥ When you insert a CD media containing MP3 files (CD-ROM,
CD-R, CD-RW) into the slot, this player will automatically enter
MP3 mode and start playing the MP3s on the discs.
≥ If you record too many folders and MP3 files onto a disc, it may
take some time before playback starts.
≥ It may take a few moments for play to begin after the disc has
been inserted.
≥ Loading a disc when the power is off allows the power to be
turned on.
≥ When “/” is displayed on the monitor, the operation is prohib-
ited by the unit or disc.
CQ-D7400W
21
Page 22
Disc Operations (continued)
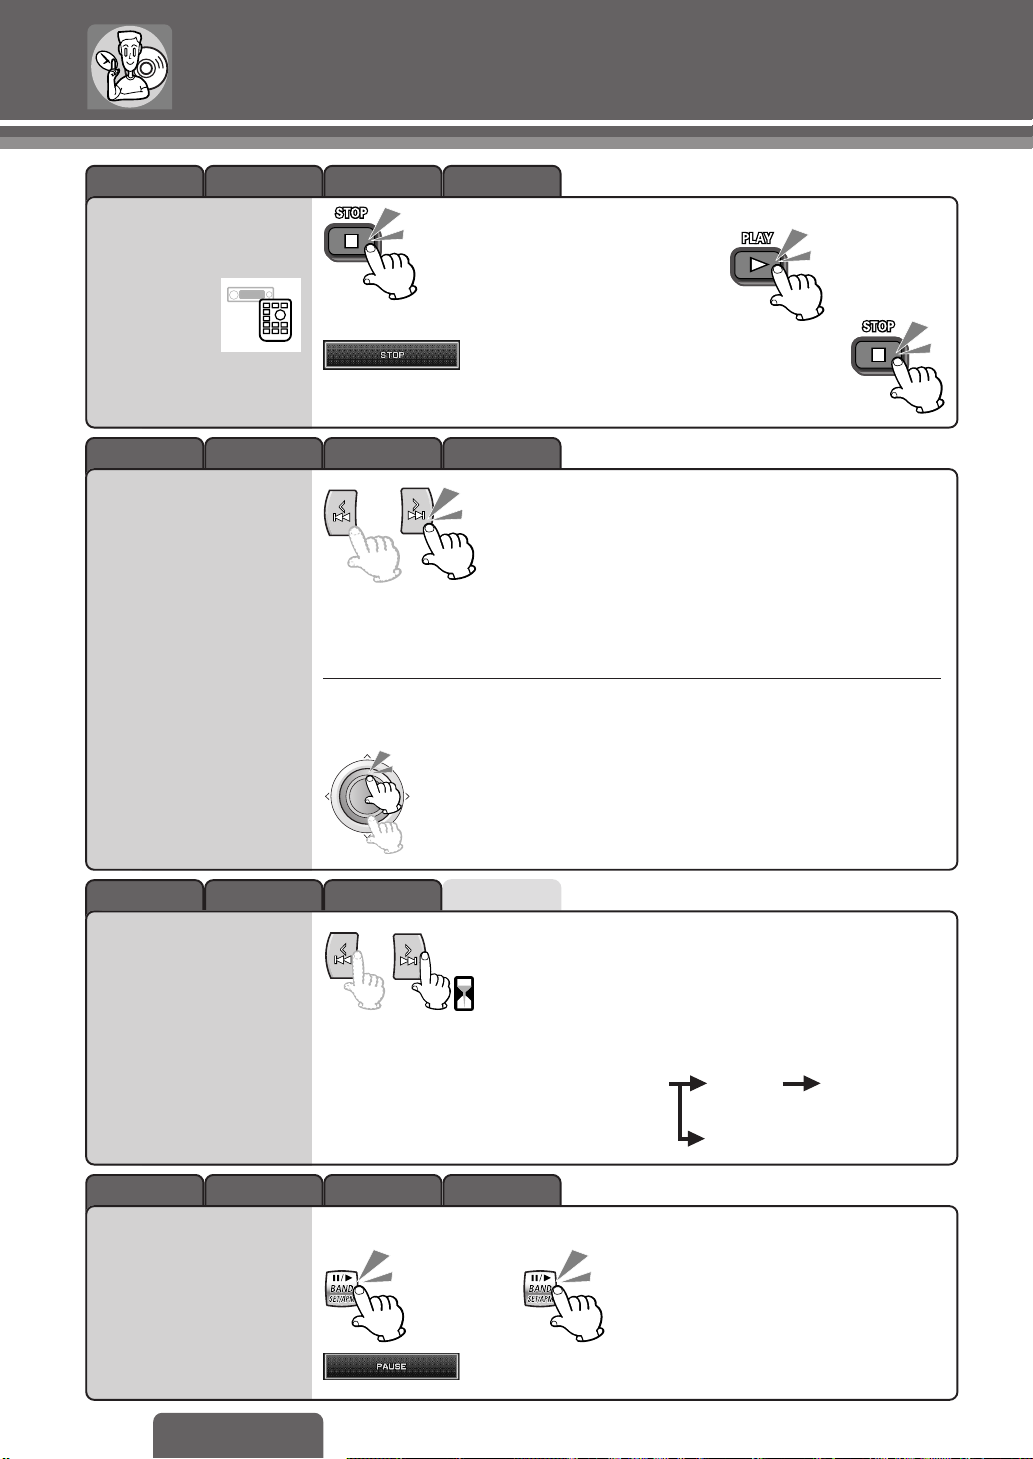
Stop
Chapter/Track/
Folder/File
MP3CDVideo CDDVD Video
≥ To resume from the point where [∫] was pressed.
(Continued playback function)
≥ To cancel continued playback (During stop)
MP3CDVideo CDDVD Video
[9]: Next Chapter/track/file
[:]: Beginning of the current chapter/track/file.
For the previous chapter/track/file, press twice.
Note:
≥ If you press [:]/[9] for 2 seconds or more,
the file will continue to scroll up or down as long as
you hold down the button.
Selection
Fast
Forward/
Fast Reverse
MP3 only
(Folder selection)
R
E
T
N
E
(During playback)
["]: Next folder.
[#]: Previous folder.
MP3CDVideo CDDVD Video
[9] (5): Fast forward
[:] (6): Fast reverse
0.5 sec.
≥ Continuing to hold down the button will speed
it (double-speed fast forward or reverse) up.
Normal speed 2 times 10 times
MP3CDVideo CDDVD Video
To resume normal playback
Note:
≥ If you press ["]/[#] for
2 seconds or more, the
folder will continue to scroll
up or down as long as you
hold down the button.
(DVD video/Video CD)
20 times (CD)
22
Pause
CQ-D7400W
Page 23

MP3CDVideo CDDVD Video
Slow
Playback
Direct title/
(During pause)
0.5 sec.
MP3CDVideo CDDVD Video
Direct Title selection (DVD video)
Select the
input mode.
Direct chapter selection (DVD video)
Select the
input mode.
≥ Playback is at approximately 1/3 normal speed.
≥ Reverse slow playback is not possible.
To resume normal playback
Input the
desired number.
Input the
desired number.
(twice)
(Example: 5)(twice)
Finalize
selection.
R
E
T
N
E
Finalize
selection.
chapter/
track/folder
Selection
(DVD: Direct chapter
selection)
R
E
T
N
(Example: 5)
Direct track selection (Video CD)
Input the desired number.
(Example: 5)
Direct folder selection (MP3)
Select the
input mode.
≥ The folder that does not have any files can not be selected. Select the folder
that has files.
≥ If no operation takes place for more than 8 seconds, direct selection mode
is released.
≥ Depending on the disc, you may not be able to perform operations in some cases.
Select the
desired folder.
E
T
N
E
Finalize selection.
Finalize
selection.
R
CQ-D7400W
E
R
E
T
N
E
R
E
T
N
E
23
Page 24

Disc Operations (continued)
MP3CDVideo CDDVD Video
Switching the
Subtitle
¡
Language
Switching the
Audio
¡
Language
Switching the
¡
Angle
(During playback)
2 sec.
(During playback)
2 sec.
(During playback)
2 sec.
≥ The subtitle language is switched every time
this is pressed for more than 2 seconds.
MP3CDVideo CDDVD Video
≥ The audio language is switched every time this
is pressed for more than 2 seconds.
MP3CDVideo CDDVD Video
≥ The angle is switched every time this is
pressed for more than 2 seconds.
MP3CDVideo CDDVD Video
Switching
(During playback)
between
Stereo and
¡
2 sec.
Monaural
¡ If no operation is performed for 2 seconds, the display returns to the regular mode.
Note:
≥ Initially, the subtitle language is the language that is set in the user settings.
(If this language has not been recorded, the language that is displayed is determined by the disc.)
≥ There may be brief delay before the subtitles appears.
≥ It may not be possible to switch subtitles/audio languages unless the unit is at the DVD menu or is at the
user settings.
≥ The number of subtitle languages/audio languages depends on the disc. (Some discs have only one lan-
guages.)
≥ Some discs do not support the angle function. See the operating manual with the disc for details.
24
CQ-D7400W
STEREO
MONO L
MONO R (The right channel is output both
Stereo sound
lights.
(The left channel is output both
on the left and right speakers.)
lights.
on the left and right speakers.)
lights.
Page 25

MP3CDVideo CDDVD Video
DVD Menu
Use this menu during
playback to select content,
audio, subtitles, etc., from
a menu (the DVD menu)
that is unique to each disc.
Title Menu
If the DVD has multiple
titles recorded on it, it is
possible to select the
preferred title from the title
menu to start playback.
(During playback)
(Example)
DVD MENU
1. SUBTITLE
2. AUDIO
3. ANGLE
(During playback)
(Example)
TITLE MENU
Rivers Castles
MP3CDVideo CDDVD Video
2 sec.
(Select item.) (Finalize selection.)
R
E
T
N
E
R
E
T
N
E
≥ DVD menu content and operations depend
on the disc. For details, refer to the guide
provided with your disc.
(Select item.) (Finalize selection.)
R
E
T
N
E
R
E
T
N
E
Dynamic
range
compression
This function only works
with Dolby Digital encoded
material.
Lovers Woods
MP3CDVideo CDDVD Video
(During playback) ≥ By compressing the range of the playback
level (the dynamic range), it is possible to
maintain the impact of audio even at low
volumes.
2 sec.
DRC OFF
DRC STANDARD
: Does not compress the dynamic range.
: Mode recommended by software creators for
≥ The same settings can be made under the
user menu settings. (page 34)
listening at low volumes. ( lights.)
DRC MINIMUM
: Most compressed mode like TV broadcasts, etc.
( lights.)
≥ When it is difficult to hear comparatively quiet sounds (such as movie
dialogue), setting “DRC MINIMUM” will make those sounds easier to hear.
≥ When the settings are changed, they are also applied to the user menu.
(page 34)
CQ-D7400W
25
Page 26

Disc Operations (continued)
On-Screen
Displays
(OSD)
MP3CDVideo CDDVD Video
Each time the button is pressed:
ON
(During the regular mode)
OFF
MP3CDVideo CDDVD Video
Current operation mode
(Play, Pause, Stop, etc.)
(DVD video only)
Playback timeTitle number
Chapter number
(DVD video only)
Switching the
text display
2 sec.
CD
(Disc name ≥ Track name)
(No text display)
MP3
(Folder name ≥ File name)
(Title name ≥ Artist name)
Changing ID3 Tag display
(During ID3 Tag display)
R
E
T
N
E
Album name Artist name
26
(No text display)
CQ-D7400W
Page 27

≥ To scroll the title (When the title is displayed)
Album name Title name
or
R
E
T
N
E
2 sec.
2 sec.
≥ Holding down the button for 2 seconds or longer
will scroll the text one cycle.
≥ “NO TITLE” is displayed when there is no information
on the disc.
Note:
≥ When playing the file(s) in the top tier (in the root folder),
“ROOT” will be displayed as the folder name.
≥ Carefully read the MP3 Support Chart for the types and
number of characters displayed. (page 61)
CQ-D7400W
27
Page 28

Disc Operations (Random/Scan/Repeat Play)
Menu (MODE)
1
(During playback)
Select “DVD/VCD/CD/MP3”.
Random Play
Folder Random Play
Submenu
2
MP3CDVideo CDDVD Video
MP3CDVideo CDDVD Video
MODE
(The name of the mode currently
selected will be displayed.)
(Example: MP3)
Select
RANDOM
AUDIO
Select
FOLDER RANDOM
28
MP3CDVideo CDDVD Video
Scan Play
MP3CDVideo CDDVD Video
Track/File Repeat Play
MP3CDVideo CDDVD Video
Chapter/Folder Repeat Play
CQ-D7400W
FUNCTION
PICTURE
MODE
* The name of
the mode
currently
selected will
be displayed.
Select
SCAN
Select
REPEAT
*
Select (DVD video)
CHAPTER REPEAT
Select (MP3)
FOLDER REPEAT
Page 29

SEL(Select)
2 sec.
3
ON
ON
OFF
Setting
Finish the
4
setting.
Note:
Press [DISP] on the main
unit or [RET] on the remote
control unit to return to the
regular mode.
All the tracks (files) play in a random
sequence. lights.
CancelOFF
All the files on the current folder play in
a random sequence. lights.
Cancel
SET
DISP(Display)
RET[RETURN]
4[RANDOM]
5[SCAN]
6[REPEAT]
SEL(Select)
Direct operation on the remote control unit
Each time the button is pressed;
ON OFF
Each time the button is pressed
and held for 2 seconds;
ON OFF
2 sec.
ON
OFF
ON
OFF
ON
OFF
The first 10 seconds of each track
plays in sequence. lights.
Cancel
Repeat the current track/file.
lights.
Cancel
Repeat the current folder.
(DVD video)/ (MP3)
lights.
Cancel
(Except
Video CD)
(Video CD
only)
Each time the button is pressed;
ON OFF
Each time the button is pressed;
ON OFF
Each time the button is pressed and
held for more than 2 seconds;
ON OFF
Each time the button is pressed
and held for more than 2 seconds;
ON OFF
2 sec.
29
CQ-D7400W
Page 30

CAR DVD PLAYER/RECEIVER
SOURCE
SOURCE
:9
CD Changer control
CD changer functions are designed for optional Panasonic
DISC
:TRACK
CAR DVD PLAYER/RECEIVER
9TRACK
DISC
CD changer unit.
Preparation:
≥ Connect the CD changer, and load a magazine (disc).
CD changer Mode
1
≥ Playback starts automatically.
Disc
number
Load a disc in the magazine.
Track
number
Lights when the changer
is connected.
Playback
Time
Load a magazine with CDs.
30
CQ-D7400W
Page 31

Disc Selection
2
Track Selection
3
(Next disc)
(Previous disc)
Fast Forward/Fast Reverse:
Release to resume the regular play.
Note:
≥ The power will be turned on automatically when a magazine is loaded.
≥ The following functions are not supported during playback through a CD changer.
CD-ROM, CD-RW playback
・
CD text display
・
MP3 playback
・
Pause
・
Stop
・
≥ In principle, CD-R disc play is supported but it does not follow that it will be possible to play all such
discs properly.
Next track
Beginning of the current track.
For the previous track, press twice.
Fast forward Fast reverse
2 sec.
2 sec.
CQ-D7400W
31
Page 32

CD Changer control (Random/Scan/Repeat Play)
Menu (MODE)
1
(During playback)
Select “CD≥CH”.
or
Random Play
Disc Random Play
Submenu
2
AUDIO
MODE
(The name of the mode currently
selected will be displayed.)
Select
RANDOM
Select
DISC RANDOM
32
Scan Play
Disc Scan Play
Repeat Play
Disc Repeat Play
CQ-D7400W
FUNCTION
PICTURE
MODE
* The name of
the mode
currently
selected will
be displayed.
Select
SCAN
Select
DISC SCAN
Select
*
REPEAT
Select
DISC REPEAT
Page 33

3
Setting
Finish the
4
setting.
Note:
Press [DISP] on the main
unit or [RET] on the remote
control unit to return to the
regular mode.
SEL(Select)
SET
DISP
(Display)
RET[RETURN]
4[RANDOM]
5[SCAN]
6[REPEAT]
SEL(Select)
Direct operation on the remote control unit
ON
OFF
ON
OFF
ON
OFF
ON
OFF
ON
All the tracks on all disc in the magazine
play in a random sequence.
lights.
Cancel
All the tracks on the current disc play
in a random sequence.
lights.
Cancel
The first 10 seconds of each track on
the discs play in sequence.
lights.
Cancel
The first 10 seconds of the first track of
all the discs in the magazine play in
sequence. lights.
Cancel
Repeat the current track.
lights.
Each time the button is pressed;
ON OFF
Each time the button is pressed
and held for 2 seconds;
ON OFF
2 sec.
Each time the button is pressed;
ON OFF
Each time the button is pressed
and held for 2 seconds;
ON OFF
2 sec.
Each time the button is pressed;
ON OFF
OFF
ON
OFF
Cancel
Repeat the current disc.
lights.
Cancel
Each time the button is pressed
and held for 2 seconds;
ON OFF
2 sec.
33
CQ-D7400W
Page 34

DVD settings
(While disc stopped)
1
Display
the Main Menu.
〈Main Menu〉
1. Menu Language : English
2. Subtitle Language : English
3. Audio Language : English
4. TV Aspect : 16:9
5. TV Mode (4:3) : Pan&Scan
6. On-Screen Messages : ON
7. D. Range Compression : OFF
Setting the Menu Language
Setting the Subtitle Language
Setting the Audio Language
0: Exit
Select each setting.
2
(Example:5)
1. Menu Language
2. Subtitle Language
3. Audio Language
34
Setting the connected
monitor’s aspect ratio
Setting the video format
When viewing video on a wide screen with a 4:3
aspect ratio
Setting On-Screen Messages
This is to select OSD (page 26) messages which will be
displayed when OSD is turned off.
Producing Audio that is
audible at low volumes
(Dynamic Range Compression)
This function is effective for Dolby Digital encoded
software.
CQ-D7400W
4. TV Aspect
5. TV Mode
6. On-Screen Messages
7. D.Range Compression
Page 35

Select each item.
3
Finish the setting.
4
≥ To apply changes to settings, be
sure to press [0].
≥ After the initial settings have been
changed and entered, the player
returns to the start of the disc and
begins playback.
1. English: English (Default)
2. French: French
3. Spanish: Spanish
1. English: English (Default)
2. French: French
3. Spanish: Spanish
1. English: English (Default)
2. French: French
3. Spanish: Spanish
1. 4:3: When a conventional monitor is connected.
2. 16:9: When a wide-screen monitor is connected. (Default)
3. Return: The display returns to “Main Menu”.
1. Pan & Scan: Plays in Pan & Scan mode (Default)
2. Letterbox: Plays in Letter Box mode
3. Return: The display returns to “Main Menu”.
4. Other: Other language (page 69)
5. Return: The display returns to “Main Menu”.
4. Other: Other language (page 69)
5. Disp off: Subtitle language is not displayed.
6. Return: The display returns to “Main Menu”.
4. Other: Other language (page 69)
5. Return: The display returns to “Main Menu”.
≥ When you want to
select Korean, after
pressing “4” in
Step 3, enter
“7579.” (page 69)
≥ When the disc has
predetermined
language or other
settings, these
settings are not
reflected.
≥ If “Pan & Scan” or “Letterbox” is already
set in the software, this setting is ignored.
1. ON: On-Screen Display messages such as “Play” and “Pause” will always be displayed on the
screen for 5 seconds. (Default)
2. OFF: On-Screen Display messages such as “Play” and “Pause” will not be displayed.
3. Return: The display returns to “Main Menu”.
1. Minimum: Most compressed mode like TV broadcasts, etc.
2. Standard: Mode recommended by software creators for listening at low volumes.
3. OFF: Does not compress the dynamic range. (Default)
4. Return: The display returns to “Main Menu”.
CQ-D7400W
35
Page 36

Audio settings
Menu (AUDIO)
1
Select “AUDIO”.
AUDIO
Submenu
2
PARAMETRIC EQ
PRO LOGIC ΙΙ
Setting the
absence/presence and
size of each speaker
Default : FRONT (Front L/R)...LARGE
CENTER (Center)*...NONE
SURROUND (Surround L/R)...LARGE
SUB WOOFER (Subwoofer)**...NO
* A center speaker (option, EAB-CF2
recommended) is required.
** A subwoofer (option, CJ-SFW300D
recommended) is required. A power
amplifier (option) is also required for
connecting a subwoofer.
FUNCTION
PICTURE
MODE
* The name of
the mode
currently
selected will
be displayed.
DOWN MIX
MULTI≥CH
SP SETUP
*
SP LEVEL
SP DELAY
36
CQ-D7400W
Page 37

Speaker settings
CAR DVD PLAYER/RECEIVER
Setting
3
Select the
speaker.
Finish the
4
Setting.
Note:
Press [DISP] on the
main unit or [RET] on
the remote control unit
to return to the regular
mode.
RET
[RETURN]
SEL(Select)
SET
DISP(Display)
SEL
(Select)
CAR DVD PLAYER/RECEIVER
FRONT
LARGE
SMALL : for small speakers, or when bass playback is not
: for large speakers, when bass playback is possible
CENTER
LARGE
SMALL : for small speakers, or when bass playback is not
NONE : when not using a center speaker
: for large speakers, when bass playback is possible
SURROUND
LARGE
SMALL
NONE
: for large speakers, when bass playback is possible
: for small speakers, or when bass playback is not
: when not using surround speakers
SUB WOOFER
YES
NO : when not using a subwoofer
: when using a subwoofer
Front speaker setting
(at least 100 Hz or lower)
possible
Center speaker setting
(at least 100 Hz or lower)
possible
Surround speaker setting
(at least 100 Hz or lower)
possible
Subwoofer speaker setting
Note:
≥ This setting applies to Dolby
Digital, Dolby Pro Logic II and
dts audio. It does not apply to
audio such as CD, Radio, AUX,
or CD changer.
≥ If no operation takes place for
more than 60 seconds in the
settings, the display returns to
the regular mode.
37
CQ-D7400W
Page 38

Audio settings (continued)
Menu (AUDIO)
1
Select “AUDIO”.
AUDIO
Submenu
2
PARAMETRIC EQ
PRO LOGIC ΙΙ
38
Adjusting the output
balance of each
speaker
Default: d0 dB for all speakers
Setting range: j12 dB to i12 dB (1 dB steps)
CQ-D7400W
FUNCTION
PICTURE
MODE
* The name of
the mode
currently
selected will
be displayed.
DOWN MIX
MULTI≥CH
SP SETUP
*
SP LEVEL
SP DELAY
Page 39

Speaker settings
CAR DVD PLAYER/RECEIVER
Setting
3
Select the
speaker.
Finish the
4
Setting.
Note:
Press [DISP] on the
main unit or [RET] on
the remote control unit
to return to the regular
mode.
RET
[RETURN]
SEL(Select)
SET
DISP(Display)
SEL
(Select)
CAR DVD PLAYER/RECEIVER
FRONT L
CENTER
FRONT R
≥
R
SUR
≥
L
SUR
SUB ≥ W
A test signal (continuous tone) is output from each speaker for
approximately two seconds.
Adjust the output balance so that the tone appears to have the
same volume from each speaker.
Adjusting the output balance:
Adjust the volume of all of the other speakers to the volume level
of the speaker from which the test signal appears to the quietest.
≥ If the speaker setting is “NONE” or “NO” for a speaker, the test
signal is not output and that speaker cannot be selected.
(page 36)
≥ Press [
%%
%] or [
%%
Left front speaker output balance
Center speaker output balance
Right front speaker output balance
Right surround speaker output balance
Left surround speaker output balance
Subwoofer speaker output balance
$$
$] to adjust the volume of the test signal.
$$
Note:
≥ If no operation takes place for
more than 60 seconds in the
settings, the display returns to
the regular mode.
39
CQ-D7400W
Page 40

Audio settings (continued)
Menu (AUDIO)
1
Select “AUDIO”.
Adjusting the Timing
AUDIO
Submenu
2
PARAMETRIC EQ
PRO LOGIC ΙΙ
with which the Audio
from Each Speaker
Reaches the Listener’s
Position
(Delay time setting)
Default: 0 ms for all speakers
Setting range:
Center speaker...0 ms to 5 ms (1 ms steps)
Surround speakers...0 ms to 15 ms
(1 ms steps)
1 ms = 0.001 seconds
FUNCTION
PICTURE
MODE
* The name of
the mode
currently
selected will
be displayed.
DOWN MIX
MULTI≥CH
SP SETUP
*
SP LEVEL
SP DELAY
40
CQ-D7400W
Page 41

Speaker settings
CAR DVD PLAYER/RECEIVER
Setting
3
Select the
speaker.
Finish the
4
Setting.
Note:
Press [DISP] on the
main unit or [RET] on
the remote control unit
to return to the regular
mode.
RET
[RETURN]
SEL(Select)
SET
DISP(Display)
SEL
(Select)
CAR DVD PLAYER/RECEIVER
CENTER
SURROUND
Adjust the delay time so that output from the center and
surround speakers reaches the listener’s ears at the same time
as the output from the front speakers.
≥ Make this adjustment while listening to sound.
≥ If the speaker setting is “NONE” for a speaker, that speaker
cannot be selected. (page 36)
Center speaker delay time setting
Surround speaker delay time setting
Note:
≥ If no operation takes place for
more than 60 seconds in the
settings, the display returns to
the regular mode.
41
CQ-D7400W
Page 42

Audio settings (continued)
Menu (AUDIO)
1
Select “AUDIO”.
How to adjust the sound
AUDIO
Submenu
2
PARAMETRIC EQ
PRO LOGIC ΙΙ
quality to center on a
particular frequency
(Parametric equalizer)
Default
SPEAKER : ALL
BAND : LOW
FREQ : 40 Hz
GAIN : 0 dB
WIDTH : 4
Setting range
SPEAKER : ALL/FRONT L/CENTER/FRONT R/
L≥SUR/R≥SUR
BAND : LOW/MID/HIGH
FREQ : (LOW) 40/80/100/160 Hz
(MID) 200/500/1 k/2 k Hz
(HIGH) 3.15 k/8 k/10 k/12.5 k Hz
GAIN : j12 to i12 dB (2 dB step)
WIDTH : 1/2/3/4
FUNCTION
PICTURE
MODE
* The name of
the mode
currently
selected will
be displayed.
DOWN MIX
MULTI≥CH
SP SETUP
*
SP LEVEL
SP DELAY
42
CQ-D7400W
Page 43

Sound settings
CAR DVD PLAYER/RECEIVER
Setting
3
Select the
item.
Finish the
4
Setting.
Note:
Press [DISP] on the
main unit or [RET] on
the remote control unit
to return to the regular
mode.
RET
[RETURN]
Numeric
buttons
SEL(Select)
SET
DISP(Display)
SEL
(Select)
CAR DVD PLAYER/RECEIVER
SPEAKER
BAND
FREQ
GAIN
WIDTH
★ The following settings can be configured only when the
SPEAKER setting is set to ALL.
Preset memory
Loading the
preset settings
: Select the speaker to be adjusted.
ALL : All speakers
FRONT L : Front left speaker
FRONT R: Front right speaker
CENTER : Center speaker
L≥SUR : Rear left speaker
R≥SUR : Rear right speaker
: The frequency to be adjusted is separated into
3 bands. Select the band you want to adjust from
among these 3 bands.
LOW: Low frequency range
MID: Midrange
HIGH: High frequency range
: Select the frequency to be centered on when you make
adjustments within each band (LOW/MID/HIGH).
: Set the amount (dB) by which the equalizer is to be
adjusted.
: Set the bandwidth to be used when the equalizer is
adjusted. (The smaller the number, the sharper the
equalizer curve becomes.)
: The settings are preset
for each number. (1 to 6)
2 sec.
: The preset settings are
called.
★
Note:
≥ When playing a Dolby Digital/dts
source, the parametric equalizer
settings will not be implemented.
≥ If no operation takes place for
more than 60 seconds in the
settings, the display returns to
the regular mode.
≥ The presets are common to all
modes, and six types of settings
can be made. When the preset
settings are loaded, the preset
number which was last set for
each mode is loaded.
≥ In the SPEAKER settings,
adjustment values that are set for
an individual (except ALL)
speaker are shared among all
modes.
≥ The CENTER/L
settings cannot be made when
CENTER/SURROUND was set to
NONE in the SP SETUP setting
(page 36) for the adjustment
range of the SPEAKER setting.
≥
SUR/R≥SUR
CQ-D7400W
43
Page 44

Audio settings (continued)
Menu (AUDIO)
1
Select “AUDIO”.
AUDIO
Submenu
2
PARAMETRIC EQ
PRO LOGIC ΙΙ
Changing 2 channel
audio to 5.1 channel
Surround Playback
(PRO LOGIC ΙΙ)
Default
MODE : OFF
PANORAMA : OFF
DIMENSION : d0 (j3 to i3, by 1 step)
CENTER WIDTH : 3 (0 to 7, by 1 step)
FUNCTION
PICTURE
MODE
* The name of
the mode
currently
selected will
be displayed.
DOWN MIX
MULTI≥CH
SP SETUP
*
SP LEVEL
SP DELAY
44
CQ-D7400W
Page 45

CAR DVD PLAYER/RECEIVER
Sound settings
Setting
3
Select the
item.
Finish the
4
Setting.
Note:
Press [DISP] on the
main unit or [RET] on
the remote control unit
to return to the regular
mode.
RET
[RETURN]
SEL(Select)
SET
DISP(Display)
SEL
(Select)
CAR DVD PLAYER/RECEIVER
MODE
: PRO LOGIC OFFOFF
:
MOVIE
MUSIC
MATRIX
In Music mode, the following controls are activated.
The stereo sound of movies and TV dramas is turned into
stereoscopic sound approaching that of 5.1 channel recordings.
: Broad, deep sound is reproduced, allowing you to enjoy
realistic feeling music and such. Furthermore, by adjusting
the 3 parameters described below, you can reproduce
acoustic fields according to your preferences.
: Since the directional emphasis adjustment circuit is
turned off, playback will be a simple surround sound.
This is good for when FM stereo reception is erratic.
PANORAMA
Turning this circuit on will enlarge the front stereo image and add
the surround-sound speakers to create the effect of being wrapped
in sidewall sound images.
DIMENSION
This adjusts the location of the soundfield to the front or rear.
i : Moves the soundfield to the front.
j : Moves the soundfield to the rear.
CENTER WIDTH
The closer it is to 0, the higher it is the proportion of the center
channel component output from the center speaker.
The closer it is to 7, the higher it is the proportion of the center
channel component output from the front speakers.
0: The center channel component is not distributed between the
front left and right speakers.
7:
The center channel component is distributed between the front left
and right speakers. (Sound is not output from the center speaker.)
Note:
≥ If no operation takes place for
more than 60 seconds in the
settings, the display returns to
the regular mode.
45
CQ-D7400W
Page 46

Audio settings (continued)
Menu (AUDIO)
1
Select “AUDIO”.
Changing Dolby Digital/
dts audio to 2 channel
AUDIO
Submenu
2
PARAMETRIC EQ
PRO LOGIC ΙΙ
Stereo Playback
(DOWN MIX)
Default:OFF
Changing 2 channel
Dolby Digital and dts
audio to 5.1 channel
Surround Playback
(MULTI≥CH)
Default:ON
FUNCTION
PICTURE
MODE
* The name of
the mode
currently
selected will
be displayed.
DOWN MIX
MULTI≥CH
SP SETUP
*
SP LEVEL
SP DELAY
46
CQ-D7400W
Page 47

CAR DVD PLAYER/RECEIVER
Sound settings
Setting
3
Finish the
4
Setting.
Note:
Press [DISP] on the main
unit or [RET] on the remote
control unit to return to the
regular mode.
RET
[RETURN]
SEL(Select)
SET
DISP(Display)
SEL
(Select)
CAR DVD PLAYER/RECEIVER
ON
OFF
ON
OFF
: Down Mix (2 channel stereo playback)
Use this setting when only front speakers are
connected.
≥ The Center (C) and Surround (LS), (RS) and
Subwoofer signals are combined with and
output through Front (R) and (L).
: Recorded signal format
(Example: 5.1 channel surround playback)
(default)
: This expands the 2 channel signals from Dolby
Digital and dts to 5.1 channel signals.
: Normal sound (2 channel stereo playback)
Note:
≥ If no operation takes place for
more than 60 seconds in the
settings, the display returns to
the regular mode.
47
CQ-D7400W
Page 48

Function settings
Menu (FUNCTION)
1
Select “FUNCTION”.
Mute/Attenuation
(MUTE KEY)
Default: MUTE
AUDIO
Submenu
2
MUTE KEY
Navigation mute level
(EXT. MUTE)
Select the mute level of this unit during the
voice guidance from the Panasonic car
navigation system (available in future).
Default: 0
Setting range: OFF, 0, 1, 2
Button Operation Sound
(BEEP)
Default: ON
Setting AUX input level
(AUX INPUT LEVEL)
Default: LOW
FUNCTION
PICTURE
MODE
* The name of
the mode
currently
selected will
be displayed.
EXT. MUTE
BEEP
*
AUX INPUT LEVEL
48
CQ-D7400W
Page 49

3
CAR DVD PLAYER/RECEIVER
ATT
Setting
Finish the
4
Setting.
Note:
Press [DISP] on the main
unit or [RET] on the remote
control unit to return to the
regular mode.
: No soundMUTE
: Decrease the volume by j20 dB. (attenuation)
RET
[RETURN]
SEL(Select)
SET
DISP(Display)
SEL
(Select)
CAR DVD PLAYER/RECEIVER
: Does not change the volume.OFF
: Decreases the volume to “0” (silence).0
: Decreases the volume by j20 dB.1
: Decreases the volume by j10 dB.2
: Operation sound is ON.ON
OFF
: Operation sound is OFF.
Normally this is set to LOW. Set this to HIGH when the level of
external input is high (when the sound is distorted or the “OVER”
display appears).
This book refers to the
connection to the
Panasonic car navigation
system that will come on
the market in future.
Descriptions regarding
the car navigation
system are boxed with
dotted line.
Note:
≥ If no operation takes place for
more than 60 seconds in the
settings, the display returns to
the regular mode.
49
CQ-D7400W
Page 50

Picture (Display) settings
Menu (PICTURE)
1
Select “PICTURE”.
Background Display
Switching
(3D GRAPHICS)
Default: ALL
AUDIO
FUNCTION
Submenu
2
3D GRAPHICS
Contrast
(CONTRAST)
Default: 3
Setting range: 1 to 5
Clock adjustment
(CLOCK ADJUST)
24-hour system
Dimmer
Default: 3
PICTURE
MODE
* The name of
the mode
currently
selected will
be displayed.
CONTRAST
*
CLOCK ADJUST
: Darker
: Medium
: Brighter
50
CQ-D7400W
Page 51

3
CAR DVD PLAYER/RECEIVER
ALL
Setting
: Random display among
pattern A to E
Finish the
4
Setting.
Note:
Press [DISP] on the main
unit or [RET] on the remote
control unit to return to the
regular mode.
:F1
A
: Soccer
B
: Space sceneC
: Snow board
D
: MTBE
RET
[RETURN]
SEL(Select)
SET
DISP(Display)
SEL
(Select)
CAR DVD PLAYER/RECEIVER
[$] : Tilting up view
angle.
[%] : Tilting down view
angle.
%%
Press [
%] : The hour
%%
display highlights.
""
Press [
"] : Put forward.
""
##
Press [
#] : Put back.
##
$$
Press [
$] : The minutes
$$
display highlights.
""
Press [
"] : Put forward.
""
##
Press [
#] : Put back.
##
Note:
≥ If no operation takes place for
more than 60 seconds in the
settings, the display returns to
the regular mode.
51
CQ-D7400W
Page 52

Troubleshooting
Preliminary Steps
Check and take steps as described in the tables below.
If You Suspect Something Wrong
Immediately switch the power off.
Disconnect the power connector and check that there is
neither smoke nor heat from the unit before asking for
repairs. Never try to repair the unit by yourself because
it is dangerous to do so.
Error Display Messages
❐ DVD video/Video CD/CD/MP3
Display
≥ Disc is dirty, or is upside down.
≥ Disc has scratches.
≥ A disc that has data other than CD-DA or MP3 type is loaded.
➡ Check the disc.
≥ Disc has scratches.
➡ Check the disc.
Caution:
≥ Do not use the unit if it malfunctions or if
there is something wrong.
≥ Do not use the unit in abnormal condition, for
example, without sound, or with smoke or foul
smell, which can cause ignition or electric
shock. Immediately stop using it and call the
store where you purchased it.
Cause/Step
No operation by some cause.
➡ If normal operation is not restored, call the store where you
purchased the unit or the nearest Servicenter to ask for repairs.
The display continues if you cannot switch off the power.
≥ The player for some reason cannot read the file you are trying to play.
(File recorded in an unsupported file system, compression scheme,
data format, file name extension, damaged data, etc. )
➡ Select a file that the player can read. Confirm the type of data
recorded on the disc. Create a new disc if necessary.
≥ No disc in the player.
➡ Insert a disc into the player.
≥ An attempt was made to play a disc with a region number that was
not “3” or “ALL”.
➡ Eject the disc.
≥ An attempt was made to play a PAL disc.
➡ Eject the disc.
52
CQ-D7400W
Page 53

❐ CD Changer
Display Cause/Step
≥ Disc is dirty, or is upside down.
≥ A disc other than a music CD (CD-DA type) is loaded.
➡ Check the disc.
≥ Disc has scratches.
➡ Check the disc.
≥ The changer will not operate for some reason.
➡ Press [<] (eject) on the changer. If the changer does not respond,
press the changer’s reset switch.
≥ No disc is in the changer (magazine).
➡ Insert discs into the changer (magazine).
≥ No magazine in the changer.
➡ Insert the magazine with discs.
Note:
≥ For details, refer to operating instructions for the changer used.
Troubleshooting Tips
❐ Common
Trouble Cause/Step
No power.
No sound.
Car’s engine switch is not on.
➡ Turn your car’s ignition switch to ACC or ON.
Cables are not correctly connected.
➡ Connect cables correctly.
➡ Connect the battery cable to the terminal that is always active.
➡ Connect the accessory cable to your car’s ACC source.
➡ Connect the grounding wire to a metal part of the car.
Fuse is burnt out.
➡ Call the store where you purchased the unit, or your nearest
Servicenter and ask for fuse replacement.
Mute is set to ON.
➡ Set it to OFF.
Cables are not correctly connected.
➡ Connect cables correctly.
Condensation (dew).
➡ Wait for a while before use.
53
CQ-D7400W
Page 54

Troubleshooting (continued)
❐ Common (continued)
Trouble Cause/Step
Only sound, no display.
Noise.
Buttons unusable (each
source operation).
Audio sound is output
but the demonstration
display appears.
The power goes off
suddenly without
apparent reason.
❐ Radio
The display shows “display and light off”.
➡ Press [DISP] (display) to change the display.
A mobile phone is used near the unit.
➡ Keep the mobile phone away from the unit.
The unit’s grounding wire is not connected securely.
➡ Check the metal areas of the car body (chassis), and connect the
grounding wire more securely.
Menu is displayed.
➡ Press [RET] or [DISP] (display) to return to the regular mode.
Demonstration mode is ON.
➡ Press [DISP] (display) to cancel demonstration mode.
The safety devices has been trigged by some apparent reason.
➡ Call the store where you purchased the unit, or your nearest
Servicenter.
Too much noise in FM
stereo and monaural
broadcasts.
54
Trouble Cause/Step
Station is too far, or signals are too weak.
➡ Select other stations of higher signal level.
The motor antenna relay control lead is not connected correctly.
➡ If there is a motor antenna in the car, connect the motor antenna
relay control lead to the motor antenna lead that is installed in the
car correctly.
The ground connection of the radio antenna is not secure enough.
➡ Check the ground connection of the mounted base part of the
antenna, and tighten up the screw.
The radio antenna is not extended enough.
➡ Extend fully the radio antenna.
CQ-D7400W
Page 55

❐ DVD video/Video CD/CD
Trouble Cause/Step
The disc is inside but
no sound.
Sound skips, bad sound
quality.
(e. g. caused by noise)
Disc is upside down.
➡ Place disc in the correct direction with the label side up.
≥ Disc is dirty.
≥ Disc has scratches.
➡ Clean disc or change disc, referring to the section on “Notes on Disc”.
The unit can only play the following types of discs: DVD video, Video
CD, CD and CD-DA data recorded CD-R and CD-RW, and MP3 data
recorded CD-R and CD-RW.
➡ The unit may not successfully play back a CD-R/RW that is made in
combination of writing software, a CD recorder (CD-R/RW drive)
and a disc which are incompatible one another. Refer to instructions
for the concerned devices for details.
≥ Disc is dirty.
≥ Disc has scratches.
➡ Clean disc or change disc, referring to the section on “Notes on Disc”.
➡ The unit may not successfully play back a CD-R/RW that was made
by the combination of writing software, a CD recorder (CD-R/RW
drive) and a disc if they are incompatible one another. Refer to
instructions for the concerned devices for details.
Sound skips due to
vibration.
Disc is not ejected.
CD text is not displayed
normally.
Time is counted but no
sound comes out.
Mounting angle is over 30x.
➡ Adjust mounting angle to less than 30x.
Unstable mounting.
➡ Mount the unit securely with the mounting parts, referring to the
section on installation.
≥ Disc is defective.
≥ Mechanical trouble.
➡ Open the panel and press [<] (eject). If the disc still does not
eject, press the reset switch. (page 59)
≥ Disc is dirty.
≥ Disc has scratches.
➡ Clean disc, referring to the section on “Notes on Disc”.
The first track of a mix mode disc was reproduced. (Mix mode is a
format in which data except music is recorded on the first track and
music data is recorded on other than the first track in a session. )
➡ Play back music data recorded on other than the first track.
55
CQ-D7400W
Page 56

Troubleshooting (continued)
❐ DVD video/Video CD/CD (continued)
Trouble Cause/Step
≥ Condensation (dew).
The disc will not play,
or else it stops very
quickly.
The picture does not
appear on the monitor.
➡ Wait for a while before use.
≥ Disc is dirty.
≥ Disc has scratches.
➡ Clean disc or change disc, referring to the section on “Notes on Disc”.
Cables are not correctly connected.
➡ Connect cables correctly.
➡ Check the settings for the monitor itself.
➡ Stop the car and apply the parking brake.
The buttons do not
work.
Video CD menu playback does not work.
distorted while fast
forwarding or reversing.
No subtitles appear.
It is difficult to hear
quiet sounds.
Cannot switch the audio
language/subtitle
language/angle.
The audio/subtitle
language selected in the
initial settings is not
used.
Some operations are not permitted with certain discs.
➡ Refer to the guide provided with your disc.
➡ Menu playback is only possible when playing a video CD that has the
playback control feature.
➡ A certain amount of distortion is normal.The picture becomes
Subtitles must be recorded on the disc, or they will not appear.
➡ Refer to the guide provided with your disc.
➡ Set the Dynamic range compression setting to “Minimum”.
≥ It is not possible to switch if the disc does not have multiple audio
languages/subtitle languages/angles recorded on it.
➡ Refer to the guide provided with your disc.
≥ Some discs permit switching through a menu screen.
≥ Sometimes, switching angles is possible only with certain scenes.
If audio or subtitles in that language are not recorded on the disc, the
audio or subtitles do not switch to that language. (Some discs permit
switching through a menu screen.)
➡ Refer to the guide provided with your disc.
screen are not in the
desired language.
56
➡ Check the setting for “Menu Language” in the user settings.Messages in the menu
CQ-D7400W
Page 57

❐ MP3
No playback.
Trouble Cause/Step
The disc does not conform to any of the file systems supported by this
unit.
➡ Insert a disc that conforms to the file systems supported by this
unit. For supported file systems see “Notes on MP3”.
The MP3 file is missing the “mp3” file name extension.
➡ Make sure to add the “mp3” extension to each MP3 file name.
It takes too long for
playback to start.
Poor recording quality,
sound skipping
Files are not played in
the desired order.
Folder/file name is not
displayed correctly.
The folders and files recorded on the disc are layerded too much.
➡ As checking of files takes longer in this case, do not record any
unnecessary folders or files other than MP3s on the disc.
➡ The recording quality differs depending on the encoding software used,
and on settings such as the bit rate. Set the bit rate within the range
specified in the MP3 support chart. (page 61)
It is recommended to set the bit rate to “128 kbps or more” and “Fixed”.
High-speed writing was executed when MP3 data was recorded on the disc.
➡ Decrease writing speed as low as possible.
Files or folders are not recorded in the desired playback order.
➡ Some writing software lets you specify the recording order by
adding a prefix in the range of 01–99, etc. to the file name.
For details, refer to the user manual of your writing software.
The disc does not conform to any of the file systems supported by this
unit.
➡ Insert a disc that conforms to the file systems supported by this
unit. For supported file systems, see “Notes on MP3”.
➡ There may a problem with your writing software or CD recorder
(CD-R/RW drive). For details, refer to user manual of your writing
software.
File playing time is not
displayed correctly.
You turned off the ignition switch of the car during playback.
➡ Playing another file will return the file playing time to normal.
You played a VBR (Variable Bit Rate) format MP3 file.
➡ The file playing time of VBR (Variable Bit Rate) format MP3 file is
sometimes displayed incorrectly.
57
CQ-D7400W
Page 58

Troubleshooting (continued)
❐ Sound Setting
Trouble Cause/Step
There is no sound from
one of the speakers.
➡ Check the speaker level or parametric equalizer settings.
Cables are not correctly connected.
➡ Connect the cables correctly.
Left and right sounds are
reversed in stereo
listening.
Dynamic range
compression does not
work. (“DRC” does not
light . )
❐ Remote Control Unit
Trouble Cause/Step
Buttons are invalid for
operation.
The right speaker wire is connected to the left speaker and the left
speaker wire to the right speaker.
➡ Connect the speaker wires to the correct ones.
This function only works with Dolby Digital encoded material.
Battery polarities are reversed.
➡ Insert the battery correctly.
Wrong battery.
➡ Check the battery.
The battery has run down.
➡ Replace the battery.
Remote control unit is in the wrong direction.
➡ Direct the remote control unit at sensor on the front panel.
Maintenance
Your product is designed and manufactured to ensure a minimum of maintenance. Use a dry, a soft cloth for
routine exterior cleaning. Never use benzine, thinner or other solvents.
Product Servicing
If the suggestions in the charts do not solve the problem, we recommend that you take it to your nearest
authorized Panasonic Servicenter. The product should be serviced only by a qualified technician.
Replacing the Fuse
Use fuses of the same specified rating (10 A). Using different substitutes or fuses with higher ratings, or
connecting the unit directly without a fuse, could cause fire or damage to the unit.
If the replacement fuse fails, contact your nearest Panasonic Servicenter for service.
58
CQ-D7400W
Page 59

What to do if the player does not operate no matter which button you press
Reset switch
DVD
In case a problem may arise
Turn off the power immediately.
Disconnect the power cable after making sure there is no smoke and the unit does not become hot.
Refer repairs to the dealer where you purchased the unit.
Never repair the unit by yourself.
Press the reset switch using a break-proof pin.
≥ The power is turned off and the unit restarts immediately.
(Registered settings and adjustments are not cleared.)
For no reaction by the reset switch
Refer repairs to the dealer where you purchased the unit.
No trouble in this case
Dew condensation
≥ When you play back a disc in a rainy day or right after turning on the heater, playback may not function
correctly because of dew condensation on the optical lens of this unit or on the disc. In such a case,
eject the disc and wait for approx. an hour to let dew evaporate spontaneously.
Initialization of all settings and adjustments that are registered (Memory clearance)
or
2 sec.
≥ The message appears to make sure
of memory clearance.
2 sec.
≥ Registered settings and adjustments are cleared
and the power is turned off.
(The settings return to the factory default.)
To avoid initializing the settings and adjustments,
press other buttons to cancel it.
CQ-D7400W
59
Page 60

Notes on MP3
■ What is MP3?
MP3 (abbreviation for MPEG Audio Layer 3) is an audio compression technology format. By such processing
as shaving off sound registers that cannot be heard by human ears and sounds that cannot be heard because
they are buried by large sounds, audio can be compressed while still maintaining the sound quality. Since files
can be compressed to approximately 1/10th the size of the original file, music files equivalent to the amount on
10 music CDs can be written onto a single disc. (When the files are converted to MP3 files at [bit rate of
128 kbps and a sampling frequency of 44.1 kHz] and written to a 650 MB CD-R/RW disc.)
■ What formats can be played back?
CD-R/RW discs that are compliant with ISO9660 Level 1/Level 2, Joliet and Romeo (extension formats), or
ISO9660 Apple extension formats can be played.
≥ UDF, Apple HFS and Rock Ridge formats are not supported.
≥ What is the ISO9660 format?
This is a logical format for files and folders. (international standard)
The ISO9660 format has the following restrictions on the number of characters that can be used.
For details, please see the user’s manual for the writing software.
Level File Names
Level 1 8.3 format
(8 characters or less of one byte English upper case
letters, one byte numbers or “_”, plus the extension)
Level 2
≥ What is the extension format?
Joliet and Romeo are logical formats for files and folders used on Windows, whereas the ISO9660 Apple
extension is used on Macintosh computers. These formats have the following restrictions on the number of
characters that can be used. For details, please see the user’s manual for the writing software.
Name File Names/Folder Names
Joliet Maximum of 64 one-byte characters, used with 8.3 format
Romeo
ISO9660
Apple Extension
Maximum of 31 one byte characters
(including extension)
(including “mp3 (MP3)” extension)
Maximum of 128 one-byte characters (including “mp3 (MP3)” extension)
Maximum of 31 one-byte characters (including “mp3 (MP3)” extension)
Maximum of 8 one byte characters
(extensions not allowed)
Maximum of 31 one byte characters
Folder Names
60
CQ-D7400W
Page 61

■ MP3 Support Chart
CD-ROM
format
Sampling
frequency
ISO9660 Level 1/Level 2, Joliet and Romeo (extension formats), ISO9660 Apple extension
* When files are not compliant with these standards, they may not be played back properly
and the characters and such may not be displayed correctly.
≥ MPEG 1 Layer 3: 32 kHz, 44.1 kHz, 48 kHz
≥ MPEG 2 Layer 3: 16 kHz, 22.05 kHz, 24 kHz
Bit rate ≥ MPEG 1 Layer 3: 32 kbps ~ 320 kbps
≥ MPEG 2 Layer 3: 8 kbps ~ 160 kbps
* When file is converted using VBR (variable bit rate), it may not be able to be played back.
No. of files Maximum of 512 (maximum of 512 files per folder)
No. of folders Maximum of 255 (including the root folder)
Folder hierarchy Maximum of 8 tiers (including the root tier)
Playback order In hierarchical order
ID3 Tag
Types of
displayable
characters
No. of displayable
characters
Ver. 1.0/1.1/2.0 (Song name, artist name, album name only)
ASCII character set
A to Z, a to z, digits 0 to 9, and the following symbols:
(space) ! " # $ % & ' ( ) * + , - . / : ; < = > ? @ [ \ ] ^ _ ` { | } ~
* For certain symbols and languages, characters that cannot be displayed correctly will be
displayed as asterisks (“¢”).
Maximum of 64 one-byte characters
* Extensions will not be displayed.
Notes
≥ Encoding software and writing software are not included with this player.
≥ Sound quality during playback will differ depending on the conditions at the time of conversion. For details,
please see the user’s manual for the encoding software.
≥ Discs written with multi-session and discs containing a mixture of different data formats (such as discs in
which MP3 is mixed with Mixed Mode CD, CD-Extra or CD-DA) may not be able to be played back properly.
Also, discs written using the packet write format may not be able to be played back properly. Panasonic
recommends using “Disc At Once” for writing discs.
≥ Discs may not play properly or characters may not be displayed properly depending on the writing software
and drive used, or on the combination used. Also, if conditions for writing to the disc are poor, there may be
breaks in the sound or noise may occur.
≥ Always attach the “mp3 (MP3)” extension to MP3 files. When other extensions are used, or no extension is
used, you will not be able to playback those files.
≥ It may take time before playback starts for discs with a lot of tiers or a complex structure. Please do not
write non-MP3 files and unnecessary folders to the disc.
≥ Because the writing software may rearrange the files and folders when writing to the disc, the playback order
may not be as desired. Also, the playback order may differ even for the same disc depending on the player
used. In some cases, you may be able to specify the playback order by using 3-digit numbers “001” ~ “255”
(or 2-digit numbers) at the beginning of the file name.
≥ M3U play lists are not supported.
≥ WMA and MP3 PRO are not supported.
■ Copyright
Except for one’s personal enjoyment of the copyrighted material, such as music, copying (recording), distribution and delivery of discs without the permission of the copyright owner is prohibited by copyright laws.
CQ-D7400W
61
Page 62

Notes on Disc
Notes on CD-Rs/RWs
≥ You may have trouble playing back some CD-R/
RW discs recorded on CD recorders (CD-R/RW
drives), either due to their recording characteristics or dirt, fingerprints, scratches, etc. on the
disc surface.
≥ CD-R/RW discs are less resistant to high tem-
peratures and high humidity than ordinary music
CDs. Leaving them inside a car for extended
periods may damage them and make playback
impossible.
≥ The unit may not successfully play back a CD-R/
RW that was made by the combination of writing
software, a CD recorder (CD-R/RW drive) and a
disc if they are incompatible one another.
≥ This unit cannot play the CD-R/RW discs if the
session is not closed.
≥ This unit cannot play the CD-R/RW discs which
contains other than CD-DA or MP3 data (video
CD, etc. ).
≥ Be sure to observe the instructions of CD-R/RW
disc for handling it.
Copyright
Copying, broadcasting, public performance and
renting of discs without prior consent is prohibited
by law. This player incorporates copyright protection technology that is protected by U.S. patents
and other intellectual property rights owned by
Macrovision Corporation and other rights owners.
Use of this copyright protection technology must
be authorized by Macrovision Corporation, and is
intended for home and other limited viewing uses
only, unless otherwise authorized by Macrovision
Corporation. Reverse engineering or disassembly is
prohibited.
Maintenance
How to hold the disc
≥ Do not touch the underside of the disc.
≥ Do not scratch the disc.
≥ Do not bend the disc.
≥ When not in use, keep the disc in the case.
Label side
Do not use irregular shaped discs.
Do not leave discs on the following places:
≥ Direct sunlight
≥ Near car heaters
≥ Dirty, dusty and damp areas
≥ Seats and dashboards
Disc cleaning
Use a dry, soft cloth to wipe from the center
outward.
<Right> <Wrong>
Do not attach any seals or labels to your discs.
Do not write on the disc label in a heavy pen or
ballpoint pen stroke.
62
CQ-D7400W
Page 63

Definition of Terms
Dolby Digital
This fully discrete format divides the music signals into
5.1 channels: Front Left (L), Front Right (R), Center (C),
Left Surround (LS), Right Surround (RS) and Subwoofer
(SW: 0.1 channel) for recording and playback. The
number of channels that are recorded depends on the
software. (1 to 5.1 channels)
Manufactured under license from Dolby
Laboratories. “Dolby”, “Pro Logic”, and the
double-D symbol are trademarks of Dolby
Laboratories.
Dolby Pro Logic II
Dolby Pro Logic II creates five full-bandwidth output
channels from two-channel sources. This is done using
an advanced, high-purity matrix surround decoder that
extracts the spatial properties of the original recording
without adding any new sounds or tonal colorations.
dts
This format requires more data than Dolby Digital, and
provides higher quality surround playback.
Similar to Dolby Digital, this fully discrete format divides
the music signals into 5.1 channels: Front Left (L), Front
Right (R), Center (C), Left Surround (LS),
Right Surround (RS) and Subwoofer (SW: 0.1 channel)
for recording and playback.
Manufactured under license from Digital
Theater Systems, Inc. US Pat. No. 5,451,942
and other world-wide patents issues and
pending. “DTS” and “DTS Digital Surround”
are trademarks of Digital Theater Systems,
Inc. C 1996 Digital Theater Systems, Inc. All
rights reserved.
Interactive DVD
An interactive DVD is DVD software which
includes multiple angles, multiple plot endings,
etc.
Letterbox screen
This refers to screen on which the playback
picture of wide-screen DVDs or Video CDs
appears with black bands running along the top
and bottom.
LPCM (Linear PCM audio)
In this format, the audio signal is converted to
digital data and recorded in two channels
without compression. Because the capacity of a
DVD video disc is large, it can store more data
with better accuracy than a CD.
Pan & Scan screen
This refers to a screen on which the playback
picture of wide-screen DVDs or Video CDs is cut
off at the left and right sides.
Playback Control (Video CD)
When a video CD package is labeled as “supports playback control”, etc., the user can
display a menu screen on the TV and interactively access certain scenes and information.
Title, Chapter (DVD)
DVDs are divided into some large sections
(titles) or some small sections (chapters). Each
section is numbered; these numbers are called
“Title number” or “Chapter number”.
Title 1 Title 2
Chapter1 Chapter2 Chapter1
…… ……
“DTS” and “DTS Digital Surround” are
trademarks of Digital Theater Systems, Inc.
Track (Video CD/CD)
Video CDs or CDs are divided into some sections
(tracks). Each section is numbered; these
numbers are called “Track number”.
Track1 Track2
Track3 Track
CQ-D7400W
……
63
Page 64

Before installing and wiring the player
Disassembly
Forbidden
Installation Flow
Warning
Disconnect the battery’s - terminal.
Do not disassemble, repair or modify
the player
Do not disassemble, repair or modify
the player, or cut the cord to connect it
to the power supply for another device.
This could cause fire, electrical shock
or other malfunction.
Caution
Have a professional technician wire
and install the player
Professional skill and experience is
required to wire and install the player.
For safety’s sake, always ask the store
from which you purchased the player
to install and wire it for you.
Check the wiring and installation parts
In the unlikely event that something is wrong, please
contact the store from which you purchased the player.
≥ Wiring
Item Qty.
Power cord 1
Clamp connector 1
Wire the player. (page 66)
≥ When connecting the player to other
devices, do the wiring after carefully
reading the user’s manual for each device.
≥ In order to prevent short circuit accidents,
always plug in the power cord after all the
wiring has been completed.
Install. (page 65)
After the installation, reconnect the battery’s
- terminal.
For safety’s sake, always use gloves
when wiring and installing the player.
Check the dimensions and angle of the
installation part
≥ Depending on the shape and dimensions of the
dashboard, you may not be able to install the
player or it may contact the gearshift. For details,
please consult with the retailer.
When the audio space is not DIN size or 2DIN
side, please consult with the retailer.
DIN size: 180 mm (w) a 50 mm (h)
2DIN size: 180 mm (w) a 100 mm (h)
≥ Install the player at 30 degrees or less with
respect to a horizontal axis.
≥ Installation
Binding-Head screws (M5 a 6 mm) 4
Flat-Head screws (M5 a 6 mm)
Spacers 2
Double-Faced Adhesive tape 2
64
Item Qty.
CQ-D7400W
Within 30e
4
Remove the transportation brackets.
Transportation bracket t 2
Page 65

Installation
The shape of and method for affixing the attachment brackets used differs according to
the car manufacturer and car model. For details, please consult with the retailer.
In-Dash Monitor
Accessory screws
*Refer to the description
below.
Accessory screws
≥ Always use the accessory screws provided
with the player. Do not use screws of a different
length.
≥ Select the accessory screws that match the
shape of the holes in the attachment bracket.
Binding-Head screw (M5 a 6 mm)
Bracket (L)
Bracket for the car
Bracket for the car
When there are hooks,
use long-nose pliers or
such to bend them flat.
Bracket (R)
CQ-D7400W
≥ When the bracket is not steady, reinforce the
attachment with a spacer(s) to secure it.
A spacer is not used in this hole.
Binding-Head screw
(M5 a 6 mm)
Binding-Head screw (M5 a 6 mm)
Double-Faced Adhesive tape
Spacer
Flat-Head screw (M5 a 6 mm)
Bracket for the car
65
CQ-D7400W
Page 66

Electrical Connections
Power connector
(Orange)
(Red)
(Yellow)
(Black)
(Blue/White Stripe)
(Brown/White Stripe)
(Dark Blue)
(Green/Yellow Stripe)
ANT-CONT MAX0.1A
AMP-CONT MAX0.1A
TWIN CD•C-CONT
Antenna terminal
Connect the radio antenna.
CQ-D7400W
(Yellow)
Pre Out Cord
(Front)
Video Output
Cord
Pre Out Cord
(Rear)
AUX Input Cord
NAVI MUTE
Resistor (220 Ω)
ACC
≥
This lead is not intended for use with a switch actuated power antenna.
To ACC power, 12 V DC.
To the car battery,
continuous 12 V DC.
To a clean, bare metallic
part of the car chassis.
To an external amplifier.
(Max. 100 mA)
In future use
In future use
Not used
VIDEO-OUT
Changer Control Cord
VIDEO-CONT
To the auto antenna control
power lead of the car. (Max. 100 mA)
≥
Connect the battery power cord to a connector that is always supplied with power from the car battery.
Fuse (10 A)
BATTERY 10 A
AUX-IN
Motor Antenna Relay Control Lead
Dual CD changer Control Lead
External Amplifier Control Power Lead
Navi Mute Lead
ACC Power Lead
Battery Lead
Ground
Lead
Antenna
Wiring Diagram
Caution:
≥ Be sure to connect the power connector after completion of all other connections
for prevention of shortings.
Example Combination
≥ Color LCD TV monitor (CY-TV7200W)
≥ External amplifier for center speaker
≥ External amplifier for subwoofer
≥ Center speaker (EAB-CF2)
≥ Subwoofer (CJ-SFW300D)
66
CQ-D7400W
Page 67

RCA Cord
(option)
(Yellow)
R (Red)
Video Input Cord
VTR-IN
Pre Out Cord
PRE-OUT
FRONT
REAR
CENTER-OUT
Pre Out Cord (Center)
S.W-OUT
Subwoofer Cord
CD.C-IN
CD Changer
Input Cord
FRONT R
Front Speaker Lead (Right)
FRONT L
Front Speaker Lead (Left)
REAR R
Rear Speaker Lead (Right)
REAR L
Rear Speaker Lead (Left)
R (Red)
L (White)
R (Red)
L (White)
(Black)
(Monaural)
(Black)
R (Red)
L (White)
L (White)
Color LCD TV monitor
(CY-TV7200W,option)
External amplifier
External amplifier
(Gray)
(Gray/Black Stripe)
(White)
(White/Black Stripe)
(Violet)
(Violet/Black Stripe)
(Green)
(Green/Black Stripe)
+
-
+
-
+
-
+
-
Center speaker
(EAB-CF2, option)
Subwoofer
(CJ-SFW300D, option)
(R)
Front
(L)
(R)
Rear
(L)
How to connect the side brake connection lead
Parking brake switch
Chassis
Connect the parking brake cord
to the one that is not connected to
the vehicles chassis while the brake is in the released state.
Side brake (parking brake) connection lead
SIDE BRAKE
(Blue/Yellow Stripe)
Side brake (parking brake)
connection lead
Push the end of the cord in until
it touches this part.
≥
Be sure to connect this as a safety measure.
Snap shut
Vehicle lead
Clamp connector
67
CQ-D7400W
Page 68

Electrical Connections (continued)
Connection of CD changer and external amplifier
Refer to the operating instrunctions for each connecting device in conjunction with this book.
Example Combination
≥ CD changer (CX-DP880)
≥ External amplifier
≥ Upgraded system speakers
L (White)
Upgraded
System
Speakers
Upgraded
System
Speakers
FRONT
REAR
External
amplifier
R (Red)
L (White)
External
amplifier
R (Red)
CQ-D7400W
CENTER-OUT
S.W-OUT
CD.C-IN
Changer Control Cord
(Black)
(Monaural)
External
amplifier
External
amplifier
R (Red)
L (White)
DIN Cord
Battery Lead
Ground Lead
Center
Speaker
Subwoofer
RCA Cord
68
CD changer
(CX-DP880, option)
CQ-D7400W
Page 69

Language Code List
In “Other” cases (Menu Language, Subtitle Language, Audio Language) (page 34)
Input the four digit
language code. (See below.)
Code Language Name
6565 Afar
6566 Abkhazian
6570 Afrikaans
6577 Ameharic
6582 Arabic
6583 Assamese
6588 Aymara
6590 Azerbaijani
6665 Bashkir
6669 Byelorussian
6671 Bulgarian
6672 Bihari
6678 Bengali; Bangla
6679 Tibetan
6682 Breton
6765 Catalan
6779 Corsican
6783 Czech
6789 Welsh
6865 Danish
6869 German
6890 Bhutani
6976 Greek
6978 English
6979 Esperanto
6983 Spanish
6984 Estonian
6985 Basque
7065 Persian
7073 Finnish
7074 Fiji
7079 Faroese
7082 French
7089 Frisian
7165 Irish
7168 Scots Gaelic
7176 Galician
7178 Guarani
7185 Gujarati
7265 Hausa
7273 Hindi
7282 Croatian
To input the number again: Finalize selection.
(ENTER)
Setting is finished and the display
returns to “Main Menu”.
Code Language NameCode Language Name
7285 Hungarian
7289 Armenian
7365 Interlingua
7378 Indonesian
7383 Icelandic
7384 Italian
7387 Hebrew
7465 Japanese
7473 Yiddish
7487 Javanese
7565 Georgian
7575 Kazakh
7576 Greenlandic
7577 Cambodian
7578 Kannada
7579 Korean
7583 Kashmiri
7585 Kurdish
7589 Kirghiz
7665 Latin
7678 Lingala
7679 Laothian
7684 Lithuanian
7686 Latvian, Lettish
7771 Malagasy
7773 Maori
7775 Macedonian
7776 Malayalam
7778 Mongolian
7779 Moldavian
7782 Marathi
7783 Malay
7784 Maltese
7789 Burmese
7865 Nauru
7869 Nepali
7876 Dutch
7879 Norwegian
7982 Oriya
8065 Panjabi
8076 Polish
8083 Pashto, Pushto
8084 Portuguese
8185 Quechua
8277 Rhaeto-Romance
8279 Romanian
8285 Russian
8365 Sanskrit
8368 Sindhi
8372 Serbo-Croatian
8373 Singhalese
8375 Slovak
8376 Slovenian
8377 Samoan
8378 Shona
8379 Somali
8381 Albanian
8382 Serbian
8385 Sundanese
8386 Swedish
8387 Swahili
8465 Tamil
8469 Telugu
8471 Tajik
8472 Thai
8473 Tigrinya
8475 Turkmen
8476 Tagalog
8479 Tonga
8482 Turkish
8484 Tatar
8487 Twi
8575 Ukrainian
8582 Urdu
8590 Uzbek
8673 Vietnamese
8679 Volapük
8779 Wolof
8872 Xhosa
8979 Yoruba
9072 Chinese
9085 Zulu
CQ-D7400W
R
E
T
N
E
69
Page 70

Specifications
General
Power supply voltage : 12 V DC (11 Vj16 V), - ground (test voltage: 14.4 V)
Current consumption : Less than 3.0 A (CD play mode; 0.5 Wa4 ch)
Power output : 17 Wa4 ch (1 kHz, 1 %, 4 ≠)
Maximum output : 50 Wa4 ch
Suitable speaker impedance : 4 ≠j8 ≠
Audio input impedance : 10 k≠
Audio input sensitivity : 200 mV
Maximum audio input level : 2 V
Pre-out output voltage : 5 Vrms
Pre-out output impedance : 60 ≠
External dimensions (WaHaD) : 178a50a155 mm
Weight : 1.6 kg
Tuner (Radio) Section
FM tuner section
Reception frequency range : 87.50 MHzj108.00 MHz
Usable sensitivity : 11 dBf (75 ≠)
Auditory compensation S/N
ratio (mono) : 70 dB
Stereo separation : 35 dB (1 kHz)
Alternate channel selectivity : 75 dB
AM tuner section
Reception frequency range : 531 kHzj1602 kHz
Usable sensitivity : 28 dB/¨V (S/N 20 dB)
Image interference ratio : 65 dB
Video Section
Signal format : NTSC
Video output : 75 ≠, 1 Vp-p
Region Number : 3 and ALL
Audio Section
Frequency response : 20 Hzj44 kHz (96 kHz sampling frequency DVD video only)
(When “LARGE” is selected) : 20 Hzj22 kHz (48 kHz sampling frequency DVD video only)
: 20 Hzj20 kHz (CD)
Delay time
Dolby Digital
Center : 0j5 ms
Rear (Surround) L/R : 0j15 ms
Distortion
Front L/R (1 kHz, 0 dB, PCM input) : 0.01 %
Dynamic range : more than 95 dB
S/N ratio : more than 100 dB
Pickup-wave length : 650 nm
Note:
≥ Specifications and design are subject to modification, without notice, due to improvements in technology.
70
CQ-D7400W
Page 71

After-Sales Service
Warranty period One year from the date of purchase
■ Repair request
Follow the remedies on the Troubleshooting pages. If the trouble cannot be solved, turn off the power and
refer repairs to the dealer where you purchased the unit.
≥ Within the warranty period
The dealer where you purchased the unit will repair it as specified in the warranty card. Please take the
unit to the dealer along with the warranty card.
≥ After the warranty period
Repair is available on a chargeable basis.
■ Holding period of functional parts for repair
We will hold the functional parts (which are indispensable to maintain its original performance) for 6 years
after suspension of producing the unit.
Customer Center
For repair or handling
To the dealer where you purchased the unit
For inquires
To “Customer Center”
Tel : (02)2633-0878
CQ-D7400W
71
Page 72

Matsushita Electric Industrial Co., Ltd.
Web Site: http://www.panasonic.co.jp/grobal/
YEFM284094 F0903-0 Printed in Japan
 Loading...