

Page 1
E
N
G
L
I
S
H
2
CQ-DF602W
11
General
E
N
G
L
I
S
H
1
CQ-DF602W
10
Before Reading these Instructions
You can operate this unit by pressing buttons on the main unit and the remote control unit.
∫ These instructions describe buttons that are concerned with operations as follows.
Example: Press [P·SET "] or [P·SET #]/["] or [#].
∫ Some operations can be activated by pressing buttons only on main unit or remote control unit.
Those cases are described in the instructions.
Example: Press [OPEN] on the main unit.
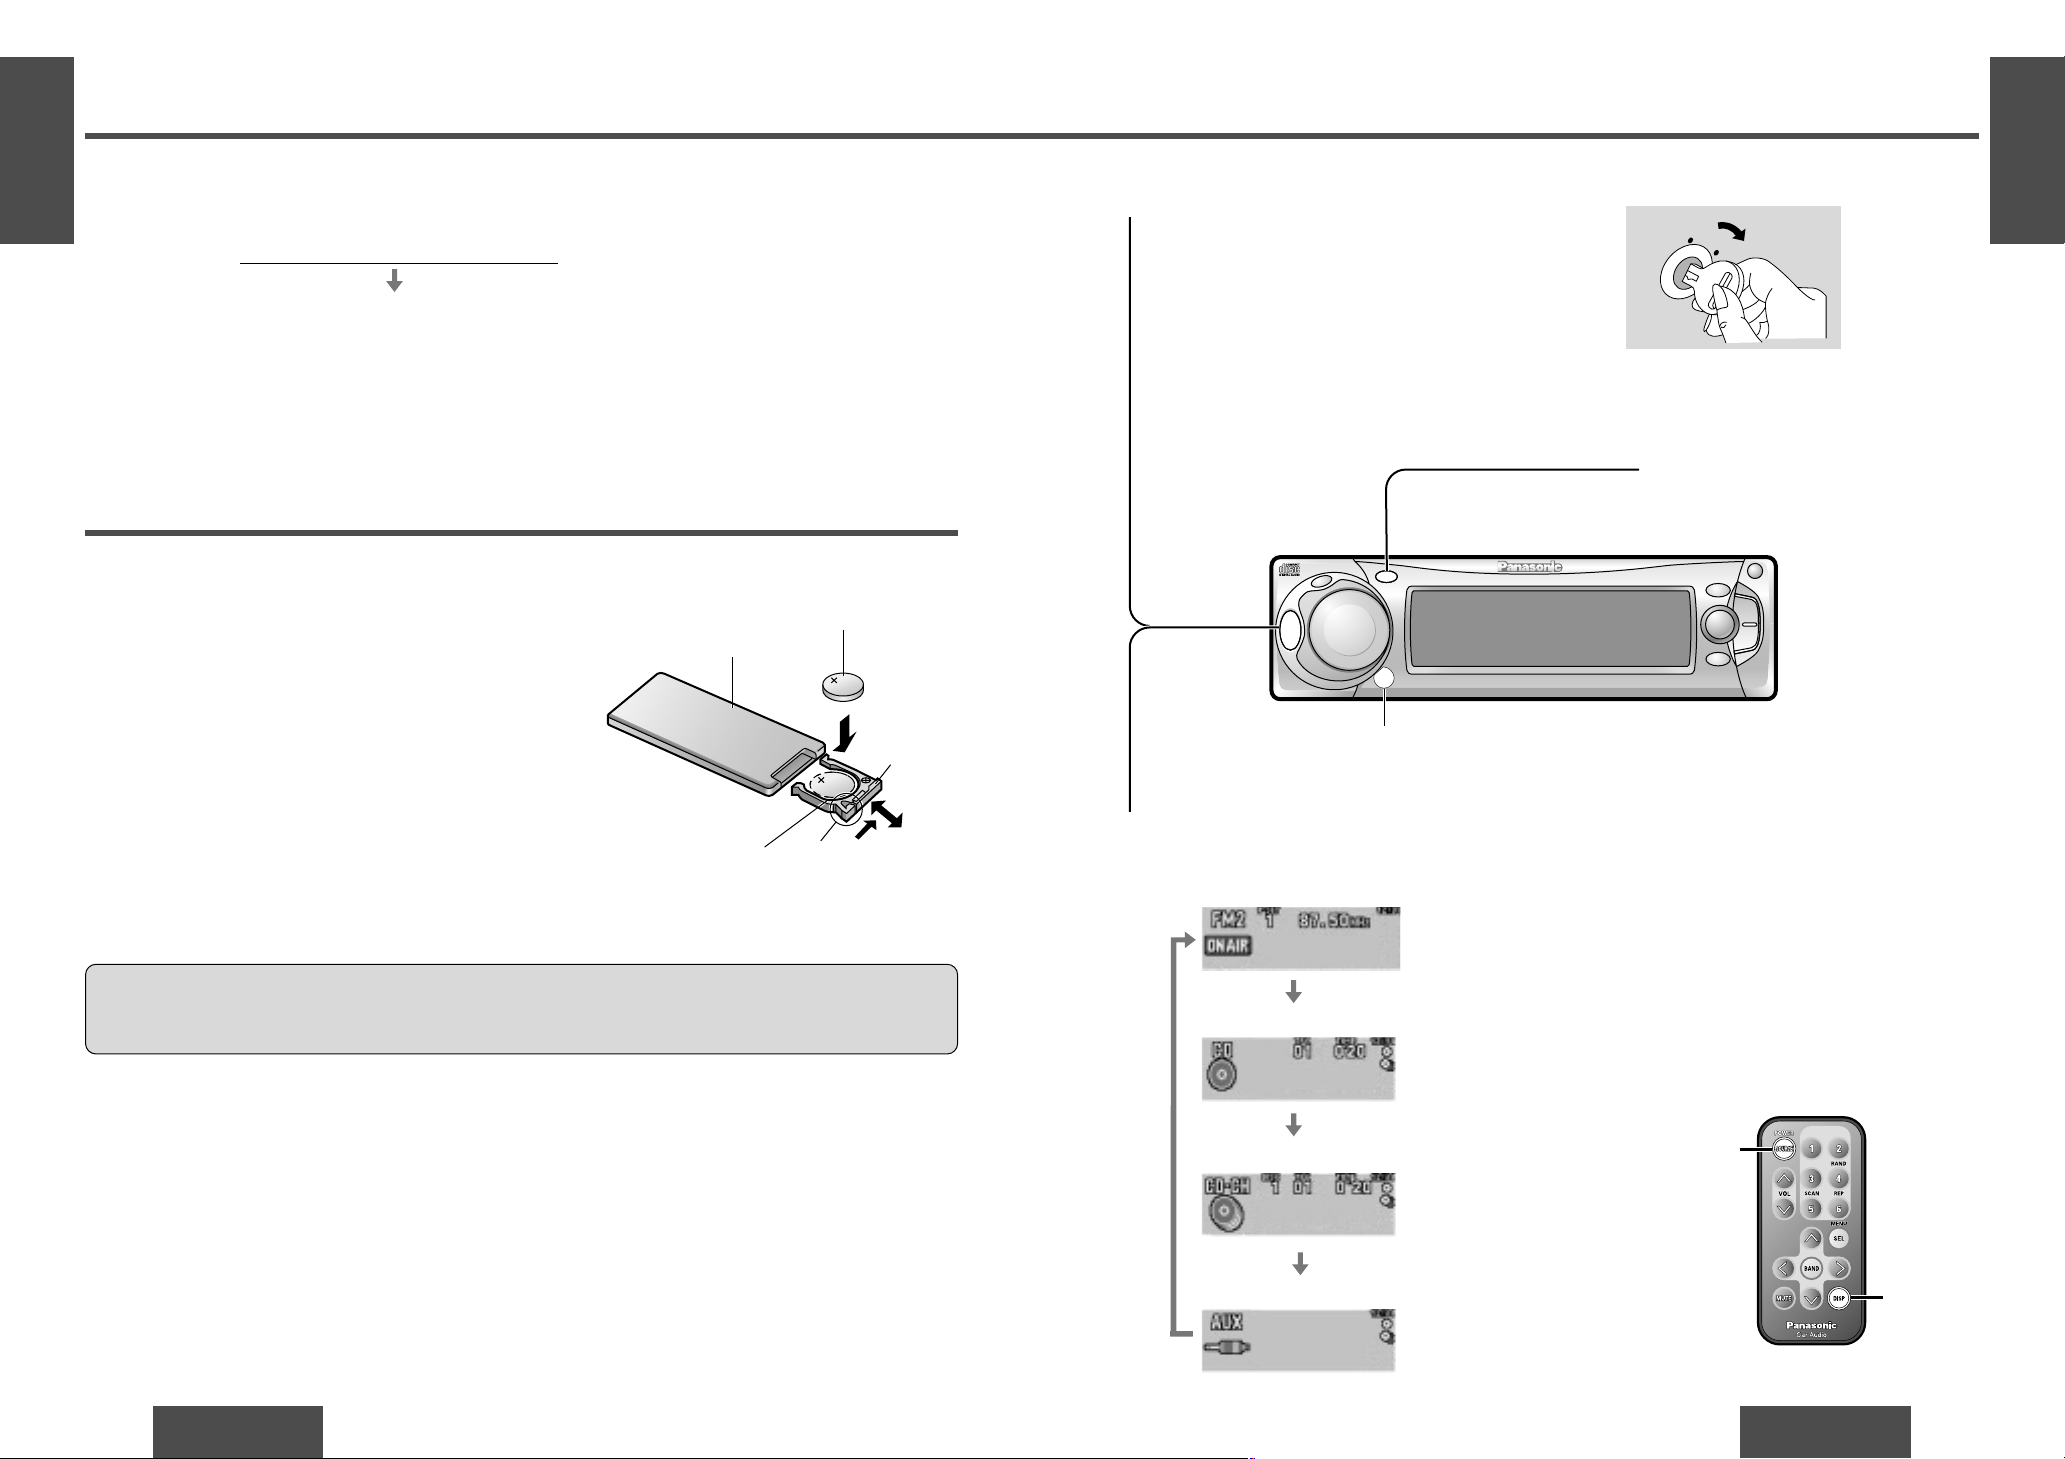
Battery Installation
1 Remove the battery holder.
Pull the battery holder by the position B while pushing
position A in the direction indicated by the arrow.
2 Install the battery on the battery holder.
Set a new battery properly with its “i” side facing up
as shown in the figure.
3 Insert the battery holder.
Push the battery holder back into its original position.
Battery Notes
Remove and dispose of an old battery immediately.
Battery Information:
≥ Battery type: Panasonic lithium battery (CR2025) (included)
≥ Battery life: Approximately 6 months with normal use (at room temperature)
≥ Do not disassemble or short the battery. Do not throw a battery into a fire.
≥ Keep batteries away from children to avoid the risk of accidents.
≥ Be careful to observe proper local disposal rules when you dispose of batteries.
Caution:
≥ Improper use of batteries may cause overheating, an explosion or ignition, resulting in injury or a fire.
Battery leakage may damage the unit.
[buttons on the main unit]/[remote control unit]
Point the remote control unit at the main unit’s sensor.
Remote Control Unit Preparation
Lithium battery
(included)
Back side
Position B
Position ABattery holder
Note:
≥ When the power is switched on for the
first time, a demonstration message appears on the display.
To cancel this display, press [DISP] (display).
AC
C
O
N
[SOURCE]
(POWER)
[DISP]
(Display)
Power
Turn the key in the ignition until the accessory indicator lights.
ON: Press [SRC] (PWR)/[SOURCE] (POWER).
OFF:Press and hold [SRC] (PWR)/[SOURCE]
(POWER) again for more than 1 second.
≥ After turning off the ignition key, a security
message is displayed, and the panel removable
alarm that reminds you to take the panel is activated.
(When security function is set to on ➡ page 28)
1
Source
Press [SRC] (SOURCE)/[SOURCE] to change the source.
2
Radio
CD player
CD changer control
AUX-IN setting
(When a CD is in the player.)
(When a CD changer is connected and magazine is in the
changer.) (➡ page 20)
SRC
DISP
P.SET
CQ-DF602W
N
5
O
6
W
X
;
/ 1
OPEN
BAND
TUNE
TRACK
PW
R
M
U
T
E
P
U
S
H
CD RECEIVER WITH FULL DOT MATRIX DISPLAY
DISC
SET/APM
M
E
N
U
VOLUME
S
O
U
R
C
E
MOSFET
50W X 4
Remote control signal sensor
Page 2
E
N
G
L
I
S
H
4
CQ-DF602W
13
E
N
G
L
I
S
H
3
CQ-DF602W
12
General (Continued)
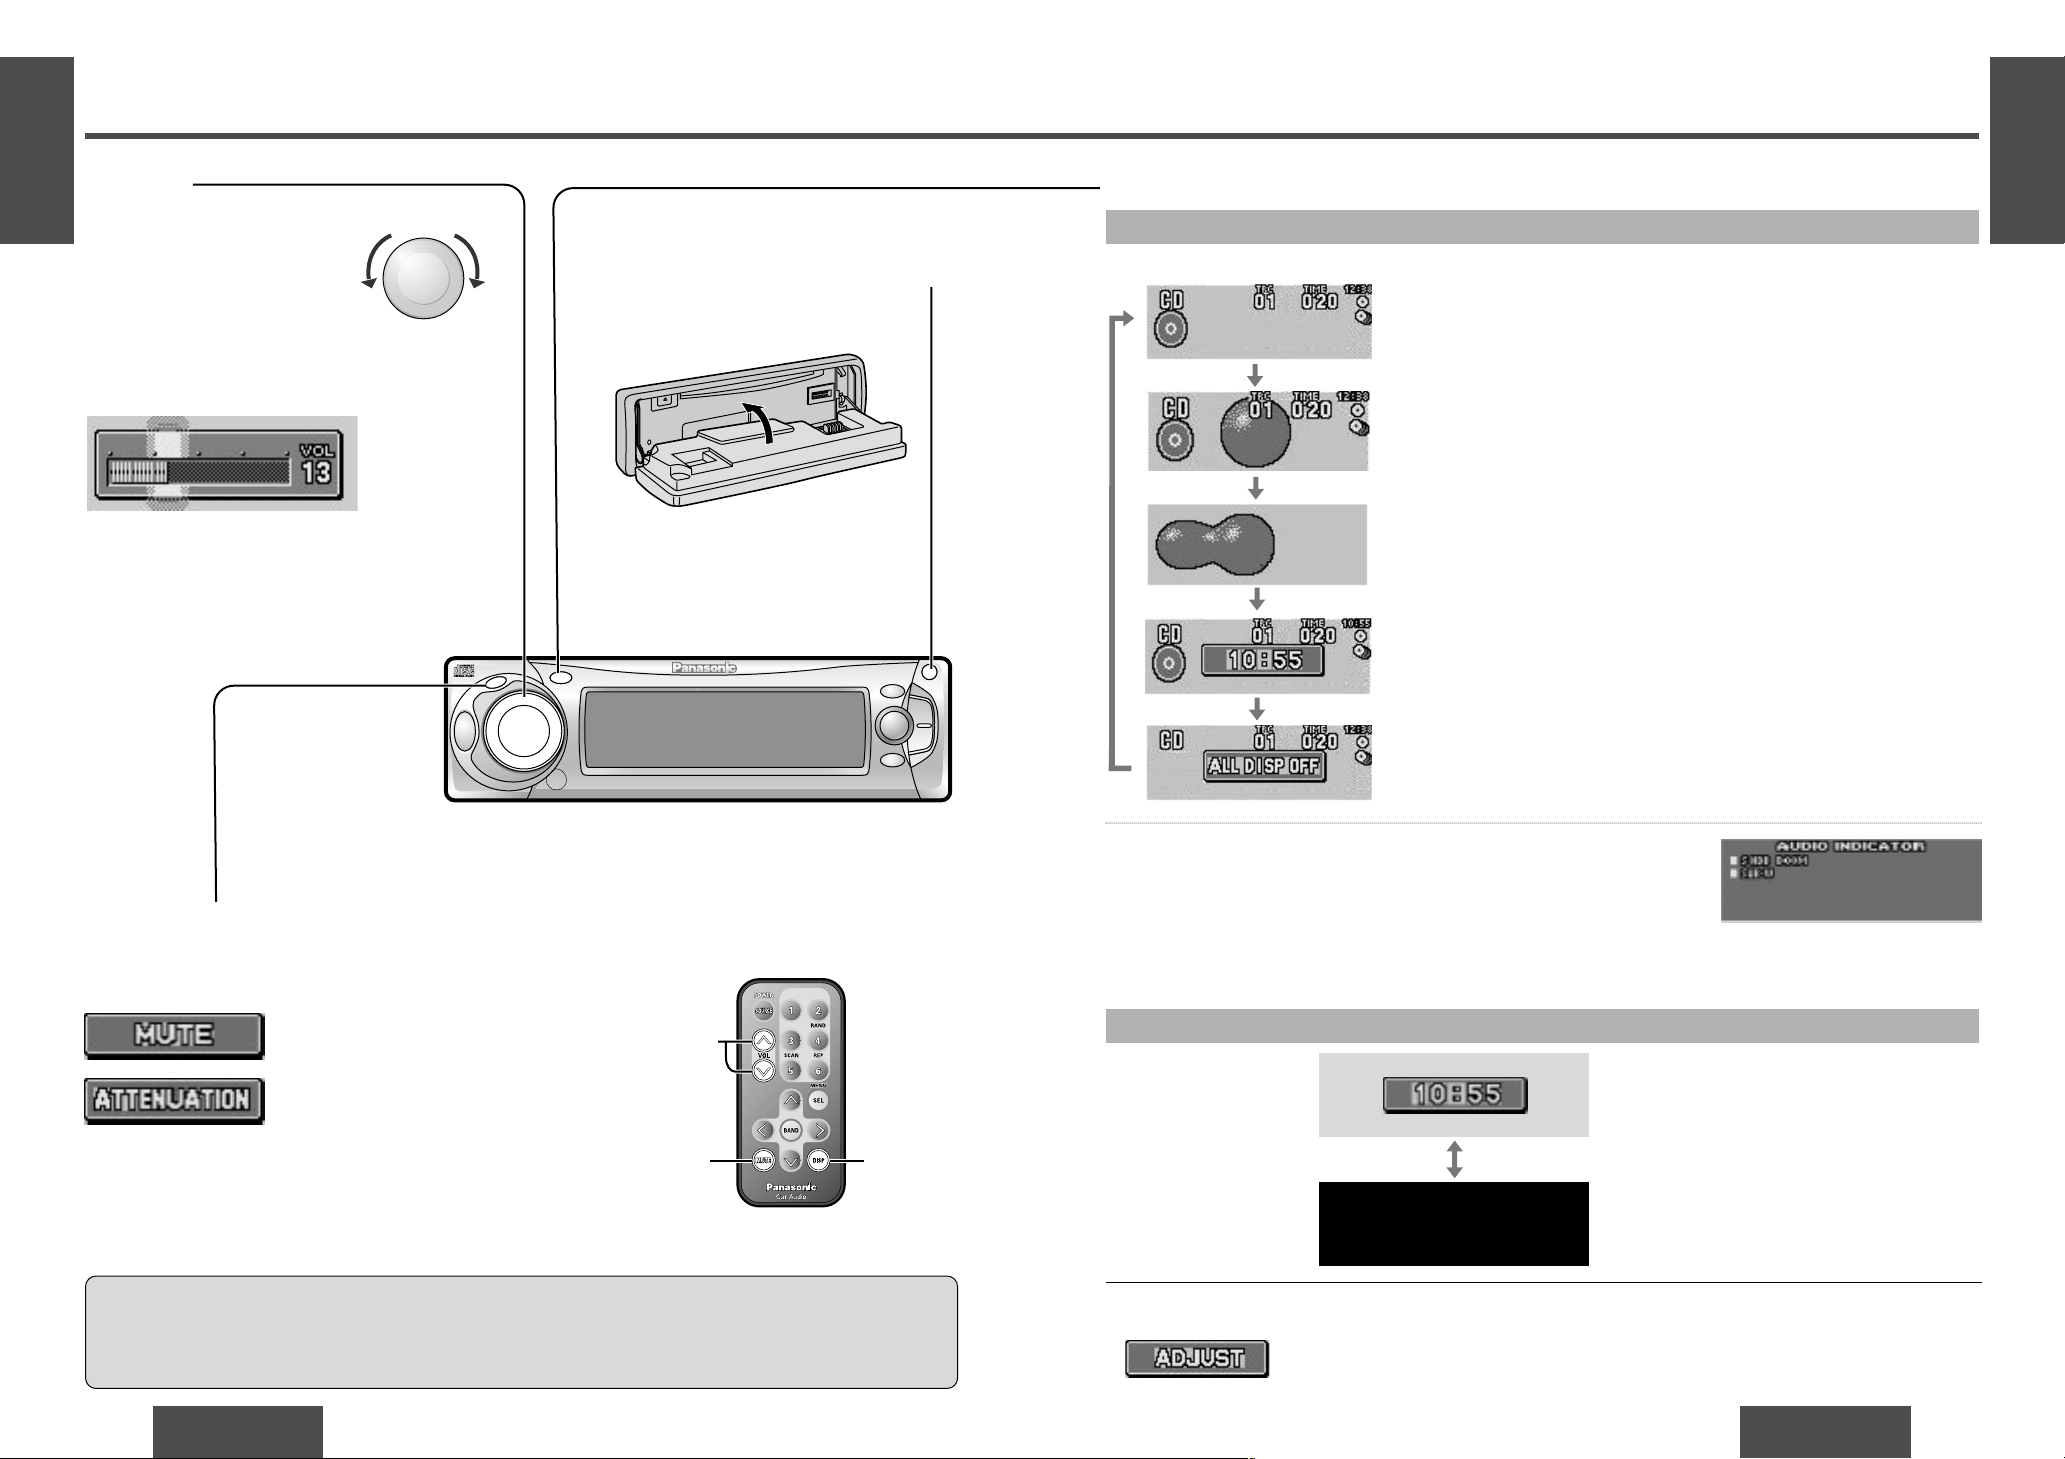
Mute/Attenuation
ON: Press [
MUTE
].
OFF: Press again.
Setting range:
0 to 40
Open/Close the Front Panel
OPEN: Press [OPEN] on the front panel.
CLOSE: Raise the panel by hand.
: No sound.
Caution:
≥ To avoid damaging the front panel, do not push it down or place objects on it while it is open.
≥ Do not pitch your finger or hand in the front panel.
≥ Do not insert foreign matter into the disc slot.
Note:
≥ The sound level for each source is stored in
memory.
(There is one volume setting for AM radio band
and one volume setting for FM radio band.)
: Decrease the volume to 1/10.
Close
Decreasing volume range depends on setting.
(➡ page 28)
Display Change
When Power is ON
Press [DISP] (display).
Press and hold [DISP] (display) for more than 2 seconds.
≥ The audio indicator is displayed and returns to the previous display.
≥ When the indicator lights, the audio function (S
·
HDB/SUB·W) is now
activated.
Press [DISP] (display) again to cancel.
Display and light off (when it is turned on.)
If you press a button, the light is turned on, the mode display appears
for 5 seconds, and the light is turned off again.
When Power is OFF
Press [DISP] (display).
Mode display
Mode and spectrum analyzer display
Mode and clock display
Clock display
Display and light off
Spectrum Analyzer (S·A) display
If you press a button, the mode and spectrum analyzer display
appear for 5 seconds.
Note:
≥ Set the Spectrum Analyzer (S·A) display pattern in a separate procedure. (➡ page 26)
≥ : Displays before adjusting the clock. (➡ page 28)
SRC
DISP
P.SET
CQ-DF602W
N
5
O
6
W
X
;
/ 1
OPEN
BAND
TUNE
TRACK
PW
R
M
U
T
E
P
U
S
H
CD RECEIVER WITH FULL DOT MATRIX DISPLAY
DISC
SET/APM
M
E
N
U
VOLUM
E
S
O
U
R
C
E
MOSFET
50W X 4
[VOL "]
[VOL #]
(Volume)
[MUTE]
[DISP]
(Display)
P
U
S
H
M
E
N
U
VO
LUM
E
Volume
On the main unit:
Turn [VOLUME] dial
Clockwise: Up
Counterclockwise: Down
On the remote control unit:
[VOL "]: Up
[VOL #]: Down
Down Up
Page 3
E
N
G
L
I
S
H
6
CQ-DF602W
15
E
N
G
L
I
S
H
5
CQ-DF602W
14
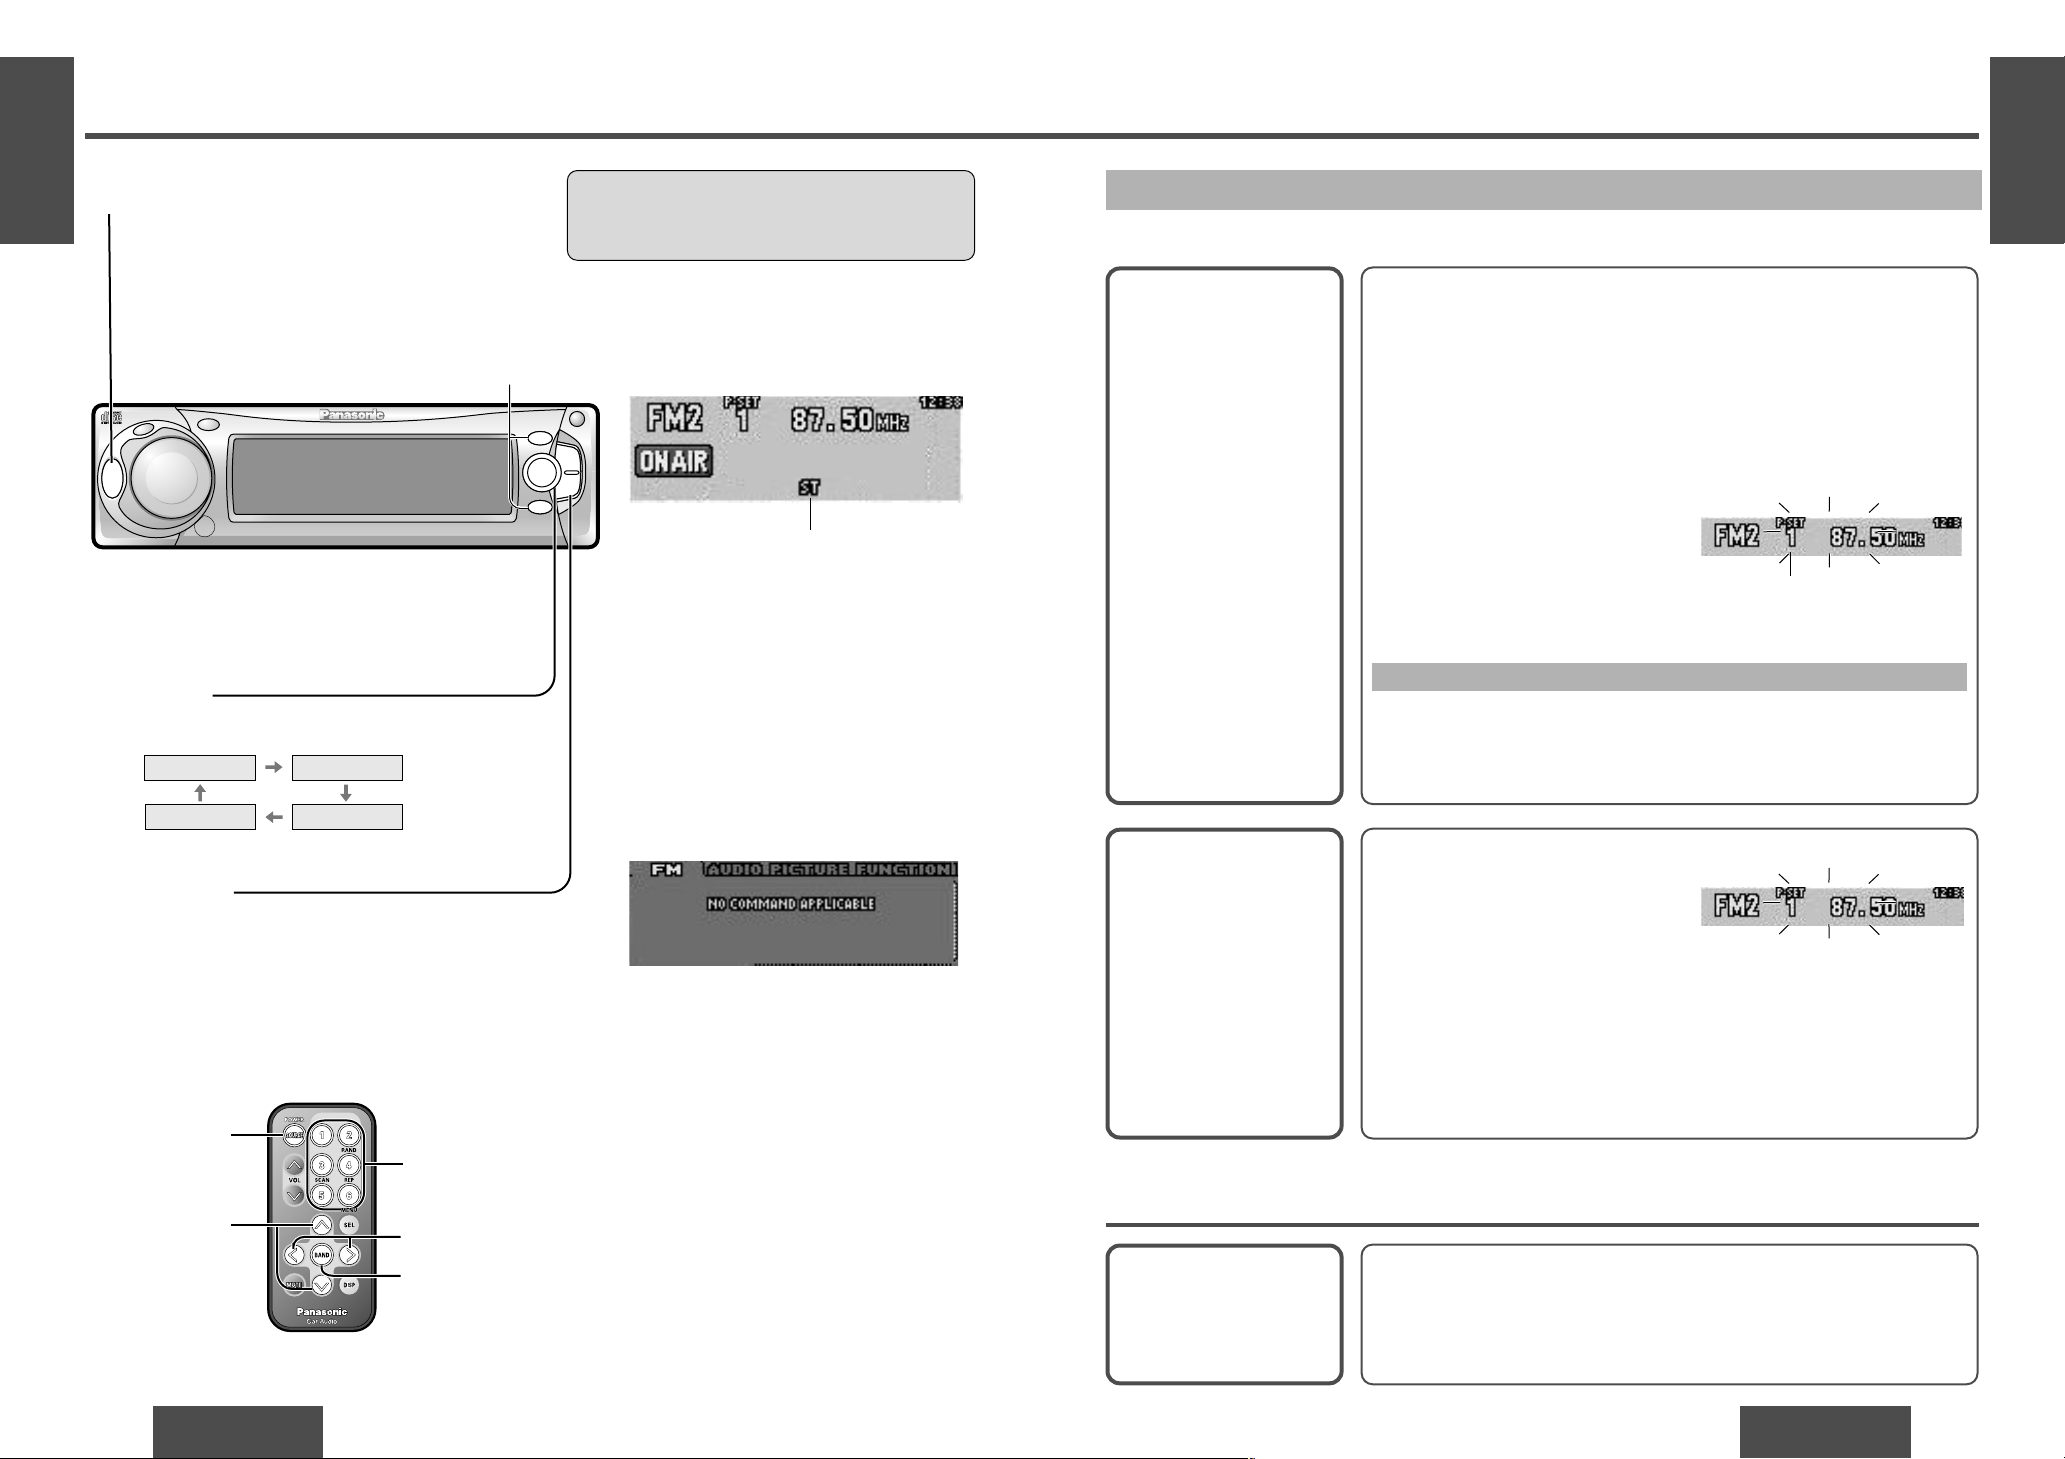
Radio
Band
Press [BAND] to change the band.
2
Radio Mode
Press [SRC] (SOURCE)/[SOURCE] to change to
the radio mode.
1
Tuning
[TUNE $]/[$]: Up
[TUNE %]/[%]: Down
Press and hold [TUNE $] or [TUNE %]/[$] or
[%] for more than 0.5 seconds, then release.
Seeking will start.
3
[SOURCE]
["] [#]
(Preset station/
select)
[%] [$] (Tune)
[1] to [6]
(Preset station)
[BAND]
(Auto preset memory)
FM1 FM2
FM3AM
Radio mode display
FM stereo indicator
One-Touch Selection of a Preset Station
Up to 6 stations each can be saved in the FM1, FM2, FM3 and AM preset station memories.
Manual Preset
Memory
Manually save a station in
the preset memory.
Entering numbers directly on the remote control unit
1 Select a band and frequency (step 1, 2 and 3 on the previous
page).
2 Press and hold [1] to [6] for more than 2 seconds to memorize.
Auto Preset
Memory (APM)
Automatically save relatively strong stations in
the preset memory.
1 Select a band (steps 1 and 2 on
the previous page).
2 Press and hold [BAND] (APM) for
more than 2 seconds.
Note:
≥ Existing saved stations are overwritten with new stations after following this procedure.
Preset Station
Calling
1 Select a band (steps 1 and 2 on the previous page).
2 Press [P·SET "] or [P·SET #]/["] or [#] to select the preset
number for tuning in the preset station.
(Press [1] to [6] on the remote control unit.)
Note:
≥ Frequency setting can be performed even after selecting a preset number.
1 Select a band and frequency (steps 1, 2 and 3 on the previous
page).
2 Press and hold [P·SET "] or [P·SET #]/["] or [#] for more than
2 seconds until the preset number blinks.
3 Press [P·SET "] or [P·SET #]/["] or [#] to select a preset num-
ber (1j6).
4 Press and hold [P·SET "] or [P·SET #]/["] or [#] for more than
2 seconds to memorize.
Scanning:
≥ The display blinks once, and a re-
ceiving station is saved in the
memory.
Preset number
≥ The 6 strongest available stations will be automatically saved in the mem-
ory under preset number 1 to 6.
≥ Once set, the preset stations are sequentially scanned for 5 seconds
each. (Scanning)
≥ Press [P·SET "] or [P·SET #]/["] or [#] for the broadcast you want
to listen to.
(Press [1] to [6] on the remote control unit.)
Caution:
≥ To ensure safety, never attempt to preset sta-
tions while you are driving.
[P·SET "] [P·SET #]
(Preset station/select)
SRC
DISP
P.SET
CQ-DF602W
N
5
O
6
W
X
;
/ 1
OPEN
BAND
TUNE
TRACK
PW
R
M
U
T
E
P
U
S
H
CD RECEIVER WITH FULL DOT MATRIX DISPLAY
DISC
SET/APM
M
E
N
U
VOLUM
E
S
O
U
R
C
E
MOSFET
50W X 4
Note:
≥ When pressing [MENU] in radio mode,
the following display appears. This is
because radio mode does not have any
menu settings.
Page 4

E
N
G
L
I
S
H
8
CQ-DF602W
17
E
N
G
L
I
S
H
7
CQ-DF602W
16
CD Player
Note:
≥ Loading a disc when the power is off allows the
power to be turned on.
Track Selection
[TRACK 5]/[$]: Advance to the next track.
[TRACK 6]/[%]: Back to the beginning of the
current track.
Back to the previous track.
(Press twice.)
Open the front panel.
Press [OPEN] on the front panel.
1
Insert the disc.
Playback will start automatically after the unit
recognized the loaded disc as an ordinary
music CD. (When a CD-R or CD-RW which has
CD-DA formatted data as the same as an ordinary music CD is loaded, this unit recognizes it
as an ordinary music CD.)
Close the front panel manually.
2
CD Player Mode
(When CD is in the player.)
Press [SRC] (SOURCE)/[SOURCE] to change to CD
player mode.
Playback will start automatically.
Listening to a CD
Disc Insert and Playback
Stop and Disc Eject
1 Press [OPEN] on the front panel.
2 Press [<] (eject) to stop CD play and eject the
disc.
(Eject)
<
Label side
Close
CD player mode display
≥ Do not insert a disc when this indicator
lights.
≥ Lights when the disc is loaded/played.
Scan, random and repeat indicator
Track Search
Press and hold.
[TRACK 5]/[$]: Fast forward
[TRACK 6]/[%]: Fast backward
Release to resume the regular play.
Note:
≥ Ejecting the disc when the unit is in the CD player
mode allows the power to be turned off.
Track number Track playing time
Pause
Press [BAND] (
[ [
/1).
Press [BAND] (
[ [
/1) again to cancel.
SRC
DISP
P.SET
CQ-DF602W
N
5
O
6
W
X
;
/ 1
OPEN
BAND
TUNE
TRACK
PW
R
M
U
T
E
P
U
S
H
CD RECEIVER WITH FULL DOT MATRIX DISPLAY
DISC
SET/APM
M
E
N
U
VOLUM
E
[SRC] (SOURCE)
SOURCE
MOSFET
50W X 4
[SOURCE]
[%] [$]
(Track)
[DISP]
(Display)
[BAND]
(Pause)
Caution:
≥ Only 12 cm CD, CD-DA data recorded CD-R and CD-RW discs are available for this unit.
≥ This unit does not support CD text display.
≥ This unit does not support MP3 disc playback.
≥ Refer to page 35 about notes on CD-Rs/RWs.
≥ To avoid damaging the front panel, do not push it down or place objects on it while it is open.
≥ Do not use irregular shaped discs.
≥ Do not use discs that have a seal or label attached.
≥ Do not insert foreign matter into the disc slot.
Page 5

E
N
G
L
I
S
H
10
CQ-DF602W
19
E
N
G
L
I
S
H
9
CQ-DF602W
18
CD Player (Continued)
Menu Setting on CD Player Mode
Random Play
Default: OFF
Repeat Play
Default: OFF
Press [BAND] (SET) to change setting.
12 3Menu Submenu Setting
Scan Play
Default: SCAN OFF
Press [P·SET "] or
[P·SET #]/["]or [#] to
select .
∫ REP
: All the available tracks plays in a random se-
quence.
: Cancel
OFF
ON
Press [BAND] (SET) to change setting.
: Repeat the current track.
: Cancel
OFF
ON
Direct setting on the remote control unit when the menu is not
displayed
Press [4] (RAND) to change setting.
Press [6] (REP) to change setting.
Note:
≥ Operations except setting should be performed after
returning to the mode display.
≥ Press [MENU], [DISP] (display) to return to the reg-
ular mode.
Only for the remote control unit
Press [5] (SCAN) to change setting.
Press [MENU]/[SEL] (MENU)
during CD playing to display
“CD” tab.
: The first 10 seconds of each track
plays in sequence.
: Cancel
Press [P·SET "] or
[P·SET #]/["]or [#] to
select .
∫ RAND
When the menu is not displayed
[MENU] [DISP] (Display)
[BAND] (Setting)
[P·SET "] [P·SET #] (Submenu)
SRC
DISP
P.SET
CQ-DF602W
N
5
O
6
W
X
;
/ 1
OPEN
BAND
TUNE
TRACK
P
W
R
MU
TE
PU
SH
CD RECEIVER WITH FULL DOT MATRIX DISPLAY
DISC
SET/APM
M
E
N
U
V
O
L
U
M
E
SO
U
R
C
E
MOSFET
50W X 4
[SEL] (MENU)
["] [#]
(Submenu)
[5] (SCAN)
[4] (RAND)
[6] (REP)
[BAND] (Setting)
[DISP] (Display)
P
U
S
H
M
E
N
U
VOLUME
(Press.)
Page 6

E
N
G
L
I
S
H
12
CQ-DF602W
21
[SOURCE]
[%] [$]
(Track)
[DISP]
(Display)
["] [#]
(Disc)
E
N
G
L
I
S
H
11
CQ-DF602W
20
CD Changer Control
CD changer functions are designed for optional Panasonic CD changer unit.
Preparation:
≥ Connect the CD changer, and load a magazine (disc).
Note:
≥ Loading a magazine when the power is off allows the power to be turned on.
≥ Ejecting the magazine when the unit is in the CD changer mode allows the power to be turned off.
≥ This unit does not support CD-ROM, CD-R or CD-RW playback through the CD changer. Use the CD changer
to listen to normal music CD exclusively.
≥ This unit does not support CD text display of the CD changer control.
≥ Pausing does not function in the CD changer mode.
CD Changer Mode
(When a CD changer is connected and a magazine is in the changer.)
Press [SRC] (SOURCE)/[SOURCE] to change to
CD changer mode.
Playback starts automatically.
Note:
≥ : Load a magazine
with CDs.
≥ : Magazine is ejected
in the CD changer
mode.
1
Disc Selection
[DISC "]/["]: Next disc.
[DISC #]/[#]: Previous disc.
CD changer mode display
2
Scan, random and repeat indicator
≥ Lights when the changer (magazine) is
connected.
≥ Lights when the disc is played.
Track Selection
[TRACK 5]/[$]: Advance to the next track.
[TRACK 6]/[%]: Back to the beginning of the
current track.
Back to the previous track.
(Press twice.)
3
Track Search
Press and hold.
[TRACK 5]/[$]: Fast forward
[TRACK 6]/[%]: Fast backward
Release to resume the regular play.
Disc number Track number
Track playing time
SRC
DISP
P.SET
CQ-DF602W
N
5
O
6
W
X
;
/ 1
OPEN
BAND
TUNE
TRACK
PW
R
M
U
T
E
P
U
S
H
CD RECEIVER WITH FULL DOT MATRIX DISPLAY
DISC
SET/APM
M
E
N
U
VOLUM
E
S
O
U
R
C
E
MOSFET
50W X 4
Page 7

E
N
G
L
I
S
H
14
CQ-DF602W
23
E
N
G
L
I
S
H
13
CQ-DF602W
22
CD Changer Control (Continued)
Random Play
Default: OFF
Scan Play
Default: SCAN OFF
Repeat Play
Default: OFF
Press [MENU]/[SEL] (MENU)
during CD changer playing to
display
“CD-CH” tab.
Press [P·SET "] or
[P·SET #]/["]or [#] to
select .
∫ RAND
Disc Random Play
Default: OFF
Press [P·SET "] or
[P·SET #]/["]or [#] to
select .
∫ D·RAND
Press [P·SET "] or
[P·SET #]/["]or [#] to
select .
∫ REP
Disc Scan Play
Default: DISC SCAN OFF
Disc Repeat Play
Default: OFF
Press [P·SET "] or
[P·SET #]/["]or [#] to
select .
∫ D·REP
Press [BAND] (SET) to change setting.
: All the available tracks on all discs in the maga-
zine plays in a random sequence.
: Cancel
OFF
ON
Press [BAND] (SET) to change setting.
: All the available tracks on the current disc plays
in a random sequence.
: Cancel
OFF
ON
Press [5] (SCAN) to change setting.
Press [BAND] (SET) to change setting.
: Repeat the current track.
: Cancel
OFF
ON
Press [BAND] (SET) to change setting.
: Repeat the current disc.
: Cancel
OFF
ON
Press and hold [5] (SCAN) for more than 2 seconds to change
setting.
Direct setting on the remote control unit when the menu is not displayed
Press [4] (RAND) to change setting.
Press and hold [4] (RAND) for more
than 2 seconds to change setting.
Press [6] (REP) to change setting.
Press and hold [6] (REP) for more
than 2 seconds to change setting.
Only for the remote control unit
: Cancel
: Cancel
Menu Setting on CD Changer Mode
2
Submenu
3
Setting
Note:
≥ Operations except setting should be performed after
returning to the mode display.
≥ Press [MENU], [DISP] (display) to return to the reg-
ular mode.
1 Menu
: The first 10 seconds of each track on all
discs plays in sequence.
: The first 10 seconds of the first track of all
the discs plays in sequence.
When the menu is not displayed
[MENU] [DISP] (Display) [BAND] (Setting)
[P·SET "] [P·SET #] (Submenu)
SRC
DISP
P.SET
CQ-DF602W
N
5
O
6
W
X
;
/ 1
OPEN
BAND
TUNE
TRACK
P
W
R
M
UTE
PU
SH
CD RECEIVER WITH FULL DOT MATRIX DISPLAY
DISC
SET/APM
M
E
N
U
V
O
L
U
M
E
S
O
U
R
C
E
MOSFET
50W X 4
[SEL] (MENU)
["] [#]
(Submenu)
[5] (SCAN)
[4] (RAND)
[6] (REP)
[BAND] (Setting)
[DISP] (Display)
P
U
S
H
M
E
N
U
VOLUME
(Press.)
Page 8

E
N
G
L
I
S
H
16
CQ-DF602W
25
E
N
G
L
I
S
H
15
CQ-DF602W
24
Audio Settings [AUDIO]
Note:
≥ Operations except setting should be performed after
returning to the mode display.
≥ Press [MENU], [DISP] (display) to return to the reg-
ular mode.
BAS
(Bass)
TRE
(Treble)
1 Press [TUNE $] or [TUNE %]/[$] or [%] to select “BAS”.
2 Press [P·SET "]/["]: Increase the bass.
Press [P·SET #]/[#]: Decreases the bass.
1 Press [TUNE $] or [TUNE %]/[$] or [%] to select “TRE”.
2 Press [P·SET "]/["]: Increases the treble.
Press [P·SET #]/[#]: Decreases the treble.
BAL
(Balance)
FAD
(Fader)
Press [TUNE $]/[$]: Right enhanced.
Press [TUNE %]/[%]: Left enhanced.
Press [P·SET "]/["]: Front enhanced.
Press [P·SET #]/[#]: Rear enhanced.
Press [P·SET "] or [P·SET #]/["] or [#] to change setting.
Press [TUNE $]/[$]: Increase the level.
Press [TUNE %]/[%]: Decrease the level.
3 Setting
Bass and Treble
You can adjust the bass and treble sound.
Default: BAS (Bass) 0
TRE (Treble) 0
Setting range: j12 to i12 (by 2 steps)
Subwoofer Level
You can change the subwoofer volume
level.
Default: 0
Setting range:j∞ (Subwoofer mute),
j6 to i6 (by 2 steps)
1 Press [P·SET "] or
[P·SET #]/["] or
[#] to select
.
2 Press [BAND] (SET)
to set.
∫ S·HDB
1 Press [P·SET "] or
[P·SET #]/["] or
[#] to select
.
2 Press [BAND] (SET)
to set.
∫ BAS/TRE
1 Press [P·SET "] or
[P·SET #]/["] or
[#] to select
.
2 Press [BAND] (SET)
to set.
∫ BAL/FAD
1 Press [P·SET "] or
[P·SET #]/["] or
[#] to select
.
2 Press [BAND] (SET)
to set.
∫ SUB WOOFER
Balance and Fader
You can adjust the sound balance among
the front, rear, right and left speakers.
Default: BAL (Balance) Center
FAD (Fader) Center
Setting range: 15 levels each
12
Audio menu display
Menu Submenu
S·HDB (Super High
Definition Bass)
Especially for rock music, the bass-sound
will be more powerful.
Default: OFF
Setting range: OFF, BOOM, TIGHT
1 Press [MENU]/[SEL]
(MENU).
2 Press [TUNE $] or
[TUNE %]/[$] or [%] to
select
“AUDIO” tab.
: The bass sounds of the speakers are
strongly emphasized.
: The bass sounds of the speakers are mod-
erately emphasized. (The sounds of the subwoofer can be heard clearly.)
: S·HDB is non-active.
[MENU] [DISP] (Display) [BAND] (Setting)
[P·SET "] [P·SET #] (Submenu/setting)
[TUNE $] [TUNE %] (Menu/setting)
SRC
DISP
P.SET
CQ-DF602W
N
5
O
6
W
X
;
/ 1
OPEN
BAND
TUNE
TRACK
P
W
R
MUTE
PU
SH
CD RECEIVER WITH FULL DOT MATRIX DISPLAY
DISC
SET/APM
M
E
N
U
VO
L
U
M
E
S
O
U
R
C
E
MOSFET
50W X 4
Note:
≥ When S·HDB is on, the indicator (S·HDB
BOOM or TIGHT) is shown on the audio
indicator display. (➡ page 13)
["] [#]
(Submenu/
setting)
[%] [$] (Menu/setting)
[BAND] (Setting)
[DISP] (Display)
P
U
S
H
M
E
N
U
VOLUM
E
Note:
≥ When subwoofer level is set “j∞”, the indicator
(SUB·W) is not shown on the audio indicator display. (➡ page 13)
(Press.)
Page 9

E
N
G
L
I
S
H
18
CQ-DF602W
27
E
N
G
L
I
S
H
17
CQ-DF602W
26
Picture (Display) Settings [PICTURE]
Press [TUNE $] or [TUNE %]/[$] or [%] to change setting.
Press [TUNE $]/[$]: Decreases the contrast.
Press [TUNE %]/[%]: Increases the contrast.
: Display showing a cube that continues to
change.
: Display showing a globe that continues
to change.
: Display showing the image of a soccer.
C
B
A
Note:
≥ Change the display to show the Spectrum Analyzer (S·A) display.
(➡ page 13)
: Display showing a text pattern.
: Display showing the image of a circuit.
: Standard spectrum analyzer display
(9 bands).
STD
E
D
: Clock display ON
: Clock display OFF
OFF
ON
Note:
≥ Operations except setting should be performed after
returning to the mode display.
≥ Press [MENU], [DISP] (display) to return to the reg-
ular mode.
Clock display
3 Setting
2 Press [BAND] (SET) to set.
Spectrum Analyzer (S·A)
Display Pattern
Default: Pattern A
Variety: 6 types
Contrast
Allows you to adjust the display contrasts
for better viewing.
Default: 3
Setting range: 1 to 5
Clock on the Mode Display
Default: ON
(“jj:jj” will appear before
adjusting the clock.)
(Clock adjustment ➡ page 28)
1 Press [P·SET "] or
[P·SET #]/["] or
[#] to select
.
2 Press [BAND] (SET)
to set.
∫ S·A PATTERN
1 Press [P·SET "] or
[P·SET #]/["] or
[#] to select
.
2 Press [BAND] (SET)
to set.
∫ CONTRAST
Picture (display) menu display
1 Menu 2 Submenu
Dimmer (display brightness
setting range)
Default: 3
Setting range: 1 to 3
1 Press [P·SET "] or
[P·SET #]/["] or
[#] to select
.
2 Press [BAND] (SET)
to set.
∫ DIMMER
1 Press [P·SET "] or
[P·SET #]/["] or
[#] to select
Press [TUNE $] or [TUNE %]/[$] or [%] to change setting.
: Bright : Medium : Dark
123
[MENU] [DISP] (Display) [BAND] (Setting)
[P·SET "] [P·SET #] (Submenu/setting)
[TUNE $] [TUNE %] (Menu/setting)
SRC
DISP
P.SET
CQ-DF602W
N
5
O
6
W
X
;
/ 1
OPEN
BAND
TUNE
TRACK
P
W
R
MUTE
P
US
H
CD RECEIVER WITH FULL DOT MATRIX DISPLAY
DISC
SET/APM
M
E
N
U
V
O
L
U
M
E
S
O
U
R
C
E
MOSFET
50W X 4
["] [#]
(Submenu/
setting)
[%] [$] (Menu/setting)
[BAND] (Setting)
[DISP] (Display)
P
U
S
H
M
E
N
U
VOLUME
∫ CLOCK-ON
∫ CLOCK-OFF
1 Press [MENU]/[SEL]
(MENU).
2 Press [TUNE $] or
[TUNE %]/[$] or [%] to
select
“PICTURE” tab.
(Press.)
Increase Decrease
Page 10

1 Press [P·SET "] or
[P·SET #]/["] or
[#] to select
.
2 Press [BAND] (SET)
to set.
∫ CLOCK ADJ
E
N
G
L
I
S
H
20
CQ-DF602W
29
E
N
G
L
I
S
H
19
CQ-DF602W
28
Clock Basics
Press [BAND] (SET) to change setting.
: No sound.
: Decrease the volume to
1
/
10.
(Attenuation)
ATT
MUTE
Press [BAND] (SET) to change setting.
: Security function is active.
: Security function is non-active.
OFF
ON
Security Function
When the key in the ignition is turned OFF.
≥ Security message will be active.
≥ The panel removable alarm will be active.
When the removable face plate is removed.
≥ The security indicator blinks. (➡ page 41)
3 Setting
Mute/Attenuation
You can select how much to lower the
volume when [MUTE] is pressed.
Default: MUTE
Security Function
The security indicator blinks when the removable face plate is removed from the
unit.
Default: ON
Press [P·SET "] or
[P·SET #]/["] or [#]
to select
.
∫ MUTE KEY
Press [P·SET "] or
[P·SET #]/["] or [#]
to select .
∫ S-LED
Function menu display
1 Menu 2 Submenu
3 Setting1 Menu 2 Submenu
Clock Adjustment
(24 hour system)
Default: “ADJUST” (not adjusted.)
Function Settings [FUNCTION]
1 Press [MENU]/[SEL]
(MENU).
2 Press [TUNE $] or
[TUNE %]/[$] or [%] to
select
“FUNCTION” tab.
Note:
≥ Operations except setting should be performed after
returning to the mode display.
≥ Press [MENU], [DISP] (display) to return to the reg-
ular mode.
Hours
set.
Minutes
set.
1 [TUNE %]/[%]: The hour display highlights.
2 [P·SET "]/["]: Put forward.
[P·SET #]/[#]: Put back.
1 [TUNE $]/[$]: The minutes display highlights.
2 [P·SET "]/["]: Put forward.
[P·SET #]/[#]: Put back.
Highlighted.
[MENU]
[DISP] (Display)
[BAND] (Setting)
[P·SET "] [P·SET #] (Submenu/hour/minute)
[TUNE $] [TUNE %] (Menu/setting)
SRC
DISP
P.SET
CQ-DF602W
N
5
O
6
W
X
;
/ 1
OPEN
BAND
TUNE
TRACK
P
W
R
MUTE
PU
SH
CD RECEIVER WITH FULL DOT MATRIX DISPLAY
DISC
SET/APM
M
E
N
U
V
O
LU
M
E
S
O
U
R
C
E
MOSFET
50W X 4
["] [#]
(Submenu/
setting)
[%] [$] (Menu/setting)
[BAND] (Setting)
[DISP] (Display)
P
U
S
H
MENU
VOLUME
P
U
S
H
M
E
N
U
VOLUME
1 Press [MENU]/[SEL]
(MENU).
2 Press [TUNE $] or
[TUNE %]/[$] or [%] to
select
“PICTURE” tab.
(Press.)
(Press.)
3 Press [BAND] (SET) to set.
 Loading...