

Page 1
OneHome
Camera Integration Note
Manufacturer: Panasonic
Model Number(s): BB-HCM311A, BB-HCM331A, KX-HCM110A
OneHome Versions:
Comments: Network Camera (EasyConfig.exe version 1.0.21)
Document Revision Date: 9/6/2006
O
VERVIEW AND SUPPORTED FEATURES
Installing the Panasonic camera can be broken down into the following steps:
1. Install cameras at desired locations, and pull power and Cat5 cabling as needed. Refer to the
Panasonic documentation for mounting details.
2. Connect the cameras electrically to the home network and configure the cameras. See Camera
Configuration.
3. Integrate the cameras into the OneHome system and test proper operation. This step is outlined
in HomeLogic Configuration Details.
T
HESE CAMERAS SUPPORT THE FOLLOWING FEATURES
3.0 (all builds), 4.0 (all builds)
:
Pan / Tilt: The camera can be turned to see various locations.
Built-in Audio: There is a built-in microphone as well as a jack for an external microphone. Audio from
the Panasonic cameras is supported in version 4.0 and later.
Presets: Some of these camera models also support presets, allowing the user to store predefined
locations such as a driveway or pool. This feature requires OneHome software version 4.0 or later.
C
AMERA CONFIGURATION
The camera configuration is done with software provided by Panasonic, which must be run from a
computer with Windows also connected to the same network as the camera.
The software program from Panasonic is EasyConfig.exe: the version we checked is shown at the top.
I
MPORTANT NOTES
1. Cameras must be configured one at a time: If you are installing more than one camera, setup
the first one completely before powering up subsequent cameras.
2. Setup the camera within 20 minutes: Initial settings must be made within 20 minutes of the
camera being turned on. If the camera has been powered up for more than 20 minutes, cycle
power to the camera before proceeding.
3. DON’T LOSE THE CAMERA PASSWORD: During setup you will create a user name and
password, which are required to make any other changes in the future. If you lose the user name
or password you will have to factory reset the camera and repeat this entire procedure.
4. DEFAULT USER NAME / PASSWORD: For Panasonic cameras, our default user name is
Administrator and our default password is password.
HomeLogic LLC
100 Hoods Lane Marblehead, MA 09145 Phone (781) 639-5155 Fax (781) 639-9677
Page 2
S
TARTING THE PANASONIC CAMERA SOFTWARE
1. Insert the CD from the camera into your PC: once it starts up, click Camera Setup. Or, if you
have copied the files from the CD to your computer, locate and start EasyConfig.exe.
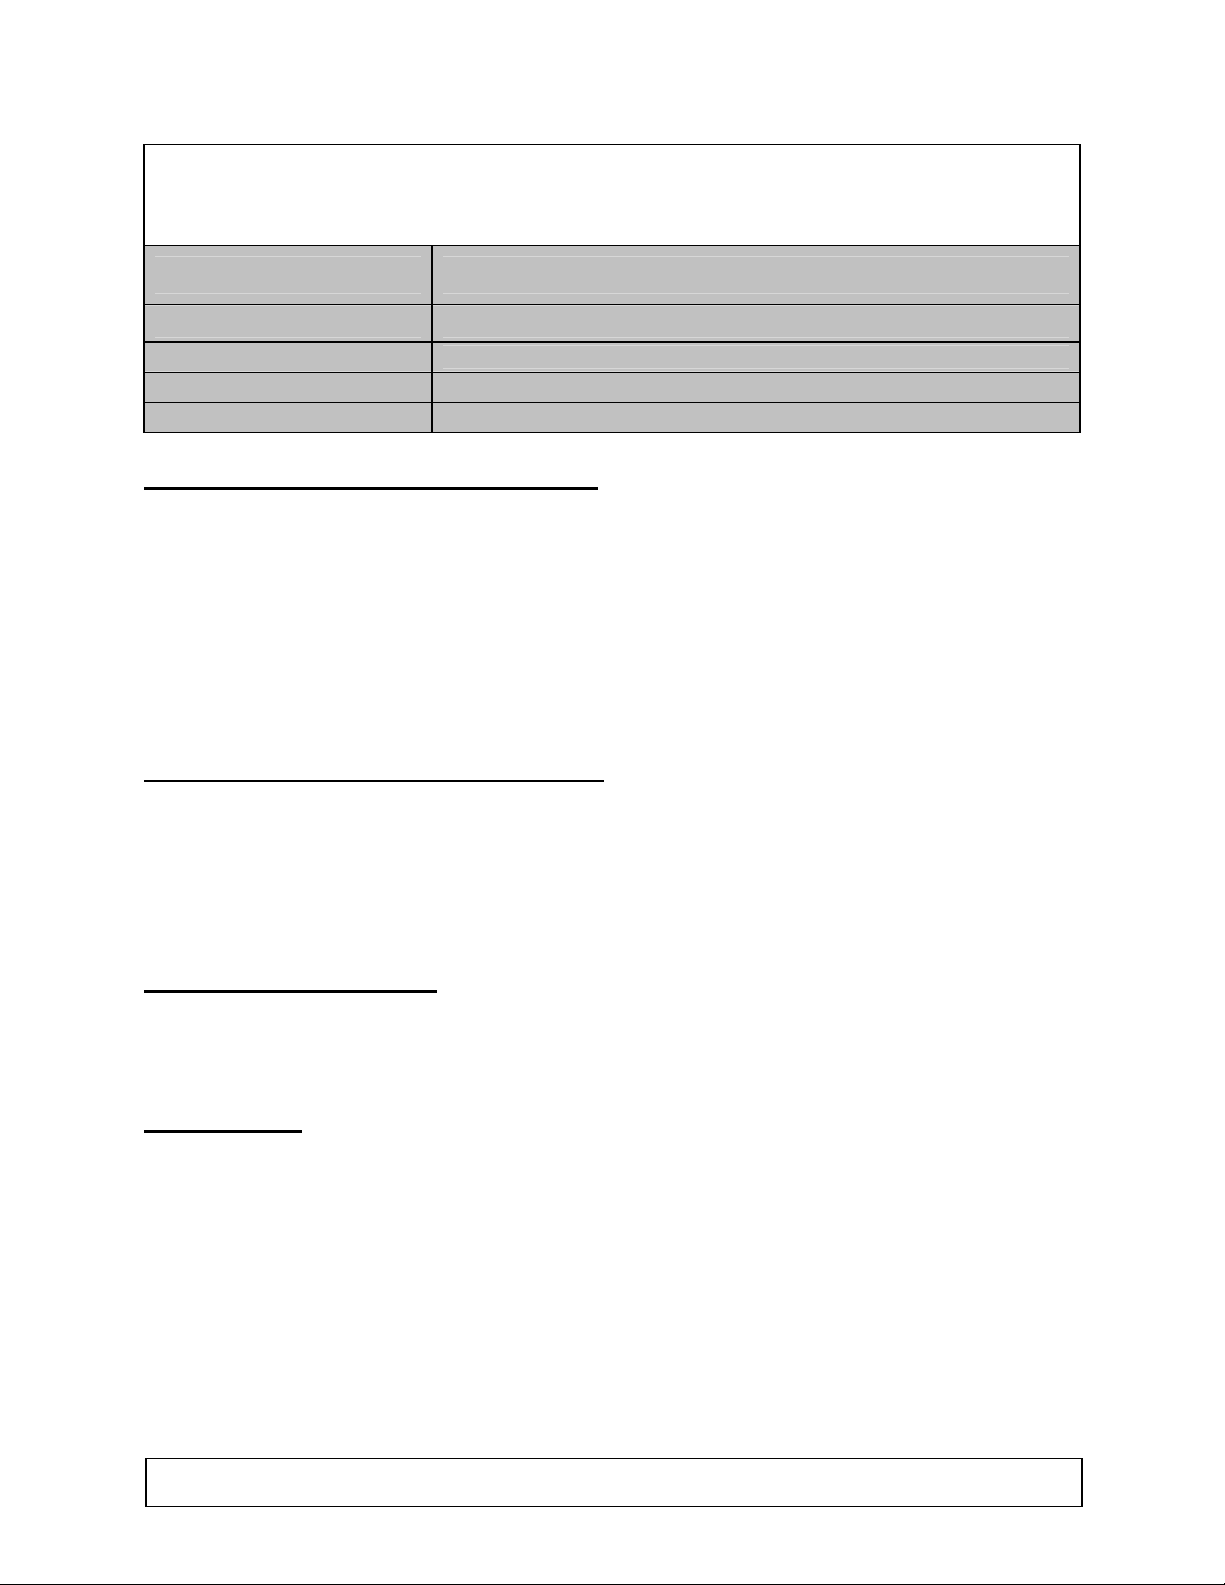
2. Wait a moment to allow the software to find the camera: the following screen appears.
3. Select the desired camera, then click Execute to bring up the camera dialog shown below:
4. Click Automatic Setup: after a short delay you will see a new browser window with the password
settings as shown below:
5. Type in your desired user name and password: these values are not needed by the OneHome
system, but must be recorded and saved to make settings to the camera. By default we set the
user name to Administrator and the password to password.
2 of 9
Page 3
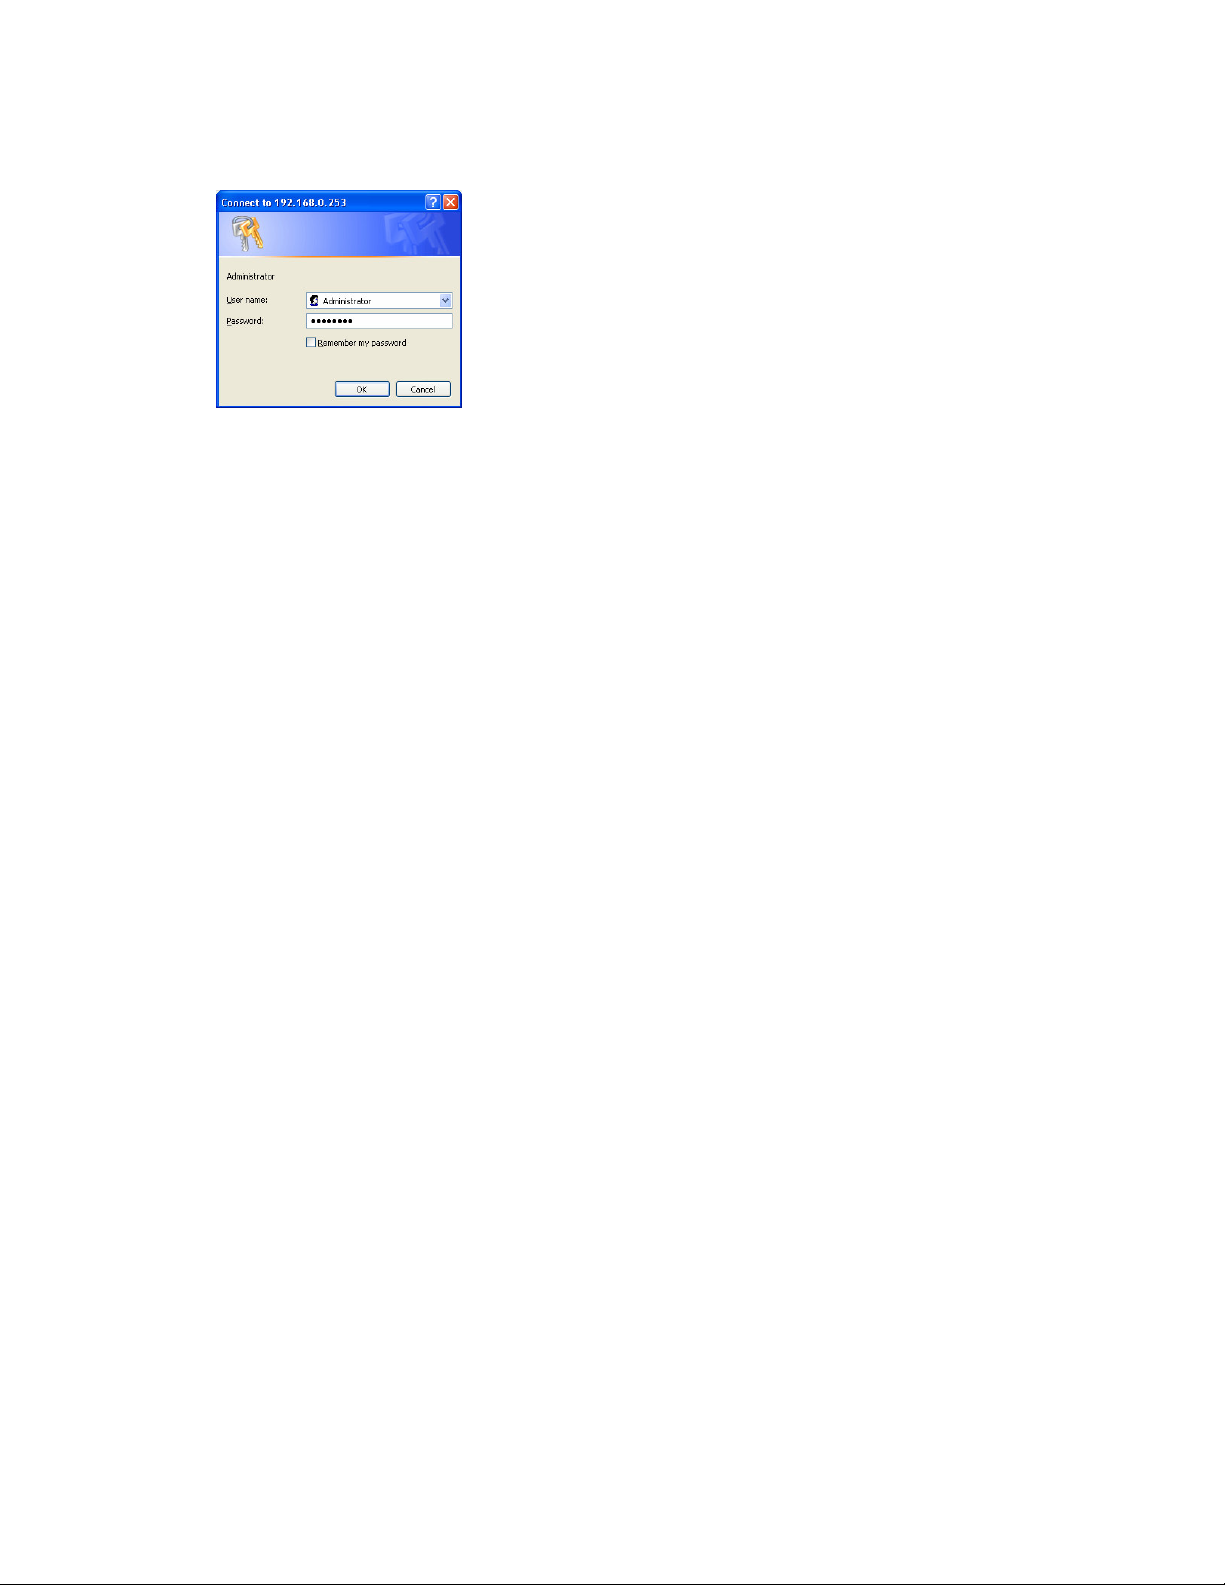
6. You will be prompted to enter your user name and password again, as shown in the image below.
Type in the user name and password you just set, and click OK.
7. After a short delay, you should see a new browser window, similar to that shown under Camera
Settings below.
8. If the Automatic Setup dialog is still present, click its Cancel button. If the Easy Setup window is
still open on your desktop, close that window now as well.
3 of 9
Page 4

C
AMERA SETTINGS
1. After typing in your user name and password, you will be shown the standard browser interface to
the camera.
2. The system will attempt to install an ActiveX control to show the camera image in the browser
window. This control is not needed for proper OneHome operation, but is needed if you wish to
see the camera image on that computer. If any dialogs appear, close them or accept the ActiveX
control as appropriate for your situation.
3. On Windows computers with popup blocking enabled, you will need to click the bar to enable the
installation of the ActiveX control (as shown below).
4. Click Setup at the top to bring up the screen shown below:
4 of 9
Page 5

5. Click UPnP on the left, then click Disable in the both parts of the screen, as shown below. Click
Save to store your settings.
6. Under Accounts to the left, click Administrator to bring up the screen below. Click Permit
access from guest users, as shown below. Re-enter your password in the boxes, then click
Save to store your changes.
5 of 9
Page 6

7. Under Accounts to the left, click General User to bring up the screen shown below.
8. Click Guest in the list, then click Modify. This brings up the Access Level options. Select
Unlimited in the drop down, as shown below, and then check (turn on) all the options, as shown
below. Click Save to save your settings.
6 of 9
Page 7

9. Click Network(IPv4) to bring up the network settings screen shown below.
10. Click Static in the Connection Mode to bring up the screen below.
11. Set the IP address to the desired value: we suggest setting the first camera to 192.168.0.80, the
second to 192.168.0.81, and so forth. Check that the other settings match the screen below, then
click Save to save the settings.
7 of 9
Page 8

12. If prompted, click to Restart to restart the camera. Note that the camera is now at a different IP
address, so the browser window won’t show the camera.
13. Go to the address line in the browser, and put in the new IP address as shown below:
14. This brings up the camera’s home page shown below:
15. The camera is now at the correct IP address with the correct settings.
16. Close the browser.
8 of 9
Page 9

H
<User Defined> (Default:
Panasonic KX/BL/BB Series
)
<User Defined> (Default:
192.168.0.80
) (See Note 2)
1. No
Communication Device
is needed: just add
Video Cameras
.
<User Defined> (Default:
Panasonic BB-HCM311A,331A
)
<User Defined> (Default:
192.168.0.80
) (See Note 2)
1. No
Communication Device
is needed: just add
Video Cameras
.
OMELOGIC CONFIGURATION DETAILS
The following table provides settings used in the HomeLogic Configurator. Please refer to the Configurator Reference Guide for more details.
In the table below:
o “<User Defined>”, etc. Type in the desired name for the item.
NEHOME SOFTWARE VERSION
O
3.0
Devices Variable Name Setting Comments
Communication Device N/A (See Note 1)
Video Cameras Name
Device Type Panasonic KX/BL/BB Series
Location
IP Address
Notes:
2. By default, set the first camera to 192.168.0.80, the second to 192.168.0.81, and so on.
N/A (See Note 1)
<User Defined> (Not Required)
O
NEHOME SOFTWARE VERSION
Devices Variable Name Setting Comments
Communication Device N/A (See Note 1) N/A (See Note 1)
Video Cameras Name
Notes:
2. By default, set the first camera to 192.168.0.80, the second to 192.168.0.81, and so on.
4.0
Device Type Panasonic BB-HCM311A,331A
Location <User Defined> (Not Required)
IP Address
9 of 9
 Loading...