

Panasonic AW-UE4, AW-HS50, AW-UE4KG, AW-UE4WG, AW-UE4KGN Operating Instructions Manual
...
Operating Instruction
Operations and Settings
4K Integrated Camera
Model No.
Model No.
AW-UE4KG
AW-UE4WG
Operations and Settings
Operating Instructions
AV0619MY0 -PS
This "Operations and Settings" describes how to operate the unit and how to
establish its settings.
For more information on how to perform basic operation and installation, refer to
the Operating Instructions "Basics".
ENGLISH
DVQP2109ZA

Trademarks and Registered Trademarks
Microsoft
®
, Windows®, Windows® 7, Windows® 10, Microsoft Edge, Internet Explorer® are either registered
trademarks or trademarks of Microsoft Corporation in the United States and other countries.
Apple, Mac, macOS, OS X and Safari are registered trademarks of Apple Inc., in the United States and other
countries.
Google Chrome™ browser is trademarks of Google LLC.
Intel
®
and Intel® Core™ are trademarks or registered trademarks of Intel Corporation in the United States and
other countries.
Adobe
®
and Reader® are either registered trademarks or trademarks of Adobe Systems Incorporated in the
United States and/or other countries.
The terms HDMI and HDMI High-Definition Multimedia Interface, and the HDMI Logo are trademarks or registered
trademarks of HDMI Licensing Administrator, Inc. in the United States and other countries.
Other names of companies and products contained in these Operating Instructions may be trademarks or
registered trademarks of their respective owners.
About Copyright and License
Distributing, copying, disassembling, reverse compiling, reverse engineering, and also exporting in violation of export
laws of the software provided with this unit are expressly prohibited.
Abbreviations
For the purposes of this manual, the model numbers of the units are given as listed in the table below.
Model number of unit
Model number given in manual
AW-UE4KG, AW-UE4WG
AW-UE4KGN, AW-UE4WGN
AW-UE4
AW-HS50N, AW-HS50E
AW-HS50
Illustrations and screen displays featured in the manual
What is shown in the manual’s illustrations and screen displays may differ from how it is actually appears.
2

Disclaimer of Warranty
IN NO EVENT SHALL Panasonic Corporation BE LIABLE TO ANY PARTY OR ANY PERSON, EXCEPT FOR
REPLACEMENT OR REASONABLE MAINTENANCE OF THE PRODUCT, FOR THE CASES, INCLUDING BUT
NOT LIMITED TO BELOW:
1. ANY DAMAGE AND LOSS, INCLUDING WITHOUT LIMITATION, DIRECT OR INDIRECT, SPECIAL,
CONSEQUENTIAL OR EXEMPLARY, ARISING OUT OF OR RELATING TO THE PRODUCT;
2. PERSONAL INJURY OR ANY DAMAGE CAUSED BY INAPPROPRIATE USE OR NEGLIGENT OPERATION
OF THE USER;
3. UNAUTHORIZED DISASSEMBLE, REPAIR OR MODIFICATION OF THE PRODUCT BY THE USER;
4. INCONVENIENCE OR ANY LOSS ARISING WHEN IMAGES ARE NOT DISPLAYED, DUE TO ANY REASON
OR CAUSE INCLUDING ANY FAILURE OR PROBLEM OF THE PRODUCT;
5. ANY PROBLEM, CONSEQUENTIAL INCONVENIENCE, OR LOSS OR DAMAGE, ARISING OUT OF THE
SYSTEM COMBINED BY THE DEVICES OF THIRD PARTY;
6. ANY DEMANDS FOR COMPENSATION, CLAIMS, ETC. OCCASIONED BY THE INFRINGEMENT OF
PRIVACY BY INDIVIDUALS OR ORGANIZATIONS WHOSE IMAGES WERE SHOT BY THE USER BECAUSE
THESE IMAGES (INCLUDING THE RECORDINGS MADE) WERE MADE AVAILABLE BY THE USER
BECAUSE IN THE PUBLIC DOMAIN. FOR SOME REASON OR OTHER OR BECAUSE THE IMAGES ENDED
UP BEING USED FOR PURPOSES OTHER THAN THE ONE DESCRIBED ABOVE;
7. LOSS OF REGISTERED DATA CAUSED BY ANY FAILURE.
3

Contents
Getting Started ............................................................................................................................................ 8
Required Personal Computer Environment .......................................................................................... 8
Network security .................................................................................................................................. 9
Characteristics .......................................................................................................................................... 10
Accessories ................................................................................................................................................ 11
Optional Accessories .......................................................................................................................... 11
Operating Precautions ............................................................................................................................... 12
Names and Functions of Parts .................................................................................................................. 14
Tilting the Camera Up and Down ............................................................................................................... 15
Panning the Camera Right and Left .......................................................................................................... 15
Wireless Remote Control(optional accessory) ........................................................................................... 16
Network Settings ....................................................................................................................................... 18
Use the Easy IP setup Software ........................................................................................................ 18
Setting the Initial Account .................................................................................................................. 20
Basic Shooting Operation .......................................................................................................................... 21
Power on and Power Off the Camera Unit ................................................................................................. 22
Power on the Camera Unit ................................................................................................................ 22
Power off the Camera Unit................................................................................................................. 22
Priority Mode ............................................................................................................................................. 23
Selecting the Camera Unit ......................................................................................................................... 26
Selecting Scene Mode .............................................................................................................................. 26
Scene Mode Type .............................................................................................................................. 26
How to select the Scene mode .......................................................................................................... 26
Operating the Camera unit ........................................................................................................................ 28
Control the Camera’s Direction .......................................................................................................... 28
Zoom In/Out Function ........................................................................................................................ 28
4

Switching the Direction or Zoom Speed ............................................................................................. 28
What to do when Encountering Problems in the Basic Shooting Operations ............................................. 29
Advanced Operations ................................................................................................................................ 30
Preset Memories ............................................................................................................................... 30
Adjust the White Balance ................................................................................................................... 31
Automatic Adjustment (AWB: AWB A or AWB B) ........................................................................ 31
Auto Tracking White Balance Adjustment (ATW) ........................................................................ 32
3200K and 5600K Presets ......................................................................................................... 32
Menu Operation ........................................................................................................................................ 33
Operations Table ............................................................................................................................... 33
When performing the operations using the wireless remote control ................................................... 33
Menu Items ............................................................................................................................................... 35
Main Menu Screen ............................................................................................................................ 35
Camera Menu .................................................................................................................................... 35
Scene ........................................................................................................................................ 36
Picture Level .............................................................................................................................. 37
AGC Max Gain ........................................................................................................................... 37
Slow Shutter .............................................................................................................................. 37
Shutter Speed ............................................................................................................................ 37
Gain ........................................................................................................................................... 38
Chroma Level ............................................................................................................................ 38
White Balance Mode .................................................................................................................. 38
Detail ......................................................................................................................................... 38
Contrast ..................................................................................................................................... 39
DRS ........................................................................................................................................... 39
Back Light COMP ...................................................................................................................... 39
DNR ........................................................................................................................................... 39
LDC ........................................................................................................................................... 39
5

System Menu .................................................................................................................................... 40
Priority Mode .............................................................................................................................. 40
Frequency .................................................................................................................................. 41
Format ....................................................................................................................................... 42
Install Position ............................................................................................................................ 42
Mirror ......................................................................................................................................... 43
Digital Zoom ............................................................................................................................... 43
Tally ........................................................................................................................................... 43
IR ID .......................................................................................................................................... 43
OSD of with Tally ........................................................................................................................ 44
OSD Status ................................................................................................................................ 44
Color Bar ................................................................................................................................... 44
Mic ................................................................................................................................ ............. 44
Maintenance Menu ............................................................................................................................ 45
Language ................................................................................................................................... 45
FW Version ................................................................................................................................ 45
IP Address ................................................................................................................................. 45
Subnet Mask .............................................................................................................................. 46
Default Gateway ........................................................................................................................ 46
MAC Address ............................................................................................................................. 46
Initialize ...................................................................................................................................... 46
Menu Table ................................................................................................................................................ 47
Web Screen Start-up ................................................................................................................................. 48
Connecting to Web Screen by Using a PC ........................................................................................ 49
Switching between Live and Setup Screen ........................................................................................ 50
Web Live Screen Operation ...................................................................................................................... 51
Web Screen Configuration ........................................................................................................................ 53
Select the Setup Screen .................................................................................................................... 53
6

Basic Settings .................................................................................................................................... 54
Selecting Priority Mode .............................................................................................................. 54
Live Page (Camera Title) ........................................................................................................... 55
Image/Audio Settings......................................................................................................................... 56
Video over IP ................................ ................................................................ ............................. 56
Image Settings ........................................................................................................................... 58
System Settings ......................................................................................................................... 62
User Mng.(User Management) .......................................................................................................... 65
User auth.( User authentication) ................................................................................................ 65
Network Settings ............................................................................................................................... 67
Network ..................................................................................................................................... 67
RTMP Setting............................................................................................................................. 69
Maintenance Settings ........................................................................................................................ 70
Language ................................................................................................................................... 70
Product Info. .............................................................................................................................. 71
Upgrading the firmware (Firmware file) ...................................................................................... 72
Default Reset ............................................................................................................................. 73
Web Camera Functions ............................................................................................................................. 74
Controllable functions ................................................................................................................ 74
Troubleshooting ......................................................................................................................................... 75
Operation ................................................................................................................................... 75
Video ......................................................................................................................................... 76
IP images ................................................................................................................................... 77
USB ........................................................................................................................................... 77
Specification .............................................................................................................................................. 78
Index ......................................................................................................................................................... 81
7

Getting Started
CPU
Intel® CoreTM i5 3.2 GHz or higher (Skylake 6500 or later)
Memory
4 GB or more
Network function
100BASE-T/TX or 1000BASE-T,
RJ-45 connector
Image display
Resolution: 1920 x 1080 pixels or more
Color generation: True Color 24-bit or more
Supported operating
systems and web
browsers
For Windows:
Microsoft® Windows® 7,10
Windows® Internet Explorer® 11
64-bit/32-bit
Microsoft Edge
Google Chrome
For Mac:
macOS 10.14
macOS 10.13
macOS 10.12
OS X 10.11
Safari
Google Chrome
Other
Graphics card support hardware acceleration
(for decode H.264/H.265/JPEG streaming)
Adobe® Reader®
(for viewing the operating instructions available on the website)
IMPORTANT
Failure to provide the required personal computer environment may slow down the delineation of the images on
the screen, make it impossible for the web browser to work and cause other kinds of problems.
Required Personal Computer Environment
[Note]
Depending on the software version of the unit, an update may be necessary.
For the latest information on compatible operating systems, and web browsers, visit the support site at the
website: https://pro-av.panasonic.net/
8

Network security
As you will use the unit connected to a network, your attention is called to the following security risks.
1) Leakage or theft of information through the unit
2) Use of the unit for illegal operations by persons with malicious intent
3) Interference with or stoppage of the unit by persons with malicious intent
It is your responsibility to take precautions such as those described below to protect yourself against the above
network security risks.
Enable user authentication from web screen.
Use the unit in a network secured by a firewall, etc.
If the unit is connected to a network that includes personal computers, make sure that the system is not infected. By
computer viruses or other malicious entities (using a regularly updated antivirus program, anti-spyware program,
etc.)."
Protect your network against unauthorized access by restricting users to those who log in with an authorized user
name and password.
After accessing the unit as an administrator, be sure to close all web browsers.
Change the administrator password periodically.
To avoid passwords that can be guessed easily by third parties, set a password of at least 8 characters in length,
including at least 3 different types of characters, such as upper case, lower case, numbers, and symbols
Restrict access to the unit by authenticating the users, for example, to prevent setting information stored on the unit
from leaking over the network.
Do not install the camera in locations where the camera or the cables can be destroyed or damaged by persons
with malicious intent.
Avoid connections that use public lines.
[Note]
Notes on user authentication
User authentication on the unit can performed via digest authentication or basic authentication. If basic
authentication is used without the use of a dedicated authentication device, password leaks may occur.
We recommend using digest authentication.
Usage restrictions
Use of the same segment is recommended for the network in which the unit and personal computer are connected.
If the equipment uses connections with different segments, events based on the settings inherent to the network
equipment, for instance, may occur so check this thoroughly prior to operation.
9

Characteristics
Multi‑format support
You can switch between the following formats via the
menus or a web browser.
[4K format]
2160/29.97p, 2160/30p, 2160/25p
[HD format]
1080/59.94p, 1080/60p, 1080/50p, 1080/29.97p ,
1080/30p, 1080/25p
720/59.94p, 720/60p, 720/50p
1/2.5” MOS sensor and ultra-wide angle 111 ° fixed
focus lens
With the ultra-wide-angle (111 ° horizontal) lens, you can
capture a wider space video, and you can reproduce
clear images for a wide range of applications.
Storage of up to 100 positions in the preset memory.
Single cable solution
By supporting PoE power supply, we have realized a
single cable solution that enables video signal / control
signal / power supply with one Ethernet cable.
IP image output functions
It supports 4K30p output with RTMP (Real-Time
Messaging Protocol), which can upload video directly to
live distribution service, and it demonstrates high
operability in live production use.
Affinity with remote camera
By supporting PoE power supply and RTMP / RTSP
support, the affinity with the remote camera series is
further enhanced.
USB camera
It is also possible to use USB camera with easy
connection one USB cable by USB power supply from
PC.
Use of easy-to-operate wireless remote control
(optional) is possible
A wireless remote control capable of operating up to four
units can be used.
It can easily be used to set the various functions or
switch between them while viewing the menu screens.
Flexible camera layout enabled by simple
connection and installation
IP control, lightweight body and simple up/down and
inverse mechanism result in outstanding DIY (indoor
applications only) connectivity and installation ease.
Remember that this unit is designed to be used indoors
only: It cannot be used in outdoor.
Energy-savings achieved by the compact main unit
design
The main unit is lightweight and compact at less than
0.5 kg and low 5 W energy consumption means multiple
cameras can be connected easily.
Overview
This 4K camera features single focus, ultra-wide angle 111 ° lens, and uses a 1/2.5” type MOS sensor and supports
wider video output in various formats including 4K / 30p output.
A single cable solution with one Ethernet cable is enabled, and compatibility with remote cameras is enhanced by
protocol support such as RTMP. In addition, it is equipped with a USB camera function that can be easily connected
and applied to various applications.
Characteristics
10
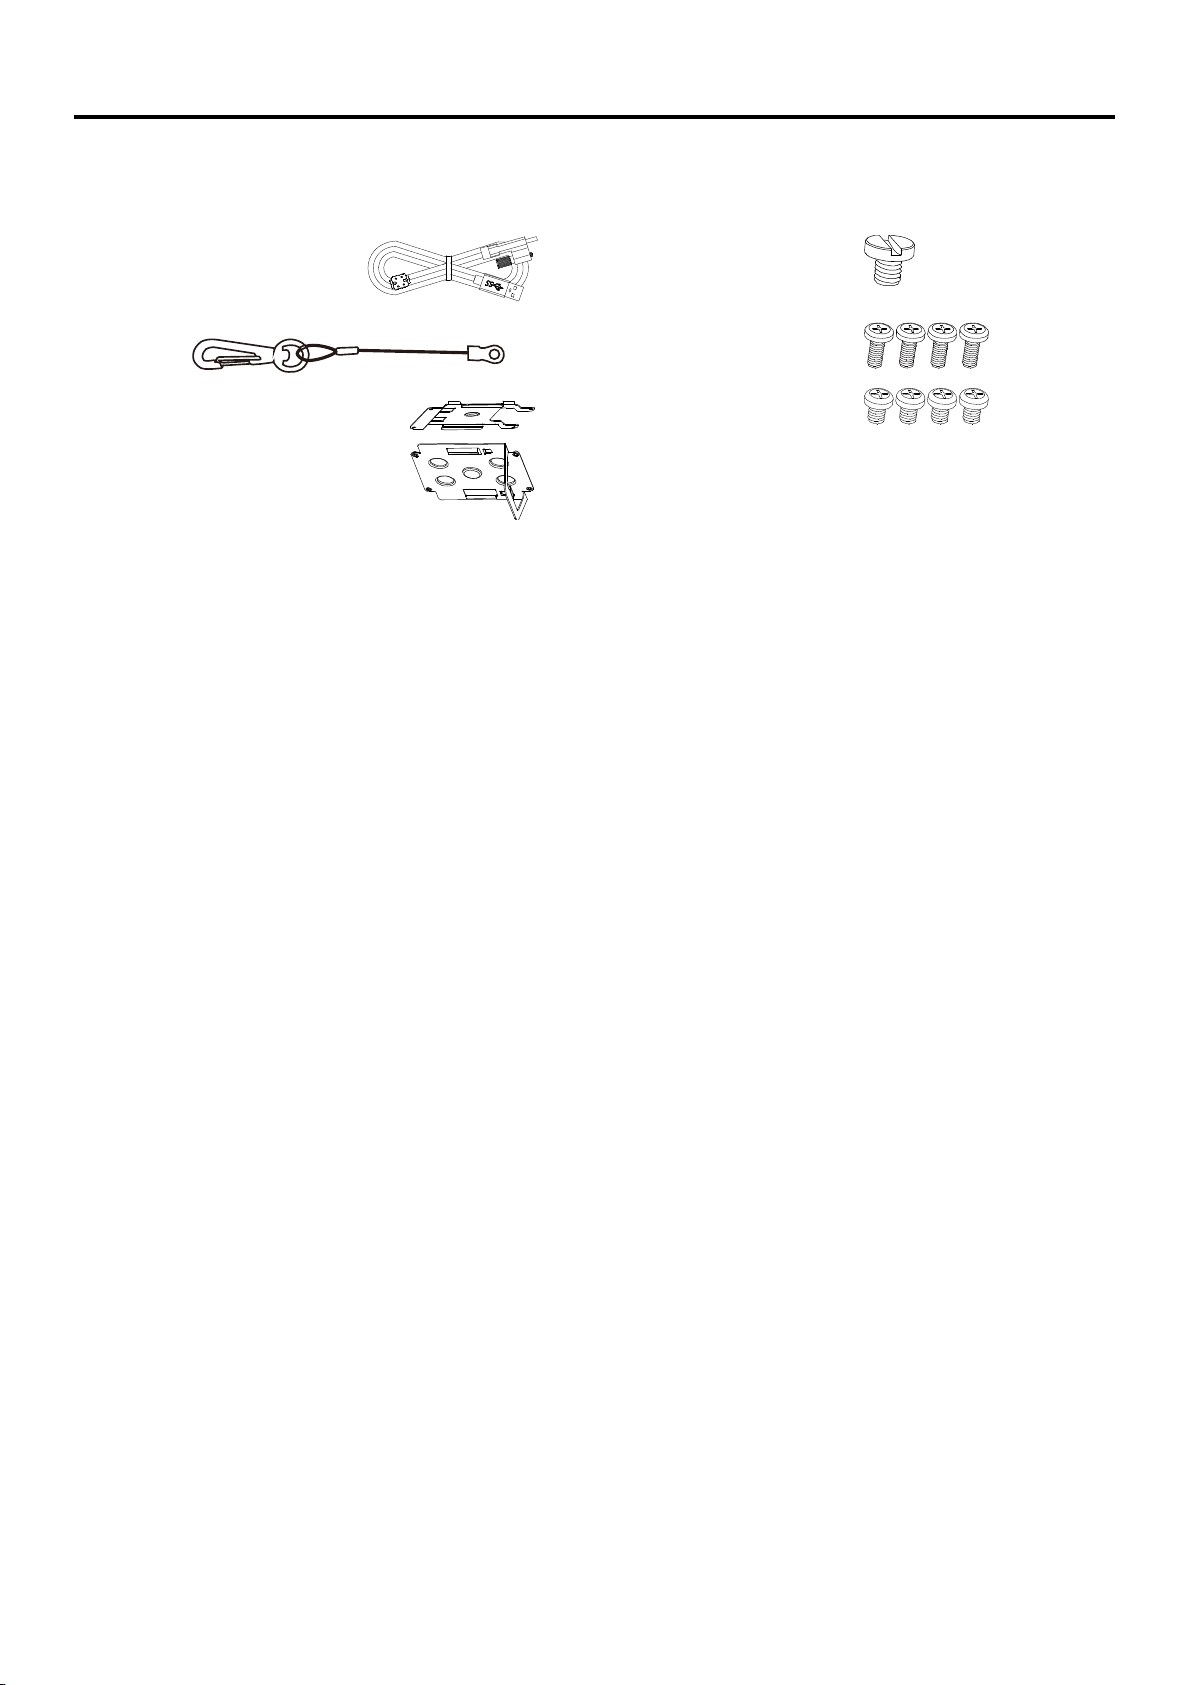
Accessories
USB Cable
Tripod screw
(I-head type, 1/4 x 20 UNC)
Drop-prevention wire
M4 screw
10 mm length (4 screws)
Mount kit
L-Mount kit
M4 screw
5 mm length(4 screws)
Check that the following accessories are present and accounted for.
After removing the product from its container, dispose of packing materials in an appropriate manner.
Optional Accessories
Wireless remote control AW-RM50G (Size “AA” dry battery x 2, obtained separately)
Direct ceiling mount bracket WV-Q105A"
[Note] For details on optional accessories, refer to the catalog or consult your local dealer.
11

Operating Precautions
Shoot under the proper lighting conditions.
To produce pictures with eye-pleasing colors, shoot
under the proper lighting conditions. The pictures may
not appear with their proper colors when shooting
under fluorescent lights. Select the proper lighting as
required.
To ensure a stable performance in the long term
Using the unit for prolonged periods in locations
where the temperature and humidity levels are high
will cause its parts to deteriorate, resulting in a
reduction of its service life. (Recommended
temperature: Max. 35 oC (95 °F))
Ensure that a cooling unit or heating unit will not blow
any air directly toward the installation location.
Do not point the camera at strong lights.
When parts of the MOS sensor are exposed to
spotlights or other strong lights, blooming (a
phenomenon where the edges of strong lights
become blurred) may occur.
What happens with high-brightness subjects
Flare may occur if an extremely bright light source is
pointed at the lens. In a case like this, change the
angle or take some other remedial action.
Concerning the Image distortion. Due to the
characteristics of the lens, the edge of the image is
distorted.
Color bars
Color bars are used to adjust the color phase, and the
widths and positions of these bars may differ from
other models.
Concerning PoE power supply
The unit complies with the IEEE802.3af standard.
Use a compatible Ethernet hub and PoE injector to
use a PoE power supply.
Turn off the power before connecting or
disconnecting the cables.
Always be sure to turn off the power before
connecting or disconnecting the cables.
When using the automatic functions
In the [Scene] such as the camera menu, the initial
settings on some items has been set to auto, making
it impossible for these items to be operated manually.
To operate them manually, switch from the auto
settings to the manual settings as required.
When using the ATW (auto tracking white
adjustment) function under fluorescent lights, the
white balance may vary.
Operating temperature range
Avoid using the unit in cold locations where the
temperature drops below 0 oC (32 °F) or hot locations
where the temperature rises above 40 oC (104 °F)
since these temperatures downgrade the picture
quality and adversely affect the internal parts.
Also, it may take a few minutes to stabilize the image
when used in low temperatures. We recommend that
you turn on this unit before use.
Concerning the HDMI interface standard
This unit has been certified as HDMI-compatible, but
on rare occasions images may not be displayed
depending on the HDMI device which has been
connected to the unit.
When the unit is not in use
Turn off the unit’s power when it is not in use. When
the unit is no longer going to be used, do not leave it
lying around, but be absolutely sure to dispose of it
properly.
Do not touch the optical system.
Under no circumstances must they be touched. In the
unlikely event that they have become dusty, remove
the dust by using a camera blower or by wiping them
gently with a lens cleaning paper.
Do not point the camera directly at the sun or a
laser beam.
Taking images of the sun, laser beams, or other
brightly lit subjects for prolonged periods of time may
damage the MOS sensor.
Personal computer used
If the same image is displayed for a prolonged period
on a PC monitor, the monitor may be damaged. Use
of a screen saver is recommended.
Concerning the IP address setting
Do not run the Easy IP Setup Software on a multiple
number of personal computers for a single camera
and set the IP address at the same time.
Otherwise, you will be unable to complete the proper
procedure and set the IP address correctly.
12

H.264/H.265 patent pool licensing
This product is licensed based on the AVC Patent
Portfolio License, and the license does not extend
beyond uses by users, who engage in the acts
described below, for their own personal and
non-profit applications.
(i) Recoding of image information in compliance with
the AVC standard (hereafter, “AVC videos”)
(ii) Playing of AVC videos recorded by consumers
engaging in personal activities or AVC videos
acquired from licensed providers
For details, visit MPEG LA, LLC website
(http://www.mpegla.com).
Handle the unit carefully.
Do not drop the unit or subject it to strong impact or
vibration. Doing so may cause the unit to malfunction.
Keep the unit away from water
Avoid all direct contact with water. Otherwise,
problems may occur.
Disposal of the unit
When the unit has reached the end of its service life
and is to be disposed of, asks a qualified contractor to
dispose of the unit properly in order to protect the
environment.
Maintenance
Turn off the unit’s power before proceeding with
maintenance. Otherwise, you may injure yourself.
Wipe the surfaces using a soft dry cloth. Avoid all
contact with benzene, paint thinners and other
volatile substances, and avoid using these
substances. Otherwise, the casing may become
discolored.
Use the unit in an environment with minimal
moisture and dust.
Avoid using the unit in an environment with high
concentration of moisture or dust since these
conditions will damage the internal parts.
Information on software used with this product
This product incorporates the following software:
(1) the software developed independently by or for Panasonic Corporation,
(2) the software owned by third party and licensed to Panasonic Corporation,
(3) the software licensed under the GNU General Public License, Version 2.0 (GPL V2.0),
(4) the software licensed under the GNU LESSER General Public License, Version 2.1 (LGPL V2.1), and/or
(5) open source software other than the software licensed under the GPL V2.0 and/or LGPL V2.1.
The software categorized as (3) - (5) are distributed in the hope that it will be useful, but WITHOUT ANY
WARRANTY, without even the implied warranty of MERCHANTABILITY or FITNESS FOR A PARTICULAR
PURPOSE. Please refer to the detailed terms and conditions that can be downloaded from the web screen
At least three (3) years from delivery of this product, Panasonic will give to any third party who contacts us at the
contact information provided below, for a charge no more than our cost of physically performing source code
distribution, a complete machine-readable copy of the corresponding source code covered under GPL V2.0, LGPL
V2.1 or the other licenses with the obligation to do so, as well as the respective copyright notice thereof.
https://pro-av.panasonic.net
However, do not contact Panasonic for questions regarding obtained source codes.
13
Names and Functions of Parts
1
3
4
3
5
6 8 9 10
11
7
2
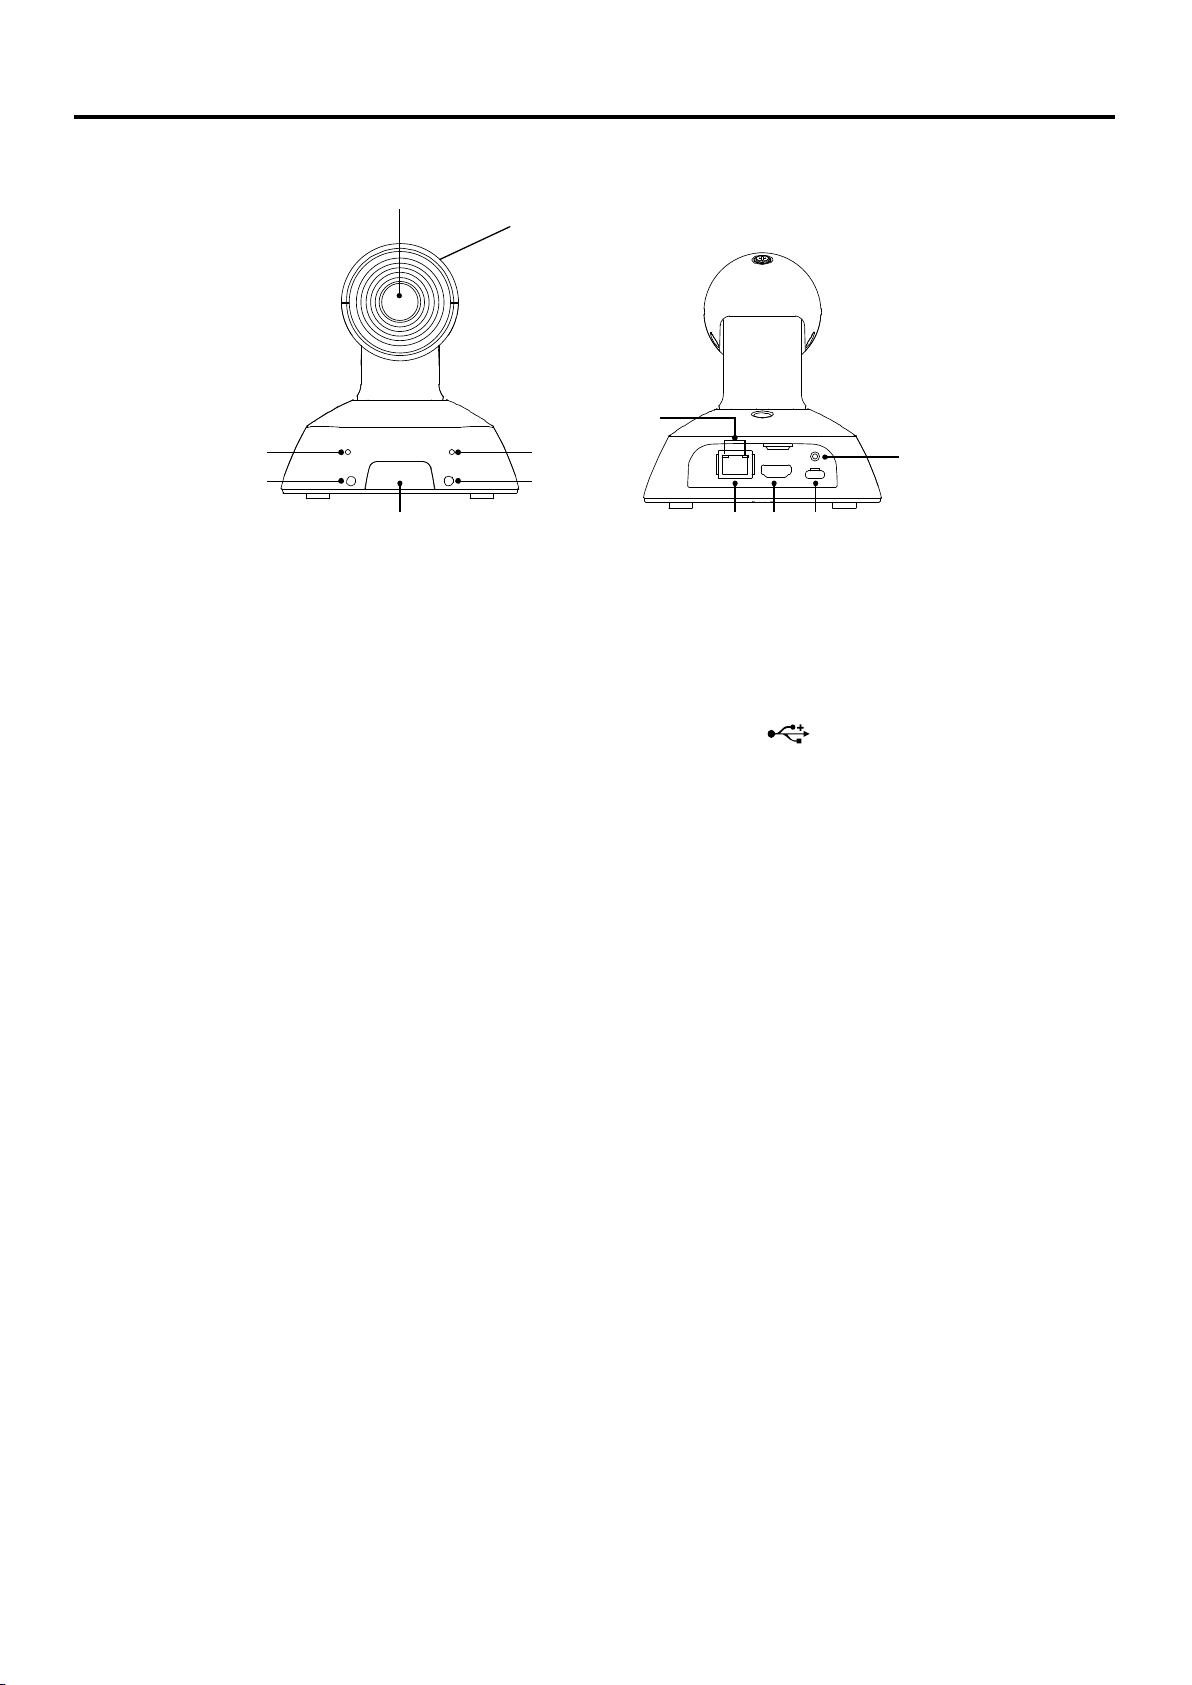
1. Lens
2. Camera head
3. Internal microphone
4. Power status indicator
- Orange light: Standby mode
- Green light: The unit is turned on
- Flashing green light: The unit is receiving a
wireless remote control signal with a matching
remote control ID
- Flashing orange light: The unit is receiving a
wireless remote control signal with a different
remote control ID
- Flash red light: Firmware updating
- Red light: Firmware update failure or other
abnormal.
5. Tally status indicator
6. Wireless remote control signal light-sensing area
7. LAN indicator(LINK/ACT)
Lights up when data is transmitted/received via LAN.
8. LAN connector
Use a category 5e or above LAN cable with a
maximum length of 100 m (328 ft.)
9. HDMI terminal
10. USB terminal
[ ]
Power can be supplied from any device that
complies with USB battery charging standards.
Always use a USB cable is included in accessories.
11. Screw hole for USB cable
14
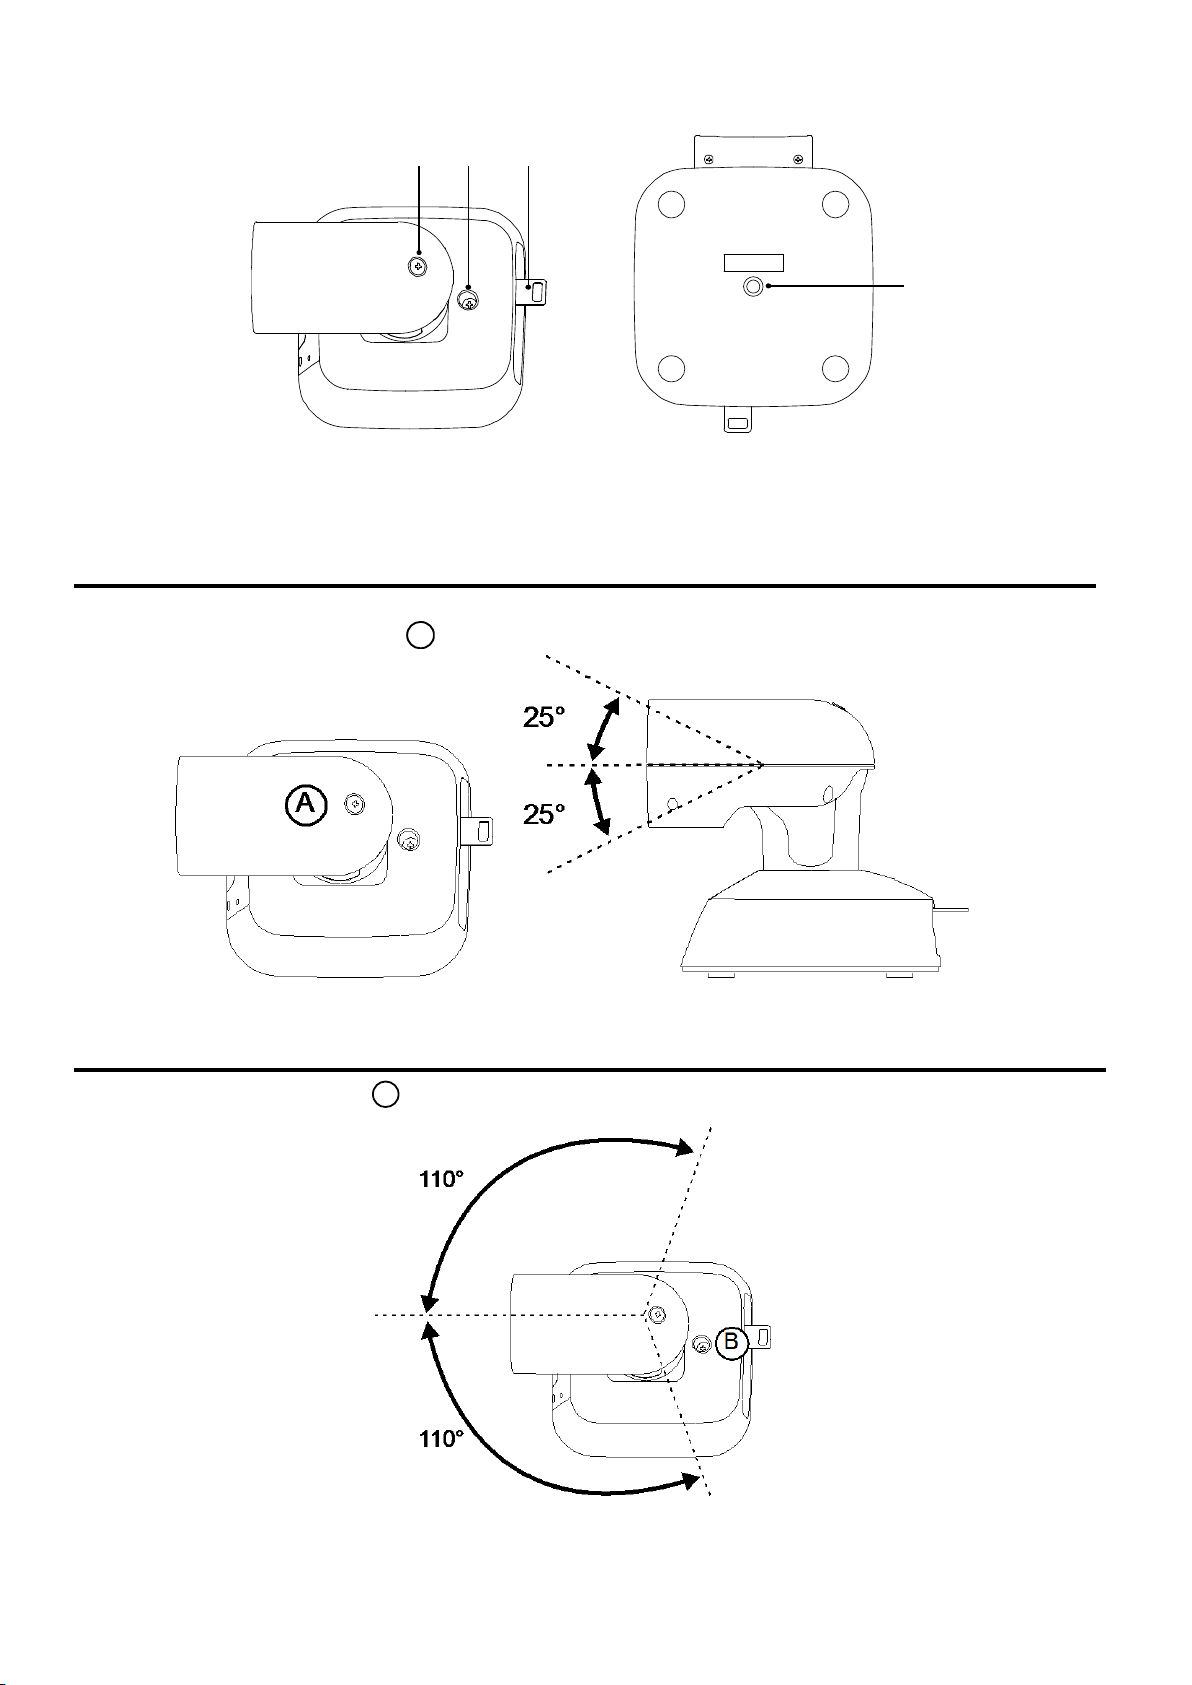
Names and Functions of Parts (continued)
12 13 14
15
12. Perpendicular fixing screw
13. Horizontal fixing screw
14. Drop-prevention wire mounting portion
15. Mount hole
[Screw: I-head type, 1/4 x 20 UNC
Clamping torque: 1.47 N · m(15kgf · cm)]
Tilting the Camera Up and Down
When the perpendicular fixing screw A
is loosened, the camera can be tilted approximately 25 °up or down.
After adjusting the position of the camera, firmly tighten the screw to fix the camera in position.
Panning the Camera Right and Left
When the horizontal fixing screw B is loosened, the camera can be pan 110 ° in the horizontal right or left.
After adjusting the position of the camera, firmly tighten the screw to fix the camera in position.
15
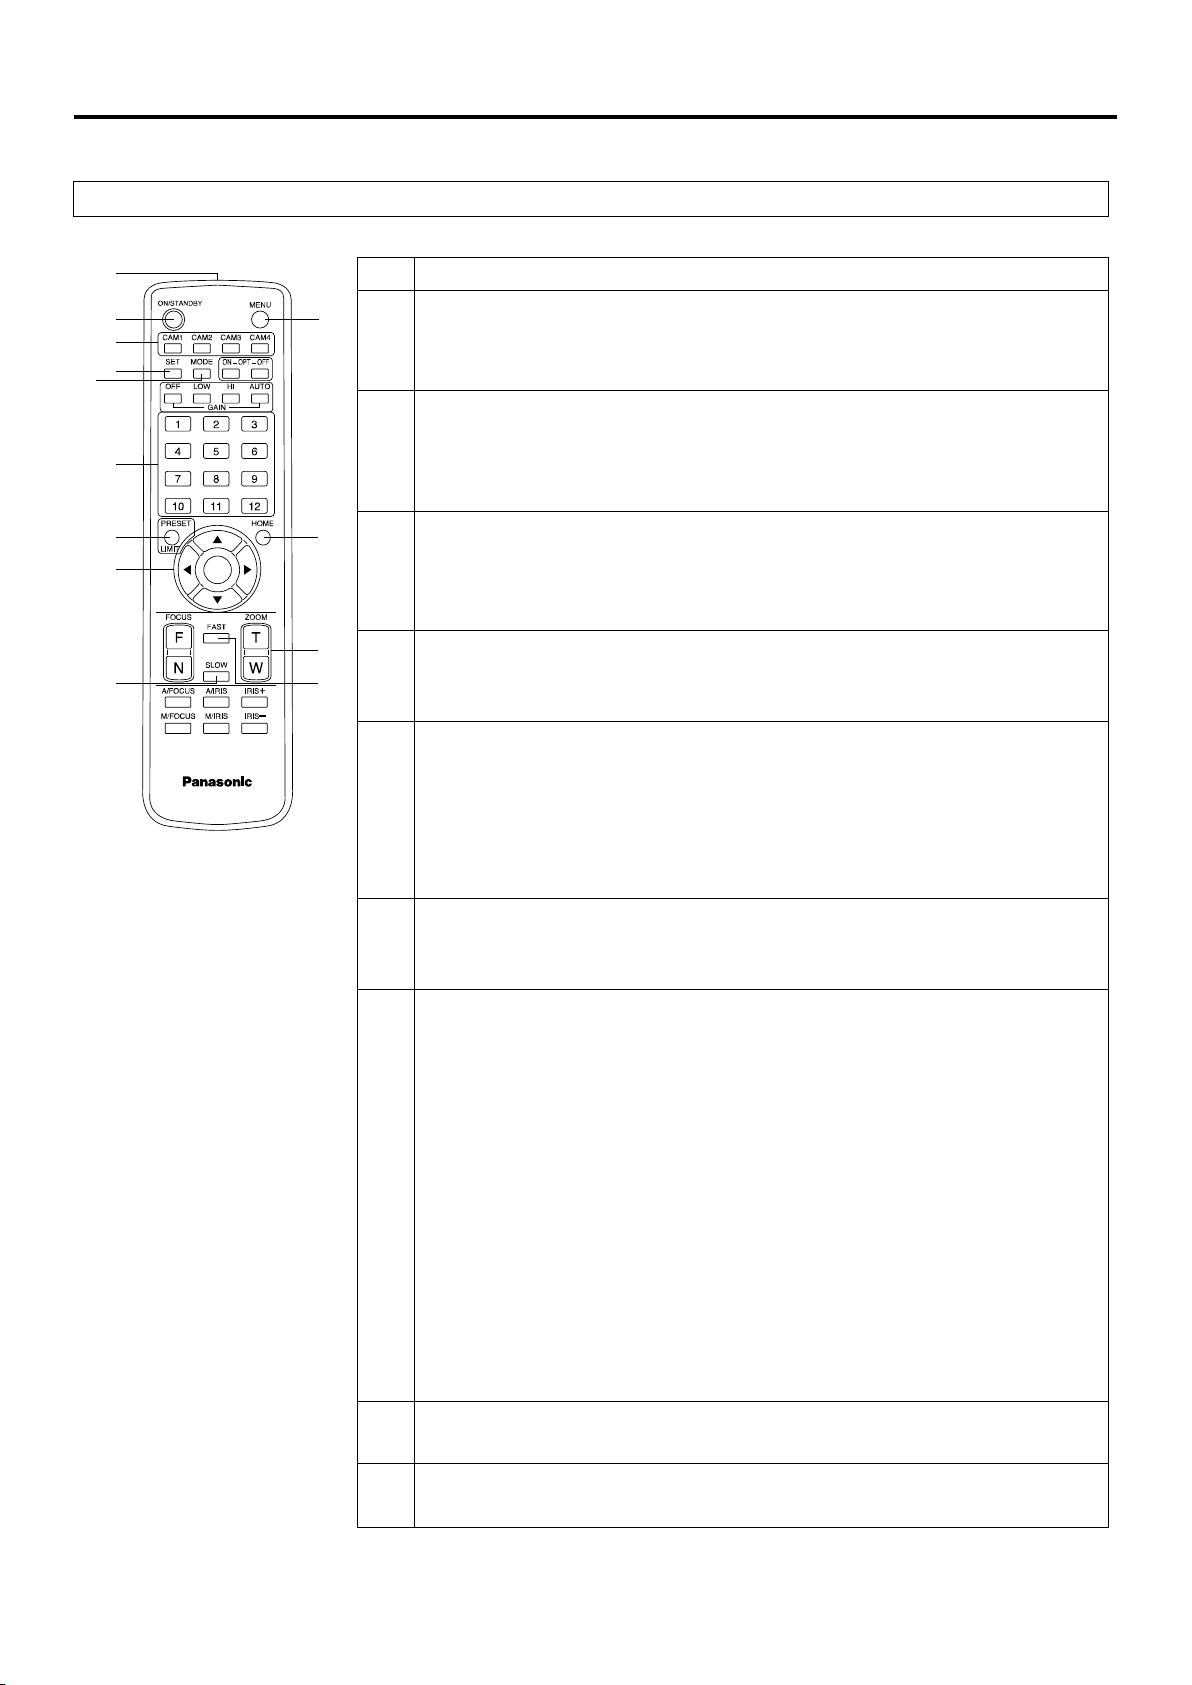
Wireless Remote Control(optional accessory)
Consult your dealer concerning the purchase of a wireless remote control.
1
2
3
4
5
6
7
8
9
10
11
12
13
1
Signal transmission window
2
ON/STANDBY button
Each time this is pressed for 2 seconds, operation switches between turning
on the unit‘s power and establishing the standby status.
3
CAM1 to CAM4 buttons
Selects a camera to be operated.
Once a button has been selected, the unit corresponding to the selected
button can be operated.
4
SET button
If this button is pressed when the [AWB A] memory or [AWB B] memory has
been selected for the white balance adjustment, the white balance is
automatically adjusted and registered in the selected memory.
5
MODE button
Each time you press the button, the signal switches between the color bar
signal output and the camera image output.
6
1 to 12 buttons
These are used to call the information on the unit’s directions and other
settings, which have been registered in the units preset memories No.1 to
No.12, and reproduce those settings.
Setting in preset memories No.13 and above cannot be called from the
wireless remote control
7
PRESET button
Press this button and any of the buttons from 1 to 12 simultaneously to
register a preset memory.
8
Pan-tilt buttons and menu operation buttons
(1)These are used to change the unit’s direction. The unit is tilted in the
up/down direction using the [▲] and [▼] buttons and panned in the left/right
direction using the [◄] and [►] buttons.
The [○] button does not work during tilting and panning.
When the [▲] or [▼] and [◄] or [►] buttons are pressed at the same time,
the unit moves diagonally.
(2) The buttons are used for menu operations when the unit displays the
camera menus.
Use the [▲] and [▼] buttons to select the menu items.
When a selected item has a sub-menu, the sub-menu will be displayed by
pressing the [] or [►] button.
When the [] or [►] button is pressed on the setting menu at the bottom
hierarchical level, the new setting is entered.
9
SLOW button
Changes the pan/tilt or zoom speed to low speed.
10
MENU button
Press and hold for 2 seconds to display the camera menu of the unit.
You can operate the unit with the optional wireless remote control (AW-RM50G).
Buttons used for operating this unit are described.
16
1
2
3
4
5
6
7
8
9
10
11
12
13
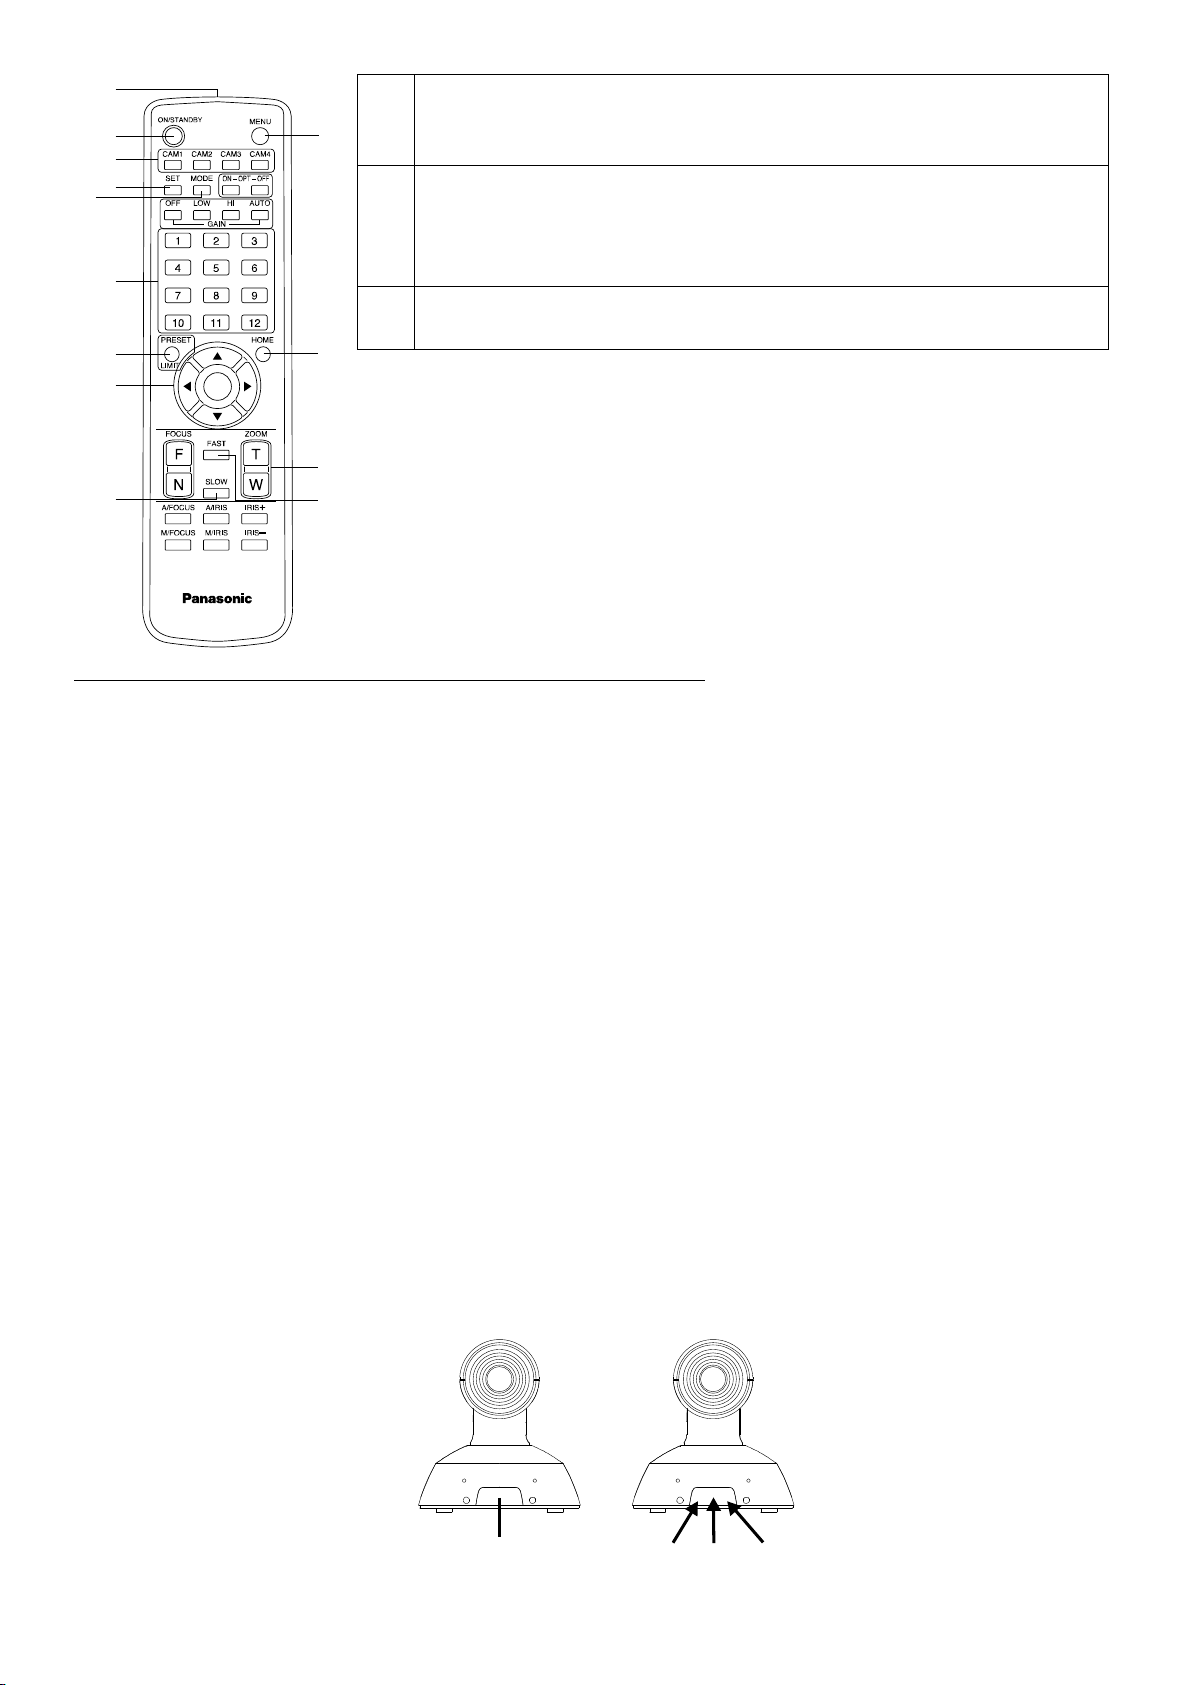
11
HOME button
If you press and hold the button for 2 seconds, the zoom level of the unit is
changed to x1.
12
ZOOM button
These are used to adjust the digital zoom.
The zoom is adjusted in the wide-angle using the [W] button and in the
telephoto using the [T] button
13
FAST button
Changes the pan/tilt or zoom speed to high speed.
Check out the following points before using the wireless remote control.
Wireless remote control signal
light-sensing area(front side)
Point the wireless remote control at the unit’s wireless remote control signal light‑sensing area (front side),
and operate it within a range of 10 meters (32.8 ft.) from the area.
Refer to <Layout of wireless remote control signal light-sensing areas> on the below.
The signal sensing distance is reduced if the angle at which the wireless remote control signals are sensed
is increased.
The light-sensing sensitivity is reduced to about one-half when the wireless remote control is pointed at an angle of
40 degrees from each position in front of a wireless remote control signal light-sensing area (front panel or back
panel).
If the remote control is operated from the behind the unit, it may be either difficult or impossible to perform the
desired operations.
If the unit is installed near fluorescent lights, plasma monitors or other such products or if the unit is
exposed to sunlight, the effects of the light may make it impossible for the unit to be operated using the
wireless remote control.
Be sure to follow the steps below for installation and use.
Take steps to ensure that the wireless remote control signal light- sensing area will not be exposed to the light
from fluorescent lights, plasma monitors or other such products or from the sun.
Install the unit away from fluorescent lights, plasma monitors and other such products.
For about 10 minutes even after the batteries have been removed from the wireless remote control, the
selection of the operation to be performed (the <CAM1>, <CAM2>,
<CAM3> or <CAM4> button which was
pressed last) will remain stored in the memory.
When a longer period of time elapses, however, the selection is reset to the status established when
the <CAM1> button was pressed.
<Layout of wireless remote control signal light-sensing areas>
[Note] The arrows in the figure below show the light-sensing directions in which the wireless remote control signals
travel.
17
Network Settings
Use the Easy IP setup Software to Establish the Unit’s Settings
The settings related to the unit’s network can be established using the Easy IP Setup Software.
You can obtain Easy IP Setup Software (EasyIPSetup.exe) by downloading it from the following website.
https://pro-av.panasonic.net/
To establish the settings for a multiple number of units, the settings must be selected for each camera involved.
If the settings cannot be established using the Easy IP Setup Software, select the settings separately for the unit and
personal computer on the Network setup screen [Network] of the setting menu.
[Note]
If, after the network settings have been established, another device in the same network has the same IP address,
the network operations will not be performed properly.
Set the IP address in such a way that it does not duplicate an existing IP address.
Do not establish network settings from a multiple number of Easy IP Setup Software programs at the same time for
a single camera.
The IP address settings may no longer be recognized as a result.
To enhance the security of the Easy IP Setup Software, it will not be possible to make network settings for the target
camera once about 20 minutes or more have elapsed after turning the power of the camera on. (When the [Easy IP
Setup accommodate period] setting is [20min] )
The Easy IP Setup Software cannot be used from a different subnet via a router.
Use Easy IP Setup Software ver. 4.25R00 or newer.
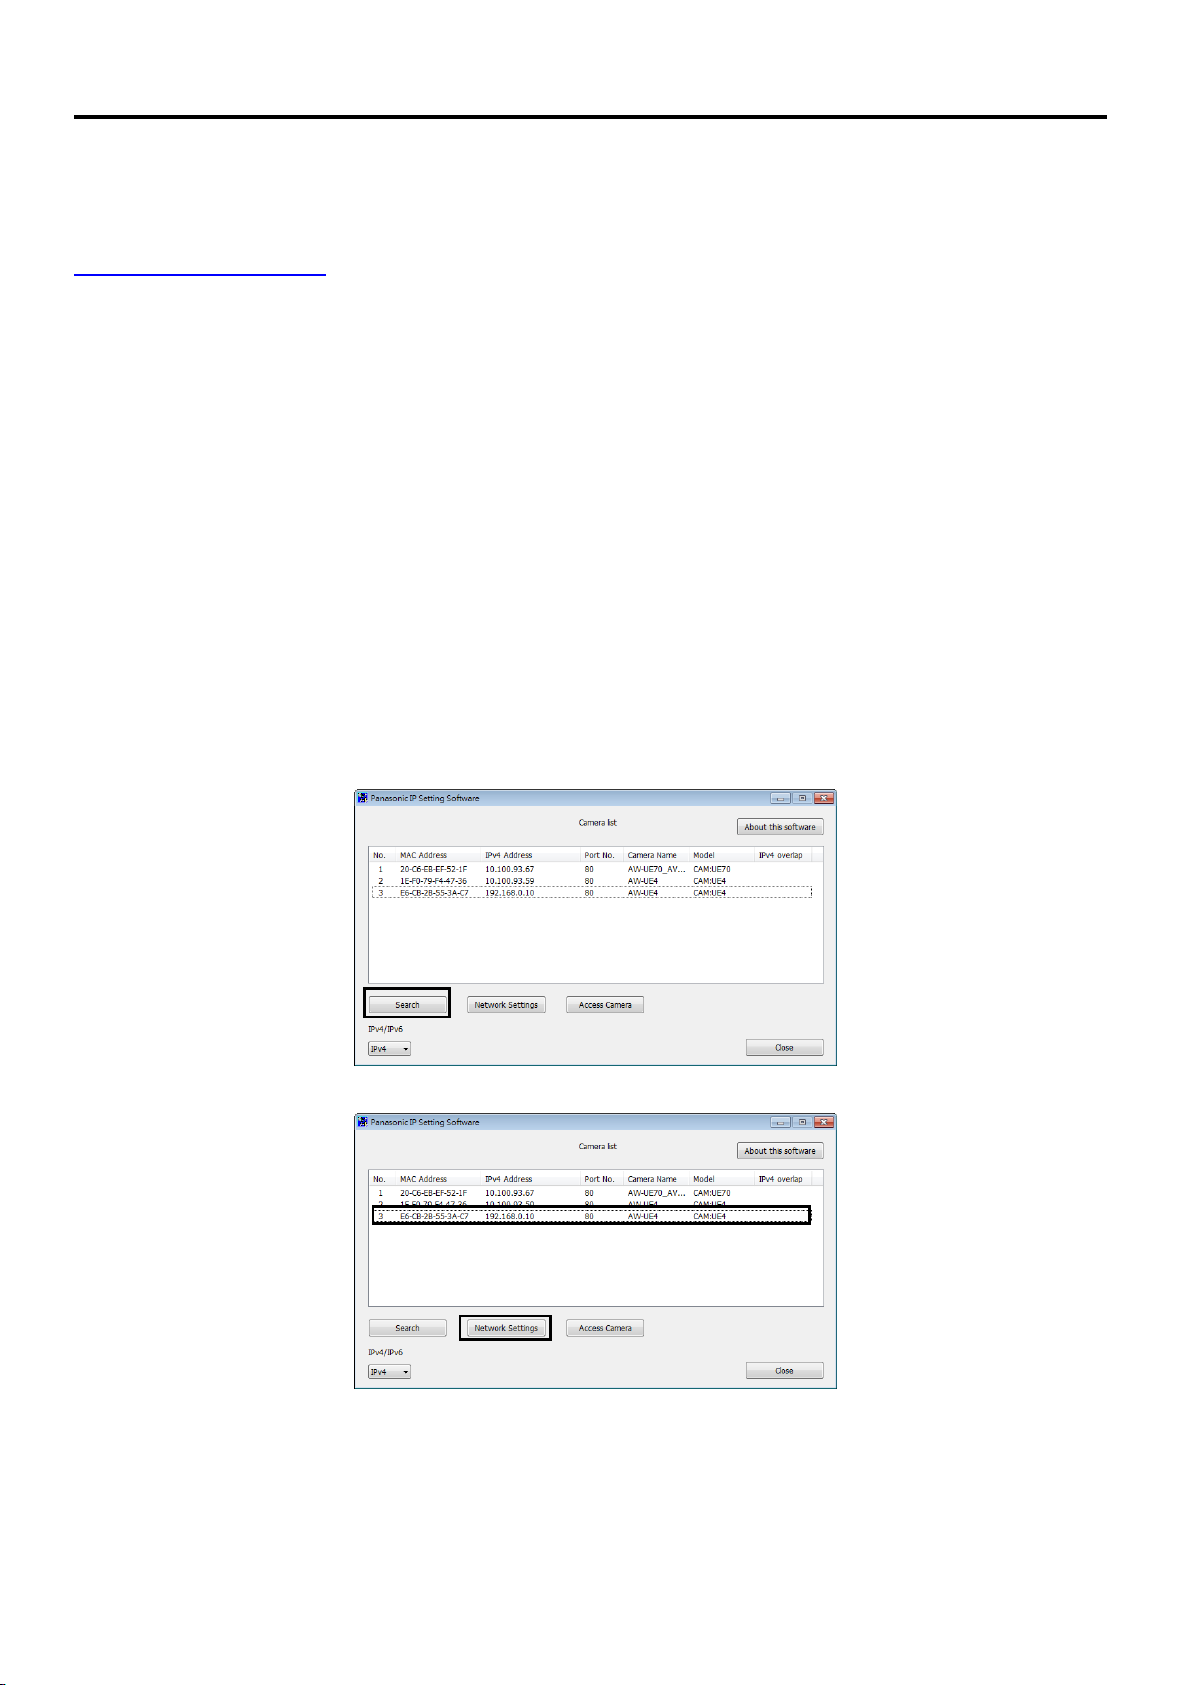
1. Start the Easy IP Setup Software.
2. Click the [Search] button.
3. Click the MAC address/IPv4 address of the camera to be set, and click the [Network Settings] button.
[Note]
When a DHCP server is being used, the IP address allocated to the unit can be checked by clicking the [Search]
button of the Easy IP Setup Software.
If the same IP address is used for any additional cameras, the numbers of the additional cameras will be displayed
in the [IPv4 overlap] column of the cameras concerned.
When the [Access Camera] button is clicked, the live screen of the selected camera is displayed.
This unit supports an IPv4/IPv6 switching function.
18
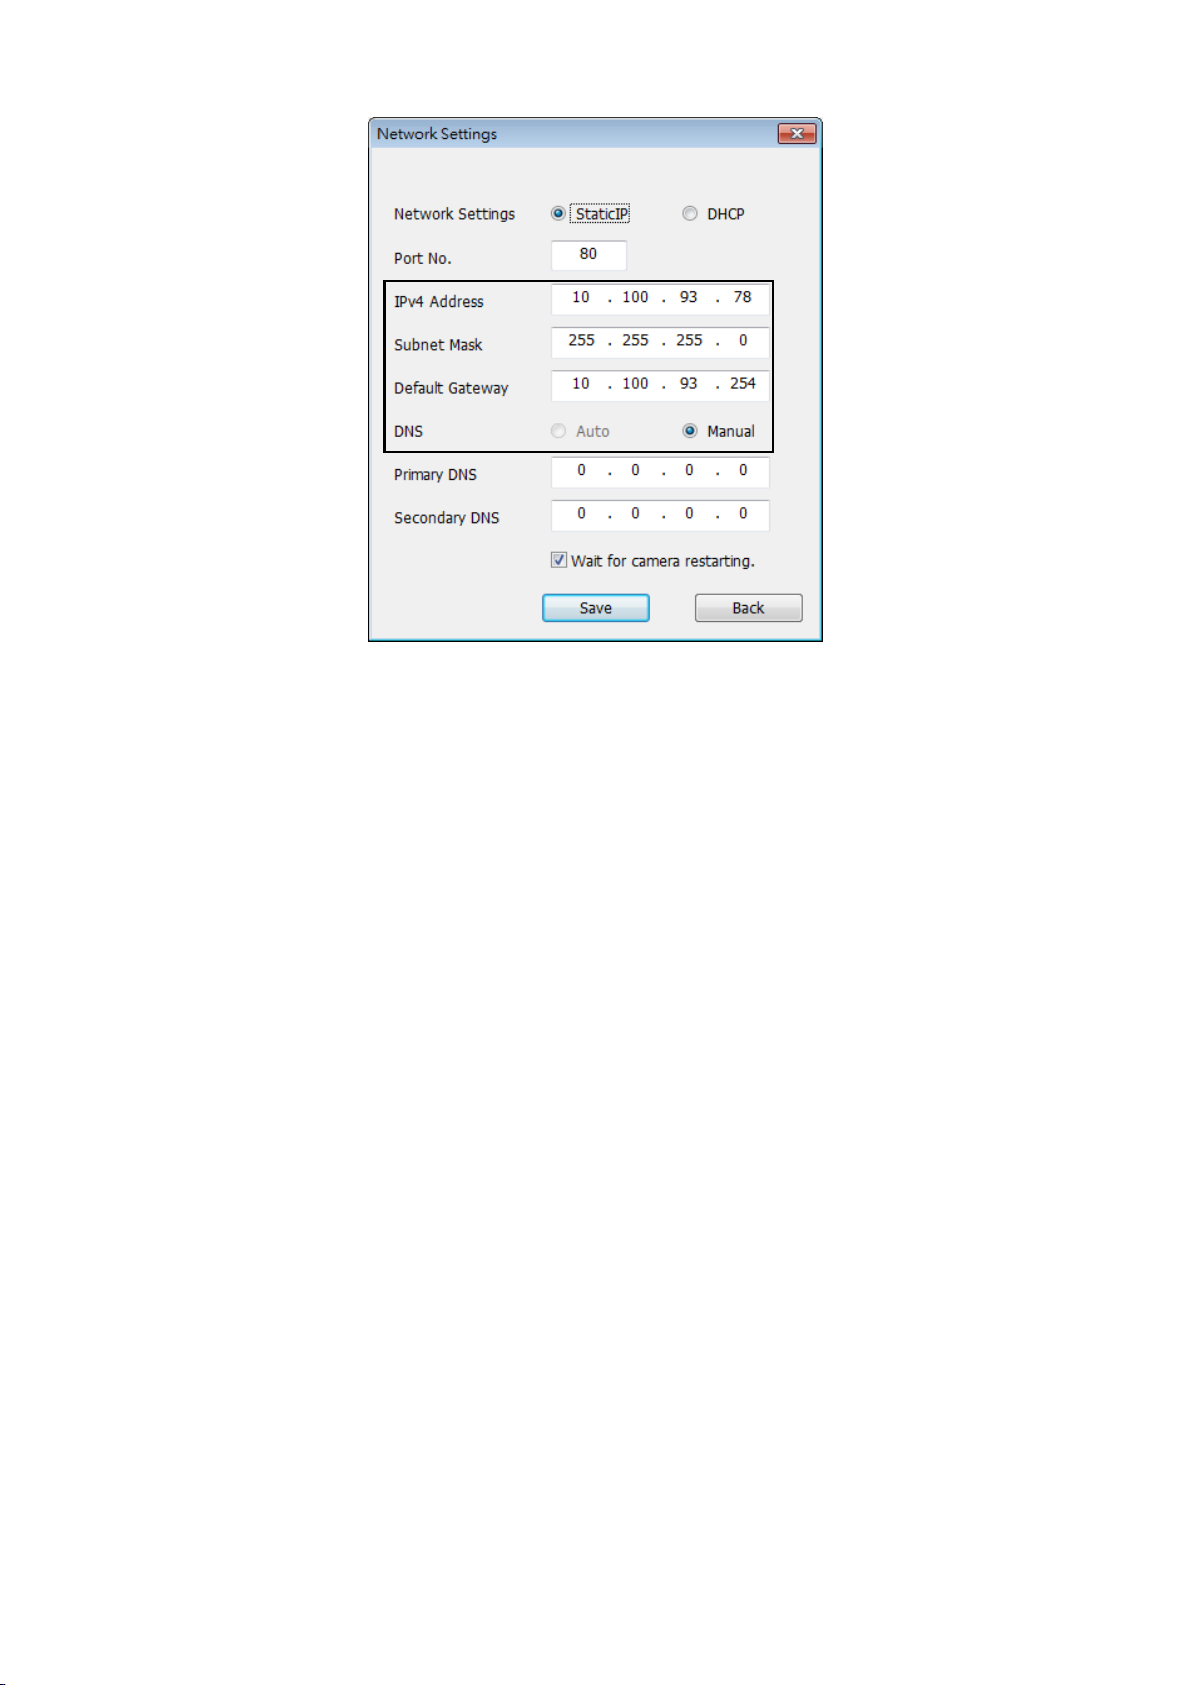
4. Input the network items, and click the [Save] button.
[Note]
When a DHCP server is being used, [DNS] of the Easy IP Setup Software can be set to [Auto].
After the [Save] button is clicked, it takes about 1 minute for the settings in the unit to be completed. If the USB
terminal power supply or LAN cable is disconnected before the settings are completed, the settings will be canceled.
In this case, repeat the steps to establish the settings.
When a firewall (including software) has been introduced, enable access to all the UDP ports.
19
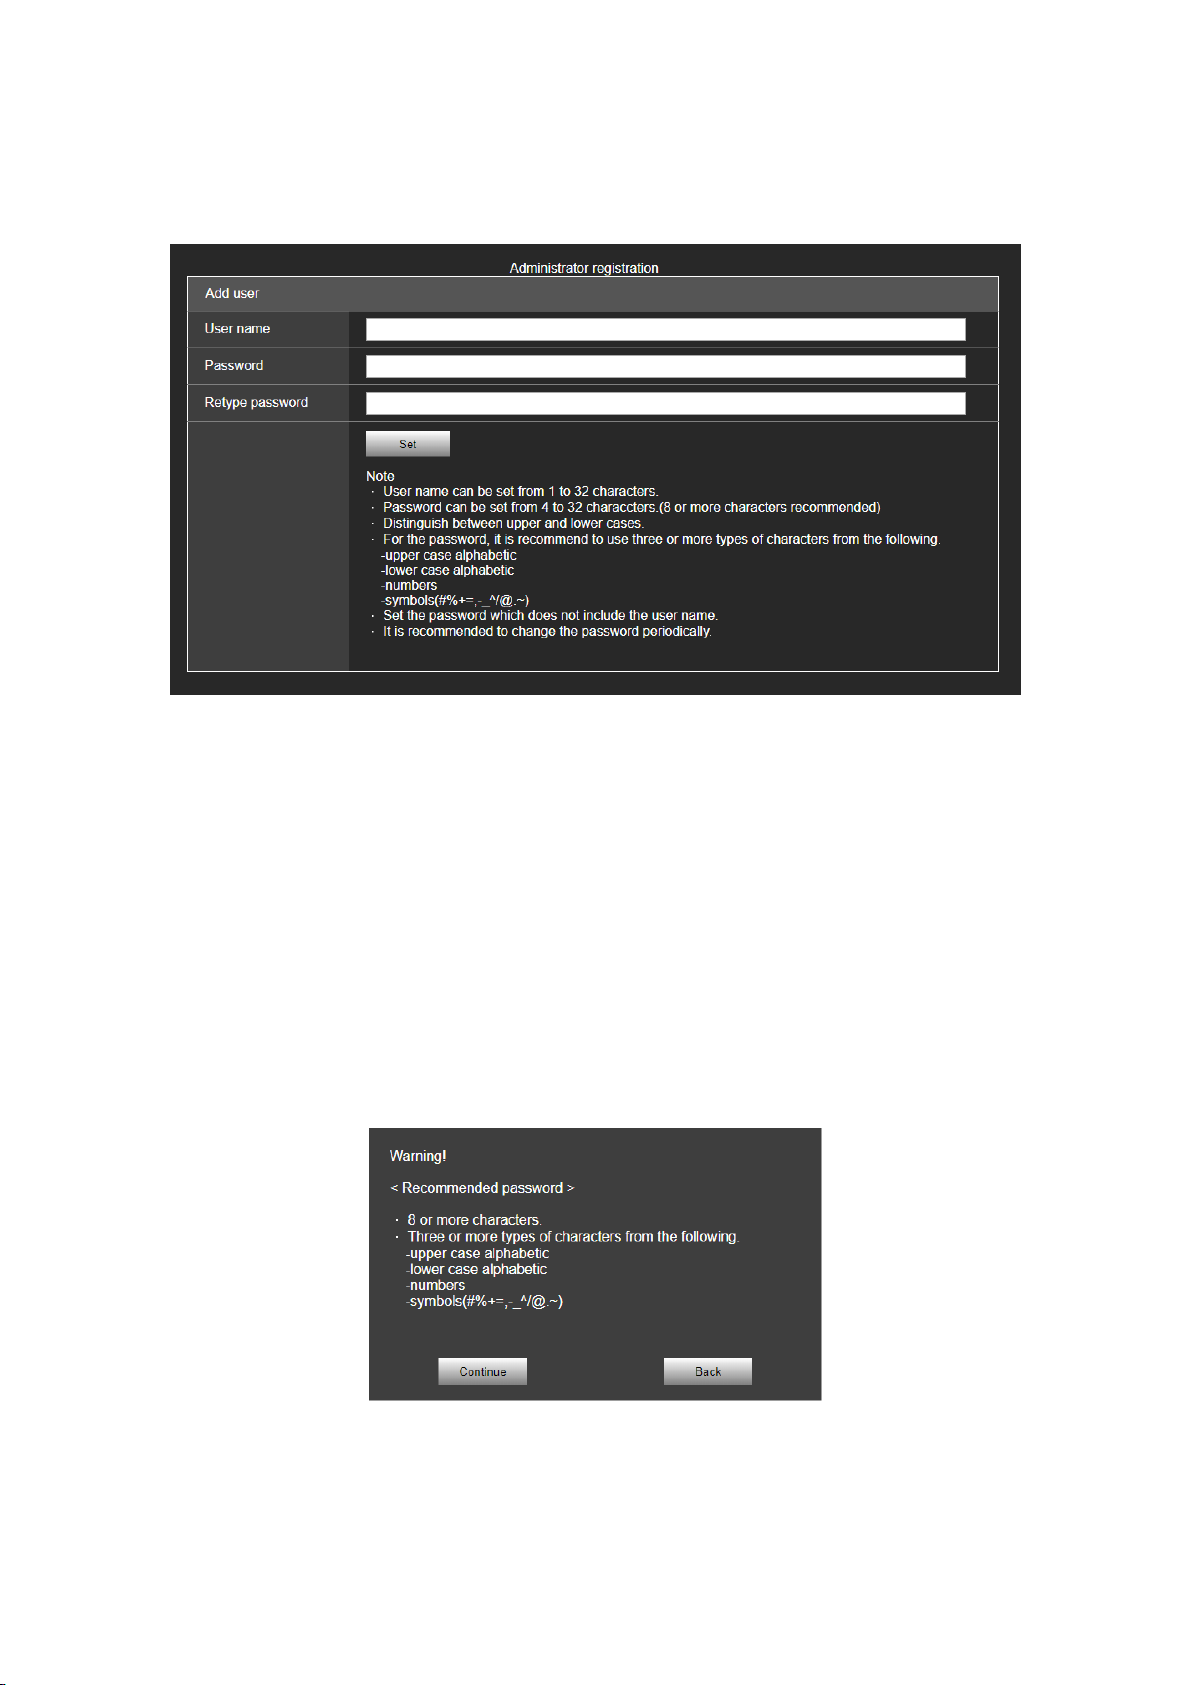
Setting the Initial Account
1. Set the initial account.
In the initial state, the initial account setting screen is displayed when the web screen is displayed.
Set a user name and password.
[Note]
The usable symbols for user name is following (# % + = , - _ ^ / @ . ~)
Do not set character strings that can be easily guessed by third parties.
Change the password at regular intervals.
The password must use at least 3 of the following 4 character types and be 8 characters or longer.
- Alphabet upper cases
- Alphabet lower cases
- Numerals
- Symbols (# % + = , - _ ^ / @ . ~ )
When a password is set that does not adhere to the above policy, take responsibility for use of the device with due
consideration for the security risks in the installation environment, etc.
A warning is displayed if the set password goes against the recommended setting policy. When changing the
password, click the [Back] button and set the password again.
When continuing with the setting with full understanding of the security risks, click [Continue] to complete the
setting.
If you forget the account information that was set, consult your local deader.
2. Completing registration of the initial account
After completing registration of the initial account, the live screen [Live] is automatically displayed after a few seconds.
This completes the process of registering the initial account.
20

Basic Shooting Operation
With the basic operations, it is assumed that the white balance will be adjusted automatically (as per the factory
settings).
Due to the characteristics of the lens, the edge of the image is distorted.
1.
Make sure the subject brightness is in the appropriate level.
2.
Make sure the unit and all devices are well connected and power on.
3.
Press one of the [CAM1] to [CAM4] buttons on the wireless remote control to select the unit if using the wireless remote control. Even when using only one unit, it must still be selected from the wireless remote control.
4.
Select the scene (shooting) mode.
Select one of the three (Full Auto, Shutter Priority, and Manual) scene modes, each of which corresponds to a
set of circumstances in which the subject will be shot.
Select the mode that satisfies the shooting conditions and suits your preferences.
When continuing to shoot in the same circumstances, there is no need to select another mode.
5.
Start shooting.
21

Power on and Power Off the Camera Unit
Power on the Camera Unit
When performing the operations using the wireless remote control.
1. Set all the power switches of the units and devices connected in the system to ON.
The unit does not have a power switch. When power is supplied to it, the status indicator LED will light up orange.
2. Press one of the [CAM1] to [CAM4] buttons on the wireless remote control to select the unit.
3. Press the [ON/STANDBY] button on the wireless remote control for 2 seconds.
The POWER ON mode is established, images are output, and control can be exercised.
The unit’s status indicator LED now lights up green.
[Note]
It takes about 30 seconds per unit for the initial settings operation to be completed. During this period, the unit
cannot be operated.
The unit stores its STANDBY / POWER ON mode status in the memory.
If the power supply is cut off while the operation is in POWER ON mode, the operation will transfer to the POWER
ON mode the next time power is supplied.
When transferring to the STANDBY mode
- Status indicator LED: Orange
When transferring to the POWER ON mode
- Status indicator LED: Green (after the initial setting operation is completed)
- The pan/tilt position is moved to the position which was stored in the memory when the transition to the
STANDBY mode was made.
POWER ON preset
- The pan/tilt position return to the place just before entering STANDBY mode when returning from STANDBY
mode to POWER ON mode.
If the power is turned off, the pan/tilt position returns to the initial state.
4. If multiple units are going to be used, repeat steps 2 and 3 as required.
The unit’s status indicator LED blinks green when a signal matched by the remote control ID has been received,
and it blinks orange when a signal that is not matched by the remote control ID has been received.
Power off the Camera Unit
When performing the operations using the wireless remote control
1. Press one of the [CAM1] to [CAM4] buttons on the wireless remote control to select the unit.
2. Press the [ON/STANDBY] button on the wireless remote control for 2 seconds.
The unit enters STANDBY mode.
3. The unit’s status display lamp now lights up orange.
4. If a multiple number of units are used, repeat steps 1 and 2 as required.
5. Set all the power switches of the units and devices connected in the system to OFF.
22

Priority Mode
Power
Supply
Priority Mode
Output terminal
HDMI
USB
LAN
RTSP/RTMP
Web(HTTP)
PoE
HDMI (4K)
[50 Hz]
2160/25p
[59.94 Hz]
2160/29.97p
[60 Hz]
2160/30p
-
-
MJPEG :
[50 Hz]
720/10 fps、360/25 fps
[59.94 Hz、60 Hz]
720/10 fps、360/30 fps
USB (4K)
-
MJPEG:
2160/5 fps
-
MJPEG :
[50 Hz]
720/10 fps、360/25 fps
[59.94 Hz/60 Hz]
720/10 fps、360/30 fps
IP (4K)
-
-
H264 or H.265:
[50 Hz]
2160/25 fps、10 fps、5 fps
[59.94 Hz/60 Hz]
2160/30 fps、15 fps 、5 fps
MJPEG :
[50 Hz]
720/10 fps、360/25 fps
[59.94 Hz、60 Hz]
720/10 fps、360/30 fps
Standard
[50 Hz]
1080/50p、1080/25p、
720/50p
[59.94 Hz]
1080/59.94p、
1080/29.97p、
720/59.94p
[60 Hz]
1080/60p、1080/30p、
720/60p
MJPEG:
[50 Hz]
1080/25 fps、
10 fps、5 fps
720/25 fps、10 fps、
5 fps
360/25 fps、10 fps、
5 fps
[59.94 Hz/6 0Hz]
1080/30 fps 、
15 fps、5 fps
720/30 fps、
15 fps 、5 fps
360/30 fps、15 fps、
5 fps
YUV:
[50 Hz]
360/10 fps
[59.94 Hz/60 Hz]
360/15 fps
-
MJPEG :
[50 Hz]
720/10 fps、360/25 fps
[59.94 Hz/60 Hz]
720/10 fps、360/30 fps
Changing the priority mode enables the unit to perform operation for various applications.
HDMI(4K): 4K video is output to an external monitor connected via an HDMI cable.
IP(4K): Enables IP image transmission. IP image transmission of 4K images uses the H.264/H.265 video coding
format. This unit cannot display H.264/H.265 format images on the Live screen. To display H.264/H.265 images,
use an external device or external software that supports H.264/H.265 images.
USB(4K): Enables the unit to be used as a 4K Web camera. The camera can also be controlled from a personal
computer. When the unit is used as a 4K-compatible Web camera, the frame rate will be fixed at 5 fps.
Standard: HD format video is output to an external monitor connected via an HDMI cable. Enables the unit to be
used as a Web camera. The camera can also be controlled from a personal computer.
IP: Enables IP image transmission. The IP transmission of H.264/H.265 images is also supported. This unit cannot
display H.264/H.265 format images on the Live screen. To display H.264/H.265 images, use an external device or
external software that supports H.264/H.265 images.
Functions that can be and functions that cannot be controlled simultaneously.
23

Power
Supply
Priority Mode
Output terminal
HDMI
USB
LAN
RTSP/RTMP
Web(HTTP)
PoE
IP
[50 Hz]
1080/25p
[59.94 Hz]
1080/29.97p
[60 Hz]
1080/30p
-
H264or H.265:
[50 Hz]
1080/50 fps、25 fps、10 fps、
5 fps
720/50 fps、25 fps、10 fps、
5 fps
360/50 fps、25 fps、10 fps、
5 fps
[59.94 Hz/60 Hz]
1080/60 fps、30 fps、15 fps、
5 fps
720/60 fps、30 fps、15 fps、
5 fps
360/60 fps、30 fps、15 fps、5 fps
MJPEG :
[50 Hz]
720/10 fps、360/25 fps
[59.94 Hz/60 Hz]
720/10 fps、360/30 fps
USB
(PC Power)
USB (4K)
-
MJPEG:
2160/5 fps
-
MJPEG :
[50 Hz]
720/10 fps、360/25 fps
[59.94 Hz/60 Hz]
720/10 fps、360/30 fps
Standard
-
MJPEG:
[50Hz]
1080/25 fps、
10 fps、5 fps
720/25 fps、10 fps、
5 fps
360/25 fps、10 fps、
5 fps
[59.94 Hz/60 Hz]
1080/30 fps、
15 fps、5 fps,
720/30 fps、15 fps、
5 fps
360/30 fps、15 fps、
5 fps
YUV:
[50 Hz]
360/10 fps
[59.94 Hz/60 Hz]
360/15 fps
-
MJPEG :
[50 Hz]
720/10 fps、360/25 fps
[59.94 Hz/60 Hz]
720/10 fps、360/30 fps
USB
(AC adapter)
5 V/1 A or
more
HDMI (4K)
[50 Hz]
2160/25p
[59.94 Hz]
2160/29.97p
[60 Hz]
2160/30p
-
-
MJPEG :
[50 Hz]
720/10 fps、360/25 fps
[59.94 Hz/60 Hz]
720/10 fps、360/30 fps
IP(4K)
-
-
H264 or H.265:
[50 Hz]
2160/25 fps、10 fps、5 fps
[59.9 Hz/60 Hz]
2160/30 fps、15 fps、5 fps
MJPEG :
[50 Hz]
720/10 fps、360/25 fps
[59.94 Hz/60 Hz]
720/10 fps、360/30 fps
24

Power
Supply
Priority Mode
Output terminal
HDMI
USB
LAN
RTSP/RTMP
Web(HTTP)
USB
(AC adapter)
5 V/1 A or
more
IP
[50Hz]
1080/25p
[59.94Hz]
1080/29.97p
[60Hz]
1080/30p
-
H264 or H.265:
[50Hz]
1080/50 fps、25 fps、10 fps、
5 fps
720/50 fps、25 fps、10 fps、
5 fps
360/50 fps、25 fps、10 fps、
5 fps
[59.94Hz/60Hz]
1080/60 fps、30 fps、15 fps、
5 fps
720/60 fps、30 fps、15 fps 、
5 fps
360/60 fps、30 fps、15 fps、5 fps
MJPEG :
[50Hz]
720/10 fps、360/25 fps
[59.94Hz/60Hz]
720/10 fps、360/30 fps
25
Selecting the Camera Unit
When performing the operations using the wireless remote control
Press the [CAM1], [CAM2], [CAM3] or [CAM4] button.
The camera unit’s status indicator LED blinks green when a signal matched by the remote control ID has been
received, and it blinks orange when a signal that is not matched by the remote control ID has been received.
Selecting Scene Mode
Scene Mode Type
The unit has three preset scene modes, each of which corresponds to a set of circumstances in which the subject will
be shot.
Select the mode that satisfies the shooting conditions and suits your preferences.
The settings can be changed by menu operations.
The results of the white balance and other adjustments are stored in the memory separately by shooting mode. Be
absolutely sure to select the shooting mode before making any adjustments.
Full Auto
User can adjust the picture level, AGC MaxGain, slow shutter, Chroma level, and white balance.
Shutter Priority
User can adjust the picture level, AGC MaxGain, shutter speed, Chroma level, and white balance.
Manual
User can adjust the shutter speed, Gain, Chroma level, and white balance.
How to select the Scene mode
When performing the operations using the wireless remote control
1
Press the [CAM1], [CAM2], [CAM3] or [CAM4] button to select the unit.
2
Press the [MENU] button for 2 seconds.
The menu is displayed.
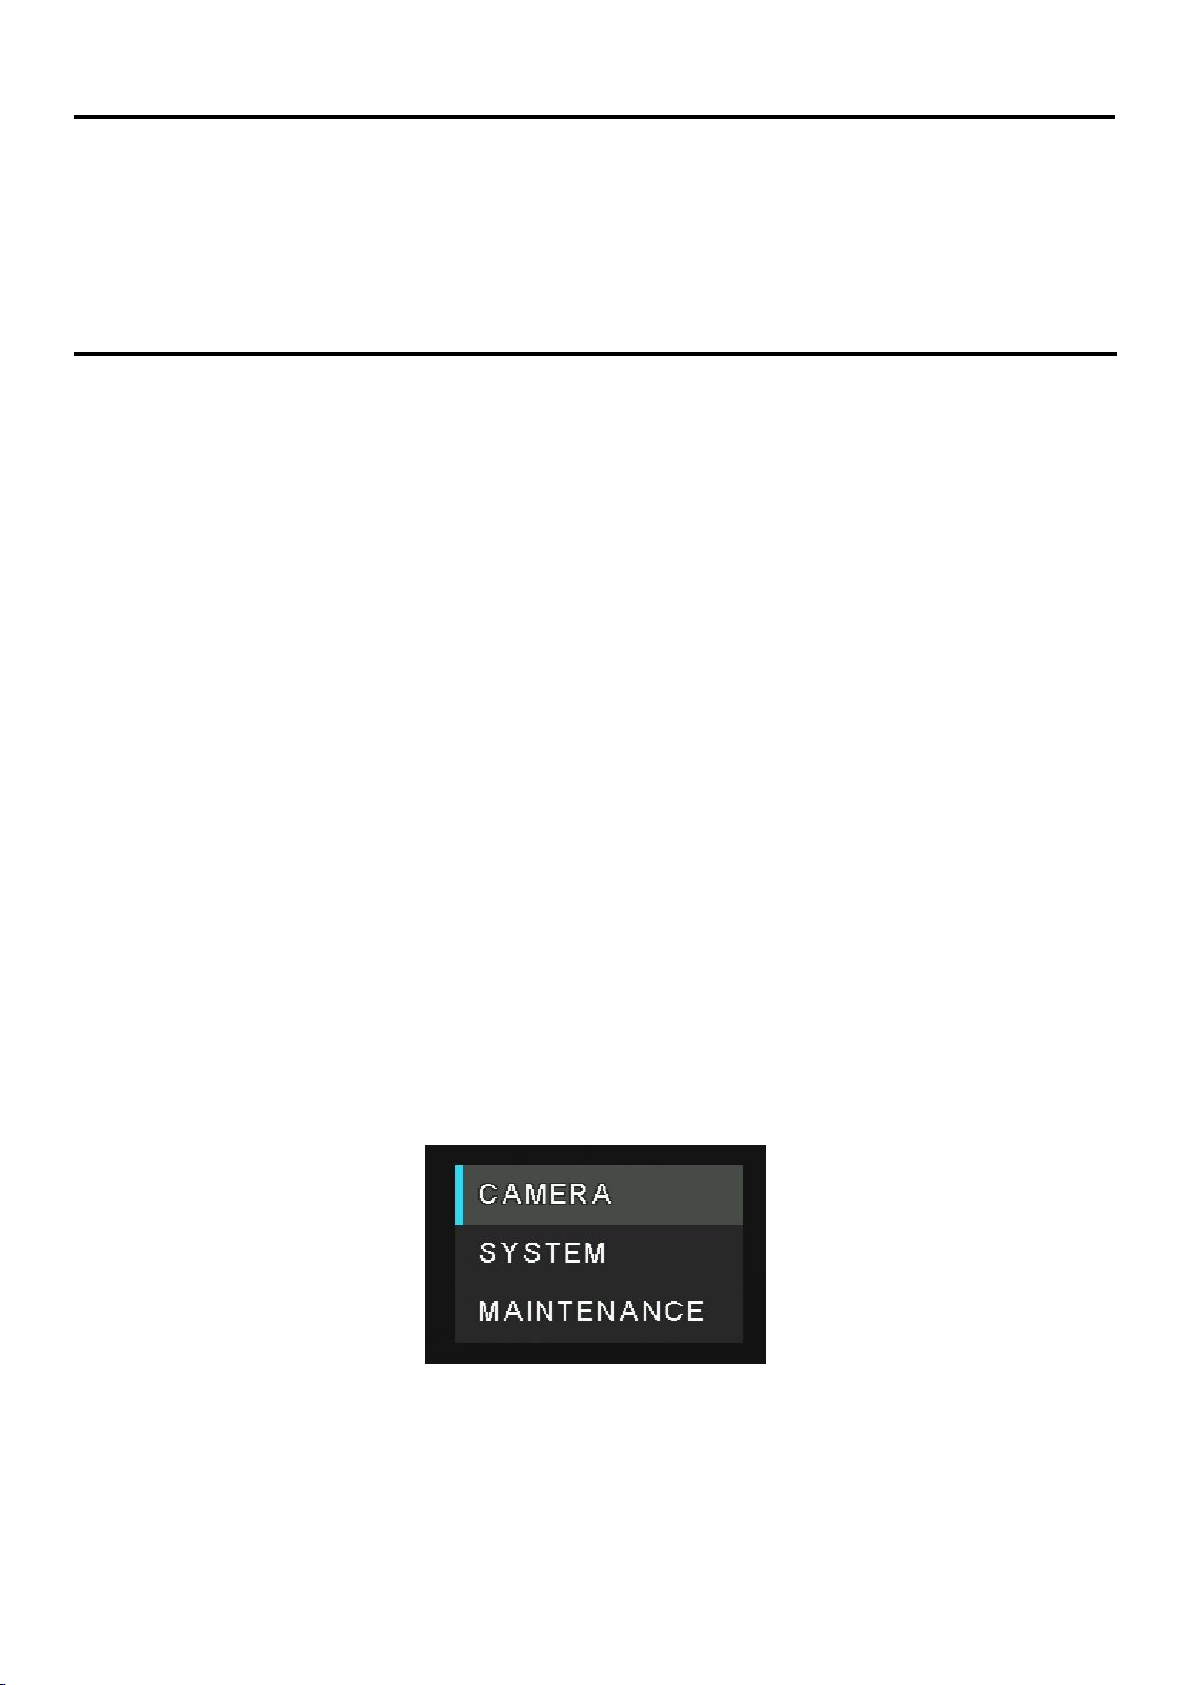
3
Press the [▲] or [▼] button to bring the highlight to “CAMERA”.
26
 Loading...