

Panasonic AJ-PX230, AJ-PX230E Operation Manual
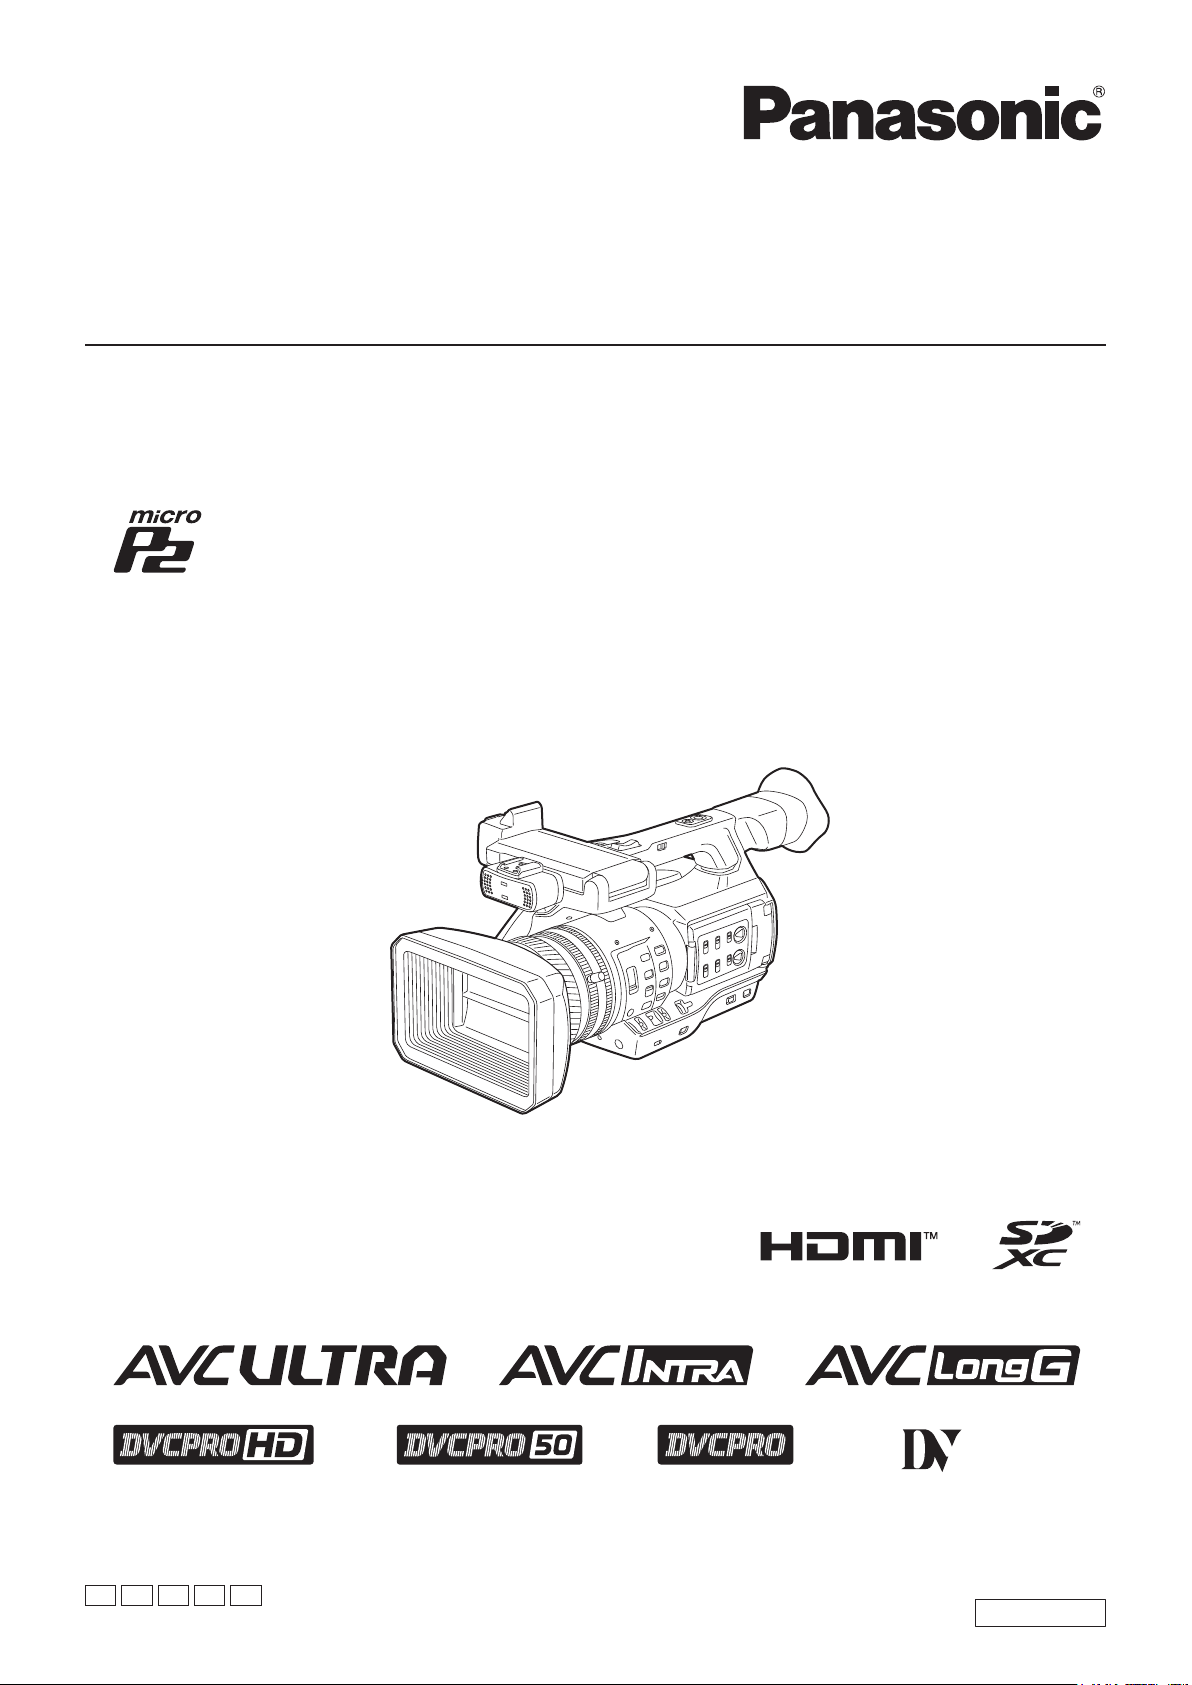
Operating Instructions
Memory Card Camera-Recorder
Model No. AJ-PX230
Model No. AJ-PX230E
Before operating this product, please read the instructions carefully and save this manual for future use.
Before using this product, be sure to read “Read this first!” (pages 2 to 11).
P PJ EJ EN
W0316HM3059 -YI
END
ENGLISH
VQT5M55A-3(E)

Read this rst!
Read this rst!
indicates safety information.
CAUTION
RISK OF ELECTRIC SHOCK
DO NOT OPEN
CAUTION: TO REDUCE THE RISK OF ELECTRIC SHOCK,
DO NOT REMOVE COVER (OR BACK).
NO USER-SERVICEABLE PARTS INSIDE.
REFER TO SERVICING TO QUALIFIED SERVICE PERSONNEL.
The lightning flash with arrowhead symbol,
within an equilateral triangle, is intended to
alert the user to the presence of uninsulated
“dangerous voltage” within the product’s
enclosure that may be of sufficient magnitude
to constitute a risk of electric shock to
persons.
The exclamation point within an equilateral
triangle is intended to alert the user to
the presence of important operating and
maintenance (servicing) instructions in the
literature accompanying the appliance.
WARNING:
• To reduce the risk of fire or electric shock, do not
expose this equipment to rain or moisture.
• To reduce the risk of fire or electric shock, keep
this equipment away from all liquids. Use and
store only in locations which are not exposed
to the risk of dripping or splashing liquids, and
do not place any liquid containers on top of the
equipment.
CAUTION:
The mains plug of the power supply cord shall
remain readily operable.
The AC receptacle (mains socket outlet) shall be
installed near the equipment and shall be easily
accessible.
To completely disconnect this equipment from the
AC mains, disconnect the power cord plug from
the AC receptacle.
CAUTION:
Danger of explosion or fire if battery is incorrectly
replaced or mistreated.
• Do not disassemble the battery or dispose of it
in fire.
• Do not store in temperatures over 60°C (140°F).
• Do not expose the battery to excessive heat
such as sunshine, fire or the like.
For Battery Pack
• Use specified charger.
• Replace only with same or specified type.
CAUTION:
In order to maintain adequate ventilation, do
not install or place this unit in a bookcase, builtin cabinet or any other confined space. To
prevent risk of electric shock or fire hazard due to
overheating, ensure that curtains and any other
materials do not obstruct the ventilation.
WARNING:
Always keep memory cards (optional accessory)
or accessories (microphone holder screws) out of
the reach of babies and small children.
CAUTION:
To reduce the risk of fire or electric shock and
annoying interference, use the recommended
accessories only.
CAUTION:
Do not jar, swing, or shake the unit by its handle
while the conversion lens or another accessory is
attached.
Due to the added weight of the conversion lens,
any strong jolt to the handle may damage the unit
or result in personal injury.
CAUTION:
Do not lift the unit by its handle while the tripod is
attached. When the tripod is attached, its weight
will also affect the unit’s handle, possibly causing
the handle to break and hurting the user. To carry
the unit while the tripod is attached, take hold of
the tripod.
CAUTION:
Excessive sound pressure from earphones and
headphones can cause hearing loss.
CAUTION:
Do not leave the unit in direct contact with the skin
for long periods of time when in use.
Low temperature burn injuries may be suffered if
the high temperature parts of this unit are in direct
contact with the skin for long periods of time.
When using the equipment for long periods of
time, make use of the tripod.
CAUTION:
To prevent electric shock, match wide blade of
plug to wide slot, fully insert.
– 2 –
Read this rst!
indicates safety information.
CAUTION:
Keep metal objects (such as necklaces and
hairpins) away from the battery.
Short-circuiting may occur across the terminals,
causing the battery to heat up, and you may
seriously burn yourself if you touch the battery in
this state.
The rating plate is on the underside of the Camera Recorder, Battery Charger and AC Adaptor.
CAUTION:
A coin type battery is installed inside of the unit.
Do not store the unit in temperatures over 60 °C
(140 °F).
Do not leave the unit in an automobile exposed to
direct sunlight for a long period of time with doors
and windows closed.
To remove the battery
Para remover a bateria
Main Power Battery (Lithium ion Battery)
Bateria Principal de Energia
(Refer to page 32 for the detail.)
Press the battery release button.
Pressione o botão para liberar a bateria.
Battery release button
Botão de liberação da bateria
Back-up Battery (Lithium Battery)
• For the removal of the battery for disposal at the end of its service life, please consult your dealer.
rBatteries that may be used with this product (as of October 2018)
Panasonic AG-VBR59 batteries may be used with this product.
It has been found that counterfeit battery packs which look very similar to the genuine product are made
available to purchase in some markets. Some of these battery packs are not adequately protected with internal
protection to meet the requirements of appropriate safety standards. There is a possibility that these battery
packs may lead to fire or explosion. Please be advised that we are not liable for any accident or failure occurring
as a result of use of a counterfeit battery pack. To ensure that safe products are used we would recommend that
a genuine Panasonic battery pack is used.
– 3 –

Read this rst!
Brazil Only
Brasil Apenas
rManuseio de baterias usadas
BRASIL
Após o uso, as pilhas e /ou baterias poderão
ser entregues ao estabelecimento comercial
ou rede de assistência técnica autorizada.
Cobrir os terminais positivo (+) e negativo (-) com uma fita isolante adesiva, antes de depositar numa caixa
destinada para o recolhimento. O contato entre partes metálicas pode causar vazamentos, gerar calor, romper
a blindagem e produzir fogo.
Não desmonte, não remova o invólucro, nem amasse a bateria. O gás liberado pela bateria pode irritar a
garganta, danificar o lacre do invólucro ou o vazamento provocar calor, ruptura da blindagem e produzir fogo
devido ao curto circuito dos terminais. Não incinere nem aqueça as baterias, elas não podem ficar expostas a
temperaturas superiores a 100°C (212°F). O gás liberado pela bateria pode irritar a garganta, danificar o lacre
do invólucro ou o vazamento provocar calor, ruptura da blindagem e produzir fogo devido ao curto circuito dos
terminais provocado internamente.
Evite o contato com o liquido que vazar das baterias. Caso isto ocorra, lave bem a parte afetada com bastante
água. Caso haja irritação, consulte um médico.
Battery Charger / AC Adaptor
Disconnect the AC mains plug from the AC mains socket when not in use.
Information on Disposal in other Countries outside the European Union
EU
These symbols are only valid in the European Union. If you wish to discard these items, please contact your
local authorities or dealer and ask for the correct method of disposal.
ІНФОРМАЦІЯ ПРО ПІДТВЕРДЖЕННЯ ВІДПОВІДНОСТІ ПРОДУКТУ
Виробник: Panasonic Corporation Панасонік Корпорейшн
Адреса виробника: Kadoma, Osaka, Japan Кадома, Осака, Японія
Країна походження: China Китай
Уповноважений Представник: ТОВ “ПАНАСОНІК УКРАЇНА ЛТД”
Адреса Уповноваженого Представника: провулок Охтирський, будинок 7, місто Київ, 03022, Україна
Примітки:
Термін служби виробу 7 років
Дату виготовлення можна визначити за комбінацією букв і цифр серійного номера, що розташований на маркувальній
табличці виробу.
Приклад: X X
XXXXXXX
Рік: остання цифра року (5 – 2015, 6 – 2016,…0 – 2020)
Місяць: А – Січень, В – Лютий… L – Грудень
– 4 –
Read this rst!
Декларація про відповідність
Справжнім компанія Panasonic Corporation заявляє, що професійні відеокамери AJ-PX230 відповідають Технічному
регламенту радіообладнання.
Повний текст декларації про відповідність доступний на веб- сайті
https://service.panasonic.ua (розділ «Технічне регулювання»)
Частота: 1575,42 МГц (GPS)
Максимальна потужність передачі: N / A
< Предупреждение >
Следуйте нижеприведённым правилам, если иное не указано в других документах.
1. Устанавливайте прибор на твёрдой плоской поверхности, за исключением отсоединяемых или
несъёмных частей.
2. Хранить в сухом, закрытом помещении.
3. Во время транспортировки не бросать, не подвергать излишней вибрации или ударам о другие
предметы.
4. Утилизировать в соответствии с национальным и/или местным законодательством.
Правила и условия реализации не установлены изготовителем и должны соответствовать национальному
и/или местному законодательству страны реализации товара.
ИНФОРМАЦИЯ О СООТВЕТСТВИИ ПРОДУКТА
АККУМУЛЯТОРНЫЕ БАТАРЕИ
модели AG-VBR59x, AG-VBR89x, AG-VBR118x “Panasonic”
Декларация о соответствии зарегистрирована ЦС “ЕВРО-ТЕСТ”
(«x» -- набор букв от А до Z и/или «/», и/или цифры от 0 до 9 и/или пробел,
обозначающий маркетинговый код изделия)
Декларация соответствия: № POCC JP.АЕ61.Д01412
Дата принятия декларации: 02.02.2016
Декларация действительна до: 01.02.2023
модели AG-VBR59x, AG-VBR89x,
AG-VBR118x “Panasonic”
соответствуют требованиям
нормативных документов:
Срок службы 300 (тристо) циклов
ГОСТ 12.2.007.12 - 88
ГОСТ Р МЭК 62133-2004
ГОСТ Р МЭК 61960-2007
(Пп. 5.3, 7.1, 7.2, 7.6)
Производитель:
Panasonic Corporation, Osaka, Japan
Made in China
Импортёр
ООО «Панасоник Рус», РФ, 115191, г. Москва,
ул. Большая Тульская, д. 11, 3 этаж.
тел. 8-800-200-21-00
Панасоник Корпорэйшн, Осака, Япония
Сделано в Китае
– 5 –

Read this rst! (For USA and Canada)
Read this rst!
(For USA and Canada)
indicates safety information.
CAUTION:
This apparatus can be operated at a voltage in the range of 100-240 V AC.
Voltages other than 120 V are not intended for U.S.A. and Canada.
Operation at a voltage other than 120 V AC may require the use of a different AC plug. Please contact either
a local or foreign Panasonic authorized service center for assistance in selecting an alternate AC plug.
FCC NOTICE (USA)
Declaration of Conformity
Model Number: AJ-PX230
Trade Name: Panasonic
Responsible Party: Panasonic Corporation of North America
Two Riverfront Plaza, Newark, NJ 07102
Support contact: 1-800-524-1448
This device complies with Part 15 of the FCC Rules.
Operation is subject to the following two conditions:
(1) This device may not cause harmful interference, and (2) this device must accept any interference
received, including interference that may cause undesired operation.
To assure continued compliance, follow the attached installation instructions and do not make any
unauthorized modifications.
CAUTION:
This equipment has been tested and found to comply with the limits for a Class B digital device, pursuant
to Part 15 of the FCC Rules. These limits are designed to provide reasonable protection against harmful
interference in a residential installation. This equipment generates, uses and can radiate radio frequency
energy and, if not installed and used in accordance with the instructions, may cause harmful interference
to radio communications. However, there is no guarantee that interference will not occur in a particular
installation. If this equipment does cause harmful interference to radio or television reception, which
can be determined by turning the equipment off and on, the user is encouraged to try to correct the
interference by one or more of the following measures:
• Reorient or relocate the receiving antenna.
• Increase the separation between the equipment and receiver.
• Connect the equipment into an outlet on a circuit different from that to which the receiver is connected.
• Consult the dealer or an experienced radio/TV technician for help.
The user may find the booklet “Something About Interference”
available from FCC local regional offices helpful.
FCC Warning:
To assure continued FCC emission limit compliance, follow the attached installation instructions and the
user must use only shielded interface cables when connecting to host computer or peripheral devices.
Also, any unauthorized changes or modifications to this equipment could void the user’s authority to
operate this device.
NOTIFICATION (Canada)
CAN ICES-3(B)/NMB-3(B)
– 6 –
Read this rst! (For USA and Canada)
IMPORTANT SAFETY INSTRUCTIONS
1) Read these instructions.
2) Keep these instructions.
3) Heed all warnings.
4) Follow all instructions.
5) Do not use this apparatus near water.
6) Clean only with dry cloth.
7) Do not block any ventilation openings. Install in accordance with the manufacturer’s instructions.
8) Do not install near any heat sources such as radiators, heat registers, stoves, or other apparatus (including amplifiers) that
produce heat.
9) Do not defeat the safety purpose of the polarized or grounding-type plug. A polarized plug has two blades with one wider
than the other. A grounding-type plug has two blades and a third grounding prong. The wide blade or the third prong are
provided for your safety. If the provided plug does not fit into your outlet, consult an electrician for replacement of the
obsolete outlet.
10) Protect the power cord from being walked on or pinched particularly at plugs, convenience receptacles, and the point
where they exit from the apparatus.
11) Only use attachments/accessories specified by the manufacturer.
12) Use only with the cart, stand, tripod, bracket, or table specified by the manufacturer, or sold with the apparatus.
When a cart is used, use caution when moving the cart/ apparatus combination to avoid injury from tip-over.
13) Unplug this apparatus during lightning storms or when unused for long periods of time.
14) Refer all servicing to qualified service personnel. Servicing is required when the apparatus has been damaged
in any way, such as power-supply cord or plug is damaged, liquid has been spilled or objects have fallen into the
apparatus, the apparatus has been exposed to rain or moisture, does not operate normally, or has been dropped.
For USA and Canada
A lithium ion/polymer battery that is recyclable powers the product you have purchased.
Please call 1-800-8-BATTERY for information on how to recycle this battery.
– 7 –
Read this rst! (For Europe)
Read this rst!
(For Europe)
indicates safety information.
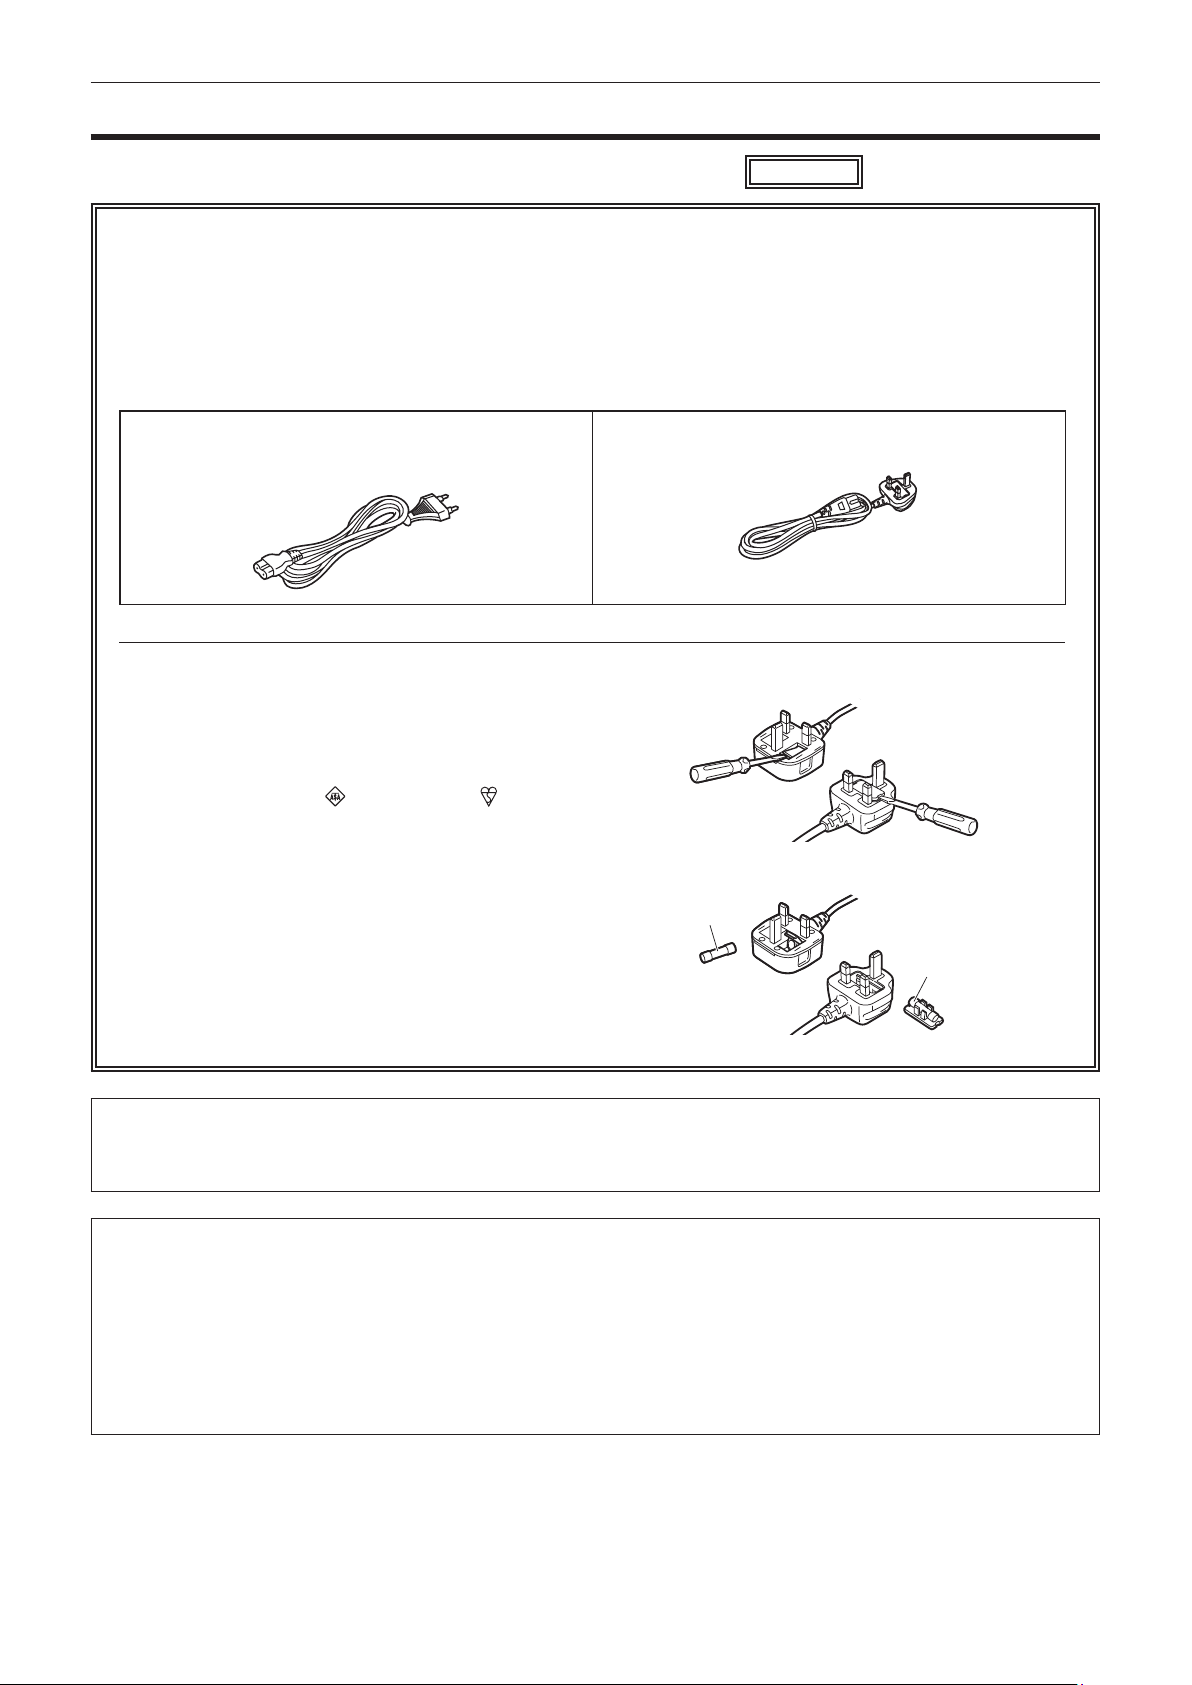
Caution for AC Mains Lead
FOR YOUR SAFETY PLEASE READ THE FOLLOWING TEXT CAREFULLY.
This product is equipped with 2 types of AC mains cable. One is for continental Europe, etc. and the other one
is only for U.K.
Appropriate mains cable must be used in each local area, since the other type of mains cable is not suitable.
TYPE C
(FOR CONTINENTAL EUROPE, ETC.
Not to be used in the U.K.)
FOR U.K. ONLY
This appliance is supplied with a moulded three pin mains
plug for your safety and convenience.
A 5 amp fuse is fitted in this plug.
Should the fuse need to be replaced please ensure that
the replacement fuse has a rating of 5 amps and that it is
approved by ASTA or BSI to BS1362.
Check for the ASTA mark
body of the fuse.
or the BSI mark on the
TYPE BF
(FOR U.K. ONLY)
How to replace the fuse
1. Open the fuse compartment with a screwdriver.
Or
If the plug contains a removable fuse cover you must
ensure that it is refitted when the fuse is replaced.
If you lose the fuse cover the plug must not be used until
a replacement cover is obtained.
A replacement fuse cover can be purchased from your
local Panasonic Dealer.
2. Replace the fuse.
Fuse
Or
Fuse
For Turkey
AEEE Yönetmeliğine Uygundur.
AEEE Complies with Directive of Turkey.
Declaration of Conformity (DoC)
Hereby, “Panasonic Corporation” declares that this product is in compliance with the essential
requirements and other relevant provisions of Directive 2014/53/EU.
Customers can download a copy of the original DoC to our RE products from our DoC server:
http://www.doc.panasonic.de
Contact to Authorized Representative:
Panasonic Marketing Europe GmbH, Panasonic Testing Centre, Winsbergring 15, 22525 Hamburg,
Germany
– 8 –

Read this rst! (For Europe)
English
Declaration of Conformity (DoC)
Hereby, “Panasonic Corporation” declares that this product
is in compliance with the essential requirements and other
relevant provisions of Directive 2014/53/EU.
Customers can download a copy of the original DoC to our
RE products from our DoC server:
http://www.doc.panasonic.de
Contact to Authorized Representative:
Panasonic Marketing Europe GmbH, Panasonic Testing
Centre, Winsbergring 15, 22525 Hamburg, Germany
Български
Декларация за съответствие (DoC)
С настоящото “Panasonic Corporation” декларира, че
този продукт е в съответствие с основните изисквания и
други съответни разпоредби на Директива 2014/53/EС.
Клиентите могат да изтеглят копие от оригиналната DoC
за нашите RE от нашия DoC сървър:
http://www.doc.panasonic.de
Свържете се с нашия упълномощен представител:
Panasonic Marketing Europe GmbH, Panasonic Testing
Centre, Winsbergring 15, 22525 Hamburg, Германия
Hrvatski
Izjava o sukladnosti (DoC)
Ovime, tvrtka “Panasonic Corporation” izjavljuje da
ovaj proizvod udovoljava osnovnim zahtjevima i ostalim
relevantnim odredbama Direktive 2014/53/EU.
Kupci mogu preuzeti kopiju originalne DoC za naše RE
proizvode s našeg DoC poslužitelja:
http://www.doc.panasonic.de
Obratite se ovlaštenom predstavniku:
Panasonic Marketing Europe GmbH, Panasonic Testing
Centre, Winsbergring 15, 22525 Hamburg, Njemačka
Suomi
Vaatimustenmukaisuusvakuutus (DoC)
Täten “Panasonic Corporation” vakuuttaa, että tämä tuote
on direktiivin 2014/53/EU keskeisten vaatimusten ja muiden
olennaisten määräysten mukainen.
Asiakkaat voivat ladata kopion alkuperäisestä DoC:sta
kaikille REtuotteillemme DoC-palvelimeltamme:
http://www.doc.panasonic.de
Valtuutetun edustajan yhteystiedot:
Panasonic Marketing Europe GmbH, Panasonic Testing
Centre, Winsbergring 15, 22525 Hamburg, Saksa
Lietuviškai
Atitikties deklaracija (DoC)
Bendrovė “Panasonic Corporation” patvirtina, kad šis
gaminys atitinka direktyvos 2014/53/ EB esminius
reikalavimus ir kitas taikytinas nuostatas.
Mūsų RE originalios DoC kopiją klientai gali atsisiųsti iš
mūsų DoC serverio:
http://www.doc.panasonic.de
Įgaliotojo atstovo adresas:
Panasonic Marketing Europe GmbH, Panasonic Testing
Centre,
Winsbergring 15, 22525 Hamburg, Vokietija
Česky
Prohlášení o shodě (DoC)
Společnost “Panasonic Corporation” tímto prohlašuje,
že tento výrobek je ve shodě se základními požadavky a
dalšími příslušnými ustanoveními směrnice 2014/53/EU.
Zákazníci si mohou stáhnout originál DoC pro naše
produkty RE z našeho serveru DoC:
http://www.doc.panasonic.de
Kontakt na Autorizovaného obchodního zástupce:
Panasonic Marketing Europe GmbH, Panasonic Testing
Centre,
Winsbergring 15, 22525 Hamburg, Německo
Dansk
Overensstemmelseserklæring (DoC)
Hermed erklærer “Panasonic Corporation”, at dette
produkt opfylder de væsentligste krav og andre relevante
bestemmelser fastsat i direktiv 2014/53/EU.
Kunder kan downloade en kopi af det originale DoC for
vores REprodukter fra vores Doc-server:
http://www.doc.panasonic.de
Kontakt til autoriseret repræsentant:
Panasonic Marketing Europe GmbH, Panasonic Testing
Centre, Winsbergring 15, 22525 Hamburg, Tyskland
Nederlands
Verklaring van Conformiteit (DoC)
Bij dezen verklaart “Panasonic Corporation” dat dit product
in overeenstemming is met de essentiële vereisten en
andere relevante uiteenzettingen van Richtlijn 2014/53/EU.
Klanten kunnen een kopie downloaden van het originele
DoC bij onze RE producten vanaf onze DoC server:
http://www.doc.panasonic.de
Neem contact op met de bevoegde vertegenwoordiger:
Panasonic Marketing Europe GmbH, Panasonic Testing
Centre, Winsbergring 15, 22525 Hamburg, Duitsland
Norsk
Samsvarserklæring (DoC)
“Panasonic Corporation” erklærer herved at dette produktet
samsvarer med de grunnleggende kravene og andre
relevante bestemmelser i direktivet 2014/53/EU.
Kundene kan laste ned en kopi av original DoC for våre
REprodukter fra vår DoC-server:
http://www.doc.panasonic.de
Kontaktinformasjon autorisert representant:
Panasonic Marketing Europe GmbH, Panasonic Testing
Centre, Winsbergring 15, 22525 Hamburg, Tyskland
Eesti
Vastavusdeklaratsioon (DoC)
Käesolevaga kinnitab “Panasonic Corporation”, et see
toode vastab direktiivi 2014/53/EL olulistele nõuetele ja
teistele asjakohastele sätetele.
Kliendid saavad originaalse DoC meie RE-toodetele alla
laadida meie DoC serverist:
http://www.doc.panasonic.de
Võtke ühendust volitatud esindajaga:
Panasonic Marketing Europe GmbH, Panasonic Testing
Centre, Winsbergring 15, 22525 Hamburg, Saksamaa
– 9 –

Read this rst! (For Europe)
Magyar
Megfelelőségi nyilatkozat (DoC)
A “Panasonic Corporation” ezennel kijelenti, hogy ez
a termék megfelel a 2014/53/EU irányelv lényeges
követelményeinek és egyéb vonatkozó rendelkezéseinek.
A vásárlók az alábbi címen elérhető DoC szerverünkről
töltheti le az RE termékeinkhez tartozó eredeti DoC
másolatát:
http://www.doc.panasonic.de
A hivatalos képviselő elérhetősége:
Panasonic Marketing Europe GmbH, Panasonic Testing
Centre, Winsbergring 15, 22525 Hamburg, Németország
Ελληνικάa
Δήλωση Συμμόρφωσης (DoC)
Η “Panasonic Corporation” δηλώνει ότι το προϊόν αυτό
είναι συμμορφωμένο προς τις βασικές απαιτήσεις και άλλες
σχετικές διατάξεις της Οδηγίας 2014/53/EΕ.
Ο πελάτες μπορούν να κατεβάσουν ένα αντίγραφο
του πρωτοτύπου DoC σχετικό με τα προϊόντα μας RE
(ραδιοεξοπλισμός) από το δικό μας σέρβερ DoC:
http://www.doc.panasonic.de
Επικοινωνήστε με τον Εξουσιοδοτημένο Αντιπροσωπό μας:
Panasonic Marketing Europe GmbH, Panasonic Testing
Centre, Winsbergring 15, 22525 Hamburg, Γερμανία
Polski
Deklaracja zgodności (DoC)
“Panasonic Corporation” niniejszym oświadcza, że ten
produkt jest zgodny zzasadniczymi wymogami oraz innymi
właściwymi postanowieniami Dyrektywy 2014/53/UE.
Kopię oryginalnej DoC obejmującej nasz RE klienci mogą
pobrać z naszego serwera DoC:
http://www.doc.panasonic.de
Kontakt z autoryzowanym przedstawicielem:
Panasonic Marketing Europe GmbH, Panasonic Testing
Centre, Winsbergring 15, 22525 Hamburg, Niemcy
Português
Declaração de Conformidade (DoC)
Com o presente documento, a “Panasonic Corporation”
declara que este produto se encontra em conformidade
com os requisitos especícos e demais especicações
referentes à Diretiva 2014/53/UE.
Os clientes podem descarregar uma cópia da DoC original
para os nossos produtos RE a partir do nosso servidor
DoC:
http://www.doc.panasonic.de
Contacto com um Representante Autorizado:
Panasonic Marketing Europe GmbH, Panasonic Testing
Centre, Winsbergring 15, 22525 Hamburg, Alemanha
Latviski
Atbilstības deklarācija (DoC)
Ar šo “Panasonic Corporation” paziņo, ka šis izstrādājums
atbilst pamatprasībām un pārējiem Direktīvas 2014/53/ES
noteikumiem.
Oriģinālās DoC kopiju klienti var lejupielādēt pie mūsu RE
produktiem no mūsu DoC servera:
http://www.doc.panasonic.de
Lūdzam sazināties ar pilnvaroto parstāvi:
Panasonic Marketing Europe GmbH, Panasonic Testing
Centre, Winsbergring 15, 22525 Hamburg, Vācijā
Română
Declaraţie de Conformitate (DoC)
“Panasonic Corporation” declară prin prezenta că acest
produs este conform cu cerinţele esenţiale şi alte prevederi
relevante ale Directivei 2014/53/UE.
Clienţii pot descărca o copie a DoC pentru produsele
noastre RE de pe serverul nostru DoC:
http://www.doc.panasonic.de
Contactaţi Reprezentantul Autorizat:
Panasonic Marketing Europe GmbH, Panasonic Testing
Centre, Winsbergring 15, 22525 Hamburg, Germania
Svenska
Försäkran om Överensstämmelse (DoC)
Härmed garanterar “Panasonic Corporation” att denna
produkt överensstämmer med tillämpbara krav och andra
föreskrifter i enlighet med direktiv 2014/53/EU.
Kunder kan hämta en kopia av den ursprungliga DoC för
våra RE-produkter från vår DoC-server:
http://www.doc.panasonic.de
Kontakt till Auktoriserad Representant:
Panasonic Marketing Europe GmbH, Panasonic Testing
Centre, Winsbergring 15, 22525 Hamburg, Tyskland
Slovensky
Vyhlásenie o zhode (DoC)
“Panasonic Corporation” týmto vyhlasuje, že tento výrobok
je v súlade so základnými požiadavkami a ďalšími
príslušnými ustanoveniami smernice 2014/53/EU.
Zákazníci si môžu prevziať kópiu pôvodného dokumentu
DoC pre naše výrobky RE z nášho servera DoC:
http://www.doc.panasonic.de
Kontakt na splnomocneného zástupcu:
Panasonic Marketing Europe GmbH, Panasonic Testing
Centre, Winsbergring 15, 22525 Hamburg, Nemecko
Slovenščina
Izjava o skladnosti (DoC)
“Panasonic Corporation” s tem dokumentom izjavlja,
da je izdelek v skladu z bistvenimi zahtevami in drugimi
pomembnimi določbami Direktive 2014/53/EU.
Stranke lahko prenesejo kopijo izvirnega dokumenta DoC
za izdelke RE z našega strežnika DoC:
http://www.doc.panasonic.de
Naslov pooblaščenega predstavnika:
Panasonic Marketing Europe GmbH, Panasonic Testing
Centre, Winsbergring 15, 22525 Hamburg, Nemčija
Türkçe
Uygunluk Beyanı (DoC)
“Panasonic Corporation” işbu belge ile bu ürünün 2014/53/
EU sayılı Direktif’in temel gereklerine ve diğer ilgili
hükümlerine uygun olduğunu beyan etmektedir.
Müşterilerimiz RE ürünlerimizle ilgili orijinal DoC belgesinin
bir kopyasını DoC sunucumuzdan indirebilir:
http://www.doc.panasonic.de
Yetkili Temsilci ile temasa geçin:
Panasonic Marketing Europe GmbH, Panasonic Testing
Centre, Winsbergring 15, 22525 Hamburg, Almanya
– 10 –
Read this rst! (For Europe)
Note regarding the Power Management function specified under COMMISSION REGULATION (EC) No
1275/2008 implementing Directive 2009/125/EC of the European Parliament and of the Council.
This device is designed and manufactured for use at a broadcasting station and/or in a similar environment.
This device is not equipped with a Power Management function or the Power Management function is set to OFF
as it will prevent the device from fulfilling its intended purpose for the reasons below.
1. If the device is a Studio Camera, a Weather Camera, a Mixer or other processor:
A Power Management function may cause the device to suddenly stop during recording or while On Air.
2. If the device is a Studio Monitor:
A Power Management function may cause video for the confirmation of whether a signal is normal, or whether
the signal has been lost, to be un-viewable.
3. If the device is a Camera Recorder:
A professional camera recorder must be able to start quickly at any time, but a Power Management function
will cause an increase in the time taken to resume from Stand-by mode.
Manufactured by: Panasonic Corporation, Osaka, Japan
Importer’s name and address of pursuant to EU rules:
Panasonic Marketing Europe GmbH
Panasonic Testing Centre
Winsbergring 15, 22525 Hamburg, Germany
Disposal of Old Equipment and Batteries
Only for European Union and countries with recycling systems
EU
These symbols on the products, packaging, and/or accompanying documents mean that used electrical and electronic
products and batteries must not be mixed with general household waste.
For proper treatment, recovery and recycling of old products and used batteries, please take them to applicable collection
points in accordance with your national legislation.
By disposing of them correctly, you will help to save valuable resources and prevent any potential negative effects on human
health and the environment.
For more information about collection and recycling, please contact your local municipality, dealer or supplier.
Penalties may be applicable for incorrect disposal of this waste, in accordance with national legislation.
Note for the battery symbol (bottom symbol):
This symbol might be used in combination with a chemical symbol. In this case it complies with the requirement set by the
Directive for the chemical involved.
– 11 –

f SDXC logo is a trademark of SD-3C, LLC.
f The terms HDMI and HDMI High-Denition Multimedia Interface, and the HDMI Logo are trademarks or registered trademarks of HDMI Licensing
Administrator, Inc. in the United States and other countries.
f MMC (Multi Media Card) is a registered trademark of Inneon Technologies AG.
f Microsoft
f Screenshots are used according to Microsoft Corporation guidelines.
f Apple, Macintosh, Mac OS are trademarks or registered trademarks of Apple Inc. in the United States and/or other countries.
f All other names, company names, product names, etc., contained in this instruction manual are trademarks or registered trademarks of their
respective owners.
f This product is licensed under the AVC Patent Portfolio License. All other acts are not licensed except private use for personal and non-prot purposes
such as what are described below.
f Use of DCF Technologies under license from Multi-Format, Inc.
®
and Windows® are registered trademarks or trademarks of Microsoft Corporation in the United States and/or other countries.
- To record video in compliance with the AVC standard (AVC Video)
- To play back AVC Video that was recorded by a consumer engaged in a personal and non-commercial activity
- To play back AVC Video that was obtained from a video provider licensed to provide the video
Visit the MPEG LA, LLC website (http://www.mpegla.com/) for details.
How to read this document
r Illustrations
f Illustrations of the camera, menu screens, and other items, may vary from the actual items.
r Conventions used in this manual
f Words and phrases in [ ] brackets indicate details and content displayed in the viewnder or LCD monitor.
f Words and phrases in < > brackets indicate design text used on this camera, such as button names.
r Reference pages
f Reference pages in this document are indicated by (page 00).
r Terminology
f SD memory card, SDHC memory card, and SDXC memory card are referred to as “SD memory card”.
f A memory card with the “microP2” logo such as AJ-P2M032AG memory card (optional) is referred to as a “microP2 memory card”.
f Video that is created during a single recording operation is referred to as a “clip”.
– 12 –

Contents
Contents
Read this rst! 2
Read this rst! (For USA and Canada) 6
Read this rst! (For Europe) 8
Chapter 1 Overview 15
Before using the camera 16
Setting the region of use (setting the frame frequency, etc.) 18
Accessories 19
Use of the camera on a system 20
Basic conguration devices 20
What you can do with this camera 21
Recording to the memory card 21
Linking to external devices 21
Chapter 2 Description of Parts 22
Left side 23
Right side 25
Front side, rear side 27
Top side 2 8
Chapter 3 Preparation 30
Power supply 31
Charging the battery 31
Attaching and removing the battery 32
Using the AC adaptor 33
Attaching and adjusting accessories 34
Adjusting the grip belt 34
Attaching the shoulder strap 34
Attaching the lens hood 34
Attaching the eye cup 35
Attaching the front microphone 36
Attaching a tripod 36
Turning on/off the power 37
How to turn on the power 37
How to turn off the power 3 7
Charging the built-in battery 38
Setting the date/time of the internal clock 39
Inspections before shooting 40
microP2 memory card 4 1
Inserting a microP2 memory card 41
Ejecting the microP2 memory card 41
Preventing accidental erasure 42
microP2 memory card access LED and status of microP2
memory card 42
Recording time of microP2 memory card 42
CPS (Content Protection System) 43
Handling of microP2 memory card recorded data 43
Assigning functions to the USER buttons 45
Selectable functions 45
Adjusting and setting the LCD monitor 47
Using the LCD monitor 47
Adjusting the LCD monitor 47
Mirror shooting 47
Highlighting the outlines of images 4 7
Adjusting and setting the viewnder 48
Using the viewnder 48
Adjusting the viewnder 48
Highlighting the outlines of images 4 8
Tally lamp 49
Chapter 4 Shooting 50
Basic procedures 51
Preparation 5 1
Shooting 51
Selecting the resolution, codec, and video format for recording 52
Adjustable settings when shooting 54
Iris 54
Gain 54
Super gain 54
Brightness adjustment 54
Macro 54
Focusing (manual focus) 54
Focus assist function 55
Area mode function 56
Level gauge function 57
Adjusting the white and black balance 58
Adjusting the white balance 58
Adjusting the black balance 59
Using the zoom function 61
Setting the <ZOOM> switch 61
Adjusting the zoom position 6 1
Zoom ring 61
Adjusting image quality 62
Detail function 62
Skin tone function 62
RB gain control function 63
Chroma setting function 63
Matrix function 63
Color correction function 64
Black control function 6 4
Gamma function 64
Knee function 64
High color function 65
White clip function 65
Setting the electronic shutter 66
Shutter mode 66
Adjusting with the <SEL/PUSH SET> dial button and <MODE/
MENU CANCEL> button 6 6
Flash band compensation (FBC) function 67
Setting the ash band compensation function 67
Variable frame rate (VFR) recording function 68
Native variable frame rate recording 68
Standard variable frame rate recording (pull-down recording) 68
Selecting audio input and adjusting recording levels 70
Selecting audio input signals 70
Using the built-in microphone 70
Using the external microphone and audio device 70
Adjusting the recording level 7 1
Displaying the audio level detailed 71
Getting position information using the GPS 72
Special recording functions 73
Pre-recording 73
Interval recording 7 3
One-shot recording 74
Loop recording 74
One-clip recording 75
Simultaneous recording 76
Background recording 76
Hot swap recording 77
Recording check function 78
Shot mark recording function 78
Text memo recording function 78
Convenient shooting functions 79
Low angle shooting 7 9
Scan reverse shooting 79
Zebra patterns display 79
Displaying the center marker 7 9
Displaying the safety zone marker 7 9
Displaying frame marker 80
Checking and displaying the shooting status 80
Changing image size 80
Image stabilization function 8 0
Dynamic range stretcher function 8 0
Backlight compensation 80
Color bars 80
Time stamp function 80
Deleting last clip function 81
Waveform monitor function 81
Direct menu operation 81
Multi formats 82
Selecting recording signals 82
System modes and recording functions 82
List of recording settings and recording functions 8 6
Selecting video output 86
Recording/playback and output format list 88
Handling setting data 9 0
Setting data le conguration 9 0
Handling SD memory cards 9 0
Performing operations on SD memory cards 91
How to use user data 92
How to use scene le data 92
How to restore the scene le or menu setting status to the
factory settings 94
Saving to an SD memory card and loading saved data 94
– 13 –

Contents
Setting the time data 95
Denition of time data 95
Recording of time codes and user bits 95
User bits settings 100
How to input user bits 100
Setting the time code 101
Setting and displaying the counter 102
Chapter 5 Playback 103
Basic procedures 104
Preparation 104
Playback 104
Thumbnail operations 105
Thumbnail operation overview 105
Thumbnail screen 105
Selecting thumbnails 106
Setting thumbnail screen display 108
Changing thumbnails 109
Shot mark 109
Text memo 109
Deleting clips 111
Restoring clips 111
Reconnecting incomplete clips 111
Copying clips 111
Setting clip metadata 112
Formatting the microP2 memory card 11 4
Formatting SD memory cards 11 4
Properties
11 5
Chapter 9 Maintenance 156
Frequently asked questions 157
Power supply 157
Battery 157
Shooting 157
Editing 157
Playback 157
Others 158
Warning system 159
Cases indicated by error codes 159
Cases indicated by error messages 159
Updating the camera rmware 162
Cleaning and storing 163
Cleaning the camera recorder 163
Cautions when storing the camera recorder 163
Chapter 10 Specication 164
Specications 165
Dimensions 165
Specications 165
Index 169
Chapter 6 Menu Operations 120
Setting menu structure 121
Menu types and how to open them 121
Main menu structure 121
Setting menu display 122
Setting menu basic operations 122
Setting [USER MENU] 123
Setting menu initialization 123
Menu list 124
[SCENE FILE] 124
[SYSTEM MODE] 129
[USER SW] 130
[SW MODE] 130
[AUTO SW] 132
[RECORDING SETUP] 133
[CLIP] 134
[AUDIO SETUP] 136
[OUTPUT SEL] 137
[USB SETUP] 138
[DISPLAY SETUP] 138
[CARD FUNCTIONS] 141
[OTHER FUNCTIONS] 141
[MAINTENANCE] 141
[DIAGNOSTIC] 142
[USER MENU SEL] 142
[OPTION MENU] list 143
[AREA SELECT] 143
[AWB PRE CONTROL] 143
[CAM REMOTE ADJ.] 143
[LCD SUB BRIGHTNESS] 143
[ENG SECURITY] 143
Chapter 7 Display 144
Screen status display 145
Conguration of status display on screen 145
Selecting display items on screen 145
Displaying screen 145
Checking and displaying shooting status 149
Mode check display 150
Chapter 8 Connecting to External Devices 152
Connecting with headphones, remote control, or TV/
monitor 153
Headphones 153
Remote control 153
TV/monitor 153
Connection function with the <USB2.0 DEVICE> terminal 155
Connecting to a computer in the USB device mode 155
– 14 –

Chapter 1 Overview
Before using the camera, read this chapter.

Chapter 1 Overview — Before using the camera
Before using the camera
r Before using the camera, always check if the built-in battery is not consumed, and then set the date/time.
The internal clock of the camera is reset when the built-in battery has been consumed. This may result in the metadata of the clip not recorded correctly,
and it may not display correctly in the thumbnail screen.
Check if the built-in battery is not consumed before using. (page 38)
Also, set the correct date/time. (page 39)
r When using this product during rain or snow or when at the beach, be careful that water does not get inside the camera recorder.
Water causes damage to the camera recorder and memory card. (Repair may be impossible)
r Keep the camera recorder away from devices (TVs, TV games, etc.) that produce magnetism.
f If you use the camera recorder on or near TVs, video and sound data may be distorted by electromagnetic waves.
f Strong magnetic elds produced by speakers and large motors may cause damage to recorded contents and may distort images.
f Electromagnetic waves emitted by microcomputers may have a harmful effect on the camera recorder and may corrupt video and sound data.
f The camera recorder may not operate properly if it receives harmful effects from devices that produce magnetism. If this happens, turn off the camera
recorder and either remove the battery or unplug the AC adaptor from the power outlet. Then, replace the battery or reconnect the AC adaptor. After
that, turn on the camera recorder.
r Do not use the camera recorder near radio transmitters or high-voltage devices.
If you use the camera recorder near radio transmitters or high-voltage devices, the recorded video and sound data may suffer harmful effects.
r When using the camera recorder at the beach, etc., be careful that sand and dust do not get inside the camera recorder.
Sand and dust may damage the camera recorder and memory card. (Be careful when inserting and removing the memory card)
r Battery charger and battery
f If the <CHARGE> lamp continues blinking even when the battery is at its optimal temperature, the battery or battery charger may be damaged.
Contact a dealer.
f If the battery is warm, it will take longer than usual to charge.
f If you use the battery charger near a radio, the radio sound may be distorted. Keep the battery and battery charger at least 1 m away from radios
when in use.
f Noise may be emitted when using the battery charger, but this is not a malfunction.
r When carrying the camera recorder, be careful not to drop it.
f Strong shocks will damage the camera recorder body and it may not operate properly.
f If you carry the camera recorder, use a grip belt or shoulder strap and handle it carefully.
r Do not apply insecticide or volatile materials to the camera recorder.
f If insecticide or volatile materials come into contact with the camera recorder, the camera recorder body may warp and the paint may come off.
f Do not allow the camera recorder to remain in contact with rubber or vinyl objects for a long period of time.
r After using the camera recorder, either remove the battery or disconnect the AC cable from the power outlet.
r Battery characteristics
The battery is a rechargeable lithium-ion battery. It produces electrical energy via an internal chemical reaction. This chemical reaction is easily
inuenced by the surrounding temperature and humidity, so the effective usage time of the battery is reduced when the surrounding temperature is hot
or cold. When used in extremely low temperature environments, the effective usage time is approximately ve minutes.
When the battery is in an extremely hot environment, its protective function will operate and the camera recorder cannot be used temporarily.
r After using the camera recorder, be sure to remove the battery.
Be sure to remove the battery from the camera recorder. (If the battery is left in the camera recorder, it will continue to consume a small amount of
electric current even when the power is turned off)
If the battery is left inside the camera recorder for a long time, it will over discharge and may become unusable even if it is recharged.
Do not remove the battery when the power is turned on.
Turn off the power and remove the battery after the operation lamp goes completely out.
r Take proper care of the battery terminal.
Do not allow dust or foreign objects on the battery terminal.
Also, if you drop the battery by mistake, make sure that the battery body and the terminal are not warped.
Inserting a deformed battery into the camera recorder or attaching it to the battery charger may cause damages on the camera recorder or battery
charger.
r Cautions when throwing memory cards away or transferring them to others
Formatting memory cards or deleting data using the functions of the camera or a computer will merely change the le management information: it will
not completely erase the data on the cards. When throwing these cards away or transferring them to others, either physically destroy them or use a
data deletion program for computers (commercially available) to completely erase the data. Users are responsible for managing the data stored in their
memory cards.
r LCD monitor and viewnder
f If the same image or letters are allowed to be displayed on the LCD monitor for a long time, the image may be burned into the screen. It will return to
normal after leaving the camera recorder turned off for several hours.
– 16 –

Chapter 1 Overview — Before using the camera
f Condensation sometimes forms on the LCD panel of the LCD monitor in locations subject to extreme temperature differences. If this happens, wipe
with a soft, dry cloth.
f If the camera recorder is very cold, the LCD monitor will be slightly darker than normal immediately after the power is turned on. The screen will return
to its regular brightness when the temperature inside increases.
f Since the viewnder of the camera uses organic EL, if the same image or letters are allowed to be displayed for a long time, the image may be burned
into the screen. There is no problem with the recorded images.
Switch the screen by turning off the screen or by using the eye sensor, etc.
f The LCD monitor and viewnder (organic EL) are highly-precisely managed so that at least 99.99% of the dots are effective pixels and 0.01% or less
are invalid pixels and always lit. This is not a malfunction and it has no effect whatsoever on the recorded images.
r Do not point the eye piece of the lens and viewnder at the sun.
Doing so might damage the components inside.
r Protective cap for the terminal
Place a protective cap on connection terminals not being used.
r GPS
GPS (Global Position System) satellite is managed by the United States Department of State and its precision is sometimes intentionally changed.
Position it in a location where there is a good view of the sky and there is no inuence of obstacles such as roofs and trees, etc.
Depending upon the surrounding environment and the time, it may take a long time to position and errors may be larger.
r Caution regarding laser beams
The MOS sensor may be damaged if the MOS sensor is subjected to light from a laser beam.
Take sufcient care to prevent laser beams from striking the lens when shooting in an environment where laser devices are used.
r Note the following points.
f If you prepare to record important images, always shoot some advance test footage to verify that both pictures and sound are being recorded
normally.
f Should video or audio recording fail due to a malfunction of the camera or the microP2 memory card during the use, Panasonic is not liable for the
content of recording.
f Set up or check the calendar and time zone before recording (Setting the date/time of the internal clock). These settings have an effect on the
management and playback order for recorded contents.
r Software information about this product
1 This product includes software licensed under GNU General Public License (GPL) and GNU Lesser General Public License (LGPL), and
customers are hereby notied that they have rights to obtain, re-engineer, and redistribute the source code of these software.
2 This product includes software licensed under MIT-License.
3 This product includes software developed by the OpenSSL Project for use in the OpenSSL Toolkit (http://www.openssl.org/).
4 This product includes software licensed under OpenBSD License.
5 This product includes PHP, freely available from <http://www.php.net/>.
6 This software is based in part on the work of the Independent JPEG Group.
7 This product includes software licensed under the MOZILLA PUBLIC LICENSE.
For details on these descriptions (originally provided in English) and how to obtain the source code, visit the following website.
https://pro-av.panasonic.net/
We do not accept inquiries about the details of the source code obtained by the customer.
r Precautions when installing USB drivers
For the latest information on the driver, visit the following website.
https://pro-av.panasonic.net/
f Install the required driver into your computer from the website.
f For installation procedure of the driver, refer to the installation manual on the website.
– 17 –

Chapter 1 Overview — Setting the region of use (setting the frame frequency, etc.)
Setting the region of use (setting the frame frequency, etc.)
When the camera is shipped, the region of use is not set. Before you use the camera for the rst time, follow the steps below to change the setting to
the frame frequency of the region of use.
Connect the charged battery or AC adaptor to the camera and turn <ON> the power switch without the region of use set.
1
The [AREA SELECT] screen for setting the region of use is displayed.
Move the control stick up or down to select the region of use from [NTSC]/[NTSC (J)] (Japan)/[PAL], and press the control stick.
2
Select [YES] in the confirmation message and press the control stick.
3
The camera will be initialized according to the region of use selected and automatically restarted.
After setting up the region of use once, this screen will not be displayed when subsequently turning the power on. To change the region of use, set it
in [OPTION MENU] → [AREA SETTING].
NOTE
@@
t When making this setting to use the camera for the rst time, only the following items are changed on the camera. Menu setting values other than the
following items stay at their factory settings.
Factory settings [NTSC] [NTSC (J)] [PAL]
[LINE&FREQ] [1080-59.94i] [1080-59.94i] [1080-59.94i] [1080-50i]
[REC FORMAT] [AVC-I100/60i] [AVC-I100/60i] [AVC-I100/60i] [AVC-I100/50i]
[SETUP] [7.5%A] [7.5%A] [0%] [0%]
[HEADROOM] [20dB] [20dB] [20dB] [18dB]
[REC META DATA] →
[LANGUAGE]*
M/D/Y Display*
[TIME ZONE]
*1 Not displayed in the menu item when [NTSC] or [PAL] is selected.
*2 Not included in the menu item. Each character indicates the following: M: Month, D: Day, Y: Year.
1
2
— — [JAPANESE] —
M/D/Y M/D/Y Y/M/D D/M/Y
+0:00 +0:00 +9:00 +0:00
– 18 –
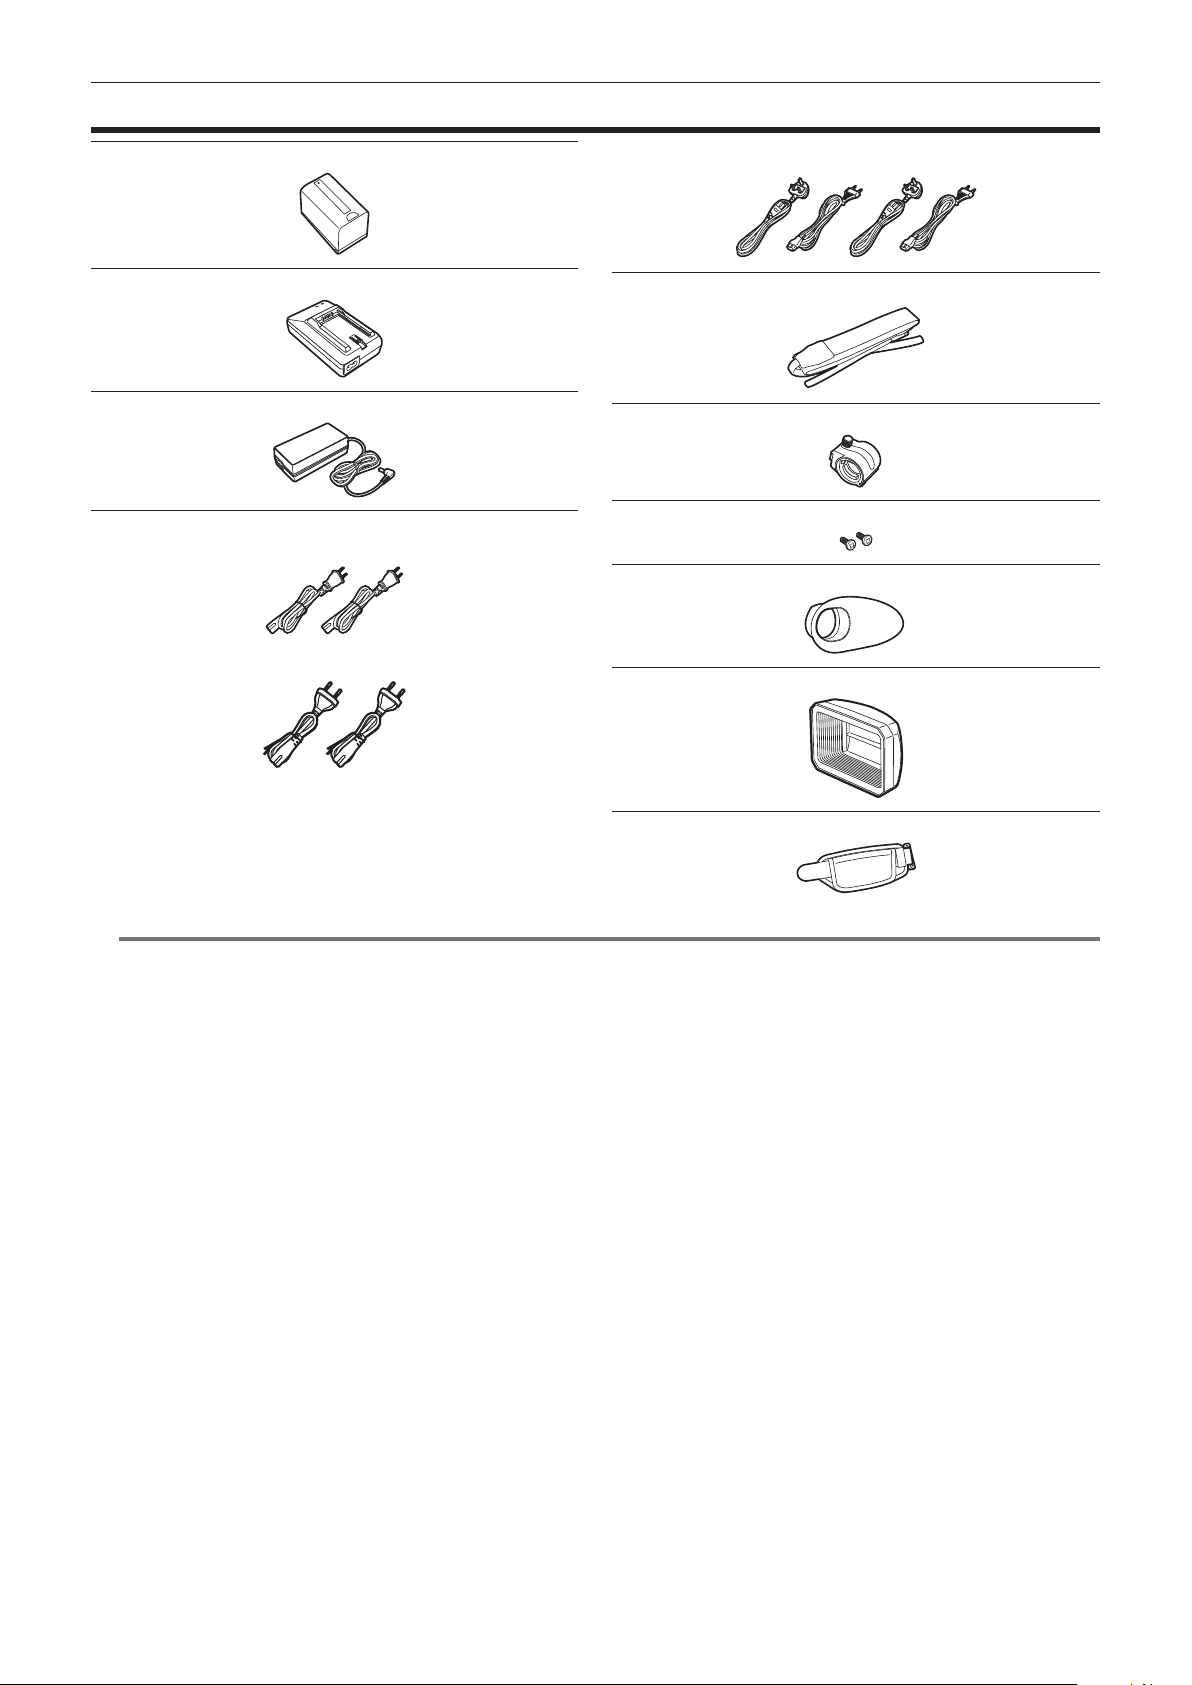
Accessories
Chapter 1 Overview — Accessories
Battery (Parts No.: AG-VBR59) (page 31)
Battery charger (page 31)
AC adaptor (page 33)
AC cable (page 31, 33)
f For USA and Canada (2)
f For India (2)
f For areas except USA, Canada and India (4)
Shoulder strap (page 34)
Microphone holder (page 36)
12 mm screws for microphone holder (2) (page 36)
Eye cup (page 35)
Lens hood (already attached to the product) (page 34)
Grip belt (already attached to the product) (page 34)
NOTE
@@
t Dispose the AC cable cap (only if attached) and packing material properly after unpacking the product.
– 19 –

Chapter 1 Overview — Use of the camera on a system
Use of the camera on a system
Parts other than the camera are optionally available. Use the following recommended parts.
Basic conguration devices
Equipment necessary for shooting with the camera, such as batteries, etc.
Part name Part No. Remark
Super-directional electret stereo microphone
(phantom +48V)
Battery
SD memory card*
microP2 memory card*
* For the latest information on microP2 memory card and SD memory card that are not described in the Operating Instructions, visit the support desk at the
following website:
https://pro-av.panasonic.net/
AG-MC200G “Attaching the front microphone” (page 36)
AG-VBR59 (7.28 V, 5900 mAh: Product comparable
to the included battery)
AG-VBR89 (7.28 V, 8850 mAh)
AG-VBR118 (7.28 V, 11800 mAh)
VW-VBD58 (7.2 V, 5800 mAh)
CGA-D54/CGA-D54s (7.2 V, 5400 mAh)
Visit the support desk at the website* “microP2 memory card” (page 41)
“Attaching and removing the battery” (page 32)
– 20 –
Chapter 1 Overview — What you can do with this camera
What you can do with this camera
This camera is a P2 hand-held camera recorder with the following features.
f The camera has an optical 22x cam-type zoom and a newly-developed 1/3-type 2.2 million pixel 3MOS sensor with high sensitivity F11 (59.94 Hz)/F12
(50 Hz) and low noise.
f In addition to AVC-Intra 200/AVC-Intra 100/AVC-Intra 50, as a recording codec, the camera also has a low-rate and full HD (1920×1080, 4:2:2, 10-bit)
image quality AVC-LongG 50/AVC-LongG 25, and is also capable of long time recording with AVC-LongG 12 (4:2:0, 8-bit).
f microP2 memory card is supported.
f The progressive full frame rate recording in 1080/60P, 1080/50P, 720/60P, and 720/50P, and 3G SDI/HDMI output are supported.
Recording to the memory card
microP2 memory card
The following can be recorded on the microP2 memory card:
f HD/SD recording
f AVC Ultra system codec support
f Simultaneous recording
f Background recording
f Variable frame rate
Slow & quick motion recording
SD memory card
Settings for user les and scene les, etc. can be stored in and loaded from the SD memory card.
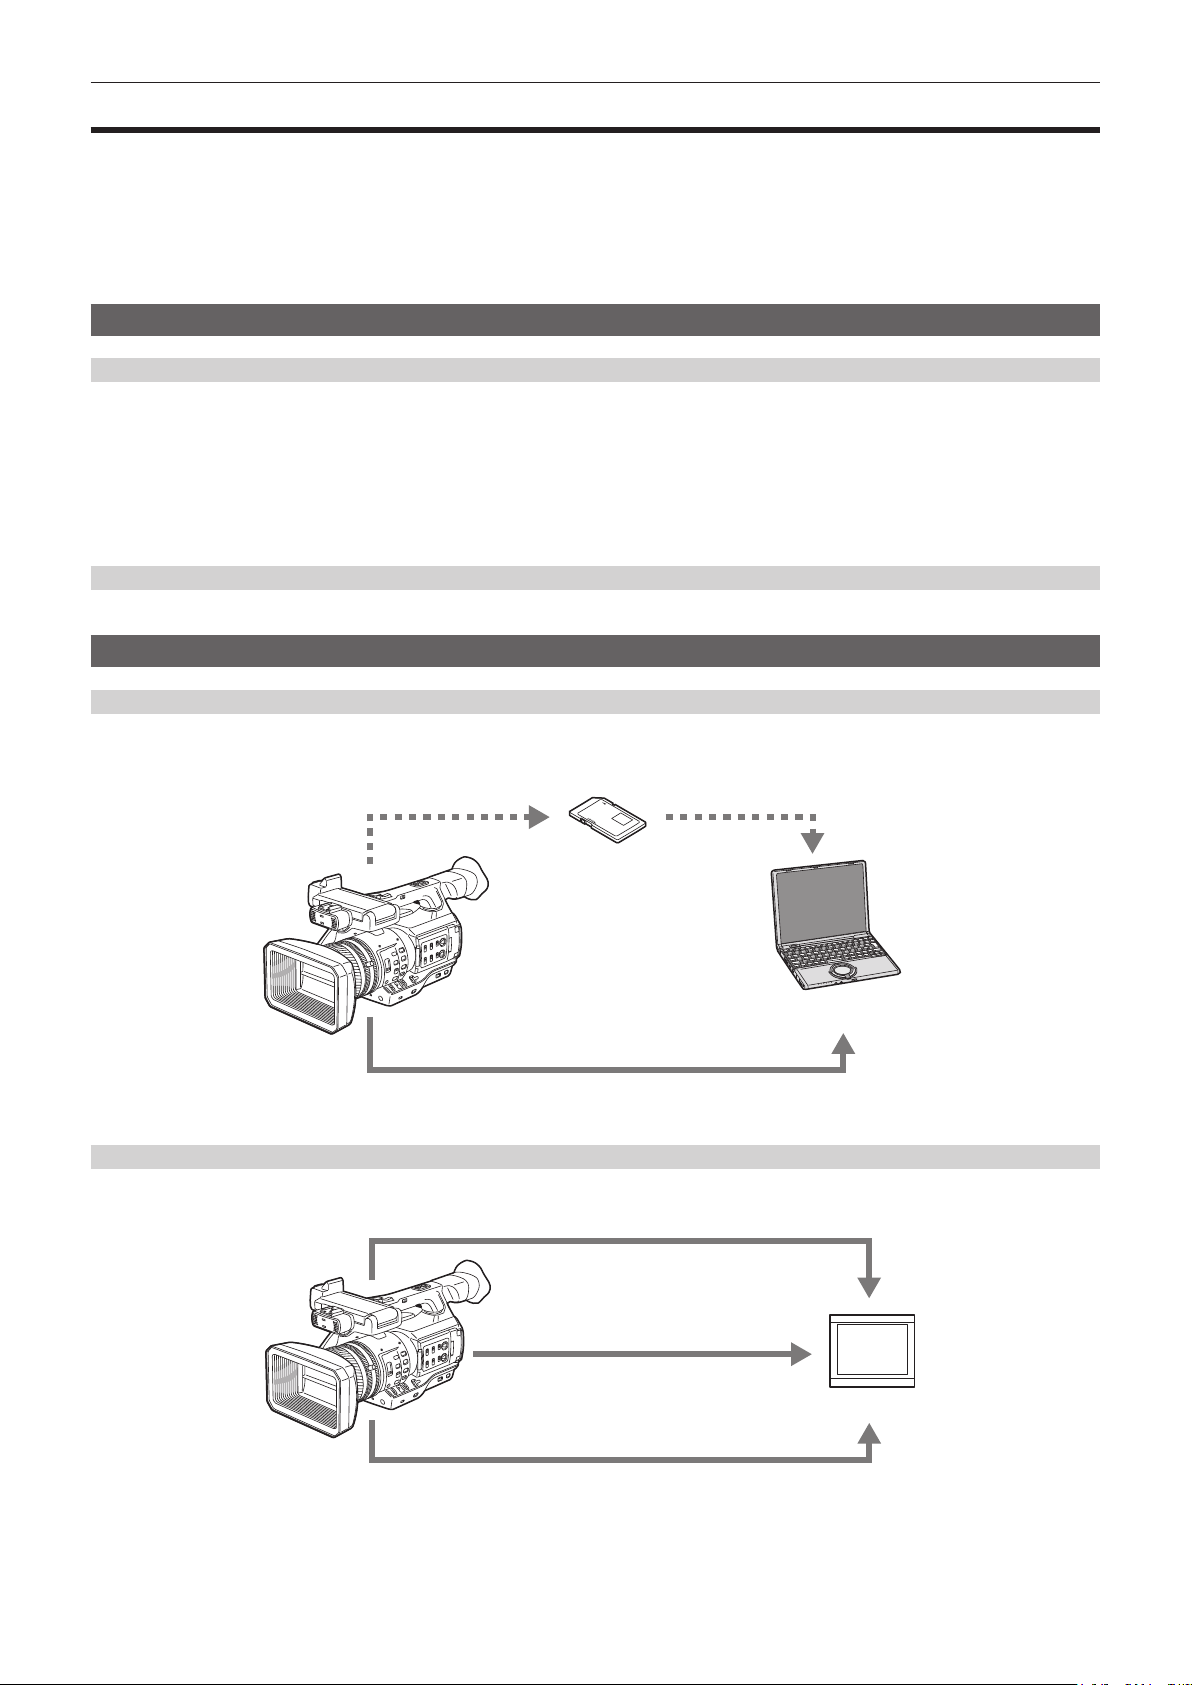
Linking to external devices
USB device mode
Data (les) for performing nonlinear editing on a computer are transferred.
microP2 memory card*
USB 2.0 (device mode)*
*1 microP2 memory card is optionally available. It is not supplied with the camera.
*2 The USB 2.0 cable is not supplied with the camera. Prepare a commercial USB 2.0 cable (double-shielded for noise suppression).
2
Connecting to monitor
A monitor can be connected to output images.
Audio pin cable*
1
1
Personal computer
HDMI cable*
BNC cable (HD SDI/SD SDI)*
*1 Cables are optionally available. They are not supplied with the camera.
*2 Use an HDMI cable (optional) with double shielding. For the HDMI cable, using Panasonic HDMI cable is recommended.
*3 For the BNC cable (optional) connected to the <SDI OUT> terminal, prepare a double-shielded cable equivalent to 5C-FB.
2
Monitor
3
– 21 –

Chapter 2 Description of Parts
This chapter describes the names, functions, and operations of parts on the camera.

Left side
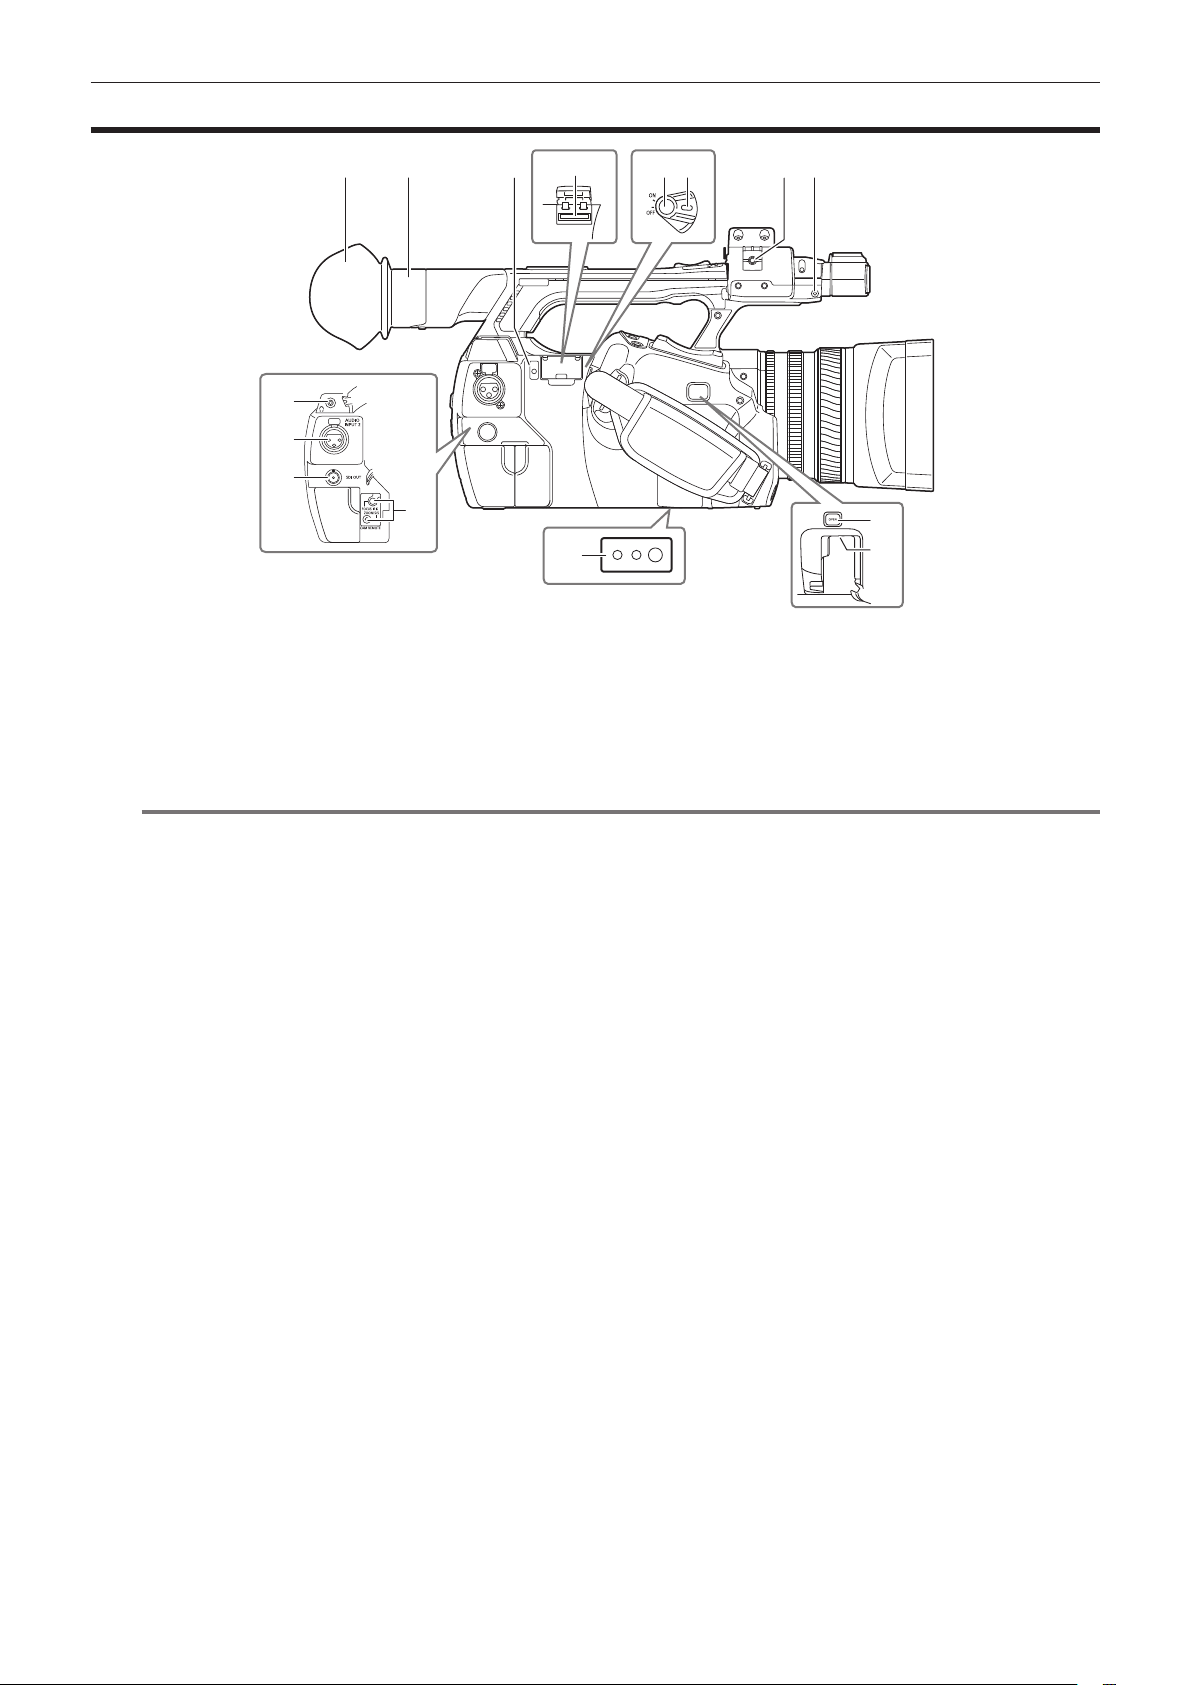
Chapter 2 Description of Parts — Left side
20 21
22
23
26 27
2524
28
29
30
31
1
2
3
4
5
7 9 11 13 14
6 8
1 Focus ring (page 54)
Focus manually when the <FOCUS> switch is set to <M>.
2 Zoom ring (page 61)
Adjust the zoom manually when the <ZOOM> switch is set to <MANUAL>.
3 Lens cover switching lever (page 35)
Open/close the lens cover.
4 Iris ring (page 54)
Adjust the lens iris manually when the manual iris is set with the <IRIS> button.
5 <ZOOM> switch (page 61)
Select the operation of the zoom.
<SERVO>: You can use the motor-driven zoom using the zoom lever.
<MANUAL>: You can operate the zoom ring manually to adjust the angle of view.
6 <DISP/MODE CHK> switch (page 80)
This is the spring switch to check the status of the shooting, etc.
f Push this switch towards the <OFF> side to clear all displays except the display of the operation status, frame display such as an area, counter,
marker, and safety zone.
f Push this switch towards the <CHK> side to display all information such as setting status of the functions for the shooting, the list of functions
assigned to the USER buttons on the LCD monitor during shooting stand-by or shooting. Each time the switch is pushed towards the <CHK> side,
the display of the status switches in turn.
7 <GAIN> switch (page 54)
Switch the brightness of the screen according to the lighting conditions under which you are shooting.
8 <F.AUDIO LEVEL> dial (page 71)
In the following conditions, the recording levels for the audio channels 1 to 4 can be adjusted.
f When the <CH1>/<CH2> switch is set to <MANU>
f When [AUTO LEVEL CH3]/[AUTO LEVEL CH4] is set to [OFF] in the main menu → [AUDIO SETUP] → [RECORDING CH SETTING]
Assignment of audio channels 1 to 4 can be performed in the main menu → [AUDIO SETUP] → [RECORDING CH SETTING] → [FRONT VR
SELECT].
9 <WHITE BAL> switch (page 58)
Select the method for adjustment of the white balance.
<PRST>: Set the white balance to the preset value. Each time the <AWB> button is pressed, [3200K], [5600K], and [VAR] are toggled.
<A>/<B>: Select when using the stored value of the adjustment of the white balance.
10 <MENU> button (page 122)
Press this button to display [USER MENU]. Press this button for 3 seconds or more to display the main menu. Press it again to return to the original
image.
11 <SEL/PUSH SET> dial button (page 122)
Move, select, and set the items in the setting menu while the setting menu is displayed.
Set the preset values of the shutter, synchro scan, variable frame rate value, and white balance.
12 <MODE/MENU CANCEL> button (page 66)
f When the setting menu is not displayed, each press of the button switches modes to change the variable value of shutter speed, variable frame
rate, and white balance.
f When the setting menu is displayed, setting of the menu items is canceled and the previous screen is displayed.
10 12
15
16 18
17 19
– 23 –

Chapter 2 Description of Parts — Left side
13 <AUTO/MANUAL> switch
Select the method to adjust the focus, gain, iris, white balance, and shutter speed at shooting. You can set the function to assign to <AUTO> in the
main menu → [AUTO SW].
<AUTO>: Adjust automatically. (Auto mode)
<MANUAL>: Adjust manually. (Manual mode)
14 <SLOT SEL> button
Select the microP2 memory card slot for the target of recording.
This button can be used as the USER button (USER7). (page 45)
15 Diopter adjustment lever (page 48)
Adjust the diopter scale so that the viewnder screen can be viewed clearly.
16 <INPUT 1>/<INPUT 2> switch (page 70)
Switch audio input signals connected to the <AUDIO INPUT 1>/<AUDIO INPUT 2> terminal.
<LINE>: Select when audio equipment is connected by the line input.
<MIC>: Select when the external microphone is connected.
<+48V>: Select when the external microphone is connected and the microphone needs power supply.
17 <CH1 SELECT>/<CH2 SELECT> switch (page 70)
Select the audio to be recorded to audio channel 1/2.
<INT(L)>/<INT(R)>: Record left audio (right audio) of the built-in microphone.
<INPUT1>: Record input signals from the <AUDIO INPUT 1> terminal.
<INPUT2>: Record input signals from the <AUDIO INPUT 2> terminal.
18 <CH1>/<CH2> switch (page 71)
Select the method to adjust the input level of audio channel 1/2.
<AUTO>: Adjust automatically.
<MANU>: Adjust using the <AUDIO LEVEL CH1>/<AUDIO LEVEL CH2> dial.
19 <AUDIO LEVEL CH1>/<AUDIO LEVEL CH2> dial (page 71)
Adjust the recording level of audio channel 1/2.
20 Internal speaker
Output audio during playback.
When connecting the headphones to the headphones terminal, audio from the speaker turns off automatically.
21 HANDLE ZOOM switch (page 61)
Select the operation of the zoom lever (handle side).
<FIX>: Zoom in/out with the speed set in the main menu → [SW MODE] → [H.ZOOM SPEED].
<VAR>: Zoom speed changes depending on how strong the lever is pushed. (When pushed gently, the speed becomes slower, and when pushed
strongly, it becomes faster.)
<OFF>: The zoom lever does not work.
22 <ND FILTER> switch (page 54)
Select the lter to suit the illumination of the subject.
<1/64>: Reduce the amount of light entering the MOS sensor to 1/64.
<1/16>: Reduce the amount of light entering the MOS sensor to 1/16.
<1/4>: Reduce the amount of light entering the MOS sensor to 1/4.
<OFF>: Does not use the ND lter.
23 <IRIS> button (page 54)
Select the method for adjustment of the lens iris.
24 <FOCUS ASSIST> button (page 55)
Enables/disables the focus assist function which is set in the main menu → [SW MODE] → [FOCUS ASSIST MODE].
This button can be used as the USER button (USER1). (page 45)
25 <MACRO> button (page 54)
Switch on/off the macro function of the focus.
This button can be used as the USER button (USER2). (page 45)
26 <FOCUS> switch (page 54)
Select the focus function.
<A>: Changes to the auto focus mode. Adjust the focus automatically.
<M>: Changes to the manual focus mode. Control the focus ring manually to adjust the focus.
<c>: Changes to the manual focus mode after the focus distance is set to innity.
This is the spring switch. Even when the <FOCUS> switch is pushed towards the <c> side, the switch returns to the <M> position.
27 <PUSH AUTO> button (page 55)
When the button is pressed in manual focus mode, focus is adjusted automatically while it is pressed.
28 <OIS> button (page 80)
Switch on/off the image stabilization function.
This button can be used as the USER button (USER3). (page 45)
29 <ZEBRA> button (page 79)
Select the display of either zebra of marker.
This button can be used as the USER button (USER4). (page 45)
30 <WFM> button (page 81)
Select whether to display the waveform monitor on the LCD monitor.
This button can be used as the USER button (USER5). (page 45)
31 <A.IRIS.LEVEL> button
Switch on/off the auto iris function.
Set the target value of the auto iris level in the main menu → [SCENE FILE] → [A.IRIS LEVEL EFFECT].
This button can be used as the USER button (USER6). (page 45)
– 24 –
Right side
Chapter 2 Description of Parts — Right side
1
9
10
11
1 Eye cup (page 35)
2 Eye piece
3 Busy (active status indication) lamp (page 91)
Indicate the active status of the SD memory card, and is illuminated when the card is active.
4 SD memory card slot (page 91)
This is the insertion slot for the SD memory card (optional). The SD memory card is used for recording/opening the camera setting menu, or
uploading the metadata, etc.
NOTE
@@
t Cautions when using SD memory cards
- On the camera, use SD memory cards that conform to the SD standard, SDHC standard, or the SDXC standard.
- MMC (Multi Media Card) cannot be used. (Bear in mind that taking pictures may no longer be possible if you use them.)
- When using miniSD/microSD cards with the camera, always install the adaptor specially designed for miniSD/microSD cards. (The camera will
not work properly if only the miniSD/microSD adaptor is installed. Make sure that the card has been inserted into the adaptor before use.)
- Use of Panasonic SD memory cards and miniSD/microSD cards is recommended. Be sure to format cards on the camera before use.
- Refer to our support desk at the following website for the latest information not included in these operating instructions.
https://pro-av.panasonic.net/
- SDHC memory cards are a standard that was established in 2006 by the SD Association for large-capacity memory cards that exceed 2 GB.
- SDXC memory cards are a standard that was established in 2009 by the SD Association for large-capacity memory cards that exceed 32 GB.
5 Recording button (grip side) (page 51)
Press this button to start recording. Press it again to stop recording.
Used for direct shooting in thumbnail mode.
6 Power switch (page 51)
Switch on/off the power.
7 Microphone cable clamp (page 36)
Used for securing the microphone cable.
8 Pin holder
Attach the zoom ring pin which is removed from the camera.
9 Headphones terminal (page 153)
This is the connecting terminal of headphones for audio monitor.
10 <AUDIO INPUT 2> terminal (XLR, 3-pin) (page 70)
Connect the audio equipment or the microphone.
11 <SDI OUT> terminal (page 153)
This is the output terminal for HD/SD SDI signals.
12 <CAM REMOTE> terminal (page 153)
Connect the remote control (optional) to control some functions remotely.
<FOCUS IRIS>: (3.5 mm mini jack) Control the focus operation and iris operation remotely.
<ZOOM S/S>: (2.5 mm mini jack) Control the zoom operation and start/stop operation of recording remotely.
13 Tripod holes
Attach the tripod. (bottom)
f Mounting hole size
- 1/4-20 UNC (screw length 5.5 mm or shorter)
- 3/8-16 UNC (screw length 5.5 mm or shorter)
14 <OPEN> button
Use this button when opening the cover of the <USB2.0 HOST> terminal at the bottom of the button.
2 3
12
13
54 6
87
14
15
– 25 –

15 <USB2.0 HOST> terminal (sub-host)
This is the USB terminal for maintenance.
Chapter 2 Description of Parts — Right side
– 26 –
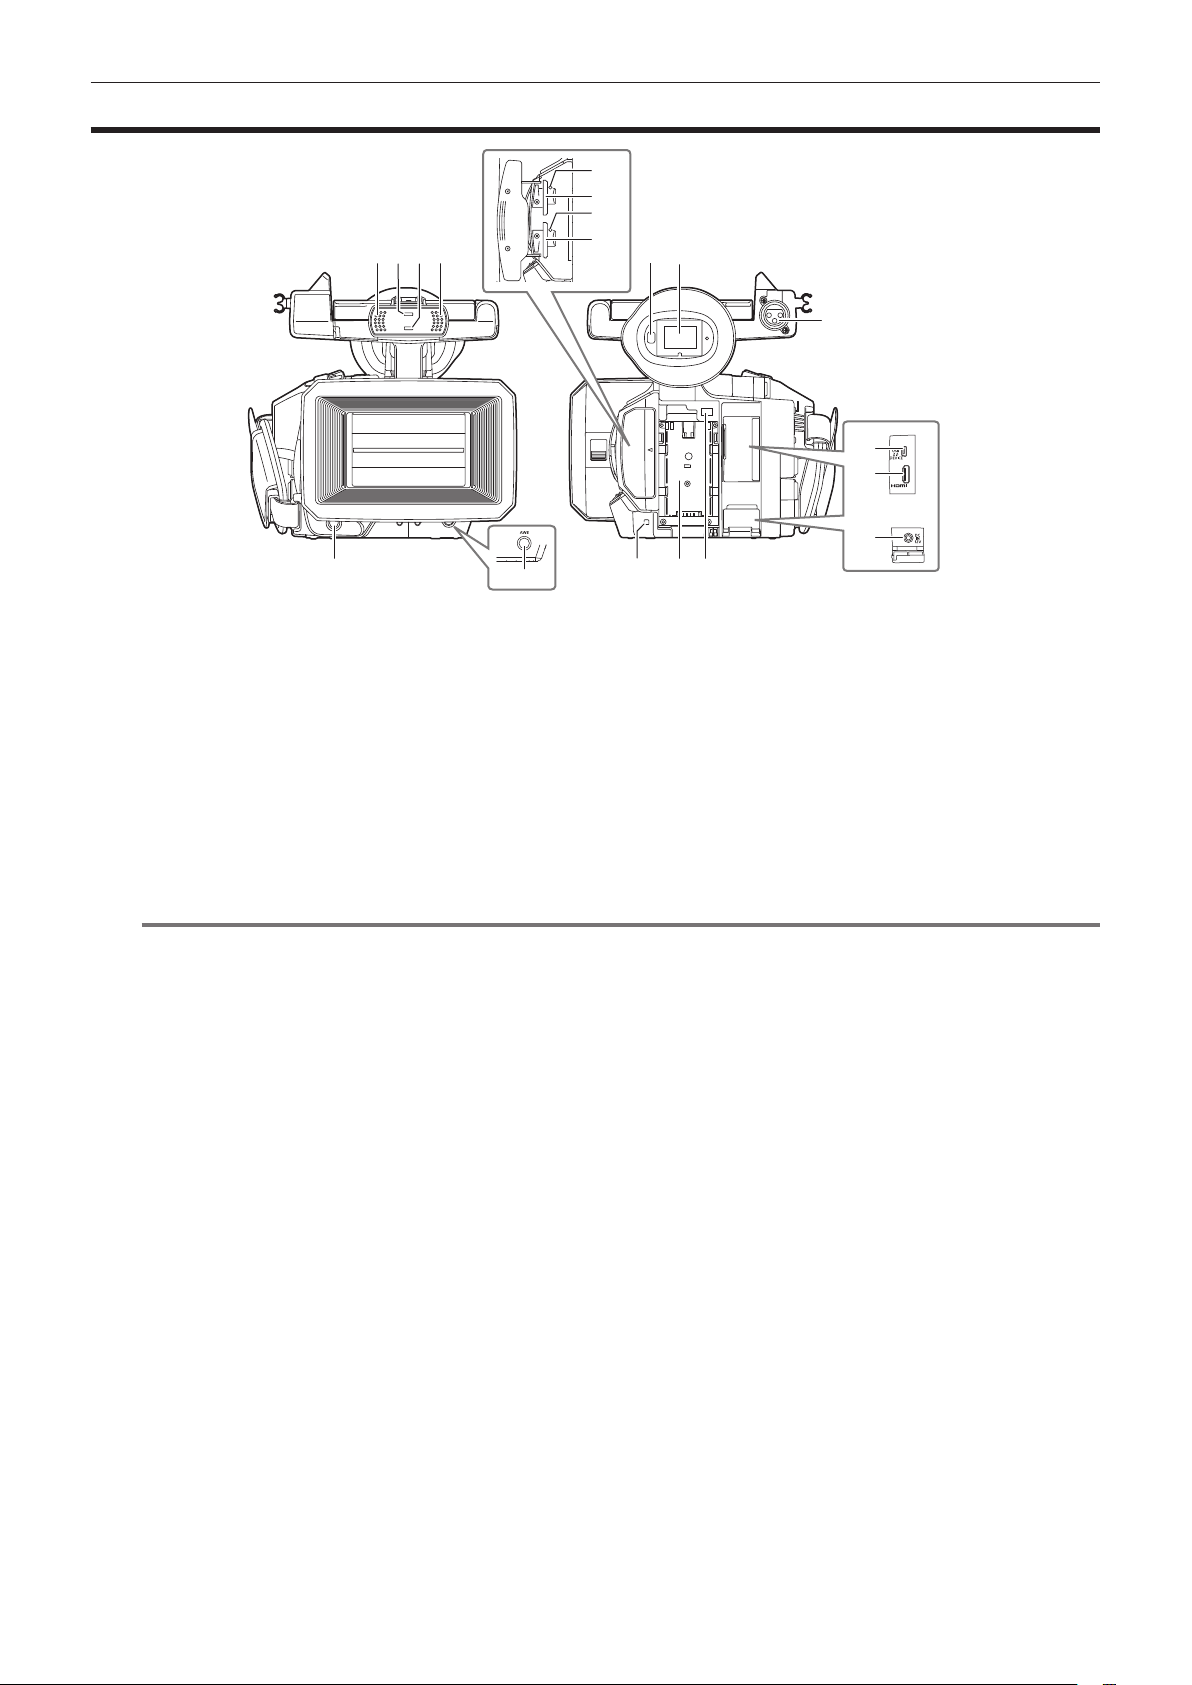
Chapter 2 Description of Parts — Front side, rear side
Front side, rear side
12
13
14
1 1
2 3
4
1 Built-in microphone (page 70)
This is the built-in stereo microphone.
2 Light sensor
Detects indoor and outdoor light.
3 Front tally lamp (page 49)
Lights during shooting. This lamp will blink when the battery level becomes low.
4 Recording button (front side) (page 51)
Press this button to start recording. Press it again to stop recording.
The operation of this button can be forbidden by the main menu → [SW MODE] → [FRONT REC].
5 <AWB> button (page 58)
Press this button to adjust the white balance. Press it for two seconds or more to adjust the white balance and then black balance.
6 Eye sensor (page 48)
Bring your eyes closer to display the screen on the viewnder.
NOTE
@@
t The eye sensor may not work properly depending on the shape of glasses in use, how you hold the camera, or by hitting the strong light around
the eye piece.
7 Viewnder (page 48)
8 <AUDIO INPUT 1> terminal (XLR, 3-pin) (page 36)
Connect the audio equipment or the microphone.
9 Rear tally lamp (page 49)
Light during shooting. This lamp will blink when the battery level becomes low.
10 Battery attachment (page 32)
11 Battery release button (page 32)
Remove the battery.
12 microP2 memory card 1 access LED (page 42)
Indicate the access status of recording and playback of the card inserted in the microP2 memory card slot 1.
13 microP2 memory card slot 1 (page 41)
14 microP2 memory card 2 access LED (page 42)
Indicate the access status of recording and playback of the card inserted in the microP2 memory card slot 2.
15 microP2 memory card slot 2 (page 41)
16 <USB2.0 DEVICE> terminal (device) (page 155)
Connect to a computer with the USB 2.0 cable to transfer data.
17 <HDMI OUT> (monitor output) terminal (page 153)
This is the output terminal of the video for monitor.
18 <DC IN 12V> terminal (page 33)
This is the input terminal for the external power supply. Connect the supplied AC adaptor.
5
15
76
8
16
17
18
11109
– 27 –
Top side
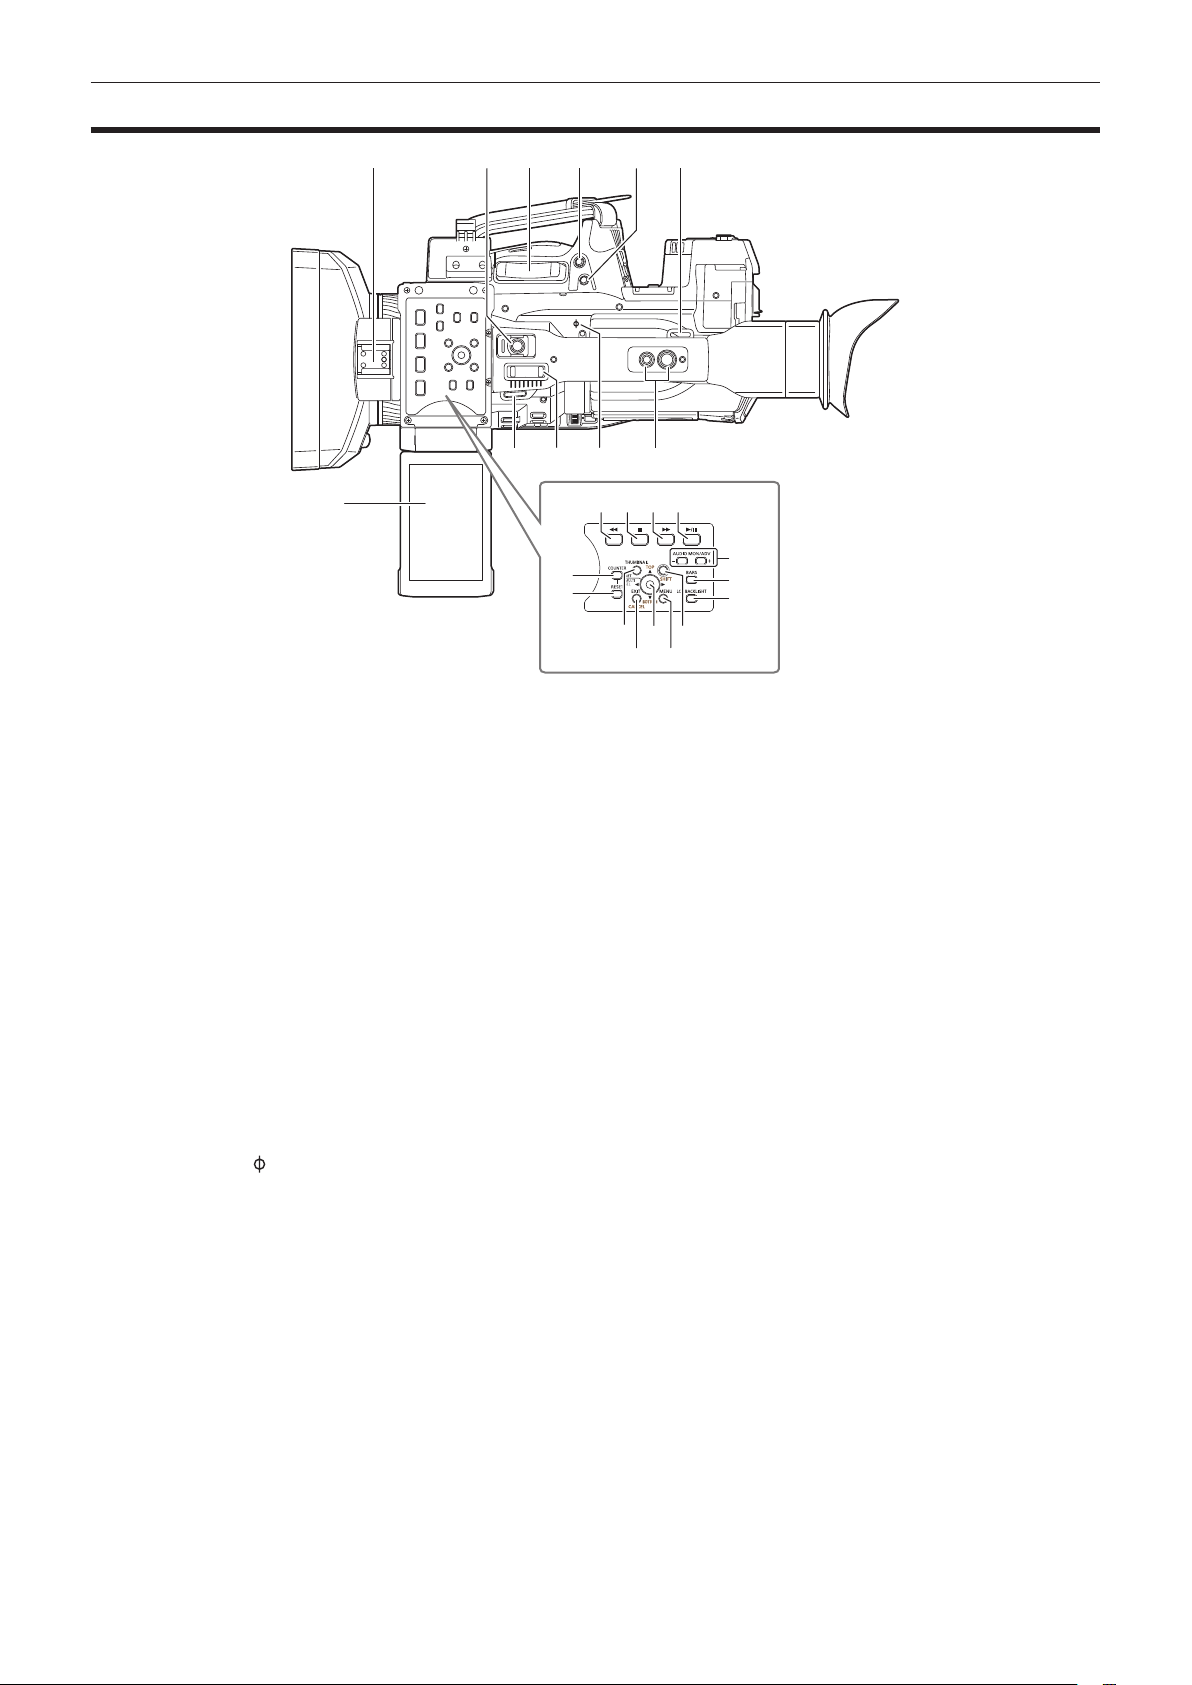
Chapter 2 Description of Parts — Top side
14 15 16
19
20
18
6
22
23
24
21
1
7
1 Light shoe
Attach the video light.
2 Recording button (handle side) (page 51)
Press this button to start recording. Press it again to stop recording.
This includes hold mechanism.
3 Zoom lever (grip side) (page 61)
Adjust the zoom of an image.
<T>: Zoom in the image.
<W>: Zoom out the image.
4 <IRIS> button (page 54)
Select the method for adjustment of the lens iris.
This button can be used as the USER button (USER8). (page 45)
5 <REC CHECK> button (page 51)
Press this button while recording is suspended, to play back the video and audio of the most recent clip for approximately three seconds.
6 Shoulder strap attachment (page 34)
Attach the shoulder strap.
7 LCD monitor (page 47)
8 Zoom lever (handle side) (page 61)
Adjust the zoom of an image.
<T>: Zoom in the image.
<W>: Zoom out the image.
9 Focal plane index <
Indicate the focal plane of the MOS sensor.
It provides a reference for measuring the accurate focal distance from the subject.
10 Handle mounting holes
Mount the handle.
f Mounting hole size
- 1/4-20 UNC (screw length 5.5 mm or shorter)
- 3/8-16 UNC (screw length 5.5 mm or shorter)
11 <COUNTER> button (page 100)
Switch the display item of the counter.
12 <RESET> button
Reset the display of the time counter.
13 <%> button
This works when the thumbnail screen is displayed.
Press this button during a pause to perform fast-reverse playback.
Press this button during playback to perform 4x speed reverse playback.
If it is pressed with playback paused, the clip being played back is paused at its start point (cued state).
>
2 53
6 109
4
8
13
11
12
17
– 28 –

Chapter 2 Description of Parts — Top side
14 <(> button
This works when the thumbnail screen is displayed.
Press this button to stop playback.
Press this button when you stop interval recording or one-shot recording, or when you end combining to the clip of one-clip recording.
15 <)> button
This works when the thumbnail screen is displayed.
Press this button during a pause to perform fast playback.
Press this button during playback to perform 4x speed playback.
If it is pressed with playback paused, the clip being played back is paused at the start point of the next clip (cued state).
16 <=/&> button
This works when the thumbnail screen is displayed.
Press this button to view playback image.
Press it during playback to pause playback.
17 <THUMBNAIL> button (page 105)
Press the button to display the thumbnail screen on the LCD monitor and viewnder. Press it again to return to the regular display.
18 <EXIT>/<CANCEL> buttons (page 106)
Restore the display to the previous state while the setting menu or property screen is displayed.
Press this button while holding down the <SHIFT> button to act as the cancel button. This is convenient, for example, for batch-canceling clip
selections.
19 Control stick (page 106)
Use this button to select a thumbnail or to perform operations of menus and area mode function.
20 <MENU> button (page 122)
Press this button to display [USER MENU]. Press this button for 3 seconds or more to display the main menu.
Press it while the thumbnail is displayed to display the operation screen of the thumbnail menu, and clips can be deleted.
21 <SHIFT> button (page 106)
Use this button together with the control stick or other buttons.
f Press the control stick upward/downward while holding down the <SHIFT> button.
This moves the cursor to the thumbnail of the clip at the start or the end on the thumbnail screen.
f Press the control stick while holding down the <SHIFT> button.
This selects all clips from the previously selected clip up to the clip at the cursor position.
f Press the <EXIT>/<CANCEL> buttons while holding down the <SHIFT> button.
This works as the cancelation function. (page 29)
Operations with the <SHIFT> button held down are displayed in orange at each operation section.
22 <AUDIO MON/ADV> button (page 104)
<+>: When pressing during playback, the audio volume of the monitor is increased. When pressing during pause, frame-by-frame play is performed.
<−>: When pressing during playback, the audio volume of the monitor is decreased. When pressing during pause, frame-by-frame rewind is
performed.
23 <BARS> button (page 80)
Switch on/off the color bar. The color bar is interlocked with the test tone (1 kHz).
24 <LCD BACKLIGHT> button (page 47)
Select the brightness of the backlight of the LCD monitor.
– 29 –

Chapter 3 Preparation
Before you use the camera, mount the battery following the procedures in this chapter. The mounting of accessories is also described in this chapter.
 Loading...