

Panasonic AG-MDR15P, AG-MDR15E Operating Instructions Manual

This product is eligible for the AVCCAM
3 Year Warranty Repair Program. For
details, see page 7.
Before use
Operating Instructions
Memory Card Portable Recorder
of parts
Model No. AG-MDR15P
Model No. AG-MDR15E
Before operating this product, please read the instructions carefully and save this manual
for future use.
M0610TW0 - SS
ENGLISH
VQT2X04 (E)
Reference Menu Displays Editing Playback Recording Preparation Description

Read this first!
CAUTION
RISK OF ELECTRIC SHOCK
DO NOT OPEN
CAUTION: TO REDUCE THE RISK OF ELECTRIC
SHOCK, DO NOT REMOVE COVER (OR BACK).
NO USER-SERVICEABLE PARTS INSIDE.
REFER SERVICING TO QUALIFIED SERVICE
PERSONNEL.
The lightning flash with arrowhead symbol,
within an equilateral triangle, is intended to
alert the user to the presence of uninsulated
“dangerous voltage” within the product’s
enclosure that may be of sufficient magnitude
to constitute a risk of electric shock to persons.
The exclamation point within an equilateral
triangle is intended to alert the user to
the presence of important operating and
maintenance (servicing) instructions in the
literature accompanying the appliance.
WARNING:
• To reduce the risk of fire or electric shock,
do not expose this equipment to rain or
moisture.
• To reduce the risk of fire or electric shock,
keep this equipment away from all liquids.
Use and store only in locations which
are not exposed to the risk of dripping or
splashing liquids, and do not place any liquid
containers on top of the equipment.
WARNING:
Always keep memory cards out of the reach of
babies and small children.
CAUTION:
The mains plug of the power supply cord shall
remain readily operable.
The AC receptacle (mains socket outlet) shall be
installed near the equipment and shall be easily
accessible.
To completely disconnect this equipment from the
AC mains, disconnect the mains plug from the AC
receptacle.
indicates safety information.
CAUTION:
In order to maintain adequate ventilation, do
not install or place this unit in a bookcase,
built-in cabinet or any other confined space. To
prevent risk of electric shock or fire hazard due
to overheating, ensure that curtains and any
other materials do not obstruct the ventilation.
CAUTION:
To reduce the risk of fire or electric shock and
annoying interference, use the recommended
accessories only.
CAUTION:
This apparatus can be operated at a voltage in
the range of 110 - 240 V AC.
Voltages other than 120 V are not intended for
U.S.A. and Canada.
Operation at a voltage other than 120 V
AC may require the use of a different AC
plug. Please contact either a local or foreign
Panasonic authorized service center for
assistance in selecting an alternate AC plug.
CAUTION:
A coin type battery is installed inside of the unit.
Do not expose the unit to excessive heat such as
sunshine, fire or the like.
CAUTION:
Excessive sound pressure from earphones and
headphones can cause hearing loss.
CAUTION:
Do not leave the unit in direct contact with the
skin for long periods of time when in use.
Low temperature burn injuries may be suffered
if the high temperature parts of this unit are
in direct contact with the skin for long periods
of time.
MEDICAL EQUIPMENT
WITH RESPECT TO ELECTRIC SHOCK, FIRE
AND MECHANICAL HAZARDS ONLY IN
76KA
E203021
ACCORDANCE WITH UL 60601-1,1ST EDITION
2
indicates safety information.
NOTICE FOR MEDICAL USE
• This is an apparatus intended for recording playing-back of image from specified camera classified
as;
ā Protection against Electric Shock Class II
ā Protection against Ingress of Water IPX0
ā Mode of Operation Continuous
ā Not suitable for use in the presence of a Flammable Anaesthetic mixture with Air or with Oxygen
or Nitrous Oxide.
• Equipment connected to signal input and/or output parts must be certified according to the
appropriate lEC 60601-1 and/or IEC 60601-1-1 harmonized national standard.
Furthermore all configurations shall comply with the system standard IEC 60601-1-1. Everybody
who connects additional equipment to the signal input part, or signal output part configures a
medical system, and is therefore responsible that the system complies with the requirements of
the standard IEC 60601-1-1. If in doubt, consult the technical service department or your local
representative.
Leakage current of this unit may be exceeded the allowable value when conductively connected to
other equipment. To avoid increment of the leakage current, separation device shall be applied.
• Use with the Compact Camera Head (AG-MDC10G: Optional).
• Do not use the Compact Camera Head in handheld style.
• Operator: To reduce the risk of electric shock, do not touch the patients during operating the
equipment.
■TRANSPORT AND STORAGE CONDITION
AMBIENT TEMPERATURE
RELATIVE HUMIDITY
ATMOSPHERIC PRESSURE 500 hPa to
1060 hPa
30% to 80%
-10°C to 60°C
Operating precaution
Operating near any appliance which generates
strong magnetic fields may give rise to noise in
the video and audio signals.
If this should be the case, deal with the situation
by, for instance, moving the source of the
magnetic fields away from the unit before
operation.
For Europe
Attention
Battery is used for the memory backup in the product.
At the end of their useful life, you
should not throw them away.
Instead, hand them in as small chemical waste.
Attentie
Voor het reservegeheugen van het
apparaat wordt gebruikgemaakt van
eet batterij.
Wanneer de batterij is uitgeput, mag u
deze niet gewoon weggooien, maar dient u deze
als klein chemisch afval weg te doen.
TO REMOVE THE BATTERY
Back-up Battery (Lithium Battery)
• For the removal of the battery for disposal at the end of its service life, please consult your dealer.
Portable Recorder
The rating plate is on the backside of the unit.
AC Adapter
The rating plate is on the underside of the AC Adapter.
Disconnect the AC mains plug from the AC mains socket when not in use.
3
Read this first! (continued)
For AG-MDR15E
indicates safety information.
Caution for AC Mains Lead
FOR YOUR SAFETY PLEASE READ THE FOLLOWING TEXT CAREFULLY.
This product is equipped with 2 types of AC mains cable. One is for continental Europe, etc. and the
other one is only for U.K.
Appropriate mains cable must be used in each local area, since the other type of mains cable is
not suitable.
FOR CONTINENTAL EUROPE, ETC.
Not to be used in the U.K.
FOR U.K. ONLY
This appliance is supplied with a moulded three
pin mains plug for your safety and convenience.
A 240 volts, 5 amp fuse is fitted in this plug.
(Voltage Rating: AC 240 V)
Should the fuse need to be replaced please
ensure that the replacement fuse has a rating
of 240 volts, 5 amps and that it is approved by
ASTA or BSI to BS1362.
Check for the ASTA mark
on the body of the fuse.
If the plug contains a removable fuse cover you
must ensure that it is refitted when the fuse is
replaced.
If you lose the fuse cover the plug must not be
used until a replacement cover is obtained.
A replacement fuse cover can be purchased
from your local Panasonic Dealer.
or the BSI mark
FOR U.K. ONLY
How to replace the fuse
1. Open the fuse compartment with a
screwdriver.
2. Replace the fuse
Fuse
4

indicates safety information.
FCC NOTICE (USA)
Declaration of Conformity
Model Number: AG-MDR15P
Trade Name: Panasonic
Responsible Party: Panasonic Corporation of North America
Support contact: 1-800-524-1448
This device complies with Part 15 of the FCC Rules.
Operation is subject to the following two conditions:
(1)This device may not cause harmful interference, and (2) this device must accept any interference
received, including interference that may cause undesired operation.
To assure continued compliance, follow the attached installation instructions and do not make any
unauthorized modifications.
One Panasonic Way, Secaucus, NJ07094
Note:
This equipment has been tested and found to comply with the limits for a class B digital device,
pursuant to Part 15 of the FCC Rules. These limits are designed to provide reasonable protection
against harmful interference in a residential installation. This equipment generates, uses, and can
radiate radio frequency energy, and if not installed and used in accordance with the instructions,
may cause harmful interference to radio communications. However, there is no guarantee
that interference will not occur in a particular installation. If this equipment does cause harmful
interference to radio or television reception, which can be determined by turning the equipment off
and on, the user is encouraged to try to correct the interference by one of the following measures:
• Reorient or relocate the receiving antenna.
• Increase the separation between the equipment and receiver.
• Connect the equipment into an outlet on a circuit different from that to which the receiver is
connected.
• Consult the dealer or an experienced radio/TV technician for help.
The user may find the booklet “Something About Interference” available from FCC local regional
offices helpful.
Warning:
To assure continued FCC emission limit compliance, follow the attached installation instructions and
the user must use only shielded interface cables when connecting to host computer or peripheral
devices. Also, any unauthorized changes or modifications to this equipment could void the user’s
authority to operate this device.
NOTIFICATION (Canada)
This class B digital apparatus complies with Canadian ICES-003.
5

EMC NOTICE FOR THE PURCHASER/USER OF THE APPARATUS
1. Applicable standards and operating environment (AG-MDR15E)
The apparatus is compliant with:
• standards EN55103-1 and EN55103-2 1996.11, and
• electromagnetic environments E1, E2, E3 and E4
2. Pre-requisite conditions to achieving compliance with the above standards
<1> Peripheral equipment to be connected to the apparatus and special connecting cables
• The purchaser/user is urged to use only equipment which has been recommended by us as
peripheral equipment to be connected to the apparatus.
• The purchaser/user is urged to use only the connecting cables described below.
<2> For the connecting cables, use shielded cables which suit the intended purpose of the
apparatus.
• Video signal connecting cables
Use double shielded coaxial cables, which are designed for 75-ohm type high-frequency applications,
for SDI (Serial Digital Interface).
Coaxial cables, which are designed for 75-ohm type high-frequency applications, are recommended
for an
alog video signals.
• Audio signal connecting cables
If your apparatus supports AES/EBU serial digital audio signals, use cables designed for AES/EBU.
Use shielded cables, which provide quality performance for high-frequency transmission applications,
for analog audio signals.
• Other connecting cables (IEEE1394, USB)
Use shielded cables, which provide quality performance for high-frequency applications, as
connecting cables.
• When connecting to the DVI signal termina
• If your apparatus is supplied with ferrite core(s), they must be attached on cable(s) following
instructions in this manual.
3. Performance level
l, use a cable with a ferrite core.
The performance level of the apparatus is equivalent to or better than the performance level required by
these standards.
However, the apparatus may be adversely affected by interference if it is being used in an EMC environment,
such as an area where strong electromagnetic
towers, cellular phones, etc.). In order to minimize the adverse effects of the interference on the apparatus in
cases like this, it is recommended that the following steps be taken with the apparatus being affected and
with its operating environment:
1. Place the apparatus at a distance from the source of the interference.
2. Change the direction of the apparatus.
3. Change the connection method used for the
4. Connect the apparatus to another power outlet where the power is not shared by any other
appliances.
fields are generated (by the presence of signal transmission
apparatus.
6

To remove the battery
Back-up Battery (Lithium Battery)
For the removal of the battery for disposal at the
end of its service life, please consult your dealer.
EEE Yönetmeliğine Uygundur.
EEE Complies with Directive of Turkey.
Thank you for purchasing this Panasonic AVCCAM device.
Register as a user for this device to receive a special service warranty up to three years of free warranty repairs.
AVCCAM 3 Year Warranty Repair Program*
Customers who register as users on the website will receive an extended warranty repair valid for up to
three years.
1st year 2nd year 3rd year
AVCCAM device
*1: Please note that this extended warranty is not available in some countries/regions. *2: Not all models eligible for extended
warranty coverage. *3: The basic warranty period may vary depending on the country/region. *4: Not all repair work is
covered by this extended warranty.
*
2
Basic warranty
3
*
Extended warranty repair
1
4
*
Free 3 years of Warranty Repairs
Make sure to save the “Registration Notice” e-mail
Purchase
AVCCAM product
Details about user registration and the extended warranty: http://panasonic.biz/sav/pass_e
Please note, this is a site that is not maintained by Panasonic Canada Inc. The Panasonic Canada Inc. privacy policy does not apply and is not applicable in relation to any
information submitted. This link is provided to you for convenience.
Register online
within 1 month
“Registration Notice”
e-mail sent
during the warranty period.
7

EU
● SDHC Logo is a trademark of SD-3C, LLC.
● “AVCHD” and the “AVCHD” logo are trademarks of Panasonic Corporation and Sony Corporation.
● This product has been manufactured under license from Dolby Laboratories.
Dolby and the double-D symbol are trademarks of Dolby Laboratories.
● HDMI, the HDMI logo, and High-Definition Multimedia Interface are trademarks or registered trademarks
of HDMI Licensing LLC.
● Microsoft®, Windows®, and Windows Vista® are either registered trademarks or trademarks of
Microsoft Corporation in the United States and/or other countries.
● Screenshots are used in accordance with Microsoft Corporation guidelines.
● IBM and PC/AT are registered trademarks of International Business Machines Corporation.
● Intel® is a registered trademark or a trademark of Intel Corporation in the United States and/or other
countries.
● Macintosh® is a trademark of Apple Inc., registered in the United States and other countries.
● Other model names, company names, and product names listed in these operating instructions are
trademarks or registered trademarks of their respective companies.
● This product is licensed under the AVC Patent Portfolio License for the personal and non-commercial
use of a consumer, and no license is granted or shall be implied for any use other than the personal
uses detailed below.
– To encode video in compliance with the AVC standard (“AVC Video”)
– To decode AVC Video that was encoded by a consumer engaged in a personal and non-commercial activity
– To decode AVC Video that was obtained from a video provider licensed to provide AVC Video
• Additional information may be obtained from MPEG LA, LLC (http://www.mpegla.com).
– Separate license contracts must be obtained from MPEG LA where SD Memory Cards containing information
recorded with this product are to be distributed to end users for commercial purposes. “End user” refers to
persons or organizations handling such contents for personal use.
Note concerning illustrations in these instructions
• Illustrations (portable recorder, menu screens, etc.) in these operating instructions differ slightly from the
actual portable recorder.
References
• References are shown as (Page 00).
Terminology
• Both SD Memory Cards and SDHC Memory Cards are referred to as “SD Memory Cards” in these
operating instructions.
• Video data created in one recording operation is called a “clip”.
• The optional compact camera head (AG-MDC10G) is referred to as “camera head” in these operating
instructions.
8

Using the portable recorder
This memory card portable recorder is an AVCCAM recording and playback device that is compact. It is
equipped with an SD Memory Card slot, a 3.5-inch LCD monitor, and a wide range of input and output
terminals, such as SDI, HDMI, USB 2.0 and CAMERA (for connecting the AG-MDC10G optional camera
head). In addition to enabling the easy playback of content shot with an AVCCAM camera-recorder, this
device supports backup recording and file management on SD Memory Cards.
Recording onto an SD Memory Card
HD-SDI input recording (Page 34)
1
It is possible to connect an external device equipped with an HD-SDI output (HD camera-recorder, HD
information camera system, etc.) to the unit and record the data on an SD Memory Card.
In addition, operations for starting or stopping recording on the portable recorder can be performed from
some types of camera-recorder. (When SDI input is selected.)
(For details on the compatible devices, see page 87.)
AG-MDR15 (portable recorder)
Camera recorder
HD-SDI signal
SD Memory Card
32
Shooting with a camera (Page 35)
2
When the portable recorder is connected to the AG-MDC10G camera head (optional), data can be
recorded onto an SD Memory Card.
• Camera functions for the camera head, such as zoom, focus and iris, can be performed with manual
operations on the portable recorder.
AG-MDR15 (portable recorder)
AG-MDC10G camera head
(optional)
Camera cable
(optional)
SD Memory Card
32
9

Using the portable recorder (continued)
Playing SD Memory Card content
Playback on the portable recorder’s LCD monitor
3
(Page 58)
Content (video/audio) that is shot with an AVCCAM camera-recorder and recorded onto an SD Memory
Card can be played back on-the-spot.
AG-MDR15
AVCCAM camera-recorder
SD Memory Card
32
(portable recorder)
Outputting to an external monitor for playback
4
(Page 70)
Content (video/audio) on an SD Memory Card can be output to an external monitor for playback.
AG-MDR15
SD Memory Card
(portable
recorder)
External monitor
32
• Use the HD-SDI output of content that is recorded and played in AVCCAM format only for outputting to
an external monitor.
HD-SDI output
HDMI output
Editing SD Memory Card content
Connecting to a computer for editing (Page 71)
5
The portable recorder can be connected to a computer with a USB connection, enabling content on the SD
Memory Card to be copied and edited with the computer.
AG-MDR15
(portable recorder)
SD Memory Card
32
USB 2.0 cable
Computer
10

HD-SDI output
Example of system configuration for SDI mode
6
■When outputting data in the portable recorder’s recording format
Select [SDI EE SEL] → [NORMAL] in the [AV OUT SETUP] setup menu.
• Using the setup menus (Page 27)
AG-MDR15 (portable recorder)
Camera-recorder
HD-SDI input signal
• Data such as information in the OSD and menu screens can be added to the output signal.
(When [OUTPUT OSD] → [ON] is selected in the [DISPLAY SETUP] setup menu.)
• S-VITC/UMID information is not output.
• Use when performing checks on an external monitor.
HD-SDI output signal
External monitor
■When outputting the input data unchanged
Select [SDI EE SEL] → [THROUGH] in the [AV OUT SETUP] setup menu.
• Using the setup menus (Page 27)
Camera-recorder
AG-MDR15 (portable recorder)
HD-SDI input signal
HD-SDI output
signal
External device, such as
a recorder
• The HD-SDI input signal is output unchanged.
• Use when recording or editing is required on the output device.
• In PB mode, the setting switches automatically to [NORMAL].
11

Using the portable recorder (continued)
Example of system configuration for CAM mode
7
AG-MDR15 (portable recorder)
AG-MDC10G camera head
(optional)
Camera cable
(optional)
• Frame sequence information is not output.
• S-VITC/UMID information is not output.
• Use when performing checks on an external monitor.
External monitor
HD-SDI output signal
12

Contents
Read this first! ................................................2
Using the portable recorder ..........................9
Precaution for use ........................................ 15
Before use
Operating precautions ................................. 18
Accessories ..................................................20
Optional accessories ...................................20
Description of parts
Description of parts ...................................... 21
Operation panel, LCD and system parts .........21
Terminals and system parts ............................. 22
Preparation
Power sources .............................................. 23
Using the AC adapter ...................................... 23
Turning the power on/off ............................. 24
Tally lamp ...................................................... 25
SD Memory Card access lamp .................... 25
Operation modes .......................................... 26
Using the setup menus ................................ 27
Using the menus ............................................. 27
Initializing the setup menus ............................. 28
Setting the date and time/Recharging the
built-in battery/Adjusting the LCD
monitor .................................................. 29
Setting the date and time ................................ 29
Recharging the built-in battery ........................ 30
Adjusting the LCD monitor .............................. 30
SD Memory Cards......................................... 31
Inserting and removing SD Memory Cards .....31
Protecting SD Memory Cards .......................... 31
Repairing SD Memory Cards .......................... 32
Formatting SD Memory Cards ......................... 32
SD Memory Card recording times ................... 33
Recording
Recording onto an SD Memory Card
(REC mode) ...........................................34
Performing HD-SDI input recording
(SDI mode) .................................................. 34
Shooting and recording with a camera
(CAM mode) ................................................ 35
Setting the time code ................................... 37
Setting the time code ....................................... 37
Specifying the time code (TC PRESET) .......... 37
Setting user information .................................. 38
Using the [USER] button .............................. 39
Useful recording and shooting functions .. 42
White balance and black balance adjustmen
Adjusting the white balance and black balance ...
Using focus assist (FA) .................................... 44
Wave form monitor (WFM) .............................. 44
Temporarily switching to auto focus mode
(ONE PUSH AF) .......................................... 44
Preventing accidental operation (KEY LOCK)
Turning off the LCD monitor screen (LCD OFF)
Adjusting the recording level of
the input audio (MIC LEV) ........................... 45
Color bar .......................................................... 45
Time stamp function ........................................ 45
Using the REPEAT REC function .................... 46
Operating the camera head ......................... 48
Using the zoom function .................................. 48
Digital zoom function ....................................... 48
PRE REC ........................................................ 49
Optical Image Stabilizer .................................. 49
Performing manual adjustments
(CAMERA FUNCTIONS) ............................. 50
Shooting in progressive mode .................... 54
Clip metadata ................................................ 55
Uploading the metadata (META DATA) ........... 56
Selecting the USER CLIP NAME recording
method ........................................................57
t ... 43
43
... 44
... 45
13

Contents (continued)
Playback
Clip playback (PB mode) .............................58
Thumbnail screen ......................................... 59
Playback settings (PLAY SETUP)................ 61
Setting the playback format (PB FORMAT) ..... 61
Repeat playback (REPEAT PLAY) .................. 61
Resume playback (RESUME PLAY) ............... 62
Setting the skip method (SKIP MODE)............ 62
Thumbnail operations .................................. 63
Selecting the thumbnail display method
(THUMBNAIL SETUP) ................................ 63
Deleting and protecting clips (OPERATION) ... 64
Formatting cards/Checking clip and card
information (CARD FUNCTIONS) ............... 65
Useful playback functions ........................... 67
Fast forward/rewind ......................................... 67
Next/previous clip ............................................ 67
Frame-by-frame playback ............................... 68
Adjusting the volume ....................................... 68
Viewing images on a television or monitor ...... 68
Editing
Connecting external devices ....................... 69
Using headphones .......................................... 69
Using the external microphone ........................ 69
Viewing images on a television or monitor ...... 70
Connecting to a computer
(nonlinear editing/file transfer) ..................... 70
Nonlinear editing (PC mode) ....................... 71
Menu
Setup menu structure ..................................82
Recording (REC) mode menu ......................... 82
Playback (PB) mode menu .............................. 83
Setup menu list ............................................. 84
CAMERA SETUP ............................................ 84
RECORDING SETUP ..................................... 86
TC/UB SETUP ................................................. 88
AV OUT SETUP .............................................. 89
DISPLAY SETUP ............................................. 90
CARD FUNCTIONS ........................................91
META DATA ..................................................... 91
PLAY SETUP ................................................... 92
THUMBNAIL SETUP ....................................... 92
OPERATION....................................................93
OTHER FUNCTIONS ...................................... 93
Reference
Troubleshooting ........................................... 96
Updating the portable recorder ................. 100
Maintenance Inspections ........................... 100
Cleaning ......................................................100
Storage Precautions................................... 100
Recording format list .................................101
How to handle data recorded on
SD Memory Card ................................. 102
Specifications ............................................. 103
Index ............................................................ 105
Displays
Screen displays ............................................ 72
Regular displays .............................................. 72
Main warning displays ..................................... 77
Selecting the display items .............................. 80
Recording and output format
compatibility list ................................... 81
14

Precaution for use
Always take some trial shots before actual shooting.
• When shooting important events, always take some trial shots and check that the sound and images
have been recorded properly before actual shooting.
Be sure to check and set the date, time and time zone.
• These settings affect the control and playback sequence of the recorded contents. Before making a
recording, set and check the date, time and time zone. (Page 29)
Panasonic makes no compensation for your recordings.
• Please understand that Panasonic makes no compensation for your recordings in cases where images
and/or sound were not recorded as you intended due to problems with the camera-recorder or SD/SDHC
Memory Cards.
Respect copyrights
• Copyright laws forbid the use of video and audio material you have recorded for any purpose other than
your own personal enjoyment. Remember that restrictions apply to the shooting of certain material even
if it is intended for private use.
Multipurpose screw holes
• M3 (3 mm diameter) type screws (length: 8 mm) can be used for the four screw holes at the sides of the
portable recorder.
When using the screws, do not tighten them with excessive force. Use of screws other than the M3
(3 mm diameter) type screws (length: 8 mm) may damage the portable recorder.
Multipurpose screw
For other usage notes, see page 18.
holes
There are 2 more multipurpose screw holes on the opposite side.
(Continued on the next page)
15
Precaution for use (continued)
Media that can be used in this unit
• SD/SDHC Memory Cards can be used in this unit.
• SDXC Memory Cards can not be used.
• It is recommended that you use SD Memory Cards or SDHC Memory Cards of SD speed class 2 or
above, or the Panasonic SD Memory Cards.
Note that class 4 or higher is required when recording in PH mode and HA mode.
Card type Recording capacity Recording/playback Reading of metadata
8 MB
16 MB
32 MB
SD Memory
Card
SDHC Memory
Card
64 MB
128 MB
256 MB
512 MB
2 GB
4 GB
6 GB
8 GB
12 GB
16 GB
32 GB
• Please see our support desk at the following website for the latest information not included in these
operating instructions.
http://pro-av.panasonic.net/
• This product is compatible with SD Memory Cards formatted under the SD-standard FAT12 and FAT16
formats, and with SDHC Memory Cards formatted under the FAT32 format.
• Only SDHC Memory Cards may be used for capacities of 4 GB or greater.
• 4 GB (or greater) memory cards without the SDHC logo are not based on the SD standard.
• Use this product to format the SD Memory Cards to be used. Formatting memory cards on computers
or other devices may cause recording to take longer than normal, or may cause cards to become
incompatible with this product. (Page 32) (Use this product to reformat any cards that have already been
formatted on computers, etc.)
• Always install the relevant special adapter when using miniSD/miniSDHC/microSD/microSDHC cards
with this product. (The product will not operate correctly if only the adapter is inserted – always insert a
memory card into the adapter first.)
• MultiMediaCards cannot be used with this product.
Cannot be used.
Successful operation cannot be
guaranteed. Recording may be
suddenly terminated with certain
SD Memory Cards.
Can be used.1 GB
Can be used.
Can be used.
16
SDHC-compatible device
• This product (SDHC-compatible device) is compatible both with SD Memory Cards and with SDHC
Memory Cards. SDHC Memory Cards may be used with SDHC Memory Card-compatible devices, but
cannot be used with devices that are only compatible with SD Memory Cards. (Always check the relevant
product’s operating instructions when using SDHC Memory Cards with other devices.)
When cards of SD speed class 4 or above are recommended for the SD-compatible devices, use of such
cards will ensure stable recording operations.
SDHC-compatible
device
Can be used Can be used Cannot be used Can be used
SDHC Memory Card SD Memory Card SDHC Memory Card SD Memory Card
SD-compatible
device
■What is AVCHD?
AVCHD is a standard for the recording and playback of highly detailed, high-definition video.
Video is compressed in the MPEG-4 AVC/H.264 formats, and audio is recorded in Dolby Digital.
■Information regarding compatibility of SDHC Memory Cards and recorded video
SDHC Memory Cards
• SDHC Memory Cards cannot be used with non-SDHC-compatible equipment.
• Ensure that all equipment is SDHC-compatible when using card with other
devices.
Compatibility of recorded video
• Recorded video cannot be used with non-AVCHD-compatible
equipment. For details, please see your product’s operating
instructions.
• Recorded video cannot be played back on non-compatible
(non-AVCHD-compatible) equipment.
• Playback may not always be possible on all AVCHD-compatible
equipment. Please use this product for playback in such
instances.
Non-AVCHD-compatible DVD
recorder or DVD player, etc.
17

Operating precautions
The portable recorder and SD Memory Card
become warm during usage. This is not a defect.
Do not allow any water to get into the unit when
using it in the rain or snow or at the beach.
• Failure to heed this caution will cause the unit
or a card to malfunction (and may result in
irreparable damage).
The portable recorder should be used as far
as possible from sources of magnetism and
electromagnetism (cell phones, microwave
ovens, TVs, game machines, etc.).
• If the portable recorder is operated on top of or
close to a TV, the electromagnetism can cause
distortion of audio and video.
• Strong magnetism from speakers, large motors, etc. can
cause recordings to be lost and video to be distorted.
• Electromagnetic waves emitted from digital
circuits, including microcomputers, can impact
each other, causing distortion of audio and video.
• If the portable recorder is so adversely affected
that it does not operate normally, remove the
AC adaptor, reconnect it and turn the power on
again.
As much as possible, avoid using the portable
recorder close to radio towers and high-voltage lines.
• If used close to these places, radio waves and high
voltage can adversely affect recorded audio and video.
Use the cords and cables that are provided with the
portable recorder or separately sold accessories.
Do not extend the cords and cables to use.
When carrying the portable recorder, take care
not to drop it or let it hit other objects.
• Strong impact can cause the outer case to break
AC adapter
• The AC adapter can interfere with radio reception
• The AC adapter may make some noise when you
Place the portable recorder close to a power
outlet, and make sure that a cutoff (the power
plug) is easily accessible.
After use, disconnect the AC power supply
cable.
About the SD Memory Card
• The memory capacity shown on the SD Memory
• Protect the SD Memory Card from strong impact,
• Electrical noise, static electricity and failure of the
• If used for a long period of time, the portable
or damage the portable recorder.
so keep radios at least 1 meter away from it.
are using it, but this is normal.
Card label is the total of the capacity provided for
copyright protection and management and the
capacity that is usable as ordinary memory in the
portable recorder, in a PC, etc.
bending and dropping.
portable recorder or SD Memory Card can result
in damage or loss of data on the SD Memory
Card.
recorder surface and SD Memory Card will
become somewhat hot, but this is not a sign of
product failure.
If using the portable recorder at the beach or
any place that is sandy or dusty, take care that
sand and dust do not get inside the portable
recorder or on its terminals. Do not allow the
portable recorder to get wet with salt water, etc.
• Sand and dust can damage the unit or a card.
(Be especially careful when inserting or removing
a card.)
• If the portable recorder has come in contact with
salt water, wipe with a cloth that has been well
wrung out, then wipe with a dry cloth.
If insect sprays or other volatile substances are
being used in the area, take care that they do
not come in contact with the portable recorder.
• These can warp the unit or cause the finish to come off.
• Do not leave the unit in contact with rubber or
PVC products for extended periods of time.
18
Cautions for usage of SD Memory Cards
• Do not allow dirt, water, or other substances to
come into contact with the connector part on the
reverse of the card.
• Do not leave the card in the following places:
–
In direct sunlight or in places of high temperatures.
e.g. close to heating equipment
– In highly humid or dusty locations
– In locations with high variations in temperature
(condensation may appear on card)
– In places subject to static electricity or
electromagnetic waves
• Store cards in bags or cases after use.

What to remember when throwing memory
cards away or transferring them to others
Formatting memory cards or deleting data using
the functions of the unit or a computer will merely
change the file management information: it will
not completely erase the data on the cards. When
throwing these cards away or transferring them
to others, either physically destroy them or use a
data deletion program for computers (commercially
available) to completely erase the data. Users are
responsible for managing the data on their memory
cards.
Liquid crystal displays
• Images or letters can get burned onto the screen
of the LCD if they are displayed for a long time,
but you can fix this by leaving the unit off for
several hours.
• The LCD monitor was made by high-precision
engineering, but black points may appear on the
LCD monitor screen, or points may remain on all
the time (red, blue or green points). This is not a
sign of product failure. The LCD monitor pixels
are highly precisely controlled with more than
99.99 % of the pixels effective. This leaves less
than 0.01 % of pixels that may not light or may
remain on all the time. These points are not being
recorded as video on the SD Memory Card.
• Condensation may form if you use the unit where
temperatures fluctuate. Wipe dry with a soft, dry
cloth.
• The LCD may appear dim after immediately
turning on a cold recorder, but will brighten as the
unit warms up.
• Do not keep the unit in humid areas. Although
rare, this could cause the inside of the LCD
monitor to become cloudy when the power is
turned on.
Before use
Protecting the terminals
Install the covers when the connection terminals
are not being used.
19

Accessories
AC Adapter
VSK0721
DC cable CD-ROM
• Please consult a retailer when purchasing additional accessories.
• The protectors for enclosed products, such as a plug cover or foam cartons, must be treated properly.
• Do not use other than the AC adapter with the part number listed above.
AC power supply cables
AG-MDR15P
AG-MDR15E
(For the U.K.)
AG-MDR15E
(For areas other than
the U.K.)
Optional accessories
• Compact camera head for AG-MDR15
AG-MDC10G (The camera head option cable is required for connecting to the AG-MDR15.)
Image sensor
1/4.1-inch, MOS type solid state image sensor × 3
Lens
Optical image stabilizer lens, motorized 12 × zoom
F1.8 to 2.8 (f = 4.0 mm to 48 mm)
(35 mm equivalent: 40.8 mm to 490 mm)
Filter diameter
43 mm
Color separation optical system
Prism system
• Camera head option cable
AG-C20003G (3 m (118-1/8 inches))
AG-C20020G (20 m (787-3/8 inches))
20

Description of parts
Operation panel, LCD and system parts
■Front
LCD monitor
(Page 30)
MENU button
(Page 27)
POWER button
(Page 24)
POWER lamp
(Page 24)
REW button
(Pages 27, 42, 58)
Indicated by
operation descriptions.
Tally lamp
(Page 25)
REC/PAUSE button
(Pages 34, 35)
SHIFT/EXEC button
(Pages 39, 42)
in the
REC/
PAUSE
AUDIO MON/ADV
PLAY/STILL button
(Pages 27, 42, 58)
Indicated by
operation descriptions.
ENTER button
(Pages 27, 39, 42, 58)
AUDIO MON/ADV button
(Pages 42, 45, 68)
FF button
(Pages 27, 42, 58)
Indicated by
operation descriptions.
USER button
(Pages 39, 42)
MODE button
(Pages 26, 58)
STOP button
(Pages 27, 42, 58)
Indicated by
operation descriptions.
in the
in the
in the
Before use
of parts
Description
■Rear ■Side
Slide stoppers
Slide stoppers
Multipurpose
screw holes
(Page 15)
Built-in speaker
(Page 68)
Multipurpose
screw holes
(Page 15)
21

Description of parts (continued)
Terminals and system parts
SD card cover
(Page 31)
DC cable attachment release button (Page 23)
CAMERA terminal (Page 35)
DC cable attachment compartment
(Page 23)
CAMERA terminal cover
SD Memory Card
access lamp
(Page 25)
SD Memory Card slot
(Page 31)
Card slot cover
(Page 31)
Card slot cover
open button
(Page 31)
Terminal covers
The terminals are inside the terminal cover.
Microphone terminal (Page 45, 71)
REMOTE jack
You can connect a remote control unit (optional) to
control the zoom and recording start/stop.
HDMI output terminal (Page 70)
HD-SDI OUT terminal
(Page 70)
HD-SDI IN terminal
(Page 34)
• Use a double shielded cable equivalent to 5C-FB to connect to the HD-SDI IN terminal and HD-SDI
OUT terminal.
Headphone jack (3.5 mm mini-jack)
(Pages 68, 69)
USB terminal (Pages 70, 69)
22

Power sources
Using the AC adapter
Installation
Removal
Connect the DC cable to the AC adapter.
1
Plug the AC power supply cable into the
2
power outlet.
Insert the DC cable plate into the DC cable
3
attachment compartment of the portable
recorder until it clicks into place.
Press the [POWER] button for 2 seconds or
1
longer to turn off the power. Check that the
POWER lamp goes off.
Remove the DC cable plate while pressing
2
the DC cable attachment release button and
sliding the DC cable plate in the direction of
the button.
DC cable attachment release button
POWER lamp
Disconnect the AC power supply cable from
3
the power outlet.
• The AC adapter is designed to be compatible
with all power supply voltages (100 V to 240 V)
and power supply frequencies (50 Hz, 60 Hz)
around the world. Note that the shape of the
power outlet varies depending on the country.
Use a plug that is suitable for the country of use.
Contact a Panasonic authorized service center
for assistance in selecting a converter plug.
• Disconnect the AC power supply cable from the
power outlet when not using the portable recorder.
of parts
Preparation Description
23

Turning the power on/off
Press the [POWER] button for 2 seconds or longer.
• The POWER lamp (green) illuminates and the
power turns on.
• If you press the [POWER] button for 2 seconds
or longer when the power is on, the POWER
lamp flashes, the power turns off, and then the
lamp goes off.
Also, the POWER lamp flashes in the following
circumstances.
• Recording error has occurred
• Camera cable is disconnected (when the AGMDC10G camera head (optional) is connected)
• Power-saving mode
In line with the [POWER SAVE] setting in the
[OTHER FUNCTIONS] setup menu, the following
will apply if no designated operations∗ are
performed for approximately 5 minutes during
recording standby (when an SD Memory Card
has been inserted).
ON: The portable recorder turns off
automatically.
OFF: Does not switch off the portable recorder.
∗ For details on the designated operations, see
[POWER SAVE] in the setup menu (Page 94).
REC/
PAUSE
AUDIO MON/ADV
24

Tally lamp
The tally lamp turns on during recording (orange).
Also, the tally lamp flashes in the following
circumstances.
(flashes 4 times per second)
• Recording error has occurred
• SD Memory Card is full
• System frequency has been changed
(flashes once per second)
• Remaining memory of the SD Memory Card is low
• Setup menu has been initialized (Page 28)
■When the AG-MDC10G camera head
(optional) is connected
The tally lamp flashes in the following circumstances.
(flashes 4 times per second)
• Cooling fan is not operating correctly
• Internal temperature of the camera is abnormally high
• Recording signal is corrupted
• Optical Image Stabilizer is not operating correctly
• Problem with the focus function
• Camera cable is disconnected
SD Memory Card access lamp
The SD Memory Card access lamp lights as
follows depending on the access condition of the
SD Memory Card in the portable recorder.
Tally lamp
REC/
PAUSE
REC/
PAUSE
AUDIO MON/ADV
Preparation
■REC mode, PB mode
Illuminated orange: Reading/writing possible
Flashing orange (fast): Verifying card/inspecting
card for possible defects
Flashing orange (slow): Accessing card
(recording, playing back
or loading)
Off: No card inserted/unformatted or incompatible
card inserted
■PC mode
Flashing orange (slow): Accessing card
Off: A status other than accessing
SD Memory Card access lamp
• Do not perform any of the following operations
while the SD Memory Card access lamp is
flashing.
Performing these operations may damage the
SD Memory Card or its contents, or cause the
portable recorder to fail to operate correctly.
ā Removing the SD Memory Card
ā Switching off the power
ā Connecting or disconnecting the USB
connection cable
ā Shaking or striking the recorder
25

REC mode
PB mode
PC mode
Operation modes
The portable recorder has 3 operation modes: REC mode, PB mode and PC mode.
Press the [MODE] button to change the mode.
Press the
[POWER] button
for 2 seconds or
longer to turn on
the power.
or
While the power is off, connect the
AG-MDC10G camera head (optional) to the
portable recorder with the camera cable
(optional), and then press the [POWER] button
for 2 seconds or longer to turn on the power.
∗
Be sure to turn off the portable recorder’s
power before connecting or disconnecting
the camera head.
AUDIO MON/ADV
REC/
PAUSE
<SDI mode>
Used when connecting the portable
recorder to a device that has an
HD-SDI output, for recording onto
the portable recorder’s SD Memory
Card. This is suitable for operations
<CAM mode>
Used when operating the
AG-MDC10G camera head
(optional) to shoot with the portable
recorder and record onto the SD
Memory Card.
AUDIO MON/ADV
REC/
PAUSE
such as long backup recordings.
• Before switching between SDI mode and CAM mode, be sure to turn off
the power of the portable recorder. Connect or disconnect the camera
cable and then turn on the power again.
Press the [MODE] button.
Used for the playback of clips that are recorded
on the SD Memory Card.
Also, clip management operations, such as
deletion and protection, can be performed on the
thumbnail display screen.
* When both CAM
and SDI cables
are connected,
CAM mode has
precedence over
SDI mode. To record
in SDI mode, be
sure to turn off the
power, disconnect
the camera cable
(optional) then turn
on the power again.
Press the
[POWER]
button for 2
seconds or
longer
to turn off the
power.
26
Press the [MODE] button for 2 seconds or longer. “CHECK USB CABLE.” is
displayed. Connect the portable recorder to the computer with a USB cable.
• Operation is not transferred to the PC mode when the AG-MDC10G
camera head is connected.
When the AG-MDC10G is connected, turn
off the power, disconnect the camera cable, turn the power back on, and
then proceed with the operation.
Used when connecting to a computer to perform
operations such as clip saving and editing.
Using the setup menus
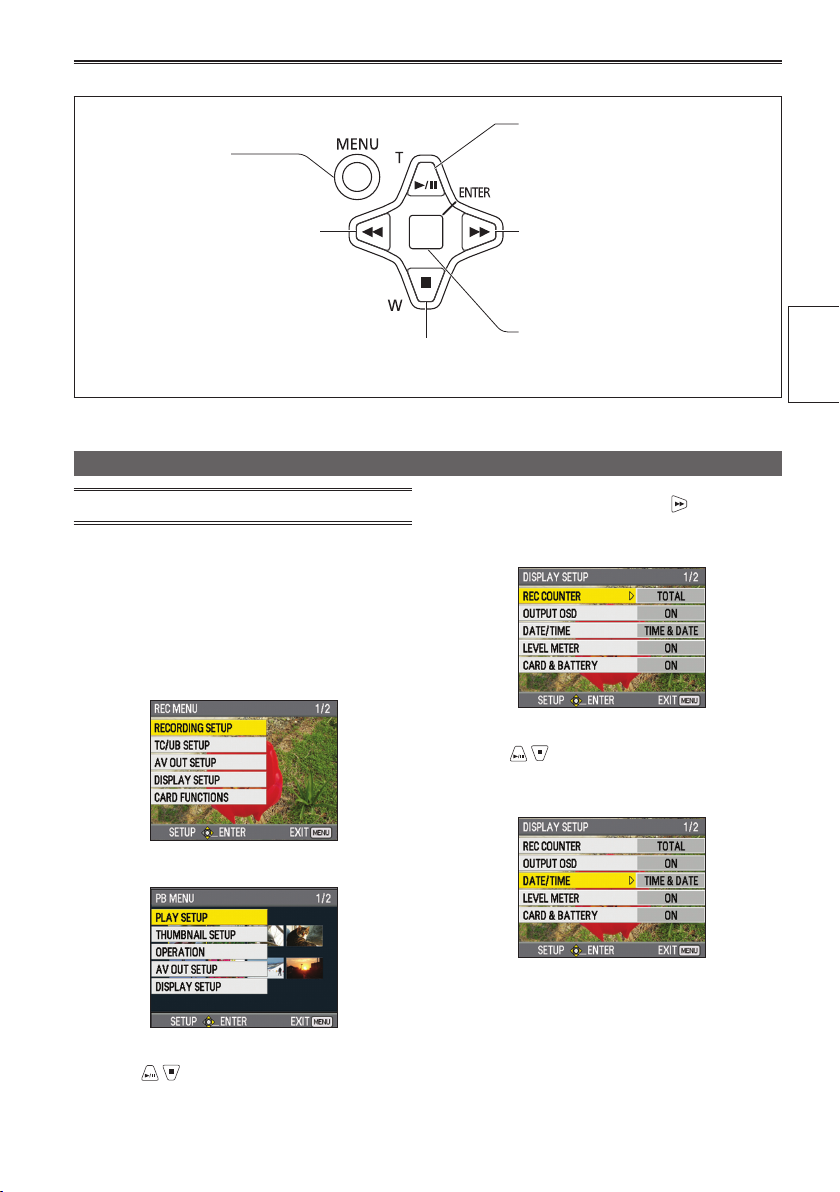
■Button operations in the setup menus
Displays the menu.
When the menu is displayed,
closes the menu.
Moves to the menu item above.
For some items, changes the
value.
Moves to the menu item on the
left. For some items, changes the
value.
Moves to the menu item below.
For some items, changes the value.
Using the menus
• The menu items in gray cannot be changed.
When the portable recorder is not recording
1
or playing back the clips, press the [MENU]
button.
The following is displayed on the LCD monitor.
• When PREREC is set, the function screen is
displayed after “Wait” appears.
REC mode (Example)
Moves to the menu item to the
right. For some items, changes
the value.
Sets the selected item or value.
Press the [ENTER] button or to display
3
the setting items.
Example:
Press to move to the item that you
4
want to set.
Example:
Preparation
PB mode (Example)
Press to move the yellow cursor to the
2
function that you want to set.
(Continued on the next page)
27

Using the setup menus (continued)
Press the [ENTER] button or to set the
5
item.
Press
Example:
Repeat steps 4 to 5 to change any other
6
items.
Press the [MENU] button to complete the
setting and return to the normal screen.
Repeat steps 2 to 5 to change any other
7
settings.
Press the [MENU] button to complete the
setting and return to the normal screen.
to change the values.
• Press to return to the previous menu.
Initializing the setup menus
Perform the following operation during REC mode
to return the setup menus to their factory default
settings.
Press the [MENU] button.
1
Select [OTHER FUNCTIONS] → [MENU
2
INIT] → [YES], and then press the [ENTER]
button.
When “TURN POWER OFF” appears, turn the
power off by pressing the [POWER] button for 2
seconds or longer, then turn the power back on
again. The current setup menus return to their
factory default settings.
• Even when the setup menus have been
initialized, [TIME ZONE] will not revert to its
factory default setting.
• The metadata is not initialized even when
the setup menus have been initialized. (For
Initializing the metadata, see page 91.)
28

Setting the date and time/Recharging the built-in battery/Adjusting the LCD monitor
Before recording with this portable recorder, first set the date and time and adjust the LCD monitor in the setup menus.
Setting the date and time
The [CLOCK SET] value in the setup menu is
recorded in the content (clip) and affects the thumbnail
playback sequence. Before recording, be sure to
check and set [CLOCK SET] and [TIME ZONE].
This example shows how to adjust the calendar to
17:20 on October 10, 2009.
Press the portable recorder’s [POWER]
1
button for 2 seconds or longer to turn on
the power. (Page 24)
Press the [MENU] button.
2
Using the setup menus (Page 27)
Select [OTHER FUNCTIONS] → [TIME ZONE],
3
and then press the [ENTER] button or
Press the [ENTER] button twice to display
4
the setting screen. Press
difference from Greenwich Mean Time, and
then press the [ENTER] button. (Page 94)
to set the time
.
Press to select [OCT].
6
Press to move the cursor to the next
7
item, and then press
Repeat steps 6 and 7 to set the remaining items.
8
to select [10].
Preparation
Press to return to the [OTHER FUNCTIONS]
5
setup menu, then select [CLOCK SET] →
[YES] and press the [ENTER] button.
• The date can be set to any date between
January 1, 2001 and December 31, 2039.
• “--.--.----” is displayed for any date beyond
December 31, 2039.
• Time is displayed in the 24-hour format.
When settings are complete, press the [ENTER]
9
button, select [YES] on the confirmation screen,
and then press the [ENTER] button again.
(Continued on the next page)
29

Setting the date and time/Recharging the built-in battery/Adjusting the LCD monitor (continued)
• Slight time errors may occur, so check that the
time is correct before recording.
• When using the recorder overseas, do not set
the [CLOCK SET] time to the local time, but
instead enter the time difference from Greenwich
Mean Time in [TIME ZONE]. (Page 94)
Recharging the built-in battery
The recorder’s built-in battery saves the date and
time.
When “LOW INTERNAL BATTERY” is displayed
even when the date and time are set, it means
that the built-in battery is low. Recharge using the
following procedure.
Reset the date and time after the battery is fully
recharged.
Connect the AC adapter to the portable
1
recorder. (Page 23)
• Leave off the power of the portable recorder.
Leave the portable recorder like this for
2
about 4 hours.
• The built-in battery recharges during this
time.
• Check the time code and menu operations
after recharging.
If the date and time are still not memorized after
recharging, the built-in battery must be replaced.
Consult the place of purchase.
Adjusting the LCD monitor
Press the portable recorder’s [POWER]
1
button for 2 seconds or longer to turn on
the power. (Page 24)
Press the [MENU] button.
2
Using the setup menus (Page 27)
Select [DISPLAY SETUP] → [LCD SET] →
3
[YES], and then press the [ENTER] button.
LCD COLOR LEVEL:
LCD BRIGHTNESS: Adjusts the brightness of the
LCD CONTRAST: Adjusts the contrast of the
• Be careful because if all the LCD monitor
adjustment values are set to the lowest value, the
screen will be difficult to see.
Press to set the item value, and then
5
press the [ENTER] button.
Adjusts the color density of
the screen.
screen.
screen.
Press to select an item, and then
4
press the [ENTER] button.
30
Press the [MENU] button to close the menu.
6
 Loading...