


CORDLESS CHAINSAW
INSTRUCTION MANUAL
SPECIFICATIONS
Input: |
18V |
Bar Length: |
250mm (10”) |
Cutting Length Max.: |
230mm |
Chain Speed: |
4.3m/s |
Chain Pitch: |
9.53mm (3/8”) |
Chain Gauge: |
1.1mm (.043”) |
Oil Tank Capacity: |
200ml |
Weight: |
3.0kg |
ozito.com.au
STANDARD EQUIPMENT
10
250
Chainsaw
Guide Bar Cover
Screwdriver
10in
250mm
40 3/8” LP
|
PXCCSS-018 |
|
|
|
|
WARRANTY |
|
|
IN ORDER TO MAKE A CLAIM UNDER THIS WARRANTY YOU |
The benefits provided under this warranty are in addition to other rights and |
|
MUST RETURN THE PRODUCT TO YOUR NEAREST BUNNINGS |
remedies which are available to you at law. |
|
Our goods come with guarantees that cannot be excluded at law. You are entitled to |
|
|
WAREHOUSE WITH YOUR BUNNINGS REGISTER RECEIPT. PRIOR TO |
|
|
a replacement or refund for a major failure and for compensation for any other |
|
|
RETURNING YOUR PRODUCT FOR WARRANTY PLEASE TELEPHONE |
|
|
reasonably foreseeable loss or damage. You are also entitled to have the goods |
|
|
OUR CUSTOMER SERVICE HELPLINE: |
repaired or replaced if the goods fail to be of acceptable quality and the failure |
|
Australia 1800 069 486 |
does not amount to a major failure. |
|
Generally you will be responsible for all costs associated with a claim under this |
|
|
New Zealand 0508 069 486 |
warranty, however, where you have suffered any additional direct loss as a result of |
|
a defective product you may be able to claim such expenses by contacting our |
|
|
|
|
|
|
customer service helpline above. |
|
TO ENSURE A SPEEDY RESPONSE PLEASE HAVE THE MODEL |
|
|
NUMBER AND DATE OF PURCHASE AVAILABLE. A CUSTOMER |
5 YEAR REPLACEMENT WARRANTY |
|
SERVICE REPRESENTATIVE WILL TAKE YOUR CALL AND |
Your Product is guaranteed for a period of 60 months from the original date of |
|
ANSWER ANY QUESTIONS YOU MAY HAVE RELATING TO THE |
purchase and is intended for DIY (Do It Yourself) use only. If a product is defective it |
|
will be replaced in accordance with the terms of this warranty. Lithium Ion |
|
|
WARRANTY POLICY OR PROCEDURE. |
|
|
batteries and chargers are covered by a 36 month |
|
|
|
warranty Warranty excludes consumable parts, for example: guide bar, chain |
|
WARNING |
and included accessories. |
|
|
|
|
The following actions will result in the warranty being |
|
|
void. |
|
|
• If the tool has been operated on a supply voltage other |
|
|
than that specified on the tool. |
|
|
• If the tool shows signs of damage or defects caused |
|
|
by or resulting from abuse, accidents or alterations. |
|
|
• Failure to perform maintenance as set out within the instruction manual. |
|
|
• If the tool is disassembled or tampered with in any way. |
|
|
• Professional, industrial or high frequency use. |
|
|
|
|
|
OZITO Australia/New Zealand (Head Office) 1-23 Letcon Drive, Bangholme, Victoria, Australia 3175. |
0718 |
|

KNOW YOUR PRODUCT |
|
SETUP & PREPARATION |
|
|
|
CORDLESS CHAINSAW
1. |
Rear Handle |
8. |
Guide Bar Locking Knob |
2. |
Trigger Switch |
9. |
Guide Bar |
3. |
Oil Level Window |
10. |
Chain |
4. |
Chain Oil Tank Cap |
11. |
Bucking Spikes |
5. |
Side Cover |
12. |
Motor Cover |
6. |
Front Handle |
13. |
Lock-Off Button |
7. |
Chain Brake |
14. |
Battery Seating |
1 |
2 |
3 |
4 |
5 |
6 |
7 |
8 |
9 |
10 |
10in
250mm
40 3/8” LP
11 12 13 14
10in
250mm
ACCESSORIES
15 Guide Bar Cover |
16 Screwdriver |
|
|
|
|
|
15 |
|
16 |
||
|
|
|
|
|
BATTERY & CHARGER
This tool is compatible with all battery and chargers from the Ozito Power X Change Range.
ONLINE MANUAL
Scan this QR Code with your mobile device to take you to the online manual.
1. INSERTING & REMOVING BATTERY
Installing a Battery into the Chainsaw
1. Align the ribs of the battery with the recess below the handle
2.Slide the battery in so that it clicks into place.
Removing a Battery from the Chainsaw
1. Press and hold the battery release tab to release the battery.
2. Slide the battery out.
OPERATION
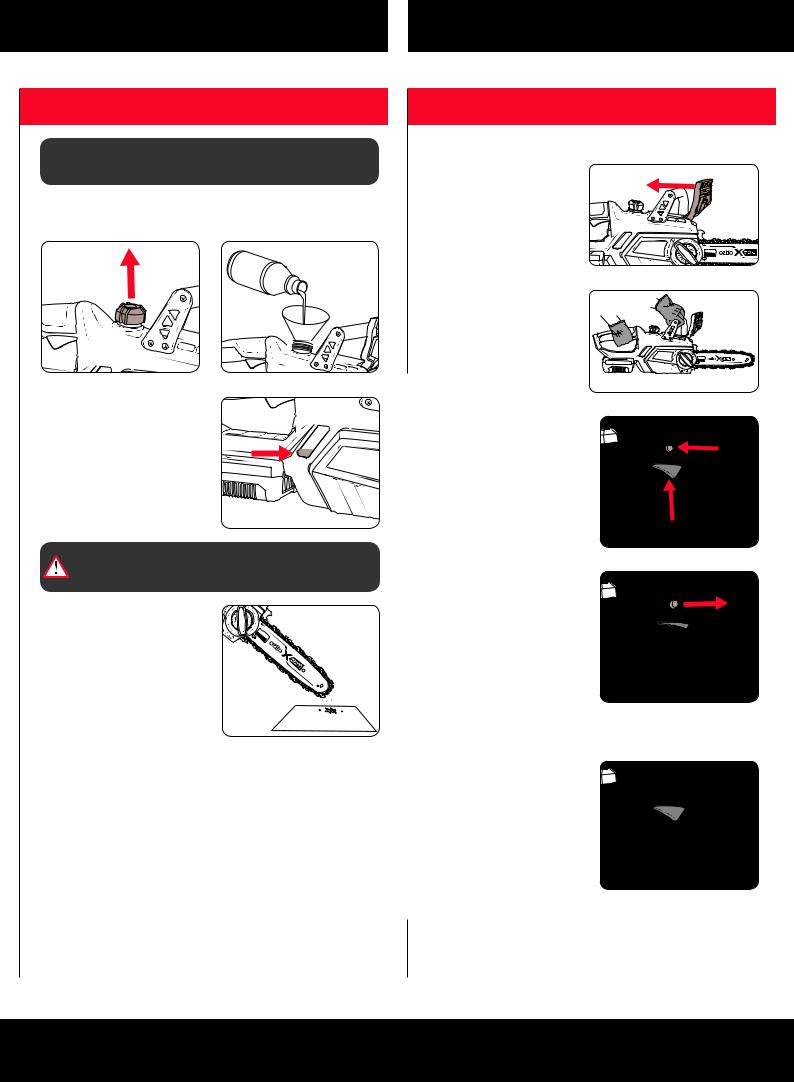
2. OIL
IMPORTANT: ONLY USE OIL THAT IS EXPRESSLY LABELLED “CHAIN BAR OIL”.
1. Remove the chain bar oil cap.
3.Refit cap and clean any oil spillage.
4.Always fill the oil tank when the oil level is below the minimum mark on the oil level window.
2.Fill the tank with chain bar oil. The capacity of the chain oil tank is 220ml. Do not over fill.
WARNING!: NEVER START WORK UNLESS THE CHAIN AND BAR ARE LUBRICATED
5. To check the lubricating system, |
|
|
|
|
|
switch on the chainsaw and hold it |
|
|
|
mm |
|
with the guide bar and chain above |
|
|
|
||
|
|
2 |
1 |
|
|
|
40 |
5 |
|
in |
|
|
3/8”LP |
|
0 |
|
|
some light coloured paper such as newspaper. A steadily increasing stain caused by oil spray shows the lubricating system is working.
Note: Chain bar oil may leak if the tool is left for long periods. This is normal. If the tool is to be left unused for an extended time, drain the oil from the tool. Refill before use.
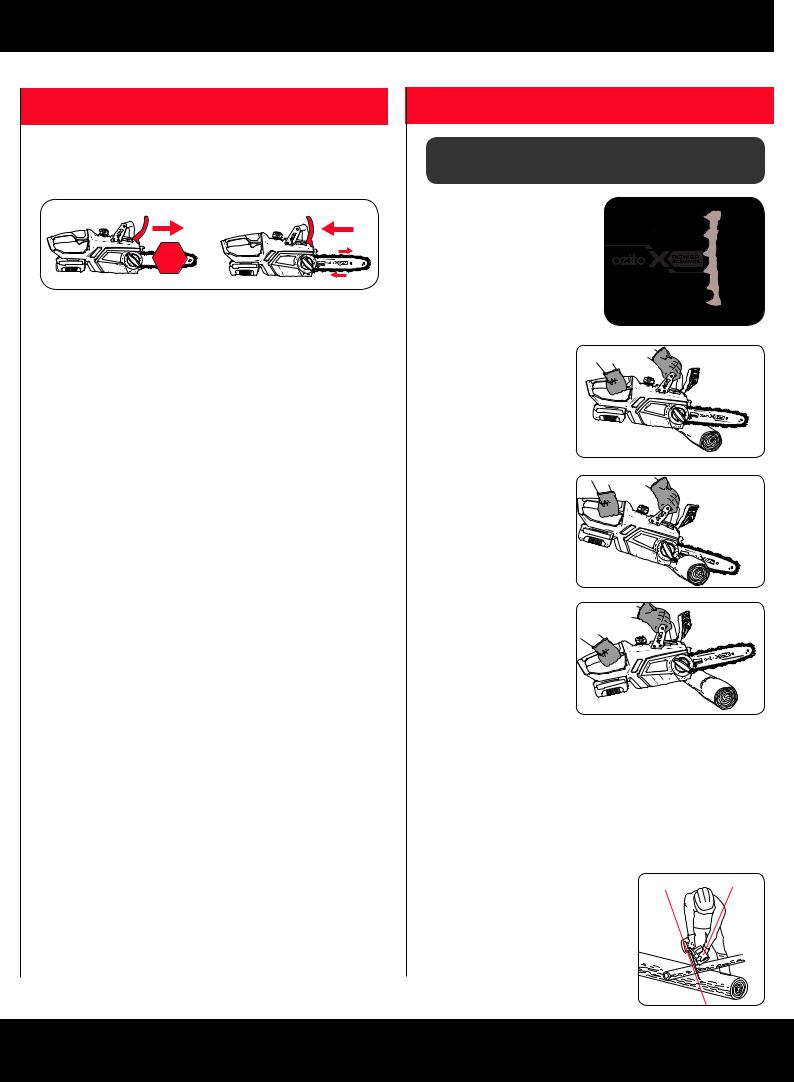
3. SWITCHING ON/OFF
Switching ON
1. |
Pull the hand guard/chain brake |
|
towards you. |
|
10in |
|
250mm |
|
40 |
|
3/8” LP |
2. |
Hold the front handle with your |
|
left hand and the rear handle |
|
with your right hand. |
|
10 |
|
250 |
3. |
Press the lock-off button with |
|
your thumb, then squeeze the |
|
trigger switch. The chainsaw |
|
starts after a short delay. |
4. |
The chain will now be running, |
|
ready to make a cut. Release |
|
the lock-off switch. |
Switching OFF
1.Release the trigger switch, the chain and motor will quickly stop.
Running in the Chain
Prior to operation, a new chain should be run in for 2–3 minutes and then its tension should be checked and adjusted as detailed in “MAINTENANCE”.
4. CHAIN BRAKE
The chain brake operates automatically in the event of kick back.
The chainsaw is fitted with a hand guard/chain brake which when operated brings the chain to a stop within a tenth of a second.
BRAKE ON |
BRAKE OFF RUN |
STOP |
250 |
|
10 |
The chain brake can be operated manually by pushing it forward or automatically as a result of kickback.
Kickback occurs if the chain catches on the wood being cut and the chainsaw recoils back suddenly.
In the event of kickback, your hand (which is on the front handle during operation) jerks forward causing the back on your hand to push the guard forward, engaging the chain brake and quickly stopping the chain.
5. CUTTING
CAUTION: FIRST TIME USERS SHOULD, AS A MINIMUM PRACTISE, CUT LOGS ON A SAW-HORSE OR CRADLE
1.Press the bucking spikes against the timber ensuring the chain
is not making contact with the material being cut.
2. Start cutting by holding the chainsaw by the front handle and raising the rear handle.
10 250
3.If you cannot cut the timber in a single stroke, apply light pressure to the front handle and continue sawing, draw the chainsaw back a little then apply the bucking spikes a little lower and finish the cut by raising the rear handle.
4.Withdraw the chainsaw from the cut while the chain is still running.
10 25
10 250
Hints and Tips
•Do not force the saw into the cut. Apply only light pressure whilst running the chain.
•If the saw chain gets caught in the cut, do not try to remove it by twisting the guide bar or pulling forcibly. Use a lever or wedge to open up the cut so that the saw chain is freed.
•Keep your left arm with elbow locked in a “straight arm” position to withstand any kickback force.
•While cutting, always:
–Run the chainsaw motor at full speed. This makes the job safer, as there is less chance of pull-in or kick-back.
–Position your body to the left of the chainsaw so if it kicks back
uncontrollably, it goes over your right shoulder, never stand in the cutting line of the saw.
–Keep a firm grip with your left hand on the front handle, with your thumb securely below the handle.
CHAIN
LINE  STRAIGHT ARM
  POSITION

APPLICATIONS
Felling a Tree
WARNING!: FELLING A TREE SHOULD ONLY BE DONE BY TRAINED OPERATORS.
Decide the direction in which you wish the tree to fall, taking into account the direction of the wind, the position of branches, lean of the tree, ease of subsequent limbing and 


bucking and other factors prevalent at the time.
Limbing
WARNING!: FELLING ALWAYS KEEP A BALANCED
 STANCE. DO NOT STAND ON THE LOG. BE ALERT TO THE FACT THAT THE LOG MAY ROLL OVER. WHEN WORKING ON A SLOPE, ALWAYS STAND ON THE UP HILL
SIDE OF THE LOG.
Limbing is the process of removing the branches from a fallen tree. Check the direction in which a branch will bend before cutting it. Always cut on the opposite side to the bending direction so that the guide bar is not pinched in
the cut. For large limbs that cannot be removed in one cut, make an initial cut |
||
from the bent side and finish |
1 |
|
by sawing from the opposite |
||
|
||
direction. Do not remove |
|
|
limbs that are supporting the |
|
|
fallen tree on the ground until |
|
|
the tree has been cut into |
|
|
lengths. |
2 |
|
|
||
Bucking
Bucking is cutting a log into lengths for easier handling. To saw a log lying |
|||
on the ground, first saw halfway, then roll the log over and cut from the |
|
||
opposite side. To saw the end of a log |
|
|
|
supported off the ground, first saw up |
|
|
|
from the bottom one-third through the |
|
|
|
log then finish by sawing down from |
|
|
|
the top. To saw a log in the middle |
|
|
|
of two supports holding it off the |
|
|
|
ground, first saw down from the top |
1 |
2 |
|
one-third through the log then finish |
|||
|
|
||
by sawing up from the bottom. |
|
|
|
|
2 |
1 |
|
CAUTION: FIRST AVOID CUTTING THE GROUND AS THIS WILL VERY QUICKLY DULL THE SAW CHAIN.
Pruning
WARNING!: DO NOT USE AN UNSTABLE FOOTHOLD OR LADDER. DO NOT OVERREACH. DO NOT SAW
ABOVE SHOULDER HEIGHT. ALWAYS USE BOTH HANDS TO HOLD THE SAW. FIRST CUT UP FROM THE BOTTOM AND FINISH DOWN FROM THE TOP.
Pruning is the removal of a limb or |
2 |
|
branch from a standing tree. |
||
|
1
PXCCSS-018

MAINTENANCE
WARNING: BEFORE CLEANING YOUR CHAINSAW OR CARRYING OUT ANY MAINTENANCE PROCEDURE,
MAKE SURE THE BATTERY REMOVED TO PREVENT ACCIDENTAL STARTING.
CAUTION: ALWAYS WEAR GLOVES WHEN HANDLING THE CHAIN AS IT IS VERY SHARP AND CAN CUT YOU
WHEN IT IS NOT MOVING.
Adjusting the Chain Tension
1.Loosen the guide bar locking knob slightly, by rotating it in an anti clockwise direction.
2.Adjustment chain tension screw CLOCKWISE to increase chain tension. Turning screw COUNTERCLOCKWISE will decrease amount of tension on
the chain. Adjust the chain tension screw for the correct tension.
For the correct chain tension, pull up on the chain from the top and middle of the exposed guide bar. The bottom tip of the links should only just stay in the track.
3.After the chain has been accurately tensioned, lock the guide bar in place with the guide bar locking knob.
3 - 4mm gap is the ideal tension
Note: Proper tension of the chain is extremely important and must be checked before starting, as well as during any cutting operation. Taking the time to make adjustments to the chain will result in improved cutting performance and prolonged chain life.
Maintaining the guide bar
1.Remove any sawdust from the guide bar, including the groove.
Oil and sawdust combine and emit a burning smell during operation if the blade is not regularly cleaned.
2.Make sure that the oil port is not clogged. Grease the nose sprocket at the tip of the guide bar.
3.Check for oil leakage and loose fastenings, especially those securing the handles and the guide bar.
4.Reverse the guide bar every 8 working hours to ensure uniform wear. Check the guide rails frequently and if necessary remove burrs and square up the rails using a flat file.
Chain Sharpening
Chain File: 3.96mm (5/32”)
Chain Pitch: 9.53mm (3/8”) Chain Gauge: 1.1mm (0.043”)
Sharpen the chain regularly to maintain optimum performance of the saw. Signs of a dull chain are:
•The sawdust becomes powder-like
•Extra force is required to execute a cut
•The cut does not track in a straight line
•Increased vibration
30° |
30° |
LEFT HAND |
|
CUTTERS |
|
|
HAND |
Sharpen each cutter using a round 3.96mm (5/32”) chain file. Keep the file level with the top plate of the tooth. Always use outward strokes and maintain a 30° angle between the chain and file. After sharpening, the cutters must all have the same width and length.
After every 3–4 uses get an authorised repair centre to professionally sharpen your chain. They have the special tools necessary to ensure the correct cutting angles and depths.
TROUBLESHOOTING
Cleaning and storing
•Keep the handles free of grease so that you can maintain a firm grip.
•Clean the device as required with a damp cloth and, if necessary, mild washing up liquid.
•If the chainsaw is not to be used for an extended period of time
then you should remove the chain oil from the tank. Briefly immerse the chain and the cutter rail in an oil bath and then wrap them
in oil paper.
•Ensure that the guide bar cover is in place when storing.
CAUTION! ALWAYS DISCONNECT THE BATTERY BEFORE CLEANING THE CHAINSAW.
CAUTION! NEVER IMMERSE THE UNIT IN WATER OR OTHER LIQUIDS IN ORDER TO CLEAN IT.
CAUTION! STORE THE CHAINSAW IN A SAFE AND DRY PLACE OUT OF THE REACH OF CHILDREN.
Battery protection system
The tool is equipped with the battery protection system, which helps to ensure a long service life.
The output power automatically cuts off during operation when the tool and/or battery are placed under the following situations:
•When the tool is overloaded:
If this occurs, release the trigger switch and remove causes of overload, then pull the switch trigger again to restart.
•When the remaining battery capacity becomes low:
Recharge the battery pack.
Note: The battery protection system does not in any way damage the tool.
Note: The indicated capacity may be lower than the actual level during use or immediately after using the tool.
LED lights do not illuminate on charger
Check the charging adaptor is securely plugged into the wall outlet. Check the battery is firmly connected to the charging cradle.
Check that the charging jack is securely connected to the charging cradle.
The battery has a short run time
Ensure the battery is properly charged. It will take 4-5 charging cycles before the battery
reaches optimum charge and run time.
Sparking visible through the housing air vents
A small amount of sparking may be visible through the housing vents. This is normal and does not indicate a problem.
 Loading...