


CORDLESS GLUE GUN
7.2V Lithium Ion
INSTRUCTION MANUAL SPECIFICATIONS
Input: |
7.2V |
Glue Stick Diameter: |
7.2mm |
Glue Stick Length: |
190mm |
Heating Time: |
15sec |
Working Time: |
45min |
Battery Power: |
1.3Ah Lithium Ion |
Charge time: |
3-5 Hours |
Weight: |
0.38kg |
ozito.com.au
WHAT’S IN THE BOX
Cordless Glue Gun
Glue Stick x 3
Charging Adaptor
GGL-7000

KNOW YOUR PRODUCT
CORDLESS GLUE GUN
1 |
Protective Nozzle Cover |
5 |
7.2V Battery |
2 |
Trigger Flow Control |
6 |
Charging Socket |
3 |
On / Off Button |
7 |
Glue Display |
4 |
LED Indicator Lights |
8 |
Glue Stick Entry |
|
|
|
|
|
|
|
|
|
|
|
|
|
|
|
|
|
|
|
|
|
|
|
|
|
|
|
|
|
|
|
|
|
|
|
|
|
|
|
|
|
|
|
|
|
|
|
|
|
|
|
|
|
|
|
|
|
|
|
|
|
|
|
|
|
|
|
|
|
|
|
|
|
|
|
|
|
|
|
|
|
|
|
|
|
|
|
|
|
|
|
|
|
|
|
|
|
|
|
|
|
|
|
|
|
|
|
|
|
|
|
|
|
|
|
|
|
|
|
|
|
|
|
|
|
|
|
|
|
|
|
|
|
|
|
|
|
|
|
|
|
|
|
|
|
1 |
|
2 |
|
3 |
|
4 |
|
|
5 |
|
6 |
|
7 |
|
|
8 |
||||||
ACCESSORIES |
|
|
|
|
|
|
|
|
|
|
|
|
|
|
|
|
|
|
|||||
9 |
Charging Adaptor |
|
|
11 |
Glue Sticks x 3 |
|
|
|
|
|
|
|
|
||||||||||
10 |
Charging Jack |
|
|
|
|
|
|
|
|
|
|
|
|
|
|
|
|
|
|
||||
9 |
10 |
11 |
SETUP & PREPARATION
1. BATTERY
CAUTION! THE POWER SUPPLY FOR THIS CHARGER
SHOULD BE PROTECTED BY A RESIDUAL CURRENT
DEVICE (RATED AT 30MA OR LESS). A RESIDUAL
CURRENT DEVICE REDUCES THE RISK OF ELECTRIC
SHOCK.
Charging
1 Plug the charging jack into the charging socket on the glue gun.
2Plug the charging adaptor into a power point and switch on.
3 The red light will illuminate to
indicate charging.
Note: Once fully charged, the green light only will be illuminated.
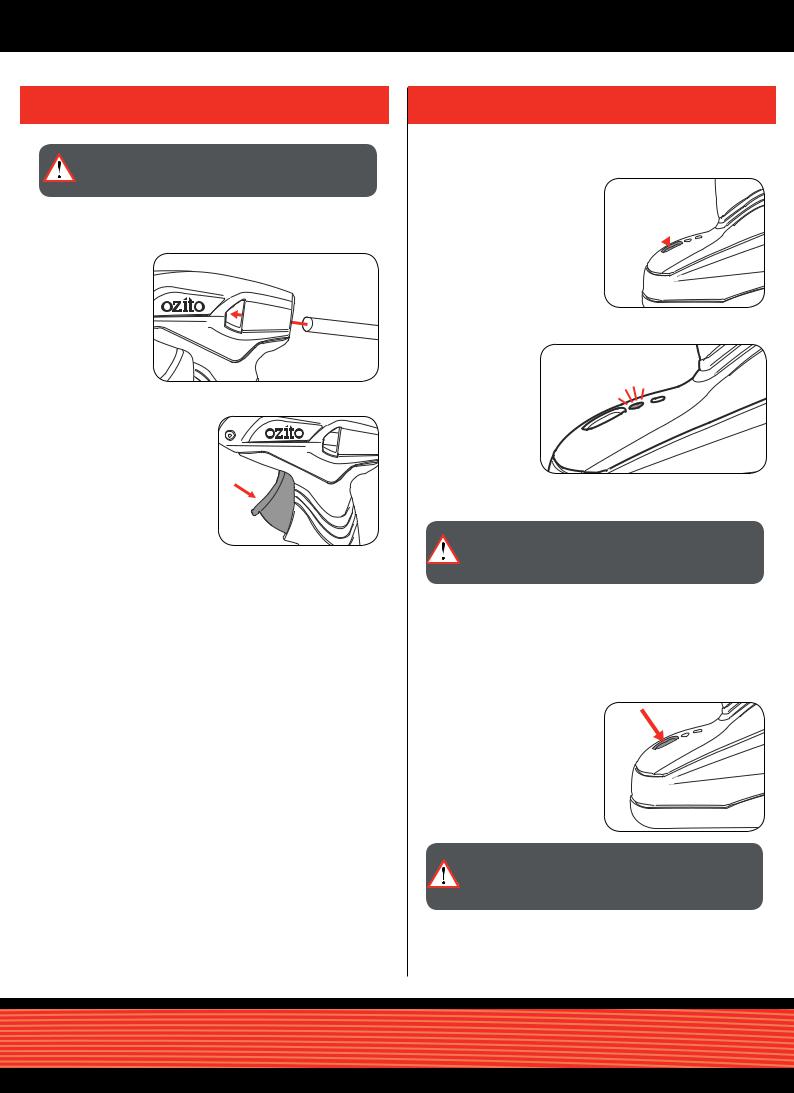
2. LOADING THE GLUE STICK
WARNING! Ensure the tool IS switched off and ALLOWED TO COOL DOWN before performing any of the following TASKS.
Installing the Glue Stick
1Insert the glue stick into the glue stick entry and
slide down gently.
2 Squeeze the trigger flow control multiple times to allow the glue stick to be pushed down.
OPERATION
3. SWITCHING THE GLUE GUN ON
Switching the Glue Gun On
1 Hold the on/off switch down for 2 seconds to start the glue gun.
 2sec
2sec
2The first indicator light will glow red and then green to
indicate the glue gun is on.
Note: Allow the glue gun to heat up before you start operating.
WARNING! The glue gun nozzle and heated glue gun become hot while in use. In the event of accidental skin contact with hot glue, run under cold water immediately.
Switching the Glue Gun Off
1 Press the on/off switch to stop the glue gun.
CAUTION! The protective nozzle will remain hot for a few minutes. Do not store the glue gun directly after use. Allow the nozzle to cool and the glue to solidify.
 Loading...