

Page 1

Instruction Manual
ELECTRIC SKILLET WITH REMOVABLE HINGED LID
READ ALL INSTRUCTIONS BEFORE USING THIS APPLIANCE
Manuel d’Instructions
POÊLE ÉLECTRIQUE AVEC COUVERCLE ARTICULÉ
LIRE TOUTES LES INSTRUCTIONS AVANT D’UTILIZER CET APPAREIL
Manual de Instrucciones
SARTÉN ELÉCTRICO CON TAPA ATICULADA REMOVIBLE
LEA TODAS LAS INSTRUCCIONES ANTES DE USAR ESTE APARATO
M a n u a l d e I n s t r u ç õ e s
PANELA ELÉTRICA COM TAMPA ARTICULADA REMOVÍVEL
LEIA TODAS AS INSTRUÇÕES ANTES DE USAR ESTE APARELHO
MODEL/MODÈLE
MODELO
MODEL/MODÈLE
MODELO
CKSTSKSH12
CKSTSKSH12
Page 2

English-1
IMPORTANT SAFEGUARDS
When using your electric skillet, basic safety precautions should always be followed,
including the following:
1. READ ALL INSTRUCTIONS BEFORE USE.
2. Be sure that handles are assembled and fastened properly.
3. DO NOT touch hot surfaces. Use handles or knobs.
4. To protect against electric shock, do not immerse the temperature controller, cord or plug
in water or other liquids.
5. Unplug the appliance from the outlet when not in use and before cleaning. Allow
appliance to cool before putting on or taking off parts and before cleaning appliance.
6. DO NOT operate any appliance with a damaged cord or plug, or after the appliance
malfunctions, or has been damaged in any manner. Return to an Authorized Service
Station for examination, repair or electrical or mechanical adjustment.
7. The use of accessory attachments not recommended by the appliance manufacturer may
cause injuries.
8. DO NOT use outdoors.
9. DO NOT let cord hang over edge of table or counter or touch hot surfaces.
10. DO NOT place on or near a hot gas or electric burner or in a heated oven.
11. Use extreme caution when moving the appliance if it contains hot oil or any other hot
liquid.
12. Always attach the temperature controller to the appliance first, then plug into the
wall outlet. To disconnect, switch off, remove plug from the wall outlet, then remove the
temperature controller from the appliance.
13. Only use the appliance with the Oster® Temperature Controller.
14. DO NOT use appliance for anything other than its intended use.
15. This appliance is not intended for use by persons (including children) with reduced
physical, sensory or mental capabilities, or lack of experience and knowledge, unless
they have been given supervision or instruction concerning use of the appliance by a
person responsible for their safety. Children should be supervised to ensure that they do
not play with the appliance.
16. Close supervision is necessary when any appliance is used by or near children, or
incapacitated individuals.
THIS UNIT IS FOR HOUSEHOLD USE ONLY
(For 120 & 127 volts with two flat pins only) This appliance has a polarized plug (one
blade is wider than the other). To reduce the risk of electric shock, this plug will fit in a
polarized outlet only one way. If the plug does not fit fully in the outlet, reverse the plug. If it
still does not fit, contact a qualified electrician. DO NOT MODIFY THE PLUG IN ANY WAY.
EXTENSION CORD USE
A short power-supply cord is provided to reduce the risk resulting from becoming entangled
in or tripping over a longer cord. An extension cord may be used if care is exercised in its
use. If an extension cord is used, the electrical rating of the cord must be at least as great
as the electrical rating of the appliance. The extension cord should be arranged so that it will
not drape over the countertop or tabletop where it can be pulled on by children or tripped
over unintentionally.
SAVE THESE INSTRUCTIONS
Page 3

English-2
DESCRIPTION OF THE APPLIANCE
2
3
4
1. Cool-Touch Wide Handles
2. Lid lifting Handle
3. Hinge
4. Removable Glass Lid
5. Probe
6. Temperature Control Knob
7. Quick-Release Latch
5
6
7
1
Page 4

English-3
BEFORE USING YOUR ELECTRIC SKILLET
CONDITIONING OF THE NON-STICK COATED SKILLET:
Before using your new appliance, wash the inside of the skillet with warm, sudsy
water and dry. When washing the skillet, make sure the temperature controller
is removed. Rub a lm of cooking or salad oil all over the non-stick coating on
the inside of the skillet. Remove any excess oil with a cloth or paper towel.
The OSTER® Electric Skillet is now ready for use and it is unnecessary to
condition it again.
OPERATING INSTRUCTIONS
1. Push the temperature controller rmly into its socket found at the side of the appliance.
Plug into the appropriate electrical outlet.
2. Set the temperature you want by turning the knob on the temperature controller. The
indicator light will come on. Set the temperature of your choice opposite the indicator
light. When the light goes off, the chosen cooking temperature has been reached.
During cooking, the light will blink on and off indicating the temperature is being
maintained. Guidance in the choice of temperatures is supplied later in this book.
3. The capacity of your skillet is 3.97 liters / 16.75 cups.
4. It is recommended that you do not cook with the Electric Skillet standing on
temperature sensitive surfaces.
5. For simmering, set the temperature control knob to 150°C/300°F or SIMMER and wait
until the liquid boils. Turn the knob toward the WARM setting. Set the dial to this point
each time SIMMER is specied in a recipe.
6. DO NOT use metal utensils in your Electric Skillet as they may damage the non-stick
coating. Wood or plastic coated spatulas are best. If you use plastic tools, make sure
they are suitable for use on hot surfaces.
7. To remove the temperature controller, rst unplug from the wall outlet, then wrap your
hand around the temperature controller and the quick release latch and squeeze. The
controller will automatically release.
Page 5

English-4
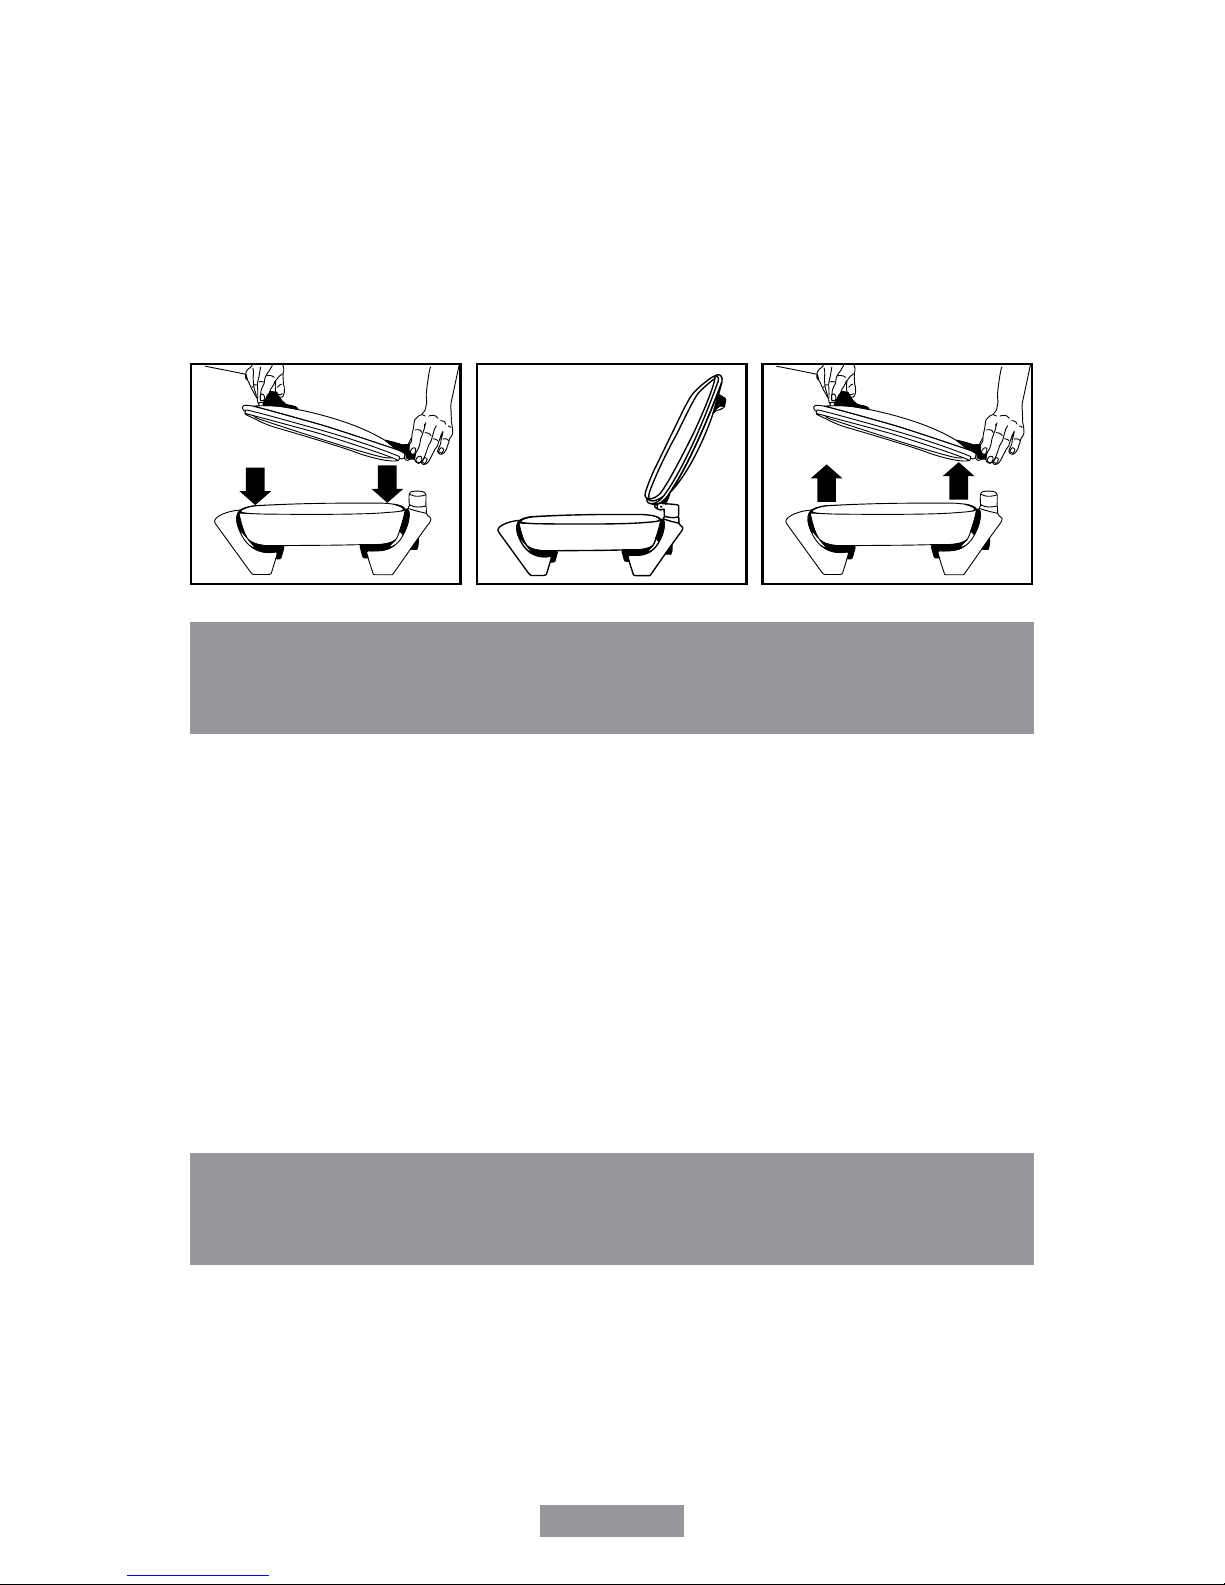
THE HINGED LID WAS SPECIALLY DESIGNED TO MAKE PREPARING AND
SERVING FOOD EASIER.
• To attach the lid, be sure to align the lid hinge so that it slides down onto the matching
heating base hinge. (see Fig. 1).
• When raising and lowering the lid, always use the lid lifting handle (see Fig. 2).
Note: Lid opens away from the steam.
• To remove the lid, use both hands to gently lift up and remove. (see Fig. 3).
Fig. 1 Fig. 2 Fig. 3
CLEANING THE SKILLET
REMOVE THE TEMPERATURE CONTROL KNOB.
Allow the appliance to cool. Wash the skillet and lid with hot sudsy water. You can
totally immerse the skillet or place in the dishwasher. The lid is also dishwasher-safe
providing it is placed in the TOP RACK ONLY. DO NOT PLACE LID UPSIDE DOWN
IN BOTTOM DISHWASHER RACK. To remove stubborn food residues, use a nylon
scourer. NEVER use abrasive powder cleaners or metal scouring pads because these
will damage the non-stick coating. After washing, dry the skillet thoroughly, while paying
particular attention to the electrical socket and pins.
DO NOT USE METAL PADS TO CLEAN ELECTRICAL PINS.
STORAGE AND MAINTENANCE
Allow appliance to cool before storing. Store your Electric Skillet in a dry location,
such as on a tabletop or countertop, or on a cupboard shelf. Wind the electrical cord
into a coil and secure with a twist fastener.
Other than recommended cleaning, no further user maintenance should be necessary.
Page 6

English-5
FOOD TEMPERATURE APPROXIMATE TIME
BACON
175º C / 350º F 5 – 8 Minutes
EGGS (Fried)
150º C / 300º F
3 – 5 Minutes
EGGS (Scrambled)
162º C / 325º F
2 – 3 Minutes
PANCAKES
190º C / 375º F
1 – 3 Minutes
HAMBURGER
(1/2-inch Thick)
190º C / 375º F
Rare
4 – 8 Minutes
Well Done
9 – 12 Minutes
HAM
(1/2-inch – 1/4 -inch Slices)
162º C / 325º F
10 – 20 Minutes
POTATOES
(Country Fried)
(Crispy Brown)
162º C / 325º F
175º C / 350º F
10 – 12 Minutes
10 – 12 Minutes
SAUSAGE
170º C / 340º F
12 – 15 Minutes
FISH
190º C / 375º F
5 – 8 Minutes
PORK CHOPS
(Breaded)
(Brown)
190º C / 375º F
110º C / 225º F
10 – 15 Minutes
30 – 40 Minutes
CUBE OR MINUTE
STEAK
205º C / 400º F
2 – 4 Minutes
LIVER
(Calf’s, Lamb or
Tender Beef)
175º C / 350º F
5 – 10 Minutes
FRENCH TOAST
162º C / 325º F
4 – 6 Minutes
CRUSTY CHICKEN
(Use 4 Tbsp. Oil)
Do Not add water
200º C / 400º F
150º C / 300º F
12 – 18 Minutes
10 – 15 Minutes
COOKING TIME
Page 7

Français-1
PRÉCAUTIONS IMPORTANTES
Lors de l’utilisation d’un appareil électroménager, prenez toujours les précautions de
base, ainsi que celles qui suivent:
1.
LISEZ TOUTES LES INSTRUCTIONS AVANT D’UTILISER.
Assurez-vous que les poignées sont assemblées et fixées correctement.2.
NE3. touchez pas les surfaces chaudes. Utilisez les poignées ou les boutons.
Pour éviter tout risque de choc électrique, ne plongez pas le régulateur de température, le 4.
cordon d’alimentation ou la fiche dans de l’eau ou dans tout autre liquide.
Débranchez l’appareil de la prise murale quand il ne fonctionne pas ou avant de le nettoyer. 5.
Laissez l’appareil refroidir avant d’assembler ou de retirer des éléments ou avant de le nettoyer.
N’utilisez jamais un appareil dont le cordon ou la fiche sont endommagés, ou après que cet 6.
appareil ait connu un mauvais fonctionnement, ou ait été endommagé de quelque manière que
ce soit. Apportez l’appareil à un Centre de Service Agréé Oster® pour toute révision, réparation
ou réglage mécanique ou électrique.
L’utilisation d’accessoires non recommandés par le fabricant peut provoquer des incendies, un 7.
choc électrique ou une blessure.
N’utilisez pas cet appareil en plein air.8.
NE9. laissez jamais le cordon pendre d’une table ou d’un plan de travail, ni ne le laissez en
contact avec des surfaces chaudes.
NE10. le posez jamais sur ou près d’une cuisinière (électrique ou à gaz) ou d’un four chauds.
Soyez très prudent quand vous bougez l’appareil si celui-ci contient de l’huile ou tout autre 11.
liquide chaud.
Reliez toujours le contrôleur de température à l’appareil avant d’insérer la fiche dans la prise 12.
murale. Pour débranchez l’appareil, éteignez l’interrupteur, retirez la fiche de la prise murale,
puis enlevez le régulateur de température de l’appareil.
N’utilisez que le régulateur de température Oster13.
®
.
N’utilisez pas cet appareil pour un autre but que celui pour lequel il a été conçu.14.
Cet appareil n’est pas destiné à être utilisé par des personnes (enfants y compris) dont les 15.
capacités physiques, sensorielles ou mentales sont diminuées, ou qui ne disposent pas
des connaissances ou de l’expérience nécessaire, à moins qu’elles n’aient été formées et
encadrées pour l’utilisation de cet appareil par une personne responsable de leur sécurité. Les
enfants doivent être surveillés pour s’assurer qu’ils NE jouent pas avec l’appareil.
Les enfants et personnes handicapées doivent être surveillés lorsqu’ils utilisent l’appareil ou 16.
que l’appareil est utilisé à côté d’eux.
CET APPAREIL EST CONÇU POUR UN USAGE MÉNAGER UNIQUEMENT.
(Seulement pour appareils de 120 & 127 v avec deux fiches plates) Afin de réduire les risques de
choc électrique, cet appareil fonctionne sur une prise polarisée (une lame est plus large que l’autre).
La fiche ne peut être insérée dans une prise murale polarisée que dans un seul sens ; si la fiche ne
s’insère pas totalement dans la prise, inversez le sens d’insertion. Si la fiche ne s’insère toujours pas,
contactez un électricien qualifié. NE TENTEZ PAS DE FORCER CETE SECURITE. NE TENTEZ
JAMAIS DE MODIFIER LA FICHE ÉLECTRIQUE.
UTILISATION D’UNE RALLONGE
Le cordon électrique fourni est volontairement court afin de réduire les risques d’accrochage ou de
chute inhérents à un cordon plus long. Une rallonge électrique peut être utilisée si les précautions
nécessaires sont respectées. En cas d’utilisation d’une rallonge, la puissance électrique nominale
du cordon doit être au moins équivalente à celle de l’appareil. La rallonge devra être disposée de
façon à ce qu’elle ne pende pas du bord du plan de travail ou de la table (risque qu’un enfant ne
tire dessus ou risque de trébucher).
CONSERVEZ CES INSTRUCTION
Page 8

Français-2
DESCRIPTION DE L’APPAREIL
2
3
4
1. Larges poignées fraîches au toucher
2. Poignée pour soulever le couvercle
3. Charnière
4. Couvercle en verre amovible
5. Sonde
6. Bouton de commande de température
7. Loquet à ouverture rapide
5
6
7
1
Page 9

Français-3
AVANT D’UTILISER VOTRE POÊLE ÉLECTRIQUE
TRAITEMENT DU REVÊTEMENT ANTIADHÉSIF:
Avant d’utiliser votre nouvel appareil, lavez l’intérieur de la poêle à l’eau chaude
savonneuse et essuyez. Quand vous lavez la poêle, assurez-vous que le régulateur
de température est enlevé. Déposez un film d’huile sur toute la surface du revêtement
antiadhésif à l’intérieur de pan. Enlevez l’excès d’huile avec un chiffon ou de l’essuie-tout.
La Poêle Électrique OSTER® est maintenant prête à l’emploi. Il ne sera pas nécessaire de
renouveler cette opération à l’avenir.
MODE D’EMPLOI
Insérez fermement le régulateur de température dans son emplacement situé sur le 1.
côté de l’appareil. Branchez-le dans une prise adéquate.
Sélectionnez la température désirée en tournant le bouton du contrôleur de 2.
température. Le témoin lumineux va s’allumer. Sélectionnez la température de votre
choix en positionnant le bouton en face du témoin lumineux correspondant. Quand le
témoin lumineux s’éteint, la température de cuisson choisie a été atteinte. Au cours
de la cuisson, le témoin lumineux va s’éteindre et s’allumer indiquant ainsi que la
température est maintenue. Ce livret comporte un guide de conseils pour bien choisir
sa température de cuisson.
La capacité de la poêle électrique est de 3.
3.97 litres / 16.75 tasses.
N’utilisez jamais cet Poêle Électrique sur des surfaces sensibles à la chaleur.4.
Pour le maintien au chaud, positionnez le bouton de régulation de la température 5.
sur 150°C/300°F ou MIJOTAGE et attendez l’ébullition. Tournez le bouton vers la
position CHAUD. Mettez le cadran sur cette position chaque fois que MIJOTAGE est
mentionné dans une recette.
N’utilisez jamais d’ustensiles en métal dans votre poêle électrique : ils pourraient 6.
endommager le revêtement antiadhésif. Des spatules en bois ou gainées de plastique
sont les ustensiles idéaux. Si vous utilisez des ustensiles en plastique, assurez-vous
qu’ils sont résistants à la chaleur.
Pour enlever le régulateur de température, saisissez le régulateur avec la main ainsi 7.
que le loquet à ouverture rapide et appuyez. Le régulateur sera automatiquement
éjecté.
Page 10
Français-4
LE COUVERCLE A CHARNIERE A ETE SPECIFIQUEMENT CONÇU POUR
FACILITER LA PREPARATION ET LE SERVICE DES ALIMENTS
• Pour attacher le couvercle, bien aligner sa charnière de façon à ce qu’elle glisse dans
la charnière assortie de la base chauffante (Voir Fig. 1 )
• Toujours utiliser la poignée pour soulever ou baisser le couvercle (voir Fig. 2).
Remarque : Le couvercle s’ouvre du côté opposé de la vapeur.
• Pour enlever le couvercle, utiliser les deux mains pour soulever soigneusement le
couvercle et pour l’enlever. (Voir Fig. 3 )
Fig. 1 Fig. 2 Fig. 3
NETTOYAGE DE LA POÊLE
ENLÈVEMENT DU BOUTON DE RÉGULATION DE TEMPÉRATURE.
DLaissez l’appareil refroidir. Lavez la poêle et le couvercle à l’eau chaude savonneuse.
Vous pouvez complètement immerger la poêle dans l’eau ou la laver dans le lavevaisselle. Le couvercle résiste au lave-vaisselle, à condition que vous le placiez dans le
PANIER SUPÉRIEUR UNIQUEMENT. NE PLACEZ PAS LE COUVERCLE À L’ENVERS
DANS LE PANIER INFERIEUR DU LAVE-VAISELE. Pour retirer les résidus de nourriture
récalcitrants, utilisez un tampon à récurer en nylon. N’utilisez JAMAIS de poudres à
récurer abrasives ou de tampons à récurer en métal: ils endommageraient le revêtement
antiadhésif. Après lavage, essuyez soigneusement la poêle, en faisant particulièrement
attention aux douilles et aux broches électriques. N’UTILISEZ PAS DE TAMPONS EN
MÉTAL POUR NETOYER LES BROCHES ÉLECTRIQUES.
RANGEMENT ET ENTRETIEN
Laissez refroidir l’appareil avant de le ranger. Rangez votre Poêle Électrique dans un
endroit sec, tel qu’un dessus de table ou un plan de travail, ou sur l’étagère d’un placard.
Enroulez le cordon et fixez-le avec une attache.
Aucun entretien autre que les consignes de nettoyage indiquées n’est nécessaire pour
votre appareil.
Page 11
Français-5
ALIMENTS TEMPERATURE LE TEMP
APPROXIMATIF
BACON
175º C / 350º F 5 – 8 Min.
OEUFS (Sur le plat)
150º C / 300º F
3 – 5
Min.
OEUFS (Brouillés)
162º C / 325º F
2 – 3
Min.
CRÊPES
190º C / 375º F
1 – 3
Min.
HAMBURGUER
(1/2-Pouces d’épaisseur
épaisseur 1,27 cm)
190º C / 375º F
BLEU
4 – 8
Min.
Bien CUIT
9 – 12
Min.
JAMBON - TRANCHES
(1/2 Pouce - 1/4 pouce)
(1,25 cm - 0,60 cm)
162º C / 325º F
10 – 20 Minutos
POMMES DE TERRE
(Style campagnard)
(Croustillantes)
162º C / 325º F
175º C / 350º F
10 – 12
Min.
10 – 12
Min.
SAUCISSE
170º C / 340º F
12 – 15
Min.
POISSON
190º C / 375º F
5 – 8
Min.
CÔTES DE PORC
(Panés)
(Grillés à point)
190º C / 375º F
110º C / 225º F
10 – 15
Min.
30 – 40
Min.
CUBE OU
STEAK MINUTE
205º C / 400º F
2 – 4
Min.
FOIE
(Veau, agneau ou boeuf
très tendre)
175º C / 350º F
5 – 10
Min.
PAIN PERDU
162º C / 325º F
4 – 6
Min.
POULET RÔTI
(Utilisez 4 cuillère de
table d’huile)
N’ajoutez pas d’eau
200º C / 400º F
150º C / 300º F
12 – 18
Min.
10 – 15
Min.
TABLEAU DE CUISSION DES ALIMENTS
Page 12

Español-1
PRECAUCIONES IMPORTANTES
Obedezca siempre las precauciones elementales de seguridad cuando vaya a
hacer uso de su Sartén Eléctrico, incluyendo las siguientes:
1.
LEA TODAS LAS INSTRUCCIONES ANTES DE USAR.
2. Verifique que se hayan ensamblado y sujetado los mangos en forma correcta.
3. NO toque superficies calientes. Use mangos o perillas.
4. Como protección contra choques eléctricos, no sumerja el controlador de la temperatura, el
cable o el enchufe en agua u otros líquidos.
5. Desenchufe el electrodoméstico del tomacorriente cuando no esté en uso y antes de limpiar.
Deje que la unidad se enfríe antes de quitar o agregar piezas y antes de limpiarla.
6. NO opere ningún electrodoméstico que tenga el cable o enchufe dañado, si la unidad no
funciona correctamente o se ha dañado de alguna manera. Envíelo a un Centro de Servicio
Oster
®
para que lo revisen, reparen o para un ajuste eléctrico o mecánico.
7. El uso de accesorios no recomendados por el fabricante del electrodoméstico puede causar
heridas.
8. NO lo use al aire libre.
9. NO permita que el cable cuelgue por sobre el mostrador o la mesa ni toque superficies
calientes.
10. NO lo coloque cerca o sobre una estufa a gas o eléctrica o en el horno caliente.
11. Use suma precaución al desplazar el electrodoméstico si contiene aceite caliente o cualquier
otro líquido caliente.
12. Siempre coloque el controlador de temperatura en el electrodoméstico primero, luego
enchúfelo al tomacorriente de la pared. Para desconectar, apáguelo, quite el enchufe del
tomacorriente de la pared y quite el controlador de temperatura del electrodoméstico.
13. SÓLO use el electrodoméstico con el Controlador de Temperatura Oster
®
14. NO use el electrodoméstico para un propósito distinto para el cual fue diseñado.
15. Este dispositivo no ha sido diseñado para ser utilizado por personas (incluidos niños) con
capacidades físicas, sensoriales o mentales disminuidas, o sin experiencia o conocimiento,
a menos que la persona encargada de su seguridad haya supervisado o instruido a dichas
personas respecto al uso del dispositivo. Los niños deberán estar bajo supervisión para
cerciorarse de que no jueguen con el dispositivo.
16. Se requiere estricta supervisión cuando las personas discapacitadas o los niños utilicen cualquier
electrodoméstico o estén cerca de él.
ESTA UNIDAD ES SÓLO PARA USO DOMÉSTICO
(Únicamente para productos de 120 y 127 voltios con dos clavijas planas) Este artefacto
eléctrico cuenta con un enchufe polarizado (una clavija es más ancha que la otra). Para disminuir
el riesgo de descarga eléctrica, este enchufe entrará sólo de una manera en un tomacorriente
polarizado. Si el enchufe no entra por completo en el tomacorriente, inviértalo. Si aún no encaja,
comuníquese con un electricista calificado. NO MODIFIQUE EL ENCHUFE DE NINGUNA FORMA.
CÓMO USAR UN CABLE ELÉCTRICO CORTO
Un cable eléctrico corto se provee para reducir riesgos resultantes de enredarse
o tropezar con un
cordón largo. Un cable de extensión puede usarse con cuidado.
Si el cable de extensión es usado,
la potencia eléctrica marcada en el cable de extensión, debe ser por lo menos igual o mayor a la
potencia eléctrica del aparato. El cable de extensión debe colocarse de manera que no cuelgue
del mostrador o de la mesa, donde pueda ser jalado por niños o donde puede tropezarse con él
accidentalmente.
GUARDE ESTAS INSTRUCCIONES
Page 13

Español-2
DESCRIPCIÓN DE LA UNIDAD
2
3
4
1. Mangos anchos fríos al tacto
2. Mango de tapa
3. Bisagra
4. Tapa de vidrio removible
5. Conector
6. Control de temperatura
7. Traba de apertura rápida
5
6
7
1
Page 14

Español-3
ANTES DE USAR SU SARTÉN ELÉCTRICO
CONDICIONAMIENTO DEL SARTÉN CON RECUBRIMIENTO ANTIADHERENTE
Antes de usar el electrodoméstico nuevo, lave el interior del sartén con agua y jabón tibia
y seque. Antes de lavar el sartén, debe quitar el controlador. Frote una película de aceite
de cocina o para ensalada sobre el recubrimiento antiadherente dentro del sartén. Quite
el exceso de aceite con un paño o toalla de papel.
El Sartén Eléctrico Oster® está ahora lista para usar y no es necesario acondicionarla
nuevamente.
INSTRUCCIONES OPERATIVAS
1. Introduzca el controlador de temperatura rmemente en su enchufe en la parte lateral
del electrodoméstico. Enchufe en el tomacorriente apropiado.
2. Para jar la temperatura deseada gire la perilla del controlador de temperatura. Se
encenderá la luz indicadora. Fije la temperatura de su preferencia en el lado opuesto a
la luz indicadora. Se apagará la luz cuando se ha alcanzado la temperatura deseada.
Durante la cocción, la luz titilará intermitentemente para indicarle que se mantiene la
temperatura. Este libro ofrece una guía para la elección de la temperatura.
3. La capacidad de su Sartén Eléctrico es de 3.97 litros / 16.75 tazas
4. No se recomienda usar el Sartén Eléctrico sobre supercies sensibles a la
temperatura.
5. Para cocinar a fuego lento, coloque la perilla de control de la temperatura en
150°C/300°F o FUEGO LENTO (SIMMER) y espere que el líquido hierva. Gire la
perilla hacia el selector TIBIO (WARM). Coloque la perilla en este punto cada vez que
la receta indique FUEGO LENTO.
6. No use utensilios de metal en su Sartén Eléctrico, ya que pueden dañar el
recubrimiento antiadherente. Se recomienda usar espátulas de madera o plástico. Si
usa utensilios de plástico, verique que sean aptos para supercies calientes.
7. Para remover el controlador de temperatura, primero desenchufe del tomacorriente
de la pared, ponga su mano alrededor del controlador de temperatura, la traba de
apertura rápida y apriete. El controlador se liberará automáticamente.
Page 15

Español-4
LA TAPA CON BISAGRAS FUE DISEÑADA ESPECIALMENTE PARA PREPARAR Y
SERVIR LA COMIDA CON MAYOR FACILIDAD.
• Para colocar la tapa, asegúrese de alinear la bisagra de la tapa de forma que pueda
deslizarse hacia abajo encajando dentro de la bisagra de la base que calienta. (ver Fig.1).
• Cuando levante y baje la tapa, utilice siempre la perilla que eleva la tapa (ver Fig. 2)
Nota: La tapa abre fuera del alcance del vapor.
• Para sacar la tapa, utilice ambas manos para levantarla suavemente y sacarla.
(ver Fig. 3).
Fig. 1 Fig. 2 Fig. 3
CÓMO LIMPIAR EL SARTÉN ELÉCTRICO
QUITE LA PERILLA DE CONTROL DE LA TEMPERATURA
Deje enfriar el electrodoméstico. Lave el sartén y la tapa con agua jabonosa caliente.
Puede sumergir totalmente el sartén o colocarla en el lavaplatos. La tapa también
se puede lavar en el lavaplatos, siempre y cuando la coloque EN EL ESTANTE
SUPERIOR SOLAMENTE. NO COLOQUE LA TAPA DADA VUELTA EN
EL ESTANTE INFERIOR DEL LAVAPLATOS. Para quitar restos de comida
que quedaron adheridos, use una esponja de nylon. NUNCA use polvos abrasivos o
esponjas de metal, porque dañarán el recubrimiento antiadherente. Luego de lavar, seque
el sartén por completo, prestando atención al enchufe eléctrico y pernos. NO USE
ESPONJAS DE METAL PARA LIMPIAR LOS PERNOS ELÉCTRICOS.
ALMACENAMIENTO Y MANTENIMIENTO
Deje enfriar el electrodoméstico antes de guardarlo. Guarde el Sartén Eléctrico en un
lugar seco, por ejemplo sobre la mesa de cocinar o en un estante del armario. Enrosque
el cable eléctrico en una bobina y sujételo con un gancho.
Salvo por la limpieza recomendada, no se requiere ningún mantenimiento especial.
Page 16

Español-5
TIPO DE ALIMENTO TEMPERATURA TIEMPO
APROXIMADO
TOCINO
175º C / 350º F 5 – 8 Minutos
HUEVOS (Fritos)
150º C / 300º F
3 – 5 Minutos
HUEVOS (Revueltos)
162º C / 325º F
2 – 3 Minutos
PANQUEQUES
190º C / 375º F
1 – 3 Minutos
HAMBURGUESAS
(13 mm de Grosor)
190º C / 375º F
Poco Cocida
4 – 8 Minutos
Bien Cocida
9 – 12 Minutos
JAMÓN
(rebanadas de 6 a 13 mm
de grosor)
162º C / 325º F
10 – 20 Minutos
PAPAS
(papas fritas en cubos
estilo desayuno)
162º C / 325º F
175º C / 350º F
10 – 12 Minutos
10 – 12 Minutos
SALCHICHA
170º C / 340º F
12 – 15 Minutos
PESCADO
190º C / 375º F
5 – 8 Minutos
CHULETAS DE CERDO
(empanizadas)
(doradas)
190º C / 375º F
110º C / 225º F
10 – 15 Minutos
30 – 40 Minutos
BISTEC EN CUBOS O
BISTEC DELGADO
205º C / 400º F
2 – 4 Minutos
HÍGADO
(Bife de Ternero,
Cordero o Tierno)
175º C / 350º F
5 – 10 Minutos
TOASTADA FRANCESA
162º C / 325º F
4 – 6 Minuos
POLLO CROCANTE
(Use 4 Cu. de Aceite)
No Agregue Agua
200º C / 400º F
150º C / 300º F
12 – 18 Minutos
10 – 15 Minutos
TIEMPO DE COCCIÓN
Page 17

Português-1
PRECAUÇÕES IMPORTANTES
Ao usar um eletrodoméstico, certifique-se de sempre seguir as seguintes
precauções de segurança:
1.
LEIA TODAS AS INSTRUÇÕES ANTES DE USAR.
Certifique-se de montar o aparelho corretamente.2.
NÃO3. toque nas superfícies quente. Use as alças ou botões.
Como forma de proteção contra choques elétricos, não submergir o controle de temperatura, 4.
o fio e o plugue na água ou em outros líquidos.
Desligue o aparelho da tomada quando o mesmo não estiver sendo usado e antes de limpar. 5.
Deixe o aparelho esfriar antes de tirar ou colocar peças e antes de limpá-lo.
NÃO6. use nenhum eletrodoméstico que esteja com o fio ou plugue danificado, caso o aparelho
não funcionar corretamente ou se estiver danificado de alguma maneira. Leve-o ao Centro de
Serviço Autorizado Oster
®
mais próximo para que o aparelho seja revisado, reparado ou para
que sejam feitos ajustes elétricos ou mecânicos.
O uso de acessórios não recomendados pelo fabricante do eletrodoméstico pode causar 7.
ferimentos.
NÃO8. usar o aparelho ao ar livre.
NÃO9. deixe que o fio fique pendurado sobre um balcão ou mesa nem toque superfícies
quentes.
NÃO10. coloque o aparelho perto ou sobre um fogão a gás ou elétrico ou em um forno quente.
Tenha bastante cuidado ao mover o aparelho caso o mesmo contenha óleo ou qualquer outro 11.
líquido quente.
Antes de ligar na tomada, coloque a unidade de controle de temperatura no aparelho. Para 12.
desligar da tomada, desligue o aparelho, retire o plugue da tomada e em seguida retire a
unidade de controle de temperatura do eletrodoméstico.
Use o aparelho somente com a unidade de controle de temperatura Oster13.
®
.
NÃO14. use este eletrodoméstico para fins que não sejam aqueles aos quais o mesmo foi
desenvolvido.
Este aparelho elétrico não está destinado a ser usado por pessoas (incluindo crianças) cujas 15.
capacidades físicas, sensoriais ou mentais estejam reduzidas ou careçam de experiência
e conhecimento necessários para utilizá-lo, a menos que uma pessoa responsável por
sua segurança tenha supervisionado ou instruído quanto ao uso deste eletrodoméstico. As
crianças deverão estar sob supervisão para garantir que NÃO brinquem com o aparelho
elétrico.
É necessária a estrita supervisão quando se utilize o eletrodoméstico próximo a crianças ou 16.
pessoas incapacitadas.
ESTA UNIDADE DESTINA-SE APENAS PARA O USO DOMÉSTICO.
(Somente para produtos somente para uso em 120 & 127 volts com dois pinos planos) Para
reduzir o risco de descargas elétricas, este aparelho conta com um plugue polarizado (uma ponta é
mais larga que a outra). Como medida de segurança, este plugue entrará somente de uma maneira
em uma tomada polarizada. Se o plugue não encaixar, basta inverter o plugue e colocá-lo ao revés.
Se mesmo assim ainda não encaixar, chame a um eletricista qualificado. DE NENHUMA MANEIRA
TENTE MODIFICAR ESTÁ MEDIDA DE SEGUNÇA.
COMO USAR UM FIO DE EXTENSÃO:
Un cable eléctrico corto se provee para reducir riesgos resultantes de enredarse
o tropezar con un
cordón largo. Un cable de extensión puede usarse con cuidado.
Si el cable de extensión es usado,
la potencia eléctrica marcada en el cable de extensión, debe ser por lo menos igual o mayor a la
potencia eléctrica del aparato. El cable de extensión debe colocarse de manera que no cuelgue
del mostrador o de la mesa, donde pueda ser jalado por niños o donde puede tropezarse con él
accidentalmente.
GUARDE ESTAS INSTRUÇÕES
Page 18

Português-2
DESCRIÇÃO DO APARELHO
2
3
4
1. Alças grandes frias ao tato
2. Alça da tampa
3. Dobradiça
4. Tampa de vidro removível
5. Elemento de contato
6. Unidade de controle da temperatura
7. Trava de fácil abertura
5
6
7
1
Page 19

Português-3
ANTES DE USAR SUA PANELA ELÉTRICA
PREPARANDO A PANELA ELÉTRICA COM REVESTIMENTO
ANTIADERENTE.
Antes de usar o eletrodoméstico pela primeira vez, lave o interior da panela com água
morna e sabão e seque-a. Antes de lavar a panela, retire a unidade de controle de
temperatura. Unte com óleo de cozinha o revestimento anti-aderente dentro da panela.
Remova o excesso de óleo com um pano ou toalha de papel.
Agora sua panela elétrica Oster® já estará pronta para ser usada e não será necessário
untá-la outra vez.
INSTRUÇÕES DE USO
Insira a unidade de controle de temperatura firmemente em seu lugar de encaixe na 1.
lateral do aparelho. Ligue o aparelho na tomada.
Gire o botão para selecionar a temperatura desejada. O luz indicadora acenderá. 2.
Coloque a temperatura selecionada no lado oposto ao da luz indicadora. A luz se
apagará quando a temperatura desejada for alcançada. Durante o cozimento, a luz
piscará de forma intermitente indicando que o aparelho está mantendo-se à mesma
temperatura. Este manual inclui um guia para escolha da temperatura.
A capacidade de sua panela elétrica é de 3.
3,97 litros / 16,75 xícaras.
Não é recomendado usar a Panela Elétrica sobre superfícies sensíveis à temperaturas 4.
altas.
Para cozinhar em fogo lento, coloque o botão da unidade de controle de temperatura 5.
na posição de 150°C/ 300°F ou Fogo Lento (SIMMER) e espere até que o líquido
ferva. Gire o botão para a posição de Morno (WARM). Gire o botão nesta posição toda
vez que a receita indique Fogo Lento.
Não use utensílios de metal para mexer os alimentos na sua Panela Elétrica, pois eles 6.
podem danificar o revestimento anti-aderente. É recomendado o uso de utensílios de
plástico que sejam resistentes ao contato com superfícies quentes.
Para retirar a unidade de controle de temperatura, segure a unidade de controle de 7.
temperatura e a trava com a mão e aperte. A unidade de controle de temperatura se
soltará automaticamente.
Page 20

Português-4
A TAMPA COM DOBRADIÇA FOI ESPECIALMENTE DESENVOLVIDA PARA
PREPARAR E SERVIR A COMIDA MAIS FACILMENTE.
• Para colocar a tampa, certique-se de que a dobradiça da tampa esteja alinhada com
a dobradiça na base para que a mesma possa deslizar para baixo encaixando-se
dentro da dobradica da base. (veja Fig. 1).
• Quando for levantar e abaixar a tampa, use a alça que levanta a tampa (veja Fig. 2).
Observação: A tampa abre fora do alcance do vapor.
• Para retirar a tampa, use ambas mãos para levantá-la com cuidado e retirá-la (veja
Fig. 3).
Fig. 1 Fig. 2 Fig. 3
COMO LIMPAR SUA PANELA ELÉTRICA
RETIRE A UNIDADE DE CONTROLE DE TEMPERATURA.
Deixe esfriar o aparelho. Lave a panela e a tampa com água ensaboada e quente. A
panela pode ser completamente submergida na água ou colocada na lava-louças. A
tampa também pode ser lavada na lava-louças, mas deve ser colocada SOMENTE NA
PRATELEIRA SUPERIOR DA MESMA. NÃO COLOQUE A TAMPA DE CABEÇA PARA
BAIXO NA PARTE DE BAIXO DA MÁQUINA DE LAVARLOUÇAS. Para retirar os
resíduos de alimentos que ficarem grudados na superfície da panela, utilize uma esponja
de nylon. NUNCA utilize sapólio ou palha de aço, pois isso danificaria o revestimento
anti-aderente. Após lavar, seque bem a panela e principalmente o encaixe da unidade de
controle de temperatura e seus pinos. NÃO USE PALHA DE AÇO PARA LIMPAR OS
PINOS ELÉTRICOS.
ARMAZENAMENTO E MANUTENÇÃO
Deixe o aparelho esfriar antes de guardá-lo. Guarde a Panela Elétrica em um local seco,
como por exemplo um balcão ou gabinete da cozinha. Enrole o fio elétrico como uma
bobina e amarre-o com um arame para fios.
Além da limpeza recomendada este eletrodoméstico não requer nenhum tipo de
manutenção especial.
Page 21
Português-5
BACON
175°C/350°F 5 – 8 MIN.
OVOS
(FRITOS)
150°C/300°F 3 – 5 MIN.
OVOS
(MEXIDOS)
162°C/325°F 2 – 3 MIN.
PANQUECAS
190°C/375°F 1 – 3 MIN.
HAMBÚRGUER
190°C/375°F POCO COCIDA
(Com 13 mm de espessura)
4 – 8 MIN.
BIEN COCIDA
9 – 12 MIN.
PRESUNTO
162°C/325°F 10 – 20 MIN.
(Fatias de 6 a 13 mm
de Espesura)
BATATAS
162°C/325°F 10 – 12 MIN.
175°C/350°F 10 – 12 MIN.
SALSICHA
170°C/340°F 12 – 15 MIN.
PEIXE
190°C/375°F 5 – 8 MIN.
CHULETAS DE PORCO
(Milanesa)
190°C/375°F 10 – 15 MIN.
(Douradas)
110°C/225°F 30 – 40 MIN.
BISTECA EM CUBOS
205°C/400°F 2 – 4 MIN.
O BISTECA DELGADO
FÍGADO
175°C/350°F 5 – 10 MIN.
REBANADAS
162°C/325°F 4 – 6 MIN.
FRANGO CROCANTE
200°C/400°F 12 – 18 MIN.
(Use 4 colheres de óleo)
150°C/300°F 10 – 15 MIN.
NÃO ADUCIONAR ÁGUA
(Bife de noviho, cordeiro)
TIPO DE ALIMENTO
TEMPERATURA
TEMPO
APROXIMADO
(Batatas fritas em cubos)
(Douradas e crocantes)
TABELA DE COZIMENTO DOS ALIMENTOS
Page 22

© 2010 Sunbeam Products, Inc. All rights reserved. Distributed by Sunbeam Latin America, LLC,
5200 Blue Lagoon Drive, Suite 470, Miami, FL 33126.
One year limited warranty – please see insert for details.
© 2010 Sunbeam Products, Inc. Tout droit réservé. Distribué par by Sunbeam Latin America, LLC,
5200 Blue Lagoon Drive, Suite 470, Miami, FL 33126.
Une année de garantie limitée – veuillez lire le feuillet sur la garantie pour plus de détails.
© 2010 Sunbeam Products, Inc. Todos los derechos reservados. Distribuido por Sunbeam Latin America, LLC,
5200 Blue Lagoon Drive, Suite 470, Miami, FL 33126.
Garantía limitada de un año – por favor consulte los detalles en el inserto.
© 2010 Sunbeam Products, Inc. Todos os direitos reservados. Distribuído pela Sunbeam Latin America, LLC,
5200 Blue Lagoon Drive, Suite 470, Miami, FL 33126.
Garantia limitada de um ano – para maiores detalhes, consulte o certicado.
Printed in China Imprimé en Chine Impreso en China Impresso na China
P.N. 143002
CBA-051410
SARTÉN ELÉCTRICO OSTER
®
MODELOS: CKSTSKSH12, CKSTSKSH12-013,
LEA EL INSTRUCTIVO ANTES DE USAR EL APARATO
LA SIGUIENTE INFORMACION ES PARA MEXICO
IMPORTADOR: SUNBEAM MEXICANA, S.A. DE C.V.
AV. JUÁREZ No. 40-201,
EX–HACIENDA DE SANTA MÓNICA,
TLALNEPANTLA, ESTADO DE MÉXICO,
C.P. 54050, R.F.C. SME570928G90, TEL. 53660800
PAÍS DE ORIGEN: CHINA
PAÍS DE PROCEDENCIA: CHINA, E.U.A.
CONTENIDO: 1 PIEZA
CARACTERÍSTICAS ELÉCTRICAS
60 Hz 120 V~ 1200 W
 Loading...