

Page 1

User Manual
Manual de
Instrucciones
Oster® Nutrition Center / Centro de Nutrición
MODELS/MODELOS BCSTFP0000, 1791, 1792, 1795 P.N. 140879
Nutrition Center
Centro de Nutrición
Page 2

1
English
IMPORTANT SAFEGUARDS
ADDITIONAL SAFEGUARDS
When using electrical appliances, basic safety precautions shall always be taken,
including the following:
1.
READ ALL INSTRUCTIONS BEFORE USE.
2. Do not touch hot surfaces. Use handles or knobs. Unplug before inserting or
removing parts.
3. To protect against electrical shock, do not immerse cord, plugs, or appliance base
in water or other liquid.
4. This appliance is not intended for use by persons (including children) with reduced
physical, sensory or mental capabilities, or lack of experience and knowledge,
unless they have been given supervision or instruction concerning use of the
appliance by a person responsible for their safety. Children should be supervised
to ensure that they do not play with the appliance.
5. Close supervision is necessary when any appliance is used by or near children, or
incapacitated individuals. This Product is not a toy.
6. Unplug from outlet when not in use or before cleaning or storing. Allow to cool
before putting on or taking off parts, and before cleaning the appliance.
7. Do not operate the appliance with a damaged cord or plug, in the event of a
malfunction, or if it is dropped or damaged in any manner. Return appliance to the
nearest authorized service facility for examination, repair, electrical or mechanical
adjustment.
8. Accessory attachments not recommended by the appliance
manufacturer may result in fire, electric shock or injury to persons. Use only JCS
supplied accessories or replacement parts with this unit.
9. Do not use outdoors.
10. Do not let cord hang over edge of table or counter, or touch hot surfaces.
11. Do not place on or near a hot gas or electric burner, or in a heated oven.
12. Extreme caution must be used when moving an appliance containing hot water or
other hot liquids.
13. To disconnect, push then remove plug from wall outlet.
14. Do not use appliance for other than its intended use.
15. Before serving, be sure food is at a safe temperature.
16. Before serving, unplug cord from wall outlet and remove blade from steam/blend
container. Do not leave cord within child’s reach.
17. Avoid contact with moving parts.
18. Double-blade cutter is extremely sharp. Use caution when removing to clean.
Handle carefully. Grasp top of double-blade cutter to remove.
19. The appliance is intended for processing small quantities of food, and is especially
recommended for preparing baby food. The appliance is intended for preparing up
to 480ml/16 oz. of food at any one time.
Bowl must be in place and locked before replacing double-blade cutter.
20. Do not attempt to defeat the interlock mechanisms.
21. Make sure reservoir lid is in place before operating appliance.
22. Keep hands and utensils away from the cutting blade while chopping food to
reduce the risk of severe injury to persons or damage to the food chopper. A
scraper may be used but only when the food chopper is not running.
23. The appliance does not contain any user serviceable parts. Do not dismantle.
24. Do not move the appliance when in use, when plugged or if it contains hot water.
25. Only use plastic bottles approved for boiling or glass thermo-resistant bottles/containers with this appliance.
26. To prevent electric shock, do not open base.
27. For household use only.
28. Never use the steam function without water in the water reservoir.
29. Sterilizer releases steam through vent openings in lid. To avoid injury, maintain a
safe distance away from vents . Allow to cool before handling. Sterilized water is
hot. Allow to cool before draining.
If you have questions, contacts us at www.osterbaby.com.
SAVE THESE INSTRUCTIONS
Page 3

2
Nutrition Center
English
This appliance must be grounded while in use to protect the operator from
electrical shock. The appliance is equipped with a 3-conductor cord and a 3-prong
grounding-type plug to fit the proper grounding-type receptacle.
CAUTION: To ensure continual protection against the risk of electircal shock con-
nect to properly ground outlet only. If you do not have a grounded outlet as contact
a qualified electrician. Do not attempt to modify the plug in any way. Do not use an
extension cord.
What is Included with Your Oster®Baby Nutrition Center
Important Plug Information
Model # Parts Included Functions
• Oster® Baby Nutrition Center base • Sterilizing
1791 and
BCSTFP0000
Baby Food
Preparation
Center
1792
Baby Food
Preparation
Center
1795
Sterilization
Module
• Steam / blend container • Warming
• Steam / blend lid • Steaming baby food
• Steam / blend screen • Processing baby food
• Stainless steel blade • Steaming with
• Steam / blend base tri-level steam trays
• Water reservoir
• Water reservoir lid
• Motor drive
• Nutrient collector/measuring cup
• Sterilizer lid
• Accessory tray
• Bottle tray
• Sterilizer base
• Warmer holder
• Warmer base
• Tri-level steam trays
• Tri-level steam trays lid
• Food containers (3)
• Food container lids (3)
Extension Cord Use
A short power-supply cord is provided
to reduce the risk resulting from
becoming entangled in or tripping over a
longer cord. An extension cord may be used
if care is exercised in its use. The extension
cord should be arranged so that it will
not drape over the countertop or tabletop
where it can be pulled by children or tripped
over unintentionally. If the extension cord
is used, use only 3-wire extension cords,
which have 3-prong grounding-type plugs
and 3-pole cord connectors that accept the
plug from the appliance. Use only extension
cords having an electrical rating not less than the rating of the appliance. Do not
use damaged extension cords. Examine extension cord before using and replace if
damaged. Do not abuse extension cord and do not yank on any cord to disconnect.
Keep cord away from heat and sharp edges. 2-prong adapter may be used
–sketches B and C– (included).
A B
C
• Oster® Baby Nutrition Center base
• Steaming baby food
• Steam / blend container
• Processing baby food
• Steam / blend lid
• Steaming with
• Steam / blend screen
tri-level steam trays
• Stainless steel blade
• Steam / blend base
• Water reservoir
• Water reservoir lid
• Motor drive
• Nutrient collector/measuring cup
• Sterilizer lid • Sterilizing (models 1791,
BCSTFP0000 or 1792
REQUIRED for functionality)
• Accessory tray
• Bottle tray
• Sterilizer base
Page 4

3
English
Features
Introduction
Congratulations on your purchase of the Oster® Baby Nutrition Center, the
ultimate baby food preparation system that helps caregivers satisfy babies’
nutritional needs from birth to 24 months.
Features and Benefits
• 16oz(480mL)steam/blendcontainer: Prepares up to six 4 oz (120 mL)
servings of baby food per use.
•Automaticshut-off: When steaming, warming or sterilizing cycle is complete,
the appliance changes to stand-by mode and automatically turns off the heating
element.
•Built-insafetyswitch: Modules must be properly assembled to engage the
security devices that allow the appliance to function.
•Largecapacitysterilizer: Sterilizes up to 6 wide or 8 tall bottles and
accessories.
•Modulardesign: Modules are interchangeable in the base and disassemble
for easy storing and cleaning.
•Nutrientrecovery: Nutrient collector cup captures nutrients from foods during
the steaming process. The nutrients can be easily added back to the food during
processing through the lid opening.
•Onesteam/blendcontainer: Steaming and processing without transferring
food allows for less mess and faster food preparation.
• This appliance can be purchased in 3 separate modules. Each module performs
one or more functions listed below:
1.BabyFoodPreparationCenter
(Model1791,BCSTFP0000)
• Sterilizes bottles and accessories
• Warms bottles and baby foods
• Steams with steam/blend container
• Steams with Tri-level steam trays
• Processes baby food and purees
2.BabyFoodPreparationModule
(Model1792)
• Steams with steam/blend container
• Processes baby food and purees
3.SterilizationModule
(Model1795)
• Sterilizes bottles and accessories
•Water-volumebasedoperation: The amount of water used will determine the
cooking, warming and sterilizing time.
Page 5

4
Nutrition Center
English
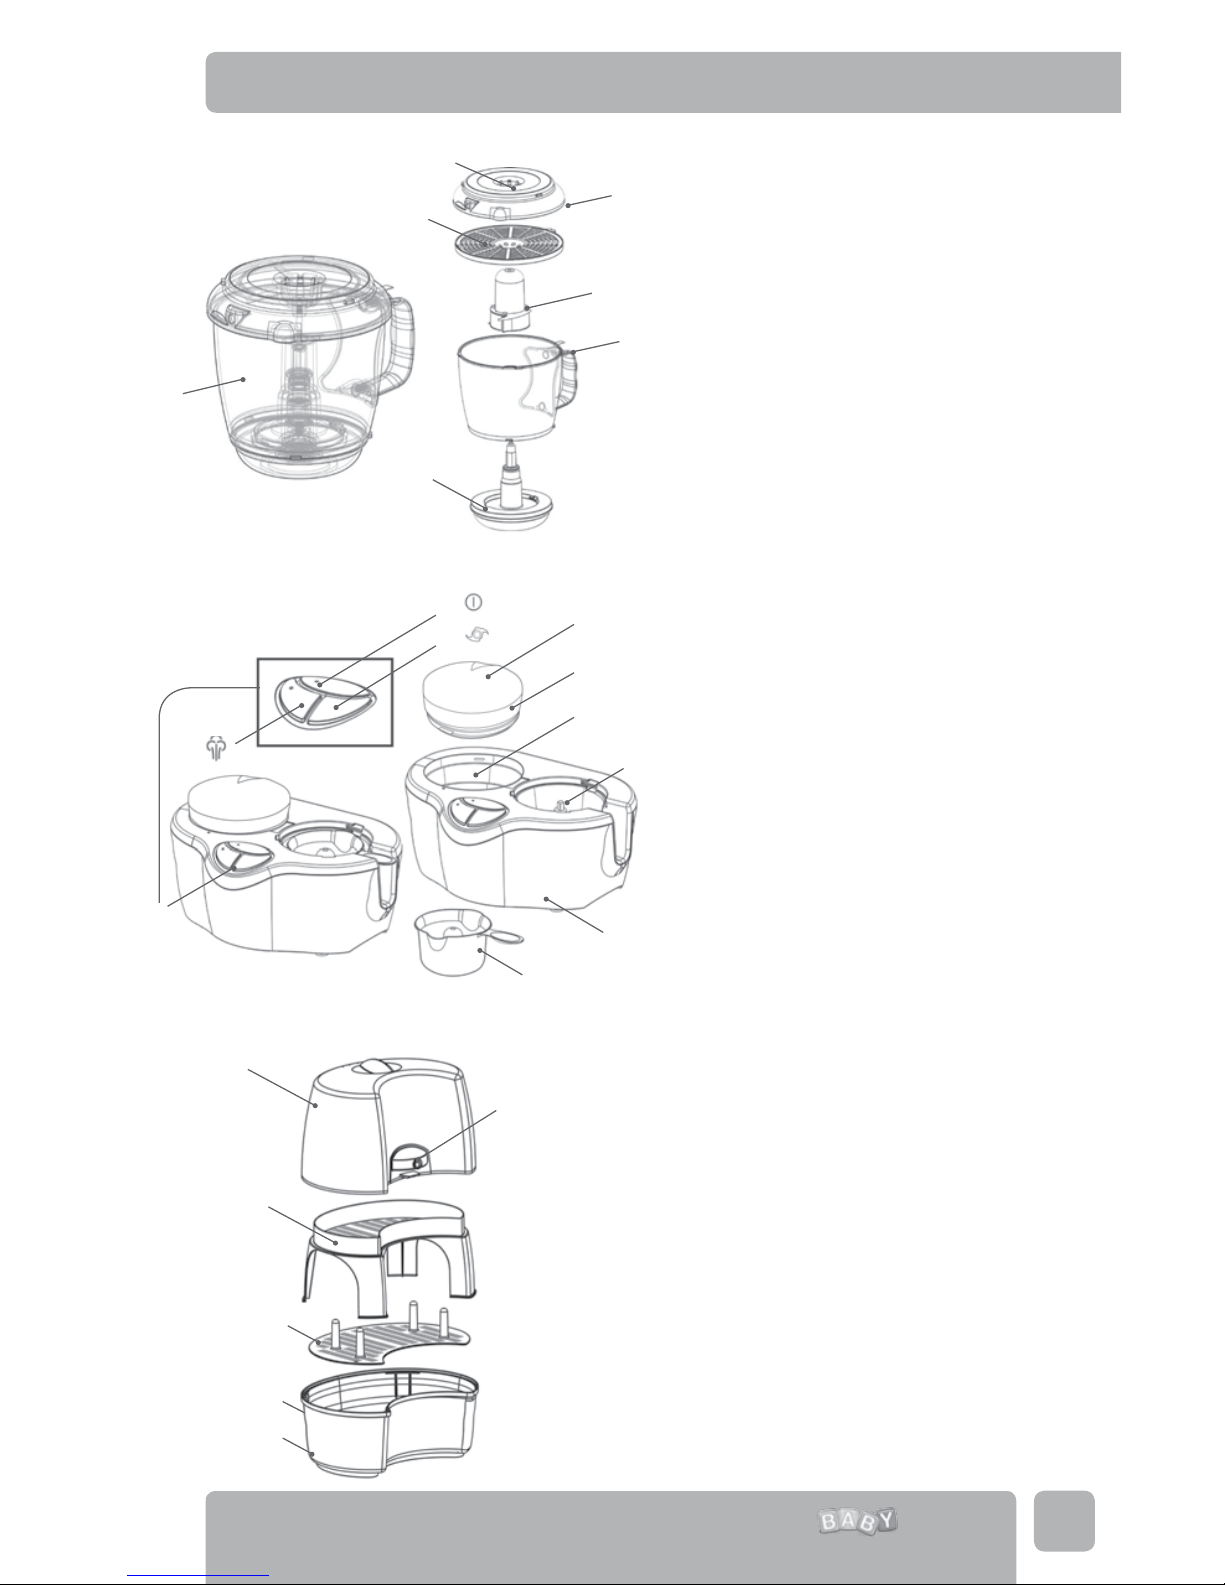
Get To Know Your Oster®Baby Nutrition Center
3
2
4
Steam/Blend
Container Parts
1. Steam/blend container
2. Steam/blend lid
3. Lid opening
4. Steam/blend screen
5. Stainless steel blade
6. Blade Holder
7. Lid release button
Base Parts
8. Oster® Baby Nutrition Center
Base: Not dishwasher safe
9. Control panel (see close up)
10. On/Off button and power light
11. Steam button and steam light
12. Pulse button
13. Water reservoir
14. Water reservoir lid
15. Steam guide
16. Motor drive
17. Nutrient collector/measuring cup
Sterilizer Parts
18. Sterilizer lid
19. Accessory tray
20. Bottle tray
21. Sterilizer base
22. Drain plug (on back of the
sterilizer base)
23. Steam entry
5
7
1
6
10
14
12
15
13
11
16
9
8
17
18
23
19
20
21
22
Page 6

5
English
24a
Warmer Parts
24. Warmer (assembled)
24a. Warmer holder
24b. Warmer base
25. Warmer steam entry
24b
24
25
27
26
Tri-level
Steamer Parts
26. Tri-level steam trays (3)
27. Tri-level steam trays lid
29
28
Storage
Container Parts
28. Food containers (3)
29. Food container lids (3)
Page 7

6
Nutrition Center
English
Before First Use
1. Make sure the appliance is turned off and the power cord is unplugged.
2. Clean ALL PARTS (see “Cleaning and Maintenance”).
• NEVERIMMERSETHESTEAM/BLENDBASEORAPPLIANCEBASEINANYLIQUIDOR
PLACEINTHEDISHWASHER.
•CAUTION:THEBLADESAREEXTREMELYSHARP.BECAREFULWHENHANDLING
DOUBLEEDGECUTTERBLADES.
Assembling the Steam/Blend Container
Before using the steam/blend container to steam or process food, make sure the
steam/blend lid, steam/blend screen, stainless steel blade and steam/blend base are
securely assembled.
Opening and Closing the Steam/Blend Container Lid (1)
1. To open, press and hold the lid release button (7), and twist the steam/blend lid
(2) from locked
to unlocked .
2. To close, twist from unlocked
to locked until the notch on the lid release
button (7) engages with the slot in the tab on steam/blend lid (2) and the lid is
secure.
* The Steam/blend screen must be installed for the lid to assemble to the
steam/ blend container (see “Attaching and Removing the Steam/blend
Screen” instructions below).
* The Steam/blend screen is not required when steaming with the tri-level
steam trays (see “Steaming with the Tri-Level Steam Trays” instructions for
assembling and operating this module).
Attaching and Removing the Steam/Blend
Screen (4)
1. To remove, pull the steam/blend screen (4) tab away from steam/blend lid.
2. To attach, align the center of the steam/blend screen (4) with the metal rod on
the bottom of the steam/blend lid (2). Align the steam/blend screen tab between
the two tabs on the steam/blend lid. Press the tab on the screen down until it
clicks into the steam/blend lid (2).
3. For maximum performance, make sure that the steam channels are well adjusted. Remove vapor channels to thoroughly clean. Once cleaning is complete
be sure to securely affix channels back in place.
Attaching and Removing the
Stainless Steel Blade (5)
1. Once the steam/blend lid (2) is removed, the stainless steel blade (5) can be
easily dropped onto the center column in the steam/blend container (1)
for use. Place stainless steel blade axel on bottom part of vaporizer/processor jar
and turn it until it is tightly fitted with the blade in the closed position.
2. The stainless steel blade (5) is easily removed by pulling it from the steam/
blend container (1).
CAUTION: THE BLADE IS SHARP. HANDLE CAREFULLY FROM THE TOP OF
THE BLADE.
Page 8

7
English
IMPORTANT:
• Bottles, accessories, toys and other objects should
be cleaned before sterilizing.
• This sterilizer does not sterilize up to clinical
standards.
• Place the appliance on a at and stable surface.
• Make sure the appliance and power cord are out
of children’s reach.
• Ensure drain plug is secured to prevent leaking
during sterilizing.
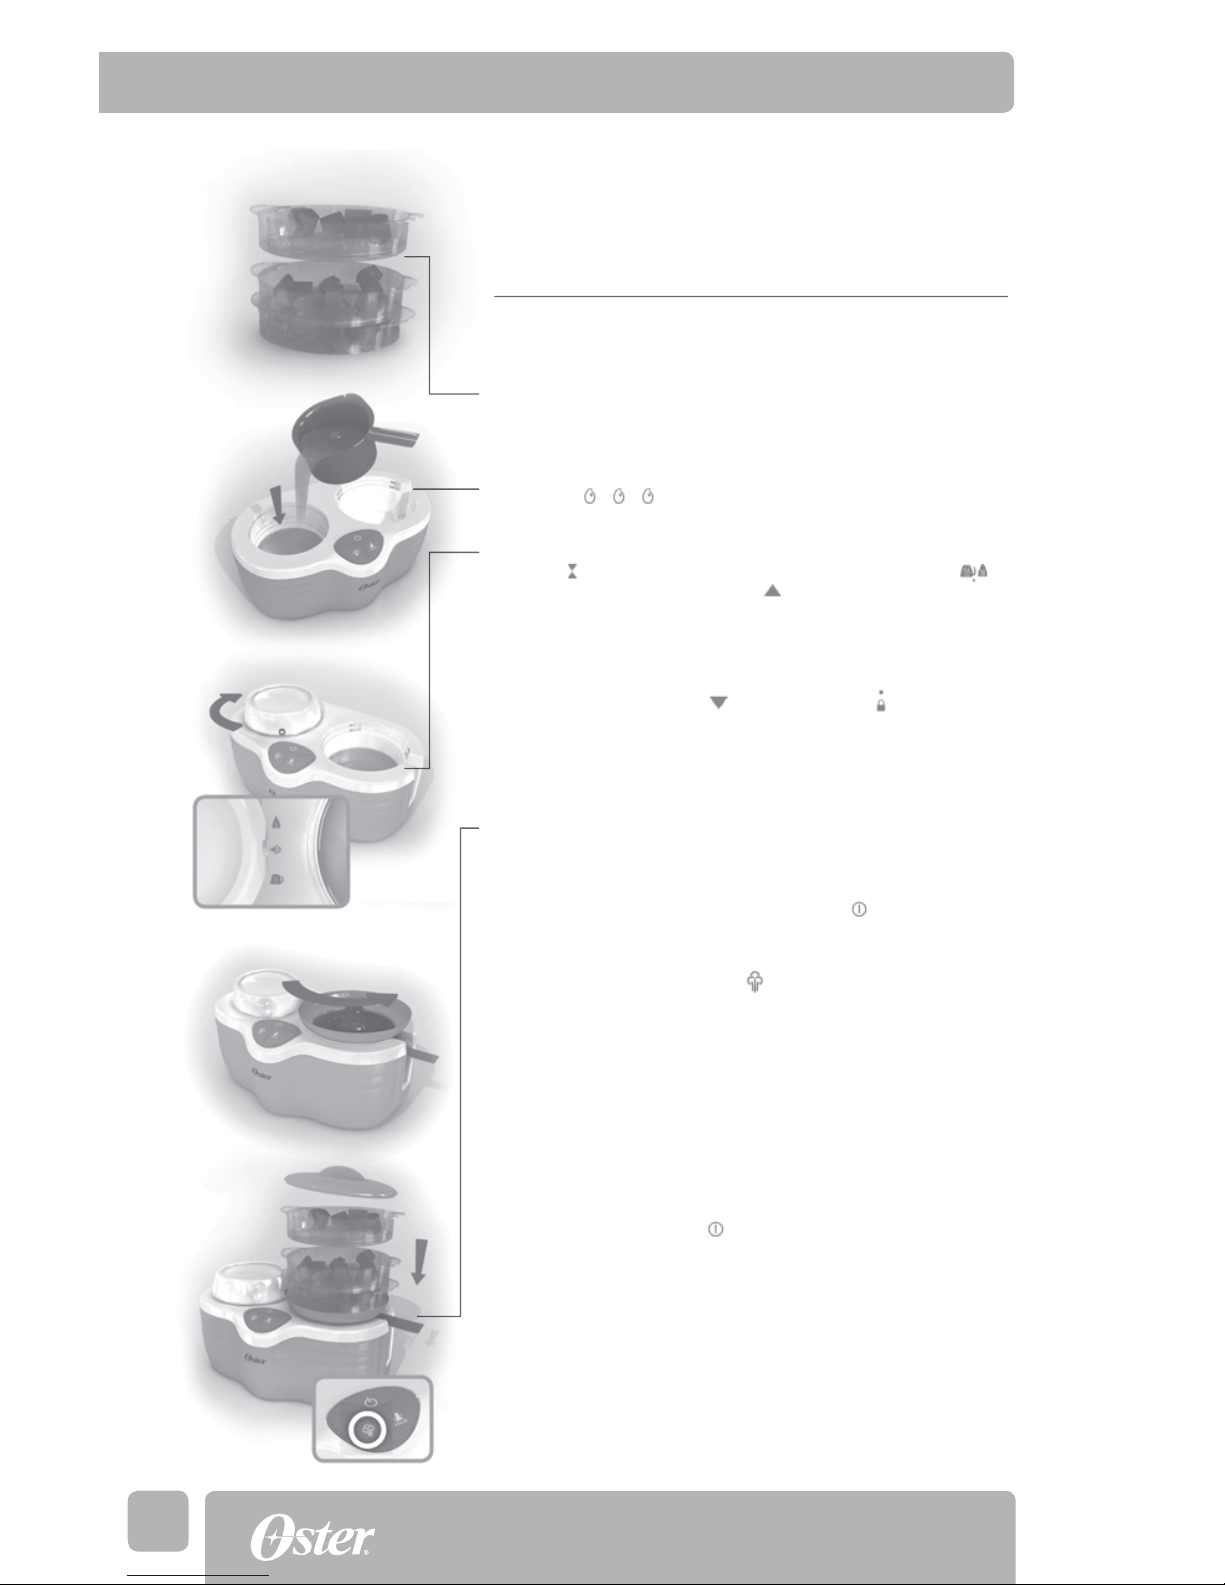
1. Fill the water reservoir (13) with filtered and
distilled water to water level 3.
2. Lock the water reservoir lid (14) into place on
the water reservoir (13) by twisting the double
arrow icon counterclockwise until the sterilizer
icon is aligned with the arrow at the base.
3. Place the bottle tray (20) into the sterilizer base (21).
* Place cleaned baby bottles upside down onto the
bottle tray (20).
4. Place the accessory tray (19) over the bottles, onto
the top interior edge of the sterilizer base (20).
* Place accessories disassembled on top of the
accessory tray (19).
5. Cover with the sterilizer lid (18), slide sterilizer
towards the Oster® Baby Nutrition Center base
until the sterilizer steam entry (23) engages with
the water reservoir steam guide (15).
6. Plug the power supply cord into an electrical outlet
and press the on/off button (10).
* A 1-second beep and power light will indicate the
Oster® Baby Nutrition Center is on.
7. Press the steam button
(11).
* A 1-second beep and illuminated steam light will
indicate STERILIZING has begun. Sterilizing can
be stopped at any time by pressing the
steam button (11).
WARNING: During Steaming, the sterilizer
releases steam through the steam vent holes on
the top of the sterilizer lid. To avoid injury, keep
clear of the steam.
8. STERILIZING is complete when a 3 second beep
has sounded and the steam light turns off. The
Oster® Baby Nutrition Center appliance is now in
stand-by mode and the heating element is off.
9. Press the on/off button
(10).
* The power light turns off, indicating that the
Oster® Baby Nutrition Center is off.
10. Remove sterilized bottles and accessories as
required for feeding. WARNING: Parts are hot after
sterilizing. Allow sufficient time for the sterilizer lid,
bottles and accessories to cool before handling or
use oven mitts to handle immediately.
11. Remove the drain plug (22) located on the bottom
of the sterilizer base (21) to release excess
condensation after sterilizing. WARNING: Sterilized
water is hot. Allow water to cool before draining.
Sterilizing
Page 9

8
Nutrition Center
English
IMPORTANT:
• Parts and accessories are for use with this appliance
only. Parts, including the food container lid, are not to
be boiled or microwaved.
• Place the appliance on a at and stable surface.
• Make sure the appliance and supply cord are out of
children’s reach.
1. Fill nutrient collector/measuring cup (17) with filtered
and distilled water to the recommended water level
(See table on page 13) and pour it into the water reservoir (13). Fill marks are located on the inside of the
base of the container.
WARNING: Do not overfill water reservoir. The bottle
or food container may be heated too long and the
food may be too hot for feeding.
2. Lock the water reservoir lid (14) into place on
the water reservoir (15) by twisting the double
arrow icon clockwise until the blend/warming
icon is aligned with the arrow at the base.
3. Lock the warmer (24) into place over the motor drive
(16) by twisting the arrow on the warmer (24) from
unlocked
to locked .
* Make sure the warmer steam entry (25) is fully
engaged with the water reservoir lid steam guide (16).
4. Place the bottle or food container in the center of the
warmer (24).
* Place food container lid (29) on container to
prevent food spills during warming.
5. Plug the power supply cord into an electrical outlet
and press the on / off button
(10).
* A 1-second beep and illuminated power light will
indicate the Oster® Baby Nutrition Center is on.
6. Press the steam button
(11).
* A 1-second beep and illuminated steam light will
indicate that WARMING has begun.
WARNING: During WARMING, the warmer
releases steam through the interior vent holes in
the warmer holder. Keep clear of the steam during
Warming to avoid injury.
* WARMING is complete when a 3 second beep has
sounded and the steam light turns off. The Oster®
Baby Nutrition Center is now in stand-by
mode and the heating element is off.
7. Press on/off button
(10).
* The power light turns off, indicating that the
Oster® Baby Nutrition Center is off.
8. Remove the bottle or food container for feeding.
WARNING: Bottle and food container are hot after the
WARMING cycle. Allow sufficient time for the bottle or
food container to cool before handling or use oven
mitts to handle immediately.
* Shake bottle or mix food thoroughly to ensure even
temperature.
* Test the temperature of the food before feeding.
If food is not warm, then operate for another
WARMING cycle.
Warming
Page 10

9
English
PREPARING BABY FOOD AND PUREES
Steaming with the Steam/Blend Container
IMPORTANT:
• Place the appliance on a at and stable surface.
• Make sure the appliance and supply cord are out
of children’s reach.
• Make sure the nutrient collector/measuring cup
(17) is in place over the steam/blend base motor
drive (16) to catch all the nutrients that are
released when the food is steaming. This also
protects the motor drive (16) from spills.
1. Assemble the steam/blend container (1)
(See “Assembling Steam/Blend Container”
instructions).
2. Before steaming and processing, wash all food
thoroughly. For best results, cut fruits,
vegetables and meats into approximately 1-inch
(2 cm) cubes.
3. Assemble the steam/blend container screen
(4) and lid (2) (See attaching and Removing
the Steam/Blend Screen and Attaching and
Removing Steam/Blend Lid).
4. Fill the assembled steam/blend container (1)
with 1cm (1inch) chopped food cubes.
(Note: Can use food processor or chop by hand.)
5. Depending on the type of food to be steamed,
fill the water reservoir (13) to the recommended
water level 1
2 3 . (See chart, page 14). Fill
marks are located on the inside of the base of
the container.
6. Lock the water reservoir lid (14) into place on the
water reservoir (13) by twisting the double arrow
icon clockwise until the blend/warming icon
is aligned with arrow at the base.
7. Place the nutrient collector/measuring cup (17)
over the steam/blend motor drive (16) to catch
the nutrients that release when the food is
steaming.
8. Once the lid (2) is locked into position, ip the
steam/blend container upside down.
9. Lock the steam/blend assembly into place over
the motor drive (16) by twisting the arrow
on
the steam/blend lid (2) from unlocked
to locked
The steam/blend assembly is now locked into
position for STEAMING.
10. Plug the power supply cord into an electrical
outlet and press the on/off button (10).
* When you hear a 1-second beep and the
power light turns on, indicating the appliance
is on.
11. Press the steam button (11).
* A 1-second beep and steam light will indicate
STEAMING has begun. WARNING: During
STEAMING, steam releases through the
steam outlet in the steam/blend lid.
Keep clear of the steam to avoid injury.
* STEAMING is complete when a 3 second
beep has sounded and the steam light turns
off. Time varies depending on food and
water level.
* The Oster® Baby Nutrition Center is now
in stand-by mode and the heating element is
off.
12. Press on/off button (10).
* The power light turns off indicating that the
Oster® Baby Nutritrion Center is off.
13. The food is now ready to serve or process (See
instructions in the “How to Process with the
Steamer/Processor Jar” section)
WARNING: Test the temperature of the food
before feeding. If food is not cooked, then cook
for another STEAMING cycle.
Page 11

10
Nutrition Center
English
IMPORTANT:
• Place the appliance on a at and stable surface.
• Make sure the appliance and supply cord are out of
children’s reach.
• To process food that does not require cooking, follow
the PROCESSING steps only, beginning at step 4.
1. Remove the steam/blend container from the Oster
®
Baby Nutrition Center base (8).
• Twist handle from the locked
to unlocked until
steam/blend lid (2) arrow
aligns with unlocked .
2. Carefully remove the nutrient collector/measuring
cup (17) from the motor drive (16) and set aside.
WARNING: The liquid may be hot. Be careful when
handling.
3. Flip the steam/blend container (1) so the steam/blend
lid (2) is on top.
4. Lock steam/blend assembly into place over the
motor drive (16) by twisting from unlocked
to
locked
aligning the arrow on the steam/blend
container (1) to the unlocked
. The steam/blend
assembly is now locked into position for
PROCESSING.
5. Slowly pour the contents of the nutrient collector/
measuring cup (17) back into the steam/blend
container (1) through the lid opening (3) on the
steam/blend lid (2). WARNING: Liquid nutrients may
be hot. Use caution when handling.
• To achieve desired consistency, adjust the amount
of liquid you add to the baby food from the
nutrient collector/measuring cup (17).
6. Press the pulse button
(12) to process the food to
desired consistency.
• Food is now ready to be served.
IMPORTANT:
Carefully remove the blade before serving food.
• Use the food containers (28) to store leftovers.
• To reheat, follow the WARMING instructions.
WARNING:
Food container and lid are not microwave-safe.
PREPARING BABY FOOD AND PUREES
Processing with the Steam/Blend Container
Page 12
11
English
PREPARING BABY FOOD AND PUREES
Steaming with the Tri-Level Steam Trays
IMPORTANT:
• Place the appliance on a at and stable surface.
• Make sure the appliance and supply cord are out
of children’s reach.
• Make sure to place the nutrient collector/
measuring cup (17) over the motor drive (16) to
catch the nutrients that release when the food
is steaming. This also protects the motor drive
(16) from spills.
1. Before steaming, wash foods thoroughly. For best
results, cut fruits, vegetables and meats into
approximately 1-inch (2.5 cm) cubes.
2. Fill each tri-level steam tray (26) with chopped
foods.
* If steaming a variety of foods at one time,
place meats and fish in the lower trays and
fruits and vegetables in the upper trays.
3. Depending on the type of food to be steamed, fill
the water reservoir (13) to the suggested water
level 1
2 3 (See chart on page 13). Fill marks are
located on the inside of the base of the container.
4. Lock the water reservoir lid (13) into place on the
water reservoir (15) by twisting the double arrow
icon
clockwise until the blend/warming icon
is aligned with the arrow
at the base.
5. Place the nutrient collector/measuring cup (17)
over the motor drive (16) to catch the nutrients
that release when the food is steaming.
6. Remove steamer/processor grill and adjust
steamer/processor jar cover (2) over the motor
base turning arrow
from the open to the
closed position.
* The steamer/processor grill is not necessary
when steaming with the Tri-Level Trays. (See
instructions in the “How to Place and Remove
the Steamer/Processor Grill” section)
7. Firmly place the tri-level steam trays (26) filled
with food on top of the steam / blend lid (2),
stacking them on top of each other.
8. Cover with the tri-level steam trays lid (27).
9. Plug the power supply cord into an electrical
outlet and press the on/off button
(10).
* A 1-second beep and illuminated power light
will turn on, indicate the Oster
®
Baby
Nutrition Center is on.
10. Press the steam button
(11) .
* A 1-second beep and illuminated steam light
(12), indicate STEAMING has begun.
WARNING: During STEAMING, steam
releases through the steam outlet in the steam/
blend lid. Keep clear of the steam to avoid
injury.
* STEAMING is complete when a 3 second beep
is sounded and the steam light turns off. Time
varies depending on food and water level.
* The Oster
®
Baby Nutrition Center is now
in stand-by mode and the heating element
is off.
11. Press on/off button
(10).
* The power light turns off, indicating the Oster
®
Baby Nutrition Center is off.
12. Serve as finger food or prepare baby food or
purees using the processor (See “Processing with
the Steam/Blend Container”).
WARNING: Steam/blend container is hot after
STEAMING. Allow sufficient time for the steam/
blend container to cool or use oven mitts to handle
immediately.
WARNING: Test the temperature of the food
before feeding. If food is not cooked, then cook
for another STEAMING cycle. Test again before
serving.
Page 13

12
Nutrition Center
English
Water Level Guide
Steaming with the steam/blend container
Fruits
Fruits
Vegetables
Vegetables
Warming
Sterilization
Steaming
Processing (Pulse function only)
Chicken
Chicken
Level 3
Level 3
2 – 20 sec. in total (e.g. 4 pulses x 5 sec.)
Level 3
Level 3
5 - 20 min
Meat
Meat
Level 3
Level 3
Fish
Fish
Steaming with the tri-level trays*
Approximate Operating times (For reference only)
* If combining more than one type of food, use highest water level input.
FoodType WaterLevel
FoodType WaterLevel
Procedure Approximatetime
Warming
Bottles 8 oz
(236 mL)
Room
Room
1oz / 30mL
2oz / 60mL
1oz / 30mL
2oz / 60mL
Refrigerated
Refrigerated
Food 8 oz
(236 mL) (in
food container
ONLY)
Sterilizing
Tall bottles (Max 8)
8oz / 236mL
Wide Bottles (Max 6
) 8oz / 236mL
1oz / 30mL
1oz / 30mL
20 min
2oz / 60mL
2oz / 60mL
5 - 15 min
Item Temperature WaterLevelInput
Item WaterLevelInput
236ml /8oz
236ml /8oz
Page 14

13
English
Cleaning and Maintenance
1. Always make sure the appliance is off and unplugged from the electrical outlet
before cleaning.
• Disassemble all parts.
• Clean the steam/blend base and Oster® Baby Nutrition Center base
with a soft, damp cloth.
WARNING:THESTEAM/BLENDBLADEHOLDERANDOSTERBABY
NUTRITIONCENTERBASEARENOTDISHWASHER-SAFEORWATERPROOF.
NEVERIMMERSEINANYLIQUID.
• Wash the following parts on the top shelf of the dishwasher:
- Steam/blend container
- Steam/blend lid
- Steam/blend screen
- Blade holder
- Nutrient collector/measuring cup
- Tri-level steam trays and lid
- Food containers and lids
• Please hand wash the following parts:
- Stainless steel blade
- Sterilizing lid
- Sterilizing base
- Warmer holder and warmer base
- Water reservoir lid
- Bottle tray
- Accessory tray
2. Additional cleaning:
• Once a month run the unit on the steam cycle with the jar in plase. Use
filtered water and 30 ml (1 oz.) of lemon juice. This will help clean out any
deposits in the steaming unit. Wash and wipe units fully after steam
cleaning cycle.
3. We suggest storing the Oster® Baby Nutrition Center on a dry counter or
kitchen tabletop for easy access.
The bottle sterilizing module can be conveniently placed in the baby’s room or
kitchen, depending on your needs.
Page 15

14
Nutrition Center
English
Oster® Baby Nutrition Center Troubleshooting Chart
• Oster® Baby Nutrition Center is ready for use. Start
STEAMING, WARMING, STERILIZING or PROCESSING.
• To put the appliance in stand-by mode, or to turn power
off, press the power button. Power light will turn off.
Oster® Baby Nutrition Center
beeps once and power light
turns on.
In STEAMING, WARMING or
STERILIZING mode:
You hear 3 beeps and the
steam light turns off or is
blinking.
• Steamer, warmer, or sterilizer module is not properly
assembled.
• See “Sterilizing”, “Warming” or “Processing Baby
Food and Purees” instructions to properly engage
module with the base, then follow instructions to
operate the module.
• The STEAMING, WARMING or STERILIZING cycle is
complete.
• Water Reservoir is empty; rell with water according
to the recipe, then follow instructions to operate the
module.
In STEAMING, WARMING or
STERILIZING mode:
You hear 1 long beep and the
steam light turns off.
At start of the PROCESSING
mode, you hear 3 beeps.
• Processor module is not properly assembled.
• See “Processing Baby Food and Purees” instructions
to properly engage module with the base, then follow
instructions to operate the module.
Situation Solution
While on Sterilization mode,
the processing function does
not turn on.
• The Oster® Nutrition Center is designed to operate
a single function at a time. While sterilizing, the pulse
function cannot be used to process food.
Troubleshooting
Page 16

15
English
1 Year Limited Warranty
Sunbeam Products, Inc., doing business as Jarden Consumer Solutions, or if
in Canada, Sunbeam Corporation (Canada) Limited, doing business as Jarden
Consumer Solutions (collectively “Sunbeam”) warrants that for a period of one
year from the date of purchase, this product will be free from defects in material
and workmanship. Sunbeam, at its option, will repair or replace this product or
any component of the product found to be defective during the warranty period.
Replacement will be made with a new or remanufactured product or component. If
the product is no longer available, replacement may be made with a similar product of equal or greater value. This is your exclusive warranty.
This warranty is valid for the original retail purchaser from the date of initial retail
purchase and is not transferable. Keep the original sales receipt. Proof of purchase
is required to obtain warranty performance. Sunbeam dealers, service centers, or
retail stores selling Sunbeam products do not have the right to alter, modify or any
way change the terms and conditions of this warranty.
This warranty does not cover normal wear of parts or damage resulting from any
of the following: negligent use or misuse of the product, use on improper voltage
or current, use contrary to the operating instructions, disassembly, repair or alteration by anyone other than Sunbeam or an authorized Sunbeam service center.
Further, the warranty does not cover: Acts of God, such as re, ood, hurricanes
and tornadoes.
What are the limits on Sunbeam’s Liability?
Sunbeam shall not be liable for any incidental or consequential damages caused
by the breach of any express, implied or statutory warranty or condition.
Except to the extent prohibited by applicable law, any implied warranty or condition of merchantability or fitness for a particular purpose is limited in duration to
the duration of the above warranty.
Sunbeam disclaims all other warranties, conditions or representations, express,
implied, statutory or otherwise.
Sunbeam shall not be liable for any damages of any kind resulting from the purchase, use or misuse of, or inability to use the product including incidental, special,
consequential or similar damages or loss of profits, or for any breach of contract,
fundamental or otherwise, or for any claim brought against purchaser by any other
party.
Some provinces, states or jurisdictions do not allow the exclusion or limitation of
incidental or consequential damages or limitations on how long an implied warranty lasts, so the above limitations or exclusion may not apply to you.
This warranty gives you specific legal rights, and you may also have other rights
that vary from province to province, state to state or jurisdiction to jurisdiction.
How To Obtain Warranty Service
In the U.S.A.
If you have any question regarding this warranty or would like to obtain warranty
service, please call 1 877-777-5650 or visit www.osterbaby.com and a convenient
service center address will be provided to you.
In Canada
If you have any question regarding this warranty or would like to obtain warranty
service, please call 1 800-667-8623 and a convenient service center address will be
provided to you.In the U.S.A., this warranty is offered by Sunbeam Products, Inc
located in Boca Raton, Florida 33431. In Canada, this warranty is offered by Sunbeam Corporation (Canada) Limited, located at 5975 Falbourne Street, Mississauga,
Ontario L5R 3V8.
PLEASEDONOTRETURNTHISPRODUCTTOANYOFTHESEADDRESSESORTO
THEPLACEOFPURCHASE.
Page 17

16
Nutrition Center
English
Page 18

17
English
PRECAUCIONES IMPORTANTES
RECOMENDACIONES ADICIONALES
Al usar aparatos eléctricos se deben tomar las siguientes precauciones básicas de
seguridad:
1. LEA TODAS LAS INSTRUCCIONES ANTES DE USAR.
2. No toque superficies calientes. Use las manijas o las perillas. Desenchufe antes de
insertar o retirar piezas.
3. Para protegerse contra descargas eléctricas, no sumerja el cable, los enchufes ni la
base del artefacto en agua ni en ningún otro líquido.
4. Este artefacto eléctrico no está destinado para ser usado por personas (incluyendo
niños) cuyas capacidades físicas, sensoriales o mentales estén disminuidas, o
carezcan de la experiencia y conocimiento necesarios para utilizarlo, a menos que
una persona responsable por su seguridad les haya supervisado o instruido en
el uso de este electrodoméstico. Los niños deberán estar bajo supervisión para
cerciorarse de que no jueguen con el artefacto eléctrico.
5. Se requiere estricta supervisión cuando las personas discapacitadas o los niños utilicen
cualquier electrodoméstico o estén cerca de él. Este producto no es un juguete.
6. Desconecte de la pared cuando el aparato no esté en uso, antes de limpiarlo o de
guardarlo. Déjelo enfriar antes de colocar o retirar piezas y antes de limpiarlo.
7. No haga funcionar el aparato con un cable o enchufe dañado, después de que
haya presentado fallas, se haya caído o haya sufrido cualquier tipo de daño. Lleve
el aparato al centro de servicio autorizado más cercano a su domicilio para su
inspección, reparación, ajuste eléctrico o mecánico.
8. El uso de accesorios no recomendados por el fabricante puede ocasionar incendios,
choques eléctricos o lesiones personales. Utilice únicamente accesorios o piezas de
reemplazo suministrados por JCS para esta unidad.
9. No usar en exteriores.
10. No deje que el cable cuelgue del borde de la mesa o encimera ni que toque
superficies calientes.
11. No lo coloque sobre o cerca de un quemador caliente de gas o eléctrico, ni en un
horno caliente.
12. Es necesario tener extremo cuidado al transportar un aparato que contenga agua u
otros líquidos calientes.
13. Para desconectarlo, oprima el botón de encendido/apagado y luego desenchúfelo
del tomacorriente.
14. No use el aparato de forma distinta a la estipulada por el fabricante.
15. Antes de servir los alimentos, verifique que la temperatura sea la adecuada.
16. Antes de servir los alimentos, desenchufe el cable del tomacorriente y quite la cuchilla
del recipiente vaporizador/procesador. No deje el cable al alcance de los niños.
17. Evite el contacto con piezas en movimiento.
18. La cuchilla de doble faz es muy filosa. Se recomienda precaución al sacarla para
limpiarla. Maneje con cuidado. Sujete la cuchilla de doble faz por la parte superior
para sacarla. El recipiente debe estar colocado en su lugar y asegurado antes de
volver a colocar la cuchilla de doble faz.
19. El uso de este aparato está previsto para la preparación de pequeñas cantidades de
alimentos para congelar y se recomienda específicamente para la preparación de
alimentos para bebés. Su uso está previsto para la preparación de hasta 480 ml /16
oz. de alimentos de cada vez.
20. No intente desactivar los mecanismos de engranaje.
21. Asegúrese de que la tapa del compartimiento de agua esté bien colocada antes de
hacer funcionar el aparato.
22. Mantenga las manos y los utensilios lejos de la cuchilla de corte mientras pica
alimentos para disminuir el riesgo de sufrir lesiones personales graves o de dañar
el picador de alimentos. Se puede usar un utensilio para raspar pero sólo cuando el
picador de alimentos no esté funcionando.
23. El aparato no contiene piezas que el usuario pueda reparar. No lo desmonte.
24. No mueva el aparato cuando esté en uso, enchufado o si contiene agua caliente.
25. Use únicamente biberones plásticos aptos para hervir o biberones/recipientes de
vidrio termorresistentes con este electrodoméstico.
26. Para evitar descargas eléctricas, no abra la base.
27. Exclusivamente para uso doméstico.
28. Nunca use la función de vaporización con el compartimiento de agua vacío.
29. El esterilizador despide vapor por las aberturas de ventilación de la tapa. Para
prevenir lesiones, manténgase a una distancia prudente de las aberturas. Deje que
se enfríe antes de manipular. El agua esterilizada estará caliente. Deje que se enfríe
antes de vaciar.
Si tiene alguna pregunta, comuníquese con nosotros en www.osterbaby.com
GUARDE ESTAS INSTRUCCIONES
Page 19

Centro de Nutrición
18
English
Siempre que este aparato esté en uso deberá estar conectado a tierra para proteger
al operador contra choques eléctricos. El aparato está equipado con un cable de
3 conductores y un enchufe de 3 clavijas con conexión a tierra que encaja en el
tomacorriente correspondiente. Precaución: para garantizar la protección constante
contra el riesgo de descargas eléctricas, conecte únicamente a un tomacorriente
con la debida conexión a tierra. Si no dispone de un tomacorriente con conexión
a tierra como el que se muestra en la ilustración, llame a un electricista calificado.
No intente modificar el enchufe en modo alguno. No utilice una extensión.
Qué incluye su Centro de Nutrición Oster
®
Información importante sobre el enchufe
Modelo# Piezasincluidas Funciones
• Base del Centro de Nutrición Oster
®
• Recipiente vaporizador/procesador
• Tapa del recipiente vaporizador/ procesador
• Rejilla del recipiente vaporizador/ procesador
• Cuchilla de acero inoxidable
• Base de vaporizador/procesador
• Compartimiento de agua
• Tapa del compartimento de agua
• Base del motor
• Taza medidora/recolectora de nutrientes
• Tapa del esterilizador
• Bandeja de accesorios
• Bandeja para biberones
• Base del esterilizador
• Porta-calentador
• Base del calentador
• Bandeja de vaporización en tres niveles
• Tapa de la bandeja de vaporización en tres
niveles
• Recipientes para alimentos (3)
• Tapas de los recipientes para alimentos (3)
• Base del Oster
®
centro de nutrición
• Recipiente vaporizador/procesador
• Tapa del recipiente vaporizador/ procesador
• Rejilla del recipiente vaporizador/ procesador
• Cuchilla de acero inoxidable
• Eje de cuchilla de acero inoxidable
• Compartimiento de agua
• Tapa del compartimento de agua
• Base del motor
• Taza medidora/recolectora de nutrientes
• Tapa del esterilizador
• Bandeja de accesorios
• Bandeja para biberones/mamilas
• Base del esterilizador
• Esterilización
• Calentamiento
• Vaporización de
alimentos para el
bebé
• Procesamiento de
alimentos para el
bebé
• Vaporización con
la bandeja de
vaporización en
tres niveles
• Vaporización de
alimentos para el
bebé
• Procesamiento de
alimentos para el
bebé
• Vaporización con
la bandeja de
Vaporización en
tres niveles
• Esterilización (se
Requieren los
modelos 1791 y
1972 para efectos de
funcionalidad)
1791 and
BCSTFP0000
Centro de
preparación de
alimentos para el
bebé
1792
Módulo de
Preparación de
Alimentos para el
bebé
1795
Módulo de
Esterilización
Uso de una extensión
El aparato dispone de un cable de alimentación
corto para disminuir el riesgo de que se
produzcan enredos o tropiezos con un cable
más largo. Se puede usar una exten¬sión
si se emplean las debidas precauciones. La
extensión debe colocarse de manera tal que no
cuelgue del borde de la mesa o encimera para
que los niños no puedan alcanzarla ni pueda
ocasionar tropiezos accidentales.
Deberá usar únicamente extensiones de 3
conductores que tengan enchufes de 3 clavijas
con conexión a tierra y conectores de 3 polos
que admitan el enchufe del aparato. Use sólo extensiones que tengan al menos las
mismas especificaciones eléctricas del aparato.
No use extensiones dañadas. Examine la extensión antes de usarla y reemplácela
si está dañada. No maltrate la extensión ni tire de ningún cable para desconectarlo.
Mantenga el cable alejado del calor y de bordes filosos. Pueden usarse
adaptadores para 2 clavijas – ilustraciones b y c – (incluidos).
A B
C
Page 20

19
English
Características
Introducción
Felicitaciones por la compra de su Centro de Nutrición Oster®, lo más avanzado
en sistemas de preparación de alimentos para bebés, el cual ha sido diseñado
para permitir que la persona a cargo del bebé satisfaga sus necesidades nutricionales desde el nacimiento hasta los 24 meses.
Características y beneficios
• Recipientevaporizador/procesadorde16oz(480mL): prepara porciones
de hasta 4 oz (120 mL) de alimentos para bebés de cada vez.
• Apagadoautomático: cuando se completa el ciclo de vaporización,
calentamiento o esterilización, el aparato pasa al modo de espera (stand-by)
y apaga automáticamente la resistencia.
• Dispositivosdeseguridadintegrados: los módulos deben estar
correctamente montados para conectar los dispositivos de seguridad que
permiten el funcionamiento del aparato.
• Esterilizadordegrancapacidad: esteriliza hasta 6 biberones anchos u 8
altos y accesorios.
• Diseñomodular: los módulos pueden intercambiarse en la base y
desmontarse para limpiarlos y guardarlos con facilidad.
• Recuperacióndenutrientes: la taza medidora / recolectora de nutrientes
permite recoger los nutrientes de los alimentos durante el proceso de
vaporización. Los nutrientes pueden luego ser agregados a los alimentos
durante el procesamiento a través de la abertura de la tapa.
• Unsolorecipiente: permite llevar a cabo los ciclos de vaporización y
procesamiento sin transferir los alimentos, lo cual acelera el proceso de
preparación y de limpieza posterior.
• Los 3 módulos de este aparato se pueden comprar por separado. Cada
módulo desempeña una o más de las funciones que se describen a
continuación:
1.Centrodepreparacióndealimentosparaelbebé
(Modelo1791,BCSTFP0000)
• Sterilizes bottles and accessories
• Warms bottles and baby foods
• Steams with steam/blend container
• Steams with Tri-level steam trays
• Processes baby food and purees
2.Módulodepreparacióndealimentosparaelbebé
(Modelo1792)
• Vaporiza con el recipiente vaporizador / procesador
• Procesa purés y alimentos para el bebé
3.MódulodeEsterilización
(Modelo1795)
• Esteriliza biberones y accesorios
•Operaciónbasadaenelvolumendeagua: la cantidad de agua usada
determinará el tiempo de cocción, calentamiento y esterilización.
Page 21
Centro de Nutrición
20
English
Conozca su Centro de Nutrición Oster®
3
2
4
Piezas del recipiente
vaporizador/procesador
1. Recipiente vaporizador/
procesador
2. Tapa del recipiente vaporizador/
procesador
3. Abertura de la tapa
4. Rejilla del recipiente del
vaporizador/procesador
5. Cuchilla de acero inoxidable
6. Eje de la cuchilla de acero
inoxidable
7. Botón de seguridad
Piezas de la base
8. Base del Centro de Nutrición
Oster®: no apta para el lavaplatos
9. Panel de control (consulte el
detalle)
10. Botón de encendido/apagado y
luz piloto
11. Botón y luz de vaporización
12. Botón pulsador
13. Compartimiento de agua
14. Tapa del compartimiento de
agua
15. Guía de vaporización
16. Base del motor
17. Taza medidora/recolectora de
nutrientes
Piezas del Esterilizador
18. Tapa del esterilizador
19. Bandeja de accesorios
20. Bandeja de biberones
21. Base del esterilizador
22. Tapón de drenaje (en la parte
posterior de la base del
esterilizador)
23. Entrada de vapor del
esterilizador
5
7
1
6
10
14
12
15
13
11
16
9
8
17
18
23
19
20
21
22
Page 22

21
English
24a
Piezas del
calentador
24. Calentador (ensamblado)
24a. Porta-calentador
24b. Base del calentador
25. Entrada de vapor del
calentador
24b
24
25
27
26
Piezas del
vaporizador en
tres niveles
26. Bandejas de vaporización
en niveles (3)
27. Tapa de las bandejas de
vaporización en tres niveles
29
28
Piezas de los
recipientes de
almacenamiento
28. Recipientes para alimentos (3)
29. Tapas de recipientes para
alimentos (3)
Page 23

Centro de Nutrición
22
English
Recomendaciones previas al primer uso
1. Asegúrese de que el aparato esté apagado y el cable de alimentación desenchufado.
2. Limpie TODAS LAS PIEZAS (consulte la sección “Limpieza y mantenimiento”).
• NUNCASUMERJALABASEDELRECIPIENTEVAPORIZADOR/PROCESADORNILABASE
DELAPARATOENNINGÚNLÍQUIDO,NITAMPOCOLOSCOLOQUEENELLAVAPLATOS.
• ADVERTENCIA:LASCUCHILLASSONEXTREMADAMENTEFILOSAS.MANIPULECON
CUIDADOLASCUCHILLASDEACEROINOXIDABLE.
Montaje del recipiente vaporizador/procesador
Antes de usar el recipiente vaporizador/procesador para vaporizar o procesar
alimentos, asegúrese de que la abertura de la tapa, la rejilla del recipiente vaporizador/
procesador y la cuchilla de acero inoxidable estén correctamente ensamblados.
Cómo abrir y cerrar la tapa del recipiente vaporizador/procesador (1)
1. Para abrirla, oprima y sostenga el botón de seguridad de la tapa (7) y gire la
tapa del recipiente vaporizador/procesador (2) de la posición de cerrado
a la
posición de abierto
.
2. Para cerrarla, gire de la posición de abierto
a la posición de cerrado hasta
que la musca en el botón de seguridad de la tapa (7) encaje en la ranura de la
lengüeta de la tapa del recipiente vaporizador/procesador (2) y la tapa quede fija.
* La rejilla del recipiente vaporizador/procesador debe estar instalada para
poder montar la tapa en el recipiente vaporizador/procesador (siga las
instrucciones que aparecen más abajo sobre “Cómo colocar y retirar la rejilla
del recipiente vaporizador/procesador).
* No se necesita la rejilla del recipiente vaporizador/procesador para vaporizar
con la bandeja de vaporización en tres niveles (siga las instrucciones sobre
“Cómo vaporizar con la bandeja de vaporización en tres niveles” para el
montaje y el funcionamiento de este módulo).
Cómo colocar y retirar la rejilla del recipiente vaporizador/
procesador (4)
1. Para retirar la rejilla del recipiente vaporizador/procesador (4) levante la lengüeta
de la tapa.
2. Para colocarla, el centro de la rejilla del recipiente vaporizador/procesador (4)
se debe alinear con la vara metálica que se encuentra en el fondo de la tapa
del recipiente vaporizador/ procesador (2) y la lengüeta se debe alinear con la
ranura de la tapa del recipiente vaporizador/procesador. Oprima la lengüeta de
la rejilla hasta que encaje en la ranura de la tapa (2).
3. Para mejor desempeño, asegúrese de que los canales de vapor estén bien
ajustados. Retírelos para limpiarlos a fondo. Después de la limpieza asegúrese
de fijar los canales firmemente en su lugar.
Cómo colocar y retirar la cuchilla de acero inoxidable (5)
1. Una vez retirada la tapa del recipiente vaporizador/procesador (2), la cuchilla
de acero inoxidable (5) puede colocarse fácilmente en la columna central del
recipiente vaporizador/procesador (1) para utilizarla. Coloque el eje de la cuchilla
de acero inoxidable en la parte inferior del recipiente vaporizador/procesador y
gírelo hasta que quede fijo y con la cuchilla en posición cerrada.
2. La cuchilla de acero inoxidable (5) puede ser retirada con facilidad levantándola
del recipiente vaporizador/procesador (1).
ADVERTENCIA: LA CUCHILLA ES EXTREMADAMENTE FILOSA. MANIPÚLELA
CON CUIDADO POR LA PARTE SUPERIOR.
Page 24

23
English
IMPORTANTE:
• Los biberones, accesorios, juguetes y otros objetos
deben lavarse antes de ser esterilizados.
• Este esterilizador no cumple con los estándares
clínicos de esterilización.
• Coloque el aparato sobre una supercie plana y
estable.
• Asegúrese de que tanto el aparato como el cable de
alimentación estén fuera del alcance de los niños.
• Asegúrese de que el tapón de desagüe esté bien
ajustado para prevenir escapes durante el proceso de
esterilización.
1. Llene el compartimiento de agua (13) con agua filtrada
y destilada hasta el nivel 3.
2. Fije la tapa del compartimiento de agua (14) sobre el
compartimiento de agua (13) girando el ícono de
echa doble hacia la izquierda, hasta alinear el ícono
de esterilización con la echa de la base.
3. Coloque la bandeja de biberones/mamilas (20) en la
base del esterilizador (21).
* Coloque los biberones limpios boca abajo en la
bandeja de biberones/mamilas (20).
4. Coloque la bandeja de accesorios (19) sobre los
biberones y sobre el borde interior superior de la base
del esterilizador (20).
* Los accesorios deben colocarse desmontados
sobre la bandeja de accesorios (19).
5. Cubra con la tapa del esterilizador (18), deslice el
esterilizador hacia la base del Centro de Nutrición
Oster® hasta que la entrada de vapor del esterilizador
(23) encaje en la guía de vapor del compartimiento de
agua (15).
6. Enchufe el cable de alimentación a un tomacorriente y
oprima el botón de encendido/apagado
(10).
* Escuchará una señal por un segundo y se 6.
encenderá la luz piloto indicando que el aparato está
encendido.
7. Oprima el botón de vaporización
(11).
* Se escuchará una señal de un segundo y se
encenderá la luz de vaporización indicando que
se ha iniciado el ciclo de ESTERILIZACIÓN. La
esterilización se puede detener en cualquier
momento oprimiendo el botón de vaporización
(11). ADVERTENCIA: durante el ciclo de
vaporización, el esterilizador despide vapor a través
de las aberturas de ventilación de la parte superior
de la tapa del esterilizador. Para evitar lesiones,
manténgase alejado del vapor.
* La esterilización estará completa cuando suene una
señal por 3 segundos y se apague la luz de vapor.
Ahora el Centro de Nutrición Oster® entrará en
modo de espera y la resistencia se apagará.
8. Oprima el botón de encendido/apagado
(10).
* Se apagará la luz piloto indicando que el Centro de
Nutrición Oster
®
está apagado.
9. Retire los biberones y accesorios esterilizados en
la medida que los necesite para alimentar al bebé.
ADVERTENCIA: las piezas recién esterilizadas estarán
calientes. Espere el tiempo suficiente para que la
tapa del esterilizador, los biberones y accesorios se
enfríen antes de tocarlos o use guantes de horno para
manipularlos de inmediato.
10. Retire el tapón de drenaje (22) ubicado en el fondo
de la base del esterilizador (21) para que salga el
exceso de condensación una vez completado el ciclo
de esterilización. ADVERTENCIA: el agua esterilizada
estará caliente. Espere a que el agua se enfríe antes de
drenarla.
Esterilización
Page 25

Centro de Nutrición
24
English
IMPORTANTE:
• Las piezas y accesorios son para uso exclusivo con este
aparato. Las piezas, incluyendo la tapa del recipiente de
alimentos, no deben hervirse ni colocarse en el horno de
microondas.
• Coloque el aparto sobre una supercie plana y estable.
• Asegúrese de que el aparato y el cable de alimentación
estén fuera del alcance de los niños.
1. Llene la taza medidora/recolectora de nutrientes (17)
con agua filtrada y destilada hasta el nivel recomendado
(consulte la tabla en la página 13) y viértala en el
compartimiento de agua (13). Las marcas de nivel se
encuentran en la parte interior de la base del recipiente.
ADVERTENCIA:no llene el compartimiento de agua más
de lo indicado. El biberón o el recipiente de alimentos
puede llegar a calentarse por demasiado tiempo o estar
excesivamente caliente para alimentar al bebé.
2. Fije la tapa del compartimiento de agua (14) en su lugar
sobre el compartimiento de agua (15) girando el ícono de
echa doble
hacia la derecha hasta alinear el ícono de
procesamiento/calentamiento
con la echa
de la base.
3. Fije el calentador (24) sobre la base del motor (16)
girando la echa del calentador (24) de la posición
abierto
a la posición cerrado
.
* Asegúrese de que la entrada de vapor del calentador
(25) esté bien calzada con la guía de vaporización (16)
de la tapa del compartimiento de agua.
4. Coloque el biberón o el recipiente de alimentos en el
centro del calentador (24).
* Coloque la tapa del recipiente de alimentos (29) sobre
su respectivo recipiente para prevenir derrames de
alimentos durante el proceso de calentamiento.
5. Enchufe el cable de alimentación a un tomacorriente y
oprima el botón de encendido/apagado
(10).
* Se escuchará una señal de 1 segundo y se encenderá la
luz piloto indicando que el Centro de Nutrición Oster
®
está encendido.
6. Oprima el botón de vaporización (11).
* Se escuchará una señal de 1 segundo y se encenderá
la luz de vaporización indicando que el ciclo de
CALENTAMIENTO ha comenzado. ADVERTENCIA:
durante el ciclo de CALENTAMIENTO, el calentador
despide vapor a través de las aberturas de ventilación
internas del porta-calentador. Manténgase alejado del
vapor durante el proceso de calentamiento para evitar
lesiones.
* El ciclo de CALENTAMIENTO estará completo cuando
se escuche una señal por 3 segundos y la luz de
vaporización se apague. El Centro de Nutrición Oster®
estará ahora en modo de espera y la resistencia estará
apagada.
7. Oprima el botón de encendido/apagado
(10).
* Se apagará la luz piloto indicando que el Centro de
Nutrición Oster
®
está apagado.
8. Retire el biberón o el recipiente de alimentos para
alimentar al bebé.
ADVERTENCIA: el biberón y recipiente de alimentos
estarán calientes después del ciclo de CALENTAMIENTO.
Espere el tiempo suficiente para que el biberón o el
recipiente de alimentos se enfríe antes de tocarlo, o use
guantes de horno para manipularlo inmediatamente.
* Agite el biberón o mezcle bien los alimentos antes de
alimentar para obtener una temperatura uniforme.
* Verifique la temperatura de los alimentos antes de
alimentar al bebé. Si los alimentos no están
suficientemente calientes, haga funcionar otro ciclo de
CALENTAMIENTO.
Calentamiento
Page 26

25
English
CÓMO PREPARAR PURÉS Y ALIMENTOS PARA BEBÉS
Cómo vaporizar con el recipiente vaporizador/procesador
IMPORTANTE:
• Coloque el aparato sobre una supercie plana y
estable.
• Asegúrese de que tanto el aparato como el cable de
alimentación estén fuera del alcance de los niños.
• Asegúrese de colocar la taza medidora/recolectora de
nutrientes (17) en su lugar sobre la base del motor (16)
para recoger todos los nutrientes que resultarán del
proceso de vaporización de los alimentos. Esto protege
también la base del motor (16) contra los líquidos que
se puedan derramar.
1. Monte el recipiente vaporizador/procesador (1) (siga las
instrucciones de la sección de ‘Montaje del recipiente
vaporizador/procesador”)
2. Lave cuidadosamente todos los alimentos antes de
vaporizarlos y procesarlos. Para obtener mejores
resultados, corte las frutas, vegetales y carnes en cubos
de 1 pulgada (2,5 cm).
3. Monte la rejilla del recipiente vaporizador/procesador
(4) y la tapa (2) (consulte la sección “Cómo colocar y
retirar la rejilla del recipiente vaporizador/procesador
y Cómo colocar y retirar la tapa del recipiente
vaporizador/procesador).
4. Llene el recipiente vaporizador/procesador (1) con
1 pulgada (2,5 cm) de los alimentos previamente
cortados. (Nota: puede usarse un procesador de
alimentos o cortarlos a mano).
5. Dependiendo del tipo de alimento que se va a
vaporizar, llene el compartimento de agua (13) hasta
el nivel de agua recomendado 1
2 3 . (consulte
el cuadro en la página 14). Las marcas de nivel se
encuentran en la parte interior de la base del recipiente.
6. Fije la tapa del compartimiento de agua (14) en su lugar
sobre el compartimiento de agua (13) girando el ícono
de echa doble
hacia la derecha hasta alinear el ícono
de procesamiento/calentamiento con la echa
de la
base.
7. Coloque la taza medidora/recolectora de nutrientes (17)
sobre la base del motor (16) para recoger los nutrientes
que resultarán del proceso de vaporización de los
alimentos.
8. Una vez que la tapa esté bien asegurada (2) invierta la
posición del recipiente vaporizador/procesador con la
tapa hacia abajo.
9. Fije el conjunto del recipiente vaporizador/procesador
en su lugar sobre la base del motor (16) girando
la echa
de la tapa del recipiente vaporizador/
procesador (2) de la posición de abierto
a la posición
cerrado. El recipiente vaporizador/procesador está ahora
asegurado en la posición de VAPORIZACIÓN.
10. Enchufe el cable de alimentación a un tomacorriente.
Oprima el botón de encendido/apagado
(10).
* Escuchará una señal por 1 segundo y la luz piloto
se encenderá indicando que el Centro de Nutrición
Oster
®
está encendido.
11. Oprima el botón de vaporización
(11).
* Se escuchará una señal por 1 segundo y la luz
piloto se encenderá indicando que el proceso de
VAPORIZACIÓN ha comenzado. ADVERTENCIA:
durante la VAPORIZACIÓN, se despide vapor a
través de la salida de vapor de la tapa del recipiente
vaporizador/procesador. Manténgase alejado del
vapor para evitar lesiones.
* El proceso de VAPORIZACIÓN estará completo
cuando se escuche una señal por 3 segundos y la
luz de vaporización se apague. El tiempo varía de
acuerdo con los alimentos y el nivel de agua. El
Centro de Nutrición Oster
®
estará ahora en modo
de espera y la resistencia estará apagada.
12. Oprima el botón de encendido/apagado
(10).
* La luz piloto se apagará indicando que el Centro de
Nutrición Oster
®
está apagado.
13. Ahora los alimentos estarán listos para servir o
procesar (consulte las instrucciones en la sección
“Cómo procesar con el recipiente vaporizador/
procesador”). ADVERTENCIA: verifique la temperatura
de los alimentos antes de alimentar al bebé. Si la
comida no está bien cocida, haga funcionar otro ciclo
de VAPORIZACIÓN.
Page 27

Centro de Nutrición
26
English
IMPORTANTE:
• Coloque el aparato sobre una supercie plana y
estable.
• Asegúrese de que tanto el aparato como el cable de
alimentación estén fuera del alcance de los niños.
• Para procesar alimentos que no requieran cocción
previa en el recipiente vaporizador/procesador,
siga solamente los pasos de PROCESAMIENTO,
empezando en el paso 4.
1. Retire el recipiente vaporizador/procesador (1) de la
base del Centro de Nutrición Oster
®
(8).
• Gire la manilla de la posición de cerrado
a la
posición de abierto hasta que la echa de la
tapa del recipiente vaporizador/procesador (2) esté
alineada con la posición de abierto .
2. Retire con cuidado la taza medidora/recolectora de
nutrientes (17) de la base del motor (16) y déjela a un
lado. ADVERTENCIA: el líquido puede estar caliente.
Tenga cuidado al manipularlo.
3. Invierta el recipiente vaporizador/procesador (1) para
que la tapa del recipiente vaporizador/procesador (2)
quede hacia arriba.
4. Fije el recipiente vaporizador/procesador en posición
sobre el motor (16) girando la echa del recipiente
vaporizador/procesador de la posición de abierto
a la posición de cerrado
. El recipiente vaporizador/
procesador estará ahora fijado en la posición de
PROCESAMIENTO.
5. Lentamente vierta el contenido de la taza medidora/
recolectora de nutrientes (17) dentro del recipiente
vaporizador/procesador (1) a través de la abertura (3)
en la tapa del recipiente vaporizador/procesador (2).
ADVERTENCIA: los líquidos pueden estar calientes.
Tenga cuidado al manipularlos.
• Para obtener la consistencia deseada, ajuste la
cantidad de líquido de la taza medidora/recolectora
de nutrientes (17) que agregue a los alimentos
para el bebé.
6. Oprima a intervalos el botón pulsador
(12)
para procesar los alimentos hasta obtener la
consistencia deseada.
• La comida está ahora lista para servir.
IMPORTANTE: retire la cuchilla con cuidado antes
de servir los alimentos.
• Para guardar sobrantes de alimentos, use los
recipientes correspondientes (28).
• Para recalentar, siga las instrucciones de
CALENTAMIENTO.
ADVERTENCIA: ni el recipiente de alimentos ni la
tapa son aptos para uso en el horno de microondas.
CÓMO PREPARAR PURÉS Y ALIMENTOS PARA BEBÉS
Cómo procesar con el recipiente vaporizador/procesador
Page 28

27
English
CÓMO PREPARAR PURÉS Y ALIMENTOS PARA BEBÉS
Cómo vaporizar con la vaporera de tres niveles
IMPORTANTE:
• Coloque el aparato sobre una supercie plana y estable.
• Asegúrese de que tanto el aparato como el cable de
alimentación estén fuera del alcance de los niños.
• Asegúrese de colocar la taza medidora/recolectora
de nutrientes (17) sobre la base del motor (16) para
recolectar todos los nutrientes que resultarán del proceso
de vaporización. Esto protege también la base del motor
(16) de los líquidos que se puedan derramar.
1. Lave cuidadosamente todos los alimentos antes de
vaporizarlos. Para obtener mejores resultados, corte los
alimentos en cubos de 1 pulgada (2,5 cm).
2. Llene cada bandeja de vaporización en tres niveles (26)
con alimentos cortados.
* Para vaporizar diferentes alimentos al mismo tiempo,
se recomienda colocar carnes y pescado en los
niveles inferiores y frutas y vegetales en los niveles
superiores.
3. Dependiendo del tipo de alimento que se va a vaporizar,
llene el compartimiento de agua (13) hasta el nivel de
agua recomendado 1
2 3 (consulte el cuadro en la
página 13). Las marcas de nivel se encuentran en la parte
interior de la base del recipiente.
4. Ajuste la tapa del compartimiento de agua (13) en
posición sobre el compartimiento de agua (15) girando
el ícono de echa doble
en el sentido de las agujas del
reloj hasta alinear el ícono de procesamiento/
calentamiento
con la echa de la base.
5. Coloque la taza medidora/recolectora de nutrientes
(17) sobre la base del motor (16) para recoger todos los
nutrientes que resultarán del proceso de vaporización de
los alimentos.
6. 6. Retire la rejilla del recipiente vaporizador/procesador y
ajuste la tapa del recipiente vaporizador/procesador (2) en
posición sobre la base del motor girando la echa
de la
posición de abierto
a la posición de cerrado
.
* La rejilla del recipiente de vaporizador/procesador
no se necesita para vaporizar con la bandeja de
vaporización en tres niveles. (Consulte las
instrucciones de “Cómo colocar y retirar la rejilla del
recipiente vaporizador/procesador).
7. Coloque la bandeja de vaporización en tres niveles
(26) con los alimentos sobre la tapa del vaporizador/
procesador (2), apilándolas firmemente una sobre otra.
8. Cubra con la tapa de la bandeja de vaporización en
niveles (27).
9. Enchufe el cable de alimentación a un tomacorriente.
Oprima el botón de encendido/apagado
(10).
* Se escuchará una señal por 1 segundo y se iluminará
la luz piloto indicando que el aparato está encendido.
10. Oprima el botón de vaporización
(11) .
* Escuchará una señal auditiva por 1 segundo y la
luz piloto se encenderá indicando que el proceso
de VAPORIZACIÓN ha comenzado. ADVERTENCIA:
durante la VAPORIZACIÓN, se despide vapor a
través de la salida de vapor de la tapa del recipiente
vaporizador/procesador. Manténgase alejado del vapor
para evitar lesiones.
* El proceso de VAPORIZACIÓN habrá culminado cuando
se escuche una señal por 3 segundos y la luz de
vaporización se apague. El tiempo varía de acuerdo con
los alimentos y el nivel de agua. El Centro de Nutrición
Oster
®
estará ahora en modo de espera y la resistencia
estará apagada.
11. Oprima el botón de encendido/apagado
(10).
* La luz piloto se apagará indicando que el Centro de
Nutrición Oster
®
está apagado.
12. Sirva los alimentos para comerlos con la mano, prepare
comidas o purés para bebés utilizando el procesador
(consulte la sección de “Cómo procesar con el recipiente
vaporizador/procesador”). ADVERTENCIA:el recipiente
vaporizador/procesador estará siempre caliente después
del proceso del proceso de VAPORIZACIÓN. Espere el
tiempo suficiente para que el recipiente vaporizador/
procesador se enfríe o use guantes de horno para
manipularlo inmediatamente. ADVERTENCIA: verifique la
temperatura de los alimentos antes de alimentar al bebé.
Si los alimentos no están bien cocidos, haga funcionar
otro ciclo de VAPORIZACIÓN. Pruebe nuevamente los
alimentos antes de servirlos.
Page 29

Centro de Nutrición
28
English
Guía del nivel de agua
Vaporización con el recipiente vaporizador/procesador
Frutas
Frutas
Vegetales
Vegetales
Calentamiento
Esterilización
Vaporización
Procesamiento (operación de pulsos, solamente)
Pollo
Pollo
Nivel 3
Nivel 3
2 - 20 seg. en total (ej. 4 pulsos x 5 seg.)
Nivel 3
Nivel 3
5 - 20 min.
Carne
Carne
Nivel 3
Nivel 3
Pescado
Pescado
Vaporización con el vaporizador en tres niveles*
Tiempos aproximados de operación (sólo como referencia)
* Cuando combine más de un tipo de alimento, use el nivel de agua más alto.
Tipodealimento Niveldeagua
Tipodealimento Niveldeagua
Procedimiento Tiempoaproximado
Calentamiento
Biberones
8 oz (236 mL)
Ambiente
Ambiente
1oz / 30mL
2oz / 60mL
1oz / 30mL
2oz / 60mL
Refrigerado
Refrigerado
Alimentos 8 oz
(236 mL)
(SÓLO en
recipientes para
alimentos)
Esterilización
Biberones altos (máx. 8)
8oz / 236mL
Biberones anchos (máx. 6)
8oz / 236mL
1oz / 30mL
1oz / 30mL
20 min.
2oz / 60mL
2oz / 60mL
5 - 15 min.
Artículo Temperatura Niveldeagua
Artículo Niveldeagua
236ml /8oz
236ml /8oz
Page 30

29
English
Localización y solución de fallas comunes
Guía de localización y solución de fallas comunes del
Centro de Nutrición Oster®
• El sistema está listo para ser usado. Inicie el ciclo de
VAPORIZACIÓN, CALENTAMIENTO, ESTERILIZACIÓN o
PROCESAMIENTO
• Para poner la base en modo de espera (stand-by) o
para desconectarla, oprima el botón de encendido/
apagado. La luz piloto se apagará.
El Centro de Nutrición Oster
®
suena una vez y la luz piloto
se enciende.
En el modo de VAPORIZACIÓN,
CALENTAMIENTO o
ESTERILIZACIÓN:
se escuchan 3 señales y la luz
indicadora de vaporización
permanece apagada o
intermitente.
• El vaporizador, el calentador o el módulo de
esterilización no está correctamente montado.
• Consulte las instrucciones de “Esterilización”,
“Calentamiento” o “Cómo preparar purés y alimentos
para bebés” para enganchar el módulo en la base y
luego siga las instrucciones de funcionamiento del
módulo.
• Ha terminado el ciclo de VAPORIZACIÓN,
CALENTAMIENTO o ESTERILIZACIÓN.
• El compartimiento de agua está vacío; llénelo de agua
de acuerdo con la receta, luego siga las instrucciones
de funcionamiento del módulo.
En el modo de VAPORIZACIÓN,
CALENTAMIENTO o
ESTERILIZACIÓN:
se escucha 1 señal y la luz
indicadora se apaga.
Al comenzar el modo de
PROCESAMIENTO, se
escuchan 3 señales.
En el modo de Esterilización,
la función de procesamiento
no enciende.
• El módulo del procesador no está correctamente
montado.
• Consulte las instrucciones de “Cómo preparar purés y
alimentos para bebés” para enganchar el módulo en la
base y luego siga las instrucciones de funcionamiento
del módulo
• El Centro de Nutrición Oster® está diseñado para
operar una sola función a la vez. Mientras esteriliza no
permite pulsar para procesar alimentos.
Situación Solución
Limpieza y mantenimiento
1. Asegúrese siempre de que el aparato esté apagado y desenchufado del
tomacorriente antes de limpiarlo.
• Desmonte todas las piezas.
• Limpie la base del recipiente vaporizador/procesador y la base del Centro de
Nutrición Oster
®
con un paño suave y húmedo.
ADVERTENCIA:ELEJEDELACUCHILLADELVAPORIZADOR/PROCESADOR
YLABASEDELCENTRODENUTRICIÓNOSTERNOPUEDENUSARSEENEL
LAVAPLATOSNISONAPRUEBADEAGUA.NUNCALOSSUMERJAENNINGÚN
LÍQUIDO.
• Lave las siguientes piezas colocándolas en la bandeja superior de su lavaplatos:
- Recipiente vaporizador/procesador
- Tapa del recipiente vaporizador/procesador
- Rejilla del recipiente vaporizador/procesador
- Eje de la cuchilla de acero inoxidable
- Taza medidora/recolectora de nutrientes
- Bandeja de vaporización en tres niveles y tapa
- Recipientes para alimentos y tapas
• Lave a mano las siguientes piezas:
- Cuchilla de acero inoxidable
- Tapa de esterilización
- Base de esterilización
- Porta-calentador y base del calentador
- Tapa del compartimiento de agua
- Bandeja de biberones
- Bandeja de accesorios
2. Se aconseja guardar el Centro de Nutrición Oster® en una encimera o mesa de
la cocina, para que esté siempre a mano.
El módulo de esterilización puede guardarse convenientemente en la habitación
del bebé o en la cocina, de acuerdo con sus necesidades.
Page 31

Centro de Nutrición
30
English
Garantía limitada de 1 año
Sunbeam Products, Inc., que opera bajo la razón social Jarden Consumer
Solutions, o en Canadá, Sunbeam Corporation (Canada) Limited, que opera bajo la
razón social Jarden Consumer Solutions (en conjunto denominadas “Sunbeam”),
garantiza que durante el período de un año a partir de la fecha de compra, este
producto no presentará defectos ni en el material ni en la mano de obra. Sunbeam,
a su discreción, reparará o reemplazará este producto o cualquier componente
del mismo que se considere como defectuoso durante el período de garantía. El
reemplazo se efectuará por un producto o componente nuevo o reacondicionado.
Si el producto ya no estuviera disponible, se reemplazará por un producto similar
de igual o mayor valor. Esta es su garantía exclusiva.
Esta garantía tiene validez para el comprador minorista original a partir de la
fecha de la compra inicial al por menor y no es transferible. Conserve el recibo de
venta original. La prueba de compra es necesaria para hacer valer la garantía. Los
distribuidores Sunbeam, los Centros de Servicio o las tiendas de menudeo que
vendan productos Sunbeam no tienen potestad para alterar, modificar ni cambiar
de forma alguna los términos y condiciones de esta garantía.
Esta garantía no ampara el desgaste normal de las piezas ni los daños que se
produzcan como resultado de cualquiera de las siguientes circunstancias: uso
negligente o inadecuado del producto, uso con un voltaje o corriente inadecuados,
uso contrario a las instrucciones de funcionamiento, desensamblaje, reparación o
alteración por terceros distintos de Sunbeam o un Centro de Servicio Autorizado
Sunbeam. Asimismo, la garantía no ampara: actos de fuerza mayor tales como
incendios, inundaciones, huracanes y tornados.
¿Cuáles son los límites de la responsabilidad de Sunbeam?
Sunbeam no será responsable por daños accidentales o resultantes ocasionados
por el incumplimiento de cualquier garantía o estipulación expresa, implícita o
estatutaria.
Excepto en la medida en que lo prohíban las leyes pertinentes, cualquier
garantía o estipulación implícita sobre la comerciabilidad o adecuación para
un fin determinado tendrá una duración limitada al plazo de la garantía antes
mencionada.
Sunbeam desconoce cualesquiera otras garantías, estipulaciones o
representaciones, expresas, implícitas, estatutarias o de otra naturaleza.
Sunbeam no será responsable por daños de ningún tipo que resulten de la
compra, utilización o uso inadecuado del producto, o la imposibilidad de uso del
mismo, incluyendo daños accidentales, especiales, resultantes o similares o la
pérdida de ganancias, ni por ningún incumplimiento contractual, fundamental o
de otra naturaleza, ni por ninguna acción emprendida por terceros en contra del
comprador.
Algunas provincias, estados o jurisdicciones no permiten la exclusión o limitación
de los daños accidentales o resultantes ni las limitaciones en cuanto a la duración
de una garantía implícita, por lo tanto es posible que las limitaciones o exclusiones
anteriores no se apliquen en su caso.
Esta garantía le otorga derechos legales específicos pero también puede gozar de
otros derechos que varían de una provincia a otra, de un estado a otro, o de una
jurisdicción a otra.
Cómo obtener servicio en garantía
En EE.UU.
Si tiene preguntas relativas a esta garantía o desea obtener servicio en garantía,
sírvase llamar al 1 877-777-5650 o visite www.osterbaby y se le proporcionará la
dirección de un centro de servicio que le resulte conveniente.
En Canadá
Si tiene preguntas relativas a esta garantía o desea obtener servicio en garantía,
sírvase llamar al 1 800-667-8623 y se le proporcionará la dirección de un centro de
servicio que le resulte conveniente. En EE.UU., esta garantía la ofrece Sunbeam
Products, Inc., ubicada en Boca Raton, Florida 33431. En Canadá, esta garantía la
ofrece Sunbeam Corporation (Canada) Limited, ubicada en 5975 Falbourne Street,
Mississauga, Ontario l5R 3V8.
LEROGAMOSQUENODEVUELVAESTEPRODUCTOANINGUNADELAS
DIRECCIONESANTERIORESNIALLUGARDONDELOADQUIRIÓ.
Page 32

© 2010 Sunbeam Products, Inc. Todos los derechos reservados.
Distribuido por Sunbeam Latin America, LLC,
5200 Blue Lagoon Drive, Suite 470, Miami, FL 33126.
© 2010 Sunbeam Products, Inc. All rights reserved.
Distributed by Sunbeam Latin America, LLC,
5200 Blue Lagoon Drive, Suite 470, Miami, FL 33126.
www.osterbaby.com
Printed in China Impreso en China
CBA-042610
 Loading...