

Page 1
Instruction Manual
SPEED HAND/ STAND MIXER
PLEASE READ ALL INSTRUCTIONS BEFORE USING THIS APPLIANCE
2600 2601
2600 2601
MODELS/MODÉLES
MODELOS
MODELS/MODÉLES
MODELOS
Manuel d' Instructions
BATTEUR À MAIN/ SUR PIED DE VITESSES
LIRE TOUTES LES INSTRUCTIONS AVANT D' UTILISER CET APPAREIL
Manual de Instrucciones
BATIDORA MANUAL Y DE PEDESTAL DE VELOCIDADES
LEA TODAS LAS INSTRUCCIONES ANTES DE USAR ESTE APARATO
Manual de Instruções
BATEDEIRA DE MÃO E DE PEDESTAL DE VELOCIDADES
LEIA TODAS AS INSTRUÇÕES ANTES DE USAR ESTE APARELHO
&
&
10
10
10
10
1
2
1
2
f
f
O
/
Page 2

IMPORTANT SAFEGUARDS
• READ ALL INSTRUCTIONS BEFORE USING THE HAND/ STAND MIXER.
• To protect against risk of electrical shock, do not put the hand/ stand mixer in water or
other liquid.
•
NEVER use the mixer if you have wet hands.
•
Close supervision is necessary when mixer is used near children.
•
Unplug from outlet while not in use, before putting on or taking off parts and before
cleaning
.
•
AVOID contacting moving parts. Keep hands, hair, clothing, as well as spatulas and
other utensils away from beaters during operation to reduce risk of injury to persons
and/ or damage to the mixer.
• NEVER
switch on the appliance until the working attachments are in the mixing bowl
with the ingredients to be mixed. Always wait until the attachments stop before you
remove the bowl.
• DO NOT
operate mixer with a damaged cord plug or after the appliance malfunctions is
dropped or damaged in any manner. Return appliance to an authorized Oster® Service
Center for examination, repair or adjustment.
• DO NOT
use it outdoors.
• DO NOT
let the cord hang over the edge of the table or counter or touch hot surfaces,
including the stove.
• REMOVE beaters from mixer before washing.
• DO NOT
place mixer on or near a hot burner, or in a heated oven.
1
When using electrical appliances, basic safety precautions should always be followed
including the following:
Page 3

2
• This mixer is intended for household use only.
• DO NOT use mixer for other than intended use. Do not us this appliance to stir paints
(lacquers, polyesters, etc.) This could result in an explosion!
• DO NOT leave mixer unattended while in operation.
•
Repairs to the appliance may only be carried out by trained personnel. As a result of
incorrect repairs considerable dangers for the user may result. Please contact an
authorized Oster® Service Center in the event of repairs being necessary.
• Ensure fingers are kept away from moving whisks and dough hooks. This could result
in injury.
• NEVER clean the appliance under running water or submerge it.
•
The manufacturer is not liable for any damages, which are caused by using the
appliance for any other purpose than that intended or incorrect use.
(For 120 & 127 Volts)
To reduce the risk of electrical shock, this appliance has a polarized plug (one blade is
wider than the other). This plug fits a polarized outlet only one way. This is a safety feature
intended to help reduce the risk of electrical shock. If the plug does not fit fully into the
outlet, reverse the plug. If it still does not fit, contact a qualified electrician.
DO NOT attempt to defeat this safety feature.
SAVE THESE INSTRUCTIONS
Page 4
3
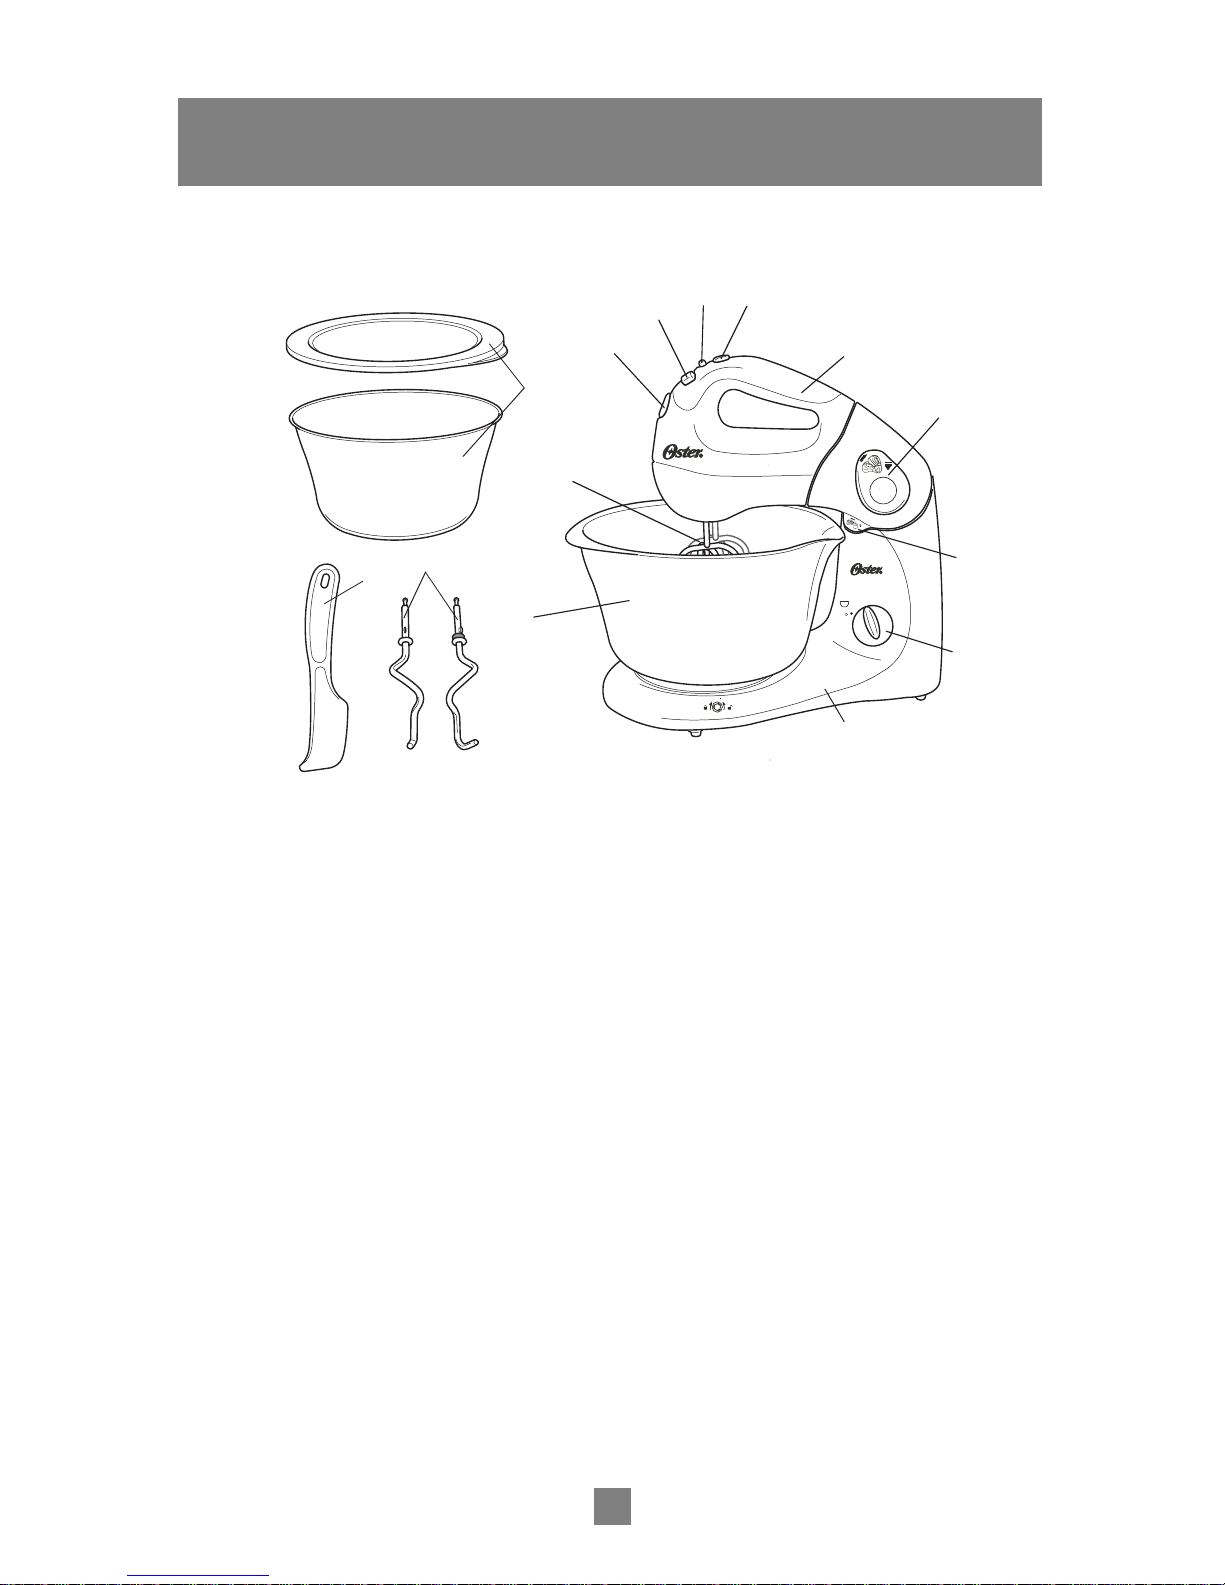
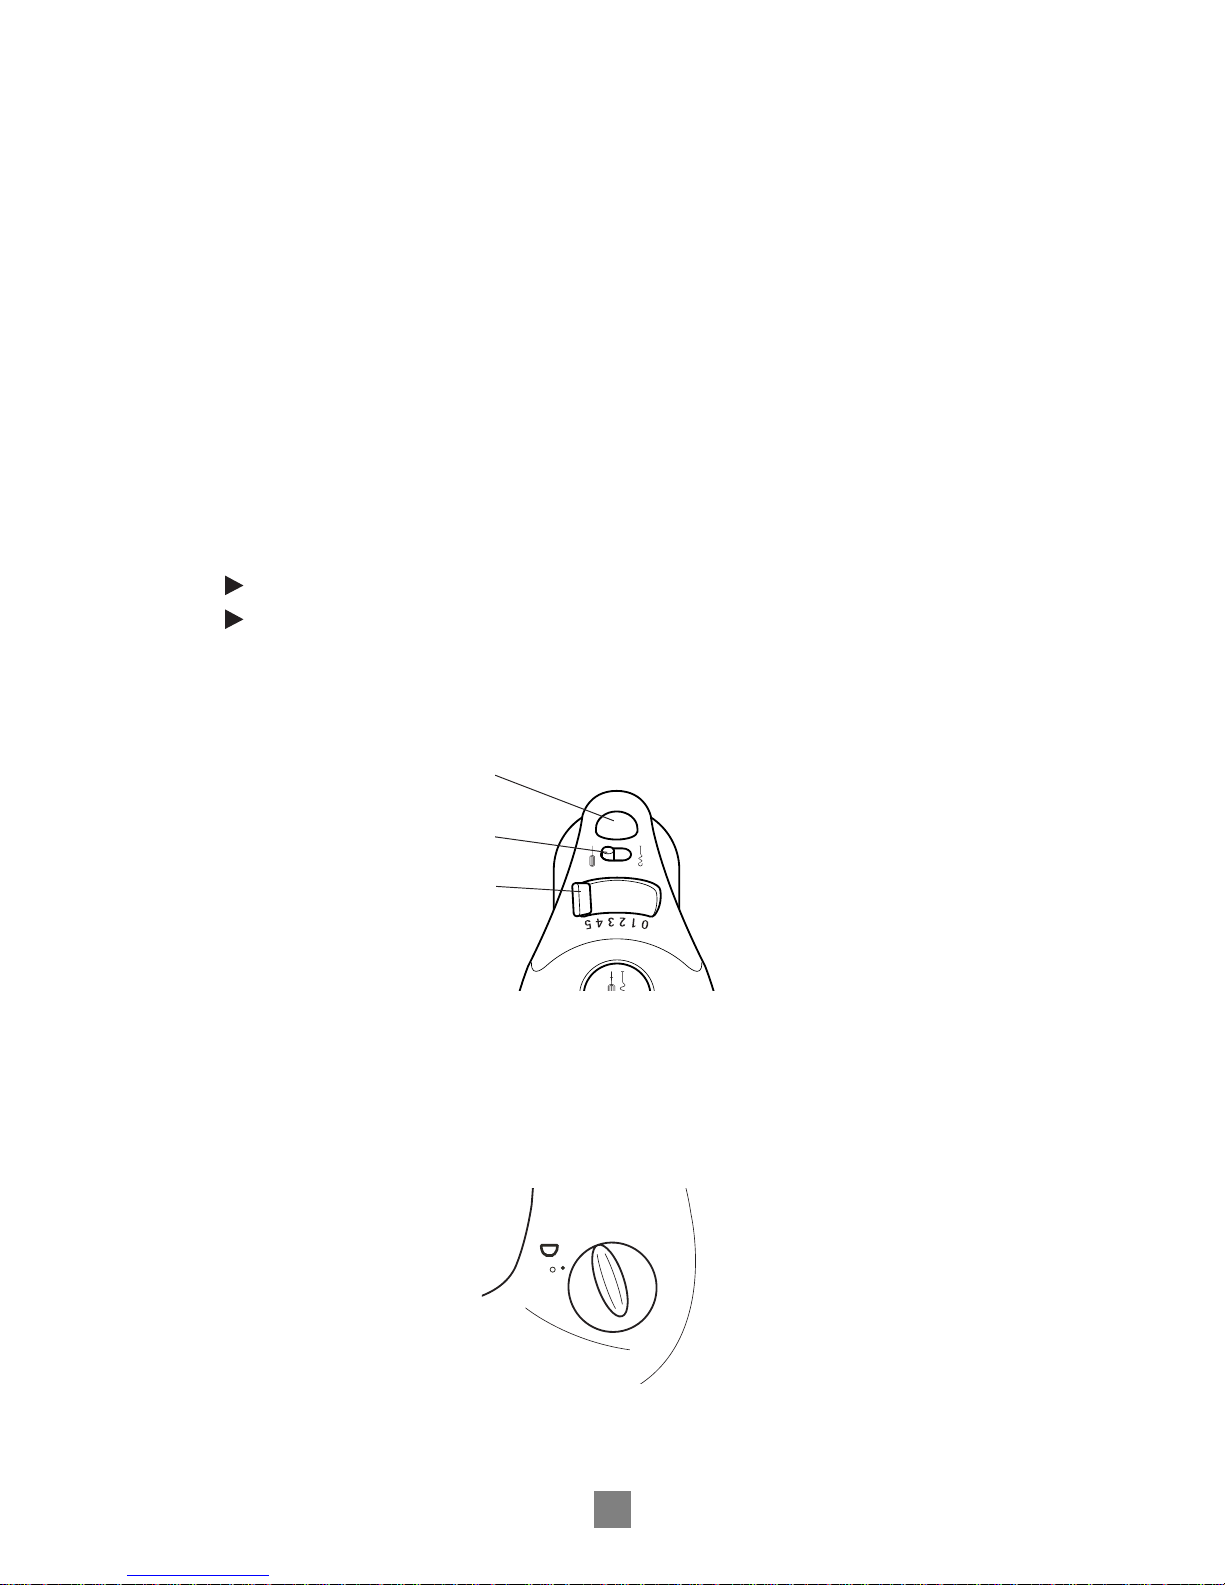
1. Beater Eject Button
2. Mixer On/ Speed Selector Switch
3. Beater/ Dough Hook Switch.
4. Burst of Power
5. Mixer
6. Raise/ Lower Button
7. Lock Release
8. Mixing Bowl On/Speed Selector Switch
9. Mixer Stand
10. Mixing Bowl (Plastic bowl for model 2600 and stainless steel bowl for
model 2601) The mixing bowl for model 2601 includes a lid
11. Whisk Beaters (Chrome plated for model 2600 and stainless steel for model 2601)
12. Dough Hooks (Chrome plated for model 2600 and stainless steel for model 2601)
13. Spatula
12
13
10
DESCRIPTION OF THE APPLIANCE
1
2
34
5
6
7
8
9
10
11
1
2
f
f
O
/
Page 5
OPERATING
You can use the Mixer to mix, knead and whisk food. The Mixer and Mixing Bowl are
each driven separately by their own motors, and the speeds of the Mixer and Mixing
Bowl can be individually adjusted. The Mixer has a single ON/ Speed Range Selector
Switch while the Mixing Bowl has an independent On/Speed Selector Switch. The
Mixer can be easily removed from the processor stand in a moment and used as a
standard Hand Mixer (figure 2). When used in this way, move the hand mixer in a
smooth circular motion around the inside of the Bowl containing the ingredients.
PREPARING FOR USE
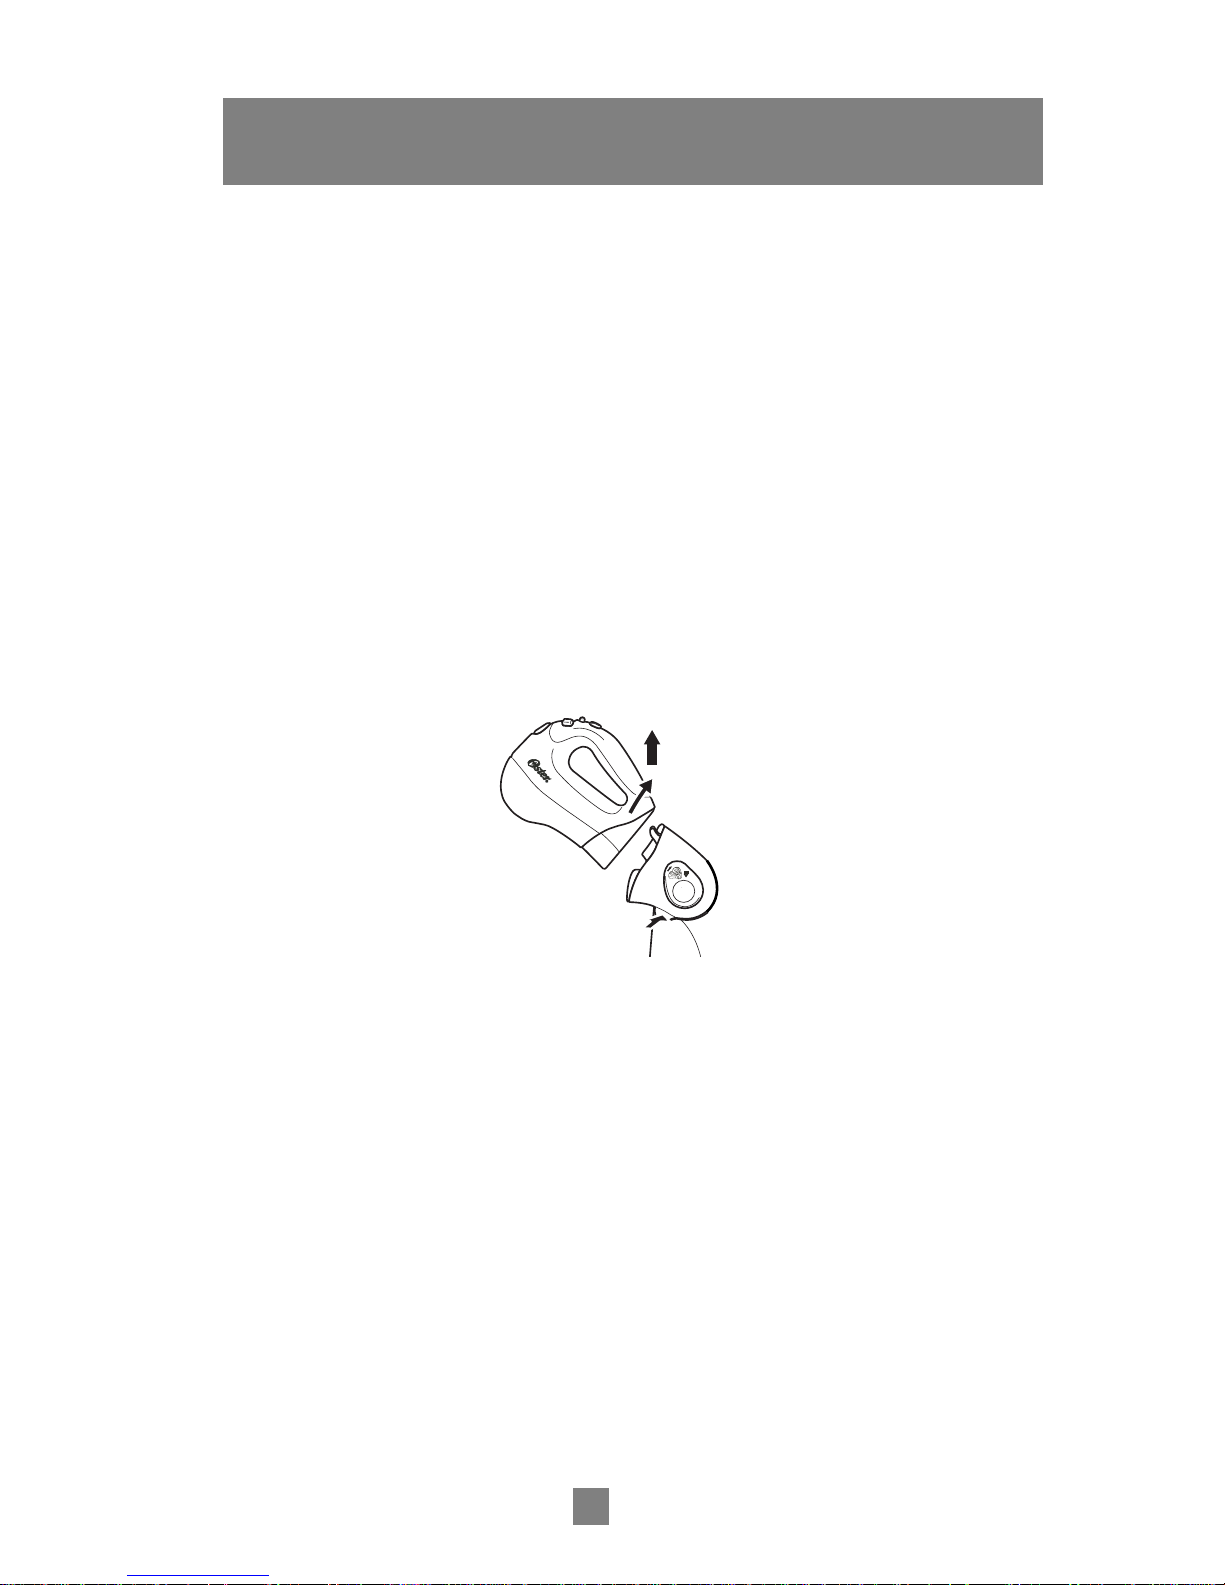
Fitting the Mixer to/ or removing from the stand (figure 2).
Before fitting or removing the Mixer switch off the appliance and remove the plug from
the electrical outlet.
To fit, push the mixer on to the stand (the two latches on the mixer stand engage in the
mixer) and then press down to lock.
To remove, press the Lock Release (figure 2) and pull the Mixer upwards.
4
(figure 2)
USING YOUR HAND/STAND MIXER
Page 6
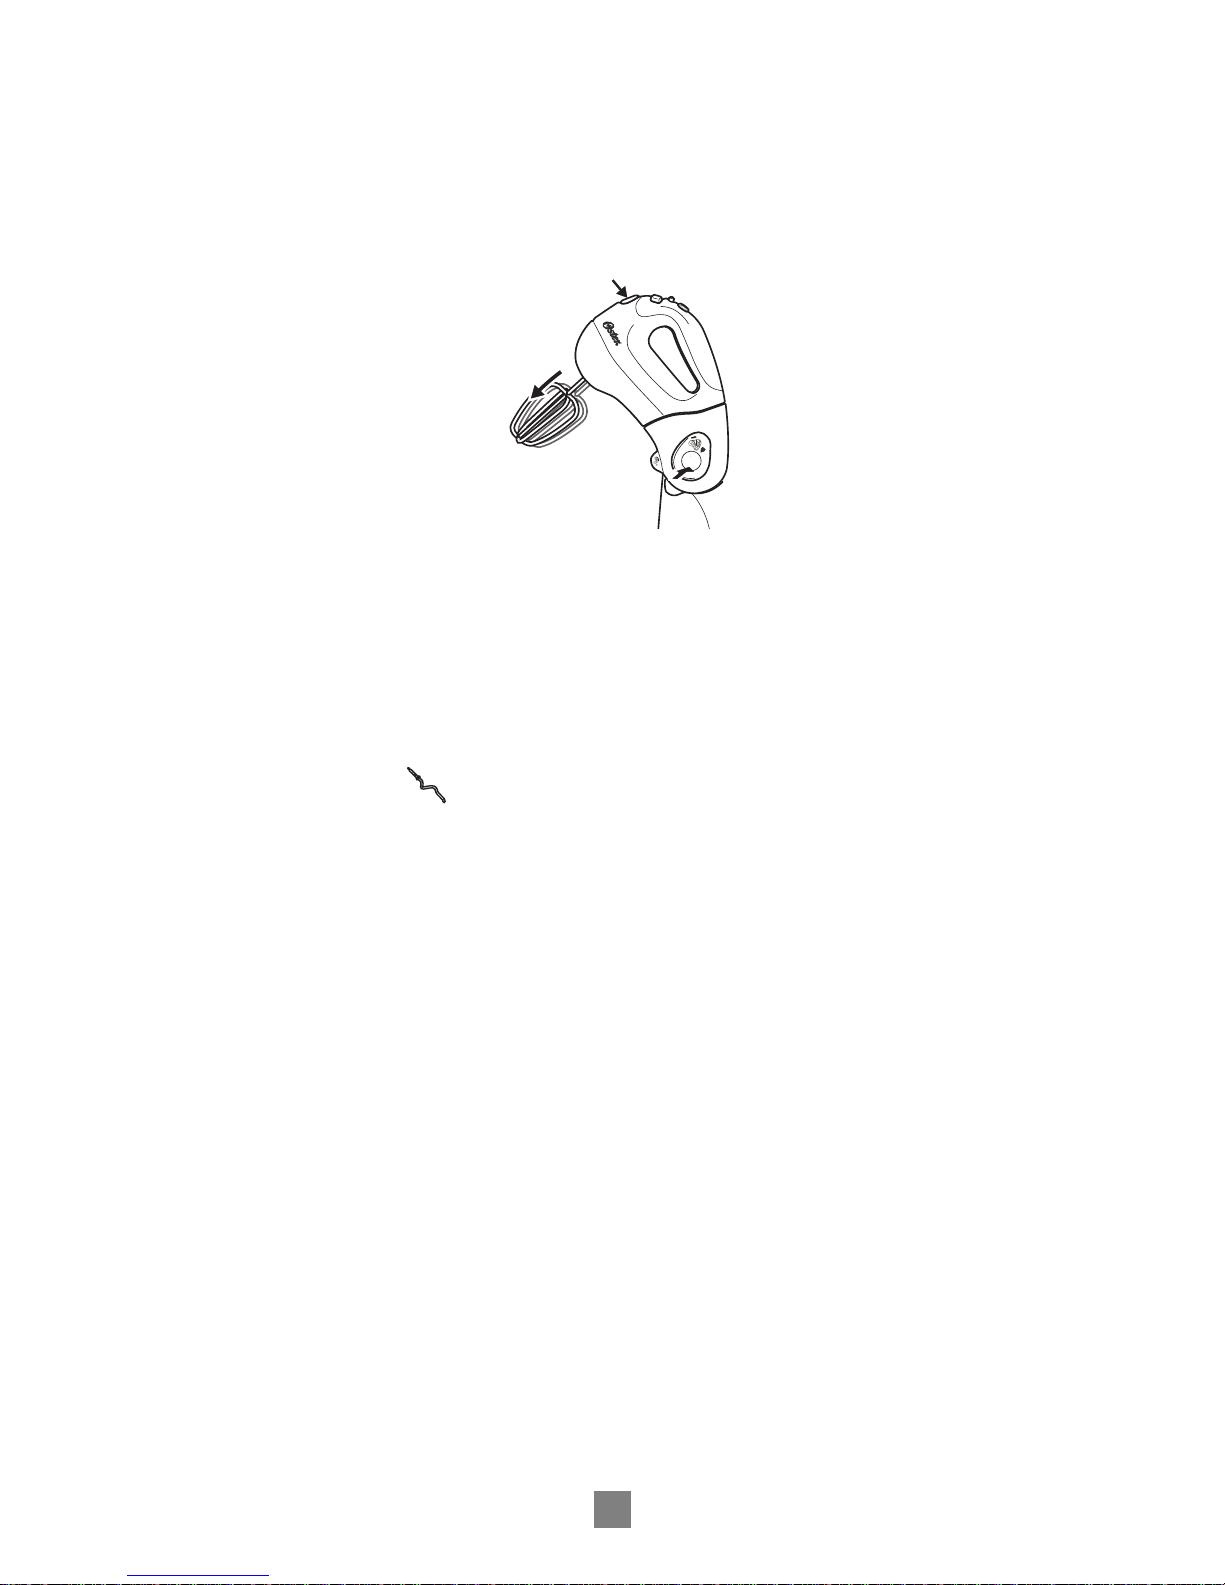
INSERTING/REMOVING BEATERS DOUGH HOOKS
Before releasing the Beaters or Dough Hooks, switch off the Mixer and remove the
plug from the electrical outlet.
Push the Beaters or Dough Hooks into the slots on the underside of the mixers,
until they click
into place. The two Dough Hooks have different plug shapes and must be
pushed into
the correct slots. Inserting the wrong way would lead the dough to “move”
upwards. One
of the Dough Hooks has an additional small ring near the collar on the shaft. This
Dough Hook will only fit in the slot for which it is intended.
This is identified by a symbol,
To remove the accessories, hold firmly with one hand, while pressing the Beater
Ejector Button (figure 3).
CONNECTION
Before using your Hand Mixer for the first time, wash the Beaters in hot/ soapy water,
or the dishwasher. Rinse and dry.
Be sure the speed controls are in the "0" position and the unit is unplugged from an
electrical outlet. Plug cord into an electrical outlet. Insert Beaters as indicated above.
5
(figure 3)
&
Page 7
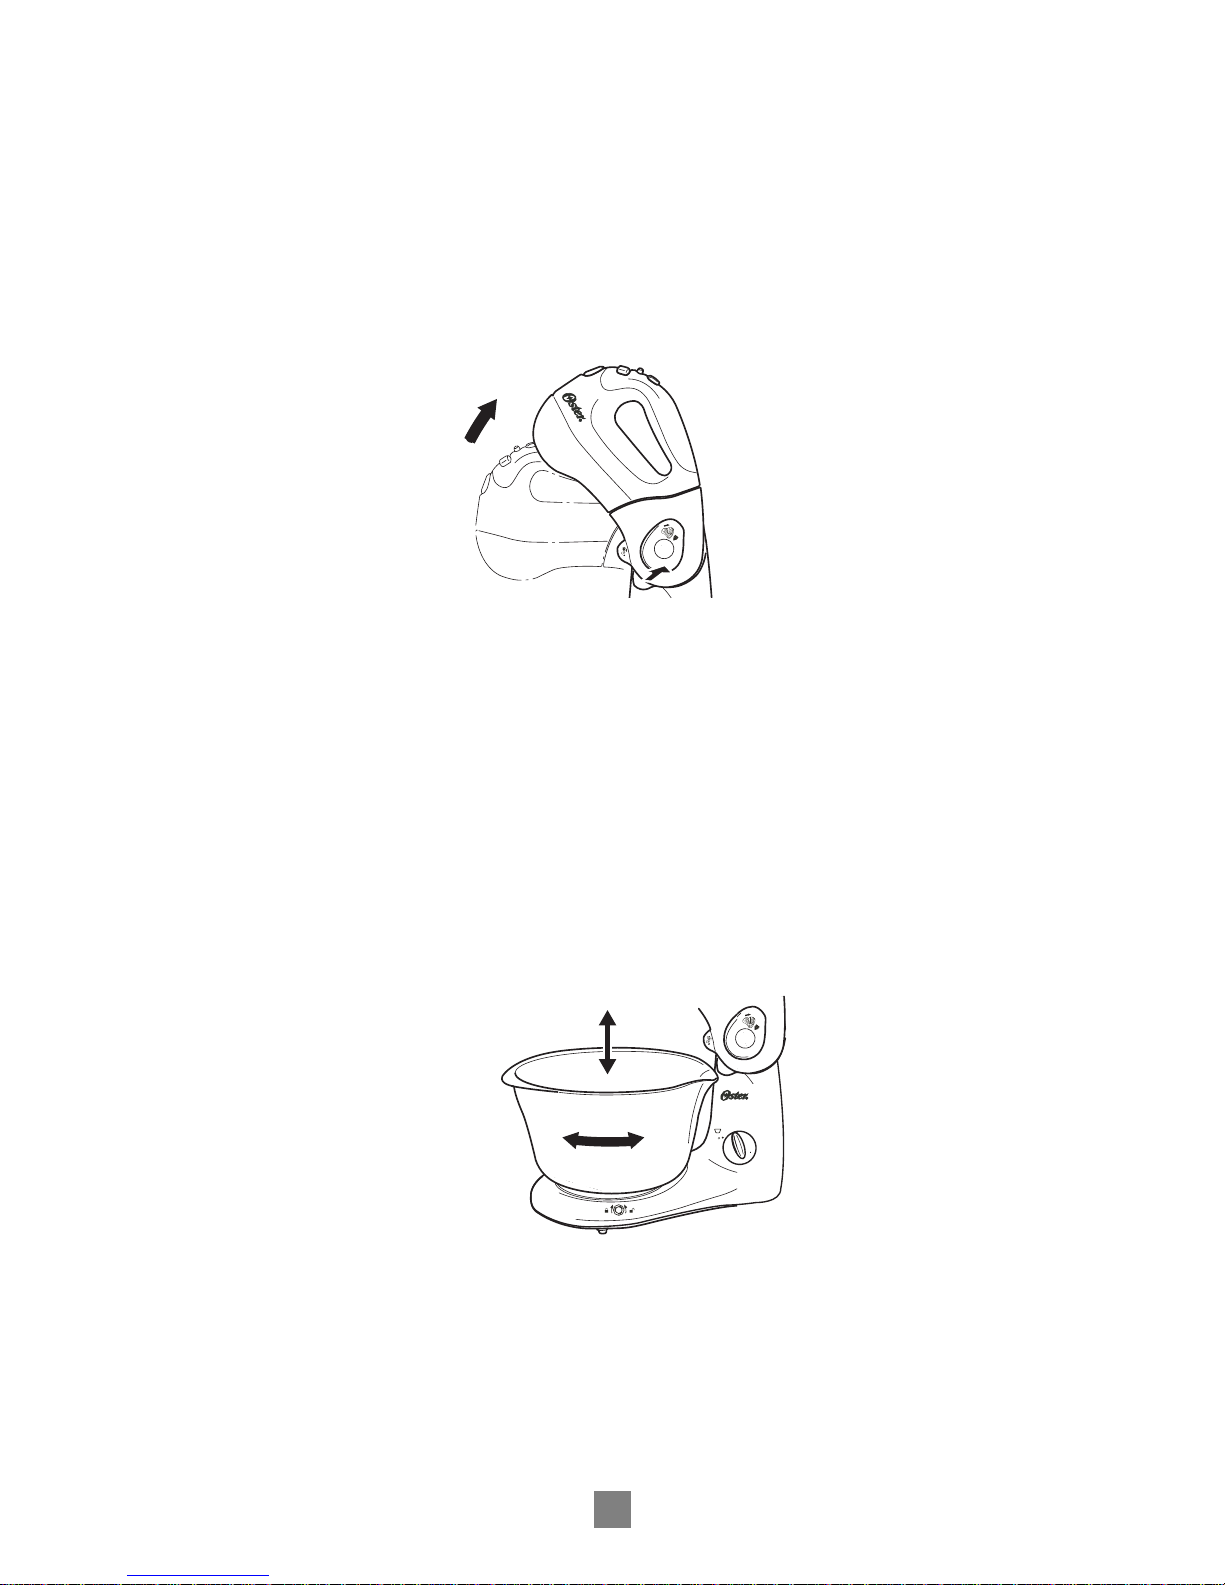
RAISING/ LOWERING THE MIXER
Ensure the Mixer is switched off before raising/ lowering. Press the Raise/ Lower
Button (figure 4) and lift the Mixer up or lower it until it clicks in place. This will facilitate
removal of Beaters as well the Bowl.
PLACING/ REMOVING THE MIXING BOWL
Place the Mixing Bowl on the guide on the Stand (figure 5) and latch in place by gently
turning it clockwise. To remove it, turn it counterclockwise to unlatch. It may be
necessary to hold the base to prevent it from rotating. The off-center position of the
Mixer makes it easy to add ingredients while the Mixer is in operation.
6
(figure 4)
(figure 5)
1
2
f
f
O
/
Page 8
MIXING WITH THE STAND MIXER
When the Mixer is attached to the Stand, the Mixing Bowl can be switched on in up to
two different speeds. The Mixer must not be run continuously for more than 10
minutes at a time. After this time, allow it to cool for at least 20 minutes before
re-using.
Maximum processing quantities:
Processing in the Mixing Bowl must not exceed 1.5 kg solid or 1.75 liquid foodstuffs.
The On/ Mixer Speed Range Selector Switch (figure 6, item 2) is used to:
Switch the Mixer on,
Control the Mixer Speed (5 speed settings) in the pre-selected speed range.
As long as the Burst of Power Button (figure 6, item 4) is pressed and held when
the appliance is in operation, the mixer operates at its maximum speed.
The additional 5 speeds for the Stand Mixer are obtained by selecting the Mixing Bowl
Speed Selector Switch (figure 7).
7
(figure 6)
(figure 7)
1
2
3
4
2
B
u
r
s
t
f
f
O
/
Page 9

The Mixing Bowl has two speed settings. The Mixing Bowl On/Speed Selector Switch
(figure 7) is used to switch the Mixing Bowl on and select it's speed as follow:
0/Off = off
1 = low speed
2 = high speed
MIXING WITH THE HAND MIXER
Slowly guide Mixer around sides and through center of bowl, going in the same
direction. Be careful not to over beat the mixture. Over beating the mixture tends to
make some mixtures tough.
Whenever scraping of the bowl is required, stop the Mixer and scrape sides and
bottom of bowl with the rubber spatula as needed. Turn speed control to "0" and rest
Mixer on its heel rest while adding ingredients. Be sure to position Beaters over mixing
bowl so any dripping will fall back into mixing bowl.
Ingredients should be added to the mixing bowl as they are specified in the recipe.
When combining wet and dry ingredients, you may wish to moisten ingredients on low
speed, and then turn to the desired speed as specified in the mixing guide.
Speed Mixing tasks
1 Fold
2 Stir
8
SPEED GUIDE FOR HAND/STAND MIXER
Use when stirring liquid ingredients or when a gentle action is required.
Use when folding two portions of a recipe together such as a beaten egg
into a batter
Use when mixing dry and liquid ingredients together alternately in a
recipe.
Use when preparing any of the ready-prepared or packaged instant
puddings.
Page 10

3 Mix
4 Blend
5 Beat
9
Use when a recipe calls for combining ingredients together.
Use for quick breads or muffins that require a brisk action, just enough to
blend.
Use when preparing cake mixes or for directions calling for medium speed.
Use to cream butter and sugar together.
Use when preparing a frosting from a recipe or package and to mash
potatoes.
Use when whipping cream for desserts and whipping egg whites.
Use Dough Hooks only for fold (1) and stir (2).
When operating the unit as a Stand Mixer, all five speeds will allow for operation in two
levels, low and high, enabling to reach up to 10 speed levels for flexibility and higher
performance.
CARING FOR YOUR MIXER
CLEANING
Wash the Beaters before and after use. Rinse and dry. Beaters may be washed in a
dishwasher. After removing cord from electrical outlet, clean Mixer head with a damp
cloth and wipe dry. DO NOT IMMERSE MIXER IN WATER. Avoid the use of abrasive
cleaners that will mar the finish of your mixer. The motor of your mixer has been carefully
lubricated at the factory and does not require any additional lubricant.
The Stainless Steel Mixing Bowl (model 2601) can be washed in the dishwasher. The lid
of the stainless steel mixing bowl must not be washed in the dishwasher.
Wash the Plastic Mixing Bowl (model 2600) in water with soapy water. If you wish to wash
the Plastic Mixing Bowl in the dishwasher, it must be placed in the upper basket.
STORAGE
Coil the electrical cord of the Mixer with a plastic twist fastener. Store the Mixer on its heel
rest in a clean, dry location such as a cabinet or a shelf. Store Beaters and Dough Hooks
in a drawer.
MAINTENANCE
Other than the recommended cleaning, no further user maintenance should be necessary.
If for any reason your Mixer should require repairs, do not try to fix it yourself. Send it to
an authorized Oster® Service Center.
Page 11

Sunbeam Products, Inc. ("Sunbeam") warrants that for a period of ONE year from the
date of purchase, this product will be free from defects in material and workmanship.
Sunbeam, at its option, will repair or replace this product or any component of the
product found to be defective during this warranty period. Replacement will be made
with a new or remanufactured product or component. If the product is no longer
available, replacement may be made with a similar product of equal or greater value.
This is your exclusive warranty.
This warranty is valid for the original retail purchaser from the date of initial retail
purchase and is not transferable. Keep the original sales receipt. Proof of purchase is
required to obtain warranty performance. Sunbeam dealers, service centers or retail
stores selling Sunbeam products do not have the right to alter, modify or any way
change the terms and conditions of this warranty.
This warranty does not cover normal wear of parts or damage resulting from any of the
following; negligent use or misuse of the product, use on improper voltage or current,
use contrary to the operating instructions, disassembly, repair or alteration by anyone
other than a Sunbeam or an Authorized Service Center. Further, the warranty does not
cover Acts of God, such as fire, flood, hurricanes and tornadoes.
Sunbeam shall not be liable for any incidental or consequential damages caused by the
breach of any express or implied warranty. Except to the extent prohibited by
applicable law, any implied warranty of merchantability or fitness for a particular
purpose is limited in duration to the duration of the above warranty.
How To Obtain Warranty Service: Please see the country specific warranty insert or
contact your local authorized distributor.
Do Not Return This Product To The Place of Purchase
10
- YEAR LIMITED WARRANTY
1
Page 12

PRÉCAUTIONS IMPORTANTES
• LISEZ TOUTES LES INSTRUCTIONS AVANT D'UTILISER LE MALAXEUR À
MAIN/SUR PIED.
• Dans le but d'éviter les risques d'électrocution, ne déposez pas le malaxeur à main/sur
pied dans l'eau ou dans d'autres liquides.
•
N'utilisez jamais le malaxeur si vous avez les mains mouillées.
•
Vous devez pratiquer une surveillance des plus assidues lorsque vous utilisez le
malaxeur et que des enfants sont présents.
•
Débranchez toujours le malaxeur lors des périodes de non-utilisation, avant la pose ou le
retrait des accessoires et avant le nettoyage.
•
Évitez de toucher aux pièces en mouvement. Gardez les mains, les cheveux, les
vêtements ainsi que les spatules et les autres ustensiles éloignés des batteurs durant le
fonctionnement afin de réduire le risque de blessures personnelles et/ou les dommages
au malaxeur.
• Ne mettez jamais l'appareil en marche avant que toutes les pièces mobiles ne soient à
l'intérieur du bol à mélanger ainsi que les ingrédients à mélanger. Attendez toujours
que les pièces mobiles soient arrêtées avant d'enlever le bol.
• Ne vous servez pas d'un malaxeur dont la fiche ou le cordon est endommagé ou après
que l'appareil a mal fonctionné ou qu'il a été échappé ou endommagé de quelque
façon que ce soit. Retournez l'appareil à un centre de service Oster® autorisé pour
une vérification, une réparation ou un réglage.
• N'utilisez pas l'appareil à l'extérieur.
• Ne permettez pas que le cordon soit suspendu par-dessus le bord de la table ou du
comptoir ou qu'il ne vienne en contact avec des surfaces chaudes, y compris la
cuisinière.
• Retirez les batteurs du malaxeur à main avant de les laver.
• Ne placez pas le malaxeur à main sur un brûleur à gaz ou électrique, ni dans un four
chaud.
11
L'utilisation du malaxeur à main exige certaines précautions fondamentales, y compris
celles qui suivent :
Page 13

12
• Ce malaxeur a été conçu pour un usage ménager seulement.
• Utilisez le malaxeur à main uniquement à des fins pour lesquelles il a été conçu.
N'utilisez pas cet appareil pour brasser de la peinture (les laques, les polyesters, etc.)
Ceci pourrait provoquer une explosion !
• Un malaxeur en marche doit toujours être sous surveillance.
•
Les réparations de l'appareil doivent toujours être effectuées par du personnel qualifié.
Des dangers considérables peuvent être engendrés à la suite de réparations
inadéquates. Veuillez S.V.P. communiquer avec un centre de service Oster® lorsque des
réparations s'avèrent nécessaires.
• Assurez-vous de garder vos doigts éloignés des fouets et des crochets pétrisseurs en
mouvement. Ceci pourrait causer des blessures.
• Cet appareil ne doit jamais être lavé à l'eau du robinet ni submergé dans l'eau.
•
Le fabricant n'est pas responsable de tout dommage résultant d'une utilisation de
l'appareil à des fins autres que pour lesquelles il a été conçu ou à la suite d'une
utilisation inadéquate.
Cet appareil possède une fiche polarisée (une des lames est plus large que l'autre). Ceci a
pour but de diminuer les risques d'électrocution. Il n'y a qu'une façon de brancher cette
fiche sur une prise polarisée. Ceci est une caractéristique de sécurité dont le but est de
diminuer les risques d'électrocution. Inversez la fiche si celle-ci ne se branche pas
parfaitement dans la prise. Communiquez avec un électricien qualifié s'il est toujours
impossible de la brancher. N'essayez pas de contourner cette caractéristique de sécurité.
VEUILLEZ CONSERVER CES DIRECTIVES DANS UN LIEU SÛR
(Pour 120 et 127 Volts)
Page 14

13
1. Éjecteur des batteurs
2. Commutateur de sélection de mise en marche/de réglage de la vitesse
3. Bouton des batteurs/crochets pétrisseurs
4. Bouton Burst of Power® Augmentation de la puissance
5. Malaxeur
6. Bouton soulever/abaisser
7. Dégagement du blocage
8. Commutateur de réglage de la vitesse du bol à mélanger
9. Pied du robot culinair
10. Bol à mélanger (Bol en plastique pour le modèle 2600 et en acier inoxydable pour le
modèle 2601) Un couvercle est inclus avec le bol à mélanger modèle 2601
11. Batteurs-Fouets (plaqués de chrome pour le modèle 2600 et d'acier inoxydable pour le
modèle 2601)
12. Crochets pétrisseurs (plaqués de chrome pour le modèle 2600 et d'acier inoxydable
pour le modèle 2601)
13. Spatule
12
13
10
DESCRIPTION DE L'APPAREIL
1
2
34
5
6
7
8
9
10
11
1
2
f
f
O
/
Page 15

FONCTIONNEMENT
Vous pouvez utiliser le malaxeur pour mélanger, pétrir et fouetter les aliments. Le
mélangeur et le bol à mélanger sont entraînés séparément par leur propre moteur et
les vitesses du malaxeur et du bol à mélanger peuvent être réglées individuellement.
Cependant, le malaxeur possède un simple COMMUTATEUR DE SÉLECTION DE
MISE EN MARCHE/ RÉGLAGE DE LA VITESSE. Le malaxeur peut facilement être
enlevé du pied du robot culinaire en un tournemain et il peut être utilisé comme un
malaxeur à main normal (figure 2). Déplacez le malaxeur à main dans un mouvement
lent et circulaire autour de l'intérieur du bol contenant les ingrédients lorsque vous
l'utilisez de cette façon.
PRÉPARATION POUR L'UTILISATION
Installation/enlèvement du malaxeur du pied du robot culinaire (figure 2).
Fermez le commutateur du malaxeur et débranchez la fiche de la prise électrique
avant l'installation ou l'enlèvement du malaxeur.
Pour l'installation, appuyez le malaxeur sur le pied du robot culinaire (les deux loquets
du pied du robot culinaire s'accrochent au malaxeur). Ensuite, poussez vers le bas
pour bloquer.
Pour l'enlèvement, appuyez sur le dégagement du blocage (figure 2) et soulevez le
malaxeur vers le haut.
14
(figure 2)
UTILISATION DE VOTRE BATTEUR À MAIN / SUR PIED
Page 16

POSE/RETRAIT DES BATTEURS ET DES CROCHETS PÉTRISSEURS
Fermez le commutateur du malaxeur et débranchez la fiche de la prise électrique
avant le retrait des batteurs ou des crochets pétrisseurs.
Introduisez les batteurs-fouets ou les crochets pétrisseurs dans les fentes sur le dessous des
malaxeurs jusqu'à ce qu'ils s'engagent en place. Les deux crochets pétrisseurs possèdent des
formes d'embranchement différentes et doivent être insérés dans les fentes appropriées. Un
mauvais branchement entraînerait la pâte vers le haut. Un des crochets pétrisseurs possède un
petit anneau additionnel près du col sur l'axe. Ce crochet pétrisseur ne pourra être branché que
dans la fente pour laquelle il a été conçu. Ceci est identifié par un symbole.
Pour enlever les accessoires, tenez-les solidement dans votre main tout en appuyant
sur le bouton d'éjection des batteurs (figure 3).
CONNEXION
Avant d'utiliser votre malaxeur pour la première fois, lavez les accessoires dans de
l'eau chaude savonneuse ou au lave-vaisselle. Rincez-les et séchez-les bien.
Assurez-vous que le contrôle de la vitesse est en position " 0 " et que l'appareil est
débranché de la prise électrique. Branchez le cordon dans une prise électrique.
15
(figure 3)
Page 17

POUR SOULEVER/ABAISSER LE MALAXEUR
Assurez-vous que le commutateur du malaxeur est fermé avant de soulever ou
d'abaisser celui-ci. Appuyez sur le bouton soulever/ abaisser (figure 4) et soulevez le
malaxeur ou abaissez-le jusqu'à ce qu'il se bloque. Ceci a pour but de faciliter
l'éjection des batteurs ainsi que l'enlèvement du bol.
MISE EN PLACE/RETRAIT DU BOL À MÉLANGER
Déposez le bol à mélanger sur le guide de la base (figure 5) et bloquez-le en place en
le tournant doucement dans le sens horaire. Pour l'enlever, tournez-le dans le sens
anti-horaire pour le débloquer. Il peut être nécessaire de retenir la base pour
l'empêcher de tourner. La position hors-centre du malaxeur facilite l'ajout d'ingrédients
pendant que le robot culinaire fonctionne.
16
(figure 4)
(figure 5)
1
2
f
f
O
/
Page 18

MÉLANGER AVEC LE MALAXEUR SUR PIED
Le bol à mélanger se met à tourner automatiquement lorsque le commutateur du
malaxeur est mis en position de marche et que le malaxeur est installé sur le pied du
robot culinaire. Le malaxeur ne doit pas fonctionner continuellement pendant
plus de 10 minutes à la fois. Après ce temps, laissez-le refroidir pour au moins
20 minutes avant de le réutiliser.
Quantités maximales à manipuler :
La quantité à manipuler dans le bol à mélanger ne doit pas dépasser 1,5 kg d'aliments
solides ou 1,75 kg de liquides.
Le commutateur de sélection de mise en marche/de réglage de la vitesse (figure 6,
article 2) est utilisé pour :
Mettre le malaxeur en marche,
Contrôler la vitesse du malaxeur (5 réglages de vitesse) dans la gamme de
vitesse présélectionnée.
Le malaxeur va fonctionner à sa vitesse maximale pour aussi longtemps que le
bouton d'augmentation de la vitesse (figure 6, article 4) est enclenché et qu'il est
maintenu enfoncé.
Les 5 vitesses additionnelles du malaxeur sur pied s'obtiennent en réglant la vitesse
du bol à mélanger (figure 7).
17
(figure 6)
(figure 7)
1
2
f
f
O
/
3
4
2
B
u
r
s
t
Page 19

Le bol à mélanger possède deux réglages de vitesse. Le commutateur de sélection de
vitesse du bol à mélanger (figure 7) est utilisé pour choisir la vitesse du bol à
mélanger:
0/Off = off
1 = basse vitesse
2 = haute vitesse
MÉLANGER AVEC LE MALAXEUR À MAIN
Déplacez lentement le malaxeur autour des côtés et à travers le centre du bol
enconservant la même direction. Prenez soin de ne pas trop brasser le mélange.
Certains mélanges durcissent lorsqu'ils sont trop brassés.
Arrêtez le malaxeur et grattez comme requis les côtés et le fond du bol à l'aide d'une
spatule de caoutchouc lorsque vous devez gratter le bol. Réglez le contrôle de vitesse
à " 0 " et déposez le malaxeur sur son talon d'appui pendant que vous ajoutez des
ingrédients. Assurez-vous que les batteurs sont placés au-dessus du bol à mélanger
de façon que tout égouttement tombe dans le bol à mélanger.
Les ingrédients doivent être ajoutés au bol à mélanger selon les précisions de la
recette. Il est possible que vous souhaitiez humecter les ingrédients à basse vitesse,
lorsque vous mélangez des ingrédients humides et secs, pour ensuite régler à la
vitesse désirée selon les précisions du guide de mélange.
Vitesse Fonction
1 Fold
2 Brasser
3 Amalgamer
18
GUIDE DE VITESSE POUR LE MALAXEUR À MAIN/SUR PIED
Choisir lorsque vous mélangez les ingrédients liquides ou lorsqu'un
mouvement léger est désiré.
Choisir dans le but de lier deux portions d'une recette ensemble comme un
œuf battu avec une pâte.
Choisir afin de brasser ensemble les ingrédients secs et liquides d'une
recette de façon alternée.
Choisir lorsque vous préparez l'un ou l'autre des préparations ou des
puddings instantanés.
Choisir lorsqu'une recette demande de combiner ensemble des ingrédients.
Choisir pour les pains ou les muffins à cuisson rapide nécessitant un
brassage bref suffisant pour mélanger.
Page 20

4 Mélanger
5 Battre
19
Choisir quand vous préparez des mélanges à gâteaux ou lorsque les
directives demandent une vitesse moyenne.
Choisir quand vous fabriquez une crème à base de beurre et de sucre.
Choisir lorsque vous préparez un glaçage selon une recette ou un
emballage et pour préparer une purée de pommes de terre.
Choisir lorsque vous fouettez de la crème pour le dessert et que vous f
ouettez les blancs d'œufs.
N'utilisez les crochets pétrisseurs que pour lier (1) et brasser (2).
Lorsque vous utilisez l'appareil comme malaxeur sur pied, toutes les cinq vitesses
permettent le fonctionnement à deux nivaux, bas et haut, permettant ainsi d'obtenir
jusqu'à 10 nivaux de vitesse pour une flexibilité accrue et une plus grande performance.
ENTRETIEN DU MALAXEUR
NETTOYAGE
Lavez les batteurs avant et après l'usage. Rincez et asséchez-les. Les batteurs peuvent
être lavés au lave-vaisselle. Nettoyez la tête du malaxeur à l'aide d'un linge humide et
asséchez-le après avoir retiré le cordon de la prise électrique. LE MALAXEUR NE DOIT
PAS ÊTRE SUBMERGÉ DANS L'EAU. Évitez d'utiliser des nettoyeurs abrasifs qui vont
rayer le fini de votre malaxeur. Le moteur de votre malaxeur a été lubrifié avec soin chez
le fabricant et il ne demande pas de lubrification additionnelle.
Le bol à mélanger en acier inoxydable (modèle 2601) peut être lavé dans le
lave-vaisselle. Le couvercle du bol à mélanger en acier inoxydable ne doit pas être lavé
dans le lave-vaisselle.
Lavez le bol à mélanger de plastique (modèle 2600) dans de l'eau savonneuse. Vous
devez placer le bol à mélanger de plastique dans le panier supérieur du lave-vaisselle si
vous désirez laver celui-ci au lave-vaisselle.
ENTREPOSAGE
Enroulez le cordon électrique du malaxeur et attachez-le avec un tortillon de plastique.
Rangez le malaxeur en le déposant sur son talon d'appui dans un endroit propre et sec,
tel qu'une armoire de cuisine ou une étagère. Entreposez les batteurs et les crochets
pétrisseurs dans un tiroir.
ENTRETIEN
À part le nettoyage recommandé, aucun autre entretien n'est requis par l'utilisateur.
N'essayez pas de réparer par vous-même le malaxeur si celui-ci a besoin d'être réparé
pour quelque raison que ce soit. Expédiez-le à un centre autorisé de service Oster.
Page 21

Sunbeam Products, Inc. ("Sunbeam") garantit que pour une période de UN an à
compter de la date d'achat, ce produit ne présentera aucun vice mécanique ou
électrique, matériel ou de fabrication. Sunbeam, selon son choix, réparera ou
remplacera ce produit ou tout autre élément défectueux, durant la période de
couverture de la garantie. Le remplacement consistera en un produit ou un élément
nouveau ou remanufacturé. Si le produit n'est plus disponible, il sera remplacé par un
produit d'une valeur comparable ou supérieure.
Cela constitue votre garantie exclusive.
Cette garantie est valable pour l'acheteur original à partir de la date d'achat initiale et
ne peut être transférée. Conserver le reçu d'achat original. Une preuve d'achat est
requise pour obtenir une application de la garantie. Les revendeurs, centres de service
ou magasins de revente Sunbeam, n'ont pas le droit de transformer, modifier ou
changer de quelque façon les termes et les conditions de cette garantie.
La présente garantie ne couvre ni l'usure normale des pièces ni les dommages
entraînés par l'un quelconque des cas suivants: l'utilisation inappropriée ou négligente
du produit, son utilisation à une tension ou à un courant inadéquats, son utilisation
contraire aux directives du mode d'emploi, ou son démontage, sa réparation, son
remaniement, sa modification ou sa transformation par toute personne autre qu'un
centre de service après-vente agréé de Sunbeam. De plus, la garantie ne couvre
aucun des actes de Dieu comme incendie, inondation, ouragans et tornades.
Sunbeam n'acceptera aucune responsabilité de dommages conséquents ou
accessoires découlant du manquement à quelque garantie explicite ou implicite sur ce
produit. Sauf dans la mesure où l'empêchent les lois applicables, la durée de toute
garantie implicite sur la qualité marchande ou le caractère utilisable de ce produit pour
un but précis se limite à la durée de la garantie susmentionnée.
Pour Obtenir le Service de Garantie : Veuillez consulter l'insert de garantie
correspondant au pays spécifique ou contacter votre distributeur agréé local.
NE PAS RETOURNER CE PRODUIT À SON EMPLACEMENT D'ACHAT
20
- AN DE GARANTIE LIMITÉE
1
Page 22

MEDIDAS DE SEGURIDAD
• LEA TODAS LAS INSTRUCCIONES ANTES DE USAR LA BATIDORA DE
MANO/ PEDESTAL.
• Como protección contra descargas eléctricas, no sumerja la Batidora de Mano/
Pedestal en agua u otro líquido.
•
NUNCA use la Batidora con las manos húmedas.
•
NO deje la Batidora al alcance de los niños sin supervisión.
•
Cuando el aparato no esté en uso, desconéctelo del tomacorriente antes de poner o
quitar partes y antes de limpiarlo.
•
Evite el contacto con partes móviles. Mantenga las manos, el cabello, la ropa, así como
las espátulas y los utensilios lejos de los Batidores mientras esté funcionando para
reducir el riesgo de lesión a personas y/ o daños a la Batidora.
• NUNCA encienda la unidad hasta que los accesorios estén en el Tazón de Mezclar
con los ingredientes para procesar. Siempre espere hasta que los accesorios se
detengan antes de quitar el tazón.
• NO opere la Batidora si tiene el cable o enchufe dañado, si la unidad no funciona
correctamente, o se cae o se daña de alguna manera. Envíe la unidad a un Centro de
Servicio Oster® autorizado para su revisión, reparación o ajuste.
• NO use la unidad en el exterior.
• NO deje el cable colgado sobre el borde de la mesa o mesada ni toque superficies
calientes, como el de la estufa.
• Quite los Batidores de la Batidora antes de lavarlos.
• NO coloque la Batidora o el Tazón sobre o cerca de la hornilla o dentro de un horno
caliente.
21
Cuando use algún aparato eléctrico siempre deben seguirse las medidas básicas de
seguridad incluyendo las siguientes:
Page 23

22
• Esta Batidora es para uso doméstico solamente.
• NO use la Batidora más que para lo que ha sido diseñada. No use la unidad para
mezclar pinturas (lacas, poliéster, etc.) ¡Se podría producir una explosión!
• NO opere la Batidora sin continua supervisión.
•
Solo personal calificado puede reparar la unidad. Las reparaciones incorrectas pueden
ser peligrosas para el usuario. Comuníquese con un Centro de Servicio Oster®
autorizado si necesita realizar reparaciones.
• Mantenga los dedos alejados de los Batidores y los Ganchos Amasadores. Podría
lastimarse.
• NUNCA limpie la unidad bajo agua del grifo ni la sumerja en el agua.
•
El fabricante no es responsable por los daños causados si se usa la unidad para un
propósito distinto para el cual se creó o por el uso incorrecto.
Para reducir el riesgo de descargas eléctricas, este aparato cuenta con un enchufe
polarizado (una clavija es más ancha que otra). Este enchufe entra en un toma corriente
de una sola manera. Esta es una medida de seguridad, para reducir el riesgo de choque
eléctrico. Si el enchufe no encaja en el toma corriente simplemente colóquelo al revés. Si
aún así no encaja llame a un electricista calificado. De ninguna manera intente modificar
esta medida de seguridad.
GUARDE ESTAS INSTRUCCIONES
(Para 120 y 127 Voltios)
Page 24

23
1. Botón Expulsor de los Batidores
2. Interruptor Selector de Velocidad/ Encendido de la Batidora
3. Interruptor de Batidores/ Ganchos Amasadores
4 Botón de Potencia Adicional - Burst of Power®
5. Batidora
6. Botón para Subir/ Bajar
7. Liberador de la Traba de Seguridad
8. Interruptor Selector de Velocidad/ Encendido del Tazón de Mezclar
9. Pedestal
10. Tazón de Mezclar (tazón de plástico para el modelo 2600 y tazón de acero inoxidable
para el modelo 2601) El tazón de mezclar para el modelo 2601 incluye tapa
11. Batidores (cromados para el modelo 2600 y de acero inoxidable para el modelo 2601)
12. Ganchos Amasadores (cromados para el modelo 2600 y de acero inoxidable para el
modelo 2601)
13. Espátula
12
13
10
DESCRIPCIÓN DE LA UNIDAD
1
2
34
5
6
7
8
9
10
11
1
2
f
f
O
/
Page 25

FUNCIONAMIENTO
Puede usar la Batidora para mezclar, amasar y batir alimentos. La Batidora y el Tazón
de Mezclar cada uno tiene su motor por separado, por lo tanto se pueden ajustar las
velocidades de la Batidora y del Tazón en forma individual. La batidora posee un
Interruptor Selector de Velocidad/ Encendido mientras el Tazón de Mezclar posee su
Interruptor Selector de Velocidad/ Encendido independiente. La Batidora puede
quitarse fácilmente del Pedestal en tan sólo unos segundos y usarse como una
Batidora de Mano común (figura 2). Cuando se use de esta manera, gire la Batidora
de Mano en forma lenta y circular alrededor y por dentro del Tazón donde colocó los
ingredientes.
PREPARACIÓN PARA SU USO
Cómo colocar la Batidora y cómo quitarla del Pedestal (figura 2).
Antes de colocar o quitar la Batidora, desconéctela y quite el enchufe del
toma corriente eléctrico.
Para colocarla, empuje la Batidora hacia el Pedestal (las dos trabas en el Pedestal
están conectadas a la Batidora) y luego presione hacia abajo para trabar.
Para quitarla, presione el liberador de la traba de seguridad (figura 2) y empuje la
Batidora hacia arriba.
24
(figura 2)
BATIDORA DE MANO Y DE PEDESTAL
Page 26

CÓMO INSERTAR/ QUITAR LOS BATIDORES Y GANCHOS
AMASADORES
Antes de quitar los Batidores o Ganchos Amasadores, desenchufe la Batidora y quite
el enchufe del toma corriente eléctrico.
Empuje los Batidores o Ganchos Amasadores hacia las ranuras en la cara inferior de la
Batidora, hasta que escuche un "clic" y estén en su lugar. Los dos Ganchos Amasadores tienen
distintas formas de enchufe y los debe empujar en las ranuras correctas. Si los inserta de
manera incorrecta, la masa podría irse hacia arriba. Uno de los Ganchos Amasadores posee un
pequeño anillo cerca del manguito en el eje. Este Gancho Amasador sólo entra en la ranura
correspondiente. La misma está identificada con el símbolo
Para quitar los accesorios, sostenga firme con una mano y presione el Botón Expulsor
de los Batidores (figura 3).
CONEXIÓN
Antes de usar la Batidora de Mano por primera vez, lave los Batidores en agua
jabonosa caliente o el lavaplatos. Enjuague y seque.
Verifique que los controles de velocidad estén en la posición "0" y la batidora este
desconectada del tomacorriente eléctrico. Inserte los batidores según las
instrucciones anteriores. Conecte el cable en un toma corriente eléctrico.
25
(figura 3)
Page 27

CÓMO SUBIR / BAJAR LA BATIDORA
Verifique que la Batidora esté desenchufada antes de subirla / bajarla. Presione el
Botón para Subir/ Bajar (figura 4) y suba o baje la Batidora hasta que escuche un
"clic" y esté en su lugar. De esta manera será más fácil quitar los Batidores y el Tazón.
CÓMO COLOCAR /QUITAR EL TAZÓN DE MEZCLAR
Coloque el Tazón de Mezclar en la guía de la base (figura 5) y trábelo en su lugar
girándolo lentamente en el sentido de las agujas del reloj. Para quitarlo y destrabarlo,
gírelo en sentido contrario a las agujas del reloj. Es probable que tenga que sostener
la base para evitar que gire. La posición desalineada de la Batidora facilita la
incorporación de ingredientes mientras la Batidora está funcionando.
26
(figura 4)
(figura 5)
2
1
2
f
f
O
/
Page 28

CÓMO MEZCLAR CON LA BATIDORA DE PEDESTAL
Cuando la batidora está adherida al Pedestal, el Tazón de Mezclar puede ser
encendido manualmente en dos velocidades. No debe usar la Batidora en forma
continúa durante más de 10 minutos. Después de este tiempo, deje enfriar la
unidad por lo menos 20 minutos antes de volverla a usar.
Máximas cantidades de procesamiento:
No se deben procesar en el Tazón alimentos sólidos que pesen más de 1,5 kg o
líquidos que pesen más de 1,75 kg.
El Interruptor Selector de Velocidad/ Encendido de la Batidora (figura 6, ítem 2) se usa
para:
Encender la Batidora,
Controlar la velocidad de la Batidora (5 posiciones de velocidad) en el rango
de velocidad preseleccionado.
Al presionar y sostener el Botón de Potencia Adicional - Burst of Power® (figure 6,
ítem 4) con la unidad en funcionamiento, la Batidora funciona a velocidad máxima.
Las 5 velocidades adicionales de la Batidora de Pedestal se obtienen seleccionando
la velocidad del Tazón de Mezclar (figura 7).
27
(figura 6)
(figura 7)
1
2
f
f
O
/
3
4
2
B
u
r
s
t
Page 29

El Tazón de Mezclar tiene dos velocidades. El Interruptor Selector de Velocidad del
Tazón de Mezclar (figura 7) se usa para prender o seleccionar la velocidad del Tazón
de Mezclar:
0/Off = apagado
1 = baja velocidad
2 = alta velocidad
CÓMO MEZCLAR CON LA BATIDORA DE MANO
Lentamente guíe la Batidora alrededor de los lados y a través del centro del tazón,
siguiendo la misma dirección. Tenga cuidado de no excederse en el batido de la
mezcla. Si se excede en el batido, la mezcla quedará muy espesa.
Cuando necesite raspar el tazón, detenga la Batidora y raspe los lados y el fondo del
tazón con la Espátula de goma, según sea necesario. Gire el control de velocidad a
"0" y deje reposar la batidora en el pedestal mientras incorpora los ingredientes.
Coloque los batidores sobre el tazón de la mezcla para que cualquier salpicadura
caiga dentro del tazón.
Debe agregar los ingredientes al tazón de mezclar según lo especificado en la receta.
Al combinar ingredientes líquidos y sólidos, es recomendable humedecer los
ingredientes en velocidad baja y luego girar hacia la velocidad deseada, según se
especifica en la guía de mezclar.
Velocidad Tipo de Mezclado
1 Incorporar
2 Revolver
3 Unir
28
GUÍA DE VELOCIDADES PARA LA BATIDORA DE MANO/PEDESTAL
Se usa para revolver ingredientes líquidos o cuando se requiera una
acción suave.
Se usa cuando se incorporan dos porciones de una receta, por ejemplo
cuando se incorpora un huevo batido a una mezcla.
Se usa para unir ingredientes líquidos y secos en forma alternada en una
receta.
Se usa para mezclas preparadas para pudines instantáneos.
Se usa cuando debe combinar ingredientes en una receta.
Se usa para hacer panecillos o "muffins" que requieren una acción rápida
para mezclar sólo lo suficiente.
Page 30

4 Mezclar
5 Batir
29
Se usa para preparar mezclas de pasteles o con recetas que requieran
velocidad media.
Se usa para mezclar mantequilla y azúcar juntas.
Se usa para preparar coberturas para decorar de una receta o paquete y
para preparar puré.
Se usa para batir crema para postres y para batir claras.
Use los Ganchos Amasadores solamente para Incorporar (1) y Revolver (2).
Si usa la unidad como Batidora de Pedestal, las cinco velocidades permitirán operar en
dos niveles, baja y alta (velocidades del Tazón de Mezclar), esto permite que la batidora
alcance hasta 10 niveles de velocidad para mayor flexibilidad y rendimiento.
CÓMO CUIDAR SU BATIDORA
LIMPIEZA
Lave los Batidores antes y después de cada uso. Enjuague y seque. Los Batidores
pueden lavarse en el lavaplatos. Después de quitar el cable del toma corriente eléctrico,
limpie el cabezal de la Batidora con un paño húmedo y luego seque. NO SUMERJA LA
BATIDORA EN AGUA. Evite el uso de limpiadores abrasivos que dañarán el acabado de
la Batidora. El motor fue cuidadosamente lubricado en la fábrica y no requiere ningún
otro lubricante.
El Tazón de Mezclar de acero inoxidable (modelo 2601) puede lavarse en el lavaplatos.
La tapa del tazón de acero inoxidable no debe lavarse en el lavaplatos.
Lave el Tazón de plástico (modelo 2600) en agua jabonosa. Si desea lavar el Tazón de
plástico en el lavaplatos, colóquelo en el estante superior.
ALMACENAMIENTO
Enrolle el cable eléctrico de la Batidora con un sujetador de enrollar de plástico. Guarde
la Batidora apoyada en el Pedestal en un lugar seco y limpio, como un gabinete o
estante. Guarde los Batidores o Ganchos Amasadores en un cajón.
MANTENIMIENTO
No se requiere ningún mantenimiento adicional a la limpieza requerida. Si por algún
motivo, la Batidora necesita reparación, no trate de repararla usted mismo. Envíela a un
Centro de Oster® autorizado.
Page 31

Sunbeam Products Inc. (“Sunbeam”) garantiza que, por un período de UN año a partir
de la fecha de compra, este producto estará libre de defectos en el material y en su
fabricación. Bajo la opinión de Sunbeam, reparará o repondrá este producto o
cualquier componente del mismo si se encuentra defectuoso durante el periodo de
garantía. La reposición se hará con un producto o un componente nuevo o
refabricado. Si el producto ya no está disponible, la reposición se hará con un producto
similar de igual o mayor valor. Esta es su garantía exclusiva. Esta garantía es válida
para el comprador original a partir de la fecha de compra inicial y no es transferible.
Guarde el recibo de compra original. La prueba de compra es requerida para obtener
los servicios de garantía. Los vendedores de productos Sunbeam, los centros de
servicio o tiendas que vendan productos Sunbeam no tienen el derecho de alterar,
modificar o realizar ningún otro cambio a los términos y condiciones de esta garantía.
Esta garantía no cubre el desgaste por uso normal o daños de partes como resultado
de lo siguiente: uso negligente o mala utilización del producto, uso con una corriente
eléctrica o un voltaje inadecuado, uso contrario a las instrucciones de operación,
desensambles, reparaciones o alteraciones que no sean hechas por Sunbeam o por
un Centro de Servicio Autorizado. Además, la garantía no cubre Actos de Dios tales
como incendios, inundaciones, huracanes y tornados.
Sunbeam no se hace responsable por ningún daño emergente o incidental causado
por el rompimiento de cualquier garantía expresa o implícita. Excepto al alcance
prohibido por la ley aplicable, cualquier garantía implícita de comercialización o arreglo
para un propósito particular, está limitada en duración de la garantía antes
mencionada.
Cómo Obtener el Servicio de Garantía: Por favor consulte el inserto de la garantía
correspondiente al país o póngase en contacto con su distribuidor autorizado local.
NO REGRESE ESTE PRODUCTO AL LUGAR DE COMPRA
30
GARANTÍA LIMITADA DE AÑO
1
Page 32

CUIDADOS IMPORTANTES
• LEIA TODAS AS INSTRUÇÕES ANTES DE USAR A BATEDEIRA DE MÃO E
DE PEDESTAL.
• Para proteger-se contra o risco de choque elétrico, não mergulhe a Batedeira em água
ou em outro líquido.
•
NUNCA use a Batedeira com as mãos úmidas ou molhadas.
•
É necessária vigilância total ao usar a Batedeira perto de crianças.
•
Retire o aparelho da tomada quando não estiver em uso, antes de inserir ou retirar as
peças e antes de limpá-lo.
•
Evite o contato com as peças móveis. Mantenha as mãos, os cabelos e as roupas, bem
como espátulas ou outros utensílios longe dos Batedores durante o uso, para reduzir o
risco de ferimentos às pessoas e/ou danos à Batedeira.
• NUNCA ligue o aparelho antes que os Batedores estejam dentro da Tigela de Mistura
com os ingredientes a serem processados. Espere sempre até que os Batedores
parem antes de remover a Tigela.
• Não use a Batedeira com fio ou plugue danificados ou após ter apresentado defeitos
ou ainda caso o aparelho caia ou apresente avarias de qualquer tipo. Envie o aparelho
a um Centro de Serviço Oster® autorizado para exame, conserto ou ajuste.
• NÃO use o aparelho ao ar livre.
• NÃO deixe que o fio fique pendurado sobre a borda de uma mesa ou bancada ou que
toque superfícies quentes, inclusive o fogão.
• Remova os batedores do aparelho antes de lavá-los.
• NÃO coloque a Batedeira sobre um bico de gás ou próximo a ele, ou em um forno
aquecido.
31
Ao usar aparelhos eletrodomésticos, as instruções básicas de segurança devem sempre
ser observadas, entre elas:
Page 33

32
• Esta Batedeira foi desenvolvida somente para uso doméstico.
• NÃO use a Batedeira para outro fim que não o planejado. Não use este aparelho para
misturar tintas (verniz, poliéster, etc.). Isso pode causar uma explosão!
• NÃO deixe a Batedeira sem a presença de um adulto enquanto estiver sendo usada.
•
Consertos no aparelho devem ser feitos somente por pessoal treinado. Podem ocorrer
riscos sérios ao usuário causados por reparos incorretos. Entre em contato com um
Centro de Serviço Oster® Autorizado caso sejam necessários consertos no aparelho.
• Assegure-se que os dedos, roupas e cabelo sejam mantidos longe dos Batedores e
dos Ganchos Amassadores, pois esses podem causar danos.
• NUNCA limpe o aparelho sob água corrente ou mergulhe-o em água para limpeza.
•
O fabricante não se responsabiliza por danos causados pelo uso do aparelho em
qualquer outro fim que o planejado ou pelo uso incorreto do mesmo.
Para reduzir o risco de choque elétrico, este aparelho possui um plugue polarizado (uma
das lâminas é mais larga do que a outra), encaixando-se em uma tomada polarizada
somente de uma única forma. Esse é um recurso de segurança planejado para reduzir o
risco de choque elétrico. Caso o plugue não se encaixe completamente na tomada,
inverta-o. Se, mesmo assim, ainda não se encaixar, entre em contato com um eletricista
habilitado. Não tente eliminar esse recurso de segurança.
GUARDE ESTAS INSTRUÇÕES
(Para 120 e 127 Voltios)
Page 34

33
1. Botão para Remoção dos Batedores/ Ganchos Amassadores
2. Botão Seletor para Ligar/ Selecionar Velocidades da Batedeira
3. Botão dos Batedores/ Ganchos Amassadores
4. Acelerador de Potência - Burst of Power®
5. Batedeira
6. Botão para Levantar/ Abaixar
7. Botão de Liberação da Trava de Segurança
8. Botão Seletor para Ligar/ Selecionar Velocidades da Tigela de Mistura
9. Pedestal
10. Tigela de Mistura (Tigela plástica para o modelo 2600 e Tigela em aço inoxidável para
o modelo 2601) A Tigela de Mistura do modelo 2601 contém uma Tampa
11. Batedores (cromados para o modelo 2600 e em aço inoxidável para o modelo 2601)
12. Ganchos Amassadores (cromados para o modelo 2600 e em aço inoxidável para o
modelo 2601)
13. Espátula
12
13
10
DESCRIÇÃO DO APARELHO
1
2
34
5
6
7
8
9
10
11
1
2
f
f
O
/
Page 35

Page 36

COLOCAÇÃO / REMOÇÃO DOS BATEDORES E DOS GANCHOS
AMASSADORES
Antes de retirar os Batedores ou os Ganchos Amassadores, desligue a Batedeira e
retire o plugue da tomada elétrica.
Pressione os Batedores ou os Ganchos nos orifícios localizados na parte de baixo da Batedeira,
até que escute o clique de ajuste. Os dois Ganchos Amassadores têm formas de pinos
diferentes e devem ser colocados nos orifícios corretos. A inserção dos Ganchos Amassadores
de forma equivocada pode fazer com que a massa suba pelo gancho. Um dos ganchos possui
um pequeno anel próximo à parte superior do eixo. Esse Gancho Amassador somente se
encaixará no orifício para o qual foi projetado. Isso é identificado pelo símbolo.
Para remover os acessórios, segure com firmeza com uma das mãos, pressionando o
Botão para Remoção dos Batedores/ Ganchos Amassadores (figura 3).
CONEXÃO
Antes de usar a Batedeira pela primeira vez, lave os Batedores em água quente e
sabão ou na máquina de lavar louças. Enxágüe-os e seque-os.
Antes de conectar o aparelho à tomada elétrica, certifique-se de que os controles de
velocidade estejam na posição "0". Insira os Batedores limpos e secos segundo as
instruções já detalhadas anteriormente. Em seguida, conecte o aparelho a uma
tomada elétrica.
35
(figura 3)
Page 37

COMO LEVANTAR E ABAIXAR A BATEDEIRA
Certifique-se que a Batedeira esteja desligada antes de abaixá-la ou levantá-la.
Pressione o Botão para Levantar/ Abaixar (figura 4) e levante ou abaixe a Batedeira
até escutar um clique de ajuste. Isso facilita a remoção dos Batedores e também da
Tigela.
COLOCAÇÃO/ REMOÇÃO DA TIGELA DE MISTURA
Coloque a Tigela de Mistura na guia da base (figura 5) e trave-a no local girando-a
delicadamente no sentido horário. Para remover a Tigela gire-a no sentido anti-horário
até que se destrave. Pode ser necessário segurar a base para evitar que gire. A
posição descentralizada da Batedeira facilita a adição de ingredientes durante o
funcionamento do aparelho.
36
(figura 4)
(figura 5)
1
2
f
f
O
/
Page 38

COMO USAR A BATEDEIRA COM PEDESTAL
Quando a Batedeira estiver no Pedestal, a tigela de mistura pode ser acionada em até
duas velocidades. A Batedeira não deve funcionar de forma contínua e
ininterrupta por mais do que 10 minutos por utilização. Após esse tempo, deixe
que esfrie por, pelo menos 20 minutos, antes de usá-la novamente.
Quantidades máximas de processamento:
O processamento da Tigela de Mistura não deve exceder 1,5 kg de alimentos sólidos
ou 1,75 l de líquidos.
O Botão Seletor para Ligar/ Selecionar Velocidades da Batedeira (figura 6, item 2) é
usado para:
Ligar a Batedeira,
Controlar a velocidade da Batedeira (5 ajustes de velocidade) no intervalo de
velocidade pré-selecionado.
Enquanto o Botão Acelerador de Potência - Burst of Power (figura 6, item 4) for
mantido pressionado e o aparelho estiver em funcionamento, a Batedeira operará
em sua velocidade máxima.
As 5 velocidades adicionais para a Batedeira de Pedestal são obtidas através da
seleção da velocidade da Tigela de Mistura (figura 7).
37
(figura 6)
(figura 7)
1
2
f
f
O
/
3
4
2
B
u
r
s
t
Page 39

A Tigela de Mistura possui dois ajustes de velocidade. O Botão Seletor para Ligar/
Selecionar Velocidades da Tigela de Mistura (figura 7) é usado para selecionar a
velocidade da Tigela de Mistura:
0/Off = desligado
1 = baja velocidad
2 = alta velocidade
COMO USAR A BATEDEIRA MANUAL
Movimente com cuidado a Batedeira nas laterais e em direção ao centro da tigela,
sempre na mesma direção. Tome o cuidado de não bater demais a massa. O excesso
de trabalho da massa tende a endurecer algumas preparações.
Sempre que for necessário raspar a tigela, pare a Batedeira e raspe os lados e o
fundo da tigela com uma espátula de borracha, conforme necessário. Coloque o
controle de velocidade em "0" e descanse a Batedeira em sua base enquanto estiver
adicionando os ingredientes. Certifique-se de posicionar os Batedores na tigela de
mistura de forma que qualquer gota caia na tigela de mistura.
Os ingredientes devem ser adicionados à tigela de mistura na ordem especificada na
receita. Ao combinar ingredientes secos e líquidos, pode ser interessante misturar os
ingredientes em baixa velocidade e, em seguida, voltar à velocidade desejada, como
especificado no guia de mistura.
Velocidade Tarefas de mistura
1 Incorporar
2 Mexer
3 Unir
38
GUIA DE VELOCIDADE PARA A BATEDEIRA MANUAL / COM PEDESTAL
Use para ingredientes líquidos ou quando for necessária uma ação
suave.
Use quando for mesclar duas partes de uma receita, como um ovo batido
em uma massa.
Use para misturar ingredientes secos e líquidos de forma alternada em `
uma receita.
Use quando da preparação de qualquer pudim instantâneo em pó ou
pronto para ser preparado.
Use quando uma receita exigir a combinação e incorporação dos
ingredientes.
Use para muffins ou pães rápidos que exijam uma ação rápida, somente
para misturar.
Page 40

4 Misturar
5 Bater
39
Use quando do preparo de misturas de bolo ou para instruções que exijam
velocidade média.
Use para misturar em creme a manteiga e o açúcar.
Use quando estiver preparando um glacê de uma receita ou pacote e para
amassar batatas.
Use em creme chantili para sobremesas e para bater claras em neve.
Use os Ganchos Amassadores somente para Incorporar (1) e Mexer (2).
Quando o aparelho for usado como Batedeira de Pedestal, todas as cinco velocidades
permitirão a operação em dois níveis, baixo e alto (velocidades da Tigela de Mistura),
permitindo atingir até 10 níveis de velocidade para um melhor desempenho e
flexibilidade.
CUIDADOS COM SUA BATEDEIRA
LIMPEZA
Lave os Batedores antes e após o uso. Enxágüe-os e seque-os. Os Batedores podem
ser lavados em máquina de lavar louças. Após remover o fio da tomada elétrica, limpe a
Batedeira com um pano úmido e passe em seguida um pano seco. NÃO MERGULHE A
BATEDEIRA EM ÁGUA. Evite o uso de limpadores abrasivos que poderão danificar o
acabamento de sua Batedeira. O motor de sua Batedeira foi cuidadosamente lubrificado
na fábrica e não necessita de nenhum lubrificante adicional.
A Tigela de Mistura em aço inoxidável (modelo 2601) pode ser lavada em máquina de
lavar louças. A Tampa da Tigela de aço inoxidável não pode ser lavada na máquina de
lavar pratos.
Lave a Tigela plástica de mistura (modelo 2600) em água com sabão liquido. Se desejar
lavar a Tigela plástica na máquina de lavar louças, ela deve ser colocada na cesta
superior.
ARMAZENAMENTO
Enrole o fio elétrico da Batedeira em torno do prendedor de plástico. Guarde a Batedeira
em sua base de descanso em um local limpo e seco, como um armário ou prateleira.
Guarde os Batedores e os Ganchos Amassadores em uma gaveta.
MANUTENÇÃO DO APARELHO
Além da limpeza recomendada, não é necessária nenhuma outra manutenção do
usuário. Se, por qualquer motivo sua batedeira necessitar de reparos, não tente
consertá-la sozinha. Envie-a a um Centro de Serviço Oster autorizado.
Page 41

Sunbeam Products, Inc. ("Sunbeam") garante que, por um período de UM ano a partir
da data de compra, este produto ficará livre de defeitos materiais e de mão-de-obra. A
seu critério, a Sunbeam reparará ou substituirá este produto ou qualquer componente
do produto que possa apresentar defeitos durante o período de garantia. A
substituição será feita com um novo produto ou omponente novo e recondicionado. Se
o produto não estiver mais disponível, a substituição poderá ser feita com um produto
semelhante de igual ou maior valor. Esta é a sua garantia exclusiva.
Esta garantia é válida para o comprador original em varejo a partir da data de compra
de varejo inicial, e não poderá ser transferida. Guarde o recibo original de venda. Para
obter serviços de garantia, é necessário ter um comprovante de compra. Os
distribuidores, postos de assistência técnica ou lojas de varejo da Sunbeam que
vendem os produtos da Sunbeam não têm o direito de alterar, modificar ou mudar de
qualquer maneira os termos e condições desta garantia.
Esta garantia não cobre o desgaste normal de peças ou danos resultantes de qualquer
dos seguintes casos: uso negligente ou errôneo do produto, uso de tensão ou corrente
inadequadas, uso contrário às instruções operacionais, desmonte, conserto ou
alterações efetuadas por outrem que não a Sunbeam ou posto de assistência técnica
autorizada. Além disso, a garantia não cobre casos de força maior, tais como
incêndios, enchentes, furacões e tornados.
Sunbeam não se responsabilizará por quaisquer danos emergentes ou indiretos
causados pela violação de qualquer garantia expressa ou implícita. Exceto na medida
proibida pelas leis aplicáveis, quaisquer garantias implícitas de comerciabilidade ou
adequação a um fim específico limitam-se à duração expressa pela garantia acima.
Como Obter Serviço Autorizado na Garantia: Consulte as condições dagarantia
específica do país ou entre em contato com o seu representante local.
NÃO DEVOLVA ESTE PRODUTO AO LOCAL ONDE ELE FOI COMPRADO
40
GARANTÍA LIMITADA DE ANO
1
Page 42

Printed in China Imprimé en Chine Impreso en China Impresso na China
P.N. 113549
PARA MÉXICO SÓLAMENTE - FOR MEXICO ONLY
BATIDORA DE PEDESTAL OSTER®
MODELOS 2600, 2600-12, 2600-13, 2601, 2601-12, 2601-13
IMPORTADOR: SUNBEAM MEXICANA, S.A. DE C.V.
AV. JUÁREZ No. 40-201,
EX–HACIENDA DE SANTA MÓNICA,
TLALNEPANTLA, ESTADO DE MÉXICO,
C.P. 54050, R.F.C. SME570928G90, TEL. 53660800
PAÍS DE ORIGEN: CHINA
PAÍS DE PROCEDENCIA: CHINA, E.U.A.
LEA EL INSTRUCTIVO ANTES DE USAR EL APARATO
CARACTERÍSTICA ELÉCTRICAS
60 Hz 120 V~ 325 W
CONTENIDO: 1 PIEZA
©2003 Sunbeam Products, Inc. All rights reserved.
OSTER® and Burst of Power® are registered trademarks of Sunbeam products, Inc.
Distributed by Sunbeam Products, Inc., Boca Raton, FL. 33431.
©2003 Sunbeam Products, Inc. Tous droists réservés.
OSTER® et Burst of Power® sont marques déposées de Sunbeam products, Inc.
Distribué par Sunbeam Products, Inc., Boca Raton, FL. 33431.
©2003 Sunbeam Products, Inc. Todos los derechos reservados.
OSTER® y Burst of Power® son marcas registradas de Sunbeam products, Inc.
Distribuido por Sunbeam Products, Inc., Boca Raton, FL. 33431.
©2003 Sunbeam Products, Inc. Todos os direitos reservados.
OSTER® e Burst of Power® são marcas registradas da Sunbeam Products, Inc.
Distribuído pela Sunbeam Products, Inc., Boca Raton, Florida 33431.
 Loading...