

Page 1
72150-02 REV C
SIMPLY AMAZING
®
FRANÇAIS
GUIDE D’UTILISATION PAGE 8
ESPAÑOL
GUIA DEL USUARIO PAGE 16
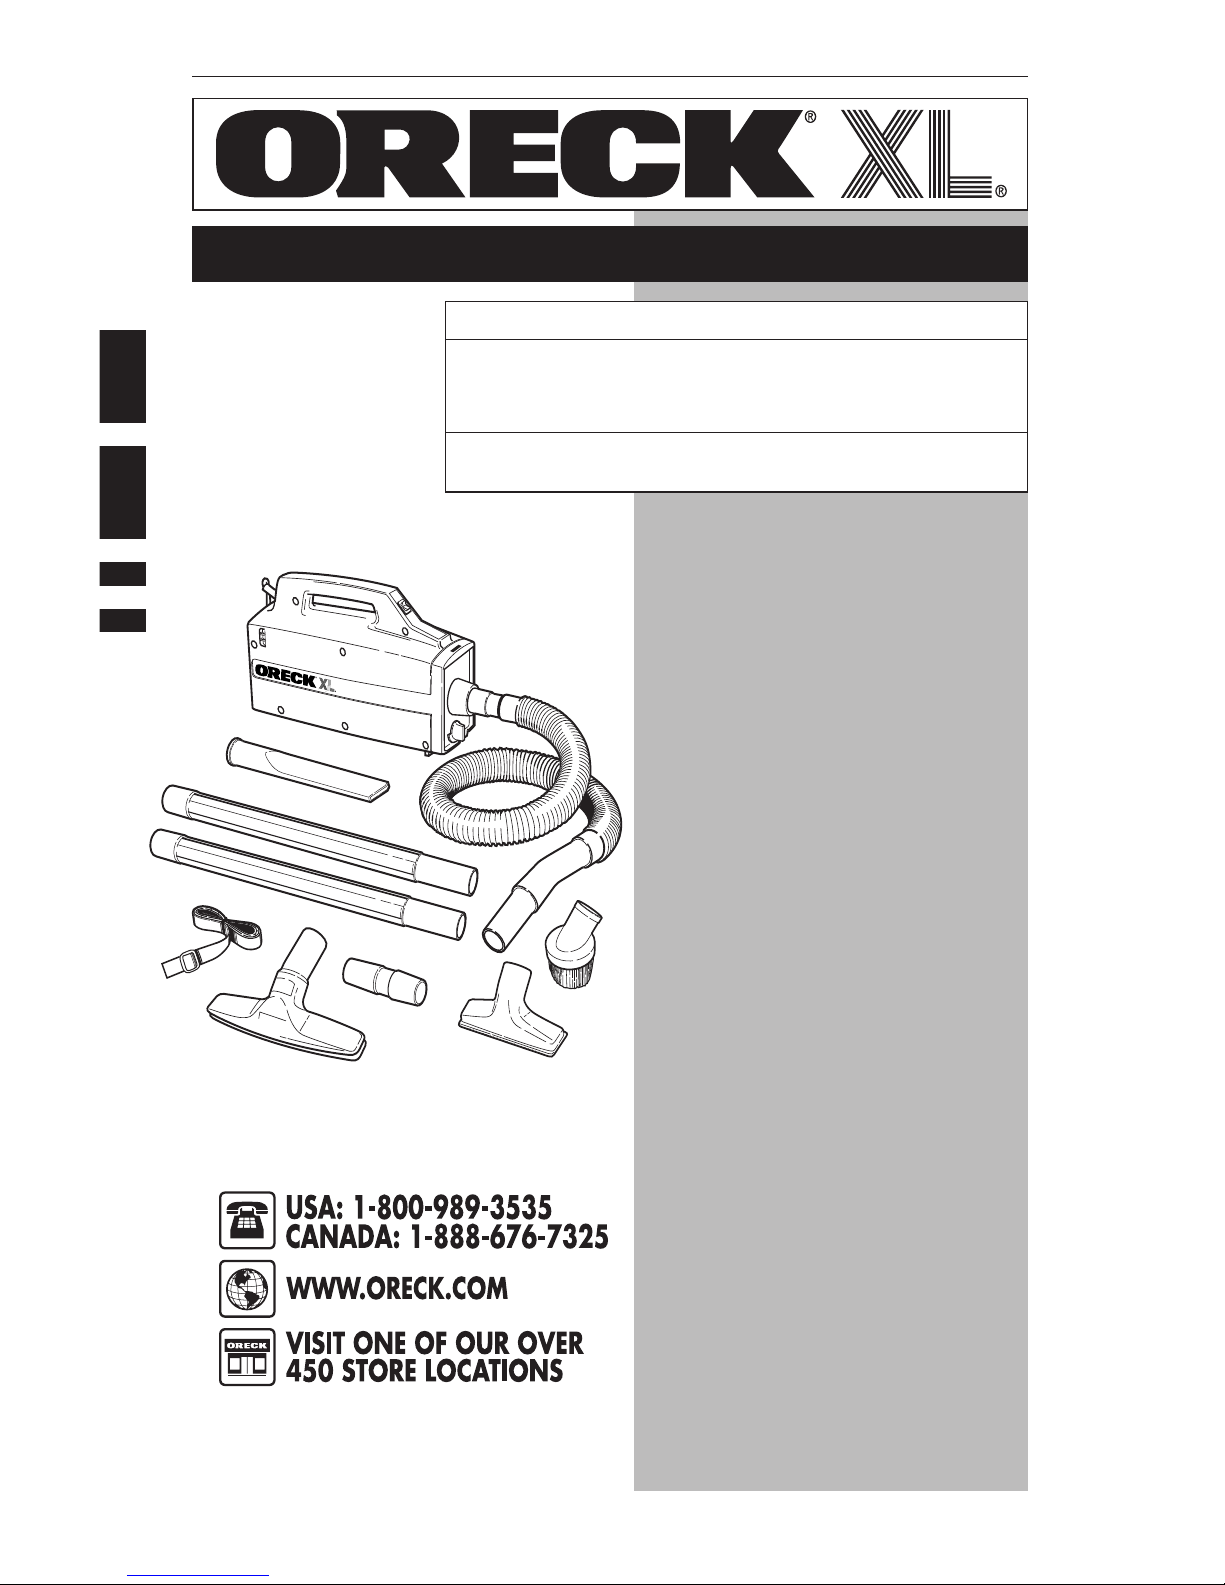
USER’S GUIDE
COMPACT
CANISTER
VACUUMS
•IMPORTANT•
SAVE THIS BOOKLET!
Includes:
• Safety Warnings
• Parts List
• Operating Instructions
• Maintenance
• Warranty
• Trouble Diagnosis
• Accessories List
USA: 1-800-989-3535
CANADA: 1-888-676-7325
COMMERCIAL: 1-800-242-1378
www.oreck.com
www.oreckcommercial.com
VISIT ONE OF OUR OVER
450 STORE LOCATIONS
ENGLISH
Page 2

ENGLISH
BEFORE OPERATING
CLEANER, READ ALL
INSTRUCTIONS IN THIS
MANUAL CAREFULLY.
Safeguards, Important
Safety Instructions . . . . . . . page 1
Warranty . . . . . . . . . . . . . . page 2
Accessory Parts List . . . . . . . page 3
Operating . . . . . . . . . . . . . page 4
Assembly Instructions . . . . . page 5
Maintenance & Customer
Service . . . . . . . . . . . . . . . page 6
Troubleshooting Guide,
Accessories . . . . . . . . . . . page 7
Français Guide
D’utilisation . . . . . . . . . . . . page -8
Español Guia Del Usuario . . page 16
Table of Contents
Safeguards
WARNING: Unplug cord
from electrical outlet
before servicing.
• IMPORTANT: Make sure filter bag
is in place. Do not operate cleaner
without filter bag. Damage to motor
may occur.
• Be sure bag gasket is in place. If
the white bag gasket is damaged or
lost, replace at once.
• For best results, change disposable
filter bag regularly even if it is not
completely full. An extremely dirty
bag or a bag close to full will affect
the suction of the cleaner and can
create excessive motor heat that
could damage the motor. A good
practice is to change filter bag
ever
y 30 days even if it is not full.
• Do not pick up moist material or
liquids.
• Clean your vacuum cleaner with
a damp (not wet) cloth in the
disposable bag cavity and the
outside of canister unit.
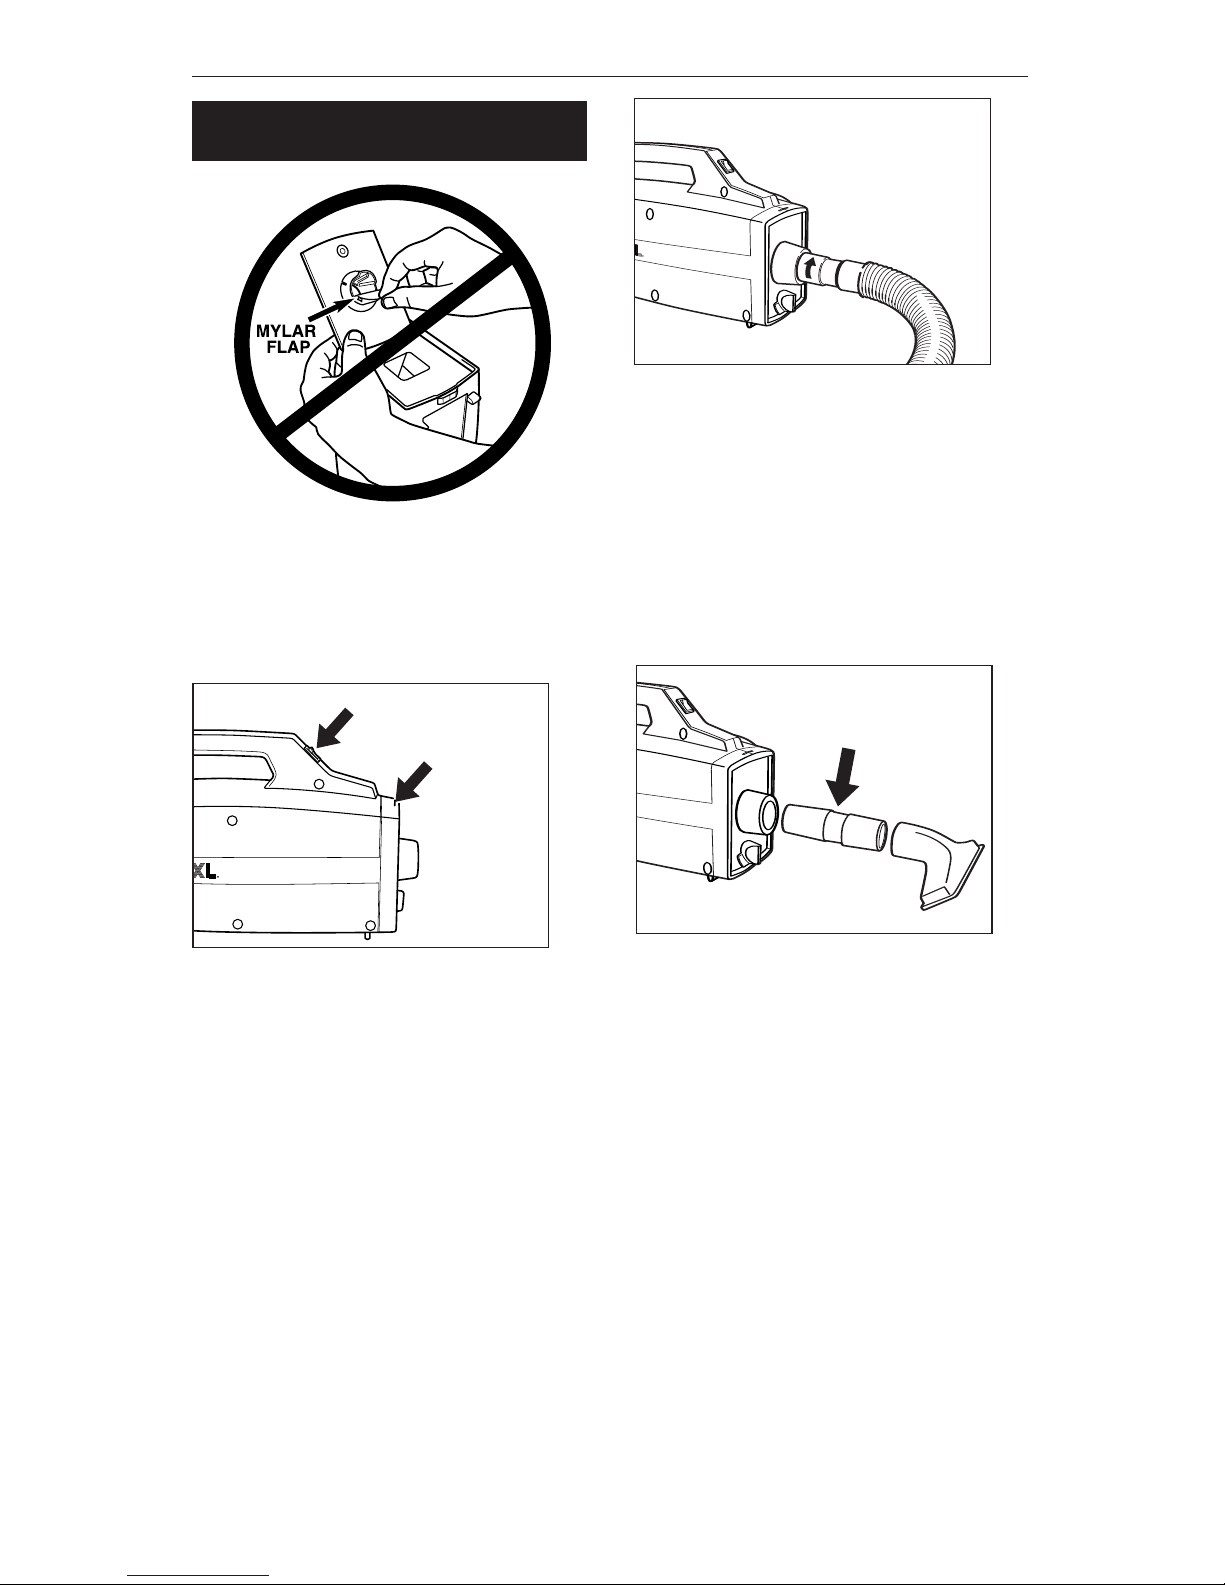
•
IMPORTANT: DO NOT REMOVE
the dirt retaining flap attached on
the back of the front plate. It must
be left in place for the unit to operate properly and to ensure cleaning
effectiveness.
•
MOTOR PROTECTION SYSTEM:
If fine materials such as soot,
cement, plaster dust, copy machine
powder, etc. are picked up, the bag
surface may seal and cause the
motor to shut off to avoid over-heating. If this happens, turn the switch
off and unplug the cleaner. Replace
filter bag. Check and clear any
clogs in hose or accessories. After
approximately 30 min. the motor
will have cooled and the cleaner
will be ready to use.
Note: The cleaner must remain
unplugged for 30 minutes for motor
to cool and system to reset.
When using an electrical
appliance, basic precautions
should always be followed,
including the following:
READ ALL INSTRUCTIONS
BEFORE USING THIS VACUUM
CLEANER
WARNING
To reduce the risk of fire,
electric shock, or injury:
IMPORTANT
SAFETY INSTRUCTIONS
• Do not leave appliance
unattended when plugged in.
Unplug from outlet when not in
use and before ser
vicing.
•
Do not use outdoors or on wet
surfaces.
•
Do not allow to be used as a toy
.
Close attention is necessar
y when
used by or near children.
• Use only as described in this
manual.
• Do not use with damaged cord
or plug. If appliance is not
1
Page 3

ENGLISH
working as it should, has been
dropped, damaged, left outdoors,
or dropped into water, return it to
a service center or call customer
service.
Commercial 1-800-989-3535
Canada 1-888-676-7325
• Do not pull or carry by cord, use
cord as a handle, close door on
cord, or pull cord around sharp
edges or corners. Do not run appliance over cord. Keep cord away
from heated surfaces.
• Do not unplug by pulling on cord.
To unplug, grasp the plug, not the
cord.
• Do not handle plug or appliance
with wet hands.
• Do not put any object into
openings. Do not use with any
opening blocked; keep free of
dust, lint, hair and anything else
that may reduce air flow.
• Keep hair, loose clothing, fingers
and all parts of body away from
openings and moving parts.
• Do not use to pick up anything that
is burning or smoking, such as cigarettes, matches, or hot ashes.
• Do not use without filter bag
assembly in place.
• Turn off all controls before
unplugging.
• Use extra care when cleaning on
stairs.
• Do not use to pick up flammable or
combustible liquids, such as gasoline, or use in areas where they
may be present.
SAVE THESE
INSTRUCTIONS
Household Use Only
Polarized Plug Notice
This product is equipped with a polarized alternating current line plug (a
plug having one blade wider than the
ORECK MANUFACTURING COMPANY:
(ORECK gives you the following limited
warranty for this product only if it was
originally purchased for use, not resale,
from ORECK or an ORECK Authorized
Retail Dealer.)
Oreck will repair or replace, free of
charge, to the original purchaser, any part
which is found to be defective in material
or workmanship within three (3) years of
the date of purchase; ten (10) years on
housing. This limited warranty applies to
normal domestic use. Any commercial use
of this product will void this limited
warranty.
Parts subject to normal wear are not
covered by this limited warranty.
This limited warranty does not apply to
any part subjected to accident, abuse,
commercial use, alteration, misuse,
damage caused by fire or act of God, the
use of voltages other than indicated on the
serial number plate of this product or
service of this product by other than
ORECK or an ORECK Factory Authorized
Service Center.
ORECK does not authorize any person or
representative to assume or grant any
other warranty obligation with the sale of
this product.
ORECK’s limited warranty is valid only if
you retain proof of purchase from ORECK
or an O
RECK
Authorized Retail Dealer for
this product. If you purchase this product
from any other source, your purchase is
“AS IS,” which means ORECK grants you
no warranty, and that you, not ORECK,
assume the entir
e risk of the quality and
per
formance of this product, including the
entire cost of any necessary servicing or
r
epairs of any defects.
Warranty
2
other). This plug will fit into the power
outlet only one way. This is a safety
feature. If you are unable to insert the
plug fully into the outlet, try reversing
the plug. If the plug should still fail to
fit, contact an electrician to replace
the obsolete outlet. Do not defeat the
purpose of the polarized plug.
Page 4

ENGLISH
ORECK’s liability for damages to you for
any costs whatsoever arising out of this
statement of limited warranty shall be
limited to the amount paid for this product
at the time of original purchase, and
ORECK shall not be liable for any direct,
indirect, consequential or incidental
damages arising out of the use or inability
to use this product.
Some states do not allow the exclusion or
limitation of incidental or consequential
damages, so the above limitation or
exclusion may not apply to you.
ALL EXPRESS AND IMPLIED WARRANTIES
FOR THIS PRODUCT, INCLUDING IMPLIED
WARRANTIES OF MERCHANTABILITY
AND FITNESS FOR A PARTICULAR
PURPOSE, ARE LIMITED IN DURATION TO
THE WARRANTY PERIOD, AND NO
WARRANTIES, WHETHER EXPRESS OR
IMPLIED, WILL APPLY AFTER THIS PERIOD.
Some states do not allow limitations on the
duration of implied warranties, so the
above limitation may not apply to you.
This warranty gives you specific legal
rights, and you may also have other rights
which vary from state to state.
CALL CUSTOMER SERVICE
HOT LINE
US 1-800-989-3535
Canada 1-888-676-7325
Whenever calling, please be sure to
have your model and serial number
from data plate.
1. Adjustable shoulder strap.
2. Flexible hose with built-in adapter
for easy insertion in vacuum or
blower por
t.
3. Crevice tool.
4. Fabric tool.
5. Bare floor & wall tool. BB70AW
6.
Deluxe Bare floor and wall tool.
BB870AD*
1
2
3
4
5
6
7
8
10
11
Accessory Parts List
9
3
(Parts vary in design
according to model. All
parts not available for all models.)
* BB870-AW Owners:
The On-Board Tool Caddy and the
Deluxe Floor/ Carpet Black Tool
can be purchased separately.
** Caddy not included in all
BB870-AD Models
To order new parts or accessories call:
US 1-800-989-3535
CANADA 1-888-676-7325
7. Tool adapter tube for fitting tools
directly to vacuum when not
using hose.
8. Two extension wands.
9. Dusting brush.
10. Two paper filter bags.
11. On Board Tool Caddy.
BB870AD**
Page 5
ENGLISH
To Operate
Shoulder Strap
Insert end of shoulder strap into slot in
front of on/off power switch. Pull
through three to four inches and insert
into plastic clip. One inch of strap
must be completely through clip. Insert
other end of strap through slot located
at back of handle. Insert end into clip
and pull through. Adjust length by
pulling strap through clip. Strap must
go through both front and back clips.
IMPORTANT: Before using shoulder
strap, pull both ends to be sure it is
secur
e.
ON/OFF
Switch
Twist and Push to
install tools.
Twist and pull to
remove tools.
Hose & Tool Installation
The flexible hose uses a Shurlok
®
locking system that prevents hose
removal unless intended. To install
hose, align “J” slot in hose coupling
with tab inside the suction port. Insert
hose in port. Twist collar clockwise to
lock hose coulping in port. Twist
counterclockwise and pull to remove
hose.
The extension wands and cleaning
tools supplied with your Oreck XL
Compact Cannister Vacuum lock
together with friction.
Twist and
push
to be sure they lock tightly
when installing. Twist and pull to
remove.
When installing tools directly to
blower or suction port without using
hose, tool adapter must be used.
IMPORTANT: DO NOT REMOVE
the dirt retaining flap attached on the
back of the front plate. It must be left in
place for the unit to operate properly
and to ensure cleaning effectiveness.
4
Strap Slot
Adapter Tube
Page 6
ENGLISH
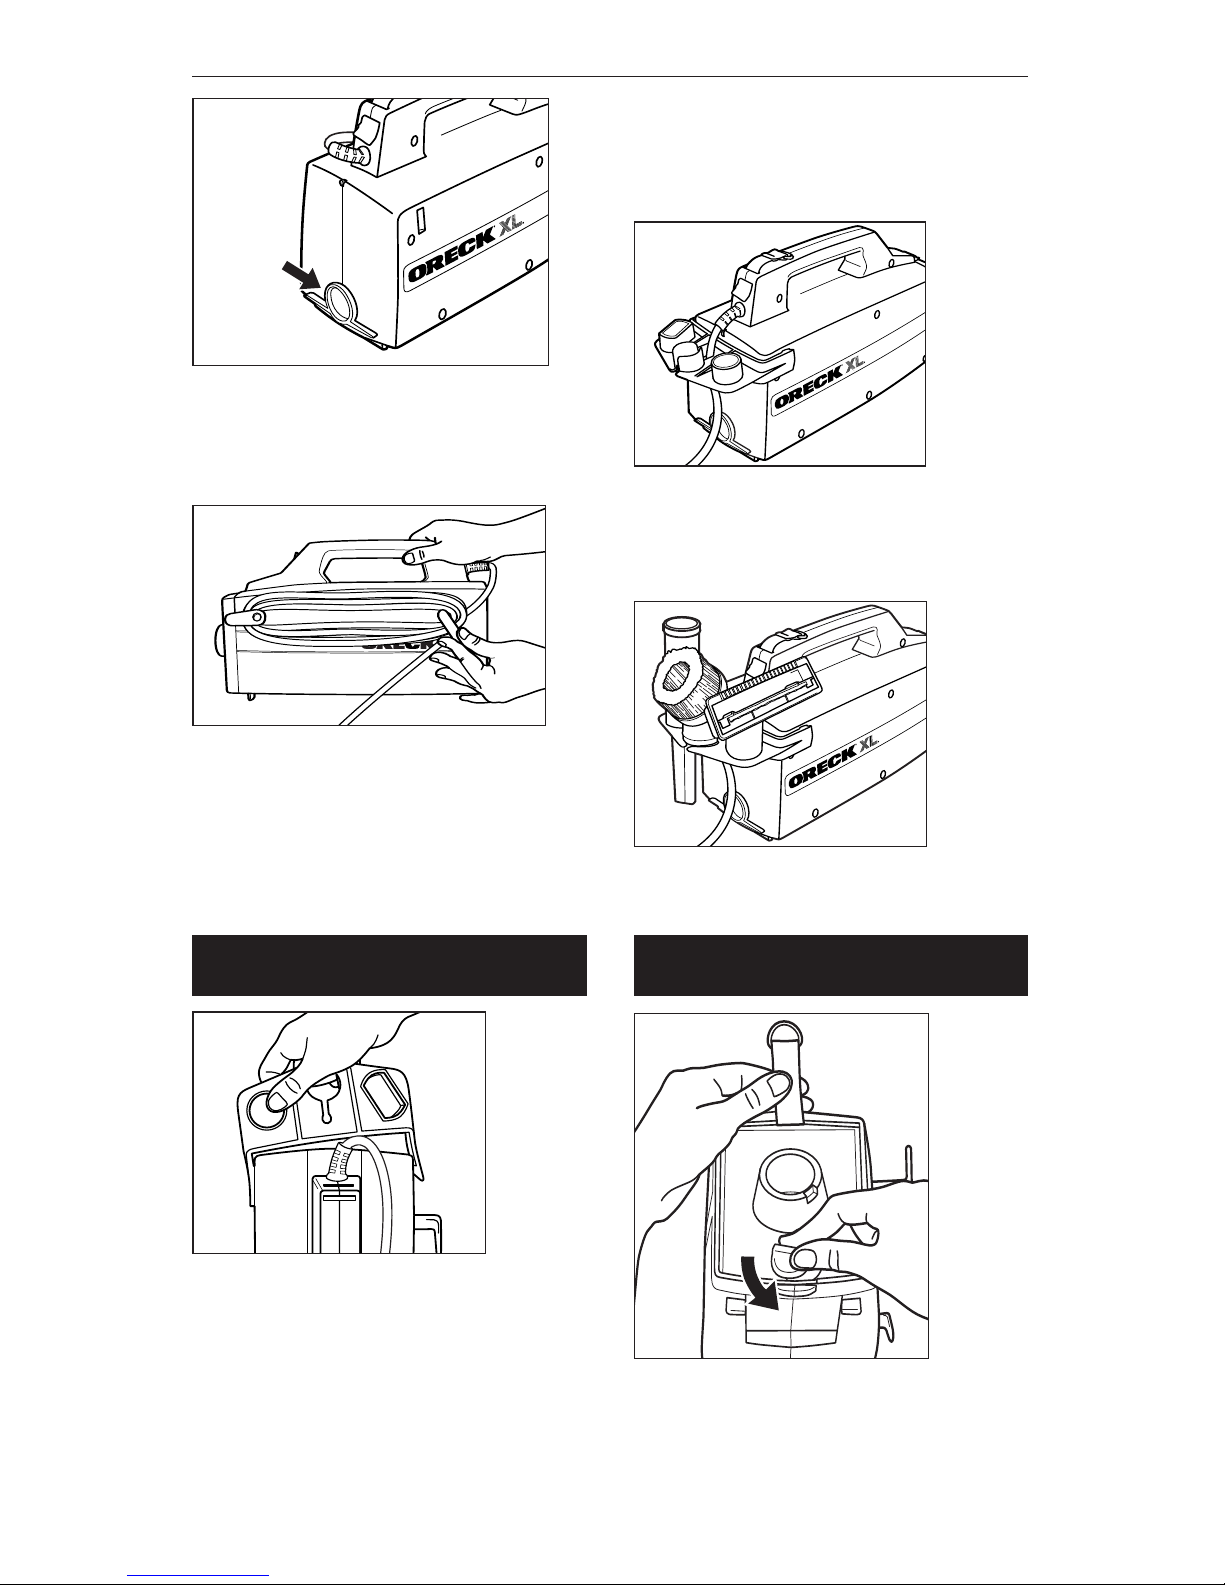
Blower Port
The blower port is located at the rear
of the machine. Installation of tools is
the same as described for suction port.
Blower Port
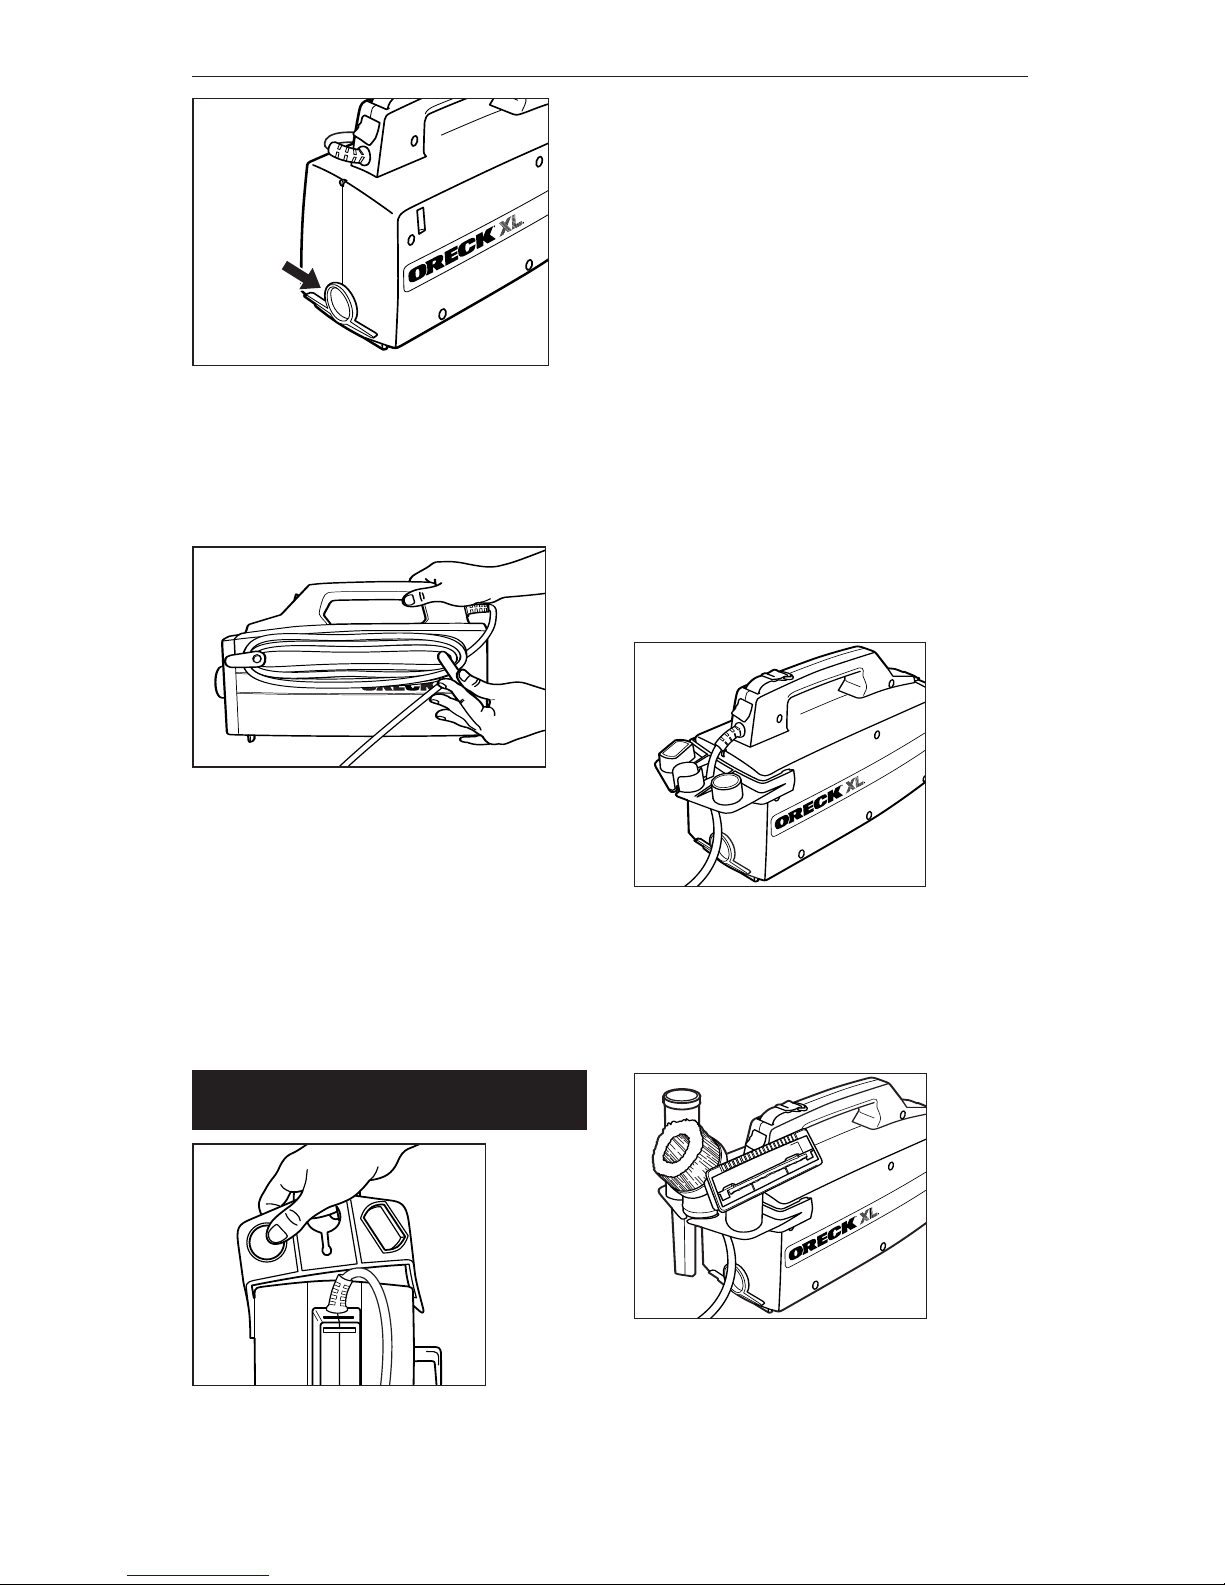
Cord Dump
Twist cord dump to easily release
stored cord.
Plug cord into electrical outlet.
Power Switch
Push power switch to “ON” (I) position.
Assembly
Attach Caddy and Insert Tools
Locate caddy clip indents at top r
ear
corners of appliance. Place appliance
on firm, non-slip surface or hold in
your lap. Grasp handle firmly. Place
end of caddy in outside indent then
str
ongly push and pull other end of
caddy into opposite indent. Be sure
rims on caddy openings face up.
A
void trapping fingers when caddy
snaps on; painful pinch could r
esult.
If caddy needs to be removed, a large
flat-head screwdriver inserted under
caddy clip at indent can be used to
carefully pry caddy loose.
Pull cord through center opening in
caddy and push until it is seated at
back of slot at rear of center opening
in caddy.
Insert crevice tool, brush and fabric
tool into caddy in spaces provided.
Maintenance
A
CHANGING THE FILTER BAG
A. Use only genuine
ORECK XL filter
bags. Stand unit on its back. Holding
strap away from door, twist knob
counter
clockwise to r
elease and lift out
fr
ont plate.
B.
5
Page 7

ENGLISH
C. Remove used bag and insert fresh
bag. The cardboard rim fits smoothly
into the recessed top. Replace the front
plate and close unit by turning knob
clockwise.
THE WHITE BAG GASKET GLUED IN
THE HOUSING MUST BE IN PLACE
OR UNIT WILL NOT OPERATE
PROPERLY. REPLACE IF NEEDED.
B
C
REPLACING MICRO FILTER
Stand unit on
its back.
Twist knob and lift
out front plate.
Remove disposable
bag.
Remove old filter
from bottom inside
unit.
Replace with new
filter.
A replacement filter
is supplied in each package of
12 ORECK XL filter bags or you may
order filters separately.
Micro Filter
Your ORECK COMPACT CANISTER
VACUUM is a product of precise
engineering. The motor bearings are
permanently lubricated and should
not be oiled. If you require additional
information or have problems with
your ORECK appliance, you may call
ORECK customer service.
In USA 1-800-989-3535
In Canada 1-888-676-7325
Please specify the model number and
serial/code number which can be
found on the data plate on the back of
the vacuum.
Save your sales or purchase slip.
Should your ORECK appliance require
warranty service in the U.S.A., present
this slip to the Authorized Service
Center as your proof of purchase
date, or, in Canada, call customer
service.unauthorized Oreck
Maintenance and
Customer Service
6
White
Gasket
Page 8

Problems Possible Source Areas to Check
Cleaner Will Not Run
1. Not plugged in properly 1. Be sure cleaner is firmly
plugged into wall outlet.
2. No electricity in wall outlet. 2. Check electrical
source–fuse or
circuit breaker.
3. Motor protector tripped. 3. See “Motor Protection
System” page 1.
4. Needs service. 4. Take to service center
or call for nearest
service center.
Vacuum Will Not
1. Filter bag is full. 1. Replace filter bag. See
Pick Up Or Has
“Changing the Filter Bag,”
Low Suction
page 5.
2. Hose/wand tool is clogged. 2. Remove obstructions.
3. Air leak due to missing or 3. Replace gasket.
damaged gasket. See page 6.
Tools/Wands Will Not
1. Proper friction fit not 1. Push and turn.
Stay Together
being obtained.
ENGLISH
Troubleshooting Guide
ALL OTHER SERVICING SHOULD BE DONE BY AN ORECK AUTHORIZED SERVICE CENTER.
7
To order call:
US: 1-800-989-3535
CANADA: 1-888-676-7325
Replacement Treated
Filter Bags (12 pk. with
1 Micro Filter)
No. PKBB12DW
Replacement
Micr
o Filter
No. 72005-01
Replacement White
Bag Gasket
No. 72017-02
V
inyl Tool Rack
No. CADDYBB
Oreck Fresh Air® Tabs No. AIRTABS
ACCESSORIES SOLD
SEPARATELY
Page 9

FRANCAIS
8
SIMPLY AMAZING
®
GUIDE D’UTILISATION
FRANÇAIS
•IMPORTANTE•
CONSERVEZ CE
FASCICULE
Comprend:
A
vertissements de sécurité
Garantie
Nomenclature
Mode d’emploi
Entretien
Guide de dépannage
Accessoires
NOIR AVEC DES ROUES
AVANT D’UTILISER
L’ASPIRATEUR, LIRE
ATTENTIVEMENT TOUTES LES
INSTRUCTIONS DE CE MANUEL.
Protections . . . . . . . . . . . . . page 8
Consignes de sécurité
importantes . . . . . . . . . . . . page 9
Garantie . . . . . . . . . . . . . . page 10
Nomenclature accessoire . . page 11
Mode d’emploi . . . . . . . . . page 12
Assemblage, Entretien . . . . . page 13
Entretien et service
à la clientèle . . . . . . . . . . . page 14
Guide de dépannage,
Accessoires . . . . . . . . . . . . page 15
Table des matières
Protections
AVERTISSEMENT : Avant
d’exécuter cette
opération, débranchez
le cordon d’alimentation
de la prise murale.
• IMPORTANT: Sassurer que le sac fil-
trant soit en place. Ne pas utiliser
laspirateur sans le sac filtrant. Le
moteur pourrait sen trouver dtrior.
• Sassurer que le joint du sac soit en
place. Si le joint de sac blanc est
abm ou perdu, le rem placer sans
attendre.
• Pour obtenir de meilleurs rsultats,
changer rgulirement le sac filtrant
jetable mme sil nest pas
compltement plein. Un sac
extr
mement sale ou pr
esque plein
affectent laspiration de lappareil et
peuvent faire surchauffer le moteur et
donc labmer. Il est conseill de changer le sac filtrant tous les 30 jours mme
sil nest pas plein.
• Ne pas aspirer de matriaux humides
ni liquides.
• Nettoyer laspirateur avec un chiffon
humide (pas mouill) dans la cavit du
sac jetable et sur lextrieur du traneau.
Page 10

FRANCAIS
Lorsque vous utilisez un appareil
électroménager, vous devez
toujours prendre certaines
précautions de base, y
compris les suivantes:
Lire toutes les instructions
avant d’utiliser cet
aspirateur
AVERTISSEMENT
Pour réduire les risques
d’incendie, d’électrocution
et de blessure:
CONSIGNES DE SÉCURITÉ
IMPORTANTES
• Ne jamais laisser l’appareil
branché sans surveillance.
L’appareil doit être débranché
après chaque utilisation et avant
toute réparation.
•
Ne jamais utiliser à l’extérieur ou
sur une surface humide.
• Ne doit pas servir de jouet. Une
surveillance attentive est
nécessair
e lorsque l’appar
eil est
utilisé par ou à proximité d’un
enfant.
• Utilisez uniquement selon les
instructions figurant dans ce
manuel. Utiliser uniquement les
accessoires recommandés par le
fabricant.
• Ne jamais utiliser si le cordon
d’alimentation ou la fiche de
connexion sont endommagés. Si
l’appareil ne fonctionne pas
normalement, s’il a été échappé, s’il
a été endommagé, s’il a été laissé
à l’extérieur ou s’il est tombé dans
l’eau, il faut le retourner à un centre
de service après-vente ou appeler le
service à la clientèle.
Commercial 1-800-989-3535
Canada 1-888-676-7325
• Ne jamais tirer ou transporter
l’appareil par le cordon
d’alimentation, ni utiliser le cordon
en guise de poignée, ni fermer
une porte sur le cordon, ni tirer le
cordon autour d’un coin à angle
pointu. Garder le cordon à l’écart
des surfaces chaudes.
• Ne pas faire avancer l’appareil
sur le cordon.
• Ne jamais débrancher l’appareil
en tirant sur le cordon. Pour
débrancher, saisir la fiche et non
le cordon.
• Ne jamais manipuler la fiche de
connexion et l’appareil avec les
mains humides.
• Ne jamais insérer d’objet dans les
ouvertures. Ne pas utiliser si des
ouvertures sont bloquées. Elles
doivent être exemptes de
poussière, de charpie, de cheveux
et de toute autre substance
pouvant réduire le débit d’air.
• Garder les cheveux, les vêtements
amples, les doigts et toutes les
parties du corps à bonne distance
des ouvertures et des pièces
mobiles.
•
Ne jamais utiliser pour ramasser
des substances chaudes ou
fumantes, comme des cigar
ettes,
des allumettes ou des cendres
chaudes.
• Ne jamais utiliser sans sac
filtrant.
9
• IMPORTANT: Ne pas enlever la
partie mobile de retenue de la saleté
à l'avant. Afin d'obtenir les meilleurs
résultats de nettoyage et que l'aspirateur fonctionne normalement, elle doit
rester en position.
• SYSTME DE PROTECTION DU
MOTEUR : Lorsque des particules
fines comme la suie, le ciment, la
poussire de pltre, la poudre de
photocopieur, etc... sont aspires, la
surface du sac risque de se boucher
et entrane lextinction du moteur pour
viter sa surchauffe. Dans ce cas,
teignez laspirateur et dbranchez-le.
Remplacez le sac de filtration, vrifiez
que le tuyau et les accessoires ne sont
pas bouchs. Environ 30 minutes plus
tard, le moteur aura suffisament refroidi et laspirateur est prt fonctionner
nouveau.
N.B.: Laspirateur doit rester dbranch
pendant 30 minutes pour que le
moteur puisse refroidir et le systme se
remettre zro.
Page 11

ORECK MANUFACTURING COMPANY :
(La société ORECK vous offre avec ce
pr
oduit la garantie limitée suivante, unique
ment s’il a été acheté auprès de la société
ORECK ou d’un revendeur autorisé ORECK
pour l’utiliser et non pour le
r
evendr
e.)
La société ORECK offre à l’acheteur
original du pr
oduit de répar
er ou
FRANCAIS
• Avant de débrancher, arrêter
toutes les commandes.
• Redoubler de prudence lors du
nettoyage d’escaliers.
• Ne jamais utiliser pour ramasser
des liquides inflammables ou
combustibles, comme de l’essence
à moteur ou à briquet.
• Ne jamais utiliser l’appareil dans
un espace clos où se dégage des
vapeurs inflammables, explosives
ou toxiques provenant d’une
peinture à l’huile, d’un diluant à
peinture, de substances antimites,
ni dans un espace où il y a des
poussières inflammables.
• Cet appareil ne doit jamais servir
à ramasser des substances
toxiques comme la Javel, les
produits de débouchage,
l’essence, etc.
CONSERVER CES
INSTRUCTIONS
Usage Ménager Uniquement
Avis de fiche polarisée
Ce produit est équipé d’une fiche
polarisée à courant alternatif (avec
une patte plus large que l’autre). Cette
fiche ne peut être insérée dans une
prise électrique que dans un seul sens.
Il s’agit d’un dispositif de sécurité. Si
vous n’arrivez pas à insérer
complètement la fiche dans un sens,
essayez de la retourner. Si la fiche
n’entre toujours pas, demandez à un
électricien de remplacer votre ancienne prise. Ne tentez pas d’altérer la
fiche polarisée.
Garantie
remplacer sans frais toute pièce s’avérant
présenter un défaut de matériau ou de maind’oeuvre dans un délai de trois (3) ans
après la date d’achat, le boîtier étant quant
à lui garanti dix (10) ans. Cette garantie limitée est valable pour un usage domestique
normal. La garantie limite pour usage commercial de ce produit est de 1 an.
Les pices sujettes une usure normale ne sont
pas couvertes par cette garantie
limite.
Les courroies d’entraînement, les balais rotatifs, les ampoules électriques, les sacs jetables et les autres pièces sujettes à l’usure ne
sont pas couvertes par cette garantie limitée.
Cette garantie limitée ne couvre pas les
pièces victimes d’un accident, d’un usage
abusif, à l'utilisation commerciale d'abus,
d’une modification, d’une mauvaise
utilisation, de dommages causés par un
incendie ou une catastrophe naturelle, ainsi
que les appareils utilisés avec une tension
électrique autre que celle indiquée sur leur
plaque signalétique, ni les appareils réparés
à l’extérieur de la société ORECK ou d’un
centre de service après-vente ORECK.
La société ORECK n’autorise aucune
personne et aucun représentant à accorder
ou offrir d’autres clauses de garantie avec
ce produit.
La garantie limitée ORECK est valable
uniquement si vous conservez une preuve
d’achat de la société ORECK ou d’un revendeur autorisé ORECK. Si vous achetez ce
produit ailleurs, vous l’achetez «en l’état», ce
qui signifie que la société ORECK ne vous
accorde alors aucune garantie. Dans ce cas,
vous assumez tout le risque relatif à la qualité et aux
performances de ce produit, ce qui
comprend tous les frais de réparation et
de correction d’éventuels défauts.
La responsabilité de la société ORECK pour
d’éventuels dommages subis par vous ou r
el
ativement aux frais qui découlent de cet
énoncé de garantie limitée ne peut dépasser
le montant payé pour ce produit lors de son
achat original. La société ORECK ne peut
être tenue responsable de tout dommage
direct ou indirect relatif à l’utilisation ou à
l’incapacité d’utiliser ce pr
oduit.
10
Page 12

FRANCAIS
1
1
Puisque certains États ou provinces
interdisent l’exclusion ou la restriction des
dommages indirects, il est possible que l’exclusion ou la restriction ci-dessus ne s’applique pas à vous.
Toute garantie expresse ou implicite
relative à ce produit, y compris les garanties
implicites de qualité commerciale ou de convenance à un usage
quelconque, s’applique pendant une
durée équivalente à la période de garantie
et aucune garantie expresse ou implicite ne
pourra s’appliquer après cette période.
Puisque certains États ou provinces ne
permettent pas les restrictions sur la durée
des garanties implicites, il est possible que
la restriction ci-dessus ne s’applique pas à
vous.
Cette garantie vous accorde des droits
juridiques précis et il est également
possible que vous ayez d’autres droits
dépendant de votre lieu de résidence.
Appelez le service
téléphonique gratuit
d’assistance à la clientèle
US: 1-800-989-3535
CANADA: 1-888-676-7325
Lorsque vous téléphonez, n’oubliez pas
de noter le numéro de modèle et le
numéro de série de l’appareil, lesquels
figurent sur sa plaque signalétique.
1. Bandoulire rglable.
2. Boyau flexible avec adaptateur
intgr pour faciliter linsertion dans le
port de soufflante ou daspirateur.
3. Suceur plat.
4. Suceur pour tapisseries.
5. Suceur pour murs et sols nus.
BB870-AW
6. Suceur pour murs et sols nus.
BB870-AD*
7. Tube adaptateur daccessoire pour
adapter les accessoir
es
dir
ectement sur laspirateur lorsque
le boyau nest pas utilis.
8. Deux raccords.
Nomenclature accessoire
9. Brosse pousseter.
10. Deux sacs en papier filtrant.
11. Porte-accessoires intgr.
BB870-AD**
1
2
3
4
5
6
7
8
10
11
9
(Les pices peuvent varier
de forme selon le modle.
Toutes les pices ne sont pas offertes
sur tous les modles.)
* Propritaires de BB870-AW: Le
porte-accessoires intgr et l e suceur
noir de moquette/sol de luxe
peuvent tre achets sparment.
** Le porte-accessoires nquipe
pas tous les modles BB870-AD.
Pour commander de nouvelles pices
ou de nouveaux accessoires,
prire dappeler le:
US 1-800-989-3535
CANADA 1-888-676-7325
Page 13

Installation daccessoire et
boyau
Le tuyau flexible utilise un système de
blocage Shurlok® qui l'empêche de se
déboîter involontairement. Pour
installer le tuyau, alignez l'ouverture
en "J" dans le raccord de tuyau avec
le loquet dans l'orifice d'aspiration.
Insérez le tuyau dans l'orifice. Tournez
la bague en vissant pour bloquer le
raccord de tuyau sur l'orifice. Pour
enlever le tuyau, tournez en dévissant
et tirez.
Le tube d'extension réglable et les
outils de nettoyage fournis avec votre
aspirateur compact Oreck XL se
montent ensemble par friction. Tournez
et enfoncez les outils fermement à
l'installation. Tournez-les et tirez-les
pour les enlever. Quand vous installez
les outils directement sur
l'orifice d'aspiration ou de soufflage
sans utiliser le tuyau, il faut utiliser le
tube d'adaptation d'outil.
Pour régler le tube d'extension,
appuyez sur le bouton de déblocage
et sortez le tube intérieur de la
longueur voulue. Le tube va se bloquer
quand vous relâchez ce bouton.
FRANCAIS
12
Mode d’emploi
Bandoulire
Insrer lextrmit de la bandoulire dans
la fente devant le commutateur
marche-arrt. Tirer 8 -10 centimtres et
insrer dans la pince en plastique.
2,5 cm de bandoulire doivent tre compltement insrs dans la pince.
Insrer lautre extrmit de la bandoulire
dans la fente au dos du manche.
Insrer lextrmit dans la pince et tirer.
Rgler la longueur en tirant la
bandoulir
e dans la pince. La ban
doulire doit passer dans les pinces
avant et arrire.
IMPORTANT: Avant dutiliser la
bandoulire, tirer sur les deux extrmits
pour sassur
er de la fer
met de la
fixation.
Tourner et pousser pour
installer les accessoires.
Tourner et tirer pour
sortir les accessoires.
Tube Adaptateur
Commutateur
Marche/Arrt
Avant Pour
Bandoulire
IMPORTANT: Ne pas enlever la partie mobile de retenue de la saleté à l'avant. Afin d'obtenir les meilleurs résultats de nettoyage et que l'aspirateur
fonctionne normalement, elle doit rester
en position.
Page 14

FRANCAIS
13
Port de
soufflante
Port de soufflante
Le port de soufflante se trouve larrire de
lappareil. Linstallation des accessoires
se fait de la mme manire que pour le
port daspiration.
Rangement du cordon
Tourner le casier de rangement pour
sortir facilement le fil rang.
Brancher le cordon dans une
prise lectrique.
Commutateur
Pousser le commutateur sur la position
ON (marche) (1).
Assemblage
Fixer le porte-accessoires et
insr
er les accessoires
Identifier les encoches de pince de
porte-accessoires aux coins arrire
suprieurs de lappar
eil.
Placer lappareil sur une surface ferme
non glissante ou le tenir sur les
genoux. Saisir fermement le manche.
Placer lextrmit du porte-accessoires
dans lencoche extrieure puis pousser
fermement et tirer lautre extrmit du
porte-accessoires dans lencoche
oppose. Sassurer que les bords du
porte-accessoires soient orients vers
le haut. Viter de se faire coincer les
doigts lors de lembotement du porteaccessoires ; un pincement douloureux
pourrait en rsulter. Si le porteaccessoires doit tre dpos, celui-ci peut
tre soigneusement cart au niveau de
lencoche en insrant un grand tournevis
lame plate sous la pince de
porte-accessoires.
Insrer le suceur plat, la brosse et le
suceur pour tapisserie dans le
porte-accessoires aux emplacements
correspondants.
Tirer le cordon dans louverture centrale du porte-accessoires et pousser
jusqu ce quil soit positionn larrire de
la fente larrire de louverture centrale
du porte-accessoires.
Page 15

CHANGEMENT DE SAC FILTRANT
A. Nutiliser que des sacs filtrants
Oreck XL. Placer lappareil sur le dos.
Tourner le bouton dans le sens inverse
des aiguilles dune montre pour relcher
et soulever la plaque avant.
B.
C.
Retirer le sac usag et insrer un sac
neuf. La bordure en carton tient
parfaitement dans le dessus encastr.
Remettre la plaque avant en place et
fermer lquipement en tournant le
bouton dans le sens des aiguilles dune
montre.
Blanc
joint
LE JOINT DE SAC
BLANC COLL
DANS LE BOTIER
DOIT TRE EN
PLACE SINON
LAPPAREIL NE
POURRA PAS
FONCTIONNER
CORRECTEMENT.
LE REMPLACER SI
NCESSAIRE
Remplacement du micro filtre
Placer lappareil
sur le dos.
Tourner le bouton et
soulever la plaque
avant.
Retirer le sac jetable.
Retirer lancien filtre
du fond de lappareil.
Remplacer par un fil-
tre neuf.
Un filtre de rechange
est fourni dans
chaque paquet de
12 sacs filtrants
Oreck XL ou vous pouvez commander
les filtres sparment.
Micro Filtre
Laspirateur traneau compact Oreck est
le fruit dtudes prcises. Les paliers du
moteur sont lubrifiés de façon
permanente et ne doivent pas être
huilés. Si vous avez besoin
d’informations supplémentaires ou si
vous avez des problèmes avec votre
appareil ORECK, vous pouvez appeler
le service à la clientèle ORECK au:
USA 1-800-989-3535
Canada 1-888-676-7325
Veuillez indiquer le numéro de modèle
et le numéro de série/code
apparaissant sur la plaque
signalétique derrière l’aspirateur.
Conservez votre reçu de vente ou de
caisse. Si votr
e appareil ORECK a un
jour besoin d’une réparation sous
garantie aux États-Unis, présentez ce
coupon au centr
e autorisé de ser
vice
après-vente comme preuve d’achat
datée. Au Canada, appelez le service
à la clientèle.
nauthorized Or
eck
Entretien et service
à la clientèle
FRANCAIS
14
Entretien
A
B
C
Page 16

Guide de dépannage
Pour commander de nouvelles pices
ou de nouveaux accessoires, prire
dappeler le:
US 1-800-989-3535
CANADA 1-888-676-7325
Sacs filtrants traits de
rechange (paquet de
12 avec 1 micro filtre)
rf PKBB12DW
Micro filtre
de rechange
rf 72005-01
Joint de sac blanc
de rechange
rf 72017-02
Porte-accessoires
en vinyle
r
f CADDYBB
Languettes dair frais rf AIRTABS
FRANCAIS
15
PROBLÉME CAUSE POSSIBLE VÉRIFICATIONS
TOUTES LES AUTRES RÉPARATIONS DOIVENT ÊTRE FAITES DANS UN CENTRE DE RÉPARATION AUTORISÉ.
1. Mal branch
2. Pas dlectricit dans la
prise murale.
3. Protection du moteur
dclanche.
4. Besoin dtre rpar.
1. Le sac filtrant est plein.
2. Boyau/raccord bouch
3. Fuite dair en raison dun
joint dtrior ou manquant
1. Pas de bon raccord par
friction
1. Sassurer que laspirateur
soit fermement branch
dans une prise murale.
2. Vrifier le fusible ou le
disjoncteur de la source
lectrique.
3. Voir le Systme de protection
du moteur la page 9.
4. Lamener au centre de
rparation ou appeler pour
connatre le centre
dentretien le plus proche.
1. Remplacer le sac filtrant.
Voir Remplacer le sac
filtrant, page 14.
2. Dboucher
3. Remplacer le joint.
Voir page 14.
1. Pousser et tourner.
Laspirateur ne
fonctionne pas
Laspirateur naspire
pas ou naspire que
faiblement
Les accessoires et
les raccords ne
restent pas
solidaires
ACCESSOIRES VENDU
SÉPARÉMENT
Page 17

ESPAÑOL
16
SIMPLY AMAZING
®
GUIA DEL USUARIO
ESPAÑOL
•IMPORTANTE•
¡GUARDE ESTE FOLLETO!
Incluye:
Advertencias de seguridad
Garantía
Lista de piezas
Instrucciones de operación
Mantenimiento
Diagnóstico de problemas
Accesorios
ASPIRADORAS COMPACTAS
ANTES DE OPERAR LA
ASPIRADORA, LEA CON CUIDADO
TODAS LAS INSTRUCCIONES
INCLUIDAS EN ESTE MANUAL.
Información de seguridad, . .página 16
Instrucciones importantes . . .página 17
Garantía . . . . . . . . . . . . . . .página 18
Lista de accesorios . . . . . . .página 19
Instrucciones de operación . .página 20
Ensamblaje . . . . . . . . . . . . .página 21
Mantenimiento,
Mantenimiento y servici
a clientes . . . . . . . . . . . . . .página 22
Guía para identificación
de problemas, Accesorios . .página 23
Indice
Información de
seguridad
ADVERTENCIA:
Desconecte el cordón de
la toma eléctrica antes
de dar servicio.
• IMPORTANTE: Asegurarse que la
bolsa de filtro está colocada. No
usar la aspiradora sin la bolsa de
filtro. Se puede dañar el motor.
• Asegurarse que la empaquetadura
de la bolsa está colocada. Si la
empaquetadura blanca está dañada
o se perdió, colocar una nueva
inmediatamente.
• Para obtener mejores resultados,
cambiar la bolsa de filtro
desechable regularmente incluso si
no está totalmente llena. Una bolsa
muy sucia o una casi llena afectará
la fuerza de aspiración y puede
causar el calentamiento excesivo
del motor y dañarlo. Una buena
medida es cambiar la bolsa de filtro
cada 30 días aunque no esté
totalmente llena.
• No aspirar material húmedo ni
líquidos.
•
Limpiar la aspiradora con un paño
húmedo (pero no mojado) en la
cavidad de la bolsa desechable y el
exterior del aparato.
Page 18

ESPAÑOL
17
Cuando utilice un aparato
eléctrico, siempre debe seguir
precauciones básicas,
incluyendo las siguientes:
Lire toutes les instructions
avant d’utiliser cet
aspirateur
ADVERTENCIA
Para reducir el riesgo
de incendio, descarga
eléctrica o lesiones:
INSTRUCCIONES IMPORTANTES
DE SEGURIDAD
• No deje el aparato sin atender
cuando esté conectado.
Desconéctelo de la toma de
corriente cuando no esté en uso
y antes de darle ser
vicio.
•
No la use en exterior
es ni en
super
ficies mojadas.
• No permita que se use como
juguete. Es necesario poner
mucha atención cuando la usen
• IMPORTANTE: No retire el faldón
de retención de suciedad que se
encuentra sujeto a la parte trasera
de la placa frontal. Debe estar colocado para que la máquina funcione
correctamente y asegurar la eficacia de la limpieza.
• SISTEMA DE PROTECCION DEL
MOTOR: Cuando se recogen o
aspiran materiales finos como holln,
cemento, polvo de yeso, polvo de
mquinas copiadoras, etc., la
superficie de la bolsa puede
obturarse y el motor se apagara
para evitar el recalentamiento. Si
esto sucede, apague el interruptor y
desenchufe la aspiradora. Cambie
la bolsa de filtro, verifique si hay
atascos en la manguera o en los
accesorios y despjelos. Despus de
unos 30 minutos aproximadamente,
el motor se habr enfriado y la
aspiradora estar lista para usarse.
NOTA: La aspiradora debe
permanecer desenchufada durante
30 minutos para que el motor se
enfre y el sistema de reposicione.
los niños o cuando se use cerca
de ellos.
• Usela solamente como se
describe en este manual. Utilice
solamente los aditamentos
recomendados por el fabricante.
• No la use con el cordón o
clavija dañados. Si la
aspiradora no funciona como
debería, si se ha caído,
dañado, dejado en exteriores, o
dejado caer en agua, envíela a
un centro de servicio o llame a
servicio a clientes al:
Commercial 1-800-989-3535
Canada 1-888-676-7325
• No tire de ella ni la mueva por
el cordón, ni use el cordón
como asa, no cierre la puerta
sobre el cordón, ni jale el
cordón alrededor de bordes o
esquinas afiladas. Mantenga el
cordón lejos de las superficies
calientes.
• No opere el aparato sobre el
cordón.
• No lo desconecte jalando el
cordón. Para desconectarlo,
tome la clavija, no el cordón.
• No manipule la clavija ni el
aparato con las manos
mojadas.
• No ponga objetos pesados en
las aberturas. No lo use con
alguna abertura bloqueada;
manténgalo libre de polvo,
pelusa, cabello y cualquier cosa
que pueda reducir el flujo de
aire.
• Mantenga el cabello, ropa
suelta, dedos y todas las partes
del cuerpo lejos de las aberturas
y partes móviles.
• No la use para que aspire
cualquier cosa que se esté
quemando o arrojando humo,
como cigarrillos, cerillos o
cenizas calientes.
•
Apague todos los contr
oles
antes de desconectarla.
• Tenga cuidado especial cuando
limpie alguna escalera.
Page 19

ESPAÑOL
Aviso de la clavija polarizada
Este producto viene equipado con una
clavija polarizada para línea de
corriente alterna (una clavija que tiene
una espiga más ancha que la otra).
Esta clavija solamente se ajusta de
una sola manera en la toma de
corriente. Esta es una característica de
seguridad. Si no puede insertar la
clavija completamente en la toma de
corriente, intente invirtiendo la clavija.
Si todavía no puede insertarla, llame
a un electricista para que reemplace
la toma de corriente obsoleta. No le
quite el propósito a la clavija
polarizada.
ORECK MANUFACTURING COMPANY:
(ORECK le ofrece la siguiente garantía
limitada para este producto solamente si
se compró originalmente para usarse, no
para revenderse, de ORECK o de un
distribuidor minorista autorizado por
ORECK.)
ORECK r
eparará o r
eemplazará, sin
cargo, al comprador original, cualquier
Garantie
parte que se encuentre como defectuosa
en material o mano de obra durante tres
(3) años a partir de la fecha de compra y
diez (10) años en el bastidor. Cualquier
uso comercial de este producto anulará
esta garantía limitada.Las piezas sujetas a
desgaste normal no están cubiertas por
esta garantía limitada. Las correas de
impulsión, cepillos revolventes, bombillas,
bolsas desechables y otras piezas sujetas
al desgaste normal no se cubren con esta
garantía limitada.
Esta garantía limitada no aplica para
cualquier parte sujeta a accidente, abuso,
al uso comercial del abuso, alteración, uso
indebido, daños provocados por incendio
o causas de fuerza mayor, uso de voltajes
diferentes a los indicados en la placa del
número de serie de este producto, o el
servicio de este producto por alguien que
no forme parte de ORECK o de un centro
de servicio autorizado de fábrica de
ORECK.
La garantía limitada de ORECK no
autoriza a cualquier persona o
representante a asumir u otorgar cualquier
otra obligación de garantía con la venta
de este producto.
La garantía limitada de ORECK es válida
solamente si mantiene su comprobante de
compra para este producto de ORECK o
de un distribuidor minorista autorizado por
ORECK. Si compra este producto de
cualquier otra fuente, su compra es “TAL
CUAL”, lo que significa que ORECK no le
otorga garantía alguna, y que usted, no
ORECK asume el riesgo total de la calidad
y el desempeño de este producto,
incluyendo el costo total de cualquier
servicio o reparaciones necesarias de
cualquier defecto.
La responsabilidad por daños de ORECK
para usted por cualquier costo que surja
por esta declaración de garantía limitada
se limitará al monto pagado por este
producto al momento de la compra
original, y ORECK no será responsable
de cualquier daño dir
ecto, indirecto,
consecuental o incidental que surja por el
uso o incapacidad de uso de este
pr
oducto.
Algunos estados no per
miten la exclusión
o la limitación de daños incidentales o
• No la use para aspirar líquidos
inflamables o combustibles,
como gasolina o líquido para
encendedores, ni la use en
áreas donde puedan estar presentes.
• No use el aparato en espacios
cerrados donde puedan emanarse vapores inflamables,
explosivos o tóxicos por pintura
a base de aceite, adelgazador
de pintura, algunas sustancias a
prueba de moho, o en un área
donde haya presente polvo
inflamable.
• No aspire con este aparato
material tóxico como blanqueador con cloro, limpiador
de drenajes, gasolina, etc
GUARDE ESTAS
INSTRUCCIONES
Sólo para uso casero
18
Page 20

ESPAÑOL
Appelez le service
téléphonique gratuit
d’assistance à la clientèle
US: 1-800-989-3535
CANADA: 1-888-676-7325
Lorsque vous téléphonez, n’oubliez pas
de noter le numéro de modèle et le
numéro de série de l’appareil, lesquels
figurent sur sa plaque signalétique.
1. Correa ajustable para colgar del
hombro.
2. Manguera flexible con adaptador
incorporado para fácil inserción en
la boca de aspiración o soplado.
3. Boquilla para hendiduras.
4. Accesorio para telas.
5. Accesorio para paredes y pisos
desnudos. BB870-AW*
6. Accesorio para paredes y pisos
desnudos. BB870-AD, BB870-AS*
7.
Tubo adaptador para encajar los
accesorios dir
ectamente a la
aspiradora cuando no se usa
la manguera.
8. Dos tubos de extensión.
9. Cepillo para polvo.
10. Dos bolsas de filtro de papel.
11. Portaaccesorios en la máquina.
BB870AD**
Lista de accesorios
consecuentales, así que la limitación o
exclusión anterior puede no aplicar para
usted.
TODAS LAS GARAntIas expresas e
implIcitas para este producto, incluyendo
las garantIas implIcitas de capacidad de
comercialización y aptitud para un
propósito en particular, estAn limitadas en
duración al periodo de la garantIa, y no
aplicarà ninguna garantIa, expresa o
implIcita, despuEs de este periodo.
Algunos estados no permiten las limitaciones en la duración de las garantías
implícitas, así que la limitación anterior
puede no aplicar para usted.
Esta garantía le concede derechos legales
específicos, y puede también tener otros
derechos que varían de estado a estado.
19
1
2
3
4
5
6
7
8
10
11
9
(El diseño de las piezas
varía de acuerdo con el
modelo. No todas las piezas están
disponibles en todos los modelos.)
* Dueños de BB870.AW: El
portaaccesorios en la máquina y el
accesorio negro para pisos/
alfombras de lujo puede comprarse
por separado.
**Portaaccesorios no está incluido
en todos los modelos BB870-AD
Para pedir piezas nuevas o
accesorios, llamar al:
US 1-800-989-3535
CANADA 1-888-676-7325
Page 21

ESPAÑOL
Correa para hombro
Insertar el extremo de la correa en la
ranura que se encuentra delante del
interruptor de encender /apagar. Tirar
de la correa hasta que hayan pasado
unas tres o cuatro pulgadas e
insertarla en la presilla de plástico.
Una pulgada de correa debe
atravesar totalmente la presilla.
Insertar el otro extremo de la correa a
través de la ranura ubicada en la
parte trasera del mango. Insertar el
extremo en la presilla y tirar de la
correa para atravesarla. Ajusta la l
ongitud tirando de la correa a través
de la presilla. La correa debe pasar
por las presillas delantera y trasera.
IMPORTANTE: Antes de usar la correa
para hombro, tirar de ambos extremos
para asegurarse que está firme.
Instalación de la manguera
y accesorios
La manguera flexible tiene un sistema
de fijación Shurlok® que impide el
retiro de la manguera a menos que se
desee hacerlo. Para instalar la
manuguera, alinee la ranura “J”en el
acople de la manguera con la
lengueta dentro de la boca de
aspiración. Inserte la manguera en la
boca. Gire el collar en sentido de las
agujas del reloj para trabar el acople
de la manguera en las boca. Gire en
sentido contrario a las agujas del reloj
y tire para desconectar la manguera.
El tubo de extensión adjustable y los
accesorios de limpieza suministrados
con su aspiradora compaacta Oreck
XL se traban juntos por fricción. Gire y
empuje para asegurarse que quedan
bien trabados una vez instalados.
Gire y tire para desconectarlos.
Cunado conecte los accesorios directamente a la boca de aspiración o de
soplado sin usar la manguera, deberá
instalar el tubo adaptador de accesorios.
Para ajustar el tubo extensión, oprima
el botón soltador y tire del tubo interior hasta dejarlo del largo deseado. El
tubo se trabará al soltar el butón.
Para acortarlo, oprima el botón soltador y empuje el tube interior.
Instrucciones de
operación
20
Interruptor De
Encendido/Apagado
Delantera
Para La
Correa
IMPORTANTE: No retire el faldón de
retención de suciedad que se encuentra sujeto a la parte trasera de la
placa frontal. Debe estar colocado
para que la máquina funcione correctamente y asegurar la eficacia de la
limpieza.
Girar y empujar
para instalar los
accesorios. Girar y
tirar para
separarlos.
Tubo Adapator
Page 22
ESPAÑOL
21
Boca de soplado
La boca de soplado se encuentra en
la parte trasera de la máquina. La
instalación de los accesorios es igual
que la descrita para la boca de
aspiración.
Descargador del cordón
Girar el descargador para soltar
fácilmente el cordón.
Enchufar el cordón en el
tomacorriente.
Interruptor eléctrico
Empujarlo a la posición
"ENCENDIDO" (I).
Ensamblaje
Instalación del por
taaccesorios
e inserción de los accesorios
En las esquinas superiores traseras de
la aspiradora, ubicar las muescas
para las grapas del por
taaccesorios.
Colocar la aspiradora sobre una
superficie firme y antideslizante o
sostenerla en el regazo. Tomar
firmemente el mango. Colocar el
extremo del portaaccesorios en la
muesca exterior y luego empujar y
tirar con fuerza el otro extremo del
portaaccesorios dentro de la muesca
opuesta. Asegurarse que los rebordes
en las aberturas del portaaccesorios
queden hacia arriba. Evitar que los
dedos queden atrapados al encajar el
portaaccesorios; se puede causar un
apriete doloroso. En el caso de ser
necesario retirar el portaaccesorios,
insertar un destornillador grande
plano debajo de la grapa del
portaaccesorios en la muesca y
apalancar cuidadosamente hasta
soltarlo.
Insertar la boquilla para hendiduras,
el cepillo y el accesorio para telas en
el portaaccesorios en los espacios
provistos.
Pasar el cordón eléctrico por la
abertura central del portaaccesorios y
empujarlo hasta que quede asentado
en la parte trasera de la ranura
ubicada en la parte trasera de la
abertura central.
Boca de
Soplado
Page 23

ESPAÑOL
22
Mantenimiento
A
CAMBIO DE LA BOLSA DE FILTRO
A. Usar solamente bolsas de filtro
ORECK XL genuinas. Apoye la
aspiradora sobre la parte trasera.
Sujete el tirante lejos de la puerta, gire
la perilla en sentido contrario a las
agujas del reloj para soltar y levantar
la placa delantera.
B.
C.
Retirar la bolsa vieja e insertar una
nueva. El aro de cartón encaja
suavemente en la parte superior
rebajada. Volver a colocar la placa
frontal y cerrar la máquina girando la
perilla en sentido de las manecillas del
reloj.
REEMPLAZO DEL MICROFILTRO
Apoyar la máquina en su
parte trasera.
Girar la perilla y
levantar la placa frontal.
Retirar la bolsa desechable.
Retirar el filtro viejo de la
unidad inferior interior.
Reemplazarlo con un filtro nuevo.
En cada paquete de 12 bolsas de filtro
Oreck XL se incluye un filtro de
repuesto. También se pueden pedir
filtros por separado.
Micro Filtro
LA EMPAQUETADURA BLANCA DE LA
BOLSA PEGADA A LA CAJA DEBE
ESTAR EN SU LUGAR PARA QUE LA
ASPIRADORA FUNCIONE
CORRECTAMENTE. CAMBIARLA DE
SER NECESARIO.
Blanco
empaquetadura
Su aspiradora compacta Oreck es un
producto construido con precisión. Los
cojinetes del motor están lubricados
permanentemente y no debe ponerles
aceite. Si requiere información
adicional o si tiene problemas con su
aparato ORECK, puede llamar al
servicio a clientes de ORECK al:
USA 1-800-989-3535
Canada1-888-676-7325
Por favor especifique el número de
modelo y el número de serie/código,
el cual se puede encontrar en la placa
de datos en la parte posterior de la
aspiradora.
Guarde su recibo de ventas o de
compra. En caso que su aparato
ORECK necesitara servicio de
garantía en los EE. UU., presente este
recibo en el centro de servicio
autorizado como su comprobante de
fecha de compra, o en Canadá, llame
a ser
vicio a clientes.
uthorized Oreck
Mantenimiento y
servicio a clientes
B
C
Page 24

©2005 Oreck Holdings, LLC. All Rights Reserved. All word marks, logos, product
configurations, and r
egister
ed trademarks ar
e owned and used under the authority
of Oreck Holdings, LLC.
ESPAÑOL
Guía para identificación de problemas
Para pedir piezas nuevas o accesorios,
llamar al:
US: 1-800-989-3535
CANADA: 1-888-676-7325
PROBLEMA POSIBLE CAUSA AREAS A VERIFICAR
TOUTES LES AUTRES RÉPARATIONS DOIVENT ÊTRE FAITES DANS UN CENTRE DE RÉPARATION AUTORISÉ.
1. Está mal enchufada.
2. No hay electricidad en
el tomacorriente.
3. El protector del motor
se activ.
4. Necesita servicio.
1. La bolsa de filtro
está llena.
2. Manguera/tubo de
extensión está obturado.
3. Escape de aire
debido a que falta la
empaquetadura o está
dañada.
1. No se obtiene buen
ajuste por fricción.
1. Asegurarse de enchufar
firmemente la aspiradora al
tomacorriente en la pared.
2. Revisar el fusible o
interruptor automático en el
tablero de energía eléctrica.
3. Vea la seccin Sistema de
proteccin del motor en la
página 17.
4. Llevarla o llamar al centro
de servicio más cercano.
1. Cambiar la bolsa. Ver "Para
cambiar la bolsa de filtro,"
en la página 22.
2. Quitar las obstrucciones.
3. Cambiar la
empaquetadura. Ver la
página 22.
1. Empujar y girar los tubos
o accesorios.
La aspiradora no
funciona
La aspiradora no
aspira o tiene
poca fuerza de
aspiración
Accesorios/tubos
de extensión no
se mantienen
conectados
ACCESORIOS VENDIDO
POR
SEPARADO
Bolsas de filtro tratadas
de repuesto (pqte. de
12 con 1 microfiltro) No. PKBB12DW
Microfiltro de
repuesto No. 72005-01
Empaquetadura
blanca de
repuesto para bolsa
No. 72017-02
Parrilla de vinilo
para accesorios No. CADDYBB
T
abletas aromatizantes
ambientales No. AIR
TABS
72150-02 REV C
06/05 ECN# R-8022
 Loading...