

Page 1
Подсоединения Начальная настройка Воспроизведение
AV РЕСИВЕР
Инструкция по эксплуатации (Basic Manual) разъясняет вам все основные шаги,
необходимые для начала использования AV ресивера — от подсоединения до всех
необходимых функций управления воспроизведением. Таким образом, базовая
инструкция по эксплуатации информирует вас о часто используемых функциях.
Кроме этого, имеется еще одная часть Инструкции, которая называется Расширенной
инструкцией по эксплуатации (Advanced Manual) и дает вам более детальную
информацию и описывает более сложные настройки.
СОДЕРЖАНИЕ
Передняя панель ............................................................. 3
Задняя панель .................................................................. 4
Дисплей ............................................................................ 4
Шаг 1: Подсоединения .................................. 5
1 Подсоединение акустических систем ........................ 5
• Расположение акустических систем ...................... 5
• Типы верхних акустических систем ........................ 5
• Инструкции по подсоединению акустических
систем ......................................................................... 7
2 Подсоединения телевизора и плееров ..................... 8
• Подсоединение кабелем HDMI ............................... 8
• Подсоединение компонентов, не имеющих разъем
HDMI ............................................................................ 9
3 Прочие подсоединения ..............................................10
Шаг 2: Начальная настройка .......................11
1 AccuEQ Room Calibration .............................................11
2 Подсоединение источников .......................................12
3 Настройка режимов пульта ........................................13
4 Сетевые соединения ...................................................13
Шаг 3: Воспроизведение ............................15
1 Основные операции ....................................................15
• Названия кнопок пульта ДУ и их функции .............15
2 Сетевые функции ........................................................16
3 AirPlay® (настройка AirPlay) .........................................16
4 Bluetooth (настройка Bluetooth) ...................................17
5 Функции приема АМ / FM радио ..................................17
Инструкция по эксплуатации
(Basic Manual)
6 Мультизонные функции ..............................................18
• Подсоединение компонентов в зонах ...................18
• Воспроизведение в зонах .......................................19
7 Меню быстрой настройки ...........................................19
8 Другие полезные функции ......................................... 20
Возможные неисправности ..........................................21
Технические характеристики ....................................... 22
Таблица разрешений дисплея ..................................... 23
Разрешения, поддерживаемые HDMI ......................... 23
Прилагаемые аксессуары .................................Обложка
Page 2

Подсоединения Начальная настройка Воспроизведение
Основные достоинства
• AV ресивер оборудован 7‑канальным усилителем
• Поддерживает воспроизведение формата Dolby Atmos,
обеспечивающего распределение и перемещение
звуков на все 360 градусов, включая вертикальное
измерение
• Поддерживает воспроизведение формата DTS:X,
который является объектно‑ориентированной
технологией окружающего звука следующего
поколения компании DTS, который обеспечивает
полное погружение в вашей гостиной.
• Режим прослушивания Dolby Surround расширяет
2‑канальные, 5.1‑канальные или 7.1‑канальные источники
на имеющуюся конфигурацию акустических систем
• Оборудован входными / выходными разъемами
HDMI IN / OUT, совместимыми с сигналом 4K
(Для воспроизведения видео с разрешением 4K
или 1080p, используйте высокоскоростной кабель —
high speed HDMI или high speed HDMI кабель с Ethernet)
• Оборудован двумя выходными разъемами HDMI
• Поддерживает функцию сквозного пропуска видео
HDMI Through от источника (плеера) на телевизор
в режиме Standby
• Поддерживает HDCP2.2, более совершенный протокол
защиты контента от копирования (на входах HDMI IN1 –
IN3 / выходе HDMI OUT MAIN / SUB)
• Поддерживает ARC (Audio Return Channel) — канал
возврата аудио сигнала
• Поддерживает воспроизведение с USB накопителей
• Поддерживает множество сетевых функций, таких
как интернет‑радио, DLNA, AirPlay и т. п.
• Поддерживает Wi‑Fi и Bluetooth соединение
• Оборудован выходным разъемом PHONO
для подключения проигрывателей виниловых
пластинок
• Обеспечивает возможность подсоединения колонок
би‑ампингом (Bi‑Amping)
• Функция управления синхронизацией звука и видео
A / V Sync
• Мультизонные функции, позволяющие воспроизводить
различные источники в главной и во второй комнате
• 32‑разрядный DSP процессор с превосходной
цифровой обработкой сигналов
• Функция Music Optimizer™ для улучшения звучания
сжатых файлов
• Согласованный по фазе бас — Phase Matching Bass
• Система автоматической коррекции акустики
помещения AccuEQ Room Calibration с помощью
прилагаемого микрофона
• Поддерживает воспроизведение аудио файлов
в форматах MP3, WMA, WMA Lossless, FLAC, WAV,
Ogg Vorbis, Apple Lossless, DSD, Dolby TrueHD по сети
и с USB накопителей (поддерживаемые форматы
зависят от среды и условий использования)
Список поставляемых аксессуаров приводится
на последней странице обложки.
Полную инструкцию по эксплуатации можно найти
здесь:
http://www.onkyo.com / manual / txnr646/ adv / en.html
Ru-2
Page 3
Подсоединения Начальная настройка Воспроизведение
M
S
1 24 9 F G H I K6 L578 J
(European, Australian
and Asian models)
N
3
P QO
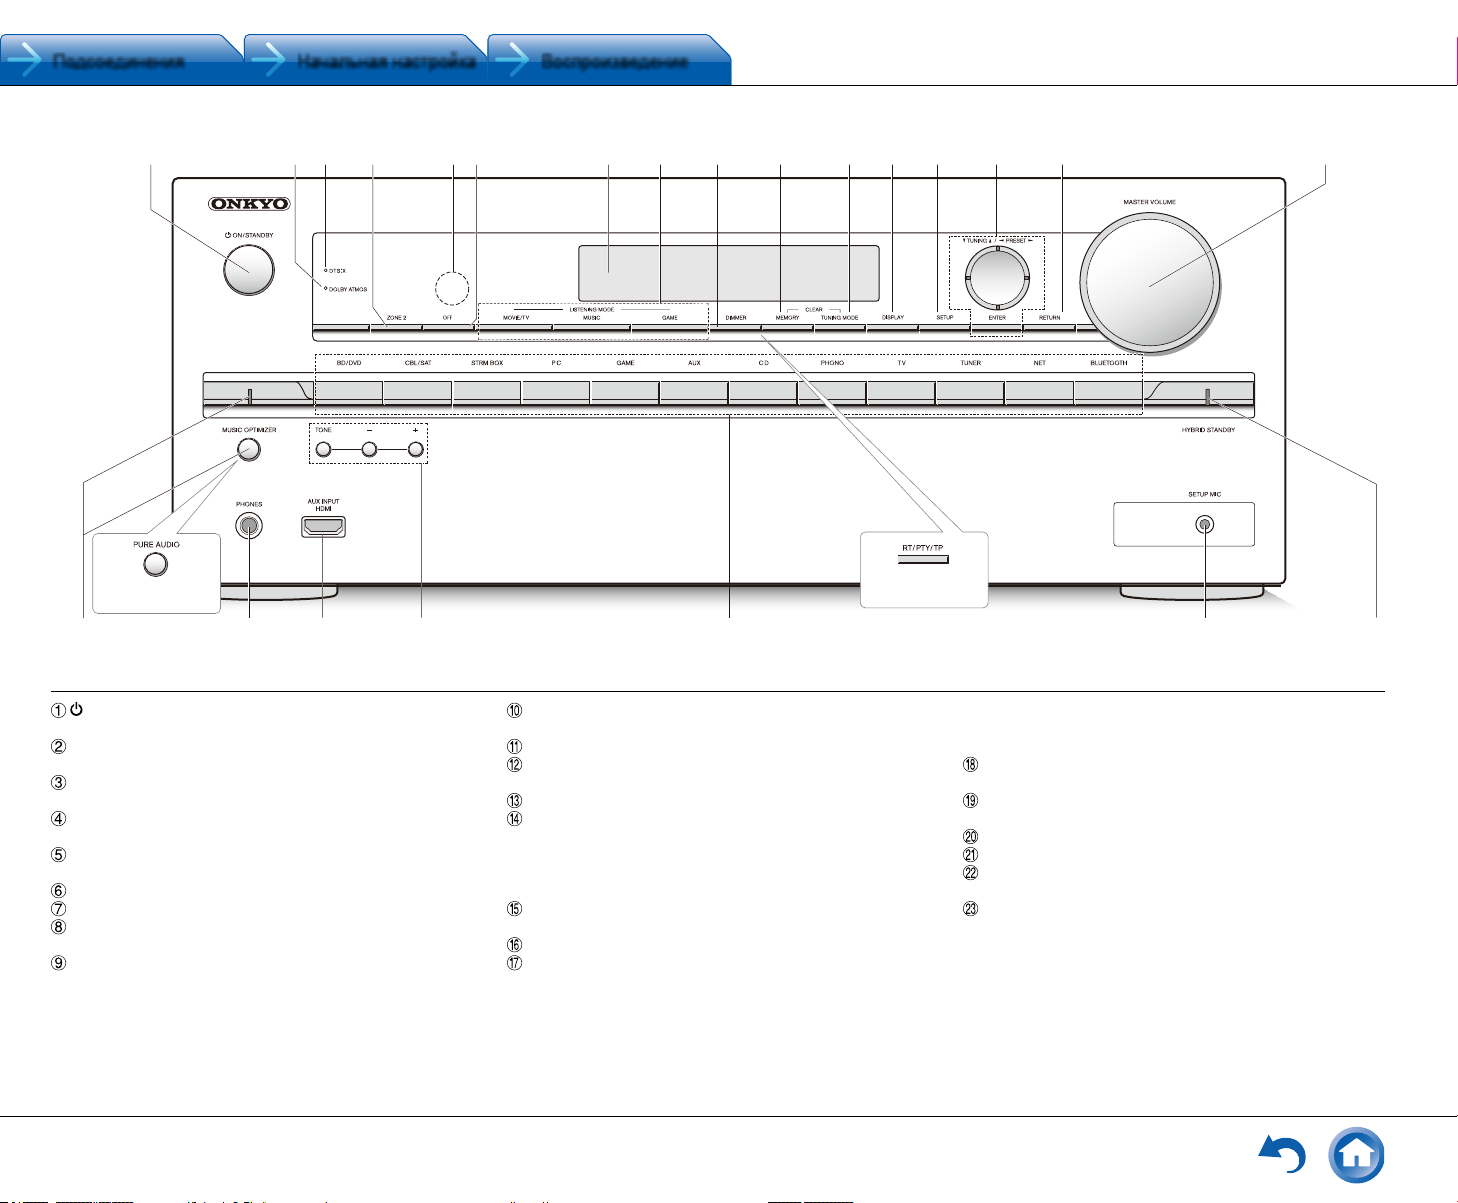
Передняя панель
Кнопка ON / STANDBY: включает ресивер и перево‑
дит его в режим standby.
Индикатор DOLBY ATMOS: загорается, когда ресивер
воспроизводит звук в формате Dolby Atmos
Индикатор DTS:X: загорается, когда ресивер воспро‑
изводит звук в формате DTS:X
Кнопка ZONE 2: управляет мультизонными функциями
ZONE
Датчик ИК дистанционного управления: получает
сигналы от пульта
Кнопка OFF: отключает функции ZONE
Дисплей
Кнопки LISTENING MODE: позволяет выбирать режим
прослушивания.
Кнопка DIMMER (Модели для Северной Америки
и Тайваня): изменяет яркость дисплея.
Кнопка RT / PTY / TP (Европейская, австралийская
и азиатские модели): используется при приеме ради‑
останций, передающих текстовую информацию.
(European, Australian
and Asian models)
Кнопка MEMORY: регистрирует радиостанции и сти‑
рает их.
Кнопка TUNING MODE: переключает режим настройки
Дисплей: переключает информацию, выводимую
на дисплей
Кнопка SETUP: используется при задании настроек
Кнопки стрелок курсора, TUNING, PRESET и кнопка ENTER: двигают курсор и подтверждают выбор.
При прослушивании AM / FM передач, служат для на‑
стройки на станции — TUNING или для выбора зареги‑
стрированных станций с помощью PRESET.
Кнопка RETURN: возвращает дисплей на предыдущий
уровень
Ручка MASTER VOLUME: регулировка громкости
Кнопка MUSIC OPTIMIZER и индикатор: включает
и отключает функцию MUSIC OPTIMIZER, которая
улучшает качество сжатого аудио.
Кнопка / индикатор PURE AUDIO (Европейская,
австралийская и азиатские модели): Дисплей
R
и аналоговые видео схемы отключаются при переводе
ресивера в режим Pure Audio для обеспечения самого
чистого звука.
Гнездо PHONES: для подключения наушников
со стандартным штекером
Вход AUX INPUT HDMI разъем: можно подключить HD
видеокамеру или другие устройства
Кнопки TONE и TONE LEVEL: регулировки тембра
Кнопки селектора входов
Гнездо SETUP MIC: для подключения измерительного
микрофона
Индикатор HYBRID STANDBY: загорается, когда реси‑
вер переходит в режим standby при сквозном пропуске
сигналов — HDMI Through, USB Power Out в Standby,
сетевом режиме Network Standby или пробу ждении —
Wakeup после активации Bluetooth.
Ru-3
Page 4
Подсоединения Начальная настройка Воспроизведение
F
9
8
(Taiwanese models)
9 SPEAKERS terminals: Speakers are connected. To
use the Multi-zone function, connect the speakers in the
separate room to the ZONE2 speaker terminals.
F Power cord (North American, European, Australian
and Asian models)
AC INLET (Taiwanese models): The supplied power
cord is connected.
G DIGITAL IN COAXIAL/OPTICAL jacks: Digital audio
signals are input.
H GND terminal: The ground wire of the turntable is
connected.
I COMPOSITE AUDIO IN jacks: Analog audio signals are
input.
J LINE OUT ZONE 2 jack: Audio output jack connected
to the pre-main amplifier for multi-zone playback in a
separate room.
K PRE OUT SUBWOOFER jack: A subwoofer with built-in
amplifier is connected.
14 623 75
98
Display
1 Lights in the following conditions. "Z2": Zone 2 output
is on. / "HDMI": HDMI signals are input and HDMI
input selector is selected. / "ARC": Audio signals are
input from ARC compatible TV and TV input selector
is selected. / "3D": Input signals are 3D. / "USB" ():
"NET" input is selected and USB storage device is
connected. / "NET" (): "NET" input is selected and
the unit is connected to the network. / "DIGITAL":
Digital signals are input and the digital input selector is
selected. / Cursor indicators: NET or USB is controlled.
¼ "USB" and "NET" will flash if the connection is not correct.
2 Stays lit when headphones are connected.
3 Lights when NET or USB is controlled.
4 Lights according to the type of input digital signals and
the listening mode.
5 Stays lit when Music Optimizer is enabled.
6 Lights in the following conditions. "AUTO": Tuning mode
is auto. / "TUNED": Receiving AM/FM radio.
flashes while tuning is automatically performed. / "FM
STEREO": Receiving FM stereo. / "RDS" (European,
Australian and Asian models): Receiving RDS
broadcasting.
7 "MUTING": Flashes when muting is on.
8 Lights in the following conditions. "SLEEP": Sleep timer
has been set. / "ASb" (Auto Standby): Auto Standby
is on. / "ch": Channel is being set. / "Hz": Crossover
frequencies are being set. / "m/ft": Speaker distances
are being set. / "dB": Speaker volume is being set.
9 Displays various information of the input signals.
Pressing DISPLAY displays the type of input digital
signals and the listening mode.
90°
98
G
IH J K
14 623 75
98
Display
1 Lights in the following conditions. "Z2": Zone 2 output
is on. / "HDMI": HDMI signals are input and HDMI
input selector is selected. / "ARC": Audio signals are
input from ARC compatible TV and TV input selector
is selected. / "3D": Input signals are 3D. / "USB" ():
"NET" input is selected and USB storage device is
connected. / "NET" (): "NET" input is selected and
the unit is connected to the network. / "DIGITAL":
Digital signals are input and the digital input selector is
selected. / Cursor indicators: NET or USB is controlled.
¼ "USB" and "NET" will flash if the connection is not correct.
2 Stays lit when headphones are connected.
1
2 3 5 764
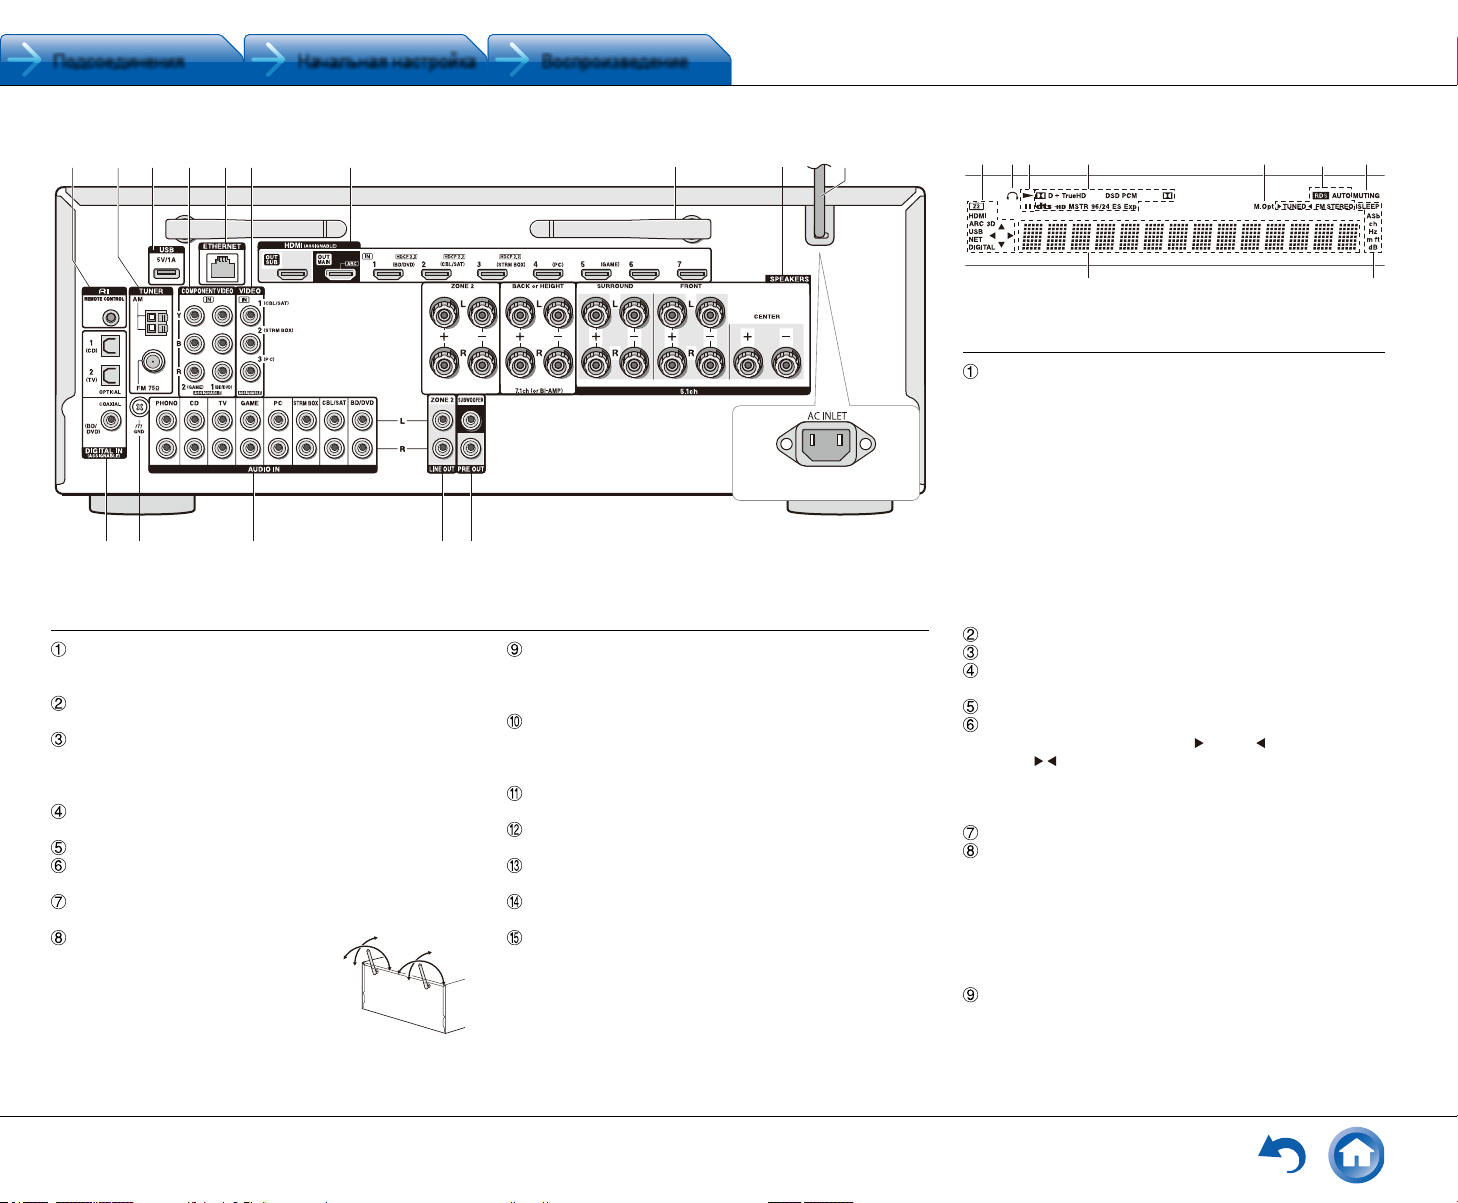
Задняя панель
Разъем дистанционного управления по шине RI:
продукт Onkyo с разъемом RI можно подсоединить
и синхронизировать управление с ресивером.
TUNER AM / FM — Разъемы FM антенна (75 Ом) и АМ
антенна: для подсоединения прилагаемых антенн
USB порт: для подсоединения USB накопителей,
чтобы воспроизводить с них музыкальные файлы. USB
устройства могут получать питание при подсоедине‑
нии кабелем.
Разъем COMPONENT VIDEO IN: Разъем компонентно‑
го аналогового видео входа.
Порт ETHERNET: для соединения с локальной сетью.
Разъем COMPOSITE VIDEO IN: Разъем композитного
аналогового видео входа.
Разъемы HDMI IN и OUT: Для передачи цифровых ау‑
дио и видео сигналов между ресивером и источником.
Антенны беспроводной связи:
Для соединения по сети Wi‑Fi
или при использовании Bluetooth‑ос‑
нащенных устройств. Выберите углы
их нак лона в соответствии со стат‑
сом соедининия.
Ru-4
180°
180°
Клеммы SPEAKERS: для подсоединения комплекта
АС. Для использования функции Zone, подсоедини‑
те колонки в отдельной комнате к разъемам ZONE2
на ресивере.
Сетевой шнур (Североамериканская, европейская,
австралийская и азиатские модели)
Разъем AC INLET (Модели для Тайваня): для сете‑
вого шнура
Разъемы DIGITAL IN COAXIAL / OPTICAL: Для приема
цифровых аудио сигналов
Клемма GND: Для подключения заземления проигры‑
вателя виниловых пластинок
Разъем COMPOSITE AUDIO IN: Разъем для аналого‑
вого аудио входа.
Разъемы LINE OUT ZONE 2: Для вывода аналоговых
аудио сигналов на дополнительный усилитель в ZONE 2.
Разъем PRE OUT SUBWOOFER: Для подсоединения
активного сабвуфера
90°
8
9
F
14 623 75
Дисплей
Загорается в следующих случаях. “Z2”: выход на Zone
2 активирован. / “HDMI”: HDMI сигналы поступают и вы
бран входной селектор HDMI. Этот индикатор слабо
светится, когда активирована функция HDMI Standby
Through и ресивер находится в режиме ожидания
Standby / “ARC”: аудио сигналы поступают с ARC‑совме‑
(Taiwanese models)
стимого TV и выбран входной селектор TV / CD. / “3D”:
на вход поступает 3D сигнал. / “USB” (*): выбран
вход “NET” и USB накопитель подсоединен. / “NET”
(*): выбран вход “NET” и устройство подсоединено
к сети. / “DIGITAL”: на вход поступают цифровые сигна‑
лы и выбран входной селектор цифрового входа. NET
или USB контролируется.
*“USB” и “NET” индикат оры будут мигать, если соединение непра‑
вильное.
Загорается, когда подсоединены наушники.
Загорается, когда NET или USB контролируется.
Загорается в соответствии с типом входного цифрово‑
го сигнала и режимом прослушивания.
Загорается, когда включена функция Music Optimizer.
Загорается в следующих случаях. “AUTO”: режим
настройки автоматический. / “
радио. мигает в процессе автоматической настрой‑
ки. / “FM STEREO”: прием FM стерео. / “RDS” (евро‑
пейская, австралийская и азиатские модели): прием
передач с RDS.
“MUTING”: мигает при приглушении звука.
Загорается в следующих случаях. “SLEEP”: таймер
сна установлен. / Этот индикатор слабо светится, когда
активирована функция Power Out at Standby для функ‑
ции STRM BOX, и ресивер находится в режиме ожида‑
ния Standby / “ASb” (Auto Standby): режим Auto Standby
включен. / “ch”: задан канал. / “Hz”: задаются частоты
кроссовера. / “m / ft”: задаются расстояния до АС. / “dB”:
задаются громкости АС.
Выводит различную информацию о типах входных сиг‑
налов. При нажатии на кнопку DISPLAY показывает тип
входных цифровых сигналов и режим прослушивания.
‑
TUNED ”: прием AM / FM
Page 5
Подсоединения Начальная настройка Воспроизведение
Step 1: Connections
1 Connecting speakers
Speaker layout
Characteristics of speaker types
"# output front stereo sound and $
output center sound such as dialogs and
vocals. %& create back sound field. '
reproduces bass sounds and creates rich
sound field.
Connecting 78 speakers, 9F speakers
or GH speakers enables playback in 7.1
ch configuration. 78 (back) speakers
improve sense of envelopment created by
back sound field as well as seamlessness
of back sounds, providing more natural
sound experiences in the sound field.
9F or GH (height) speakers produce
surround effects on a height plane. This
unit can perform optimal sound field
processing for the type of height speakers
actually installed and registered in "Initial
Setup".
Height speaker types
Installing speakers in ceiling
fe
Dolby Surround listening mode. Install Top
Front speakers so that they are positioned
at a point between directly above the
listening position and directly above the
front speakers. Install Top Middle speakers
so they are directly above the listening
position. Install Top Rear speakers so
they are positioned at a point between
directly above the listening position and
directly above the back speakers. You can
select (a)(b), (c)(d) or (e)(f) on the
unit. For connection with the unit, use the
SPEAKERS BACK or HEIGHT terminals.
● Dolby Laboratories recommends
placing the speakers as described in
"Installing speakers in ceiling" to obtain
the best Dolby Atmos effect.
Using Dolby Enabled Speakers
Characteristics of speaker types
"# output front stereo sound and $
output center sound such as dialogs and
vocals. %& create back sound field. '
reproduces bass sounds and creates rich
sound field.
Connecting 78 speakers, 9F speakers
or GH speakers enables playback in 7.1
ch configuration. 78 (back) speakers
improve sense of envelopment created by
back sound field as well as seamlessness
of back sounds, providing more natural
sound experiences in the sound field.
9F or GH (height) speakers produce
surround effects on a height plane. This
unit can perform optimal sound field
processing for the type of height speakers
actually installed and registered in "Initial
Setup".
Height speaker types
Installing speakers in ceiling
Dolby Surround listening mode. Install Top
Front speakers so that they are positioned
at a point between directly above the
listening position and directly above the
front speakers. Install Top Middle speakers
so they are directly above the listening
position. Install Top Rear speakers so
they are positioned at a point between
directly above the listening position and
directly above the back speakers. You can
select (a)(b), (c)(d) or (e)(f) on the
unit. For connection with the unit, use the
SPEAKERS BACK or HEIGHT terminals.
● Dolby Laboratories recommends
placing the speakers as described in
"Installing speakers in ceiling" to obtain
the best Dolby Atmos effect.
Using Dolby Enabled Speakers
g
i
h
j
g h
Dolby Enabled Speakers (Front)
i j
Dolby Enabled Speakers (Surround)
Dolby Surround listening mode. Install Top
Front speakers so that they are positioned
at a point between directly above the
listening position and directly above the
front speakers. Install Top Middle speakers
so they are directly above the listening
position. Install Top Rear speakers so
they are positioned at a point between
directly above the listening position and
directly above the back speakers. You can
select (a)(b), (c)(d) or (e)(f) on the
unit. For connection with the unit, use the
SPEAKERS BACK or HEIGHT terminals.
● Dolby Laboratories recommends
placing the speakers as described in
"Installing speakers in ceiling" to obtain
the best Dolby Atmos effect.
Using Dolby Enabled Speakers
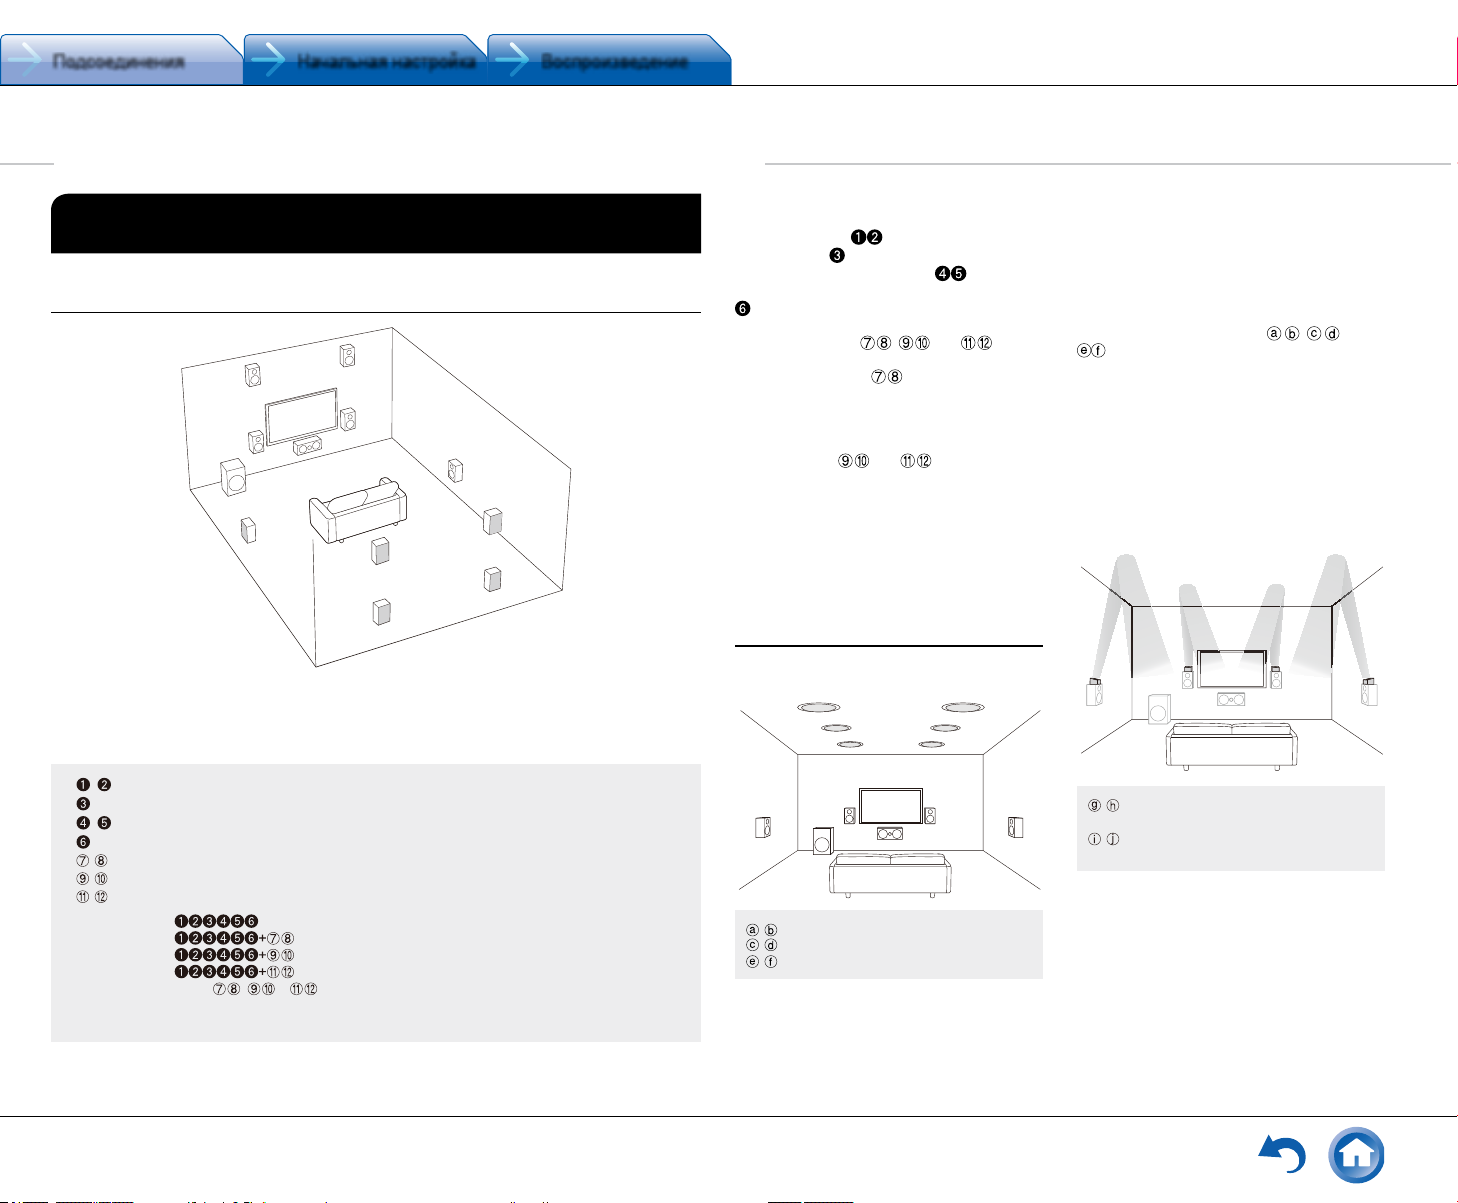
Шаг 1: Подсоединения
1 Подсоединение акустических систем
Размещение акустических систем
9
"
'
%
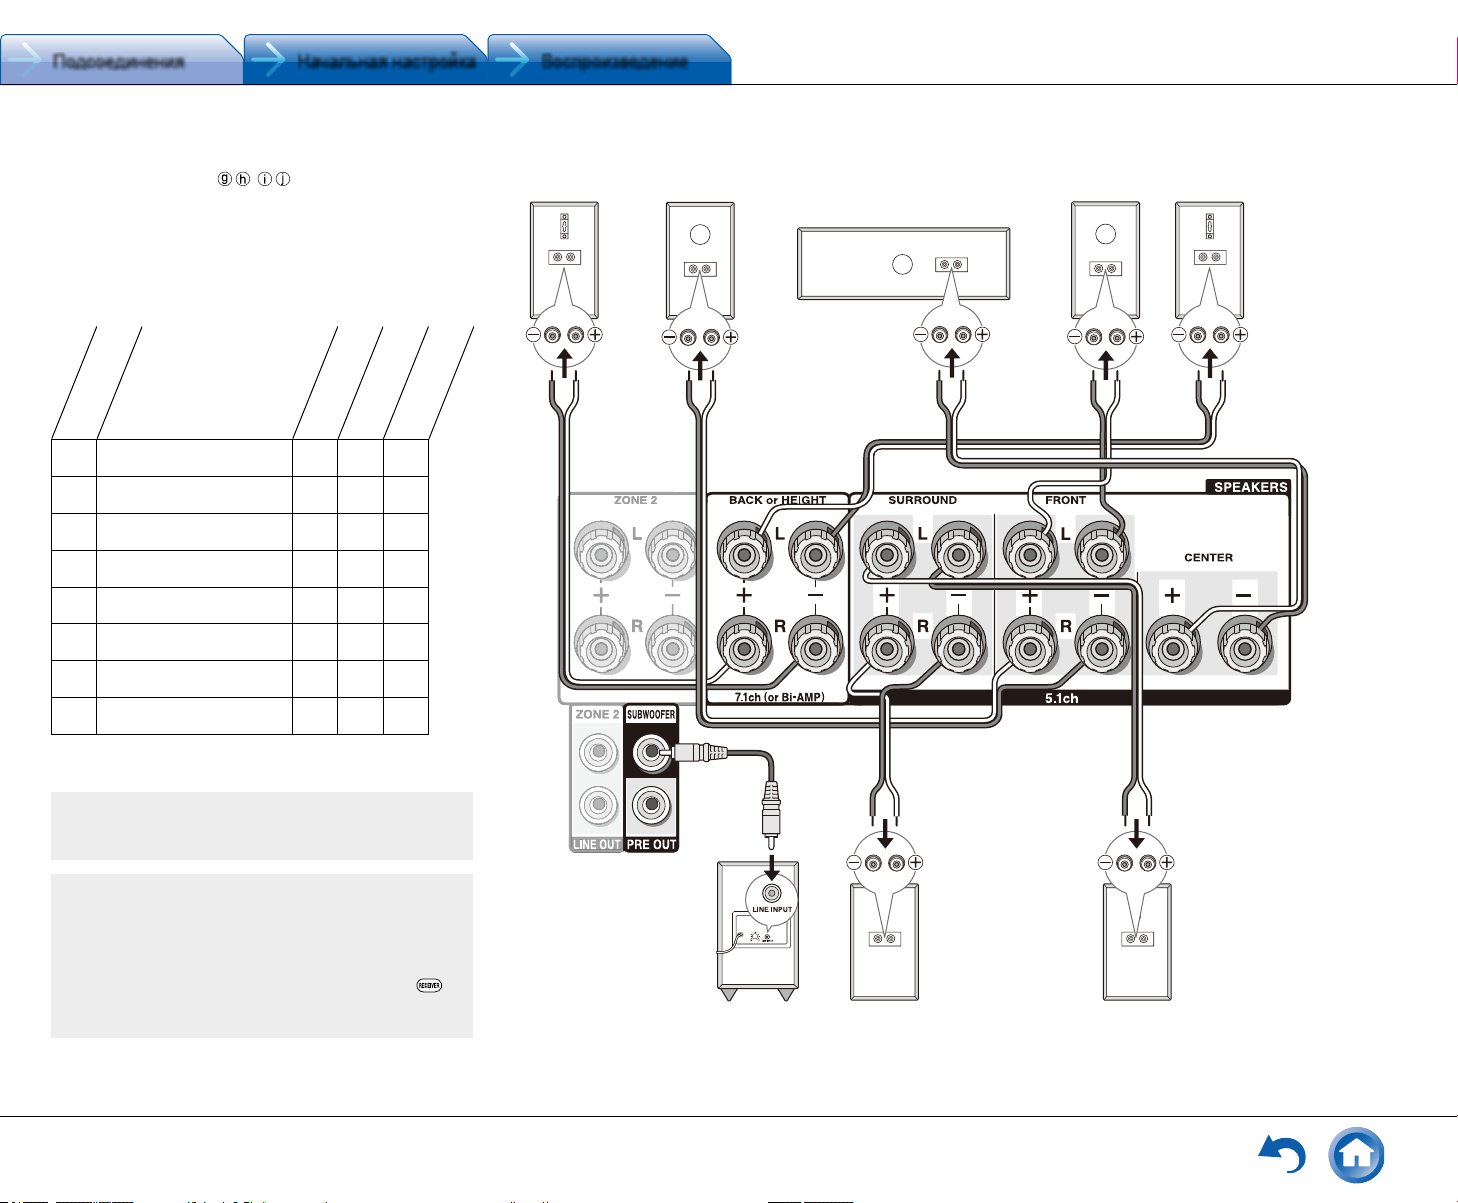
Важно: Не подключайте сетевой шнур, пока не закончите все другие соединения.
Фронтальные АС
Центральная АС
Боковые АС
Сабвуфер
Задние тыловые АС
Верхние фронтальные АС
Верхние тыловые АС
• 5.1 каналов:
• 7.1 каналов: или
Акустические системы , и разделяют
одни и те же пары клемм. Поэтому выберите только
одну из этих групп.
F
#
$
&
H
G
8
7
или
• Для прослушивания звуковой
дорожки в формате Dolby Atmos
необходимо установить верхние
фронтальные АС или верхние
тыловые АС. Существует множество
различных типов верхних АС, кроме
указанных. Для получения более
подробной информации смотрите
следующий раздел.
• При использовании функции Multi‑
Zone, смотрите раздел “Multi‑Zone”
из “Step 3: Playing Back”.
Характеристики типов акустических
систем
Фронтальные АС выдают фронтальный
стерео звук, а
диалоги и вокал. Тыловые АС
эффект окружения звуком сзади. Сабвуфер
выдает басовые звуки и создает богатое
звуковое поле.
Установка колонок , или позво‑
ляет воспроизводить 7.1‑канальные записи.
Задние тыловые АС улучшают чувство
окружения, создаваемое тыловым звуковым
полем. Они также улучшают ощущение нераз‑
рывности тылового звукового поля и обеспечи‑
вают более естественное звучание.
Верхние Height
ляют создавать эффект окружения звуком
в вертикальной плоскости. Этот ресивер
может осуществлять оптимальную обработку
звукового поля для того типа верхних АС,
которые реально установлены и зарегистриро‑
ваны в меню «Начальной настройки» — “Initial
Setup”.
центральная АС выдает
Характеристики типов верхних
акустических систем
Установка акустических систем
в потолок
c d
Top Front — верхние фронтальные АС
Top Middle — верхние боковые АС
Top Rear — верхние тыловые АС
Потолочные акустические системы исполь‑
зуются для максимизации эффекта в режи‑
мах прослушивания Dolby Atmos или Dolby
создают
или АС позво‑
fe
a b
Surround. Устанавливайте потолочные
фронтальные АС (Top Front) на полпути между
креслом слушателя и фронтальными АС.
Устанавливайте потолочные средние АС (Top
Middle) прямо над местом для прослушивания.
Устанавливайте потолочные тыловые АС (Top
Rear) на полпути между креслом слушателя
и задними тыловыми АС.
Вы можете выбрать вариант
на ресивере. Для подсоединения к реси‑
веру используйте клеммы SPEAKERS BACK
или HEIGHT.
• Dolby Laboratories рекомендует размещать
акустические системы для получения
наилучшего эффекта от режимов прослу‑
шивания Dolby Atmos как описано в разделе
«Установка АС в потолок» — “Installing
speakers in ceiling”.
,
Использование Dolby-оснащенных
акустических систем
i
g
h
Dolby‑оснащенные акустические
системы (Front)
Dolby‑оснащенные акустические
системы (Surround)
Dolby‑оснащенные акустические системы
специально сконстрированы для использова‑
ния в качестве верхних АС ‑Height. Имеется
два типа Dolby‑оснащенных акустических
систем: одни предназначены для установки
на верхнюю крышку других колонок, таких
как фронтальные или тыловые АС, а другие
являются неотъемлемой частью обычных
колонок. Dolby‑оснащенные акустические
системы излучают вверх — в потолок, чтобы
или
j
Ru-5
Page 6
Подсоединения Начальная настройка Воспроизведение
Step 1: Connections
создать эффект прихода звуков сверху в режимах Dolby Atmos
и Dolby Surround — за счет отражения звука от потолка. Вы
можете выбрать вариант , на ресивере. Для подсо‑
единения к ресиверу используйте клеммы SPEAKERS BACK
или HEIGHT.
При воспроизведении записей в Dolby Atmos, количество тре‑
буемых АС зависит от того, как вы расположили свои тыловые
или верхние колонки. Ниже приведены комбинации АС для вос‑
произведения звуковых дорожек в формате Dolby Atmos.
Front ‑
Вариант
Тыловые или верхние
подсоединения
1 Back ‑ тыловые
2 Front High ‑ фронтальные
верхние
3 Rear High ‑ тыловые верхние
4 Top Front – потолочные
фронтальные
5 Top Middle – потолочные средние
6 Top Rear – потолочные задние
7 Dolby Enabled Speaker (Front) ‑
Dolby‑оснащенные акустические
системы (фронтальные)
8 Dolby Enabled Speaker (Surround)
‑ Dolby‑оснащенные акустические
системы (тыловые)
Тр: требуются, О: опционные
* подсоединение сабвуфера ‑ опиция.
Тр О Тр
Тр О О
Тр О О
Тр О О
Тр О О
Тр О О
Тр О О
Тр О Тр
Center ‑
центральная
фронтальные
Surround ‑
тыловые
8FH
Right back
Правая задняя АС
или правая верхняя АС
Or right height
#
Фронтальная
Front R
правая АС R
$
Center
Центральная АС
"
Фронтальная
Front L
левая АС L
Шаг 1: Подсоединения
79G
Левая задняя
Left back
АС или левая
Or left height
верхняя АС
A speaker configuration
Конфигурация с только
where only one back
одной задней тыловой АС
speaker is connected is
не поддерживается
not supported.
Важно: (Североамериканская и тайвань ская модель) Подс о‑
единяйте АС с импедансом от 4 Ом до 16 Ом. Использование
акус тически х систем с меньшим и мпедансом может прив ести
к повр еждению ресив ера.
Важно: (Европейс кая, австралийская и азиатские модели). Подсо‑
единяйте АС с импедансом от 4 Ом до 16 Ом. Вы должны из менить
наст ройк и, если импеданс колонок на ходится в диапазоне от 4
Ом до 6 Ом. Испол ьзование акус тически х систем с меньшим
импеданс ом, че м установк а, может прив ести к повреждению реси‑
вера. Вы можете сделать настройку, следуя указаниям на экране
телевизора. Выберите пунк т с помощью кнопо к кур сора на пульте
и нажмите ENTER, чтобы подтвердить выбор. Для во зврата к пре ‑
дыду щему меню на жмите кнопку RETURN. Нажм ите кн опку
RECEIVER, а затем кнопку SETUP на пульте. Выберите “2. Speaker
Conguration” — “Speaker Impedance” и измените значение по умол‑
чанию c “6ohms” на “4ohms”.
Ru-6
Subwoofer with built-in
Активный сабвуфер
power amplifier
'
&
Surround R
Боковая правая АС Боковая левая АС
%
Surround L
Page 7
Подсоединения Начальная настройка Воспроизведение
Step 1: Connections
Instructions on how to connect speakers
When using commercially available banana plugs:
tighten the speaker terminals to the end and then insert
the banana plugs. Do not insert the core of speaker cable
directly into the hole for banana plug of speaker terminal.
(North American models)
Step 1: Connections
Instructions on how to connect speakers
Cut and remove the plastic coating from the end of the
speaker cable, twist the core and connect it to the terminal.
Be sure to make correct connection between the unit's
jacks and speaker's jacks (+ to + and - to -) for each
channel. If connection is wrong, a bass sound may become
poor due to reverse phase. Up to two subwoofers with
built-in power amplifier can be connected to the subwoofer
jacks. Set the cut-off filter selection switch of the subwoofer
to DIRECT. If the subwoofer does not have a cut-off filter
selection switch but has a cut-off frequency adjusting dial,
turn it to the maximum frequency. If your subwoofer does
not have built-in power amplifier, you can connect a power
amplifier between the unit and the subwoofer.
● The speaker setting is 7.1 channels at the time of
purchase. You can change it manually or by using
automatic speaker setting.
● Short-circuiting the + cable and - cable or contacting
the cable core to the rear panel of the unit may cause
failure. Also do not connect two or more cables to one
speaker terminal or one speaker to several terminals.
When using commercially available banana plugs:
tighten the speaker terminals to the end and then insert
the banana plugs. Do not insert the core of speaker cable
directly into the hole for banana plug of speaker terminal.
(North American models)
Step 1: Connections
When using commercially available banana plugs:
tighten the speaker terminals to the end and then insert
the banana plugs. Do not insert the core of speaker cable
directly into the hole for banana plug of speaker terminal.
(North American models)
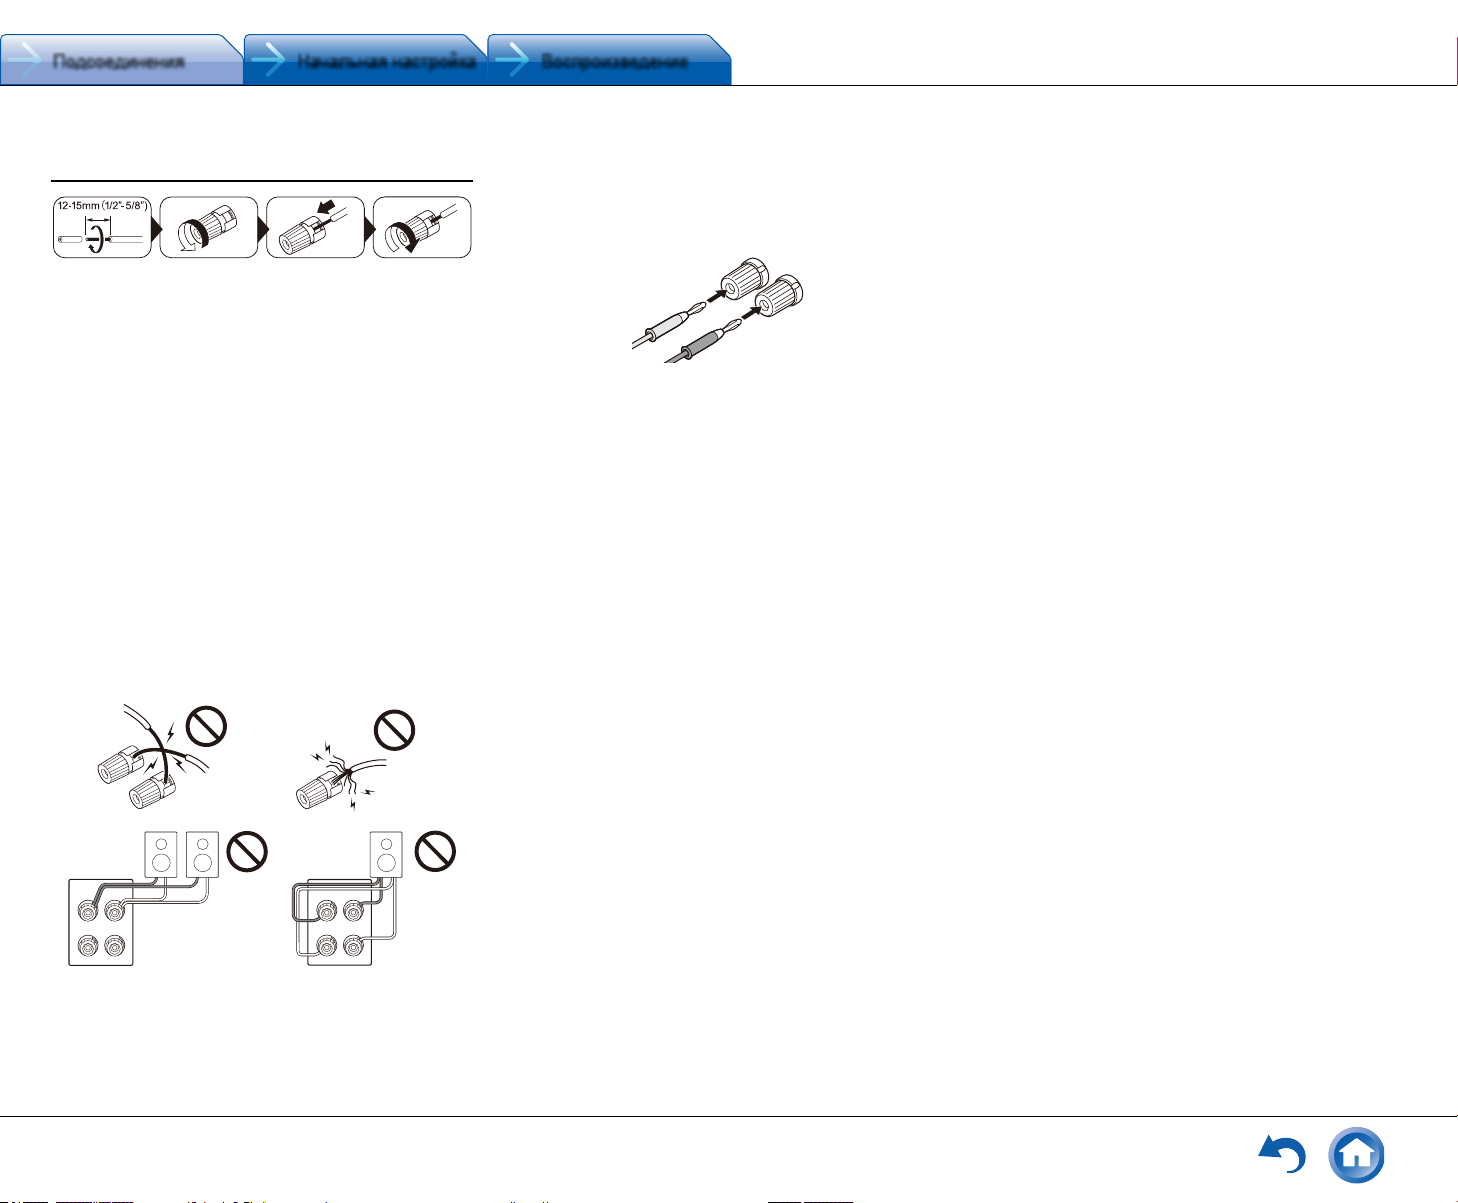
Инструкции по подсоединению акустических
систем
Зачистите примерно по 12‑15 мм пластиковой изоляции
с концов кабеля, плотно скрутите жилы проводника,
и подсоедините к к леммам. Правильно подключайте —
плюсовые (+) клеммы только к плюсовым (+) клеммам,
и минусовые (‑) клеммы только к минусовым (‑) клеммам
для каждого канала. Если вы их перепутаете, звук будет
не в фазе и не натуральным. Выходной разъем «Сабву‑
фер» поддерживает подключение сабвуфера со встроен‑
ным усилителем мощности. Установите переключатель
выбора частоты среза для фильтра сабвуфера в поло‑
жение DIRECT. Если сабвуфер не имеет встроенного
усилителя мощности, вы можете подк лючить усилитель
между ресивером и сабвуфером.
• В момент покупки настройка типа акустических систем
находится в положении 7.1 ch. Вы можете изменить
ее вручную, или с помощью автоматической системы
задания конфигурации колонок.
• Короткое замыкание плюсового + и минусового концов
кабеля или касание проводниками кабеля задней па‑
нели устройства может привести к поломке ресивера.
Также не подключайте два или несколько кабелей
к одной колонке или же одну колонку к нескольким
разъемам.
При использование коммерчески доступных разъемов типа «бананы»: затяните клемму АС до упора перед
тем, как вставить этот штекер. Не вставляйте сердцевину
колоночного кабеля непосредственно в центральное
отверстие клеммы АС.
(для Североамериканской модели).
Шаг 1: Подсоединения
Ru-7
Page 8
Подсоединения Начальная настройка Воспроизведение
Step 1: Connections
2 Connecting the TV and players
Step 1: Connections
HDMI
OUT
HDMI
OUT
Game console
Personal computer
DIGITAL
OPTICAL
OUT
AUDIO
OUT
TV
¼z Audio connection with a TV not supporting ARC
¼ Select an appropriate
connection for your TV.
2 Подсоединение TV и плееров
TV
Шаг 1: Подсоединения
HDMI
OUT
HDMI
IN
Для использования функции ARC, подсоедините
To use the ARC function, connect to the ARC
на телевизоре тот HDMI разъем, который совместим
compatible HDMI jack of the TV and make an
с ARC, и сделайте необходимые настройки
appropriate setting on the unit. See "2 Source
ресивера. См. Раздел 2 главы «Шаг 2: Соединение
источников» в секции «Начальная настройка» —
Connection" of "Step 2: Initial Setup".
“Step 2: Initial Setup”.
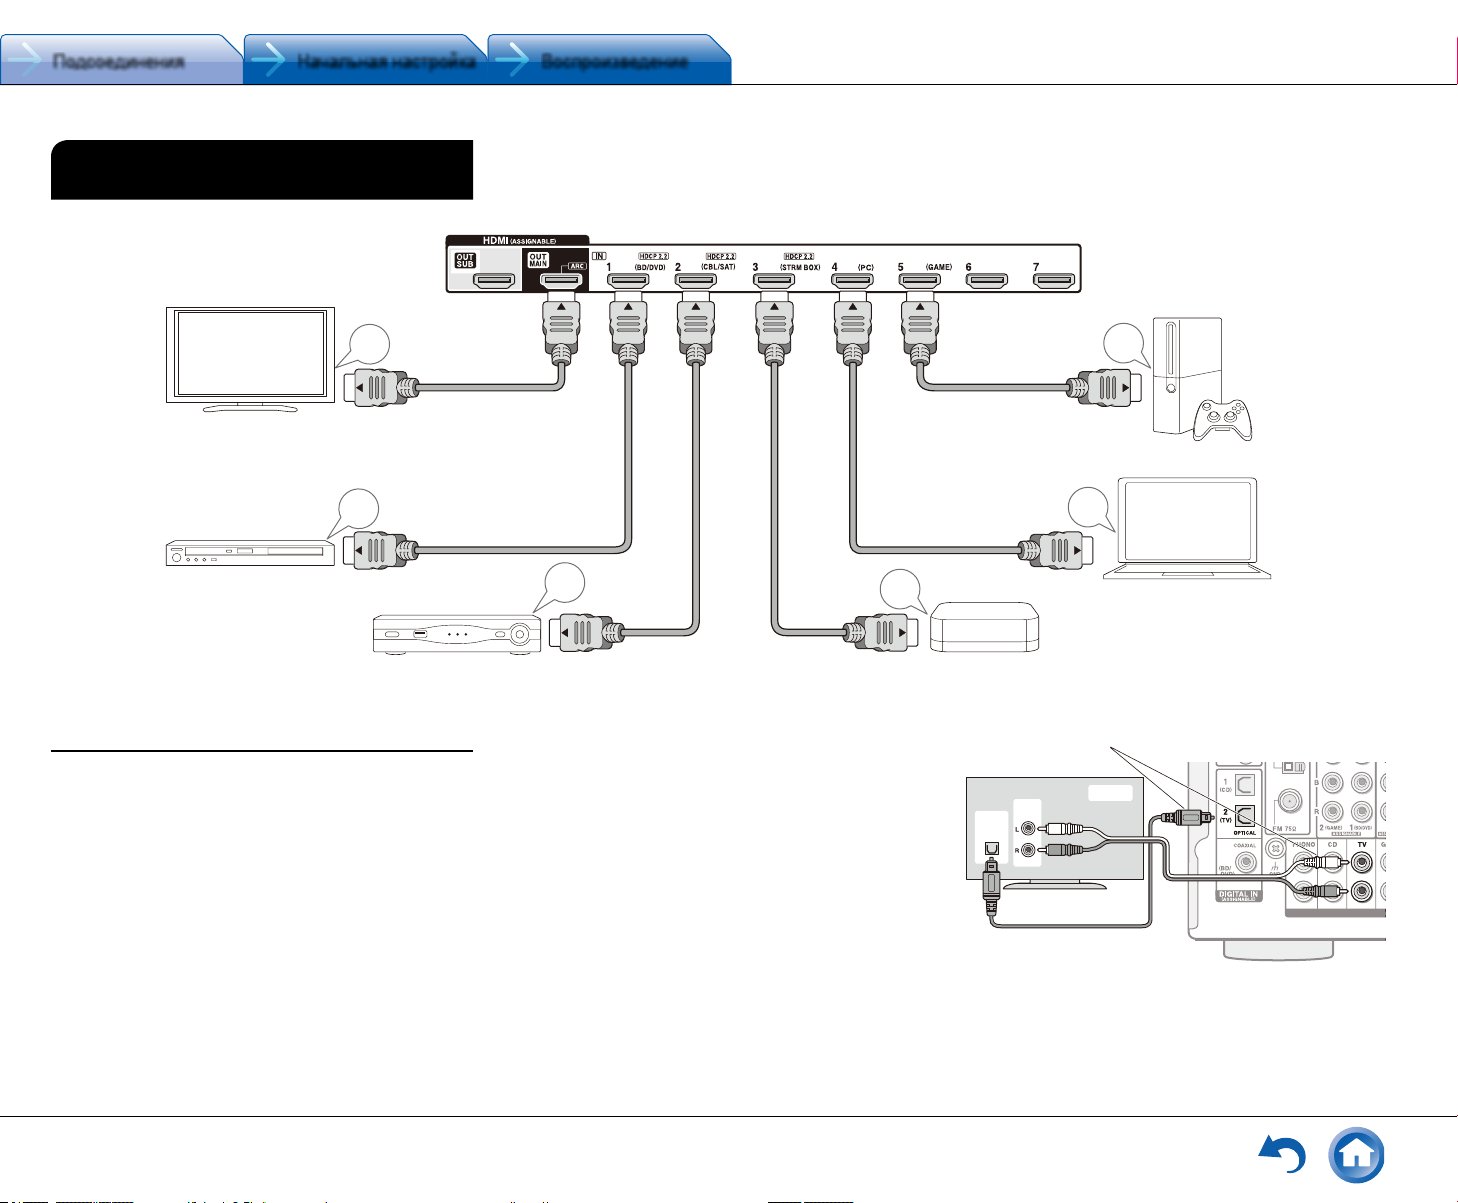
Подсоединение с помощью HDMI кабеля
Blu-ray Disc/
Blu‑ray /DVD плеер
DVD player
AV ресивер оснащен множеством HDMI разъемов
на задней панели, и каж дый их них соответствует кнопке
селектора входов с тем же названием на передней па‑
нели. Например, Blu‑ray плеер будет соединен с разъ‑
емом IN 1, а кнопка BD / DVD на передней панели будет
использоваться для включения прослушивания воспро‑
изводимого звука (если плеер совместим со стандартом
CEC, нужный вход будет выбран автоматически). Если вы
хотите подсоединить еще один Blu‑ray плеер, вы сможете
использовать любой другой разъем кроме IN 1. Назначе‑
ние входных разъемов и кнопок селектора можно изме‑
нить. Как это можно сделать, смотрите в Расширенной
инструкции — Advanced Manual).
Чтобы подключить TV к AV ресиверу, соедините выход
HDMI OUT MAIN ресивера с входным разъемом HDMI
Ru-8
HDMI кабель
HDMI cable
Спутниковая / кабельная
приставка и т. п.
set-top box, etc.
HDMI
OUT
HDMI
OUT
на телевизоре с помощью HDMI кабеля. С помощью
этого соединения можно будет выводить на экран теле‑
визора меню настроек AV ресивера или же передавать
аудио / видео сигналы с плеера прямо на TV. Если ваш
TV поддерживает функцию ARC (Audio Return Channel —
канал возврата аудио), можно будет воспроизводить
звук телевизора через колонки, подсоединенные к AV
ресиверу, не делая дополнительных соединений. Если
ваш TV не поддерживает функцию ARC, потребуется, до‑
полнительно к соединению с разъемом HDMI OUT MAIN,
проложить цифровой оптический кабель меж ду цифро‑
вым аудио выходом TV и входом DIGITAL IN OPTICAL AV
ресивера или же аналоговый аудио кабель между аудио
выходом TV и аналоговым входным разъемом AUDIO IN
TV на AV ресивере.
HDMI
OUT
Игровая приставка
Game console
HDMI
OUT
Персональный компьютер
Personal computer
Потоковый медиа‑плеер и т. п.
Streaming media Player, etc.Satellite/Cable
● Соединение с TV, не поддерживающим функ цию ARC
*Выберите н ужн ое со един ение для вашего ТВ
AV ресивер поддерживает функцию сквозного пропуска
HDMI Through, которая позволяет проходить через него
сигналам от плеера на TV, даже когда AV ресивер нахо‑
дится в режиме ожидания standby.
Page 9
Подсоединения Начальная настройка Воспроизведение
Step 1: Connections
modify the settings to enable the input selection link with
CEC (Consumer Electronics Control) compliant device,
connection with ARC compatible TV, and HDMI Standby
Through function. See
Initial Setup".
Another TV can be connected to the HDMI OUT SUB
jack.
To enjoy HDCP2.2 protected video, connect the player
to one of the HDMI IN1 to IN3 jacks and connect the
unit and the TV via HDMI. You will be unable to view
images protected by HDCP2.2 if your TV does not have
a HDCP2.2 compatible input jack.
To play 4K or 1080p video, use a high speed HDMI
cable or high speed HDMI with Ethernet cable.
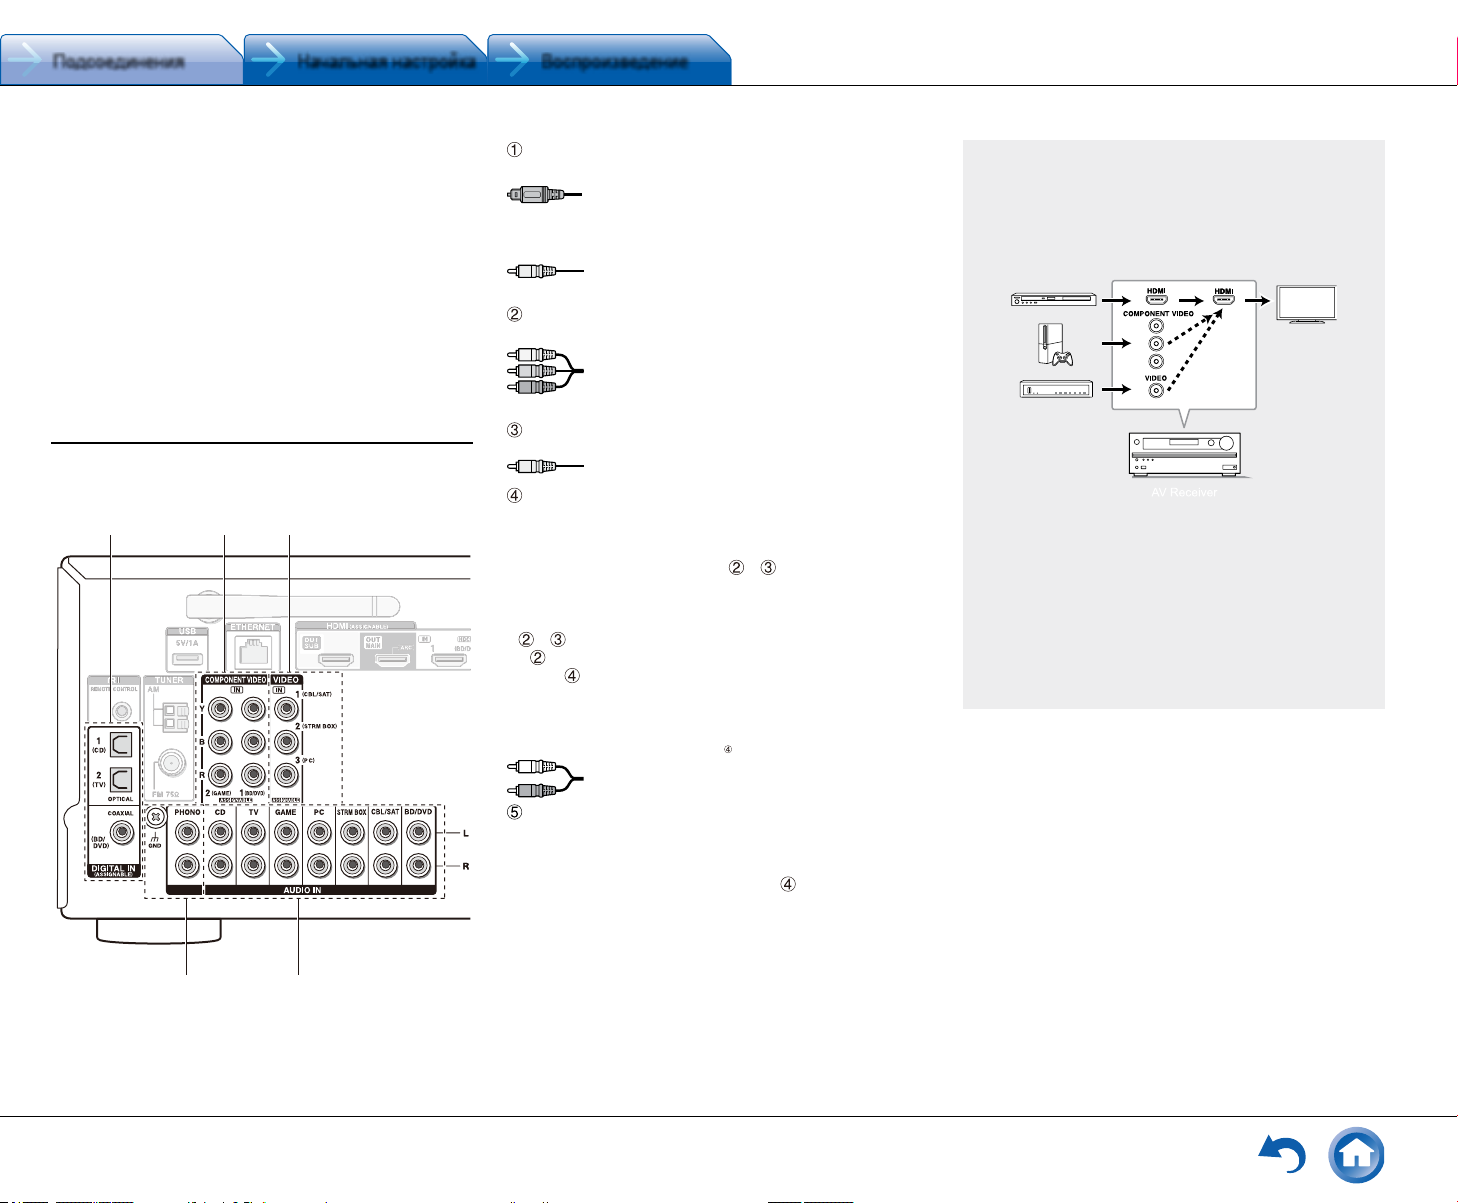
Connecting Components without HDMI
If your AV component does not have HDMI jack, use an
available jack of your component for cable connection with
this unit.
4
5
1 A player with a digital audio out jack can be connected.
Digital optical cable (OPTICAL)
¼ As the digital in optical jack of the unit has a
cover, push in the cable against the cover as it
is turned inside.
Digital coaxial cable (COAXIAL)
2 A player with component video output jacks can be
connected.
Component video cable
¼ Its transmitted video has higher quality than
that of composite video cable.
3 A player with a composite video output jack can be
connected.
Composite video cable
4 A player with analog audio out jacks can be connected.
When using jacks 2 and 3 for video input, connect
to the audio input jacks corresponding to the jacks
connected at 2 and 3. (For example, when video input
connection is to the 2 BD/DVD jack, the audio input
connection should also be to the 4 BD/DVD jacks.)
¼ It is possible to change assignment of the input jacks and input
selector buttons. For how to make settings, see the Advanced
Manual.
¼ To enjoy multi-zone playback with a player, connect player to either
1 or 4 jacks.
Analog audio (RCA) cable
5 Connect a turntable that uses an MM type cartridge and
does not have a built-in audio equalizer. If the connected
turntable has a built-in audio equalizer, connect it to the
4 CD jack.
¼ If it uses an MC type cartridge, install an audio equalizer compatible
with MC type cartridge between the unit and the turntable by
connecting it to the 4 CD jack. For details, refer to the turntable's
instruction manual.
¼ If the turntable has a ground wire, connect it to the GND terminal of
this unit. If connecting the ground wire increases noise, disconnect it.
Video upconversion function
Video signals input to the composite video input
jack or the COMPONENT VIDEO IN jacks will be
upconverted to HDMI signals and then output from
the HDMI output jack.
AV Receiver
¼ When you upconvert video signals input to
the COMPONENT VIDEO IN jacks and output
them from the HDMI OUT jack, set the output
resolution of the player to 480i or 576i. If the input
has 480p/576p or higher resolution, a message
prompting you to change the resolution setting
will appear. If your player does not support 480i or
576i output, use the composite video jack.
¼ If multiple video signal inputs are put into one input
system, the output will be made in the order of
HDMI, COMPONENT VIDEO/composite video.
Необходимо сделать соответствующие настройки,
чтобы активировать системные функции — выбор связи
по HDMI с CEC‑совместимым устройством, соединение
с ARC‑совместимым ТВ и функцию HDMI Through. См.
Раздел “2 Source Connection” в главе “Step 2: Initial Setup”.
● Еще один телевизор можно подсоединить к разъему
HDMI OUT SUB.
● Для просмотра видео, защищенного протоколом
HDCP2.2, подсоедините плеер к одному из разъемов
IN1 – IN3, и подсоедините TV кабелем HDMI. Ваш
плеер и TV должны поддерживать HDCP2.2, иначе вы
не увидите изображение.
● Для воспроизведения 4K или 1080p видео, исполь‑
зуйте высокоскоростной HDMI кабель или высокоско‑
ростной HDMI кабель с Ethernet.
Подсоединение компонентов без HDMI
Если ваш AV компонент не имеет разъемов HDMI, ис‑
пользуйте другие доступные разъемы для соединения
с ресивером.
1 23
Плеер с цифровым аудио выходным разъемом можно
подсоединить.
Плеер с компонентными видео выходными разъемами
можно подсоединить.
Плеер с композитным видео выходным разъемом
можно подсоединить.
Плеер с аналоговыми аудио выходными разъемами
можно подсоединить.
Используйте аналоговый аудио кабель для соединения
с плеером.
При использовании разъемов
видео, подсоедините аудио с Blu‑ray плеера или другого
подобного плеера, с помощью аналогового аудио кабеля
на соответствующие разъемы этого ресивера, связанные
с
и . (Например, когда видео входом является разъ‑
BD / DVD, соединением для аудио сигнала будет
ем
разъем
*Можно изменить назначение входных разъемов и кнопок с елек‑
тора входов. О том, как это сделать, написано в Расширенн ой
Инструкции — Advanced Manual.
*Для получения мультизонного вос произведения с плеера, подсо‑
едините этот плее р к разъ емам .
Подсоединяйте виниловый проигрыватель, в кото‑
ром используется головка звукоснимателя типа MM
и у него не встроенного фонокорректора. Если у вини‑
лового проигрывателя есть встроенный фонокоррек‑
тор, подсоедините его к разъемам
* Если в нем исп ользуется головка звукоснимателя типа MC,
подк лючите фонокоррек тор совместимый с головкой звукосни ‑
мателя типа MC меж ду ресивером и проигр ывателем виниловых
плас тино к, соединив его с разъемом (4) CD. За более подро бной
инфо рмацией обращайтесь в Инструкцию на проигрыватель.
* Если проиг рыватель виниловых пласт инок имеет к лемму зазем‑
ления, сое дините ее с разъемом GND на вашем реси вере. Если
при этом шум увеличится, отсо един ите кабель обратно.
Используйте цифровой оптический кабель
(OPTICAL) для соединения.
*Так как цифровой оптический разъем реси вера имеет
крыш ечку, надав ите на н ее кончиком кабеля и вставьте
его до упора.
Используйте цифровой коаксиальный
(COAXIAL) аудио кабель для соединения.
Используйте компонентный видео кабель
для подсоединения TV с компонентными вхо‑
дами и плеера. Компонентный видео кабель
*Он передает видео лучшего качества, чем компо зитн ый.
Композитный видео кабель.
и для передачи
BD / DVD.)
Аналоговый аудио (RCA) кабель
CD.
Шаг 1: Подсоединения
Функция масштабирования видео
Видео сигналы, поступающие на композитный видео
вход или на входные разъемы COMPONENT VIDEO
преобразуются в HDMI сигналы и затем выдаются
на выходные HDMI разъемы.
*Когда видео сигн алы, поступающие на разъемы
COMPONENT VIDEO масштабируются и выд аются на HDMI
выходы, их разрешение ф икси руется на уровне 480i, по этому
установите выхо дное разрешение плеера в положение
480i / 576i. Если вход имеет разр ешен ие 480p / 576 p ил и выше,
появится с ообщение, подсказывающее сменить разрешение.
Если же ваш плеер не поддерживает на в ыходе разрешение
480i / 576i, используйте его композитный видео выход.
*Если несколько в идео сигналов пост упают на одну входную
систему, на выходе появятся сигналы в следующем порядке:
HDMI, к омпо нентный ил и комп озитный. Имейте в в иду,
что преобразование входны х цифр овых аудио си гналов
в аналоговые и наоборот — невозможно.
Ru-9
Page 10
Подсоединения Начальная настройка Воспроизведение
Step 1: Connections
3 Other connections
AM/FM antenna connections
Connect the antennas to listen to AM/FM broadcast. When
listening to the broadcast for the first time, adjust the
antenna position and orientation to get the best reception.
Network connection
You can enjoy Internet radio, DLNA and AirPlay by
connecting the unit to LAN. The unit can be connected to
the router with an Ethernet cable or to the wireless LAN
router with Wi-Fi connection. In case of wired connection,
connect the Ethernet cable to the Ethernet port. See "4
Network Connection" of "Step 2: Initial Setup" for Wi-Fi
settings.
Internet radio
Router
NAS
Headphones connection
Connect stereo headphones with a standard plug (1/4
inch or ø 6.3 mm) to the PHONES jack on the front panel.
Sound from the speakers will be off while you are using the
headphones.
● If you selected any other listening mode than Pure
Audio (European, Australian and Asian models), Stereo,
Mono and Direct, connecting headphones will switch the
listening mode to Stereo.
Power cord
Taiwanese models include removable power cords.
Connect the power cord to AC INLET of the unit and then
connect to the outlet. Always disconnect the outlet side
Step 1: Connections
Network connection
You can enjoy Internet radio, DLNA and AirPlay by
connecting the unit to LAN. The unit can be connected to
the router with an Ethernet cable or to the wireless LAN
router with Wi-Fi connection. In case of wired connection,
connect the Ethernet cable to the Ethernet port. See "4
Network Connection" of "Step 2: Initial Setup" for Wi-Fi
settings.
Подсоединение к компьютерной сети
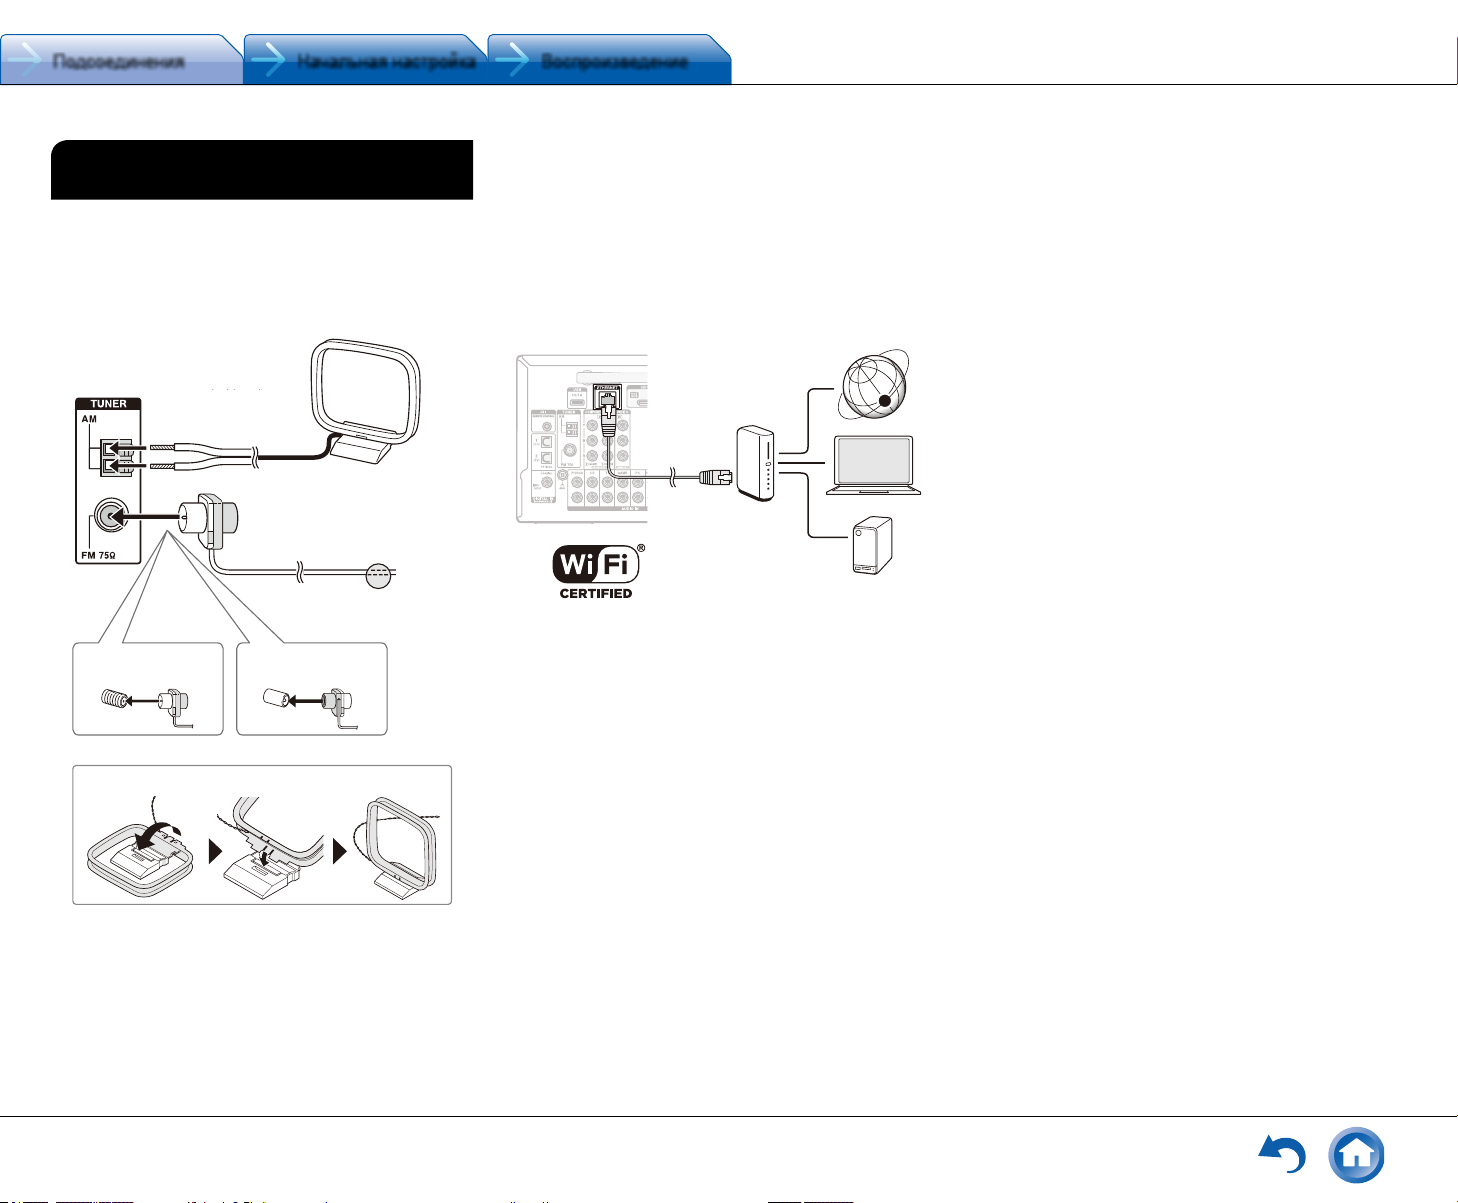
3 Прочие подсоединения
Подсоединение АМ / FM антенн
Подсоедините поставляемые антенны для приема
АМ / FM радиопередач. При первом прослушивании
настройтесь на FM радиостанцию и найдите положение
и ориентацию антенны, обеспечивающее наилучший
прием.
Вы можете слушать интернет‑радио и потоковое аудио
по DLNA и через AirPlay, подсоединив AV ресивер к ва‑
шей домашней сети LAN. AV ресивер можно подсоеди‑
нить к LAN порту на роутере с помощью Ethernet кабеля
или к беспроводному LAN роутеру по Wi‑Fi. В случае
проводного соединения подключите Ethernet кабель
к порту Ethernet. По вопросам настройки Wi‑Fi обращай‑
тесь в Раздел 4 Шага 2: «Начальная настройка». “Step 2:
Initial Setup”.
Шаг 1: Подсоединения
Рамочная АМ антенна
AM loop antenna
(прилагается)
(supplied)
Комнатная FM антенн а
Indoor FM antenna
(прилагается)
(supplied)
(Модели для Северной
(North American and
Амер ики и Тайваня).
Taiwanese models)
Сборка рамочно й АМ антенны (прилагаетс я)
Assemble the AM loop antenna (supplied).
(Европейская, австралийская
и азиатс кая модели)
Ru-10
С помо щью кн опок
Fix with a tack on
зафиксируйте антенну
the wall.
на стене.
(European, Australian
and Asian models)
Интернет‑радио
Internet radio
Роутер
Router
Компьютер
Подсоединение наушников
Подсоедините пару стереофонических наушников
со стандартным штекером (1 / 4 дюйма или 6.3‑мм) к гнез‑
ду PHONES AV‑ресивера. При подсоединении наушников
к гнезду PHONES колонки отключаются
• Если вы выбрали режим прослушивания, иной
чем Pure Audio (Европейская, австралийская и азиат‑
ская модели), Stereo, Mono или Direct, то при подсоеди‑
нении наушников режим прослушивания устанавлива‑
ется в Stereo.
NAS
NAS
медиа‑сервер
Сетевой шнур
*У модели для Тайваня съемный сетевой шнур. Вставьте
сначала его в разъем AC INLET на задней панели AV ре‑
сивера и только потом другой конец в настенную розетку.
Всегда сначала вынимайте вилку из настенной розетки,
а затем уже из AV ресивера. Включение ресивера может
привести к всплеску сетевого напряжения, который
может подействовать на компьютер или другое электроо‑
борудование в той же цепи. Рекомендуется использовать
отдельную розетку для компьютера или другого чувстви‑
тельного оборудования.
Page 11

Подсоединения Начальная настройка Воспроизведение
Step 2: Initial Setup
"Initial Setup" automatically starts on the TV when you first
turn the unit on.
Before Start
Setup is performed as a series of responses to questions
asked by the unit. Select the item with the cursors of
the remote controller and press ENTER to confirm your
selection. To return to the previous screen, press RETURN.
● You need to use HDMI connection between the unit and
TV.
● Switch the input on the TV to that assigned to the unit.
1 AccuEQ Room Calibration
The test tone coming from each speaker will be measured
to enable setting of the number of speakers, volume
level, each speaker's optimum crossover frequencies,
and distance from the primary listening position, and also
enable correction of distortion caused by the room acoustic
environment.
● You cannot return to the previous screen during speaker
setup, even if you press RETURN.
1� Place the speaker setup microphone�
AccuEQ Room Calibration
This step you can automatically calibrate
your room to get correct surround sound.
Would you like to calibrate your room now
or later?
Do it Now
Initial Setup
Before Start
Setup is performed as a series of responses to questions
asked by the unit. Select the item with the cursors of
the remote controller and press ENTER to confirm your
selection. To return to the previous screen, press RETURN.
● You need to use HDMI connection between the unit and
TV.
● Switch the input on the TV to that assigned to the unit.
Select the language first. Next, a summary of the initial
settings is displayed. Select "Yes" in this screen and press
ENTER on the remote controller.
1 AccuEQ Room Calibration
The test tone coming from each speaker will be measured
to enable setting of the number of speakers, volume
level, each speaker's optimum crossover frequencies,
and distance from the primary listening position, and also
enable correction of distortion caused by the room acoustic
environment.
● You cannot return to the previous screen during speaker
setup, even if you press RETURN.
1� Place the speaker setup microphone�
AccuEQ Room Calibration
This step you can automatically calibrate
your room to get correct surround sound.
Would you like to calibrate your room now
or later?
Do it Now
Do it Later
Initial Setup
Exit
SETUP
When the screen above is displayed, before starting the
procedure, place the supplied speaker setup microphone
at the measurement position by referring to the following
figure.
1 AccuEQ Room Calibration
The test tone coming from each speaker will be measured
to enable setting of the number of speakers, volume
level, each speaker's optimum crossover frequencies,
and distance from the primary listening position, and also
enable correction of distortion caused by the room acoustic
environment.
● You cannot return to the previous screen during speaker
setup, even if you press RETURN.
1� Place the speaker setup microphone�
AccuEQ Room Calibration
This step you can automatically calibrate
your room to get correct surround sound.
Would you like to calibrate your room now
or later?
Do it Now
Do it Later
Initial Setup
Exit
SETUP
When the screen above is displayed, before starting the
procedure, place the supplied speaker setup microphone
at the measurement position by referring to the following
figure.
Шаг 2: Начальная настройка
Первоначальная настройка “Initial Setup” автоматически
запускается на экране телевизора, когда вы первый раз
включаете ресивер.
Перед началом процедуры
Настройка проводится путем ответа на вопросы, воз‑
никающие на экране TV. Выбирайте пункт с помощью
кнопок курсора на пульте и нажимайте ENTER для под‑
Initial Setup
Language Select
English
Deutsch
Français
Español
Italiano
Nederlands
Svenska
SETUP
Exit
Настройки производятся в следующем порядке:
1-й Шаг: AccuEQ Room Calibration
● Автоматическая калибровка для оптимальной на‑
стройки АС.
2-й Шаг: Source Connection
● Проверка правильности подсоединения каждого
входного источника
● Задание настроек связи по HDMI
3-й Шаг: Remote Mode Setup
● Задание настроек, необходимых для управления
4-й Шаг: Network Connection
● Проверка правильности сетевых соединений
● Задание настроек Wi‑Fi
*Оповещен ие о дос тупности обновления пр ошивки ПО — “Firmware
Update notication”
Когда AV ре сивер подсоед инен к с ети Интернет через лок альную сеть,
и дост упна новая версия ПО, вс плыв ает оповещение “ Firmware Update
Available”. Используйте кнопки к урс ора на п ульте, чтобы выбрать
“Update Now” — обновить сейчас, а затем нажм ите ENTER для под‑
тверждения. AV ресивер автоматически переходит в режим st andby
чере з 3 мину ты после появления на дисп лее сообщения “Completed!”
и обно вление будет также завершено.
другими AV компонентами с пульта ДУ
тверждения своего выбора. Для возврата к предыдуще‑
му меню, нажмите RETURN.
● Необходимо использовать HDMI соединение между
● Переключите вход телевизора на тот, который назна‑
Выберите сначала язык меню. Затем на экране TV появит‑
ся краткий перечень начальных настроек. Выберите “Yes”
на этом экране и нажмите кнопку ENTER на пульте ДУ.
Переделка начальной настройки: Если вы завер‑
шите процедуру на полпути или смените настройки,
сделанные первый раз, а затем захотите вызвать
setup wizard еще раз, нажмите кнопку RECEIVER
и затем кнопку SETUP на пульте, выберите “8.
Miscellaneous” ‑ “Initial Setup”, и нажмите кнопку
ENTER.
ресивером и TV.
чен на ресивере.
Welcome to initial setup.
Have you connected all the speakers and devices?
Before starting, please connect speakers and sources.
Now, would you like to start initial setup?
1st Step : AccuEQ Room Calibration
2nd Step : Source Connection
3rd Step : Remote Mode Setup
4th Step : Network Connection
Yes
No
Initial Setup
AccuEQ — Автоматическая настройка
1
и калибровка акустических систем
Система AccuEQ воспринимает тестовые сигналы от ка‑
ждой из колонок с помощью прилагаемого к комплекте
калибровочного микрофона и автоматически определяет
число подсоединенных акустических систем, их громкость,
оптимальные частоты разделения для каж дой из колонок
и расстояния от основного места для прослушивания.
Затем AccuEQ устраняет искажения, вызванные акустикой
комнаты, путем измерения акустических проблем по всей
области прослушивания, чтобы получить чистый, хорошо
сбалансированный звук для каждого из слушателя.
● Невозможно вернуться к предыдущему меню во время
калибровки АС, даже если нажать на кнопку RETURN.
1. Разместите калибровочный микрофон в точке
измерения
Initial Setup
AccuEQ Room Calibration
This step you can automatically calibrate
your room to get correct surround sound.
Would you like to calibrate your room now
or later?
Do it Now
Do it Later
SETUP
Exit
Когда появится показанный выше стартовый экран, перед
началом процедуры разместите калибровочный микрофон
в точке измерения
SETUP
Exit
*Правильн ые изм ерения невозможны, е сли держать микрофон в руках,
т. к. это приведет к погрешно стям в измерениях. Автонастройка и авто‑
калибровка также невоз можн а, есл и подключены наушники.
согласно рисунку, приведенному ниже.
Measurement position
Зона прослушивания
Listening area
Точка измерения
для ми крофона
with microphone
Ru -11
Page 12

Подсоединения Начальная настройка Воспроизведение
Step 2: Initial Setup
¼ The subwoofer sound may not be detected since it is extremely
low frequencies. Set the subwoofer volume to around the half of its
maximum volume and make its frequency to the maximum level.
¼ Measurement may be interrupted if there is ambient noise or radio
frequency interference. Close the window and turn off the home
appliance and fluorescent light.
2� After placing the microphone at the measurement
position, select "Do it Now" with the cursors and
press ENTER�
3� When "Please plug microphone that came in a
box with AV receiver" is displayed, connect the
microphone to the SETUP MIC jack of the unit�
SETUP MIC jack
5� The test tones sound from the connected speakers
and automatic speaker setting starts�
Measurement will be made 3 times or more for each
speaker. It takes several minutes to be completed. Keep
the room as quiet as possible during measurement. If
any of the speakers do not produce the test tone, check
for disconnection.
● During measurement, each speaker outputs the test
tones at a high volume. Be careful of sound leak
that may disturb your neighbors, or be careful not to
frighten young children.
6� When the measurement is completed, the
measurement result is displayed�
Press
t/u
on the remote controller to check the
settings. Press ENTER with "Save" selected. Select
"On" in the next screen and press ENTER on the remote
controller.
● You should normally select "On (All Channels)", and
to disable just the front speakers, you should select
"On (Except Front Left/Right)".
● If there is an error message, follow the on-screen
instruction to remove the error cause.
7� When "Please unplug setup microphone�" is
press ENTER�
Start playback of the selected device. If connection is
correct, video/audio of the input source selected on the
unit will be played.
3� After checking the connection, select "Yes" with the
cursors and press ENTER�
● If you select "No" and press ENTER, the error cause
will be displayed. Follow the guidance to remove the
error cause and check the connection again.
4� Select "Yes" with the cursors and press ENTER
on the remote controller to check the connection
of other inputs or select "No, Done Checking" and
press ENTER to skip�
If you select "Yes", you will return to the screen of step
2.
If you select "No, Done Checking", you will proceed to
step 5.
5� Set the CEC link function�
Select "Yes" to enable the HDMI link function with CEC-
compliant equipment, then select "Yes" again in the next
screen.
Source Connection
Step 2: Initial Setup
¼ The subwoofer sound may not be detected since it is extremely
low frequencies. Set the subwoofer volume to around the half of its
maximum volume and make its frequency to the maximum level.
¼ Measurement may be interrupted if there is ambient noise or radio
frequency interference. Close the window and turn off the home
appliance and fluorescent light.
2� After placing the microphone at the measurement
position, select "Do it Now" with the cursors and
press ENTER�
3� When "Please plug microphone that came in a
box with AV receiver" is displayed, connect the
microphone to the SETUP MIC jack of the unit�
SETUP MIC jack
Calibration
microphone
4� Select the settings for the connected speakers, the
type of the height speakers, and other appropriate
settings�
5� The test tones sound from the connected speakers
and automatic speaker setting starts�
Measurement will be made 3 times or more for each
speaker. It takes several minutes to be completed. Keep
the room as quiet as possible during measurement. If
any of the speakers do not produce the test tone, check
for disconnection.
● During measurement, each speaker outputs the test
tones at a high volume. Be careful of sound leak
that may disturb your neighbors, or be careful not to
frighten young children.
6� When the measurement is completed, the
measurement result is displayed�
Press
t/u
on the remote controller to check the
settings. Press ENTER with "Save" selected. Select
"On" in the next screen and press ENTER on the remote
controller.
● You should normally select "On (All Channels)", and
to disable just the front speakers, you should select
"On (Except Front Left/Right)".
● If there is an error message, follow the on-screen
instruction to remove the error cause.
7� When "Please unplug setup microphone�" is
displayed, disconnect the microphone�
2 Source Connection
You can check the connections on the different inputs and
make HDMI link function settings.
1� When the Source Connection start screen is
displayed, select "Yes, Continue" with the cursors
and press ENTER�
press ENTER�
Start playback of the selected device. If connection is
correct, video/audio of the input source selected on the
unit will be played.
3� After checking the connection, select "Yes" with the
cursors and press ENTER�
● If you select "No" and press ENTER, the error cause
will be displayed. Follow the guidance to remove the
error cause and check the connection again.
4� Select "Yes" with the cursors and press ENTER
on the remote controller to check the connection
of other inputs or select "No, Done Checking" and
press ENTER to skip�
If you select "Yes", you will return to the screen of step
2.
If you select "No, Done Checking", you will proceed to
step 5.
5� Set the CEC link function�
Select "Yes" to enable the HDMI link function with CEC-
compliant equipment, then select "Yes" again in the next
screen.
The following CEC-compatible devices are found;
Do you wish to turn on the CEC link?
xxxxxxxxxxx
Yes
No
Source Connection
Exit
SETUP
If you select "Yes", the connection with ARC compatible
TV and HDMI Standby Through function will be set to
"On" and enabled.
Step 2: Initial Setup
press ENTER�
Start playback of the selected device. If connection is
correct, video/audio of the input source selected on the
unit will be played.
3� After checking the connection, select "Yes" with the
cursors and press ENTER�
● If you select "No" and press ENTER, the error cause
will be displayed. Follow the guidance to remove the
error cause and check the connection again.
4� Select "Yes" with the cursors and press ENTER
on the remote controller to check the connection
of other inputs or select "No, Done Checking" and
press ENTER to skip�
If you select "Yes", you will return to the screen of step
2.
If you select "No, Done Checking", you will proceed to
step 5.
5� Set the CEC link function�
Select "Yes" to enable the HDMI link function with CEC-
compliant equipment, then select "Yes" again in the next
screen.
*Звук актив ного сабвуфера может не опр еделяться системой из‑за того,
что он воспро изводит очень низ кие звуки на ма лых ур овнях гром кости.
Увеличьте громкость сабвуфера приблизительно до половины от ма к‑
сима льной, и установите частоту его крос совера на максимум.
*Во время измерений генерируется тест‑то н на выс окой громкост и.
Обес печьте в к омнате максима льно возможную тишину. Если
в комнате имеется з аметный фоновы й шум ил и радиочастотное
излучение, то это может исказ ить результаты измерений. Закройте
окна, отключите сотовые телефоны, телевизоры, радиопри емники
и конд ицио неры, домашние приборы и флуоресцентные лампы.
2. После установки микрофона в точке измерения
выберите с помощью кнопок курсора “Do it Now” —
«Сделать сейчас» и нажмите кнопку ENTER.
3. Когда на дисплее появится сообщение “Please
plug microphone that came in a box with AV receiver”
(«Пожалуйста, вставьте микрофон, который прилагается в коробке с AV ресивером»), подключите
микрофон к разъему SETUP MIC на панели AV-ресивера.
4. Выберите установки для подсоединенных АС, тип
верхних колонок, и другие необходимые настройки.
Когда на экране телевизора появится меню, указанное
выше, выберите с помощью кнопок курсора на пульте
нужную строку, при этом содержание пункта будет пока‑
зано в нижнем левом углу экрана. Смотрите на экране
на диаграмму каналов “Speaker Channels”, которая будет
меняться каждый раз при выборе различного числа
каналов. Затем следуйте указаниям, появляющимся
на экране телевизора. После задания нужных вариантов
нажмите кнопку ENTER для подтверждения.
● Следите за содержанием пункта, который появ‑
AccuEQ Room Calibration
Speaker Channels
Subwoofer
Height Speaker
Bi-Amp
Powered Zone2
Select how many speakers you have.
7.1ch
Yes
-----
No
No
ENTER
Next
Calibration
microphone
ляется в нижнем левом углу экрана, когда курсор
находится на этом объекте.
5 Начинается процесс автоматической настройки
и каждая подключенная АС по очереди издает
тестовый сигнал.
Тест‑тон измеряется микрофоном и измерения повторя‑
ются трижды или более для каждой АС. Процесс занима‑
ет несколько минут. Обеспечьте в комнате максимально
возможную тишину. Если какая‑нибудь из колонок не вы‑
дает тест‑тон, проверьте ее соединения.
● В ходе измерений каждая их АС выдает тест‑тон
с высоким уровнем громкости. Будьте внимательны,
чтбы утечка звука не беспокоила ваших соседей,
или будьте осторожны и не напугайте ваших детей.
6. Когда измерения будут завершены, на дисплей
будут выведены результаты.
Нажимайте на кнопки ◄ / ► на пульте, чтобы проверить
настройки. Нажатие на кнопку ENTER после выбора
“Save” позволяет сохранить настройки. В следующем
экране, показывающем, что “AccuEQ” активирована —
“On”, нажмите кнопку ENTER на пульте.
● Обычно вы должны выбрать “On (All Channels)”, а что‑
бы отключить только фронтальные АС, вы должны
выбрать “On (Except Front Left / Right)”.
● Если возникли сообщения об ошибках, следуйте
указаниям на экране, чтобы устранить их причину.
7. Когда на экране появится сообщение “Please unplug
setup microphone.”, отсоедините измерительный
микрофон.
2 Подсоединение источников
Вы можете проверить, подсоединен ли каж дый источник
правильно и задать настройки связи по HDMI.
1. Когда на экране ТВ появится стартовое меню
Source Connection («Подсоединение источников»),
выберите “Yes, Continue” с помощью кнопок курсора и нажмите кнопку ENTER.
Ru-12
Initial Setup
Source Connection
This step will start to check if the
connections were made correctly.
Would you like to continue?
Yes. Continue
No. Skip
SETUP
Exit
Шаг 2: Начальная настройка
2. Выберите желаемый вход для проверки соединения и нажмите кнопку ENTER.
Запустите воспроизведение на выбранном источнике.
Если соединение правильное, видео / аудио с выбранного
источника будет воспроизводиться.
3. После проверки соединения, выберите “Yes” с помощью кнопок курсора и нажмите кнопку ENTER.
● Если вы выберете “No” и нажмете кнопку ENTER,
появится сообщение об ошибке. Следуйте указаниям
на экране, чтобы устранить причину ошибки и про‑
верьте соединение еще раз.
4. Выберите “Yes” с помощью кнопок курсора и нажмите кнопку ENTER на пульте, чтобы проверить
соединения для других входов или выберите “No,
Done Checking” и нажмите кнопку ENTER чтобы
пропустить этот шаг.
Если вы выберете “Yes”, вы вернетесь к экрану на Шаге 2.
Если вы выберете “No, Done Checking”, вы перейдете
к Шагу 5.
5. Активирование связанных функций HDMI
Выберите “Yes” с помощью кнопок курсора чтобы активи‑
ровать связанные функции HDMI с CEC‑совместимыми
устройствами, затем выберите еще раз “Yes”, в следую‑
щем меню.
Если вы выберете “Yes”, соединение с ARC‑совмести‑
мым TV, а также функция сквозного пропуска HDMI
Through будут установлены в положение “On” и активи‑
рованы.
Source Connection
The following CEC-compatible devices are found;
Do you wish to turn on the CEC link?
xxxxxxxxxxx
Yes
No
SETUP
Exit
Page 13

Подсоединения Начальная настройка Воспроизведение
Step 2: Initial Setup
3 Remote Mode Setup
Make the following preparations�
Wi-Fi connection requires an access point such
as wireless LAN router (). Write down the SSID
and password (key) of the access point if they are
shown in the label of the main body. If the access
point has an automatic setting button (may be
called differently according to the manufacturer),
you can set up without inputting the password.
For how to use the automatic setting button of the
access point, refer to its instruction manual.
¼ The unit supports Wi-Fi connection with 2.4 GHz
access point.
Button" and "PIN code". See below for details of and
how to set each method.
Enter Password: Enter the password of the access point
to establish connection.
1 Select "Enter Password" with the cursor buttons and
press ENTER.
2 Enter the password () on the keyboard screen, select
"OK" with the cursor buttons and press ENTER.
¼ Select "A/a" and press ENTER to toggle between upper and lower
case. Select "
" or "" and press ENTER to move the cursor to
the selected direction. Select and press ENTER to delete the
character at the left of the cursor position. To select whether to
mask the password with "" or display it in plain text, press D on
the remote control. Press +10 on the remote controller to switch
Step 2: Initial Setup
3 Remote Mode Setup
Remote Mode Setup
Preprograming remote will give you control
of other devices from AV receiver remote.
Would you like to setup your remote to
control your devices? This may take a while
depending on what and how many you have
connected. You can always come back to remote
setup from setup “7-2 Remote Mode Setup”.
Yes, Continue
No, Skip
Initial Setup
Exit
SETUP
4 Network Connection
Make the following preparations�
Wi-Fi connection requires an access point such
as wireless LAN router (). Write down the SSID
and password (key) of the access point if they are
shown in the label of the main body. If the access
point has an automatic setting button (may be
called differently according to the manufacturer),
you can set up without inputting the password.
For how to use the automatic setting button of the
access point, refer to its instruction manual.
¼ The unit supports Wi-Fi connection with 2.4 GHz
access point.
1� Select the method of Wi-Fi connection with the
cursors and press ENTER�
Scan Networks: Use this unit to search for and connect
to a wireless LAN router or other access point.
Use iOS Device (iOS7 or later): Select this method to
let this unit share the Wi-Fi settings with your iOS device
and establish a Wi-Fi connection with ease. (The device
must be compatible with iOS version 7 or later.)
If you selected "Scan Networks"
2� Select the SSID of the access point to be connected
with the cursor buttons and press ENTER�
When the SSID of the access point appears on the TV
screen, select the desired access point.
● If you changed the initial setting of the access point to
skip password entry, step 3 is unnecessary.
● If you changed the initial setting of the access point
to hide the SSID, see "When the access point is not
displayed".
3� Select and set the authentication method�
The "Enter Password" screen may be displayed
automatically if the wireless LAN router does not have
an automatic setting button.
Wi-Fi Setup
Button" and "PIN code". See below for details of and
how to set each method.
Enter Password: Enter the password of the access point
to establish connection.
1 Select "Enter Password" with the cursor buttons and
press ENTER.
2 Enter the password () on the keyboard screen, select
"OK" with the cursor buttons and press ENTER.
¼ Select "A/a" and press ENTER to toggle between upper and lower
case. Select "
" or "" and press ENTER to move the cursor to
the selected direction. Select and press ENTER to delete the
character at the left of the cursor position. To select whether to
mask the password with "" or display it in plain text, press D on
the remote control. Press +10 on the remote controller to switch
between upper and lower case. Press CLR to delete all the input
characters.
3 If the security method of the access point to be
connected is WEP, select "Default Key ID", select "OK"
and press ENTER.
Push Button: Use the automatic setting button of the
access point to establish connection.
1 Select "Push Button" with the cursor buttons and press
ENTER.
2 Hold down the automatic setting button of the access
point for the necessary seconds, select "OK" with the
cursor buttons and press ENTER.
PIN code: Select this method when the automatic setting
button of the access point is beyond the reach. Select "PIN
code" with the cursor buttons and press ENTER to display
the 8-digit PIN code. Register the displayed PIN code to the
access point, select "OK" with the cursor buttons and press
ENTER. For how to register the PIN code to the access
point, refer to its instruction manual.
Step 2: Initial Setup
Make the following preparations�
Wi-Fi connection requires an access point such
as wireless LAN router (). Write down the SSID
and password (key) of the access point if they are
shown in the label of the main body. If the access
point has an automatic setting button (may be
called differently according to the manufacturer),
you can set up without inputting the password.
For how to use the automatic setting button of the
access point, refer to its instruction manual.
¼ The unit supports Wi-Fi connection with 2.4 GHz
access point.
1� Select the method of Wi-Fi connection with the
cursors and press ENTER�
Scan Networks: Use this unit to search for and connect
to a wireless LAN router or other access point.
Use iOS Device (iOS7 or later): Select this method to
let this unit share the Wi-Fi settings with your iOS device
and establish a Wi-Fi connection with ease. (The device
must be compatible with iOS version 7 or later.)
If you selected "Scan Networks"
2� Select the SSID of the access point to be connected
with the cursor buttons and press ENTER�
When the SSID of the access point appears on the TV
screen, select the desired access point.
● If you changed the initial setting of the access point to
skip password entry, step 3 is unnecessary.
● If you changed the initial setting of the access point
to hide the SSID, see "When the access point is not
displayed".
3� Select and set the authentication method�
The "Enter Password" screen may be displayed
automatically if the wireless LAN router does not have
an automatic setting button.
Button" and "PIN code". See below for details of and
how to set each method.
Enter Password: Enter the password of the access point
to establish connection.
1 Select "Enter Password" with the cursor buttons and
press ENTER.
2 Enter the password () on the keyboard screen, select
"OK" with the cursor buttons and press ENTER.
¼ Select "A/a" and press ENTER to toggle between upper and lower
case. Select "
" or "" and press ENTER to move the cursor to
the selected direction. Select and press ENTER to delete the
character at the left of the cursor position. To select whether to
mask the password with "" or display it in plain text, press D on
the remote control. Press +10 on the remote controller to switch
between upper and lower case. Press CLR to delete all the input
characters.
3 If the security method of the access point to be
connected is WEP, select "Default Key ID", select "OK"
and press ENTER.
Push Button: Use the automatic setting button of the
access point to establish connection.
1 Select "Push Button" with the cursor buttons and press
ENTER.
2 Hold down the automatic setting button of the access
point for the necessary seconds, select "OK" with the
cursor buttons and press ENTER.
PIN code: Select this method when the automatic setting
button of the access point is beyond the reach. Select "PIN
code" with the cursor buttons and press ENTER to display
the 8-digit PIN code. Register the displayed PIN code to the
access point, select "OK" with the cursor buttons and press
ENTER. For how to register the PIN code to the access
point, refer to its instruction manual.
Настройка режимов пульта —
3
Remote Mode Setup
Initial Setup
Remote Mode Setup
Preprograming remote will give you control
of other devices from AV receiver remote.
Would you like to setup your remote to
control your devices? This may take a while
depending on what and how many you have
connected. You can always come back to remote
setup from setup “7-2 Remote Mode Setup”.
Yes, Continue
No, Skip
SETUP
На этом шаге вы можете активировать управление дру‑
гими компонентами с вашего пульта ресивера. Когда поя‑
вится меню Remote Mode Setup, выберите “Yes“ с помо‑
щью кнопок курсора и нажмите кнопку ENTER на пульте.
Слейдуйте указаниям, чтобы выбрать желаемую кнопку
REMOTE MODE и в меню с клавиатурой введите первые
три буквы марки устройства, которое вы хотите запро‑
граммировать (например, “ONK“ для ONKYO) и найдите
код пульта для него. Указания на экране объяснят вам
также, как настроить пульт.
4 Сетевое соединение
Initial Setup
Network Connection
Do you want to connect network connection?
It gives you network services that our AV
receiver support. If you wish to skip this step.
select “No. Skip”.
Yes
No, Skip
Вы можете проверить сетевое соединение и сделать на‑
стройки сети Wi‑Fi. Когда на экране ТВ появится старто‑
вое меню Network Connection, выберите “Yes“ с помощью
кнопок курсора и нажмите кнопку ENTER на пульте. Если
вы выберете “ Wired“ в следующем меню, вы сможете
увидеть состояние кабельных соединений в локальной
сети. Чтобы настроить параметры сети Wi‑Fi, выберите
“Wireless“, нажмите кнопку ENTER на пульте и переходи‑
те в раздел, приведенный ниже.
Exit
SETUP
Exit
Проверьте перед началом процедуры следующее.
Wi‑Fi соединение требует наличия точки доступа,
такой как беспроводный LAN роутер (*). Запишите
SSID и пароль (ключ) точки доступа, если они указаны
на нак лейке на его корпусе. Если точка доступа
имеет кнопку авто настройки (она может называться
производителем и по‑другому), вы можете сделать
настройку без ввода пароля. За информацией,
как использовать кнопку авто настройки, обращайтесь
к инструкции на роутер.
*Ресивер поддерживает Wi‑Fi со един ение с 2.4 GHz то чкам и
доступа.
1. Выберите метод Wi-Fi соединения с помощью курсора и нажмите кнопку ENTER.
Scan Networks: использует этот ресивер для поиска
и соединения с беспроводным роутером LAN или дру‑
гой точкой доступа.
Use iOS Device (iOS7 или новее): Выберите этот
метод для того, чтобы разрешить вашему ресиверу
разделить Wi‑Fi настройки с вашим iOS устройством
и легко установить Wi‑Fi соединение. (устройство
должно быть совместимо с iOS версии 7 или новее.)
■ Если вы выберете “Scan Networks”
2. Выберите SSID точки доступа, к которой надо подсоединиться, с помощью кнопок курсора и нажмите
ENTER.
Когда SSID точки доступа появится на экране TV, вы‑
берите желаемую точку доступа.
● Если вы сменили начальные установки точки досту‑
па, чтобы пропустить ввод пароля, шаг 4 начнется
автоматически.
● Если вы сменили начальные установки точки досту‑
па, чтобы скрыть SSID, см. раздел “When the access
point is not displayed”.
3. Выберите и задайте метод аутентификации.
На экране может автоматически появится сообще‑
ние “Enter Password”, если роутер беспроводной сети
не имеет кнопки автонастройки.
Wi-Fi Setup
Select the authentication method.
Enter Password
Push Button
PIN code
Шаг 2: Начальная настройка
Когда появится экран, приведенный выше, выберите
и задайте один из трех методов аутентификации: “Enter
Password”, “Push Button” и “PIN code”. Ниже приведены
подробности, как использовать каждый из методов.
Ввод пароля — Enter Password: Введите пароль точки
доступа, чтобы установить соединение.
Выберите “Enter Password” с помощью кнопок курсора
и нажмите кнопку ENTER.
Введите пароль (*) на экране с клавитурой, выберите
“OK” с помощью кнопок курсора и нажмите кнопку
ENTER.
• В некоторых случаях, экра н с кла витурой в ывод ится на дисплей
автоматически вмес то окна аутентификации — в зависимости
от устройс тва, являющегося точкой доступа.
*Для пе рек лючения регис тра символ ов, выберите “Shift” и нажмите
кнопку ENTER.
Выберите “Left” или “Right” и нажмите кнопку ENTER
для передвижения курсора в выбранном направлении.
Выберите “BS” (забой) и нажмите кнопку ENTER для сти‑
рания слева от курсора. Для выбора скрытия пароля
символами “*” или вывода его обычным текстом, нажмите
кнопку D на пульте. Нажмите кнопку + 10 на пульте
для активирования функции “Shift“ или кнопку CLR, что‑
бы стереть все введенные символы.
Если метод защиты данных для подсоединяемой
точки доступа — это WEP, то выберите “Default Key ID“,
затем выберите “OK“ и нажмите кнопку ENTER.
Нажатием кнопки — Push Button: Используйте кнопку
авто настройки точки доступа, чтобы установить соеди‑
нение.
Выберите “Push Button“ с помощью кнопок курсора
и нажмите кнопку ENTER.
Нажмите и удержите кнопку авто настройки точки
доступа на необходимое количество секунд, затем
выберите “OK“ с помощью кнопок курсора и нажмите
кнопку ENTER.
PIN код: Выберите этот метод, когда кнопка авто
настройки точки доступа вам недоступна. Выберите
“PIN code“ с помощью кнопок курсора и нажмите кнопку
ENTER для вывода на экран 8‑разрядного PIN кода.
Зарегистрируйте показанный на экране PIN код в точ‑
ке доступа, выберите “OK” с помощью кнопок курсора
и нажмите кнопку ENTER. Как зарегистрировать PIN код
в точке доступа, смотрите в Инструкции на устройство.
Ru-13
Page 14

Подсоединения Начальная настройка Воспроизведение
Step 2: Initial Setup
When the access point is not displayed
Select "Other..." with the
c
cursor on the remote
controller and press ENTER to display the keyboard
screen. Input the SSID and password. Make the
following settings according to the router setting.
WPA/WPA2 method
Select "WPA" or "WPA2" in "Security Method",
select "OK" and press ENTER.
WEP method
Select "WEP" in "Security Method" and select
"Default Key ID". Then select "OK" and press
ENTER.
● If encryption setting has not been made on the
wireless LAN router, select "None" in "Security
Method", select "OK" and press ENTER.
If you selected "Use iOS Device (iOS7 or
later)"
2� On the iOS device, go to "Settings"-"Wi-Fi" and turn
on the setting, then select this unit in "SETUP NEW
AIRPLAY SPEAKER"�
3� Tap "Next"�
When connection is successful
"Successfully Connected" is displayed on the screen.
To improve our products and services of Onkyo Corporation,
Onkyo may collect information about your receiver usage.
To know more about what type of information we collect and
how we use it please review Onkyo’s Privacy Policy at
http://www.onkyo.com/privacy/
I have read Onkyo’s Privacy Policy and agree to its terms.
Yes
No
ONKYO PRIVACY STATEMENT
Terminating initial setup
After finishing the initial setup, keep "Finished" selected
and press ENTER on the remote controller. Connection and
setting of the unit is now complete.
Audio output of connected players
To enjoy digital surround sound including Dolby Digital and
DTS, audio output should be set to "Bitstream output" on the
connected Blu-ray Disc Player or other device.
Depending on the settings on the Blu-ray Disc Player, there
may be cases when Dolby TrueHD, Dolby Atmos, and DTS-
HD Master Audio is not output according to the format of the
source.
In this case, in the Blu-ray Disc Player settings try setting "BD
video supplementary sound" (or secondary sound) to "Off".
Change the listening mode after changing the setting to
confirm.
Step 2: Initial Setup
Audio output of connected players
To enjoy digital surround sound including Dolby Digital and
DTS, audio output should be set to "Bitstream output" on the
connected Blu-ray Disc Player or other device.
Depending on the settings on the Blu-ray Disc Player, there
may be cases when Dolby TrueHD, Dolby Atmos, and DTS-
HD Master Audio is not output according to the format of the
source.
In this case, in the Blu-ray Disc Player settings try setting "BD
Шаг 2: Начальная настройка
Когда точка доступа не появляется
Выберите “Other…“ кнопкой ► на пульте и нажмите
кнопку ENTER для вывода клавиатуры на экран. Вве‑
дите SSID и пароль. Сделайте следующие установки
в соответствии с настройками роутера.
■ WPA / WPA2 метод защиты
Выберите “WPA“ или “WPA2“ в меню “Security method“,
затем выберите “OK“ и нажмите кнопку ENTER.
■ WEP метод защиты
Выберите “WEP“ в “Security method“, и затем выбери‑
те “Default Key ID“. Потом выберите “OK“ и нажмите
кнопку ENTER.
● Если установки шифрования не были заданы
для беспроводного LAN роутера, выберите “None“
в меню “Security method“, затем выберите “OK“
и нажмите кнопку ENTER.
■ Если вы выбрали “Use iOS Device (iOS7 или новее)“
2. На iOS устройстве зайдите в меню “Settings““Wi-Fi“ и включите режим настройки, затем выберите этот ресивер в меню “SETUP NEW AIRPLAY
SPEAKER“.
3. Коснитесь иконки “Next“.
■ Когда соединение успешно установлено.
Когда соединение успешно установлено, на экране появ‑
ляется сообщение “Successfully Connected“.
Если же это сообщение не появляется, попробуйте
повторить настройку еще раз. Если соединение с помо‑
Network Connection
MAC Address xxxxxxxxxxx
IP Address, Subnet Mask, Gateway, DNS Server
Gateway Ping
Internet Service Test
Successfully connected.
Next
SETUP
Exit
щью кнопки “Push Button“ не работает, попробуйте “Enter
Password“.
● После завершения соединения появляется экран под‑
тверждения спрашивающий вашего согласия с поли‑
тикой конфиденциальности. Выберите “Yes“ и нажмите
кнопку ENTER для подтверждения вашего согласия.
Ru-14
ONKYO PRIVACY STATEMENT
To improve our products and services of Onkyo Corporation,
Onkyo may collect information about your receiver usage.
To know more about what type of information we collect and
how we use it please review Onkyo’s Privacy Policy at
http://www.onkyo.com/privacy/
I have read Onkyo’s Privacy Policy and agree to its terms.
Yes
No
■ Завершение первоначальной настройки
После завершения первоначальной настройки оставьте
выбранным пункт “Finished“ и нажмите кнопку ENTER
на пульте. Соединение и настройки теперь завершены.
Аудио выход подсоединенных плееров
Для прослушивания цифрового окружающего звука, в том
числе в форматах Dolby Digital и DTS, аудио выход дол‑
жен быть задан как “Bitstream output“ на подсоединенных
плеерах Blu‑ray дисков и других устройствах.
В зависимости от настроек Blu‑ray плеера, может оказать‑
ся, что звук в форматах Dolby TrueHD, Dolby Atmos, и DTS
HD Master Audio не выдается в соответствии с форматом
источника.
В таких случаях попробуйте в настройках Blu‑ray плеера
задать “BD video supplementary sound“ (или вторичный
звук) как “Off“.
Смените режим прослушивания после смены установок,
чтобы подтвердить изменения.
Page 15

Подсоединения Начальная настройка Воспроизведение
Part names and functions of the remote
controller
1
8
9
F
I
H
G
2
3
4
5
6
7
J
1 z RECEIVER button: Turns the unit on or into standby
mode.
2 REMOTE MODE/INPUT SELECTOR buttons: Switch
the input to be played. Furthermore, by registering a
particular remote control code to a button, you can
switch the remote control mode to operate other
equipment by pressing that button.
3 RECEIVER button: Switches the remote controller to
the mode for operating this unit.
4 Cursor buttons and ENTER button: Move the cursor
and confirms the selection.
5 SETUP button: Displays the screen for making various
settings for this unit.
6 Listening mode buttons: Allow you to select the
listening mode.
MOVIE/TV button: You can select a listening mode
suitable for movies and TV programs.
MUSIC button: You can select a listening mode suitable
for music.
GAME button: You can select a listening mode suitable
for games.
STEREO button: You can select a listening mode for
stereo and all channel stereo sources.
● For details on the listening modes, see the Advanced
Manual.
7 DIMMER button: Switches the brightness of the display.
8 ZONE2 button: For use when the unit is connected with
a pre-main amplifier or speakers in a separate room and
sound is played there.
9 MUSIC OPT button: Turns on/off the MUSIC
OPTIMIZER function that improves the quality of the
compressed audio.
F MUTING button: Temporarily mutes audio. Press again
to cancel muting.
G VOLUME buttons: Allow you to adjust the volume. This
button also cancels the muting.
H RETURN button: Returns the display to the previous
state.
I Q button: Displays the Quick Setup menu that allows
you to quickly access the frequently used setting items
including sound quality adjustment.
J DISPLAY button: Switches the information on the
display.
Шаг 3: Воспроизведение
1 Основные операции
Чтобы управлять ресивером с пульта: ваш
пульт может оказаться в режиме, который позволяет
управлять другими устройствами. В этом состоянии
вы не сможете управлять своим ресивером. Всегда
сначала нажимайте сначала кнопку RECEIVER что‑
бы вернуть пульт в режим RECEIVER для управления
вашим ресивером.
1. Включение питания.
Нажмите кнопку RECEIVER на пульте для вк люче‑
ния питания.
● Переключите вход TV на тот, на который назначен AV
ресивер. Для этого используйте пульт телевизора.
2. Выберите вход AV ресивера и запустите воспроизведение на плеере или TV.
● Нажмите кнопку
назначен желаемый плеер. Нажмите кнопк у TV
для воспроизведения звука с телевизора. Вы можете
также использовать кнопки селектора входов на па‑
нели AV ресивера.
● Вход будет выбран автоматически, если TV или пле‑
ер совместим с стандартом CEC и подсоединен
к ресиверу с помощью HDMI кабеля.
3. Выберите желаемый режим прослушивания.
После нажатия на кнопку
режимов прослушивания, чтобы выбрать нужный
вам из всех режимов. За более подробной информа‑
цией о режимах прослушивания обращайтесь в раздел
“Listening modes”.
4. Отрегулируйте громкость с помощью кнопки-ка-
чалки VOL
INPUT SELECTOR, на которую
RECEIVER нажимайте кнопку
.
Названия кнопок пульта ДУ и их функции
Кнопка ON / OFF RECEIVER: включает AV ресивер
и переводит его в режим standby.
Кнопки REMOTE MODE / INPUT SELECTOR выбирают
вход для воспроизведения. Кроме того, зарегистриро‑
вав какой‑нибудь код команды пульта на эту кнопку, вы
сможете переключать режимы пульта, чтобы управ‑
лять другим оборудованием при нажатии этой кнопки.
*Кнопка PHONO для этого ресивера не может б ыть ис пользована
Кнопка RECEIVER: переключает пульт в режим управ‑
ления AV ресивером.
Кнопки со стрелками курсора и ENTER двигают
курсор и подтверждают выбор.
Кнопка SETUP: выводит на экран меню настроек и по‑
зволяет выбирать различные установки для ресивера.
Кнопки LISTENING MODE позволяют выбирать режим
прослушивания.
MOVIE / TV: Выбирает режим прослушивания, предна‑
значенный для просмотра кино и ТВ передач.
MUSIC: Выбирает режим прослушивания, предназна‑
ченный для музыки.
GAME: Выбирает режим прослушивания, предназна‑
ченный для видео игр.
STEREO: Выбирает режимы прослушивания Stereo
или All Channel Stereo.
За более подробной информацией о режимах прослу‑
шивания обращайтесь в Расширенную Инструкцию
Кнопка DIMMER изменяет яркость дисплея.
Кнопка ZONE2: для использования, когда к ресиверу
подсоединен предусилитель или АС в отдельной ком‑
нате и звук воспроизводится там.
Кнопка MUSIC OPT: включает / выключает функцию
MUSIC OPTIMIZER для улучшения качества звучания
сжатых файлов
Кнопка MUTING приглушает временно звук. Нажмите
еще раз для отмены приглушения.
Кнопки VOLUME: регулировка громкости. Эти кнопки
отменяют приглушение звука.
Кнопка RETURN: возвращает дисплей на предыдущий
уровень
Кнопка Q: выводит меню Quick Setup, позволяющее
настраивать часто используемые функции, вк лючая
выбор входов и регулировку громкости.
Кнопка DISPLAY: переключает информацию на дис‑
плее.
Ru-15
Page 16

Подсоединения Начальная настройка Воспроизведение
Step 3: Playing Back
2 Network Functions
You can enjoy sources such as Internet radio by connecting
the unit to a network. For details on the operation, see the
Advanced Manual.
● The on-screen displays are not displayed when the
OSD language is set to Chinese. Operate by confirming
the display on the main unit. (European, Australian,
Taiwanese and Asian models)
● This unit needs to be connected to the same router as a
computer or NAS device.
Home media
You can play music files in a shared folder on the computer
or NAS device connected to the network. Select the server
with the cursors, select the desired music file and press
ENTER to start playback.
● This unit needs to be connected to the same router as a
computer or NAS device.
USB
Connect the USB storage device to the USB port on the
rear of the unit, select the desired folder or music file
with the cursors, and press ENTER to confirm and start
playback.
swipe from the bottom of the screen of the iOS device.
● If the AirPlay icon is not displayed, confirm that this unit
and the iOS device are both connected to the router
correctly.
3� Play music files from an iPhone, iPod touch, or iPad�
Playing music files from a computer
● AirPlay is compatible with iTunes 10.2 or later.
1� Press NET on the remote controller�
2� Turn on your computer and start iTunes�
3� Click the AirPlay icon of iTunes and select this unit
from the list of devices displayed�
4� Play iTunes music files�
Step 3: Playing Back
2 Network Functions
You can enjoy sources such as Internet radio by connecting
the unit to a network. For details on the operation, see the
Advanced Manual.
● The on-screen displays are not displayed when the
OSD language is set to Chinese. Operate by confirming
the display on the main unit. (European, Australian,
Taiwanese and Asian models)
Press NET on the remote controller to display the NET
TOP screen on the TV. Select the item with the cursors of
the remote controller and press ENTER to confirm your
selection.
¼ To return to the previous screen, press RETURN.
¼ Available services may vary depending on your area of residence.
● This unit needs to be connected to the same router as a
computer or NAS device.
Home media
You can play music files in a shared folder on the computer
or NAS device connected to the network. Select the server
with the cursors, select the desired music file and press
ENTER to start playback.
● This unit needs to be connected to the same router as a
computer or NAS device.
USB
Connect the USB storage device to the USB port on the
rear of the unit, select the desired folder or music file
with the cursors, and press ENTER to confirm and start
playback.
3 AirPlay
®
You can wirelessly enjoy music files stored on an iPhone®,
iPod touch®, or iPad®. You can also play back music files
on the computer with iTunes.
Important: This unit needs to be connected to the network
through the same router as the iOS terminal or PC.
Playing music files from an iPhone, iPod
touch, or iPad
Update the OS version on your iOS device to the latest
version before connecting it to this unit.
1� Press NET on the remote controller�
2� Tap the AirPlay icon, select this unit from the list of
devices displayed, and click "Done"�
swipe from the bottom of the screen of the iOS device.
● If the AirPlay icon is not displayed, confirm that this unit
and the iOS device are both connected to the router
correctly.
3� Play music files from an iPhone, iPod touch, or iPad�
Playing music files from a computer
● AirPlay is compatible with iTunes 10.2 or later.
1� Press NET on the remote controller�
2� Turn on your computer and start iTunes�
3� Click the AirPlay icon of iTunes and select this unit
from the list of devices displayed�
4� Play iTunes music files�
● If "6. Hardware"-"Power Management"-"Network
Standby" is set to on in the Setup menu, then once
AirPlay starts, this unit turns on automatically and the
"NET" input source is selected. Even if this setting
is "Off", if the unit is already on then the "NET" input
source can be selected.
● Due to the characteristics of AirPlay wireless technology,
the sound produced on this unit may slightly be behind
the sound played on the AirPlay-enabled device.
● Information such as the name of the track is displayed
on the unit's display during AirPlay playback.
● There may be some differences in how operations are
performed depending on the iOS or iTunes version.
● The on-screen displays are not displayed when the
OSD language is set to Chinese. Operate by confirming
the display on the main unit. (European, Australian,
Taiwanese and Asian models)
Step 3: Playing Back
● This unit needs to be connected to the same router as a
computer or NAS device.
Home media
You can play music files in a shared folder on the computer
or NAS device connected to the network. Select the server
with the cursors, select the desired music file and press
ENTER to start playback.
● This unit needs to be connected to the same router as a
computer or NAS device.
USB
Connect the USB storage device to the USB port on the
rear of the unit, select the desired folder or music file
with the cursors, and press ENTER to confirm and start
playback.
3 AirPlay
®
You can wirelessly enjoy music files stored on an iPhone®,
iPod touch®, or iPad®. You can also play back music files
on the computer with iTunes.
Important: This unit needs to be connected to the network
through the same router as the iOS terminal or PC.
Playing music files from an iPhone, iPod
touch, or iPad
Update the OS version on your iOS device to the latest
version before connecting it to this unit.
1� Press NET on the remote controller�
2� Tap the AirPlay icon, select this unit from the list of
devices displayed, and click "Done"�
swipe from the bottom of the screen of the iOS device.
● If the AirPlay icon is not displayed, confirm that this unit
and the iOS device are both connected to the router
correctly.
3� Play music files from an iPhone, iPod touch, or iPad�
Playing music files from a computer
● AirPlay is compatible with iTunes 10.2 or later.
1� Press NET on the remote controller�
2� Turn on your computer and start iTunes�
3� Click the AirPlay icon of iTunes and select this unit
from the list of devices displayed�
4� Play iTunes music files�
● If "6. Hardware"-"Power Management"-"Network
Standby" is set to on in the Setup menu, then once
AirPlay starts, this unit turns on automatically and the
"NET" input source is selected. Even if this setting
is "Off", if the unit is already on then the "NET" input
source can be selected.
● Due to the characteristics of AirPlay wireless technology,
the sound produced on this unit may slightly be behind
the sound played on the AirPlay-enabled device.
● Information such as the name of the track is displayed
on the unit's display during AirPlay playback.
● There may be some differences in how operations are
performed depending on the iOS or iTunes version.
● The on-screen displays are not displayed when the
OSD language is set to Chinese. Operate by confirming
the display on the main unit. (European, Australian,
Taiwanese and Asian models)
Volume: The volume of this unit and the AirPlay-
enabled device are linked. Take care that the
volume does not become too loud when you adjust
the volume on the AirPlay-enabled device. You may
damage the unit or the speakers. Stop play on the
AirPlay-enabled device immediately if the volume
becomes too loud at any point.
● Ресивер должен быть подключен к тому же самому
2 Сетевые функции
Вы можете прослушивать такие источники как интер‑
нет‑радио, подсоединив ресивер к сети. За подробностя‑
ми обращайтесь к Расширенной Инструкции — Advanced
Manual.
● Экранные меню не выводятся, когда язык OSD задан
как Chinese. Управляйте ресивером с помощью
дисплея на его передней панели. (Европейские,
австралийские, тайваньские и азиатские модели).
Нажмите кнопку NET на пульте для вывода меню NET TOP
на телевизоре. Выберите пункт с помощью кнопок курсора
на пульте и нажмите ENTER для подтверждения выбора.
*Для во зврата в пре дыдущее меню нажмите RETURN.
*Дост упные сервисы з ависят от вашего региона.
Network
TuneIn
Pandora
Spotify
SiriusXM Internet Radio
Slacker Personal Radio
Deezer
AUPEO! PERSONAL RADIO
AirPlay
сы: Ресивер поступает с заранее подготовленными
интернет‑радио сервисами (*). Вы можете слушать
TuneIn или другие подобные интернет‑радиостанции,
зарегистрированные заранее. После выбора желаемого
сервиса следуйте указанаиям на экране и с помощью
кнопок курсора на пульте выберите на экране телеви‑
зора желаемый сервис или музыкальный файл, а затем
нажмите ENTER для запуска воспроизведения.
хранящиеся на PC или NAS устройстве, подключенном
к сети. С помощью кнопок курсора на пульте выберите
сначала сервер, затем желаемый музыкальный файл
и нажмите ENTER для запуска воспроизведения.
Internet radio services — интернет‑радио серви‑
DLNA: Вы можете проигрывать музыкальные файлы,
Ru-16
роутеру, что и PC или NAS устройство.
Home Media: Вы можете проигрывать музыкальные
файлы, хранящиеся в разделяемой папке на PC или NAS
устройстве, подключенном к сети.
С помощью кнопок курсора выберите сначала сервер,
затем желаемый музыкальный файл и нажмите ENTER
для запуска воспроизведения.
● Ресивер должен быть подключен к тому же самому
роутеру, что и PC или NAS устройство.
USB: Подключите USB накопитель к USB порту
на задней панели ресивера, чтобы можно было вос‑
производить с него файлы. Выберите желаемую папку
или музыкальный файл с помощью кнопок курсора, затем
нажмите ENTER для запуска воспроизведения.
3 AirPlay
Вы можете без проводов слушать музыкальные файлы,
хранящиеся в iPhone®, iPod touch®, или iPad®. Вы можете
также проигрывать музыкальные файлы, хранящиеся
на компьютере с помощью iTunes.
Важно: Ресивер должен быть подключен к сети через
тот же самый роутер, что и iOS устройство или компью‑
тер PC.
■ Воспроизведение музыкальных файлов с iPhone,
iPod touch, или iPad
Обновите версию OS на вашем iOS устройстве до самой
новой, преж де чем подсоединять его к этому ресиверу.
1. Нажмите кнопку NET на пульте ДУ.
2. Коснитесь иконки AirPlay, выберите этот ресивер
из списка устройств на дисплее и кликните “Done”.
● Иконка AirPlay будет выведена на дисплей в центре
управления, если вы используете iOS 7 или новее.
Для вывода на дисплей центра управления, проведи‑
те пальцем снизу вверх по экрану iOS устройства.
Шаг 3: Воспроизведение
● Если иконка AirPlay не появилась на дисплее, убе‑
дитесь, что ресивер и iOS устройство подк лючены
к сети через роутер правильно.
3. Воспроизводите музыкальные файлы с iPhone,
iPod touch, или iPad.
■ Воспроизведение музыкальных файлов с компью-
тера
● Технология AirPlay совместима с iTunes 10.2 или новее.
1. Нажмите кнопку NET на пульте ДУ.
2. Включите ваш компьютер и запустите iTunes.
3. Кликните иконку AirPlay в iTunes и выберите этот
ресивер из списка устройств на дисплее.
4. Воспроизводите музыкальные файлы с помощью
iTu nes.
● Если режим “6. Hardware”‑“Power Management”‑
“Network Standby” активирован в меню Setup, тогда
как только AirPlay запустится, этот ресивер автома‑
тически включится и входной источник “NET” будет
выбран. Даже если эта установка в положении “Off”,
но если ресивер уже включен, тогда входной источ‑
ник “NET” также может быть выбран.
● Ввиду свойств беспроводной технологии AirPlay,
звук, выдаваемый ресивером, может слегка отста‑
вать от звука, воспроизводимого AirPlay‑ оснащен‑
ным устройством.
● Такая информация, как название трека, отобража‑
ется на дисплее ресивера в ходе воспроизведения
по AirPlay.
● Возможны некоторые отличия в работе в зависимо‑
сти от версий iOS или iTunes.
● Экранные меню не выводятся, когда язык OSD задан
как Chinese. Управляйте ресивером с помощью
дисплея на его передней панели. (Европейские,
австралийские, тайваньские и азиатские модели).
Volume – Громкость: Громкость ресивера
и AirPlay‑оснащенного устройства связаны между
собой. Будьте осторожны, чтобы звук не стал слишком
громким, когда вы регулируете уровень на AirPlay‑ос‑
нащенном устройстве. Иначе можно повредить
ресивер или колонки. Немедленно прекратите воспро‑
изведение на AirPlay‑оснащенном устройстве, если
громкость стала слишком большой в любой момент.
Page 17

Подсоединения Начальная настройка Воспроизведение
Step 3: Playing Back
4 Bluetooth
®
You can wirelessly enjoy music files stored in a smartphone
or other Bluetooth-enabled device. The coverage area is 48
feet (15 meters).
● The Bluetooth-enabled device needs to support the
A2DP profile.
● Note that connection is not always guaranteed with all
Bluetooth-enabled devices.
Pairing
Pairing is necessary when connecting the Bluetooth-
enabled device for the first time. Before starting the
procedure, learn how to enable the Bluetooth setting
function and to connect with other devices on the
Bluetooth-enabled device.
1� Press BLUETOOTH on the remote controller�
The unit begins pairing and "Now Pairing..." is displayed.
function takes some time to start up.
● If the volume setting on the Bluetooth-enabled device is
low, the sound will not be output from this unit.
● Due to the characteristics of Bluetooth wireless
technology, the sound produced on this unit may slightly
be behind the sound played on the Bluetooth-enabled
device.
● The on-screen displays are not displayed when the
OSD language is set to Chinese. Operate by confirming
the display on the main unit. (European, Australian,
Taiwanese and Asian models)
5 AM/FM Radio
The Basic Manual explains the method using automatic
tuning. For manual tuning, see the Advanced Manual.
1� Press TUNER on the main unit several times to
select either "AM" or "FM"�
2� Press TUNING MODE on the unit, so that the
"AUTO" indicator on the display lights�
3� Press
l
TUNINGj on the unit�
The automatic tuning to a radio station starts. Searching
stops when one is tuned. When tuned into a radio
When registered, the preset number stops flashing.
To select a preset radio station, press
d
PRESETc
on the main unit or CH +/− on the remote controller.
● To delete a preset station, after selecting the preset
number you want to delete with
d
PRESETc on the
main unit, press TUNING MODE while holding down
MEMORY on the main unit. When the preset number is
deleted, it disappears from the display.
AM/FM frequency step setting
It may be necessary for you to change the
frequency step to tune the radio in your area.
Change the step with the following procedure. Note
that when this setting is changed, all radio presets
are deleted.
1 After pressing
RECEIVER on the remote
controller, press SETUP.
2. Use the cursor buttons to select "6. Hardware"
and press ENTER.
3. Select "Tuner" with the cursor and press ENTER.
4. Select "AM / FM Frequency Step" (North
American and Taiwanese models) or "AM
Frequency Step" (European, Australian and
Asian models) with the cursor and select the
frequency step for your area.
(For Taiwanese models only)
The setting is "10 kHz / 0.2 MHz" at the time
Step 3: Playing Back
function takes some time to start up.
● If the volume setting on the Bluetooth-enabled device is
low, the sound will not be output from this unit.
● Due to the characteristics of Bluetooth wireless
technology, the sound produced on this unit may slightly
be behind the sound played on the Bluetooth-enabled
device.
● The on-screen displays are not displayed when the
OSD language is set to Chinese. Operate by confirming
the display on the main unit. (European, Australian,
Taiwanese and Asian models)
5 AM/FM Radio
The Basic Manual explains the method using automatic
tuning. For manual tuning, see the Advanced Manual.
1� Press TUNER on the main unit several times to
select either "AM" or "FM"�
2� Press TUNING MODE on the unit, so that the
"AUTO" indicator on the display lights�
3� Press
l
TUNINGj on the unit�
The automatic tuning to a radio station starts. Searching
stops when one is tuned. When tuned into a radio
station, the "cTUNEDd" indicator on the display lights.
The "FM STEREO" indicator lights if the radio station is
an FM radio station.
TUNED
FM STEREO
When registered, the preset number stops flashing.
To select a preset radio station, press
d
PRESETc
on the main unit or CH +/− on the remote controller.
● To delete a preset station, after selecting the preset
number you want to delete with
d
PRESETc on the
main unit, press TUNING MODE while holding down
MEMORY on the main unit. When the preset number is
deleted, it disappears from the display.
AM/FM frequency step setting
It may be necessary for you to change the
frequency step to tune the radio in your area.
Change the step with the following procedure. Note
that when this setting is changed, all radio presets
are deleted.
1 After pressing
RECEIVER on the remote
controller, press SETUP.
2. Use the cursor buttons to select "6. Hardware"
and press ENTER.
3. Select "Tuner" with the cursor and press ENTER.
4. Select "AM / FM Frequency Step" (North
American and Taiwanese models) or "AM
Frequency Step" (European, Australian and
Asian models) with the cursor and select the
frequency step for your area.
(For Taiwanese models only)
The setting is "10 kHz / 0.2 MHz" at the time
of purchase. Please change it to "9 kHz /
0.05 MHz".
переключается на BLUETOOTH. Воспроизводите музыку
Воспроизведение с Bluetooth
3
совместимых устройств
Вы можете без проводов слушать музыкальные файлы,
хранящиеся в смартфоне или другом Bluetooth‑совмести‑
мом устройстве. Соединение действует на расстоянии
до 15 метров.
● Bluetooth‑совместимое устройство должно поддер‑
живать протокол A2DP.
● Имейте в виду, что соединение не гарантируется
всегда и для всех Bluetooth‑совместимых устройств.
■ Сопряжение AV ресивера с Bluetooth-совместимым
устройством — Pairing
Сопряжение (или как говорят иногда — спаривание)
необходимо при первоначальном использовании
Bluetooth‑совместимых устройств. Перед тем, как начать
процедуру, узнайте как активировать функцию уста‑
новки Bluetooth и как соединиться с другими устрой‑
ствами для вашего Bluetooth‑совместимого устройства.
Understanding Icons on the Display
1 Нажмите кнопку Bluetooth-на пульте
AV ресивер войдет в режим сопряжения и на дисплее
появится сообщение “Now Pairing…”.
2 Пока на дисплее выведено сообщение “Now
Pairing…”, завершите соединение на Bluetooth-совместимом устройстве, которое находится поблизости, в течение 1 минуты.
Если название AV ресивера появится на дисплее
Bluetooth‑совместимого устройства, выберите его. Через
некоторое время процедура сопряжения завершится.
● Если требуется пароль, введите “0000”.
● Когда вы налаживаете связь с любым другим
Bluetooth‑совместимым устройством, начинай‑
те сопряжение нажатием и удержанием кнопки
BLUETOOTH до тех пор, пока на дисплее не появится
сообщение “Now Pairing…”. Этот AV ресивер может
сохранить данные о 8 сопряженных устройствах.
■ Воспроизведение музыки на Bluetooth-совместимом устройстве.
Если AV ресивер включен и связь с Bluetooth‑совмести‑
мым устройством установлена, его вход автоматически
в этом состоянии.
За более подробной информацией об использовании
пульта для этих операций обращайтесь в расширенную
Инструкцию — Advanced Manual.
● Если на Bluetooth‑совместимом устройстве выбра‑
на слишком малая громкость, звука на выходе AV
ресивера может не быть даже после успешного
сопряжения.
● Из‑за свойств беспроводной технологии Bluetooth,
звук, воспроизводимый AV ресивером может слегка
запаздывать по сравнению со звуком, выдаваемым
Bluetooth‑совместимым устройством.
● Экранное меню не выводится, когда язык OSD задан
как Chinese. Управляйте, ориентируясь на индика‑
цию дисплея на самом ресивере. (для европейских,
австралийских, тайваньских и азиатских моделей).
5 Прослушивание АМ / FM радио
В этом кратком руководстве описывается метод автона‑
стройки на радиостанции. За более подробной инфор‑
мацией о ручной настройке на АМ / FM радиостанции
обращайтесь в Расширенную Инструкцию — Advanced
Manual.
1 Нажмите несколько раз кнопку TUNER на пульте
для выбора “АМ” или “FM”.
2 Нажмите кнопку TUN MODE на ресивере, так чтобы
на дисплее появился индикатор “AUTO”.
3 Нажмите кнопку курсора TUNING
Запустится автоматический поиск станций. Когда стан‑
ция найдена, поиск останавливается. При настройке
на радиостанцию, появляется индикатор TUNED. При на‑
стройке на стереофоническую радиостанцию, загорается
индикатор “FM STEREO”.
Кроме того, вы можете нажимать на кнопки TUNING
на самом ресивере.
Регистрация радиостанций: Вы можете сохранить
в памяти до 40 ваших любимых АМ и FM радиостанций,
в общей сложности.
1 Настройтесь на радиостанцию АМ / FM, которую вы
хотите зарегистрировать.
AUTO
Actual display varies
Реальный вид отображения
depending on the country
зави сит от с тран ы.
or the region
/ .
Шаг 3: Воспроизведение
2 Нажмите на кнопку MEMORY на пульте, чтобы начал
вспыхивать номер предварительной настройки (пресета).
3 Пока вспыхивает номер пресета (около 8 секунд), ис‑
пользуйте кнопки CH + / — для выбора ячейки предва‑
рительной настройки в диапазоне от 1 до 40.
Кроме того, вы можете нажимать на кнопки PRESET
на самом ресивере.
4 Нажмите кнопку MEMORY на ресивере еще раз для ре‑
гистрации станции.
Когда станция зарегистрирована, номер пресета прекра‑
щает мигать.
Повторите эту процедуру для всех ваших любимых
АМ / FM радиостанций. Для выбора пресета используйте
кнопки PRESET / на ресивере, либо кнопку CH + /‑
на пульте ДУ.
● Для удаление предварительных настроек выбери‑
те пресет, который вы хотите удалить, и нажмите
на кнопку MEMORY, затем пока номер пресетат
мигает на дисплее, нажмите на кнопку CLR на пуль‑
те. Данная предварительная настройка удалена, и ее
номер исчезает с дисплея.
Задание шага настройки в FM / АМ диапазоне
Возможно вам понадобится сменить шаг настройки в FM / АМ
диапазоне для вашего региона. Выполните для этого следую‑
щую процедуру. Имейте в виду, что при смене шага настройки
будут с терты и все настройки на радиостанции (пресеты).
1 После нажатия на кнопку RECEIVER на пульте, нажимайте
кнопку SETUP.
2. Выберите “5. Hardware” с помощью кнопок к урсора и на жми‑
те ENTER.
3. Выберите “ Tuner” с помощью кнопок курсора и нажмите
ENTER.
4. Выберите “AM / FM Frequency Step” (североамериканские
и тайваньские модели) или “AM Frequency Step” (европейские,
австралийские и азиатск ие модели) с помощью кнопок курсо ‑
ра и выберите шаг настройки для вашего региона.
(только для тайваньских моделей) В момент покупки шаг
задан как “10 kHz / 0.2 MHz”. Измените его на “9 kHz / 0.05 MHz”.
Ru-17
Page 18

Подсоединения Начальная настройка Воспроизведение
Step 3: Playing Back
6 Multi-zone
You can listen to audio in a room (called Zone 2) other than
the one where this unit is located (called the main room).
Sources you can playback
● External players (1)
● NET (2)
● Bluetooth
● AM/FM Radio
1 Only analog and 2ch PCM audio signals can be output to Zone 2.
2 DSD and Dolby TrueHD audio signals cannot be output to Zone 2.
Important: Connection with external players
To listen to a player in Zone 2, you must connect using an
RCA cable, a digital optical cable (OPTICAL), or a digital
coaxial cable (COAXIAL). Some players may require audio
output setting.
Making Multi-zone Connection
There are the following two methods of connection:
a. Connecting with a pre-main amplifier in a separate room
b. Connecting with speakers in a separate room
a� Connecting with a pre-main amplifier in a
separate room
It is possible to play 2 ch source in a separate room while
7.1 ch source is being played in the main room.
Connect the LINE OUT ZONE2 jacks of the unit and the
line-in jacks of the pre-main amplifier in a separate room
with an RCA cable.
Main room
Zone 2
● The volume should be adjusted with the pre-main
amplifier used in the separate room.
b� Connecting with speakers in a separate
room
Connect the speakers in another room to the SPEAKERS
ZONE2 jacks of the unit using speaker cables. Note that
5.1 ch will be the maximum () in the main room during
Zone 2 playback. No sound will be output from the back
speakers and height speakers.
¼ In this case, the Dolby Atmos listening mode cannot be selected.
Main room
Zone 2
These settings are required: After connecting the
speakers, press
RECEIVER and then SETUP
on the remote controller, select "2. Speaker" -
"Configuration" and set "Powered Zone2" to "Yes".
● Adjust the volume on this unit. To adjust the
volume, press ZONE2 on the remote controller
and then adjust with VOLj/l. To control on the
main unit, press ZONE 2 and within 8 seconds,
adjust with the MASTER VOLUME control. You
can mute the sound by pressing MUTING on the
remote controller.
Step 3: Playing Back
Making Multi-zone Connection
There are the following two methods of connection:
a. Connecting with a pre-main amplifier in a separate room
b. Connecting with speakers in a separate room
a� Connecting with a pre-main amplifier in a
separate room
It is possible to play 2 ch source in a separate room while
7.1 ch source is being played in the main room.
Connect the LINE OUT ZONE2 jacks of the unit and the
line-in jacks of the pre-main amplifier in a separate room
with an RCA cable.
b� Connecting with speakers in a separate
room
Connect the speakers in another room to the SPEAKERS
ZONE2 jacks of the unit using speaker cables. Note that
5.1 ch will be the maximum () in the main room during
Zone 2 playback. No sound will be output from the back
speakers and height speakers.
¼ In this case, the Dolby Atmos listening mode cannot be selected.
Main room
Zone 2
These settings are required: After connecting the
speakers, press
RECEIVER and then SETUP
on the remote controller, select "2. Speaker" -
"Configuration" and set "Powered Zone2" to "Yes".
● Adjust the volume on this unit. To adjust the
Step 3: Playing Back
b� Connecting with speakers in a separate
room
Connect the speakers in another room to the SPEAKERS
ZONE2 jacks of the unit using speaker cables. Note that
5.1 ch will be the maximum () in the main room during
Zone 2 playback. No sound will be output from the back
speakers and height speakers.
¼ In this case, the Dolby Atmos listening mode cannot be selected.
Подключение устройств в Multi-zone
6 Использование функции Multi-zone
Вы можете слушать аудио во второй комнате (называе‑
мой Zone 2). При этом можно слушать звук от различных
аналоговых устройств в главной (где установлен реси‑
вер) и во второй комнате.
■ Источники, которые можно прослушивать
● Внешние плееры (*1)
● NET (*2)
● BLUETOOTH
● AM / FM радиостанции
*1 Только аналоговые или 2‑к анальные PCM аудио сигн алы могу т
быть выданы на Zone 2.
*2 Аудио с игналы DSD и Dolby TrueHD н е мог ут быть выд аны
на Zone 2.
Важно: Соединение с внешним плеером
Длы выдачи аудио с плеера, как источника для Zone 2,
необходимо подсоединить выходные аналоговые RCA
аудио разъемы плеера, или цифровой оптический выход
(OPTICAL), или коаксиальный (COAXIAL). На некоторых
плеерах, возможно, необходимо ак тивировать нужный
аудио выход.
DIGITAL
OPTICAL
OUT
Ru-18
AUDIO
OUT
Возможны два метода соединения:
a. Соединение c усилителем в другой комнате.
b. Соединение c акустическими системами в другой
комнате.
■ a. Подсоединение усилителя или ресивера в другой
комнате
Вы сможете слушать 2‑канальное стерео в другой комна‑
те во время 7.1‑канального воспроизведения в главной
комнате.
Подсоедините к разъемам LINE OUT ZONE 2 на ресивере
линейный вход дополнительного усилителя в отдельной
комнате с помощью аналогового (RCA) кабеля.
● Громкость необходимо регулировать с помощью до‑
полнительного усилителя, установленного в отдель‑
ной комнате.
Zone 2
Main room
Шаг 3: Воспроизведение
■ b. Подсоединение акустических систем в другой
комнате
Можно напрямую подсоединить колонки, установленные
в отдельной комнате без дополнительного усилителя.
Просто подключите их к разъемам SPEAKERS ZONE2
ресивера, с помощью колоночных кабелей. В таком
случае при включении функции Zone в главной комнате
возможно только максимум (*) 5.1‑канальное воспроиз‑
ведение. На задние тыловые АС и на верхние АС звук
выдаваться не будет.
*В этом случ ае реж им про слушивания Dolby Atmos не может быть
выбран.
Main room
Zone 2
Требуется изменение установок: После подсоединения
акус тических систем, на жмите кнопку
SETUP на пульте, потом выберите “2. Speaker Conguration”
и задайте “Powered Zone2” как “Yes”, после этого нажмите
ENTER на пульте.
• Отрегулируйте громкость на ресивере. Д ля этого сначала
нажмите кнопк у ZONE2 на пульте, потом регулируйте
громкость кнопками VOL / . Можно также приглушить
громкость в Зоне 2, нажав на кнопк у MUTING.
RECEIVER и затем
Page 19

Подсоединения Начальная настройка Воспроизведение
Step 3: Playing Back
Performing Multi-zone Playback
It is possible to perform playback in the main room and a
separate room at the same time, for example by playing
the Blu-ray Disc player in the main room where the unit is
placed while playing Internet radio in a separate room. It is
also possible to perform playback only in a separate room.
● With external players, it is possible to play the same
source or different sources in the main room and
separate room.
● With "NET" and "BLUETOOTH", you cannot select
different inputs for the main room and separate room.
For example, if "NET" has been selected in the main
room and then "BLUETOOTH" is selected as playback
source in the separate room, the input in the main room
will change to "BLUETOOTH" accordingly.
● When listening to AM/FM broadcasting, you cannot
select different stations for the main room and separate
room. Therefore broadcasting of the same station will be
heard in the both rooms.
Playing Back
1� Press ZONE2 on the remote controller, point
the remote controller at the main unit and press
zRECEIVER�
"Z2" lights on the main unit display and the multi-zone
function is enabled. (Zone 2 is now on.)
played in the other room. (To play the same source in the
main room and separate room, press ZONE2 twice.)
To turn off the function
After pressing ZONE2 on the remote controller, press
zRECEIVER. Alternatively press OFF on the main unit.
● If ZONE 2 is on, power consumption during standby
becomes larger than normal.
● If ZONE 2 is turned on when the listening mode of the
main room is Pure Audio, it will automatically switch to
the Direct listening mode. (European, Australian and
Asian models)
● While ZONE 2 is on, the RI linked system function
(interlink between Onkyo components) is disabled.
● Pressing INPUT SELECTOR on the remote controller
while you are using the remote controller for Zone 2 will
switch the controlled target to the main room. To control
Zone 2 again, press the ZONE2 button to enter the
Zone control mode.
7 Quick Setup Menu
You can perform common settings on the TV screen while
playing.
1� Press Q on the remote controller�
The Quick Setup menu is displayed on the connected
TV's screen.
Quick Setup
Listening Mode
Audio
MOVIE/TV
MUSIC
BD/DVD
Listening Mode: Select the listening mode from the
categories of "MOVIE/TV", "MUSIC" and "GAME". After
selecting the Listening Mode, press ENTER button to
confirm.
● It cannot be set when audio is played from the TV's
speakers.
Audio: You can perform various audio settings including
audio quality and speaker level adjustment.
● You cannot select this item when audio is output from
the TV's speakers.
Bass, Treble: Adjust volume of the front speaker.
● It cannot be set if the listening mode is Pure Audio
(European, Australian and Asian models) or Direct.
Phase Matching Bass: Suppress phase shift in the
midrange to enhance bass sound. Thus smooth and
powerful bass sound can be obtained.
● It cannot be set if the listening mode is Pure Audio
(European, Australian and Asian models) or Direct.
Center Level, Subwoofer Level: Adjust the speaker
level while listening to the sound. The adjustment you
made will be reset to the previous status when you turn
the unit to standby mode.
● Changes may not be possible depending on the
settings in speakers.
● This setting is not possible during MUTING or when
using headphones.
A/V Sync: If the video is behind the audio, you can
delay the audio to offset the gap. Different settings can
be set for each input selector.
● It cannot be set if the listening mode is Pure Audio
(European, Australian and Asian models) or Direct.
Step 3: Playing Back
played in the other room. (To play the same source in the
main room and separate room, press ZONE2 twice.)
To turn off the function
After pressing ZONE2 on the remote controller, press
zRECEIVER. Alternatively press OFF on the main unit.
● If ZONE 2 is on, power consumption during standby
becomes larger than normal.
● If ZONE 2 is turned on when the listening mode of the
main room is Pure Audio, it will automatically switch to
the Direct listening mode. (European, Australian and
Asian models)
● While ZONE 2 is on, the RI linked system function
(interlink between Onkyo components) is disabled.
● Pressing INPUT SELECTOR on the remote controller
while you are using the remote controller for Zone 2 will
switch the controlled target to the main room. To control
Zone 2 again, press the ZONE2 button to enter the
Zone control mode.
7 Quick Setup Menu
You can perform common settings on the TV screen while
playing.
1� Press Q on the remote controller�
The Quick Setup menu is displayed on the connected
TV's screen.
Listening Mode: Select the listening mode from the
categories of "MOVIE/TV", "MUSIC" and "GAME". After
selecting the Listening Mode, press ENTER button to
confirm.
● It cannot be set when audio is played from the TV's
speakers.
Audio: You can perform various audio settings including
audio quality and speaker level adjustment.
● You cannot select this item when audio is output from
the TV's speakers.
Bass, Treble: Adjust volume of the front speaker.
● It cannot be set if the listening mode is Pure Audio
(European, Australian and Asian models) or Direct.
Phase Matching Bass: Suppress phase shift in the
midrange to enhance bass sound. Thus smooth and
powerful bass sound can be obtained.
● It cannot be set if the listening mode is Pure Audio
(European, Australian and Asian models) or Direct.
Center Level, Subwoofer Level: Adjust the speaker
level while listening to the sound. The adjustment you
made will be reset to the previous status when you turn
the unit to standby mode.
● Changes may not be possible depending on the
settings in speakers.
● This setting is not possible during MUTING or when
using headphones.
A/V Sync: If the video is behind the audio, you can
delay the audio to offset the gap. Different settings can
be set for each input selector.
● It cannot be set if the listening mode is Pure Audio
(European, Australian and Asian models) or Direct.
AccuEQ Room Calibration: Enable or disable the
settings made by automatic speaker setting. To enable
them, you should normally select "On (All Ch)", and to
disable just the front speakers, you should select "On
Воспроизведение в Multi-zone
Вы можете подсоединить воспроизводить звук в главной
и во второй комнате одновременно, например, от Blu‑
ray плеера в главной комнате, где установлен ресивер,
и интернет‑радио — во второй комнате. Можно также
воспроизводить звук только во второй комнате.
● От внешних плееров можно воспроизводить как один
и тот же, так и раздельные источники в главной
и во второй комнате одновременно.
● Если вы выбрали как входной селектор “NET”
и “BLUETOOTH”, один и тот же источник будет
и в главной комнате и в Zone 2. Например, если “NET”
выбран в главной комнате и затем “BLUETOOTH”
выбран для дополнительного усилителя в отдель‑
ной комнате, то вход для главной комнаты сразу же
изменится на “BLUETOOTH”.
● Невозможно одновременно прослушивать разные
AM / FM радиостанции в основной комнате и в Zone 2.
Например, если вы слушаете радиостанцию FM в ос‑
новной комнате, она также будет звучать в Zone 2.
Воспроизведение
1 Нажмите кнопку Zone 2 на пульте, затем направьте
пульт на AV-ресивер и нажмите кнопку STANDBY / ON
RECEIVER.
Загорится индикатор “Z2” на передней панели ресивера
и мультизонные функции будут активированы. (Вклю‑
чится Zone 2).
2 Нажмите кнопку Zone2 на пульте еще раз и затем
кнопку селектора входов INPUT SELECTOR для выбора источника для отдельной комнаты.
● Если вы переведете ресивер в режим standby в ходе
мультизонного воспроизведения, индикатор Z2 будет
притушен и режим сменится на воспроизведение
только в отдельной (второй) комнате. Исполнение
шагов 1 и 2 пока ресивер в режиме standby, также
изменит режим на воспроизведение только в отдель‑
ной комнате. Для прослушивания одного и того же
источника в главной комнате и в отдельной комнате,
нажмите и удержите кнопку ZONE2 около 3 секунд.
Управление с AV-ресивера: Нажмите кнопку ZONE2
и в течение 8 секунд, нажмите кнопку входного селектора
для входа, который должен воспроизводиться в отдель‑
ной комнате. (Для воспроизведения одного и того же
источника в главной комнате и в отдельной комнате,
нажмите кнопку ZONE2 дваж ды).
Для отключения мультизонных функций: Нажимай‑
те сначала ZONE 2 на пульте, а затем нажмите кнопку
RECEIVER. Для управление с AV‑ресивера, нажмите
кнопку OFF.
● Если ZONE 2 включена, потребление в режиме
standby становится больше нормального.
● Если ZONE 2 включается, когда режим прослушива‑
ния в главной комнате Pure Audio, он автоматически
сменится на Direct. (Европейская, австралийская
и азиатские модели).
● Пока ZONE 2 включена, связанные системные функ‑
ции по шине RI (взаимосвязь между компонентами
Onkyo) не работают.
● При нажатии на кнопку INPUT SELECTOR на пульте,
когда вы используете пульт для управления в Zone 2,
целевой объект управления переключится на глав‑
ную комнату. Чтобы вновь управлять в Zone 2, на‑
жмите на кнопку ZONE2 опять, чтобы войти в режим
управления мульти‑зоной.
Использование меню быстрой
7
настройки Quick Setup
Вы можете проделать общие настройки на ТВ экране
во время воспроизведения.
1 Нажмите кнопку Q на пульте.
На экране подсоединенного телевизора появится меню
Quick Setup.
Quick Setup
Listening Mode
Audio
HDMI
Information
2 Используйте кнопки курсора на пульте для выбора
желаемого пункта меню и затем нажмите кнопку
ENTER для подтверж дения выбора.
● Нажимайте кнопку RETURN для возврата в предыду‑
щее меню.
3 Выбирайте настройки с помощью кнопок курсора
на пульте.
■ Listening Mode: Выбирает режим прослушивания
из следующих категорий: “MOVIE / TV”, “MUSIC” и “GAME”.
После выбора режима прослушивания, нажмите кнопку
ENTER для подтверж дения.
MOVIE/TV
MUSIC
GAME
BD/DVD
Шаг 3: Воспроизведение
● Эта настройка невозможна, когда звук воспроизодит‑
ся из динамиков телевизора.
■ Audio: Вы можете изменять различные аудио уста‑
новки, включая регулировки качества звука и уровней
громкости.
● Эта установка недоступна, когда вы слушаете
звуковое сопровождение через динамики вашего
телевизора.
Bass, Treble: Регулировка низко‑ и высокочастотного
выхода на фронтальные колонки.
Тембр сигнала в фронтальных колонках нельзя регу‑
лировать в режиме Direct.
PM Bass (Phase Matching Bass) — согласованный
по фазе бас
Подавляет эффект фазового сдвига средних частот,
чтобы улучшить басовый отклик. Таким образом
получается гладкий и мощный бас на всех уровнях
громкости.
● Эта установка недоступна, когда выбран режим
прослушивания Direct.
Center Level, Subwoofer Level — Уровни громкости
АС: Регулирует громкость каждой из АС во время
прослушивания входного источника. Эти временные
настройки отменяются, когда AV ресивер переходит
в режим standby.
● В зависимости от установок колонок, некоторые
параметры невозможно отрегулировать.
● Эта настройка невозможна, когда звук приглушен
MUTING или воспроизодится из наушников.
A / V Sync: Если изображение отстает от звука, это
можно исправить, применив задержку для аудио
сигнала.
● Функция A / V Sync отключается, когда выбран
режим прослушивания Direct.
AccuEQ Room Calibration: Активирует или отменяет
настройки звукового поля, сделанные в ходе автома‑
тической калибровки колонок. Чтобы активировать
эти настройки, вы должны выбрать “On (All Ch)”,
а чтобы отключить только фронтальные АС, вы долж‑
ны выбрать “On (ex. L / R)”. Эта установка может быть
задана отдельно для каждого входного селектора.
● Эти установки не могут быть использованы, если
автоматическая калибровка колонок не была
проведена.
● Эти установки не могут быть использованы, если
подсоединены наушники или выбран режим про‑
слушивания Pure Audio (Европейская, австралий‑
ская и азиатские модели) или Direct.
Equalizer: Назначает установки эквалайзера, задан‑
ные в меню “Setup”‑“2. Speaker”‑“Equalizer Settings”
Ru-19
Page 20

Подсоединения Начальная настройка Воспроизведение
Step 3: Playing Back
Checking the Input Format
Press DISPLAY on the remote controller several times to
switch the display of the main unit in order of:
на предустановки “Preset1” — “Preset3”. Такие же
установки звукового поля применяются ко всем диа‑
пазонам при установке в положении “Off”.
● Эти установки невозможно задать, если режим
прослушивания — Pure Audio
(Европейская, австралийская и азиатские модели)
или Direct.
Music Optimizer: Улучшает качество звучания
сжатых файлов. Ее следует использовать для музы‑
кальных файлов, сжатых с потерями, таких как MP3.
Настройка запоминается индивидуально для каждо‑
го входа.
● Music Optimizer работает только с входными циф‑
ровыми аудио сигналами PCM, частота выборки
которых ниже 48 кГц и с аналоговыми аудио сигна‑
лами. С битстрим потоками он не работает.
● Music Optimizer не работает при выборе режима
прослушивания Pure Audio (Европейская, австра‑
лийская и азиатские модели).
Late Night — Ночной режим прослушивания: Делает
так, чтобы тихие звуки были хорошо слышны даже
при небольшой громкости. Эта функция особенно
полезна ночью, чтобы никого не беспокоить. Функция
Late Night может быть использована, только когда
входным источником является Dolby Digital, Dolby
Digital Plus или Dolby TrueHD.
● При переходе AV‑ресивера в режим standby функ‑
ция Late Night возвращается в состояние “Off”.
Для источников Dolby TrueHD, она устанавливает‑
ся в “Auto”.
● Если “Loudness Management” установлено в поло‑
жении “Off”, эта функция недоступна при воспро‑
изведении Dolby Digital Plus или Dolby TrueHD.
CinemaFILTER: Корректирует звуковую дорожку, чье
высокочастотное содержимое слишком резкое, сде‑
лав ее более подходящей для домашнего просмотра.
● Эта функция может быть использована со следу‑
ющими режимами прослушивания: Dolby Digital,
Dolby Digital Plus, Dolby PLII Movie, Dolby TrueHD,
Multichannel, DSD, DTS, DTS Neo:6 Cinema, DTS
96 / 24, DTS‑HD High Resolution Audio, DTS‑HD
Master Audio, DTS Express.
Center Spread: Регулирует ширину звукового поля
фронтальных каналов при воспроизведении в режи‑
ме прослушивания Dolby Surround.
Чтобы расширить звуковое поле влево и вправо,
установите в положение “On”. Чтобы сконцентрировать
звуковое поле в центре, установите в положение “Off”.
● Эта установка может быть в положении “Off” в за‑
висимости от настроек колонок.
Dialog Control: Можно повысить долю диалогов в об‑
щем звучании с шагом в 1 dB вплоть до 6 dB, чтобы
легче было их слушать по сравнению с фоновым
шумом.
● Эти установки не могут быть использованы,
для контента иного, чем DTS:X.
● Эти установки не могут быть использованы,
для некоторых типов контента.
■ HDMI: Выбирает выходной разъем HDMI OUT для вы‑
дачи сигнала.
■ Information: Выводит на дисплей аудио информацию.
Audio: Отображает источник входного аудиосигна‑
ла, формат, число каналов, частоту дискретизации,
режим прослушивания и число выходных каналов.
Video: Отображает информацию, такую как: видео
источник входного сигнала, разрешение, цветовое
пространство, глубину цвета, 3D‑информацию, фор‑
мат изображения и выход.
Tun er: Отображает информацию, такую как диа‑
пазон, частота и номер пресета. Эта информация
отображается только тогда, когда “TUNER” выбран
в качестве входного источника.
8 Прочие полезные функции
■ Регулировки качества звука
Имеется возможность усилить или ослабить басы
и высокие частоты в фронтальных колонках. Нажимайте
кнопку TONE на ресивере несколько раз, чтобы выбрать
желаемую регулировку — “Bass”, “Treble”, и “PM Bass”
(согласованный по фазе бас — Phase Matching Bass),
а затем регулируйте с помощью кнопок + / ‑.
“Bass”: позволяет усилить или ослабить басы.
“Tr ebl e”:позволяет усилить или ослабить высокие
частоты.
“Phase Matching Bass”:позволяет сохранить ясность
средних частот и одновременно эффективно усилить
басы.
Шаг 3: Воспроизведение
Проверка формата входного сигнала
Нажмите кнопку DISPLAY на пульте ДУ несколько раз,
чтобы выбрать желаемую информацию на дисплее
ресивера:
Input source & volume
Входн ой источни к и громкос ть
Listening mode
Режим прослушивания
Signal format
Форм ат сигнала
Sampling frequency
Часто та дискре тизации
Input signal resolution
Разрешение входного сигнала
● Если в позиции «Формат сигнала» выведено “Dolby D
5.1”, на вход поступает сигнал Dolby Digital 5.1‑каналь‑
ный. Когда вы слушаете AM / FM радио, то на дисплее
появляется диапазон, частота и номер пресета.
Воспроизведение аудио и видео с разных источников: Вы можете слушать звук с одного входного источ‑
ника, а видео смотреть с другого. Например, можно
слушать CD‑плеер, и одновременно смотреть видео
с Blu‑ray / DVD плеера. В таком случае надо нажать
BD / DVD, а затем TV / CD. Потом запустить воспроизве‑
дение на BD / DVD плеере и CD плеере. Эта функция
использует тот факт, что когда выбран источник только
аудио (CD, NET, BLUETOOTH или TUNER (*), видео источ‑
ник при этом не меняется.
*Когда выбран NET ил и BLUETOOTH, нажмите кноп ку MODE
на пульте.
Ru-20
Page 21

Подсоединения Начальная настройка Воспроизведение
● Do not unplug the power cord until "Clear" disappears from
the display.
● Do not unplug the power cord until "Clear" disappears from
the display.
1.
While holding
down CBL/SAT,
2.
Press zON/
STANDBY�
● How to reset the remote controller:
1�
While holding down RECEIVER on the remote controller,
press Q until the remote indicator stays lit (about 3
seconds)�
2� Within 30 seconds, press RECEIVER again�
Прочее
Обнаружение и устранение неисправностей
Перед тем как начать процедуру
Проблема может быть решена простым включением / выклю‑
чением питания или же отс оединением вилки от розетки,
что гораздо проще, чем проверять соединения, установк и
или режимы работы. Попробуйте сначала простейшие меры
на ресивере и на подключенных к нему устройствах. Если
проблема состоит в том, что видео или аудио не выдается
на выход или не работает управление по HDMI, отсоедине‑
ние / подсоединение HDMI кабеля может решить ее. При об ‑
ратном подсоединении будьте осторожны и не скручивайте
HDMI кабель, т. к. он может не войти нормально в разъем.
После восстановления соединений, включите и потом вык лю‑
чите ресивер и подключенные к нему устройства.
AV-ресивер неожиданно выключается
● Когда функция Auto Standby или Sleep Timer уста‑
новлена и срабатывает, AV ресивер автоматически
переходит в режим ожидания standby.
● Возможно активирована схема защиты усилителя.
Если это произошло, то когда вы попытаетесь вклю‑
чить ресивер вновь, на дисплее появится надпись
“AMP Diag Mode”. После этого ресивер войдет в ре‑
жим определения ненормальных условий работы.
Если такие условия не обнаружены, надпись “AMP
Diag Mode” на дисплее исчезнет, и ресивер вернет‑
ся в нормальное состояние. Если же на дисплее
возникает сообщение “CHECK SP WIRE”, возможно
закорочены колоночные кабели. Отключите ресивер
и проверьте не касаются ли голые жилы кабеля зад‑
ней панели или других оголенных проводников. По‑
сле этого, вк лючите ресивер вновь. Если на дисплее
появится надпись “NG”, немедленно отсоедините
сетевой шнур и обратитесь к вашему дилеру Onkyo.
Звук отсутствует или он очень тихий
● Выбрана неправильная кнопка селектора входов.
Выберите ну жный вход для ресивера. Убедитесь,
что звук не приглушен — MUTING не мигает.
● Не все режимы прослушивания используют все АС.
Отсутствует изображение
● Выбрана неправильная кнопка селектора входов.
● Для выдачи видео в режиме standby с подсоединен‑
ного к ресиверу плеера необходимо активировать
режим “HDMI Through”.
● Изображение на телевизоре нечеткое или зашумлен‑
ное — возможно сетевой кабель и другие кабели соз‑
дают помехи. В таком случае попробуйте увеличить
расстояние между кабелем от ТВ‑антенны и другими
кабелями.
Видео и звук не синхронизированы
● Видео может запаздывать по отношению к звуку
в зависимости от установок и соединений вашего TV.
Проделайте необходимые настройки согласно Шагу
3 — “Step 3: Playing Back”, “4 Quick Setup Menu”, “A / V
Sync”.
Невозможно воспроизвести цифровой окружающий
звук
● Для прослушивания цифрового окружающего звука,
включая Dolby Digital и DTS, на подсоединенном
Blu‑ray плеере или другом устройстве выход должен
быть задан как “Bitstream output”.
Невозможно воспроизвести звук, такой как Dolby
Atmos в звуковом формате источника
● Если вы не можете выдать аудио в соответствующем
звуковом формате источника (Dolby TrueHD, Dolby
Atmos, DTS‑HD Master Audio, и т. п.), попробуйте
задать в установках Blu‑ray Disc плеера параметр
“BD video supplementary sound” (или вторичный звук)
как “Off”. Смените режим прослушивания для каждо‑
го из источников после изменения этой установки —
для подтверждения выбора.
Управление по HDMI не работает правильно
● Установите функцию HDMI CEC (RIHD) в положе‑
нии “On”. Необходимо так же сделать установки
для управления по HDMI на телевизоре. Обращай‑
тесь к инструкции на ТВ.
Не могу получить доступ к сети
● Попробуйте включить / выключить ресивер и ваш
роутер, чтобы проверить их состояние. Это помогает
в большинстве случаев.
● Если нужный вам беспроводный роутер не находит‑
ся в списке точек доступа, возможно у него задана
установка на скрытие SSID или же параметр ANY
дезактивирован. Измените эти установки и попробуй‑
те еще раз.
■ Сброс установок ресивера
Сброс установок ресивера и возвращение статуса
на момент на момент покупки может решить проблему.
Если методы, перечисленные выше не помогли решить
проблему самостоятельно, попробуйте сделать сброс
установок ресивера согласно следующей процедуре.
Прочее
Если вы перезапустите ресивер, все установки вернут‑
ся к их заводским значениям по умолчанию. Поэтому
предварительно запишите все ваши настройки, прежде
чем делать reset.
● Как сделать сброс установок ресивера:
1. Нажмите и удержите кнопку CBL / SAT на ресивере
(обратите внимание, что шаг 2 должен выполняться
при нажатой этой кнопке)
2. Нажмите кнопку
плее появится надпись “Clear” и ресивер вернется
в состояние standby.
● Как сбросить установки пульта ДУ:
1. Удерживая нажатой кнопку RECEIVER, нажмите
и удержите кнопку Q до тех пор, пока индикатор
на пульте не загорится (около 3 секунд).
2. В течение 30 секунд, нажмите кнопку RECEIVER
еще раз.
RECEIVER
ON / STANDBY на ресивере. На дис‑
Индикатор
Remote
пульта
indicator
Q
Ru-21
Page 22

Подсоединения Начальная настройка Воспроизведение
ТЕХНИЧЕСКИЕ ХАРАКТЕРИСТИКИ
Секция усилителя
Номинальная выходна я мощность (Североамериканская
мод ель)
Минимум 100 Вт непрерывная, RMS, на канал, нагрузка 8 Ом,
полоса 20 Гц‑20 кГц, макс. общие гармонические искажения
0,7 % (FTC), от 250 мВт до номинальной мощности.
Номинальная выходна я мощность в режиме окружающего
звука (*)
170 Вт на канал, (на 6 Ом, на 1 кГц, макс. THD 0,9 %)
*Рефе ренсн ый выход для к аждой из ак устичес ких си стем.
В зависимости от источника и выбранного режима прослуши‑
вания может вообще не быть звука на выходе.
Номинальная выходна я мощность (Прочие модели)
7 кана лов x 160 Вт, на 6 Ом, 1 кГц, нагружен 1 канал, 1 % (IEC)
Максимальная эффективная выходная мощность
7 кана лов x 175 Вт, на 6 Ом, частота 1 кГц, нагру жен 1 канал
(JEITA) (Азиатские модели)
Динамическая выходная мощность (*)
* IEC60268‑кратковременная максимальная выходная
мощность
240 Вт (3 Ом, фронт)
210 Вт (4 Ом, фронт)
120 Вт (8 Ом, фронт)
Общие гармонические искажения THD+N
0,08 % (20 Гц‑20 кГц, при 0.5 мощности)
Чувствительность входа и импе данс:
200 мВ / 47 кОм (LINE, 1 кГц, 100 Вт, 8 Ом)
3.5 мВ / 47 кОм (PHONO MM)
Номинальный выходной уровень RCA и импе данс:
100 мВ / 2.3 кОм (ZONE2 LINE OUT)
1 В / 470 Ом (SUBWOOFER PRE OUT)
Перегрузка по входу Phono:
70 мВ (MM 1 кГц, 0.5 % режим Direct)
Диапазон частот:
10 Гц‑100 кГц / +1 дБ, — 3дБ (режим Direct)
Регулировки тембра:
±10 дБ, 20 Гц (BASS)
±10 дБ, 20 кГц (TREBLE)
Отношение сигнал / шум:
100 дБ (LINE, IHF‑A‑взвеш.)
80 дБ (PHONO MM, IHF‑A)
Импеданс АС:
6 Ом — 16 Ом (Североамериканская и тайваньская модель)
4 Ом — 16 Ом, 6 Ом — 16 Ом (Прочие)
Видео секция
Уровень сигнала
1 В (размах) / 75 Ом (компонентный Y)
0,7 В (размах) / 75 Ом (компонентные сигналы Pb / Cb, Pr / Cr)
1 В (размах) / 75 Ом (композитный)
Максимальное разрешение компонентного видеосигнала:
4 8 0 i / 5 7 6 i
Секция тюнера
Диапазон частот настройки FM
87,5 МГц‑107,9 МГц
(Североамериканская и тайваньская модель)
87,5 МГц‑108,0 МГц, RDS (Прочие)
Диапазон частот настройки АМ
530 / 522 кГц‑1710 / 1611 кГц
Число ячеек памяти (предварительные настройки):
40
Сетевая секция
Ethernet LAN
1 0 B A S E ‑ T / 1 0 0 B A S E ‑ T X
Wireless LAN
IEEE 802.11 b / g / n standard
®
standard)
(Wi‑Fi
2.4 GHz band:
1‑11 ch (North American)
10‑11 ch (Spain)
10‑13 ch (France)
1‑13 ch (Others)
®
standard)
(Wi‑Fi
Bluetooth секция
Система связи:
Bluetooth Specication version 2.1 + EDR (Enhanced Data Rate)
Максимальная дальность связи:
в пределах прямой видимости, около 15 м (*)
Диапазон частот:
2.4 ГГц
Метод модуляции:
FHSS (Freq Hopping Spread Spectrum)
Совместимые профили Bluetooth:
A2DP 1.2 (Advanced Audio Distribution Prole)
AVRCP 1.3 (Audio Video Remote Control Prole)
Поддерживаемые кодеки:
SBC
Диапазон частот передачи (A2DP):
20 Hz — 20,000 Hz (час тота дискретизации 44.1 кГц)
* Реальный радиус действия зависит от таких факторов,
как препятс твия между устройствами, магнитные поля вокруг
СВЧ‑печей, статическое электричество, беспроводные теле ‑
фоны, чувствительность приемников, эффективность антен‑
ны, операционная система, программные приложения и т. п.
Общие характеристики
Источник питания:
переменный ток, 120 В, 60 Гц (Североамериканская и тай‑
ваньская модель)
переменный ток, 220‑240 В, 50 / 60 Гц (Прочие)
Потребляемая мощнос ть:
6.4 А (Североамериканская и тайваньская модель)
630 Вт (Прочие)
0.1 Вт (в режиме Standby, Североамериканская и тайваньская
модель)
0.15 Вт (в режиме Standby, прочие модели)
2.6 Вт (в реж име Network Standby)
70 Вт (Потребление в режиме холостого хода)
Размеры (ШхВхГ):
435 х 173.5 х 329 мм
1 7‑ 1 / 8 " × 6‑13 / 16" × 12‑15 / 16"
Вес:
9.4 кг (19.0 lbs.) (Североамериканская и тайваньская модель)
9.8 kg (21.6 lbs.) (Прочие)
HDMI
Входы:
IN1 (BD / DVD, HDCP2.2), IN2 (CBL / SAT, HDCP2.2), IN3 (STRM
BOX,
HDCP2.2), IN4 (PC), IN5 (GAME), IN6, IN7, AUX INPUT HDMI
(front)
Выход:
OUT MAIN (ARC), OUT SUB
Разрешение видео:
4K 60 Hz (RGB / YCbCr 4:4:4 / YCbCr 4:2:2, 24 bit)
Прочее
Аудио форматы:
Dolby Atmos, Dolby TrueHD, Dolby Digital Plus, Dolby Digital,
DTS:X, DTS‑HD
Master Audio, DTS‑ HD High Resolution Audio, DTS 96 / 24, DTS‑
ES, DTS,
DTS Express, DSD, Multichannel PCM (до 8 каналов)
Поддержка:
3D, Audio Return Channel, Deep Color, x.v.Color™, LipSync,
CEC, 4K,
Extended Colorimetry (sYCC601, Adobe RGB, Adobe YCC601),
Content Type, 3D Dual View, 21:9 Aspect Ratio Video Format
Видеовходы
Компонентный:
COMPONENT IN1 (BD / DVD), IN2 (GAME)
Композитные:
IN1 (CBL / SAT), IN2 (STRM BOX), IN3 (PC), AUX INPUT (front)
Аудио входы
Цифровые входы:
OPTICAL (1 CD, 2 TV)
COAXIAL (BD / DVD)
Аналоговые входы:
BD / DVD, CBL / SAT, STRM BOX, PC, GAME, TV, CD, PHONO
Аудио выходы
Аналоговые выходы:
ZONE2 LINE OUT
2 SUBWOOFER PRE OUT
Выходы на АС:
FRONT L / R, CENTER, SURROUND L / R, BACK или HEIGHT,
ZONE2 L / R
Выход на наушники:
PHONES (Front, ø 6.3)
Прочие
Setup Mic 1 (Front)
RI REMOTE CONTROL 1
USB 1 (1.1, 5 V / 1 A)
Ethernet 1
Поддержка многоязычных экранных меню
(Североамериканская модель) English, German, French,
Spanish, Italian, Dutch,
Swedish
(Тайваньская модель) English, German, French, Spanish,
Italian, Dutch, Swedish,
Chinese (□)
(Прочие) English, German, French, Spanish, Italian, Dutch,
Swedish,
Russian, Chinese (□)
* OSD не отображается, если входной селектор “NET”
или “BLUETOOTH ”. Используйте дисплей ресивера
для управления.
Характеристики и возможности мог ут быть изменены без предва‑
рительного уведомления.
Ru-22
Page 23

Подсоединения Начальная настройка Воспроизведение
Таблица разрешений видео сигналов на дисплее
В этой Таблице показана информация о форматах изображения и различных разреше‑
ниях, с которыми поступающие на вход видео сигналы с выдаются ресивером на выход.
Вход
Выход
4K
1080p/24
1080p
HDMI
Компонентный
Композитный 480i/576i
1080i
720p
480p/576p
480i/576i
1080p
1080i
720p
480p/576p
480i/576i
HDMI
4K 1080p/24 1080p 1080i 720 p 480p/576p 480i/576i
Разрешения, поддерживаемые по HDMI
Поддержка
входа
HDMI вход
IN1 ‑ IN3
HDMI вход
IN4 – IN6
Технология
защиты
контента
HDCP1.4
HDCP2.2
HDCP1.4
Разрешение
дисплея
720×480i 60Hz
720×576i 50Hz
720×480p 60Hz
720×576p 50Hz
1920×1080i 50/60Hz
128 0×720 p 24/25/30/50/60Hz
1680×720p 24/25/30/50/60Hz
1920×1080 p 24/25/30/50/60Hz
2560×1080p 24/25/30Hz
4K
(3840×2160p)
4K SMPTE
(40 96 ×216 0p)
720×480i 60Hz
720×576i 50Hz
720×480p 60Hz
720×576p 50Hz
1920×1080i 50/60Hz
128 0×720 p 24/25/30/50/60Hz
1680×720p 24/25/30/50/60Hz
1920×1080 p 24/25/30/50/60Hz
2560×1080p 24/25/30Hz
4K
(3840×2160p)
4K SMPTE
(40 96 ×216 0p)
Частота кадров
24/25/30Hz
50/60Hz
24/25/30Hz
50/60Hz
24/25/30Hz
50/60Hz
24/25/30Hz
50/60Hz
Цветовое
пространство
RGB/
YCbCr4:4:4/
YCbCr4:2:2
RGB/
YCbCr4:4:4/
YCbCr4:2:2
RGB/
YCbCr4:4:4
YCbCr4:2:2 8/10/12bit
YCbCr4:2:0 8/10/12/16bit
RGB/
YCbCr4:4:4/
YCbCr4:2:2
RGB/
YCbCr4:4:4
YCbCr4:2:2 8/10/12bit
YCbCr4:2:0 8/10/12/16bit
RGB/
YCbCr4:4:4/
YCbCr4:2:2
RGB/
YCbCr4:4:4/
YCbCr4:2:2
RGB/
YCbCr4:4:4
YCbCr4:2:2 8/10/12bit
YCbCr4:2:0 8/10/12/16bit
RGB/
YCbCr4:4:4/
YCbCr4:2:2
RGB/
YCbCr4:4:4
YCbCr4:2:2 8/10/12bit
YCbCr4:2:0 8/10/12/16bit
Разрядность
цвета
8/10/12/16bit
8/10/12/16bit
8bit
8/10/12/16bit
8bit
8/10/12/16bit
8/10/12/16bit
8bit
8/10/12/16bit
8bit
Прочее
Примечания
Для формата
YCbCr4:2:2,
поддерживает‑
ся разряд‑
ность цвета до
8/10/12bit.
Для формата
YCbCr4:2:2,
поддерживает‑
ся разряд‑
ность цвета до
8/10/12bit.
Для формата
YCbCr4:2:2,
поддерживает‑
ся разряд‑
ность цвета до
8/10/12bit.
Для формата
YCbCr4:2:2,
поддерживает‑
ся разряд‑
ность цвета до
8/10/12bit.
Для формата
YCbCr4:2:2,
поддерживает‑
ся разряд‑
ность цвета до
8/10/12bit.
Для формата
YCbCr4:2:2,
поддерживает‑
ся разряд‑
ность цвета до
8/10/12bit.
Ru-23
Page 24

Подсоединения Начальная настройка Воспроизведение
Others
GNU License
Copyright (C) 1991, 1999 Free Software Foundation, Inc. 59 Temple Place, Suite 330, Boston, MA 02111-1307 USA Everyone
gave you. You must make sure that they, too, receive or can get the source code. If you link other code with the library, you must
ary and
is no warranty for the free library. Also, if the library is modified by someone else and passed on, the recipients should know that
When a program is linked with a library, whether statically or using a shared library, the combination of the two is legally speaking
General Public License. It also provides other free software developers Less of an advantage over competing non-free programs.
These disadvantages are the reason we use the ordinary General Public License for many libraries. However, the Lesser license
becomes a de-facto standard. To achieve this, non-free programs must be allowed to use the library. A more frequent case is that
Предупреждения
Для европейских моделей
Декларация соответствия
Мы, с полной ответственностью заяв‑
ляем о том, что этот продукт соответ‑
ствует перечисленным ниже техниче‑
ским стандартам:
— Безопасности
— Пределам и методам измерения радио помех
— Пределам на засорение гармониками сетевого напря‑
жения питания
— Ограничениям на изменение напряжения, флуктуа‑
ции напряжения и на фликер (случайные колебания
напряжения питания)
— Директиве по утилизации отработанного электриче‑
ского и электронного оборудования — RoHS Directive,
2 0 11 / 6 5 / E U
— Настоящим документом, Onkyo Corporation, заявляет,
что TX‑NR545 соответствует основным требованиям
и другим уместным ограничениям Директивы —
Directive 1999 / 5 / EC.
Прочее
Important Notice Regarding Software
The software package installed in this product includes software licensed to Onkyo Corporation (hereinafter, called "Onkyo")
directly or indirectly by third party developers. Please be sure to read this notice regarding such software.
Notice Regarding GNU GPL/LGPL-applicable Software
This product includes the following software that is covered by GNU General Public License (hereinafter, called "GPL") or by
GNU Lesser General Public License (hereinafter, called "LGPL").
Onkyo notifies you that, according to the attached GPL/LGPL, you have right to obtain, modify, and redistribute software source
code for the listed software.
Package List
linux uClibc busybox
libgcc libstdc++ libmms
compat-wireless wpa_supplicant dnsmasq
libiconv bluez dbus
iperf faad
GNU LESSER GENERAL PUBLIC LICENSE
Version 2�1, February 1999
is permitted to copy and distribute verbatim copies of this license document, but changing it is not allowed.
[This is the first released version of the Lesser GPL. It also counts as the successor of the GNU Library Public License, version
2, hence the version number 2.1.]
Preamble
The licenses for most software are designed to take away your freedom to share and change it. By contrast, the GNU General
Public Licenses are intended to guarantee your freedom to share and change free software--to make sure the software is free
for all its users.
This license, the Lesser General Public License, applies to some specially designated software packages--typically libraries--of
the Free Software Foundation and other authors who decide to use it. You can use it too, but we suggest you first think carefully
about whether this license or the ordinary General Public License is the better strategy to use in any particular case, based on
the explanations below.
When we speak of free software, we are referring to freedom of use, not price. Our General Public Licenses are designed to
make sure that you have the freedom to distribute copies of free software (and charge for this service if you wish); that you
receive source code or can get it if you want it; that you can change the software and use pieces of it in new free programs; and
that you are informed that you can do these things.
To protect your rights, we need to make restrictions that forbid distributors to deny you these rights or to ask you to surrender
these rights. These restrictions translate to certain responsibilities for you if you distribute copies of the library or if you modify it.
For example, if you distribute copies of the library, whether gratis or for a fee, you must give the recipients all the rights that we
provide complete object files to the recipients, so that they can relink them with the library after making changes to the libr
recompiling it. And you must show them these terms so they know their rights.
We protect your rights with a two-step method: (1) we copyright the library, and (2) we offer you this license, which gives you
legal permission to copy, distribute and/or modify the library. To protect each distributor, we want to make it very clear that there
what they have is not the original version, so that the original author's reputation will not be affected by problems that might be
introduced by others.
Finally, software patents pose a constant threat to the existence of any free program. We wish to make sure that a company
cannot effectively restrict the users of a free program by obtaining a restrictive license from a patent holder. Therefore, we
insist that any patent license obtained for a version of the library must be consistent with the full freedom of use specified in
this license.
Most GNU software, including some libraries, is covered by the ordinary GNU General Public License. This license, the GNU
Lesser General Public License, applies to certain designated libraries, and is quite different from the ordinary General Public
License. We use this license for certain libraries in order to permit linking those libraries into non-free programs.
a combined work, a derivative of the original library. The ordinary General Public License therefore permits such linking only if
the entire combination fits its criteria of freedom. The Lesser General Public License permits more lax criteria for linking other
code with the library.
We call this license the "Lesser" General Public License because it does Less to protect the user's freedom than the ordinary
provides advantages in certain special circumstances.
For example, on rare occasions, there may be a special need to encourage the widest possible use of a certain library, so that it
a free library does the same job as widely used non-free libraries. In this case, there is little to gain by limiting the free library to
free software only, so we use the Lesser General Public License.
In other cases, permission to use a particular library in non-free programs enables a greater number of people to use a large
body of free software. For example, permission to use the GNU C Library in non-free programs enables many more people to
use the whole GNU operating system, as well as its variant, the GNU/Linux operating system.
Although the Lesser General Public License is Less protective of the users' freedom, it does ensure that the user of a program
that is linked with the Library has the freedom and the wherewithal to run that program using a modified version of the Library.
The precise terms and conditions for copying, distribution and modification follow. Pay close attention to the difference between
a "work based on the library" and a "work that uses the library". The former contains code derived from the library, whereas the
latter must be combined with the library in order to run.
TERMS AND CONDITIONS FOR COPYING, DISTRIBUTION AND MODIFICATION
0. This License Agreement applies to any software library or other program which contains a notice placed by the
copyright holder or other authorized party saying it may be distributed under the terms of this Lesser General
Public License (also called "this License"). Each licensee is addressed as "you".
A "library" means a collection of software functions and/or data prepared so as to be conveniently linked with application
programs (which use some of those functions and data) to form executables.
The "Library", below, refers to any such software library or work which has been distributed under these terms. A "work based
on the Library" means either the Library or any derivative work under copyright law: that is to say, a work containing the Library
or a portion of it, either verbatim or with modifications and/or translated straightforwardly into another language. (Hereinafter,
Ru-24
Page 25

Подсоединения Начальная настройка Воспроизведение
Others
translation is included without limitation in the term "modification".)
"Source code" for a work means the preferred form of the work for making modifications to it. For a library, complete source code
means all the source code for all modules it contains, plus any associated interface definition files, plus the scripts used to control
compilation and installation of the library.
Activities other than copying, distribution and modification are not covered by this License; they are outside its scope. The act of
running a program using the Library is not restricted, and output from such a program is covered only if its contents constitut
work based on the Library (independent of the use of the Library in a tool for writing it). Whether that is true depends on wha
Library does and what the program that uses the Library does.
1. You may copy and distribute verbatim copies of the Library's complete source code as you receive it, in any
medium, provided that you conspicuously and appropriately publish on each copy an appropriate copyright
notice and disclaimer of warranty; keep intact all the notices that refer to this License and to the absence of any
warranty; and distribute a copy of this License along with the Library.
You may charge a fee for the physical act of transferring a copy, and you may at your option offer warranty protection in
exchange for a fee.
2. You may modify your copy or copies of the Library or any portion of it, thus forming a work based on the
Library, and copy and distribute such modifications or work under the terms of Section 1 above, provided that
you also meet all of these conditions:
a) The modified work must itself be a software library.
b) You must cause the files modified to carry prominent notices stating that you changed the files and the date
of any change.
c) You must cause the whole of the work to be licensed at no charge to all third parties under the terms of this
License
d) If a facility in the modified Library refers to a function or a table of data to be supplied by an application
program that uses the facility, other than as an argument passed when the facility is invoked, then you must
make a good faith effort to ensure that, in the event an application does not supply such function or table, the
facility still operates, and performs whatever part of its purpose remains meaningful.
(For example, a function in a library to compute square roots has a purpose that is entirely well-defined
independent of the application. Therefore, Subsection 2d requires that any application-supplied function or table
used by this function must be optional: if the application does not supply it, the square root function must still
compute square roots.)
These requirements apply to the modified work as a whole. If identifiable sections of that work are not derived
from the Library, and can be reasonably considered independent and separate works in themselves, then this
License, and its terms, do not apply to those sections when you distribute them as separate works. But when you
distribute the same sections as part of a whole which is a work based on the Library, the distribution of the
whole must be on the terms of this License, whose permissions for other licensees extend to the entire whole,
and thus to each and every part regardless of who wrote it.
Thus, it is not the intent of this section to claim rights or contest your rights to work written entirely by you; rather, the intent is to
exercise the right to control the distribution of derivative or collective works based on the Library.
In addition, mere aggregation of another work not based on the Library with the Library (or with a work based on the Library) o
volume of a storage or distribution medium does not bring the other work under the scope of this License.
3. You may opt to apply the terms of the ordinary GNU General Public License instead of this License to a given
copy of the Library. To do this, you must alter all the notices that refer to this License, so that they refer to the
ordinary GNU General Public License, version 2, instead of to this License. (If a newer version than version 2 of
the ordinary GNU General Public License has appeared, then you can specify that version instead if you wish.)
Do not make any other change in these notices.
Once this change is made in a given copy, it is irreversible for that copy, so the ordinary GNU General Public License applies to
all subsequent copies and derivative works made from that copy.
This option is useful when you wish to copy part of the code of the Library into a program that is not a library.
4. You may copy and distribute the Library (or a portion or derivative of it, under Section 2) in object code or
executable form under the terms of Sections 1 and 2 above provided that you accompany it with the complete
corresponding machine-readable source code, which must be distributed under the terms of Sections 1 and 2
above on a medium customarily used for software interchange.
If distribution of object code is made by offering access to copy from a designated place, then offering
equivalent access to copy the source code from the same place satisfies the requirement to distribute the
source code, even though third parties are not compelled to copy the source along with the object code.
5. A program that contains no derivative of any portion of the Library, but is designed to work with the Library by
being compiled or linked with it, is called a "work that uses the Library". Such a work, in isolation, is not a
derivative work of the Library, and therefore falls outside the scope of this License.
However, linking a "work that uses the Library" with the Library creates an executable that is a derivative of the Library (because
it contains portions of the Library), rather than a "work that uses the library". The executable is therefore covered by this License.
Section 6 states terms for distribution of such executables.
When a "work that uses the Library" uses material from a header file that is part of the Library, the object code for the work may
be a derivative work of the Library even though the source code is not. Whether this is true is especially significant if the w
can be linked without the Library, or if the work is itself a library. The threshold for this to be true is not precisely defined by law.
If such an object file uses only numerical parameters, data structure layouts and accessors, and small macros and small inline
functions (ten lines or less in length), then the use of the object file is unrestricted, regardless of whether it is legally a
work. (Executables containing this object code plus portions of the Library will still fall under Section 6.)
Otherwise, if the work is a derivative of the Library, you may distribute the object code for the work under the terms of Section 6.
Any executables containing that work also fall under Section 6, whether or not they are linked directly with the Library itself
6. As an exception to the Sections above, you may also combine or link a "work that uses the Library" with the
Library to produce a work containing portions of the Library, and distribute that work under terms of your
choice, provided that the terms permit modification of the work for the customer's own use and reverse
engineering for debugging such modifications.
You must give prominent notice with each copy of the work that the Library is used in it and that the Library and its use are
covered by this License. You must supply a copy of this License. If the work during execution displays copyright notices, you
must include the copyright notice for the Library among them, as well as a reference directing the user to the copy of this
License. Also, you must do one of these things:
a) Accompany the work with the complete corresponding machine-readable source code for the Library
including whatever changes were used in the work (which must be distributed under Sections 1 and 2 above);
and, if the work is an executable linked with the Library, with the complete machine-readable "work that
uses the Library", as object code and/or source code, so that the user can modify the Library and then relink
to produce a modified executable containing the modified Library. (It is understood that the user who changes
the contents of definitions files in the Library will not necessarily be able to recompile the application to use
the modified definitions.)
b) Use a suitable shared library mechanism for linking with the Library. A suitable mechanism is one that (1)
uses at run time a copy of the library already present on the user's computer system, rather than copying
library functions into the executable, and (2) will operate properly with a modified version of the library, if the
user installs one, as long as the modified version is interface-compatible with the version that the work was
made with.
c) Accompany the work with a written offer, valid for at least three years, to give the same user the materials
specified in Subsection 6a, above, for a charge no more than the cost of performing this distribution.
alternatively, under the terms of the ordinary General Public License).
To apply these terms, attach the following notices to the library. It is safest to attach them to the start of each source file to most
e as
whose authors commit to using it. (Some other Free Software Foundation software is covered by the GNU Library General Public
pients
and can be reasonably considered independent and separate works in themselves, then this License, and its terms, do not apply
b) Accompany it with a written offer, valid for at least three years, to give any third party, for a charge no more
Прочее
d) If distribution of the work is made by offering access to copy from a designated place, offer equivalent
access to copy the above specified materials from the same place.
e) Verify that the user has already received a copy of these materials or that you have already sent this user a
copy.
For an executable, the required form of the "work that uses the Library" must include any data and utility programs needed for
e a
reproducing the executable from it. However, as a special exception, the materials to be distributed need not include anything
t the
that is normally distributed (in either source or binary form) with the major components (compiler, kernel, and so on) of the
operating system on which the executable runs, unless that component itself accompanies the executable.
It may happen that this requirement contradicts the license restrictions of other proprietary libraries that do not normally
accompany the operating system. Such a contradiction means you cannot use both them and the Library together in an
executable that you distribute.
7. You may place library facilities that are a work based on the Library side-by-side in a single library together
with other library facilities not covered by this License, and distribute such a combined library, provided that the
separate distribution of the work based on the Library and of the other library facilities is otherwise permitted,
and provided that you do these two things:
a) Accompany the combined library with a copy of the same work based on the Library, uncombined with any
other library facilities. This must be distributed under the terms of the Sections above.
b) Give prominent notice with the combined library of the fact that part of it is a work based on the Library, and
explaining where to find the accompanying uncombined form of the same work.
8. You may not copy, modify, sublicense, link with, or distribute the Library except as expressly provided under
this License. Any attempt otherwise to copy, modify, sublicense, link with, or distribute the Library is void, and will
automatically terminate your rights under this License. However, parties who have received copies, or rights,
from you under this License will not have their licenses terminated so long as such parties remain in full
compliance.
9. You are not required to accept this License, since you have not signed it. However, nothing else grants you
permission to modify or distribute the Library or its derivative works. These actions are prohibited by law if you
do not accept this License. Therefore, by modifying or distributing the Library (or any work based on the
Library), you indicate your acceptance of this License to do so, and all its terms and conditions for copying,
distributing or modifying the Library or works based on it.
10. Each time you redistribute the Library (or any work based on the Library), the recipient automatically receives
a license from the original licensor to copy, distribute, link with or modify the Library subject to these terms and
conditions. You may not impose any further restrictions on the recipients' exercise of the rights granted herein.
You are not responsible for enforcing compliance by third parties with this License.
11. If, as a consequence of a court judgment or allegation of patent infringement or for any other reason (not
limited to patent issues), conditions are imposed on you (whether by court order, agreement or otherwise) that
contradict the conditions of this License, they do not excuse you from the conditions of this License. If you
cannot distribute so as to satisfy simultaneously your obligations under this License and any other pertinent
obligations, then as a consequence you may not distribute the Library at all. For example, if a patent license
n a
would not permit royalty-free redistribution of the Library by all those who receive copies directly or indirectly
through you, then the only way you could satisfy both it and this License would be to refrain entirely from
distribution of the Library.
If any portion of this section is held invalid or unenforceable under any particular circumstance, the balance of the section is
intended to apply, and the section as a whole is intended to apply in other circumstances.
It is not the purpose of this section to induce you to infringe any patents or other property right claims or to contest validity of
any such claims; this section has the sole purpose of protecting the integrity of the free software distribution system which
is implemented by public license practices. Many people have made generous contributions to the wide range of software
distributed through that system in reliance on consistent application of that system; it is up to the author/donor to decide if he or
she is willing to distribute software through any other system and a licensee cannot impose that choice.
This section is intended to make thoroughly clear what is believed to be a consequence of the rest of this License.
12. If the distribution and/or use of the Library is restricted in certain countries either by patents or by
copyrighted interfaces, the original copyright holder who places the Library under this License may add an
explicit geographical distribution limitation excluding those countries, so that distribution is permitted only in or
among countries not thus excluded. In such case, this License incorporates the limitation as if written in the
body of this License.
13. The Free Software Foundation may publish revised and/or new versions of the Lesser General Public License
from time to time. Such new versions will be similar in spirit to the present version, but may differ in detail to
address new problems or concerns.
Each version is given a distinguishing version number. If the Library specifies a version number of this License which applies to
it and "any later version", you have the option of following the terms and conditions either of that version or of any later version
published by the Free Software Foundation. If the Library does not specify a license version number, you may choose any
version ever published by the Free Software Foundation.
14. If you wish to incorporate parts of the Library into other free programs whose distribution conditions are
ork
incompatible with these, write to the author to ask for permission. For software which is copyrighted by the
Free Software Foundation, write to the Free Software Foundation; we sometimes make exceptions for this. Our
derivative
decision will be guided by the two goals of preserving the free status of all derivatives of our free software and
of promoting the sharing and reuse of software generally.
NO WARRANTY
15. BECAUSE THE LIBRARY IS LICENSED FREE OF CHARGE, THERE IS NO WARRANTY FOR THE LIBRARY, TO THE
.
EXTENT PERMITTED BY APPLICABLE LAW. EXCEPT WHEN OTHERWISE STATED IN WRITING THE COPYRIGHT
HOLDERS AND/OR OTHER PARTIES PROVIDE THE LIBRARY "AS IS" WITHOUT WARRANTY OF ANY
KIND, EITHER EXPRESSED OR IMPLIED, INCLUDING, BUT NOT LIMITED TO, THE IMPLIED WARRANTIES OF
MERCHANTABILITY AND FITNESS FOR A PARTICULAR PURPOSE. THE ENTIRE RISK AS TO THE QUALITY AND
PERFORMANCE OF THE LIBRARY IS WITH YOU. SHOULD THE LIBRARY PROVE DEFECTIVE, YOU ASSUME THE
COST OF ALL NECESSARY SERVICING, REPAIR OR CORRECTION.
16. IN NO EVENT UNLESS REQUIRED BY APPLICABLE LAW OR AGREED TO IN WRITING WILL ANY COPYRIGHT
HOLDER, OR ANY OTHER PARTY WHO MAY MODIFY AND/OR REDISTRIBUTE THE LIBRARY AS PERMITTED
ABOVE, BE LIABLE TO YOU FOR DAMAGES, INCLUDING ANY GENERAL, SPECIAL, INCIDENTAL OR
CONSEQUENTIAL DAMAGES ARISING OUT OF THE USE OR INABILITY TO USE THE LIBRARY (INCLUDING BUT
NOT LIMITED TO LOSS OF DATA OR DATA BEING RENDERED INACCURATE OR LOSSES SUSTAINED BY YOU
OR THIRD PARTIES OR A FAILURE OF THE LIBRARY TO OPERATE WITH ANY OTHER SOFTWARE), EVEN IF
SUCH HOLDER OR OTHER PARTY HAS BEEN ADVISED OF THE POSSIBILITY OF SUCH DAMAGES.
END OF TERMS AND CONDITIONS
How to Apply These Terms to Your New Libraries
If you develop a new library, and you want it to be of the greatest possible use to the public, we recommend making it
free software that everyone can redistribute and change. You can do so by permitting redistribution under these terms (or,
effectively convey the exclusion of warranty; and each file should have at least the "copyright" line and a pointer to where the
full notice is found.
<one line to give the library's name and an idea of what it does.>
Copyright (C) <year> <name of author>
This library is free software; you can redistribute it and/or modify it under the terms of the GNU Lesser General Public Licens
published by the Free Software Foundation; either version 2.1 of the License, or (at your option) any later version.
This library is distributed in the hope that it will be useful, but WITHOUT ANY WARRANTY; without even the implied warranty
of MERCHANTABILITY or FITNESS FOR A PARTICULAR PURPOSE. See the GNU Lesser General Public License for more
details.
You should have received a copy of the GNU Lesser General Public License along with this library; if not, write to the Free
Software Foundation, Inc., 59 Temple Place, Suite 330, Boston, MA 02111-1307 USA
Also add information on how to contact you by electronic and paper mail.
You should also get your employer (if you work as a programmer) or your school, if any, to sign a "copyright disclaimer" for the
library, if necessary. Here is a sample; alter the names:
Yoyodyne, Inc., hereby disclaims all copyright interest in the library `Frob' (a library for tweaking knobs) written by James
Random Hacker.
signature of Ty Coon, 1 April 1990
Ty Coon, President of Vice
That's all there is to it!
GNU GENERAL PUBLIC LICENSE
Version 2, June 1991
Copyright (C) 1989, 1991 Free Software Foundation, Inc.59 Temple Place - Suite 330, Boston, MA 02111-1307, USA
Everyone is permitted to copy and distribute verbatim copies of this license document, but changing it is not allowed.
Preamble
The licenses for most software are designed to take away your freedom to share and change it. By contrast, the GNU General
Public License is intended to guarantee your freedom to share and change free software--to make sure the software is free for
all its users. This General Public License applies to most of the Free Software Foundation's software and to any other program
License instead.) You can apply it to your programs, too.
When we speak of free software, we are referring to freedom, not price. Our General Public Licenses are designed to make sure
that you have the freedom to distribute copies of free software (and charge for this service if you wish), that you receive source
code or can get it if you want it, that you can change the software or use pieces of it in new free programs; and that you know
you can do these things.
To protect your rights, we need to make restrictions that forbid anyone to deny you these rights or to ask you to surrender the
rights. These restrictions translate to certain responsibilities for you if you distribute copies of the software, or if you modify it.
For example, if you distribute copies of such a program, whether gratis or for a fee, you must give the recipients all the rights
that you have. You must make sure that they, too, receive or can get the source code. And you must show them these terms so
they know their rights.
We protect your rights with two steps: (1) copyright the software, and (2) offer you this license which gives you legal permission
to copy, distribute and/or modify the software.
Also, for each author's protection and ours, we want to make certain that everyone understands that there is no warranty for this
free software. If the software is modified by someone else and passed on, we want its recipients to know that what they have is
not the original, so that any problems introduced by others will not reflect on the original authors' reputations.
Finally, any free program is threatened constantly by software patents. We wish to avoid the danger that redistributors of a free
program will individually obtain patent licenses, in effect making the program proprietary. To prevent this, we have made it clear
that any patent must be licensed for everyone's free use or not licensed at all.
The precise terms and conditions for copying, distribution and modification follow.
TERMS AND CONDITIONS FOR COPYING, DISTRIBUTION AND MODIFICATION
This License applies to any program or other work which contains a notice placed by the copyright holder saying it may
be distributed under the terms of this General Public License. The "Program", below, refers to any such program or work,
and a "work based on the Program" means either the Program or any derivative work under copyright law: that is to say, a
work containing the Program or a portion of it, either verbatim or with modifications and/or translated into another language.
(Hereinafter, translation is included without limitation in the term "modification".) Each licensee is addressed as "you".
Activities other than copying, distribution and modification are not covered by this License; they are outside its scope. The
act of running the Program is not restricted, and the output from the Program is covered only if its contents constitute a work
based on the Program (independent of having been made by running the Program). Whether that is true depends on what the
Program does.
You may copy and distribute verbatim copies of the Program's source code as you receive it, in any
medium, provided that you conspicuously and appropriately publish on each copy an appropriate copyright notice and disclaimer
of warranty; keep intact all the notices that refer to this License and to the absence of any warranty; and give any other reci
of the Program a copy of this License along with the Program.
You may charge a fee for the physical act of transferring a copy, and you may at your option offer warranty protection in
exchange for a fee.
You may modify your copy or copies of the Program or any portion of it, thus forming a work based on the Program, and copy
and distribute such modifications or work under the terms of Section 1 above, provided that you also meet all of these conditions:
a) You must cause the modified files to carry prominent notices stating that you changed the files and the
date of any change.
b) You must cause any work that you distribute or publish, that in whole or in part contains or is derived from
the Program or any part thereof, to be licensed as a whole at no charge to all third parties under the terms of this License.
c) If the modified program normally reads commands interactively when run, you must cause it, when started
running for such interactive use in the most ordinary way, to print or display an announcement including an appropriate copyright
notice and a notice that there is no warranty (or else, saying that you provide a warranty) and that users may redistribute the
program under these conditions, and telling the user how to view a copy of this License. (Exception: if the Program itself is
interactive but does not normally print such an announcement, your work based on the Program is not required to print an
announcement.)
These requirements apply to the modified work as a whole. If identifiable sections of that work are not derived from the Program,
to those sections when you distribute them as separate works. But when you distribute the same sections as part of a whole
which is a work based on the Program, the distribution of the whole must be on the terms of this License, whose permissions for
other licensees extend to the entire whole, and thus to each and every part regardless of who wrote it.
Thus, it is not the intent of this section to claim rights or contest your rights to work written entirely by you; rather, the intent is to
exercise the right to control the distribution of derivative or collective works based on the Program.
In addition, mere aggregation of another work not based on the Program with the Program (or with a work based on the
Program) on a volume of a storage or distribution medium does not bring the other work under the scope of this License.
You may copy and distribute the Program (or a work based on it, under Section 2) in object code or executable form under the
terms of Sections 1 and 2 above provided that you also do one of the following:
a) Accompany it with the complete corresponding machine-readable source code, which must be distributed
under the terms of Sections 1 and 2 above on a medium customarily used for software interchange;or,
Ru-25
Page 26

Подсоединения Начальная настройка Воспроизведение
Others
than your cost of physically performing source distribution, a complete machine-readable copy of the corresponding source code,
to be distributed under the terms of Sections 1 and 2 above on a medium customarily used for software interchange; or,
c)
(This alternative is allowed only for noncommercial distribution and only if you received the program in object code or executa
form with such an offer, in accord with Subsection b above.)
The source code for a work means the preferred form of the work for making modifications to it. For an executable work,
complete source code means all the source code for all modules it contains, plus any associated interface definition files, plu
the scripts used to control compilation and installation of the executable. However, as a special exception, the source code
distributed need not include anything that is normally distributed (in either source or binary form) with the major components
(compiler, kernel, and so on) of the operating system on which the executable runs, unless that component itself accompanies
the executable.
If distribution of executable or object code is made by offering access to copy from a designated place, then offering equivalent
access to copy the source code from the same place counts as distribution of the source code, even though third parties are not
compelled to copy the source along with the object code.
You may not copy, modify, sublicense, or distribute the Program except as expressly provided under this License. Any attempt
otherwise to copy, modify, sublicense or distribute the Program is void, and will automatically terminate your rights under
this License. However, parties who have received copies, or rights, from you under this License will not have their licenses
terminated so long as such parties remain in full compliance.
You are not required to accept this License, since you have not signed it. However, nothing else grants you permission to modify
or distribute the Program or its derivative works. These actions are prohibited by law if you do not accept this License. Therefore,
by modifying or distributing the Program (or any work based on the Program), you indicate your acceptance of this License to do
so, and all its terms and conditions for copying, distributing or modifying the Program or works based on it.
Each time you redistribute the Program (or any work based on the Program), the recipient automatically receives a license from
the original licensor to copy, distribute or modify the Program subject to these terms and conditions. You may not impose any
further restrictions on the recipients' exercise of the rights granted herein. You are not responsible for enforcing compliance by
third parties to this License.
If, as a consequence of a court judgment or allegation of patent infringement or for any other reason (not limited to patent
issues), conditions are imposed on you (whether by court order, agreement or otherwise) that contradict the conditions of this
License, they do not excuse you from the conditions of this License. If you cannot distribute so as to satisfy simultaneously y
obligations under this License and any other pertinent obligations, then as a consequence you may not distribute the Program
at all. For example, if a patent license would not permit royalty-free redistribution of the Program by all those who receive c
directly or indirectly through you, then the only way you could satisfy both it and this License would be to refrain entirely f
distribution of the Program.
If any portion of this section is held invalid or unenforceable under any particular circumstance, the balance of the section i
intended to apply and the section as a whole is intended to apply in other circumstances.
It is not the purpose of this section to induce you to infringe any patents or other property right claims or to contest validi
any such claims; this section has the sole purpose of protecting the integrity of the free software distribution system, which
is implemented by public license practices. Many people have made generous contributions to the wide range of software
distributed through that system in reliance on consistent application of that system; it is up to the author/donor to decide if
she is willing to distribute software through any other system and a licensee cannot impose that choice.
This section is intended to make thoroughly clear what is believed to be a consequence of the rest of this License.
If the distribution and/or use of the Program is restricted in certain countries either by patents or by copyrighted interfaces
original copyright holder who places the Program under this License may add an explicit geographical distribution limitation
excluding those countries, so that distribution is permitted only in or among countries not thus excluded. In such case, this
License incorporates the limitation as if written in the body of this License.
The Free Software Foundation may publish revised and/or new versions of the General Public License from time to time. Such
new versions will be similar in spirit to the present version, but may differ in detail to address new problems or concerns.
Each version is given a distinguishing version number. If the Program specifies a version number of this License which applies
to it and "any later version", you have the option of following the terms and conditions either of that version or of any later
published by the Free Software Foundation. If the Program does not specify a version number of this License, you may choose
any version ever published by the Free Software Foundation.
If you wish to incorporate parts of the Program into other free programs whose distribution conditions are different, write to the
author to ask for permission. For software which is copyrighted by the Free Software Foundation, write to the Free Software
Foundation; we sometimes make exceptions for this. Our decision will be guided by the two goals of preserving the free status o
all derivatives of our free software and of promoting the sharing and reuse of software generally.
NO WARRANTY
BECAUSE THE PROGRAM IS LICENSED FREE OF CHARGE, THERE IS NO WARRANTY FOR THE PROGRAM, TO
THE EXTENT PERMITTED BY APPLICABLE LAW. EXCEPT WHEN OTHERWISE STATED IN WRITING THE COPYRIGHT
HOLDERS AND/OR OTHER PARTIES PROVIDE THE PROGRAM "AS IS" WITHOUT WARRANTY OF ANY KIND, EITHER
EXPRESSED OR IMPLIED, INCLUDING, BUT NOT LIMITED TO, THE IMPLIED WARRANTIES OF MERCHANTABILITY
AND FITNESS FOR A PARTICULAR PURPOSE. THE ENTIRE RISK AS TO THE QUALITY AND PERFORMANCE OF THE
PROGRAM IS WITH YOU. SHOULD THE PROGRAM PROVE DEFECTIVE, YOU ASSUME THE COST OF ALL NECESSARY
SERVICING, REPAIR OR CORRECTION.
IN NO EVENT UNLESS REQUIRED BY APPLICABLE LAW OR AGREED TO IN WRITING WILL ANY COPYRIGHT HOLDER,
OR ANY OTHER PARTY WHO MAY MODIFY AND/OR REDISTRIBUTE THE PROGRAM AS PERMITTED ABOVE, BE
LIABLE TO YOU FOR DAMAGES, INCLUDING ANY GENERAL, SPECIAL, INCIDENTAL OR CONSEQUENTIAL DAMAGES
ARISING OUT OF THE USE OR INABILITY TO USE THE PROGRAM (INCLUDING BUT NOT LIMITED TO LOSS OF DATA
OR DATA BEING RENDERED INACCURATE OR LOSSES SUSTAINED BY YOU OR THIRD PARTIES OR A FAILURE OF
THE PROGRAM TO OPERATE WITH ANY OTHER PROGRAMS), EVEN IF SUCH HOLDER OR OTHER PARTY HAS BEEN
ADVISED OF THE POSSIBILITY OF SUCH DAMAGES.
END OF TERMS AND CONDITIONS
How to Apply These Terms to Your New Programs
If you develop a new program, and you want it to be of the greatest possible use to the public, the best way to achieve this is
make it free software which everyone can redistribute and change under these terms.
To do so, attach the following notices to the program. It is safest to attach them to the start of each source file to most effectively
convey the exclusion of warranty; and each file should have at least the "copyright" line and a pointer to where the full notic
is found.
<one line to give the program's name and an idea of what it does.>
Copyright (C) <year> <name of author>
This program is free software; you can redistribute it and/or modify it under the terms of the GNU General Public License as
published by the Free Software Foundation; either version 2 of the License, or (at your option) any later version.
This program is distributed in the hope that it will be useful, but WITHOUT ANY WARRANTY; without even the implied warranty
of MERCHANTABILITY or FITNESS FOR A PARTICULAR PURPOSE. See the GNU General Public License for more details.
You should have received a copy of the GNU General Public License along with this program; if not, write to the Free Software
Foundation, Inc., 59 Temple Place - Suite 330, Boston, MA 02111-1307, USA.
Also add information on how to contact you by electronic and paper mail.
If the program is interactive, make it output a short notice like this when it starts in an interactive mode:
Gnomovision version 69, Copyright (C) year name of author Gnomovision comes with ABSOLUTELY NO WARRANTY; for details
type `show w'. This is free software, and you are welcome to redistribute it under certain conditions; type `show c' for details.
The hypothetical commands `show w' and `show c' should show the appropriate parts of the General Public License. Of course,
the commands you use may be called something other than `show w' and `show c'; they could even be mouse-clicks or menu
FOR ANY DIRECT, INDIRECT, INCIDENTAL, SPECIAL, EXEMPLARY, OR CONSEQUENTIAL DAMAGES (INCLUDING, BUT
NOT LIMITED TO, PROCUREMENT OF SUBSTITUTE GOODS OR SERVICES; LOSS OF USE, DATA, OR PROFITS; OR
BUSINESS INTERRUPTION) HOWEVER CAUSED AND ON ANY THEORY OF LIABILITY, WHETHER IN CONTRACT, STRICT
the
file ansi2knr.c for full details.) However, since ansi2knr.c is not needed as part of any program generated from the IJG code, this
It appears that the arithmetic coding option of the JPEG spec is covered by patents owned by IBM, AT&T, and Mitsubishi. Hence
AND FITNESS FOR A PARTICULAR PURPOSE ARE DISCLAIMED. IN NO EVENT SHALL THE FOUNDATION OR
items--whatever suits your program.
Accompany it with the information you received as to the offer to distribute corresponding source code.
Ru-26
rom
ty of
version
You should also get your employer (if you work as a programmer) or your school, if any, to sign a "copyright disclaimer" for the
program, if necessary. Here is a sample; alter the names:
ble
Yoyodyne, Inc., hereby disclaims all copyright interest in the program `Gnomovision' (which makes passes at compilers) written
by James Hacker.
<signature of Ty Coon>, 1 April 1989
s
Ty Coon, President of Vice
This General Public License does not permit incorporating your program into proprietary programs. If your program is a
subroutine library, you may consider it more useful to permit linking proprietary applications with the library. If this is what you
want to do, use the GNU Library General Public License instead of this License.
Notice Regarding Third-party Software
This product includes the following software that is directly or indirectly licensed to Onkyo by third-party developers.
1. bfsh-sk
2. ixml
3. libcurl
4. libFLAC
5. libjpeg
6. libogg
7. libpng
8. libvorbis
9. ntp
10. OpenSSL
11. popt
12. RSA Data Security, Inc. MD5 Message-Digest Algorithm
13. thttpd 2.25b
14. zlib
15. Apple Lossless
16. Boost
our
17. Expat
18. FastDelegate
opies
19. Tremolo
20. Tremor
21. Mersenne Twister
s
22. cURL
23. c-ares
24. LZ4
In response to requests from the copyright owners of each piece of software, Onkyo notifies you of the following:
he or
1. bfsh-sk
2. ixml
3. libcurl
, the
4. libFLAC
5. libjpeg
6. libogg
7. libpng
8. libvorbis
9. ntp
10. OpenSSL
11. popt
12. RSA Data Security, Inc. MD5 Message-Digest Algorithm
13. thttpd 2.25b
14. zlib
15. Apple Lossless
f
16. Boost
17. Expat
18. FastDelegate
19. Tremolo
20. Tremor
21. Mersenne Twister
22. cURL
23. c-ares
24. LZ4
(1) bfsh-sk
Copyright (c) 2007 Samuel KABAK
Permission is hereby granted, free of charge, to any person obtaining a copy of this software and associated documentation files
(the "Software"), to deal in the Software without restriction, including without limitation the rights to use, copy, modify, merge,
publish, distribute, sublicense, and/or sell copies of the Software, and to permit persons to whom the Software is furnished to do
so, subject to the following conditions:
The above copyright notice and this permission notice shall be included in all copies or substantial portions of the Software.
THE SOFTWARE IS PROVIDED "AS IS", WITHOUT WARRANTY OF ANY KIND, EXPRESS OR IMPLIED, INCLUDING
BUT NOT LIMITED TO THE WARRANTIES OF MERCHANTABILITY, FITNESS FOR A PARTICULAR PURPOSE AND
to
NONINFRINGEMENT. IN NO EVENT SHALL THE AUTHORS OR COPYRIGHT HOLDERS BE LIABLE FOR ANY CLAIM,
DAMAGES OR OTHER LIABILITY, WHETHER IN AN ACTION OF CONTRACT, TORT OR OTHERWISE, ARISING FROM, OUT
OF OR IN CONNECTION WITH THE SOFTWARE OR THE USE OR OTHER DEALINGS IN THE SOFTWARE.
e
(2) ixml
Copyright (c) 2000-2003 Intel Corporation All rights reserved.
Redistribution and use in source and binary forms, with or without modification, are permitted provided that the following
conditions are met:
* Redistributions of source code must retain the above copyright notice, this list of conditions and the
following disclaimer.
* Redistributions in binary form must reproduce the above copyright notice, this list of conditions and the
following disclaimer in the documentation and/or other materials provided with the distribution.
* Neither name of Intel Corporation nor the names of its contributors may be used to endorse or promote
products derived from this software without specific prior written permission.
THIS SOFTWARE IS PROVIDED BY THE COPYRIGHT HOLDERS AND CONTRIBUTORS "AS IS" AND ANY EXPRESS OR
IMPLIED WARRANTIES, INCLUDING, BUT NOT LIMITED TO, THE IMPLIED WARRANTIES OF MERCHANTABILITY AND
FITNESS FOR A PARTICULAR PURPOSE ARE DISCLAIMED. IN NO EVENT SHALL INTEL OR CONTRIBUTORS BE LIABLE
Прочее
LIABILITY, OR TORT (INCLUDING NEGLIGENCE OR OTHERWISE) ARISING IN ANY WAY OUT OF THE USE OF THIS
SOFTWARE, EVEN IF ADVISED OF THE POSSIBILITY OF SUCH DAMAGE.
(3) libcurl
COPYRIGHT AND PERMISSION NOTICE
Copyright (c) 1996 - 2007, Daniel Stenberg, <daniel@haxx.se>.
All rights reserved.
Permission to use, copy, modify, and distribute this software for any purpose with or without fee is hereby granted, provided that
the above copyright notice and this permission notice appear in all copies.
THE SOFTWARE IS PROVIDED "AS IS", WITHOUT WARRANTY OF ANY KIND, EXPRESS OR IMPLIED, INCLUDING
BUT NOT LIMITED TO THE WARRANTIES OF MERCHANTABILITY, FITNESS FOR A PARTICULAR PURPOSE AND
NONINFRINGEMENT OF THIRD PARTY RIGHTS. IN NO EVENT SHALL THE AUTHORS OR COPYRIGHT HOLDERS
BE LIABLE FOR ANY CLAIM, DAMAGES OR OTHER LIABILITY, WHETHER IN AN ACTION OF CONTRACT, TORT OR
OTHERWISE, ARISING FROM, OUT OF OR IN CONNECTION WITH THE SOFTWARE OR THE USE OR OTHER DEALINGS
IN THE SOFTWARE.
Except as contained in this notice, the name of a copyright holder shall not be used in advertising or otherwise to promote the
sale, use or other dealings in this Software without prior written authorization of the copyright holder.
(4) libFLAC
Copyright (C) 2000,2001,2002,2003,2004,2005,2006,2007 Josh Coalson
Redistribution and use in source and binary forms, with or without modification, are permitted provided that the following
conditions are met:
- Redistributions of source code must retain the above copyright notice, this list of conditions and the
following disclaimer.
- Redistributions in binary form must reproduce the above copyright notice, this list of conditions and the
following disclaimer in the documentation and/or other materials provided with the distribution.
- Neither the name of the Xiph.org Foundation nor the names of itsy be us contributors may be used to
endorse or promote products derived from this software without specific prior written permission.
THIS SOFTWARE IS PROVIDED BY THE COPYRIGHT HOLDERS AND CONTRIBUTORS "AS IS"AND ANY EXPRESS
OR IMPLIED WARRANTIES, INCLUDING, BUT NOT LIMITED TO, THE IMPLIED WARRANTIES OF MERCHANTABILITY
AND FITNESS FOR A PARTICULAR PURPOSE ARE DISCLAIMED. IN NO EVENT SHALL THE FOUNDATION OR
CONTRIBUTORS BE LIABLE FOR ANY DIRECT, INDIRECT, INCIDENTAL, SPECIAL, EXEMPLARY, OR CONSEQUENTIAL
DAMAGES (INCLUDING, BUT NOT LIMITED TO, PROCUREMENT OF SUBSTITUTE GOODS OR SERVICES; LOSS OF
USE, DATA, OR PROFITS; OR BUSINESS INTERRUPTION) HOWEVER CAUSED AND ON ANY THEORY OF LIABILITY,
WHETHER IN CONTRACT, STRICT LIABILITY, OR TORT (INCLUDING NEGLIGENCE OR OTHERWISE) ARISING IN ANY
WAY OUT OF THE USE OF THIS SOFTWARE, EVEN IF ADVISED OF THE POSSIBILITY OF SUCH DAMAGE.
(5) libjpeg
The authors make NO WARRANTY or representation, either express or implied, with respect to this software, its quality,
accuracy, merchantability, or fitness for a particular purpose. This software is provided "AS IS", and you,its user, assume the
entire risk as to its quality and accuracy.
This software is copyright (C) 1991-1998, Thomas G. Lane.
All Rights Reserved except as specified below.
Permission is hereby granted to use, copy, modify, and distribute this software (or portions thereof) for any purpose, without fee,
subject to these conditions:
If any part of the source code for this software is distributed, then this README file must be included, with this copyright
and no-warranty notice unaltered; and any additions, deletions, or changes to the original files must be clearly indicated in
accompanying documentation.
If only executable code is distributed, then the accompanying documentation must state that "this software is based in part on
work of the Independent JPEG Group".
Permission for use of this software is granted only if the user accepts full responsibility for any undesirable consequences; the
authors accept NO LIABILITY for damages of any kind.
These conditions apply to any software derived from or based on the IJG code, not just to the unmodified library. If you use our
work, you ought to acknowledge us.
Permission is NOT granted for the use of any IJG author's name or company name in advertising or publicity relating to this
software or products derived from it. This software may be referred to only as "the Independent JPEG Group's software".
We specifically permit and encourage the use of this software as the basis of commercial products, provided that all warranty or
liability claims are assumed by the product vendor.
ansi2knr.c is included in this distribution by permission of L. Peter Deutsch, sole proprietor of its copyright holder, Aladdin
Enterprises of Menlo Park, CA. ansi2knr.c is NOT covered by the above copyright and conditions, but instead by the usual
distribution terms of the Free Software Foundation; principally, that you must include source code if you redistribute it. (See the
does not limit you more than the foregoing paragraphs do.
The Unix configuration script "configure" was produced with GNU Autoconf. It is copyright by the Free Software Foundation but
is freely distributable. The same holds for its supporting scripts (config.guess, config.sub, ltconfig, ltmain.sh). Another support
script, install-sh, is copyright by M.I.T. but is also freely distributable.
arithmetic coding cannot legally be used without obtaining one or more licenses. For this reason, support for arithmetic coding
has been removed from the free JPEG software.
(Since arithmetic coding provides only a marginal gain over the unpatented Huffman mode, it is unlikely that very many
implementations will support it.) So far as we are aware, there are no patent restrictions on the remaining code.
The IJG distribution formerly included code to read and write GIF files. To avoid entanglement with the Unisys LZW patent, GIF
reading support has been removed altogether, and the GIF writer has been simplified to produce "uncompressed GIFs". This
technique does not use the LZW algorithm; the resulting GIF files are larger than usual, but are readable by all standard GIF
decoders.
We are required to state that
"The Graphics Interchange Format(c) is the Copyright property of ompuServe Incorporated. GIF(sm) is a Service Mark property
of CompuServe Incorporated."
(6) libogg
Copyright (c) 2002, Xiph.org Foundation
Redistribution and use in source and binary forms, with or without modification, are permitted provided that the following
conditions are met:
- Redistributions of source code must retain the above copyright notice, this list of conditions and the
following disclaimer.
- Redistributions in binary form must reproduce the above copyright notice, this list of conditions and the
following disclaimer in the documentation and/or other materials provided with the distribution.
- Neither the name of the Xiph.org Foundation nor the names of its contributors may be used to endorse or
promote products derived from this software without specific prior written permission.
THIS SOFTWARE IS PROVIDED BY THE COPYRIGHT HOLDERS AND CONTRIBUTORS "AS IS" AND ANY EXPRESS
OR IMPLIED WARRANTIES, INCLUDING, BUT NOT LIMITED TO, THE IMPLIED WARRANTIES OF MERCHANTABILITY
Page 27

Подсоединения Начальная настройка Воспроизведение
Others
CONTRIBUTORS BE LIABLE FOR ANY DIRECT, INDIRECT, INCIDENTAL, SPECIAL, EXEMPLARY, OR CONSEQUENTIAL
DAMAGES (INCLUDING, BUT NOT LIMITED TO, PROCUREMENT OF SUBSTITUTE GOODS OR SERVICES; LOSS OF
USE, DATA, OR PROFITS; OR BUSINESS INTERRUPTION) HOWEVER CAUSED AND ON ANY THEORY OF LIABILITY,
WHETHER IN CONTRACT, STRICT LIABILITY, OR TORT (INCLUDING NEGLIGENCE OR OTHERWISE) ARISING IN ANY
WAY OUT OF THE USE OF THIS SOFTWARE, EVEN IF ADVISED OF THE POSSIBILITY OF SUCH DAMAGE.
(7) libpng
COPYRIGHT NOTICE, DISCLAIMER, and LICENSE:
If you modify libpng you may insert additional notices immediately following this sentence.
This code is released under the libpng license.
libpng versions 1.2.6, August 15, 2004, through 1.4.0, January 3, 2010, are Copyright (c) 2004, 2006-2007 Glenn RandersPehrson, and are distributed according to the same disclaimer and license as libpng-1.2.5 with the following individual added t
the list of Contributing Authors:
Cosmin Truta
libpng versions 1.0.7, July 1, 2000, through 1.2.5 - October 3, 2002, are Copyright (c) 2000-2002 Glenn Randers-Pehrson, and
are distributed according to the same disclaimer and license as libpng-1.0.6 with the following individuals added to the list o
Contributing Authors:
Simon-Pierre Cadieux
Eric S. Raymond
Gilles Vollant
and with the following additions to the disclaimer:
There is no warranty against interference with your enjoyment of the library or against infringement. There is no warranty that
our efforts or the library will fulfill any of your particular purposes or needs. This library is provided with all faults, and the entire
risk of satisfactory quality, performance, accuracy, and effort is with the user.
libpng versions 0.97, January 1998, through 1.0.6, March 20, 2000, are Copyright (c) 1998, 1999 Glenn Randers-Pehrson, and
are distributed according to the same disclaimer and license as libpng-0.96, with the following individuals added to the list o
Contributing Authors:
Tom Lane
Glenn Randers-Pehrson
Willem van Schaik
libpng versions 0.89, June 1996, through 0.96, May 1997, are Copyright (c) 1996, 1997 Andreas Dilger Distributed according to
the same disclaimer and license as libpng-0.88, with the following individuals added to the list of Contributing Authors:
John Bowler
Kevin Bracey
Sam Bushell
Magnus Holmgren
Greg Roelofs
Tom Tanner
libpng versions 0.5, May 1995, through 0.88, January 1996, are Copyright (c) 1995, 1996 Guy Eric Schalnat, Group 42, Inc.
For the purposes of this copyright and license, "Contributing Authors" is defined as the following set of individuals:
Andreas Dilger
Dave Martindale
Guy Eric Schalnat
Paul Schmidt
Tim Wegner
The PNG Reference Library is supplied "AS IS". The Contributing Authors and Group 42, Inc. disclaim all warranties, expressed
or implied, including, without limitation, the warranties of merchantability and of fitness for any purpose. The Contributing Authors
and Group 42, Inc. assume no liability for direct, indirect, incidental, special, exemplary, or consequential damages, which may
result from the use of the PNG Reference Library, even if advised of the possibility of such damage.
Permission is hereby granted to use, copy, modify, and distribute this source code, or portions hereof, for any purpose, without
fee, subject to the following restrictions:
source.
This Copyright notice may not be removed or altered from any source or altered source distribution.
The Contributing Authors and Group 42, Inc. specifically permit, without fee, and encourage the use of this source code as a
component to supporting the PNG file format in commercial products. If you use this source code in a product, acknowledgment
is not required but would be appreciated.
(8) libvorbis
Copyright (c) 2002-2004 Xiph.org Foundation
Redistribution and use in source and binary forms, with or without modification, are permitted provided that the following
conditions are met:
following disclaimer.
following disclaimer in the documentation and/or other materials provided with the distribution.
promote products derived from this software without specific prior written permission.
THIS SOFTWARE IS PROVIDED BY THE COPYRIGHT HOLDERS AND CONTRIBUTORS "AS IS" AND ANY EXPRESS
OR IMPLIED WARRANTIES, INCLUDING, BUT NOT LIMITED TO, THE IMPLIED WARRANTIES OF MERCHANTABILITY
AND FITNESS FOR A PARTICULAR PURPOSE ARE DISCLAIMED. IN NO EVENT SHALL THE FOUNDATION OR
CONTRIBUTORS BE LIABLE FOR ANY DIRECT, INDIRECT, INCIDENTAL, SPECIAL, EXEMPLARY, OR CONSEQUENTIAL
DAMAGES (INCLUDING, BUT NOT LIMITED TO, PROCUREMENT OF SUBSTITUTE GOODS OR SERVICES; LOSS OF
USE, DATA, OR PROFITS; OR BUSINESS INTERRUPTION) HOWEVER CAUSED AND ON ANY THEORY OF LIABILITY,
WHETHER IN CONTRACT, STRICT LIABILITY, OR TORT (INCLUDING NEGLIGENCE OR OTHERWISE) ARISING IN ANY
WAY OUT OF THE USE OF THIS SOFTWARE, EVEN IF ADVISED OF THE POSSIBILITY OF SUCH DAMAGE.
(9) ntp
This file is automatically generated from html/copyright.html
Copyright Notice
jpg "Clone me," says Dolly sheepishly
Last update: 20:31 UTC Saturday, January 06, 2007
The following copyright notice applies to all files collectively called the Network Time Protocol Version 4 Distribution. Unless
specifically declared otherwise in an individual file, this notice applies as if the text was explicitly included in the file.
Copyright (c) David L. Mills 1992-2007
Permission to use, copy, modify, and distribute this software and its documentation for any purpose with or without fee is hereby
granted, provided that the above copyright notice appears in all copies and that both the copyright notice and this permission
notice appear in supporting documentation, and that the name University of Delaware not be used in advertising or publicity
pertaining to distribution of the software without specific, written prior permission. The University of Delaware makes no
representations about the suitability this software for any purpose. It is provided "as is" without express or implied warranty.
The following individuals contributed in part to the Network Time Protocol Distribution Version 4 and are acknowledged as
authors of this work.
[1]Mark Andrews <mark_andrews@isc.org> Leitch atomic clock controller
mailto: mills@udel.edu
mailto: moeller@gwdgv1.dnet.gwdg.de
The OpenSSL toolkit stays under a dual license, i.e. both the conditions of the OpenSSL License and the original SSLeay license
in the
in the
INTERRUPTION) HOWEVER CAUSED AND ON ANY THEORY OF LIABILITY, WHETHER IN CONTRACT, STRICT LIABILITY,
(11) popt
Прочее
Redistributions of source code must retain the above copyright notice, this list of conditions and the
Redistributions in binary form must reproduce the above copyright notice, this list of conditions and the
Neither the name of the Xiph.org Foundation nor the names of its contributors may be used to endorse or
The origin of this source code must not be misrepresented.
Altered versions must be plainly marked as such and must not be misrepresented as being the original
[2]Bernd Altmeier <altmeier@atlsoft.de> hopf Elektronik serial line and PCI-bus devices
[3]Viraj Bais <vbais@mailman1.intel.com> and [4]Clayton Kirkwood <kirkwood@striderfm.intel.com> port to WindowsNT 3.5
[5]Michael Barone <michael,barone@lmco.com> GPSVME fixes
[6]Jean-Francois Boudreault <Jean-Francois.Boudreault@viagenie.qc.ca>IPv6 support
[7]Karl Berry <karl@owl.HQ.ileaf.com> syslog to file option
[8]Greg Brackley <greg.brackley@bigfoot.com> Major rework of WINNT port. Clean up recvbuf and iosignal code into separate
modules.
[9]Marc Brett <Marc.Brett@westgeo.com> Magnavox GPS clock driver
[10]Piete Brooks <Piete.Brooks@cl.cam.ac.uk> MSF clock driver, Trimble PARSE support
[11]Reg Clemens <reg@dwf.com> Oncore driver (Current maintainer)
o
[12]Steve Clift <clift@ml.csiro.au> OMEGA clock driver
[13]Casey Crellin <casey@csc.co.za> vxWorks (Tornado) port and help with target configuration
[14]Sven Dietrich <sven_dietrich@trimble.com> Palisade reference clock driver, NT adj. residuals, integrated Greg's Winnt port.
[15]John A. Dundas III <dundas@salt.jpl.nasa.gov> Apple A/UX port
f
[16]Torsten Duwe <duwe@immd4.informatik.uni-erlangen.de> Linux port
[17]Dennis Ferguson <dennis@mrbill.canet.ca> foundation code for NTP Version 2 as specified in RFC-1119
[18]John Hay <jhay@icomtek.csir.co.za> IPv6 support and testing
[19]Glenn Hollinger <glenn@herald.usask.ca> GOES clock driver
[20]Mike Iglesias <iglesias@uci.edu> DEC Alpha port
[21]Jim Jagielski <jim@jagubox.gsfc.nasa.gov> A/UX port
[22]Jeff Johnson <jbj@chatham.usdesign.com> massive prototyping overhaul
[23]Hans Lambermont <Hans.Lambermont@nl.origin-it.com> or [24]<H.Lambermont@chello.nl> ntpsweep
[25]Poul-Henning Kamp <phk@FreeBSD.ORG> Oncore driver (Original author)
[26]Frank Kardel [27]<kardel (at) ntp (dot) org> PARSE <GENERIC> driver (>14 reference clocks), STREAMS modules for
f
PARSE, support scripts, syslog cleanup, dynamic interface handling
[28]William L. Jones <jones@hermes.chpc.utexas.edu> RS/6000 AIX modifications, HPUX modifications
[29]Dave Katz <dkatz@cisco.com> RS/6000 AIX port
[30]Craig Leres <leres@ee.lbl.gov> 4.4BSD port, ppsclock, MagnavoxGPS clock driver
[31]George Lindholm <lindholm@ucs.ubc.ca> SunOS 5.1 port
[32]Louis A. Mamakos <louie@ni.umd.edu> MD5-based authentication
[33]Lars H. Mathiesen <thorinn@diku.dk> adaptation of foundation code for Version 3 as specified in RFC-1305
[34]Danny Mayer <mayer@ntp.org>Network I/O, Windows Port, Code Maintenance
[35]David L. Mills <mills@udel.edu> Version 4 foundation: clock discipline, authentication, precision kernel; clock drivers:
Spectracom, Austron, Arbiter, Heath, ATOM, ACTS, KSI/Odetics; audio clock drivers: CHU, WWV/H, IRIG
[36]Wolfgang Moeller <moeller@gwdgv1.dnet.gwdg.de> VMS port
[37]Jeffrey Mogul <mogul@pa.dec.com> ntptrace utility
[38]Tom Moore <tmoore@fievel.daytonoh.ncr.com> i386 svr4 port
[39]Kamal A Mostafa <kamal@whence.com> SCO OpenServer port
[40]Derek Mulcahy <derek@toybox.demon.co.uk> and [41]Damon Hart-Davis <d@hd.org> ARCRON MSF clock driver
[42]Rainer Pruy <Rainer.Pruy@informatik.uni-erlangen.de> monitoring/trap scripts, statistics file handling
[43]Dirce Richards <dirce@zk3.dec.com> Digital UNIX V4.0 port
[44]Wilfredo Sanchez <wsanchez@apple.com> added support for NetInfo
[45]Nick Sayer <mrapple@quack.kfu.com> SunOS streams modules
[46]Jack Sasportas <jack@innovativeinternet.com> Saved a Lot of space on the stuff in the html/pic/ subdirectory
[47]Ray Schnitzler <schnitz@unipress.com> Unixware1 port
[48]Michael Shields <shields@tembel.org> USNO clock driver
[49]Jeff Steinman <jss@pebbles.jpl.nasa.gov> Datum PTS clock driver
[50]Harlan Stenn <harlan@pfcs.com> GNU automake/autoconfigure makeover, various other bits (see the ChangeLog)
[51]Kenneth Stone <ken@sdd.hp.com> HP-UX port
[52]Ajit Thyagarajan <ajit@ee.udel.edu>IP multicast/anycast support
[53]Tomoaki TSURUOKA <tsuruoka@nc.fukuoka-u.ac.jp>TRAK clock driver
[54]Paul A Vixie <vixie@vix.com> TrueTime GPS driver, generic TrueTime clock driver
[55]Ulrich Windl <Ulrich.Windl@rz.uni-regensburg.de> corrected and validated HTML documents according to the HTML DTD
References
mailto: mark_andrews@isc.org
mailto: altmeier@atlsoft.de
mailto: vbais@mailman1.intel.co
mailto: kirkwood@striderfm.intel.com
mailto: michael.barone@lmco.com
mailto: Jean-Francois.Boudreault@viagenie.qc.ca
mailto: karl@owl.HQ.ileaf.com
mailto: greg.brackley@bigfoot.com
mailto: Marc.Brett@westgeo.com
mailto: Piete.Brooks@cl.cam.ac.uk
mailto: reg@dwf.com
mailto: clift@ml.csiro.au
mailto: casey@csc.co.za
mailto: Sven_Dietrich@trimble.COM
mailto: dundas@salt.jpl.nasa.gov
mailto: duwe@immd4.informatik.uni-erlangen.de
mailto: dennis@mrbill.canet.ca
mailto: jhay@icomtek.csir.co.za
mailto: glenn@herald.usask.ca
mailto: iglesias@uci.edu
mailto: jagubox.gsfc.nasa.gov
mailto: jbj@chatham.usdesign.com
mailto: Hans.Lambermont@nl.origin-it.com
mailto: H.Lambermont@chello.nl
mailto: phk@FreeBSD.ORG
http://www4.informatik.uni-erlangen.de/%7ekardel
mailto: kardel(at)ntp(dot)org
mailto: jones@hermes.chpc.utexas.edu
mailto: dkatz@cisco.com
mailto: leres@ee.lbl.gov
mailto: lindholm@ucs.ubc.ca
mailto: louie@ni.umd.edu
mailto: thorinn@diku.dk
mailto: mayer@ntp.org
mailto: mogul@pa.dec.com
mailto: tmoore@fievel.daytonoh.ncr.com
mailto: kamal@whence.com
mailto: derek@toybox.demon.co.uk
mailto: d@hd.org
mailto: Rainer.Pruy@informatik.uni-erlangen.de
mailto: dirce@zk3.dec.com
mailto: wsanchez@apple.com
mailto: mrapple@quack.kfu.com
mailto: jack@innovativeinternet.com
mailto: schnitz@unipress.com
mailto: shields@tembel.org
mailto: pebbles.jpl.nasa.gov
mailto: harlan@pfcs.com
mailto: ken@sdd.hp.com
mailto: ajit@ee.udel.edu
mailto: tsuruoka@nc.fukuoka-u.ac.jp
mailto: vixie@vix.com
mailto: Ulrich.Windl@rz.uni-regensburg.de
(10) OpenSSL
LICENSE ISSUES
==============
apply to the toolkit. See below for the actual license texts. Actually both licenses are BSD-style Open Source licenses. In case of
any license issues related to OpenSSL please contact openssl-core@openssl.org.
OpenSSL License
--------------============================================
Copyright (c) 1998-2007 The OpenSSL Project. All rights reserved.
Redistribution and use in source and binary forms, with or without modification, are permitted provided that the following
conditions are met:
Redistributions of source code must retain the above copyright notice, this list of conditions and the
following disclaimer.
Redistributions in binary form must reproduce the above copyright notice, this list of conditions and the following disclaimer
documentation and/or other materials provided with the distribution.
All advertising materials mentioning features or use of this software must display the following acknowledgment:
"This product includes software developed by the OpenSSL Project for use in the OpenSSL Toolkit. (http://www.openssl.org/)"
The names "OpenSSL Toolkit" and "OpenSSL Project" must not be used to endorse or promote products derived from this
software without prior written permission. For written permission, please contact openssl-core@openssl.org.
Products derived from this software may not be called "OpenSSL" nor may "OpenSSL" appear in their names without prior
written permission of the OpenSSL Project.
Redistributions of any form whatsoever must retain the following acknowledgment:
"This product includes software developed by the OpenSSL Project for use in the OpenSSL Toolkit
(http://www.openssl.org/)"
THIS SOFTWARE IS PROVIDED BY THE OpenSSL PROJECT "AS IS" AND ANY EXPRESSED OR IMPLIED WARRANTIES,
INCLUDING, BUT NOT LIMITED TO, THE IMPLIED WARRANTIES OF MERCHANTABILITY AND FITNESS FOR A
PARTICULAR PURPOSE ARE DISCLAIMED. IN NO EVENT SHALL THE OpenSSL PROJECT OR ITS CONTRIBUTORS
BE LIABLE FOR ANY DIRECT, INDIRECT, INCIDENTAL, SPECIAL, EXEMPLARY, OR CONSEQUENTIAL DAMAGES
(INCLUDING, BUT NOT LIMITED TO, PROCUREMENT OF SUBSTITUTE GOODS OR SERVICES; LOSS OF USE, DATA,
OR PROFITS; OR BUSINESS INTERRUPTION) HOWEVER CAUSED AND ON ANY THEORY OF LIABILITY, WHETHER IN
CONTRACT, STRICT LIABILITY, OR TORT (INCLUDING NEGLIGENCE OR OTHERWISE) ARISING IN ANY WAY OUT OF
THE USE OF THIS SOFTWARE, EVEN IF ADVISED OF THE POSSIBILITY OF SUCH DAMAGE.
============================================
This product includes cryptographic software written by Eric Young (eay@cryptsoft.com). This product includes software written
by Tim Hudson (tjh@cryptsoft.com).
Original SSLeay License
--------------------------Copyright (C) 1995-1998 Eric Young (eay@cryptsoft.com) All rights reserved.
This package is an SSL implementation written by Eric Young (eay@cryptsoft.com).
The implementation was written so as to conform with Netscapes SSL.
This library is free for commercial and non-commercial use as long as the following conditions are aheared to. The following
conditions apply to all code found in this distribution, be it the RC4, RSA, lhash, DES, etc., code; not just the SSL code. The
SSL documentation included with this distribution is covered by the same copyright terms except that the holder is Tim Hudson
(tjh@cryptsoft.com).
Copyright remains Eric Young's, and as such any Copyright notices in the code are not to be removed.
If this package is used in a product, Eric Young should be given attribution as the author of the parts of the library used.
This can be in the form of a textual message at program startup or in documentation (online or textual) provided with the
package.
Redistribution and use in source and binary forms, with or without modification, are permitted provided that the following
conditions are met:
Redistributions of source code must retain the copyright notice, this list of conditions and the following
disclaimer.
Redistributions in binary form must reproduce the above copyright notice, this list of conditions and the following disclaimer
documentation and/or other materials provided with the distribution.
All advertising materials mentioning features or use of this software must display the following acknowledgement: "Eric Young
(eay@cryptsoft.com)"
The word `cryptographic' can be left out if the rouines from the library being used are not cryptographic related :-).
If you include any Windows specific code (or a derivative thereof) from the apps directory (application code) you must include an
acknowledgement: "This product includes software written by Tim Hudson (tjh@cryptsoft.com)"
THIS SOFTWARE IS PROVIDED BY ERIC YOUNG "AS IS" AND ANY EXPRESS OR IMPLIED WARRANTIES, INCLUDING,
BUT NOT LIMITED TO, THE IMPLIED WARRANTIES OF MERCHANTABILITY AND FITNESS FOR A PARTICULAR
PURPOSE ARE DISCLAIMED. IN NO EVENT SHALL THE AUTHOR OR CONTRIBUTORS BE LIABLE FOR ANY DIRECT,
INDIRECT, INCIDENTAL, SPECIAL, EXEMPLARY, OR CONSEQUENTIAL DAMAGES (INCLUDING, BUT NOT LIMITED
TO, PROCUREMENT OF SUBSTITUTE GOODS OR SERVICES; LOSS OF USE, DATA, OR PROFITS; OR BUSINESS
OR TORT (INCLUDING NEGLIGENCE OR OTHERWISE) ARISING IN ANY WAY OUT OF THE USE OF THIS SOFTWARE,
EVEN IF ADVISED OF THE POSSIBILITY OF SUCH DAMAGE.
============================================
Ru-27
Page 28

Подсоединения Начальная настройка Воспроизведение
Others
Copyright (c) 1998 Red Hat Software
Permission is hereby granted, free of charge, to any person obtaining a copy of this software and associated documentation file
(the "Software"), to deal in the Software without restriction, including without limitation the rights to use, copy, modify, merge,
publish, distribute, sublicense, and/or sell copies of the Software, and to permit persons to whom the Software is furnished to
so, subject to the following conditions:
The above copyright notice and this permission notice shall be included in all copies or substantial portions of the Software.
THE SOFTWARE IS PROVIDED "AS IS", WITHOUT WARRANTY OF ANY KIND, EXPRESS OR IMPLIED, INCLUDING
BUT NOT LIMITED TO THE WARRANTIES OF MERCHANTABILITY, FITNESS FOR A PARTICULAR PURPOSE AND
NONINFRINGEMENT. IN NO EVENT SHALL THE X CONSORTIUM BE LIABLE FOR ANY CLAIM, DAMAGES OR
OTHER LIABILITY, WHETHER IN AN ACTION OF CONTRACT, TORT OR OTHERWISE, ARISING FROM, OUT OF OR IN
CONNECTION WITH THE SOFTWARE OR THE USE OR OTHER DEALINGS IN THE SOFTWARE.
Except as contained in this notice, the name of the X Consortium shall not be used in advertising or otherwise to promote the
sale, use or other dealings in this Software without prior written authorization from the X Consortium.
(12) RSA Data Security, Inc. MD5 Message-Digest Algorithm
Copyright (C) 1991-2, RSA Data Security, Inc. Created 1991. All rights reserved.
License to copy and use this software is granted provided that it is identified as the "RSA Data Security, Inc. MD5 MessageDigest Algorithm" in all material mentioning or referencing this software or this function.
License is also granted to make and use derivative works provided that such works are identified as "derived from the RSA Data
Security, Inc. MD5 Message-Digest Algorithm" in all material mentioning or referencing the derived work.
RSA Data Security, Inc. makes no representations concerning either the merchantability of this software or the suitability of this
software for any particular purpose. It is provided "as is" without express or implied warranty of any kind.
These notices must be retained in any copies of any part of this documentation and/or software.
(13) thttpd 2.25b
Copyright c 2000 by Jef Poskanzer <jef@mail.acme.com>. All rights reserved.
Redistribution and use in source and binary forms, with or without modification, are permitted provided that the following
conditions are met:
following disclaimer.
Redistributions in binary form must reproduce the above copyright notice, this list of conditions and the following disclaimer
documentation and/or other materials provided with the distribution.
THIS SOFTWARE IS PROVIDED BY THE AUTHOR AND CONTRIBUTORS "AS IS" AND ANY EXPRESS OR IMPLIED
WARRANTIES, INCLUDING, BUT NOT LIMITED TO, THE IMPLIED WARRANTIES OF MERCHANTABILITY AND FITNESS
FOR A PARTICULAR PURPOSE ARE DISCLAIMED. IN NO EVENT SHALL THE AUTHOR OR CONTRIBUTORS BE LIABLE
FOR ANY DIRECT, INDIRECT, INCIDENTAL, SPECIAL, EXEMPLARY, OR CONSEQUENTIAL DAMAGES (INCLUDING, BUT
NOT LIMITED TO, PROCUREMENT OF SUBSTITUTE GOODS OR SERVICES; LOSS OF USE, DATA, OR PROFITS; OR
BUSINESS INTERRUPTION) HOWEVER CAUSED AND ON ANY THEORY OF LIABILITY, WHETHER IN CONTRACT, STRICT
LIABILITY, OR TORT (INCLUDING NEGLIGENCE OR OTHERWISE) ARISING IN ANY WAY OUT OF THE USE OF THIS
SOFTWARE, EVEN IF ADVISED OF THE POSSIBILITY OF SUCH DAMAGE.
(14) zlib
zlib.h -- interface of the `zlib' general purpose compression library version 1.1.4, March 11th, 2002
Copyright (C) 1995-2002 Jean-loup Gailly and Mark Adler
This software is provided `as-is', without any express or implied warranty. In no event will the authors be held liable for any
damages arising from the use of this software.
Permission is granted to anyone to use this software for any purpose, including commercial applications, and to alter it and
redistribute it freely, subject to the following restrictions:
software. If you use this software in a product, an acknowledgment in the product documentation would be appreciated but is not
required.
Altered source versions must be plainly marked as such, and must not be misrepresented as being the original software.
This notice may not be removed or altered from any source distribution.
Jean-loup Gailly
jloup@gzip.org
The data format used by the zlib library is described by RFCs (Request for Comments) 1950 to 1952 in the files
ftp://ds.internic.net/rfc/rfc1950.txt (zlib format), rfc1951.txt (deflate format) and rfc1952.txt (gzip format).
(15) Apple Lossless
Apache License
Version 2.0, January 2004
http://www.apache.org/licenses/
TERMS AND CONDITIONS FOR USE, REPRODUCTION, AND DISTRIBUTION
"License" shall mean the terms and conditions for use, reproduction, and distribution as defined by Sections 1 through 9 of thi
document.
"Licensor" shall mean the copyright owner or entity authorized by the copyright owner that is granting the License.
"Legal Entity" shall mean the union of the acting entity and all other entities that control, are controlled by, or are under
common control with that entity. For the purposes of this definition, "control" means (i) the power, direct or indirect, to cause the
direction or management of such entity, whether by contract or otherwise, or (ii) ownership of fifty percent (50%) or more of the
outstanding shares, or (iii) beneficial ownership of such entity.
"You" (or "Your") shall mean an individual or Legal Entity exercising permissions granted by this License.
"Source" form shall mean the preferred form for making modifications, including but not limited to software source code,
documentation source, and configuration files.
"Object" form shall mean any form resulting from mechanical transformation or translation of a Source form, including but not
limited to compiled object code, generated documentation, and conversions to other media types.
"Work" shall mean the work of authorship, whether in Source or Object form, made available under the License, as indicated
by a copyright notice that is included in or attached to the work (an example is provided in the Appendix below).
"Derivative Works" shall mean any work, whether in Source or Object form, that is based on (or derived from) the Work and
for which the editorial revisions, annotations, elaborations, or other modifications represent, as a whole, an original work of
authorship. For the purposes of this License, Derivative Works shall not include works that remain separable from, or merely link
(or bind by name) to the interfaces of, the Work and Derivative Works thereof.
"Contribution" shall mean any work of authorship, including the original version of the Work and any modifications or additions to
END OF TERMS AND CONDITIONS
documentation covered by this license (the "Software") to use, reproduce, display, distribute, execute, and transmit the Software,
and to prepare derivative works of the Software, and to permit third-parties to whom the Software is furnished to do so, all subject
unless such copies or derivative works are solely in the form of machine-executable object code generated by a source language
DAMAGES OR OTHER LIABILITY, WHETHER IN AN ACTION OF CONTRACT, TORT OR OTHERWISE, ARISING FROM, OUT
YOUR ACCEPTANCE OF SUCH TERMS AND CONDITIONS. IF YOU DO NOT AGREE TO ACCEPT AND BE BOUND BY THE
You may otherwise modify Your copy of this Work (excluding the Articles) in any way to create a Derivative
The Articles discussing the Work published in any form by the author may not be distributed or republished
the prior written consent of the Author.
s
that Work or Derivative Works thereof, that is intentionally submitted to Licensor for inclusion in the Work by the copyright owner
or by an individual or Legal Entity authorized to submit on behalf of the copyright owner. For the purposes of this definition,
"submitted" means any form of electronic, verbal, or written communication sent to the Licensor or its representatives, including
do
but not limited to communication on electronic mailing lists, source code control systems, and issue tracking systems that are
managed by, or on behalf of, the Licensor for the purpose of discussing and improving the Work, but excluding communication
that is conspicuously marked or otherwise designated in writing by the copyright owner as "Not a Contribution."
"Contributor" shall mean Licensor and any individual or Legal Entity on behalf of whom a Contribution has been received by
Licensor and subsequently incorporated within the Work.
Grant of Copyright License.
Subject to the terms and conditions of this License, each Contributor hereby grants to You a perpetual, worldwide, non-exclusive,
no-charge, royalty-free, irrevocable copyright license to reproduce, prepare Derivative Works of, publicly display, publicly
perform, sublicense, and distribute the Work and such Derivative Works in Source or Object form.
Ru-28
Redistributions of source code must retain the above copyright notice, this list of conditions and the
The origin of this software must not be misrepresented; you must not claim that you wrote the original
Mark Adler
madler@alumni.caltech.edu
Definitions.
Grant of Patent License.
Subject to the terms and conditions of this License, each Contributor hereby grants to You a perpetual, worldwide, non-exclusive,
no-charge, royalty-free, irrevocable (except as stated in this section) patent license to make, have made, use, offer to sell, sell,
import, and otherwise transfer the Work, where such license applies only to those patent claims licensable by such Contributor
that are necessarily infringed by their Contribution(s) alone or by combination of their Contribution(s) with the Work to which
such Contribution(s) was submitted. If You institute patent litigation against any entity (including a cross-claim or counterclaim
in a lawsuit) alleging that the Work or a Contribution incorporated within the Work constitutes direct or contributory patent
infringement, then any patent licenses granted to You under this License for that Work shall terminate as of the date such
litigation is filed.
Redistribution.
in the
You may reproduce and distribute copies of the Work or Derivative Works thereof in any medium, with or without modifications,
and in Source or Object form, provided that You meet the following conditions:
You must give any other recipients of the Work or Derivative Works a copy of this License; and
You must cause any modified files to carry prominent notices stating that You changed the files; and
You must retain, in the Source form of any Derivative Works that You distribute, all copyright, patent, trademark, and attribution
notices from the Source form of the Work, excluding those notices that do not pertain to any part of the Derivative Works; and
If the Work includes a "NOTICE" text file as part of its distribution, then any Derivative Works that You distribute must include
a readable copy of the attribution notices contained within such NOTICE file, excluding those notices that do not pertain to any
part of the Derivative Works, in at least one of the following places: within a NOTICE text file distributed as part of the Derivative
Works; within the Source form or documentation, if provided along with the Derivative Works; or, within a display generated
by the Derivative Works, if and wherever such third-party notices normally appear. The contents of the NOTICE file are for
informational purposes only and do not modify the License. You may add Your own attribution notices within Derivative Works
that You distribute, alongside or as an addendum to the NOTICE text from the Work, provided that such additional attribution
notices cannot be construed as modifying the License.
You may add Your own copyright statement to Your modifications and may provide additional or different license terms and
conditions for use, reproduction, or distribution of Your modifications, or for any such Derivative Works as a whole, provided Your
use, reproduction, and distribution of the Work otherwise complies with the conditions stated in this License.
Submission of Contributions.
Unless You explicitly state otherwise, any Contribution intentionally submitted for inclusion in the Work by You to the Licensor
shall be under the terms and conditions of this License, without any additional terms or conditions.
Notwithstanding the above, nothing herein shall supersede or modify the terms of any separate license agreement you may have
executed with Licensor regarding such Contributions.
Trademarks.
This License does not grant permission to use the trade names, trademarks, service marks, or product names of the Licensor,
except as required for reasonable and customary use in describing the origin of the Work and reproducing the content of the
NOTICE file.
s
Disclaimer of Warranty.
Unless required by applicable law or agreed to in writing, Licensor provides the Work (and each Contributor provides its
Contributions) on an "AS IS" BASIS, WITHOUT WARRANTIES OR CONDITIONS OF ANY KIND, either express or implied,
including, without limitation, any warranties or conditions of TITLE, NON-INFRINGEMENT, MERCHANTABILITY, or FITNESS
FOR A PARTICULAR PURPOSE. You are solely responsible for determining the appropriateness of using or redistributing the
Work and assume any risks associated with Your exercise of permissions under this License.
Limitation of Liability.
In no event and under no legal theory, whether in tort (including negligence), contract, or otherwise, unless required by applicable
law (such as deliberate and grossly negligent acts) or agreed to in writing, shall any Contributor be liable to You for damages,
including any direct, indirect, special, incidental, or consequential damages of any character arising as a result of this License
or out of the use or inability to use the Work (including but not limited to damages for loss of goodwill, work stoppage, computer
failure or malfunction, or any and all other commercial damages or losses), even if such Contributor has been advised of the
possibility of such damages.
Accepting Warranty or Additional Liability.
While redistributing the Work or Derivative Works thereof, You may choose to offer, and charge a fee for, acceptance of
support, warranty, indemnity, or other liability obligations and/or rights consistent with this License. However, in accepting such
obligations, You may act only on Your own behalf and on Your sole responsibility, not on behalf of any other Contributor, and only
if You agree to indemnify, defend, and hold each Contributor harmless for any liability incurred by, or claims asserted against,
such Contributor by reason of your accepting any such warranty or additional liability.
Прочее
APPENDIX: How to apply the Apache License to your work.
To apply the Apache License to your work, attach the following boilerplate notice, with the fields enclosed by brackets "[]"
replaced with your own identifying information. (Don't include the brackets!) The text should be enclosed in the appropriate
comment syntax for the file format. We also recommend that a file or class name and description of purpose be included on the
same "printed page" as the copyright notice for easier identification within third-party archives.
Copyright ? 2011 Apple Inc. All rights reserved.
Licensed under the Apache License, Version 2.0 (the "License");
you may not use this file except in compliance with the License.
You may obtain a copy of the License at
http://www.apache.org/licenses/LICENSE-2.0
Unless required by applicable law or agreed to in writing, software distributed under the License is distributed on an "AS IS"
BASIS, WITHOUT WARRANTIES OR CONDITIONS OF ANY KIND, either express or implied.
See the License for the specific language governing permissions and limitations under
the License.
(16) Boost
http://www.boost.org/
Boost Software License - Version 1.0 - August 17th, 2003
Permission is hereby granted, free of charge, to any person or organization obtaining a copy of the software and accompanying
to the following:
The copyright notices in the Software and this entire statement, including the above license grant, this restriction and the
following disclaimer, must be included in all copies of the Software, in whole or in part, and all derivative works of the Software,
processor.
THE SOFTWARE IS PROVIDED "AS IS", WITHOUT WARRANTY OF ANY KIND, EXPRESS OR IMPLIED, INCLUDING BUT
NOT LIMITED TO THE WARRANTIES OF MERCHANTABILITY, FITNESS FOR A PARTICULAR PURPOSE, TITLE AND NONINFRINGEMENT. IN NO EVENT SHALL THE COPYRIGHT HOLDERS OR ANYONE DISTRIBUTING THE SOFTWARE BE
LIABLE FOR ANY DAMAGES OR OTHER LIABILITY, WHETHER IN CONTRACT, TORT OR OTHERWISE, ARISING FROM,
OUT OF OR IN CONNECTION WITH THE SOFTWARE OR THE USE OR OTHER DEALINGS IN THE SOFTWARE.
(17) Expat
http://www.jclark.com/xml/expat.html
Expat License. Copyright (c) 1998, 1999, 2000 Thai Open Source Software Center Ltd
Permission is hereby granted, free of charge, to any person obtaining a copy of this software and associated documentation files
(the "Software"), to deal in the Software without restriction, including without limitation the rights to use, copy, modify, merge,
publish, distribute, sublicense, and/or sell copies of the Software, and to permit persons to whom the Software is furnished to do
so, subject to the following conditions:
The above copyright notice and this permission notice shall be included in all copies or substantial portions of the Software.
THE SOFTWARE IS PROVIDED "AS IS", WITHOUT WARRANTY OF ANY KIND, EXPRESS OR IMPLIED, INCLUDING
BUT NOT LIMITED TO THE WARRANTIES OF MERCHANTABILITY, FITNESS FOR A PARTICULAR PURPOSE AND
NONINFRINGEMENT. IN NO EVENT SHALL THE AUTHORS OR COPYRIGHT HOLDERS BE LIABLE FOR ANY CLAIM,
OF OR IN CONNECTION WITH THE SOFTWARE OR THE USE OR OTHER DEALINGS IN THE SOFTWARE.
(18) FastDelegate
http://www.codeproject.com/KB/cpp/FastDelegate.aspx
THE WORK (AS DEFINED BELOW) IS PROVIDED UNDER THE TERMS OF THIS CODE PROJECT OPEN LICENSE
("LICENSE"). THE WORK IS PROTECTED BY COPYRIGHT AND/OR OTHER APPLICABLE LAW. ANY USE OF THE WORK
OTHER THAN AS AUTHORIZED UNDER THIS LICENSE OR COPYRIGHT LAW IS PROHIBITED.
BY EXERCISING ANY RIGHTS TO THE WORK PROVIDED HEREIN, YOU ACCEPT AND AGREE TO BE BOUND BY THE
TERMS OF THIS LICENSE. THE AUTHOR GRANTS YOU THE RIGHTS CONTAINED HEREIN IN CONSIDERATION OF
TERMS OF THIS LICENSE, YOU CANNOT MAKE ANY USE OF THE WORK.
Definitions.
a. "Articles" means, collectively, all articles written by Author which describes how the Source Code and
Executable Files for the Work may be used by a user.
b. "Author" means the individual or entity that offers the Work under the terms of this License.
c. "Derivative Work" means a work based upon the Work or upon the Work and other pre-existing works.
d. "Executable Files" refer to the executables, binary files, configuration and any required data files included
in the Work.
e. "Publisher" means the provider of the website, magazine, CD-ROM, DVD or other medium from or by
which the Work is obtained by You.
f. "Source Code" refers to the collection of source code and configuration files used to create the Executable
Files.
g. "Standard Version" refers to such a Work if it has not been modified, or has been modified in accordance
with the consent of the Author, such consent being in the full discretion of the Author.
h. "Work" refers to the collection of files distributed by the Publisher, including the Source Code, Executable
Files, binaries, data files, documentation, whitepapers and the Articles.
i. "You" is you, an individual or entity wishing to use the Work and exercise your rights under this License.
Fair Use/Fair Use Rights. Nothing in this License is intended to reduce, limit, or restrict any rights arising from fair use, fair
dealing, first sale or other limitations on the exclusive rights of the copyright owner under copyright law or other applicable laws.
License Grant. Subject to the terms and conditions of this License, the Author hereby grants You a worldwide, royalty-free, nonexclusive, perpetual (for the duration of the applicable copyright) license to exercise the rights in the Work as stated below:
a. You may use the standard version of the Source Code or Executable Files in Your own applications.
b. You may apply bug fixes, portability fixes and other modifications obtained from the Public Domain or from
the Author. A Work modified in such a way shall still be considered the standard version and will be subject to this License.
c.
Work, provided that You insert a prominent notice in each changed file stating how, when and where You changed that file.
d. You may distribute the standard version of the Executable Files and Source Code or Derivative Work in
aggregate with other (possibly commercial) programs as part of a larger (possibly commercial) software distribution.
e.
without the Author's consent. The author retains copyright to any such Articles. You may use the Executable Files and Source
Code pursuant to this License but you may not repost or republish or otherwise distribute or make available the Articles, without
Page 29

Подсоединения Начальная настройка Воспроизведение
Others
Any subroutines or modules supplied by You and linked into the Source Code or Executable Files this Work shall not be
considered part of this Work and will not be subject to the terms of this License.
Patent License. Subject to the terms and conditions of this License, each Author hereby grants to You a perpetual, worldwide,
non-exclusive, no-charge, royalty-free, irrevocable (except as stated in this section) patent license to make, have made, use,
import, and otherwise transfer the Work.
Restrictions. The license granted in Section 3 above is expressly made subject to and limited by the following restrictions:
a.
associated disclaimers that may appear in the Source Code or Executable Files.
b.
c.
the prior written consent of the Author.
d.
or any part of the Work inside a larger software distribution that itself is being sold. The Work by itself, though, cannot be sold,
leased or rented.
e.
must include a copy of, or the Uniform Resource Identifier for, this License with every copy of the Executable Files or Source
Code You distribute and ensure that anyone receiving such Executable Files and Source Code agrees that the terms of this
License apply to such Executable Files and/or Source Code. You may not offer or impose any terms on the Work that alter
or restrict the terms of this License or the recipients' exercise of the rights granted hereunder. You may not sublicense the
Work. You must keep intact all notices that refer to this License and to the disclaimer of warranties. You may not distribute
the Executable Files or Source Code with any technological measures that control access or use of the Work in a manner
inconsistent with the terms of this License.
f.
immoral or improper material. The Work is subject to applicable export laws. You agree to comply with all such laws and
regulations that may apply to the Work after Your receipt of the Work.
Representations, Warranties and Disclaimer. THIS WORK IS PROVIDED "AS IS", "WHERE IS" AND "AS AVAILABLE",
WITHOUT ANY EXPRESS OR IMPLIED WARRANTIES OR CONDITIONS OR GUARANTEES. YOU, THE USER, ASSUME
ALL RISK IN ITS USE, INCLUDING COPYRIGHT INFRINGEMENT, PATENT INFRINGEMENT, SUITABILITY, ETC. AUTHOR
EXPRESSLY DISCLAIMS ALL EXPRESS, IMPLIED OR STATUTORY WARRANTIES OR CONDITIONS, INCLUDING
WITHOUT LIMITATION, WARRANTIES OR CONDITIONS OF MERCHANTABILITY, MERCHANTABLE QUALITY OR FITNESS
FOR A PARTICULAR PURPOSE, OR ANY WARRANTY OF TITLE OR NON-INFRINGEMENT, OR THAT THE WORK (OR ANY
PORTION THEREOF) IS CORRECT, USEFUL, BUG-FREE OR FREE OF VIRUSES. YOU MUST PASS THIS DISCLAIMER ON
WHENEVER YOU DISTRIBUTE THE WORK OR DERIVATIVE WORKS.
Indemnity. You agree to defend, indemnify and hold harmless the Author and the Publisher from and against any claims, suits,
losses, damages, liabilities, costs, and expenses (including reasonable legal or attorneys' fees) resulting from or relating to
use of the Work by You.
Limitation on Liability. EXCEPT TO THE EXTENT REQUIRED BY APPLICABLE LAW, IN NO EVENT WILL THE AUTHOR OR
THE PUBLISHER BE LIABLE TO YOU ON ANY LEGAL THEORY FOR ANY SPECIAL, INCIDENTAL, CONSEQUENTIAL,
PUNITIVE OR EXEMPLARY DAMAGES ARISING OUT OF THIS LICENSE OR THE USE OF THE WORK OR OTHERWISE,
EVEN IF THE AUTHOR OR THE PUBLISHER HAS BEEN ADVISED OF THE POSSIBILITY OF SUCH DAMAGES.
Termination.
a.
term of this License. Individuals or entities who have received Derivative Works from You under this License, however, will not
have their licenses terminated provided such individuals or entities remain in full compliance with those licenses. Sections 1,
7, 8, 9, 10 and 11 will survive any termination of this License.
b.
infringements You claim are made by the Work, your License from such contributor to the Work ends automatically.
c.
copyright in the Work). Notwithstanding the above, the Author reserves the right to release the Work under different license terms
or to stop distributing the Work at any time; provided, however that any such election will not serve to withdraw this License (or
any other license that has been, or is required to be, granted under the terms of this License), and this License will continue
full force and effect unless terminated as stated above.
Publisher. The parties hereby confirm that the Publisher shall not, under any circumstances, be responsible for and shall not
have any liability in respect of the subject matter of this License. The Publisher makes no warranty whatsoever in connection with
the Work and shall not be liable to You or any party on any legal theory for any damages whatsoever, including without limitation
any general, special, incidental or consequential damages arising in connection to this license. The Publisher reserves the right
to cease making the Work available to You at any time without notice.
Miscellaneous
a.
an individual, the laws of location of the principal place of residence of the Author.
b.
validity or enforceability of the remainder of the terms of this License, and without further action by the parties to this Lic
such provision shall be reformed to the minimum extent necessary to make such provision valid and enforceable.
c.
waiver or consent shall be in writing and signed by the party to be charged with such waiver or consent.
d.
herein. There are no understandings, agreements or representations with respect to the Work not specified herein. The Author
shall not be bound by any additional provisions that may appear in any communication from You. This License may not be
modified without the mutual written agreement of the Author and You.
(19) Tremolo
http://wss.co.uk/pinknoise/tremolo
Copyright (C) 2002-2009 Xiph.org Foundation Changes Copyright (C) 2009-2010 Robin Watts for Pinknoise Productions Ltd
Redistribution and use in source and binary forms, with or without modification, are permitted provided that the following
conditions are met:
following disclaimer.
following disclaimer in the documentation and/or other materials provided with the distribution.
promote products derived from this software without specific prior written permission.
THIS SOFTWARE IS PROVIDED BY THE COPYRIGHT HOLDERS AND CONTRIBUTORS "AS IS" AND ANY EXPRESS
OR IMPLIED WARRANTIES, INCLUDING, BUT NOT LIMITED TO, THE IMPLIED WARRANTIES OF MERCHANTABILITY
AND FITNESS FOR A PARTICULAR PURPOSE ARE DISCLAIMED. IN NO EVENT SHALL THE FOUNDATION OR
CONTRIBUTORS BE LIABLE FOR ANY DIRECT, INDIRECT, INCIDENTAL, SPECIAL, EXEMPLARY, OR CONSEQUENTIAL
DAMAGES (INCLUDING, BUT NOT LIMITED TO, PROCUREMENT OF SUBSTITUTE GOODS OR SERVICES; LOSS OF
USE, DATA, OR PROFITS; OR BUSINESS INTERRUPTION) HOWEVER CAUSED AND ON ANY THEORY OF LIABILITY,
WHETHER IN CONTRACT, STRICT LIABILITY, OR TORT (INCLUDING NEGLIGENCE OR OTHERWISE) ARISING IN ANY
WAY OUT OF THE USE OF THIS SOFTWARE, EVEN IF ADVISED OF THE POSSIBILITY OF SUCH DAMAGE.
(20) Tremor
http://wiki.xiph.org/index.php/Tremor
Copyright (c) 2002, Xiph.org Foundation
Redistribution and use in source and binary forms, with or without modification, are permitted provided that the following
conditions are met:
- Redistributions of source code must retain the above copyright notice, this list of conditions and the
following disclaimer.
- Redistributions in binary form must reproduce the above copyright notice, this list of conditions and the
You agree not to remove any of the original copyright, patent, trademark, and attribution notices and
You agree not to advertise or in any way imply that this Work is a product of Your own.
The name of the Author may not be used to endorse or promote products derived from the Work without
You agree not to sell, lease, or rent any part of the Work. This does not restrict you from including the Work
You may distribute the Executable Files and Source Code only under the terms of this License, and You
You agree not to use the Work for illegal, immoral or improper purposes, or on pages containing illegal,
This License and the rights granted hereunder will terminate automatically upon any breach by You of any
If You bring a copyright, trademark, patent or any other infringement claim against any contributor over
Subject to the above terms and conditions, this License is perpetual (for the duration of the applicable
This License shall be governed by the laws of the location of the head office of the Author or if the Author is
If any provision of this License is invalid or unenforceable under applicable law, it shall not affect the
No term or provision of this License shall be deemed waived and no breach consented to unless such
This License constitutes the entire agreement between the parties with respect to the Work licensed
Redistributions of source code must retain the above copyright notice, this list of conditions and the
Redistributions in binary form must reproduce the above copyright notice, this list of conditions and the
Neither the name of the Xiph.org Foundation nor the names of its contributors may be used to endorse or
ense,
following disclaimer in the documentation and/or other materials provided with the distribution.
- Neither the name of the Xiph.org Foundation nor the names of its contributors may be used to endorse or
promote products derived from this software without specific prior written permission.
THIS SOFTWARE IS PROVIDED BY THE COPYRIGHT HOLDERS AND CONTRIBUTORS "AS IS" AND ANY EXPRESS
OR IMPLIED WARRANTIES, INCLUDING, BUT NOT LIMITED TO, THE IMPLIED WARRANTIES OF MERCHANTABILITY
AND FITNESS FOR A PARTICULAR PURPOSE ARE DISCLAIMED. IN NO EVENT SHALL THE FOUNDATION OR
CONTRIBUTORS BE LIABLE FOR ANY DIRECT, INDIRECT, INCIDENTAL, SPECIAL, EXEMPLARY, OR CONSEQUENTIAL
DAMAGES (INCLUDING, BUT NOT LIMITED TO, PROCUREMENT OF SUBSTITUTE GOODS OR SERVICES; LOSS OF
USE, DATA, OR PROFITS; OR BUSINESS INTERRUPTION) HOWEVER CAUSED AND ON ANY THEORY OF LIABILITY,
WHETHER IN CONTRACT, STRICT LIABILITY, OR TORT (INCLUDING NEGLIGENCE OR OTHERWISE) ARISING IN ANY
WAY OUT OF THE USE OF THIS SOFTWARE, EVEN IF ADVISED OF THE POSSIBILITY OF SUCH DAMAGE.
(21) Mersenne Twister
http://www.math.sci.hiroshima-u.ac.jp/~m-mat/MT/MT2002/CODES/mt19937ar.c
Copyright (C) 1997 - 2002, Makoto Matsumoto and Takuji Nishimura,
All rights reserved.
Redistribution and use in source and binary forms, with or without modification, are permitted provided that the following
conditions are met:
Redistributions of source code must retain the above copyright notice, this list of conditions and the following disclaimer.
Redistributions in binary form must reproduce the above copyright notice, this list of conditions and the following disclaimer in the
documentation and/or other materials provided with the distribution.
The names of its contributors may not be used to endorse or promote products derived from this software without specific prior
written permission.
THIS SOFTWARE IS PROVIDED BY THE COPYRIGHT HOLDERS AND CONTRIBUTORS "AS IS" AND ANY EXPRESS
OR IMPLIED WARRANTIES, INCLUDING, BUT NOT LIMITED TO, THE IMPLIED WARRANTIES OF MERCHANTABILITY
AND FITNESS FOR A PARTICULAR PURPOSE ARE DISCLAIMED. IN NO EVENT SHALL THE COPYRIGHT OWNER OR
CONTRIBUTORS BE LIABLE FOR ANY DIRECT, INDIRECT, INCIDENTAL, SPECIAL, EXEMPLARY, OR CONSEQUENTIAL
DAMAGES (INCLUDING, BUT NOT LIMITED TO, PROCUREMENT OF SUBSTITUTE GOODS OR SERVICES; LOSS OF
USE, DATA, OR PROFITS; OR BUSINESS INTERRUPTION) HOWEVER CAUSED AND ON ANY THEORY OF LIABILITY,
WHETHER IN CONTRACT, STRICT LIABILITY, OR TORT (INCLUDING NEGLIGENCE OR OTHERWISE) ARISING IN ANY
any
WAY OUT OF THE USE OF THIS SOFTWARE, EVEN IF ADVISED OF THE POSSIBILITY OF SUCH DAMAGE.
(22) cURL
http://curl.haxx.se
COPYRIGHT AND PERMISSION NOTICE
Copyright (c) 1996 - 2011, Daniel Stenberg, <daniel@haxx.se>. All rights reserved.
Permission to use, copy, modify, and distribute this software for any purpose with or without fee is hereby granted, provided that
the above copyright notice and this permission notice appear in all copies.
THE SOFTWARE IS PROVIDED "AS IS", WITHOUT WARRANTY OF ANY KIND, EXPRESS OR IMPLIED, INCLUDING
BUT NOT LIMITED TO THE WARRANTIES OF MERCHANTABILITY, FITNESS FOR A PARTICULAR PURPOSE AND
2, 6,
NONINFRINGEMENT OF THIRD PARTY RIGHTS. IN NO EVENT SHALL THE AUTHORS OR COPYRIGHT HOLDERS
BE LIABLE FOR ANY CLAIM, DAMAGES OR OTHER LIABILITY, WHETHER IN AN ACTION OF CONTRACT, TORT OR
OTHERWISE, ARISING FROM, OUT OF OR IN CONNECTION WITH THE SOFTWARE OR THE USE OR OTHER DEALINGS
IN THE SOFTWARE.
Except as contained in this notice, the name of a copyright holder shall not be used in advertising or otherwise to promote the
sale, use or other dealings in this Software without prior written authorization of the copyright holder.
(23) c-ares
in
http://c-ares.haxx.se
Copyright 1998 by the Massachusetts Institute of Technology.
Permission to use, copy, modify, and distribute this software and its documentation for any purpose and without fee is hereby
granted, provided that the above copyright notice appear in all copies and that both that copyright notice and this permission
notice appear in supporting documentation, and that the name of M.I.T. not be used in advertising or publicity pertaining to
distribution of the software without specific, written prior permission. M.I.T. makes no representations about the suitability of this
software for any purpose. It is provided "as is" without express or implied warranty.
(24)LZ4
Copyright (c) 2011-2014, Yann Collet All rights reserved.
Redistribution and use in source and binary forms, with or without modification,are permitted provided that the following
conditions are met:
* Redistributions of source code must retain the above copyright notice, this list of conditions and the following disclaimer.
* Redistributions in binary form must reproduce the above copyright notice, this list of conditions and the following disclaimer in
the documentation and/or other materials provided with the distribution.
THIS SOFTWARE IS PROVIDED BY THE COPYRIGHT HOLDERS AND CONTRIBUTORS "AS IS" AND ANY EXPRESS
OR IMPLIED WARRANTIES, INCLUDING, BUT NOT LIMITED TO, THE IMPLIED WARRANTIES OF MERCHANTABILITY
AND FITNESS FOR A PARTICULAR PURPOSE ARE DISCLAIMED. IN NO EVENT SHALL THE COPYRIGHT HOLDER OR
CONTRIBUTORS BE LIABLE FOR ANY DIRECT, INDIRECT, INCIDENTAL, SPECIAL, EXEMPLARY, OR CONSEQUENTIAL
DAMAGES (INCLUDING, BUT NOT LIMITED TO, PROCUREMENT OF SUBSTITUTE GOODS OR SERVICES;
LOSS OF USE, DATA, OR PROFITS; OR BUSINESS INTERRUPTION) HOWEVER CAUSED AND ON
ANY THEORY OF LIABILITY, WHETHER IN CONTRACT, STRICT LIABILITY, OR TORT(INCLUDING NEGLIGENCE OR
OTHERWISE) ARISING IN ANY WAY OUT OF THE USE OF THISSOFTWARE, EVEN IF ADVISED OF THE POSSIBILITY OF
SUCH DAMAGE.
Прочее
Ru-29
Page 30

Подсоединения Начальная настройка Воспроизведение
Информация о лицензиях и торговых марках
Марка и логотип Bluetooth® — это зарегистрированные торговые
Произведено по лицензии Dolby Laboratories. “Dolby”, “Pro
Logic” и с имвол двойного D являются торговыми марками Dolby
Laboratories.
For DTS patents, see http://patents.dts.com. Изготовлено по лицен‑
зии от DTS Licensing Limited. DTS зарегистрированная торговая
марка, а логотипы DTS, символ DTS и DTS‑HD Master Audio —
торговые марки DTS, Inc. DTS, Inc. Все права защищены.
“CINEMA FILTER” и “CINEMA FILTER (логотип)” — это торговые
марки Onkyo Corporation.
HDMI, логотип HDMI и High Denition Multimedia Interface являются
торговыми марками или зарегистрированными торговыми марка‑
ми HDMI Licensing, LLC в США и других странах.
Логотип Wi‑Fi CERTIFIED — это знак сертификации альянсом
Wi‑Fi Alliance. Логотип Wi‑Fi certied указывает на подтвержден‑
ную международной ассоциацией интероперабельность — озна‑
чает что “Wi‑Fi Alliance” гарантирует, что устройство прошло тест
на совместимость с другим Wi‑Fi с ертифицированным оборудо‑
ванием.
AirPlay,, iPhone, и iPod touch являются торговыми марками
Apple Inc., зарегис трированными в США и других странах.
iPad Air и iPad mini — это торговые марки Apple Inc.
“Made for iPod” и “ Made for iPhone” означает, что электронные
аксессуары были разработаны для подс оединения специально
к iPod или iPhone, с оответственно, и были с ертифицированы
разработчиком, чтобы удовлетворить с тандартам качества
Apple. Компания Apple не несет ответственность за работу этого
устройства или его совмес тимость с о стандартами безопасности
и регулятивными нормами.
Пожалуйс та, примите во внимание, что использование этого
аксессуара с iPod или iPhone может повлиять на работу беспро ‑
водной связи.
AirPlay работает с iPhone, iPad, и iPod touch с iOS 4.3.3 или но‑
вее, Mac с OS X Mountain Lion или новее, и PC с iTunes 10.2.2
или новее.
Apple, Apple TV и Safari — это торговые марки Apple Inc., зареги‑
стрированные в США и других странах.
марки Bluetooth SIG, Inc. и любое использование этих марок ком‑
панией Onkyo лицензировано. Другие торговые марк и и торговые
названия прина длежат их с оответствующим вла дельцам.
Onkyo не гарантирует Bluetooth совместимость между AV ресиве‑
ром и Bluetooth‑ оборудованными устройствами.
Для совместимости между AV ресивером и друг ими устрой‑
ствами с Bluetooth технологией, необходимо изучить докумен‑
тацию на эти устройства или проконсультироваться с дилером.
В некоторых странах могут быть ограничения на ис пользование
устройств с технологией Bluetooth. Проверьте их отсутствие
у местной администрации.
SIRIUS, XM и связанные с ними марки и логотипы — это торговые
марки Sirius XM Radio Inc. и ее подраз делений. Все права заре‑
зервированы.
DLNA ®, логотип DLNA и DLNA CERTIFIED™ являются торговыми
марками, сервисными марками или сертификационными марками
Digital Living Network Alliance.”
Этот продукт защищен некоторыми правами на интеллект уаль‑
ную собственность, которыми владеет Microsoft. Использование
или распространение подобных технологий за рамками этого
продукта запрещено без на личия лицензии от Microsoft.
Windows и логотип Windows являются торговыми марками группы
компаний Microsoft.
QR Code — это зарегис трированная торговая марка DENSO
WAVE INCORPORATED.
“x.v.Color” — это торговая марка Sony Corporation.
MPEG Layer‑3 технология кодирования аудио лицензирована
у Fraunhofer IIS and Thomson.
InstaPrevue и логотип InstaPrevue — являются торговыми марками
или зарегистрированными торговыми марками Silicon Image, Inc.
в США United States и других странах.
AccuEQ, Music Optimizer, RIHD и WRAT — это торговые марки
Onkyo Corporation.
*Все осталь ные торгов ые марк и являются с обственн остью соот ветствующих
владельцев
DISCLAIMER — ПИСЬМЕННЫЙ ОТКАЗ ОТ ОТВЕТСТВЕННОСТИ
С помощью этого устройства вы полу чаете возможность с оеди‑
няться с другими с ервисами или веб‑сайтами, которые не нахо‑
дятся под контролем какой‑либо компании, которая бы констру‑
ировала, производила или дистрибьютировала эти устройства,
или ее филиа лов (afliates, вмес те называемых “Company”). Мы
не имеем никакой возможности контролировать природу, содер‑
жание и доступность этих сервисов. Включений любых ссылок
не означает обязательно рекомендацию или одобрение взглядов,
выражаемых на них.
Вся информация, контент и сервисы дост упные через это устрой‑
ство принадлежат сторонним организациям и защищены копи‑
райтом, патентами, торговыми марками и / или другими законами
Прочее
об интеллектуальной собственности, действующими в разных
странах. Информация, контент и сервисы предоставляемые
через это устройство предназначены только для вашего персо‑
нального некоммерческого исполь зования. Любую информацию,
контент и сервисы нельзя исполь зовать любым способом, кроме
предварительно одобренного в ладельцем контента или сер‑
вис‑провайдером.
Вы не имеете права модифицировать, копировать, повторно
публиковать, переводить, эксплуатировать, создавать произ‑
водные работы, закачивать, постить, передавать, продавать
или распространять в любой манере любую информацию, кон ‑
тент или сервисы дост упные через это ус тройство, без явно вы‑
сказанного разрешения соответствующего владельца авторского
права, патента, торговой марки и / или другой интеллектуальной
собственности, вк лючая, без ограничений, владельца контента
или сервис‑провайдера.
КОНТЕНТ И СЕРВИСЫ, ДОСТ УПНЫЕ ЧЕРЕЗ ЭТО УСТРОЙСТВО
ПРЕДОСТАВЛЯЮТСЯ «КАК ЕСТЬ» (“AS IS”).
КОМПАНИЯ НЕ ГАРАНТИРУЕТ ДОСТОВЕРНОСТЬ ПРЕДО‑
СТАВЛЯЕМЫХ ТАКИМ ОБРАЗОМ ИНФОРМАЦИИ, КОНТЕНТА
И СЕРВИСОВ, ВЫРАЖЕННОЙ ЯВНО ИЛИ ОПОСРЕДОВАННО,
ДЛЯ ЛЮБЫХ ЦЕЛЕЙ.
КОМПАНИЯ ОТКАЗЫВАЕТСЯ ОТ ЛЮБЫХ ГАРАНТИЙ, ВЫРАЖЕН‑
НОЙ ЯВНО ИЛИ ОПОСРЕДОВАННО, ВКЛЮЧАЯ, НО НЕ ОГРА‑
НИЧИВА ЯСЬ, ГАРАНТИЯМИ НА НАЗВАНИЯ, НА ПОСТАВКИ
БЕЗ НАРУШЕНИЯ ПРАВ НА ТОРГОВЛЮ, ИЛИ НА ПРИГОДНОСТЬ
ДЛЯ КОНКРЕТНЫХ ЦЕЛЕЙ.
Компания не дает никаких гарантий любого рода, выраженных
явно или под разумевающихся, относительно полноты, точно‑
сти, надежности, законности, пригодности или дост упности
по отношению к информации, контенту или сервисам дост упным
через это устройство. Компания не несет ответс твенности, будь
то в рамках контракта или договора, за любой прямой или кос‑
венный, специальный, случайный или последующий ущерб
или любые другие ущербы, возникшие вследствие или в соеди‑
нении с любой информацией, содержащейся в или полученной
в результате исполь зования любого контента или сервиса вами
или любыми сторонними организациями, даже если Company
была предупреж дена о возможности таких ущербов, Компания
не нес ет отвественности по любым претензиям третьих сторон
от пользователей этого устройства или любых сторонних орга‑
низаций.
Ни при каких обстоятельствах Компания не несет отвественности
за любые перебои в дост упности контента или сервисов.
Любые вопросы или запросы на сервисы, относящиеся к инфор‑
мации, контенту или сервис ам, должны направляться прямо
в адрес соответствующих владельцев контента или сервис‑про‑
вайдеров.
Ru-30
Page 31

Подсоединения Начальная настройка Воспроизведение
Прочее
Ru-31
Page 32

Подсоединения Начальная настройка Воспроизведение
How to use the remote controller
Supplied Accessories
Indoor FM antenna --- (1)
AM loop antenna --- (1)
Remote controller (RC-898M) --- (1)
Batteries (AA/R6) --- (2)
Power cord (Taiwanese models) --- (1)
Speaker setup microphone --- (1)
How to use the remote controller
Batteries (AA/R6)
Remote control sensor
Approx.
16 ft. (5 m)
AV Receiver
¼ If you do not use the remote controller for a long time, remove the
batteries to prevent leakage.
¼ Note that keeping consumed batteries inside may cause corrosion
resulting in damage of the remote controller.
F1502-0
Поставляемые аксессуары
Комнатная FM антенна (1)
Использование пульта ДУ
Сенсор дистанционного управления
Remote control sensor
AV ресив ер
AV Receiver
Рамочная АМ антенна (1)
Batteries (AA/R6)
Пульт ДУ (RC‑898M) (1)
Батарейки (АА / R6)
Батарейки (АА / R6)
Approx.
Примерно 5 м
16 ft. (5 m)
● Если пульт не будет использоваться в течение дли‑
Сетевой шнур (модели для Тайваня) (1)
тельного времени, извлеките элементы питания во из‑
бежание утечки и коррозии.
● Немедленно извлекайте разряженные элементы пи‑
Настроечный микрофон (1)
тания во избежание утечки и коррозии, которые могут
повредить пульт.
Число в скобках указывает количество. На упаковке, бук‑
ва в конце названия изделия указывает на его цвет.
ONKYO CORPORATION
Kitahama Chuo Bldg, 2‑2‑22 Kitahama, Chuo‑ku, OSAKA
541‑ 0 041, JA PA N
http://www.onkyo.com /
Europe
ONKYO EUROPE ELECTRONICS GmbH
Liegnitzerstrasse 6, 82194 Groebenzell, GERMANY
Tel: +49‑8142‑4401‑0 Fax: +49‑8142‑4208‑213
http://www.eu.onkyo.com /
The Americas
ONKYO U. S. A. CORPORATION
18 Park Way, Upper Saddle River, N. J. 07458, U. S. A.
For Dealer, Service, Order and all other Business
Inquiries:
Tel: 201‑785‑2600 Fax: 201‑785‑2650
http://www.us.onkyo.com /
For Product Support Team Only:
1‑800‑229‑1687
ONKYO EUROPE ELECTRONICS GmbH (UK Branch)
Meridien House, Ground oor, 69‑71 Clarendon Road,
Watford, Hertfordshire, WD17 1DS, United Kingdom
Tel: +44 (0) 8712‑00‑19‑96 Fax: +44 (0) 8712‑00‑19‑95
China
ONKYO CHINA LIMITED (Hong Kong)
Unit 1033, 10 / F, Star House, No 3, Salisbury Road, Tsim
Sha Tsui Kowloon, Hong Kong.
Tel: 852‑2429‑3118 Fax: 852‑2428‑9039
http://www.hk.onkyo.com /
SN 29401973
© Copyright 2015 Onkyo Corporation Japan. All rights reserved. Onkyo has the Privacy Policy. You can review it at [http://www.onkyo.com/privacy/].
ONKYO CHINA PRC (Mainland)
1301, 555 Tower, No.555 West NanJing Road, Jing’an
District, Shanghai, China 200041,
Tel: 86‑21‑52131366 Fax: 86‑21‑52130396
http://www.cn.onkyo.com /
Asia, Oceania, Middle East, Africa
Please contact an ONKYO distributor referring to Onkyo
SUPPORT site.
http://www.intl.onkyo.com / support / local_support / index.html
Приведенная выше информация может быть измене‑
на без предварительного уведомления.
Посетите веб‑сайт Onkyo, чтобы узнать о последних
обновлениях.
* 2 9 4 0 1 9 7 9 *
 Loading...