

Page 1

UNIVERSAL
REMOTE CONTROL
REPLACES REMOTES
44
TV
DVD
VCR/PVR
CBL/SAT
EASY SETUP
DIGITAL
READY*
FAVORITE
CHANNEL
MASTER
POWER KEY*
LIMITED
LIFETIME
WARRANTY
*See back for details
URC 4021
USES 2 AAA BATTERIES
(NOT INCLUDED)
Page 2

TABLE OF CONTENTS
Introduction . . . . . . . . . . . . . . . . . . . . . . . . . . . . . . . . . . . . . . . . . . . . . . . . . . . . . . . 3
Features And Functions . . . . . . . . . . . . . . . . . . . . . . . . . . . . . . . . . . . . . . . . . . . . . . 4
Key Charts. . . . . . . . . . . . . . . . . . . . . . . . . . . . . . . . . . . . . . . . . . . . . . . . . . . . . . . . . . . . . . . . . . 5
Device Table . . . . . . . . . . . . . . . . . . . . . . . . . . . . . . . . . . . . . . . . . . . . . . . . . . . . . . . . . . . . . . . . 6
Installing Batteries . . . . . . . . . . . . . . . . . . . . . . . . . . . . . . . . . . . . . . . . . . . . . . . . . 7
Programming Device Control. . . . . . . . . . . . . . . . . . . . . . . . . . . . . . . . . . . . . . . . . . 8
Searching For Your Code . . . . . . . . . . . . . . . . . . . . . . . . . . . . . . . . . . . . . . . . . . . . . 9
Checking The Codes . . . . . . . . . . . . . . . . . . . . . . . . . . . . . . . . . . . . . . . . . . . . . . . . 9
Programming A Master Power Macro . . . . . . . . . . . . . . . . . . . . . . . . . . . . . . . . . . 10
Programming The Power Key For The Master Power Macro . . . . . . . . . . . . . . . . . . . . . . . . . . . 10
Operating The Master Power Macro . . . . . . . . . . . . . . . . . . . . . . . . . . . . . . . . . . . . . . . . . . . . . 10
Clearing The Master Power Macro . . . . . . . . . . . . . . . . . . . . . . . . . . . . . . . . . . . . . . . . . . . . . . 11
Re-Assigning Device Keys . . . . . . . . . . . . . . . . . . . . . . . . . . . . . . . . . . . . . . . . . . . 11
Using Channel Scan . . . . . . . . . . . . . . . . . . . . . . . . . . . . . . . . . . . . . . . . . . . . . . . 11
Programming Favorite Channel Scan . . . . . . . . . . . . . . . . . . . . . . . . . . . . . . . . . . 12
Changing Volume Lock . . . . . . . . . . . . . . . . . . . . . . . . . . . . . . . . . . . . . . . . . . . . . 13
Locking Volume Control To One Mode
(Global Volume Lock). . . . . . . . . . . . . . . . . . . . . . . . . . . . . . . . . . . . . . . . . . . . . . . . . . . . . . . . . 13
Unlocking Volume Control For A Single Device
(Individual Volume Unlock). . . . . . . . . . . . . . . . . . . . . . . . . . . . . . . . . . . . . . . . . . . . . . . . . . . . 13
Unlocking All Volume Control
(Restoring Default Setting ) . . . . . . . . . . . . . . . . . . . . . . . . . . . . . . . . . . . . . . . . . . . . . . . . . . . 13
Clearing Custom Programming. . . . . . . . . . . . . . . . . . . . . . . . . . . . . . . . . . . . . . . 14
Restoring Factory Default Settings . . . . . . . . . . . . . . . . . . . . . . . . . . . . . . . . . . . . 14
Troubleshooting . . . . . . . . . . . . . . . . . . . . . . . . . . . . . . . . . . . . . . . . . . . . . . . . . . . 15
Instructions To The User . . . . . . . . . . . . . . . . . . . . . . . . . . . . . . . . . . . . . . . . . . . . 16
Limited Lifetime Warranty . . . . . . . . . . . . . . . . . . . . . . . . . . . . . . . . . . . . . . . . . . . 16
Additional Information. . . . . . . . . . . . . . . . . . . . . . . . . . . . . . . . . . . . . . . . . . . . . . 17
Manufacturer’s Codes . . . . . . . . . . . . . . . . . . . . . . . . . . . . . . . . . . . . . . . . . . . . . . 18
Setup Codes For Cable Boxes . . . . . . . . . . . . . . . . . . . . . . . . . . . . . . . . . . . . . . . . . . . . . . . . . . 18
Setup Codes For Cable Box/PVR (or DVR) Combos. . . . . . . . . . . . . . . . . . . . . . . . . . . . . . . . . . 18
Setup Codes For DVD Players . . . . . . . . . . . . . . . . . . . . . . . . . . . . . . . . . . . . . . . . . . . . . . . . . . 18
Setup Codes For DVD Player/VCR Combos . . . . . . . . . . . . . . . . . . . . . . . . . . . . . . . . . . . . . . . . 18
Setup Codes For PVRs (or DVRs).. . . . . . . . . . . . . . . . . . . . . . . . . . . . . . . . . . . . . . . . . . . . . . . 19
Setup Codes For Satellite Receivers . . . . . . . . . . . . . . . . . . . . . . . . . . . . . . . . . . . . . . . . . . . . . 19
Setup Codes For Satellite Receiver/PVR (or DVR) Combos. . . . . . . . . . . . . . . . . . . . . . . . . . . . 19
Setup Codes For TVs . . . . . . . . . . . . . . . . . . . . . . . . . . . . . . . . . . . . . . . . . . . . . . . . . . . . . . . . . 19
Setup Codes For TV/DVD Player Combos . . . . . . . . . . . . . . . . . . . . . . . . . . . . . . . . . . . . . . . . . 20
Setup Codes For TV/VCR Combos . . . . . . . . . . . . . . . . . . . . . . . . . . . . . . . . . . . . . . . . . . . . . . . 20
Setup Codes For TV/VCR/DVD Player Combos . . . . . . . . . . . . . . . . . . . . . . . . . . . . . . . . . . . . . 21
Setup Codes For VCRs. . . . . . . . . . . . . . . . . . . . . . . . . . . . . . . . . . . . . . . . . . . . . . . . . . . . . . . . 21
2
Page 3

INTRODUCTION
The One ForAll 4 Device Universal Remote Control (URC-4021) is
designed to remotely operate up to four home entertainment devices.It
also featuresintuitive and easy-to-use keys for instant control of DVD and
PVR (or DVR) components. Moreover,its sophisticated technology will
allowyou to consolidate your original home entertainment remote
controls into one easy-to-use product. Advanced features include:
• Intuitive buttonstoallow easy access to functions and menus on your DVD
player,PVR(or DVR),and Cable/Satellite devices
• Direct code setup for easy device programming
• Step-and-Set codesearch and CodeVerificationfor an alternate wayto pro-
gram devices
• Power Macrofor masteron/off control of all of your equipment with a single
keystroke
• Volume Lock/Unlock feature to lock or unlockthe volumecontrol to one mode
or individual modes
• Device KeyRe-Assignmenttoremotely control a second (duplicate) device
• Channel Scan
• Color-codedkeys to quickly locate popularfunctions
• Extensive codelibrary for popular videodevices includingDVD players and
PVRs (or DVRs)
and Favorite Channel Scan foreasy channelsurfing
The URC-4021 remote control requires two (2) new AAA alkaline batteries (not included) and some easy programming to control your devices.
For best results,please read and perform all instructions listed here.Also,
keep this guide for future reference.
3
Page 4

FEATURES AND FUNCTIONS
Use the illustration below to locate featuresonthe One For All 4 Device
Universal Remote Control (URC-4021)andthen study the KeyCharts (on
the next twopages) to learn how they function.
To find outwhat type of devices can be controlled by each device keyafter
programming, see the
Device Table on page 6.
4
Page 5
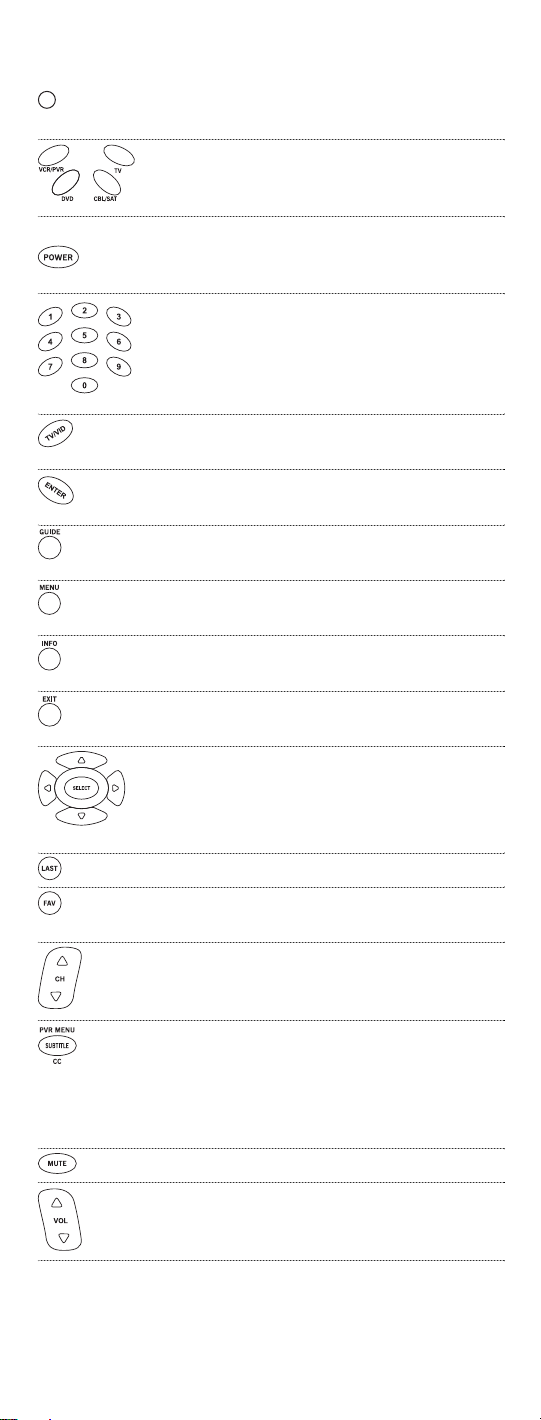
Key Charts
When the LED (redlight) blinks,the remote controlis
working and(after programming)issendingsignals.
Press VCR/PVR, DVD,CBL/SAT,or TV once to select a
desired homeentertainmentdevice to control.
Also see the Device Table on page 6.
Press POWER oncetoturn on or off the selected device.
Formaster power control,see Programming
A MasterPower Macro on page 10.
Use the keypad (1 ~ 9 and 0) to directly select channels
(e.g.,009 or 031).
Use TV/VID to switchthe TV’s inputtoview TV or video
programs.
Press ENTER onceafter entering the channel numberson
some TVs.
Use GUIDE to display your selected device’s program
guide or setup menu.
Press MENU once to displayyour selected device’s main
menu.
Use INFO to display the current channel and program or
on-screen directory.
Use EXIT to exit from your selected device’sguide or
menu.
Use the Cursor Keys to move the cursor in the program
guide and menu screens.
Use SELECT(OK)tochoose optionsfromyourselected
device’smenuor guide.
Press LAST once to recall the last channel.
Use FAV to scan all channels,or after programming,
to scan up to 10 favoritechannels.
Use CH▲ (orCH▼) to select the next higher (or lower)
channel.
PressSUBTITLE/CConceto display(or turnoff) subtitlesor
closedcaptions,if available onyour DVD playeror
cable/satelliteservice.
Fora PVR (or DVR), press PVR MENU once to display a
list of your recorded shows.
Press MUTE once to turn the soundoff or on.
Use VOL▲ (orVOL▼) to raise (or lower) the sound vol-
ume.
5
Page 6

Use REW,PLAY,FWD, PAUSE,or STOP to control yourVCR,
PVR (orDVR),or DVD player.
For a DVD player,use SKIP F. or SKIP R. to viewthe next
or previous chapter.
For a VCR,PVR (or DVR),or VOD (if available),use SCAN-
or SCAN+ to quickly scan forward orback throughavideo
program.UseREPLAY foran instantreplay.UseQUICK
SKIPto advancethe videoprogram a presetamount (as
setonyourdevice).
Press REC twice to recordaVCR or PVR (orDVR) program.
Use SLEEP to set the sleep timer on a selecteddevice if
equipped with this feature.
UseSET for all programming sequences.
Device Table
NOTE: Please refertothe tablebelow whenperformingthe instructions in“Programming
Device Control”on page 8.
Afterprogramming,theOneFor All 4 Device Universal Remote Control will
be able to control the followingtypes of devices:
DEVICE KEY CONTROLS THESE TYPES OF DEVICES
• DVD Player
• TV/DVD Player Combo
• VCR/DVD Player Combo
• VCR
• TV/VCR Combo
• TV/VCR/DVD Player Combo
• VCR/DVD Player Combo
• PVR (or DVR)
• Cable Box (orConverter)
• Cable Box/PVR(or DVR)Combo
• SatelliteReceiver
• SatelliteReciver/PVR (orDVR) Combo
• Television
6
Page 7
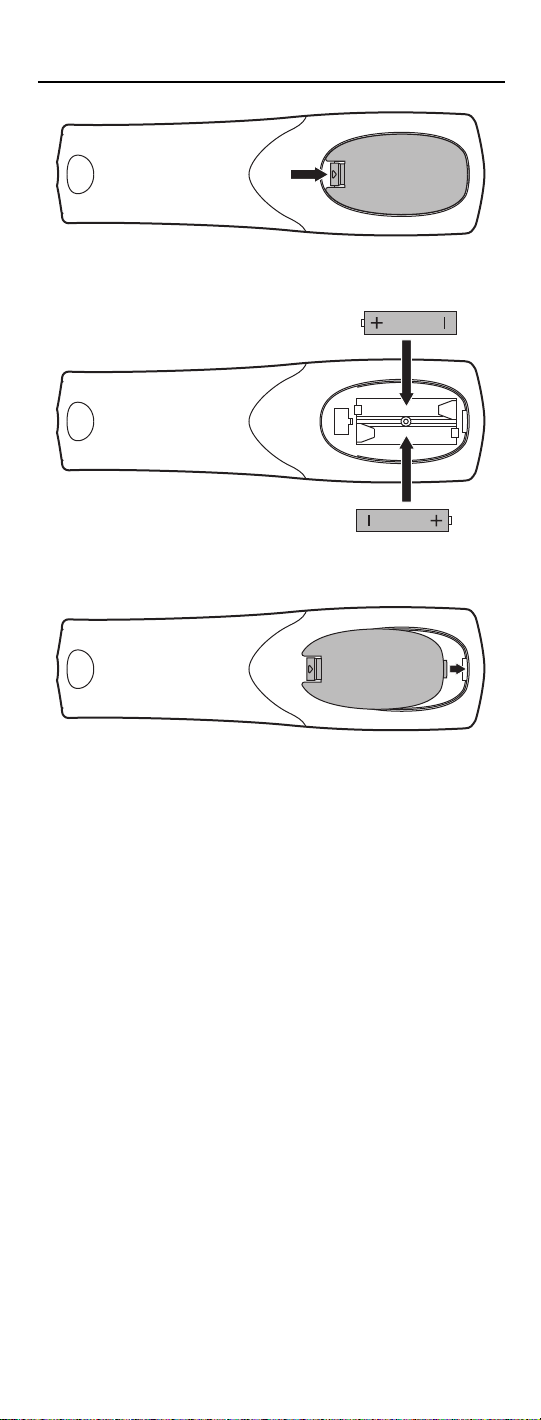
INSTALLING BATTERIES
❶
❸
❷
❷
1. On the remote control’s back,push the tab and lift off the
battery cover.
2. Obtaintwo (2) new AAA alkaline batteries. Match the +
and – marks on the batteries to the + and – marks in the
battery case,theninsert the new batteries.
3. Press the battery cover backinto place. The tab should
clickwhen the cover is locked.
4. Test the remote control by pressing anymodekey (e.g.,
TV).If the batteriesare insertedcorrectly, the LED (red
light) will blink.
NOTE: Whenbatteries need replacement,the remotecontrol will stopoperating.Remove
the oldbatteriesand insert newones within 10 minutes to ensure all of your programming
informationisrestored.
Battery Precautions: Do not mix old andnew batteries.• Do notmix alkaline, standard
(carbon-zinc) or rechargeable (nickelcadmium)batteries.•Always remove old,weak or
worn-out batteries promptly and recycle ordispose of them inaccordancewith Local and
NationalRegulations.
7
Page 8

PROGRAMMING DEVICE CONTROL
TheOneFor All 4Device Universal Remote Control is preprogrammed at
thefactorytooperate an RCA TV, aToshiba DVD player,a Motorola cable
box,and an RCAVCR.To control devicesotherthan thedefault brands,perform the following steps;otherwiseskip this section:
1. Turn on a desired device (e.g.,VCRorDVD player) and,if
applicable, insert media (e.g.,cassetteor disc).
NOTE: Please read steps 2 through 4 completely before proceeding.
Highlightorwrite down thecodes anddevice youwishto program
before starting step2.
2. On the remote control,press a devicekey once(i.e., VCR/PVR,
DVD,CBL/SAT,or TV).
NOTE: To programcontrol of a VCR,PVR (or DVR),TV/VCRCombo,
or TV/VCR/DVD Player Combo press VCR/PVR once.After programmingaVCR Combo device, youwillbe able to control channel selection,volume, andVCR functions.
NOTE: To programcontrol of a DVD Player,DVD Player/VCR
Combo,orTV/DVD Player Combo, press DVD once.After programming a DVD Combo device,you willbe ableto control channel selection, volume,and DVD functions.
NOTE: To programcontrol of a Cable Box, CableBox/PVR(or DVR)
Combo,Satellite Receiver,or a SatelliteReceiver/PVR (or DVR)
Combo,press CBL/SAT once.
3. Press and hold SET until the LED (redlight) blinks twice,
then release
SET.
4. Use the
Manufacturer’s Codes (starting on page 18) to
locate the type of deviceandbrand name and then enter
the firstfour-digit code for your device.If performed correctly, the
NOTE:If the LEDdid notblinktwice,repeat steps2through4and enter
thesame codeagain.
LED will blink twice.
5. Aim the remote control at the device and press POWER
once. The device should turn off.If it does not,repeat
steps 2 through 5,trying eachcode for yourbrand until
youfind one that works.If it still doesn’t work,try
Searching ForYour Codeonnext page.
NOTE: If the device does nothave a POWER key,press PLAY.
6. Repeat steps 1 through 5 for each device you wantto con-
trol. Forfuture reference,write downeachworkingdevice
code in thefollowing boxes:
VCR/PVRCode:
DeviceType:______________
DVD Code:
DeviceType:______________
CBL/SAT Code:
DeviceType:______________
TV Code:
DeviceType:______________
8
Page 9

SEARCHING FOR YOUR CODE
If your devicedoes not respondto the remote control aftertryingallcodes
listed foryour brand,or if your brand is not listed at all,trysearching for
your code.
NOTE: Beforeperforming a code search foraDVD player or aVCR, turn onthe deviceand
insertthe required media.
Forexample,to search fora code foryour TV:
1. On the remote control, press
2. Press and hold
SET until the LED (red light) blinks twice,
TV once.
then release SET.
3. Enter
9 - 9 - 1. The LED will blink twice.
4. Aim the remote control at the TV and slowly alternate
between pressing
POWER and TV.Stop whentheTV turns
off (after pressing POWER).If the device does not have a
Power key, youcansubstitute another function,such as
0 ~ 9 , CH▲, or PLAY).
digits
NOTE: Inthe search mode,the remotecontrol willsend IR codes from
its libraryto the selected device,starting with themostpopular code
first.
5. To lock in the code,pressand release SET.The LED will blink
twice.
6. To search for the codes of your other devices,repeatsteps
1 through5,but substitute the appropriate device key for
the deviceyou are searchingfor.
CHECKING THE CODES
If you have set up the remotecontrol using the Searching ForYour Code pro-
cedure (as above), you mayneedto findout which four-digitcode is operating your equipment.For example,to findout which codeis operatingyour
TV:
1. On the remote control, press
2. Press and hold
then release
3. Enter
SET until the LED (red light) blinks twice,
SET.
9 - 9 - 0. The LED will blink twice.
4. To view the code for the first digit,press
seconds,countthe
write downthenumber in the leftmostbox in the TV
code boxes on page8.
NOTE: If a code digit is“0”, the LEDwillnot blink.
TV once.
1 once.Wait 3
LED blinks (e.g., three blinks = 3) and
9
Page 10

5. Repeat step 4 (on the previous page)three moretimesfor
remaining digits.Use 2 for the second digit, 3 for the third
digit,and
4 for the fourth digit.Write downthe code dig-
its in the remaining TV code boxes on page 8.
6. To check for codes of otherdevices, repeat steps 1
through 5 (starting on the previous page), butsubstitute
the appropriatedevice key for eachdevice you arechecking.Write down the device’s code digits in the appropriate codeboxes on page8.
PROGRAMMING A MASTER POWER MACRO
In its default state, the POWERkey on the One For All 4 Device Universal
Remote Control will individually power your homeentertainmentdevices
on or off.However, you can also program a
POWER keythat will sequentially turn on or off all the devices with a single
key press.
Programming The PowerKeyFor The Master Power Macro
1. Press and hold SET until the LED (redlight) blinks twice,
then release SET.
Master Power Macroonto the
2. Enter
9 - 9 - 5. The LED will blink twice.Then press POWER
once.
3. Forthefirst device you want in the power-on sequence,
press its device key(e.g.,
CBL/SAT) once.
4. Repeat step 3 up to three more times to add desired
devices to the power-on sequence (e.g.,
TV).
VCR/PVR, DVD,and
5. To save the settingsandexit the program, press and hold
SET until the LED blinkstwice,then releaseSET.
Operating The Master Power Macro
1. Afterprogramming,point the remote control at the
devices and press
tially turn on (or off) your devices.
NOTE:When POWERis pressed for less than2 seconds, a power commandwill onlybe senttothe currently-selected device. This allows
youto still individually powerdeviceson or off.
2. Devices will turn on (oroff) according to your
programmed sequence.
NOTE: Thecurrently-selected device will always turn onoroff first,
followedbythe remaining programmedsequence.After themaster
power sequence hasbeen completed,the remote controlwill be setto
controlthe first powered-on device.
NOTE:If one ormoredevices does not haveaPOWER key, the power
off/onsequencemay beslightly delayedwhen the remote controlsignals
thedevice(s). Thisaction is normal.
POWER foratleast 2 seconds to sequen-
continuedon next page...
10
Page 11

PROGRAMMING A MASTER POWER MACRO
(continued)
Clearing The Master Power Macro
1. Press and hold SET until the LED (redlight) blinks twice,
then release
SET.
2. Enter
9 - 9 - 5. The LED will blink twice.Then press POWER
once.
3. Press and hold
SET.The Master Power Macro is now cleared.
SET until the LED blinkstwice,then release
RE-ASSIGNING DEVICE KEYS
TheOne ForAll 4 Device Universal Remote Control can be settocontrola
secondPVR,VCR,or DVDplayer.Forexample,to controlaTV,a cable box,
twoDVD players,re-assign the unusedVCR/PVRkey to operate the second
and
DVD playerasfollows:
1. On the remote control, press and hold
(redlight) blinks twice, thenrelease SET.
2. Enter
3. Press
9 - 9 - 2. The LED will blink twice.
DVD once.
SET until the LED
4. Press
VCR/PVRonce.The LED will blink twice.The VCR/PVR
keyis now readyto be set up tocontrolyour second DVD
player. See
To re-assign a second VCR orPVR(or DVR)tothe unused
Programming Device Control on page 8.
DVD key, repeat
steps 1 through 4. However, in step3 substitute VCR/PVR forDVD,andinstep 4
substitute
second VCRorPVR (or DVR).See
NOTE: Onlyone device canbeassignedto an unused device keyat a time.
DVD forVCR/PVR.Now the DVD key will be readyto be set up as your
Programming Device Control on page 8.
USING CHANNEL SCAN
In the CBL/SAT or TV mode, use the FAV key to start a 3-secondscanof all
channels.Or,if programmed,use the FAV key to scan only your favorite
channels to view a desiredchannel (see
on next page. )
1. Press
CBL/SAT or TV once.
Programming Favorite Channel Scan
11
Page 12

2. Press FAVonce.
• If Favorite Channel Scanhas beenset up,scanning of
favoritechannels willstart withupto 100 channel changes
oruntil stopped bypressing anykey.
• If Favorite Channel Scan has not been set up, scanning
will start with the current channel, and continue up to
100channel changesor until stoppedby pressingany key.
3. To stop scanningchannelsatany time,press anykey
once.
PROGRAMMING FAVORITE CHANNEL SCAN
In the CBL/SAT or TV mode, you can store a list of up to 10 favorite channels,
in any order, that will be immediatelyscanned when FAV is pressed(see
Using Channel Scan on the previous page).
NOTE:Favorite channels canonlybe programmedfor one mode.After programming,if FAV
is pressed while inanother mode,the remote control will start scanning all channelsinstead
(if applicableto theselecteddevice).
1. On the remote control, press CBL/SATorTV once.
2. Press and hold
SET until the LED (red light) blinks twice,
then release SET.
3. Enter
9 - 9 - 6. The LED will blink twice.
4. Use the keypad to entera favorite channel number (e.g.,
031).Then press SET once.
NOTE: If the original remote control required pressingan Enterkey
to change the channel,also pressthe ENTER keyafter the channel
number (e.g.,0 - 3 - 1 - ENTER).On some satellite receivers and cable
boxes, youmay needto pressthe SELECT (OK) key instead of ENTER.
5. If desired,repeatstep 4 for each channeltobe stored, up
to a total of 10 channels.
NOTE: If you try entering more than 10 channels,the remote control
will automatically exit programming.To change yourfavorite channel listat this point, you will firstneed to delete theexistinglist by
performing the steps in“Clearing CustomProgramming”onpage 14.
Then,perform the instructions in thissectiononce again.
6. To exit programming with less than 10 favoritechannels
stored, press and hold
SET until the LED blinkstwice.
Otherwise, the remote control will automatically exit the
program after 10 channels have been stored.
12
Page 13

CHANGING VOLUME LOCK
The One ForAll 4 Device Universal Remote Control is set at the factory for
independent volume control of each selected device. However, youmay
change the VolumeLock setting to Global Volume Lockso that a device’s vol-
ume will be locked to one mode (e.g., to control TV volume in all other
modes).After that,if desired,you can perform
selected device to set its volume control forindependent operation.
Locking Volume Control To One Mode
(Global Volume Lock)
1. Press and hold SET until the LED (redlight) blinks twice,
then release SET.
Individual Volume Unlock on a
2. Enter
3. Now,when you press
9 - 9 - 3 and thenpress any mode key once (e.g., TV).
LED will blink twice.
The
VOL▲, VOL▼,or MUTE, the volume of
the selected device (e.g.,
TV) will be controlled, regardless
of the mode you have selected.
Unlocking Volume Control For A Single Device (Individual Volume
Unlock)
1. After performing GlobalVolumeLock (above),press a desired
mode keywhere you want volume to be unlocked (e.g.,
DVD) and controlled within its own mode.
2. Press andand hold
then release SET.
3. Enter
9 - 9 - 3 and thenpress VOL▼ once.The LED will
blink four times.
SETuntil the LED(redlight) blinkstwice,
4. If desired,repeatsteps 1 through 3 (of this section) for
each device that you want volume to be unlocked.
5. Now,after you selecta devicethat has volume unlocked
DVD),pressing VOL▲,VOL▼, or MUTE will control the
(e.g.,
device’svolume only in its own mode.
Unlocking All Volume Control (Restoring Default Setting)
NOTE: Performingthese instructions will restore independentvolumecontrol for allprogrammed devices (e.g.,TV volume control in TV mode,VCR volume in VCR/PVR mode,
etc.).
1. On the remote control, pressand hold SETuntil theLED(red
light) blinks twice,thenrelease
13
SET.
Page 14

2. Enter 9 - 9 - 3 and then press VOL▲ once.The LED will
blink four times.
3. Volume will againbe independently controlled according
to its default states for all programmed devices.
CLEARING CUSTOM PROGRAMMING
The One ForAll 4 Device Universal Remote Control contains an Operational
FeatureReset
If desired,you can use it to clear custom programming,except your setup
codesandreassigned device keys,andreset them to originalfactory settings.Also see
IMPORTANT: Executingthis program will erase all your customsettings for
Power Macro, Favorite Channels,and Volume Lock.
1. Press and hold SET until the LED (redlight) blinks twice,
program.
RestoringFactory DefaultSettings as below.
then release SET.
2. Enter
9 - 8 - 0. The LED will blink twice.The remote control
will returnto normal operation.
RESTORING FACTORY DEFAULT SETTINGS
The One ForAll 4 Device Universal Remote Control also contains a Factory
program that you can use to reset all customsettings and setup codes
Reset
to originalfactory settings.Also see ClearingCustom Programming as above.
IMPORTANT: Executingthis program will erase all your customsettings for
Power Macro, Favorite Channels,Volume Lock, ReassignedDevices, andall
device settings.
1. Press and hold SET until the LED (redlight) blinks twice,
then release
2. Enter
will returnto normal operation.
SET.
9 - 8 - 1. The LED will blink twice.The remote control
14
Page 15

TROUBLESHOOTING
PROBLEM: LED (red light) does not blink whenyou pressa key.
SOLUTION: Replace batteries with two new AAA alkaline batteries.
PROBLEM: LED blinkswhen you press a key, buthome entertain-
mentdevice does not respond.
SOLUTION: Make sure the remotecontrol is aimed at your home
entertainment deviceandis not farther than 15 feet
away.
PROBLEM: The unit does notcontrol home entertainment devices
or commands are notworking properly.
SOLUTION: Try all listed codes forthedevice brands being set up.
Make surethey can be operated with an infrared remote
control.
PROBLEM: Changing channels does not work.
SOLUTION: If original remote requiredpressingENTER orSELECT to
change channels,press ENTERor SELECT onthisremote
after enteringthe channelnumber.
PROBLEM: Tried Searching ForYour Code method and still could
not find a working code.
SOLUTION: Clear the device keyas follows:Pressandhold SET until
the LED (red light) blinks twice,then release.Next enter
9 - 9 - 2. Then press the devicekey to be cleared twice.
Now repeattheSearching ForYour Code method on
page 9.
PROBLEM: CH▲ and CH▼ do not work for your RCA TV.
SOLUTION: DuetoRCA design (1983-1987),only the original
remote control will operatethese functions.
PROBLEM: No remote control of volume.
SOLUTION: See ChangingVolume Lock on page 13 to lock/unlock
volume.
Foradditional information:
• Internet:http://www.oneforall.com
15
Page 16

INSTRUCTIONS TO THE USER
This equipment has been tested and found to complywiththe limits fora class
B digital device,pursuant topart15of the FCC Rules.These limits are designed
to provide a reasonable protection against harmful interference in a residential
installation.Thisequipment generates, uses,and can radiateradio frequency
energy andif not installed and used in accordance with the instructions, may
causeharmful interference to radio communications.However, there is no guarantee that interference will not occur in a particular installation.If this equipmentdoes cause harmful interference to radio or television reception,which can
be determined by turningthe equipment off and on,the user is encouragedto
try to correcttheinterference by one or more of the following measures:
• Reorient or relocate thereceiving antenna.
• Increase separation between equipmentandreceiver.
• Connectequipment into an outlet ora circuit different from thattowhich the
receiverisconnected.
• Consult dealerorexperienced radio/TVtechnician for help.
LIMITED LIFETIME WARRANTY
Audiovox ElectronicsCorporation (the“Company”) warrants to youtheoriginal
retail purchaser of this product thatshouldit, under normal use andconditions,be
proven defective in material or workmanshipduring its lifetime whileyou own it,
suchdefect(s)willberepaired or replaced (attheCompany’s option) without charge
for partsand repairlabor. To obtainrepair or replacement within the terms of this
Warranty, theproduct is to be delivered with proof of warrantycoverage (e.g.dated
bill of sale),specification of defect(s),transportation prepaid,to the Company at the
address shown below. ThisWarrantydoes not cover product purchased,serviced or
used outside the United Statesor Canada.This Warranty is not transferable and does
not extend to costs incurredfor installation, removalor reinstallation of the product.
ThisWarrantydoes not apply if in the Company’s opinion,the product has been
damaged through alteration,improper installation,mishandling, misuse,neglect,
accident,or the simultaneous use of different battery types (e.g.alkaline,standard or
rechargeable).
THE EXTENT OF THE COMPANY’S LIABILITY UNDER THISWARRANTY IS
LIMITEDTO THE REPAIR OR REPLACEMENT PROVIDED ABOVE AND, IN NO
EVENT, SHALL THE COMPANY’S LIABILITY EXCEED THE PURCHASE PRICE
PAID BYPURCHASER FOR THE PRODUCT.
ThisWarrantyisin lieu of all other express warranties or liabilities.ANY IMPLIED
WARRANTIES,INCLUDINGANYIMPLIEDWARRANTYOFMERCHANTABILITY
OR FITNESS FOR A PARTICULAR PURPOSESHALL BE LIMITEDTO DURATION
OF THISWARRANTY.INNO CASE SHALLTHECOMPANY BE LIABLE FORANYCONSEQUENTIAL OR INCIDENTAL DAMAGES WHATSOEVER.No person orrepresentative is authorizedtoassume for the Company anyliabilityother than
expressed herein in connection with the saleof thisproduct. Some states/provinces
do not allow limitations onhow long an implied warranty lastsor the exclusionor
limitation of incidentalorconsequentialdamage so the above limitations or exclusions may not apply to you.ThisWarranty givesyou specific legal rights and youmay
also have other rights,whichvary from state/provinceto state/province.U.S.A.:
Audiovox ElectronicsCorporation,150 MarcusBlvd.,Hauppauge,NewYork 11788
CANADA:Audiovox ReturnCenter,c/o Genco, 6685Kennedy Road,Unit 3, Door16,
Mississauga, Ontario L5T 3A5
URC-4021 07/08
16
Page 17

ADDITIONAL INFORMATION
ONE FORALL® is the registered trademark of Universal Electronics Inc.
AudiovoxAccessories Corporation is the Licenseeof the ONEFORALL® brand
for North America.
Copyright 2004 by Universal Electronics Inc.No part of this publication maybe
reproduced,transmitted,transcribed,storedin any retrieval system,ortranslated
to any language,in any formorby any means,electronic,mechanical,magnetic,
optical,manual,or otherwise, without the prior written permissionof Universal
ElectronicsInc.
The One For All® 4 Device Universal Remote Control iscompatible foruse in
North America, excluding Mexico.
This One For All® 4 Device Universal Remote Controlis covered by one or more
of the following US Patents:
6,587,067 6,496,135 5,515,052 5,959,751
6,587,067 5,481,256
17
Page 18

MANUFACTURER’S CODES
[CÓDIGOS DEL FABRICANTE]
Setup Codes for Cable Boxes
[Códigos de configuración para cajas (convertidores) de cable]
ABC 0003,0008
Americast 0899
Bell South 0899
Digeo 1187
GeneralInstrument 0003,0276
Jerrold 0003,0276
Memorex 0000
Motorola 0276,1187, 1376
Pace 0008, 1877
Panasonic 0000
Paragon 0000
Pioneer 0533,1877
Setup Codes for Cable Box/PVR (or DVR) Combos
[Códigos de configuración para equipo combinado de cable/PVR
(o DVR)]
Americast 0899
Digeo 1187
Motorola 1376,1187
Pace 1877
Setup Codes for DVD Players
[Códigos de configuración para reproductores de DVD]
Akai 0695, 0899
Alco 0790
ApexDigital 0672,0717, 0755,0794,0796,
0830,1020, 1056,1061
Audiovox 0790
Blaupunkt 0717
BlueParade 0571
Broksonic 0695
California Audio Labs0490
Denon 0490
Diamond Vision 1316,1609, 1610
Disney 0675
Durabrand 1127
DVD2000 0521
Emerson 0675,0821, 1268
Funai 0675,1268
Gateway 073
GE 0522,0717
GoVideo 0741,0744, 1044,1075
GoldStar 0741
Gradiente 0490
Greenhill 0717
Grundig 0539
Hitachi 0573
Hiteker 0672
iLo 1348,1472
Initial 0717, 1472
Insignia 1830
Integra 0571, 0627
JVC 0558,0623, 0867,1164
Kawasaki 0790
Kenwood 0490
Pulsar 0000
Quasar 0000
Runco 0000
ScientificAtlanta 0008,1877
Starcom 0003
Supercable 0276
Torx 0003
Toshiba 0000
Zenith 0000,0899
Pioneer 1877
ScientificAtlanta 1877
Supercable 0276
Zenith 0899
KLH 0717,0790,1020
Lenoxx 1127,1938
LG 0741
Magnavox 0503,0539,0646,0675,0821,
1268
Marantz 0539
Memorex 0695
Microsoft 0522
Mintek 0717, 1472
Mitsubishi 0521,1521
NAD 0741
Nesa 0717
NexxTech 1830
Norcent 1830
Onkyo 0503,0627
Panasonic 0490,0503, 0703, 1362, 1462,
1490,1762
Philips 0503, 0539, 0646, 0675
Pioneer 0525,0571
Polaroid 1020,1061,1316
PolkAudio 0539
Presidian 0675
Proceed 0672
Proscan 0522
RCA 0522,0571,0717,0790,0822,
1022,1132
Regent 1938
Rotel 0623
Samsung 0490, 0573, 0744, 0820, 0899,
1044,1075
Sansui 0695
continuedon next page...
continúa en la páginasiguiente...
18
Page 19

MANUFACTURER’S CODES
[CÓDIGOS DEL FABRICANTE]
Setup Codes for DVD Players
[Códigos de configuración para reproductores de DVD]
Sanyo 0695
Sharp 0630,0675
Shinsonic 0533
Sony 0533,0864, 1033,1431
Superscan 0821
Sylvania 0675, 0821,1268
Symphonic 0675,1268
Teac 0790
Setup Codes For DVD Player/VCR Combos
[Códigos de configuración para equipo combinado de DVD/VCRs]
ApexDigital 1061
Broksonic 0695
Emerson 0675
Funai 0675
GoVideo 0741,0744, 1044,1075
GoldStar 0741
JVC 0867,1164
LG 0741
Memorex 0695
Panasonic 1762
Philips 0675
Technics 0490,0703
ThetaDigital 0571
Toshiba 0503, 0695,1045,1154
Urban Concepts 0503
Venturer 0790
Xbox 0522
Yamaha 0490,0539
Zenith 0503,0741
Polaroid 1061
Presidian 0675
RCA 0522,0822
Samsung 0820, 1044, 1075
Sansui 0695
Sharp 0630
Sony 0864,1033, 1431
Sylvania 0675
Symphonic 0675
Toshiba 0503
Zenith 0741
Setup Codes for PVRs (or DVRs)
[Códigos de configuración para PVR (o DVR) (Videograbadoras
Personales Digitales en Disco Duro)]
ABS 1972
Alienware 1972
CyberPower 1972
Dell 1972
DirecTV 0739
Gateway 1972
Hewlett Packard 1972
Howard Computers 1972
HP 1972
Hughes Network
Systems 0739
Humax 0739
Hush 1972
iBUYPOWER 1972
Linksys 1972
MediaCenter PC 1972
Microsoft 1972
Mind 1972
Niveus Media 1972
Northgate 1972
Panasonic 0616
Philips 0618, 0739
RCA 0880
ReplayTV 0614,0616
Samsung 0739
SonicBlue 0614,0616
Sony 0636,1972
Stack9 1972
Systemax 1972
Tagar Systems 1972
Tivo 0618, 0636,0739
Toshiba 1008, 1972
Touch 1972
Viewsonic 1972
Voodoo 1972
ZT Group 1972
Setup Codes for Satellite Receivers
[Códigos de configuración para receptores de satélite]
DirecTV 1377, 0099,0247,0392,0566,
0639,0724, 0749,0819,1076,
1108,1142, 1392,1442,1609,
1639,1640, 1749, 1856
Dish Network 0775
Dish Network
System 0775, 1005, 1505, 1775
Dishpro 0775, 1005,1505,1775
Echostar 0775, 1005,1505,1775
Expressvu 0775,1775
GE 0392,0566
GeneralInstrument 0869
GOI 0775,1775
Hisense 1535
Hitachi 0819
19
Page 20

HTS 0775,1775
Hughes 0749,1442,1749
Hughes Network
Systems 0749, 1142, 1442, 1749
iLo 1535
Jerrold 0869
JVC 0775,1775
Magnavox 0724
Memorex 0724
Mitsubishi 0749
Motorola 0856,0869
NextLevel 0869
Panasonic 0247,0701
Paysat 0724
Philips 0099, 0724, 0749, 0819, 1076,
1142,1442, 1749
Pioneer 1442
Proscan 0392,0566
Proton 1535
RadioShack 0869
RCA 0392,0566,0855,1392
Samsung 1108, 1142, 1276, 1377, 1442,
1609
Sony 0639,1639, 1640
Star Choice 0869
Tivo 1142, 1442
Toshiba 0749, 0790,0819,1285,1749
UltimateTV 1392, 1640
Uniden 0724
US Digital 1535
USDTV 1535
Voom 0869
Zenith 1856
Setup Codes for Satellite Receiver/PVR (or DVR) Combos
[Códigos de configuración para equipo combinado de receptores
de satélite/PVR (o DVR)]
DirecTV 1377, 0099,0392,0639,1076,
1142,1392, 1442,1640
Dish Network System0775, 1505
Dishpro 0775, 1505
Echostar 0775, 1505
Expressvu 0775
Hughes Network
Systems 1142, 1442
Motorola 0869
Philips 1142, 1442
Proscan 0392
RCA 1392
Samsung 1442
Sony 0639,1640
Star Choice 0869
Setup Codes for TVs
[Códigos de configuración para TVs]
Admiral 0093,0463
Advent 0761, 0783, 0815, 0817, 0842
Aiko 0092
Akai 0030, 0060, 0672, 0702, 0812
AmericaAction 0180
Anam 0180
AOC 0030
ApexDigital 0156,0748, 0765,0767,0879
Audiovox 0092,0180,0451
Aventura 0171
Bell & Howell 0154
Bradford 0180
Broksonic 0180,0236,0463
Candle 0030
Carnivale 0030
Carver 0054
Celebrity 0000
Celera 0765
Changhong 0765
Citizen 0030,0060,0092
Clarion 0180
Commercial Solutions 0047
Contec 0180
Craig 0180
Crosley 0054
Crown 0180
CurtisMathes 0030,0047, 0054, 0060, 0093,
0145,0154, 0166,0451,0702
CXC 0180
Daewoo 0092, 0451,0672, 1661
Denon 0145
Diamond Vision 1996,1997
Dumont 0017
Durabrand 0171,0178, 0180,0463,1034
Dwin 0093
Electroband 0000
Electrograph 1755
Emerson 0154,0171, 0178, 0180, 0236,
0451,0463, 1944,1963
Envision 0030
ESA 0171,0812
Fisher 0154
Funai 0171,0180
Futuretech 0180
Gateway 1755,1756
GE 0047,0051, 0178,0451
Gibralter 0017,0030
GoldStar 0030, 0178
Grunpy 0180
Haier 1034
Hallmark 0178
Harman/Kardon 0054
Harvard 0180
Havermy 0093
HelloKitty 0451
Hisense 0748
Hitachi 0145
iLo 1286
continuedon next page...
continúa en la páginasiguiente...
20
Page 21

MANUFACTURER’S CODES
[CÓDIGOS DEL FABRICANTE]
Setup Codes for TVs
[Códigos de configuración para TVs]
Infinity 0054
Insignia 1204
Inteq 0017
JBL 0054
JCB 0000
Jensen 0761, 0815, 0817
JVC 0053
KEC 0180
Kenwood 0030
KLH 0765, 0767
KTV 0030, 0180
LG 0178,1265
LXI 0047, 0054, 0154, 0156, 0178
Magnavox 0030,0054,1944,1963
Marantz 0030, 0054
Matsushita 0250
Maxent 1755
Megatron 0145, 0178
Memorex 0150,0154, 0178,0463
MGA 0030, 0150, 0178
Midland 0017, 0047, 0051
Mitsubishi 0093,0150, 0178, 1250
Motorola 0093
MTC 0030,0060
Multitech 0180
NAD 0156,0178
NEC 0030
NetTV 1755
Nikko 0030,0092, 0178
Norcent 0748
Norwood Micro 1286
NTC 0092
Onwa 0180
Optimus 0154,0166, 0250
Optonica 0093
Orion 0236,0463
Panasonic 0051,0250
Penney 0030,0047, 0051,0060,0156,
0178
Philco 0030,0054
Philips 0054
Pilot 0030
Pioneer 0166,0679
Polaroid 0765
Portland 0092
Prima 0761,0783, 0815,0817
Prism 0051
Proscan 0047
Proton 0178
Pulsar 0017
Quasar 0051,0250
RadioShack 0030, 0047,0154,0178,0180
RCA 0047,0090,0679
Realistic 0030,0154,0178,0180
Runco 0017,0030
Sampo 0030, 1755
Samsung 0030, 0060, 0178, 0702, 0812
Sansui 0463
Sanyo 0154
Scotch 0178
Scott 0178,0180,0236
Sears 0047,0054,0154,0156,0171,
0178
Sharp 0093
ShengChia 0093
Sony 0000
Soundesign 0178,0180
Squareview 0171
SSS 0180
Starlite 0180
Superscan 0093
Supreme 0000
SVA 0748
Sylvania 0030, 0054,0171,1944,1963
Symphonic 0171,0180
Tandy 0093
Tatung 1286,1756
Technics 0051,0250
Techwood 0051
Teknika 0054, 0060, 0092, 0150, 0180
Telefunken 0702
TMK 0178
TNCi 0017
Toshiba 0060, 0154,0156,1265
TVS 0463
US Logic 1286
Vector Research 0030
Victor 0053
Vidikron 0054
Vidtech 0178
Viewsonic 1755
Vizio 1756
Wards 0030, 0054, 0178
Waycon 0156
Westinghouse 0000,0451
WhiteWestinghouse 0463
Yamaha 0030
Zenith 0017,0092,0178,0463,1265
Setup Codes For TV/DVD Player Combos
[Códigos de configuración para equipo combinado de TV/DVDs]
Akai 0695
ApexDigital 0830
Broksonic 0695
Diamond Vision 1610
Emerson 0675,1268
iLo 1472
21
Page 22

Initial 1472
Magnavox 1268
Mintek 1472
Panasonic 1490
RCA 1022
Samsung 0899
Sansui 0695
Sylvania 0675, 1268
Toshiba 0695
Setup Codes For TV/VCR Combos
[Códigos de configuración para equipo combinado de TV/VCRs]
Broksonic 1479
Citizen 1278
Colt 0072
Daewoo 1278
Emerson 0593,1278, 1479
Funai 0000
GE 0240,0807
GoldStar 1237
Harley Davidson 0000
Hitachi 0000
Lloyd's 0000
Magnasonic 0593,1278
Magnavox 0000,0593
Magnin 0240
Memorex 0162,1237
MGA 0240
Mitsubishi 0807
Optimus 0162,0593
Orion 1479
Panasonic 0162
Penney 0240,1237
Quasar 0162
RadioShack 0000
RCA 0240,0807
Samsung 1014
Sansui 0000,1479
Sanyo 0240
Sears 0000,1237
Sony 0000,1232
Symphonic 0000,0593
Thomas 0000
Toshiba 0845, 1145
Zenith 0000,1479 0000,1479,0479
Setup Codes For TV/VCR/DVD Player Combos
[Códigos de configuración para equipo combinado de
TV/VCR/DVD]
Akai 0899
Diamond Vision 1609
Emerson 0821
Magnavox 0821
Panasonic 1362,1462
RCA 1132
Sharp 0630
Superscan 0821
Sylvania 0821
Toshiba 1045
Setup Codes For VCRs
[Códigos de configuración para VCRs]
ABS 1972
Admiral 0048,0209
Adventura 0000
Aiwa 0000, 0037
Alienware 1972
AmericanHigh 0035
Asha 0240
Audiovox 0037
Beaumark 0240
Bell & Howell 0104
Broksonic 0121,0184,0209,1479
Calix 0037
Canon 0035
Carver 0081
CCE 0072
Citizen 0037,1278
Colt 0072
Craig 0037, 0047, 0072, 0240
CurtisMathes 0035,0060, 0162
Cybernex 0240
CyberPower 1972
Daewoo 0045, 1278
Dell 1972
Denon 0042
DirecTV 0739
Durabrand 0039
Dynatech 0000
Electrohome 0037,0043
Electrophonic 0037
Emerex 0032
Emerson 0000,0037, 0043, 0121, 0184,
Fisher 0047, 0104
Fuji 0035
Funai 0000,0593, 1593
Garrard 0000
Gateway 1972
GE 0035,0060, 0240,0807
GoVideo 0240
GoldStar 0037, 1237
Gradiente 0000
Harley Davidson 0000
Harman/Kardon 0081
Harwood 0072
Hewlett Packard 1972
HI-Q 0047
22
0209,0593, 1278,1479,1593
continuedon next page...
continúa en la páginasiguiente...
Page 23

MANUFACTURER’S CODES
[CÓDIGOS DEL FABRICANTE]
Setup Codes For VCRs, continued
[Códigos de configuración para VCRs, continuación]
Hitachi 0000,0042
Howard Computers 1972
HP 1972
Hughes Network
Systems 0042, 0739
Humax 0739
Hush 1972
iBUYPOWER 1972
JVC 0067
KEC 0037
Kenwood 0067
KLH 0072
Kodak 0035,0037
Linksys 1972
Lloyd's 0000
Logik 0072
LXI 0037
Magnasonic 0593,1278
Magnavox 0000,0035,0039,0081,0593
Magnin 0240
Marantz 0035, 0081
Marta 0037
Matsushita 0035,0162
MediaCenter PC 1972
MEI 0035
Memorex 0000,0035, 0037,0039,0047,
0048,0104, 0162,0209,0240,
1237
MGA 0043, 0240
MGN Technology 0240
Microsoft 1972
Mind 1972
Minolta 0042
Mitsubishi 0043,0067, 0807
Motorola 0035,0048
MTC 0000,0240
Multitech 0000, 0072
NEC 0067,0104
Nikko 0037
Niveus Media 1972
Noblex 0240
Northgate 1972
Olympus 0035
Optimus 0037,0048, 0104, 0162, 0593,
1062
Orion 0184,0209, 1479
Panasonic 0035,0162, 0616, 1062
Penney 0035,0037, 0042,0240,1237
Pentax 0042
Philco 0035
Philips 0035, 0081, 0618, 0739
Pilot 0037
Pioneer 0067
PolkAudio 0081
Presidian 1593
Profitronic 0240
Proscan 0060
Protec 0072
Pulsar 0039
Quasar 0035,0162
RadioShack 0000
Radix 0037
Randex 0037
RCA 0042,0060,0240,0807,0880
Realistic 0000,0035,0037,0047,0048,
0104
ReplayTV 0614,0616
Ricavision 1972
Runco 0039
Samsung 0045,0240,0739,1014
Sanky 0039,0048
Sansui 0000,0067, 0209, 1479
Sanyo 0047,0104, 0240
Scott 0043,0045,0121,0184
Sears 0000,0035,0037,0042,0047,
0104,1237
Sharp 0048,0807
Shintom 0072
Shogun 0240
Singer 0072
SonicBlue 0614,0616
Sony 0000,0032, 0035,0636,1232,
1972
Stack9 1972
STS 0042
Sylvania 0000, 0035,0043,0081,0593,
1593
Symphonic 0000,0593, 1593
Systemax 1972
Tagar Systems 1972
Teac 0000
Technics 0035,0162
Teknika 0000, 0035, 0037
Thomas 0000
Tivo 0618, 0636,0739
TMK 0240
Toshiba 0043, 0045,0209,0845,1008,
1145,1972, 1503
Totevision 0037,0240
Touch 1972
Unitech 0240
Vector 0045
Video Concepts 0045
Videomagic 0037
Videosonic 0240
Viewsonic 1972
Villain 0000
Voodoo 1972
Wards 0000, 0035, 0042, 0047, 0048,
0060,0072, 0081,0240
WhiteWestinghouse 0072, 0209
XR-1000 0000, 0035,0072
Zenith 0000,0039,0209,1479
ZT Group 1972
23
 Loading...