

Page 1
2592
1944
HQ
2592
1944
HQ
2592
1944
HQ
YES
2006 . 01 . 01
00 : 00
SETUP
1AG6P1P2990--
VH521901
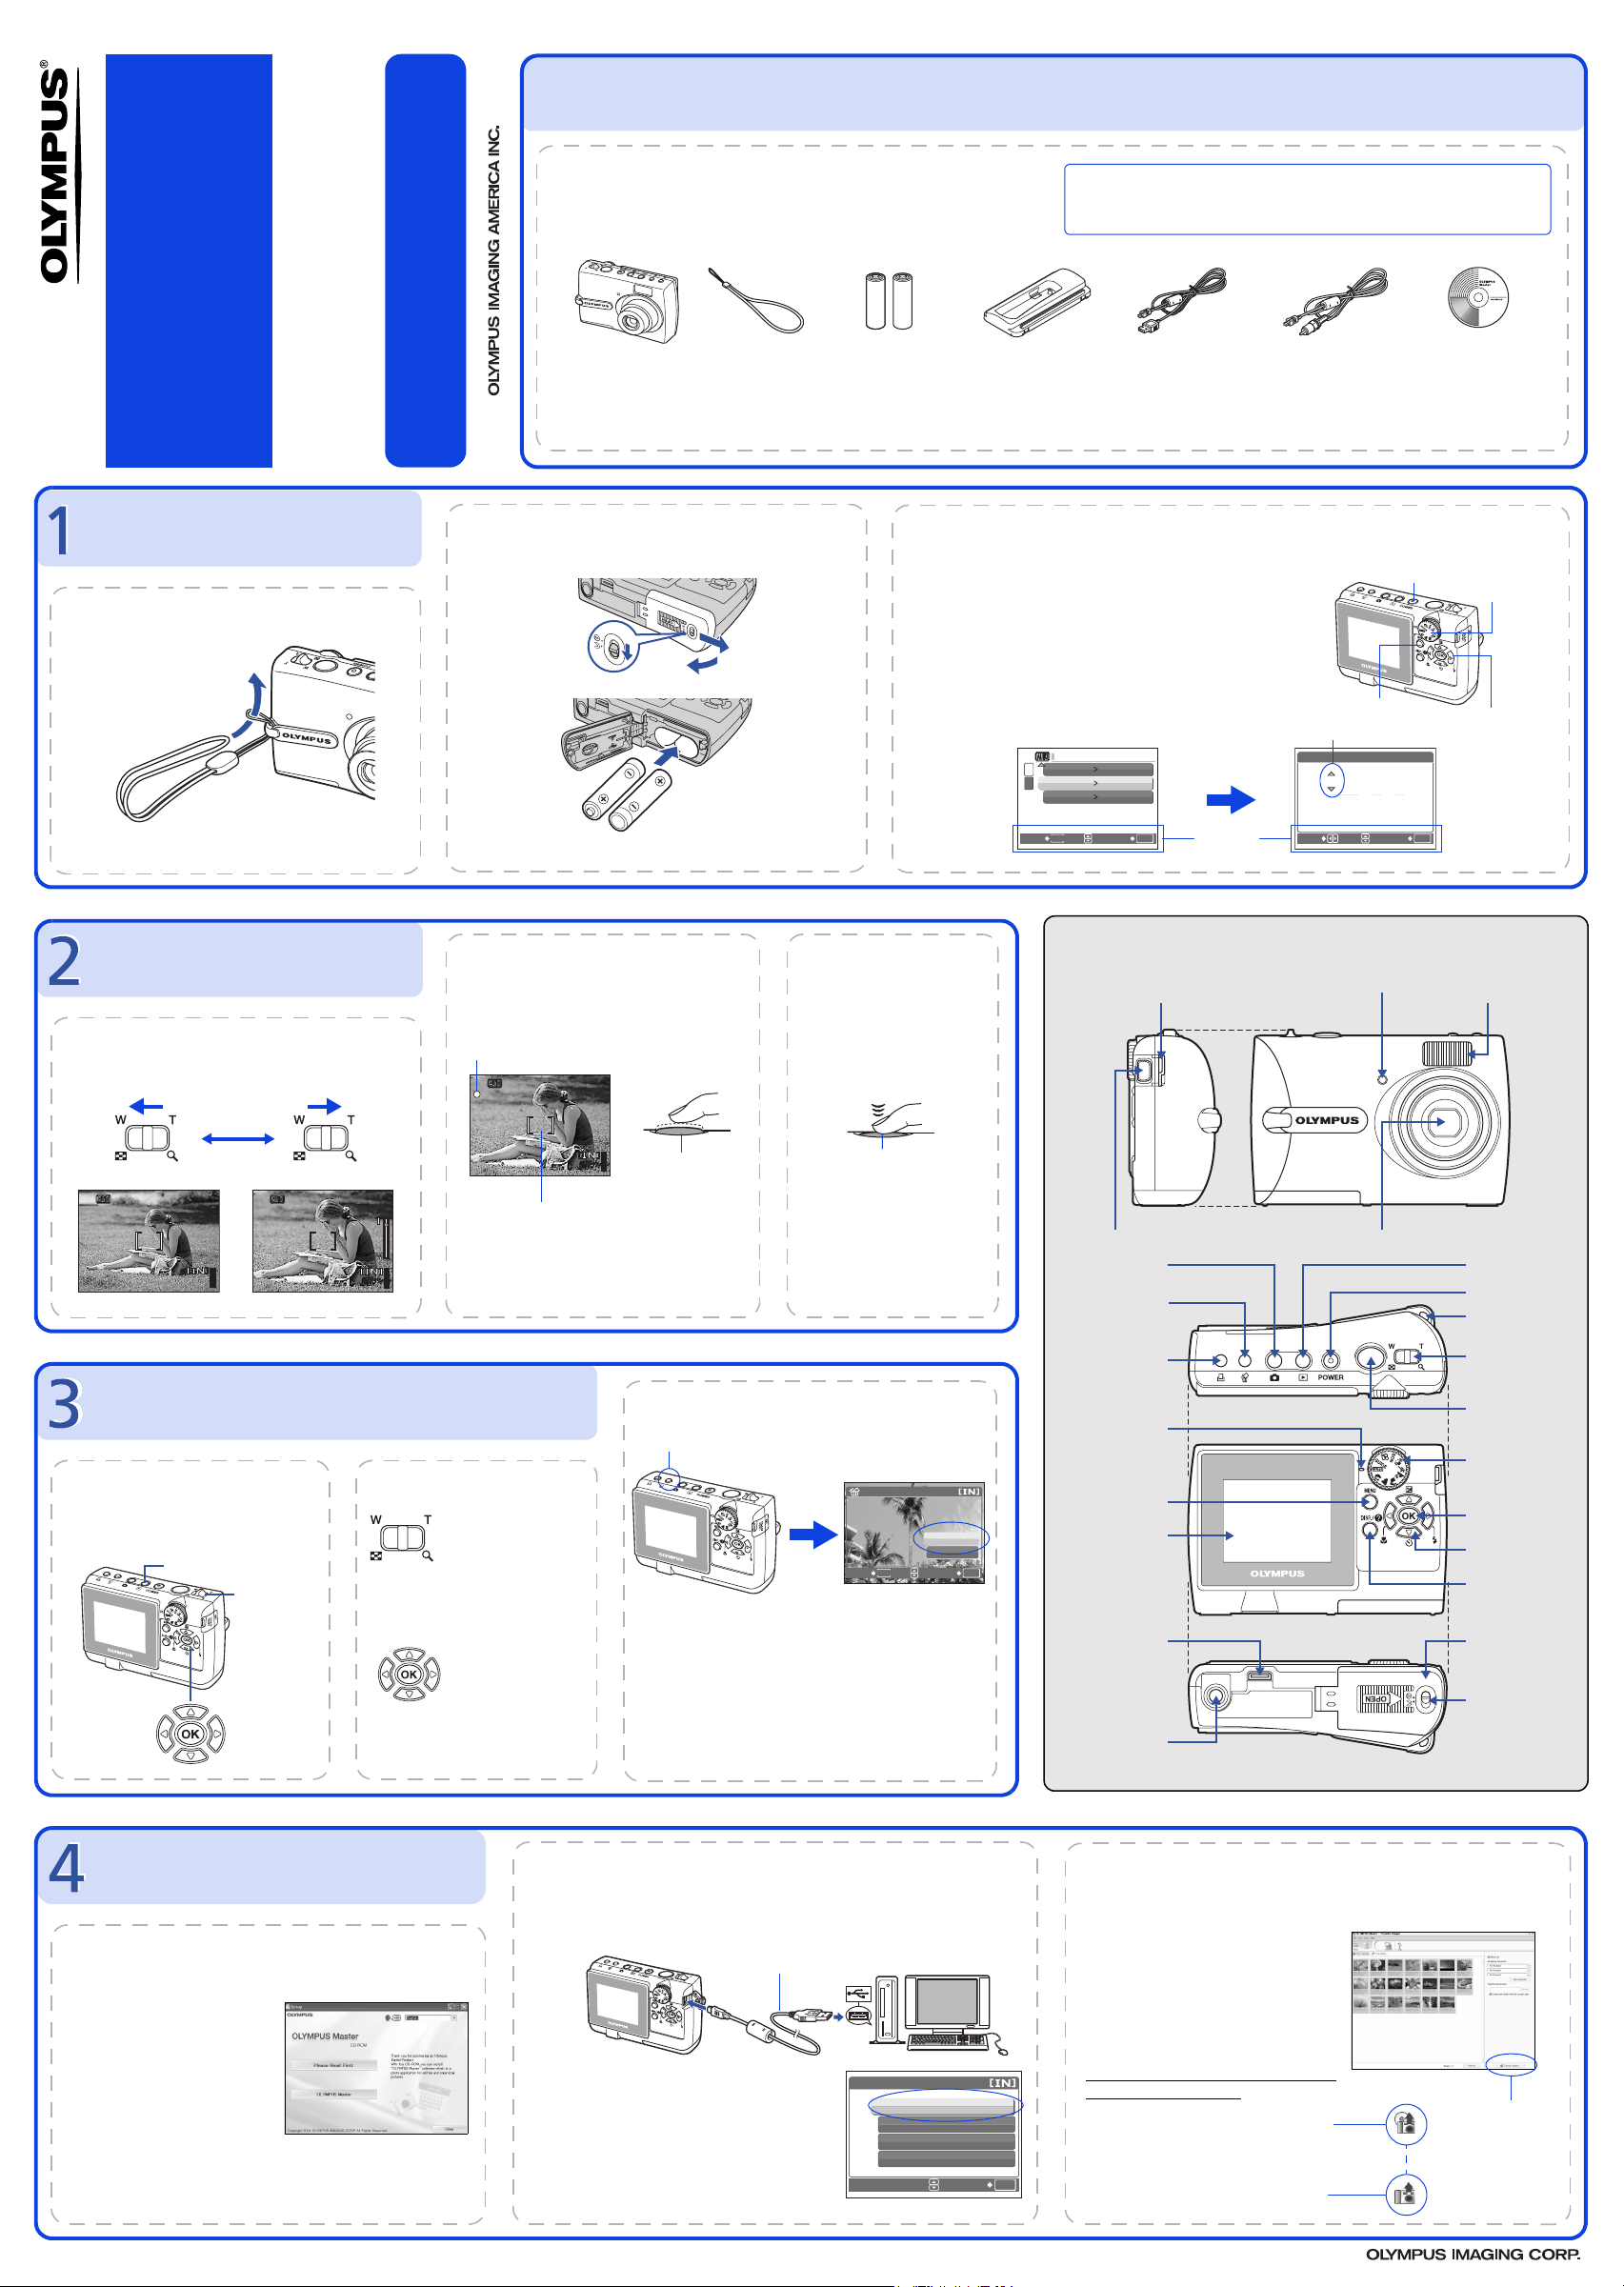
BEFORE YOU BEGIN
FE-130/X-720/X-740
Quick Start Guide
FE-140/X-725
Start Here
GET STARTED
a. Attach the strap
Pull the strap tight so that it does not come loose.
Gather these items (box contents)
The images of the LCD screen and illustrations of the camera used in
this manual may differ from the actual product. For this manual, all of
the images are based on the FE-130/X-720/X-740 model.
Digital Camera Strap AA Batteries (two) Camera insert* USB Cable (light gray) Video Cable (black)
OLYMPUS Master
software CD-ROM
Items not shown: Advanced Manual (CD-ROM), Basic Manual, warranty card. Contents may vary depending on purchase location.
For more information, please refer to the Basic & Advanced
Manuals or visit: www.olympusamerica.com/support
* Use it when connecting the camera to an optional printer which is compatible to the ImageLink print system.
b. Insert the batteries
c. Set the date and time
1 Set the mode dial to h, and press the POWER button
to turn the camera on.
1
2
2 Press the MENU button to display the top menu and
select [SETUP]>[X] using the arrow pad (O/N/X/Y).
POWER Button
Mode Dial
3 Set “Date format“, “Y“, “M“, “D“, “hour“ and
3
4
“minute“ by following the operation guide.
SETUP
s
1
2
BACK
X
VIDEO OUT
MENU
NORMAL
'06.01.01 00:00
NTSC
OK
SET
Operation
guide
MENU Button
Date format
X
x
MOVE
2006 . 01 . 01
Y M D
00 : 00
SET
Arrow Pad
(O/N/X/Y)
OK
TAKE A PICTURE
b. Focus
1 Using the monitor, place the AF target mark
over your subject.
a. Zoom
Green Lamp
2592
HQ
AF Target Mark
×
1944
2 Press and hold the shutter button halfway
HQ
2592
×
1944
2592
1944
HQ
44
×
44
to lock the focus.
The green lamp indicates the focus is locked.
REVIEW OR ERASE A PICTURE
a. Press the q button b. Take a closer look
The last picture taken will be displayed.
q Button
Zoom Lever
Arrow Pad
Prev. Picture Next Picture
Press the K button to return to
shooting mode.
Pull the lever
toward T to
enlarge the picture
up to 10 times the
original size, or
push the lever
toward W to
reduce the size.
Press F to return
to the original size.
Press O/N/X/Y
to scroll around.
(Pressed Halfway)
44
Shutter Button
c. To erase a picture
S Button
1 Display the picture you want to erase.
2 Press the S button.
3 Select [YES], and press F.
The picture is permanently erased.
c. Take the picture
1 Press the shutter button
completely to take the
picture.
(Pressed Completely)
Shutter Button
Pictures will be recorded in the
internal memory of the camera.
If the optional xD-Picture Card
(hereinafter called “card“) is
inserted into the camera,
pictures will be recorded in the
card.
ERASE
YES
NO
BACK
MENU
SET
OK
Connector Cover
Multi-Connector
Button
K
(Shooting Mode)
S Button (Erase)
< Button (Print)
Card access lamp
MENU Button
Monitor
Printer connector
Tripod Socket
CAMERA DIAGRAM
Self-Timer Lamp
Lens
Flash
q Button
(Playback Mode)
POWER Button
Strap Eyelet
Zoom Lever
Shutter Button
Mode Dial
F Button
Arrow Pad
(O/N/X/Y)
DISP./E Button
Battery
Compartment/
Card Cover
Cover-lock
TRANSFER IMAGES
a. Install the software
1 Insert the OLYMPUS Master CD-ROM.
2 Windows:
Click the “OLYMPUS
b. Connect the camera to the computer
1 Connect the camera and computer using the USB cable (provided).
The monitor will turn on automatically.
USB cable
2
1
c. Transfer images to the computer
1 With the camera now connected,
open OLYMPUS Master.
The [Transfer Images] window is
displayed.
2 Select the images you want to
transfer, and click the [Transfer
Images] button.
[Transfer Images] window
Master“ button.
Macintosh:
Double-click the “Installer“
icon.
3 Simply follow the on-screen
instructions.
Remember to register your camera when you install OLYMPUS
Printed in Japan © 2006
Master or visit:
www.olympusamerica.com/prodreg
2 Select [PC] on the monitor, and press F.
Your PC will now recognize your camera as a
removable storage drive.
USB
PC
EASY PRINT
CUSTOM PRINT
EXIT
SET
OK
If the [Transfer Images] window is not
displayed automatically:
a. Click the “Transfer Images” icon
on the OLYMPUS Master main
menu.
b. Click the “From Camera” icon.
[Transfer Images]
button
Page 2

2592
1944
HQ
2592
1944
HQ
2592
1944
HQ
SIM
x
2006 . 01 . 01
00 : 00
CONFIG.
ANTES DE COMEÇAR
FE-130/X-720/X-740
Guia de iniciação rápida
FE-140/X-725
Começar aqui
INICIAÇÃO
a. Colocar a correia
Puxar bem a correia de modo a que não fique solta.
Para maiores informações, consulte os Manuais Básico e Avançado
ou visite a página web: www.olympusamerica.com/support
Reúna estes itens (conteúdo da caixa)
As imagens do ecrã LCD e as ilustrações da câmara utilizadas neste
manual podem diferir do produto real. Neste manual, todas as imagens
têm como base o modelo FE-130/X-720/X-740.
Câmara Digital Correia Pilhas AA (duas) Acoplador da câmara* Cabo USB (cinzento-claro) Cabo de vídeo (preto)
CD-ROM do software
OLYMPUS Master
Itens não ilustrados: Manual Avançado (CD-ROM), Manual Básico, Cartão de Garantia. O conteúdo pode variar consoante o local de aquisição.
*Use-o ao conectar a câmara a uma impressora opcional que seja compatível ao sistema de impressão ImageLink.
b. Inserir as pilhas
1 Coloque o seletor de modo em h e pressione o botão
c. Definir a data e hora
Botão POWER
POWER da câmara na posição ligado.
1
3
4
2
2 Pressione o botão MENU para visualizar o menu
principal e seleccione [CONFIG.]>[X] usando o
selector em cruz (O/N/X/Y).
3 Configure “formato da data”, “A”, “M”, “D”, “hora”
e “minuto” seguindo o guia de funcionamento.
formato da data
CONFIG.
s
1
X
2
SAIDA VIDEO
MENU
RETROCEDER
NORMAL
'06.01.01 00:00
NTSC
OK
DEF
Guia de
funcionamento
X
ZONA
Botão MENU
x
2006 . 01 . 01
A M D
00 : 00
DEF
Selector em cruz
(O/N/X/Y)
OK
Selector
de modo
FOTOGRAFAR
b. Focar
1 Utilizando o ecrã, colocar a marca AF sobre o
tema fotográfico.
a. Zoom
Luz verde
HQ
2592
1944
×
Marca AF
2 Pressione o botão disparador até meio e
HQ
2592
×
1944
2592
1944
HQ
44
×
44
manter nessa posição para bloquear a
focagem.
A luz verde indica que a focagem está bloqueada.
REVER OU APAGAR UMA FOTOGRAFIA
a. Pressione o botão q b. Ver mais de perto
A última imagem fotografada será
visualizada.
Botão q
Alavanca do
Zoom
Selector em cruz
Fotografia
anterior
Fotografia
seguinte
Pressione o botão K para voltar
ao modo fotografia.
Pressione a alavanca
na direcção T para
aumentar a imagem
até 10 vezes o
tamanho original,
ou pressione a
alavanca na
direcção W para
reduzir o tamanho.
Pressione F para
voltar ao normal.
Pressione O/N/X/
Y para percorrer a
imagem.
1 Premir totalmente o botão
(Premido até meio)
Botão disparador
44
As fotos serão gravadas na
memória interna da câmara.
Se o cartão opcional xD-Picture
Card (de agora em diante
denominado “cartão”) estiver
inserido na câmara, as fotos
serão amazenadas no cartão.
c. Para apagar uma fotografia
Botão S
1 Visualizar a fotografia que pretende apagar.
2 Pressione o botão S.
3 Seleccionar [SIM] e pressione F.
A fotografia é eliminada permanentemente.
c. Fotografar
disparador para fotografar.
(Totalmente premido)
Botão disparador
APAGAR
SIM
NAO
MENU
RETROCEDER
DEF
OK
DIAGRAMA DA CÂMARA
Tampa do Conector
Multi-Conector
Botão K
(Fotografia)
Botão S (Apagar)
Botão <
(Impressão)
Luz de acesso
ao cartão
Botão MENU
Ecrã
Conector da
impressora
Encaixe para tripé
Luz do temporizador
Objectiva
Flash
Botão q
(Reprodução)
Botão POWER
Ilhó da correia
Alavanca do Zoom
Botão disparador
Selector de modo
Botão F
Selector em cruz
(O/N/X/Y)
Botão DISP./E
Tampa do
compartimento da
bateria/cartão
Travão da tampa
TRANSFERIR IMAGENS
a. Instalar o software
1 Inserir o CD-ROM OLYMPUS Master.
2 Windows:
Fazer clique no botão
“OLYMPUS Master“.
Macintosh:
Fazer duplo clique no ícone
“Installer“.
3 Seguir simplesmente as
instruções no ecrã.
Lembre-se de registar sua câmara quando instalar OLYMPUS
Master ou visitando:
www.olympusamerica.com/prodreg
b. Ligar a câmara ao computador
1 Ligar a câmara ao computador usando o cabo USB (fornecido).
O ecrã legar-se-á automaticamente.
Cabo USB
2
2 Seleccionar [PC] no ecrã e pressione F.
O PC reconhece agora a câmara como um
disco amovível.
1
USB
PC
IMP. FÁCIL
IMP. PERSON.
SAIDA
DEF
c. Transferir imagens para o computador
1 Com a câmara ligada, abrir o
OLYMPUS Master.
Surge a janela [Transfer Images]
(Transferir imagens).
2 Seleccionar as imagens que
pretende transferir e fazer clique
no botão [Transfer Images]
(Transferir imagens).
Se a janela [Transfer Images] (Transferir
imagens) não surgir automaticamente:
a. Fazer clique no ícone “Transfer
Images” (Transferir imagens) no
menu principal do OLYMPUS Master.
OK
b. Fazer clique no ícone “From
Camera” (Da câmara).
Janela [Transfer Images]
(Transferir imagens)
Botão [Transfer Images]
(Transferir imagens)
 Loading...