

Page 1
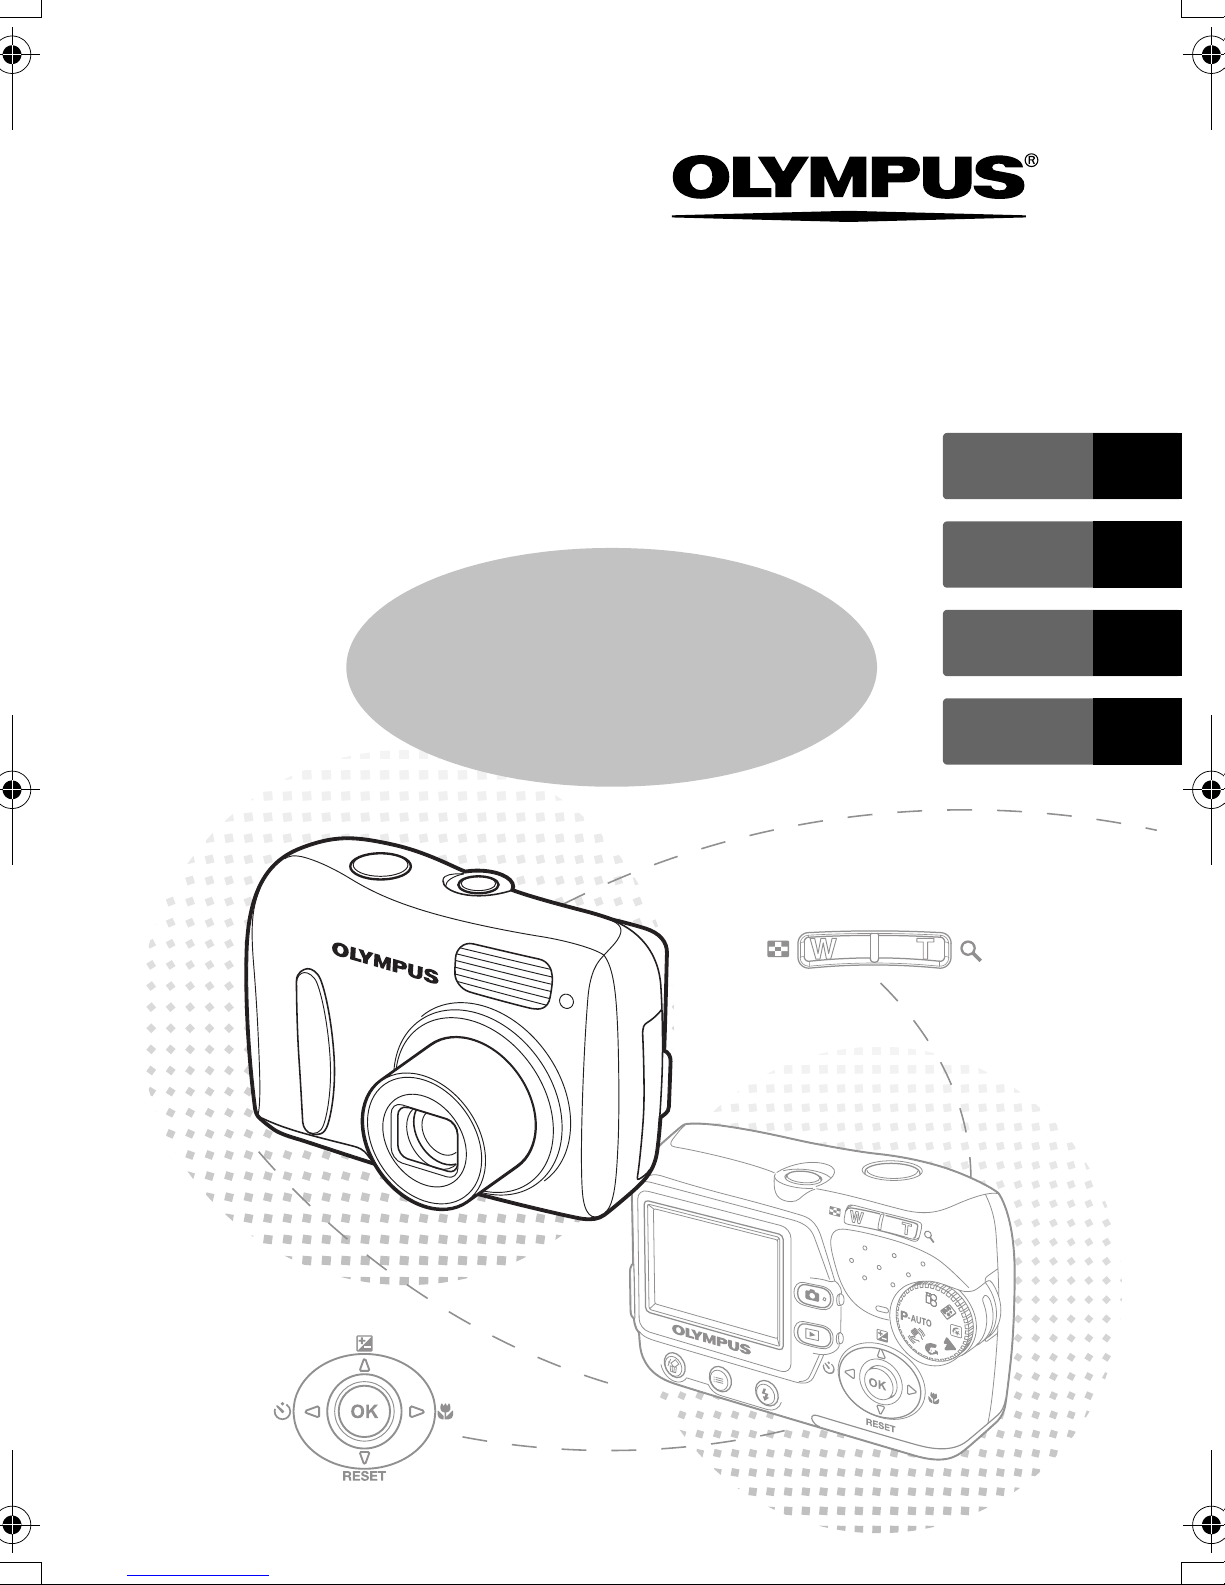
DIGITAL CAMERA
FE-115/X-715
ENGLISH 2
FRANÇAIS 30
Basic
Manual
ESPAÑOL 58
PORTUGUÊS
86
Page 2

En
Table of Contents
CAMERA DIAGRAM ...............................................................................3
BEFORE YOU BEGIN...............................................................................4
GETTING STARTED.................................................................................5
Step 1 GETTING STARTED ......................................................................... 5
Step 2 TAKE A PICTURE ............................................................................ 6
Step 3 REVIEW OR ERASE A PICTURE ........................................................ 7
Step 4 TRANSFER IMAGES......................................................................... 8
BASIC OPERATION ...............................................................................10
Shooting Tips.......................................................................................... 10
Shooting Button and Playback Button ..................................................... 10
Shooting Mode Buttons .......................................................................... 11
Power Save Feature................................................................................. 11
Shooting Mode....................................................................................... 12
Self-Timer ............................................................................................... 12
Exposure Compensation Mode................................................................ 13
Macro Mode........................................................................................... 13
Flash Modes............................................................................................ 14
MENUS AND SETTINGS .......................................................................15
Menu...................................................................................................... 15
Erase All Pictures ..................................................................................... 15
Select a Language ................................................................................... 16
Monitor Symbols & Icons......................................................................... 17
Thumbnail (Index) Display........................................................................ 18
CONNECTING THE CAMERA................................................................19
Playback on a TV..................................................................................... 19
Direct Printing (PictBridge)....................................................................... 20
OLYMPUS Master SOFTWARE ............................................................21
SPECIFICATIONS...................................................................................22
SAFETY PRECAUTIONS ........................................................................24
Before using your camera, read this manual carefully to ensure correct use.
We recommend that you take test shots to get accustomed to your camera before
taking important photographs.
Please observe the safety precautions at the end of this manual.
The images of the LCD screen and illustrations of the camera used in this manual
may differ from the actual product.
2
Page 3
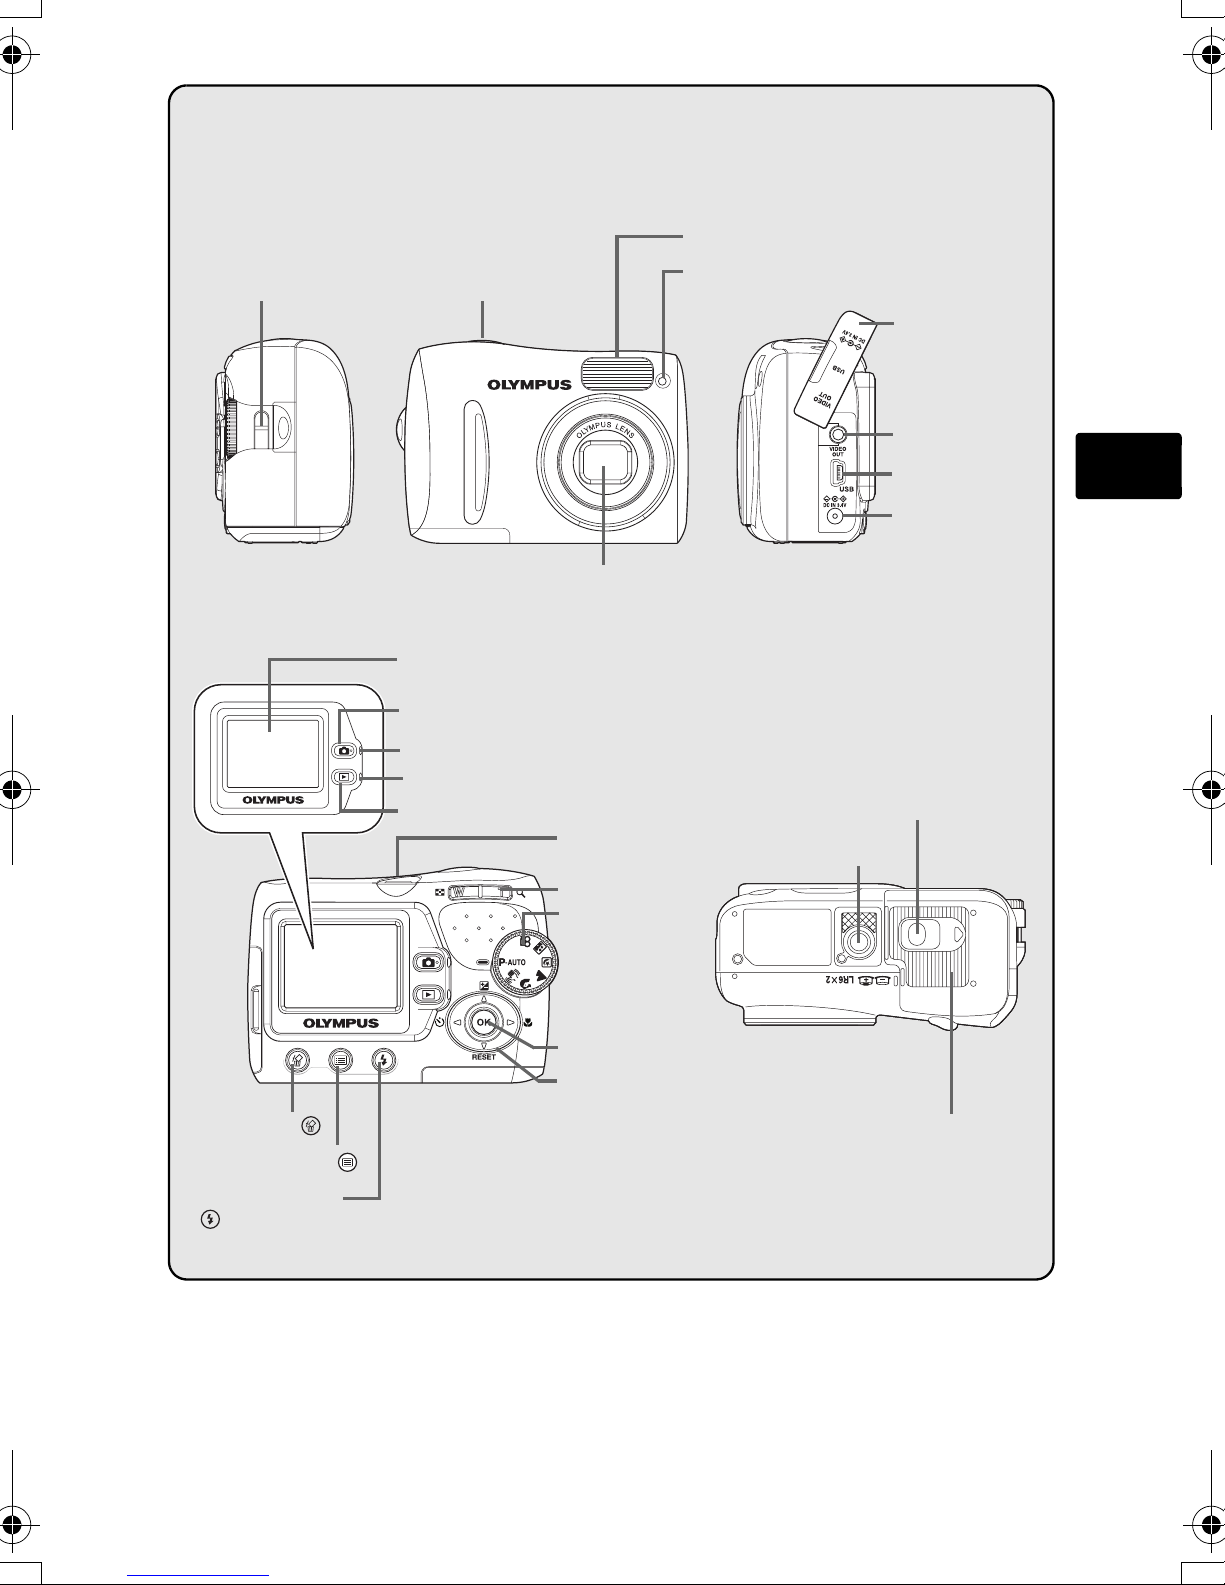
Strap Eyelet
CAMERA DIAGRAM
Flash
Shutter Button
Self-Timer Lamp
Connector Cover
VIDEO OUT Jack
Monitor
Shooting Button (l )
Orange Lamp
Green Lamp
Playback Button (k )
Power Switch
Zoom Button
Mode Dial
OK Button (i)
Lens
Lock Button
Tripod Socket
USB Connector
DC-IN Jack
OPEN
PUSH
En
Erase Button ( )
Menu Button ( )
Flash Mode Button
()
Arrow Pad([\]^)
Battery Compartment/
Card Cover
3
Page 4
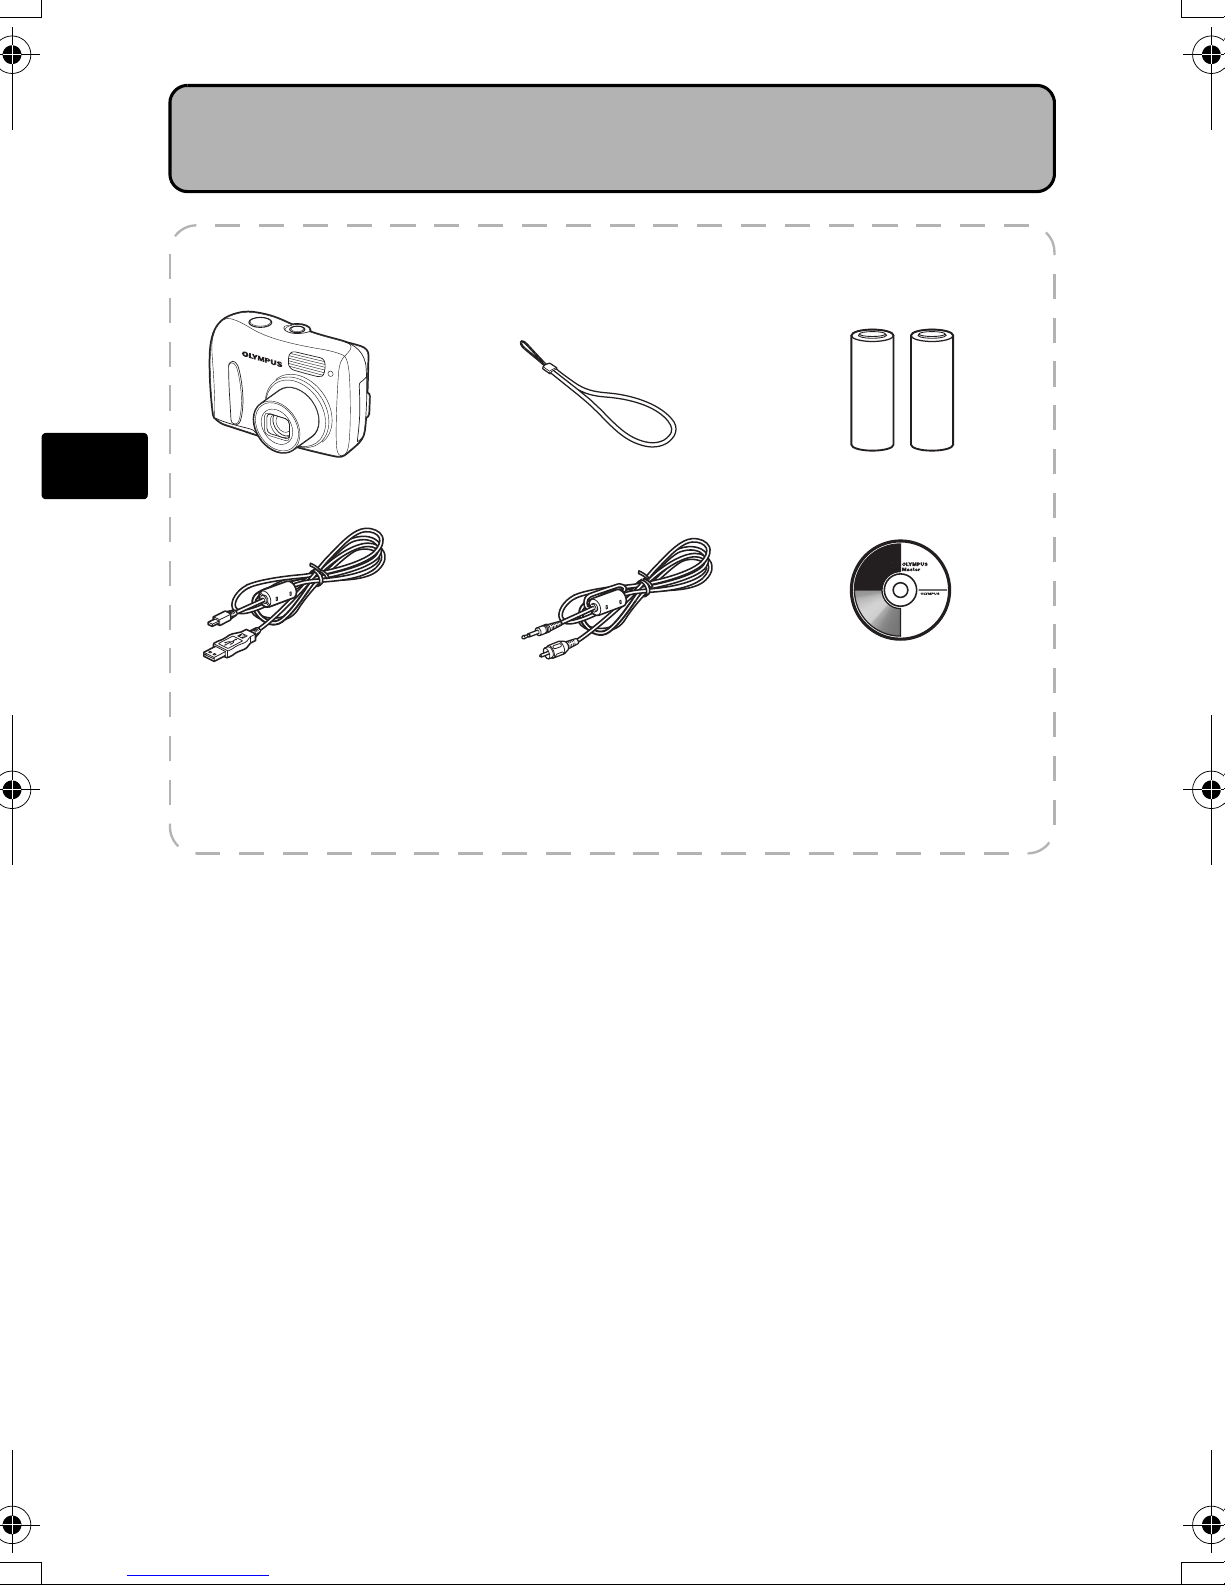
BEFORE YOU BEGIN
Gather these items (box contents)
En
Digital Camera Strap AA Batteries (two)
USB Cable (light gray) Video Cable (black)
Items not shown: Advanced Manual (CD-ROM), Basic Manual (This manual),
Warranty card. Contents may vary depending on purchase location.
OLYMPUS Master
software CD-ROM
4
Page 5
GETTING STARTED
Step 1 GETTING STARTED
GETTING STARTED
a. Attach the strap b. Insert the batteries
Strap eyelet
Pull the strap tight so that it does
not come loose.
c. Set the date and time
1
Lock button
3
Battery compartment/card cover
En
2
1 Turn the mode dial to and press the power switch to turn the camera on.
2 Press to display the menu screen.
2006_01_01
3 Press [/\ to set an item. Press ^/] to
select the next field.
2006 . 01 . 01
Operation guide
5
Page 6
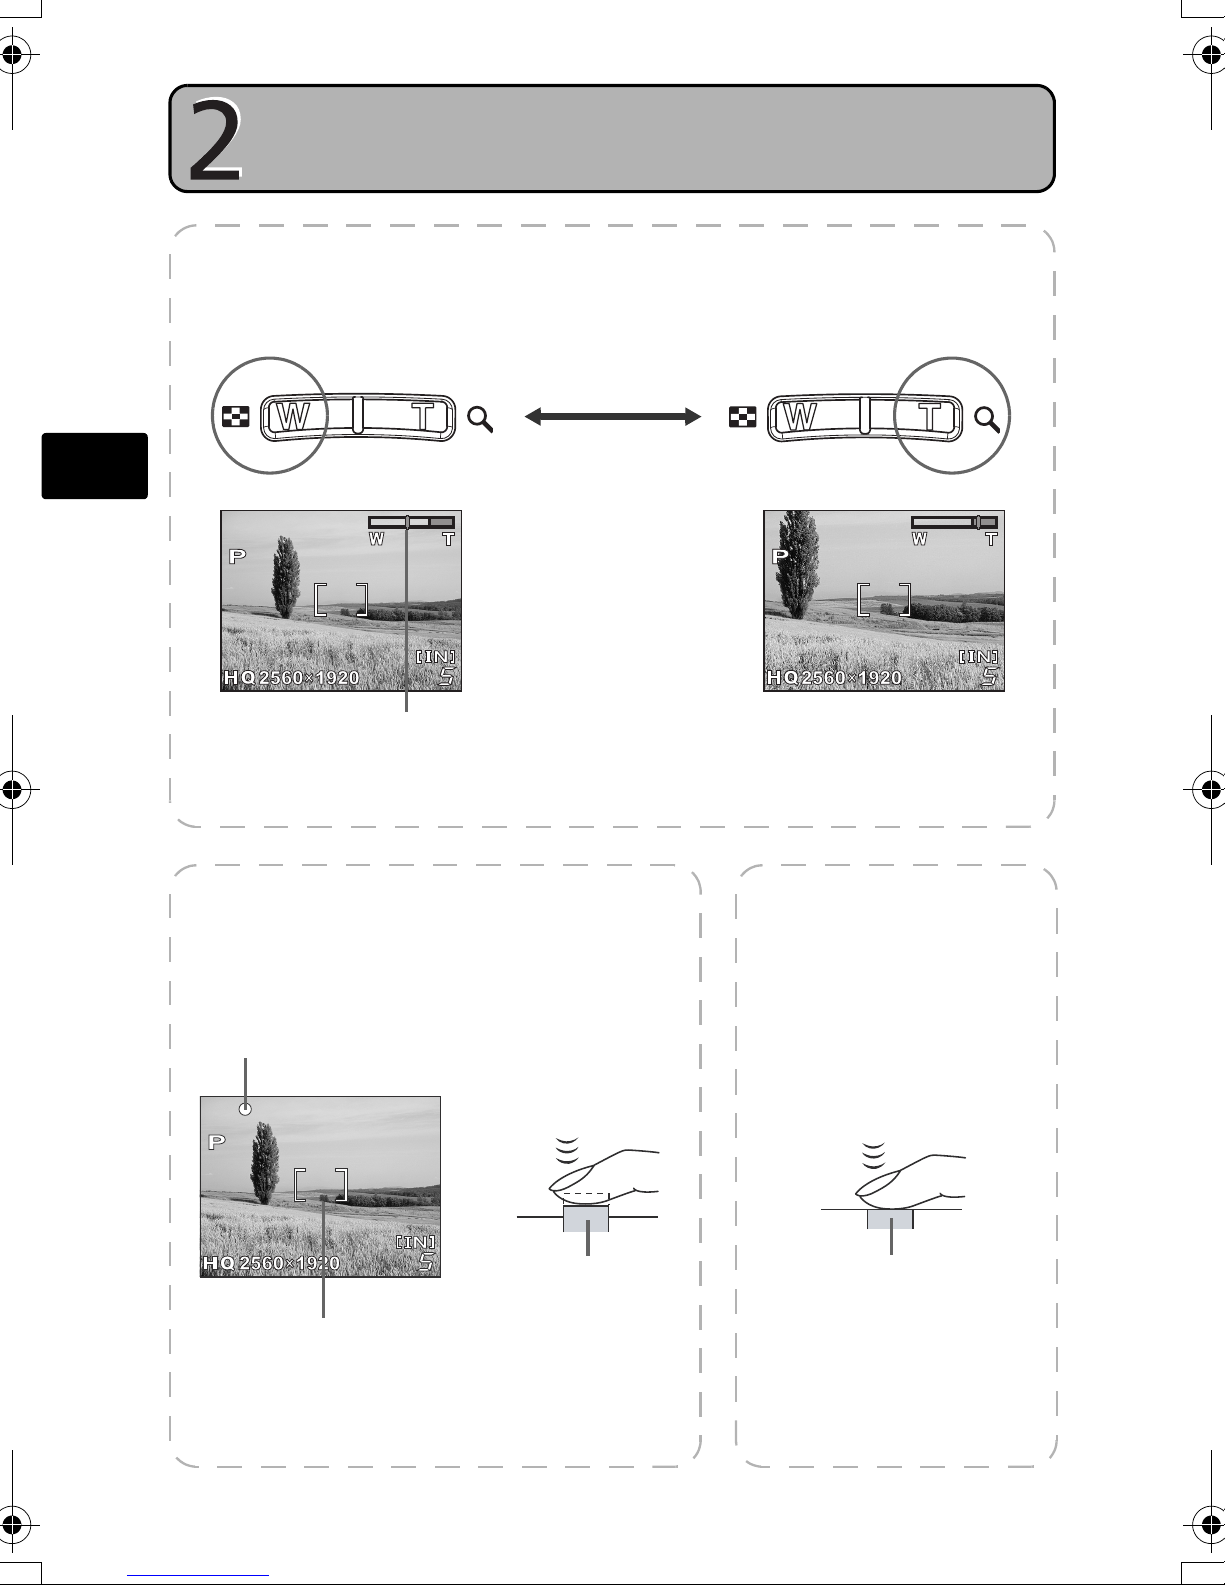
En
Step 2 TAKE A PICTURE
TAKE A PICTURE
a. Zoom
Zoom Out: Zoom In:
The cursor moves to the left or
right according to the degree of
zoom.
b. Focus
1 Using the monitor, place the AF target mark
over your subject.
Green lamp
(Pressed Halfway)
Shutter Button
c. Take the picture
1 Press the shutter button
completely to take the
picture.
(Pressed Completely)
Shutter Button
AF target mark
2 Press and hold the shutter button halfway
to lock the focus.
The green lamp indicates the focus is locked.
6
Page 7
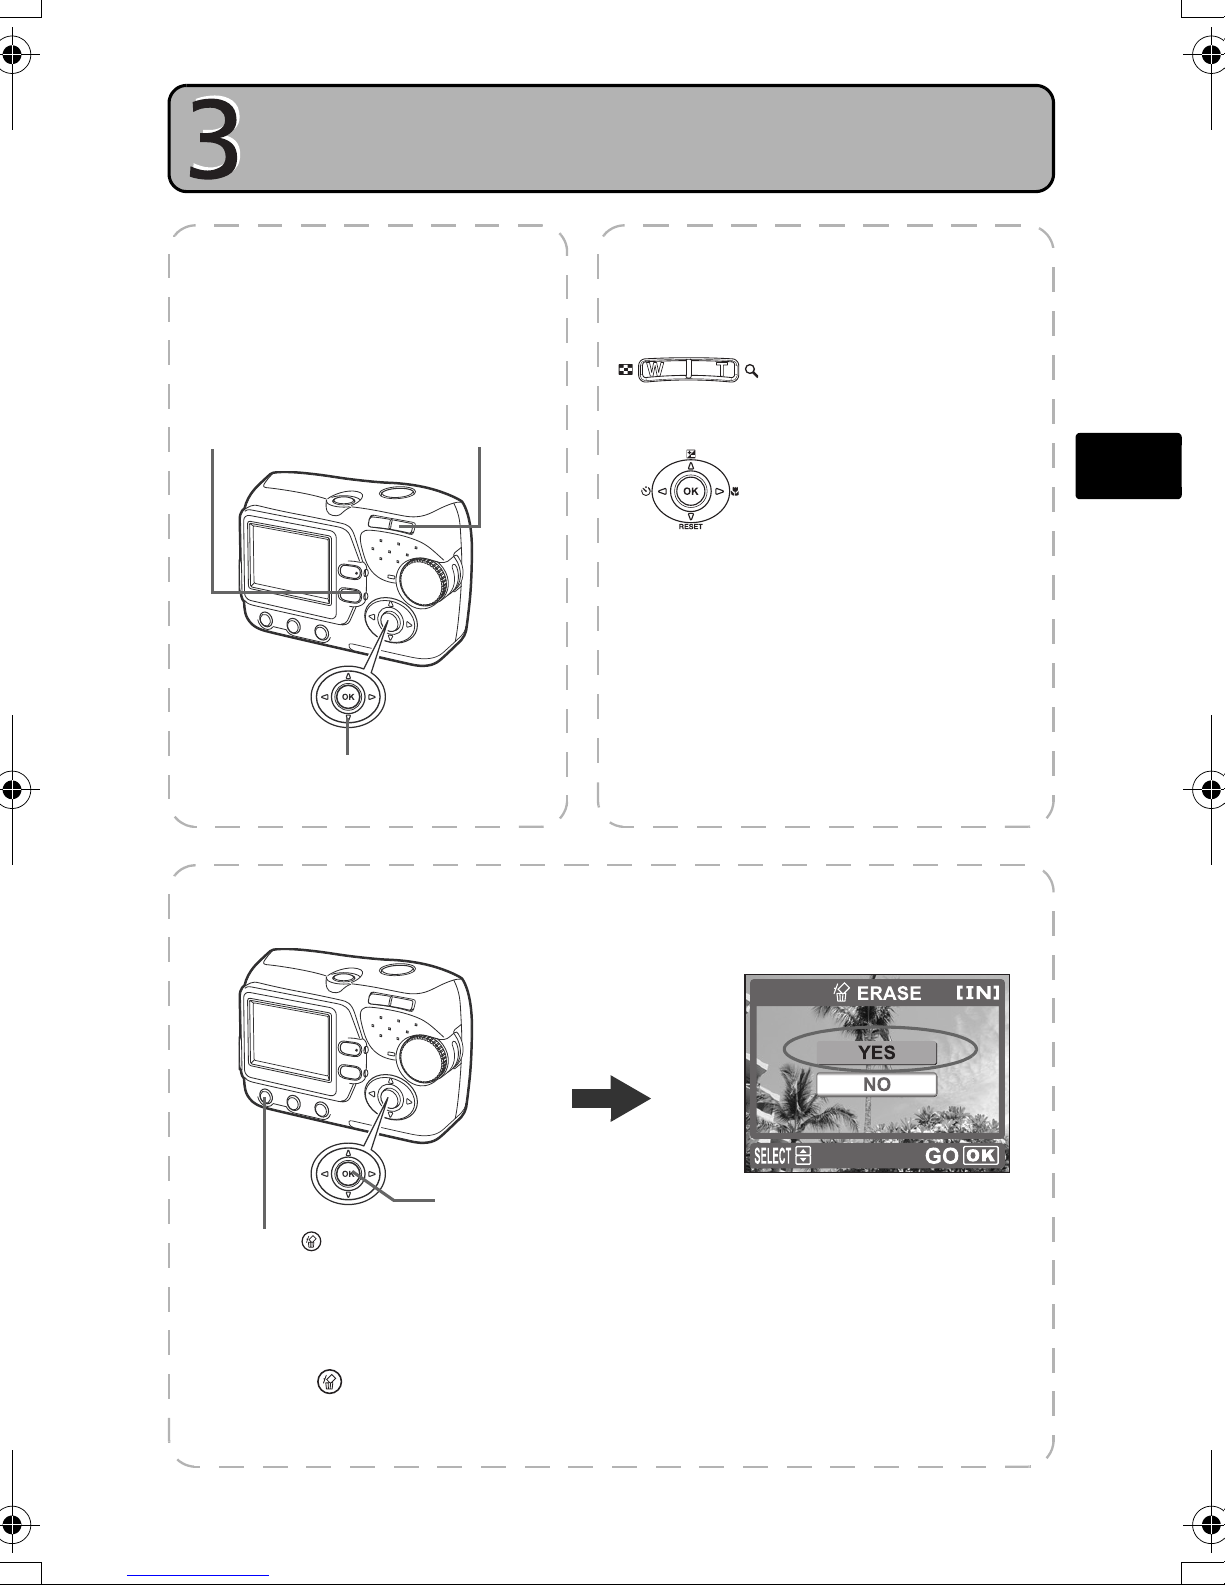
Step 3 REVIEW OR ERASE A PICTURE
REVIEW OR ERASE A PICTURE
a. Press k b. Take a closer look
The last picture taken will be
displayed.
Playback button (k)
Prev. picture
Arrow pad
Zoom button
Next picture
c. To erase a picture
Press T (U) to enlarge
the image.
Press W (G) to return
to normal.
Press [/\ or ^/] to
scroll around.
Press l to return to shooting mode.
En
Erase button ( )
1 Display the picture you want to
erase.
2 Press .
OK button
3 Select [YES], and press i.
The picture is permanently erased.
7
Page 8
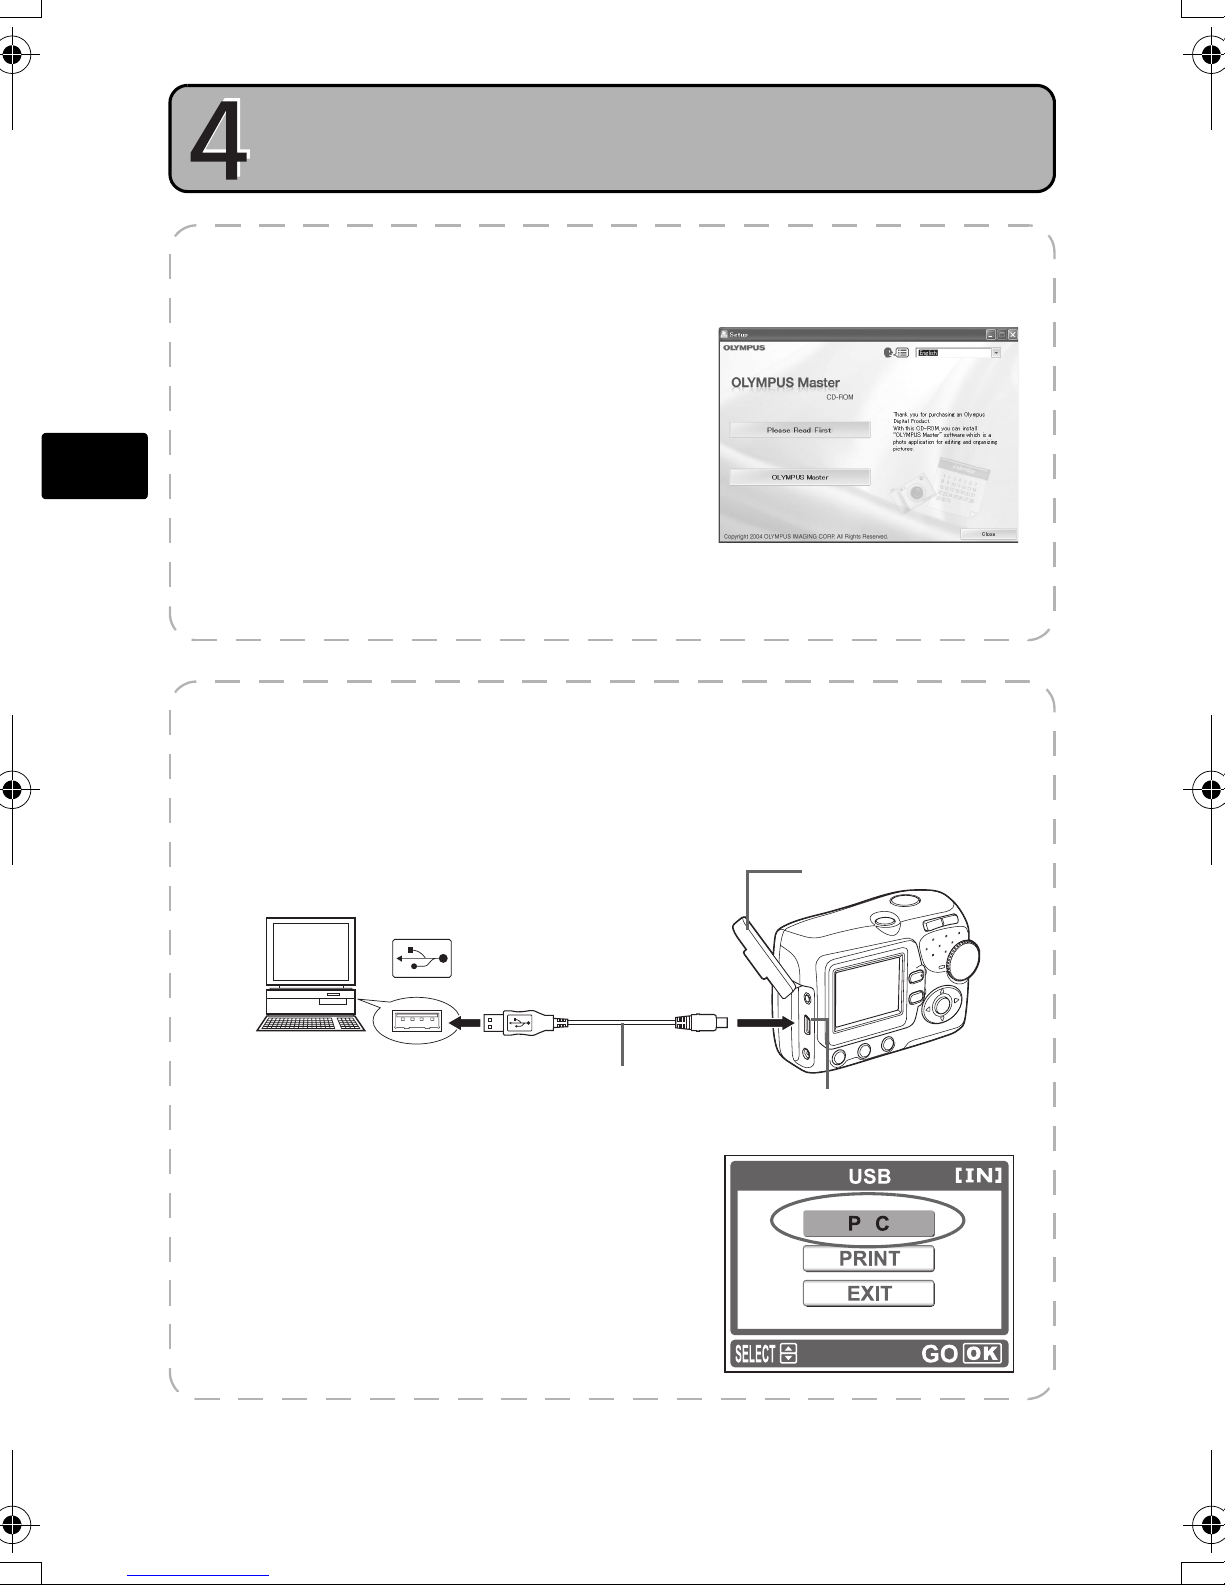
En
Step 4 TRANSFER IMAGES
TRANSFER IMAGES
a. Install the software
1 Insert the OLYMPUS Master CD-ROM.
2 Windows: Click the “OLYMPUS
Master“ button.
Macintosh: Double-click the
“Installer“ icon.
3 Simply follow the on-screen
instructions.
b. Connect the camera to the computer
1 Connect the camera and computer using the USB cable (included).
The monitor will turn on automatically.
Connector cover
Look for this mark.
USB port
2 Select [PC] on the monitor, and press i.
USB cable
USB connector
Your PC will now recognize your camera as a
removable storage drive.
8
Page 9
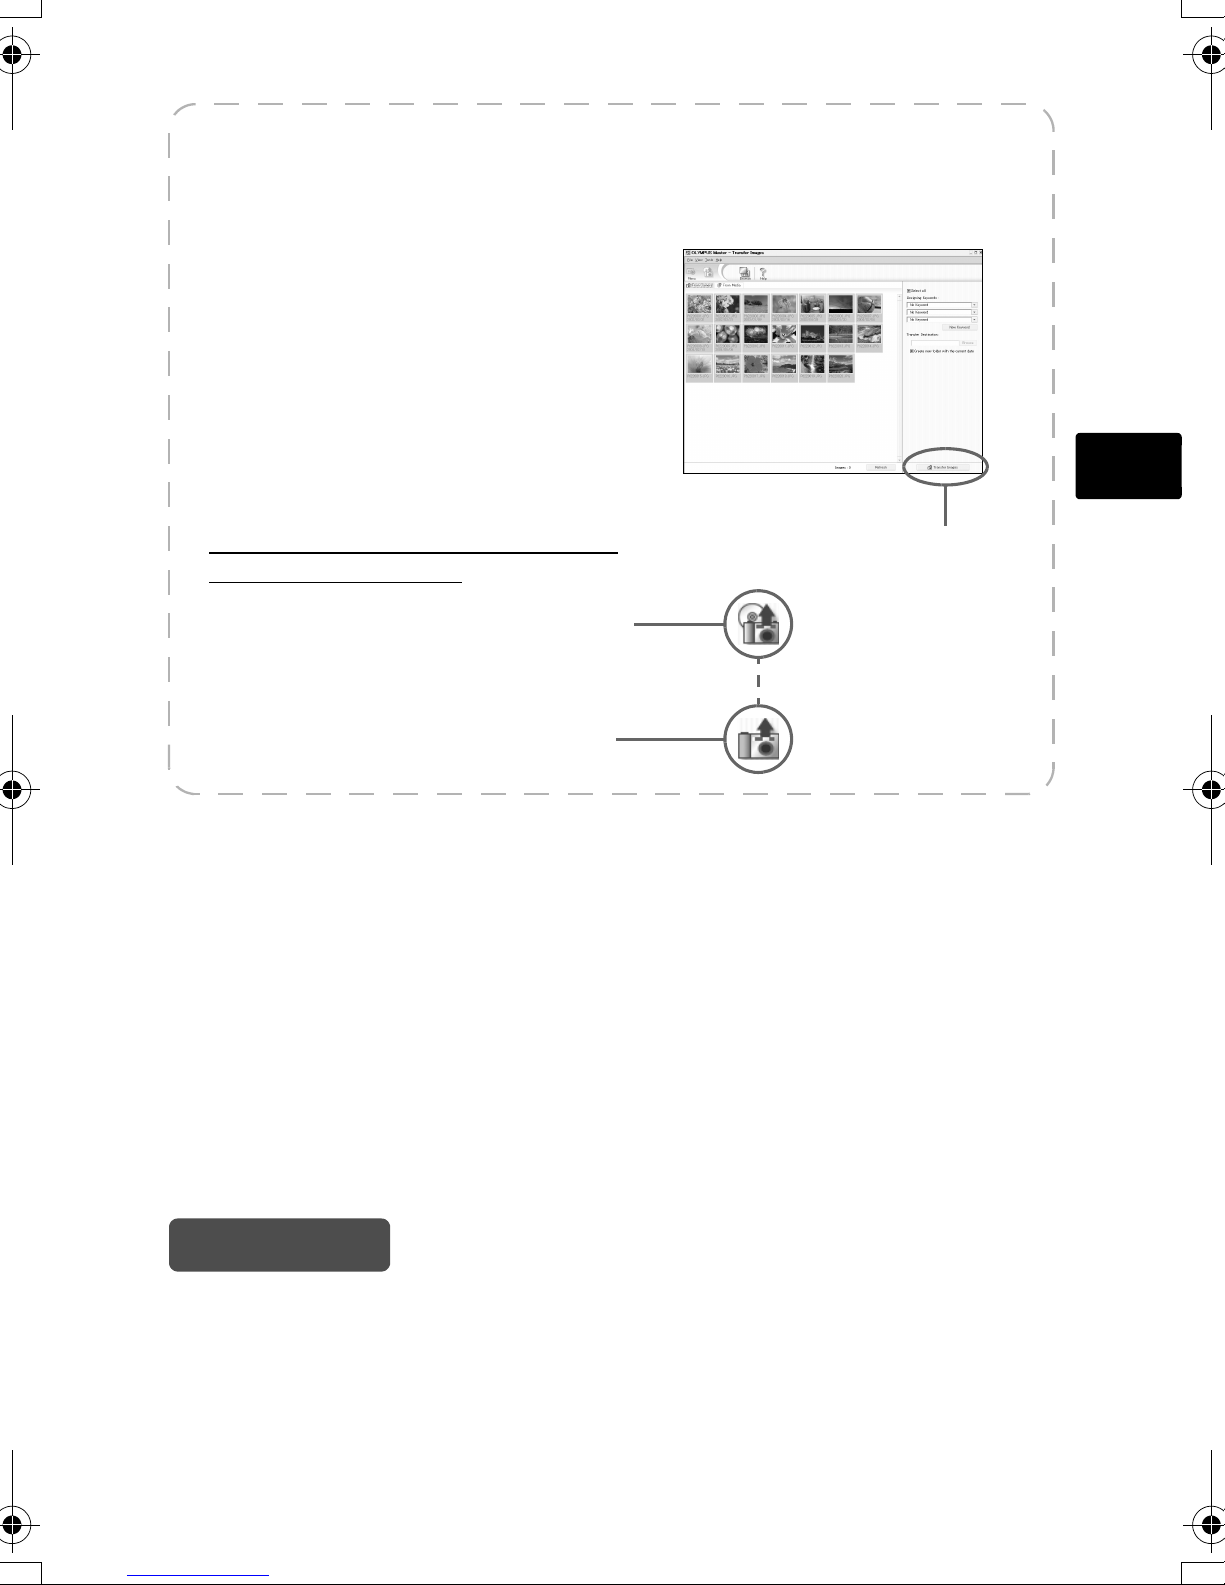
c. Transfer images to the computer
1 With the camera now connected,
open OLYMPUS Master.
The [Transfer Images] window is
displayed.
2 Select the images you want to
transfer, and click the [Transfer
Images] button.
If the [Transfer Images] window is not
displayed automatically:
a. Click the “Transfer Images” icon
on the OLYMPUS Master main
menu.
b. Click the “From Camera” icon.
[Transfer Images] window
En
[Transfer Images] button
Tips
• For more detailed information regarding camera setup and usage, please refer to
the camera’s “Advanced Manual” provided on CD-ROM.
• For information on how to use other features of OLYMPUS Master software not
mentioned above, open "Help" in the OLYMPUS Master software, or read the
reference manual (PDF format).
9
Page 10
En
BASIC OPERATION
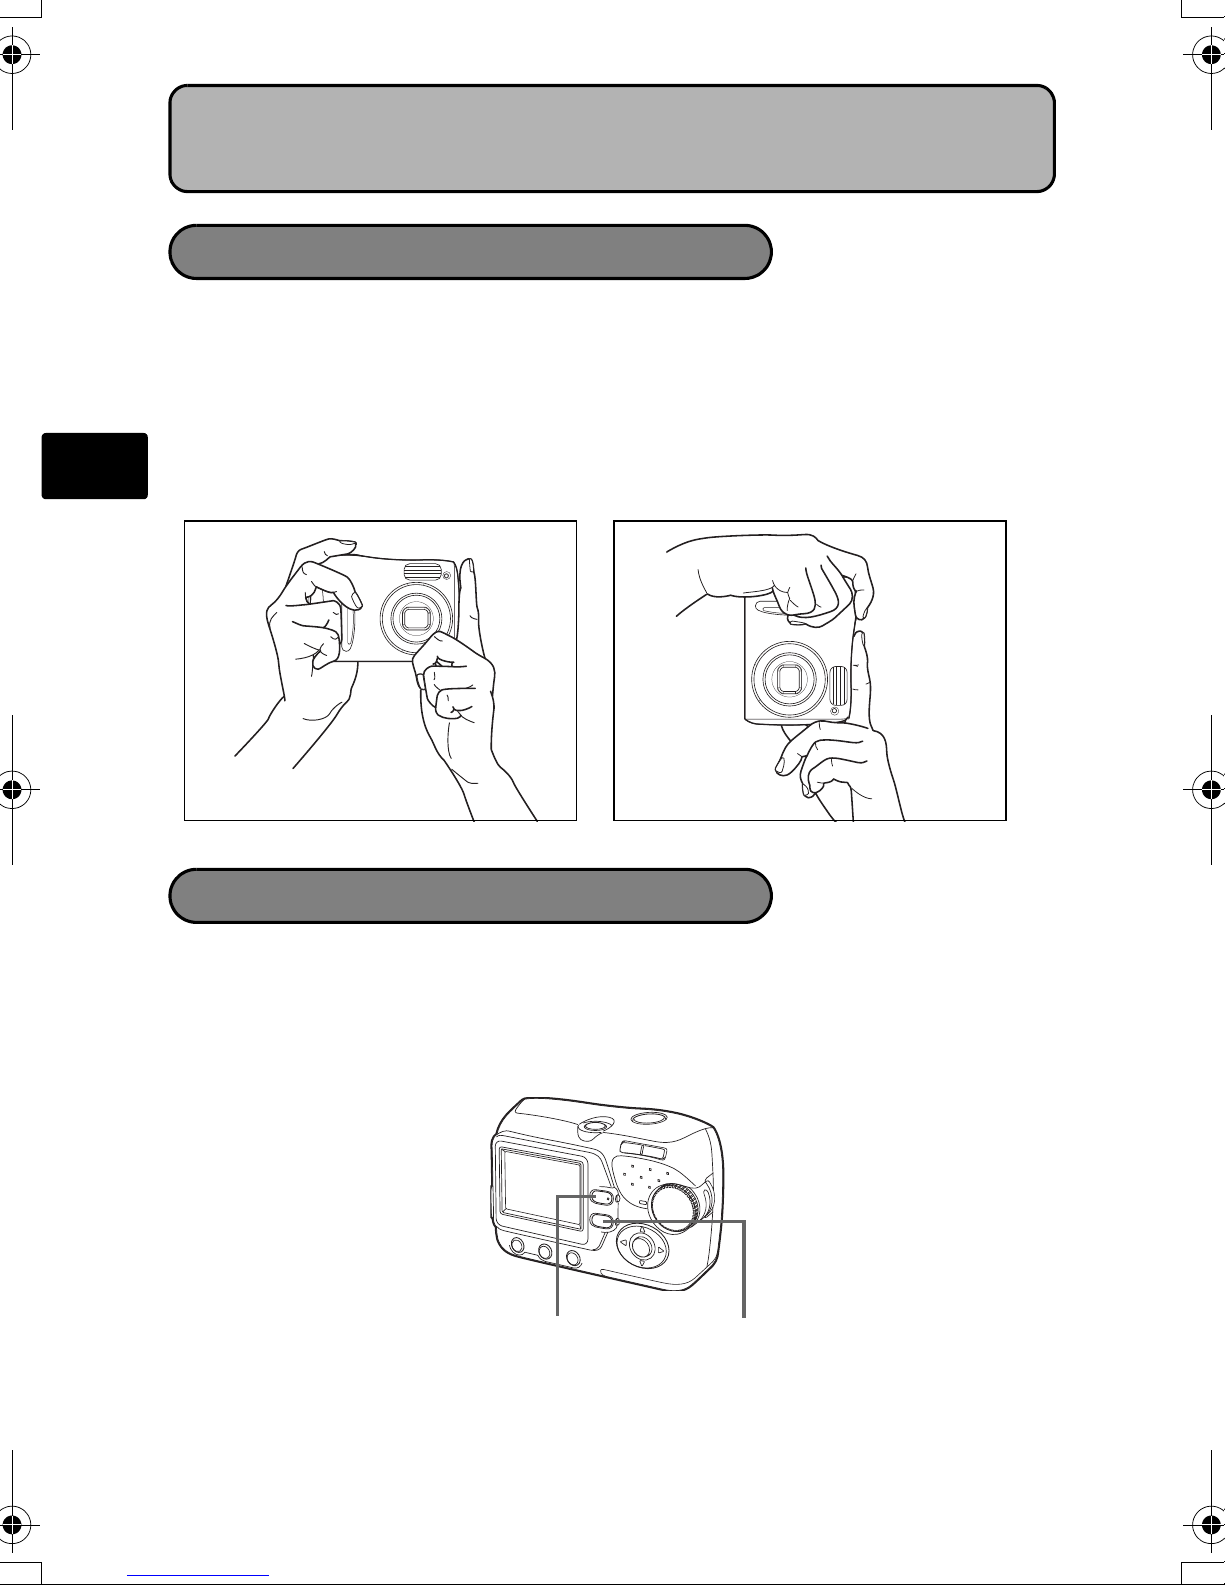
Shooting Tips
Pictures may appear blurred as the result of moving the camera while the shutter
button is being pressed.
To prevent the camera from moving, hold the camera firmly with both hands while
keeping your elbows at your sides. Keep your fingers and the strap away from the
lens and flash.
Horizontal grip Vertical grip
Shooting Button and Playback Button
When taking pictures or making shooting settings, select shooting mode by pressing
l.
When displaying, editing or deleting pictures you have taken, select playback mode
by pressing k.
button (Shooting mode)
l
button (Playback mode)
k
10
Page 11
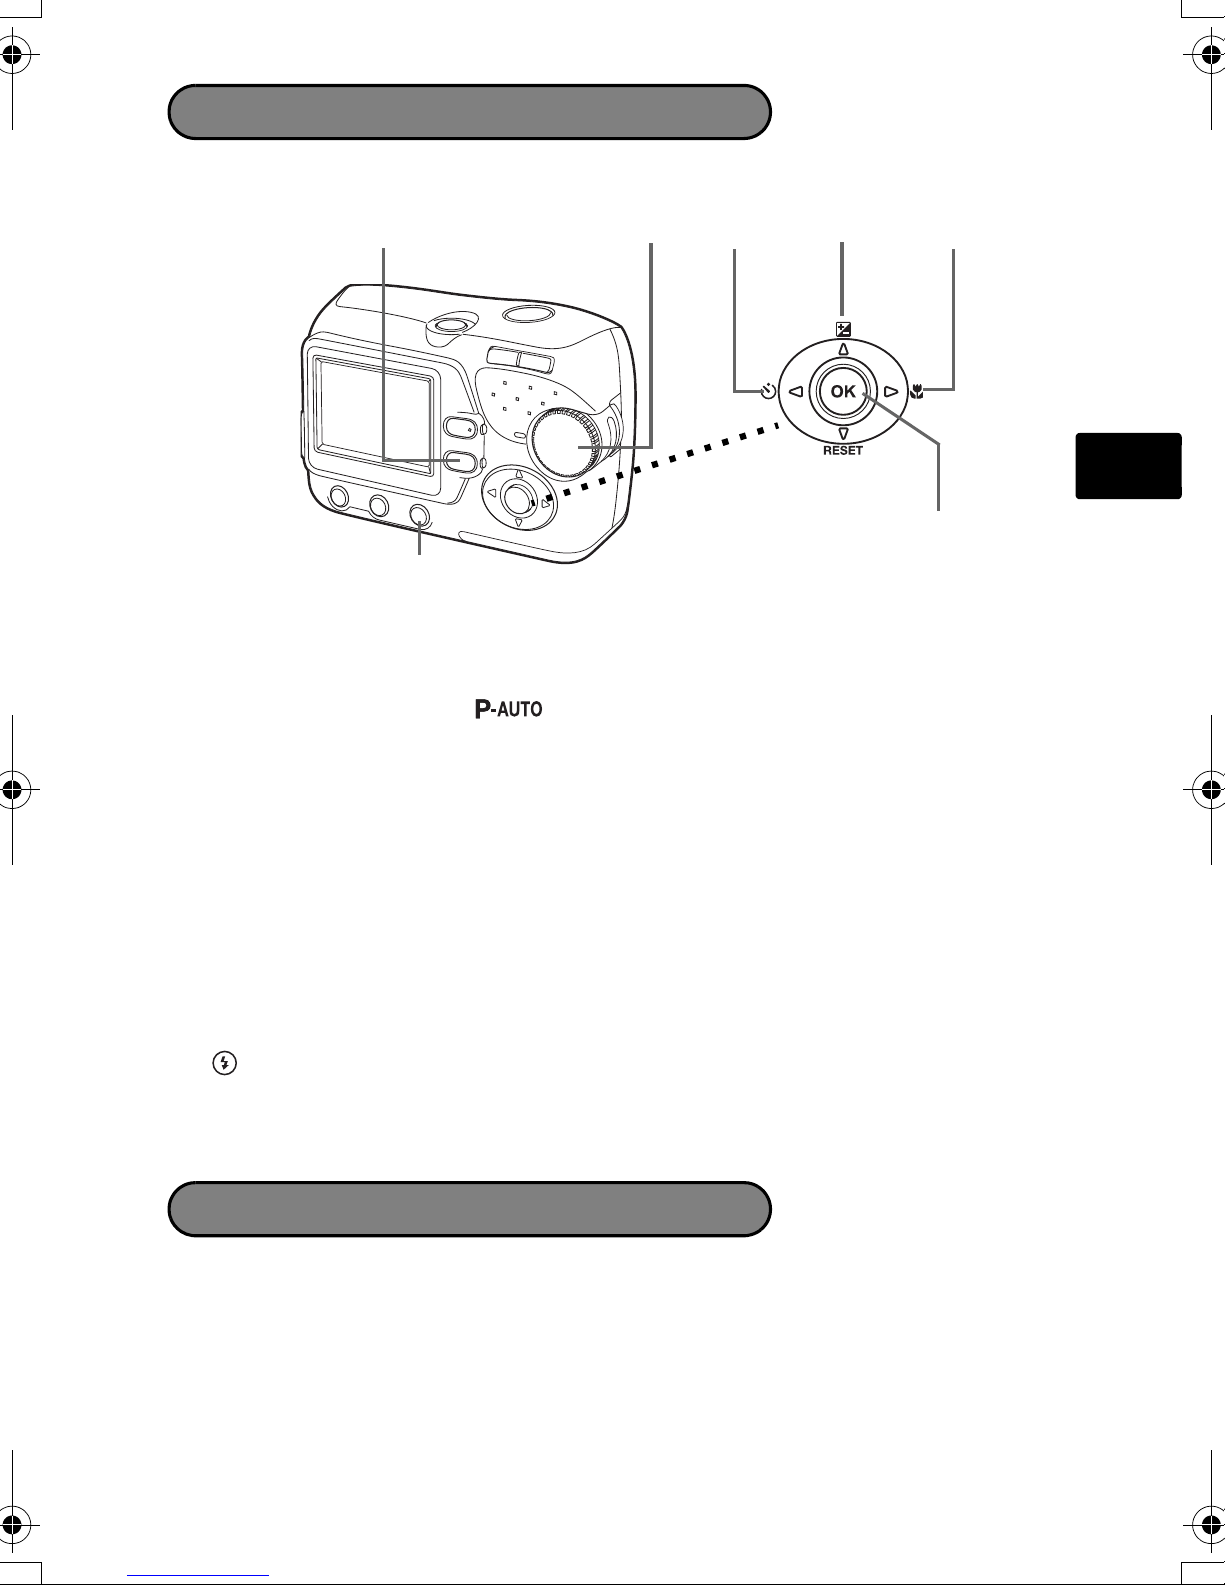
Shooting Mode Buttons
While in shooting mode, use these buttons for quick access to some of the more
commonly used features.
1 2 4
3
5
6
7
1 k button (Playback Mode)
The camera switches to playback mode.
2 Mode dial
In addition to the default ( ) mode, there are other modes that have optimal
settings for their purpose and shooting conditions.
3 ^Y button (Self-timer)
Select the self-timer to delay the shot approximately 12 seconds from when the shutter
button is pressed.
En
4 [F button (Exposure Compensation)
Use this setting to overexpose (+) or underexpose (-) a picture.
5 ]& button (Macro Mode)
Use macro or super macro mode when taking close-up pictures such as of a flower.
6 i button
Press to confirm settings.
7 button (Flash Mode)
Select from 4 flash modes - Auto, ! (Red-eye reduction), # (Fill-in flash), or
$ (Flash off).
Power Save Feature
To save battery power, the camera automatically enters to the sleep mode and
stops operating if not used for 30 seconds. The monitor switches off automatically.
Press the shutter button, l or k to turn the monitor on. You can select the
length of time after which the camera automatically enters to the sleep mode.
If the camera is not operated for 30 minutes after the camera enters sleep mode,
it automatically retracts the lens and turns off. To resume operation, turn on the
power again.
11
Page 12
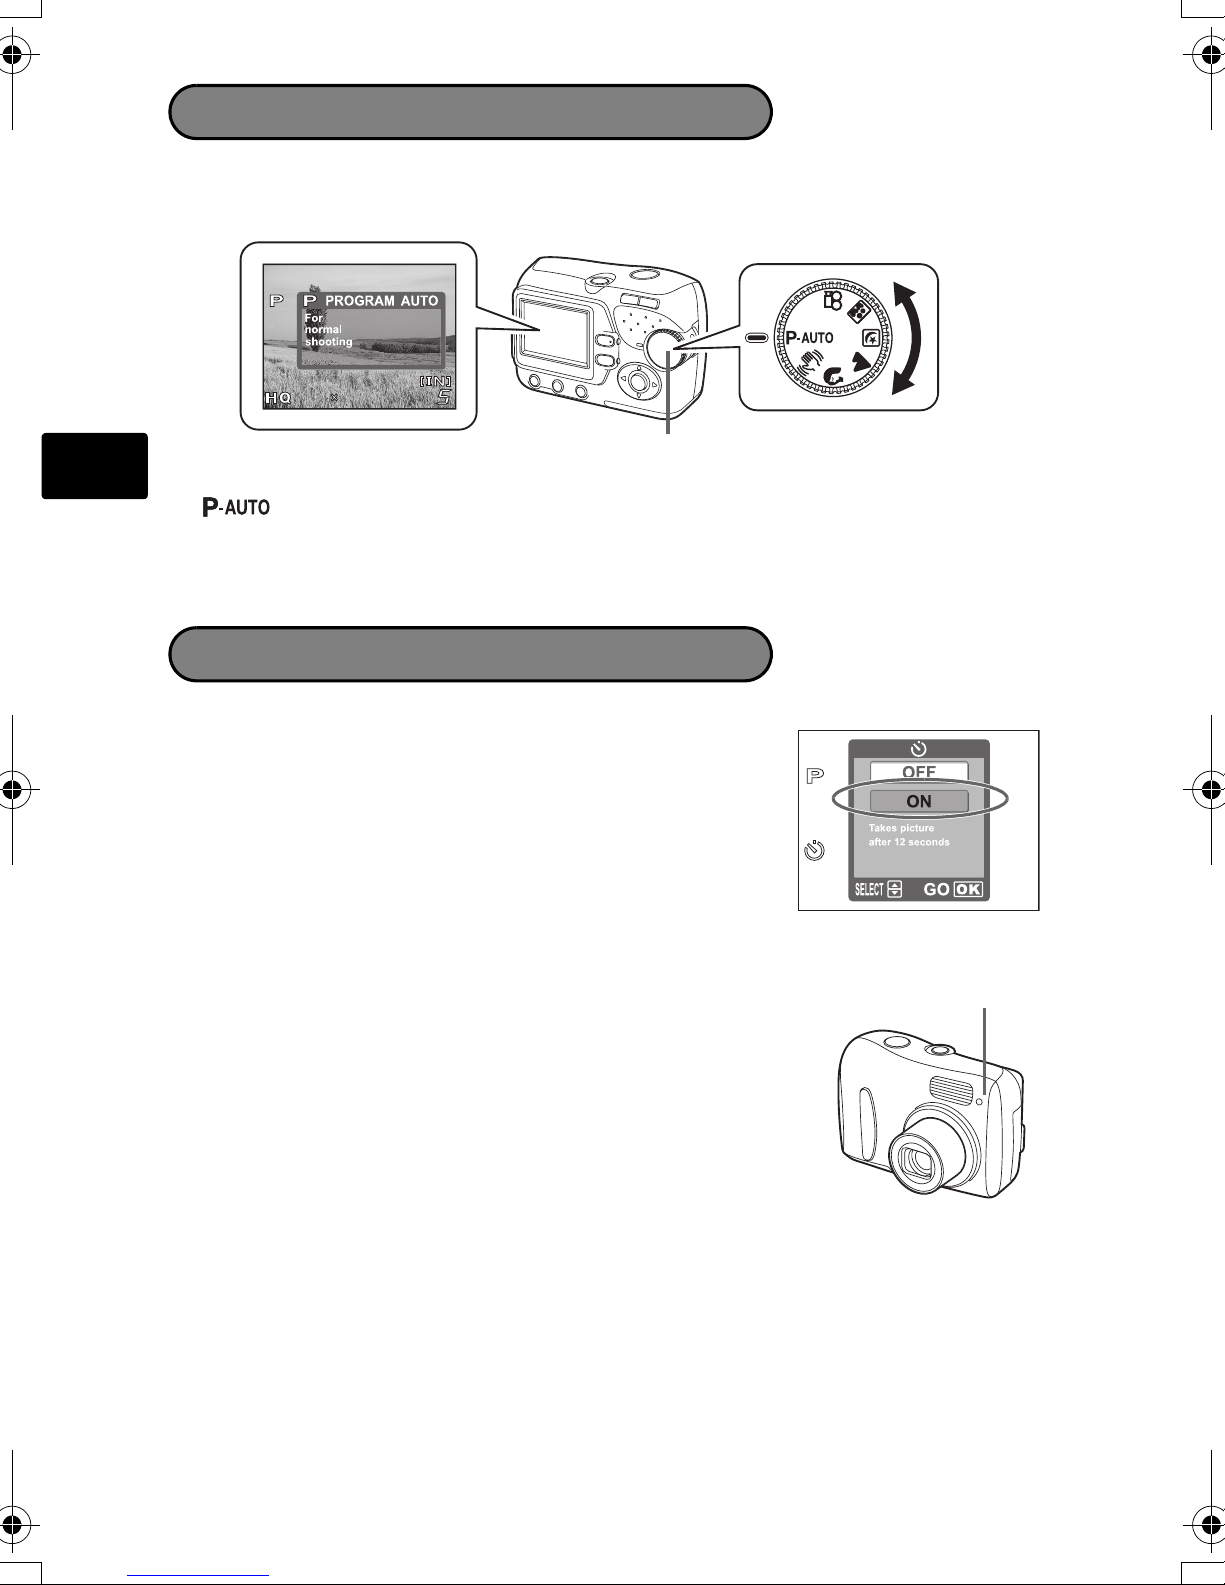
Shooting Mode
1920
2560
Turn the mode dial to select a shooting mode. As you turn the mode dial, the
description for each mode is displayed on the monitor.
1920
2560
En
Mode dial
• PROGRAM AUTO • h
D IMAGE STABILIZATION
• i PORTRAIT
• l LANDSCAPE • m NIGHT SCENE • o SELF PORTRAIT
• n MOVIE
Self-Timer
1 Press ^ (Y).
The self-timer settings screen is displayed.
2 Press [\ to select [ON], and press i.
You can also set by pressing ^ (Y) repeatedly.
3 Press the shutter button fully to take the picture.
The self-timer lamp lights for approximately 10 seconds
after the shutter button is pressed, then starts blinking.
After blinking for approximately 2 seconds, the picture is taken.
Self-timer lamp
12
Page 13
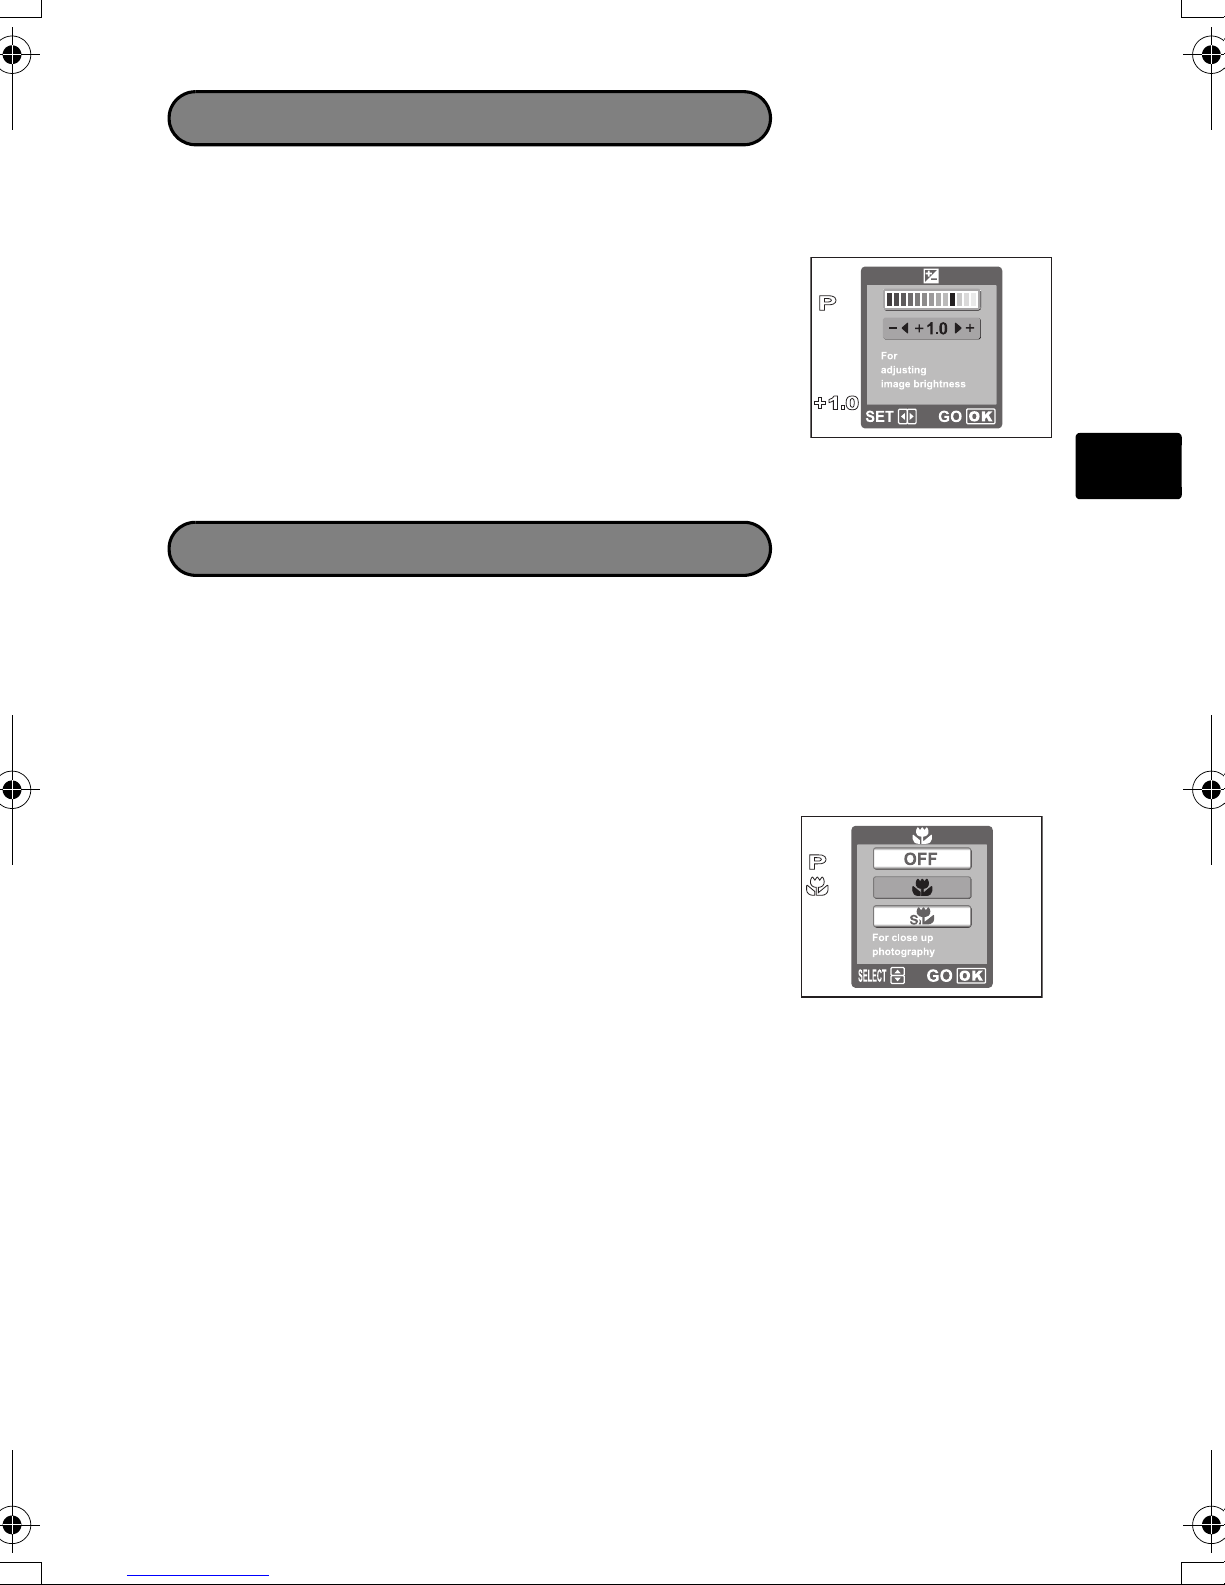
Exposure Compensation Mode
1 Press [ (F).
The setting screen for the exposure compensation is displayed.
2 Press ^ ] to select the exposure compensation
value, and press i.
Select a [ + ] value to brighten the image or a [ - ] value to
darken the image.
3 Take the picture.
Macro Mode
& This mode lets you take pictures as close as 20 cm/8 in. to your subject (When the
zoom is set to the widest setting).
% Use this mode to take pictures as close as 2 cm/0.8 in. to your subject. The position
of the zoom is fixed automatically and cannot be changed.
En
1 Press ] (&)
The setting screen for the macro shooting is displayed.
2 Press [\ to select macro mode, and press i.
You can also set by pressing ] (&) repeatedly.
3 Take the picture.
13
Page 14
En
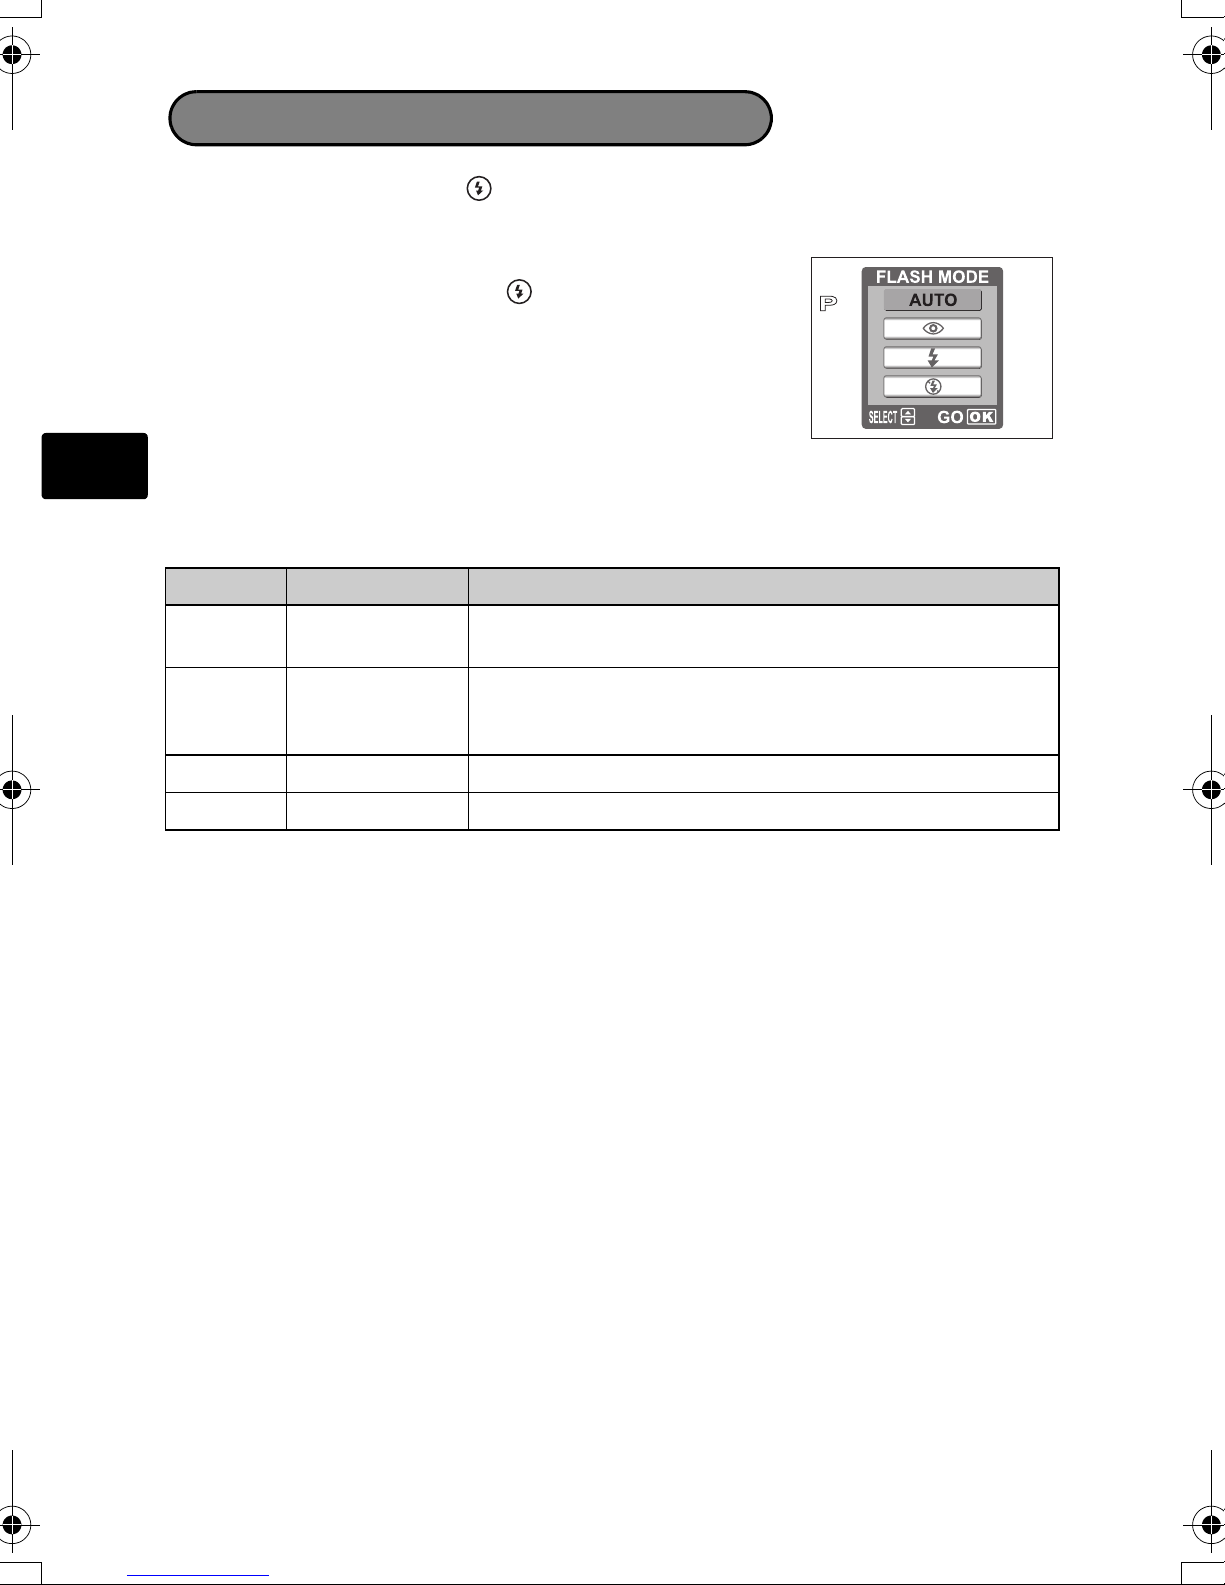
Flash Modes
1 Press flash mode button ( ).
Flash setting screen is displayed.
2 Press [\ to select the flash mode, and press i.
You can also set by pressing repeatedly.
3 Press the shutter button halfway.
In conditions where the flash will fire, # lights (flash stand-
by).
4 Press the shutter button completely to take the picture.
Flash working range:
W (max.): Approx. 0.2 m to 3.8 m (0.7 ft. to 12.5 ft.)
T (max.) : Approx. 0.5 m to 2.2 m (1.6 ft. to 7.2 ft.)
Icon Flash Mode Description
No
indication
!
#
$ Flash off The flash does not fire even in low light conditions.
Auto flash The flash fires automatically in low light or backlight
conditions.
Red-eye
reduction flash
Fill-in flash The flash fires regardless of the available light.
The red-eye reduction flash mode significantly reduces this
phenomenon by emitting pre-flashes before firing the
regular flash.
14
Page 15
MENUS AND SETTINGS
Menu
1 Press to display the camera’s menu on the monitor.
2 Use the arrow pad and i to navigate and select
menu items.
2006_01_01
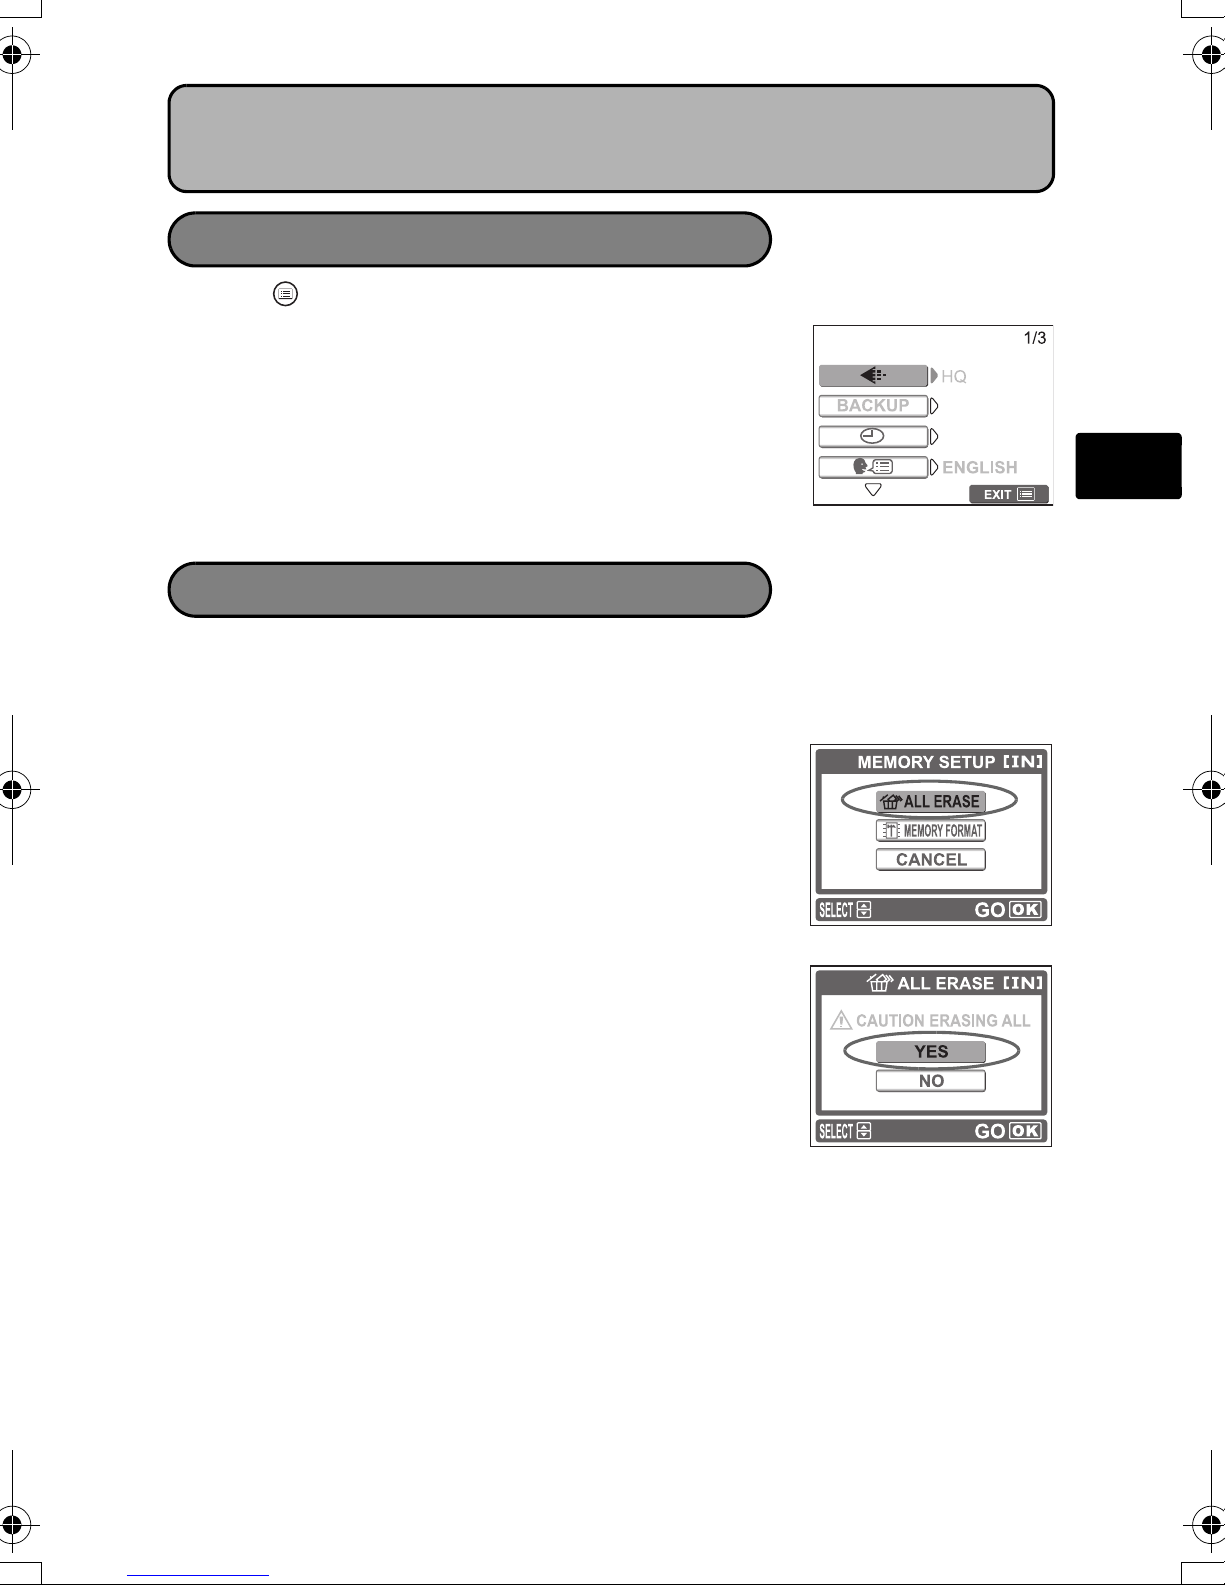
Erase All Pictures
1 In the playback mode, select [MEMORY SETUP]* from the menu, and press i.
*When a card is inserted into the camera, [CARD SETUP] is displayed.
En
2 Press [\ to select [RALL ERASE], and press i.
3 Press [\ to select [YES], and press i.
All the pictures are erased.
15
Page 16
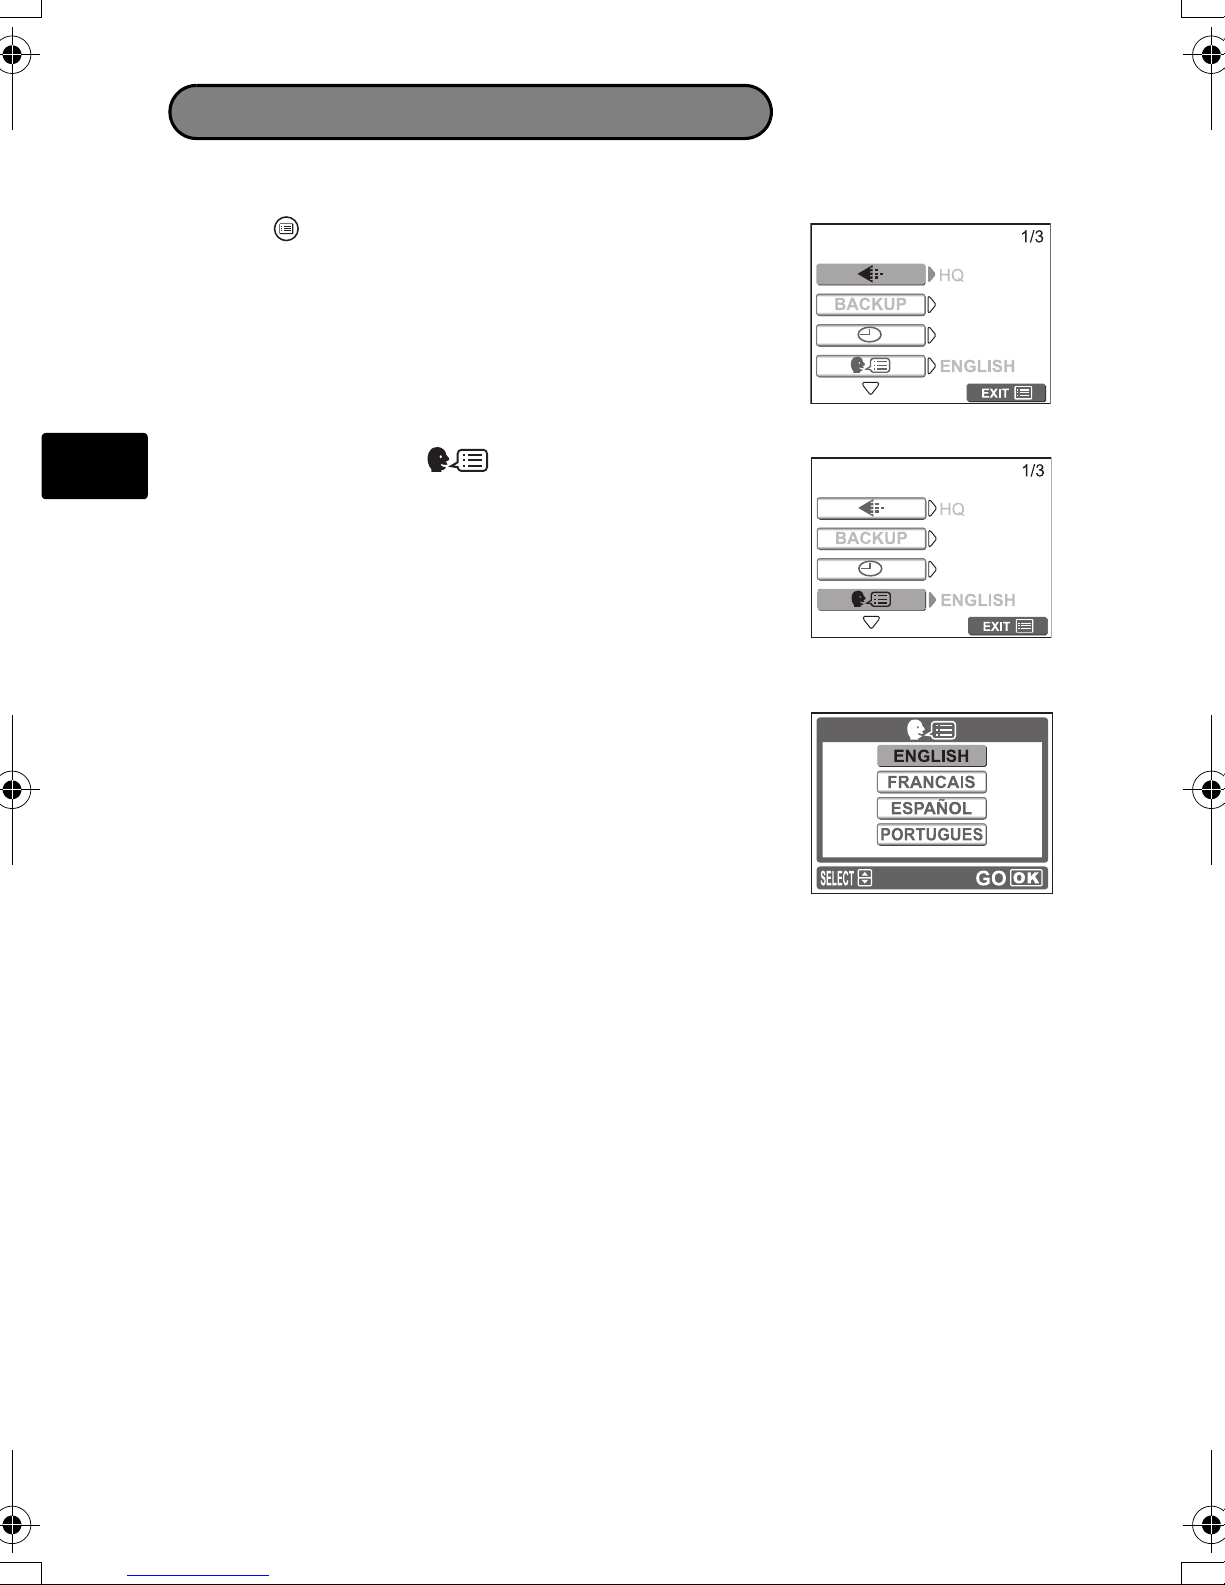
Select a Language
You can select a language for on-screen display. Available languages vary depending
on the area where you purchased this camera.
1 Press .
The menu screen is displayed.
2006_01_01
Menu screen
En
2 Press [\ to select [ ].
The selected item is displayed in yellow.
2006_01_01
3 Press i or ].
4 Press [\ to select a language, and press i.
16
Page 17
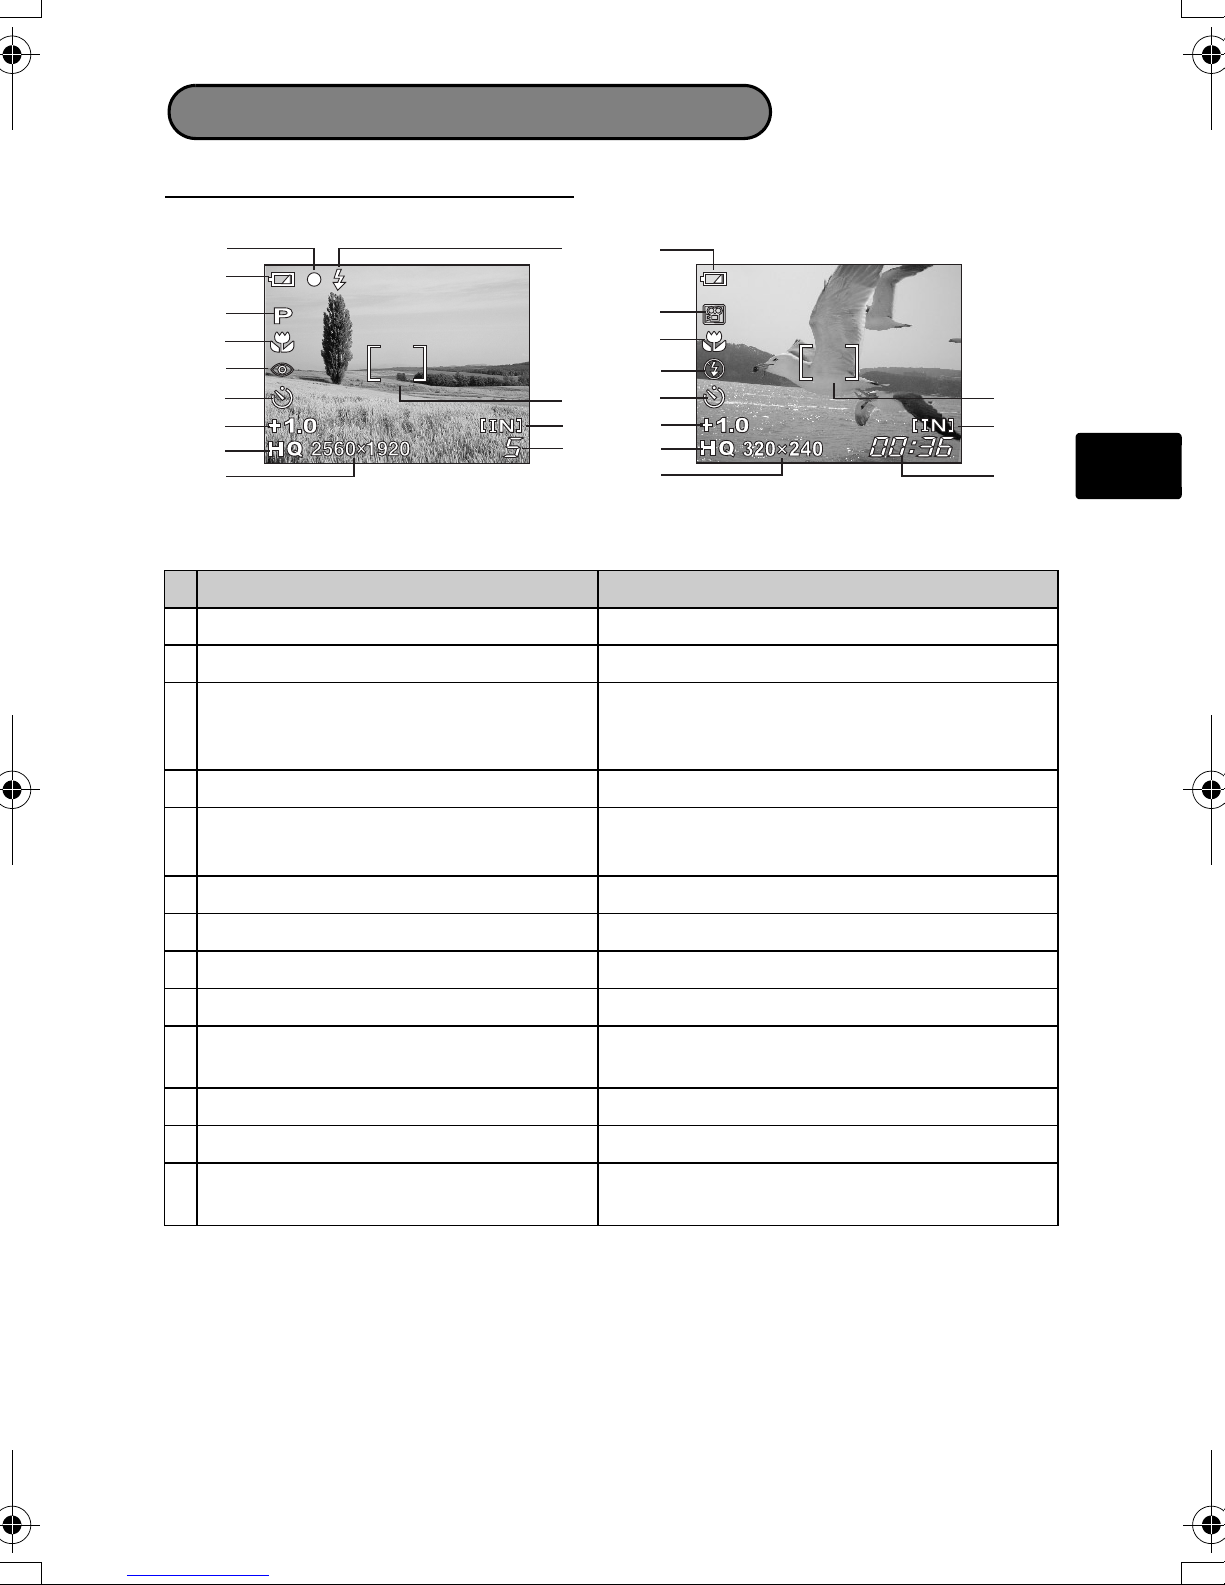
Monitor Symbols & Icons
(Monitor - Shooting Mode
2
1
4
5
6
7
8
9
10
3
11
12
13
1
4
5
6
7
8
9
10
MovieStill picture
Items Indications
Battery check e=full power, f=low power
1
2 Green lamp {=Auto Foucus Lock
Flash standby
3
# (Lit)
Camera movement warning/ Flash
charge
4 Shooting mode
Macro mode
5
Super macro mode
# (Blinks)
P, I, L, m, o, N
&
%
11
12
13
En
6 Flash mode
7 Self-timer
!, #, $
Y
8 Exposure compensation -2.0 – +2.0
9 Record mode SHQ, HQ, SQ1, SQ2
10 Image size 2560×1920, 2048×1536, 640×480,
320×240, 160×120
11 AF target mark [ ]
12 Current memory [IN] (internal memory), [xD] (card)
Number of storable still pictures
13
Remaining recording time
5
00:36
17
Page 18

(Monitor - Playback mode
10
06
10
06
En
2
1
4
020210
06
3
5
6
7
8
9
10
Still picture
2
1
4
020210
06
Movie
Items Indications
1 Battery check
e=full power, f=low power
2 Current memory [IN] (internal memory), [xD] (card)
3 Print reservation/Number of prints <×10
4 File number M100-0018
5 Protect 9
6 Record mode SHQ, HQ, SQ1, SQ2
7 Image size 2560×1920, 2048×1536, 640×480,
320×240, 160×120
11
5
6
7
8
9
10
8 Exposure compensation -2.0 – +2.0
9 Date and time ’06.02.10 12:30
Number of frames
10
Elapsed time/total recording time
18
00:00/0015
(movie)
11
Movie
n
Thumbnail (Index) Display
This function lets you show several pictures at the same time on the monitor when
you reviewing pictures.
1 Press the zoom button toward W (G) to switch to
the thumbnail (index) display.
Use the arrow pad to select the picture and press i to
display a single-frame.
Press T (U) on the zoom button to return to single-
frame playback.
Index display
18
Page 19
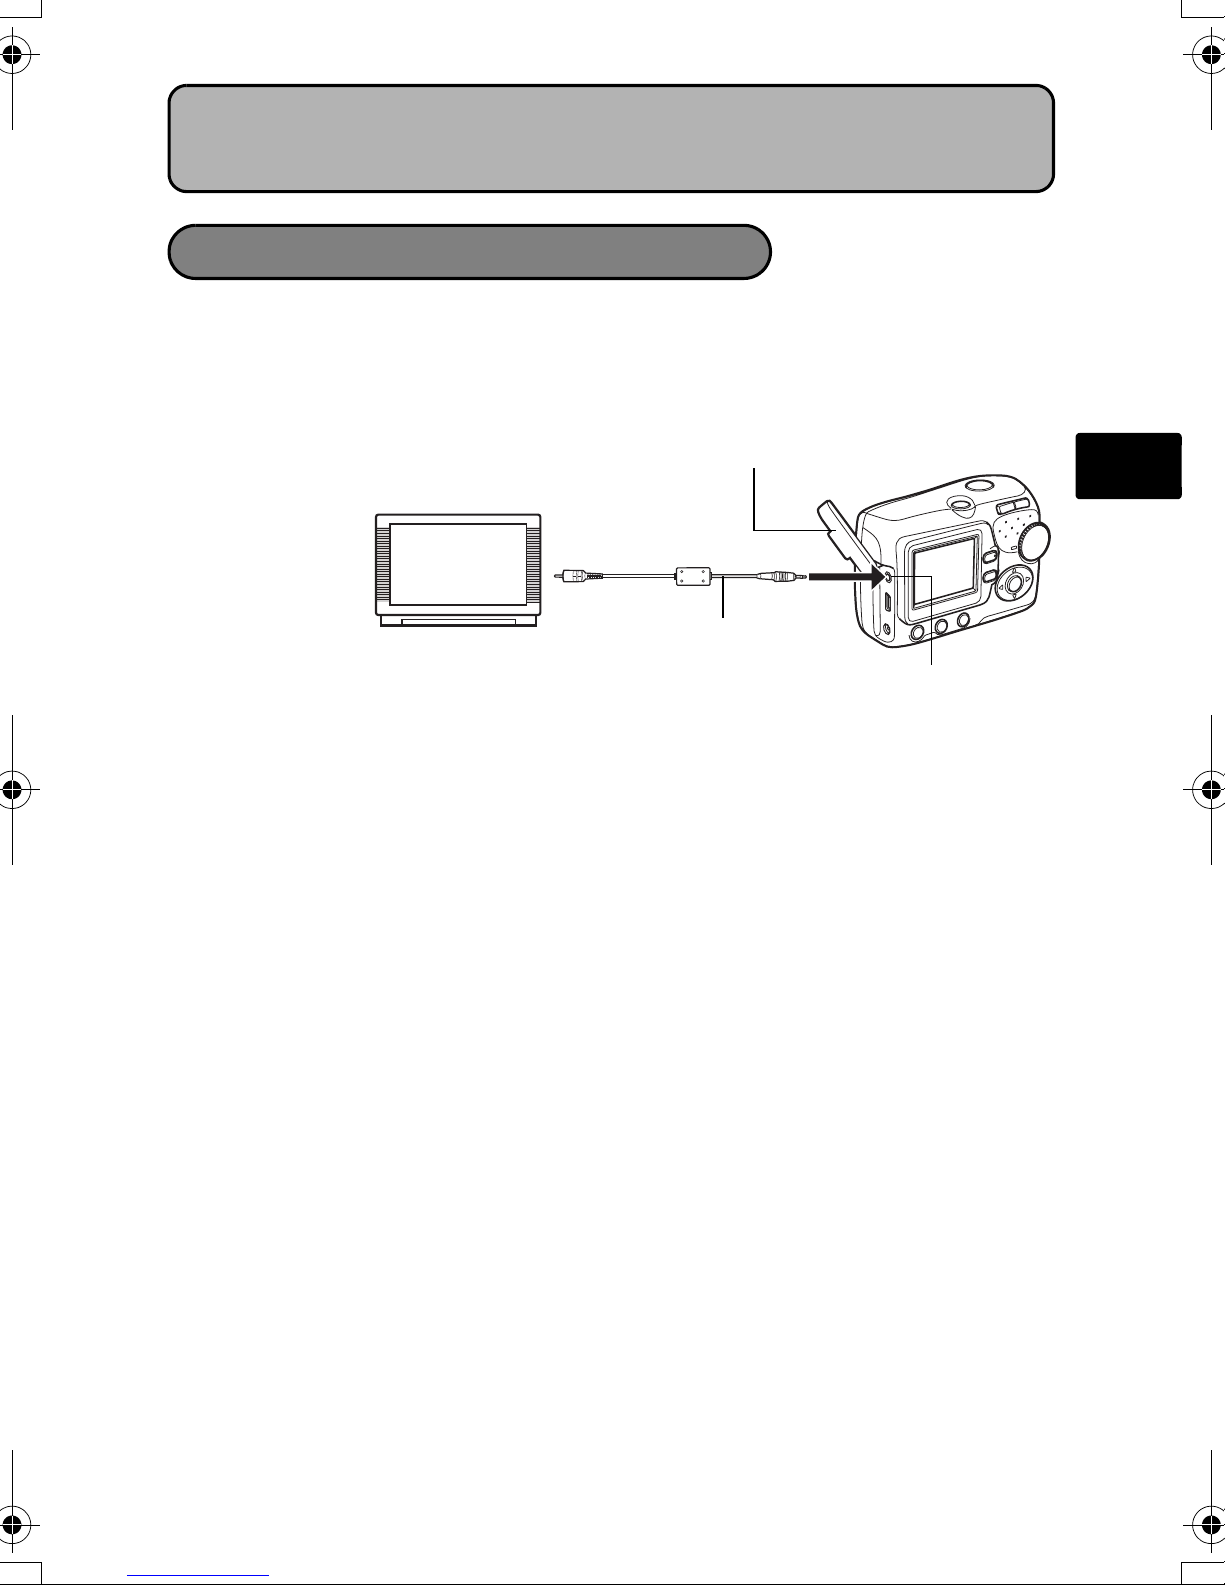
CONNECTING THE CAMERA
Playback on a TV
Use the video cable provided with the camera to playback recorded images on your
TV. Both still pictures and movies can be played back.
1 Make sure that the TV and camera are turned off. Connect the VIDEO OUT jack
on the camera to the video input terminal on the TV using the video cable.
Connector cover
Video cable
Connect to the TV’s video input
(yellow) terminal.
VIDEO OUT jack
2 Turn the TV on and set it to the video input mode.
For details of switching to video input, refer to your TV’s instruction manual.
3 Press the power switch to turn the camera on, and press k.
The last picture taken is displayed on the TV. Use the arrow pad to select the picture you
want to display.
En
19
Page 20
En
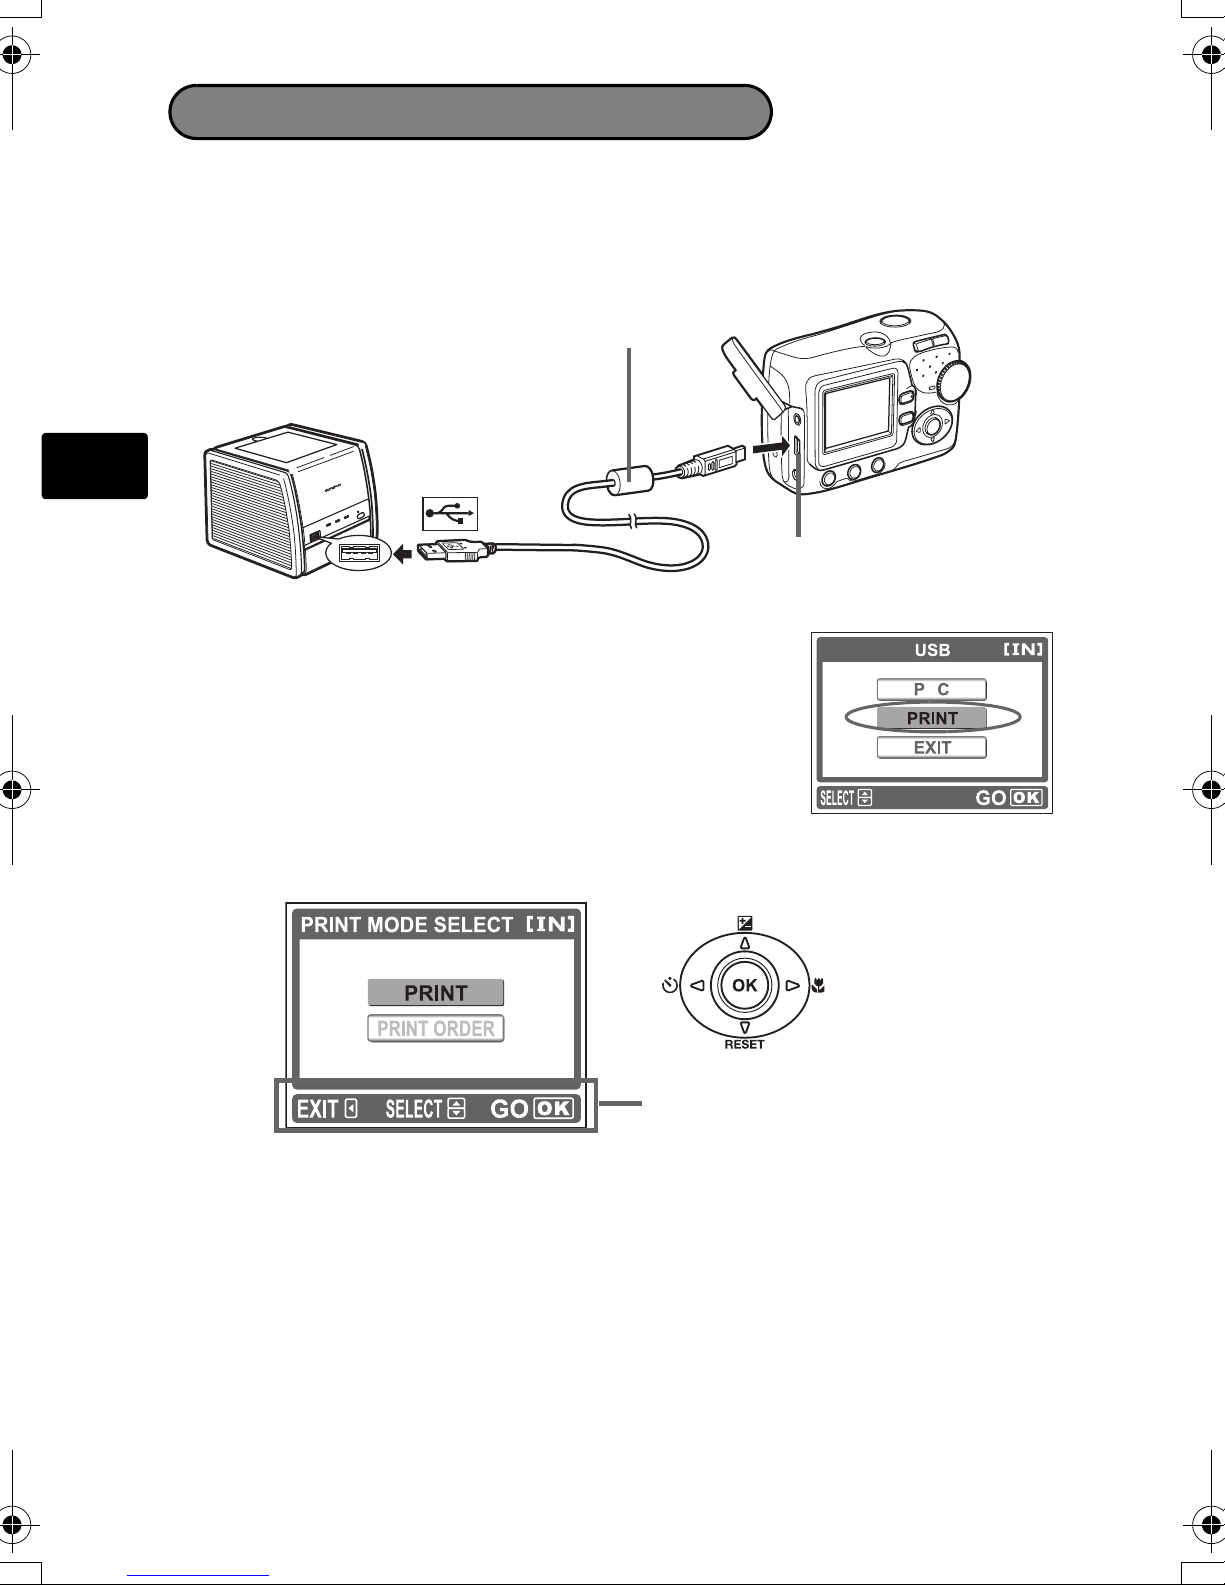
Direct Printing (PictBridge)
Using the provided USB cable, you may connect your camera directly to a PictBridge
compatible printer such as the Olympus P-11 to make prints.
1 Connect one end of the provided USB cable into the camera’s USB connector and
the other end into the printer’s USB connector.
USB cable
USB connector
2 Press [\ to select [PRINT], and press i.
While the camera is connected to a printer, the green lamp
on the camera remains on.
ONE MOMENT is displayed and the camera and printer are
connected. The PRINT MODE SELECT screen is displayed on
the monitor.
3 Use the arrow pad to select pictures and make prints.
Follow the operation guide displayed
here.
20
Page 21
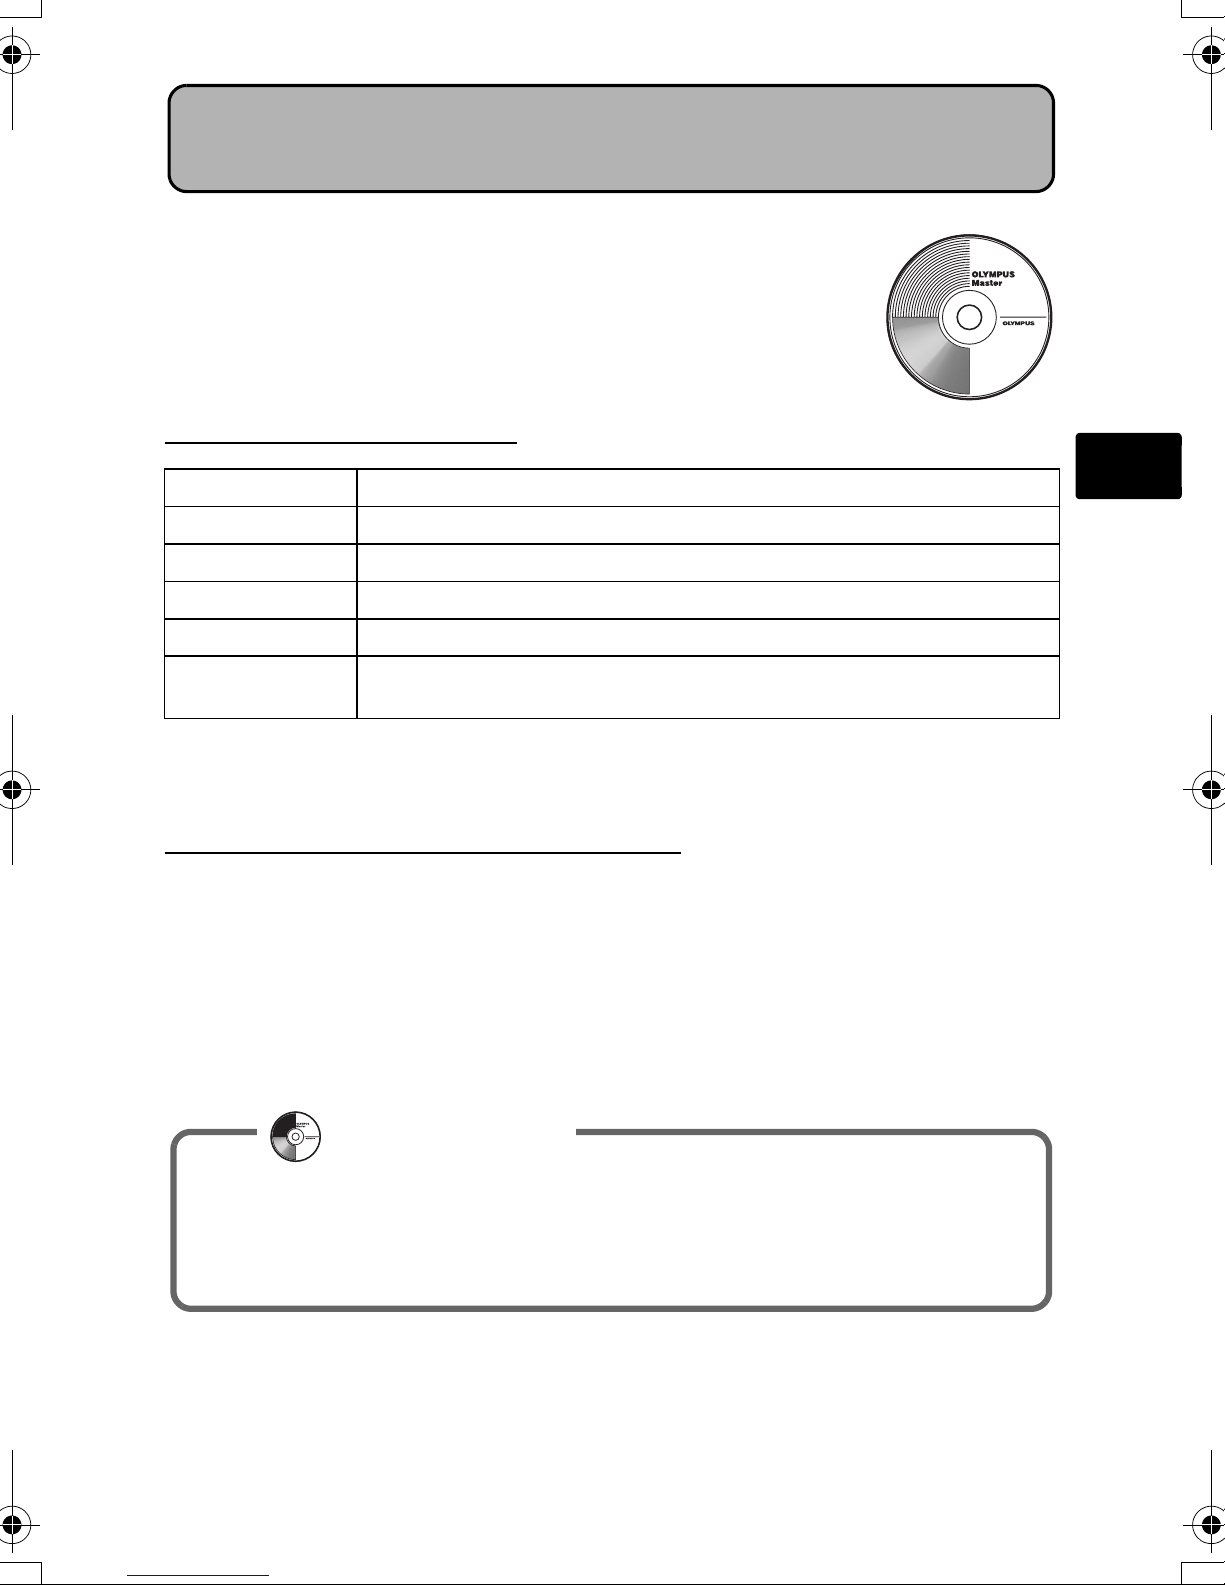
OLYMPUS Master SOFTWARE
OLYMPUS Master Software: Use this software to download
pictures from the camera, view, organize, retouch, e-mail and
print your digital pictures and movies and more! This CD also
contains the complete software reference manual in Adobe
Acrobat (PDF) format.
(System Requirements
OS Windows 98SE/Me/2000 Professional/XP or Mac OS X (10.2 or later)
CPU Pentium III 500MHz/Power PC G3, or faster
RAM 128MB or more (256MB or more recommended)
Hard Disk 300MB or more free space
Connection USB port
Monitor
For the latest support information, visit the Olympus website
(http://www.olympus.com/digital)
1024 x 768 pixels resolution or more with a minimum of 65,536 (Windows) /
32,000 (Macintosh) colors
(Upgrade (OLYMPUS Master Plus)
In addition to the functions in OLYMPUS Master, the OLYMPUS Master Plus features
movie editing, album printing, contact sheet printing, HTML album, free stitch
panorama, CD/DVD writing functions, and a lot more, allowing you to greatly expand
your digital photograph capabilities.
You need to have OLYMPUS Master installed in a computer with an internet
connection.
En
User Registration
Register your camera when you install OLYMPUS Master to activate your
warranty, receive notifications of software and camera firmware updates, and
more.
21
Page 22
SPECIFICATIONS
Camera
Product type : Digital camera (for shooting and displaying)
Recording system
Still picture : Digital recording, JPEG (in accordance with Design rule for
Camera File system (DCF))
En
Applicable
standards
Movie : QuickTime Motion JPEG support
Memory : Internal memory, xD-Picture Card (16 MB – 1 GB)
No. of storable pictures
No. of effective pixels : 5,000,000 pixels
Image pickup device : 1/2.5" CCD solid-state image pickup,
Lens : Olympus lens 6.2 mm to 17.4 mm, f3.0 to 5.0
Photometric system : Center-weighted metering
Shutter speed : 1 to 1/2000 sec. (NIGHT SCENE mode: 2 sec)
: Exif 2.2, Digital Print Order Format (DPOF), PRINT Image
Matching III, PictBridge
Record
mode
SHQ 2560 × 1920 7 4
HQ 2560 × 1920 22 12
SQ1 2048 × 1536 34 19
SQ2 640 × 480 160 91
5,360,000 pixels (gross)
(equivalent to 38 mm to 106 mm lens on 35 mm camera)
IImage size
Internal
memory
Card (Using a
16 MB card)
Shooting range : 0.5 m (1.6 ft.) to ∞ (W), 0.9 m (3.0 ft.) to ∞ (T) (normal)
Monitor : 1.5" TFT color LCD display, 130,000 pixels
Outer connector : DC-IN jack, USB connector (mini-B), VIDEO OUT jack
Automatic calendar system : 2006 up to 2099
Operating environment
Temperature : 0ºC to 40ºC (32ºF to 104ºF) (operation)/-20ºC to 60ºC
Humidity : 30% to 90% (operation)/10% to 90% (storage)
Power supply : 2 AA batteries (Oxyride batteries/alkaline batteries/NiMH
Dimensions : 87.5 mm (W) x62.5 mm (H) x 38.5 mm (D) (3.4 x 2.5 x 1.5
22
0.2 m (0.7 ft.) to 0.5m (1.6 ft.) (W), 0.5 m (1.6 ft.) to 0.9
m (3.0 ft.)(T) (macro mode)
(-4ºF to 140ºF) (storage)
batteries) or an Olympus AC adapter (optional)
in.)
excluding protrusions
Page 23

Weight : 140 g (4.9 oz) without battery and card
Design and specifications subject to change without notice.
En
23
Page 24

En
SAFETY PRECAUTIONS
SAFETY PRECAUTIONS
CAUTION
RISK OF ELECTRIC SHOCK
DO NOT OPEN
CAUTION: TO REDUCE THE RISK OF ELECTRICAL SHOCK, DO NOT
REMOVE COVER (OR BACK). NO USER-SERVICEABLE PARTS INSIDE.
REFER SERVICING TO QUALIFIED OLYMPUS SERVICE PERSONNEL.
An exclamation mark enclosed in a triangle alerts you to important operating and
maintenance instructions in the documentation provided with the product.
DANGER
WARNINGS
CAUTION
WARNING!
TO AVOID THE RISK OF FIRE OR ELECTRICAL SHOCK, NEVER DISASSEMBLE, EXPOSE THIS PRODUCT TO WATER
OR OPERATE IN A HIGH HUMIDITY ENVIRONMENT.
If the product is used without observing the information given under this symbol, serious
injury or death may result.
If the product is used without observing the information given under this symbol, injury or
death may result.
If the product is used without observing the information given under this symbol, minor
personal injury, damage to the equipment, or loss of valuable data may result.
General Precautions
Read All Instructions — Before you use the product, read all operating instructions.
Save all manuals and documentation for future reference.
Cleaning — Always unplug this product from the wall outlet before cleaning. Use
only a damp cloth for cleaning. Never use any type of liquid or aerosol cleaner, or
any type of organic solvent to clean this product.
Attachments — For your safety, and to avoid damaging the product, use only
accessories recommended by Olympus.
Water and Moisture — For precautions on products with weatherproof designs,
read the weatherproofing sections.
Location — To avoid damage to the product mount the product securely on a stable
tripod, stand, or bracket.
Power Source — Connect this product only to the power source described on the
product label.
Lightning — If a lightning storm occurs while using an AC adapter, remove it from
the wall outlet immediately.
Foreign Objects — To avoid personal injury, never insert a metal object into the
product.
24
Page 25
SAFETY PRECAUTIONS
Heat — Never use or store this product near any heat source such as a radiator, heat
register, stove, or any type of equipment or appliance that generates heat,
including stereo amplifiers.
Handling the Camera
WARNING
( Do not use the camera near flammable or explosive gases.
( Do not use the flash on people (infants, small children, etc.) at
close range.
• You must be at least 1 m (3 ft.) away from the faces of your subjects. Firing the
flash too close to the subject’s eyes could cause a momentary loss of vision.
( Keep young children and infants away from the camera.
• Always use and store the camera out of the reach of young children and
infants to prevent the following dangerous situations which could cause
serious injury:
• Becoming entangled in the camera strap, causing strangulation.
• Accidentally swallowing the battery, cards or other small parts.
• Accidentally firing the flash into their own eyes or those of another child.
• Accidentally being injured by the moving parts of the camera.
( Do not look at the sun or strong lights with the camera.
( Do not use or store the camera in dusty or humid places.
( Do not cover the flash with a hand while firing.
En
CAUTION
( Stop using the camera immediately if you notice any unusual
odors, noise, or smoke around it.
• Never remove the batteries with bare hands, which may cause a fire or burn
your hands.
( Never hold or operate the camera with wet hands.
( Do not leave the camera in places where it may be subject to
extremely high temperatures.
• Doing so may cause parts to deteriorate and, in some circumstances, cause the
camera to catch fire. Do not use the charger or AC adapter if it is covered (such
as a blanket). This could cause overheating, resulting in fire.
( Handle the camera with care to avoid getting a low-temperature
burn.
• When the camera contains metal parts, overheating can result in a lowtemperature burn. Pay attention to the following:
• When used for a long period, the camera will get hot. If you hold on to the
camera in this state, a low-temperature burn may be caused.
• In places subject to extremely cold temperatures, the temperature of the
camera’s body may be lower than the environmental temperature. If
possible, wear gloves when handling the camera in cold temperatures.
25
Page 26
SAFETY PRECAUTIONS
( Be careful with the strap.
• Be careful with the strap when you carry the camera. It could easily catch on
stray objects - and cause serious damage.
Battery Handling Precautions
Follow these important guidelines to prevent batteries from leaking,
overheating, burning, exploding, or causing electrical shocks or burns.
En
DANGER
• Use only the Olympus brand NiMH batteries and fitting charger.
• Never heat or incinerate batteries.
• Take precautions when carrying or storing batteries to prevent them from coming
into contact with any metal objects such as jewelry, pins, fasteners, etc.
• Never store batteries where they will be exposed to direct sunlight, or subjected to
high temperatures in a hot vehicle, near a heat source, etc.
• To prevent causing battery leaks or damaging their terminals, carefully follow all
instructions regarding the use of batteries. Never attempt to disassemble a battery
or modify it in any way, by soldering, etc.
• If battery fluid gets into your eyes, flush your eyes immediately with clear, cold
running water and seek medical attention immediately.
• Always store batteries out of the reach of small children. If a child accidentally
swallows a battery, seek medical attention immediately.
WARNING
• Keep batteries dry at all times.
• To prevent batteries from leaking, overheating, or causing a fire or explosion, use
only batteries recommended for use with this product.
• Never mix batteries (old and new batteries, charged and uncharged batteries,
batteries of different manufacture or capacity, etc.).
• Do not charge alkaline or lithium batteries if they are not rechargeable.
• Insert the battery carefully as described in the operating instructions.
• Do not use batteries if their body is not covered by the insulating sheet or if the
sheet is torn, as this may cause fluid leaks, fire, or injury.
CAUTION
• Do not remove batteries immediately after using the camera. Batteries may
become hot during prolonged use.
• Always unload the battery from the camera before storing the camera for a long
period.
26
Page 27
• The following AA batteries cannot be used.
SAFETY PRECAUTIONS
Batteries whose bodies
are only partially or not
at all covered by an
insulating sheet.
Batteries whose terminals are raised, but
not covered by an
insulating sheet.
Batteries whose
terminals are flat and not
completely covered by
an insulating sheet.
(Such batteries cannot
be used even if the terminals are partially
covered.)
• If NiMH batteries are not charged within the specified time, stop charging them
and do not use them.
• Do not use a battery if it is cracked or broken.
• If a battery leaks, becomes discolored or deformed, or becomes abnormal in any
other way during operation, stop using the camera.
• If a battery leaks fluid onto your clothing or skin, remove the clothing and flush the
affected area with clean, running cold water immediately. If the fluid burns your
skin, seek medical attention immediately.
• Never subject batteries to strong shocks or continuous vibration.
En
27
Page 28
En
For customers in North and South America
For customers in USA
Declaration of Conformity
Model Number : FE-115/X-715
Trade Name : OLYMPUS
Responsible Party :
Address : Two Corporate Center Drive, P.O. Box 9058, Melville, NY
11747-9058 U.S.A.
Telephone Number : 1-631-844-5000
Tested To Comply With FCC Standards
FOR HOME OR OFFICE USE
This device complies with Part 15 of t he FCC rules. Operation is subject to the following two
conditions:
(1)This device may not cause harmful interference.
(2)This device must accept any interference received, including interference that may cause
undesired operation.
For customers in Canada
This Class B digital apparatus meets all requirements of the Canadian Interference-Causing
Equipment Regulations.
Trademarks
• IBM is a registered trademark of International Business Machines Corporation.
• Microsoft and Windows are registered trademarks of Microsoft Corporation.
• Macintosh is a trademark of Apple Computer Inc.
• xD-Picture Card™ is a trademark.
• All other company and product names are registered trademarks and/or
trademarks of their respective owners.
• The standards for camera file systems referred to in this manual are the “Design
Rule for Camera File System/DCF” standards stipulated by the Japan Electronics
and Information Technology Industries Association (JEITA).
28
Page 29

MEMO
29
Page 30

Table des matières
ILLUSTRATION DE L’APPAREIL PHOTO...............................................31
AVANT DE COMMENCER ....................................................................32
POUR DÉMARRER ................................................................................33
Étape 1 POUR DÉMARRER....................................................................... 33
Étape 2 PRISE DE VUE ............................................................................. 34
Étape 3 CONSULTATION OU EFFACEMENT D’UNE PHOTO ...................... 35
Étape 4 TRANSFERT D’IMAGES................................................................ 36
FONCTIONNEMENT DE BASE ..............................................................38
Astuces relatives à la prise de vue............................................................ 38
Fr
Touche de prise de vue et touche d’affichage.......................................... 38
Touches du mode prise de vue................................................................ 39
Fonction d’économie d’énergie ............................................................... 39
Mode prise de vue .................................................................................. 40
Retardateur............................................................................................. 40
Mode de compensation d’exposition....................................................... 41
Mode gros plan....................................................................................... 41
Modes flash ............................................................................................ 42
MENUS ET PARAMÈTRES ....................................................................43
Menu...................................................................................................... 43
Effacement de toutes les photos ............................................................. 43
Sélection d’une langue............................................................................ 44
Icônes et symboles de l’écran .................................................................. 45
Affichage des miniatures (index).............................................................. 46
CONNEXION DE L’APPAREIL PHOTO ..................................................47
Affichage sur un téléviseur...................................................................... 47
Impression directe (PictBridge)................................................................. 48
LOGICIEL OLYMPUS Master ................................................................49
CARACTÉRISTIQUES.............................................................................50
PRÉCAUTIONS DE SÉCURITÉ ...............................................................52
Avant d’utiliser l’appareil photo, lisez attentivement ce manuel afin de garantir un
fonctionnement correct de l’appareil photo.
Nous vous recommandons de prendre des photos-test pour vous habituer à votre
appareil avant de commencer à prendre de vraies photos.
Veuillez respecter les précautions de sécurité détaillées à la fin du présent manuel.
Il est possible que les représentations de l’écran ACL et que les illustrations de
l’appareil photo utilisées dans ce manuel ne correspondent pas au produit réel.
30
Page 31

ILLUSTRATION DE L’APPAREIL PHOTO
Flash
Œillet de courroie
Déclencheur
Objectif
Écran ACL
Touche de prise de vue (l )
Voyant du retardateur
Couvercle de
connecteur
Prise VIDEO OUT
Connecteur USB
Prise d’entrée CC
(DC-IN)
Fr
Touche
d’effacement ( )
Touche menu ( )
Touche mode flash
()
Voyant orange
Voyant vert
Touche d’affichage (k )
Commutateur
marche/arrêt
Touche de zoom
Molette mode
Touche OK (i)
Molette de défilement ([\]^)
Touche de verrouillage
Embase filetée
de trépied
PUSH
Couvercle de la carte/
du compartiment de la
batterie
OPEN
31
Page 32

Fr
AVANT DE COMMENCER
Rassemblez les éléments suivants (contenu de la boîte)
Appareil photo numérique Courroie Batteries AA (deux)
Câble USB (gris clair) Câble vidéo (noir)
Éléments non représentés : Manuel avancé (CD-ROM), Manuel de base (le
présent manuel), carte de garantie. Le contenu peut varier selon le lieu d’achat.
CD-ROM du logiciel
OLYMPUS Master
32
Page 33

POUR DÉMARRER
Étape 1 POUR DÉMARRER
POUR DÉMARRER
a. Fixez la courroie. b. Insérez les piles.
Œillet de courroie
Tendez la courroie afin qu’elle ne
soit pas relâchée.
c. Réglez la date et l’heure.
1
Touche de verrouillage
Touche de
3
Couvercle de la carte/de la batterie
2
Fr
1 Tournez la molette mode sur et appuyez sur le commutateur
d’alimentation pour mettre l’appareil photo sous tension.
2 Appuyez sur pour afficher l’écran du menu.
SAUVEGARDER
2006_01_01
FRANCAIS
3 Appuyez sur [/\ pour définir un élément.
Appuyez sur ^/] pour sélectionner le champ
suivant.
Guide d’utilisation
2006 . 01 . 01
AMJ
SELECT
CONF
QUITTE
OK
33
Page 34

Fr
Étape 2 PRISE DE VUE
PRISE DE VUE
a. Zoom
Zoom extérieur : Zoom intérieur :
Le curseur se déplace à gauche ou
à droite selon le degré de zoom.
b. Mise au point
1 À l’aide de l’écran, placez le repère de mise
au point automatique sur le sujet souhaité.
Voyant vert
(à moitié enfoncé)
Déclencheur
c. Prise de vue
1 Appuyez complètement
sur le déclencheur pour
prendre la photo.
(enfoncé complètement)
Déclencheur
Repère de mise au point automatique
2 Maintenez le déclencheur à moitié enfoncé
de manière à verrouiller la mise au point.
Le voyant vert indique que la mise au point
est verrouillée.
34
Page 35

Étape 3 CONSULTATION OU EFFACEMENT D’UNE P HOTO
CONSULTATION OU EFFACEMENT D’UNE PHOTO
a. Appuyez sur k. b. Observez attentivement la
photo.
La dernière photo prise s’affiche.
Touche d’affichage (k)
Photo précédente
Touches fléchées
Touche de zoom
Photosuivante
c. Pour effacer une photo
Appuyez sur T (U)
pour agrandir l’image.
Appuyez sur W (G)
pour revenir à la
normale.
Appuyez sur [/\ ou
^/] pour vous
déplacer dans la photo.
Fr
Appuyez sur l pour retourner au
mode prise de vue.
Touche d’effacement ( )
1 Affichez la photo que vous
souhaitez effacer.
2 Appuyez sur .
Touche OK
S
EFFACER
OUI
NON
SELECT
OK
3 Sélectionnez [OUI] et appuyez
sur i.
La photo est effacée de manière
définitive.
35
Page 36

Étape 4 TRANSFERT D’IMAGES
TRANSFERT D’IMAGES
a. Installez le logiciel.
1 Insérez le CD-ROM OLYMPUS Master.
2 Windows : cliquez sur le bouton
“OLYMPUS Master“.
Macintosh : double-cliquez sur l’icône
du programme
“d’installation“.
Fr
3 Il vous suffit de suivre les instructions
affichées à l’écran.
b. Connectez l’appareil photo à l’ordinateur.
1 Connectez l’appareil photo et l’ordinateur à l’aide du câble USB (inclus).
L’écran s’allume automatiquement.
Couvercle du connecteur
Recherchez ce repère.
Port USB
Câble USB
Connecteur USB
2 Sélectionnez [PC] sur l’écran et appuyez
sur i.
L’ordinateur PC identifie l’appareil photo
comme étant un lecteur de stockage
amovible.
36
IMPRESSION
SELECT
QUITTE
OK
Page 37

c. Transfert d’images vers l’ordinateur
1 Une fois l’appareil photo connecté,
ouvrez OLYMPUS Master.
La fenêtre [Transférer les images]
s’affiche.
2 Sélectionnez les images que vous
souhaitez transférer et cliquez sur
le bouton [Transférer les images].
Si la fenêtre [Transférer les images] ne
s’affiche pas automatiquement :
a. Cliquez sur l’icône “Transférer
les images” du menu principal
OLYMPUS Master.
b. Cliquez sur l’icône “À partir de
l’appareil photo”.
Fenêtre [Transférer les images]
Bouton [Transférer les images]
Fr
Astuces
• Pour obtenir des informations plus détaillées au sujet de la configuration et de
l’utilisation de l’appareil photo, veuillez vous reporter au “Manuel avancé” de
l’appareil photo (inclus sur le CD-ROM).
• Pour plus d’informations relatives à l’utilisation des fonctions du logiciel OLYMPUS
Master software qui ne sont pas mentionnées ici, ouvrez l’aide du logiciel OLYMPUS
Master ou lisez le manuel de référence (format PDF).
37
Page 38

FONCTIONNEMENT DE BASE
Astuces relatives à la prise de vue
Il est possible que les photos apparaissent floues suite au déplacement de l’appareil
photo lors de l’activation du déclencheur.
Pour éviter que l’appareil photo ne se déplace, maintenez-le fermement des deux
mains, sans soulever les coudes. Maintenez vos doigts et la courroie à distance de
l’objectif et du flash.
Prise en main horizontale Prise en main verticale
Fr
Touche de prise de vue et touche d’affichage
Lorsque vous prenez des photos ou effectuez des réglages de prise de vue,
sélectionnez le mode de prise de vue en appuyant sur
Lors de l'affichage, de l'édition ou de la suppression de photos que vous avez prises,
sélectionnez le mode d'affichage en appuyant sur
Touche l (mode prise de vue) Touche k (mode d’affichage)
k
l
.
.
38
Page 39

Touches du mode prise de vue
2
Lorsque le mode prise de vue est activé, utilisez les touches suivantes pour accéder
rapidement à certaines des fonctions les plus fréquemment utilisées.
1
3
4
5
6
7
1 Touche k (mode d’affichage)
Le mode d’affichage de l’appareil photo est activé.
2 Molette mode
L’appareil photo dispose non seulement d’un mode par défaut ( ) mais également de
modes présentant des paramètres adaptés à l’objectif souhaité et aux conditions de prise de vue.
3 Touche ^Y (retardateur)
Activez le retardateur pour retarder la prise de vue d’environ 12 secondes à compter
du moment où vous appuyez sur le déclencheur.
Fr
4 Touche [F (compensation d’exposition)
Utilisez ce paramètre pour surexposer (+) ou sous-exposer (-) une photo.
5 Touche ]& (mode gros plan)
Utilisez le mode gros plan ou très gros plan lors de la prise de photos en gros plan (gros
plan d’une fleur, par exemple).
6 Touche i
Appuyez sur cette touche pour confirmer les paramètres.
7 bouton (mode flash)
Sélectionnez l’un des quatre modes flash : automatique, ! (réduction de l’effet
« yeux rouges »), # (flash d’appoint) ou $ (flash désactivé).
Fonction d’économie d’énergie
Pour économiser l’énergie des piles, l’appareil passe automatiquement en mode veille (état
d’attente) au bout de 30 secondes d’inactivité. L’écran ACL s’éteint automatiquement.
Appuyez sur le déclencheur,
sélectionner la durée après laquelle l’appareil photo entre automatiquement en mode veille.
Si vous n’utilisez pas l’appareil photo dans les 30 minutes qui suivent l’activation
du mode de veille, l’appareil photo rentre l’objectif et s’éteint automatiquement.
Si vous souhaitez utiliser de nouveau l’appareil photo, rallumez-le.
l
ou
k
pour allumer l’écran ACL. Vous pouvez
39
Page 40

Mode prise de vue
1920
2560
Faites tourner la molette mode pour sélectionner un mode prise de vue. Lorsque vous
tournez la molette mode, la description correspondant à chaque mode s’affiche à
l’écran.
PROGRAM AUTO
Pour
prise de vue
normale
1920
2560
Molette mode
Fr
• PROGRAM AUTO • h STABILISATION IMAGE • i PORTRAIT
• l PAYSAGE • m SCENE NUIT • o AUTO PORTRAIT
• n MOVIE
Retardateur
1 Appuyez sur ^ (Y).
L’écran des réglages du retardateur apparaît.
2 Appuyez sur [\ pour sélectionner [ACTIVE] et
appuyez ensuite sur i.
Vous pouvez également définir le mode en appuyant
plusieurs fois sur ^ (Y).
3 Enfoncez complètement le déclencheur pour
prendre la photo.
Le voyant du retardateur s’allume pendant environ dix secondes lorsque vous appuyez sur
le déclencheur. Il se met ensuite à clignoter. Lorsque le voyant clignote depuis
environ deux secondes, la photo est prise.
DESACTIVE
ACTIVE
Prend une photo
avec un retard
de 12 secondes.
SELECT
OK
40
Voyant du retardateur
Page 41

Mode de compensation d’exposition
1 Appuyez sur [ (F).
L’écran des réglages du retardateur apparaît.
2 Appuyez sur ^ ] pour sélectionner la valeur de
compensation d’exposition et appuyez ensuite sur
i.
Sélectionnez une valeur [ + ] pour augmenter la
luminosité de l’image ou une valeur [ - ] pour réduire la
luminosité de l’image.
3 Prenez la photo.
Pour modifier
la luminosité
de l’image.
CONF
OK
Mode gros plan
& Ce mode vous permet de prendre des photos à 20 cm du sujet (Lorsque le zoom est
en position grand angle).
% Utilisez ce mode pour prendre des photos à 2 cm du sujet. La position du zoom est
fixée automatiquement et ne peut pas être modifiée.
1 Appuyez sur ] (&).
L’écran de paramétrage de la prise de vue en gros plan s’affiche.
2 Appuyez sur [\ pour sélectionner le mode gros
plan et appuyez ensuite sur i.
Vous pouvez également définir le mode en appuyant
plusieurs fois sur ] (&).
3 Prenez la photo.
DESACTIVE
Prise de vue près
du sujet.
SELECT
OK
Fr
41
Page 42

Modes flash
1 Appuyez sur la touche mode flash ( ).
L’écran de paramétrage du flash s’affiche.
2 Appuyez sur [\ pour sélectionner le mode flash et
appuyez ensuite sur i.
Vous pouvez également définir le mode flash en appuyant
plusieurs fois sur .
3 Enfoncez le déclencheur jusqu’à mi-course.
Dans les conditions de déclenchement du flash, # s’allume
(flash en attente).
4 Appuyez complètement sur le déclencheur pour
prendre la photo.
Plage de fonctionnement du flash :
W (max.) : 0,2 m à 3,8 m environ
T (max.) : 0,5 m à 2,2 m environ
Fr
Icône Mode flash Description
Aucune
indication
!
#
$
Flash
automatique
Flash de réduction
de l’effet « yeux
rouges »
Flash d’appoint Le flash se déclenche quelles que soient les conditions
Flash désactivé Le flash ne se déclenche pas, même dans des situations de
Le flash se déclenche automatiquement lorsque l’éclairage
est faible ou à contre-jour.
Ce mode permet de réduire de manière importante l’effet
« yeux rouges » en émettant une série de pré-éclairs avant
de déclencher le flash principal.
d’éclairage.
faible éclairage.
MODE FLASH
AUTO
SELECT
OK
42
Page 43

MENUS ET PARAMÈTRES
Menu
1 Appuyez sur pour afficher le menu de l’appareil photo à l’écran.
2 Utilisez les touches fléchées et la touche i pour
naviguer et sélectionner les éléments de menu.
SAUVEGARDER
2006_01_01
FRANCAIS
QUITTE
Effacement de toutes les photos
1 En mode d’affichage, sélectionnez [CONF MEMOIRE]* dans le menu et appuyez
ensuite sur i.
*Lorsqu'une carte est insérée dans l'appareil photo, [CONFIG CARTE] s'affiche.
Fr
2 Appuyez sur [\ pour sélectionner [RTOUT EFFAC]
et appuyez ensuite sur i.
3 Appuyez sur [\ pour sélectionner [OUI] et appuyez
ensuite sur i.
Toutes les photos sont effacées.
CONF MEMOIRE
R
TOUT EFFAC
<
FORMATER
ANNULER
SELECT
R
TOUT EFFAC
ATTENTION TOUT EFFAC
OUI
NON
SELECT
OK
OK
43
Page 44

Sélection d’une langue
Vous pouvez sélectionner la langue d’affichage à l’écran. Les langues disponibles
varient en fonction du lieu d’achat de l’appareil photo.
1 Appuyez sur .
L’écran du menu s’affiche.
SAUVEGARDER
2006_01_01
FRANCAIS
QUITTE
Écran du menu
2 Appuyez sur [\ pour sélectionner [ ].
L’élément sélectionné s’affiche en jaune.
Fr
3 Appuyez sur i ou sur ].
4 Appuyez sur [\ pour sélectionner une langue et
appuyez ensuite sur i.
SAUVEGARDER
2006_01_01
FRANCAIS
QUITTE
PORTUGUES
OK
44
Page 45

Icônes et symboles de l’écran
(Écran - mode prise de vue
2
1
4
5
6
7
8
9
10
Éléments Indication
Contrôle de la batterie
1
2 Voyant vert
Veille du flash
3
Avertissement de bougé/chargement
du flash
4 Mode prise de vue
3
11
12
13
1
4
5
6
7
8
9
10
VidéoImage fixe
e=pleine puissance, f=faible puissance
{=verrouillage de la mise au point
automatique
# (Allumé)
# (Clignote)
P, I, L, m, o, N
11
12
13
Fr
Mode gros plan
5
Mode super gros plan
6 Mode flash
7 Retardateur
&
%
!, #, $
Y
8 Compensation d’exposition -2,0 – +2,0
9 Mode d’enregistrement SHQ, HQ, SQ1, SQ2
10 Taille d’image 2560×1920, 2048×1536, 640×480,
320×240, 160×120
11 Repère de mise au point automatique [ ]
12 Mémoire [IN] (mémoire interne), [xD] (carte)
Nombre d’images fixes pouvant être
13
stockées
Durée d’enregistrement restante
5
00:36
45
Page 46

(Écran - mode d’affichage
10
06
10
06
Fr
2
1
4
020210
06
3
5
6
7
8
9
10
Image fixe
2
1
4
020210
06
Vidéo
Éléments Indication
1 Contrôle de la batterie
e=pleine puissance, f=faible puissance
2 Mémoire [IN] (mémoire interne), [xD] (carte)
Réservation d’impression/nombre
3
d’impressions
<×10
4 Numéro de fichier M100-0018
5 Protection 9
6 Mode d’enregistrement SHQ, HQ, SQ1, SQ2
11
5
6
7
8
9
10
7 Taille d’image 2560×1920, 2048×1536, 640×480,
320×240, 160×120
8 Compensation d’exposition -2,0 – +2,0
9 Date et heure ’06.02.10 12:30
Nombre de cadres
10
Temps écoulé/durée totale de
18
00:00/0015
l’enregistrement (vidéo)
11
Vidéo
n
Affichage des miniatures (index)
Cette fonction vous permet d’afficher simultanément plusieurs photos à l’écran lors
de la consultation.
1 Appuyez sur la touche de zoom W (G) pour
activer l’affichage des miniatures (index).
Utilisez la molette de défilement pour sélectionner la
photo et appuyez sur i pour afficher une seule image.
Appuyez sur T (U) sur le bouton de zoom pour revenir
à l
’affichage d’une seule image.
46
Affichage d’index
Page 47

CONNEXION DE L’APPAREIL PHOTO
Affichage sur un téléviseur
Utilisez le câble vidéo fourni avec l’appareil photo pour lire les images enregistrées sur
votre téléviseur. La lecture peut porter sur des images fixes ou des vidéos.
1 Assurez-vous que le téléviseur et l’appareil photo sont éteints. Connectez la prise
Prise VIDEO OUT de l’appareil photo à la prise d’entrée vidéo du téléviseur à l’aide
du câble vidéo.
Couvercle du connecteur
Câble vidéo
Connectez la prise à la prise d’entrée
vidéo du téléviseur (jaune).
Prise VIDEO OUT
Fr
2 Allumez le téléviseur et activez le mode entrée vidéo.
Pour plus de détails au sujet de l’activation de l’entrée vidéo, reportez-vous au manuel du
téléviseur.
3 Appuyez sur le commutateur marche/arrêt pour allumer l’appareil photo, puis sur
k.
La dernière photo prise est affichée sur le téléviseur. Utilisez les touches fléchées pour
sélectionner la photo que vous voulez afficher.
47
Page 48

Impression directe (PictBridge)
Le câble USB fourni vous permet de connecter directement l’appareil photo à une
imprimante compatible PictBridge, telle que l’imprimante Olympus P-11, pour
procéder aux impressions.
1 Connectez une extrémité du câble USB fourni au connecteur USB de l’appareil
photo et l’autre extrémité au connecteur USB de l’imprimante.
Câble USB
Fr
Connecteur USB
2 Appuyez sur [\ pour sélectionner [IMPRESSION] et
appuyez ensuite sur i.
Lorsque l’appareil photo est connecté à un ordinateur, le
voyant vert de l’appareil photo reste allumé.
UN MOMENT s’affiche, puis l’appareil photo et l’imprimante
sont connectés. L’écran SEL MD IMP s’affiche.
SELECT
IMPRESSION
3 Utilisez les touches fléchées pour sélectionner les photos et procéder à des
impressions.
SEL MD IMP
IMPRESSION
DEMANDE D'IMPRESSION
QUITTE
OK
QUITTE
SELECT
48
OK
Suivez les instructions de
fonctionnement affichées ici.
Page 49

LOGICIEL OLYMPUS Master
Logiciel OLYMPUS Master : utilisez ce logiciel pour télécharger
des images à partir de l’appareil photo, pour afficher,
organiser, retoucher, envoyer par courrier électronique et
imprimer vos photos numériques, vos vidéos, etc. ! Ce
CD-ROM contient également le manuel de référence complet
(au format Adobe Acrobat (PDF)).
(Configuration système requise
Système
d’exploitation
Unité centrale Pentium III 500MHz/Power PC G3 ou plus rapide
Mémoire vive 128 Mo ou plus (256 Mo ou plus recommandés)
Disque dur Espace disponible de 300 Mo ou plus
Connexion Port USB
Écran ACL
Pour obtenir les dernières informations relatives à la prise en charge, consultez le site
Internet Olympus
(http://www.olympus.com/digital)
Windows 98SE/Me/2000 Professional/XP ou Mac OS X (version 10,2
ou une version plus récente)
Résolution de 1024 × 768 pixels ou plus, avec 65.536 (Windows)/32.000
(Macintosh) couleurs minimum
(Mise à niveau (OLYMPUS Master Plus)
OLYMPUS Master Plus dispose non seulement des fonctions OLYMPUS Master, il vous
permet également de modifier les vidéos, d’imprimer des albums ou des bandes
témoins, de créer des albums HTML, des panoramas sans reliure, de graver des CD/
DVD, etc. Vous bénéficiez ainsi de possibilités bien plus nombreuses en matière de
photographie numérique.
OLYMPUS Master doit être installé sur votre ordinateur et vous devez disposer d’une
connexion Internet.
Fr
Enregistrement de l’utilisateur
Enregistrez votre appareil photo lors de l’installation de OLYMPUS Master de
manière à activer votre garantie, à recevoir des notifications lors des mises à
jour du logiciel et du micrologiciel de l’appareil photo, etc.
49
Page 50

CARACTÉRISTIQUES
Appareil photo
Type de produit : Appareil photo numérique (prise de vue et affichage)
Système d’enregistrement
Images fixes : Enregistrement numérique, JPEG (selon la règle de
conception des systèmes de fichiers d’appareil photo (DCF))
Fr
Normes
applicables
Vidéo : Prise en charge de QuickTime Motion JPEG
Mémoire : Mémoire interne, xD-Picture Card (16 Mo - 1 Go)
Nombre d’images
pouvant être stockées
Nombre de pixels
effectifs
Capteur d’image : capture d’image CCD 1/2,5",
Objectif : Objectif Olympus 6,2 mm à 17,4 mm, f3,0 à 5,0
Système de mesure : Métrage pondéré au centre
: Exif 2.2, Digital Print Order Format (DPOF), PRINT Image
Matching III, PictBridge
Mode
d’enregistrement
SHQ 2560 × 1920 7 4
HQ 2560 × 1920 22 12
SQ1 2048 × 1536 34 19
SQ2 640 × 480 160 91
: 5.000.000 pixels
5.360.000 pixels (bruts)
(équivalent à un objectif 38 mm à 106 mm sur un appareil
photo 35 mm)
Taille
d’image
Mémoire
interne
Carte (avec une
carte de 16 Mo)
Vitesse d’obturation : 1 à 1/2000 s. (mode SCENE NUIT : 2 s.)
Portée de prise de vue : 0,5 m à ∞ (W), 0,9 m à ∞ (T) (normal)
Écran ACL : Écran couleur à cristaux liquides TFT de 1,5", 130.000 pixels
Connecteurs externes : Prise d’entrée CC (DC-IN), connecteur USB (mini-B), Prise
Calendrier automatique : de 2006 à 2099
Conditions de
fonctionnement
Température : 0ºC à 40ºC (32ºF à 104ºF) (fonctionnement)/-20ºC à 60ºC
Humidité : 30% à 90% (fonctionnement)/10% à 90% (stockage)
Alimentation : 2 piles AA (piles Oxiryde/piles alcalines/piles NiMH) ou un
50
0,2 m à 0,5 m (W), 0,5 m à 0,9 m (T) (mode gros plan)
VIDEO OUT
(-4ºF à 140ºF) (stockage)
adaptateur CA Olympus (optionnel)
Page 51

Dimensions : 87,5 mm (largeur) × 62,5 mm (hauteur) × 38,5 mm
(profondeur) saillies non incluses
Poids : 140 g sans batterie, ni carte
La conception et les caractéristiques peuvent étre modifiées sans préavis.
Fr
51
Page 52

PRÉCAUTIONS DE SÉCURITÉ
PRÉCAUTIONS DE SÉCURITÉ
ATTENTION : POUR RÉDUIRE LE RISQUE DE DÉCHARGE ÉLECTRIQUE, NE PAS
RETIRER LA PARTIE AVANT NI LE DOS DU BOÎTIER. AUCUNE PIÈCE À L’INTÉRIEUR
NE PEUT ÊTRE RÉPARÉE PAR L’UTILISATEUR. SE RÉFÉRER À DU PERSONNEL DE
Fr
ATTENTION
RISQUE DE DÉCHARGE
ÉLECTRIQUE NE PAS OUVRIR
DÉPANNAGE QUALIFIÉ POUR UNE RÉPARATION.
Le point d’exclamation à l’intérieur d’un triangle vous alerte sur certains points
importants concernant le maniement et l’entretien de l’appareil figurant dans la
documentation fournie avec le produit.
DANGER
AVERTISSEMENT
ATTENTION
AVERTISSEMENT !
POUR ÉVITER LES RISQUES D’INCENDIE OU DE DÉCHARGE ÉLECTRIQUE, NE JAMAIS EXPOSER CE PRODUIT À
L’EAU NI LE FAIRE FONCTIONNER DANS UN ENVIRONNEMENT TRÈS HUMIDE.
Si le produit est utilisé sans respecter les informations données sous ce symbole, des
blessures graves, voire mortelles pourraient en résulter.
Si le produit est utilisé sans respecter les informations données sous ce symbole, des
blessures voire la mort pourraient en résulter.
Si le produit est utilisé sans observer les informations données sous ce symbole, des
blessures, des dommages à l’appareil ou des pertes de données pourraient en résulter.
Précautions générales
Lire toutes les instructions — Avant d’utiliser l’appareil, lire toutes les instructions
de fonctionnement. Conservez tous les manuels et la documentation pour
pouvoir vous y référer ultérieurement.
Nettoyage — Toujours débrancher ce produit de la prise de courant avant
nettoyage. N’utiliser qu’un chiffon humide pour le nettoyage. Ne jamais utiliser
de produits de nettoyage liquides ou aérosols, ni de solvants organiques pour
nettoyer ce produit.
Accessoires — Pour votre sécurité, et pour éviter d’endommager le produit, n’utiliser
que des accessoires recommandés par Olympus.
Eau et humidité — Pour les précautions concernant les appareils manufacturés de
manière à résister aux intempéries, lire les sections correspondantes.
Emplacement — Pour éviter de l’endommager, installez solidement l’appareil sur un
trépied, un support ou une console stables.
Alimentation — Ne raccorder ce produit qu’à la source d’alimentation décrite sur
l’étiquette du produit.
52
Page 53

PRÉCAUTIONS DE SÉCURITÉ
Foudre — Si un orage avec foudre se produit alors qu’un adaptateur secteur est
utilisé, débranchez-le immédiatement de la prise murale.
Corps étrangers — Pour éviter toute blessure, n’insérez jamais de pièce métallique
dans l’appareil.
Chaleur — Ne jamais utiliser ni ranger ce produit près d’une source de chaleur telle
qu’un radiateur, un accumulateur de chaleur, ou tout type d’appareil qui génère
de la chaleur, comprenant les amplificateurs.
Maniement de l’appareil
AVERTISSEMENT
( Ne pas utiliser l’appareil à proximité de gaz inflammables ou
explosifs.
( Ne pas utiliser le flash de très près sur des personnes (bébés,
jeunes enfants, etc.).
• Vous devez être à une distance d’au moins 1 mètre du visage de vos sujets.
Déclencher le flash trop près des yeux d’un sujet peut entraîner une perte de
vision momentanée.
( Ne pas laisser l’appareil à la portée des enfants.
• Toujours utiliser et ranger l’appareil hors de la portée des jeunes enfants et des
bébés pour empêcher les situations dangereuses suivantes qui pourraient
causer des blessures graves :
• Devenir enroulé dans la courroie de l’appareil, causant la strangulation.
• Avaler accidentellement la batterie, des cartes ou d’autres petites pièces.
• Déclencher accidentellement le flash dans leurs yeux ou ceux d’un autre
enfant.
• Se blesser accidentellement par des parties en mouvement de l’appareil.
( Ne pas regarder le soleil ni des lumières puissantes avec
l’appareil.
( Ne pas utiliser ni ranger l’appareil dans des endroits poussiéreux
ou humides.
( Ne pas couvrir le flash avec une main pendant le déclenchement.
Fr
ATTENTION
( Arrêter immédiatement d’utiliser l’appareil si vous remarquez
une odeur, un bruit anormal ou de la fumée provenant de
l’appareil.
• Ne jamais retirer les piles à mains nues, vous risquez un incendie ou de vous
brûler les mains.
( Ne jamais tenir ou utiliser l’appareil photos avec des mains
mouillées.
53
Page 54

PRÉCAUTIONS DE SÉCURITÉ
( Ne pas laisser l’appareil dans des endroits où il pourrait être
soumis à des températures très élevées.
• Ceci pourrait causer une détérioration de certaines pièces et, dans certaines
circonstances, l’appareil pourrait prendre feu. Ne pas utiliser le chargeur ni un
adaptateur secteur s’il est couvert (par exemple par une couverture). Ce qui
pourrait causer une surchauffe, débouchant sur un incendie.
( Manipuler l’appareil soigneusement afin d’éviter une brûlure à
basse température.
• Lorsque l’appareil contient des parties métalliques, une surchauffe peut
déboucher sur une brûlure à basse température. Faire attention aux points
suivants :
• Utilisé pendant une longue durée, l’appareil devient chaud. Si vous tenez
l’appareil dans ces conditions, une brûlure à basse température risque de se
produire.
• Dans des endroits sujets à des températures très froides, la température du
Fr
corps de l’appareil peut être plus basse que la température ambiante. Si
possible, mettre des gants en tenant l’appareil à des températures basses.
( Faire attention avec la courroie.
• Faire attention avec la courroie en portant l’appareil. Elle peut facilement
s’accrocher à des objets sur le passage et causer des dommages sérieux.
Précautions de manipulation de la batterie
Veuillez suivre ces consignes importantes pour éviter le coulage du liquide
des batteries, une génération de chaleur, des brûlures, une explosion, ou
causer des décharges électriques ou brûlures.
DANGER
• Utiliser uniquement des piles NiMH de marque Olympus et le chargeur
correspondant.
• Ne jamais chauffer ni mettre au feu des piles.
• Prendre des précautions en transportant ou rangeant des piles pour éviter qu’elles
viennent en contact avec des objets métalliques comme des bijoux, des épingles à
cheveux, des agrafes, etc.
• Ne jamais ranger des piles où elles seraient exposées en plein soleil, ou sujettes à
des températures élevées dans un véhicule chaud, près d’une source de chaleur,
etc.
• Pour éviter de causer des coulages de liquide de pile ou d’endommager leurs
bornes, respecter scrupuleusement toutes les instructions concernant l’usage des
piles. Ne jamais tenter de démonter une pile ni la modifier, en soudant, etc.
• Si du liquide de pile entrait dans vos yeux, les laver immédiatement avec de l’eau
claire et froide du robinet et consulter immédiatement un médecin.
• Toujours ranger les piles hors de la portée des jeunes enfants. Si un enfant avale
accidentellement une pile, consulter immédiatement un médecin.
54
Page 55

PRÉCAUTIONS DE SÉCURITÉ
AVERTISSEMENT
• Maintenir à tout moment les piles au sec.
• Pour éviter un coulage du liquide des piles, une génération de chaleur ou de causer
un incendie ou une explosion, n’utiliser que les piles recommandées pour
l’utilisation avec ce produit.
• Ne jamais mélanger des piles/batteries (piles neuves et usagées, batteries chargées
et déchargées, piles/batteries de fabricant ou de capacité différente, etc.).
• Ne pas charger des piles alcalines ou au lithium si elles ne sont pas rechargeables.
• Insérer soigneusement la pile comme indiqué dans les instructions de
fonctionnement.
• Ne pas utiliser de piles dont le corps n’est pas recouvert d’une feuille isolante ou si
la feuille est déchirée, cela pourrait causer une fuite de liquide, un incendie ou des
blessures.
ATTENTION
• Ne pas retirer les piles immédiatement après avoir utilisé l’appareil photo. Les piles
peuvent devenir chaudes lors d’une utilisation prolongée.
• Toujours retirer la batterie de l’appareil avant de le ranger pour une longue durée.
• Les piles AA suivantes ne peuvent pas être utilisées.
Piles dont le corps n’est
que partiellement
recouvert ou pas du tout
recouvert par une feuille
isolante.
• Si des piles NiMH ne sont pas chargées au bout de la durée spécifiée, arrêter de les
charger et ne pas les utiliser.
• Ne pas utiliser une batterie si elle est endommagée ou cassée.
• Si une pile fuit, se décolore ou se déforme, ou présente tout autre aspect anormal,
arrêter d’utiliser l’appareil photo.
• Si du liquide de pile coule sur vos vêtements ou sur votre peau, retirer le vêtement
et laver immédiatement la zone affectée avec de l’eau claire et froide du robinet.
Si le liquide vous brûle la peau, consulter immédiatement un médecin.
• Ne jamais soumettre les piles à des chocs violents ni à des vibrations continues.
Piles dont la borne
relevée, mais pas
recouverte par une
feuille isolante.
- est
Piles dont les bornes sont
plates et pas complètement
recouvertes par une feuille
isolante. (De telles piles ne
peuvent pas être utilisées
même si la borne
partiellement recouverte.)
- est
Fr
55
Page 56

Pour les utilisateurs d’Amérique du Nord et du Sud
Pour les utilisateurs aux États-Unis
Déclaration de conformité
Modèle numéro : FE-115/X-715
Marque : OLYMPUS
Organisme responsable :
Adresse : Two Corporate Center Drive, P.O. Box 9058, Melville,
NY 11747-9058 États-Unis
Numéro de téléphone : 1-631-844-5000
Testé pour être en conformité avec la réglementation FCC
POUR L’UTILISATION A LA MAISON OU AU BUREAU
Cet appareil est conforme aux normes de la Section 15 des directives FCC. Son utilisation
est soumise aux deux conditions suivantes :
(1) Cet appareil ne doit pas causer de brouillage radioélectrique.
(2) Cet appareil doit pouvoir résister à toutes les interférences, y compris celles susceptibles
d’entraver son bon fonctionnement.
Fr
Pour les utilisateurs au Canada
Cet appareil numérique de la catégorie B est conforme à la législation canadienne sur les
appareils générateurs de parasites.
Marques déposées
• IBM est une marque déposée de la société International Business Machines
Corporation.
• Microsoft et Windows sont des marques déposées de la société Microsoft
Corporation.
• Macintosh est une marque de Apple Computer Inc.
• xD-Picture Card est une marque déposée.
• Tous les autres noms de sociétés et appellations de produits sont des marques,
déposées ou non, des propriétaires respectifs.
• Les normes pour les systèmes de fichiers d’appareil photo indiquées dans ce
manuel sont les normes “Design Rule for Camera File System/DCF” stipulées par
l’association JEITA (Japan Electronics and Information Technology Industries
Association).
56
Page 57

MEMO
57
Page 58

Contenido
DIAGRAMA DE LA CÁMARA...............................................................59
ANTES DE COMENZAR ........................................................................60
INTRODUCCIÓN ...................................................................................61
Paso 1 INTRODUCCIÓN........................................................................... 61
Paso 2 TOMA DE FOTOGRAFÍAS ............................................................. 62
Paso 3 REVISIÓN O BORRADO DE FOTOGRAFÍAS .................................... 63
Paso 4 TRANSFERENCIA DE IMÁGENES ................................................... 64
UTILIZACIÓN BÁSICA...........................................................................66
Consejos de fotografía............................................................................ 66
Botón de fotografía y botón de reproducción.......................................... 66
Botones de modo de fotografía............................................................... 67
Función de ahorro de energía.................................................................. 67
Es
Modo de fotografía................................................................................. 68
Disparador automático............................................................................ 68
Modo de compensación de la exposición ................................................ 69
Modo macro........................................................................................... 69
Modos flash............................................................................................ 70
MENÚS Y AJUSTES ..............................................................................71
Menú...................................................................................................... 71
Borrado de todas las fotografías.............................................................. 71
Selección de idioma ................................................................................ 72
Símbolos e iconos de monitor ................................................................. 73
Visualización de miniaturas (índice) ......................................................... 74
CONEXIÓN DE LA CÁMARA ................................................................75
Reproducción en un televisor .................................................................. 75
Impresión directa (PictBridge) .................................................................. 76
SOFTWARE OLYMPUS Master ............................................................77
ESPECIFICACIONES...............................................................................78
PRECAUCIONES DE SEGURIDAD .........................................................80
Antes de empezar a usar la cámara, lea con atención este manual para garantizar
un uso correcto.
Antes de tomar fotografías importantes, le recomendamos que realice varias
tomas de prueba para familiarizarse con el uso de su cámara.
Tenga en cuenta las precauciones de seguridad que figuran al final de este manual.
Las imágenes de la pantalla LCD y las ilustraciones de la cámara que se usan en
este manual pueden diferir del producto real.
58
Page 59

DIAGRAMA DE LA CÁMARA
Enganche para correa
Botón disparador
Flash
LED del disparador automático
Tapa del conector
Toma VIDEO OUT
Conector USB
Jack DC-IN
Objetivo
Botón de
borrado ( )
Botón de menú ( )
Botón de modo
flash ( )
Monitor
Botón de fotografía (l )
Lámpara naranja
Lámpara verde
Botón de reproducción (k )
Botón de encendido
Botón de zoom
Disco de modo
Botón OK (i)
Teclas de control ([\]^)
Botón de bloqueo
Rosca trípode
Tapa del compartimiento
de la batería/tarjeta
PUSH
Es
OPEN
59
Page 60

Es
ANTES DE COMENZAR
Reúna estos elementos (contenido de la caja)
Cámara digital Correa Pilas AA (dos)
Cable USB (gris claro) Cable de vídeo (negro)
CD-ROM del software
OLYMPUS Master
Elementos no mostrados: Manual Avanzado (CD-ROM), Manual Básico (este
manual), tarjeta de garantía. El contenido puede variar en función de la
ubicación de compra.
60
Page 61

INTRODUCCIÓN
Paso 1 INTRODUCCIÓN
INTRODUCCIÓN
a. Enganche la correa b. Inserte las pilas
1
Botón de bloqueo
3
Compartimiento de la batería/cubierta de la
tarjeta
Enganche para correa
Tire de la correa para que quede
apretada y no se suelte.
c. Ajuste la fecha y hora
1 Gire el disto de modo hasta y presione el botón de encendido para
encender la cámara.
2 Presione para visualizar la pantalla de menú.
2
Es
3 Presione [/\ para activar una opción Presione
^/] para seleccionar el siguiente campo.
BACKUP
SELECC.
Instrucciones
2006_01_01
ESPAÑOL
SALIR
2006 . 01 . 01
AMD
ACEPT.
OK
61
Page 62

Es
Paso 2 TOMA DE FOTOGRAFÍAS
TOMA DE FOTOGRAFÍAS
a. Zoom
Zoom de alejamiento: Zoom de acercamiento:
El cursor se desplaza a la
izquierda o a la derecha según el
grado de zoom.
b. Enfoque
1 Con el monitor, coloque la marca de objetivo
de enfoque automático (AF) sobre el sujeto.
Lámpara verde
(media presión)
Botón disparador
Marca de objetivo de enfoque
automático (AF)
c. Tome la fotografía
1 Presione el botón
disparador a fondo para
tomar la fotografía.
(presión completa)
Botón disparador
2 Mantenga presionado el botón disparador
(media presión) para bloquear el enfoque.
La lámpara verde indica que el enfoque está
bloqueado.
62
Page 63

Paso 3 REVISIÓN O BORRADO DE FOTOGRAFÍAS
REVISIÓN O BORRADO DE FOTOGRAFÍAS
a. Presione k b. Mire más de cerca
Se mostrará la última fotografía
tomada.
Botón de reproducción (k)
Fotografía anterior
Teclas de control
Botón de zoom
Fotografíasiguiente
c. Para borrar una fotografía
Presione T (U) para
ampliar la imagen.
Presione W (G) para
volver al modo normal.
Presione [/\ o ^/]
para desplazarse por la
imagen.
Presione l para volver al modo de
fotografía.
Es
Botón de borrado ( )
1 Visualice la fotografía que desea
borrar.
2 Presione .
Botón Aceptar
S
BORRAR
SI
NO
SELECC.
OK
3 Seleccione [SI] y presione i.
La fotografía se borrará de forma
permanente.
63
Page 64

Es
Paso 4 TRANSFERENCIA DE IMÁGENES
TRANSFERENCIA DE IMÁGENES
a. Instale el software
1 Inserte el CD-ROM de OLYMPUS Master.
2 Windows: Haga clic en el botón
“OLYMPUS Master“.
Macintosh: Haga doble clic en el
icono “Installer“.
3 Basta con seguir las instrucciones en
pantalla.
b. Conecte la cámara al ordenador
1 Conecte la cámara y el ordenador usando el cable USB (incluido).
El monitor se encenderá automáticamente.
Tapa del conector
Busque esta marca.
Puerto USB
2 Seleccione [PC] en el monitor y presione
i.
Cable USB
Conector USB
IMPRIMIR
SALIR
El PC reconocerá ahora la cámara como una
unidad de almacenamiento extraíble.
64
SELECC.
OK
Page 65

c. Transfiera imágenes al ordenador
1 Con la cámara conectada, abra
OLYMPUS Master.
Se mostrará la ventana [Transferencia
de imágenes].
2 Seleccione las imágenes que desee
transferir y haga clic en el botón
[Transferencia de imágenes].
Si la ventana [Transferencia de imágenes]
no se muestra automáticamente:
a. Haga clic en el icono
“Transferencia de imágenes” en
el menú principal de OLYMPUS
Master.
b. Haga clic en el icono “Desde
cámara”.
Ventana
[Transferencia de imágenes]
Botón [Transferencia de imágenes]
Es
Consejos
• Para obtener información más detallada acerca de la configuración y el uso de la
cámara, consulte el “Manual Avanzado” de la cámara que se incluye en formato
CD-ROM.
• Para obtener información sobre el uso de otras funciones del software OLYMPUS
Master no mencionadas anteriormente, abra "Ayuda" en el software OLYMPUS
Master o lea el manual de referencia (formato PDF).
65
Page 66

UTILIZACIÓN BÁSICA
Consejos de fotografía
Es posible que las imágenes aparezcan borrosas como resultado de mover la cámara
mientras está presionado el botón disparador.
Para evitar que la cámara se mueva, sujétela firmemente con ambas manos y
mantenga los codos a los lados. Mantenga los dedos y la correa alejados del objetivo
y el flash.
Sujeción horizontal Sujeción vertical
Es
Botón de fotografía y botón de reproducción
Cuando tome fotografías o realice ajustes de fotografía, seleccione el modo de toma
de fotografías presionando
Cuando visualice, edite o borre fotografías que usted haya tomado, seleccione el
modo de reproducción presionando
Botón l (modo de fotografía) Botón k (modo de reproducción)
l
.
.
k
66
Page 67

Botones de modo de fotografía
En modo de fotografía, utilice estos botones para acceder de forma rápida a algunas
de las funciones utilizadas con más frecuencia.
1
2
3
7
1 Botón k (modo de reproducción)
La cámara cambia al modo de reproducción.
2 Disco de modo
Además del modo predeterminado ( ), existen otros modos con ajustes óptimos
para su propósito y condiciones de fotografía.
4
5
6
Es
3 Botón ^Y (disparador automático)
Seleccione el disparador automático para retrasar la fotografía 12 segundos
aproximadamente desde el momento en que se presione el botón disparador.
4 Botón [F (compensación de la exposición)
Utilice este ajuste para aumentar (+) o reducir (-) la exposición de una fotografía.
5 Botón ]& (modo macro)
Utilice el modo macro o supermacro al tomar fotografías en primer plano como la de una flor.
6 Botón i
Presione para confirmar los ajustes.
7 Botón (modo flash)
Seleccione entre 4 modos de flash: Automático, ! (reducción de ojos rojos), #
(flash de relleno) o $ (flash desactivado).
Función de ahorro de energía
Para ahorrar energía de las pilas, la cámara entra automáticamente en el modo de
reposo y deja de funcionar tras aproximadamente 30 segundos de inactividad. El
monitor se apaga automáticamente. Presione el botón obturador, l o
para encender el monitor. Puede seleccionar el lapso de tiempo después del cual
la cámara entra automáticamente en el modo de reposo.
Si la cámara no se utiliza durante 30 minutos una vez que ha pasado al modo inactivo, retrae de
forma automática el objetivo y se apaga. Para volver a utilizar la cámara, enciéndala nuevamente.
k
67
Page 68

Modo de fotografía
1920
2560
Gire el disco de modo para seleccionar un modo de fotografía. A medida que gira el
disco de modo, la descripción de cada modo se muestra en el monitor.
PROGR. AUTO
Para
fotograf.
normal
1920
2560
Disco de modo
• PROGR. AUTO • h Estabilización de imagen
• l PAISAJE • m ESC.NOCT. • o AUTO - RETRATO
• n VIDEO
Es
Disparador automático
1 Presione ^ (Y).
Aparecerá la pantalla de opciones del disparador
automático.
2 Presione [\ para seleccionar [ON], y presione i.
También puede realizar los ajustes presionando ^ (Y)
repetidamente.
3 Presione el botón disparador a fondo para tomar la
fotografía.
La lámpara del disparador automático se enciende durante aproximadamente 10
segundos, y luego empieza a parpadear. Después de parpadear durante
2 segundos, se toma la foto.
• i RETRATO
DESACTIV.
ACTIVADO
Tom a
la foto
después de 12 seg.
SELECC.
Lámpara de disparador
automático
OK
68
Page 69

Modo de compensación de la exposición
1 Presione [ (F).
Se muestra la pantalla de ajustes para la compensación de la exposición.
2 Presione ^ ] para seleccionar el valor de
compensación de la exposición, y presione i.
Seleccione un valor [ + ] ara aumentar el brillo de la
imagen o un valor [ - ] para oscurecerla.
3 Tome la fotografía.
Para
ajustar
el brillo de imag.
ACEPT.
OK
Modo macro
& Este modo le permite tomar fotografías a una distancia de 20 cm del sujeto (Cuando
el objetivo zoom está ajustado en granangular máximo).
% Utilice este modo para tomar fotografías a una distancia de 2 cm del sujeto. La
posición del zoom se fija automáticamente y no se puede cambiar.
Es
1 Presione ] (&)
Se muestra la pantalla de ajustes para la fotografía macro.
2 Presione [\ para seleccionar el modo macro, y
presione i.
También puede realizar los ajustes presionando ] (&)
repetidamente.
3 Tome la fotografía.
DESACTIV.
Para toma
de fotografías
en primer plano.
SELECC.
OK
69
Page 70

Modos flash
1 Presione el botón de modo flash ( ).
Se muestra la pantalla de ajustes de flash.
2 Presione [\ para seleccionar el modo flash, y presione
i.
También puede realizar los ajustes presionando
repetidamente.
3 Presione a medias el botón obturador.
Si las condiciones requieren que el flash se dispare, se
enciende # (flash en espera).
4 Presione el botón disparador a fondo para tomar la
fotografía.
Alcance del flash:
W (máx.): Aprox. de 0,2 m a 3,8 m
T (máx.): Aprox. de 0,5 m a 2,2 m
Icono Modo flash Descripción
Es
Sin
indicación
Flash
automático
El flash se dispara automáticamente en condiciones de
baja iluminación o de contraluz.
MODO FLASH
FLASH AUTO
SELECC.
OK
!
#
$
Flash con reducción de ojos rojos
Flash de relleno El flash se dispara independientemente de la luz
Flash
desactivado
El modo flash con reducción de ojos rojos reduce
significativamente este fenómeno emitiendo destellos
previos antes de que se dispare el flash regular.
disponible.
El flash no se dispara, aún en condiciones de baja
iluminación.
70
Page 71

MENÚS Y AJUSTES
Menú
1 Presione para visualizar el menú de la cámara en el monitor.
2 Para navegar y seleccionar opciones de menú, utilice
las teclas de control y i.
BACKUP
Borrado de todas las fotografías
2006_01_01
ESPAÑOL
SALIR
1 En el modo de reproducción, seleccione [CONF. MEM.]* en el menú y presione i.
*Cuando se inserta una tarjeta en la cámara se visualiza [CONFIG. TARJ.].
2 Presione [\ para seleccionar [RBORRAR TODO] y
presione i.
SELECC.
3 Presione [\ para seleccionar [SI], y presione i.
Se borran todas las fotografías.
SELECC.
CONF. MEM.
R
BORRAR TODO
<
FORMATEAR
CANCELAR
OK
R
BORRAR TODO
PRECAUC. BORR. TODO
SI
NO
OK
Es
71
Page 72

Selección de idioma
Puede seleccionar un idioma para la visualización en pantalla. Los idiomas disponibles
varían en función de la zona en la que adquirió esta cámara.
1 Presione .
Aparece la pantalla de menú.
BACKUP
Pantalla de menú
2 Presione [\ para seleccionar [ ].
La opción seleccionada se muestra en amarillo.
BACKUP
Es
3 Presione i o ].
2006_01_01
ESPAÑOL
SALIR
2006_01_01
ESPAÑOL
SALIR
4 Presione [\ para seleccionar un idioma, y presione
i.
PORTUGUES
SELECC.
OK
72
Page 73

Símbolos e iconos de monitor
(Monitor: Modo de fotografía
2
1
4
5
6
7
8
9
10
3
11
12
13
1
4
5
6
7
8
9
10
VideoFotografía
Opción Indicaciones
Verificación de la batería
1
e=potencia total, f=potencia baja
2 Lámpara verde {= Bloqueo de enfoque automático
Flash en espera
3
# (Se enciende)
Aviso de movimiento de la cámara /
Carga del flash
4 Modo de fotografía
Modo macro
5
Modo Supermacro
# (Parpadea)
P, I, L, m, o, N
&
%
11
12
13
Es
6 Modo de flash
7 Disparador automático
!, #, $
Y
8 Compensación de la exposición -2,0 – +2,0
9 Modo de grabación SHQ, HQ, SQ1, SQ2
10 Tamaño de imagen 2560×1920, 2048×1536, 640×480,
320×240, 160×120
Marca de objetivo de enfoque
11
automático (AF)
[ ]
12 Memoria actual [IN] (memoria interna), [xD] (tarjeta)
Número de fotografías almacenables
13
Tiempo de grabación restante
5
00:36
73
Page 74

(Monitor: Modo de reproducción
10
06
10
06
Es
2
1
4
020210
06
3
5
6
7
8
9
10
Fotografía
2
1
4
020210
06
Video
Opción Indicaciones
1 Verificación de la batería
e=potencia total, f=potencia baja
2 Memoria actual [IN] (memoria interna), [xD] (tarjeta)
3 Reserva de impresión/número de copias <×10
4 Número de archivo M100-0018
5 Protección 9
6 Modo de grabación SHQ, HQ, SQ1, SQ2
7 Tamaño de imagen 2560×1920, 2048×1536, 640×480,
320×240, 160×120
11
5
6
7
8
9
10
8 Compensación de la exposición -2,0 – +2,0
9 Fecha y hora ’06.02.10 12:30
Número de cuadro
10
Tiempo de reproducción/tiempo total
18
00:00/0015
de grabación (video)
11
Video
n
Visualización de miniaturas (índice)
Esta función permite visualizar varias fotografías al mismo tiempo en el monitor al
revisar las fotografías.
1 Presione el botón de zoom hacia W (G) para
cambiar a la visualización de miniaturas (índice).
Utilice las teclas de control para seleccionar la
fotografía y presione
Presione T (
reproducción de un solo cuadro.
U) en el botón del zoom para volver a la
i para visualizar un solo cuadro.
74
Visualización de índice
Page 75

CONEXIÓN DE LA CÁMARA
Reproducción en un televisor
Emplee el cable de vídeos suministrado con la cámara para reproducir en el televisor
imágenes grabadas. Se pueden reproducir tanto imágenes fijas como vídeos.
1 Compruebe que el televisor y la cámara estén apagados. Conecte la toma VIDEO
OUT. de la cámara al terminal de entrada de vídeo del televisor usando el cable
de vídeo.
Tapa del conector
Cable de vídeo
Conéctelo al terminal de entrada
de vídeo (amarillo) del televisor.
Toma VIDEO OUT.
2 Encienda el televisor y cambie al modo de entrada de vídeo.
Para más información sobre cómo cambiar a entrada de vídeo, consulte el manual de
instrucciones del televisor.
3 Presione el interruptor de encendido para encender la cámara y presione k.
En el televisor aparecerá la última fotografía tomada. Utilice las teclas de control para
seleccionar la fotografía que desea visualizar.
Es
75
Page 76

Impresión directa (PictBridge)
Mediante el cable USB, puede conectar su cámara directamente a una impresora
compatible con el estándar PictBridge, como el modelo Olympus P-11, para realizar
copias.
1 Conecte un extremo del cable USB suministrado al conector USB de la cámara y
el otro extremo al conector USB de la impresora.
Cable USB
Conector USB
2 Presione [\ para seleccionar [IMPRIMIR], y presione
Es
i.
Mientras la cámara está conectada a una impresora, la
lámpara verde de la cámara permanece encendida.
Aparece el mensaje UN MOMENTO y se conectan la cámara
y la impresora. Aparece la pantalla S MODO IMP en el
monitor.
IMPRIMIR
SALIR
SELECC.
OK
3 Utilice las teclas de control para seleccionar fotografías y realizar copias.
S MODO IMP
IMPRIMIR
ORDEN IMPRESIÓN
SALIR
SELECC.
OK
Siga las instrucciones que se muestran aquí.
76
Page 77

SOFTWARE OLYMPUS Master
Software OLYMPUS Master: Utilice este software para
descargar fotografías desde la cámara, visualizar, organizar,
retocar, enviar por correo electrónico e imprimir vídeos y
fotografías digitales y mucho más. Este CD también contiene
el manual de referencia del software completo en formato
Adobe Acrobat (PDF).
(Requisitos del sistema
SO
CPU Pentium III 500MHz/Power PC G3 o superior
RAM 128 MB o más (se recomienda al menos 256 MB)
Disco Duro 300 MB o más de espacio libre
Conexión Puerto USB
Monitor
Para obtener la información de asistencia más actualizada, visite el sitio Web de
Olympus
(http://www.olympus.com/digital)
Windows 98SE/Me/2000 Professional/XP o Mac OS X (10.2 o
posterior)
1024 × 768 píxeles de resolución o más con un mínimo de 65.536 (Windows)
/ 32.000 (Macintosh) colores
(Actualización (OLYMPUS Master Plus)
Además de las funciones de OLYMPUS Master, OLYMPUS Master Plus ofrece la
edición de videos, impresión de álbumes, impresión de hojas de contactos, álbum
HTML, coser panorama gratuito, funciones de escritura en CD/DVD y muchas más
opciones, lo que permite ampliar en gran medida las posibilidades de fotografía
digital.
Debe tener OLYMPUS Master instalado en su equipo con una conexión de Internet.
Es
Registro de usuario
Registre su cámara al instalar OLYMPUS Master para activar la garantía, recibir
notificaciones de actualizaciones de software y firmware de la cámara y
mucho más.
77
Page 78

ESPECIFICACIONES
Cámera
Tipo de producto : Cámara digital (para fotografía y reproducción)
Sistema de grabación
Fotografía : Grabación digital, JPEG (de acuerdo con las normas de
diseño para sistema de archivos de cámara (DCF))
Es
Estándares
aplicables
Vídeo : Compatible con QuickTime Motion JPEG
Memoria : Memoria interna, tarjeta xD-Picture Card (16 MB – 1 GB)
Núm. de fotografías
almacenables
Núm. de píxeles
efectivos
Dispositivo de captura de
imagen
Objetivo : Objetivo Olympus 6,2 mm a 17,4 mm, f3,0 a 5,0
: Exif 2.2, Formato de reserva de impresión digital (DPOF),
PRINT Image Matching III, PictBridge
Modo de
grabación
SHQ 2560 × 1920 7 4
HQ 2560 × 1920 22 12
SQ1 2048 × 1536 34 19
SQ2 640 × 480 160 91
: 5.000.000 de píxeles
: Elemento captador de imágenes CCD de estado sólido, de
1/2,5",
5.360.000 píxeles (en tatal)
(equivalente a un objetivo de 38 mm a 106 mm en una
cámara de 35 mm)
Tamaño de
imagen
Memoria
interna
Tarjeta (utilizando una
tarjeta de 16 MB)
Sistema fotométrico : Sistema de medición centrada
Velocidad de obturación : 1 a 1/2.000 s (2 s en el modo ESC.NOCT.)
Alcance de fotografía : 0,5 m a ∞ (W), 0,9 m a ∞ (T) (normal)
Monitor : Pantalla LCD TFT en color de 1,5", 130.000 píxeles
Conector exterior : Jack DC-IN, conector USB (mini-B), toma VIDEO OUT.
Sistema de calendario
automático
Entorno de
funcionamiento
Temperatura : 0ºC a 40º C (32ºF a 104ºF) (funcionamiento)/-20ºC a 60ºC
Humedad : 30% a 90% (funcionamiento)/10% a 90%
78
0,2 m a 0,5m (W), 0,5 m a 0,9 m (T) (modo macro)
: 2006 hasta 2099
(-4ºF a 140ºF) (almacenamiento)
(almacenamiento)
Page 79

Fuente de alimentación : 2 baterías tipo AA (baterías Oxyride/baterías alcalinas/
baterías NiMH) o un adaptador de CA Olympus (opcional)
Dimensiones : 87,5 mm (An.) × 62,5 mm (Alt.) × 38,5 mm (P.)
excluyendo los salientes
Peso : 140 g sin la batería ni la tarjeta
El diseño y las especificaciones están sujetas a cambios sin previo aviso.
Es
79
Page 80

PRECAUCIONES DE SEGURIDAD
PRECAUCIONES DE SEGURIDAD
PRECAUCIÓN: PARA REDUCIR EL RIESGO DE DESCARGAS ELÉCTRICAS, NO
RETIRE LA CUBIERTA (O PARTE TRASERA). EN EL INTERIOR NO HAY PIEZAS QUE EL
USUARIO PUEDA REPARAR. REMITA LA REPARACIÓN A PERSONAL DE SERVICIO
El signo de admiración dentro de un triángulo equilátero tiene como finalidad alertar al
usuario de la existencia de importantes instrucciones de operación y mantenimiento en la
documentación suministrada con el producto.
PRECAUCIÓN
RIESGO DE DESCARGAS
ELÉCTRICAS NO ABRIR
ESPECIALIZADO OLYMPUS.
PELIGRO
Es
ADVERTENCIA
PRECAUCIÓN
¡ADVERTENCIA!
PARA EVITAR EL RIESGO DE INCENDIO O DESCARGAS ELÉCTRICAS, NUNCA EXPONGA ESTE PRODUCTO AL
AGUA NI LO UTILICE EN UN ENTORNO MUY HÚMEDO.
Si el producto es utilizado sin observar la información representada bajo este símbolo,
podría causar serias lesiones o muerte.
Si el producto es utilizado sin observar la información representada bajo este símbolo,
podría causar serias lesiones o muerte.
Si el producto es utilizado sin observar la información representada bajo este símbolo,
podría causar lesiones personales menores, daños al equipo, o pérdida de datos
importantes.
Precauciones Generales
Lea todas las instrucciones — Antes de utilizar este producto, lea todas las
instrucciones operativas. Conserve todos los manuales y documentación para
referencia futura.
Limpieza — Siempre desenchufe el producto de la toma de corriente antes de
limpiarlo. Para la limpieza use sólo un paño húmedo. Nunca use limpiadores
líquidos o aerosoles, ni solventes orgánicos de ningún tipo para limpiar este
producto.
Accesorios — Para su seguridad y evitar daños al producto, utilice únicamente los
accesorios recomendados por Olympus.
Agua y humedad — Para obtener información sobre las precauciones de los
productos diseñados a prueba de la intemperie, consulte las secciones de
resistencia a la intemperie.
Ubicación — Para evitar daños al producto, móntelo de forma segura sobre un
trípode, base o soporte estable.
Fuentes de alimentación — Conecte este producto únicamente con la fuente de
alimentación descrita en la etiqueta del producto.
80
Page 81

PRECAUCIONES DE SEGURIDAD
Rayos — Si se produce una tormenta eléctrica mientras está utilizando un adaptador
de CA, retírelo de la toma de corriente mural inmediatamente.
Objetos extraños — Para evitar daños personales, nunca inserte objetos de metal
en el producto.
Calentadores
tales como radiadores, rejillas de calefacción, estufas o cualquier tipo de equipo o
aparato generador de calor, incluyendo amplificadores estéreo.
— Nunca utilice ni guarde este producto cerca de fuentes de calor,
Manejo de la Cámara
ADVERTENCIA
( No utilice la cámara cerca de gases inflamables o explosivos.
( No utilice el flash a corta distancia de las personas (especialmente
niños menores y mayores, etc.).
• Debe mantener, por lo menos, una distancia de 1 m de la cara de los sujetos.
Si dispara el flash demasiado cerca de los ojos del sujeto, podría causarle la
pérdida de visión momentánea.
( Mantenga a los niños menores y mayores alejados de la cámara.
• Utilice y guarde siempre la cámara fuera del alcance de los niños menores y
mayores, para prevenir las siguientes situaciones de peligro que podrían
causarles serias lesiones:
• Enredarse con la correa de la cámara, ocasionando asfixia.
• Ingerir accidentalmente una pila, tarjetas, u otras piezas pequeñas.
• Disparar el flash accidentalmente hacia sus propios ojos o hacia los ojos de
otro niño.
• Lesionarse accidentalmente con las piezas móviles de la cámara.
( No apunte la cámara directamente al sol o a luces fuertes.
( No utilice ni guarde la cámara en lugares polvorientos o
húmedos.
( No cubra el flash con la mano mientras efectúa el disparo.
Es
PRECAUCIÓN
( Interrumpa inmediatamente el uso de la cámara si percibe algún
olor, ruido o humo extraño alrededor de la misma.
• Nunca retire las baterías con las manos descubiertas, ya que podría causar un
incendio o quemarle las manos.
( Nunca sostenga ni utilice la cámara con las manos mojadas.
( No deje la cámara en lugares donde pueda estar sujeta a
temperaturas extremadamente altas.
• Si lo hace puede provocar el deterioro de las piezas y, en algunas
circunstancias, provocar que se prenda fuego. No utilice el cargador o el
adaptador CA si está cubierto (por ejemplo con una frazada). Esto podría
causar recalentamiento, resultando en incendio.
81
Page 82

PRECAUCIONES DE SEGURIDAD
( Manipule la cámara con cuidado para evitar una quemadura de
baja temperatura.
• Ya que la cámara contiene partes metálicas, el recalentamiento puede resultar
en una quemadura de baja temperatura. Preste atención a lo siguiente:
• Cuando la utilice durante un largo período, la cámara se recalentará. Si
mantiene a la cámara en este estado, podría causar una quemadura de baja
temperatura.
• En lugares sujetos a temperaturas extremadamente bajas, la temperatura de
la carcasa de la cámara puede ser más baja que la temperatura ambiente. Si
es posible, póngase guantes cuando manipule la cámara en temperaturas
bajas.
( Tenga cuidado con la correa.
• Tenga cuidado con la correa cuando transporte la cámara. Podría engancharse
en objetos – sueltos y provocar daños graves.
Precauciones acerca del uso de las pilas
Es
Siga estas importantes indicaciones para evitar que se produzcan fugas, recalentamientos,
incendios o explosión de las pilas, o que cause descargas eléctricas o quemaduras.
PELIGRO
• Utilice únicamente baterías NiMH de la marca Olympus y el cargador
correspondiente.
• Nunca caliente ni incinere las pilas.
• Tome precauciones al transportar o guardar las pilas a fin de evitar que entren en
contacto con objetos metálicos, tales como alhajas, horquillas, cierres, etc.
• Nunca guarde las pilas en lugares donde queden expuestas a la luz solar directa o
sujetas a altas temperaturas en el interior de un vehículo con calefacción, cerca de
fuentes de calor, etc.
• Para evitar que ocurran fugas de líquido de las pilas o daños de sus terminales, siga
cuidadosamente todas las instrucciones respectivas al uso de las pilas. Nunca
intente desarmar una pila ni modificarla de ninguna manera, por soldadura, etc.
• Si el fluido de la pila penetrara en sus ojos, lávelos de inmediato con agua corriente
fresca y limpia, y solicite atención médica inmediatamente.
• Siempre guarde las pilas fuera del alcance de los niños menores. Si un niño ingiere
una pila accidentalmente, solicite atención médica inmediatamente.
ADVERTENCIA
• Conserve las pilas siempre secas.
• Para evitar que ocurran fugas de líquido, recalentamiento de las pilas, o que causen
incendio o explosión, utilice únicamente las pilas recomendadas para este
producto.
• Nunca mezcle las pilas (pilas nuevas con usadas, pilas cargadas con descargadas,
pilas de distinta marca o capacidad, etc.).
82
Page 83

PRECAUCIONES DE SEGURIDAD
• No intente cargar las baterías alcalinas o la pila de litio si no son recargables.
• Inserte la batería con cuidado como se describe en las instrucciones operativas.
• No utilice baterías si el cuerpo no está cubierto con una lámina aislante o si dicha
lámina está perforada, ya que podría provocar fugas de líquido, incendio o lesión.
PRECAUCIÓN
• No retire las baterías inmediatamente después de utilizar la cámara. Las baterías
pueden recalentarse durante el uso prolongado.
• Siempre retire la batería de la cámara antes de guardar la cámara por un largo
tiempo.
• Las siguientes pilas AA no pueden ser utilizadas.
Pilas parcialmente
cubiertas o no cubiertas
totalmente por una hoja
aislante.
Pilas con terminales en relieve, pero no
cubiertos por una hoja
aislante.
Pilas con terminales planos,
pero no completamente
cubiertos por una hoja
aislante (Tales pilas no
pueden ser usadas aunque
los terminales - estén
parcialmente cubiertos).
• Si las pilas de NiMH no se recargan dentro del tiempo especificado, interrumpa la
recarga de las mismas y no las use.
• No utilice una pila si está rajada o quebrada.
• Si se producen fugas de líquido, decoloración o deformación de la batería, o
cualquier otra anormalidad durante la operación, interrumpa el uso de la cámara.
• Si el fluido de la pila entrara en contacto con su ropa o con su piel, quítese la ropa
y lave de inmediato la parte afectada con agua corriente fresca y limpia. Si el fluido
quemara su piel, solicite atención médica inmediatamente.
• Nunca exponga la pila a fuertes impactos ni a vibraciones continuas.
Es
83
Page 84

Para los clientes de Norte y Sudamérica
Para los clientes de Estados Unidos
Declaración de conformidad
Número de modelo : FE-115/X-715
Nombre comercial : OLYMPUS
Entidad responsable:
Dirección : Two Corporate Center Drive, P.O. Box 9058, Melville,
NY 11747-9058 EE.UU.
Número de teléfono: 1-631-844-5000
Se ha probado su cumplimiento con las normas FCC
PARA USO DOMÉSTICO O COMERCIAL
Este dispositivo cumple con el Apartado 15 de las normas FCC. La operación se encuentra
sujeta a las dos condiciones siguientes:
(1) Este dispositivo podría no causar interferencia perjudicial.
(2) Este dispositivo debe aceptar cualquier interferencia que se reciba, incluyendo aquellas
interferencias que pueden provocar un funcionamiento no deseado.
Para los clientes de Canadá
Este aparato digital de Clase B cumple con todos los requerimientos de las reglamentaciones
canadienses sobre equipos generadores de interferencia.
Es
Marcas comerciales
• IBM es una marca registrada de International Business Machines Corporation.
• Microsoft y Windows son marcas registradas de Microsoft Corporation.
• Macintosh es una marca comercial de Apple Computer Inc.
• xD-Picture Card es una marca comercial.
• Todos los demás nombres de compañías y productos son marcas registradas y/o
marcas comerciales de sus respectivos propietarios.
• Las normas para sistemas de archivos de cámara referidas en este manual son las
“Normas de Diseño para Sistema de Archivos de Cámara/DCF” estipuladas por la
Asociación de Industrias Electrónicas y de Tecnología de Información de Japón
(JEITA).
84
Page 85

MEMO
85
Page 86

Po
Índice
DIAGRAMA DA CÂMARA....................................................................87
ANTES DE COMEÇAR...........................................................................88
INICIAÇÃO ............................................................................................89
Passo 1 INICIAÇÃO ................................................................................. 89
Passo 2 FOTOGRAFAR............................................................................. 90
Passo 3 REVER OU APAGAR UMA FOTOGRAFIA...................................... 91
Passo 4 TRANSFERIR IMAGENS................................................................ 92
FUNCIONAMENTO BÁSICO .................................................................94
Dicas para fotografar .............................................................................. 94
Botão Fotografia e botão Reprodução..................................................... 94
Botões do Modo Fotografia..................................................................... 95
Função de poupança de energia.............................................................. 95
Modo Fotografia..................................................................................... 96
Temporizador.......................................................................................... 96
Modo de Compensação da Exposição ..................................................... 97
Modo Macro........................................................................................... 97
Modos Flash............................................................................................ 98
MENUS E DEFINIÇÕES .........................................................................99
Menu...................................................................................................... 99
Apagar todas as imagens ........................................................................ 99
Seleccionar um idioma .......................................................................... 100
Símbolos e ícones do ecrã ..................................................................... 101
Visualização de miniaturas (Índice) ........................................................ 102
LIGAR A CÂMARA..............................................................................103
Reprodução num televisor..................................................................... 103
Impressão directa (PictBridge)................................................................ 104
SOFTWARE OLYMPUS Master ..........................................................105
ESPECIFICAÇÕES ................................................................................106
PRECAUÇÕES DE SEGURANÇA .........................................................108
Antes de utilizar a câmara, leia este manual atentamente para garantir uma
utilização correcta.
Recomendamos que tire fotografias de teste para se habituar à câmara antes de
começar a tirar fotografias importantes.
Respeite as precauções de segurança apresentadas no final deste manual.
As imagens do ecrã LCD e as ilustrações da câmara utilizadas neste manual podem
diferir do produto real.
86
Page 87

Ilhó da correia
DIAGRAMA DA CÂMARA
Flash
Disparador
Objectiva
Ecrã
Botão Fotografia (l)
Luz laranja
Luz verde
Botão Reprodução (k)
Botão de ligação
Luz do temporizador
Fecho de bloqueio
Encaixe para
tripé
Tampa do
conector
Entrada VIDEO OUT
Conector USB
Entrada DC-IN
Po
Botão Apagar ( )
Botão de menu ( )
Botão Flash ( )
Botão Zoom
Selector de
modo
Botão OK (i)
Selector em cruz ([\]^)
OPEN
PUSH
Tampa do
compartimento
para pilhas/cartão
87
Page 88

ANTES DE COMEÇAR
Reúna estes itens (conteúdo da caixa)
Câmara Digital Correia Pilhas AA (duas)
Po
Cabo USB (cinzento-claro) Cabo de vídeo (preto)
Itens não ilustrados: Manual Avançado (CD-ROM), Manual Básico (este manual),
Cartão de Garantia. O conteúdo pode variar consoante o local de aquisição.
CD-ROM do software
OLYMPUS Master
88
Page 89

INICIAÇÃO
Passo 1 INICIAÇÃO
INICIAÇÃO
a. Colocar a correia b. Inserir as pilhas
Ilhó da correia
Puxar bem a correia de modo a que
não fique solta.
c. Definir a data e hora
1
Botão de bloqueio
3
2
Tampa do compartimento para pilhas/cartão
Po
1 Rode o selector de modo para e prima o
botão de ligação para ligar a câmara.
2 Premir para visualizar o ecrã do menu.
3 Premir [/\ para definir um item. Premir ^/]
para seleccionar o campo seguinte.
Guia de funcionamento
BACKUP
2006 . 01 . 01
AMD
SELEC
DEF
2006_01_01
PORTUGUES
SAIR
VAI
89
Page 90

Po
Passo 2 FOTOGRAFAR
FOTOGRAFAR
a. Zoom
Reduzir: Ampliar:
O cursor move-se para a
esquerda ou para a direita de
acordo com o grau do zoom.
b. Focar
1 Utilizando o ecrã, colocar a marca AF sobre o
tema fotográfico.
Luz verde
(Premido até
metade)
Disparador
Marca AF
2 Premir o disparador até metade e manter
nessa posição para bloquear a focagem.
A luz verde indica que a focagem está
bloqueada.
c. Fotografar
1 Premir totalmente o
disparador para
fotografar.
(Totalmente premido)
Disparador
90
Page 91

Passo 3 REVER OU APAGAR UMA FOTOGRAFIA
REVER OU APAGAR UMA FOTOGRAFIA
a. Premir k b. Ver mais de perto
A última imagem fotografada
será visualizada.
Botão Reprodução
(k)
Fotografia
anterior
Selector em cruz
Botão Zoom
Fotografia
seguinte
c. Para apagar uma fotografia
Prima T (U) para
ampliar a fotografia.
Prima W (G) para
voltar ao normal.
Premir [/\ ou ^/]
para percorrer a imagem.
Premir l para voltar ao modo
fotografia.
Po
Botão Apagar
()
1 Visualizar a fotografia que
pretende apagar.
2 Premir .
Botão OK
S
APAGAR
SIM
NAO
SELEC
VAI
3 Seleccionar [SIM] e premir i.
A fotografia é eliminada
permanentemente.
91
Page 92

Passo 4 TRANSFERIR IMAGENS
TRANSFERIR IMAGENS
a. Instalar o software
1 Inserir o CD-ROM OLYMPUS Master.
2 Windows: Fazer clique no botão
“OLYMPUS Master“.
Macintosh: Fazer duplo clique no
ícone “Installer“.
3 Seguir simplesmente as instruções no
ecrã.
Po
b. Ligar a câmara ao computador
1 Ligar a câmara ao computador usando o cabo USB (incluído).
O ecrã ligar-se-á automaticamente.
Tampa do conector
Procure esta marca.
Porta USB
2 Seleccionar [PC] no ecrã e premir i.
Cabo USB
Conector USB
IMPRIMIR
O PC reconhece agora a câmara como um
disco amovível.
92
SELEC
SAIR
VAI
Page 93

c. Transferir imagens para o computador
1 Com a câmara ligada, abrir o
OLYMPUS Master.
Surge a janela [Transfer Images]
(Transferir imagens).
2 Seleccionar as imagens que
pretende transferir e fazer clique
no botão [Transfer Images]
(Transferir imagens).
Se a janela [Transfer Images] (Transferir
imagens) não surgir automaticamente:
a. Fazer clique no ícone “Transfer
Images” (Transferir imagens) no
menu principal do OLYMPUS
Master.
b. Fazer clique no ícone “From
Camera” (Da câmara).
Janela [Transfer Images]
(Transferir imagens)
Botão [Transfer Images]
(Transferir imagens)
Po
Dicas
• Para obter informações pormenorizadas relativamente à configuração e utilização
da câmara, consultar o “Manual avançado” da câmara fornecido em CD-ROM.
• Para obter informações sobre como utilizar outras funções do software OLYMPUS
Master que não tenham sido mencionadas, abrir a “Ajuda” do software OLYMPUS
Master ou ler o manual de referência (em formato PDF).
93
Page 94

FUNCIONAMENTO BÁSICO
Dicas para fotografar
As fotografias podem ficar desfocadas devido à oscilação da câmara quando o
disparador é premido.
Para evitar a oscilação da câmara, segurar a câmara com firmeza usando as duas
mãos, enquanto mantém os cotovelos junto a si. Manter os dedos e a correia
afastados da objectiva e do flash.
Segurar na horizontal Segurar na vertical
Po
Botão Fotografia e botão Reprodução
Para tirar fotografias ou efectuar definições de fotografia, seleccione o modo
fotografia premindo l.
Para visualizar, editar ou eliminar fotografias que tirou, seleccione o modo
reprodução premindo k.
Botão l (Modo Fotografia) Botão k (Modo Reprodução)
94
Page 95

Botões do Modo Fotografia
No Modo Fotografia, utilize estes botões para obter um acesso rápido a algumas das
funções mais frequentemente utilizadas.
1 2 4
3
5
6
7
1 Botão k (Modo Reprodução)
A câmara muda para o Modo Reprodução.
2 Selector de modo
Além do modo predefinido ( ), existem outros modos que possuem melhores
definições para as respectivas finalidades e condições de fotografia.
3 Botão ^Y (Temporizador)
Seleccione o temporizador para atrasar o disparo cerca de 12 segundos a partir do
momento em que o disparador é premido.
Po
4 Botão [F (Compensação da exposição)
Utilize esta definição para aumentar (+) ou diminuir (-) a exposição de uma fotografia.
5 Botão ]& (Modo Macro)
Utilize o Modo Macro ou Super Macro para fotografar grandes planos como, por
exemplo, de uma flor.
6 Botão i
Prima para confirmar as definições.
7 Botão (Modo Flash)
Seleccione entre 4 modos flash - Automático, ! (Redução do efeito de olhos
vermelhos), # (Activação forçada) ou $ (Flash desligado).
Função de poupança de energia
Para poupar energia das pilhas, a câmara entra automaticamente em modo inactivo e
deixa de funcionar se não for utilizada durante 30 segundos. O ecrã desliga-se
automaticamente. Prima o disparador, l ou k, para ligar o ecrã. Pode seleccionar
o intervalo de tempo após o qual a câmara entra automaticamente em modo inactivo.
Se a câmara não for utilizada durante 30 minutos após entrar em modo inactivo,
a objectiva é recolhida e a câmara desliga-se automaticamente. Para voltar a
utilizar a câmara, ligue-a novamente.
95
Page 96

Modo Fotografia
1920
2560
Rode o selector de modo para seleccionar um modo de fotografia. À medida que
roda o selector de modo, surge no ecrã a descrição de cada modo.
PROGR AUTO
Para
fotografia
normal
1920
2560
Selector de modo
• PROGR AUTO • h ESTAB. IMAGEM • i RETRATO
• l PAISAGEM • m CENA NOCT • o AUTO-RETRATO
• n VÍDEO
Temporizador
Po
1 Premir ^ (Y).
Surge o ecrã das definições do temporizador.
2 Premir [\ para seleccionar [LIGADO] e premir i.
Também é possível fazer a definição premindo ^ (Y)
repetidamente.
3 Premir totalmente o disparador para fotografar.
A luz do temporizador acende-se durante
aproximadamente 10 segundos depois de o disparador
ser premido e depois começa a piscar. Depois de piscar
durante aproximadamente 2 segundos, a imagem é
fotografada.
DESLIGADO
LIGADO
A Foto tirada
após 12 sec.
SELEC
VAI
Luz temporizador
96
Page 97

Modo de Compensação da Exposição
1 Premir [ (F).
Surge o ecrã de definição da compensação da exposição.
2 Premir ^ ] para seleccionar o valor da
compensação da exposição e premir i.
Seleccione um valor [ + ] para clarear a imagem ou um
valor [ - ] para escurecer a imagem.
Para alterar
o brilho da imagem.
3 Fotografar.
DEF
VAI
Modo Macro
& Este modo permite-lhe tirar fotografias a uma distância de apenas 20 cm do seu
tema fotográfico (Quando o zoom estiver definido para a definição mais ampla).
% Utilize este modo para tirar fotografias a uma distância de apenas 2 cm do seu tema
fotográfico. A posição do zoom está fixada automaticamente e não pode ser
alterada.
Po
1 Premir ] (&)
Surge o ecrã de definição da fotografia Macro.
2 Premir [\ para seleccionar o Modo Macro e premir
i.
Também é possível fazer a definição premindo
] (&) repetidamente.
3 Fotografar.
DESLIGADO
Para tirar a foto
de perto.
SELEC
VAI
97
Page 98

Modos Flash
1 Premir o botão do Modo Flash ( ).
Surge o ecrã de definição do Flash.
Po
2 Premir [\ para seleccionar o Modo Flash e premir i.
Também é possível fazer a definição premindo
repetidamente.
MODO FLASH
AUTOMATICO
3 Premir o disparador até meio.
Quando o flash disparar, acende-se # (flash em espera).
4 Premir totalmente o disparador para fotografar.
Alcance fotográfico do flash:
W (máx.): Cerca de 0,2 m a 3,8 m
T (máx.) : Cerca de 0,5 m a 2,2 m
Ícone Modo Flash Descrição
Sem
indicação
!
#
$ Flash desligado O flash não dispara mesmo em situações de luz fraca.
Flash automatico O flash dispara automaticamente em condições de luz
fraca ou contraluz.
Flash de redução
do efeito de
olhos vermelhos
Activação
forçada
O modo flash de redução do efeito de olhos vermelhos
reduz significativamente este fenómeno, emitindo préflashes antes de disparar o flash habitual.
O flash dispara independentemente da luz disponível.
SELEC
VAI
98
Page 99

MENUS E DEFINIÇÕES
Menu
1 Premir para visualizar os menus da câmara no ecrã.
2 Usar o selector em cruz e i para navegar e
seleccionar os itens do menu.
BACKUP
2006_01_01
PORTUGUES
SAIR
Apagar todas as imagens
1 No Modo Reprodução, seleccionar [CONFIG MEM]* no menu e premir i.
*Quando se insere um cartão na câmara, surge a mensagem [CONF CARTAO].
2 Premir [\ para seleccionar [RAPAG IMAGS] e
premir i.
3 Premir [\ para seleccionar [SIM] e premir i.
Todas as imagens são apagadas.
CONFIG MEM
R
APAG IMAGS
<
FORMATACAO
CANCELAR
SELEC
R
APAG IMAGS
ATENCAO-APAG IMAGS
SIM
NAO
SELEC
Po
VAI
VAI
99
Page 100

Seleccionar um idioma
É possível seleccionar um idioma para a visualização no ecrã. Os idiomas disponíveis
variam de acordo com a zona onde a câmara foi comprada.
1 Premir .
Surge o ecrã do menu.
BACKUP
2006_01_01
PORTUGUES
SAIR
Ecrã do menu
2 Prima [\ para seleccionar [].
O item seleccionado surge a amarelo.
BACKUP
2006_01_01
PORTUGUES
SAIR
3 Premir i ou ].
Po
4 Premir [\ para seleccionar um idioma e premir i.
SELEC
PORTUGUES
VAI
100
 Loading...